

Page 1

2
2.
GRAPHICAL SYMBOLS EXPLANATION
CAUTION
RISK OF ELECTRIC SHOCK
DO NOT OPEN.
CAUTION : TO REDUCE THE RISK OF
ELECTRIC SHOCK, DO NOT
REMOVE COVER(OR BACK)
NO PARTS INSIDE.
REFER SERVICING TO
QUALIFIED SERVICE PERSONNEL.
This lightning flash with arrowhead symbol, within an
equilateral triangle is intended to alert the user of the
presence of uninsulated "dangerous voltage" within
the product's enclosure that may be of sufficient
magnitude to constitute a risk of electric shock to persons.
The exclamation point within an equilateral triangle is
intended to alert the user of the presence of important
operating and maintenance (Servicing) instructions in
the literature accompanying the appliance.
1. Any changes or modifications in construction of this device which are not expressly
approved by the party responsible for compliance could avoid the user’s authority to
operate the equipment.
INSTALLATION PRECAUTIONS
About this user’s guide
This user's Guide identifies the features of the L-10 ELF television and describes how to program
the television using the infrared hand unit. "THESE INSTRUCTIONS ARE FOR L-10 ELF TV's
THAT ARE NOT COMPUTER CONTROLLED"
Programming is the process of selecting from among the many features of the L-10 ELF. It is
also the process of adding and removing channels from the six service levels this TV provides.
Please read through this guide carefully, with a L-10 ELF TV in front of you, as you begin the
process of learning how to program these televisions. Also keep the guide handy, so you can
refer to it, for future programming changes.
The information in this guide describes each of the main SETUP MENU items: Rental: (service
level), Picture, Sound, Channel Set up, Features, Blocking and Language. It also describes how
you can access and change the features within these menu options. To get ready, turn the TV on
and press the SETUP button on the infrared hand unit and the SETUP MENU will appear on the
TV.
Before installing TV's in the hospital, please obtain and read the instructions for attaching the TV
to the support arm. These instructions are not part of this guide and should be obtained from the
TV rental service provider.
3. Use only DC18 ~ 32V, AC 25 ~ 35V source from a CSA Certified / UL Approved Class 2
power Supply suitable for use in Healthcare Facilities.
4. INSTALLATION AND CONNECTION
Installation of the television receiver must be performed by the qualified service
personnel only. Mount the television receiver to the support arm and connect the external
coaxial cable to the coaxial cable of support arm for power source and TV signal.
5. CLEANING
Clean the exterior of your equipment by removing dust with lint-free cloth.
For the further cleaning, use soft cloth or paper towel dampened with water.
CAUTION: To avoid damage to the surface of the equipment, do not use abrasive or
chemical cleaning agents.
Owner's Manual
OPERATING INSTRUCTIONS
BEFORE USING TELEVISION RECEIVER,
READ AND OBSERVE ALL OF THIS OWNER’S MANUAL
MODEL : L-10 ELF
Part No. 11906674
Page 2
Owner's Manual
The
L-10 ELF
is a 10 inch, 125 channel, television, designed specifically for use in
hospitals. It provides for six service levels: Free, Locked, Basic Unpaid, Basic
Paid, Premium 1, Premium 2.
One coaxial cable provides the TV with low voltage AC or DC power and a TV
signal. The signal source for the television is cable (CATV) or a TV antenna.
In most hospitals, the source of the signal is cable. Programming screens and
rental instructions come in three languages: Spanish, French and English.
4
Owner's Manual
About the L-10 ELF television
L-10 ELF
Television
3
About this user’s guide
THE CONTENTS
Installation Precautions . . . . . . . . . . . . . . . . . . . . . . . . . . . . . . . . . . . . . . . . . . . . . . . . . . . . . . . . 2
About the L-10 ELF television
. . . . . . . . . . . . . . . . . . . . . . . . . . . . . . . . . . . . . . . . . . . . . . . . . . 3
About service levels
. . . . . . . . . . . . . . . . . . . . . . . . . . . . . . . . . . . . . . . . . . . . . . . . . . . . . . . . . . . 6
About the infrared hand unit
. . . . . . . . . . . . . . . . . . . . . . . . . . . . . . . . . . . . . . . . . . . . . . . . . . . 8
About programming the L-10 ELF
. . . . . . . . . . . . . . . . . . . . . . . . . . . . . . . . . . . . . . . . . . . . . 10
How do I select a TV service level?
. . . . . . . . . . . . . . . . . . . . . . . . . . . . . . . . . . . . . . . . . . . . 11
How do I adjust the quality of the TV picture?
. . . . . . . . . . . . . . . . . . . . . . . . . . . . . . . . . . 15
How do i adjust the guality of the TV sound?
. . . . . . . . . . . . . . . . . . . . . . . . . . . . . . . . . . . 16
How do I change the setup of the channels?
. . . . . . . . . . . . . . . . . . . . . . . . . . . . . . . . . . . 18
How do I change the features of the TV?
. . . . . . . . . . . . . . . . . . . . . . . . . . . . . . . . . . . . . . 21
How do I operate the V-chip?
. . . . . . . . . . . . . . . . . . . . . . . . . . . . . . . . . . . . . . . . . . . . . . . . . 24
How do I change the language in menu and programming options?
. . . . . . . . . . . . . 34
What if
. . . . . . . . . . . . . . . . . . . . . . . . . . . . . . . . . . . . . . . . . . . . . . . . . . . . . . . . . . . . . . . . . . . . . . . . 35
Safeguards
. . . . . . . . . . . . . . . . . . . . . . . . . . . . . . . . . . . . . . . . . . . . . . . . . . . . . . . . . . . . . . . . . . . . 36
Page 3

TV's are generally programmed for the required service levels before they are
installed in a hospital. When you replace TV's or when channel numbers change,
reprogramming is needed.
The most common service levels used are levels 1 to 4. Premium 1 and/or
Premium 2 Service Levels are used when "pay per view" movies or events or
when movie channels are offered at an extra charge.
1. Free Service Level
The Free Service Level lets patients watch hospital education and information
channels, without renting the television. The channels over which education and
information are broadcast must be programmed into this level of service.
Entertainment channels are not generally included and therefore are not
programmed into this Free Service Level.
2. Locked Service Level
The Locked Service Level does not let the
patient, "self rent" and when a patient tries to
do so, this message appears.
The free channels, over which education and
information are broadcast, must be
programmed into this service level so that the
non paying viewer can watch the
free education and information channels.
Locked service makes it possible to cut off rental, to those who continue to "self
rent" and then refuse to pay for this rental service.
6
Owner's Manual
About service levels
For Additional
Service Please
Contact TV
Representative
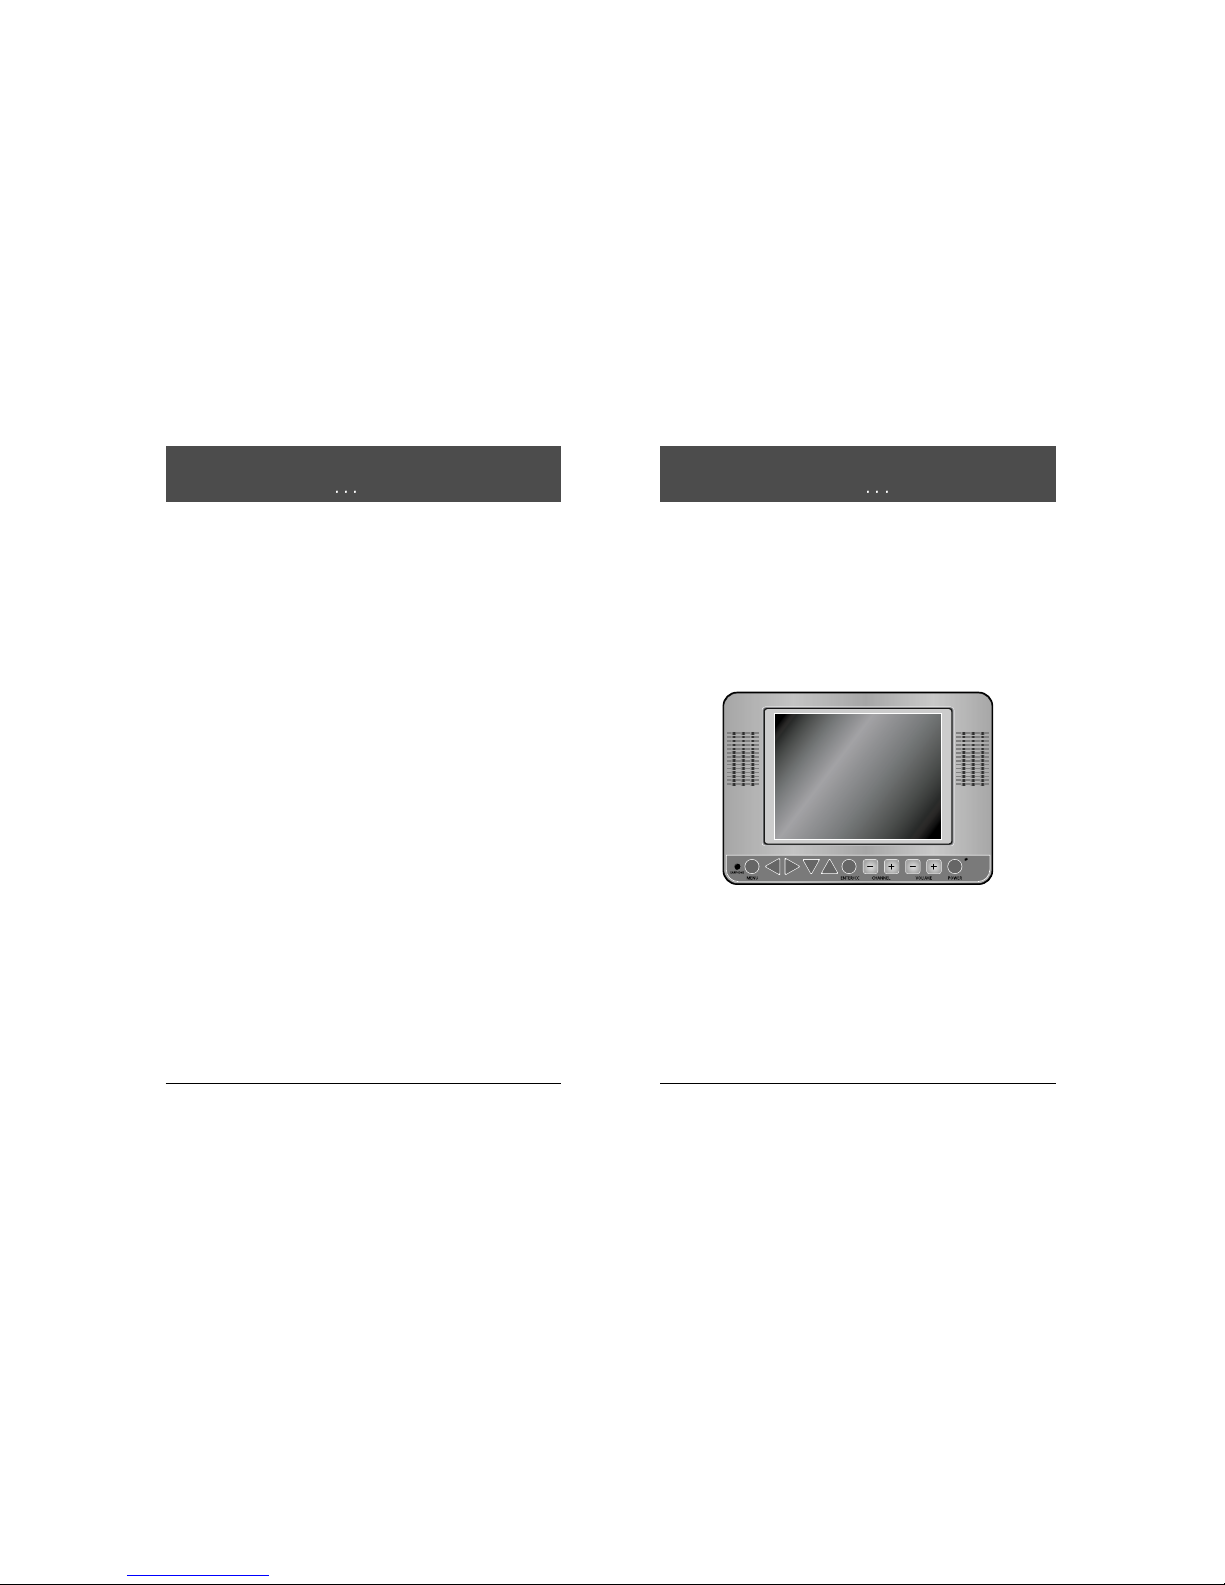
In the easy to clean, membrane control panel, on the lower front of the TV, there
are 11 large, easy to read, buttons. Either the patient or the TV representative
can use the 5 buttons on the right side, to turn the TV on and off, change
channels and raise or lower the sound. These functions can be controlled as well,
with the infrared hand unit. The far right side of this panel responds to the infrared
beam produced when you press the buttons on the hand held infrared unit.
On the left side of the membrane control panel, the Menu button and the Enter
button makes it easy for patients to rent the television or "self rent", as it is called,
when the TV representative is not present. The other 4 buttons, on the left side of
the panel, become active when the L-10 TV is operated as part of a computerized
system. Patients can then use these buttons to select from the menu options that
appear on the TV.
The infrared hand unit lets the TV representative manage the special features of
the L-10, such as levels of service, channel groupings and selections and as well
change the quality of the picture, features and choice of language.
EARPHONE Jack
The EARPHONE Jack is in the lower left corner. Insert an ear piece or head set
and the sound comes only from this device.
Closed Captioning :
When available, captions (CC) may be displayed on a selected channel by
pressing the ENTER/CC button on the front panel of thetelevision or on the
remote control unit.
By continuing to press the ENTER/CC button four different selections can be
made.
Caption 1, Caption 2, Text 1, Text 2.
Once you choose a Caption leave it in that selection unless you know there is
something available in one of the other options.
Once selection is made it is remembered until you change it.
To turn off captions continue pressing the ENTER/CC button until the OFF
position is reached.
5
Owner's Manual
About the L-10 ELF television
Page 4
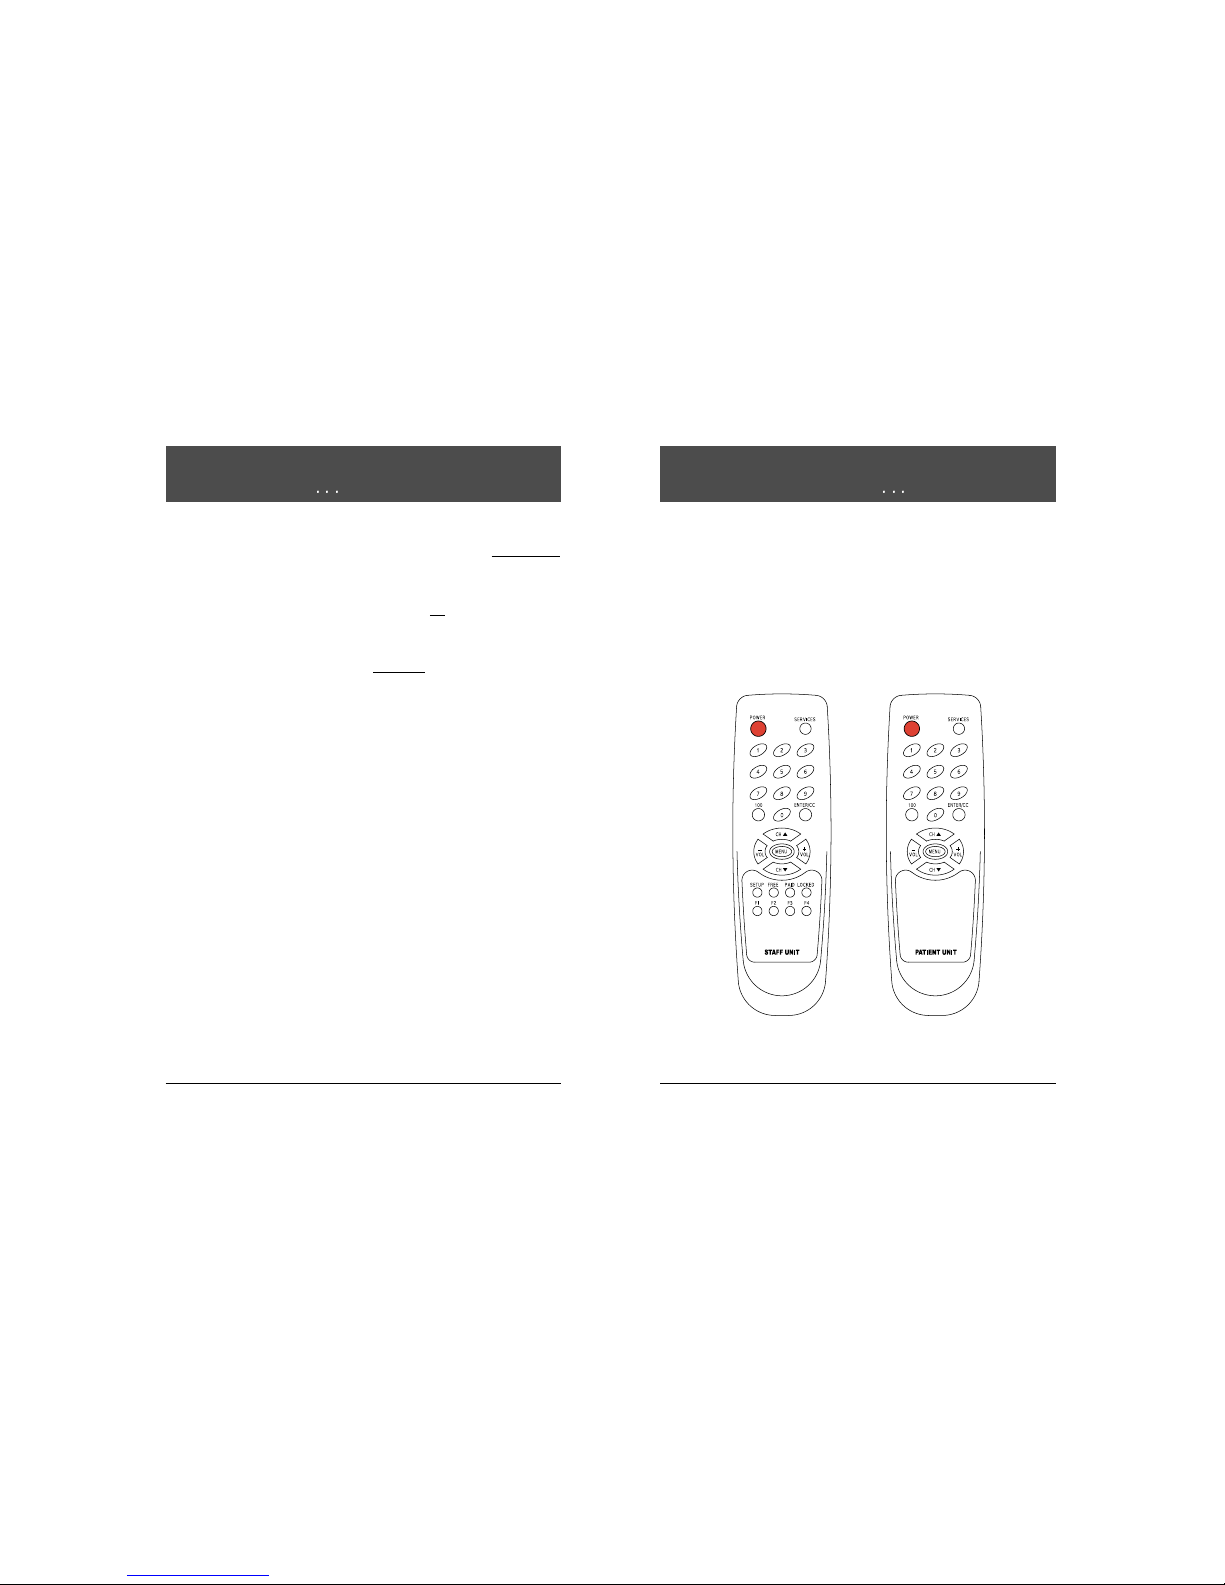
The infrared unit is hand held and produces an infrared beam that you cannot
see. This beam travels in a straight line, much like the light beam from a flashlight.
The infrared hand unit operates with two "AA" cell batteries.
In some hospitals, the patient may have the option of using an infrared hand unit
that has fewer buttons than the unit used by the TV representative. With their
infrared hand unit, patients can self rent, change channels and volume levels but
they are not able to select or change the special features of the
L-10
. The TV
representative can perform all the patients' functions and can also select and
change the special features that the
L-10 ELF
TV offers.
8
Owner's Manual
3. Basic Unpaid Service Level
When a patient "self rents", the TV automatically goes to the Basic Unpaid
Service Level. All the entertainment channels available in the hospital, as well as
the education and information channels must be programmed into this service
level.
This confirms that the TV is rented but the rental fee is not
paid.
4. Basic Paid Service Level
When you collect the rental fee and press the PAID button on the infrared hand
unit, the TV automatically changes to the Basic Paid
Service Level. The Basic
Paid and the Basic Unpaid Service Levels should be assigned the same group of
channels (channelmap).
This confirms that the TV is rented and the rental fee is paid.
5. Premium 1 Service Level
This level of service is available only when special services such as "pay per
view" movies or events or movie channels are offered at an additional cost to the
basic service level. The Premium 1 Service Level is usually made available to
patients who have rented and paid for the basic service level.
6. Premium 2 Service Level
This service level, when provided, is in addition to Premium 1. Premium 2
Service Level must include its own selected channel(s) as well as the channel(s)
programmed in Premium 1 Service Level. The Premium 2 Service Level is usually
only made available to patients who have the Basic Paid Service Level and the
Premium 1 Service Level.
IN NON-RENTAL ACCOUNTS, TV MUST BE PROGRAMMED IN THE BASIC UNPAID
OR BASIC PAID SERVICE LEVEL. THIS WILL DISABLE THE SELF RENT FEATURE.
7
Owner's Manual
About the infrared (IR) hand unit
Infrared Hand Held Unit
For the TV representative
For the patient
About service levels
Page 5
Programming is the process of selecting options from the special features of the
L-10 TV. Programming includes selecting entertainment channels, as well as
educational and information channels and assigning these to different service
levels. TV's are programmed before they are installed in a hospital; however,
when TV's are replaced or the channel numbers change, reprogramming is
needed. Make these programming changes with the infrared hand unit .
How do I program the L-10 ELF?
1. Turn the TV on.
To do this, point the infrared (IR) hand unit at the lower right corner of the
television and press the POWER button. A small light emitting diode beside
the POWER button on the TV "lights up" when the TV is on. You can also turn
the TV on by pressing the POWER button on the TV control panel.
2. Press SETUP. The main SETUP MENU
appears on the TV screen.
3. Press the CHANNEL (CH
) button on the
infrared hand unit until your menu selection
is highlighted.
4. Press the VOLUME (VOL
) button to
accept the selection or to change the option.
When you have completed a selection, press
SETUP on the infrared hand held unit to return
to the previous menu selection. Continue to
Press SETUP until the TV program appears.
10
Owner's Manual
How to use the infrared hand unit :
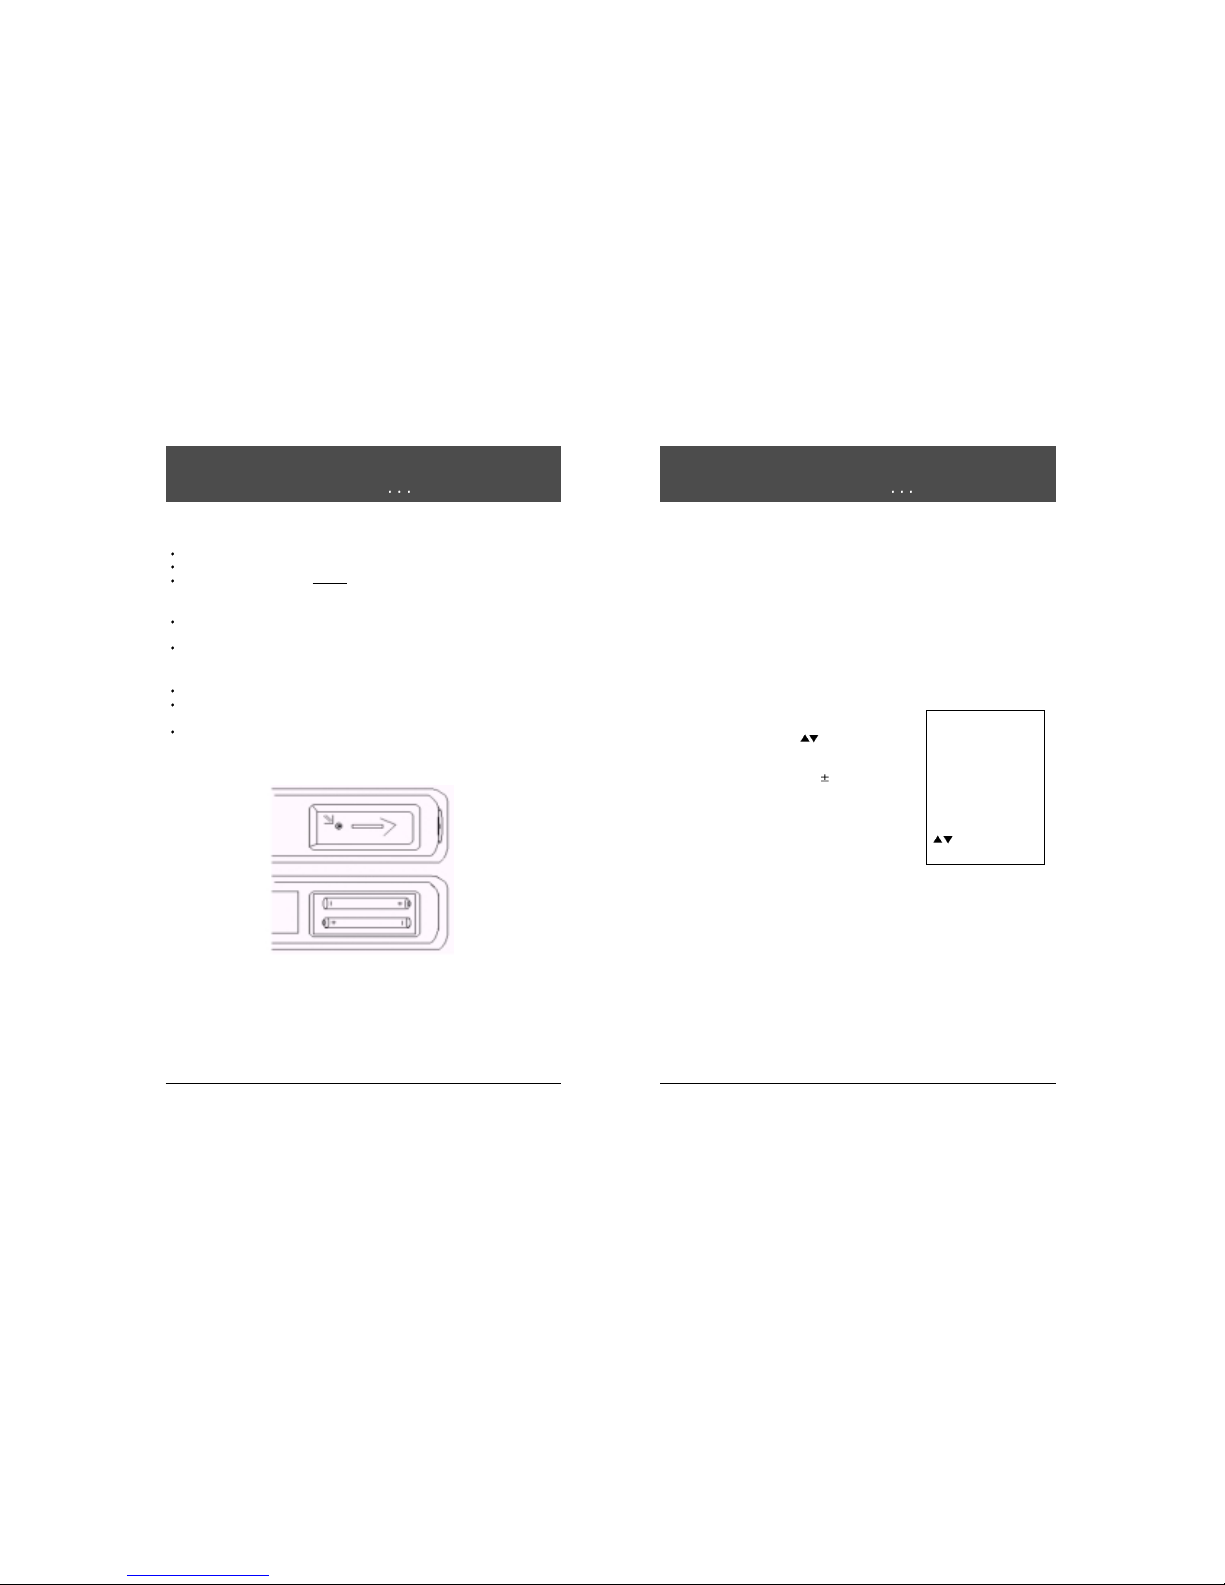
Hold the IR unit flat in the palm of your hand, with the buttons up.
Stand about the length of your arm, back from the television.
Point the infrared hand unit directly at the lower, right corner of the front control
panel on the television. This is important. A misdirected infrared beam can
change programming on a nearby television.
Make the selection on the infrared hand unit by pressing and releasing the
button(s) quickly.
The FREE, PAID, LOCKED buttons work even when the TV is turned off.
How to install and change batteries in the infrared hand unit :
Press down on the ridged area of the battery cover and slide it off.
Install 2 "AA" batteries in the battery holder. Make sure to match the + end of
each battery to the + end in the battery holder.
Replace the battery cover and turn the remote over.
9
Owner's Manual
About programming the
L-10 ELF
SETUP MENU
Rental: Free
Picture
Sound
Channel Setup
Features
Blocking
Language: English
TO Select
+
-
To Change
Main SETUP MENU
About the infrared (IR) hand unit
Infrared Hand Unit (back view)
Installing New Batteries
Page 6
Locked - Choose VOL Locked Service
Level or simply press the LOCKED button on
the infrared hand unit to block the "self rent"
feature. If a viewer tries to "self rent", this
message appears on the TV.
Free - Choose VOL Free or press the FREE button on the infrared hand unit
to make the channels programmed in this service level, available to the patient,
free of charge.
12
Owner's Manual
How do I select a TV service level?
For Additional Service
Please Contact TV
Representative.
1. Press SETUP on the infrared hand unit.
2. Press CH
to select Rental: service level
3. Press VOL
to change the Rental: service
level.
Basic Unpaid - The TV automatically goes
to this service level when the TV is "self
rented".
When the rental fee is paid, simply press the
PAID button on the infrared hand unit.
Basic Paid - Choose VOL Basic Paid or simply press the PAID button on
the infrared hand unit when the patient pays the rental fee for the basic rental
service level.
Confirms that the rental fee is paid and the Basic Paid Service Level is activated.
Premium 1 - Choose VOL Premium 1, to rent this service level to patients
also renting the Basic Paid Service Level. The channels programmed in the
Premium 1 Service Level would normally include the same channels (channel
map) that is programmed in the Basic Paid Service Level.
Premium 2 - Choose VOL Premium 2 to rent this service level. The
channels programmed in the Premium 2 Service Level would normally include
the same channels (channel map) that are programmed in the Premium 1
Service Level.
11
Owner's Manual
HHow do I select a TV service level?
SETUP MENU
Rental: Free
Picture
Sound
Channel Setup
Features
Blocking
Language: English
TO Select
+ - To Change
Main SETUP MENU
Page 7

"Self rent" is a valuable feature of the L-10 ELF television. Patients have the
option of enjoying entertainment programming when a TV representative is not
available to carry out the rental transaction.
The "self rent" feature is available when Free is the selected service level and
channels are assigned to the Rental: Basic Unpaid option.
How does a patient "self rent"?
To "self rent", patients press the MENU button
on the control panel of the TV or press the
MENU button on the infrared hand unit. This
message appears on the TV screen:
When the patient presses ENTER, either on
the infrared hand unit or on the control panel of
the L-10 TV, the service level automatically
changes from Rental: Free to Rental: Basic
Unpaid.
From self rent to Rental: Basic Paid
When you collect the rental fee, press Paid on the infrared hand unit or
Press SETUP
Select CH Rental: service levels
Press VOL to change the level of service to Basic Paid.
13
Owner's Manual
When a patient chooses to rent both the Basic and a Premium Service
Level:
Press SETUP.
Select Channel Setup.
Select Assign channel maps.
Identify the number of the map assigned to the Basic Paid Service Level.
Identify which channels are included in this map.
Select the channel map for the selected Premium option.
Add the channels from the Basic Paid Service Level to the selected Premium
Service Level, channel map, using the Autoprogram or
the Add/Delete
function.
Select the Premium service from the service level selections.
Press SETUP to return to TV programming.
Channel CH to be sure that the channels from the Basic Paid Service
Level and selected Premium Service Level are available to the viewer.
14
Owner's Manual
How do I select a TV service level?
How do I select a TV service level?
Confirm Rental
Press enter to
confirm
your rental.
Press any other
button
to cancel.
Page 8
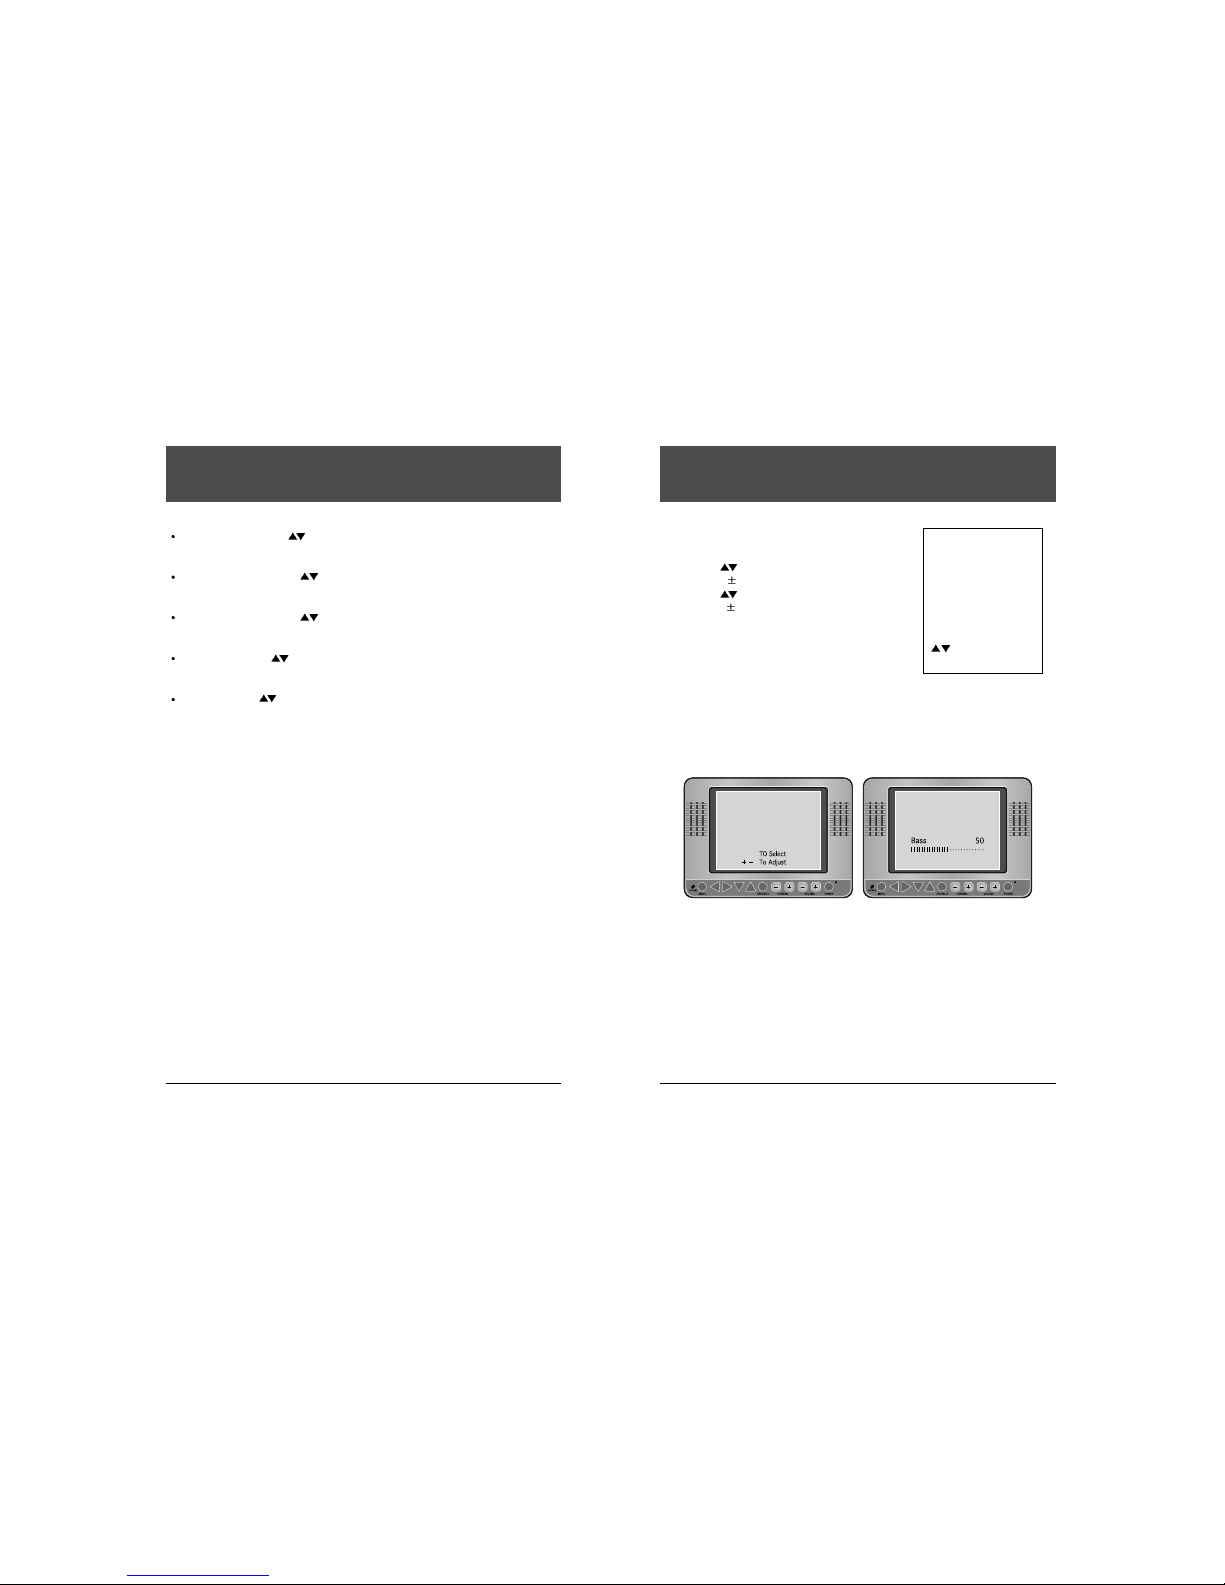
To adjust the quality of the TV sound ...
1. Press SETUP on the infrared hand unit.
2. Press CH
to select Sound.
3. Press VOL
to accept this selection.
4. Press CH
to select a Sound option.
5. Press VOL
to adjust the selected Sound option.
To adjust any of the Sound options, hold down
VOL+ to increase and VOL- to decrease the
adjustment. The sliding color bar that appears
on the screen increases and decreases as
adjustments are made. So does the number
(from 0 to 100) that appears above the bar.
Generally, the standard point on the bar or
about 50 is a good level.
16
Owner's Manual
Contrast - Select CH Contrast to adjust the overall contrast of the picture.
Hold down the VOL+ button to increase or the VOL- button to reduce contrast.
Brightness - Select CH Brightness to adjust the brightness of the picture.
Hold down VOL+ to increase or the VOL- to reduce brightness.
Sharpness - Select CH Sharpness to adjust the overall sharpness of the
picture. Hold down VOL+ to increase or VOL- to decrease the sharpness.
Color - Select CH Color to adjust the amount of color in the picture. Hold
down VOL+ to increase or VOL- to reduce the color.
Tint - Select CH Tint to adjust the color of the flesh tones. Hold down VOL+
button to increase or VOL- to reduce skin color.
15
Owner's Manual
How do I adjust the quality of the TV sound?
▲ ▼
Sound
Bass 50
Treble 50
Balance 0
Mts Stereo
Adjusting Sound Quality
SETUP MENU
Rental: Free
Picture
Sound
Channel Setup
Features
Blocking
Language: English
TO Select
+ - To Accept
Main SETUP MENU
How do I adjust the quality of the TV picture?
Page 9
18
Owner's Manual
17
Owner's Manual
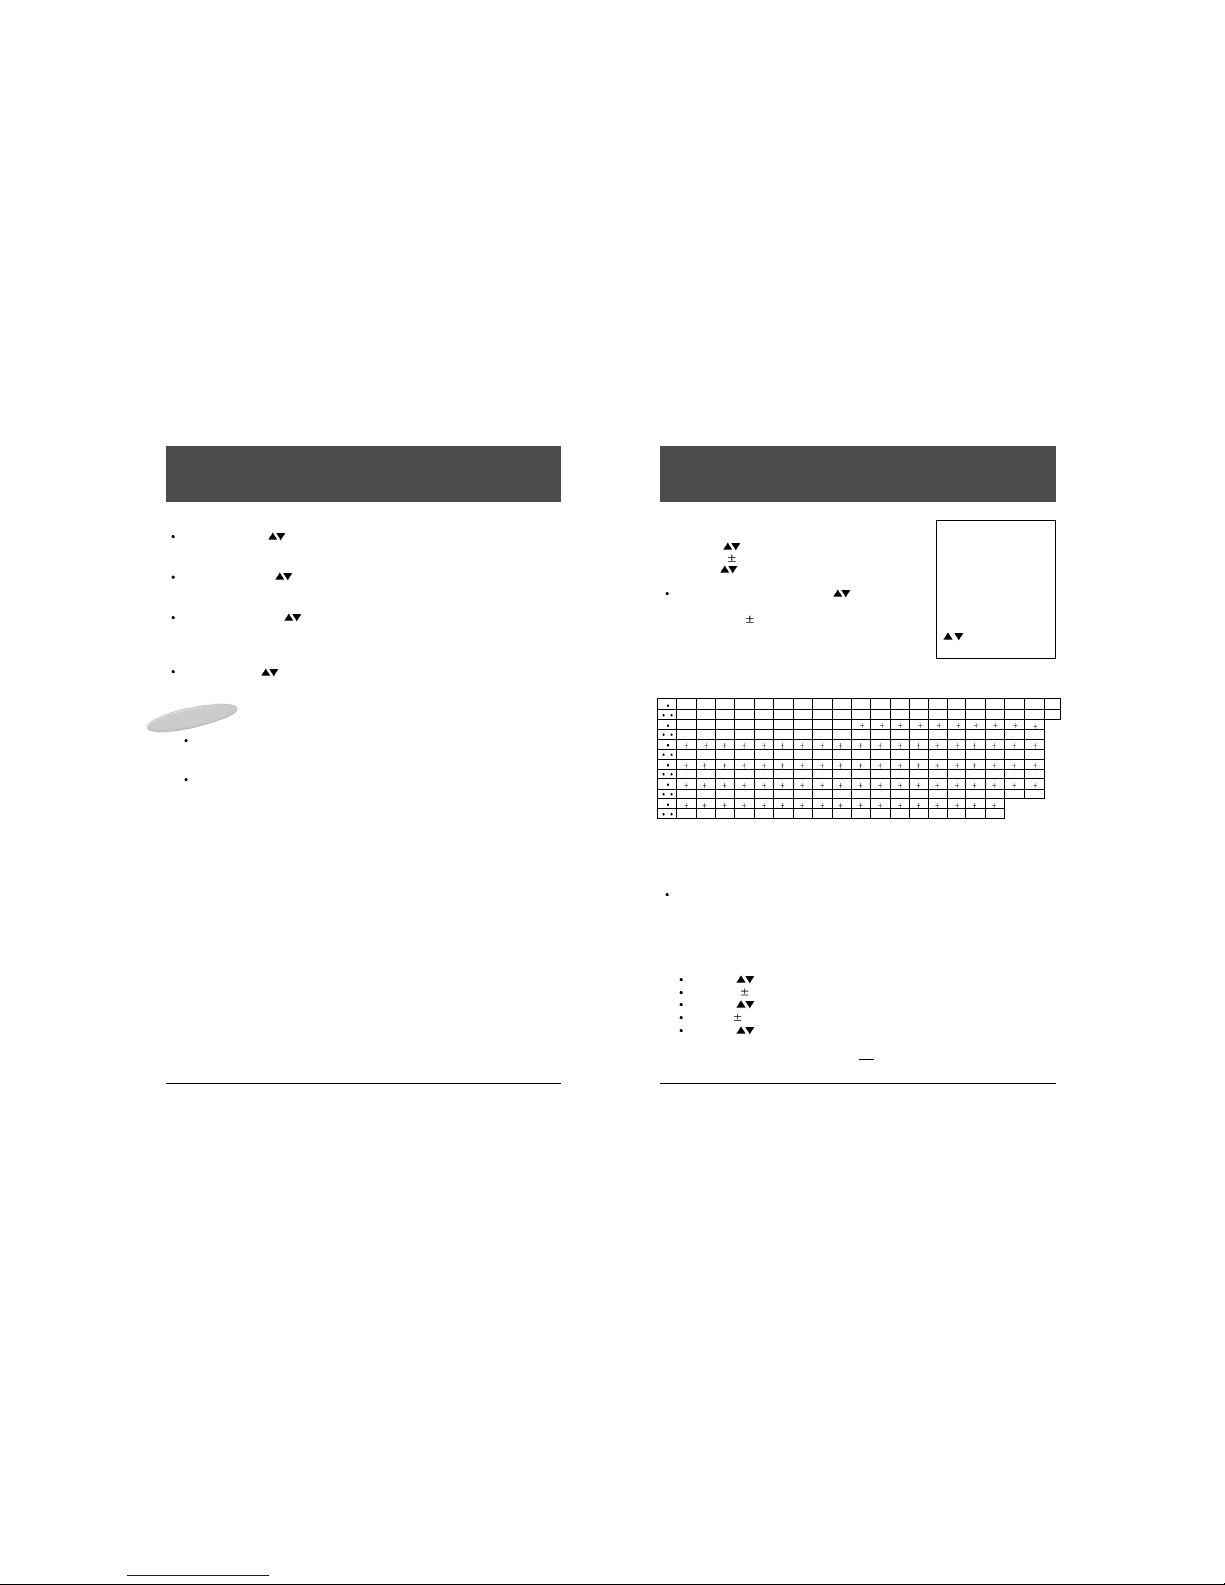
1. Press SETUP on the infrared hand unit.
2. Select CH
Channel Setup.
3. Press VOL
to accept this selection.
4. Press CH
to select a Channel Setup option.
Antenna : CATV/TV - Select CH
Antenna: to change the source of the TV signal.
Choose VOL CATV (cable TV), when
cable is the signal source. When an antenna
is the signal source, choose TV. In almost all
hospitals, cable is the source of the signal.
CATV Install
The chart below is typical of many cable channel allocations.
NOTE TO CATV SYSTEM INSTALLER
This reminder is provided to call the CATV system installer’s attention to article 820-40 of the NEC
that provides guidelines for proper grounding and, in particular, specifies that cable ground shall be
connected to the grounding system of the building, as close to the point of cable entry as practical.
Assign channel maps -
A channel map is the method of organizing channels
in different service levels. When a map does not contain any channels, the word
"empty" appears beside it. Before you identify which channel map should go with
which service level, you must know which channels, the map contains. It is
easiest to keep a written list of the map number and the channels assigned to it.
To identify which channels are included in a channel map ...
Select CH ADD/Delete channels.
Press VOL to accept the selection.
Select CH the desired map.
Press VOL to accept the selection. Add/Delete channels for the selected Map #.
Press CH to change channels. When + appears before the channel
number, this channel is included in the selected Map. When - appears before
the channel number, this channel is not
included.
How do I change the set up of the channels?
A-8 A-4
01
28
47 48 49 50 51 52 53 54 55 56 57 58 59 60 61 62 63 64 65
66 67 68 69 70 71 72 73 74 75 76 77 78 79 80 81 82 83 84
29 30 31 32 33 34 35 36 37 38 39 40 41 42 43 44 45 46
96 97 98 99 14 15 16 17 18 19 20 21 22 23 24 252627
A-3 A-2 A-1 A B C
OPQ RSTU VW
W 1W2
W 11 W 12 W 13 W 14 W 15 W 16 W 17 W 18 W 19 W 20 W 21 W 22 W 23 W 24 W 25 W 26 W 27 W 28 W 29
W
30 W 31 W 32 W 33 W 34 W 35 W 36 W 37 W 38 W 39 W 40 W 41 W 42 W 43 W 44 W 45 W 46 W 47 W 48
85 86 87 88 89 90 91 92 93 94 100 101 102 103 104 105 106 107 108
W 49 W 50 W 51 W 52 W 53 W 54 W 55 W 56 W 57 W 58 W 59 W 60 W 61 W 62 W 63 W 64 W 65 W 66 W 67
109 110 111 112 113 114 115 116 117 118 119 120 121 122 123 124 125
W 68 W 69 W 70 W 71 W 72 W 73 W 74 W 75 W 76 W 77 W 78 W 79 W 80 W 81 W 82 W 83 W 84
W 3W4W 5W6W7W8W9
W 10
DE FGHI JKLMN
A-5
95
SETUP MENU
Rental: Free
Picture
Sound
Channel Setup
Features
Blocking
Language: English
TO Select
+
-
To Accept
Main SETUP MENU
Bass - Select CH Bass to adjust the amount of bass in the sound.
Hold down VOL+ to increase or the VOL- button to reduce bass.
Treble - Select CH Treble to adjust the amount of treble in the sound.
Hold down VOL+ to increase or the VOL- to reduce treble.
Balance - Select CH Balance to adjust the balance in the sound.
Hold down VOL+ to increase right volume, and hold down VOL- to increase left
volume.
Mts - Select CH Mts to adjust the mts of the sound.
Hold down VOL+, the selection will change in the order Stereo - Sap - Mono.
How do I adjust the quality of the TV sound?
NOTES:
Reception of Sereo or SAP broadcast information is of course dependent on a
television station actually broadcasting such material. Not all stations do, and
some stations only broadcast Stereo/SAP material during part of the day.
If the L-10 ELF is set to STEREO and no stereo signal is being broadcast, a
MONO signal will automatically be received.
Page 10

To clear map ...
Select CH Clear map to automatically remove all channels from a map.
Press VOL to accept this selection.
Press CH to select the map to be cleared.
Press VOL . The channels are removed from the map after a short pause
and the word "empty" appears beside the selected map.
To Add/Delete channels
Select CH
Add/Delete channels to add/remove channels, one at a time.
Press VOL to accept this selection.
Press CH to select a map.
Press VOL . The message, Add/Delete channels with the map number
appears on the TV screen.
Press VOL + to add the channel to the selected map. When + appears
beside the channel number, it confirms that this channel has been added.
Press VOL- to remove the channel from the selected map. When - appears
beside the channel number, it confirms that this channel has been removed.
Fine tune - Select CH FineTune to adjust the TV signal. Hold down VOL+
to make the signal stronger or VOL- to make the signal weaker. The suggested
level of fine tuning is generally close to 0.
Video Mode -
Select CH Video Mode to change the source of the TV or Video, PC
Press VOL+ to accept this selection.
Whenever this VOL+ button is pressed.
20
Owner's Manual
To assign a channel map ...
Select CH Assign channel maps to program the channel selection with
the appropriate level of service.
Press VOL to accept this selection.
Press CH to select this level of service.
Press VOL to assign a map by number to the selected service level.
Continue to press VOL
until the desired map number has been assigned.
When an empty channel map is assigned to
an available service level, any attempt to
access this service level produces this
message.
When a service level is not used, assign it
an empty channel map.
To autoprogram channel maps ...
Select CH Autoprogram to quickly add several channels to a selected
map. Tune to the first channel that you wish to select in this process.
Channels are added or removed either by pressing CH
or by entering the
number of the desired channel, using the digit keys on the infrared hand unit.
Press VOL to accept the selection.
Press CH
to select the map. The word "empty" appears beside any map
to which channels are not assigned.
Press VOL . Autoprogram and the channel number appears on the TV
screen.
Press CH to begin adding channels. Channels, above the channel
number to which the TV is currently tuned, will be added, one by one.
To stop autoprogramming, press VOL .
If you choose not to automatically add any channels to the map, press VOL
and return to the previous menu.
19
Owner's Manual
How do I change the set up of the channels?
TV VIDEO PC
How do I change the set up of the channels?
No Channels
Available.
Please Contact TV
Representative.
Page 11
Speaker
When the speaker is turned off, viewers can hear the TV only with an ear
phone or a head set. The speaker may be turned on in some levels of service
and turned off in others.
To turn the speaker on and off ...
Select CH Speaker.
Press VOL to accept this selection.
Press CH to select a service level.
Press VOL to turn the speaker off or on.
Remember, if you connect a head set or ear phones to the EARPHONE jack,
you will only hear through this listening device, even when the speaker is on.
The TV will display this reminder, "ear phone only" for a few seconds after a
channel change to indicate the speaker is not available. Once the listening
device is removed from the ear phone jack, the sound will come from the TV
speaker, providing the speaker has been programmed "ON" in that service
level.
Volume Limit
When a patient increases the volume either by pressing VOL+ on the infrared
hand unit or on the control panel of the TV, the audio level will not increase
beyond the setting of the volume limit.
To change the volume limit ...
Select CH Volume Limit
to control the limit of the sound that the TV can
produce.
Press VOL to accept this selection.
A sliding color bar appears on the screen and increases or decreases as you
make changes. So does the number (from 0 to 100) above the bar. When the
TV operates at the maximum sound limit, the number showing is 100.
Hold down VOL- to reduce the maximum sound limit.
Hold down VOL+ to increase, up to 100, the maximum sound limit.
22
Owner's Manual
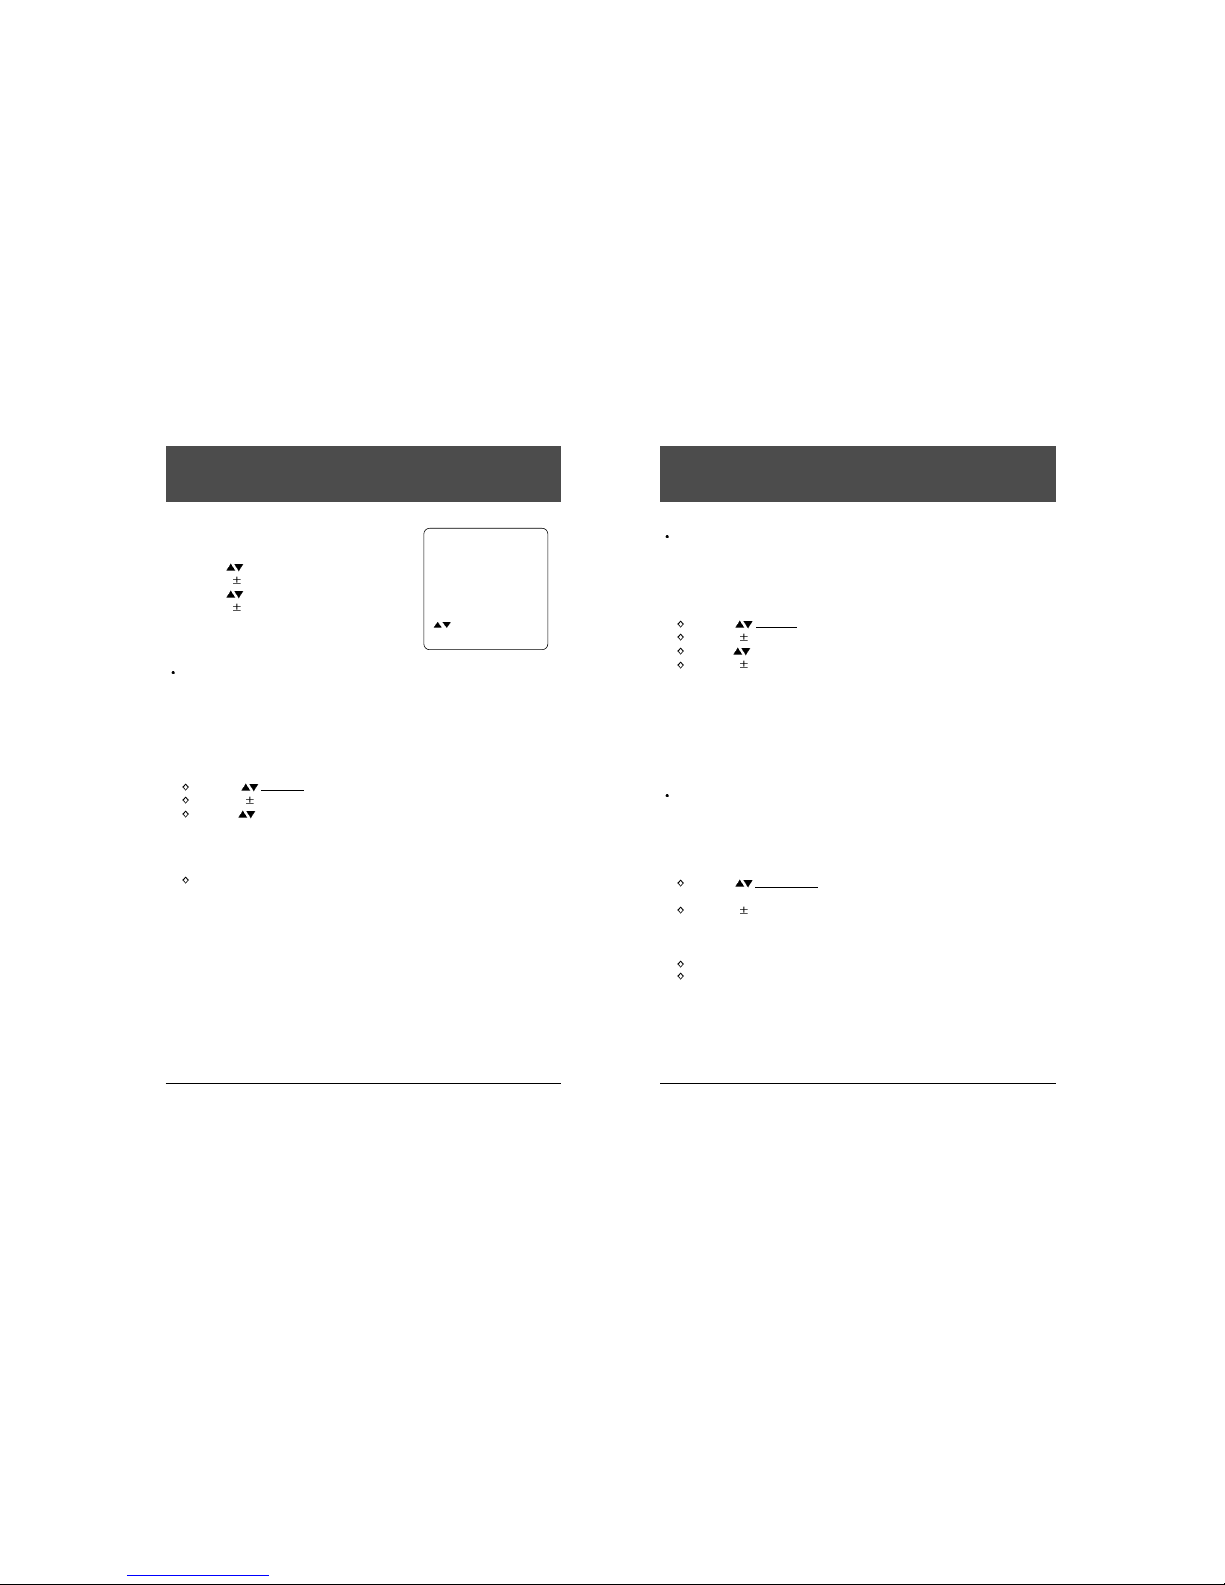
To change the Features of the TV
1. Press SETUP on the infrared hand unit.
2. Press CH
to select Features.
3. Press VOL
to accept this selection.
4. Press CH
to select a Features option.
5. Press VOL
to change the selected
Features option.
Marquee
A Marquee channel is a message or promotional channel.
The content is on the selected channel before the TV is installed in the
hospital. The messages are used to inform viewers and to advertise services.
When a Marquee channel is programmed to a selected service level, it is
always the first channel to appear when the TV is turned on.
To assign a Marquee channel to a level of service ...
Select CH Marquee.
Press VOL to accept this selection.
Press CH to select a service level.
Enter the number of the Marquee channel on the digit keys of the infrared hand
unit, to assign it to this selected service level. The channel number now
appears beside the selected rental service and the TV tunes to this channel as
confirmation of the selection.
To turn off the Marquee channel, enter channel 0.
21
Owner's Manual
How do I change the features of the TV?How do I change the features of the TV?
Main SETUP MENU
SETUP MENU
Rental: Free
Picture
Sound
Channel Setup
FFee aattuu rr eess
Blocking
Language: English
TO Select
+ - To Accept
Page 12
24
Owner's Manual
Rental
The Rental option, provides three ways to "self rent". If Rental: Menu is
selected, patients start the rental process by pressing the MENU button on the
TV control panel or on the infrared hand unit. If Rental: Earpiece
is selected,
the self rent process begins when an ear phone or head set is inserted into the
EARPHONE jack on the front of the TV. Selecting Rental: Ear and Menu
makes it possible to self rent using either one of the options.
To change the "self rent" options ...
Select CH Rental to change these "self rent" options.
Press VOL to select either Menu or Earpiece or Ear and Menu.
Computer: Off/On
The L-10 Television can be programmed and controlled by a computer system
or a quick programming device. Set the computer to "on", even when the TV
does not have a computer module installed.
Background: off/on
The background color for the menu and programming screens is either off or
on.
To change the background off/on ...
Select (CH ) Background:
Press VOL to make the selection change.
23
Owner's Manual
How do I operate the V-chip?
CALLING UP THE BLOCKING MENU
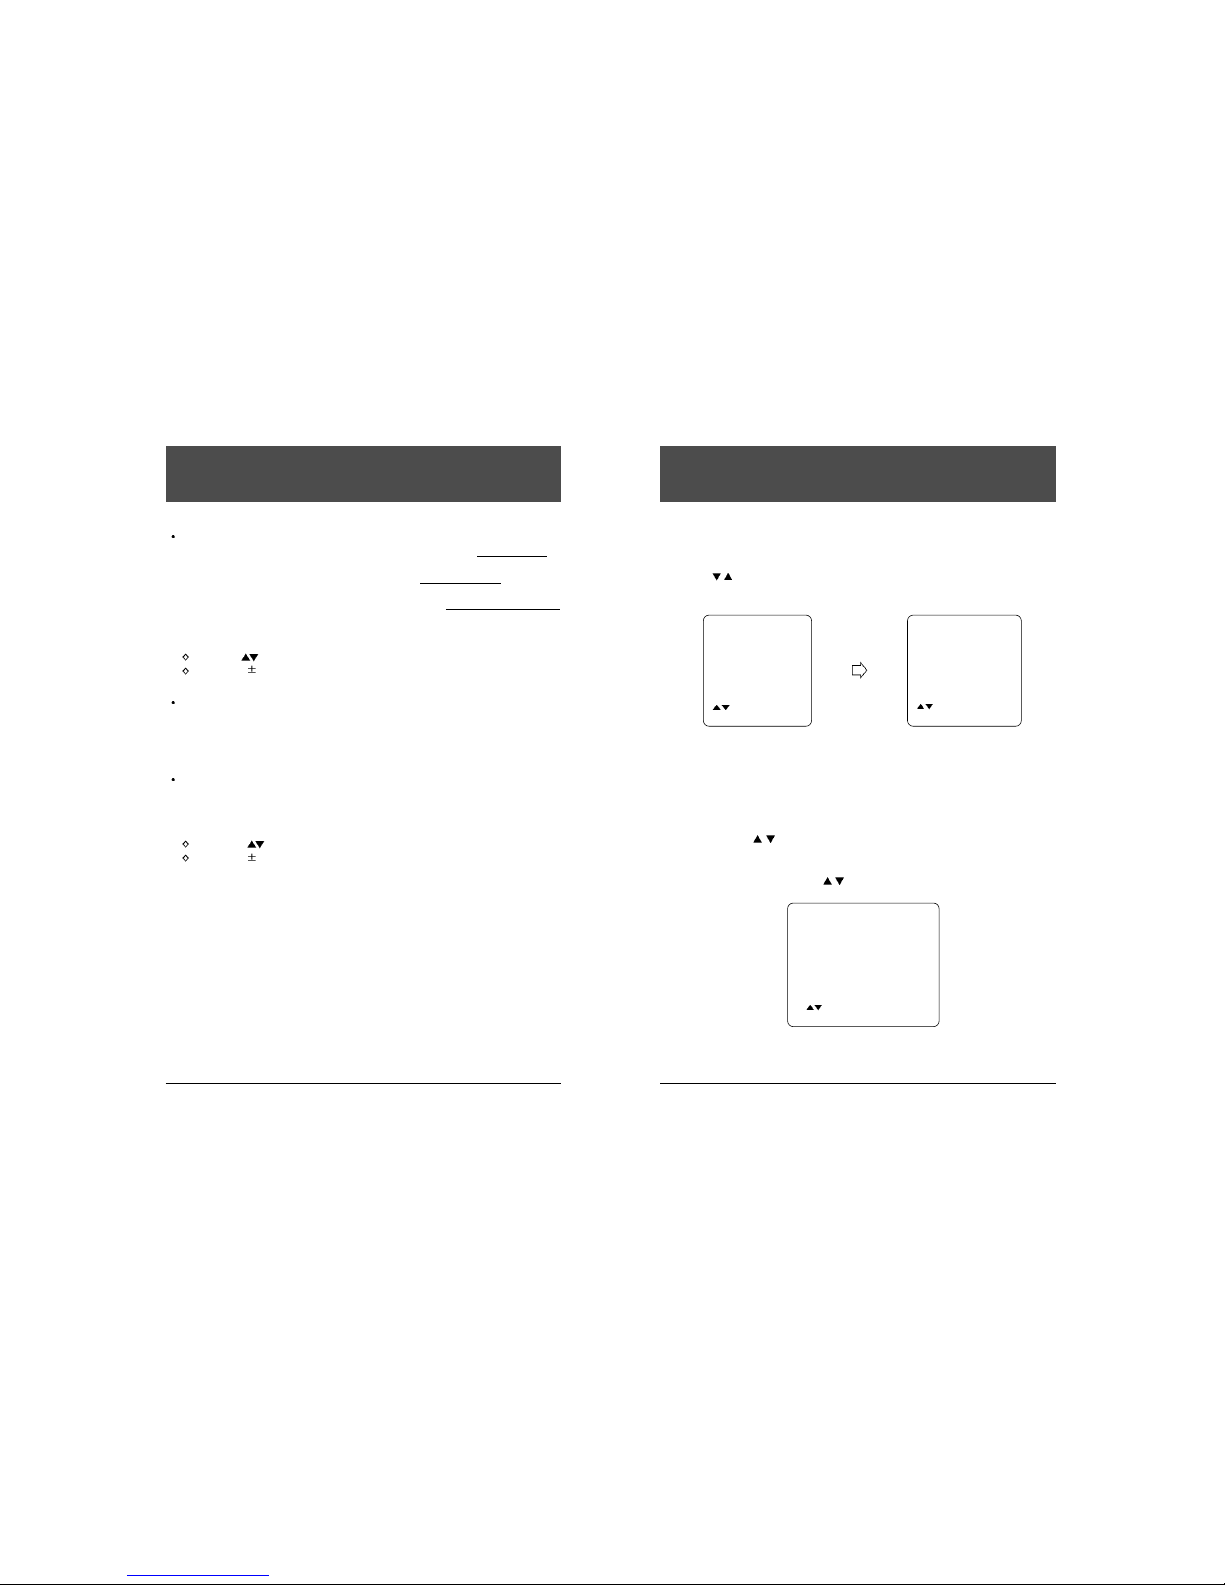
1. Press SETUP on the infrared hand unit.
2. Press CH
/ to select Blocking.
3. Press VOL +/- to accept this selection.
4. The BLOCKING MENU will appear.
MOTION PICTURE RATING
This procedure allows parents to block programs which contain MOTION PICTURE
ratings that they consider inappropriate see next page for Motion Picture ratings.
1. Press VOL +, CH
/ button and select the rating which you wish to block.
2. Press VOL + button.
VIEW changes to LOCK
3. To change the rating, press CH
/ button and select N/A, and then press VOL+
button.
SETUP MENU
Rental: Free
Picture
Sound
Channel Setup
Features
BBlloocc kkiinn gg
Language: English
TO Select
+ - To Accept
BLOCKING
MMOOTTIIOONN PP IICCTTUURREE
TV PARENTAL GUIDE
CANADIAN ENGLISH
CANADIAN FRENCH
BLOCK OFF
TO Select
+ - To Accept
MOTION PICTURE
NN //AA VV IIEEWW
GVIEW
PG VIEW
PG-13 VIEW
RVIEW
NC-17 VIEW
XVIEW
TO Select
+ - To Accept
How do I change the features of the TV?
Page 13
26
Owner's Manual
25
Owner's Manual
How do I operate the V-chip?
TV PARENT AL GUIDE RATING
This procedure allows parents to block programs which contain TV Parental guide
ratings that they consider inappropriate. Content labels are designed to indicate
specific contents of TV programs within each TV Parental Guide rating. For example, if
a program is rated TV-Y7 but has strong Fantasy Violence content, the program will be
labeled as TV-Y7-FV. The TV Parental Guide menu allows you to block all -FV labeled
programs while viewing all regular TV-Y7 programs.
NOTE: Each rating has a different set of content labels that you can choose to block or
view. Labels that show
----
cannot be changed within the selected rating.
Refer to the rating and content label guides on the following pages.
1. Press VOL +, CH
/ button and select the rating which you wish to block.
2. Press VOL + BLOCKING in the center column changes to magenta, and
VIEW will
change to LOCK.
3. Press CH / to select the content label you want to block.
Press VOL + to switch the selected label between VIEW and LOCK.
4. When you have finished setting the TV parental guide ratings, press MENU button
repeatedly to return to TV screen.
TV PARENTAL GUIDE
NONE
TV-Y BLOCKING VIEW
TT VV-- YY 77
FANTASY V VIEW
TV-G VIOLENCE ---TV-PG SEXUAL ---TV-14 LANGUAGE ---TV-MA DIALOG ----
TO Select
+ - To Accept
How do I operate the V-chip?
MOTION PICTURE RATING.
RATING REMARKS
N/A (No rating) Not rated or not applicable program movie
has not been rated or ratings do not apply.
G (General audience) All ages admitted
PG (Parental guidance suggested) Some material may not be suitable for
children.
PG-13 (Parents strongly cautioned) Some material may be inappropriate for
children under 13.
R (Restricted) Under 17 requires accompanying
parent or adult guardian.
NC-17 (No one 17 and under admitted)
X (Adults only)
NOTE
You do not need to block each MOTION PICTURE rating individually.
For example, if you block movies with an R (restricted) rating, the V-chip will
automatically block NC-17 and X rated movies.
In the same manner, passing (unblocking) the PG-13 rating would automatically
pass PG and G rated movies.
Page 14
28
Owner's Manual
27
Owner's Manual
How do I operate the V-chip?
TV-Y7 (FV;Directed to older children): This program is designed for children age 7
and above.
It may be more appropriate for children who have acquired the developmental skills
needed to distinguish between make-believe and reality.
Themes and elements in this program may include mild fantasy violence or comedic
violence that may frighten children under the age of 7.
Therefore, parents may wish to consider the suitability of this program for their very
young children.
TV PARENTAL GUIDE
NONE
TV-Y BLOCKING VIEW
TT VV-- YY 77
FANTASY V VIEW
TV-G VIOLENCE ---TV-PG SEXUAL ---TV-14 LANGUAGE ---TV-MA DIALOG ----
TO Select
+ - To Accept
NOTE
For those program where fantasy violence may be more intense or more
combative than other programs in this category may be designated TV-Y7-FV.
How do I operate the V-chip?
NONE: Not rated or not applicable program.
Important note: You have the ability to block all programs which
are not rated, but you should be aware that such blocking may
have unintended consequences.
For example, the following types of non-rated programming
might be blocked: emergency bulletins, news, weather, religion,
sports, politics, local, unrated old movies, etc.
TV-Y(All Children): This rating is designed to be appropriate for all children.
Whether animated or live-action, the themes and elements in this
program are specifically designed for a very young audience,
including children from ages 2~6.
All content labels are blocked.
TV PARENTAL GUIDE
NN OONNEE
VIEW
TV-Y BLOCKING
TV-Y7 FANTASY V
TV-G VIOLENCE
TV-PG SEXUAL
TV-14 LANGUAGE
TV-MA DIALOG
TO Select
+ - To Accept
TV PARENTAL GUIDE
NONE
TT VV --YY
BLOCKING VIEW
TV-Y7 FANTASY V ---TV-G VIOLENCE ---TV-PG SEXUAL ---TV-14 LANGUAGE ---TV-MA DIALOG ----
TO Select
+ - To Accept
Page 15
30
Owner's Manual
29
Owner's Manual
How do I operate the V-chip?
TV-14 (D/L/S/V: Parental caution recommended): This rating contains some
material that many parents would find unsuitable for children under 14 years of
age.
Parents are strongly urged to exercise great care in monitoring the programs and
are cautioned against letting children under the age of 14 watch unattended.
TV-14 rated progams contain one or more of the following:
Intense violence (V), intense sexual situations (S), strong coarse
language (L), or intensely suggestive dialogue (D).
TV-MA (L/S/V: Mature audience only): This rating is specifically designed to be
viewed by adults and therefore may be unsuitable for children under 17.
TV-MA rated programs contain one or more of the following:
Graphic violence (V), explicit sexual activity (S), or crude
indecent language (L).
TV PARENTAL GUIDE
NONE
TV-Y BLOCKING VIEW
TV-Y7 FANTASY V ---TV-G VIOLENCE VIEW
TV-PG SEXUAL VIEW
TT VV-- 11 44
LANGUAGE VIEW
TV-MA DIALOG VIEW
TO Select
+ - To Accept
TV PARENTAL GUIDE
NONE
TV-Y BLOCKING VIEW
TV-Y7 FANTASY V ---TV-G VIOLENCE VIEW
TV-PG SEXUAL VIEW
TV-14 LANGUAGE VIEW
TT VV-- MMAA
DIALOG ----
TO Select
+ - To Accept
How do I operate the V-chip?
TV-G (General audience): Most parents would find this rating suitable for all ages.
Although this rating does not signify a program designed specifically for children, most
parents may let younger children watch TV-G programs unattended.
It contains little or no violence, no strong language and little or no sexual dialogue or
situations.
TV-PG (D/L/S/V: Parental guidance suggested): This rating contains material that
parents may find unsuitable for younger children.
Many parents may want to watch it with their younger children.
The theme itself may call for parental guidance and/or the program contains one or
more of the following:
Moderate violence (V), some sexual situations (S), infrequent coarse language (L), or
some suggestive dialogue (D).
TV PARENTAL GUIDE
NONE
TV-Y BLOCKING VIEW
TV-Y7 FANTASY V ---TT VV --GG
VIOLENCE ---TV-PG SEXUAL ---TV-14 LANGUAGE ---TV-MA DIALOG ----
TO Select
+ - To Accept
TV PARENTAL GUIDE
NONE
TV-Y BLOCKING VIEW
TV-Y7 FANTASY V ---TV-G VIOLENCE VIEW
TT VV-- PP GG
SEXUAL VIEW
TV-14 LANGUAGE VIEW
TV-MA DIALOG VIEW
TO Select
+ - To Accept
Page 16
32
Owner's Manual
31
Owner's Manual
How do I operate the V-chip?
CANADIAN ENGLISH RATING
CANADIAN ENGLISH RATING
CANADIAN FRENCH RATING
CANADIAN FRENCH RATING
RATING REMARKS
E Exempt
C Children
C8+ Children eight years and older
G General programming,
suitable for all audience
PG Parental Guidance
14+ Viewers 14 years and older
18+ Adult Programming
RATING REMARKS
E Exempt
G General
8ANS+ Children eight years and older
13ANS+ Viewers 13 years and older
16ANS+ Viewers 16 years and older
18ANS+ Adult Programming
CANADIAN ENGLISH
E VIEW
C VIEW
C8+ VIEW
GVIEW
PG VIEW
14+ VIEW
18+ VIEW
TO Select
+ - To Accept
CANADIAN FRENCH
E VIEW
G VIEW
8ANS+ VIEW
13ANS+ VIEW
16ANS+ VIEW
18ANS+ VIEW
TO Select
+ - To Accept
How do I operate the V-chip?
CONTENT LABELS
TV Parental Guidelines may have one or more letters added to the basic rating to let
parents know when a show contains higher levels of potentially, offensive material.
Note that the content label should be considered in light of its associated rating.
For example, a "V" is likely to designate considerably more intense violence when
associated with a TV-MA rated program than when it is associated with a TV-PG rated
program.
V Violence D Suggestive dialogue
S Sexual situations FV Fantasy violence
L Coarse or crude indecent language
NOTE
You do not need to block each TV parental guide rating individually.
The TV-Y and TV-Y7 ratings are handled as a group, and the TV-G, TV-PG, TV14, and TV-MA Ratings are handled as a group.
For example, if you choose a program with a TV-14 rating, the V-chip will
automatically also block TV-MA rated programs.
In the same manner, passing (unblocking) the TV-MA rating would automatically
also pass TV-14 rated programs.
Also note that you have the option of passing or blocking programs based on their
content label (D,L,S,V,FV) without necessarily blocking all programs that carry a
specific rating.
For example, you may pass some TV-PG programs, but not those which also
carry a "V"(moderate violence) content label.
In this case, the V-chip would automatically block TV-14 and TV-MA rated
programs which carry the "V".
Page 17
To select either English, Spanish or French in the
programming screens and rental instructions ...
Select CH Language: English
Press VOL
to select Spanish. Press again
to select French. Press again to return to
English.
34
Owner's Manual
33
Owner's Manual
Main SETUP MENU
SETUP MENU
Rental: Free
Picture
Sound
Channel Setup
Features
Blocking
LL aa nn gguuaa ggee:: EE nn ggll ii ss hh
TO Select
+ - To Accept
How do I change the language?How do I operate the V-chip?
TO ACTIVATE V-CHIP FUNCTION
BLOCK
1. Press SETUP on the infrared hand unit.
2. Select
CH
Blocking.
3. Press VOL+ button to set BLOCK ON.
BLOCKING
MOTION PICTURE
TV PARENTAL GUIDE
CANADIAN ENGLISH
CANADIAN FRENCH
BB LL OOCCKK OO NN
TO Select
+ - To Change
Page 18

36
Owner's Manual
The "self rent" feature is not available .
Make sure that Rental: Free is the selected rental service level.
The only channels being broadcast are 2-13. All other channels are snowy.
Make sure that in Channel Setup: Antenna: CATV is selected, not TV.
The sound is too low and the VOL+ doesn't make it loud enough.
Check the Volume Limit. If it is lower than 100, raise the limit. Access Features:
Volume Limit to make the change.
When I rent the Basic Paid Service Level, the patient is unable to receive the
channels included in the Free Service Level.
All channels programmed in the Free Service Level must be programmed in the
Basic Paid Service Level, as well. The patient who rents can watch the channels
in both these service levels. Access Channel Set up to make this change.
35
Owner's Manual
Electrical energy can perform many useful functions. This unit has been
engineered and manufactured to assure your personal safety. However, improper
use can result in potential electrical shock or fire hazards. In order not to defeat
the safe-guards incorporated on this receiver, observe the following basic rules for
its installation, use and servicing. Your television is fully transistorized and does
not contain any user serviceable components. Removal of the cabinet cover may
expose you to dangerous voltages. Refer all servicing to qualified service
personnel.
1. Read all of these instructions.
2. Save these instruction for later use.
3. Disconnect this television receiver from power source before cleaning. Do not
use liquid cleaners or aerosol cleaners. Use a damp cloth for cleaning.
4. Do not use attachments not recommended by the television receiver
manufacturer as they may result in the risk of fire, electric shock, or injury to
persons.
5. Do not use this television receiver near water for example, near washbowl,
laundary tub, in a wet basement, or the like.
6. Do not place this television receiver on an unstable cart, stand or table. This
television receiver may fall, causing serious injury to a child or an adult, and
serious damage to the appliance. Use only with a fixing mechanism arm,
recommended by the manufacturer. The mounting of television receiver
should follow the manufacturer's instructions, and should use a mounting kit
appliance by the manufacturer.
7. An appiance and cart combination should be moved with care.
Quick stops, excessive force, and uneven surfaces may cause the appliance
and cart combination to overturn.
8. Slots and openings in the cabinet and the back or bottom are provided for
ventilation, and to insure reliable operation of the television receiver and to
protect it from overheating, these openings must not be blocked or covered.
The openings should never be blocked by placing the television receiver on a
bed sofa or similar surface. This television receiver should never be placed
near or over radiator or heat registor. This television receiver should not be
placed in a built-in installation such as a bookcase unless proper ventilation is
provided.
SAFEGUARDS What if
CAUTION
PLEASE READ AND OBSERVE ALL WARNINGS AND INSTRUCTIONS CONTAINED
IN THIS SAFEGUARDS AND THOSE ON YOUR TELEVISION. RETAIN THIS
INSTRUCTIONS FOR REFERENCE.
Page 19

9. This television receiver should be operated only from the type of power
source indicated on the marking label.
10. Follow all warnings and instructions marked on the television receiver.
11. Never push objects of any kind into this television receiver through cabinet
slots as they may touch dangerous voltage points or short out parts that could
result in a fire or electric shock.
Never spill liquid of any kind on the television receiver.
12. Do not attempt to service this television receiver yourself as opening or
removing covers may expose you to dangerous voltage or other hazards.
Refer all servicing to qualified service personnel.
13. Disconnect this television receiver from power source and refer servicing to
qualified service personnel under the following conditions.
a. If liquid has been spilled into the television receiver.
b. If the television receiver has been exposed to rain or water.
c. If the television receiver. does not operate normally by following the operating
instructions.
Adjust only those controls that are covered by the operating instructions as
improper adjustment of other controls may result in damage and will often
require extensive work by a qualified technician to restore the television
receiver. to normal operation.
d. If the television receiver. has been dropped or the cabinet has been damaged.
e. When the television receiver exhibits a distinct change in performance - this
indicates a need for service.
14. When replacement parts are required, be sure the service technician has
used replacement parts specified by the manufacturer that have the same
characteristics as the original part. Unauthorized substitutions may result in
fire, electric shock, or injuey to persons.
15. Upon completion of any service or repairs to this television receiver, ask the
service technician to perform routine safety checks to determine that the
television is in safe operating condition.
37
Owner's Manual
SAFEGUARDS
 Loading...