

Page 1
User manual
Page 2

Please read this manual
prior to using this device
The images in this user manual are intended only as the tools to facilitate better
understanding of the device, and may differ from actual product. The specifications
and functions of SMVB-6100 may undergo alterations from time to time as our
continuous product-enhancement endeavors. In such cases, the information will be
duly communicated on our website or via other appropriate communications channels.
This device has been tested and found to comply with the limits for a class B digital
device, pursuant to part 15 of the FCC rules and EMI (Electromagnetic Interference)
requirements for vehicle and commercial purpose. This device is designed to provide
a reasonable protection against harmful interference in a residential installation.
Page 3

Contents
··············· 3
················ 6
11
················ 14
··············· 17
·············
19
1 Product responsibility / Warning
10 SD card Format
11 Warranty
. . . . . . . . . . . .. . . . . . . . . . . . . 21
. . . . . . . . . 2
2 Liability
.
8 Installation
9 Viewer
. .
7 Specifications
3 Components
6 Operation
. . . . . . . . . . . . . . . . . . . . . . . . .
. . . . . . . . . . . . . . . . . . . . . .
4 Names of each parts
. . . . . . . . . . . . . . . . . . 7
9
5 Features
. . . . . . . . . . . . . . . . . . . . . . . . . . .
13
Page 4

카드
●
SD카드를 무리하게 분리할 경우, 제품에 손상을 줄 우려가 있으므로 주의하십시오.
●
제품 동작 중에 SD카드를 분리할 경우 저장된 데이터의 문제발생 및 SD카드가 손상될 수 있습니다.
●
보관이나 운반 시 정전기 및 외부의 전압에 의해 데이터가 파괴될 수 있으니 카드케이스에 보관하시길
바랍니다. (고온 다습한 장소나 부식의 염려가 있는 환경에서는 사용 및 보관을 피하십시오.)
●
중요한 데이터는 반드시 다른 저장 장치(HDD, CD, 이동식디스크 등)에 저장 보관하시길 바랍니다.
●
제품의 정상작동 여부를 확인하기 위해 주 1회 이상은 DATA를 확인해 주시고 한 달에 1회 이상은 SD
카드를 포맷하여 사용해 주십시오.
●
SD카드는 자체 사용수명이 있기에 장시간 사용할 경우 SD카드 자체에도 문제가 발생되어 영상데이터
를 정상적으로 저장하지 못할 수 있으므로, 주기적으로 SD카드를 확인하시고, SD카드를 별도로 구입
하여 사용하시기 바랍니다.
(※ SD카드 포맷 후 제품에 삽입하시면 폴더가 자동 생성되어 영상 녹화/저장됩니다.)
A
●
This product was designed to assist you in driving safety by recording driving
information and data for driver reference.
●
This product does not guarantee to record information on every accident.
A very minor force to the device may not trigger the G -force sensor to activate
event recording.
●
This product is not liable for any data loss caused by physical damage to the product
or its accessories.
●
The manufacture and distributor have no liability for any injury or damage to
property associated with the use of this product.
●
The manufacturer and distributor limit any and all liability to the exclusive remedies
of product repair or replacement at the manufacturer/distributor discretion, to the fullest
ex tent permitted by the law.
2
Product responsibility / Warning
Product responsibility / Warning
Please read below contents.
Page 5

B
Precautions
B1. Device
●
Do not open/fix/alter this device. Any customer alterations will void the
warranty.
●
Do not use any accessories other than those included with the device
or approved by manufacturer.
●
Disconnect power from device when the device is connected for long time without
operating vehicle. Even if there is a battery discharge protection mechanism in the
device, this exercise will
p
revent the potential battery discharge.
●
Only use manufacturer's power connecting cable in a direct connection
to vehicle battery.
●
Remove all substance from the lens, including the tinting film, that may
affect the quality of the recorded image. Any obstruction may degrade the
recordedimage quality. hec.
3
●
Do not expose this product to extreme temperature. This product may be
damaged if it is exposed outside of recommended operating and storage
temperature.
●
Do not spray automobile clean products directly to the products. Products
May be damaged if directly exposed to the cleaning products.
●
Do not operate product while driving. Only operate in a safe environment.
●
If product is physically damaged during a fatal accident, the recorded data
may get damaged and may not be able to recover them.
Page 6

제품 사용
제품 또는 SD카드의 고장 및 화재의 원인이 될 수도 있으니 아래 사항을 준수하여 주시길 바랍니다.
제품 개봉 후, 처음 사용시 SD카드를 컴퓨터에 연결하여 꼭 포맷하여 사용해 주십시오.
(※ SD카드를 별도 구입한 경우에도 처음 사용시에는 꼭 포맷하여 사용해 주십시오.)
●
외부환경(차랑 내부 온도상승으로 인한 열 발생 등)으로 인해 제품이 다운될 수 있습니다.
●
본 제품을 차량에 장착 시 설치의 위치나 방향 및 사용자의 조작 실수로 인해 정상적인 녹화가 되지 않
을 수 있습니다.(설치 후 반드시 녹화된 파일을 확인하십시오.)
●
여름철 장시간 주차 시 차랑 내부의 온도가 급격히 올라가므로 햇빛을 등지고 직사광선을 피하고 그늘
진 곳에 주차하여 블랙박스의 깨끗한 영상 상태를 유지하고, 오작동을 방지하십시오.
●
운전 중에는 단말기를 조작하지 마십시오.
●
기름 또는 물 묻은 손으로 SD카드 또는 단말기를 만지지 마십시오.
●
기기 내부에 금속류나 이물질을 넣지 마십시오.
●
본 제품을 청소할 때는 물이나 휘발성 약품으로 닦지 마시고, 부드럽고 마른 천으로 사용하여 주십시
오.(정전기가 발생되는 천 및 기타 제품을 사용하지 마십시오.)
●
차량에 장착하여 사용 중 큰 사고로 인하여 제품 본체가 무리한 힘과 강한 충격으로 인해 파손되거나
전원이 차단되어 영상녹화가 되지 않는 상황은 책임지지 않습니다.
●
영상 녹화를 방해하는 이물질 및 차량 전면에 과도한 선팅을 한 차량에서는 녹화된 화면이 희미하거나
왜곡될 수 있습니다.
●
제품의 부착 위치를 변경한 경우 카메라 각도가 변경될 수 있으니 부착 후 카메라 각도를 조절하여 주
시고, 녹화된 영상을 확인하여 주십시오.
●
제품 또는 SD카드에 문제가 있을 시 방치하지 마시고 바로 A/S문의를 주시거나, A/S입고를 시켜 문
제를 바로 해결하십시오.
●
SD카드는 본사가 지정한 정품카드와 권장카드만을 사용하십시오. 비품 사용시 데이터 손실의 원인이
되며 타제품에 사용되는 SD카드를 단말기에 연결 시 제품 또는 SD카드의 오동작을 일으킬 수 있습니
다.
●
펌웨어 업그레이드 도중에 SD카드를 분리하거나 전원 및 시동을 끄지 마십시오. 제품 또는 SD카드의
오동작을 일으키거나 데이터 손실의 원인이 됩니다.
●
주행 시 영상을 기록함으로써 발생할 수 있는 사고에 대해 본 제품은 참고용 녹화기록이며 영상기록은
법적인 구속력이 없음을 알려드립니다. 기록녹화에 대해 법적인 분쟁 및 손해 등 에 대해서는 당사가
일체 책임을 지지 않습니다.
●
장착 시 당사에서 제공하는 케이블 및 SD카드를 사용하시고 상시 전원 연결 시 전문가의 조언으로 설
치할 것을 권합니다.
4
B
Precautions
●
During suddenlighting condition changes, such as entering a dark tunnel, alley,
or turning towards direct sunlight on a very bright day, the video quality may be
compromised.
●
Check the product frequently to ensure that the camera angle is properly adjusted.
After violent force is applied to the vehicle or product, the camera angle may be altered
resulting in an unwanted picture quality.
Page 7

●
Only use Micro SD memory card provided from manufacturer or those with class 10 or UHS1.
●
Do not open/fix/modify Micro SD card.
●
Micro SD card is consumable and recommended to be replaced with a new card after six (6) months.
Product may not function properly if micro SD card's working speed decreases.
●
Check micro SD card's data regularly to check its operation .
It is recommended to format micro SD card at least once a month for the optimal performance.
Important data have to be backed up prior to format since format will delete all data.
1. Warranty will be voided if above are not kept by user .
●
Backup micro SD card memory to HDD or CD/DVD if any data is needed to be preserved.
Data might get lost due to the memory corruption in micro SD card.
●
Insert or remove the micro SD card when the power in the product is completely off.
●
Do not remove micro SD card while firmware is being updated. This could cause a malfunction to the device .
●
Do not remove micro SD card while it is saving or reading.
Note
5
B2 . Micro SD Card
2. Manufacturer is not liable for micro SD card s' recorded contents outside of its
recommended product life.
3. If S D c ard is pur cha sed s ep ara tely by us er, ple ase fo rma t S D c ard pr ior to u se .
Page 8
3
ࢷࡕ۴ ୯؏֩Ԃ یࡈ֩Ѝ߲
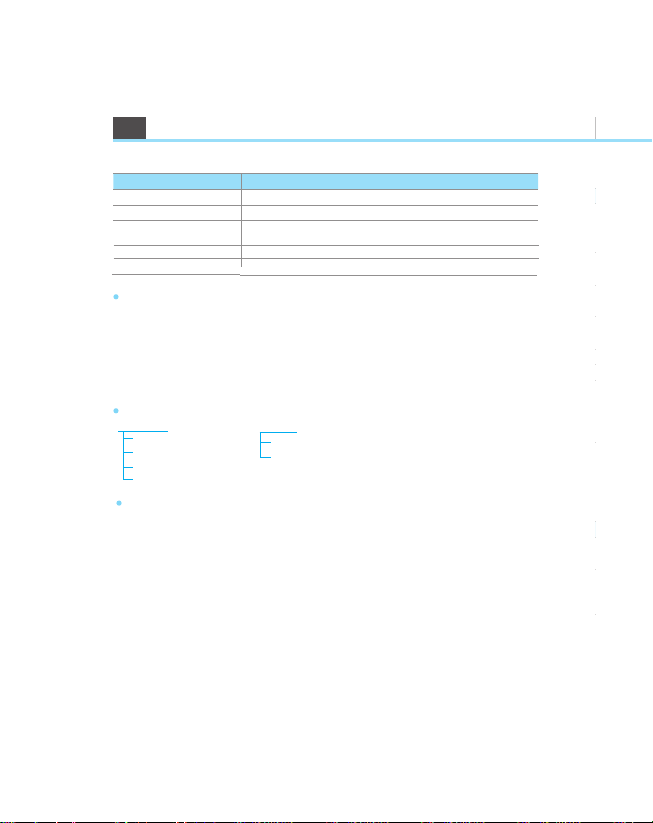
명칭
1
카메라 렌즈
2
짧게 - 수동녹화, 길게 - 포맷
3
거치대
4
시큐리티 LED
3
6
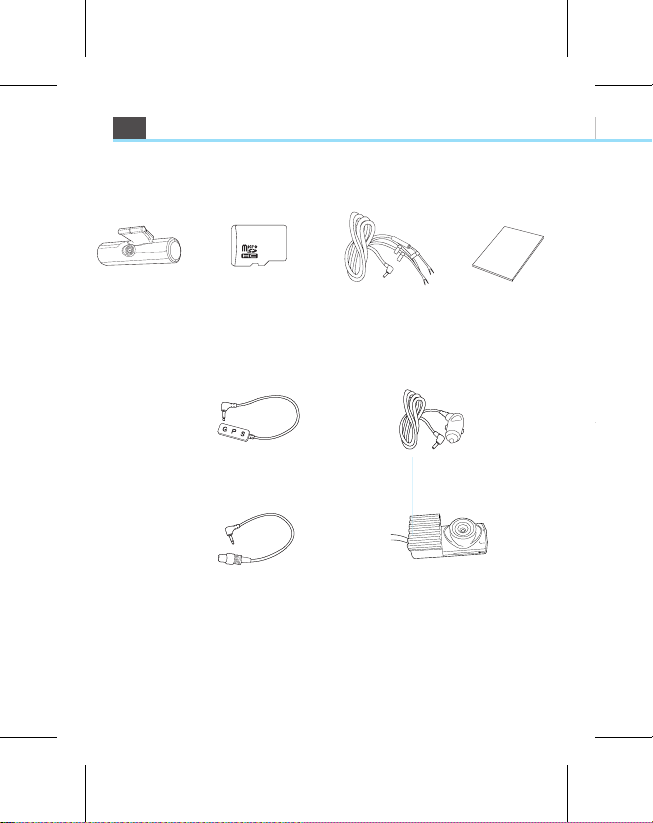
Device
Micro SDHC card
Power cable
Rear camera(Option)
User manual
Components
Option
GPS module
Ciger Jack cable
Video out cable
- Actual device or parts could be different from above configurations due to the possible
modification by manufacturer.
- Micro SD card is consumable and only can be exchanged within 14-days from purchase.
Components
Page 9
4
4
3
1 4 2
123
4
7
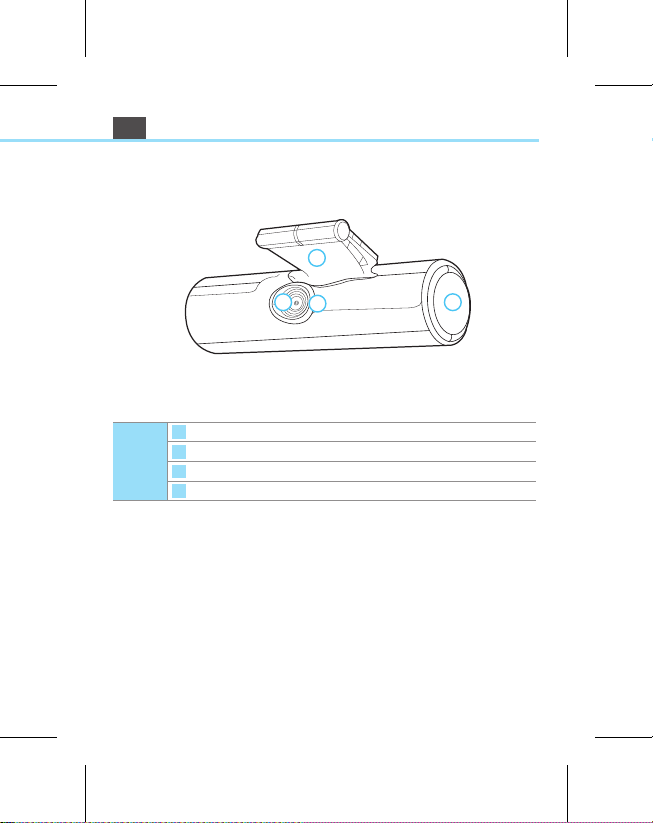
<Front>
Name
Camera Lens
Mounting cradle
Security LED
Short push - Manual recording, Long push -Format
Name of each parts
Page 10
1
●
선명한 화질, 최적의 화각으로 고화질 영상 기록
주,야간 모두 선명한 해상도 및 최적의 시야각으로 HD 고화질 영상을 제공해 드립니다.
●
상시(차량운행)녹화
차량 운행시 모든 주행 상황을 1분 단위 연속 영상파일로 "INFINITE 폴더" 에 저장합니다.
●
이벤트(충격감지)녹화
영상녹화 중 외부 충격이 발생하면 3축 가속도센서로 정확하게 감지하여 충격감지 시점 이전 15초부터
이후 15초까지 총 30초의 영상기록을 "EVENT 폴더" 에 저장합니다.
●
수동(강제)녹화
상시(차량운행)녹화 중 수동녹화 버튼을 누르면 이벤트가 발생한 것과 동일하게 인식되어 전후 15초 총
30초의 영상기록을 버튼을 누른 시점에 "MANUAL 폴더" 에 저장합니다.
●
주차(CCTV)녹화
차량 주차 중 움직임 감지 및 충격에 의한 영상기록을 저장합니다.
●
모션디텍터 기능
주차모드 전환 시 움직임을 감지하여 녹화가 됩니다.
●
G-Sensor 내장
G-센서 내장으로 충격, 가속, 감속을 감지하여 사고 당시의 영상 및 정보를 자동으로 기록하고 저장합니다.
●
오토 포맷 기능
블랙박스에서 버튼 동작으로 직접 포맷이 가능합니다.
●
전용 pc뷰어
블랙박스 영상을 전용 pc 뷰어로 재생하면 각종 운행 정보를 손쉽게 확인할 수 있습니다.
●
저 전압방지(배터리 방전 방지) 전원차단 장치
주차모드녹화 중 설정된 전압 이하로 전압이 낮아질 경우 자동으로 블랙박스의 전원이 off 되어 블랙박스
로 인한 차량 배터리 방전을 막아 줍니다. 설정은 차단전압 4단계 중 선택하실 수 있습니다.
●
고온(온도) 차단(선택사항)
블랙박스의 내부온도가 87도 이상이 될 때 블랙박스의 전원이 자동off 되어 블랙박스의 고장을 방지합니다.
(주차모드에서 동작)
●
SD(메모리)카드 자동관리 기능
녹화 영상 저장오류 및 SD(메모리)카드에 문제 발생시 음성안내로 알려 드립니다.
●
주차모드 이벤트 자동 알림 기능
주차모드 중 이벤트녹화가 발생하였다면 상시(차량운행)녹화 전환 시 음성으로 알려 드립니다.
4
제품 보증과 책임의 범위 / 경고
13
12
5
6
7
8
5
6
7
8
9
10
11
12
13
8
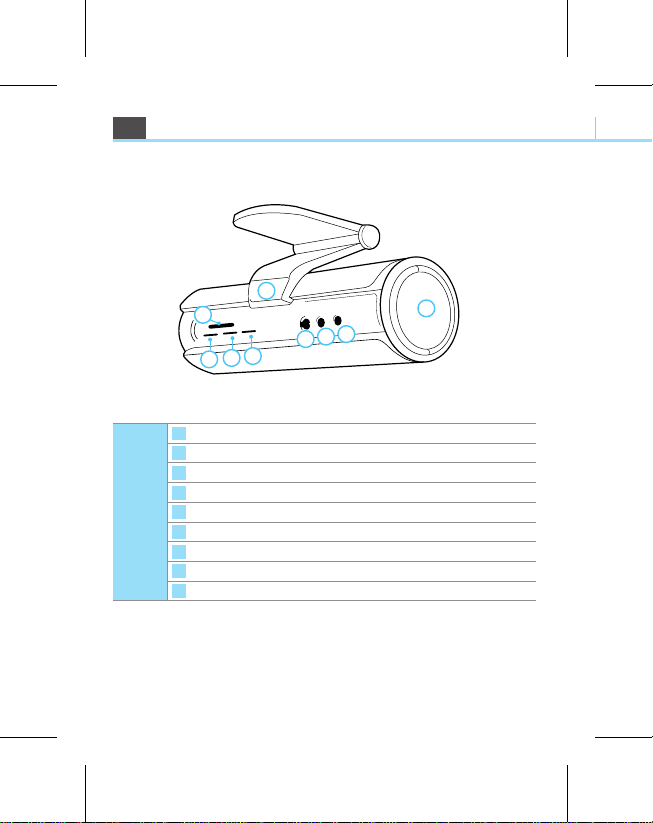
<Rear>
Name of each parts
Rear cam/GPS/Error on/off Status LED
Micro SD card slot
Recording on/off Status LED
Voice on/off Status LED
TV-OUT or GPS module port
Power port
Short push - Voice recording on/off, Long push - Recording on/off
Rear camera port
Cradle insert hole
Name
11
10
9
Page 11

5
5
●
HD (1280x720) resolution and 30 fps with wide view angle
●
Normal recording mode
Store 1 minute by 1 minute continuous file in "INFINITE folder" during driving.
●
Event recording mode
When device detects exceeded force in the device, device automatically saves 15 seconds before and
15 seconds after of the triggered event into the "EVENT folder".
●
Manual recording mode
During normal recording mode, the manual recording button can be pushed to generate
event, saving 30 seconds (15 seconds before and 15 seconds after pushing button)
into the "MANUAL folder".
●
Parking recording mode
When device's camera detects movement or G-sensor detect change of force, it will trigger event
recording mode and save them under "Parking folder."
●
Auto format function by pushing a button
●
PC Viewer
Recording image can be played with exclusive viewer to confirm the driving information.
●
Battery discharge protection
If the voltage is below set-up voltage, the power to the device is automatically turned off to elimate the
battery discharge.
High-temperature shut-off protection
With international temperature above 87 degrees Celcius (189 degrees Farenheit), the device is automatically
turned off to prevent possible damage.
●
Micro SD card automatic guidance
The voice guidance will be announced when image was not properly recorded or SD card has problem
Event alarm for parking mode event
When event is happened during parking mode, the voice guidance is announced at the start of normal mode.
9
Features
●
Page 12
1
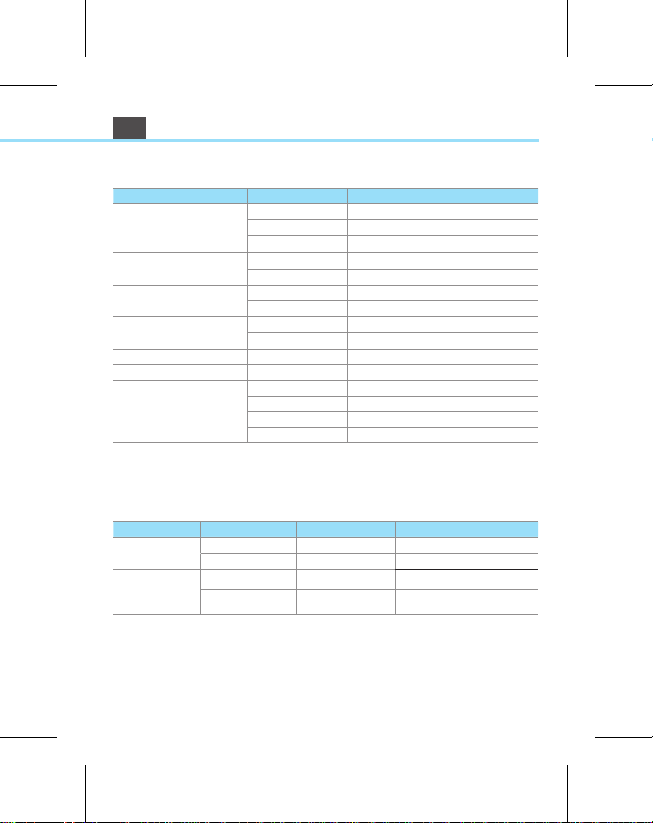
LED 동작상태에따른제품동작
버튼 기능에따른제품동작(설치후)
버튼 명칭 조작방법 설명
우측버튼
좌측버튼
SD CARD 포맷 길게 누름
LED 동작 상태 설명
BLUE
RED
WHITE
GREEN
W+G 점멸 SD CARD가 없거나 이상동작을 함
B+R+W+G 점멸 SD CARD 포맷 중
시큐리티 LED
5
제품 보증과 책임의 범위 / 경고
The range quota of folders can be changed from Viewer program.
10
Features
Memory card Information
Folder
Description
File name
S : Front
D : Front/Rear
Create a file_dates_time_channel.avi
Rec : Normal recording
Event : Event recording
Manual : Manual recording
Park : Parking(Motion) recording
Playing File Form
File type_20150823_202252_D.avi
Event recording file_23th Aug, 2015 202252_Front/Rear.avi
- If memory exceeds its capacity, device deletes oldest file to make a room for new recordings.
Therefore, if user wants to keep old recordings, user must backup the recordings prior to the
deleting of files or formatting.
- After formatting SD card and turning the power on, each folder and setting quota will be
automatically generated.
- File folder quota, and number and size of files could be different based on the recording method,
environment and status of SD card memory.
EVENT
INFINITE
PARKING
MANUAL
SETTING
EVENT : 20%
INFINITE : 40%
PARKING : 20%
MANUAL : 10%
Baseline quota is as follows :
Saves the setting value
Stores recorded file due to the motion sensing and g-sensor
trigger during parking mode
Stores recorded file due to the triggering of G-sensor
Stores recorded file during normal mode
Stores the recorded file due to the manual recording
Page 13
6
6
1.
2.
11
Security LED
Blinking
OFF
Blinking
Blinking
Blinking 1 second
Blinking 2 seconds
ON
ON
ON
ON
ON
OFF
OFF
OFF
OFF
RED
BLUE
WHITE
WHITE
W+R
B+R+W
Missing SD card or malfunction
Stop Voice recording
Voice recording
GPS connecting
Rear camera connecting
Rear camera disconnected
GPS disconnected
Formatting SD card
Device LED functions
No recording
Normal recording
Event or Motion recording
No recording
Creating file from motion detection
Parking mode (not recording)
Normal or event recording
Button functions
LED
LED Status
Description
Description
Button
Right
Left
Function
Voice recording
Formatting
SD Card
Manual recording
Video recording
Operating Method
Short push
Short push
long push
long push
Voice recording start/stop
Video recording stop/start
Start manual recording
Create folder automatically
after SD card formatting
Functions
Page 14
1
구분 내용
해상도 전방(1280 X 720P HD) / 후방(720 X 480 D1)
영상 프레임 수 전,후방 30fps
영상 포맷 H.264(MPEG4 Level 10)
저장 방식 Micro SD Card (8~32GB 사용가능)
영상 기록 시간 충돌 전 15초, 충돌 후 15초
동작 상태 확인 LED 및 Speaker 내장
촬영 각도 전방 110도 / 후방 120도
가속도 센서 3축(X, Y, Z) 가속도 센서
주차 모드 ACC 전원 on/off에 따른 전환 방식
음성 녹음 고감도 MIC 내장, MUTE 지원
녹화 방식 상시 녹화, 이벤트 녹화, 강제 녹화, 주차 모드
SD카드 포맷 블랙박스 자체 포맷 기능 지원
동작 전압 12~24V
전류 소모 약 290mAh (12V 기준, 후방카메라 연결)
동작 온도 -20도 ~ 70도
보존 온도 -35도 ~ 80도
고온 차단온도 87도
PC 동작 환경 XP, VISTA, WIN7
배터리 용량 전원보 조장치 슈퍼캐패시터
GPS 외장 Type
부가 기능 LED Security
Player 전용 PC Viewer 지원, 일반 멀티미디어 플레이어
제품 Size
6
제품 보증과 책임의 범위 / 경고
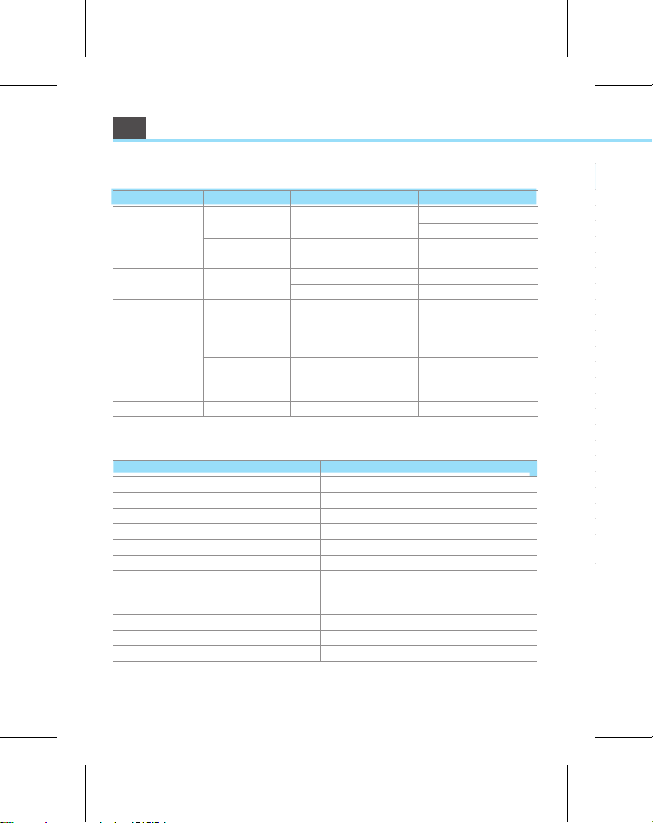
3.Device Functions
Name
Function
Operating Method
Blackbox is ON
B+, ACC and Ground
Connected to fuse box
Constant Power
Parking mode possible
Power
Normal recording only
Ciger jack(Option)
(Parking mode not possible )
ACC power ON
Normal mode recording start s
When connected to
constant power
Mode function
ACC power OFF
Parking mode recording start s
Battery discharge
protection during
parking mode
When B+ value is less than
protection voltage from viewer
program, device shuts down
By checking B+ voltage
level when ACC power if off
Protection
Default value: 12.0 V
(Only operating
during parking mode )
Blackbox temperature check
Blackbox protect ed
Blackbox recording
by the sensor
by the temperature
when ACC power ON
Constant & Cigar jack
End
Disconnect from B+
Device ended
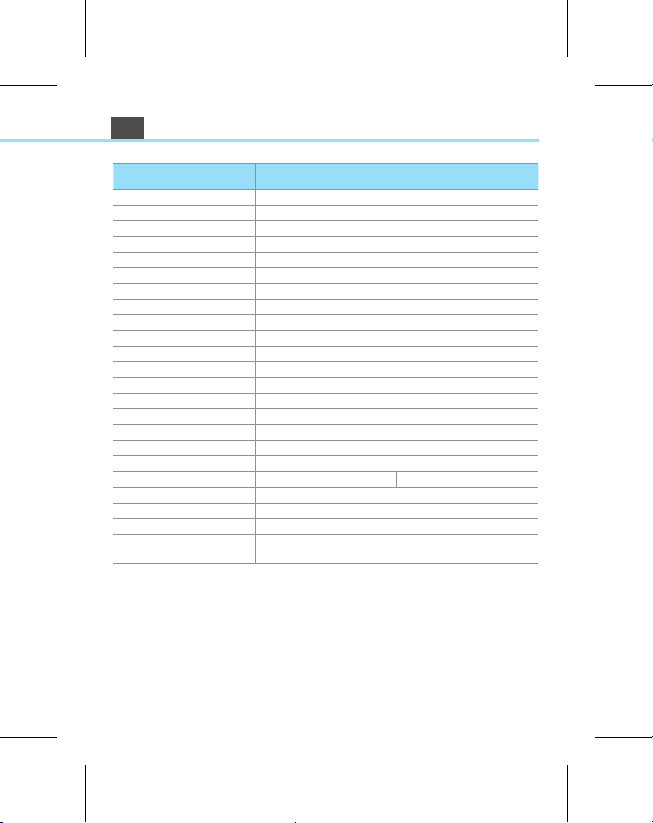
4. Voice Guidance Description
Message
Description
"Start recording."
Start the Infinite recording.
"Update is started. Do not off the power."
Firmware update start ed
"Update is completed."
Firmware update completed
" Rear camera connection."
2ch recording start ed
" Parking mode start."
Switch to the parking mode.
"Dama ged file is saved on parking mode."
Event file is created on parking mode
"Please check the SD CARD."
SD card is empty
Disconnection with SD card
" Off the system for high temperature."
Inside temperature cut-off function started
"Off the system for car battery."
Battery protection started
No voice guidance. LED indicated
GPS connection
12
Description
Operation
Connected to Cigar Jack
Page 15
7
7
List
Desciption
Front(1280x720P HD) / Rear(720X480 D1 with Night Vision)
Resolution
Recording speed
Front/Rear 30 frames per second
H.264 (MPEG4 Level 10)
Video Compression format
Micro SD Card (8 ~ up to 32 GB)
Memory
15 seconds before/after collision
Event video recording duration
LED and internal speaker
Status indicator
Viewing angle
Front 110˚/ Rear 120˚
Accelerometer
3-Axis (X,Y,Z)
Parking mode
Conversion method from ACC power on/off
High sensitive internal MIC, MUTE possible
Voice recording
Infinite/Event/Manual/Parking
Recording mode
Self-formatting system
SD Card format
12~24V
Power
Current sinking
290mAh(based on 12V with rear camera)
Operation temperature
-20℃(4F) ~ 70℃(158F)
Keeping temperature
-35℃(31F) ~ 80℃(176F)
Cutoff temperature
87℃(187F)
PC operation
XP, VISTA, WIN7
Sustaining power system
Super capacitor
Battery
ExternalType
GPS
Additional function
LED Security
Player
ATM PC Viewer, General Multimedia player
Front: 93.5mm x 34.5mm(Cylindricality including mounting)
Size
Rear: Depending on rear camera selection
13
Specifications
Page 16
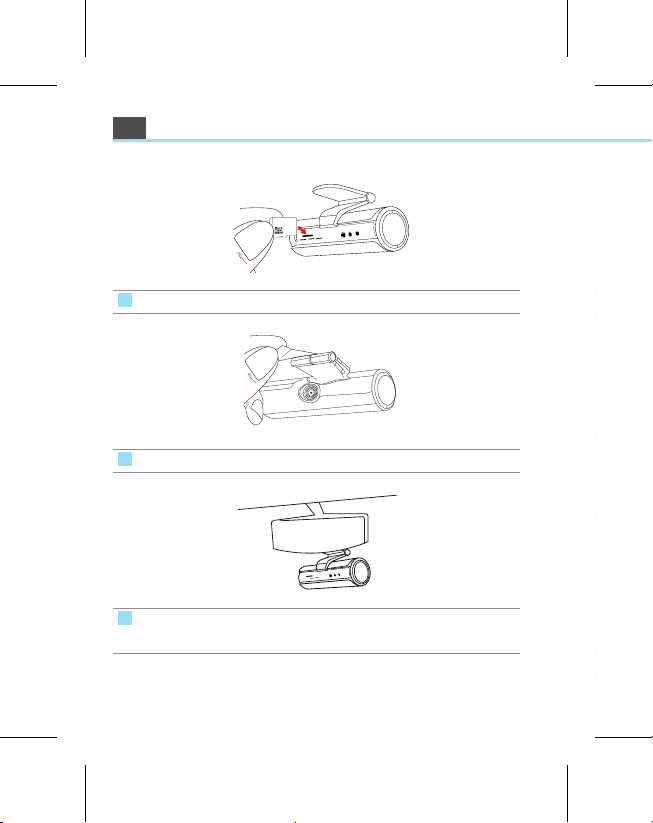
1
4
부착된 기기의 전원시거 플러그를 단말기 잭에 연결하여 줍니다.
5
상시 전원케이블의 배선은 아래와 같습니다.
- 검정선 : GND(접지), (예) 차체
- 흰선 : ACC, (예) 시거잭휴즈
- 빨강선 : BAT(B+), (예) 비상등
6
시거잭 전원선(옵션)을 구매하신 후에 설치하실 수 있습니다.
8
제품 보증과 책임의 범위 / 경고
Aitz
1
Insert the micro SD to the slot with right direction .
2
Remove double-sided protective tape from mounting cradle.
3
Clean the windshield glass, where the front camera is mounted, with soft
fabric or cotton flannel, and attach the front cam. Adjust the angle of camera.
14
Installation
Page 17
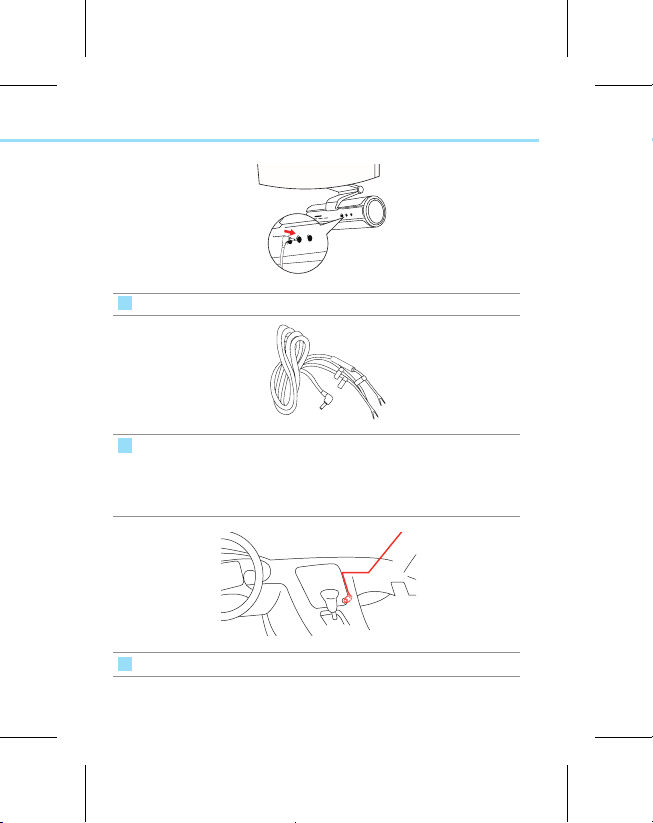
ࢷࡕ۴ ୯؏֩Ԃ یࡈ֩Ѝ߲
8
4 Plug po wer cable jack into the DC power terminal socket.
5 The w iring of constant power cable is as follows:
- Black : GND (i.e., chassis)
- White : ACC (i.e., Ciger jack fuse)
- Red : BAT(B+) (i.e., hazard light fuse)
6
Cigar jack power cable can be purchase as option and install ed per above picture.
15
Page 18
1
① 큰 화면
전방 영상 또는 지도를 크게 볼 수 있는 화면
② 작은 화면
후방 영상 또는 지도를 작게 볼 수 있는 화면
③
파일 목록
재생할 파일의 목록
④
화면밝기
영상의 화면 밝기를 조정하는 스크롤
⑤ 음량조절
화면 음량을 조정하는 스크롤
⑥
ZOOM기능
뷰어 화면을 확대하여 볼 수 있는 기능
환경설정
사용자가 차량환경에 맞춰서 사용하며 제품의
기능을 선택하여 사용
영상캡쳐
재생되고 있는 영상 화면을 사진으로 저장
8
제품 보증과 책임의 범위 / 경고
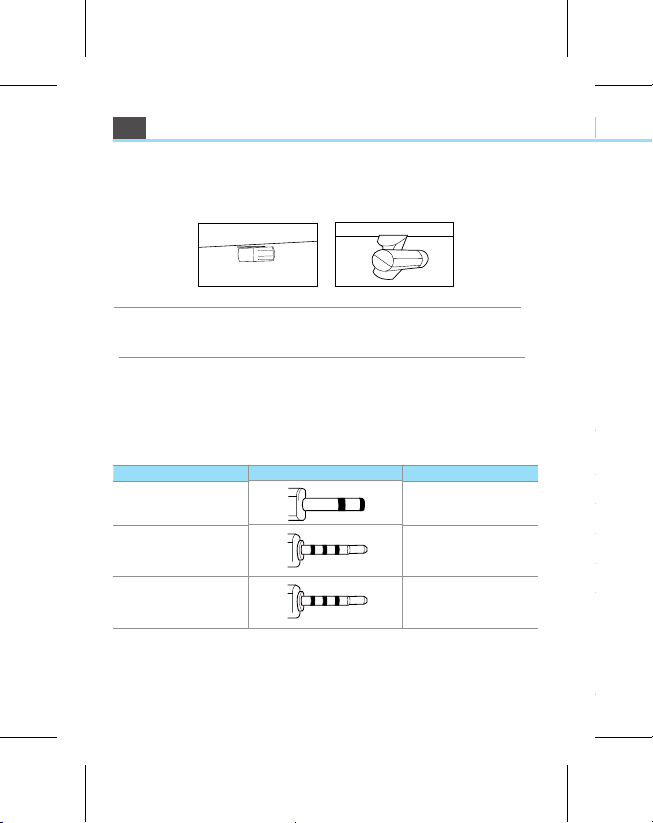
Install the Rearview camera
Rear camera can be installed towards inside of front windshield, driverside window and
passengerside window per user's preferences .
Terminal and Pin arrangement
① G N D
② AC C
③ B +
① V C C (5V )
② N C
③ C V B S
④ G N D
① V C C (5V )
② TX
③ C V B S
④ G N D
16
③ ②
①
④ ③ ② ①
④ ③ ② ①
After attaching rearview camera on the rear windshield window, plug rearview cable jack into VIN socket
Installation
Power terminal
Rear cable terminal
Image
Pin array
port
External GPS
AV-out terminal
of front camera.
Page 19
5
9
13
12
10
11
1
3
2
6
5
4
①
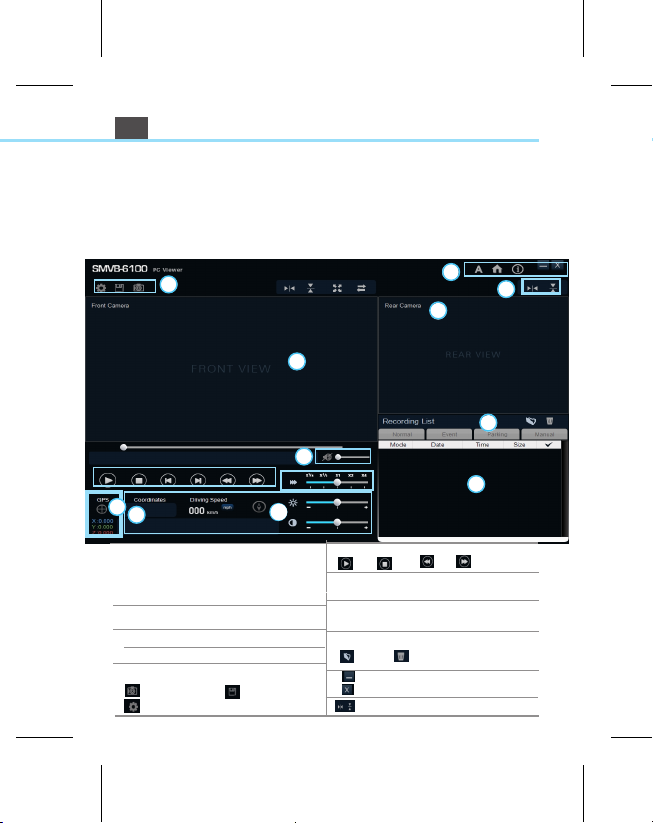
Main screen
⑦
Playback
Folder
Pause
Pre
Frontview video or Large screen
Next
②
Rear screen
⑧
G- Sensor graph
G-Sensor graph for video
Rearview video or small screen
③
File list
Recording file list
④
Brightness
⑩
Driv
ing
route shows in the map
(Optional GPS )
Adjust screen bright
⑤
Volume
⑪
Folder name
Set the volume
⑥
⑫
Minimize the Viewer
Close the VIewer
⑬
Rear video left-right screen reversal
1
7
Viewer
View er Dow nloadin g is as follows
1. In to t he w ww .aitz .co .kr
2. Cl ic k 'D o wn lo a d ' w h ic h i s up p er si de o f we b si te .
3. C li ck ' S/ W d ow n lo a d' .
4.C lick to 'S MV B6 100 Vie we r', th en d own loa d th e set ting file .
8
ele te
D
Im age c apture
En virom ent se tup
SD card forma t
Page 20
1
① [내 컴퓨터]를 클릭한다.
② [이동식저장소가 있는 장치]에서 해당 [이동식디스크]를 오른쪽 마우스로 클릭한다.
③ 메뉴 바에 있는 [포맷]을 클릭한다.
④
좌측 그림과 같이 포맷 창이 열리면 파일시스템을 [FAT32]로 지정해주고 시작버튼을 클릭한다.
※ SD카드 포맷 시에는 반드시 파일시스템을 [FAT32]로 지정하여 포맷하십시오.
⑤ 시작버튼을 클릭하면 아래와 같이 경고 창이 열린다 경고 창이 열리면 [확인] 버튼을 클릭한다.
1. [ 내 컴퓨터 ]를 클릭한다
2. [ 이동식저장소가 있는 장치]에서
해당 [ 이동식디스크]를 오른쪽
마우스로 클릭한다.
9
제품 보증과 책임의 범위 / 경고
18
Viewer
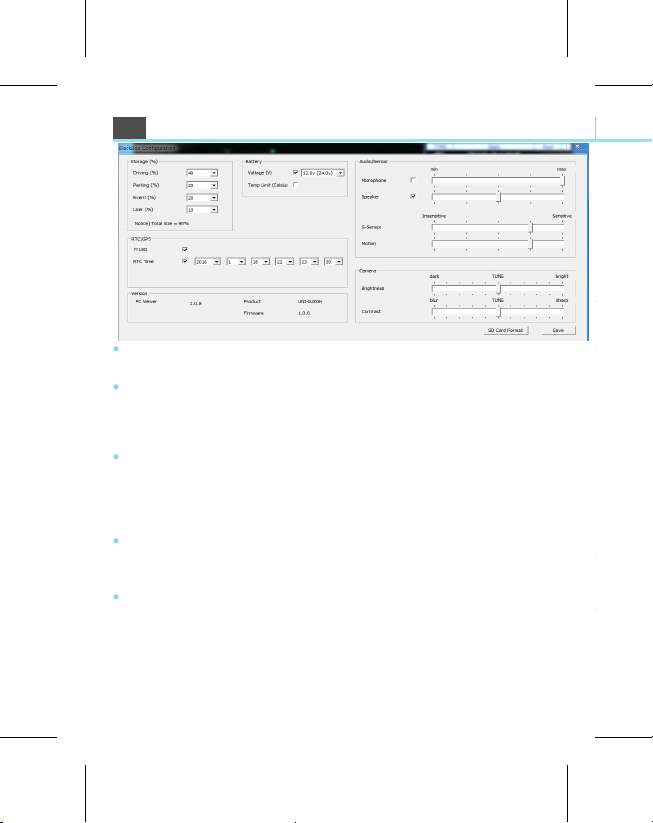
Storage disk(%)
Share the recording video in folder of SD Card.
Low voltage setting
Voltage setting : Cut-off voltage can set the 4 levels. (11.6V,11.8V,2.0V,12.2V)
(Truck: 23.6V, 23.8V, 24.0V, 24.2V)
Cut-off temperature : If the temperature is higher than 87℃, the power is off.
Setting
Screen setting
Others
Voice recording : set the voice recording levels.
Voice guidance : Set the voice guidance levels.
G-Sensor sensitivity: Set the sensitive when impact occured.
Motion sensitivity: Set the object recognition sensitivity during parking mode.
Contrast: Set the screen brightness.
Resolution: Set the screen resolution.
Front LED: During parking mode, select to the Blackbox LED ON/OFF.
PC time synchronization: Synchronize the time between Blackbox and PC.
Page 21
10
1. [ 내 컴퓨터 ]를 클릭한다
2. [ 이동식저장소가 있는 장치]에서
해당 [ 이동식디스크]를 오른쪽
마우스로 클릭한다.
1. [ 내 컴퓨터 ]를 클릭한다
2. [ 이동식저장소가 있는 장치]에서
해당 [ 이동식디스크]를 오른쪽
마우스로 클릭한다.
3. 메뉴 바에 있는
[포맷]을 클릭한다.
1. [ 내 컴퓨터 ]를 클릭한다
2. [ 이동식저장소가 있는 장치]에서
해당 [ 이동식디스크]를 오른쪽
클릭한다.
5. 시작버튼을 클릭하면 아래와 같이
경고 창이 열린다
경고 창이 열리면 [확인] 버튼을
클릭한다
1. [ 내 컴퓨터 ]를 클릭한다
2. [ 이동식저장소가 있는 장치]에서
해당 [이동식디스크]를 오른쪽
마우스로 클릭한다.
3. 메뉴 바에 있는
[포맷]을 클릭한다.
4. 좌측 그림과 같이 포맷 창이 열리면
파일시스템을 [FAT32]로 지정해주고
시작버튼을 클릭한다.
5. 시작버튼을 클릭하면 아래와 같이
경고 창이 열린다
경고 창이 열리면 [확인] 버튼을
클릭한다
1. [ 내 컴퓨터 ]를 클릭한다
2. [ 이동식저장소가 있는 장치]에서
해당 [이동식디스크]를 오른쪽
마우스로 클릭한다.
3. 메뉴 바에 있는
[포맷]을 클릭한다.
4. 좌측 그림과 같이 포맷 창이 열리면
파일시스템을 [FAT32]로 지정해주고
시작버튼을 클릭한다.
10
방법
1
2
345
④
⑤
19
SD card Format
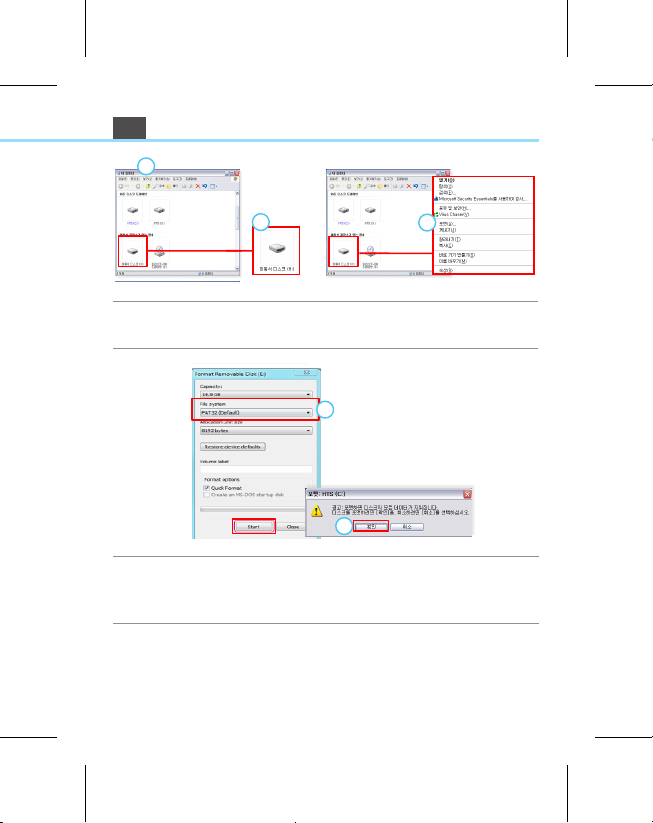
Click [My computer].
Click [Format] in the menu bar.
Click [Removable disk] in the [Removable device] with right mouse.
If the format window is open like above-left picture, designate file system with
[FAT 32] , then click 'start' button.
* If is important to designate the file system with [FAT32] for formatting SD card.
Click 'Start' button, then below window will be opened. Then, click the [Yes].
①
②
③
Page 22
1
8. 포맷이 완료된 후,
[닫기] 버튼을 클릭한다
6. 그림과 같이 상태 바가 움직이면
포맷이 진행 중이오니 취소버튼을
누르지 말고 완료될 때까지 기다린다
7. [포맷이 완료되었습니다 ]라는
문구의
창이 열리면 [확인] 버튼을
클릭한다
6. 그림과 같이 상태 바가 움직이면
포맷이 진행 중이오니 취소버튼을
누르지 말고 완료될 때까지 기다린다
6. 그림과 같이 상태 바가 움직이면
포맷이 진행 중이오니 취소버튼을
누르지 말고 완료될 때까지 기다린다
본 제품의 보증기간은 구입일로부터 1년입니다.(액세서리 6개월, SD카드 3개월)
●
취급 부주의 또는 과전압, 천재지변(우천, 낙뢰, 기타 불가항력) 등으로 인한 고장 발생 시에는 무상 보증이
적용되지 않습니다.
●
제품 수령 후 14일 이내 반품 및 교환이 가능합니다.
소비자 피해 유형
정상 사용
상태에서 성능 및
기능 고장이
발생한 경우
구입 후 10일 이내에 중요한 수리를
요할 때
교환된 제품이 10일 이내에 중요한
수리를 요하는 고장 발생
동일 하자로 3회 이상 고장 발생시 무상 수리 유상 수리
동일 하자로 4회 이상 고장 발생시 제품교환 / 구입가 환급 유상 수리
소비자가 수리 의뢰한 제품을 사업자가
분실한 경우
부품 보유기간 이내 수리용 부품을 보유
하고 있지 않아 수리가 불가능한 경우
수리용 부품은 있으나 수리가 불가능한 경우
사용자 부주의로
인해 발행한 경우
사용자의 취급 부주의(낙하,충격,파손,
무리한 동작 등) 또는 잘못된 사용으로
인한 고장 및 제품 손상
사용으로 고장이 난 경우
당사의 A/S 기사가 아닌 소비자 또는
제3자가 수리, 개조한 후 고장이 난 경우
7
9
제품 보증과 책방임법의 범위 / 경고
6
⑥
8
⑦
⑧
20
SD card Format
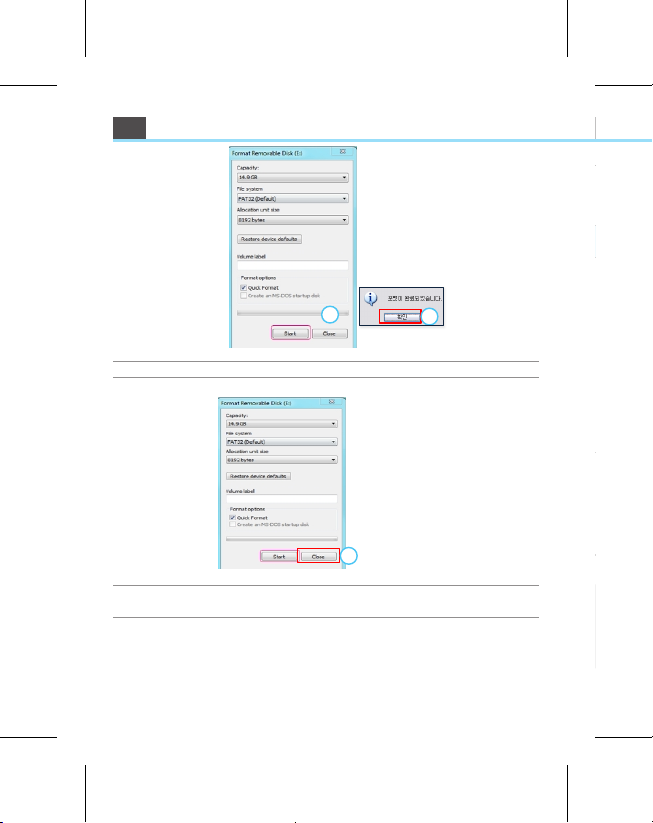
Click [Close] button, after format is completed.
When the window with [Format is completed] shows up, click [Yes] button.
If the bar is progressing, the formatting is on-going. Do not click 'Cancel' button.
please wait.
Page 23
11
11
●
●
☎ :
☎ :
21
Warrantee
Product Name :
Serial No. :
Purchased When :
Customer information :
Paid Repair
N/A
N/A
N/A
Exchange /
Refund
Exchange /
Refund
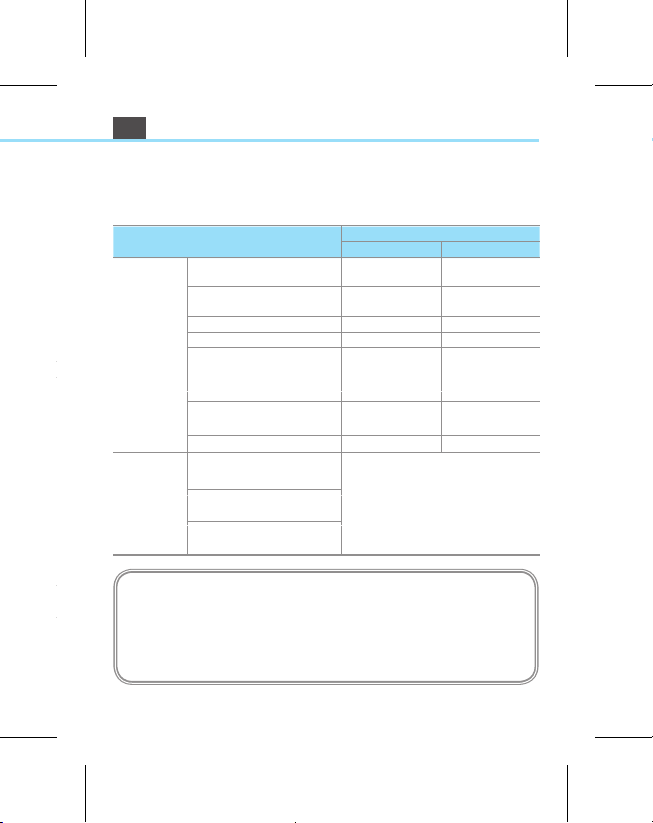
The terms of this product warranty is 1 year from purchase date.
Consumer Loss Type
Warranty
Within the term
Out of the term
Free repair
Paid Repair
Paid Repair
Change
Change
Refund
Refund
Change
Change
Malfunction
due to
customer
fault
For
performance/
functional
problems
under normal
use conditions
The warranty is only valid in the country where you purchased the product.
Accessories such as Battery or Micro SD card warranty is 6 months.
within 10 days of purchased
within 1 month of purchased
up to 3 times repeated
up to 4 times repeated
For the loss of a product
while in A/S
Repair is unavailable
When repair is unavailable
due to lack of spare
Malfunction & damage
caused by user negligence
Repaired by unauthorized
persons
Electric power problem or
connection parts problem
Page 24
Homepage: www.aitz.co.kr
US / CANADA (Distributor) : GSI SYSTEMS INC.
1201 S. State college Blvd, Fullerton,CA 92831
Tel: 1 - 714 - 349 - 8131
Homepage : www.gsisystemsus.com
Manufacture : ATM CO., LTD
681-300 92,Hamwol 20-gil, Seongan-dong, Jung-gu, Ulsan, Korea
 Loading...