

Page 1

User Guide
Page 2

Discovery Delay – Table of ContentsTable of Contents
Table of Contents
Overview � � � � � � � � � � � � � � � � � � � � � � � � � � � � � � � � � � � � � � � � � � � � � � � � � � � � 5
Terminology � � � � � � � � � � � � � � � � � � � � � � � � � � � � � � � � � � � � � � � � � � � � � � � � � 6
Signal � � � � � � � � � � � � � � � � � � � � � � � � � � � � � � � � � � � � � � � � � � � � � � 6
Dry signal � � � � � � � � � � � � � � � � � � � � � � � � � � � � � � � � � � � � � � � � � � � � 6
Wet Signal � � � � � � � � � � � � � � � � � � � � � � � � � � � � � � � � � � � � � � � � � � � 6
Repeats � � � � � � � � � � � � � � � � � � � � � � � � � � � � � � � � � � � � � � � � � � � � � 6
Milliseconds (ms) � � � � � � � � � � � � � � � � � � � � � � � � � � � � � � � � � � � � � � � 6
Beats Per Minute (BPM) � � � � � � � � � � � � � � � � � � � � � � � � � � � � � � � � � � � 7
Modulation � � � � � � � � � � � � � � � � � � � � � � � � � � � � � � � � � � � � � � � � � � � 7
MIDI � � � � � � � � � � � � � � � � � � � � � � � � � � � � � � � � � � � � � � � � � � � � � � 7
Overview Diagram � � � � � � � � � � � � � � � � � � � � � � � � � � � � � � � � � � � � � � � � � � � � 8
1� 7 Segment Display � � � � � � � � � � � � � � � � � � � � � � � � � � � � � � � � � � � � � � 8
2� Preset/Select/Hold To Edit Buttons � � � � � � � � � � � � � � � � � � � � � � � � � � � � 8
3� Up & Down Buttons � � � � � � � � � � � � � � � � � � � � � � � � � � � � � � � � � � � � 8
4� Mix Knob � � � � � � � � � � � � � � � � � � � � � � � � � � � � � � � � � � � � � � � � � � 8
5� Lo Cut Knob � � � � � � � � � � � � � � � � � � � � � � � � � � � � � � � � � � � � � � � � 9
6� Hi Cut Knob: � � � � � � � � � � � � � � � � � � � � � � � � � � � � � � � � � � � � � � � � 9
7� Bypass LED � � � � � � � � � � � � � � � � � � � � � � � � � � � � � � � � � � � � � � � � � 9
8� Bypass/Preset Down Switch: � � � � � � � � � � � � � � � � � � � � � � � � � � � � � � � � 9
9� Time Division LEDs � � � � � � � � � � � � � � � � � � � � � � � � � � � � � � � � � � � � 9
10� Division Button � � � � � � � � � � � � � � � � � � � � � � � � � � � � � � � � � � � � � � 9
11� Regen Knob � � � � � � � � � � � � � � � � � � � � � � � � � � � � � � � � � � � � � � � � 9
12� Time Knob � � � � � � � � � � � � � � � � � � � � � � � � � � � � � � � � � � � � � � � � �10
13� Modulation Depth Knob � � � � � � � � � � � � � � � � � � � � � � � � � � � � � � � � �10
14� Modulation Waveform Display & Select Button � � � � � � � � � � � � � � � � � � � �10
15� Modulation Speed Knob � � � � � � � � � � � � � � � � � � � � � � � � � � � � � � � � �10
16� Tempo LED � � � � � � � � � � � � � � � � � � � � � � � � � � � � � � � � � � � � � � � � �10
17� Tap-Tempo Switch � � � � � � � � � � � � � � � � � � � � � � � � � � � � � � � � � � � � �10
Revision: 1.2 (7/1/2021)
2
Page 3

Discovery Delay – Table of ContentsTable of Contents
Inputs & Outputs � � � � � � � � � � � � � � � � � � � � � � � � � � � � � � � � � � � � � � � � � � � � 11
1� 18VDC Power Input � � � � � � � � � � � � � � � � � � � � � � � � � � � � � � � � � � � �11
2� External Switch (Stereo TRS 1/8”) � � � � � � � � � � � � � � � � � � � � � � � � � � � � �11
3� TAP External Switch (Mono TS 1/4”) � � � � � � � � � � � � � � � � � � � � � � � � � � �11
4� Output (Mono TS 1/4”) � � � � � � � � � � � � � � � � � � � � � � � � � � � � � � � � � �12
5� Expression Pedal (Stereo TRS 1/4”) � � � � � � � � � � � � � � � � � � � � � � � � � � � �12
6� Input (Mono TS 1/4”) � � � � � � � � � � � � � � � � � � � � � � � � � � � � � � � � � � � �12
7� MIDI In (5 PIN DIN) � � � � � � � � � � � � � � � � � � � � � � � � � � � � � � � � � � � �12
8� MIDI Out/ru (5 PIN DIN) � � � � � � � � � � � � � � � � � � � � � � � � � � � � � � �12
Controls � � � � � � � � � � � � � � � � � � � � � � � � � � � � � � � � � � � � � � � � � � � � � � � � � � � � 13
Bypass Foot Switch� � � � � � � � � � � � � � � � � � � � � � � � � � � � � � � � � � � � � � �13
Tap Foot Switch � � � � � � � � � � � � � � � � � � � � � � � � � � � � � � � � � � � � � � � �13
Mix Knob � � � � � � � � � � � � � � � � � � � � � � � � � � � � � � � � � � � � � � � � � � � �14
Time Knob � � � � � � � � � � � � � � � � � � � � � � � � � � � � � � � � � � � � � � � � � � �14
Regen Knob � � � � � � � � � � � � � � � � � � � � � � � � � � � � � � � � � � � � � � � � � � �15
Hi Cut Knob � � � � � � � � � � � � � � � � � � � � � � � � � � � � � � � � � � � � � � � � � �15
Lo Cut Knob � � � � � � � � � � � � � � � � � � � � � � � � � � � � � � � � � � � � � � � � � �15
Speed Knob � � � � � � � � � � � � � � � � � � � � � � � � � � � � � � � � � � � � � � � � � � �16
Depth Knob � � � � � � � � � � � � � � � � � � � � � � � � � � � � � � � � � � � � � � � � � �16
Waveforms Button � � � � � � � � � � � � � � � � � � � � � � � � � � � � � � � � � � � � � � �16
Division Button � � � � � � � � � � � � � � � � � � � � � � � � � � � � � � � � � � � � � � � �16
Preset Select (Edit Save) � � � � � � � � � � � � � � � � � � � � � � � � � � � � � � � � � � � �17
Up & Down Arrow Buttons � � � � � � � � � � � � � � � � � � � � � � � � � � � � � � � � � �17
Presets � � � � � � � � � � � � � � � � � � � � � � � � � � � � � � � � � � � � � � � � � � � � � � � � � � � � � 19
Selecting a Preset � � � � � � � � � � � � � � � � � � � � � � � � � � � � � � � � � � � � � � � �19
Editing / Saving Presets � � � � � � � � � � � � � � � � � � � � � � � � � � � � � � � � � � � �19
Mapping Expression pedal � � � � � � � � � � � � � � � � � � � � � � � � � � � � � � � � � �20
Erasing presets � � � � � � � � � � � � � � � � � � � � � � � � � � � � � � � � � � � � � � � � �21
Factory Reset of all Presets � � � � � � � � � � � � � � � � � � � � � � � � � � � � � � � � � �21
Live Preset Mode (Bypass / Tap) � � � � � � � � � � � � � � � � � � � � � � � � � � � � � � �22
Revision: 1.2 (7/1/2021)
3
Page 4

Discovery Delay – Table of ContentsTable of Contents
MIDI � � � � � � � � � � � � � � � � � � � � � � � � � � � � � � � � � � � � � � � � � � � � � � � � � � � � � � 23
Changing MIDI Channel: � � � � � � � � � � � � � � � � � � � � � � � � � � � � � � � � � � �23
Changing Presets With Program Changes (PC#s) � � � � � � � � � � � � � � � � � � � � �23
Changing Knob Settings With Control Changes (CC#s) � � � � � � � � � � � � � � � � �24
Setting MIDI Out/ru Modes � � � � � � � � � � � � � � � � � � � � � � � � � � � � � � � �24
Accepting/Denying CC#s � � � � � � � � � � � � � � � � � � � � � � � � � � � � � � � � � � �26
Sending Patch Changes � � � � � � � � � � � � � � � � � � � � � � � � � � � � � � � � � � � �27
Sending Patch Changes and Controller Change data � � � � � � � � � � � � � � � � � � �27
MIDI time sync � � � � � � � � � � � � � � � � � � � � � � � � � � � � � � � � � � � � � � � �27
MIDI Sysex dump & load of memory � � � � � � � � � � � � � � � � � � � � � � � � � � � �27
MIDI Table � � � � � � � � � � � � � � � � � � � � � � � � � � � � � � � � � � � � � � � � � � �28
Global Settings � � � � � � � � � � � � � � � � � � � � � � � � � � � � � � � � � � � � � � � � � � � � � � 30
Editing Global Settings � � � � � � � � � � � � � � � � � � � � � � � � � � � � � � � � � � � �30
True Bypass - Buer Bypass mode � � � � � � � � � � � � � � � � � � � � � � � � � � � � � �30
MIDI Channel: � � � � � � � � � � � � � � � � � � � � � � � � � � � � � � � � � � � � � � � � �30
MIDI Sync � � � � � � � � � � � � � � � � � � � � � � � � � � � � � � � � � � � � � � � � � � �30
MIDI CC accept � � � � � � � � � � � � � � � � � � � � � � � � � � � � � � � � � � � � � � � �30
MIDI Out/ru modes � � � � � � � � � � � � � � � � � � � � � � � � � � � � � � � � � � � �30
External Switch functions � � � � � � � � � � � � � � � � � � � � � � � � � � � � � � � � � � �30
Dry On/O � � � � � � � � � � � � � � � � � � � � � � � � � � � � � � � � � � � � � � � � � � �30
Sysex Dump/Send � � � � � � � � � � � � � � � � � � � � � � � � � � � � � � � � � � � � � � �30
Example Settings � � � � � � � � � � � � � � � � � � � � � � � � � � � � � � � � � � � � � � � � � � � � 33
Usage Cases � � � � � � � � � � � � � � � � � � � � � � � � � � � � � � � � � � � � � � � � � � � � � � � � � 34
Discovery Analog Delay > Front of Amp � � � � � � � � � � � � � � � � � � � � � � � � � �34
Discovery Analog Delay > Eects Loop of Amp � � � � � � � � � � � � � � � � � � � � � �35
MIDI Switching from External Device � � � � � � � � � � � � � � � � � � � � � � � � � � �36
Technical Specications � � � � � � � � � � � � � � � � � � � � � � � � � � � � � � � � � � � � � � � 37
Warranty � � � � � � � � � � � � � � � � � � � � � � � � � � � � � � � � � � � � � � � � � � � � � � � � � � � 38
FCC Compliance � � � � � � � � � � � � � � � � � � � � � � � � � � � � � � � � � � � � � � � � � � � 39
Revision: 1.2 (7/1/2021)
4
Page 5

Discovery Delay – OverviewOverview
Overview
e long-standing mission of Suhr has been to bring the simplicity and tone of analog circuitry to today’s guitarists� e Suhr Discovery Analog Delay is the new revolutionary pedal, designed by Kevin Suhr� e Discovery Analog Delay is the rst of
its kind, for Suhr and the world�
Retaining the tone, vibe, and creative inspiration of iconic analog delay units, yet
adding the versatility of the most modern and expandable delay pedals available
today�
e nest analog delay packed with 127 savable preset spaces, Tap Tempo, High/Locut, with every parameter mappable to an expression pedal per preset, MIDI ins and
outs, and every parameter you could ask for� at’s just the beginning�
e Suhr Discovery Analog Delay is a product that has been years in the making�
We took our time with this one to make it as perfect as we could in the smallest
package, full of features that include a few no other analog delay has�
We knew we wanted an amazing bucket brigade style analog delay� We also knew
that having only one setting was not enough for the endless amounts of sounds that
could be achieved� at is why we allowed you to save up to 127 presets, recallable
via MIDI� All knobs are programmable for each preset, and can also be controlled
individually via MIDI� We didn’t stop there� We allowed you to program the expression pedal dierently for every preset to control every knob in any direction desired�
We didn’t stop there� We allowed you to dump all your presets to a MIDI Sysex le
for backup on a computer� You can even transfer presets between units�
Revision: 1.2 (7/1/2021)
5
Page 6

Discovery Delay – TerminologyTerminology
Terminology
Here is a list of a few common terms used in this manual� Please familiarize yourself
with the terms you do not already know� Understanding these terms will better help
you understand how to use the Discovery Delay, or any delay for that matter�
Signal
A signal in this text refers to an audio signal, which is a representation of sound in
the form of changing level of electrical voltage� Such a signal can come from your
guitar pickups, through your guitar cable and into the Discovery� It may also come
from previous eect, or from your ampliers eects send�
Dry signal
e Dry signal refers to your unaected guitar signal, or whatever signal that has
been connected to the input of the Discovery� is has no delay eect on it� When
the pedal is bypassed, all you are hearing is the dry signal�
Wet Signal
e Wet signal refers to the delay eect itself only without any dry signal� A delay
makes a copy of your dry signal, and plays it a certain amount of time later, which
creates the wet signal� e Dry and Wet signals are then mixed to form the nal output signal�
Repeats
Repeats is a term used among users of Delay eects that refers to the actual repeated
dry signal that make up the wet signal� e wet signal is a repeated copy of the dry
signal that feedbacks into itself and keeps repeating what you play into it� Repeats
are also commonly referred to as “echoes”
Milliseconds (ms)
A millisecond is 1/1000 of a second� Milliseconds are abbreviated as “ms”� us, it
takes 1000 ms to make up 1 whole second�
Revision: 1.2 (7/1/2021)
6
Page 7

Discovery Delay – TerminologyTerminology
Beats Per Minute (BPM)
‘Beats Per Minute’ refers to the tempo (speed) of a piece of music� A beat refers to a
quarter note in a measure, so 4 beats would equal 1 measure� 120 BPM would equate
to 120 quarter notes in a minute if only quarter notes were played for a whole minute�
Modulation
To modulate is to continually change the value of a parameter� In the case of this
delay, the parameter that is being continually altered is the delay time� e delay
time is “wiggled” a certain amount of time before and aer the center time, causing
a change in pitch in the wet signal� e amount of wiggle is determined by the Speed
and Depth controls� When this changing pitch on the wet signal is mixed with the
dry signal, the result is a chorus type eect, which sounds like multiple voices are being played at once�
MIDI
MIDI is an abbreviation for Musical Instrument Digital Interface� is is a standard
of digital communication between musical instrument devices that was developed in
the 1980’s in collaboration with a few music manufacturers� Today, it is the leading
communication protocol between musical instruments� MIDI allows you to change
presets and control knob positions on the Discovery from any device that can send
MIDI information�
Revision: 1.2 (7/1/2021)
7
Page 8
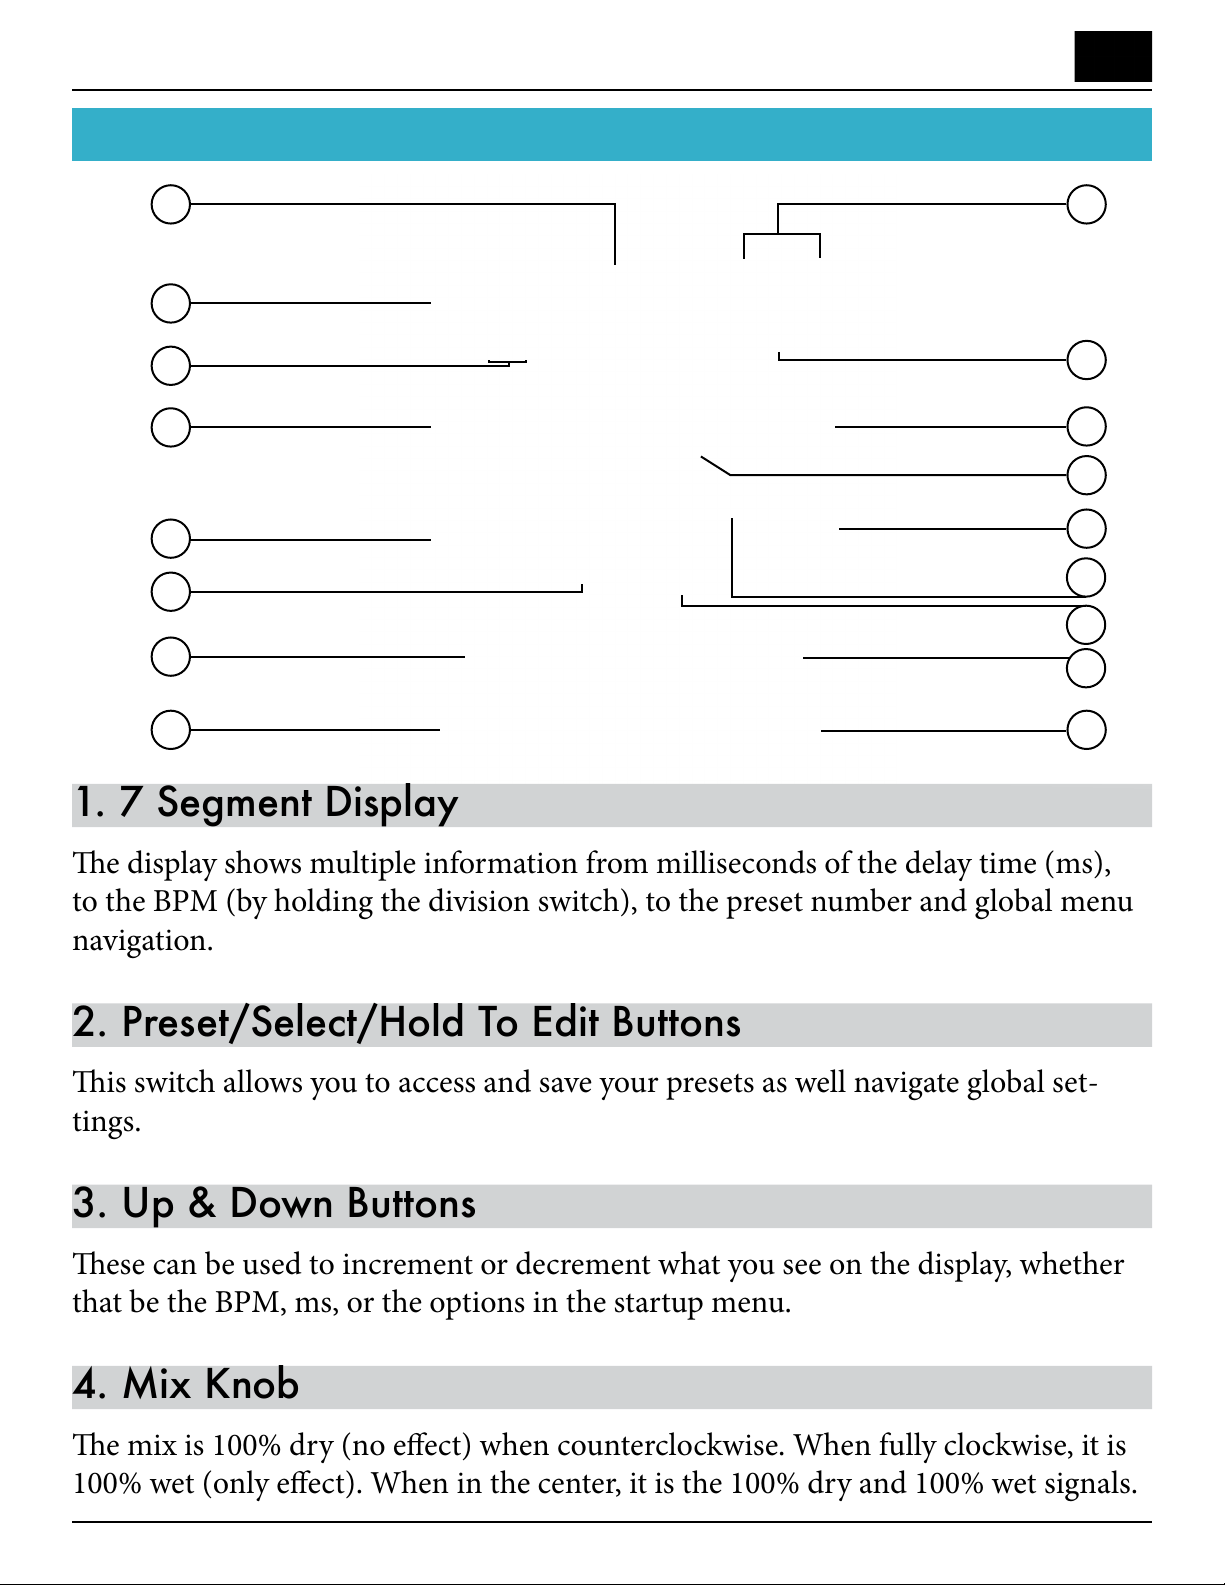
Discovery Delay – Overview DiagramOverview Diagram
1. 7 Segment Display
e display shows multiple information from milliseconds of the delay time (ms),
to the BPM (by holding the division switch), to the preset number and global menu
navigation.
2. Preset/Select/Hold To Edit Buttons
is switch allows you to access and save your presets as well navigate global set-
tings.
3. Up & Down Buttons
ese can be used to increment or decrement what you see on the display, whether
that be the BPM, ms, or the options in the startup menu.
4. Mix Knob
e mix is 100% dry (no eect) when counterclockwise. When fully clockwise, it is
100% wet (only eect). When in the center, it is the 100% dry and 100% wet signals.
Overview Diagram
1
2
3
4
5
6
7
8
9
10
11
12
13
14
15
16
17
Revision: 1.2 (7/1/2021)
8
Page 9

Discovery Delay – Overview DiagramOverview Diagram
5. Lo Cut Knob
e low cut reduces bass from the delayed signal only� Fully counter-clockwise is no
low (bass) cut� Full clockwise results in maximum low cut�
6. Hi Cut Knob:
e high cut reduces high frequencies from the delayed signal� Fully counter-clockwise is the brightest and clearest tone (no high-cut), clockwise will be the darkest�
7. Bypass LED
Turns on when the pedal eect is on and o when the pedal is in bypass mode�
8. Bypass/Preset Down Switch:
e bypass switch engages or disengages the eect� Factory default is true bypass
mode� (Refer to manual to switch between true or buered bypass mode�)
9. Time Division LEDs
Indicates which of the 5 time divisions are selected� 1/4 - Quarter Note, d1/8 - Dotted Eighth-Note, 1/8 - Eighth-Note, 1/3 - Triplet and 1/16 - Sixteenth-Note�
10. Division Button
e Division button selects one of the 5 divisions� Holding the division button will
toggle the display to show milliseconds (ms) or BPM of the delay time� A dot in the
bottom right corner of the display denotes BPM�
11. Regen Knob
e Regen controls how long your delay echoes last for� Full clockwise position will
result in continuous oscillations�
Revision: 1.2 (7/1/2021)
9
Page 10

Discovery Delay – Overview DiagramOverview Diagram
12. Time Knob
e time knob can be used to alter the milliseconds (in 5ms increments) or BPM
(range 55-250BPM), depending on which is shown on the display� e range in milliseconds accessed by the knob is 40ms - 1100ms� You can manually adjust millisecond/BPM times (in 1ms increments) with the [▲] and [▼] buttons to get specic
delay times�
13. Modulation Depth Knob
e depth knob controls how intense the modulation of the delay is�
14. Modulation Waveform Display & Select Button
is button selects one of the 3 waveforms (Triangle, Sine, and Square) to modulate
the delay time with�
15. Modulation Speed Knob
e speed knob controls the speed of a LFO (low frequency oscillator), which controls the delay time around the center of what is displayed on the display� is results
in a chorus-type eect�
16. Tempo LED
is LED ashes at the tempo of the delay time (Milliseconds)�
17. Tap-Tempo Switch
Tap more than once to set the quarter-note delay time�
Revision: 1.2 (7/1/2021)
10
Page 11
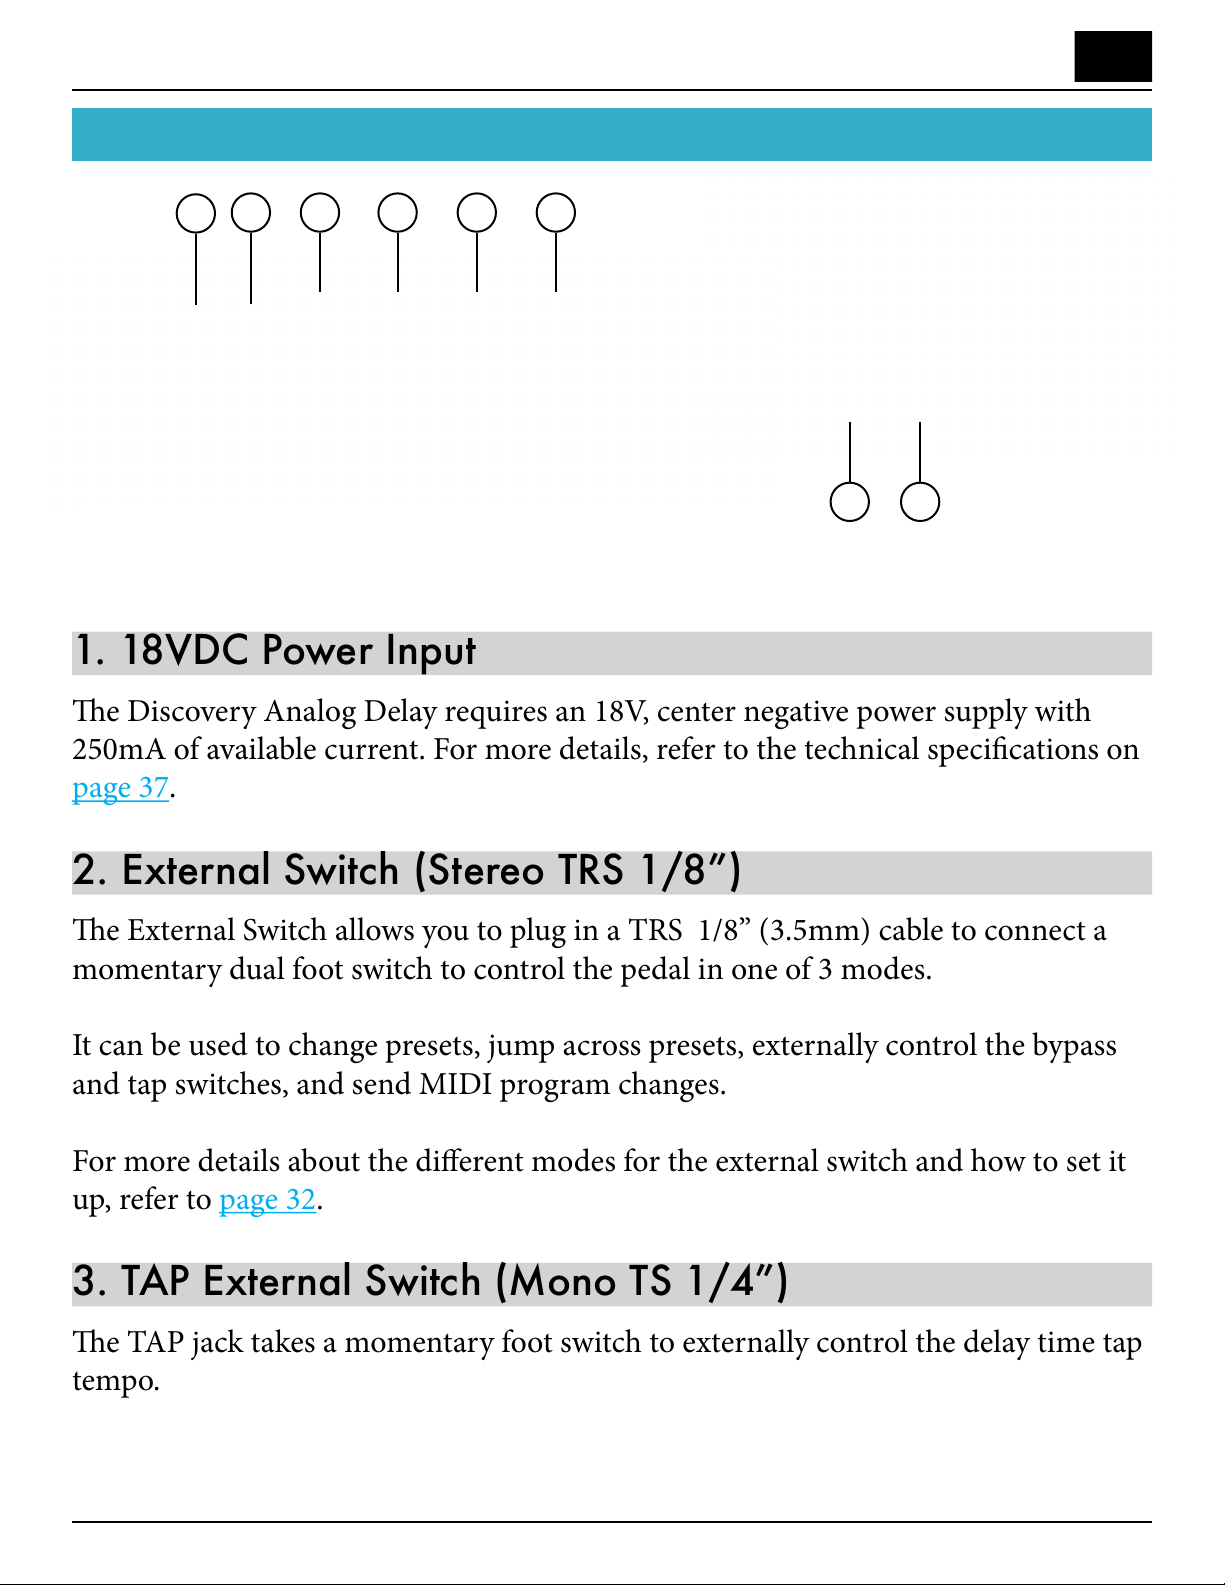
Discovery Delay – Inputs & OutputsInputs & Outputs
1. 18VDC Power Input
e Discovery Analog Delay requires an 18V, center negative power supply with
250mA of available current. For more details, refer to the technical specications on
page 37.
2. External Switch (Stereo TRS 1/8”)
e External Switch allows you to plug in a TRS 1/8” (3.5mm) cable to connect a
momentary dual foot switch to control the pedal in one of 3 modes.
It can be used to change presets, jump across presets, externally control the bypass
and tap switches, and send MIDI program changes.
For more details about the dierent modes for the external switch and how to set it
up, refer to page 32.
3. TAP External Switch (Mono TS 1/4”)
e TAP jack takes a momentary foot switch to externally control the delay time tap
tempo.
Inputs & Outputs
1
4 32
65
7
8
Revision: 1.2 (7/1/2021)
11
Page 12

Discovery Delay – Inputs & OutputsInputs & Outputs
4. Output (Mono TS 1/4”)
Plug the output of the eect to the next device.
5. Expression Pedal (Stereo TRS 1/4”)
e expression pedal input allows you to connect a low impedance 10K ohm expression pedal to control all the knobs per preset� For details on how to use the mapping
process for the expression pedal, refer to page 20�
6. Input (Mono TS 1/4”)
e input should be connected to your guitar, the previous eects output, or the effects send of an amplier or mixer�
7. MIDI In (5 PIN DIN)
e MIDI IN uses the standard DIN 5 connection for MIDI communication� Uses
for this are changing presets, syncing delay time to MIDI clock, and controlling all
parameters� Refer to the MIDI section in this manual for more information
8. MIDI Out/Thru (5 PIN DIN)
e MIDI OUT/THRU jack is used to pass MIDI communication from the MIDI IN
jack to the next device� Depending on the global settings, this output can be set as a
hardware through for ultra low latency when no MIDI information is to be generated from the Discovery itself� When set as an output, the Discovery delay can send its
own messages such as Program changes and Controller changes� is can be used to
control other pedals� For more information, refer to the MIDI section on page 23�
Revision: 1.2 (7/1/2021)
12
Page 13

Discovery Delay – ControlsControls
Controls
Bypass Foot Switch
e bypass switch has a few functions
1� To bypass (turn o) the eect
2. To jump to a lower adjacent preset when in “Preset Mode”
3. To select a preset when using an external 2 button foot switch in the EXT SW jack
e Discovery delay has the option to bypass the eect in two ways���
True Bypass (input is physically connected to output, completely taking all circuitry
out of the signal path� is will cut o any echoing repeats)�
Buer Bypass (the input to the delay path is disconnected, leaving the delays to
“Trail” until they decay and leaving the guitar without the eect)�
Refer to the global settings section to select whether the bypass is in True or Buer
bypass modes�
Tap Foot Switch
e tap tempo switch will count the amount of time between switch presses and set
the delay time to that time when division is set to Quarter Note�
How it Works:
e Discovery utilizes an averaging algorithm that will average the last 4 successive
taps, and drop the oldest tap aer 4� If not pressed for longer than 1�5 seconds, the
tap averaging restarts�
Going into “Preset Mode”:
Holding down the Tap switch for 1�1 seconds will put the pedal into “Preset Mode”,
in which the Bypass and Tap switches take on new functions of decrementing and
incrementing which preset you are on� is allows you to easily change presets with
your feet�
Revision: 1.2 (7/1/2021)
13
Page 14

Discovery Delay – ControlsControls
Mix Knob
e [MIX] knob mixes in (or out) the delay eect� It also mixes in or out your guitar
signal�
100% Dry / 0% Wet
100% Dry / 100% Wet
0% Dry / 100% Wet
From full counter clockwise to the middle, the knob is mixing the wet delay eect
from 0-100%
From middle to full clockwise, the wet delay eect stays 100%, while your dry guitar
signal fades out from 100% to 0% (at full clockwise)�
When the mix knob is 50% on (half way), it is 100% dry + 100% wet
Time Knob
e [TIME] knob can be used to:
1. Alter the milliseconds (40-1100ms in 5ms increments)
2. Alter the BPM (range from 55-250BPM)
depending on which is shown on the display�
e arrow buttons can also be used to push the delay beyond these limits, or increment by singular millisecond or BPM values�
Revision: 1.2 (7/1/2021)
14
Page 15

Discovery Delay – ControlsControls
Regen Knob
e [REGEN] knob sets the amount of feedback o the delay back to its internal
input mixer� is controls how long the delay repeats last until they decay away�
Due to the internal limiter in the regen circuit, maxed out regen settings allow for
distorted self oscillations and sound eects�
Hi Cut Knob
e high cut reduces high frequencies from the delayed signal, giving you a “darker”
sound commonly associated with bucket brigade analog delay pedals�
Fully counter-clockwise is the brightest and clearest tone� For the classic warm vintage style analog delay tones, set the knob past half way� e high cut knob also helps
reduce noise and should be experimented with when running into the front of an
amp or gain stage for desired tone/noise�
For the clearest low noise delay eect, place the Discovery in the eects loop of your
amplier and keep the hi cut knob fully counter clockwise�
Lo Cut Knob
e [LO CUT] reduces bass from the delayed signal only� is is helpful to echo the
frequency ranges that you want to and prevent extra bass from muddying up your
Revision: 1.2 (7/1/2021)
15
Page 16

Discovery Delay – ControlsControls
tone� A full counter-clockwise position results in no low cut� Full clockwise results in
maximum low cut�
Speed Knob
e [SPEED] knob controls the speed of a LFO (low frequency oscillator), which
controls the delay time around the center of what is displayed on the display� Changing the delay time automatically like this causes an audible pitch bend in the delayed
signal, causing a chorusing eect� is is commonly known as “modulated delay”�
Depth Knob
e [DEPTH] knob controls how intense the modulation of the delay is� With full
clockwise positions, you will notice audible pitch bending on the delayed signal� At
full counter-clockwise positions, there is no modulation�
Waveforms Button
e [~] button selects one of the 3 waveforms
1. Tri angle
2. Sine
3. Square
to modulate the delay time with� e LED also pulses to indicate both speed and
depth of the modulation� e brighter the LED range, the larger the depth and intense the modulation eect�
Division Button
e [DIVISION] button selects one of the 5 divisions selections which is indicated
by the 5 LEDs in the division section
1. Quarter note [1/4]
2. Dotted Eighth note [d1/8]
3. Eighth note [1/8]
4. Triplet note [1/3]
5. Sixteenth note [1/16]
Revision: 1.2 (7/1/2021)
16
Page 17

Discovery Delay – ControlsControls
8888
8888
P 01
8888
8888
8888
8888
8888 120
Holding the division button will toggle the display to show milliseconds (ms) or
BPM of the delay time� A dot in the bottom right corner of the display indicates you
are looking at the BPM�
8888
Preset Select (Edit Save)
e [PRESET SELECT] button has multiple functions�
is switch allows you to access your presets� e rst time you press it, you will
see
mode� It’s simple, the position you set the knobs is what you will hear �
Pressing [▲] will access presets 1 - 127� Using the [▲] and [▼] buttons, you can
jump to another preset by pressing the [PRESET SELECT] button� Pressing the
[PRESET SELECT] button again will jump back to the ms/BPM view on the display�
Editing: Holding the [PRESET SELECT] button down will bring the word
500
on the screen, which is a manual mode� No settings are recalled in this
to the screen� e screen will blink and you can change all the settings of the delay
in preparation for saving� One the desired settings are dialed in, pressing the [PRESET SELECT] button will prompt the display to show
the Preset slot to save in� One last press of the [PRESET SELECT] button will store
those settings in that preset location�
Up & Down Arrow Buttons
e [▲] and [▼] buttons are used for incrementing or decrementing whatever is
shown on the display� It is also used for navigating which presets to recall, and for
navigating the global settings menu�
� Now choose
Revision: 1.2 (7/1/2021)
17
Page 18

Discovery Delay – ControlsControls
Tip:
Holding the arrow buttons will cause it to continuously burst to ramp through settings quickly without having to continuously push them�
Button Milliseconds BPM Presets
[▲]
[▼]
add 1 ms� Add 1 BPM Increase 1 preset
subtract 1 ms� Subtract 1 BPM Decrease 1 preset
Revision: 1.2 (7/1/2021)
18
Page 19

Discovery Delay – PresetsPresets
8888
8888
Presets
Selecting a Preset
e [PRESET SELECT] button is used to look at what preset you are on and for se-
lecting a preset when moving to a new one�
1. Press [PRESET SELECT]�
2. Use [▲] and [▼] buttons to jump to a new location� e display will blink, indi-
cating the new preset has not been selected yet�
3. Press [PRESET SELECT] to select new location�
4. Press [PRESET SELECT] to view delay time on the display�
Editing / Saving Presets
Creating a new preset or Editing a current preset is the same process�
1. Select the preset you want to edit�
is a good place to start for a fresh preset (the settings you currently see on
the pedal will be what you hear)�
2. Hold the [PRESET SELECT] button for half a second�
e display will show EDIT on the screen, followed by displaying the preset you are
editing, then the display will start to blink, indicating you are editing�
Revision: 1.2 (7/1/2021)
P 018888
19
Page 20

Discovery Delay – PresetsPresets
8888
8888
8888
8888
8888
8888
8888
3. Set the knobs to your desired settings� For expression pedal editing, refer to bot-
tom of this page�
4. Press [PRESET SELECT] button again� e display will read
show a preset location while blinking�
and
5. Use the [▲] and [▼] arrow buttons to select which location you want to store to�
6. Press the [PRESET SELECT] button one more time�
7. is display will show
aer saving is complete�
Mapping Expression pedal
Requirement: A low resistance 10K ohm expression pedal should be used.
If the expression pedal has a limit knob, set it so the expression pedal is working with its full range.
1. Edit a preset by holding down the [PRESET SELECT] button�
2. Once editing a preset and the display is blinking, tilt the expression pedal com-
pletely to the top (toe) or bottom (heel) position�
3. When in the top/bottom position, you should see a dot in the center of the dis-
play indicating you are in the right area� Set your controls as desired for this position�
4. Tilt the expression pedal completely to the opposite direction, and repeat step 3�
5. Tilt the expression back and forth while playing to determine if the desired map-
ping is correct�
Revision: 1.2 (7/1/2021)
20
Page 21

Discovery Delay – PresetsPresets
8888
8888
6. Once mapping is as desired, press the [PRESET SELECT] to store�
7. Use the [▲] [▼] buttons to select a new location, then [PRESET SELECT] to
complete the save�
Notes:
1.
When editing a new preset (such as in
sitions are mapped to what the knob settings were before editing� It is worth setting
the settings as close as possible before editing the preset�
2. Divisions settings are global through the whole sweep of the expression mapping
and can not be changed with the expression pedal�
mode), the top and bottom po-
3. You can manually adjust millisecond/BPM times with the [▲] and [▼] buttons
to get specic delay times in the top/bottom positions�
4. When changing delay times, it is normal for the pitch to change due to the bucket
brigade technology�
5. If you nd yourself in “Edit Mode” accidentally and wish to exit that mode,
press the [▲] and [▼] buttons simultaneously to act as a “Cancel” and you will exit
“Edit Mode”�
Erasing presets
1. Press the [PRESET SELECT] button�
2. If not on the Preset you want to erase, use the [▲] and [▼] buttons to select a
new preset, then [Preset Select] to select it�
3. Hold [BYPASS] foot switch while pressing [PRESET SELECT]�
4.
Revision: 1.2 (7/1/2021)
will temporarily show on the display� Once nished, the preset is erased�
21
Page 22

Discovery Delay – PresetsPresets
8888
8888
Factory Reset of all Presets
1. With the pedal power disconnected, hold down [TAP ] [WAVEFORM ~] and
[DIVISION] buttons simultaneously �
2. Plug in power while keeping those buttons held�
3.
will display on the screen, erasing all presets and global settings�
Live Preset Mode (Bypass / Tap)
1. Hold the [TAP] foot switch for 1�1 seconds until Discovery displays the preset
you are on (for example,
2. Use the [TAP] switch to increment the preset by 1 and the [BYPASS] switch to
decrement the preset by 1�
3. To revert back to view the delay time on the display and reverting the foot switch-
es to the normal functions, hold the [TAP] switch for half a second�
)�
Revision: 1.2 (7/1/2021)
22
Page 23

Discovery Delay – MIDIMIDI
8888
8888
8888
MIDI
Changing MIDI Channel:
1. Power on the unit while holding the [PRESET SELECT] button�
2. Press the [▼] button until you see
�
3. Use the [▲] and [▼] buttons to select the channel�
4. Press the [PRESET SELECT] button to select the channel�
5. When complete, you will see
until you see
�
on the menu again� Scroll down with [▼]
6. Press [PRESET SELECT] to nishing editing the global settings�
Changing Presets With Program Changes (PC#s)
Discovery’s presets can be changed via Program Changes coming from any MIDI
device, being that a MIDI switcher or DAW, or really anything that can send a Program Changes via a 5-pin MIDI cable�
1. Be sure the Discovery and your MIDI device are transmitting on the same MIDI
channel� For directions on changing Discovery’s MIDI Channel, please refer to the
instructions in the section above�
2. Connect the MIDI OUT from your MIDI device via 5-pin MIDI cable to the
[MIDI IN] of your Discovery�
3. Send Program Changes from your MIDI device to change the presets of your
Discovery� For a MIDI table with PC#s and corresponding a Discovery presets, refer
to page 28�
Revision: 1.2 (7/1/2021)
23
Page 24

Discovery Delay – MIDIMIDI
Changing Knob Settings With Control Changes (CC#s)
Every knob and parameter on Discovery can be controlled with Control Changes
(CC#s) being sent from any MIDI device� For a MIDI Table containing the Control
Change numbers and corresponding functions, please refer to page 29� To set Dis-
covery to ignore Controller Changes, refer to page 31�
1. Be sure the Discovery and your MIDI device are transmitting on the same MIDI
channel� For directions on changing Discovery’s MIDI Channel, please refer to page
23�
2. Send Control Change numbers (CC#s) and a value ranging from 0-127 to control
the desired knob� For a MIDI table with CC#s and corresponding functions, refer to
page 29�
Setting MIDI Out/Thru Modes
Discovery has a few modes for the MIDI OUT/THRU jack� On factory settings,
THRU is set to pass data from the MIDI IN jack�
Four dierent OUT modes progressively send more and more data from the Discovery to control other devices and Discovery pedals�
THRU
e MIDI OUT/THRU jack sends a hardware buered copy of the MIDI IN to the
OUT� is is the lowest possibly latency and is recommended when Discovery is not
sending its own MIDI data�
OUT
e MIDI OUT/THRU jack will
1. Pass MIDI data from INPUT to OUT
2. Send PC (Patch Change) data when selecting new presets
Revision: 1.2 (7/1/2021)
24
Page 25

Discovery Delay – MIDIMIDI
OUT2
e MIDI OUT/THRU jack will send
1. Pass MIDI data from INPUT to OUT�
2. Send PC (Patch Change) data when selecting new presets�
3. Send CC (Control Change) data for
• Tap Tempo
• Expression Pedal
OUT3
e MIDI OUT/THRU jack will send
1. Pass MIDI data from INPUT to OUT
2. Send PC (Patch Change) data when selecting new presets
3. Send CC (Control Change) data for
• Tap Tempo
• Expression Pedal
• Seven Segment Display View
• Bypass
OUT4
e MIDI OUT/THRU jack will send
1. Pass MIDI data from INPUT to OUT
2. Send PC (Patch Change) data when selecting new presets
3. Sends CC (Controller Change) data for
• Tap Tempo
• Expression Pedal
• Seven Segment Display View
• Bypass
• All Knobs
• Up and Down arrow buttons
• Division Button
• Waveform Button
Revision: 1.2 (7/1/2021)
25
Page 26

Discovery Delay – MIDIMIDI
8888
8888
8888
8888
8888
8888
Setting the mode
1. Power on the unit while holding the [PRESET SELECT] button�
2. Press the [▼] button until you see
�
3. Use the [▲] and [▼] buttons to select the mode�
4. Press the [PRESET SELECT] button to save the mode�
5. When complete, you will see
until you see
�
on the menu again� Scroll down with [▼]
6. Press [PRESET SELECT] to nishing editing the global settings�
Accepting/Denying CC#s
e Discovery can reject incoming CC data if desired� is is done in the Global
Settings�
1. Power on the unit while holding the [PRESET SELECT] button�
2. Press the [▼] button until you see
.
3. Use the [▲] and [▼] buttons to select the mode�
• “On”: Discovery will accept MIDI CC
• “OFF”: Discovery will not accept MIDI CC
4. Press the [PRESET SELECT] button to save the mode
5. When complete, you will see
until you see
�
on the menu again� Scroll down with [▼]
6. Press [PRESET SELECT] to nishing editing the global settings
Revision: 1.2 (7/1/2021)
26
Page 27

Discovery Delay – MIDIMIDI
8888
8888
Sending Patch Changes
e Discovery can send patch changes whenever its preset has changed� is can be
done using the [PRESET SELECT] button to select a new preset� It can also be done
with your feed in “Preset Mode” by holding the [TAP] switch and using [BYPASS]
and [TAP] to change presets�
In order to send patch changes, the global settings for the MIDI OUT/THRU jack
must be set to one of the OUT modes� For more information on setting MIDI Out/
ru modes, refer to page 30.
Sending Patch Changes and Controller Change data
Along with sending patch changes (As described in Sending Patch Changes), Discovery can send CC (Controller Change) data�
To achieve this, the global settings for the MIDI OUT/THRU jack must be set to
one of the OUT modes (OUT2, OUT3, or OUT4)� For more information on setting
MIDI Out/ru modes, refer to page 30.
MIDI time sync
Discovery can be synced to a MIDI clock source, such as a computer, drum machine, guitar MIDI foot switcher etc�
In order to sync, the global setting
For more information on editing Global Settings, refer to page 30�
must be set to
Note:
�
When MIDI sync is enabled, switching to presets will not recall the saved delay time�
MIDI Sysex dump & load of memory
Discovery has the ability to store all preset data as a MIDI Sysex (System Exclusive)
le� It can even send all preset data directly to an other Discovery unit via a MIDI
Revision: 1.2 (7/1/2021)
27
Page 28

Discovery Delay – MIDIMIDI
8888
8888
8888
cable�
To Send and Receive the Sysex data, you must enter the global settings and scroll to
� For more information regarding editing Global Settings, refer to page 31�
Selecting
will immediately begin transmitting all preset data to the receiv-
ing device�
Selecting
will display four dots on the display� Once data is being received
from the MIDI IN jack, a counter on the display will count up to 100, then the display will show “donE” when complete�
MIDI Table
PROGRAM CHANGES (PC#)
PC# (Decimal) FUNCTION
0 Preset 1
1 Preset 2
2 Preset 3
3 Preset 4
4 Preset 5
5 Preset 6
6 Preset 7
7 Preset 8
8 Preset 9
9 Preset 10
10 Preset 11
11 Preset 12
12 Preset 13
13 Preset 14
... ...
122 Preset 123
123 Preset 124
124 Preset 125
125 Preset 126
126 Preset 127
127 Manual Mode (PEDL) [*Un-Writable Location]
Revision: 1.2 (7/1/2021)
28
Page 29

Discovery Delay – MIDIMIDI
CONTROLLER CHANGES (CC#s)
CC# (Decimal) CC# (Hexadecimal) VALUE RANGE FUNCTION
14 0x0E 0-127 MIX
9 0x09 0-127 REGEN
3 0x03 0-127 TIME
MODULATION
17 0x11 0-127 SPEED
18 0x12 0-127 DEPTH
21 0x15 0 TRIANGLE
1 SINE
2 SQUARE
FILTERS
15 0x0F 0-127 HI CUT
16 0x10 0-127 LO CUT
DIVISIONS
20 0x14 0 - 25 QUARTER NOTE
26-50 DOTTED EIGHTH NOTE
51 - 75 EIGHTH NOTE
76 - 100 TRIPLET
101 - 127 SIXTEENTH NOTE
MIDI SYNC
63 0x3F 0 MIDI SYNC OFF
1 MIDI SYNC ON (Quicker)
2 MIDI SYNC ON 2 (Slower
+ More Stable)
FOOT SWITCHES
102 0x66 0 BYPASS (Pedal O)
1-127 BYPASS (Pedal On)
81 0x51 Any Va lue TAP TEMPO (Sends 1 Tap)
EXPRESSION PEDAL
100 0x64 0-127 EXPRESSION
PEDAL BUTTONS
52 0x34 Any Va lue UP ARROW
53 0x35 Any Va lue DOWN ARROW
54 0x36 Any Va lue PRESET DOWN
55 0x37 Any Va lue PRESET UP
56 0x38 0 DISPLAY MILLISECONDS
1 DISPLAY BPM
2 DISPLAY PROGRAM
57 0x39 PRESET SELECT
BUTTON
Revision: 1.2 (7/1/2021)
29
Page 30

Discovery Delay – Global SettingsGlobal Settings
8888
8888
8888
8888
8888
8888
8888
Global Settings
Editing Global Settings
1. If the pedal is powered on, disconnect the power and wait at least 3 seconds
Note:
In rare instances, unplugging the power cable and replugging it too quickly can
stress the regulators and cause them to pull extra current and may risk damaging
your unit� Please wait at least 3 seconds before plugging it back in to prevent this�
2� Hold the [PRESET SELECT] button and power on the unit�
3. You will now enter a numbered list of global settings� Use the [▲] and [▼] but-
tons to scroll through the settings� Use the [PRESET SELECT] button to select a
setting�
4. Once a setting has been selected, you will return to the main numbered list�
When nished editing settings, scroll to the bottom of the list with [▼] until
is displayed� Preset [PRESET SELECT] to nish altering the settings and
start the pedal�
1. Bypass Mode:
[▲]
[▼]
Choose between ‘True’ bypass and
‘Buered’ bypass modes� When in
‘true’ bypass mode, the signal will go
directly from the pedal’s input to it’s
output without passing through the
pedal’s eect circuitry�
2. MIDI Channel:
[▼]
Revision: 1.2 (7/1/2021)
Set the MIDI channel you want your
Discovery Delay to communicate on,
1-16� e default is MIDI channel 1�
[▲]
30
Page 31

Discovery Delay – Global SettingsGlobal Settings
8888
8888
8888
8888
8888
8888
8888
8888
8888
8888
8888
8888
8888
Discovery Delay can be used as a
3. MIDI Sync:
MIDI clock to sync multiple MIDI
devices� To enable this feature, select
[▲]
[▼]
Allows you to set the Discovery Delay
4. CC Accept:
to reject incoming CC data�
[▲]
�
[▼]
5. MIDI ru/Out:
[▲]
Allows you to choose the various
Four dierent MIDI OUT modes
which progressively send more and
more data from the Discovery to
control other devices and Discovery
pedals� Please refer to page 24 for a
description of each output mode�
[▼]
Revision: 1.2 (7/1/2021)
31
Page 32

Discovery Delay – Global SettingsGlobal Settings
8888
8888
8888
8888
8888
8888
8888
8888
8888
8888
8888
8888
External Switch ModeWhen using a Momentary TRS foot switch:
6. Ext. Switch Mode:
[▲]
[▼]
BYTP-’Bypass Tap’ means Tip will control
bypass and the ring with control tap tempo�
PrSt ‘Instant Preset Mode’, pushing the Tip
with instantly go to the previous preset,
pushing the ring will instantly go to the
next preset�
PrS2 - ‘Jump Preset Mode’ Ring increments
to the next preset� e Tip will decrement
the preset to one lower� Hitting the Bypass
Switch will select the preset you choose�
7. Dry On/O:
[▼]
8. Sysex Load/Dump:
[▲]
Allows the Dry signal to be turned
o� For use in studio applications,
when being used in a bus where the
‘Dry’ signal is not needed�
Discovery has the ability to store all
preset data as a MIDI Sysex (System
Exclusive) le� It can even send all
preset data directly to an other Dis-
[▲]
covery unit via a MIDI cable�
To Send and Receive the Sysex data,
Refer to page 27 for details�
[▼]
9. Done/Exit:
Revision: 1.2 (7/1/2021)
32
Page 33

Discovery Delay – Example SettingsExample Settings
Example Settings
8888
Basic Delay
8888
Slap-Back Delay
Revision: 1.2 (7/1/2021)
8888
Long Delay
33
Page 34

Discovery Delay – Usage CasesUsage Cases
Usage Cases
Discovery Analog Delay Into Front of Amp
1. Plug in included 18V DC power supply�
2� Plug guitar into the [INPUT] via 1/4” cable�
3. Plug the [OUTPUT] to the input of your amp via 1/4” cable�
Note:
When plugging the Discovery Analog Delay into the front of an amp, especially a
high-gain amp, it’s easy for your tone to get messy and unwieldy because of the repeats being distorted by your amp� You may need to lower the [MIX] and [REGEN]
settings and use the [LO-CUT] and [HI-CUT] to reduce the bass, treble and noise
to clean up the delay to where it sits nicely with your dry signal�
Use included
18V DC power supply
88 88
Revision: 1.2 (7/1/2021)
34
Page 35

Discovery Delay – Usage CasesUsage Cases
Discovery Analog Delay Into Effects Loop of Amp
1. Plug in included 18V DC power supply�
2� Plug guitar into the front of your amp via 1/4” cable�
3. Plug the SEND of your amp’s eects loop in to the [INPUT] of Discovery�
4. Plug the RETURN of your amp’s eect loop into the [OUTPUT] of Discovery�
Note:
is setup will give you the most clean delay tones and is our preferred way to hook
up the Discovery Analog Delay to an amp with the least amount of noise�
16Ω 8Ω 8Ω 4Ω 4Ω
Effects Loop
SEND RETURN
Use included
18V DC power supply
88 88
Revision: 1.2 (7/1/2021)
35
Page 36

Discovery Delay – Usage CasesUsage Cases
MIDI out
MIDI Switching Device
MIDI Switching from External Device
1. Plug in included 18V DC power supply�
2� Plug a 5-pin MIDI Cable from devices MIDI OUT to Discovery’s [MIDI IN]�
3. Optional: Plug a 5-pin MIDI Cable from Discovery’s [MIDI OUT/THRU] to
other device’s MIDI IN�
Note:
For more information on how to set the MIDI channel of the Discovery Delay and
the MIDI OUT/THRU options, please refer to Page 23�
16Ω 8Ω 8Ω 4Ω 4Ω
MIDI in
Effects Loop
SEND RETURN
Optional: Connect to
other MIDI devices
Use included
18V DC power supply
88 88
Device with MIDI Switching (Example – Boss ES-8)
Revision: 1.2 (7/1/2021)
36
Page 37

Discovery Delay – Technical SpecicationsTechnical Specications
Technical Specications
Front Panel: Bypass Switch, Tap Switch, Display, Time Knob, Mix Knob,
Regen Knob, Lo-Cut Knob, Hi-Cut Knob, Speed Knob, Depth Knob Waveform LED Button, Divisions Button, Preset Select Button (Edit & Save), Up
& Down Buttons
Ins & Outs: Input, Output, Exp Pedal, Tap, Ext Switch, 18V DC In, MIDI
In and MIDI Out/ru
Input Impedance: 470KΩ
Output Impedance: 100Ω
Power Connector: 18Vdc, center negative, 2�1mm x 5�5mm
Current Consumption: 220mA max
Reverse Polarity Protection: Yes
Dimensions: 4” (W) x 5�33” (T) x 2�36” (H)
Weight: 1�3 lbs�
ROHS Compliant: Ye s
*All specications subject to change without prior notice
Revision: 1.2 (7/1/2021)
37
Page 38

Discovery Delay – Warranty Warranty
Warranty
For warranty information on the Suhr Discovery Delay as well as all other Suhr
products, please visit https://www�suhr�com/warranty/
Revision: 1.2 (7/1/2021)
38
Page 39

Discovery Delay – FCC Compliance FCC Compliance
FCC Compliance
is product has been tested and found to comply with the limits for a Class A digital device pursuant to Part 15 of the FCC Rules� ese limits are designed to provide
reasonable protection against harmful interference when the equipment is operated
in a commercial environment� is product generates, uses, and can radiate radio
frequency energy and, if not installed and used in accordance with the manufacturer’s instruction manual, may cause harmful interference with radio communications�
Operation of this product in a residential area is likely to cause harmful interference,
in which case you will be required to correct the interference at your own expense�
is device complies with Part 15 of the FCC Rules� Operation is subject to the following two conditions: 1) is device may not cause harmful interference� 2) is
device must accept any interference received, including interference that may cause
undesired operation�
Notice: e FCC regulations provide that changes or modications not expressly approved by J�S� Technologies Inc� could void your authority to operate this equipment�
ese limits are designed to provide reasonable protection against harmful interference in a non-residential installation� However, there is no guarantee that interference will not occur in a particular installation� If this equipment does cause harmful
interference with radio or television reception, which can be determined by turning
the equipment o and on, you are encouraged to try to correct the interference by
one or more of the following measures:
• Reorient or relocate the antenna of the radio/television receiver�
• Increase the separation between this equipment and the radio/television receiver�
• Plug the equipment into a dierent outlet so that the equipment and the radio/
television receiver are on dierent power mains branch circuits�
• Consult a representative of J�S� Technologies Inc� v an experienced radio/television technician for additional suggestions�
Revision: 1.2 (7/1/2021)
39
 Loading...