

Page 1
GUITARIST
User Manual
1
Page 2

Table of content
What is Guitarist
Getting Started
Installation
WINDOWS
macOS
The Library
Uninstalling
Authorization
Guitarist Structure
The Preset System
The Control Section
Pattern Page
The Animation Sequencer
The Song Sequencer
The Settings Page
The Action Section
The Sound Section
The Amp
The Effects
The Guitar
The Keyboard
Host Integration
Cubase
Ableton Live
ProTools
Studio One
Sonar
Logic
FL Studio
MIDI remote
Troubleshooting
Chord List
License
Contact
2
Page 3

What is Guitarist
Sugar Bytes Guitarist is a fully equipped guitar emulation, including guitar player, guitars,
effects and amplifier. With Guitarist you can create and play absolutely authentic guitar
riffs in a matter of seconds. Guitarist is based on sampled electric guitars, more than
2200 samples have been taken per guitar, providing highest sound quality.
As with all Sugar Bytes products, the sequencer system is genuinely intuitive and easy to
handle, while it is powerful enough to let you create stunning licks with just a few clicks.
Chords can be created on your own or taken from the internal chord library, including
more than 400 chords for you to explore. Strings can be individually levelled, detuned or
simply removed. A special highlight is the Animation allowing single notes to be moved
by special sequencers, introducing melodies and incredible detail to your pattern.
With Guitarist we made a dream come true and created yet another beautiful and
magical instrument that will bring you lots of inspiration, tons of ideas and great new
tracks. Sugar Bytes proudly presents and wishes for you to have a lot of fun with
Guitarist.
Getting Started
Guitarist comes as plugin and as standalone application, so it can run both independently
and in any VST/AU compatible host application. After the installation, Guitarist should be
found among your virtual instruments.
Just start the Guitarist standalone or plugin and hit the Play button on top of the
Guitarist instrument and a nice preset should start to play.
If your MIDI Keyboard is connected, you can try the Chord Keys and Pattern Keys.
The Chord Keys provide two playable octaves, the first one filled with major chords based
on the note you pressed. The second octave contains minor chords.
You can assign your own chords to these keys as well and play them with the keyboard or
with the chord sequencer. The next two octaves are the Pattern Keys.
You can save up to 24 patterns there and call them with your keyboard or with the Song
Sequencer. Check out some different presets and combine different Sound- and Pattern
presets to find combinations you like. If you have a quick idea, the audio recorder in the
standalone application will help you to keep it in mind.
BACK
TO TABLE OF CONTENT
3
Page 4

Installation
Download (requires login) the latest version here.
The standalone version and the manual will be installed into
Windows: C:\Program Files\Sugar Bytes\Guitarist
macOS: /Applications/Sugar Bytes/Guitarist
Presets will be installed into Documents\Sugar Bytes\Guitarist
Do not move the Guitarist presets after installation!
WINDOWS
Default installation paths:
VST C:\Program Files\VSTPlugins
AAX C:\Program Files\Common Files\Avid\Audio\Plug-Ins
BACK
TO TABLE OF CONTENT
4
Page 5

macOS
The Audio Unit, the VST Plugin and the the AAX Plugin will be automatically installed into
the correct folders.
Default installation paths:
VST /Library/Audio/Plug-Ins/VST/
AU /Library/Audio/Plug-Ins/Components/
AAX /Library/Application Support/Avid/Audio/Plug-Ins
The Library
The library contains the guitar samples, the different guitars are choosable from the
Settings Page in Guitarist.
The Library can be installed to a directory of your choice.
The default path is:
Windows: C:\Program Files\Sugar Bytes\Guitarist Library
macOS: /Application/Sugar Bytes/Guitarist Library
Do not move the Guitarist library after installation!
BACK
TO TABLE OF CONTENT
5
Page 6

Uninstalling
In order to uninstall Guitarist, please take the following steps:
Windows: Uninstall Guitarist under Control Panel/AddRemove Software.
macOS: Here is the way to delete everything regarding Guitarist:
/Applications/Sugar Bytes/Guitarist
/Library/Audio/Plug-Ins/VST/Guitarist.vst
/Library/Audio/Plug-Ins/Components/Guitarist.component
/Library/Application Support/Avid/Audio/Plug-Ins/Guitarist.aaxplugin
~/Documents/Sugar Bytes/Guitarist
~/Library/Preferences/com.sugar-bytes.Guitarist.plist
~ means: /Users/YOURLOGINNAME (your home folder)
(Please note that since OSX 10.7.x the library folder is a hidden folder.
Therefore please use the "Go To Folder" menu and then enter ~/Library.)
Authorization
The serial number is requested for installation.
If the serial number is missing or incorrect, the product will not produce sound.
In that case, open the settings page in Guitarist and enter the correct serial number or
just reinstall the product.
BACK
TO TABLE OF CONTENT
6
Page 7
Guitarist Structure
The Preset System
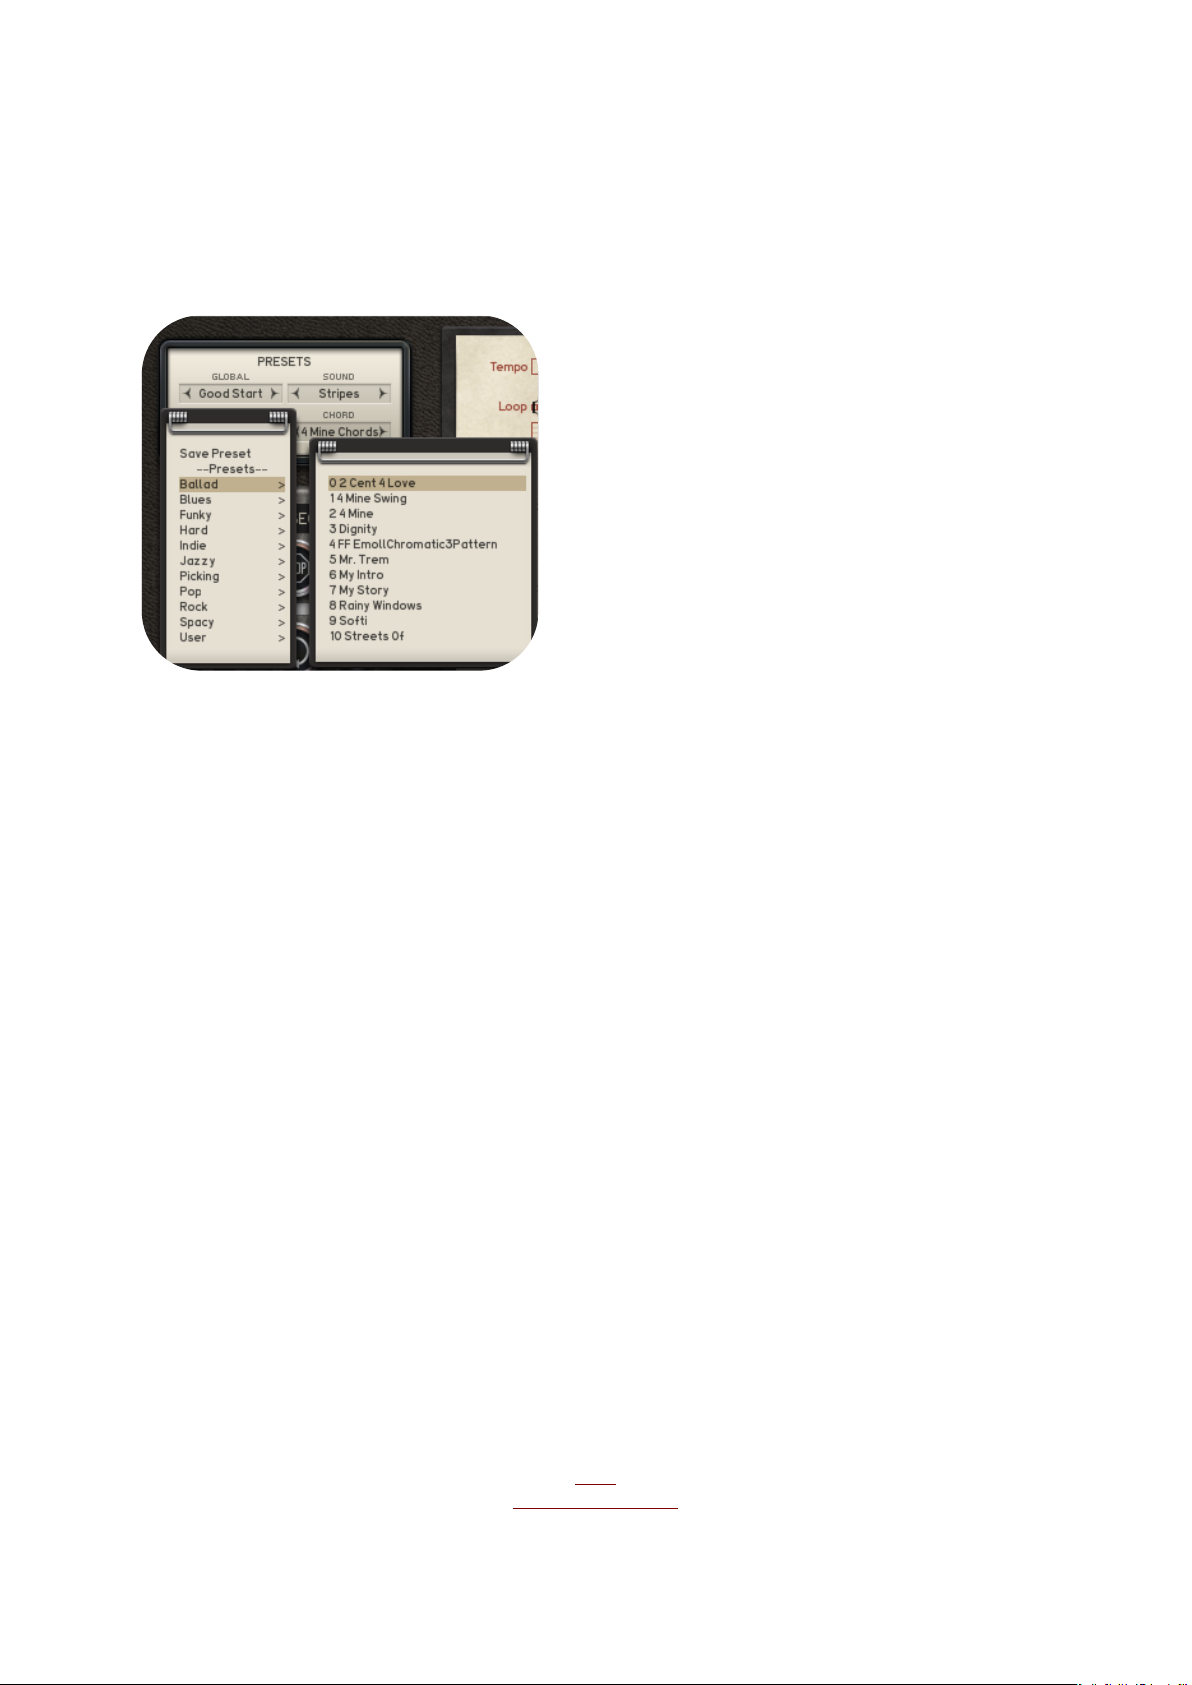
Guitarist offers a versatile Preset System which allows you to combine Sound-,
Sequence- and Chord Memory presets to create millions of new sounds out of existing
parts.
For you to save your own presets we already created a “User” folder.
The four presets systems explained:
1 Global Preset: saves all Guitarist settings.
2 Sound Preset: saves all settings from the sound area.
3 Pattern Preset: saves all settings from the pattern area and the chord memory.
4 Chord Banks: saves all in the chord memory.
The presets can be found in the Guitarist application folder under Content/Presets.
BACK
TO TABLE OF CONTENT
7
Page 8
The Control Section
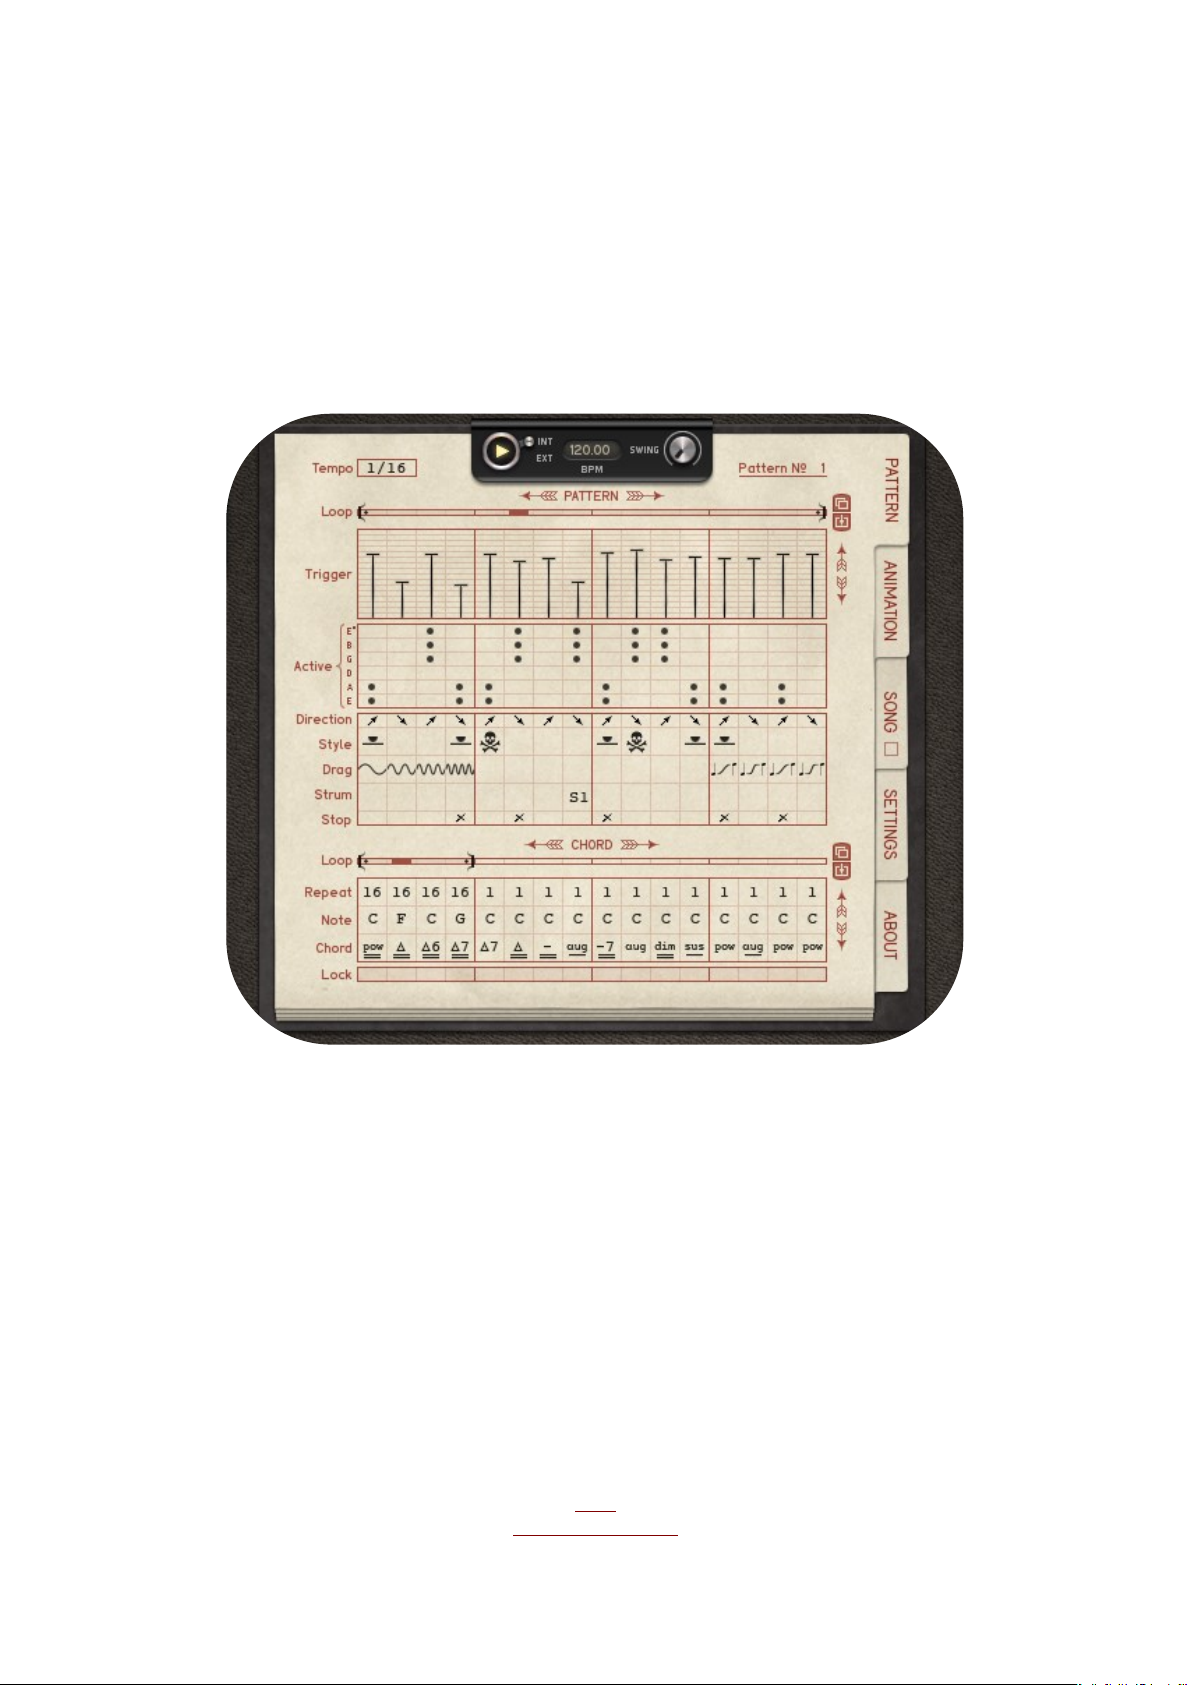
The Control Section is found in the middle of the instrument and emulates the actual guitar
player. This is where you build up your riffs, chord progressions and song arrangements.
Also there is the Settings Page where you select your guitar and find useful preferences to
make the instrument behave the way you want it to. Let´s go through the pages.
Pattern Page
Tempo
Here you determine the step resolution of the Pattern Sequencer and the basic clock for
Chord- and Song Sequencer. The Tempo is based on the song tempo of your host
sequencer or on the BPM value given in the File dialog of the Guitarist standalone.
Play
Start the sequencer manually here.
INT/EXT Select the Sync source for the sequencers
Internal will start the sequencers with MIDI notes only.
When the button is set to External, Guitarist will start with the host clock, but can be
stopped and retriggered with MIDI notes.
Swing
Select the Swing amount here. Possible amount goes from 50/50 to 75/25.
BACK
TO TABLE OF CONTENT
8
Page 9
The Pattern Sequencer
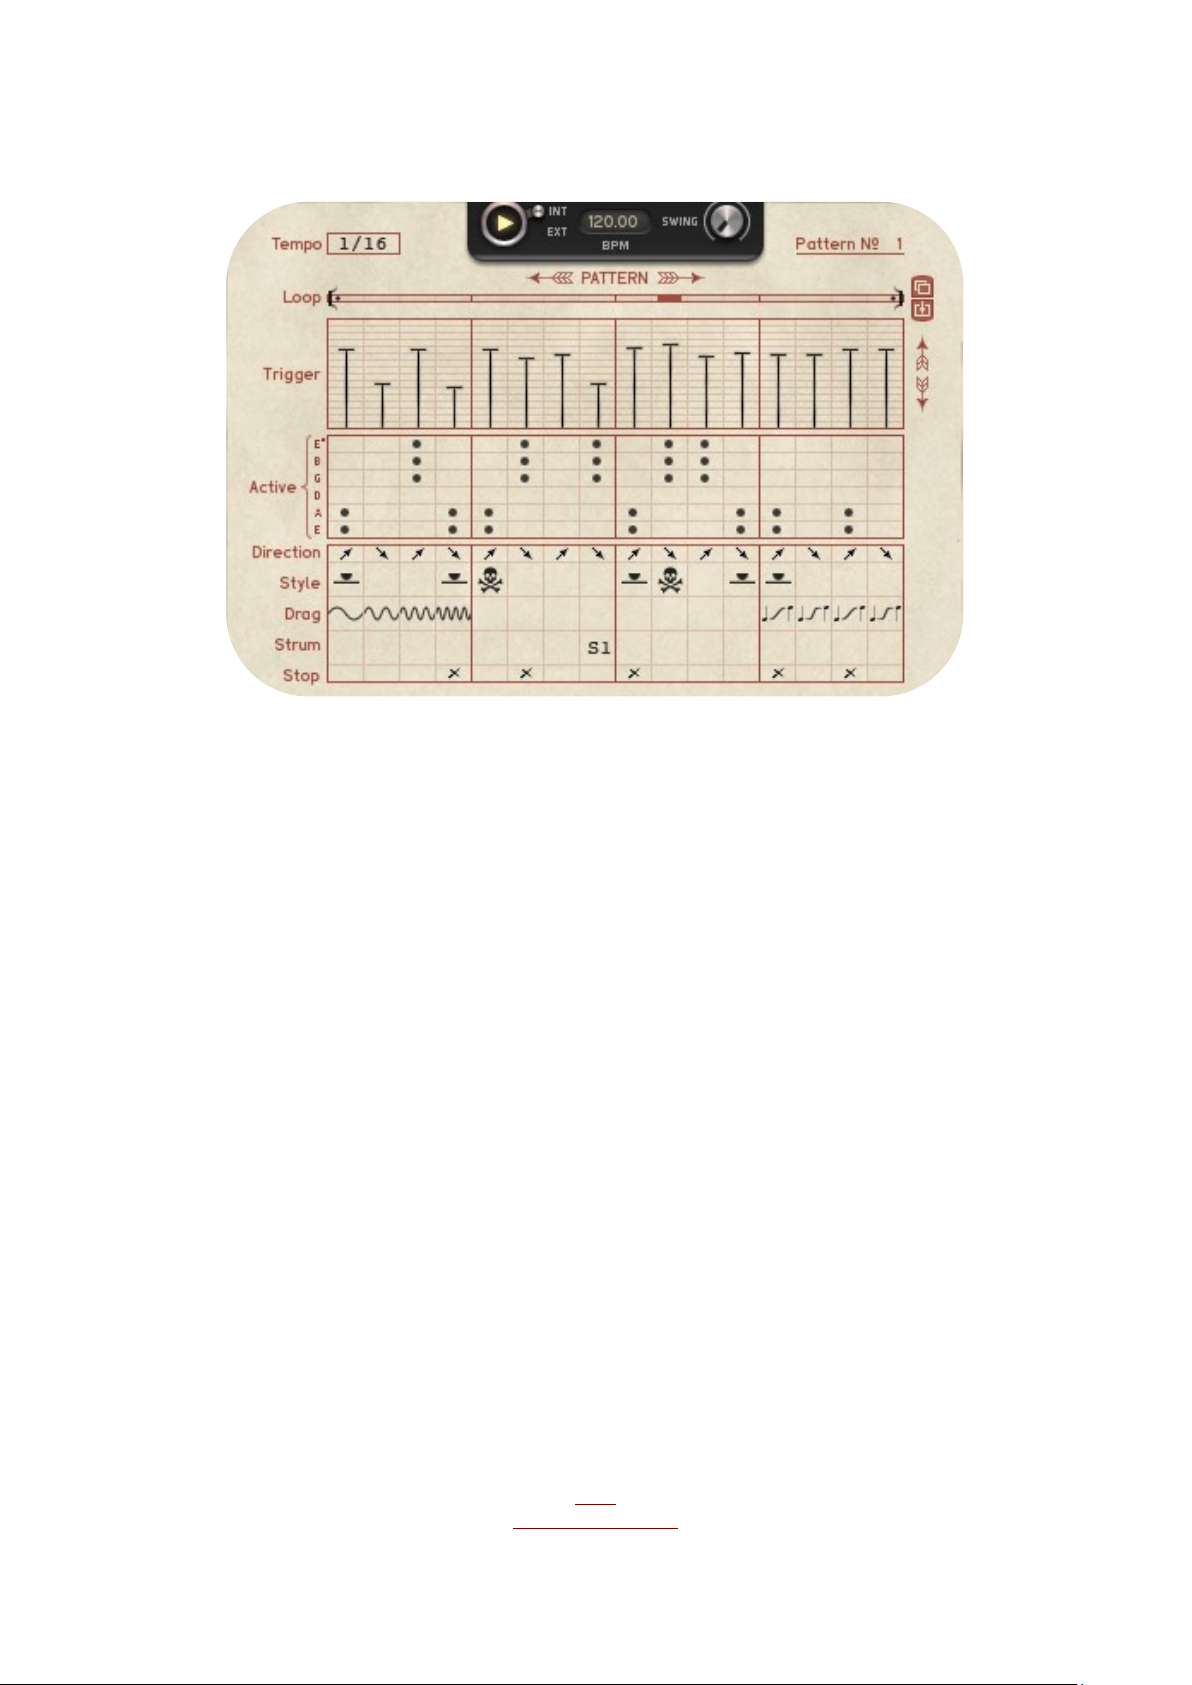
The Pattern Sequencer creates all data required for the guitar riff and actually controls
the left and right hand of the virtual guitar player. Here you can quickly make your own
patterns or adapt presets to your needs. Just select the desired tempo, draw triggers and
assign strings to be triggered.
Copy/Paste
Use these buttons to copy/paste only the range within the loop bars.
Loop
One Pattern has up to 16 steps. With the loop bar you can set a different length for short
licks, triple feels or evolving, uneven rhythms.
Trigger
When a fader is above zero, the guitar will be triggered with all settings below. Also, if the
Chord changes in the Chord Sequencer, it will only be changed when a trigger is set. If no
„Active“ notes(see below) are set for that step, but a trigger is set, fading notes can
change their chord without being retriggered.
Active
A guitar player rarely plays all 6 strings. With the Active Sequencer, you can decide for
each step which string is triggered and which is not. This function helps you to create
pickings, but also all kinds of rock grooves where bass strings and full chords are played
together.
Direction
Here you can decide for each step if the Guitar is strummed up- or downwards. Usually
the guitar player plays up/down/up/down and so on, but for special kinds of riffs it´s
good to have that sequencer.
BACK
TO TABLE OF CONTENT
9
Page 10
Style
Three playing styles are available. When no value is set for a step, the string will be
triggered normally. Damp triggers the string with a hand sitting on top of it, good for all
kinds of sounds, from metal riffs to reggae pickings. Dead triggers a dead note, meaning
the string is rather touched instead of being pressed which gives you a percussive pluck
with rich harmonics, good for creating some grooving trouble and funk. Using a lot of
dead notes to fill gaps in a pattern, will bring lots of groove to your riff.
Drag
Here you can add alternations to the guitar pitch. Basically three functions are available.
The first four modes are the vibratos, slight pitch changes in four different speeds.
The next two modes are Bend Up and Slide Up. Both create a pitchbend from two notes
below up to the original note. Bend is a continuous change, while Slide is a stepped
change, representing the guitar player´s finger moving from fret to fret. The last two
modes are realpitch glides.
Strum
With this sequencer you can perform slower strums or double triggers. You have three
slow strum speeds to choose from, Strum 1 is good for creating a kind of natural feel to
your pattern, Strum 2 is slower and good for impressive strums here and there. Strum 3 is
really slow and good for single triggers with lots of attention. Double creates two triggers
on that step.
Stop
If you encounter overlapping notes that should not overlap, use the Stop Sequencer to
stop fading notes at any time. You can also use it to create short triggers.
Another method to stop notes is to trigger dead notes on the next step, both solutions
should be tried.
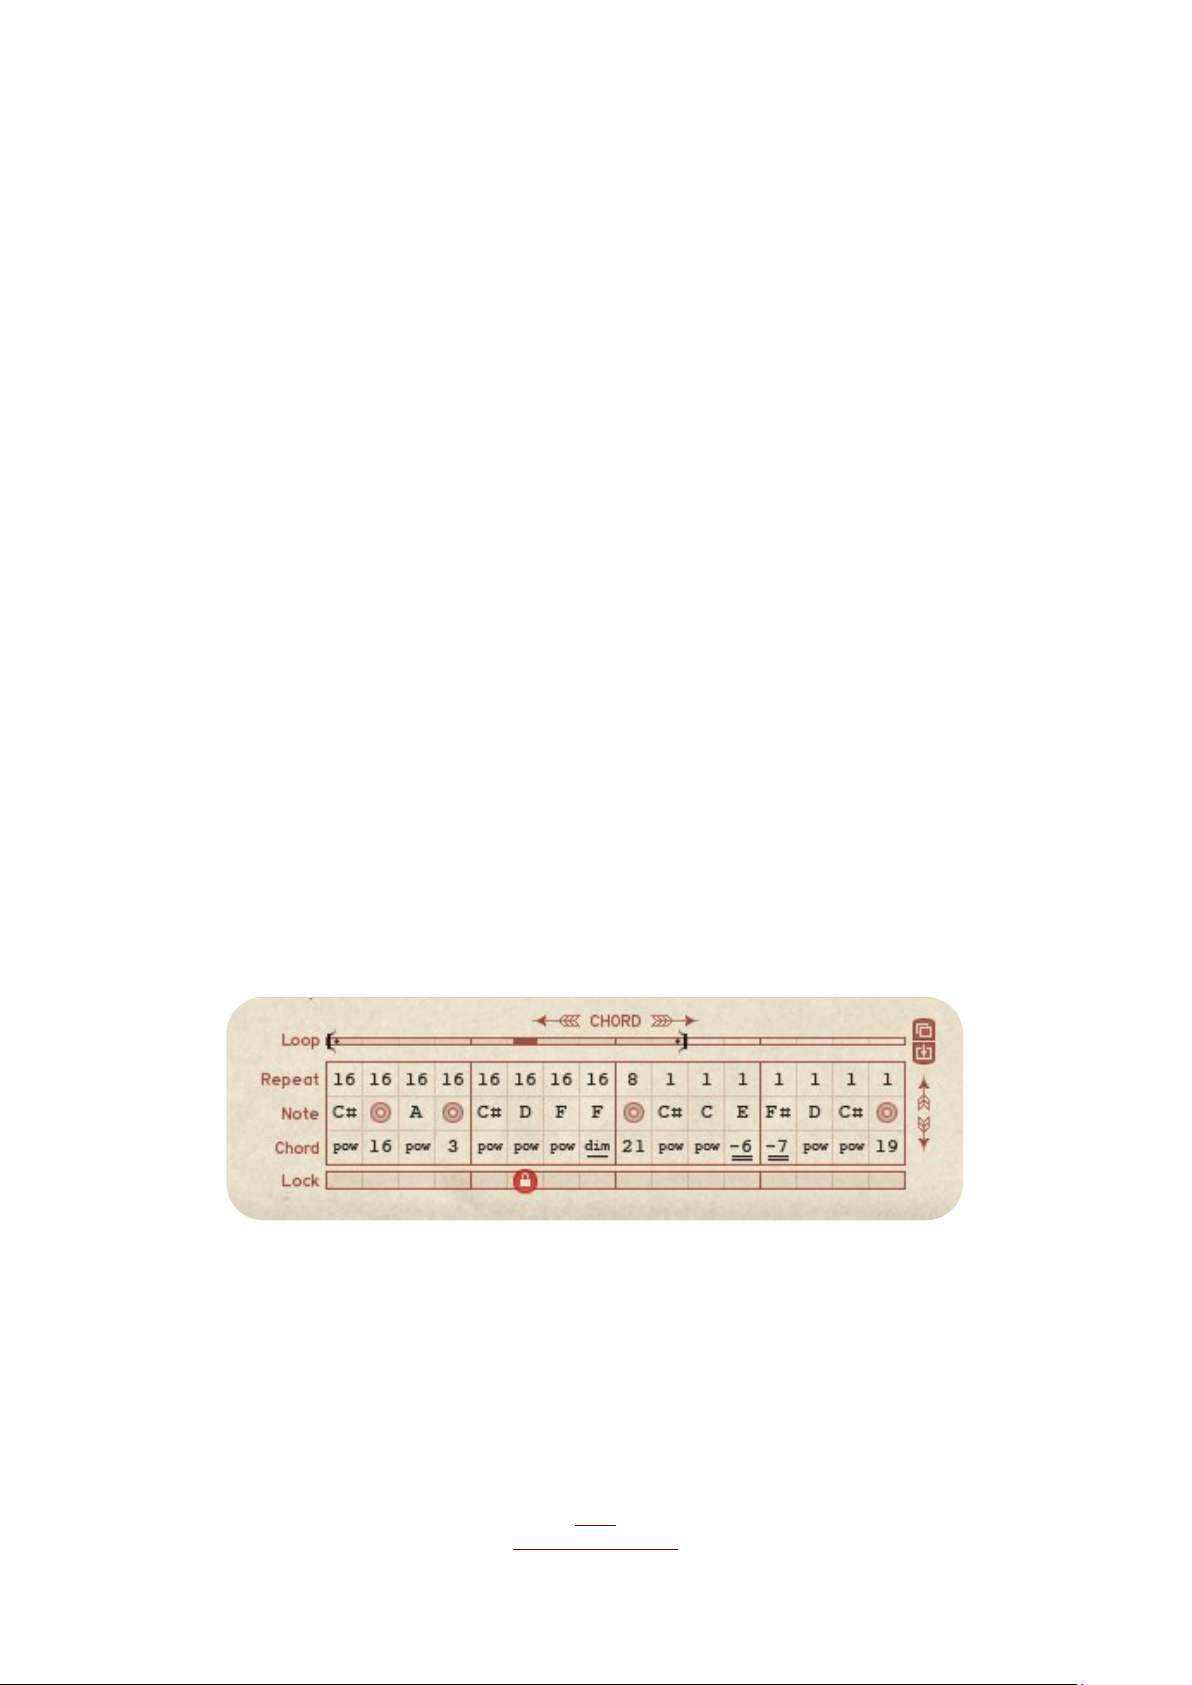
The Chord Sequencer
At the bottom of the Pattern Page you find the Chord Sequencer. This is where you
create your chord progressions, it´s where you really start to compose. More than 400
factory chords are available to you, plus you can trigger the 24 chords from the Chord
Board. The Lock function makes it easy to edit chords while the sequencer is playing.
Each step of the Chord Sequencer (when factory chords are used) and each user chord
on the Chord Board has it´s own Animation sequencer which can shift each finger up and
downindividually by 3 seminotes.
BACK
TO TABLE OF CONTENT
10
Page 11

If chords are played on the Chord Board (via MIDI or mouse) these are preferred. So you
can play your own chord progressions live, and when you release your hand from the
Chord Board, the chord sequence will go on, allowing interesting performances on stage.
Arrows
The arrows on top of the sequencer rotate the sequence within the loop bar range. This
makes it easy to choose an individual starting point for the chord progression.
The arrows on the right side transpose the root note. That way you can easily select an
individual tune for the sequence.
Copy/Paste
Use these buttons to copy/paste only the range within the loop bars.
Loop
Defines the length of a chord progression.
Repeat
Repeats the chord steps according to the selected pattern tempo. Each chord step can
be repeated by up to 16 times. If you choose 1/8 tempo, you must set 8 repeats to make
the chord play for one bar. When the tempo is set to 1/16, you set 16 repeats to make
the chord play for one bar. With the repeat sequencer you´re able to change the chord at
any time, which makes it a powerful composition tool, for you to create really natural
chord progressions, where chords can also come earlier or later.
Make sure the sum of all repeats within the loop bar makes sense, usually it should be
possible to divide the sum of all repeats by 8 or 16 in order to have a consistent song
structure.
Note
The base note for the chord chosen below. Is not used when a chord from the Chord
Board is triggered, since these chords are independent from a base note.
Lock
To edit a chord and its „Animation“(see below), a chord-step should be locked. That way
the chordstep will be played all the time, without ever jumping to the next step. Make
sure the Song Sequencer is disabled, so the pattern will not change during editing. That
is especially important when editing Animations.
Chord
Here you can choose from 12 chord models in 3 variations or the 24 user chords.
BACK
TO TABLE OF CONTENT
11
Page 12
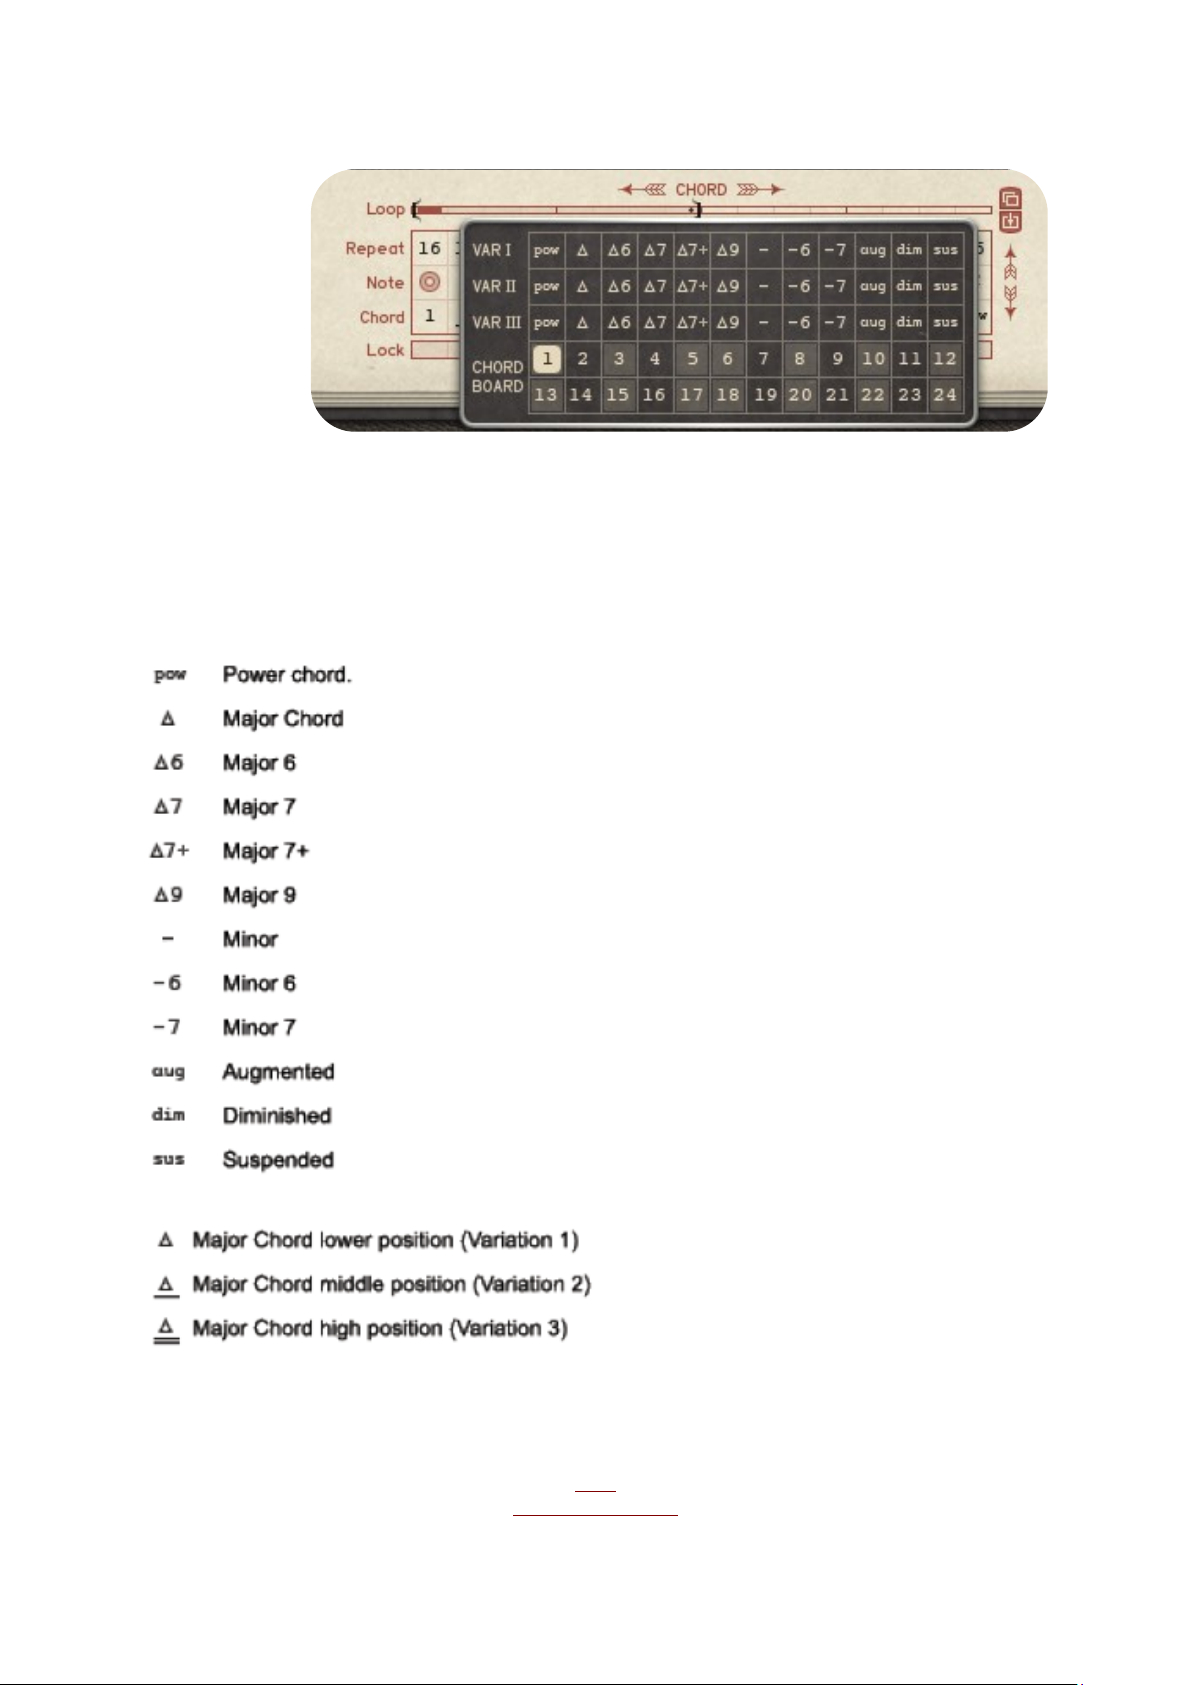
Chord Board
These are the 24 user chords available on the Chord Board.
The chords are marked dark and bright, according to the black and white keys on your
keyboard.
Chord Symbols
BACK
TO TABLE OF CONTENT
12
Page 13
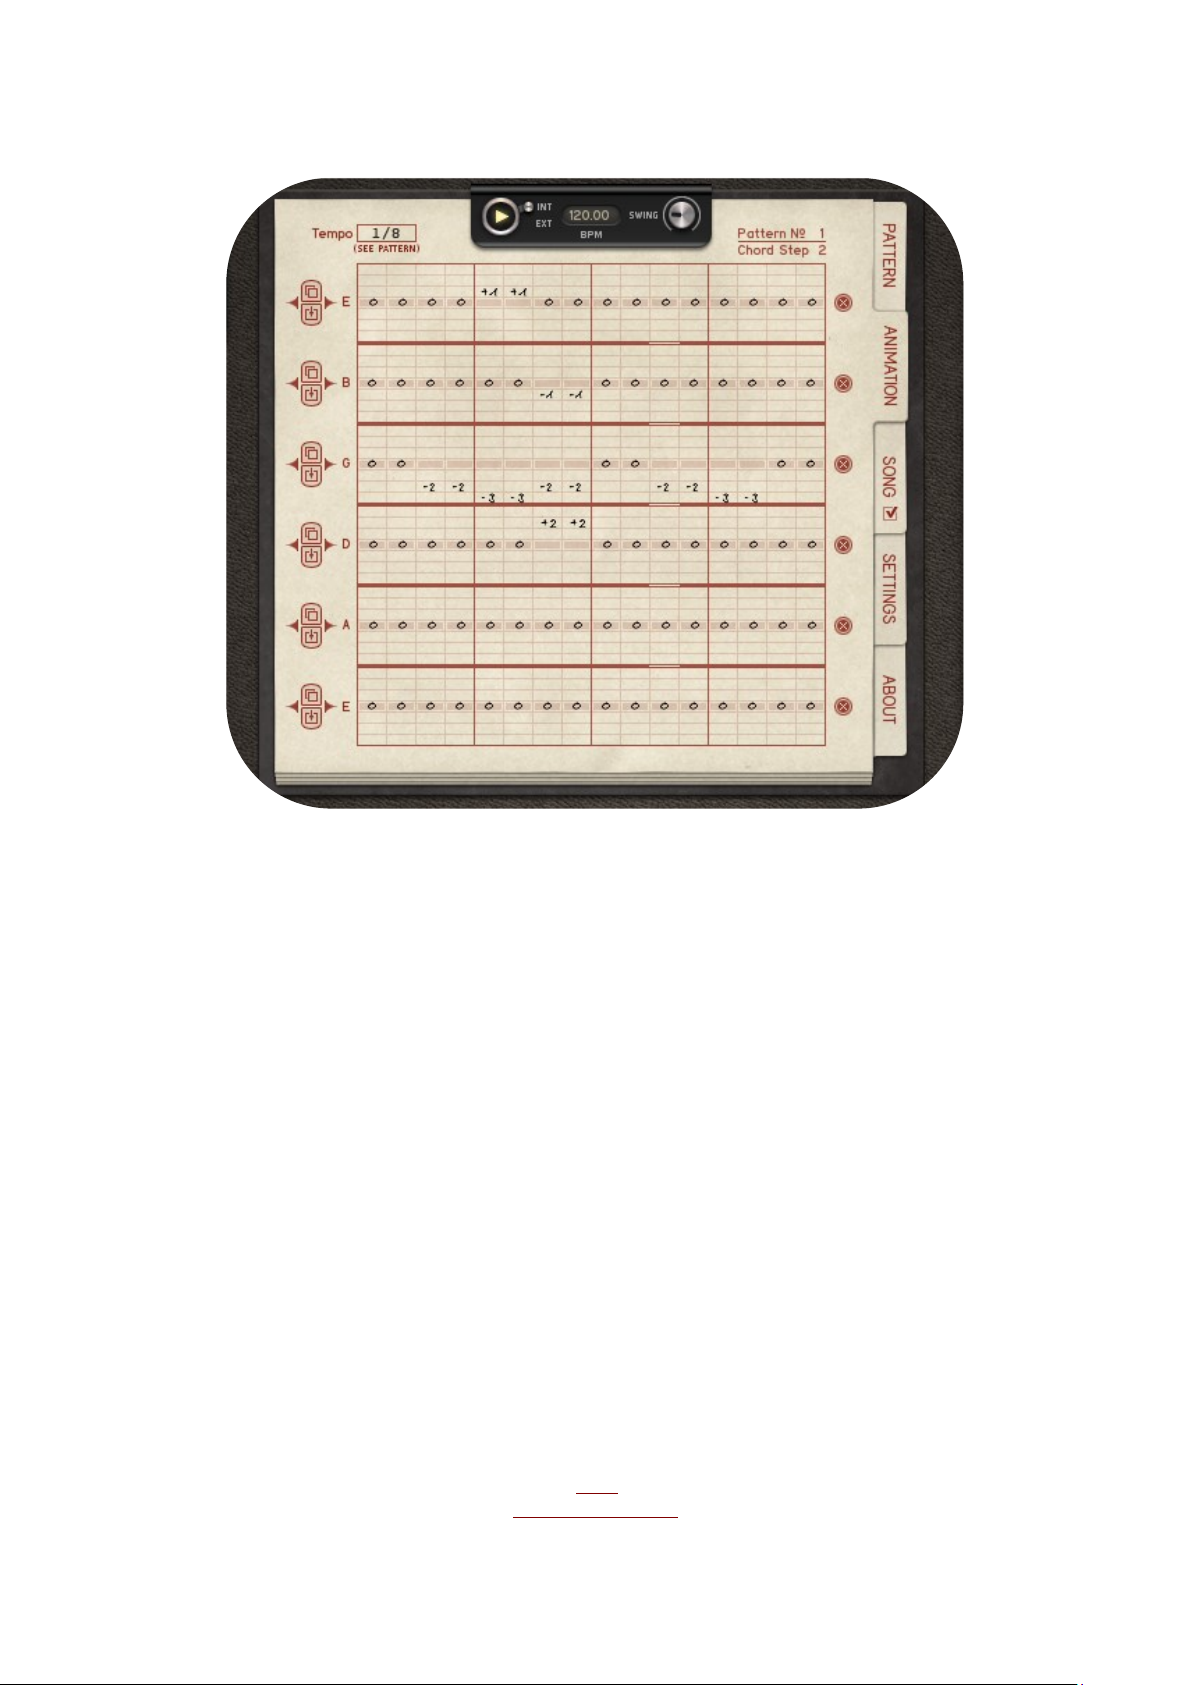
The Animation Sequencer
The Animation is a very special feature that brings life and melody to your riff.
Each of the six fingers can be moved up and down by 1, 2 or 3 semitones per step.
The Animation Sequencer runs at the tempo and loop settings of the Pattern Sequencer.
Use the Animation to alternate the chords while they are playing, create small melodies
or bridges to the next chord.
The Animation Sequencer works in a special way:
Each step of the chord sequencer has it´s own Animation sequence when factory chords
are used. Each user chord from the Chord Board also has its own Animation sequence,
but not per step. So in total there are 16 possible Animations for factory chords plus 24
Animations available for user chords. Multiplied with 24 possible patterns, this adds up to
more than 900 possible Animation sequences. With this Animation Sequencer you will
never have an animation you don´t want where you don´t want it.
In order to have a nice workflow with all of these animation sequences available, make
sure that the current chord step is locked and the Song sequencer is disabled while you
edit the Animation.
In the upper right corner you can see which pattern and which chord the Animation page
belongs to. The chord is either one of the 16 steps in the chord sequencer or one of the
user chords from the chord board.
BACK
TO TABLE OF CONTENT
13
Page 14
In the upper left corner you can see which tempo division is chosen for the pattern which
the Animation Sequencer belongs to. Between the sequencer lines you can watch the
play position and loop bar settings, which are taken from the Pattern Sequencer as well.
On the left side of the fretboard, you find little buttons to disable the Animation per
String. This is just for editing purposes and is not saved with preset or song.
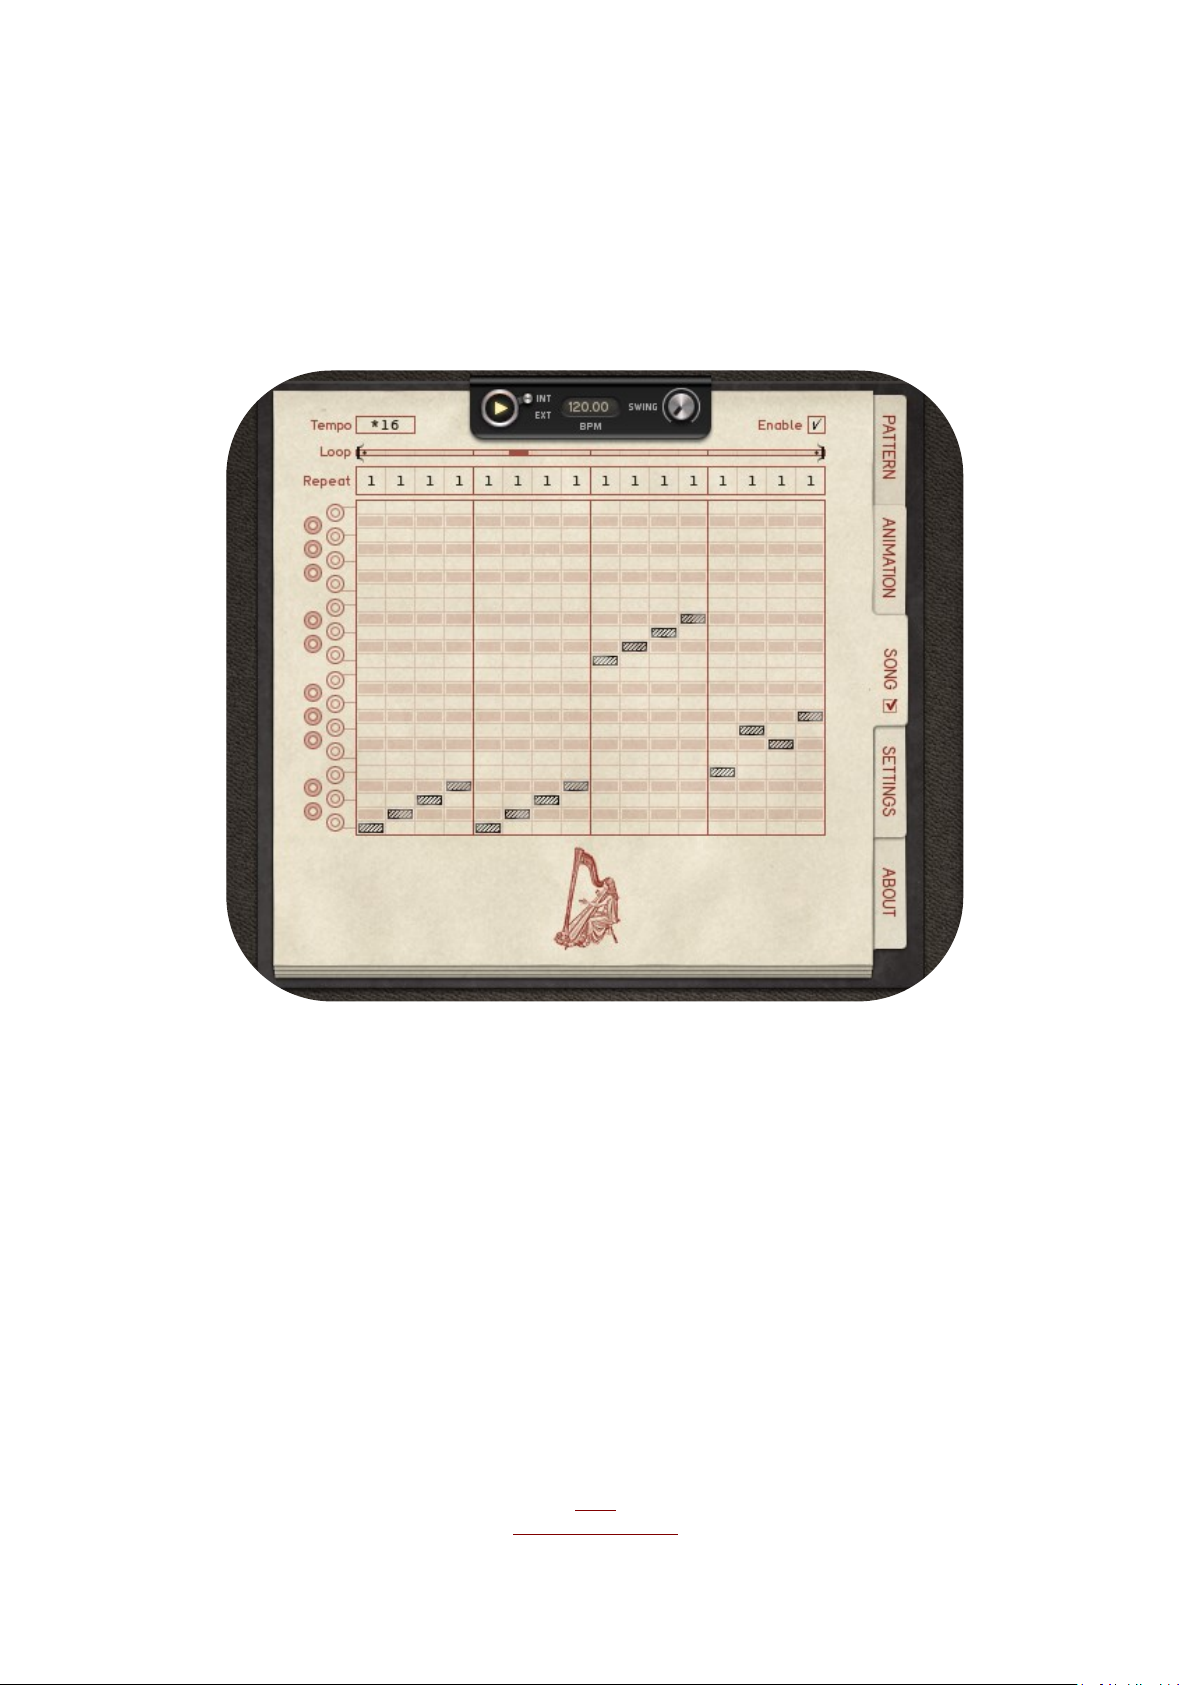
The Song Sequencer
This is for you to arrange the 24 possible patterns saved on the Pattern Keys.
Each of the 16 steps can be repeated up to 16 times. If patterns are selected by MIDI,
MIDI is handled with priority.
The Tempo control determines the resolution of the Song sequence.
*1 means that the Song sequencer is running at the same tempo as the pattern
sequencer.
*2 means that the Song sequencer is running at half pattern speed, so the song
sequencer will play the next step after two Pattern Steps have been played.
*16 means that the Song sequencer runs 16 times slower than the pattern sequencer, so
the Song sequencer will play the next step after the Pattern sequencer played a whole
16step sequence.
Use the Tempo Control together with the Repeats-Sequencer to arrange your Song
exactly the way you want. You can change patterns at any time here and create large
arrangements that last for minutes.
BACK
TO TABLE OF CONTENT
14
Page 15
Use the Enable button to enable or disable the Song sequencer.
Make sure the song sequencer is disabled whenever you want to edit patterns, because
the Song sequencer changes the patterns all the time.
In order to edit a pattern, select it on the Pattern keyboard. Use the left mouse button to
select the pattern, then use the play button to edit it while it plays.
Use the right mouse button to lock a Pattern key. Then the pattern will play all the time.
Hit the key again with the right mouse button to disable the lock mode. This lock mode is
good to edit and change patterns while they are playing.
Whether or not the song sequencer is running can easily be identified by the little
checkbox display on the Song Sequencer page selector.
Sequencer Shortcuts
Shortcuts make it easy to edit the sequencers. Especially the Shift Key helps a lot when
creating new patterns. Use it to drag the value of a step across the whole sequencer.
That helps to set all Chordsequencer-Repeats to 16 or to set all step in the ActiveSequencer to On or Off.
Here the shortcuts explained:
Shift
In the Trigger/Animation sequencer, Shift enables a fine adjustment mode on single
steps.
Click on a sequencer value and spread it across the sequencer using the Shift key in all
other sequencers. In the “Active” Sequencer, click a cell with the Shift key enabled, to
activate the whole row.
Alt
In the Trigger/Animationsequencer: Increase/decrease all values.
Strg(Ctrl)
Hold Strg/Ctrl to step through the available sequencer values.
In the Trigger/Animation sequencer Shift enables the line drawing tool.
In the “Active” sequencer, Ctrl will activate a whole column.
Rightclick
Rightclick a sequencer entry to delete it, drag the rightclick to delete more entries.
Mousewheel
Use the mousewheel to step through the available sequencer values.
BACK
TO TABLE OF CONTENT
15
Page 16
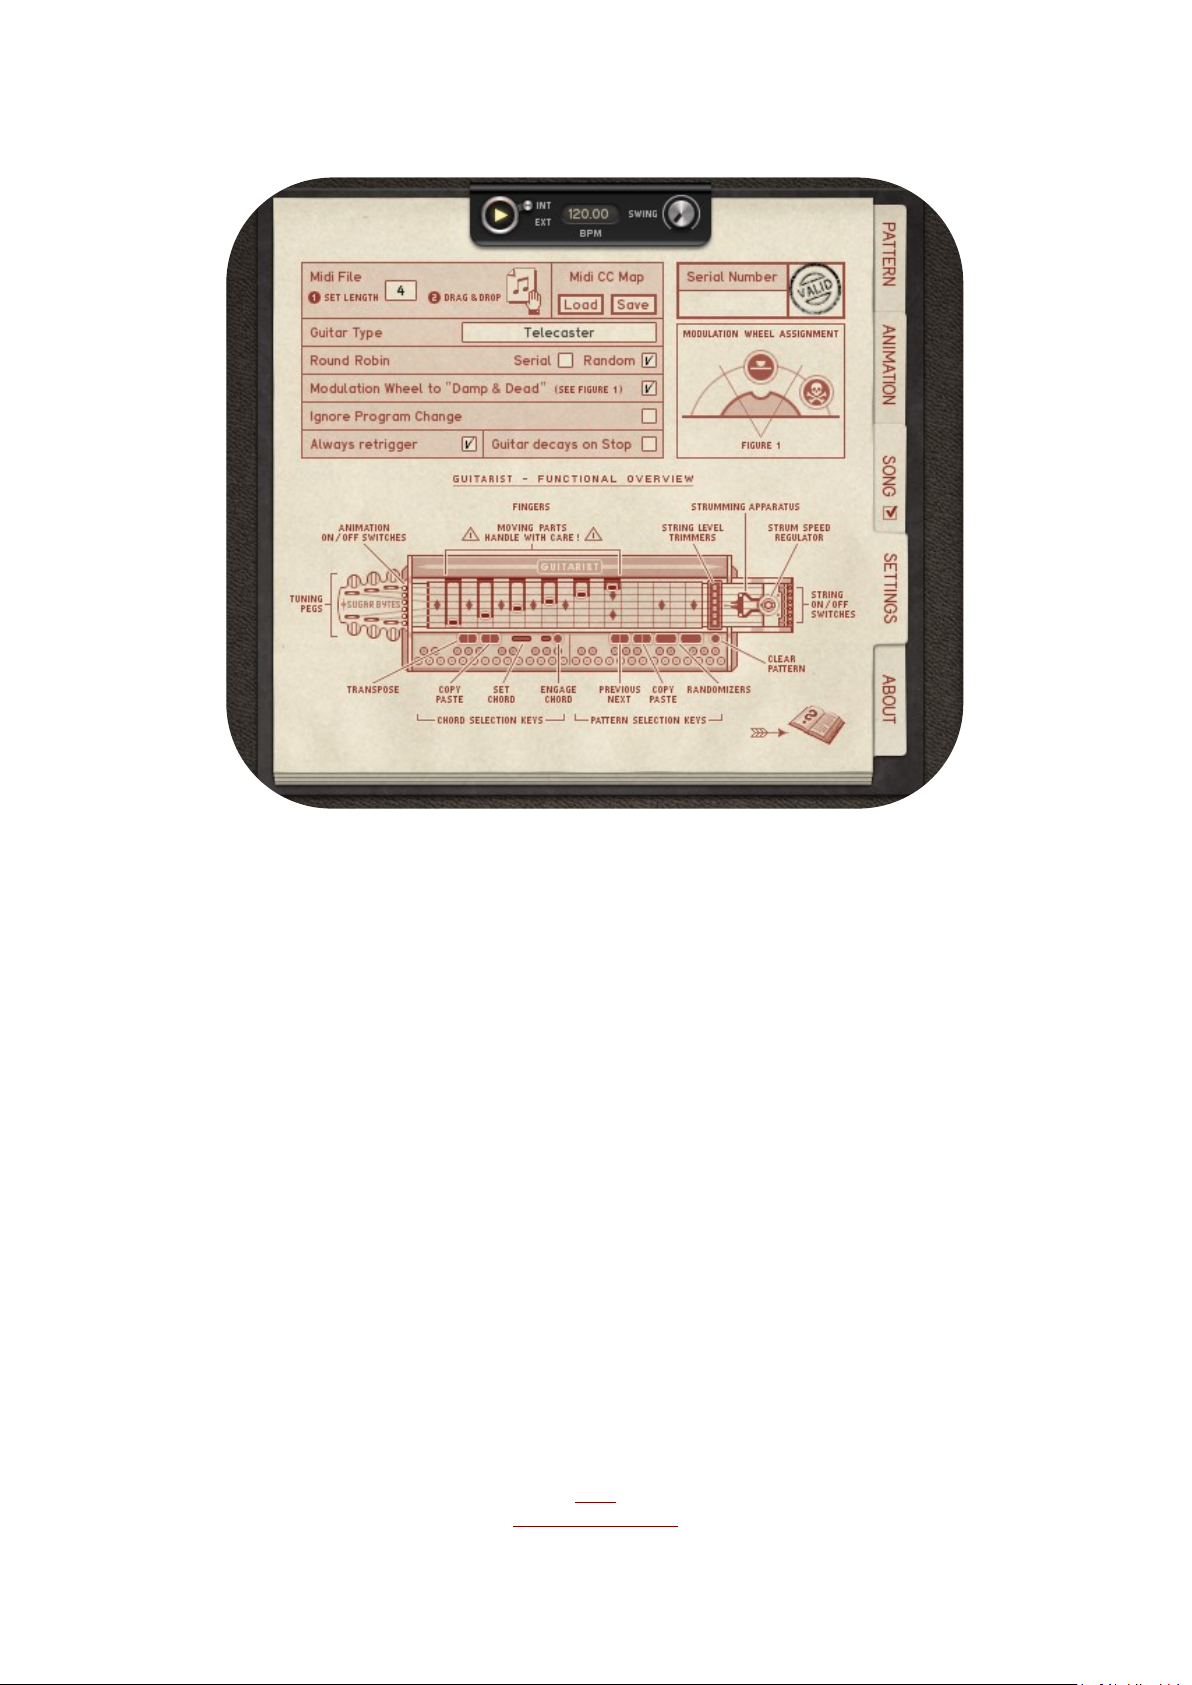
The Settings Page
Here you make important settings to control the behavior of the Guitarist.
Also the current pattern can be exported as a MIDI file from here.
All functions explained:
Guitar
Here the guitar is loaded. You can choose from three Guitars, each one comes in two
versions. A Duesenberg Starplayer Special, a Fender Stratocaster and a Fender
Telecaster.
The guitars have been recorded with lots of effort and care, more than 2200 samples are
used for each guitar.
Note: If the Guitar Type shows empty, no Guitar is loaded so please download and install
the Guitarist library. It should be installed into the application folder of Guitarist.
After that please check whether a guitar model is choosen.
Round Robin
Each guitar sample exists several times, with each trigger a different sample is played.
Round Robin Samples can be chosen randomly or serial. This supports the natural feel of
the guitar sound. The samples can be chosen in series: that way the riff will always sound
the same. If the serial mode is off, the samples will be chosen randomly.
Random Round Robin is most authentic because the sample sequence is never repeated.
BACK
TO TABLE OF CONTENT
16
Page 17

Modulation Wheel to „Damp & Dead“
While playing manually, it can be cool to insert Dead and damped notes to change the
groove while it plays, without touching the mouse. If this setting is activated, you can use
your modulation wheel for that task. Turn it half up to play all notes damped and turn it
fully up to play all notes dead.
Ignore Program Change
Avoid program changes with this setting. If the setting is off, you can change presets
with MIDI program changes.
MIDI File
The current pattern can be exported as a MIDI file to trigger different sound generators.
You can export 1, 2, 3, 4, 8 or 16 bars. Just set the desired export length, then drag the
icon onto a MIDI track in your sequencer. Drag the icon on your desktop or folder to save
the MIDI file on your computer.
Always Retrigger
When a pattern is changed by a MIDI note, the sequencer does not restart when the
notes have no gaps in between (Legato). The “Always Retrigger” option makes the
sequencer restart with each incoming note, also when notes are playing legato.
Keep Sound on Stop
When the sequencer is stopped by releasing the MIDI note or using the Play button, the
Guitarist will still sound until all strings are faded out. That might be a problem, for
example when the last chord of the verse overdubs the first chord of the chorus or when
one Guitarist instance is stopped while another one is started. In order to avoid that, the
“keep sound on stop” option will stop the guitar signal when the sequencer is stopped.
BACK
TO TABLE OF CONTENT
17
Page 18
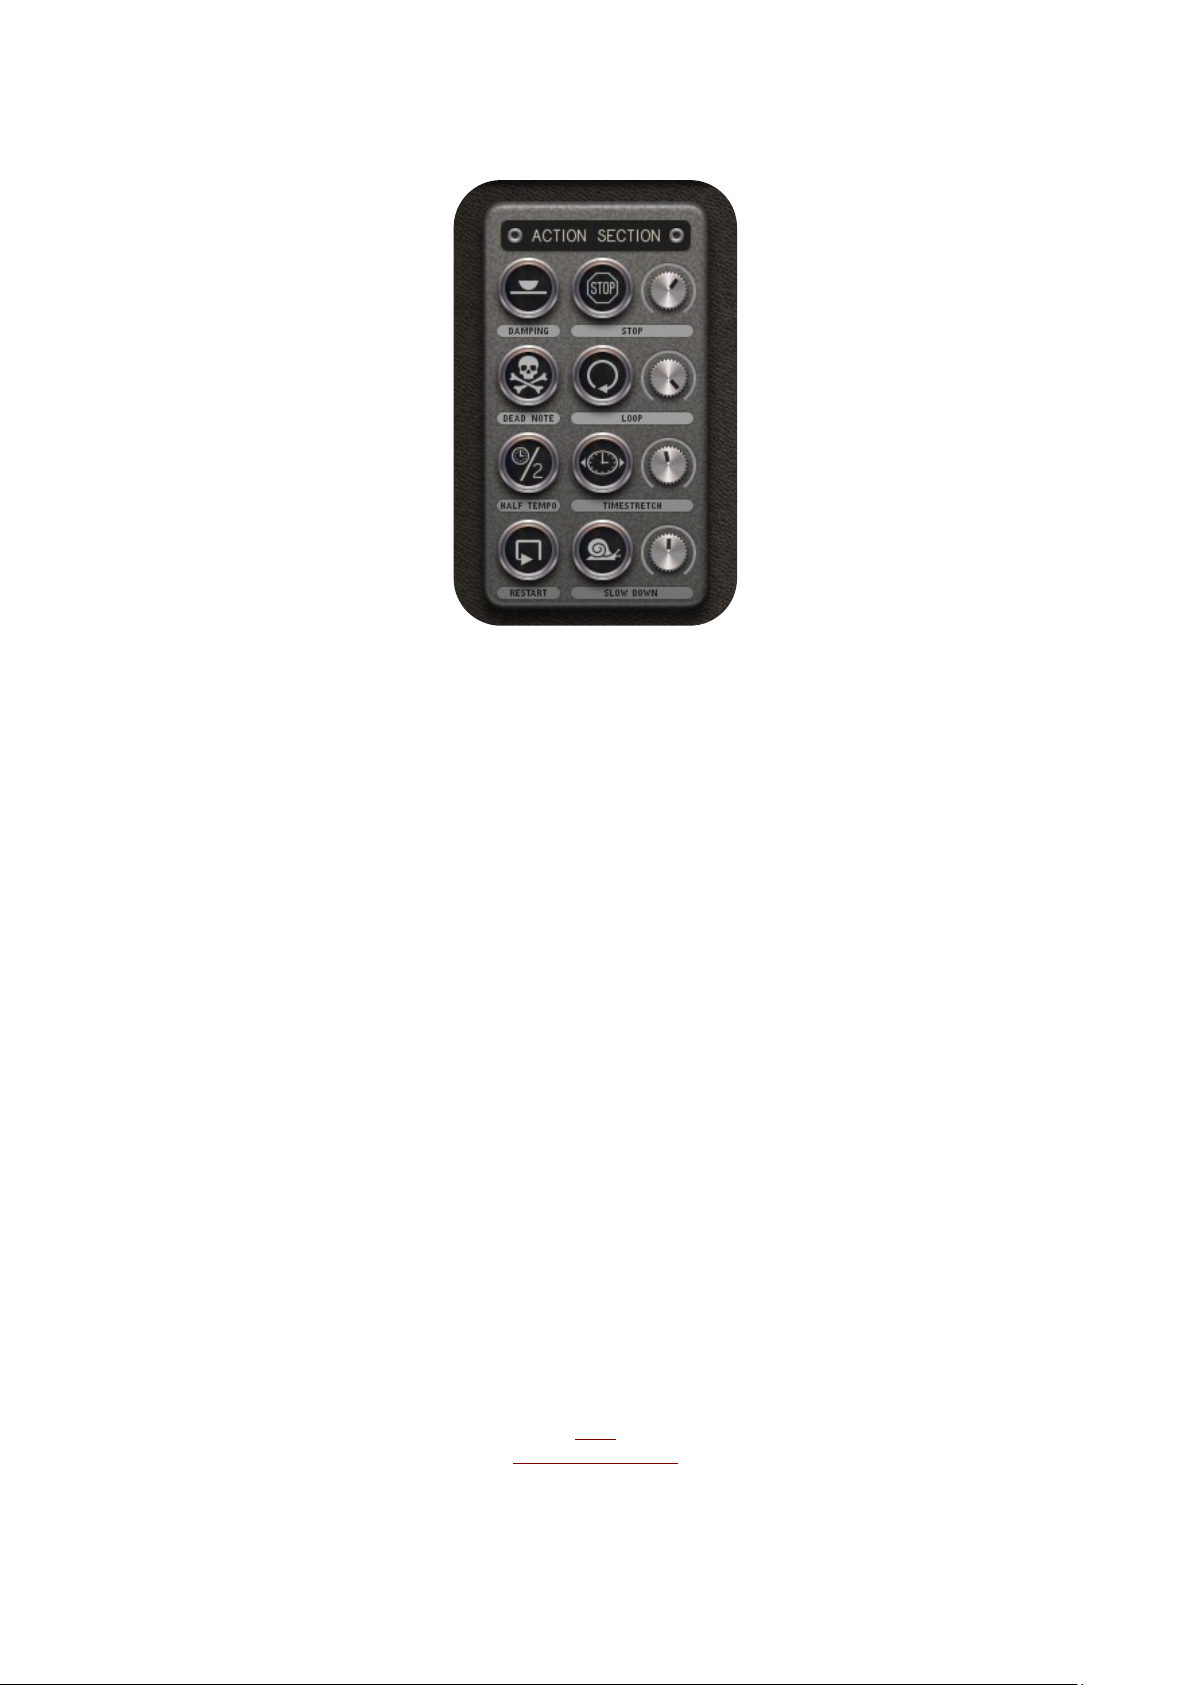
The Action Section
Here you can make immediate tweaks to the running pattern without changing it.
With just some buttons you can change playing styles, apply effects like looper or
timestretcher or play with the clock by restarting it or slowing it down.
Here´s what it really does exactly:
Damped Play all notes damped style.
Dead Play all notes dead style.
Halftempo Plays the sequence at half speed.
Restart Plays the sequence from beginning. After the button has been released,
sequencers will go back to their original position.
Stop Stop playing with a last strum. The strum speed can be set with the
attached knob.
Loop Audio looper for party time. Set the loop size with the attached knob.
Timestretch Press this one for the good old stretching effect. The knob sets the stretch
amount.
Slowdown While the button is pressed, the sequencers become slower and slower.
Slew rate is set with the attached knob.
BACK
TO TABLE OF CONTENT
18
Page 19
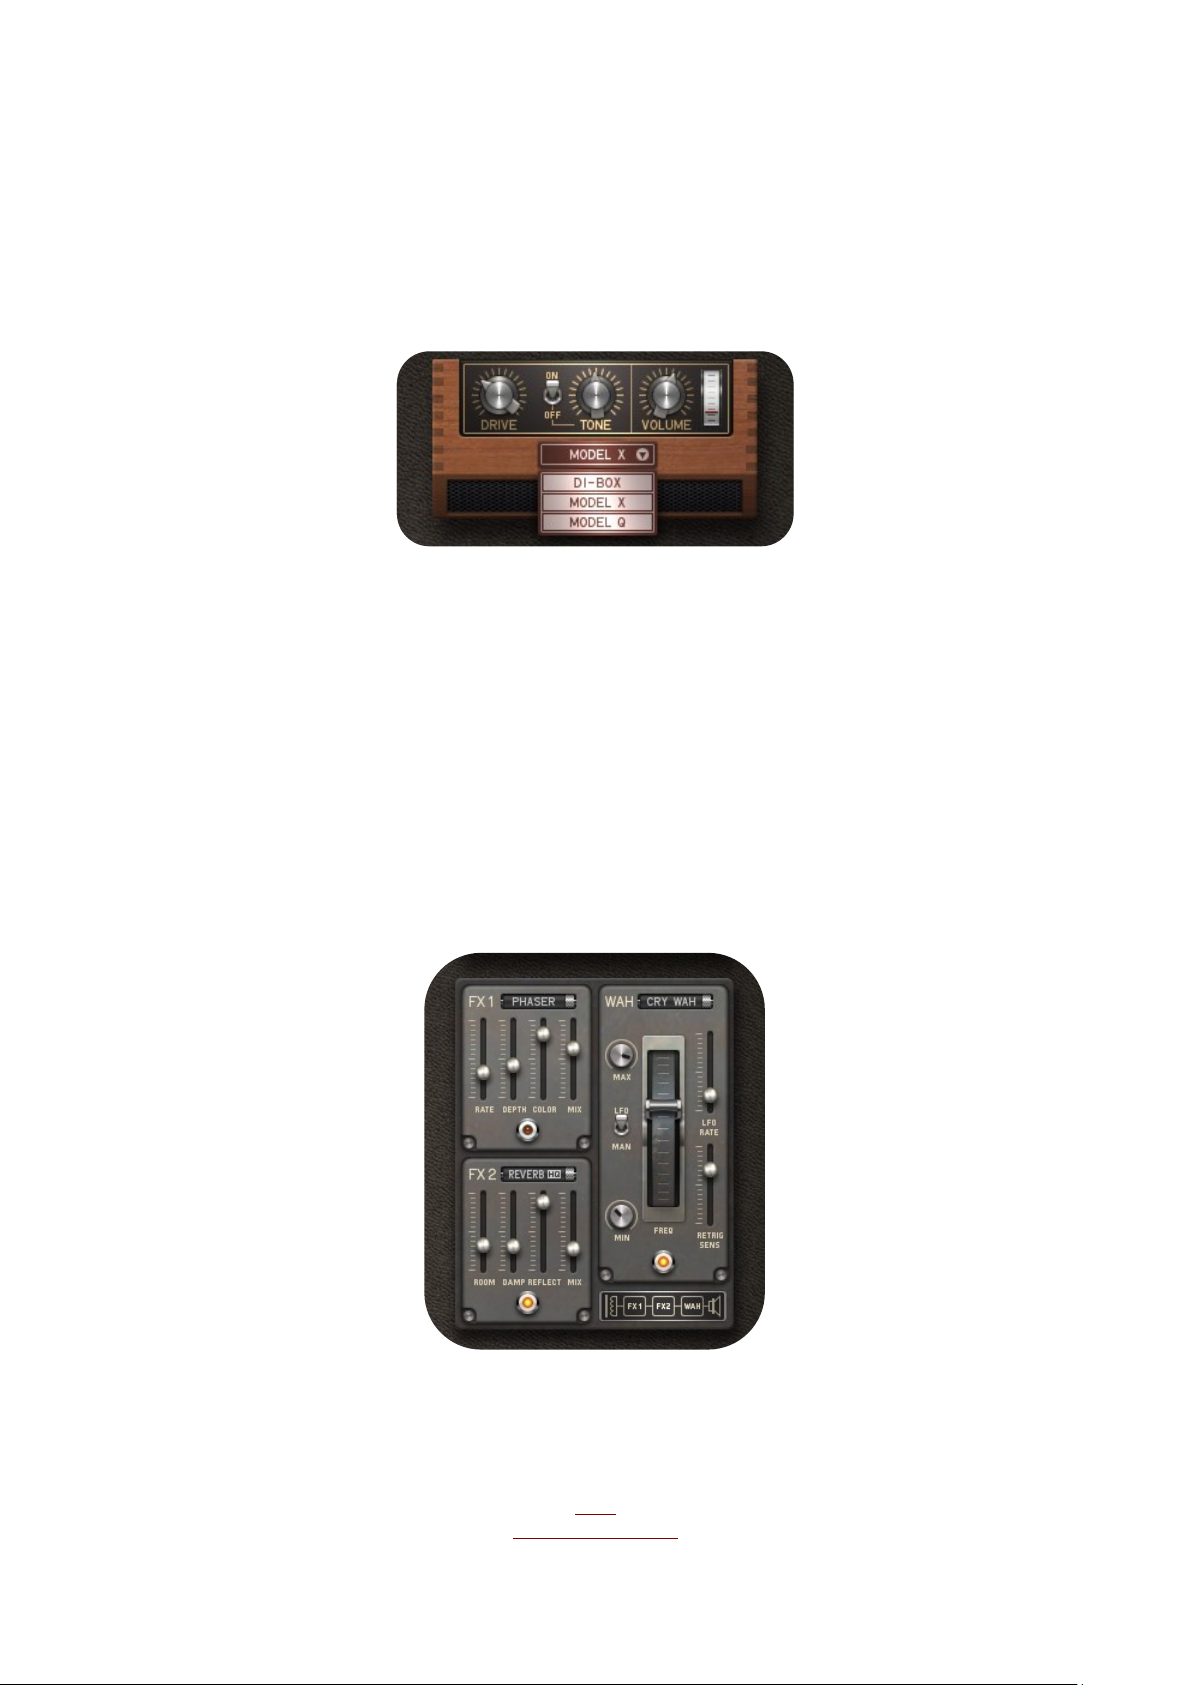
The Sound Section
Here you find the amps, effects and wah pedal. The Sound Section has it´s own preset
system, so you can find your favorite tone easily.
The Amp
Guitarist comes with two amp simulations. These have been modelled with much love
and should be ready to provide the right sound for any situation.
MODEL X emulates a classical tube amp and comes with a tone control to make the
sound rather dark or rather bright.
MODEL Q comes with a 3way equalizer which covers lots of tones, from warm and clear
Nashville sounds to earbleeding metal tones.
DI-BOX is a direct way to the output, bypassing the amp section. That way you can use
your own reamping or amp modeling solutions.
The Effects
FX 1 provides classical modulation and dynamic effects.
FX 2 offers Delays, Reverbs and the Reverse effect which is great for spacy, wide and
weird sounds.
BACK
TO TABLE OF CONTENT
19
Page 20

The Wahwah Pedal provides the 3 modes:
Cry Wah Emulation of the legendary wah pedal.
Talk Wah features the vowel effect for great humanoid sounds. Volume: Classical volume
pedal, good for tremolo effects when the LFO is used.
The Min and Max controls determines the working range of the pedal.
You can also set a higher min than max value to invert the working range.
The internal LFO is a good tool for pedal movements. Use the Retrigger Sensitivity control
to restart the LFO with the guitar audio signal.
Use the LFO/Man button to move the pedal by the LFO or manually (MIDI, Host
automation).
BACK
TO TABLE OF CONTENT
20
Page 21
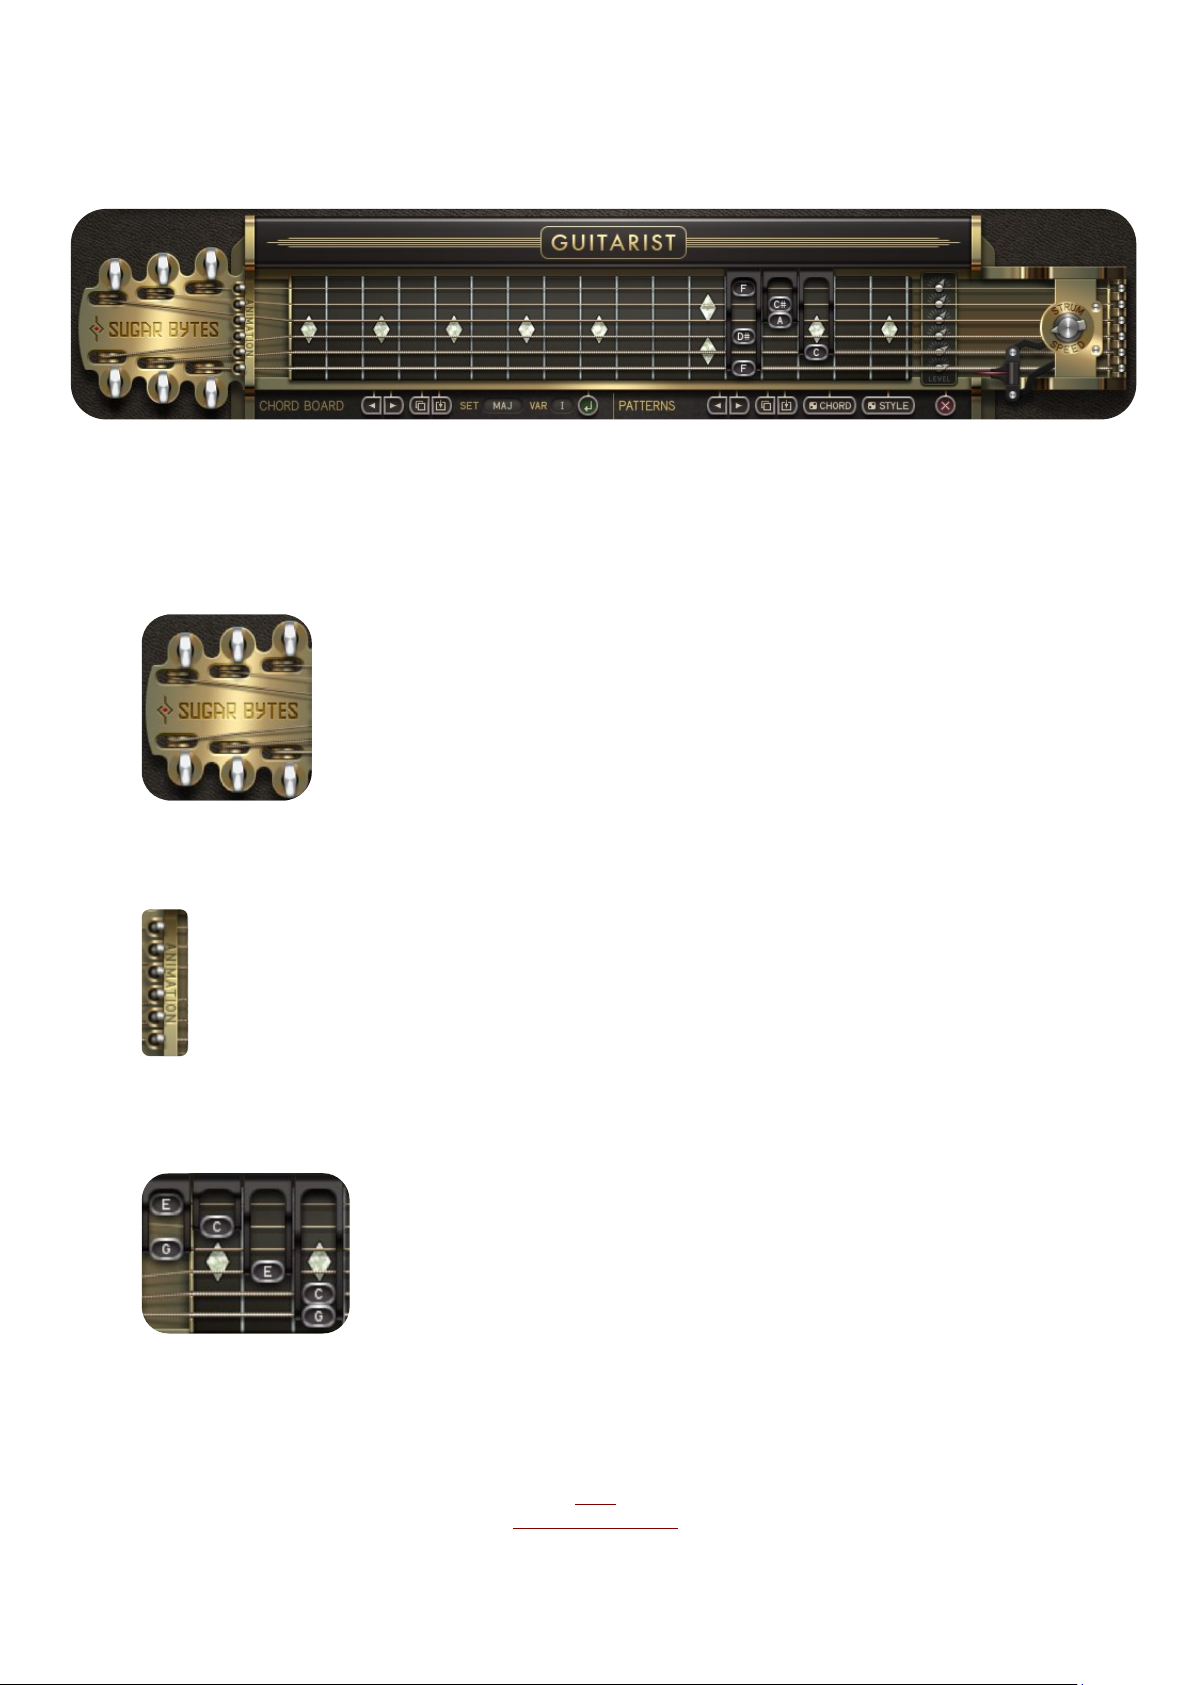
The Guitar
Headplate
Like with a real guitar, here you can affect the string tuning.
All strings are tuned at 440Hz, but with these controls you can
realize different tunings. The tuning knobs have a range of +/one semitone. Double click the tuning knob to set it back to
zero.
Animation
If fingers are moving around also when no chord is changed,
Animations might be at work.
In that case, disable Animations here for editing purposes.
This control is not saved with preset or song file.
Fingers
You have one finger available for each string, that way you
build up your chords. Left click a finger to drag it to the desired
note.
Right click a finger to deactivate or reactivate it. Each finger
shows its current note name making it easy to identify and
build up chords.
If the Finger is deactivated, it just shows a „-“. Then the string
will not be triggered.
A masterpiece of virtual mechanics. Here you watch and create your chords, set string
levels or just take strings off, detune them and set the overall strum speed.
Let’s go from left to right.
TO TABLE OF CONTENT
BACK
21
Page 22
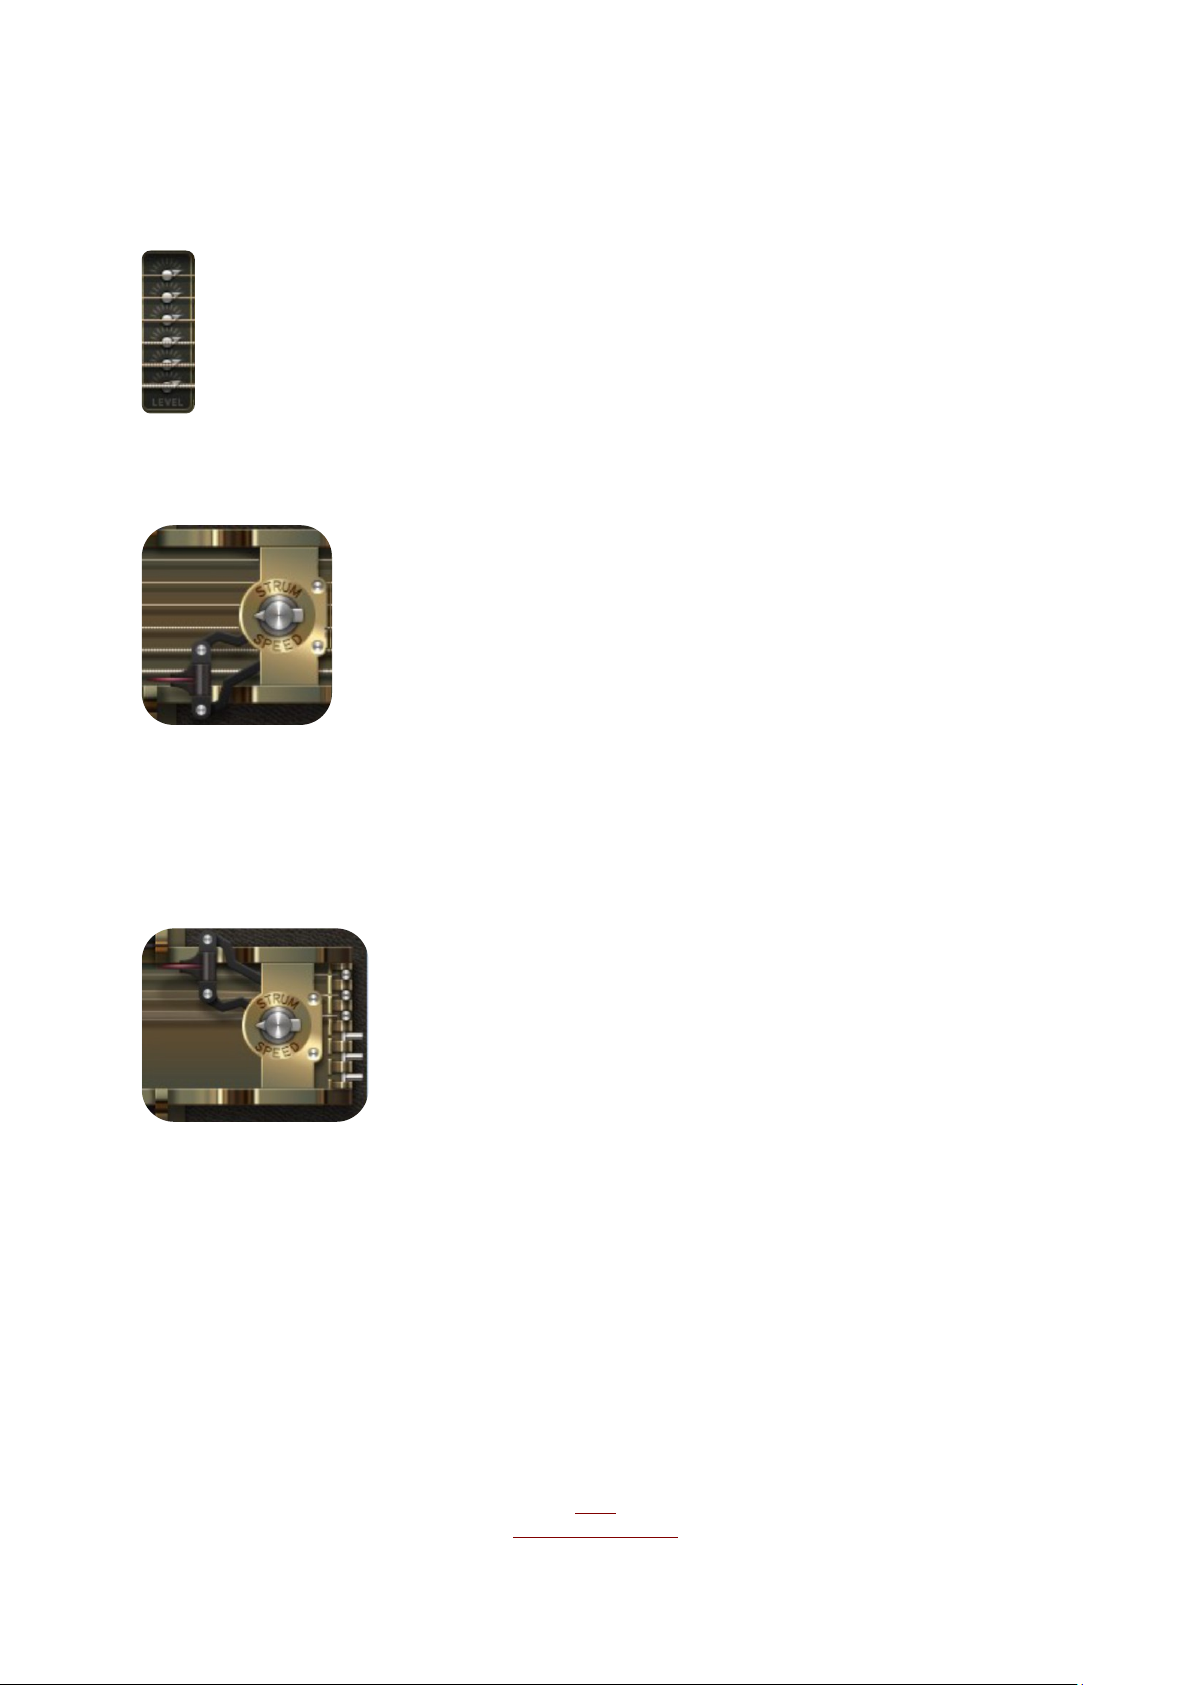
Pickup
On the pickup graphic you have a level control for each
string. Here you can set an important part of the sound
character.
Just set the string levels to where you like them to be.
These are saved with the Chord Preset file.
Pickup
The plectrum graphic is not only for entertainment.
Here you can see if the guitar engine is working and you can trigger
strings with the mouse by clicking on it. The graphic runs at original
strumming speed and so might exceed the graphic update rate of
your computer. This differs from host to host. Strum Speed
determines how fast the hand strums over the strings.
The Strum Sequencer offers three slower speeds, additionally an
internal humanizing algorithm alternates the strum speed for more
human feel. Use this control to adapt the overall strum speed to
your needs.
Strings/Holder
The plectrum graphic is not only for entertainment.
Here you can see if the guitar engine is working and you can
trigger strings with the mouse by clicking on it. The graphic runs
at original strumming speed and so might exceed the graphic
update rate of your computer. This differs from host to host.
Strum Speed determines how fast the hand strums over the
strings. The Strum Sequencer offers three slower speeds,
additionally an internal humanizing algorithm alternates the strum
speed for more human feel. Use this control to adapt the overall
strum speed to your needs.
TO TABLE OF CONTENT
BACK
22
Page 23
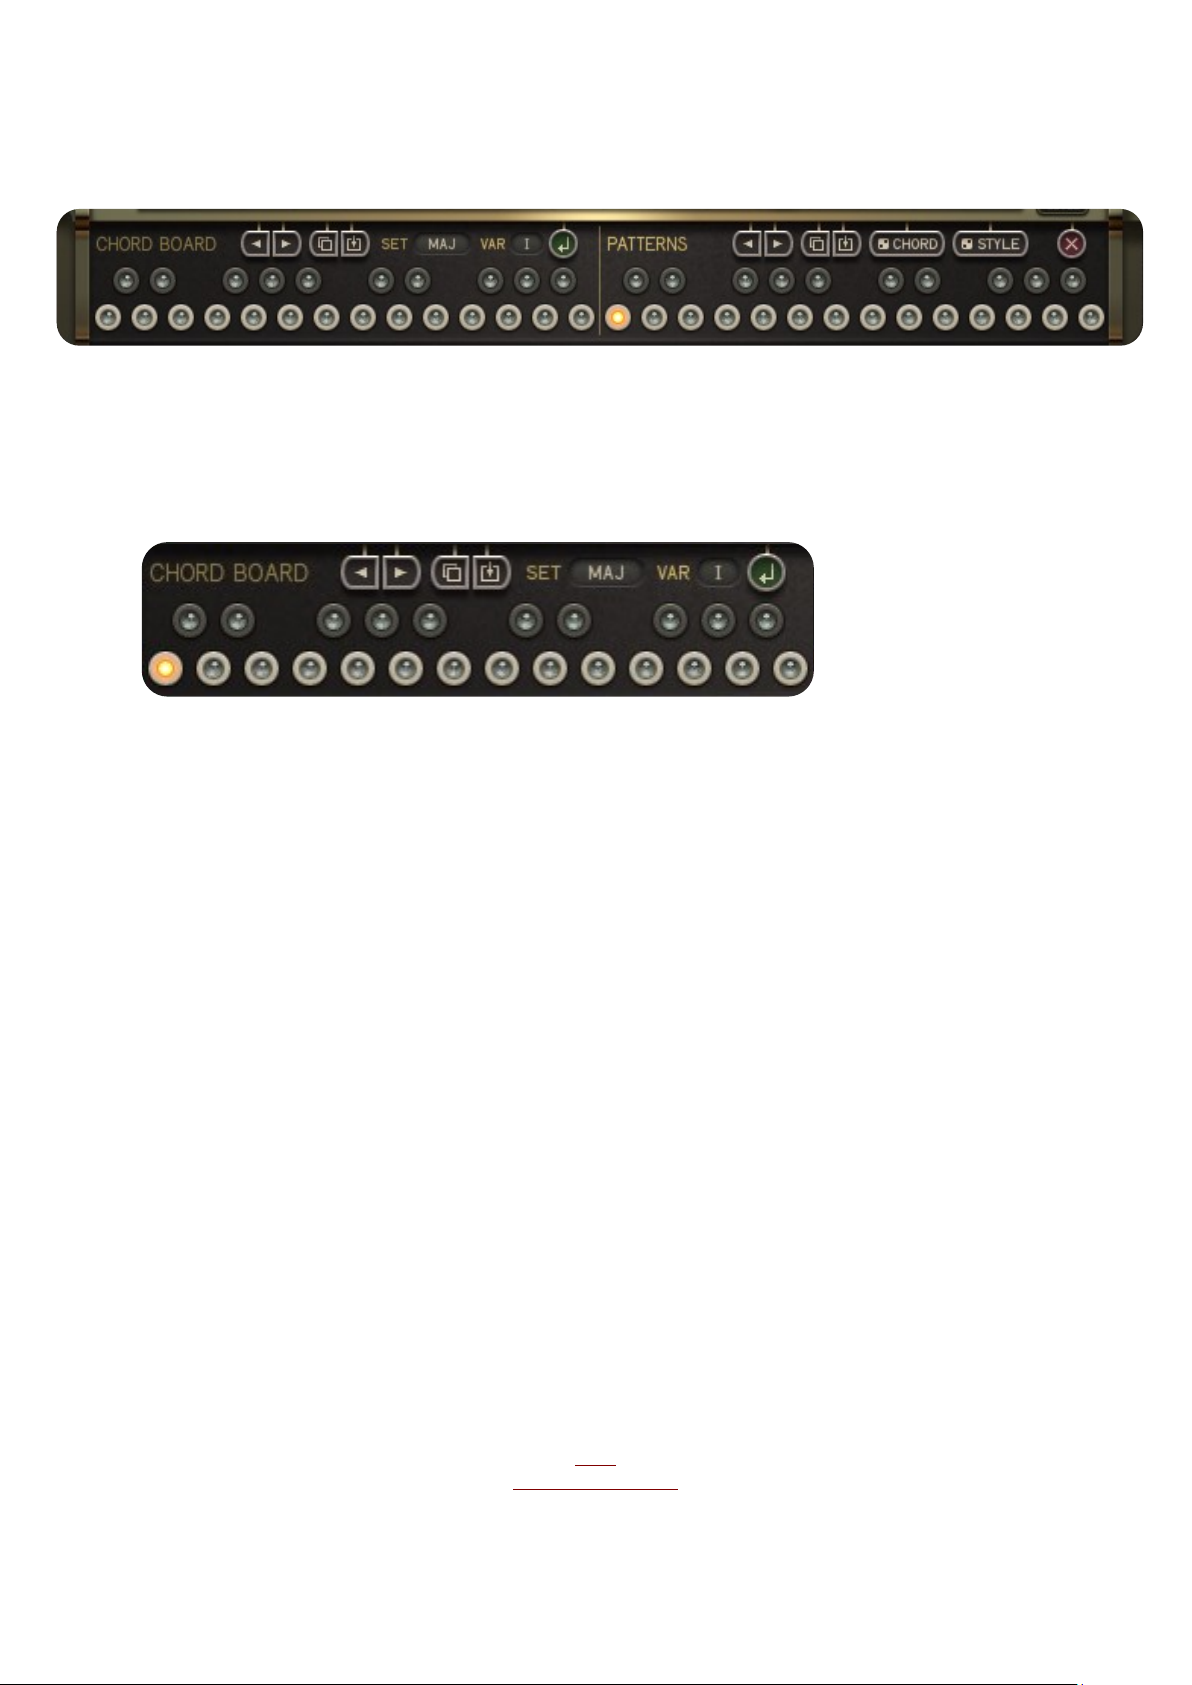
The Keyboard
The keyboard buttons on the bottom of the instrument is an important part for live playing
and the editing of chords and patterns. Leftclick a key to select a chord or pattern.
Rightclick a key to lock it. Rightclick it again to unlock it. Let’s go from left to right.
Chord Board
24 user chords can be saved on the Chord Board. You can also apply factory chords,
just choose the chord with the “Set” and “Variation” Menu. Per default we assigned major
chords to the first octave and minor chords to the second octave of the chord board.
In the chord presets list you will find alternative assignments and you can also create
your own chords.
The first key of the Chord Board responds to note C1.
Each chord on the Chord Board has its own Animation sequence per pattern. That way
you can create finger movements while the chord is playing.
When editing chords, make sure you are using the Lock mode of the chord sequencer
and have disabled the pattern sequencer.
Let’s talk about the controls:
Left/Right buttons
Transpose the chord up or down to make it fit to your song.
Copy/Paste
Use these buttons to copy chords from one chord key to another.
Set
Choose a chord type to assign it to the selected chord key according to it´s note value.
Example: If a D is chosen, and you select chord “Min7”, a D-Minor7 will be applied to the D
key.
BACK
TO TABLE OF CONTENT
23
Page 24
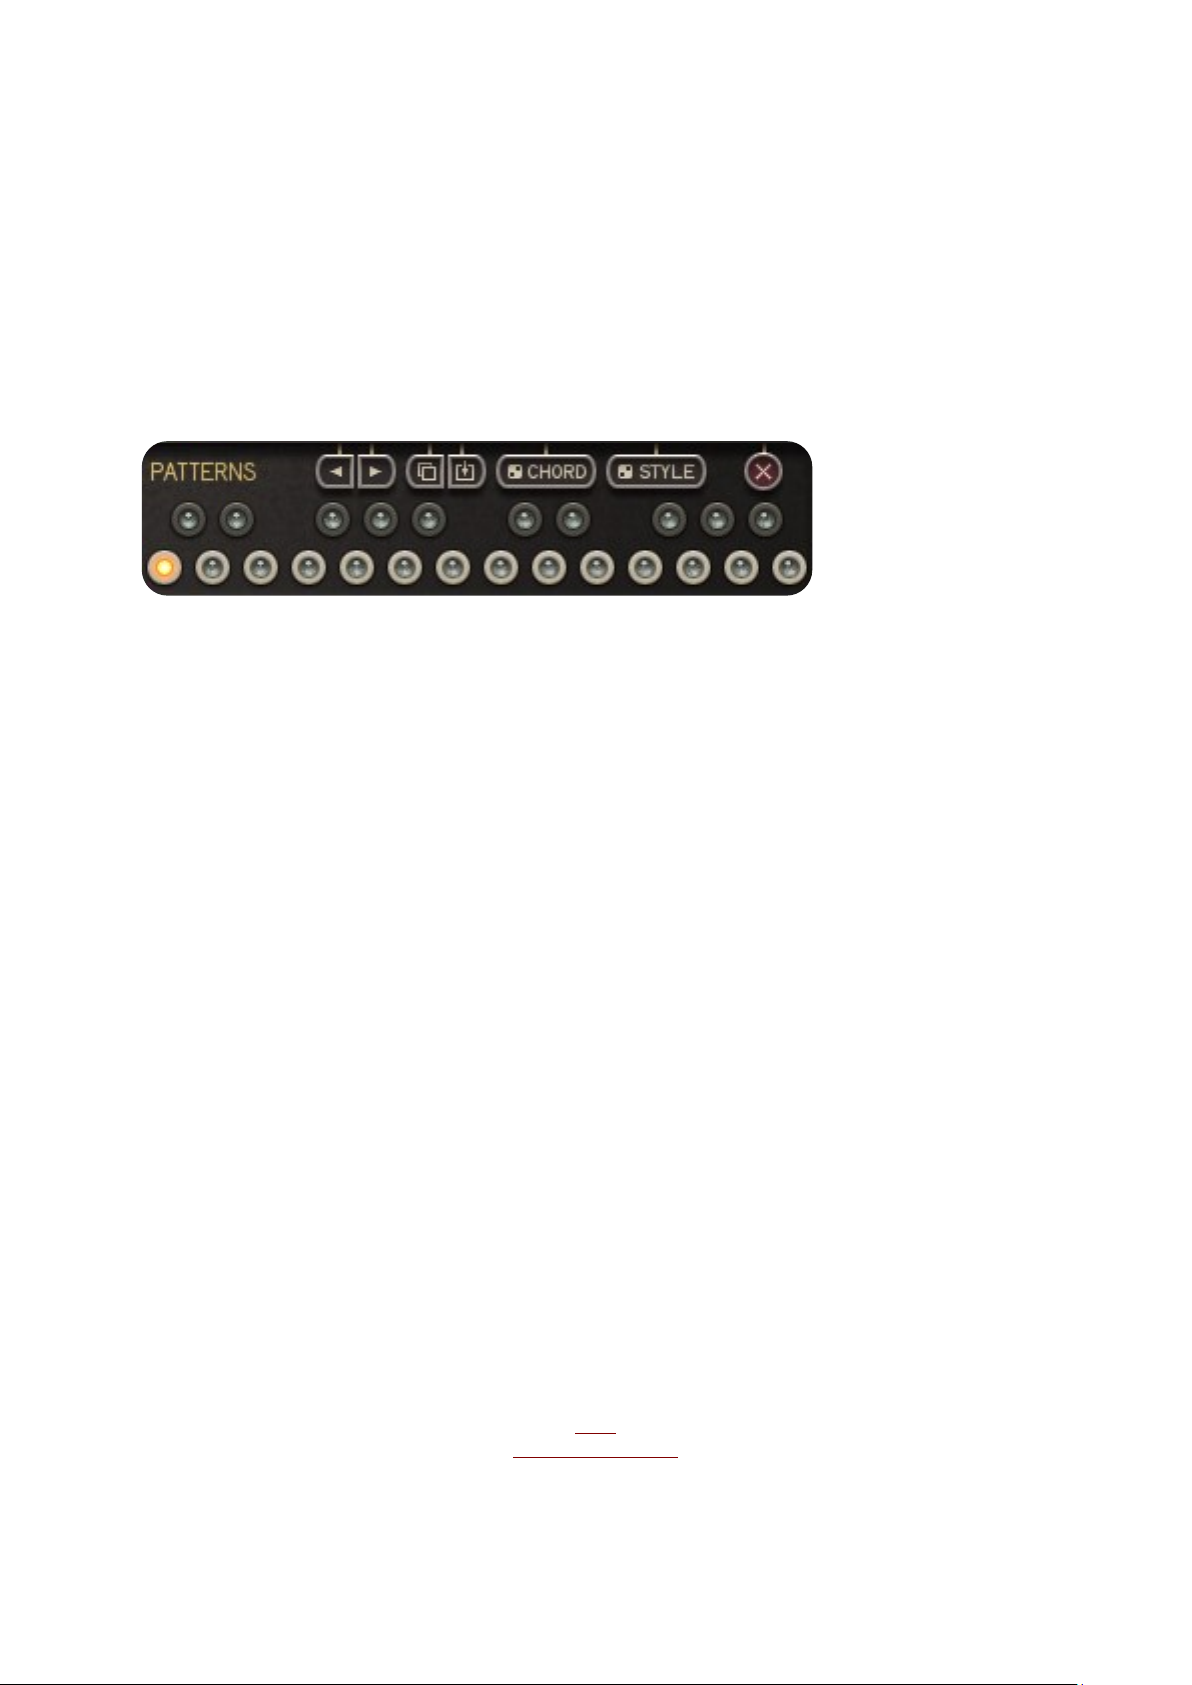
Var
Choose a variation for the factory chord. Var1 will choose a chord at lower position, Var 2
and 3 are higher positions.
Engage
After you chose chord type and variation, hit this button to assign the chord to the
selected key.
Pattern Keys
Here 24 patterns are available.
Click a pattern to select it for editing.
Rightclick a pattern to lock the key, rightclick it again to unlock it.
The first key of the Pattern Keys responds to note C3.
Above the keyboard buttons you will find some useful functions to copy/paste or
alternate patterns.
The buttons from left to right:
Left/Right
Rotate the current pattern to select its playback starting point.
Useful when you find patterns more groovy when it starts at a different step.
Copy/Paste
Copy/Paste patterns between the Pattern Keys to build up variations.
Random Chord
Creates a random chord pattern.
Random Style
Creates a random playing style (Normal, Dead, Damp) sequence.
Very useful to try new grooves.
Clear
Creates an empty pattern.
BACK
TO TABLE OF CONTENT
24
Page 25
Host Integration
Basically there are to 2 ways to work with Guitarist.
The Clock Source determines how the Guitarist engine is started and stopped.
First way is to set the Clock Source to External. Then Guitarist will always run along with
the host clock
If the Clock Source is set to Internal, Guitarist will run if you trigger it via a MIDI note.
Switch to arrangement view and set MIDI Note events to trigger the Chord Board, the
Pattern Keys and all relevant parameter via MIDI learn.
So you can trigger the related key at the exact location you want.
Cubase
Go to the Cubase plugin manager and make a full rescan there.
Ensure that Guitarist.dll (Win) or Guitarist.vst (macOS) file is in Cubase's assigned VST
Plugins folder.
Launch Cubase and open Guitarist from the VST Instrument List.
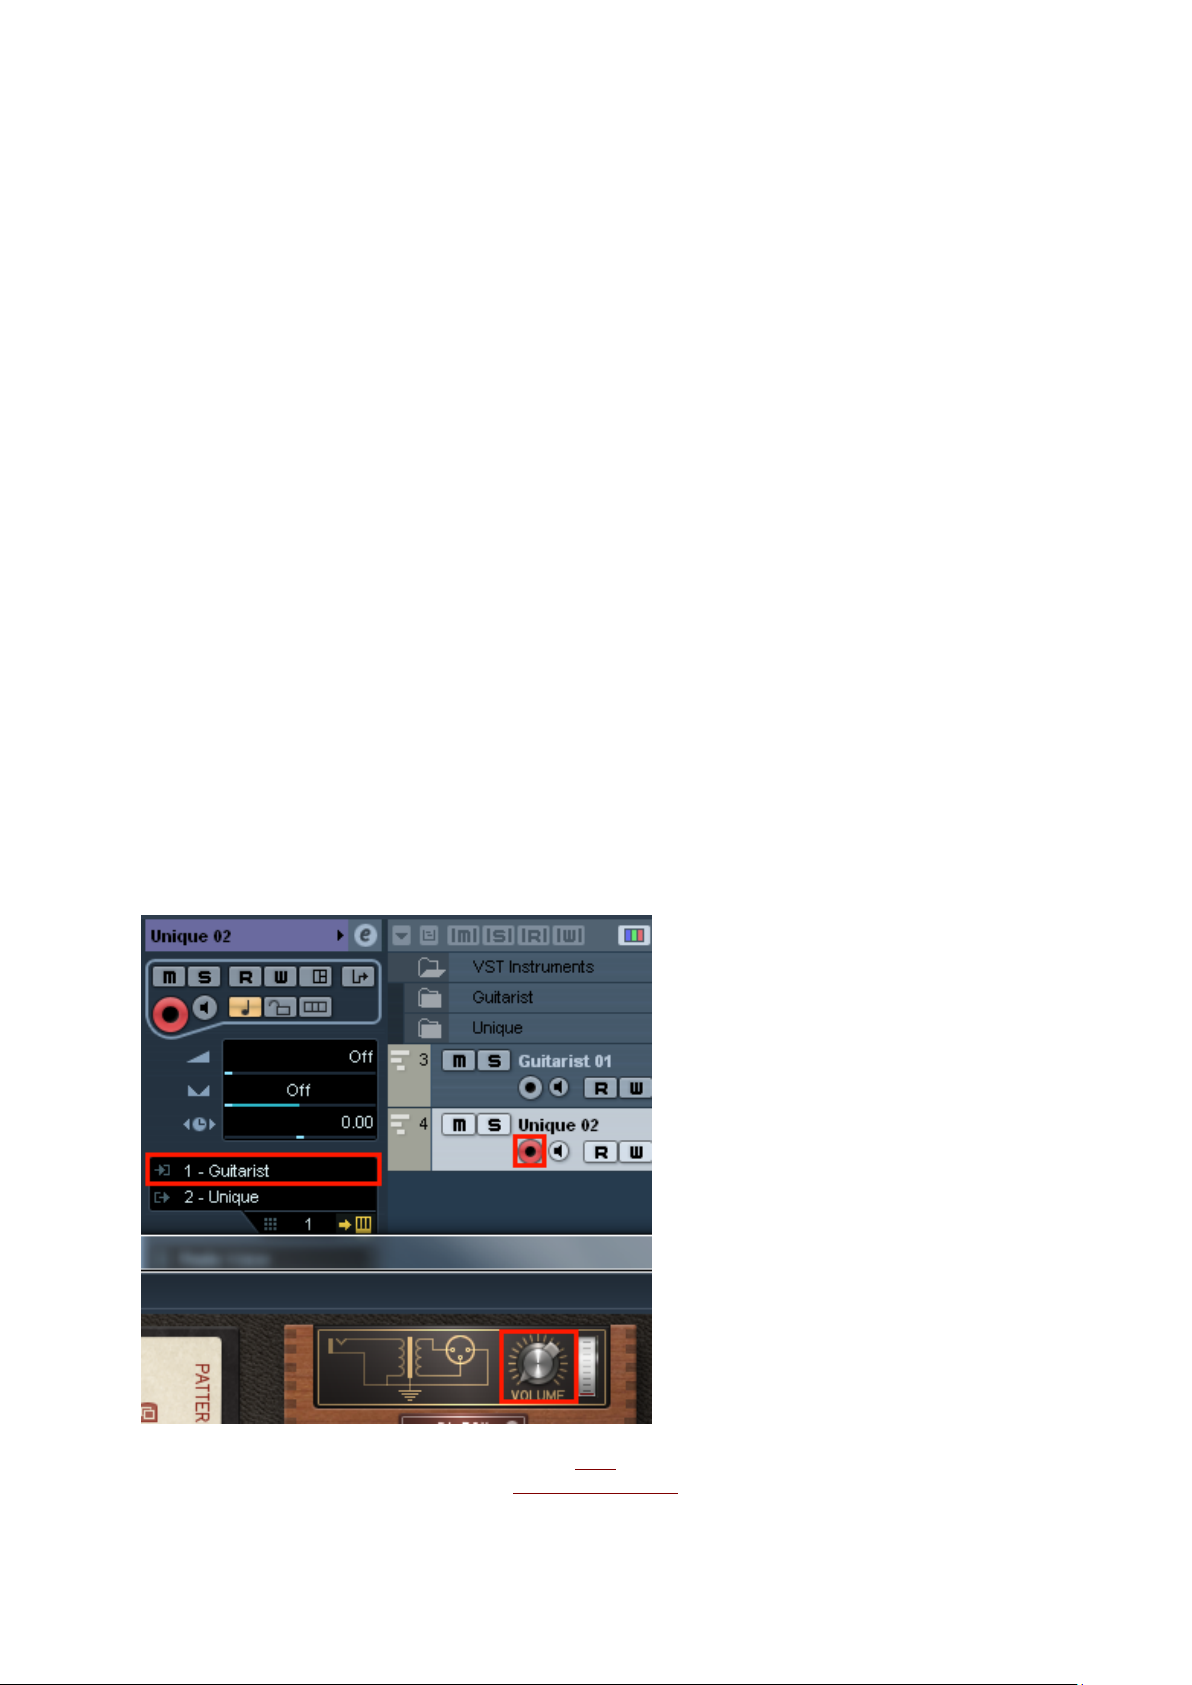
In order to route the MIDI output of Guitarist to other virtual instruments
go to devices->VST Instruments.
Then choose Guitarist and in a further instance the synth you want to control.
Choose Guitarist as MIDI input in the MIDI track for your synth (here Unique)
BACK
TO TABLE OF CONTENT
25
Page 26
Ableton Live
In Live it's highly recommended to use the VST version.
The installer will ask you for the VST plugins folder.
Make sure you set the VST Plugins folder that Live is using.
Please have a look in your VST folder and check whether the “Plugin”.dll is present beside
your other VST's.
At least in Live it can happen that a plugin gets marked as unloadable and will not be
rescanned automatically. You have to force a rescan by unchecking and checking the
'Use custom VST Folder' checkbox in Preferences/File Folder/Plug-In Sources.
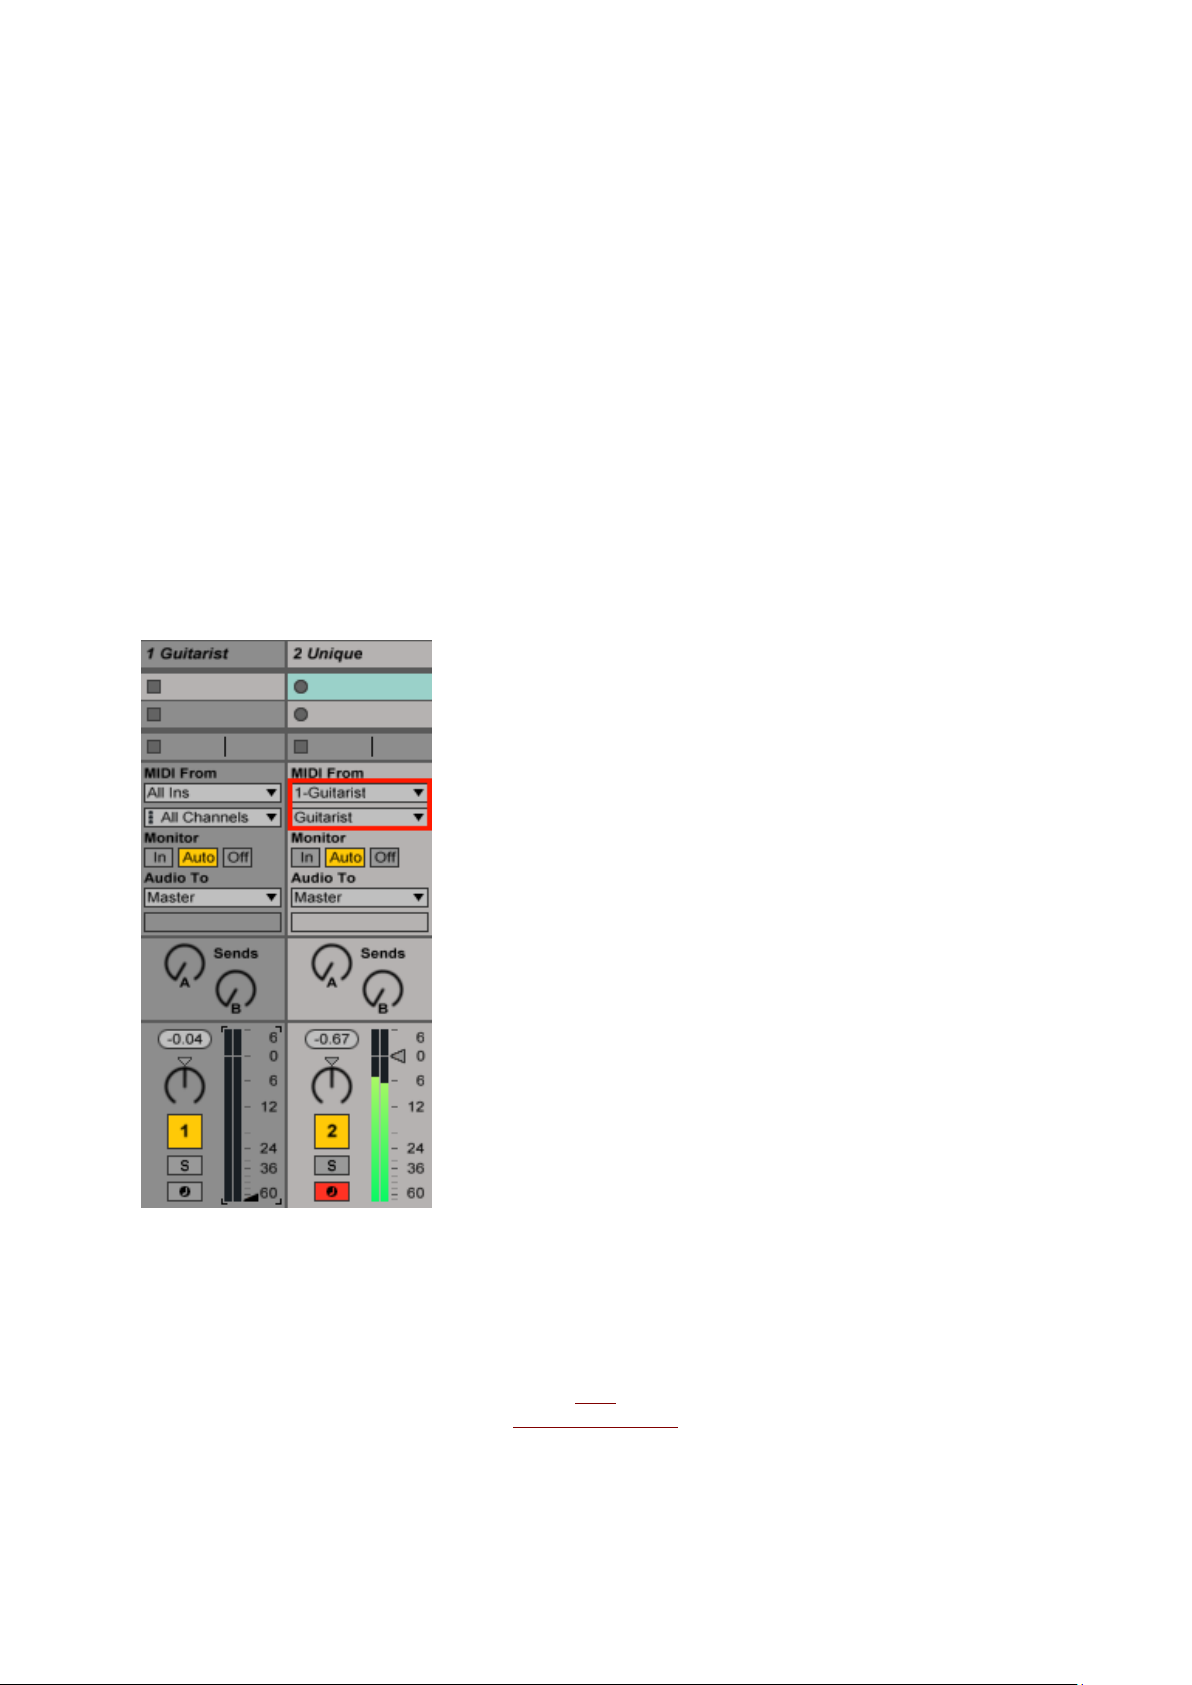
The workaround with Live is quite simple. Your setup should look like this.
In the receiving track of your target instrument make sure to select Guitarist twice as
input.
BACK
TO TABLE OF CONTENT
26
Page 27
ProTools
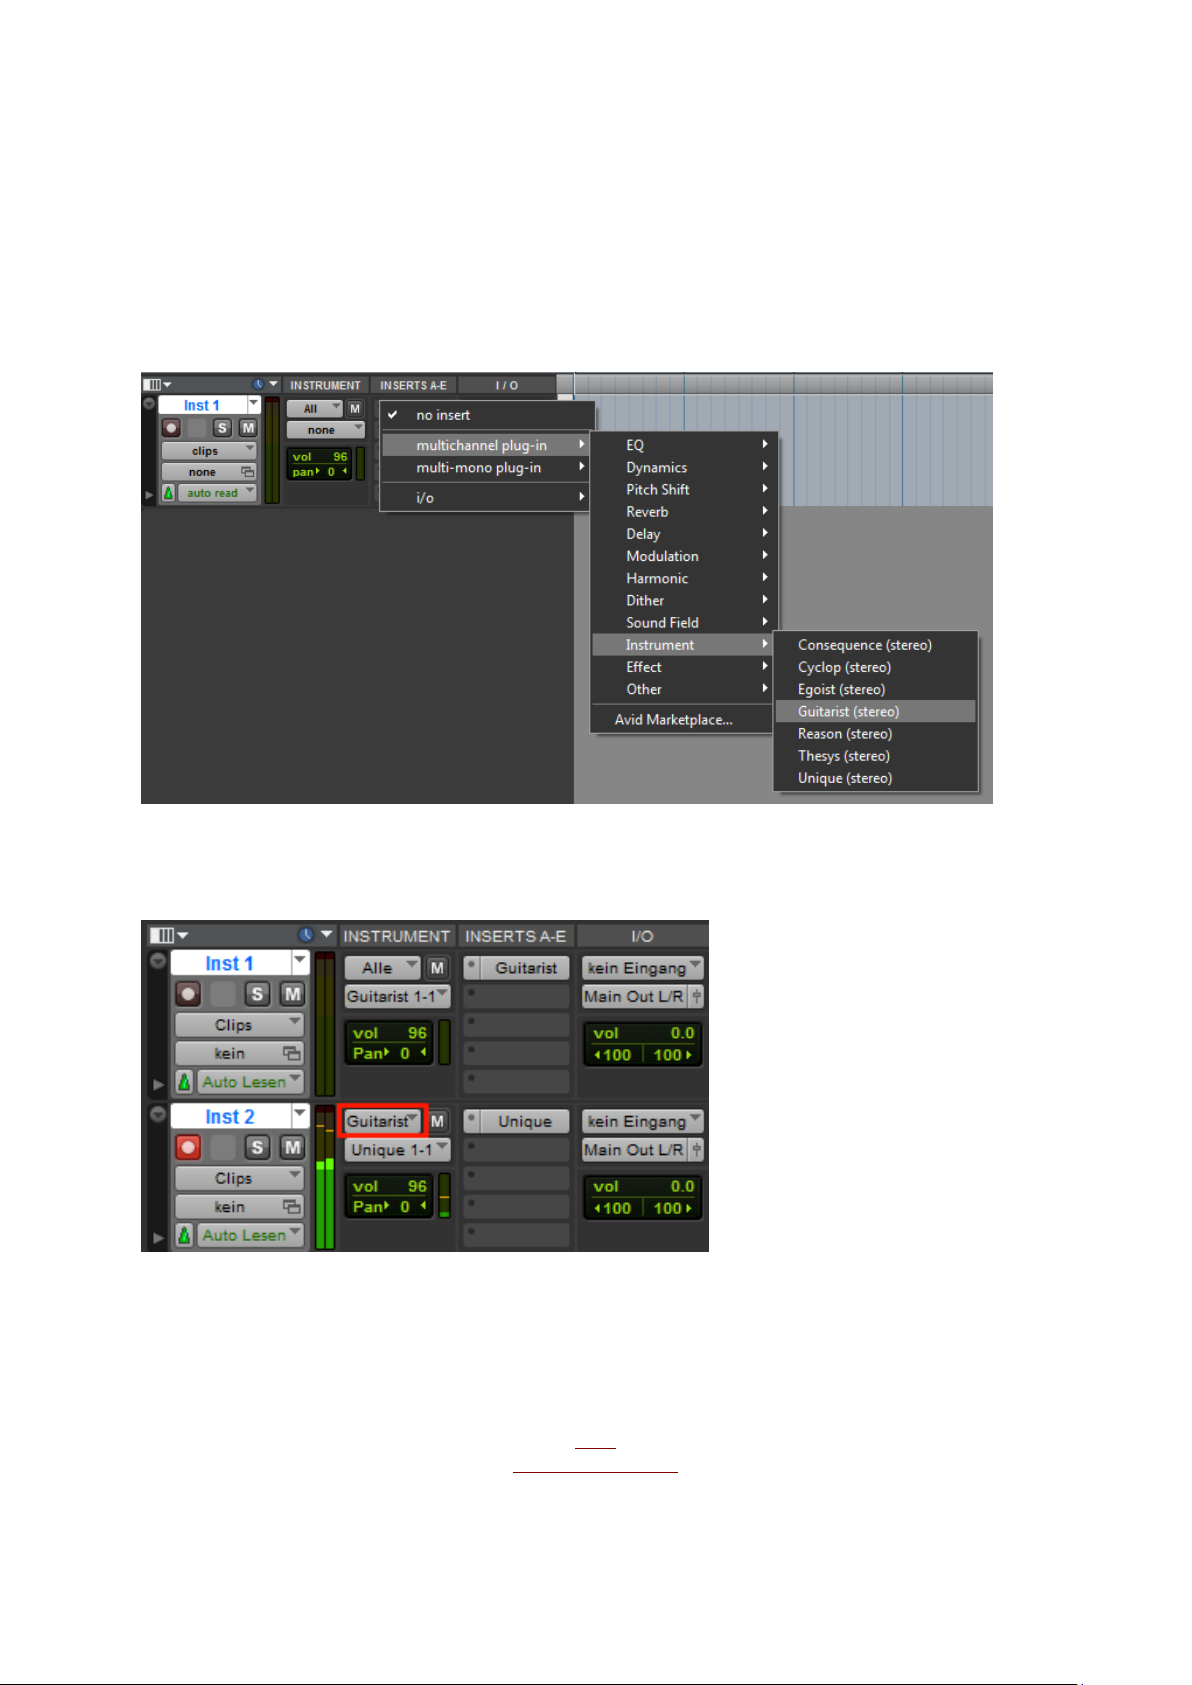
When installing Guitarist, make sure to select the AAX plug-in format.
In order to connect Guitarist to another instrument in Pro Tools, create an Instrument
track and load Guitarist as insert on that track.
Now create the target instrument track and load the target instrument.
Activate Record on the target track and choose Guitarist in the Instrument-Input menu
BACK
TO TABLE OF CONTENT
27
Page 28
Studio One
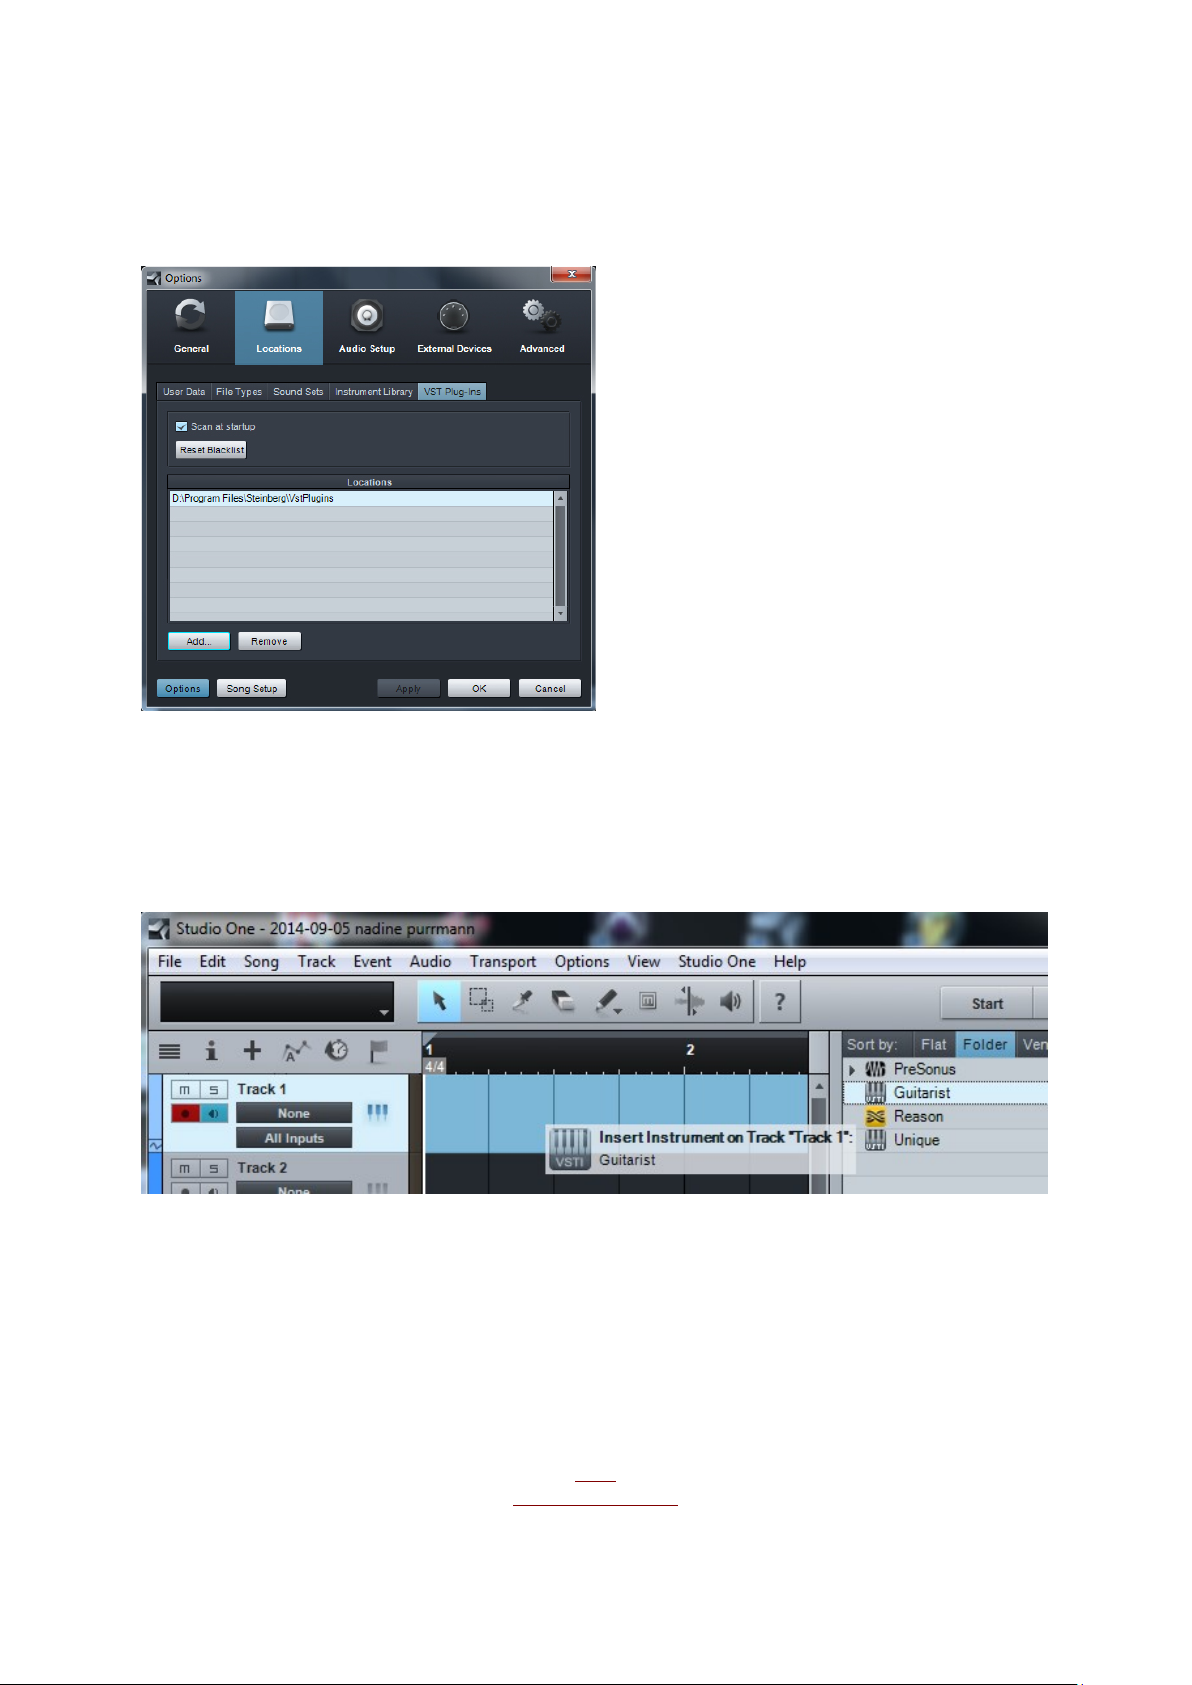
Go to the Studio One menu and choose Options, click on Locations, then VST Plug-Ins.
Click the Add button and select your VST Plugin folder. Press OK then close and re-open
Studio One. If you still don’t see your plugin, go back into that screen and click the “reset
blacklist” button, then close and open Studio One again.
Set up an Instrument Track and drag Guitarist from the Instrument Box to the track.
In order to route the MIDI output of Guitarist to other virtual instruments choose the
synth you want to control in a further Instrument Track. Then set up Guitarist as MIDI
input in the Instrument Track for your synth (here Unique).
BACK
TO TABLE OF CONTENT
28
Page 29
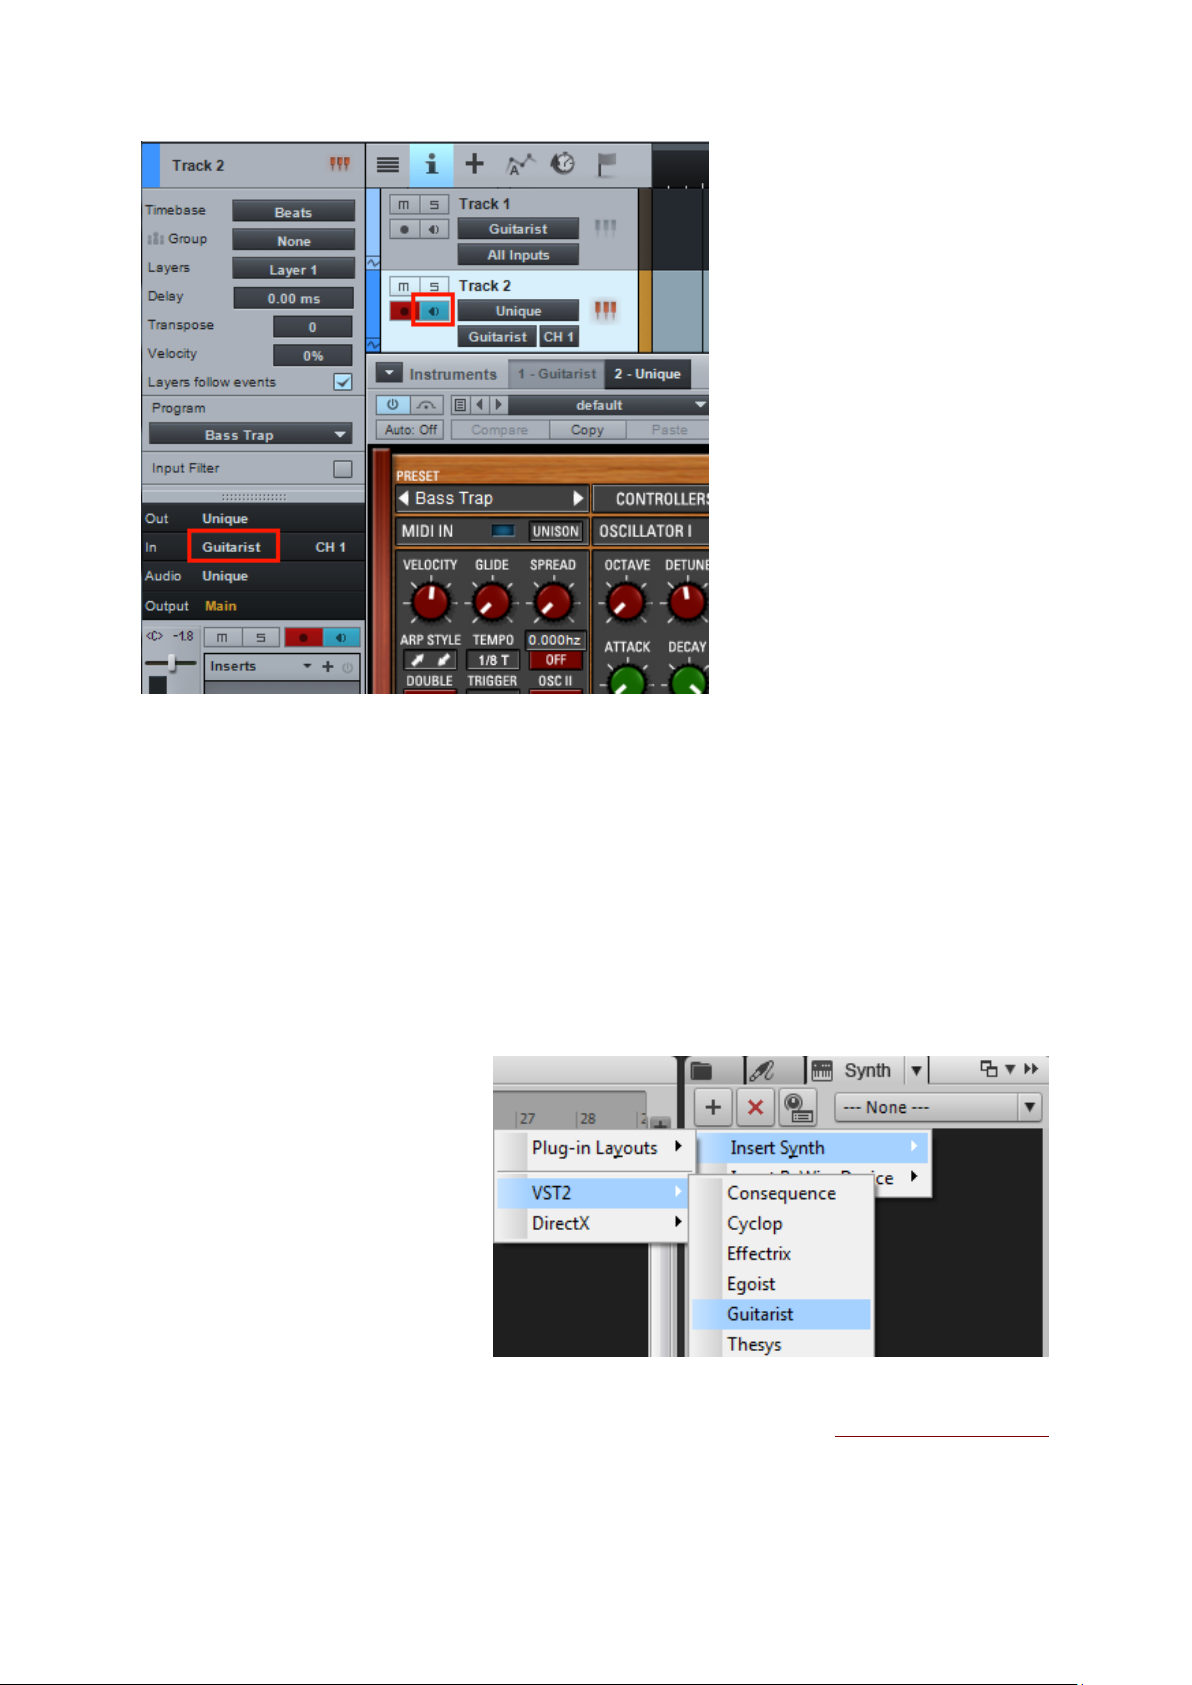
Guitarist is an Instrument,
so you should insert as a Soft
Synth.
BACK TO TABLE OF CONTENT
Sonar
Make sure you set the VST Plug-ins folder that Sonar is using.
Go to Utilities> Cakewalk Plug-in Manager. In the VST configuration section, click on
Options then click Add and select the folder your VST plugin is installed to. Press OK and
click the Scan VST Plug-ins button.
29
Page 30
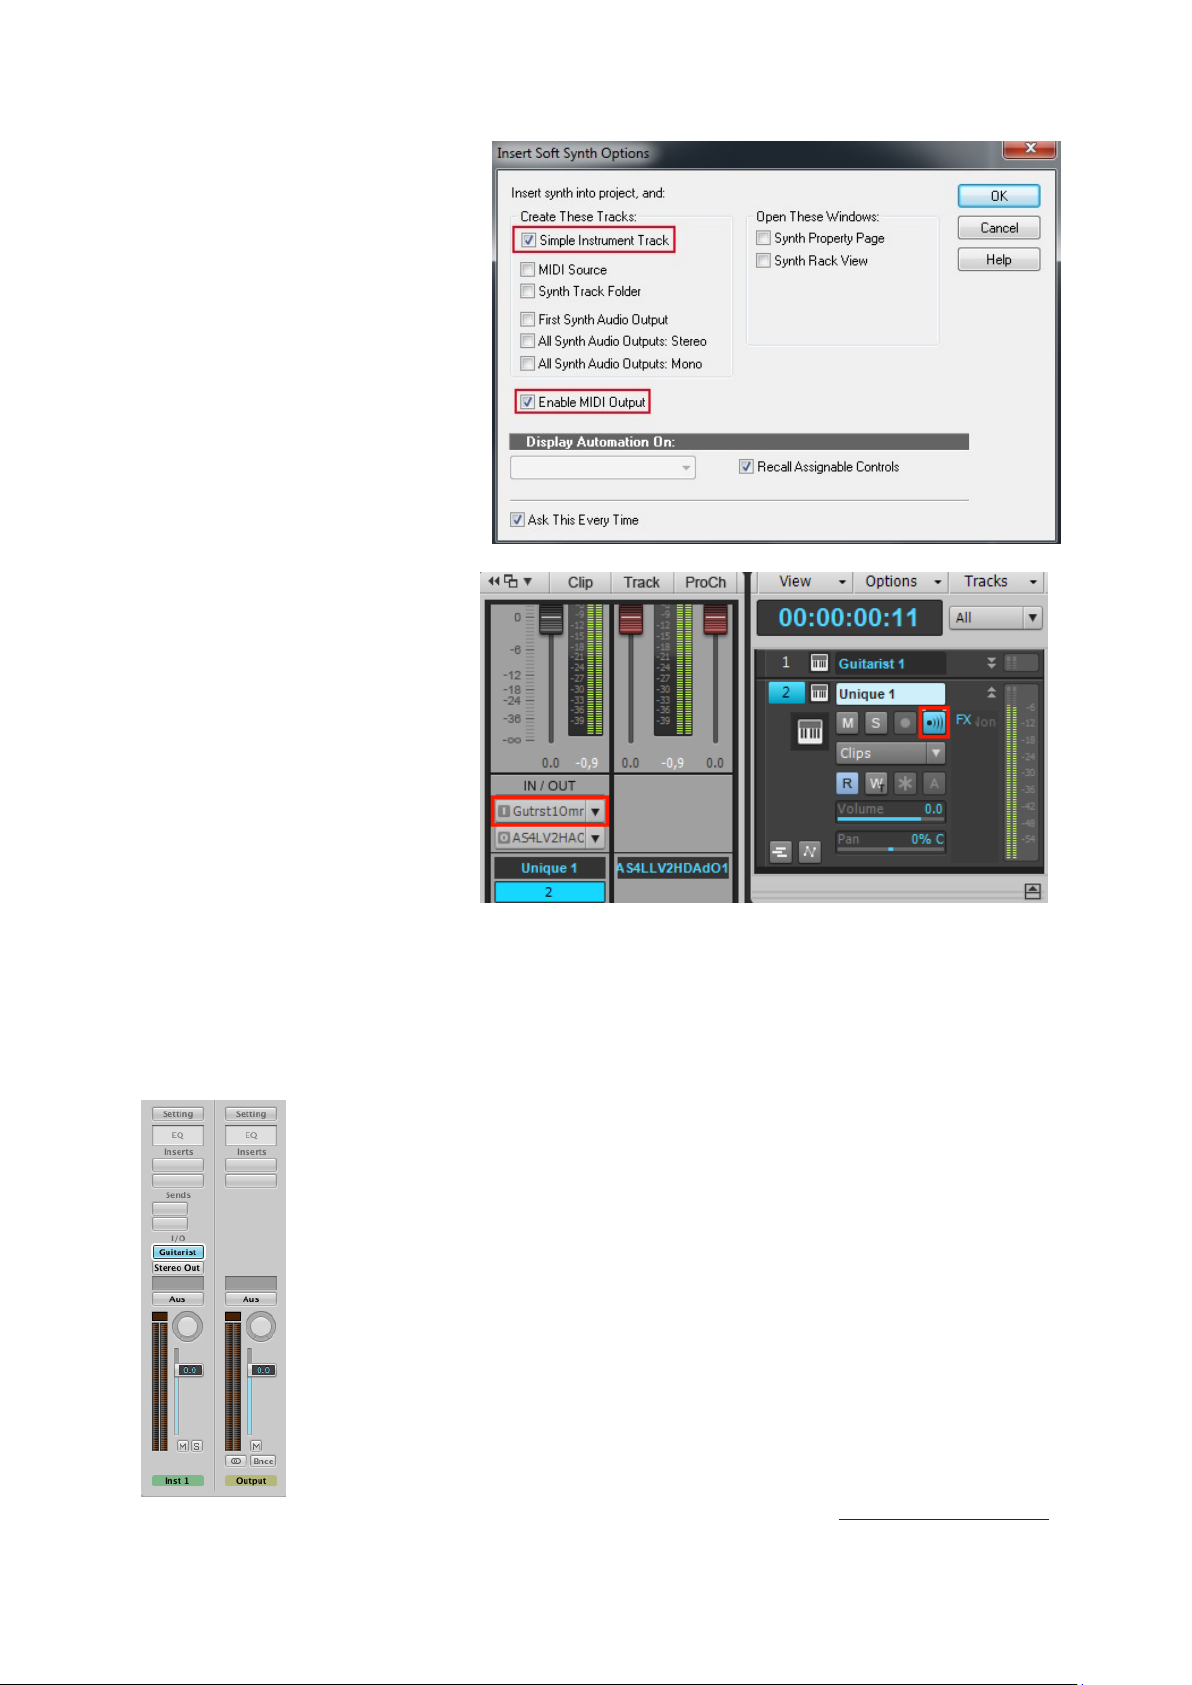
If you want to connect Guitarist
with another synth make sure
to activate the MIDI output
option in the plugin dialog from
sonar.
Now you can route the MIDI
output from Guitarist to any
other synth (here Unique).
Logic
Pick it up on an Instrument Track and choose it from the AU Instruments list in the
Plugins menu.
BACK TO TABLE OF CONTENT
30
Page 31
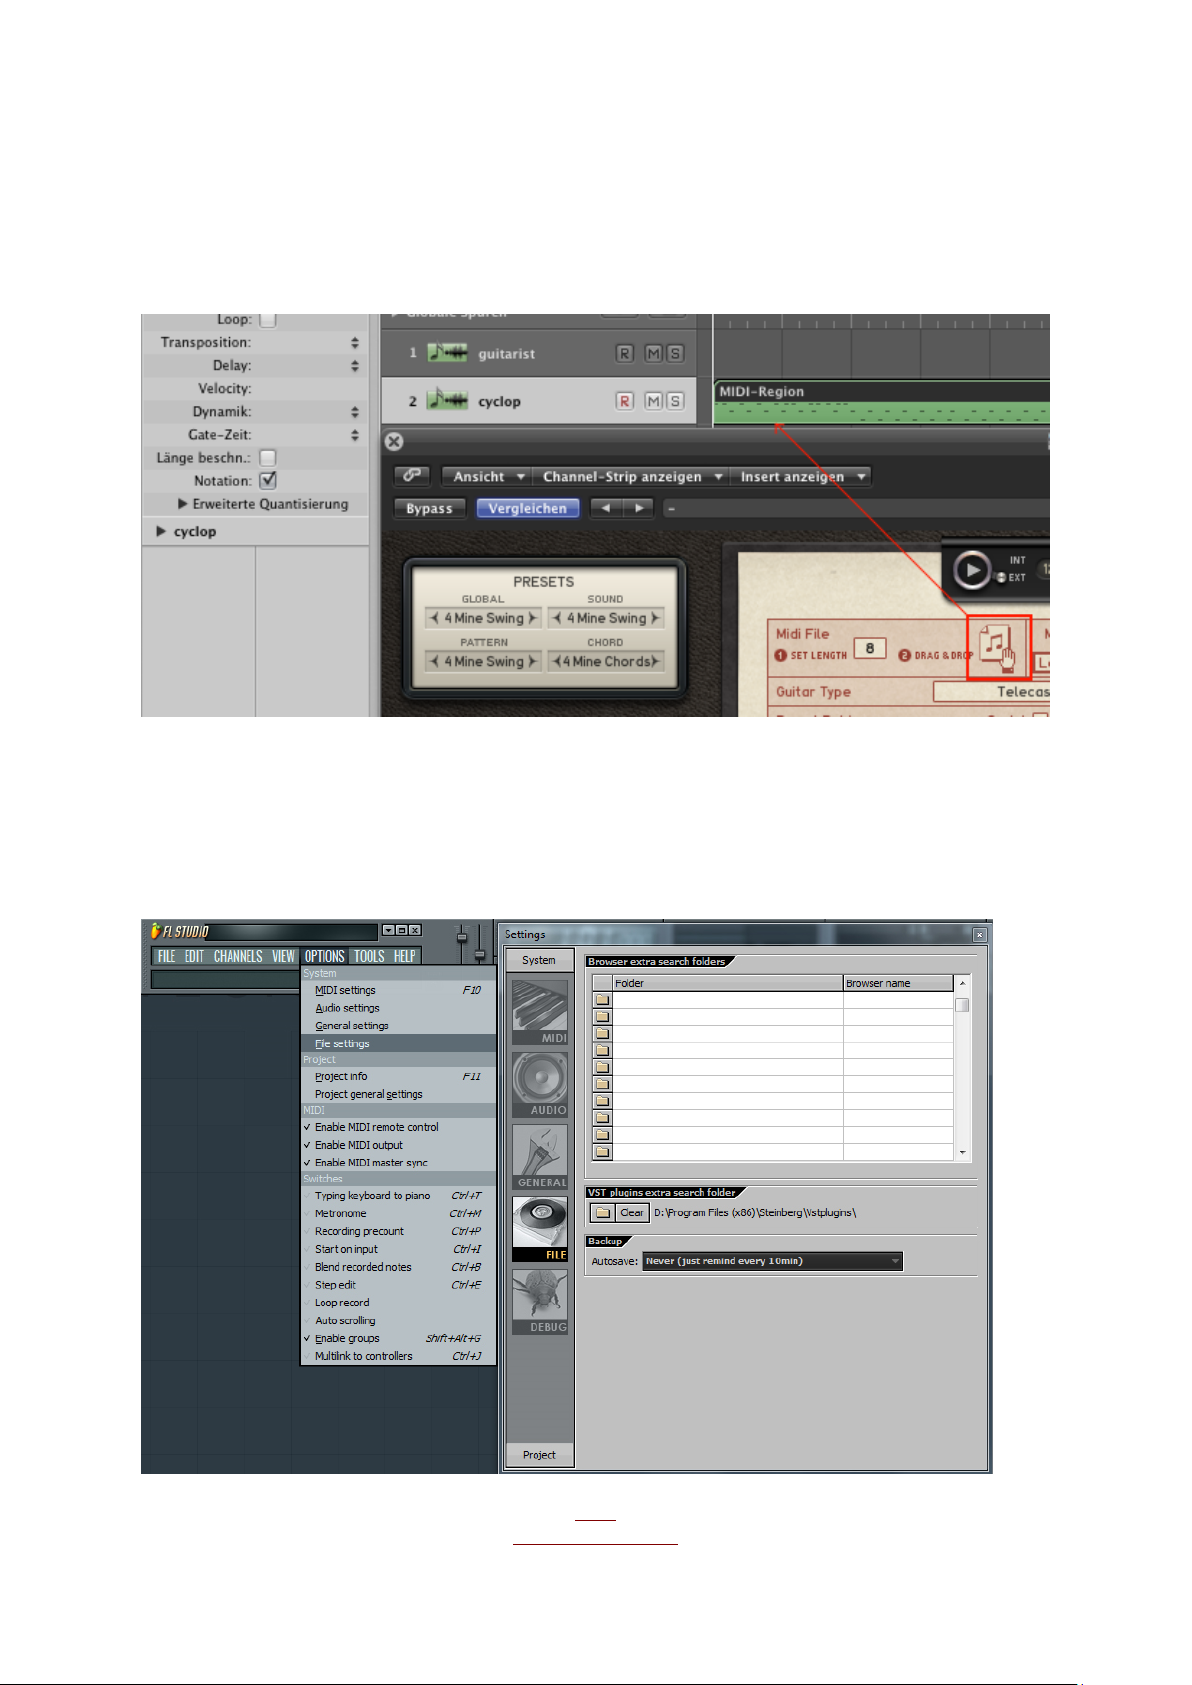
Please note :
If you are using Logic as a host, you won't be able to use VST plugins directly.
The AU format does not send and receive MIDI data "out of the box,".
So in order to patch the Guitarist MIDI output to other synths the easiest way is to use the
MIDI File drag and drop function in Guitarist!
FL Studio
Please go to Options -> File Settings and select the folder your VST plugin is installed to or
double check that you install the “Plug-In”.dll in the VST folder FL Studio is using.
BACK
TO TABLE OF CONTENT
31
Page 32
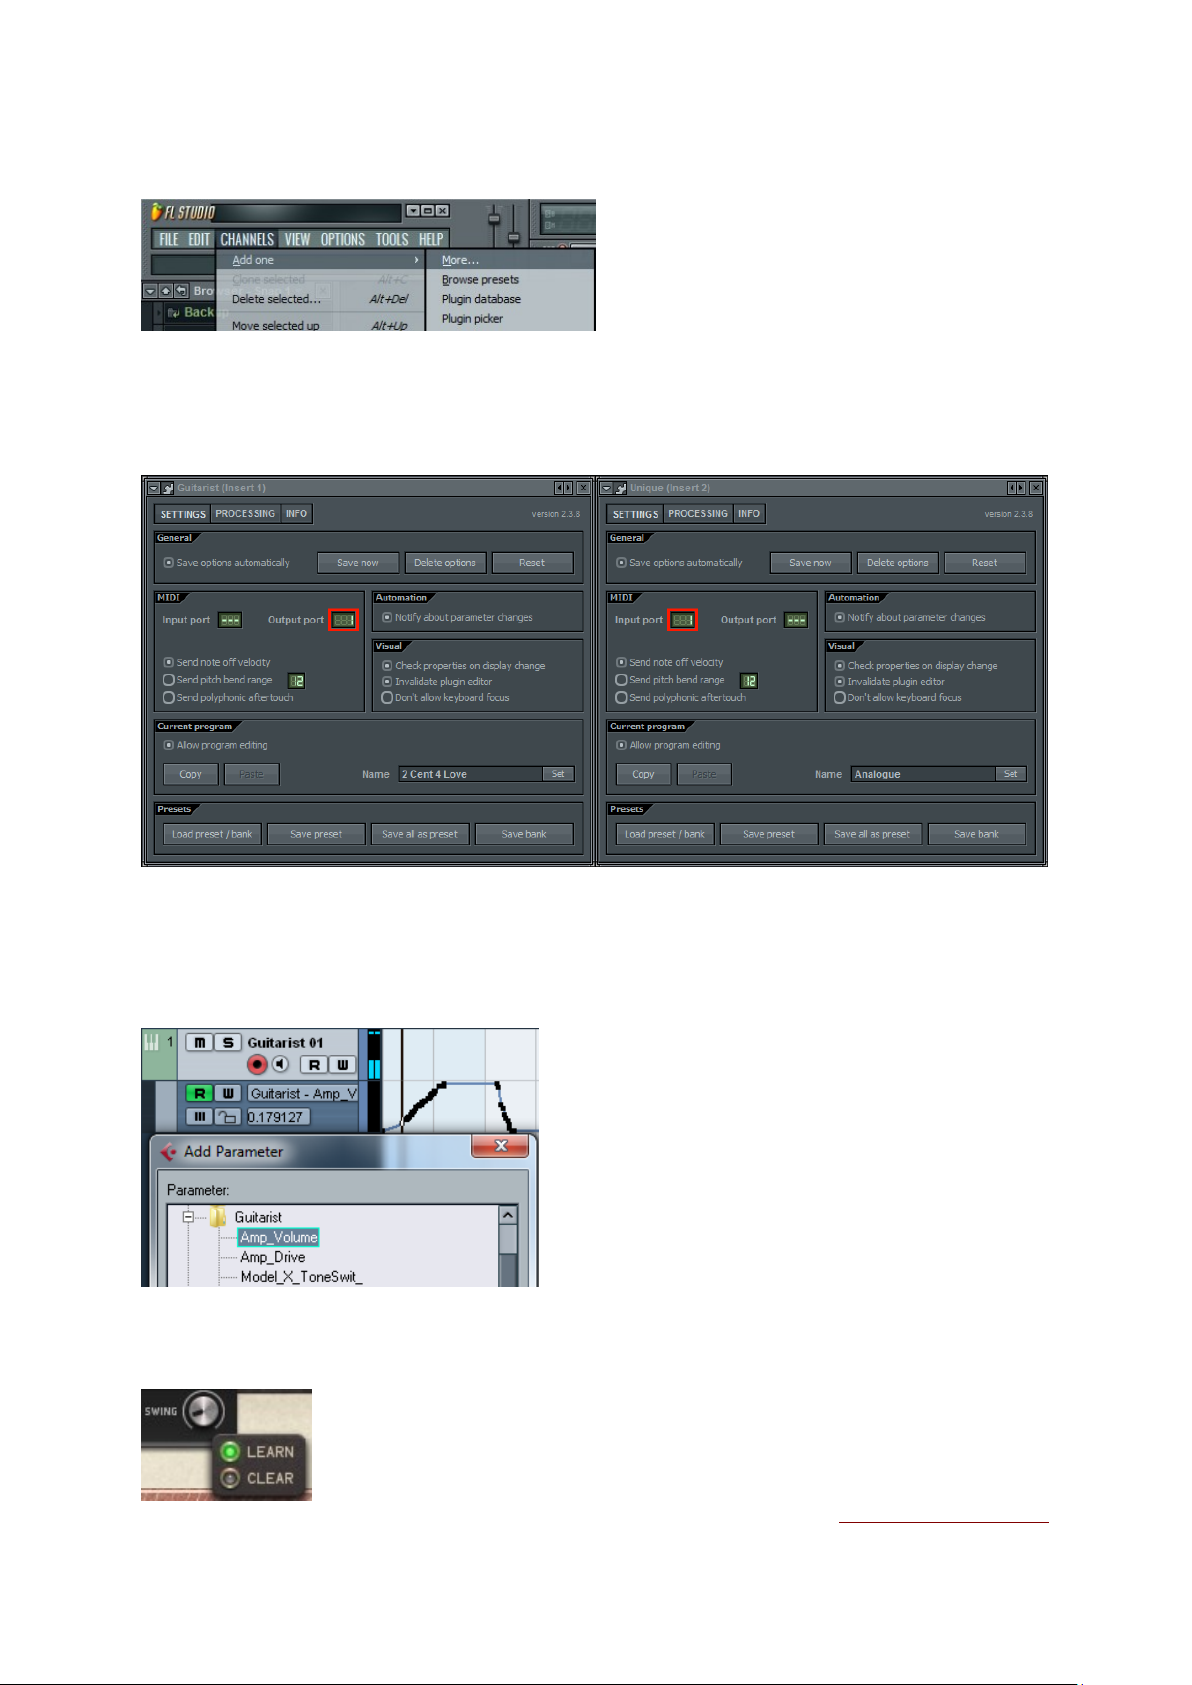
Go to Channels->Add one-> Guitarist
In order to route the MIDI output of Guitarist to other virtual instruments choose the
synth you want to control in a further Channel.
Then set up Guitarist as MIDI input in the Channel for your synth (here Unique).
MIDI remote
All relevant Guitarist parameters can be controlled via Host Automation.
All relevant Guitarist controls can be remoted via MIDI controllers.
You find the MIDI Learn function when you right click a control.
BACK TO TABLE OF CONTENT
32
Page 33

Troubleshooting
The product produces no sound? Here´s the solutions:
Check the Pattern Page and guitar:
1. Are steps drawn in the Trigger Sequencer?
2. Are steps drawn in the Active Sequencer?
3. Are all Strings active on the guitar?
4. Are all fingers showing note names?
Then check the Settings Page:
Is the serial number shown as valid?
If not, just type in the right one here or reinstall the product.
Is a guitar loaded? If not, click into the “Guitar” menu to load a guitar.
BACK
TO TABLE OF CONTENT
33
Page 34
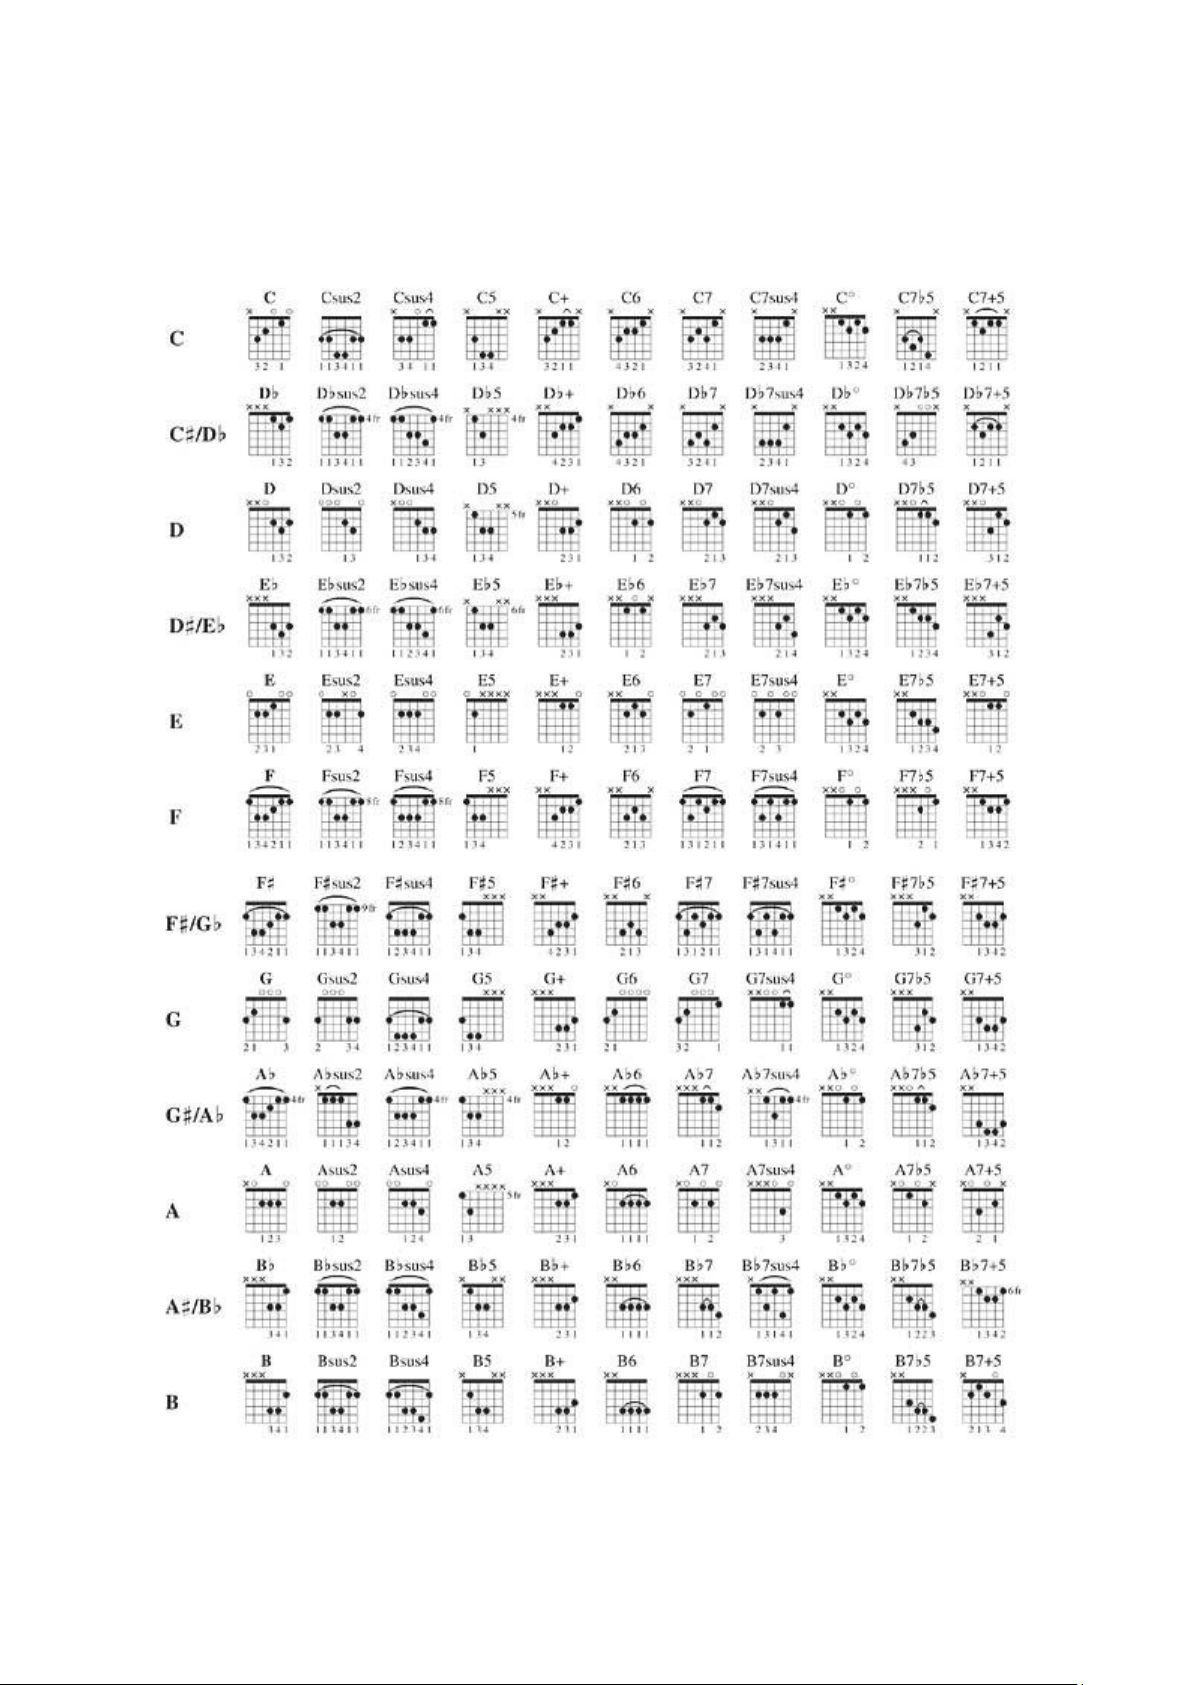
Chord List
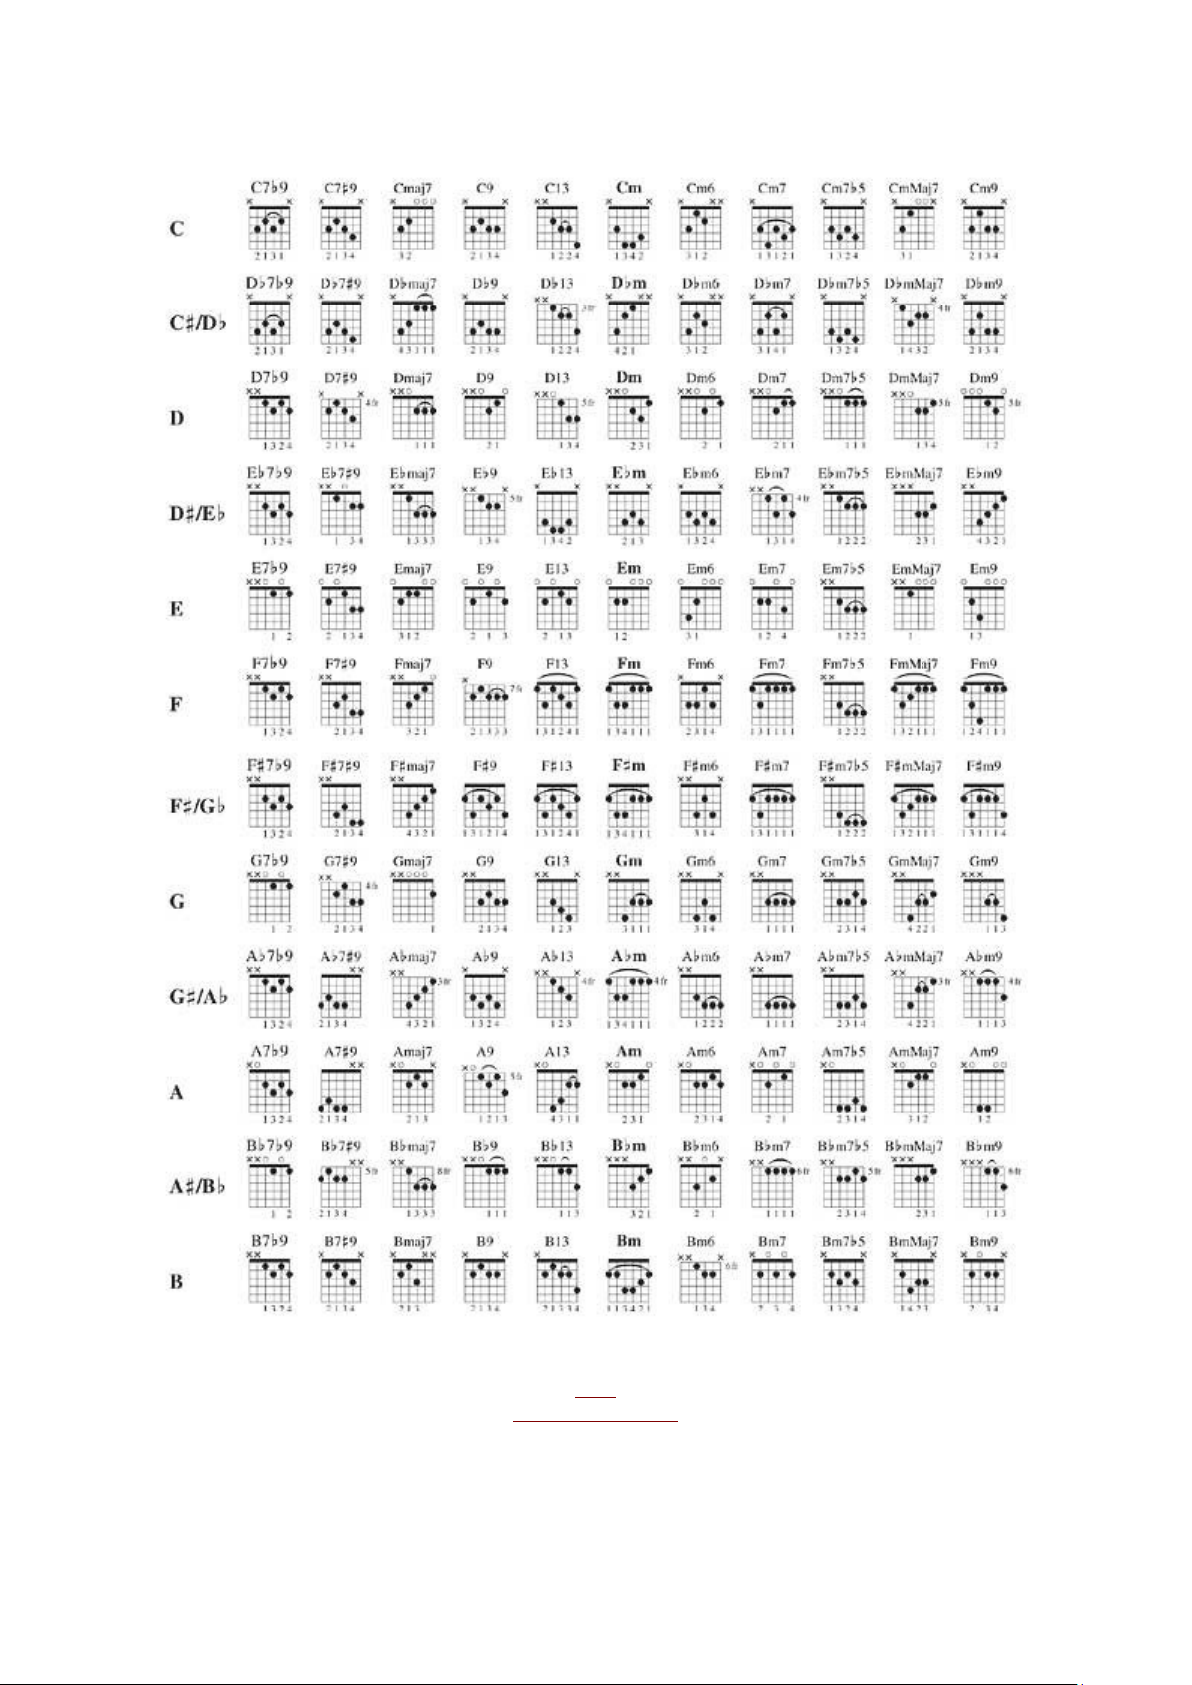
In the following chord list you find lots of chords for experimenting and learning.
34
Page 35
BACK
TO TABLE OF CONTENT
35
Page 36

License
The Guitarist License covers both the macOS and Windows versions and can be used on
two computers. For any use on more than two computers, you must buy an additional
license.
You may resell the software three months or more after purchase.
Contact
Sugar Bytes GmbH | Made of passion
Greifswalder Str. 29 | 10405 Berlin, Germany
phone:+493060920395
[email protected]
www.sugar-bytes.com
BACK
TO TABLE OF CONTENT
36
 Loading...