

Page 1
1
Page 2

What is Factory? 4
The User Interface 5
Structure 6
Presets 9
Signal path 7
Oscillators 16
Pulse Sync 18
Saw Sync 19
Saw Fractal 19
FM Formant 20
Transformer 21
Wavetable PWM 22
Wavetable Sync 23
Wavetable Formant 23
Wavetable Drone 24
Waveguide 25
Mixer 26
Filter & Drive 30
Filter Models 31
Output 37
Modulators 39
ENV 1 & ENV 2 40
LFO 1 & LFO 2 42
Sample + Hold 45
Modulation Matrix 47
Sequencer 58
2
Page 3

Arpiculation 62
Pitch Factory 63
Intonation 64
Arpeggiator 65
Gate 68
Effects 69
Settings 89
Realtime Controllers 91
Keyboard 92
Pitch Bender 92
Modwheel 92
Morph Fader 93
MIDI CC Assignments 95
Host Integration 96
Installation/Uninstallation 97
Contact 100
3
Page 4

What is Factory?
Watch video teaser
Picture this: A modular synthesizer that provides totally unlimited connectivity between all its modules.
Now picture this: In addition to that, you could modulate all those modulation paths on their part – individually, or all at the same
time, in very precise ways or at random. Finally imagine this synthesizer would be polyphonic and completely programmable – this is
exactly what Factory is about!
Factory streamlines the well-known concept of a modulation matrix and employs an interconnection system as a key element that
combines maximum routing flexibility with playful and intuitive access. As it happens to be the case, Factory is capable of
generating sounds of a huge sonic spectrum using various oscillator, filter, and effects modules. From well-known and popular
bread-and-butter sounds to highly bizarre effects and even entire drum loops, almost anything is possible. Extremely powerful
modulation options can be routed to almost every parameter via the modulation matrix. This includes envelopes, LFOs, arpeggiator,
and even a four-track step sequencer.
Finding the perfect sound for each genre is incredibly easily and efficiently executed by using the innovative and clearly structured
preset browser. Factory works as a plug-in for all common hosts or as stand-alone application.
We would like to thank you for purchasing Factory. We appreciate your choice very much and hope you will have loads of fun with
your new instrument.
4
Page 5
SSTTRRUUCCTTUURREE
SSIIGGNNAALL PPAATTHH
PPRREESSEETTSS
OOSSCCIILLLLAATTOORRSS
MMIIXXEERR
FFIILLTTEERR
DDRRIIVVEE
OOUUTTPPUUTT
MMOODDUULLAATTOORRSS
MMOODDUULLAATTIIOONN MMAATTRRIIXX
SSEEQQUUEENNCCEERR
AARRPPIICCUULLAATTIIOONN
EEFFFFEECCTTSS
SSEETTTTIINNGGSS
RREEAALLTTIIMMEE CCOONNTTRROOLLLLEERRSS
The User Interface
5
Page 6
Oscillators Mixer Filter Drive Output Modulators Sequencer Arpiculation Effects Settings Realtime Controllers
Structure
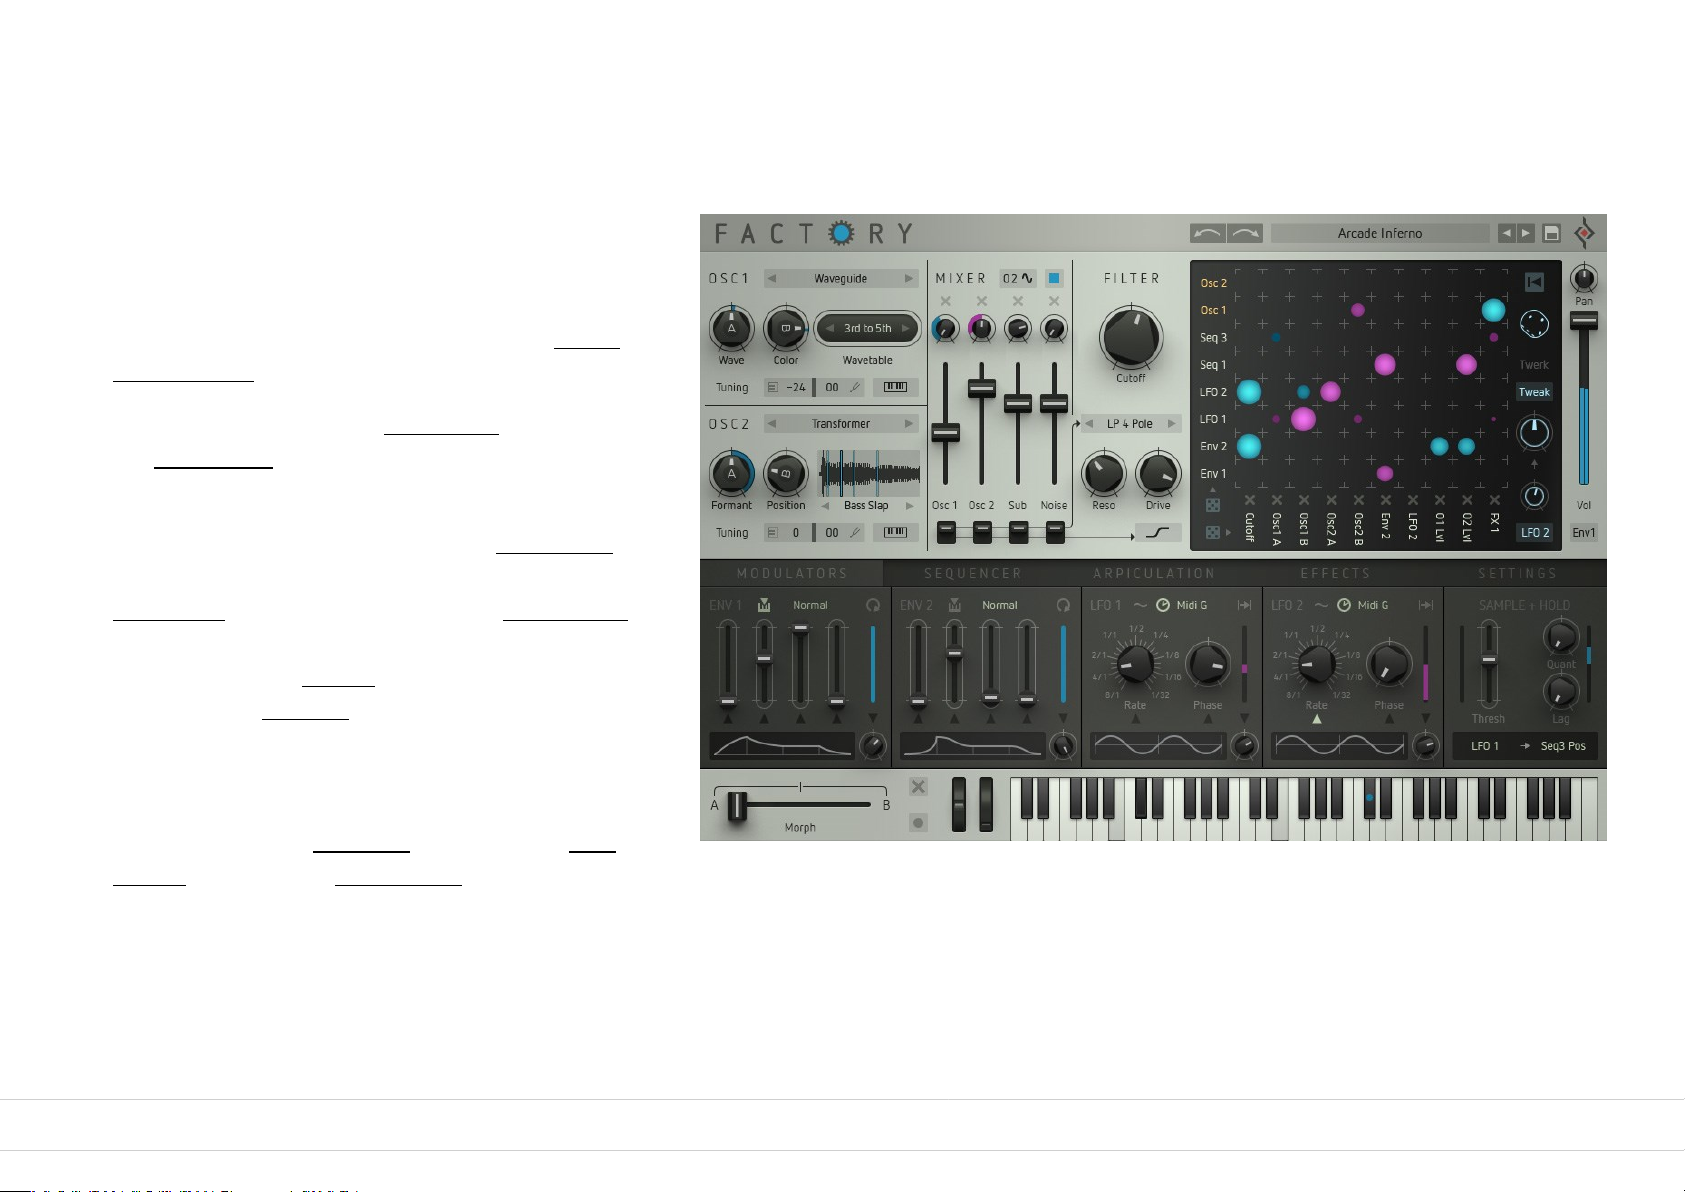
Factory‘ user interface is divided into four main
sections:
• In the top menu bar you will find the current preset
name as well as several buttons related to preset
management and a undo/redo function.
• The modules of Factory‘ signal path, together with
the mod matrix, can be found center-screen.
• Below the signal path window, five more windows
with additional modules are located: Modulators
(modulation sources),
Sequencer (4-track step-sequencer), Arpiculation
(arpeggiator as well as parameters to control
articulation with), Effects (three multi-effects
modules) and Settings (MIDI settings, global
functions). These windows are accessed via tabs.
• At the very bottom you will find the realtime
controllers such as keyboard with pitch and mod
wheels as well as the Morph fader.
6
Page 7
Oscillators Mixer Filter Drive Output Modulators Sequencer Arpiculation Effects Settings Realtime Controllers
Signal path
7
Page 8
Oscillators Mixer Filter Drive Output Modulators Sequencer Arpiculation Effects Settings Realtime Controllers
Factory’s sound generation
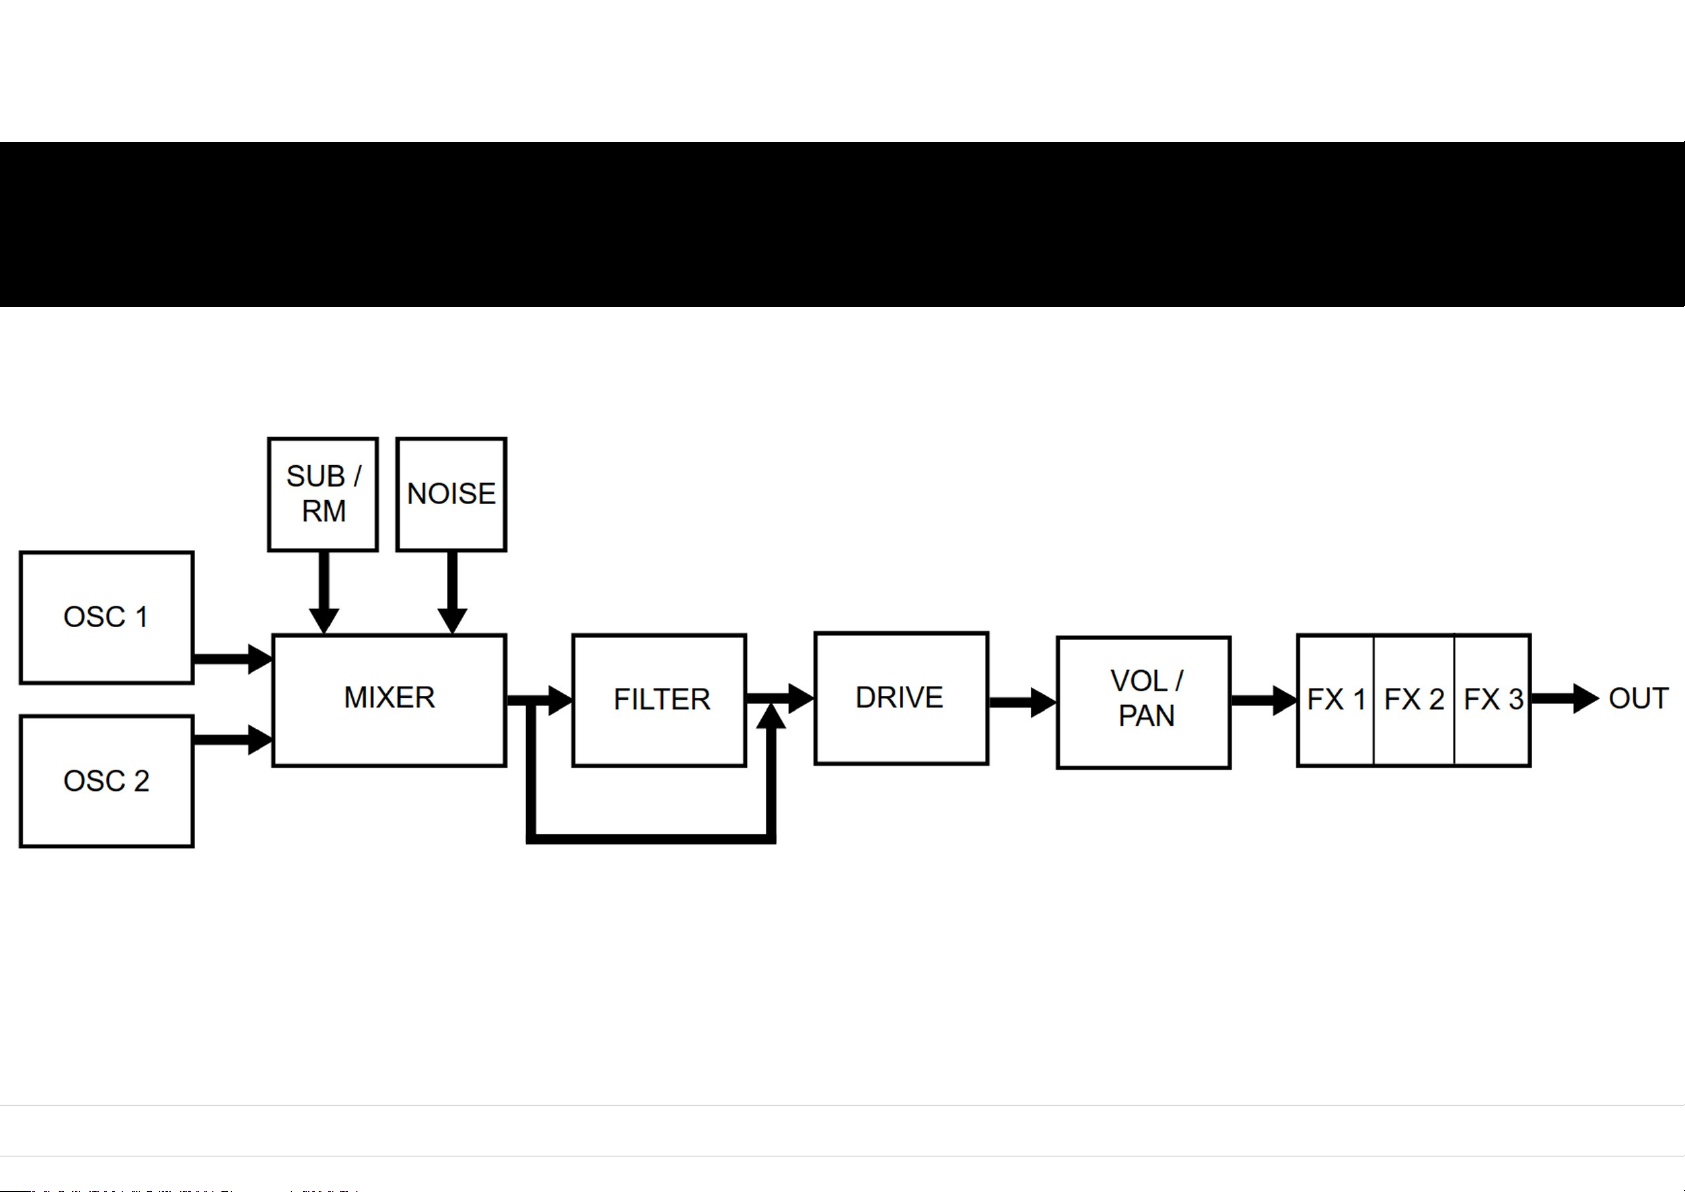
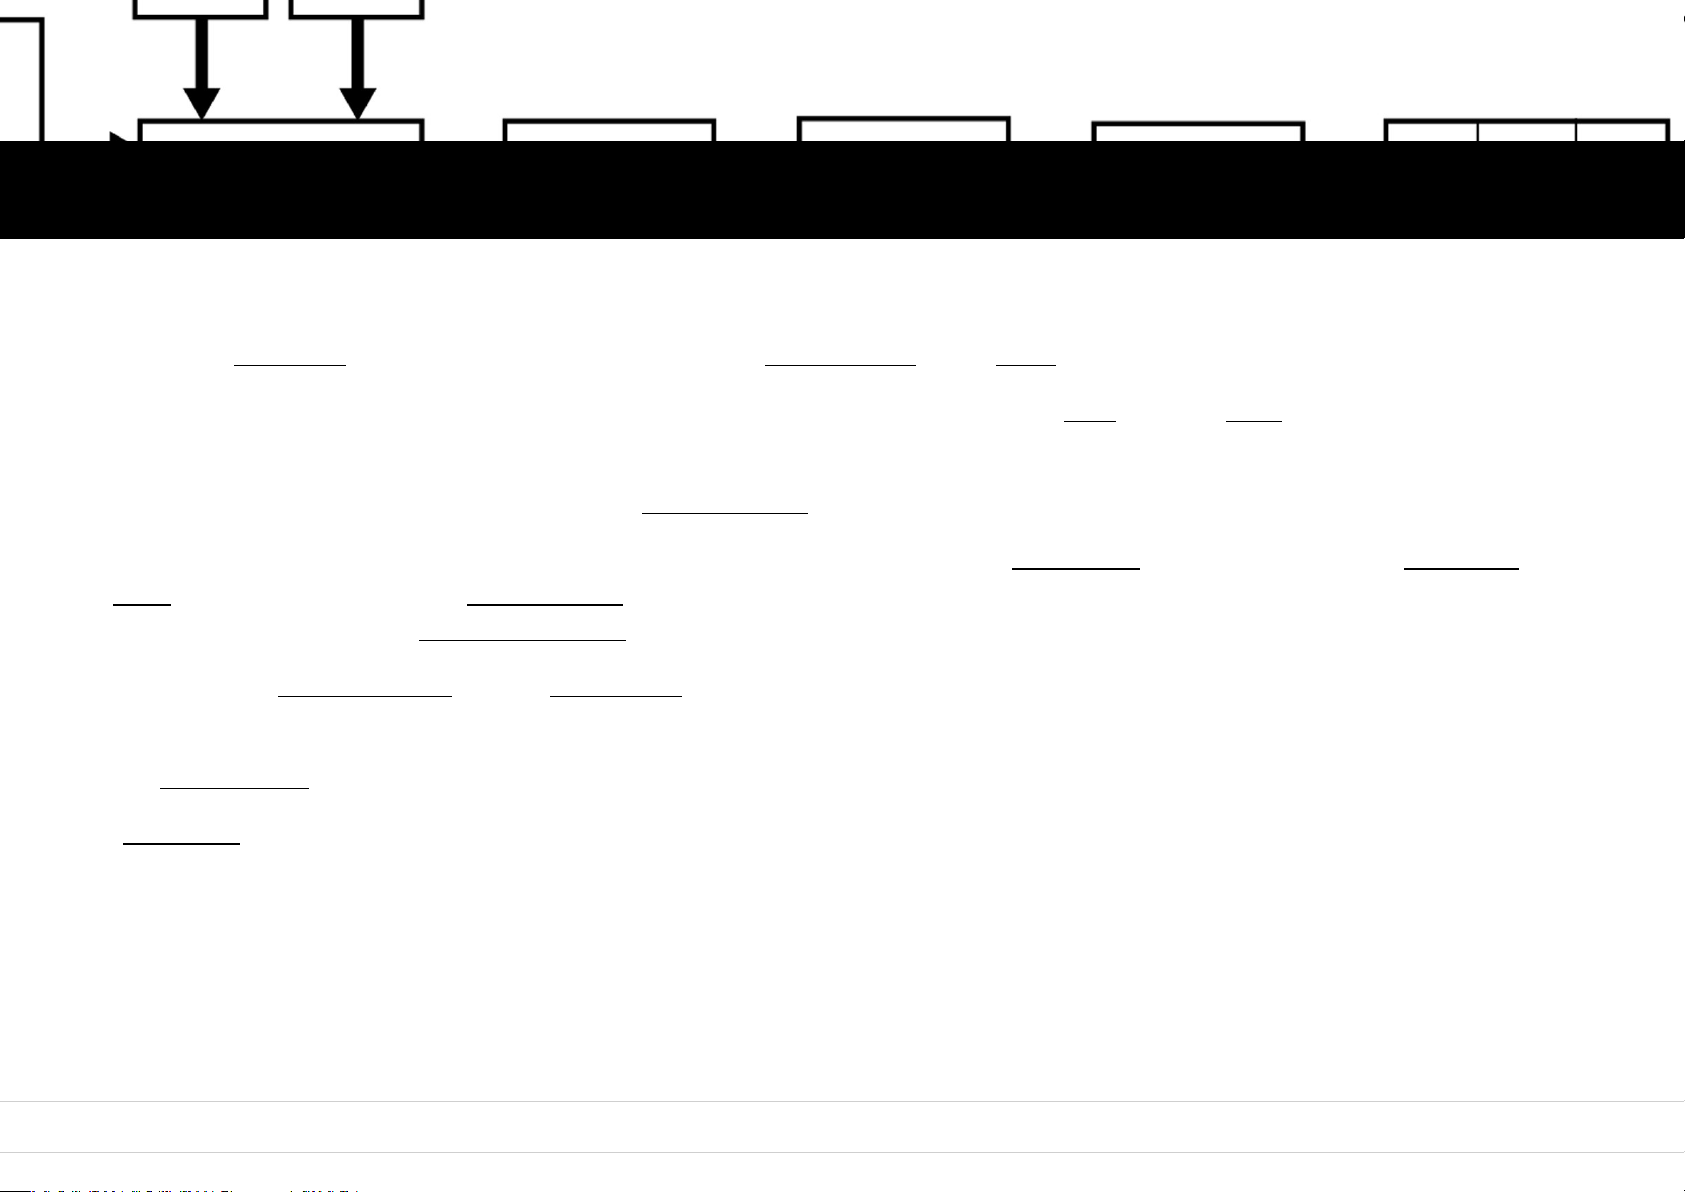
Factory employs a classic subtractive signal path but the modules in their own right, and the way they interact, are pretty innovative.
Two audio oscillators with ten synthesis models each, one sub-oscillator, and a noise source provide the audio signals.
They are combined and ring-modulated if so desired, shaped further by a multimode filter and/or a drive section as well as a level
modulation unit.
In addition to that, Factory features a powerful effects section with three multi-effects modules running in series.
As modulation sources you will find various audio signals (oscillators, noise) and modulators. The latter provide two envelopes and
LFOs as well as a very powerful sample + hold module. The interconnection between modulation sources and destinations is
executed using the central modulation matrix.
The four-track step sequencer and the arpeggiator do not only create melodies – they are entirely integrated into the sound
generation via the matrix.
The Pitch Factory determines the tonal scaling of modulations and control the function of the pitch and mod wheels.
„Intonation“ creates a bit of animation and randomness in Factory‘s sound.
8
Page 9
Presets
Preset Browser
Searching Presets
Preset Sorting Functions
Tag Presets
Save Presets
Undo/Redo
Preset Random Selection
Program (PGM) List
9
Page 10
Oscillators Mixer Filter Drive Output Modulators Sequencer Arpiculation Effects Settings Realtime Controllers
Preset Browser
In stand-alone mode, right after booting Factory will load the last active setting, i.e. Factory will exactly reproduce the current state
before the last shutdown. In plug-in mode, Factory will load a default preset. You can define any setting as your default preset.
All preset handling functions can be found in Factorys header.
Clicking on the preset name in the header will open up the preset browser.
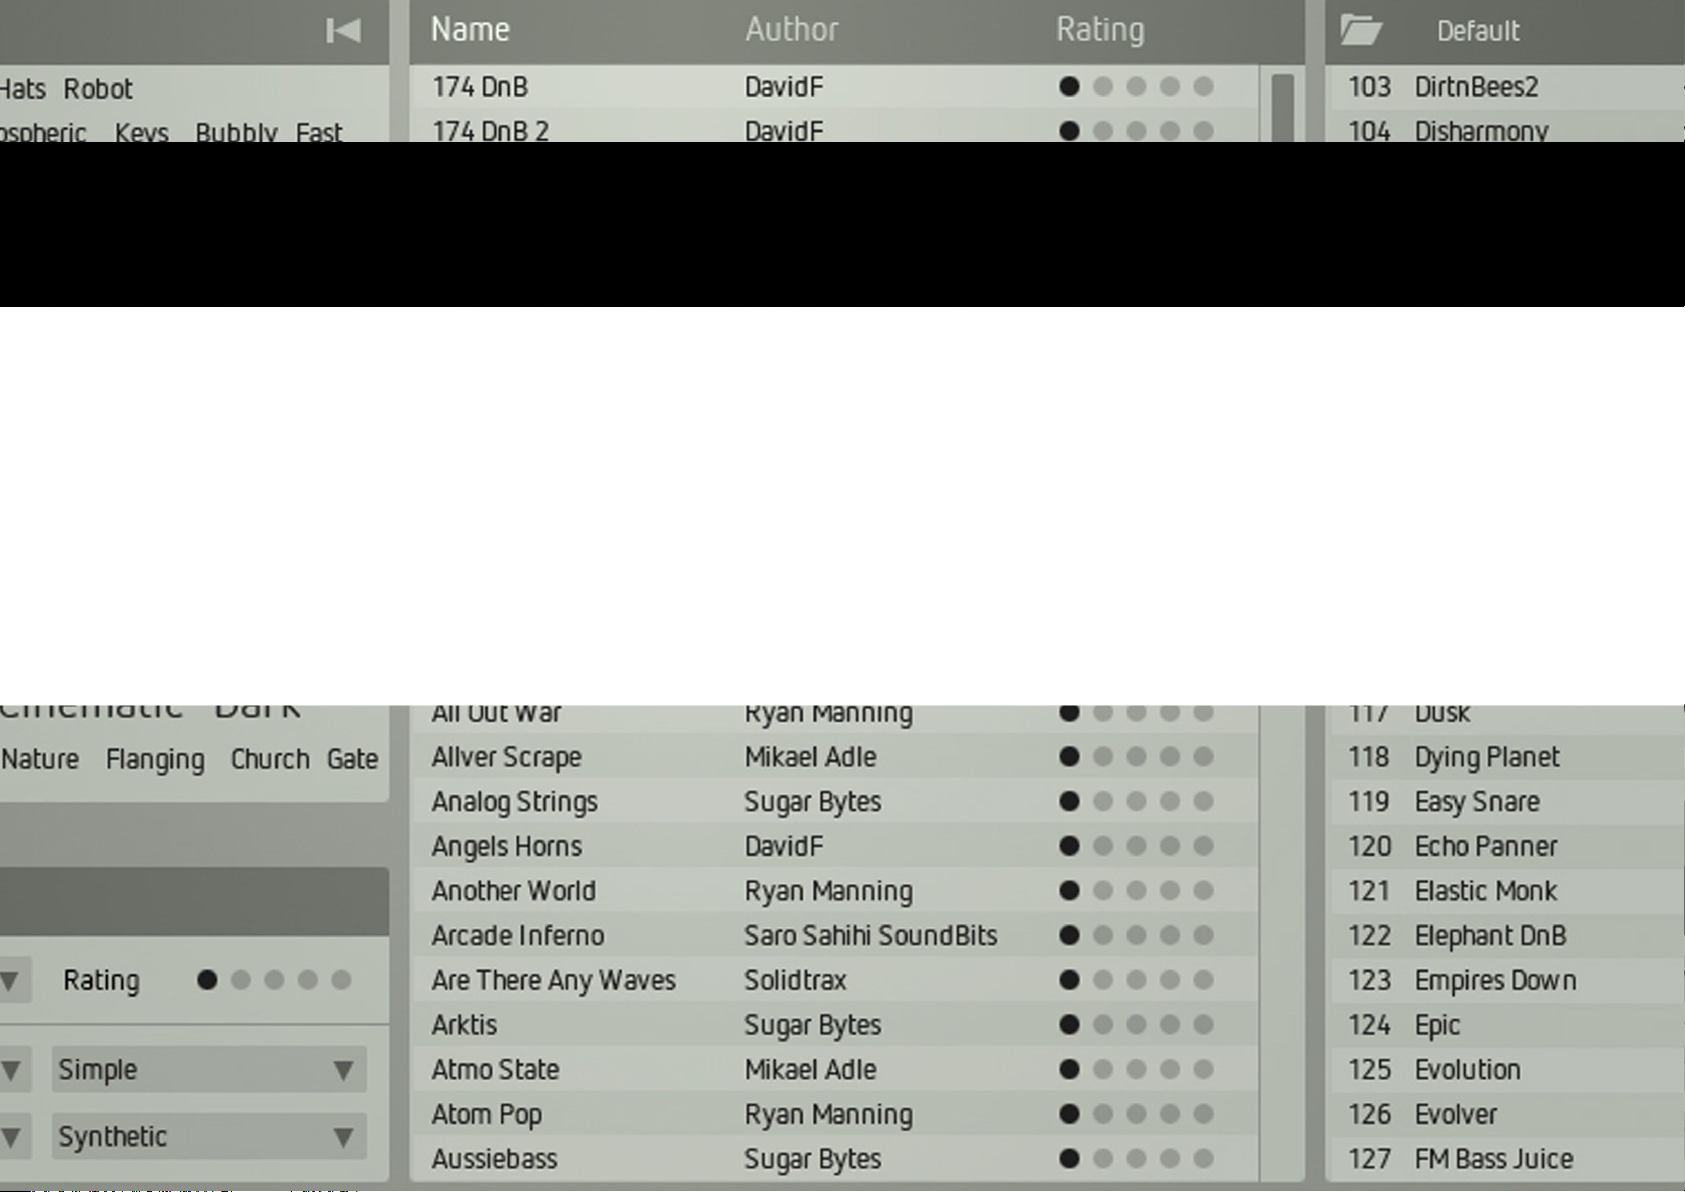
The preset browser is used to sort and archive your presets by using specific keywords or tags.
The browser provides several search functions to retrieve presets which have specific properties, labelled accordingly using the
corresponding tags. If you need e.g. a distorted synth bass, you can search the entire preset pool for this type of sound.
This will save you a lot of time.
Clicking on the preset name will load the preset. Have fun! Make use of the mod wheel and/or the morph fader while trying out the
presets – numerous presets hide some nice surprises for you...
Clicking the X symbol (top right) or the preset name (in the header) will close the preset browser
Click on the short arrow buttons in the header to load the next resp. previous preset in the current results list.
This allows you to cycle through the presets of a search one by one even when the preset browser is closed.
10
Page 11
Oscillators Mixer Filter Drive Output Modulators Sequencer Arpiculation Effects Settings Realtime Controllers
Searching Presets
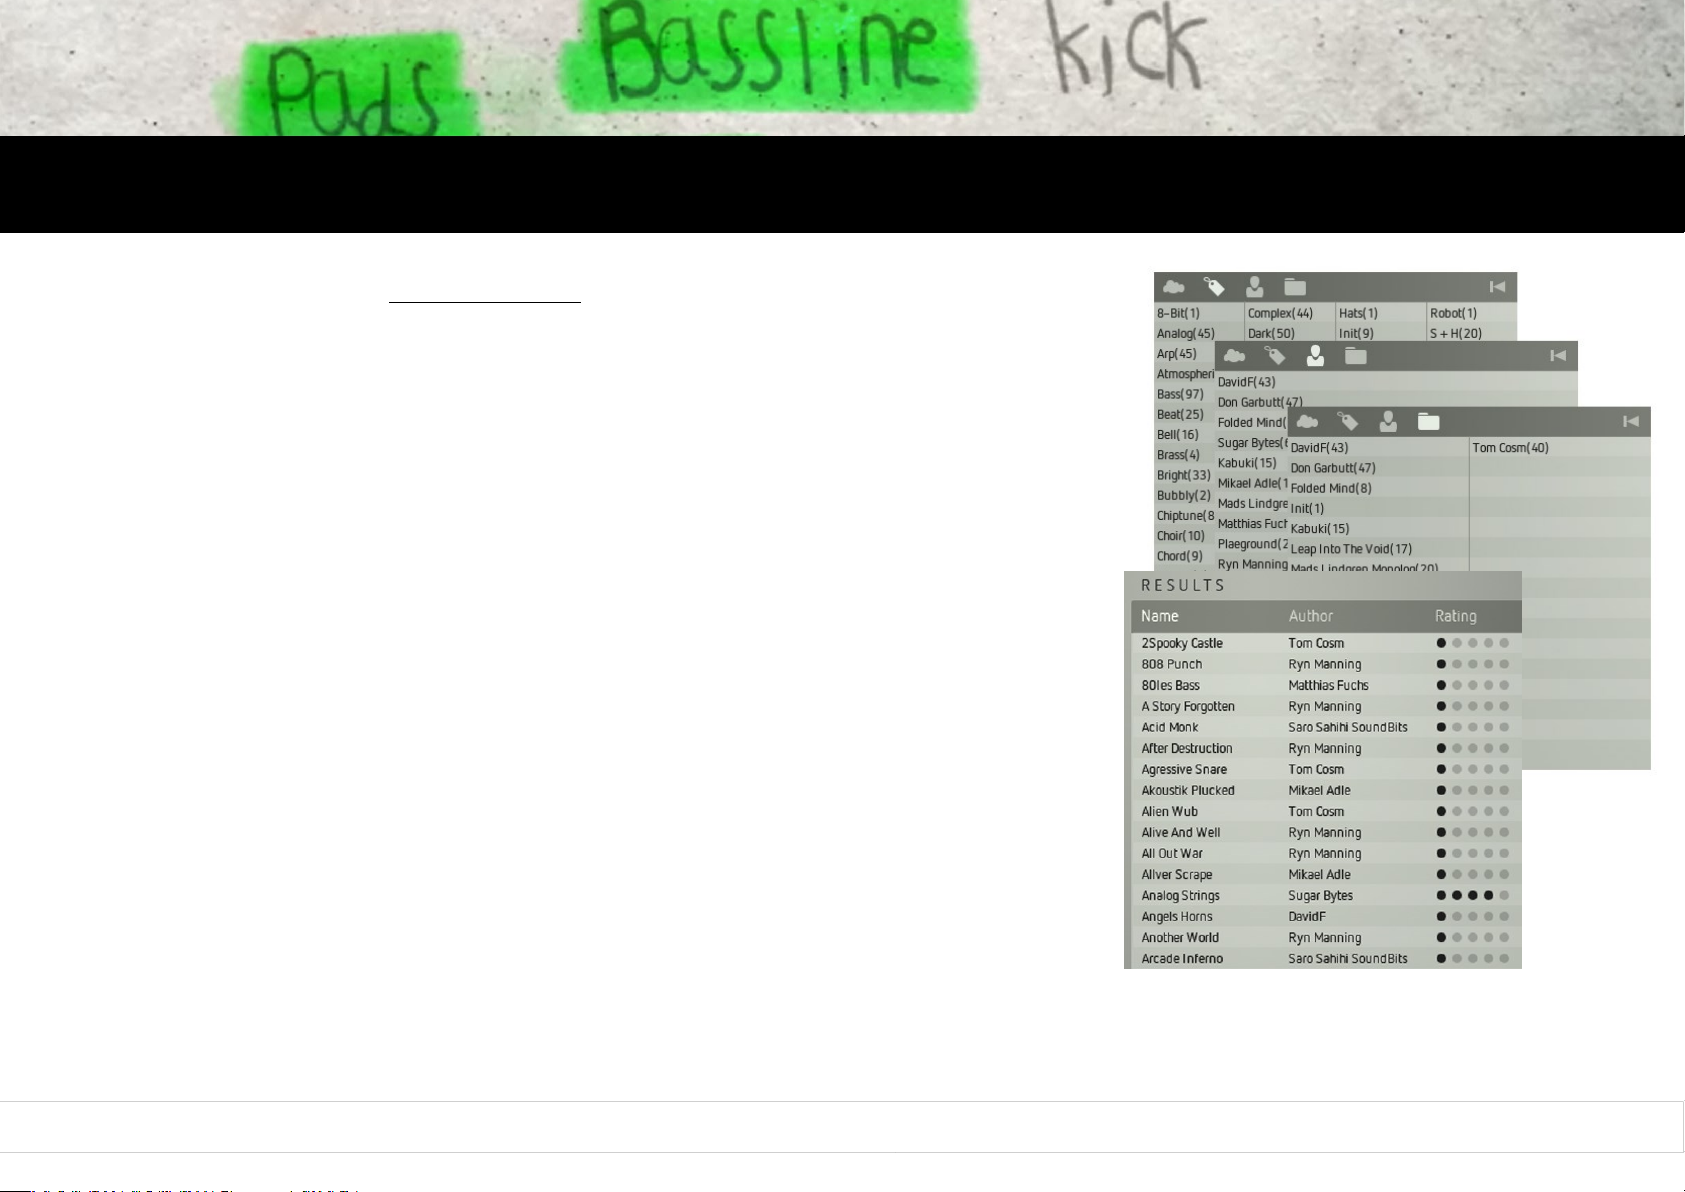
In the upper left you will find a large window labelled TRACE.
It provides several functions for tagging and searching presets described here:
The Cloud function
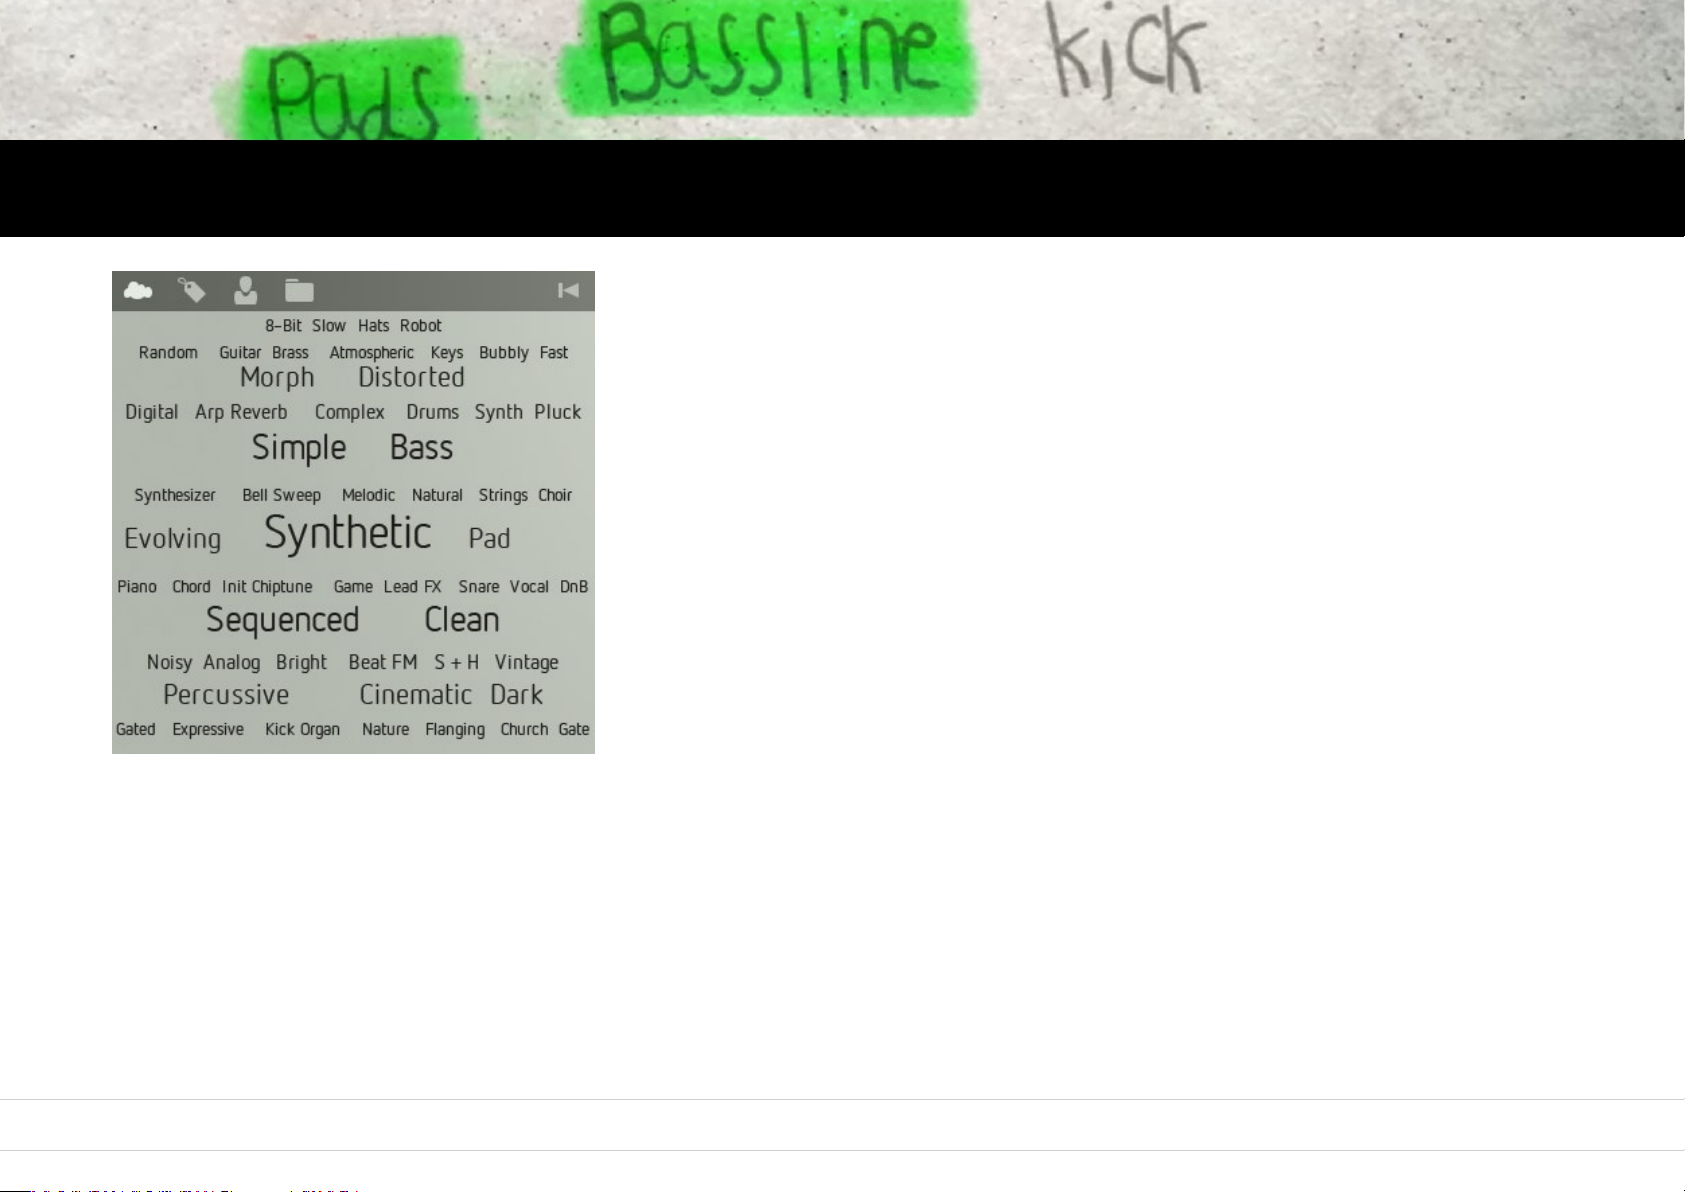
Click the cloud button. The trace window now shows all tags (keywords) that are
currently being used in your entire preset library. The size of each tag represents how
frequently this specific quality is used to classify presets in the library. In the figure
below, „Sequenced“ presets are available in a large number while only a few e.g. „FM“ or
„Morph“ presets can be found in the library.
The selection procedure is executed by clicking the desired tag. The chosen tag (e.g.
„Sequenced“) is highlighted in blue. The Results list on the right of the preset browser
now shows only presets that make use of the tag „Sequenced“. To further refine the
search, you can click another tag (e.g. „Distorted“). The selection will now be narrowed
down to presets that use these two tags. The tag selection in the cloud window will also
be updated. Since each preset is tagged with four keywords (or at least should be), you can refine the search four times by clicking
more tags (e.g. „Bright“). Clicking a blue high-lighted tag, resets the last selection.
A click on the desired preset name in the RESULTS list will load it.
Clicking the Backwards symbol above the trace window will reset the current search.
11
Page 12
Oscillators Mixer Filter Drive Output Modulators Sequencer Arpiculation Effects Settings Realtime Controllers
Preset Sorting functions
In addition to the cloud (please see above), Factory features more sorting functions that
make the task of retrieving specific presets easier.
Tag
When clicking on the tag symbol, the trace window will display all existing tags as a list. The digit
shows the number of presets that use the respective tag. Here, too, you can refine your search by
using up to four tags.
Author
By clicking on the author symbol, the trace window will present a list of all existing preset
authors. Clicking on the desired author name will further refine the search.
Folder
By clicking on the folder symbol, the trace window will display a list of all folders on your hard
drive that contain Factory presets. Clicking on the desired folder name will further refine your
search.
The results list displays the results yielded by the search, performed in the trace window.
You can change the order of the presets by Name, Author or Rating.
12
Page 13
Oscillators Mixer Filter Drive Output Modulators Sequencer Arpiculation Effects Settings Realtime Controllers
Tag Presets
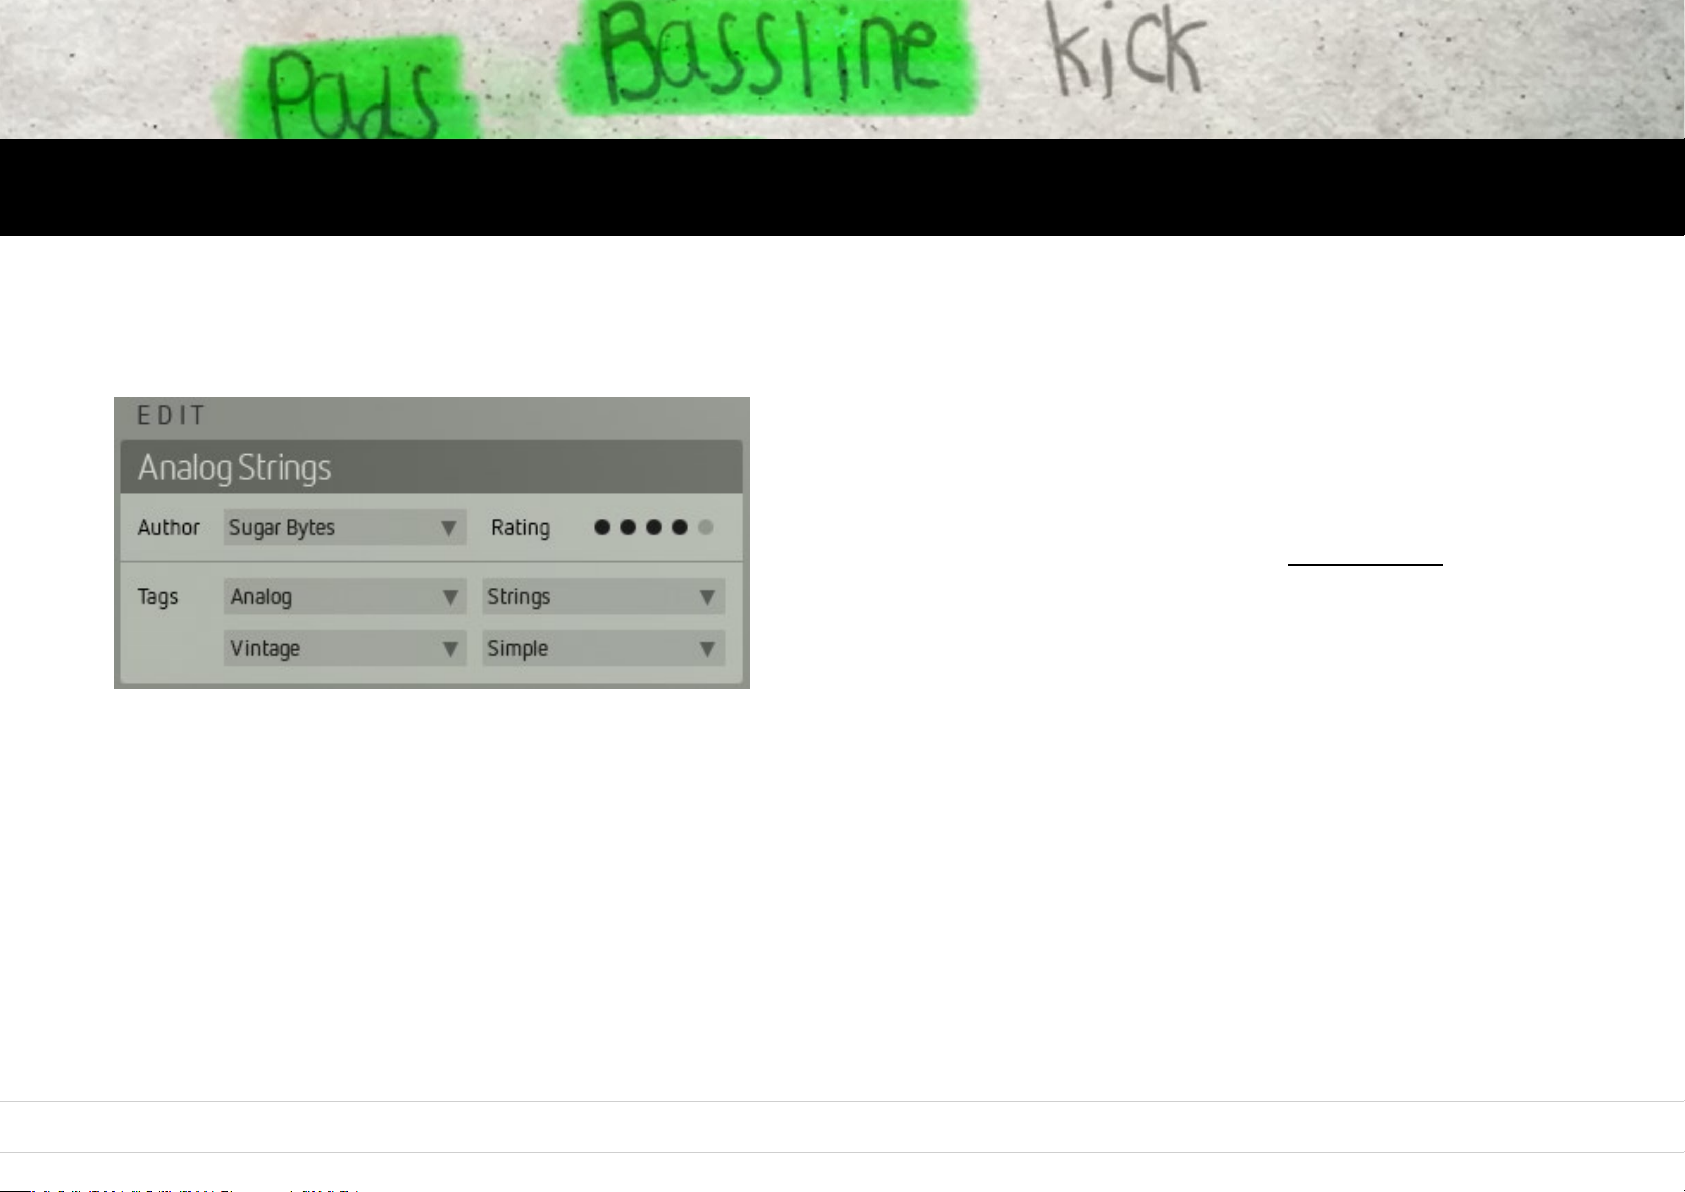
You can always tag presets or change existings tags by using the functions in the EDIT window.
Simply click the arrow symbol of the tag. A selection window will pop up. Click the desired tag – done.
This change will immediately be stored in the preset – no extra preset
saving required. You can create new tags. Click into the name of a tag
field and enter a new and meaningful tag name (“mind- blowing” is not
always a good starting point...). Each new tag will be added to the cloud
(and list). Again – please bear in mind that the cloud window might
become a bit confusing when a large amount of tags is in use. For
simplicity‘s sake, we advise you to stick to the given tags as often as you
can.
Please note: You cannot erase existing tags directly. But tags that are not connected to a preset anymore – e.g. because all the presets that
used them have been erased – are erased from the preset browser after Factorys next launch.
Author
Here, you can select the preset author‘s name, enter a new name or change the existing one. The preset browser can sort the presets by
author.
Rating
Here, you can rate the presets‘ qualities from one to five. The preset browser can sort the presets by rating.
This way it is pretty easy to retrieve your favourite presets quickly.
13
Page 14
Oscillators Mixer Filter Drive Output Modulators Sequencer Arpiculation Effects Settings Realtime Controllers
Save Preset, Undo/Redo & Random selection
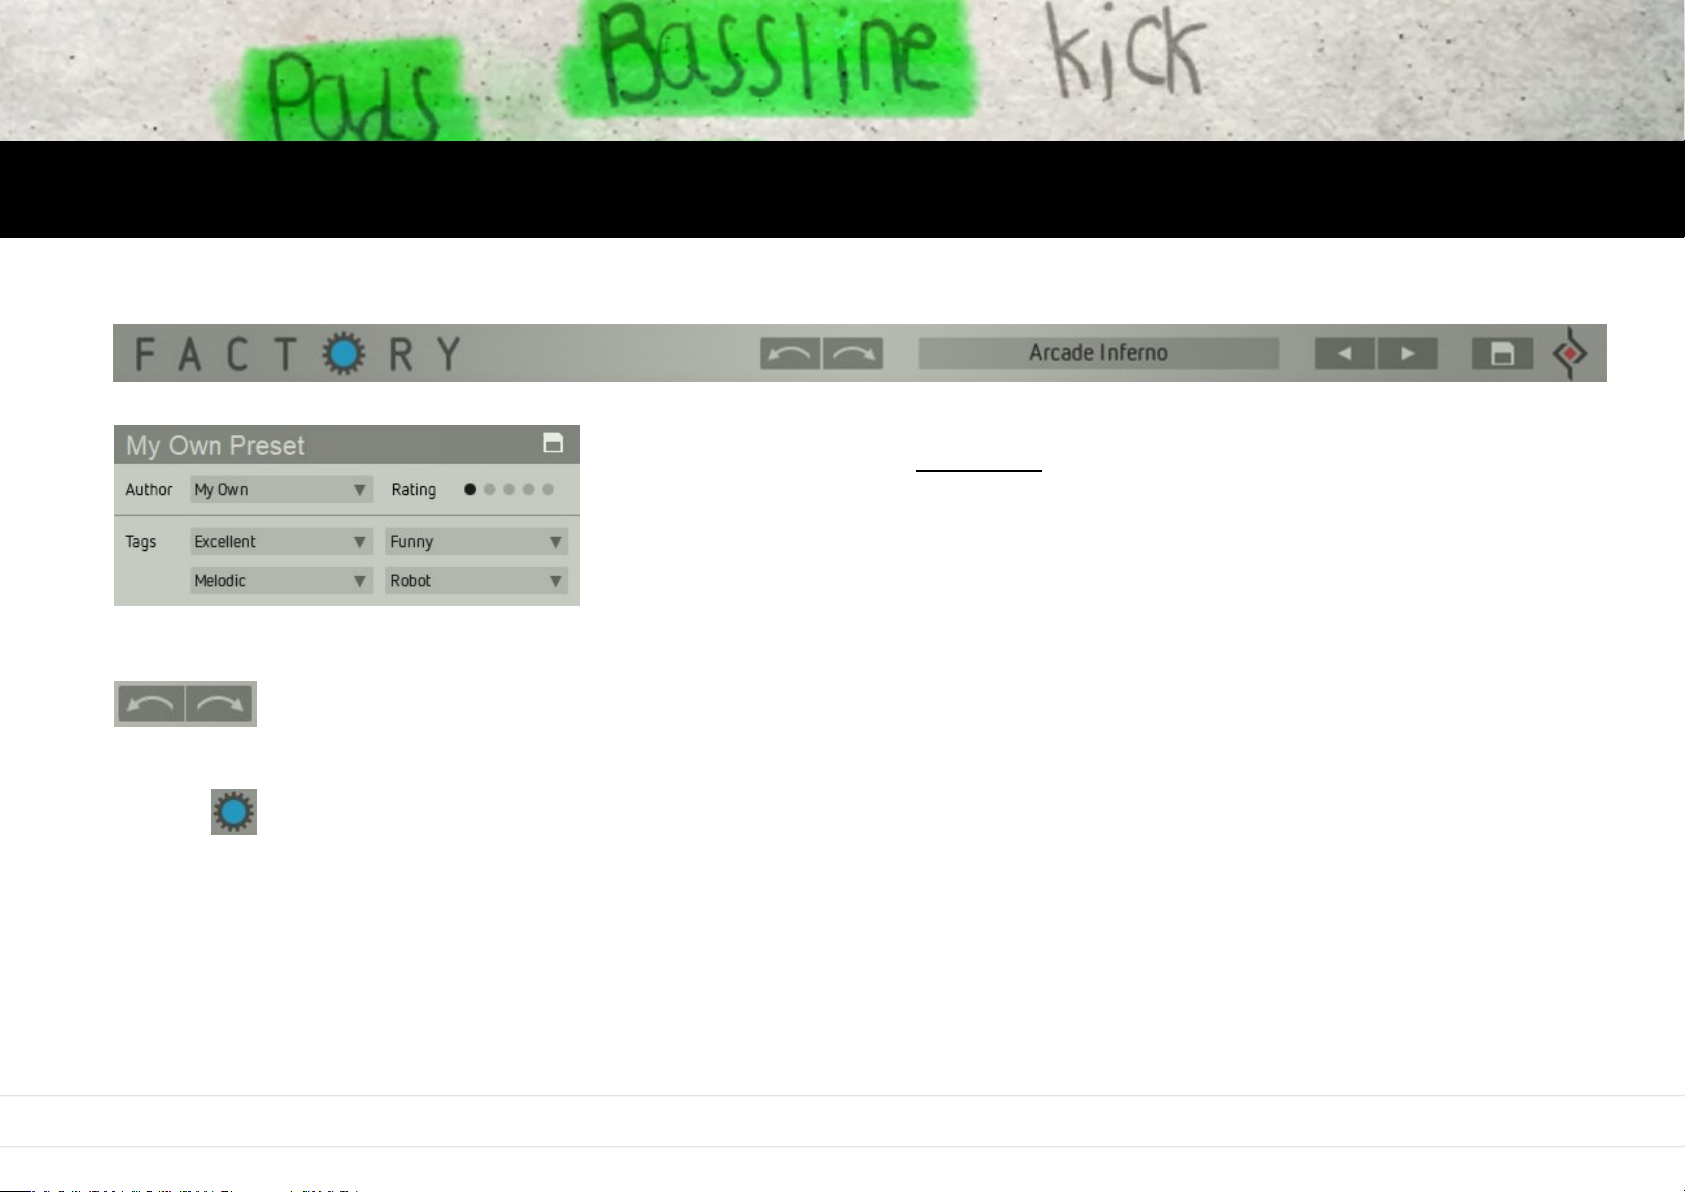
You can save your current settings at every time as a preset. Click the disk symbol right in Factorys header.
A window with preset name and tags will pop up.
As described in the section „tag presets“, you can name, tag and rate the preset here.
Next click on the disk symbol to save the current preset.
To cancel the preset save procedure, simply click somewhere onto Factorys main
window. the preset save windows will close and the save function is aborted.
These buttons (in the header) set back or redo your last operating step.
Clicking the blue colored gear of the Factory logo loads a randomly selected preset.
14
Page 15
Oscillators Mixer Filter Drive Output Modulators Sequencer Arpiculation Effects Settings Realtime Controllers
Program (PGM) List
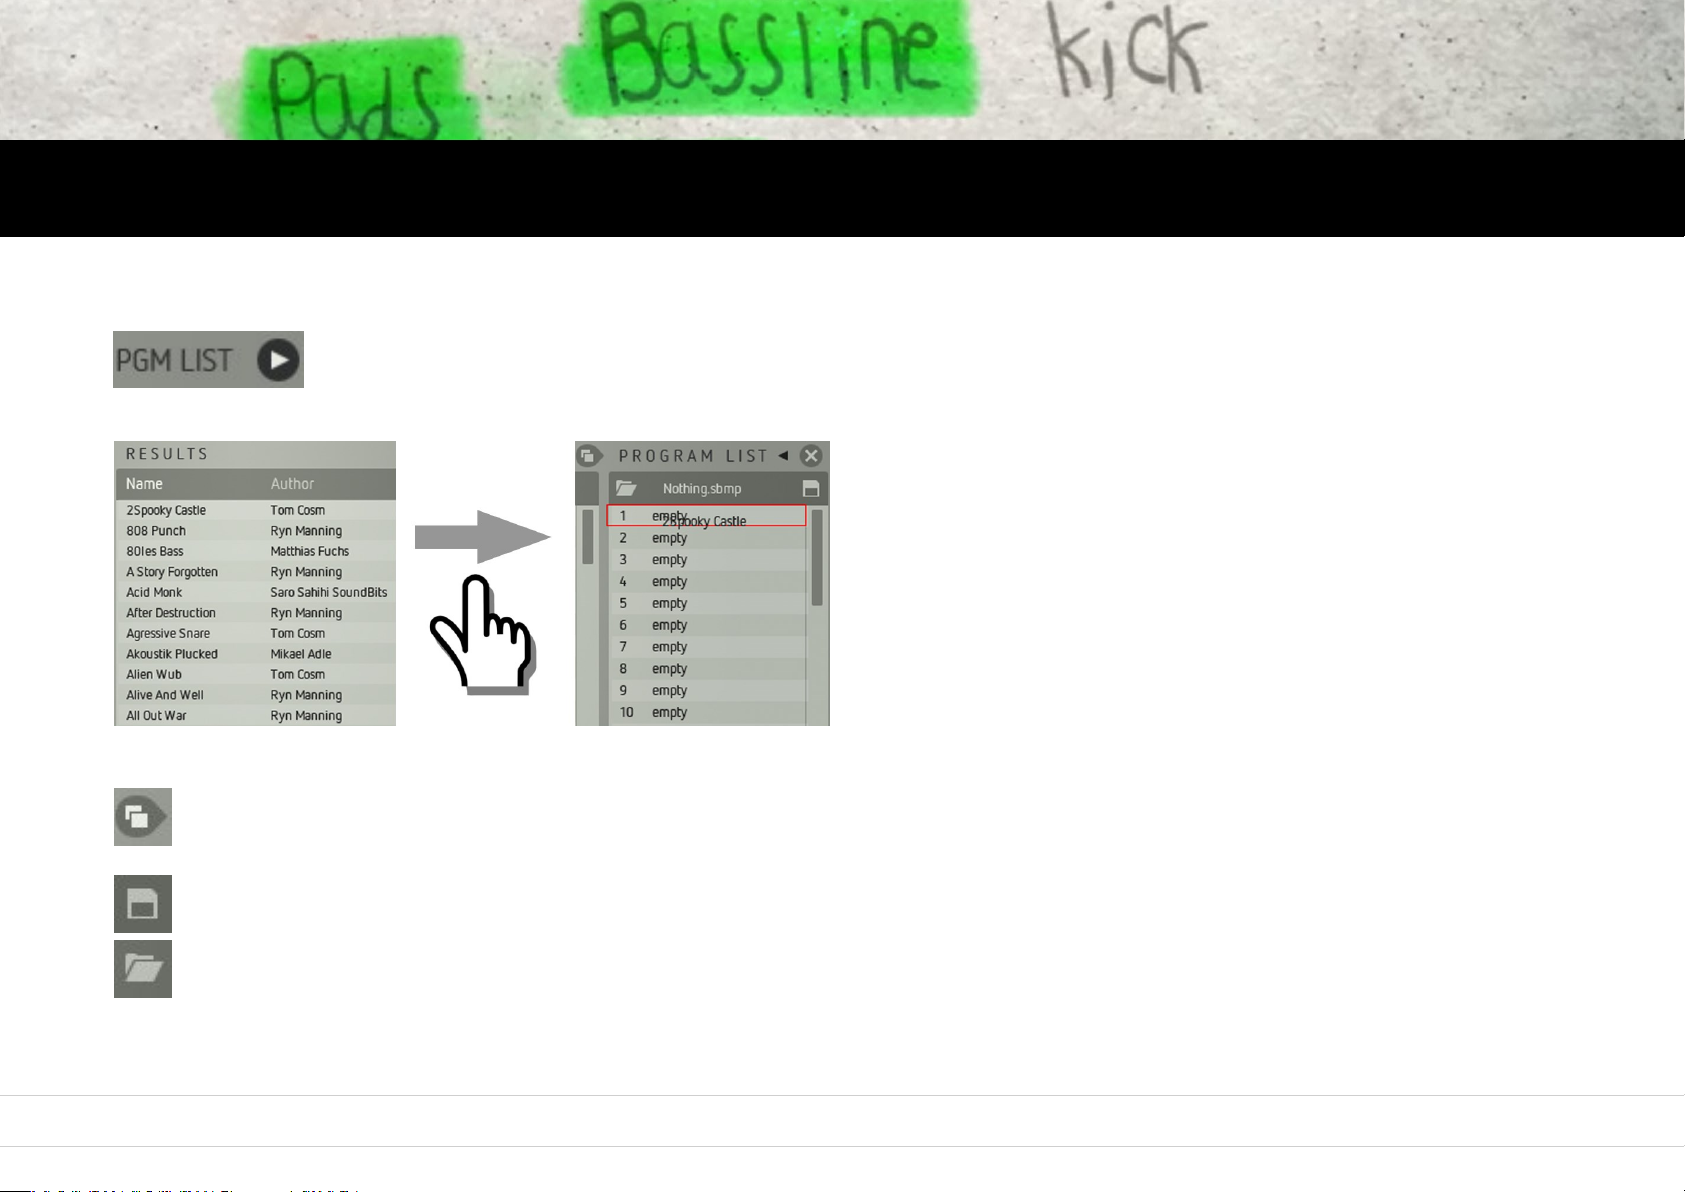
A Program list can e.g. be used to prepare a preset selection/sequence for a live gig.
Click the arrow symbol right beside „Pgm List“. (Click on the arrow symbol again to close the program list.)
A list with 128 positions will open up (in its default state, it is empty).
You can now drag‘n‘drop presets from the results list into the
program list.
Depending on its position there (1 – 128), each preset will respond
to the respective MIDI program change command.
If e.g. the preset „Bells“ is on position 58, an incoming MIDI
program change command #58 will load the preset „Bells“. You can
change the order of the presets within the program list simply by
using drag‘n‘drop.
Clicking this symbol, automatically fills the program list with the presets currently contained by the results list (of course this works only
for the first 128 presets).
When clicking the disk symbol (right), the file browser will open up. Now you can save the current program list.
When clicking on the folder symbol (left), the file browser will open up again.
Now you can load a previously saved program list.
15
Page 16
Oscillators
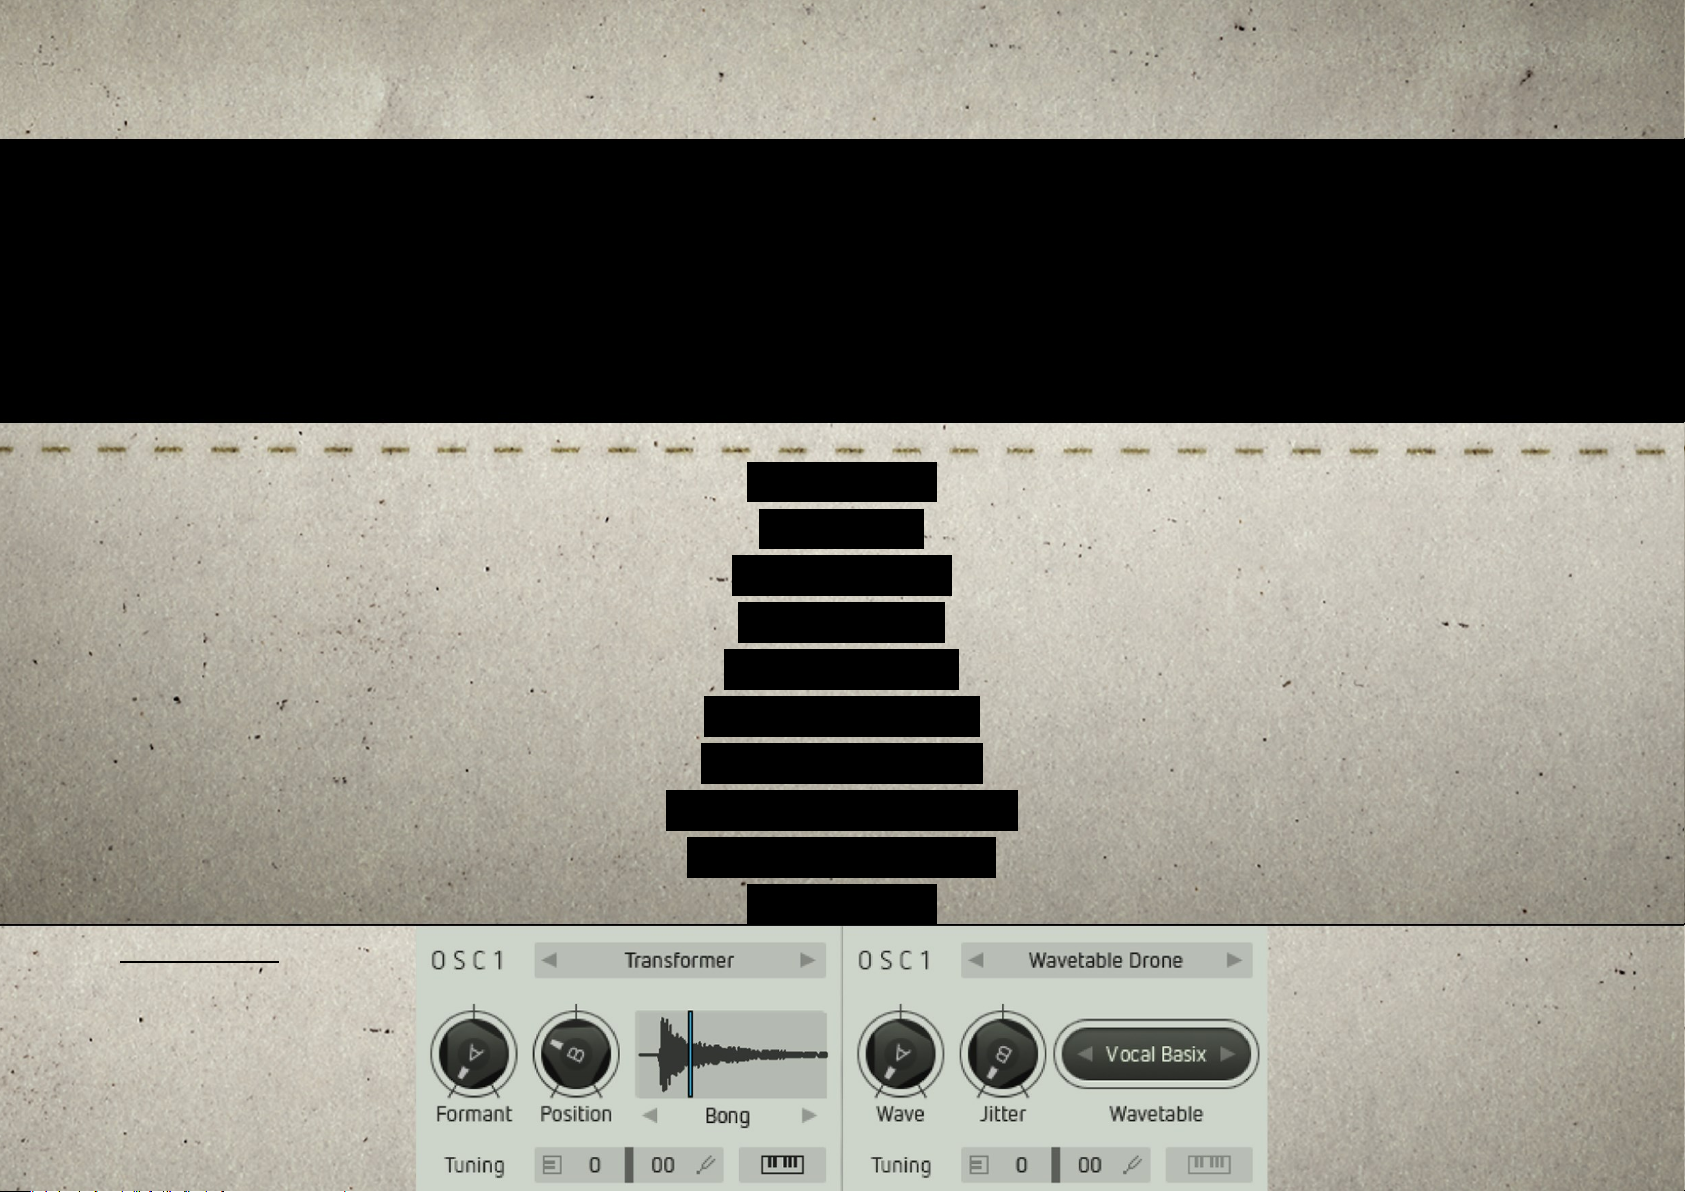
The oscillators OSC 1 and OSC 2 are Factory‘s main signal sources. They are identical with each other and
provide ten different oscillator models each, with very different sonic capabilities. The Oscillator models are:
PULSE SYNC
SAW SYNC
SAW FRACTAL
FM FORMANT
TRANSFORMER
WAVETABLE PWM
WAVETABLE SYNC
WAVETABLE FORMANT
WAVETABLE DRONE
WAVEGUIDE
Watch Video
16
Page 17
Oscillators Mixer Filter Drive Output Modulators Sequencer Arpiculation Effects Settings Realtime Controllers
Global Oscillator parameters & controls
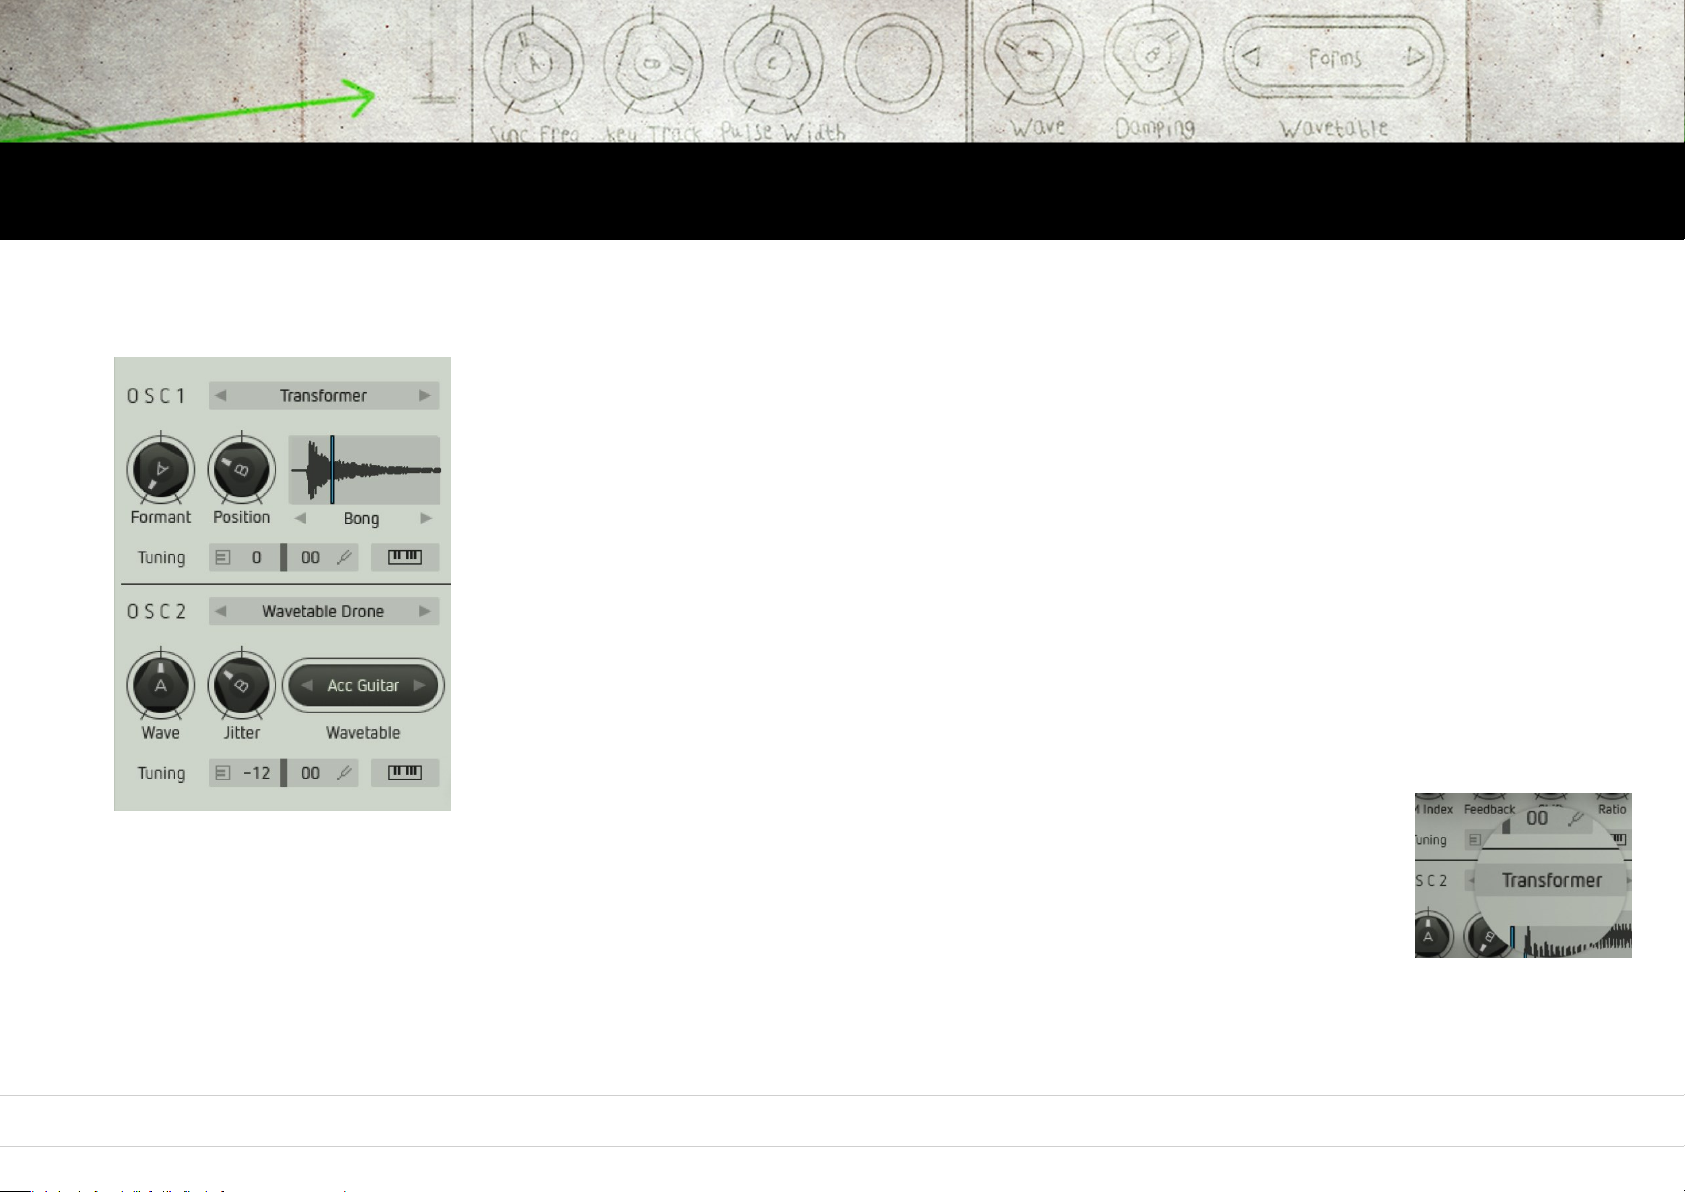
The parameters/controls of the oscillator models are a little different here and there.
However, two identical functions appear on all oscillator models:
Tuning
The left number controls the pitch of the oscillator by +/- 36 semitones (+/-3 octaves).
The right number detunes the oscillator by cents (0 to 99 cent)
Pitch Track
(keyboard symbol) connects / disconnects the pitch control to/from the keyboard.
The latter is useful for e.g. drum sounds.
Clicking on the name of the oscillator model will open up a selection window.
Load the desired model by clicking on it. You can cycle through the different models using the arrow buttons.
17
Page 18
Oscillators Mixer Filter Drive Output Modulators Sequencer Arpiculation Effects Settings Realtime Controllers
Pulse Sync
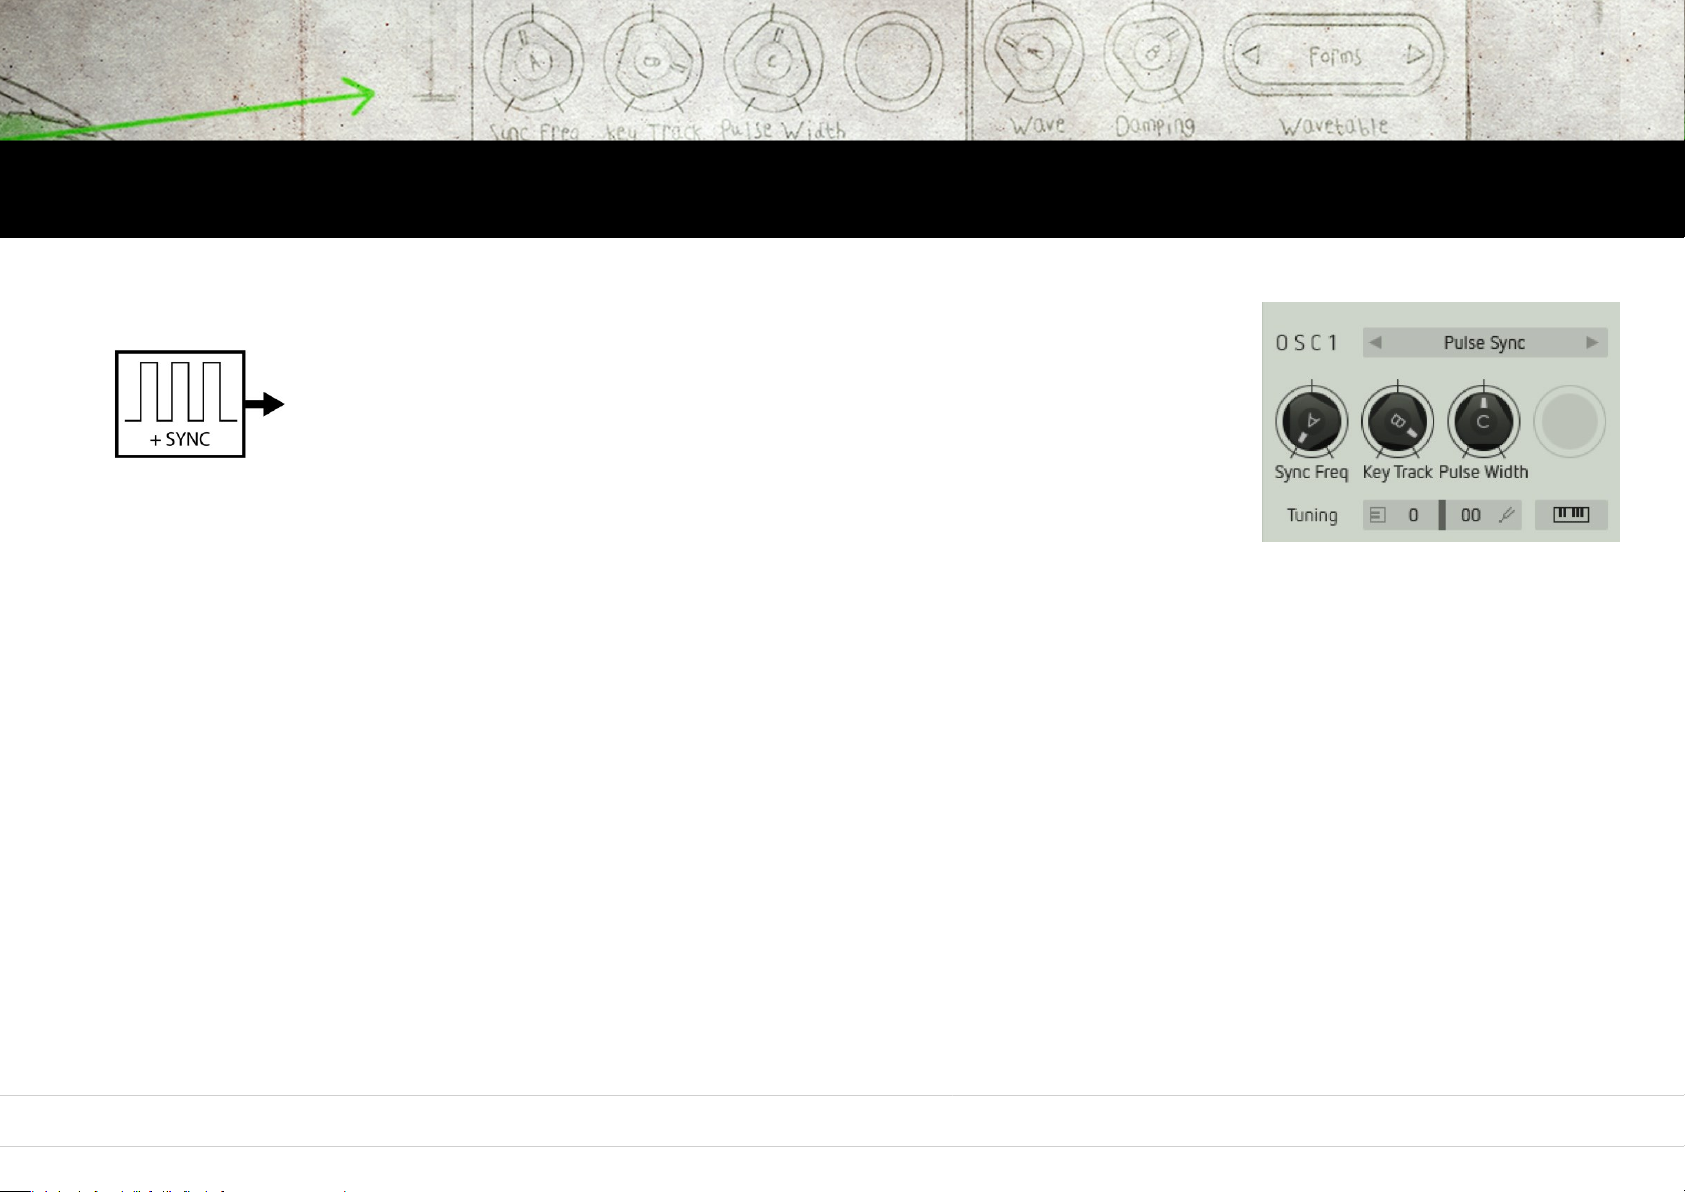
Pulse Sync
Produces a signal made up of several pulsewaves synced with each other.
The sound is dense and vivid. By and large, this is the equivalent of a classic,
fat-sounding analog pulsewave.
Sync Freq
Controls the sync frequency and thus the fundamental timbral character.
Key Track
Controls to what extent the sync frequency – and thus the sound – will change, depending on the pitch played.
Pulse Width
Controls the pulsewidth of the pulsewave. A symmetrical squarewave is generated at center setting. By turning the knob clockwise (or back),
the ratio between peaks and troughs will change increasingly.
18
Page 19
Oscillators Mixer Filter Drive Output Modulators Sequencer Arpiculation Effects Settings Realtime Controllers
Saw Sync & Saw Fractal
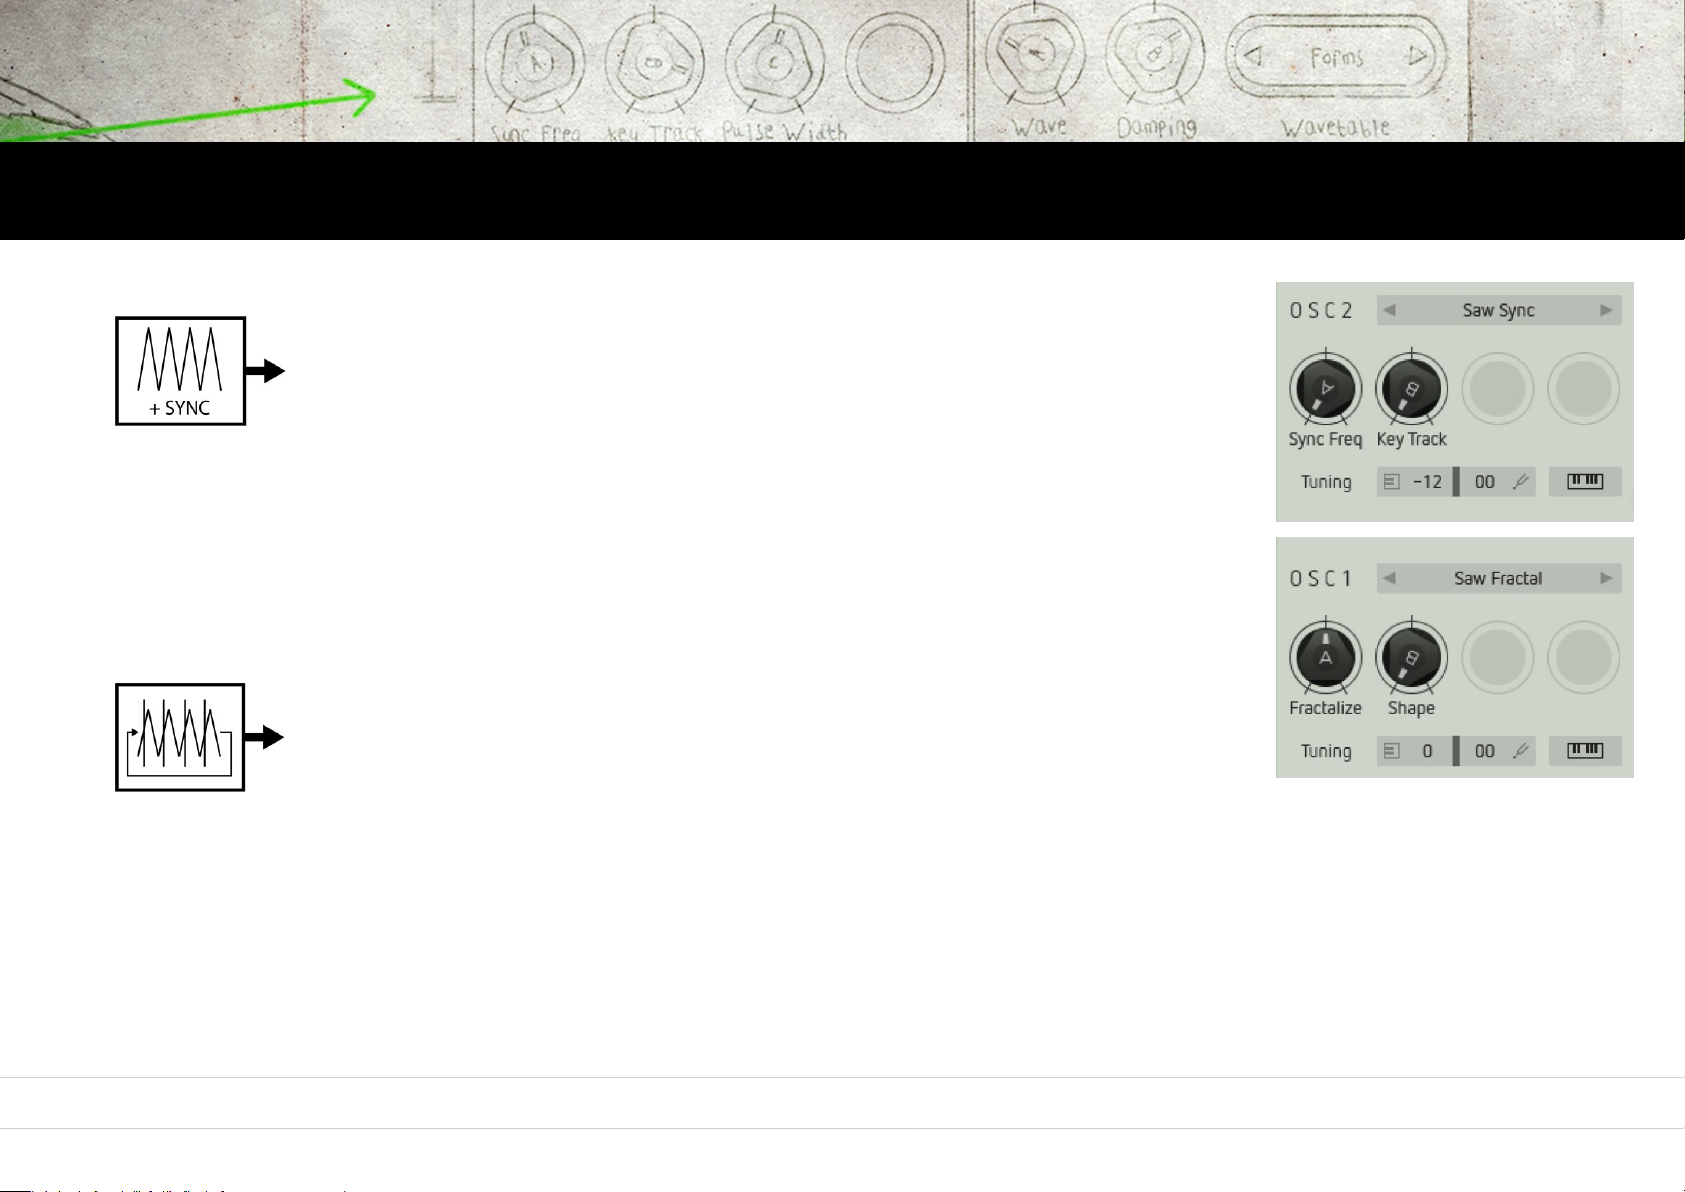
Saw Sync
Produces a signal made up of of several sawtooth waves, synced with each
other.
The sound is very bright and warm. It largely resembles a classic, analog
sawtooth wave (and fat-sounding it is, too. We thought we should point this out).
Sync Freq
Controls the sync frequency and thus its fundamental timbral character.
Key Track
Controls to what extent the sync frequency – and thus the sound – will change depending on the pitch played.
Saw Fractal
Produces a sawtooth wave that gets chopped up into tiny fragments at a set
rate, which is then fed back into the oscillator. Depending on the setting of
these controls, the sound can range somewhere between thin and static and dense and shimmering.
Fractialize
Controls the frequency of the „fragmentation“ of the signals or, in other words, the size of the chopped-up segments.
Shape
Controls feedback level and polarity. The waveform shape vaguely resembles a sawtooth wave („clockwise“) or a pulsewave („counter
clockwise“).
19
Page 20
Oscillators Mixer Filter Drive Output Modulators Sequencer Arpiculation Effects Settings Realtime Controllers
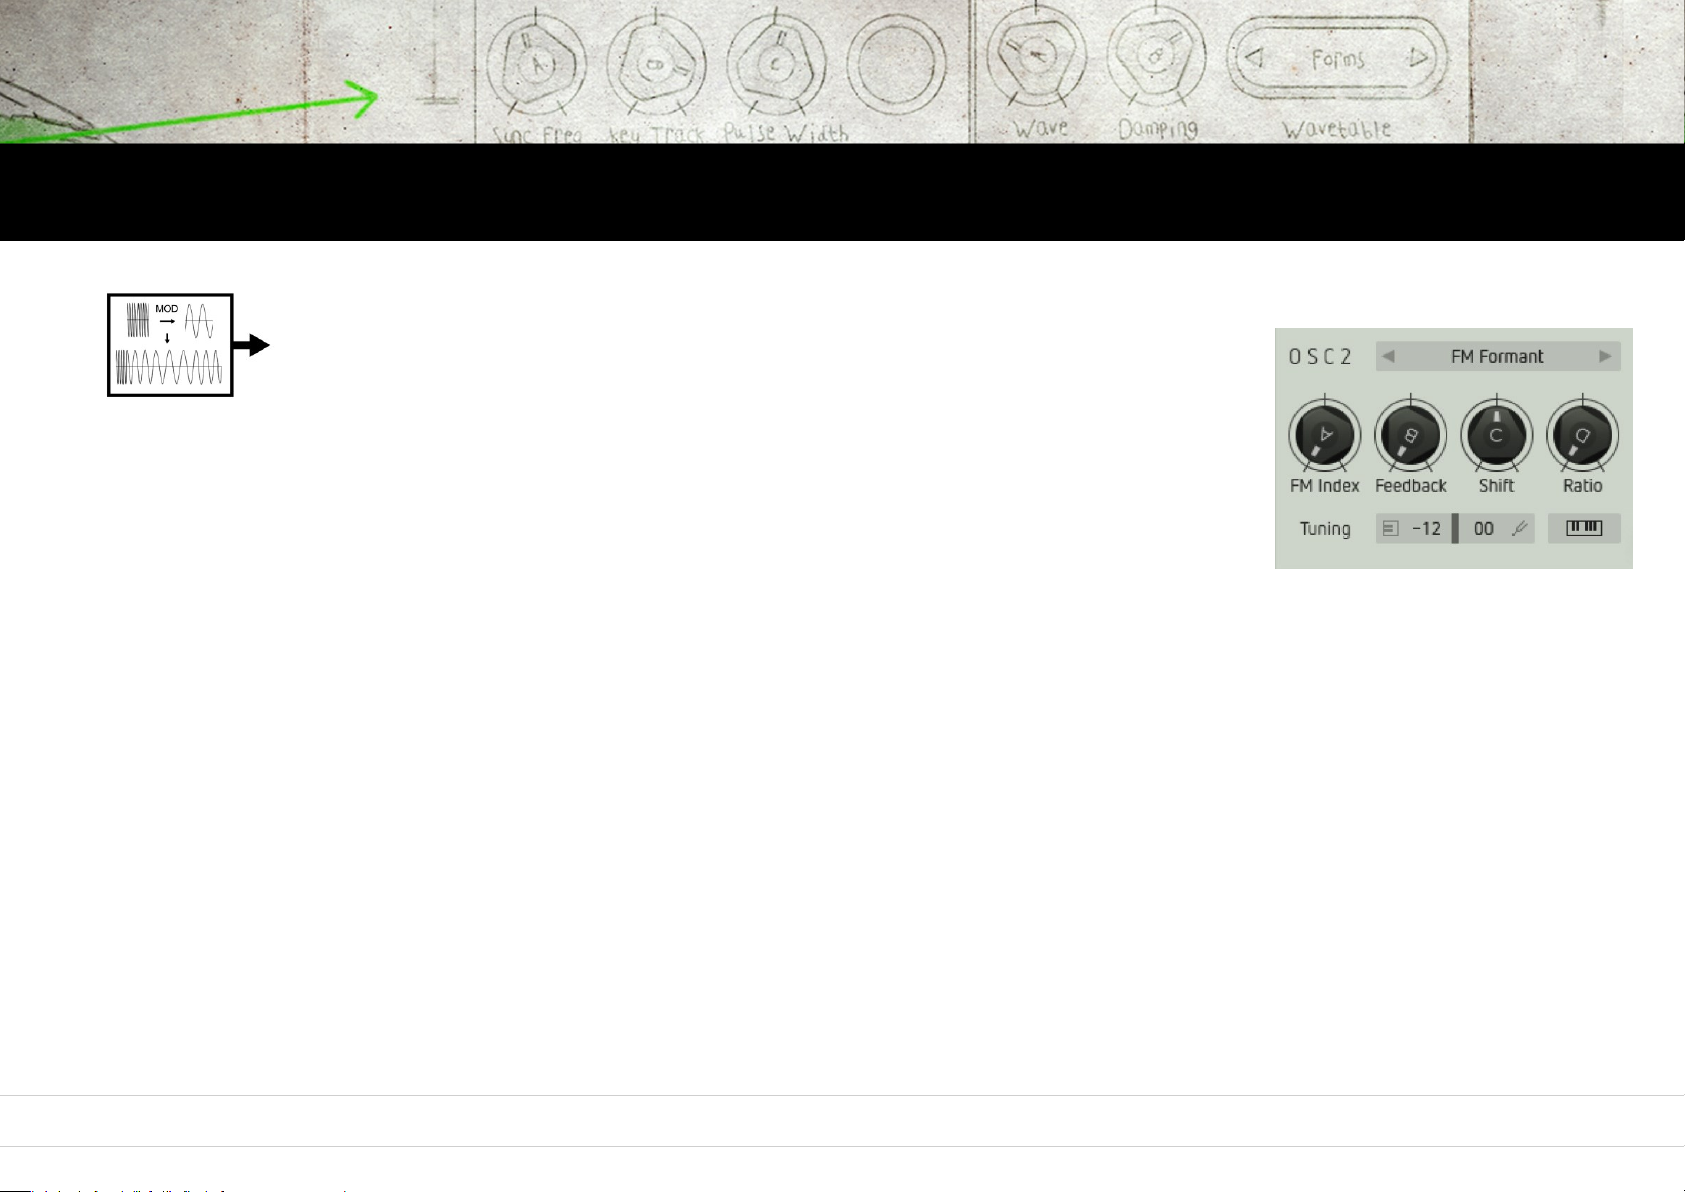
FM Formant
FM Formant
This oscillator model features Phase Modulation (much more popular under
the not quite correct term „frequency modulation / FM“, but we mustn‘t use
this nomenclature here...). A sinewave, modulated by a second one, resulting in a
very versatile and rich sound. The frequency ratio of both sinewaves is scaled – thus
all sounds can be played harmonically tuned across the whole note range. But that
is not all there is: The result of the phase modulation model will be processed
further, using formant shift.
FM Index
Controls the amount of phase modulation. Turning Amount clockwise increasingly generates more overtones.
Feedback
Distorts the resulting waveshape from sine-like (Amount and Feedback fully counter- clockwise) to sawtooth-like (Feedback fully clockwise).
Shift
Shifts the formants of the resulting PM waveform and thus alters its fundamental timbral character.
Ratio
Controls a scaled frequency ratio between both basic waveforms.
20
Page 21
Oscillators Mixer Filter Drive Output Modulators Sequencer Arpiculation Effects Settings Realtime Controllers
Transformer
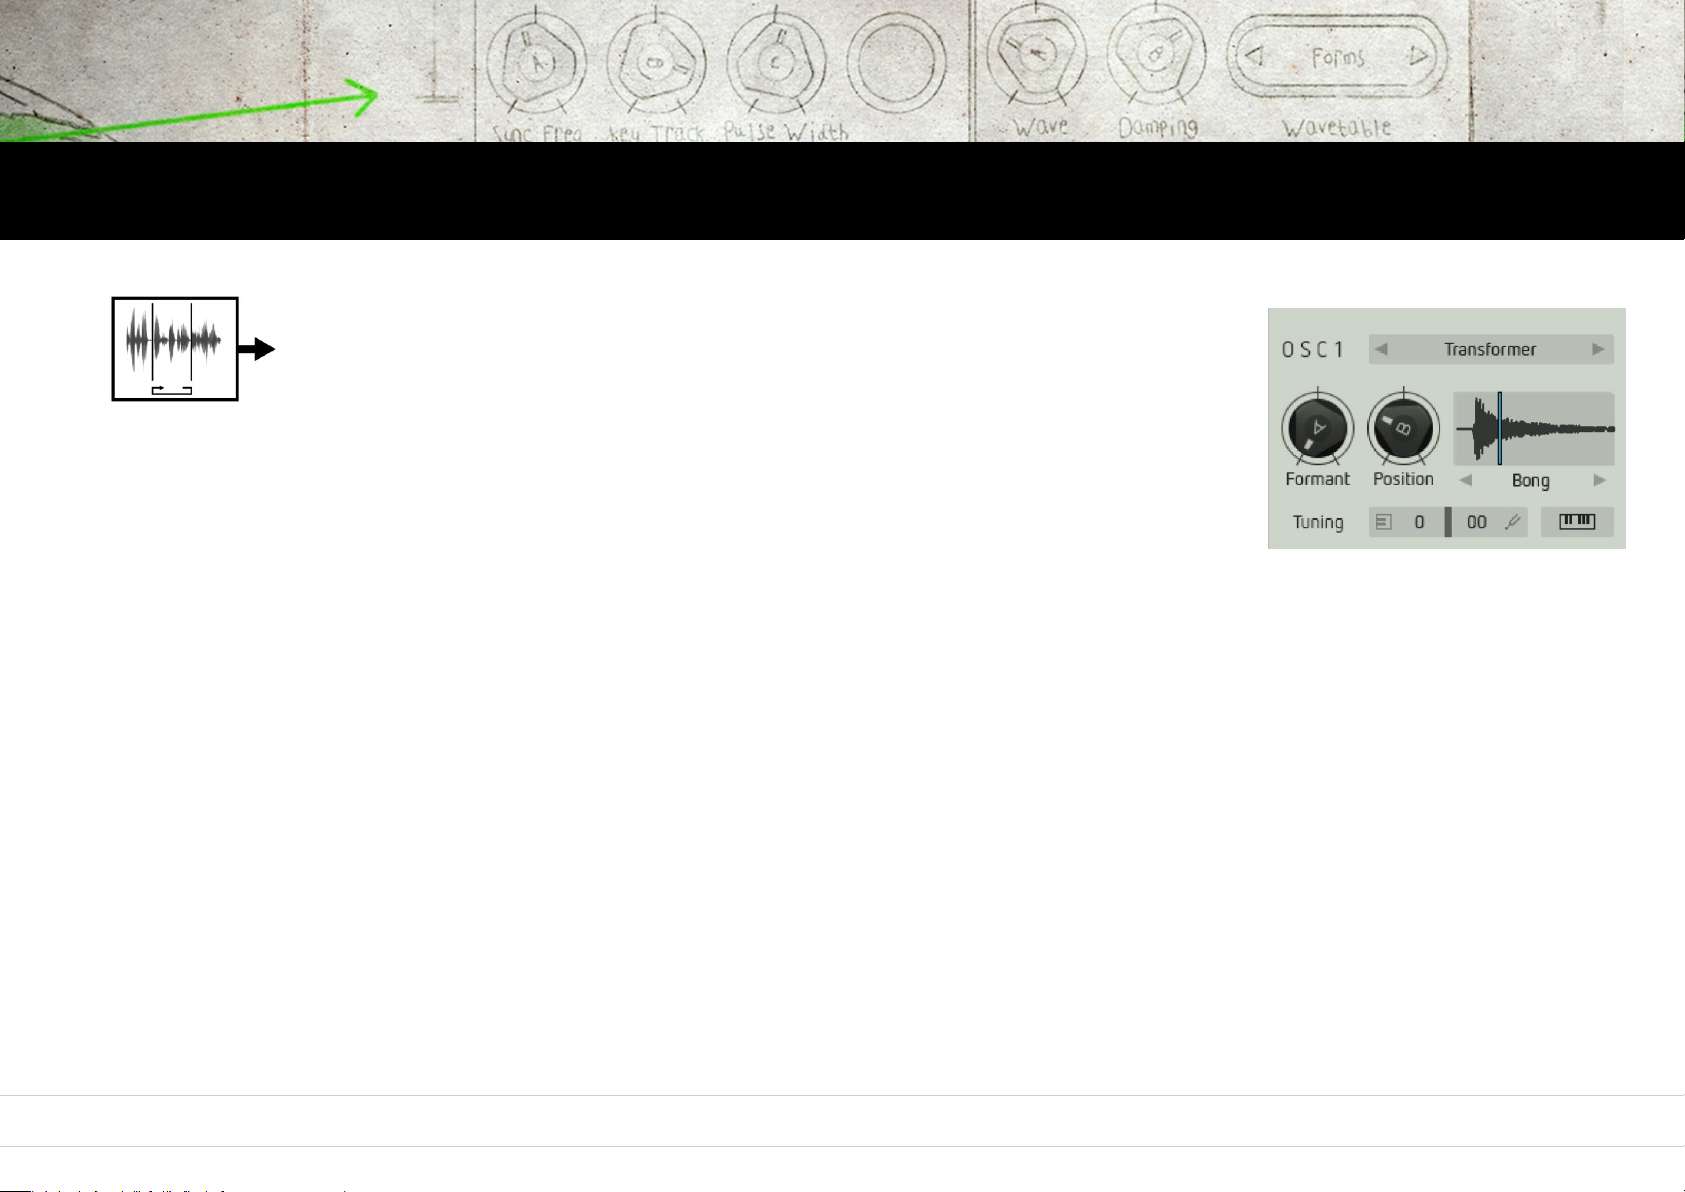
Transformer
A granular oscillator. Here, you can import a sample of your choice. The
sample will be automatically analysed and transformed into a wavetable
which is then played back in segments as a looped waveform. By applying
this process, it is possible to play the sample across a theoretically unlimited note
range. Feel free to try out any kind of sound material for more Metal Machine
Music. Even unusual sounds, e.g. vocal samples of you singing under the shower,
may yield interesting results. Or not.
Formant
Shifts the formants of the sample and thus alters its fundamental timbre.
Position
Shifts the section of the sample that will be looped and played back.
To load an audiofile, click the small waveform display. Your file browser will open up.
Select an audiofile of your choice and load it into Factory‘s oscillator by another click.
Factory will accept the audio file formats wav, aif, and mp3.
By clicking on the sample name under the sample display, you will directly open up Factory‘s sample content,
organised in groups. Using the arrow symbols, you can step through the samples.
21
Page 22
Oscillators Mixer Filter Drive Output Modulators Sequencer Arpiculation Effects Settings Realtime Controllers
Wavetable PWM
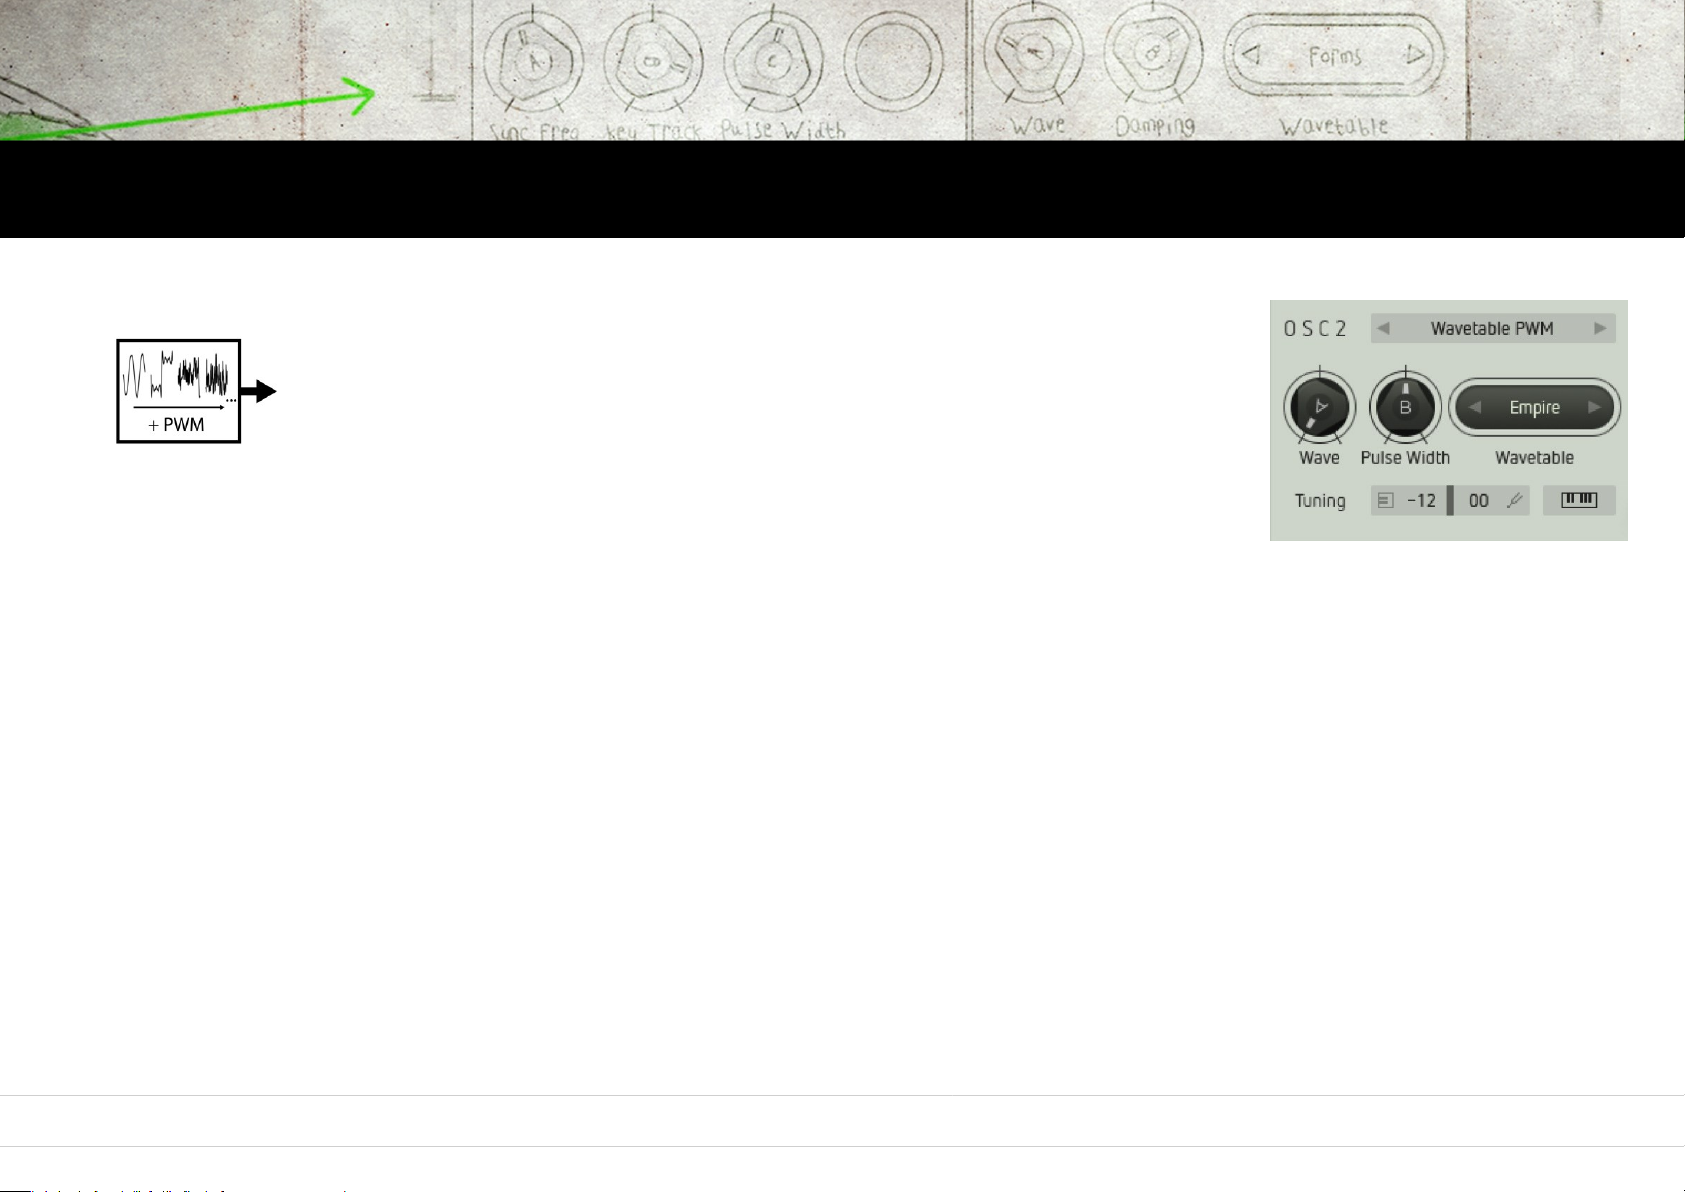
Wavetable PWM
This oscillator model uses wavetable synthesis, i.e. a series of different waveforms
that is played back sequentially. In addition to that, the resulting sound will get a
pulsewidth-modulation treatment.
Wave
Defines the playback position within the selected wavetable and thus changes its timbral character.
Pulse Width
Controls the pulsewidth of the waveform. A symmetrical wave is generated at the center setting. By turning the knob clockwise (or back), the
ratio between peaks and troughs will change increasingly.
By clicking on the wavetable name, a selection window will open up. It shows Factory‘s wavetable content, organised in groups.
You can select and load a wavetable into the oscillator or click on the short arrow symbols to step through the wavetables.
22
Page 23
Oscillators Mixer Filter Drive Output Modulators Sequencer Arpiculation Effects Settings Realtime Controllers
Wavetable Sync & Wavetable Formant
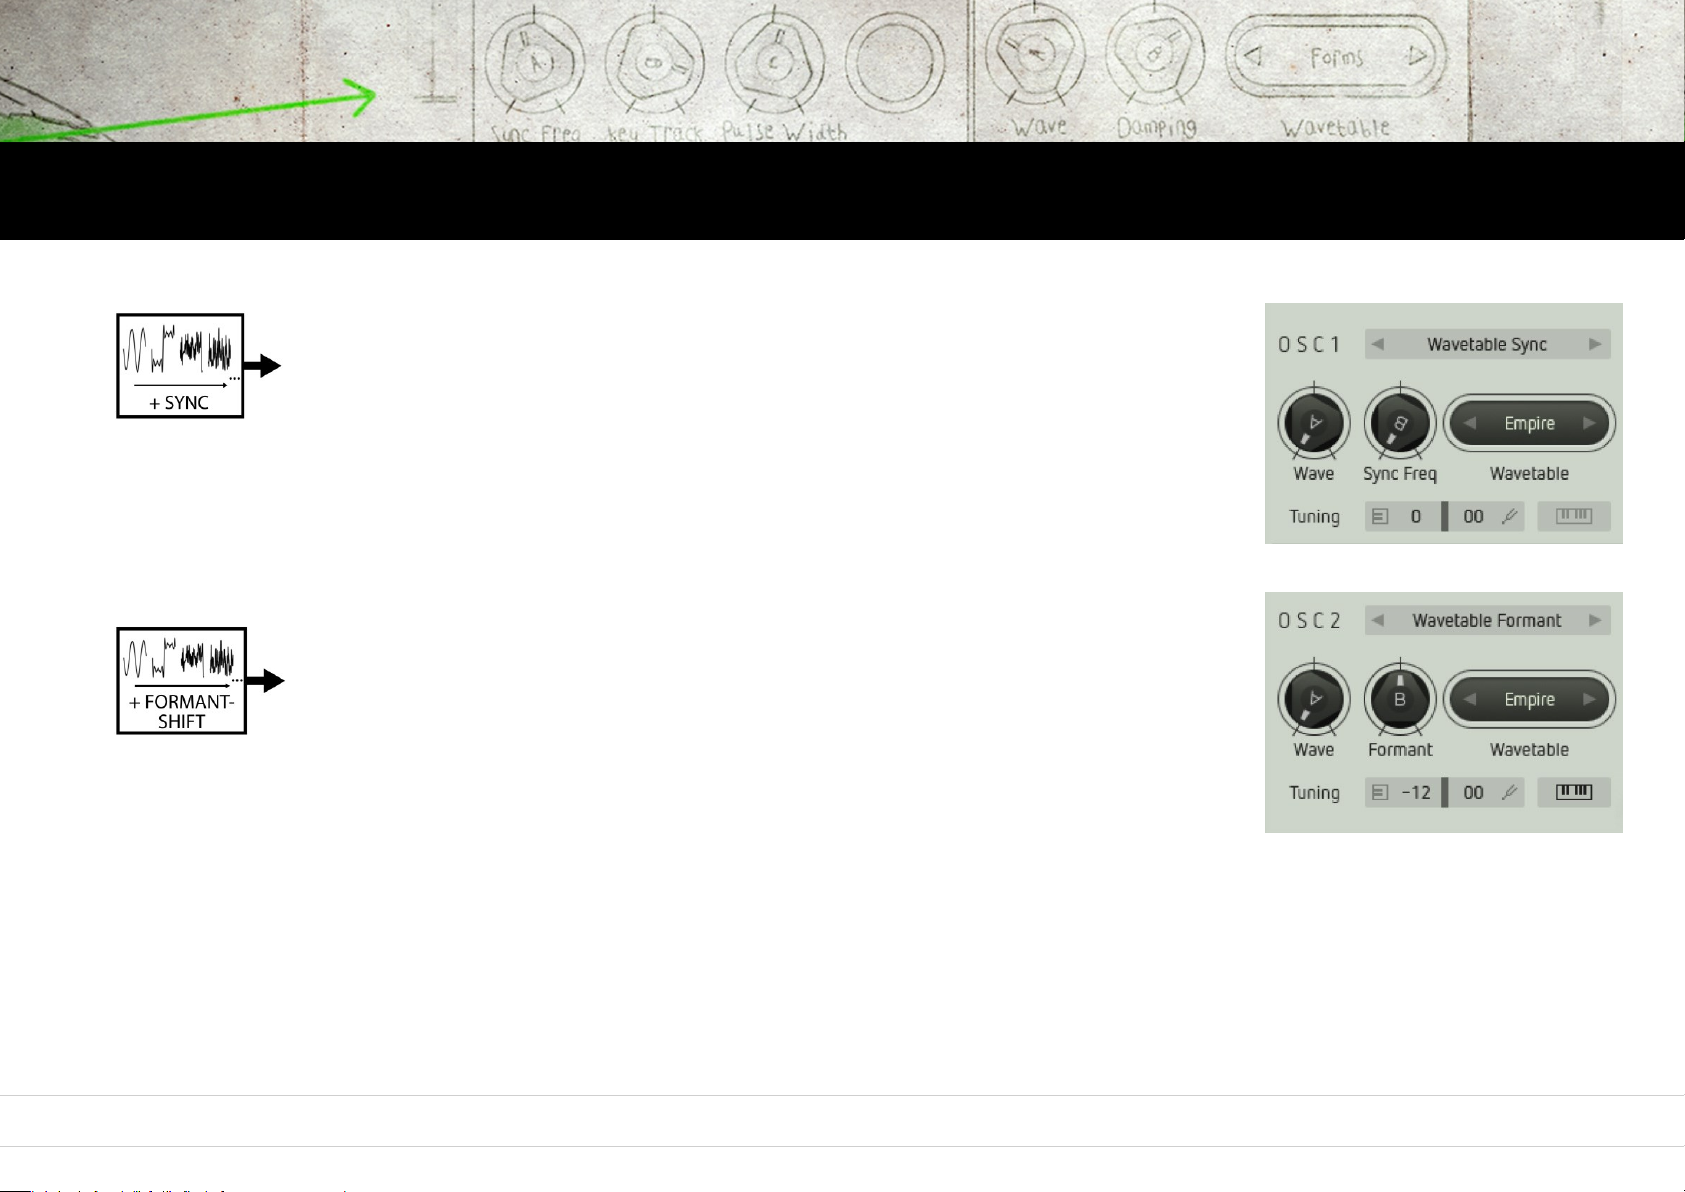
Wavetable Sync
This oscillator model also uses wavetable synthesis. In addition to that, the resulting
wave is synced to another wave running at a higher freqeuency.
This yields a completely new waveshape.
Wave
Defines the playback position within the selected wavetable and thus determines its timbral character.
Sync Freq
Controls the sync frequency and thus the timbral character, i.e. the sound grows increasingly brighter.
Wavetable Formant
Yet another wavetable oscillator. This one adds formant shifting to the produced
waveform. The sound is quite different from the other wavetable models. It can be
useful for the creation of e.g. vocal-like sounds.
Wave
Defines the playback position within the selected wavetable and thus determines its timbral character.
Formant
Shifts the formants of the produced waveform and thus determines its timbral character.
By clicking on the wavetable name you can select and load a wavetable into the oscillator or click on the short
arrow symbols to step through the wavetables.
23
Page 24
Oscillators Mixer Filter Drive Output Modulators Sequencer Arpiculation Effects Settings Realtime Controllers
Wavetable Drone
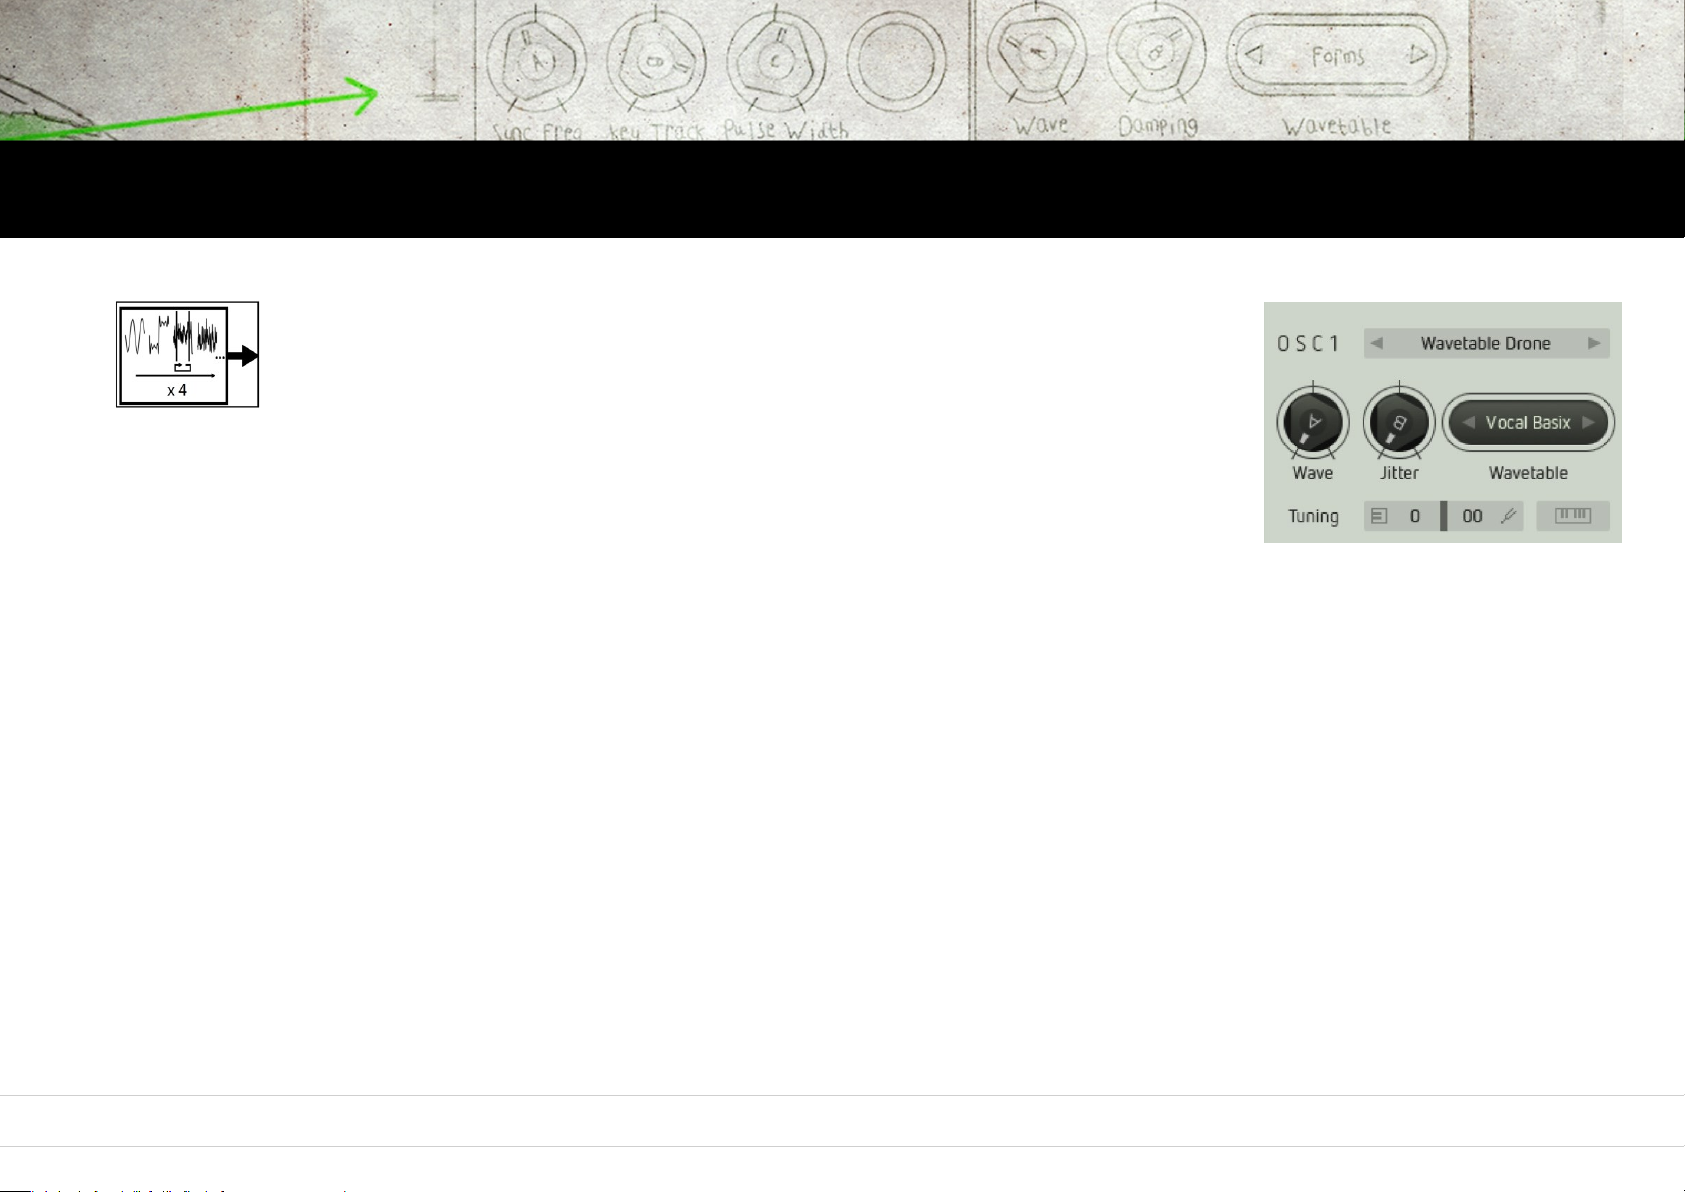
Wavetable Drone
Here comes yet another and quite unique wavetable synthesis application:
A cluster of four processed wavetables using the capabilities of a granular
synthesizer. With just one parameter (Jitter) you can create a very wide sonic scope
from „pure“ and „clean“ waveforms to harsh and complex noise.
The resulting signals are quite useful as raw material for lush strings or choirs as
well
as for drum sounds and noise effects.
Wave
Again, defines the playback position within the selected wavetable.
Jitter
Controls the timbral character of the resulting signal.
Turning the control counterclockwise will result in more tonal sound. Turning it clockwise, will provide increasingly harsh and noisy effects.
Modulating this parameter can be very interesting.
By clickping on the wavetable name, a selection window will open up. It shows Factory‘s wavetable content, organised in groups. You can select
and load a wavetable into the oscillator or click on the short arrow symbols to step through the wavetables.
24
Page 25
Oscillators Mixer Filter Drive Output Modulators Sequencer Arpiculation Effects Settings Realtime Controllers
Waveguide
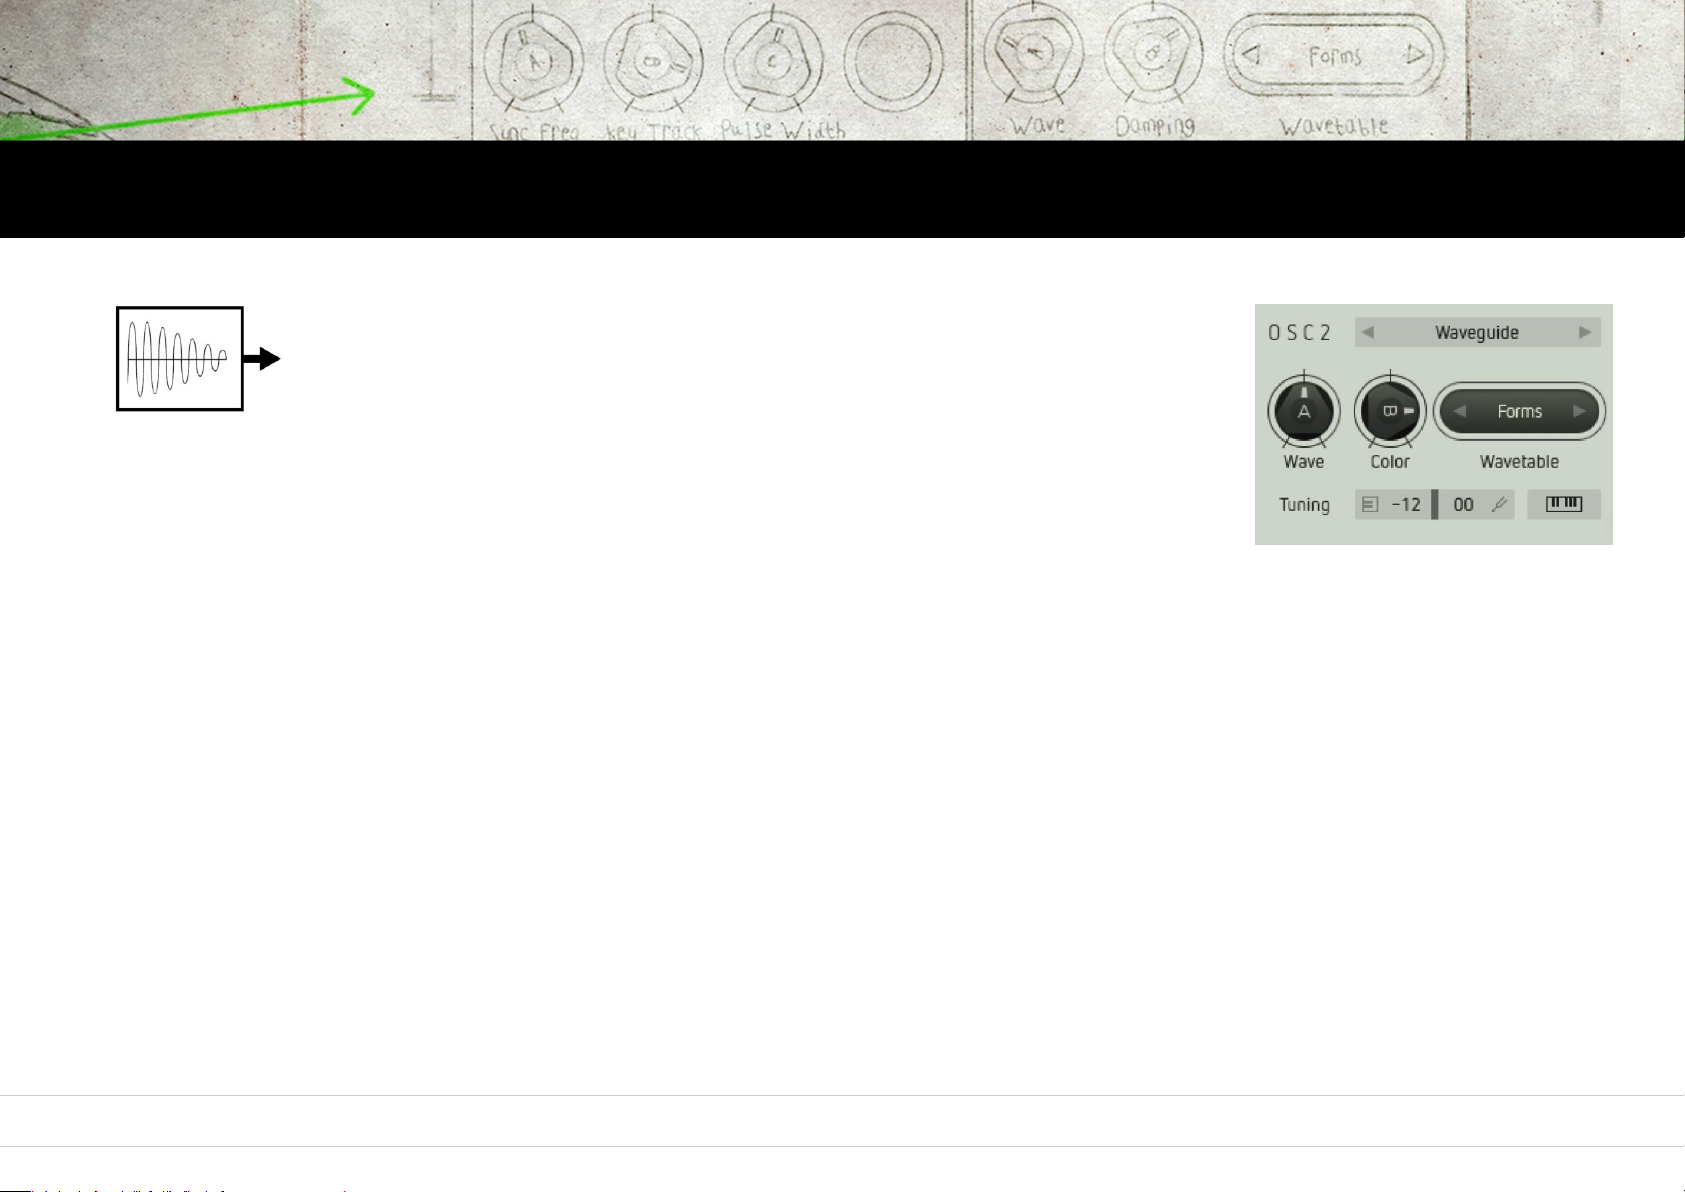
Waveguide
Uses the wavetables discussed earlier and combines them with a resonatoralgorithm. This results in percussive sounds that generally resemble plucked
strings.
Wave
Defines the playback position within the selected wavetable and thus alters its timbral character.
Color
Increasingly damps the generated waveform, which corresponds to the acoustic properties of a plucked string.
Please note when modulating the Wave parameter: Modulation will only affect the first wave cycle that is stimulating the resonator.
Modulating the Wave parameter while the previous sound is still resonating will have no audible effect.
By clicking on the wavetable name, a selection window will open up. It shows Factory‘s wavetable content, organised in groups. You can select
and load a wavetable into the oscillator or click on the short arrow symbols to step through the wavetables.
25
Page 26
Mixer
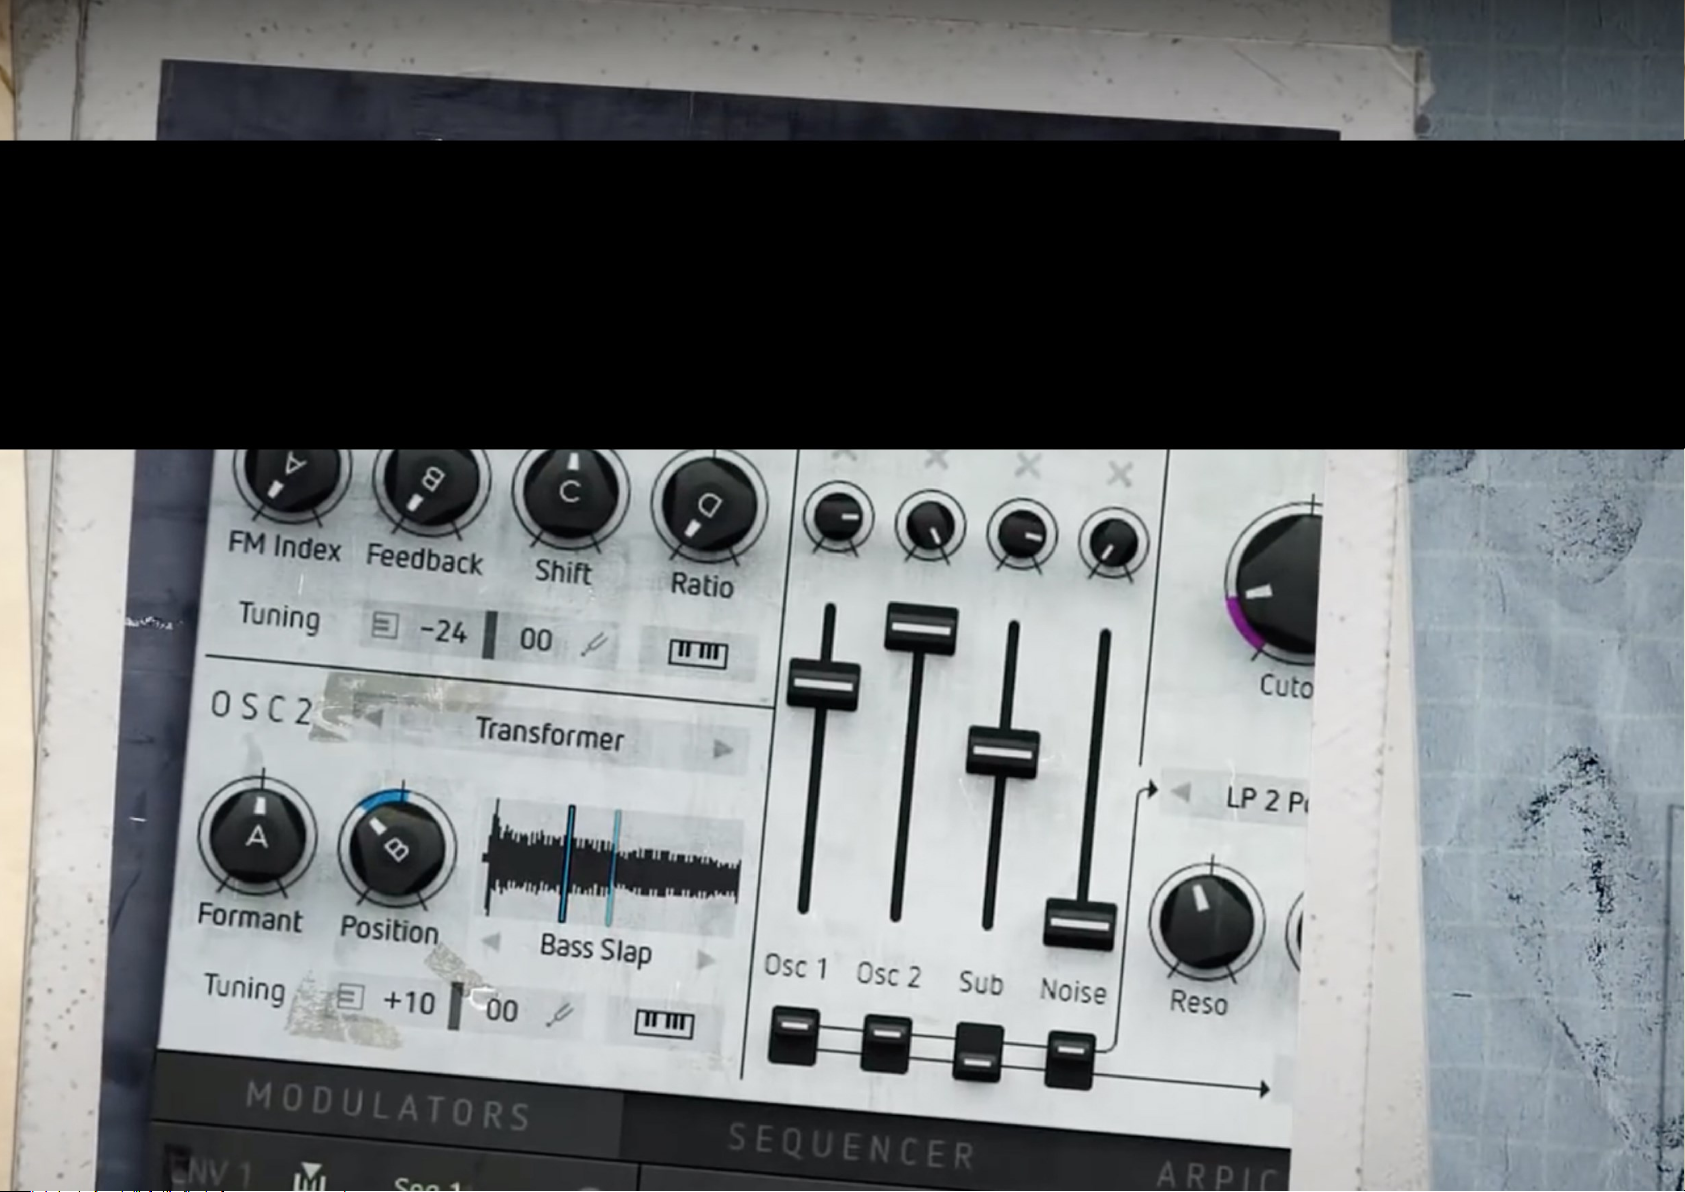
In this module, Factory‘s sound sources are combined and routed into the subsequent modules for further treatment. .
In addition, two of these signals can be ring-modulated with each other.
The section also provides a sub oscillator and a noise source.
26
Page 27
Oscillators Mixer Filter Drive Output Modulators Sequencer Arpiculation Effects Settings Realtime Controllers
Why knobs and faders?
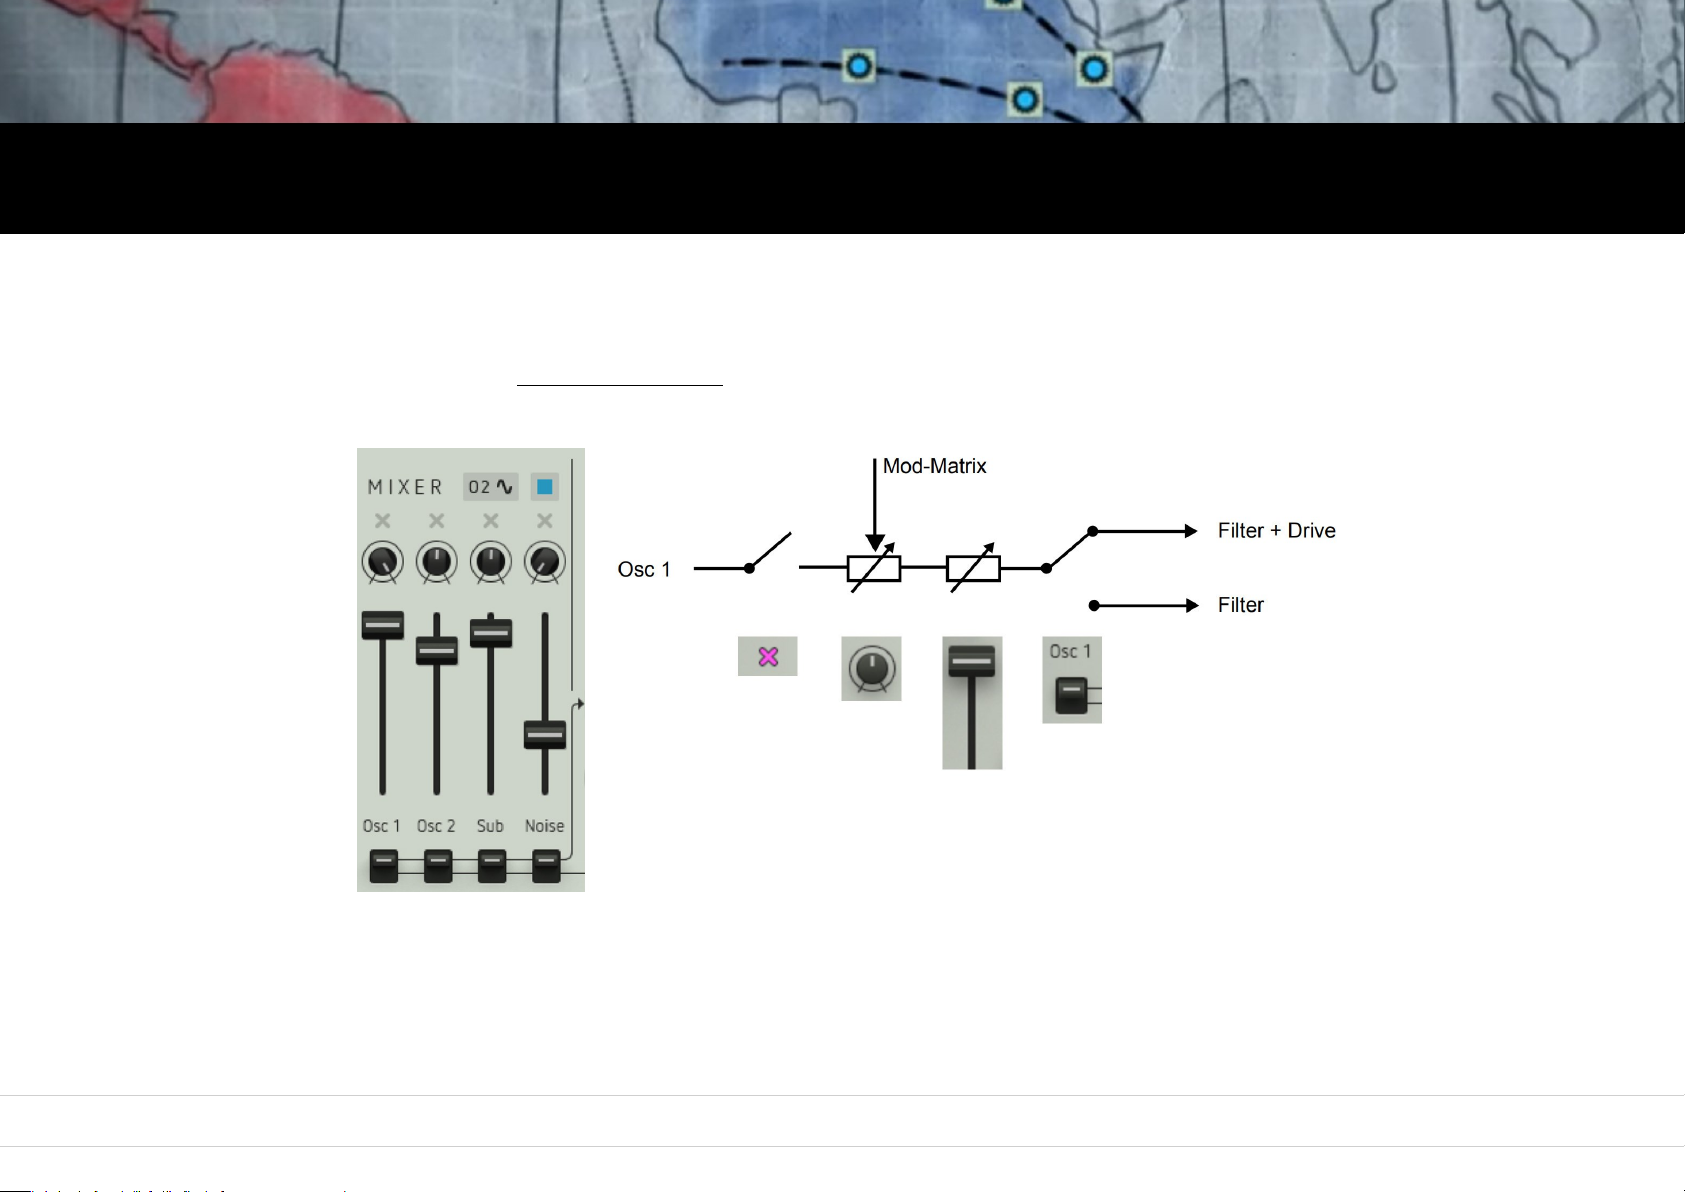
Operating principle of a channel strip:
On each mixer channel, you will find two daisy-chained level controls, a knob and a fader – why is that?
The knobs can be controlled via the modulation matrix (more about this later on). They are used for level modulation.
With the subsequent faders, you can control the level ratios between the different signals according to the faders of a mixing desk.
An example: Let‘s suppose you want to create a drum pattern made up of kick and snare, using the internal sequencer.
To generate individual hits, the sequencer‘s gate signals will open and close (modulate) two of the level knobs.
To control the level ratios of these two sounds additionally, you are using the (unmodulated) faders.
27
Page 28
Oscillators Mixer Filter Drive Output Modulators Sequencer Arpiculation Effects Settings Realtime Controllers
OSC 1, OSC 2 & Sub
Osc 1 & 2
Control the levels of both oscillator signals.
Sub
Controls the level of the suboscillator signal. Its pitch is one octave below the master oscillator.
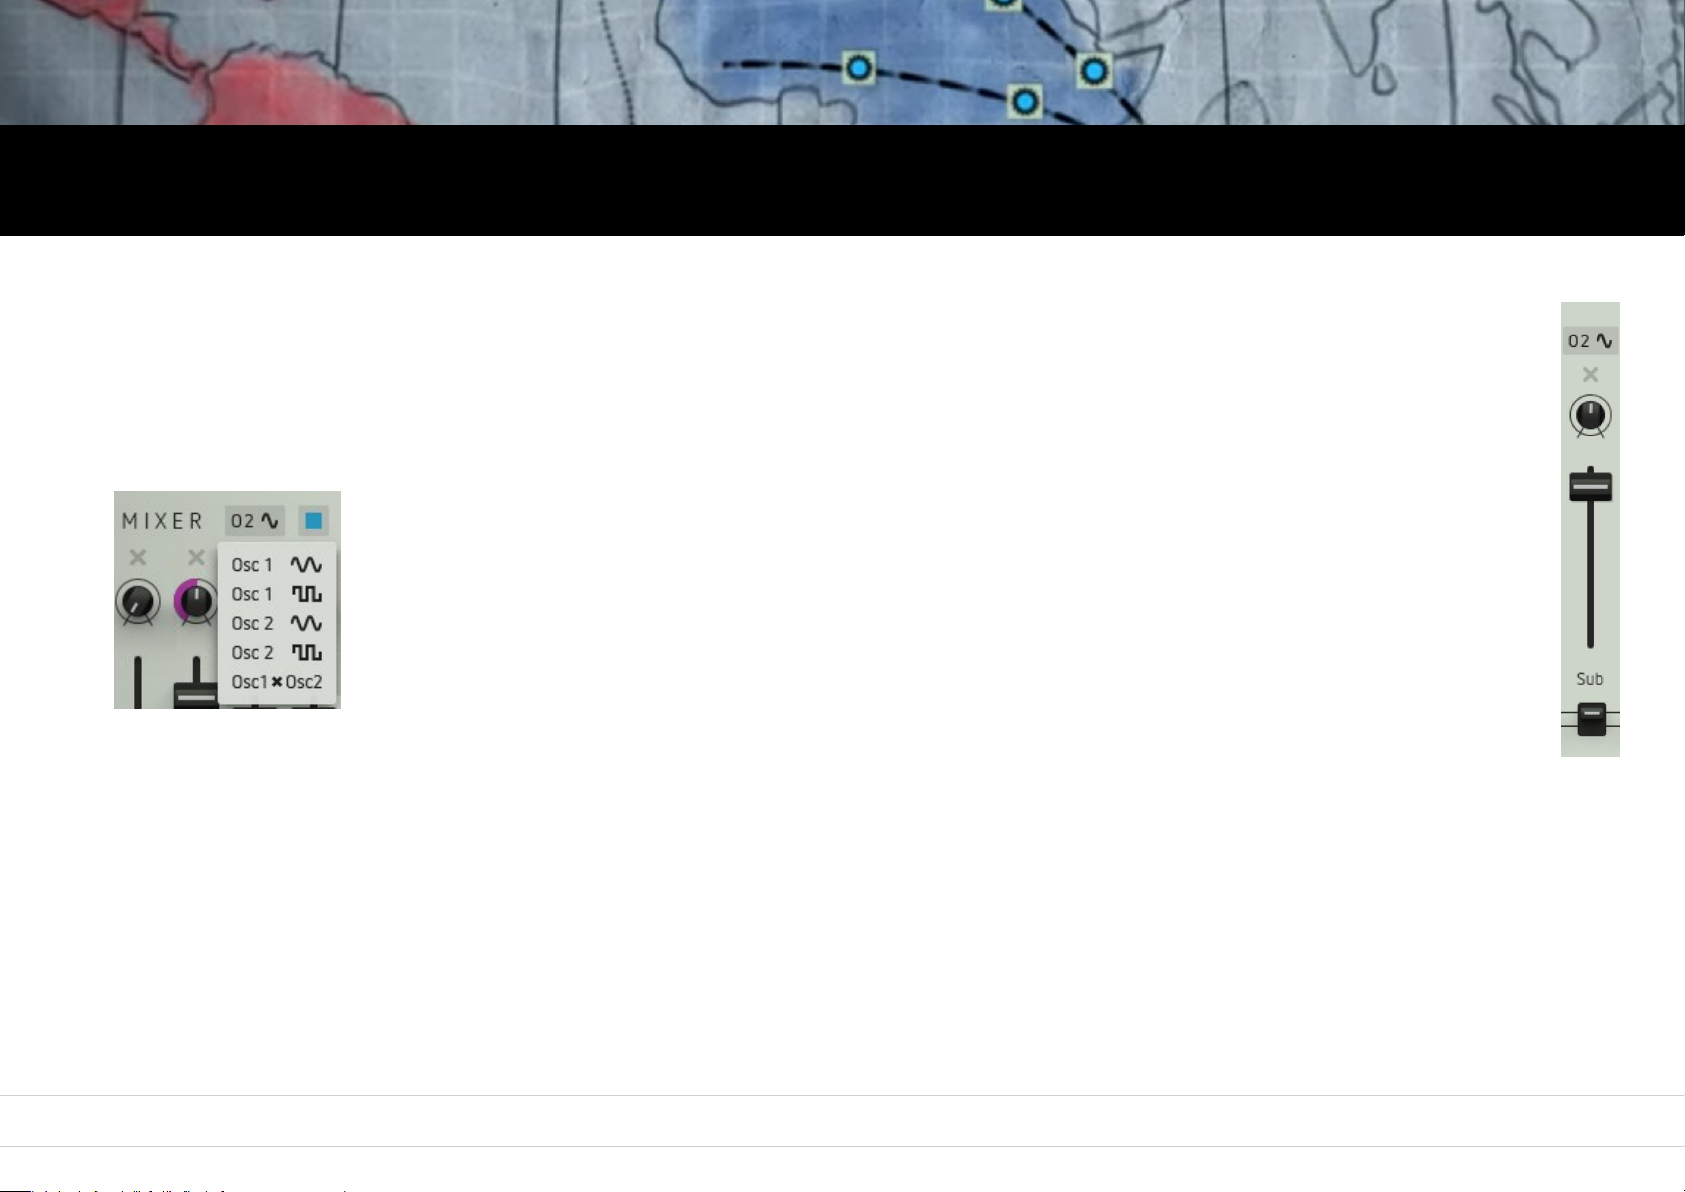
Clicking on the button above the fader will make a window pop up where you can select several sub oscillator modes:
O1 Sine
A sinewave. Pitch follows oscillator 1.
O1 Square
A squarewave. Pitch follows oscillator 1.
O2 Sine
A sinewave. Pitch follows oscillator 2.
O2 Square
A squarewave. Pitch follows oscillator 2.
Osc1xOsc2 Ring Modulation
This setting will ringmodulate the signals of oscillator 1 and oscillator 2.
The level of the ringmodulated signal is also controlled by the Sub fader. The timbral character of the ringmodulated signal depends
greatly on the oscillator settings used and can be described as ranging from „singing“ to „metallic“.
Please note: when selected as a modulation destination, the sub oscillator only gets a quantised modulation.
28
Page 29
Oscillators Mixer Filter Drive Output Modulators Sequencer Arpiculation Effects Settings Realtime Controllers
Noise, Mute & Routing switches
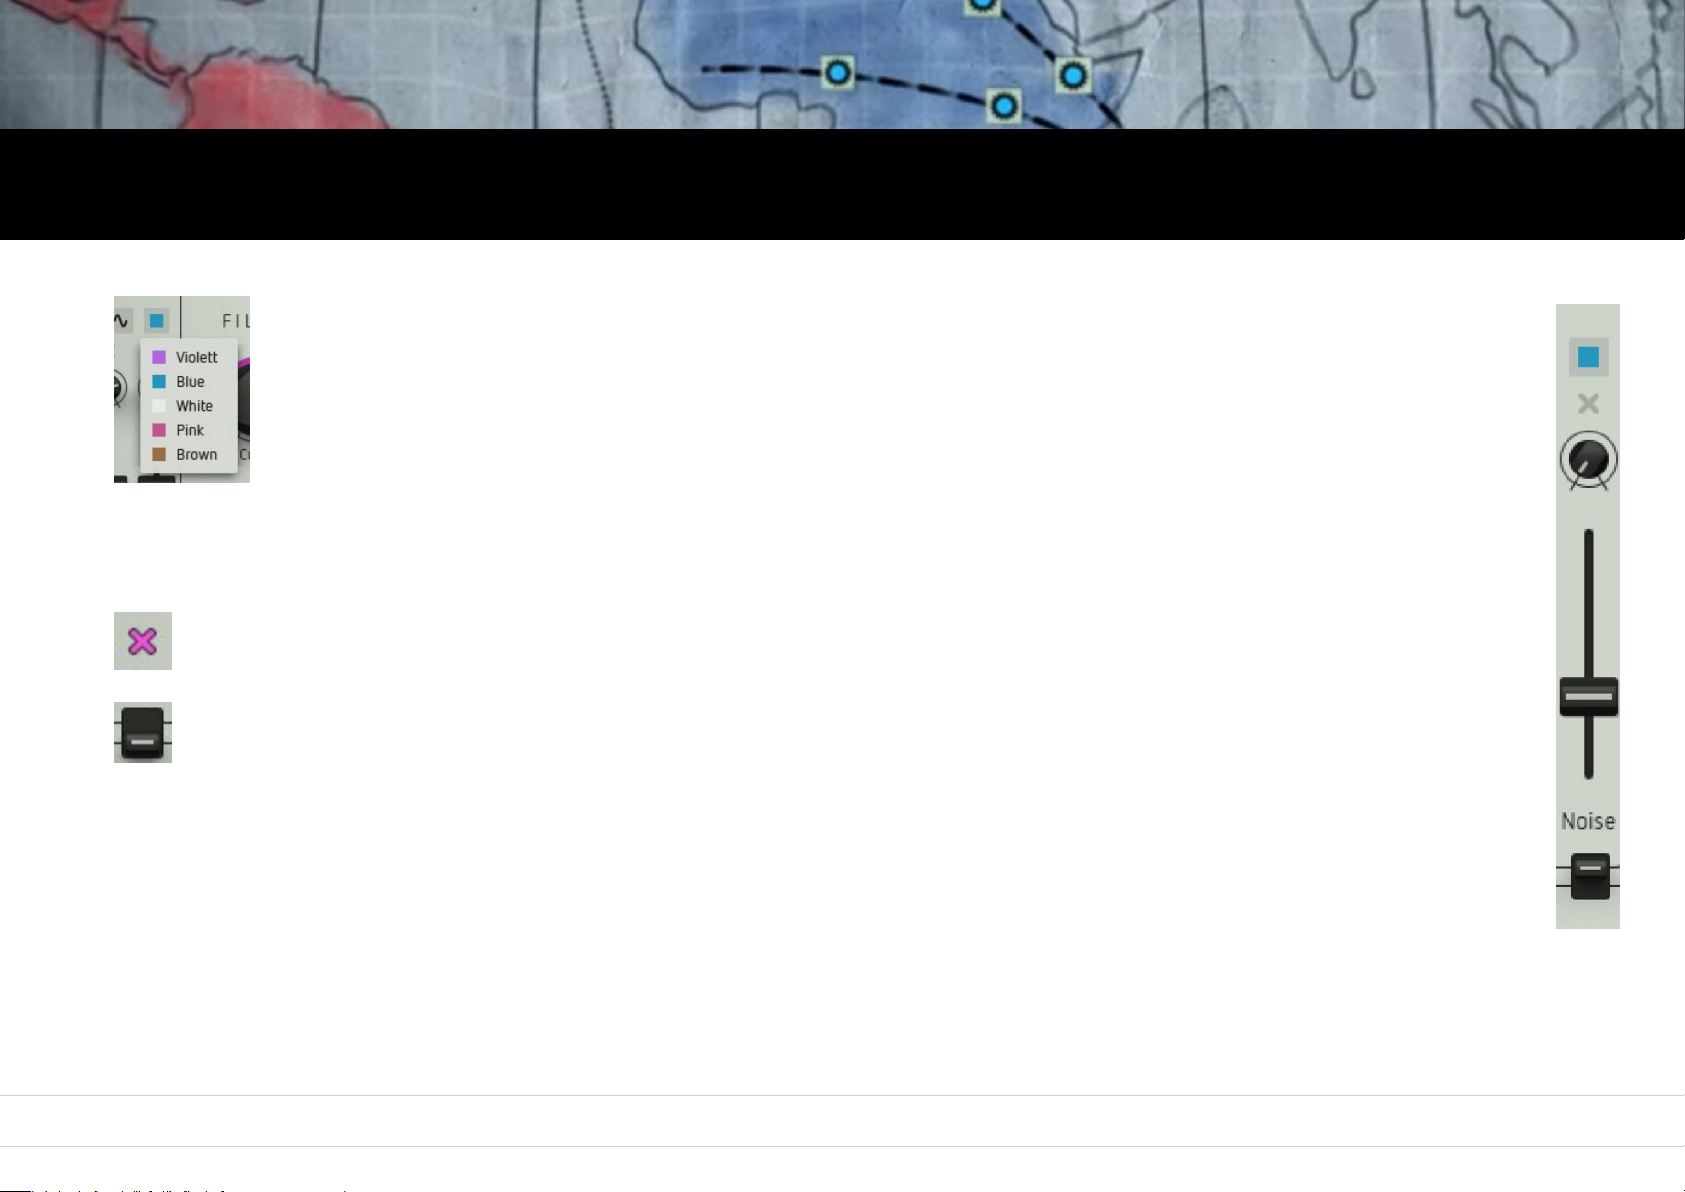
Noise
Sets the level of the noise signal. By clicking on the Color symbol,
you can choose between five different noise types with different sonic characters.
Mute function
Clicking on these symbols will mute the respective mixer signal input.
Routing switches
These switches determine which signal is routed into the filter and drive sections (up) or just into the drive section (down).
29
Page 30
Filter
Filter & Drive
As soon as the routing switches of the mixer are set to their upper position,
the corresponding signal will be sent through the filter and the subsequent drive section.
Factorys filter is a multimode filter with resonance and lots of sound-shaping potential.
Drive provides a wide range of distortion effects from soft saturation up to heavy fuzz.
In conjunction with the different filter models and their settings,
Drive can generate very intense and dynamic sounds. .
30
Page 31
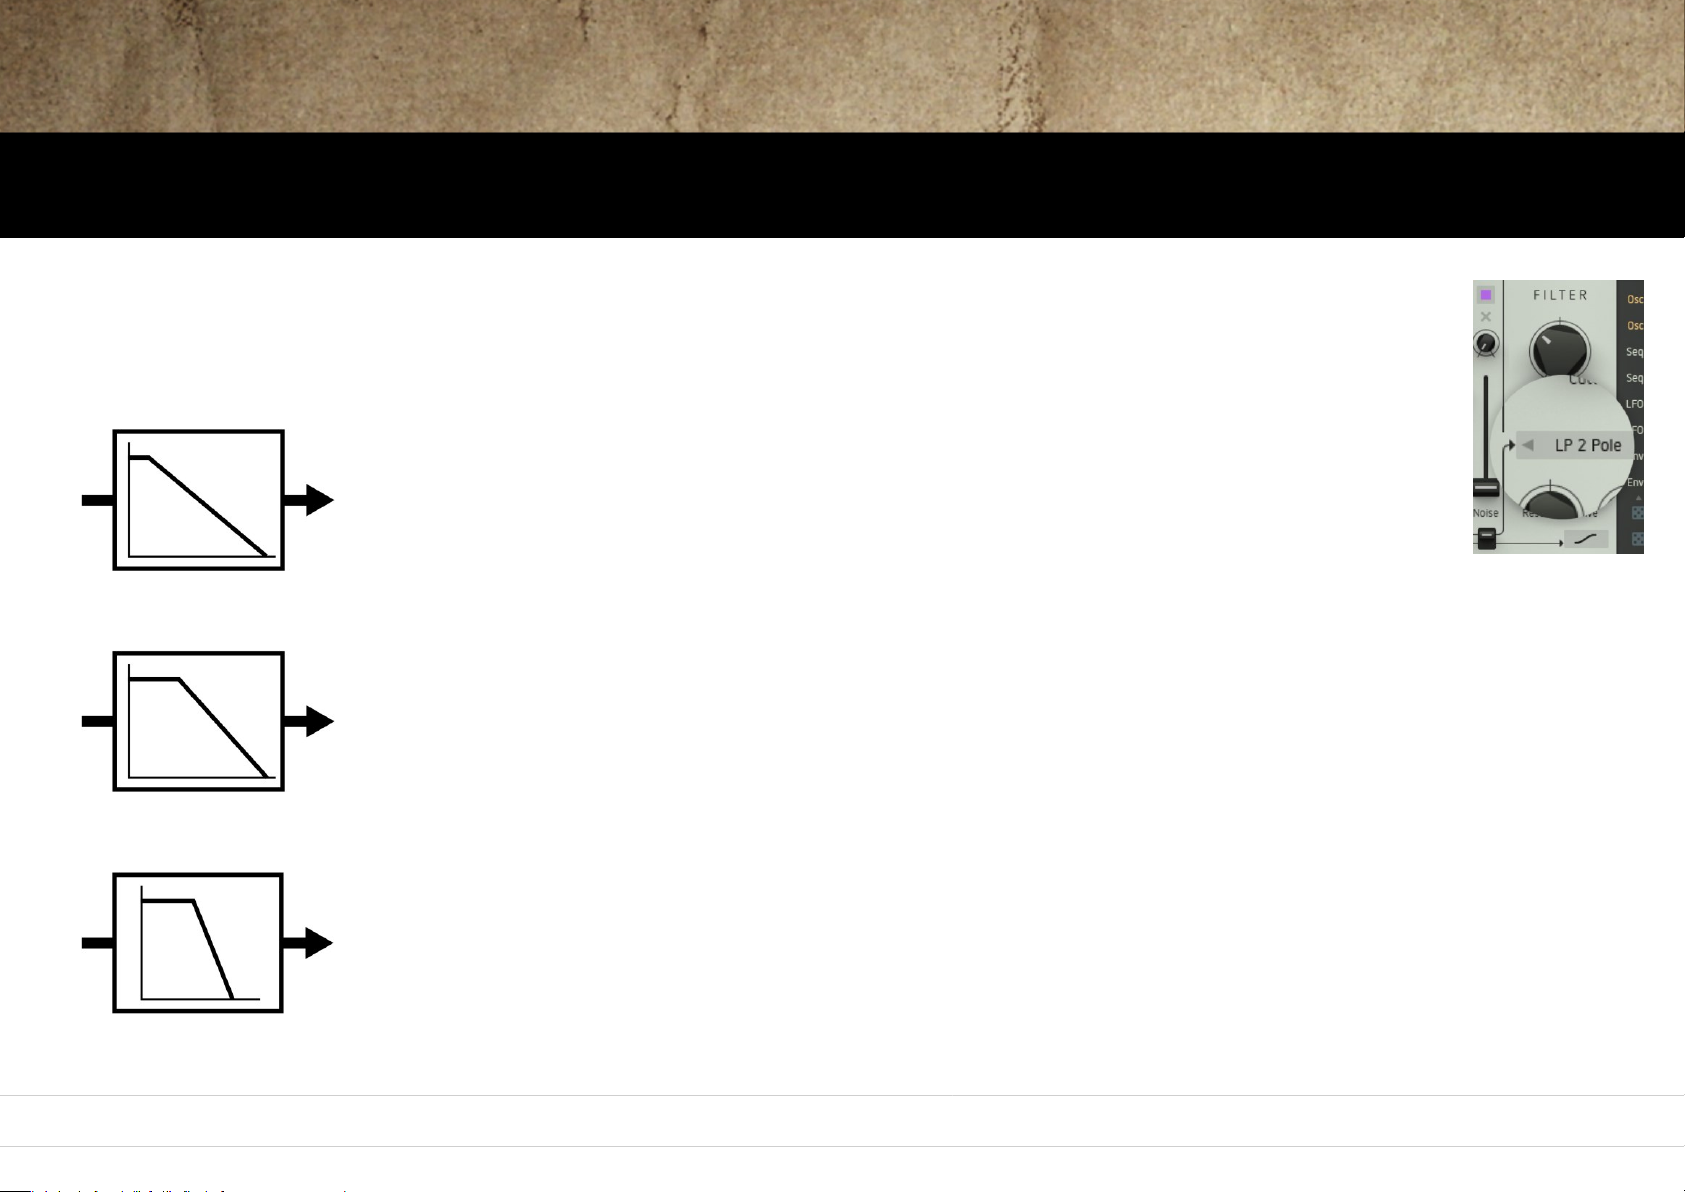
Lowpass with a 12dB slope. When the filter is closed (turning Cutoff counter-clockwise), high
frequencies will be increasingly attenuated – the sound will grow more and more dull.
Reso boosts the frequencies around the cutoff which will lead to a more and more pronounced
sound up to self-oscillation.
Lowpass with a 24dB slope. It is corresponding to the LP 2 Pole but with even more
impact on the sound.
Lowpass with a 48dB slope. Another lowpass option with even ballsier results.
ggfgdfffffffgdggggggggggggggggggggggggggggggggggggggggggggggggggggggggggggggggggggggggggggggkkk
Oscillators Mixer Filter Drive Output Modulators Sequencer Arpiculation Effects Settings Realtime Controllers
Filter Models
By clicking on the dark shadowed display, a window will pop up.
Here, you can select between eleven different filter types.
You can also step through the filter types by using the arrow buttons. The following filter models are available:
LP 2 Pole
LP 4 Pole
LP 8 Pole
31
Page 32
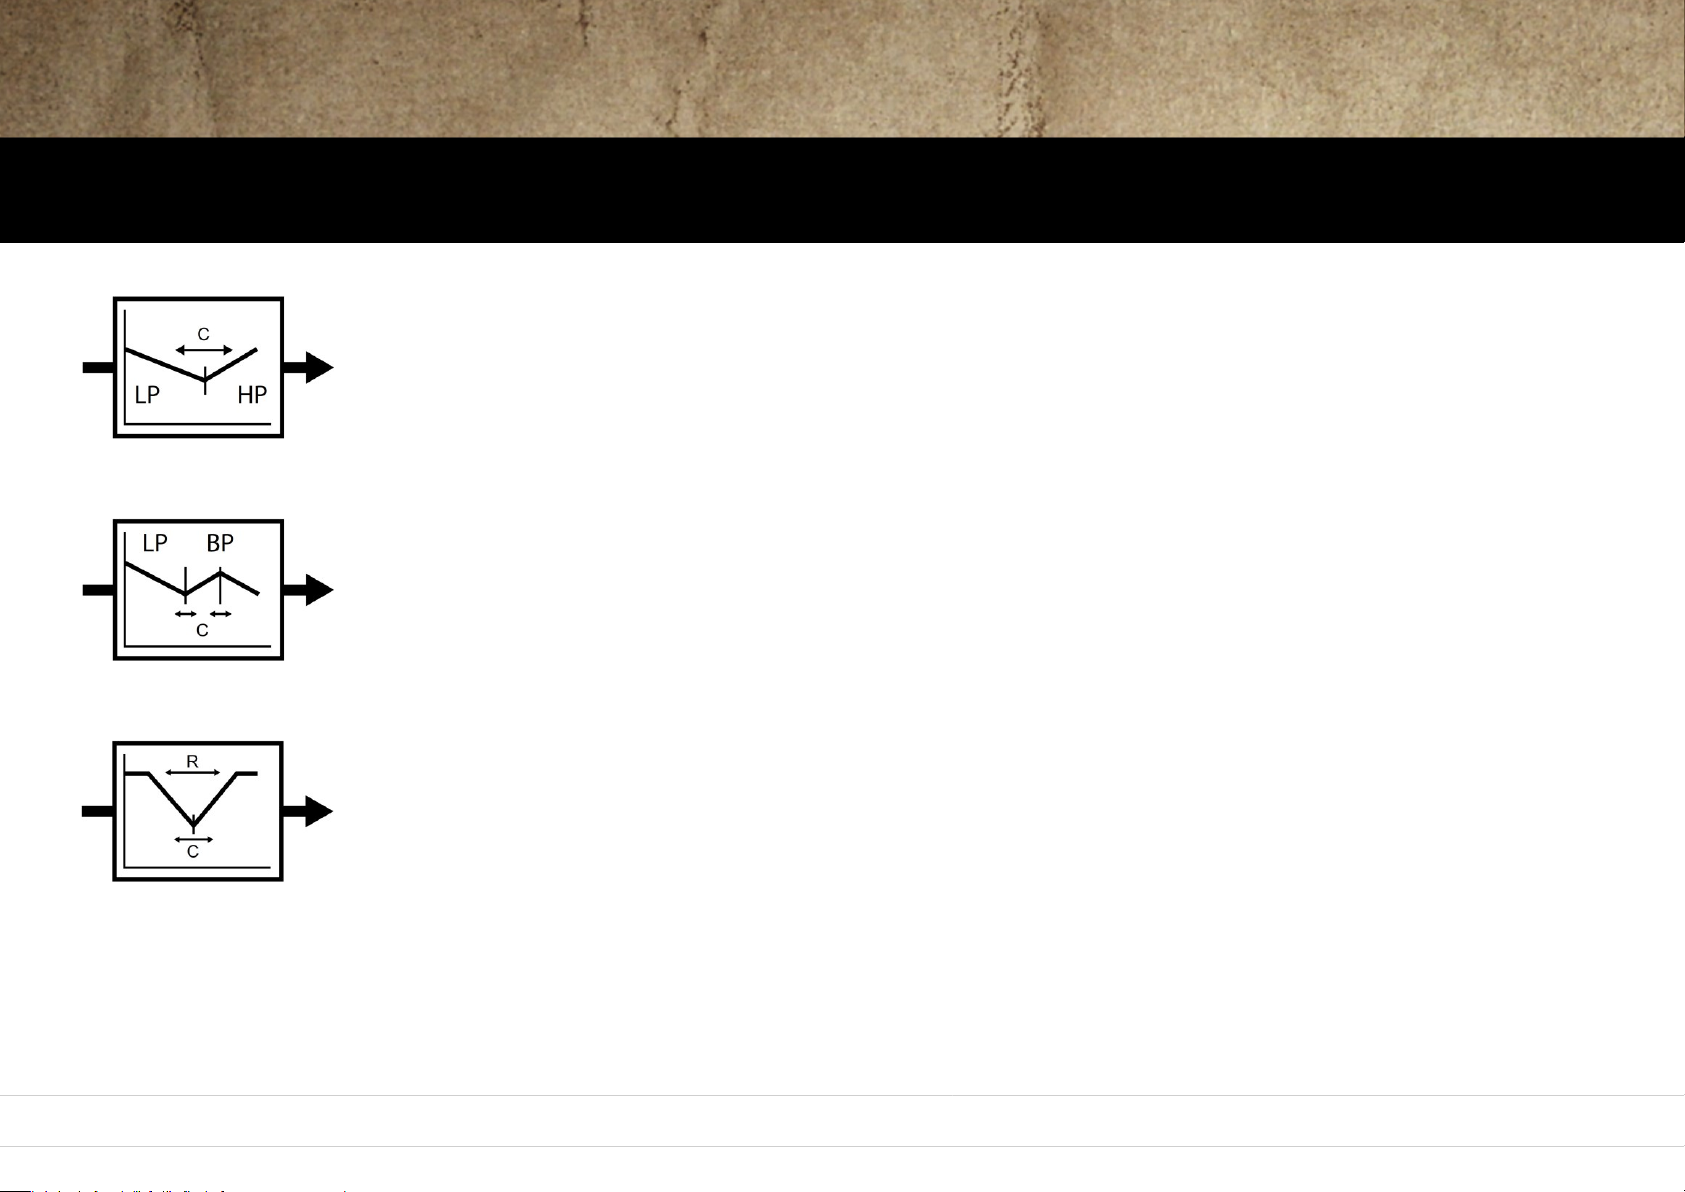
Blends between a lowpass and a highpass filter. When the Cutoff knob is at its central position, the filter
will provide a neutral effect. By turning counter-clockwise, the filter will become a lowpass, by turning
clockwise a highpass. In both cases, Reso boosts the frequencies around the cutoff/mid frequency
which will lead to an increasingly sharper and more pronounced sound.
A combination of lowpass and bandpass, useful for boosting mid-frequency content of a signal.
Cutoff controls cutoff resp. center frequency of the filters at a certain ratio. Reso boosts the frequencies
around the cutoff/mid frequency which leads to an increasingly sharper and more pronounced sound.
Attenuates a specific frequency band. Cutoff controls its center frequency, Reso its width.
Cutoff modulation results in phaser-like sounds.
Oscillators Mixer Filter Drive Output Modulators Sequencer Arpiculation Effects Settings Realtime Controllers
Filter Models
X Fade
Mid Boost
Bandreject
32
Page 33
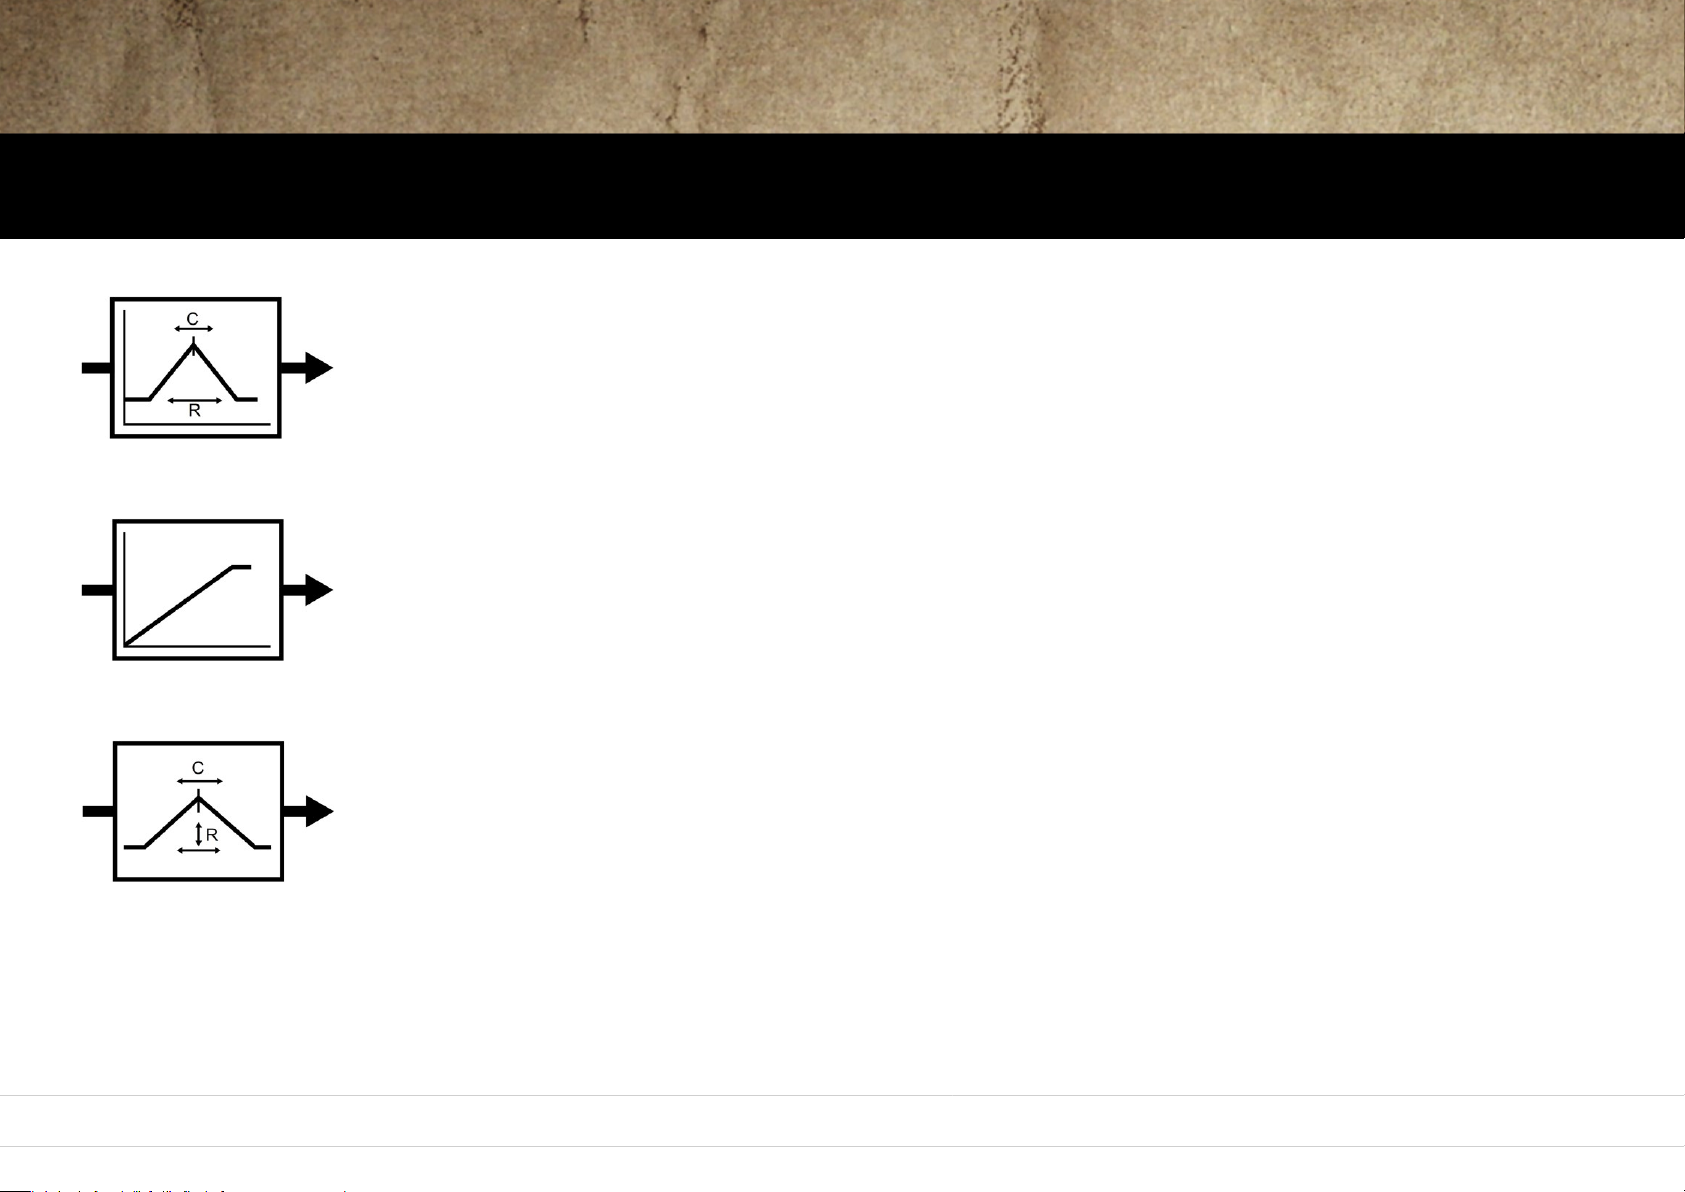
Only a specific frequency band will be passed. Again, Cutoff controls its center frequency,
Reso its width. Useful to thin out sounds around a specific frequency band.
Highpass with a 12dB slope. When the Cutoff control is turned counter-clockwise, high frequencies will
be increasingly passed through – the sound gradually becomes brighter. It works exactly the opposite
way of a lowpass. Reso again boosts the frequencies around the cutoff frequency which will leads to an
increasingly sharper and more pronounced sound.
Boosts a specific frequency range. Cutoff determines this range (its center frequency),
Reso controls the amount of boost/attenuation. The higher the boost, the narrower the range boosted.
This behaviour corresponds to a semi-parametric EQ which can be found with many mixing desks.
The sonic result differs from the Mid Boost type.
Oscillators Mixer Filter Drive Output Modulators Sequencer Arpiculation Effects Settings Realtime Controllers
Filter Models
Bandpass
Highpass
Peak
33
Page 34
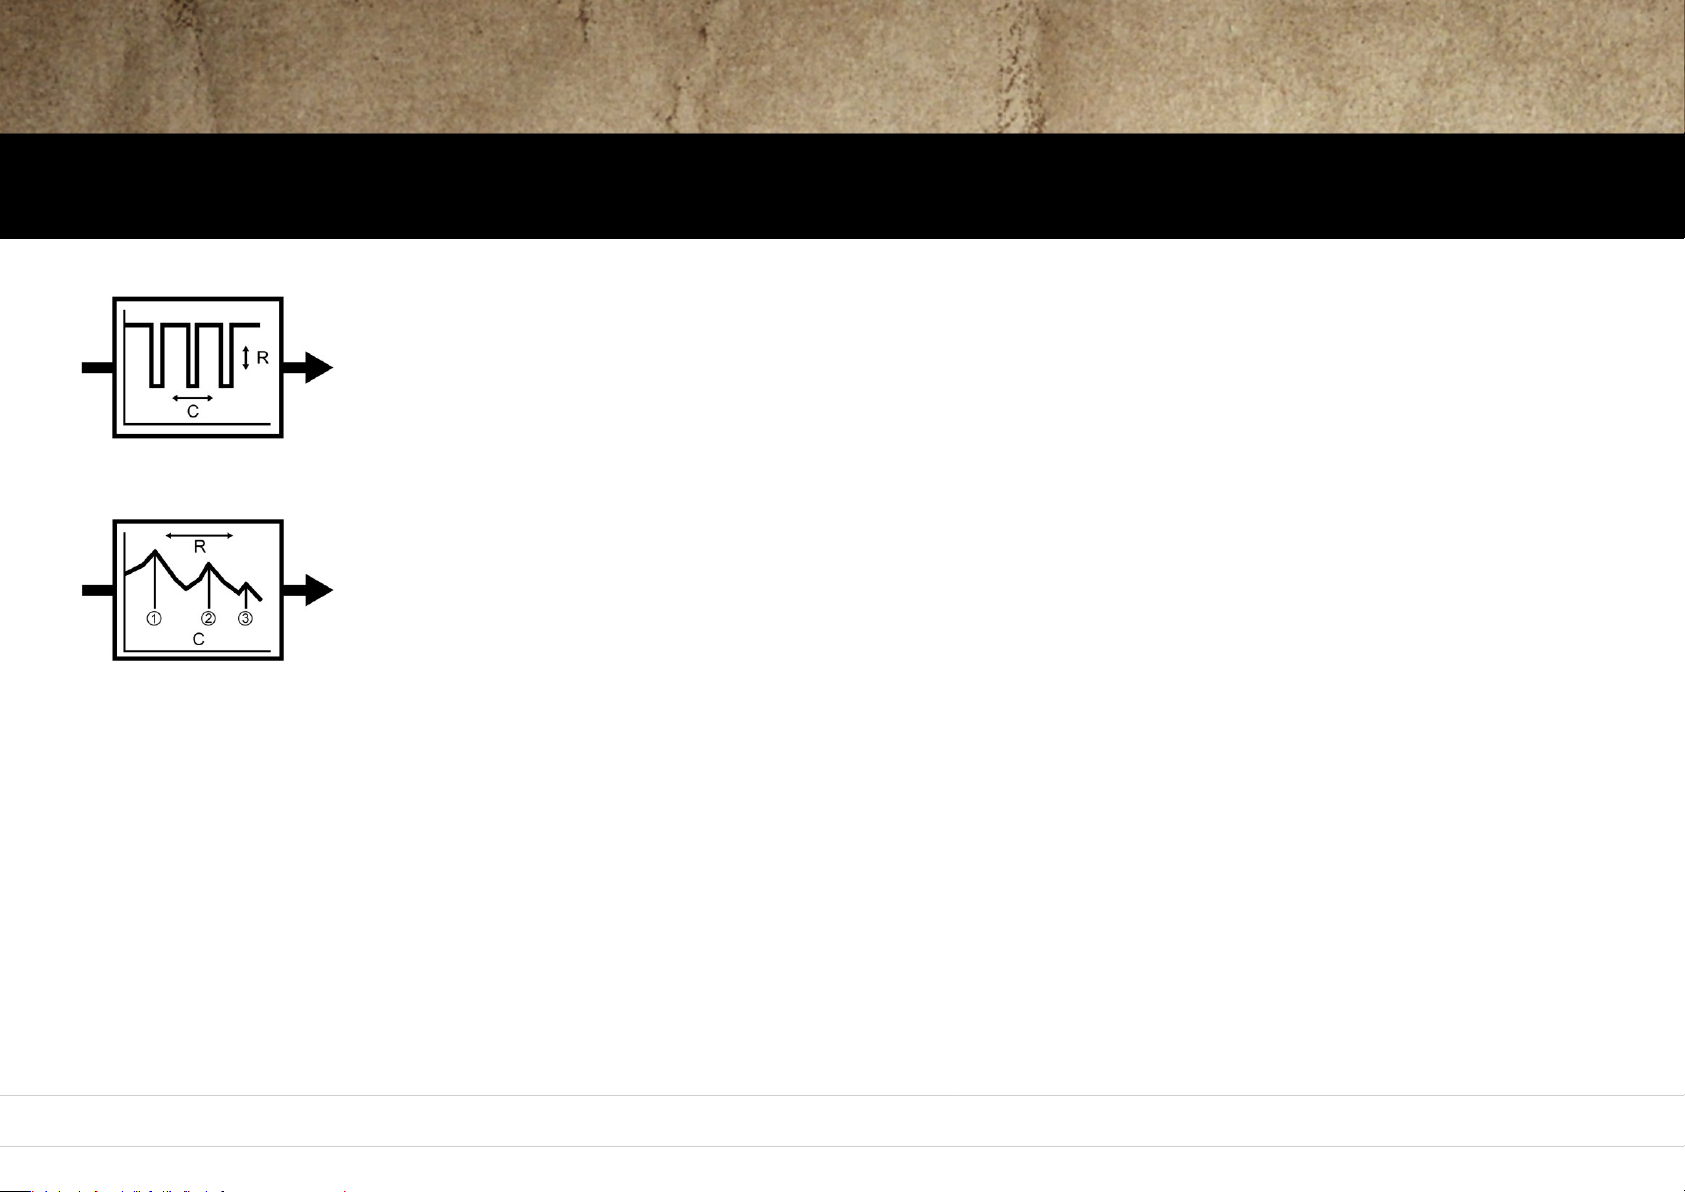
Generates a so-called comb filter effect. It generates evenly spaced peaks and notches in the frequency
band (quite similar to the teeth of a comb). Cutoff shifts their position,
Reso determines the intensity of the effect. Cutoff modulation can result in flanger-type sounds.
Generates vocal-like sounds by shifting certain formants of a signal. Cutoff selects three out of sixteen
formants, Reso shifts them up/down. The zero-position of the reso control is at 12:00. Great in
combination with e.g. vocal-like oscillator wavetables.
Oscillators Mixer Filter Drive Output Modulators Sequencer Arpiculation Effects Settings Realtime Controllers
Filter Models
Comb
Vowel
34
Page 35
Oscillators Mixer Filter Drive Output Modulators Sequencer Arpiculation Effects Settings Realtime Controllers
Drive
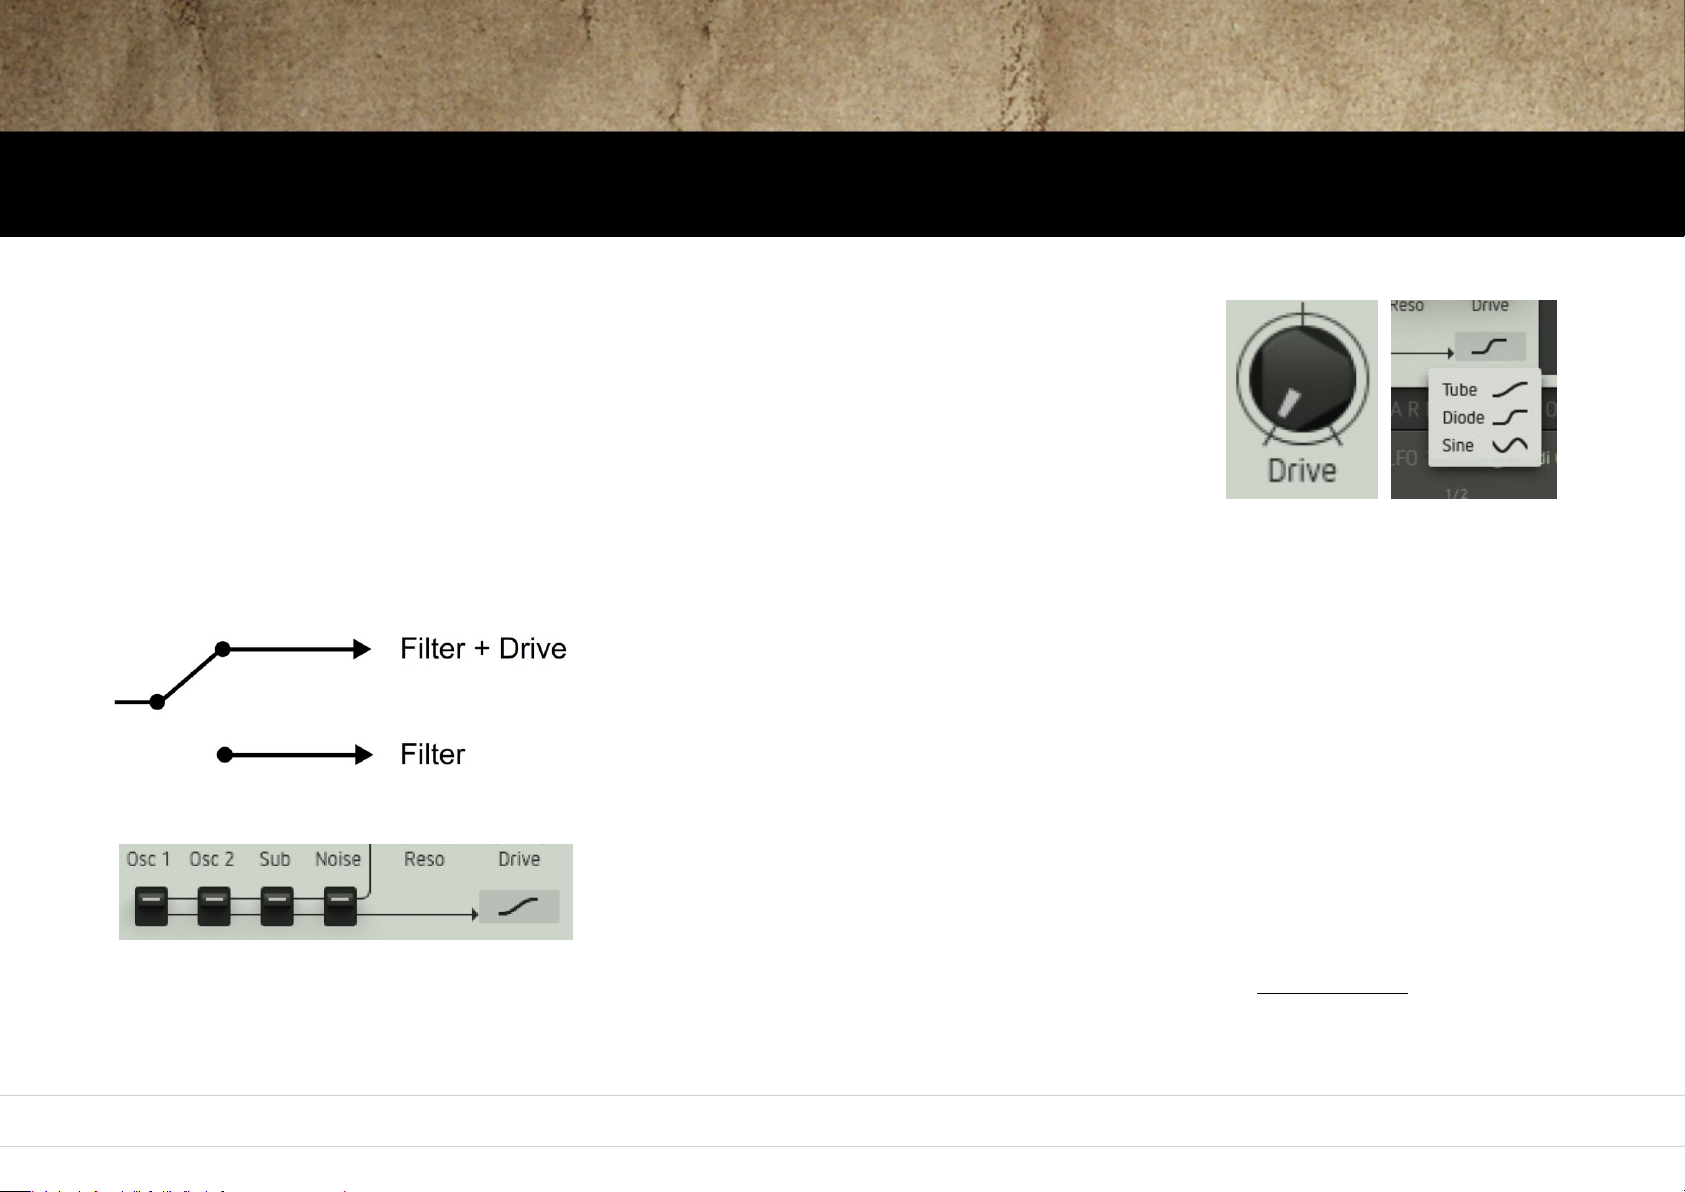
The Drive knob controls the intensity of the effect.
Set fully counter-clockwise, the effect will be disabled (off).
When clicking on the dark shadowed display, a window will pop up.
Here, you can select between three different drive types (Tube, Diode, and Sine).
They all sound very different.
Try using different routings and settings as the placement of a filter before a distortion in the signal chain can produce results which
are significantly different from a signal that is routed into the fuzz directly.
With the routing switches of the mixer in the low position, the signal is sent directly into the Drive section.
In up position, the signal first passes the filter and is then sent to the Drive section (please refer to the mixer section).
35
Page 36
Oscillators Mixer Filter Drive Output Modulators Sequencer Arpiculation Effects Settings Realtime Controllers
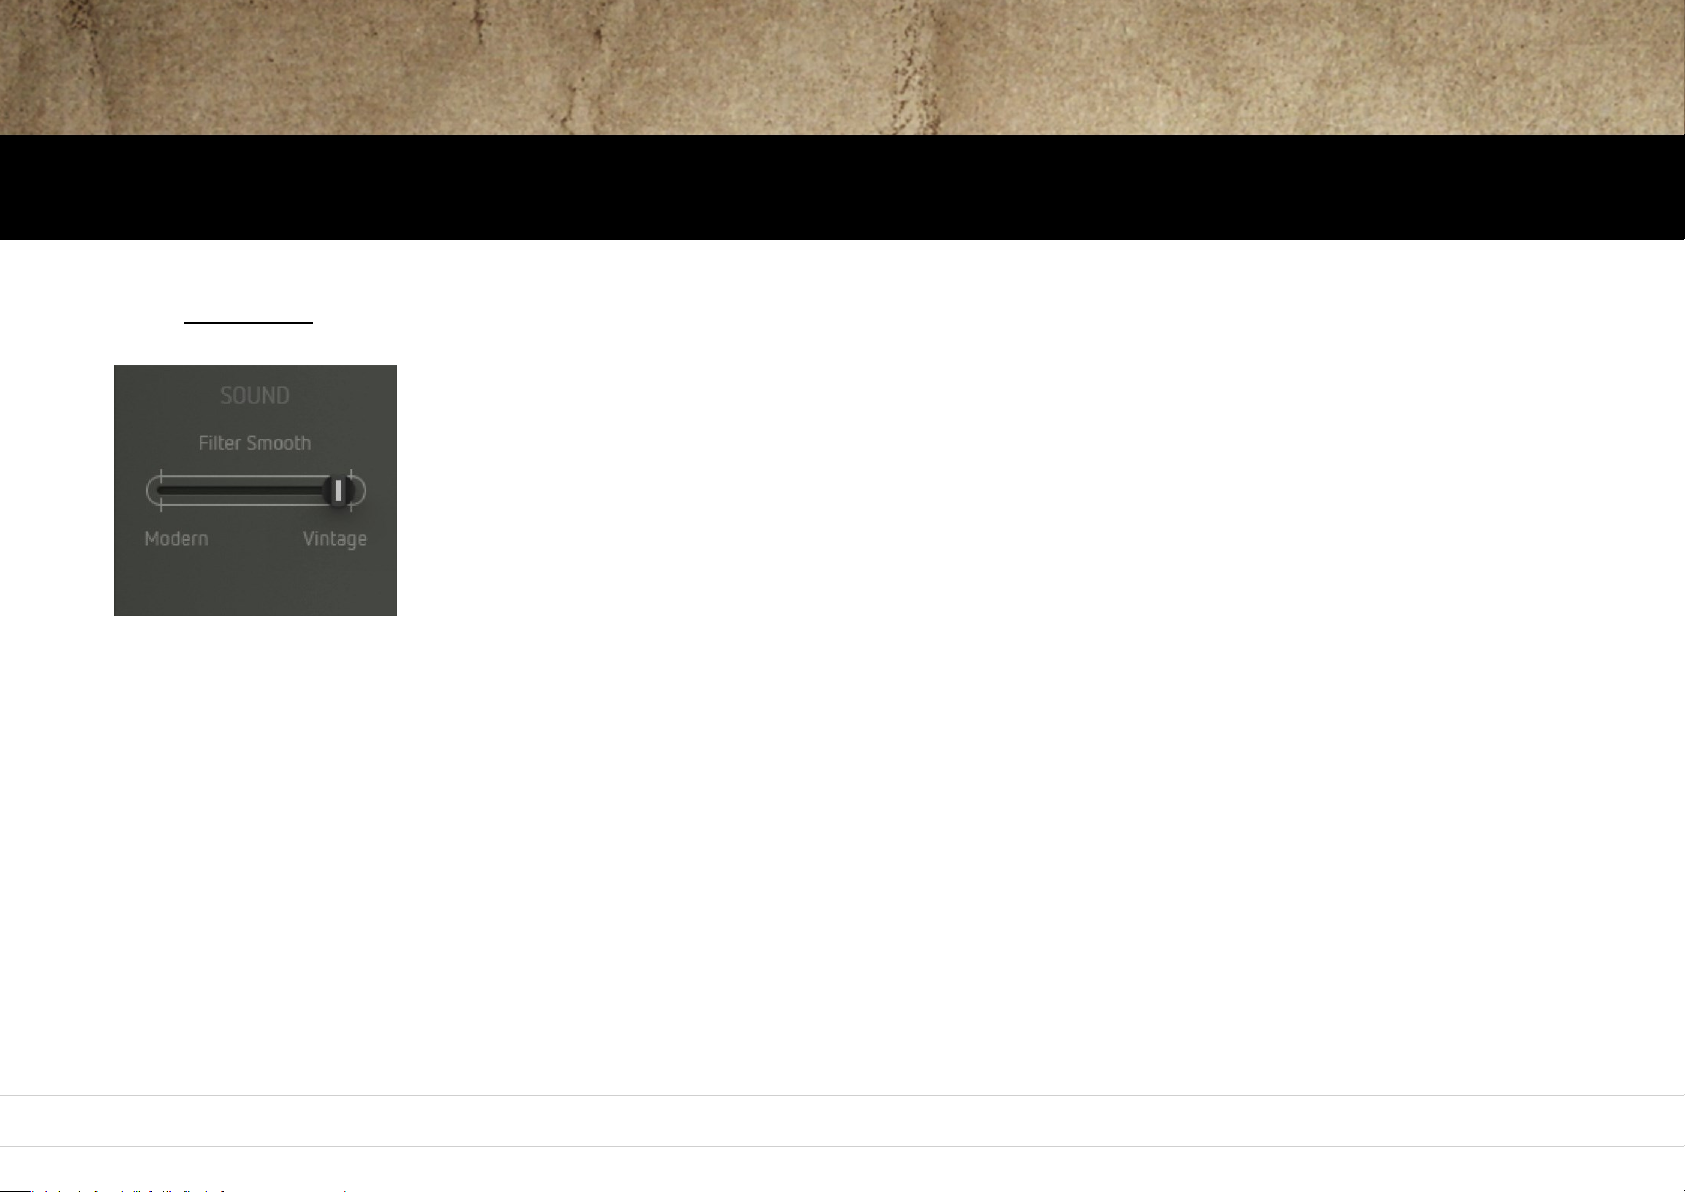
Sound Settings
In the Setting Tab you will find some parameters related to the sound of the filter and drive section.
Filter Smooth
Here you can tailor the sound character of the filter section to your personal taste.
The differences are quite subtle and best audible at high resonance settings.
36
Page 37

Output
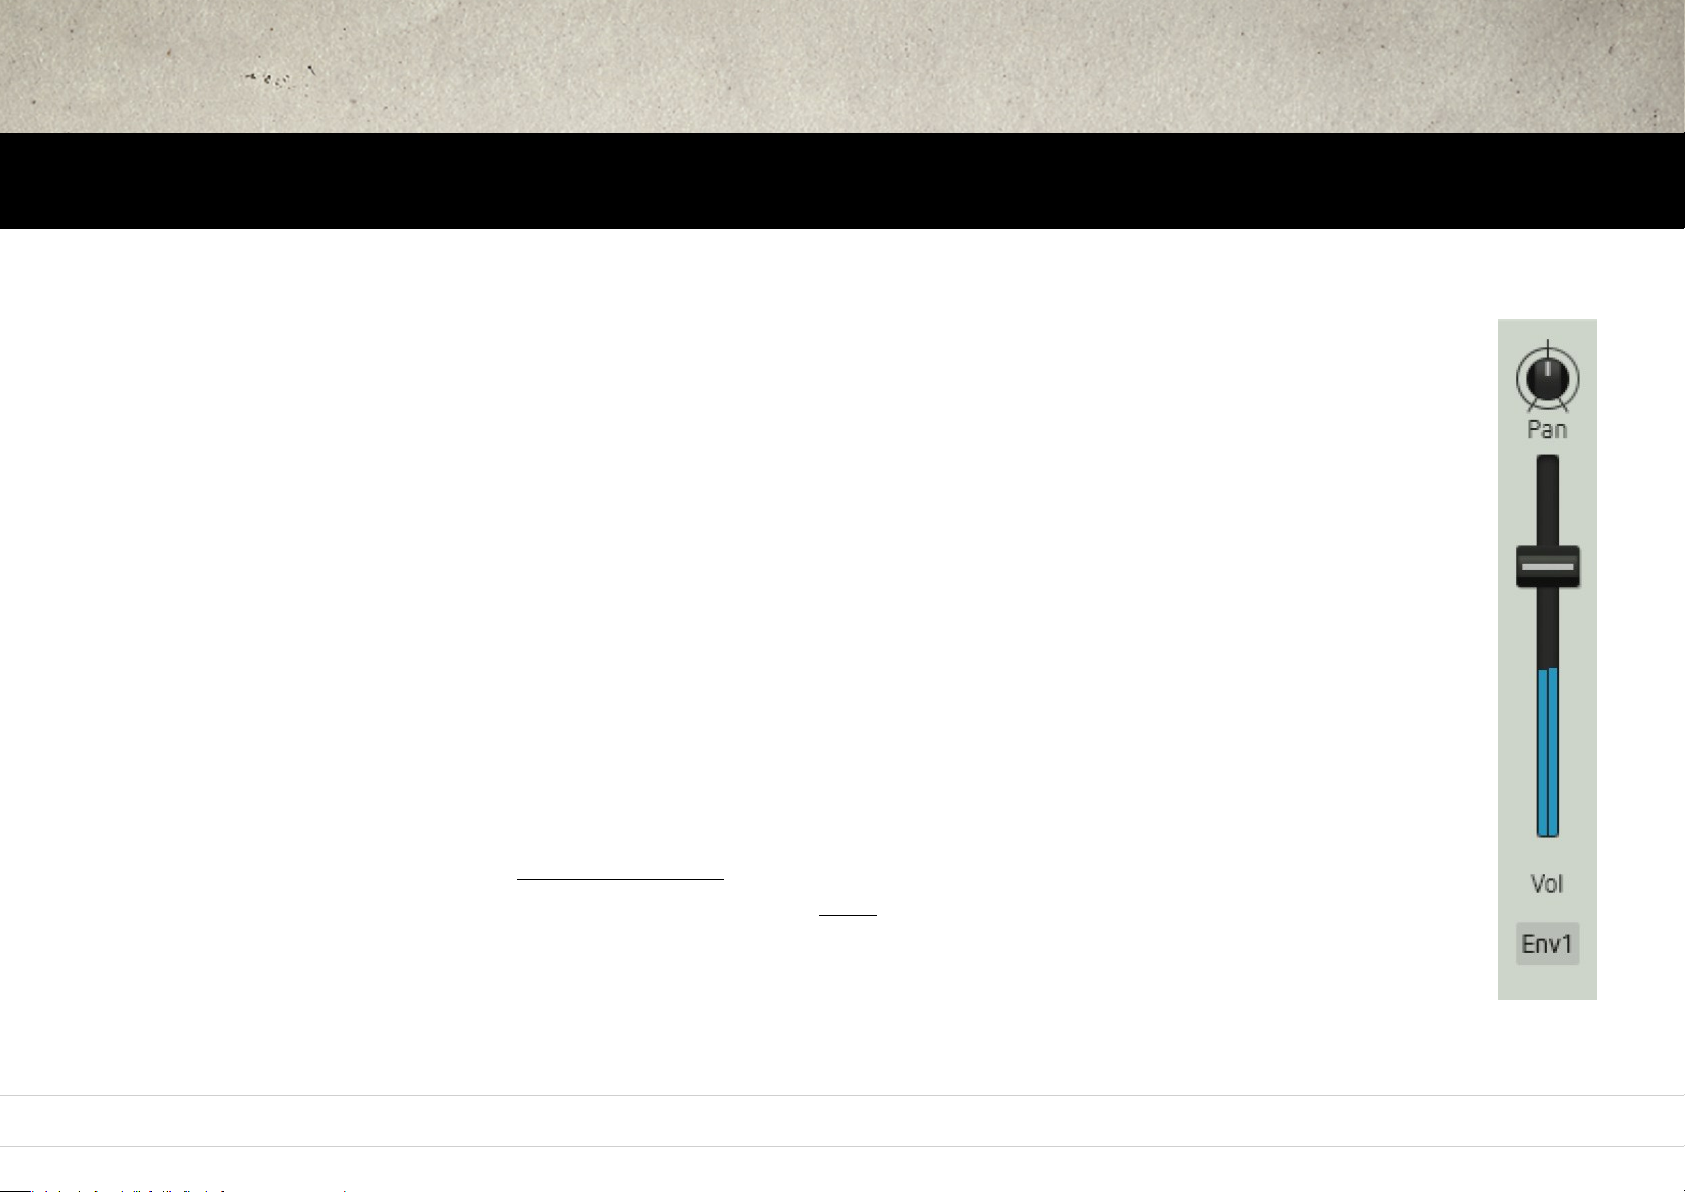
Control and modulate the overall output level (Vol) as well as the panorama position (Pan).
37
Page 38
Oscillators Mixer Filter Drive Output Modulators Sequencer Arpiculation Effects Settings Realtime Controllers
Volume Modulation & Pan
To the very right of Factorys panel, the output section is located. It‘s usually modulated by the volume envelope (ENV 1 default setting).
By clicking on the dark shadowed display, you can select between four alternative types of volume level modulation:
Off
No volume modulation. The sound will sustain infinitely at full level, even when there is no key played (resp. no MIDI note received).
Useful for all styles of Dark Ambient Music – we call it the brick-on-keyboard generator.
Gate
The sound will sustain at full level as long as a key is hold (resp. when a MIDI note-on command is received).
The level will not be modulated. This is basically an organ envelope.
Env 1
Envelope 1 modulates the volume level (default setting).
Env 2
Envelope 2 modulates the volume level.
Pan controls the position of the output signal within the stereo panorama.
This knob can be modulated via the modulation matrix which will generate an auto-panning effect.
This is especially interesting with the polyphonic feature of the LFOs: Each voice can be shifted separately within the
stereo panorama for some really head-spinning effects – without using psychotropic substances.
38
Page 39
Modulators
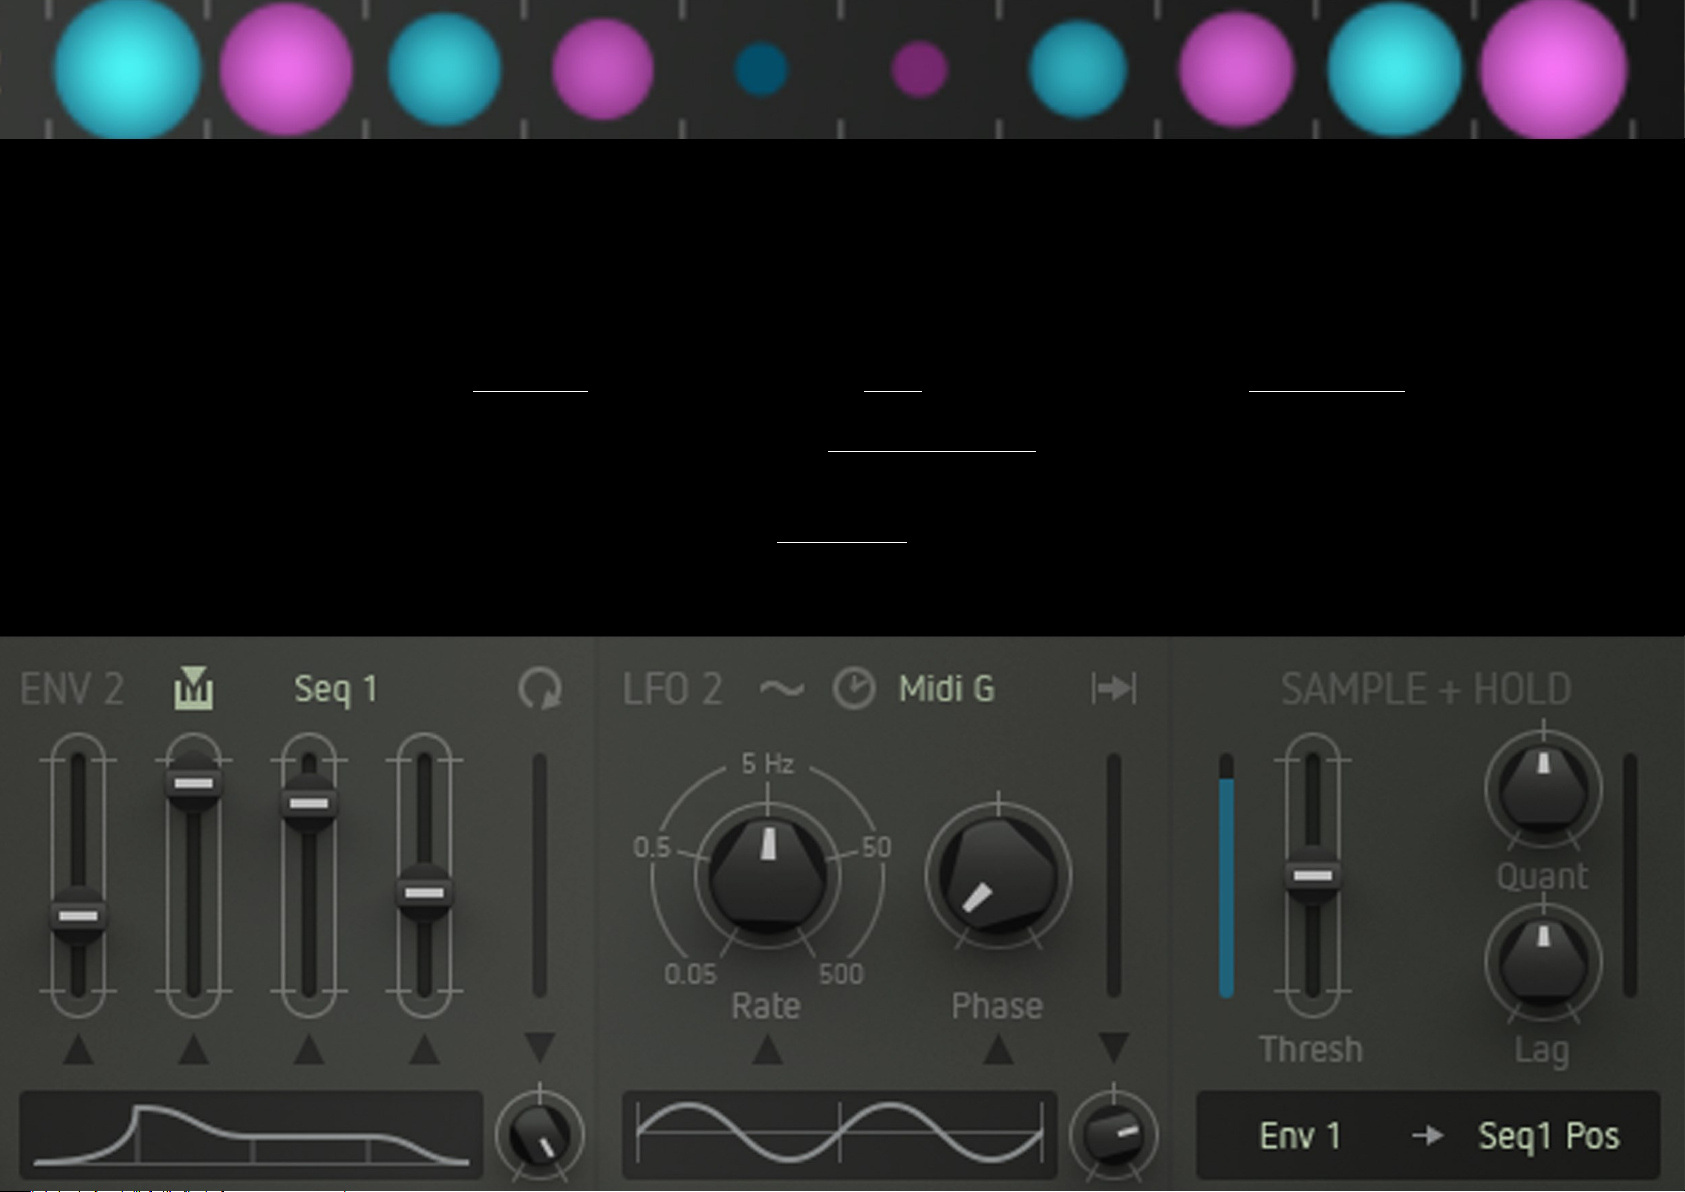
To bring its sound to live, Factory provides several modulation sources.
You will find two identical envelopes (ENV 1 and ENV 2), two LFOs that are also identical, and a sample + hold module.
All modulators can be found as modulation sources in the modulation matrix which will be covered in the next chapter.
Watch video
39
Page 40
Oscillators Mixer Filter Drive Output Modulators Sequencer Arpiculation Effects Settings Realtime Controllers
ENV 1 & ENV 2
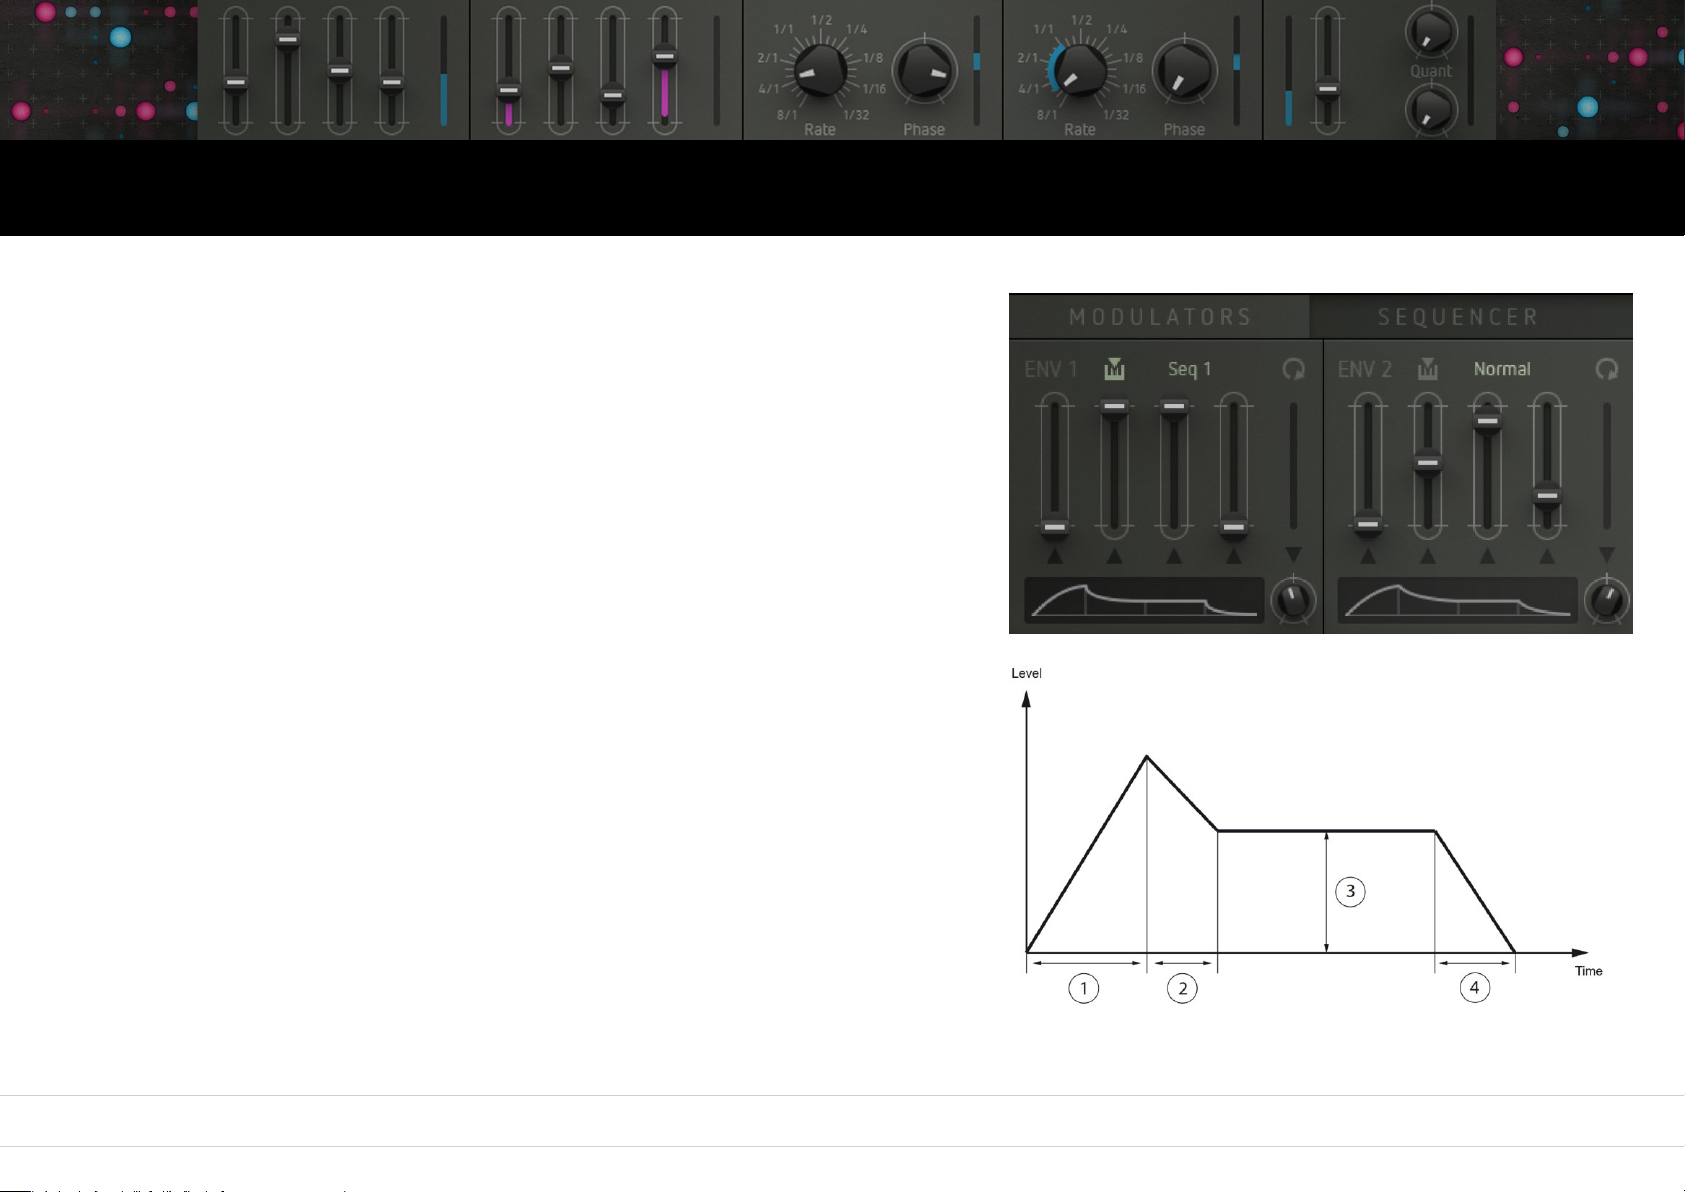
Click the tab labelled MODULATORS to open the respective window.
Envelope generators usually provide a one-off modulation. Shape and
duration can be controlled by various parameters.
Factory‘s envelope generators work exactly like this but provide a loop
function to generate complex periodic modulation shapes.
Both envelopes are identical.
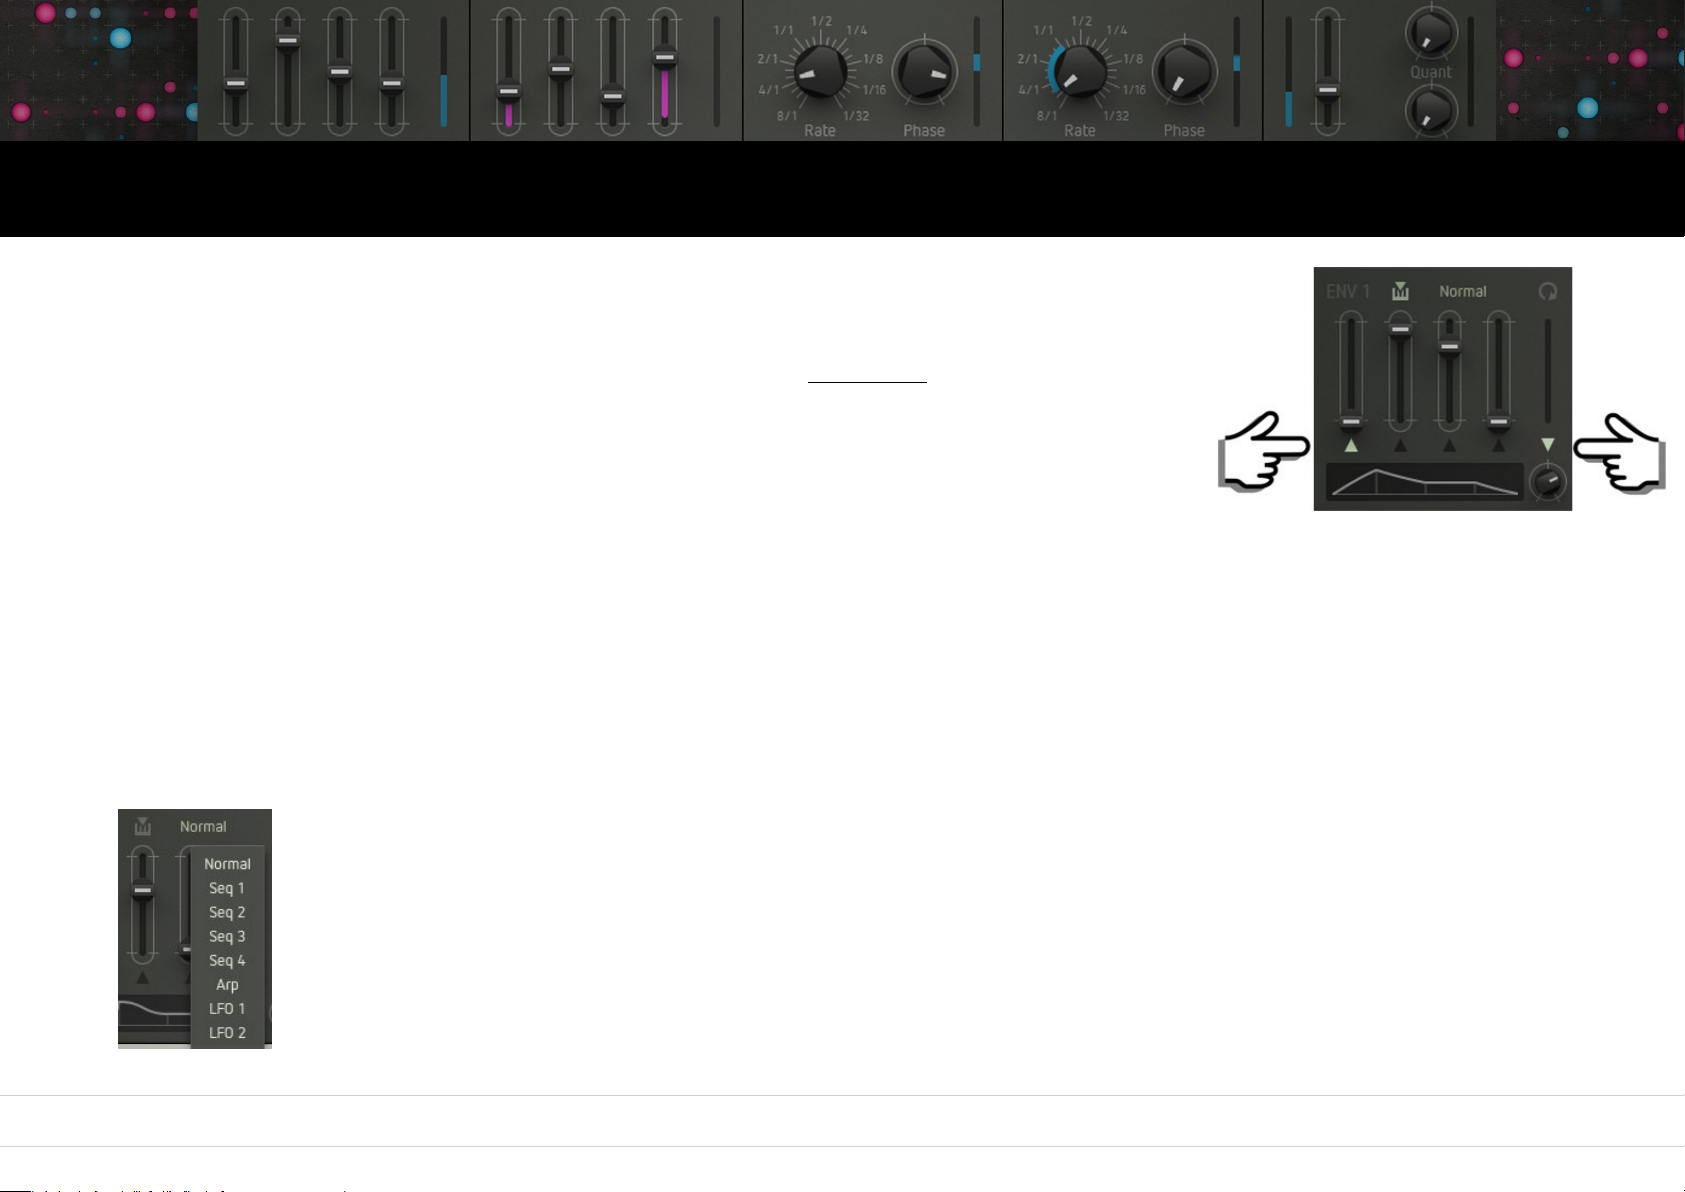
Envelope shape
The envelope shape is controlled by four faders:
• (1) The first fader (Attack) adjusts the rise time from zero to maximum level.
• (2) The second fader (Decay) adjusts the fall time from maximum to Sustain level.
• (3) The third fader adjusts the Sustain level. Its value is maintained as long as the
envelope is receiving a MIDI note-on command, i. e. until the key is released.
• (4) The fourth fader (Release) adjusts the fall time from Sustain level after
receiving a note-off message.
• The knob alters the envelope shape in its entirety. You can watch the result in the
envelope display.
40
Page 41
Oscillators Mixer Filter Drive Output Modulators Sequencer Arpiculation Effects Settings Realtime Controllers
ENV 1 & ENV 2
Modulating envelope parameters
The five parameters mentioned above can be modulated as well.
To do so, please select Env 1 or Env 2 as a modulation target in the mod matrix (more on this later).
By clicking on the arrow symbols right beneath the envelope faders/knobs, you can determine which of
these five parameters will be modulated by the mod matrix.
More envelope functions
Loop
The circular arrow symbol will loop the attack- and decay phase of the envelope. This produces periodic modulation shapes.
Velocity
When clicking the keyboard symbol, the maximum envelope level will be determined by velocity.
Trigger source
By clicking on this parameter, you can select the trigger source of the envelope. By doing so, the envelope can be triggered by a MIDI note-on
command (default) or by other events. This produces rhythmically accurate modulation. Please select between the following options:
Normal: The envelope will be triggered by the keyboard resp. a MIDI note-on command.
Seq 1 – 4: The envelope will be triggered by the active steps of the selected sequencer track.
Arp: The envelope will be triggered by the steps of the arpeggiator.
LFO 1 / 2: The envelope will be triggered as soon as the respective LFO is entering a new wave cycle.
41
Page 42
Oscillators Mixer Filter Drive Output Modulators Sequencer Arpiculation Effects Settings Realtime Controllers
LFO 1 & LFO 2
The LFOs usually provide periodic modulation.
A one-shot function is also present. That way, the LFOs can work as
mini envelopes. Both LFOs are identical.
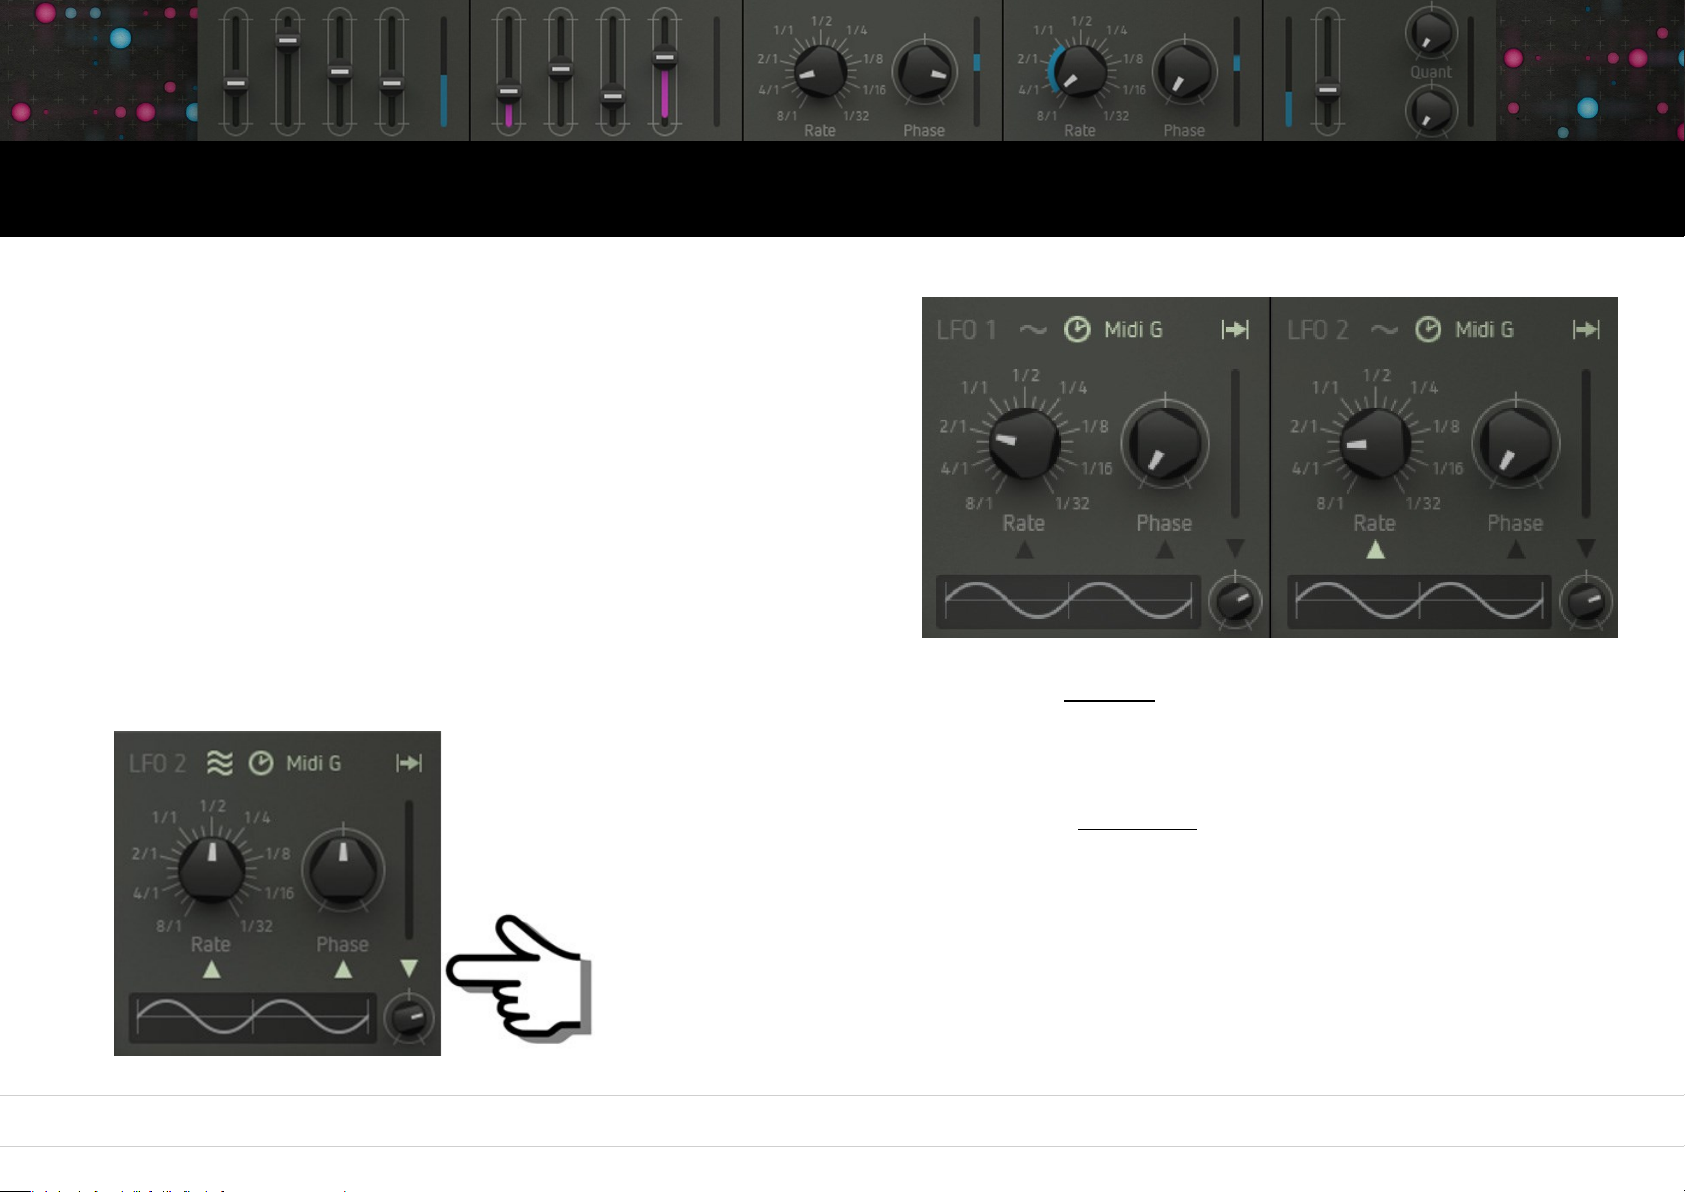
Rate
Controls the LFO speed in a range between 0.05 Hz and 500 Hz.
When the Clock symbol is active, the LFO will be in sync with the song
tempo. In this case, the Rate values will be translated into note values (eight
whole notes to 1/32 note). The lower right knob determines the waveshape
according to the graphic display.
Phase
Shifts the phase of the LFO waveform. This function is especially useful in combination with retrigger.
Modulating LFO parameters
The three parameters mentioned above can be modulated individually. To do so, please select
LFO 1 or LFO 2 as a modulation target in the mod matrix (more on this later).
By clicking the arrows beneath the faders/knobs, you can determine which of these three
parameters will be modulated by the mod matrix.
42
Page 43
Oscillators Mixer Filter Drive Output Modulators Sequencer Arpiculation Effects Settings Realtime Controllers
More LFO functions
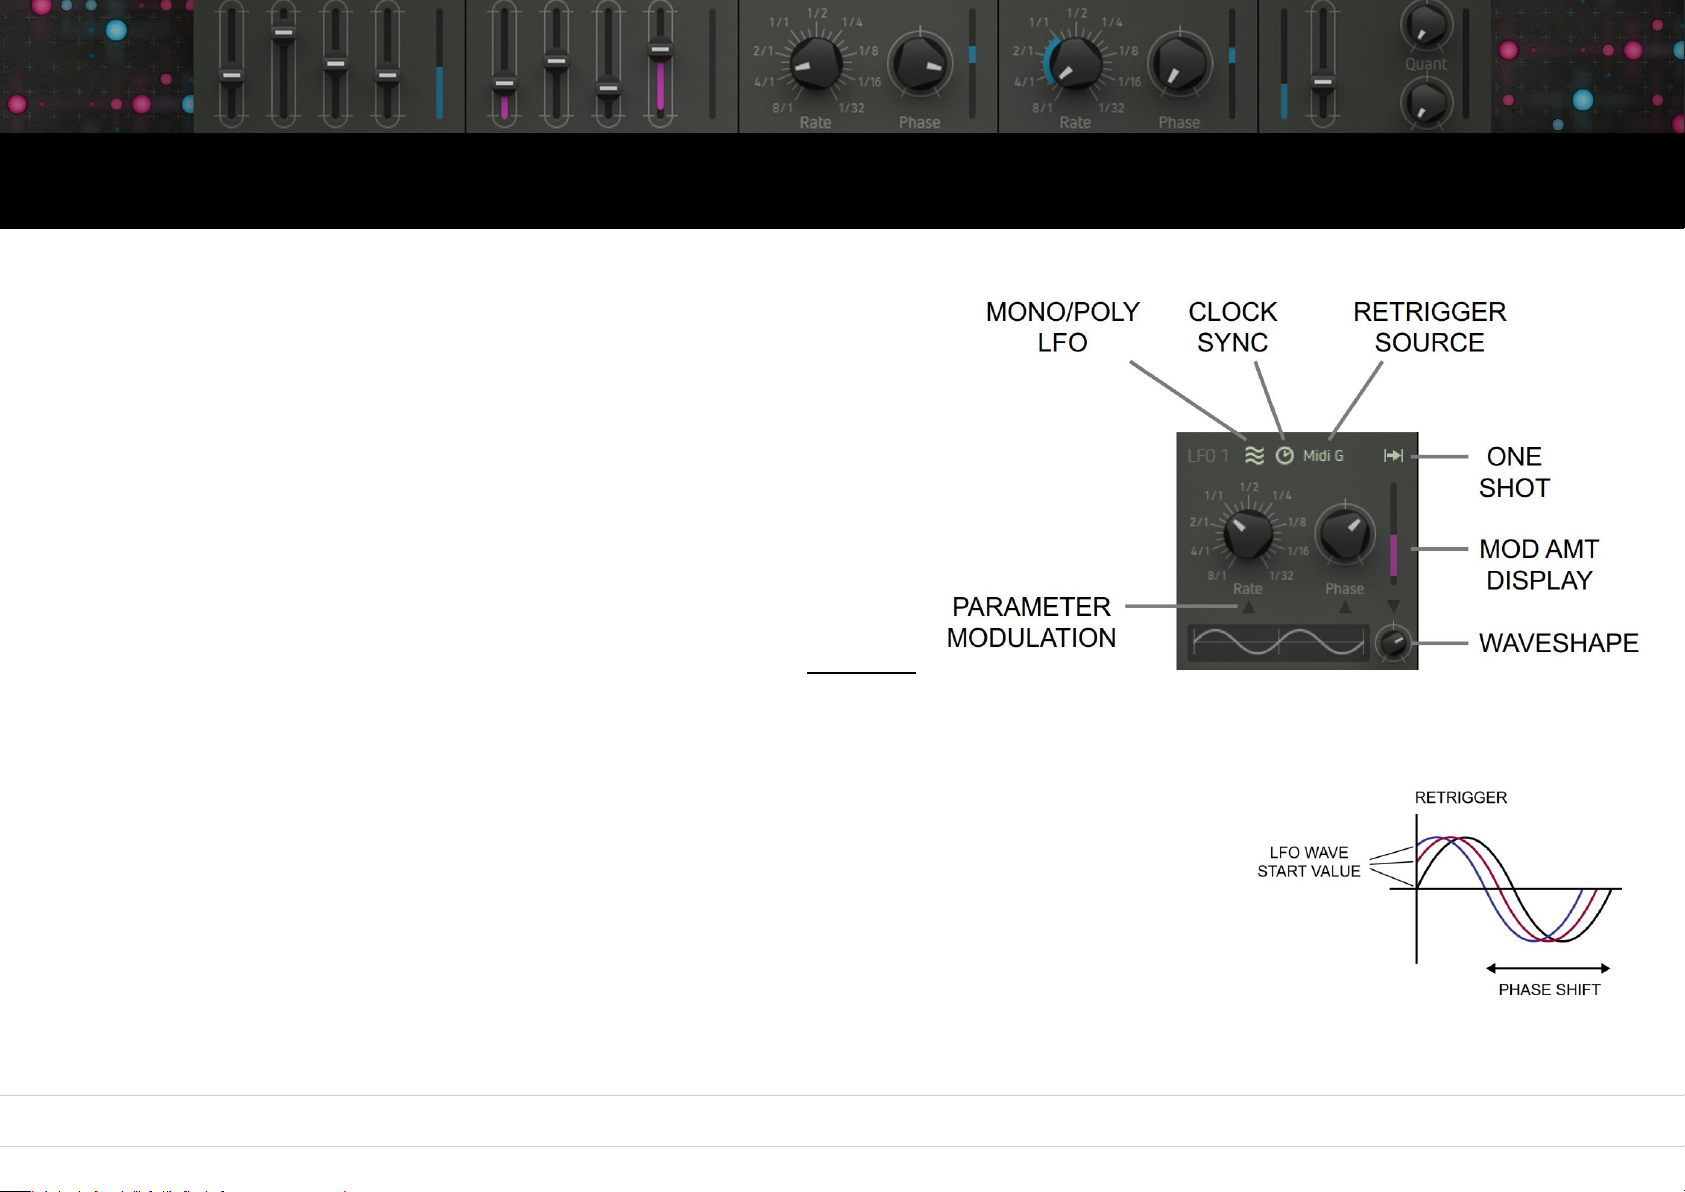
Retrigger Source
Every retrigger will restart the LFO. This allows for rhythmically correct
modulation that is perfectly in sync with the beat.
Please select between the following options:
MIDI Gate
The LFO will be restarted with every new note played.
Free
No retriggering but the LFO will still be synced to the song tempo as long as
the Clock symbol is enabled.
Seq 1 – 4
The LFO will be retriggered by the active steps of the respective sequencer
track.
MIDI Pitch
The LFO will be restarted as soon as you are playing a new pitch. When you are repeatedly playing, say, a
„G“ key three times, the LFO will not be retriggered. When you are playing e.g. a „D“ instead, the LFO will
be retriggered.
The retrigger function is very useful in combination with the phase parameter: By shifting the phase, the
LFO will not start at zero crossing but with a certain amount of offset. In other words – the starting point of
the LFO waveform can be defined and shifted back and forth which can be useful for extra-rich vibrato,
complex modulation bursts etc.
43
Page 44
Oscillators Mixer Filter Drive Output Modulators Sequencer Arpiculation Effects Settings Realtime Controllers
More LFO functions
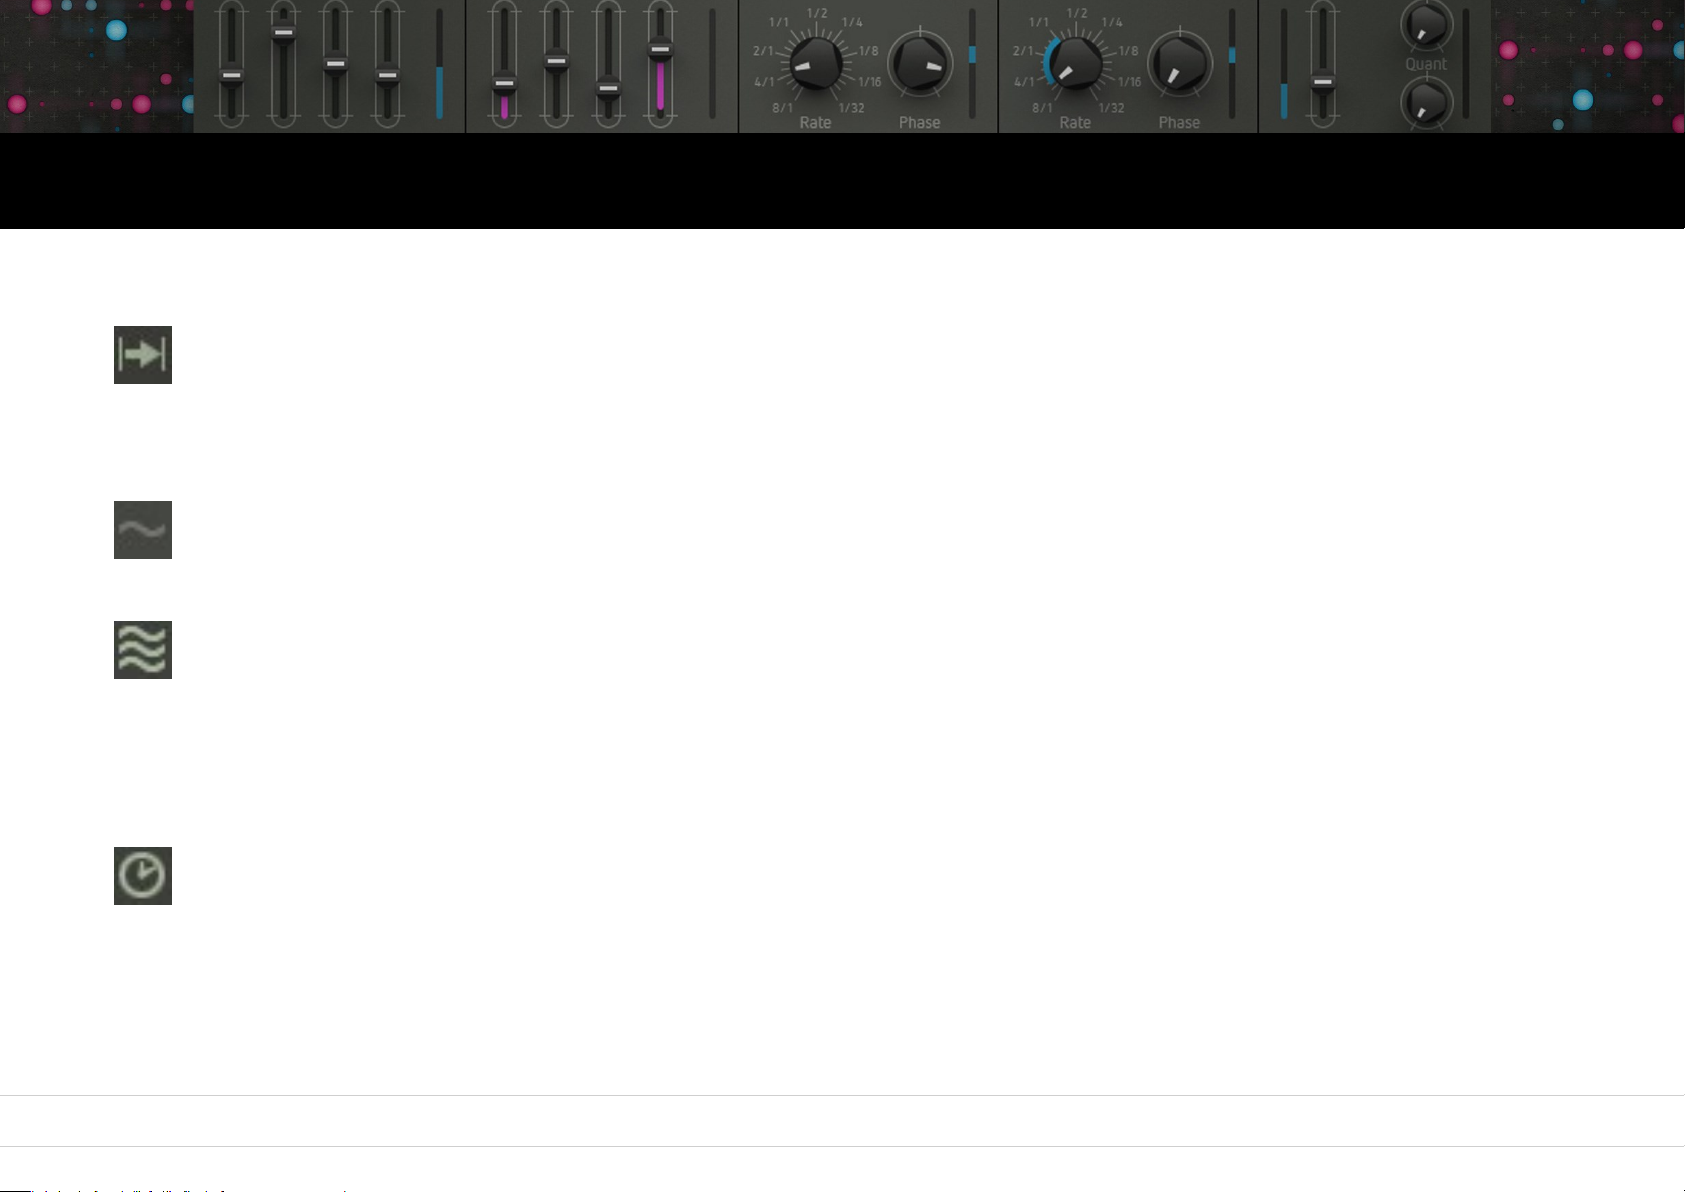
One shot
When the arrow symbol is active, the LFO will work in one-shot mode and stop after completing one full cycle.
This function is especially useful with the retrigger and Phase parameters (please see above).
Mono/Poly LFO
All voices will use the same LFO (Mono LFO).
Each voice will use its individual LFO (Poly LFO). This can result in more organic or more chaotic (i. e. life-like) sounds. It is also
interesting in combination with the retrigger function. For drum and percussion sounds, it can be more useful to use the Mono LFO
mode.
MIDI clock sync
When active, the LFO will be in sync with the song tempo. In this case, the Rate values will be translated from „Hz“ into note values
(eight whole notes to 1/32 note).
44
Page 45
Oscillators Mixer Filter Drive Output Modulators Sequencer Arpiculation Effects Settings Realtime Controllers
Sample + Hold
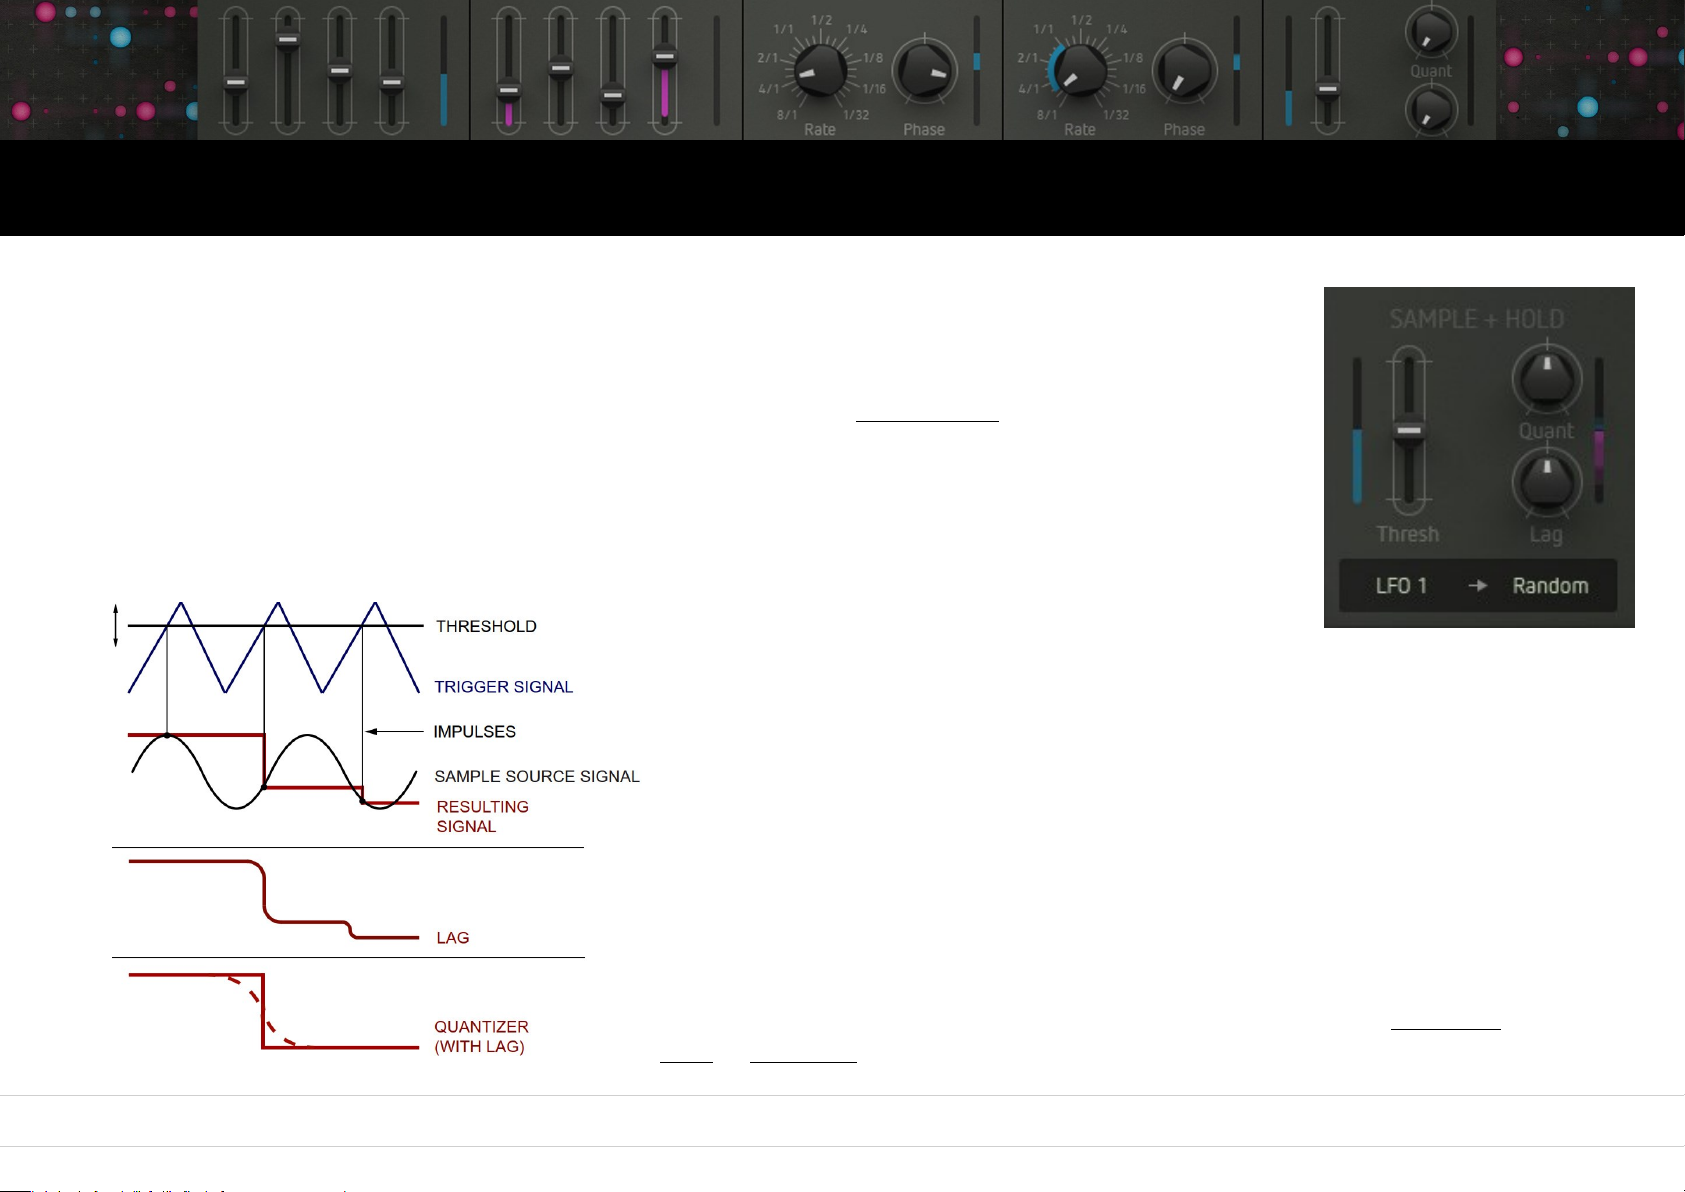
Factory‘s sample + hold module is far more powerful and advanced than most S&H functions commonly
implemented.
By using Factory‘s sample + hold module you can create almost any kind of modulation waveshape – even
rhythmically accurate and in sync with other modulation sources. Watch Video
Function principle
The module uses two signal inputs – one for the trigger signal that scans the input signal and another one for the
signal source to be sampled. Both input sources can be selected by using a drop-down menu. Every time the
trigger signal exceeds the threshold level, an impulse will be generated. This impulse will measure (scan) the
current value of the sample source signal level which is held
until the next trigger comes in, again sampling the current
value and holding etc. (“sample” and “hold”, geddit?). This will produce a stepped
waveform („resulting signal“).
The example shows the basic function principle with very simple input waveforms used.
Even here you can see how complex the resulting waveform might eventually become by
simply altering the threshold setting and the frequencies of scan pulse and sampled signal.
Triangle and sinewave can be replaced by audiosignals if so desired.
You might also want to use more complex LFO waveforms, or how about running the
sequencer outputs into it? The resulting waveform will become more and more complex,
odd, and interesting. Since the results will not always be totally predictable, we – as the
manufacturer of your choice – advise you to indulge yourself unlimited experimentation,
restricted only by your imagination. When using clocked input signals (sequencer, synced
LFOs, or envelopes), you will get rhythmic modulation effects.
45
Page 46
Oscillators Mixer Filter Drive Output Modulators Sequencer Arpiculation Effects Settings Realtime Controllers
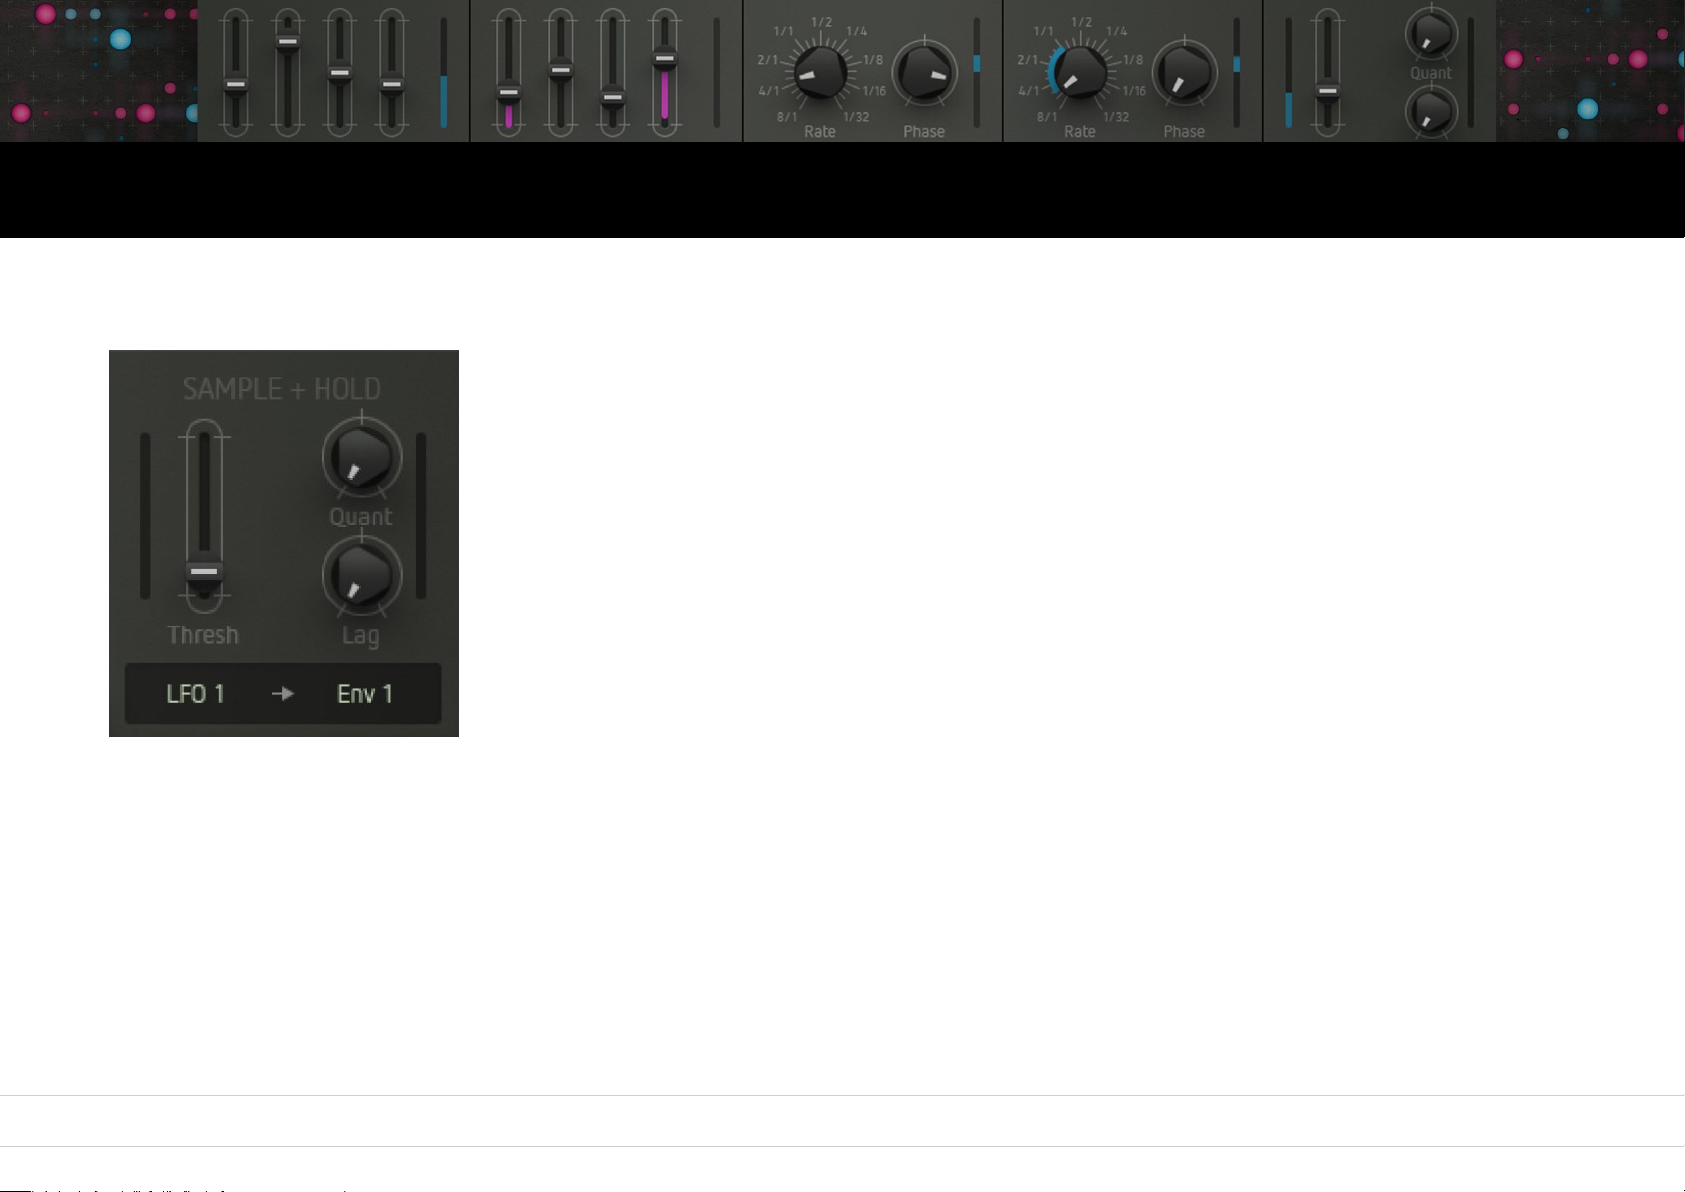
Functions / controls
Here you will find all functions of the S + H module:
Input signals
Click to select a trigger signal (left) and a sample source signal (right).
Tresh
Sets the trigger threshold level.
Lag
Increasingly smoothes the edges of the resulting waveform.
Quant
Quantizes the resulting waveform. The waveform will become increasingly coarse and more and more
stepped. Lag and Quant can be used in conjunction in order to shape the wave depending on the setting of
these parameter (please see example on previous page).
46
Page 47
Modulation Matrix
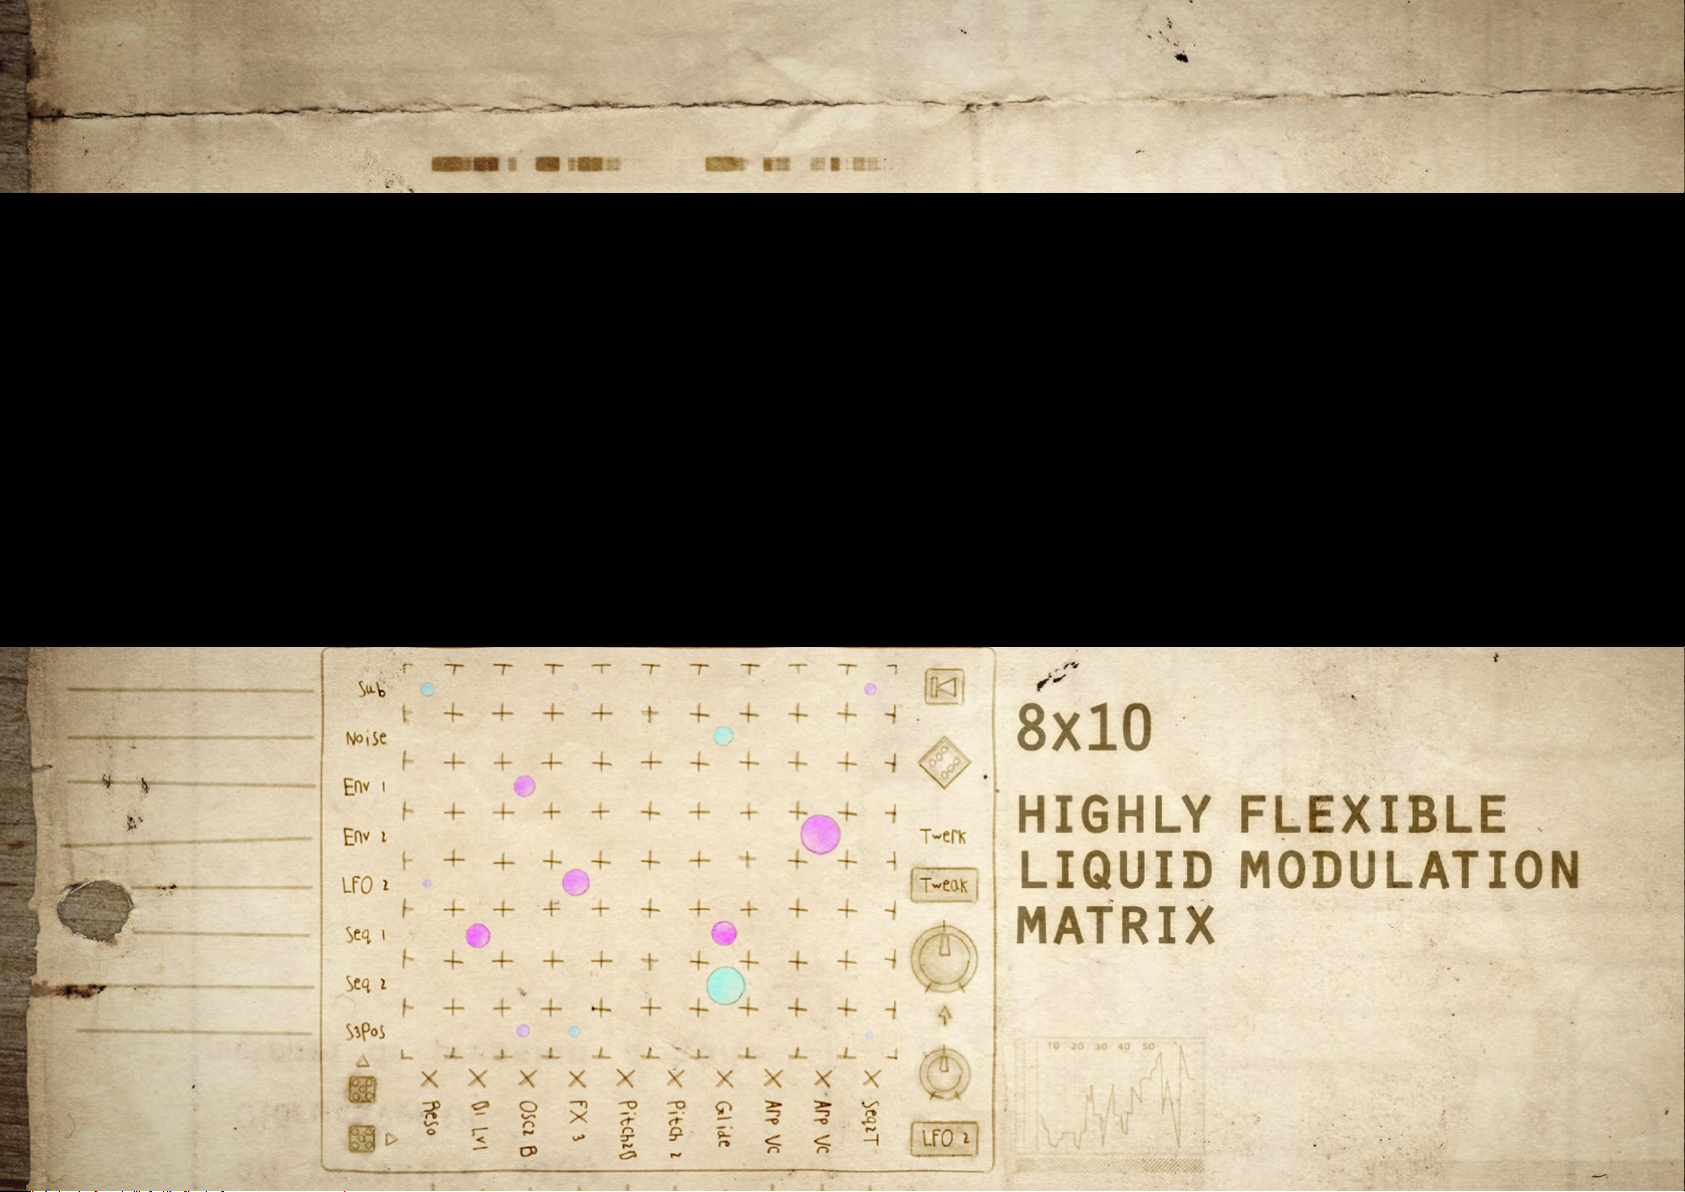
The modulation matrix is Factory‘s central key element.
It is used to set up modulation paths in a very easy and flexible manner.
It provides you with the patching flexibility and timbral power of a really big modular synthesizer,
of course fully storable in memory, and polyphonic at that!
Using Factory‘s modulation matrix, you can patch up to eight modulation paths at a time.
That should be enough for the majority of really far out sounds.
47
Page 48
Oscillators Mixer Filter Drive Output Modulators Sequencer Arpiculation Effects Settings Realtime Controllers
Function principle
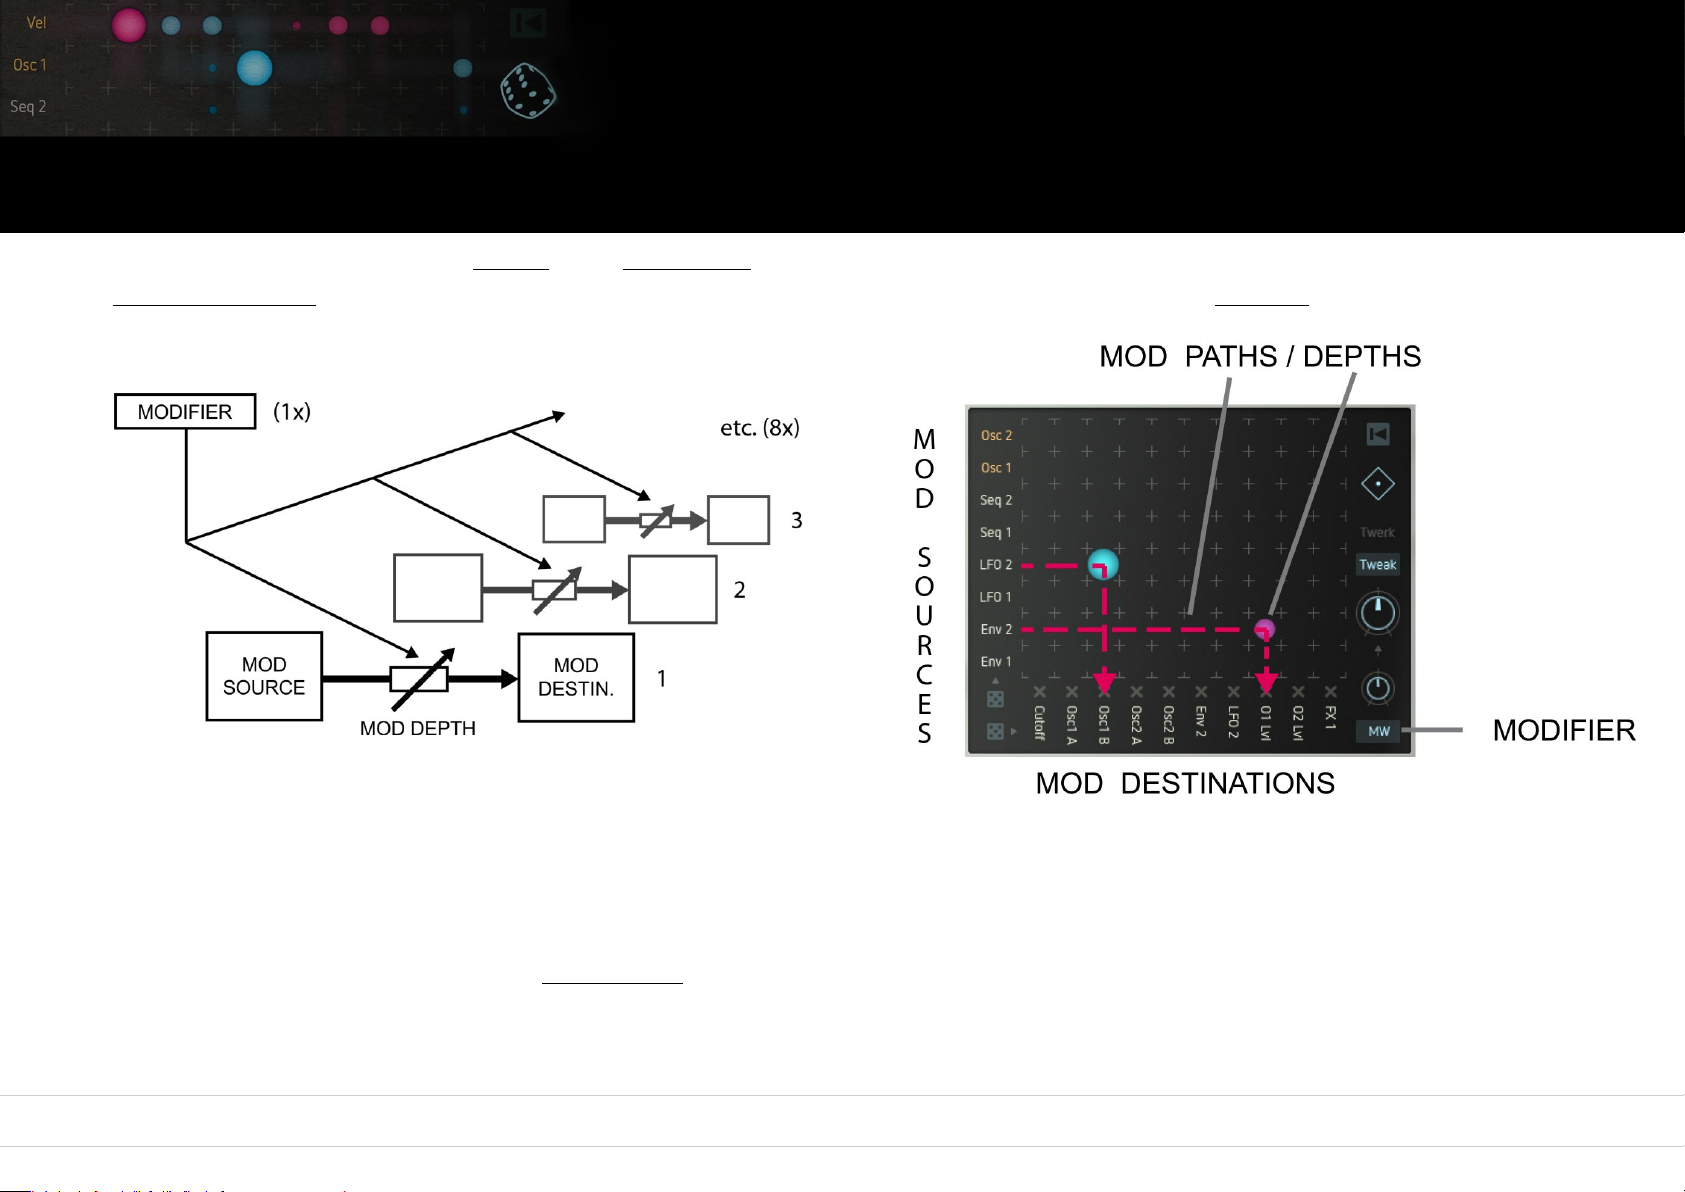
A modulation path consists of a source and a destination parameter which is modulated at a specific level. The intensity – or
modulation depth – can be manually controlled for each modulation path individually. An arbitrary modifier provides the global
control and/or modulation of all modulation depths as well.
Since Factory is a polyphonic synthesizer from a technical point of view, each voice uses its own complete modulation matrix.
Their parameter settings are of course identical (you define them on the user interface) but in the background, all active voices will be
processed separately. The technical effort takes quite a bit of calculating work, and we are glad that Factory is not all too wasteful with
the resources of your device, though. Watch video
48
Page 49
Oscillators Mixer Filter Drive Output Modulators Sequencer Arpiculation Effects Settings Realtime Controllers
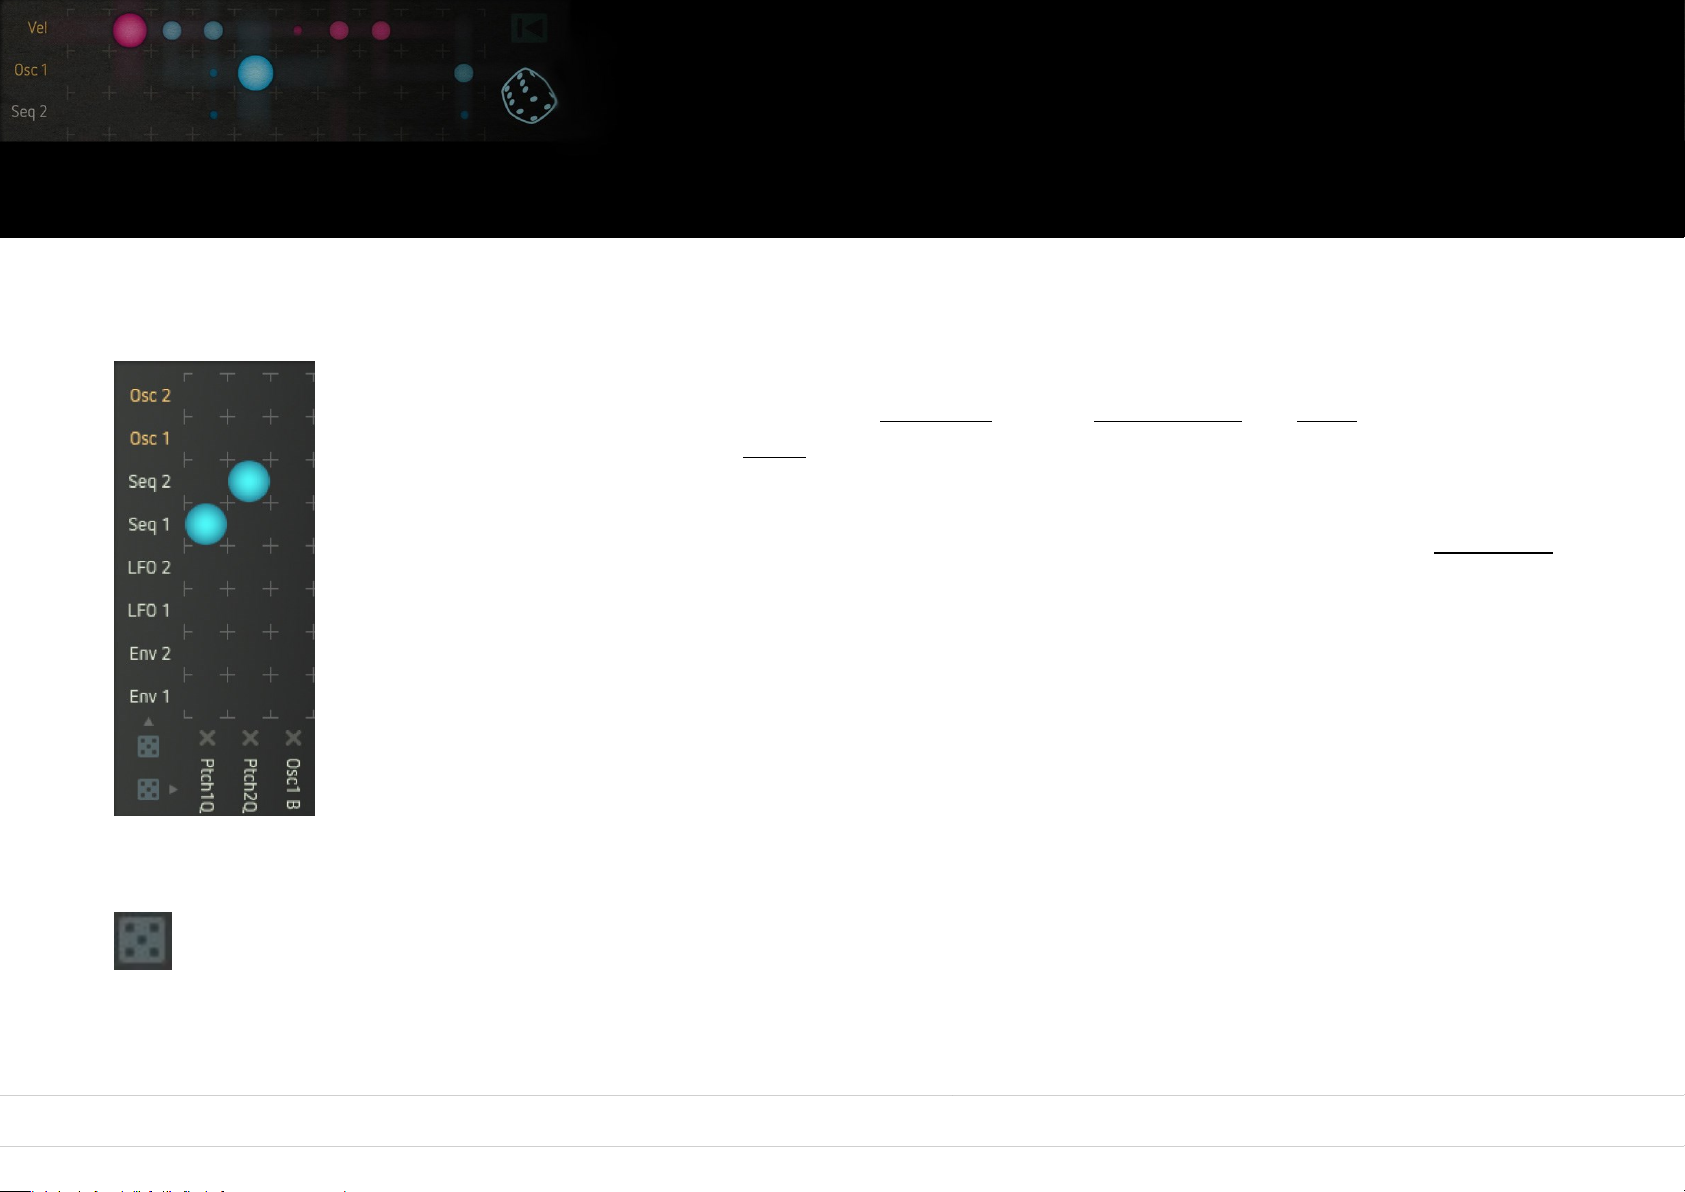
Select modulation sources
Modulation sources are arranged vertically. As soon as you click an item, a small menu will pop up and show all sources available for
this slot. A click on the desired item will allocate the source to the matrix.
The selection is the same for all slots, except 1 and 2 (labelled in orange): These additionally provide audio
signals as modulation sources (output signals of oscillators 1 and 2, sub oscillator and noise generator as well as
the summed up output signal of the mixer). These signal paths are processed in extra high resolution to ensure
an extraordinarily high sound quality.
Most of the terminology used for the sources will speak for itself. Only the sources provided by the sequencer
may require a brief introduction:
• Sequencer 1 to Sequencer 4: transmit the parameter values of the active sequencer steps, allocated to the
respective sequencer track.
• Seq 1 Position to Seq 4 Position: the respective sequencer track transmits a value according to each step
position (1 to 16). Depending on the playback direction of the sequencer, this setting creates a counter going
upward or downward respectively.
Clicking on the dice symbol right underneath the sources will allocate a random selection of modulation sources to the matrix.
Even though the results may differ from a standard synthesizer patch quite a bit, we are sure you will be a winner in most
cases.
At least, these random settings can be a spring-board for exploring uncharted timbral territories.
49
Page 50
Oscillators Mixer Filter Drive Output Modulators Sequencer Arpiculation Effects Settings Realtime Controllers
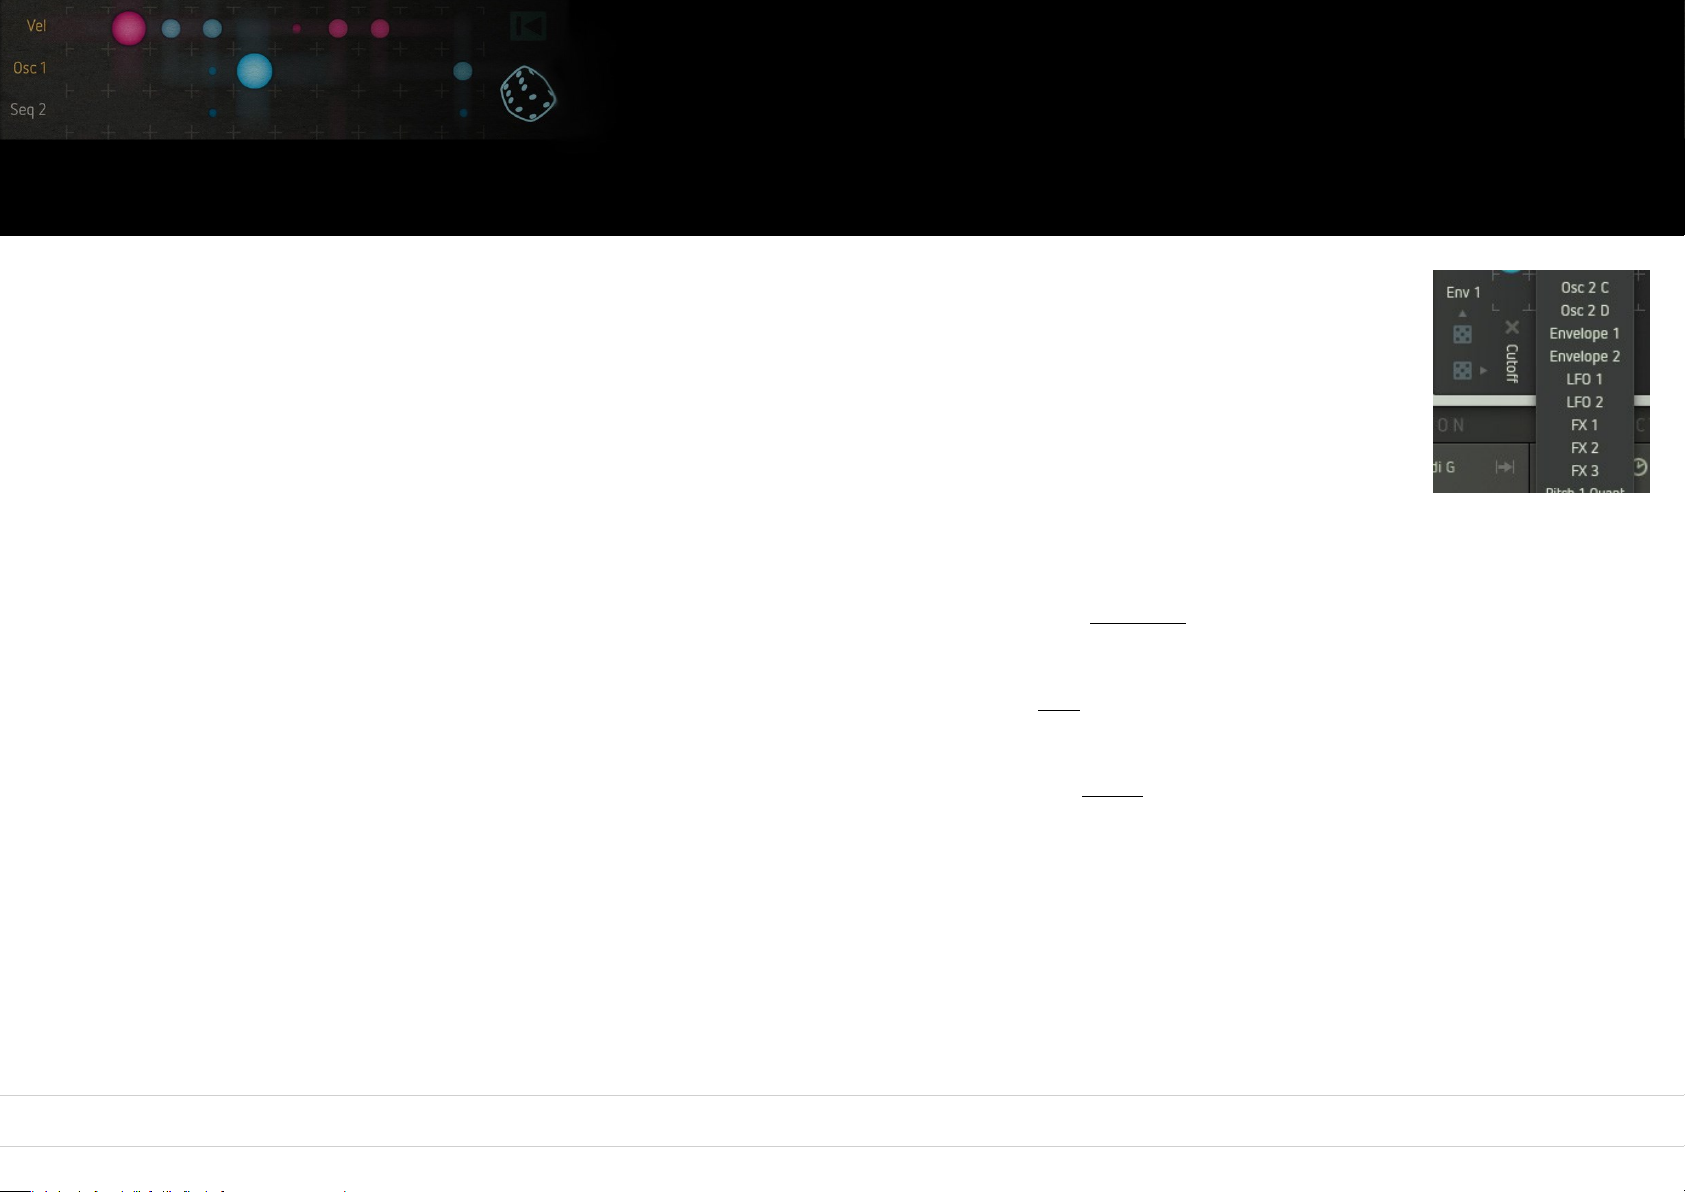
Select modulation destinations
Modulation destinations are arranged horizontally. Here, too, clicking on an item will open up a drop-down menu
that displays all destinations available for this slot. A click on the desired item will allocate the destination to the
matrix.
The selection is the same for all slots without exceptions. Some of the labellings are self-explanatory, others are
explained here:
Osc 1/2 A - D
Selects one of the four oscillator models to modulate.
Envelope 1/2
Selects an envelope module as a mod destination. Select the desired parameter directly in the envelope window (click arrow symbol).
LFO 1/2
Selects an LFO module as a mod destination. Select the desired parameter directly in the LFO window (click arrow symbol).
FX 1 – 3
Selects an effect slot as a mod destination. Select the desired effect parameter directly in the effect slot (click arrow symbol).
Pitch 1/2 Quant
Oscillator pitch. The modulation is quantized in semitones. A continuous mod source (e.g. LFO sinewave) will generate pitched sequences that
resemble little tunes.
Pitch 1/2
Oscillator pitch – no quantization. Continuous pitch alterations will be generated this way (e.g. beat frequencies, pitch sweeps).
50
Page 51
Oscillators Mixer Filter Drive Output Modulators Sequencer Arpiculation Effects Settings Realtime Controllers
Select modulation destinations
Pitch Sub
Suboscillator pitch. Normally, the suboscillator follows the pitch of its master oscillator, quantized in semitones. To modulate the suboscillators
pitch independently from its master oscillator, please use this setting as modulation destination.
Please note that this modulation is also quantised.
Arp Voice
This one is for the voice/note allocation of the arpeggiator. This way, the order in which notes will be played back can be controlled/modulated
by a modulation source.
Seq 1 – 4 Tempo
Modulates the tempo of a selected sequencer track. The tempo changes are quantized to note values in order to keep timing intact.
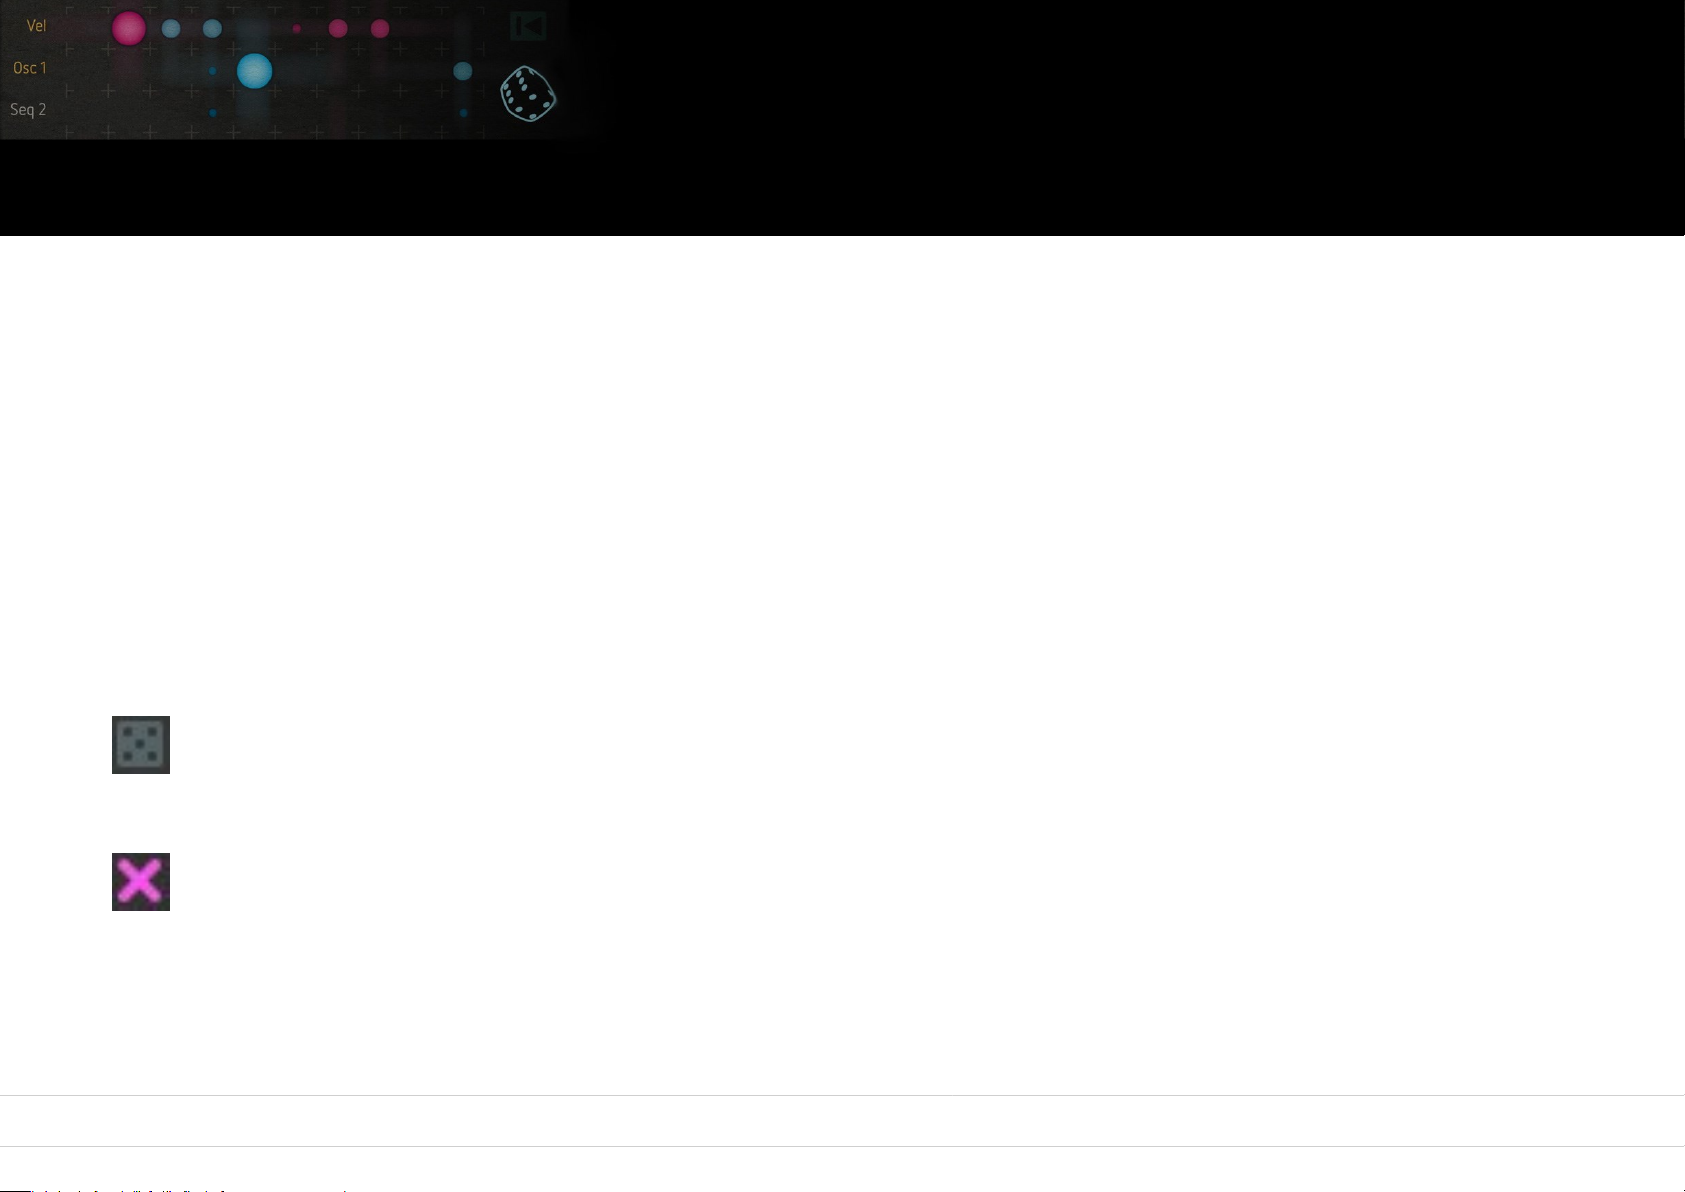
Dice
Clicking on the lower dice will allocate a random selection of modulation destinations to the matrix. Take a gamble.
Mod path mute
Clicking on a purple-colored „X“ will mute the corresponding modulation path.
This function is quite useful if you wish to tidy up the matrix temporarily or to isolate single modulation paths within a complex setting
and check their respective effect on the sound or patch.
51
Page 52
Oscillators Mixer Filter Drive Output Modulators Sequencer Arpiculation Effects Settings Realtime Controllers
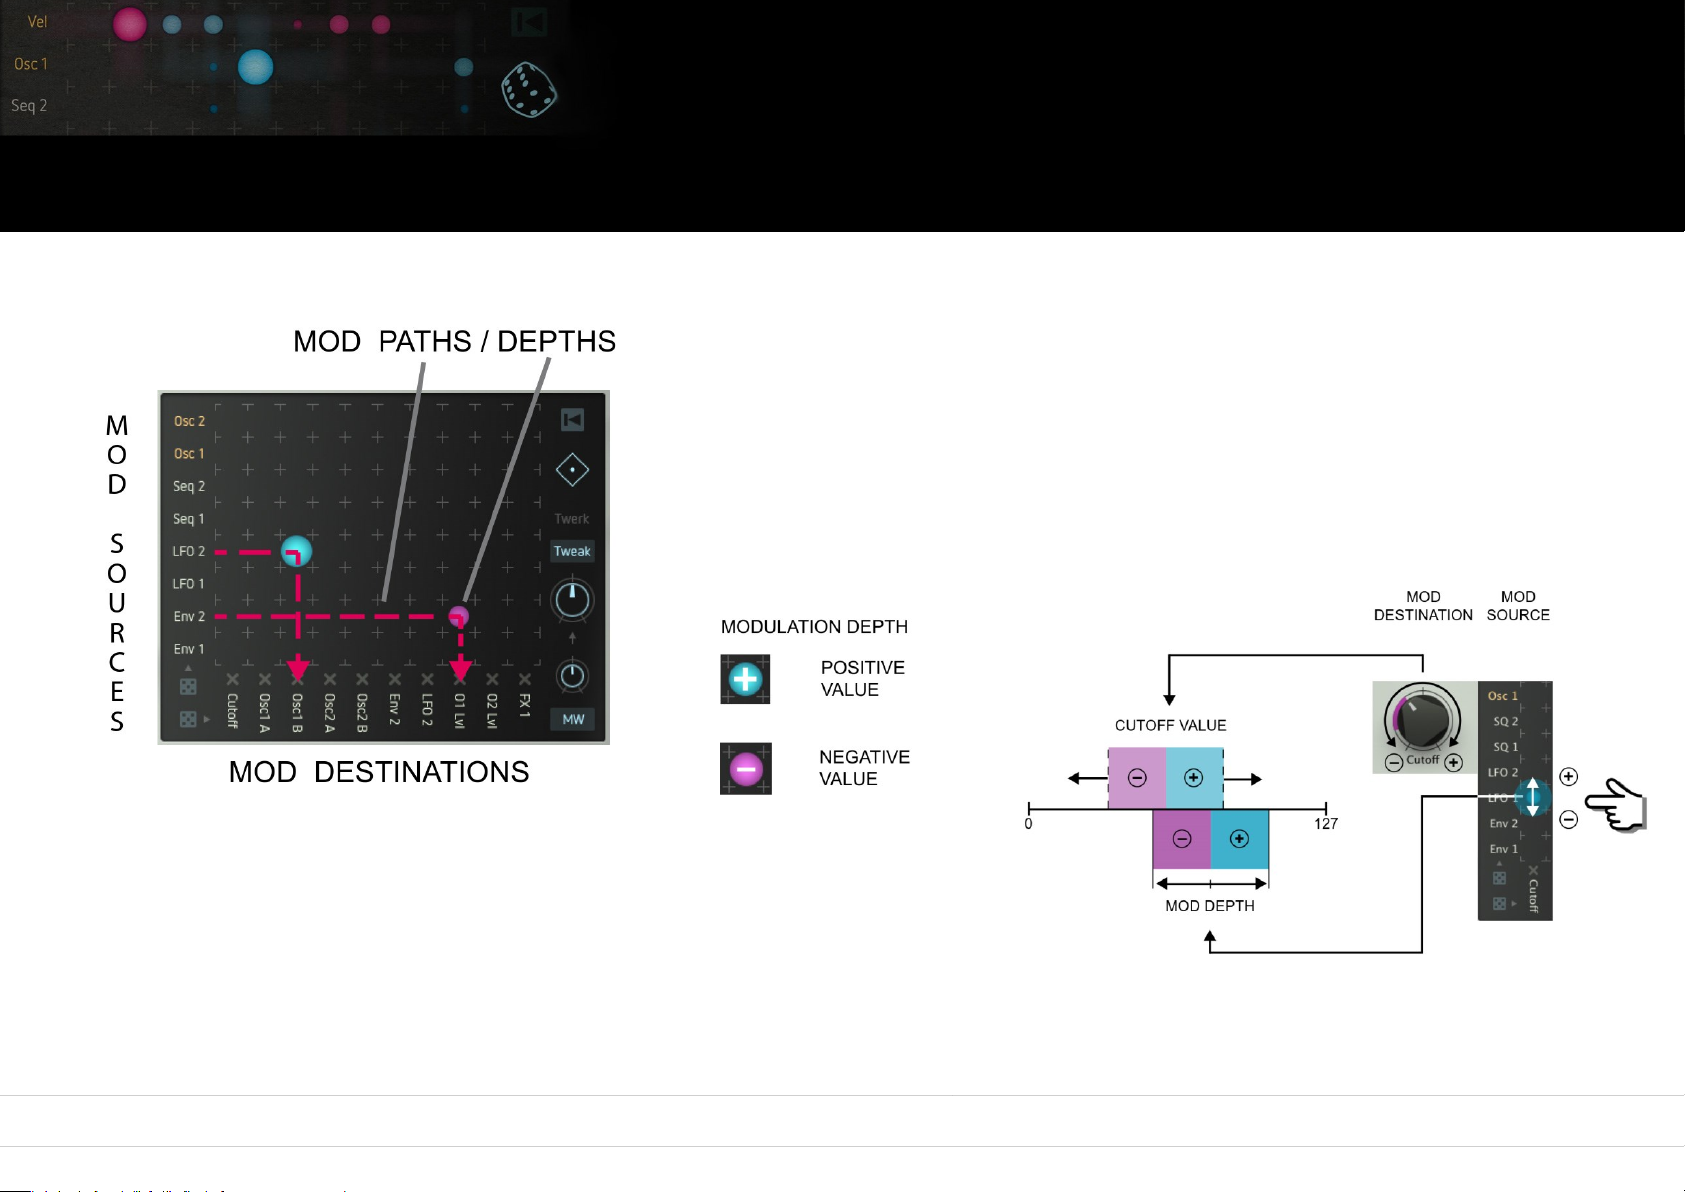
Create modulation connections / define modulation depth
To connect a source to a destination, simply place your cursor at their point of intersection in the matrix grid and move up or down
while keeping your mouse depressed. This will create a coloured circle at the intersection.
The size of the circle symbolizes the modulation depth. Blue means a positive value,
purple a negative value. A double-click on the circle will reset the modulation depth to
zero resp. disable the modulation path. Modulation depth and direction is also
displayed by colored bars or rings respectively, visible on the control of the destination
parameter. This allows you to see at a glance which source modulates which
destination at what depth.
The figure to the right explains the relation between a parameter value (here
cutoff) and modulation depth. The parameter value defines the position of the
modulation range. The amount of the modulation depth defines the width of
the modulation range. Sounds weird, we know, but just toy around with it and you will see.
52
Page 53
Oscillators Mixer Filter Drive Output Modulators Sequencer Arpiculation Effects Settings Realtime Controllers
The modifier or matrix modulation
Watch video
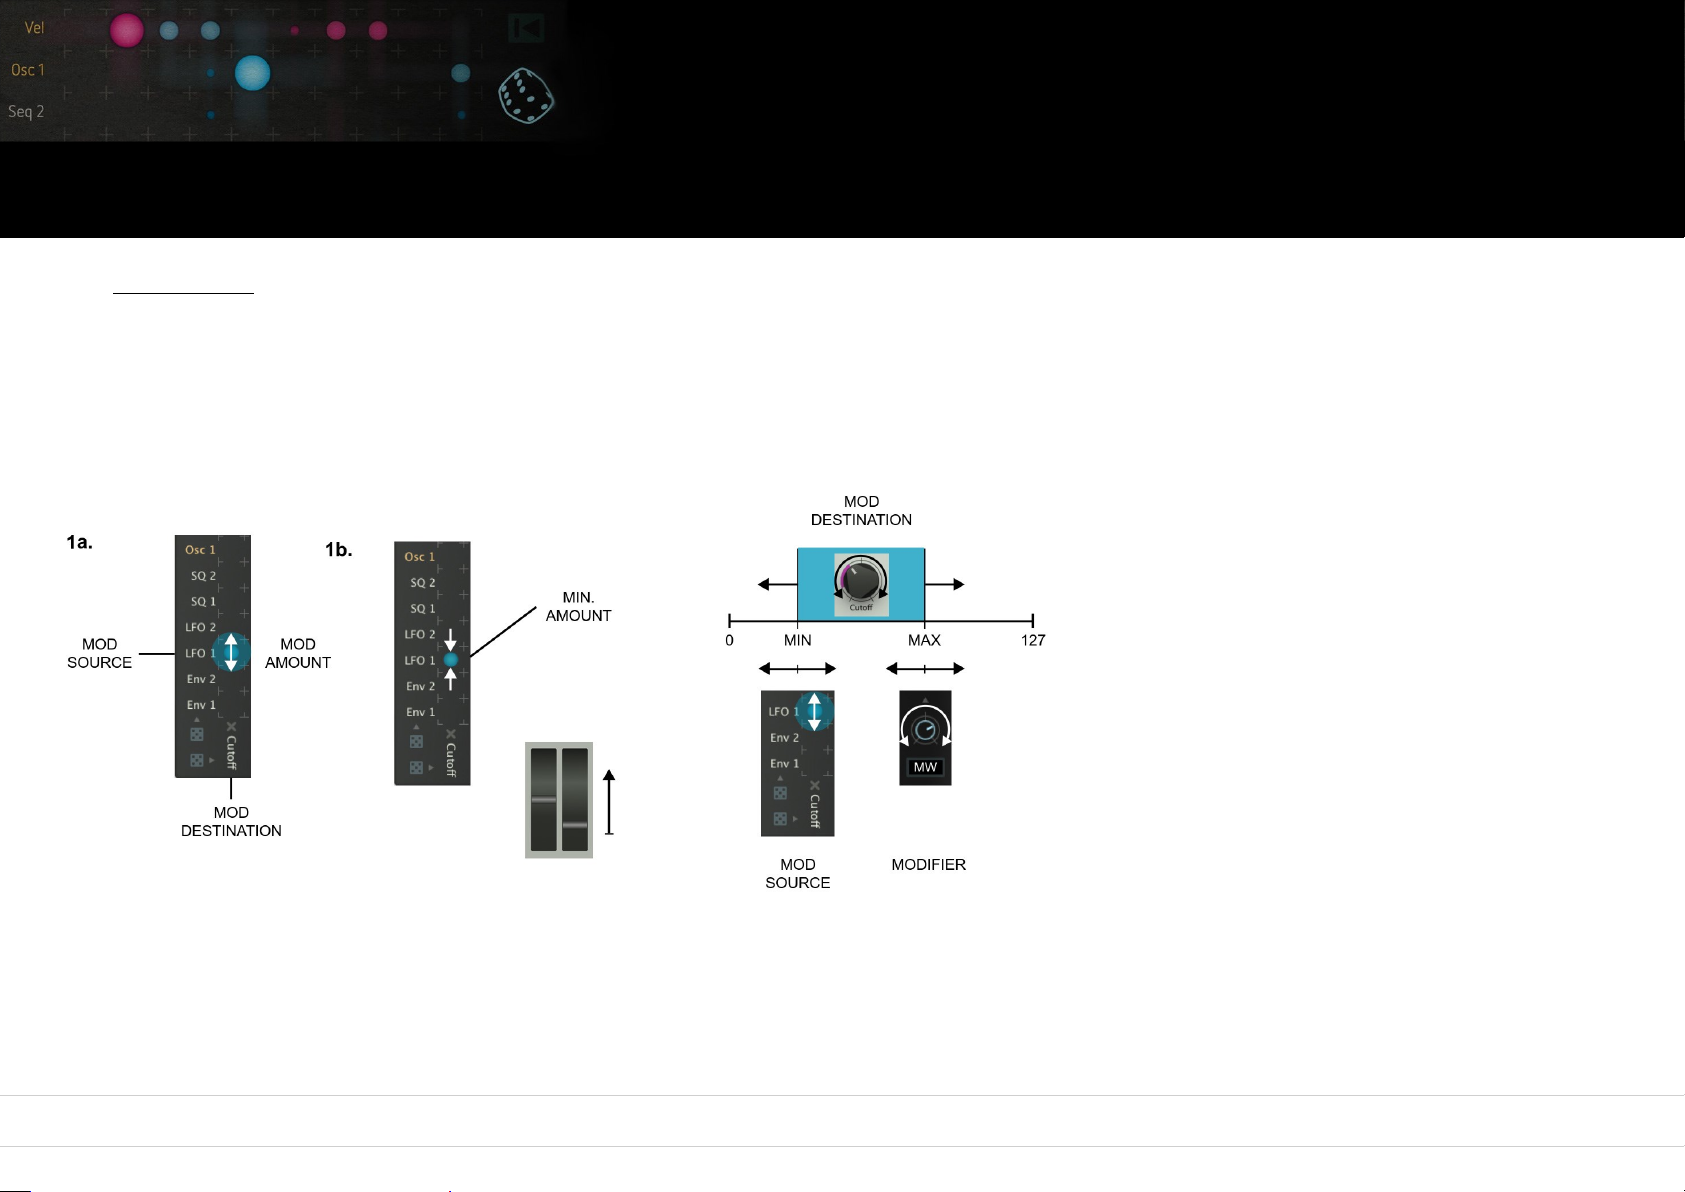
Now it is about time to introduce you to another layer of complexity inherent to the modulation path. Picture this: You want to fade
in and out a timbre variation (LFO 1 → Cutoff), using the mod wheel.
First, initialize the matrix by clicking on the rewind symbol. Then proceed like this:
1a. Create a modulation path by defining a source
(LFO 1), a destination (Cutoff) and a positive
modulation depth (a blue circle at the intersection
point). Now, a cutoff modulation should be audible
(something like “wah-wah-wah” or “boink-boink-
boink”, depending on the waveshape used for
modulation... you get an idea).
1b. Decrease the modulation depth by reducing the
circle width until the filter modulation becomes
almost in-audible. This setting defines the minimal
value of the modulation depth. It will be reached
when the modwheel is fully turned down. But now,
please turn up the modwheel fully.
53
Page 54
Oscillators Mixer Filter Drive Output Modulators Sequencer Arpiculation Effects Settings Realtime Controllers
The modifier or matrix modulation
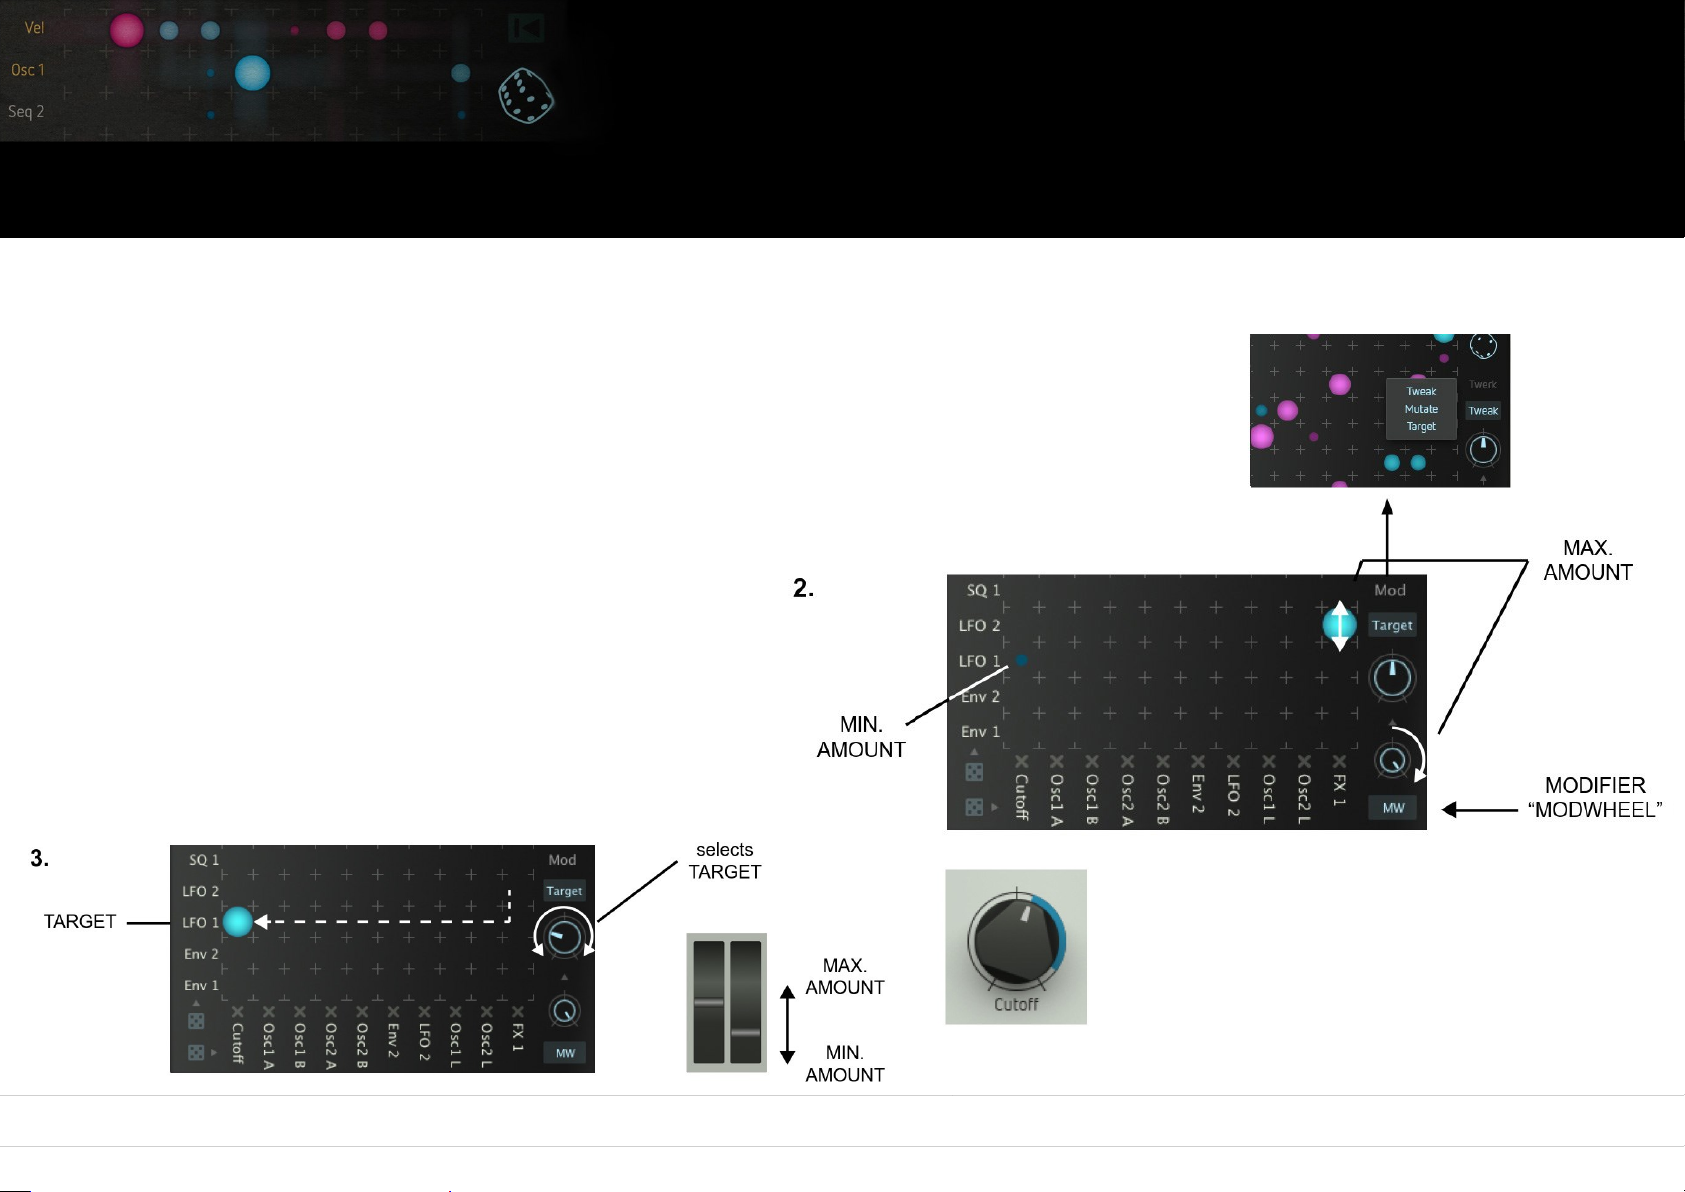
2. Select the setting „Target“ from the upper popup menu.
Then select the modifier (here MW – modwheel) using the
lower pop-up menu and turn up the intensitiy knob fully. In the
matrix, a second (blue) circle with variable size will appear. This
setting defines the maximum value of the modulation depth. It
will be reached when the modwheel has been turned up fully.
3. Turn the Target knob slowly. By doing so, you can shift the
new circle to the modulation path previously created (circle at
the intersection point between LFO 1 and Cutoff). Minimum
and maximum modulation depths will be combined
automatically.
Now turn the modwheel back and forth – the modulation depth
will change within the previously defined range. By turning the
Cutoff control, you can shift the position of this range.
The movement of the coloured ring around the
cutoff control exactly shows the resulting
modulation depth/range.
54
Page 55
Oscillators Mixer Filter Drive Output Modulators Sequencer Arpiculation Effects Settings Realtime Controllers
The modifier or matrix modulation
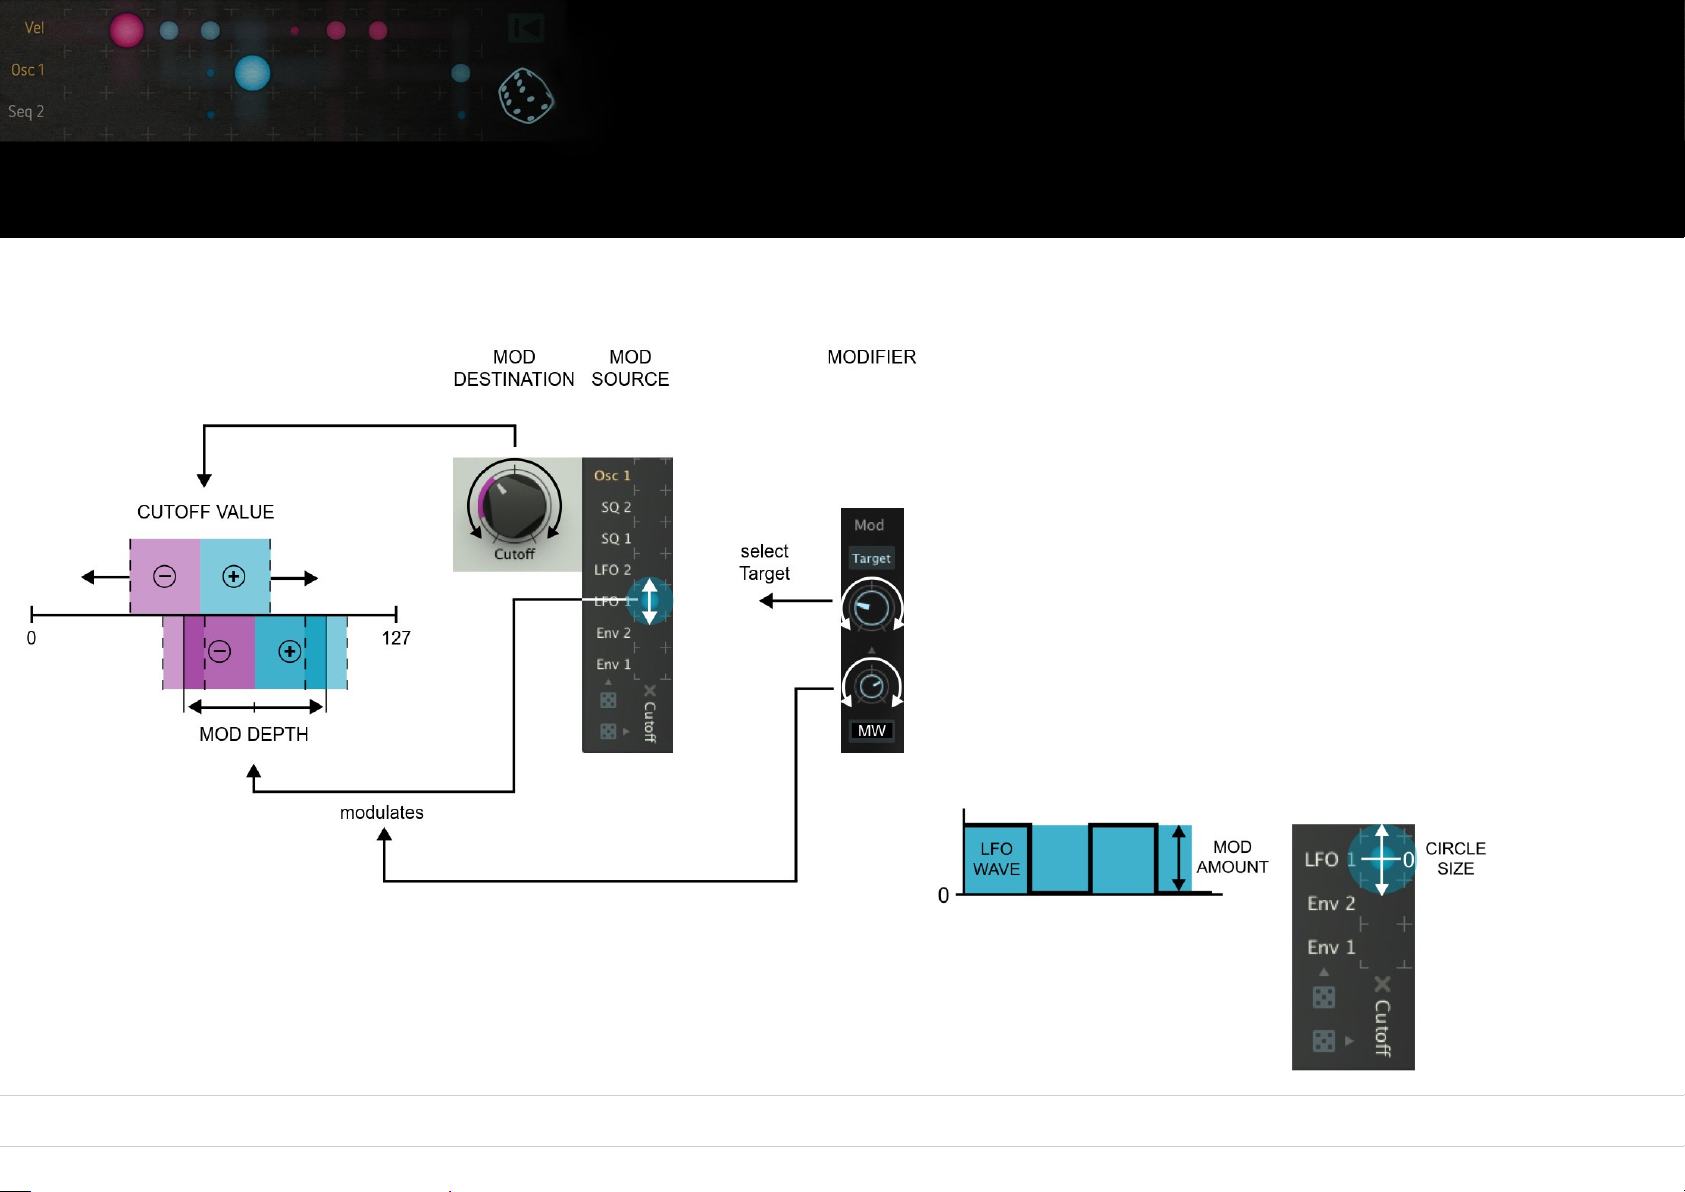
The following figure will make the relationship between the different parameters and their value settings easily understandable.
To keep things simple, we limited our example to positive
modulation depths. Of course, all these values work in a bi-polar
fashion. You can alter the example e.g. by using a negative
modulation depth for the target. That way, the timbre variation
would be increased by turning down the modwheel and vice
versa. You can adress one modifier at a time, e.g. mod wheel for
the entire matrix.
To make sure that a circle appears in the mod matrix when
setting a modifier, the corresponding modifier has to put out a
positive or negative value with an amount other than zero (the
example below shows LFO 1). When e.g. the modwheel is fully
turned down (no output), the circle will be minimized resp.
invisible. This is also why we asked you to turn up the modwheel
in step 1b.
55
Page 56
Oscillators Mixer Filter Drive Output Modulators Sequencer Arpiculation Effects Settings Realtime Controllers
Mod Tweak and Mutate functions
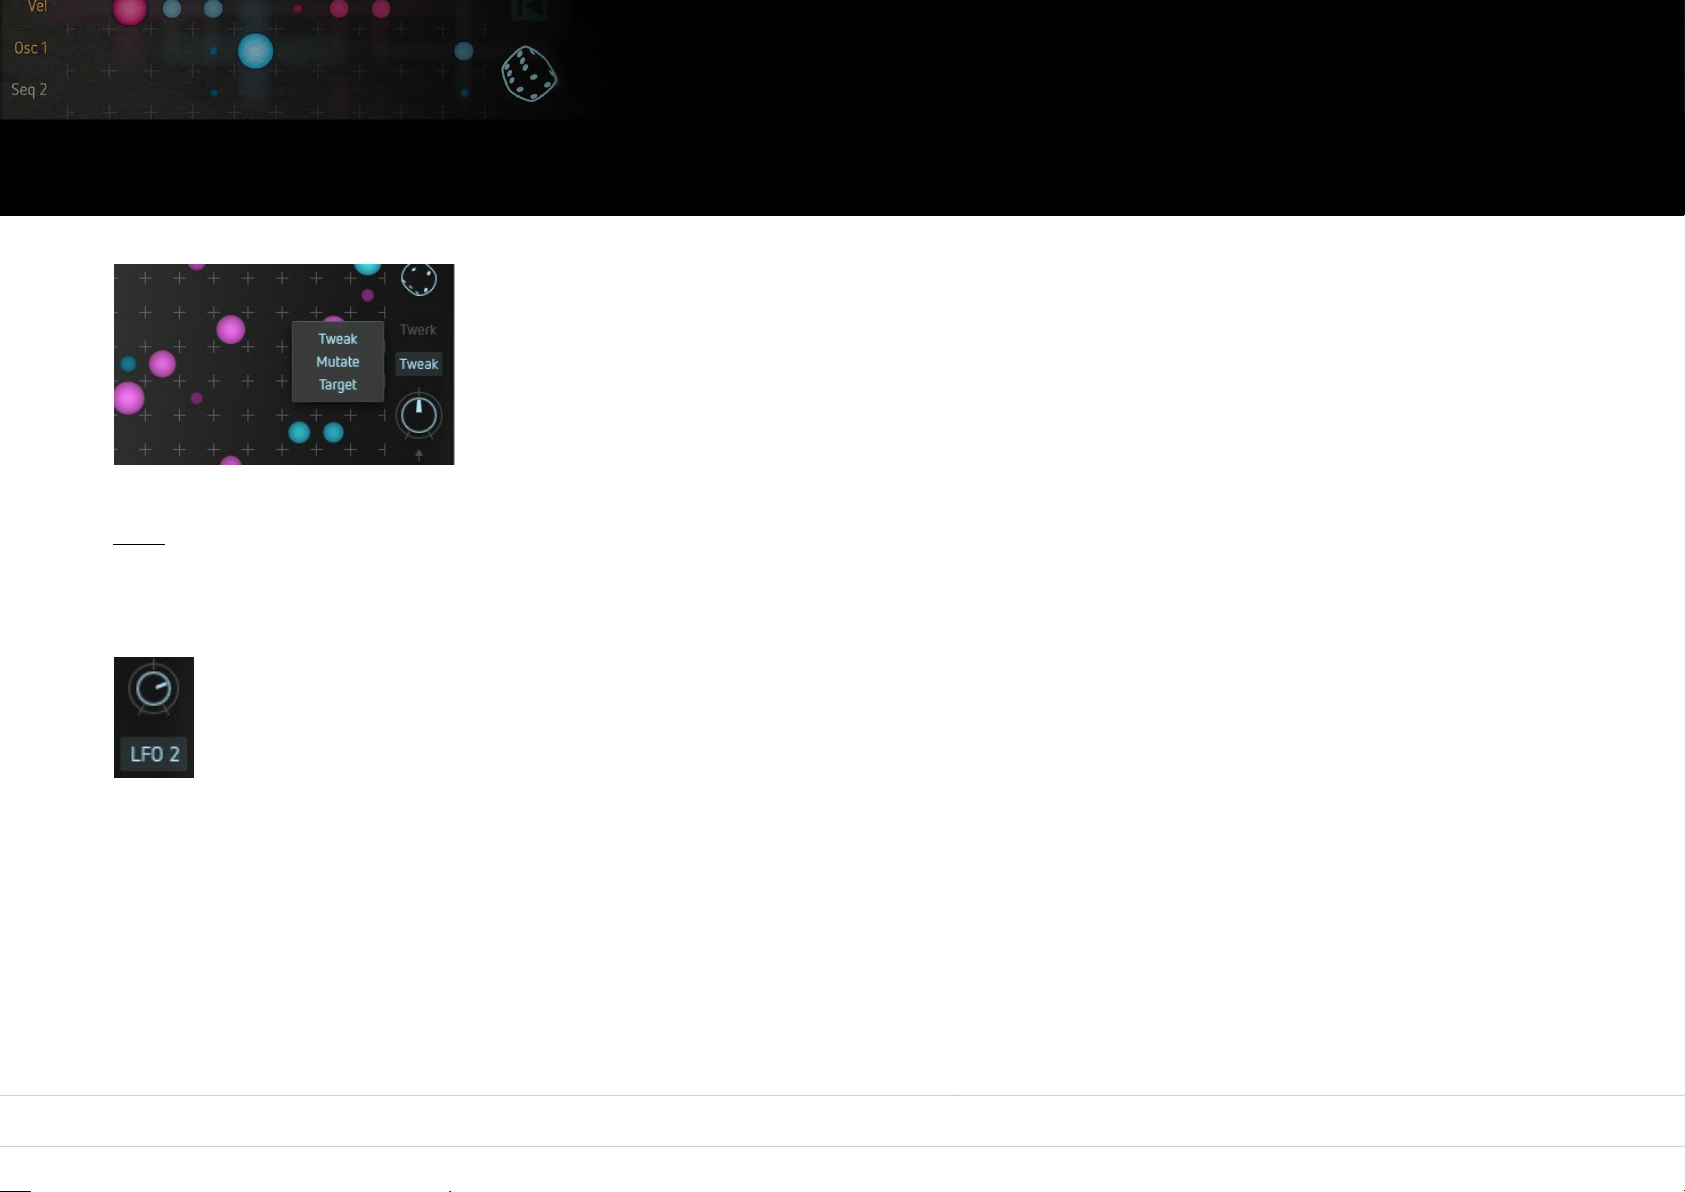
In the section above, you have modulated the modulation depth of one modulation path with a
modifier (e.g. modwheel). But there is more: The matrix provides an interesting function that
enables the chosen modifier to alter the modulation depths of all active mod paths at a time. The
ratio between the amounts will be retained.
Mod Tweak
Load an appropriate preset with many mod paths (e.g. „Choirbeast“).
Set the Mod parameter to Tweak.
Turn the knob below the selection window to alter all modulation depths manually.
Check, if „LFO 2“ is chosen as modifier. Turn the knob above the modifier and watch the pulsing circles in the matrix – nice, eh?
This will wipe the floor with most arcade games.
Now all modulation depths are changing simultaneously by the selected modifier (here LFO 2) – in accordance with their original
ratios. When a value is exceeding its available maximum range, it will be „mirrorred“.
Mod Mutate
This function works in a very similar fashion to Mod Tweak but it varies the modulation depths randomly – still in accordance with their original
ratios.
By returning the knob to its original position, the initial values will be retrieved, including all stages in between.
View it as a random fuction with undo-option, if you wish.
Probably unique in the known universe, and so incredibly useful (at least sometimes).
56
Page 57
Oscillators Mixer Filter Drive Output Modulators Sequencer Arpiculation Effects Settings Realtime Controllers
Random & Initialze
Random function (dice symbol on end)
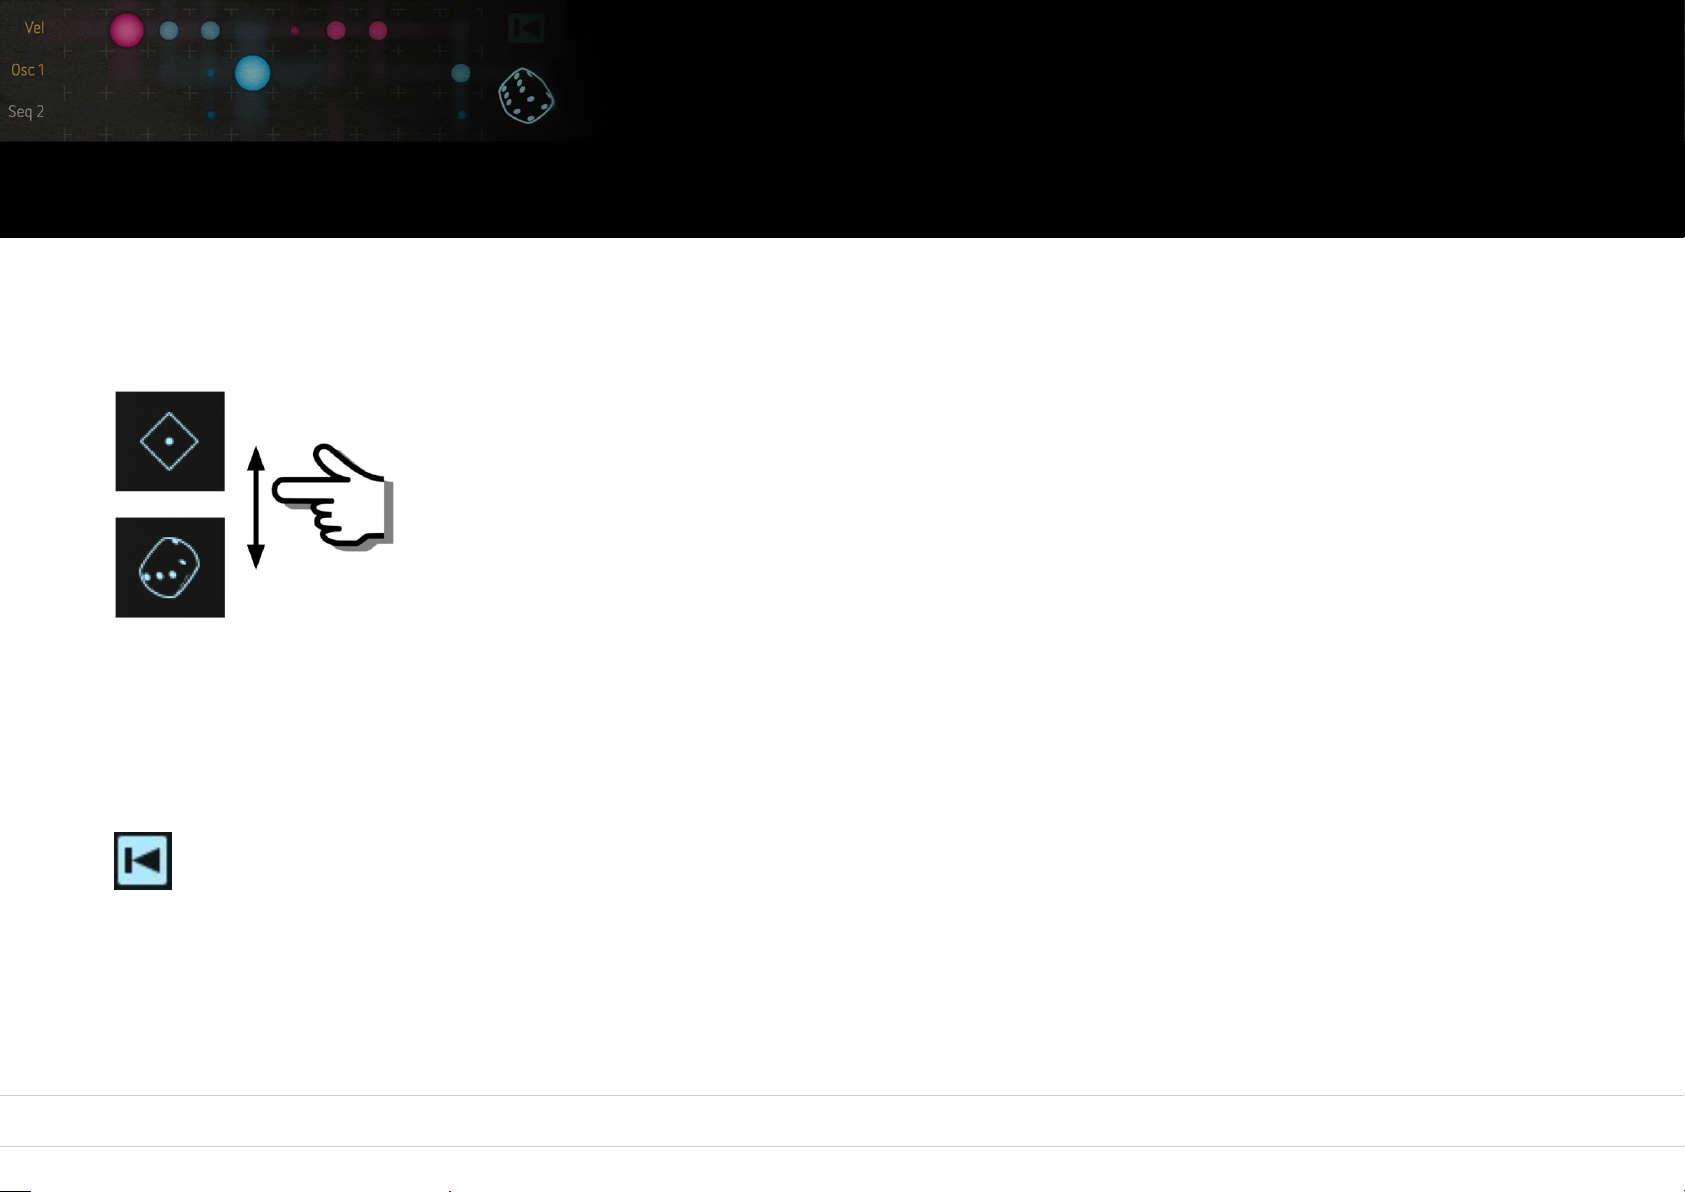
This function automatically creates new modulation paths. Keep your mouse pressed and drag vertically across the dice symbol. The matrix will
be increasingly randomised.
Again, this is the trick: By moving the mouse cursor backwards, the initial state of the matrix will be completely
recreated, including all in-between stages. By moving the cursor again, exactly the same process will be repeated.
By moving the cursor up and down (resp. „rolling the dice“) you can control an unlimited undo/redo function that
will cover all the settings / parameters of the matrix.
The matrix will be initialised and the settings / mod paths previously active are deleted only after clicking on the
backwards symbol (top right). When you are now rolling the dice again, a completely new configuration of the
matrix will be generated.
Since the results are reproducable, the practical use of this system is much higher than a conventional „random“-function.
All settings that have been generated by the Mod Tweak, Mutate, and Random functions will be stored in a preset, along with all other patch
data.
Initializing the matrix
Simply click the backwards symbol to erase all existing modulation paths (please see also „random function“).
The mod depth of single modulation paths can be set to zero resp. disabled by double-clicking on the desired circle in the matrix.
57
Page 58
Sequencer
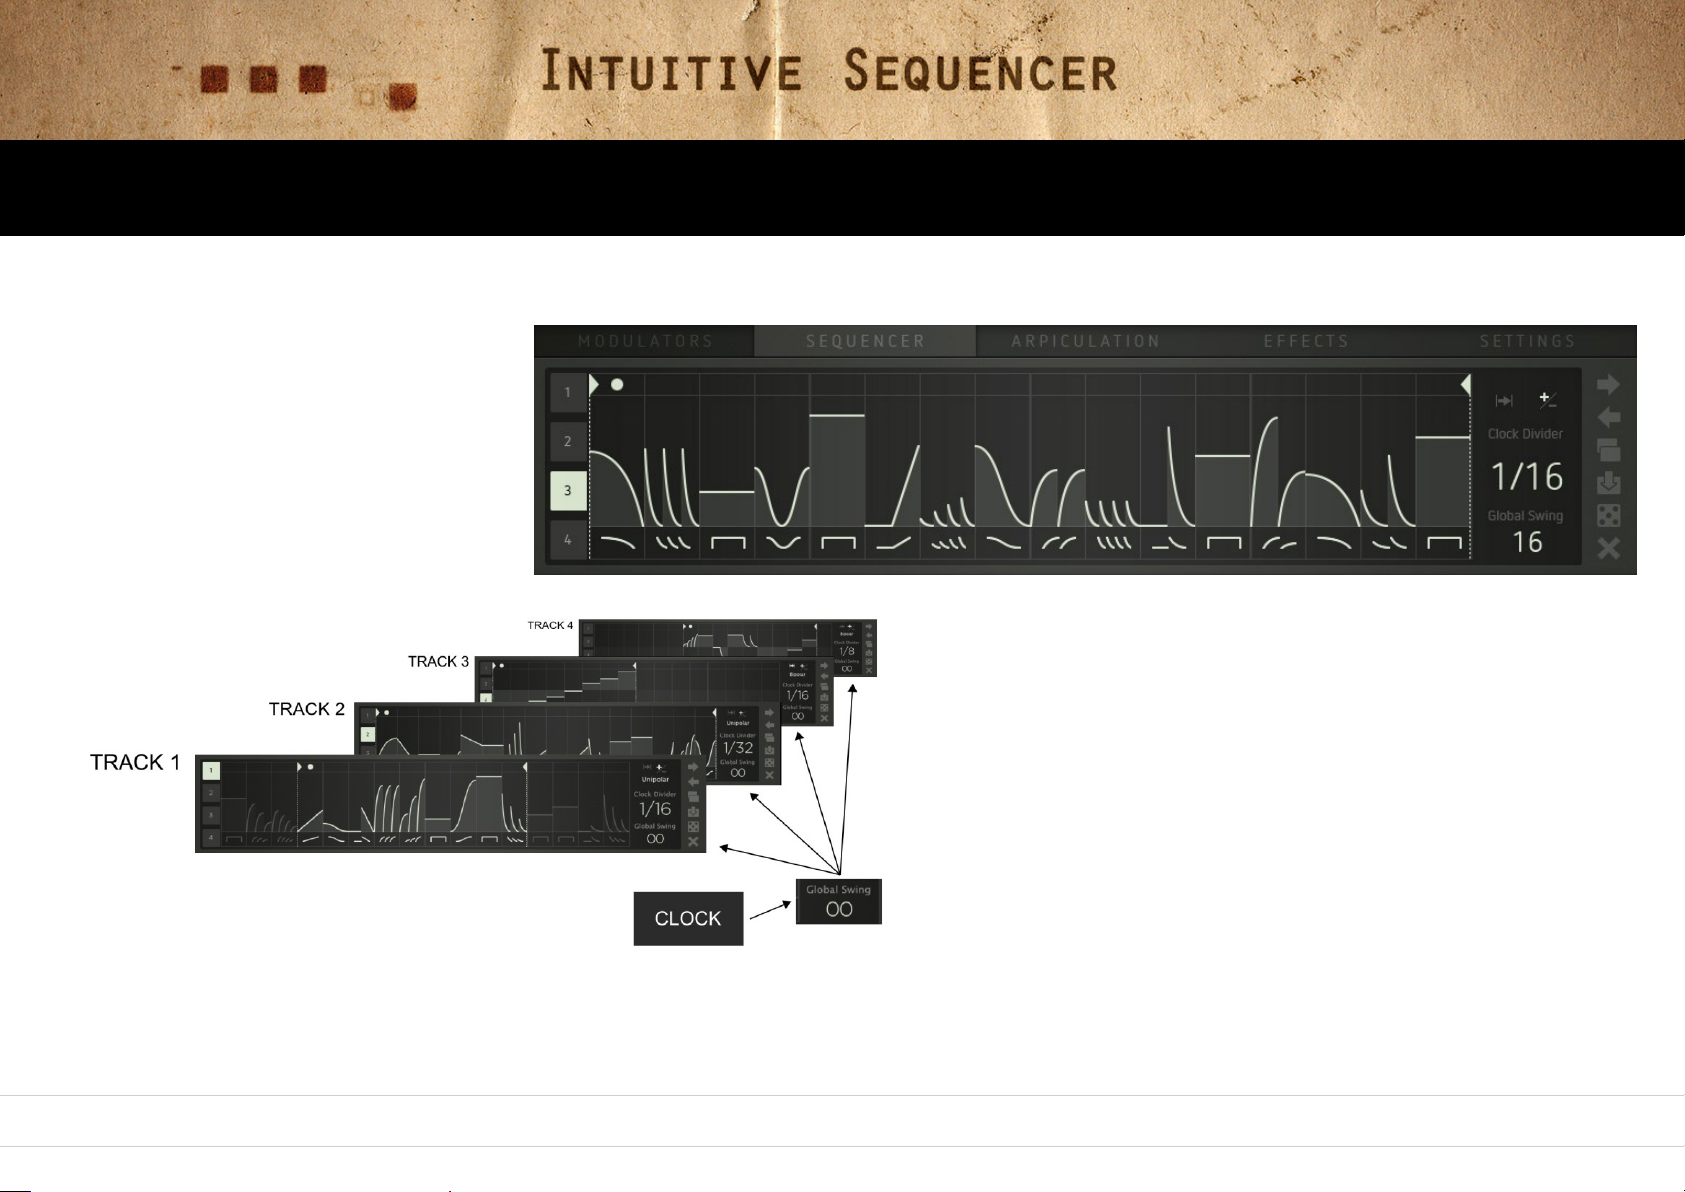
Factory features an internal step sequencer with four tracks of up to 16 steps each.
It can control pitch and – via the mod matrix – lots of sound parameters (35 parameters, to be exact...).
Watch video
58
Page 59
Oscillators Mixer Filter Drive Output Modulators Sequencer Arpiculation Effects Settings Realtime Controllers
Drawing parameter values / using Step envelopes
The sequencer window will always display one of the four tracks. All functions (except Global Swing) can be edited individually for each track.
When Factory is running in standalone mode or as plug-in with internal
clock source, the sequencer will start
playing when receiving a note-on
command (click key on the keyboard
to verify). In plug-in mode using an
external clock, Factorys sequencer will
be controlled by the start/stop
commands of the host sequencer.
You can draw pitches resp. parameter values directly into the track
window. You can select one out of 36 step envelopes per step.
These will provide different envelope shapes as well as multitriggers with steady, increasing, or decreasing levels/velocity. This
will make programming pretty complex and interesting sequences
as easy as eating cake (German saying... Germans love cake,
among other things). It is also fairly easy to create the illusion of a
sequence that contains more than 16 steps: Using e.g. step
envelopes with double triggers and running the sequence at half
speed will create the illusion of a sequence that is made up of 32
steps.
When using the quantized oscillator inputs (OSC1/2 Pitch Quantized) as mod destinations, ramp-shaped step envelopes will generate note
sequences. Their harmonics will depend on the setting of the scale parameter in the Pitch Factory window.
59
Page 60
Oscillators Mixer Filter Drive Output Modulators Sequencer Arpiculation Effects Settings Realtime Controllers
Parameters & functions
The swing function (Global Swing)
It is used to shift the offbeat steps of all tracks by the same factor. This is a global parameter. The multi-triggers are also affected by the swing
function. We advise to try out the sequencer using a slow tempo first.
Track parameters and functions
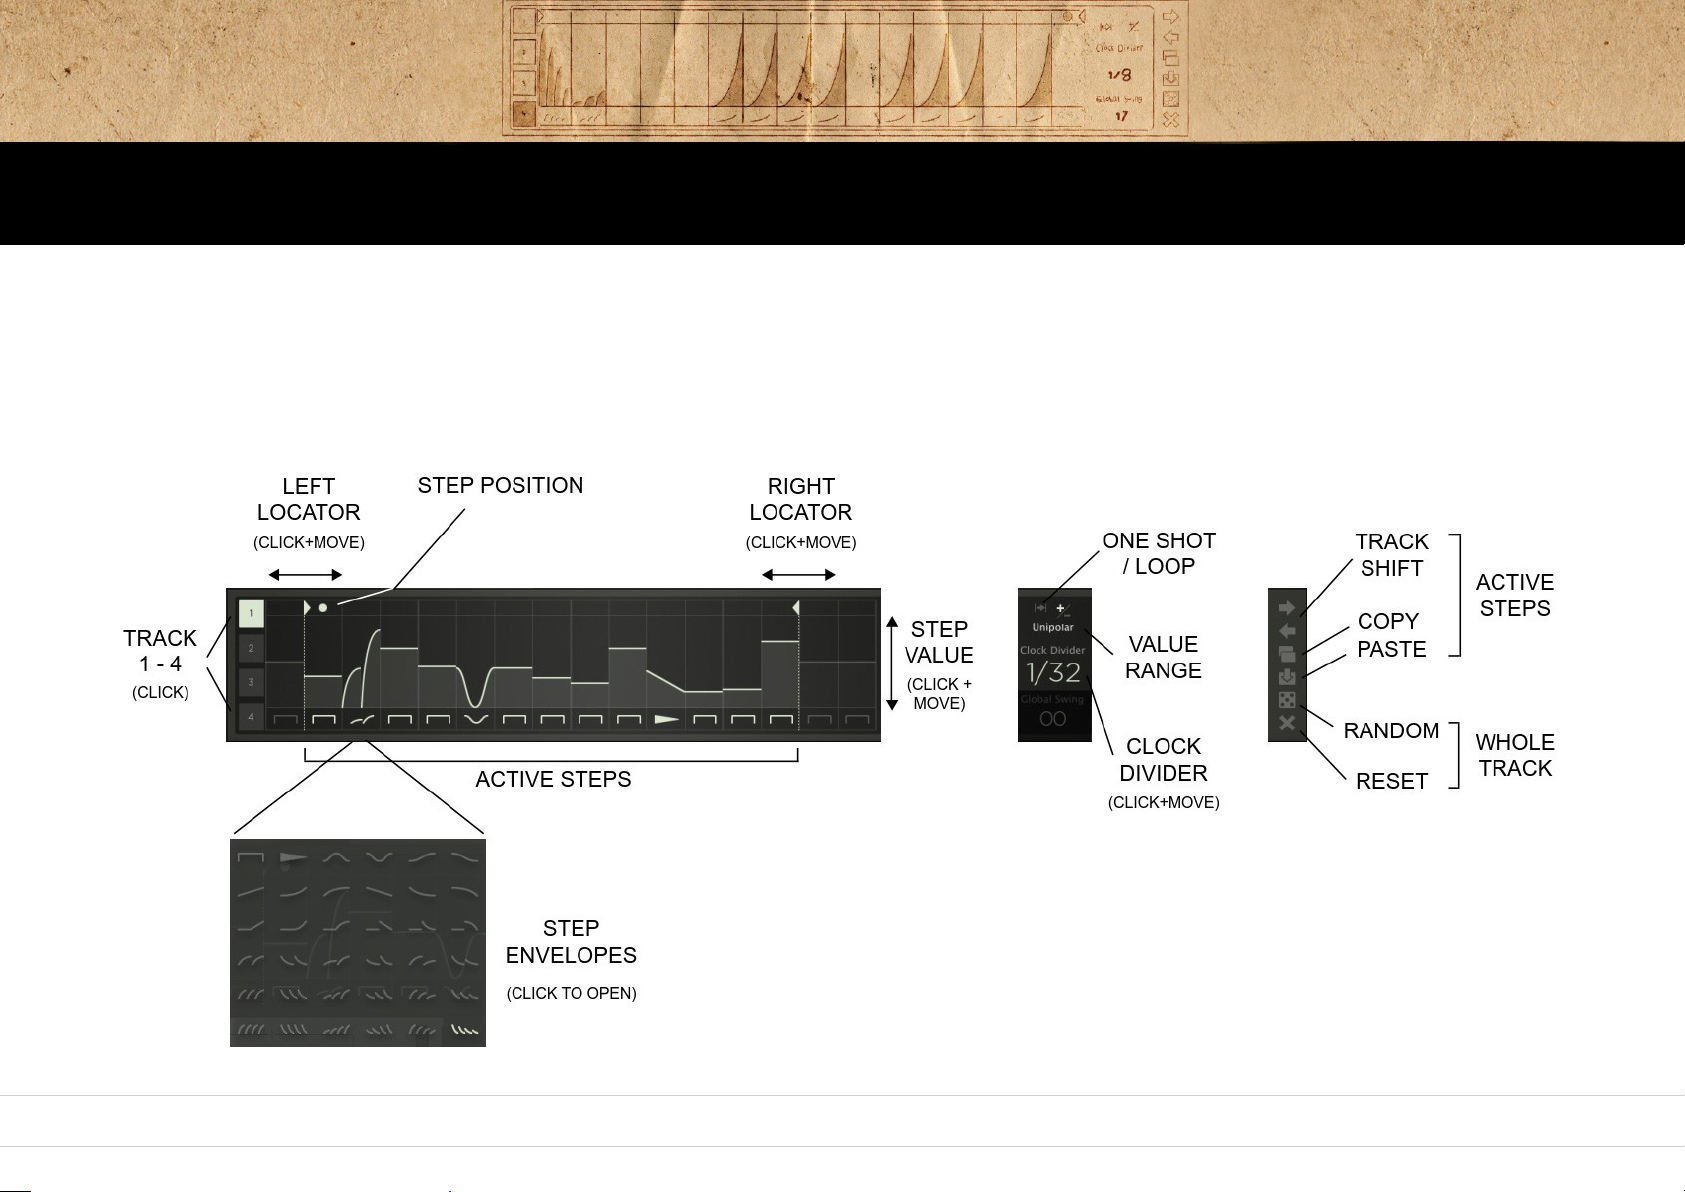
The following figure shows all the available track parameters and functions:
60
Page 61
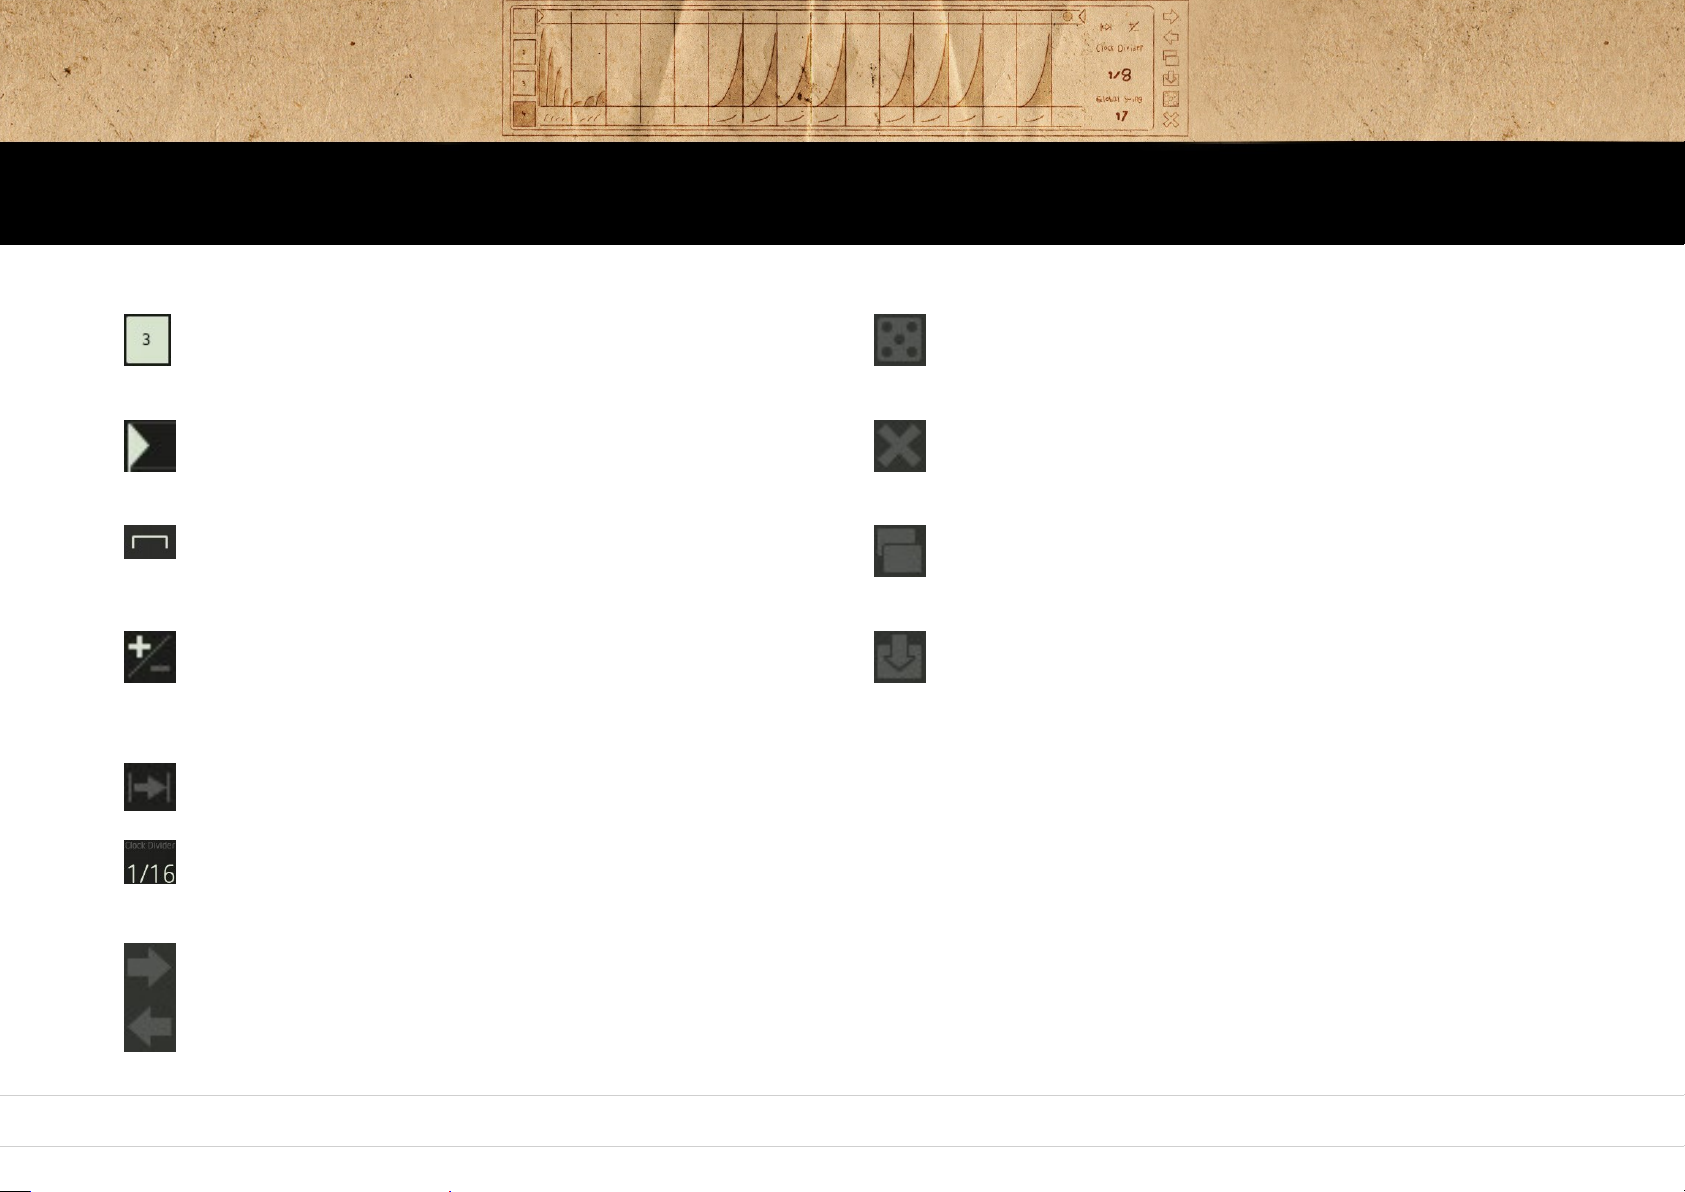
Select a track by clicking on its number button.
Clicking on the dice symbol will create a random
selection of step envelopes and values for all steps of the
current track.
By shifting the left and right locator bars, you can define the
range of the track that will be played back.
Each track can have its individual playback range.
Clicking on the X-symbol will initialize the current track, i.e. all
steps will be returned to their default settings/values.
Click on the lower field of any step to open a drop-down menu
containing the available step envelopes. Select the desired
envelope(s) for each step.
Copy will copy the range between the locator bars (now,
would you believe...?).
Draw parameter values for each step.
Per track, you can select between unipolar (positive values)
or bi-polar (positive and negative values) step parameter
ranges.
Paste will insert the copied range between the locator bars.
This can be used for the same track or for a different one.
Each track can run as a continuous loop or in one-shot mode.
Click and drag up/down to select a clock divider that
determines the clock setting resp. tempo ratio between the
individual tracks.
Track Shift will move the sequence back
and forth stepwise.
When the inserted range is smaller than the newly
defined range, the inserted range will be multiplied
accordingly. When the inserted range happens to be
larger than the newly defined range, the redundant
steps will not be inserted.
Oscillators Mixer Filter Drive Output Modulators Sequencer Arpiculation Effects Settings Realtime Controllers
Parameters & functions
61
Page 62
Arpiculation
This section provides an arpeggiator, several functions to control pitch with (Pitch Factory)
as well as some parameters that produce a certain „animation“ or „vintage feel“
(... if this were a tape recorder, some would call it “wow and flutter”).
Watch video
62
Page 63
Oscillators Mixer Filter Drive Output Modulators Sequencer Arpiculation Effects Settings Realtime Controllers
Pitch Factory
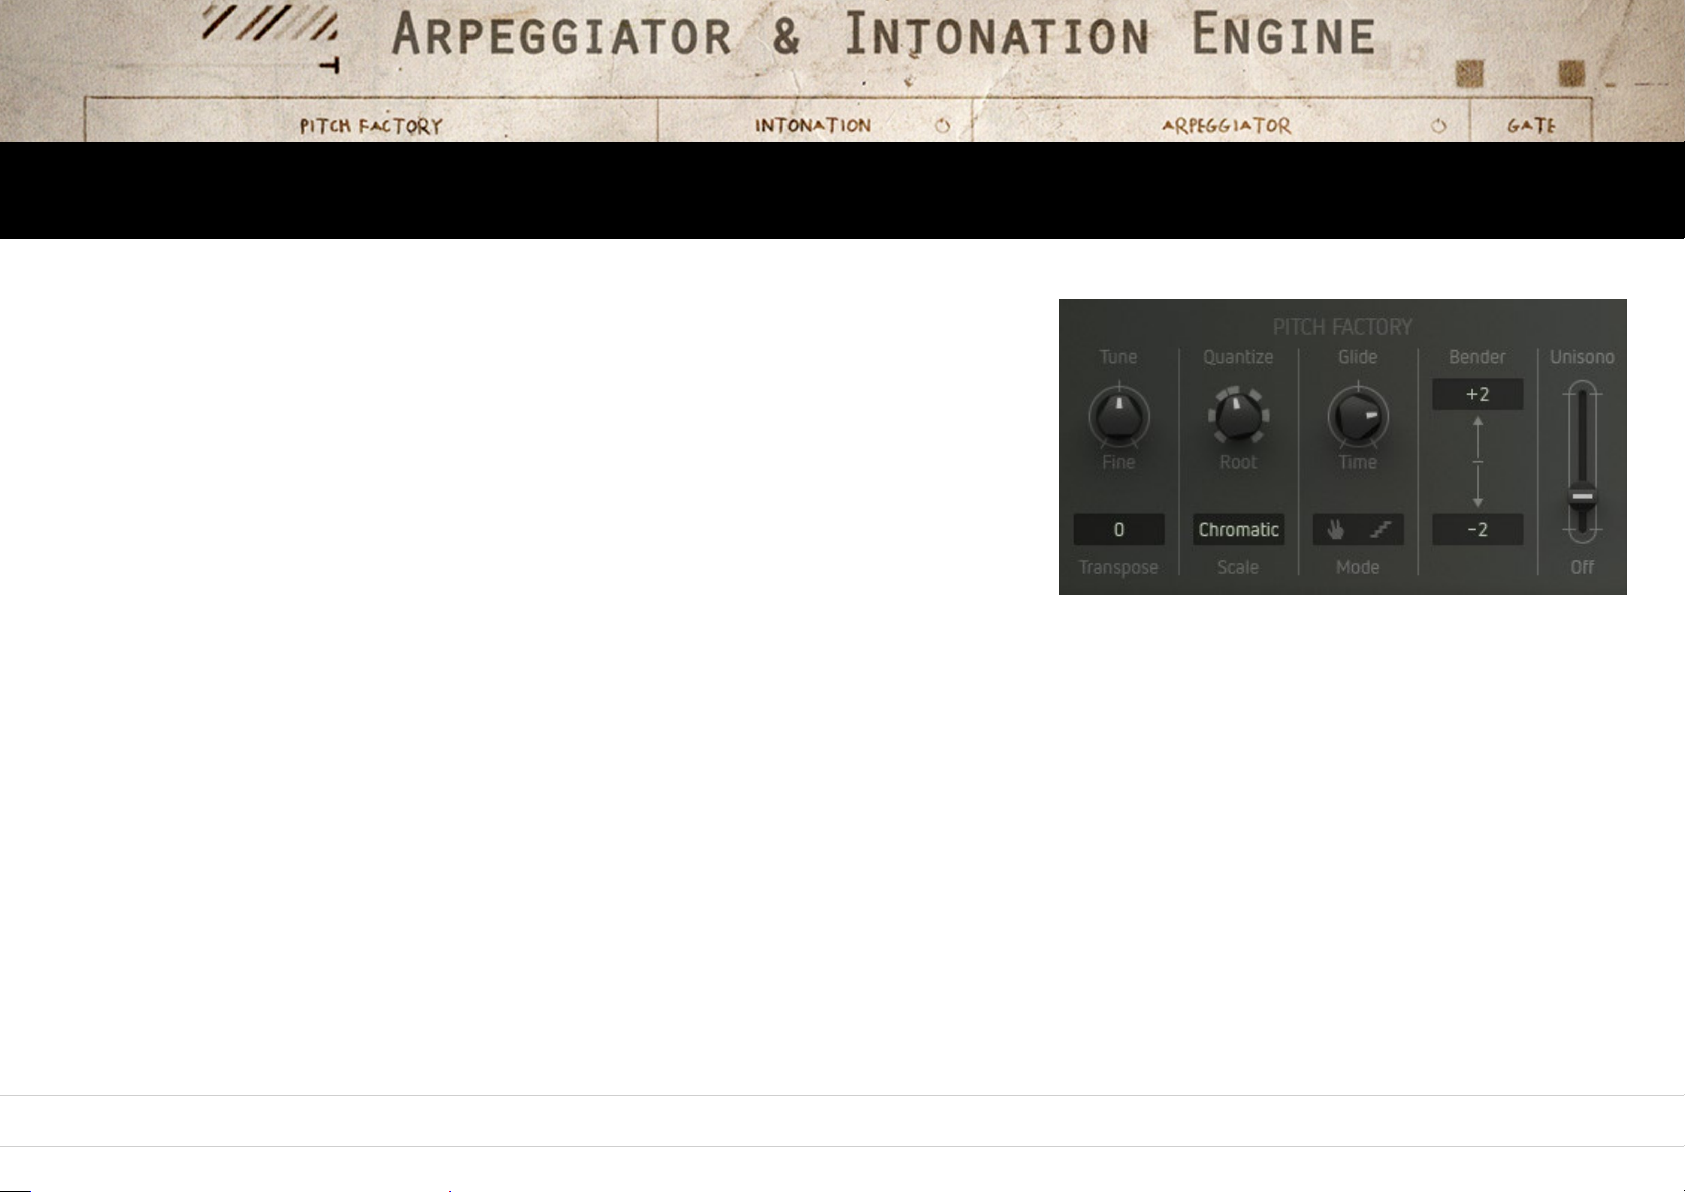
Here you will find global functions related to pitch and polyphony.
Tune
Changes the global pitch cent-wise between 0 and +/-99 cent.
Transpose
Changes the global pitch by semitones between 0 and +/-36 semitones (3 octaves).
Quantize
Using the „Scale“ drop-down window, this will select one out of twelve musical scalings.
The „Quantize“ knob above is used to select the desired root note („C“ – „B“).
This function determines the scaling of the quantized oscillator inputs (Pitch 1/2 Quant). In combination with sequencer, arpeggiator or LFOs
as modulation sources, note sequences with perfect pitch will be generated. No more odd or bum notes – unless you feel so inclined.
Glide
Time determines the duration of the glide-effect. Clicking on the staircase symbol will create a glissando (stepped) instead of a portamento
(smooth) transition. When the hand symbol is active, the glide effect will be noticeable only when playing legato, i. e. not lifting your fingers
between two key depressions.
Bender
Selects the intensity of the pitch bender individually for up/down movement by semitones (zero to 36 semitones / three octaves).
Unisono
Enables unison mode (voices will be stacked onto one single note for ultra-rich overkill sounds to melt worlds with... something along these lines,
you know). By moving up the fader, the voices will be increasingly detuned against each other.
63
Page 64
Oscillators Mixer Filter Drive Output Modulators Sequencer Arpiculation Effects Settings Realtime Controllers
Intonation
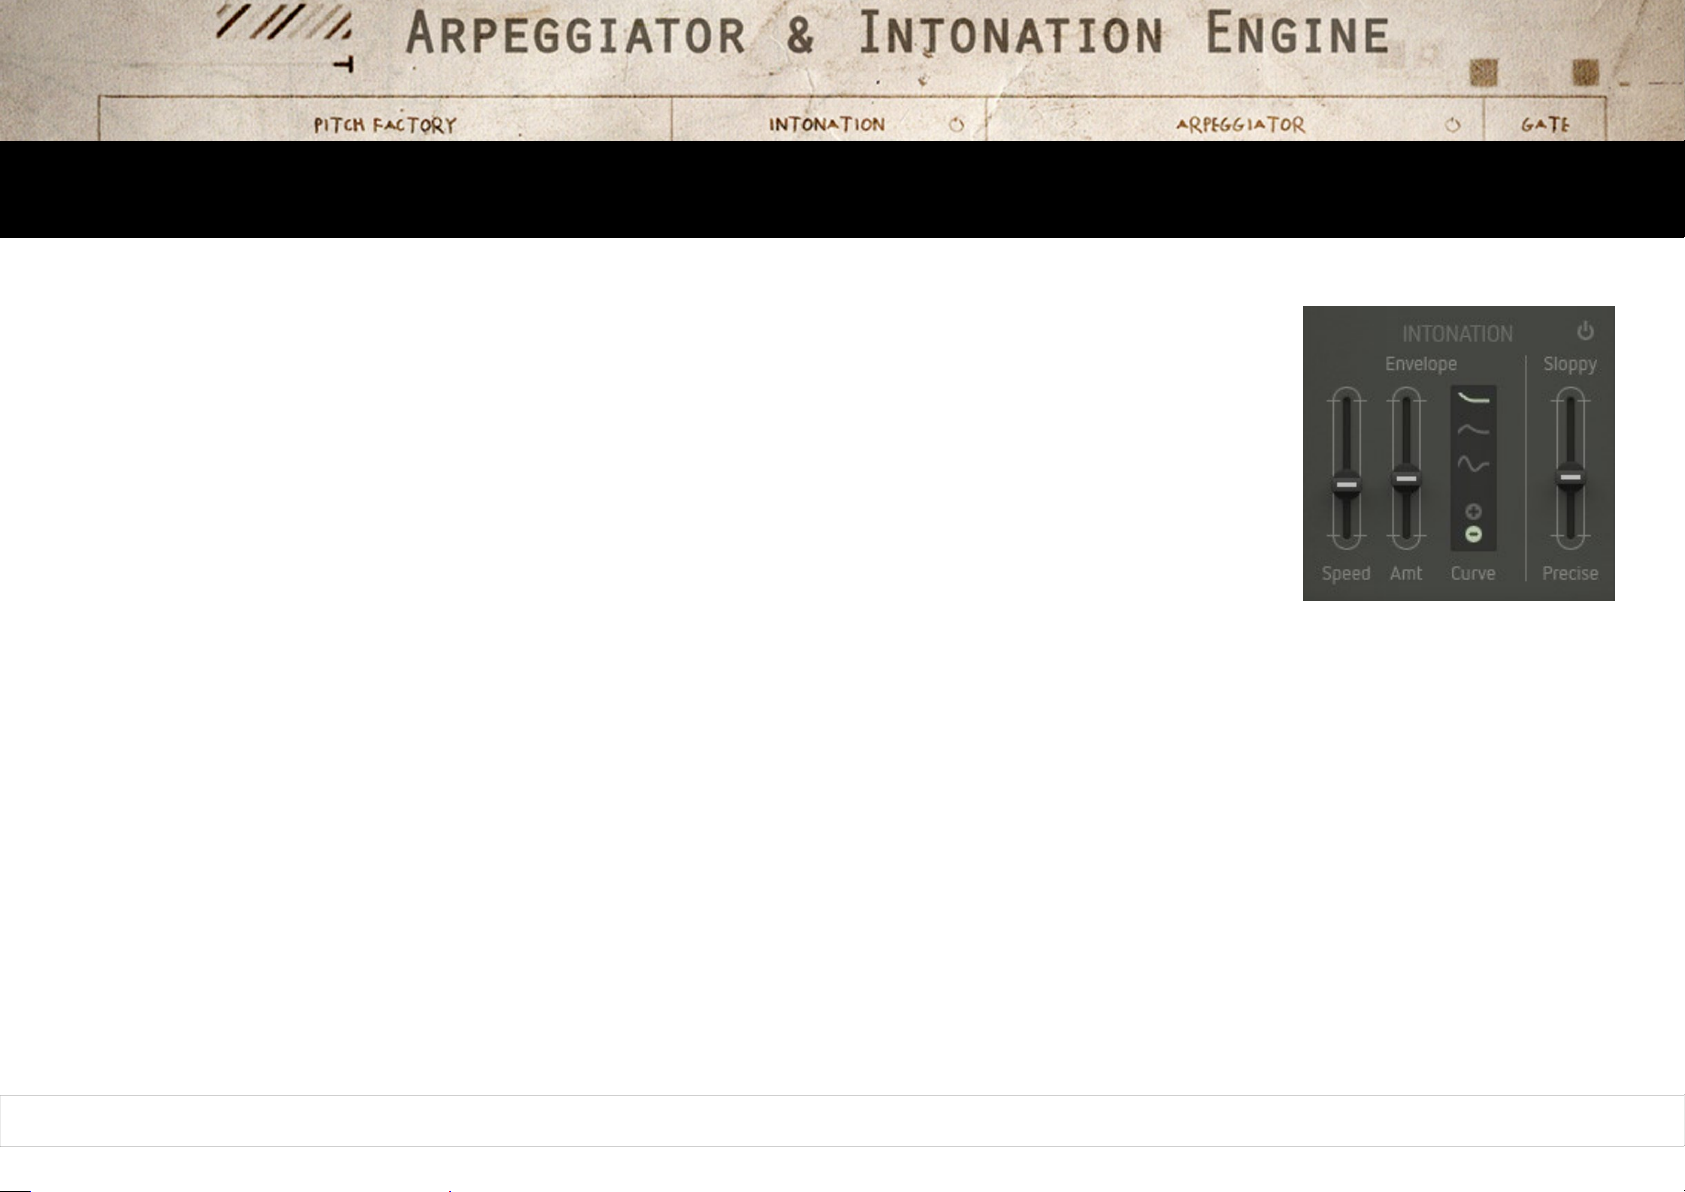
These parameters sport a simple mini-envelope that will start with the note-on command coming in.
It controls pitch and Factorys intonation. Low values can create subtle inaccuracies that may result in a
more „life-like“ or authentic tone you would also find with acoustic intruments or all synthesizers named
“vintage” (or in need of a service). High values will produce pitch-changes just like a sitar or slide guitar –
instant Ravi or Stevie Ray.
On/Off
This button will enable the Intonation parameters.
Curve
Selects between three different envelope shapes and positive resp. negative modulation depth.
Speed
Determines the duration of the envelope.
Amt
Controls the intensity of the effect.
Sloppy/Precise
Creates a pitch imprecision at the beginning of a played note.
64
Page 65
Oscillators Mixer Filter Drive Output Modulators Sequencer Arpiculation Effects Settings Realtime Controllers
Arpeggiator
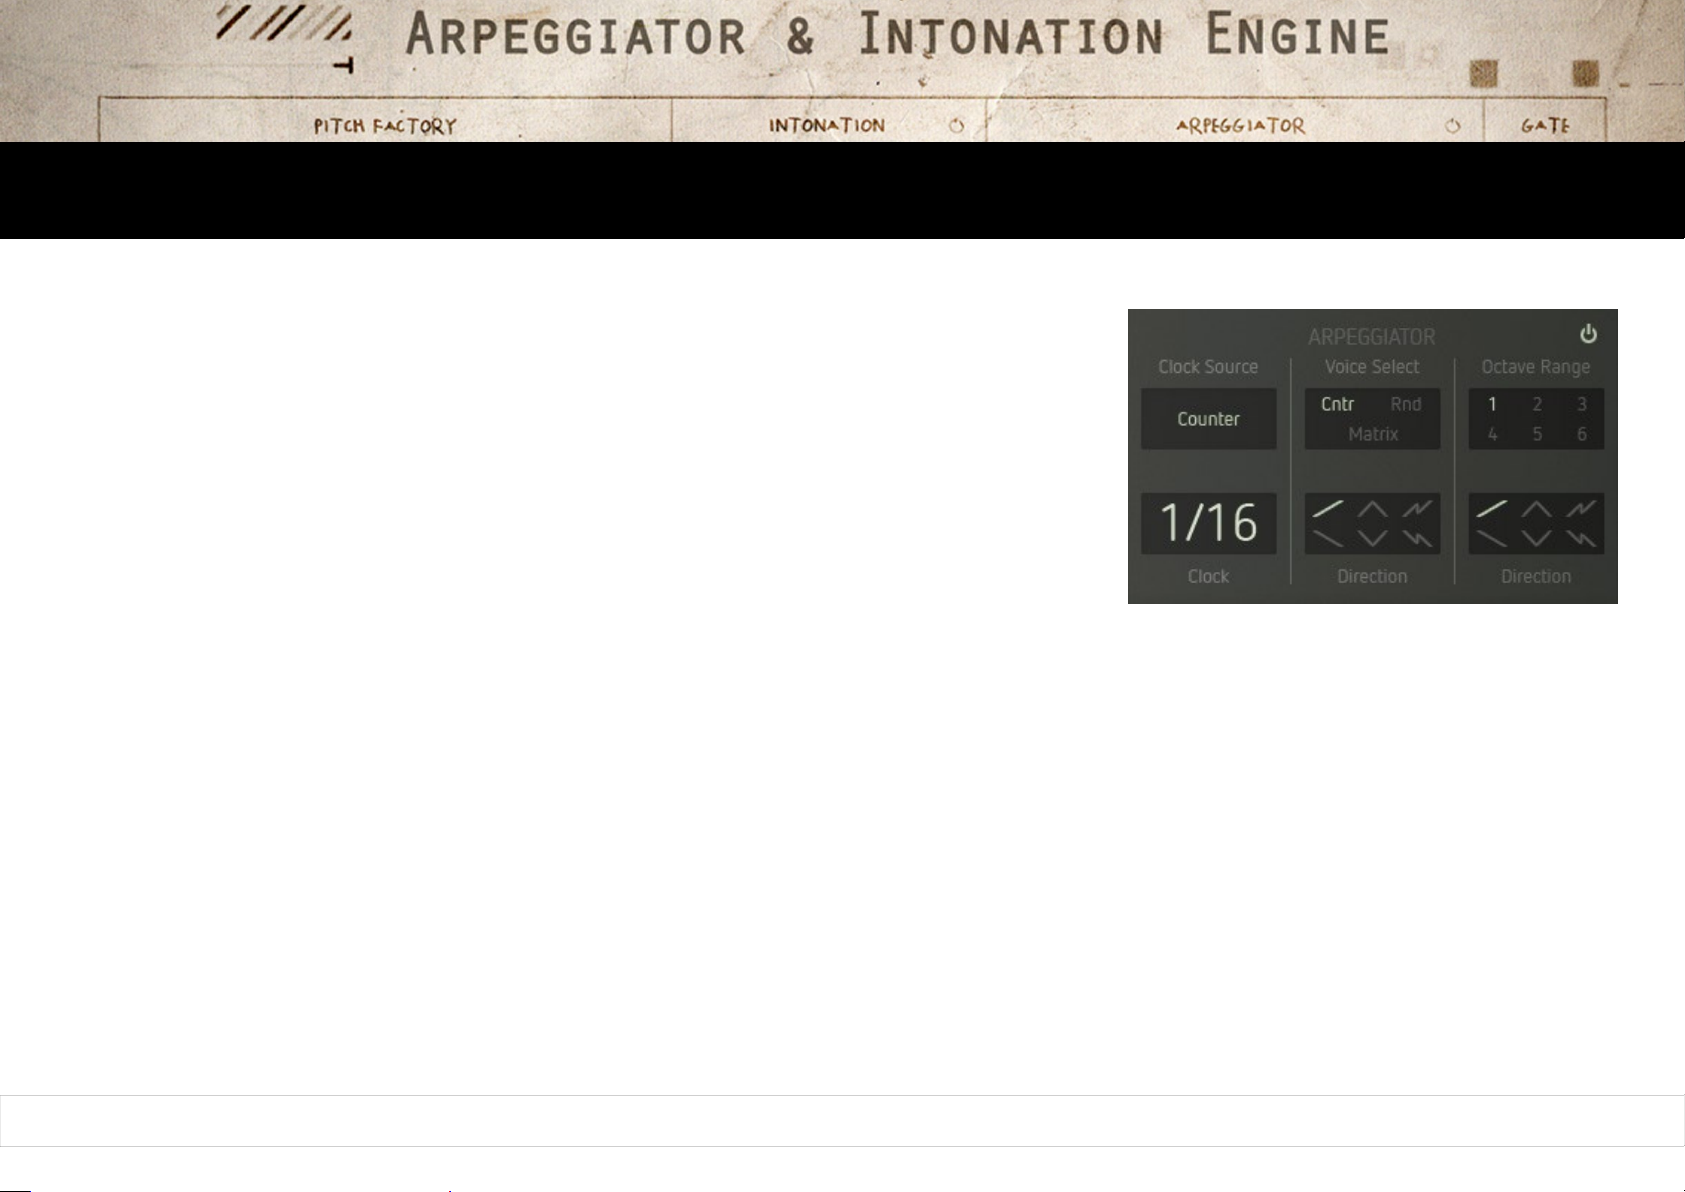
The arpeggiator breaks down the notes of a chord into a rising or falling sequence of pitches.
Enable / disable the arpeggiator using the on/off button.
Clock Source
This determines the clock source that drives the arpeggiator and controls its speed.
You will find the following options:
Counter
Factorys internal clock source.
Spawn
By leaving out clock pulses, a „stuttering effect“ is generated but the arpeggiator
will still remain in sync with the clock source.
Seq Gate 1 – 4
The gate signals of the sequencer tracks shift on the arpeggiator.
It is synced to the sequencer.
Clock
Click and drag up/down to select a clock divider that determines the tempo.
65
Page 66
Oscillators Mixer Filter Drive Output Modulators Sequencer Arpiculation Effects Settings Realtime Controllers
Arpeggiator
Voice Select
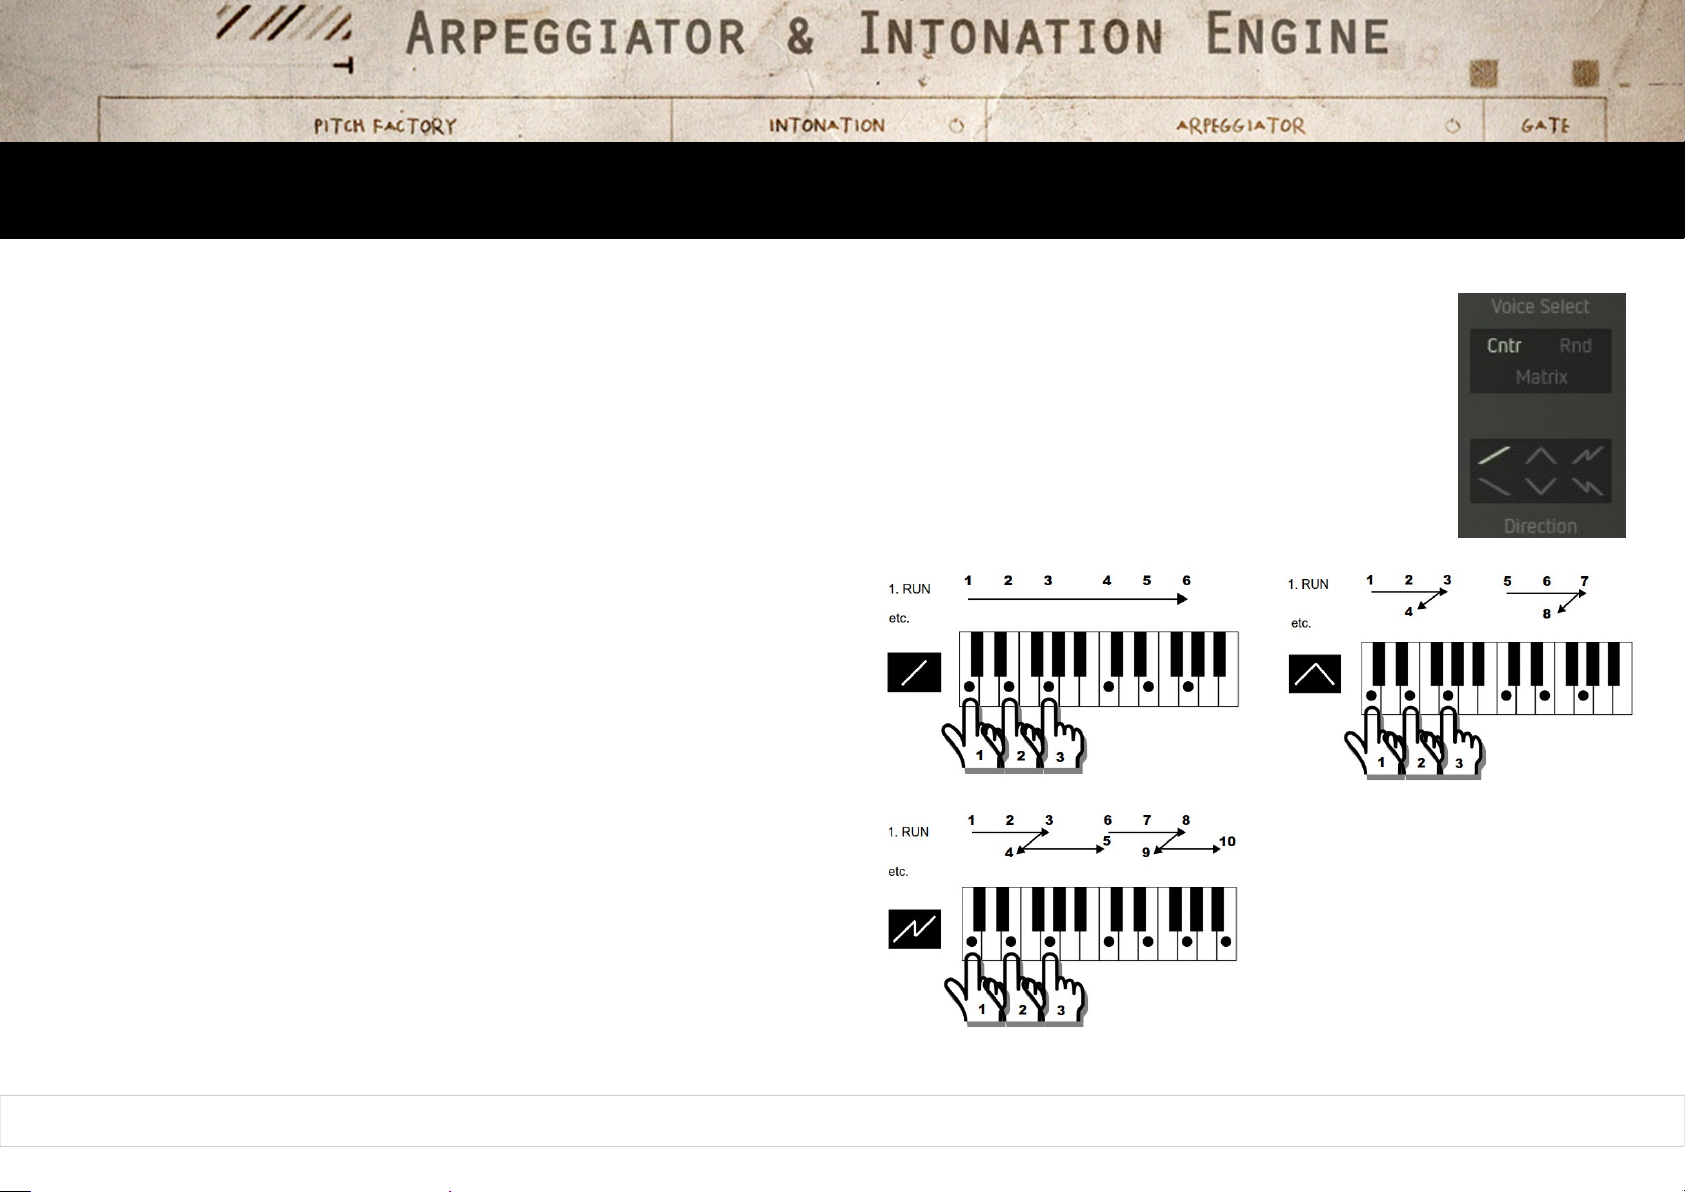
This function determines the order in which the voices are played back resp. the note order.
Cntr (Counter):
The voices/notes are played back in subsequent order. The direction depends on setting of the Direction parameter.
Rnd (Random)
The voice/note allocation is controlled randomly. A random sequence will be created that way.
Matrix
The voice/note allocation is controlled by a modulation source through
the mod matrix. Select Arp Voice as modulation destination in the matrix.
This way, the note order can be controlled/modulated in various ways.
Direction
Determines the running direction resp. the melody pattern that is played
by the arpeggiator within one octave.
The figures to the left explain the scheme: (Settings: Voice Select „Cntr“;
Octave Range „2“):
66
Page 67
Oscillators Mixer Filter Drive Output Modulators Sequencer Arpiculation Effects Settings Realtime Controllers
Arpeggiator
Octave Range
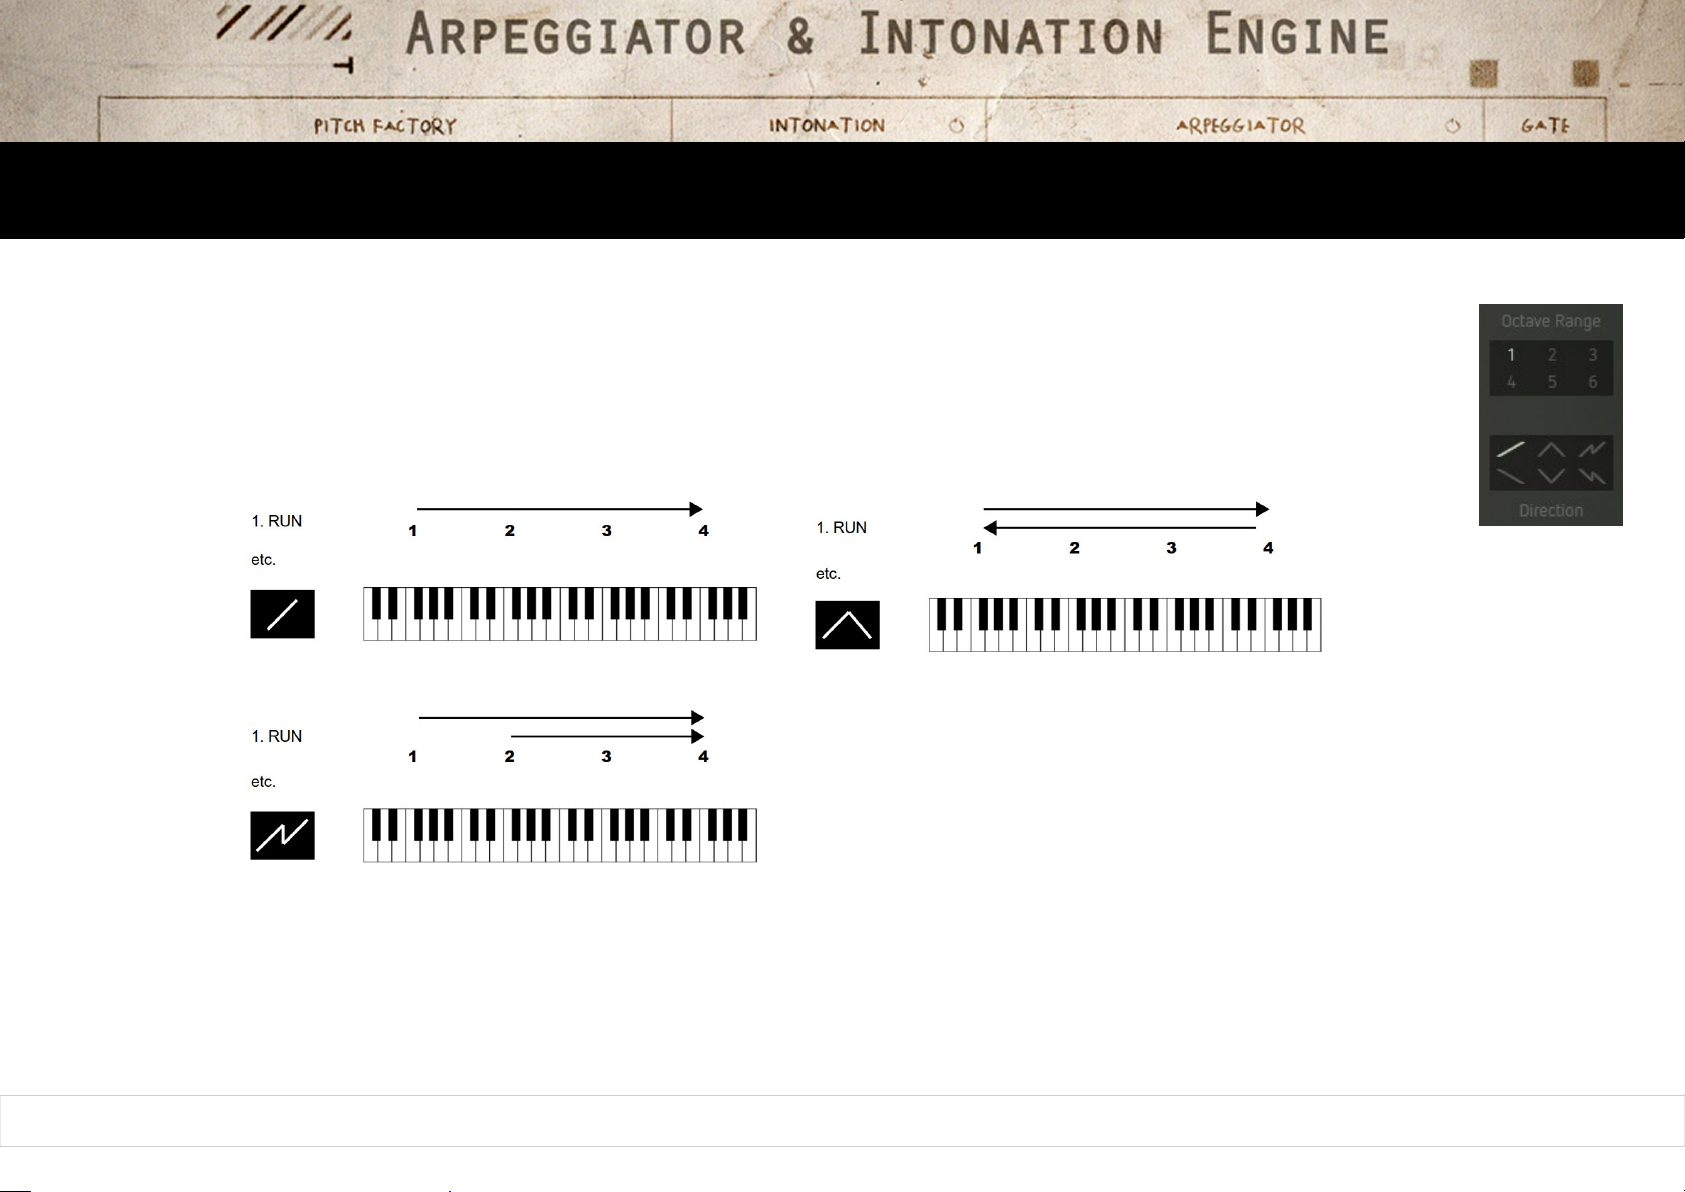
This function determines the number of octaves in which the arpeggio is played.
Direction
The Direction parameter (see above) will now be extended by the octaves order. The melodic motif selected by the direction
parameter mentioned previously will now be repeated throughout the different octaves, according to the following scheme:
(Settings: Voice Select „Cntr“; Octave Range „4“):
The combination of both direction parameters as well as the voice select function offers countless options – from simple „oldschool” arpeggios to
harp-style glissandi (or would that be glissandos?) up to weird sort-of-random sequences. To make yourself more familiar with the direction
parameter, we advise you to try out the arpeggiator with a relatively simple sound preset (e.g. „Plucky Brit“) and the clock settings „Counter“ and
„¼“, and go from there. The harmonic scale of the arpeggiator is determined by the parameters Scale and Root(-note, not beer) in the Pitch
Factory section.
67
Page 68
Oscillators Mixer Filter Drive Output Modulators Sequencer Arpiculation Effects Settings Realtime Controllers
Gate
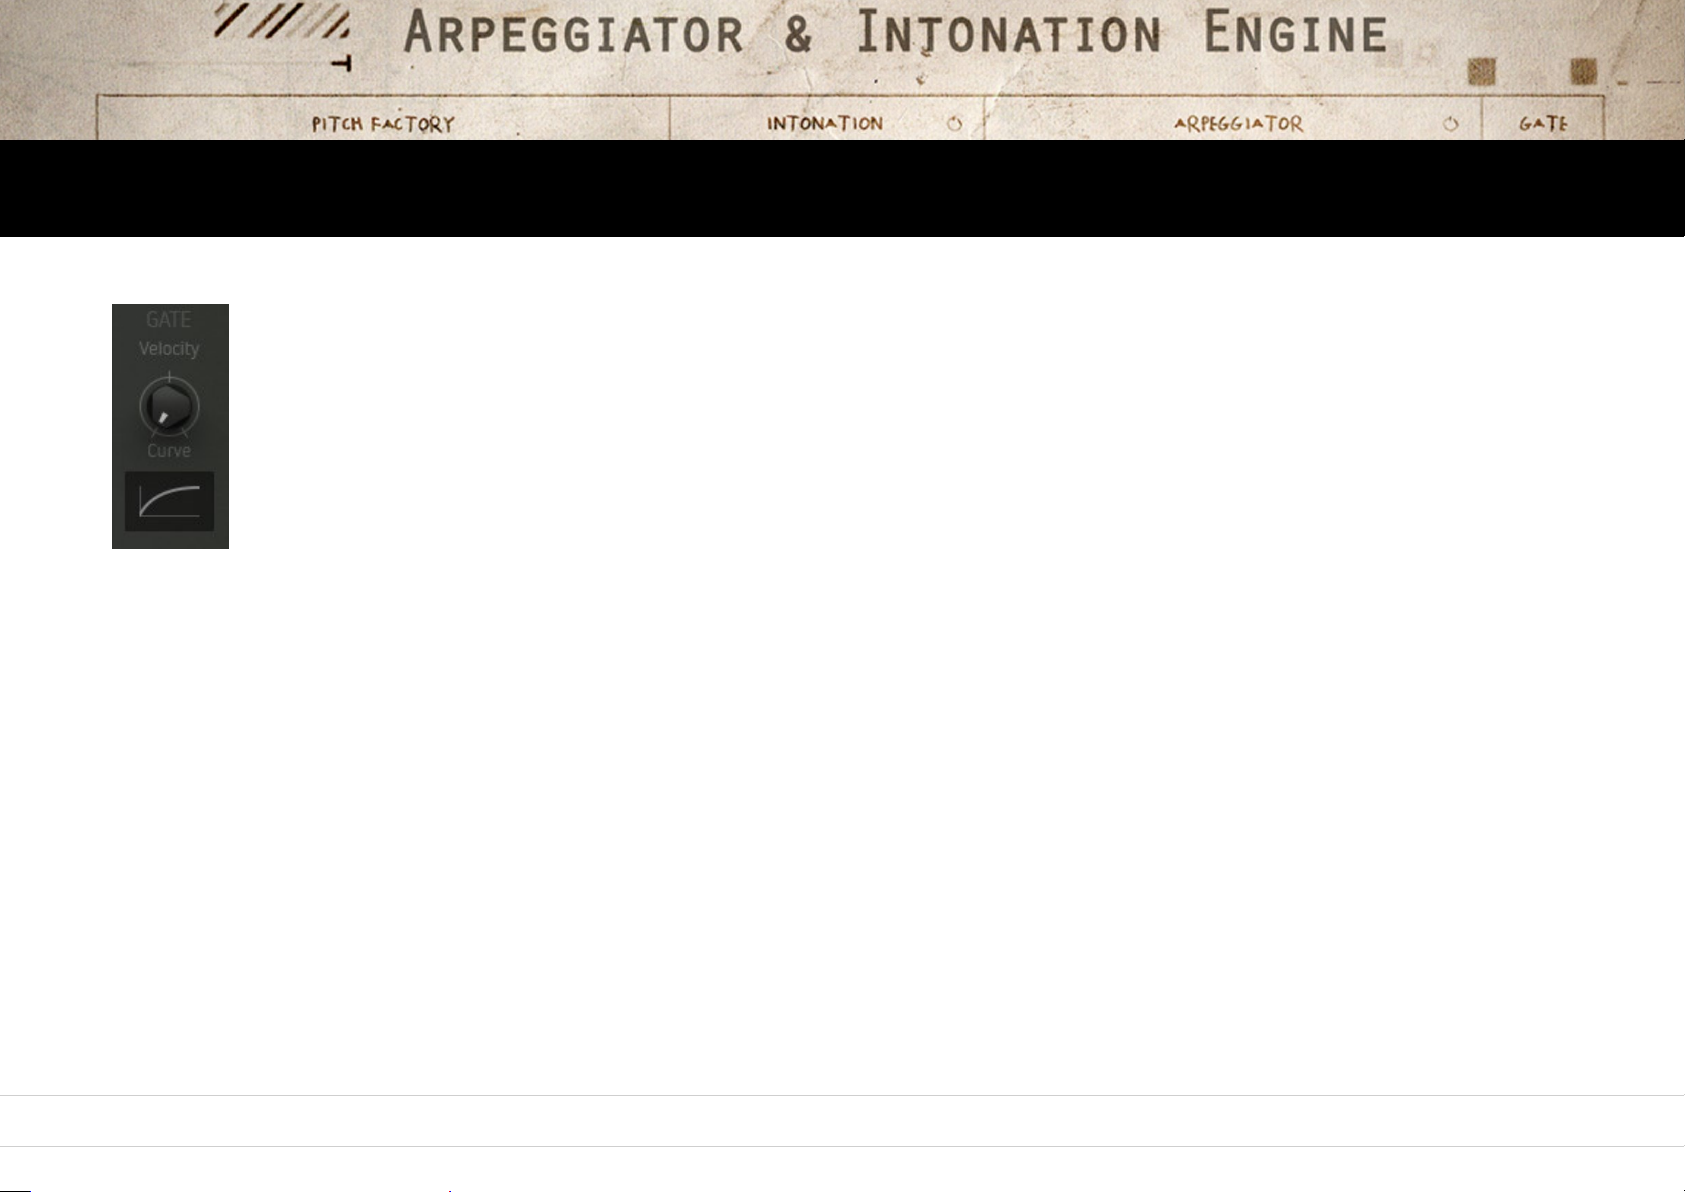
Velocity / Curve
Here you can control the velocity scaling resp. its response characteristics.
You can see the results in the graphic display.
68
Page 69
Effects
Factory sports a powerful effect section that will help you to beef up your sounds even more.
It provides three effect slots connected in series with an ample selection of 13 effects each.
You can switch their order as desired.
Modulation effects (Chorus, Phaser, Flanger) use their own internal modulation source.
In addition to this, you can modulate effect parameters using the mod matrix.
Groove Delay Pitch Delay Reverse Delay
Equalizer Lofizer Stereo Filter Dynamic Filter
Corpus Phaser Flanger
Shatter Compmax Chorus
Pianoverb Shimmer Spring Reverb Whiteverb
69
Page 70
Oscillators Mixer Filter Drive Output Modulators Sequencer Arpiculation Effects Settings Realtime Controllers
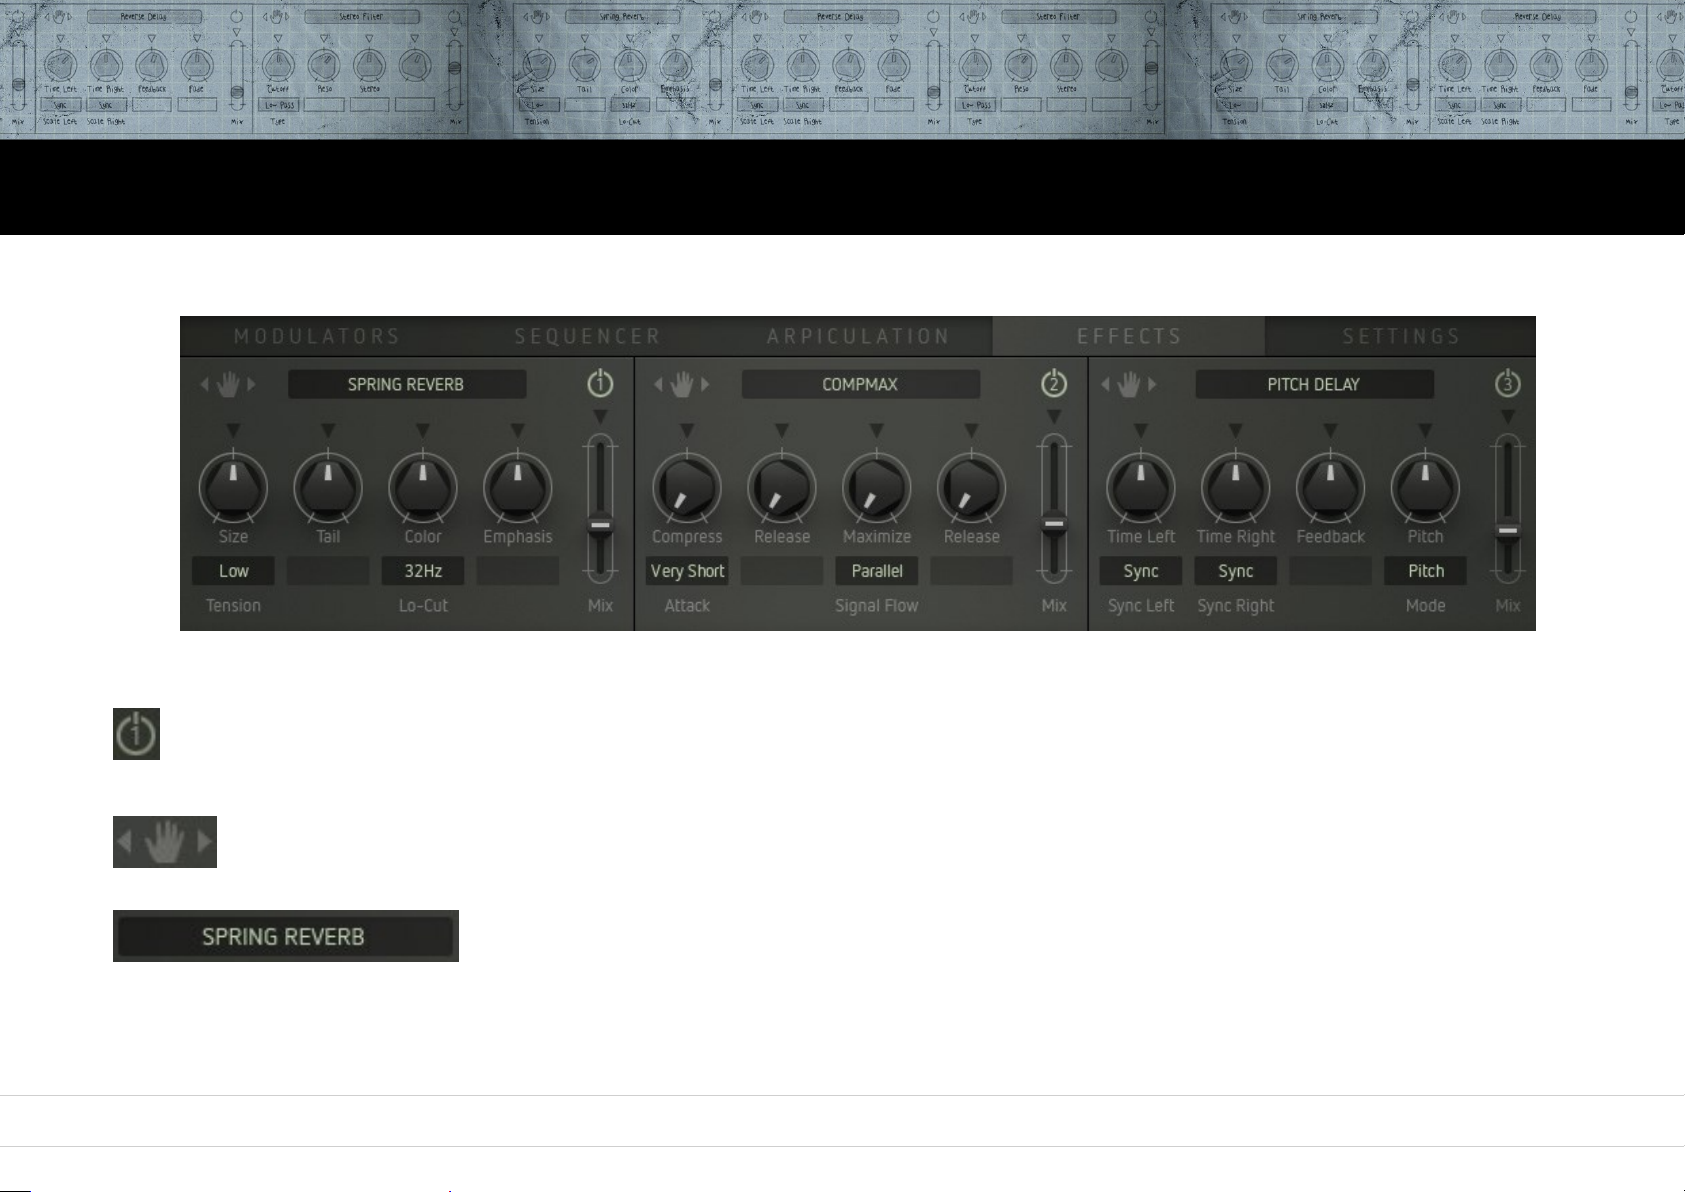
Common effect controls
All effect slots are identical. In the upper line you will find three controls that are the same for all effect slots:
Enable/disable the effect slot with its on/off button. If you decide not to use an effect slot (Mix parameter = 0),
you should disable the respective slot. This will save CPU processing power.
Click the hand symbol and drag the slot to another position.
Select an effect by clicking on the effects name. A selection window will pop up.
Load the desired effect by clicking on its name.
70
Page 71
Oscillators Mixer Filter Drive Output Modulators Sequencer Arpiculation Effects Settings Realtime Controllers
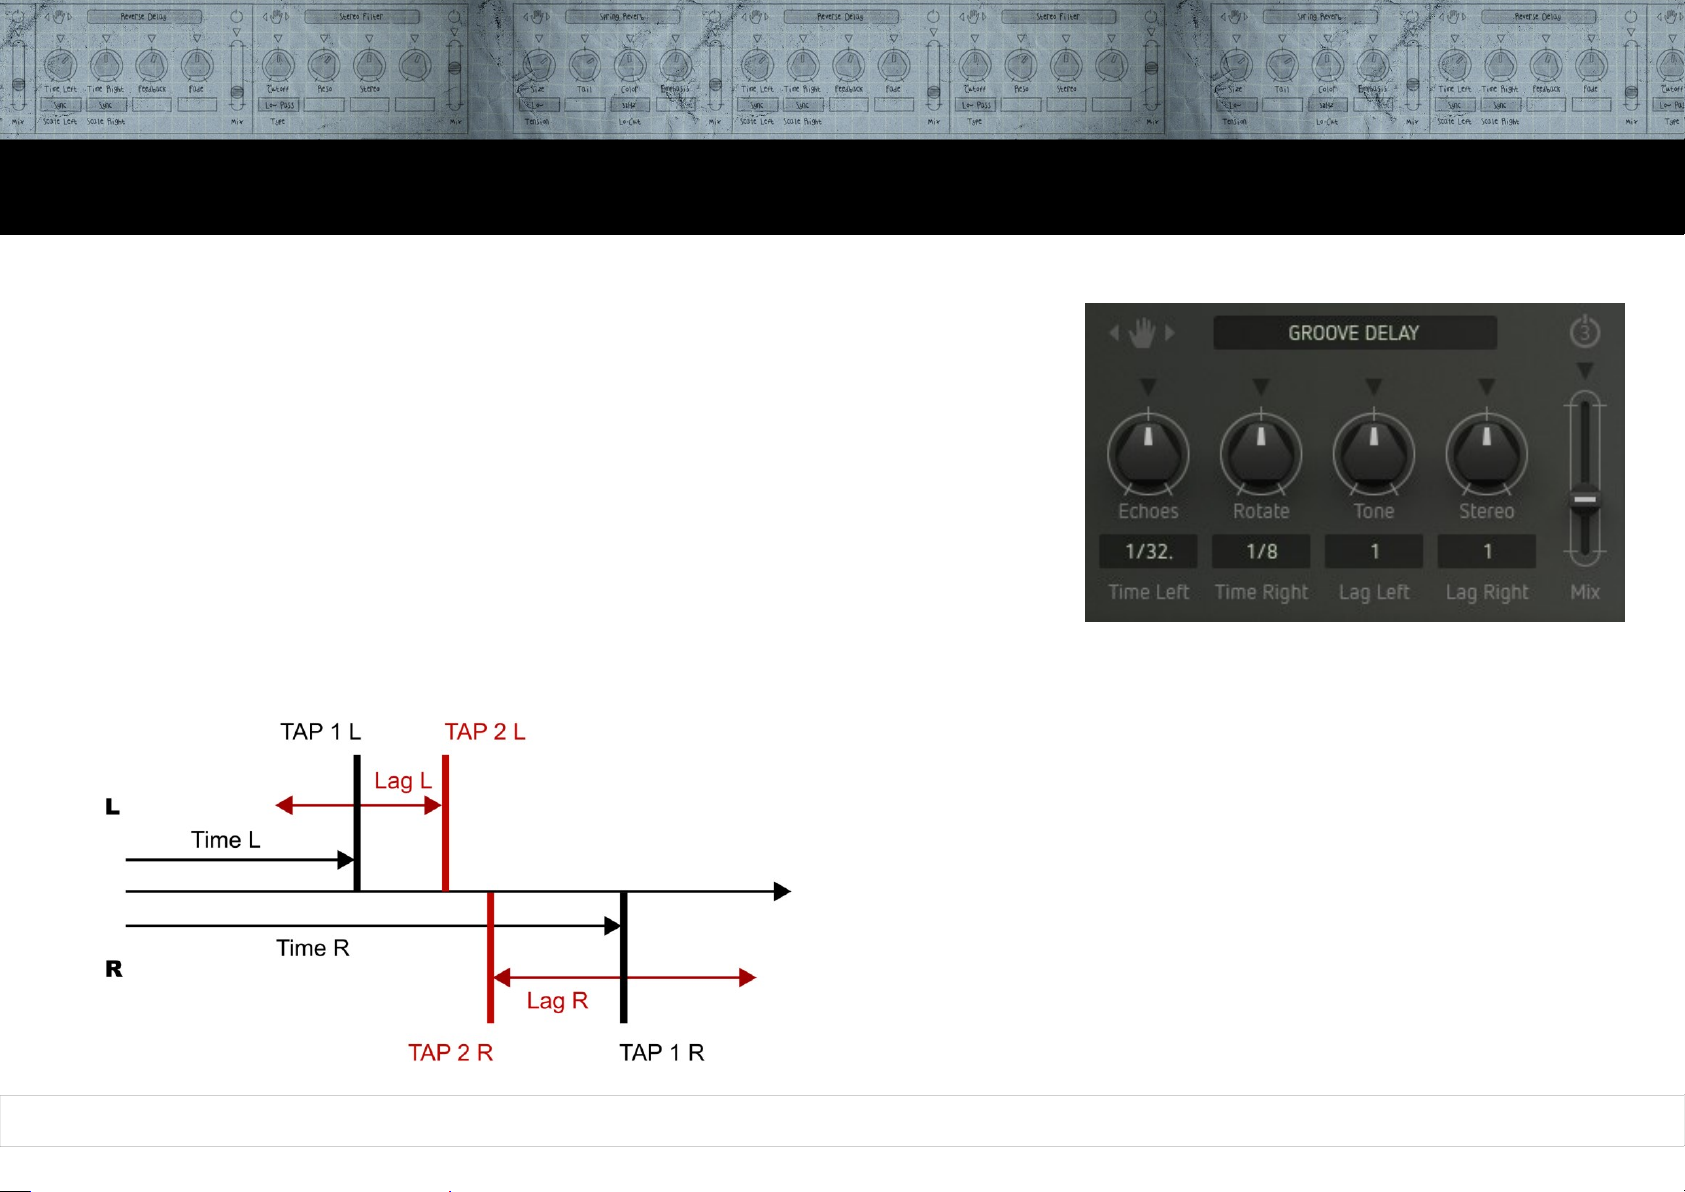
Groove Delay
A stereo delay for rhythmic echo effects. It sports two delay clicks per channel.
Their delay time can be shifted individually against each other.
Echoes
Number of repeats... repeats... repeats... re....
Rotate
Intensity of stereo panorama movement.
Tone
Cuts the high frequencies of the echoes.
Stereo
Controls the stereo width.
Time L/R
Determines the delay time of left and right channel by 15 note values.
Lag R/L
Determines the offset of the second delay click. The value is a factor that is
multiplied with the Time value. This is to make sure that the second delay
click will also be synced accurately to the rhythm.
Mix
Controls the effect level within the output signal.
71
Page 72
Oscillators Mixer Filter Drive Output Modulators Sequencer Arpiculation Effects Settings Realtime Controllers
Pitch Delay
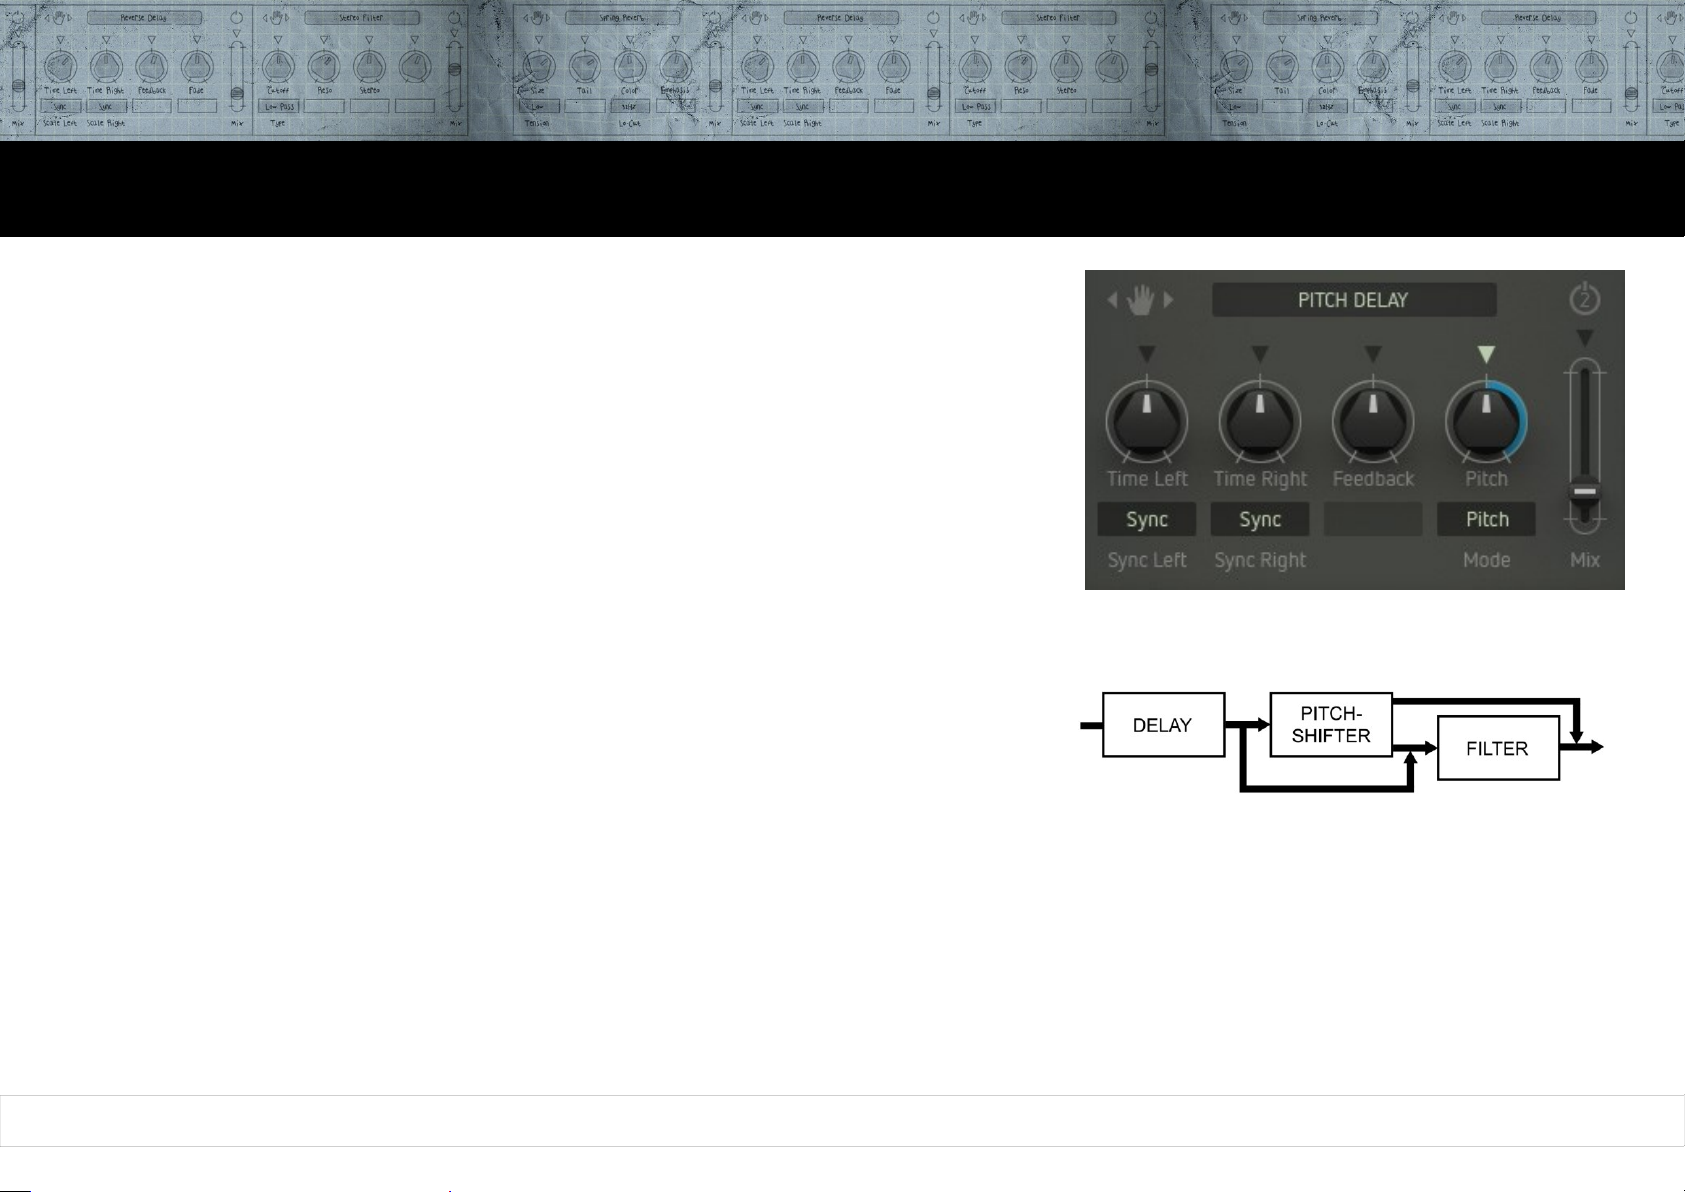
A stereo delay with pitch shifter and filter. Arpeggios are possible as well as tapeecho effects and weird flanger or comb filter sounds.
Time L/R
Determines the delay time of the left and right channels.
The values available depend on the Sync setting.
Sync L/R
Sync: The Time control is scaled and selects only even note values.
Sync TP; The Time control is scaled and selects even note values and triplets.
Free: The delay time is controlled continuously by milliseconds.
Feedback
Number of repeats, up to self-oscillation.
Pitch
Amount of pitch shifting.
Mode
Determines the signal routing within the effect and thus the operation of the integrated filter:
Pitch: No filter in the signal path. Turning the pitch control changes the pitch.
+ Fltr: The pitch shifter is combined with a filter (lowpass, combfilter, highpass each with or without a fixed resonance (Q)).
By turning the pitch control clockwise, the pitch is changed and the cutoff frequency will be increased and vice versa.
– Fltr: As above, but cutoff shift will be reversed.
Fltr: The pitch control exclusively controls the cutoff frequency. No pitch shifting.
Mix
Controls the effect level within the output signal.
72
Page 73
Oscillators Mixer Filter Drive Output Modulators Sequencer Arpiculation Effects Settings Realtime Controllers
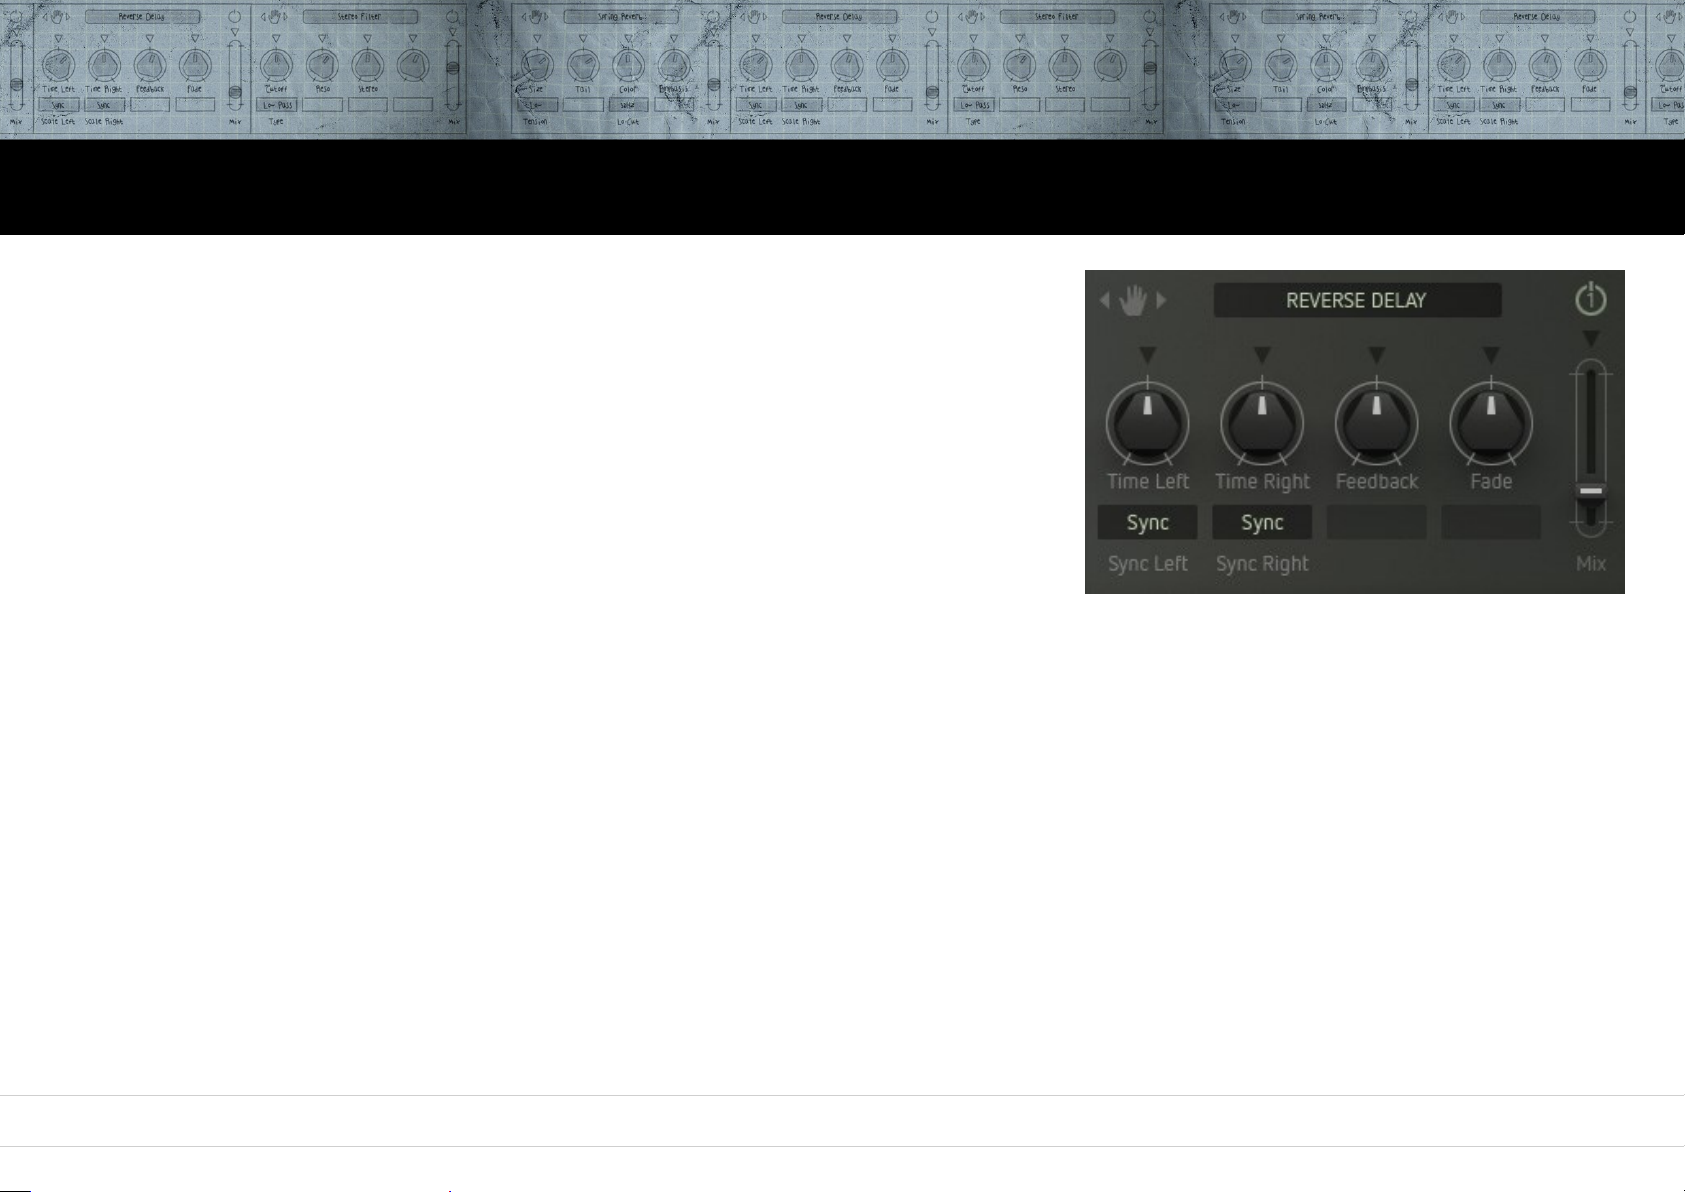
Reverse Delay
A stereo delay producing some kind of sdrawkcab, erm, backwards effect of a
reversed tape. Great for rhythmical effects, or for summoning the Dark Lord (instant
subliminal messages also work great... try klim emos teg or redrum or the like the
next time round).
Time L/R
Determines the delay time of the left and right channels. The values available depend on
the Scale setting.
Sync L/R
Sync: The Time control is scaled and selects only even note values.
Sync TP: The Time control is scaled and selects even note values and triplets.
Free: The delay time is controlled continuously by milliseconds.
Feedback
Number of repeats.. repea... okay, we have already had a laugh here.
Fade
Controls the intensity of the backwards effect.
Mix
Controls the effect level within the output signal.
73
Page 74
Oscillators Mixer Filter Drive Output Modulators Sequencer Arpiculation Effects Settings Realtime Controllers
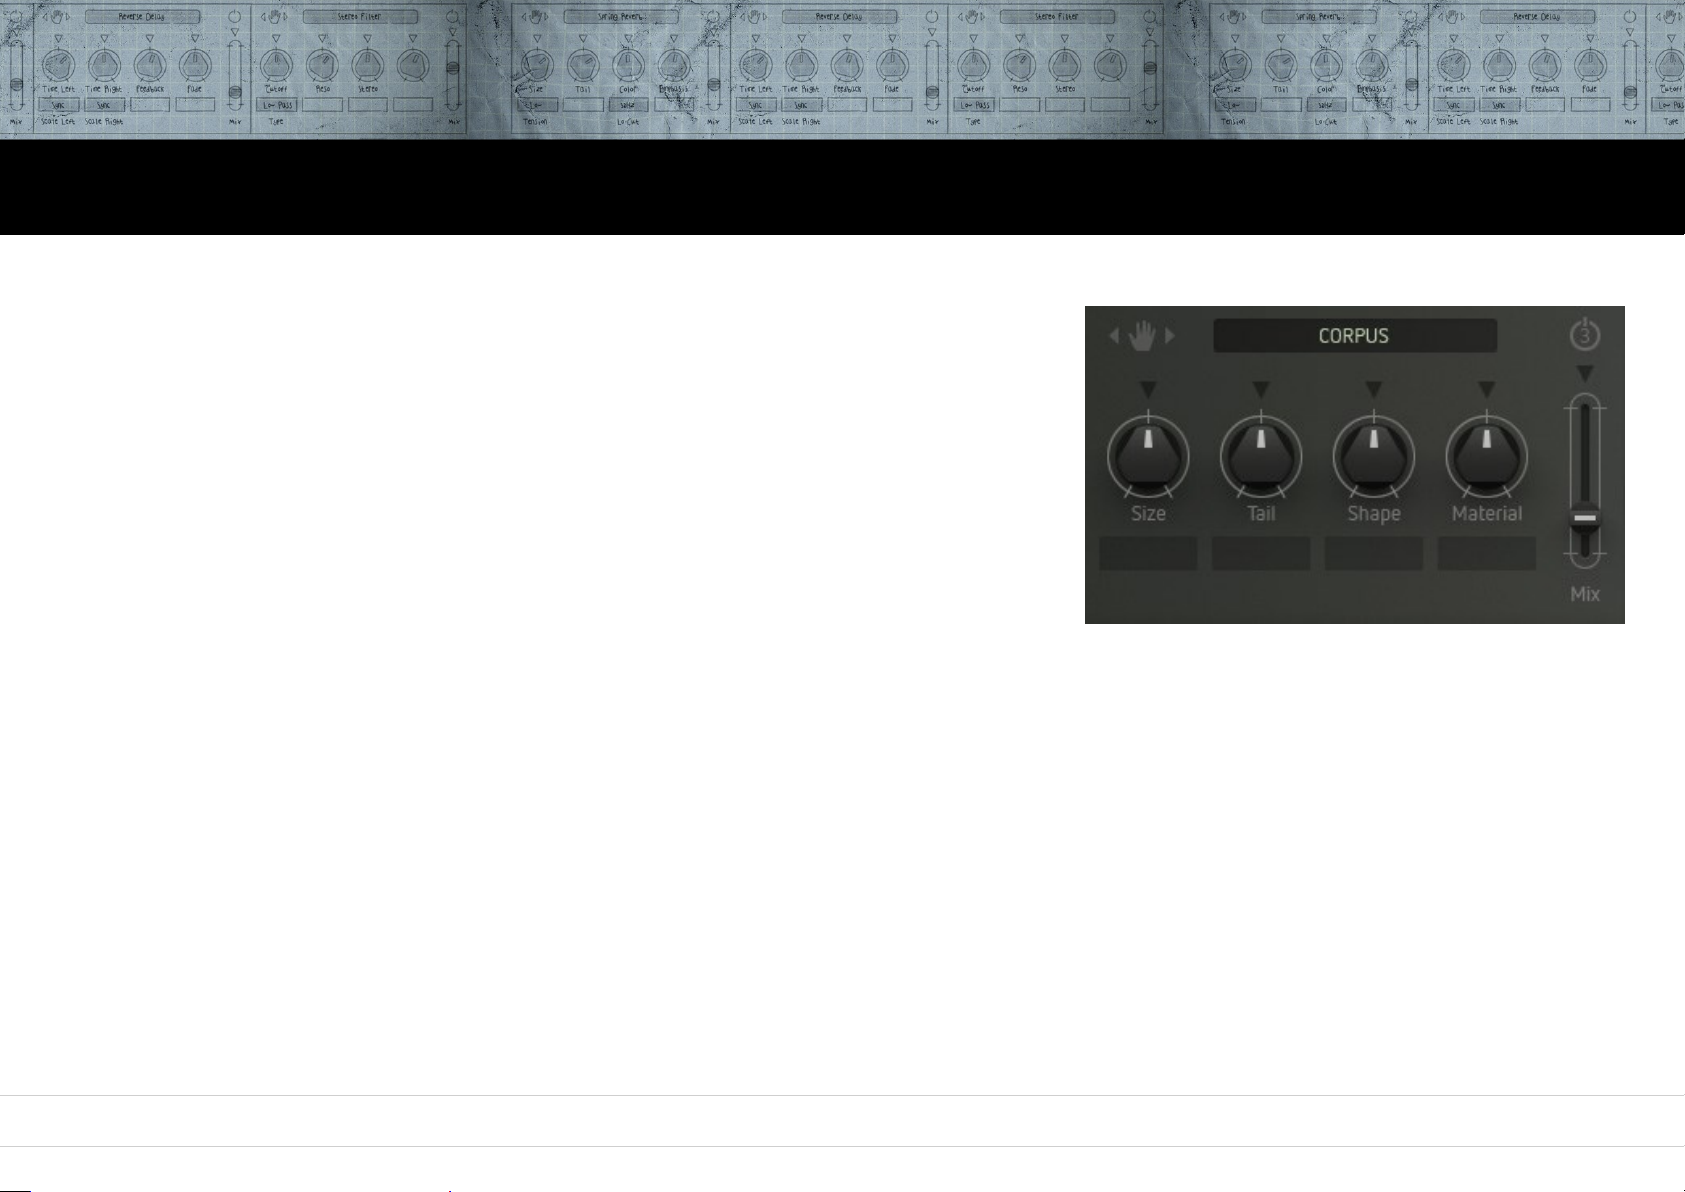
Corpus
Emulates the effect of a resonant body of definable shape and material.
Provides an ambience effect without audible reverb tail while colouring the sound at
the same time – most interesting in combination with the „Waveguide“ oscillator
model.
Size
Simulates the size of the resonant body.
Tail
Controls the decay time of the ambience effect.
Shape
Simulates the shape of the resonant body.
Material
Simulates the material of the resonant body.
Mix
Controls the effect level within the output signal.
74
Page 75
Oscillators Mixer Filter Drive Output Modulators Sequencer Arpiculation Effects Settings Realtime Controllers
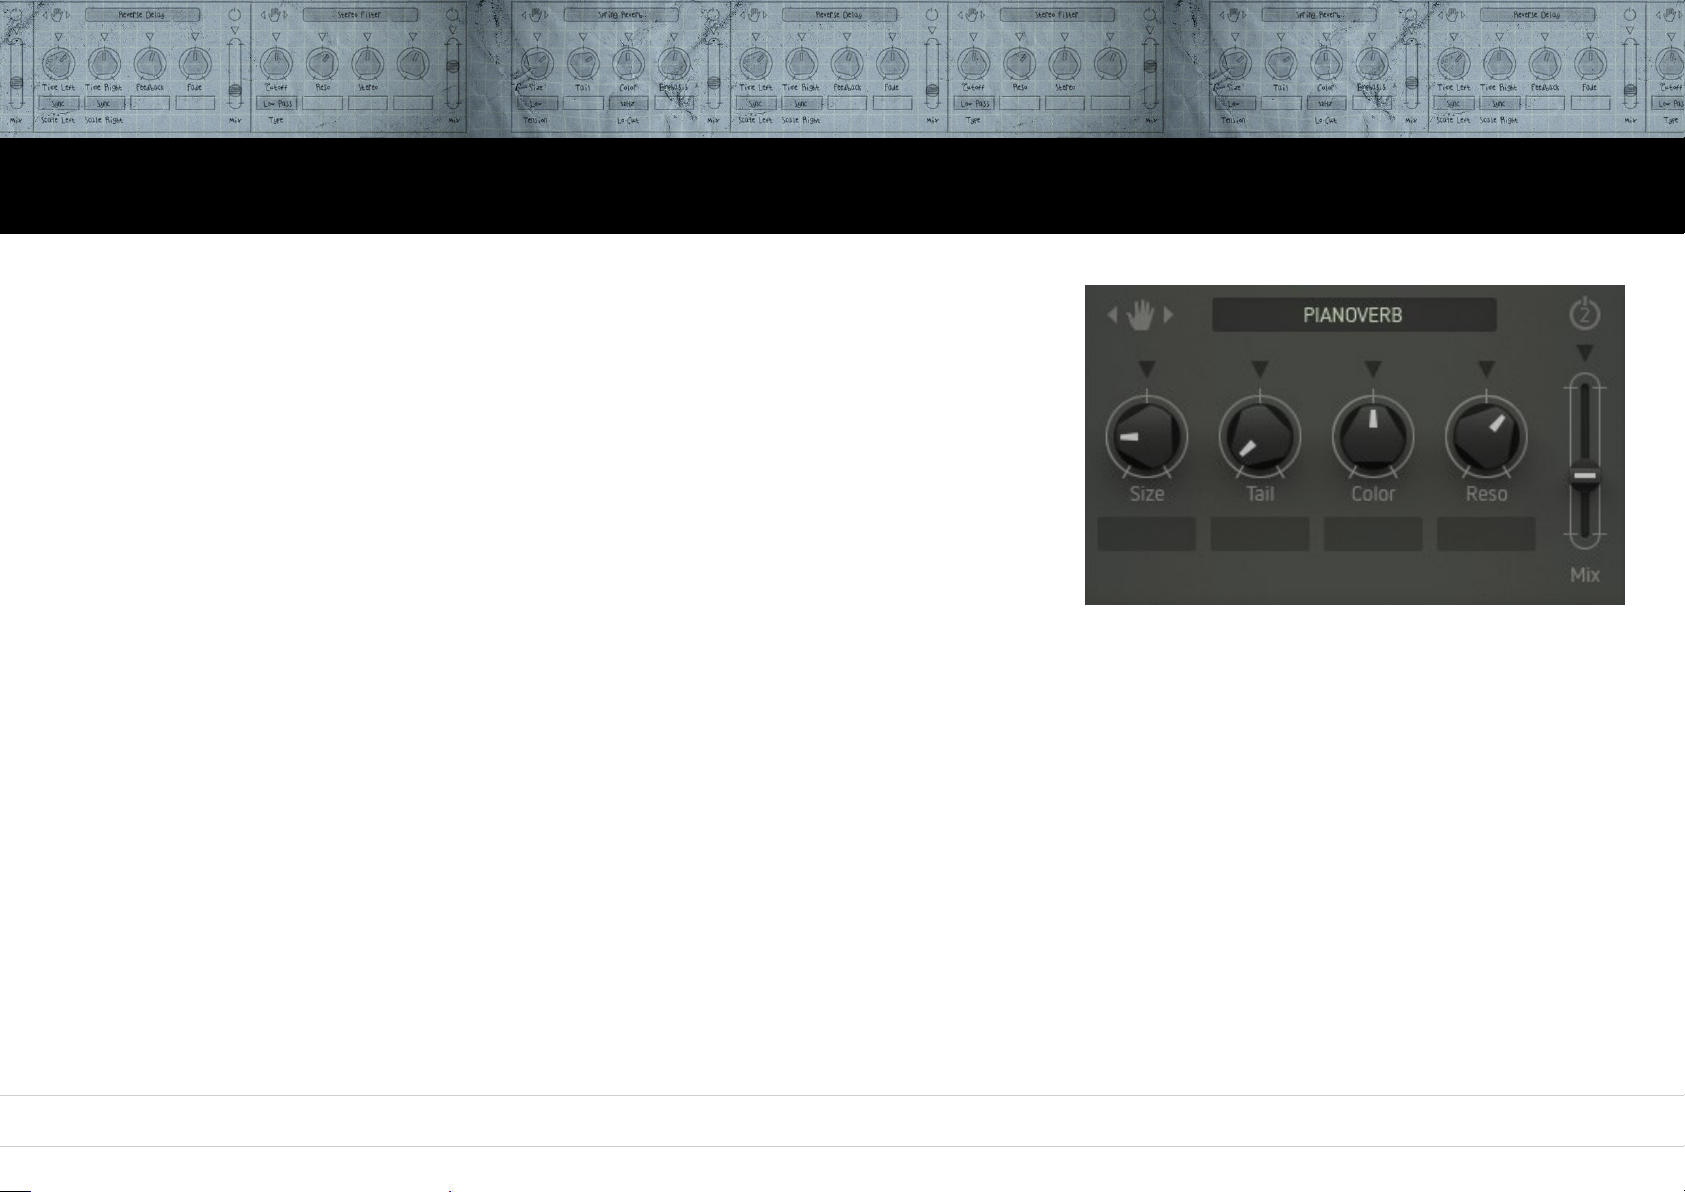
Pianoverb
Combines a reverb with a resonator effect.
The sound characteristics of the reverb can be tweaked across a wide range and
resemble the sonic properties inside a piano enclosure. By using the right parameter
values, you can create stunning „impossible rooms“ effects.
Size
Simulates the size of the resonant body / room
Tail
Controls the decay time.
Color
Colours the reverb sound from dull to bright.
Reso
Simulates resonances and alters the reverb sound.
Mix
Controls the effect level within the output signal.
75
Page 76
Oscillators Mixer Filter Drive Output Modulators Sequencer Arpiculation Effects Settings Realtime Controllers
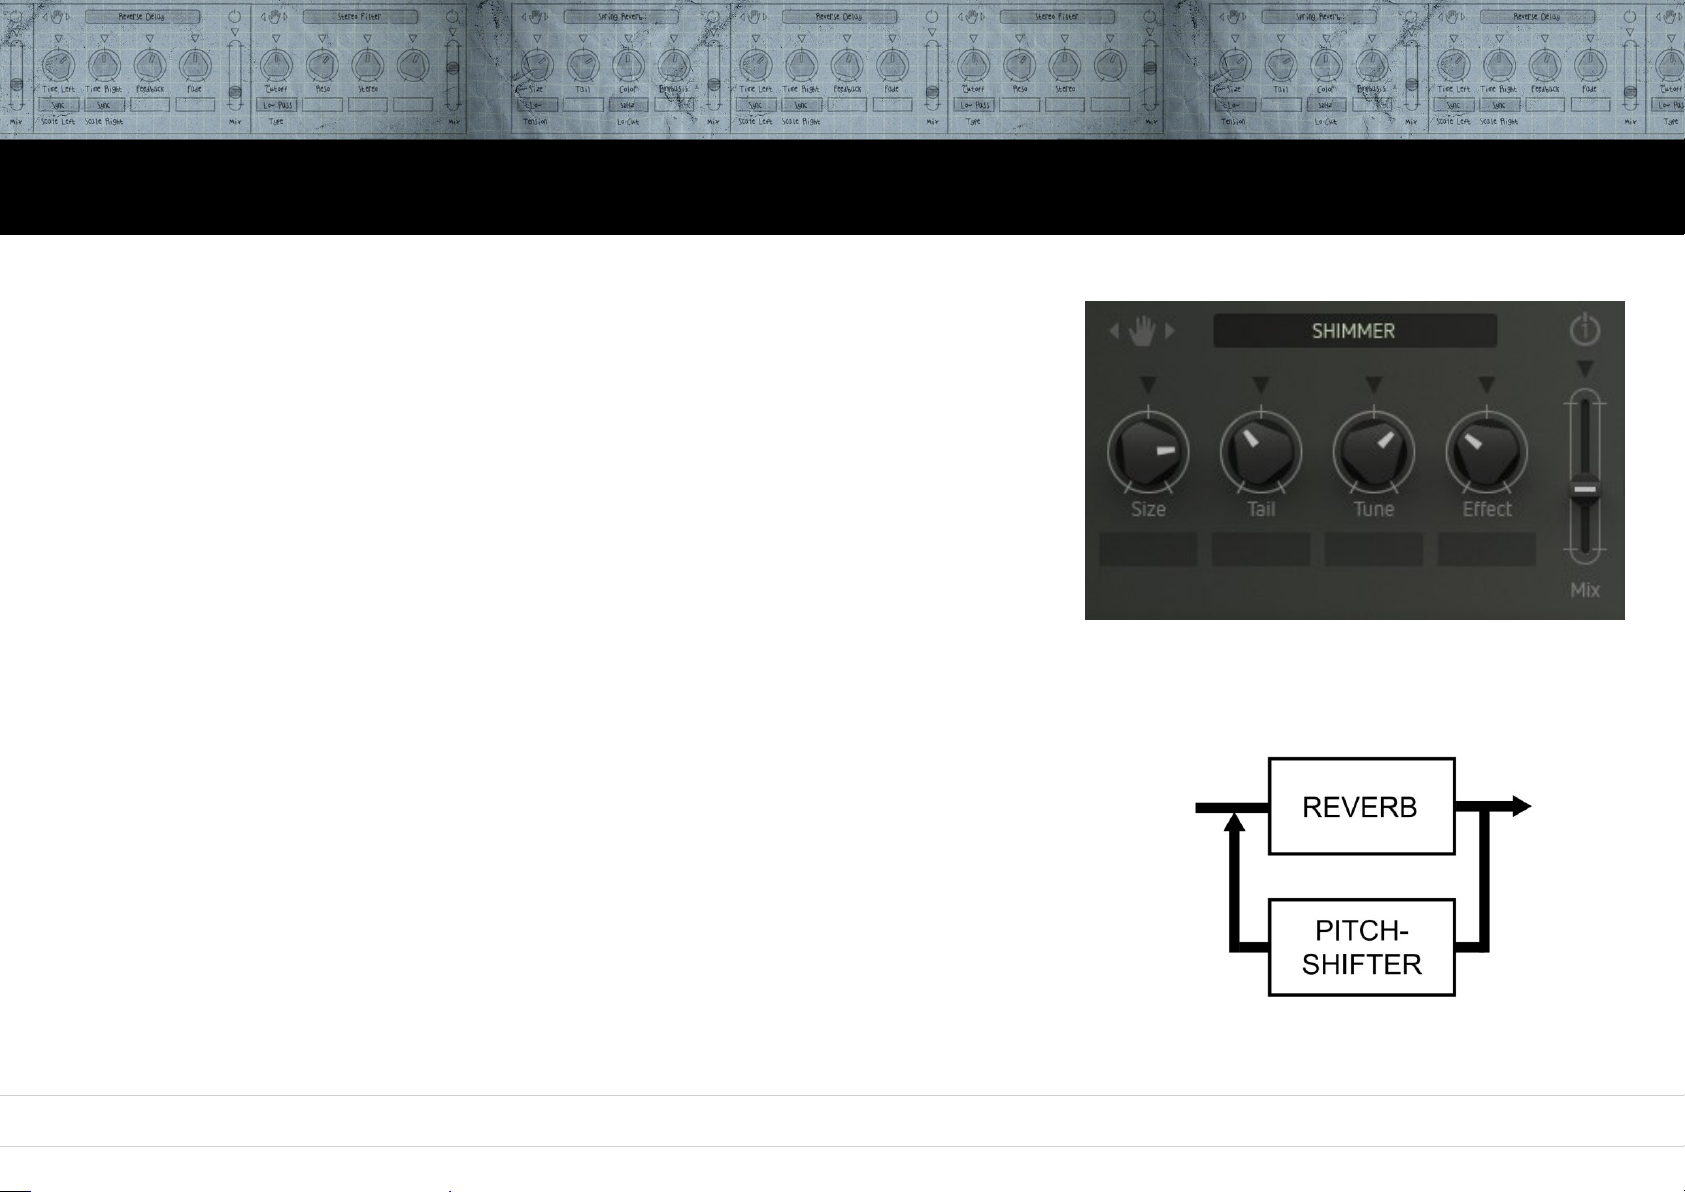
Shimmer
Combines a reverb with a pitch-shifter effect – cool...!
The reverb tail is pitch-shifted by an octave up/down.
Nice for the emulation of very large rooms / halls and the creation of weird ambient
effects.
Size
Simulates the size of the room.
Tail
Controls the decay time of the reverb tail.
Tune
Amount of pitch-shifting (+/- 12 semitones).
Effect
Controls the level of the pitch-shifted signal portion.
Mix
Controls the effect level within the output signal.
76
Page 77
Oscillators Mixer Filter Drive Output Modulators Sequencer Arpiculation Effects Settings Realtime Controllers
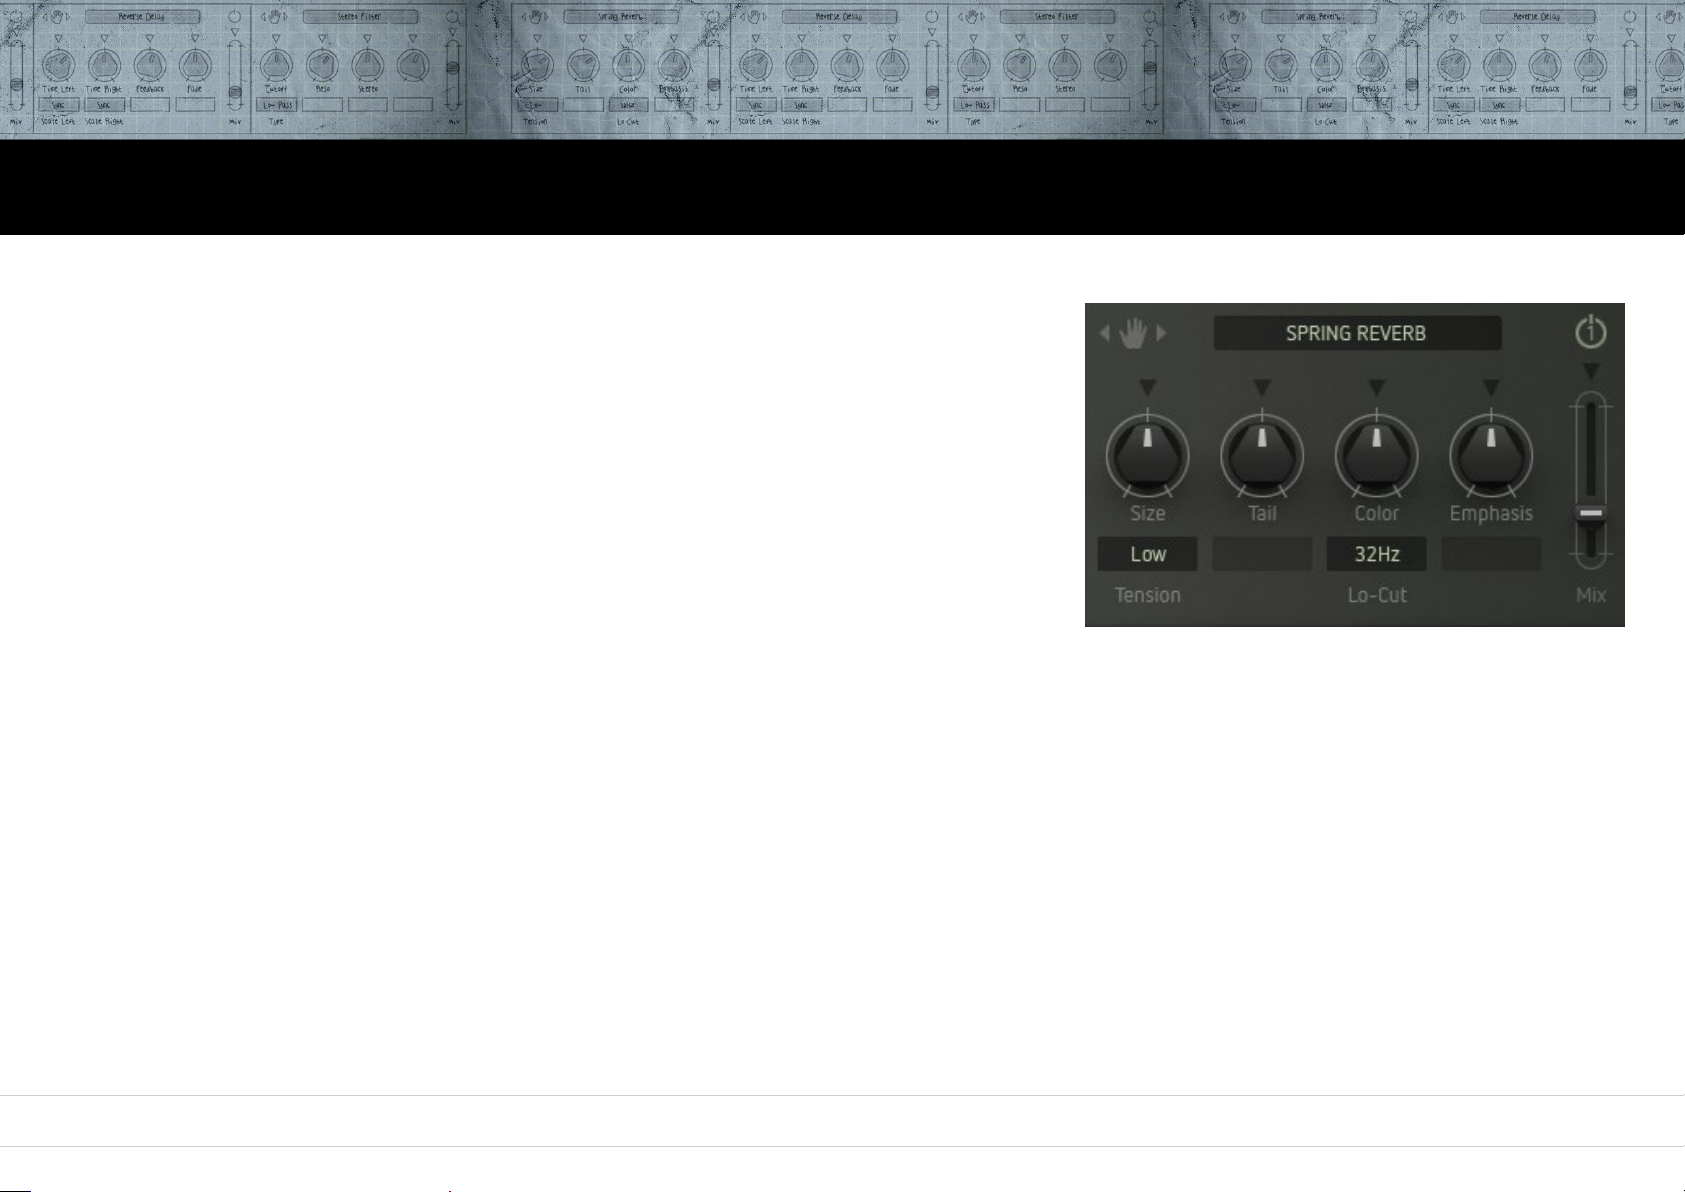
Spring Reverb
Emulates the typical sound of a spring reverb (i. e. the “boink!” factor).
Size
Simulates the room size resp. the length of the spring.
Tail
Controls the decay time of the reverb tail.
Color
Cuts high frequencies.
Emphasis
Another filter to sculpt the sound with.
Tension
Simulates the tension of the spring in four discrete steps.
Lo-Cut
Cuts low frequencies from the reverb signal in four descrete steps – this is to avoid „booming“ noise.
Mix
Controls the effect level within the output signal.
77
Page 78
Oscillators Mixer Filter Drive Output Modulators Sequencer Arpiculation Effects Settings Realtime Controllers
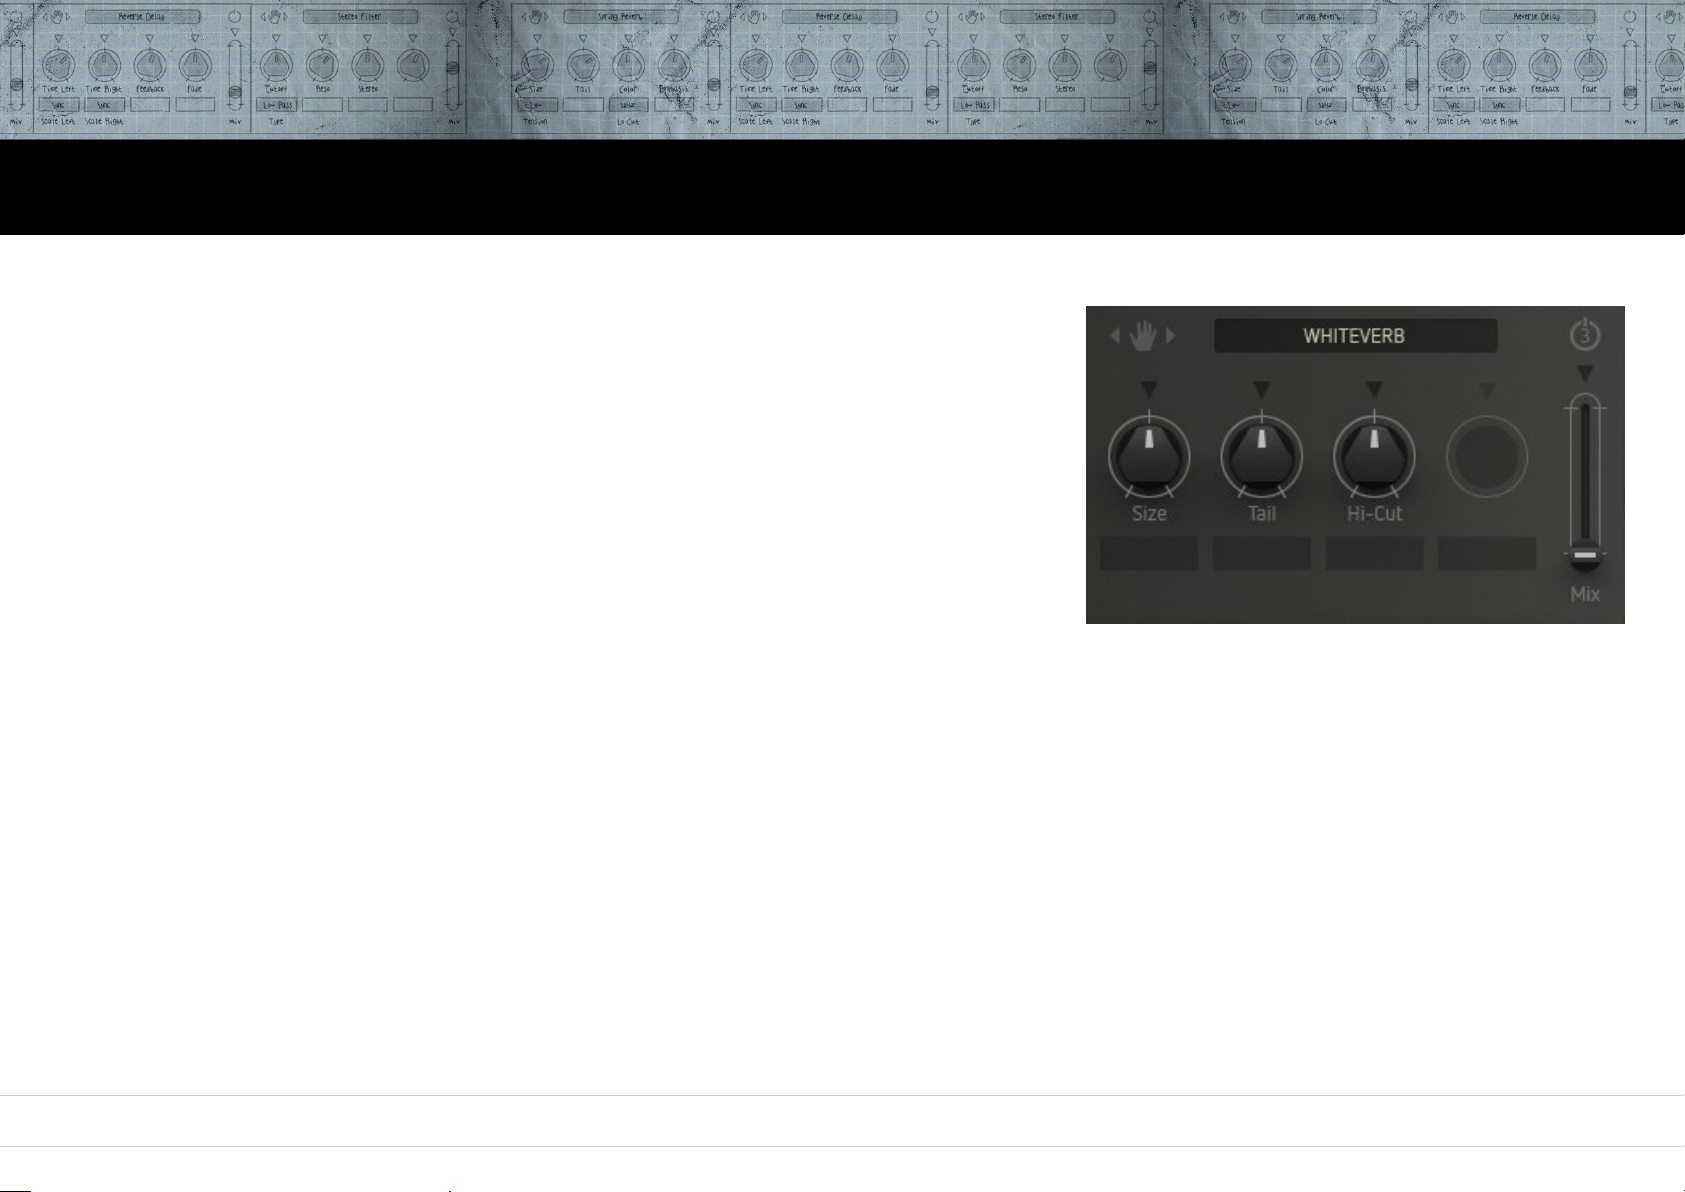
Whiteverb
Another reverb effect with just a few but very effective parameters – very useful for many applications.
Can do a very good job when used only in small amounts.
Size
Simulates the room size resp. the size of the plate.
Tail
Controls the decay time of the reverb tail.
Hi-Cut
Cuts high frequencies from the reverb signal.
Mix
Controls the effect level within the output signal.
78
Page 79
Oscillators Mixer Filter Drive Output Modulators Sequencer Arpiculation Effects Settings Realtime Controllers
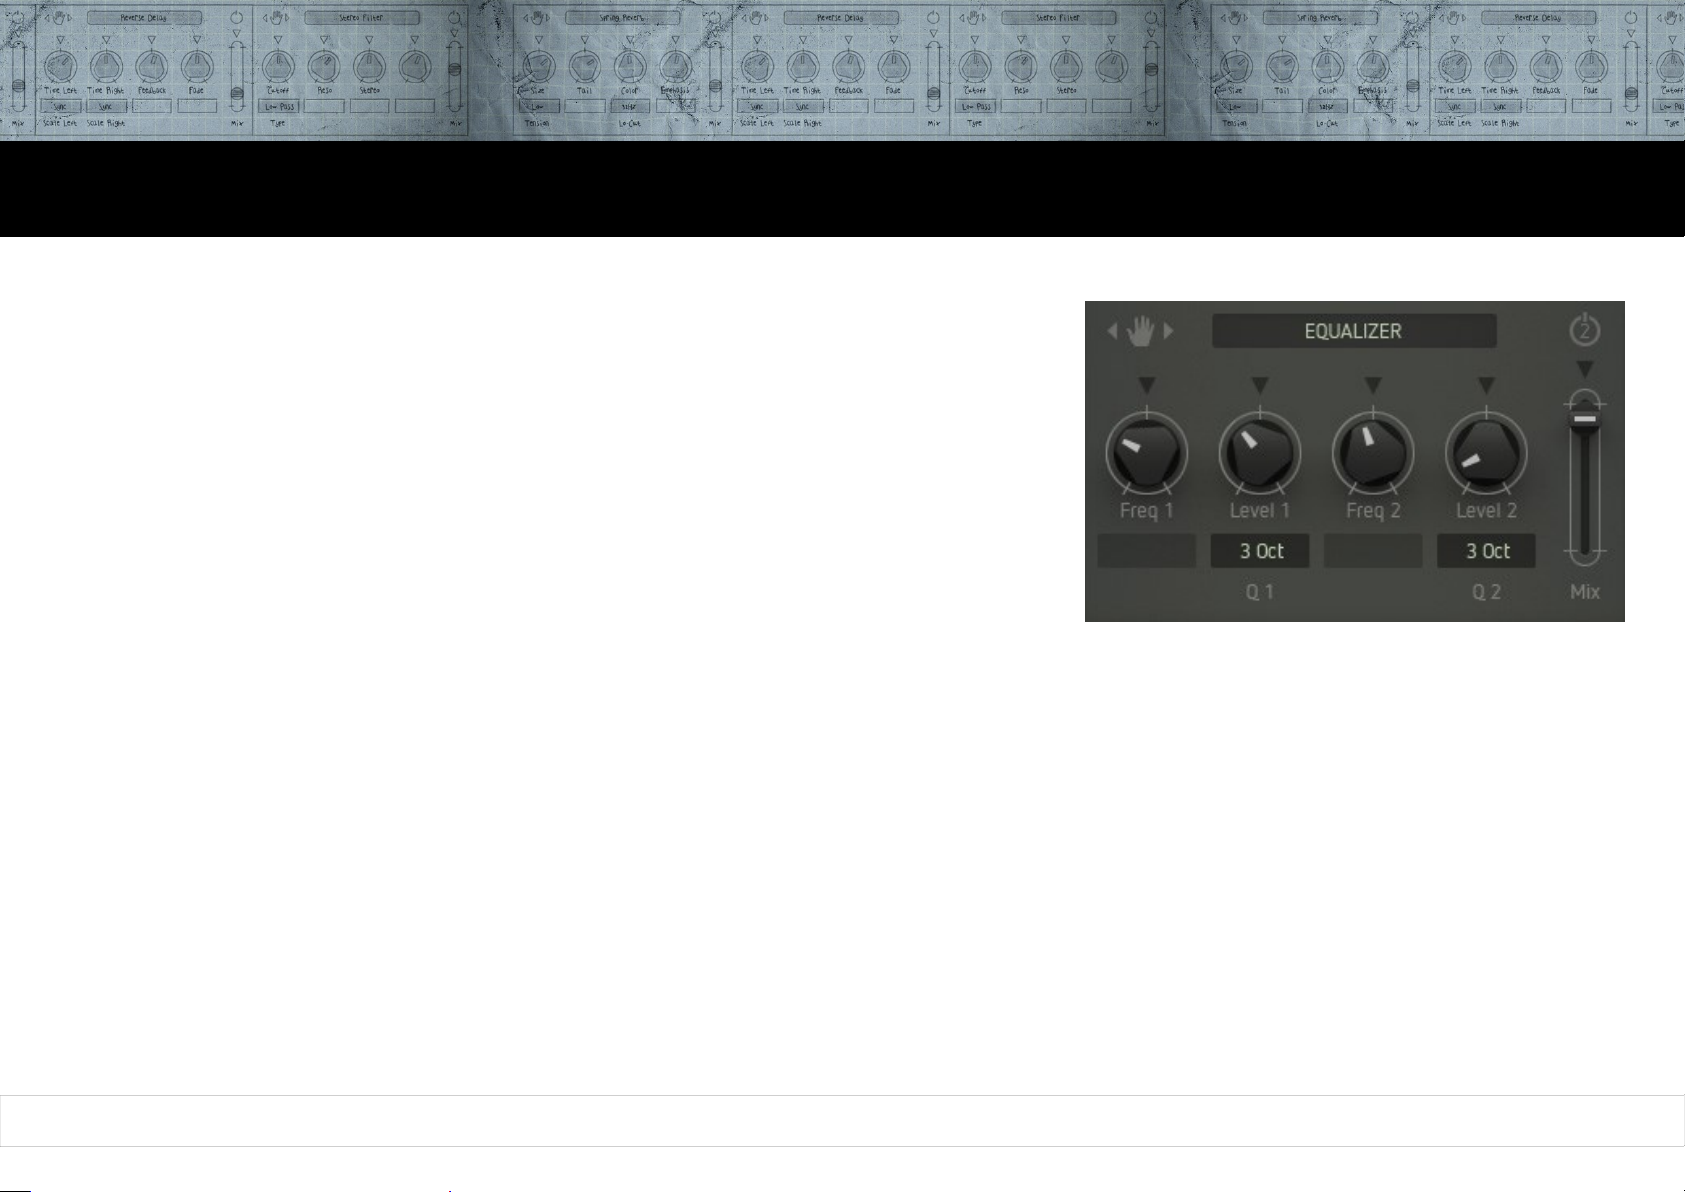
Equalizer
A fully parametric EQ with two bands that can be overlapping.
Freq 1
Center frequency of the first band.
Level 1
Cut/boost of the first band.
Q 1
Width of the first band in six discrete steps (1 – 6 octaves).
Freq 2
Center frequency of the second band.
Level 2
Cut/boost of the second band.
Q 2
Width of the second band in six discrete steps (1 – 6 octaves).
Mix
Controls the effect level within the output signal.
79
Page 80
Oscillators Mixer Filter Drive Output Modulators Sequencer Arpiculation Effects Settings Realtime Controllers
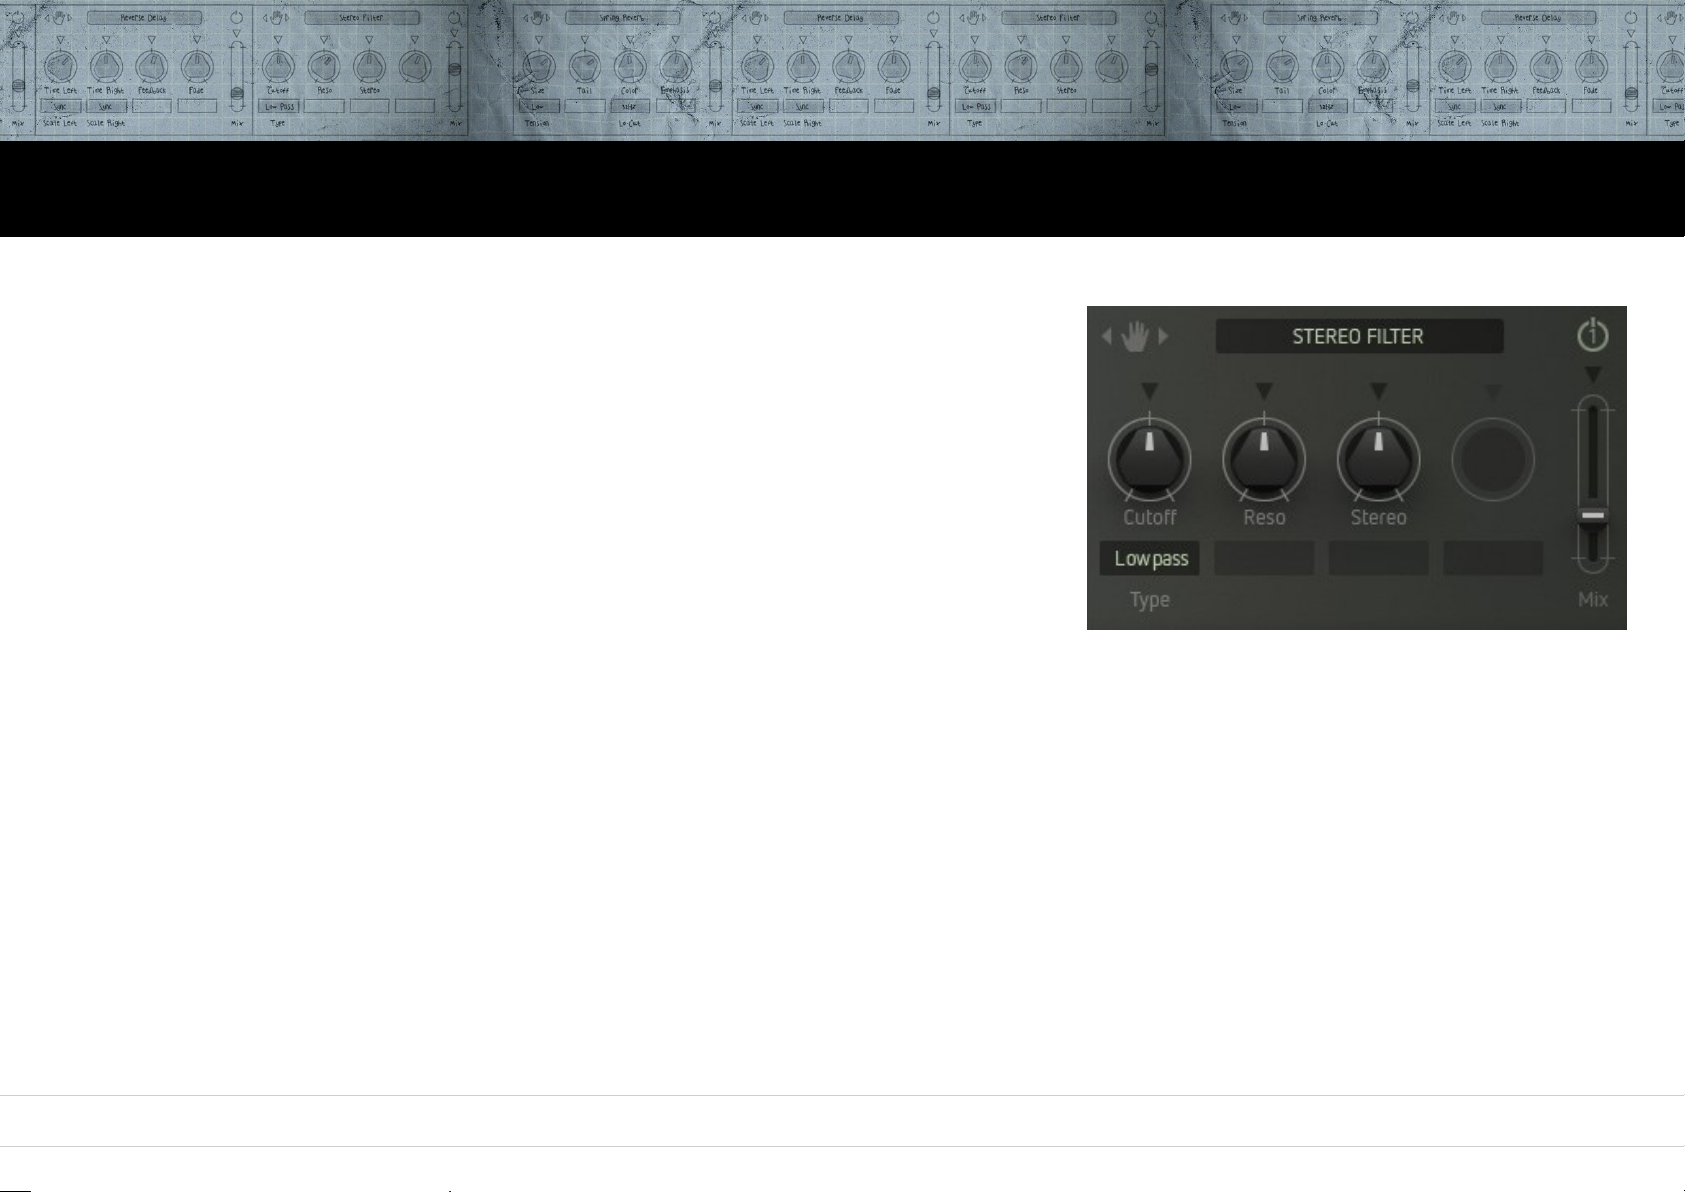
Stereo Filter
A multimode filter with resonance but no internal modulation.
By modulating it via the mod matrix, it can be used as a fully-fledged second filter in
Factory‘ signal path.
With modulation also useful for creating stereo panning effects.
Type
Determines the filter characteristics (lowpass, bandpass, highpass).
Cutoff
Operating point of the filter (cutoff resp. center frequency).
Reso
Controls the intensity of the resonance. Emphasizes frequencies around the cutoff frequency point.
Stereo
Controls the cutoff-offset between left and right channel and thus the stereo position of the effect signal.
Mix
Controls the effect level within the output signal.
80
Page 81
Oscillators Mixer Filter Drive Output Modulators Sequencer Arpiculation Effects Settings Realtime Controllers
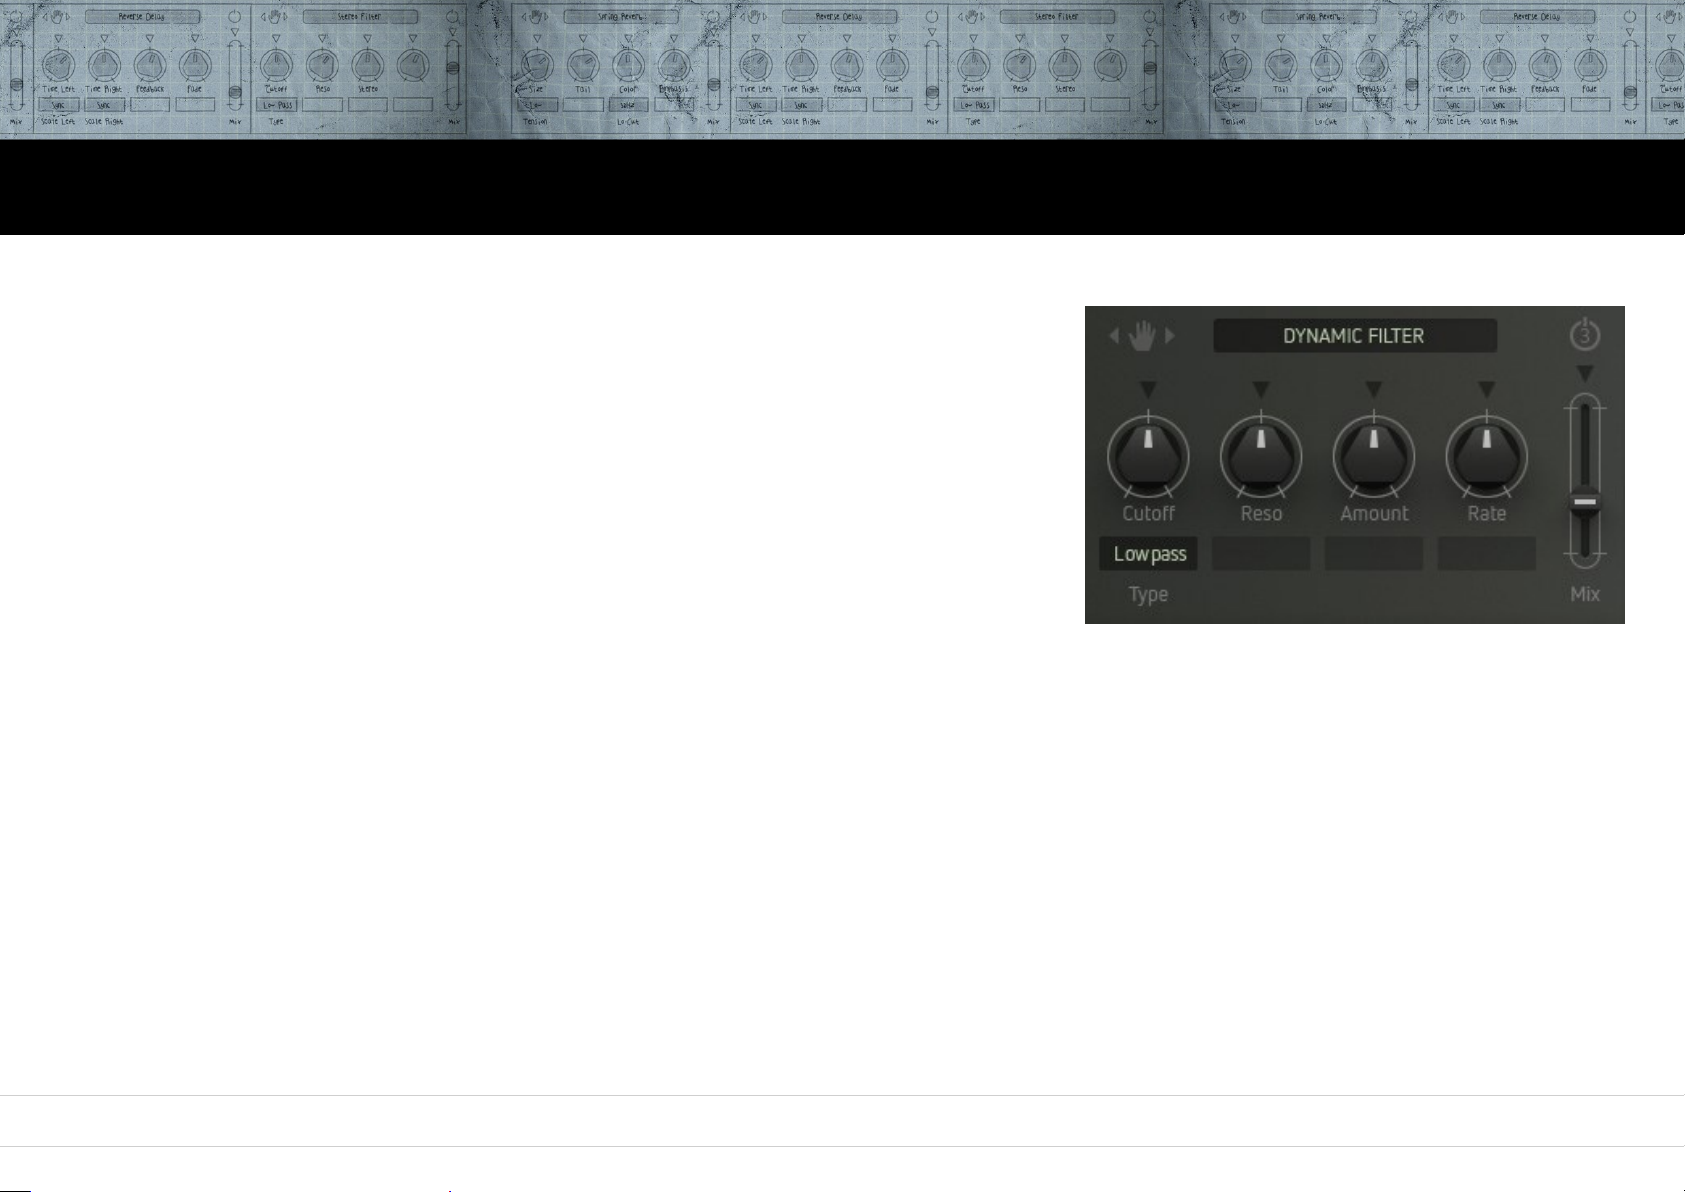
Dynamic Filter
A multimode filter with resonance and internal modulation by an envelope follower.
Provides level-controlled wah-wah and flanger-like effects.
Type
Determines the filter characteristics (lowpass, bandpass, highpass).
Cutoff
Operating point of the filter (cutoff resp. center frequency).
Reso
Controls the intensity of the resonance. “Peaks” the sound around the cutoff frequency.
Amount
Sets the threshold level of the envelope follower and controls the cutoff
resp. the intensity of the effect, depending on the level of the input signal.
Rate
Determines the duration of the envelope and thus the speed of the filter effect from slow (left) to fast (right).
Mix
Controls the effect level within the output signal.
81
Page 82
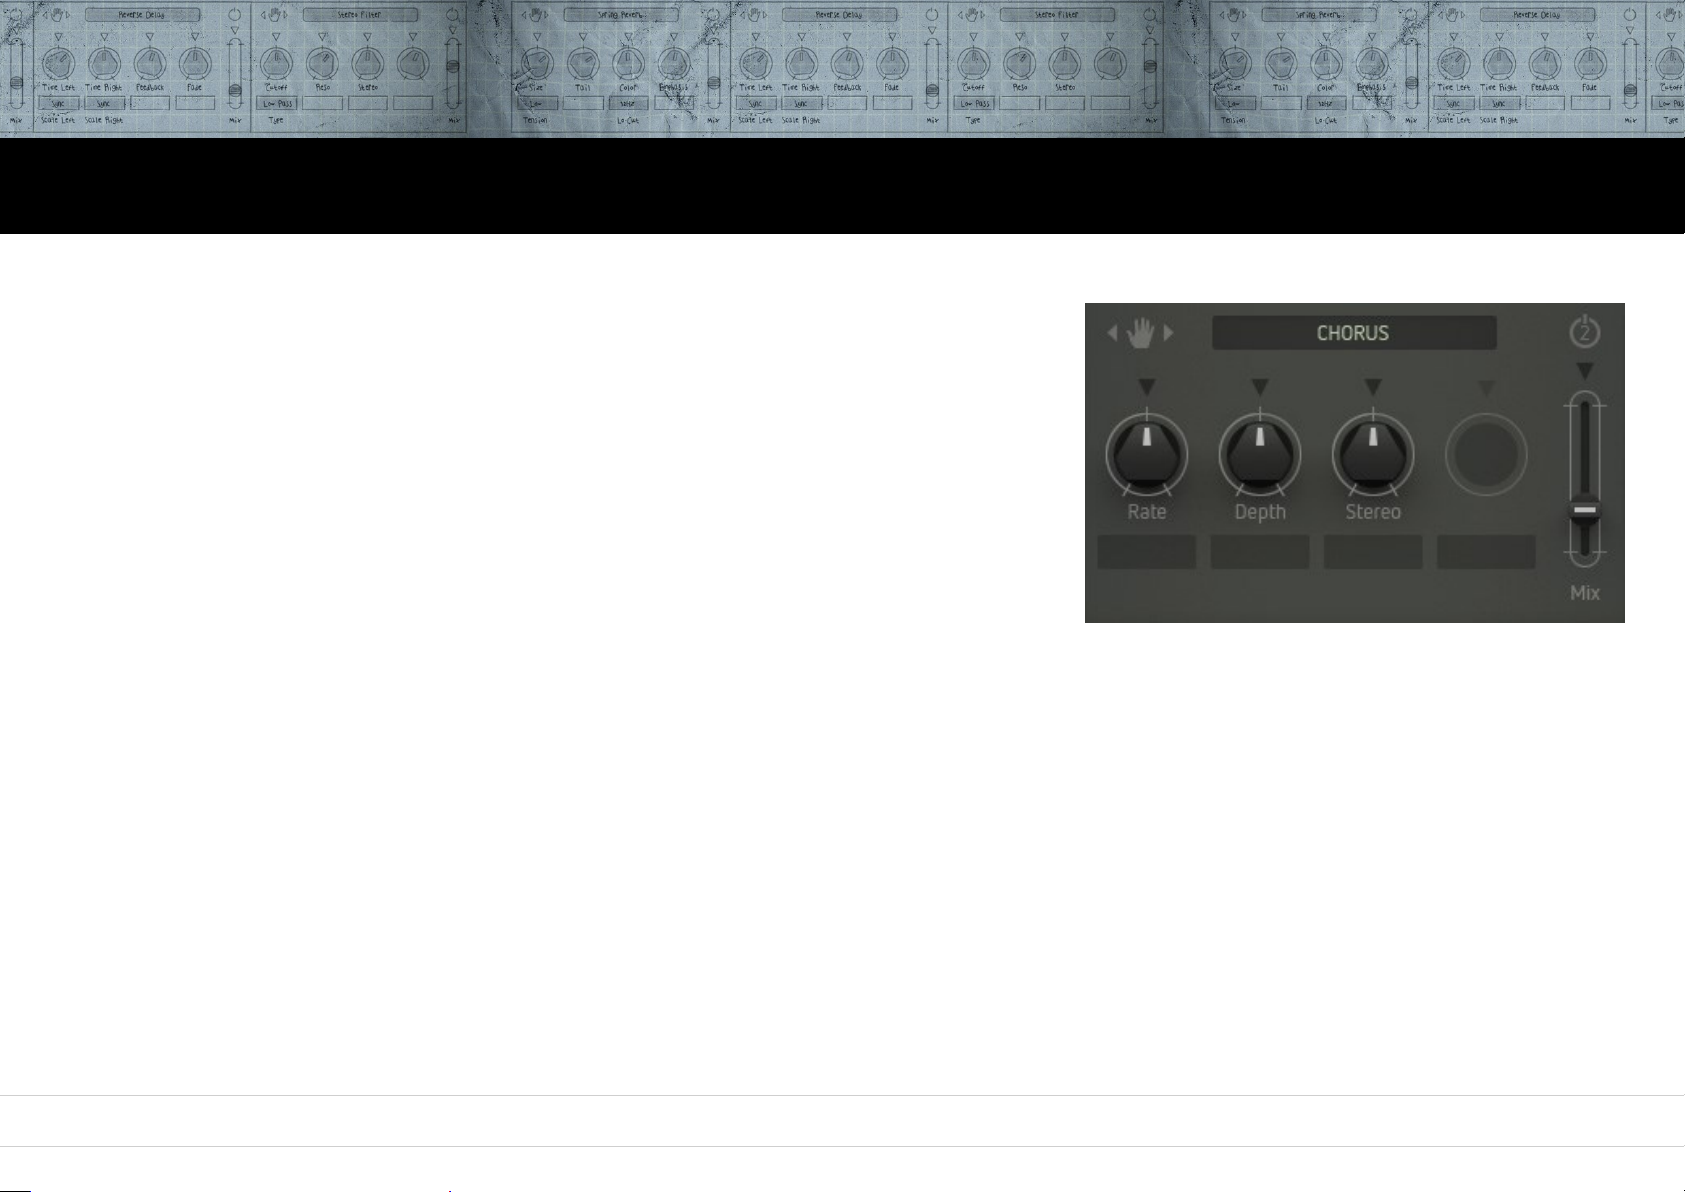
Oscillators Mixer Filter Drive Output Modulators Sequencer Arpiculation Effects Settings Realtime Controllers
Chorus
A classic stereo chorus, would you believe – simple but effective.
Great not only for pad sounds.
Rate
Controls the speed of the internal modulation.
Depth
Controls the internal modulation depth resp. the intensity of the effect.
Stereo
Controls the stereo width of the effect.
Mix
Controls the effect level within the output signal.
82
Page 83
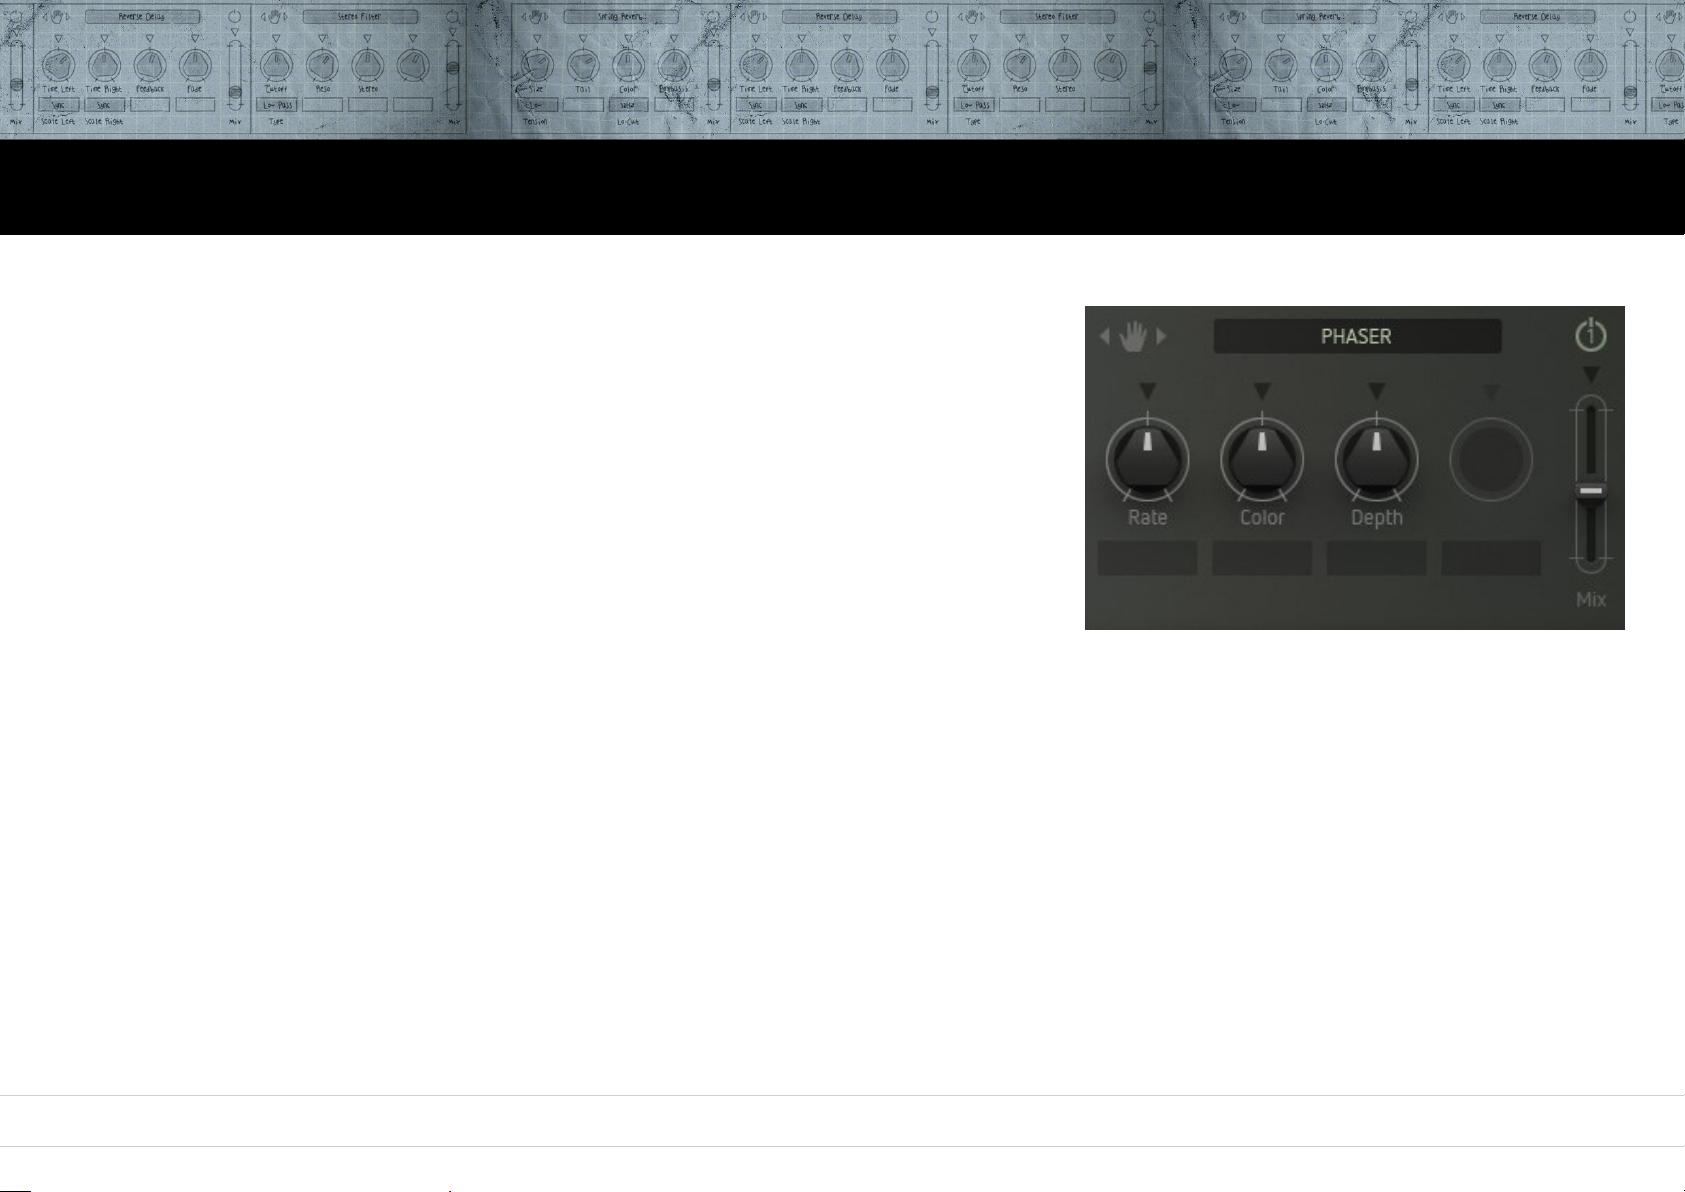
Oscillators Mixer Filter Drive Output Modulators Sequencer Arpiculation Effects Settings Realtime Controllers
Phaser
Also a classic: the phaser effect.
Rate
Controls the speed of the internal modulation.
Color
Changes the sonic response of the effect.
Depth
Controls the internal modulation depth resp. the intensity of the effect.
Mix
Controls the effect level in the output signal.
83
Page 84
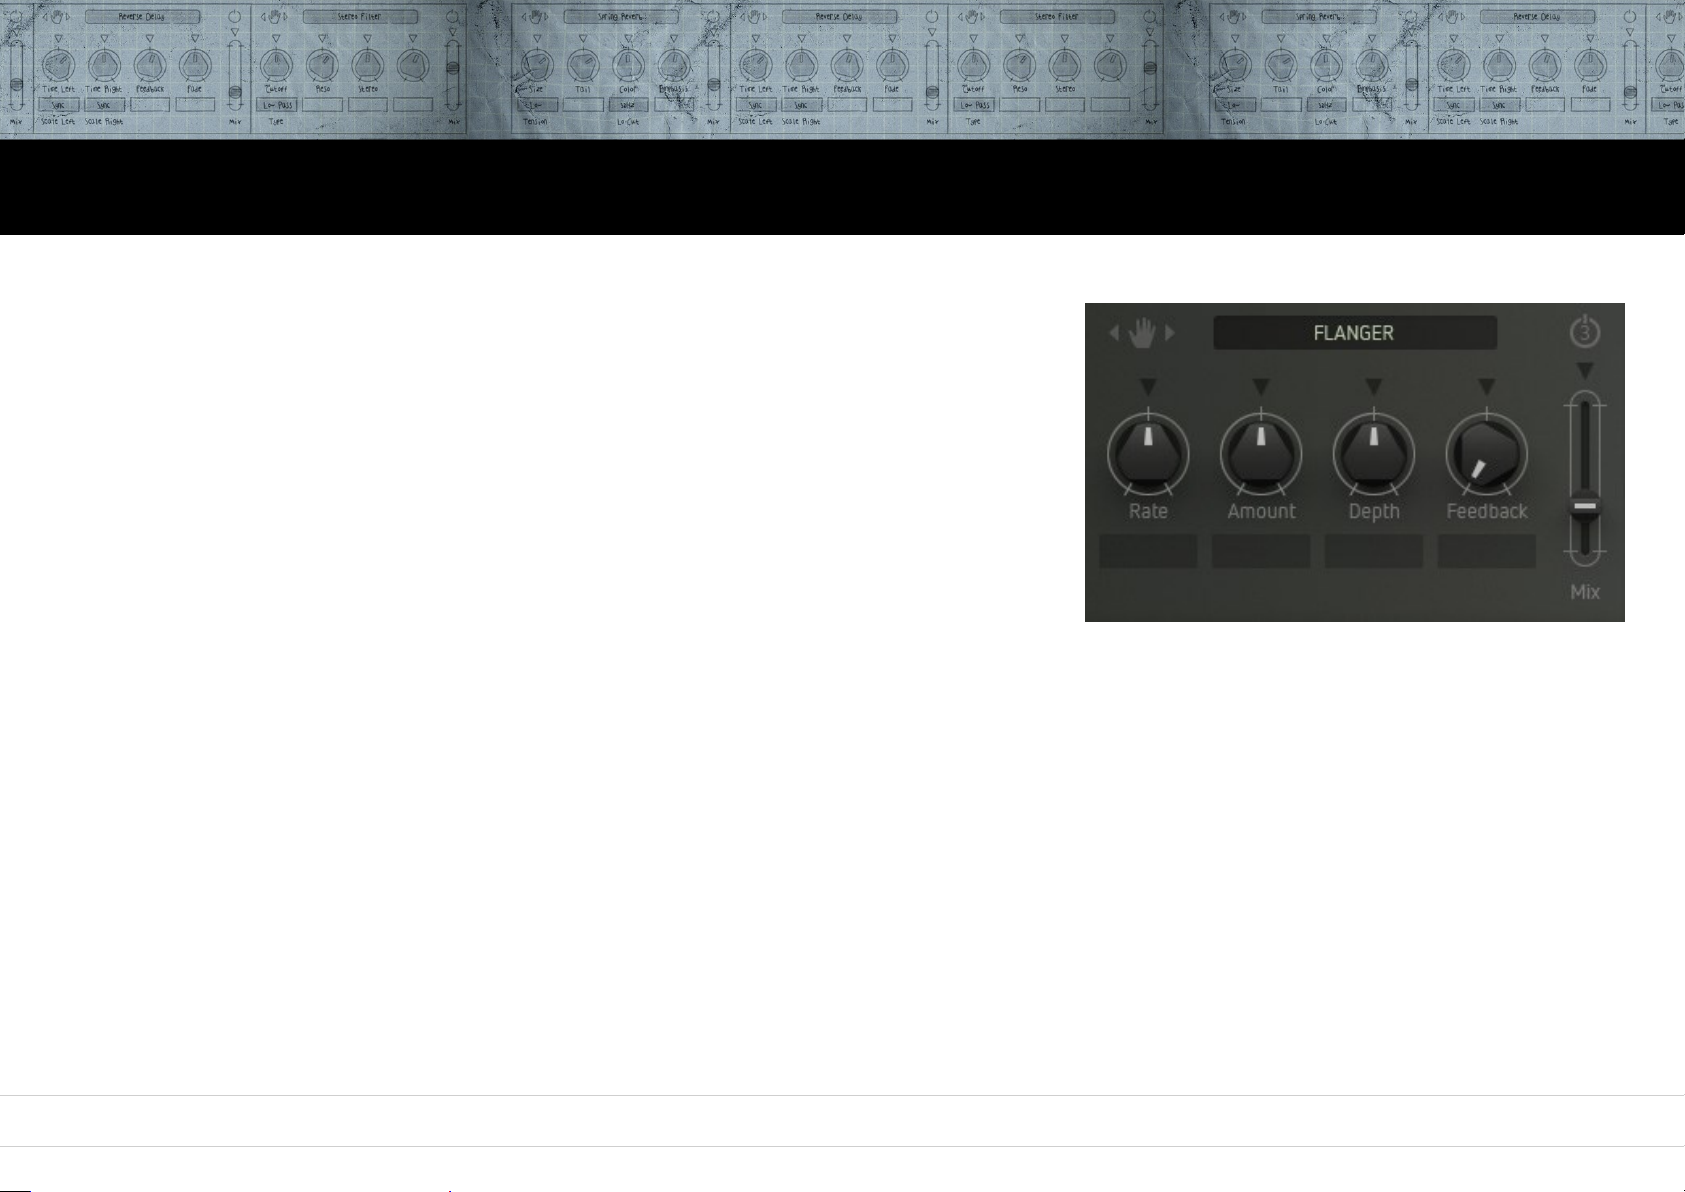
Oscillators Mixer Filter Drive Output Modulators Sequencer Arpiculation Effects Settings Realtime Controllers
Flanger
A flanger with flexible control and a wide palette of sounds.
Rate
Controls the speed of the internal modulation.
Amount
Controls the internal modulation depth.
Depth
Controls the delay time and produces either flanging, doubling, or combfilter effects.
Feedback
Determines the feedback intensity.
Mix
Controls the effect level within the output signal.
84
Page 85
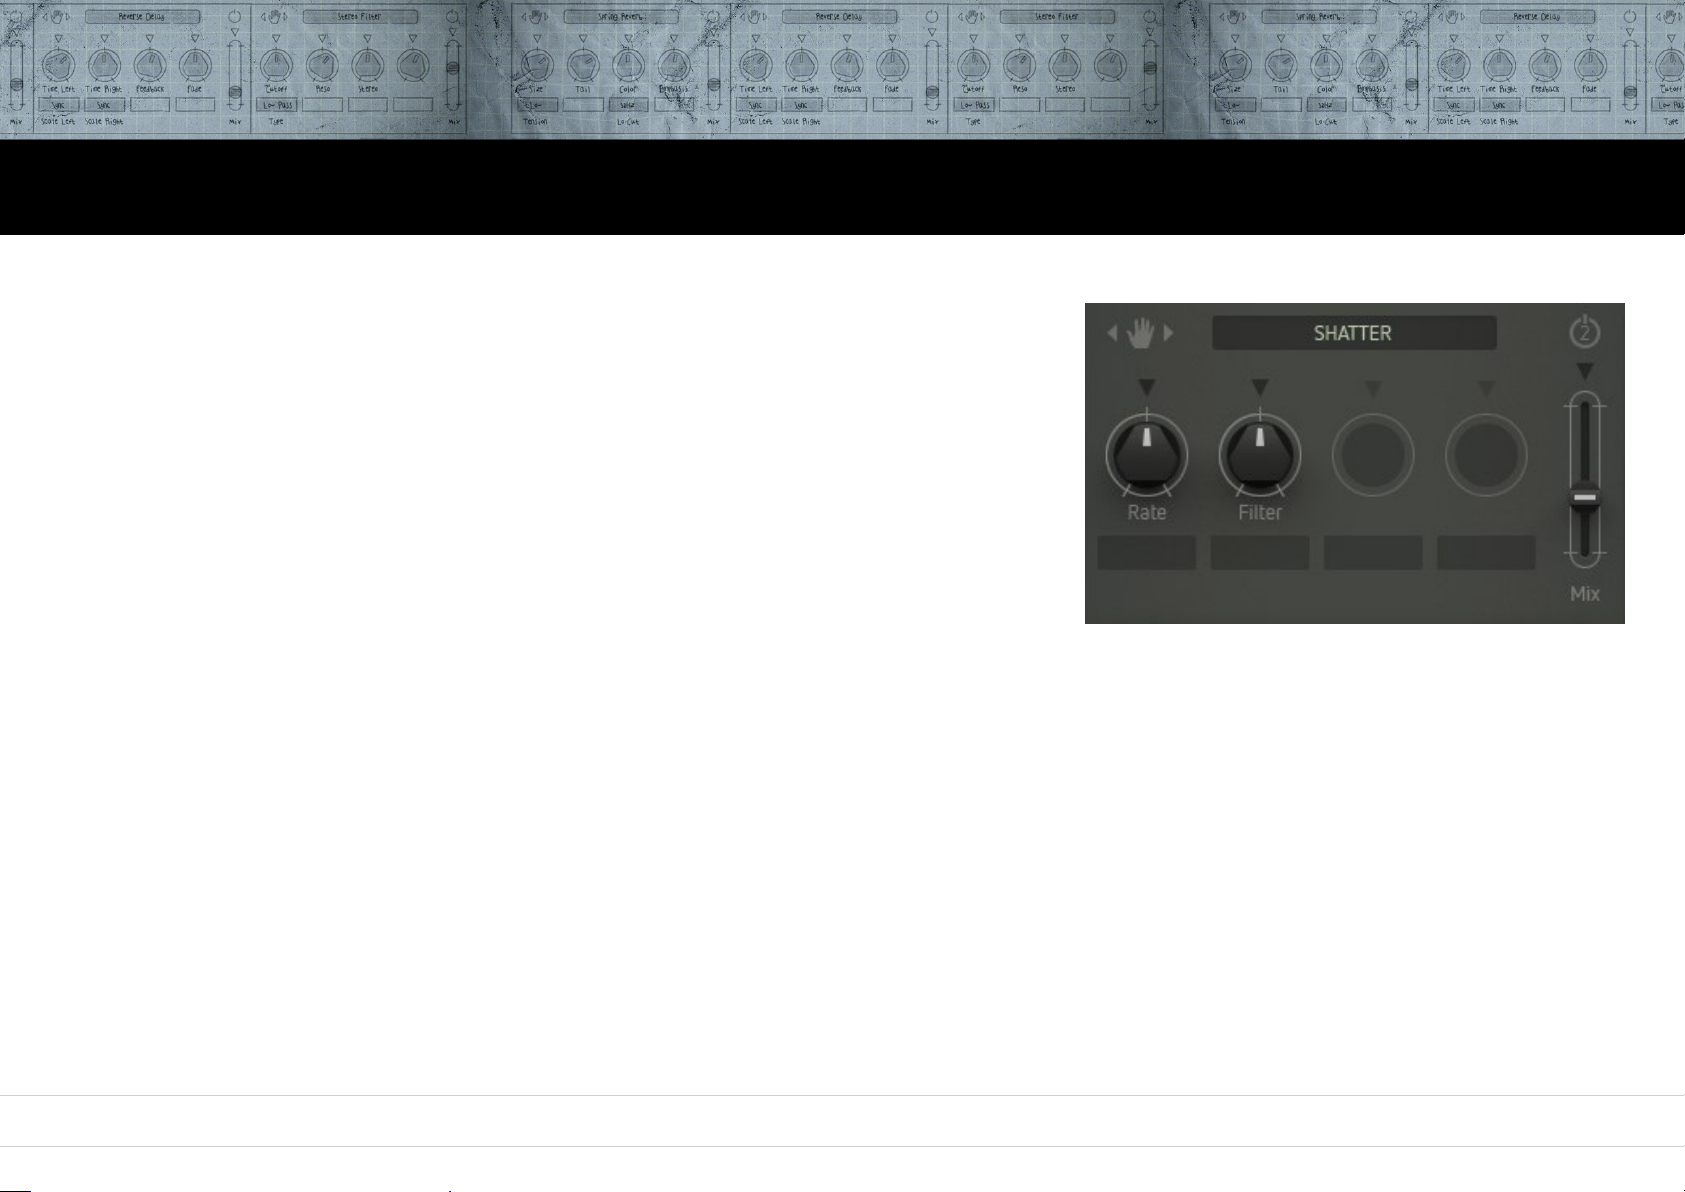
Oscillators Mixer Filter Drive Output Modulators Sequencer Arpiculation Effects Settings Realtime Controllers
Shatter
Provides a combination of a tremolo effect (level vibrato) and a filter vibrato.
Very good response to dynamic input signals.
Rate
Controls the speed of the internal modulation.
Filter
Alters the effects sound from dull to bright colours.
Mix
Controls the effect level within the output signal.
85
Page 86
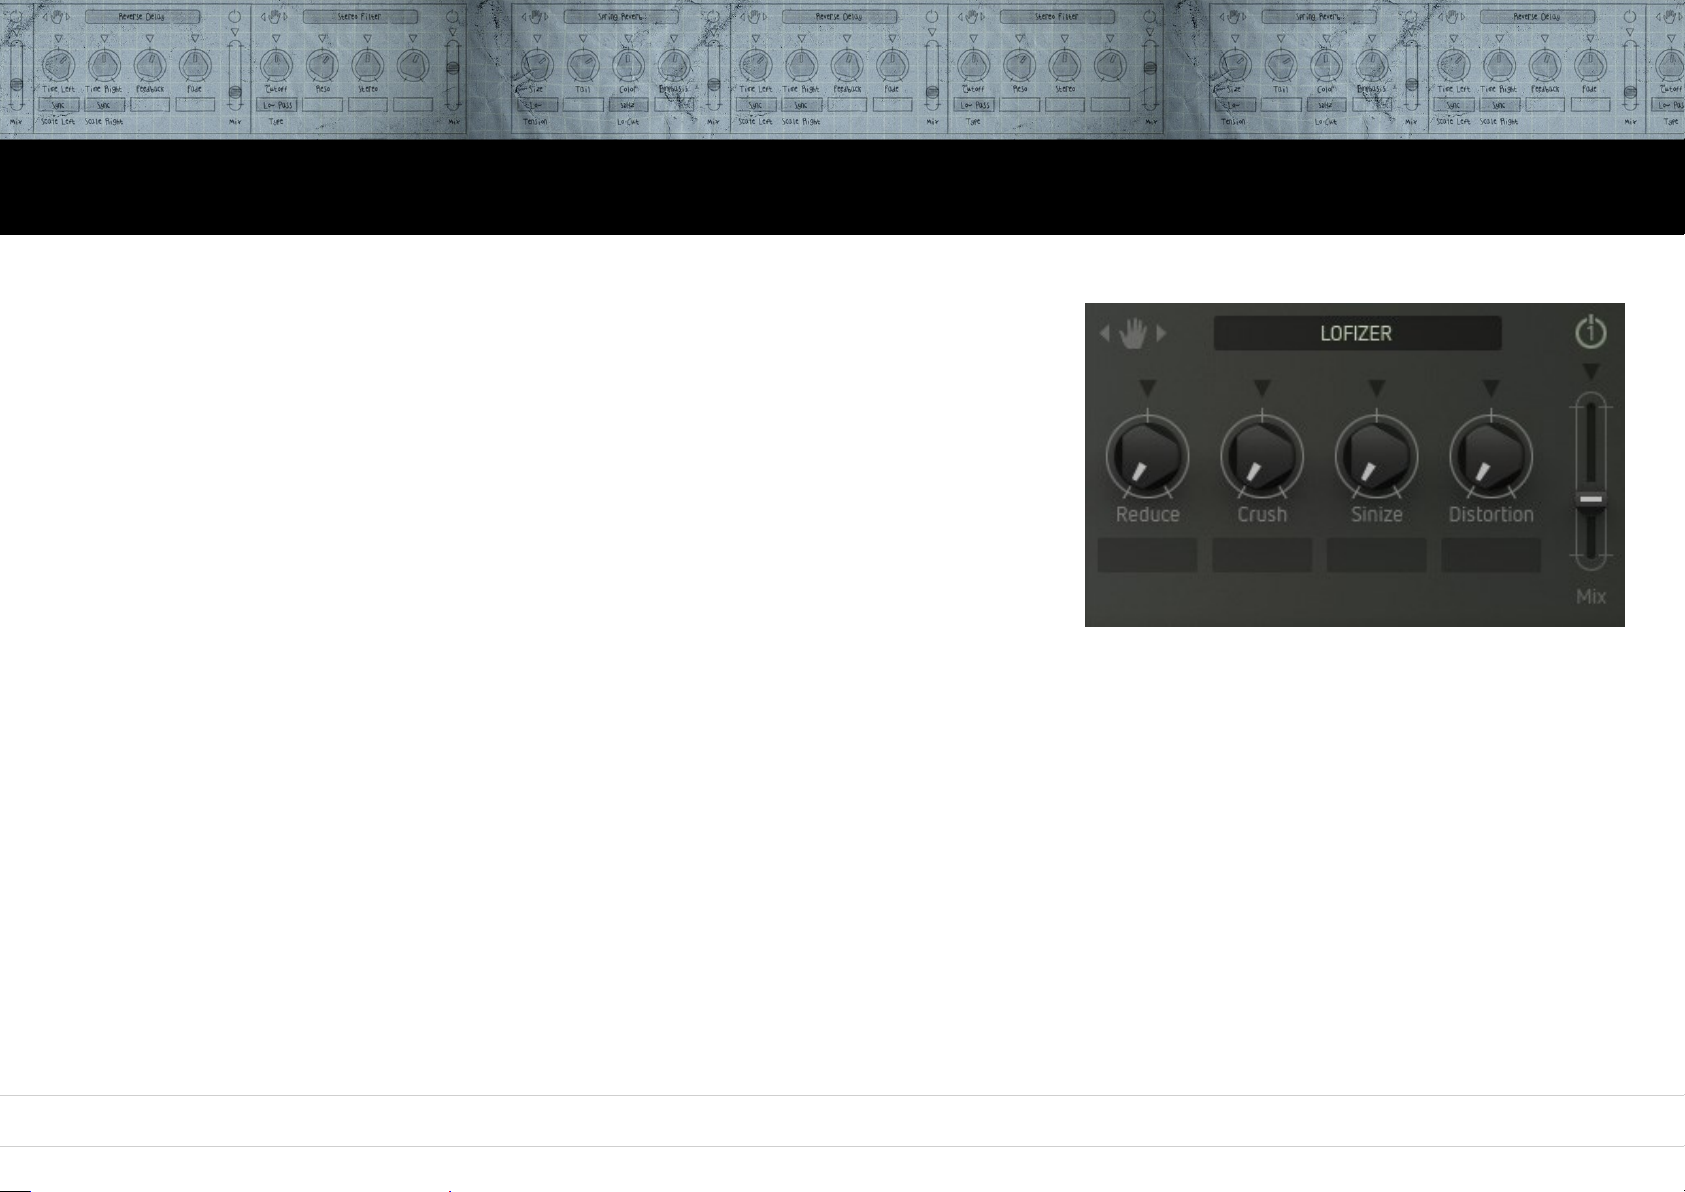
Oscillators Mixer Filter Drive Output Modulators Sequencer Arpiculation Effects Settings Realtime Controllers
Lofizer
A grinding lo-fi effect which will always be useful when you believe
your nicest sound creations to be a tad too nice perhaps...
Reduce
Decreases the bit rate of the signal.
Crush
A really evil bit crusher. Depending on the settings of the other parameters, the signal might
become inaudible. Tweak carefully.
Sinize
The signal is modulated by a sine wave which results in a sound a ringmodulator would
produce. The control determines the frequency of the sinewave.
Turned fully counter-clockwise, this modulation effect will be disabled (off).
Distorsion
Provides a mild level boost with harmonic distortion – nice and nasty... Turned fully counter-clockwise, the distorsion effect will be disabled (off).
Mix
Controls the effect level within the output signal.
86
Page 87
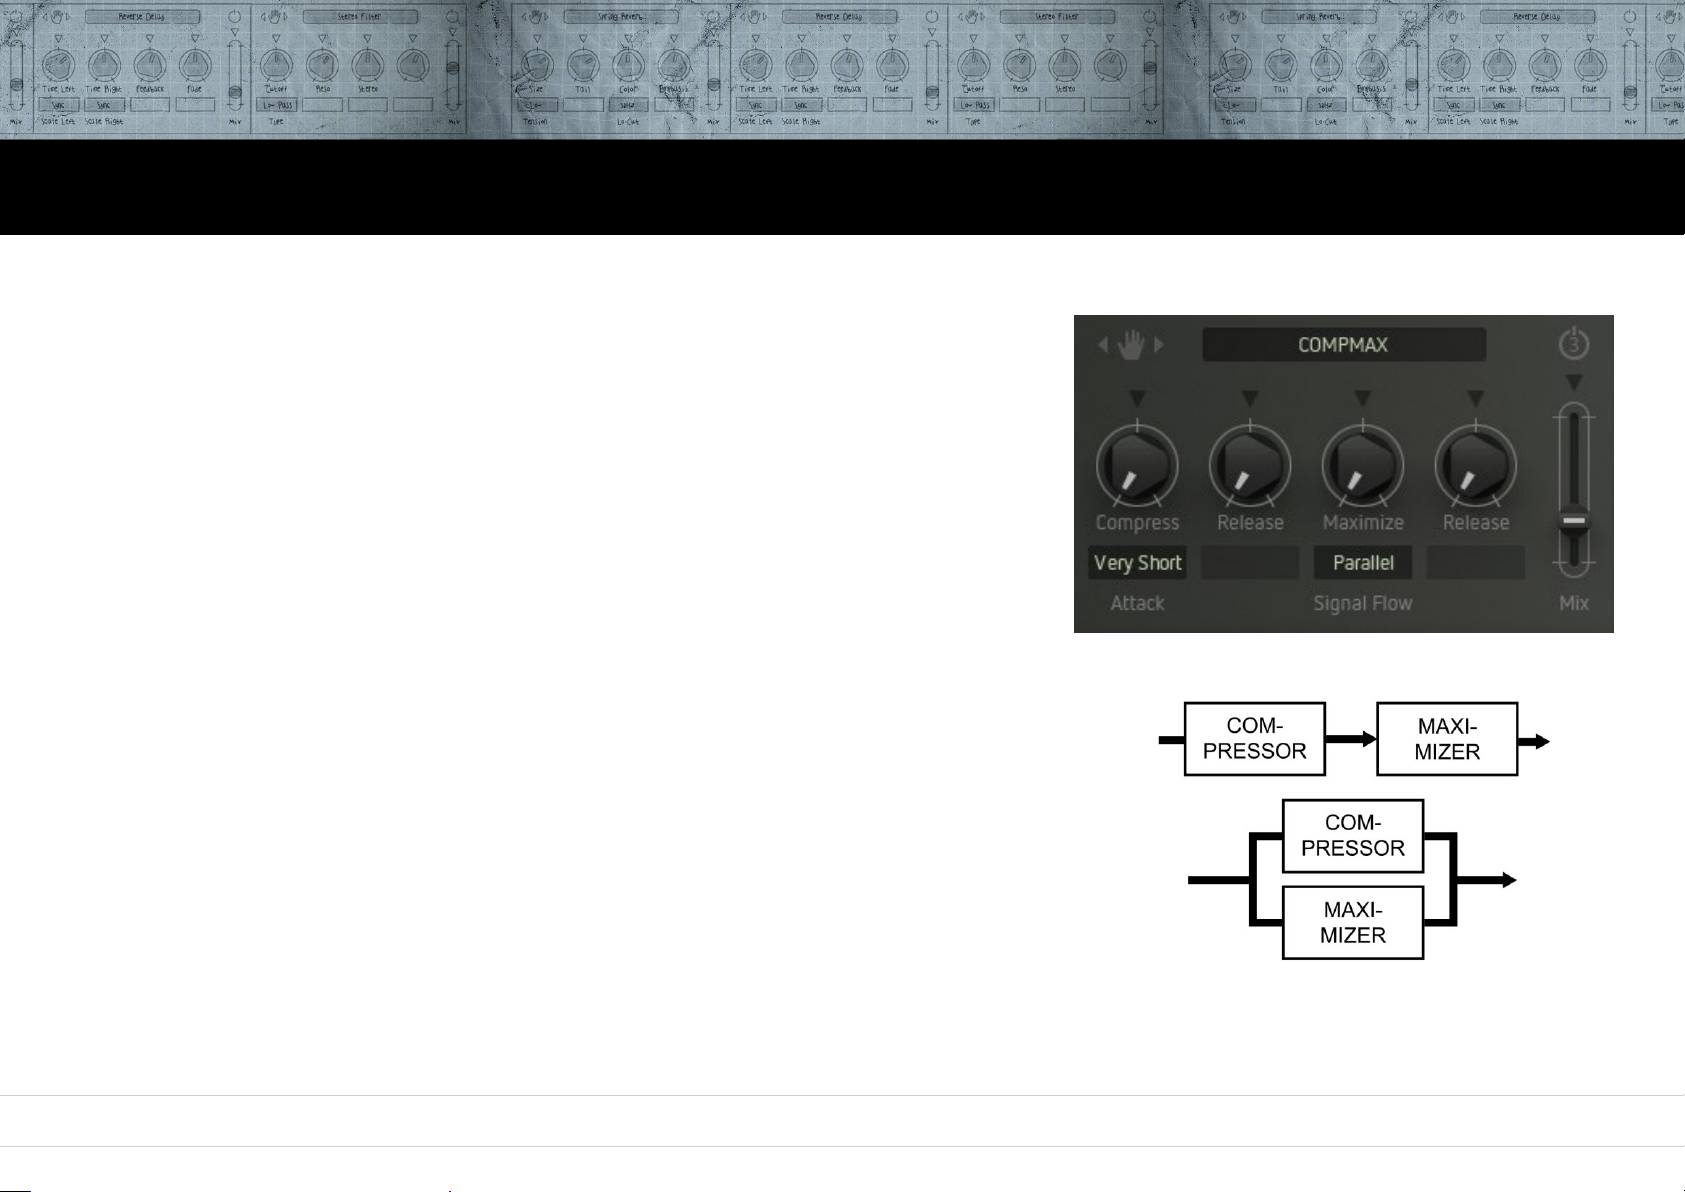
Oscillators Mixer Filter Drive Output Modulators Sequencer Arpiculation Effects Settings Realtime Controllers
Compmax
A very handy tool for controlling volume levels and increasing overall loudness.
You can boost sounds that appear a little weak – also very handy for e.g. drum- and
percussion loops / rhythmic sounds. If necessary, reduce Factorys output level (Vol) a bit.
Compress
Controls operating point of the compressor and thus the intensity of the level
compression.
Attack
Controls the attack response time of the compressor in five discrete steps.
Release
Controls the release response time of the compressor – synced to Factorys clock source.
Makes the creation of rhythmically „pumping” effects easy.
Maximize
Determines the intensity of the gain maximization.
Release
Controls the release response time of the maximizers – also synced to Factorys clock source.
Signal Flow
Determines whether compressor and maximizer work in series or in parallel. To obtain heavy
pumping effects, please use serial routing and adjust all parameters carefully.
Mix
Controls the effect level within the output signal.
87
Page 88
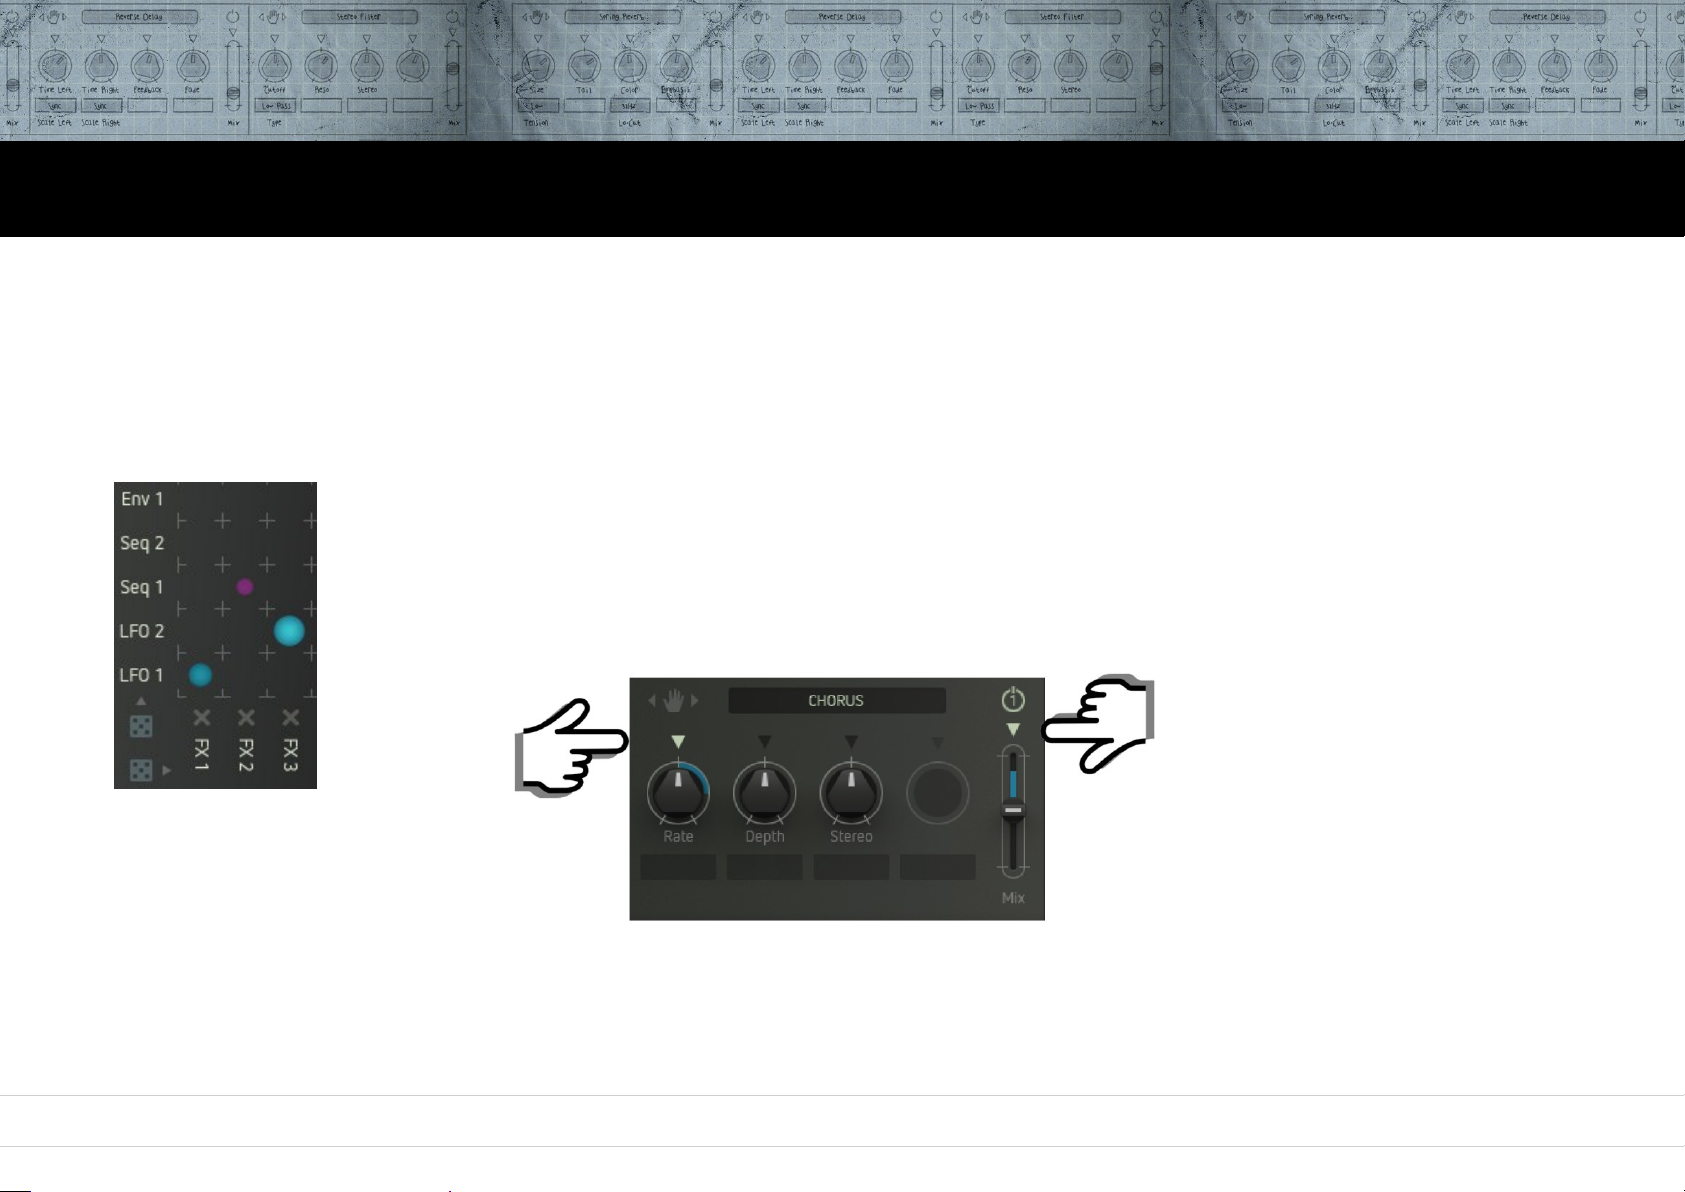
Oscillators Mixer Filter Drive Output Modulators Sequencer Arpiculation Effects Settings Realtime Controllers
Modulating effect parameters
Most of the effect parameters can be controlled via the modulation matrix.
This is an easy way to create very interesting and catchy sounds.
Imagine delay patterns controlled by the sequencer, or a bit-reduction/distortion effect controlled by keyboard pressure... Here we
go:
First, create a modulation path in the matrix with the desired effect slot as modulation destination (FX 1, FX 2 or FX 3).
Now click one (or more) of the arrow symbols, placed right above every effect parameter control.
The corresponding effect parameter(s) will now be modulated.
Range, Depth and rate of the modulation will again be displayed by a colored ring / bar on the corresponding control
element.
88
Page 89
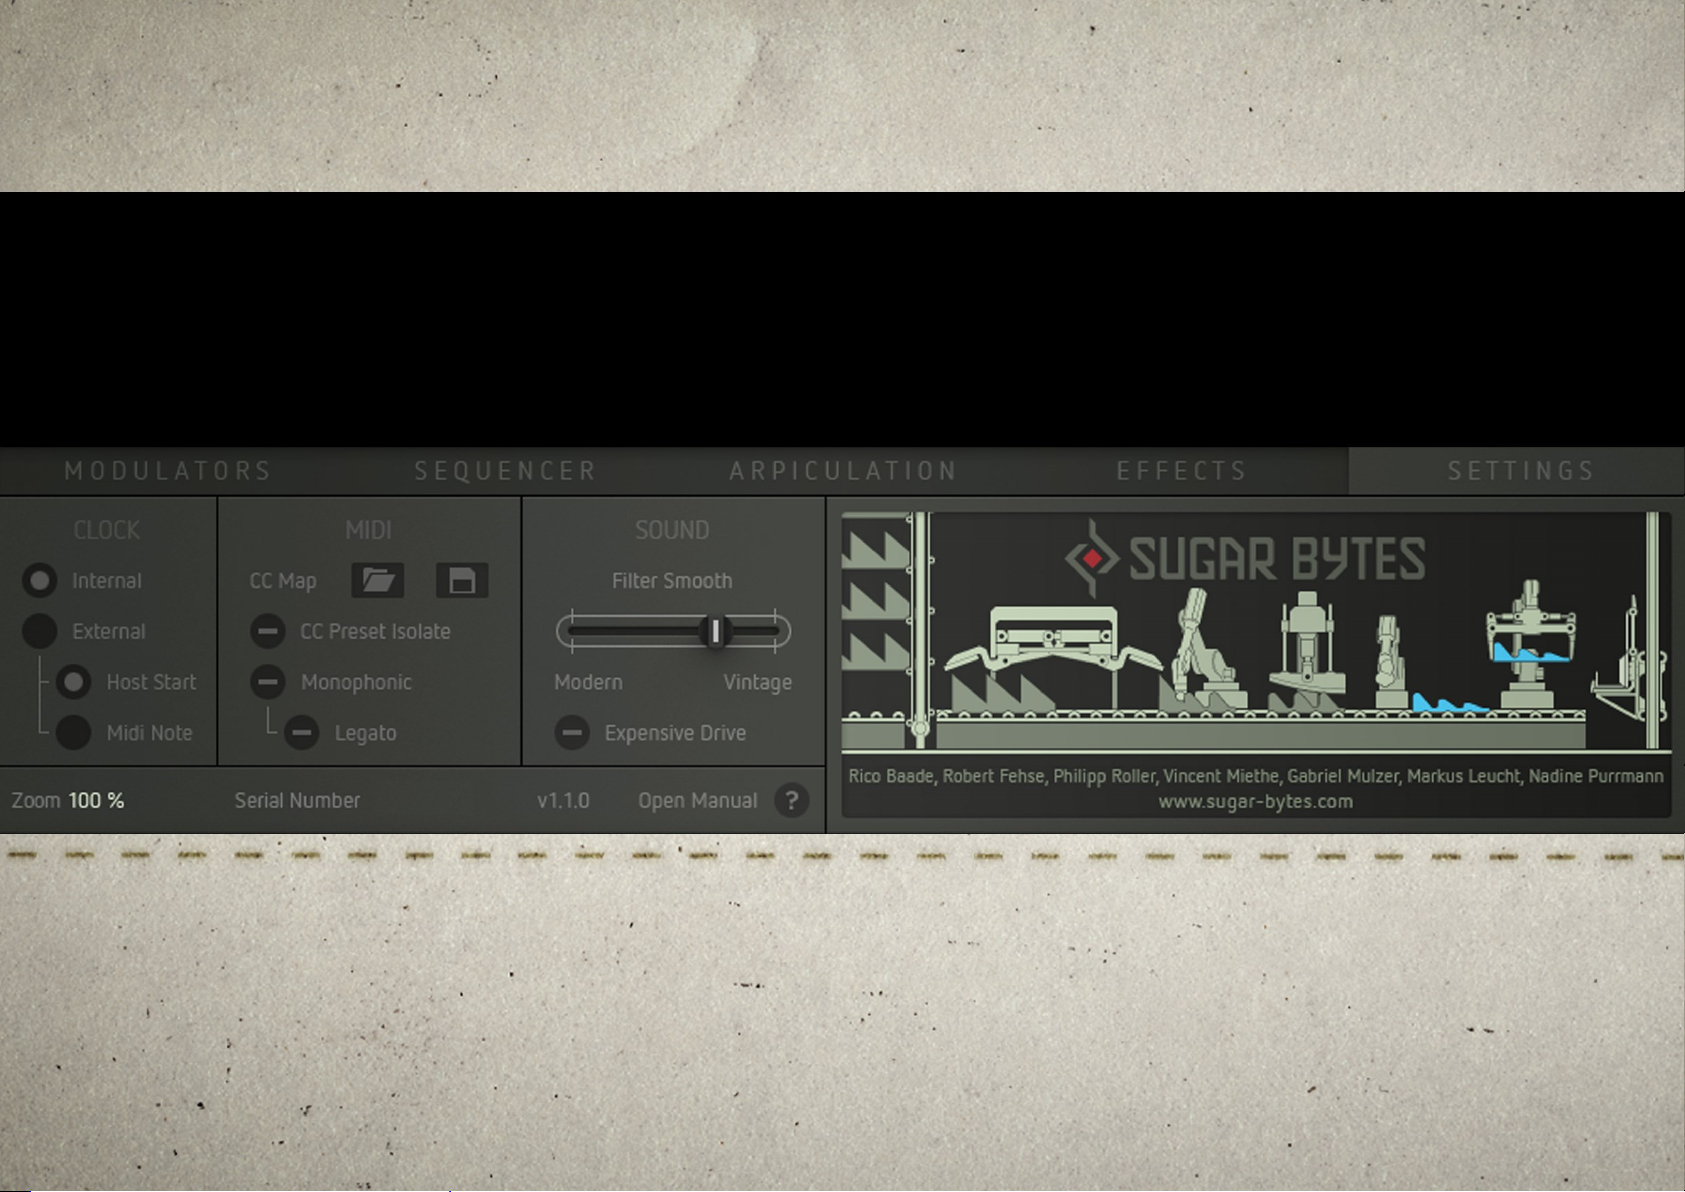
Settings
The Settings Tab opens the About Screen where you find some global settings and functions...
89
Page 90
Clock
Determines the clock source for Factorys timing-related
parameters (sequencer and arpeggiator speed, LFO rate etc).
Available settings are:
Internal
Factorys internal clock source is active.
External
Factory processes an external clock from the host
sequencer. With „Host Start“ enabled, Factory will also
require start/stop commands etc. from the host
sequencer / DAW.
CC Map
This function provides load and save of MIDI controller mappings
independent of a sound preset. Click the folder/disk symbols to open
your computers file browser and save resp. select and load the
desired CC map.
CC Preset Isolate
MIDI Learn settings won't change when loading presets.
Monophonic/Legato
If the „Monophonic“ check mark is placed, Factory works
monophonic. With the „Legato“ check mark placed, new
legato played notes will not trigger the envelopes.
Sound
Here you can tailor the sound character of the filter / drive
section to your personal taste. You will find a detailed
description of these parameters in the filter / drive chapter.
Extras
Here you can find your Factorys version- and serial number. Please
make sure, that you are always running the latest version. By clicking
„?“, you are directed to Factorys user manual.
Adjust the Factory GUI to your monitor screen size via the Zoom
menu or click into an empty area in Factory, then hold down the Ctrl
key and press „+“ to increase the size or „-“ to decrease the size.
Oscillators Mixer Filter Drive Output Modulators Sequencer Arpiculation Effects Settings Realtime Controllers
Settings
90
Page 91
Realtime Controllers
In addition to the keyboard, Factory also sports a pitch bender, a modwheel, and a Morph fader.
91
Page 92
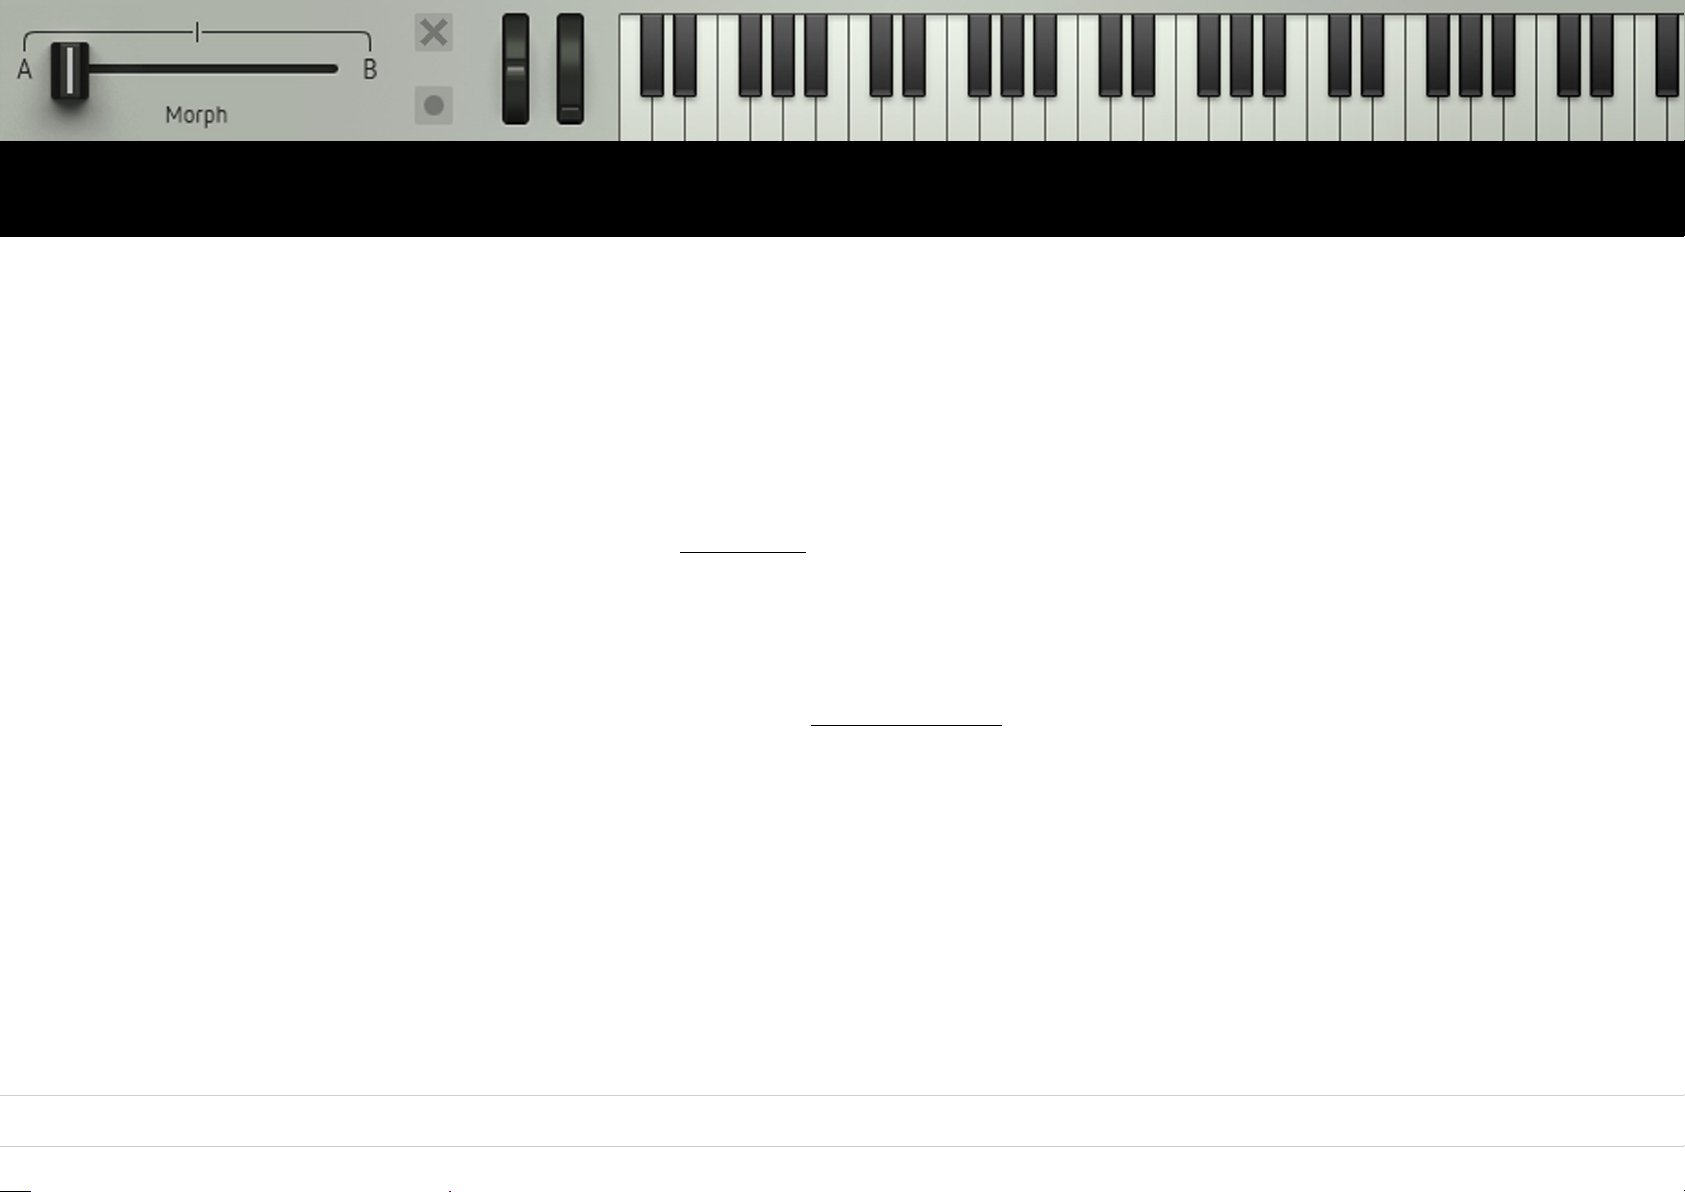
Oscillators Mixer Filter Drive Output Modulators Sequencer Arpiculation Effects Settings Realtime Controllers
Keyboard, Pitch Bender & Modwheel
Keyboard
Factorys keyboard generates velocity data: Depending on the contact point on a key, the velocity values will change.
All other keyboard-related parameters can be found in the Pitch Factory window.
Pitch Bender
Modulation depth and direction are also defined in the Arpiculation window.
Modwheel
The setup of the modwheel is performed with the assistance of the modulation matrix.
92
Page 93
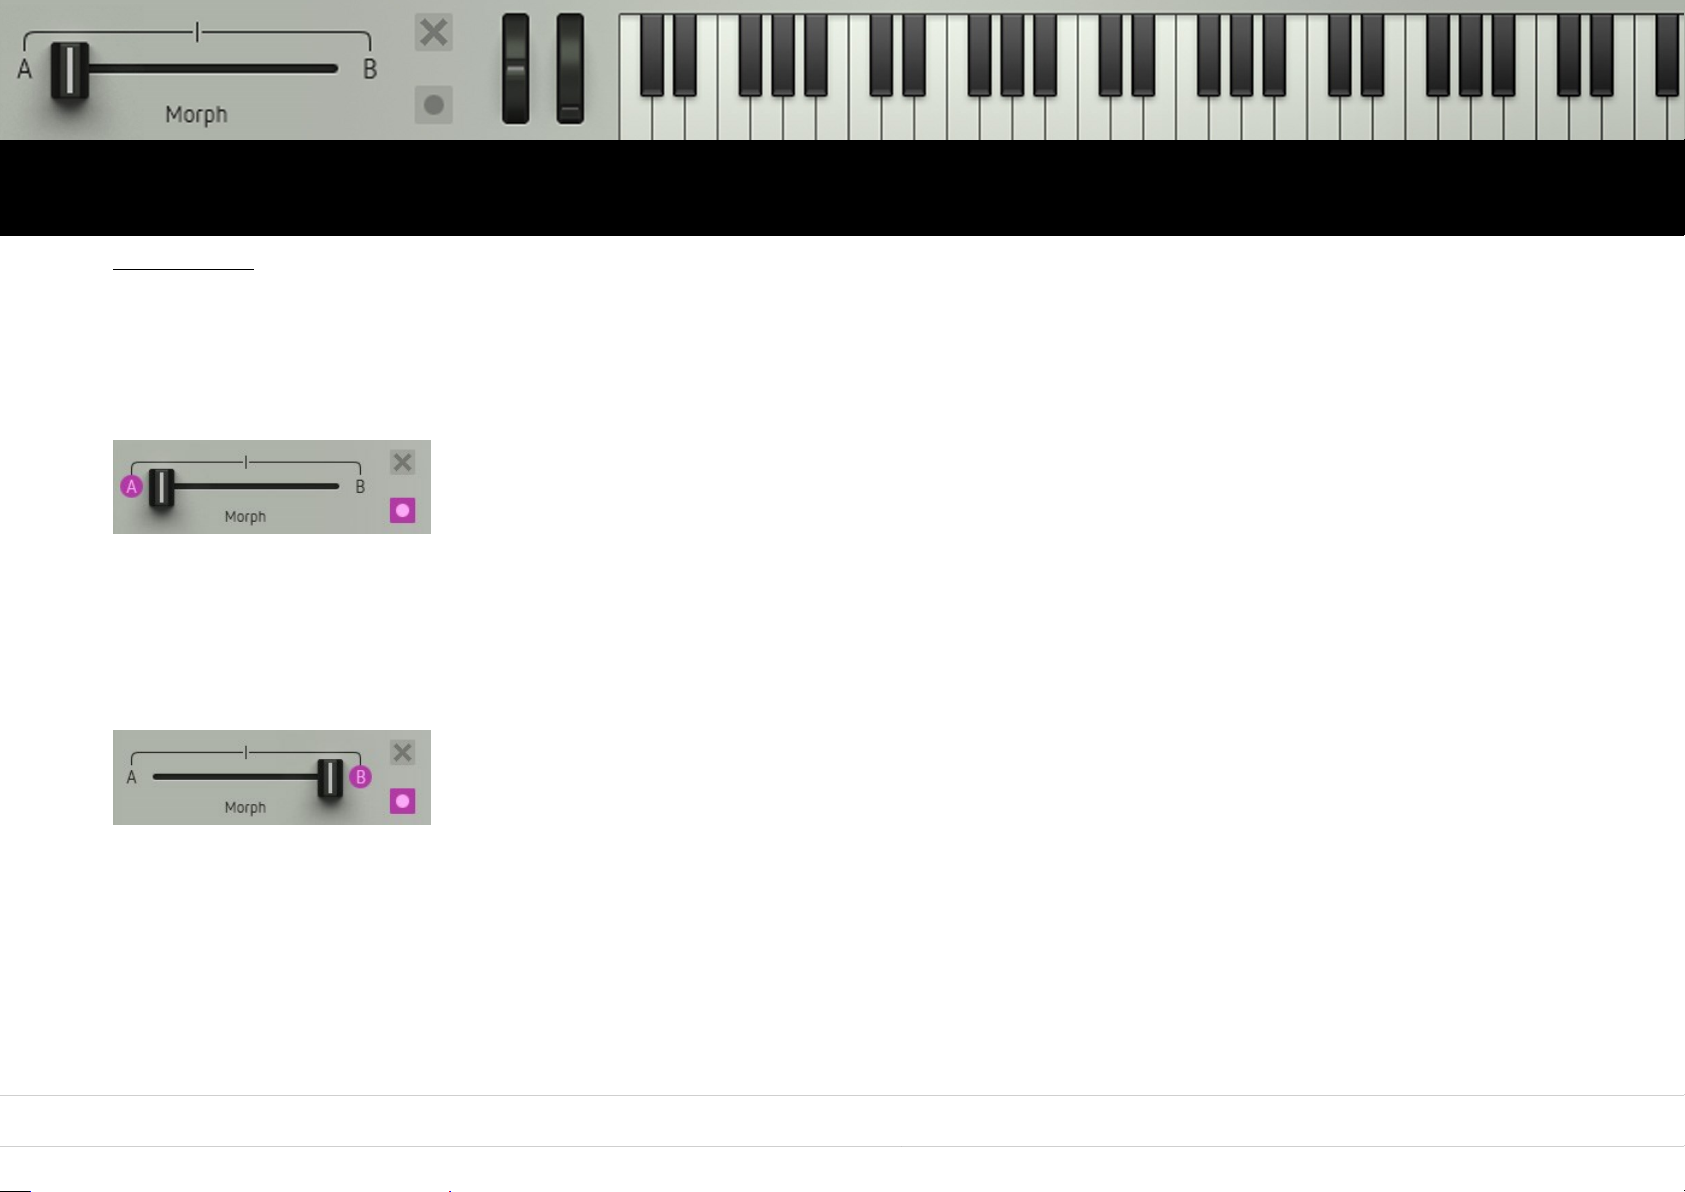
Oscillators Mixer Filter Drive Output Modulators Sequencer Arpiculation Effects Settings Realtime Controllers
Morph Fader
Watch video
The Morph fader enables you to perform complex timbre changes by just one single fader movement.
You can blend between two settings „A“ and „B“. This simple example says more than a thousand words:
• Click the record button of the Morph fader. Depending on the faders current position, the „A“ or „B“ button „lights up“.
• Move some parameter knobs and faders.
• Now move the Morph fader and watch the control surface. All knob and fader movements performed after clicking the record button have
been recorded and are now reproduced simultaneously by moving just the Morph fader. Each additional parameter movement will also be
recorded and reproduced by the Morph fader.
• Again, click on the record button of the Morph fader. Its record function will now be disabled. All previously performed knob and fader
movements will still be reproduced, but no new ones will be recorded.
• As soon as you enable the record function again, knob and fader movements will be recorded on top of the existing ones etc.
• By clicking on the X-symbol, all previously recorded knob and fader movements will be erased.
The latest knob and fader settings can now become the starting point of further sound editing.
93
Page 94
Oscillators Mixer Filter Drive Output Modulators Sequencer Arpiculation Effects Settings Realtime Controllers
Morph Fader
The Morph fader itself can be remote-controlled from a MIDI controller.
It can be very cool to assign the mod wheels MIDI CC (# 1) to the morph fader (please see below „MIDI CC assignment“).
The Morph fader records all continuously variable parameters, i.e. knobs and faders. This includes the modulation depths defined in
the mod matrix, as well as its knob settings and the random function (dice symbol).
The tuning parameters of the oscillators, clock divider settings of the master clock and sequencer tracks as well as the sequencers‘
global swing will also be recorded.
Switching functions or parameter values that are selected via a pop-up menu (e.g. Time-parameter of the Groove Delay) will not be
recorded by the Morph fader.
94
Page 95

Oscillators Mixer Filter Drive Output Modulators Sequencer Arpiculation Effects Settings Realtime Controllers
MIDI CC Assigments
Factory can receive MIDI from any source (incl. virtual MIDI).
MIDI LEARN
Right-click any control and click the left MIDI socket symbol to assign incoming MIDI CCs.
Click the field labelled „number“ and key in the desired CC number.
Click somewhere into the GUI area to close the popup window.
To erase the assignment, open up the popup window and click the crossed out MIDI socket symbol.
Within a DAW Factory’s MIDI Learn settings will be saved with the song.
When using the Standalone version of Factory:
If CC Preset Isolate is enabled in the MIDI Settings of Factory MIDI Learn settings won't change when loading presets.
If CC Preset Isolate is unchecked the CC Map will be recalled with the related preset.
95
Page 96

Oscillators Mixer Filter Drive Output Modulators Sequencer Arpiculation Effects Settings Realtime Controllers
Host Integration
Cubase
Perform a full rescan in the Cubase plugin manager. Make sure that the Factory.dll/Factory.vst3 (Win) or Factory.vst/ Factory.vst3 (macOS) file is
contained in Cubase‘s assigned VST Plugins folder. Load Factory as Instrument into an Instrument track.
Ableton Live
When using macOS, we recommend using the VST version of Factory in Live. Please note: With Ableton Live, plugins sometimes will be marked as
unloadable and not rescanned automatically. If this happens to be the case, force a rescan by unchecking and checking the‚
Use custom VST Folder‘ checkbox in Preferences/File Folder/Plug-In Sources. Set up a MIDI track and insert Factory as instrument.
Pro Tools
When installing Factory, select AAX plug-in format. (AAX 64 is supported by Pro Tools 11 and higher.) Use Factory as an instrument.
Studio One
Go to the Studio One menu and choose Options. Click Locations, then VST Plug-Ins. Click the Add... button and select your VST Plugins folder.
Press OK. Create an instrument track and pick Factory up from the Instrument list.
Sonar
Make sure that Factory is installed in the VST Plugins folder. Insert Factory as a „soft synth“.
Logic
Select Factory as an AU-Instrument from the I/O dialogue of a Software Instrument track.
FL Studio
Go to Channels>Add one>More...There you should find Factory and perform a refresh. You can now open Factory in the Mixer Inserts.
96
Page 97

The standalone version and manual will be installed into:
Windows: C:\Program Files\Sugar Bytes\Factory
macOS: /Applications/Sugar Bytes/Factory
Presets will be installed into
\Users\YOURLOGINNAME (your home folder)Documents\Sugar Bytes\Factory
Important: Do not relocate Factory presets after installation!
macOS
Default installation paths:
VST2 /Library/Audio/Plug-Ins/VST/
VST3 /Library/Audio/Plug-Ins/VST3/
AU /Library/Audio/Plug-Ins/Components/
AAX /Library/Application Support/Avid/Audio/Plug-Ins
Windows
Default installation paths:
VST2 C:\Program Files\VSTPlugins
VST3 C:\Program Files\Common Files\VST3
AAX C:\Program Files\Common Files\Avid\Audio\Plug-Ins
Oscillators Mixer Filter Drive Output Modulators Sequencer Arpiculation Effects Settings Realtime Controllers
Installation
Download (requires login) the latest version here. Double-click the installer and follow the instructions provided by the installation process.
97
Page 98

Oscillators Mixer Filter Drive Output Modulators Sequencer Arpiculation Effects Settings Realtime Controllers
Unistallation
To uninstall Factory, please follow the instructions:
Windows
Uninstall Factory under Control Panel>Add/Remove Software.
macOS
Delete all the following files and folders:
/Applications/Sugar Bytes/Factory
/Library/Audio/Plug-Ins/VST/Factory.vst
/Library/Audio/Plug-Ins/VST3/Factory.vst3
/Library/Audio/Plug-Ins/Components/Factory.component
/Library/Application Support/Avid/Audio/Plug-Ins/Factory.aaxplugin
~/Documents/Sugar Bytes/Factory
~/Library/Preferences/com.sugar-bytes.Factory.plist
98
Page 99

Oscillators Mixer Filter Drive Output Modulators Sequencer Arpiculation Effects Settings Realtime Controllers
Authorization
The serial number is requested during installation. If the serial number is missing or incorrect, the product will not produce any sound.
Check the top area of the Factory interface to verify whether your serial number is VALID. Manually entering the correct serial number there
or performing a quick reinstall, should fix any issues. One License covers both the macOS and Windows version and can be activated for two
computers at the same time. For use on more than two computers, please buy an additional license.
99
Page 100

Sugar Bytes GmbH | Made of passion
Greifswalder Str. 29 | 10405 Berlin, Germany
phone:+493060920395
Sugar Bytes are:
Rico Bernhardt & Robert Fehse
Vincent Miethe
Nadine Purrmann
Oscillators Mixer Filter Drive Output Modulators Sequencer Arpiculation Effects Settings Realtime Controllers
Contact
100
 Loading...