

SUEX 7Seven, VRx, VRt Instruction Manual And Warnings For Use

Pag. 1/41
7Seven
DIVER PROPULSION
VEHICLE
INSTRUCTION MANUAL
AND
WARNINGS FOR USE
71207 Rev02

Pag. 2/41
1. GENERAL SAFETY AND ACCIDENT PREVENTION REGULATIONS ............................................. 6
2. DESCRIPTION AND OPERATING PRINCIPLE .................................................................................. 7
3. USING THE DPV ................................................................................................................................... 8
4. PACKAGE CONTENT .......................................................................................................................... 8
5. PRELIMINARY OPERATIONS ............................................................................................................. 8
5.1. DPV START ...................................................................................................................................... 8
5.2. OPENING THE BATTERY COMPARTMENT................................................................................... 9
5.3. EXTRACTING THE BATTERY ......................................................................................................... 9
5.4. RECHARGING THE BATTERY ...................................................................................................... 10
5.5. INSERTING THE BATTERY ........................................................................................................... 10
5.6. CLOSING THE BATTERY COMPARTMENT ................................................................................. 10
6. CORRECT USE .................................................................................................................................. 11
7. BATTERY GAUGE ............................................................................................................................. 12
8. DPV DIVING SETTINGS ..................................................................................................................... 13
8.1. INSERTING THE BALLAST ............................................................................................................ 13
8.2. SETTINGS AND TRIM ADJUSTMENTS ........................................................................................ 13
9. SAFETY INSTRUCTION ..................................................................................................................... 13
9.1. INDICATOR LABEL ........................................................................................................................ 13
9.2. TRAINING ....................................................................................................................................... 14
9.3. EQUIPMENT CONFIGURATION AND RIDING POSITION ........................................................... 14
10. USING THE DPV ................................................................................................................................. 17
11. ENTERING THE WATER WITH THE DPV ......................................................................................... 17
12. EXITING THE WATER WITH THE DPV ............................................................................................. 17
13. "PARKING" THE DPV UNDERWATER ............................................................................................. 18
14. DESCENT RATE ................................................................................................................................. 18
15. ASCENT RATE ................................................................................................................................... 18
16. FREEDIVING USE OF THE DPV ....................................................................................................... 18
17. DEPTH AND OPERATING ENVIRONMENTS ................................................................................... 19
17.1. OVERHEAD ENVIRONMENTS ...................................................................................................... 19
17.2. MUDDY OR SUSPENSION- FILLED ENVIRONMENTS ............................................................... 19
18. DIVER'S POSITION DURING THE DIVE ........................................................................................... 19
19. HAZARDOUS AREA AND RESIDUAL RISKS .................................................................................. 20
20. SAFETY DEVICE ................................................................................................................................ 21
21. ELECTRICAL AND MECHANICAL SAFETY SYSTEMS .................................................................. 21
21.1. ELECTRONIC ENGINE CONTROL ................................................................................................ 21
21.2. SWITCH .......................................................................................................................................... 21
21.3. MECHANICAL CLUTCH ON THE PROPELLER ............................................................................ 22
21.4. TRIGGER GUARD .......................................................................................................................... 22
22. RUNNING TIME .................................................................................................................................. 22
23. SPEED ................................................................................................................................................ 22
24. PRECAUTIONS FOR USE ................................................................................................................. 22
25. TROUBLESHOOTING ........................................................................................................................ 23
26. DPV FLOODING, SINKING ................................................................................................................ 24
27. CLEANING AND STORAGE .............................................................................................................. 24
28. MAINTENANCE .................................................................................................................................. 25

Pag. 3/41
29. DISPOSAL AND SCRAPPING ........................................................................................................... 26
30. HANDLING .......................................................................................................................................... 26
31. STORAGE ........................................................................................................................................... 27
32. TECHNICAL SPECIFICATIONS ........................................................................................................ 27
33. PRODUCT IDENTIFICATION ............................................................................................................. 27
34. BATTERY CHARGE (GENERAL RULES) ......................................................................................... 28
35. HOW TO CORRECTLY CHARGE THE BATTERY ........................................................................... 28
36. Pb BATTERY INFORMATION ........................................................................................................... 29
37. IDEAL BATTERY CHARGING CONDITIONS ................................................................................... 30
38. IDEAL BATTERY DEPLETION CONDITIONS .................................................................................. 30
38.1. IMPORTANT NOTE ON BATTERY DEPLETION!.......................................................................... 30
39. “CUT OFF” BATTERY PROTECTION SYSTEM, OPERATING PRINCIPLE AND INSTRUCTIONS FOR USE
30
39.1. PROCEDURE TO FOLLOW IN THE EVENT THE CUT OFF DEVICE IS TRIGGERED ............... 30
40. Lead battery, frequently asked questions: ..................................................................................... 31
41. BATTERY STORAGE ......................................................................................................................... 32
42. TRANSPORTATION ........................................................................................................................... 32
43. PROP-LOCK PROPELLER ................................................................................................................ 33
43.1. DESCRIPTION ................................................................................................................................ 33
43.2. HOW TO REMOVE THE PROP LOCK PROPELLER .................................................................... 33
43.3. HOW TO INSERT THE PROP LOCK PROPELLER. ..................................................................... 34
43.4. PROP LOCK PROPELLER MAINTENANCE ................................................................................. 35
43.5. PROP LOCK PROPELLER TROUBLESHOOTING ....................................................................... 35
44. REVOLVING HANDLE ....................................................................................................................... 36
44.1. DESCRIPTION ................................................................................................................................ 36
45. SUEX BLUETOOTH ........................................................................................................................... 37
46. WARRANTY ........................................................................................................................................ 38
47. ROHS AND WEEE CONFORMITY .................................................................................................... 39
48. NOISE LEVELS .................................................................................................................................. 40
49. VIBRATION LEVELS .......................................................................................................................... 40
50. CUSTOMER SERVICE ....................................................................................................................... 40
51. CE CONFORMITY .............................................................................................................................. 41

Pag. 4/41
Welcome to the world of SUEX
SUEX S.r.l. congratulates and thanks you for your trust in purchasing our Diver Propulsion Vehicle, hereafter called
" DPV". Every DPV is the result of extensive experience and prolonged prototype testing. A capable and creative
staff, assisted by highly courageous diving experts with proven professional and recreational abilities, have created
this and other DPV to assist and extend your underwater dives.
However, never overestimate your abilities and always undertake specific underwater diving courses to be able to
use your DPV in total safety.
Always remember that fun should NEVER put your life at risk.
The SUEX staff

Pag. 5/41
In addition to normal DPV use, these accessories make it extremely important that you are
fully aware of their use and operation and the potential hazards that may be associated with
their use. (See specific paragraphs).
WARNING!
THIS MANUAL CONTAINS IMPORTANT INFORMATION AND WARNINGS FOR SAFE OPERATION OF THE
DPV.
READ BEFORE USING THE DIVER PROPULSION VEHICLE!
The Diver Propulsion Vehicle (hereafter called “DPV”) is delivered in perfect working condition, complete with
the user’s manual;
Any person attempting to use the DPV shall be deemed to have undergone to specific training and be certified
for DPV diving by qualified training agency.
Follow the instructions for safe DPV operation.
The incorrect use of the DPV or the lack of maintenance or regular service can lead to unsafe operation and
ultimately can cause injury/death or loss.
SUEX S.r.l. is not liable for injuries/death and/or losses consequent to the improper use of the DPV or lack of
maintenance.
The DPV is not a toy nor a suitable rescue means.
The DPV and all its components, i.e. the battery and battery charger, are intended for adult and expert use.
Read the manual for battery charge and use.
The DPV is equipped with an internal “cut-off” device that is triggered when the battery voltage drops below a
certain voltage.
When this cut-off device is triggered the DPV stops.
The diver must always be able to safely accomplish the dive even with a disabled DPV.
Due to constant technological developments, the SUEX DPVs may be modified at any time without prior notice.
Contractual terms may apply for version control.
This manual does not substitute an adequate DPV diving course.
Use of the DPV under the influence of alcohol and drugs and in any situation in which psycho-physical
conditions are not suited for diving is prohibited.
ADDITIONAL NOTE!
About the following parts, carefully follow the safety rules:
Prop Lock propeller
Pag. 6/41
This sign is a warning that failure of the user to adhere to the described operations will
expose him to health hazards that may lead to serious or permanent harm.
This sign is a warning that failure of the user to adhere to the described operations
may lead to damage of the vehicle.
This sign is a warning that failure of the user to adhere to the described operations
will expose him to possible health hazards that shall not, however, lead to serious or
permanent harm.
1. GENERAL SAFETY AND ACCIDENT PREVENTION REGULATIONS
Pay special attention to the hazard signs in this manual. There are 3 levels of hazard signs:
Copyrights for this manual belong exclusively to SUEX s.r.l. Reproduction of this document, in part or in whole, is
forbidden without SUEX SRL written authorization.
IMPORTANT NOTE!
THE DPV
CAN BREAK
IS NOT A LIFE-SAVING DEVICE!
Pag. 7/41
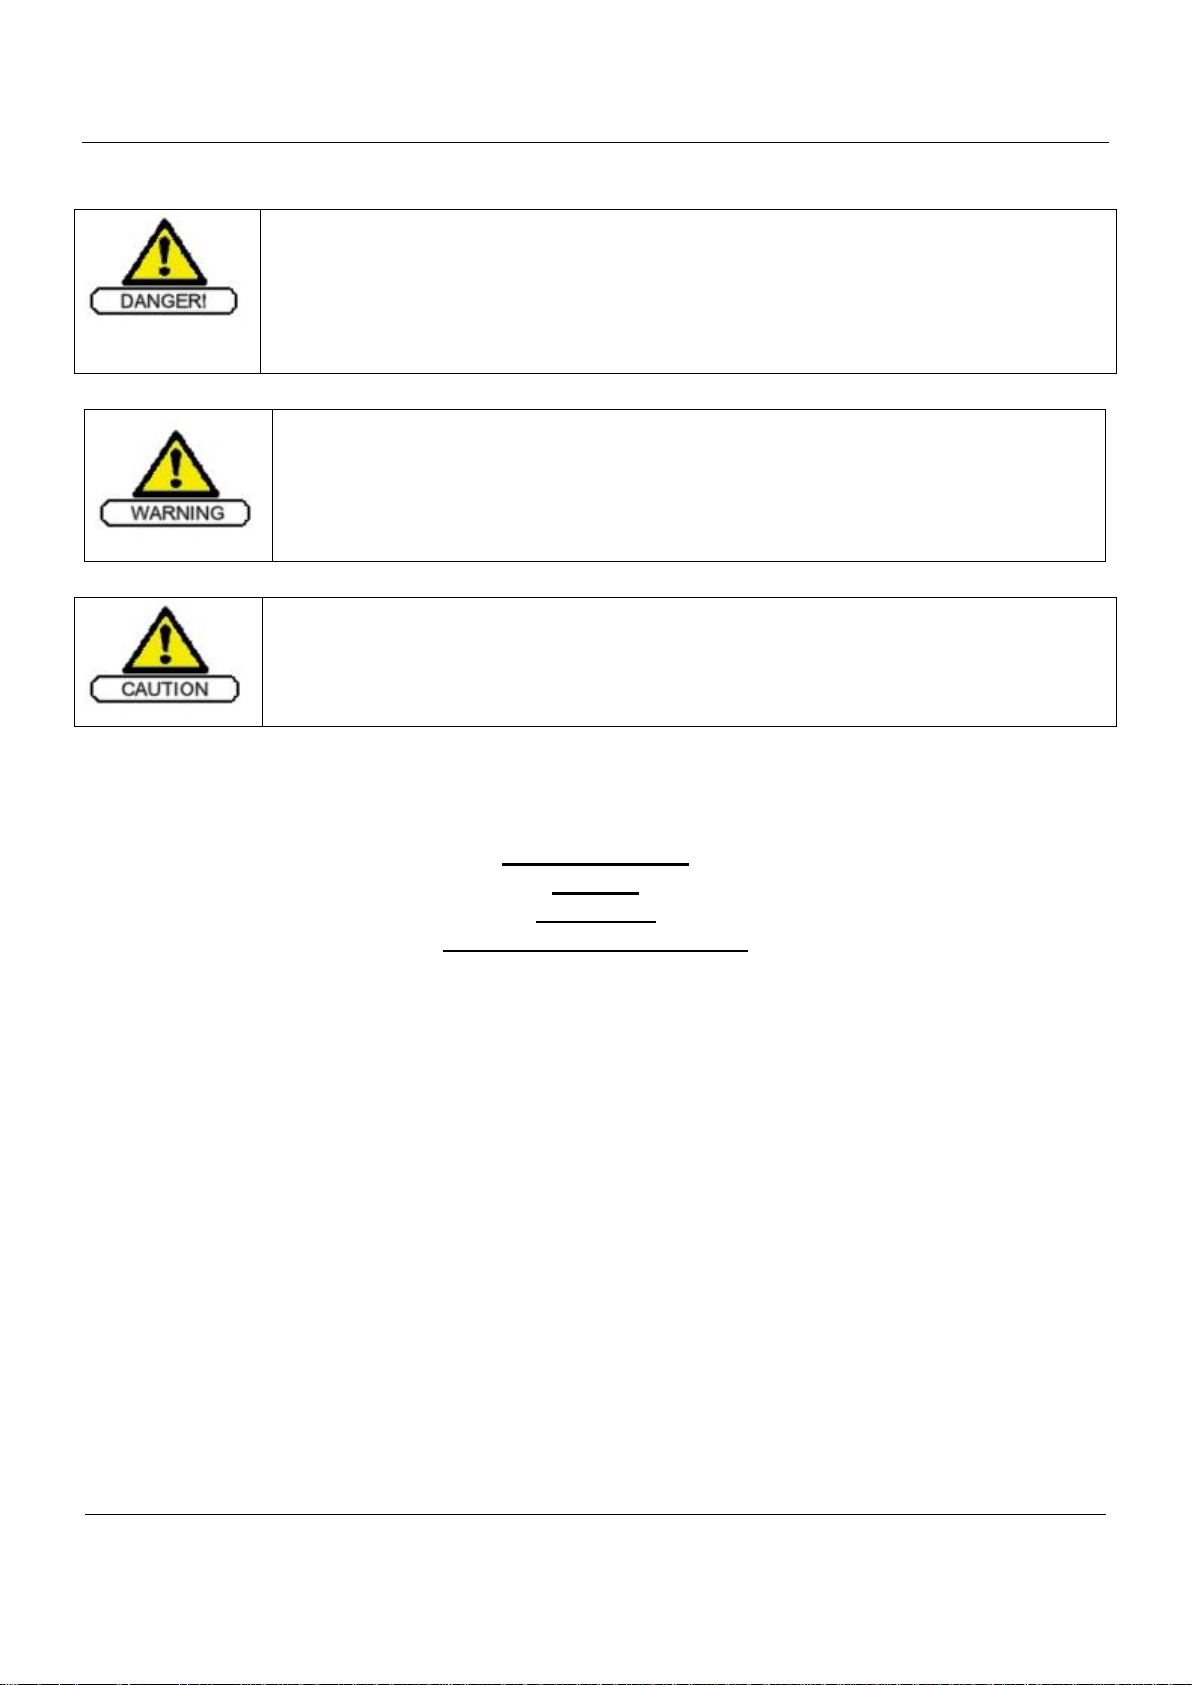
Fig.1
2. DESCRIPTION AND OPERATING PRINCIPLE
The DPV consists of a watertight, streamlined, hollow body, see figure1, inside which the electric motor, electronic
boards, rechargeable batteries and are contained. On the outside, one control handle (1) is found at the rear which
has an integrated trigger (2) to activate the propeller rotation by the means of a switch (3). The front handle (4) is
used for gripping and carrying the vehicle. The propeller (10) is located at the rear end and is protected by a shroud
which constitutes the flow conveyor – nozzle - (5). The main switch (6) for turning the power on and off and the
speed regulator knob (7) are also found at the rear.
The nosecone is in front (8). The fastening knob (9) is inserted in the nosecone. In order to access the battery
compartment remove the nosecone.

Pag. 8/41
The DPV has been designed, sized and built for the sole purpose described above. Any other
use or operation that does not comply with the instructions contained in this manual, may
damage the DPV. This would prevent the conditions for which it has been designed and built
from being achieved, and may compromise its technical and safety characteristics. The
manufacturer shall not be liable for damage to persons and/or objects deriving from
inappropriate use of the vehicle.
3. USING THE DPV
The DPV manufactured by SUEX s.r.l. has been designed and built for towing a diver underwater. Any alterations
that may substantially modify its intended purpose are forbidden.
Custom Suex engineering exclusions apply.
4. PACKAGE CONTENT
Make sure the following parts are in the box:
A DPV
A battery
A battery charger
An accessories kit
5. PRELIMINARY OPERATIONS
The following operations can be carried out after a complete and careful reading of this instruction manual
by trained personnel:
Verify the DPV is not damaged and fully operational
Verify that the DPV is hermetically closed
Verify that the battery is fully charged and connected to the motor
Verify that the towing system is fully operational
5.1. DPV START
Once the preliminary operations are carried out
Submerge the DPV
Verify that the propeller is free of any obstruction, debris
Turn the main switch in ON position (6) (see fig.2).
Hold the DPV’s handles (1) (see fig.1).
Pull the trigger(2), The DPV starts to run
Pull off the trigger and the DPV stops
Start the dive
Pag. 9/41
Fig.2
5.2. OPENING THE BATTERY COMPARTMENT
Put the DPV in vertical position on the shroud (5) on a flat surface.
Turn the front fastening knob (9) counter-clockwise. When rotating the knob the nosecone (8) (see fig. 1) starts to
lift. Continue rotating the knob until the nosecone detaches from the body. Remove the nosecone.
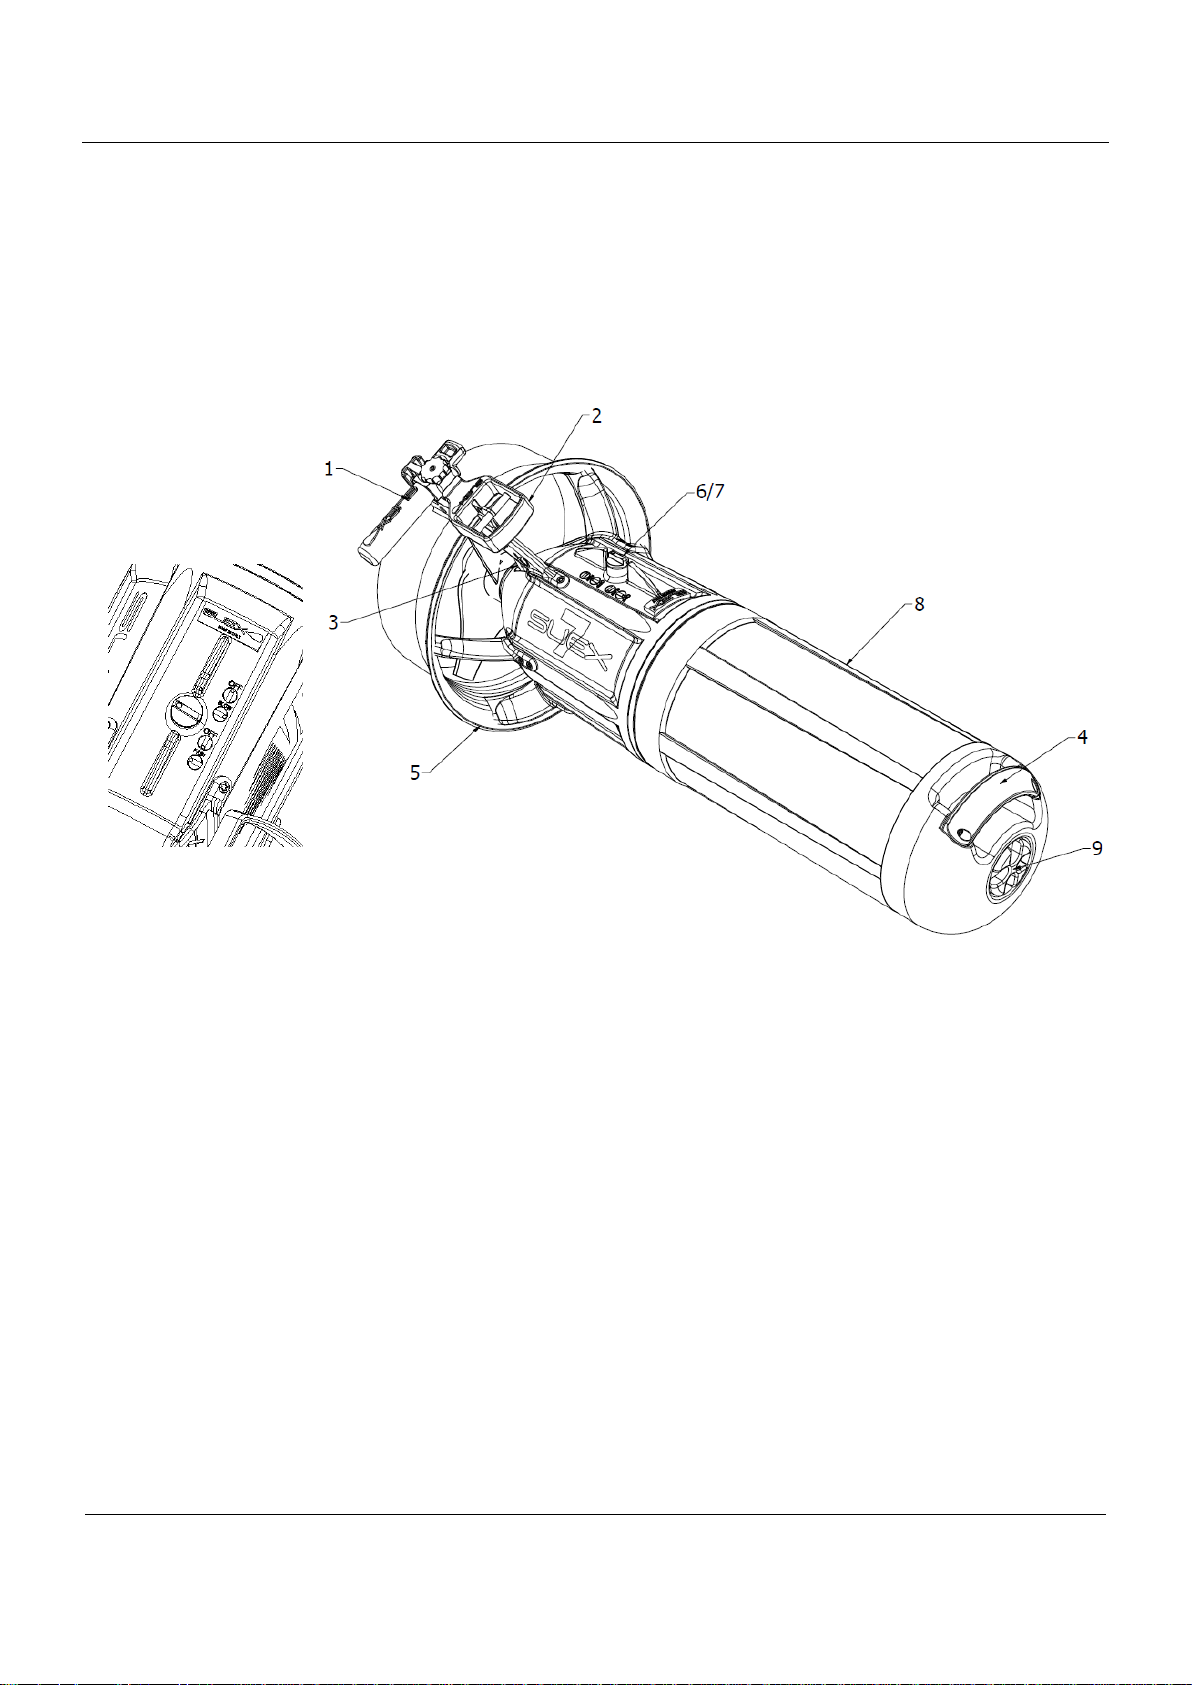
5.3. EXTRACTING THE BATTERY
After removing the nose, disconnect the red connector (15) (do not pull the cables), unscrew the ring nut (11) and
loosen the eccentric terminal. Remove the battery (14). (fig.2).

Pag. 10/41
THE BATTERY SHOULD BE CHARGED USING THE CONNECTOR ONTOP OF THE
BATTERY LID (26) ONLY!
ATTEMPTING TO CHARGE THE BATTERY THROUGH THE BATTERY - MOTOR
CONNECTOR CAN LEAD TO FIRE, EXPLOSION, PERSONAL INJURIES AND DEATH.
5.4. RECHARGING THE BATTERY
In order to recharge the battery (14), extract the battery out of the DPV (see fig. 2), put it in a safe place away from
people and flammable objects. Connect the battery charger power cord to the mains. Next plug the charger
connector into the battery’s charge socket (15) (see battery charger instructions). When the battery is fully charged,
disconnect the charger and put the battery back into the DPV.
5.5. INSERTING THE BATTERY
With the DPV in vertical position, repeat the battery extraction procedure in the reverse order.
BE CAREFULLY TO CORRECTLY POSITION THE BATTERY.
5.6. CLOSING THE BATTERY COMPARTMENT
Put the DPV in a vertical position on the shroud. Check carefully that the nosecone O-ring (19), (see fig. 2) is
properly seated, clean and properly greased with vaseline grease.
Check that the seat of the body (20), is clean. If necessary properly clean it with a suitable cloth to remove any dust
or sand. Insert the nosecone(8) matching the screw (18) up with the hole (17). Finger-fasten the knob (9) clockwise
until it closes completely.

Pag. 11/41
When turning the Main switch ON, in one of two speed, be sure that the trigger is
pulled.
When the trigger is pulled the DPV does not start when the Main ON/OFF switch is in
one of two speed.
6. CORRECT USE
After the preliminary operations, proceed as follows to start the DPV:
Always make sure the switch (6) (fig.1) is in OFF position, submerge the DPV under water and make sure nothing
is caught between the propeller blades. If something is found between the propeller blades, switch the DPV OFF,
remove the DPV from the water and free the propeller blades of the foreign object.
Be extremely careful since using hands or other parts of the body between the propeller blades is
potentially hazardous, even if a safety clutch is installed between the propeller and engine. For this reason,
avoid introducing your hands in the propeller area and, if necessary for cleaning purposes or to remove
foreign objects, use or stick or other suitable tool.
Turn the switch (6) (fig.1) choosing the speed.
Grasp the DPV handle (1) (fig. 1), or, if using the tow cord, hook the bolt-snap to the crotch strap of your harness.
Pull the trigger (2) until the engine starts.
To stop the engine, release the trigger (2).
To change propeller rpm, turn the knob (7), rotate it clockwise to drive the DPV slowly, rotate it counter-clockwise
to drive the DPV faster. This latter operation can be conducted at any time, even underwater.
When the DPV is not in use, turn the switch (6) off counter-clockwise.
IF YOU ARE NOT USING THE TOW CORD, DO NOT DRIVE THE DPV SINGLE-HANDED. YOU MAY RISK TO
LOSE THE CONTROL OF THE DPV.
WARNING: when you pull the trigger, the propeller starts to rotate and the DPV starts to move.
Pag. 12/41
7. BATTERY GAUGE
On the right side of the DPV there are two led : one blue and one red.
The blue led lights on when the switch (6) ins in ON position – both in LOW and HI speed.
The red led lights on when the battery is discharged and the residual autonomy is
of few minutes : about 15 minutes in LOW speed and 10 mins in HI speed with a brand new battery pack.
BATTERY GAUGE DISCLAIMER
The battery gauge on the DPV (or its display on an external device) provides an approximate indication of the
battery State of charge.
The state of charge indication refers to the actual condition of the battery, it is not referred to a brand new
battery.
The battery is subject to a decrease in its capacity due to various factors including aging, use and
environmental conditions. Ex: Two batteries can indicate the same charge status but have very different
durations depending on the above factors.
A particularly heavy or poor use with a few full charge/discharge cycles, environmental factors, battery damage
can lead to early decay of its capacity and therefore its duration during use as well as faulty state of charge
readings.
The same battery in different environmental situations may have different durations.
Depending on the general conditions of the battery and its use, the various sectors that indicate the state of
charge during use may not reflect accurately the remaining battery capacity.
Before each dive charge the battery 100% until the charger indicates the end of charge.
Do not use the battery gauge as a tool to plan the dive or duration of the same during its unfolding.
Plan the dive with the usual safety parameters.
NOTE: SUEX is not liable for the failed operation or erroneous evaluation of residual battery charge which
led to the incorrect assessment of DPV autonomy. THE DPV IS NOT A LIFE-SAVING DEVICE!
Pag. 13/41
Fig.3
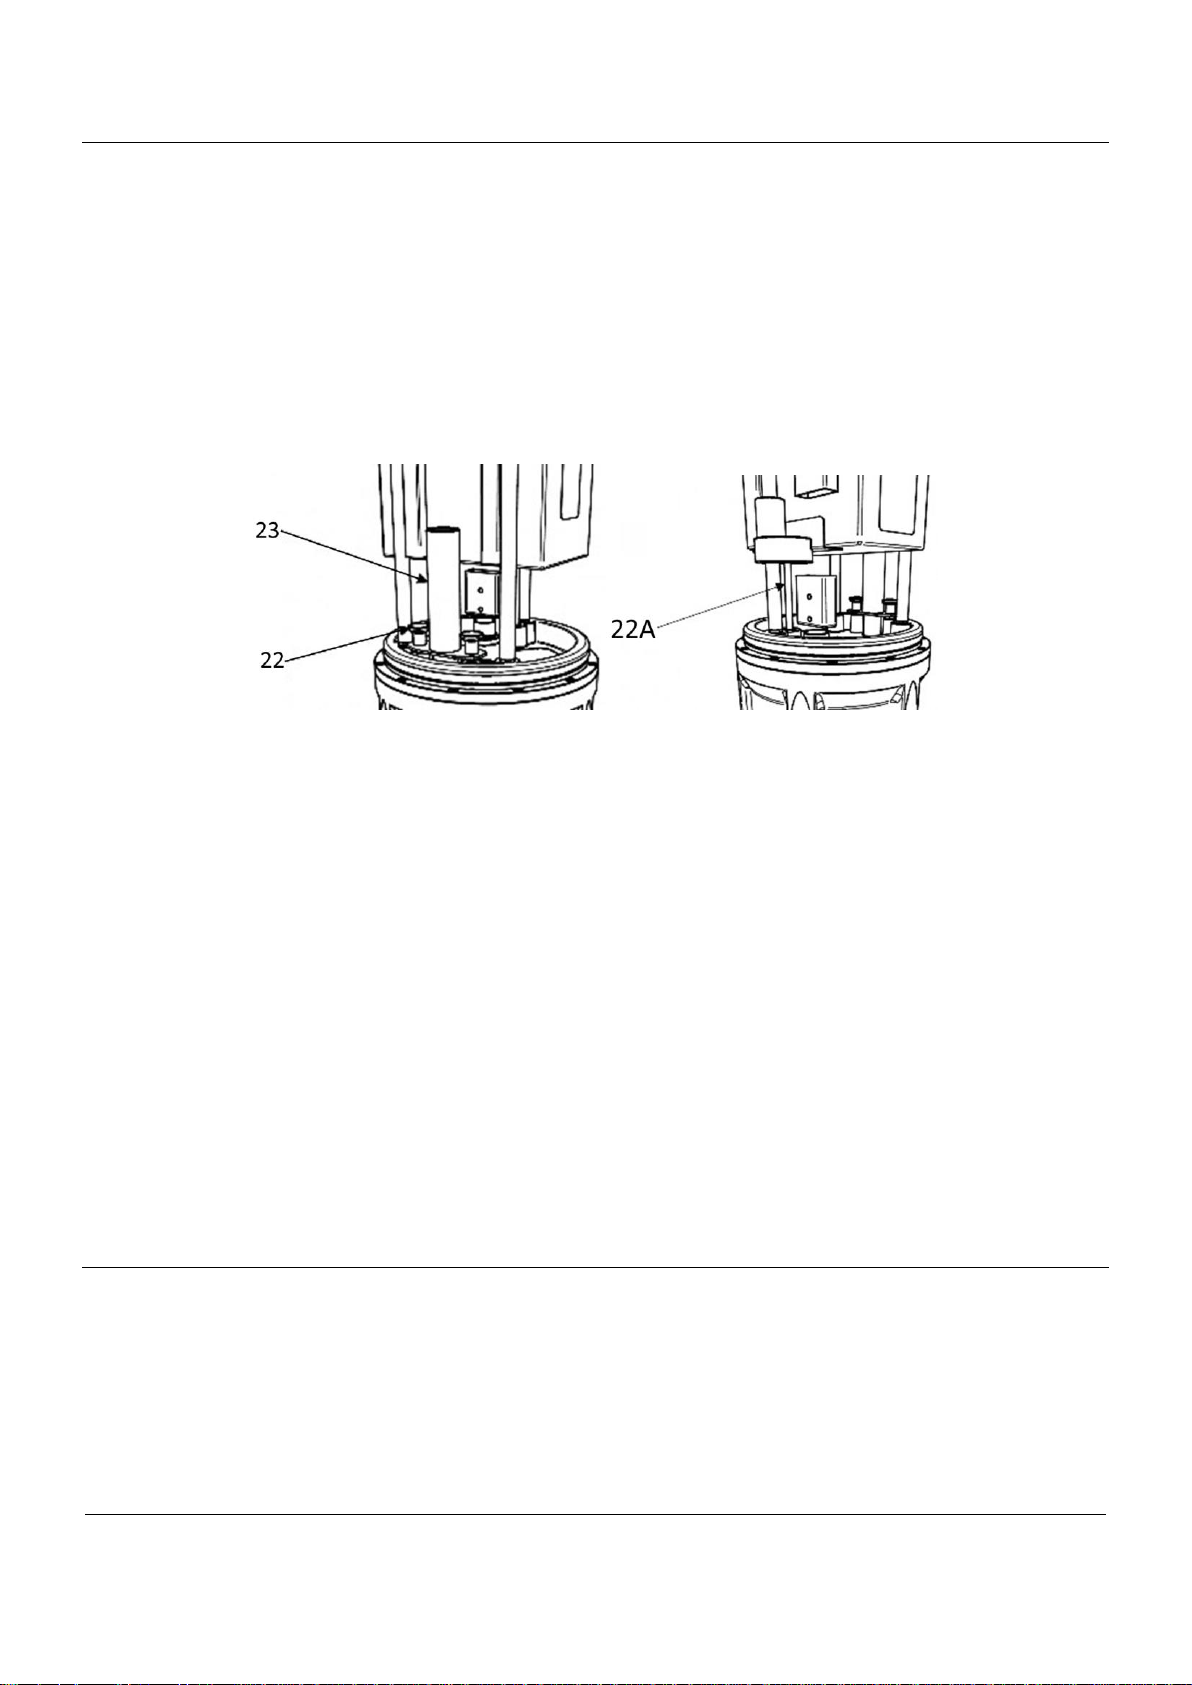
8. DPV DIVING SETTINGS
When immersed the DPV should be neutrally buoyant and neutrally trimmed. That means it has to remain at
the desired depth without sinking or floating and in horizontal position.
The DPV is delivered slightly buoyant in fresh water.
Adding the supplied ballast (23) (fig.3) it can be adjusted for sea water use.
8.1. INSERTING THE BALLAST
In order to insert the ballast (23) proceed as follow (fig.3):
Open the DPV, unscrew the nuts (22), insert the ballast (23).
Screw the nuts back (22).
The salt water ballast is attached to the DPV body by the two threaded knobs. Unscrew the threaded knobs and
remove the ballast for DPV use in fresh water.
Always leave the knobs screwed into the DPV to prevent losing them.
Carefully store the salt water ballast when not in use.
Once the settings are selected, fresh or salt water, try submerging the DPV (obviously closed as per instruction
manual).
The submerged DPV should remain perfectly horizontal. If this is not the case, move the battery along the support
rod forward, if the front tends to float, or back if the front tends to sink. To do this, after removing the battery, using
the mechanical battery support stop and retry.
8.2. SETTINGS AND TRIM ADJUSTMENTS
Buoyancy adjustment:
According to salinity and/or water temperature, you may need to adjust the buoyancy
The DPV is delivered slightly buoyant both in freshwater (without using the ballast 23) and seawater (using the
ballast 23).
In order to adjust the trim, use the srew (22A) (Fig. 3).
9. SAFETY INSTRUCTION
9.1. INDICATOR LABEL
The following indicator label is found on the DPV. It should not be removed, tampered with or destroyed. The user
of the DPV shall be responsible for replacing any worn out or illegible label with a new one, it must be requested to
our after-sales service.
SUEX S.r.l. will not be liable for damages and accidents happened in consequence of behaviors in contradiction to
the indications in it reported.
Pag. 14/41
9.2. TRAINING
In order to use the DPV the diver should have obtained DPV diving certification.
9.3. EQUIPMENT CONFIGURATION AND RIDING POSITION
The SUEX DPV is a TOW BEHIND riding style DPV. The diver is towed behind the DPV.
READ CAREFULLY!
The DPV should not be improperly connected to the diver.
The diver must be properly trained to deal with any DPV failure and including connecting and disconnecting the
DPV to the diver procedures.
The user should be able to abandon the DPV at all times and with extreme ease. The DPV must be connected to
the diver by a cord and quick-release carabineer.
The diver should always carry a cutting device in case he needs to cut the tow cord.
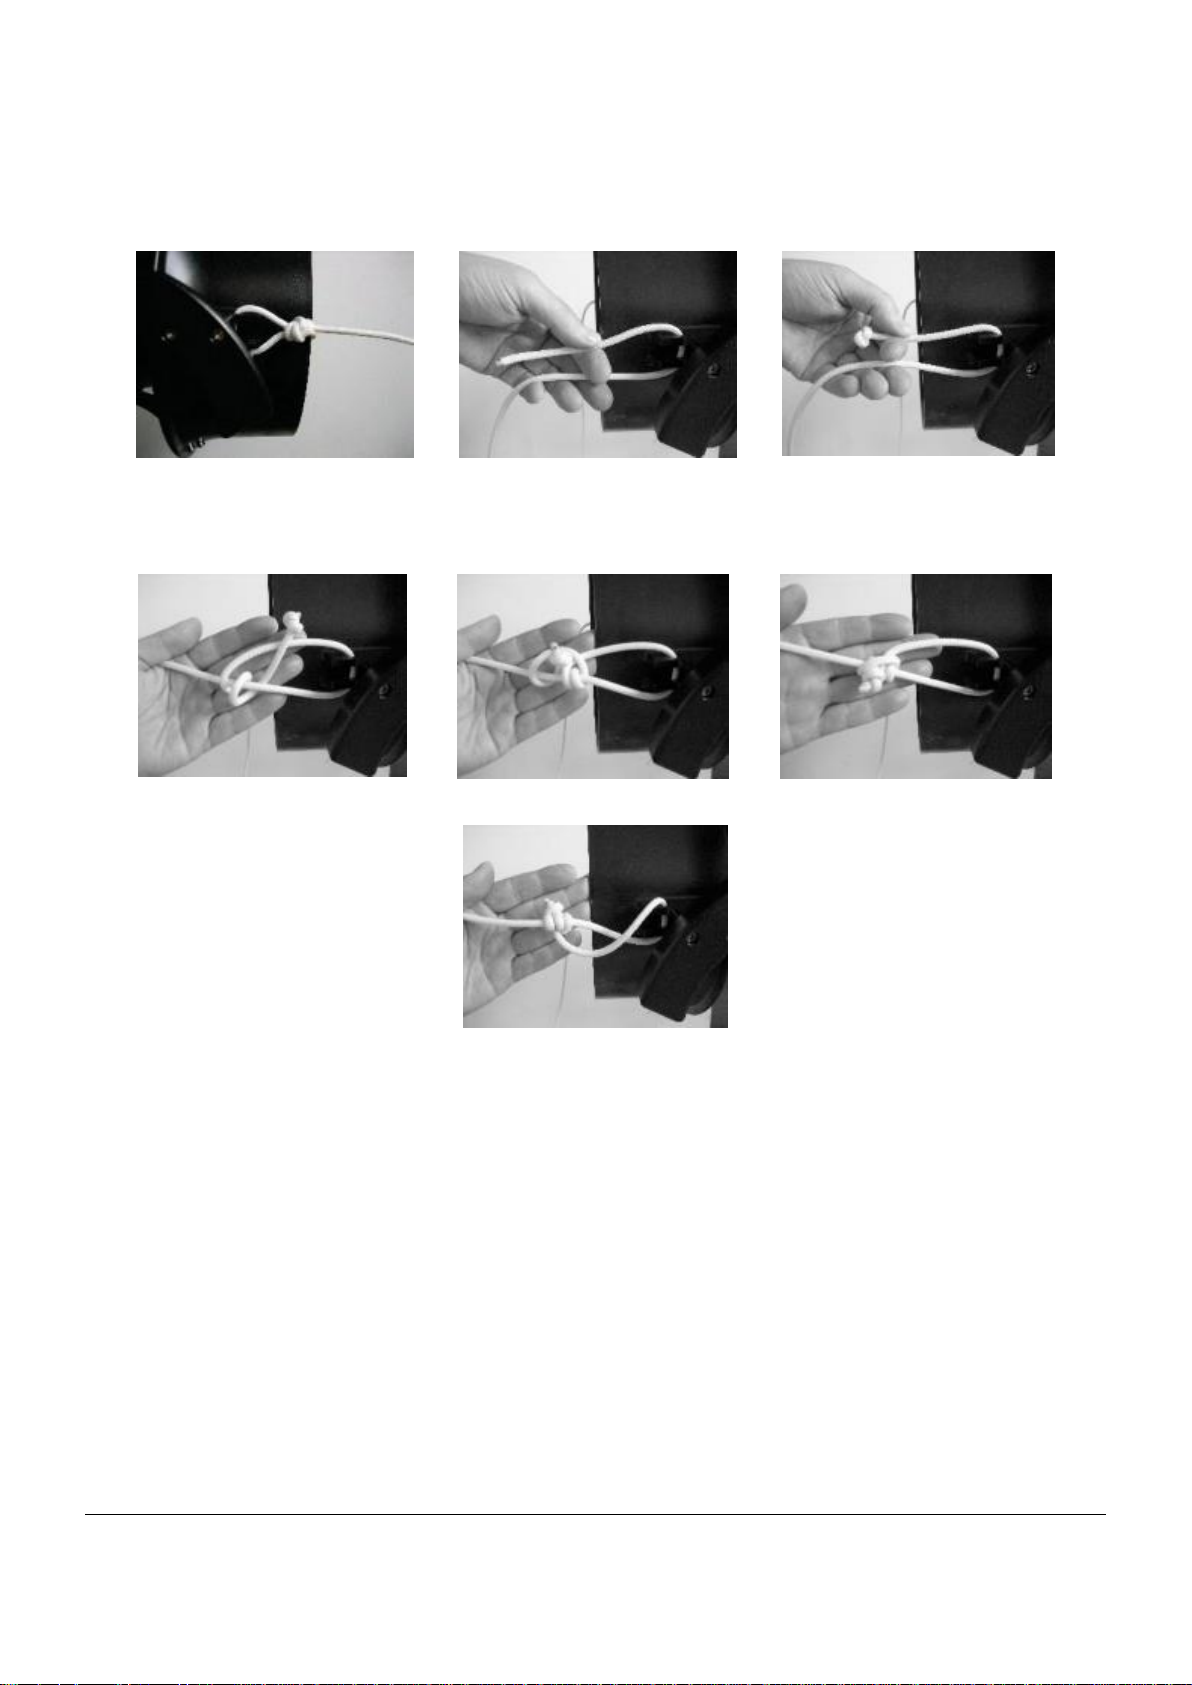
Proper ways to connect the DPV to the diver.
Use the proper towing harness (see SUEX accessories) and the provided tow cord.
Connect the carabineer to the front D-ring of the harness.
These include cords with knots, chains and elastic cords, to name a few, that do not allow the DPV to be
immediately abandoned in the event of emergency!
Pag. 15/41
Cord attachment to the left
handle
Attachment to the right handle
with adjustable knot.
Correct way to connect the tow cord to the DPV.
The tow cord should be connected to the DPV through the two holes near the handle on the shroud. See the
following illustrations.
Pag. 16/41
Make sure that your equipment (hoses, regulators, pony bottles, pressure gauges, audible
alarms, flashlights and pertinent cables, reels, etc) do not dangle and cannot get into contact
with the propeller and get entagled creating serious hazard situations.
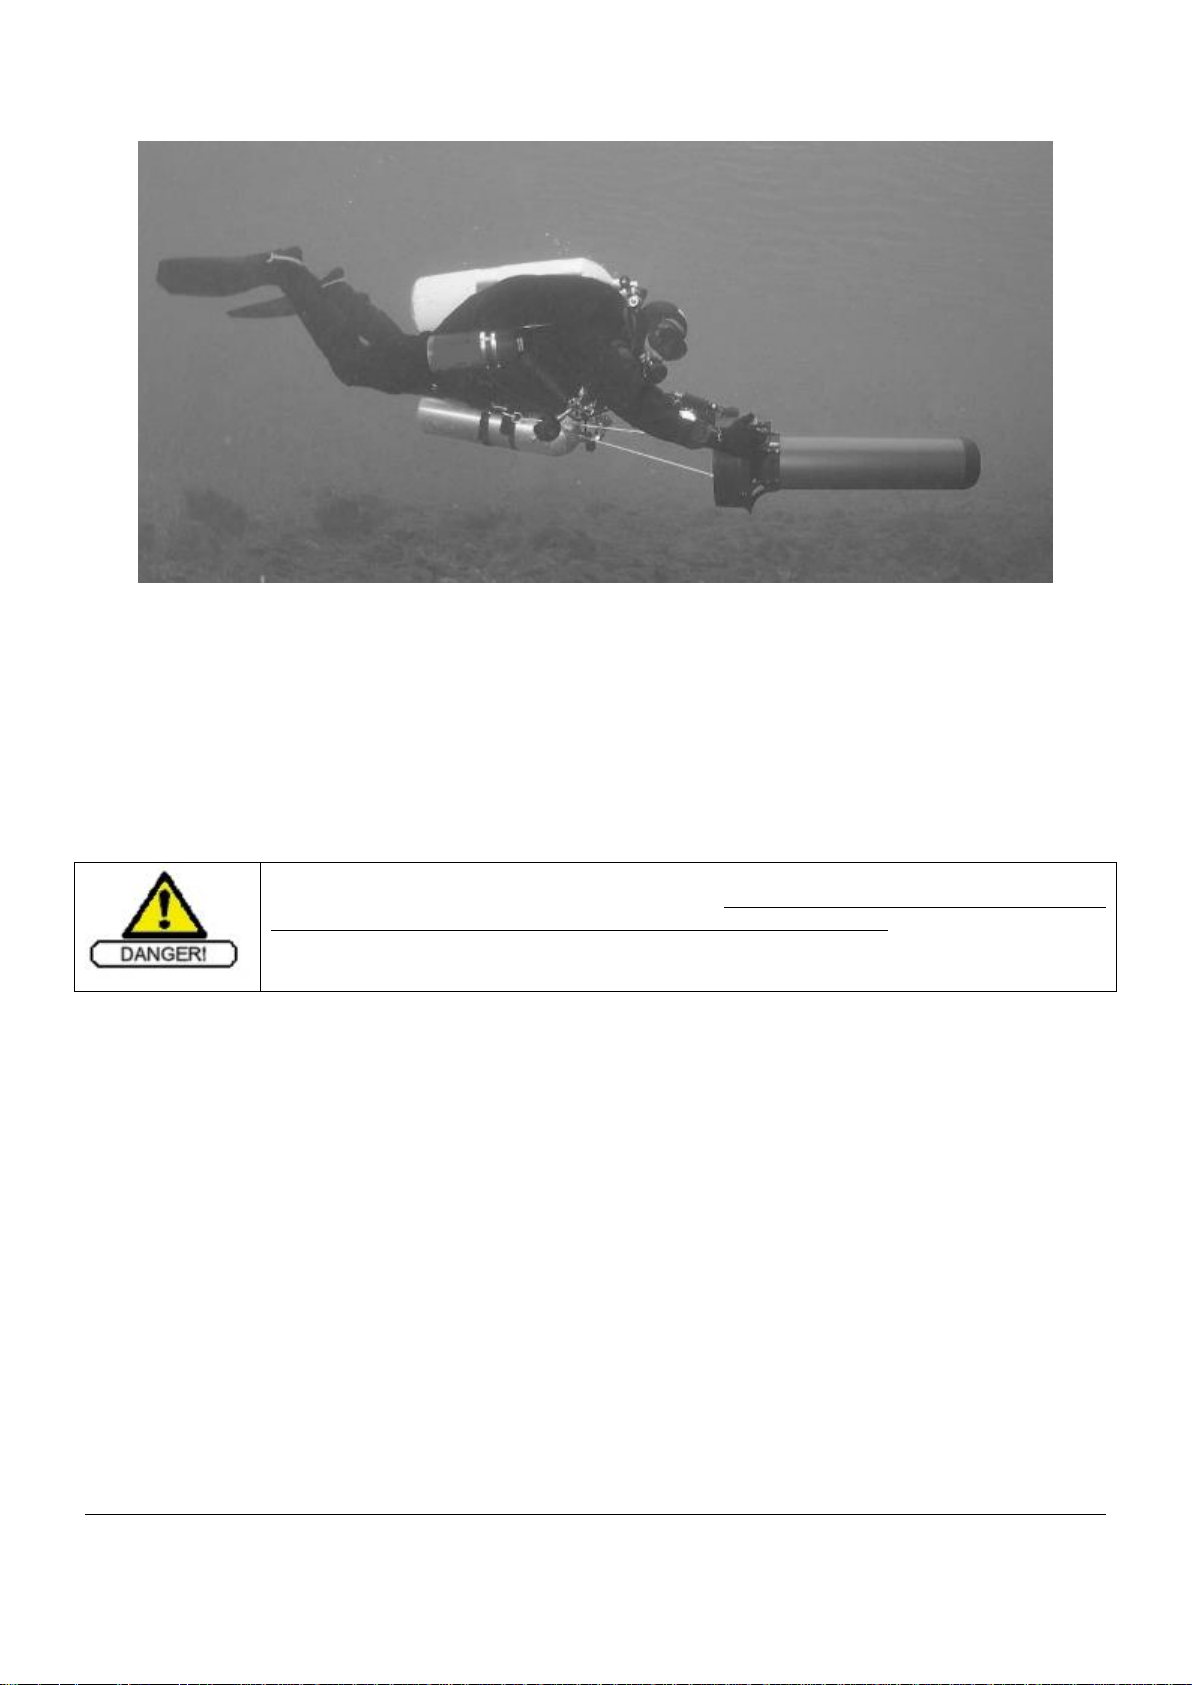
Diver position
The pictures illustrates a diver with the DPV correctly positioned. Different positions can considerably reduce drive
efficiency. Tow cord length is extremely important for good towing efficiency.
When not to using the tow cord, both handles must be used to hold and drive the DPV. This type of use does not
permit high speeds since resistance is higher with consequent arms fatigue.
The diver’s position during the dive must be as much horizontal as possible for safe, long running times, speed
and riding comfort.
Correct equipment configuration is a crucial factor for safe diving in general and becomes vital when diving with
the DPV. As a rule, the type and position of the diving equipment should guarantee perfect streamlining and no
elements should protrude or be left dangling.
Pag. 17/41
Running the propeller out of the water may be dangerous and damage the shaft seals.
Once in the water, the propeller is activated by pulling the trigger incorporated on the right
manoeuvring handle. Releasing the trigger will stop propeller rotation.
Entering the water is one of the most delicate moments in the dive. Various factors like the
change in temperature, use of scuba equipment, the weight of the equipment and other
difficulties make the addition of the DPV an inevitable added task loading.
Before turning on or using the DPV, make sure that all the equipment you use for the dive is
correctly positioned and in good working order. Only use the DPV after completing these
checks. Incorrect dive preparation is highly dangerous and, in some situations, the DPV may
represent an additional hazard.
Pay particular attention when entering rough sea since waves could lift and launch the DPV
against you with even fatal consequences.
Exiting the water is another delicate moment in the dive and, here too, the addition of the DPV
could be an extra task loading.
According to where you started the dive, always make sure the DPV is the last piece of
equipment to recovery. Always put your safety first.
Pay particular attention when exiting rough sea since waves could lift and launch the DPV
against you with even fatal consequences.
10. USING THE DPV
Underwater diving is a potentially dangerous activity and incorrect use of the DPV further increases the hazards of
the dive itself.
Before use, make sure the battery is charged, connectors are connected and that no electrical parts are oxidized.
Check the nosecone is properly closed, check its condition, especially following accidental bumps, or accidental
scratches, and make sure that the trigger and main switch are functioning correctly. After entering the water and
submerging the DPV, turn the main switch in ON position.
11. ENTERING THE WATER WITH THE DPV
12. EXITING THE WATER WITH THE DPV

Pag. 18/41
When diving you may need to “park” the DPV to continue the dive with fins only, recovering
the DPV later. We strongly recommend to turn the switch in OFF position and leave the DPV
far from areas with currents that could cause the DPV to collide with rock walls, the sea
bottom or boats. Violent collisions could compromise the DPV’s hermetic seal and irreparably
damage it.
During decompression stops turn the DPV OFF in order to avoid accidental starts and
uncontrolled ascent.
The DPV MUST NEVER BE USED FOR VERTICAL ASCENTS. Using it in such a manner
may result in an excessively rapid ascent WHICH IS POTENTIALLY DANGEROUS. During
the ascent DEACTIVATE IT BY TURNING THE MAIN SWITCH OFF, place it out of the way,
and ascend normally.
Freediving is highly dangerous activity itself. The use of the DPV for free-diving could cause
serious accidents. Always be certain and aware of your capabilities. Adequate training
courses are essential for your safety.
13. "PARKING" THE DPV UNDERWATER
DO NOT USE THE DPV TO MAINTAIN THE DECOMPRESSION DEPTH STOP!
14. DESCENT RATE
The DPV allows you to accomplish a fast descent rate.
AVOID using it to increase your descent since problems related to equalising and psychological/physical
adjustment are increased.
15. ASCENT RATE
16. FREEDIVING USE OF THE DPV

Pag. 19/41
The diver’s head or other body parts should never be beyond the propeller conveyor (5) (see
fig. 1) where flow is suctioned.
Do not direct the flow from the conveyor at you. This hampers the propulsion drive and could
move your equipment away from you.
Do not ride the DPV.
Do not attach the DPV to your tanks or their supports in any way.
Do not attach the DPV to your body, legs, arms or other parts in any way.
Do not use more than one DPV simultaneously.
Do not start the DPV with body parts other than your right hand.
Do not direct propeller flow at the sea bottom to avoid raising sand or mud.
17. DEPTH AND OPERATING ENVIRONMENTS
DO NOT EXCEED THE MAXIMUM OPERATING DEPTH!
The dive is already VERY DANGEROUS at that depth, INCORRECT USE OF THE DPV IN SUCH
ENVIRONMENTS INCREASES DIVING HAZARDS.
It is important to remember that maximum DPV operating depth refers to the DPV in perfect working conditions.
Collisions, scratches or deformations significantly reduce this limit.
17.1. OVERHEAD ENVIRONMENTS
SDives in such environments are already VERY DANGEROUS.
INCORRECT USE OF THE DPV IN SUCH ENVIRONMENTS INCREASES THE DIVING HAZARDS. DIVING IN
SUCH ENVIRONMENTS REQUIRES ADEQUATE TRAINING BY QUALIFIED AGENCIES.
The diver must be able to exit the overhead envirnoment without the use of the DPV.
17.2. MUDDY OR SUSPENSION- FILLED ENVIRONMENTS
These include those environments, obstructed or otherwise, in which visibility may suddenly fall to zero due to the
suspension that is created by moving the bed sediment. Dives in these environments are already VERY
DANGEROUS. INCORRECT USE OF THE DPV IN SUCH ENVIRONMENTS INCREASES THE DIVING
HAZARDS.
DIVING IN SUCH ENVIRONMENTS REQUIRES ADEQUATE TRAINING BY QUALIFIED AGENCIES.
18. DIVER'S POSITION DURING THE DIVE
Pag. 20/41
Entanglement and cut hazards
Do not insert any object or body part inside the flow duct, that could obstruct the rotating
propeller blades. Maintain a safety distance of at least 40 cm must between the diver’s body
and the propeller assembly.
DIVERS WITH LONG HAIR SHOULD WEAR A HOOD. LONG HAIR MAY BECOME
ENTANGLED IN THE PROPELLER IN THE EVENT OF IMPROPER USE.
AVOID OBJECTS SUCH AS FISHING LINES, DIVING EQUIPMENT, TO COME IN
CONTACT WITH THE PROPELLER.
PROTECTIVE GLOVES MUST ALWAYS BE WORN
Crushing risk
Be careful not to place fingers between the two parts when closing the nosecone
NEVER LEAVE THE DPV UNATTENDED ESPECIALLY NEAR CHILDREN. ALWAYS
TURN IT OFF BEFORE EXITING THE WATER AND DISCONNECT THE BATTERY AS
SOON AS POSSIBLE (see previous chapters).
19. HAZARDOUS AREA AND RESIDUAL RISKS
The propeller is protected by a shroud. Therefore it is exposed on both the suction and expulsion sides. Additional
protections were not installed in these areas since they would significantly reduce fluid passage in the
conduit, drastically reducing propulsion system performance and thus DPV autonomy.
A protection grid on the flow suction side can be easily clogged by weeds or other debris forcing the diver to
frequently stop to clean the grid underwater. A grid placed on the flow output side would prevent any cords or lines
caught in the propeller to be removed, inhibiting DPV operations. This would frequently distract the diver and cause
him to forget that the greater hazard is represented by the surrounding environment and diverting his main focus
away from the dive.
The propeller is also equipped with a safety clutch.

Pag. 21/41
A torque-limiting device is installed between the motor and the propeller. When the resistance
felt by the propeller exceeds a certain torque, this device is triggered, preventing the propeller
from rotating.
The device will generate a rhythmic sound signalling its insertion. If this situation occurs,
release the trigger immediately, switch off the power by means of the main switch and free the
propeller of the foreign body.
Do not leave the torque-limiting device inserted for more than 10 seconds. It has been
designed for emergency purposes and may be damaged by prolonged use.
If conditions allow you to remove the foreign body safely during the dive, then do so.
Otherwise let go of the DPV. Do not lubricate the safety device.
20. SAFETY DEVICE
21. ELECTRICAL AND MECHANICAL SAFETY SYSTEMS
The DPV has different safety systems.
21.1. ELECTRONIC ENGINE CONTROL
The electronic engine control board includes:
A short circuit emergency fuse
Temperature sensor (slows propeller rotation to a stop. The system automatically restarts when the engine is
cooled);
Maximum absorbed current sensor (maximum current that can be absorbed by the electrical engine, fully
automatic, to protect electronic parts);
Inductive sensors
21.2. SWITCH
This DPV comes with a switch the cuts off the battery from the electronic engine control. Using the switch limits
accidental start which may not occur in any case if the switch is in the OFF position.

Pag. 22/41
21.3. MECHANICAL CLUTCH ON THE PROPELLER
See chapter "Prop Lock Propeller"
21.4. TRIGGER GUARD
The trigger is isolated by a guard that forces the diver to insert a finger in the handle to press the trigger and start
the DPV.
22. RUNNING TIME
Running time data is indicative and is nevertheless referred to use:
with a DPV in perfect running order
in moderate environments
in the absence of currents
with an average load (diver with a double tank 12+12 liters or oxygen rebreather)
in perfect buoyancy conditions
As a rule, the running time should be calculated to cover the descent and ascent. An EMERGENCY running time,
which will vary according to the type of dive, must akso be established.
In any case, when planning a dive you MUST consider the event of returning to the exit point without the
use of the DPV.
23. SPEED
Speed depends on the same factors as running time. The speed chosen should be compatible with the type of dive
and be adjusted to match that of your buddies.
24. PRECAUTIONS FOR USE
Do not expose the DPV to solar radiations, closed into the car under the sun, or exposed to excessive
heat (max 50°C). Overheating and successive deformation may occur, to the prejudice of the water
tightness of mating surfaces.
Avoid bumps during the dive;
Do not direct the DPV toward other divers;
Do not use it as a stool;
Do not stand up on it;
Do not have it used by children or untrained people;
Do not transport it dismantled or open;
Do not attempt to stop the propeller with your hands;
Do not block the starter trigger when the switch is turned to on;
Do not throw it off a boat or the shore;
Do not tow it with motor boats;
Do not dismantle it;
Do not run it dry above water;
Do not wet electrical contacts;
Do not short-circuit the battery;
Do not charge the batteries with a battery charger other than the one supplied;
Do not start the DPV when holding the propeller or with objects between the blades;
Do not remove wires from the connector or invert polarity;
Do not get internal DPV parts and batteries wet.

Pag. 23/41
PROBLEM
CAUSE - SOLUTION
The DPV does not work. The propeller does not turn
when the trigger is pulled.
Open the DPV and make sure the batteries are
charged and that the connectors are inserted and not
damaged and retry.
Although the batteries are charged and connectors are
inserted, the DPV does not work.
The control system could be damaged. It should be
checked.*
The electric engine could be out of order and needs
replacement.*
The batteries could be damaged and need
replacement.
DPV autonomy has drastically diminished.
Replace the batteries.
The battery charge is broken or does not work
correctly and needs to be replaced.
When the main switch is turned off, the DPV continues
to run, there is no way to turn it off.
The control system is damaged. It should be
replaced.*
The engine is noisy.
The DPV requires overhaul.*
The DPV vibrates when the propeller turns.
The propeller was damaged and requires replacement.
The transmission system is damaged. It should be
overhauled.*
The DPV slowly floods.
Replace all seal gaskets and carefully check that
internal tube housings are not scratched. See spare
parts chapter 18
25. TROUBLESHOOTING
*operations to be carried out by SUEX authorised service centres.
Pag. 24/41
This could occur especially due to improper use, a collision, incorrect closing or lack of
maintenance.
In the event of flooding, the scooter will start to tilt downward and thus sinks.
In the event of total flooding, the situation could become POTENTIALLY HAZARDOUS since
the DPV becomes negative and will start to SINK, DRAGGING YOU DOWN and therefore
the scooter MUST BE IMMEDIATELY ABANDONED.
The DPV must be stored in a cool, clean, and ventilated place, in an upright position with the
nose facing upwards. The battery must be removed, charged and stored away from frosty
conditions or excessive heat. Make sure that the connectors do not come into contact with
metal objects inside the DPV or the battery will be shorted. Unscrew the nose till the O-ring is
exposed.
26. DPV FLOODING, SINKING
27. CLEANING AND STORAGE
After use, the DPV must be rinsed thoroughly with fresh water. A neutral detergent may be used. Before opening
the DPV, it is important to remove all traces of salt. Rinse the trigger piston.
Do not use any solvents or petroleum-based products.
Important note: always remove the battery after the use and replace nosecone to protect body.

Pag. 25/41
NOTE: using spray lubricants, it is important to air the inside of the DPV. In this way
the propelling gas go away, for the most part are inflammable!
28. MAINTENANCE
Lubrication of the nose-cone oring
Open the DPV, remove the O-ring (19) (see fig. 2) without using tools avoiding to scratch the O-ring seat, clean the
O-ring seat thoroughly using the microfiber cloth only. Do not use any type of solvent or alcohol. Apply a small
amount of vaseline grease on the O-ring and place it back. Occasionally, lubricate the lock knob screw with marine
blue grease. Never lubricate trigger or trigger piston movement.
Closing knob gasket maintenance
Whenever the closing knob (9) (see fig. 1) comes into contact with sand, rinse with running water before rotating it.
Refer to the authorized service centers for the gaskets replacement.
NOTE: leaving the DPV exposed to the sun for long periods of time could damage the colour creating
lighter or grey areas. This situation does not compromise the oxidation protection since it is only cosmetic
effect. Some longitudinal lines observable on the aluminium body are perfectly normal, they depends from
the material and are not mark of defect or material stress. Please remember that surface deterioration is
considered normal wear and tear and is not covered under warranty.
Supplementary maintenance
Every hundred hours of use or at least every two years, we recommend you overhaul the DPV checking hydraulic
seals and electrical circuits.
SUEX S.r.l. fully overhauls your DPV with shipping throughout the world.
 Loading...