

Sub-Zero & Wolf 30 Sealed Burner Rangetop, 36 Sealed Burner Rangetop, 48 Sealed Burner Rangetop Quick Start Manual
Page 1

Sealed Burner Rangetops Installation Guide
Page 2

SEALED BURNER RANGETOPS
Contents
3 Specications
6 Installation
7 Troubleshooting
Features and specications are subject to change at any
time without notice. Visit wolfappliance.com/specs for the
most up-to-date information.
Important Note
To ensure this product is installed and operated as safely
and efciently as possible, take note of the following types
of highlighted information throughout this guide:
IMPORTANT NOTE highlights information that is especially
important.
CAUTION indicates a situation where minor injury or product
damage may occur if instructions are not followed.
WARNING states a hazard that may cause serious injury or
death if precautions are not followed.
IMPORTANT NOTE: Throughout this guide, dimensions in
parentheses are millimeters unless otherwise specied.
IMPORTANT NOTE: Save these instructions for the local
electrical inspector.
2 | Wolf Customer Care 800.222.7820
Page 3
SPECIFICATIONS
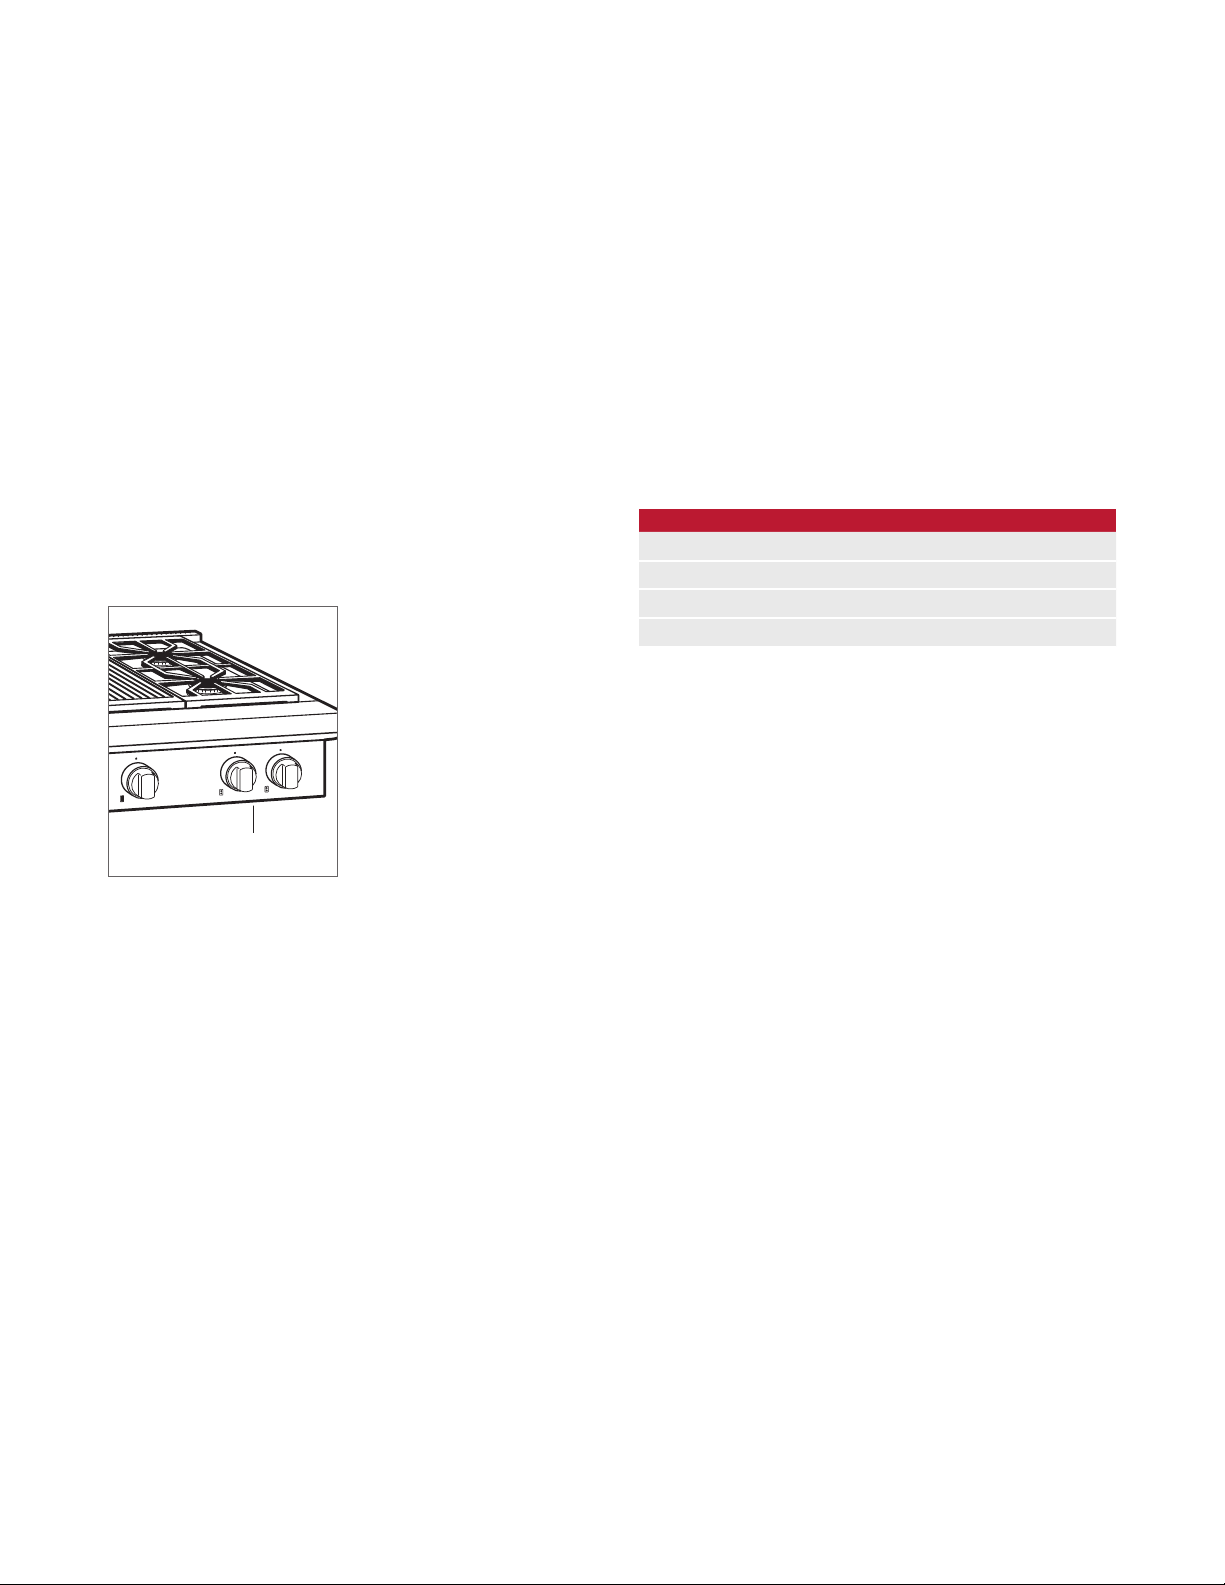
Product Information
Important product information including the model and
serial number are listed on the product rating plate. The
rating plate is located on the bottom of the control panel
assembly, at the far right. Refer to the illustration below.
If service is necessary, contact Wolf factory certied service
with the model and serial number. For the name of the
nearest Wolf factory certied service or for questions
regarding the installation, visit the contact & support section
of our website, wolfappliance.com or call Wolf customer
care at 800-222-7820.
Electrical
Installation must be electrically grounded in accordance
with local codes or, in the absence of local codes, with the
National Electrical Code, ANSI/NFPA 70.
Locate the electrical supply within the shaded area shown in
the illustration on page 5. A separate circuit, servicing only
this appliance is required. A ground fault circuit interrupter
(GFCI) is not recommended and may cause interruption of
operation.
ELECTRICAL REQUIREMENTS
Electrical Supply grounded, 110/120 VAC, 60 Hz
Service 15 amp dedicated circuit
Receptacle 3-prong grounding-type
Power Cord 6'
(1.8 m)
RATING PLATE
Rating plate location.
wolfappliance.com | 3
Page 4
SPECIFICATIONS
Gas Supply
Installation must conform with local codes or, in the absence
of local codes, with the National Fuel Gas Code.
Locate the gas supply within the shaded area shown in the
illustration on page 5.
The rangetop is equipped for use with natural or liquid
propane (LP) gas. It is design certied by the Canadian
Standards Association (CSA) for natural or LP gases. The
product rating plate has information on the type of gas that
should be used. For rating plate location, refer to the illustration on page 3. If this information does not agree with the
type of gas available, check with the local gas supplier.
GAS SUPPLY REQUIREMENTS
NATURAL GAS
Gas Supply Pressure 5" (12.5 mb) WC
Min Line Pressure 7"
Max Pressure to Regulator 14"
LP GAS
Gas Supply Pressure 10" (25 mb) WC
Min Line Pressure 11" (27.4 mb) WC
Max Pressure to Regulator 14"
(34.9 mb) WC, .5 psi (3.5 kPa)
(34.9 mb) WC, .5 psi (3.5 kPa)
(17.5 mb) WC
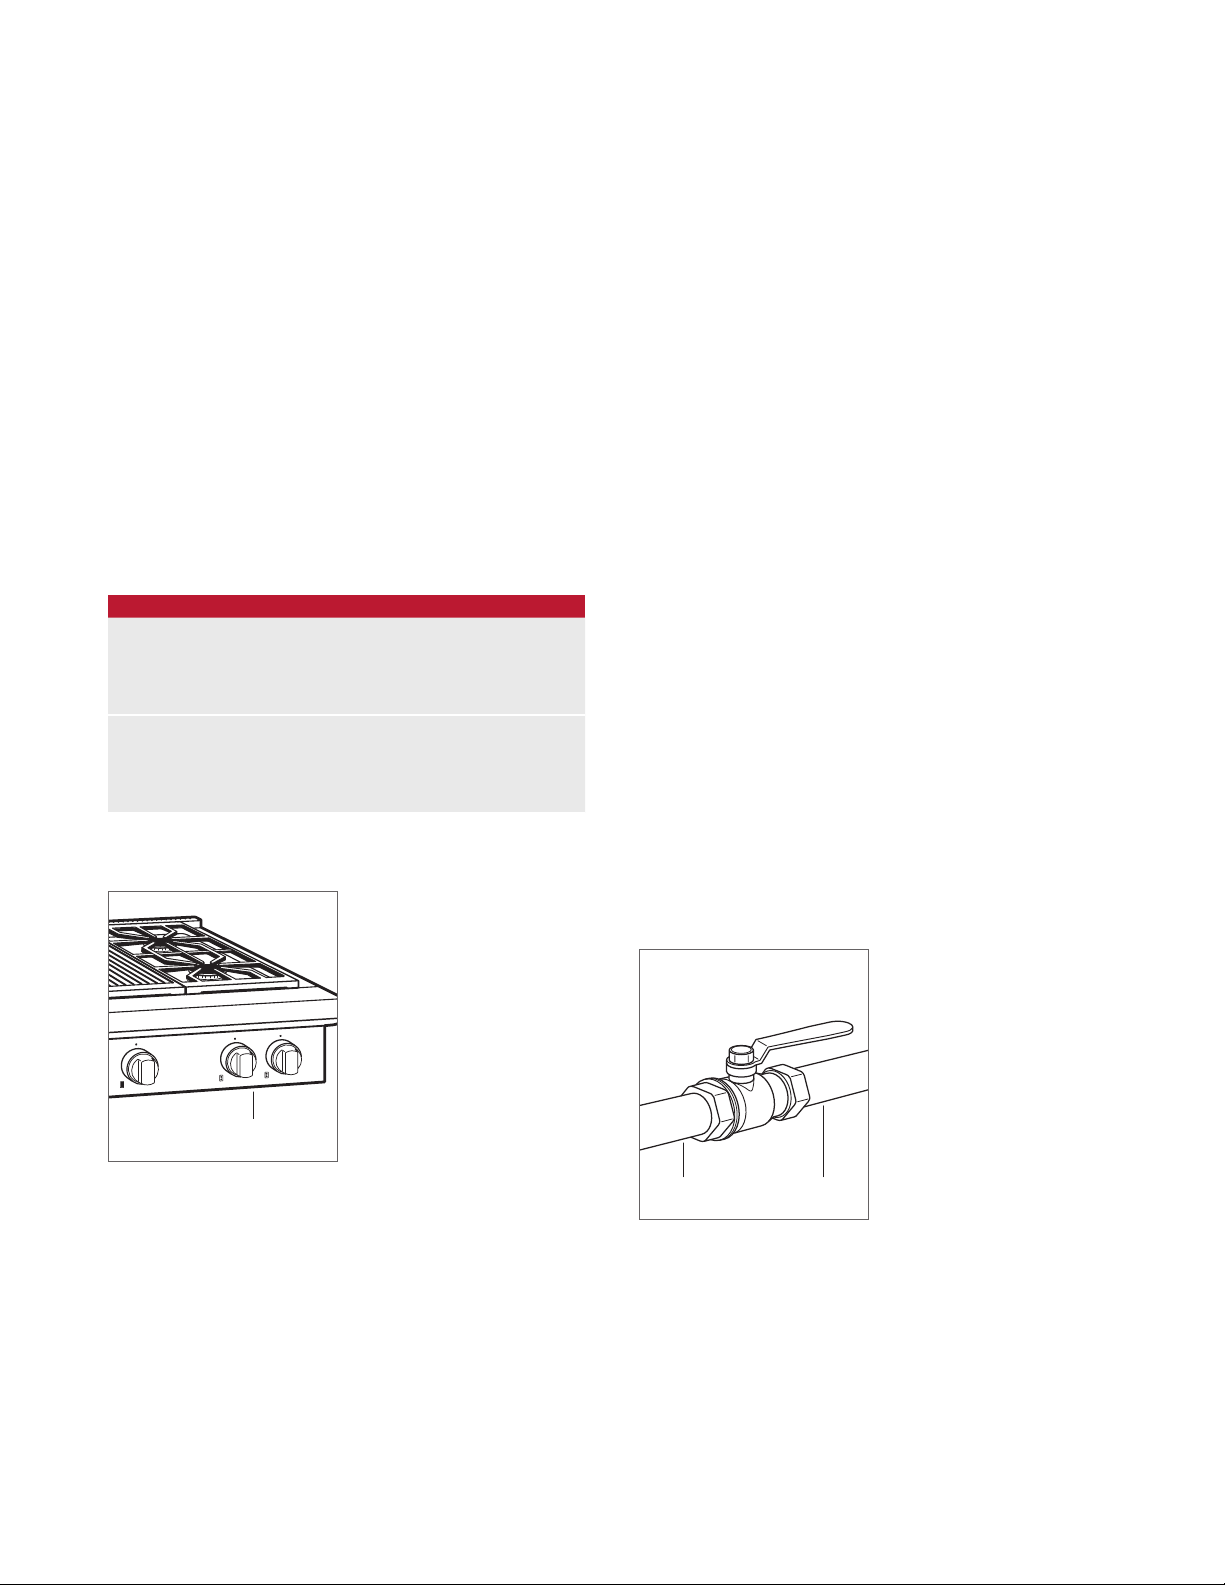
The rangetop must be connected to a regulated gas supply.
The supply line must be equipped with an approved external
gas shut-off valve located near the rangetop in an accessible location. Do not block access to the shut-off valve.
Refer to the illustration below.
3
A gas supply line of
the rangetop. If local codes permit, a certied, 3'
1
/2" (13) or 3/4" (19) ID exible metal appliance connector is
recommended to connect the units
/4" (19) rigid pipe must be provided to
(.9 m) long,
1
/2" NPT female inlet to
the gas supply line. Pipe joint compounds, suitable for use
with natural or LP gas should be used.
The appliance and its shut-off valve must be disconnected
from the gas supply piping system during any pressure
testing of the system at test pressures in excess of .5 psi
(3.5 kPa)
. The appliance must be isolated from the gas
supply piping system by closing its individual manual shutoff valve during any pressure testing of the system at test
pressures equal to or less than .5 psi
Wolf natural gas rangetops will function up to 10,250'
(3124 m)
getops up to 8,600'
in altitude without adjustment and LP gas ran-
(2621 m). If the installation exceeds
(3.5 kPa).
these elevations, contact your authorized Wolf dealer for a
high altitude conversion kit.
RATING PLATE
Rating plate location.
4 | Wolf Customer Care 800.222.7820
SHUT-OFF VALVE
OPEN POSITION
Gas shut-off valve.
GAS SUPPLYTO APPLIANCE
Page 5
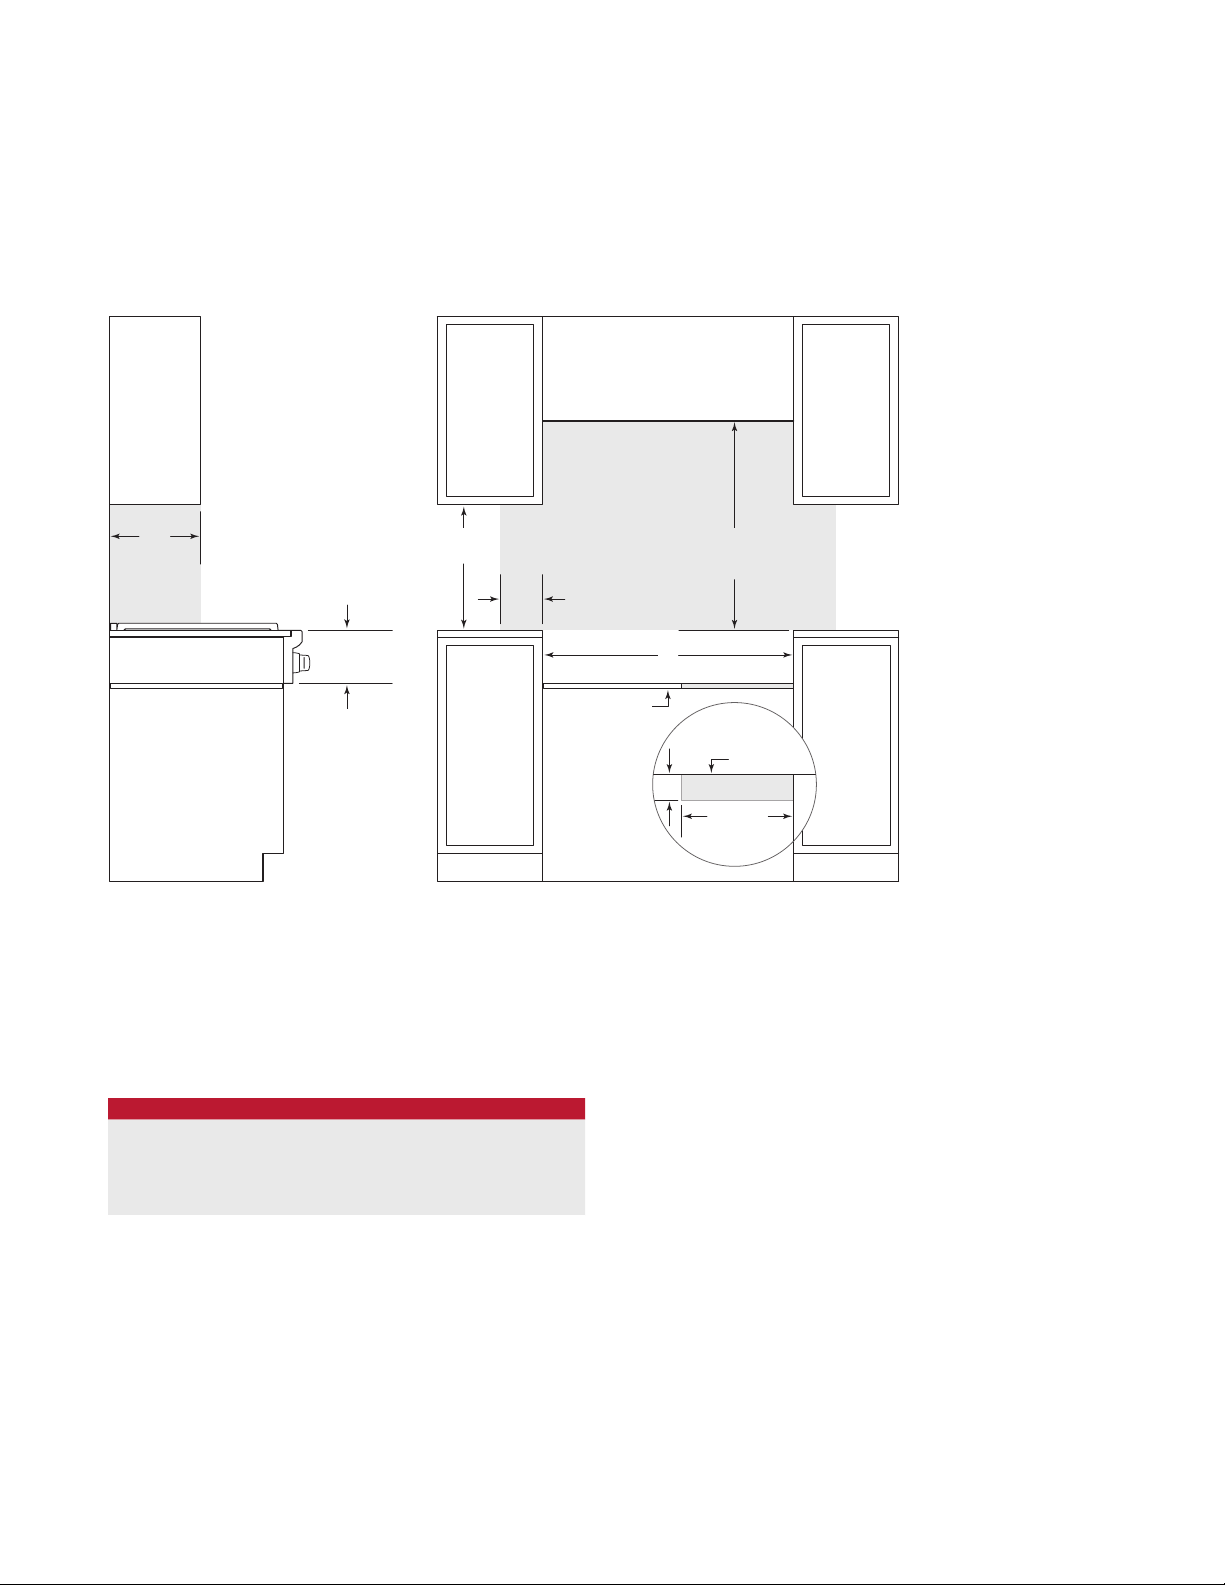
SPECIFICATIONS
SIDE
*W
NO
combus
El
Fo
Sealed Burner Rangetop
INSTALLATION
13"
(330)
71/2" (191)
OPENING
HEIGHT
18"
(457)
6"
(152)
OPENING WIDTH
PLATFORM
(762)
30"
TO 36"
TO BOTTOM OF
VENTILATION HOOD*
W
PLATFORM
TOP VIEW
4"
(102)
BACK WALL
E G
16" (406)
ELECTRICAL
AND GAS
VIEW
ithout ventilation hood, 36" (914) minimum clearance countertop to combustible materials, 44" (118) for charbroiler.
TE: Shaded area above countertop indicates minimum clearance to combustible surfaces,
tible materials cannot be located within this area.
ectrical and gas supply located through bottom of platform.
r island installation, 12" (305) minimum clearance back of range to combustible rear wall above countertop.
FRONT VIEW
SEALED BURNER RANGETOP
WIDTH OPENING WIDTH
30" Rangetop 30" (762)
36" Rangetop 36" (914)
48" Rangetop 48" (1219)
(914)
wolfappliance.com | 5
Page 6

INSTALLATION
Preparation
Prepare the nished opening for the rangetop according
to dimensions shown in the illustration on page 5. The platform must be
rear for electrical and gas supply connections. The platform
must be level to ensure that the cooking surface is level.
3
/4" (19) thick and include a cut-out at the right
Placement
Use an appliance dolly to move the unit near the opening.
Remove and recycle packing materials.
If a riser has been specied, refer to the installation instructions packaged with the riser. The riser must be installed
before the rangetop is installed.
Place unit into the opening. Connect gas and electrical.
Connections may need to be made prior to nal placement.
Gas Supply Connection
All connections to the gas piping must be wrench-tightened.
Do not overtighten or allow pipes to turn when tightening.
If a exible metal connector is being used, verify it is not
kinked, then attach the gas supply line to the regulator on
the rangetop. Open the valve and check for leaks by placing
a liquid detergent solution onto all gas connections. Bubbles
around connections indicate a gas leak. If a leak appears,
close the shut-off valve and adjust connections.
6 | Wolf Customer Care 800.222.7820
Page 7

TROUBLESHOOTING
Troubleshooting
IMPORTANT NOTE: If the rangetop does not operate prop-
erly, follow these troubleshooting steps:
• Verify electrical power is supplied to the rangetop.
• Verify the gas supply shut-off valve is in the open
position.
• If the rangetop does not operate properly, contact Wolf
factory certied service. Do not attempt to repair the
rangetop. Wolf is not responsible for service required to
correct a faulty installation.
Wolf, Wolf & Design, Wolf Gourmet, W & Design and the color red as applied to knobs are registered trademarks and service marks of Wolf Appliance, Inc. Sub-Zero, Sub-Zero &
Design, Dual Refrigeration, Constant Care, The Living Kitchen, Great American Kitchens The Fine Art of Kitchen Design, and Ingredients are registered trademarks and service marks
of Sub-Zero, Inc. (collectively, the “Company Marks.”) All other trademarks or registered trademarks are property of their respective owners in the United States and other countries.
wolfappliance.com | 7
Page 8

ESTUFAS CON QUEMADORES SELLADOS
Contenido
3 Especicaciones
6 Instalación
7 Resolución de problemas
Las características y especicaciones están sujetas a cambios sin previo aviso. Visite wolfappliance.com/specs para
obtener la información más actualizada.
Aviso importante
Para garantizar que este producto se instale y opere de
la forma más segura y eciente posible, tome nota de los
siguientes tipos de información resaltada en esta guía:
AVISO IMPORTANTE señala la información que es especial-
mente importante.
PRECAUCIÓN indica una situación en la que se pueden
sufrir heridas leves o provocar daños al producto si no se
siguen las instrucciones.
ADVERTENCIA indica peligro de que se produzcan heridas
graves o incluso la muerte si no se siguen las precauciones.
AVISO IMPORTANTE: en toda esta guía, las dimensiones
entre paréntesis son milímetros, a menos que se especique lo contrario.
AVISO IMPORTANTE: guarde estas instrucciones para el
inspector eléctrico local.
2 | Atención al cliente de Wolf 800.222.7820
Page 9

ESPECIFICACIONES
Información del producto
La información importante del producto, incluido el modelo
y número de serie de la unidad, se encuentra en la placa de
datos del producto. La placa de datos se encuentra en la
parte inferior del montaje del panel de control, en el extremo
derecho. Consulte la siguiente ilustración.
Si necesita servicio, póngase en contacto con el centro de
servicio autorizado de Wolf y tenga a la mano el modelo y
número de serie de la unidad. Para obtener los datos del
centro de servicio autorizado de Wolf más cercano o si
tiene preguntas acerca de la instalación, visite la sección de
contacto y soporte técnico en nuestra página de Internet
wolfappliance.com o llame a la línea de atención al cliente
de Wolf al 800-222-7820.
Instalación eléctrica
La instalación debe tener una conexión a tierra de conformidad
con los códigos locales o, en ausencia de códigos locales, con
el Código Nacional de Electricidad, ANSI/NFPA 70.
Localice el suministro eléctrico en la zona sombreada que
se muestra en la ilustración de la página 5. Es necesario un
circuito independiente que dé servicio únicamente a este
aparato. No es recomendable utilizar un circuito de fallos
de conexión a tierra (GFCI, por sus siglas en inglés) ya que
puede interrumpir el funcionamiento de la unidad.
REQUISITOS ELÉCTRICOS
Suministro eléctrico Con conexión a tierra, 110/120 V CA,
60 Hz
Servicio Circuito dedicado de 15 amperes
Receptáculo Conexión a tierra de 3 clavijas
Cable de alimentación
eléctrica
(1.8 m)
6'
PLACA DE DATOS
Ubicación de la placa de datos.
wolfappliance.com | 3
Page 10

ESPECIFICACIONES
Suministro de gas
La instalación debe cumplir con los códigos locales o, en
ausencia de códigos locales, con el Código Nacional de
Gas Combustible.
Localice el suministro de gas en la zona sombreada que se
muestra en la ilustración de la página 5.
La estufa está equipada para su uso con gas licuado (LP) o
propano natural. Su diseño está certicado por la Asociación Canadiense de Normas (CSA, por sus siglas en inglés)
para gas natural o LP. La placa de datos del producto contiene información sobre el tipo de gas que se debe utilizar.
Para ubicar la placa de datos, consulte la ilustración en la
página 3. Si esta información no coincide con el tipo de gas
disponible, consulte con el proveedor de gas local.
REQUISITOS DEL SUMINISTRO DE GAS
GAS NATURAL
Presión del suministro de gas 5" (12.5 mb) WC
Presión mínima de la línea 7"
Presión máxima hacia el
regulador
GAS LP
Presión del suministro de gas 10" (25 mb) WC
Presión mínima de la línea 11" (27.4 mb) WC
Presión máxima hacia el
regulador
(34.9 mb) WC, .5 psi (3.5 kPa)
14"
(34.9 mb) WC, .5 psi (3.5 kPa)
14"
(17.5 mb) WC
La estufa debe conectarse a un suministro de gas regulado.
La línea del suministro debe estar equipada con una llave
de paso externa aprobada para gas ubicada cerca de la
estufa en un lugar accesible. No bloquee el acceso a la llave
de paso. Consulte la siguiente ilustración.
Se debe proporcionar una línea de suministro de gas hecha
3
de tubo rígido de
/4" (19) para la estufa. Si el código local lo
permite, se recomienda utilizar un conector metálico exible
certicado, de 3'
(.9 m) de largo,
metro interior para conectar la entrada NPT hembra de
1
/2" (13) o 3/4" (19) de diá-
1
/2"
de la unidad a la línea de suministro de gas. Debe utilizar
compuestos para juntas de tubería aptos para uso con gas
natural o gas LP.
Debe desconectar el electrodoméstico y la llave de paso del
sistema de tuberías del suministro de gas durante cualquier prueba de presión del sistema a presiones de prueba
mayores a 5 psi
(3.5 kPa). Debe aislar el electrodoméstico del
sistema de tuberías del suministro de gas cerrando manualmente la llave de paso durante cualquier prueba de presión
del sistema a presiones de prueba iguales o inferiores a
(3.5 kPa).
0.5psi
Las estufas de gas natural de Wolf funcionarán hasta
10,250'
hasta 8,600'
(3124 m) de altitud sin ajuste y las estufas de gas LP
(2621 m). Si la instalación supera estas eleva-
ciones, póngase en contacto con su distribuidor autorizado
de Wolf para conseguir un kit de conversión para regiones
altas.
PLACA DE DATOS
Ubicación de la placa de datos.
4 | Atención al cliente de Wolf 800.222.7820
LLAVE DE PASO EN
POSICIÓN ABIERTA
A LA UNIDAD
Llave de paso del suministro
de gas.
SUMINISTRO
DE GAS
Page 11

ESPECIFICACIONES
VIST
*S
y 44" (118) para la parrilla.
NO
lo
El
Pa
Estufa con quemadores sellados
INSTALACIÓN
(330)
A LATERAL
in campana de ventilación, se requiere una distancia mínima de 36" (914) desde el mostrador hasta los materiales combustibles,
TA: La zona sombreada sobre el mostrador indica la distancia mínima a las superficies combustibles,
s materiales combustibles no se pueden colocar en esta área.
suministro eléctrico y de gas pasa por debajo de la plataforma.
ra instalaciones en isla, distancia mínima de 12" (305) de la parte posterior de la estufa a la pared trasera inflamable sobre el mostrador.
ESTUFA CON QUEMADORES SELLADOS
ANCHO ANCHURA DE
Estufa de 30" 30" (762)
Estufa de 36" 36" (914)
Estufa de 48" 48" (1219)
13"
71/2" (191)
ALTURA DE
LA ABERTURA
18"
(457)
6"
(152)
ABERTURA
30" (762) A 36" (914)
A LA PARTE INFERIOR
DE LA CAMPANA
DE VENTILACIÓN*
ANCHURA DE ABERTURA
PLATAFORMA
W
4"
(102)
VISTA FRONTAL
VISTA
SUPERIOR DE LA
PLATAFORMA
PARED
POSTERIOR
E G
(406)
16"
CONEXIÓN
ELÉCTRICA Y DE
GAS
wolfappliance.com | 5
Page 12

INSTALACIÓN
Preparación
Prepare la abertura ya con acabados para la estufa conforme a las dimensiones que se muestran en la ilustración
de la página 5. La plataforma debe tener un grosor de
(19)
e incluir un recorte en la parte posterior derecha para
la conexión eléctrica y el suministro de gas. La plataforma
debe estar nivelada para asegurar que la supercie para
cocinar esté nivelada.
3
/4"
Colocación
Utilice una plataforma rodante para mover la unidad cerca
de la abertura. Retire y recicle los materiales de embalaje.
Si se ha especicado el uso de una tarima, consulte las
instrucciones de instalación que vienen con la tarima. Debe
instalar la tarima antes de instalar la estufa.
Coloque la unidad en la abertura. Realice la conexión del
suministro de gas y eléctrico. Es posible que deba realizar
las conexiones antes de colocar la unidad de manera denitiva en su lugar.
Conexión del suministro de gas
Todas las conexiones a la tubería de gas deben apretarse
con llave. No apriete demasiado ni permita que las tuberías
giren al apretarlas.
Si se utiliza un conector de metal exible, compruebe que
no esté doblado y, a continuación, conecte la línea de
suministro de gas al regulador en la estufa. Abra la válvula y
revise si hay fugas mediante la colocación de una solución
de detergente líquido sobre todas las conexiones de gas.
La presencia de burbujas alrededor de las conexiones es
indicador de una fuga de gas. Si aparece una fuga, cierre la
llave de paso y ajuste las conexiones.
6 | Atención al cliente de Wolf 800.222.7820
Page 13

RESOLUCIÓN DE PROBLEMAS
Resolución de problemas
AVISO IMPORTANTE: si la estufa no funciona correctamente,
siga estos pasos para resolver los problemas:
• Compruebe que la estufa tenga corriente eléctrica.
• Compruebe que la llave de paso del suministro de gas
se encuentra en posición abierta.
• Si la estufa no funciona correctamente, póngase en con-
tacto con el centro de servicio autorizado de Wolf. No
intente reparar la estufa. Wolf no es responsable del ser-
vicio necesario para corregir una instalación defectuosa.
Wolf, Wolf & Design, Wolf Gourmet, W & Design y el color rojo aplicado a las perillas son marcas comerciales registradas y marcas de servicio de Wolf
Appliance, Inc. Sub-Zero, Sub-Zero & Design, Dual Refrigeration, Constant Care, The Living Kitchen, Great American Kitchens The Fine Art of Kitchen
Design e Ingredients son marcas comerciales registradas y marcas de servicio de Sub-Zero, Inc. (en conjunto, las "Marcas de la Compañía"). Todas
las demás marcas comerciales o marcas comerciales registradas son propiedad de sus respectivos propietarios en los Estados Unidos y otros países.
wolfappliance.com | 7
Page 14

DESSUS DE CUSINIÈRE À BRÛLEUR SCELLÉ
Table des matières
3 Spécications
6 Installation
7 Dépannage
Les caractéristiques et les spécications peuvent être modiées en tout temps sans préavis. Visitez wolfappliance.com/
specs pour obtenir les renseignements les plus récents.
Remarque importante
Pour s’assurer que ce produit est installé et utilisé en toute
sécurité et aussi efcacement que possible, prenez note des
types de renseignement mis en évidence tout au long de ce
guide :
REMARQUE IMPORTANTE met en évidence des renseigne-
ments qui sont particulièrement importants.
MISE EN GARDE indique une situation où une blessure
mineure ou des dommages au produit peuvent se produire
si les directives ne sont pas respectées.
AVERTISSEMENT décrit un danger qui peut causer une
blessure grave ou la mort si les précautions ne sont pas
respectées.
REMARQUE IMPORTANTE : tout au long de ce guide, les
dimensions entre parenthèses sont en millimètres à moins
d’indication contraire.
REMARQUE IMPORTANTE : conservez ces directives pour
l’inspecteur en électricité local.
2 | Service à la clientèle de Wolf 800.222.7820
Page 15

SPÉCIFICATIONS
Renseignements sur le produit
Des renseignements importants sur le produit, y compris les
numéros de modèle et de série, se trouvent sur la plaque
signalétique du produit. La plaque signalétique est située
dans le bas de l’assemblage du panneau de commande, à
l’extrême droite. Reportez-vous à l’illustration ci-dessous.
Si vous avez besoin de service, communiquez avec le service
Wolf certié par l’usine avec les numéros de modèle et de
série. Pour obtenir le nom du centre de service Wolf certié
par l’usine le près de chez vous ou si vous avez des questions concernant l’installation, consultez la section Contact et
assistance de notre site Web, wolfappliance.com ou appelez
le service à la clientèle de Wolf au 800-222-7820.
Électricité
L’installation doit être mise à la terre électriquement conformément aux codes locaux ou, en l’absence de codes
locaux, au code national de l’électricité, ANSI/NFPA 70.
Repérez l’alimentation en gaz dans la zone ombragée indiquée dans l’illustration à la page 5. Un circuit séparé servant
uniquement cet appareil est requis. Un disjoncteur de fuite
de terre (GFCI) n’est pas recommandé et peut interrompre le
fonctionnement.
EXIGENCES ÉLECTRIQUES
Alimentation électrique mise à la terre 110/120 volts CA, 60 Hz
Service circuit dédié de 15 ampères
Prise mise à la terre à trois broches
Cordon d’alimentation 6 pi
(1,8 m)
PLAQUE
SIGNALÉTIQUE
Emplacement de la plaque
signalétique.
wolfappliance.com | 3
Page 16

SPÉCIFICATIONS
Alimentation en gaz
L’installation doit se conformer aux codes locaux ou, en
l’absence de codes locaux, avec le code national relatif au
gaz combustible.
Repérez l’alimentation en gaz dans la zone ombragée indiquée dans l’illustration à la page 5.
Le dessus de cuisinière est conguré pour être utilisé avec
du gaz naturel ou de pétrole liquéé (PL). Sa conception
est certiée par l’Association canadienne de normalisation
(ACNOR) pour le gaz naturel et le gaz de pétrole liquéé.
La plaque signalétique du produit possède des renseignements sur le type de gaz qui doit être utilisé. Pour connaître
l’emplacement de la plaque signalétique, reportez-vous à
l’illustration à la page 3. Si le gaz disponible ne correspond
pas à cette information, veuillez consulter le fournisseur de
gaz local.
EXIGENCES D’ALIMENTATION EN GAZ
GAZ NATUREL
Pression d’alimentation
en gaz
Pression min. de la
conduite
Pression max. jusqu’au
régulateur
GAZ PL
Pression d’alimentation
en gaz
Pression min. de la
conduite
Pression max. jusqu’au
régulateur
5 po (12,5 mb) CE (colonne d’eau)
(17,5 mb) CE (colonne d’eau)
7 po
(34,9 mb) CE, 0,5 lb/po² (3,5 kPa)
14 po
10 po (25 mb) CE (colonne d’eau)
11 po (27,4 mb) CE (colonne d’eau)
(34,9 mb) CE, 0,5 lb/po² (3,5 kPa)
14 po
Le dessus de cuisinière doit être relié à une alimentation
en gaz régulée. La conduite d’alimentation doit être munie
d’un robinet d’arrêt de gaz externe approuvé situé près du
dessus de cuisinière à un endroit accessible. Ne bloquez
pas l’accès au robinet d’arrêt. Reportez-vous à l’illustration
ci-dessous.
Une conduite d’alimentation en gaz sous forme de tuyau
3
rigide de
/4 po (19) doit être fournie jusqu’au dessus de
cuisinière. Si les codes locaux le permettent, un connecteur d’appareil en métal exible certié de 3 pi
1
longueur et de
/2 po (13) ou 3/4 po (19) de diamètre intérieur
est recommandé pour relier l’entrée femelle de
(0,9 m) de
1
/2 po NPT
de l’unité à la conduite d’alimentation en gaz. Utilisez de la
pâte pour joints pouvant être utilisée avec du gaz naturel ou
de pétrole liquéé.
Cet appareil et son robinet d’arrêt doivent être débranchés
du système de conduite d’alimentation en gaz durant tout
essai de pression de ce système à des pressions d’essai
supérieures à 0,5 lb/po²
(3,5 kPa). Cet appareil doit être isolé
du système de conduite d’alimentation en gaz en fermant
son robinet d’arrêt manuel individuel durant tout essai de
pression du système à des pressions d’essai équivalentes
ou inférieures à 0,5 lb/po²
(3,5 kPa).
Les dessus de cuisinière au gaz naturel de Wolf fonctionneront jusqu’à une altitude de 10 250 pi
(3 124 m) sans ajus-
tement et les dessus de cuisinière au gaz PL jusqu’à 8 600
(2 621 m) d’altitude. Si l’installation dépasse ces altitudes,
pi
communiquez avec votre dépositaire Wolf pour obtenir une
trousse de conversion pour altitude plus élevée.
PLAQUE
SIGNALÉTIQUE
Emplacement de la plaque
signalétique.
4 | Service à la clientèle de Wolf 800.222.7820
POSITION OUVERTE
DU ROBINET D´ARRÊT
VERS L´APPAREIL
Robinet d’arrêt du gaz.
ALIMENTATION
EN GAZ
Page 17

SPÉCIFICATIONS
VUE DE PROFIL
*S
de 44 po (118) pour le grilloir type charbon de bois
RE
de
L´
P
comb
Dessus de cuisinière à brûleur scellé
INSTALLATION
13 po
(330)
ans hotte, un dégagement minimal de 36 po (914) du comptoir jusqu´aux matériaux combustibles est requis,
MARQUE : la zone ombragée au-dessus du comptoir indique le dégagement minimal jusqu´aux surfaces combustibles;
s matériaux combustibles ne peuvent pas se trouver dans cette zone.
alimentation électrique et en gaz est située dans le fond de la plate-forme.
our l´installation dans un îlot, un dégagement minimal de 12 po (305) derrière la cuisinière jusqu´au mur arrière
ustible au-dessus du comptoir est requis.
DESSUS DE CUISINIÈRE À BRÛLEUR SCELLÉ
LARGEUR LARGEUR DE
Dessus de cuisinière de 30 po 30 po (762)
Dessus de cuisinière de 36 po 36 po (914)
Dessus de cuisinière de 48 po 48 po (1219)
HAUTEUR
D´OUVERTURE
71/2 po (191)
DE
18 po
(457)
6 po
(152)
LARGEUR DE L´OUVERTURE
PLATE-FORME
30 po
VERS LE BAS
DE LA HOTTE*
W
DESSUS DE LA
PLATEFORME
4 po
(102)
(762)
À 36 po
VUE DE
MUR ARRIÈRE
(914)
E G
16 po (406)
ÉLECTRICITÉ
ET GAZ
VUE DE FACE
.
L’OUVERTURE
wolfappliance.com | 5
Page 18

INSTALLATION
Préparation
Préparez l’ouverture nie pour le dessus de cuisinière
conformément aux dimensions indiquées dans l’illustration
à la page 5. La plate-forme doit mesurer
seur et comprendre une découpe dans le coin arrière droit
pour les connexions d’électricité et d’alimentation en gaz.
La plate-forme doit être au niveau pour s’assurer que la
plaque de cuisson soit aussi au niveau.
3
/4 po (19) d’épais-
Mise en place
Utilisez un chariot à appareil pour déplacer l’unité près de
l’ouverture. Retirez et recyclez les matériaux d’emballage.
Si une montée a été précisée, reportez-vous aux directives
d’installation comprises avec la montée. La montée doit être
installée avant d’installer le dessus de cuisinière.
Placez l’unité dans l’ouverture. Reliez l’alimentation en gaz
et en électricité. Les connexions peuvent devoir être effectuées avant le placement nal.
Connexion de l’alimentation en gaz
Toutes les connexions vers le tuyau de gaz doivent être
serrées au moyen d’une clé. Ne serrez pas trop et ne laissez
pas les tuyaux tourner lors du serrage.
Si un connecteur en métal exible est utilisé, assurez-vous
qu’il n’est pas tordu lorsque la conduite d’alimentation en
gaz est reliée au régulateur sur le dessus de cuisinière.
Ouvrez le robinet et vériez qu’il n’y ait pas de fuites en
plaçant une solution de détergent liquide sur toutes les
connexions de gaz. Si des bulles apparaissent autour
d’une connexion, cela indique la présence d’une fuite de
gaz. En cas de fuite, fermez le robinet d’arrêt et ajustez les
connexion.
6 | Service à la clientèle de Wolf 800.222.7820
Page 19

DÉPANNAGE
Dépannage
REMARQUE IMPORTANTE : si le dessus de cuisinière ne
fonctionne pas correctement, suivez les étapes de dépannage suivantes :
• Vériez que l’alimentation électrique est fournie au
dessus de cuisinière.
• Assurez-vous que le robinet d’arrêt d’alimentation en gaz
se trouve en position ouverte.
• Si le dessus de cuisinière ne fonctionne pas correc-
tement, communiquez avec le centre de service Wolf
certié par l’usine. Ne tentez pas de réparer le dessus de
cuisinière. Wolf n’est pas responsable du service requis
pour corriger une installation défectueuse.
Wolf, Wolf & Design, Wolf Gourmet, W & Design et la couleur rouge qui est appliquée aux boutons sont des marques déposées et des marques de
service de Wolf Appliance, Inc. Sub-Zero, Sub-Zero & Design, Dual Refrigeration, Constant Care, The Living Kitchen, Great American Kitchens The Fine
Art of Kitchen Design et Ingredients sont des marques déposées et des marques de service de Sub-Zero, Inc. (collectivement, les « marques de l’En
treprise »). Toutes les autres marques de commerce ou déposées appartiennent à leurs propriétaires respectifs aux États-Unis et dans d’autres pays.
wolfappliance.com | 7
-
Page 20

WOLF APPLIANCE, INC. P.O. BOX 44848 MADISON, WI 53744 WOLFAPPLIANCE.COM 800.222.7820
823400 REV-A 10/2013
 Loading...