

Sub-Zero & Wolf 24 Drawer Microwave - Transitional, 30 Drawer Microwave - Transitional, 30 Drawer Microwave - Professional Quick Start Manual
Page 1

Drawer Microwave Oven Installation Guide
Page 2

DRAWER MICROWAVE OVEN
Contents
3 Drawer Microwave Oven
4 Specications
7 Installation
7 Troubleshooting
Features and specications are subject to change at any
time without notice. Visit wolfappliance.com/specs for the
most up-to-date information.
Important Note
To ensure this product is installed and operated as safely
and efciently as possible, take note of the following types
of highlighted information throughout this guide:
IMPORTANT NOTE highlights information that is especially
important.
CAUTION indicates a situation where minor injury or product
damage may occur if instructions are not followed.
WARNING states a hazard that may cause serious injury or
death if precautions are not followed.
IMPORTANT NOTE: Throughout this guide, dimensions in
parentheses are millimeters unless otherwise specied.
IMPORTANT NOTE: Save these instructions for the local
electrical inspector.
SAVE THESE INSTRUCTIONS
2 | Wolf Customer Care 800.222.7820
Page 3
DRAWER MICROWAVE OVEN
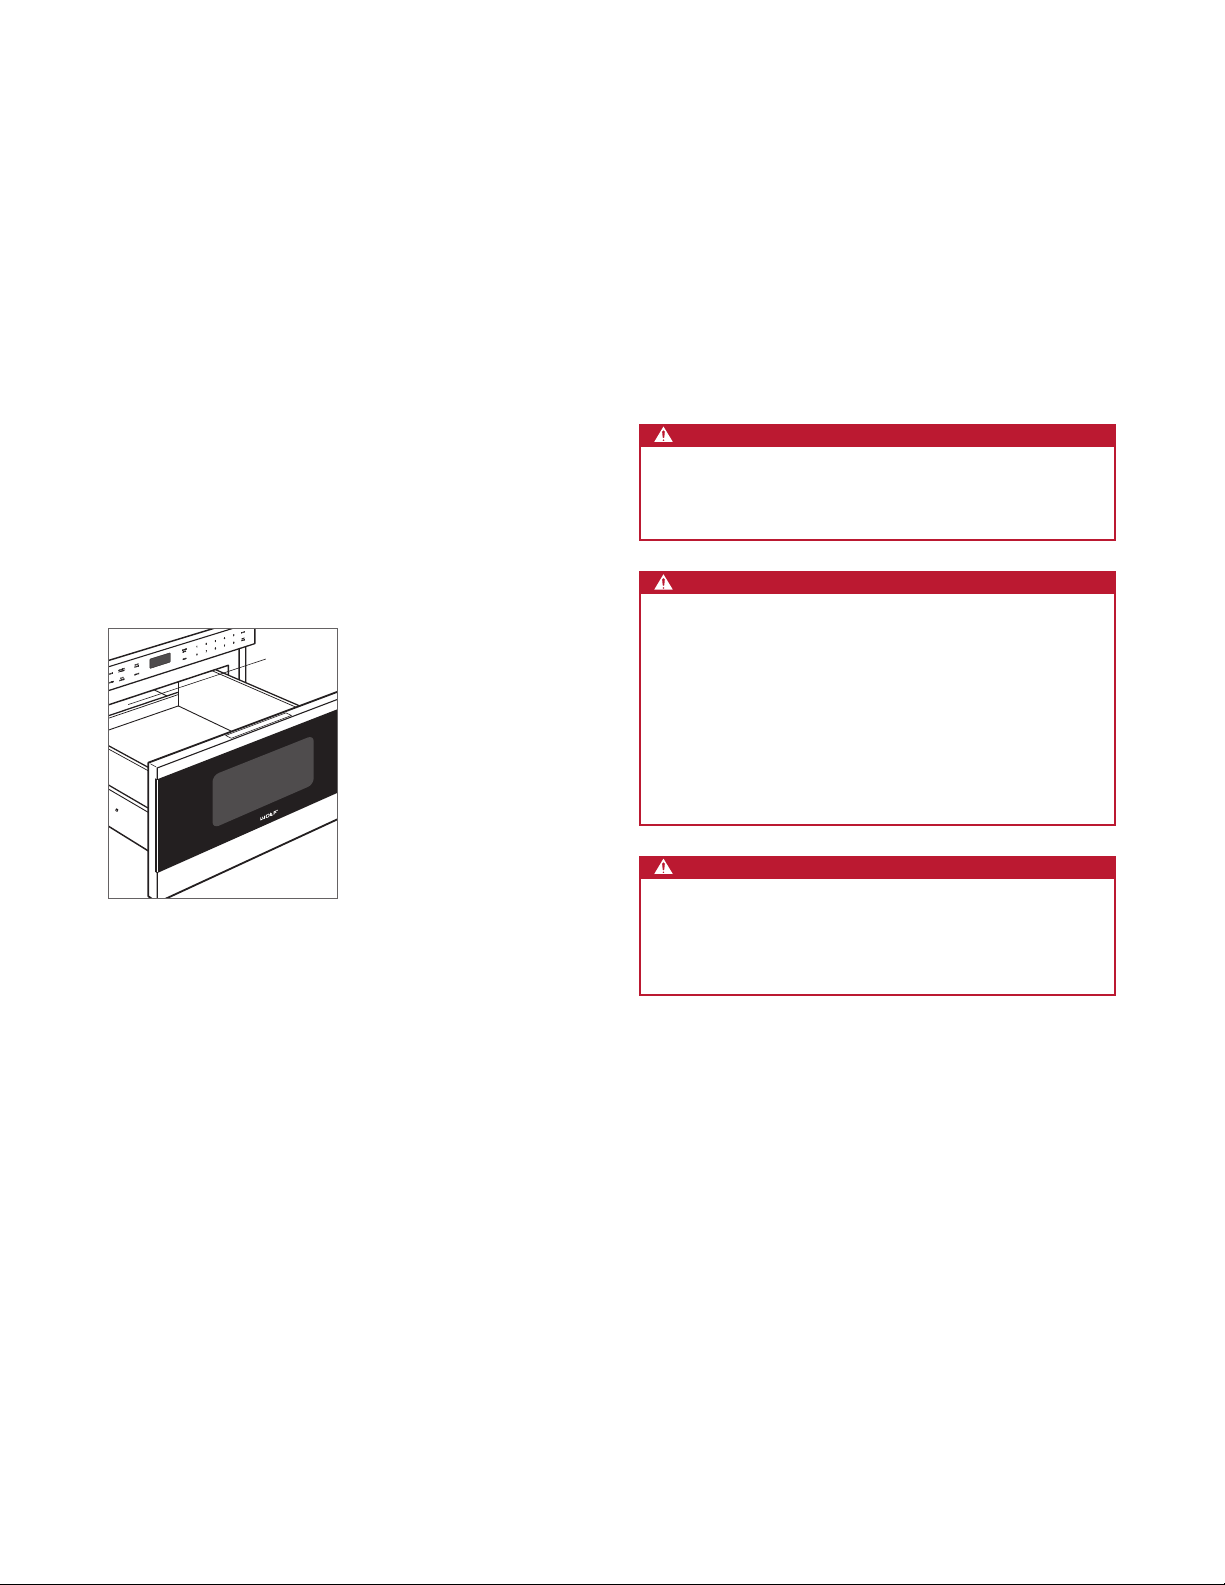
Product Information
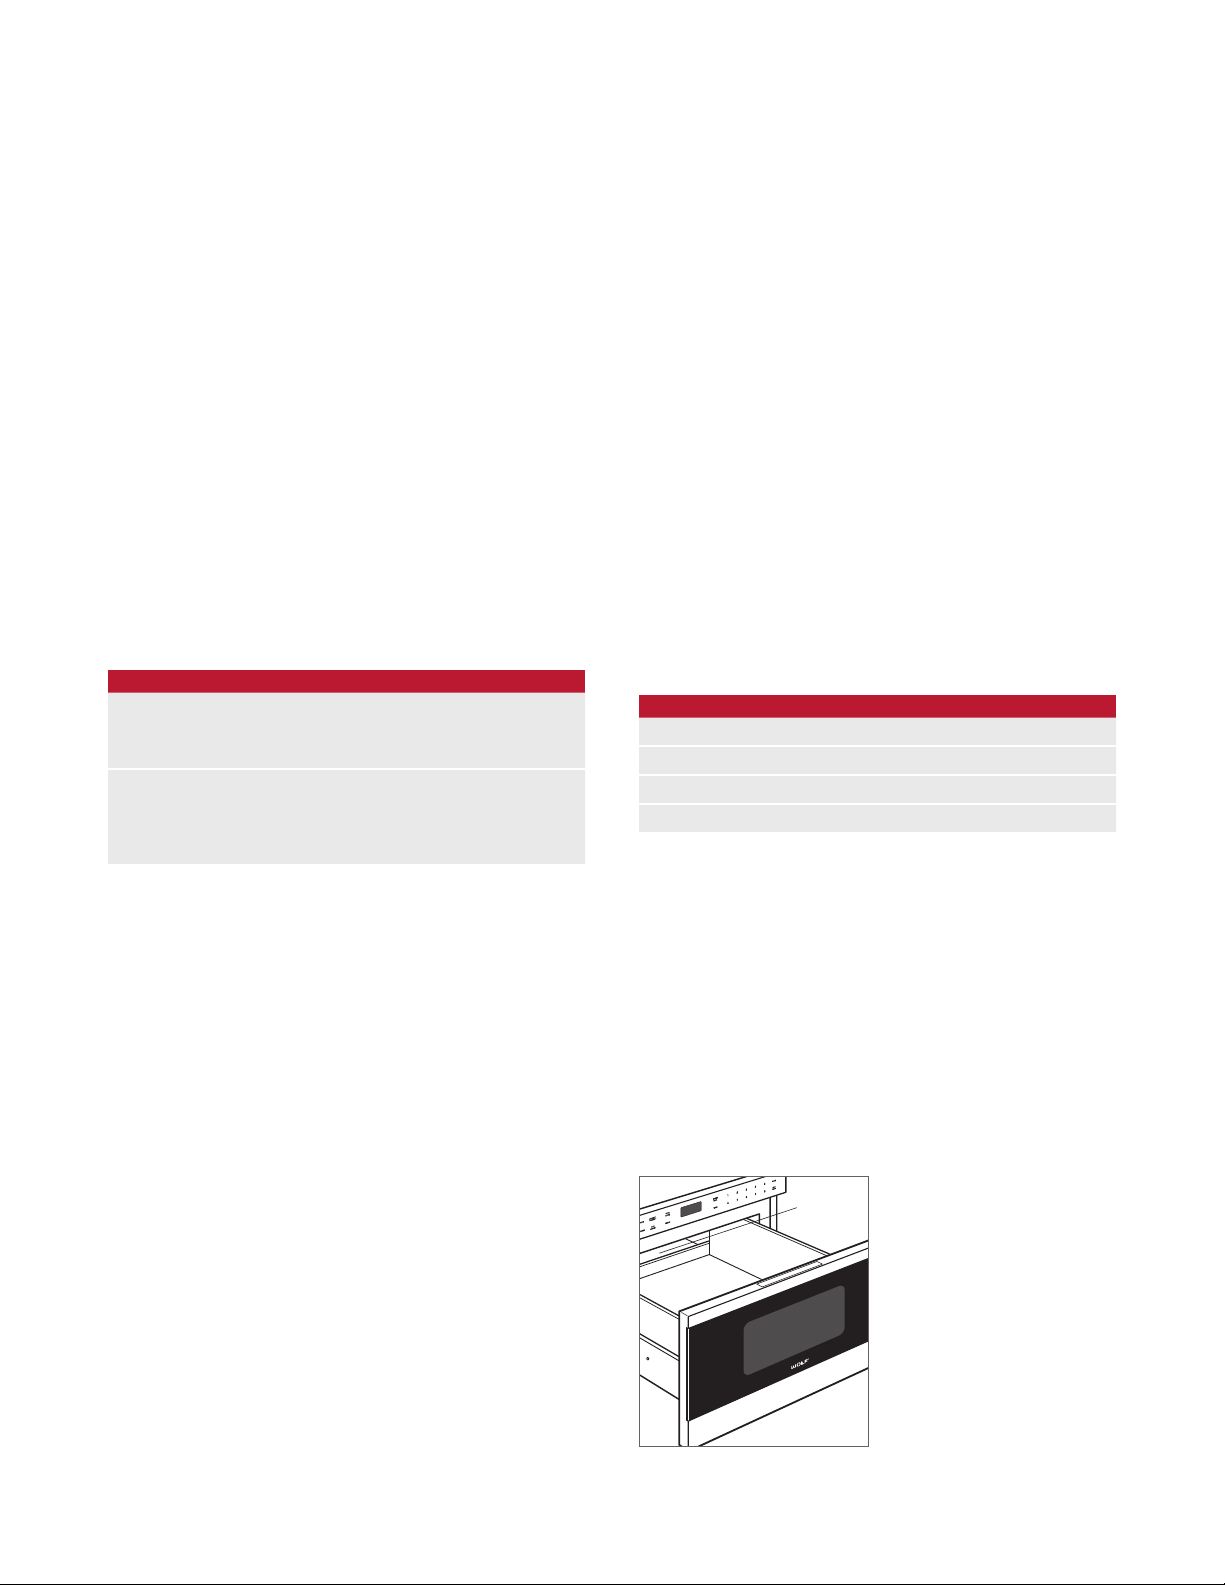
Important product information including the model and
serial number are listed on the product rating plate. The
rating plate is located on the bottom of the microwave oven
cavity. The drawer must be open to view the rating plate.
Refer to the illustration below.
If service is necessary, contact Wolf factory certied service
with the model and serial number. For the name of the
nearest Wolf factory certied service or for questions
regarding the installation, visit the contact & support section
of our website, wolfappliance.com or call Wolf customer
care at 800-222-7820.
RATING
PLATE
IMPORTANT NOTE: When using any microwave oven gener-
ating heat, there are certain safety precautions you should
follow. These precautions are listed in the Wolf drawer
microwave oven use & care guide provided with the unit.
Read all and follow carefully.
WARNING
If the information in this guide is not followed exactly,
a re or electrical shock may result that could cause
property damage, personal injury or death.
WARNING
To reduce the risk of tipping, the drawer microwave
oven must be secured by properly installed anti-tip
blocking.
This microwave oven must be electrically grounded in
accordance with local codes.
Make sure the wall coverings and the cabinets around
the appliance can withstand the heat generated by a
microwave oven.
Rating plate location.
WARNING
Improper use of the grounding plug can result in a risk
of electric shock. Do not use an extension cord. If the
power cord is too short, have a qualied electrician or
service technician install an outlet near the appliance.
wolfappliance.com | 3
Page 4
SPECIFICATIONS
Installation Requirements
The drawer microwave oven can be installed in a standard
or ush inset application. Location of the electrical supply
within the oven opening may require additional cabinet
depth. Refer to the chart below.
Finish the edges of the opening. They may be visible when
the drawer is open.
1
For ush inset installations, a minimum
required on the top and sides and
A sales accessory is required to direct air away from the
unit. Accessories are available through an authorized Wolf
dealer. For local dealer information, visit the nd a showroom section of our website, wolfappliance.com. To ensure
consistent reveals, each corner of the opening must be
exactly 90°.
INSTALLATION REQUIREMENTS
BASE SUPPORT
24" Model 125 lbs (57 kg)
30" Model 125 lbs (57 kg)
TRIM OVERLAP 24" MODEL 30" MODEL
Top
Bottom
Sides
/8" (3) reveal is
11
/16" (18) on the bottom.
5
/16" (8)
1
/16" (2)
3
/4" (19) 37/8" (98)
5
/16" (8)
1
/16" (2)
Electrical
Installation must be electrically grounded in accordance
with local codes or, in the absence of local codes, with the
National Electrical Code, ANSI/NFPA 70.
The receptacle should be located in the upper left area of
the opening. Refer to the illustrations on pages 5–6. The
receptacle may also be located in an adjacent cabinet within
reach of the power cord. An access hole must be provided
through the cabinet for the power cord.
IMPORTANT NOTE: The microwave oven is equipped with a
power cord with a 3-prong grounding plug. The power cord
must be plugged into a mating 3-prong grounded outlet. If
you only have a 2-prong outlet, have a qualied electrician
install a properly grounded outlet. If you have any questions
about the grounding or electrical instructions, consult a
qualied electrician or service technician.
ELECTRICAL REQUIREMENTS
Electrical Supply grounded, 120 VAC, 60 Hz
Service 15 amp dedicated circuit
Receptacle 3-prong grounding-type
Power Cord 4'
(1.2 m)
Anti-Tip Blocking
To reduce the risk of tipping, the drawer microwave oven
must be secured in place by anti-tip blocking. The anti-tip
blocking must be provided by the installer. Dimensions will
vary with the installation. Refer to the illustration for your
specic installation on pages 5–6.
When installed to the wall, make sure screws completely
penetrate dry wall and are secured in wood or metal, so
blocking is completely stable. When fastening, verify screws
do not penetrate electrical wiring or plumbing.
The anti-tip blocking prevents serious injury that might result
from the drawer tipping forward and hot food being spilled.
GROUNDING INSTRUCTIONS
This appliance must be grounded. The drawer microwave
oven is equipped with a cord having a grounding wire with
a grounding plug. It must be plugged into a wall receptacle
that is properly installed and grounded in accordance with
the National Electrical Code and local codes and ordinances. In the event of an electrical short circuit, grounding
reduces risk of electric shock by providing an escape wire
for the electric current.
RATING
PLATE
Rating plate location.
4 | Wolf Customer Care 800.222.7820
Page 5
SPECIFICATIONS
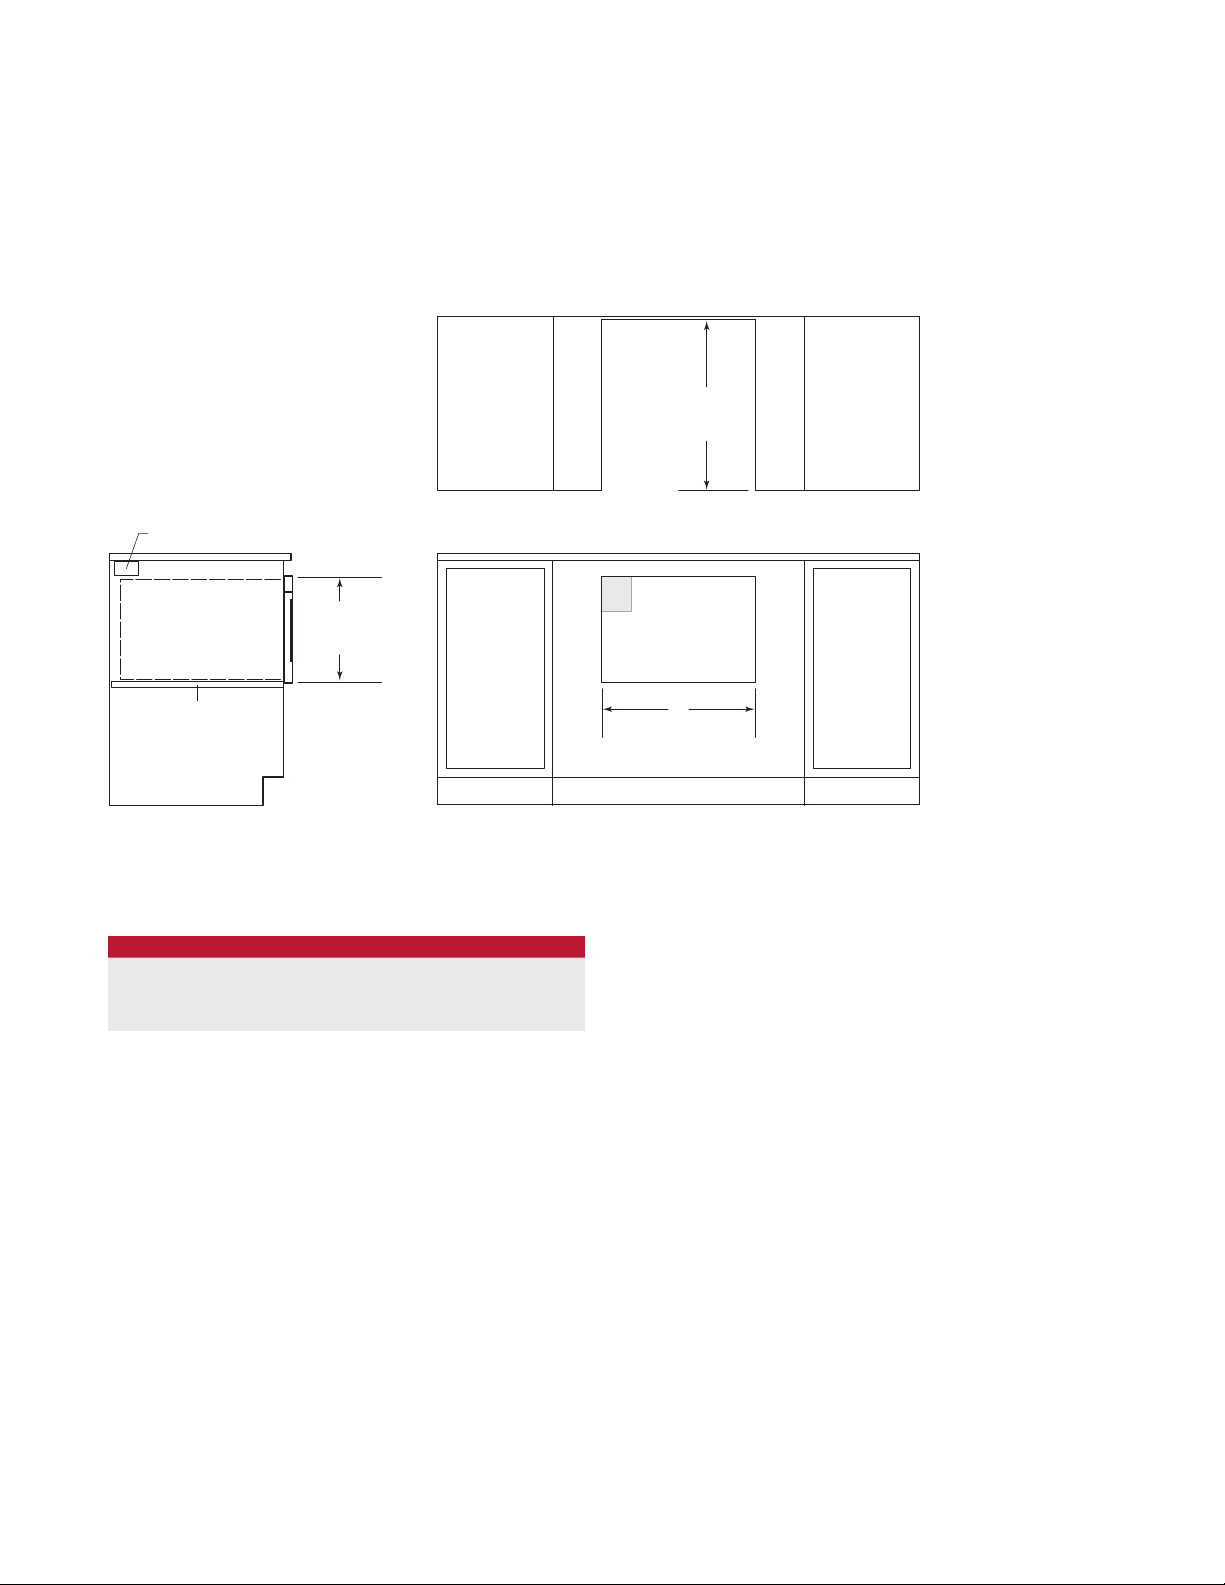
SIDE
NOTE: All dr
Dashed line represents profile of unit
Drawer Microwave Oven
STANDARD INSTALLATION
22" (559)
OPENING
DEPTH
ANTI-TIP BLOCK
BASE SUPPORT
VIEW
awer microwave ovens require the same opening dimensions.
STANDARD INSTALLATION
MODEL W
24" Model 221/8" (562)
30" Model 221/8" (562)
143/4" (375)
OPENING
HEIGHT
.
TOP VIEW
E
W
OPENING WIDTH
FRONT VIEW
wolfappliance.com | 5
Page 6
SPECIFICATIONS
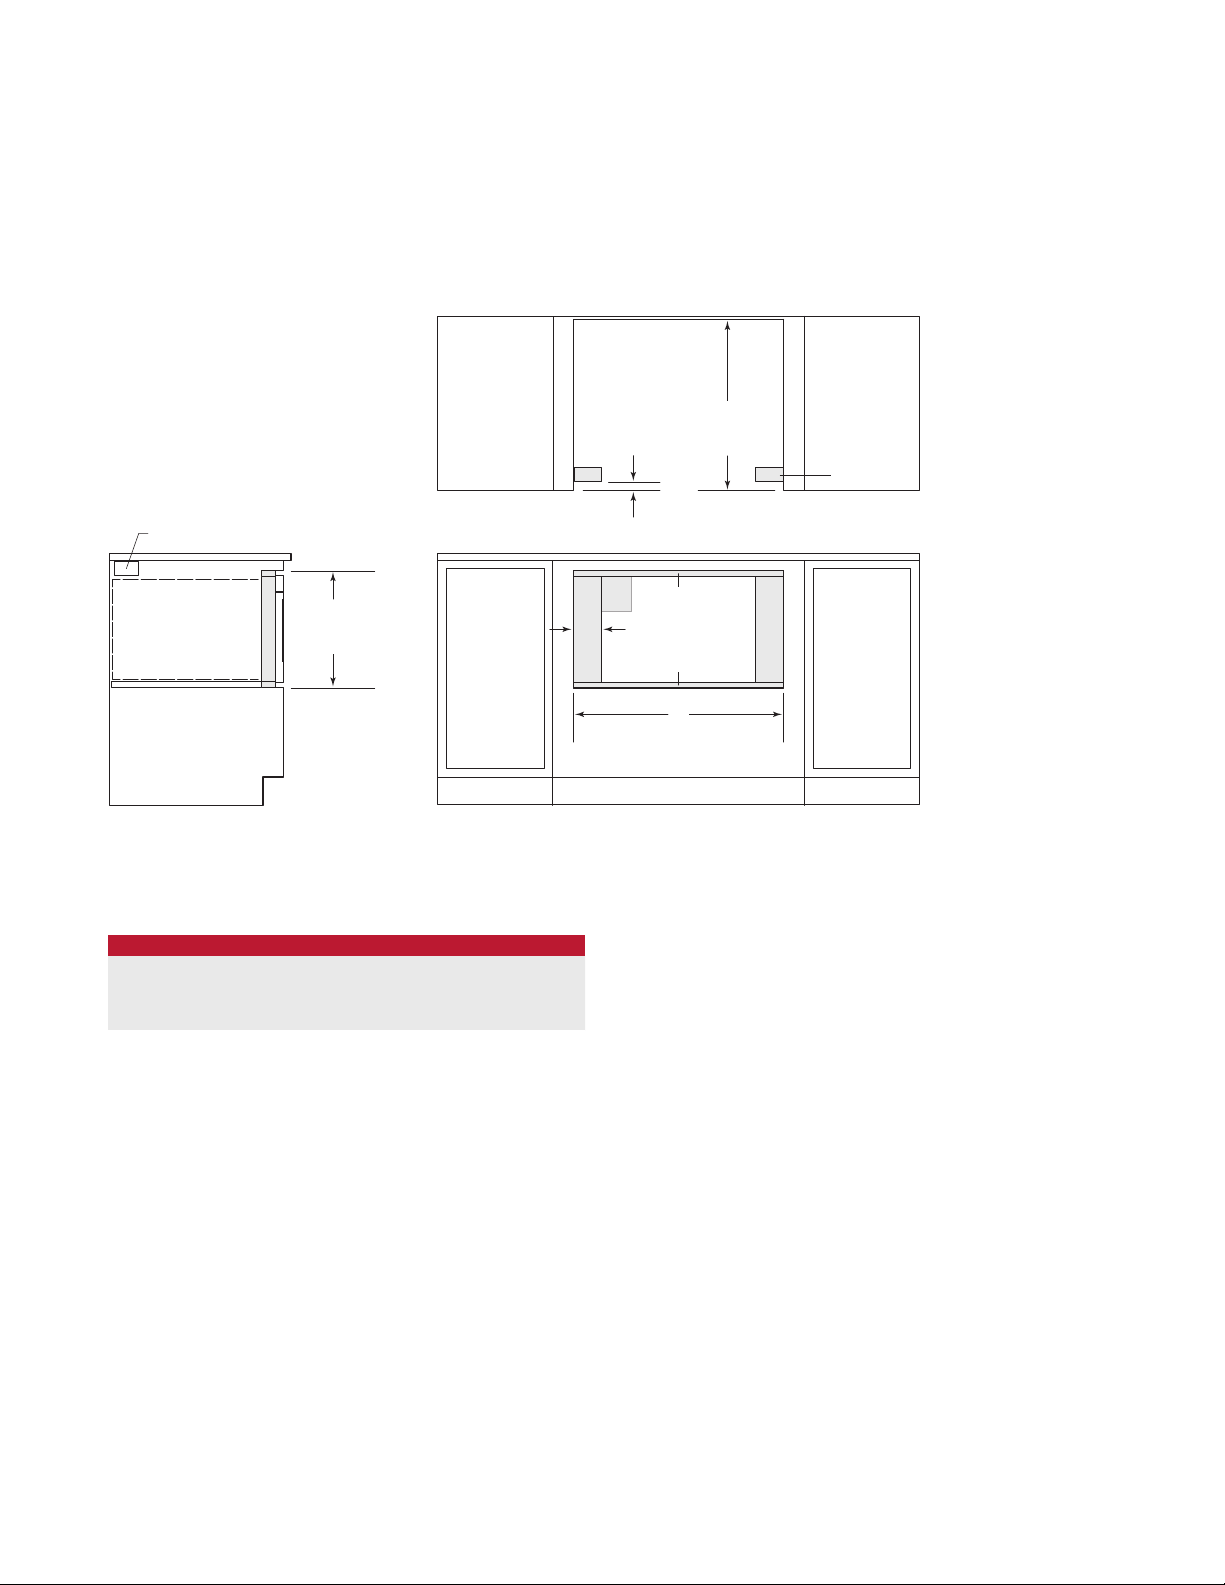
SIDE
*W
NOTE: Dashed line represents profile of unit.
Drawer Microwave Oven
FLUSH INSET INSTALLATION
11/4" (32)
231/4"
(591)
FLUSH INSET
DEPTH
FINISHED
CLEATS*
ANTI-TIP BLOCK
VIEW
ill be visible and should be finished to match cabinetry.
FLUSH INSET WIDTH
MODEL W A
24" Model 237/8" (606)
30" Model 301/8" (765) 4" (102)
1515/16" (405)
FLUSH INSET
HEIGHT
7
/8" (22)
TOP VIEW
7
E
A
3
FLUSH INSET WIDTH
FRONT VIEW
/16"(11)
/4" (19)
W
6 | Wolf Customer Care 800.222.7820
Page 7

INSTALLATION
Preparation
Remove and recycle packing materials. Do not remove the
waveguide cover, which is located on the upper surface of
the drawer interior. Refer to the illustration below.
Installation
1 Turn power off to the electrical outlet.
2 Move the unit near the opening. Plug the power cord into
the grounded outlet.
3 Position the microwave oven in the opening and slide
back until the mounting ange is ush with the face of
the cabinet. Avoid pinching the power cord between the
unit and cabinet wall.
4 Open the drawer. Using the two holes on either side of
the mounting ange as a template, pre-drill mounting
holes into the cabinet using a
5 Mount the microwave oven with the four screws pro-
vided. Refer to the illustration below.
6 Turn power back on to the electrical outlet.
1
/16" drill bit.
Troubleshooting
IMPORTANT NOTE: If the drawer microwave oven does not
operate properly, follow these troubleshooting steps:
• Verify electrical power is supplied to the microwave
oven.
• Verify proper electrical connections.
• If the microwave oven does not operate properly, contact
Wolf factory certied service. Do not attempt to repair
the oven. Wolf is not responsible for service required to
correct a faulty installation.
MOUNTING
WAVEGUIDE
COVER
Waveguide cover.
Wolf, Wolf & Design, Wolf Gourmet, W & Design and the color red as applied to knobs are registered trademarks and service marks of Wolf Appliance, Inc. Sub-Zero, Sub-Zero &
Design, Dual Refrigeration, Constant Care, The Living Kitchen, Great American Kitchens The Fine Art of Kitchen Design, and Ingredients are registered trademarks and service marks
of Sub-Zero, Inc. (collectively, the “Company Marks.”) All other trademarks or registered trademarks are property of their respective owners in the United States and other countries.
FLANGE
Mounting.
wolfappliance.com | 7
Page 8

HORNO DE MICROONDAS DE CAJÓN
Contenido
3 Horno de microondas de cajón
4 Especicaciones
7 Instalación
7 Resolución de problemas
Las características y especicaciones están sujetas a cambios sin previo aviso. Visite wolfappliance.com/specs para
obtener la información más actualizada.
Aviso importante
Para garantizar que este producto sea instalado y operado
de la forma más segura y eciente posible, tome nota de los
siguientes tipos de información resaltada en esta guía:
AVISO IMPORTANTE resalta la información que es especial-
mente importante.
PRECAUCIÓN indica una situación en la que se pueden
sufrir heridas leves o provocar daños al producto si no se
siguen las instrucciones.
ADVERTENCIA indica peligro de que se produzcan heridas
graves o incluso la muerte si no se siguen las precauciones.
AVISO IMPORTANTE: en toda esta guía, las dimensiones
entre paréntesis son milímetros, a menos que se especique
lo contrario.
AVISO IMPORTANTE: guarde estas instrucciones para el
inspector eléctrico local.
GUARDE ESTAS
INSTRUCCIONES
2 | Atención al cliente de Wolf 800.222.7820
Page 9

HORNO DE MICROONDAS DE CAJÓN
Información del producto
La información importante del producto, incluido el modelo
y número de serie de la unidad, se encuentran en la placa
de datos del producto. La placa de datos se localiza en la
parte baja de la cavidad del horno de microondas. El cajón
debe estar abierto para ver la placa de datos. Consulte la
siguiente ilustración.
Si necesita servicio, póngase en contacto con el centro de
servicio autorizado de Wolf y tenga a la mano el modelo y
número de serie de la unidad. Para obtener los datos del
centro de servicio autorizado de Wolf más cercano o si
tiene preguntas acerca de la instalación, visite la sección de
contacto y soporte técnico en nuestra página de Internet
wolfappliance.com o llame a la línea de atención al cliente
de Wolf al 800-222-7820.
PLACA DE
DATOS
AVISO IMPORTANTE: al utilizar un horno de microondas que
genera calor, hay ciertas precauciones de seguridad que
debe seguir. Estas precauciones se encuentran enumeradas
en la guía de uso y cuidado del horno de microondas de
cajón de Wolf proporcionado con la unidad. Léalas en su
totalidad y sígalas con cuidado.
ADVERTENCIA
Si no se sigue la información de esta guía al pie de la
letra se puede provocar un incendio o una descarga
eléctrica que podría causar daños a la propiedad,
lesiones personales o incluso la muerte.
ADVERTENCIA
Para reducir el riesgo de que la unidad se vuelque
hacia el frente, el horno de microondas de cajón debe
asegurarse mediante la instalación correcta de un
soporte antivuelco.
Este horno de microondas debe tener una conexión
eléctrica a tierra de conformidad con los códigos
locales.
Asegúrese de que las cubiertas de los muros y
los gabinetes que rodean el electrodoméstico
puedan soportar el calor generado por un horno de
microondas.
Ubicación de la placa de datos.
ADVERTENCIA
El uso incorrecto de la conexión a tierra puede resultar
en un riesgo de descarga eléctrica. No utilice un cable
de extensión. Si el cable de alimentación eléctrica es
demasiado corto, pida a un electricista calicado o
técnico de servicio que instale un tomacorriente cerca
del electrodoméstico.
wolfappliance.com | 3
Page 10

ESPECIFICACIONES
Requisitos de instalación
El horno de microondas de cajón se puede instalar en
una aplicación estándar o empotrable. Es posible que la
ubicación del suministro eléctrico al interior de la abertura
del horno requiera de un gabinete de mayor profundidad.
Consulte la tabla siguiente.
Dé el acabado a los bordes de la abertura. Pueden ser
visibles cuando el cajón está abierto.
Para las aplicaciones empotrables se requiere un margen
mínimo de
11
/16" (18) en la parte inferior. Se requiere un accesorio de
ventas para dirigir el aire lejos de la unidad. Los accesorios
están disponibles a través de un distribuidor autorizado
de Wolf. Para obtener más información acerca de los
distribuidores locales visite la sección para encontrar un
showroom en nuestro sitio web, wolfappliance.com. Para
asegurarse de tener un margen uniforme, cada esquina de
la abertura debe tener exactamente 90°.
REQUISITOS DE INSTALACIÓN
SOPORTE DE LA BASE
Modelo de 24" 125 lbs (57 kg)
Modelo de 30" 125 lbs (57 kg)
SUPERPOSICIÓN DEL RIBETE MODELO DE 24" MODELO DE 30"
Parte superior
Parte inferior
Laterales
1
/8" (3) en la parte superior y a los lados y uno de
5
/16" (8)
1
/16" (2)
3
/4" (19) 37/8" (98)
5
/16" (8)
1
/16" (2)
Instalación eléctrica
La instalación debe cumplir con todos los códigos eléctricos vigentes.
El receptáculo debe ubicarse en el área superior izquierda
de la abertura. Consulte la ilustración para su instalación
especíca en las páginas 5 y 6. El receptáculo también
puede ubicarse en un gabinete adyacente dentro del
alcance del cable de alimentación eléctrica. Se debe proporcionar un oricio de acceso a través del gabinete para el
cable de alimentación eléctrica.
AVISO IMPORTANTE: el horno de microondas está equipado
con un cable de alimentación eléctrica con un enchufe de
tres clavijas con conexión a tierra. El cable de alimentación
eléctrica debe conectarse a un tomacorriente de tres clavijas
con conexión a tierra. Si tiene un tomacorriente de dos
clavijas, pida a un electricista calicado que instale un tomacorriente debidamente conectado a tierra. Si tiene preguntas
acerca de la conexión a tierra o las instrucciones eléctricas,
consulte a un electricista calicado o a un técnico de servicio.
REQUISITOS ELÉCTRICOS
HORNO DE MICROONDAS DE CAJÓN
Suministro eléctrico Con conexión a tierra, 120 V CA, 60 Hz
Servicio Circuito dedicado de 15 amperes
Receptáculo Conexión a tierra de 3 clavijas
Cable de alimentación
eléctrica
(1.2 m)
4'
Soporte antivuelco
Para reducir el riesgo de que la unidad se vuelque hacia el
frente, el horno de microondas de cajón debe asegurarse
mediante un soporte antivuelco. El soporte antivuelco debe
ser proporcionado por el instalador. Las dimensiones pueden
variar de acuerdo con la instalación. Consulte la ilustración
para su instalación especíca en las páginas 5 y 6.
Al instalarlo en la pared, asegúrese de que los tornillos penetren completamente el yeso y se jen en madera o metal,
de tal manera que el soporte quede completamente estable.
Al jarlo compruebe que los tornillos no penetren los cables
eléctricos ni las tuberías.
El soporte antivuelco previene las lesiones graves que
podrían ocurrir como resultado de que el cajón se vuelque
hacia el frente y se derramen alimentos calientes.
4 | Atención al cliente de Wolf 800.222.7820
INSTRUCCIONES PARA REALIZAR LA CONEXIÓN A TIERRA
Este electrodoméstico debe ser conectado a tierra. El horno
de microondas de cajón está equipado con un cable de
alimentación eléctrica con un enchufe de conexión a tierra.
Debe conectarse a un tomacorriente de pared debidamente
instalado y conectado a tierra de conformidad con el Código
Nacional de Electricidad y los códigos y ordenanzas locales.
En caso de que se produzca un cortocircuito eléctrico, la
conexión a tierra reduce el riesgo de descarga eléctrica al
proporcionar un cable de escape para la corriente eléctrica.
PLACA
DE DATOS
Ubicación de la placa de datos.
Page 11

ESPECIFICACIONES
VIST
NOTA: todos los hornos de microondas de cajón requieren las mismas dimensiones de abertura
La línea punteada representa el perfil de la unidad.
Horno de microondas de cajón
INSTALACIÓN ESTÁNDAR
22" (559)
PROFUNDIDAD DE
LA ABERTURA
SOPORTE ANTIVUELCO
143/4" (375)
ALTURA DE
LA ABERTURA
A LATERAL
INSTALACIÓN ESTÁNDAR
MODELO A
Modelo de 24" 221/8" (562)
Modelo de 30" 221/8" (562)
VISTA SUPERIOR
E
ANCHO DE ABERTURA
A
VISTA FRONTAL
.
wolfappliance.com | 5
Page 12

ESPECIFICACIONES
VIST
*L
NOTA: la línea punteada representa el perfil de la unidad.
Horno de microondas de cajón
INSTALACIÓN EMPOTRABLE
11/4" (32)
231/4"
PROFUNDIDAD DE
(591)
LA INSTALACIÓN
EMPOTRABLE
CORNAMUSAS
TERMINADAS*
SOPORTE ANTIVUELCO
1515/16" (405)
ALTURA
EMPOTRABLE
A LATERAL
as áreas sombreadas serán visibles y se les debe dar un acabado que combine con los gabinetes.
INSTALACIÓN EMPOTRABLE
MODELO A B
Modelo de 24" 237/8" (606)
Modelo de 30" 301/8" (765) 4" (102)
VISTA SUPERIOR
7
E
/16"(11)
B
3
/4" (19)
A
ANCHO DE LA
INSTALACIÓN EMPOTRABLE
VISTA FRONTAL
.
7
/8" (22)
6 | Atención al cliente de Wolf 800.222.7820
Page 13

INSTALACIÓN
Preparación
Retire y recicle los materiales de embalaje. No retire la
cubierta de guía de onda que se encuentra en la supercie superior del interior del cajón. Consulte la siguiente
ilustración.
Instalación
1 Desconecte la alimentación del tomacorriente eléctrico.
2 Mueva la unidad cerca de la abertura. Conecte el cable
de alimentación eléctrica en un tomacorriente con conexión a tierra.
3 Coloque el horno de microondas en la abertura y des-
lícelo hacia atrás hasta que el reborde para montaje se
encuentre a ras con el frente del gabinete. Evite pellizcar
el cable de alimentación eléctrica entre la unidad y la
pared del gabinete.
4 Abra el cajón. Utilice los dos oricios ubicados a cada
lado del reborde para montaje como plantilla y perfore
los oricios de montaje en el gabinete con una broca
1
/16".
de
Resolución de problemas
AVISO IMPORTANTE: si el horno de microondas de cajón no
tiene un funcionamiento apropiado, siga estos pasos para
resolver los problemas:
• Compruebe que el horno de microondas tiene corriente
eléctrica.
• Compruebe que las conexiones eléctricas son las
adecuadas.
• Si el horno de microondas no funciona correctamente,
póngase en contacto con el centro de servicio autorizado de Wolf. No intente reparar el horno. Wolf no es
responsable del servicio necesario para corregir una
instalación defectuosa.
5 Monte el horno de microondas con los cuatro tornillos
proporcionados. Consulte la siguiente ilustración.
6 Conecte la alimentación del tomacorriente eléctrico.
CUBIERTA
DE GUÍA
DE ONDA
Cubierta de guía de onda.
Wolf, Wolf & Design, Wolf Gourmet, W & Design y el color rojo aplicado a las perillas son marcas comerciales registradas y marcas de servicio de Wolf Appliance, Inc. Sub-Zero, Sub-Zero & Design, Dual Refrigeration, Constant Care, The Living Kitchen, Great American Kitchens The Fine Art of Kitchen
Design e Ingredients son marcas comerciales registradas y marcas de servicio de Sub-Zero, Inc. (en conjunto, las “Marcas de la Compañía”). Todas
las demás marcas comerciales o marcas comerciales registradas son propiedad de sus respectivos propietarios en los Estados Unidos y otros países.
REBORDE PARA
MONTAJE
Montaje.
wolfappliance.com | 7
Page 14

FOUR À MICRO-ONDES À TIROIR
Table des matières
3 Four à micro-ondes à tiroir
4 Spécications
7 Installation
7 Dépannage
Les caractéristiques et les spécications peuvent être modiées en tout temps sans préavis. Visitez wolfappliance.com/
specs pour obtenir les renseignements les plus récents.
Remarque importante
Pour s’assurer que ce produit est installé et utilisé en toute
sécurité et aussi efcacement que possible, prenez note des
types de renseignement mis en évidence tout au long de ce
guide :
REMARQUE IMPORTANTE met en évidence des renseigne-
ments qui sont particulièrement importants.
MISE EN GARDE indique une situation où une blessure
mineure ou des dommages au produit peuvent se produire
si les directives ne sont pas respectées.
AVERTISSEMENT décrit un danger qui peut causer une
blessure grave ou la mort si les précautions ne sont pas
respectées.
REMARQUE IMPORTANTE : tout au long de ce guide, les
dimensions entre parenthèses sont en millimètres à moins
d’indication contraire.
REMARQUE IMPORTANTE : conservez ces directives pour
l’inspecteur en électricité local.
CONSERVEZ CES
DIRECTIVES
2 | Service à la clientèle de Wolf 800.222.7820
Page 15

FOUR À MICRO-ONDES À TIROIR
Renseignements sur le produit
Des renseignements importants sur le produit, y compris les
numéros de modèle et de série, se trouvent sur la plaque
signalétique du produit. La plaque signalétique est située au
fond de la cavité du four à micro-ondes. Le tiroir doit être
ouvert pour voir la plaque signalétique. Reportez-vous à
l’illustration ci-dessous.
Si vous avez besoin de service, communiquez avec le
service Wolf certié par l’usine avec les numéros de
modèle et de série. Pour obtenir le nom du centre de
service Wolf certié par l’usine le près de chez vous ou si
vous avez des questions concernant l’installation, consultez
la section Contact et assistance de notre site Web,
wolfappliance.com ou appelez le service à la clientèle de
Wolf au 800-222-7820.
PLAQUE
SIGNALÉ-
TIQUE
REMARQUE IMPORTANTE : lors de l’utilisation de tout four à
micro-ondes générant de la chaleur, il y a certaines précautions de sécurité à respecter. Ces précautions se trouvent
dans le guide d’utilisation et d’entretien du four à microondes à tiroir Wolf fourni avec l’unité. Lisez-les toutes et
respectez-les attentivement.
AVERTISSEMENT
Si les renseignements se trouvant dans ce guide ne
sont pas respectés à la lettre, un incendie ou un choc
électrique peuvent se produire causant ainsi des dommages matériels, des blessures ou la mort.
AVERTISSEMENT
En vue de réduire le risque de basculement, le four à
micro-ondes à tiroir doit être xé par un bloc antibasculement installé correctement.
Ce four à micro-ondes doit être mis à la terre électriquement conformément aux codes locaux.
Assurez-vous que les revêtements muraux et les
armoires autour de l’appareil peuvent résister à la chaleur générée par le four à micro-ondes.
Emplacement de la plaque
signalétique.
AVERTISSEMENT
Une mauvaise utilisation de la che de masse peut
entraîner un risque d’électrocution. N’utilisez pas de
rallonge électrique. Si le cordon d’alimentation est trop
court, demandez à un électricien ou à un technicien
de service qualié d’installer une prise plus près de
l’appareil.
wolfappliance.com | 3
Page 16

SPÉCIFICATIONS
Exigences d’installation
Le four à micro-ondes à tiroir peut être installé dans une
application standard ou à afeurement. L’emplacement de
l’alimentation électrique dans l’ouverture du four peut exiger
une profondeur d’armoire supplémentaire. Reportez-vous
au tableau ci-dessous.
Finissez les rebords de l’ouverture. Ils peuvent être visibles
lorsque le tiroir est ouvert.
Pour les installations à afeurement, un jeu minimum de
1
/8po (3) est requis sur le dessus et les côtés et de 11/16po
(18)
au fond. Un accessoire de vente est requis pour diriger
l’air loin de l’unité. Les accessoires sont offerts par les
dépositaires Wolf autorisés. Pour obtenir des renseignements sur les dépositaires locaux, visitez la section trouver
une salle d’exposition de notre site Web, wolfappliance.
com. Pour assurer des jeux constants, chaque coin de
l’ouverture doit être de 90° exactement.
EXIGENCES D’INSTALLATION
SUPPORT DE BASE
Modèle de 24 po 125 lb (57 kg)
Modèle de 30 po 125 lb (57 kg)
CHEVAUCHEMENT
DE LA GARNITURE
Dessus
Fond
Côtés
MODÈLE DE 24 PO MODÈLE
5
/16 po (8)
1
/16 po (2)
3
/4 po (19) 37/8 po (98)
DE 30 PO
5
/16 po (8)
1
/16 po (2)
Électricité
L’installation doit se conformer à tous les codes électriques
applicables.
La prise doit se trouver dans la zone supérieure gauche de
l’ouverture. Reportez-vous à l’illustration pour votre installation précise aux pages 5 et 6. La prise peut aussi se trouver
dans une armoire adjacente à la portée du cordon d’alimentation. Un trou d’accès doit être effectué dans l’armoire pour
passer le cordon d’alimentation.
REMARQUE IMPORTANTE : le four à micro-ondes est muni
d’un cordon d’alimentation avec une che à trois broches
mise à la terre. Le cordon d’alimentation doit être branché
dans une prise à trois broches mise à la terre. Si vous
n’avez qu’une prise à deux broches, demandez à un électricien qualié d’installer une prise correctement mise à la
terre. Si vous avez des questions au sujet des directives sur
l’électricité et la mise à la terre, consultez un électricien ou
un technicien de service qualié.
EXIGENCES ÉLECTRIQUES
FOUR À MICRO-ONDES À TIROIR
Alimentation électrique mise à la terre, 120 volts CA, 60 Hz
Service circuit dédié de 15 ampères
Prise mise à la terre à trois broches
Cordon d’alimentation 4 pi
DIRECTIVES DE MISE À LA TERRE
(1,2 m)
Bloc antibasculement
En vue de réduire le risque de basculement, le four à microondes à tiroir doit être xé par un bloc antibasculement.
Le bloc antibasculement doit être fourni par l’installateur.
Les dimensions varient selon l’installation. Reportez-vous à
l’illustration pour votre installation précise aux pages 5 et 6.
Lorsqu’il est installé sur le mur, assurez-vous que les vis
pénètrent la cloison sèche complètement et qu’elles sont
solides dans du bois ou du métal an que le bloc soit complètement stable. Lors de la xation, assurez-vous que les
vis ne pénètrent pas les ls électriques ou la plomberie.
Le bloc antibasculement évite les blessures graves qui
pourraient se produire lors du basculement du tiroir vers
l’avant et du renversement d’aliments chauds.
4 | Service à la clientèle de Wolf 800.222.7820
Cet appareil doit être mis à la terre. Le four à micro-ondes à
tiroir est muni d’un cordon avec un l de masse et une che
de masse. Cette dernière doit être branchée dans une prise
murale qui est adéquatement installée et mise à la terre
conformément au Code national de l’électricité ainsi qu’aux
ordonnances et codes locaux. Dans le cas d’un court-circuit, la mise à la terre réduit le risque de choc électrique en
fournissant un l de décharge au courant électrique.
PLAQUE
SIGNALÉ-
TIQUE
Emplacement de la plaque signalétique.
Page 17

SPÉCIFICATIONS
VUE DE PR
REMARQUE : tous les fours à micro-ondes à tiroir nécessitent les mêmes dimensions d’ouverture.
La ligne pointillée représente le profil de l’unité.
Four à micro-ondes à tiroir
INSTALLATION STANDARD
PROFONDEUR
D’OUVERTURE
22 PO (559)
DE
BLOC ANTIBASCULEMENT
HAUTEUR
D’OUVERTURE DE
3
14
/4 PO
OFIL
INSTALLATION STANDARD
MODÈLE A
Modèle de 24 po 221/8 po (562)
(375)
Modèle de 30 po 221/8 po (562)
VUE DE DESSUS
E
A
LARGEUR DE
L’OUVERTURE
VUE DE FACE
wolfappliance.com | 5
Page 18

SPÉCIFICATIONS
VUE DE PR
*L
REMARQUE : la ligne pointillée représente le profil de l’unité.
Four à micro-ondes à tiroir
INSTALLATION À AFFLEUREMENT
11/4 PO (32)
PROFONDEUR À
AFFLEUREMENT
231/4 PO (591)
DE
TAQUETS
FINIS*
BLOC ANTIBASCULEMENT
HAUTEUR DE
L’AFFLEUREMENT
1515/16 PO (405)
OFIL
es zones ombragées seront visibles et doivent être finies pour s’agencer avec les armoires.
INSTALLATION À AFFLEUREMENT
MODÈLE A B
Modèle de 24 po 237/8 po (606)
Modèle de 30 po 301/8 po (765) 4 po (102)
7
/8 po (22)
VUE DE DESSUS
7
E
/16 PO (11)
3
/4 PO (19)
HAUTEUR DE L’AFFLEUREMENT
A
VUE DE FACE
B
6 | Service à la clientèle de Wolf 800.222.7820
Page 19

INSTALLATION
Préparation
Retirez et recyclez les matériaux d’emballage. Ne retirez pas
le blindage du guide d’ondes, qui est situé sur la surface
supérieure de l’intérieur du tiroir. Reportez-vous à l’illustration ci-dessous.
Installation
1 Coupez le courant au niveau de la prise de courant.
2 Déplacez l’unité près de l’ouverture. Branchez le cordon
d’alimentation dans la prise mise à la terre.
3 Placez le four à micro-ondes dans l’ouverture et
poussez-le vers l’arrière jusqu’à ce que la bride de mon-
tage soit à égalité avec la face de l’armoire. Évitez de
coincer le cordon d’alimentation entre l’unité et le mur
de l’armoire.
4 Ouvrez le tiroir. En utilisant les deux trous de chaque
côté de la bride de montage comme gabarit, pré-percez
des trous de montage dans l’armoire au moyen d’une
mèche de
5 Installez le four à micro-ondes avec les quatre vis four-
nies. Reportez-vous à l’illustration ci-dessous.
1
/16 po.
Dépannage
REMARQUE IMPORTANTE : si le four à micro-ondes à tiroir
ne fonctionne pas correctement, veuillez suivre les étapes
de dépannage suivantes :
• Vériez l’alimentation électrique du four à micro-ondes.
• Vériez l’état des connexions électriques.
• Si le four à micro-ondes ne fonctionne pas correctement,
communiquez avec le centre service Wolf certié par
l’usine. Ne tentez pas de réparer le four. Wolf n’est pas
responsable du service requis pour corriger une installation défectueuse.
6 Rétablissez le courant au niveau de la prise de courant.
BLINDAGE
DU GUIDE
D’ONDES
Blindage du guide d’ondes.
Wolf, Wolf & Design, Wolf Gourmet, W & Design et la couleur rouge qui est appliquée aux boutons sont des marques déposées et des marques de
service de Wolf Appliance, Inc. Sub-Zero, Sub-Zero & Design, Dual Refrigeration, Constant Care, The Living Kitchen, Great American Kitchens The
Fine Art of Kitchen Design et Ingredients sont des marques déposées et des marques de service de Sub-Zero, Inc. (collectivement, les « marques de
l’Entreprise »). Toutes les autres marques de commerce ou déposées appartiennent à leurs propriétaires respectifs aux États-Unis et dans d’autres pays.
BRIDE DE
MONTAGE
Montage.
wolfappliance.com | 7
Page 20

WOLF APPLIANCE, INC. P.O. BOX 44848 MADISON, WI 53744 WOLFAPPLIANCE.COM 800.222.7820
823036 REV-A 6/2013
 Loading...