

Page 1

W ARMING D RAWER
USE &CARE INFORMATION
Page 2

CONTENTS
Introducing the Wolf Warming Drawer 3
Safety Instructions and Precautions 4
Wolf Warming Drawer Features 6
Wolf Warming Drawer Use & Care 7
Wolf Troubleshooting Guide 13
Wolf Service Information 14
Wolf Warranty 15
WOLF®is a registered trademark of Wolf Appliance Company, LLC
As you read this Use & Care Information,
take particular note of the CAUTION and
ARNING symbols when they appear.
W
This information is important for safe and
ficient use of the Wolf equipment.
ef
signals a situation where minor injury or
oduct damage may occur if you do not
pr
follow instructions.
states a hazard that may cause serious
injury or death if precautions are not
followed.
mation may
In addition, this Use & Car
ANT NOTE which highlights
signal an IMPOR
mation that is especially important.
infor
T
e Infor
Page 3

INTRODUCING THE WOLF WARMING DRAWER
THANK YOU
Your purchase of a Wolf warming drawer
attests to the importance you place upon the
uality and performance of your cooking
q
equipment. We understand this importance
and have designed and built your warming
rawer with quality materials and workman-
d
ship to give you years of dependable service.
Before you begin using your warming drawer,
please take some time to read this Use & Care
Information. It will be to your benefit to
familiarize yourself with the safety practices,
features, operation and care recommendations
of the Wolf warming drawer.
We appreciate your choice of a Wolf Appliance
product and welcome any suggestions or
comments you may have. To share your
opinions with us, please call 800-332-9513.
CONTACT
INFORMATION
Wolf Customer
Service:
800-332-9513
Website:
wolfappliance.com
Your Wolf warming drawer is protected by a
warranty that is one of the finest in the
industry. Take a moment to read the warranty
statement on page 15 and refer to it should
service become necessary.
If service is necessary, refer to the model and
serial number of the warming drawer. Both
numbers are listed on the product rating plate
located on the left front floor area of the inner
cabinet. To access the rating plate, the drawer
must be fully open. Refer to the illustration
below.
Location of
rating plate
Rating plate location
3
Page 4

SAFETY INSTRUCTIONS AND PRECAUTIONS
WHAT TO DO
IMPORTANT NOTE: Read all
instructions before using this
appliance.
Read this Use & Care Information
carefully before using your new
warming drawer
of fire, electric shock or injury to
persons.
Ensure proper installation and
servicing.
properly installed and grounded by
a qualified technician. Have the
installer show you the location of
the circuit breaker or fuse so that
you know where to turn off power.
Before performing any service,
unplug or disconnect the power
supply
switching off the circuit breaker or
removing the fuse.
Ensure that towels are stacked only
as high as the sides of the drawer
pan.
oration of the towels.
This appliance must be
for the warming drawer by
Any higher may result in discol-
to reduce the risk
The purpose of the warming drawer
is to hold hot cooked foods
serving temperature and proof yeast
dough. Cold food cannot be heated
thoroughly or cooked in the
warming drawer.
Make sure the warming drawer is
securely installed
attached cabinet.
Use care when opening the
warming drawer.
warming drawer and let warm air
escape prior to removing or
replacing food.
Always place the rack in the desired
location while the warming drawer
is cool.
Always use dry pot holders when
removing items from the warming
drawer.
can cause burns. Do not use a towel
or bulky cloth in place of pot
holders.
Wet or damp pot holders
in a firmly
Partially open the
at
4
Page 5

WHAT NOT TO DO
Do not operate the warming drawer
if the front panel has not been
installed.
Do not repair or replace any part of
the warming drawer
unless specifically recommended in literature
accompanying this appliance. All
service should be referred to a Wolf
authorized service center.
Do not leave children alone or
unattended
in the area when the
warming drawer is in use. Never
allow children to sit, stand or hide in
the appliance. Do not let children
play with the warming drawer.
Never leave the warming drawer
when you are not attending to
open
the warming drawer.
Never use the warming drawer or
other appliances for warming or
heating the room.
Do not wear loose fitting or hanging
garments while using this appliance.
Do not store or use gasoline or
other flammable vapors and liquids
in the vicinity of this or any other
appliance.
Do not touch the heating element or
the interior surface
of the warming
drawer. These surfaces may be hot
enough to burn. Remember: The
inside surfaces of the warming
drawer may be hot when opened.
Do not heat unopened food contain-
Pressure could build up and the
ers.
container could burst and cause
serious injury.
Do not use aluminum foil to line the
warming drawer.
This may cause
damage to interior surfaces of the
warming drawer.
Do not overfill the warming drawer.
This may lead to difficulty in
opening or closing the drawer, as
well as items falling out of the
drawer or behind the drawer.
Do not place more than 75 lbs
(34 kg) into the warming drawer.
Do not use the warming drawer
to dry paper products. If overheated, paper products can catch
fire.
5
Page 6
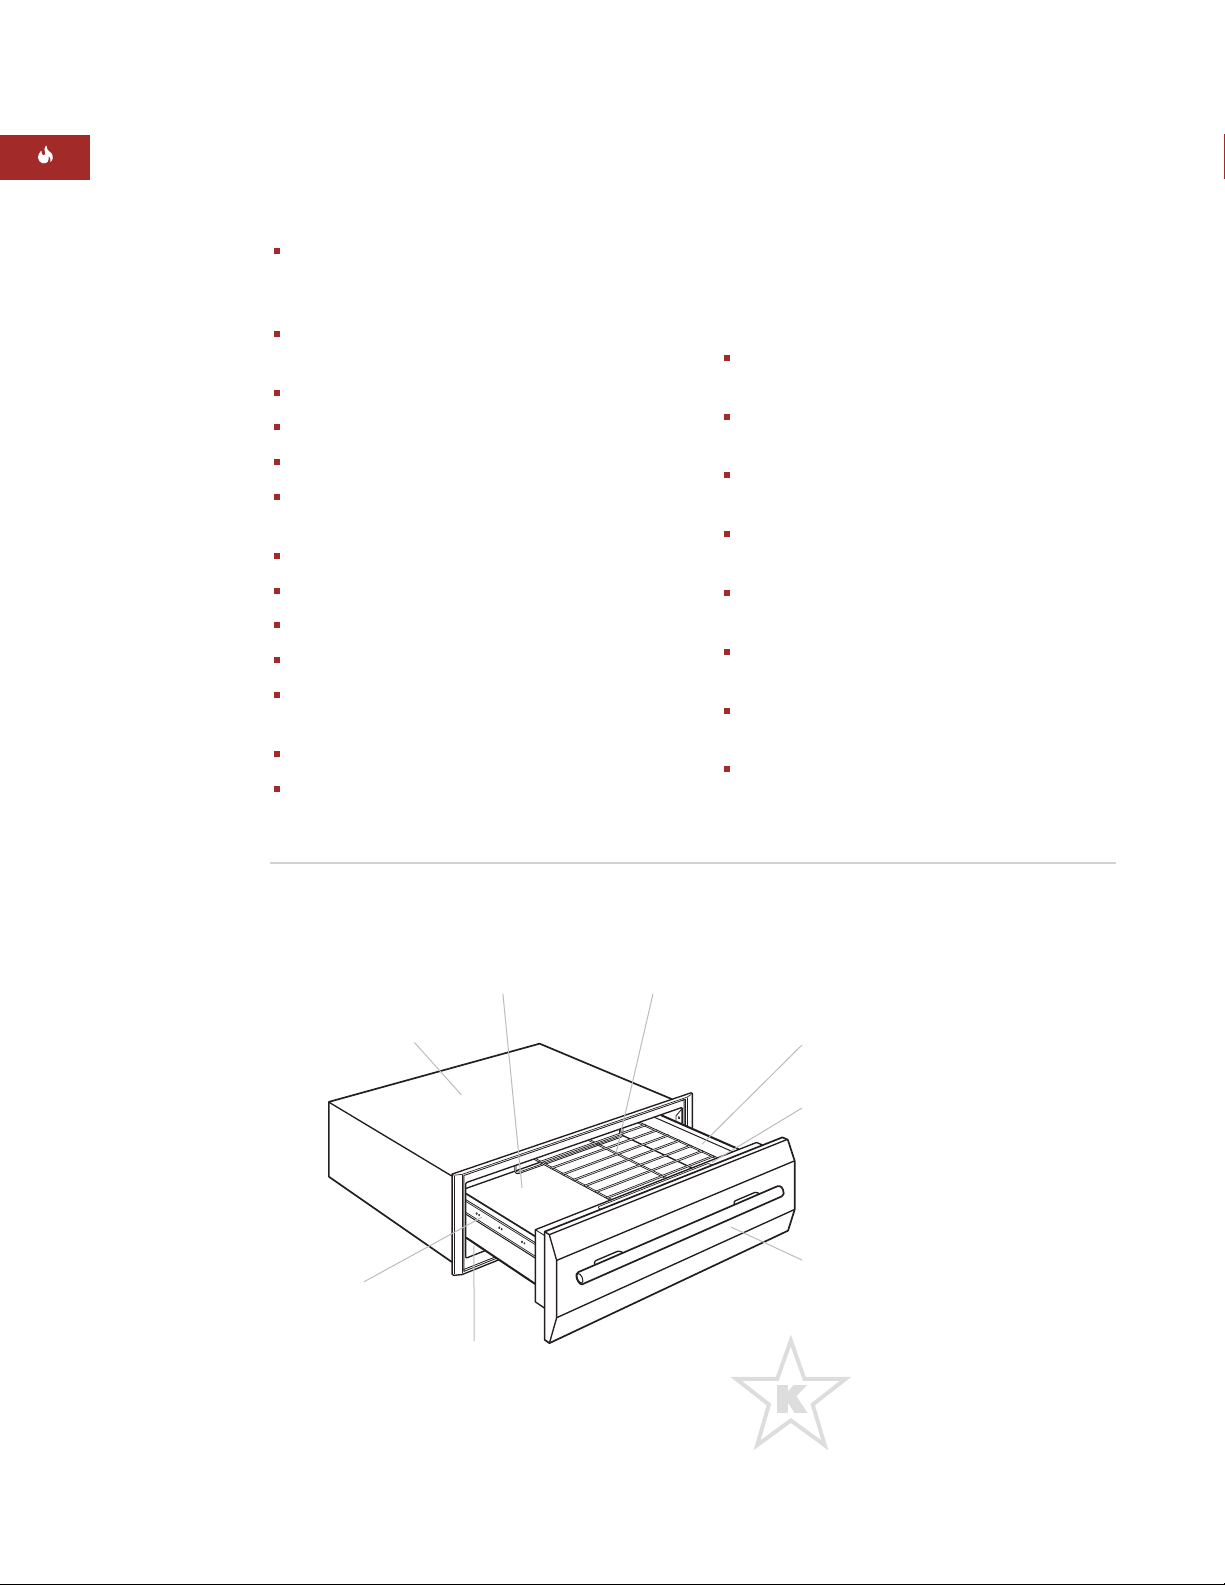
WOLF WARMING DRAWER FEATURES
WOLF
WARRANTY
Wolf products are
covered by a two
and five year
residential warranty
(exclusions apply).
See warranty
details at the end
of this guide.
WARMING DRAWER FEATURES
Stainless steel drawer front and handle
available in classic, platinum and carbon
inishes
f
ntegrated drawer front allows for custom
I
wood panel application
850-watt heating element
Hidden electronic touch control panel
Preset and variable temperature control
Preset automatic shut-off or extended
operation in Sabbath Mode
Stainless steel interior
Rack for stacking food
Removable stainless steel drawer pan
Full-extension, ball bearing drawer glides
Certified by Star-K to meet religious
regulations
CSA certified for US and Canada
Two and five year residential warranty
OPTIONAL ACCESSORIES
These accessories are available through your
Wolf dealer. To obtain local dealer information,
isit the Locator section of our website,
v
wolfappliance.com.
WWDFRONT/S –
Classic stainless steel
drawer front (with handle)
WWDFRONT/P –
Platinum stainless steel
drawer front (with handle)
WWDFRONT/B –
Carbon stainless steel
drawer front (with handle)
WWDFRONT/I –
Integrated drawer front
(accepts custom wood panel)
WDHAN/S –
Classic stainless steel handle
(for integrated drawer front)
WDHAN/P –
Platinum stainless steel
handle (for integrated drawer front)
WDHAN/B –
Carbon stainless steel handle
(for integrated drawer front)
WWDPANS –
Six-piece containers set with
lids and pan rack
MODEL WWD30
shown with Stainless Steel Drawer Front
Removable stainless
steel drawer pan
Galvanized exterior
Ball bearing
drawer glides
Location of
rating plate
Rack for stacking
food
Stainless steel
interior
Hidden electr
touch control panel
Stainless steel
drawer fr
(sold as an accessory)
This appliance is certified by Star-K
to meet strict religious regulations in
conjunction with specific instructions
found on www.star-k.org.
onic
ont shown
6
Page 7

WOLF WARMING DRAWER USE & CARE
ELECTRONIC CONTROLS
The electronic touch control panel is hidden
when the warming drawer is closed. With the
arming drawer open, the controls can be
w
accessed at the top of the drawer just behind
the drawer front.
RESETS
P
Your warming drawer features four preset
temperatures settings; PROOF, LOW, MED and
HIGH. Using the PRESETS eliminates the need
to manually set the temperature and time.
Temperature Settings for Presets:
PROOF 85˚F (30˚C)
LOW 120˚F (50˚C)
MEDIUM 160˚F (70˚C)
HIGH 200˚F (95˚C)
SETTING TEMPERATURE
Touch
POWER ON/OFF
PRESETS
or touch the
. Select one of the
TEMP
UP or DOWN
arrow pad. Touch the UP arrow to increase the
temperature and the DOWN arrow to decrease
the temperature. Two seconds after selecting
the temperature/time, the ON indicator will
illuminate as well as a beep indicating that the
unit is on. One of the
PRESETS
or the
TEMP
UP or DOWN arrow pad must be pressed
within 20 seconds of turning unit on, or the
unit will automatically shut off.
PREHEAT
uring preheat, the temperature read-out in
D
the LCD display alternates between the
setpoint and the actual temperature. The word
”Lo”will appear in the LCD display until the
temperature reaches 85˚F (30˚C). The unit will
beep once to signal preheat is complete.
AUTOMATIC SHUT-OFF
Your Wolf warming drawer has a factory
preset automatic shut-off time of four hours.
The time interval of the automatic shut-off can
be adjusted from one minute to 24 hours.
To Set Automatic Shut-Off Time:
Warming drawer must be OFF.
Touch
POWER ON/OFF
Touch one of the PRESETS;
MED
or
HIGH
or touch the
.
PROOF,LOW
TEMP
UP or
DOWN arrow pad. Touch the UP arrow to
increase the temperature and the DOWN
arrow to decrease the temperature.
Touch and hold the
TIMER
UP arrow to
increase the shut-off time or the DOWN
arrow to decrease the shut-off time.
The word TIMER will illuminate and the
automatic shut-off time will appear in the
LCD
display
.
ACCESSORIES
Optional accessories are available
through your
Wolf dealer. To
obtain local dealer
information, visit
the Locator section
of our website,
wolfappliance.com.
,
wo seconds after selecting the temperature,
T
the ON indicator will illuminate as well as a
beep, indicating the unit is on.
OFF
Display
LCD
Warming drawer control panel
/
N
O
control
ariable
V
temperature
controls
(UP and DOWN)
eset
Pr
temperature
controls
Automatic
shut-off timer
adjustment
(UP and DOWN)
7
Page 8

WOLF WARMING DRAWER USE & CARE
ELECTRONIC CONTROLS
PRESET PROGRAMMING
reset temperatures and time settings can be
P
adjusted for the PROOF, LOW, MED and HIGH
PRESETS.
The PROOF temperature range is 80–110˚F
(25–40˚C). The LOW, MED and HIGH PRESETS
can be adjusted from 80–200˚F (25–95˚C).
To Adjust Preset Temperature and Time
Settings:
Warming drawer must be OFF.
Touch
POWER ON/OFF
.
Touch and hold the desired PRESET,
PROOF,LOW,MED
The word TIMER will illuminate and ”
or
HIGH
for 5 seconds.
4:00
will flash in the LCD display along with the
temperature. Adjustments to the settings
should be made within 30 seconds. The unit
will exit the preset programming mode if
no adjustment is made within this time.
To adjust the temperature, touch and hold
the
TEMP
UP arrow to increase or the
DOWN arrow to decrease the temperature
until the desired preset temperature is
shown in the LCD display.
To adjust the time setting, touch and hold
TIMER
the
DOWN ar
UP arrow to increase or the
ow to decrease the time until the
r
desired preset time setting is shown in the
LCD display.
ouch and hold the adjusted PRESET again
T
for 5 seconds. Three quick tones will signify
that settings for the PRESET have been
changed. If 30 seconds elapse before you
touch and hold the PRESET, the unit will
exit the pr
eset programming mode with no
adjustments made.
SABBATH MODE
Sabbath Mode is for certain religious observances where some of the warming drawer
unctions need to be turned off. In Sabbath
f
Mode, the automatic shut-off feature is
disabled, allowing the warming drawer to
perate continuously.
o
o Initiate Sabbath Mode:
T
Warming drawer must be OFF.
Touch and hold
seconds. The word ”
POWER ON/OFF
Sab
” will flash in the
LCD display after 5 seconds.
Sab
While ”
PRESETS
TEMP
”
UP arrow to increase the temperature and
the DOWN arrow to decrease the tempera-
” is flashing, select one of the
or set the temperature with the
UP or DOWN arrow pads. Touch the
ture. Two tones will signify that the Sabbath
Mode has been initiated.
In Sabbath Mode, the warming drawer will
operate continuously until
ON/OFF
is touched. The word ON will
remain illuminated in the LCD display all
the while the unit is in Sabbath Mode. No
other read-outs will appear in the LCD
display.
POWER ON/OFF
Touch
to shut off the
warming drawer and exit Sabbath Mode.
When the Sabbath Mode is initiated,
the automatic shut-of
requiring the unit to be turned off
manually by touching POWER ON/OFF.
f is disabled,
for 5
POWER
8
Page 9

WOLF WARMING DRAWER USE & CARE
CONTROL PANEL BACKLIGHTING
The Wolf warming drawer has three options
for control panel backlighting; backlight off in
abbath, backlight on in Sabbath and backlight
S
off in all modes. The backlight defaults to ON
in normal use and OFF in Sabbath Mode.
o Change Control Panel Backlighting:
T
Warming drawer must be OFF.
Touch and hold
UP arrow and
TIMER
TEMP
UP arrow for 5 seconds. The current backlight setting will appear in the LCD display.
Use the
the three backlight options;
TIMER
UP arrow to scroll through
backlight off
in Sabbath, backlight on in Sabbath
(50% power), and backlight off in all
modes.
A selection should be made within
30 seconds. The unit will default to the
current backlight setting if a new selection
is not made within this time.
With the desired backlight setting selected,
POWER ON/OFF
touch
to save the setting.
TEMPERATURE DISPLAY
The warming drawer temperature display can
be changed from Fahrenheit (F) to Celsius (C)
r vice versa.
o
o Change Temperature Display:
T
Warming drawer must be OFF.
Touch and hold both the
TEMP
UP and
DOWN arrows for 5 seconds.
After 5 seconds, the unit will beep, the
backlighting will turn on, and either F or C
will appear, depending on the current
display setting.
TEMP
Touch the
UP or DOWN arrow to
select either Fahrenheit (F) or Celsius (C).
With the desired temperature display
selected, touch
POWER ON/OFF
to save
the setting.
BEFORE USING FOR THE FIRST TIME
Remove all literature and packaging
materials from inside the warming drawer.
Clean your warming drawer thoroughly
with hot water and a mild detergent. Rinse
and dry with a soft cloth. This removes
residual oil and grease left on the surface
from the manufacturing process.
Apply a stainless steel polish to protect the
finish and add luster to the exterior of your
warming drawer. Refer to Care Recommendations on
page 12.
9
Page 10

WOLF WARMING DRAWER USE & CARE
WARMING DRAWER OPERATION
Always start with hot food. The warming
drawer will keep hot food at serving
emperature. Do not use the warming
t
drawer to heat cold food other than for
proofing yeast dough and crisping crackers,
hips or dry cereal.
c
lways preheat the warming drawer. Allow
A
the following preheat times:
• 4 minutes for
• 7 minutes for
13 minutes for
•
LOW
MEDIUM
HIGH
NOTE: It is not necessary to preheat the
warming drawer for proofing.
Food in heat-safe glass and glass ceramic
containers may need higher temperature
settings as compared to food in metal
containers.
Repeated opening of the warming drawer
will allow hot air to escape and the food to
cool.
With large loads, it may be necessary to
use a higher temperature setting and to
cover some of the cooked food items.
Food should be kept hot in the cooking
container or transferred to a heat-safe
serving dish prior to being placed into the
warming drawer.
WARMING DRAWER RACK
The rack will fit in the warming drawer front to
back and allows you to double stack items.
When holding hot, cooked foods and warming
mpty serving dishes at the same time, place
e
the serving dishes on the bottom of the
warming drawer and place food on the rack.
IMPORTANT NOTE:
Always preheat the
warming drawer with the rack in position.
WARMING DRAWER PAN
The stainless steel warming drawer pan is
removable for cleaning. To remove, pull the
warming drawer completely open. Slide fingertips under the right and left side edges of the
pan. Firmly pull the pan upward, making sure
that all edges are clear from the interior of the
unit.
To replace the warming drawer pan, pull the
warming drawer completely open. The pan
should be inserted so that the rear wall has the
holes for the fan. Place pan edges on the side
rails of the drawer frame. Open and close the
drawer completely to check operation.
10
Remove serving spoons, etc., before
placing food containers in warming drawer.
Aluminum foil may be used to cover food
to increase moistur
e content.
Plastic containers or plastic wrap will melt if
placed in contact with the warming drawer
or hot utensils from the warming drawer.
Melted plastic may be difficult to remove
and is not considered a warranty repair.
Page 11

WOLF WARMING DRAWER USE & CARE
FOOD PREPARATION
PROOFING YEAST BREAD DOUGH
reheating is not required for proofing.
P
Place your dish on the bottom of the
warming drawer.
Touch
POWER ON/OFF
he control panel. ”
t
then
will appear in the
85F”
PROOF
LCD display. The word TIMER will illumi-
4:00
nate and ”
” will flash in the LCD
display.
The temperature can be adjusted by
pressing the
TEMP
UP or DOWN arrows.
The time setting can be adjusted by
pressing the
TIMER
UP or DOWN arrows.
Lightly oil the top of the dough in a bowl
large enough to allow the dough to double
in size.
Cover the dough with a damp cloth.
Let dough rest in warming drawer for 40
minutes or until dough has doubled in size
and a slight depression remains in the
surface of the dough when touched gently
with a finger.
on
TEMPERATURE SELECTION
SETTING FOODS
L
OW
eef (rare)*
B
Eggs
Tortilla Chips
MEDIUM
Beef (medium or well done)*
Bread, Soft Rolls
asseroles
C
Cooked Cereals
Fish, Seafood
Fruit
Gravy, Cream Sauces
Ham, Pork, Lamb, Poultry
Pancakes, Waffles
Pies (one crust)
Potatoes (mashed)
Vegetables
Bread, Hard Rolls
Pies (two crusts)
HIGH
Bacon
Fried Foods
Hamburger
Pizza (on plate or in box)
Potatoes (baked – in foil)
CRISPING STALE ITEMS
Preheat warming drawer on
LOW
.
Place food in shallow dish or pan.
Check for desir
minutes. Adjust time if necessar
ARMING SERVING BOWLS
W
Preheat warming drawer on
ed crispness after 45
.
y
LOW
.
Use only heat-safe dishes.
Place the empty dishes on the rack or
bottom of the war
ming drawer
IMPORTANT NOTE:
To heat fine china or
.
heat dishes to a hotter temperature, please
consult dish manufacturer for maximum
heat tolerance.
*USDA/FSIS recommends an internal temperature of 145˚F (60˚C)
as the minimum doneness for beef. Use a meat thermometer to
check internal meat temperatures.
IMPORTANT NOTE: Leave food uncovered to keep food crisp and
cover food to keep moisture in.
11
Page 12

WOLF WARMING DRAWER USE & CARE
CARE RECOMMENDATIONS
COMPONENT CARE RECOMMENDATION
SIGNATURE
POLISH
Signature Polish
is available from
Signature Limited
Laboratory,
P. O. Box 13436,
Dayton, Ohio
45413-0436, or
call 877-376-5474
(toll free).
Drawer Front
(stainless steel)
Drawer Pan
(stainless steel)
Although stainless steel is resistant to most stains, it is not totally
mpervious to damage. Salt and some cooking liquids may pit and stain
i
the surface. Always remove these spills immediately.
Exterior Cleaning:
To clean the exterior of a classic or platinum stainless
steel model, use a soft, nonabrasive stainless steel cleaner like Signature
Polish (see side note) and apply with a soft lint-free cloth. Carbon
stainless steel can be cleaned with mild soap and water.
To bring out the natural luster of all three finishes, lightly wipe the surface
with a water-dampened microfiber cloth, followed with a dry microfiber
cloth. All work should follow the grain direction of the finish. Better results
are obtained by keeping the cloth in continuous contact with the metal.
Spray degreasers:
Remove fingerprints and greasy spatters. Spray on a
cloth and wipe surface. Buff dry immediately to avoid streaking.
Hard water stains:
Use white vinegar and water.
Do not use abrasive cleaners (e.g., Comet or Soft Scrub); they will permanently scratch the surface. Do not use steel wool pads.
Under no circumstances should you use a metallic or highly abrasive
cleaner or cloth, as this will remove the carbon finish.
Although stainless steel is resistant to most stains, it is not totally
impervious to damage. Salt and some cooking liquids may pit and stain
the surface. Always remove these spills immediately.
Drawer Rack
(chrome)
Control Panel
(polycarbonate)
Spray degreasers:
Remove fingerprints and greasy spatters. Spray on a
cloth and wipe surface. Buff dry immediately to avoid streaking.
Hard water stains:
Use white vinegar and water.
Do not use abrasive cleaners (e.g., Comet or Soft Scrub); they will permanently scratch the surface. Do not use steel wool pads.
General Care:
Clean the rack with a mild detergent and water. After
cleaning, rinse with clean water and dry thoroughly with a clean cloth.
General Care:
sealed, excessive moistur
Be careful not to soak the control panel. Although they are
e may still cause damage to the contr
ols.
Use a glass cleaner to remove fingerprints, spills, etc. from the surface of
the control panel. Spray first on a cloth before wiping panel.
IMPORTANT NOTE:
Make sure the warming drawer is off and all surfaces
are cool before cleaning any part of the unit.
12
Page 13

WOLF TROUBLESHOOTING GUIDE
TROUBLESHOOTING GUIDE
PROBLEM POSSIBLE SOLUTION
Warming drawer
does not operate
Warming drawer
does not slide smoothly
Excessive condensation
No heat in the
proof setting
Food dries out in the
proof setting
A fuse may be blown or the circuit breaker tripped. Replace the
fuse or reset the circuit breaker.
Warming drawer may not be plugged in. Plug it in.
Ball bearings are out of alignment. Fully extend the drawer and
close completely to realign.
Warming drawer is overloaded or the load is unbalanced. Reduce
weight to less than 75 lbs (34 kg) or redistribute contents.
Liquid is in the warming drawer pan. Remove the liquid.
Foods are uncovered. Cover food with a lid or aluminum foil.
Temperature setting is too high. Reduce the temperature setting.
Room temperature may prevent the thermostat from turning on.
Verify that PROOF is illuminated in the LCD display on the control
panel.
Cover food with a lid or aluminum foil.
CONTACT
INFORMATION
Wolf Customer
Service:
800-332-9513
Website:
wolfappliance.com
13
Page 14

WOLF SERVICE INFORMATION
SERVICE INFORMATION
CONTACT
INFORMATION
Wolf Customer
Service:
800-332-9513
Website:
wolfappliance.com
When requesting information, literature,
replacement parts or service, always refer to
he model and serial number of your warming
t
drawer. Both numbers are listed on the
product rating plate located on the left front
loor area of the inner cabinet. To access the
f
rating plate, the drawer must be fully open.
Refer to the illustration on page 3. Record
the rating plate information below for future
reference.
Model Number
Serial Number
Installation Date
Wolf Authorized Service Center and Phone
Wolf Dealer and Phone
PRODUCT REGISTRATION
egister your new Wolf product today so that
R
we may ensure your satisfaction. You may
register by one of the following options:
1)
Mail in the completed Wolf Product
Registration Card.
2)
Register online at
3)
Register by phone by calling the Wolf
wolfappliance.com
.
Customer Service Department at
800-332-9513
.
The model and serial numbers of your appliance are printed on the enclosed Wolf Product
Registration Card. Your registration information will allow us to send you exciting new
product updates and recipes as they become
available, along with information on special
events.
BEFORE CALLING FOR SERVICE
Before calling your Wolf authorized service
center, refer to the Troubleshooting Guide on
page 13. Check the household fuse or circuit
breaker to see if it has been blown or tripped
and that the electrical connection to the
appliance has not been disconnected. A power
outage may also have caused a disruption in
service.
The information and images are the copyright
property of Wolf Appliance Company, LLC,
an affiliate of Sub-Zero Freezer Company, Inc.
Neither this book nor any information or images
contained herein may be copied or used in
whole or in part without the express written
permission of Wolf Appliance Company, LLC,
an affiliate of Sub-Zero Freezer Company, Inc.
©Wolf Appliance Company, LLC all rights
ved.
eser
r
14
Page 15

W OLF A PPLIANCE P RODUCTS
L IMITED W ARRANTY
R
ESIDENTIAL USE ONLY
FULL TWO YEAR WARRANTY*
or two years from the date of original installation, your Wolf Appliance product warranty covers all
F
parts and labor to repair or replace any part of the product that proves to be defective in materials
or workmanship. All service provided by Wolf Appliance Company under the above warranty must
be performed by a Wolf Appliance authorized service center, unless otherwise specified by Wolf
ppliance Company. Service will be provided in the home during normal business hours.
A
LIMITED THIRD THROUGH FIFTH YEAR WARRANTY
From the third through fifth year from the date of original installation, Wolf Appliance Company will
repair or replace the following parts that prove to be defective in materials or workmanship. Labor to
emove and replace defective parts is not covered. Wolf Appliance Company recommends that you
r
use a Wolf Appliance authorized service center to perform such service.
Gas Burners (excluding appearance), Electric Heating Elements, Blower Motors (vent hoods),
Electronic Control Boards, Magnetron Tubes and Induction Generators
LIMITED LIFETIME WARRANTY
For the life of the product, Wolf Appliance Company will repair or replace any BBQ body or BBQ hood
that rusts through due to defective material or workmanship. Labor to remove and replace defective
parts is not covered. Wolf Appliance Company recommends that you use a Wolf Appliance authorized service center to perform such service.
TERMS APPLICABLE TO EACH WARRANTY
The warranty applies only to products installed for normal residential use. The warranty applies only
to products installed in any one of the fifty states of the United States, the District of Columbia or
the ten provinces of Canada. This warranty does not cover any parts or labor to correct any defect
caused by negligence, accident or improper use, maintenance, installation, service or repair.
THE REMEDIES DESCRIBED ABOVE FOR EACH WARRANTY ARE THE ONLY ONES THAT WOLF
APPLIANCE COMP
WARRANTY ARISING BY OPERATION OF LAW. WOLF APPLIANCE COMPANY, LLC WILL NOT BE
RESPONSIBLE FOR ANY CONSEQUENTIAL OR INCIDENTAL DAMAGES ARISING FROM THE
BREACH OF THIS WARRANTY OR ANY OTHER WARRANTY, WHETHER EXPRESS, IMPLIED OR
ATUTORY.
ST
Some states do not allow the exclusion or limitation of incidental or consequential damages, so the
above limitation or exclusion may not apply to you. This warranty gives you specific legal rights and
you may also have other legal rights that vary from state to state.
o receive parts an
T
nearest you, contact Wolf Appliance Company, LLC, P.O. Box 44848, Madison, Wisconsin 53744;
check the Locator section of our website, wolfappliance.com, or call 800-332-9513.
Stainless Steel (classic
*
limited 60 day parts and labor warranty for cosmetic defects.
ANY
/or service and the name of the Wolf Appliance authorized service center
d
, platinum and carbon) doors, panels and product frames are covered by a
WILL PRO
, LLC
VIDE, EITHER UNDER THIS WARRANTY OR UNDER ANY
15
Page 16

OLF APPLIANCE COMPANY, LLC P. O. BOX 44848 MADISON, WI 53744 800-332-9513 WOLFAPPLIANCE.COM
W
808213
4/2006
 Loading...