


Page 1
Congratulations! As the new owner of SUBSONIC
speakers, you have a product that will provide you with
many years of listening pleasure... if looked after
properly!
Please read this manual thoroughly for maximum
safety, performance and pleasure.
Enjoy your new SUBSONIC speakers!
PM1 MK2 USER MANUAL

Page 2
CONTENTS
Safety Precautions and Unpacking
Getting Started
Single-wire Connection
Bi, Tri or Quad Amplify Connection
Care & Maintenance
Specifications
3
4
5
6
7
8
PM1 MK2 USER MANUAL

Page 3
Safety Precautions
1. Disconnect your amplifier from the AC mains before connecting or
disconnecting speaker cables to reduce risk of electric shock or fire.
2. Do not expose speaker to rain or moisture. Do not place beverages or
potted plants requiring water on top of your speakers.
3. Best placement is in a shaded area as long exposure to direct sunlight
may damage the finish.
4. Do not locate any sensitive electronic devices such as televisions,
magnetic data storage systems, computer equipment, etc., within one
meter of each speaker.
5. The Ribbon tweeter is a highly accurate and dynamic transducer. It is
also very sensitive - NEVER VACUUM the Ribbon Tweeter or blow air onto
the diaphragm of the ribbon tweeter. To do so could damage the ribbon
tweeter. Never do a ‘battery polarity test’ on the ribbon tweeter.
Unpacking
Carefully unpack each speaker — don’t touch the ribbon tweeters! — and
remove all accessory items from the cartons.
Remember to keep all the packaging, to make it easier to transport the
speakers if necessary.
Spikes (for floorstanding speakers) will be included in your carton.
We recommend carefully pivoting speakers into position rather than
sliding them if your floor is prone to scratch.
PM1 MK2 USER MANUAL

Page 4
Follow these steps to connect your source components (preamp/receiver,
power amplifiers) to the speakers. (If necessary refer to the owners manuals
included with your audio components to confirm their connection procedures.)
1. Begin by disconnecting your entire system from the AC mains before
connecting or disconnecting any cables.
2. Connect source components (CD, DVD, LP, etc.) to your preamp / receiver.
3. Turn down the volume on the preamp / receiver to avoid thumps and bumps
when powering up your amplifier.
4. Connect the preamp / receiver to your power amplifier.
5. Connect the speakers to your power amplifier. Be sure to maintain consistent
polarity. For each channel output, connect the left-channel (negative/black)
output terminal of the amplifier to the (negative/black) input terminals of each
speaker. Then connect the (positive/red) output terminal of the amplifier to the
(positive/red) input terminal of each speaker.
CAUTION! Never short-circuit the amplifier’s output terminals by touching bare
speaker wires against each other! Turn off amplifier before changing cables.
6. Be sure that all system connections are firm and secure, with no loose strands
of wire sticking out from the terminals.
7. Turn on your system.
8. Slowly raise the volume on the preamp/receiver.
Getting Started
PM1 MK2 USER MANUAL
Page 5
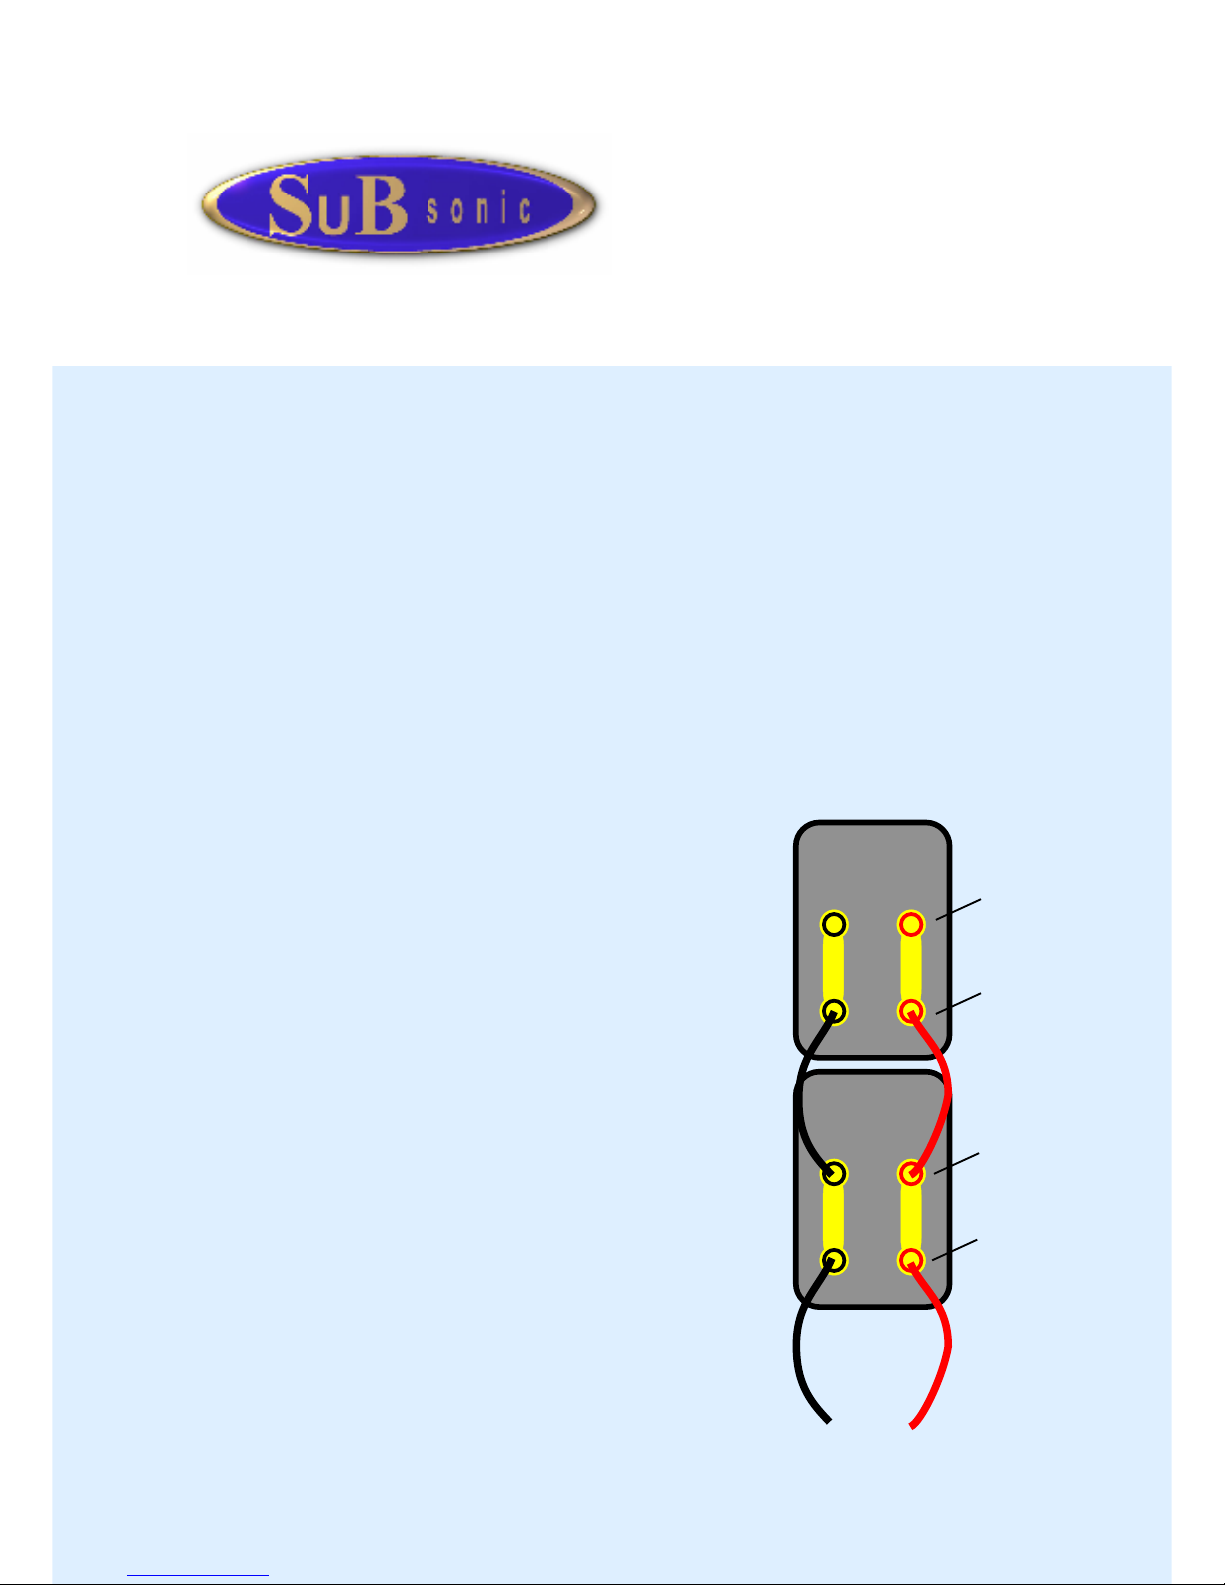
Single Wire Connection
Connect your new SUBSONIC speakers to your audio system in one of
three ways:
single-wire, bi-amplified, tri-amplified or quad-amplified . Please follow
these hookup instructions carefully for single wire connection.
1. Use high-quality speaker cable with high-quality connectors.
To preamp / receiver
2. Turn off all audio system power before
making or changing connections.
3. Verify correct polarities (i.e., + to + and - to
-) when making connections. Incorrect polarity
results in unfocused sound and softer,
diminished bass.
4. A single-wire speaker cable is necessary for
each speaker when using the supplied solidbrass jumpers. You will also need a small
length of quality speaker cable to join the top
and bottom terminal plates together.
5. Connect the quality speaker cables as shown
in the diagram opposite.
Tweeter
Terminals
Midrange
Terminals
Mid-bass
Terminals
Bass
Terminals
PM1 MK2 USER MANUAL

Page 6
Please follow these hookup instructions carefully.
1. Bi-amplifying: Use separate amplifier channels to drive each set of terminal
plates.
2. Tri-amplifying: Remove the Terminal Plate links from the TOP terminal plate.
Use separate amplifiers to drive (i) Bass/Mid-bass, (ii) Midrange and (iii) Tweeter.
3. Quad-amplifying: Remove the Terminal Plate links from the TOP and BOTTOM
terminal plates. Use separate amplifiers to drive (i) Bass, (ii)Mid-bass, (iii)
Midrange and (iv) Tweeter.
CAUTION! Failure to remove the terminal jumpers when necessary may
damage some amplifiers.
Bi, Tri or Quad Amplify Connection
To Power
Amp #2
To Power
Amp #1
To Power
Amp #2
To Power
Amp #1
To Power
Amp #3
To Power
Amp #3
To Power
Amp #1
To Power
Amp #4
To Power
Amp #2
Bi-Amp
Tri-Amp
Quad-Amp
PM1 MK2 USER MANUAL

Page 7
Care & Maintenance
CAUTION! Disconnect your entire system from the AC mains before
cleaning.
1. Remove dust from cabinet by wiping it with a clean, smooth cotton
cloth. Be especially careful when dusting lacquered surfaces. Any cloth
other than combed cotton will cause micro scratches in the finish.
2. Remove dirt and fingerprints by wiping the surface with a soft, smooth
cotton cloth slightly dampened with mild soapy water. Wipe only in the
direction of the grain. Non-abrasive acrylic polish may be used on
lacquered surfaces.
3. Clean the grille with gentle vacuuming. ALWAYS remove the grille from
the speaker before vacuuming so you do not damage the Ribbon Tweeter.
4. The woofer cone may be cleaned with a moist soft cloth. NEVER TOUCH
THE RIBBON TWEETER!!
5. The Ribbon tweeter is a highly accurate and dynamic transducer. It is
also very sensitive - NEVER VACUUM the Ribbon Tweeter or blow air onto
the diaphragm of the ribbon tweeter. To do so could damage the ribbon
tweeter. Never do a ‘battery polarity test’ on the ribbon tweeter.
CAUTION! Never use benzene, thinner, alcohol or any other volatile
cleaning agent. Window spray is not recommended. Do not use abrasive
cleaners as they may damage the finish.
PM1 MK2 USER MANUAL

Page 8
Specifications
DESCRIPTION:
4-WAY Bass reflex loudspeaker. Quad-Wireable Terminals
FREQUENCY RESPONSE:
29Hz to 30kHz (+-2.5 dB)
AMPLIFIER POWER:
25W to 200W
DRIVE UNIT DETAILS:
BASS DRIVERS
2 x 165mm Shielded Woofers. Critically damped doped paper cone.
MID-BASS DRIVER
1 x 165mm Shielded Woofers. Critically damped doped paper cone.
MID-RANGE DRIVERS
1 x 130mm Shielded midrange. Critically damped doped paper cone.
Midrange Chamber volume: 1.8 litres
RIBBON TWEETER
1 x110mm Aluminium Ribbon Tweeter. Diaphragm (528 square mm)
CABINET STYLE:
Vented Enclosure. 18mm MDF (32mm MDF baffle)
Timber Veneer. 360 Degree Interlock bracing
CROSSOVER:
18-24dB/octave 4-Way crossover
DIMENSIONS (MM):
1065(H)x 230(W)x 395(D) (Excluding 32mm Plinth)
NET WEIGHT:
35 Kg
PM1 MK2 USER MANUAL
 Loading...