

Page 1
2015 Quick Reference Guide
Page 2
2
◆
Some functions are available on certain models. ◆ For detailed operating and safety information, please consult your Owner’s Manual.
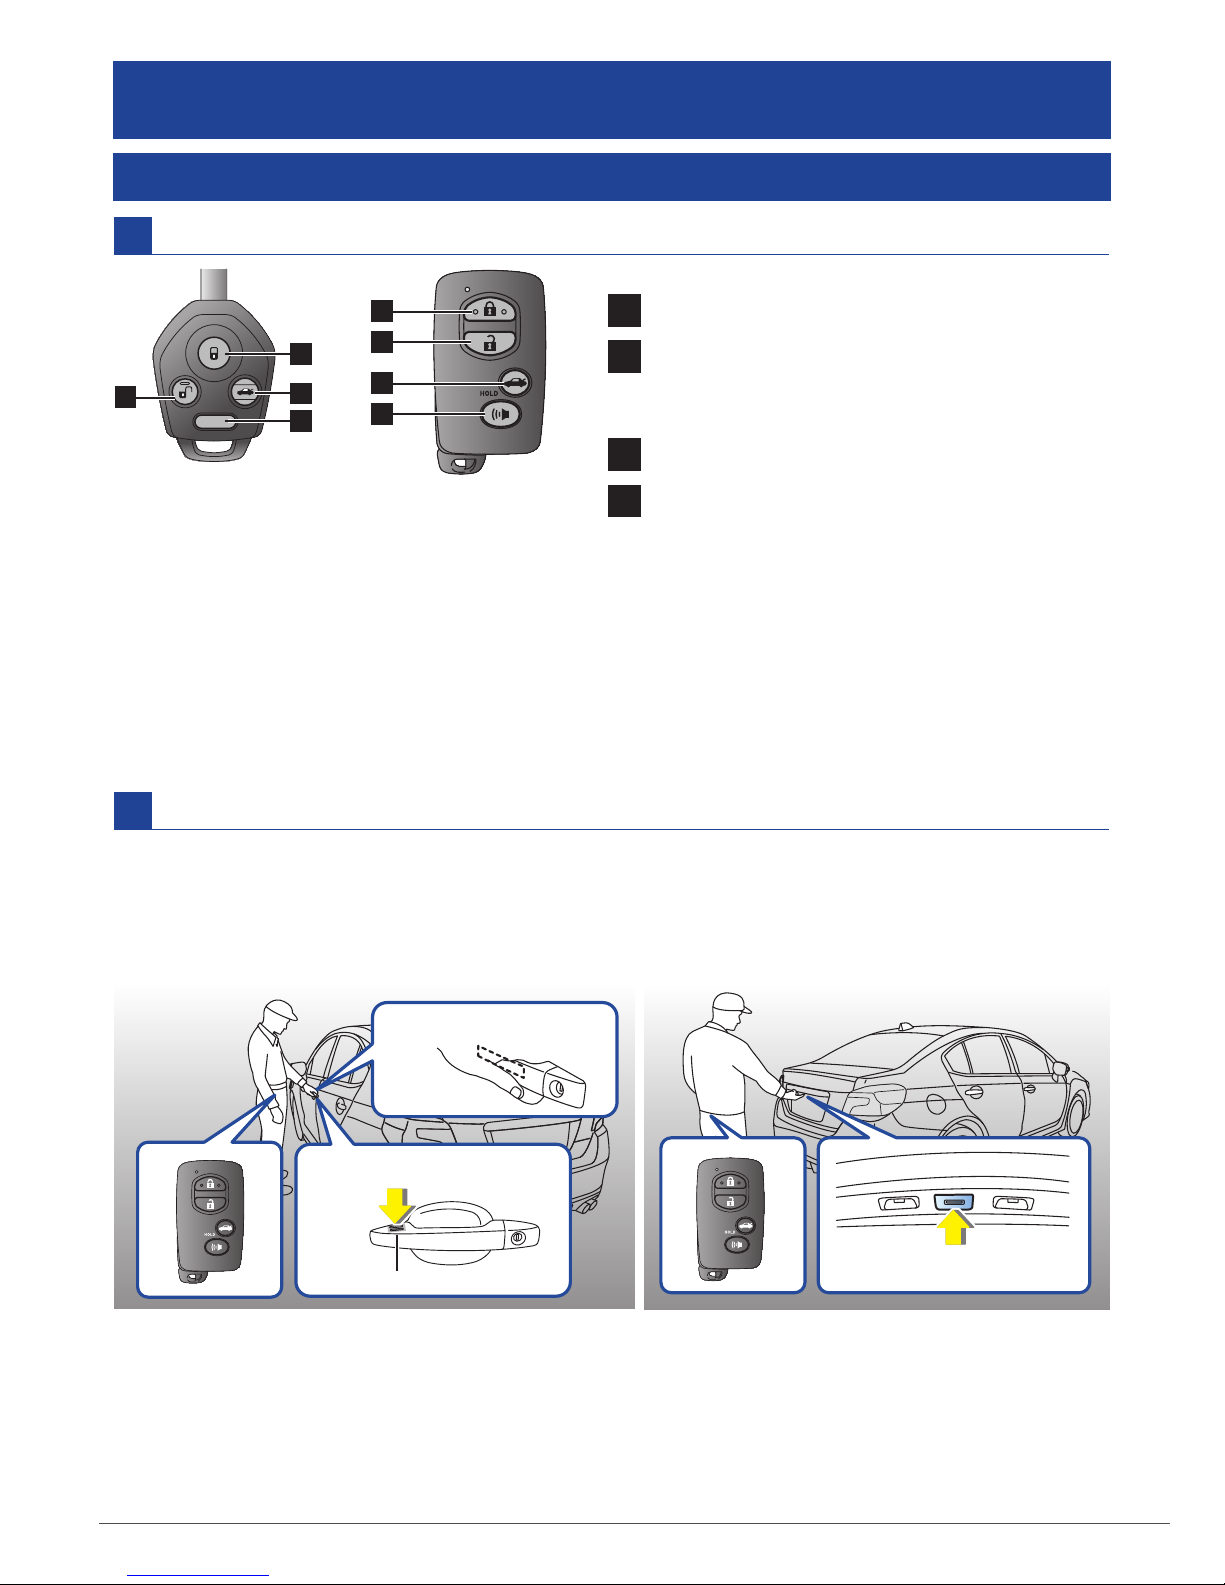
Keyless access function (if equipped)
Remote keyless entry system
All doors will be locked.
The driver’s door will be unlocked.
(To unlock all doors, briefly press the
button a second time within 5 seconds.)
1
Remote
transmitter key
Access key
Lock / Unlock doors
PANIC
Trunk lid will be opened.
BASIC OPERATION
*Grip the driver’s door handle to unlock the
driver’s door. Grip the front passenger’s door
handle to unlock all doors.
Opening Trunk:
Side door
(front door handles only)
:
All doors and trunk will be locked / unlocked by the following procedures carrying the
access key on your person. (The driver should always carry the access key.)
2
3
Press
The horn will sound and the hazard
warning will flash.
4
Locking
Unlocking*
Door lock sensor
Grip
Touc h
1
3
1
2
4
2
3
4
Page 3
3
/
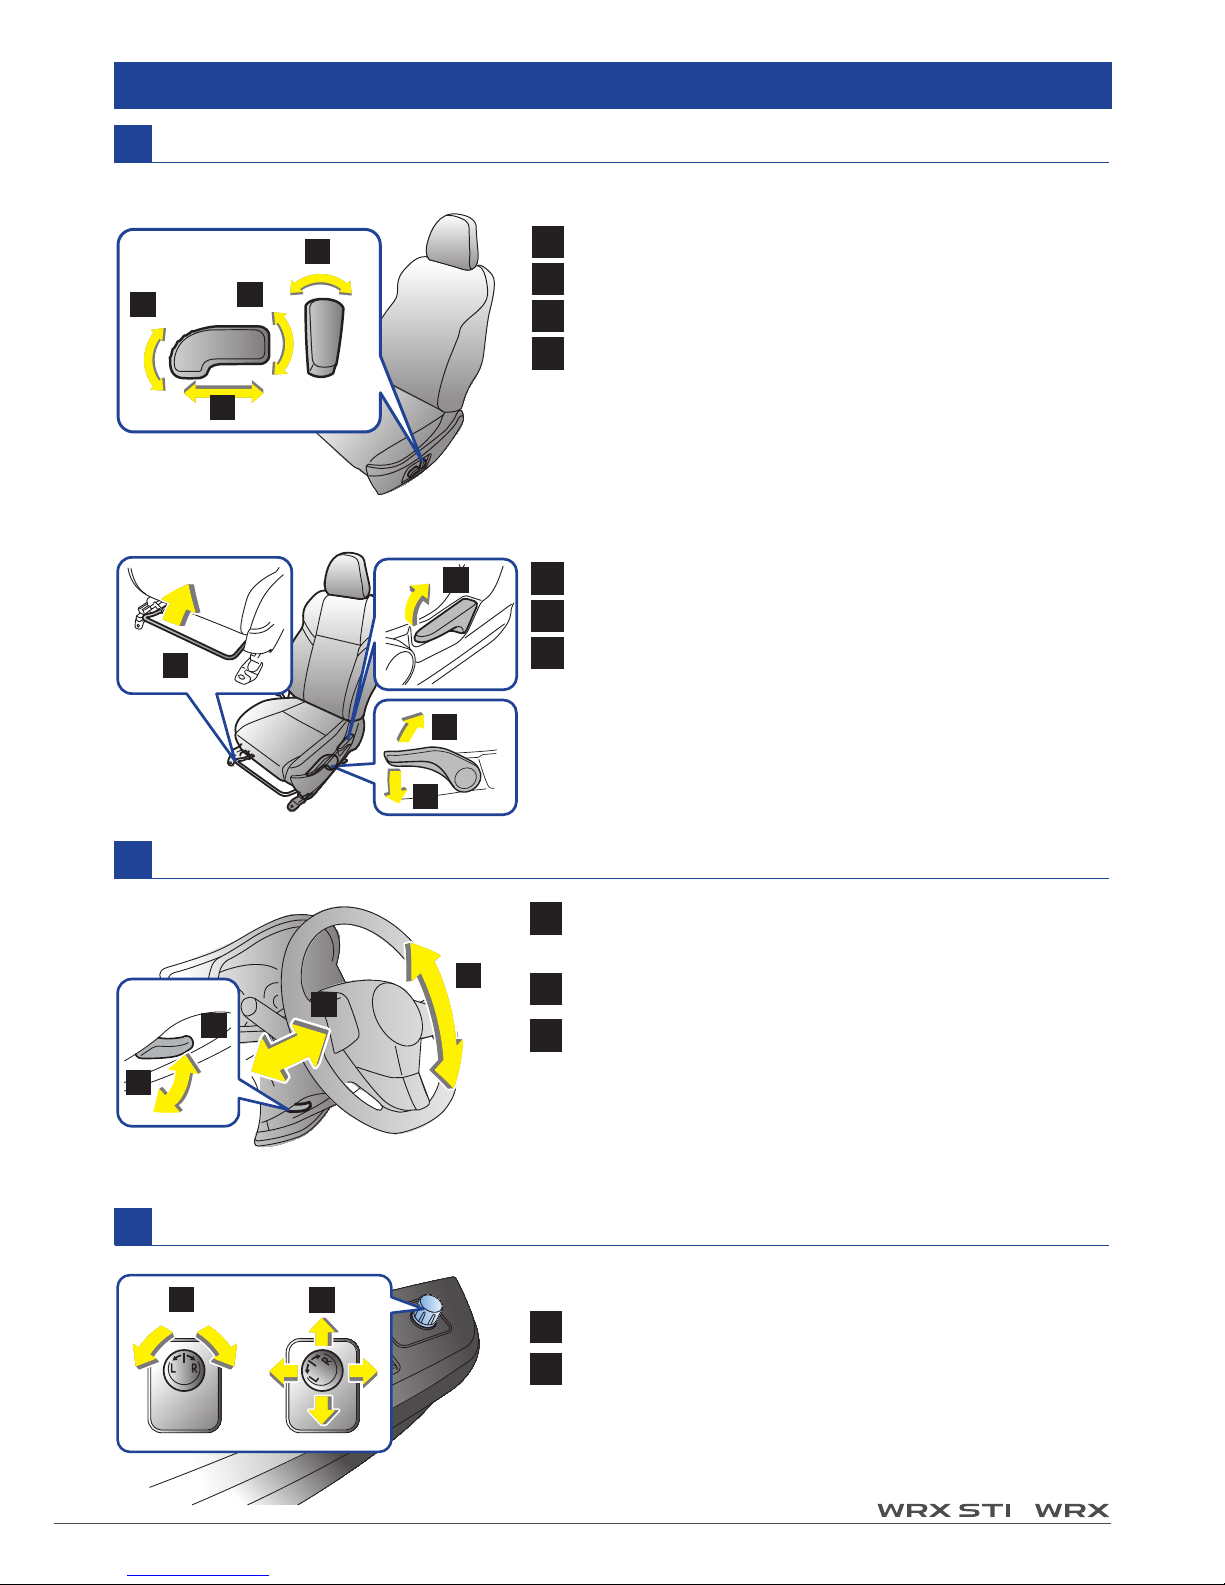
Tilt / telescopic steering wheel
Adjust the seat position and pull the tilt/
telescopic lock lever down.
Remote control mirror switch
Ignition switch must be in
ACC
or ON.
1
2
Adjustable components
Front seat
1
Forward and backward adjustment
2
Seat cushion angle
3
Seat height adjustment
4
Seatback reclining
1
Forward and backward adjustment
2
Seat height adjustment (Driver’s seat only)
3
Seatback reclining
Power seat (Driver’s seat-if equipped)
Manual seat (if equipped)
1
2
3
Move the steering wheel to the desired level.
Pull the lever up to lock the steering wheel in
place.
Make sure that the steering wheel is securely
locked by moving it up and down, and forward and
backward.
1
2
To adjust the mirror, move switch in direction
of desired movement.
Select side to adjust.
1
2
3
2
1
2
4
3
1
2
3
2
Page 4
4
◆
Some functions are available on certain models. ◆ For detailed operating and safety information, please consult your Owner’s Manual.
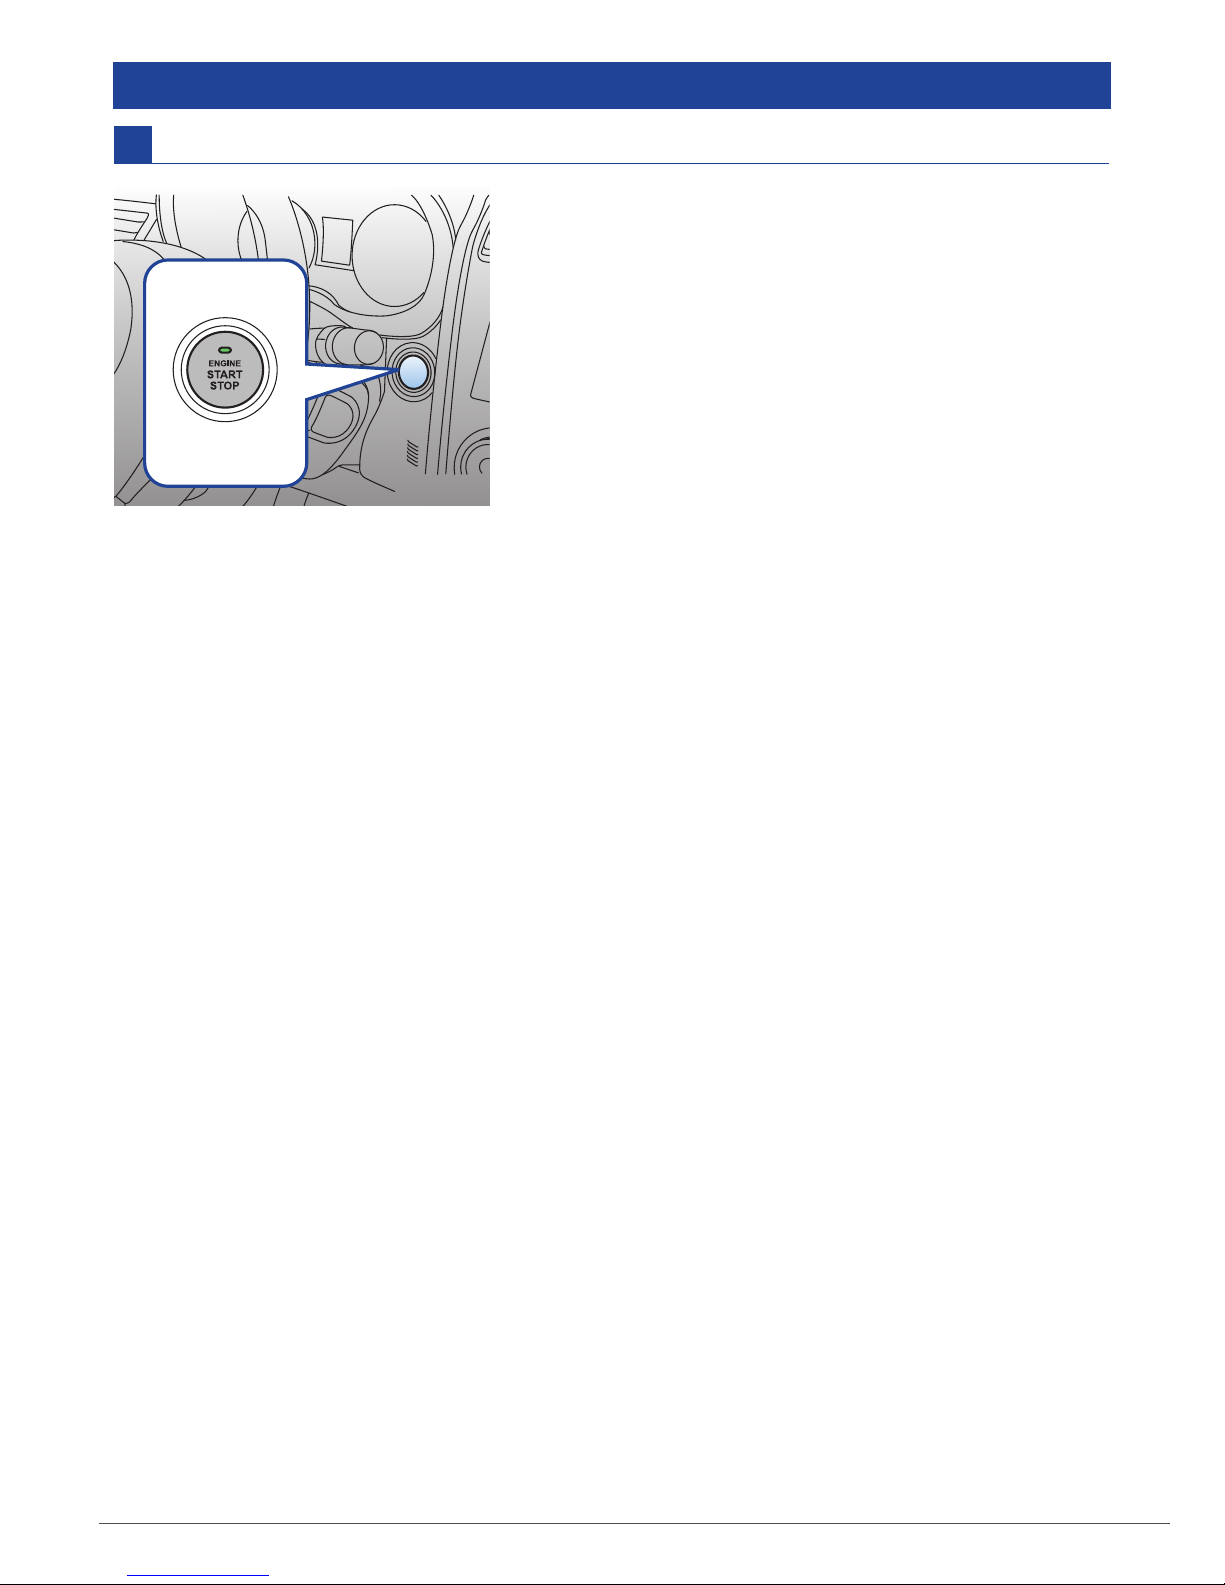
Push-button ignition switch (if equipped)
Start / Stop Engine
Starting engine
1. Carry the access key, and sit in the driver’s seat.
2. Apply the parking brake.
3. Shift the select lever in the P position. The engine can
also start when the select lever is in the N position,
however, for safety reasons, start in the P position.
4. Depress the brake pedal until the operation indicator
on the push-button ignition switch turns green. When
starting with the select lever in the N position, the
indicator does not turn green.
5. While depressing the brake pedal, press the pushbutton ignition switch.
Stopping engine
1. Stop the vehicle completely.
2. Move the selector lever to the P position.
3. Press the Push-button Ignition Switch.
Every time the button is pressed without depressing the brake pedal,
the power is switched in the sequence of
OFF➞ACC➞ON➞OFF
.
Page 5
5
/
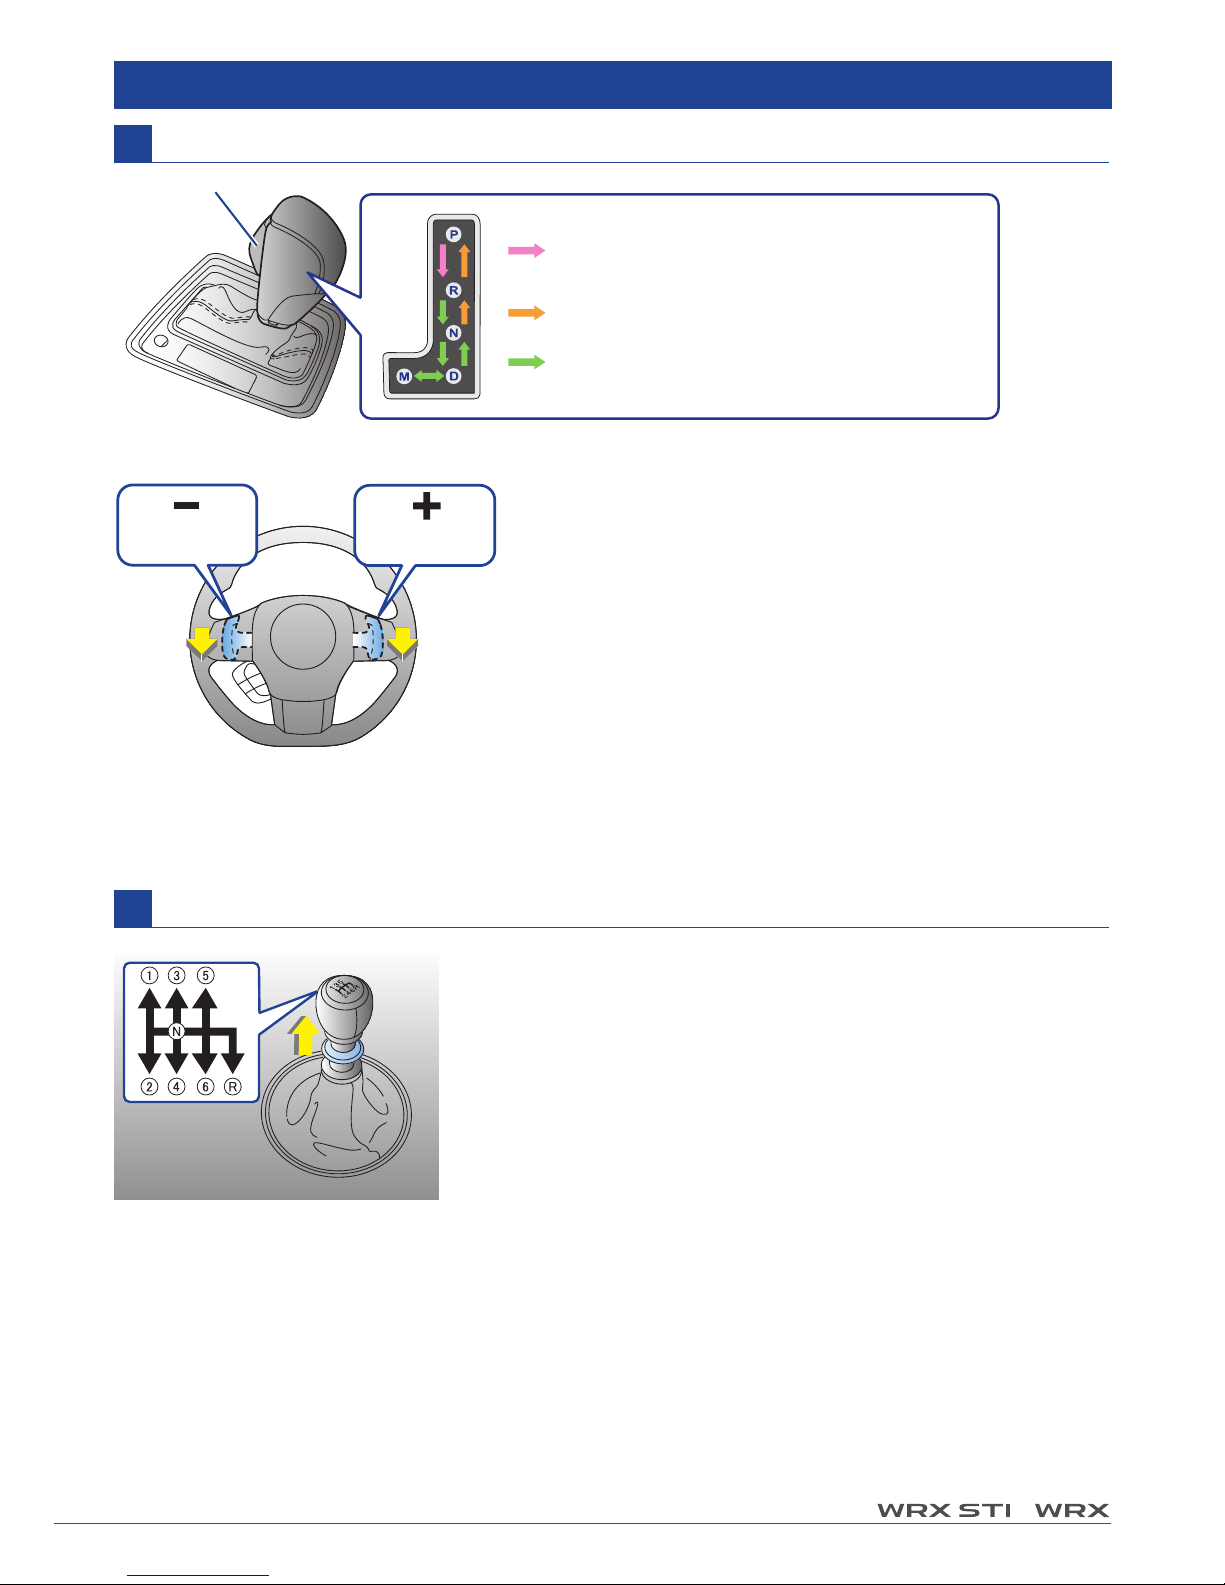
Continuously variable transmission (if equipped)
Manual transmission (if equipped)
You must raise the slider and hold it in that position before
you can move the shift lever to the R position.
To change gears, fully depress the clutch pedal, move the
shift lever, and gradually let up on the clutch pedal.
Shift paddle;
Gearshifts can be performed using the shift paddle
behind the steering wheel. To upshift to the next higher
gear position, pull the shift paddle that has + indicated
on it. To downshift to the next lower gear position, pull
the shift paddle that has - indicated on it.
Transmission
Select lever button
With the brake pedal depressed, shift
while pressing the button in
Shift while pressing the button in
Shift without pressing the button
Downshift Upshift
M = Manual mode
With the vehicle either moving or stationary, move the
select lever from the D position to the M position to
select the manual mode.
Page 6
6
◆
Some functions are available on certain models. ◆ For detailed operating and safety information, please consult your Owner’s Manual.
DRIVER’S AREA
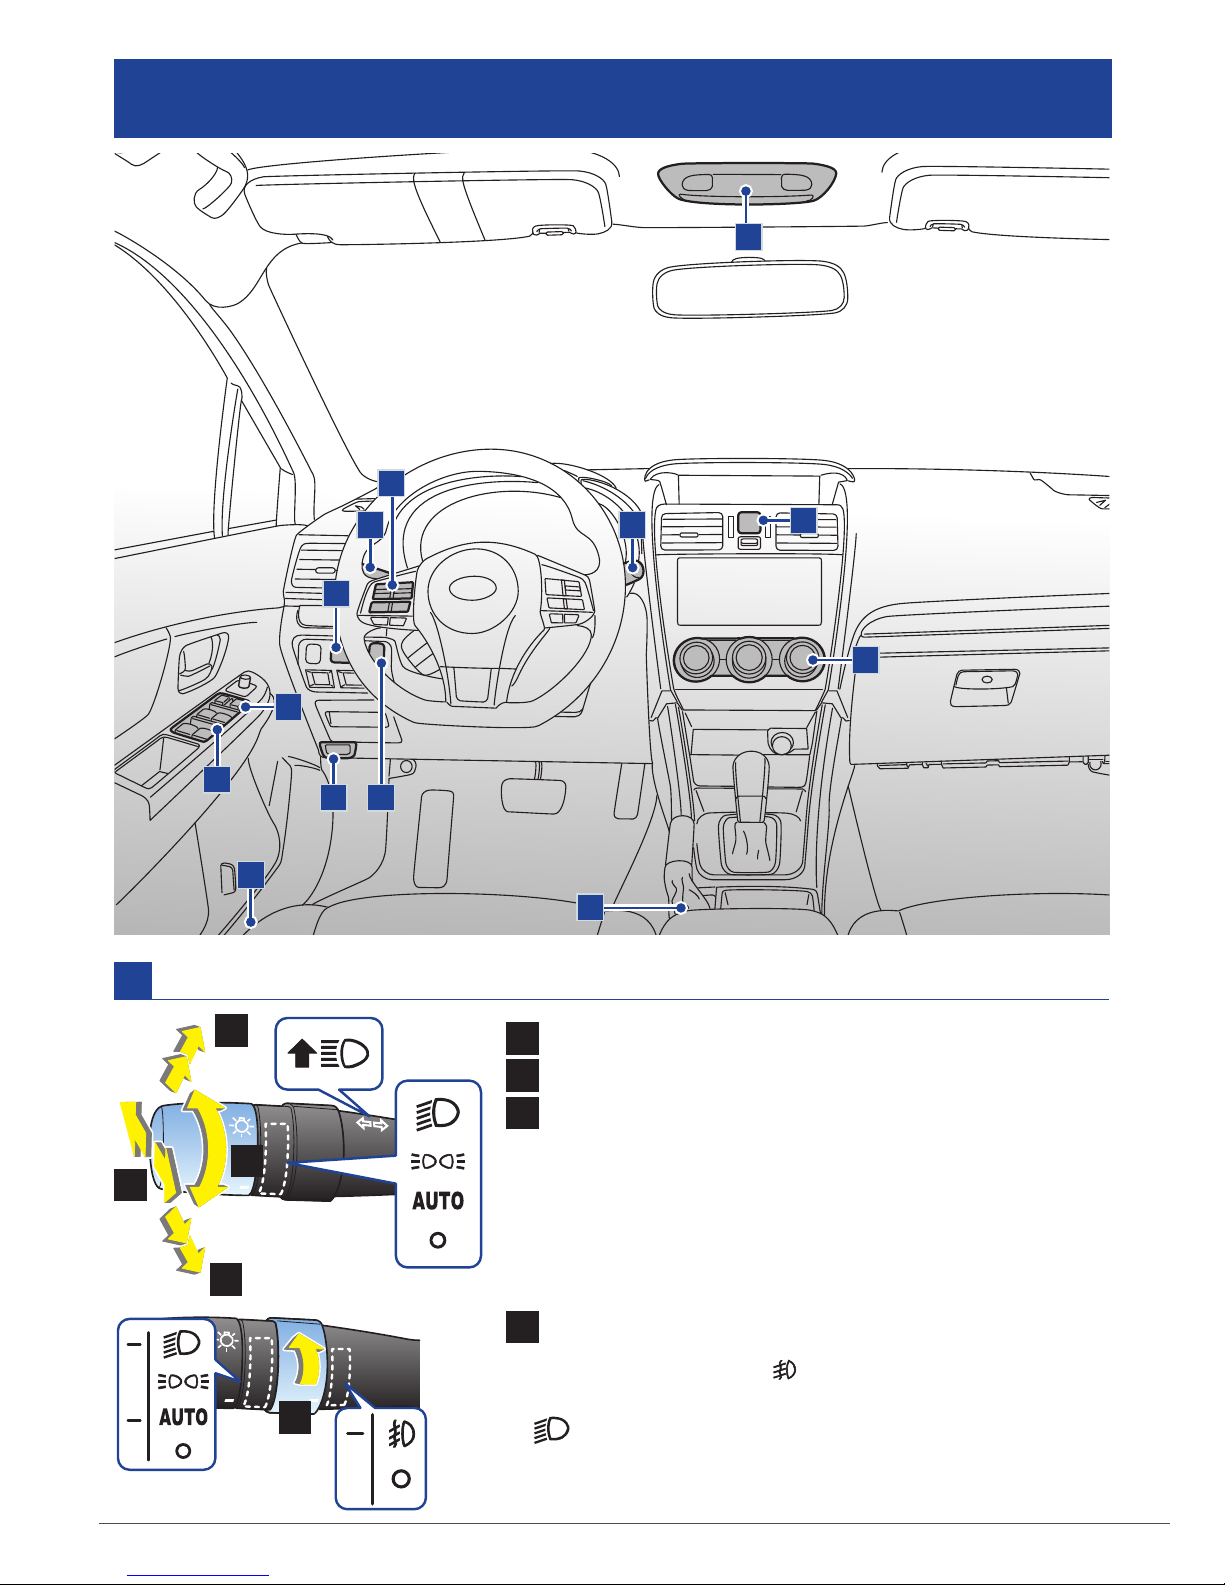
To turn on, rotate dial to .
Front fog lights operate only when headlight switch is in:
- position.
-
AUTO
position and the headlights are on.
Headlights / Turn signal / Fog light (if equipped)
A
1 Headlights
2 Headlight flasher, High/ low beam change
3 Turn signal
4
4 Fog lights (if equipped)
3
3
1
2
A
H
I
L
E
M
J
K
G F
D
B
C
Page 7
7
/
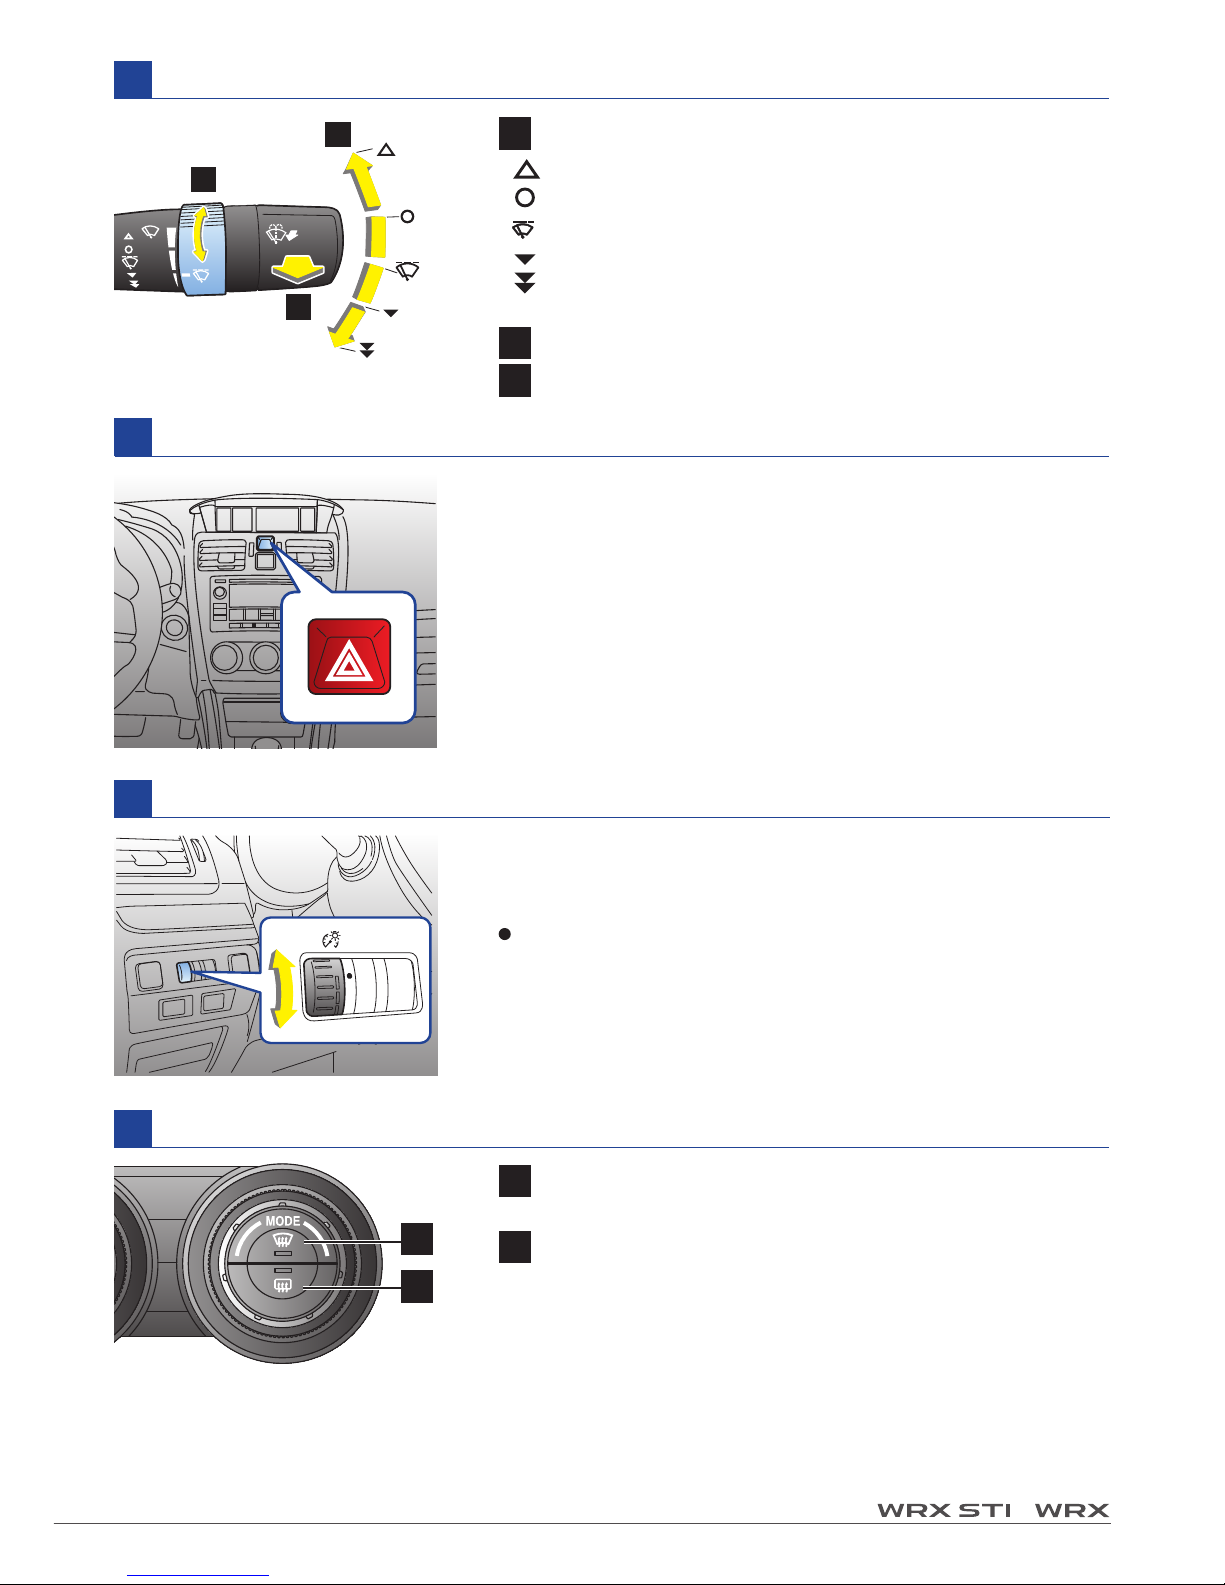
Windshield wiper and washer
1 Wiper
: Mist (for a single wipe)
: Off
: Intermittent
: Low speed
: High speed
2 Intermittent interval
3 Washer
B
1
2
3
Hazard warning asher
C
To turn on, press the button.
Use in emergency conditions.
Illumination brightness control
To adjust brightness of the instrument panel
illumination, turn dial.
When the control dial is turned fully upward to
position, the illumination brightness becomes the
maximum and the automatic dimming function does
not work at all.
D
Defroster button / Rear window defogger button
E
1 Defroster button:
Press this button to defrost windshield.
2 Rear window defogger button:
Press the button to turn on rear window defogger,
outside mirror defogger or wiper deicer.
The function will automatically shut off after
approximately 15 min.
The illustration of the print is Type A.
1
2
Page 8
8
◆
Some functions are available on certain models. ◆ For detailed operating and safety information, please consult your Owner’s Manual.
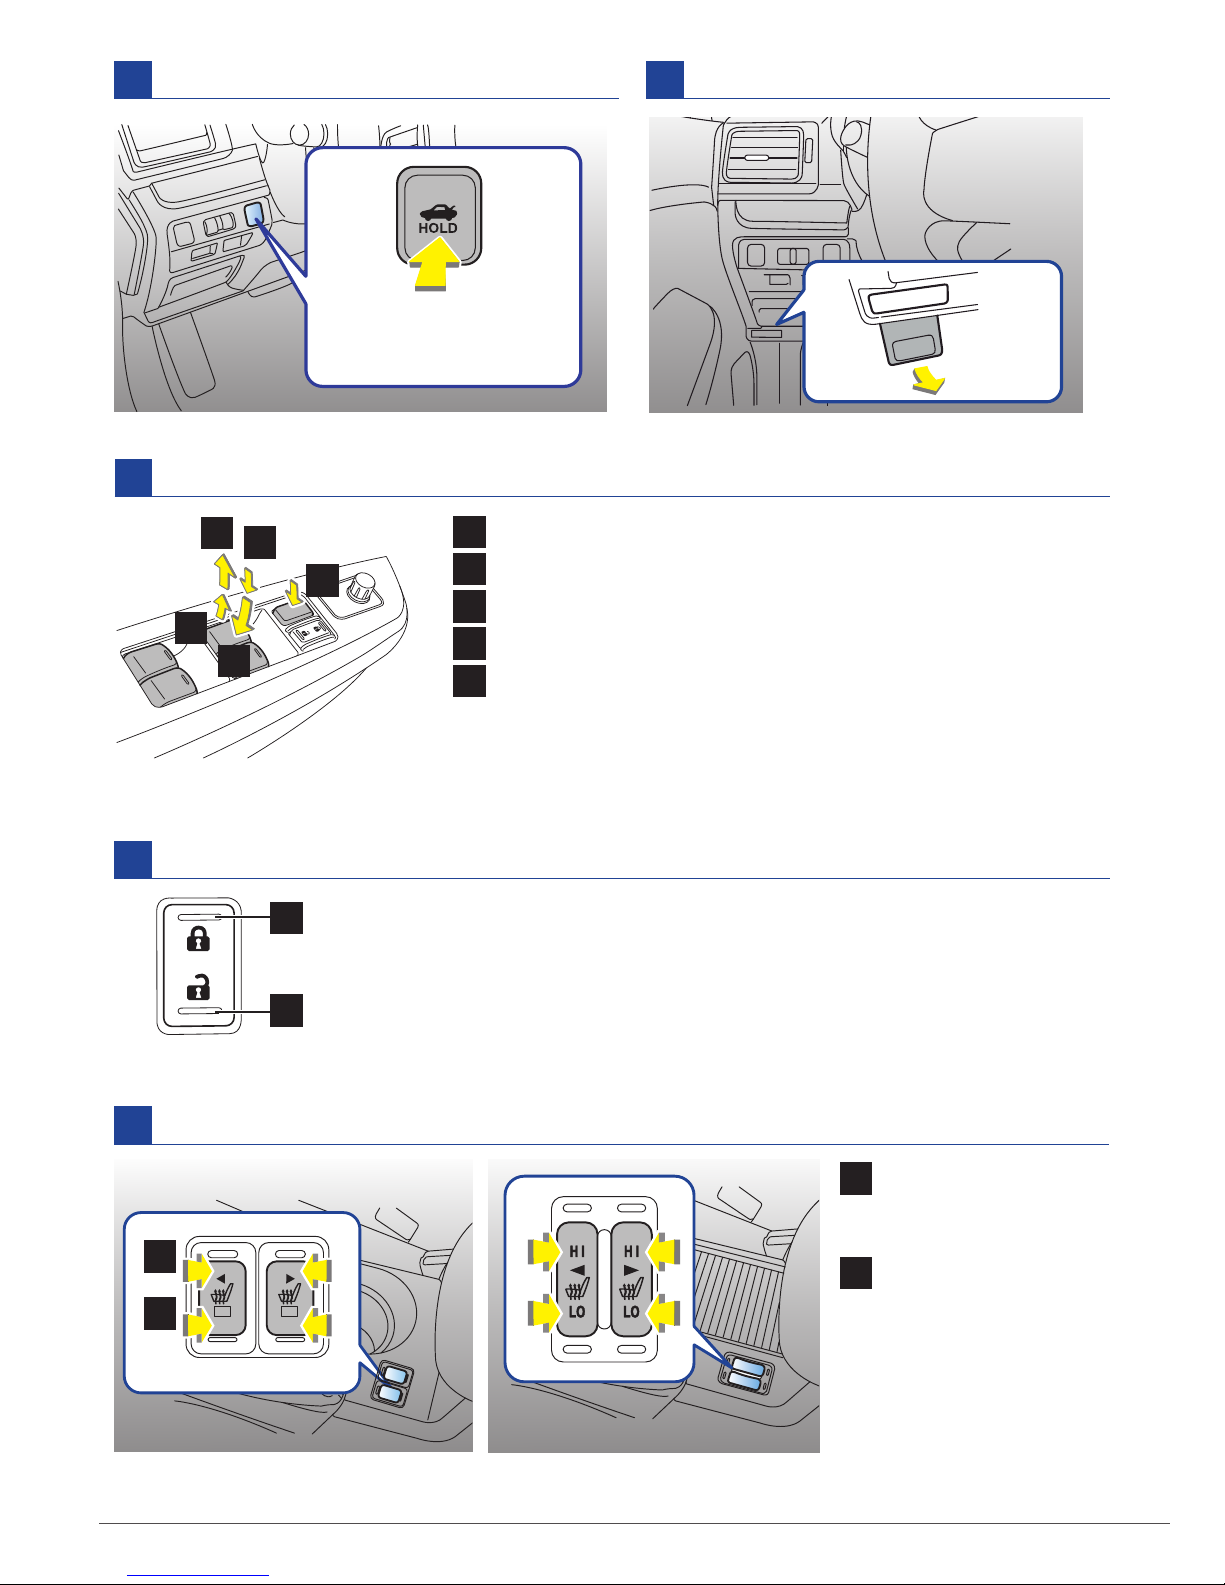
Seat heater
J
Power door locking switch
I
Power windows
H
1 HIGH (HI):
Rapid heating.
2 LOW (LO):
Normal heating.
1
2
Trunk lid opener switch
F
1
2
3
4
5
1
Closing
2
One-touch auto up (Driver’s side only)
3
Opening
4
One-touch auto down (Driver’s side only)
5
Lock switch
Type A (WRX)
Type B (WRX STI)
Press the switch for
more than 1 second.
G
Hood release knob
Pull
To unlock all doors.
To lock all doors.
1
2
Page 9
9
/
K
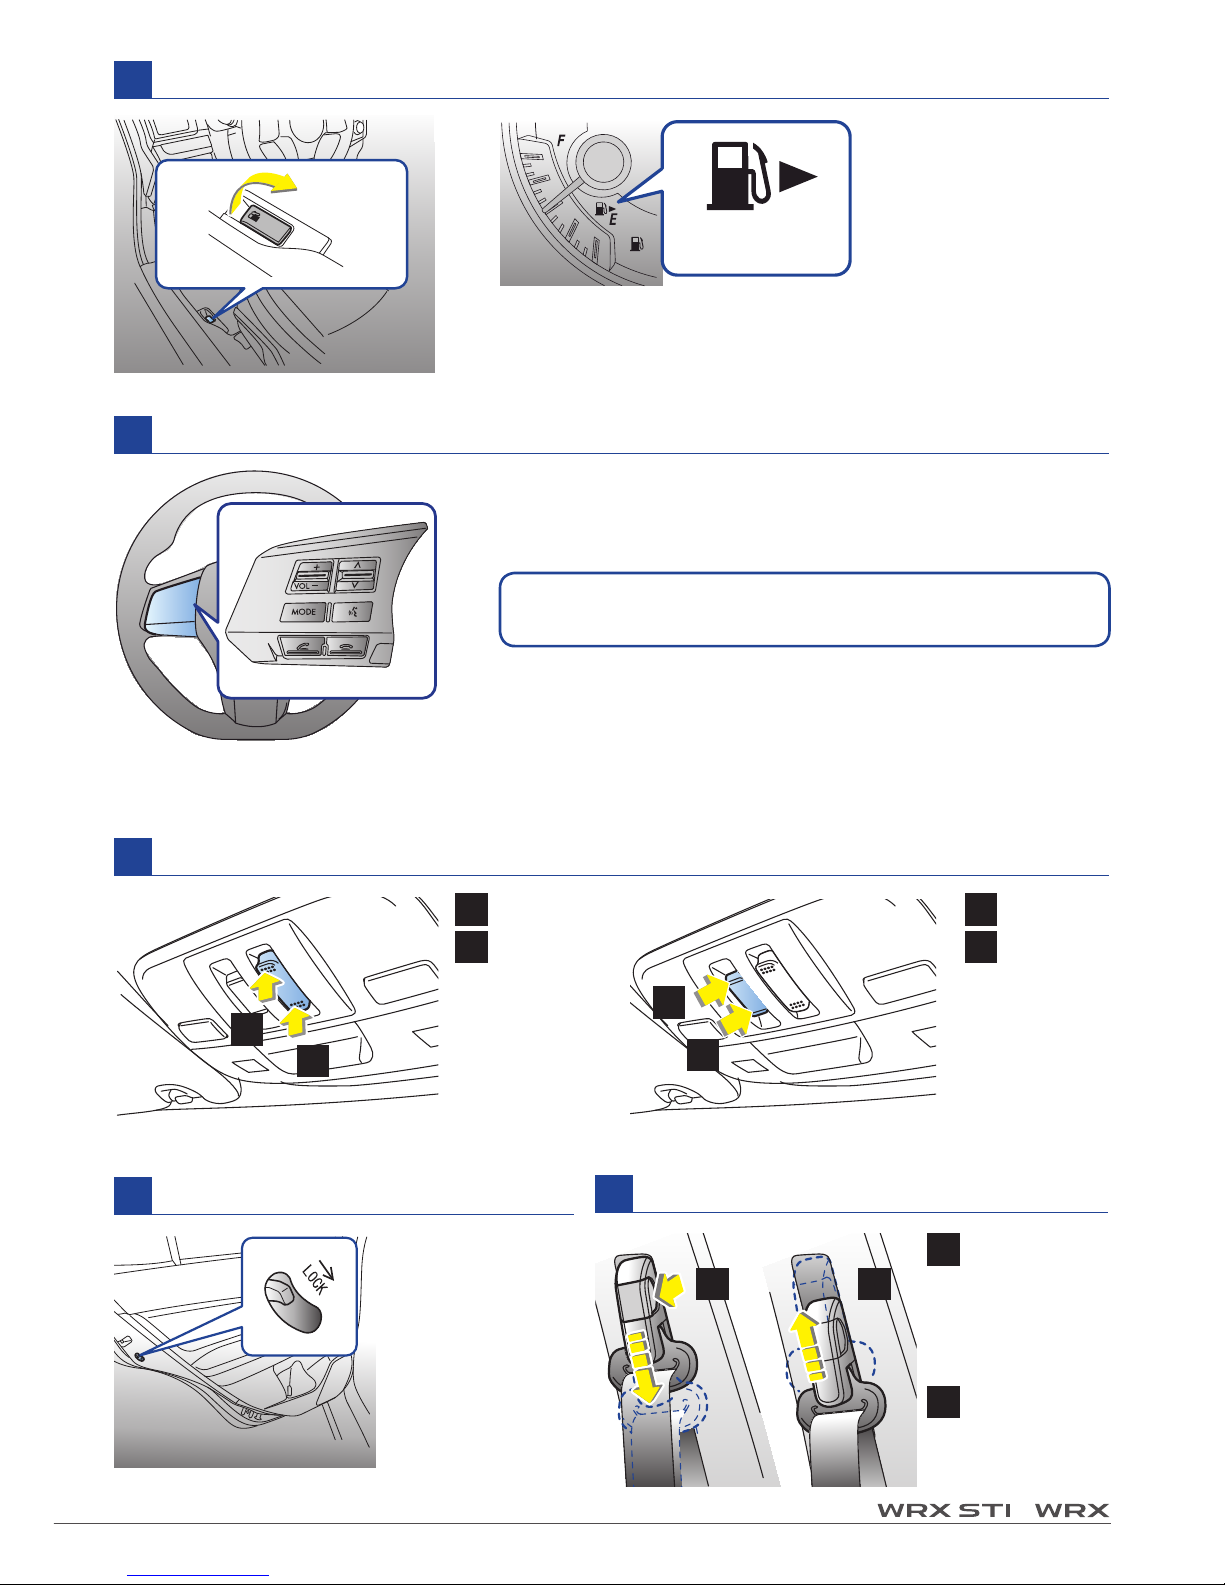
Fuel ller lid release lever
Pull
This indicates that the fuel ller door (lid) is located on
the right side of the vehicle.
Right side
Audio control buttons
L
These buttons allow the driver to control audio functions
without taking his/her hands off the steering wheel.
Front seatbelt anchor height
Child safety locks
Located on the
edge of the rear
doors.
While lever
is in the lock
position, rear
door cannot be
opened from
the inside.
1 To lower:
Pull the
release knob
and slide
anchor down.
2 To rise:
Slide anchor
up.
21
Sunroof switch (if equipped)
M
1
Raise
2
Lower
1
Open
2
Close
Tilting Sliding
2
1
2
1
For details and preparation, please refer to
your Owner's Manual.
☞
Page 10
10
◆
Some functions are available on certain models. ◆ For detailed operating and safety information, please consult your Owner’s Manual.
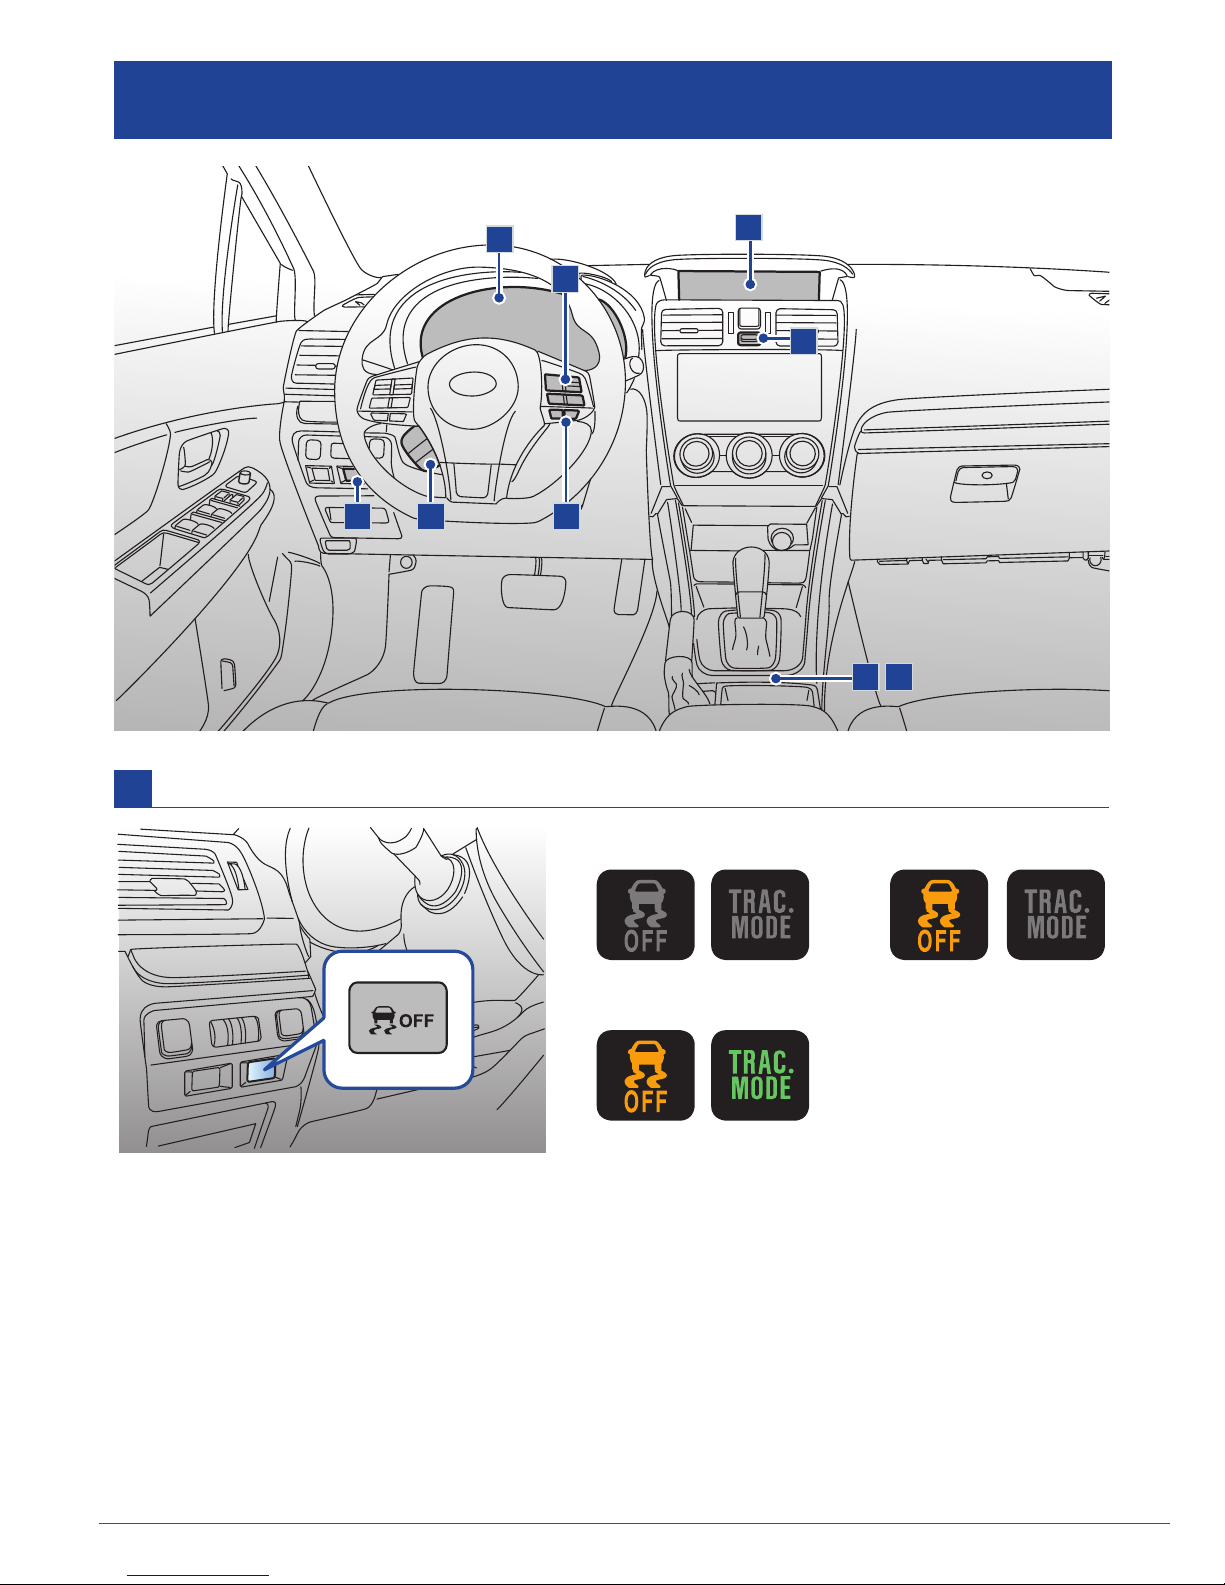
Vehicle Dynamics Control OFF switch
A
VEHICLE PERFORMANCE FUNCTIONS
Deactivating the Vehicle Dynamics Control system facilitates the following operations:
- a standing start on a steeply sloping road with a slippery surface
- extrication of the vehicle when its wheels are stuck in mud or deep snow
Deactivation should not be used except when absolutely necessary.
Please refer to the Owner’s Manual as to when Vehicle Dynamics Control should be
deactivated.
F
B
C D
A
E
C
E
F
Traction mode
Vehicle Dynamics
Control mode
Vehicle Dynamics
Control OFF mode
Indicator lights on the combination meter.
Page 11
11
/
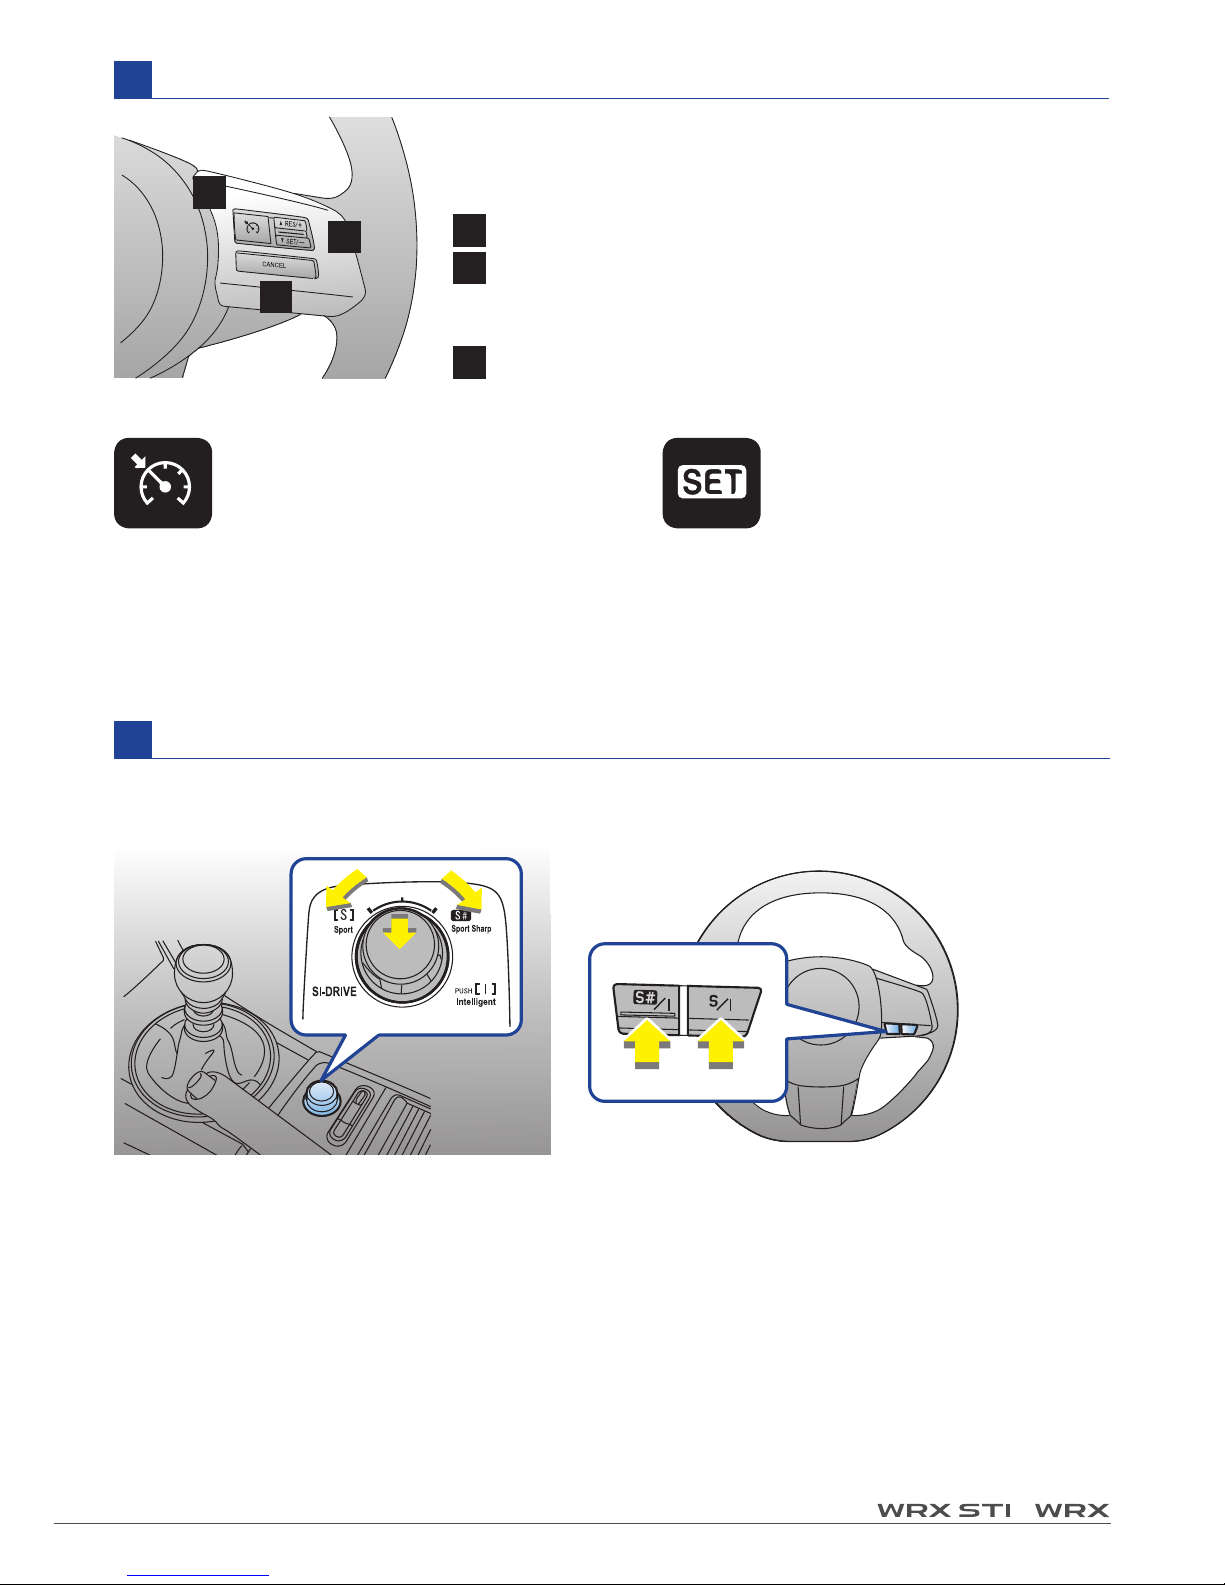
Cruise control
B
Cruise control set indicatorCruise control indicator
The cruise control main button
is pressed to activate the cruise
control function.
The vehicle speed has been set to
use the cruise control function.
1 Cruise control main button:
To activate and deactivate
2 RES/SET switch
▲RES/+ side: To increase speed
▼SET/- side: To set speed / To decrease speed
3 CANCEL button:
To temporarily cancel
Cruise control enables you to maintain a constant vehicle
speed without holding your foot on the accelerator pedal
and it is operative when the vehicle speed is 40 km/h or more.
1
2
3
SI-DRIVE switches (if equipped)
C
Intelligent (I) mode
:
This mode is ideal for smooth, efficient performance driving.
Sport (S) mode :
This mode is ideal for all-around performance driving.
Sport Sharp (S#) mode :
This mode is ideal for maximum performance driving.
This system consists of three modes: Intelligent (I), Sport (S), and Sport Sharp (S#).
By operating the SI-DRIVE switches & selector, the character of the power unit changes.
SI-DRIVE selector (STI models)
SI-DRIVE switches
Page 12
12
◆
Some functions are available on certain models. ◆ For detailed operating and safety information, please consult your Owner’s Manual.
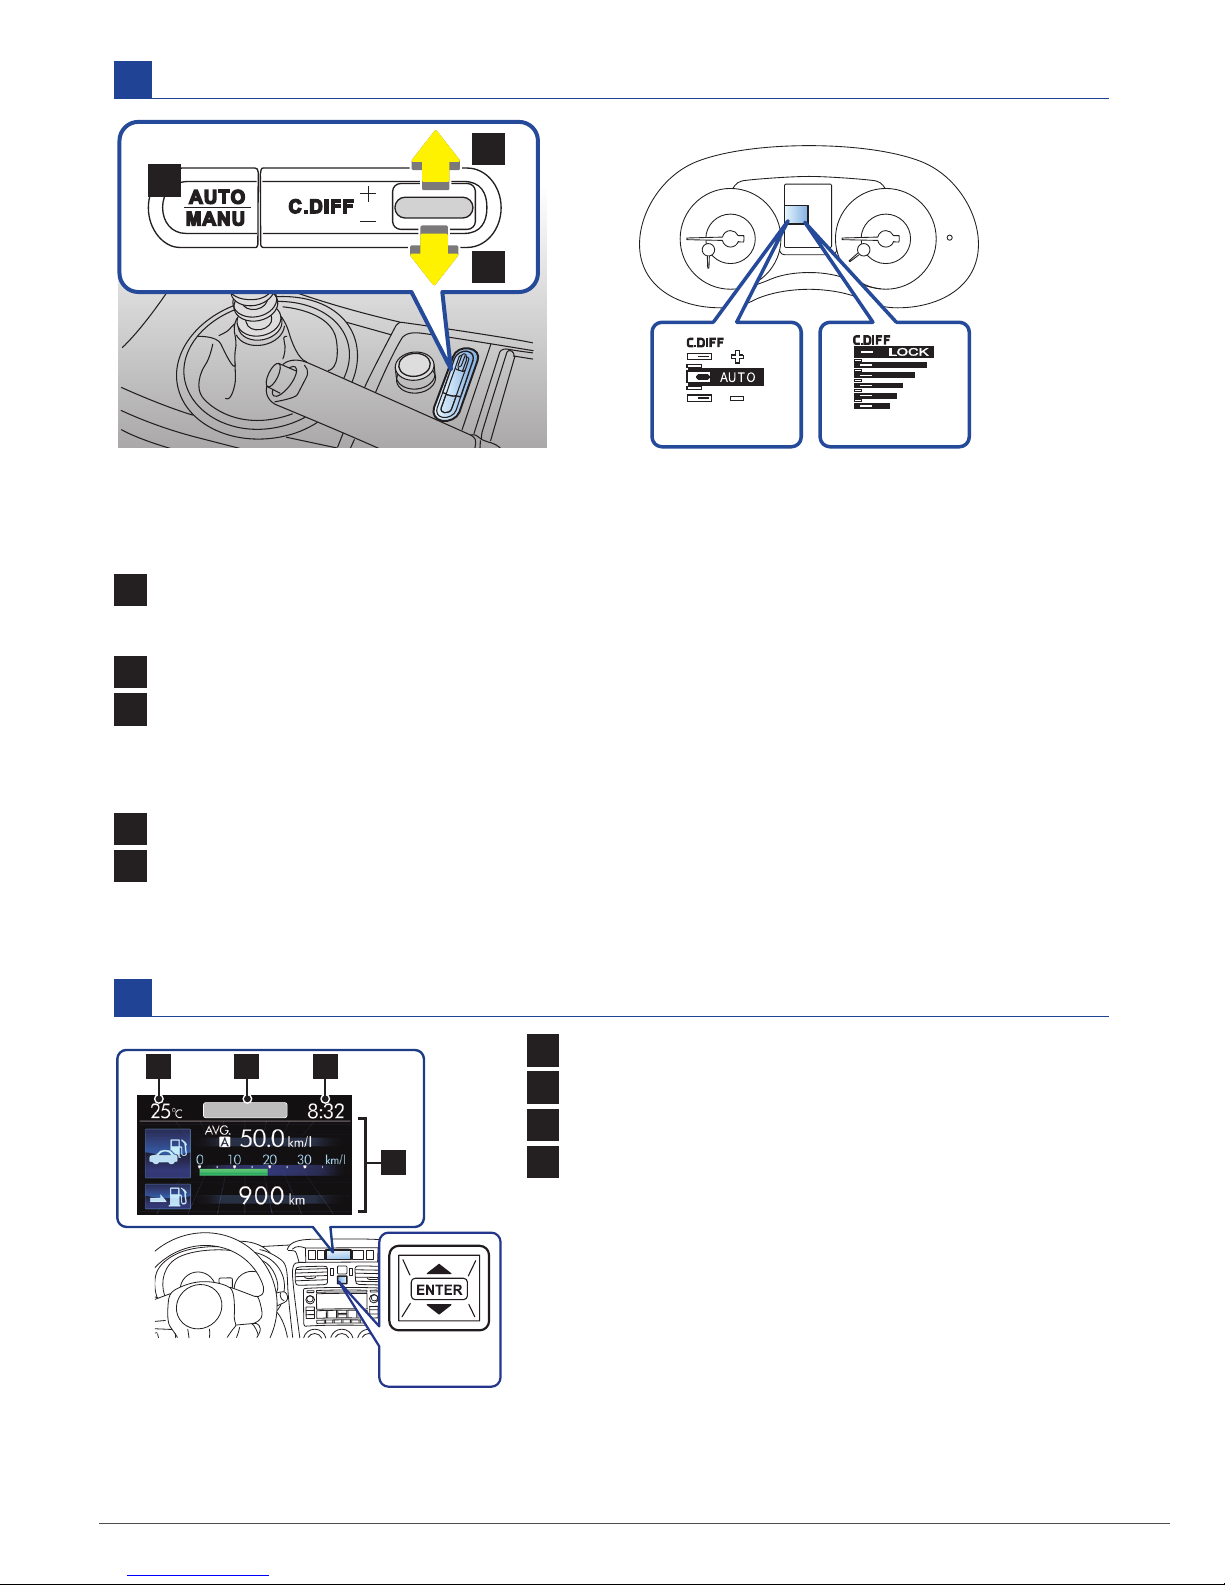
Multi-function display
E
1 Outside temperature indicator
2
Top display
3 Clock
4 Driving information display
Control switch:
By operating ▲ or ▼ of the control
switch, the screens and selection
items can be switched. When the
ENTER
button is pushed and held,
the item can be selected and set.
D
Driver’s Control Center Differential (DCCD) (STI models)
1 AUTO-MANU switch:
Press the switch from auto mode to manual mode or vice versa
1
2
3
Auto mode:
2 AUTO[+]mode
: Push the control switch forward.
3 AUTO[-] mode:
Pull the control switch rearward.
Manual mode:
When the
LOCK
indicator light illuminates, the initial LSD torque setting is maximum.
2 To increase the initial LSD torque
: Push the control switch forward.
3 To reduce the initial LSD torque:
Pull the control switch rearward.
Auto mode
Manual mode
DCCD indicator
Control
switch
4
1 2 3
The Driver’s Control Centre Differential allows you to freely change the degree of
limitation of the limited slip differential (LSD) torque of the vehicle’s center differential.
Page 13
13
/
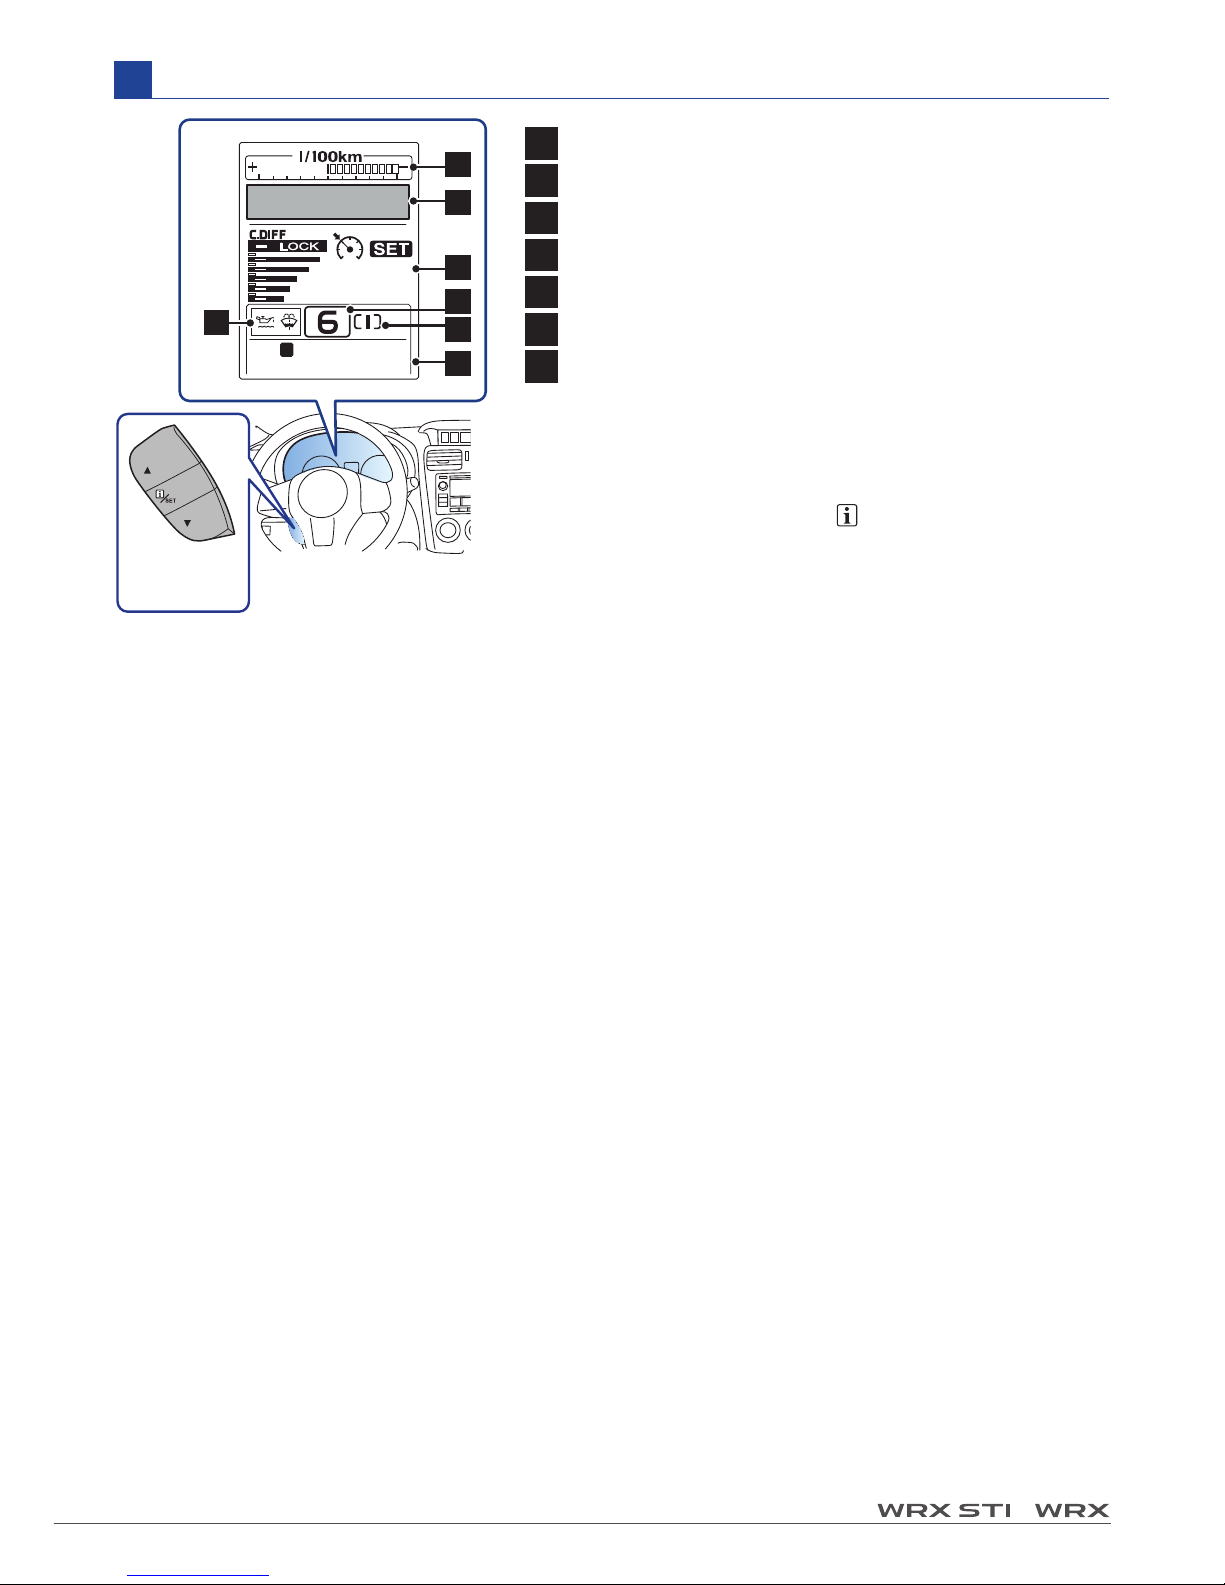
Multi information display
F
1 ECO gauge
2 Warning screen / Basic screen
3 Cruise control information / DCCD indicator
4 Warning indicator
5 Select lever / gear position indicator
6 SI-DRIVE indicator light
7 Odometer / double trip meter
Control switch:
By operating ▲ or ▼ of the
control switch, the screens and
select ion items can be switched.
When the /SET switch is pulled
toward you, the item can be
selected and set.
70
km/h
A
34.5
000900
km
Control
switch
1
2
3
5
7
6
4
Page 14
14
◆
Some functions are available on certain models. ◆ For detailed operating and safety information, please consult your Owner’s Manual.
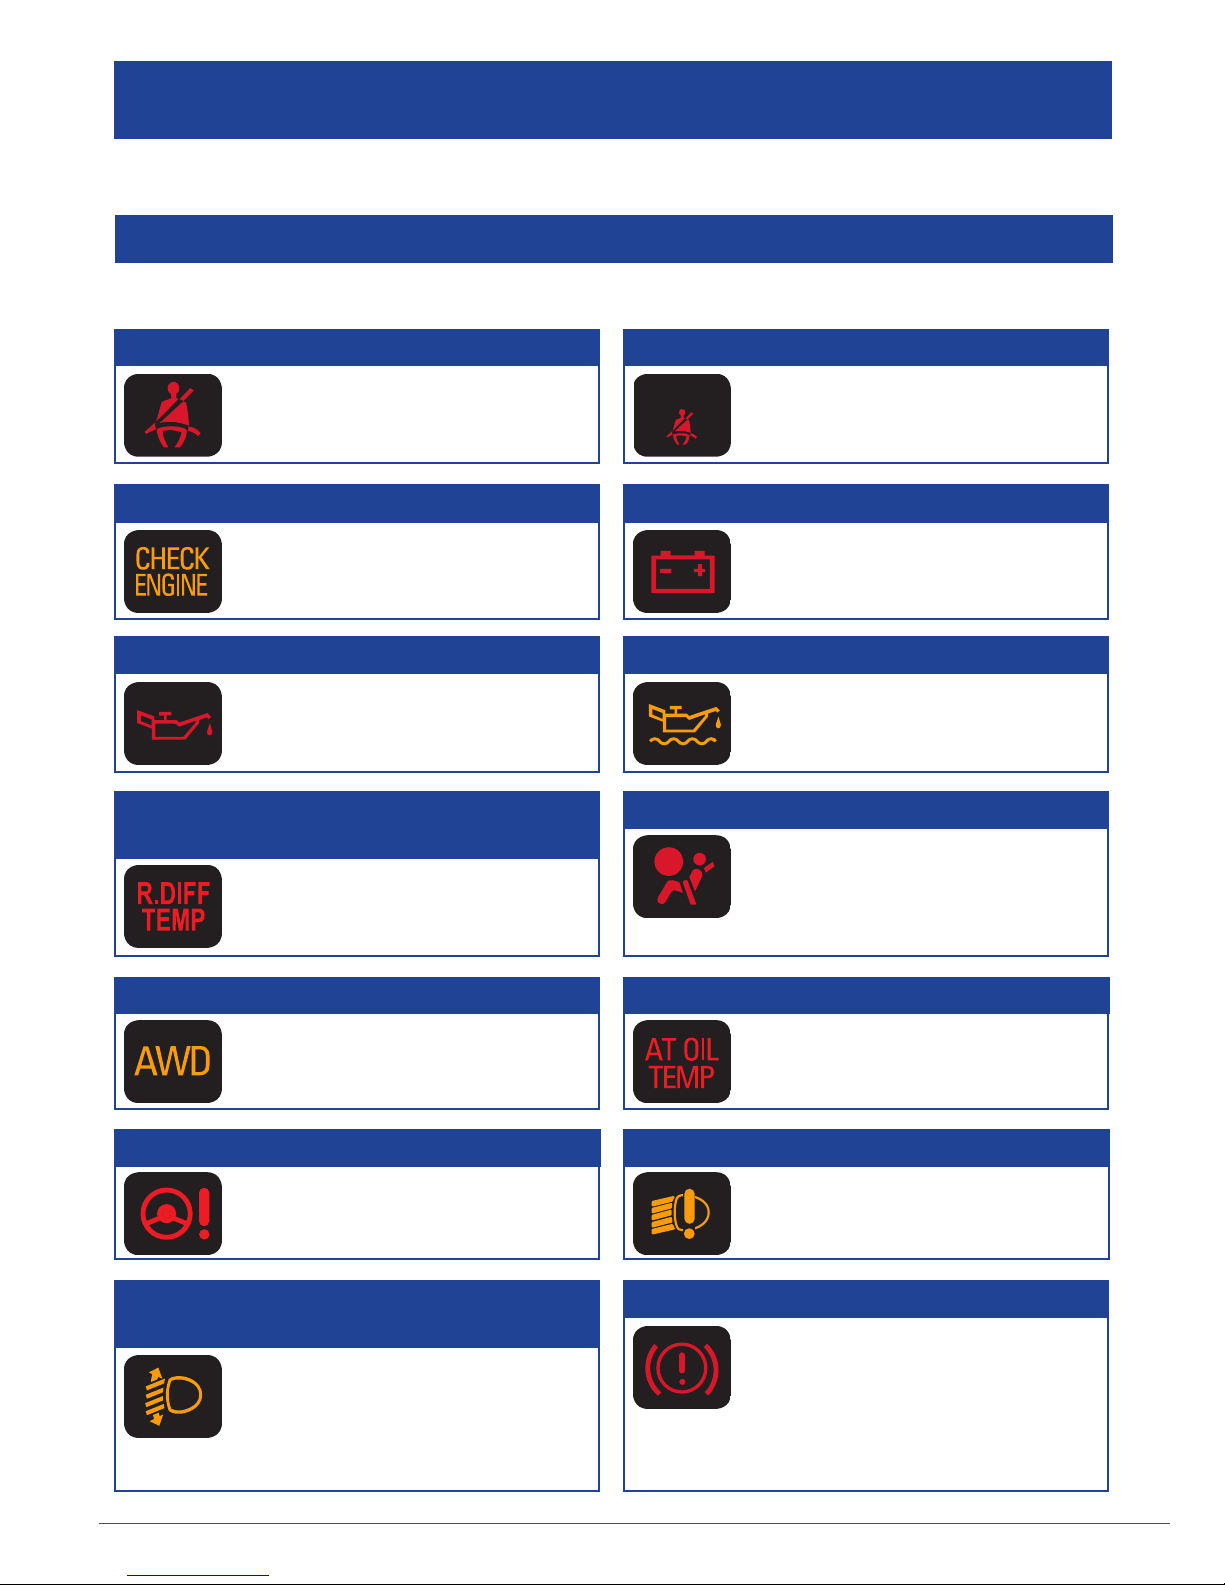
Some warning/indicator lights illuminate for a few seconds in order to check themselves
when the ignition switch is turned ON.
MAIN WARNING AND INDICATOR LIGHTS
Remind the driver to fasten
seatbelt.
Seatbelt warning
Warning lights
Refer to the Owner’s Manual for countermeasures when each warning light comes on.
If necessary, consult your authorized Subaru dealer.
Engine/Emission control system
malfunction.
Malfunction indicator (Check Engine)
Charging system malfunction.
Charge warning
Engine oil pressure is too low.
Oil pressure warning
The engine oil level decreases
to the lower limit.
Engine oil level warning (except STI)
Transmission fluid temperature
is too hot / Transmission control
system malfunction.
AT OIL TEMP warning (CVT models)
Rear differential oil temperature
is too hot.
Rear differential oil temperature warning
(STI)
The electric power steering
system malfunction.
Power steering warning (except STI)
All-Wheel Drive disengaged /
tires of different diameter fitted.
All-wheel drive warning
(if equipped)
This light illuminates when the
automatic headlight beam leveler
does not operate normally.
Automatic headlight beam leveler
warning (if equipped)
Parking brake on/ Low fluid
level/ EBD System malfunction
(Anti-lock brake system
warning light illuminates
simultaneously)/ Vacuum pump
system malfunction (except STI)
Brake system warning
LED headlight warning (if equipped)
The LED headlights
malfunction.
SRS airbag system and/
or seatbelt pretensioners
malfunction.
SRS airbag system warning
PASSENGER
Remind the front passenger to
fasten seatbelt. Location: next
to multi function display.
Front passenger’s seatbelt warning
Page 15
15
/
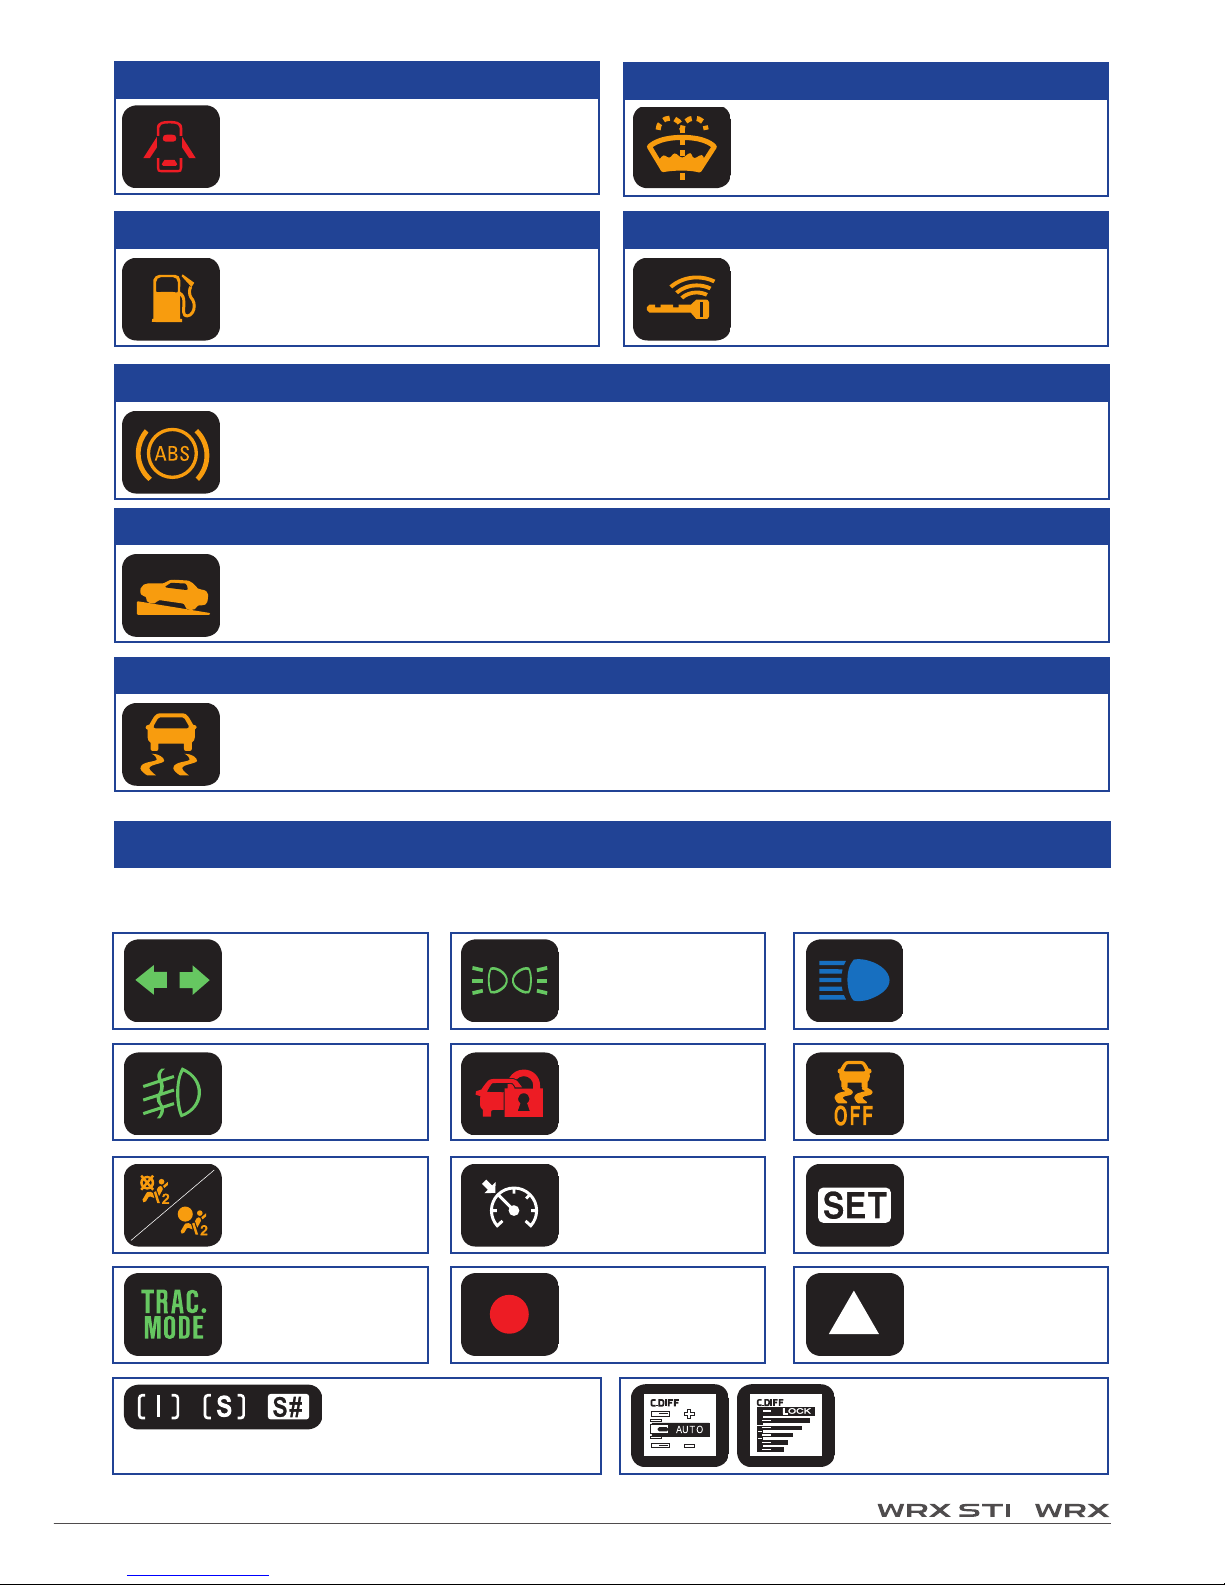
Turn signal
indicator
Indicator lights
The following indicators show the current status of your car. Refer to the Owner’s
manual for more information.
High beam
indicator
Front fog light
indicator
(if equipped)
Security
indicator
Headlight
indicator
Cruise control
indicator
Cruise control
set indicator
REV indicator
(STI)
Shift up
indicator (STI)
SI-DRIVE mode indicator (if equipped)
Anti-lock Brake System malfunction / EBD System malfunction (Brake
System warning light illuminates simultaneously).
ABS warning
Warning:
Hill start assist system malfunction.
Indicator:
Hill start assist system OFF.
Hill start assist warning / Hill start assist OFF indicator
Warning:
Vehicle Dynamics Control system malfunction.
Indicator:
Flashes during activation of the skid suppression function and the
traction control function.
Vehicle Dynamics Control warning /Vehicle Dynamics Control operation indicator
The access key is not inside
the vehicle. For other situation,
refer to Owner’s Manual.
Access key warning (if equipped)
Door open warning
The fluid level in the windshield
washer fluid tank decreases to
the lower limit.
Windshield washer fluid warning
Vehicle Dynamics
Control OFF
indicator
Traction mode
indicator
Door or trunk lid is ajar.
Fuel level low. Refill fuel
immediately.
Low fuel warning
DCCD indicator (STI)
Front passenger’s
frontal airbag ON/
OFF indicator
Page 16

All illustrations, specications, features and photographs contained in this brochure are based on product information available at the time of
its printing, and may not be completely accurate following its publication. Colours shown may vary due to reproduction variations in the printing
process, and some vehicle par ts cannot be shown in certain photographs. Subaru Canada, Inc. reserves the right to discontinue or make changes
at any time, without notice or incurring obligations, to colours, materials, equipment, accessories, features, specications and models, or to change
their prices. Please visit our Web site for the latest information and specications. For detailed operating and safety information, please consult
your Owner’s Manual. For complete details on product updates, warranties or the Subaru C. A.R.E. program, please contact your Subaru dealer.
WRX, WR X STI and Subaru are registered trademarks. Printed in Canada. © 2014 Subaru Canada, Inc. 2015 model year.
subaru.ca
Environmental Management System (EMS)
ISO 14001:2004 certied by SGS
www.subaru-earth.com
SUBARU CANADA, INC. / FUJI HEAVY INDUSTRIES LTD.
SBQRGSTI15E02.14
 Loading...