

Page 1
2020
Getting
Started Guide
Outback
Love. It’s what makes a Subaru, a Subaru.
Page 2

© 2019 Subaru of America, Inc. All rights reserved.
Contents may not be reproduced in whole or in part without prior written permission of
publisher. Specications in this Guide are based on the latest product information available
at the time of publication. Some images shown are for illustration purposes only. Some
equipment shown in photography within this Guide is optional at extra cost. Specic
options may be available only in combination with other options. Specic combinations
of equipment or features may vary from time to time, and by geographic area. Subaru
of America, Inc. reserves the right to change or discontinue at any time, without notice:
Prices, colors, materials, equipment, accessories, specications, models and packages,
without incurring any obligation to make the same or similar changes on vehicles
previously sold. Colors shown may vary due to reproduction and printing processes.
Subaru of America, Inc. is not responsible for typographical errors.
Aha™ is a trademark of Harman International Industries, Inc. Alcantara® is a registered
trademark of Alcantara S.p.A., and Alcantara is produced by the Toray Group. App Store®
is a registered trademark of Apple, Inc. Apple® is a registered trademark of Apple, Inc.
BBS® is a registered trademark of BBS Kraftahrzeugtechnik, AG. Bluetooth® is a registered
trademark of Bluetooth SIG, Inc. Brembo® is a registered trademark of Freni Brembo, S.p.A.
GreenEdge® is a registered trademark of Harman International Industries, Inc. Harman
Kardon® is a registered trademark of Harman International Industries, Inc. HD Radio® is a
registered trademark of iBiquity Digital Corporation. HomeLink® is a registered trademark
of Prince Corporation, a wholly owned subsidiary of Johnson Controls. iHeart® Radio
is a registered trademark of iHeartMedia, Inc. iPod® is a registered trademark of Apple,
Inc. iTunes® is a registered trademark of Apple, Inc. Metal-Matrix Diaphragm (MMD®) is a
registered trademark of Harman International Industries, Inc. MirrorLink™ is a trademark of
Car Connectivity Consortium, LLC. Pandora® is a registered trademark of Pandora Media,
Inc. Siri® is a registered trademark of Apple, Inc. Smart Way® is a registered trademark
of the U.S. Environmental Protection Agency. Stitcher™ is a trademark of Stitcher™, Inc.
TORSEN LSD® is a registered trademark of JTEKT TORSEN North America, Inc. SiriusXM®
All Access Radio is a registered trademark of SiriusXM Radio, Inc. SiriusXM Trafc® and
SiriusXM Travel Link® are registered trademarks of SiriusXM Radio, Inc. Added Security,
Crosstrek, Forester and Outback are registered trademarks of Subaru of America, Inc. BRZ,
EyeSight, Impreza, Lineartronic, Legacy, Subaru, SUBARU BOXER, WRX, STI and X-MODE
are registered trademarks of Subaru Corporation. Condence in Motion and SUBARU
STARLINK™ are trademarks of Subaru Corporation.
Page 3
TABLE OF CONTENTS
2 PURPOSE OF THIS GUIDE
4 ENTRY AND EXIT
8 INSTRUMENT PANEL
10 GETTING COMFORTABLE
24 CONTROLS
29 GAUGES AND WARNING LIGHTS
30 OPERATING THE VEHICLE
38 REFUELING
39 PASSENGER/CARGO AREAS
46 ENGINE COMPARTMENT
49 ADDITIONAL SPECIFICATIONS
52 STARLINK OVERVIEW
58 STARLINK HOME
62 CREATING A DRIVER PROFILE
66 MULTIMEDIA
69 PHONE
73 APPS
78 SUBARU STARLINK™ SAFETY AND SECURITY
81 MAPS (IF EQUIPPED)
100 SETTINGS AND UPDATES
110 APPENDIX: HOW TO
124 INDEX
Page 4
PURPOSE OF THIS GUIDE
FORWARD
Congratulations on choosing a Subaru vehicle! This Getting Started Guide is designed to
provide information on the basic operation and key features of your Subaru and STARLINK
Systems on your Subaru vehicle.
IMPORTANT SAFETY INFORMATION
The Getting Started Guide is not intended as a substitute for the Owner’s Manual. We
strongly encourage you to review the entire Owner’s Manual to ensure complete
understanding.
ADDITIONAL RESOURCES
If you’re having difficulty using any of the functions outlined in this guide, you can get more
information from the following sources:
Your Subaru Owner’s Manual:
Located in the glovebox
Online Subaru Owner’s Resources:
www.subaru.com/owners
Subaru Customer Support:
www.subaru.com/customer-support
1-800-SUBARU3 (1-800-782-2783)
2
Page 5
PURPOSE OF THIS GUIDE
IN CASE OF EMERGENCY
SUBARU STARLINK™ Safety and Security (subscription required)
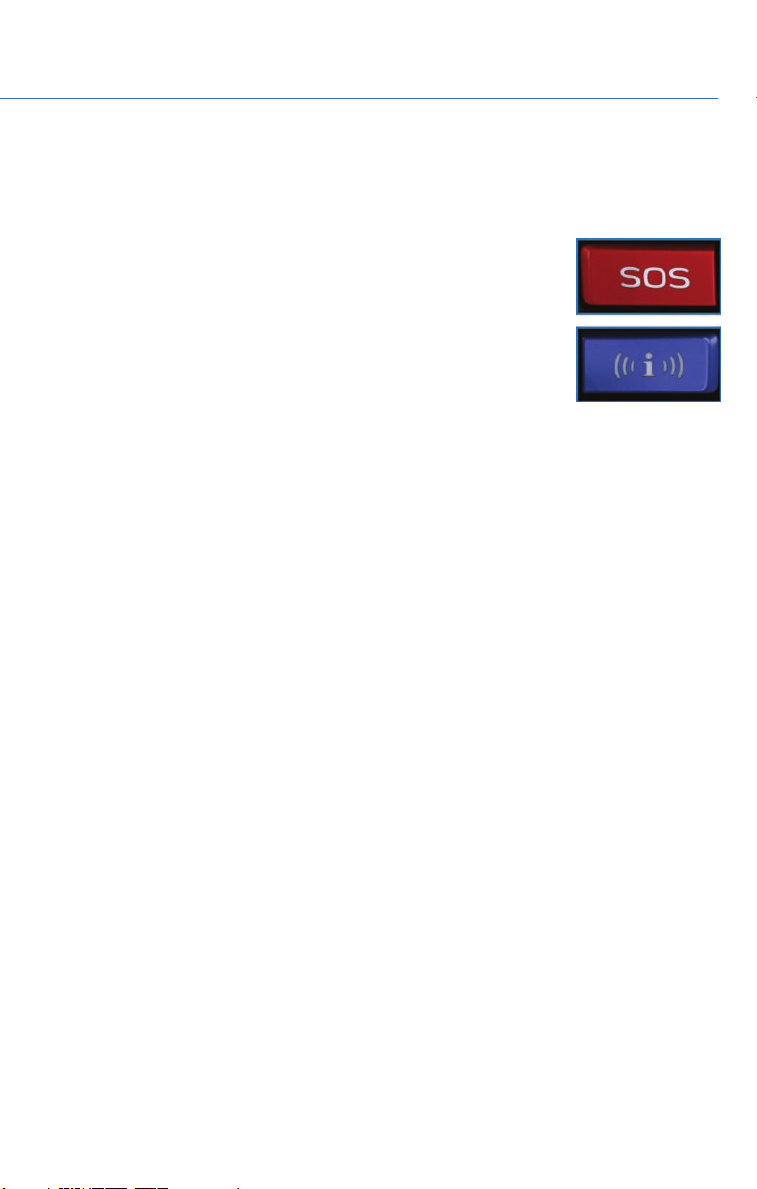
SOS Emergency: Press the red “SOS” button on the overhead
console in the event of an emergency to speak with a SUBARU
STARLINK™ Customer Care Advisor.
Enhanced Roadside Assistance: Press the blue “i” button on the
overhead console or select the “Roadside Assistance” option in the
“MySubaru” menu on the multimedia system.
Subaru Roadside Assistance
Subaru Roadside Assistance is free and standard on your Subaru. Coverage is automatic;
there are no forms to complete. Subaru Roadside Assistance is available anytime during
the 3-year/36,000-mile Subaru Limited Warranty, whichever comes first.* A Subaru
Roadside Assistance decal has been affixed to the driver’s door window. Please refer to
the Roadside Assistance guide in the owner's information kit for the details on this
coverage.
Subaru Roadside Assistance:
1-800-261-2155
Roadside assistance helps with:
• Towing to the nearest authorized Subaru Retailer if you cannot safely drive your Subaru
• Jump-start if your battery is dead
• Gasoline delivery if you run out of gas
• Flat tire change to install your spare
• Emergency lockout service
• National Subaru Retailer locator service, with phone numbers and location of the nearest
Retailer anywhere in the U.S. or Canada
*See your Retailer for details.
TOWING YOUR ALL-WHEEL DRIVE SUBARU
Since Subaru Symmetrical All-Wheel Drive distributes power to all four wheels, improper
towing may damage your AWD system. The best way to tow your Subaru is with a flatbed
truck by your Subaru Retailer or a commercial towing service.
3
Page 6
ENTRY AND EXIT
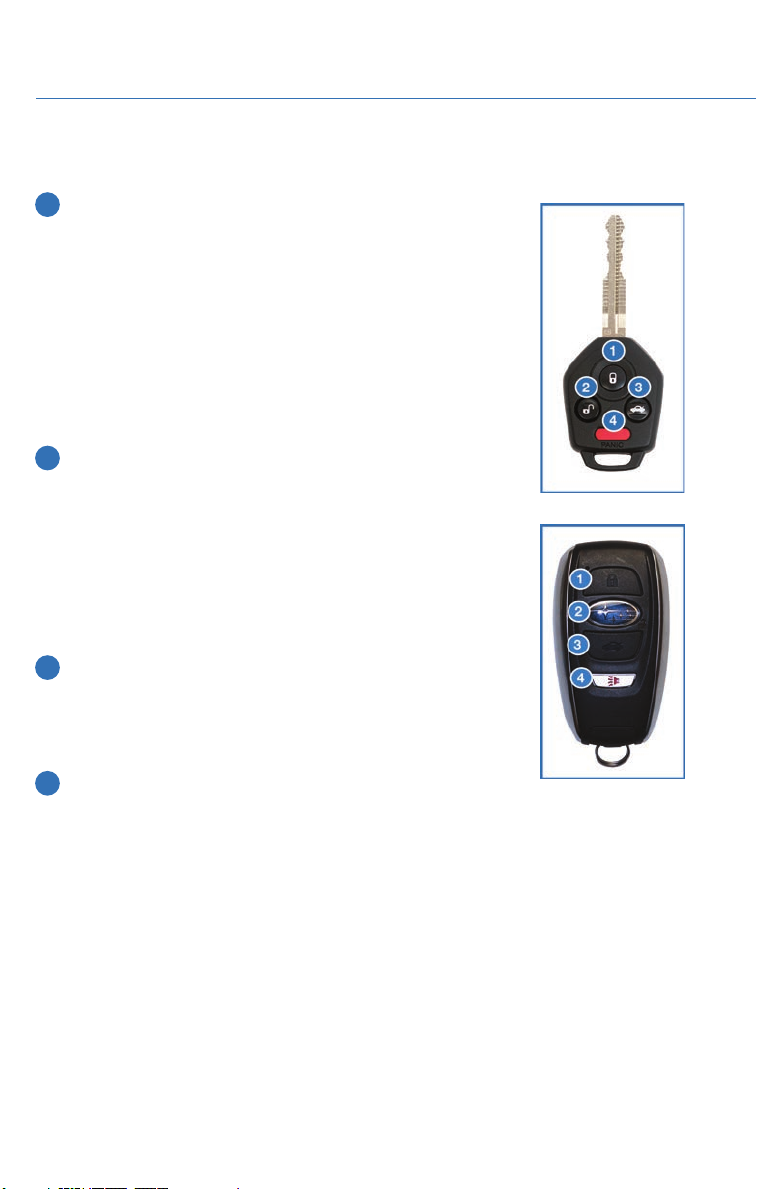
KEYLESS ENTRY
1 Lock/Arm
• Pressing this button will lock all doors, rear gate and fuel
door and activate the security alarm.
• If any of the doors or the rear gate are not fully closed, five
rapid chirps will sound and the hazard warning flashers will
flash.
• Pressing this button three times (within five seconds) will
activate the vehicle finder function. If you are within 30 feet
of your Subaru, the horn will sound once, and the hazard
warning flashers will flash three times.
2 Unlock/Disarm
• Pressing this button once will unlock the driver’s door and
fuel door if set to do so in the Touchscreen.
• Pressing this button twice (within five seconds) will unlock
all doors and rear gate.
• When you press this button, the interior lights will illuminate,
if set to the “DOOR” position on the overhead console
switch.
Access Key Fob
3 Rear Gate
• Pressing this button will unlock the rear gate.
• If equipped with a power rear gate, pressing and holding
this button will open or close the rear gate.
4 Panic Alarm
• Pressing this button will sound the horn and flash the
hazard warning lights.
• Press any button on the access key fob or transmitter to deactivate.
4
Transmitter
Page 7
ENTRY AND EXIT
Automatic Door Locking/Unlocking
With this function, all doors and the fuel lid will automatically lock or unlock when certain
conditions are met based on your preference. You can set the doors to lock when your
Subaru reaches 12 mph or you shift the select lever out of the “P” position. You can set the
doors to unlock when you shift the select lever into the “P” position, turn the ignition “OFF”
or open the driver’s door. You can change the setting in the Combination Meter Display
(CMD) or the touchscreen.
Automatic
Locking
Automatic
Unlocking
KEYLESS ACCESS WITH PUSH BUTTON START (if
equipped)
Your Subaru allows for customizing of the door unlock settings. The default setting is when
you unlock the vehicle, only the driver’s door and fuel lid unlock. If preferred, you can set
the vehicle to unlock all doors, the rear gate and the fuel lid. This adjustment can be
performed through the SUBARU STARLINK™ Multimedia Touchscreen under “Settings”,
then “Vehicle”.
Unlock Using Door Handles
Vehicle Speed
(12 mph)
Shift into Park Ignition Off Drive Door
Shift Out of
Park
Off
Open
Off
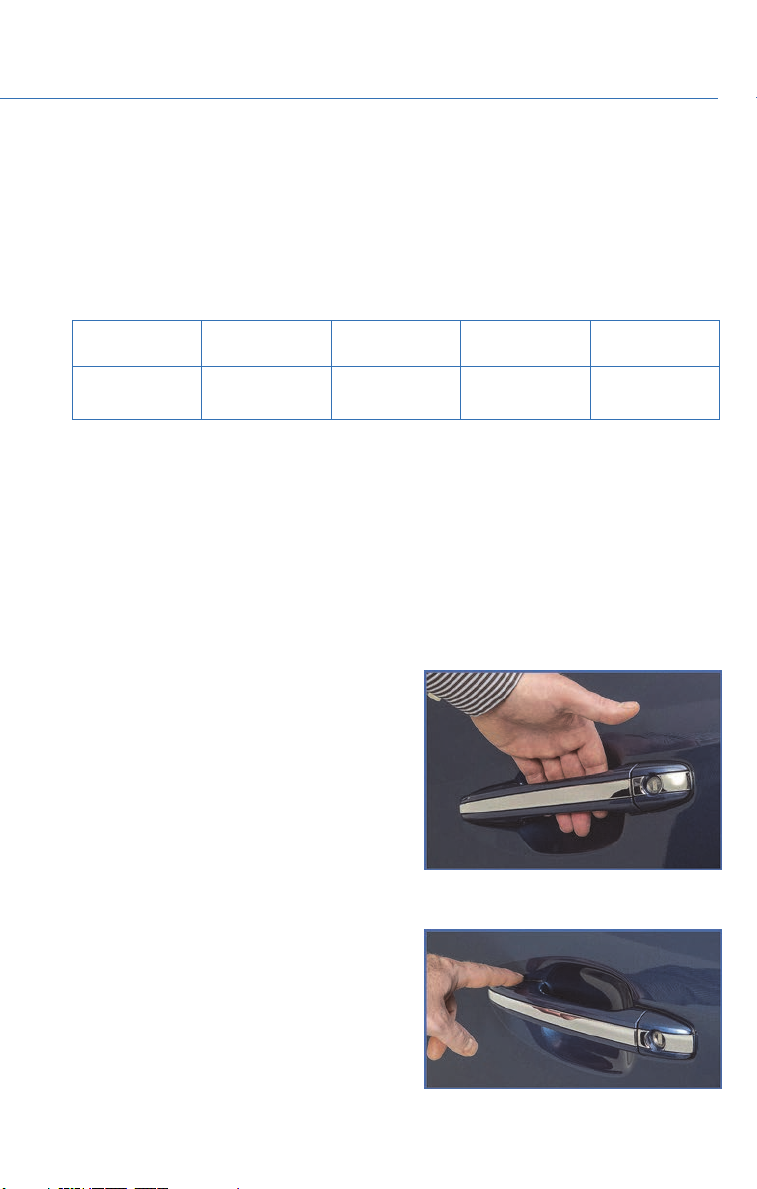
Grip the driver’s door handle to unlock the
driver’s door (or all doors depending on the
setting). Grip the front passenger’s handle to
unlock all doors and the rear gate. Two chirps
will sound and the hazard warning flashers will
flash twice.
Locking Using Door Handles
Close all doors and the rear gate and touch
the door lock sensor (two lines) on either front
door handle. All doors and the rear gate will
lock. One chirp will sound and the hazard
warning flashers will flash once.
5
Page 8
ENTRY AND EXIT
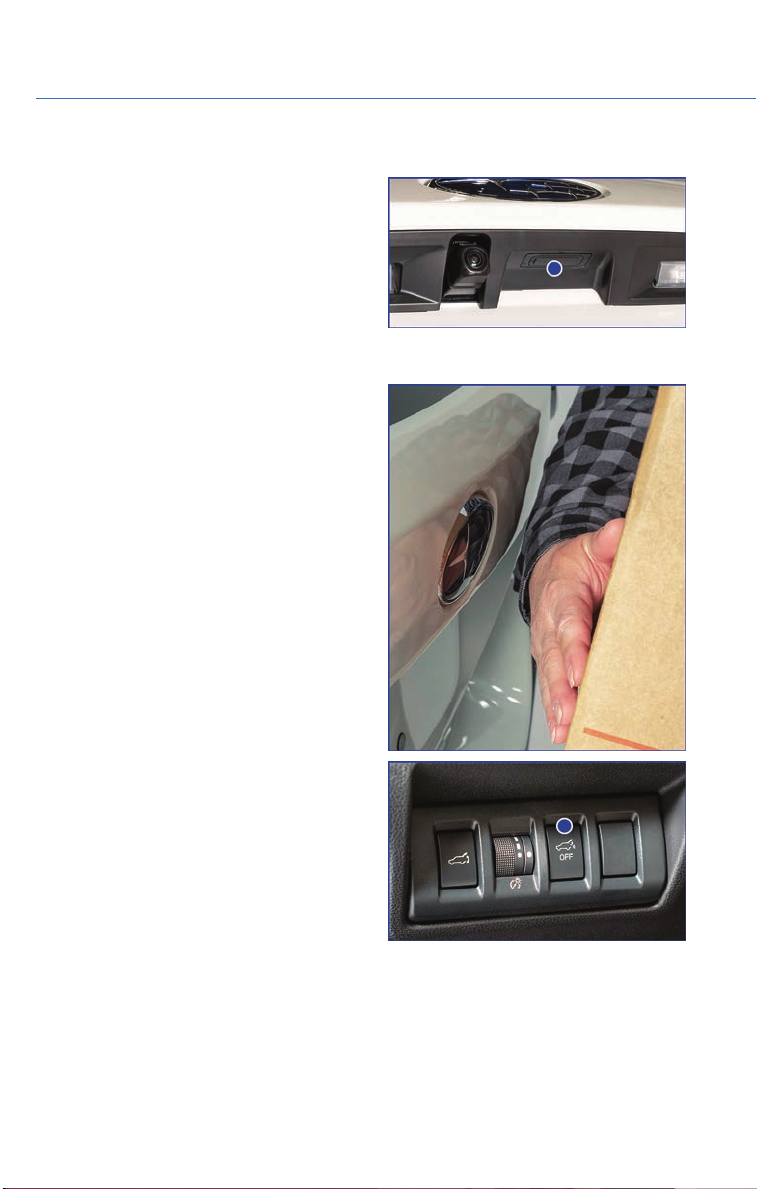
Opening the Rear Gate
Press the rear gate opener button to unlock
and open the rear gate (or also unlock all
doors depending on the setting). Two chirps
will sound and the hazard warning flashers will
flash twice.
Hands-free Power Rear Gate
The Hands-free Power Rear Gate function
uses the Subaru emblem to open the rear gate
when you have your hands full.
To open the rear gate using the hands-free
method, perform the following steps:
1. When the ignition switch is in the OFF
position, carry the access key fob with you.
2. Hold your hand over the Subaru emblem
without touching it until a chirp sounds.
3. Immediately after the chirp sounds, move
your hand away.
4. The rear gate will open automatically.
This function can be turned ON/OFF by
pressing the Hands-free Power Rear Gate
ON/OFF switch on the instrument panel.
6
Page 9
ENTRY AND EXIT
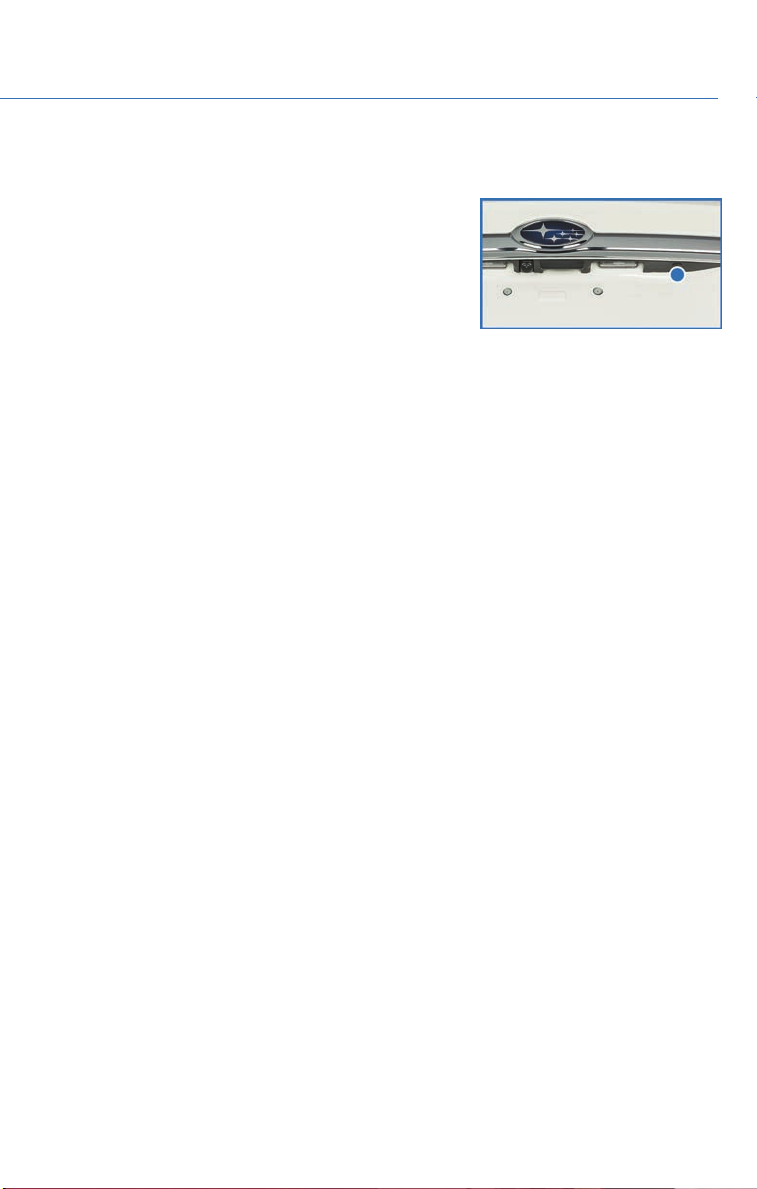
Locking Using the Rear Gate
Close all doors and the rear gate and press the rear
lock button. All doors and the rear gate will lock. One
chirp will sound and the hazard warning flashers will
flash once.
7
Page 10
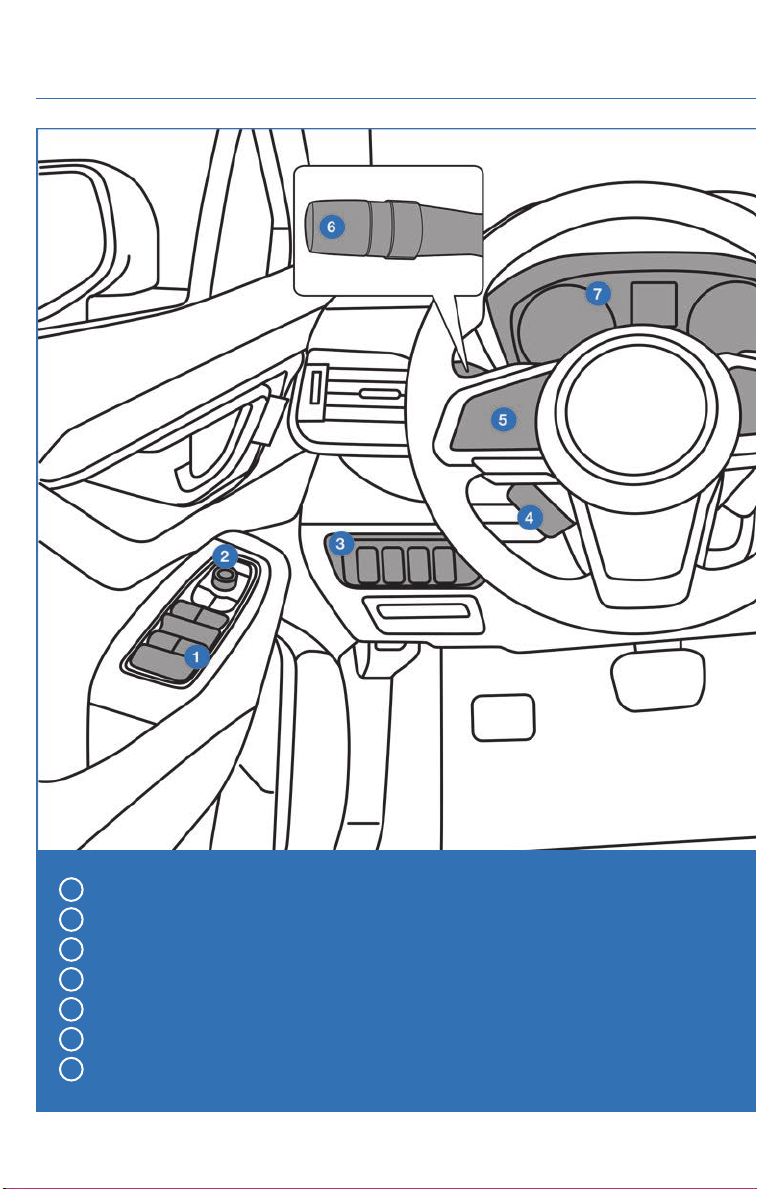
INSTRUMENT PANEL
1 Power Windows (p. 16)
2 Power Exterior Mirrors (p. 13)
3 Instrument Panel Switches (p. 27)
4 I Switch (p. 25)
5 Audio Controls (p. 24)
6 Light Controls (p. 25)
7 Combination Meter (p. 29)
8
Page 11
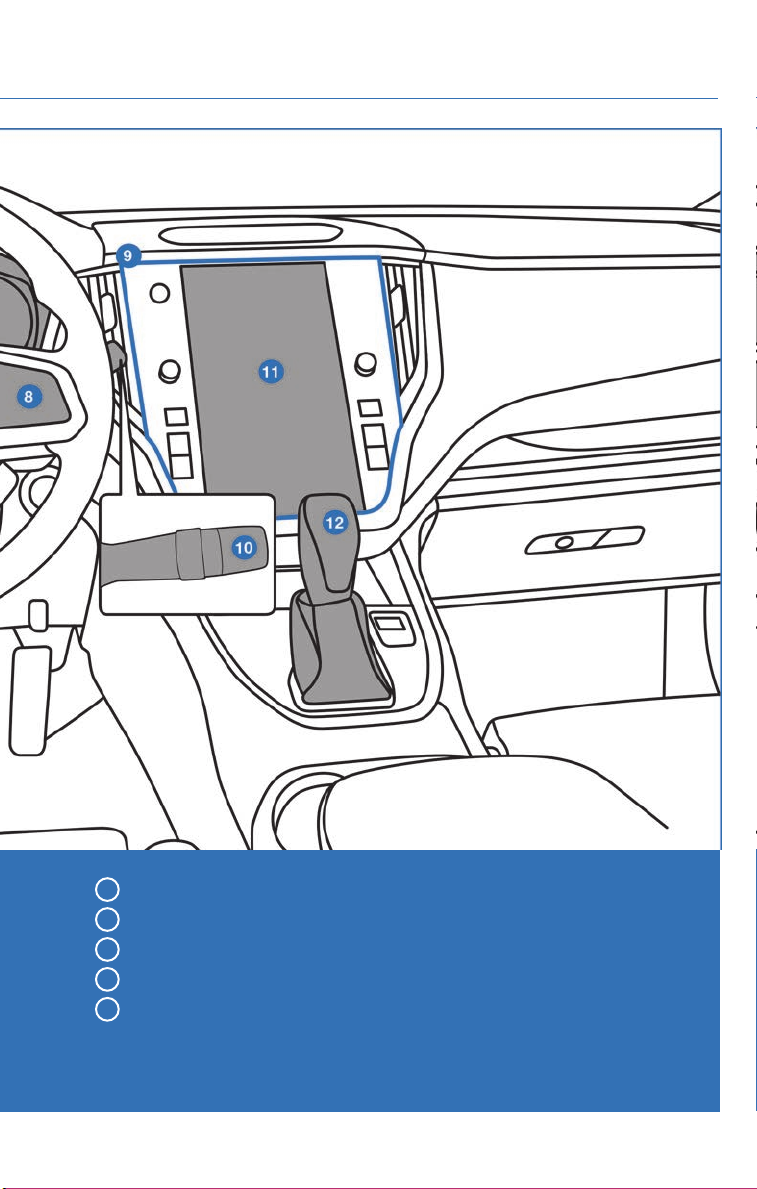
INSTRUMENT PANEL
8 Advanced Adaptive Cruise Control (p. 24)
9 Center Information Display (CID)
10 Windshield Wipers (p. 26)
11 SUBARU STARLINK™ Multimedia Touchscreen (p. 52)
12 CVT Select Lever (p. 31)
9
Page 12
GETTING COMFORTABLE
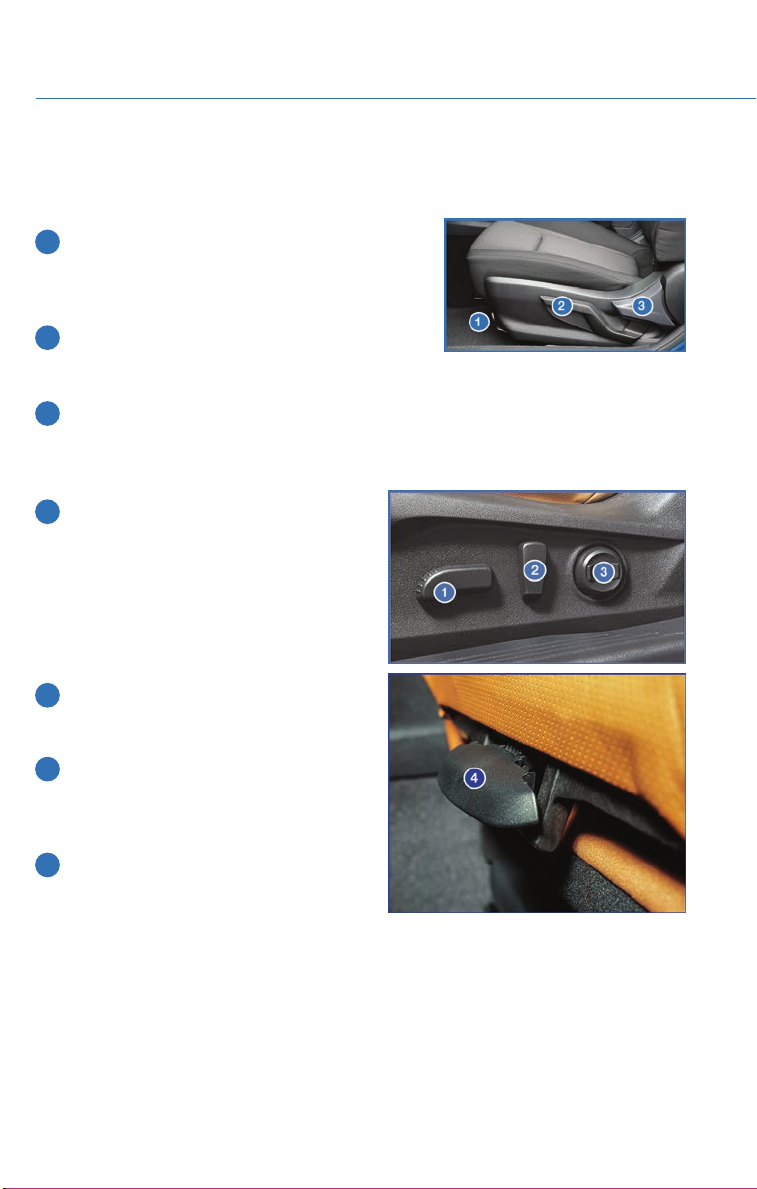
SEATING
Manual Seats
1 Forward/Backward: Pull the lever below the
seat up and slide the seat forward or backward.
Release the lever and make sure the seat is
locked into place.
2 Seat Height (Driver’s Seat): Pulling up or
pushing down on the lever will raise or lower the
seat cushion.
3 Recline Seatback: Pull the lever up to adjust the seatback to the desired position.
Release the lever and make sure the seat is locked into place.
Power Driver’s Seat (if equipped)
1 Forward/Backward and Height: Moving
the switch forward or backward will
adjust the seat in that direction. Pulling
up or pushing down on the front or back
of the switch will adjust the angle of the
seat cushion. Pulling up or pushing down
the entire switch will adjust the height of
the seat cushion.
2 Recline Seatback: Moving the switch
forward or backward will adjust the angle
of the seatback.
3 Lumbar Support (if equipped): Pressing
the front of the switch will increase
support. Pressing the rear of the switch
will decrease support.
4 Thigh Extension (if equipped): Pull up
on the lever below the seat cushion to
adjust the length.
10
Page 13
GETTING COMFORTABLE
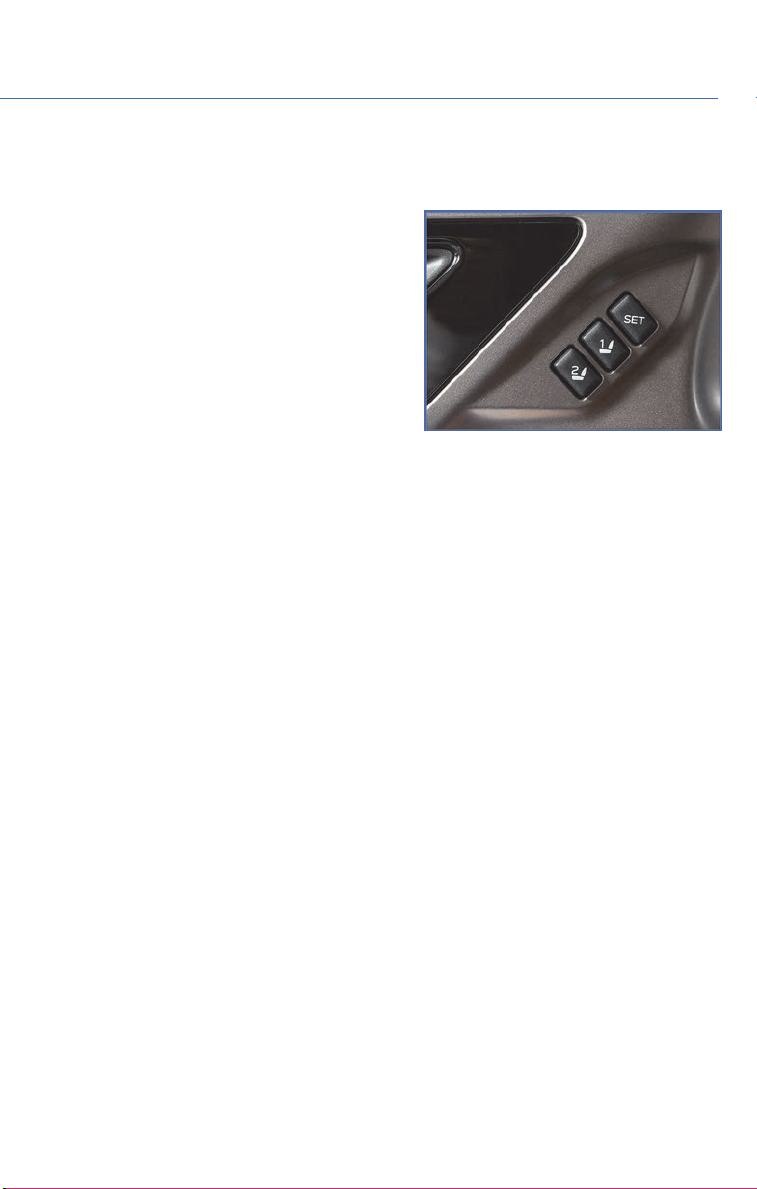
Memory Driver’s Seat (if equipped)
You can set a seat position and retrieve it using the buttons on the driver’s door or each of
the access key fobs.
To set a seat position with a button:
1. Make sure the select lever is in the “P”
position.
2. Adjust the seat to the desired position.
3. While holding the “SET” button, press and
hold either button “1” or “2”. A chirp
sounds when the position is registered.
Another option would be to press and hold
the “SET” button and either button “1” or
“2” at the same time.
To retrieve the seat position with a button:
1. Turn the ignition switch to “ON”.
2. While the select lever is in the “P” position, press button “1” or “2”.
To set a seat position with the access key fob:
1. Make sure the select lever is in the “P” position with the parking brake on and the
ignition “OFF”.
2. Adjust the seat to the desired position.
3. While holding the “SET” button, press and hold the unlock button on the access key
fob. A chirp sounds when the position is registered.
To retrieve the seat position with the access key fob:
1. Hold the access key fob.
2. Unlock and open the driver’s door.
11
Page 14
GETTING COMFORTABLE
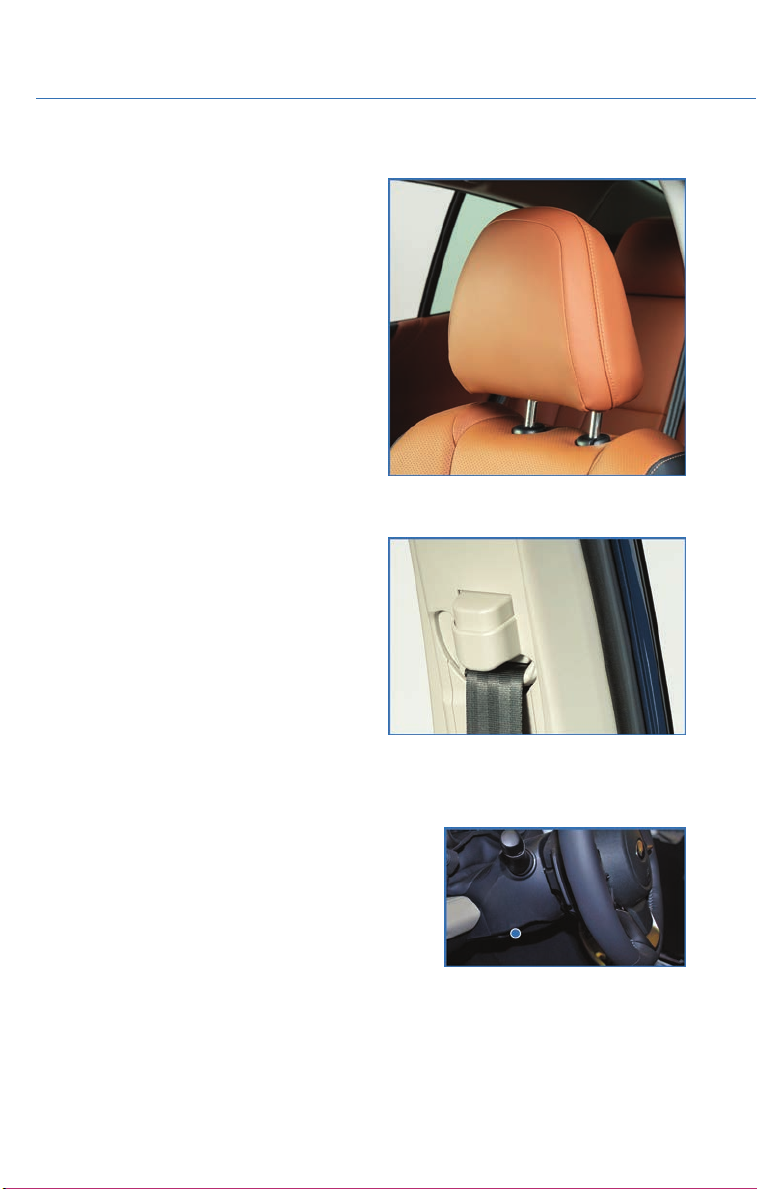
Head Restraint Adjustment
Pull the head restraint up to raise it. To lower it,
push it down while pressing the release button
on the top of the seatback. Each head restraint
should be adjusted so that the center of the
head restraint is closest to the top of the
occupant’s ears. This adjustment should be
made for any seating position, front or rear,
that has a new occupant.
You can adjust the angle of the front head
restraints by tilting them forward. You will hear
a click when the restraint is locked. Pulling the
head restraint as far forward as it will go will
allow it to return to the fully upright position.
Seatbelt Adjuster
Always position the seatbelt adjuster so the
shoulder belt passes over the middle of your
shoulder without touching your neck. Pull the
adjuster out and slide it up or down. Release
the adjuster and make sure it is locked in
place.
TILT AND TELESCOPIC STEERING COLUMN
Pull the lever down firmly to unlock, then adjust the
height and lengthwise position of the column. Push
the lever firmly back up to lock the column in place.
12
Page 15
GETTING COMFORTABLE
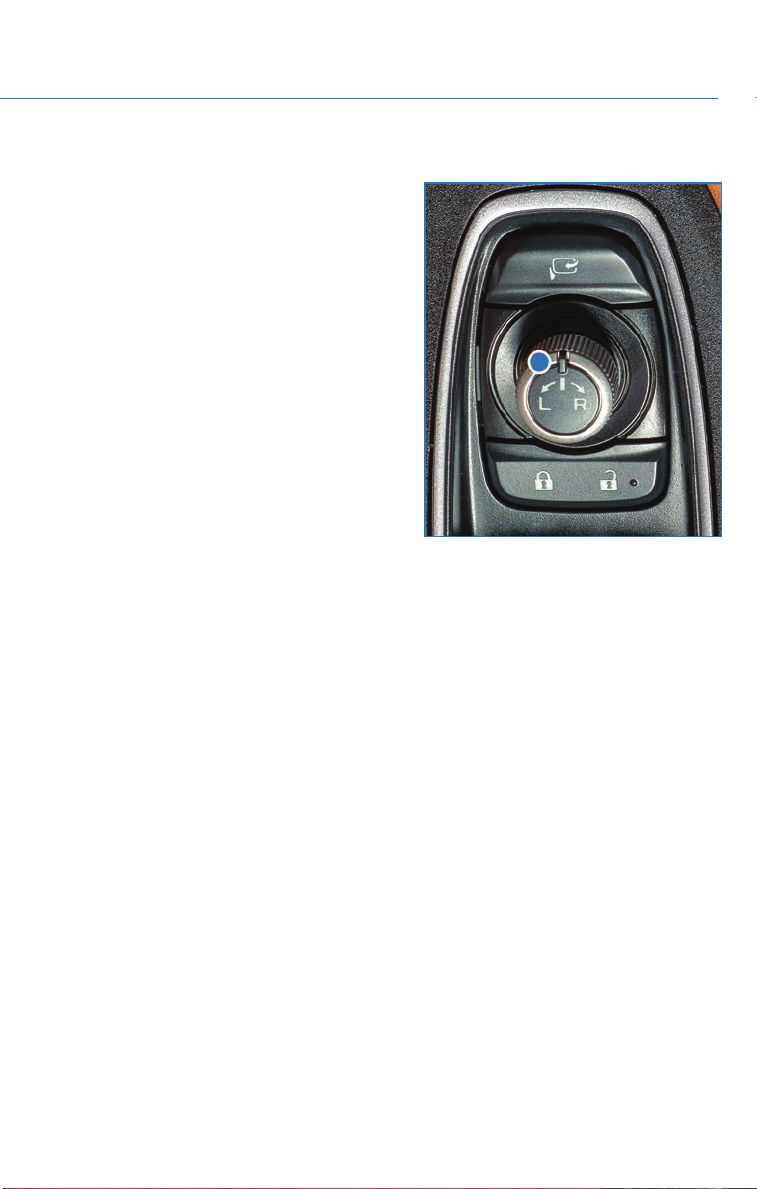
POWER EXTERIOR MIRRORS
Turn the knob to “L” (left side) or “R” (right
side) to select a mirror. Move the knob in the
direction you want to move the mirror. Return
the knob to the neutral center position.
13
Page 16
GETTING COMFORTABLE
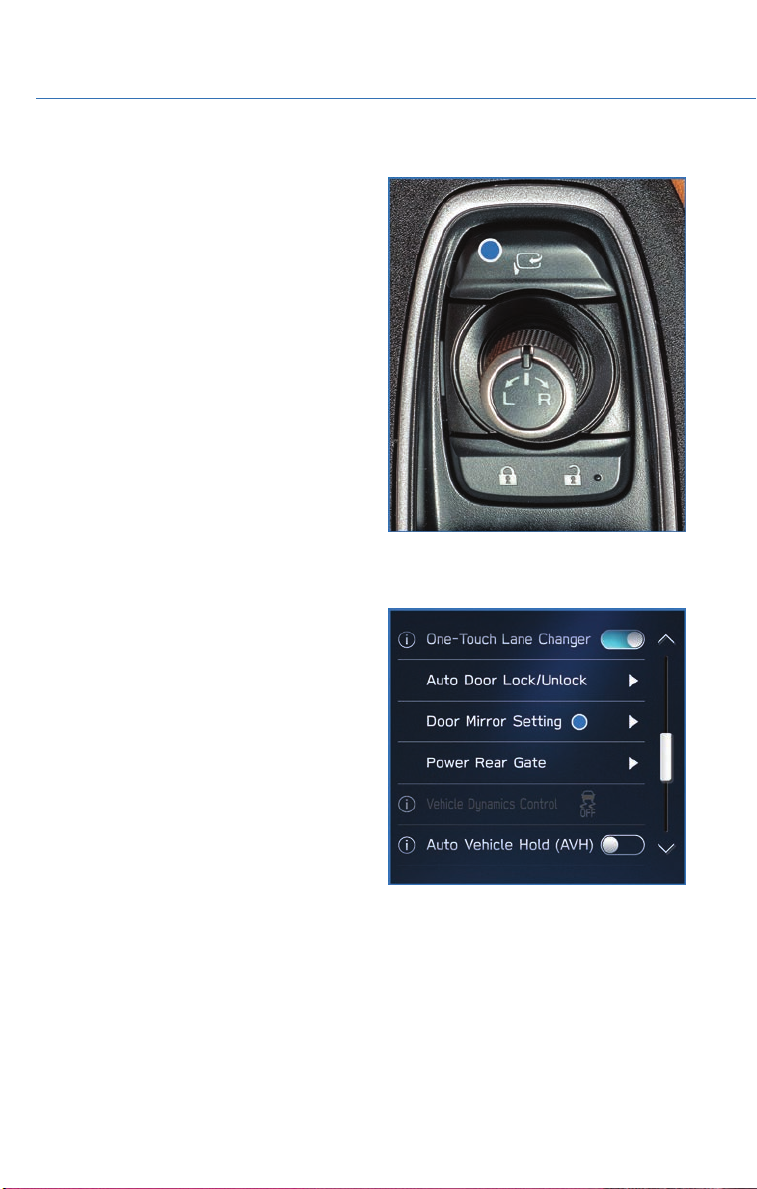
Power Folding Mirrors (if equipped)
Press the switch to fold the outside mirrors.
Press again to unfold the mirrors.
NOTE: Always ensure the mirrors are
unfolded before driving.
The power folding mirrors can also be set to automatically fold in and out. To set this in the
Touchscreen start by selecting “Home”. Then “Settings” then “Car” and finally “Door Mirror
Setting”.
14
Page 17
GETTING COMFORTABLE
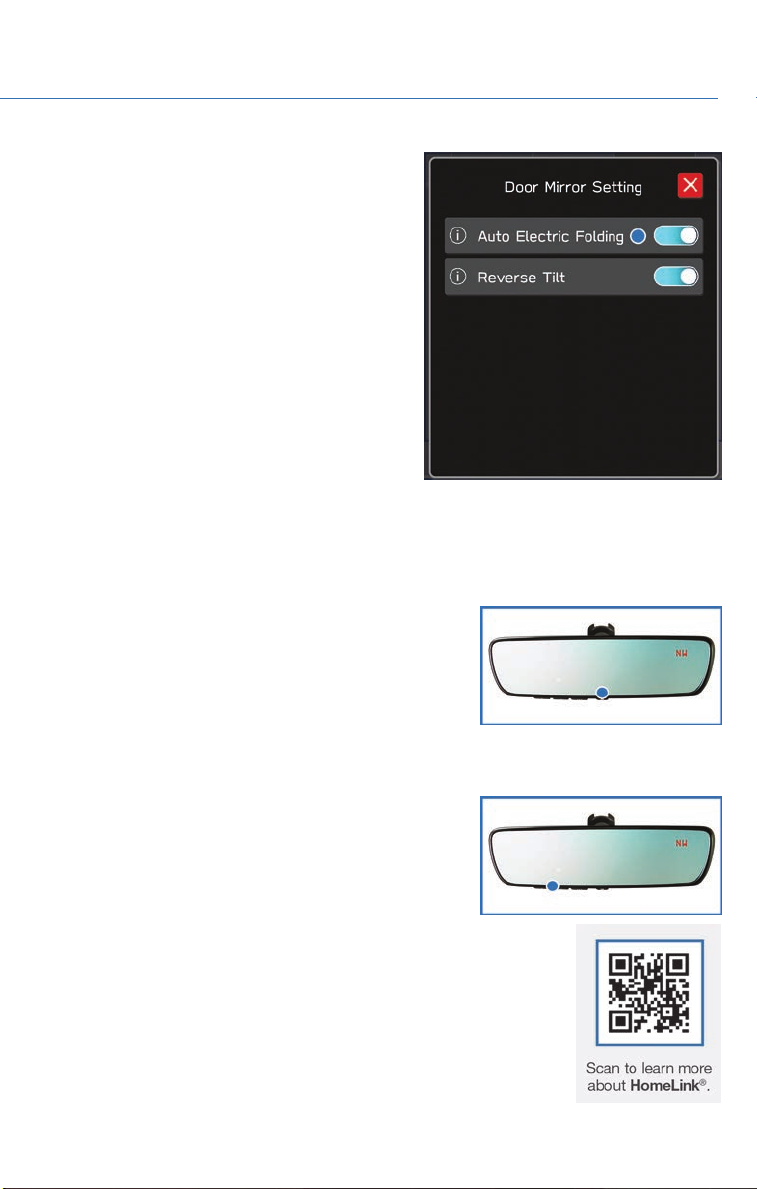
This will allow you to select “Auto Electric
Folding” to fold the mirrors when entering and
exiting the vehicle.
It will also allow “Reverse Tilt” to have the right
hand mirror tilt down when the vehicle is put
into reverse.
REAR VIEW MIRROR
Auto-dimming Mirror (if equipped)
When driving at night, the auto-dimming function
senses brightness from vehicle headlights behind you
and automatically dims to reduce glare. Pressing the
switch will turn this function on or off. A green LED
indicator on the switch will illuminate when the
function is on.
HomeLink®5 Accessory Mirror (if equipped)
The HomeLink®5 accessory mirror provides three
buttons to replace up to three hand-held radio
frequency remotes used to activate devices, such as
garage door openers, gate openers, entry door locks,
security systems and home lighting. Please see the
Owner’s Manual for programming instructions or visit
www.subaru.com/homelink to view a how-to video.
®
NOTE: HomeLink
openers or additional equipment may be required.
5 may not be compatible with some older door
15
Page 18
GETTING COMFORTABLE
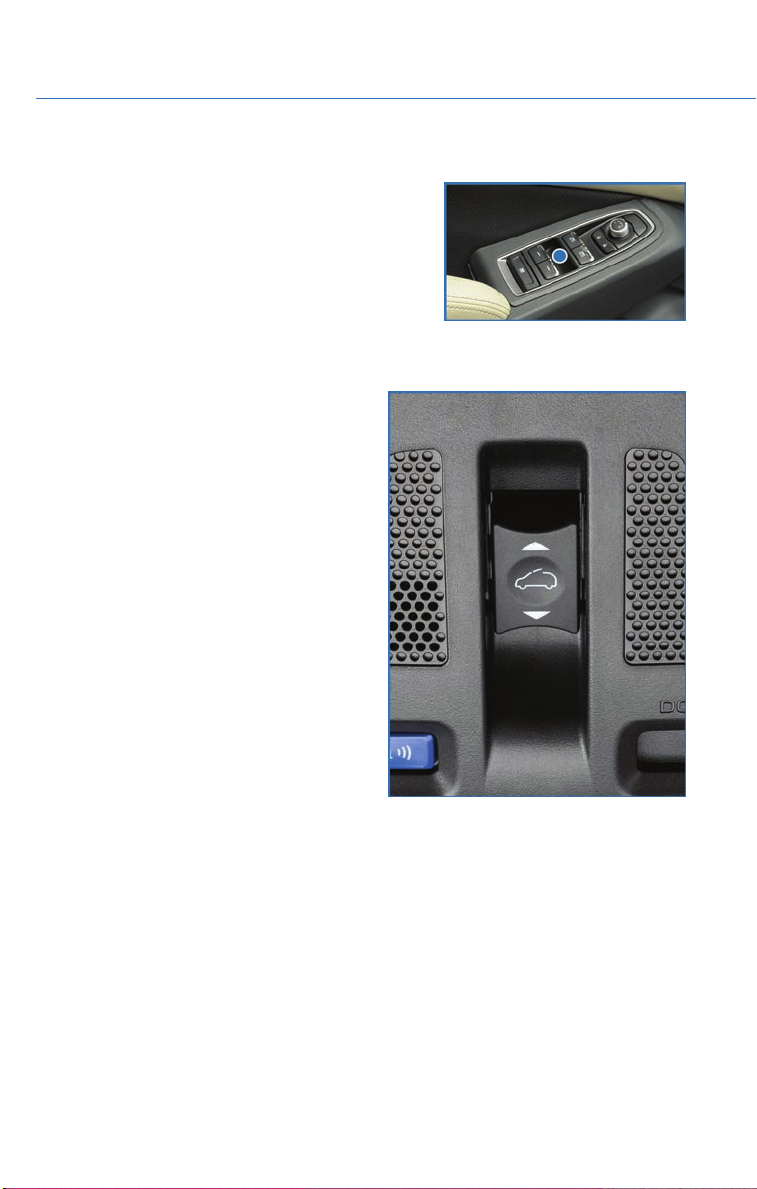
POWER WINDOWS
To open or close a window, partially press or pull up
the corresponding switch and hold. The front windows
have a one-touch auto up/down function. The rear
windows may also have auto up/down function. Fully
press down or pull up and release to automatically
open or close the window.
POWER MOONROOF
You can tilt and slide the moonroof.
Tilting the Moonroof
Push up and momentarily hold the moonroof
switch to tilt the moonroof.
Opening/Closing the Moonroof
1. Opening: With the moon roof in the fully
closed position slide the switch rearward
and release to open the moonroof. It will
stop slightly before the fully-open position
to reduce wind noise. Slide the switch
rearward again and release to fully open it.
2. Closing: Slide the switch forward and
release to close the moonroof.
16
Page 19
GETTING COMFORTABLE
CLIMATE CONTROL SYSTEM
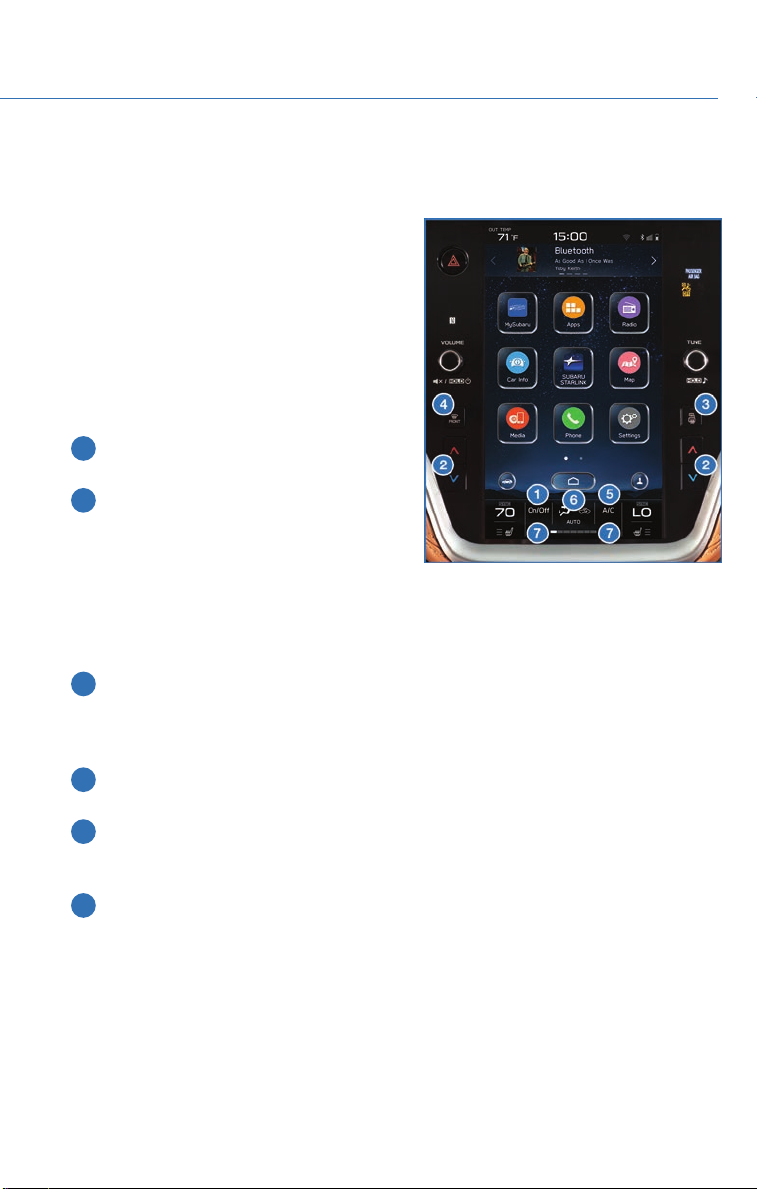
11.6–Inch Automatic Climate Control
You can set separate temperatures for the
driver and front passenger. Set your desired
temperature and let the system automatically
make the adjustments for you while you
control the fan speed or let the system have
full control in the Full Auto mode. At any time,
you can manually take control of the climate
settings.
Operation in Automatic Mode
1 On/Off Button: This button turns the
climate control on and off.
2 Temperature Control Buttons: Push the
red arrow up button to increase the
temperature or blue arrow down button to
decrease the temperature. The
temperature will appear on the screen.
You can adjust separate temperature settings for the driver’s side and passenger’s
side. You can also select the temperature on the screen to adjust via touch screen
using the arrows or by sliding the setting bars.
3 Rear Window Defogger Button: Press this button to turn on the defogger. It will
automatically turn off after about 15 minutes. If the window clears before then, press
the button again to turn it off. If equipped, the outside mirror defogger will also
activate.
4 Defroster Button: This button will turn on the front defroster. It also turns on the
climate control system if it is off.
5 Customizable Button: This button can be customized to be one of four different
modes: A/C, Max A/C, Auto or Recirculation. This is done through the “Settings” icon
by selecting “General” and then “Climate Control”.
6 Climate Control Button: This button will show another screen that allows you to
control fan speed, air flow, Max A/C, auto and recirculation modes.
17
Page 20
GETTING COMFORTABLE
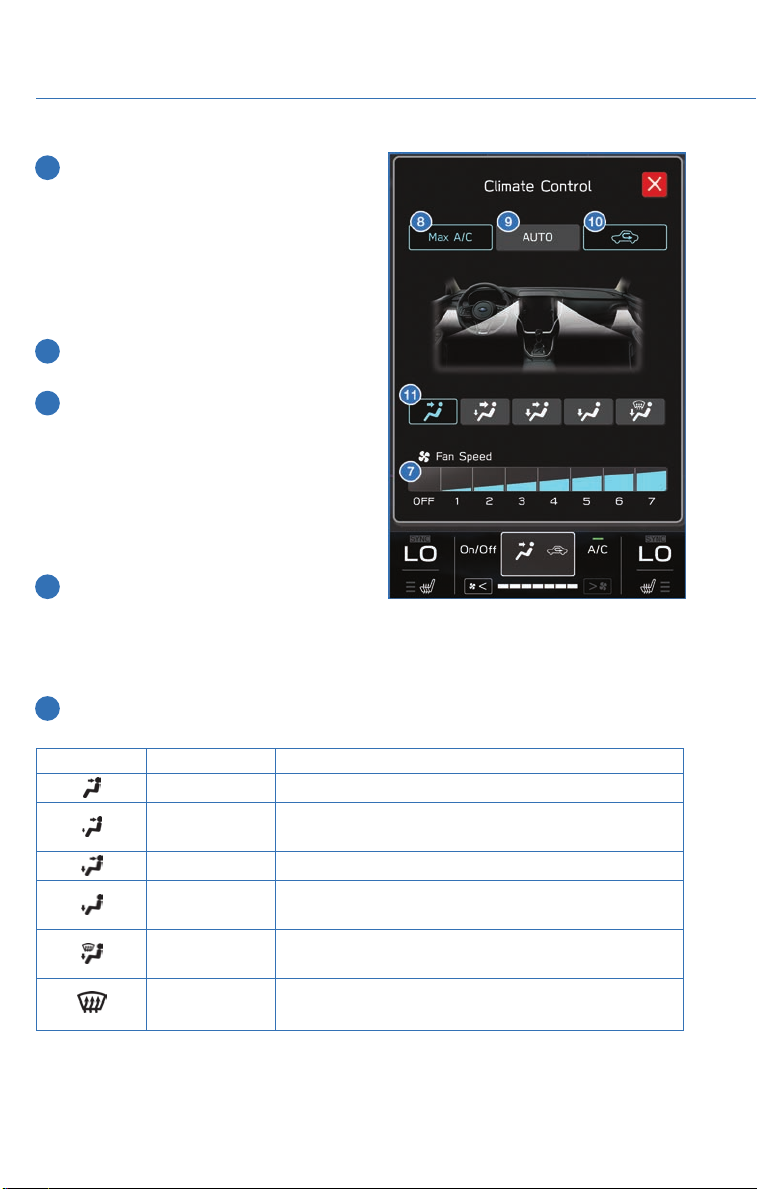
7 Fan Speed Button: Push the “Fan Up”
button to increase fan speed or “Fan
Down” button to decrease fan speed on
the main screen. You can also touch the
Climate Control Button to open the
climate control window so you to adjust
fan speed. The fan speed can be
adjusted from 1 to 7.
8 MAX A/C Button: Press this button for
quickest cooling.
9 Automatic Control Button: This system
automatically controls all of the climate
system except defogging. Press “AUTO”
to activate automatic control of
everything except the fan speed. Press a
second time for “Full Auto” mode to allow
the system to control the fan speed as
well.
10 Recirculated/Outside Air Button: Press
this button to prevent outside air from
entering your Subaru. Press the button again to allow outside air into your Subaru.
NOTE: To prevent windshield fogging, do not remain in the recirculated mode for an
extended period of time.
11 Airflow Mode Selection Buttons: Press the button to select the desired airflow
mode. The selected mode air flow is shown on the display.
ICON MODE FUNCTION
Ventilation Instrument panel outlets
Ventilation 2
Bi-Level Instrument panel outlets and foot outlets
Feet
Feet-Defrost
Defrost
Instrument panel outlets and less foot outlets than
bi-level
Foot outlets, both side outlets of the instrument panel
and some through windshield defroster outlets
Windshield defroster outlets, foot outlets and both side
outlets of the instrument panel
Windshield defroster outlets and both side outlets of
the instrument panel
18
Page 21
GETTING COMFORTABLE
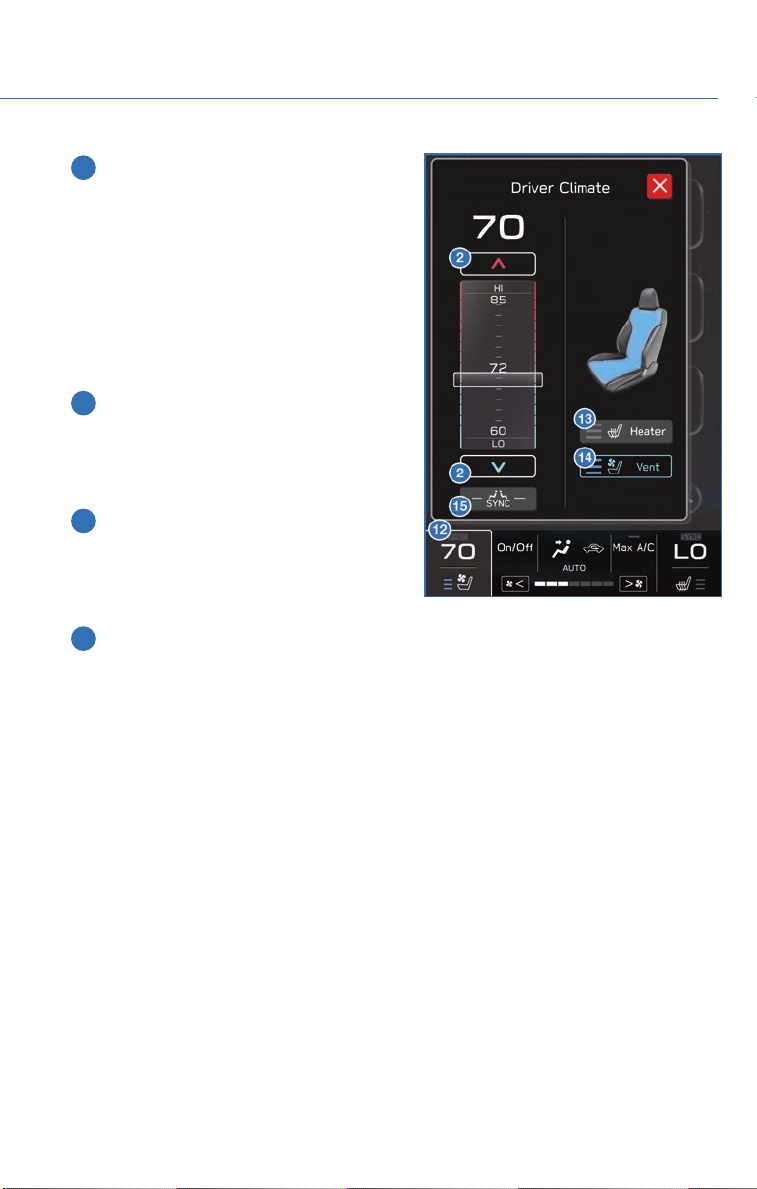
12 Driver’s Climate Button: Touching this
button will bring up another window that
will allow you to adjust the air
temperature, turn the heated/cooled
seats on or off and allow you to SYNC
(15) the passenger’s side air temp with
the driver’s temperature.
NOTE: The temperature bar only adjusts
the air temperature, it does not adjust the
seat temperature.
13 Driver Heated Seat Button: Pushing this
button will turn the heated driver seat on
High. Pushing it a second time will turn it
on Medium, third push for Low and fourth
time to turn Off.
14 Driver Vented Seat Button: Pushing this
button will turn the vented driver seat on
High. Pushing it a second time will turn it
on Medium, third push for Low and fourth
time to turn Off.
15 SYNC Button: Press the button to synchronize the driver’s and passenger’s
temperatures to the driver’s temperature control dial. This will make the Driver control
the master temperature control.
19
Page 22
GETTING COMFORTABLE
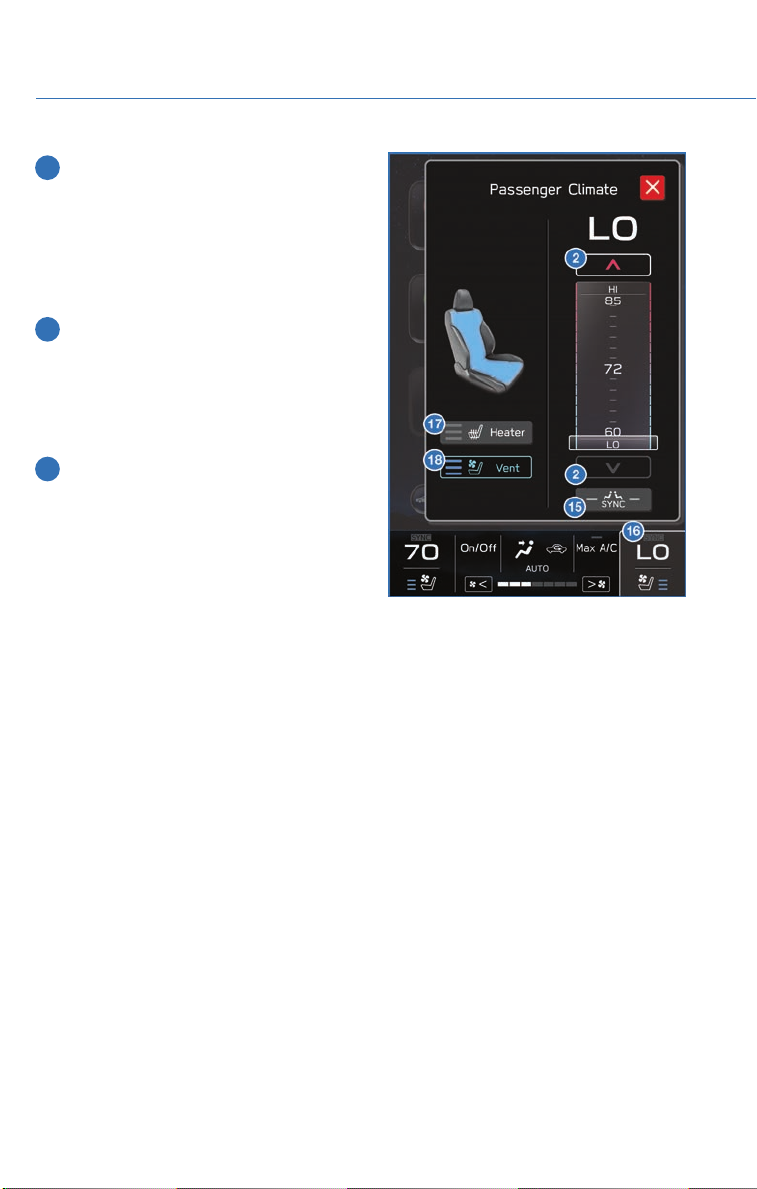
16 Passengers’s Climate Button: Touching
this button will bring up another window
that will allow you to adjust the
temperature, turn the heated/cooled
seats on or off and allow you to SYNC
(15) the passenger’s side temp with the
driver’s temperature.
17 Passenger Heated Seat Button:
Pushing this button will turn the
passenger heated seat on High. Pushing
it a second time will turn it on Medium,
third push for Low and fourth time to turn
Off.
18 Passenger Vented Seat Button:
Pushing this button will turn the
passenger vented seat on High. Pushing
it a second time will turn it on Medium,
third push for Low and fourth time to turn
Off.
Auto Mode
When using automatic mode, the fan speed, airflow distribution, air-inlet control and air
conditioning compressor are controlled automatically. To activate:
1. Press the “AUTO” button. The “FULL AUTO” indicator light illuminates on the climate
control display.
2. Set the preferred temperature using the temperature control arrows. Another method
would be to touch the climate control button, then use the touch buttons or slide bar to
adjust the temperature.
If you operate any of the buttons other than “ON/OFF”, rear window defogger, front
defroster, “SYNC”, or the temperature buttons, the “FULL” indicator light will turn off, the
"Auto" will display in the screen button. You can then manually control the system as
desired. Press the “AUTO” button to change back to “FULL AUTO” mode if the
customizable button is programmed to “Auto”.
20
Page 23
GETTING COMFORTABLE
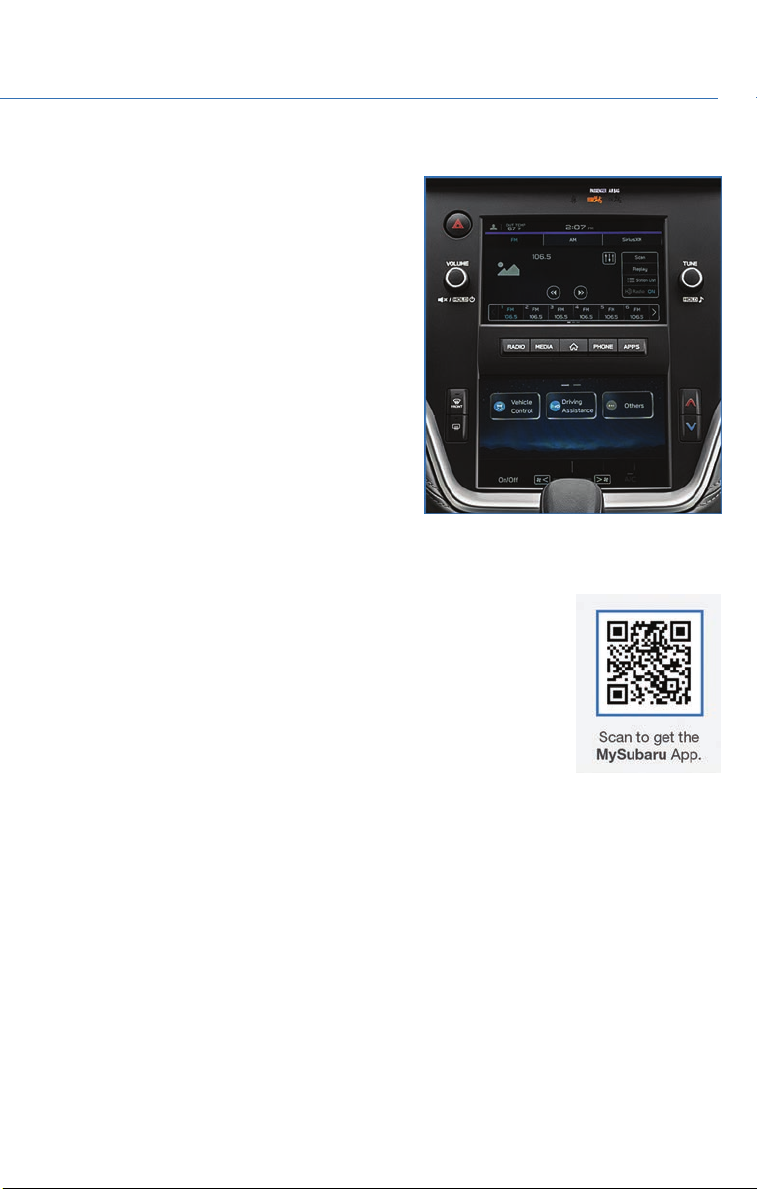
Dual 7–Inch Automatic Climate Control System
This is the Dual 7 inch display. The climate
control buttons will be on the bottom display
and will be similar to the 11.6 inch display.
Remote Engine Start with Climate Control
You can remotely start your Subaru and adjust the temperature
using the Starlink Safety and Security features through the
MySubaru app (subscription required). Please refer to STARLINK
owner's manual for a list of required vehicle conditions for this
feature.
21
Page 24
GETTING COMFORTABLE
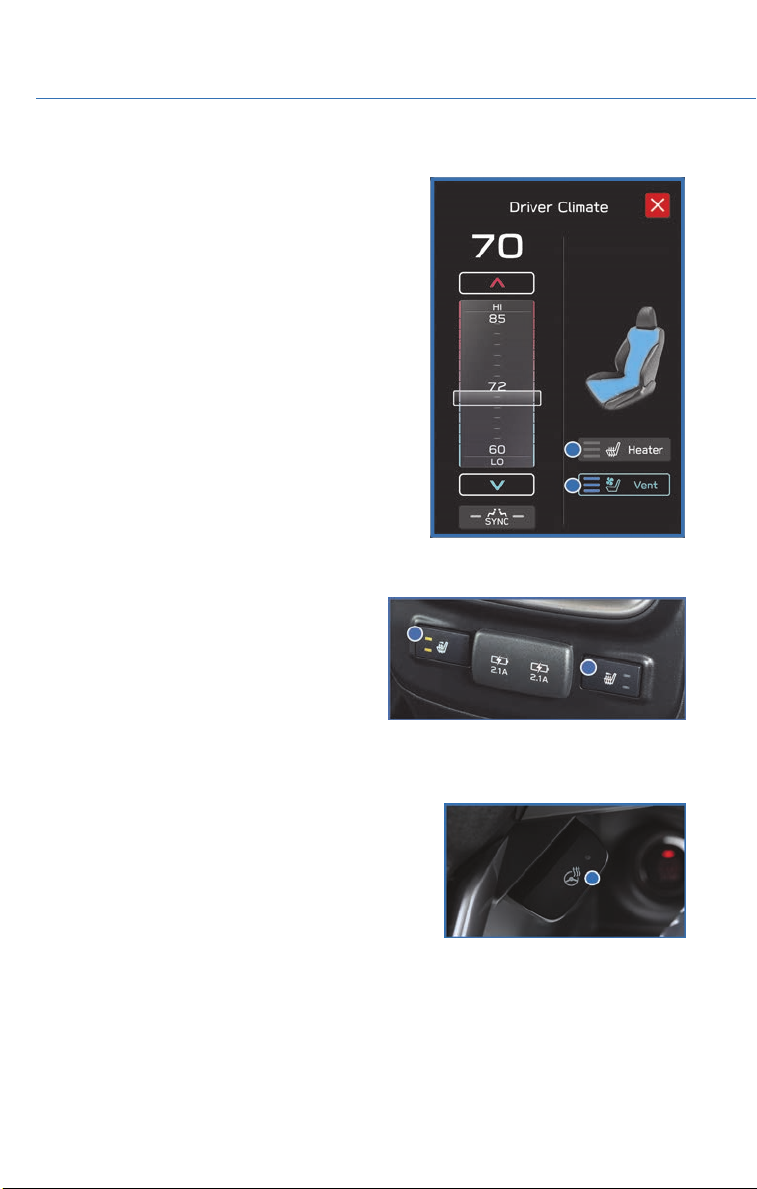
Ventilated Seats (if equipped)
Press the ventilated seat button located on the
climate control screen. There is a separate button for
the driver and passenger. Each time you press the
switch, the mode will change as follows: High, Mid,
Low, Off. Blue indicators will illuminate indicating the
level.
Heated Seats
Press the front seat heater button located on the
climate control screen. There is a separate button for
the driver and passenger. Each time you press the
button, the mode will change as follows: High, Mid,
Low, Off. Yellow indicators will illuminate indicating
the level.
Rear Seat Heater (if equipped)
Press the rear seat heater switch located on
the rear of the center console. There is a
button for each of the seats. Each time you
press the switch, the mode will change as
follows: High, Low, Off. Yellow indicators will
illuminate indicating the level.
Heated Steering Wheel (if equipped)
To activate, pull the heated steering wheel switch
while the ignition is “ON”. The indicator light on the
switch will illuminate. To deactivate, pull the switch
again. The heater will stay on for approximately 30
minutes.
22
Page 25
GETTING COMFORTABLE
ACCESSORY CONNECTIONS
Power Outlets (12V)
Power outlets (12V) are located in the front center console and in the cargo area. Electrical
power is available for use with in-vehicle electrical appliances with a maximum power
rating of 120W.
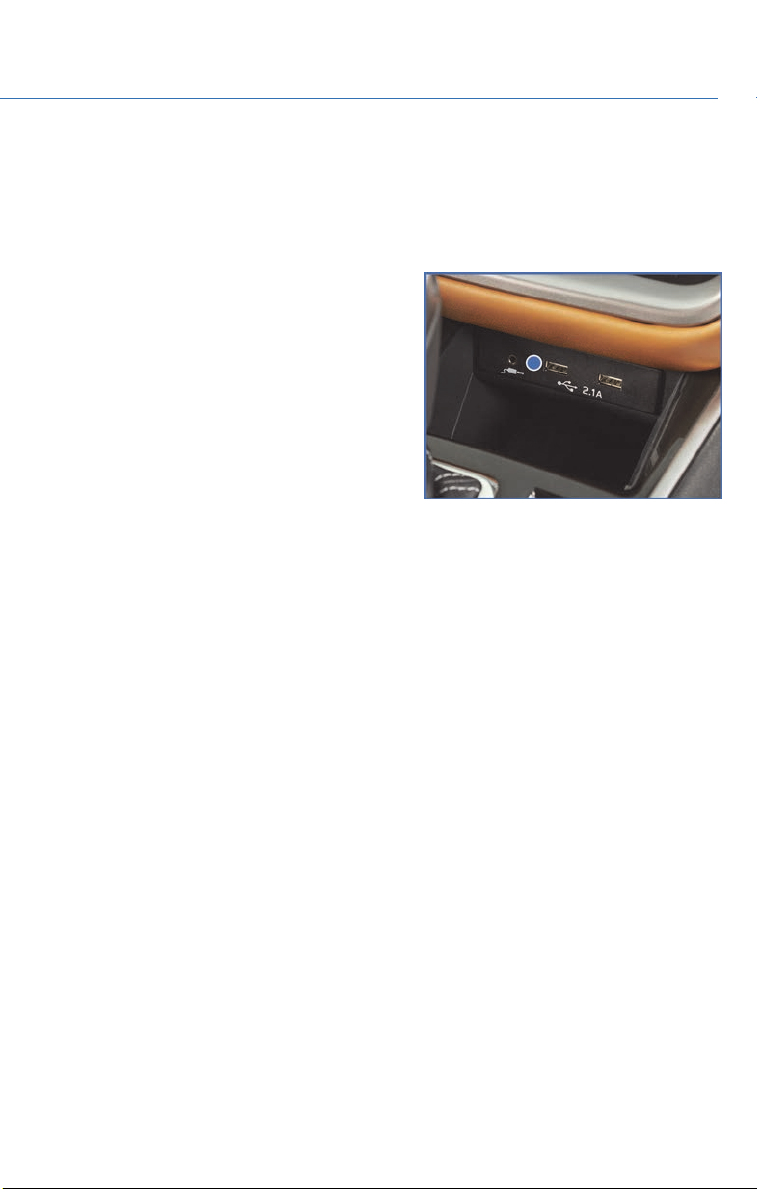
1. Auxiliary Input Jack
The 3.5mm auxiliary input jack is located in
the front of the center console. You can
connect a portable music player to the
auxiliary jack and hear the music stored on
it through your Subaru’s speakers. Press
the “Source” button located on the steering
wheel or the “Media” button on the
Touchscreen to select the auxiliary mode.
For more information, please refer to the
SUBARU STARLINK™ Owner’s Manual.
2. USB Ports
The USB ports are located in the front of the center console and the rear seat areas.
You can connect a variety of USB-equipped devices to the front center console ports,
such as portable music players or smartphones, to enjoy your favorite music through
your STARLINK Multimedia System. All ports provide charging (5V, 2.1A) to devices. For
more information, please refer to the SUBARU STARLINK™ Owner’s Manual.
23
Page 26
CONTROLS
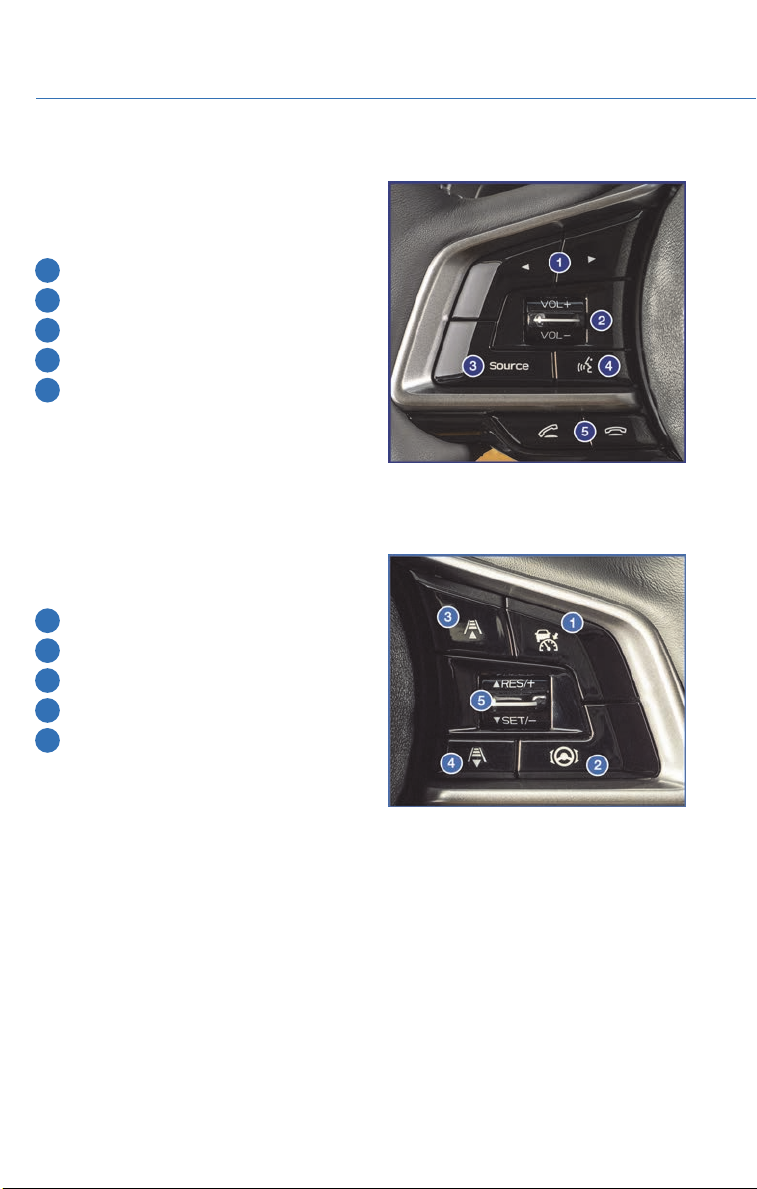
AUDIO CONTROLS
For more information please refer to the
SUBARU STARLINK™ Owner’s Manual or
page 55.
1 Presets/Skip
2 Volume
3 Source
4 Voice recognition
5 Hands-free calling
ADVANCED ADAPTIVE CRUISE CONTROL
For more information, please refer to the
EyeSight
24
®
Owner’s Manual.
1 Adaptive Cruise Control
2 Lane Centering
3 Decrease Distance
4 Increase Distance
5 Resume/Set
Page 27
CONTROLS
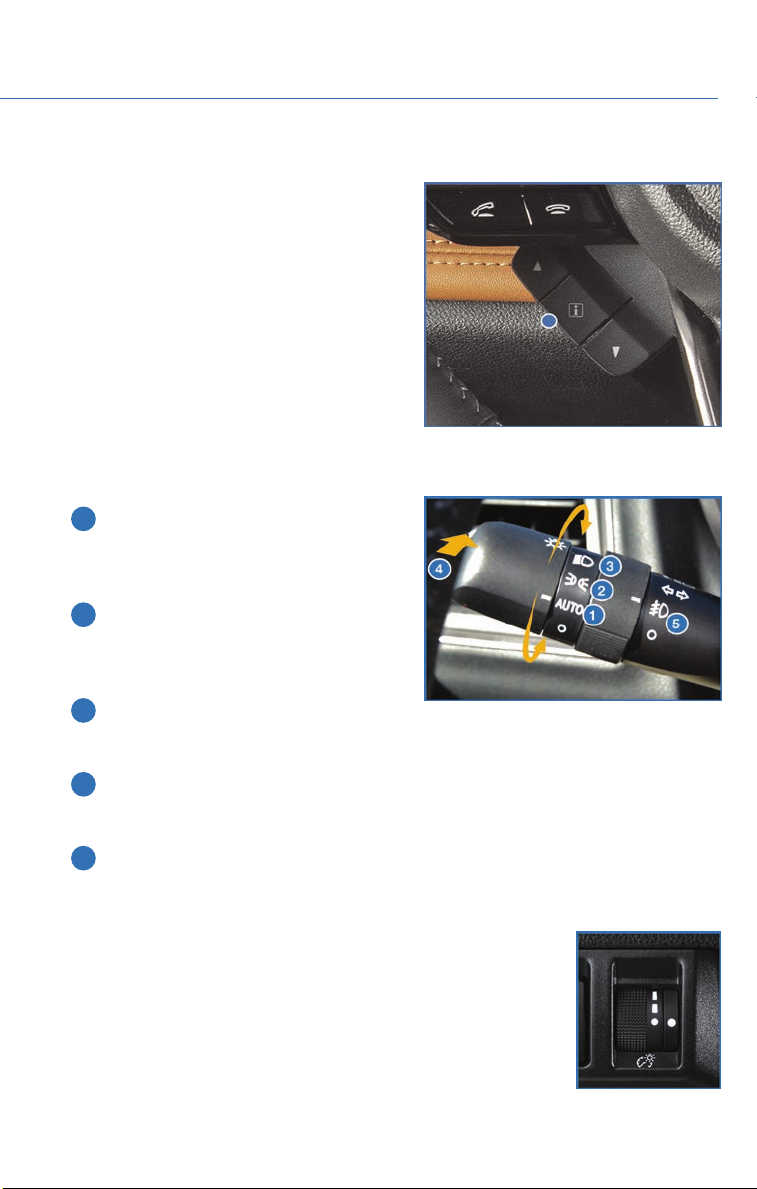
I SWITCH
Used to view important messages when red "i"
appears in the Combination Meter Display
(CMD). Pull and hold this switch to access the
important messages. Pull the arrows to move
up or down through the messages.
LIGHT CONTROLS
1 AUTO: If equipped, rotate the end of the
lever to automatically turn your headlights
on or off, depending on the level of
outside light.
2 Daytime Running Lights: Rotate the end
of the lever to turn on the instrument
panel lights, parking lights, side marker
lights, tail lights, and license plate lights.
3 Headlights: Rotate the end of the lever to
turn on the headlights, instrument panel lights, parking lights, side marker lights, tail
lights, and license plate lights.
4 High Beams: Push the lever forward to change from low beam to high beam. Pull the
lever back to center to return to low beam. If equipped, this also activates the High
Beam Assist (HBA) system.
5 Fog Lights: If equipped, rotate the dial to turn on the fog lights.
Illumination Brightness
While the light switch is on, rotating the dial on the instrument panel
upward will make the illumination brighter. When the dial is fully
rotated upward (dots aligned), the instrument panel illumination
stays at full brightness. Rotating the dial downward dims the
instrument panel illumination.
For map equipped vehicles this setting also affects the day/night
view and illumination level.
25
Page 28
CONTROLS
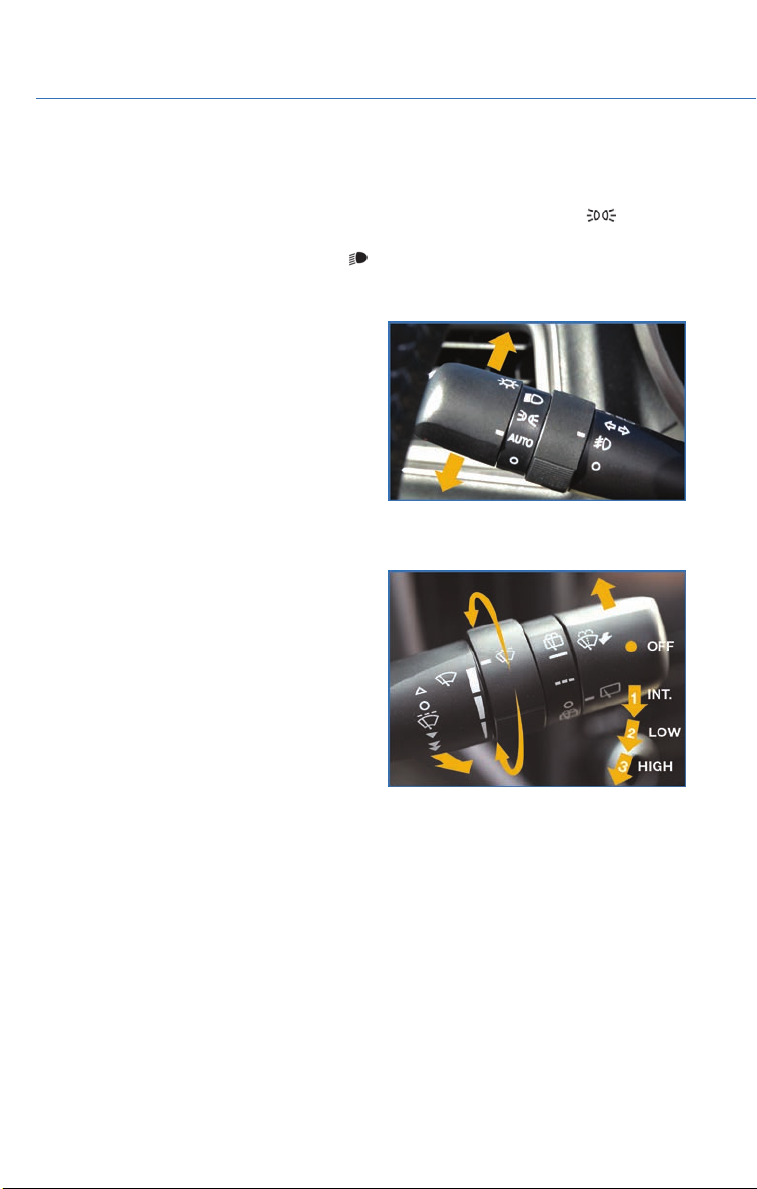
Daytime Running Lights
The daytime running lights automatically turn on when the engine has started, the parking
brake is fully released, the light switch is in the Off, “AUTO” (if equipped) or “
position, and the select lever is not in the “P” position. Always turn on the headlights when
it’s dark outside by rotating the dial to the “
” or “AUTO” position.
TURN SIGNALS
Push slightly up for right lane change or fully
up for right turn signal. Push slightly down for
left lane change or fully down for left turn
signal.
WINDSHIELD WIPERS
To turn on the wipers, press the wiper control
lever down one position for intermittent, two
positions for low speed, or three positions for
high speed. To turn the wipers off, return the
lever to the “OFF” position. For a single wipe,
move the lever up one position.
When the lever is in the intermittent position,
rotate the dial to adjust the operating interval
of the wipers.
Pull the lever toward you to spray washer fluid.
The washer will spray until you release the lever, then wipe twice.
”
26
Page 29
CONTROLS
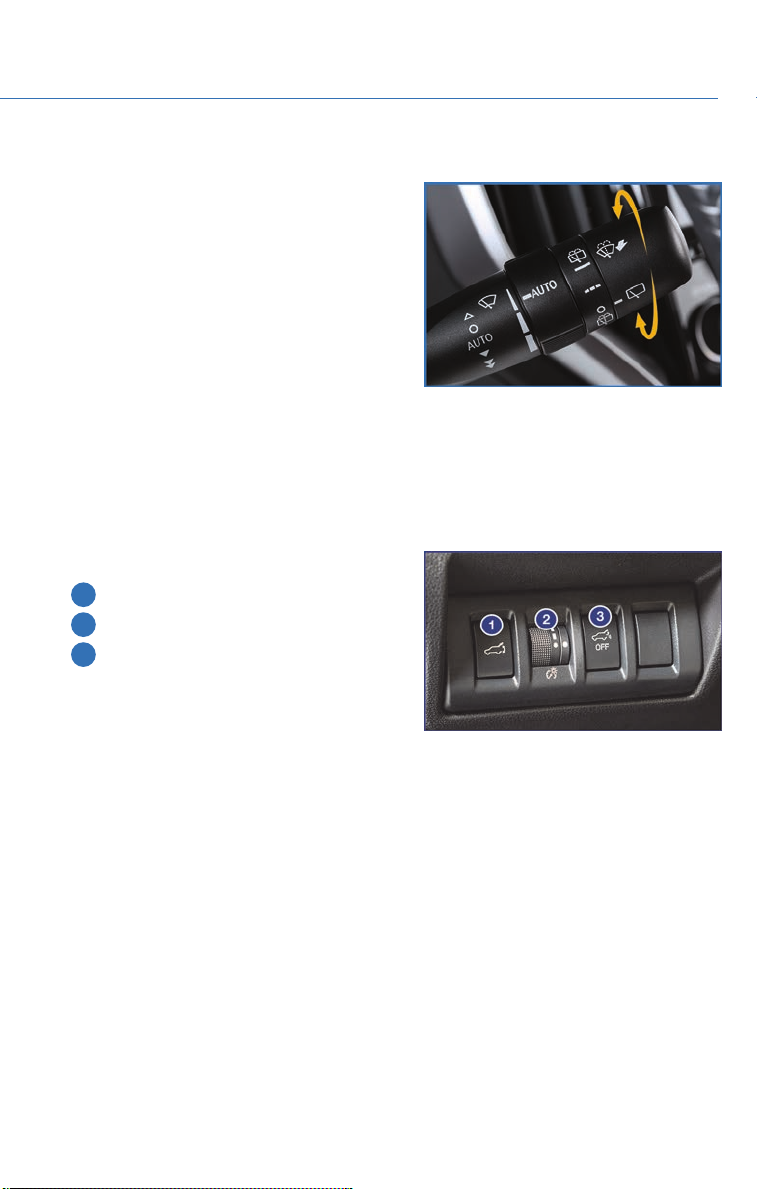
REAR WINDOW WIPER
Rotate the end of the lever up one position for
intermittent, or two positions for continuous
wipe.
When the lever in is the intermittent position,
the wiper operates at intervals corresponding
with vehicle speed. When you move the select
lever to the “R” position, the wiper will switch
to continuous operation. It will return to
intermittent when you move the select lever
out of “R”.
Rotate the dial up from the continuous wipe position or down from the ON position to
spray washer fluid. The washer will spray until you release the dial, then return to the
previous position and resume continue operation.
INSTRUMENT PANEL SWITCHES (LOWER LEFT)
The instrument panel contains these switches:
1 Power rear gate release switch (p. 42)
2 Illumination Brightness (p. 25)
Hands-free power rear gate off switch (p.
3
6)
27
Page 30
CONTROLS
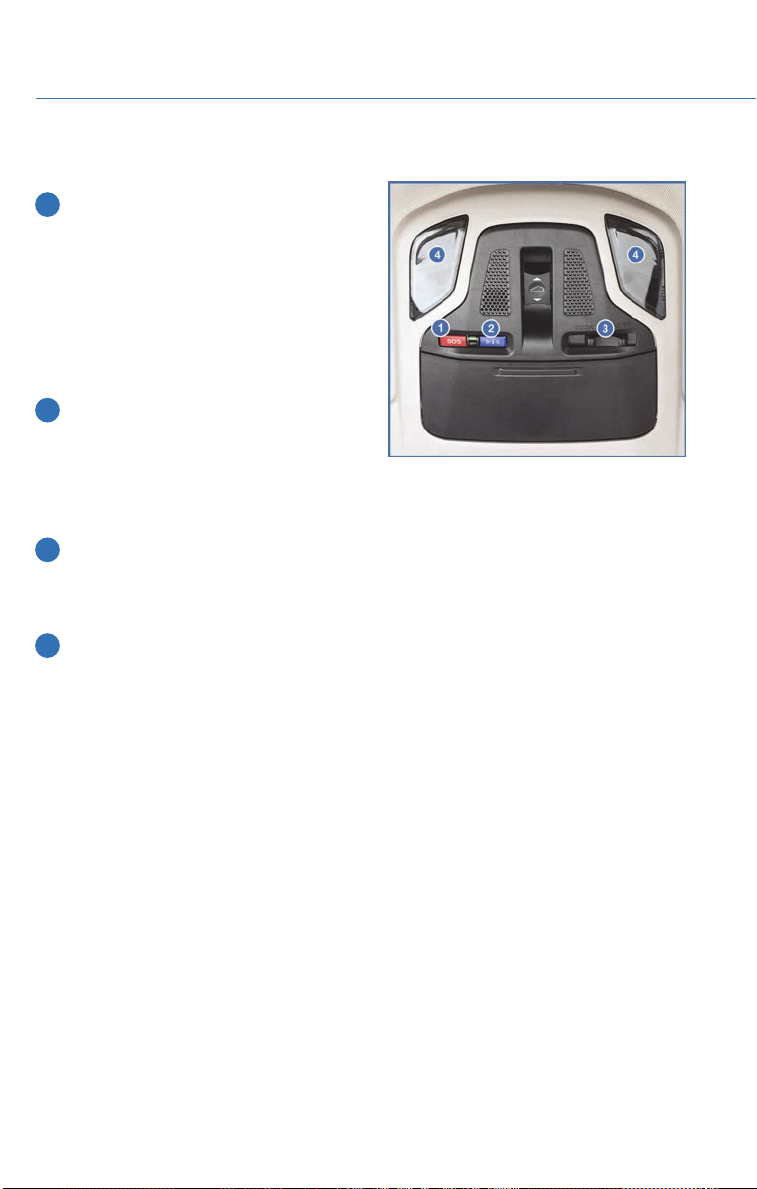
OVERHEAD PANEL
1 SOS Emergency Assistance: Press the
red “SOS” button to connect with a
SUBARU STARLINK
Advisor (Subscription required). Press
and hold the button for about two
seconds to cancel the call. Please refer to
the SUBARU STARLINK
Security Owner’s Manual or the SUBARU
STARLINK
2 Enhanced Roadside Assistance: Press
the blue “i” button to connect with a
SUBARU STARLINK
Assistance Provider (Subscription
required). Press and hold the button for about two seconds to cancel the call. See p.
78 for more information.
3 Automatic Illumination: When the switch is in the “DOOR” position, the map lights
illuminate when any door is opened, the doors are unlocked using the remote keyless
entry system or keyless access function, or the ignition is turned from “ON” or “ACC”
to “LOCK”/“OFF”.
4 Map Lights: Press a map light to turn it on or off.
NOTE: these lights can remain on even when the ignition is off, key removed from
vehicle and doors are locked.
®
®
Customer Care
Quick Guide.
®
Roadside
®
Safety and
28
Page 31
GAUGES AND WARNING LIGHTS
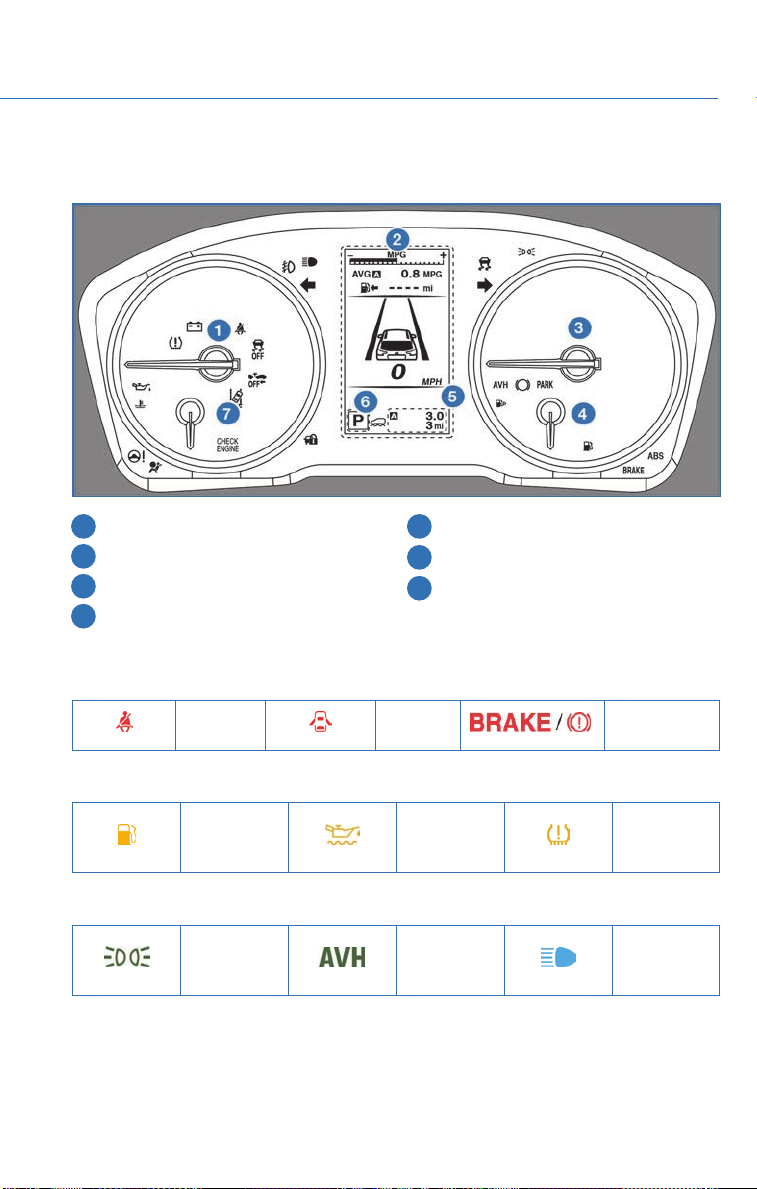
GAUGES
1 Tachometer
2 Combination Meter Display (CMD)
3 Speedometer
4 Fuel gauge
5 Trip meter and odometer
6 Select lever/gear position indicator
7 Engine coolant temperature gauge
WARNING AND INDICATOR LIGHTS
Red lights indicate immediate attention is required. Some examples are:
Seatbelt
warning
Yellow lights indicate caution. Some examples are:
Low fuel
Green and blue lights are for information. Some examples are:
Headlight
indicator
light
Door
open
Engine oil
level warning
light
Auto Vehicle
Hold ON
Brake system
Tire pressure
warning light
High beam
indicator
light
29
Page 32
OPERATING THE VEHICLE
IGNITION SWITCH
The ignition switch has four positions:
LOCK: You can only insert or remove the key in this position.
ACC (Accessory): Provides power to the radio and accessory power outlets.
ON: All electrical systems are available. The key returns to this position after starting the
engine.
START: Turn the key to this position to start the engine.
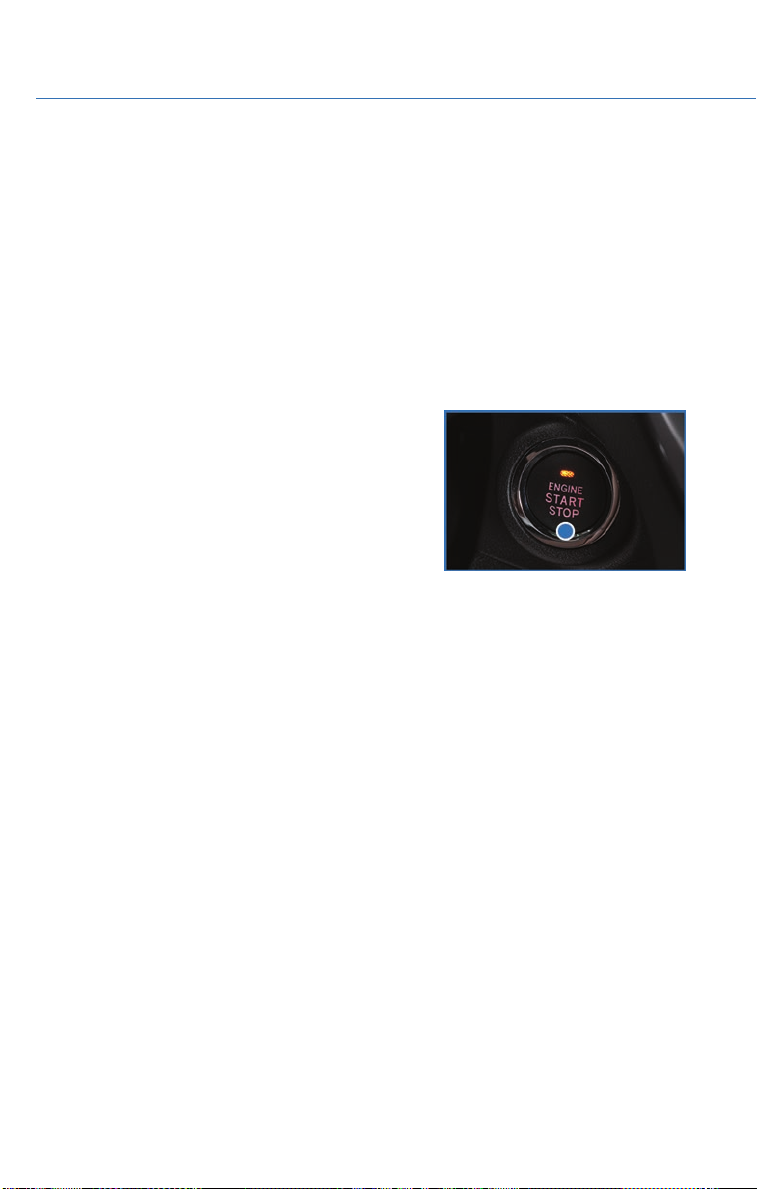
PUSH-BUTTON IGNITION SWITCH (IF EQUIPPED)
Each time you press the ignition switch without
depressing the brake pedal, the ignition position will
change as follows: ACC, ON, OFF.
ACC (Accessory): Provides power to the radio and
accessory power outlets. Orange indicator illuminates.
ON: All electrical systems will be available. Orange
indicator illuminates.
OFF: Power off and indicator off.
STARTING THE ENGINE
Without Push-button Ignition
To start the engine:
1. Make sure the select lever is in the “P” position.
2. Using the key, turn the ignition switch to “START”. NOTE: Do not depress the
accelerator pedal. Release the key as soon as the engine starts.
With Push-button Ignition
To start the engine:
1. Sit in the driver’s seat with the access key fob.
2. Make sure the select lever is in the “P” position.
3. Depress the brake pedal. Green LED on the ignition switch illuminates.
4. While depressing the brake pedal, look for the Engine START/ STOP button indicator to
turn Green and then briefly press and release the Engine START/ STOP button.
30
Page 33
OPERATING THE VEHICLE
DRIVING THE VEHICLE
Automatic Transmission Shift Mode
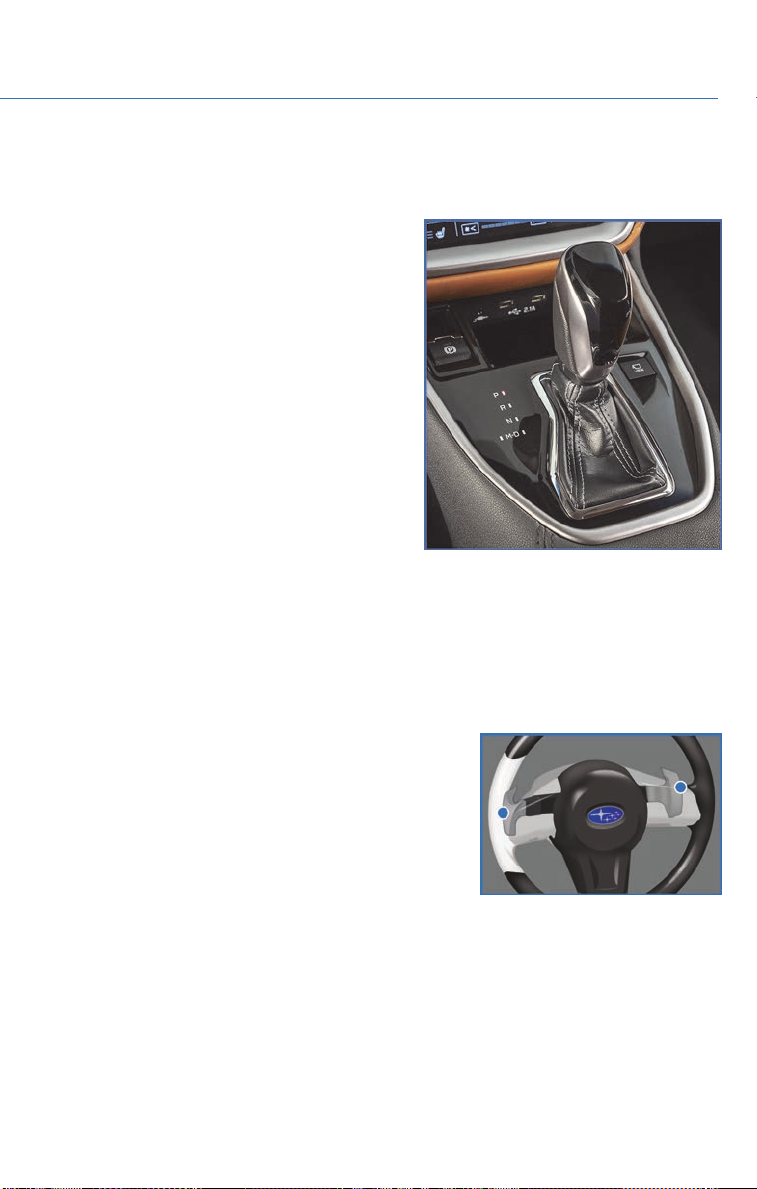
The Continuously Variable Transmission (CVT)
is electronically controlled and provides two
different driving modes: normal and manual.
Normal Mode
When the select lever is in the “D” (Drive)
position, the transmission is in normal shift
mode. The select lever position indicator in the
Combination Meter Display (CMD) shows “D”
and the transmission automatically shifts into a
suitable forward gear.
Manual Mode
In manual mode, you select the desired gear
position to obtain necessary acceleration and
engine braking. Move the selector lever left
from the “D” position into the “M” position to select manual mode. The gear position
indicator in the Combination Meter Display (CMD) shows the currently selected gear.
Arrow-shaped indicators show when upshifting or downshifting is available. To shift, use
the paddle shift control switches behind the steering wheel.
Paddle Shift Control Switches
• You can shift gears using the paddle shift control
switches. To upshift to the next higher gear, pull the
“+” paddle on the right toward you. To downshift to
the next lower gear, pull the “–” paddle on the left
toward you.
• You can temporarily shift gears even when the
selector lever is in the “D” position by pulling either
the “+” or “–” paddle toward you. Once vehicle
speed stabilizes, the transmission will switch back to normal mode.
31
Page 34
OPERATING THE VEHICLE
X-MODE
®
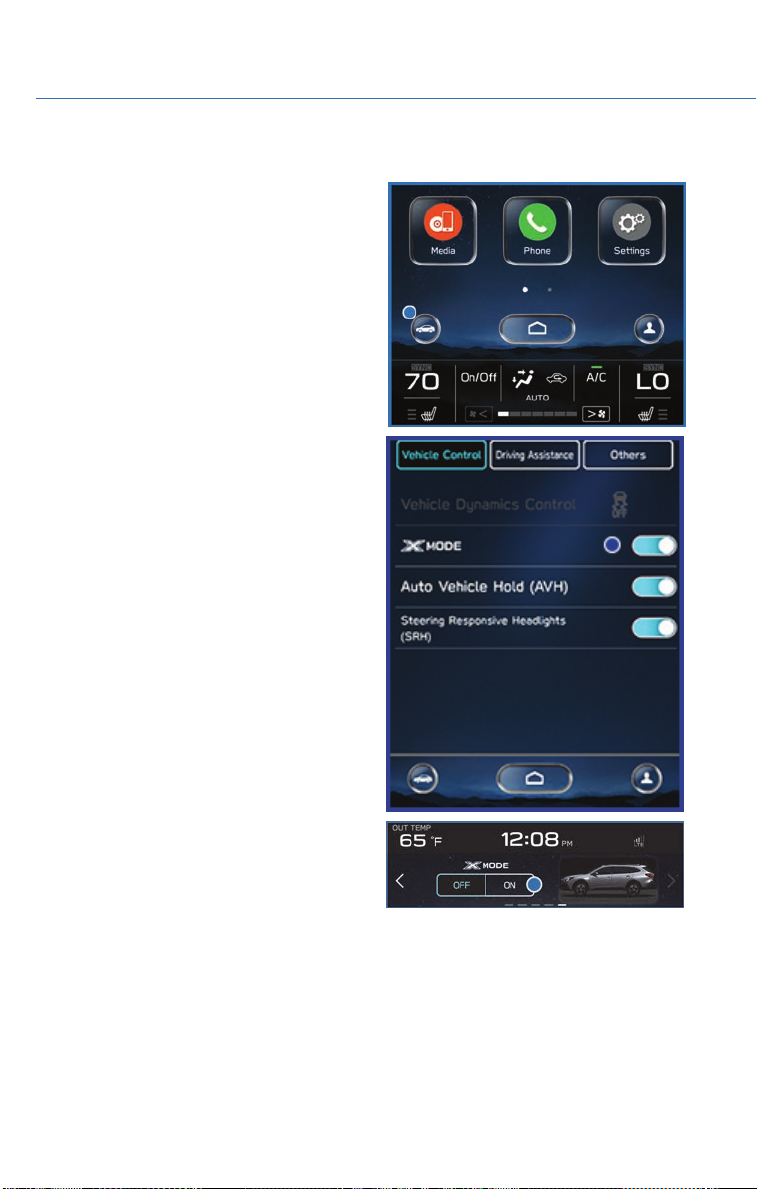
X-MODE is the integrated control system of
the engine, All-Wheel Drive (AWD) system and
Vehicle Dynamics Control (VDC) system. It
helps to maximize traction in slippery
conditions such as mud or snow. In certain
situations such as deep mud or snow, it may
help to turn VDC off to allow for more wheel
spin. X-MODE functions with the select lever in
the “D” or “R” position.
To turn X-MODE on from the Home screen,
select the “Car” button, then “Vehicle
Settings” button and then select “X-MODE”.
Turn on X-MODE in the Center Information
Display (CID) with the vehicle speed less than
12 mph to activate the system.
X-MODE can also be turned on and off from
the status bar section of the screen, use the
arrow button to move all the way to the right
and then select “On” or “Off”.
32
Page 35
OPERATING THE VEHICLE
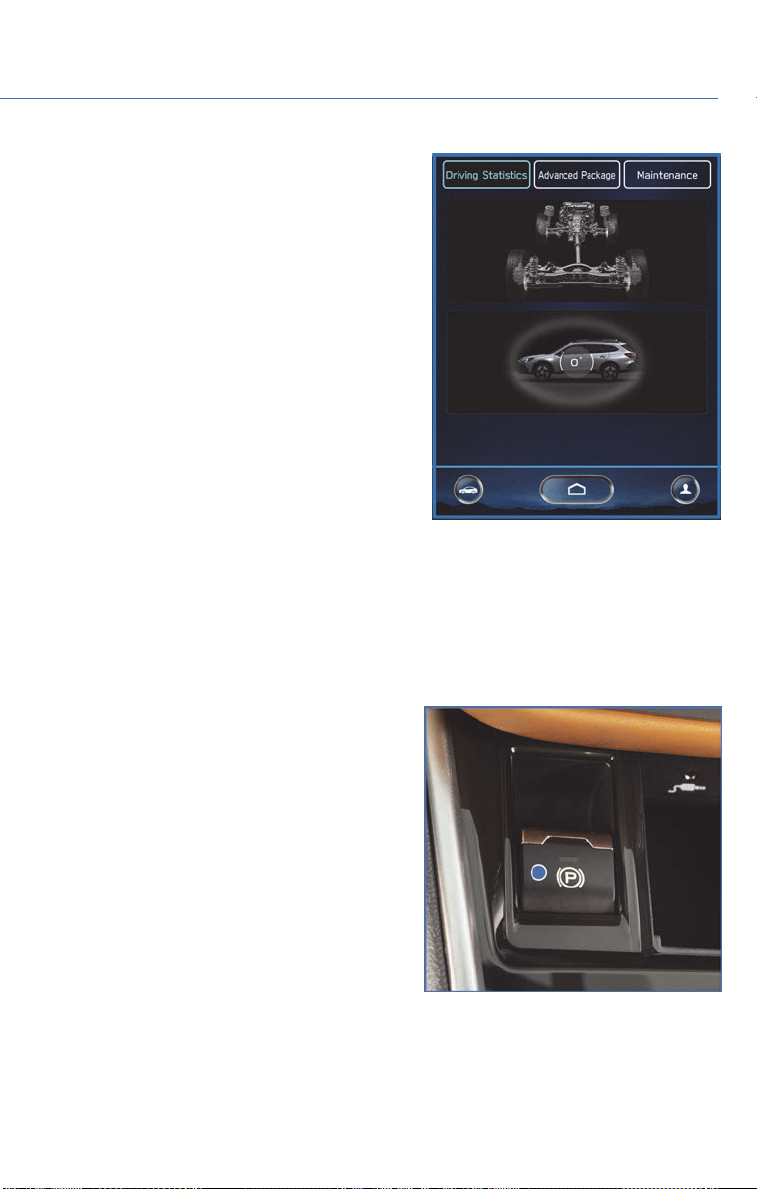
When active, the Touchscreen shows the
steering direction, vehicle angle and power
distribution. If the vehicle speed reaches
25 mph while X-MODE is active, the system is
cancelled and you will need to activate it again
once you reach a lower speed.
Hill Descent Control (HDC)
This function helps maintain a constant vehicle speed when driving down steep hills or
declines. HDC is automatically engaged with X-MODE and functions with the select lever
in the “D” or “R” position.
ELECTRONIC PARKING BRAKE (EPB)
To apply the parking brake, pull up the parking
brake switch. The indicator light on the parking
brake switch will illuminate and “PARK” will
appear in the combination meter.
To release the parking brake manually, depress
the brake pedal and push the parking brake
switch down. To automatically release, gently
press the accelerator pedal with the select
lever in the “D” or “R” position. NOTE: All the
doors must be closed and your seatbelt must
be fastened.
33
Page 36
OPERATING THE VEHICLE
Auto Vehicle Hold (AVH)
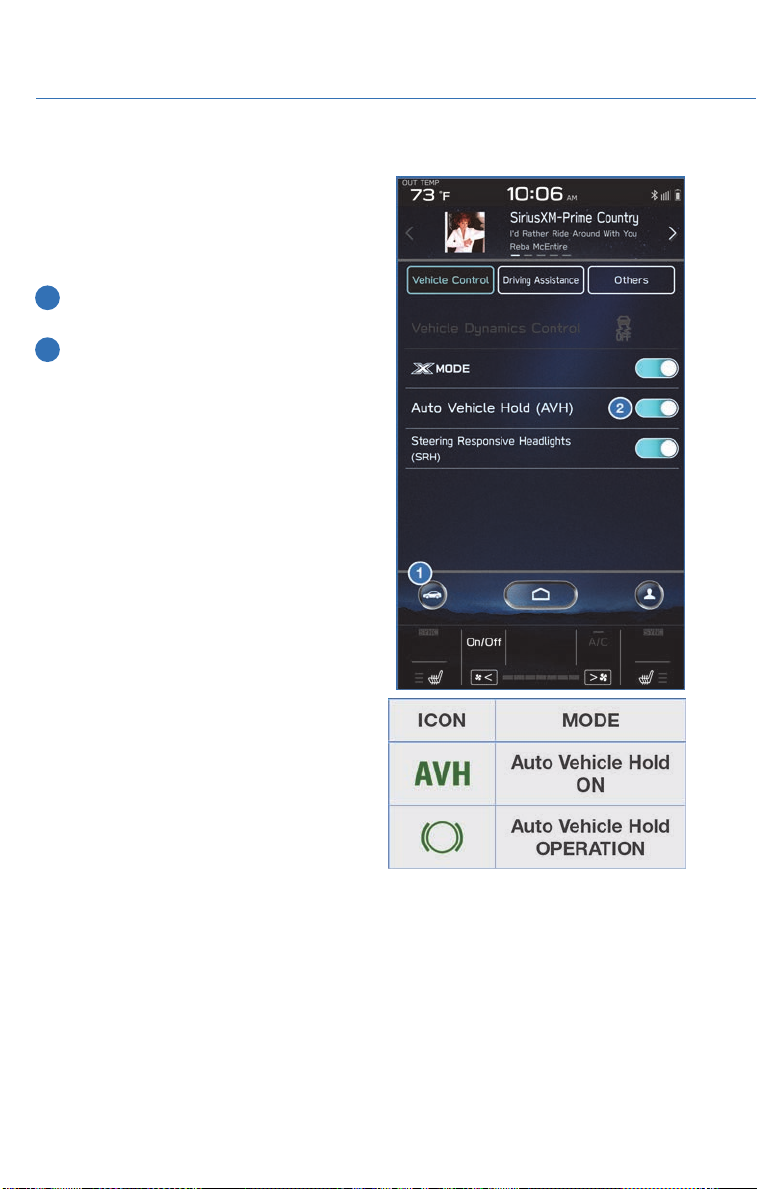
This function automatically holds your Subaru in
place when at a complete stop, such as a traffic
signal, even after you release the brake pedal.
To turn on the Auto Vehicle Hold:
1 From the Home screen select “Car
Settings” button.
2 Next, select “Auto Vehicle Hold”. The
indicator in the combination meter will
illuminate.
While your Subaru is being held by this
function, the operation indicator in the
combination meter will illuminate. The function
is canceled when you depress the accelerator
pedal or the brake pedal.
Select “Auto Vehicle Hold” again to turn it off.
The function works with the select lever in
either the “D” or “R” position.
34
Page 37
OPERATING THE VEHICLE
AUTO START–STOP SYSTEM
The Auto Start-Stop system is designed to automatically stop and restart the engine when
the vehicle is stationary for a short period of time (while waiting for a traffic light or in a
traffic jam) after the engine has warmed up. The system operates in order to reduce fuel
consumption, exhaust emissions and undesired idling noise.
System Operation
So that it can be used safely and comfortably, in addition to driver operations, the Auto
Start-Stop system is designed to constantly monitor the vehicle conditions as well as the
environment inside and outside the vehicle, in order to control stopping and restarting of
the engine.
After the vehicle has been completely stopped by depressing the brake pedal
with the select lever in the “D” position, the engine will be automatically
stopped.
If you release the brake pedal with the select lever kept in the “D” position, the
engine will be automatically restarted.
Auto Vehicle Hold (AVH) also integrates seamlessly with Auto Start-Stop functions. With
AVH, the parking brake automatically applies, so you can sit without your foot on the brake
pedal. To restart the engine, just gently press down on the accelerator pedal.
If the engine is temporarily stopped by the system, the Auto Start-Stop indicator light on
the combination meter will illuminate in green. This indicator light will turn off when the
system restarts the engine.
There are several operating conditions for this system to operate as intended. Please refer
to the Owner’s Manual for further information.
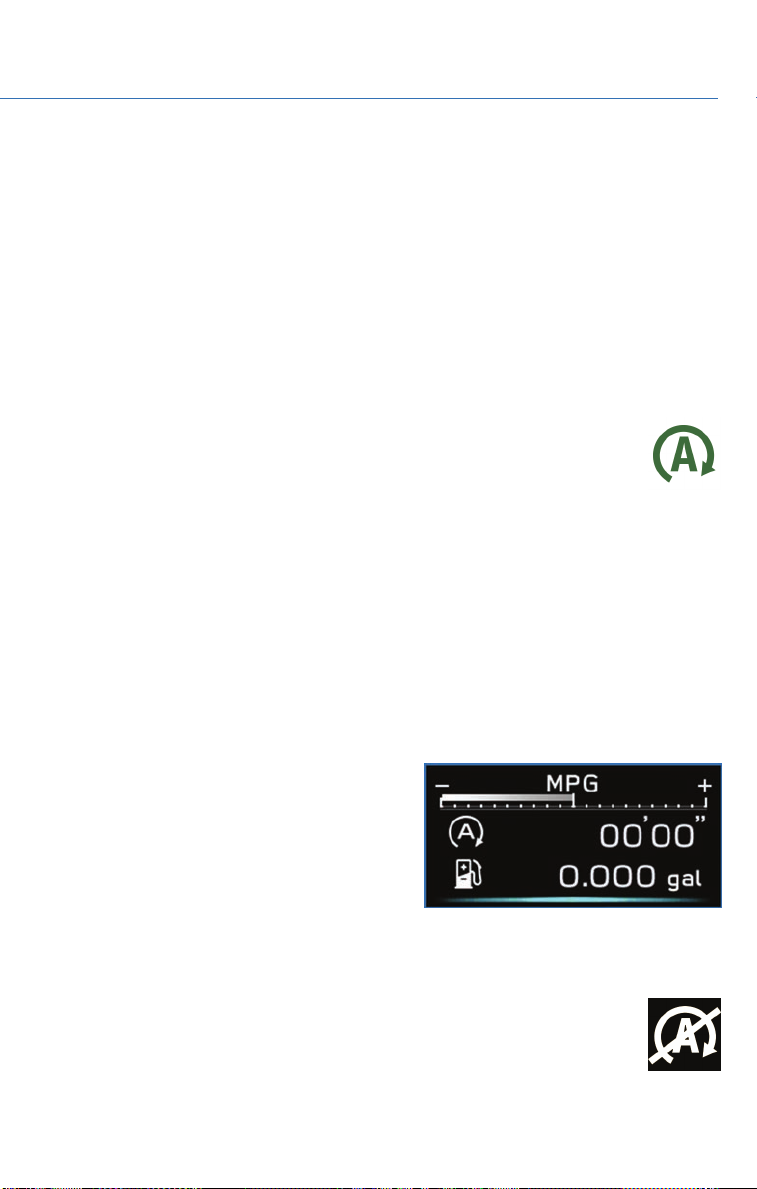
Fuel Saving Display
After you come to a stop and the Auto
Start-Stop system stops the engine the screen
to the right will display in the Combination
Meter Display (CMD). This show you how
much time the engine was off in the top time
and how much fuel was saved in the bottom
line. This is the total stop time and fuel saved
since it was reset.
No Activity Detected Indicator Light
If the operational conditions are not met when the vehicle is stopped, the
engine will not stop and the Auto Start-Stop No Activity Detected indicator
light will illuminate. This indicator is solid white when illuminated. It will turn off
when the vehicle begins to drive.
35
Page 38
OPERATING THE VEHICLE
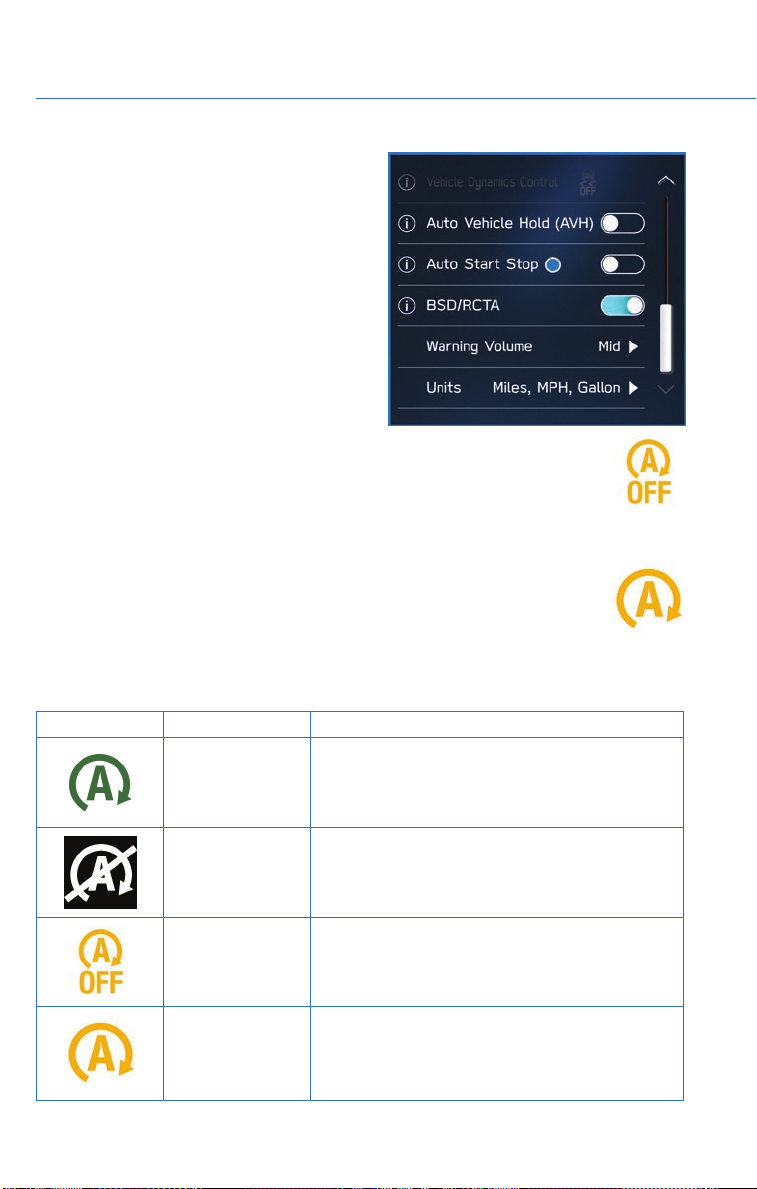
How To Turn ON/OFF The Auto Start-Stop
System
The Auto Start-Stop system can be turned on
and off in the Center Information Display (CID)
under Car Settings .
NOTE: The system will default to ON after the
vehicle has been shut off.
When the Auto Start-Stop system is turned OFF, the Auto Start-Stop OFF
indicator light in the combination meter display will illuminate. This is a solid
yellow indicator.
Auto Start-Stop Warning Light
The Auto Start-Stop warning light will illuminate in yellow when initially turning
the ignition switch to the “ON” position. The light will turn off after the engine
has started.
NOTE: If the Auto Start-Stop warning light does not turn off or is flashing
yellow after the engine has started, the Auto Start-Stop system may be malfunctioning. We
recommend that you contact your authorized SUBARU Retailer for an inspection.
INDICATOR PATTERN CONDITION
Solid green This indicator light illuminates when the engine
Solid White Operational conditions have not been met, the
Solid Yellow This light indicates that the system has been
has been temporarily stopped by the Auto
Start-Stop system. It will turn off when the engine
is restarted.
engine will not stop and this light will illuminate.
The light goes out once the brake pedal is
released.
turned off. The light will turn off once the system is
turned back on.
36
Flashing Yellow A fault has been detected with the Start-Stop
system. Please contact your authorized Subaru
Retailer.
Page 39

OPERATING THE VEHICLE
TURNING OFF THE VEHICLE
Without Push-button Ignition
To stop the engine:
1. Stop your Subaru completely.
2. Move the select lever to the “P” position.
3. Turn the ignition switch to “OFF”.
NOTE: The windows will remain active for about 45 seconds and the SUBARU
STARLINK™ Multimedia system will remain on for about three minutes or until a door is
opened, whichever occurs first.
With Push-button Ignition Switch (if equipped)
To stop the engine:
1. Stop the vehicle completely.
2. Move the select lever to the “P” position.
3. Press the ignition switch.
NOTE: The windows will remain active for about 45 seconds and the SUBARU
STARLINK™ Multimedia system will remain on for about three minutes or until a door is
opened, whichever occurs first.
DRIVERFOCUS
The DriverFocus Distraction Mitigation System monitors possible cases when the driver is
not paying attention to the forward direction, and also recognizes individual users. This
system warns the driver of inattentive, drowsy driving, and can support safe and
comfortable driving by automatically retrieving the following settings.
• Driver Position
• Climate control setting
• Combination Meter Display Settings and other display settings in the instrument panel
Refer to the EyeSight Guide or Owner’s Manual for further information on this system.
37
Page 40
REFUELING
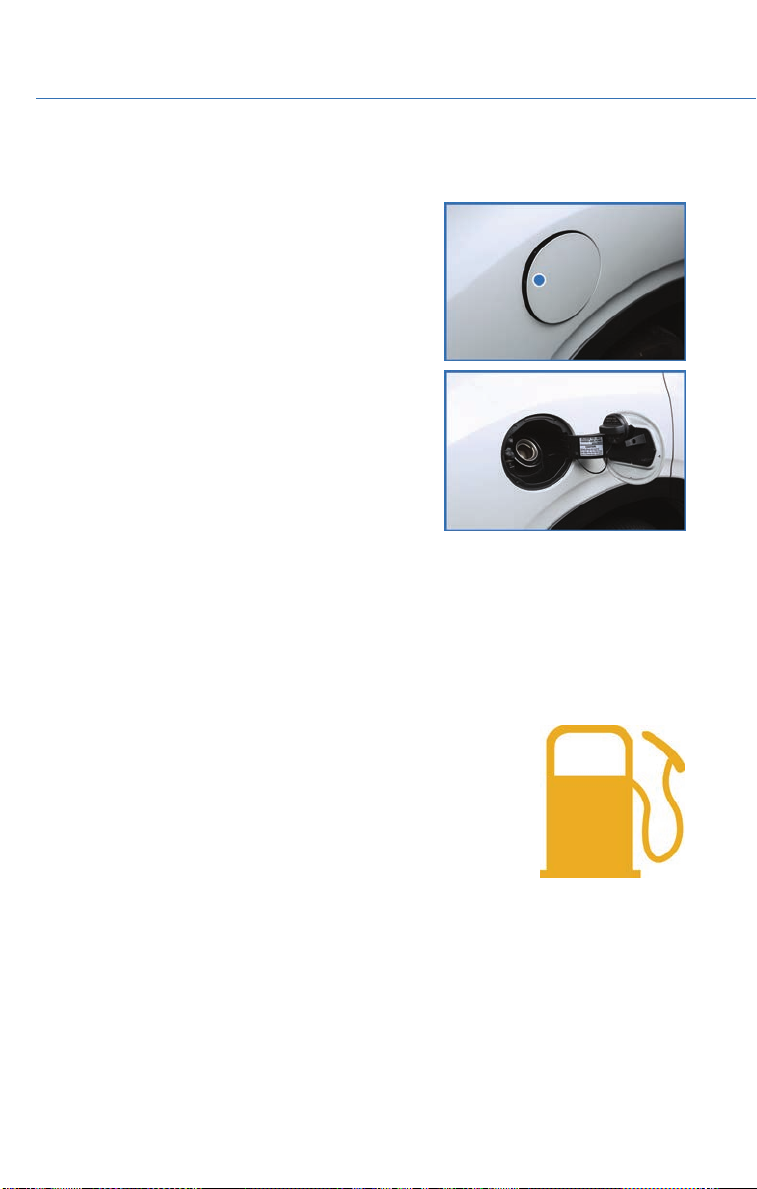
FUEL FILLER LID
The fuel filler lid is located toward the rear of the
passenger side. To open the lid:
1. Make sure your vehicle is stopped and the selector
placed in PARK. Then turn the ignition to the
"LOCK"/ "OFF" position.
2. Unlock the lid by pressing the unlock/disarm button
on the access key fob or transmitter, pressing the
unlock side of the power door locking switch, or
putting the vehicle in “LOCK”/“OFF”.
3. Push the rear side of the lid.
4. When the lid opens slightly, open it further by hand.
While refueling, place the fuel filler cap on the cap
holder inside the lid.
To close the lid, press it until you hear it latch.
FUEL
Use regular unleaded gasoline with an octane rating of 87 AKI or higher. Do not use fuels
with more than 10% ethanol. See the Owner’s Manual for more information.
FUEL CAPACITY
18.5 US gallons
The low fuel warning light illuminates when the tank is nearly empty,
at approximately 2.6 US gallons.
38
Page 41
PASSENGER/CARGO AREAS
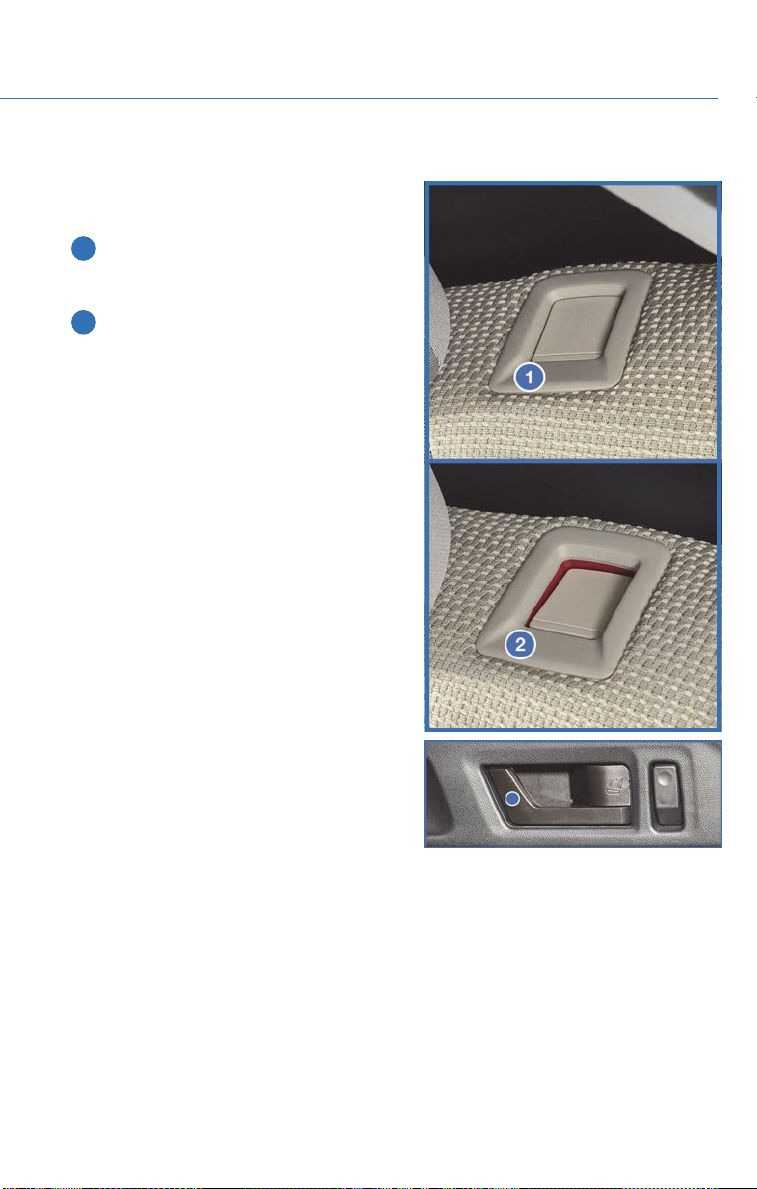
FOLDING THE REAR SEATS
The rear seats can be folded down from the
back seat or from the cargo area.
1 From the rear seat push this button to
release the rear seat and fold it down.
There is one for each side.
2 When putting the rear seat back up make
sure the seat is latched. If it is not latched
you will see the red around the button.
From the cargo area pull the lever to release
the seat and then fold forward.
39
Page 42
PASSENGER/CARGO AREAS
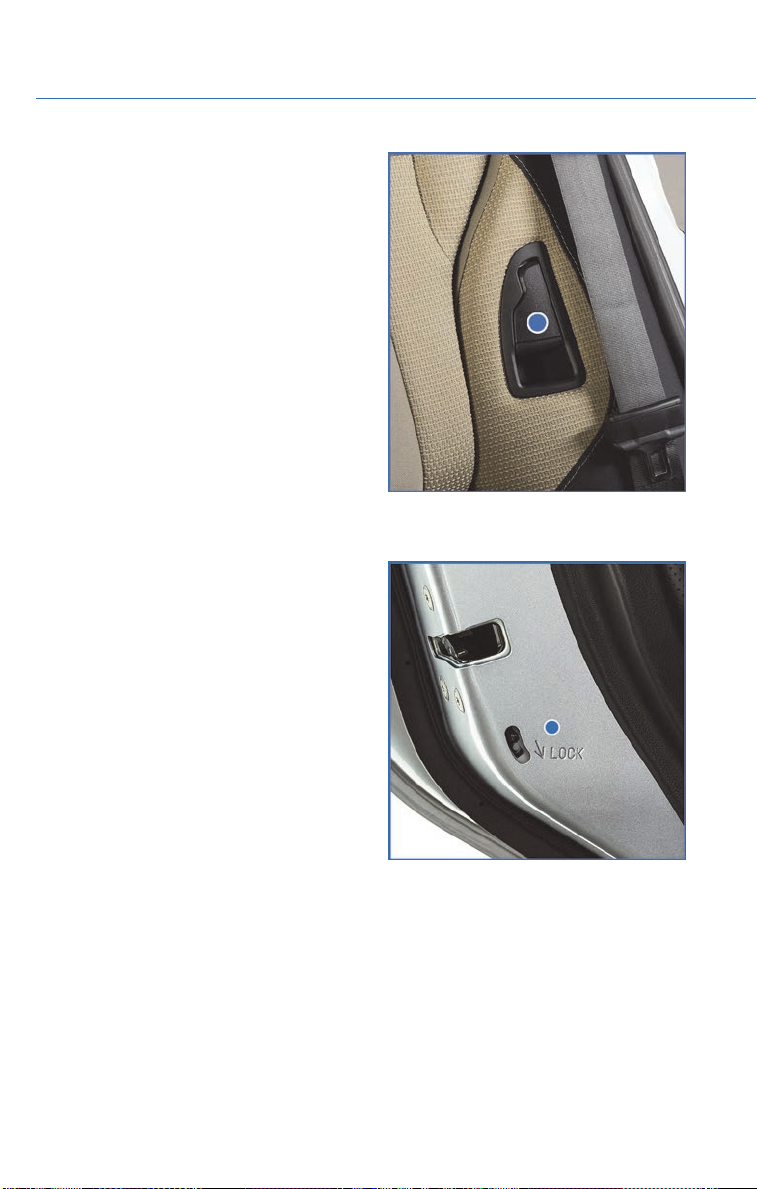
The rear seat will also recline by pulling up on
this lever and pushing back.
CHILD SAFETY LOCKS
The child safety locks are located on the inside
edges of the rear doors. In the locked position,
the rear doors can only be opened from the
outside.
40
Page 43
PASSENGER/CARGO AREAS
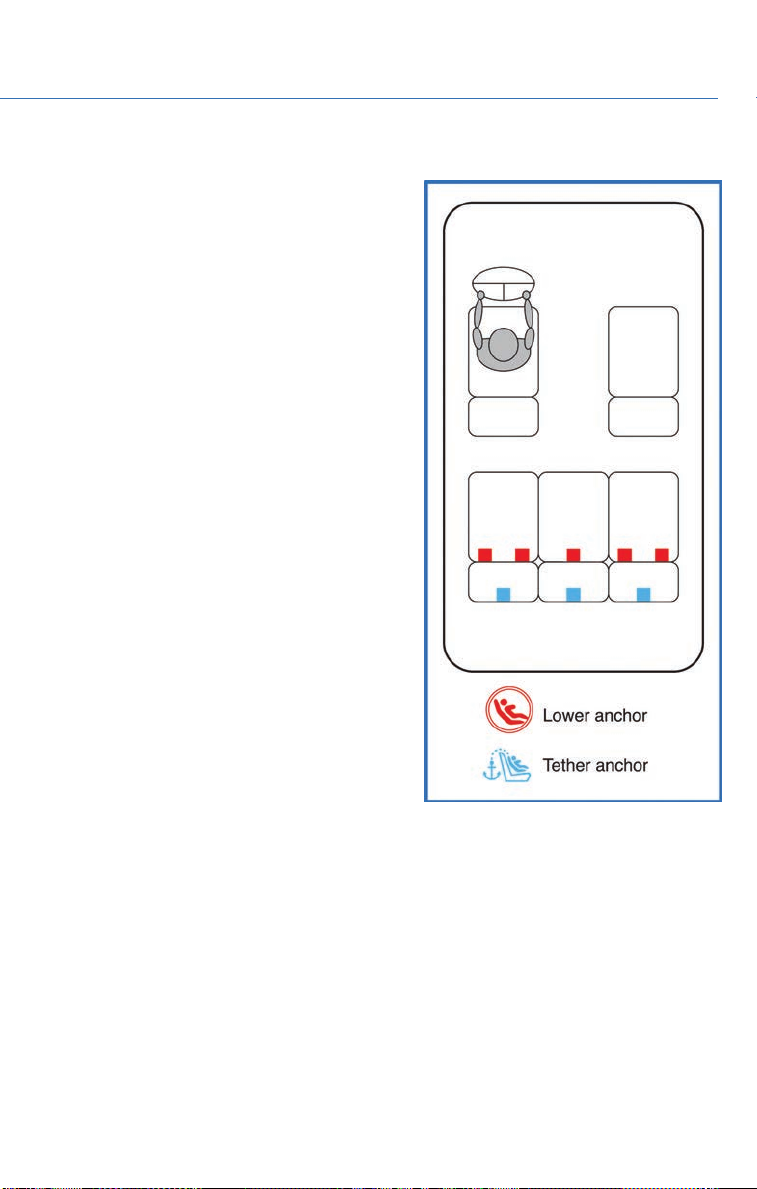
LATCH/ANCHOR
Your Subaru is equipped with Lower Anchors
and Tethers for Children (LATCH). For
maximum safety, first carefully read the LATCH
system instructions from the device
manufacturer, as well as the installation
instructions in your Owner’s Manual, to
properly install the LATCH compatible restraint
system. Use the appropriate seatbelts or
anchorages provided in your Subaru. Children
age 12 and under must properly occupy the
rear seat at all times.
41
Page 44
PASSENGER/CARGO AREAS
POWER REAR GATE (PRG) (if equipped)
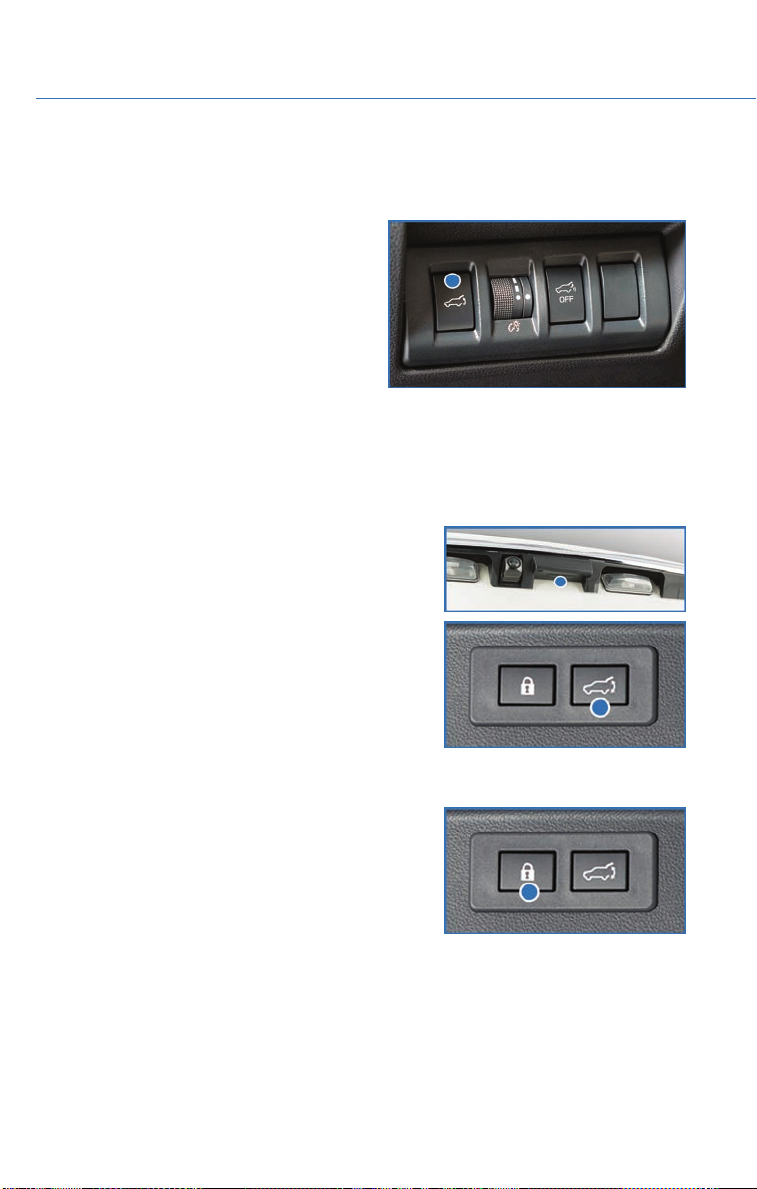
Power Rear Gate Button
Briefly press and release the button on the
instrument panel to automatically open or
close the rear gate. Two chirps will sound and
the hazard warning flashers will flash twice. If
you briefly press the button while it is closing,
it will open. If you briefly press the button while
it is opening, it will pause. Press the button
again to close the rear gate. If you attempt to
open the power rear gate with the doors locked, three rapid beeps will sound.
The operation is the same using the power rear gate button on the access key fob or
transmitter.
From the Rear of the Vehicle
To open the rear gate, unlock your Subaru or have
your access key fob with you. Then, briefly press the
button on the underside trim near the license plate.
The rear gate will automatically open. If you briefly
press the button while the gate is opening, it will
pause. Press the button again to close the rear gate.
To close the rear gate, briefly press the power rear
gate button on the inside edge of the rear gate. If you
press the button again, the rear gate will open.
Power Rear Gate Lock
With the rear gate open, press the lock button on the
inside edge of the rear gate. All doors, the rear gate
and the fuel lid will lock, and the rear gate will close.
42
Page 45
PASSENGER/CARGO AREAS
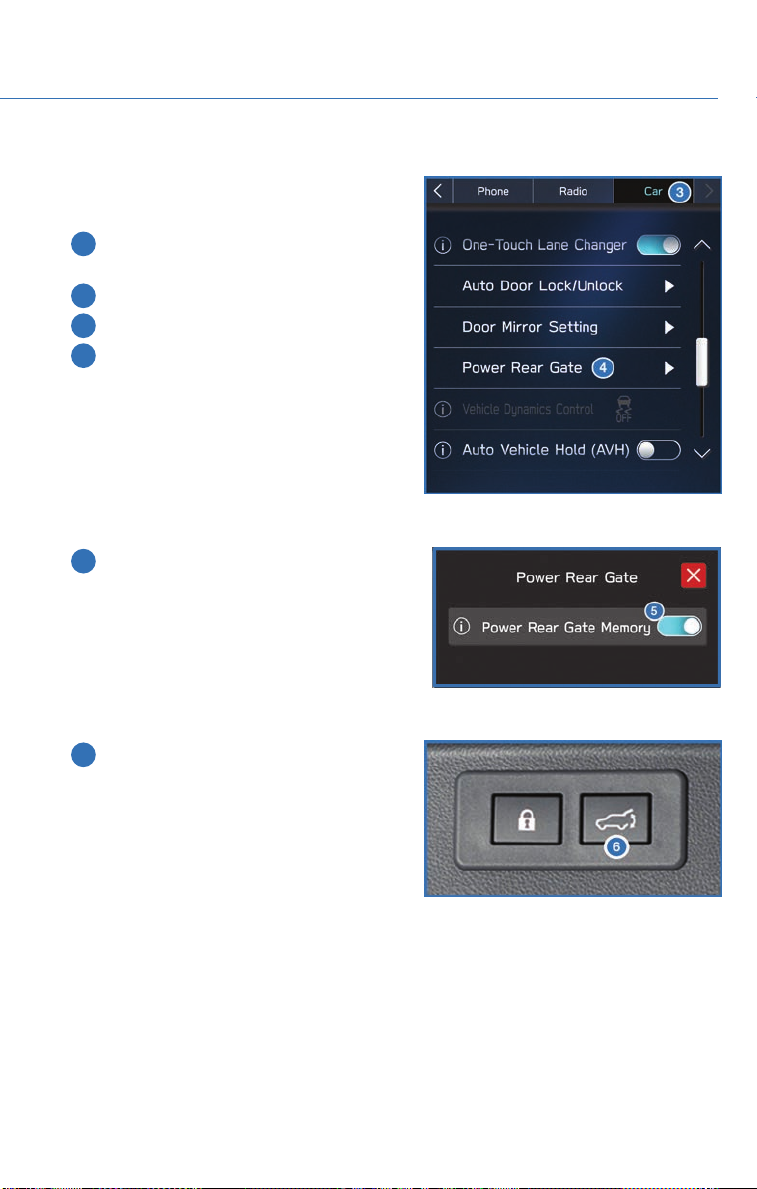
Memory Height
You can set where the rear gate stops when it
opens. To set the height:
1 In the Center Information Display (CID)
press the “Home” Button.
2 Select “Settings”.
3 Select “Car”.
4 Select “Power Rear Gate”.
5 Turn on “Power Rear Gate Memory”.
6 Now open the power rear gate and press
and hold the switch on the rear gate
when it reaches the desired height. You
will hear 2 beeps to indicate the memory
height has been set.
When the “Power Rear Gate Memory” is set to
On in the Center Information Display (CID), the
rear gate will stop at the set memory height
when you use any of the power rear gate switches.
NOTE: To adjust the memory height, once the rear gate stops, move it to the desired
height and press and hold the Power Rear Gate Switch until you hear the 2 beeps.
43
Page 46
PASSENGER/CARGO AREAS
CARGO COVER
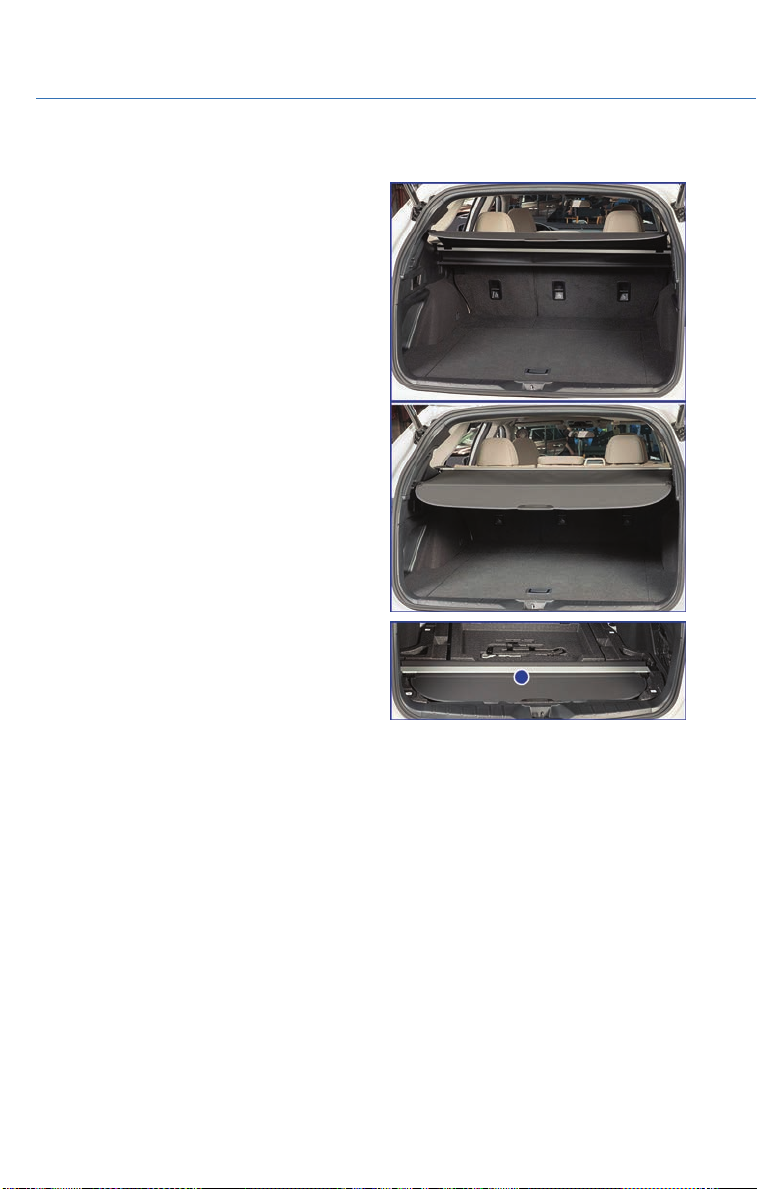
Use the detachable cargo cover to protect
contents in the cargo area from direct sunlight.
Pull the cover toward the rear of your Subaru
and insert both ends of the cover into the
guides. If more room is needed push down on
the cover closest to you and release and it will
go into its 2nd position.
Store the cover under the floor of the cargo
area when not in use. Instructions for operation
are included on the cargo cover housing.
44
Page 47
PASSENGER/CARGO AREAS
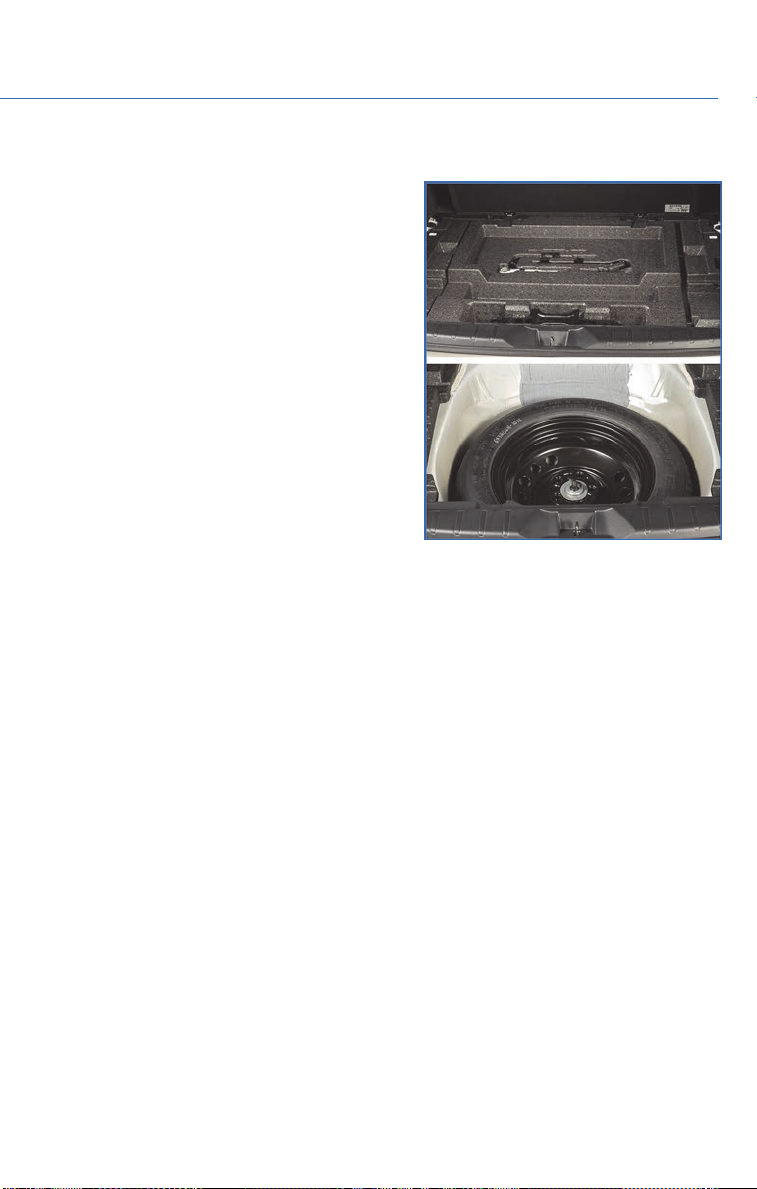
SPARE TIRE
The jack and other maintenance tools are
stored in the tool bucket on top of the spare
tire. Remove the tools to access the spare tire.
45
Page 48
ENGINE COMPAR TMENT
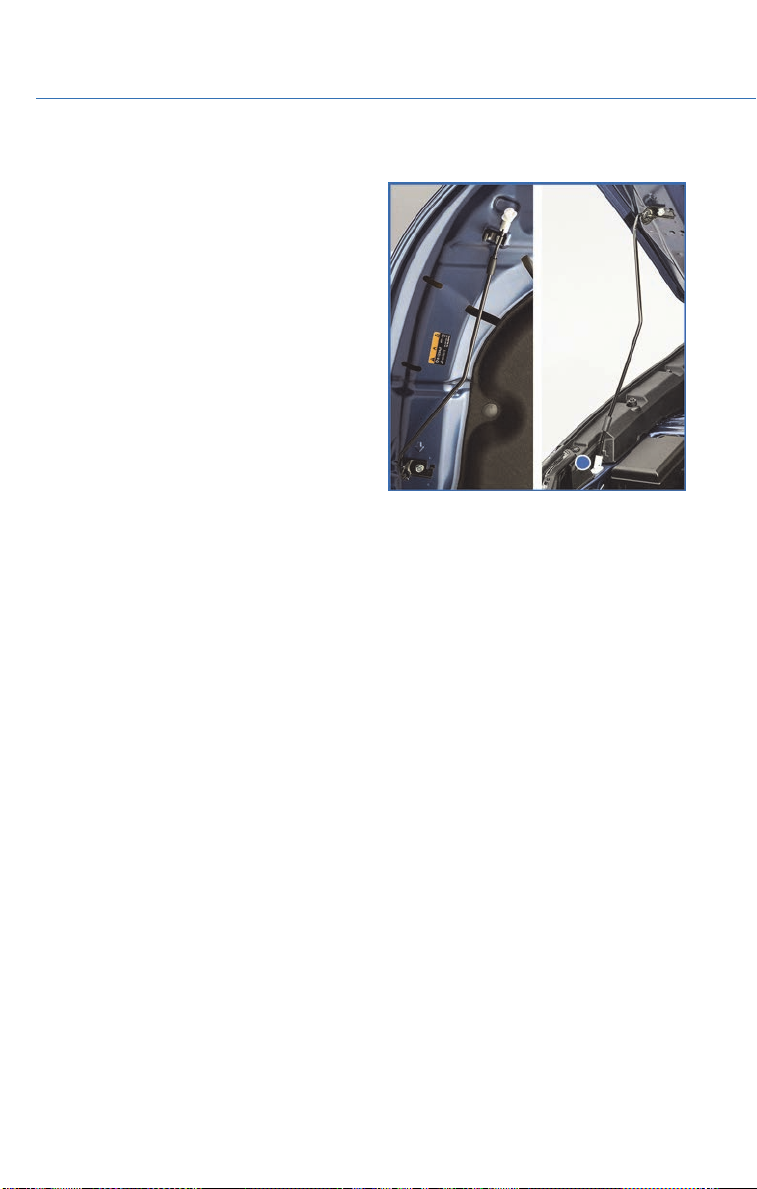
HOOD PROP
The hood prop is located on the underside of
the hood. Release it from the retainer and
insert the end into the slot marked with an
arrow.
46
Page 49
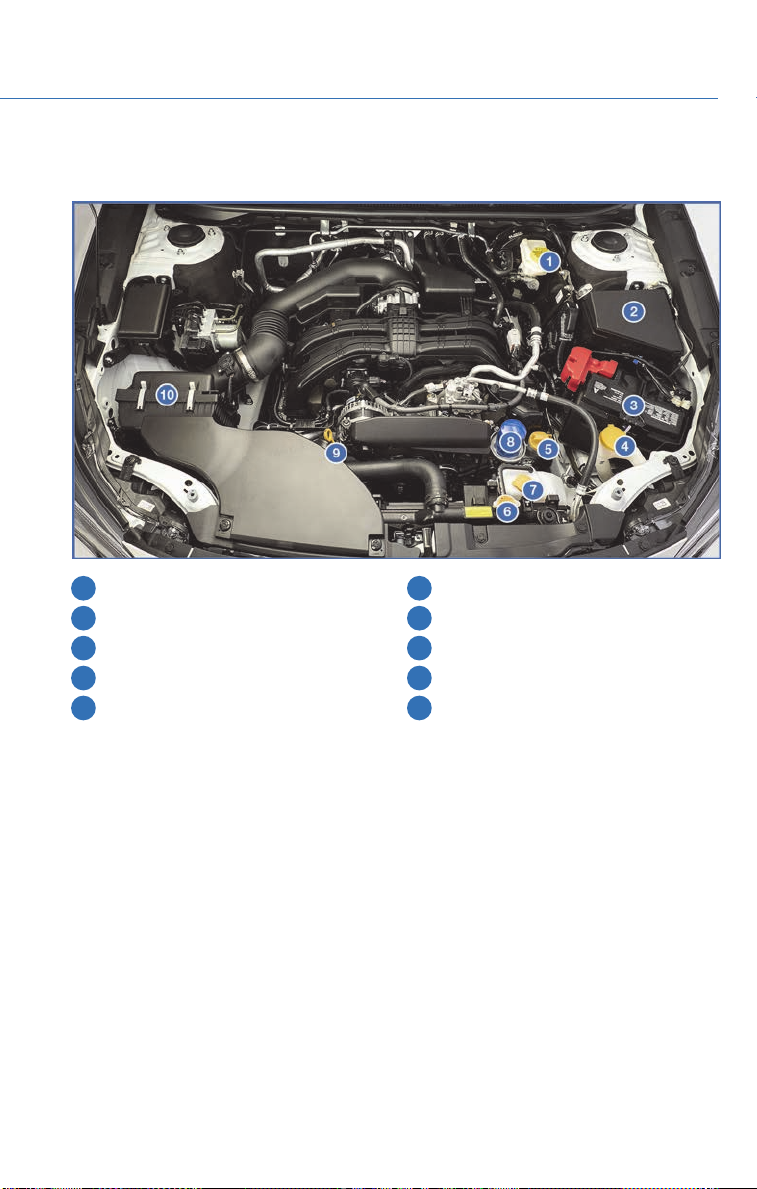
2.5L ENGINE
ENGINE COMPAR TMENT
1 Brake Fluid Reservoir
2 Main Fuse Box
3 Battery
4 Windshield Washer Tank
5 Engine Oil Filler Cap
6 Radiator Cap
7 Engine Coolant Reservoir
8 Engine Oil Filter
9 Engine Oil Dipstick
10 Air Cleaner Element
47
Page 50
ENGINE COMPAR TMENT
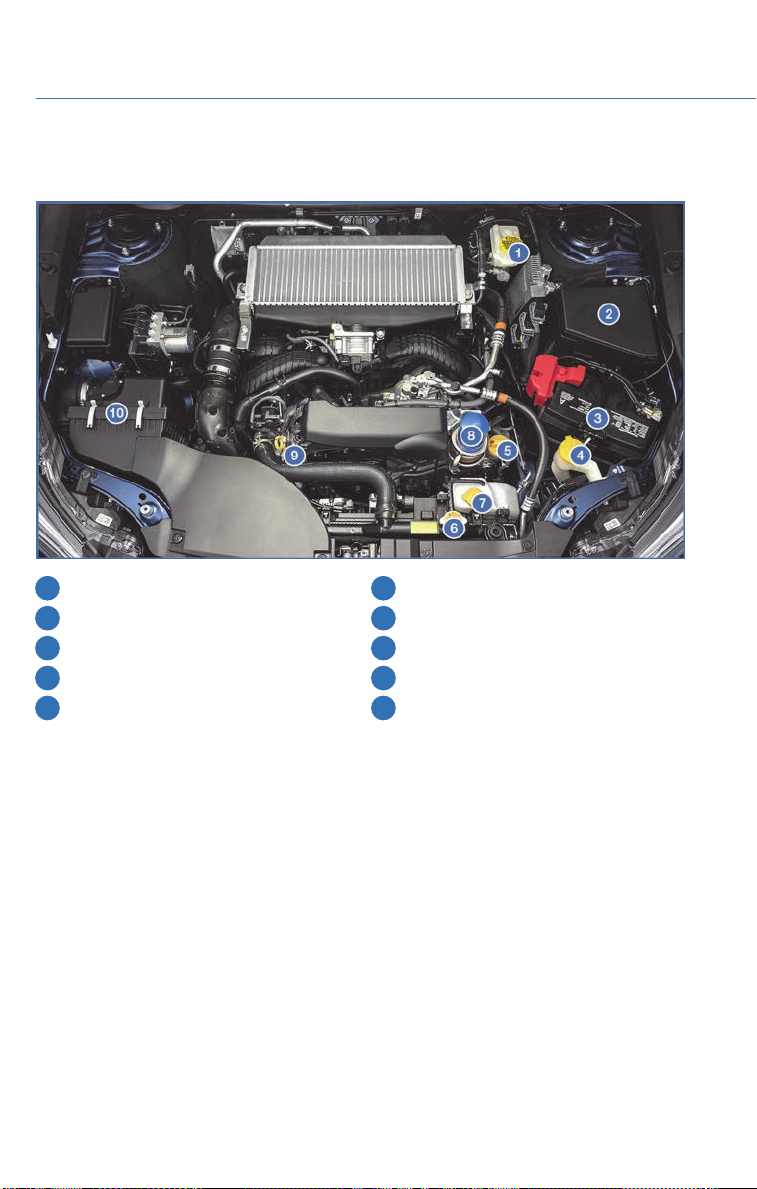
2.4L TURBO ENGINE
1 Brake Fluid Reservoir
2 Main Fuse Box
3 Battery
4 Windshield Washer Tank
5 Engine Oil Filler Cap
48
6 Radiator Cap
7 Engine Coolant Reservoir
8 Engine Oil Filter
9 Engine Oil Dipstick
10 Air Cleaner Element
Page 51
ADDITIONAL SPECIFICATIONS
NEW VEHICLE BREAK-IN
The performance and long life of your Subaru are dependent on how you handle and care
for your Subaru while it is new.
Follow these instructions during the first 1,000 miles:
• Do not race the engine.
• Do not drive at one consistent engine or vehicle speed, either fast or slow.
• Avoid starting suddenly and rapid acceleration, except in an emergency.
• Avoid hard braking, except in an emergency.
ENGINE OIL
Use 0W-20 synthetic, with one of the follow specifications:
• API classification SN or SN PLUS with the words “RESOURCE CONSERVING”.
• ILSAC GF-5, which can be identified with the ILSAC certification mark (Starburst mark).
ENGINE OIL CAPACITY
2.4L Turbo Engine
4.8 US quarts (during oil and filter change)
2.5L Engine
4.4 US quarts (during oil and filter change)
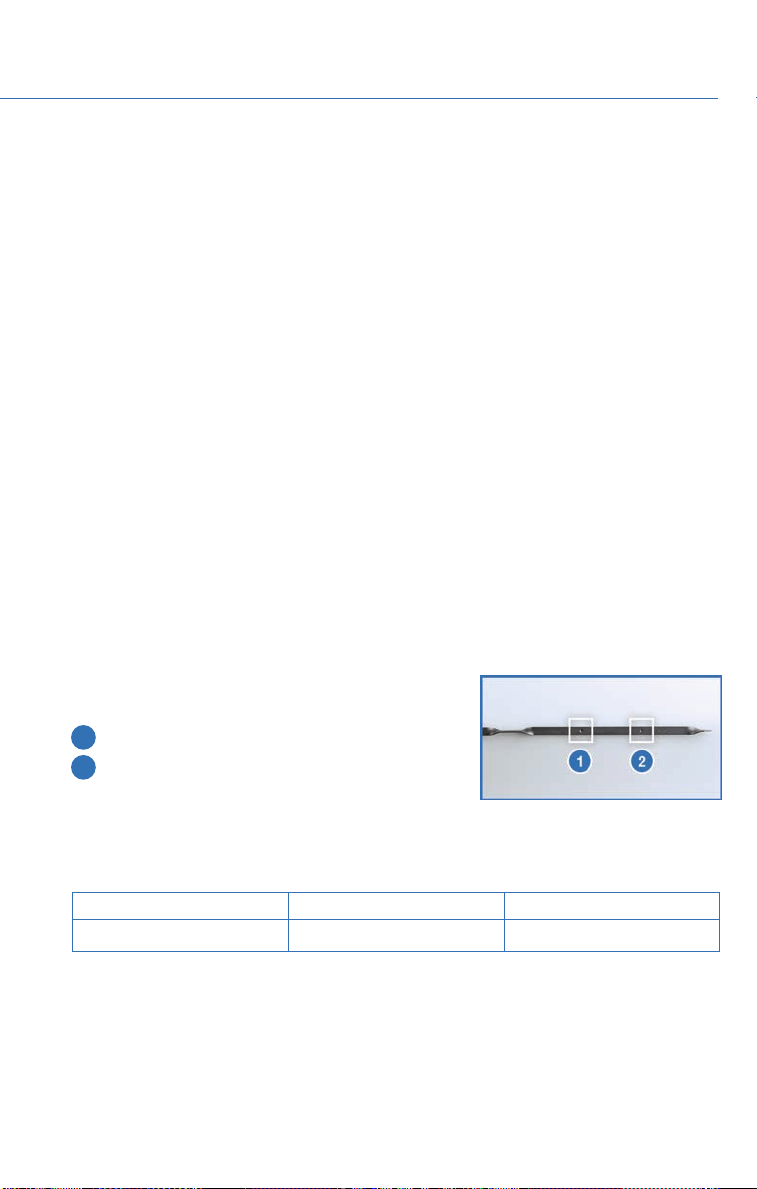
There is approximately 1 quart between the low and
full level.
1 Full Level
2 Low Level
ROOF RAIL CAPACITY
CROSS BARS DYNAMIC ROOF RAILS DYNAMIC ROOF RAILS STATIC
150 Pounds 176 Pounds 176 Pounds
49
Page 52
ADDITIONAL SPECIFICATIONS
TRAILER TOWING CAPACITY
Maximum gross trailer weight:
• 2.4L models: 3,500 pounds
• 2.5L models: 2,700 pounds
• Ensure that the trailer tongue load is from 8 to 11% of the total trailer weight and does
not exceed the maximum value of 350 pounds.
TIRE PRESSURE MONITORING SYSTEM (TPMS)
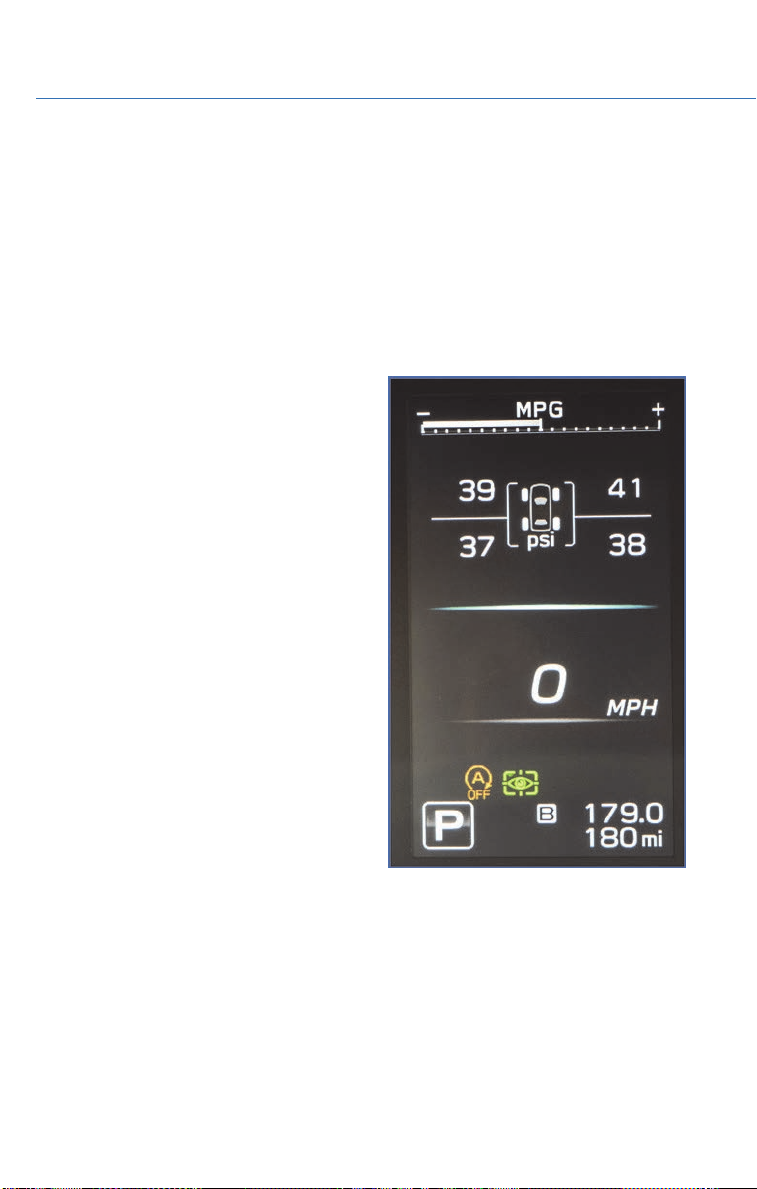
Your Subaru has a Tire Pressure Monitoring
System (TPMS). The individual tire pressure is
found in the Combination Meter Display
(CMD).
Tire pressure specification is on the tire
information placard located on the driver’s side
door pillar.
50
Page 53
ADDITIONAL SPECIFICATIONS
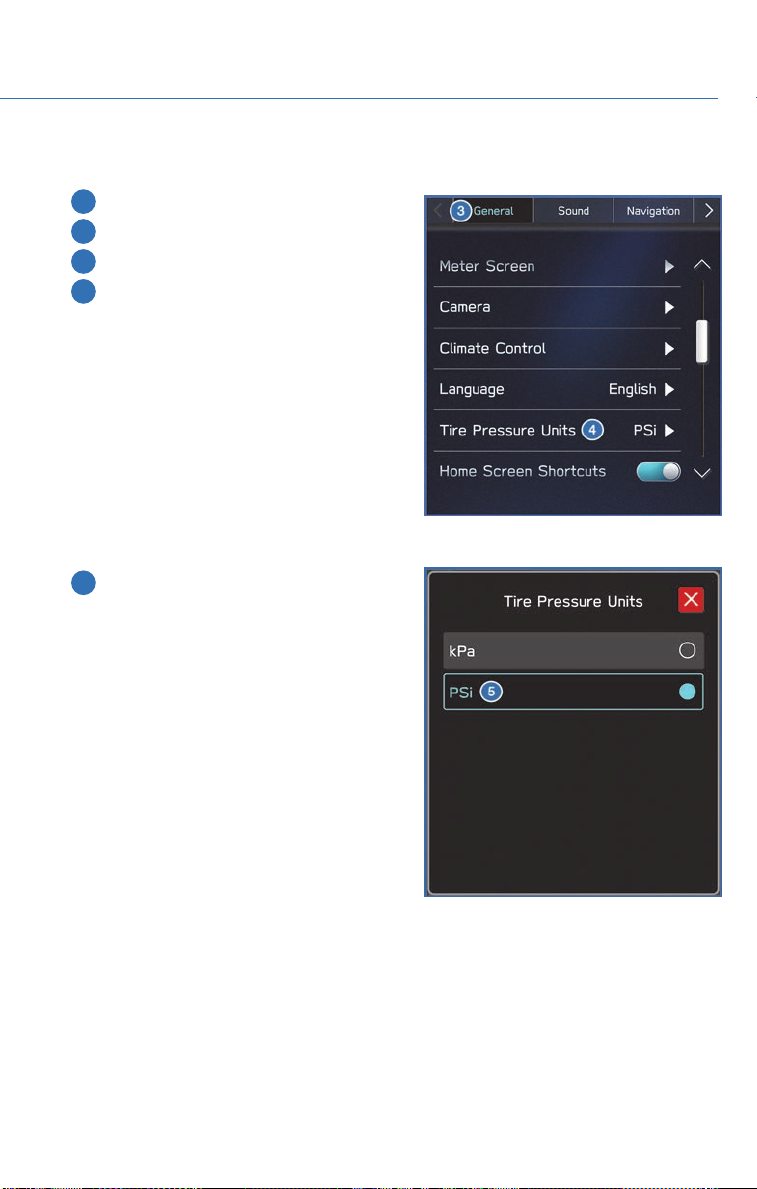
The tire pressure can be changed from kPi to PSi by using the Touchscreen.
1 Start by selecting the “Home” button.
2 Select “Settings”.
3 Select “General”
4 Now select “Tire Pressure Units”.
5 Select your desired setting either “PSi” or
“kPa”.
51
Page 54
STARLINK OVERVIEW
OVERVIEW OF YOUR MULTIMEDIA SYSTEM
SUBARU STARLINK™ Multimedia combines the radio along with the ability to connect
your phone* through Bluetooth
listening to your favorite songs that are on your phone.
* *Compatible smartphone and application required. For applications to operate, latest version of each
application required. Data provided by smartphone is displayed on the Touchscreen. Some state laws
prohibit the operation of handheld electronic devices while operating a vehicle. Smartphone apps
should only be launched when vehicle is safely parked. Your wireless carrier’s rates may apply.
Various Systems
Depending on your model and trim level, there are several types of SUBARU STARLINK™
Multimedia systems. Some of the functions described in this guide will vary by system.
• Dual 7–inch Multimedia
• 11.6–inch Multimedia Plus
• 11.6–inch Multimedia Navigation
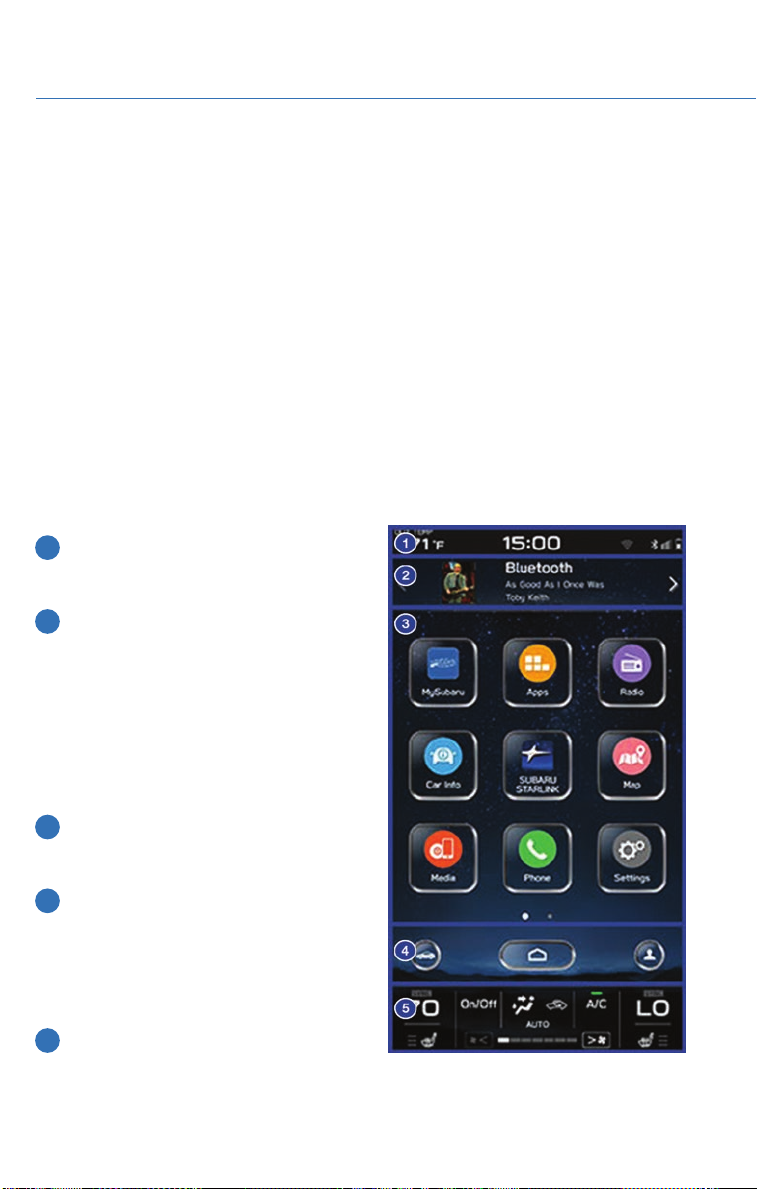
Screen Layout
1 Status Bar: The very top of the screen,
which shows the outside temperature
and clock.
2 Information Bar: This can display the
radio station or music track you're
listening to, or several other screens of
information, including X-MODE on
Outback. If you touch the arrow on the
right, you can scroll through the
information that is programmed to display
there. This can also be customized
through the “Setting” menu.
3 Home Screen: This is the main part of
the display where maps, phone features,
Apps and car information is accessed.
4 Home Buttons: The vehicle icon is a
short cut to frequently used buttons; “Car
Settings”, “Home” button which will bring
you back to the home screen, and “Driver
Profile” button on the right to create or
edit driver profiles.
5 Climate Control: The very bottom
portion of the screen contains all the
settings for climate control, including heated/vented seats. You can adjust the fan
speed or airflow mode simply by touching this area.”
52
®
to the radio for making calls, sending text messages and
Page 55
STARLINK OVERVIEW
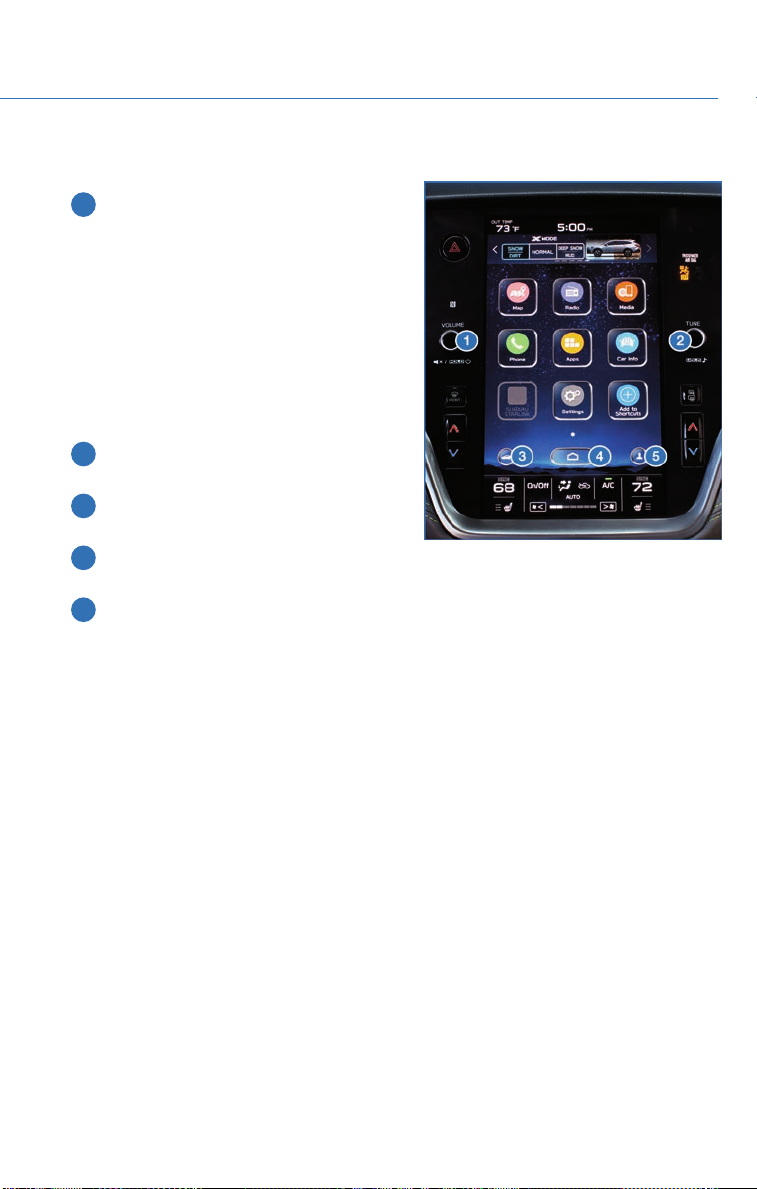
BUTTONS
1 Power/Volume/Mute Control: Press the
power/volume/mute control knob to mute
the audio, the volume will stay muted
even after the vehicle is turned off and
then restarted. Press and hold to turn the
Center Information Display (CID) on or off.
Withe the screen off you can touch the
bottom of the screen to adjust the climate
control and then the screen will go off
again. Rotate the knob to control the
volume.
2 Tune: Rotate the knob to change the
channels.
3 Car Settings: Press to display the Car
Settings menu.
4 Home: Press to return to the Home
screen.
5 Driver Profile: Press to display the driver profiles. This is also where you set up a
driver profile.
Controlling the Volume
Adjusting the Volume: Turn the “VOLUME” knob to adjust the volume. The volume stays
at that level after an ignition cycle.
Muting the Volume: Press and release the knob once to mute or un-mute the audio. It will
un-mute automatically after an ignition cycle.
Turning the System Off: Press and hold the knob for about three seconds to turn the
system off. The system remains off after an ignition cycle. Press the knob to turn it back
on.
53
Page 56
STARLINK OVERVIEW
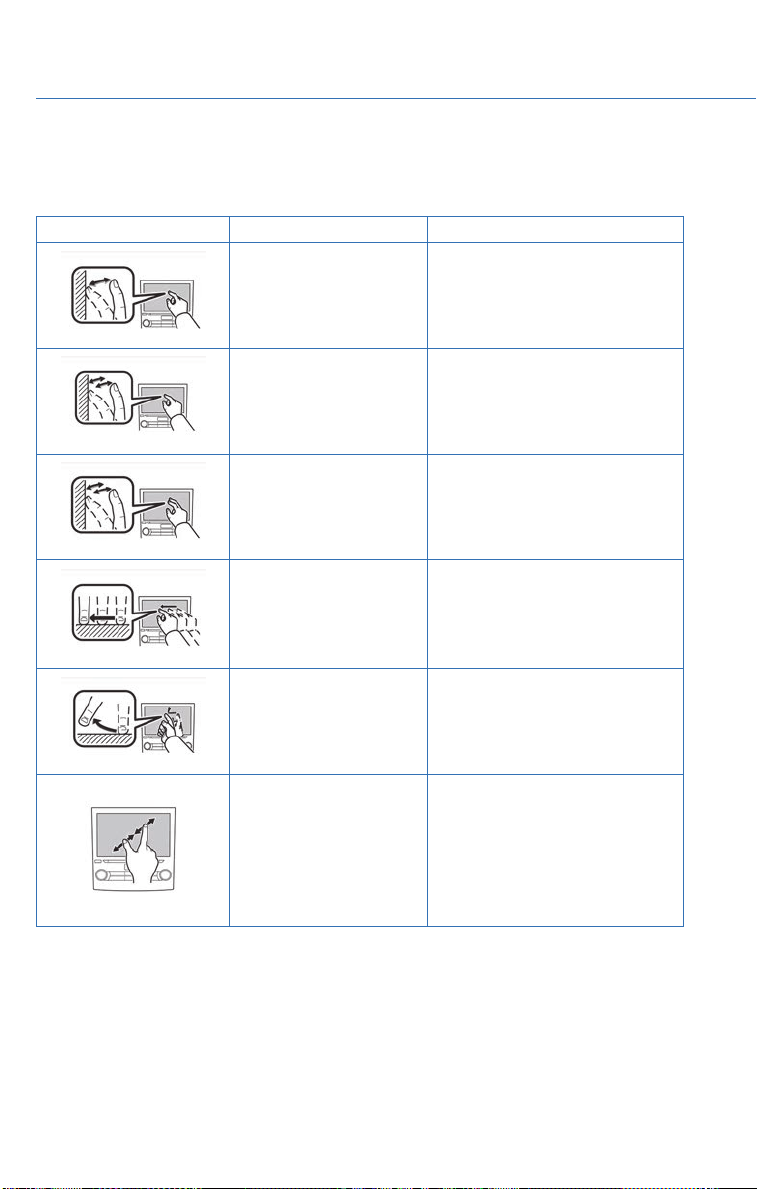
TOUCHSCREEN
Operations are performed by touching the screen directly with your finger.
MOTION ACTION USE
Touch
Quickly touch and release
once.
Double Touch with one
finger*
Quickly touch and release
twice with one finger.
Double Touch with two
fingers*
Quickly touch and release
twice with two fingers.
Drag**
Touch and drag your
finger on the screen to
move the screen to the
desired position.
Swipe**
Quickly move the screen
by swiping with your
finger.
Pinch*
Move your two fingers
further apart (pinch-out)
to zoom in on the map.
Move your two fingers
closer together (pinch-in)
to zoom out on the map.
Changing and selecting various
settings
Enlarging the scale of the map
screen
Reducing the scale of the map
screen
•
Scrolling the lists
• Scrolling the map screen*
•
Scrolling the lists
• Scrolling the map screen*
Changing the scale of the map
screen
* 11.6-inch with Navi system only
** The operations may not be performed on all screens.
54
Page 57
STARLINK OVERVIEW
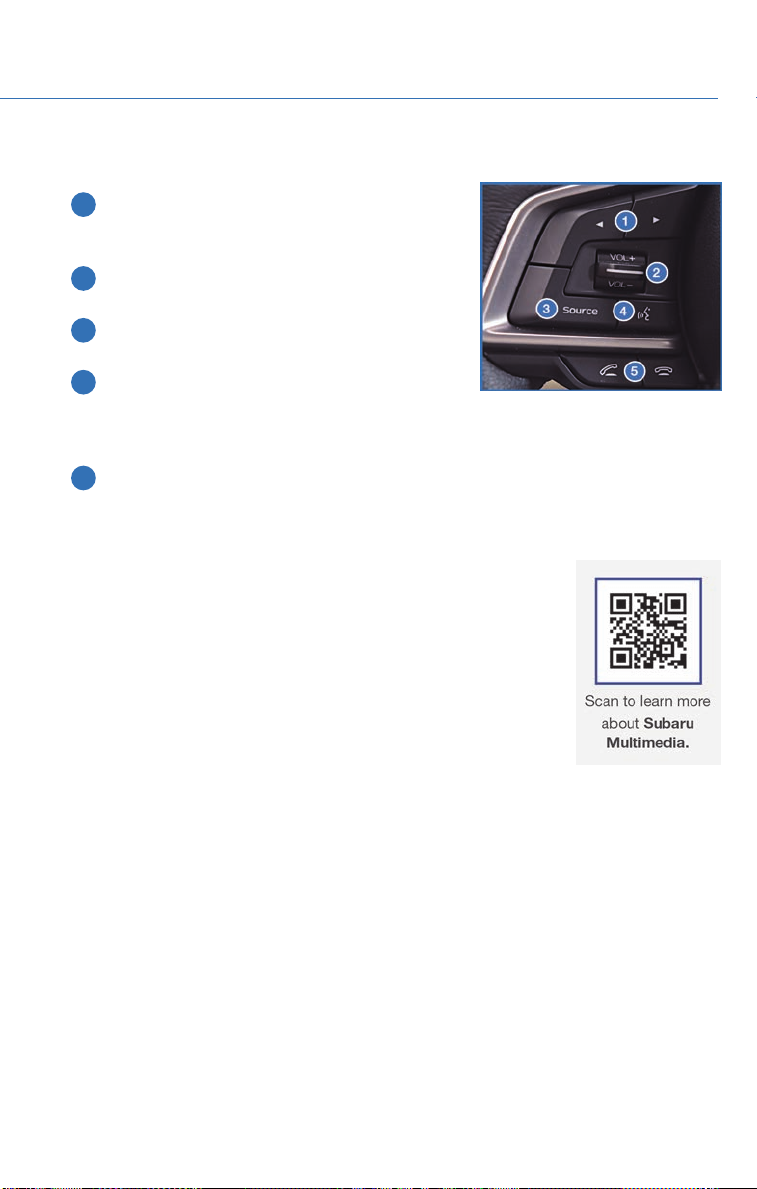
STEERING WHEEL CONTROLS
1 Presets/Skip: Press to toggle through your
presets or change a track/media file. Press and
hold to fast-forward/rewind.
2 Volume: Push the switch up/down to
increase/decrease volume.
3 Source: Press to change audio between radio
sources and media modes.
4 Voice Recognition: Press once to initiate the
built-in voice recognition system. If you have an
Android or Apple device paired, press and hold to initiate Google Assistant or Siri
functionality.
5 Call: Press to receive/end a call without taking your hands off the steering wheel.
VOICE RECOGNITION
With SUBARU STARLINK™, simple voice commands can control
features like navigation, entertainment, phone calls, and, on select
models, climate control. A microphone is located in the overhead
console. You do not need to speak directly into it.
Visit www.subaru.com/engineering/starlink/multimedia.html for
more information.
Press the talk switch to start the voice recognition system. Press
and hold the switch to cancel it.
For help with what you can say with voice recognition, press the
“Help” button on the screen or press the voice recognition button and say “Help”.
Tips
The system may not recognize the voice command if:
• You speak too quickly or at a low or high volume.
• You are driving with a window open, the climate control system set on high or have the
ventilator directed toward the microphone.
• Passengers are talking while you are saying a voice command.
In some cases, you may not be able to use voice commands if the system cannot properly
recognize the command. Examples are:
• The command is incorrect or unclear. NOTE: Certain words, accents or speech patterns
may be difficult for the system to recognize.
55
Page 58

STARLINK OVERVIEW
Common Commands
Below is a list of some of the common commands that you can use with the voice
recognition system. Please refer to your SUBARU STARLINK™ Owner’s Manual for a
complete list.
VOICE COMMAND FUNCTION EXAMPLE
Dial [Number] Places a call to the phone
number
Call [Name] [Phone Type] Places a call to the contact
name and phone type of the
contact from the phonebook
Navigate to [House Number,
Street, City, State]
Show Map
Where am I
1
1
1
Sets a destination to the
address
Displays the map screen Show Map
Displays current location on
map
Tune to [Frequency] (AM /
FM)
Switches to AM/FM and
tunes to spoken frequency
Preset [Number] Switches to the preset
channel
Satellite Channel [Name /
Channel Number]
Set Fan Speed to [1-7]
Switches to satellite channel
number
2
Sets the fan speed to the
spoken fan speed
Set Temperature to
[Number]
2, 3
Sets the temperature to the
spoken temperature
Help Changes to help screen Help
Phone Help Displays a list of voice
commands related to
controlling your phone
Media Help Displays a list of commands
related to the media
Radio Help Displays a list of commands
related to the radio
Navigation Help
1
Displays a list of voice
commands related to
navigation
Dial 555-123-4567
Call John Doe mobile
Navigate to 1234 Main
Street, Lincoln, Washington
Where am I
Tune to 99.5 FM
Preset 3
Satellite Channel Prime
Country 55
Set fan speed to 4
Set temperature to 70
Phone Help
Media Help
Radio Help
Navigation Help
1
11.6-inch Multimedia Navigation system only
2
11.6-inch Multimedia Plus and 11.6-inch Multimedia Navigation system only
3
When the A/C is off, the A/C setting will not change even if the voice command is accepted
56
Page 59

STARLINK OVERVIEW
Limitations
Google Assistant: May not work with all devices or may not be compatible with the audio
system.
®
Siri Eyes Free: Only applies to iPhone when Bluetooth
experience both built-in voice recognition system and Siri, depending on the button
pressed.
is paired. In this case, you may
57
Page 60
STARLINK HOME
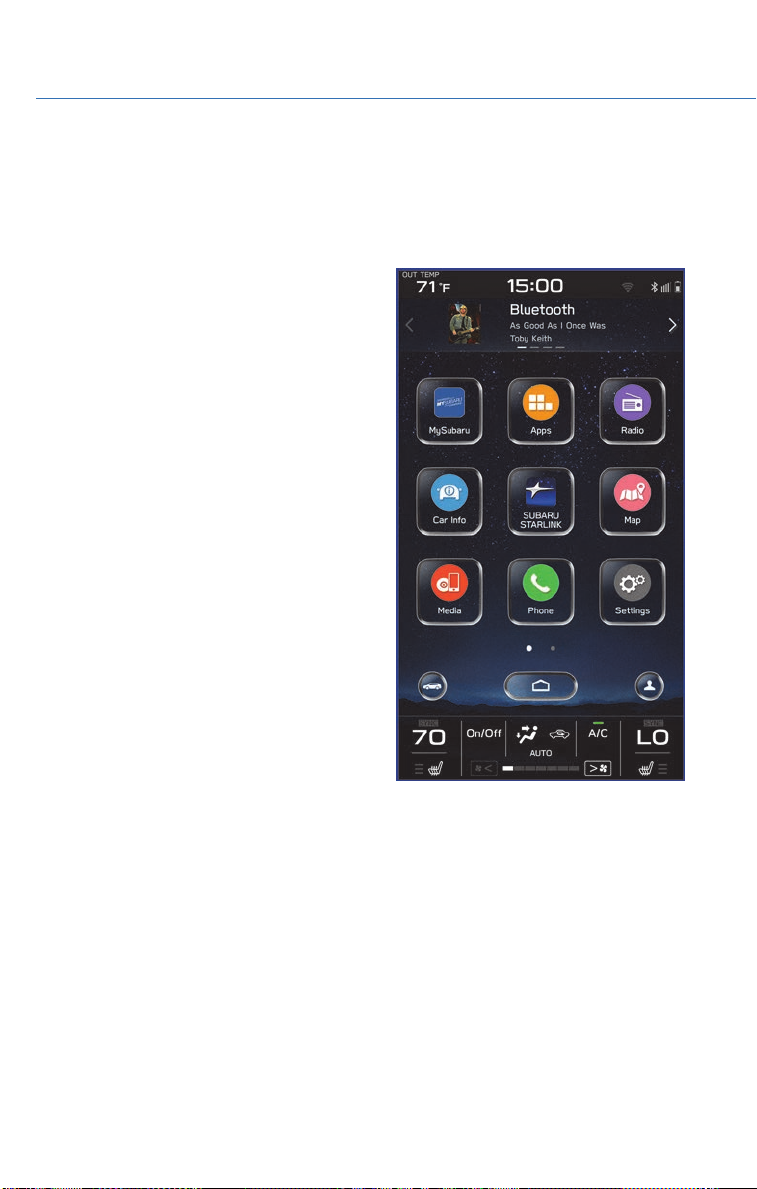
The SUBARU STARLINK™ allows you to control your phone, media, radio, apps and
navigation systems from a single screen. It also allows you to customize the Car Settings
to your preference.
HOME SCREEN ICONS
MySubaru – Whether you’re on the road or
planning adventures, the MySubaru app makes
loving every part of owning your Subaru easy.
Apps - Entertainment and convenience
applications that can be used to enhance your
driving experience. The apps included are:
MySubaru, Pandora, Travel Link, Android Auto,
SUBARU STARLINK™ and Apple Car Play.
Radio – Allows you to select a station to listen
to as well as pause and playback live radio.
Car Info – Displays the operating status of
vehicle functions, vehicle status, and vehicle
inclination in the “Driving Statistics” screen. The
current setting of various vehicle functions and
a brief description of each function can be
viewed in the “Advanced Package” screen and
vehicle maintenance intervals in the
“Maintenance” screen.
SUBARU STARLINK – Wireless pairing and
hands-free smartphone operation allow for safe
and easy connection to your favorite apps and
content. You can access news, navigation,
music, podcasts, and more through the available SUBARU STARLINK™ app.
Map – Allows you to enter a destination and have route guidance to get you where you are
going.
®
Media – Allows you to play CDs, USB/iPod music or Bluetooth
the device.
Phone – Allows you to place and receive calls and text messages.
Settings – Allows you to change the settings to your personal choice for select systems
inside the vehicle.
Add Shortcut – Allows you to add icons for various functions to the home screen.
audio by connecting to
58
Page 61
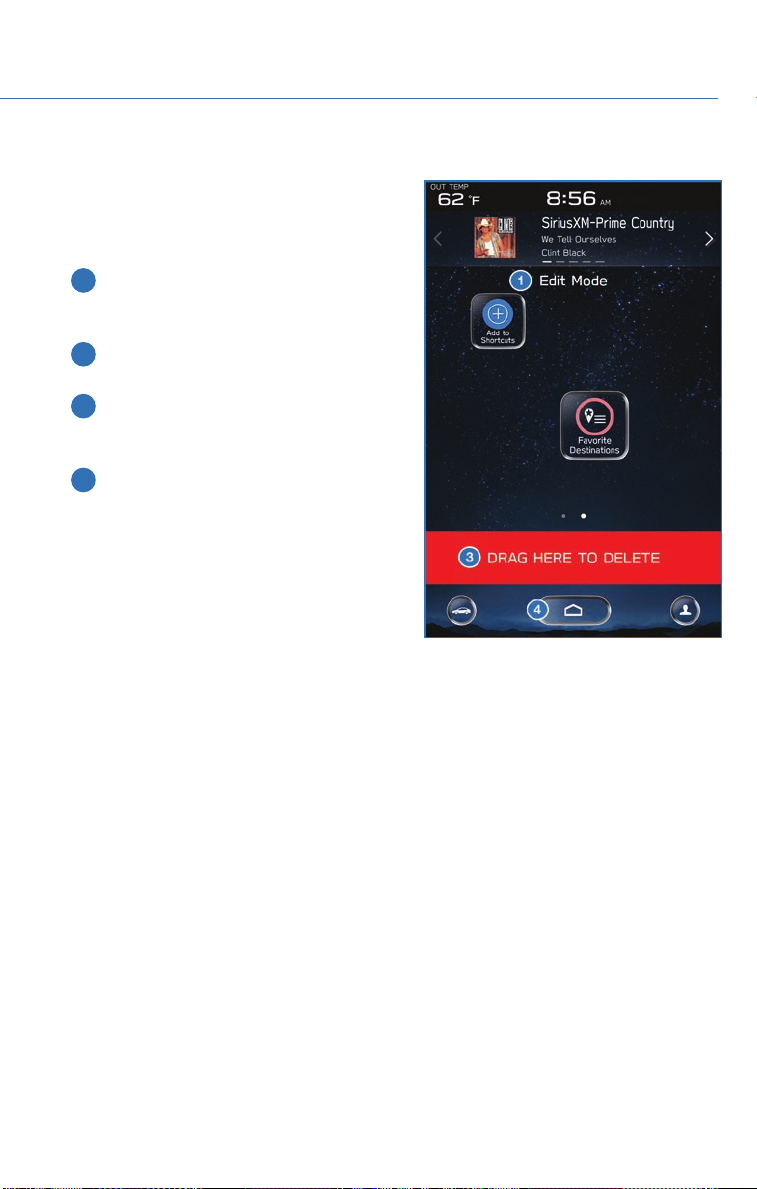
REARRANGING ICONS
You can rearrange the home screen icons
when in Edit Mode.
To rearrange icons:
1 Select and hold the shortcut icon you
want to move until “Edit Mode” is
displayed at the top of the screen.
2 Drag the icon to the desired position and
release.
3 To delete an icon, drag the icon to the
bottom of the screen labeled “DRAG
HERE TO DELETE” and release.
4 To exit “Edit Mode” touch the “Home”
button.
STARLINK HOME
59
Page 62
STARLINK HOME
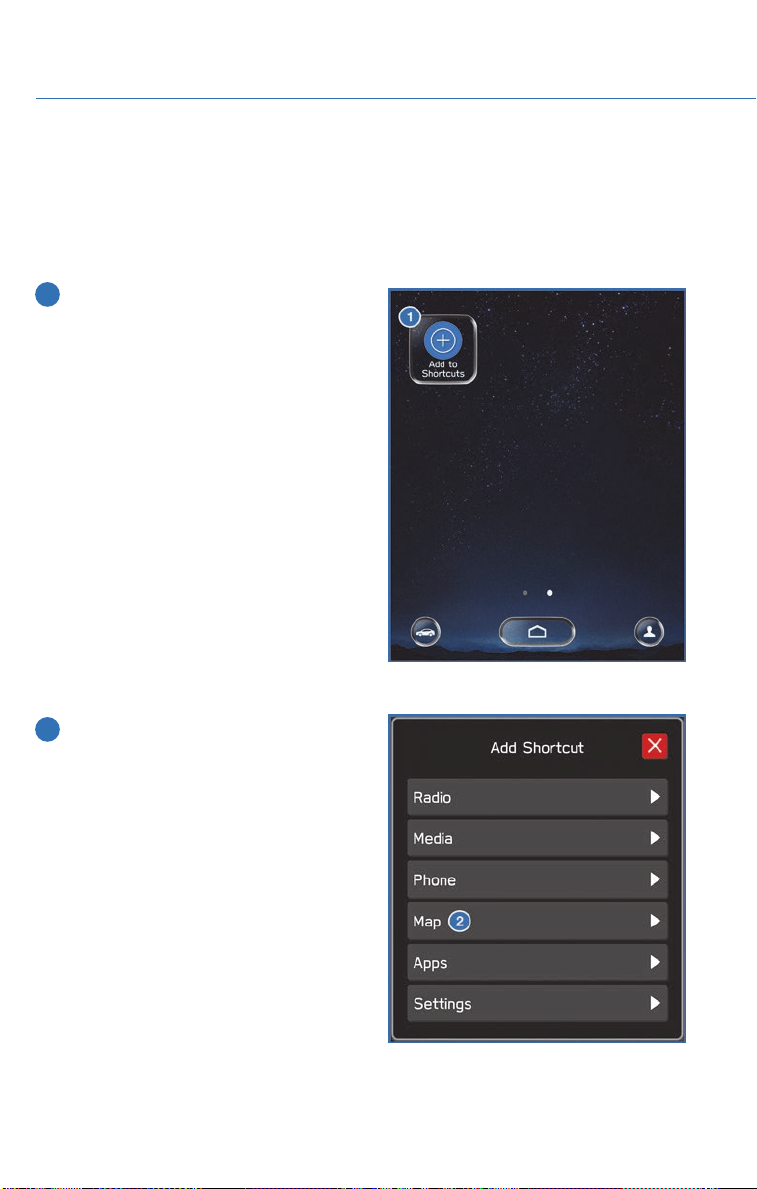
ADDING SHORTCUTS
You can add shortcut icons for various functions to the Home screen when the Home
Screen Shortcut function is turned on.
To add icons, press the “Home” button.
1 Select “Add Shortcut”.
2 Select the desired function.
60
Page 63
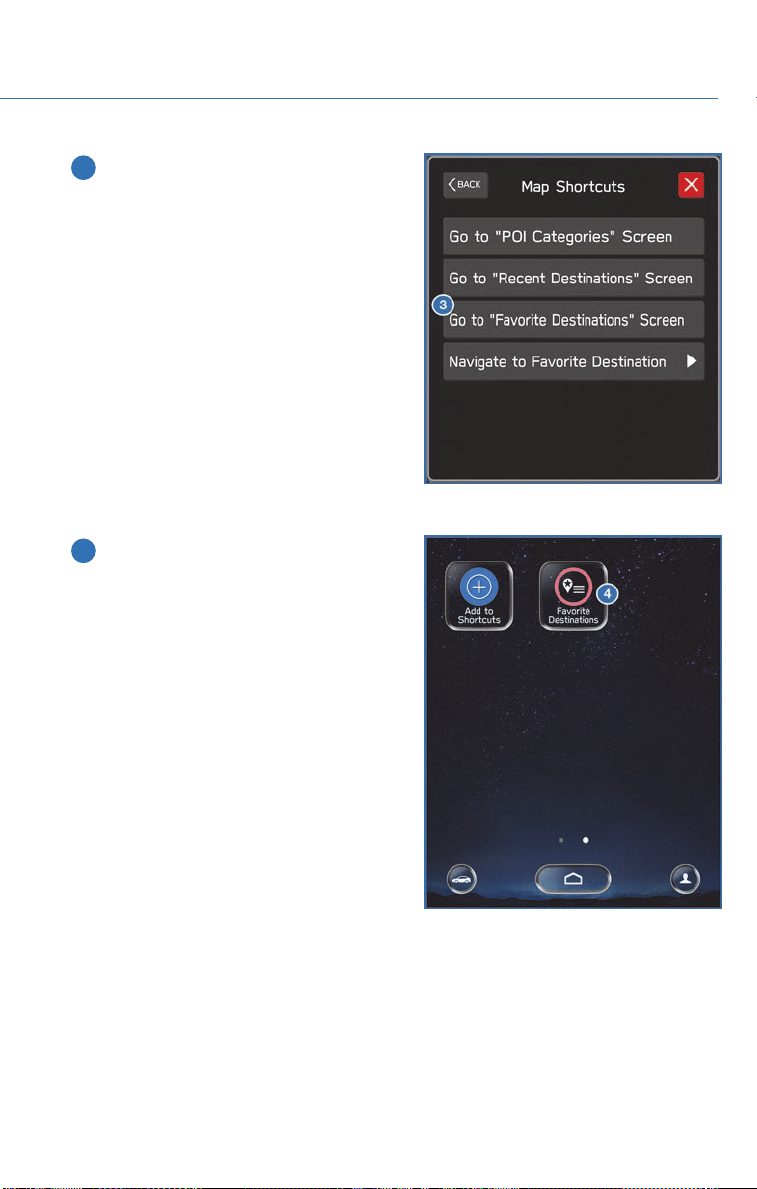
3 Select the desired shortcut function.
4 Check that the shortcut icon is displayed
on the Home screen.
STARLINK HOME
61
Page 64
CREATING A DRIVER PROFILE
WHY YOU SHOULD CREATE A PROFILE
Creating a Driver Profile provides many benefits beyond just “Pairing” a phone. The profile
records and remembers station presets, sound preferences, phone favorites, screen icons
and placement.
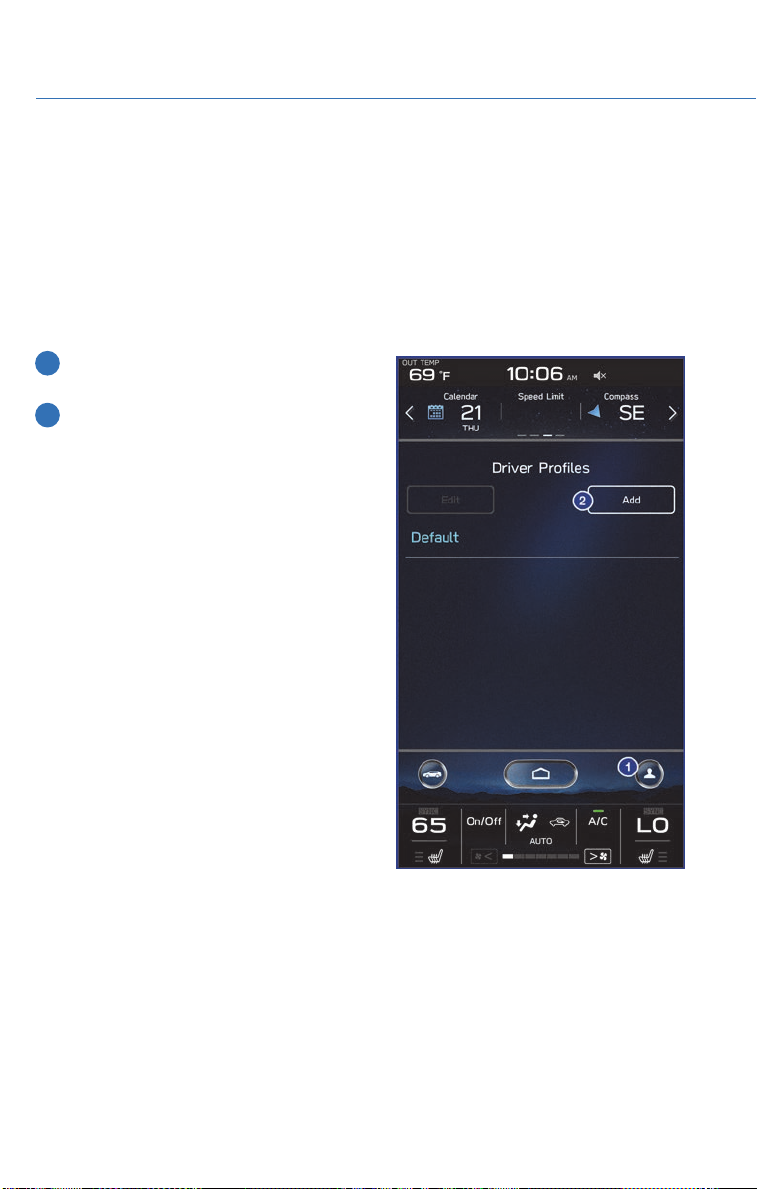
HOW TO CREATE A PROFILE
To create a driver profile:
1 From the Home screen, select the Driver
Profile button.
2 Select “Add”.
62
Page 65
CREATING A DRIVER PROFILE
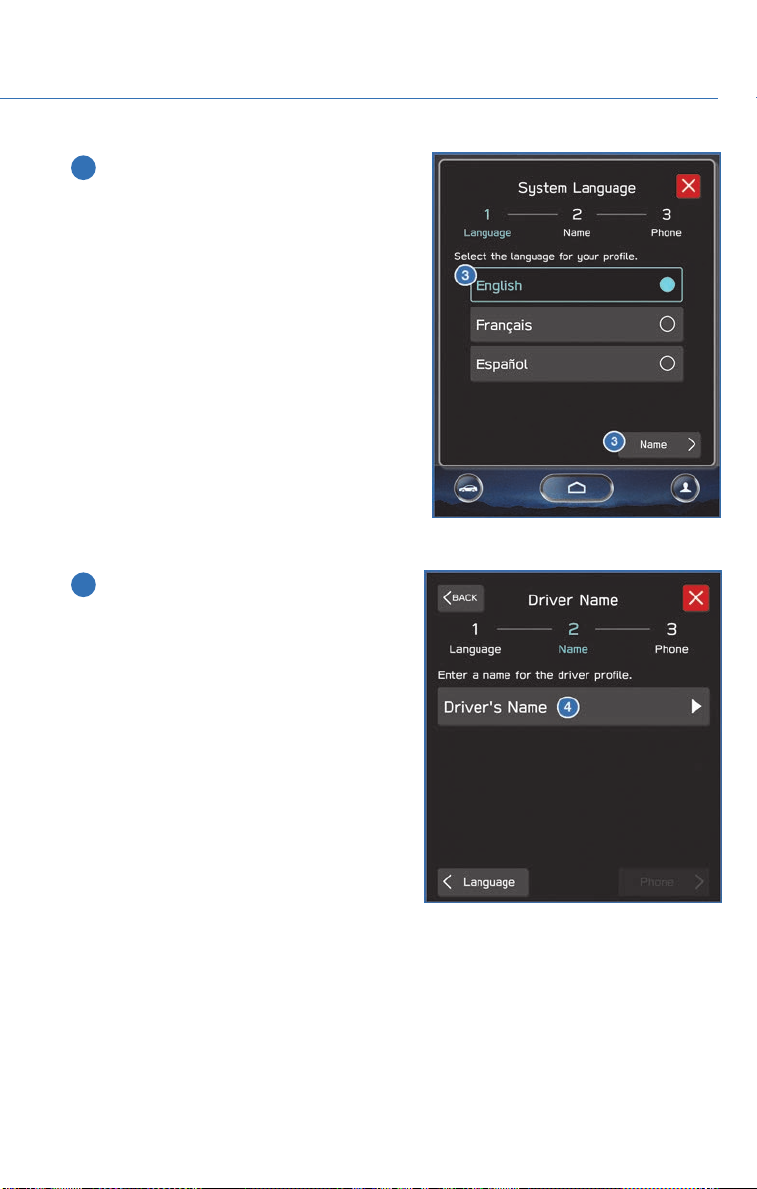
3 Select a language and then select “Name”.
4 Select “Driver’s Name”.
63
Page 66
CREATING A DRIVER PROFILE
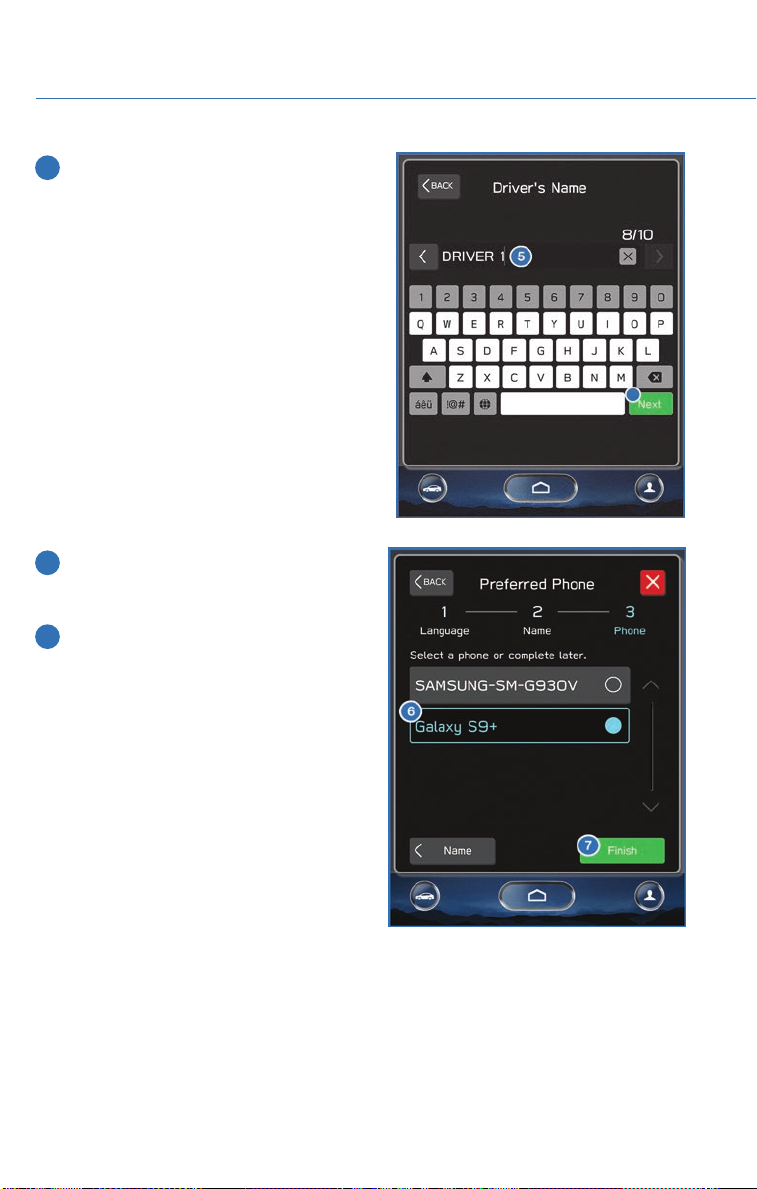
5 Type your name in using the keyboard
screen and select “Next”.
6 Select a paired phone, or if the phone has
not been paired to the system, you can
skip this step and complete it later.
7 Select “Finish”.
64
Page 67
CREATING A DRIVER PROFILE
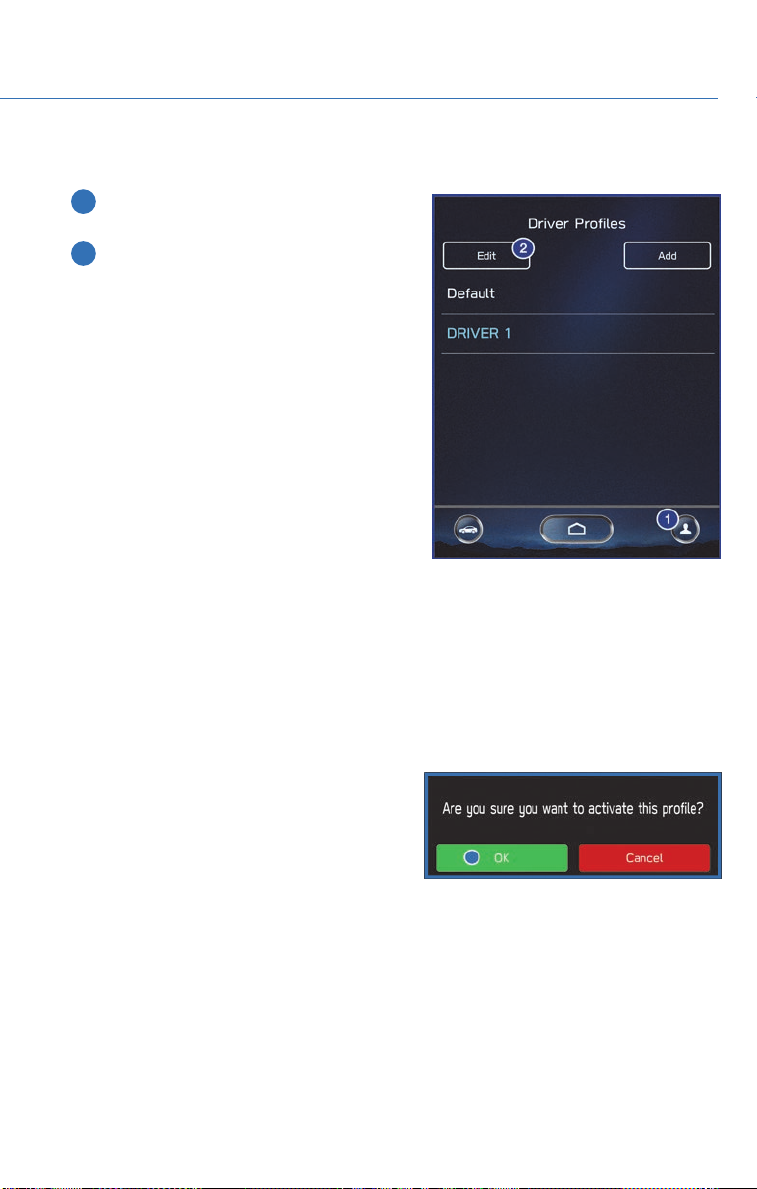
To edit a driver profile:
1 From the Home screen, select the Driver
Profile button.
2 Select “Edit” then select the profile you
need to edit. This will take you through the
same steps as when the profile was set
up.
Retrieving a Driver Profile
There are two ways to retrieve a driver profile. The system may automatically retrieve the
profile once you are in your Subaru with the radio on with your phone’s Bluetooth®active.
You can also manually retrieve or change the profile by following these steps:
1. Press the “Driver Profile” button.
2. Select the profile you want.
3. You will receive a pop up screen asking “
Are you sure you want to activate this
profile?”, select “OK”.
65
Page 68
MULTIMEDIA
RADIO
AM/FM Radio
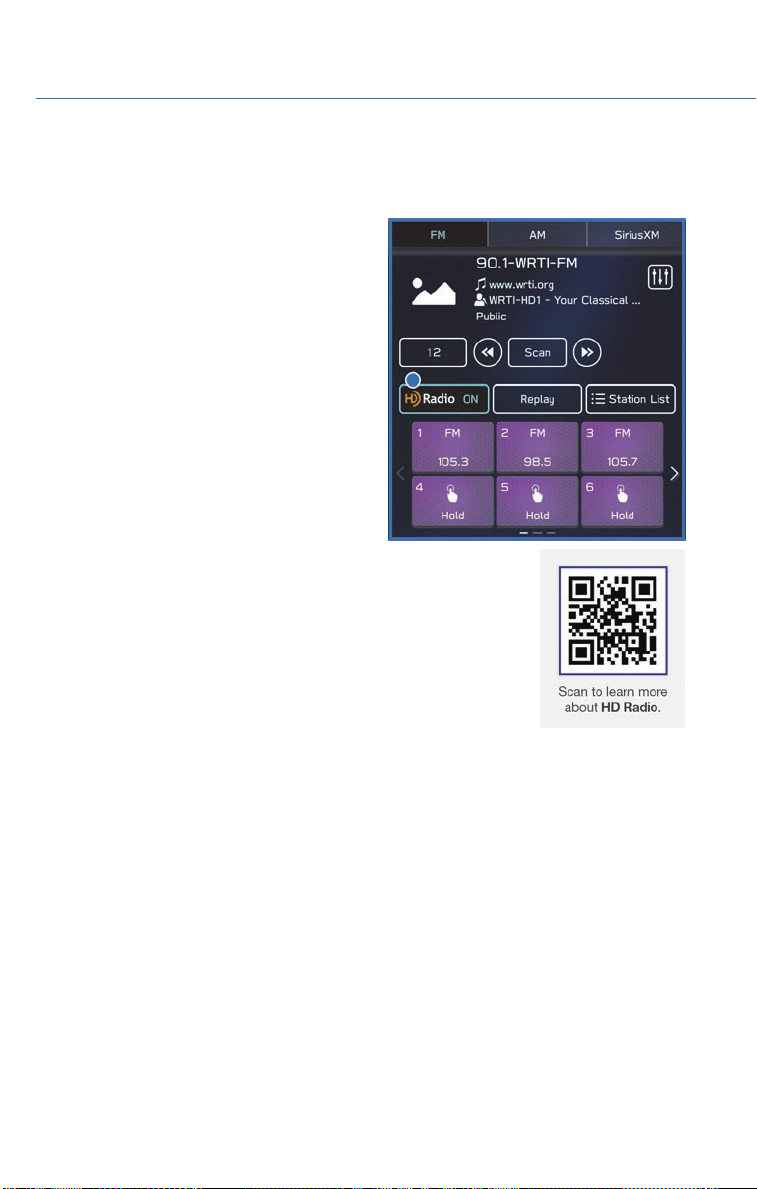
Your Subaru is equipped standard with AM/FM
radio which includes HD Radio™. HD Radio™
technology is the digital evolution of analog
AM/FM radio. Your radio has a special receiver
which allows it to receive digital broadcasts
(where available) in addition to the analog
broadcasts it already receives. Digital
broadcasts have better sound quality than
analog broadcasts as digital broadcasts
provide free, crystal clear audio with no static
or distortion. Visit www.hdradio.com for more
information and a guide to available radio
stations and programming.
66
Page 69
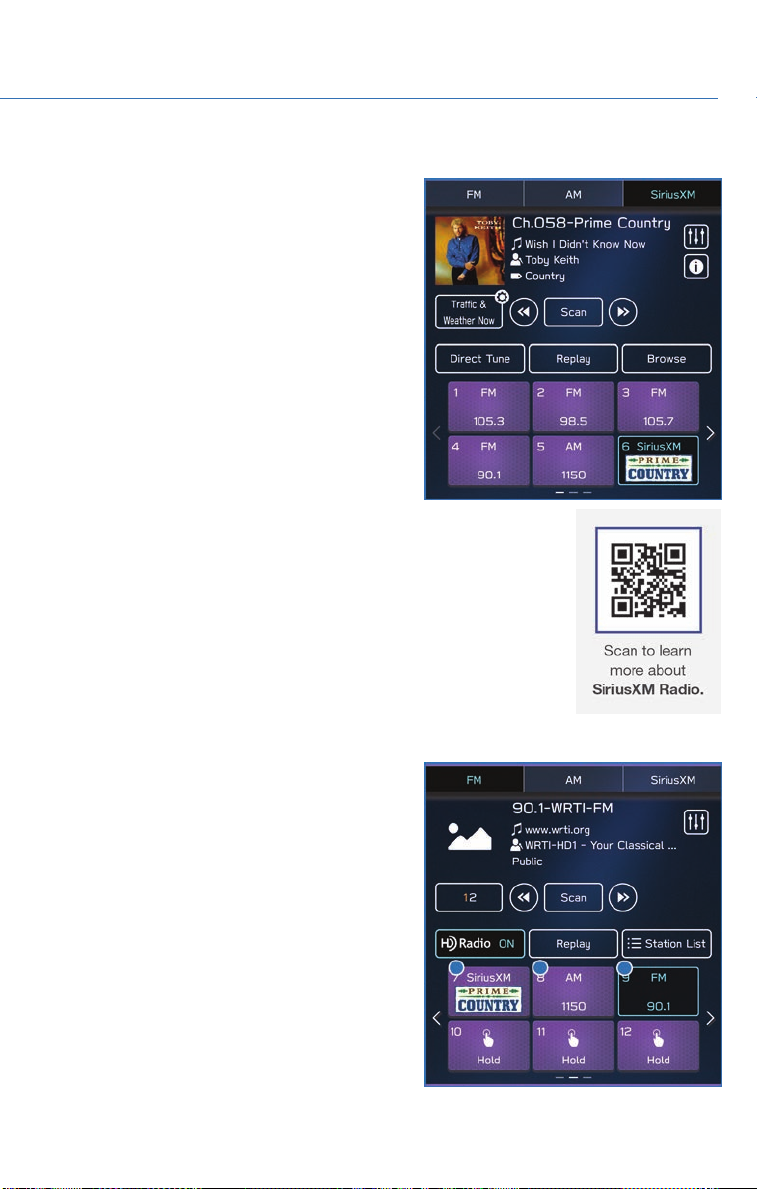
Satellite Radio
A SiriusXM®Satellite Radio is a tuner designed
exclusively to receive broadcasts provided
under a separate subscription. After a free trial
period, a subscription is necessary to continue
service. For more information or to subscribe,
visit www.siriusxm.com.
MULTIMEDIA
Setting Presets
You can preset 18 stations. Preset 1 can be a
®
SirusXM
station, allowing you to switch from SXM to
FM with a single button press. To do this:
1. Tune to the desired channel.
2. Press and hold one of the desired preset
station while preset 2 can be an FM
station buttons.
67
Page 70
MULTIMEDIA
MEDIA
Bluetooth
Your Subaru has Bluetooth®hands-free technology to manage your phone and audio
systems. Bluetooth-enabled mobile phones link directly through your Touchscreen
automatically, once connected. Receive and initiate calls or play music directly from your
device while keeping it stowed for safety.
To pair a Bluetooth
113 for Apple devices.
CD (if equipped)
The CD player holds a single disc only. To access the CD menu, put a CD in the player or
touch the CD icon on the Touchscreen. Depending on the CD format, it may show the CD
album art work on the Touchscreen.
USB / iPod
The USB connection is below the Center Information Display (CID) in front of the shifter.
You can plug in a USB memory storage device or iPod. This will bring up the media screen
with controls. If using an iPod, make sure to use an Apple certified cable or MFi certified
cable for proper operation.
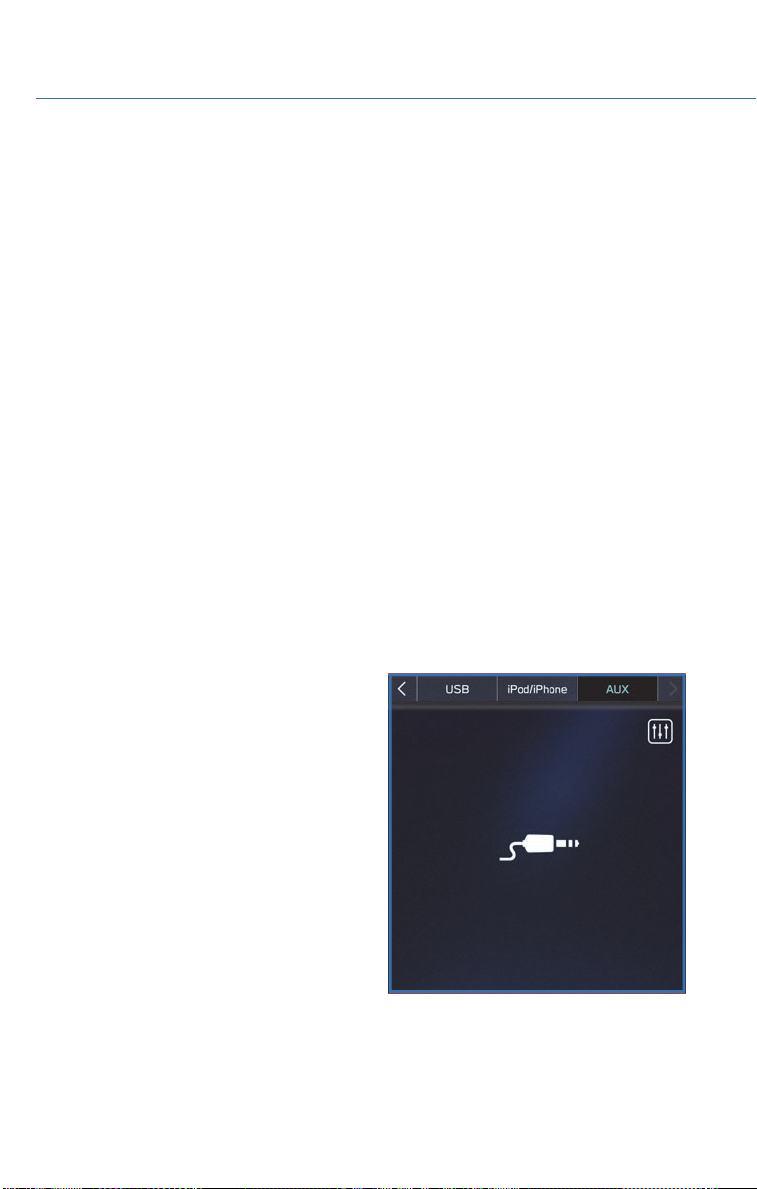
Aux Input
®
®
device to the Touchscreen, see page 110 for Android devices or page
The Aux jack is a port that allows the input
from an audio device such as MP3 players,
portable music players and iPods. To access
the Aux menu, plug in the device to the Aux
jack and the menu will appear, or select the
Aux menu from the Touchscreen.
68
Page 71
PAIRING A PHONE
Using a Bluetooth®connection with the Touchscreen allows you to
use the voice recognition system to make and receive calls. It
provides access to your phone book on your phone and can read
incoming text messages as well as reply via voice recognition. It
remembers your driver profile when your phone pairs via
Bluetooth
For instructions on how to pair your phone to the Touchscreen, see
page 110 for Android devices or page 113 for Apple devices.
Visit www.subaru.com/engineering/starlink/multimedia.html for
complete details on what is available by connecting a phone to the
Touchscreen.
®
.
MAKING A CALL
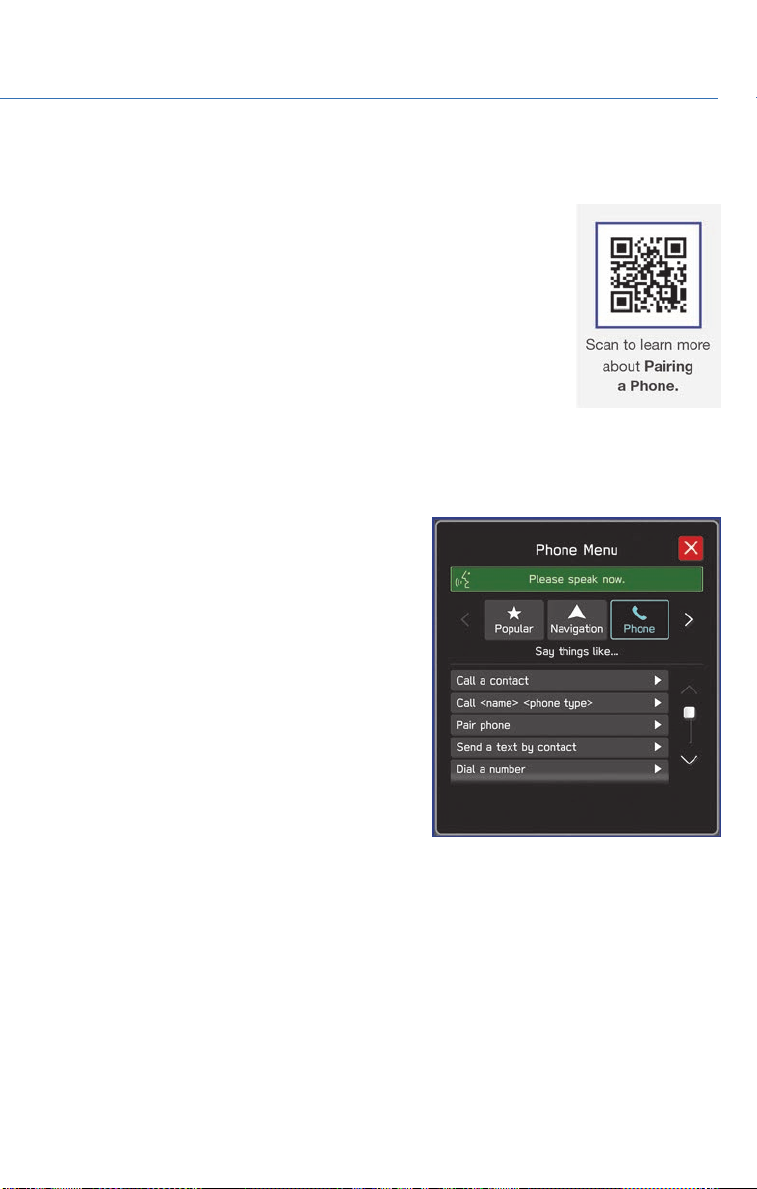
You can make a call through voice recognition
by touching the “Voice Recognition Switch” on
the steering wheel to start or stop the voice
recognition system. After pressing the “Voice
PHONE
69
Page 72
PHONE
Recognition Switch”, wait for the “Voice Guidance” screen to appear on the Touchscreen
and say “Call [name and phone type]” or “Dial
[number]”.
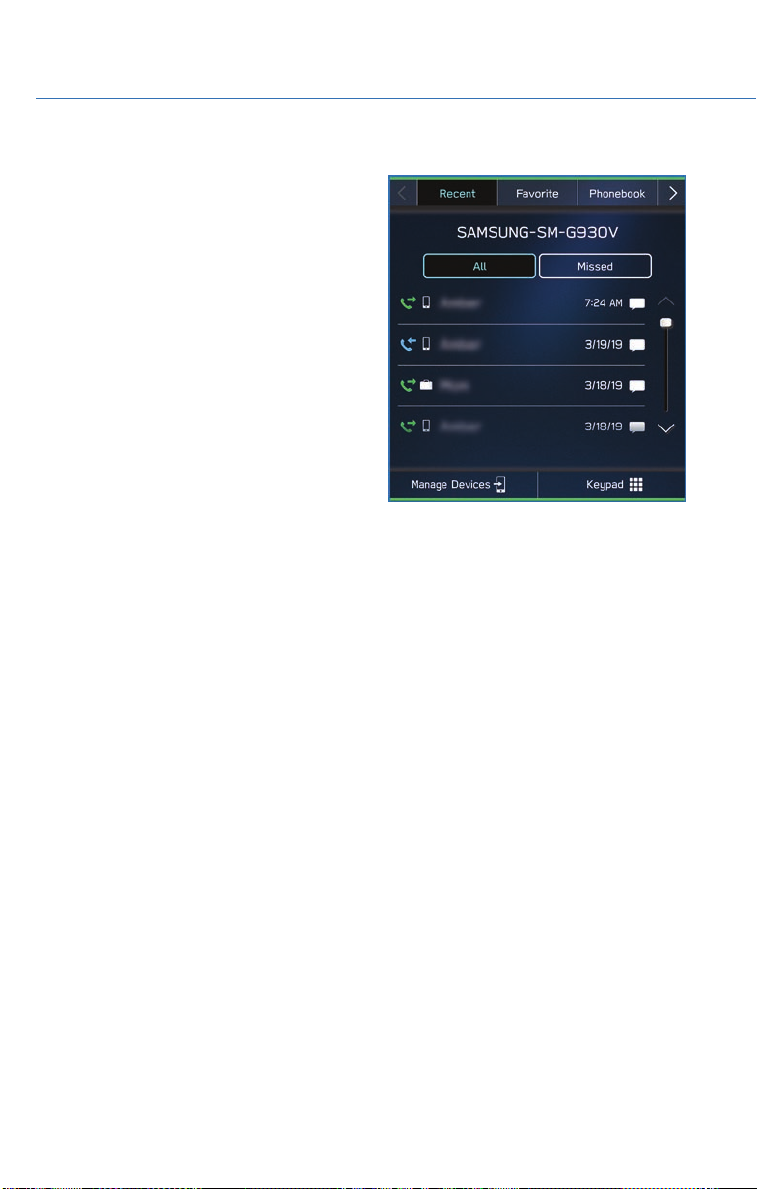
To make a call from the Touchscreen, start by pushing the “Home” button and then select
“Phone”. After the phone screen displays, select the method you would like to use to make
a call.
• Recent – Allows you to call someone that has recently called you or that you called.
• Favorites – Allows you to place a call to one of your favorites on your phone.
• Phonebook – Will display the phonebook that is on your phone.
• Messages – Allows you to call someone that recently sent you a text message.
• Keypad – Allow you to dial any number you would like.
70
Page 73
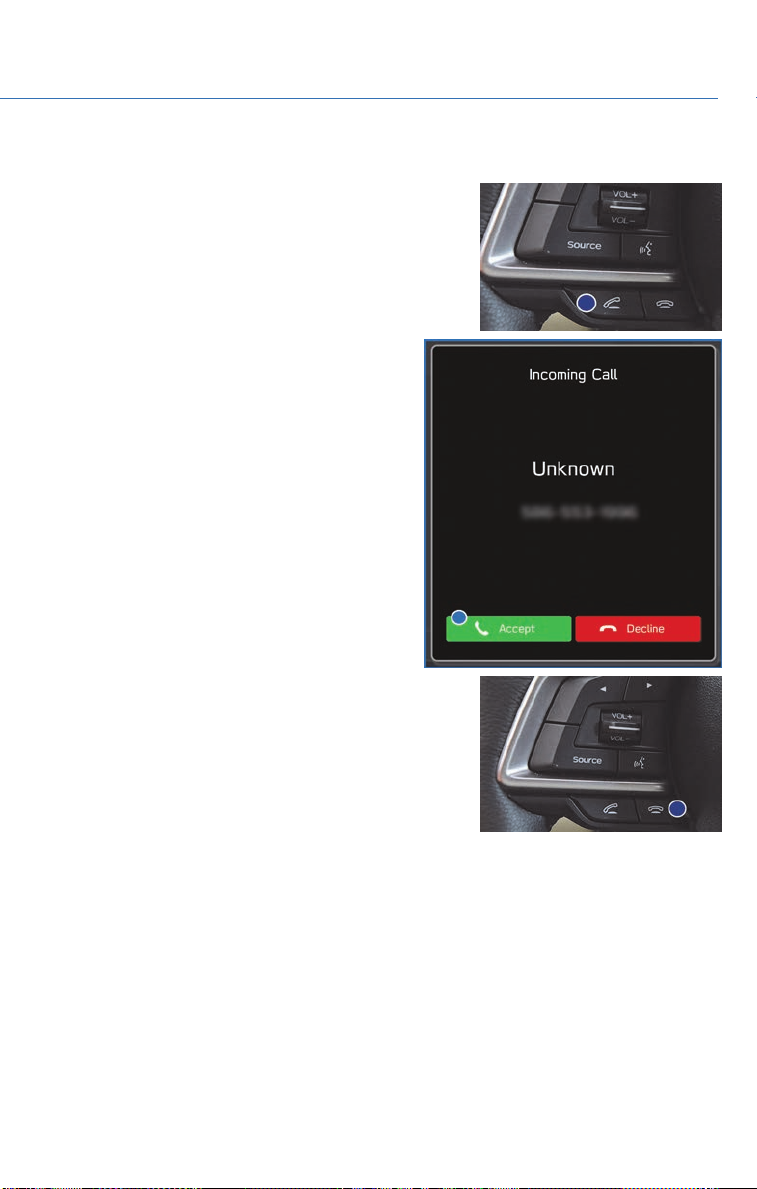
RECEIVING A CALL
To receive a call, press the “Talk” switch on the
steering wheel or the “Talk” button on the
Touchscreen.
PHONE
71
Page 74
PHONE
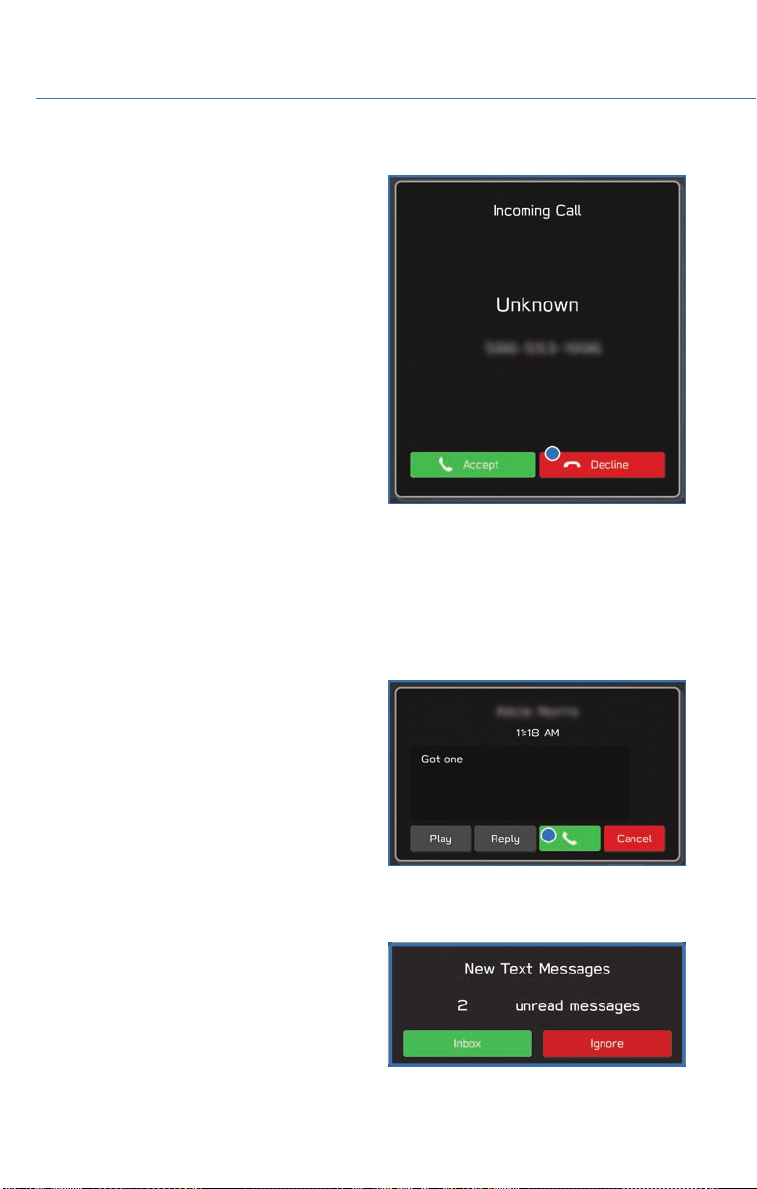
To reject a call, press the “End” switch on the steering wheel or the “End” button on the
Touchscreen.
TEXT MESSAGES
Received messages can be forwarded from the connected Bluetooth®phone, enabling
checking and replying using the system.
®
Depending on the type of Bluetooth
transferred to the message inbox. If the phone does not support the message function,
this function cannot be used.
Depending on the Bluetooth
screen display may differ, and it may not be
possible to use certain functions.
To use this function, it is necessary to set the
phonebook download function to ON.
When a Short Message Service (SMS)/
Multimedia Messaging Service (MMS) is
received, the incoming message screen pops
up with sound and is ready to be retrieved using the Touchscreen. Select “Play” to listen to
the message. You can also select the “Reply” button to reply to the sender using a
generated message.
If there is more than one unread message, this
screen will appear to allow you to either view
your inbox or ignore the message.
®
phone connected, received messages may not be
phone type, the
72
Page 75
WHAT ARE SUBARU STARLINK™ APPS?
SUBARU STARLINK™ Multimedia offers advanced connectivity
through Apple CarPlay™ or Android™ Auto apps. Wireless pairing
and hands-free smartphone operation allow for safe and easy
connection to your favorite apps and content. You can access
news, navigation, music, podcasts, and more through the available
SUBARU STARLINK™ app.
For a complete list of all the apps available, visit
www.subaru.com/engineering/starlink/multimedia.html.
APPS
Pandora
Pandora is free personalized radio that offers effortless and endless music enjoyment and
discovery.
To use the Pandora application, connect your iPhone or Android device via Bluetooth
Depending on differences between models and software version, some vehicles might be
incompatible with this app.
The Pandora application must be installed on your smartphone.
®
®
.
Android™ Auto
Android Auto can be used to view maps, play music,
and place calls by connecting your Android device to
the system. Supported applications can also be run.
For more information, please refer to page 116.
For details on the services or the operations, visit the
Android Auto sites www.android.com/auto/ or
www.support.google.com/androidauto/.
To use the Android Auto application, connect your
Android device to the USB port.
73
Page 76
APPS
Apple CarPlay™
Apple CarPlay can be used to view maps, play music, and place
calls by connecting your iPhone to the system. Supported
applications can also be run. For more information, please refer to
page 119.
For details on the services or the operations, check the Apple
CarPlay site www.apple.com/ios/carplay/.
To use the Apple CarPlay application, connect your iPhone to the
USB port.
SiriusXM®Travel Link
SiriusXM®U.S. satellite and data services are
available only in the 48 states of the
contiguous USA and DC.
Data service information, which is comprised
of sports, weather, stock and fuel, can be
received via the SiriusXM
To receive the data service information in the
vehicle, a subscription to the SiriusXM
Satellite Radio Service is necessary following a
free trial.
®
Radio.
®
74
Page 77
SUBARU STARLINK™ MOBILE APP
There are several key applications that can be
loaded to your phone and used while in your
Subaru to help you while you drive. You must
also download and log in to the SUBARU
STARLINK™ app on your phone to use these
apps.
To download the SUBARU STARLINK™ app,
go to the Apple App Store or the Google Play
Store and search for SUBARU STARLINK™ in
the menu.
Below are a few apps that you may find helpful.
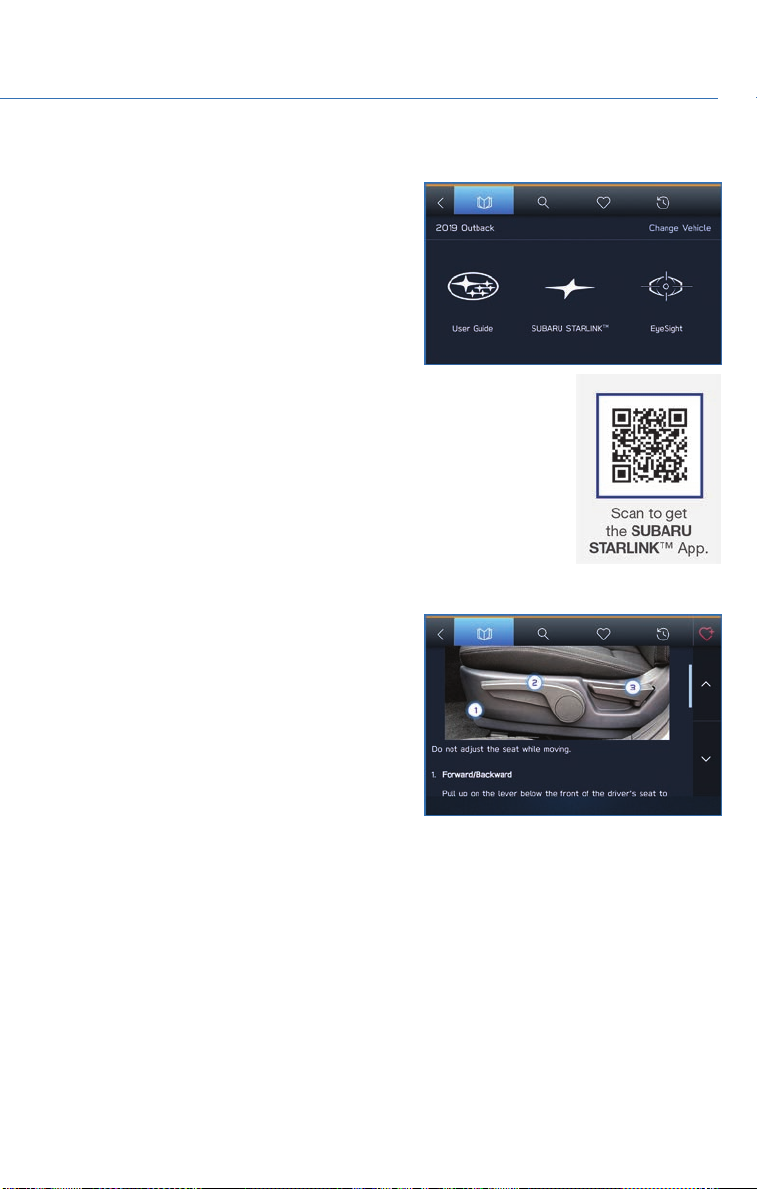
Quick Guide
Quick Guide is the digital version of the
original printed Quick Guides that are standard
in all new Subaru vehicles. The app features
In-Vehicle Help (IVH) that provides an
interactive, searchable, model-specific
concierge through the Touchscreen.
APPS
Chimani
Get the most comprehensive guide to all 417 national parks in the United States. Quickly
learn about each park’s history and highlights.
75
Page 78
APPS
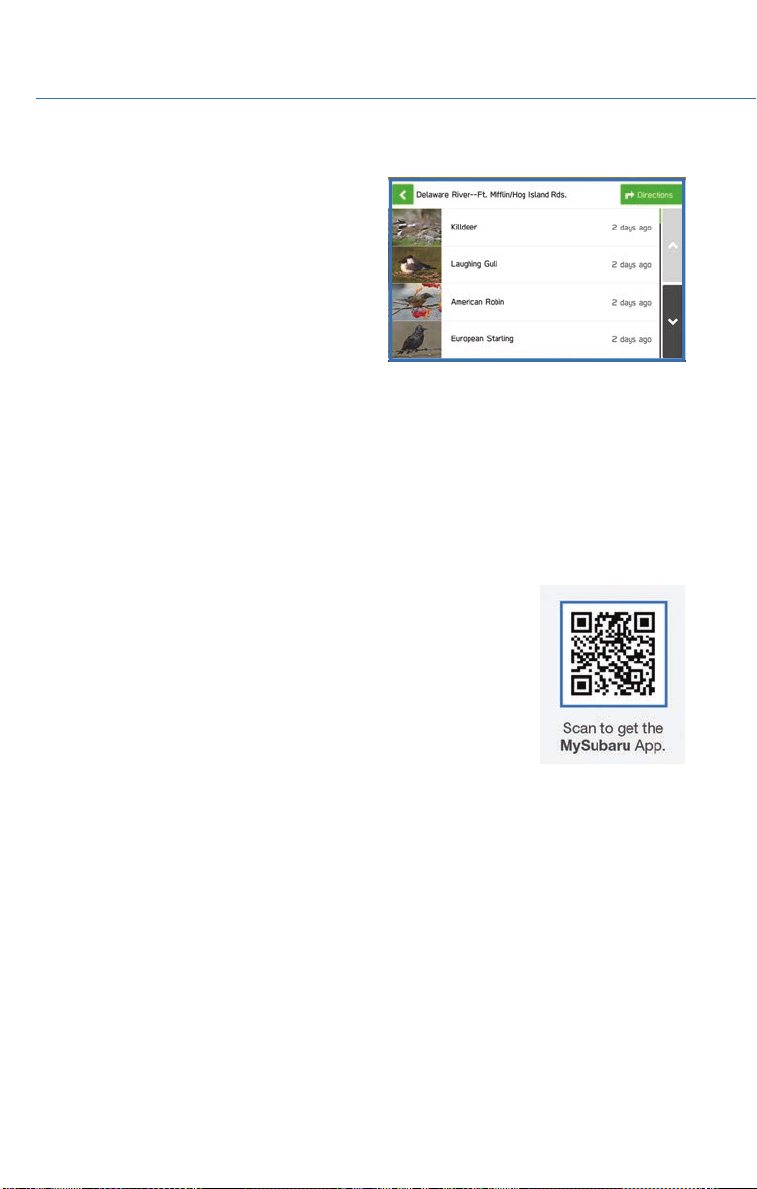
eBird
Exclusive to Subaru vehicles, the eBird app
tells you what birds are being seen near you in
real time. Based on a database of millions of
bird sightings, eBird acts as a “digital coach”
to finding the birds that are there right now.
Use the app to decide where to go based on
the distance to a great birding location and the
number of species being seen there. For
example, the app will tell you the nearest one
is 8 miles away and navigate you to the last place it was seen. Full-screen photos help you
confirm your sightings.
MYSUBARU
Whether you’re on the road or planning adventures, the MySubaru app makes loving every
part of owning your Subaru easy. Although the mobile app is great when you are on the go,
you can also visit www.MySubaru.com from your computer to access the same functions
and to aid in planning your trip before you leave.
You can download the MySubaru app from the Google Play Store or
the Apple App Store on your phone by searching MySubaru.
By creating an account, you can:
• Schedule service with a Preferred Subaru Retailer
• Get vehicle service reminders, recall alerts, and exclusive
coupons
• Track and record your service history
• Access resources like your owner’s manuals, how to videos and
more
• Have access to SUBARU STARLINK™ Safety and Security features (must have an active
SUBARU STARLINK™ subscription)
• Get help from 24-hour roadside assistance (24-hour roadside is included in standard
3-year warranty, and after 3 years with a Concierge package)
76
Page 79
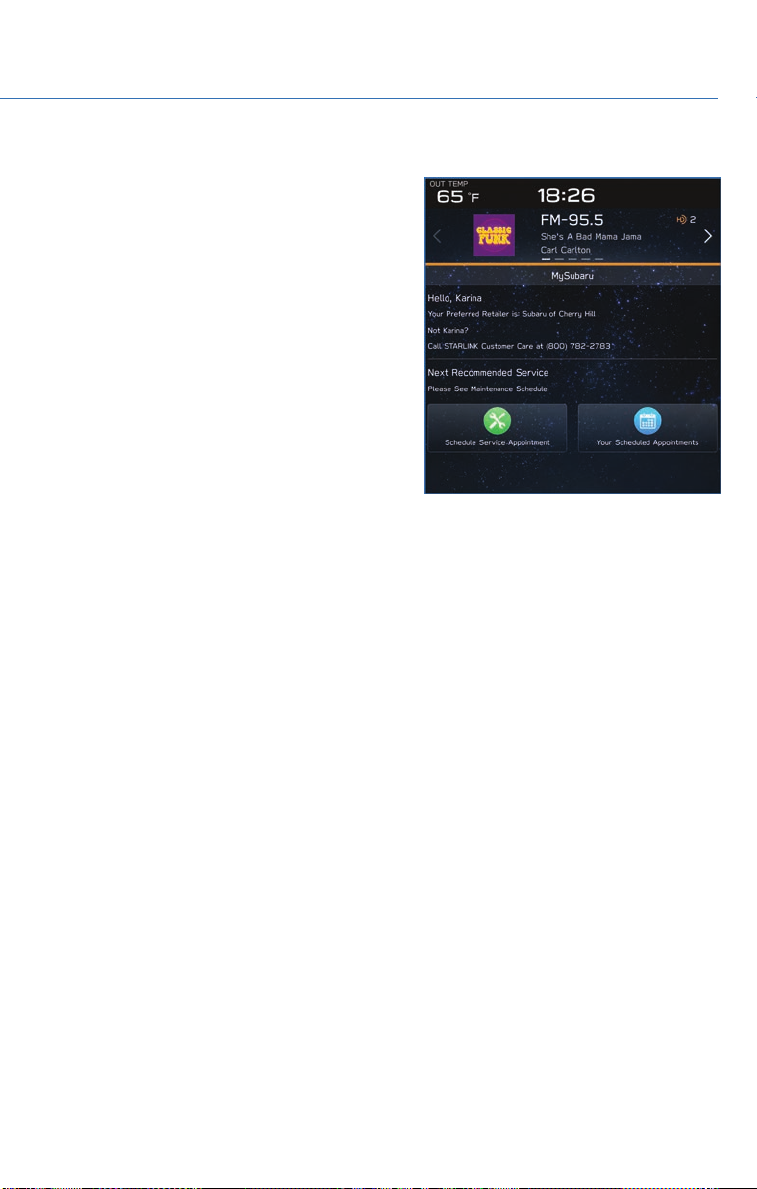
Service Appointment Scheduler
The SUBARU STARLINK Service Appointment
Scheduler can help you set an appointment
from the MySubaru website, Mobile App or the
vehicle’s Touchscreen. Getting your Subaru
vehicle to the Subaru professionals for service
is easy, no matter where you are. If you are
away from your preferred Subaru Retailer for
service, you can always use Service
Appointment Scheduler to locate any of our
certified Subaru Retailers near your location.
STARLINK Service Appointment Scheduler on
your Touchscreen is a convenient way to set a
service appointment. Simply select the
MySubaru icon on the Home screen and
choose “Make an Appointment” to get started.
APPS
77
Page 80
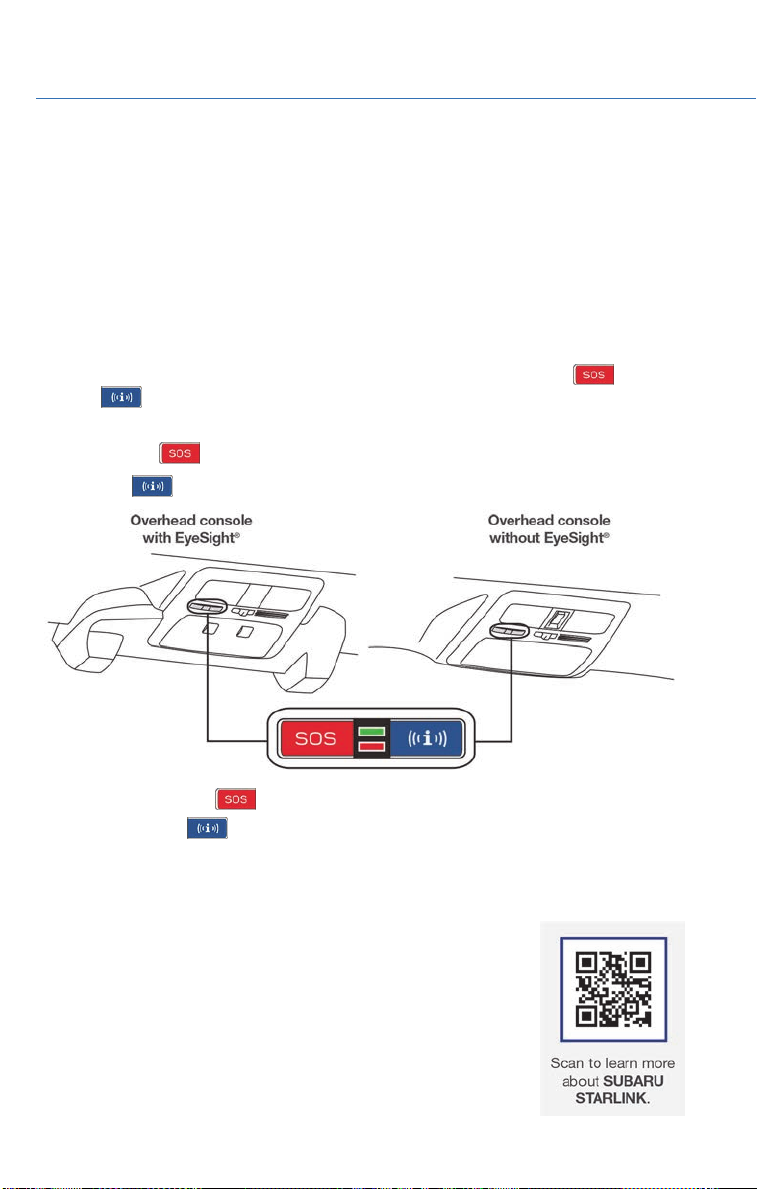
SUBARU STARLINK™ SAFETY AND SECURITY
THE SUBARU STARLINK™ EXPERIENCE
STARLINK Safety and Security services* are designed to help in your time of need. These include
Advanced Automatic Collision Notification, Enhanced Roadside Assistance, Stolen Vehicle
Recovery, the added convenience of Remote Engine Start with Climate Control, and so much more.
With the SUBARU STARLINK™ system integrated into your vehicle, advanced safety and
security technology is just a button press away. The SUBARU STARLINK™ experience
includes in-vehicle call center support, maintenance and diagnostic alerts as well as
remote services that keep you connected to your Subaru vehicle.
Located in the overhead console of most Subaru vehicles are the red SOS
i-button
there to support you 24 hours a day, 7 days a week.
The SOS button
The i-button
. Both buttons link you to the SUBARU STARLINK™ call centers that are
is for SOS Emergency Assistance.
is for Enhanced Roadside Assistance or Concierge (if subscribed).
and blue
• Press the SOS button
• Press the i-button
• To cancel an SOS Emergency Assistance, Enhanced Roadside Assistance or a
Concierge call, press and hold the same button for approximately two seconds or select
the “End Call” button displayed on the Touchscreen.
Head to www.Subaru.com/STARLINK to see all the SUBARU
STARLINK™ subscription services and packages.
* Access to STARLINK Safety and Security services requires an active
STARLINK subscription. Remote Engine Start available on keyless access
with push-button start vehicles. Remote Engine Start with Climate Control
available on vehicles with keyless access with push-button start and
automatic climate control. Not available on vehicles with manual
transmission.
78
for SOS Emergency Assistance.*
for Enhanced Roadside Assistance* or Concierge* (if subscribed).*
Page 81

SUBARU STARLINK™ SAFETY AND SECURITY
SUBARU STARLINK™ ENROLLMENT
To enroll in SUBARU STARLINK™ and access remote services, a MySubaru account is
required. MySubaru is the Subaru owner website that allows you to access vehicle remote
services, user preferences, diagnostic alerts and other useful features enabled by your
STARLINK Safety Plus, STARLINK Security Plus and STARLINK Concierge subscription.
Your Retailer may have created an account for you during the delivery process. However,
you can also create a MySubaru account on www.mysubaru.com.
Enrollment in SUBARU STARLINK™ can be done online at MySubaru.com, through the
MySubaru Mobile App, at your Subaru Retailer or by calling a STARLINK Customer Care
Representative at 1-855-753-2495.
NOTE: Please have your Vehicle Identification Number (VIN) available, as you will need it to
complete this step. After the enrollment process, you will learn more about the features in
detail at MySubaru.com.
MYSUBARU, MAKING OWNERSHIP EASY
The connection between you and your Subaru has never been simpler and the MySubaru
website (MySubaru.com) and MySubaru Mobile Application are the best way to stay in
touch with your Subaru vehicle. From MySubaru, you can access the following information
and STARLINK Safety and Security services*:
• Remote Services
• Vehicle Health
• Usage Reports
• Service Appointment Scheduler
• Vehicle Maintenance Schedules
• Service History
• Support Resources
*
Internet access is purchased separately through AT&T with monthly, per gigabyte, and unlimited data
options available. Existing AT&T customers have the option to add an additional line to their AT&T
Mobile Share plan. Available on select models.
79
Page 82
SUBARU STARLINK™ SAFETY AND SECURITY
SUBARU STARLINK™ WI-FI HOTSPOT* – STAY
CONNECTED
SUBARU STARLINK’s in-vehicle Wi-Fi Hotspot keeps you and your
family connected using AT&T’s 4G LTE nationwide cellular network.
Whether watching movies, playing games or even listening to
music, your family won’t miss a beat with SUBARU STARLINK’s
in-vehicle Wi-Fi Hotspot. Set up is quick and easy and you don’t
need a SUBARU STARLINK™ subscription to use it.
• Select “Settings” from the Home screen.
• Select “Wi-Fi Hotspot” to turn it on (if the Wi-Fi Hotpot is already
on then proceed to the next step).
• Select Wi-Fi Hotspot Settings to view or update the following
settings:
• Wi-Fi Network Name (SSID)
• SSID Broadcast (Network ON / OFF)
• Security Type (WPA / WPA2)
• Password
• Connected Devices (Maximum of 8 devices)
How to Enroll:
• Connect your tablet, smartphone or laptop to the SUBARU STARLINK™ Wi-Fi Hotspot
network listed in the settings menu and open your preferred web browser on the device
connected.
• Once the SUBARU STARLINK™ Wi-Fi Hotspot homepage loads, follow the on-screen
instructions to create a new account or to add your vehicle to an already existing AT&T
Wireless account. You can also subscribe to the Wi-Fi Hotspot from the MySubaru
website or Mobile App.
* Internet access is purchased separately through AT&T with monthly, per gigabyte, and
unlimited data options available. Existing AT&T customers have the option to add an
additional line to their AT&T Mobile Share plan. Available on select models.
80
Page 83
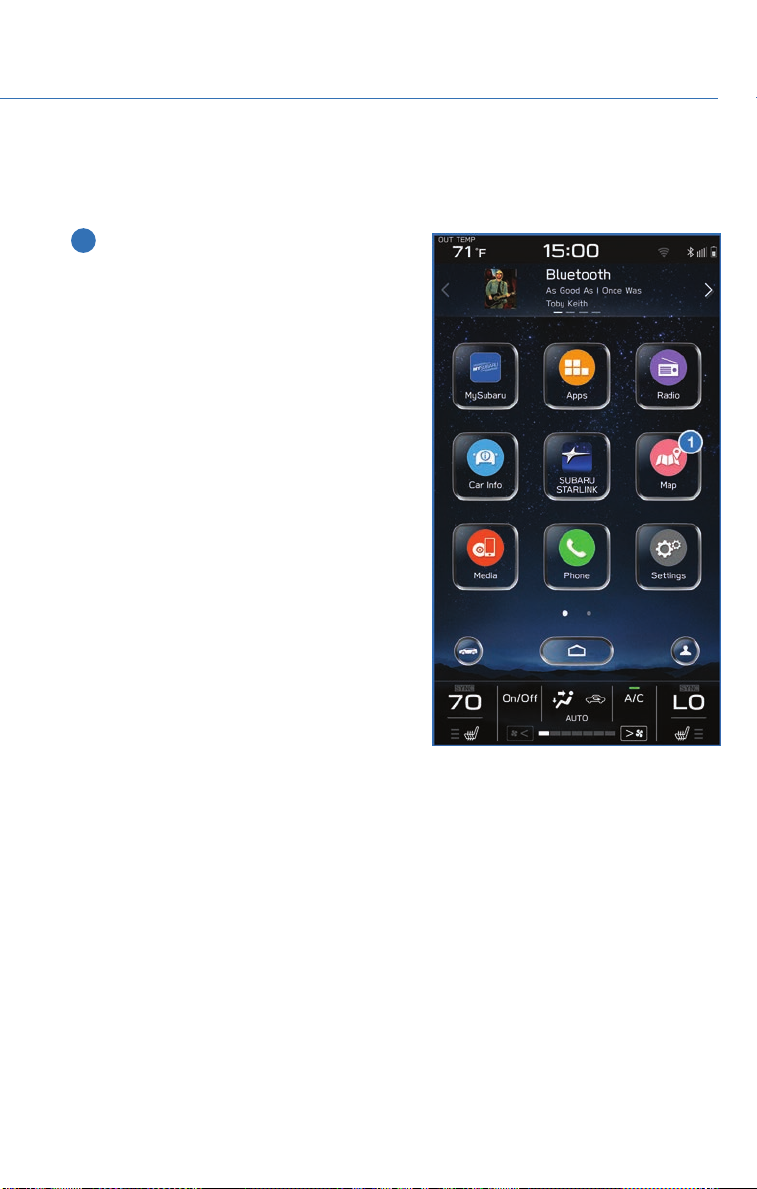
CREATING HOME/WORK
You can create a home address and work address through the Map screen.
1 Select the “Map” button from the Home
screen.
MAPS
81
Page 84
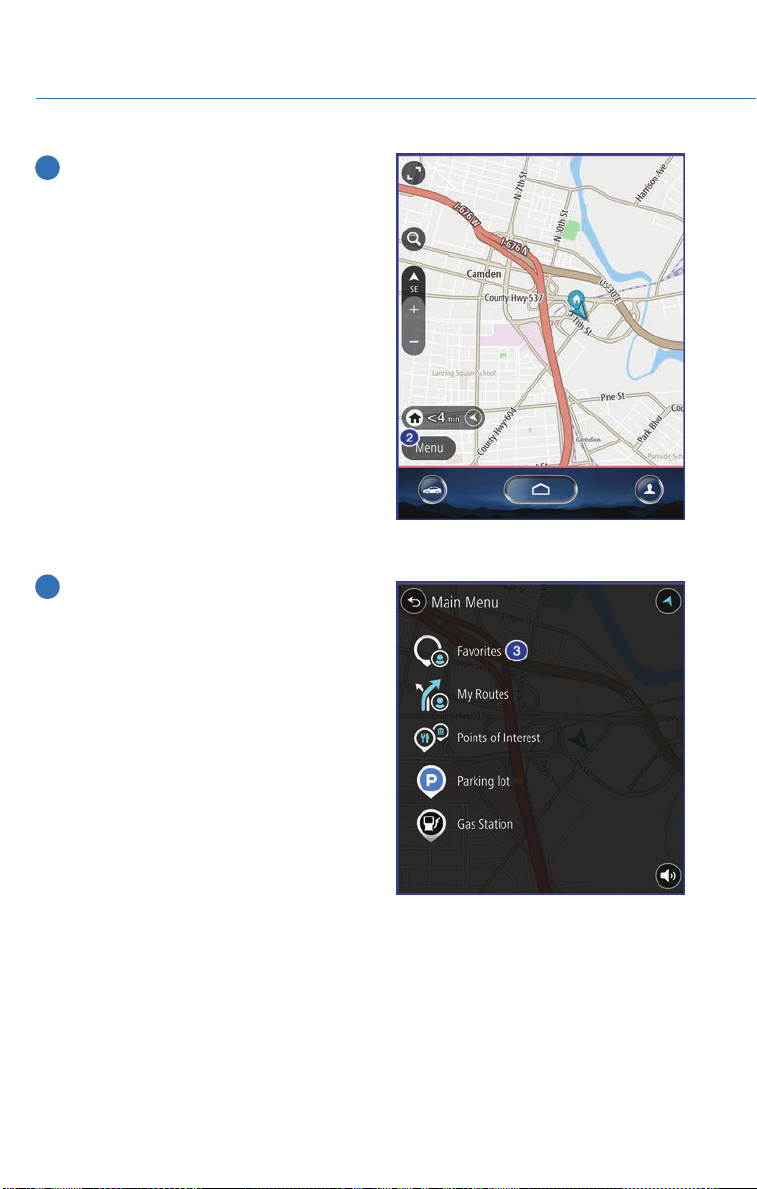
MAPS
2 Select “Menu”.
3 Select “Favorites”.
82
Page 85
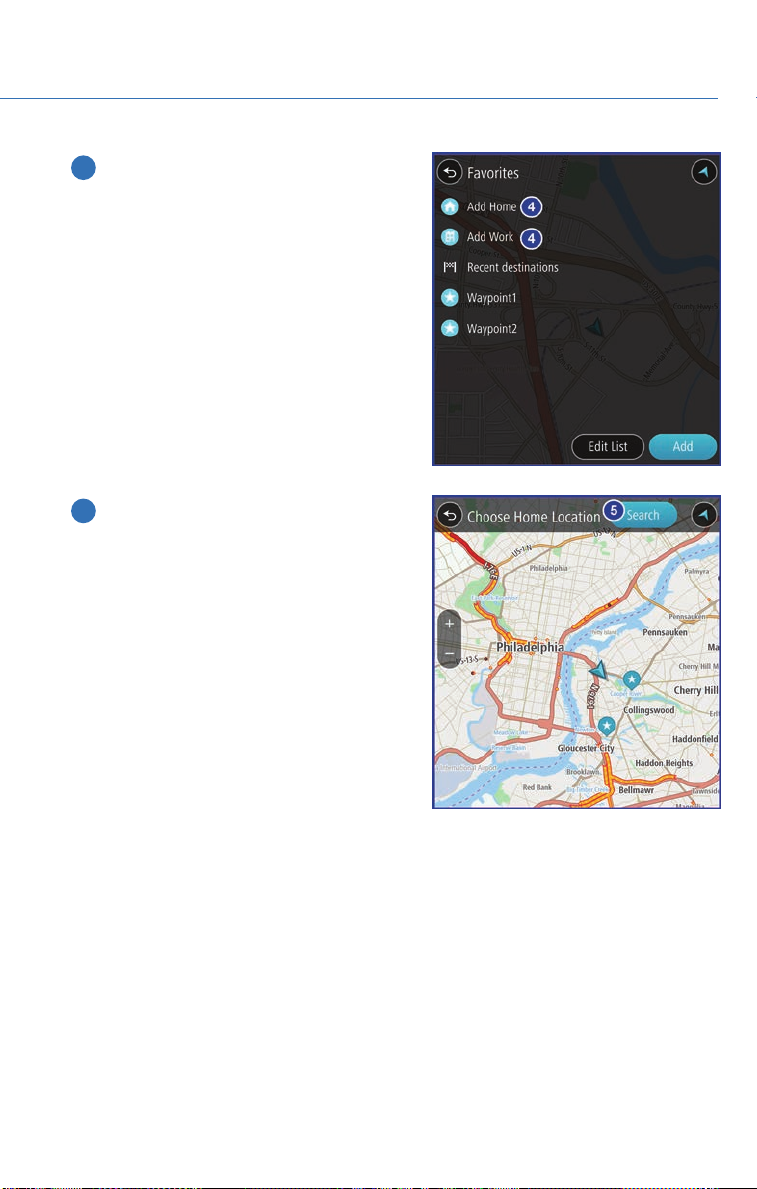
4 Select “Add Home” or “Add Work” and
enter the address in the search line.
5 Select “Search”.
MAPS
83
Page 86
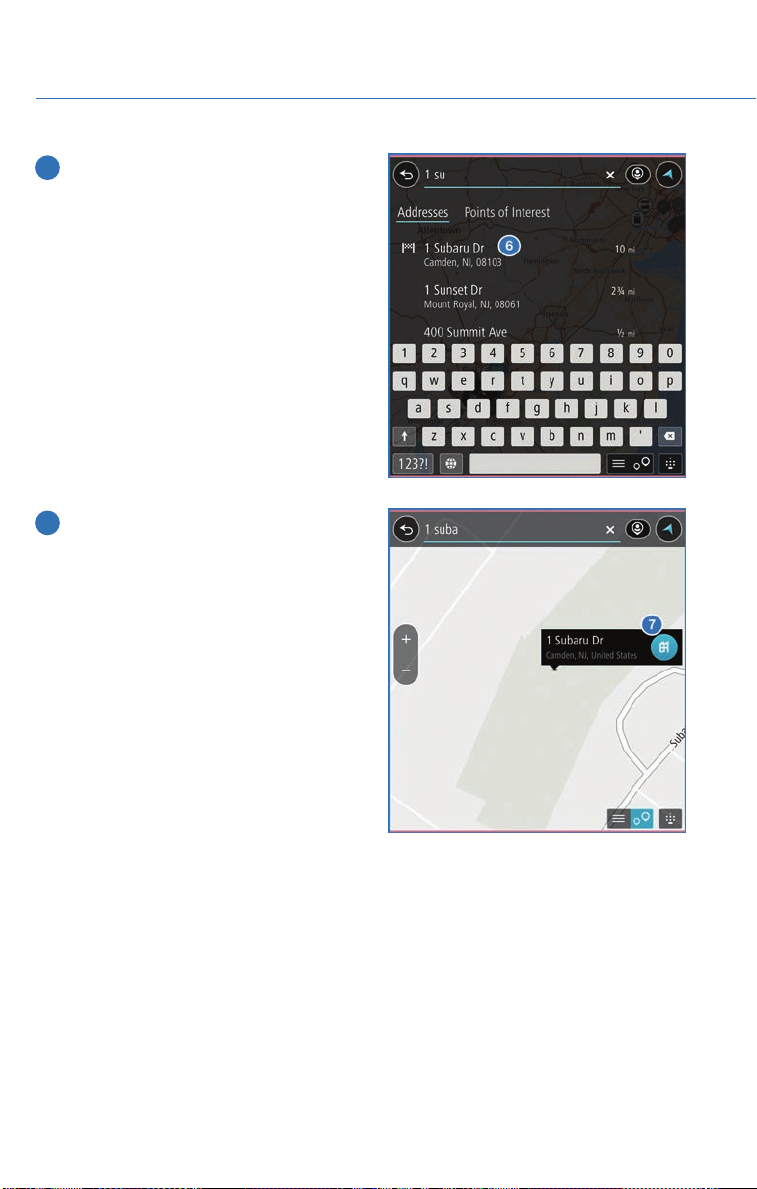
MAPS
6 As you type in the address suggestions
will display. Once your address is
displayed, select your address.
7 Touch the “Work” or “Home” icon to save
as work or home.
84
Page 87
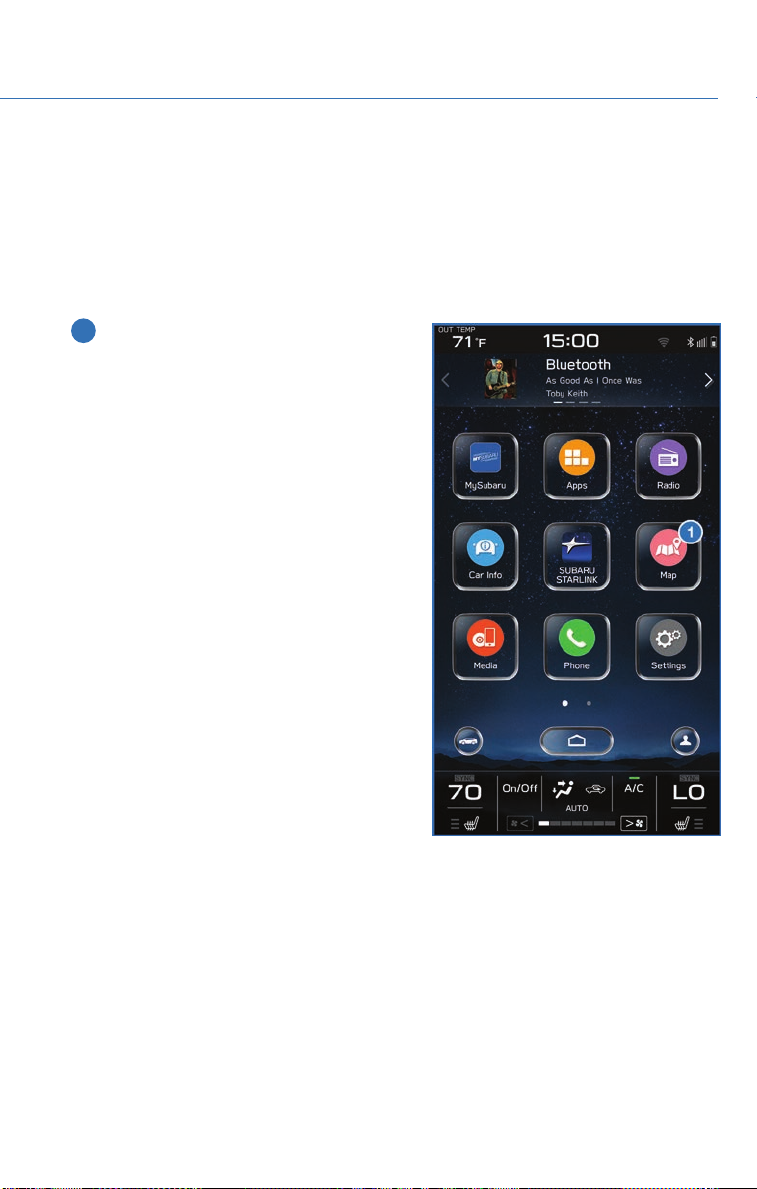
MAPS
FINDING A DESTINATION
There are two primary ways to find a destination. You can search by address or Points Of
Interest (POI).
Finding a Destination By Address
To search by address:
1 Start by pushing the “Map” button to
display the map screen.
85
Page 88
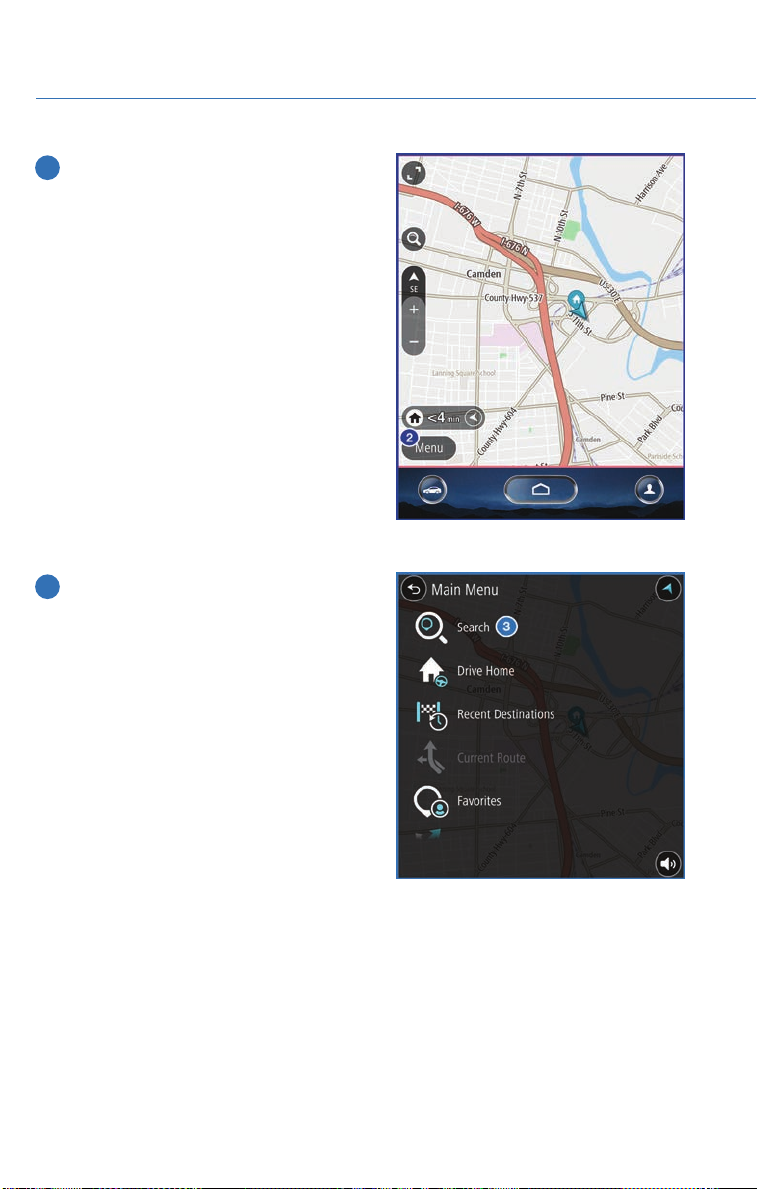
MAPS
2 Touch “Menu”.
3 Next, select “Search”.
86
Page 89
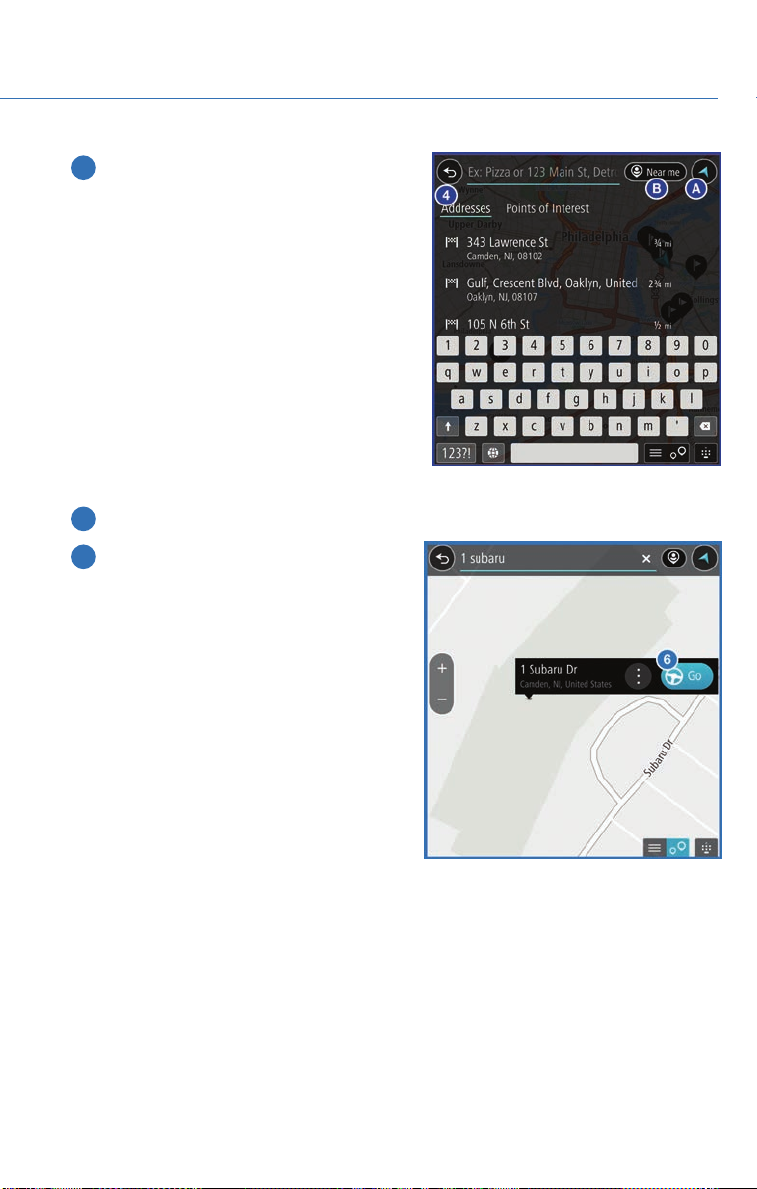
4 “Addresses” should be underlined. If not,
touch “Addresses” and then type the
address you want.
a. Selecting this icon will display the
current vehicle location.
b. Select this button to set the radius filter.
Once the filter is set, the search will only
be performed for items within that
radius. This may need to be changed if
your destination is beyond the search
radius.
NOTE: You can toggle between
“Address” and “Point Of Interest” search
by selecting the one you want.
5 When the address appears on the screen select it.
6 Select “Go”.
MAPS
87
Page 90
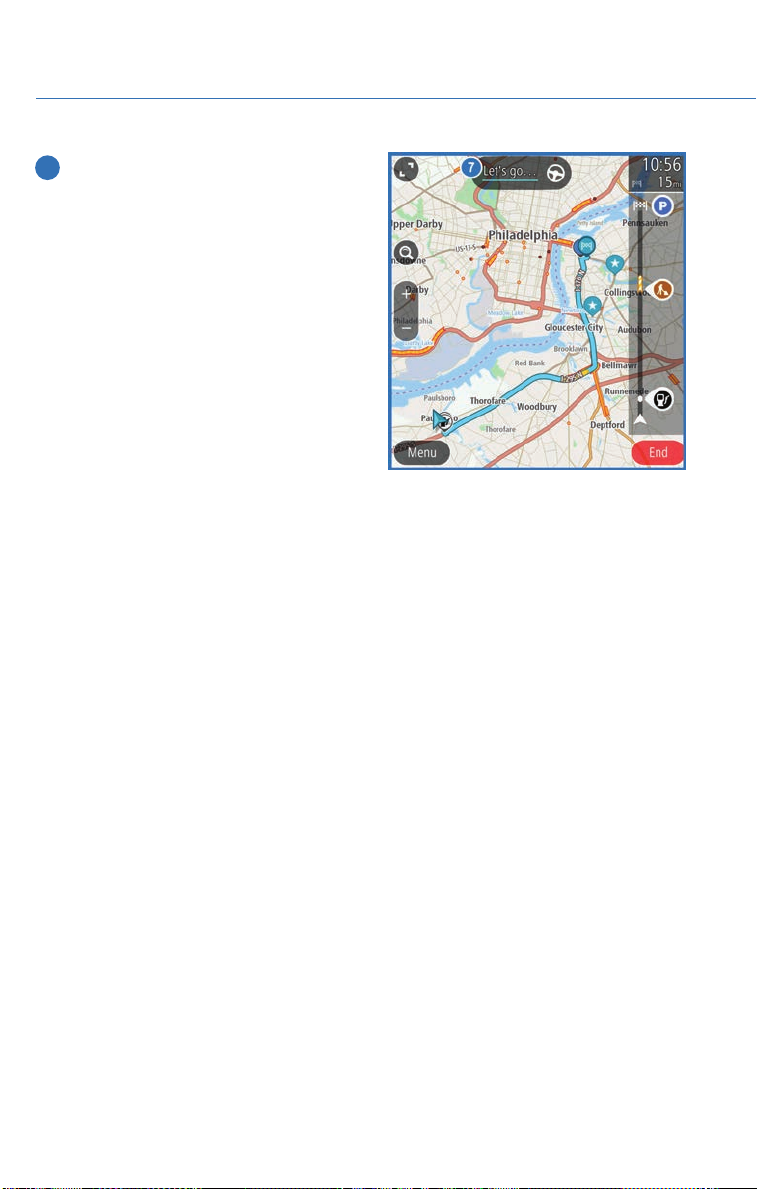
MAPS
7 Select “Let’s Go”. If selected you will see
fuel stations, rest stops, hotels, etc on the
right side of the screen.
88
Page 91
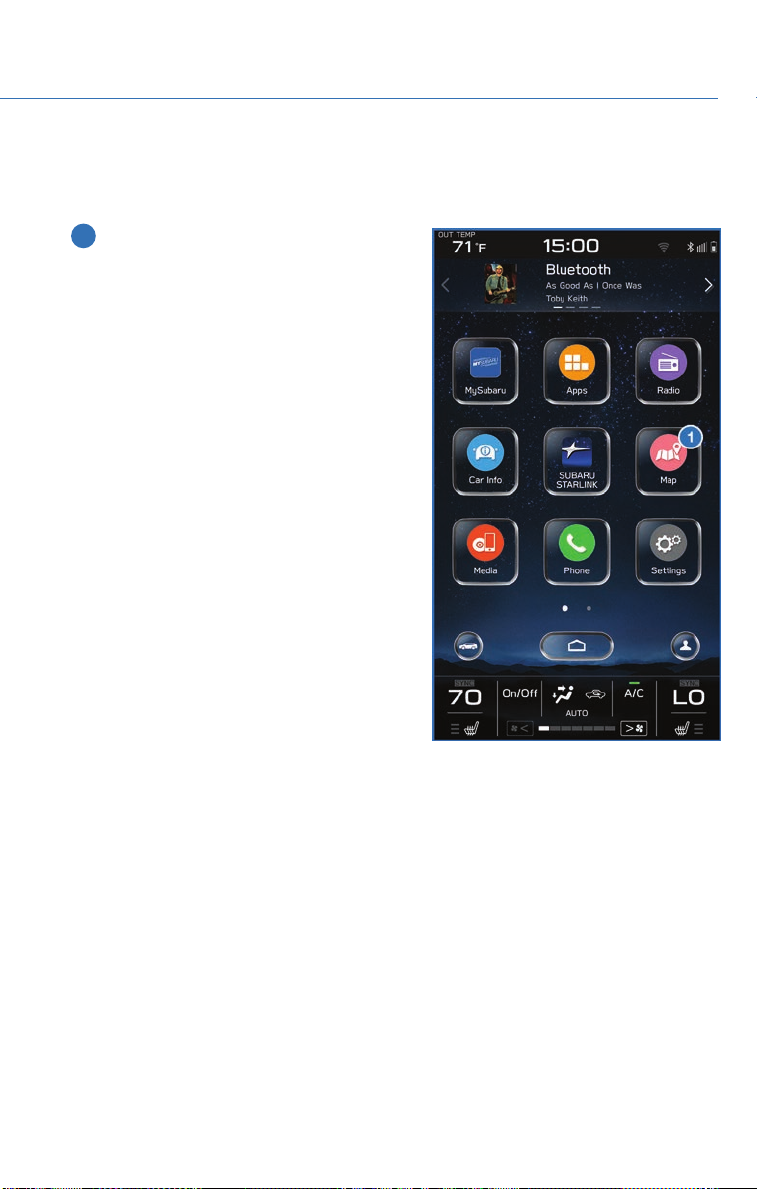
Finding a Destination By POI
To search by Points Of Interest (POI):
1 Push the “Map” button to display the map
screen.
MAPS
89
Page 92
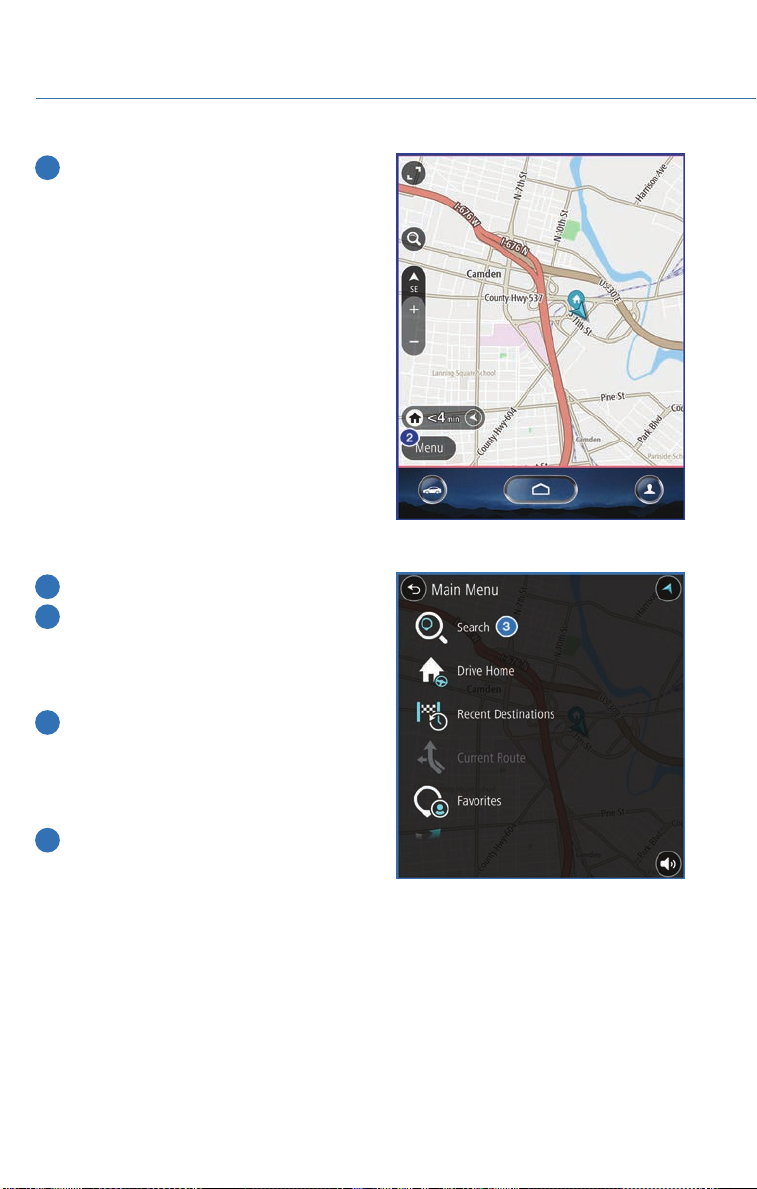
MAPS
2 Then touch “Menu”.
3 Next, select “Search”.
4 Select “Points of Interest”.
NOTE: You can toggle between
“Address” and “Point Of Interest” search
by selecting the one you want.
5 Categories are listed alphabetically. Use
the scroll bar on the right, if needed, to
display more categories, then make your
selection. Select the desired item from the
list, then touch “GO”.
6 Finally select “Let’s Go” to start navigation
to the point of interst.
90
Page 93
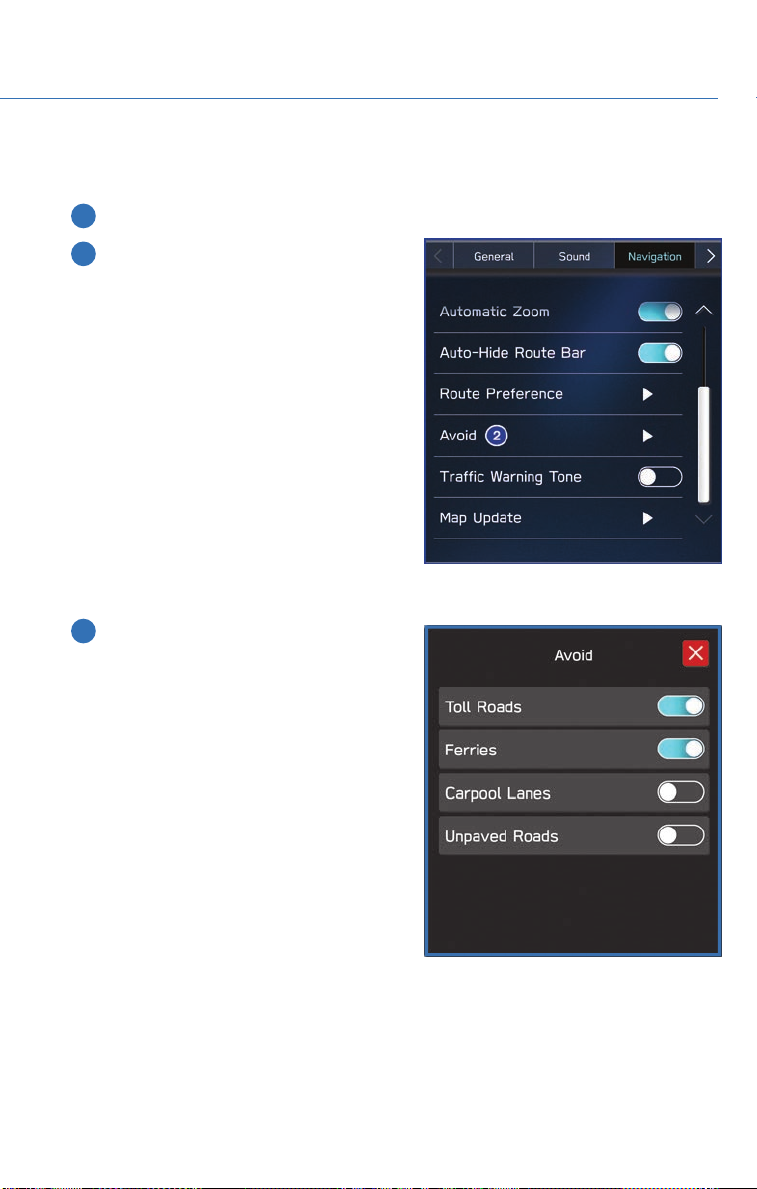
Route Options
You can set the navigation system to avoid certain types of routes. To do this:
1 From the “Home” screen select “Settings”, then “Navigation”.
2 Select “Avoid”.
3 Select the desired item to avoid.
MAPS
91
Page 94
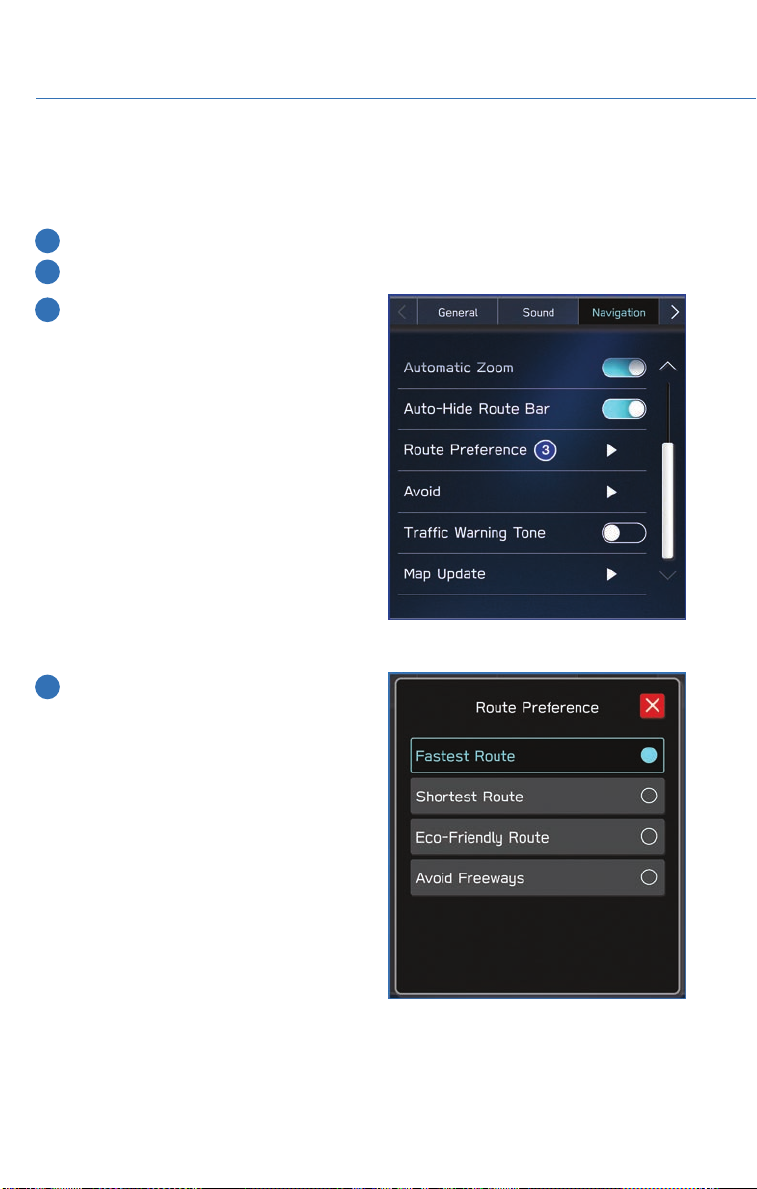
MAPS
Shortest/Fastest/Economic
You can set the route preferences to search for the shortest, fastest, or most economic
route or to avoid freeways. To do this:
1 From the ”Home” screen touch “Settings”.
2 Select “Navigation”.
3 Select “Route Preferences”.
4 Select the preference you would like to
use the most; Fastest, Shortest,
Eco-Friendly or Avoid Freeways.
92
Page 95
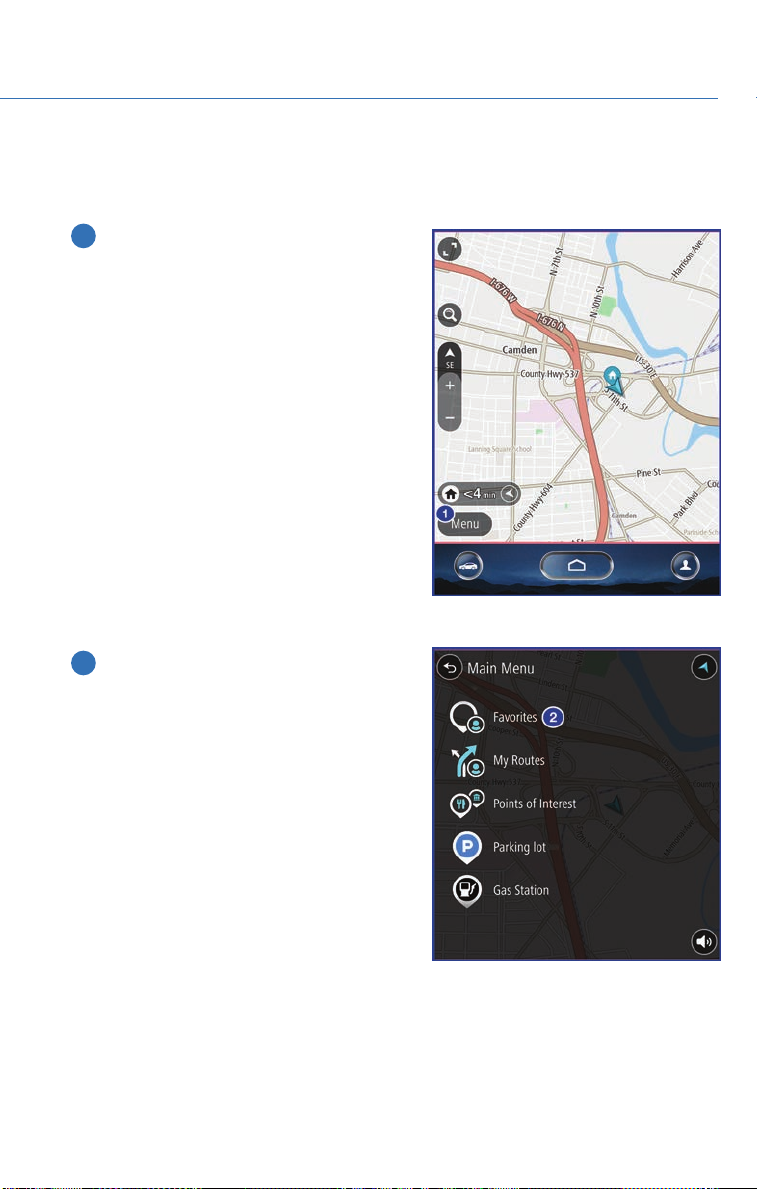
MAPS
Saving Destination as a Favorite
The registered points can be set as a destination. To save a location from the Map screen:
1 Select “Menu”.
2 Select “Favorites”.
93
Page 96
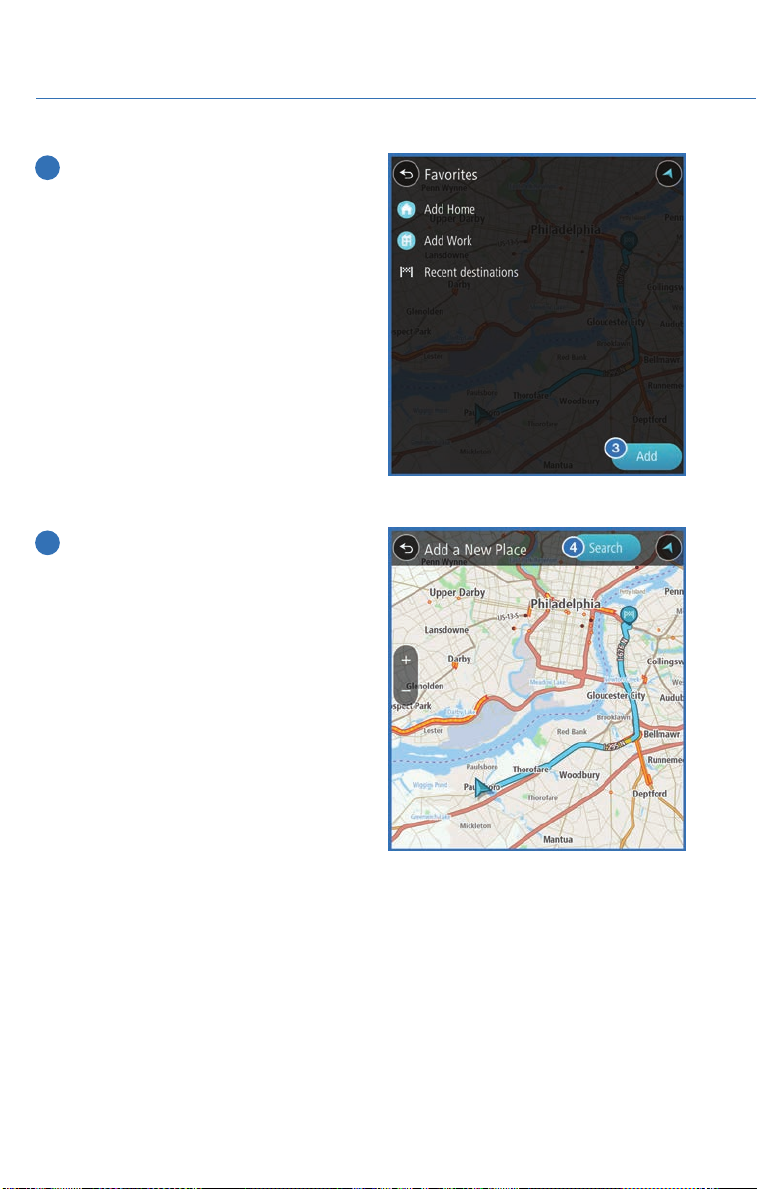
MAPS
3 Select “Add”.
4 Select “Search”.
94
Page 97
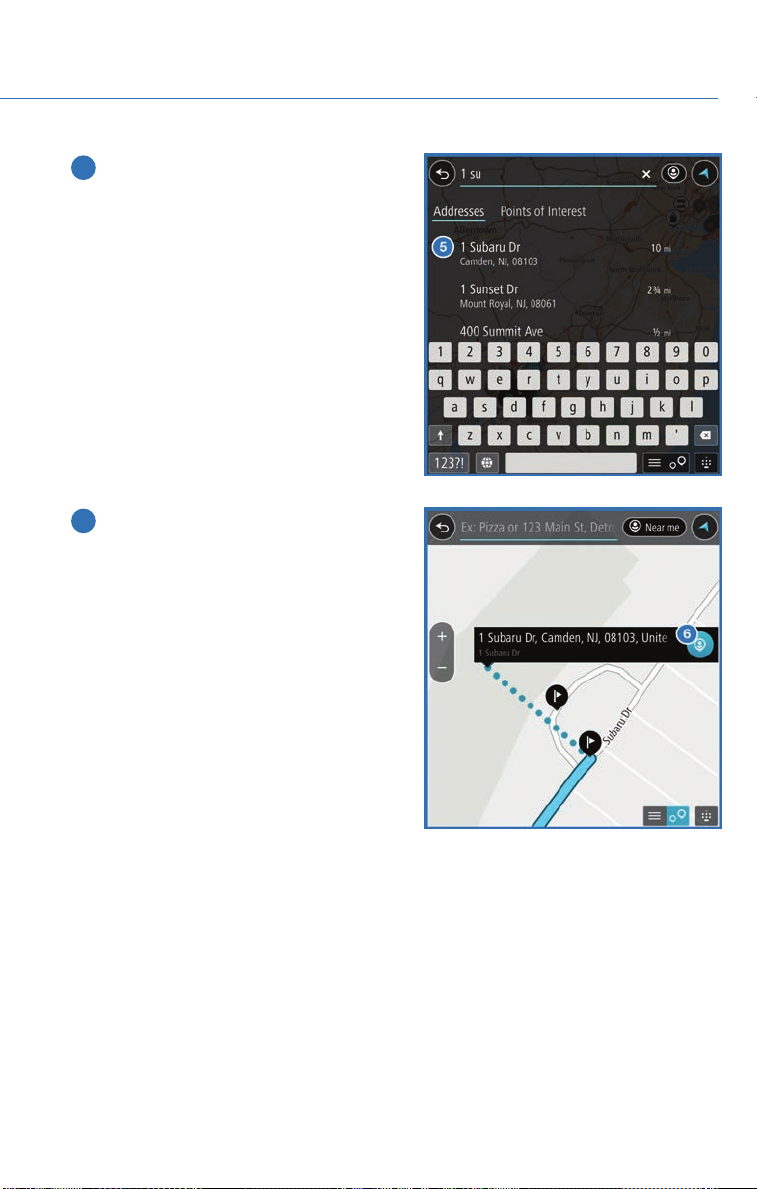
5 Start typing the address you want to
save, select the address when it appears
on the screen.
6 Select the icon on the address to save to
favorites.
MAPS
95
Page 98
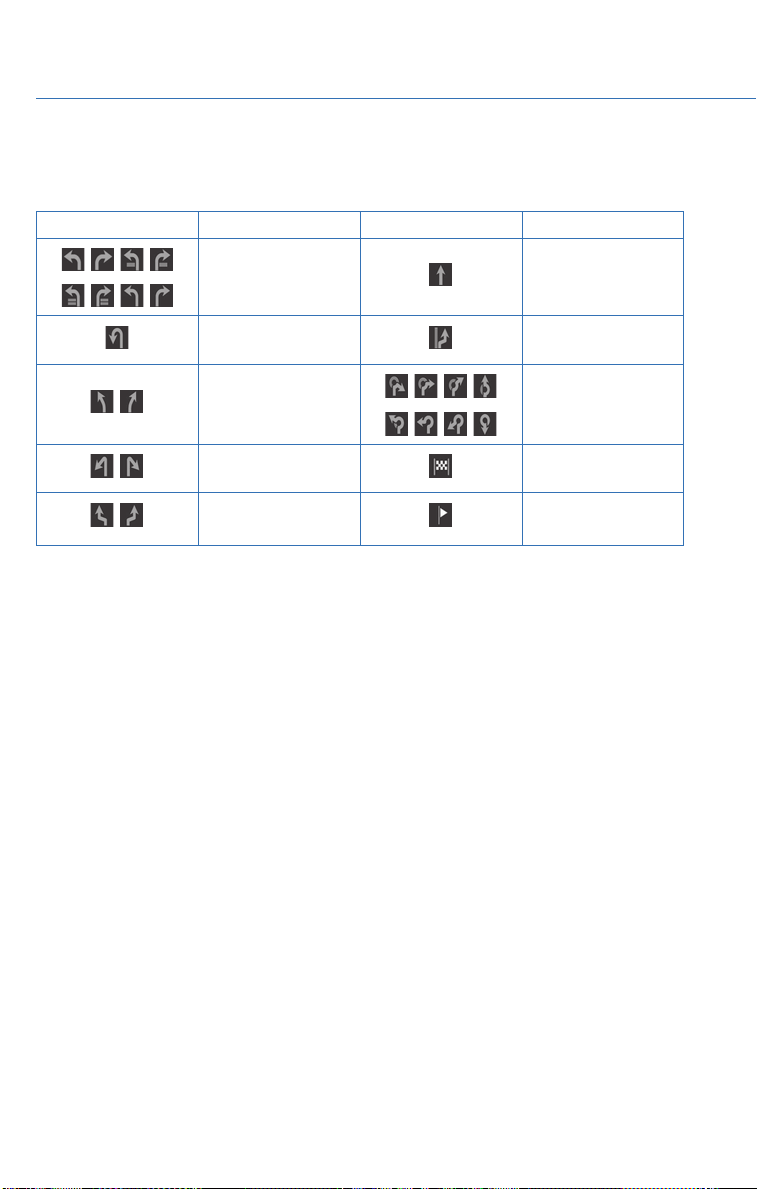
MAPS
Guidance Screen Icons
These are the common icons used for the navigation guidance.
ICON EXPLANATION ICON EXPLANATION
Turn left/right.
U-turn. Exit at the junction.
Keep left/right at the
fork in the road.
Turn left/right &
sharp curve.
Stay in the left/right
lane.
Go straight ahead at
the intersection.
Roundabout.
You have arrived at
your destination.
You have arrived at
your waypoint.
96
Page 99
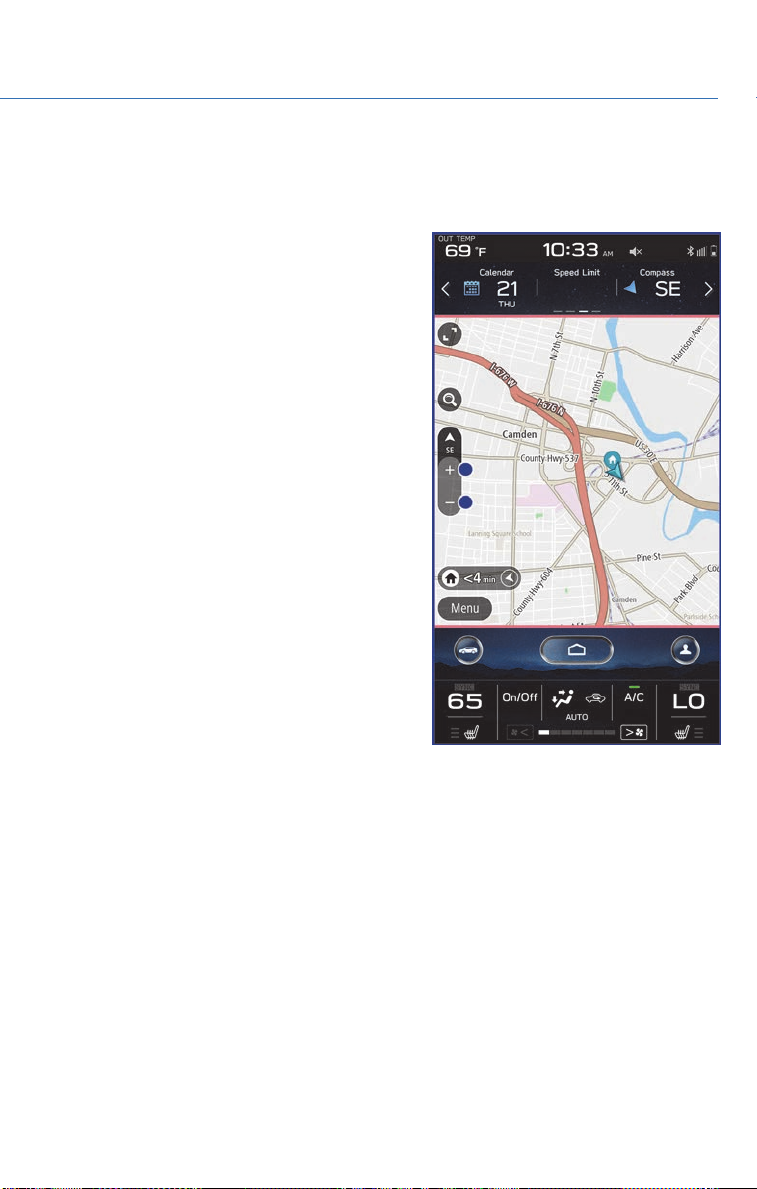
MAPS
Map Zoom
Once on the map screen, you can zoom in or out by touching the “+” or “-” buttons on the
screen. You can also use two fingers on the screen and move them apart to zoom in or
together to zoom out.
97
Page 100
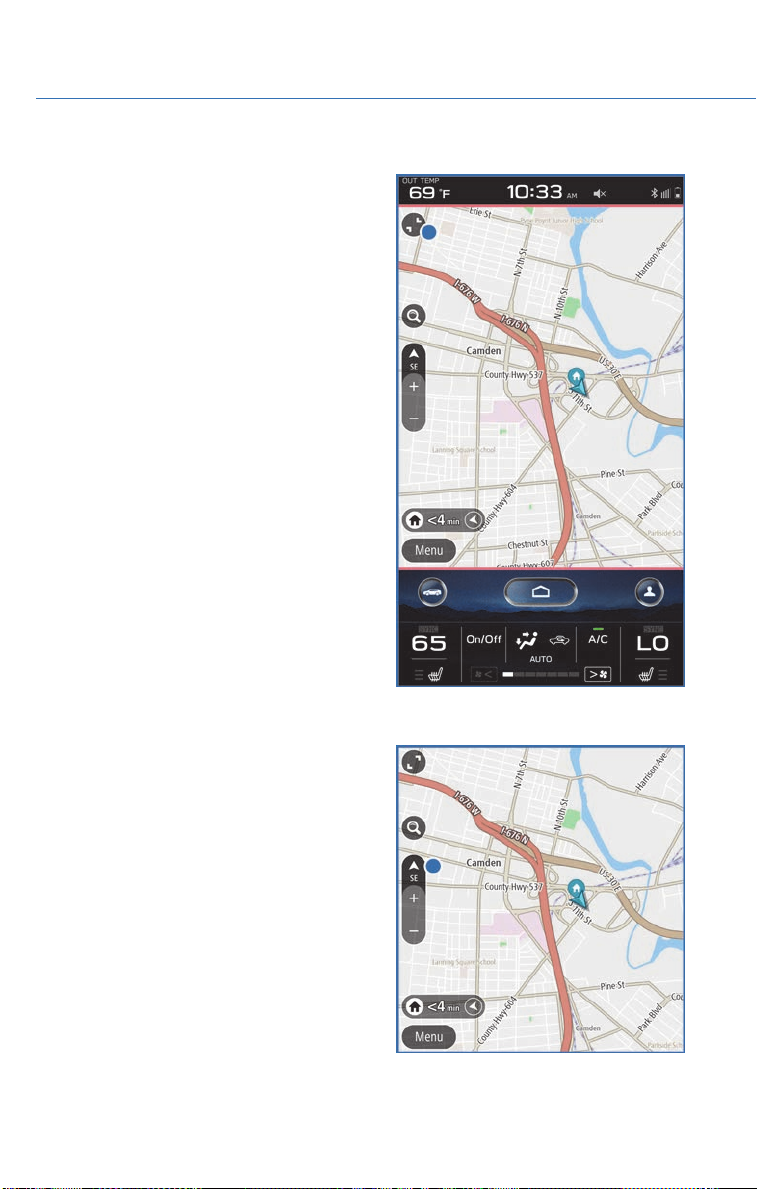
MAPS
You can also enlarge the map to cover the top portion of the screen by selecting this
button.
Map View/Perspectives
The orientation of the map can be changed
between 2D north-up, 2D heading-up, and 3D
heading-up. To change the view, select the icon
above the “+” and “-” buttons. Each time the
icon is touched, the view will change. The
direction of the arrow indicates north when in
2D heading-up and 3D heading-up modes.
98
 Loading...