

Page 1
Maintenance and service
Maintenance schedule ................................. 11-3
Maintenance precautions ............................ 11-3
Before checking or servicing in the engine
compartment .................................................. 11-4
When you do checking or servicing in the
engine compartment while the engine is
running ............................................................ 11-5
Engine hood .................................................. 11-5
Engine compartment overview ................... 11-8
2.5-liter non-turbo models ................................ 11-8
2.0-liter turbo models ....................................... 11-9
2.5-liter turbo models ....................................... 11-10
Engine oil ...................................................... 11-11
Checking the oil level ....................................... 11-11
Changing the oil and oil filter .......................... 11-12
Recommended grade and viscosity ................ 11-16
Recommended grade and viscosity under
severe driving conditions .............................. 11-18
Synthetic oil ....................................................... 11-18
Cooling system ............................................. 11-18
Cooling fan, hose and connections ................ 11-19
Engine coolant .................................................. 11-19
Air cleaner element ...................................... 11-24
Replacing the air cleaner element ................... 11-24
Spark plugs ................................................... 11-28
Recommended spark plugs ............................. 11-28
Drive belts ..................................................... 11-29
Manual transmission oil ............................... 11-30
Checking the oil level ....................................... 11-30
Recommended grade and viscosity ................ 11-31
Automatic transmission fluid ...................... 11-32
Checking the fluid level .................................... 11-32
Recommended fluid ......................................... 11-34
Front differential gear oil (AT vehicles) ...... 11-35
Checking the oil level ....................................... 11-35
Recommended grade and viscosity ............... 11-35
Rear differential gear oil ............................... 11-36
Checking the gear oil level .............................. 11-36
Recommended grade and viscosity ............... 11-37
Power steering fluid ...................................... 11-38
Checking the fluid level .................................... 11-38
Recommended fluid ......................................... 11-39
Brake fluid ..................................................... 11-40
Checking the fluid level .................................... 11-40
Recommended brake fluid ............................... 11-40
Clutch fluid (MT vehicles) ............................ 11-41
Checking the fluid level .................................... 11-41
Recommended clutch fluid .............................. 11-42
Brake booster ................................................ 11-42
Brake pedal .................................................... 11-43
Checking the brake pedal free play ................ 11-43
Checking the brake pedal reserve distance ... 11-43
Clutch pedal (MT vehicles) ........................... 11-44
Checking the clutch function .......................... 11-44
Checking the clutch pedal free play ............... 11-44
Replacement of brake pad and lining ......... 11-45
Breaking-in of new brake pads and linings .... 11-45
Parking brake stroke .................................... 11-46
Tires and wheels ........................................... 11-47
11-1
11
Page 2

Maintenance and service
Types of tires .................................................... 11-47
Tire inspection .................................................. 11-47
Tire pressures and wear .................................. 11-48
Wheel balance ................................................... 11-51
Wear indicators ................................................. 11-51
Tire rotation ....................................................... 11-52
Tire replacement ............................................... 11-53
Wheel replacement ........................................... 11-53
Aluminum wheels ......................................... 11-54
Intercooler water spray (WRX-STi) ............. 11-55
Windshield washer fluid .............................. 11-56
Replacement of wiper blades ...................... 11-57
Windshield wiper blades assembly ................ 11-57
Windshield wiper blade rubber ....................... 11-58
Rear window wiper blade assembly ............... 11-59
Rear window wiper blade rubber .................... 11-60
Battery ........................................................... 11-63
Fuses ............................................................. 11-65
Main fuse ....................................................... 11-68
Installation of accessories .......................... 11-68
Replacing bulbs ............................................ 11-69
Headlights (U.S.-spec. WRX-STi) .................... 11-70
Headlights (Except U.S.-spec. WRX-STi) ....... 11-71
Front turn signal light bulbs ............................ 11-73
Parking light ...................................................... 11-74
Front fog light ................................................... 11-78
Rear combination lights ................................... 11-78
License plate light ............................................ 11-81
Dome light, map light and cargo area light .... 11-81
Trunk light ......................................................... 11-82
High mount stop light ...................................... 11-83
11-2
Page 3

Maintenance and service
Maintenance schedule
Maintenance and service
Maintenance precautions
The scheduled maintenance items required to be serviced at regular intervals are shown in the “Warranty
and Maintenance Booklet”.
For details of your maintenance schedule, read the
separate “Warranty and Maintenance Booklet”.
When maintenance and service are required, it is recommended that all work be done by an authorized
SUBARU dealer.
If you perform maintenance and service by yourself,
you should familiarize yourself with the information
provided in this section on general maintenance and
service for your SUBARU.
Incorrect or incomplete service could cause improper
or unsafe vehicle operation. Any problems caused by
improper maintenance and service performed by you
are not eligible for warranty coverage.
y Testing of an All-Wheel Drive vehicle must
NEVER be performed on a single two-wheel dynamometer or similar apparatus. Attempting to
do so will result in transmission damage and in
uncontrolled vehicle movement and may cause
an accident or injuries to persons nearby.
y Always select a safe area when performing
maintenance on your vehicle.
y Always be very careful to avoid injury when
working on the vehicle. Remember that some of
– CONTINUED –
11-3
Page 4
Maintenance and service
the materials in the vehicle may be hazardous if
improperly used or handled, for example, battery acid.
y Your vehicle should only be serviced by persons fully competent to do so. Serious personal injury may result to persons not experienced
in servicing vehicles.
y Always use the proper tools and make certain
that they are well maintained.
y Never get under the vehicle supported only
by a jack. Always use a safety stands to support the vehicle.
y Never keep the engine running in a poorly
ventilated area, such as a garage or other
closed areas.
y Do not smoke or allow open flames around
the fuel or battery. This will cause a fire.
y Because the fuel system is under pressure,
replacement of the fuel filter should be performed only by your SUBARU dealer.
y Wear adequate eye protection to guard
against getting oil or fluids in your eyes. If
something does get in your eyes, thoroughly
wash them out with clean water.
y Do not tamper with the wiring of the SRS airbag system or seatbelt pretensioner system, or
attempt to take its connectors apart, as that
may activate the system or it can render it inoperative. The wiring and connectors of these
systems are yellow for easy identification. NEVER use a circuit tester for these wiring.
If your SRS airbag or seatbelt pretensioner
needs service, consult your nearest SUBARU
dealer.
Before checking or servicing in the en-
gine compartment
y Always stop the engine and set the parking
brake firmly to prevent the vehicle from moving.
y Always let the engine cool down. Engine
parts become very hot when the engine is running and remain hot for some time after the engine is stopped.
y Do not spill engine oil, engine coolant, brake
fluid or any other fluid on hot engine components. This may cause a fire.
y Always remove the key from the ignition
switch. When the ignition switch is in the “ON”
position, the cooling fan may operate suddenly
11-4
Page 5
Maintenance and service
even when the engine is stopped.
When you do checking or servicing in
the engine compartment while the engine is running
A running engine can be dangerous. Keep your
fingers, hands, clothing, hair and tools away
from the cooling fan, belts and any other moving engine parts. Removing rings, watches and
ties is advisable.
Engine hood
0
HSB014BA
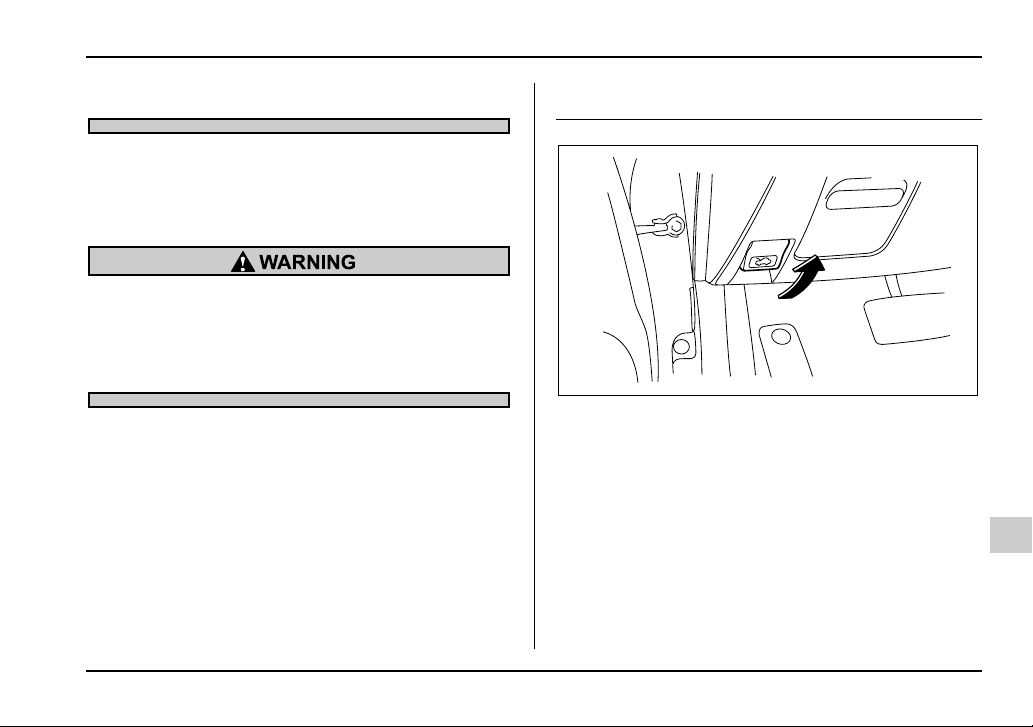
To open the hood:
1. If the wiper blades are lifted off the windshield, return them to their original positions.
2. Pull the hood release knob under the instrument
panel.
– CONTINUED –
11-5
Page 6

Maintenance and service
UGB502BA UGB503BA
3. Release the secondary hood release located under
the front grille by moving the lever toward the left.
11-6
Lift up the hood, release the hood prop from its retainer and put the end of the hood prop into the slot in the
hood.
To close the hood:
All models except WRX and WRX-STi:
1. Lift the hood slightly and remove the hood prop
from the slot in the hood and return the prop to its retainer.
2. Lower the hood until it approaches about 5.9 in (15
cm) from the closed position and let it drop.
WRX and WRX-STi:
1. Lift the hood slightly and remove the hood prop
Page 7

from the slot in the hood and return the prop to its retainer.
2. Lower the hood until it approaches about 12 in (30
cm) from the closed position and let it drop.
After closing the hood, be sure the hood is securely
locked.
If this does not close the hood, release it from a slightly
higher position. Do not push the hood forcibly to close
it. It could deform the metal.
Always check that the hood is properly locked
before you start driving. If it is not, it might fly
open while the vehicle is moving and block
your view, which may cause an accident and
serious bodily injury.
Maintenance and service
– CONTINUED –
11-7
Page 8

Maintenance and service
Engine compartment overview
2.5-liter non-turbo models
2354617
13 12 11 10 9 8
USB102BB
1) Air cleaner element (page 11-
24)
2) Manual transmission oil level
gauge (MT) (page 11-30) or Differential gear oil level gauge
(AT) (page 11-35)
3) Clutch fluid reservoir (page 11-
41)
4) Automatic transmission fluid level gauge (page 11-32)
5) Brake fluid reservoir (page 11-
40)
6) Windshield washer tank (page
11-56)
7) Fuse box (page 11-65)
8) Battery (page 11-63)
9) Engine coolant reservoir (page
11-19)
10) Engine oil filler cap (page 11-11)
11) Engine oil level gauge (page 11-
11)
12) Radiator cap (page 11-19)
13) Power steering fluid reservoir
(page 11-38)
11-8
Page 9

Maintenance and service
2.0-liter turbo models
13 12 11 10 9 8
1) Manual transmission oil level
gauge (MT) (page 11-30) or Dif-
34 5 6 712
ferential gear oil level gauge
(AT) (page 11-35)
2) Air cleaner element (page 11-
24)
3) Clutch fluid reservoir (page 11-
41)
4) Automatic transmission fluid level gauge (page 11-32)
5) Brake fluid reservoir (page 11-
40)
6) Windshield washer tank (page
11-56)
7) Fuse box (page 11-65)
8) Battery (page 11-63)
9) Engine oil filler cap (page 11-11)
10) Engine coolant reservoir (page
11-19)
11) Engine oil level gauge (page 11-
UGB138BB
11)
12) Radiator cap (page 11-19)
13) Power steering fluid reservoir
(page 11-38)
– CONTINUED –
11-9
Page 10

Maintenance and service
2.5-liter turbo models
12
12 11 10 9 8
34 5 6
7
UGB139BB
1) Manual transmission oil level
gauge (MT) (page 11-30)
2) Air cleaner element (page 11-
24)
3) Clutch fluid reservoir (page 11-
41)
4) Brake fluid reservoir (page 11-
40)
5) Windshield washer tank (page
11-56)
6) Fuse box (page 11-65)
7) Battery (page 11-63)
8) Engine oil filler cap (page 11-11)
9) Engine coolant reservoir (page
11-19)
10) Engine oil level gauge (page 11-
11)
11) Radiator cap (page 11-19)
12) Power steering fluid reservoir
(page 11-38)
11-10
Page 11

Engine oil
Checking the oil level
Check the engine oil level at each fuel stop.
1. Park the vehicle on a level surface and stop the engine.
HGB056BA
2. Pull out the dipstick, wipe it clean, and insert it
again.
3. Be sure the dipstick is correctly inserted until it
stops with the graphic symbol on its top appearing as shown in the illustration.
Maintenance and service
1
2
3
UGB081BB
2.5-liter turbo models
1) Notch
2) Upper level
3) Lower level
– CONTINUED –
11-11
Page 12

Maintenance and service
1
2
3
UGB082BB
2.5-liter non-turbo and 2.0-liter turbo models
1) Notch
2) Upper level
3) Lower level
4. Pull out the dipstick again and check the oil level on
it. If it is below the lower level, add oil to bring the level
up to the upper level.
y Use only engine oil with the recommended
grade and viscosity.
y Be careful not to spill engine oil when adding
it. If oil touches the exhaust pipe, it may cause
a bad smell, smoke, and/or a fire.
If you check the oil level just after stopping the engine,
wait a few minutes for the oil to drain back into the oil
pan before checking the level.
Just after driving or while the engine is warm, the engine oil level reading may be in a range between the
upper level and the notch mark. This is caused by thermal expansion of the engine oil.
To prevent overfilling the engine oil, do not add any
additional oil above the upper level when the engine is
cold.
Changing the oil and oil filter
Change the oil and oil filter according to the maintenance schedule in the “Warranty and Maintenance
Booklet”.
The engine oil and oil filter must be changed more frequently than listed in the maintenance schedule when
driving on dusty roads, when short trips are frequently
made, or when driving in extremely cold whether.
1. Warm up the engine by letting the engine idle for
about 10 minutes to ease draining the engine oil.
2. Park the vehicle on a level surface and stop the engine.
11-12
Page 13
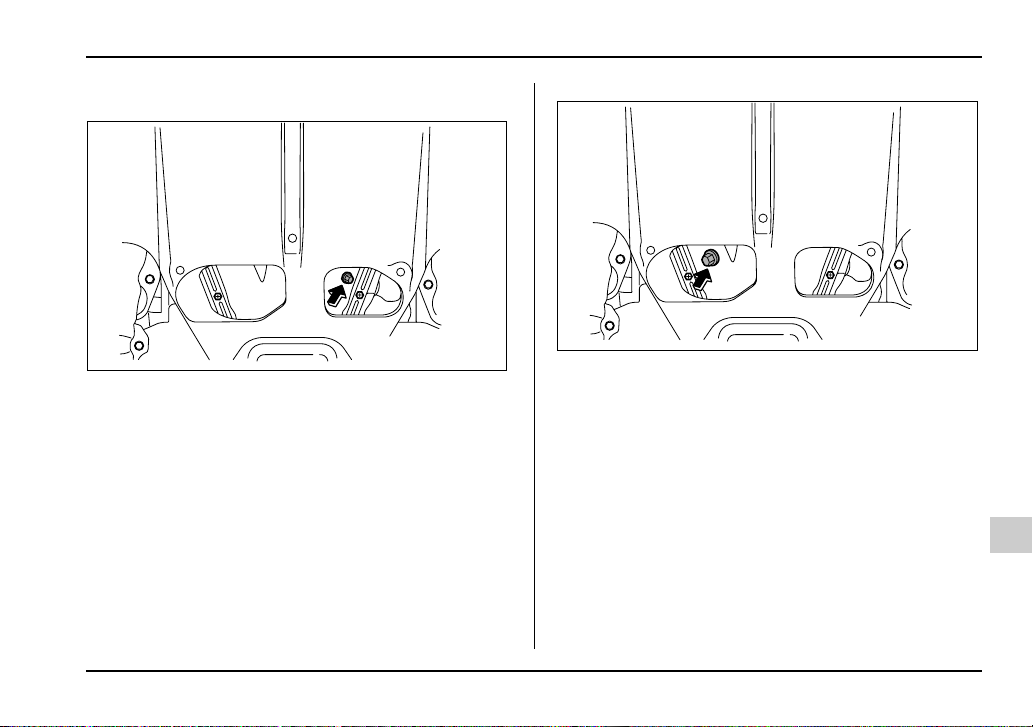
3. Remove the oil filler cap.
2.5-liter turbo models
UGB071BA
Maintenance and service
UGB085BA
2.0-liter turbo models
– CONTINUED –
11-13
Page 14

Maintenance and service
UGB057DA
2.5-liter non-turbo models
4. Drain out the engine oil by removing the drain plug
while the engine is still warm. The used oil should be
drained into an appropriate container and disposed of
properly.
Be careful not to burn yourself with hot engine
oil.
5. Wipe the seating surface of the drain plug with a
clean cloth and tighten it securely with a new sealing
washer after the oil has completely drained out.
6. Remove under cover (for Turbo).
UGB083BA
Turbo models
11-14
Page 15

Maintenance and service
Oil filter color Part number Amount of rotation
Black 15208AA080 1 rotation
White 15208AA09A 2/3 – 3/4 rotation
Never over tighten the oil filter because that can
result in an oil leak.
UGB057EA
Non-turbo models
7. Remove the oil filter with an oil filter wrench.
8. Before installing a new oil filter, apply a thin coat of
engine oil to the seal.
9. Clean the rubber seal seating area of the bottom of
engine and install the oil filter by hand turning. Be
careful not to twist or damage the seal.
10.Tighten the oil filter by the amount indicated in the
following table after the seal makes contact with the
bottom of engine.
11.Reinstall under cover (for Turbo).
12.Pour engine oil through the filler neck.
Oil capacity (guideline):
4.2 US qt (4.0 liters, 3.5 Imp qt)
The oil quantity indicated above is only guideline.
The necessary quantity of oil depends on the quantity
of oil that has been drained. The quantity of drained oil
differs slightly depending on the temperature of the oil
and the time the oil is left flowing out. After refilling the
engine with oil, therefore, you must the dipstick to confirm that the level is correct.
13.Start the engine and make sure that no oil leaks appear around the filter’s rubber seal and drain plug.
– CONTINUED –
11-15
Page 16

Maintenance and service
14.Run the engine until it reaches the normal operating temperature. Then stop the engine and wait a few
minutes to allow the oil drain back. Check the oil level
again and if necessary, add more engine oil.
Be careful not to spill engine oil when adding it.
If oil touches the exhaust pipe, it may cause a
bad smell, smoke, and/or a fire.
Recommended grade and viscosity
Oil grade:
ILSAC GF-3, which can be identified with the new
API certification mark (Starburst mark)
or API classification SL with the words “ENERGY
CONSERVING” (if you cannot obtain the oil with
SL grade, you may use SJ grade “ENERGY CONSERVING” oil).
These recommended oil grades can be identified by
looking for either or both of the following marks displayed on the oil container.
1
A
2
E
N
E
R
3
API Service label
1) Indicates the oil quality by API designations
2) Indicates the SAE oil viscosity grade
3) Indicates that the oil has fuel saving capabilities
V
R
I
C
E
S
I
P
E
S
L
SAE
5W
30
G
N
I
G
Y
C
O
V
R
E
S
N
HSB022BB
11-16
Page 17

M
A
Maintenance and service
O
L
E
R
U
T
E
P
N
A
C
I
R
E
M
I
N
S
T
I
T
U
T
E
-30 -20 -10 0 10 20 30 40
06020 80 10040
-20
5W-30*
C
E
R
T
New API Certification Mark (Starburst Mark)
In choosing an oil, you want the proper quality and viscosity, as well as one that will add to fuel economy.
The following table lists the recommended viscosities
and applicable temperatures.
When adding oil, different brands may be used together as long as they are the same API classification and
SAE viscosity as those recommended by SUBARU.
D
E
I
F
I
HSB023AA
10W-30, 10W-40
UGB084BA
SAE viscosity No. and applicable temperature
*: 5W-30 is preferred.
Engine oil viscosity (thickness) affects fuel economy.
Oils of lower viscosity provide better fuel economy.
However, in hot weather, oil of higher viscosity is required to properly lubricate the engine.
Use only engine oil with the recommended
grade and viscosity.
– CONTINUED –
11-17
Page 18

Maintenance and service
Recommended grade and viscosity
under severe driving conditions
If the vehicle is used in desert areas, in areas with very
high temperatures, or used for heavy-duty applications such as towing a trailer, use of oil with the following grade and viscosities is recommended.
API classification SL (or SJ):
SAE viscosity No.: 30, 40, 10W-50, 20W-40, 20W-50
Synthetic oil
You can use synthetic engine oil that meets the same
requirements given for conventional engine oil. When
using synthetic oil, you must use oil of the same classification, viscosity and grade shown in this owner’s
manual, and must follow the oil and filter changing intervals shown in the maintenance schedule.
Cooling system
Never attempt to remove the radiator cap until
the engine has been shut off and has cooled
down completely. Since the coolant is under
pressure, you may suffer serious burns from a
spray of boiling hot coolant when the cap is removed.
y The cooling system has been filled at the factory with a high quality, corrosion-inhibiting,
year-around coolant which provides protection
against freezing down to –33°F (–36°C). For
adding, use genuine SUBARU coolant or an
equivalent: a mixture of 50% soft water and 50%
ethylene-glycol basis coolant. Use of improper
coolants may result in corrosion in the cooling
system. It is important to maintain protection
against freezing and corrosion, even if freezing
temperatures are not expected. Never mix different kinds of coolant.
y Do not splash the engine coolant over paint-
11-18
Page 19

Maintenance and service
ed parts. The alcohol contained in the engine
coolant may damage the paint surface.
Cooling fan, hose and connections
Your vehicle employs an electric cooling fan which is
thermostatically controlled to operate when the engine
coolant reaches a specific temperature.
If the radiator cooling fan does not operate even when
the engine coolant temperature gauge exceeds the
normal operating range, the cooling fan circuit may be
defective. Check the fuse and replace it if necessary.
If the fuse is not blown, have the cooling system
checked by your SUBARU dealer.
If frequent addition of coolant is necessary, there may
be a leak in the engine cooling system. It is recommended that the cooling system and connections be
checked for leaks, damage, or looseness.
Engine coolant
T Checking the coolant level
FULL
LOW
1) “FULL” level mark
2) “LOW” level mark
Check the coolant level at each fuel stop.
1. Check the coolant level on the outside of the reservoir while the engine is cool.
2. If the level is close to or lower than the “LOW” level
mark, add coolant up to the “FULL” level mark. If the
reserve tank is empty, remove the radiator cap and refill as required.
1
2
UGB134BB
– CONTINUED –
11-19
Page 20

Maintenance and service
coolant may damage the paint surface.
1
HSB026BB
1) Rubber gaskets
3. After refilling the reserve tank and the radiator, reinstall the caps and check that the rubber gaskets inside the radiator cap are in the proper position.
y Be careful not to spill engine coolant when
adding it. If coolant touches the exhaust pipe, it
may cause a bad smell, smoke, and/or a fire.
y Do not splash the engine coolant over painted parts. The alcohol contained in the engine
11-20
T Changing the coolant
1
1) Drain plug
HSB027BB
Always add genuine Subaru cooling system conditioner whenever the coolant is replaced.
Change the engine coolant and add genuine Subaru
cooling system conditioner using the following procedures according to the maintenance schedule.
1. Remove the under cover.
2. Place a proper container under the drain plug and
loosen the drain plug.
Page 21
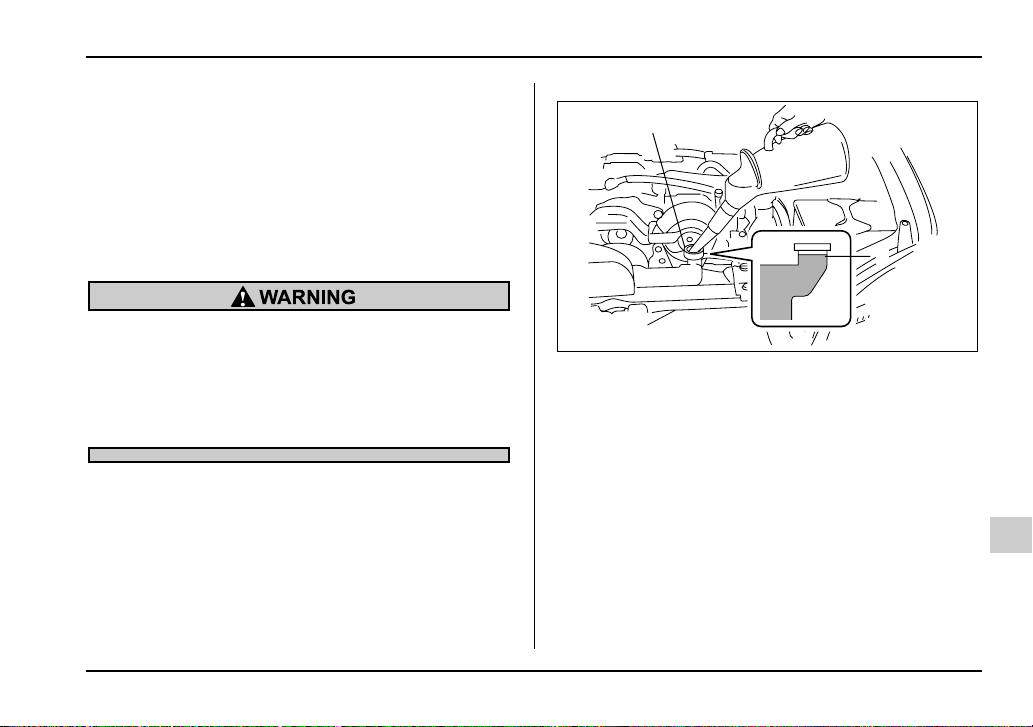
3. Loosen the radiator cap to drain the coolant from
the radiator. Then drain the coolant from the reserve
tank. Tighten the drain plug securely.
NOTE (Turbo model only)
The cap (without tabs) on top of the radiator does
not need to be removed. To add coolant, remove
the cap (with tabs) on the coolant tank on top of
the engine.
Maintenance and service
1
2
Never attempt to remove the radiator cap until
the engine has been shut off and has cooled
down completely. Since the coolant is under
pressure, you may suffer serious burns from a
spray of boiling hot coolant when the cap is removed.
4. Install the under cover.
UGB508BB
Non-turbo models
1) Filler neck
2) Fill up to this level
– CONTINUED –
11-21
Page 22

Maintenance and service
1
2
UGB140BB
Turbo models
1) Filler neck
2) Fill up to this level
5. Slowly pour the coolant and fill up to just below the
filler neck, allowing enough room to add genuine
Subaru cooling system conditioner in the radiator. Add
genuine Subaru cooling system conditioner until the
coolant level reaches the filler neck. Do not pour the
coolant too quickly, as this may lead to insufficient air
bleeding and trapped air in the system.
11-22
Guideline of coolant quantity (including coolant in reservoir
tank):
Non-turbo models:
MT. 7.4 US qt (7.0 liters, 6.2 Imp qt)
AT. 7.3 US qt (6.9 liters, 6.1 Imp qt)
Turbo models:
MT. 8.1 US qt (7.7 liters, 6.8 Imp qt)
AT. 8.0 US qt (7.6 liters, 6.7 Imp qt)
FULL
LOW
1
2
UGB134BB
1) “FULL” level mark
2) “LOW” level mark
Page 23

y Be careful not to spill engine coolant when
adding it. If coolant touches the exhaust pipe, it
may cause a bad smell, smoke, and/or a fire.
y Do not splash the engine coolant over painted parts. The alcohol contained in the engine
coolant may damage the paint surface.
6. Pour the coolant and fill to the reservoir tank’s
“FULL” level mark.
1
HSB026BB
1) Rubber gaskets
Maintenance and service
7. Put the radiator cap back on and tighten firmly. At
this time, make sure that the rubber gasket in the radiator cap is correctly in place.
8. Start and run the engine for more than five minutes
at 2,000 to 3,000 rpm.
9. Stop the engine and wait until the coolant cools
down (122 to 140°F [50 to 60°C]). If there is any loss
of coolant, add coolant to the radiator’s filler neck and
to the reserve tank’s “FULL” level.
10.Put the radiator cap and reservoir cap back on and
tighten firmly.
– CONTINUED –
11-23
Page 24

Maintenance and service
Air cleaner element
The air cleaner element functions as a filter screen.
When the element is perforated or removed, engine
wear will be excessive and engine life shortened.
The air cleaner element is a viscous type. It is unnecessary to clean or wash the element.
Do not operate the engine with the air cleaner
element removed. The air cleaner element not
only filters intake air but also stops flames if the
engine backfires. If the air cleaner element is
not installed when the engine backfires, you
could be burned.
Replacing the air cleaner element
Replace the air cleaner element according to the
maintenance schedule in the “Warranty and Maintenance Booklet”. Under extremely dusty conditions, replace it more frequently. It is recommended that you
always use genuine SUBARU parts.
T Non-turbo models
UGB092BA
1. Unsnap the two clamps holding the air cleaner
case cover.
11-24
Page 25

Maintenance and service
1
UGB104BA
2. Push the air cleaner case cover in the direction of
the arrow shown in the drawing.
2
1) Air cleaner case cover
2) Air cleaner element
UGB093BB
3. Open the air cleaner case cover and remove the air
cleaner element.
4. Clean the inside of the air cleaner cover and case
with a damp cloth and install a new air cleaner element.
– CONTINUED –
11-25
Page 26

Maintenance and service
UGB094BA
5. To install the air cleaner case cover, insert the
three projections on the air cleaner case into the slits
on the air cleaner case cover and then snap the two
clamps on the air cleaner case cover.
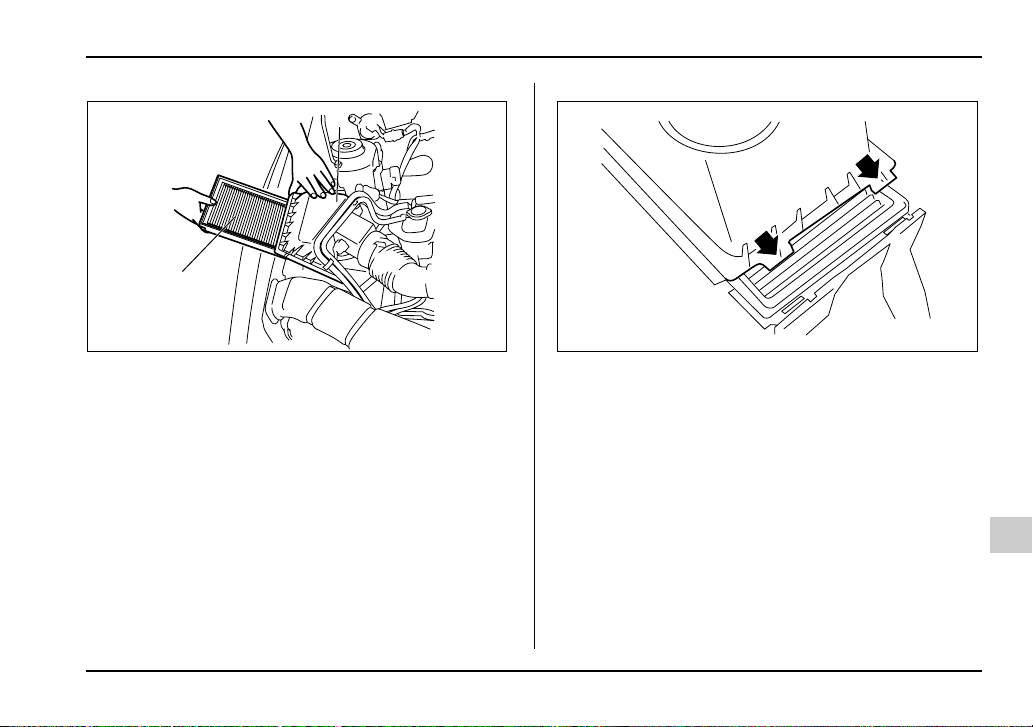
T Turbo models
USB521BA
1. Unsnap the two clamps holding the air cleaner
case cover.
11-26
Page 27
Maintenance and service
1
2
UGB126BB USB523BA
1) Air cleaner case cover
2) Air cleaner element
2. Open the air cleaner case cover and remove the air
cleaner element.
3. Clean the inside of the air cleaner cover and case
with a damp cloth and install a new air cleaner element.
4. To install the air cleaner case cover, insert the two
projections on the air cleaner case cover into the slits
on the air cleaner case and then snap the two clamps
on the air cleaner case cover.
– CONTINUED –
11-27
Page 28
Maintenance and service
Spark plugs
HSB032BA
It may be difficult to replace the spark plugs. It is recommended that you have the spark plugs replaced by
your SUBARU dealer.
The spark plugs should be replaced according to the
maintenance schedule in the “Warranty and Maintenance Booklet”.
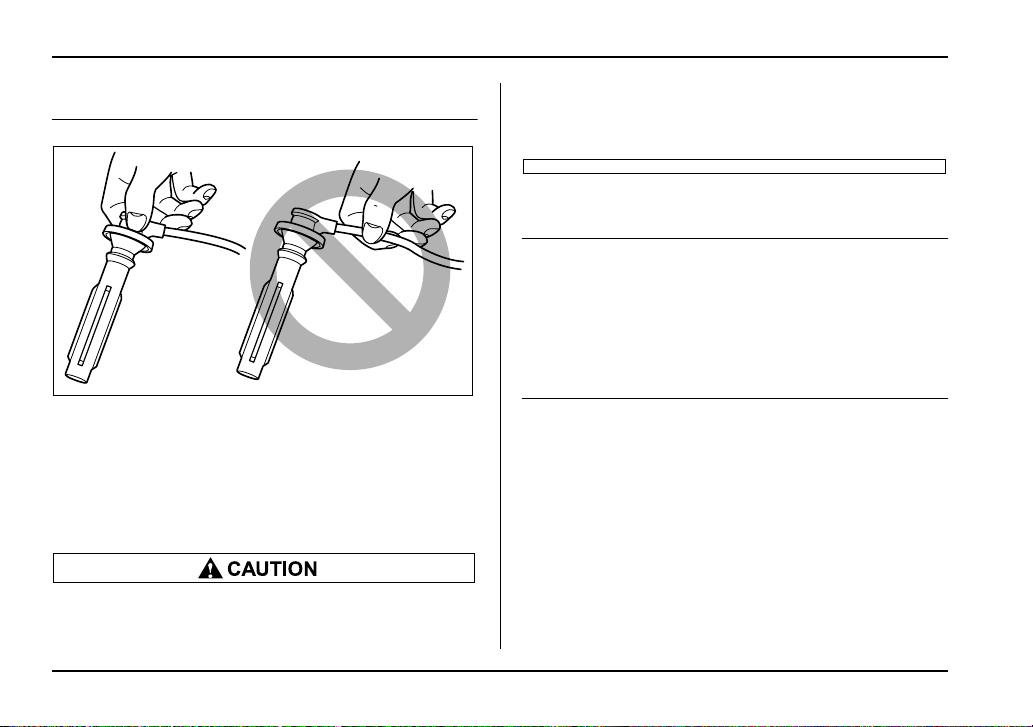
y When disconnecting the spark plug cables,
always grasp the spark plug cap, not the ca-
bles.
y Make sure the cables are replaced in the correct order.
Recommended spark plugs
2.5-liter non-turbo models:
FR5AP-11
2.0-liter turbo models:
PFR6G (NGK)
2.5-liter turbo models:
IFLR6B (NGK)
11-28
Page 29
Maintenance and service
Drive belts
1
B
3
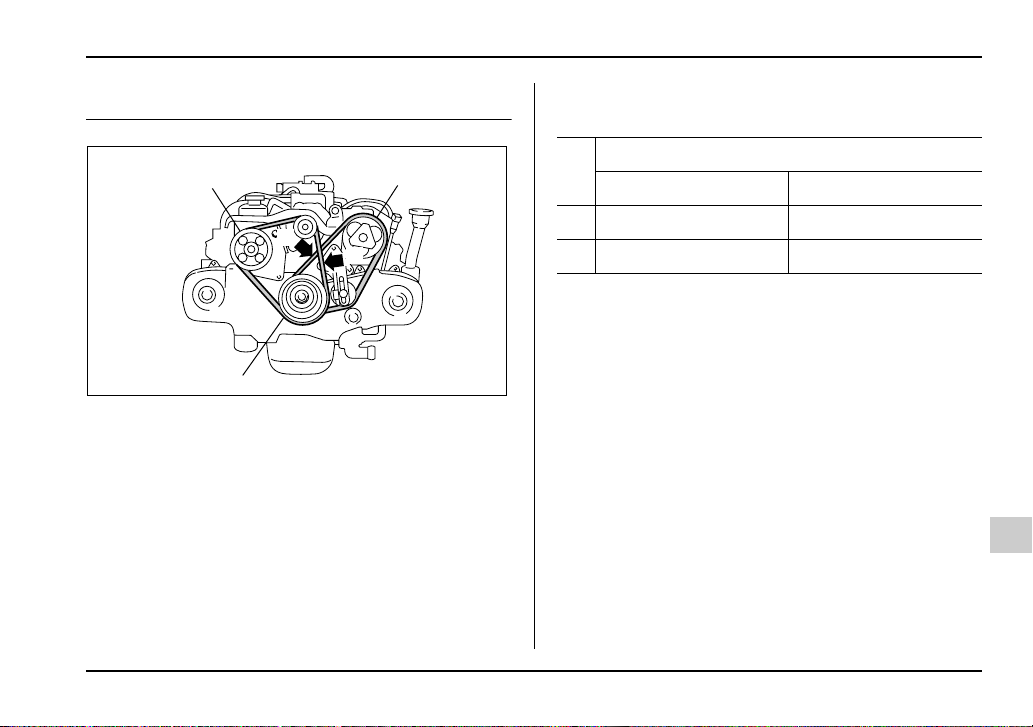
1) Power steering pump pulley
2) Air conditioner compressor pulley
3) Crank pulley
The alternator, power steering pump, and air conditioner compressor depend on drive belts. Satisfactory
performance requires that belt tension be correct.
To check belt tension, place a straightedge (ruler)
across two adjacent pulleys and apply a force of 22 lbs
(98 N, 10 kg) midway between the pulleys by using a
spring scale. Belt deflection should be the amount
specified. If a belt is loose, cracked, or worn, contact
2
A
HSB033BB
your SUBARU dealer.
in (mm)
Deflection
New belt Used belt
A 0.28 – 0.35 (7.0 – 9.0) 0.35 – 0.43 (9.0 – 11.0)
B 0.30 – 0.33 (7.5 – 8.5) 0.35 – 0.40 (9.0 – 10.0)
– CONTINUED –
11-29
Page 30
Maintenance and service
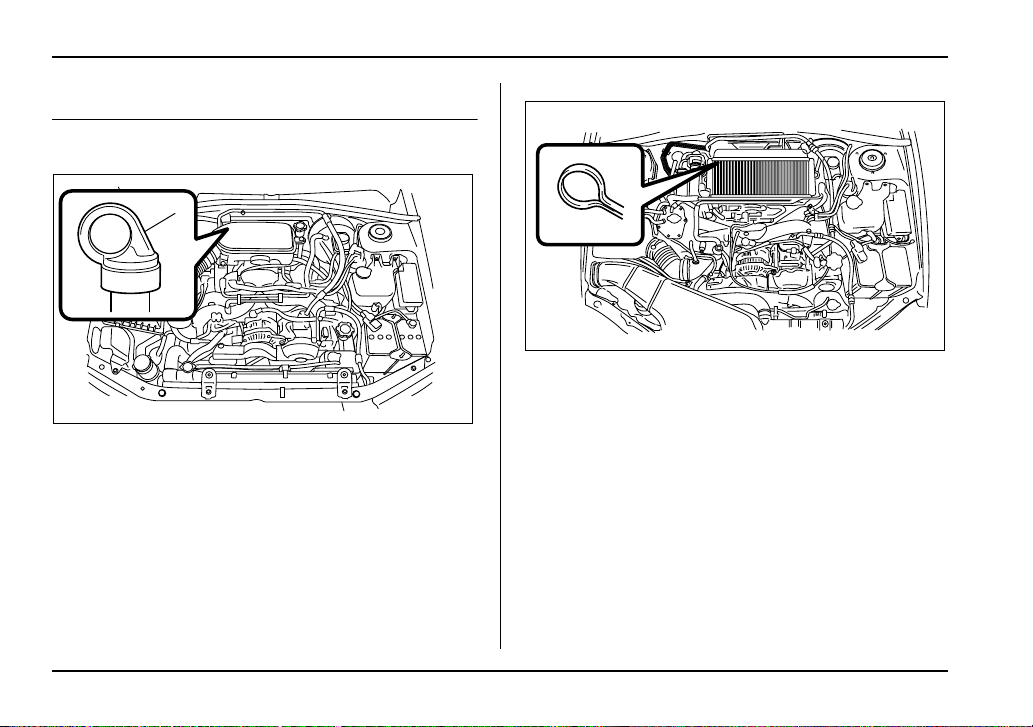
Manual transmission oil
Checking the oil level
1
5 speed transmission (Non-turbo model)
1) Yellow handle
UGB132BA
5 speed transmission (Turbo model)
UGB134CB
11-30
Page 31
Maintenance and service
UGB548CA
6 speed transmission
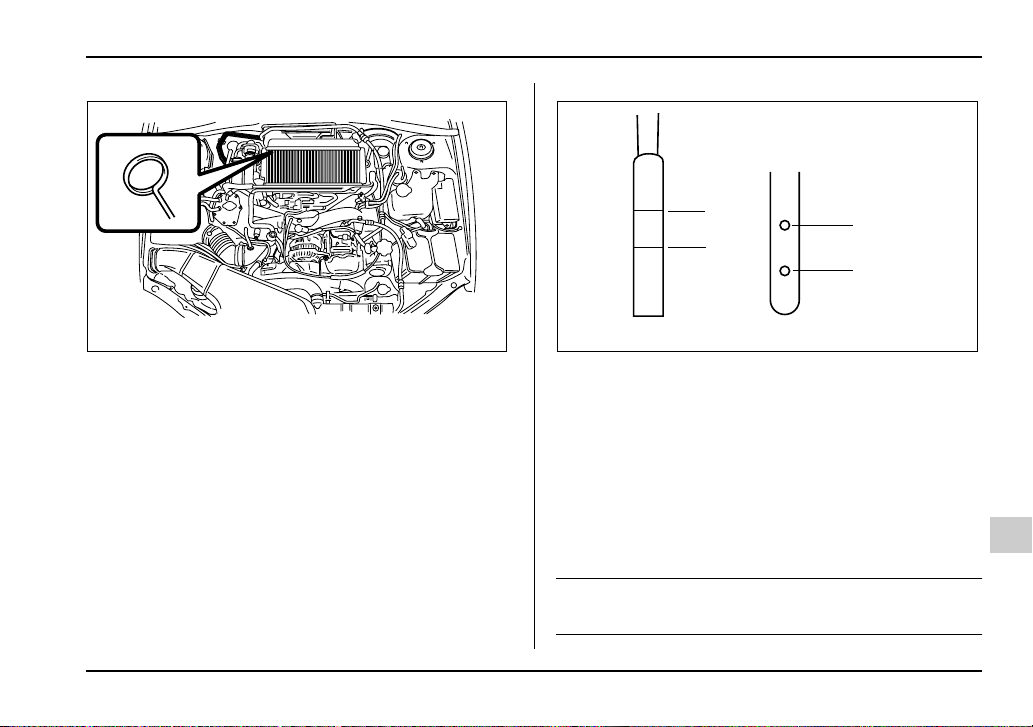
1. Park the vehicle on a level surface and stop the engine.
2. Pull out the dipstick, wipe it clean, and insert it
again.
F
L
1) Upper level
2) Lower level
1
2
FL
1
2
USB526BB
3. Pull out the dipstick again and check the oil level on
it. If it is below the lower level, add oil through the dipstick hole to bring the level up to the upper level.
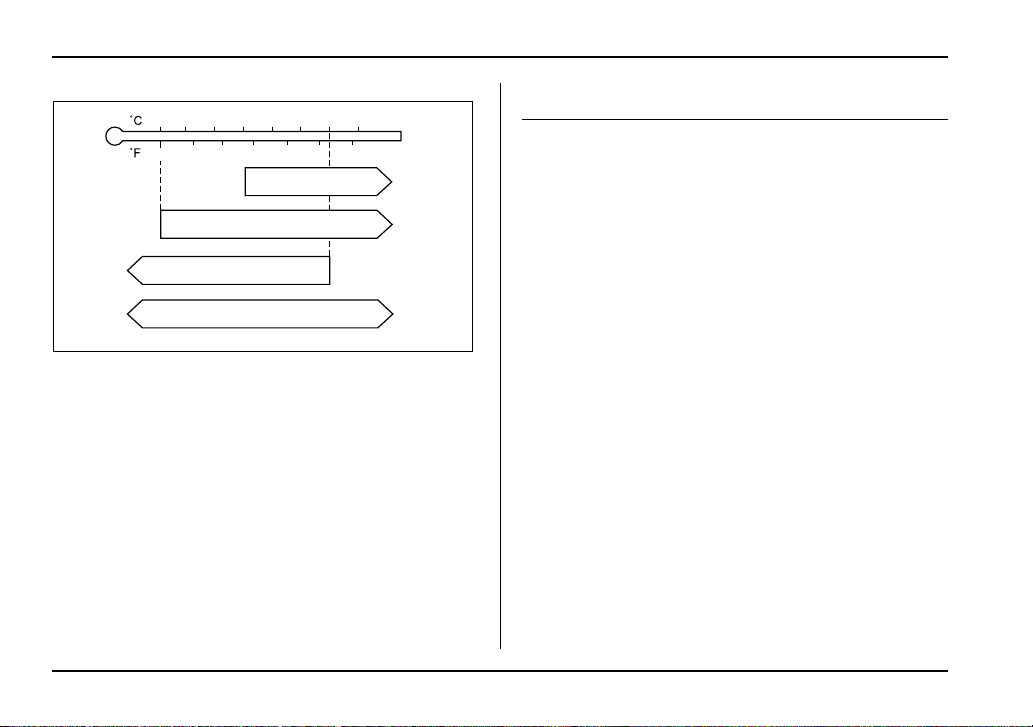
Recommended grade and viscosity
Each oil manufacturer has its own base oils and additives. Never use different brands together.
Oil grade:
API classification GL-5
– CONTINUED –
11-31
Page 32
Maintenance and service
-30 -20 -10 0 10 20 30 40
-20 0 6020
80W
75W/90
SAE viscosity No. and applicable temperature
80 10040
90
85W
HSB036BA
Automatic transmission fluid
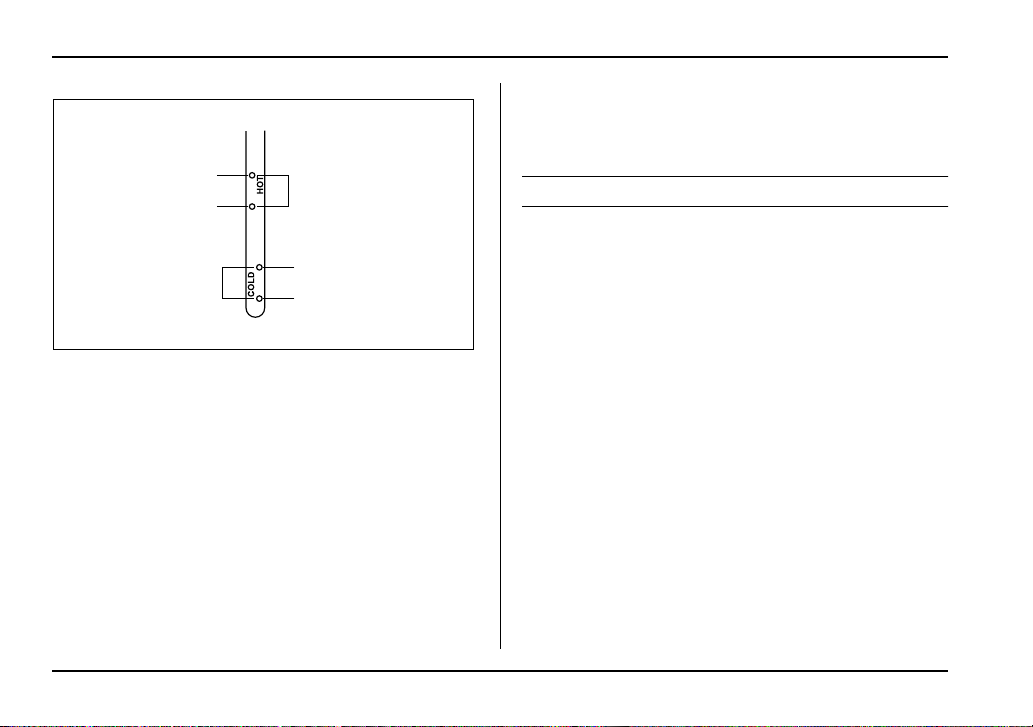
Checking the fluid level
The automatic transmission fluid expands largely as
its temperature rises; the fluid level differs according to
fluid temperature. Therefore, there are two different
scales for checking the level of hot fluid and cold fluid
on the dipstick.
Though the fluid level can be checked without warming up the fluid on the “COLD” range, we recommend
checking the fluid level when the fluid is at operating
temperature.
T Checking the fluid level when the fluid is hot
1. Drive the vehicle several miles to raise the temperature of the transmission fluid up to normal operating
temperature; 158 to 176°F (70 to 80°C) is normal.
2. Park the vehicle on a level surface and set the parking brake.
3. First shift the selector lever in each position. Then
shift it in the “P” position, and run the engine at idling
speed.
11-32
Page 33
Maintenance and service
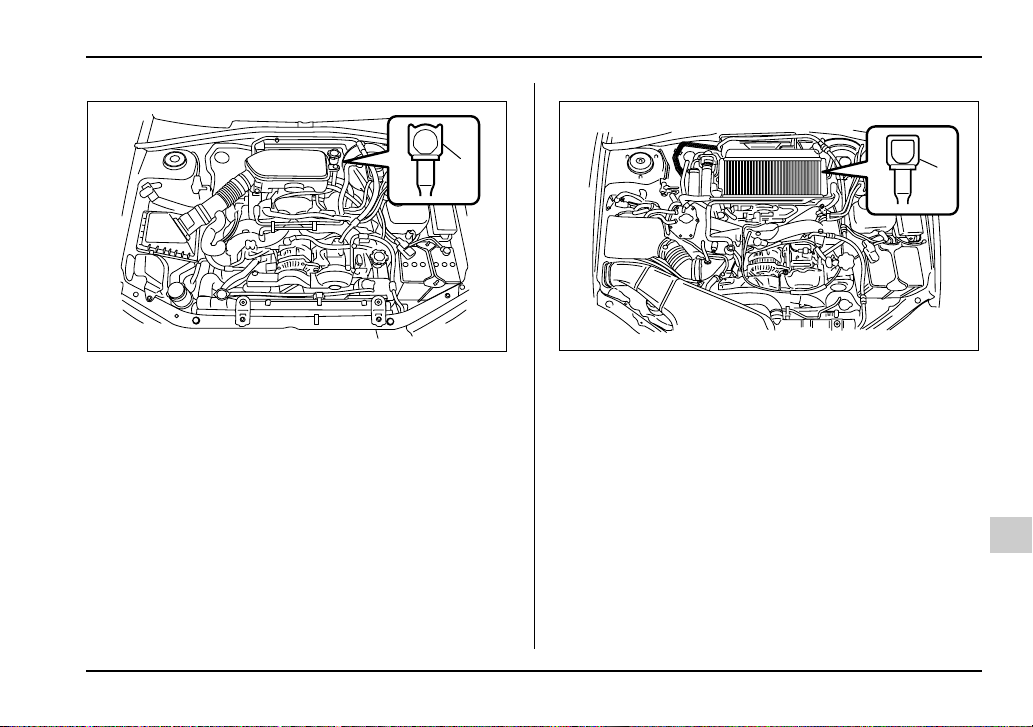
Non-turbo model
1) Yellow handle
1
UGB134DB
1
UGB121BB
Turbo model
1) Yellow handle
– CONTINUED –
11-33
Page 34
Maintenance and service
1
2
A
LF
fluid up to the upper level. Be careful not to overfill.
Recommended fluid
“Dexron III” Type Automatic Transmission Fluid
B
A) HOT range
B) COLD range
1) Upper level
2) Lower level
1
LF
2
HGB061BB
4. Pull out the dipstick and check the fluid level on the
gauge. If it is below the lower level on the “HOT”
range, add the recommended automatic transmission
fluid up to the upper level.
T Checking the fluid level when the fluid is cold
When the fluid level has to be checked without time to
warm up the automatic transmission, check to see that
the fluid level is between the lower level and upper level on the “COLD” range. If it is below that range, add
11-34
Page 35
Front differential gear oil (AT vehicles)
Checking the oil level
Maintenance and service
1
UGB134EB
1) Yellow handle
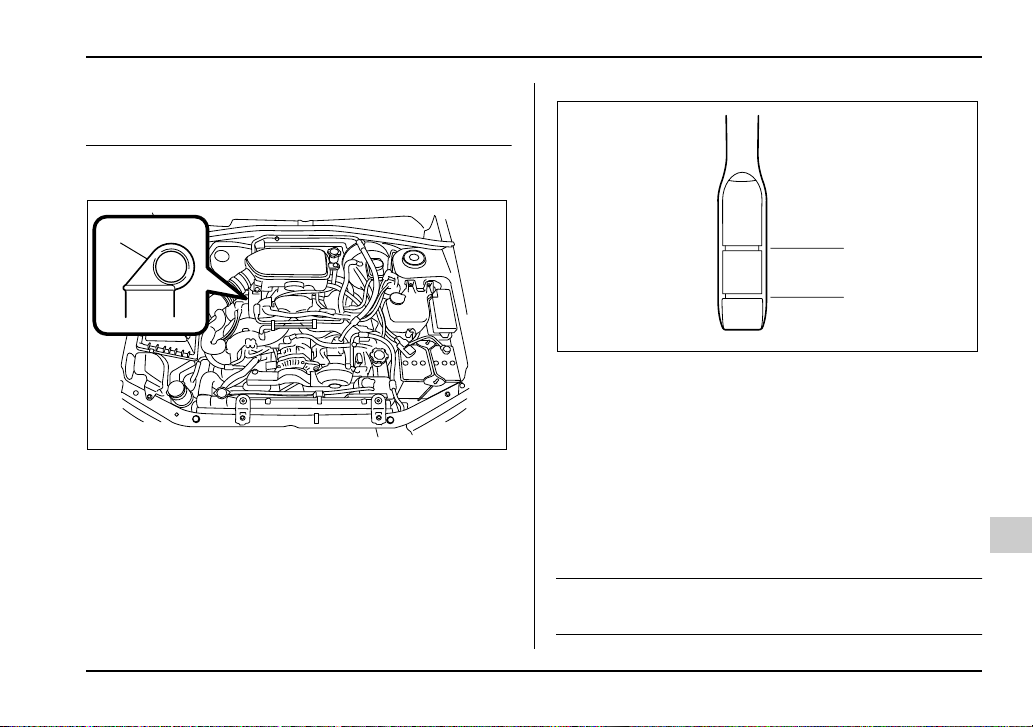
1. Park the vehicle on a level surface and stop the engine.
2. Pull out the dipstick, wipe it clean, and insert it
again.
F
1
2
L
HSB040BB
1) Upper level
2) Lower level
3. Pull out the dipstick again and check the oil level on
it. If it is below the lower level, add oil to bring the level
up to the upper level.
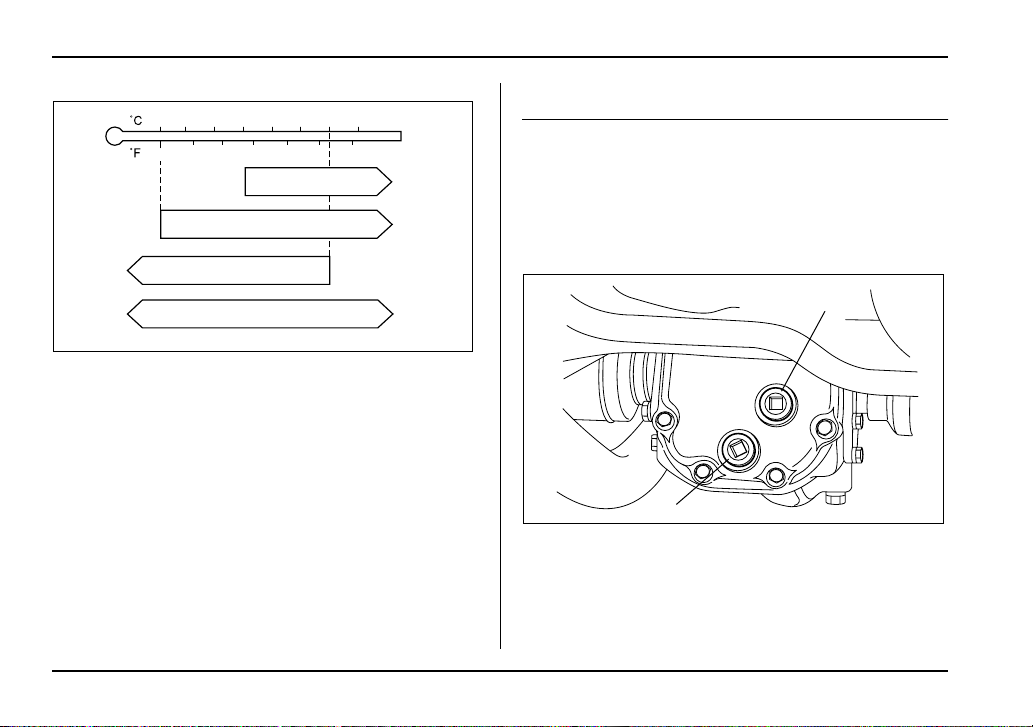
Recommended grade and viscosity
Each oil manufacturer has its own base oils and additives. Never use different brands together.
Oil grade:
API classification GL-5
– CONTINUED –
11-35
Page 36
Maintenance and service
-30 -20 -10 0 10 20 30 40
-20 0 6020
80W
75W/90
80 10040
90
85W
SAE viscosity No. and applicable temperature
HSB036BA
Rear differential gear oil
Checking the gear oil level
Your vehicle may be equipped with a rear differential
protector. The differential protector provides protection to the rear differential assembly during off-road
use. Removal of the rear differential protector is not required when checking the oil level.
1
2
1) Filler plug
2) Drain plug
HSB042BB
11-36
Page 37
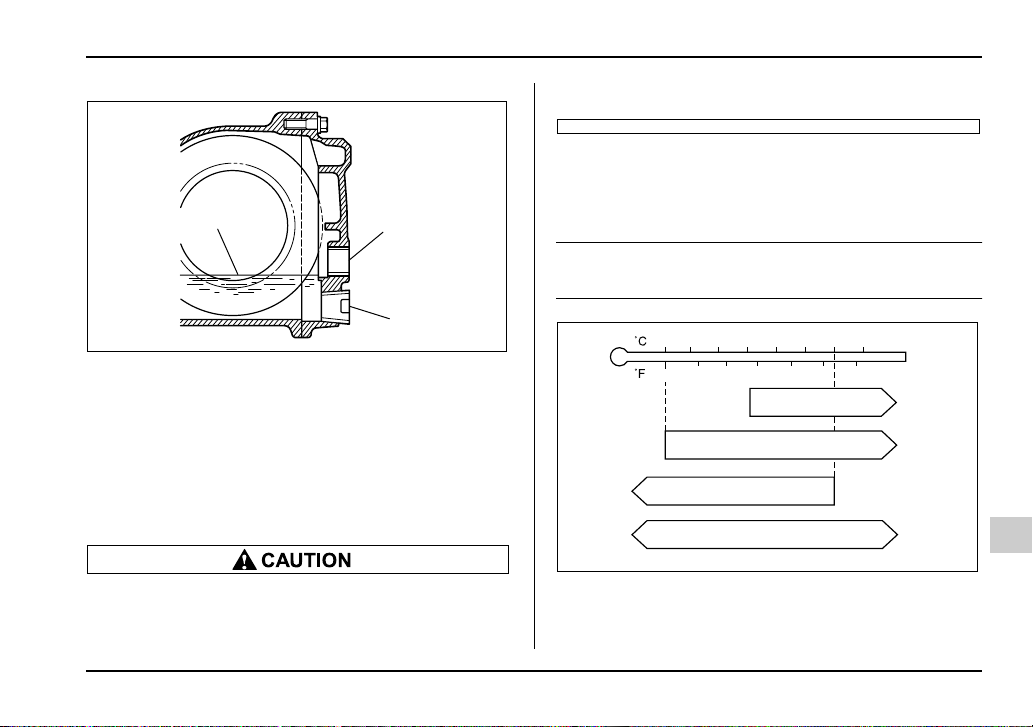
3
1
2
HSB043BB
1) Filler hole
2) Drain hole
3) Oil level
Remove the plug from the filler hole and check the oil
level. The oil level should be kept even with the bottom
of the filler hole. If the oil level is below the bottom
edge of the hole, add oil through the filler hole to raise
the level.
Maintenance and service
er.
Recommended grade and viscosity
Each oil manufacturer has its own base oils and additives. Never use different brands together.
Oil grade:
API classification GL-5
-30 -20 -10 0 10 20 30 40
-20 0 6020
80W
75W/90
80 10040
90
85W
HSB036BA
If the vehicle requires frequent refilling, there
may be an oil leak. If you suspect a problem,
have the vehicle checked at your SUBARU deal-
SAE viscosity No. and applicable temperature
Except Sti version
– CONTINUED –
11-37
Page 38
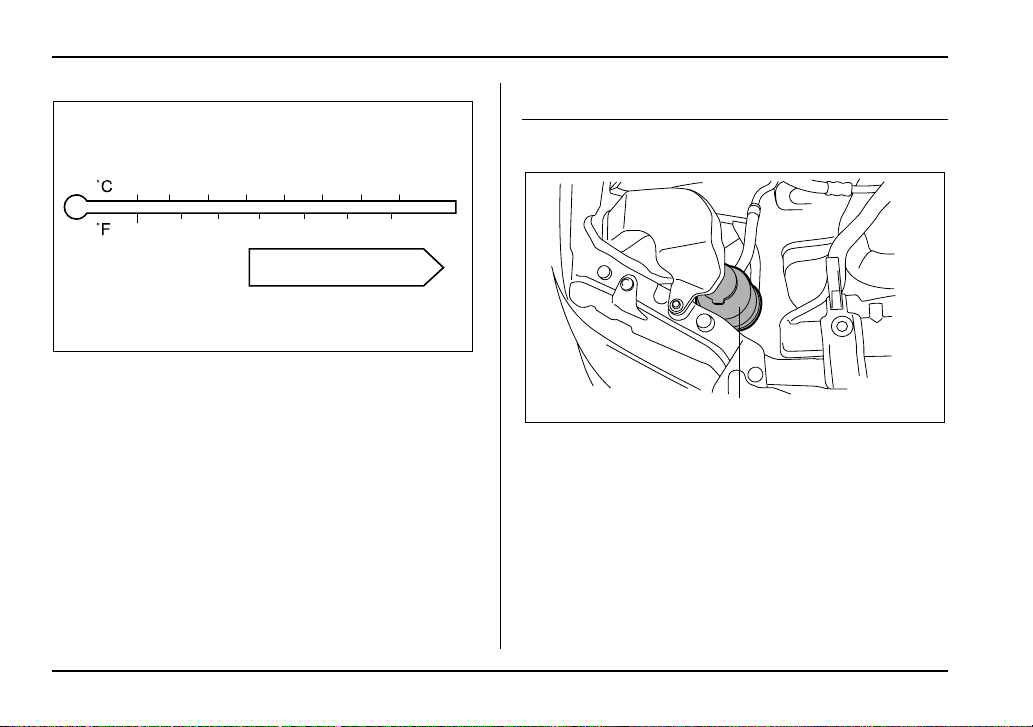
Maintenance and service
-30 -20 -10 0 10 20 30 40
-20 0 6020 80 10040
90
SAE viscosity No. and applicable temperature
Sti version
UGB087AA
Power steering fluid
Checking the fluid level
1
1) Reservoir tank
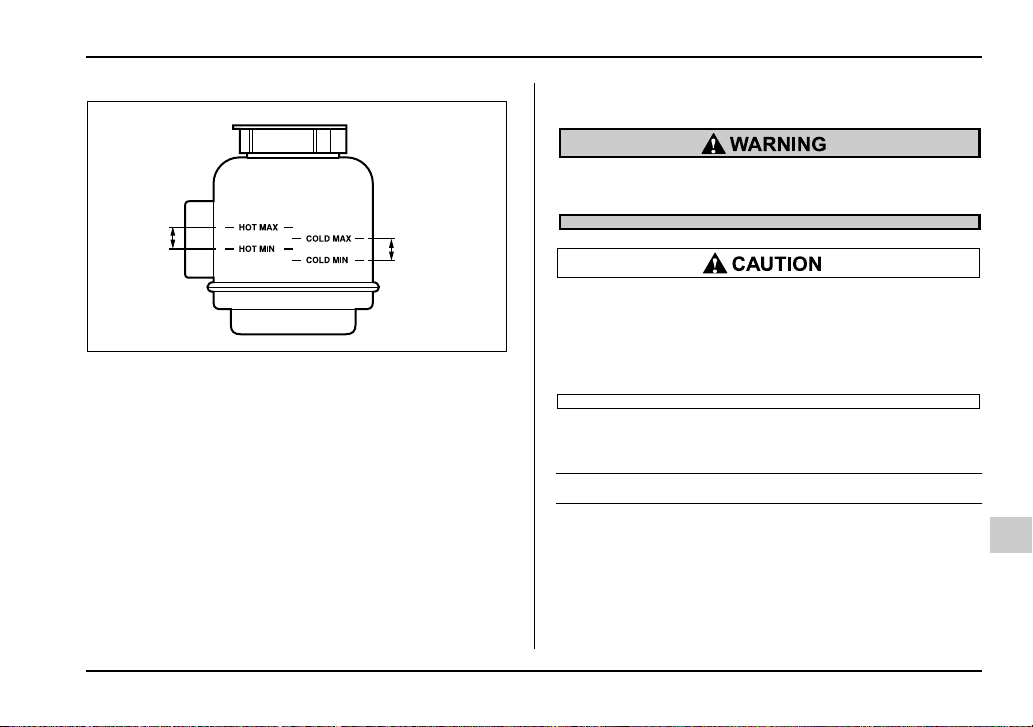
The power steering fluid expands greatly as its temperature rises; the fluid level differs according to fluid
temperature. Therefore, the reservoir tank has two different checking ranges for hot and cold fluids.
Check the power steering fluid level monthly.
1. Park the vehicle on a level surface, and stop the engine.
UGB097BB
11-38
Page 39
Maintenance and service
tion.
Be careful not to burn yourself because the fluid may be hot.
1
1) Specified range
1
HSB045BB
2. Check the fluid level of the reservoir tank.
When the fluid is hot after the vehicle has been run:
Check that the oil level is between “HOT MIN” and
“HOT MAX” on the surface of the reservoir tank.
When the fluid is cool before the vehicle is run: Check
that the oil level is between “COLD MIN” and “COLD
MAX” on the surface of the reservoir tank.
3. If the fluid level is lower than the applicable “MIN”
line, add the recommended fluid as necessary to bring
the level between the “MIN” and “MAX” line.
If the fluid level is extreme low, it may indicate possible
leakage. Consult your SUBARU dealer for an inspec-
y When power steering fluid is being added,
use only clean fluid, and be careful not to allow
any dirt into the tank. And never use different
brands together.
y Avoid spilling fluid when adding it in the tank.
Recommended fluid
“Dexron III” Type Automatic Transmission Fluid
– CONTINUED –
11-39
Page 40
Maintenance and service
MAX
MIN
Brake fluid
Checking the fluid level
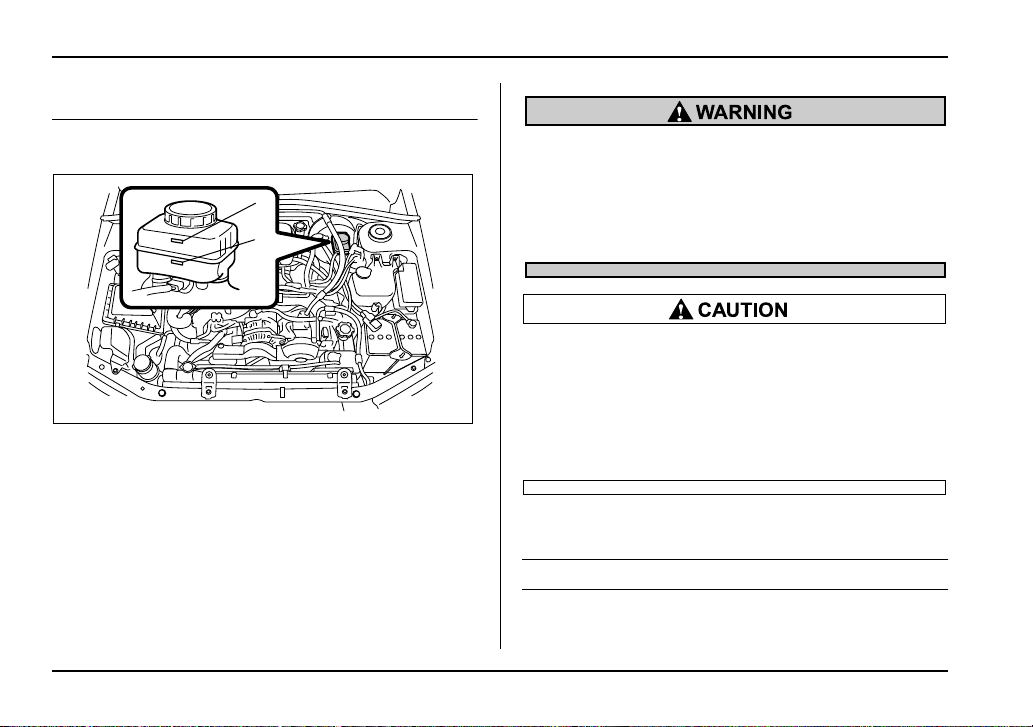
1
MAX
MIN
1) “MAX” level mark
2) “MIN” level mark
Check the fluid level monthly.
Check the fluid level on the outside of the reservoir. If
the level is below “MIN”, add the recommended brake
fluid to “MAX”.
Use only brake fluid from a sealed container.
11-40
2
UGB134FB
y Brake fluid absorbs moisture from the air.
Any absorbed moisture can cause a dangerous
loss of braking performance.
y If the vehicle requires frequent refilling, there
may be a leak. If you suspect a problem, have
the vehicle checked at your SUBARU dealer.
y Never use different brands of brake fluid together.
y When adding brake fluid, be careful not to allow any dirt into the reservoir.
y Never splash the brake fluid over painted surfaces or rubber parts. Alcohol contained in the
brake fluid may damage them.
Recommended brake fluid
FMVSS No. 116, fresh DOT 3 brake fluid
Page 41
Clutch fluid (MT vehicles)
Checking the fluid level
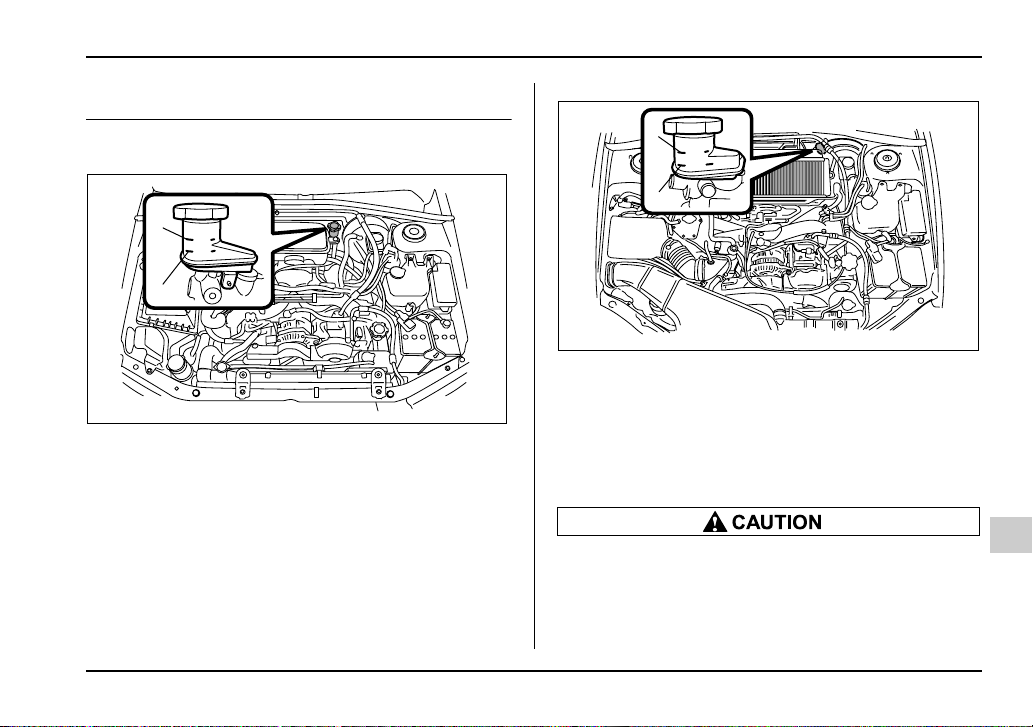
1
MAX
MIN
2
1) “MAX” level mark
2) “MIN” level mark
UGB134GB
Maintenance and service
1
MAX
MIN
2
UGB132CB
1) “MAX” level mark
2) “MIN” level mark
Check the fluid level on the outside of the reservoir. If
the level is below “MIN” level mark, add the recommended clutch fluid to “MAX” level mark.
Use only clutch fluid from a sealed container.
y Clutch fluid absorbs moisture from the air.
Any absorbed moisture can cause improper
clutch operation.
y If the vehicle requires frequent refilling, there
may be a leak. If you suspect a problem, have
– CONTINUED –
11-41
Page 42
Maintenance and service
the vehicle checked at your SUBARU dealer.
y Never use different brands of clutch fluid together.
y When clutch fluid is added, be careful not to
allow any dirt into the tank.
Recommended clutch fluid
FMVSS No. 116, fresh DOT 3 brake fluid
Brake booster
If the brake booster does not operate as described below, have it checked by your SUBARU dealer.
1. With the engine off, depress the brake pedal several times, applying the same pedal force each time. The
distance the pedal travels should not vary.
2. With the brake pedal depressed, start the engine.
The pedal should move slightly down to the floor.
3. With the brake pedal depressed, stop the engine
and keep the pedal depressed for 30 seconds. The
pedal height should not change.
4. Start the engine again and run for about one minute
then turn it off. Depress the brake pedal several times
to check the brake booster. Brake booster operates
properly if the pedal stroke decreases with each depression.
11-42
Page 43
Maintenance and service
Brake pedal
Check the brake pedal free play and reserve distance
according to the maintenance schedule in the “Warranty and Maintenance Booklet”.
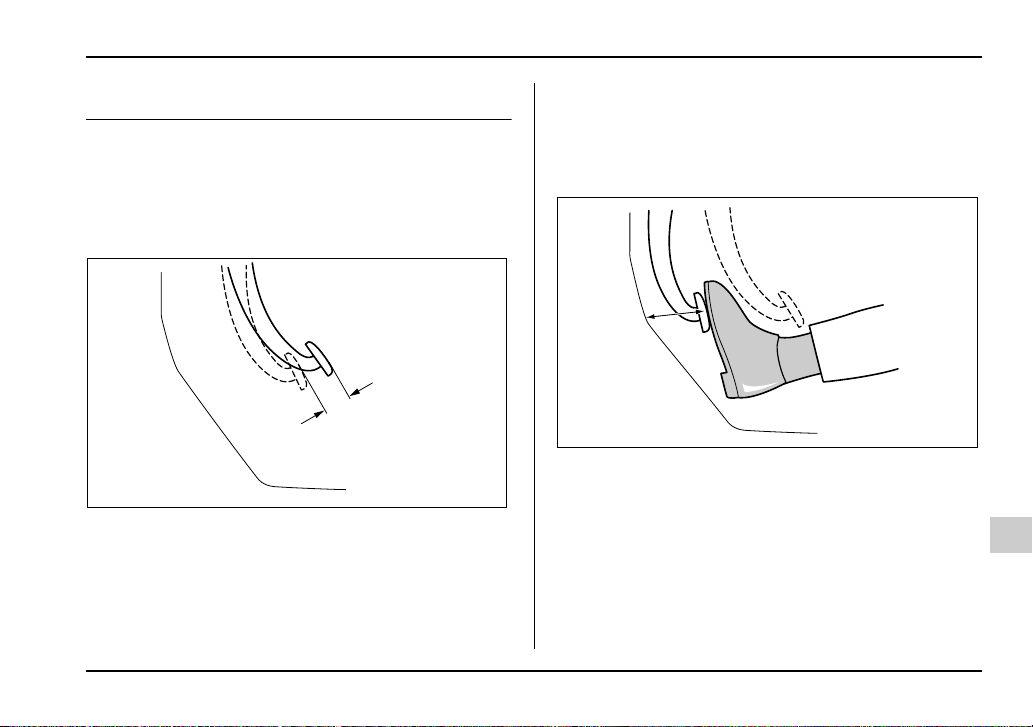
Checking the brake pedal free play
1
HSB049BB
1) 0.04 – 0.12 in (1.0 – 3.0 mm)
Stop the engine and firmly depress the brake pedal
several times. Lightly press the brake pedal down with
one finger to check the free play with a force of less
than 2 lbs (10 N, 1 kg).
If the free play is not within proper specification, con-
tact your SUBARU dealer.
Checking the brake pedal reserve dis-
tance
1
HSB050BB
1) More than 2.56 in (65 mm)
Depress the pedal with a force of approximately 66 lbs
(294 N, 30 kg) and measure the distance between the
upper surface of the pedal pad and the floor.
When the measurement is smaller than the specification, or when the pedal does not operate smoothly,
contact with your SUBARU dealer.
– CONTINUED –
11-43
Page 44
Maintenance and service
Clutch pedal (MT vehicles)
Check the clutch pedal free play and reserve distance
according to the maintenance schedule in the “Warranty and Maintenance Booklet”.
Checking the clutch function
Check the clutch engagement and disengagement.
1. With the engine idling, check that there are no abnormal noises when the clutch pedal is depressed,
and that shifting into 1st or reverse feels smooth.
2. Start the vehicle by releasing the pedal slowly to
check that the engine and transmission smoothly couple without any sign of slippage.
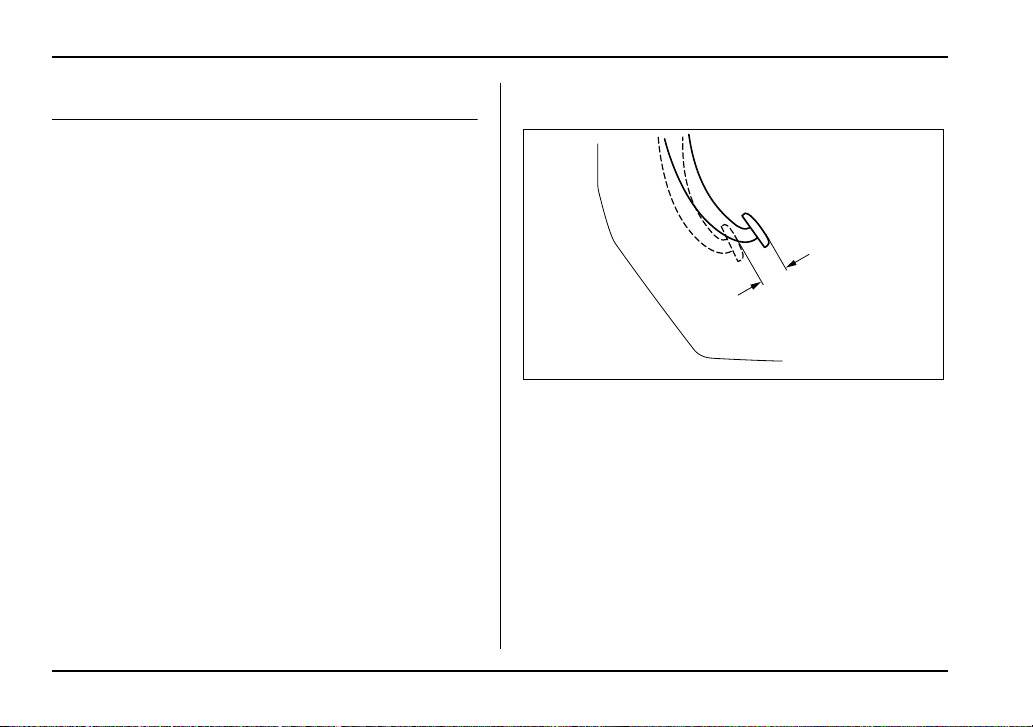
Checking the clutch pedal free play
1
HSB049BB
1) 0.16 – 0.51 in (4.0 –13.0 mm)
Lightly press the clutch pedal down with your finger
until you feel resistance, and check the free play.
If the free play is not within proper specification, contact your SUBARU dealer.
11-44
Page 45
Replacement of brake pad and lining
HS7012BA
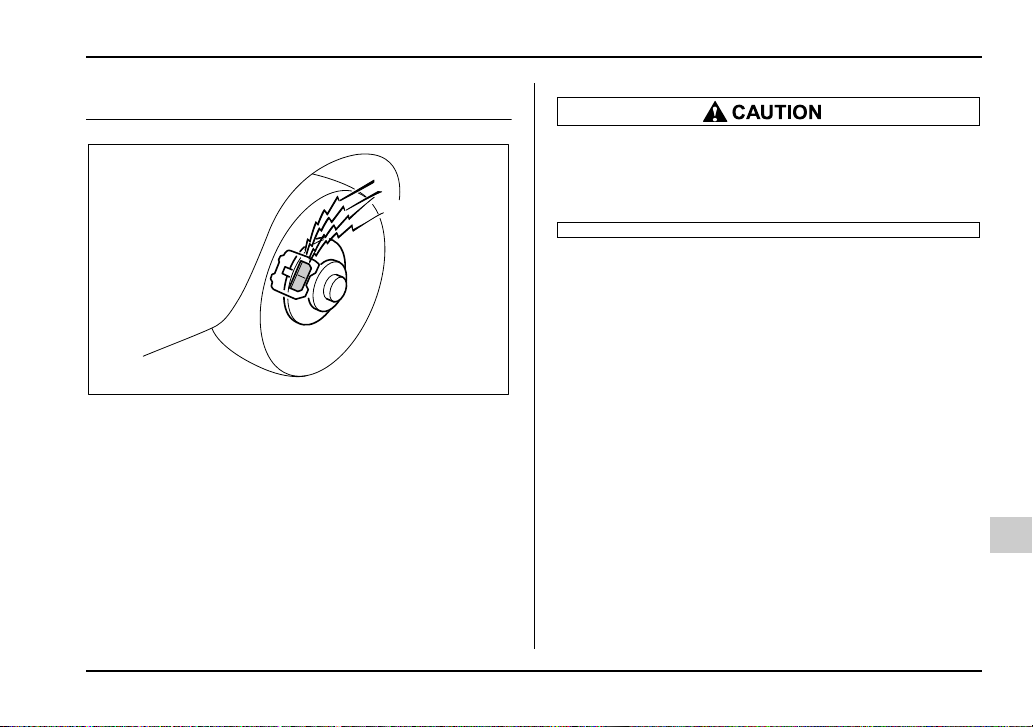
The right front disc brake and the right rear disc brake
have an audible wear indicators on the brake pads. If
the brake pads wear close to their service limit, the
wear indicator makes a very audible scraping noise
when the brake pedal is applied.
If you hear this scraping noise each time you apply the
brake pedal, have the brake pads serviced by your
SUBARU dealer as soon as possible.
Maintenance and service
If you continue to drive despite the scraping
noise from the audible brake pad wear indicator, it will result in the need for costly brake rotor repair or replacement.
Breaking-in of new brake pads and lin-
ings
When replacing the brake pad or lining, use only genuine SUBARU parts. After replacement, the new parts
must be broken in as follows:
T Brake pad and lining
While maintaining a speed of 30 to 40 mph (50 to 65
km/h), step on the brake pedal lightly. Repeat this five
or more times.
T Parking brake lining
1. Drive the vehicle at a speed of about 22 mph (35
km/h).
2. With the parking brake release button pushed in,
pull the parking brake lever SLOWLY and GENTLY.
(Pulling with a force of approximately 33 lbs [147 N, 15
kg].)
3. Drive the vehicle for about 220 yards (200 meters)
– CONTINUED –
11-45
Page 46
Maintenance and service
in this condition.
4. Wait 5 to 10 minutes for the parking brake to cool
down. Repeat this procedure.
5. Check the parking brake stroke. If the parking
brake stroke is out of the specified range, adjust it by
turning the adjusting nut located on the parking brake
lever.
Parking brake stroke:
7 – 8 notches / 44 lbs (196 N, 20 kg)
A safe location and situation should be selected for break-in driving.
Pulling the parking brake lever too forcefully
may cause the rear wheels to lock. To avoid
this, be certain to pull the lever up slowly and
gently.
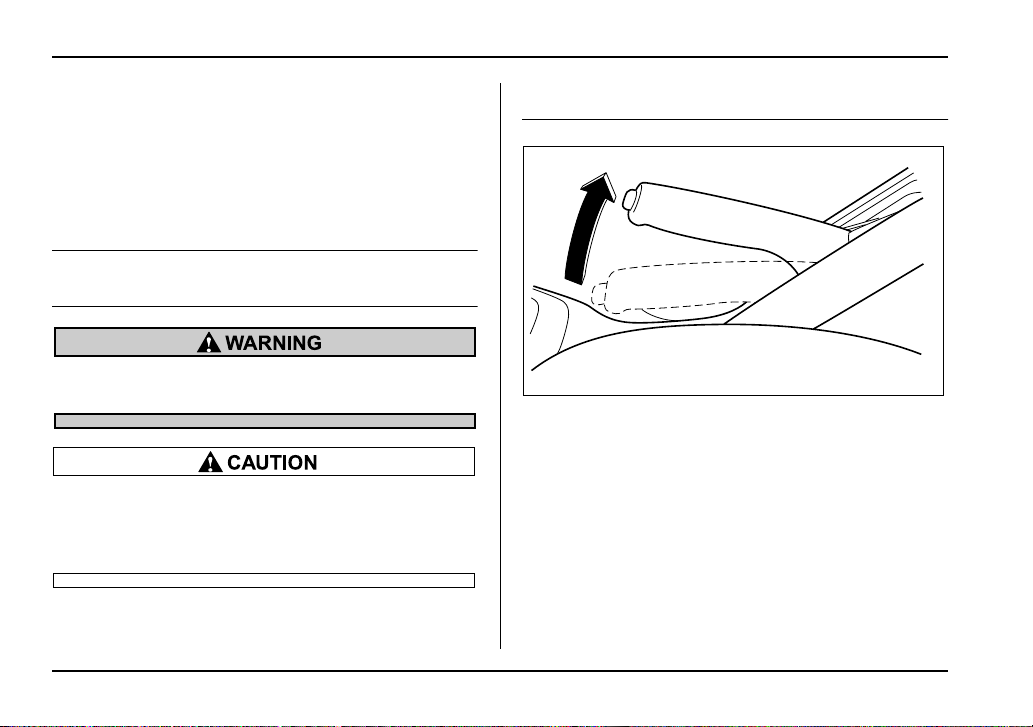
Parking brake stroke
UG7509CA
Check the parking brake stroke according to the maintenance schedule in the “Warranty and Maintenance
Booklet”. When the parking brake is properly adjusted,
braking power is fully applied by pulling the lever up
seven to eight notches gently but firmly (about 44 lbs
[196 N, 20 kg]). If the parking brake lever stroke is not
within the specified range, have the brake system
checked and adjusted at your SUBARU dealer.
11-46
Page 47
Maintenance and service
Tires and wheels
Types of tires
You should be familiar with type of tires present on
your vehicle.
The factory-fitted 17-inch tires on the WRX-STi are
summer tires. The factory-fitted tires on other versions
are all-season tires. The 17-inch tires that can be dealer-fitted on the WRX as an option are summer tires.
T All season tires
All season tires are designed to provide an adequate
measure of traction, handling and braking performance in year-round driving including snowy and icy
road conditions. However all season tires do not offer
as much traction performance as winter (snow) tires in
heavy or loose snow or on icy roads.
All season tires are identified by “ALL SEASON” and/
or “M+S” (Mud & Snow) on the tire sidewall.
T Summer tires
Summer tires are high-speed capability tires best suited for highway driving under dry conditions.
Summer tires are inadequate for driving on slippery
roads such as on snow-covered or icy roads.
If you drive your vehicle on snow-covered or icy roads,
we strongly recommend the use of winter (snow) tires.
When installing winter tires, be sure to replace all four
tires.
T Winter (snow) tires
Winter tires are best suited for driving on snow-covered and icy roads. However winter tires do not perform as well as summer tires and all season tires on
roads other than snow-covered and icy roads.
Tire inspection
Check on a daily basis that the tires are free from serious damage, nails, and stones. At the same time,
check the tires for abnormal wear.
Contact your SUBARU dealer immediately if you find
any problem.
NOTE
y When the wheels and tires strike curbs or are
subjected to harsh treatment as when the vehicle
is driven on a rough surface, they can suffer damage that cannot be seen with the naked eye. This
type of damage does not become evident until
time has passed. Try not to drive over curbs, potholes or on other rough surfaces. If doing so is unavoidable, keep the vehicle’s speed down to a
walking pace or less, and approach the curbs as
squarely as possible. Also, make sure the tires are
– CONTINUED –
11-47
Page 48
Maintenance and service
not pressed against the curb when you park the
vehicle.
y If you feel unusual vibration while driving or find
it difficult to steer the vehicle in a straight line, one
of the tires and/or wheels may be damaged. Drive
slowly to the nearest authorized SUBARU dealer
and have the vehicle inspected.
Tire pressures and wear
Maintaining the correct tire pressures helps to maximize the tires’ service lives and is essential for good
running performance. Check and, if necessary, adjust
the pressure of each tire (including the spare) at least
once a month (for example, during a fuel stop) and before any long journey.
UGB510BA
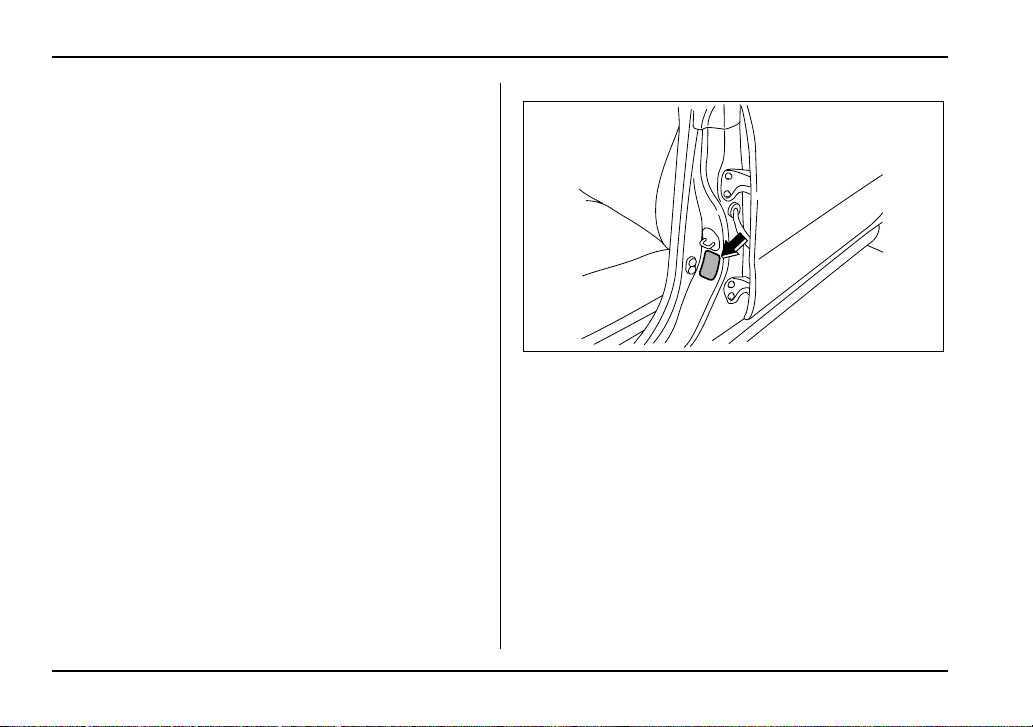
Check the tire pressures when the tires are cold. Use
a pressure gauge to adjust the tire pressures to the
values shown on the tire placard. The tire placard is located on the door pillar on the driver’s side.
Driving even a short distance warms up the tires and
increases the tire pressures. Also, the tire pressures
are affected by the outside temperature. It is best to
check tire pressure outdoors before driving the vehicle.
When a tire becomes warm, the air inside it expands,
causing the tire pressure to increase. Be careful not to
mistakenly release air from a warm tire to reduce its
pressure.
11-48
Page 49
Maintenance and service
NOTE
y The air pressure in a tire increases by approximately 4.3 psi (30 kPa, 0.3 kgf/cm
becomes warm.
y The tires are considered cold when the vehicle
has been parked for at least three hours or has
been driven less than one mile (1.6 km).
Do not let air out of warm tires to adjust pressure. Doing so will result in low tire pressure.
Incorrect tire pressures detract from controllability and
ride comfort, and they cause the tires to wear abnormally.
2
) when the tire
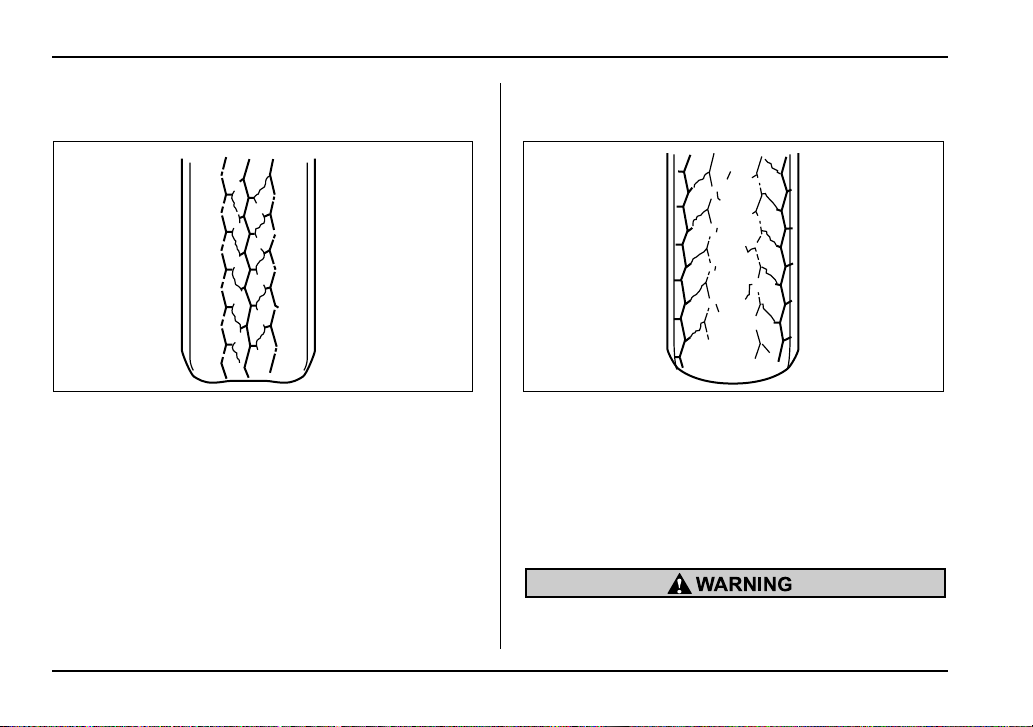
y Correct tire pressure (tread worn evenly)
HSB052AA
Roadholding is good, and steering is responsive. Rolling resistance is low, so fuel consumption is also lower.
– CONTINUED –
11-49
Page 50
Maintenance and service
y Abnormally low tire pressure (tread worn at
shoulders)
HSB053AA HSB054AA
Rolling resistance is high, so fuel consumption is also
higher.
y Abnormally high tire pressure (tread worn in cen-
ter)
Ride comfort is poor. Also, the tire magnifies the effects of road-surface bumps and dips, possibly resulting in vehicle damage.
If the tire placard shows tire pressures for the vehicle
when fully loaded and for the vehicle when towing a
trailer, adjust the tire pressures to the values that
match current loading conditions.
Driving at high speeds with excessively low tire
pressures can cause the tires to deform severe-
11-50
Page 51
Maintenance and service
ly and to rapidly become hot. A sharp increase
in temperature could cause tread separation,
and destruction of the tires. The resulting loss
of vehicle control could lead to an accident.
Wheel balance
Each wheel was correctly balanced when your vehicle
was new, but the wheels will become unbalanced as
the tires become worn during use. Wheel imbalance
causes the steering wheel to vibrate slightly at certain
vehicle speeds and detracts from the vehicle’s
straight-line stability. It can also cause steering and
suspension system problems and abnormal tire wear.
If you suspect that the wheels are not correctly balanced, have them checked and adjusted by your
SUBARU dealer. Also have them adjusted after tire repairs and after tire rotation.
NOTE
Loss of correct wheel alignment* causes the tires
to wear on one side and reduces the vehicle’s running stability. Contact your SUBARU dealer if you
notice abnormal tire wear.
*: The suspension system is designed to hold each wheel at
a certain alignment (relative to the other wheels and to the
road) for optimum straight-line stability and cornering perfor-
mance.
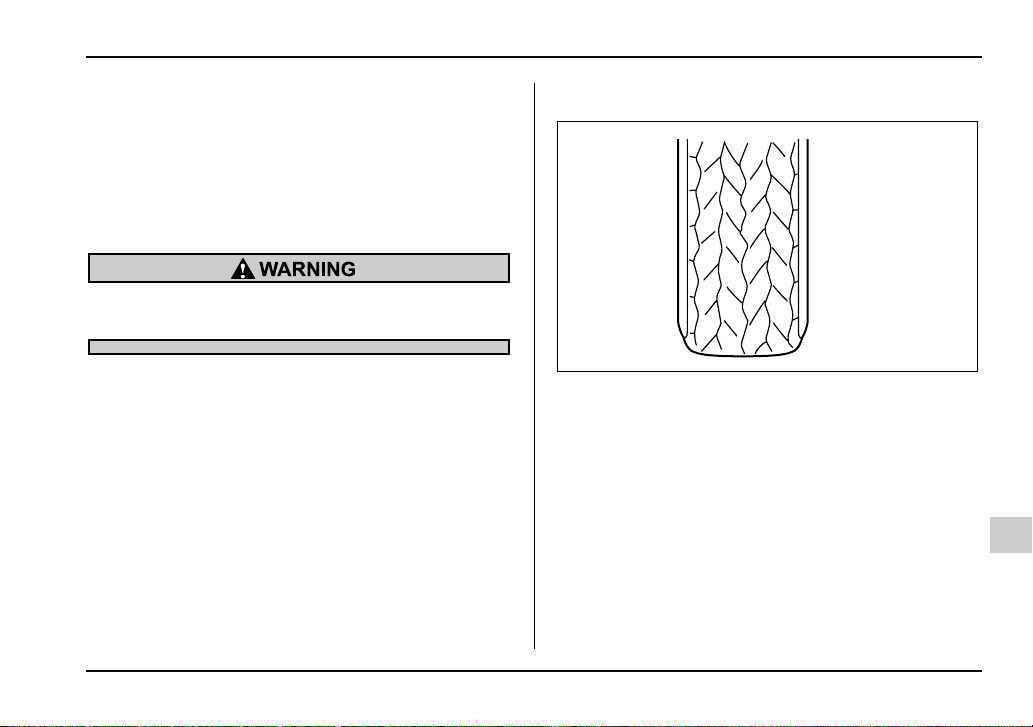
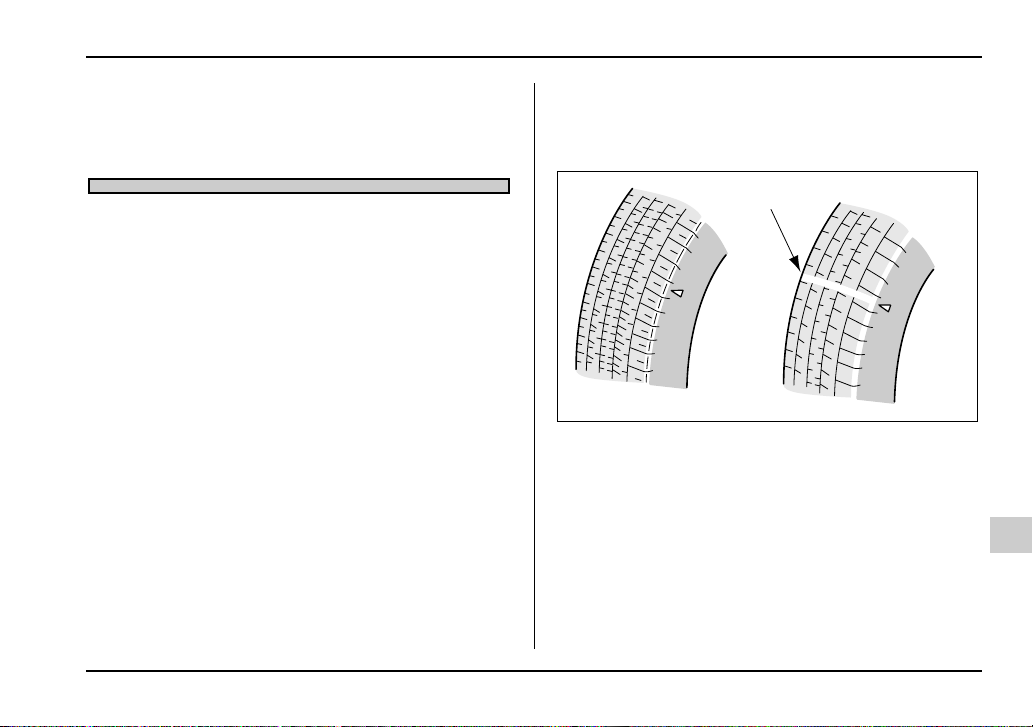
Wear indicators
A
A) New tread
B) Worn tread
1) Tread wear indicator
Each tire incorporates a tread wear indicator, which
becomes visible when the depth of the tread grooves
decreases to 0.063 in (1.6 mm). A tire must be replaced when the tread wear indicator appears as a
solid band across the tread.
B
1
HSB055BB
– CONTINUED –
11-51
Page 52
Maintenance and service
When a tire’s tread wear indicator becomes visible, the tire is worn beyond the acceptable limit
and must be replaced immediately. With a tire
in this condition, driving at high speeds in wet
weather can cause the vehicle to hydroplane.
The resulting loss of vehicle control can lead to
an accident.
NOTE
For safety, inspect tire tread regularly and replace
the tires before their tread wear indicators become
visible.
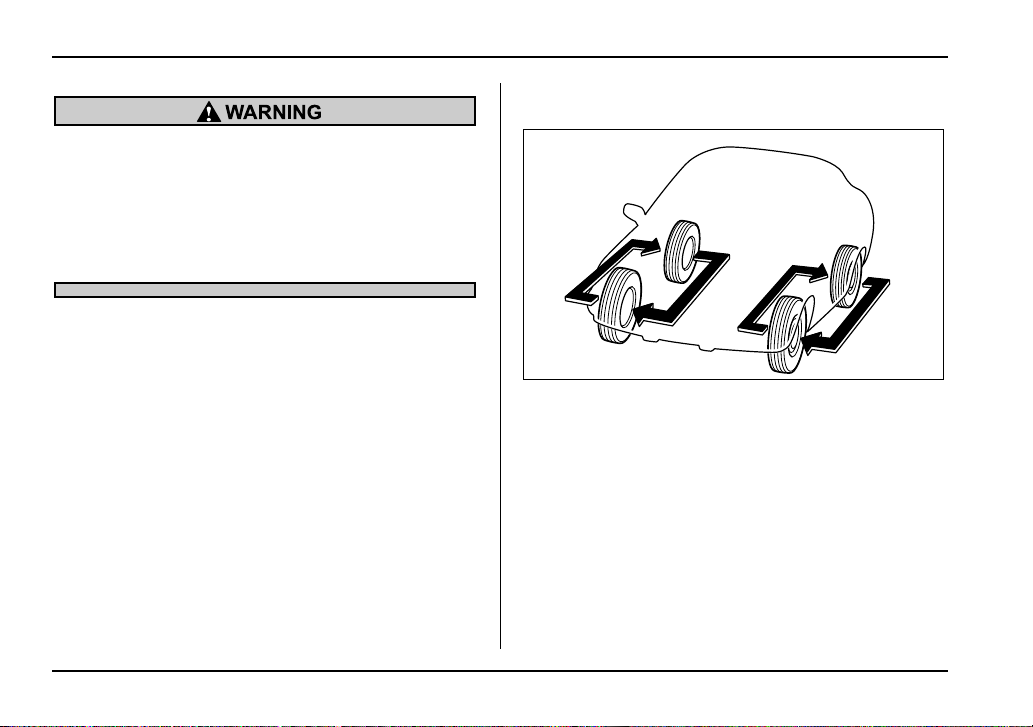
Tire rotation
HSB056BA
Tire wear varies from wheel to wheel. To maximize the
life of each tire and ensure that the tires wear uniformly, it is best to rotate the tires every 7,500 miles
(12,500 km). Rotating the tires involves switching the
front and rear tires on the right hand side of the vehicle
and similarly switching the front and rear tires on the
left hand side of the vehicle. (Each tire must be kept on
its original side of the vehicle.)
Replace any damaged or unevenly worn tire at the
time of rotation. After tire rotation, adjust the tire pressures and make sure the wheel nuts are correctly
tightened.
11-52
Page 53
Maintenance and service
After driving approximately 600 miles (1,000 km),
check the wheel nuts again and retighten any nut that
has become loose.
Tire replacement
The wheels and tires are important and integral parts
of your vehicle’s design; they cannot be changed arbitrarily. The tires fitted as standard equipment are optimally matched to the characteristics of the vehicle and
were selected to give the best possible combination of
running performance, ride comfort, and service life. It
is essential for every tire to have a size and construction matching those shown on the tire placard and to
have a speed symbol and load index matching those
shown on the tire placard.
Using tires of a non-specified size detracts from controllability, ride comfort, braking performance, speedometer accuracy and odometer accuracy. It also creates incorrect body-to-tire clearances and inappropriately changes the vehicle’s ground clearance.
All four tires must be the same in terms of manufacturer, brand (tread pattern), construction, and size. You
are advised to replace the tires with new ones that are
identical to those fitted as standard equipment.
For safe vehicle operation, SUBARU recommends re-
placing all four tires at the same time.
y All four tires must be the same in terms of
manufacturer, brand (tread pattern), construction, degree of wear, speed symbol, load index
and size. Mixing tires of different types, sizes or
degrees of wear can result in damage to vehicle’s power train. Use of different types or sizes
of tires can also dangerously reduce controllability and braking performance and can lead to
an accident.
y Use only radial tires. Do not use radial tires
together with belted bias tires and/or bias-ply
tires. Doing so can dangerously reduce controllability, resulting in an accident.
Wheel replacement
When replacing wheels due, for example, to damage,
make sure the replacement wheels match the specifications of the wheels that are fitted as standard equipment. Replacement wheels are available from
SUBARU dealers.
– CONTINUED –
11-53
Page 54
Maintenance and service
Aluminum wheels
Use only those wheels that are specified for
your vehicle. Wheels not meeting specifications could interfere with brake caliper operation and may cause the tires to rub against the
wheel well housing during turns. The resulting
loss of vehicle control could lead to an accident.
NOTE
When any of the wheels is removed and replaced
for tire rotation or to change a flat tire, always
check the tightness of the wheel nuts after driving
approximately 600 miles (1,000 km). If any nut is
loose, tighten it to the specified torque.
11-54
Aluminum wheels can be scratched and damaged
easily. Handle them carefully to maintain their appearance, performance, and safety.
y When any of the wheels is removed and replaced
for tire rotation or to change a flat, always check the
tightness of the wheel nuts after driving approximately
600 miles (1,000 km). If any nut is loose, tighten it to
the specified torque.
y Never apply oil to the threaded parts, wheel nuts, or
tapered surface of the wheel.
y Never let the wheel rub against sharp protrusions or
curbs.
y Be sure to fit tire chains on uniformly and completely
around the tire, otherwise the chains may scratch the
wheel.
y When wheel nuts, balance weights, or the center
cap is replaced, be sure to replace them with genuine
SUBARU parts designed for aluminum wheels.
Page 55
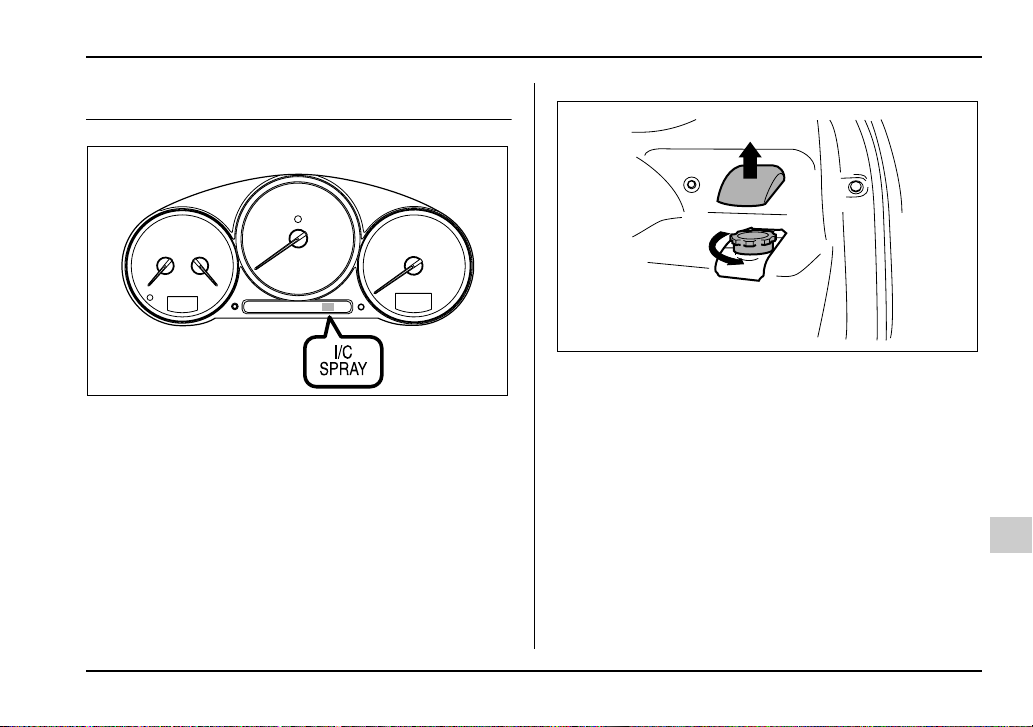
Intercooler water spray (WRX-STi)
Maintenance and service
UGB514BA
UGB079BA
Add water to the intercooler water spray tank when the
intercooler water spray warning light in the combination meter comes on. The warning light comes on
when the water in the tank has decreased to approximately 0.4 liters (0.4 US qt, 0.4 Imp qt).
The tank is located on the right hand side of the trunk.
NOTE
y Use only pure water for refilling.
y In cold weather (when you do not use the inter-
cooler water spray), keep the tank half-empty in
case the water freezes. A larger amount of water
could break the tank if it froze.
– CONTINUED –
11-55
Page 56
Maintenance and service
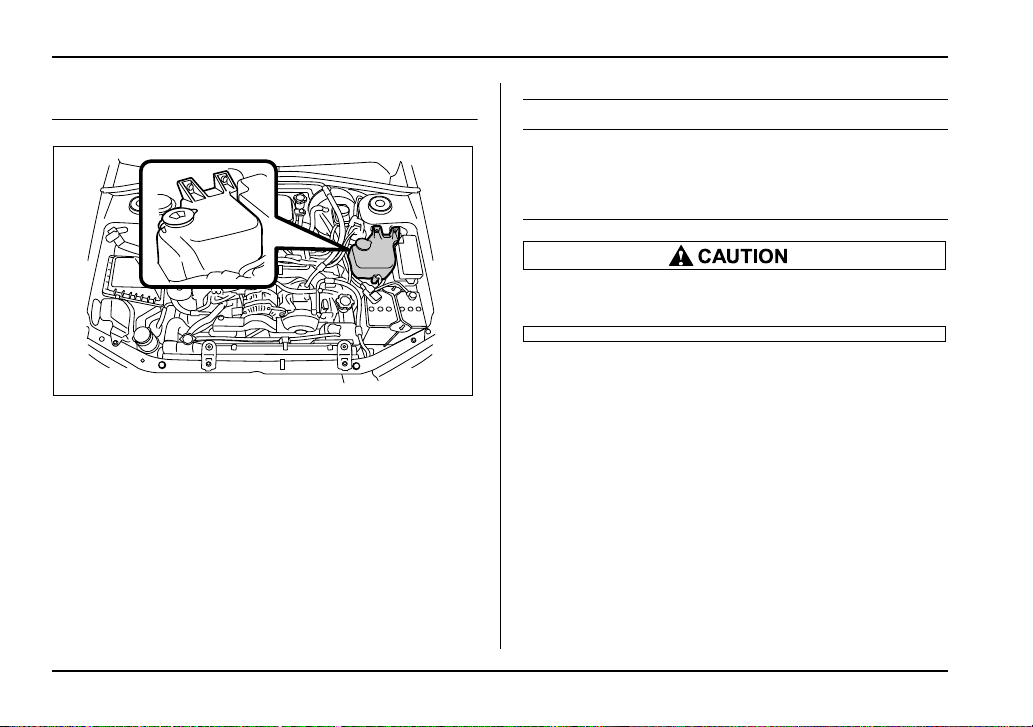
Windshield washer fluid
UGB134HA
Check the level of the washer fluid at each fuel stop. If
the level is low, fill the fluid up to the neck of the reservoir.
Use windshield washer fluid. If windshield washer fluid
is unavailable use clean water.
In areas where water freezes in winter, use an antifreeze type windshield washer fluid. SUBARU Windshield Washer Fluid contains 58.5% methyl alcohol
and 41.5% surfactant, by volume. Its freezing temperature varies according to how much it is diluted, as indicated in the following table.
Washer Fluid Concentration Freezing Temperature
30% 10.4°F (–12°C)
50% –4°F (–20°C)
100% –49°F (–45°C)
Never use engine coolant as washer fluid because it could cause paint damage.
11-56
Page 57
Maintenance and service
Replacement of wiper blades
Grease, wax, insects, or other material on the windshield or the wiper blade results in jerky wiper operation and streaking on the glass. If you cannot remove
the streaks after operating the windshield washer or if
the wiper operation is jerky, clean the outer surface of
the windshield (or rear window) and the wiper blades
using a sponge or soft cloth with a neutral detergent or
mild-abrasive cleaner. After cleaning, rinse the windshield and wiper blades with clean water. The windshield is clean if beads do not form when you rinse the
windshield with water.
Do not clean the wiper blades with gasoline or
a solvent, such as paint thinner or benzene.
This will cause deterioration of the wiper
blades.
If you cannot eliminate the streaking even after following this method, replace the wiper blades using the following procedures:
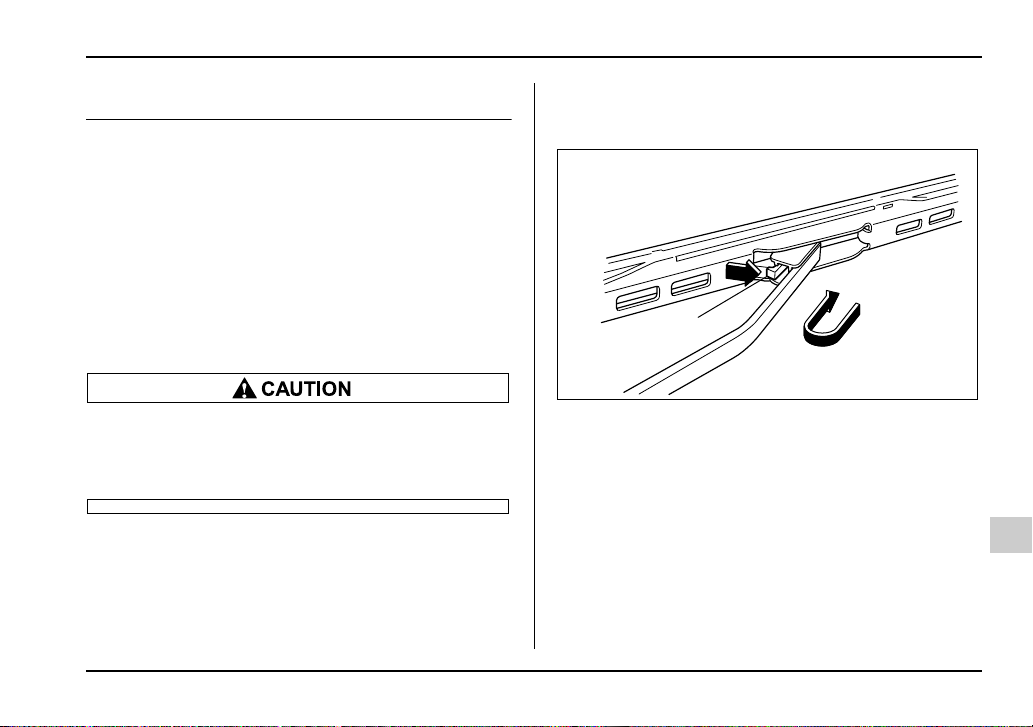
Windshield wiper blades assembly
1. Raise the wiper arm off the windshield.
1
UGB133BB
1) Stopper
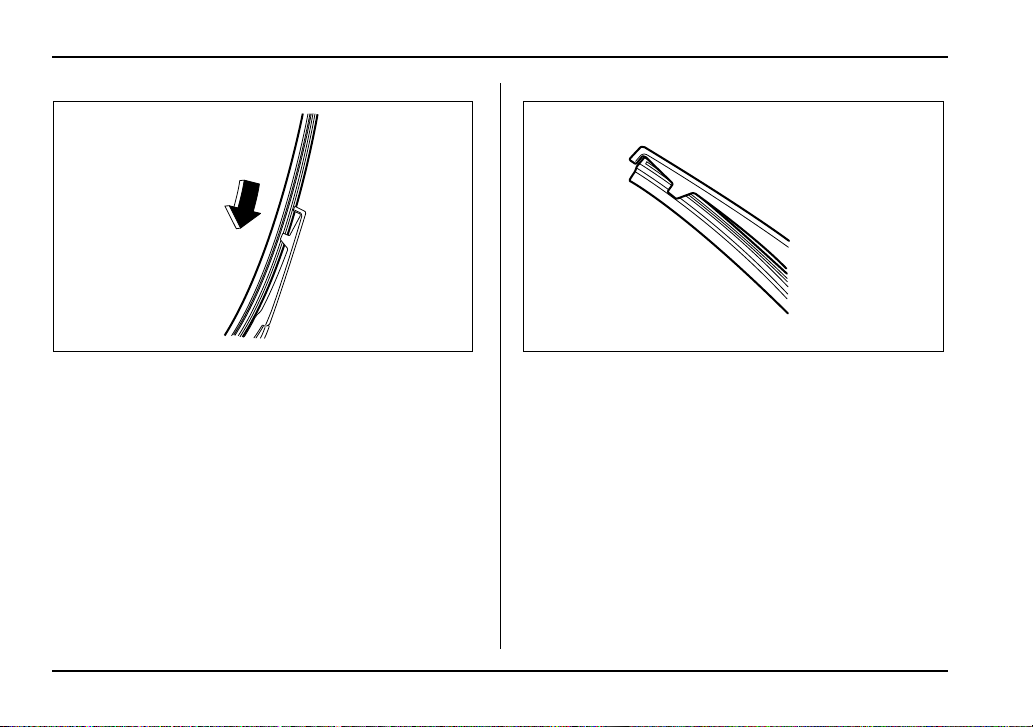
2. Remove the wiper blade assembly by holding its
pivot area and pushing it in the direction shown by the
arrow while depressing the wiper blade stopper.
3. Install the wiper blade assembly to the wiper arm.
Make sure that it locks in place.
4. Hold the wiper arm by hand and slowly lower it in
position.
– CONTINUED –
11-57
Page 58
Maintenance and service
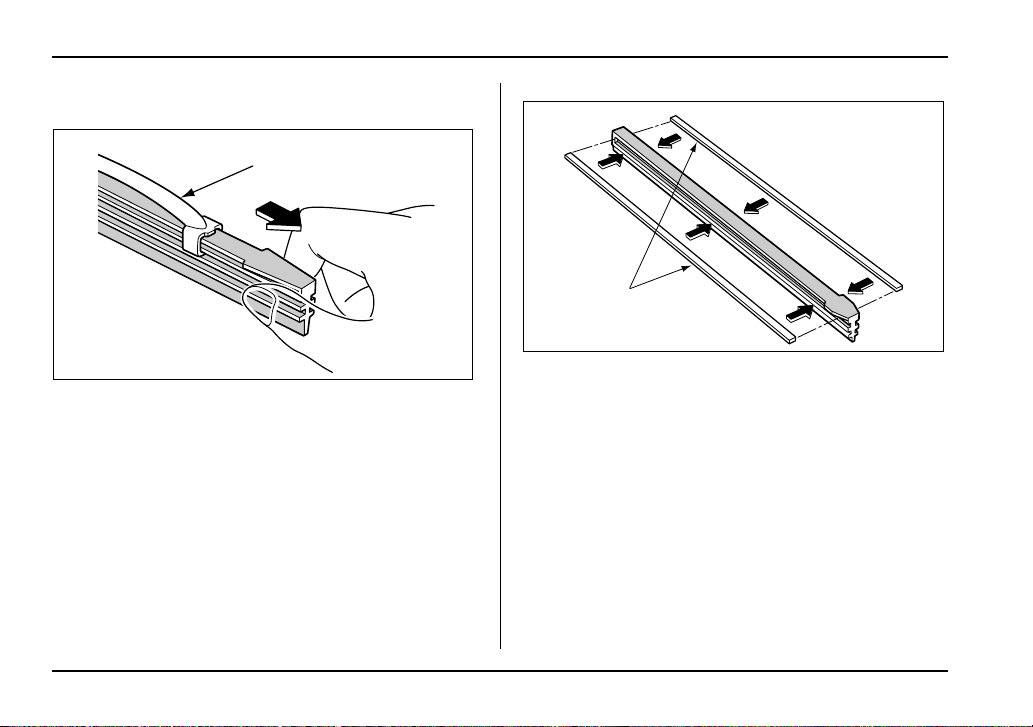
Windshield wiper blade rubber
1
HSB059BB
1) Metal support
1. Grasp the locked end of the blade rubber assembly
and pull it firmly until the stoppers on the rubber are
free of the metal support.
0
1
HSB060BB
1) Metal spines
2. If the new blade rubber is not provided with two
metal spines, remove the metal spines from the old
blade rubber and install them in the new blade rubber.
11-58
Page 59
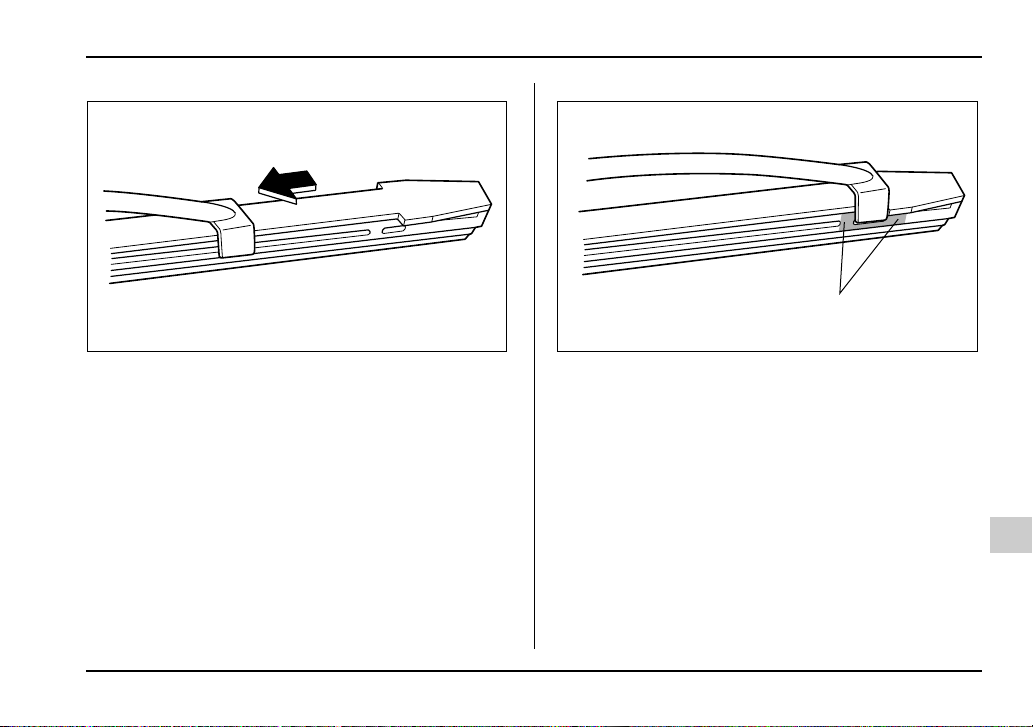
HSB061BA
Maintenance and service
1
HSB062BB
3. Align the claws of the metal support with the
grooves in the rubber and slide the blade rubber assembly into the metal support until it locks.
1) Stopper
2)
4. Be sure to position the claws at the end of the metal
support between the stoppers on the rubber as shown.
If the rubber is not retained properly, the wiper blade
may scratch the windshield.
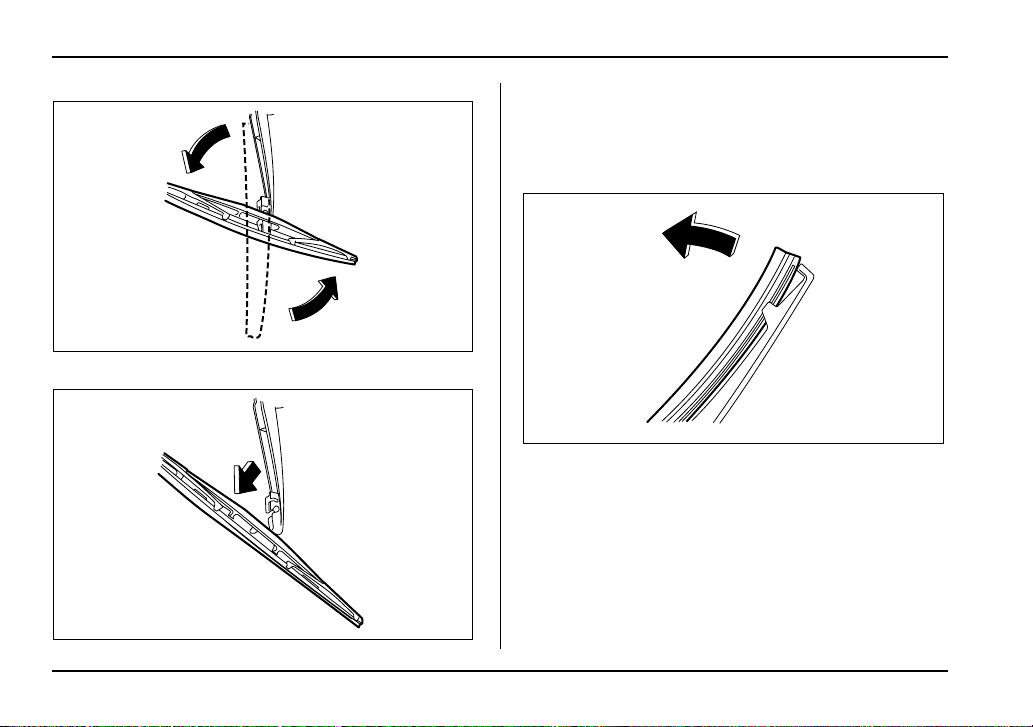
Rear window wiper blade assembly
1. Raise the wiper arm off the rear window.
– CONTINUED –
11-59
Page 60
Maintenance and service
UBB554BA
2. Turn the wiper blade assembly counterclockwise.
3. Pull the wiper blade assembly toward you to remove it from the wiper arm.
Rear window wiper blade rubber
UBB523BA
1. Pull out the end of the blade rubber assembly to unlock it from the plastic support.
11-60
UBB555BA
Page 61
Maintenance and service
A
USB586BA
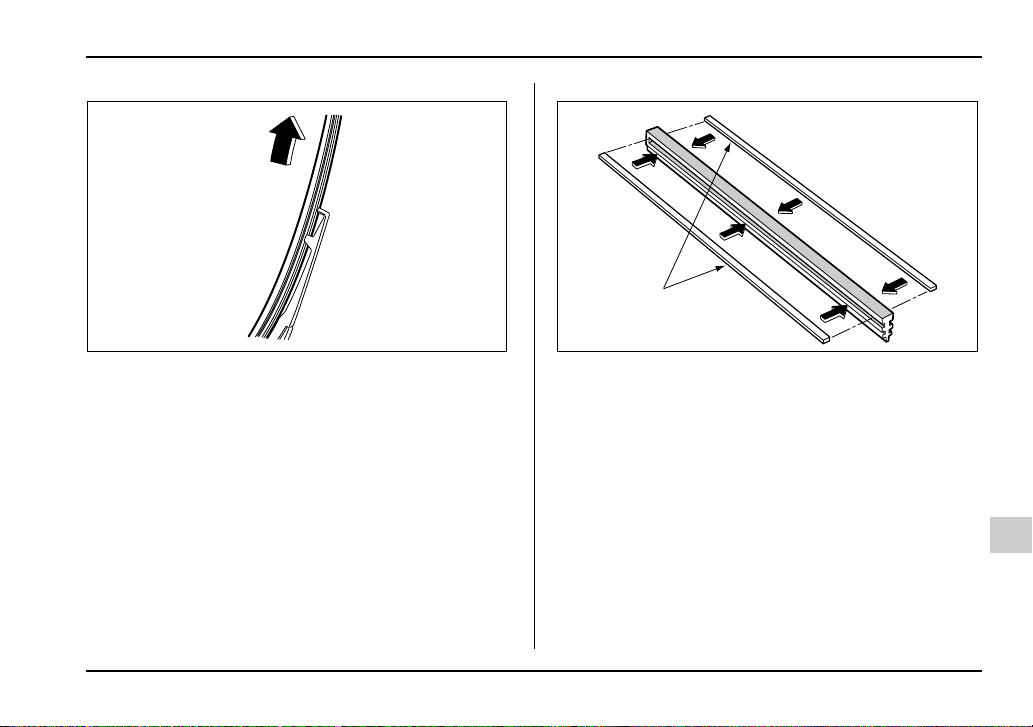
2. Pull the blade rubber assembly out of the plastic
support.
USB583BC
A) Metal spines
3. If the new blade rubber is not provided with two
metal spines, remove the metal spines from the old
blade rubber and install them in the new blade rubber.
– CONTINUED –
11-61
Page 62
Maintenance and service
USB586CA USB584BA
4. Align the claws of the plastic support with the
grooves in the blade rubber assembly, then slide the
blade rubber assembly into place.
11-62
Securely retain both ends of the rubber with the stoppers on the plastic support ends. If the rubber is not retained properly, the wiper may scratch the rear window glass.
5. Install the wiper blade assembly to the wiper arm.
Make sure that it locks in place.
6. Hold the wiper arm by hand and slowly lower it in
position.
Page 63
Maintenance and service
Battery
y Before beginning work on or near any battery, be sure to extinguish all cigarettes, matches, and lighters. Never expose a battery to an
open flame or electric sparks. Batteries give off
a gas which is highly flammable and explosive.
y For safety, in case an explosion does occur,
wear eye protection or shield your eyes when
working near any battery. Never lean over a battery.
y Do not let battery fluid contact eyes, skin,
fabrics, or paint because battery fluid is a corrosive acid. If battery fluid gets on your skin or
in your eyes, immediately flush the area with
water thoroughly. Seek medical help immediately if acid has entered the eyes.
If battery fluid is accidentally swallowed, immediately drink a large amount of milk or water,
and seek medical attention immediately.
y To lessen the risk of sparks, remove rings,
metal watchbands, and other metal jewelry.
Never allow metal tools to contact the positive
battery terminal and anything connected to it
WHILE you are at the same time in contact with
any other metallic portion of the vehicle because a short circuit will result.
y Keep everyone including children away from
the battery.
y Charge the battery in a well-ventilated area.
y Battery posts, terminals and related accesso-
ries contain lead and lead compounds, chemicals known to the State of California to cause
cancer and reproductive harm. Batteries also
contain other chemicals known to the State of
California to cause cancer. Wash hands after
handling.
– CONTINUED –
11-63
Page 64
Maintenance and service
LOWER LEVEL
UPPER LEVEL
LO
W
E
R
2
life.
1
LE
V
E
L
3
UGB117BB
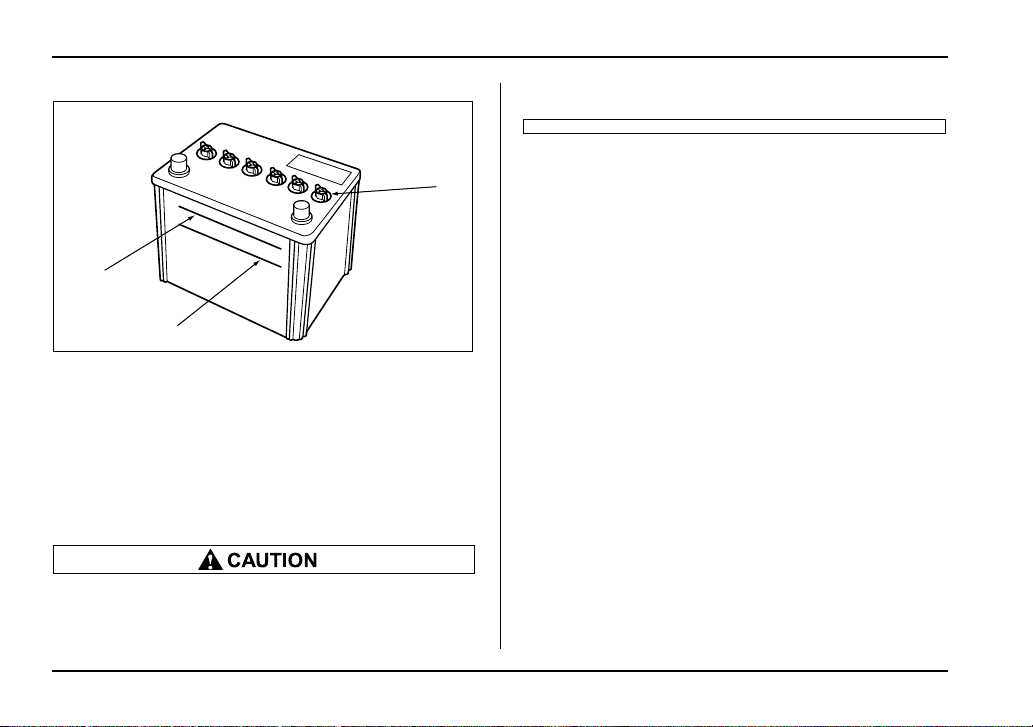
1) Cap
2) Upper level
3) Lower level
It is unnecessary to periodically check the battery fluid
level or periodically refill with distilled water.
However, if the battery fluid level is below the lower
level, remove the cap. Fill to the upper level with distilled water.
Never use more than 10 amperes when charging the battery because it will shorten battery
11-64
Page 65
Fuses
Never replace a fuse with one having a higher
rating or with material other than a fuse because serious damage or a fire could result.
The fuses are designed to melt during an overload to
prevent damage to the wiring harness and electrical
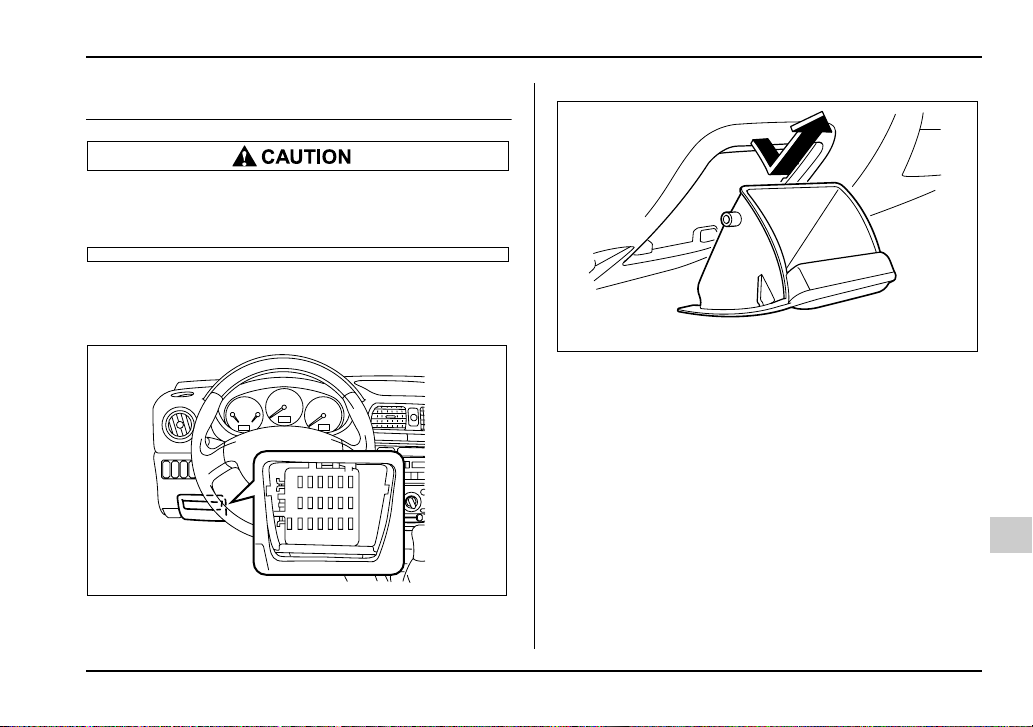
equipment. The fuses are located in two fuse boxes.
UGB088BA
One is located under the instrument panel behind the
coin tray on the driver’s seat side.
Maintenance and service
UGB550BA
To remove the coin tray, open the cover and pull the
coin tray out.
– CONTINUED –
11-65
Page 66
Maintenance and service
1
HSB065BA
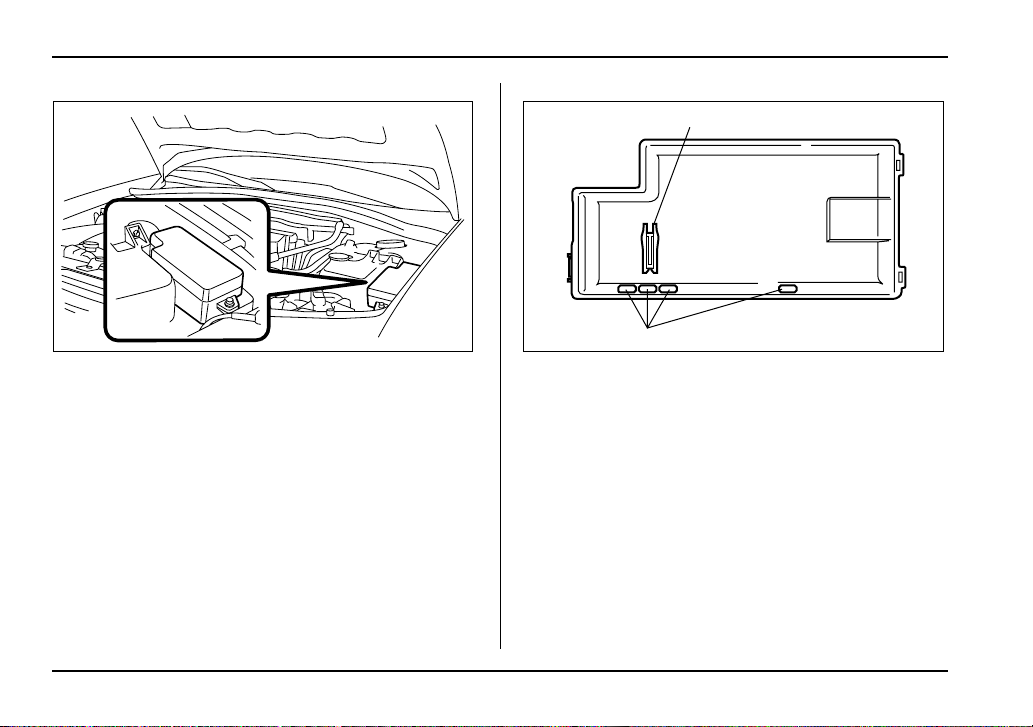
The other one is housed in the engine compartment.
11-66
2
1) Fuse puller
2) Spare fuse
HSB066BB
The fuse puller and spare fuses are stored in the main
fuse box cover in the engine compartment.
Page 67
Maintenance and service
AB
HSB067BB
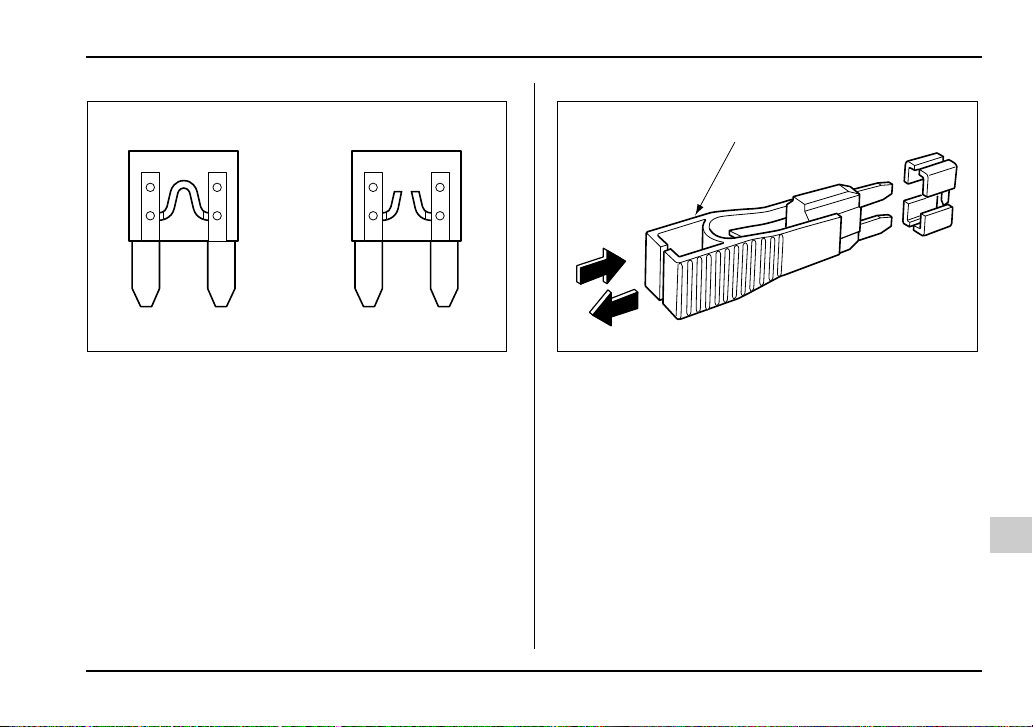
A) Good
B) Blown
If any lights, accessories or other electrical controls do
not operate, inspect the corresponding fuse. If a fuse
has blown, replace it.
1. Turn the ignition switch to the “LOCK” position and
turn off all electrical accessories.
2. Remove the cover.
3. Determine which fuse may be blown. The back side
of each fuse box cover and the “Fuses and circuits”
section in chapter 12 in this manual show the circuit for
each fuse.
1
HSB068BB
1) Fuse puller
4. Pull out the fuse with the fuse puller.
5. Inspect the fuse. If it has blown, replace it with a
spare fuse of the same rating.
6. If the same fuse blows again, this indicates that its
system has a problem. Contact your SUBARU dealer
for repairs.
– CONTINUED –
11-67
Page 68
Maintenance and service
Main fuse
HSB065BA
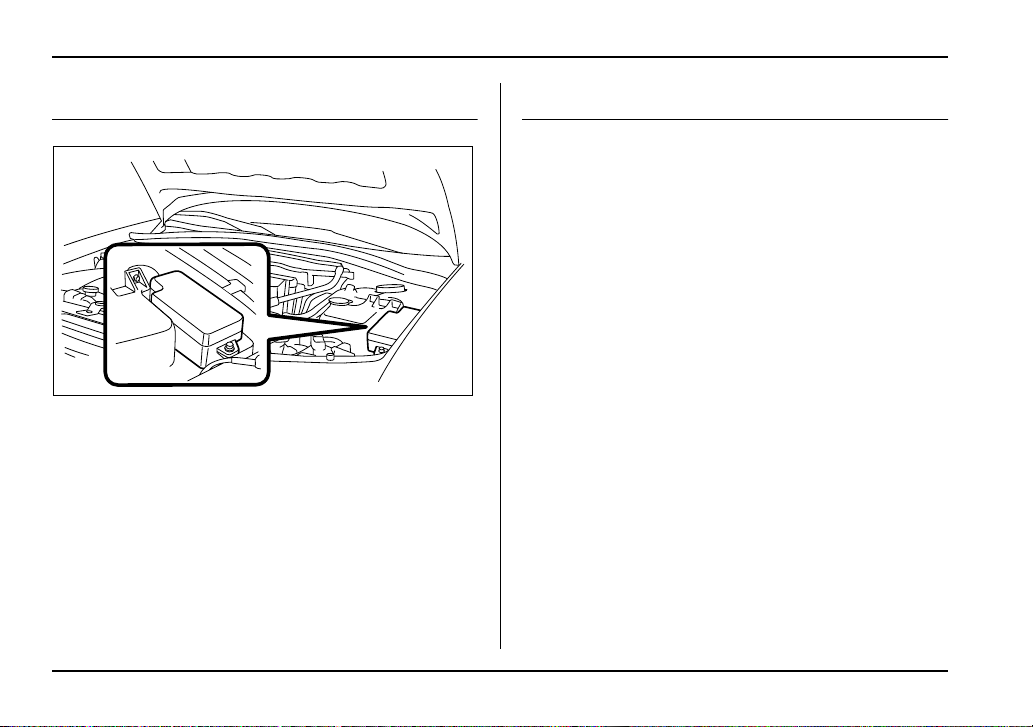
Main fuse box
The main fuses are designed to melt during an overload to prevent damage to the wiring harness and
electrical equipment. Check the main fuses if any electrical component fails to operate (except the starter
motor) and other fuses are good. A melted main fuse
must be replaced. Use only replacements with the
same specified rating as the melted main fuse. If a
main fuse blows after it is replaced, have the electrical
system checked by your nearest SUBARU dealer.
Installation of accessories
Always consult your SUBARU dealer before installing
fog lights or any other electrical equipment in your vehicle. Such accessories may cause the electronic system to malfunction if they are incorrectly installed or if
they are not suited for the vehicle.
11-68
Page 69
Replacing bulbs
123
981011
15
14 13 12
Maintenance and service
9
14 16
15
65 47
10 11
UGB135BB
– CONTINUED –
11-69
Page 70
Maintenance and service
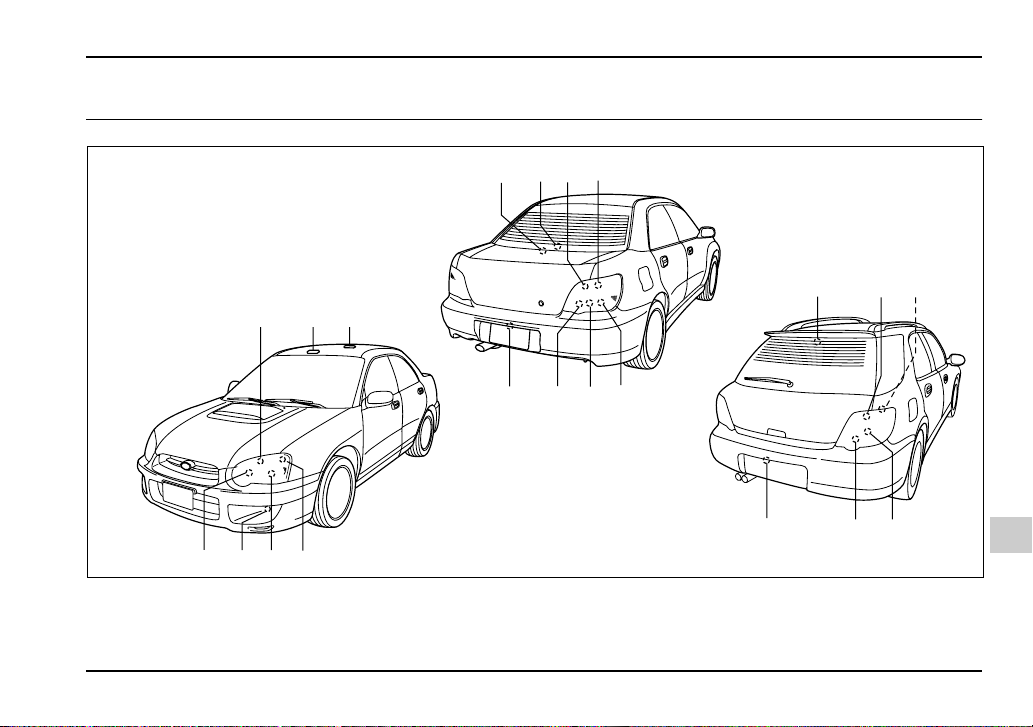
Wattage Bulb No.
1) Front turn signal 12V-21W –
2) Spot light 12V-8W –
3) Room light 12V-8W –
4) Parking light 12V-5W 168
5) Low beam head light
U.S.-spec. WRX-STi 12V-35W D2R
Except U.S.-spec.
WRX-STi
6) Front fog light 12V-55W H3
7) High beam head light 12V-60W 9005
8) Trunk room light 12V-16W W16W
9) High mount stop light
Sedan
(in compartment) 12V-18W 921
(in rear spoiler) 12V-1.2W –
Wagon 12V-13W 912
10) Backup light 12V-21W 7440
11) Rear turn signal 12V-21W
12) Brake/tail light 12V-21/5W 7443
13) Tail light 12V-21/5W 7443
14) Brake light 12V-21W 7440
15) License plate light 12V-5W 168
12V-55W H1
(HB3)
–
(Amber)
Wattage Bulb No.
16) Cargo area light 12V-13W –
Headlights (U.S.-spec. WRX-STi)
High-intensity-discharge (HID) bulbs are used
for the low beams of the headlights on the U.S.spec. WRX-STi. These HID bulbs use an extremely high voltage. To avoid the risk of an
electric shock and resulting serious injury, you
should not attempt to replace them. Neither
should you attempt to replace the high-beam
bulbs, remove/refit the headlight assemblies,
or remove any headlight-assembly components. For replacement of the headlight bulbs
(low-beam and high-beam), removal and installation of the headlight assemblies, and removal
of headlight-assembly components, contact
your SUBARU dealer.
11-70
Page 71
Maintenance and service
Headlights (Except U.S.-spec. WRX-
STi)
Halogen headlight bulbs become very hot while
in use. If you touch the bulb surface with bare
hands or greasy gloves, finger prints or grease
on the bulb surface will develop into hot spots
and cause the bulb to break. If there are finger
prints or grease on the bulb surface, wipe them
away with a soft cloth moistened with alcohol.
NOTE
y If headlight aiming is required, consult your
SUBARU dealer for proper adjustment of the headlight aim.
y It may be difficult to replace the bulbs. Have
your SUBARU dealer replace the bulbs if necessary.
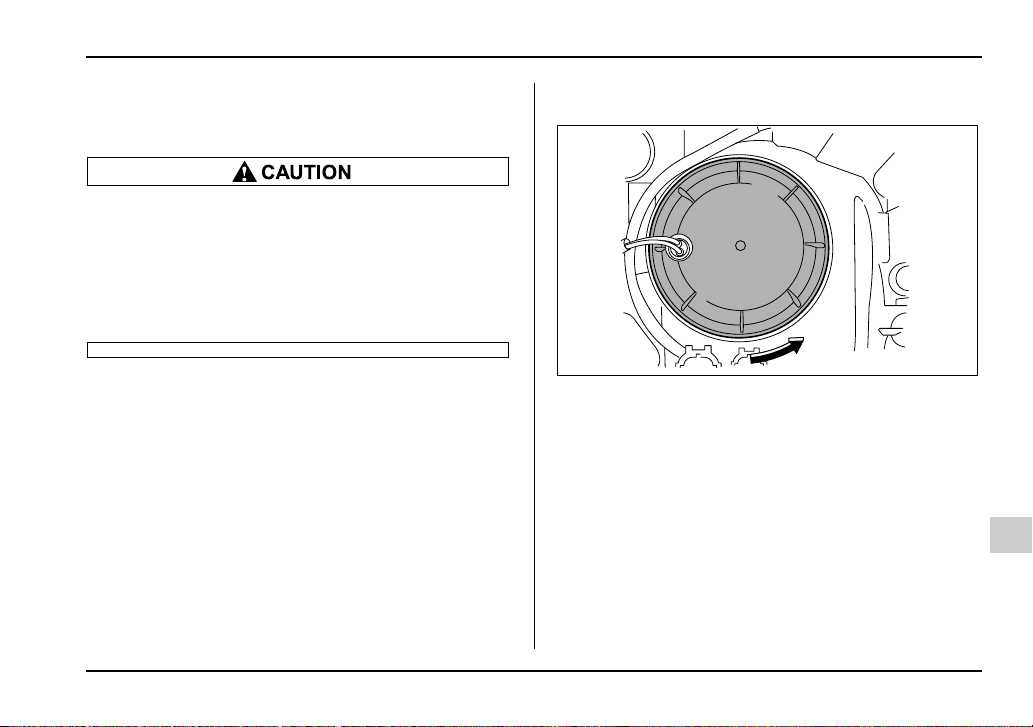
T Low beam light bulbs
UGB516BA
1. Remove the bulb cover, by turning it counterclockwise.
– CONTINUED –
11-71
Page 72
Maintenance and service
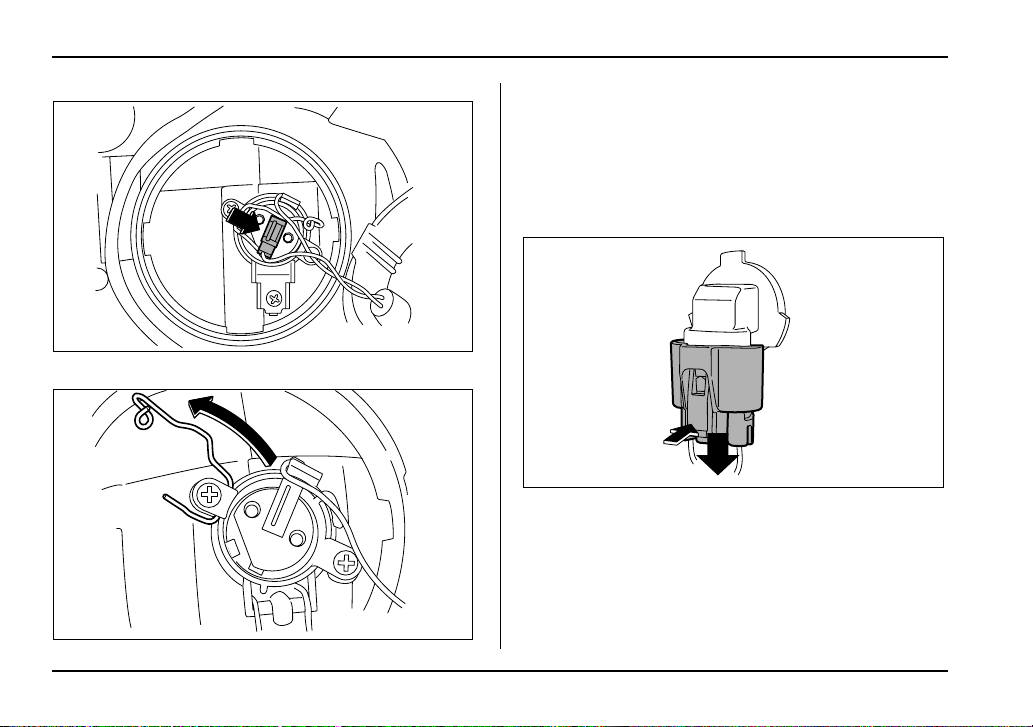
2. Disconnect the electrical connector.
3. Remove the retainer spring.
4. Replace the bulb, then set the retainer spring securely.
5. Reconnect the electrical connector.
6. Install the bulb cover.
T High beam light bulbs
UGB517BA
UGB519CA
1. Disconnect the electrical connector from the bulb.
11-72
UGB518BA
Page 73
UGB520BA
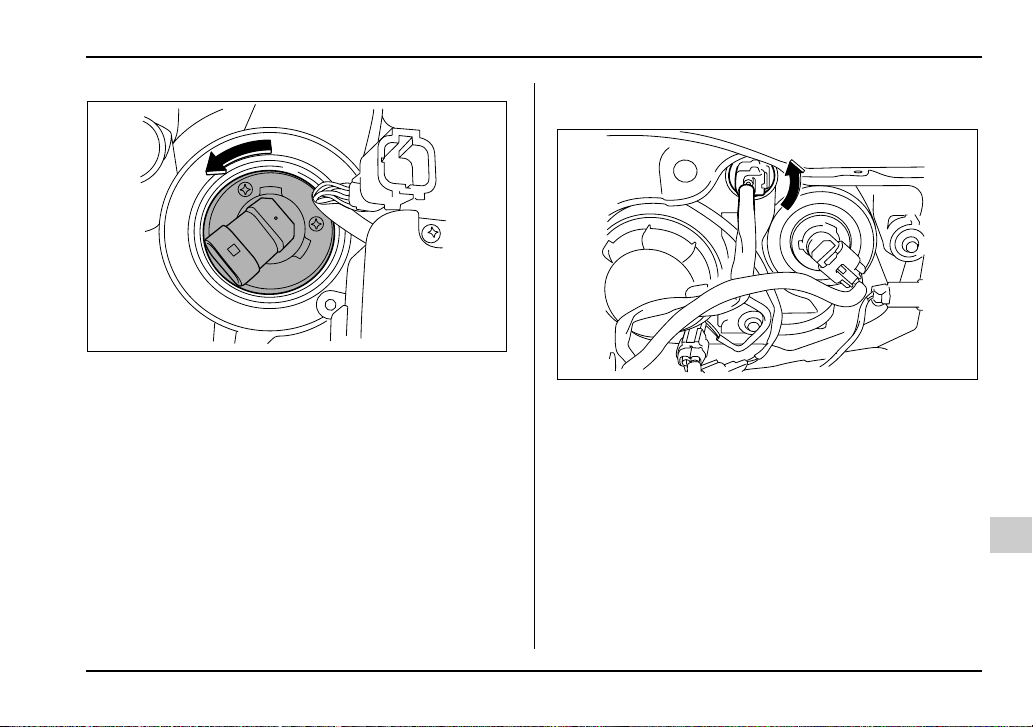
2. Remove the bulb from the headlight assembly by
turning it counterclockwise.
3. Replace the bulb with new one.
4. Reconnect the electrical connector. At this time,
use care not to touch the bulb surface.
5. To install the bulb to the headlight assembly, turn it
clockwise until it clicks.
Maintenance and service
Front turn signal light bulbs
UGB536CA
1. Remove the bulb socket from the headlight assembly by turning it counterclockwise.
– CONTINUED –
11-73
Page 74
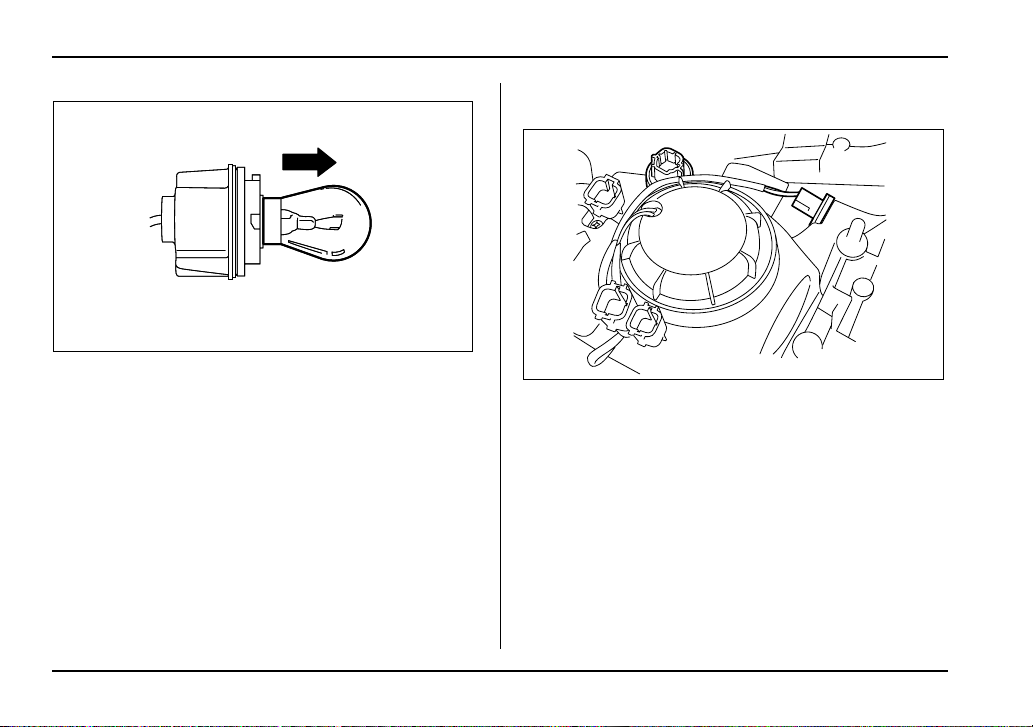
Maintenance and service
UGB531BA
2. Pull the bulb out of the socket. Install a new bulb.
3. Set the bulb socket into the headlight assembly and
turn it clockwise until it locks.
4. Install the headlight assembly and the front grille in
the reverse order of removal.
Parking light
1
UGB523BB
1) Parking light
The headlight assembly must be removed before the
parking light bulbs can be replaced. When the headlight assembly has been removed and then reinstalled, it may become necessary to make a headlight
aiming adjustment. It may be difficult to replace the
bulbs. Have your SUBARU dealer replace the bulbs if
necessary.
11-74
Page 75
Maintenance and service
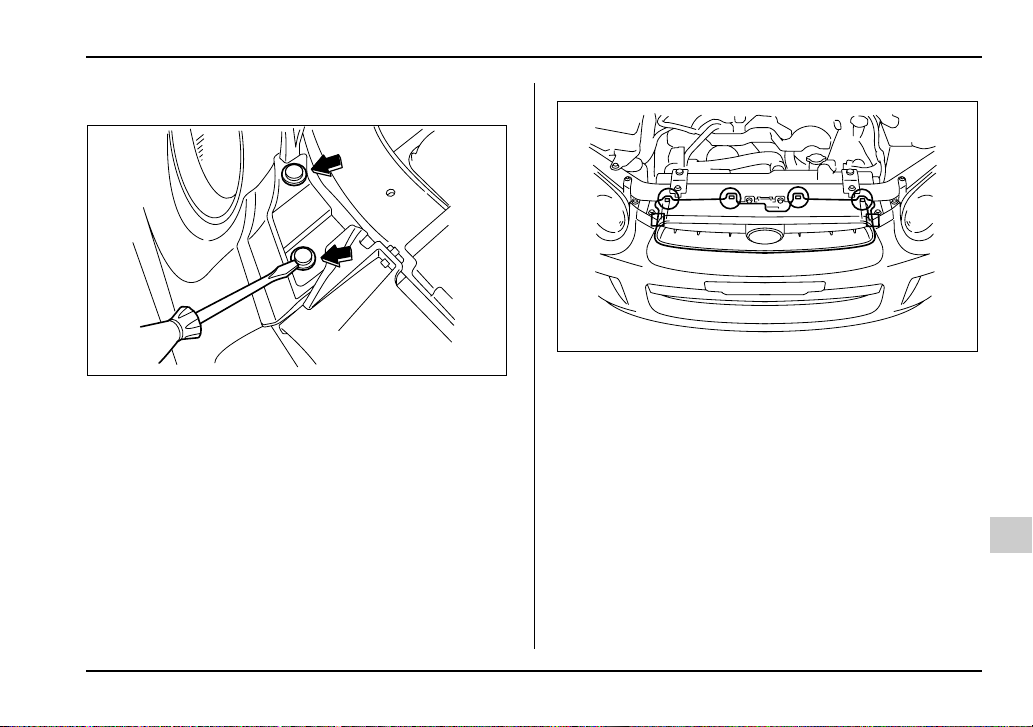
T Before removing the headlight assembly
UGB525BA
1. Loosen four clips at the top of the front bumper.
0
UGB528BA
c:Clip
: Hook
– CONTINUED –
11-75
Page 76
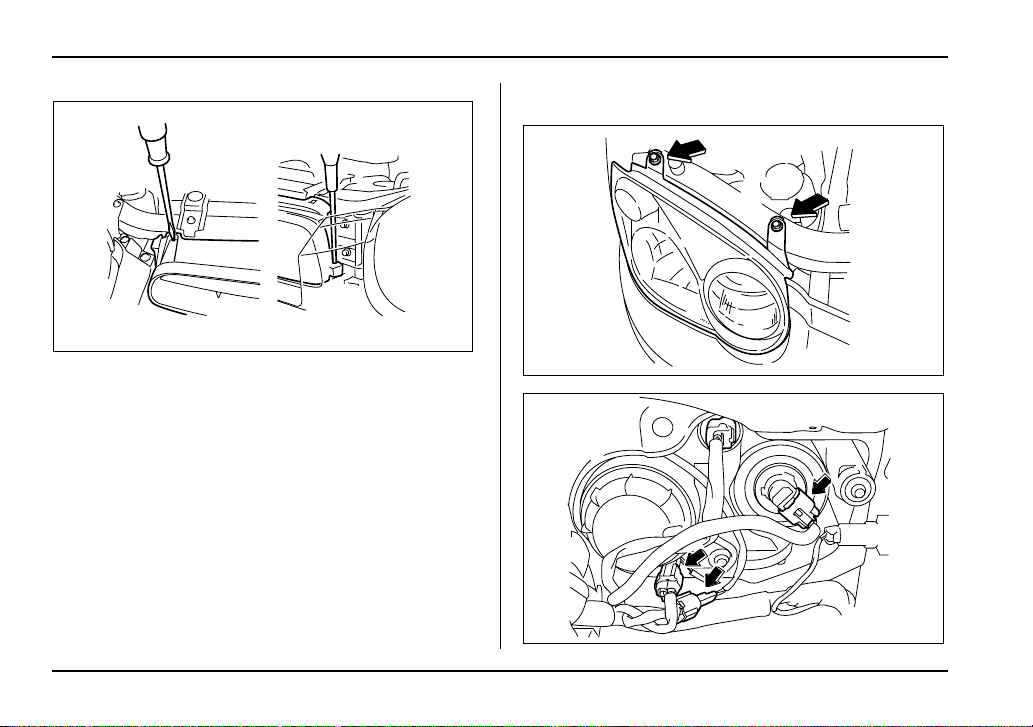
Maintenance and service
UGB529BA
2. Remove the front grille. Use a screwdriver to detach the four clips at the top and the two hooks on
each side.
T Removal of headlight assembly
UGB534BA
11-76
UGB533CA
Page 77
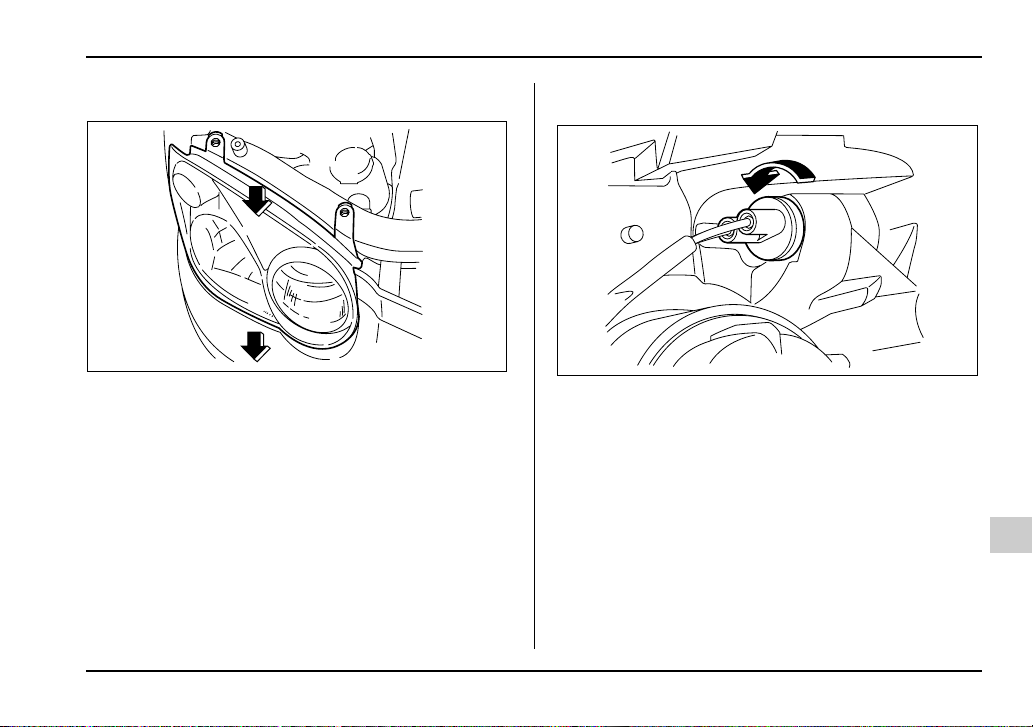
Maintenance and service
1. Remove two bolts and disconnect connectors.
UGB551BA
2. Pull the headlight assembly toward you and remove it from the vehicle.
T Parking light bulbs
UGB535BA
1. Remove the bulb socket from the headlight assembly by turning it counterclockwise.
– CONTINUED –
11-77
Page 78
Maintenance and service
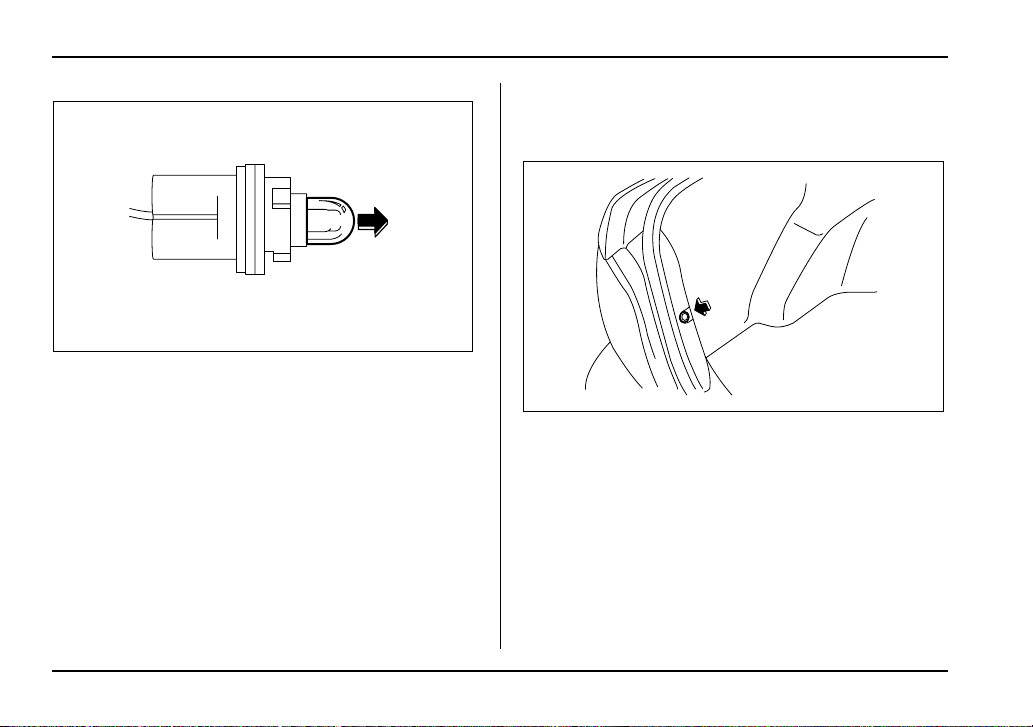
UGB532BA
2. Pull the bulb out of the socket. Install a new bulb.
3. Set the bulb socket into the headlight assembly and
turn it clockwise until it locks.
4. Install the headlight assembly and the front grille in
the reverse order of removal.
Front fog light
It may be difficult to replace the bulbs. Have your
SUBARU dealer replace the bulbs if necessary.
Rear combination lights
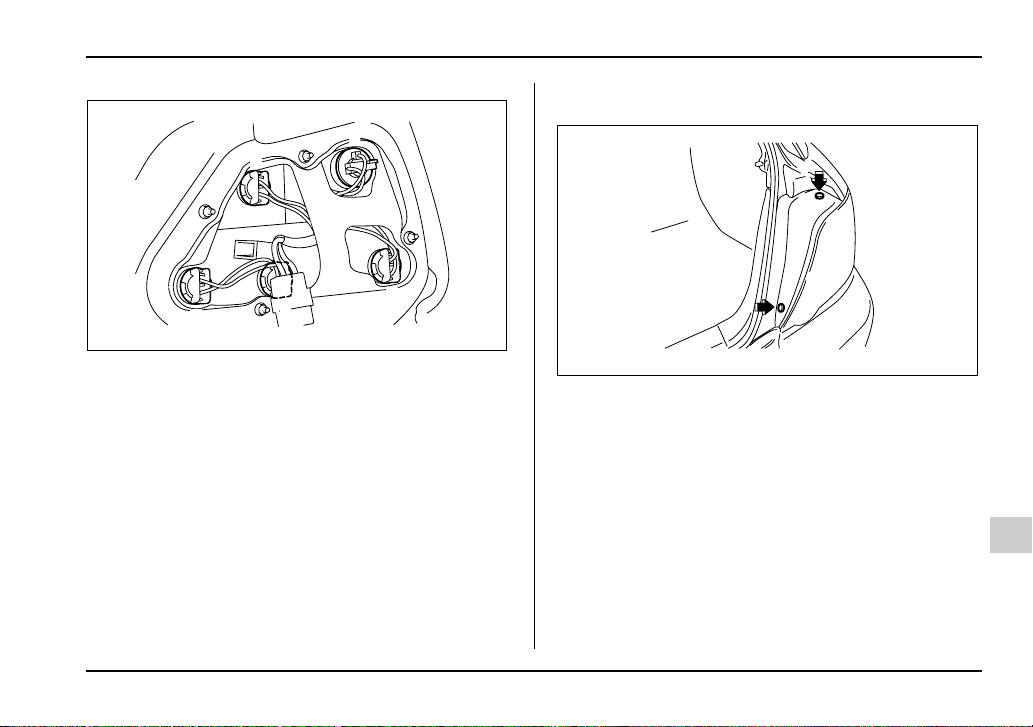
T Sedan
UGB538BA
1. Remove the clip from the rear trunk trim with a
screwdriver.
11-78
Page 79
Maintenance and service
T Wagon
2
1
3
UGB539BB
5
1) Backup light
2) Rear turn signal light
3) Brake/tail light
4) Tail light
5) Brake light
54
2. Open the rear portion of the side trunk trim panel.
3. Remove the bulb holder from the rear combination
light assembly by turning it counterclockwise.
4. Remove the bulb from the socket by pushing it and
turning counterclockwise. Install a new bulb.
5. Set the bulb holder into the rear combination light
assembly and turn it clockwise until it locks.
6. Secure the rear trunk trim panel with the clips.
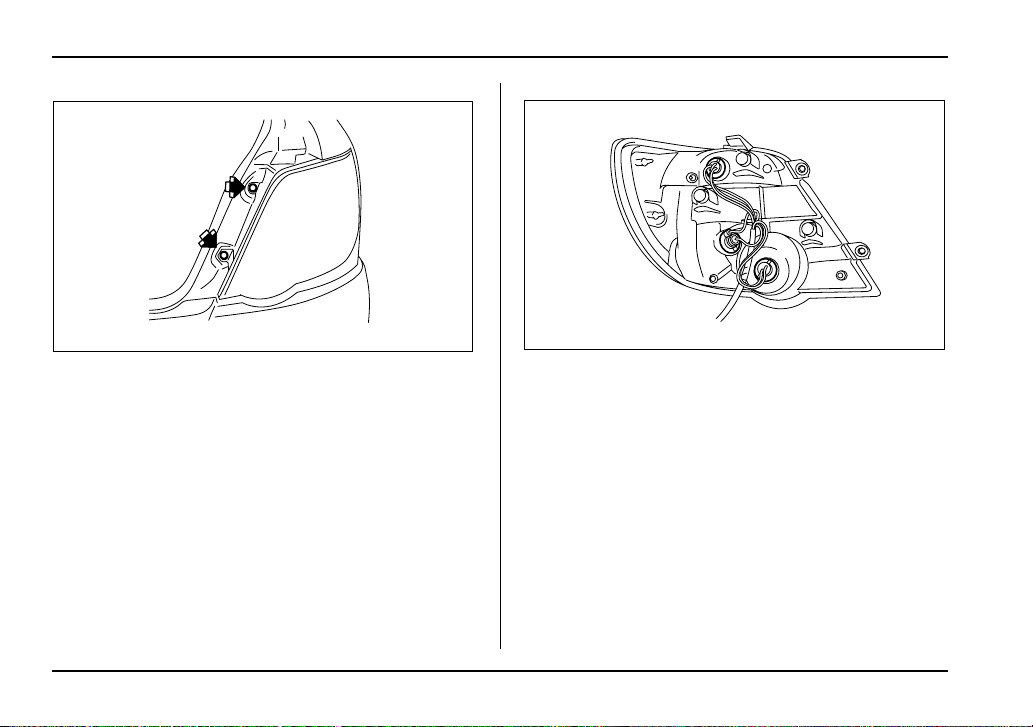
UGB540BA
1. Using a Phillips screwdriver, remove the upper and
lower screws that secure the side cover of the rear
combination light assembly.
– CONTINUED –
11-79
Page 80
Maintenance and service
1
UGB541BA
2. Remove the upper and lower screws. Then, slide
the rear combination lamp assembly to the rear and
remove it from the vehicle.
11-80
2
3
UGB542BB
1) Brake/tail light
2) Rear turn signal light
3) Backup light
3. Remove the bulb holder from the rear combination
light assembly by turning it counterclockwise.
4. Remove the bulb from the socket by pushing it and
turning counterclockwise. Install a new bulb.
5. Set the bulb holder into the rear combination light
assembly and turn it clockwise until it locks.
6. Close the cover and latch the lock.
7. Reinstall the rear combination light assembly and
its side cover.
Page 81
Maintenance and service
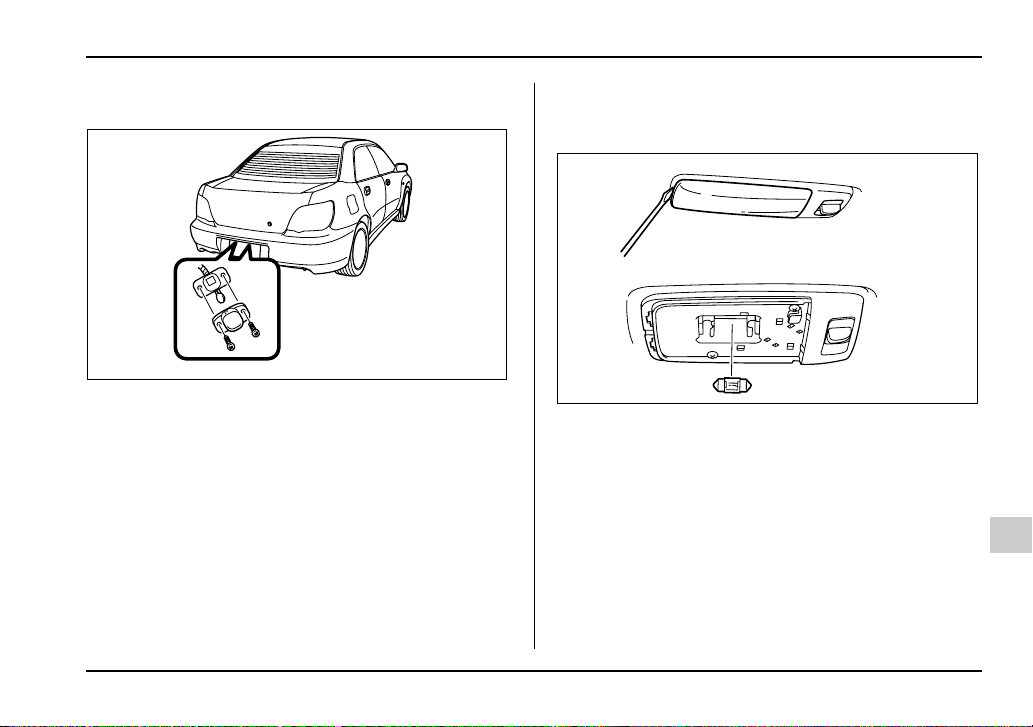
License plate light
UGB136BA
1. Remove the mounting screws using a Phillips
screwdriver.
2. Remove the cover and lens.
3. Pull the bulb out of the socket. Install a new bulb.
4. Reinstall the lens and cover.
5. Tighten the mounting screws.
Dome light, map light and cargo area
light
HSB088BA
– CONTINUED –
11-81
Page 82
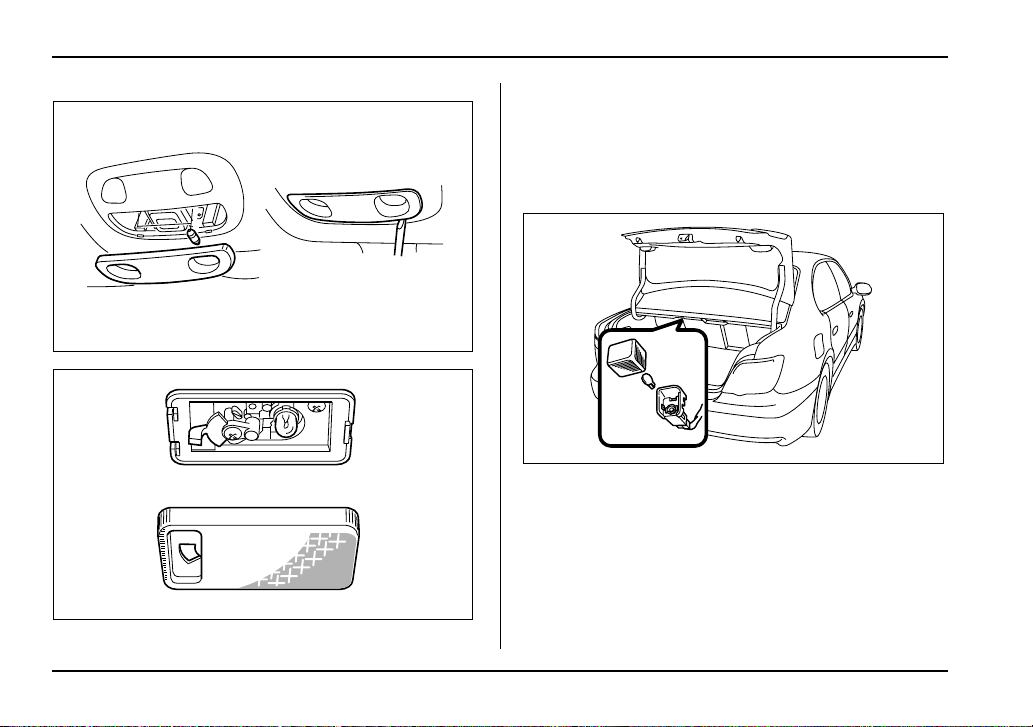
Maintenance and service
a flat-head screwdriver.
2. Pull the bulb out of the socket. Install a new bulb.
3. Reinstall the lens.
UGB544BA
UGB078BA
1. Remove the lens by prying the edge of the lens with
11-82
Trunk light
UGB137BA
1. Remove the cover by squeezing its sides and pulling it.
2. Pull the bulb out of the socket. Install a new bulb.
3. Reinstall the cover.
0
Page 83
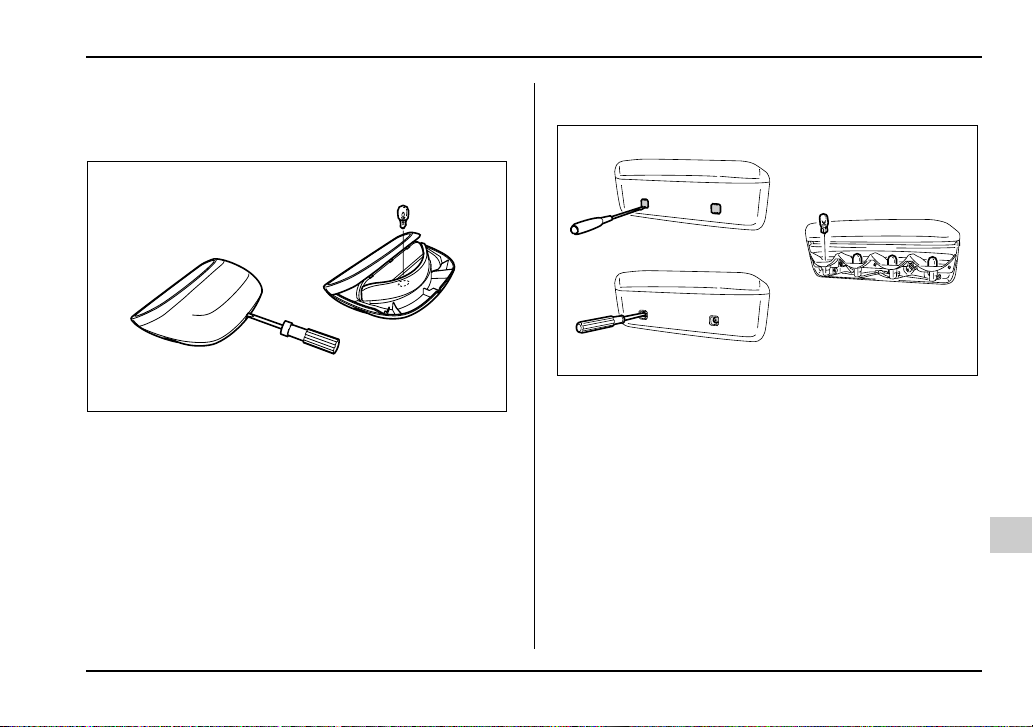
Maintenance and service
High mount stop light
T Sedan
UGB546BA
1. Remove the high mount stop light cover by prying
the edge with a screwdriver.
2. Pull the bulb out of the socket. Install a new bulb.
3. Reinstall the cover.
T Wagon
HSB091BA
1. Remove the mounting screw covers by prying the
edge with a screwdriver.
2. Remove the mounting screws using a Phillips
screwdriver and then remove the high mount stop light
cover.
3. Remove the bulbs from the socket by pushing it
and turning counterclockwise. Install a new bulb.
4. Reinstall the cover.
5. Tighten the mounting screws then reinstall the covers.
NOTE
Other bulbs may be difficult to replace. Have your
– CONTINUED –
11-83
Page 84
Maintenance and service
SUBARU dealer replace these bulbs if necessary.
11-84
 Loading...