

Page 1
Love. It’s what makes a Subaru, a Subaru.
2016
Quick Reference Guide
CROSSTREK
Page 2

Complete U.S. specications and
illustrations may not have been
available at time of publication.
Specications are based on the
latest product information available
at time of publication. Some
images shown are for illustration
purposes only. Some equipment
shown may be optional at extra
cost. Specic options may be
available only in combination
with other options. Specic
combinations of equipment or
features may vary from time
to time and by geographic
area. Certain accessories and
equipment may not be available
at the time of publication.
This Quick Reference Guide
applies to all Crosstrek models.
Therefore, some explanations may
be for equipment not installed on
your vehicle. Subaru of America,
Inc., reserves the right to change
or discontinue at any time,
without notice, prices, colors,
materials, equipment, accessories,
specications, models and
packages without incurring any
obligation to make the same or
similar changes on vehicles
previously sold. Colors shown may
vary due to reproduction process.
For detailed operating and
safety information, please
consult the Owner’s Manual.
Subaru, Outback, Legacy,
Forester, Impreza, WRX, WRX
STI, Crosstrek, BOXER, SI-DRIVE,
Lineartronic, Alcantara, EyeSight,
HD Radio, Aha Radio, and
SiriusXM are registered trademarks.
SUBARU STARLINK is a trademark
of Fuji Heavy Industries, Ltd.
All rights reserved. Contents may
not be reprinted or electronically
reproduced in whole or in part
without prior written approval
of Subaru of America, Inc.
© 2015 Subaru of America, Inc.
Page 3

2-3 Getting Started
4-5 Instrument Panel
6-9 Gauges
10-11 Personalize
12-19 Controls
20-21 While Operating
22-23 Safety/In Case of Emergency
24-25 Additional Information
Table of Contents
Page 4
2
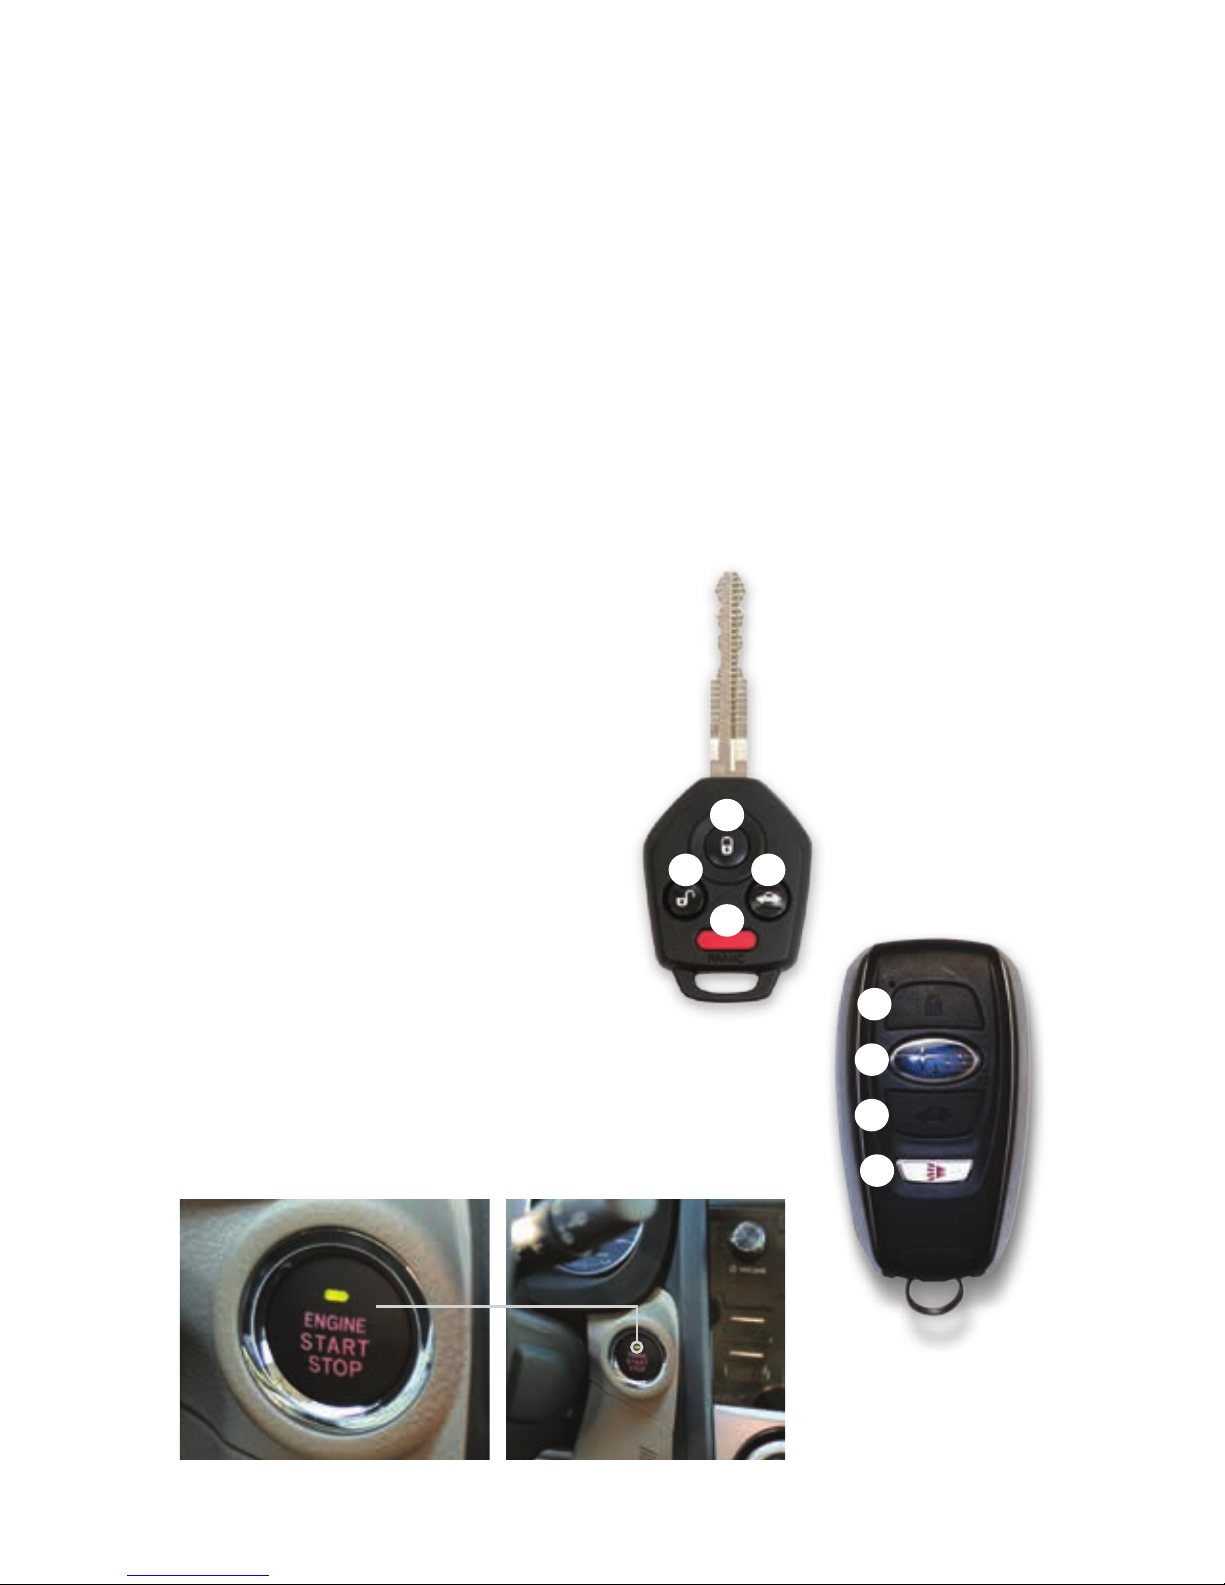
Remote Keyless Entry
1. Lock/Arm
• Press to lock all doors and the rear
gate and activate the security alarm.
• If any of the doors or the rear gate are
not fully closed, an electronic chirp
will sound and the hazard lights will
ash to alert you that the doors or the
rear gate are not properly closed.
• To activate the vehicle nder function,
press three times (within ve seconds).
If you are within 30 feet of the vehicle,
the horn will sound one time and the
hazard lights will ash three times.
2. Unlock/Disarm
• Press once to unlock the driver’s door.
• Press twice (within ve seconds) to
unlock all doors.
• When the “Unlock/Disarm” button
is pressed, the dome and map
lights will illuminate if the dome light
switch is in the middle position.
3. Unlocking the Rear Gate
• Press the button to unlock
the rear gate. An electronic
chirp will sound twice and the
hazard lights will ash twice.
4. Panic Alarm
• Press once and the horn will sound
and the hazard lights will ash.
• Press any button on the remote
to deactivate.
1
2 3
4
Keyless Access with
Push Button Start System
(if equipped)
By simply carrying the access key in your pocket, you can
lock and unlock doors, open the rear gate and start your car
without ever having to take the key fob out of your pocket.
1
2
3
4
Page 5
3
Getting
Started
Instrument
Panel
Gauges Personalize Controls
While
Operating
Safety/In Case
of Emergency
Additional
Information
Seating
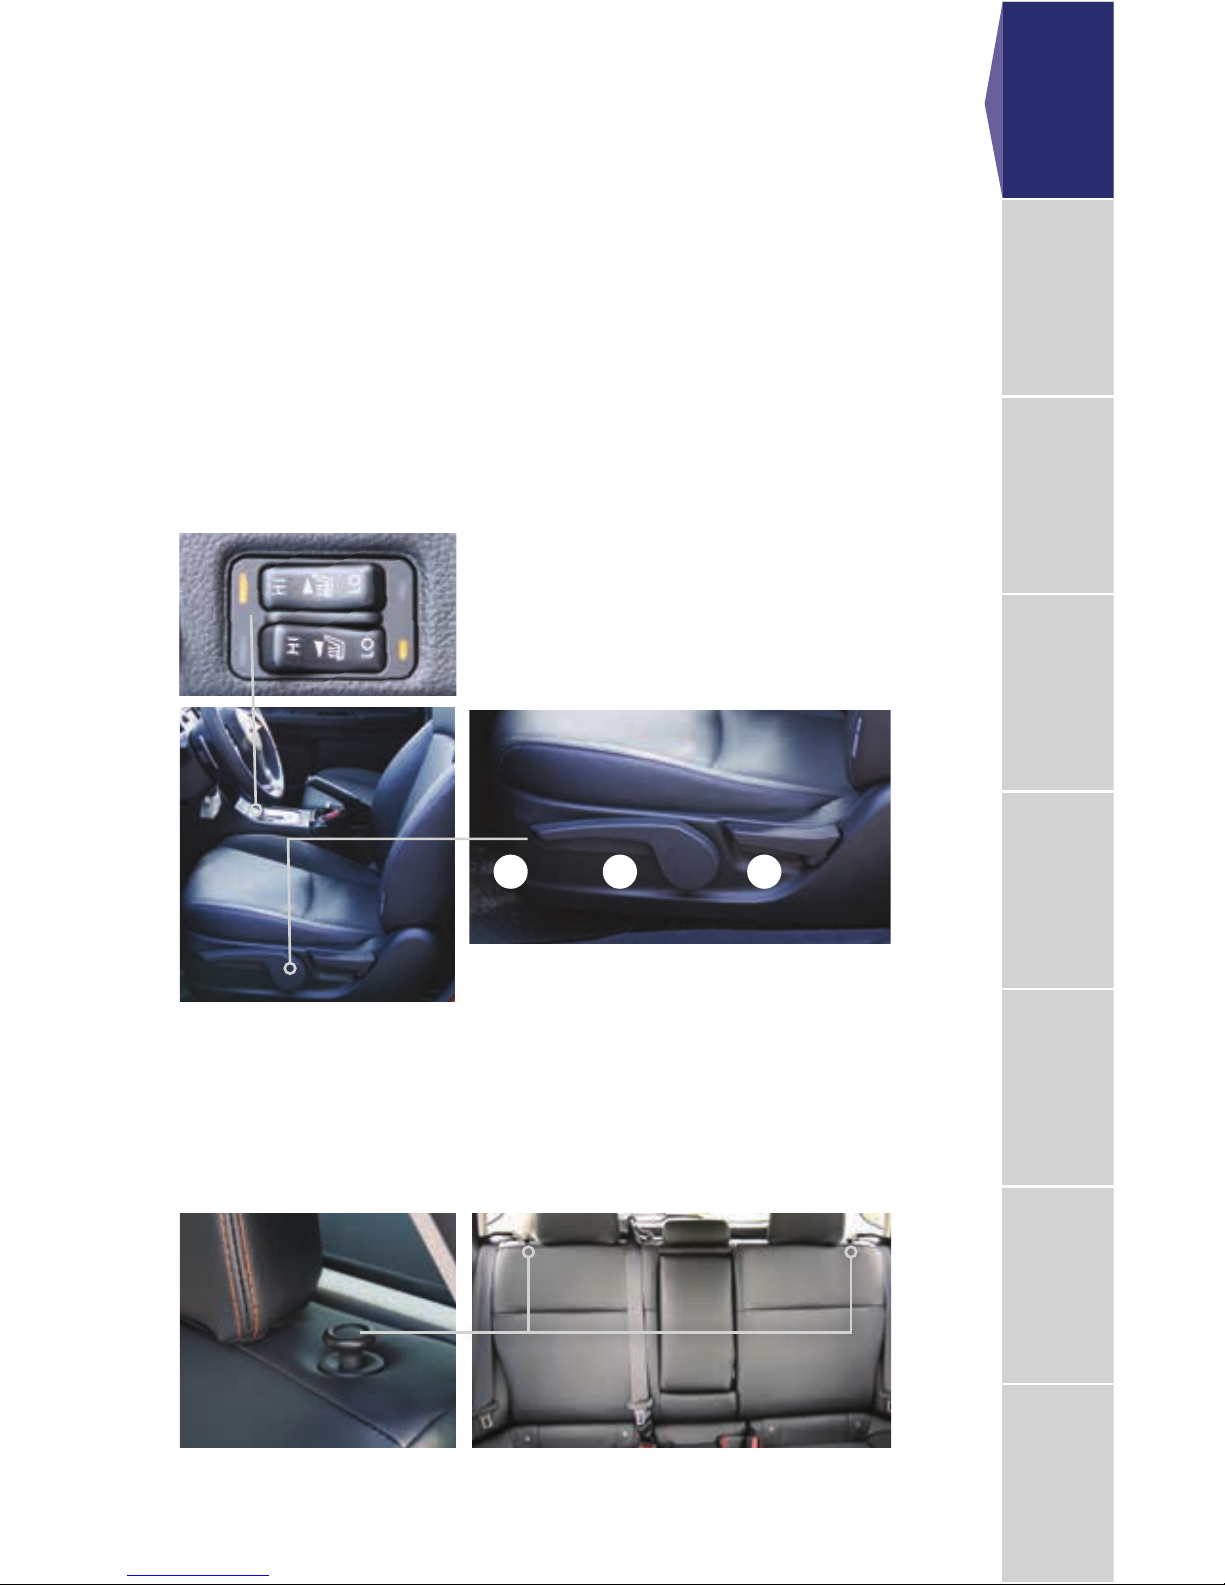
Seat Controls
1. Forward/Backward
Pull up on the lever below the front of
the driver’s seat to move the seat forward
or backward.
2. Raise/Lower Seat Cushion
To adjust the height of the driver’s seat,
pull up or push down the seat height
adjustment lever, located on the lower left
side front of the seat.
3. Recline Seatback
To adjust the seatback to the desired
position, pull up on the recline lever,
located on the lower left rear of the driver’s
seat or lower right rear of the passenger’s
seat. Do not adjust seats while driving.
Heated Seats
(if equipped)
Press the switch in the
corresponding direction
for the desired seat
temperature. To turn off the
seat heater, slightly press
in the opposite direction of
the current position.
1 2 3
Getting
Started
Folding the Rear Seat
Lower the headrests. Pull up on the release knob on the seat side that you want to
fold down. To return the seatback to its original position, raise the seatback until it
locks into place, making sure that it is securely locked.
Page 6
4
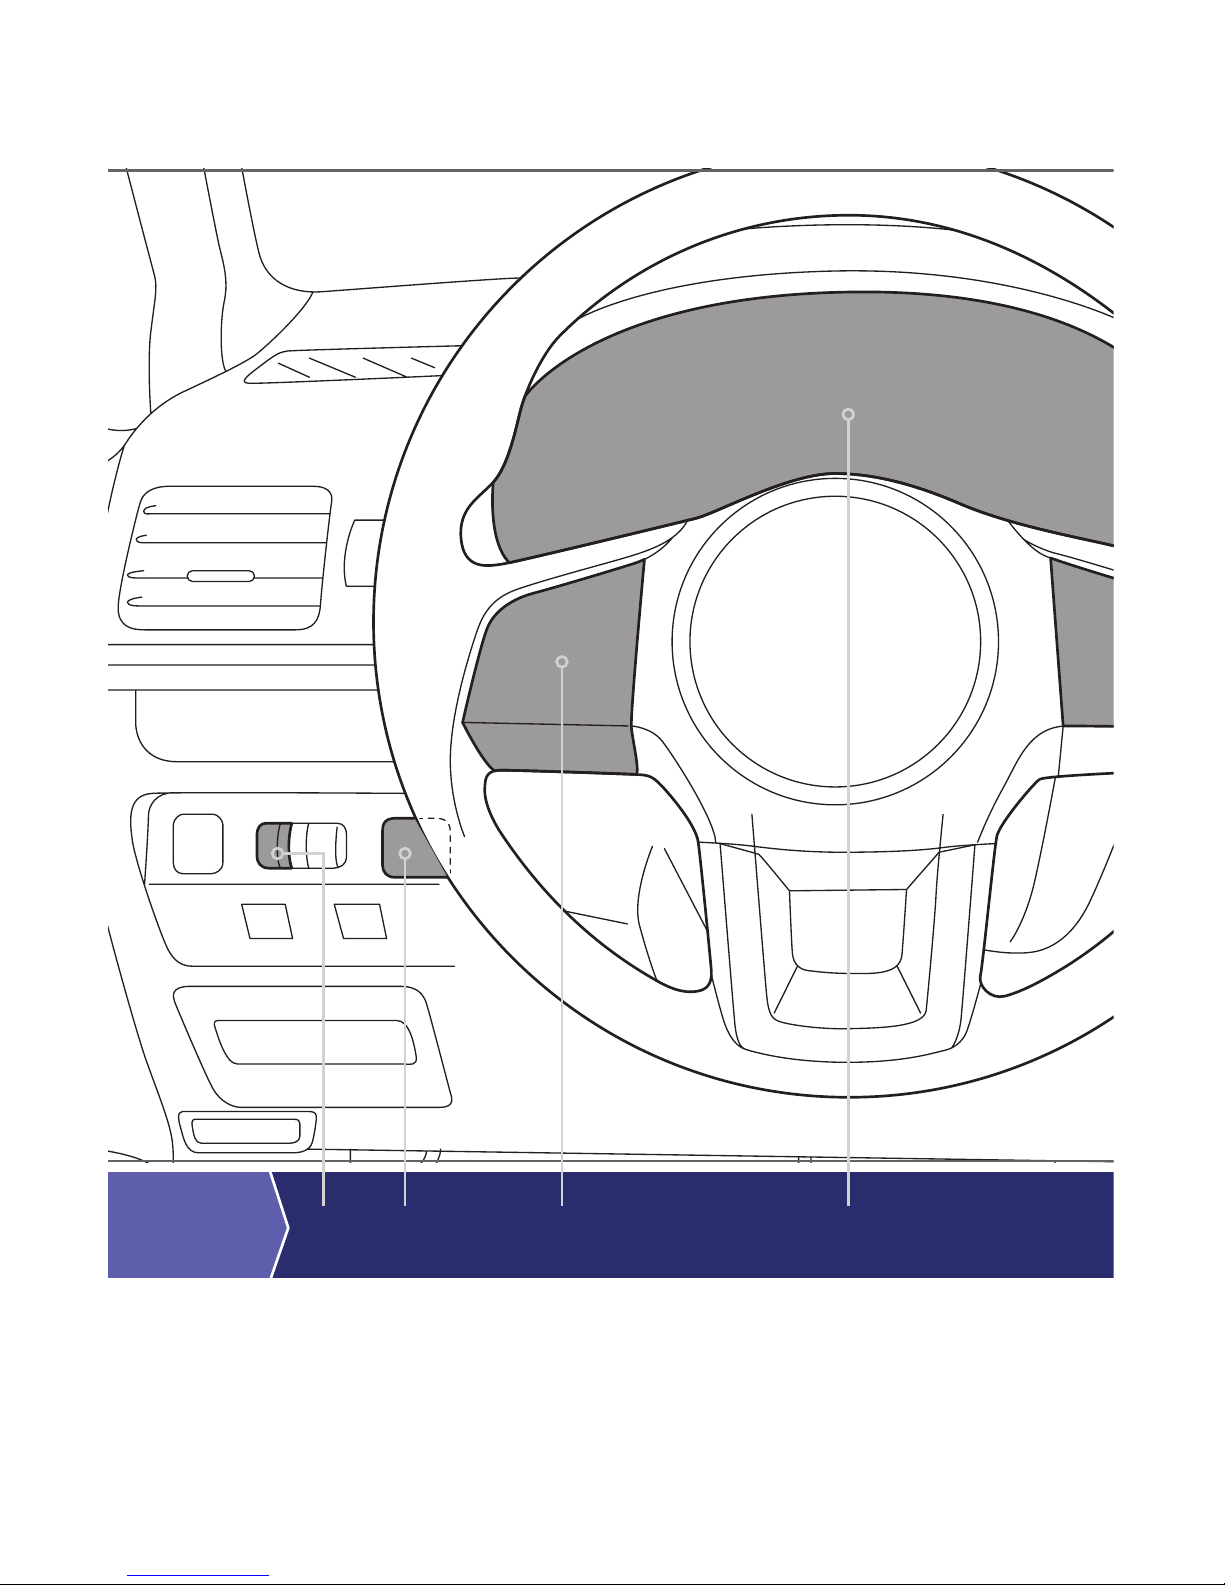
Instrument Panel
6-91812 20
PAGE
NUMBER
Page 7
5
Getting
Started
Instrument
Panel
Gauges Personalize Controls
While
Operating
Safety/In Case
of Emergency
Additional
Information
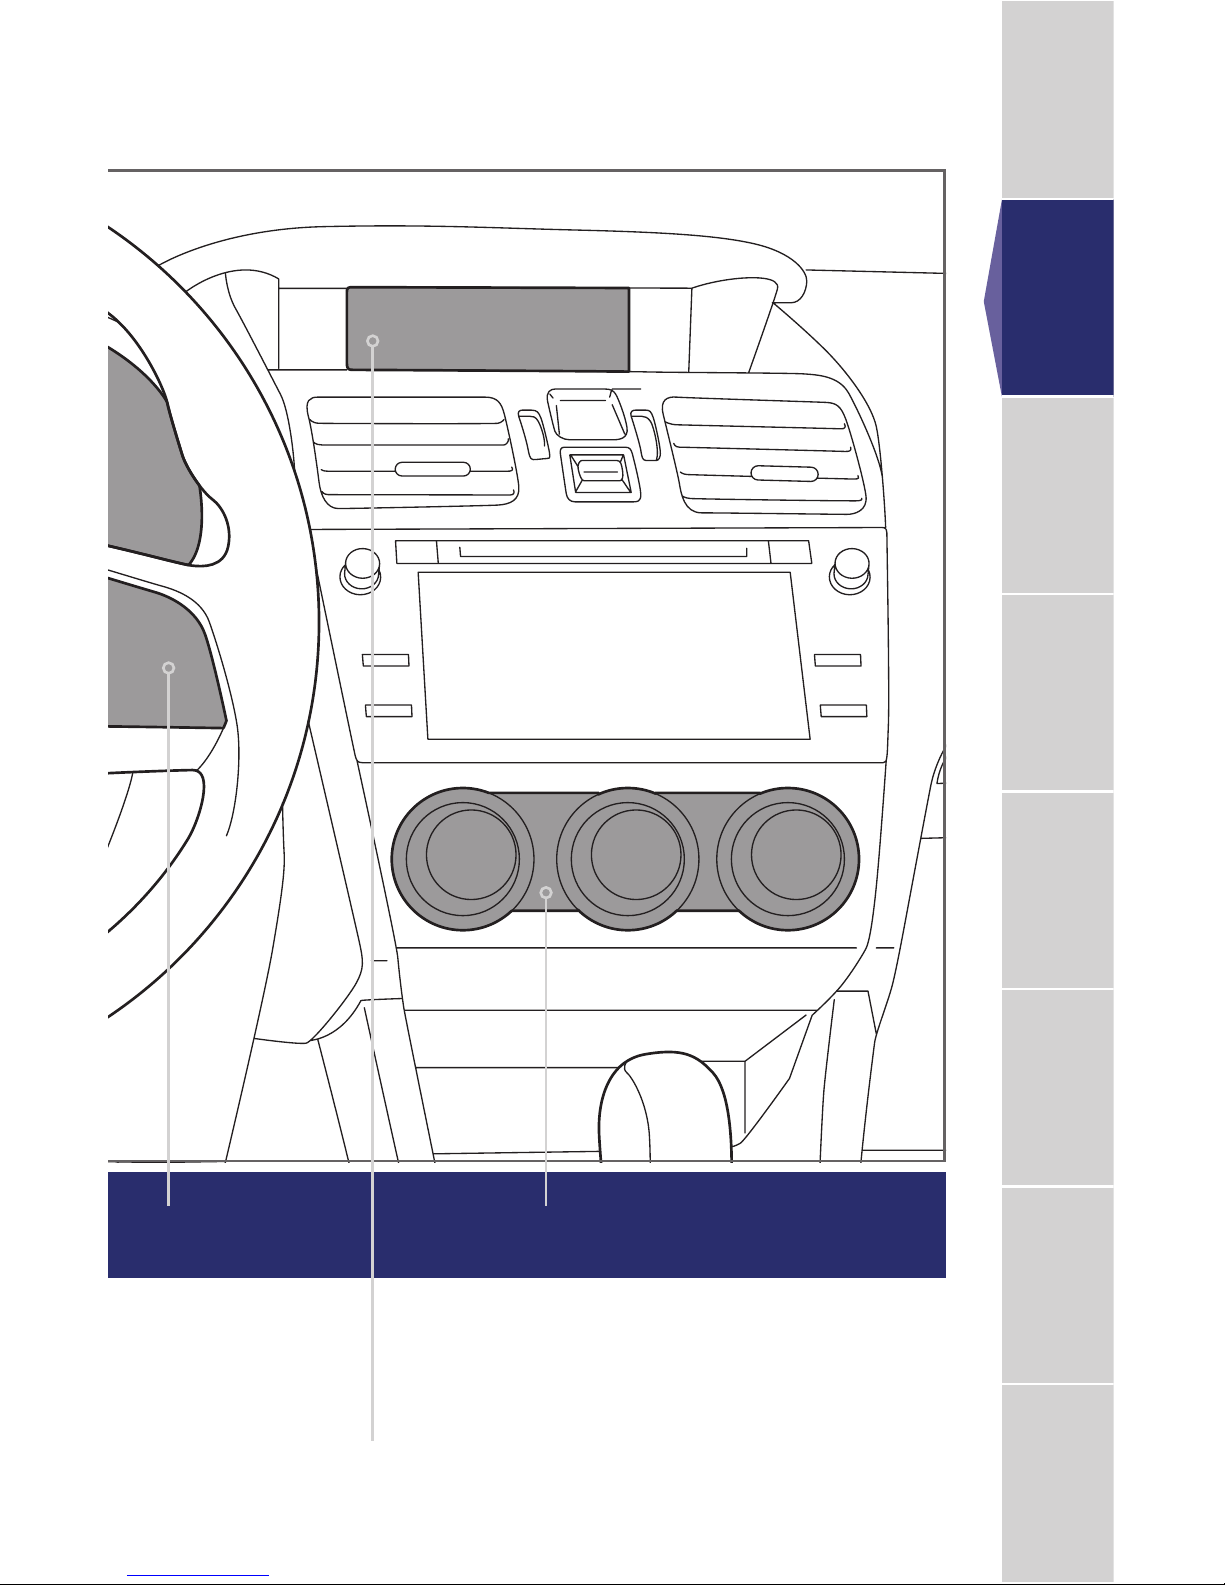
Instrument
Panel
14-1519
Clock
Press the “+” button to advance the time or the
“–” button to reverse the time. Vehicles with a
navigation system, please refer to the separate
“Operating Instructions for Navigation System.”
Page 8
6
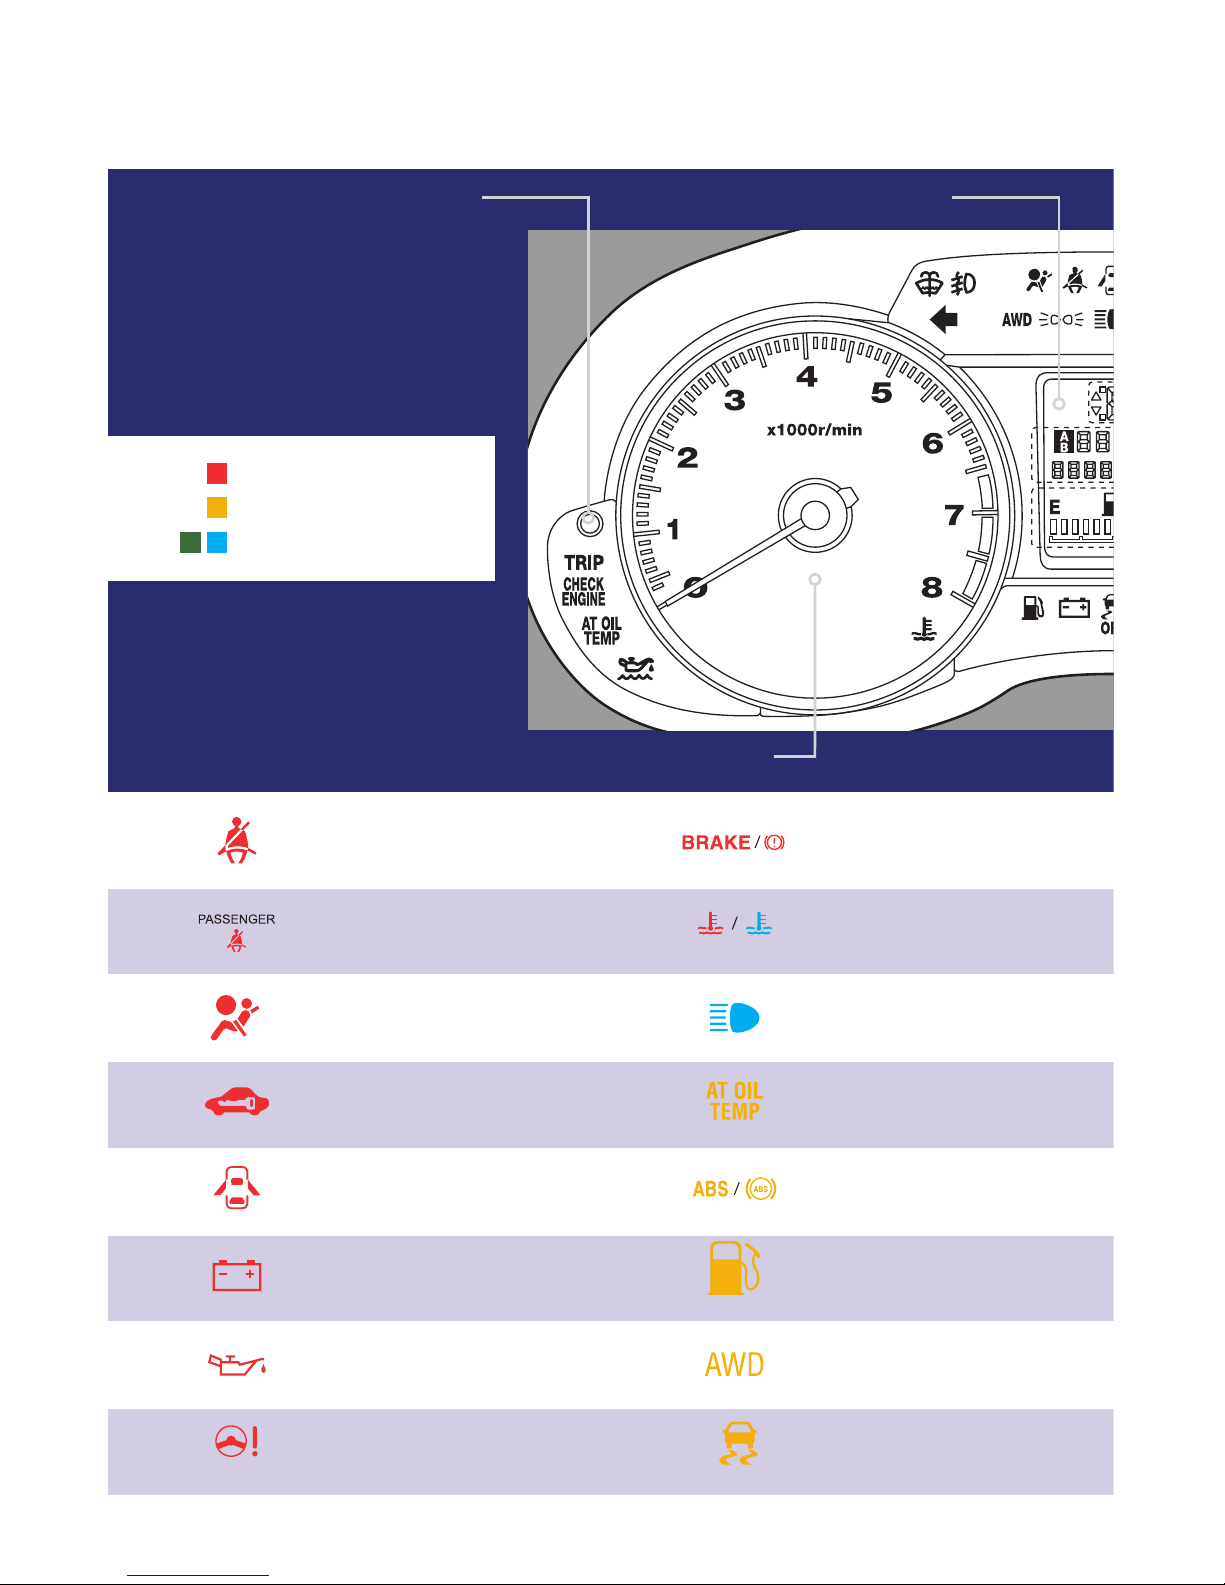
Seatbelt warning
Front passenger
seatbelt warning
SRS airbag system
Security indicator light
Door open
Charge warning
Oil pressure warning
Power steering warning
Brake system
Hot coolant temperature /
Cold coolant temperature
High beam indicator light
AT OIL TEMP
(Automatic Transmission)
ABS warning
Low fuel
All-Wheel Drive
(Automatic Transmission)
Vehicle Dynamics Control /
Vehicle Dynamics
Control operation
Immediate Attention
Caution
Informational
Gauges - Vehicles without EyeSight
Tachometer
Trip meter and odometerTrip meter A/B selection
and trip meter reset knob
Page 9
7
Getting
Started
Instrument
Panel
Gauges Personalize Controls
While
Operating
Safety/In Case
of Emergency
Additional
Information
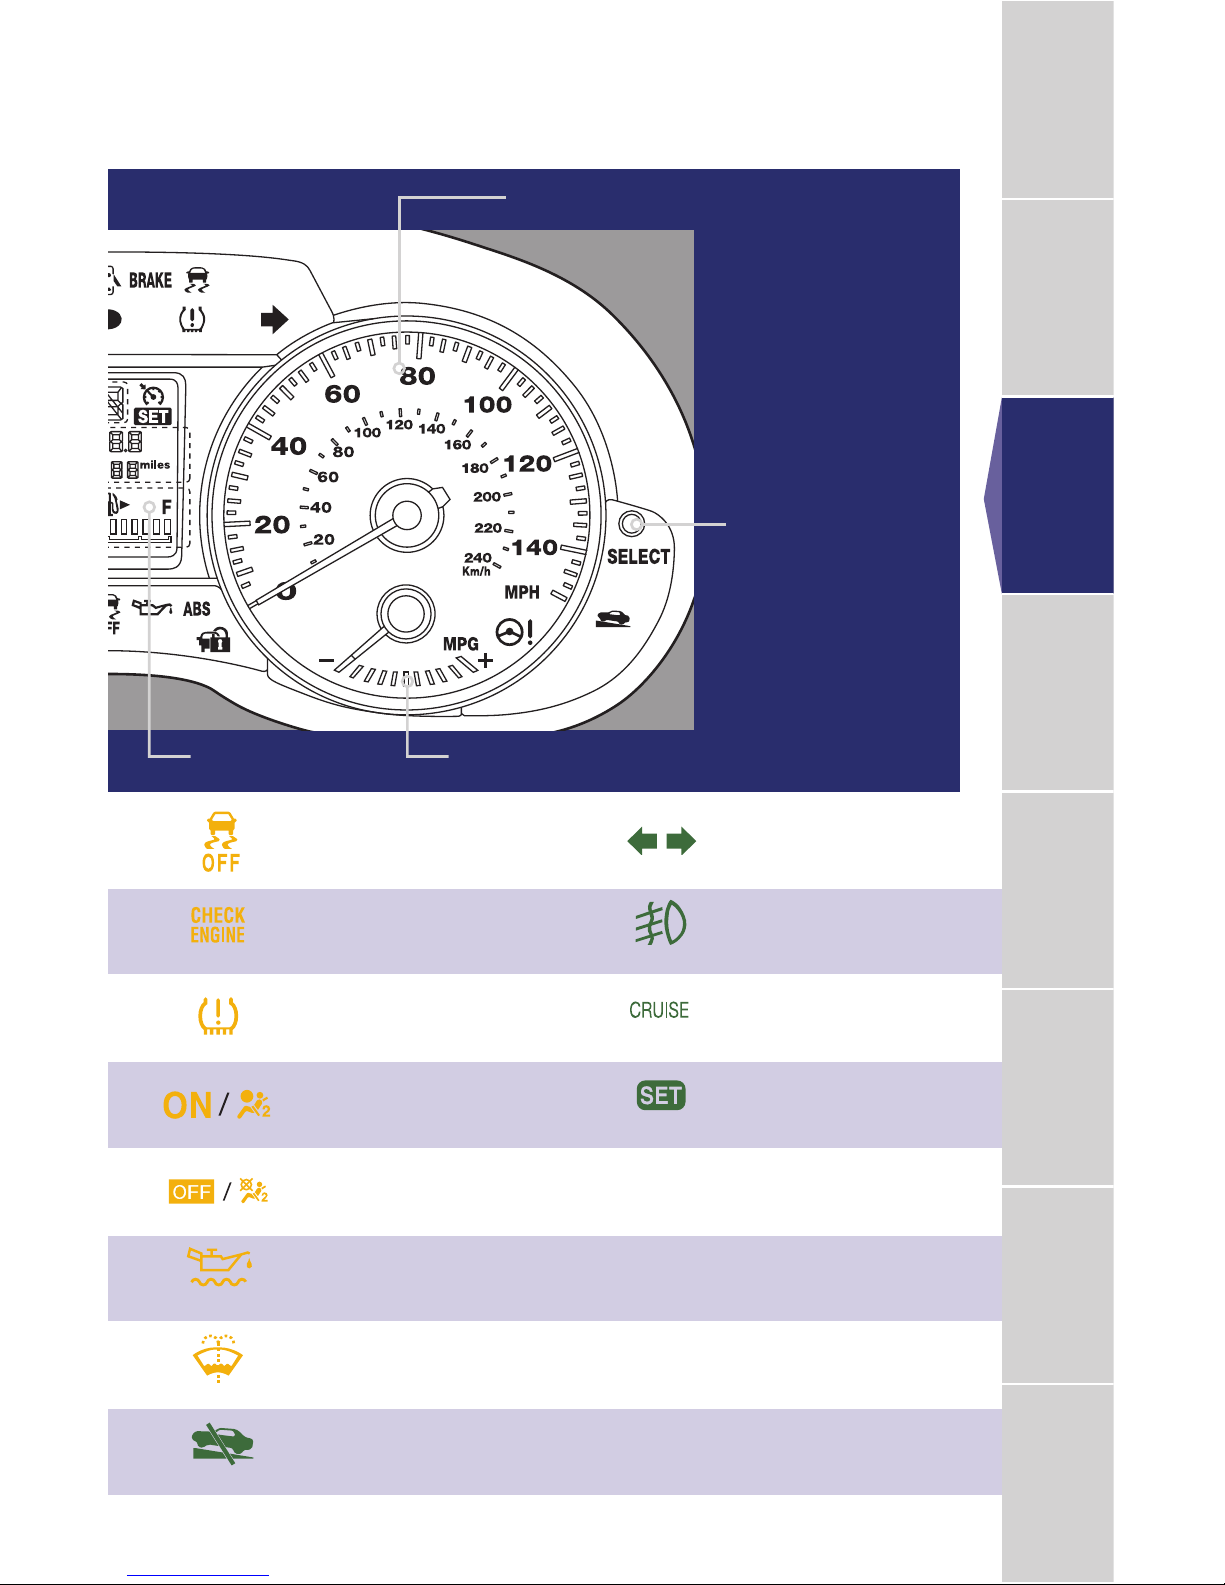
Vehicle Dynamics Control OFF
CHECK ENGINE /
Malfunction indicator
Tire pressure warning light
Front passenger frontal
airbag ON
Front passenger frontal
airbag OFF
Engine oil level warning light
Windshield washer
uid warning
Incline Start Assist
Turn signals
Front fog light indicator
light (if equipped)
Cruise control
indicator light
Cruise control set
indicator light
Gauges
Fuel gauge
Speedometer
Information display
selection knob
MPG gauge
Page 10
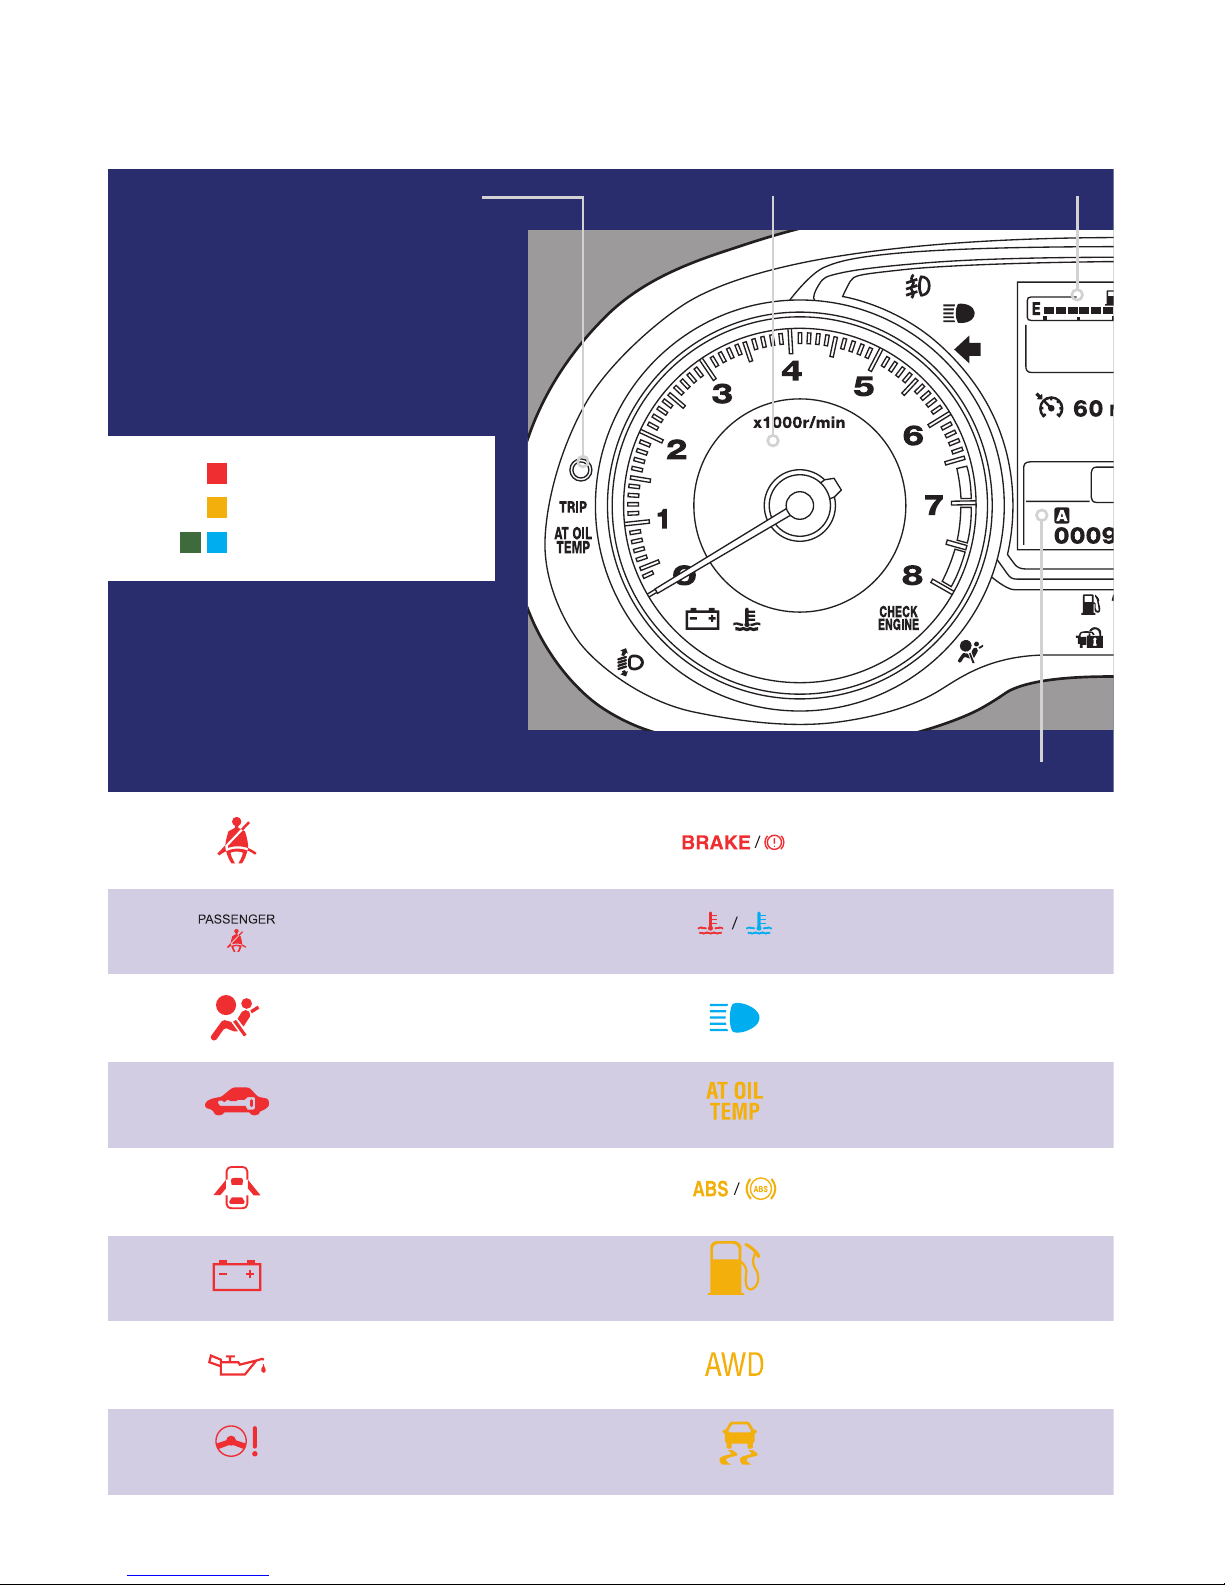
Fuel gauge
Trip meter and odometer
Tachometer
8
Seatbelt warning
Front passenger
seatbelt warning
SRS airbag system
Security indicator light
Door open
Charge warning
Oil pressure warning
Power steering warning
Brake system
Hot coolant temperature /
Cold coolant temperature
High beam indicator light
AT OIL TEMP
(Automatic Transmission)
ABS warning
Low fuel
All-Wheel Drive
(Automatic Transmission)
Vehicle Dynamics Control /
Vehicle Dynamics
Control operation
Gauges - Vehicles with EyeSight
Immediate Attention
Caution
Informational
Trip meter A/B selection
and trip meter reset knob
Page 11
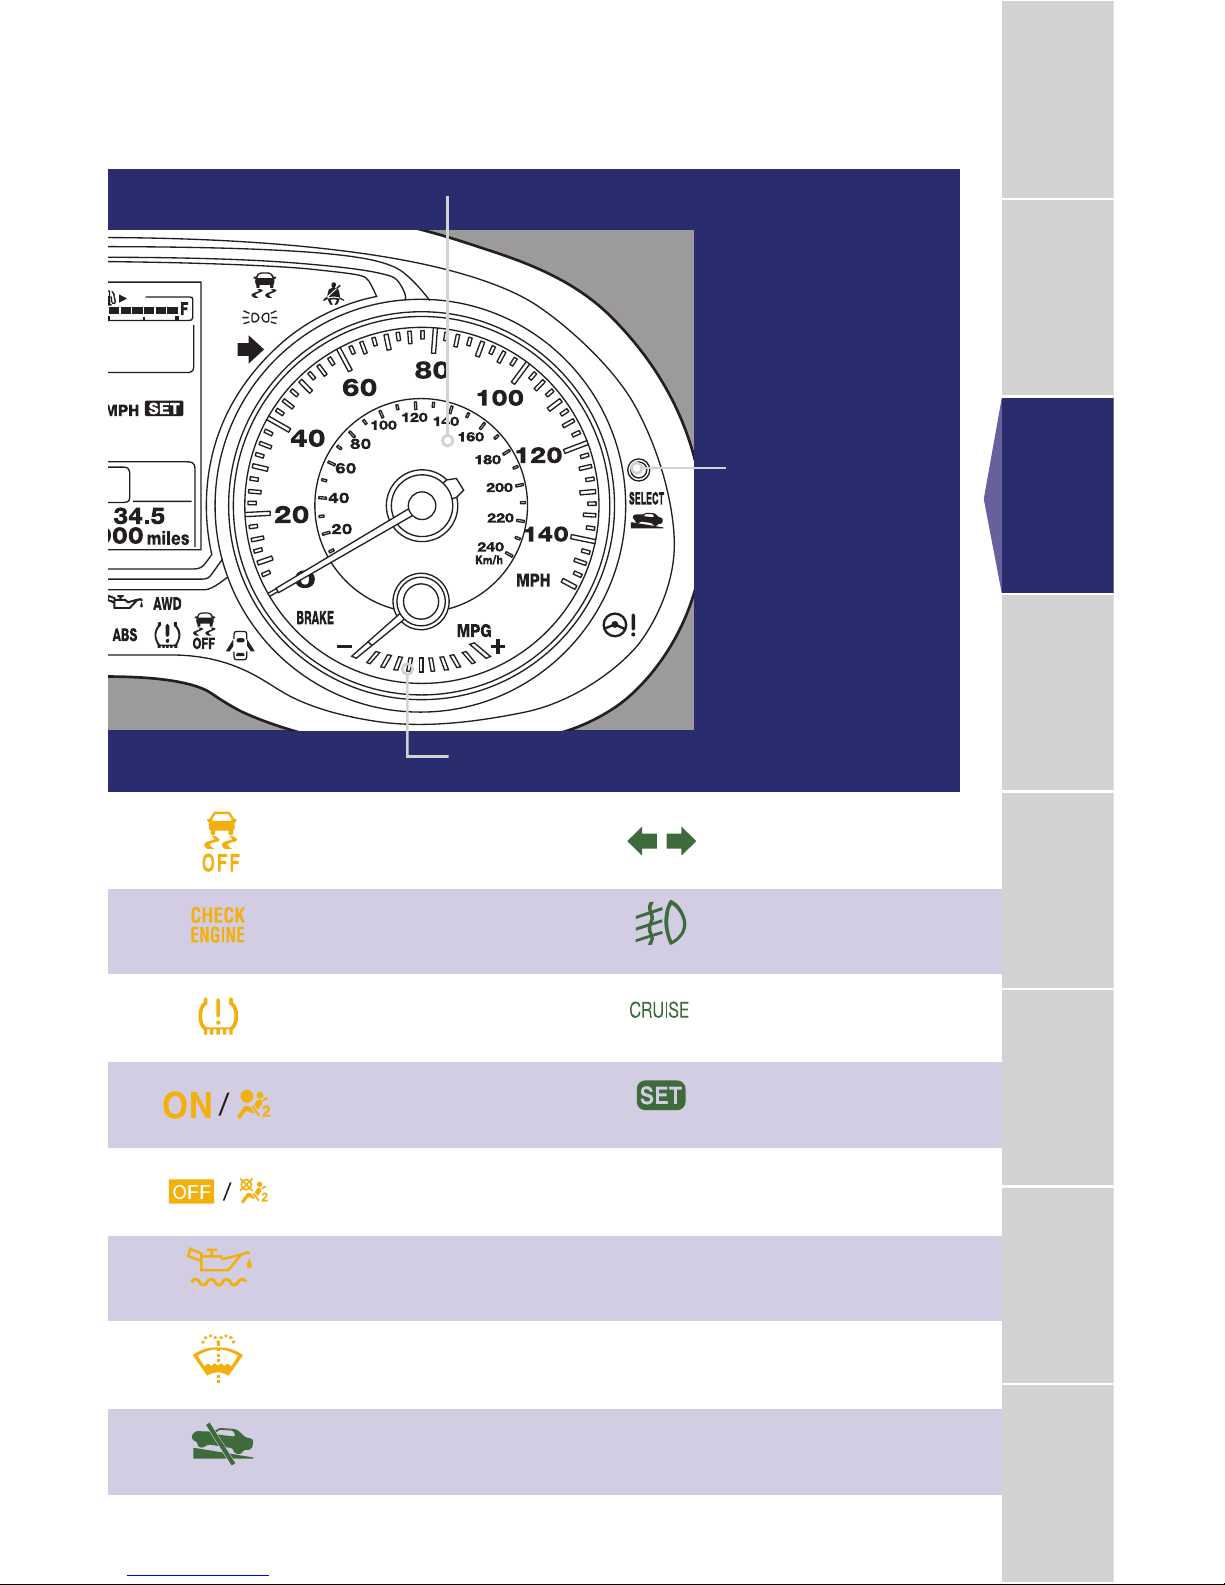
Speedometer
MPG gauge
9
Getting
Started
Instrument
Panel
Gauges Personalize Controls
While
Operating
Safety/In Case
of Emergency
Additional
Information
Vehicle Dynamics Control OFF
CHECK ENGINE /
Malfunction indicator
Tire pressure warning light
Front passenger frontal
airbag ON
Front passenger frontal
airbag OFF
Engine oil level warning light
Windshield washer
uid warning
Incline Start Assist
Turn signals
Front fog light indicator
light (if equipped)
Cruise control
indicator light
Cruise control set
indicator light
Gauges
Information display
selection knob
Page 12
10
Personalize
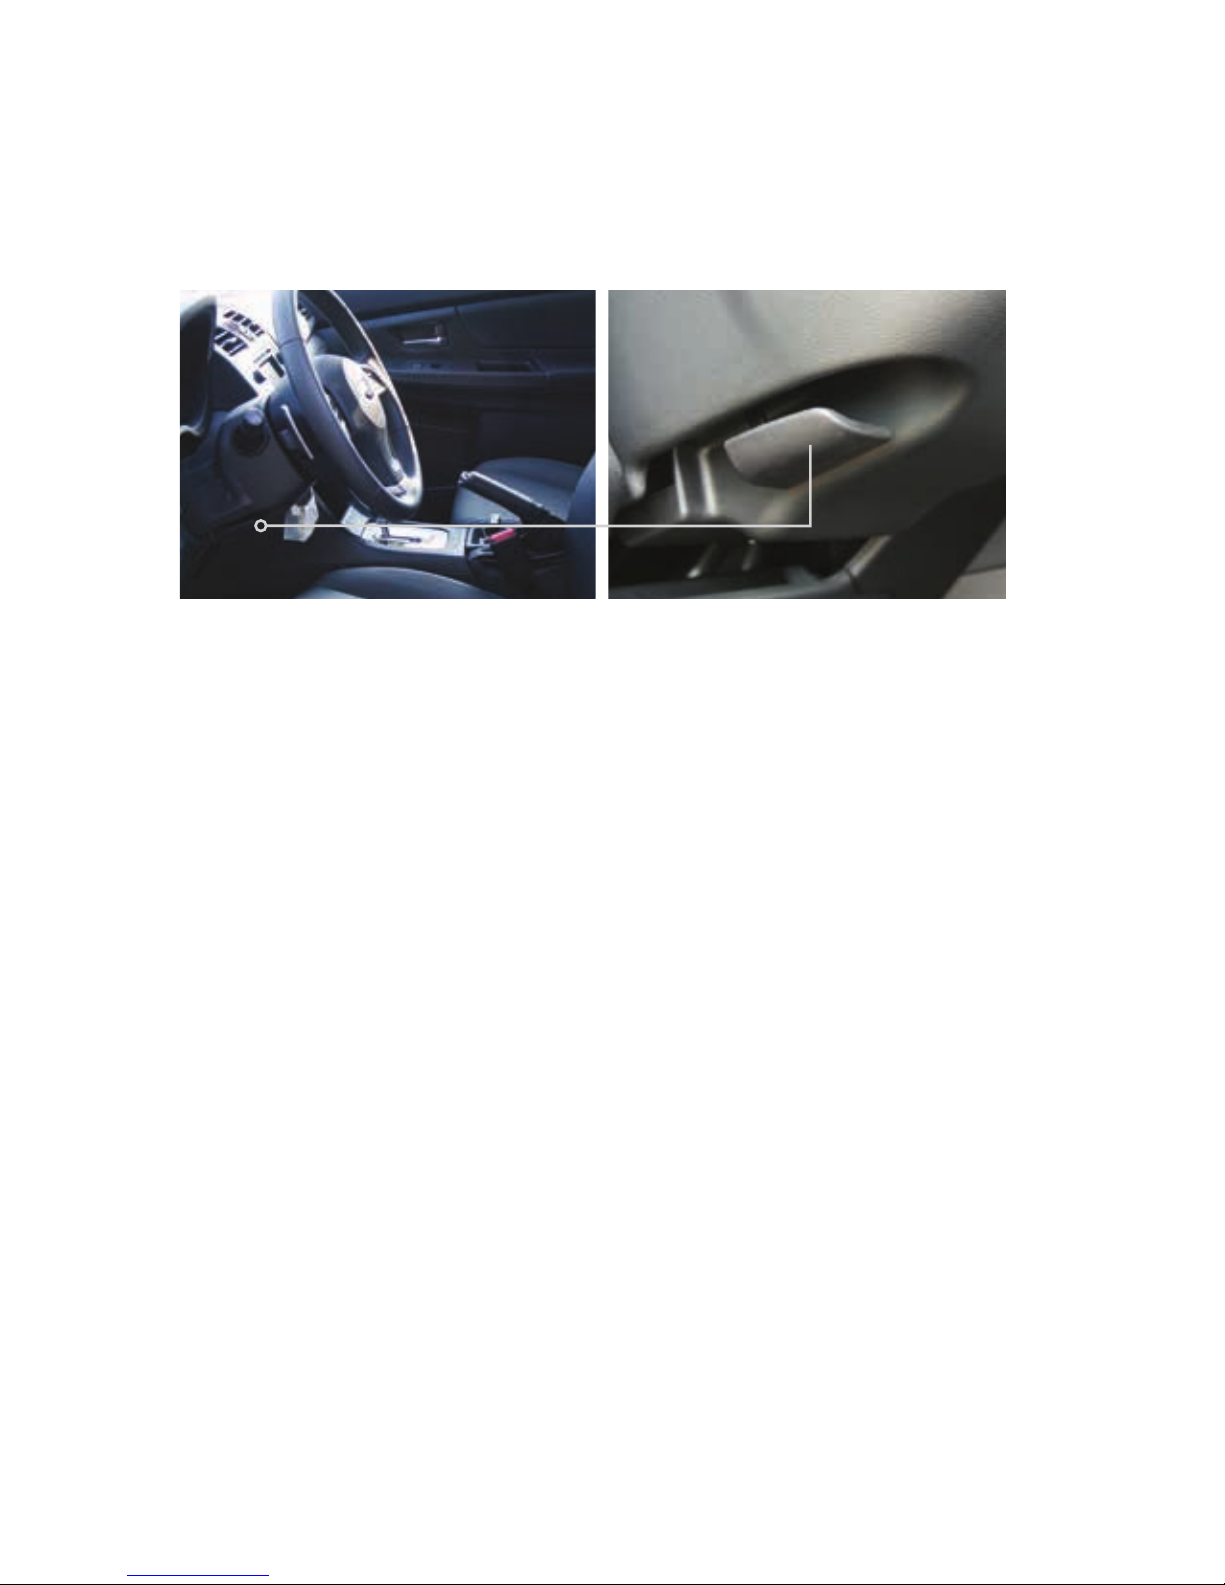
Tilt and Telescopic Steering Column
Push the lever down rmly to adjust the height and lengthwise position of the column; rmly
push the lever back up to lock the column in place. Do not adjust while driving.
Page 13
11
Getting
Started
Instrument
Panel
Gauges Personalize Controls
While
Operating
Safety/In Case
of Emergency
Additional
Information
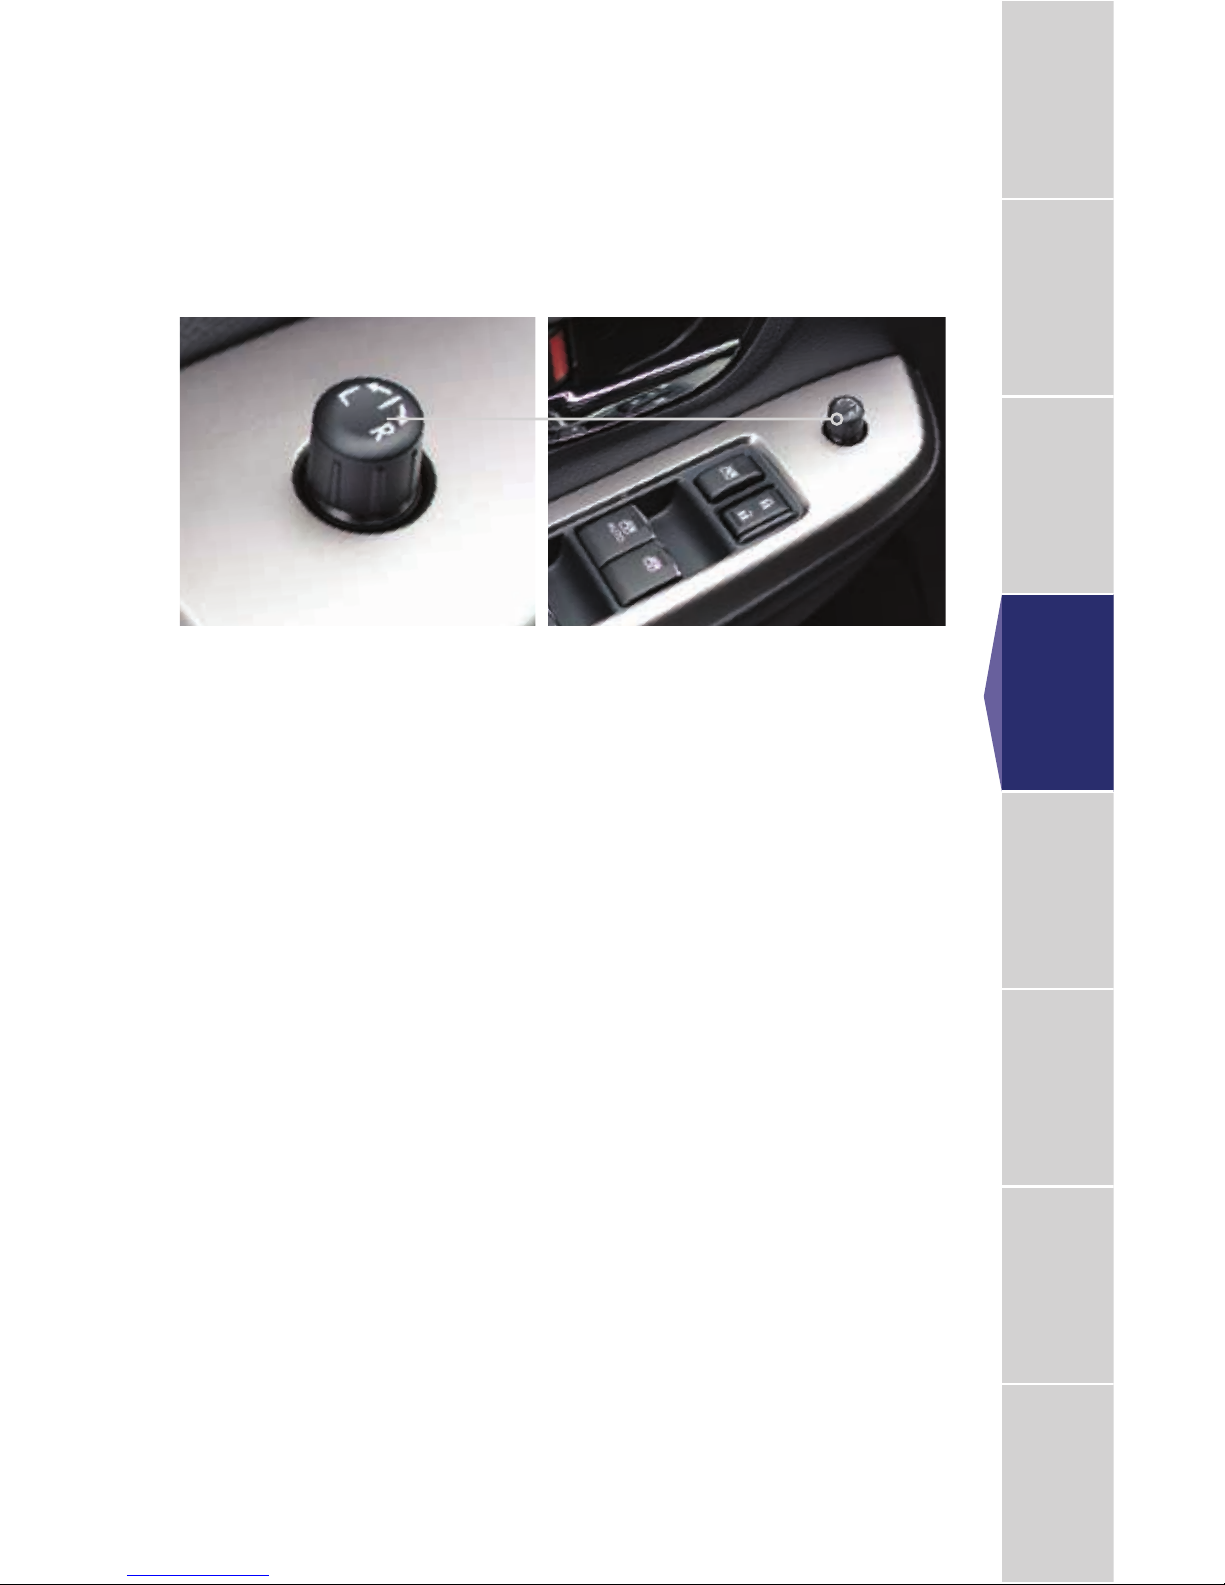
Power Exterior Mirrors
Turn the knob to the “L” side to adjust the left-hand mirror or to the “R” side to
adjust the right-hand mirror. Move the knob in the direction you want to move the
mirror. Then return the knob to the neutral/center position.
Personalize
Page 14
12
Controls
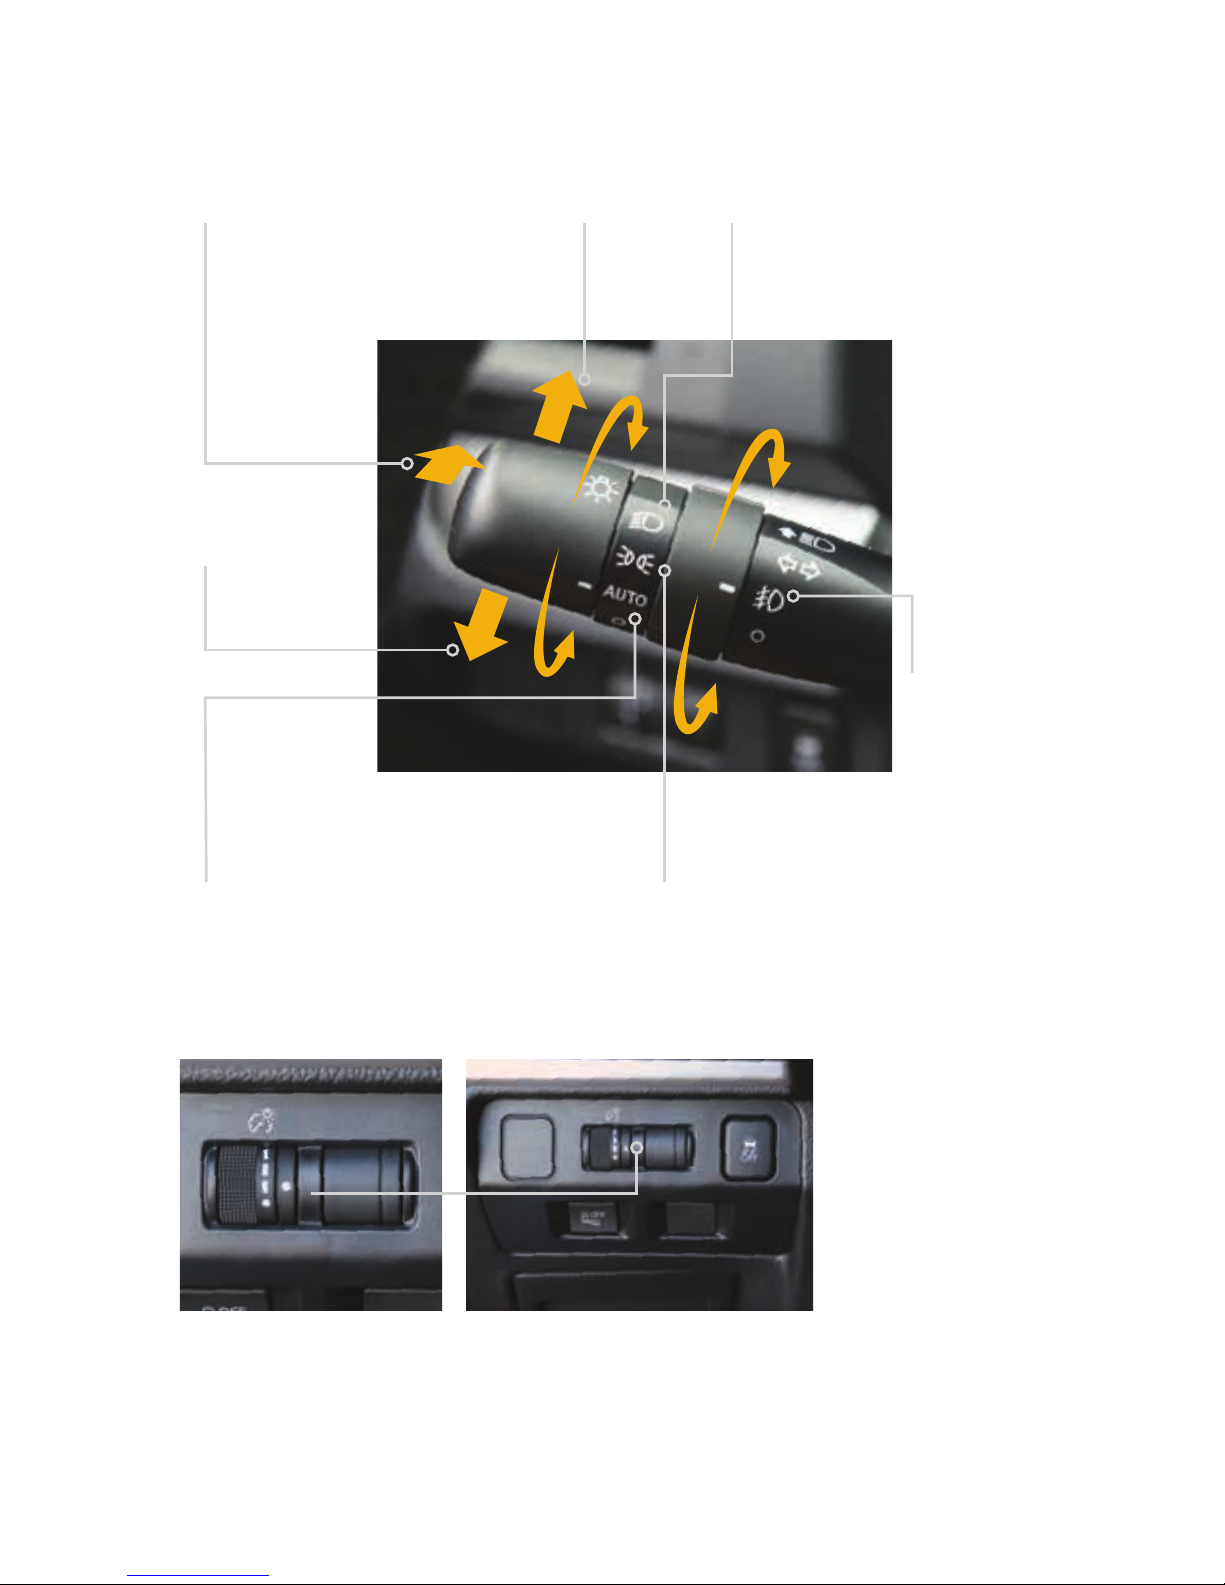
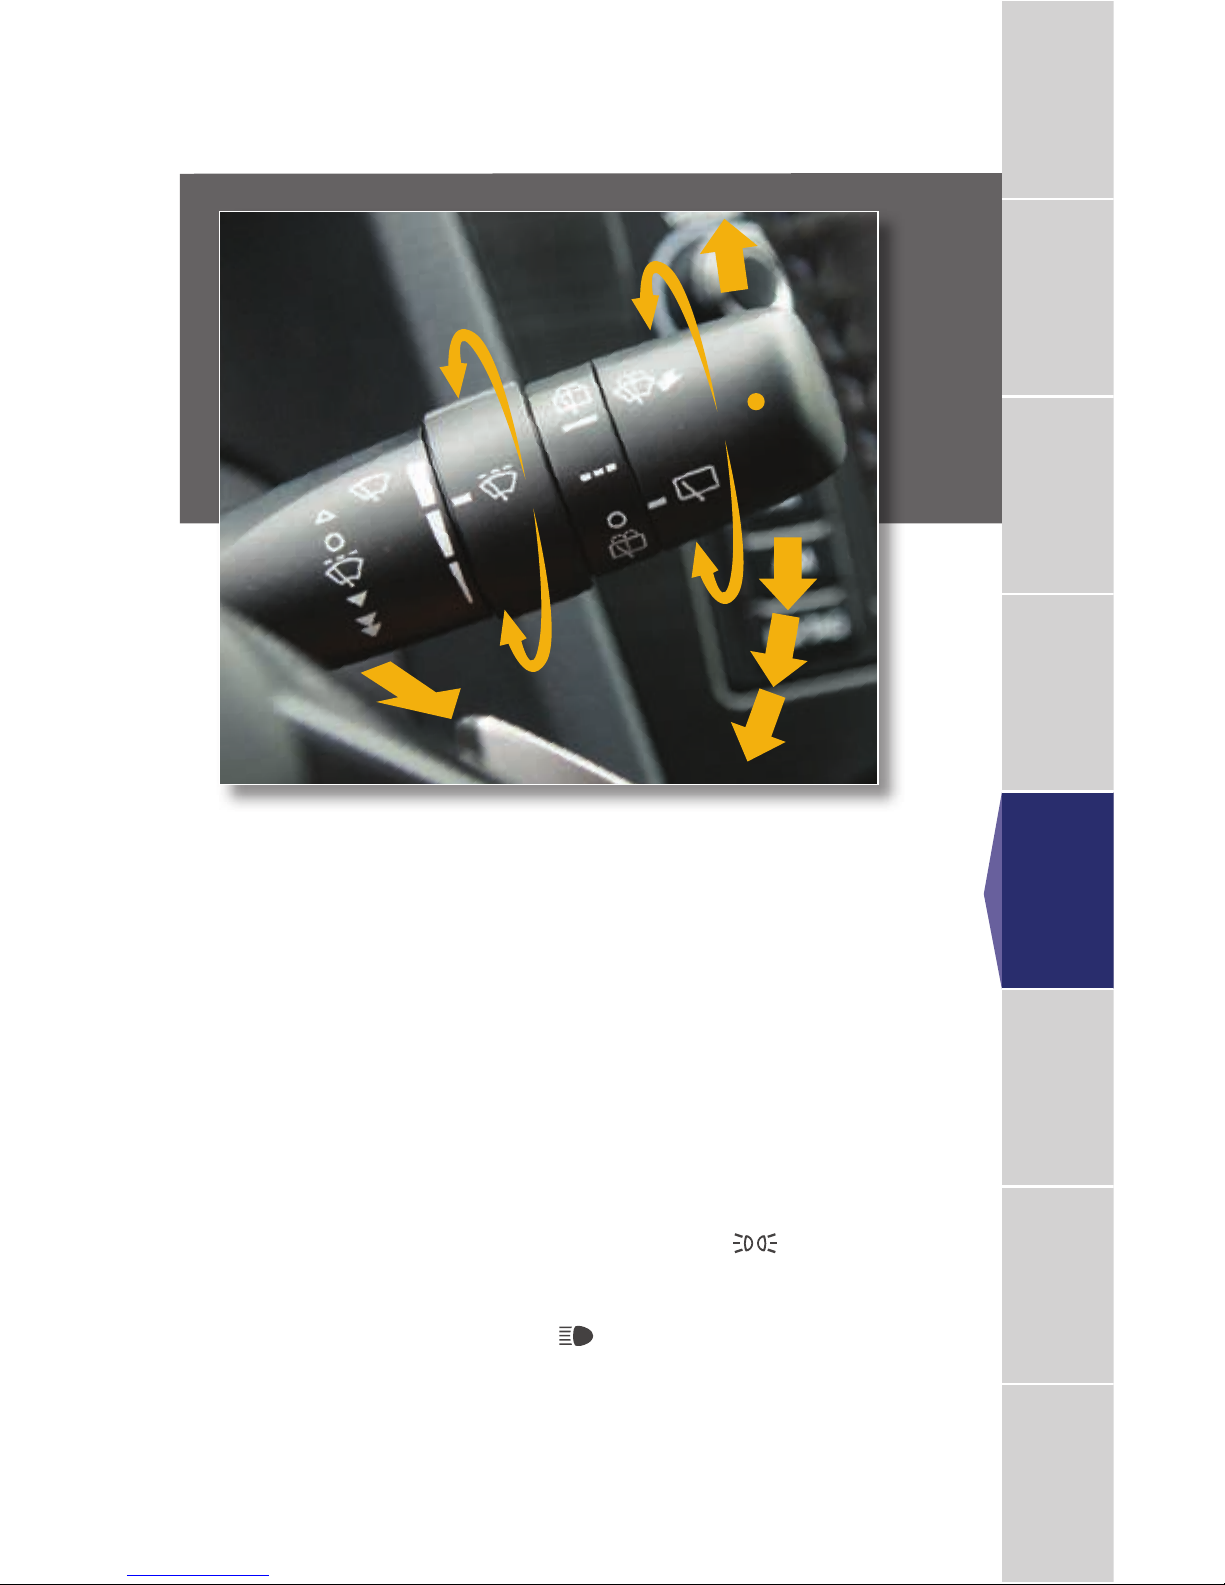
Light Controls
While the light switch is on, rotate the dial downward to dim the instrument panel illumination.
Rotate the dial upward to make the illumination brighter. When the dial is fully rotated upward,
the instrument panel illumination becomes full bright.
Turns on instrument panel
lights, tail lights, parking lights
and license plate lights.
Turns on headlights, instrument
panel illumination, parking lights,
tail lights and license plate lights.
Turns on
fog lights
(if equipped).
Push up
for right
turn signal.
Push down for
left turn signal.
AUTO (if equipped): The vehicle’s
lights are automatically on or off,
depending on the level of outside light.
Push forward to change from low
beam to high beam. Pull the lever
back to center to return to low beam.
Page 15
13
Getting
Started
Instrument
Panel
Gauges Personalize Controls
While
Operating
Safety/In Case
of Emergency
Additional
Information
Windshield Wipers
To turn on the wipers, press the wiper control lever down one level for intermittent,
two levels for low, or three levels for high speed. Return the lever to the “OFF”
position to stop the wipers. For a single wipe, move the lever up. To spray washer
uid, pull and hold the lever toward you.
To operate the rear wiper, rotate the end of the knob upward to the intermittent,
continuous, or wash position. When the rear wiper is off, rotate the knob downward
to wash and wipe the rear window.
Daytime Running Lights
Daytime running lights are standard on your vehicle. Only a reduced brightness
high beam will be automatically turned on when the engine has started, the parking
brake is fully released and the light switch is in the “OFF” or “
” position. The
brightness of the illumination of the high beam headlights is reduced by the daytime
running light system. You must always switch on your headlights when it is dark
outside by turning the light switch to the “
” position.
1
2
3
INT.
LOW
HIGH
OFF
Controls
Page 16
14
Controls
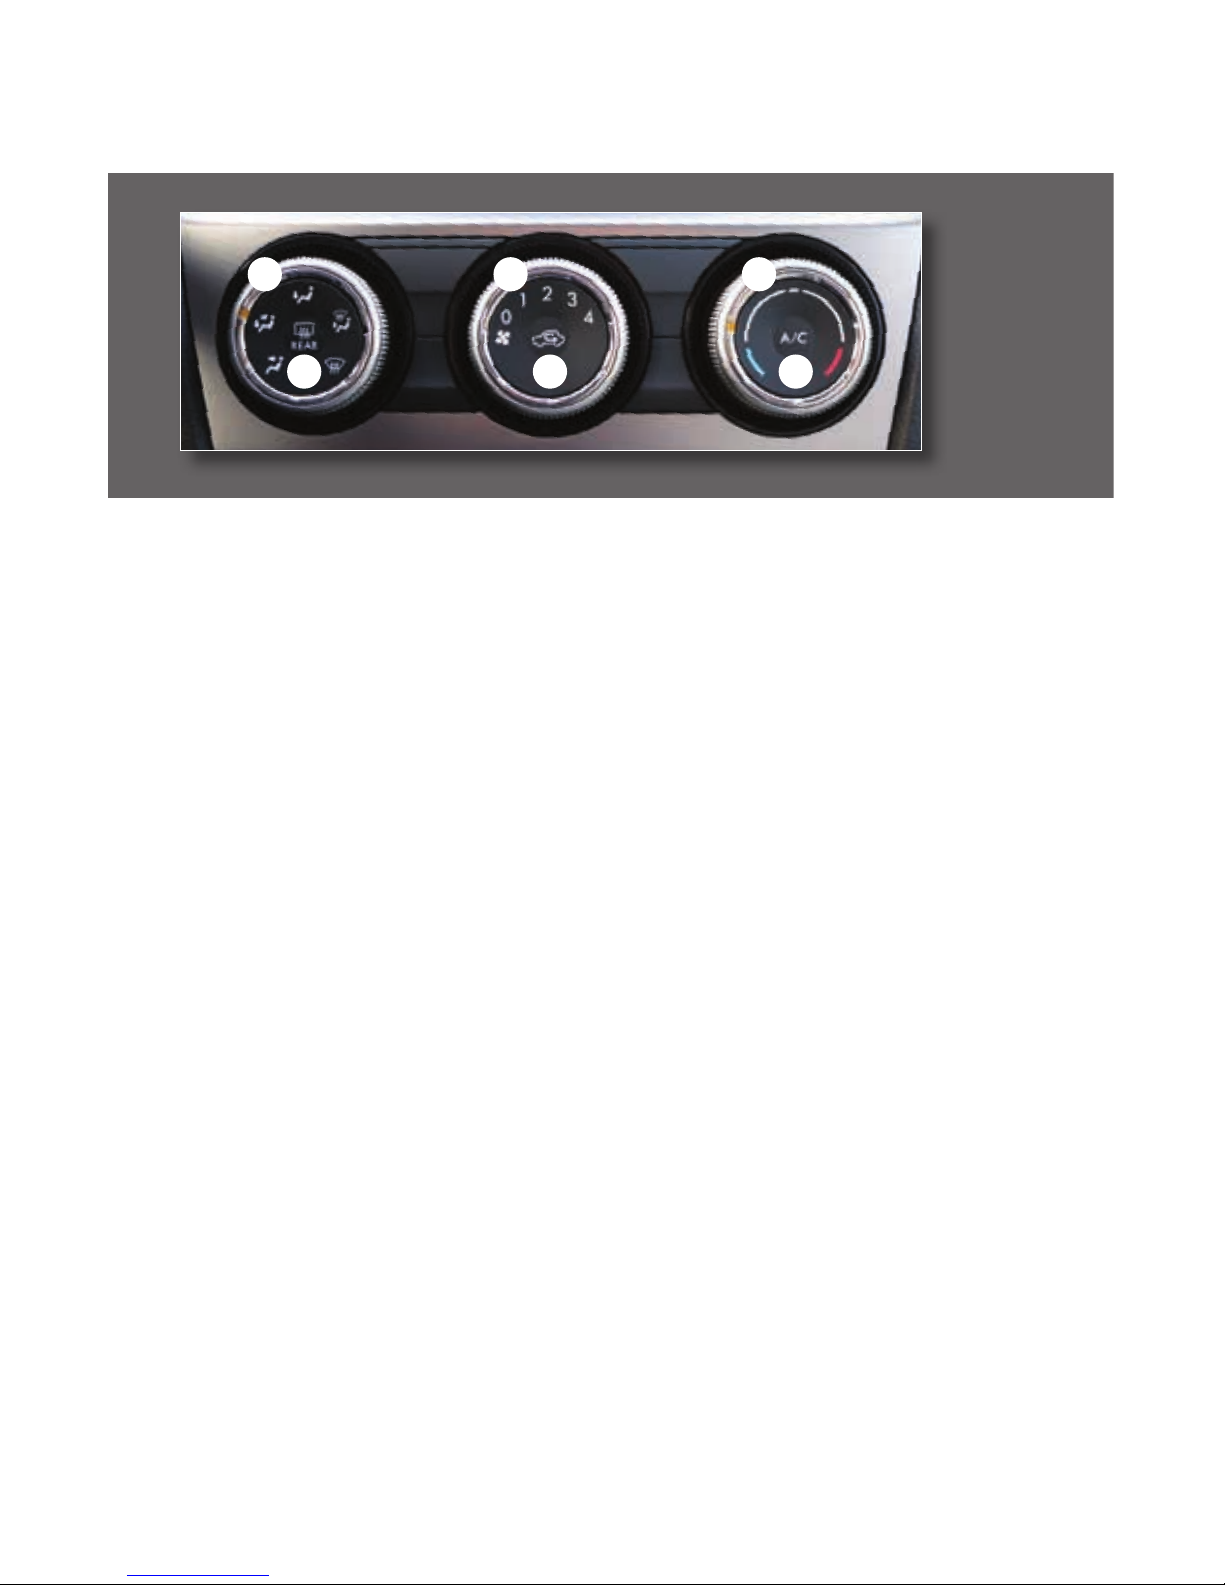
Manual Climate Control System (if equipped)
1. Air Flow Control Dial
The air ow control dial allows you to
choose the direction of air ow. Rotate
the dial for the desired air ow position.
Defrost/Defog
To clear the windshield and front door
windows of fog or frost, rotate the air
ow control dial to the defrost position,
set the temperature control to the red
position, and set the fan speed control
to the fastest speed.
2. Rear Window Defogger Button
Press the rear window defogger button
to turn on the defogger. The defogger
will automatically shut off after about
15 minutes. If the window clears before
that time, you can press the button again
to turn it off.
3. Fan Speed Control Dial
Rotate the fan speed control dial to select
one of four fan speeds.
4. Recirculated/Outside Air Button
Press the air inlet selection button to
prevent outside air from being drawn into
the passenger compartment. If the button
is pushed in, press it again to draw outside
air into the compartment. TO PREVENT
WINDSHIELD FOGGING, DO NOT
REMAIN IN THE RECIRCULATED MODE
FOR AN EXTENDED PERIOD OF TIME.
5. Temperature Control Dial
Rotate the temperature control dial from
blue for cool, to red for warm.
6. Air Conditioning Button
Press the “A/C” button to activate the
air conditioning. Press it again to turn
off the air conditioning.
531
2
4 6
Page 17
15
Getting
Started
Instrument
Panel
Gauges Personalize Controls
While
Operating
Safety/In Case
of Emergency
Additional
Information
1
4
3
62
5
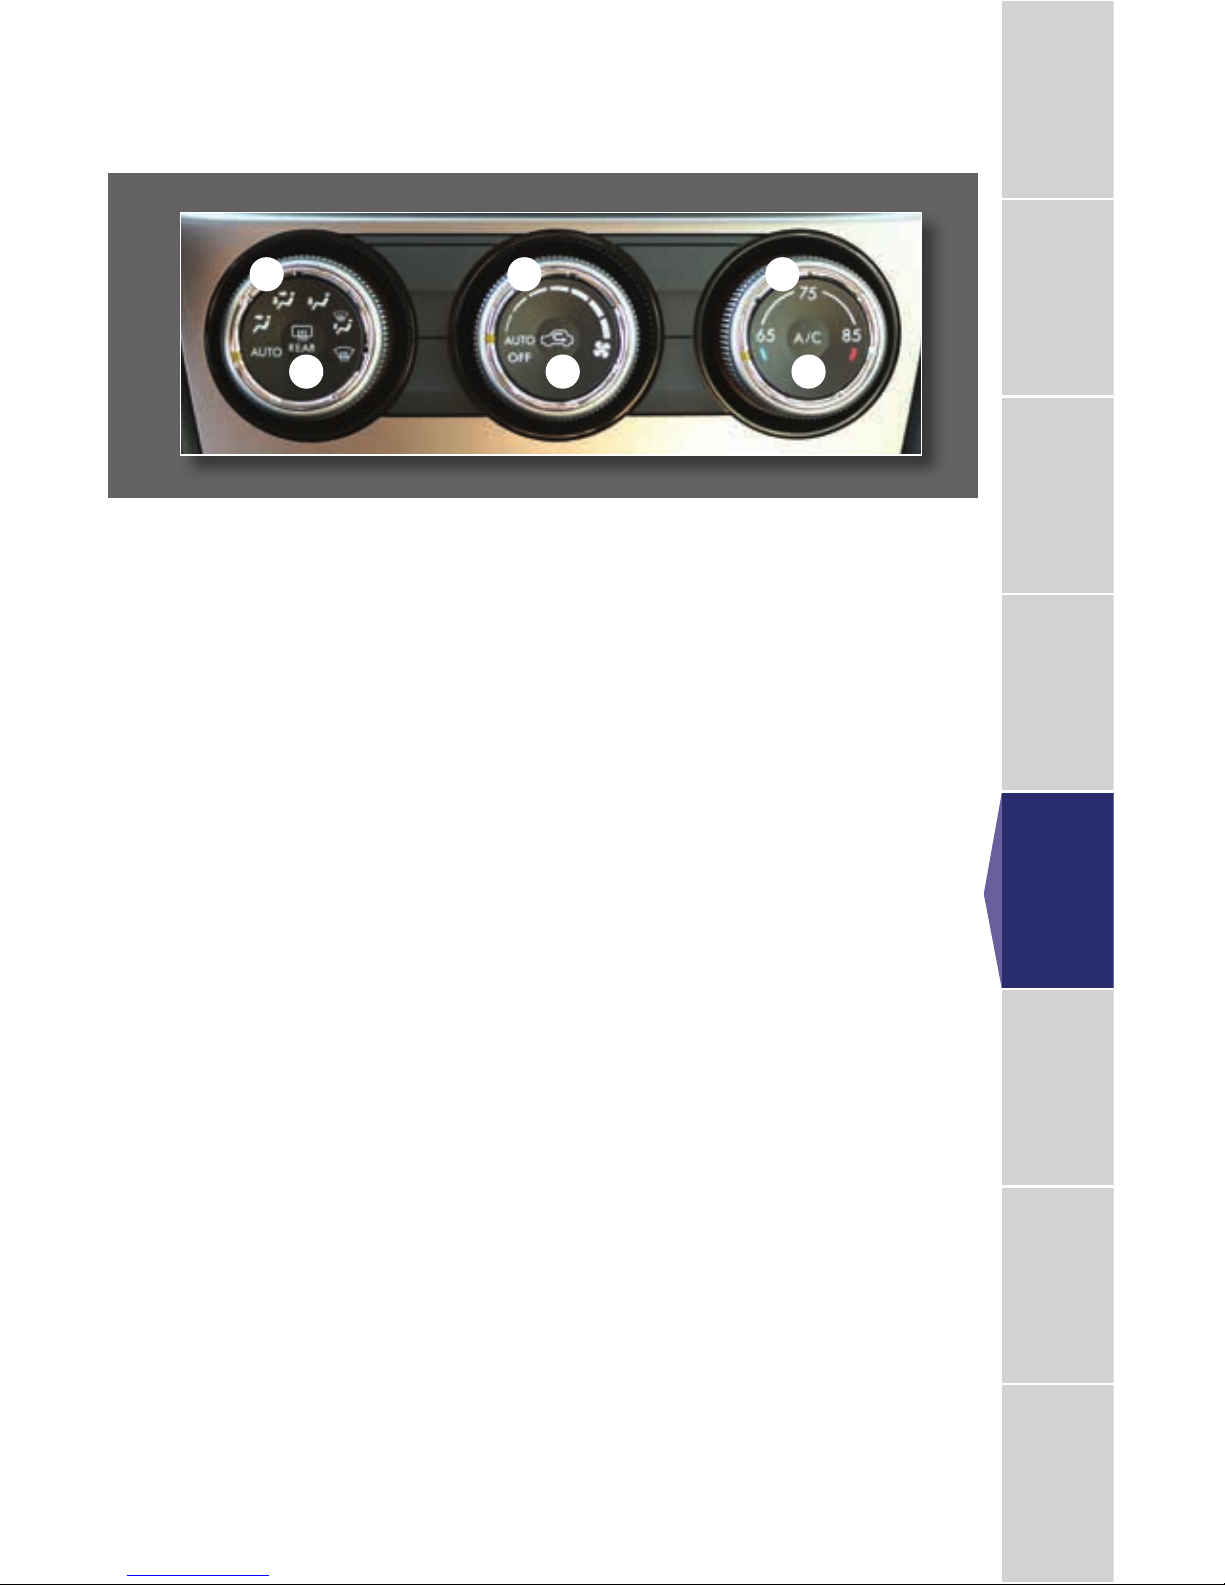
Automatic Climate Control System (if equipped)
1. Air Flow Control Dial
In the automatic setting, the system
determines the air ow location to
achieve the desired temperature, or
you can manually choose the direction
of air ow. Rotate the dial for the
desired air ow position.
Defrost/Defog
To clear the windshield and front
door windows of fog or frost, rotate
the air ow control dial to the defrost
position, set the temperature control
to the red position, and set the fan
speed control to the fastest speed.
2. Rear Window Defogger Button
Press the rear window defogger
button to turn on the defogger. The
defogger will automatically shut off
after about 15 minutes. If the window
clears before that time, you can
press the button again to turn it off.
3. Fan Speed Control Dial
In the automatic setting, the system
determines the fan speed to achieve
the desired temperature, or you
can manually rotate the fan speed
control dial to select one of seven
fan speeds.
4. Recirculated/Outside Air Button
In the automatic mode, the system
will determine if recirculated air
is needed to achieve a desired
temperature. In manual mode,
press the air inlet selection button to
prevent outside air from being drawn
into the passenger compartment.
If the button is pushed in, press
it again to draw outside air into
the compartment. TO PREVENT
WINDSHIELD FOGGING, DO NOT
REMAIN IN THE RECIRCULATED
MODE FOR AN EXTENDED PERIOD
OF TIME.
5. Temperature Control Dial
Rotate the temperature control dial
from 65 for cool to 85 for warm.
6. Air Conditioning Button
Press the “A/C” button to activate
the air conditioning. Press it again to
turn off the air conditioning.
Controls
Page 18
16
Controls
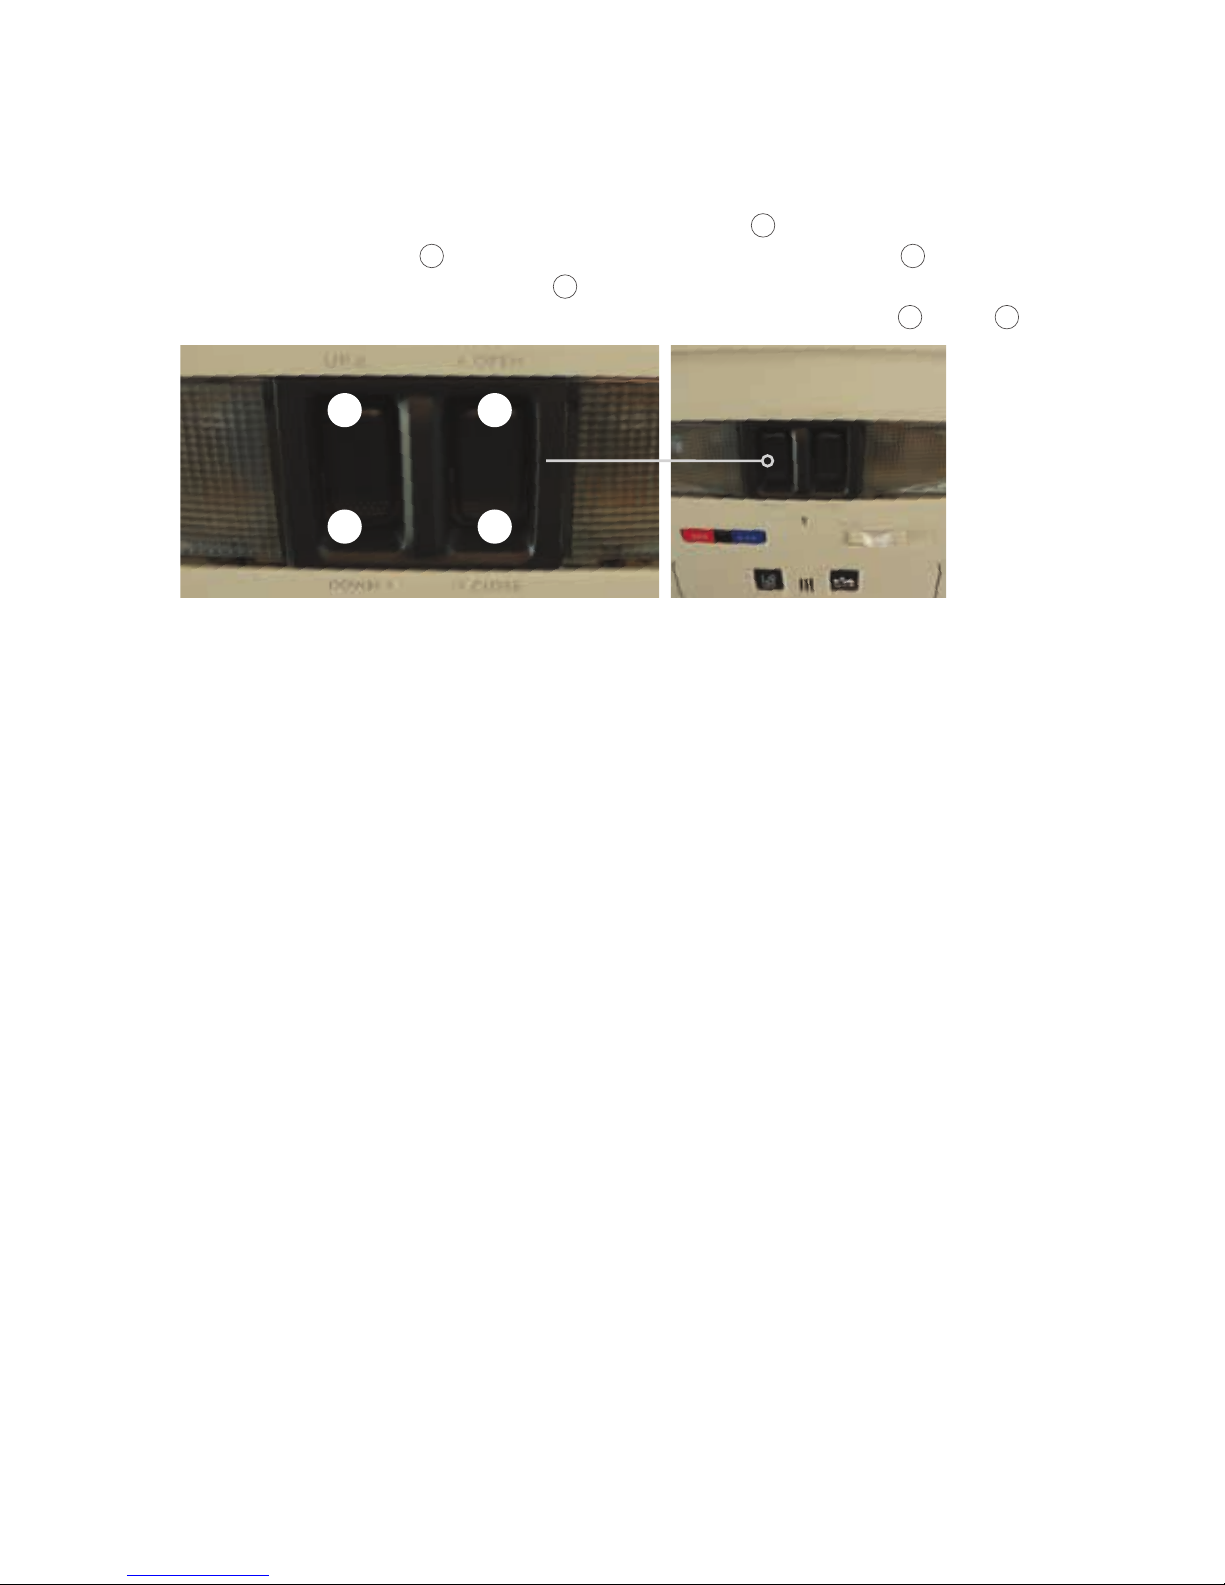
Power Moonroof (if equipped)
With the moonroof in the fully closed position, press the switch 1 to tilt the moonroof up.
Press and hold the switch
2
to lower the moonroof. Press and hold the switch 3 to fully open
the moonroof. Press and hold the switch
4
to close the moonroof. To stop the moonroof in a
midway position while opening or closing, momentarily press the switch to side
3
or side 4.
1 3
2 4
Page 19
17
Getting
Started
Instrument
Panel
Gauges Personalize Controls
While
Operating
Safety/In Case
of Emergency
Additional
Information
Controls
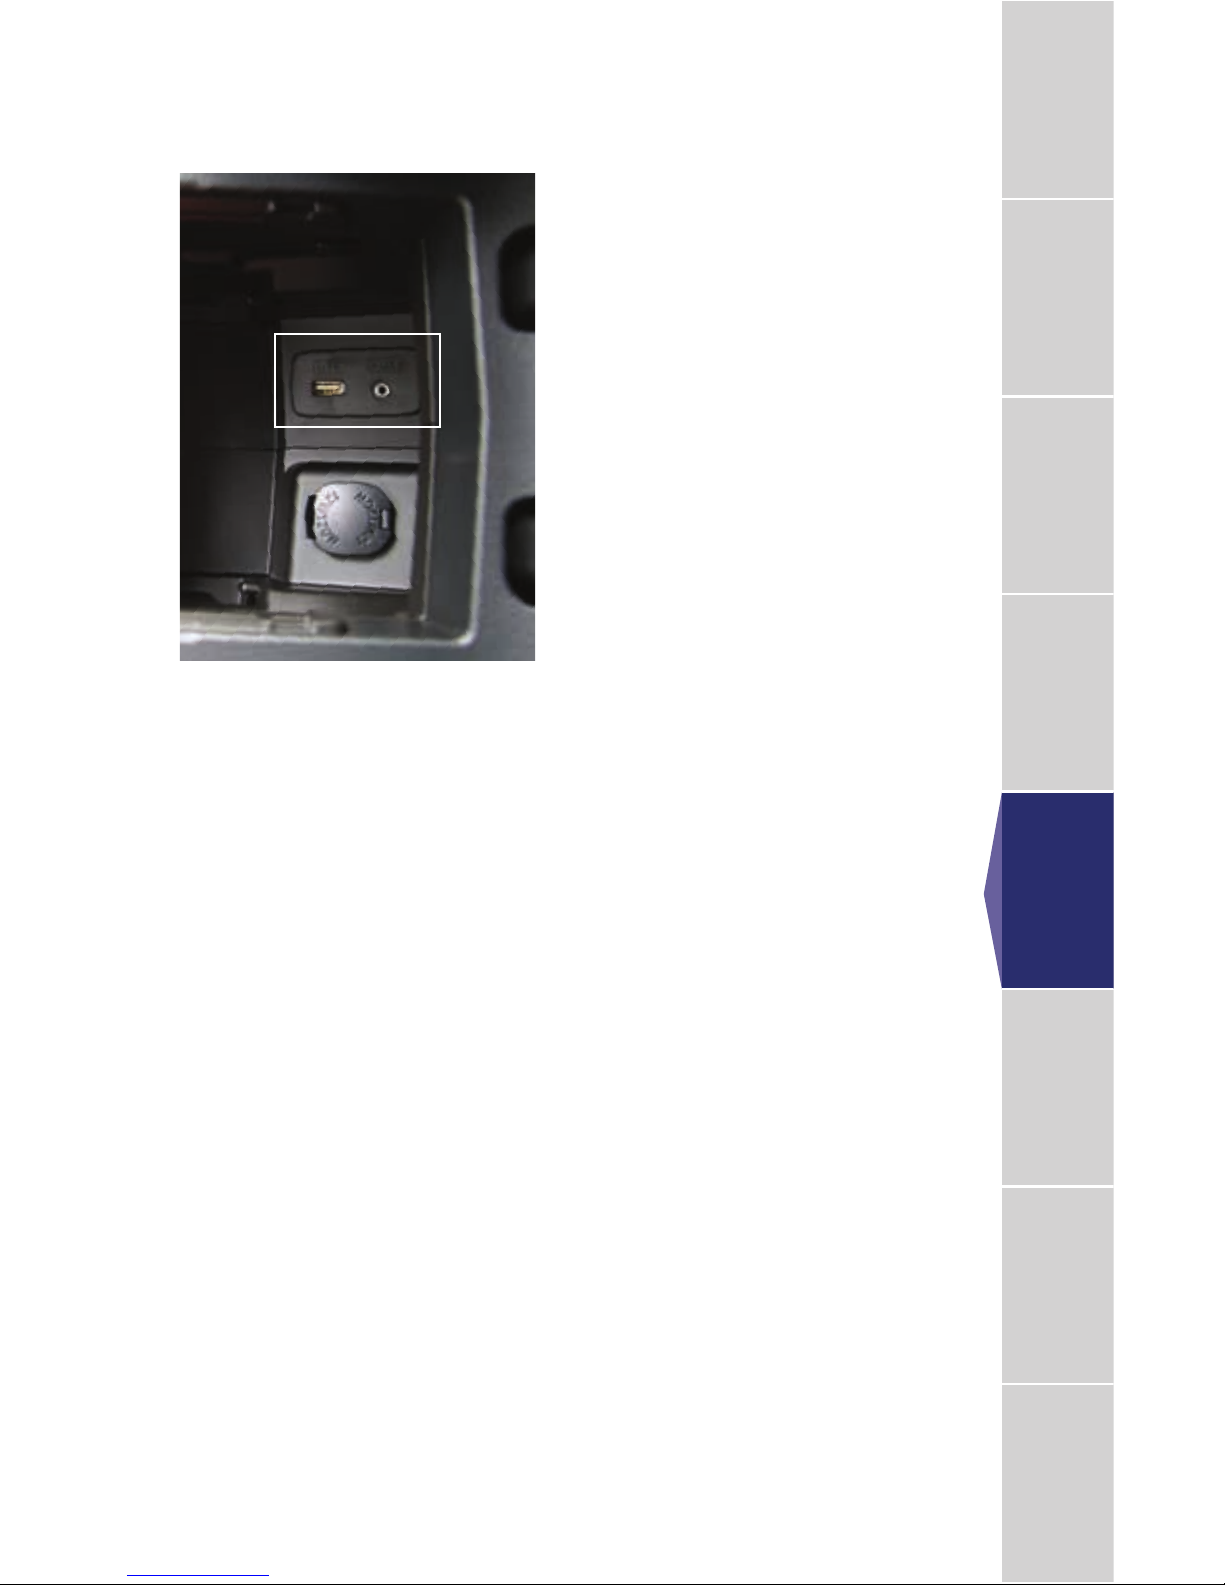
Auxiliary Input Jack
The 3.5mm auxiliary input jack is
located in the front of the center
console. You can connect a portable
music player to the auxiliary jack and
hear the music stored on it through
the vehicle speakers. Press the
“SOURCE” button located on the audio
system to select the auxiliary mode.
USB Port
The USB port is located in the front of
the center console. You can connect
a portable music player to the USB
port and hear the music stored on
it through the vehicle speakers.
Press the “SOURCE” button located
on the audio system repeatedly
until the USB mode is selected.
Page 20
18
Controls
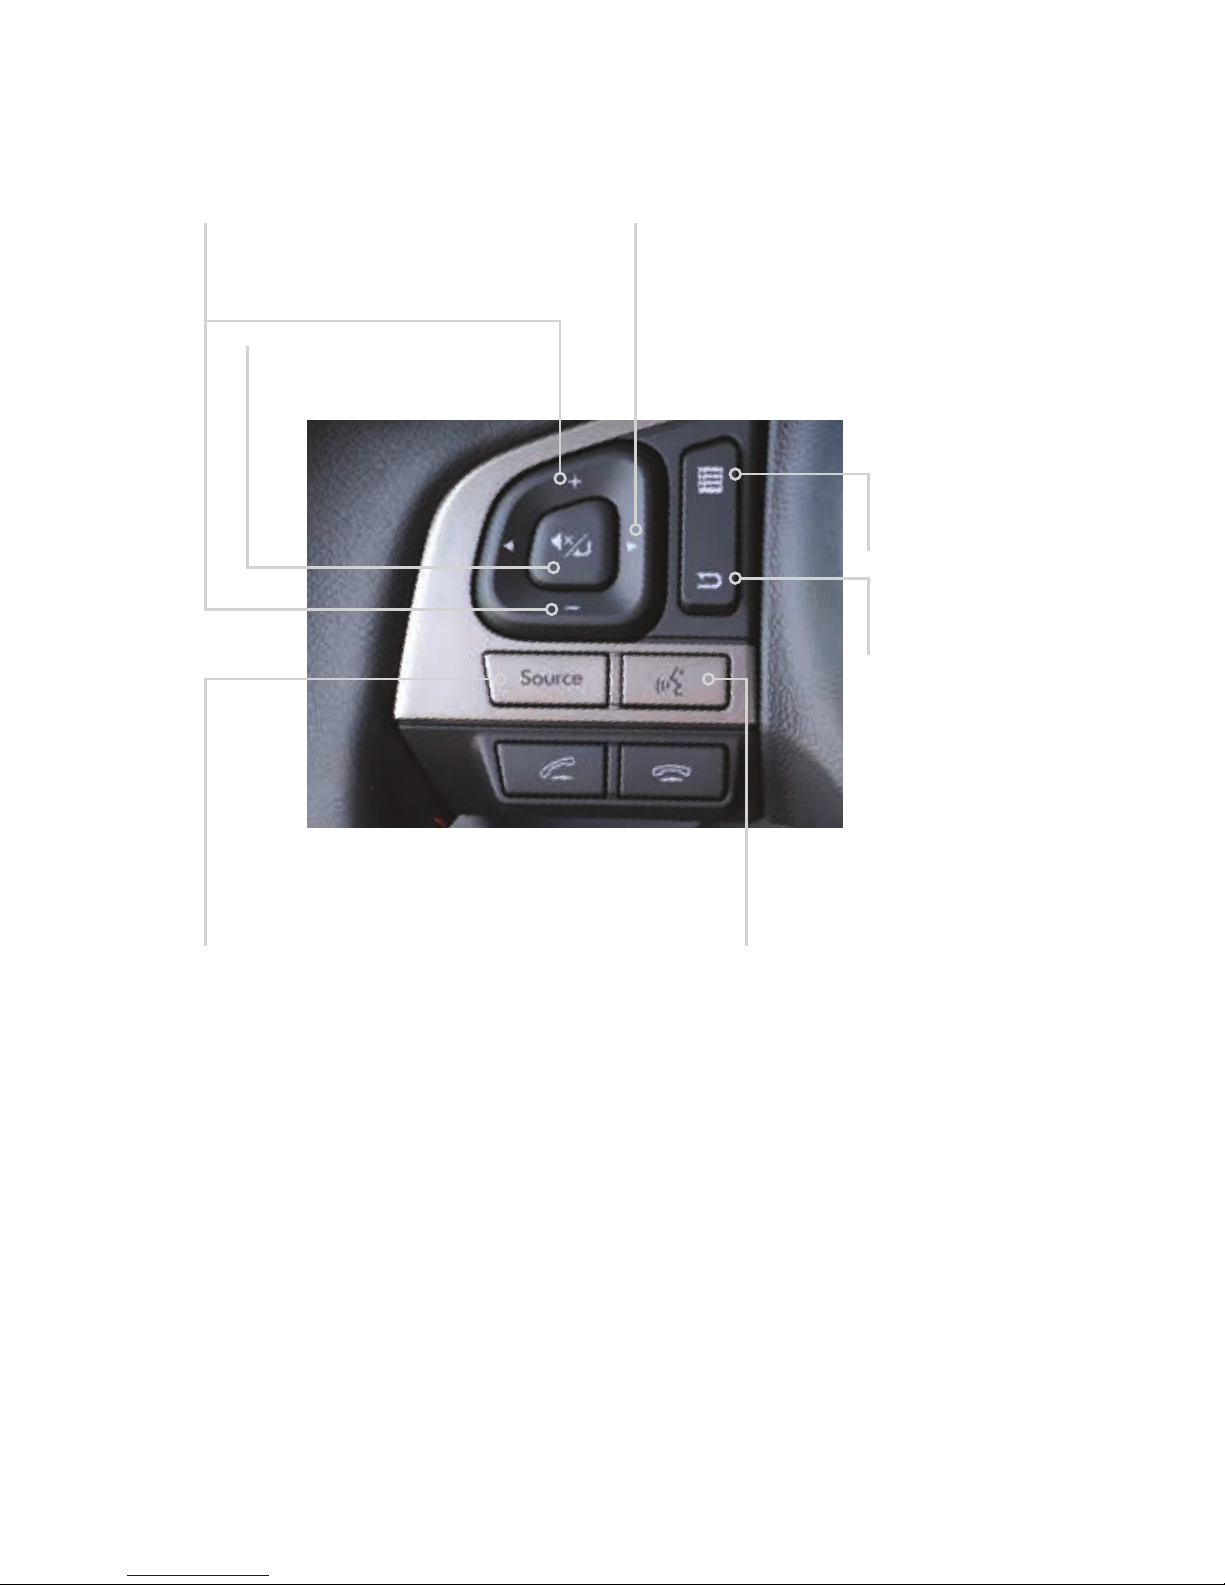
Steering Wheel Audio Controls
Press the button
to return to the
previous screen.
Press the button
to show the
list screen.
Talk switch; please refer to
the “Bluetooth audio” section
in your Owner’s Manual.
With any of the radio modes
selected, push the switch left or right
to skip through your presets. In CD
mode, push the switch up or down
to skip forward or back a track.
Push the top (+) of the switch to
increase or the bottom (–) of the
switch to decrease volume.
Press to turn audio ON/OFF
or to select the cursor entry.
Press the button to select
the desired audio mode —
FM, AM, SAT, CD, AUX, MEDIA.
Page 21
19
Getting
Started
Instrument
Panel
Gauges Personalize Controls
While
Operating
Safety/In Case
of Emergency
Additional
Information
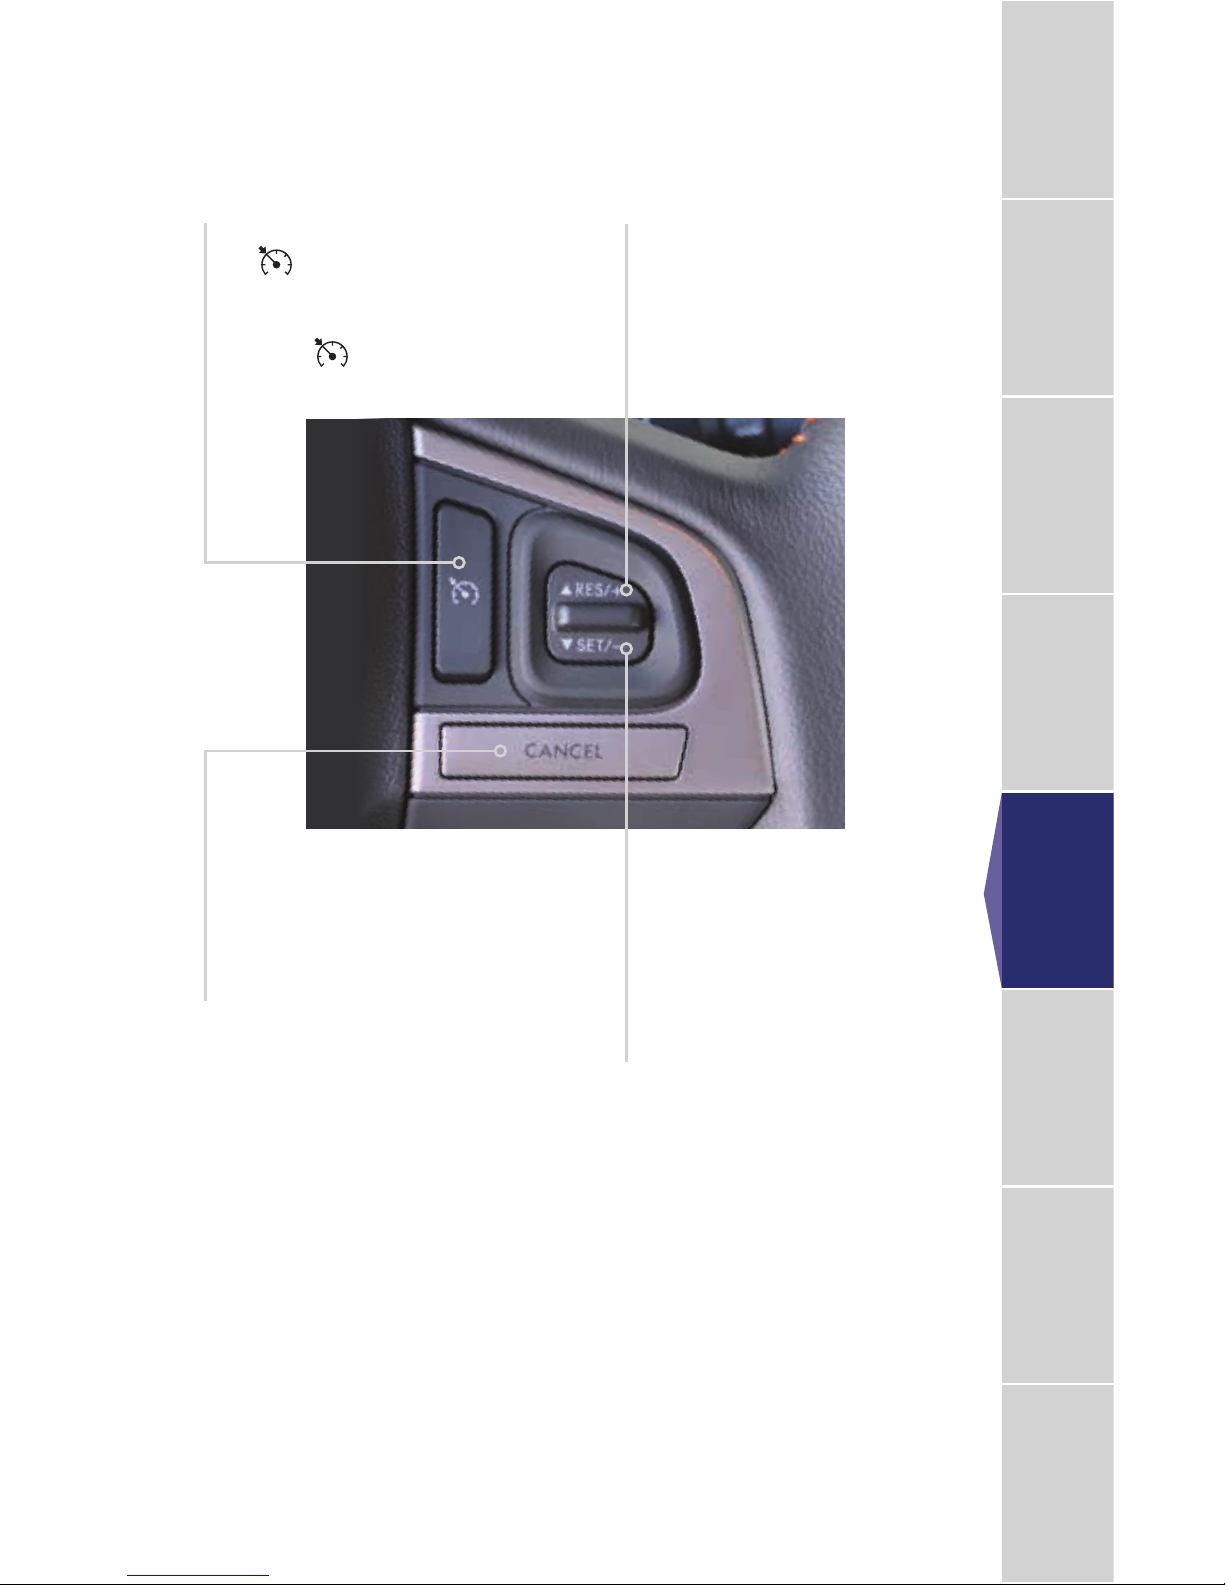
Cruise Control
Increase Speed
Push up the “RES/SET” switch to the
“RES” side; hold until your vehicle
reaches the desired speed and
release. To increase speed using the
accelerator pedal, press the pedal
until you reach the desired speed.
Push down the “RES/SET” switch to
the “SET” side to set the speed.
Decrease Speed
Push down the “RES/SET” switch to
the “SET” side; hold until your vehicle
slows to the desired speed and release.
To decrease the speed using the brake
pedal, press the pedal to release
cruise control temporarily. When the
speed decreases to the desired speed,
push down the “RES/SET” switch to
the “SET” side to set the speed.
Controls
Press the accelerator pedal
until your vehicle reaches
the desired speed. Push the
switch to the “SET” side and
release. Ease off the accelerator
pedal. Your vehicle will
maintain the desired speed.
To resume your speed
after canceling, push the
switch to the “RES” side.
To activate the cruise control, press
the “
” button. The indicator light
on the instrument panel will turn
on. To deactivate cruise control,
press the “
” button again.
To cancel the cruise control,
push the brake pedal or press
the “CANCEL” button. If you
have a manual transmission, you
can push in the clutch pedal.
Page 22
20
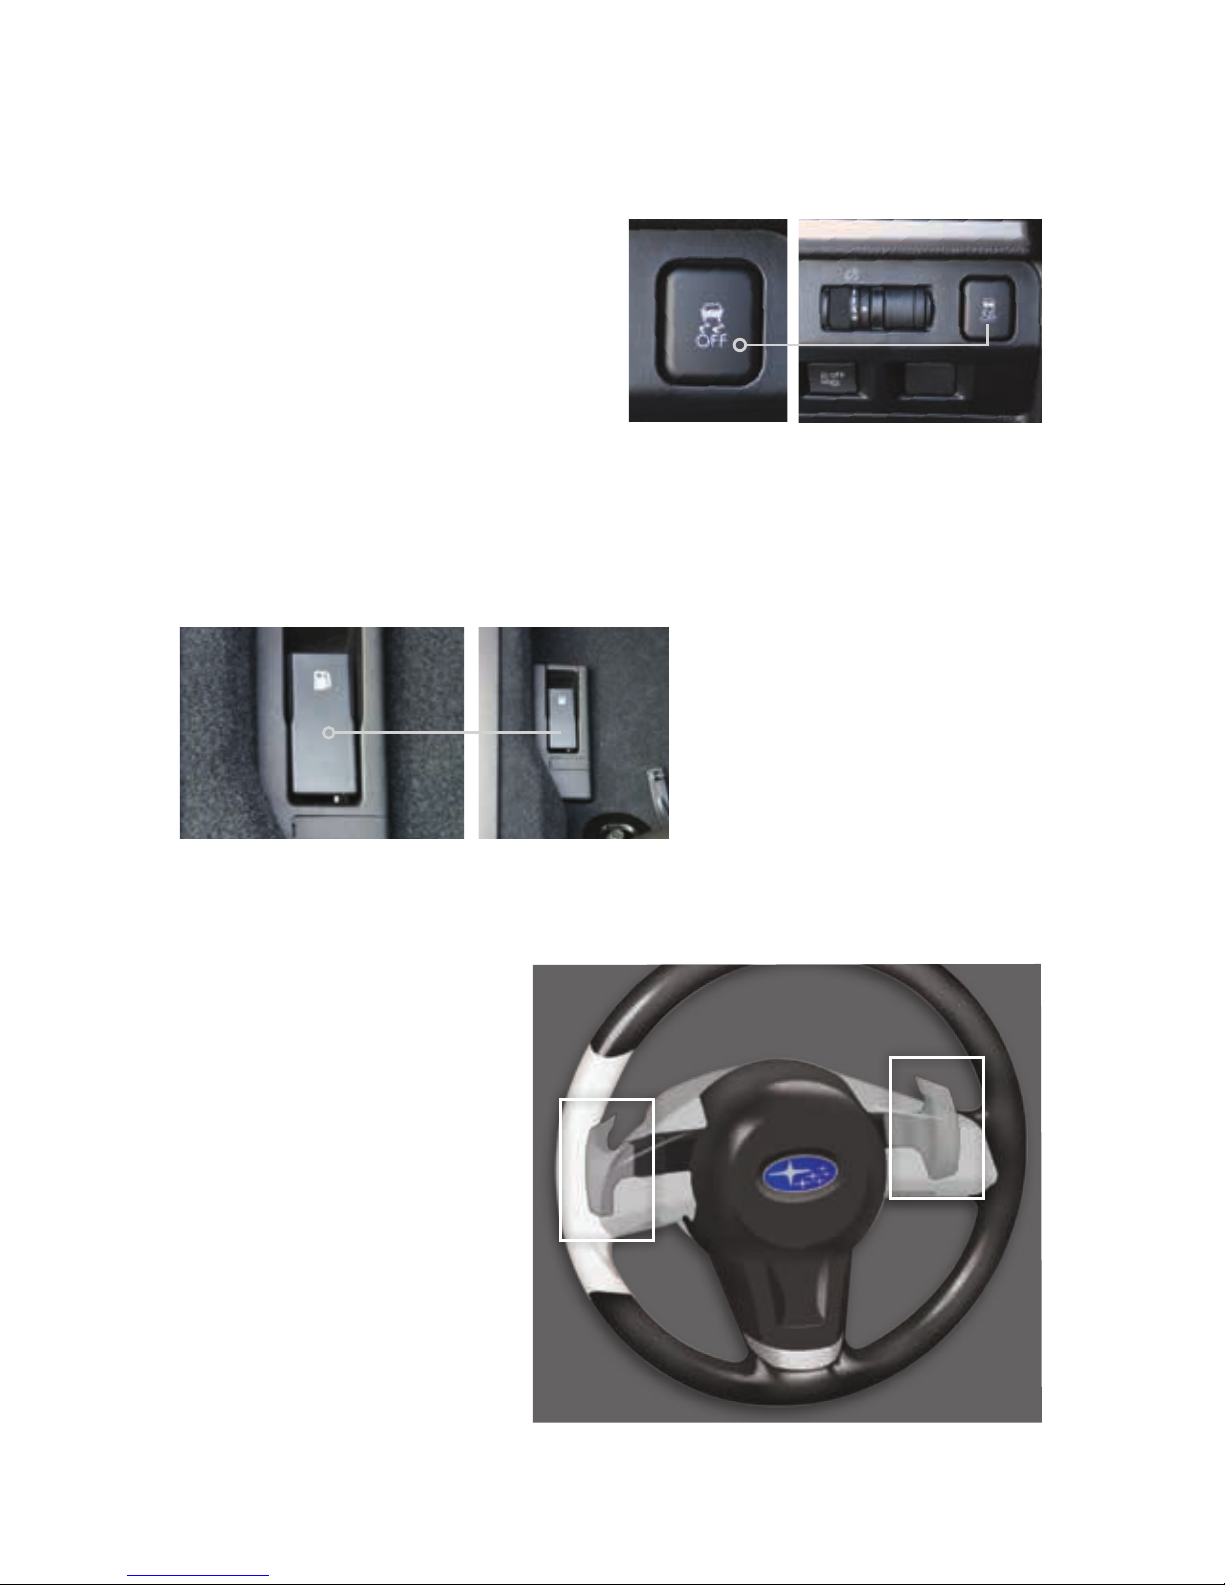
Vehicle Dynamics Control OFF Switch
Pressing the switch to deactivate the Vehicle
Dynamics Control system can help in the
following situations:
• A standing start on a steeply sloping
road with a snowy, gravel-covered,
or otherwise slippery surface.
• When the vehicle’s wheels are stuck in mud or deep snow.
Fuel Filler Lid Release
The vehicle is equipped with a fuel ller lid release. To open the fuel ller lid, pull the fuel ller
lever up and release.
While Operating
Paddle Shift Control Switches (if equipped)
• Temporary use: Even when
the selector is in the “D” (Drive)
position, you can temporarily
shift the gear by pulling the
“+” or “–” paddle shift control
switch. The transmission will
automatically switch back to
Normal Mode.
• When the selector lever is in
Manual Mode, shift to the next
higher gear by pulling the “+”
paddle shift control switch on
the steering wheel. Pull the “–”
paddle shift control switch to
shift into the next lower gear.
Page 23
21
Getting
Started
Instrument
Panel
Gauges Personalize Controls
While
Operating
Safety/In Case
of Emergency
Additional
Information
1
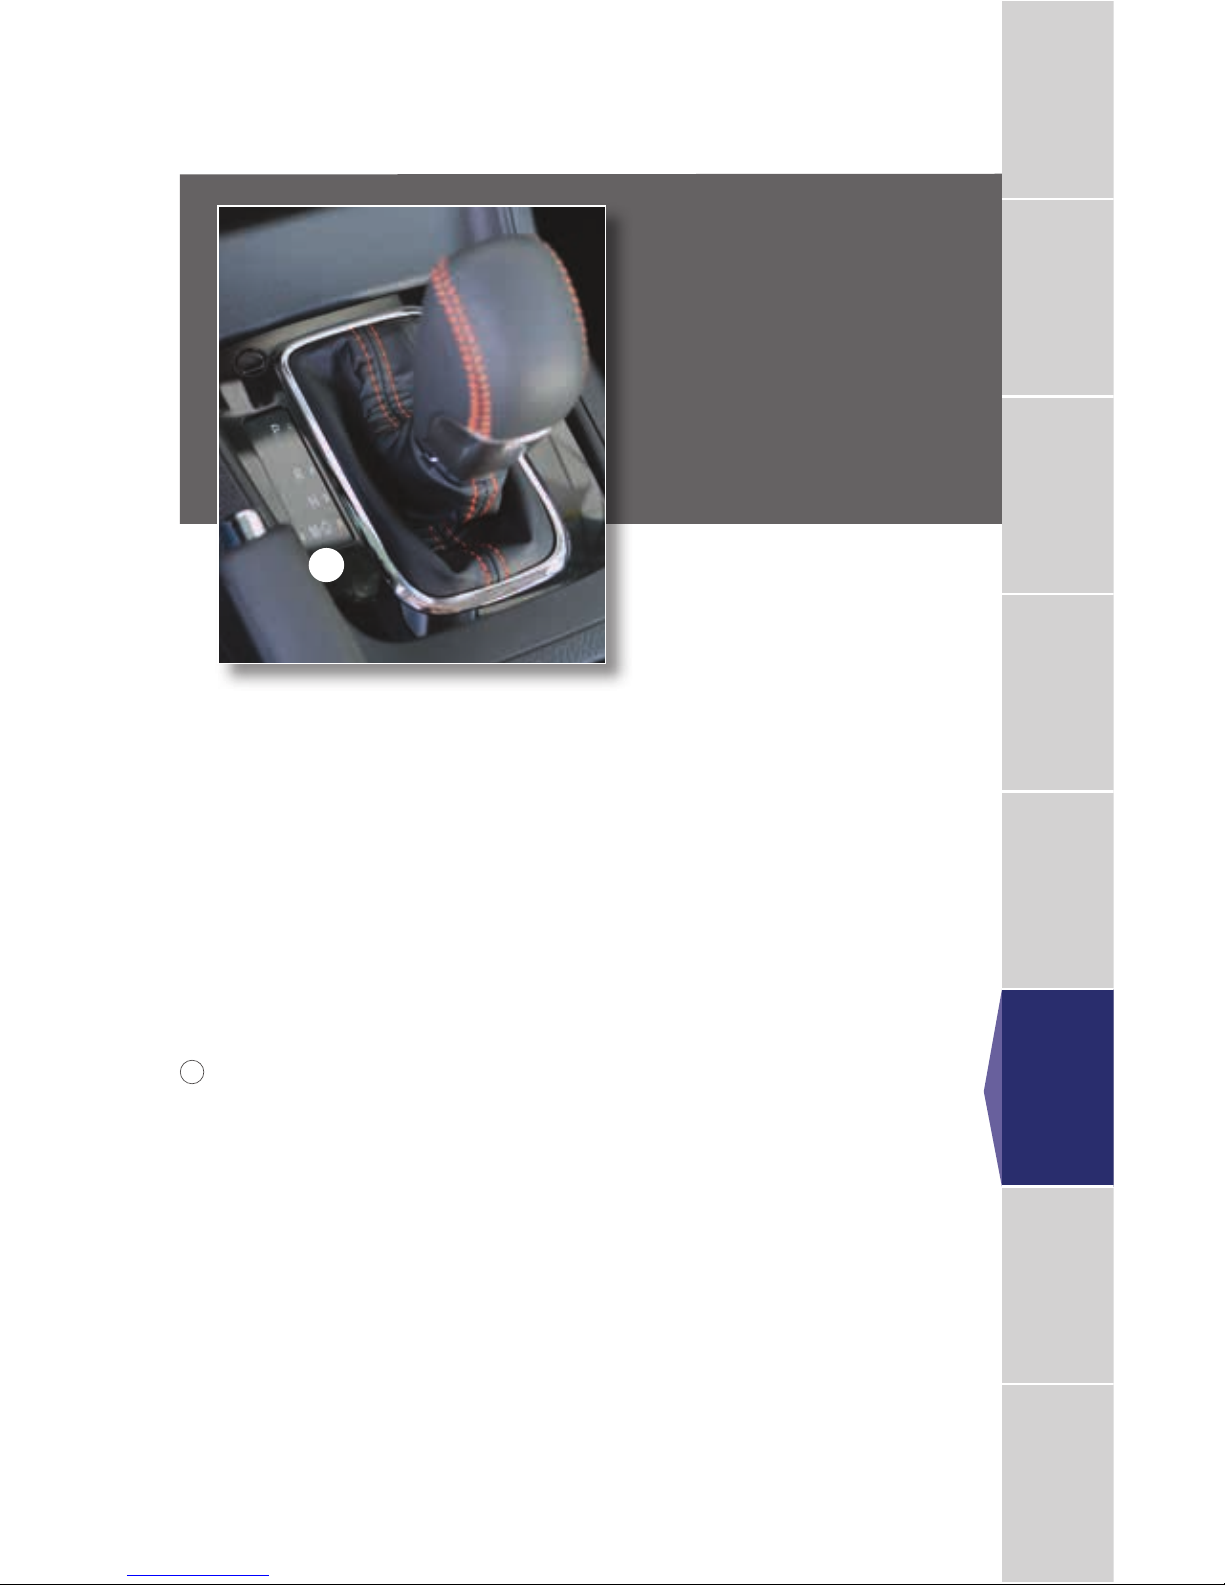
Automatic Transmission Shift Mode
The automatic transmission gives you ultimate control with two different driving
modes: Normal Mode and Manual Mode.
Normal Mode
When the selector lever is in the “D” (Drive) position, the transmission is in Normal
shift mode. The shift position indicator on the instrument panel shows “D”, and the
transmission automatically shifts into a suitable forward gear.
Manual Mode
In Manual Mode, you select the desired gear position to obtain necessary
acceleration and engine braking. Moving the selector lever left into the manual gate
1
from the “D” (Drive) position causes the transmission to change into Manual
Mode. To shift, use the paddle shift control switches. The shift position indicator
shows the selected gear position.
When Manual Shifting Operation is Possible
• Arrow-shaped lights in the center of the instrument panel show whether an
upshift is possible and whether a downshift is possible.
• Both arrows are on: Upshifting and downshifting are both possible.
• Up arrow only is on: Only upshifting is possible.
• Down arrow only is on: Only downshifting is possible.
While
Operating
Page 24
22
Safety/In Case of Emergency
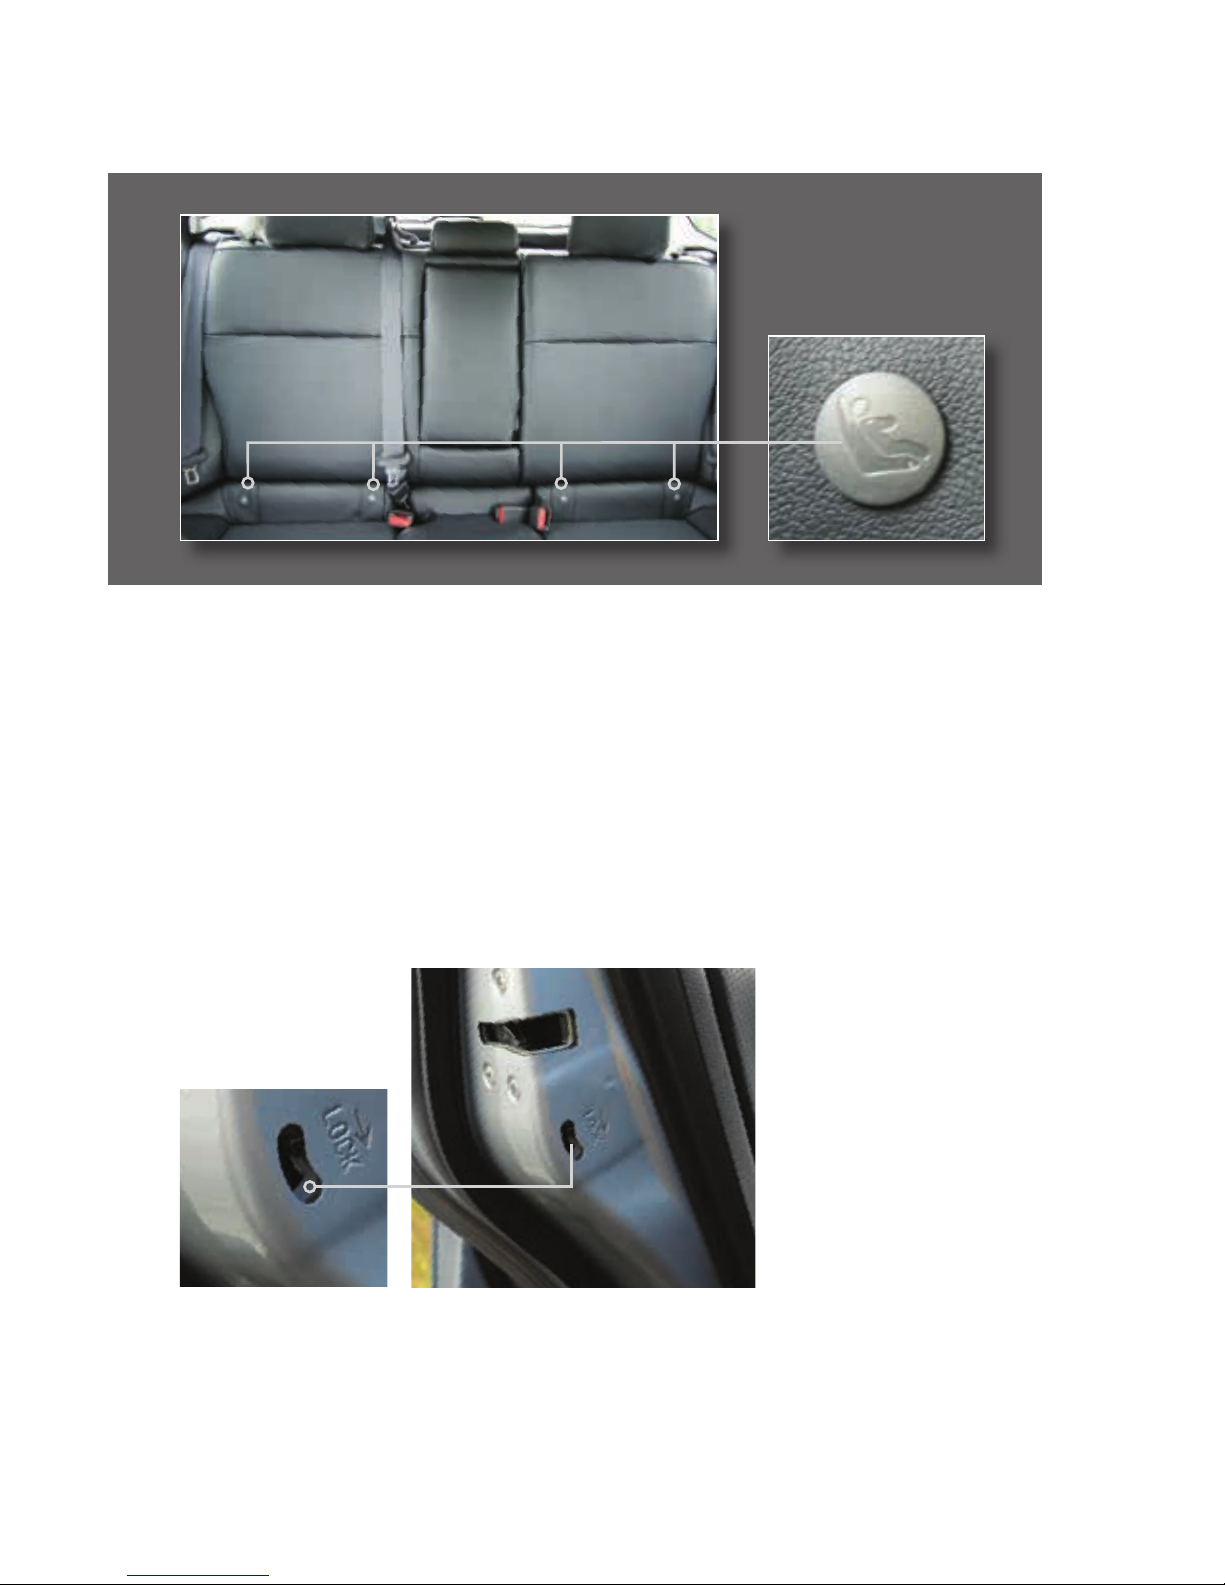
Child Restraint System
For maximum safety, rst carefully read the LATCH system instructions from the device
manufacturer, as well as the installation instructions in your Owner’s Manual, to properly install
the LATCH compatible restraint system. Use the appropriate seatbelts or anchorages provided
in your vehicle. Children age 12 and under must properly occupy the rear seat at all times.
Child Safety Locks
The child safety locks are located on the inside edges of the rear doors. In the locked
position, the rear doors can only be opened from the outside.
Page 25
23
Getting
Started
Instrument
Panel
Gauges Personalize Controls
While
Operating
Safety/In Case
of Emergency
Additional
Information
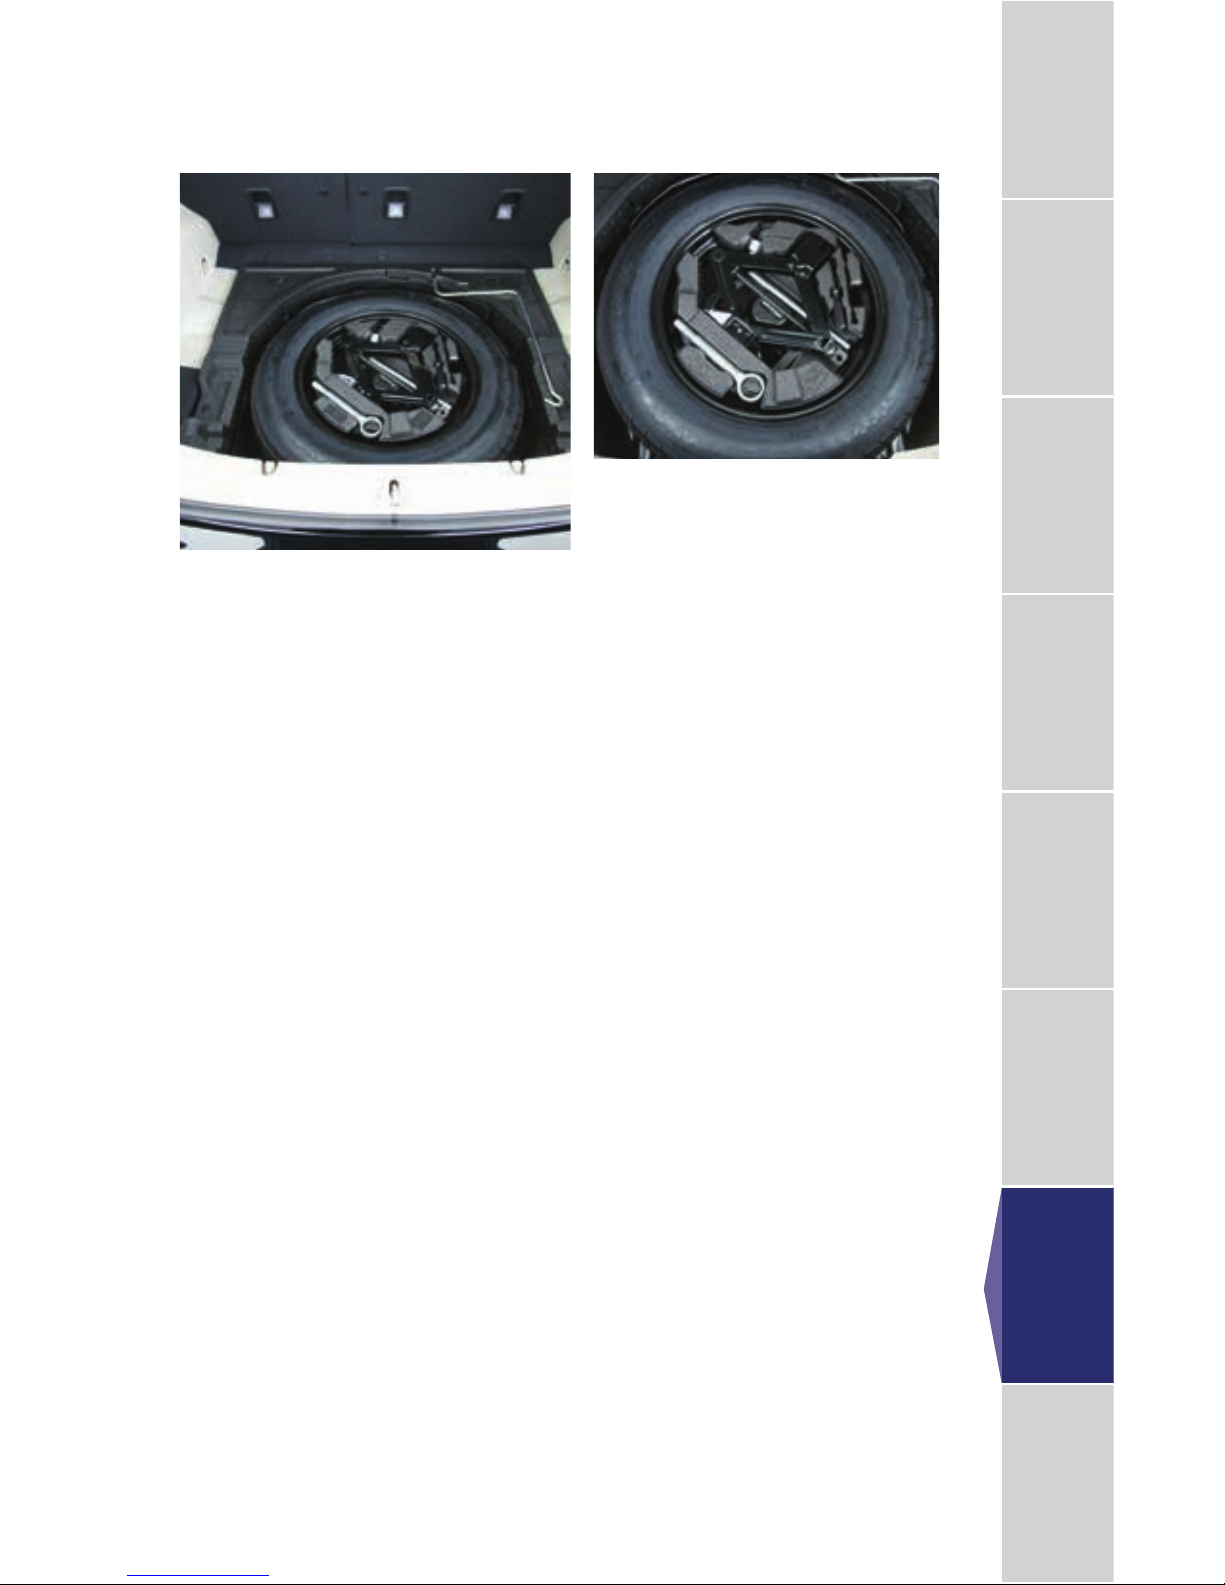
Location of Spare Tire
and Jack
A jack handle is stored under the
oor of the cargo area. A jack and
a towing hook are stored in the tool
bucket in the center of the spare
tire. Also, a tool bag that contains a
wheel nut wrench and a screwdriver
is equipped with the vehicle.
Emergency Towing Your
All-Wheel Drive Vehicle
Since Subaru Symmetrical All-Wheel
Drive distributes engine power to
all four wheels, improper towing
will severely damage your AWD
system. A atbed truck is the only
recommended way to properly
transport your AWD vehicle. If
towing is necessary, it is best
done by your Subaru retailer or a
commercial towing service.
Subaru Roadside
Assistance
Subaru Roadside Assistance is
free and standard on every 2016
Subaru vehicle. Coverage is
automatic; there are no forms
to complete. Subaru Roadside
Assistance is available anytime
during the 3-year/36,000-mile
Subaru Limited Warranty, whichever
comes rst.* A Subaru Roadside
Assistance decal has been afxed
to the driver’s door window.
Subaru Roadside Assistance:
1-800-261-2155
Exclusions
Specically excluded from Subaru
Roadside Assistance coverage are
service requests or claims resulting
from: accidents, vandalism, acts of
God, violation of any laws, misuse and
abuse, or vehicle modications not
recommended by the manufacturer.
*See your retailer for details.
Safety/In Case
of Emergency
Page 26

24
Additional Information
Fuel
• Use regular unleaded gasoline with an octane rating of 87 AKI or higher. Consult the
Owner’s Manual for more detailed information.
Fuel Capacity
• 15.9 US gal (60 liters, 13.2 lmp gal)
• When the low fuel indicator light is displayed on the instrument panel, approximately
2.6 US gal (10.0 liters, 2.2 Imp gal) of fuel remain.
• If you have recently fueled your vehicle, the Check Engine light on the instrument panel
may stay on due to a missing or loose fuel ller cap (the cap should be tightened until a
click is heard).
Page 27
25
Getting
Started
Instrument
Panel
Gauges Personalize Controls
While
Operating
Safety/In Case
of Emergency
Additional
Information
Engine Oil
Use only the following oils:
• ILSAC GF-5, which can be identied with the ILSAC certication mark
(Starburst mark).
• Or API classication SN with the words “ENERGY CONSERVING.”
- Use 0W-20 synthetic, replacement interval 6,000 miles under normal
driving conditions. No requirement at the rst 3,000 miles.
Engine Oil Capacity
• 5.1 US qt (4.8 liters, 4.2 Imp qt)
Additional
Information
Page 28
Notes
Page 29
Page 30
Notes
Page 31
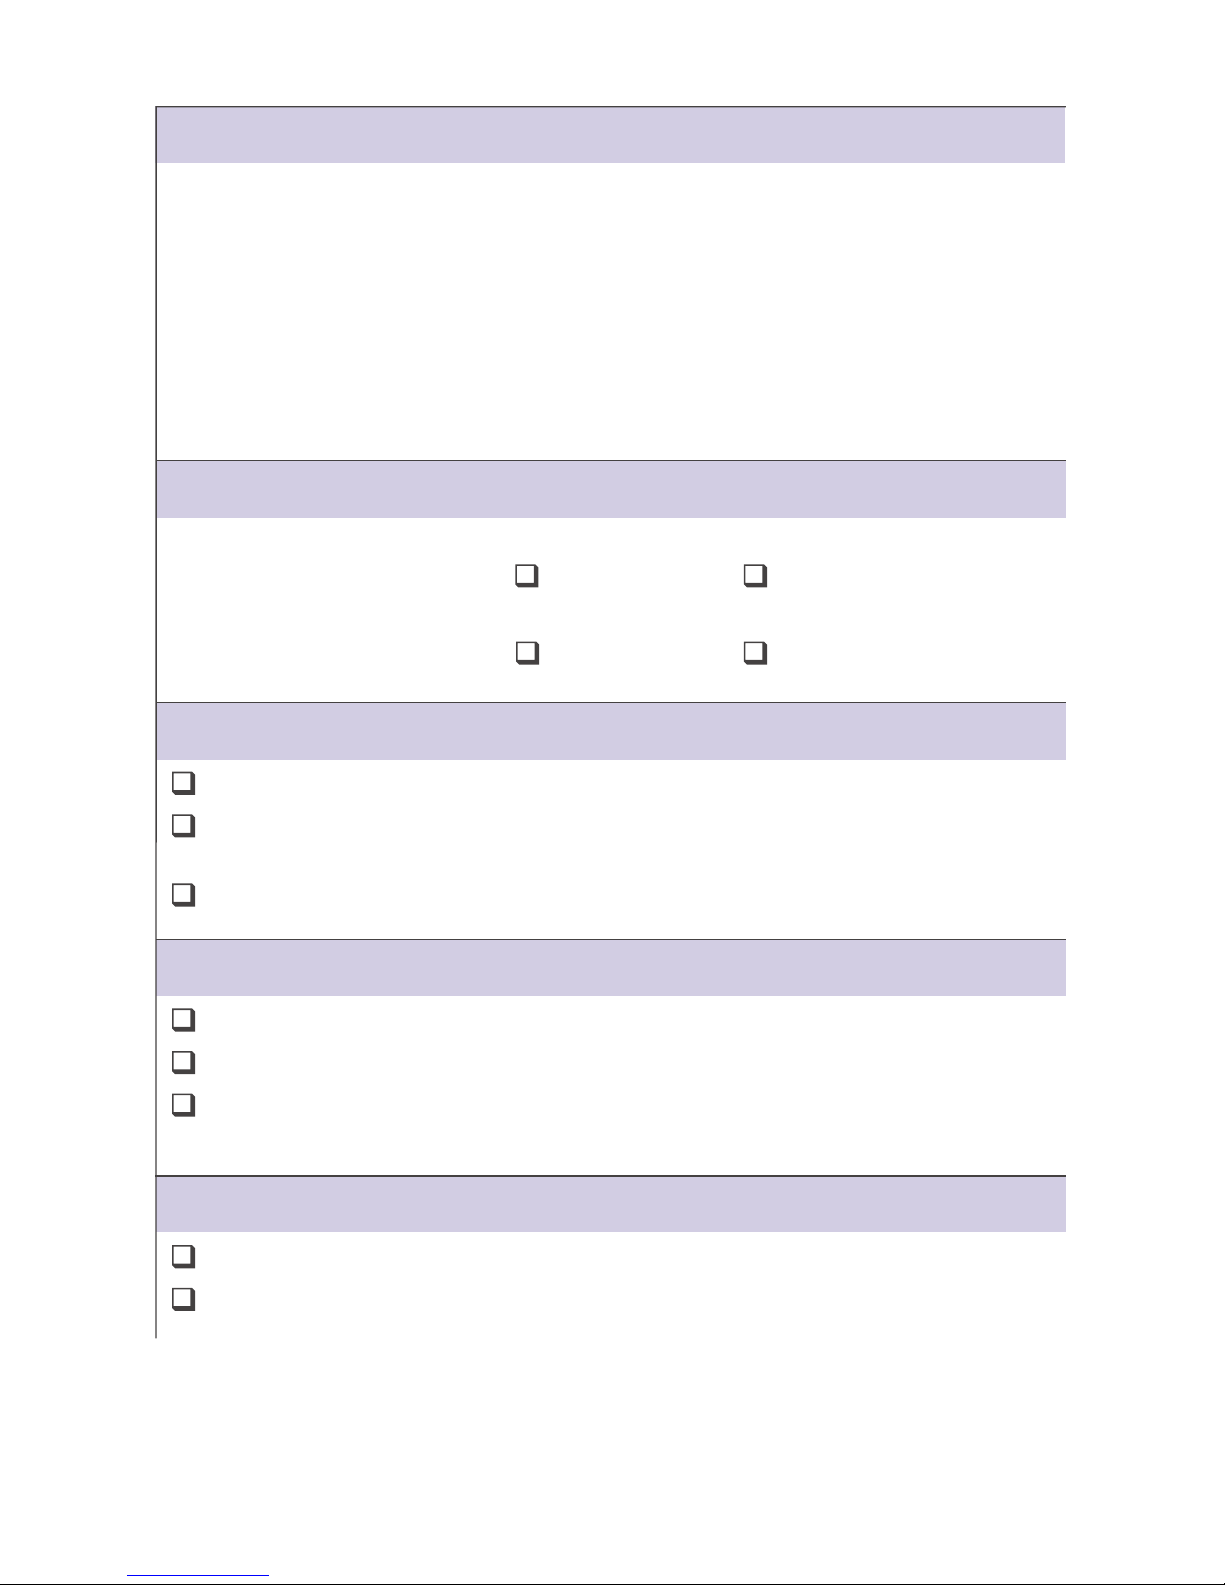
Delivery Information
Vehicle Condition
Exterior/Interior is clean and undamaged
Verify that all equipment, accessories and options
are present
Retailer Orientation
Parts & Service departments locations & hours
Service Advisor introduction and/or business card
Service appointment & “Early Bird”
drop-off procedures
Manuals & Warranties
Review vehicle manuals & maintenance schedule
Review warranty information
(Basic, Powertrain, Tire, Wear Items & Adjustments)
Review Subaru Roadside Assistance 1 (800) 261-2155
Registration & Appointment
MySubaru/SUBARU STARLINK™ Registration
Enrolled
No Thanks
1st Service Appointment
Scheduled
No Thanks
V.I.N. _______________________________________________________________________________
Delivery Date _______________________________________________________________________
Owner(s) ___________________________________________________________________________
Phone # ____________________________________________________________________________
Email ______________________________________________________________________________
Note any exceptions: ________________________________________________________________
____________________________________________________________________________________
____________________________________________________________________________________
Vehicle Delivery Checklist
Page 32
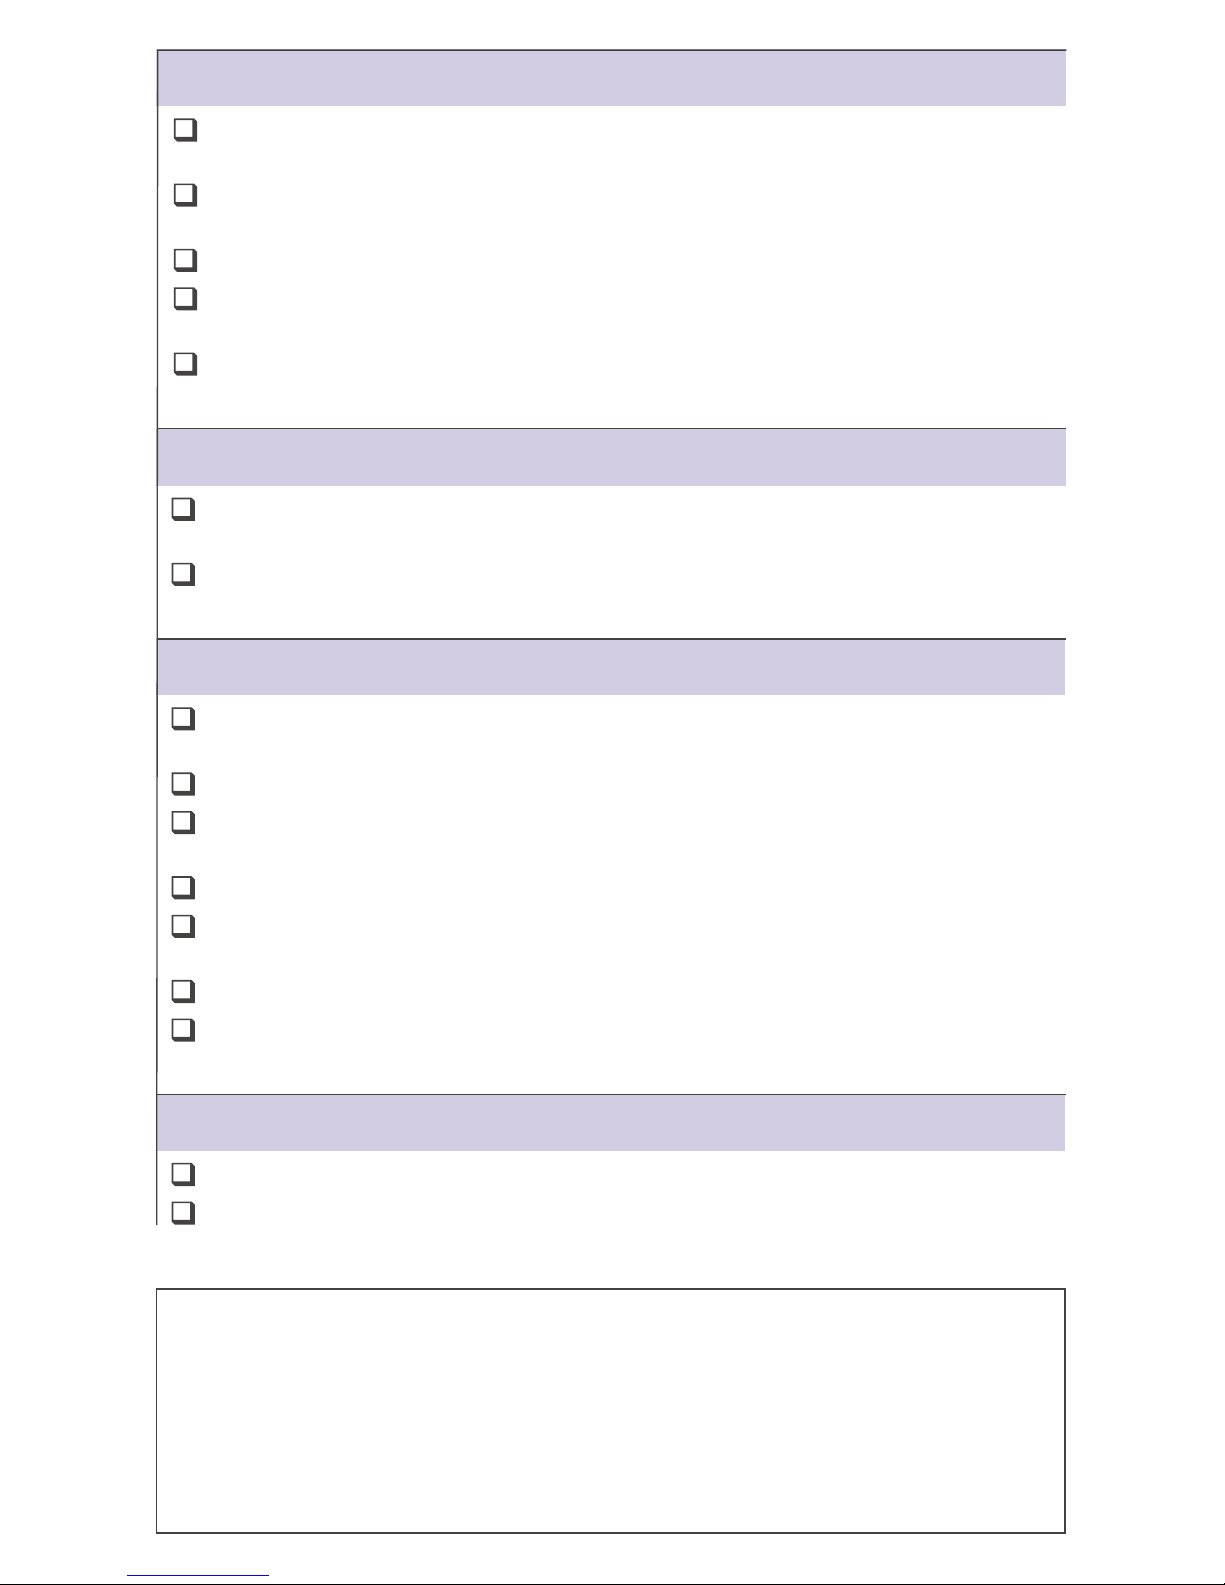
Steering Wheel & Instrument Panel
Master and Valet Keys, Keyless Access System
operation, Push Button Start* and Remote Start*
Tilt/Telescopic Steering Column Adjustments
and Paddle Shift operation*
Front & Rear* Wiper and Washer Controls
Headlights, DRL, Parking Lights, Hazard Lights,
Interior Lights, and Fog Lights*
Gauges, Warning Lights, Multi Function Display*
settings and Parking Brake operation
Safety, Comfort & Convenience
All Wheel Drive System, Emergency towing of AWD,
VDC, X-Mode* and Hill Holder* operation
Rear Vision Camera*
All Weather Package operation - Heated Seats,
Exterior Mirrors & Windshield Wiper De-icer
Review operation of climate control system
Power windows, locks, exterior mirrors, seat
and Power Moonroof* operation
Hood Release and fluid reservoir locations
Fuel Filler Door, Trunk Release, Rear Gate operation
and location of Spare Tire*, Jack & Tools
STARLINK Audio System & Bluetooth
Bluetooth - Pair owner’s phone(s) & show operation
(Download SUBARU STARLINK and MySubaru Apps*)
STARLINK Audio* and Navigation* system controls
(Sources, Presets, List & Back buttons)
Driver Assist Technology
Subaru EyeSight™ System* and SRF*
Blind Spot Detection* and Rear Cross Traffic Alert*
*If Applicable
Owner Signature(s) ________________________________________________________________
Subaru Sales Consultant ___________________________________________________________
Subaru Sales Manager _____________________________________________________________
Page 33
Subaru of America, Inc., Subaru Plaza,
P.O. Box 6000, Cherry Hill, NJ 08034-6000
MSA5B1607A
Issued December 2015
Printed in USA 12/15
 Loading...