

Page 1
2014 Quick Reference Guide
Page 2
2
Some functions are available on certain models. For detailed operating and safety information, please consult your Owner’s Manual.
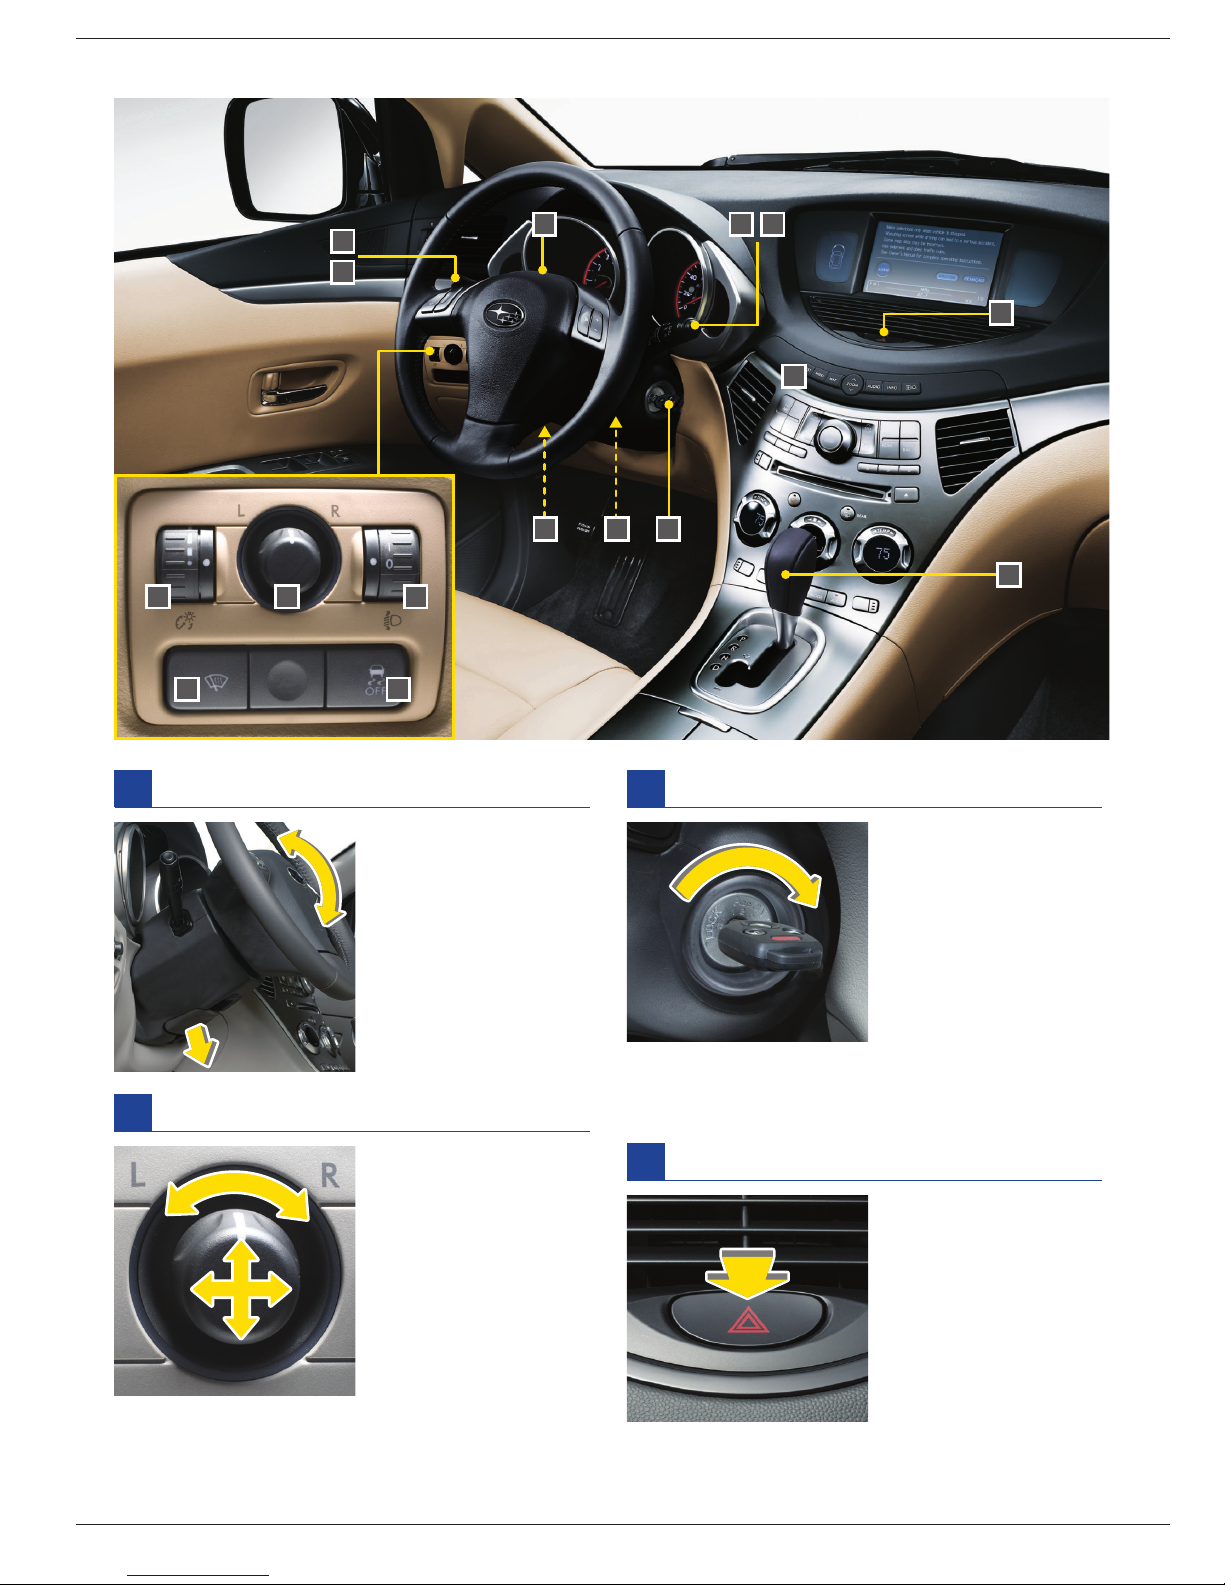
DRIVER’S AREA
A
Tilt steering wheel
Pull lever down to
unlock steering wheel
and position tilt angle.
Then push lever up to
lock steering column
in place. Make sure
the steering wheel is
securely locked by
moving it up and down.
B
Ignition switch
LOCK:
Insertion and
removal of key, steering
wheel lock.
ACC:
Electrical
accessories usage.
ON:
Normal operating
position after engine
starts.
START:
Engine starts.
B
C
A
The key can be turned from
ACC
to
LOCK
and
removed only when the selector lever is in the
P
position.
C
D
Hazard warning asher
To turn on, push button.
Use in emergency
conditions.
D
E
F
G
I J K
L N
M
N
O
Ignition switch must be
in
ACC
or ON position.
To select mirror, turn
the knob to L or to R.
To adjust the mirror,
move knob in direction
of desired movement.
H
Remote control mirror switch
Page 3
3
TRIBECA
E
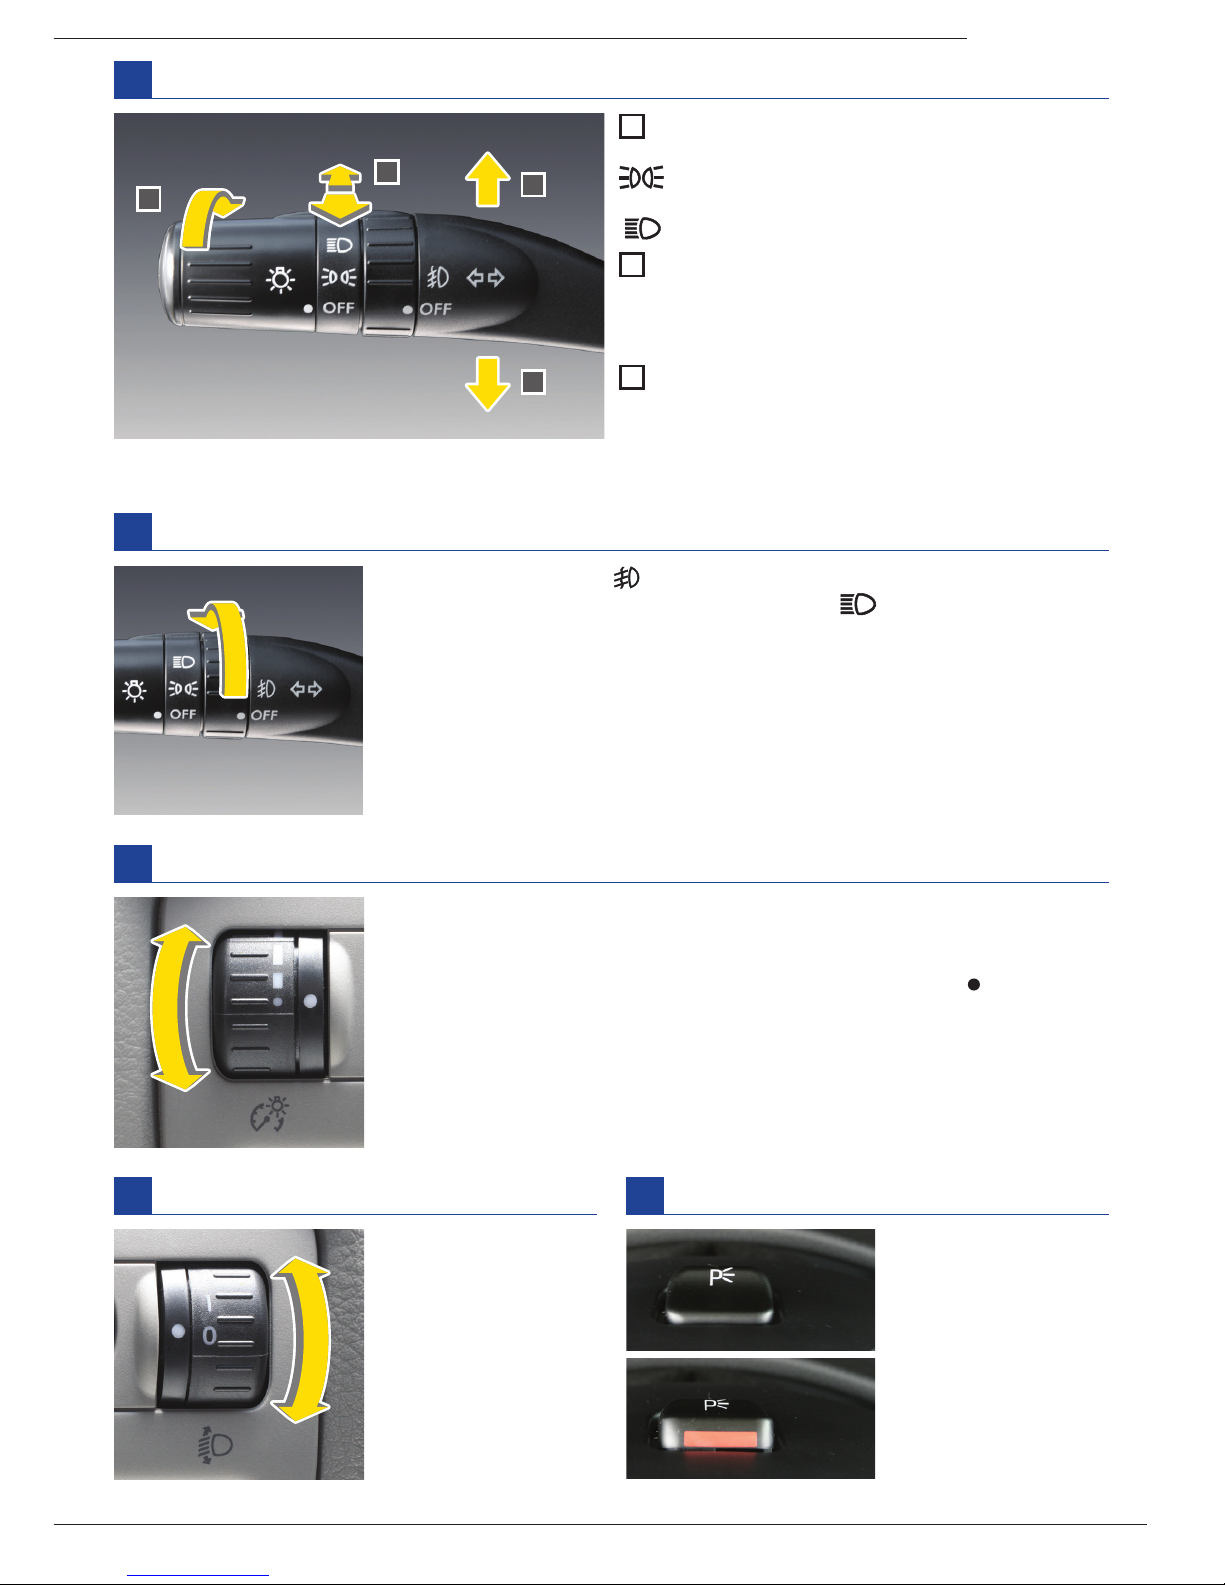
Headlights / turn signal
1
Headlights
To turn on, rotate knob to the following positions:
: Parking lights, instrument panel illumination
tail lights and licence plate lights are on.
: Headlights are on.
2
High/low beam change
To change to high beams, push lever forward.
To return, pull back to original position.
To ash high beams, pull lever back and release.
3
Turn signal
Move lever up or down.
1
2
3
3
F
Fog lights
To turn on, rotate dial to .
Fog lights operate only when headlight switch is .
However, the fog lights turn off when the headlights are switched
to high beams.
G
Illumination brightness control
To adjust brightness of the audio, air conditioner, multi-function display
(if equipped) and instrument panel illumination, turn dial.
If the displays are too dim for legibility, turn dial fully upward to position.
The illumination brightness becomes the maximum and the automatic
dimming function will be cancelled.
H
Headlight beam leveler (if equipped)
To adjust headlight
beam level, turn dial.
I
Parking light switch
To turn on, press switch.
This switch operates
regardless of ignition
switch position.
OFF
ON
To prevent the battery from discharging, make sure that the light control switch is turned to
OFF
before
leaving the vehicle.
Page 4
4
Some functions are available on certain models. For detailed operating and safety information, please consult your Owner’s Manual.
J
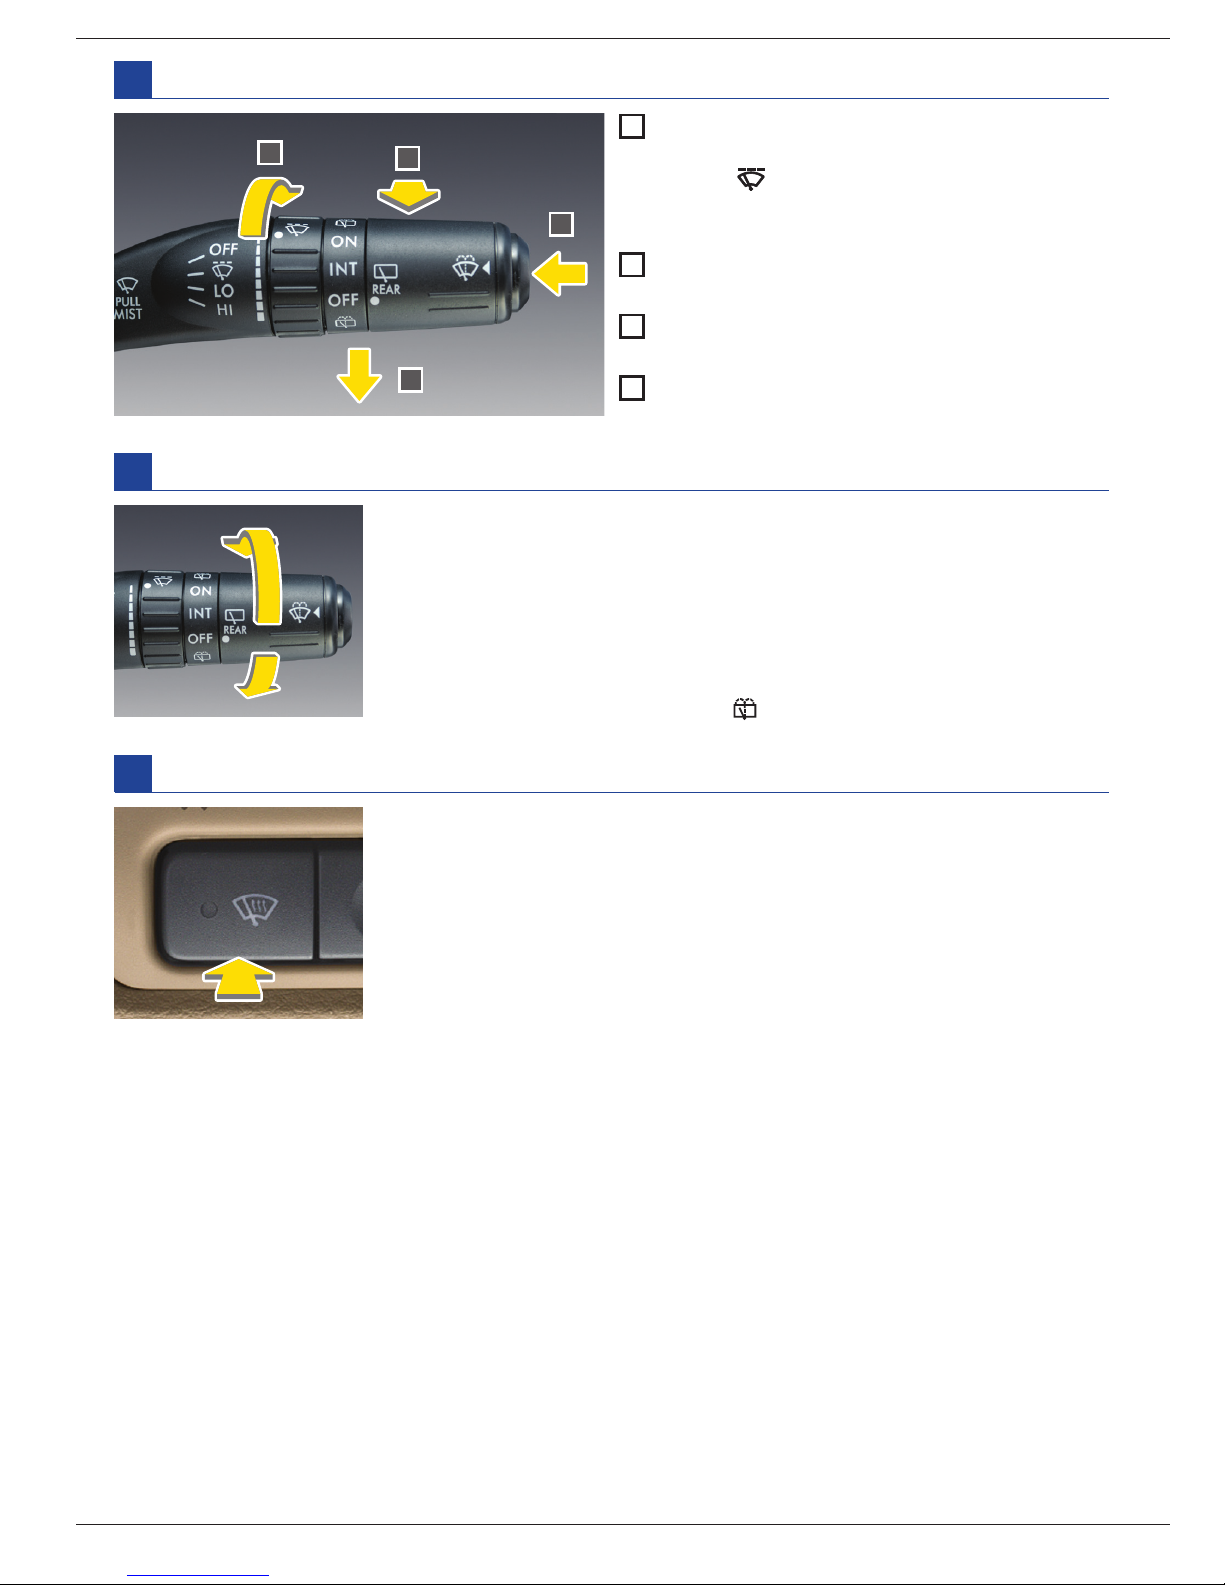
Windshield wiper and washer
1
Wiper
To operate, push lever down to the following positions:
First click /
: Intermittent
Second click / LO:
Low speed
Third click / HI:
High speed
2
Single wipe (MIST)
To operate once, pull lever back.
3
Intermittent interval
To change interval speed, turn dial.
4
Washer
To spray washer uid, push button.
1
2
3
4
K
Rear window wiper and washer
Wiper
To operate, rotate knob to the following positions:
INT:
Intermittent
When you subsequently move the selector lever to the R position,
the rear wiper will switch to continuous operation.
ON:
Continuous
Washer
To spray washer uid, rotate knob to .
L
Windshield wiper de-icer
To turn on the windshield wiper de-icer, push the button.
The de-icer will automatically shut off after about 15 minutes.
Page 5
5
TRIBECA
M
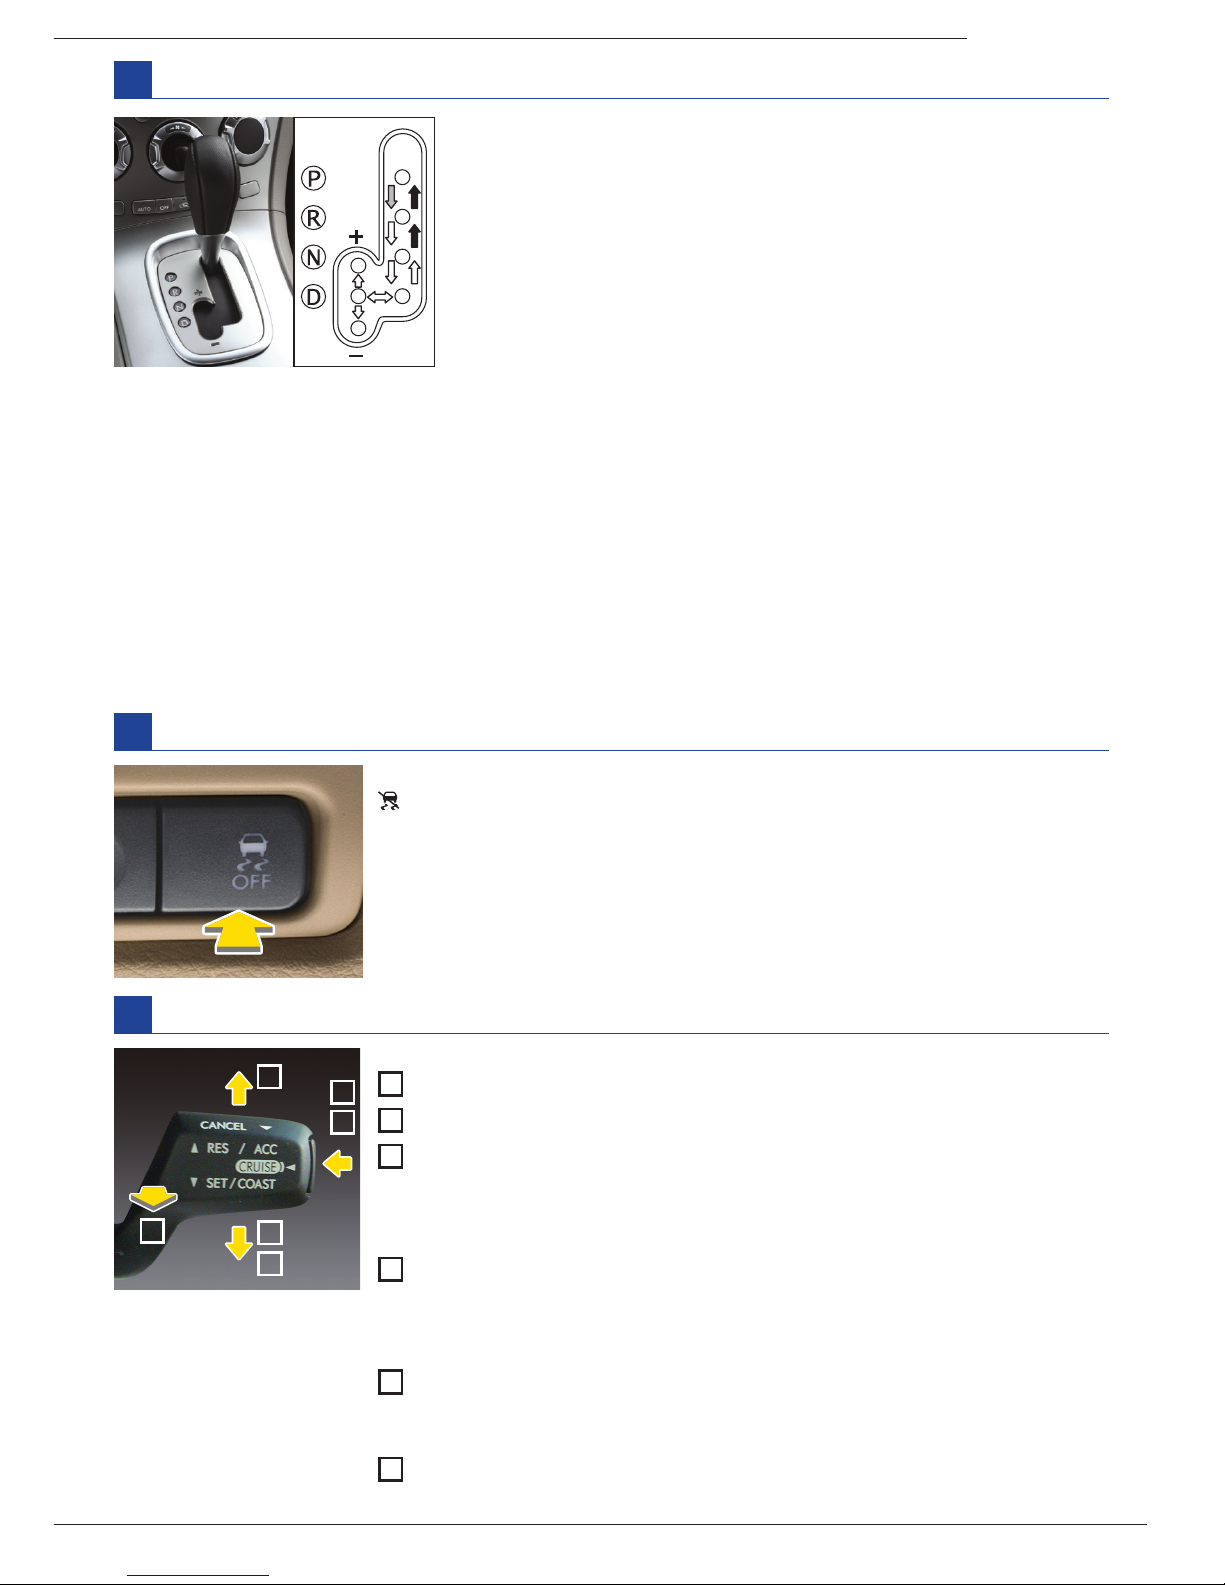
Automatic transmission
P = Park
To move gearshift from Park: Press rmly on brake pedal while
pressing select lever button in.
R = Reverse
N = Neutral
No gear engaged.
D = Drive
For normal driving: Shifts through ve forward gears automatically.
O
Cruise control
Cruise control operates when vehicle speed is 40 km/h (25 mph) or more.
1
To activate:
Push
CRUISE
button.
2
To set speed:
Push lever downward at desired speed and release it.
3
To increase the speed:
Push lever upward and hold it, release at desired
speed; or depress accelerator pedal, push lever downward and release
it at desired speed. (Incremental acceleration: Push lever upward and
release it, each tap equals an increase of 1.6 km/h [1 mph].)
4
To decrease the speed:
Push lever downward and hold it, release at
desired speed; or tap brake pedal, push lever downward and release it
at desired speed. (Incremental deceleration: Push lever downward and
release it, each tap equals a decrease of 1.6 km/h [1 mph].)
5
To temporarily cancel:
Pull lever back or tap brake pedal, shift automatic
transmission selector lever into N. Return to preset speed after it has been
cancelled: push lever upward and release it.
6
To deactivate:
Push
CRUISE
button. Cruise control is always deactivated
when ignition switch is turned to
ACC
or
LOCK
.
1
3
6
2
5
4
Rear-view camera (if equipped)
When the ignition switch is ON and the selector lever is set to R, the rear-view camera automatically
displays the rear-view image from the vehicle.
SPORT mode:
SPORT mode is used when power is needed for rapid acceleration or for uphill driving.
To select SPORT mode, simply move select lever from D to manual gate.
SPORT
light will come on in
combination meter.
MANUAL mode:
To select MANUAL mode, move the select lever from D to manual gate, then move it to the + end
or - end of the manual gate. When MANUAL mode is selected, the gear position indicator and
upshift/downshift indicator in the combination meter come on.
N
Traction Control System OFF switch
To deactivate Traction Control System, push button.
light in combination meter will come on.
Deactivation should not be used except when absolutely necessary.
Page 6
6
Some functions are available on certain models. For detailed operating and safety information, please consult your Owner’s Manual.
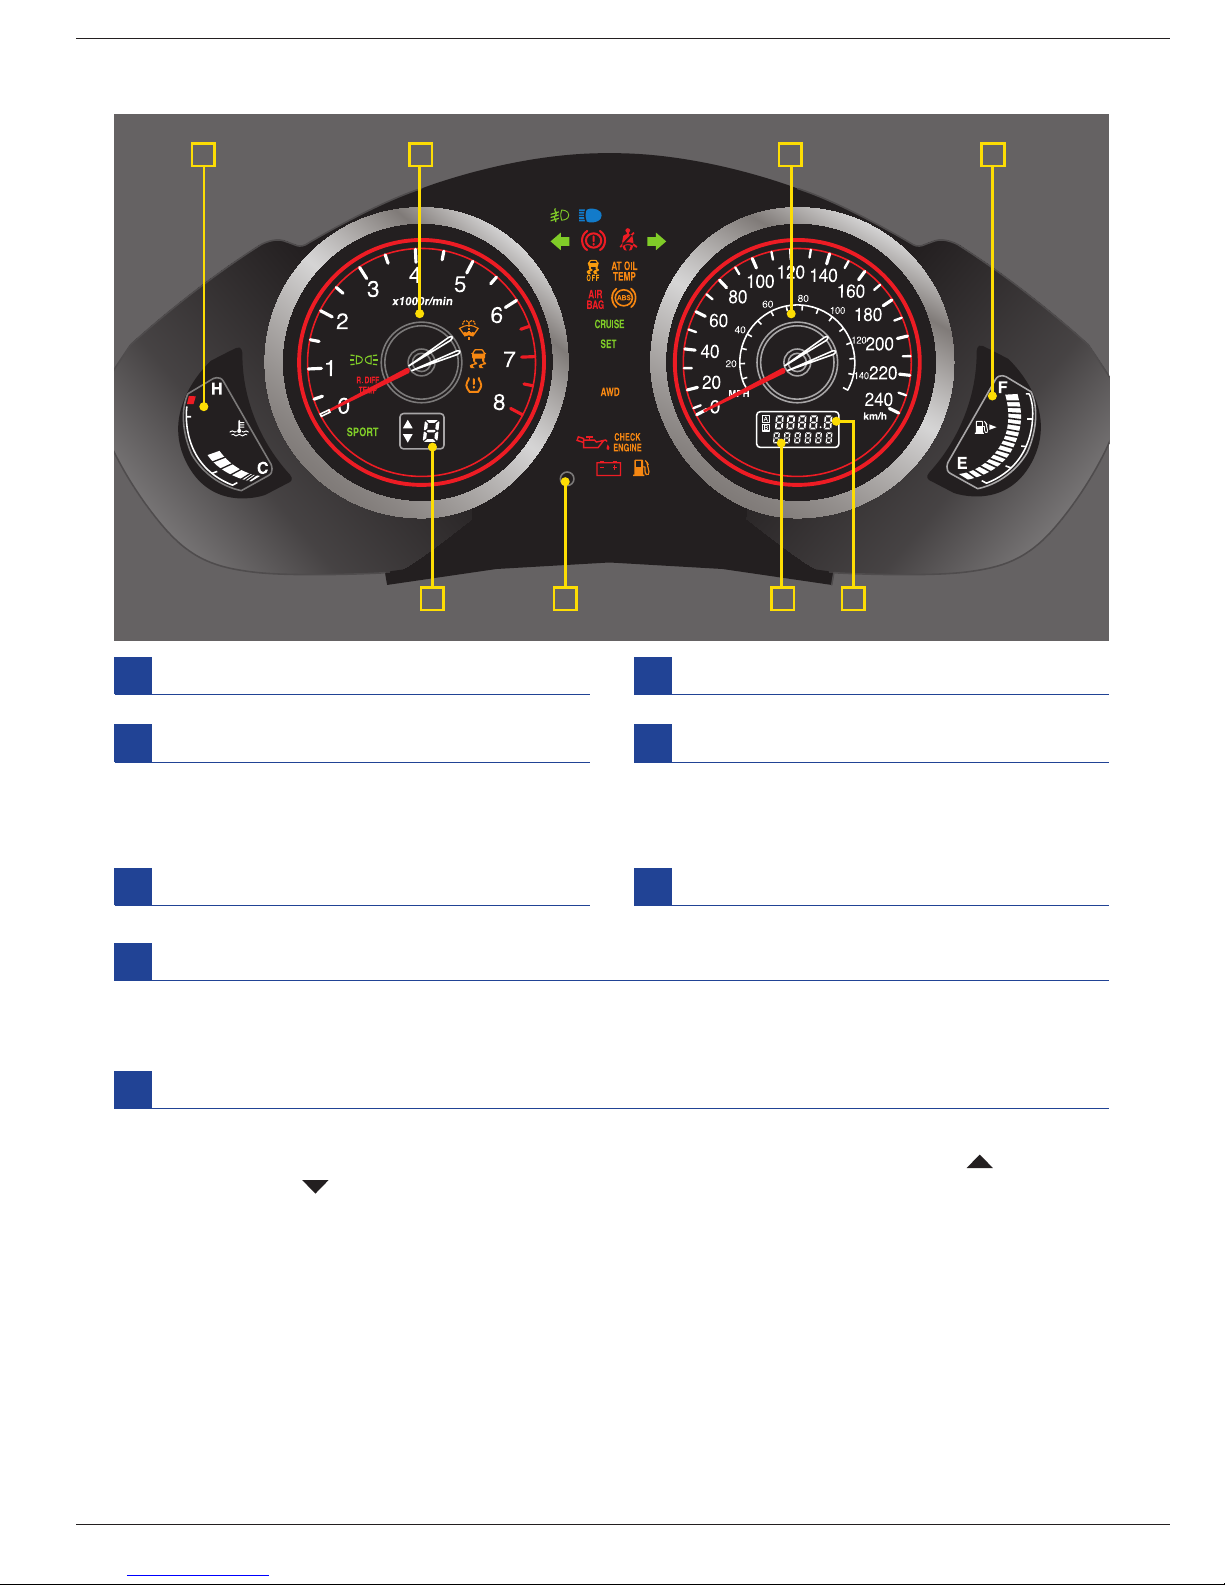
METERS / INDICATORS
A
Speedometer
B
Tachometer
Press to select between trip A and trip B.
Press and hold to reset selected trip meter.
G
Trip meter A/B selection and reset knob
If the pointer exceeds the normal operating range,
safely stop vehicle.
See the Owner’s Manual Chapter 3.
C
Temperature gauge
D
Fuel gauge
E
Trip meter
F
Odometer
The position of the selector lever is shown.
After manual mode is selected, the currently selected gear is shown. The upshift indicator and the
downshift indicator come on when each gearshift is possible.
H
Selector lever / gear position indicator
B A
H
C D
G F E
Page 7
7
TRIBECA
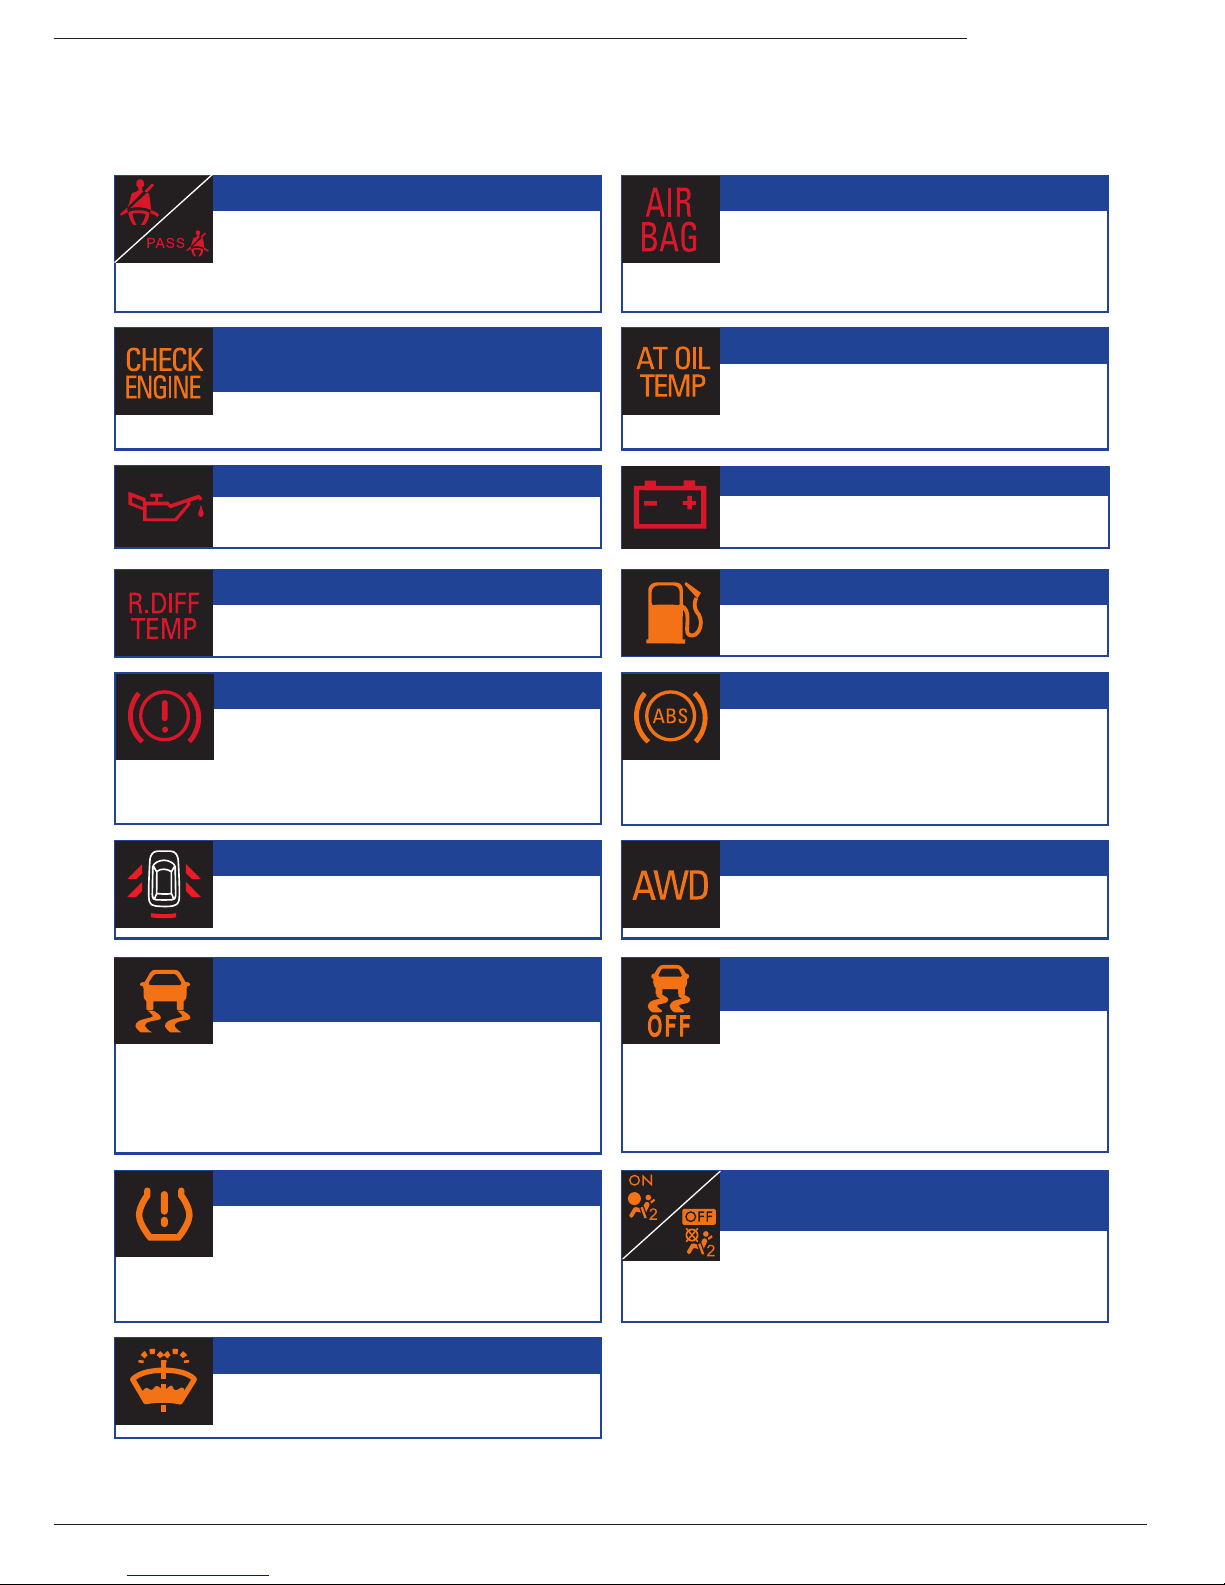
MAIN WARNING AND INDICATOR LIGHTS
Refer to the Owner’s Manual for countermeasures when each warning light comes on.
If necessary, consult your authorized Subaru dealer.
*Some warning/indicator lights illuminate for a few
seconds in order to check themselves when the
ignition switch is turned ON.
Seatbelt warning
CHECK ENGINE warning /
Malfunction indicator
Oil pressure warning
Rear differential oil temperature warning
Brake system warning
Door open warning
Vehicle Dynamics Control warning /
Vehicle Dynamics Control operation indicator
Low tire pressure warning
Windshield washer uid warning
SRS airbag system warning
AT oil temperature warning
Charge warning
Low fuel warning
Anti-lock brake system warning
All-wheel drive warning
Traction Control system
OFF indicator
Front passenger’s frontal airbag
ON and OFF indicators
Remind the driver and front passenger
to fasten seatbelt.
Engine/emission control system malfunction.
Engine oil pressure is too low.
Rear differential oil temperature is too hot.
Parking brake on / low uid level / EBD
System malfunction(Anti-lock brake system
warning light illuminates simultaneously).
Door or rear gate ajar.
Location: Center portion of dashboard.
Warning:
Vehicle Dynamics Control
system malfunction.
Indicator:
Flashes during activation of the
skid suppression function and the traction
control function.
Tire pressure monitoring system (TPMS)
illuminates a low tire pressure telltale when
one or more of your tires is signicantly
underinated.
The uid level in the windshield washer uid
tank decreases to the lower limit.
Frontal, side and curtain airbag or
seatbelt pretensioner malfunction.
Automatic transmission uid temperature
is too high / Automatic transmission control
system malfunction.
Charging system malfunction.
Fuel level low. Rell fuel immediately.
Anti-lock Brake System malfunction / EBD
System malfunction (Brake System warning
light illuminates simultaneously).
Tires of different diameter tted.
Traction Control system OFF switch
is pressed to deactivate the Traction
Control system.
The indicators show you the status of the front
passenger’s SRS frontal airbag.
Location: Center portion of dashboard.
Driver:
shown on the instrument panel
Front passenger:
shown in the center portion of dashboard
Page 8
8
Some functions are available on certain models. For detailed operating and safety information, please consult your Owner’s Manual.
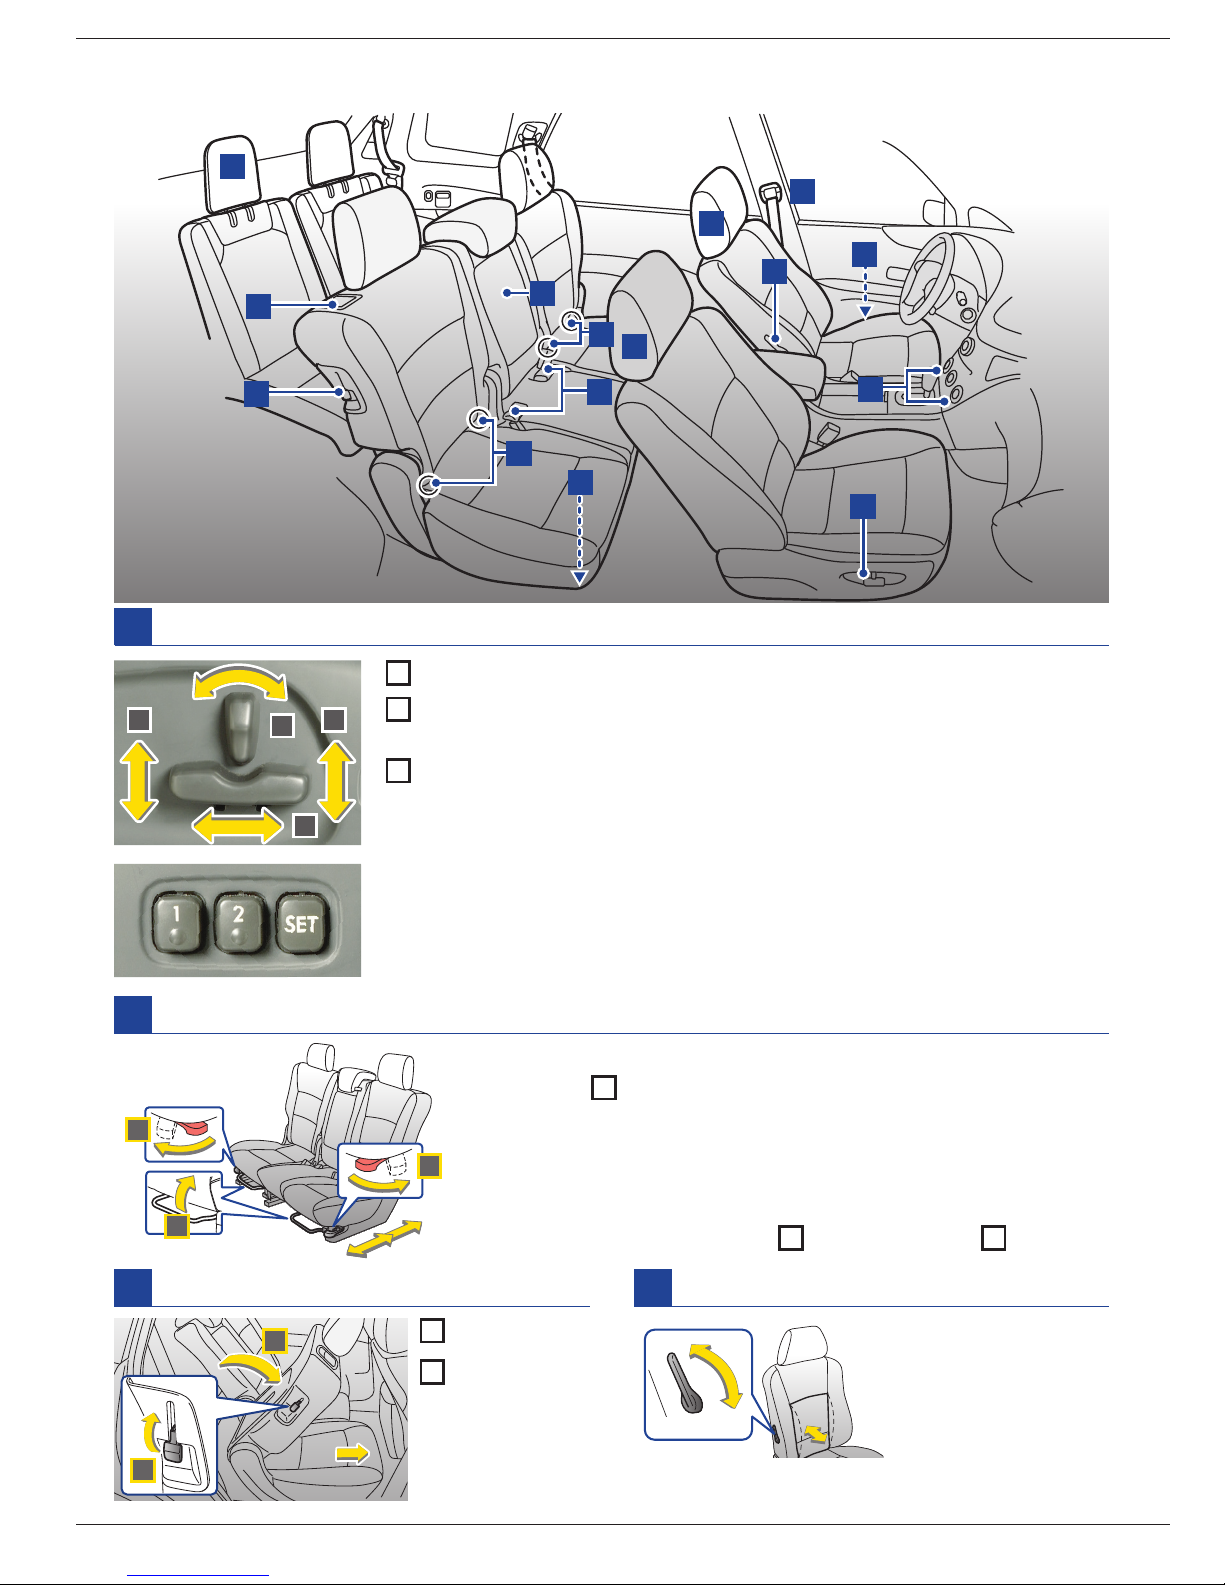
SEAT, SEATBELT
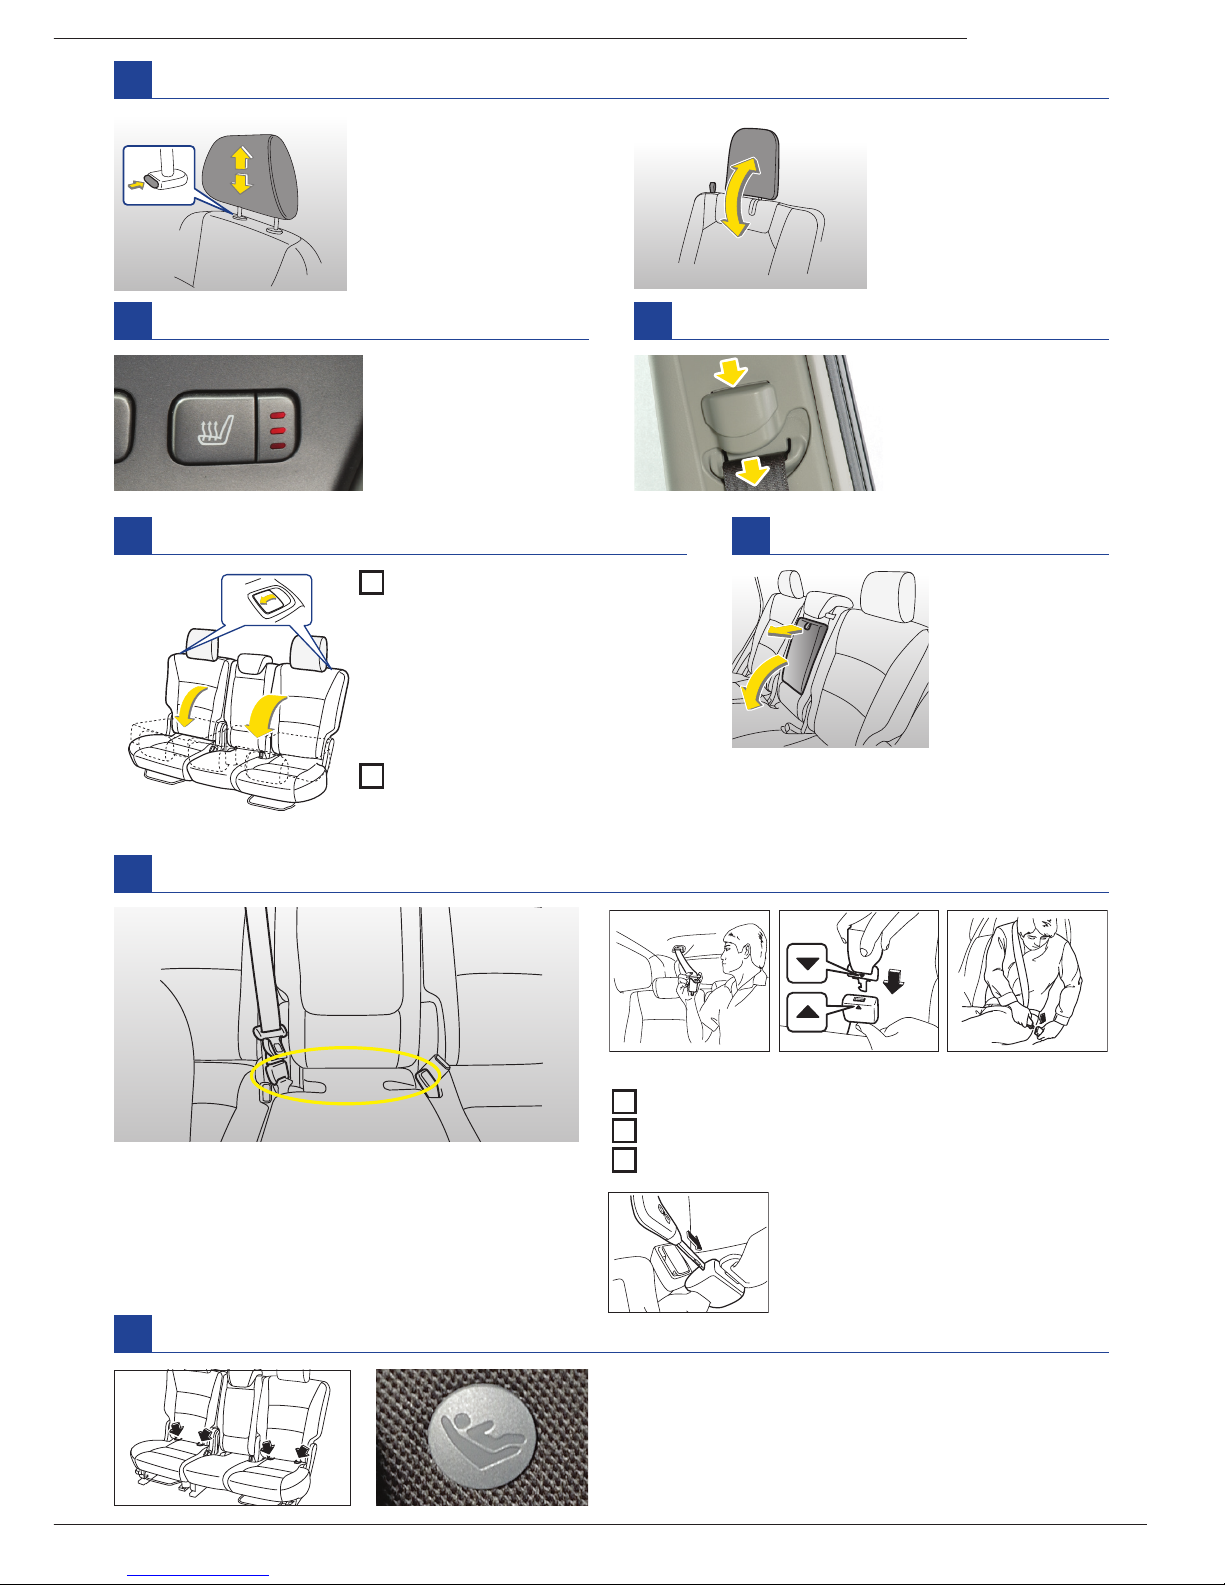
A
Power seat (front seats)
1
Forward and backward adjustment:
Move switch forward or backward.
2
Seat cushion angle and seat height adjustment (driver’s seat only):
Pull up or push down the switch.
3
Seatback reclining:
Move switch forward or backward.
Memory function (driver’s seat only – if equipped)
Two of your favourite seat positions can be registered.
To register the seat position:
With the selector lever in the P position, adjust the seat position.
While pressing the
SET
button, press 1 or 2. The chime sounds once,
and the seat position is registered.
To retrieve the seat position:
Press 1 or 2.
1
2 2
3
Forward and backward adjustment:
Pull the lever 1 upward and slide the seat to the desired position.
Intermediate stopper for second-row seats
When the seat is slid rearward, it stops partway at the lock point
so as not to trap the legs of passengers in the third-row seat.
It is possible to slide it further rearward by releasing the lock.
To release the lock, pull the lever 1 and turn the lever 2 outward.
B
Manual adjustment seat (second-row seats)
F
D
A
C
B
E
E
H
I
J
K
A
G
K
E
1
2
2
D
Lumbar support
Pull lever forward to
increase amount of
support for your
lower back.
C
To access / get out from the third-row seat
1
Raise the lever.
2
The seatback
of the secondrow seat will tip
forward and the
seat will slide
forward.
1
2
Page 9
9
TRIBECA
K
Lower anchorages
J
Second-row centre seatbelt
To fasten:
1
Pull seatbelt out of recess in the ceiling.
2
Connect webbing end to connector.
3
Fasten seatbelt in the usual way.
To disconnect connector from
the buckle, insert a key or other
hard, pointed object into the slot
in the buckle. See the Owner’s
Manual Chapter 1 for details.
The lower anchorages (bars) are used for installing
a lower anchorages child restraint system.
Each lower anchorage is located where the seat
cushion meets seatback.
See the Owner’s Manual Chapter 1 for details.
E
Head restraint adjustment
For front seats and
second-row center seat:
To raise head restraint,
pull it up.
To lower, push it down while
pressing release button.
F
Seat heater
Press the button to
activate the seat heater.
Each subsequent press
of the button will reduce
the level.
G
Front / second-row seatbelt anchor height
To lower anchor height,
push release button
and slide anchor down.
To raise anchor height,
slide anchor up.
H
Folding down the seatback
1
For second-row seats:
Place the head restraint
for center seat in its
lowest position.
For third-row seats:
Pull the strap to lower
the head restraint.
2
Pull up the lever to release
the seatback lock, and fold
down the seatback.
I
Armrest
To lower armrest,
pull on the strap
of the armrest.
For third-row seats:
To raise head restraint,
pull it up.
To lower, pull the strap.
Page 10
10
Some functions are available on certain models. For detailed operating and safety information, please consult your Owner’s Manual.
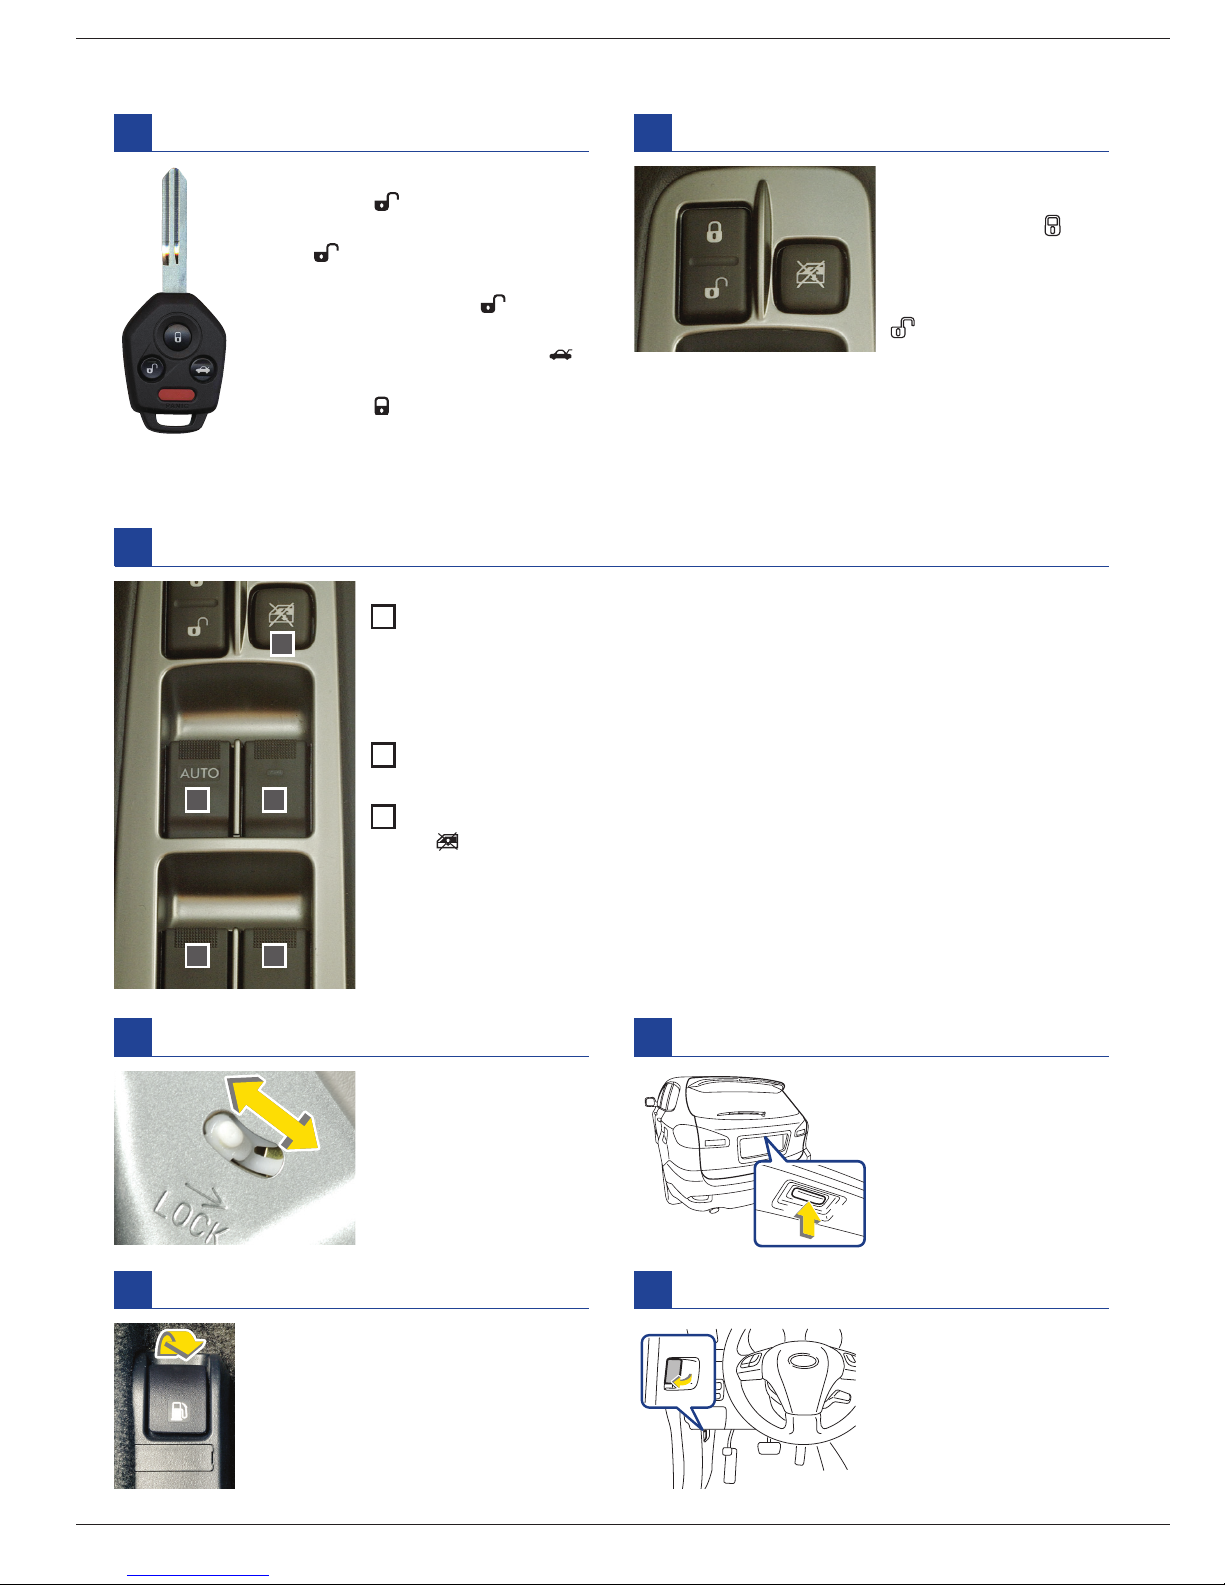
DOOR LOCKS AND WINDOWS
Remote keyless entry
To unlock driver’s door,
briey press .
To unlock all doors and rear gate:
Press once, an electronic chirp
sounds twice and the turn signal
lights ash twice. Press again a
second time within 5 seconds.
To unlock only rear gate, press .
To lock all doors and rear gate,
briey press . An electronic chirp
will sound once and the turn signal
lights will ash once.
Power windows
Ignition switch must be in ON position.
1
For driver’s window
One-touch auto down:
Push down
AUTO
switch rmly and release, window
goes down all the way; pull switch back briey to stop; press lightly and hold
for normal operation.
Pull the switch up lightly and hold it to close the window.
2
For passenger’s window
Push switch down and hold to open; pull back and hold to close.
3
Lock switch
Press button down until clicks, only driver’s window operates;
press again and passenger windows function again.
When in locked condition, the indicator lights in all of the passenger-side
switches are off.
1 2
2 2
3
Power door locks
To lock all doors
(including the rear
gate), push the side
of the switch. To unlock
all doors (including the
rear gate), push the
side of the switch.
Child safety locks
Located on the edge
of the rear doors.
While lever is in the
locked position, rear
door cannot be opened
from the inside.
Hood lock release
To open engine hood,
pull lever backward.
Fuel ller lid opener
To open fuel ller lid, pull lever up.
Rear gate opener
To open the rear gate,
rst unlock the rear
gate lock, then push
the button.
Page 11
11
TRIBECA
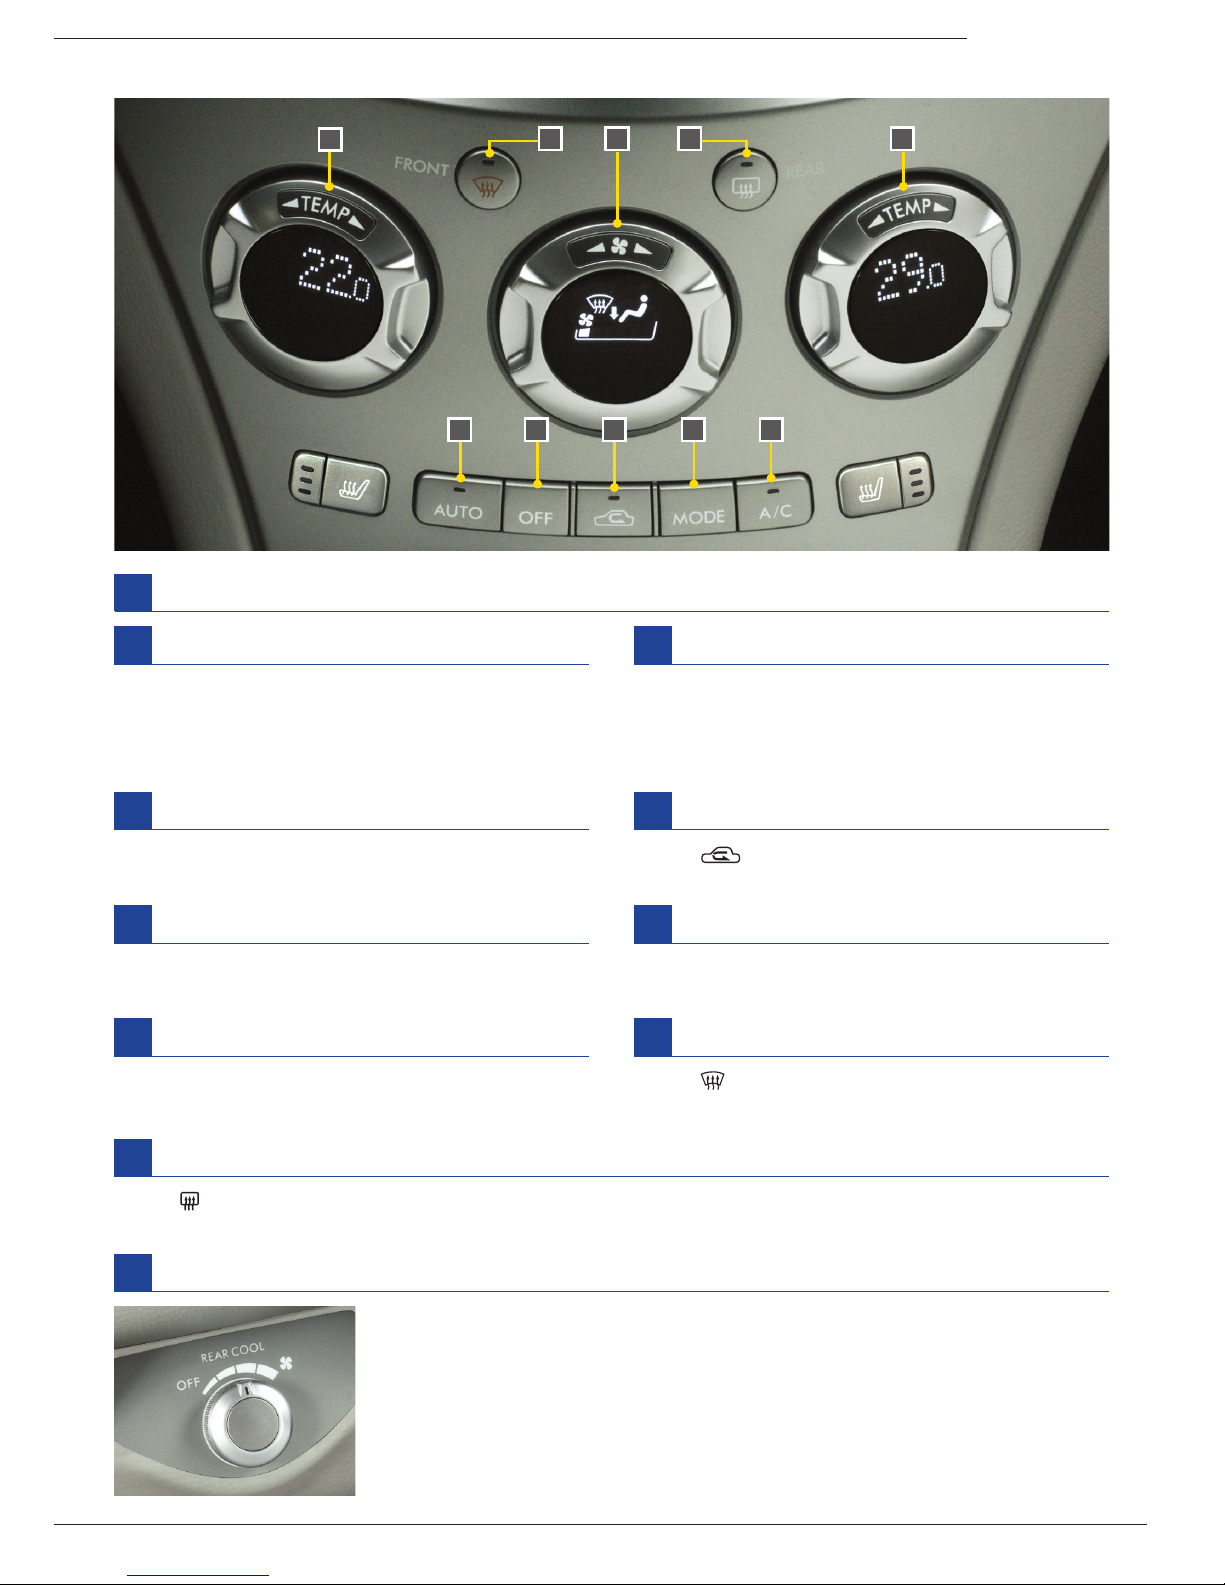
CLIMATE CONTROL
Automatic climate control
B
OFF button
Press
OFF
button to turn off the automatic climate
control system.
A
AUTO mode operation
When the
AUTO
button is pressed, fan speed,
airow distribution, air inlet control, and
air conditioner compressor operation are
automatically controlled.
C
H IF C
A B D E G
D
Air inlet selection
Press button to select air ow
(Recirculation and Outside Air).
C
Temperature control
Turn the knob to set a desired interior temperature.
F
Fan speed control
Turn the fan speed control dial to select fan speeds.
E
Air ow mode selection
Press
MODE
button to select the desired air ow
mode (Ventilation, Bi-level, Heat, Heat-defrost).
H
Defroster
Press button to defrost windshield and front
door windows.
G
Air conditioner
Press
A/C
button to activate or deactivate
air conditioner.
I
Rear window defogger / outside mirror defogger
Press button to defog rear window and outside mirrors.
The defogger will automatically shut off after about 15 minutes.
Rear air conditioner
The rear air conditioner blows cool air out of the rear ventilators while
the
A/C
button is in the ON position.
Turn dial to adjust the fan speeds.
Page 12
12
Some functions are available on certain models. For detailed operating and safety information, please consult your Owner’s Manual.
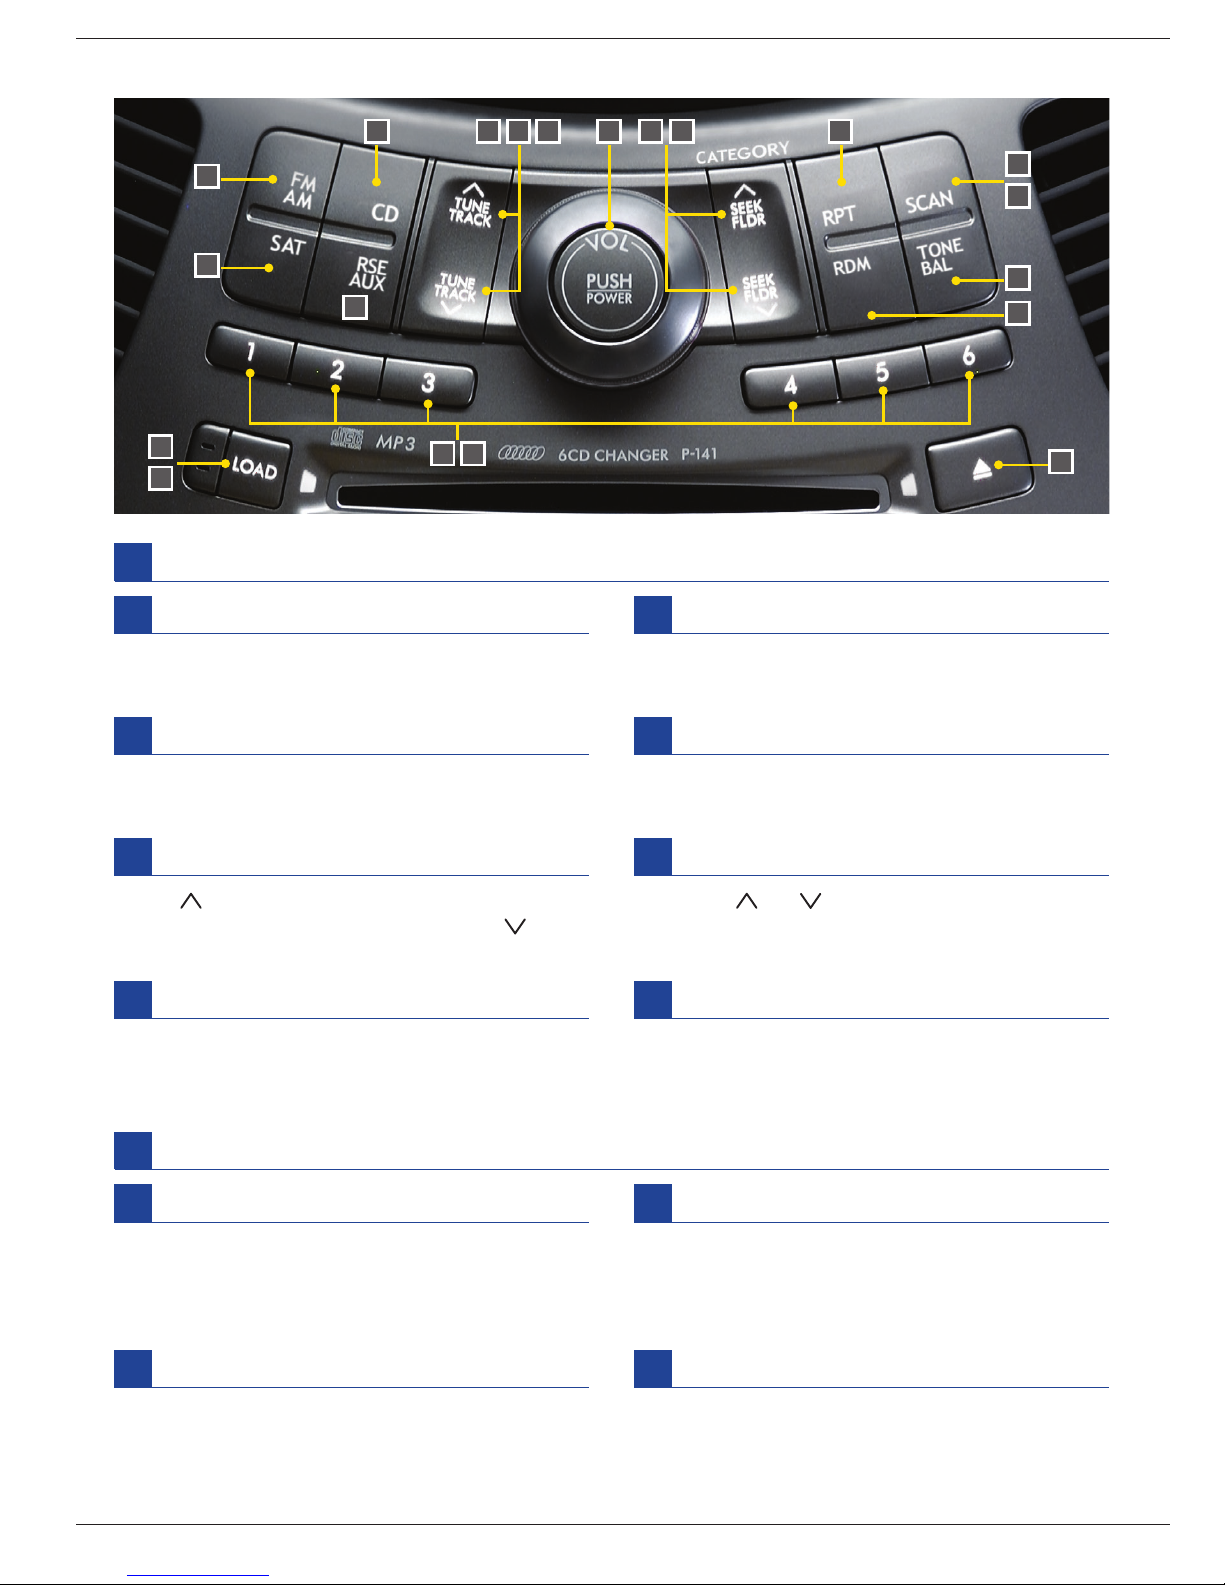
AUDIO SET
Radio operation
B
Tone and balance control
Press
TONE/BAL
to select desired control mode.
Turn
VOL
dial to adjust tone or balance level.
A
Power / volume control
Press
POWER
dial to turn on or off.
Turn the dial to control volume.
I
J
G L
C
K M AE N F R O
B
P
S
D
Satellite radio reception (if equipped)
Press
SAT
to receive the satellite radio service
(when the satellite radio tuner is connected).
C
Waveband selection
Press
FM/AM
to select desired waveband.
G
Preset
Select a frequency, then press and hold one of
the preset buttons to store it.
E
Manual tuning (TUNE)
Press side of the
TUNE/TRACK
button to
increase the tuning frequency and press side
of the button to decrease it.
CD player operation
J
Full disc loading (6-disc player)
Press and hold
LOAD
; insert CD within 15 sec.
while
ALL LOAD
on display blinks.
After CD is loaded, insert the next CD.
Continue this operation.
I
Loading (6-disc player)
Press
LOAD
; insert CD while LOAD indication on
display blinks.
L
Disc selection
Press button 1 to 6 to select a CD.
K
Play a CD
Press CD to play a CD.
D
F
Seek tuning
Press the or side of the
SEEK/FLDR
button. Radio will seek the next available station
and stop on it.
For vehicles with navigation system, refer to Owner’s Manual Supplement.
T
H
Scan tuning
Press
SCAN
to change the radio to the
SCAN mode.
H
Q
Page 13
13
TRIBECA
N
Fast-forwarding / Rewinding
Fast-forwarding:
Press and hold of the
TUNE TRACK
button.
Release the button to stop fast-forwarding.
Rewinding:
Press and hold of the
TUNE TRACK
button.
Release the button to stop rewinding.
M
Track selection
Briey press side of the
TUNE/TRACK
button
to skip to next track. Briey press side of the
button to skip to beginning of current track.
P
Random play
Press
RDM
during disc playback to play all tracks
on the disc in random order.
O
Repeat play
Briey press
RPT
to select repeat play mode.
RPT (track repeat) → D-RPT (disc repeat) →
CANCEL
R
Folder selection (MP3)
Briey press side of the
SEEK/FLDR
button to
select the next folder. Briey press side of the
button to go back to the previous folder.
Q
Scan mode
Press
SCAN
to switch into the SCAN mode.
You can listen to the rst 10 seconds of each
track/le (track) in succession.
Eject
Briey press to eject the CD currently playing.
Continue to press to eject all CDs.
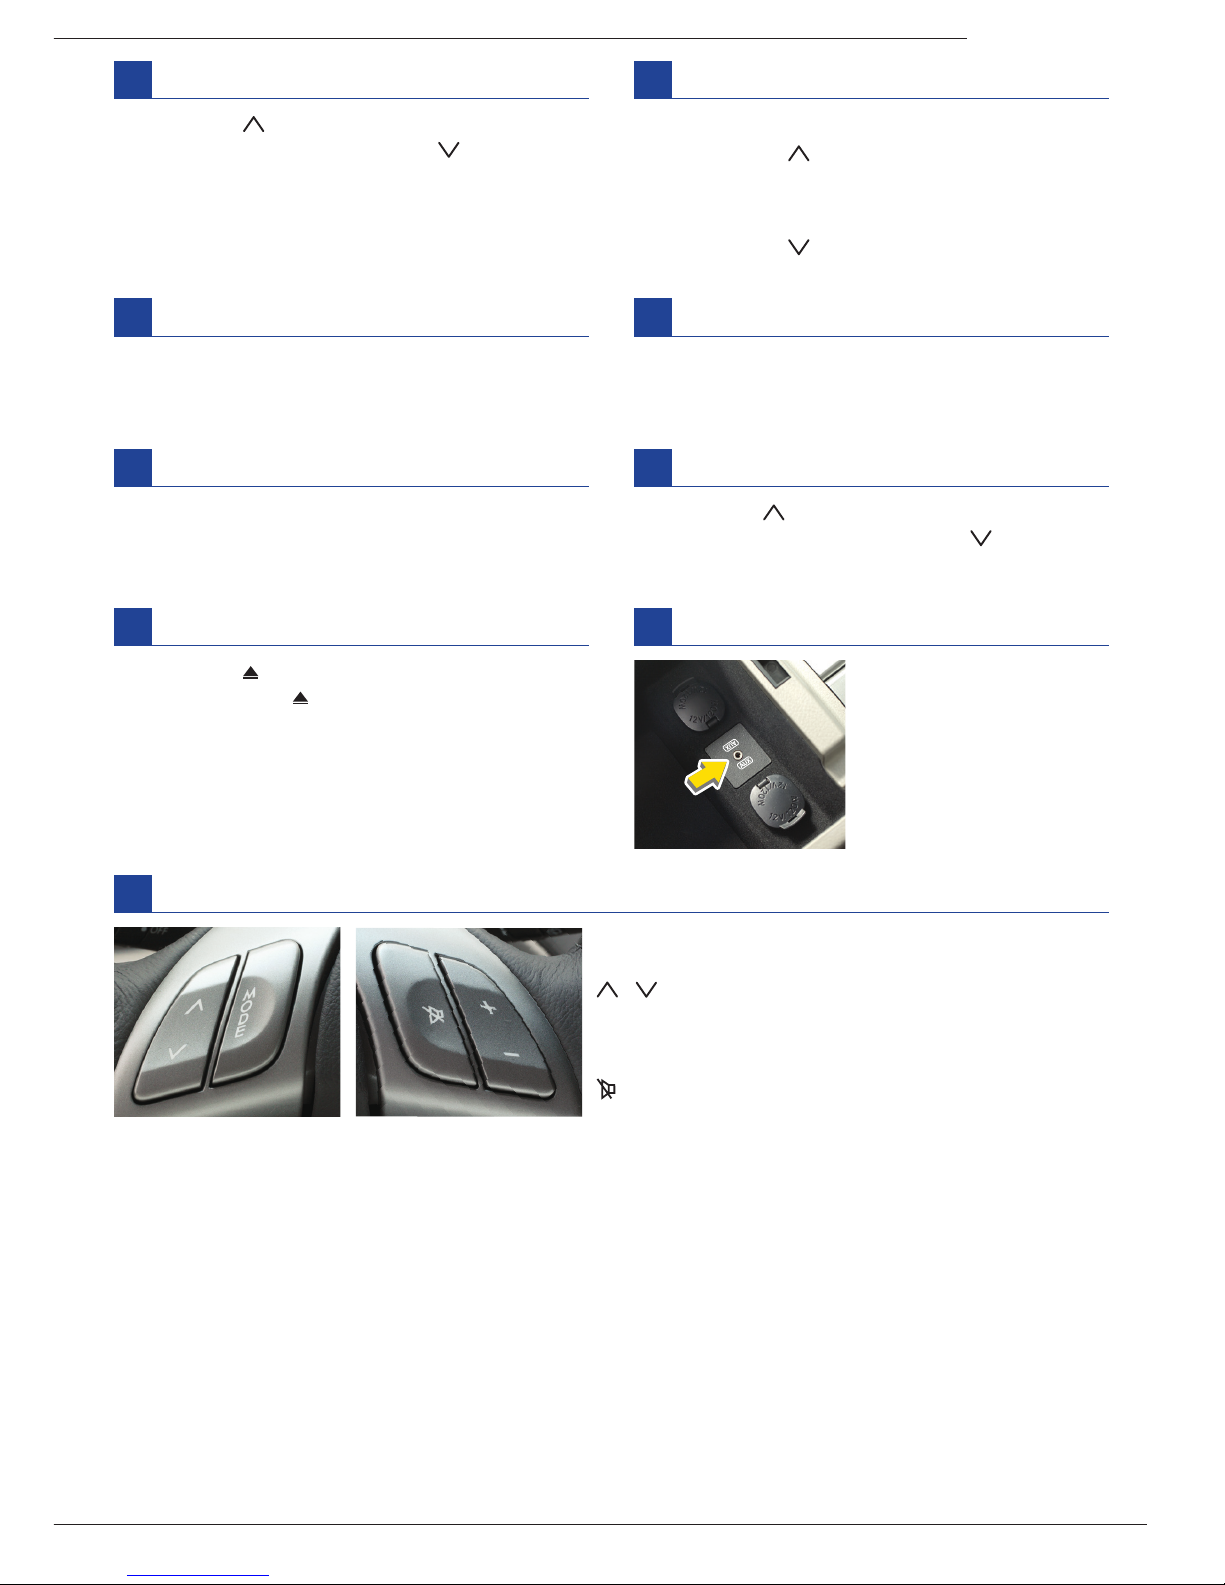
Audio control buttons
MODE:
Press to select desired audio mode.
(FM, AM, SAT, CD, AUX [RSE])
/ : Press to seek receivable radio station in
radio mode; press to skip tracks forward / backward
in CD mode.
+ / – :
Press to adjust volume level.
: Press to cut the volume to zero (mute).
S
Auxiliary input jack
To hear sounds from
portable audio player
through vehicle speakers,
connect the portable audio
player to auxiliary input
jack and press
RSE/AUX
.
T
Page 14
14
Some functions are available on certain models. For detailed operating and safety information, please consult your Owner’s Manual.
UTILITIES
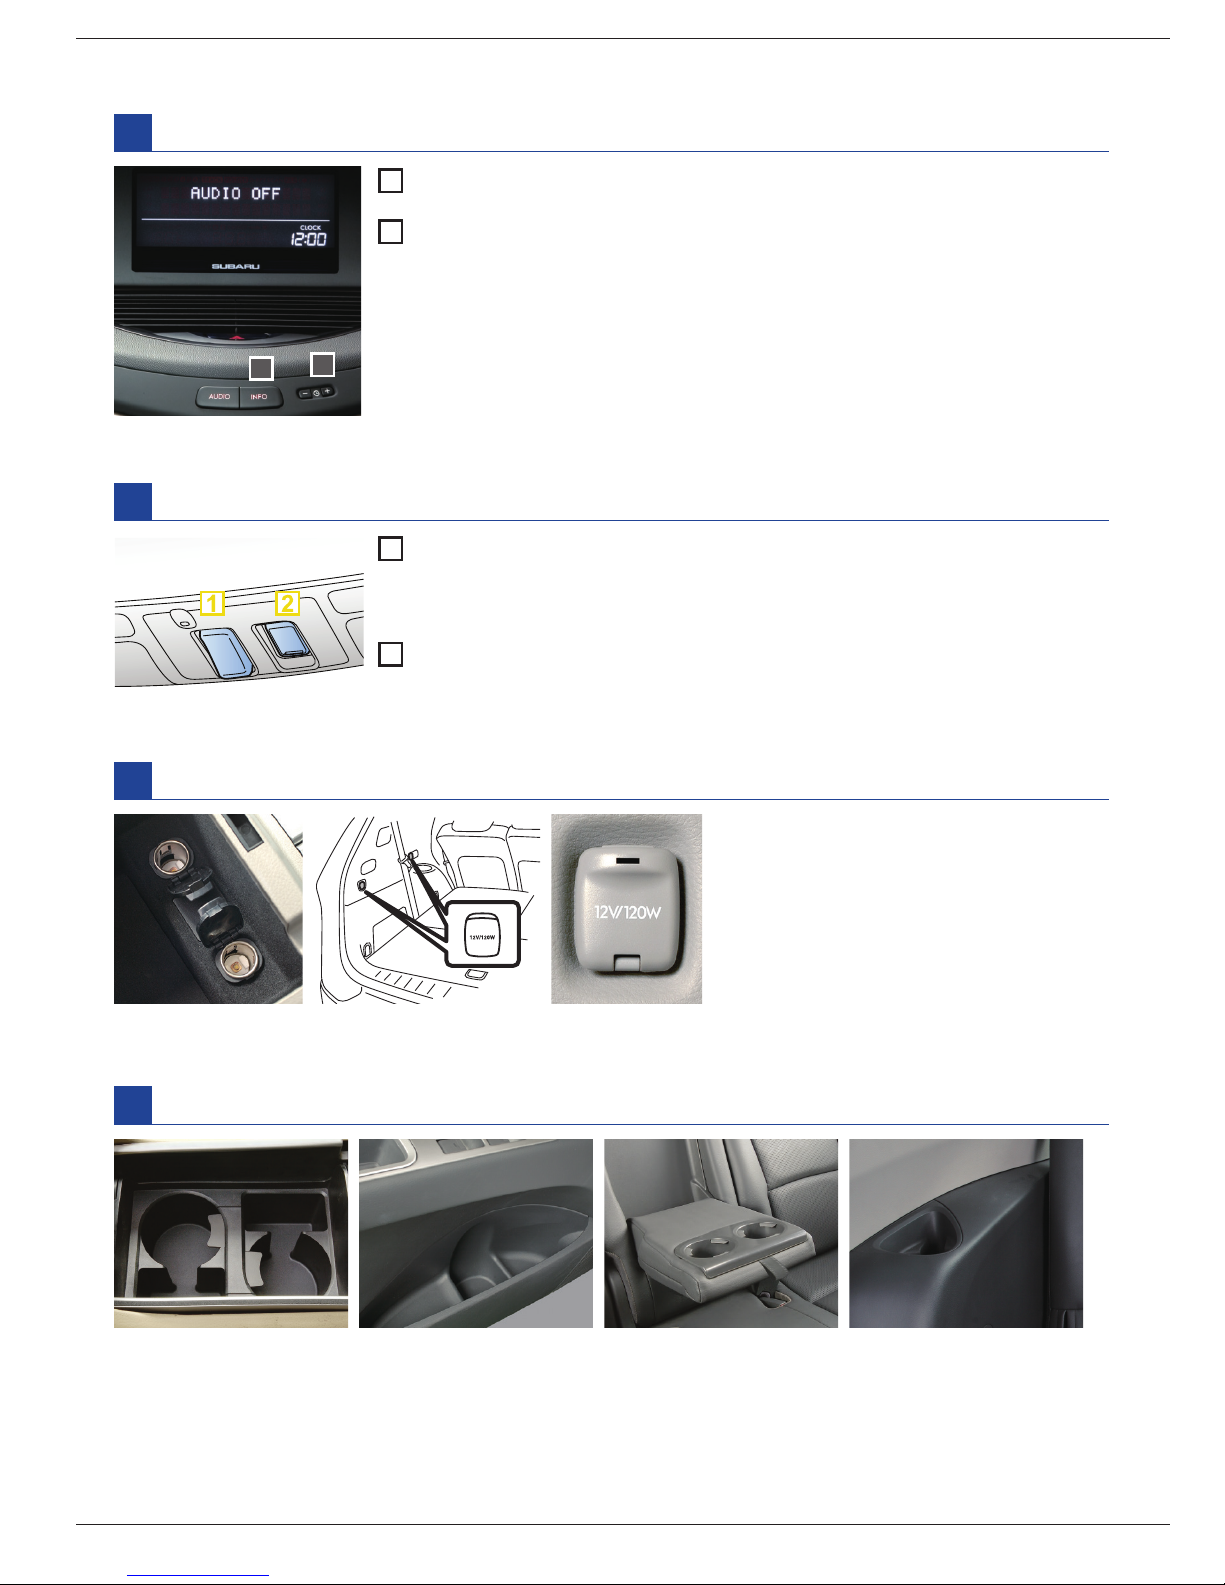
Accessory power outlets
Electrical power (12V DC) from the
battery is available at socket when
ignition switch is either in
ACC
or
ON
position.
Clock and multi-function display
Centre console
Cargo area
Cup holders
Centre console
Door pockets
(bottle holder)
Armrest
Third-row seat
1
Clock (if equipped)
To adjust the time, press + button or – button.
2
Multi-function display (if equipped)
With the ignition switch in the ON position, each successive push of the
INFO
button toggles the display in the following sequence:
Current fuel consumption Average fuel consumption Driving range on
remaining fuel Journey time Current fuel consumption
For vehicles with navigation system, refer to Owner’s Manual Supplement
(Operating Instructions for Monitor System).
2
1
Sunroof (if equipped)
1
Tilting:
Press the rear side of the
UP/DOWN
switch to raise and
front side of it to lower.
2
Sliding:
Press rear side of the
OPEN/CLOSE
switch to open and front side to close.
Page 15
15
TRIBECA
IN CASE OF EMERGENCY
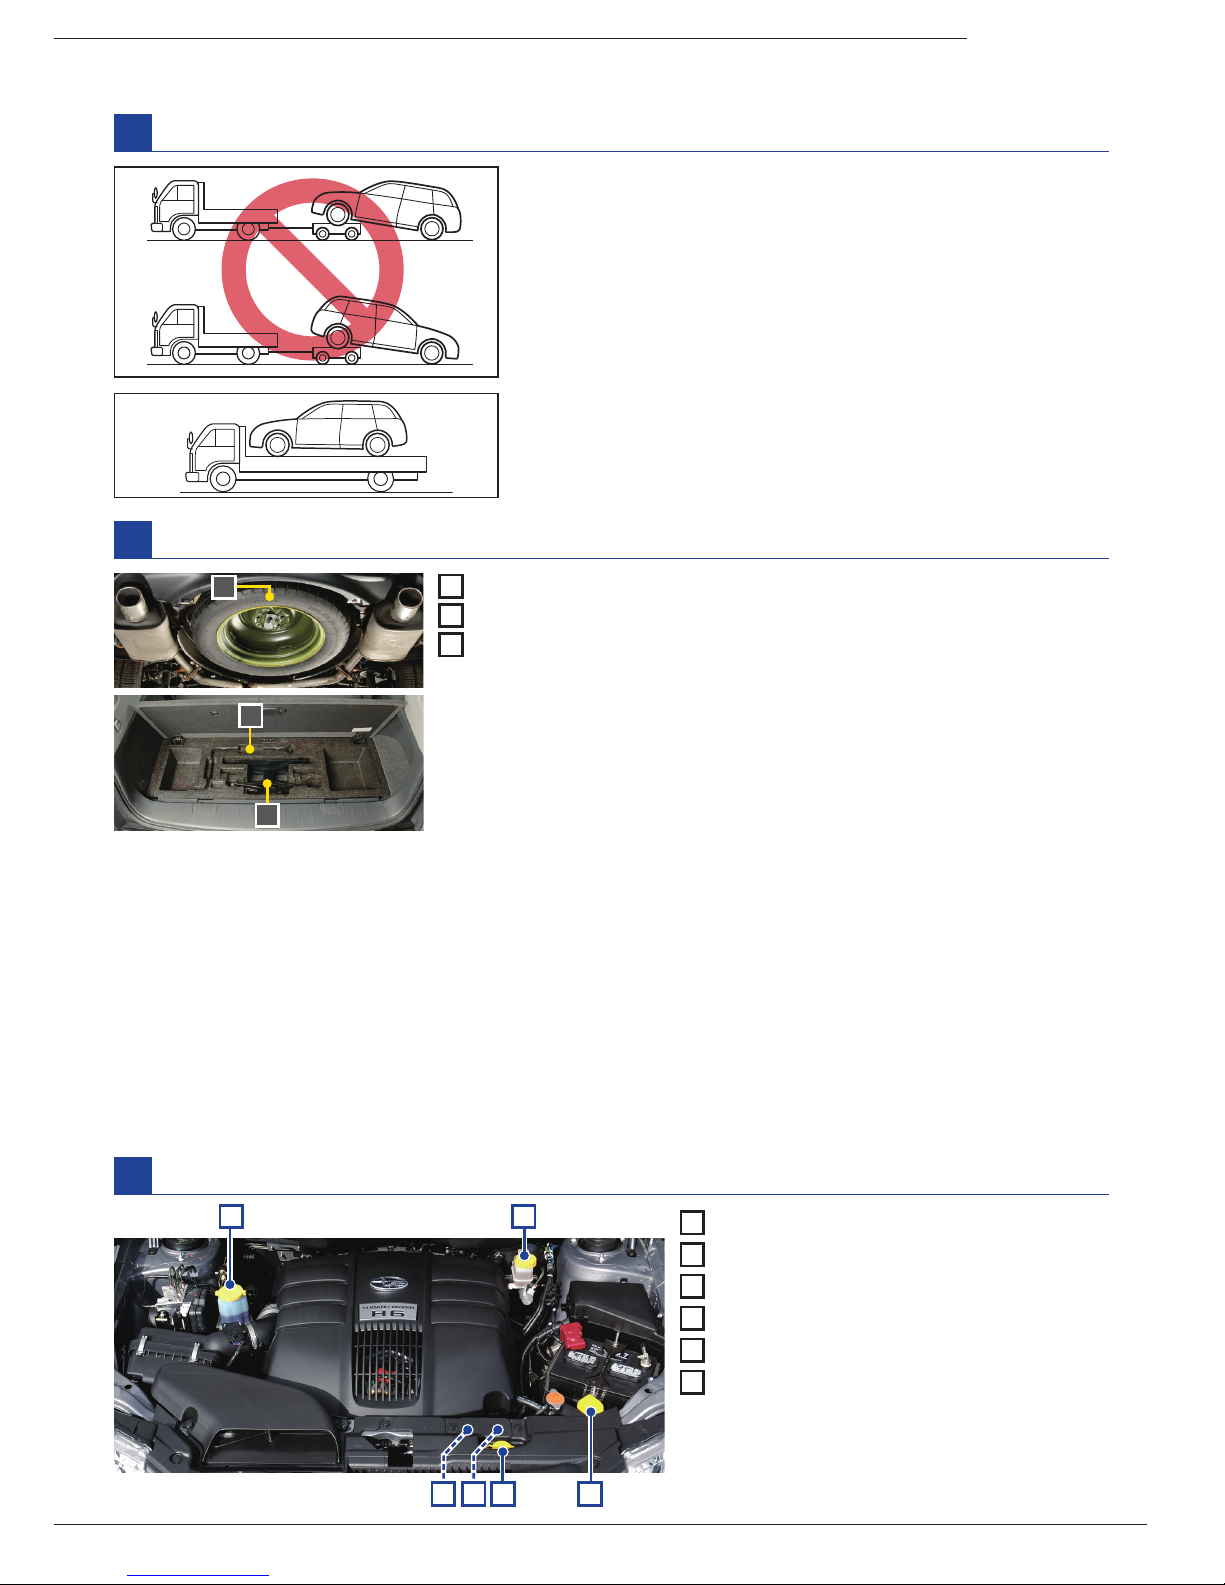
Towing
Spare tire and jack
1
Spare tire
2
Jack handle
3
Jack
The temporary spare tire is stored in the spare tire holder located
under the oor of the cargo area.
The jack and jack handle are stored under the cargo area.
See the Owner’s Manual Chapter 9 for details.
MAINTENANCE
To keep your vehicle in proper operating condition and to assure peak performance at all times,
the recommended maintenance service should be performed in accordance with the maintenance
schedule. Refer to the Owner’s Manual for information on maintenance items and intervals.
Also, we recommend that you check your vehicle yourself daily for more comfortable use of your vehicle.
When you are going to check your vehicle yourself, please do so in compliance with Chapter 11 in the
Owner’s Manual.
Engine compartment overview
1
Power steering uid reservoir
2
Brake uid reservoir
3
Windshield washer tank
4
Engine coolant reservoir
5
Engine oil ller
6
Engine oil level gauge
1
6 5 4 3
2
1
2
3
Never tow AWD vehicle with the front wheels raised off the
ground while the rear wheels are on the ground, or with the
rear wheels raised off the ground while the front wheels are
on the ground.
This will cause the vehicle to spin away due to the operation
or deterioration of the center differential.
Using a atbed truck is the best way to transport your vehicle.
Page 16

All illustrations, specications, features and photographs contained in this brochure are based on product information available at the time of
its printing, and may not be completely accurate following its publication. Colours shown may vary due to reproduction variations in the printing
process, and some vehicle parts cannot be shown in certain photographs. Subaru Canada, Inc. reserves the right to discontinue or make changes
at any time, without notice or incurring obligations, to colours, materials, equipment, accessories, features, specications and models, or to change
their prices. Please visit our Web site for the latest information and specications. For detailed operating and safety information, please consult
your Owner’s Manual. For complete details on product updates, warranties or the Subaru C.A.R.E. program, please contact your Subaru dealer.
Tribeca and Subaru are registered trademarks. Printed in Canada. © 2013 Subaru Canada, Inc. 2014 model year.
SBQRGTRI14E
SUBARU CANADA, INC. / FUJI HEAVY INDUSTRIES LTD
.
08.13
Environmental Management System (EMS)
ISO 14001:2004 certied by SGS
www.subaru-earth.com
subaru.ca
 Loading...