

Page 1

This manual describes the following types of the Legacy series.
1) Legacy
2) Outback
Page 2

Page 3

Warranties
& Warranties for U.S.A.
All SUBARU vehicles distributed by
Subaru of America, Inc. and sold at retail
by an authorized SUBARU dealer in the
United States come with the following
warranties:
. SUBARU Limited Warranty
. Emission Control Systems Warranty
. Emissions Performance Warranty
All warranty information, including details
of coverage and exclusions, is in the
“Warranty and Maintenance Booklet”.
Please read these warranties carefully.
& Warranties for Canada
All SUBARU vehicles distributed by
Subaru Canada, Inc. and sold at retail by
an authorized SUBARU dealer in Canada
come with the following warranties:
. SUBARU Limited Warranty
. Anti-Corrosion Warranty
. Emission Control Warranty
All warranty information, including details
of coverage and exclusions, is in the
“Warranty and Service Booklet”. Please
read these warranties carefully.
How to use this Owner’s
Manual
& Using your Owner’s Manual
Before you operate your vehicle, carefully
read this manual. To protect yourself and
extend the service life of your vehicle,
follow the instructions in this manual.
Failure to observe these instructions may
result in serious injury and damage to your
vehicle.
This manual is composed of fourteen
chapters. Each chapter begins with a brief
table of contents, so you can usually tell at
a gla nce if that chapter contains the
information you want.
Chapter 1: Seat, seatbelt and SRS
airbags
This chapter informs you how to use the
seat and seatbelt and contains precautions for the SRS airbags.
Chapter 2: Keys and doors
This chapter informs you how to operate
the keys, locks and windows.
Chapter 3: Instruments and controls
This chapter informs you about the operation of instrument panel indicators and
how to use the instruments and other
switches.
Chapter 4: Climate control
This chapter informs you how to operate
the climate control.
Chapter 5: Audio
This chapter informs you how to operate
your audio system.
Chapter 6: Interior equipment
This chapter informs you how to operate
interior equipment.
Chapter 7: Starting and operating
This chapter informs you how to start and
operate your SUBARU.
Chapter 8: Driving tips
This chapter informs you how to drive your
SUBARU in various conditions and explains some safety tips on driving.
Chapter 9: In case of emergency
This chapter informs you what to do if you
have a problem while driving, such as a
flat tire or engine overheating.
Chapter 10: Appearance care
This chapter informs you how to keep your
SUBARU looking good.
Chapter 11: Maintenance and service
This chapter informs you when you need
to take your SUBARU to the dealer for
scheduled maintenance and informs you
how to keep your SUBARU running
properly.
1
– CONTINUED –
Page 4
2
Chapter 12: Specifications
This chapter informs you about the dimensions and capacities of your SUBARU.
Chapter 13: Consumer information and
Reporting safety defects
This chapter informs you about Tire
information, Uniform tire quality grading
standards and Reporting safety defects.
Chapter 14: Index
This is an alphabetical listing of all that’sin
this manual. You can use it to quickly find
something you want to read.
& Safety warnings
You will find a number of WARNINGs,
CAUTIONs and NOTEs in this manual.
These safety warnings alert you to potential hazards that could result in injury to
you or others.
Please read these safety warnings as well
as all other portions of this manual carefully in order to gain a better understanding of how to use your SUBARU vehicle
safely.
WARNING
A WARNING indicates a situation in
which serious injury or death could
result if the warning is ignored.
CAUTION
A CAUTION indicates a situation in
which injury or damage to your
vehicle, or both, could result if the
caution is ignored.
NOTE
A NOTE gives information or suggestions how to make better use of your
vehicle.
& Safety symbol
You will find a circle with a slash through it
in this manual. This symbol means “Do
not”, “Do not do this”,or“Do not let this
happen”, depending upon the context.
& Abbreviation list
You will find several abbreviations in this
manual. The meanings of the abbreviations are shown in the following list.
Abbreviation Meaning
A/C Air conditioner
A/ELR
Automatic/Emergency locking
retractor
ABS Anti-lock brake system
AKI Anti knock index
ALR Automatic locking retractor
AT Automatic transmission
ATF Automatic transmission fluid
AWD All-wheel drive
CVT
Continuously variable transmission
DRL Daytime running light
EBD
Electronic brake force distribution
ELR Emergency locking retractor
FWD Front-wheel drive
GAW Gross axle weight
GAWR Gross axle weight rating
GPS Global positioning system
GVW Gross vehicle weight
GVWR Gross vehicle weight rating
Page 5
Abbreviation Meaning
HID High intensity discharge
INT Intermittent
LATCH
Lower anchors and tethers for
children
LED Light emitting diode
LSD Limited slip differential
MIL Malfunction indicator lamp
MMT
Methylcyclopentadienyl manganese tricarbonyl
MT Manual transmission
OBD On-board diagnostics
SI-DRIVE SUBARU Intelligent Drive
SRS
Supplemental restraint system
TIN Tire identification number
TPMS
Tire pressure monitoring system
VDC
Vehicle dynamics control
Vehicle symbols
There are some of the symbols you may
see on your vehicle.
For warning and indicator lights, refer to
“Warning and indicator lights” F19.
Mark Name
WARNING
CAUTION
Passengers’ windows lock
Fuel
Front fog lights
Hazard warning flasher
Seat heater
Child restraint lower anchorages
Child restraint top tether anchorages
Mark Name
Horn
Windshield wiper and washer
Rear window wiper
Rear window washer
Lights
Tail lights, license plate light
and instrument panel illumination
Headlights
Turn signal
Illumination brightness
Engine hood
Trunk lid (Legacy)
3
– CONTINUED –
Page 6
4
Mark Name
Fan speed
Instrument panel outlets
Instrument panel outlets and
foot outlets
Foot outlets
Windshield defroster and foot
outlets
Windshield defroster
Rear window defogger/Outside mirror defogger/Windshield wiper deicer
Air recirculation
Outside air
Engine oil
Washer
Mark Name
Door lock (transmitter)
Door unlock (transmitter)
Trunk lid (Legacy) or rear gate
(Outback) (transmitter)
Safety precautions when
driving
& Seatbelt and SRS airbag
WARNING
. All persons in the vehicle should
fasten their seatbelts BEFORE
the vehicle starts to move. Otherwise, the possibility of serious
injury becomes greater in the
event of a sudden stop or accident.
. To obtain maximum protection in
the event of an accident, the
driver and all passengers in the
vehicle should always wear seatbelts when the vehicle is moving.
The SRS (Supplemental Restraint
System) airbag does not do away
with the need to fasten seatbelts.
In combination with the seatbelts, it offers the best combined
protection in case of a serious
accident.
Not wearing a seatbelt increases
the chance of severe injury or
death in a crash even when the
vehicle has the SRS airbag.
Page 7
. The SRS airbags deploy with
considerab le speed and force.
Occupants who are out of proper
position when the SRS airbag
deploys could suffer very serious
injuries. Because the SRS airbag
needs enough space for deployment, the driver should always
sit upright and well back in the
seat as far from the steering
wheel as practical while still
maintaining full vehicle control
and the front passenger should
move the seat as far back as
possible and sit upright and well
back in the seat.
For instructions and precautions, carefully
read the following sections.
. For the seatbelt system, refer to “Seat-
belts” F1-12.
. For the SRS airbag system, refer to
“*SRS airbag (Supplemental Restraint
System airbag)” F1-38.
& Child safety
WARNING
. Never hold a child on your lap or
in your arms while the vehicle is
moving. The passenger cannot
protect the child from injury in a
collision, because the child will
be caught between the passenger and objects inside the vehicle.
. While riding in the vehicle, in-
fants and small children should
always be placed in the REAR
seat in an infant or child restraint
system which is appropriate for
the child’s age, height and
weight. If a child is too big for a
child restraint system, the child
should sit in the REAR seat and
be restrained using the seatbelts.
According to accident statistics,
children are safer when properly
restrained in the rear seating
positions than in the front seating positions. Never allow a child
to stand up or kneel on the seat.
. Put children in the REAR seat
properly restrained at all times in
a child restraint device or in a
seatbelt. The SRS airbag deploys
with considerable speed and
force and can injure or even kill
children, especially if they are
not restrained or improperly restrained. Because children are
lighter and weaker than adults,
their risk of being injured from
deployment is greater.
. NEVER INSTALL A REARWARD
FACING CHILD SAFETY SEAT IN
THE FRONT SEAT. DOING SO
RISKS SERIOUS INJURY OR
DEATH TO THE CHILD BY PLACING THE CHILD’S HEAD TOO
CLOSE TO THE SRS AIRBAG.
. Always turn the child safety locks
to the “LOCK” position whenever
a child rides in the rear seat.
Serious injury could result if a
child accidentally opened the
door and fell out. Refer to “Child
safety locks” F2-20.
. Always lock the passengers’ win-
dows using the lock switch when
children are riding in the vehicle.
Failure to follow this procedure
could result in injury to a child
operating the power window. Refer to “Windows” F2-21.
. Never leave unattended children,
adults or animals in the vehicle.
5
– CONTINUED –
Page 8
6
They could accidentally injure
themselves or others through
inadvertent operation of the vehicle. Also, on hot or sunny days,
the temperature in a closed vehicle could quickly become high
enough to cause severe or possibly fatal injuries.
. Help prevent children, adults or
animals from locking themselves
in the trunk. On hot or sunny
days, the temperature in the
trunk could quickly become high
enough to cause death or serious
heat-related injuries including
brain damage to anyone locked
inside, particularly for small children.
. When leaving the vehicle, close
all windows and lock all doors.
Also make certain that the trunk
is closed.
For instructions and precautions, carefully
read the following sections.
. For the seatbelt system, refer to “Seat-
belts” F1-12.
. For the child restraint system, refer to
“Child restraint systems” F1-25.
. For the SRS airbag system, refer to
“*SRS airbag (Supplemental Restraint
System airbag)” F1-38.
& Engine exhaust gas (carbon
monoxide)
WARNING
. Never inhale engine exhaust gas.
Engine exhaust gas contains
carbon monoxide, a colorless
and odorless gas which is dangerous, or even lethal, if inhaled.
. Always properly maintain the en-
gine exhaust system to prevent
engine exhaust gas from entering the vehicle.
. Never run the engine in a closed
space, such as a garage, except
for the brief time needed to drive
the vehicle in or out of it.
. Avoid remaining in a parked
vehicle for a lengthy time while
the engine is running. If that is
unavoidable, then use the ventilation fan to force fresh air into
the vehicle.
. Always keep the front ventilator
inlet grille free from snow, leaves
or other obstructions to ensure
that the ventilation system always works properly.
. If at any time you suspect that
exhaust fumes are entering the
vehicle, have the problem
checked and corrected as soon
as possible. If you must drive
under these conditions, drive
only with all windows fully open.
. Keep the trunk lid or rear gate
closed while driving to prevent
exhaust gas from entering the
vehicle.
& Drinking and driving
WARNING
Drinking and then driving is very
dangerous. Alcohol in the bloodstream delays your reaction and
impairs your perception, judgment
and attentiveness. If you drive after
drinking – even if you drink just a
little – it will increase the risk of
being involved in a serious or fatal
accident, injuring or killing yourself,
your passengers and others. In
addition, if you are injured in the
accident, alcohol may increase the
severity of that injury.
Page 9
Please don’t drink and drive.
Drunken driving is one of the most
frequent causes of accidents. Since alcohol affects all people differently, you may
have consumed too much alcohol to drive
safely even if the level of alcohol in your
blood is below the legal limit. The safest
thing you can do is never drink and drive.
However if you have no choice but to
drive, stop drinking and sober up completely before getting behind the wheel.
& Drugs and driving
WARNING
There are some drugs (over the
counter and prescription) that can
delay your reaction time and impair
your perception, judgment and attentiveness. If you drive after taking
them, it may increase your, your
passengers’ and other persons’ risk
of being involved in a serious or
fatal accident.
If you are taking any drugs, check with
your doctor or pharmacist or read the
literature that accompanies the medication
to determine if the drug you are taking can
impair your driving ability. Do not drive
after taking any medications that can
make you drowsy or otherwise affect your
ability to safely operate a motor vehicle. If
you have a medical condition that requires
you to take drugs, please consult with
your doctor.
Never drive if you are under the influence
of any illicit mind-altering drugs. For your
own health and well-being, we urge you
not to take illegal drugs in the first place
and to seek treatment if you are addicted
to those drugs.
& Driving when tired or sleepy
WARNING
When you are tired or sleepy, your
reaction will be delayed and your
perception, judgment and attentiveness will be impaired. If you drive
when tired or sleepy, your, your
passengers’ and other persons’
chances of being involve d in a
serious accident may increase.
Please do not continue to drive but
instead find a safe place to rest if you
are tired or sleepy. On long trips, you
should make periodic rest stops to refresh
yourself before continuing on your journey.
When possible, you should share the
driving with others.
& Car phone/cell phone and
driving
CAUTION
Do not use a car phone/cell phone
while driving; it may distract your
attention from driving and can lead
to an accident. If you use a car
phone/cell phone, pull off the road
and park in a safe place before
using your phone. In some States/
Provinces, only hands-free phones
may legally be used while driving.
7
– CONTINUED –
Page 10
8
& Modification of your vehicle
CAUTION
Your vehicle should not be modified
other than with genuine SUBARU
parts and accessories. Other types
of modifications could affect its
performance, safety or durability,
and may even violate governmental
regulations. In addition, damage or
performance problems resulting
from modification may not be covered under warranties.
& Driving with pets
Unrestrained pets can interfere with your
driving and distract your attention from
driving. In a collision or sudden stop,
unrestrained pets or cages can be thrown
around inside the vehicle and hurt you or
your passengers. Besides, the pets can
be hurt under these situations. It is also for
their own safety that pets should be
properly restrained in your vehicle. Restrain a pet with a special traveling
harness which can be secured to the rear
seat with a seatbelt or use a pet carrier
which can be secured to the rear seat by
routing a seatbelt through the carrier’s
handle. Never restrain pets or pet carriers
in the front passenger’s seat. For further
information, consult your veterinarian,
local animal protection society or pet
shop.
& Tire pressures
WARNING
Driving at high speeds with excessively low tire pressures can cause
the tires to deform severely and to
rapidly become hot. A sharp increase in temperature could cause
tread separation, and destruction of
the tires. The resulting loss of
vehicle control could lead to an
accident.
Check and, if necessary, adj ust the
pressure of each tire (including the spare)
at least once a month and before any long
journey.
Check the tire pressure when the tires are
cold. Use a pressure gauge to adjust the
tire pressures to the values shown on the
tire placard. For detailed information, refer
to “Tires and wheels” F11-35.
& California proposition 65
warning
WARNING
Engine exhaust, some of its constituents, and certain vehicle components contain or emit chemicals
known to the State of California to
cause cancer and birth defects or
other reproductive harm. In addition, certain fluids in vehicles and
certain components of product wear
contain or emit chemicals known to
the State of California to cause
cancer and birth defects or other
reproductive harm.
Page 11

Table of contents
Seat, seatbelt and SRS airbags
1
Keys and doors
2
Instruments and controls
Climate control
4
Audio
5
Interior equipment
6
Starting and operating
7
Driving tips
8
In case of emergency
9
Appearance care
10
Maintenance and service
11
Specifications
12
Consumer information and Reporting safety defects
13
Index
14
3
Page 12

10
Illustrated index
& Exterior
1) Engine hood lock release (page 11-7)
2) Headlight switch (page 3-27)
3) Bulb replacement (page 11-50)
4) Wiper switch (page 3-32)
5) Moonroof (page 2-28)
6) Roof rail (page 8-14)
7) Door locks (page 2-5)
8) Tire pressure (page 11-37)
9) Flat tires (page 9-6)
10) Fog light switch (page 3-30)
11) Tie-down hooks (page 9-13)
12) Towing hook (page 9-12)
Page 13
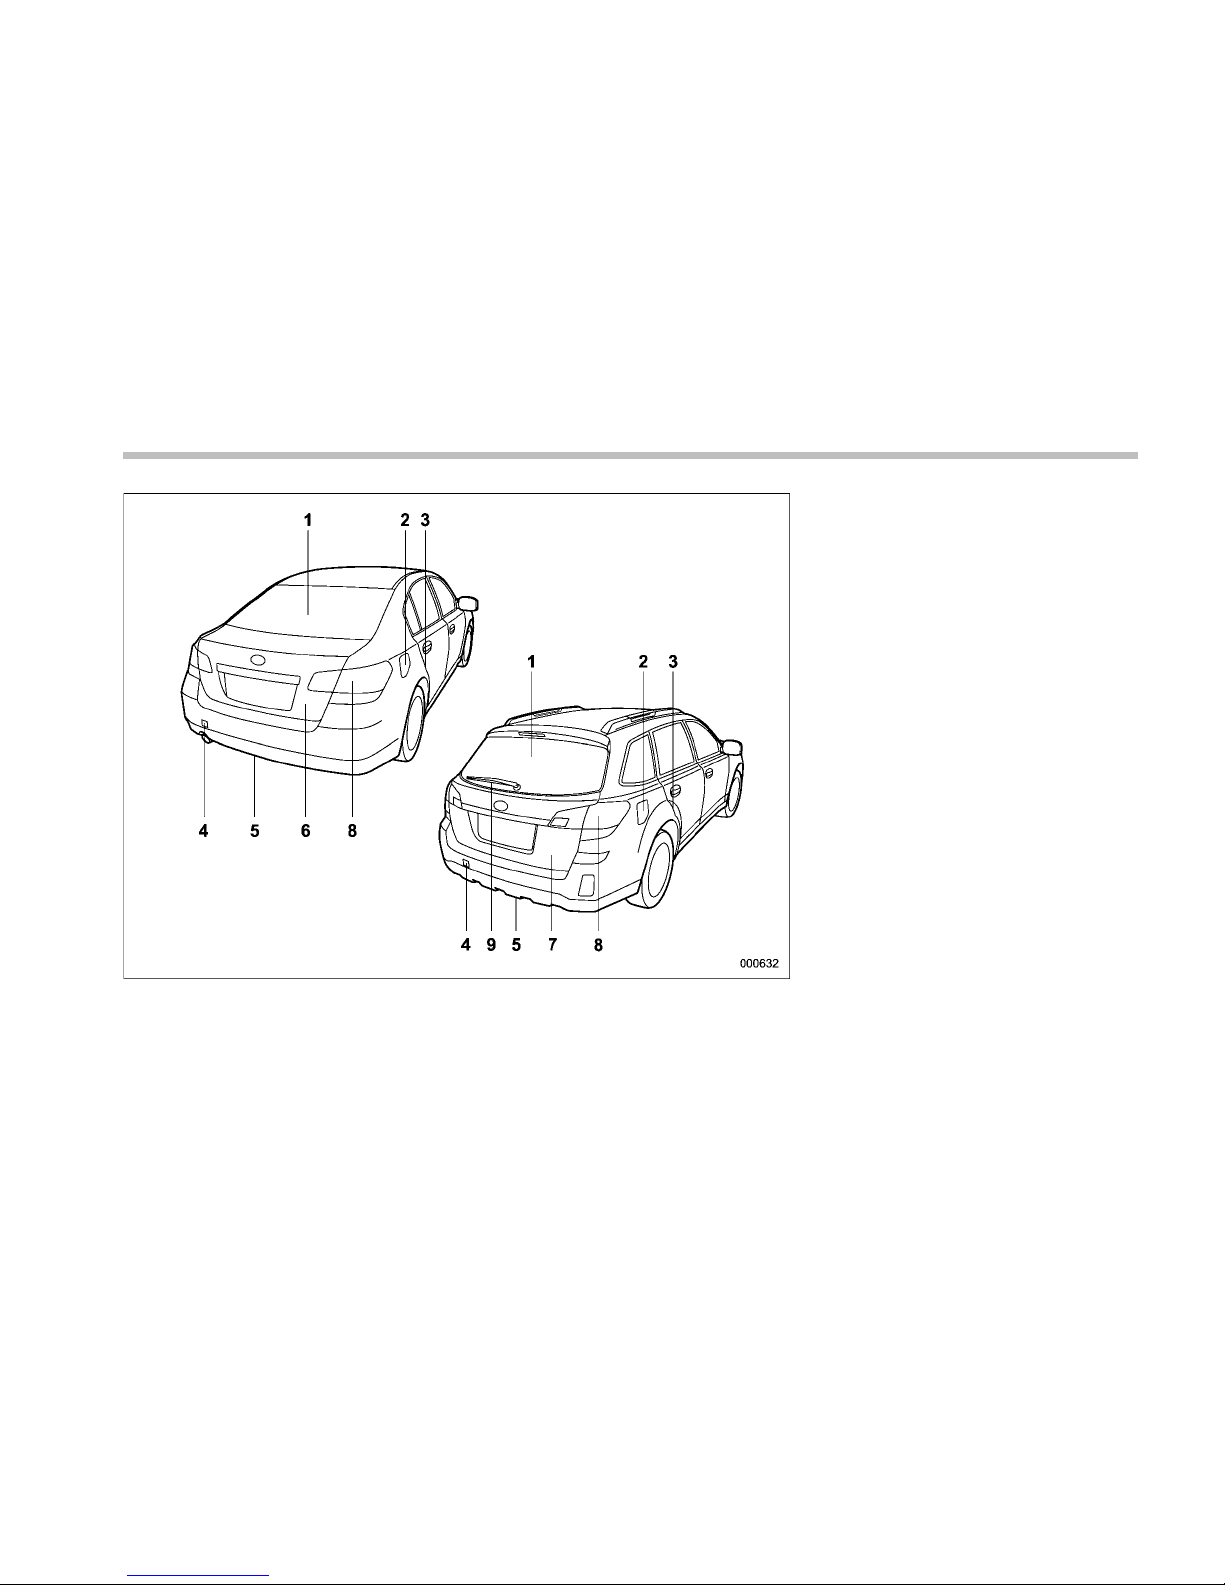
1) Rear window defogger button
(page 3-34)
2) Fuel filler lid and cap (page 7-3)
3) Child safety locks (page 2-20)
4) Towing hook (page 9-12)
5) Tie-down hooks (page 9-13)
6) Trunk lid (page 2-24)
7) Rear gate (page 2-27)
8) Bulb replacement (page 11-54)
9) Rear wiper switch (page 3-34)
11
– CONTINUED –
Page 14
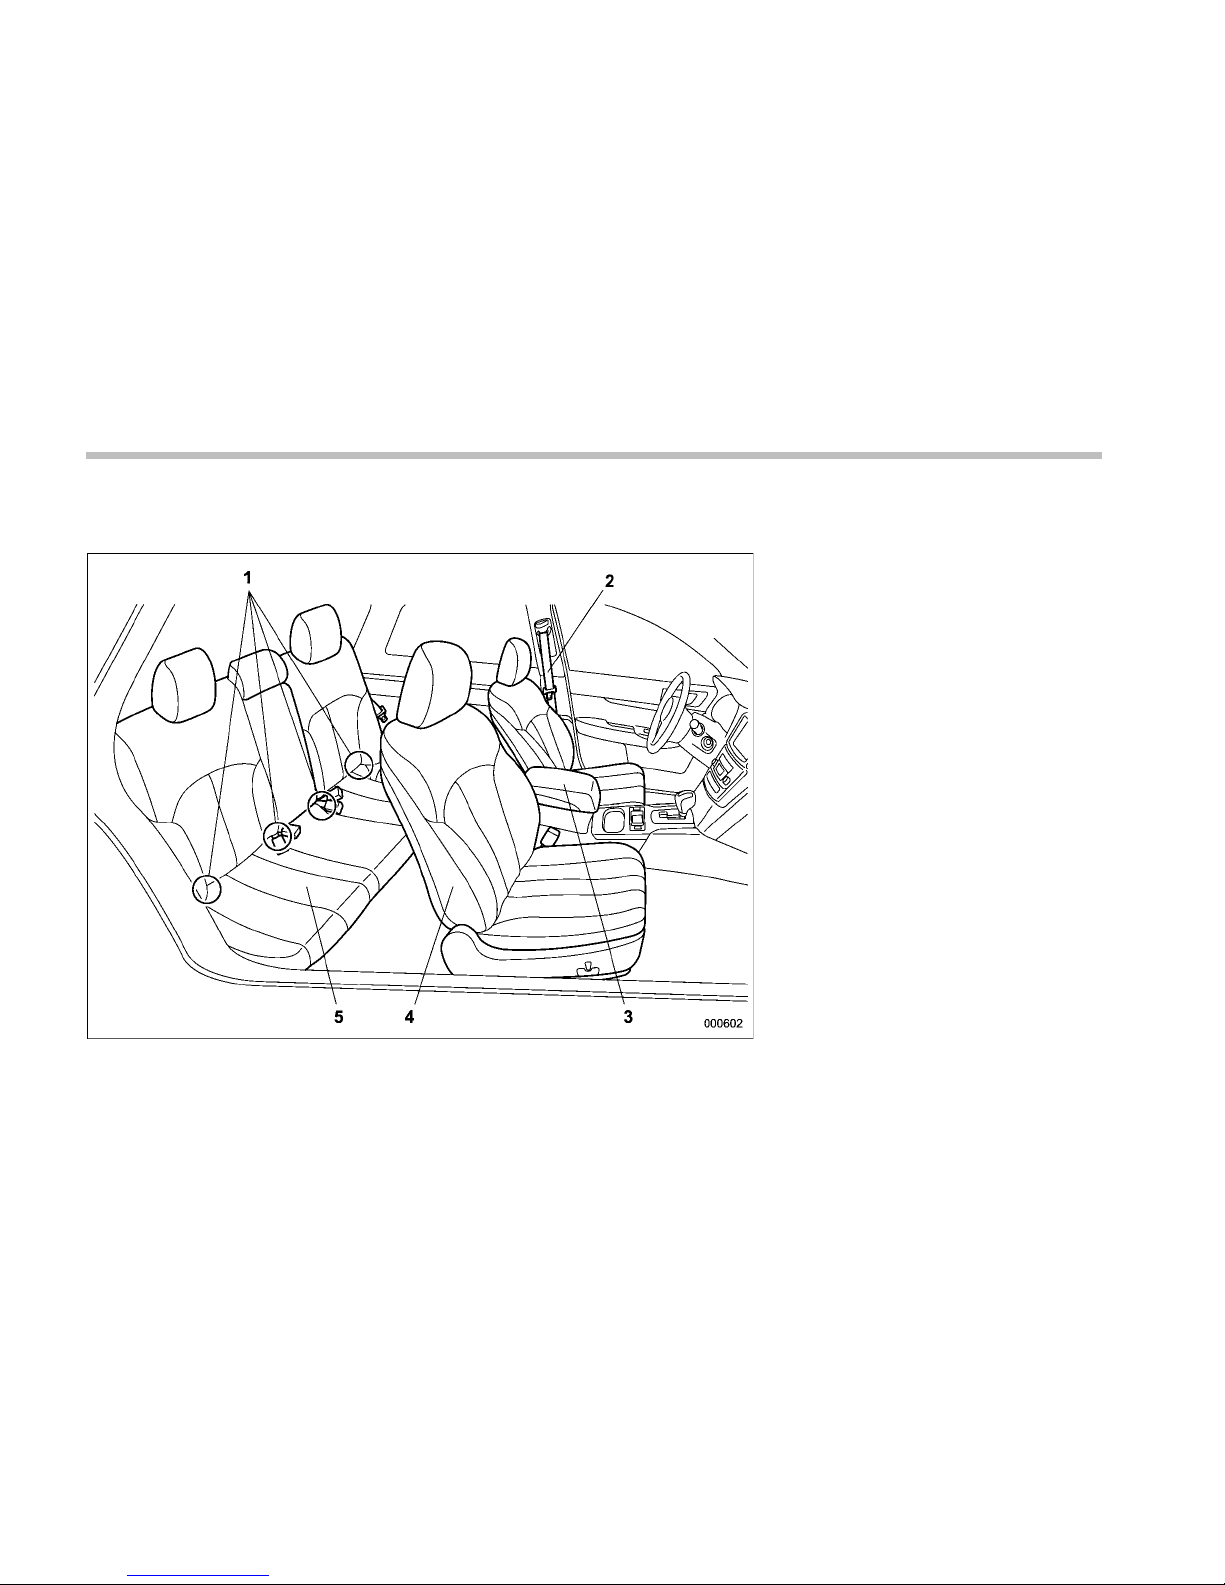
12
& Interior
! Passenger compartment area
1) Lower anchorages for child restraint
system (page 1-33)
2) Seatbelt (page 1-12)
3) Center console (page 6-6)
4) Front seat (page 1-2)
5) Rear seat (page 1-7)
Page 15
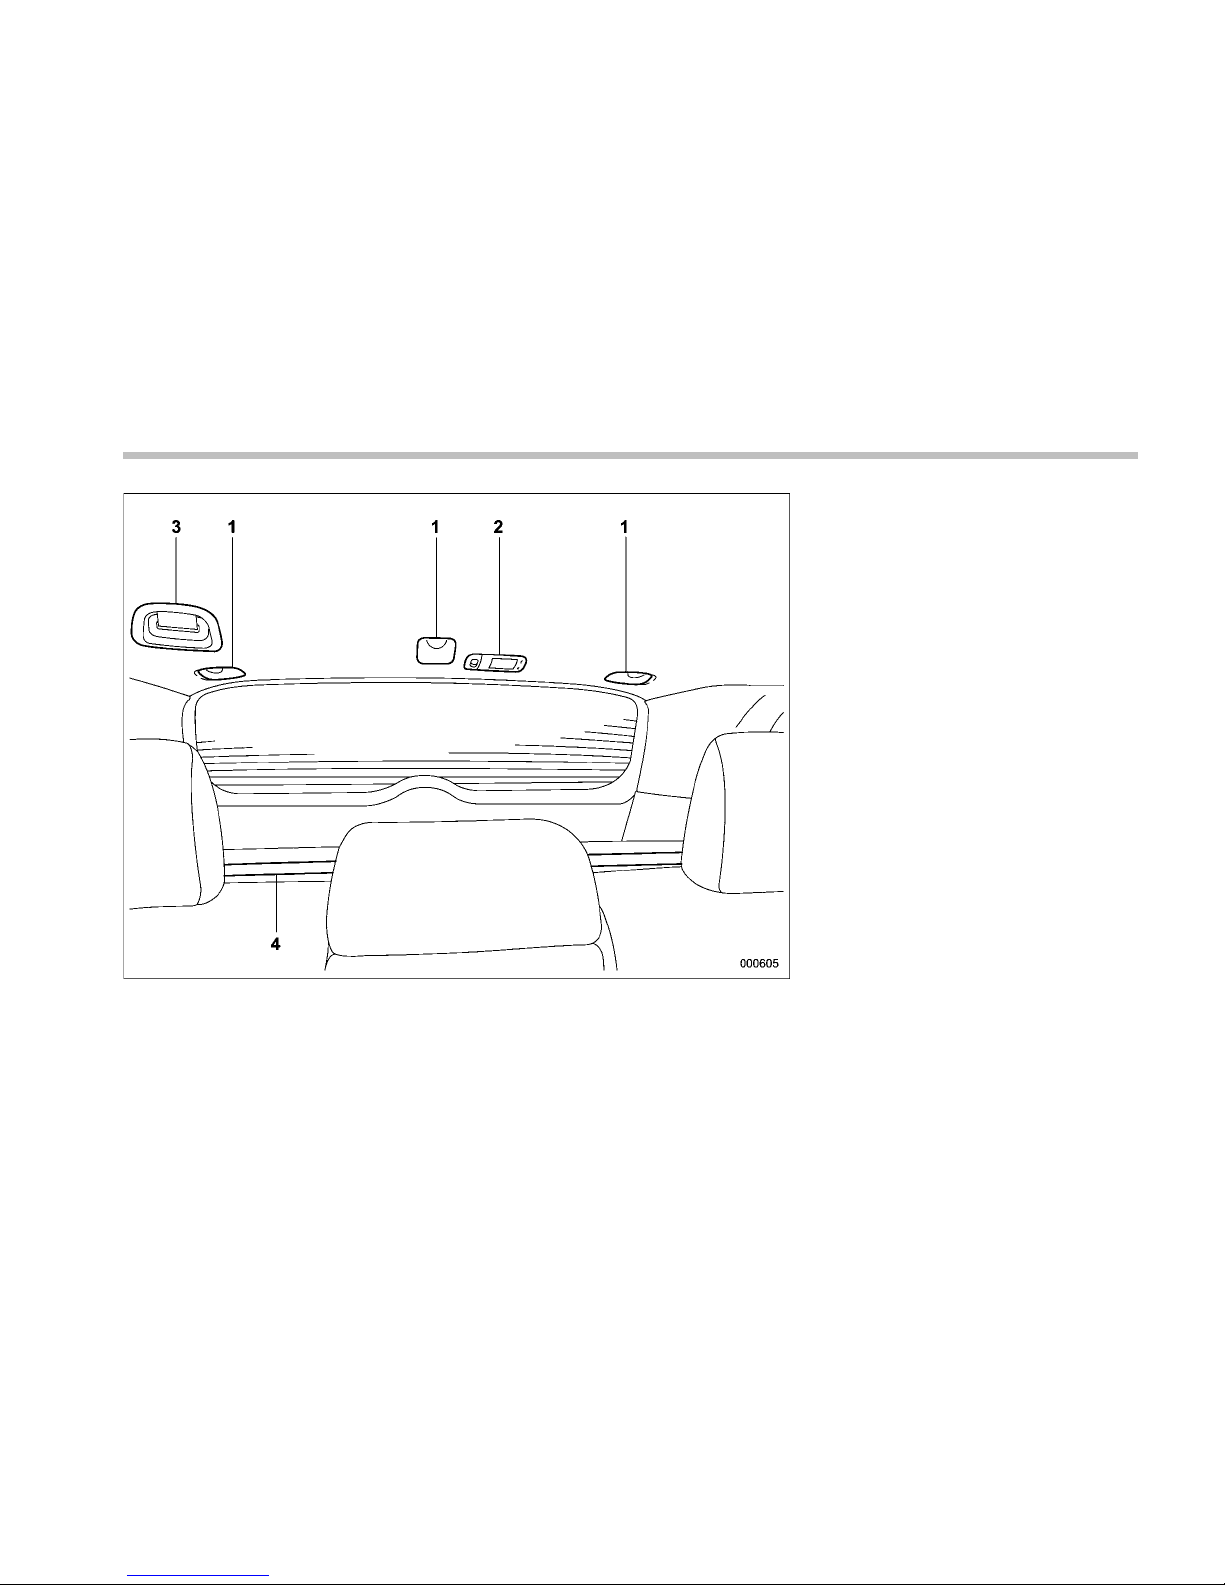
1) Top tether anchorages (page 1-35)
2) Cargo area light (page 6-3)
3) Rear center seatbelt (page 1-18)
4) Cargo area cover (page 6-15)
13
– CONTINUED –
Page 16
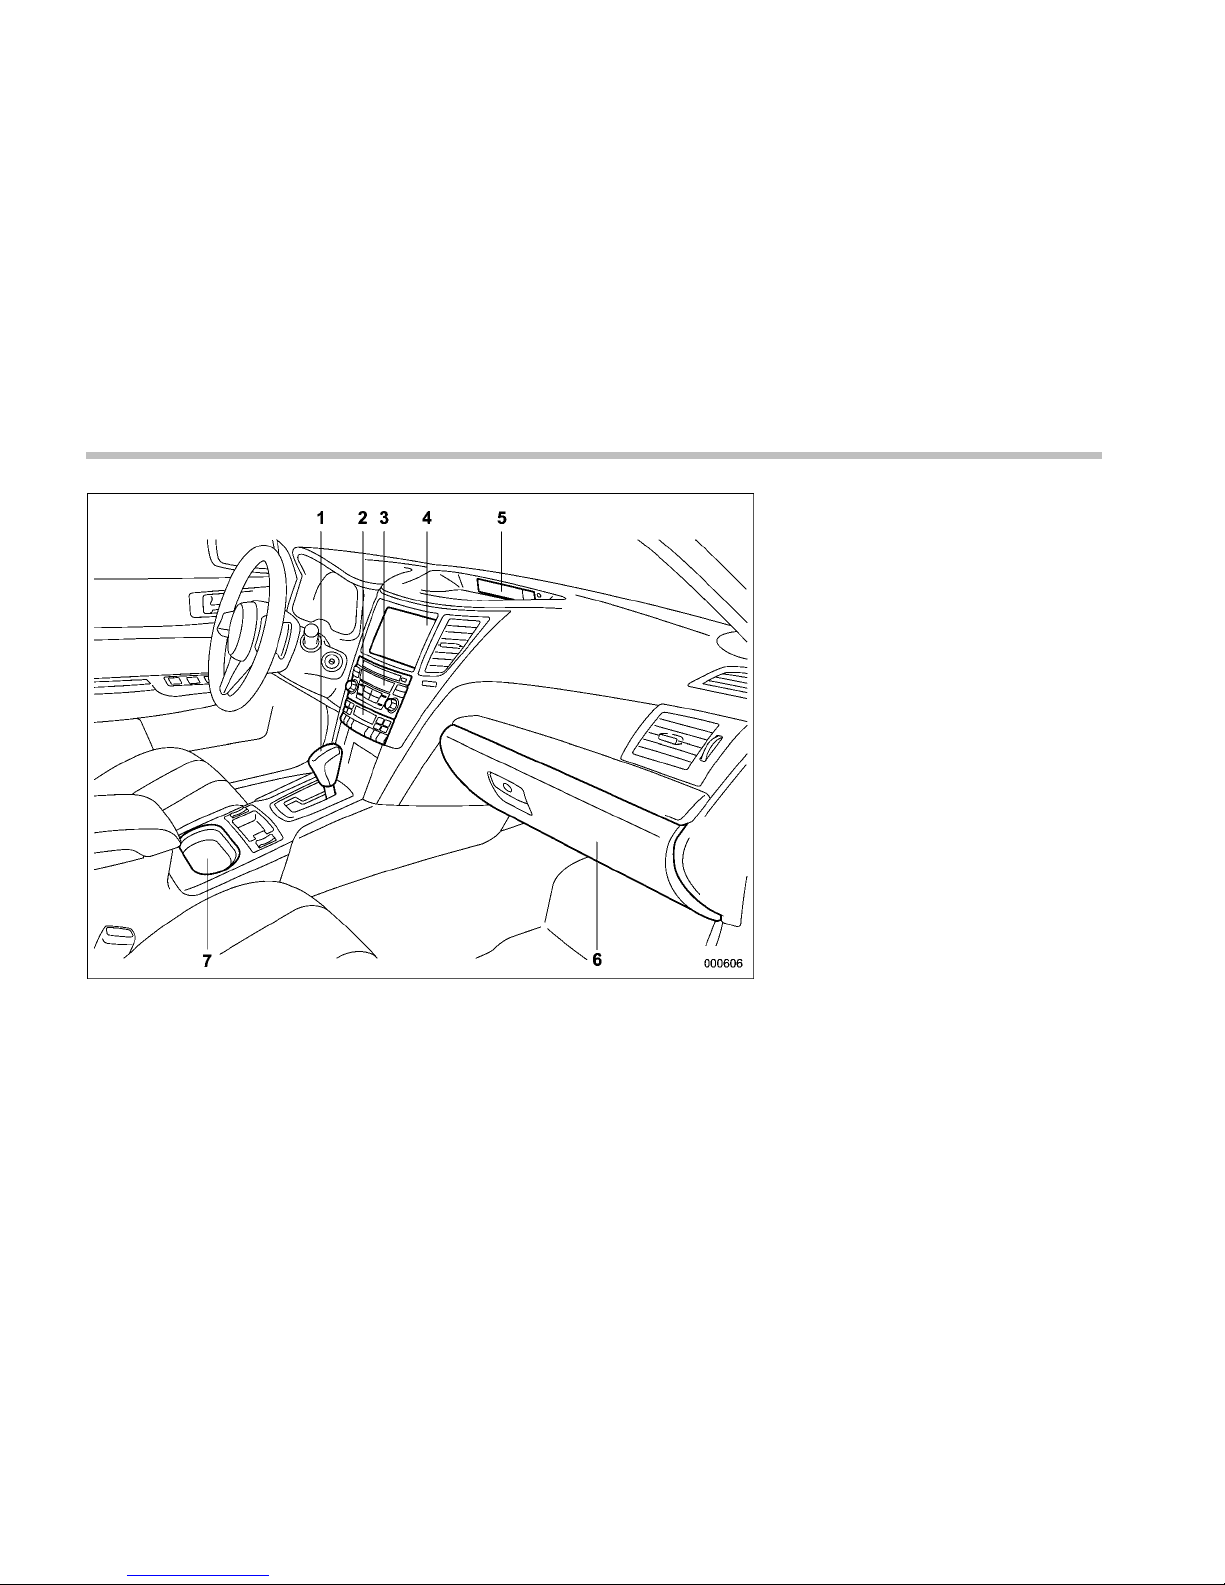
14
1) Shift lever (MT) (page 7-16)/Select lever
(AT and CVT) (page 7-19)
2) Climate control (page 4-1)
3) Audio (page 5-1)
4) Navigation system (Refer to the Owner’s
Manual supplement for the navigation
system)
5) Multi function display (page 3-24)
6) Glove box (page 6-6)
7) Cup holder (page 6-8)
Page 17
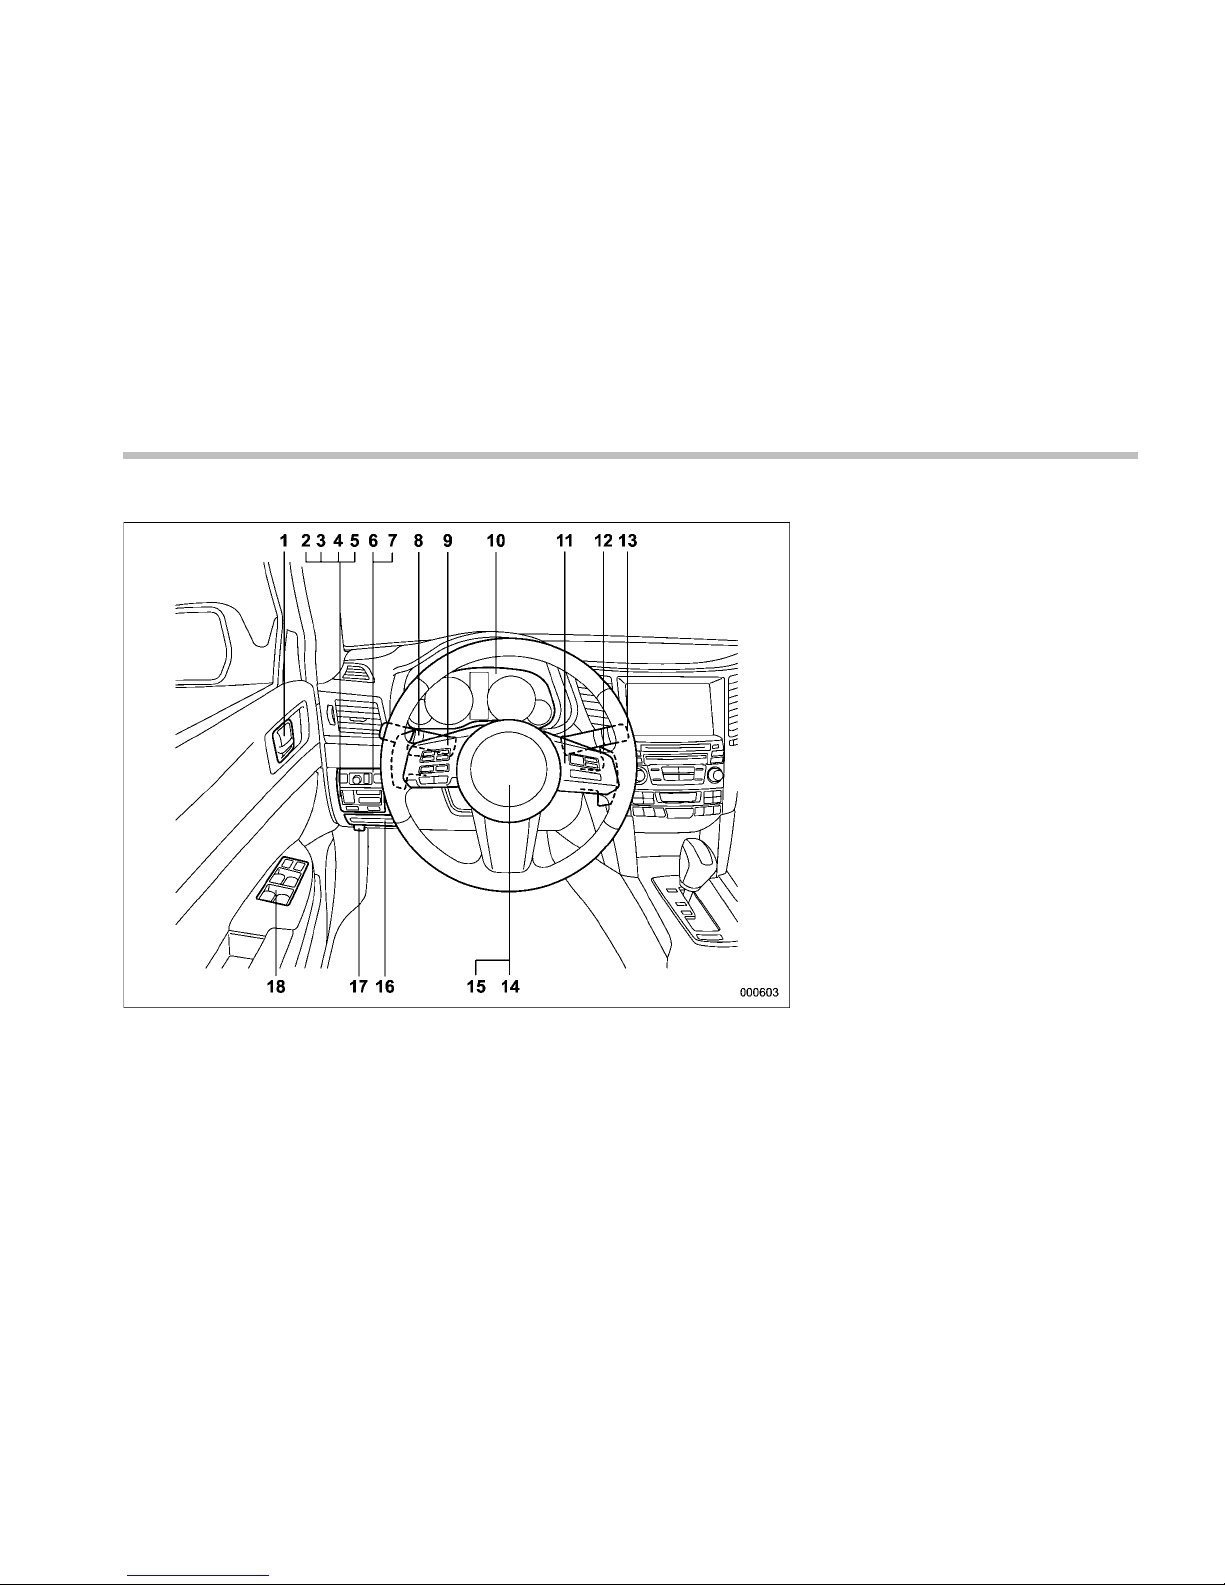
& Instrument panel
1) Door locks (page 2-5)
2) Electronic parking brake switch
(page 7-34)
3) Hill Holder switch (page 7-35)
4) Trunk lid opener switch (page 2-24)
5) Vehicle Dynamics Control OFF switch
(page 7-31)
6) Remote control mirror switch (page 3-38)
7) Illumination brightness control
(page 3-30)
8) Light control switch (page 3-27)
9) Audio control buttons (page 5-30)
10) Combination meter (page 3-5)
11) Cruise control (page 7-38)
12) Paddle shift (page 7-21)
13) Wiper control lever (page 3-31)
14) Horn (page 3-39)
15) SRS airbag (page 1-38)
16) Fuse box (page 11-48)
17) Hood lock release knob (page 11-7)
18) Power windows (page 2-21)
15
– CONTINUED –
Page 18

16
& Light control and wiper control levers/switches
1) Windshield wiper (page 3-31)
2) Mist (page 3-32)
3) Windshield washer (page 3-33)
4) Rear window wiper and washer switch
(page 3-34)
5) Wiper intermittent time control switch
(page 3-33)
6) Wiper control lever (page 3-32)
7) Light control switch (page 3-27)
8) Front fog light switch (page 3-30)
9) Headlight ON/OFF/AUTO (page 3-27)
10) Headlight flasher High/Low beam
change (page 3-28)
11) Turn signal lever (page 3-29)
Page 19
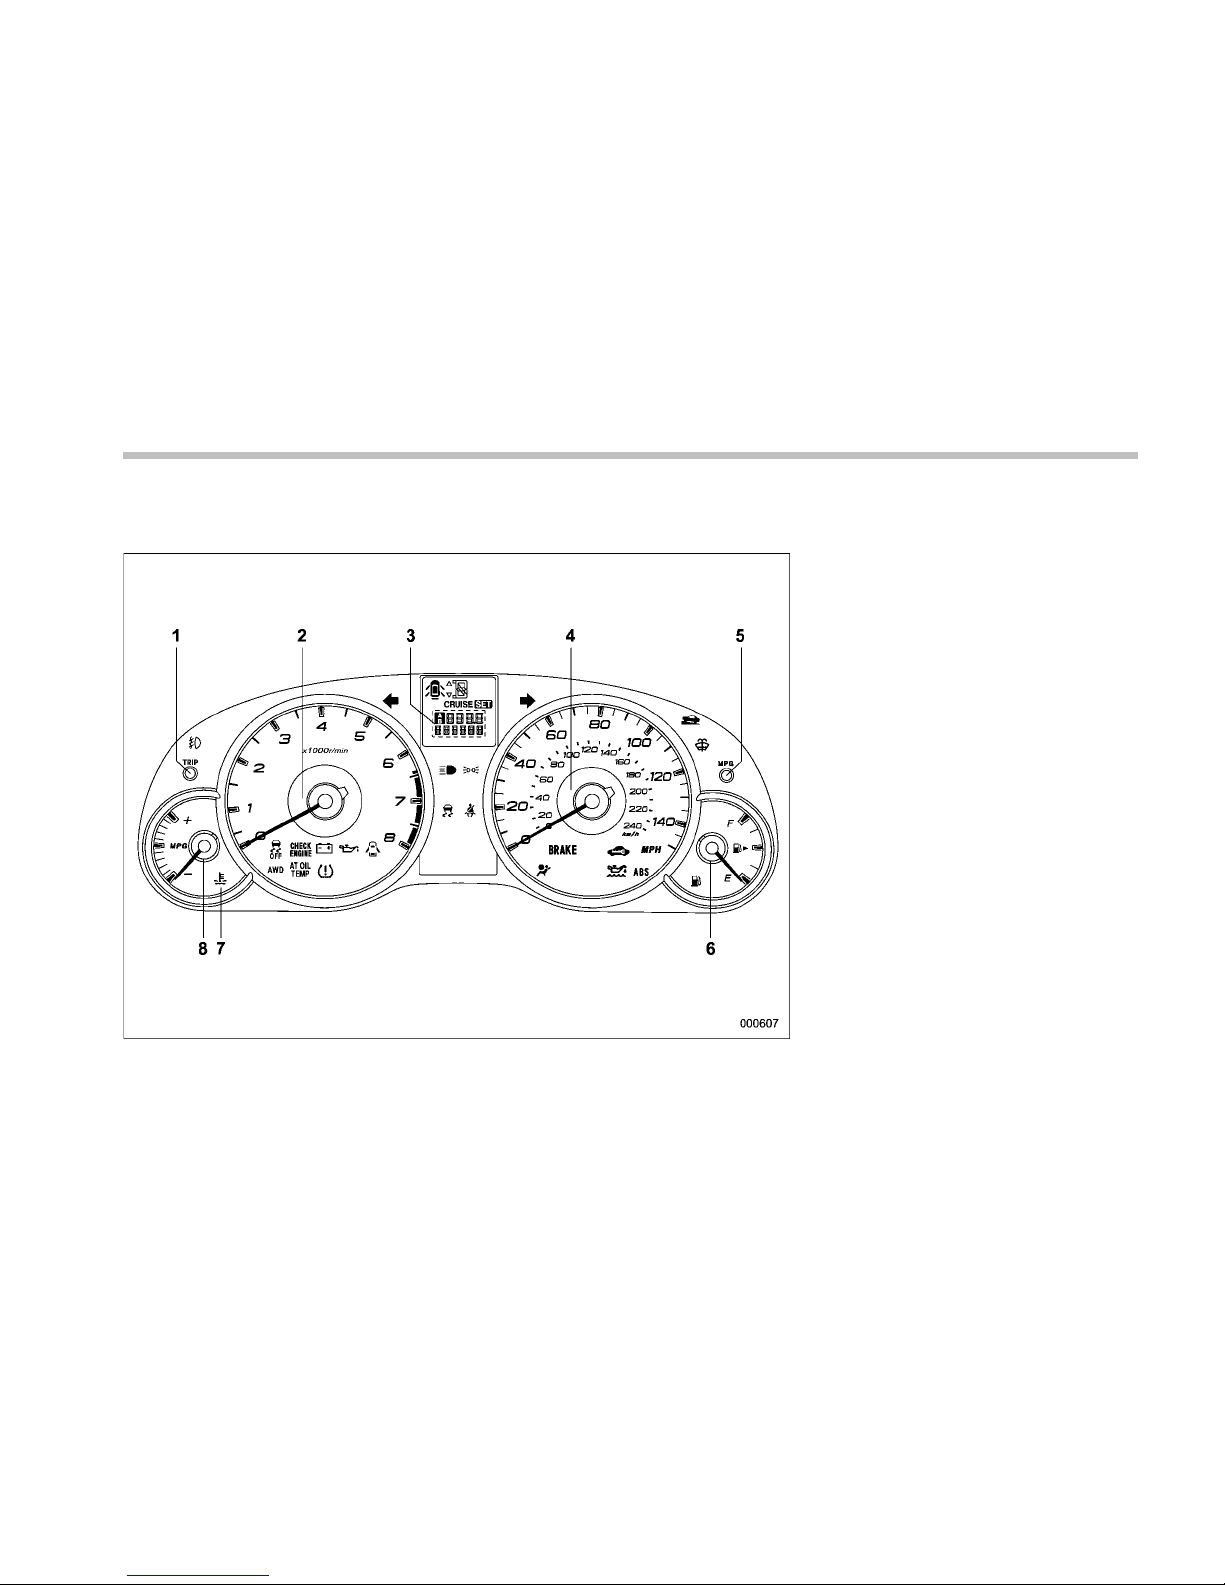
& Combination meter
! U.S.-spec. models
1) Trip meter A/B selection and trip meter
reset knob (page 3-6)
2) Tachometer (page 3-7)
3) Trip meter and odometer (page 3-6)
4) Speedometer (page 3-6)
5) Multi function display switching knob
(page 3-24)
6) Fuel gauge (page 3-7)
7) Coolant temperature warning/indicator
light (page 3-13)
8) ECO gauge (page 3-8)
17
– CONTINUED –
Page 20
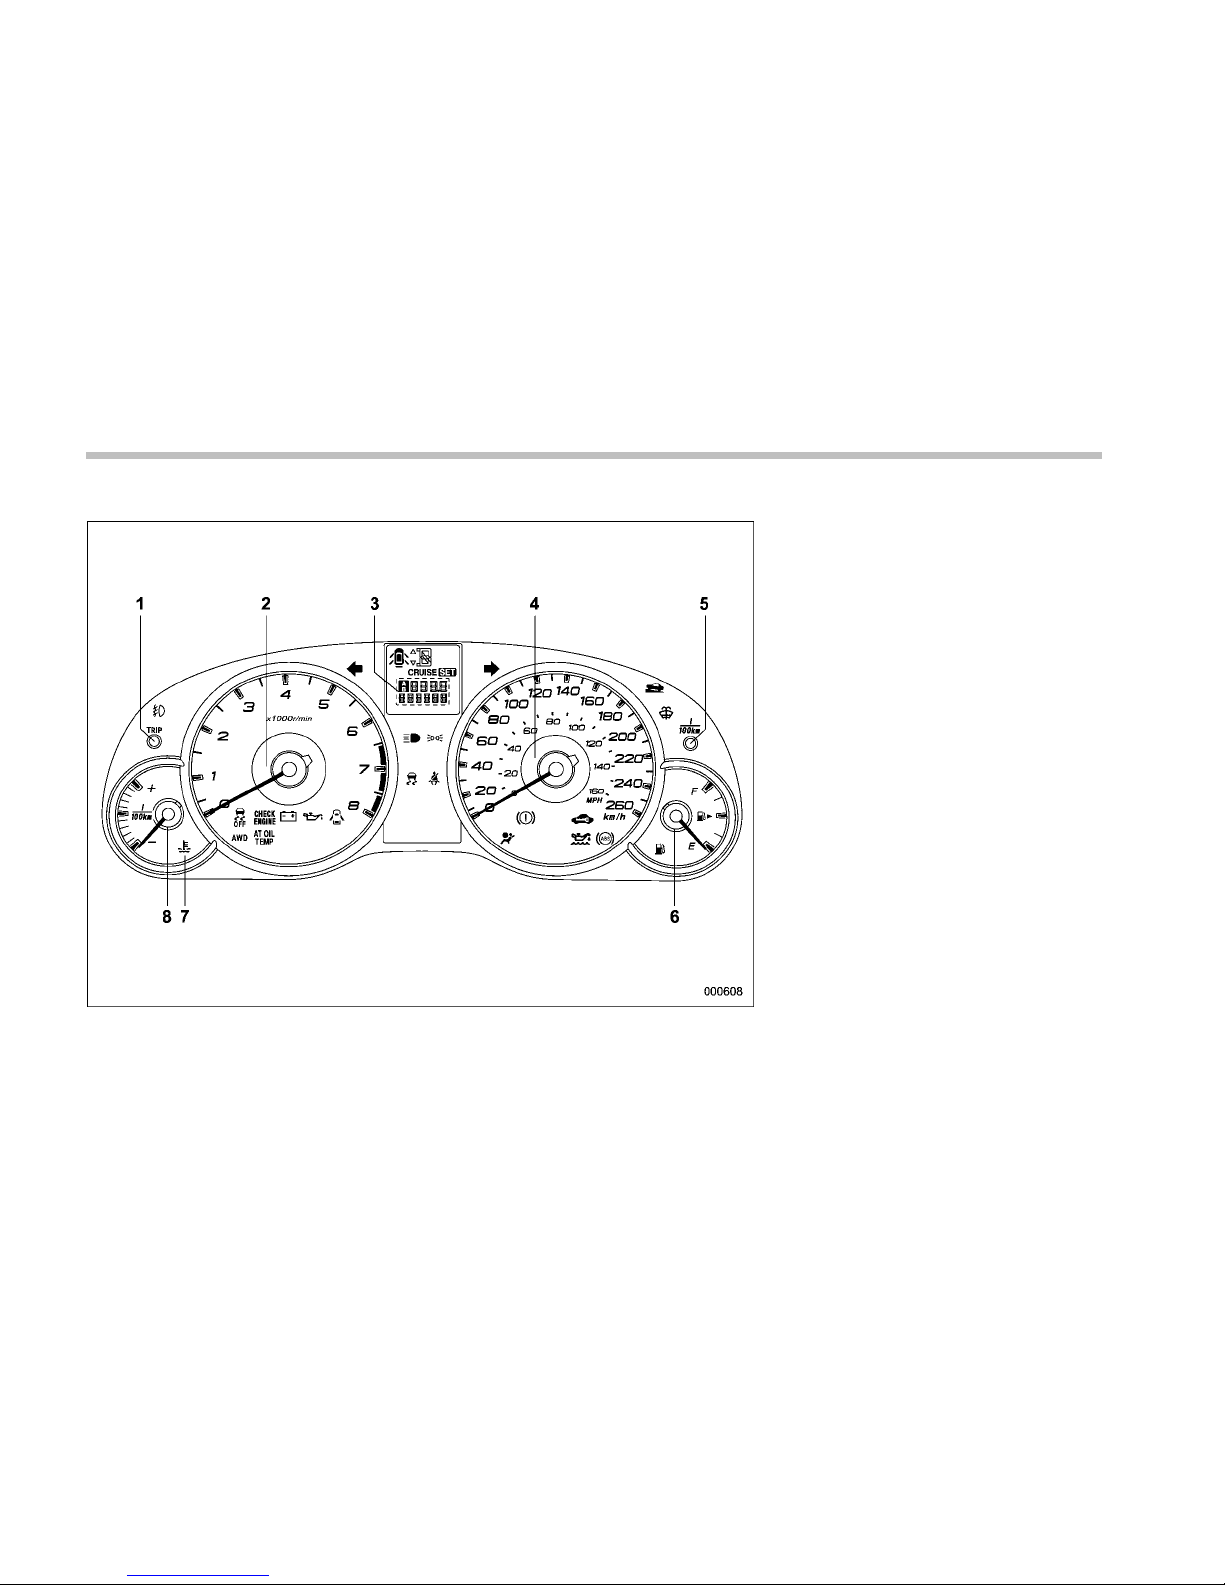
18
! Canada-spec. models
1) Trip meter A/B selection and trip meter
reset knob (page 3-6)
2) Tachometer (page 3-7)
3) Trip meter and odometer (page 3-6)
4) Speedometer (page 3-6)
5) Multi function display switching knob
(page 3-24)
6) Fuel gauge (page 3-7)
7) Coolant temperature warning/indicator
light (page 3-13)
8) ECO gauge (page 3-8)
Page 21
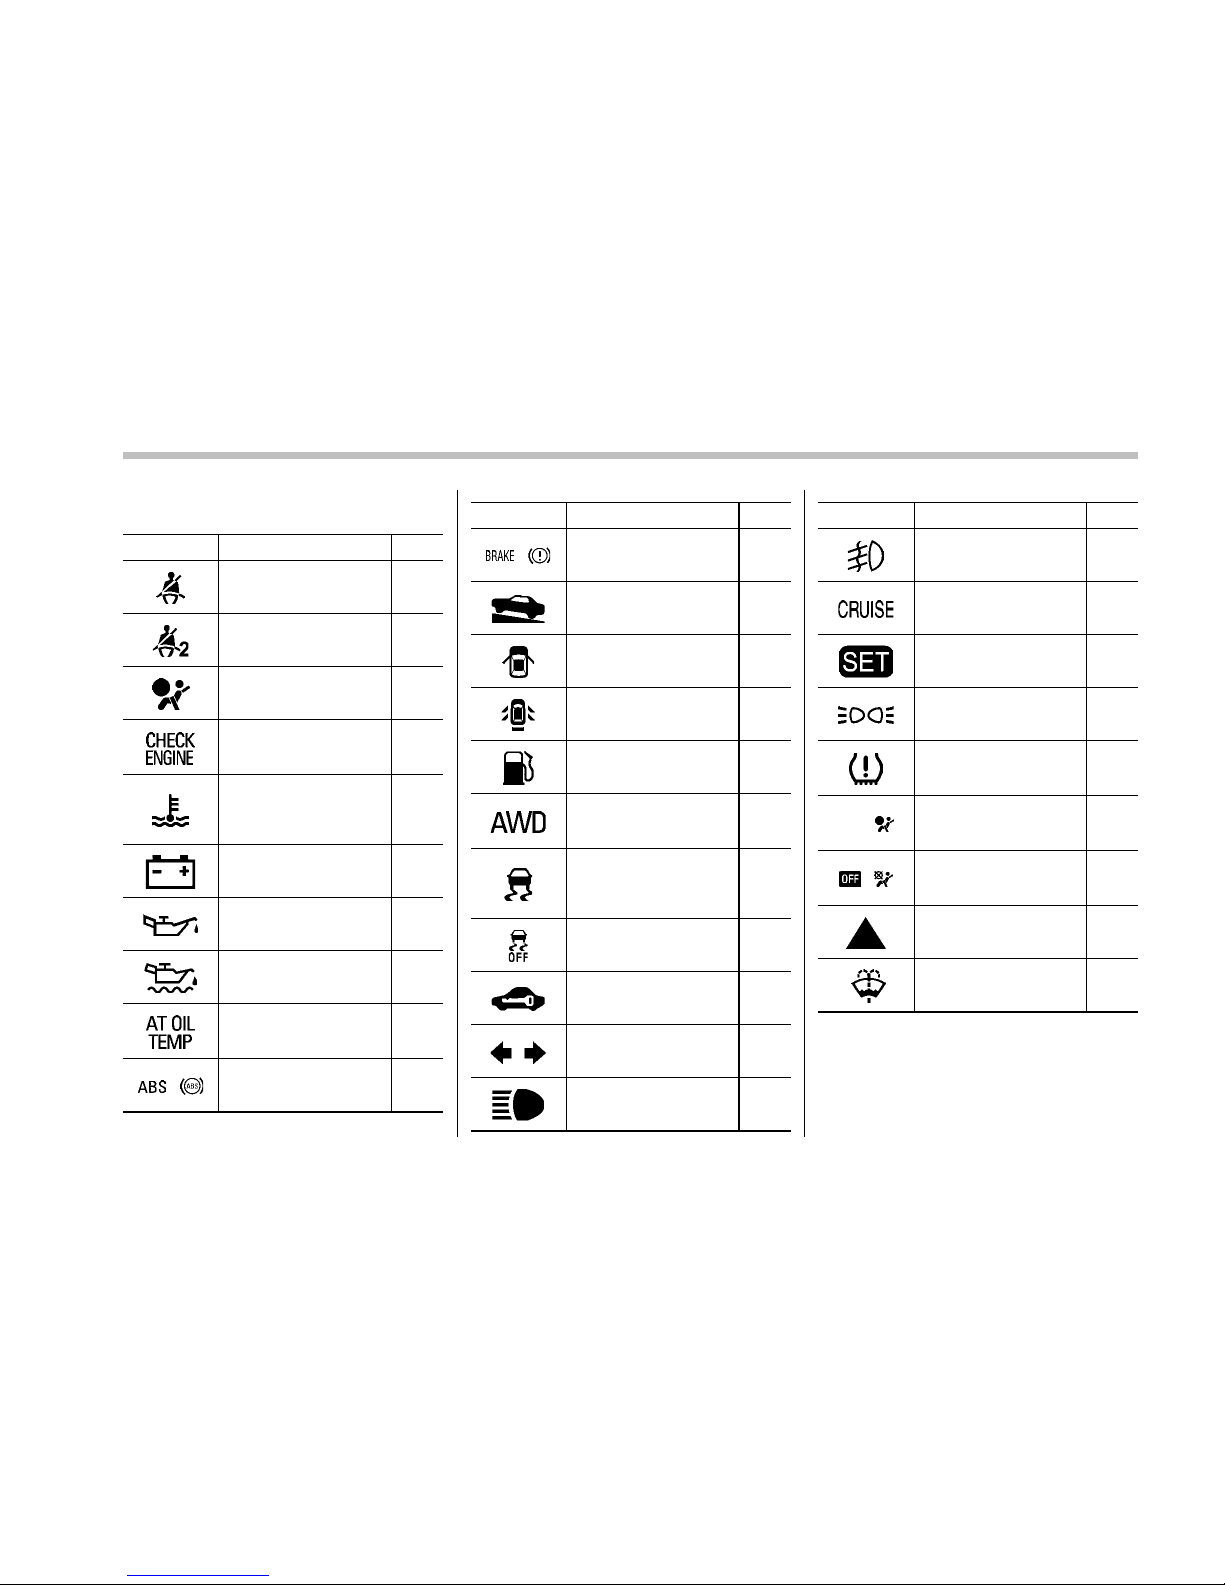
& Warning and indicator lights
Mark Name Page
Seatbelt warning light 3-10
Front passenger’s
seatbelt warning light
3-10
SRS airbag system
warning light
3-11
CHECK ENGINE warning light/Malfunction indicator lamp
3-12
Coolant temperature
low indicator light/Coolant temperature high
warning light
3-13
Charge warning light 3-14
Oil pressure warning
light
3-14
Engine oil level warning
light
3-14
AT OIL TEMP warning
light (AT and CVT models)
3-15
/ ABS warning light 3-16
Mark Name Page
/
Brake system warning
light
3-17
Hill Holder indicator
light
3-19
Door open warning light 3-20
Door open indicator
light
3-20
Low fuel warning light 3-19
All-Wheel Drive warning light (AT and CVT
models)
3-20
Vehicle Dynamics Control warning light/Vehicle Dynamics Control
operation indicator light
3-20
Vehicle Dynamics Control OFF indicator light
3-21
Security indicator light 3-22
Turn signal indicator
lights
3-23
High beam indicator
light
3-23
Mark Name Page
Front fog light indicator
light (if equipped)
3-23
Cruise control indicator
light
3-23
Cruise control set indicator light
3-23
Headlight indicator light 3-23
Low tire pressure
warning light
(U.S.-spec. models)
3-15
ON /
Front passenger’s frontal airbag ON indicator
light
1-46/
3-12
/
Front passenger’s frontal airbag OFF indicator
light
1-46/
3-12
Shift-up indicator 3-22
Windshield washer fluid
warning light
3-20
19
Page 22

20
Function settings
A SUBARU dealer can change the settings of the functions shown in the following table to meet your personal requirements. Contact
the nearest SUBARU dealer for details.
Item Function Possible settings Default setting Page
Alarm system Alarm system Operation/Non-operation Operation 2-16
Monitoring start delay time (after closure
of doors)
0 second/30 seconds 30 seconds 2-17
Impact sensor operation (only models
with shock sensors (dealer option))
Operation/Non-operation Non-operation 2-19
Passive arming Operation/Non-operation Non-operation 2-18
Map light/Dome light/Cargo area light
illumination
ON/OFF OFF 2-16
Remote keyless entry system
Hazard warning flasher Operation/Non-operation Operation 2-8
Audible signal Operation/Non-operation Operation 2-11
Key lock-in prevention Key lock-in prevention Operation/Non-operation Operation 2-7
Defogger and deicer system
for models with the automatic
climate control system
Rear window defogger, outside mirror
defogger and windshield wiper deicer
Operation for 15 minutes/
Continuous operation
Operation for 15 minutes 3-34
Map light/Dome light/Cargo
area light
Operation of map light/Dome light/Cargo
area light OFF delay timer
OFF/Short/Normal/Long Long 6-2
Battery drainage prevention
function
Battery drainage prevention function Operation/Non-operation Operation 2-6
Seatbelt warning Sounds a chime while driving Operation/Non-operation Operation 1-14
Auto on/off headlights Sensitivity of the operation of the auto on/
off headlights
Low/Normal/High/Very high Normal 3-28
Page 23

Front seats........................................................... 1-2
Manual seat ........................................................ 1-3
Power seat (if equipped)...................................... 1-4
Head restraint adjustment.................................... 1-5
Seat heater (if equipped) .................................... 1-6
Rear seats............................................................ 1-7
Reclining the seatback (Outback)......................... 1-8
Folding down the rear seatback........................... 1-8
Head restraint adjustment................................... 1-10
Armrest ............................................................... 1-12
Seatbelts ............................................................. 1-12
Seatbelt safety tips............................................. 1-12
Emergency Locking Retractor (ELR) ................... 1-13
Automatic/Emergency Locking Retractor
(A/ELR) ............................................................ 1-13
Seatbelt warning light and chime ........................ 1-14
Fastening the seatbelt ........................................ 1-15
Seatbelt maintenance ......................................... 1-22
Front seatbelt pretensioners ............................. 1-22
System monitors ................................................ 1-23
System servicing................................................ 1-24
Precautions against vehicle modification............ 1-24
Child restraint systems ..................................... 1-25
Where to place a child restraint system.............. 1-26
Choosing a child restraint system ...................... 1-28
Installing child restraint systems with A/ELR
seatbelt ........................................................... 1-28
Installing a booster seat..................................... 1-31
Installation of child restraint systems by use of
lower and tether anchorages (LATCH) .............. 1-33
Top tether anchorages ....................................... 1-35
*SRS airbag (Supplemental Restraint
System airbag) ................................................ 1-38
Models with SRS airbags and lap/shoulder
restraints for driver, front passenger, and
window-side rear passengers........................... 1-38
SUBARU advanced frontal airbag system ........... 1-43
SRS side airbag and SRS curtain airbag............. 1-53
SRS airbag system monitors.............................. 1-62
SRS airbag system servicing ............................. 1-63
Precautions against vehicle modification............ 1-64
Seat, seatbelt and SRS airbags
1
Page 24
1-2 Seat, seatbelt and SRS airbags
Front seats
WARNING
. Never adjust the seat while driv-
ing to avoid the possibility of
loss of vehicle control and of
personal injury.
. Before adjusting the seat, make
sure the hands and feet of rear
seat passe ngers or cargo are
clear of the adjusting mechanism.
. Seatbelts provide maximum re-
straint when the occupant sits
well back and upright in the seat.
To reduce the risk of sliding
under the seatbelt in a collision,
the front seatbacks should be
always used in the upright position while the vehicle is running.
If the front seatbacks are not
used in the upright position in a
collision, the risk of sliding under
the lap belt and of the lap belt
sliding up over the abdomen will
increase, and both can result in
serious internal injury or death.
. The SRS airbags deploy with
considerab le speed and force.
Occupants who are out of proper
position when the SRS airbag
deploys could suffer very serious
injuries. Because the SRS airbag
needs enough space for deployment, the driver should always
sit upright and well back in the
seat as far from the steering
wheel as practical while still
maintaining full vehicle control
and the front passenger should
move the seat as far back as
possible and sit upright and well
back in the seat.
WARNING
Put children in the rear seat properly
restrained at all times. The SRS
airbag deploys with considerable
speed and force and can injure or
even kill children, especially if they
are not restrained or improperly
restrained. Because children are
lighter and weaker than adults, their
risk of being injured from deployment is greater. Consequently, we
strongly recommend that ALL children (including those in child seats
and those that have outgrown child
restraint devices) sit in the REAR
seat properly restrained at all times
in a child restraint device or in a
seatbelt, whichever is appropriate
for the child’s age, height and
weight.
Secure ALL types of child restraint
devices (including forward facing
child seats) in the REAR seats at
all times.
NEVER INSTALL A REARWARD FACING CHILD SEAT IN THE FRONT
SEAT. DOING SO RISKS SERIOUS
INJURY OR DEATH TO THE CHILD
BY PLACING THE CHILD’S HEAD
TOO CLOSE TO THE SRS AIRBAG.
Page 25
According to accident statistics,
children are safer when properly
restrained in the rear seating positions than in the front seating positions. For instructions and precautions concerning child restraint systems, refer to “Child restraint systems” F1-25.
& Manual seat
! Forward and backward adjustment
Pull the lever upward and slide the seat to
the desired position. Then release the
lever and move the seat back and forth to
make sure that it is securely locked into
place.
! Reclining the seatback
WARNING
To prevent the passenger from sliding under the seatbelt in the event of
a collision, always put the seatback
in the upright position while the
vehicle is in motion. Also, do not
place objects such as cushions
between the passenger and the
seatback. If you do so, the risk of
sliding under the lap belt and of the
lap belt sliding up over the abdomen
will increase, and both can result in
serious internal injury or death.
Pull the reclining lever up and adjust the
seatback to the desired position. Then
release the lever and make sure the
seatback is securely locked into place.
The seatback placed in a reclined position
can spring back upward with force when
the lever is pulled. When operating the
reclining lever to return the seatback, hold
the seatback lightly so that it may be
raised back gradually.
Seat, seatbelt and SRS airbags 1-3
– CONTINUED –
Page 26
1-4 Seat, seatbelt and SRS airbags
! Seat height adjustment (driver’s
seat)
The height of the seat can be adjusted by
moving the seat cushion adjustment lever
up and down.
When the lever is pushed down, the seat
is lowered.
When the lever is pulled up, the seat rises.
& Power seat (if equipped)
WARNING
To prevent the passenger from sliding under the seatbelt in the event of
a collision, always put the seatback
in the upright position while the
vehicle is in motion. Also, do not
place objects such as cushions
between the passenger and the
seatback. If you do so, the risk of
sliding under the lap belt and of the
lap belt sliding up over the abdomen
will increase, and both can result in
serious internal injury or death.
! Driver’s seat
1) Seat position forward/backward con-
trol switch
To adjust the seat forward or backward,
move the control switch forward or
backward. During forward/backward adjustment of the seat, you cannot adjust
Page 27

the seat cushion angle or seat cushion
height.
2) Seat cushion angle control switch
To adjust the seat cushion angle, pull up
or push down the front end of the control
switch.
3) Seatback angle (reclining) control
switch
To adjust the angle of the seatback,
move the control switch.
4) Seat height control switch
To adjust the seat height, pull up or push
down the rear end of the control switch.
5) Lumbar support control switch
To increase lower back support, push the
front side of the switch. To decrease
lower back support, push the rear side of
the switch.
! Front passenger’s seat (if
equipped)
1) Seat position forward/backward con-
trol switch
To adjust the seat forward or backward,
move the control switch forward or
backward.
2) Seatback angle (reclining) control
switch
To adjust the angle of the seatback,
move the control switch.
& Head restraint adjustment
1) Head restraint
2) Release button
Both the driver ’ s seat and the front
passenger’s seat are equipped with head
restraints.
The head restraint should be adjusted so
that the center of the head restraint is
closest to the top of the occupant’s ears.
To raise:
Pull the head restraint up.
To lower:
Push the head restraint down while
pressing the release button on the top of
the seatback.
Seat, seatbelt and SRS airbags 1-5
– CONTINUED –
Page 28
1-6 Seat, seatbelt and SRS airbags
To remove:
While pressing the release button, pull out
the head restraint.
To install:
Install the head restraint into the holes that
are located on the top of the seatback until
the head restraint locks.
WARNING
. Never drive the vehicle with the
head restraints removed because
they are designed to reduce the
risk of serious neck injury in the
event that the vehicle is struck
from the rear. Therefore, when
you remove the head restraints,
you must reinstall all head restraints to protect vehicle occupants.
. All occupants, including the dri-
ver, should not operate a vehicle
or sit in a vehicle’s seat until the
head restraints are placed in their
proper positions in order to minimize the risk of neck injury in the
event of a collision.
Seat heater (if equipped)
1) HIGH – Rapid heating
2) LOW – Normal heating
3) OFF – Off
A) Left-hand side
B) Right-hand side
The seat heater operates when the ignition switch is either in the “Acc” or “ON”
position.
To turn on the seat heater, press the
“LOW” or “HIGH” position on the switch,
as desired, depending on the temperature.
Selecting the “HIGH” position will cause
the seat to heat up quicker.
To turn off the seat heater, slightly press
the opposite side of the current position.
The indicator located on the switch illuminates when the seat heater is in operation.
When the vehicle’s interior is warmed
enough or before you leave the vehicle,
be sure to turn the switch off.
CAUTION
. There is a possibility that people
with delicate skin may suffer
slight burns even at low temperatures if they use the seat heater
for a long period of time. When
using the heater, always be sure
to warn the persons concerned.
Page 29
. Do not put anything on the seat
which insulates against heat,
such as a blanket, cushion, or
similar items. This may cause the
seat heater to overheat.
NOTE
Use of the seat heater for a long period
of time while the engine is not running
can cause battery discharge.
Rear seats
WARNING
Seatbelts provide maximum restraint when the occupant sits well
back and upright in the seat. Do not
put cushions or any other materials
between occupants and seatbacks
or seat cushions. If you do so, the
risk of sliding under the lap belt and
of the lap belt sliding up over the
abdomen will increase, and both can
result in serious internal injury or
death.
WARNING
Never stack luggage or other cargo
higher than the top of the seatback
because it could tumble forward and
injure passengers in the event of a
sudden stop or accident.
Seat, seatbelt and SRS airbags 1-7
– CONTINUED –
Page 30
1-8 Seat, seatbelt and SRS airbags
& Reclining the seatback (Out-
back)
WARNING
To prevent the passenger from sliding under the seatbelt in the event of
a collision, always put the seatback
in the upright position while the
vehicle is in motion.
CAUTION
If the vehicle is equipped with a
cargo area cover, observe the following precautions.
. Be careful not to pinch your hand
between the headrest and the
cargo area cover when you recline the rear seat.
. Move the front cover of the cargo
area cover backward so that the
cover is not damaged by the
reclined seatback. Refer to “Cargo area cover” F6-15.
Pull the lever and adjust the seatback to
the desired position.
Then release the lever and make sure the
seatback is securely locked into place.
& Folding down the rear seat-
back
WARNING
. After returning the rear seat to its
original position, be certain to
place all of the seatbelts and the
tab attached to the seat cushion
above the seat cushion. And
make certain that the shoulder
belts are fully visible.
. Never allow passengers to ride
on the folded rear seatback or in
the cargo area or trunk. Doing so
may result in serious injury or
death.
. Secure all objects and especially
long items properly to prevent
them from being thrown around
inside the vehicle and causing
serious injury during a sudden
stop, a sudden steering maneuver or a rapid acceleration.
Page 31
CAUTION
The rear seatback may fold down
quickly due to the internal spring.
Hold the seatback while pulling the
release lever to slow it down.
! Legacy
CAUTION
Before folding down the rear seats,
make sure that no one is sitting and
nothing is placed on the rear seats.
Otherwise, the seatback may fold
down suddenly and an unexpected
accident may occur.
To fold down the seatback, perform the
following procedure.
1. Open the trunk lid. Refer to “Opening
the trunk lid (Legacy)” F2-10 or “To open
the trunk lid from inside” F2-24.
1) Release lever
2. Pull the release lever on the side that
you want to fold down.
3. Fold the seatback down.
To return the seatback to its original
position, raise the seatback until it locks
into place and make sure that it is securely
locked.
! Outback
Unlock the seatback by pulling the release
lever and then fold the seatback down.
To return the seatback to its original
position, raise the seatback until it locks
into place and make sure that it is securely
locked.
Seat, seatbelt and SRS airbags 1-9
– CONTINUED –
Page 32
1-10 Seat, seatbelt and SRS airbags
& Head restraint adjustment
Both the rear window side seats and the
rear center seat are equipped with head
restraints.
WARNING
. Never drive the vehicle with the
head restraints removed because
they are designed to reduce the
risk of serious neck injury in the
event that the vehicle is struck
from the rear. Therefore, when
you remove the head restraints,
you must reinstall all head restraints to protect vehicle occupants.
. All occupants, including the dri-
ver, should not operate a vehicle
or sit in a vehicle’s seat until the
head restraints are placed in their
proper positions in order to minimize the risk of neck injury in the
event of a collision.
! Rear window side seating position
1) Head restraint
2) Release button
To raise:
Pull the head restraint up.
To lower:
Push the head restraint down while
pressing the release button on the top of
the seatback.
To remove:
While pressing the release button, pull out
the head restraint.
To install:
Install the head restraint into the holes that
are located on the top of the seatback until
the head restraint locks.
The head restraint should be adjusted so
that the center of the head restraint is
closest to the top of the occupant’s ears.
When the seats are not occupied, lower
the head restraints to improve rearward
visibility.
NOTE
For Legacy, it is not possible to remove
or install the head restraint without
folding down the rear seatback. Fold
down the rear seatback and then
remove or install the head restraint.
Page 33
! Rear center seating position
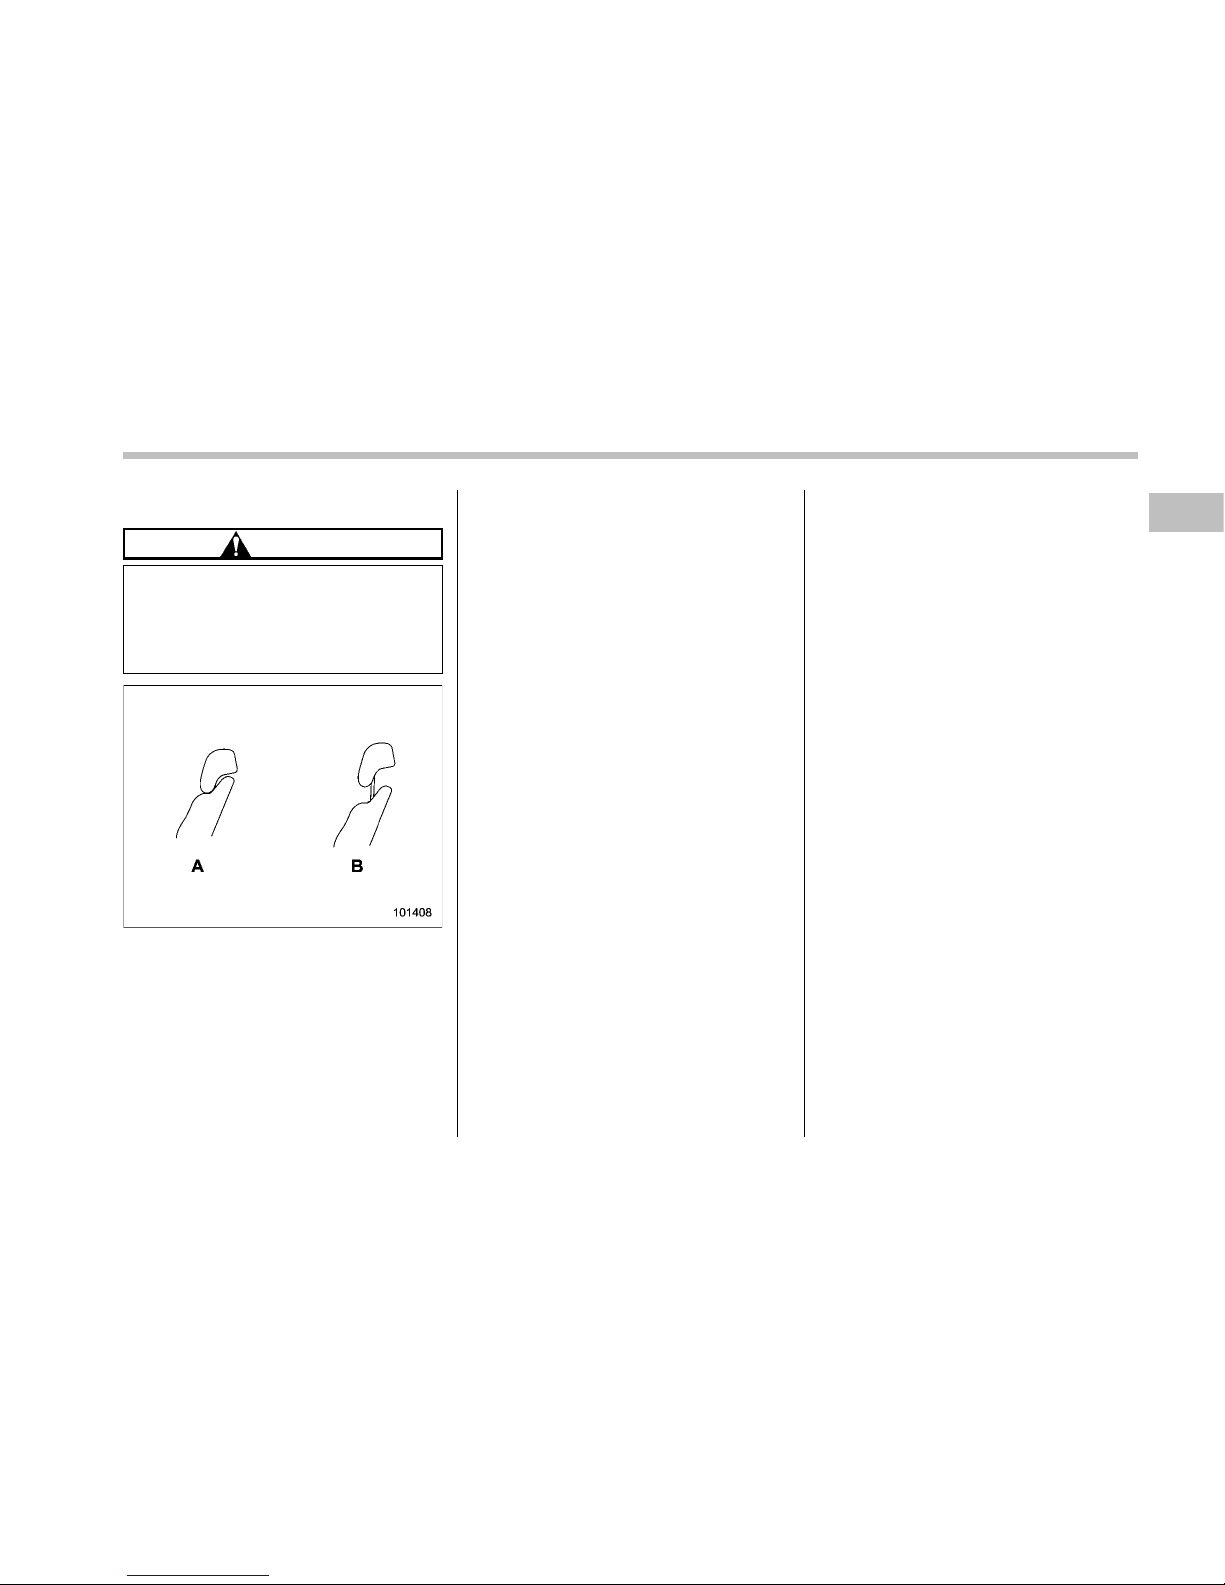
CAUTION
The head restraint is not intended to
be used at the lowest position.
Before sitting on the seat, raise the
head restraint to the extended position.
A) When not used (retracted position)
B) When used (extended position)
1) Head restraint
2) Release button
To raise:
Pull the head restraint up.
To lower:
Push the head restraint down while
pressing the release button on the top of
the seatback.
To remove:
While pressing the release button, pull out
the head restraint.
To install:
Install the head restraint into the holes that
are located on the top of the seatback until
the head restraint locks.
When the rear-center seating position is
occupied, raise the head restraint to the
extended position. When the rear center
seating position is not occupied, lower the
head restraint to improve rearward visibility.
Seat, seatbelt and SRS airbags 1-11
Page 34
1-12 Seat, seatbelt and SRS airbags
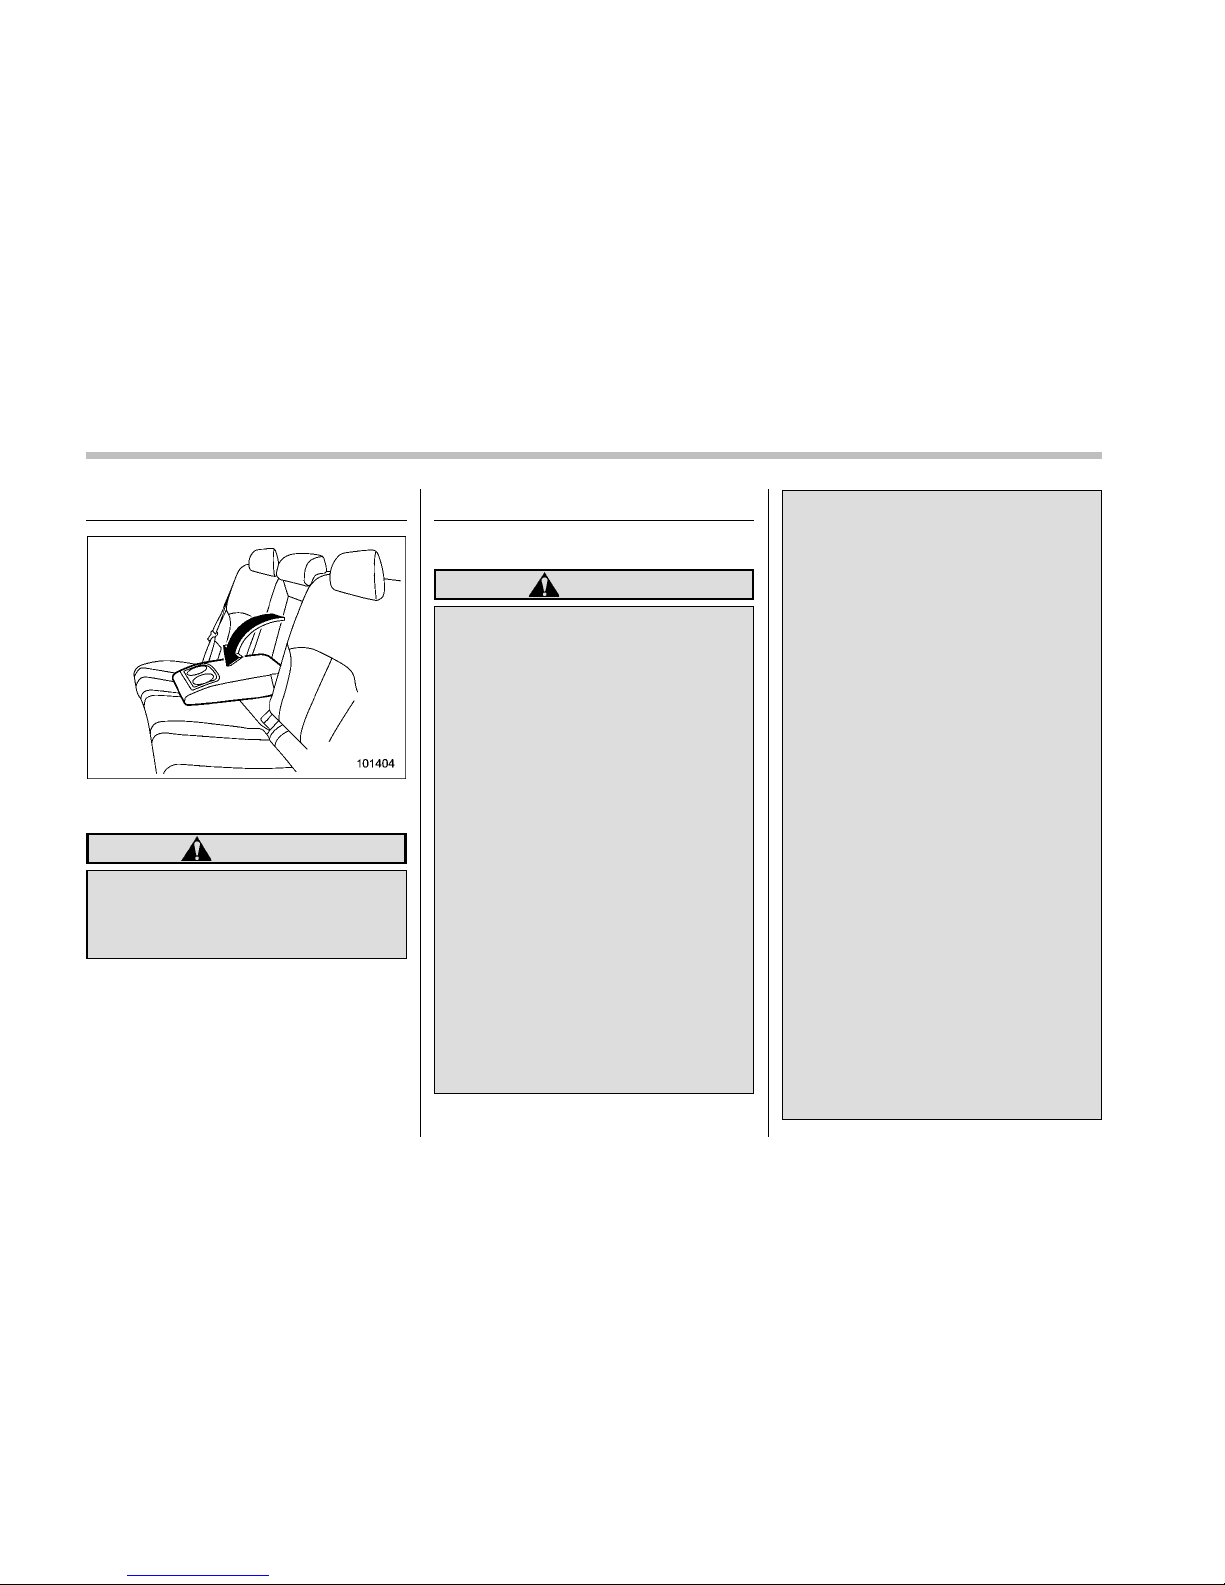
Armrest
To lower the armrest, pull on the top edge
of the armrest.
WARNING
To avoid the possibility of serious
injury, passengers must never be
allowed to sit on the center armrest
while the vehicle is in motion.
Seatbelts
& Seatbelt safety tips
WARNING
. All persons in the vehicle should
fasten their seatbelts BEFORE
the vehicle starts to move. Otherwise, the possibility of serious
injury becomes greater in the
event of a sudden stop or accident.
. All belts should fit snugly in order
to provide full restraint. Loose
fitting belts are not as effective in
preventing or reducing injury.
. Each seatbelt is designed to
support only one person. Never
use a single belt for two or more
persons – even children. Otherwise, in an acc ident, serious
injury or death could result.
. Replace all seatbelt assemblies
including retractors and attaching hardware worn by occupants
of a vehicle that has been in a
serious accident. The entire assembly should be replaced even
if damage is not obvious.
. Put children in the rear seat
properly restrained at all times.
The SRS airbag deploys with
considerable speed and force
and can injure or even kill children, especially if they are not
restrained or improperly restrained. Because children are
lighter and weaker than adults,
their risk of being injured from
deployment is greater. Consequently, we strongly recommend
that ALL children (including
those in child seats and those
that have outgrown child restraint devices) sit in the REAR
seat properly restrained at all
times in a child restraint device
or in a seatbelt, whichever is
appropriate for the child’s height
and weight.
Secure ALL types of child restraint devices (including forward facing child seats) in the
REAR seats at all times.
NEVER INSTALL A REARWARD
FACING CHILD SEAT IN THE
FRONT SEAT. DOING SO RISKS
SERIOUS INJURY OR DEATH TO
THE CHILD BY PLACING THE
CHILD’S HEAD TOO CLOSE TO
THE SRS AIRBAG.
Page 35
According to accident statistics,
children are safer when properly
restrained in the rear seating
positions than in the front seating positions. For instructions
and precautions concerning the
child restraint system, refer to
“Child restraint systems” F1-25.
Your vehicle is equipped with a crash
sensing and diagnostic module, which will
record the use of the seatbelt by the front
passenger when any of the SRS frontal,
side and curtain airbags deploys.
! Infants or small children
Use a child restraint system that is
suitable for your vehicle. Refer to “Child
restraint systems” F1-25.
! Children
If a child is too big for a child restraint
system, the child should sit in the rear seat
and be restrained using the seatbelts.
According to accident statistics, children
are safer when properly restrained in the
rear seating positions than in the front
seating positions. Never allow a child to
stand up or kneel on the seat.
If the shoulder portion of the belt crosses
the face or neck, move the child closer to
the belt buckle to help provide a good
shoulder belt fit. Care must be taken to
securely place the lap belt as low as
possible on the hips and not on the child’s
waist. If the shoulder portion of the belt
cannot be properly positioned, a child
restraint system should be used. Never
place the shoulder belt under the child’s
arm or behind the child’s back.
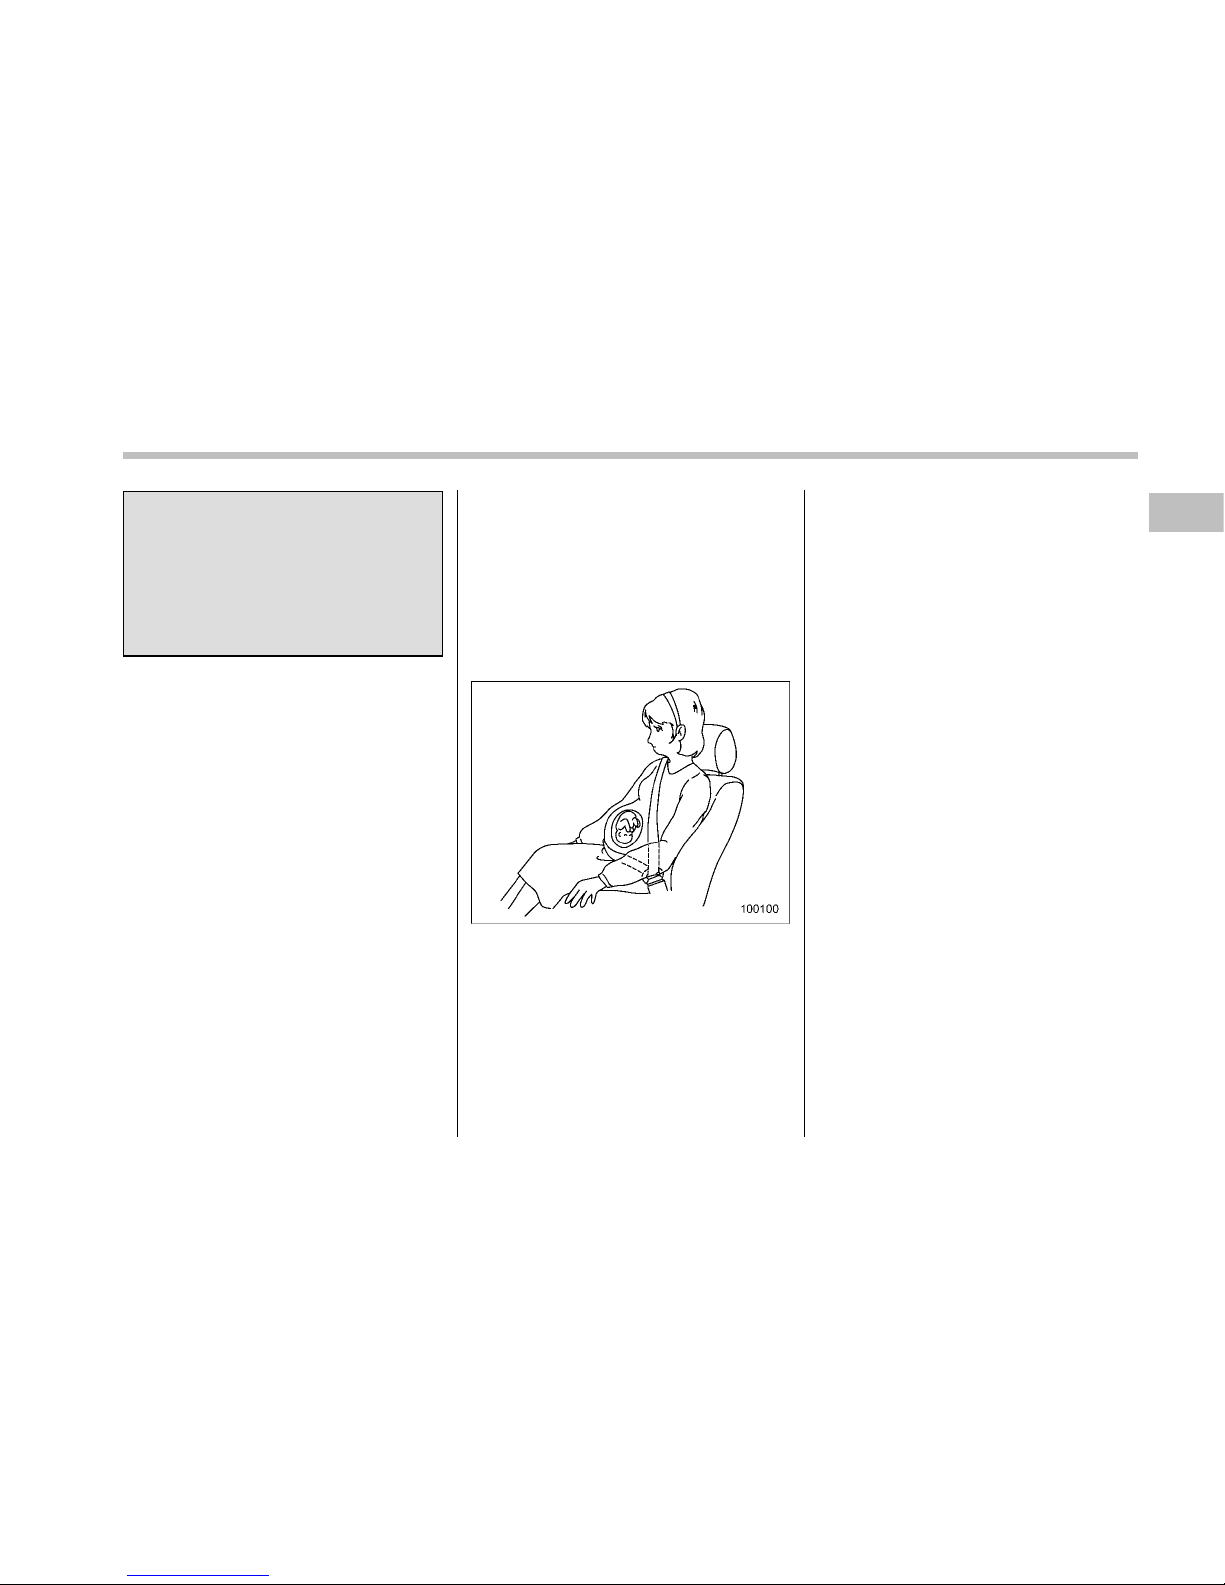
! Expectant mothers
Expectant mothers also need to use the
seatbelts. They should consult their doctor
for specific recommendations. The lap belt
should be worn securely and as low as
possible over the hips, not over the waist.
& Emergency Locking Retrac-
tor (ELR)
The driver’s seatbelt has an Emergency
Locking Retractor (ELR).
The emergency locking retractor allows
normal body movement but the retractor
locks automatically during a sudden stop,
impact or if you pull the belt very quickly
out of the retractor.
& Automatic/Emergency Lock-
ing Retractor (A/ELR)
Each passenger’s seatbelt has an Automatic/Emergency Locking Retractor (A/
ELR). The Automatic/Emergency Locking
Retractor normally functions as an Emergency Locking Retractor (ELR). The A/
ELR has an additional locking mode
“Automatic Locking Retractor (ALR)
mode” intended to secure a child restraint
system. When the seatbelt is once drawn
out completely and is then retracted even
slightly, the retractor locks the seatbelt in
that position and the seatbelt cannot be
extended. As the belt is rewinding, clicks
will be heard which indicate the retractor
functions as ALR. When the seatbelt is
retracted fully, ALR mode is canceled.
When securing a child restraint system on
the passengers’ seats, the seatbelt must
be changed over to the Automatic Locking
Seat, seatbelt and SRS airbags 1-13
– CONTINUED –
Page 36
1-14 Seat, seatbelt and SRS airbags
Retractor (ALR) mode.
When the child restraint system is re-
moved, make sure that the seatbelt
retracts fully and the retractor returned to
the Emergency Locking Retractor (ELR)
mode.
For instructions on how to convert the
retractor to the ALR mode and restore it to
the ELR mode, refer to “Installing child
restraint systems with A/ELR seatbelt”
F1-28.
& Seatbelt warning light
and chime
NOTE
If your seatbelt warning device does
not operate as described in the following, it may be out of order. Have the
device inspected and, if necessary,
repaired by the nearest SUBARU dealer.
Your vehicle is equipped with a seatbelt
warning device at the driver ’s and front
passenger’s seat, as required by current
safety standards.
With the ignition switch turned to the “ON”
position, this device reminds the driver
and front passenger to fasten their seatbelts by the warning lights in the locations
indicated in the following illustration and a
chime.
Driver’s warning light
Front passenger’s warning light
! Operation
If the driver and/or front passenger have/
has not yet fastened the seatbelt(s) when
the ignition switch is turned to the “ON”
position, the seatbelt warning light(s) will
flash for 6 seconds, to warn that the
seatbelt(s) is/are unfastened. If the driver’s seatbelt is not fastened, a chime will
also sound simultaneously.
NOTE
. If the driver’s and/or front passen-
ger’s seatbelt(s) are/is still not fastened
6 seconds later, the seatbelt warning
device operates as follows according
to the vehicle speed.
– At speeds lower than approximately 9 mph (15 km/h)
The warning light(s) for unfastened
seatbelt(s) will alternat e between
steady illumination and flashing at
15-second intervals. The chime will
not sound.
– At speeds higher than approximately 9 mph (15 km/h)
The warning light(s) for unfastened
seatbelt(s) will alternat e between
flashing and steady illumination at
15-second intervals and the chime
will sound while the warning light(s)
is/are flashing.
. It is possible to cancel the warning
operation that follows the 6-second
warning after turning ON the ignition
switch. When the ignition switch is
Page 37
turned ON next time, however, the
complete sequence of the warning
operation resumes. For further details
about canceling the warning operation,
please contact your SUBARU dealer.
If the re is no passenger on the front
passenger’s seat, the seatbelt warning
device for the front passenger’s seat will
be deactivated. The front passenger’s
occupant detection system monitors
whether or not there is a passenger on
the front passenger’s seat.
Observe the following precautions. Failure
to do so may prevent the device from
functioning correctly or cause the device
to fail.
. Do not install any accessory such as a
table or TV onto the seatback.
. Do not store a heavy load in the
seatback pocket.
. Do not allow the rear seat occupant to
place his/her hands or legs on the front
passenger’s seatback, or allow him/her to
pull the seatback.
. Do not use front seats with their backward-forward position and seatback not
being locked into place securely. If any of
them are not locked securely, adjust them
again. For the adjusting procedure, refer
to “Manual seat” F1-3 (models equipped
with manual seats only).
If the seatbelt warning device for the front
passenger’s seat does not function correctly (e.g., it is activated even when the
front passenger’s seat is empty or it is
deactivated even when the front passenger has not fastened his/her seatbelt),
take the following actions.
. Ensure that no article is placed on the
seat other than a child restraint system
and the child occupant.
. Ensure that there is no article left in the
seatback pocket.
. Ensure that the backward-forward position and seatback of front passenger’s
seat are locked into place securely by
moving the seat back and forth. (Models
equipped with manual seats only)
& Fastening the seatbelt
WARNING
. Never use a belt that is twisted or
reversed. In an accident, this can
increase the risk or severity of
injury.
. Keep the lap belt as low as
possible on your hips. In a collision, this spreads the force of the
lap belt over stronger hip bones
instead of across the weak er
abdomen.
. Seatbelts provide maximum re-
straint when the occupant sits
well back and upright in the seat.
To reduce the risk of sliding
under the seatbelt in a collision,
the front seatbacks should be
always used in the upright position while the vehicle is running.
If the front seatbacks are not
used in the upright position in a
collision, the risk of sliding under
the lap belt and of the lap belt
sliding up over the abdomen will
increase, and both can result in
serious internal injury or death.
. Do not put cushions or any other
materials between occupants
and seatbacks or seat cushions.
If you do so, the risk of sliding
under the lap belt and of the lap
belt sliding up over the abdomen
will increase, and both can result
in serious internal injury or
death.
Seat, seatbelt and SRS airbags 1-15
– CONTINUED –
Page 38
1-16 Seat, seatbelt and SRS airbags
WARNING
Never place the shoulder belt under
the arm or behind the back. If an
accident occurs, this can increase
the risk or severity of injury.
CAUTION
Metallic parts of the seatbelt can
become very hot in a vehicle that
has been closed up in sunny weather; they could burn an occupant. Do
not touch such hot parts until they
cool.
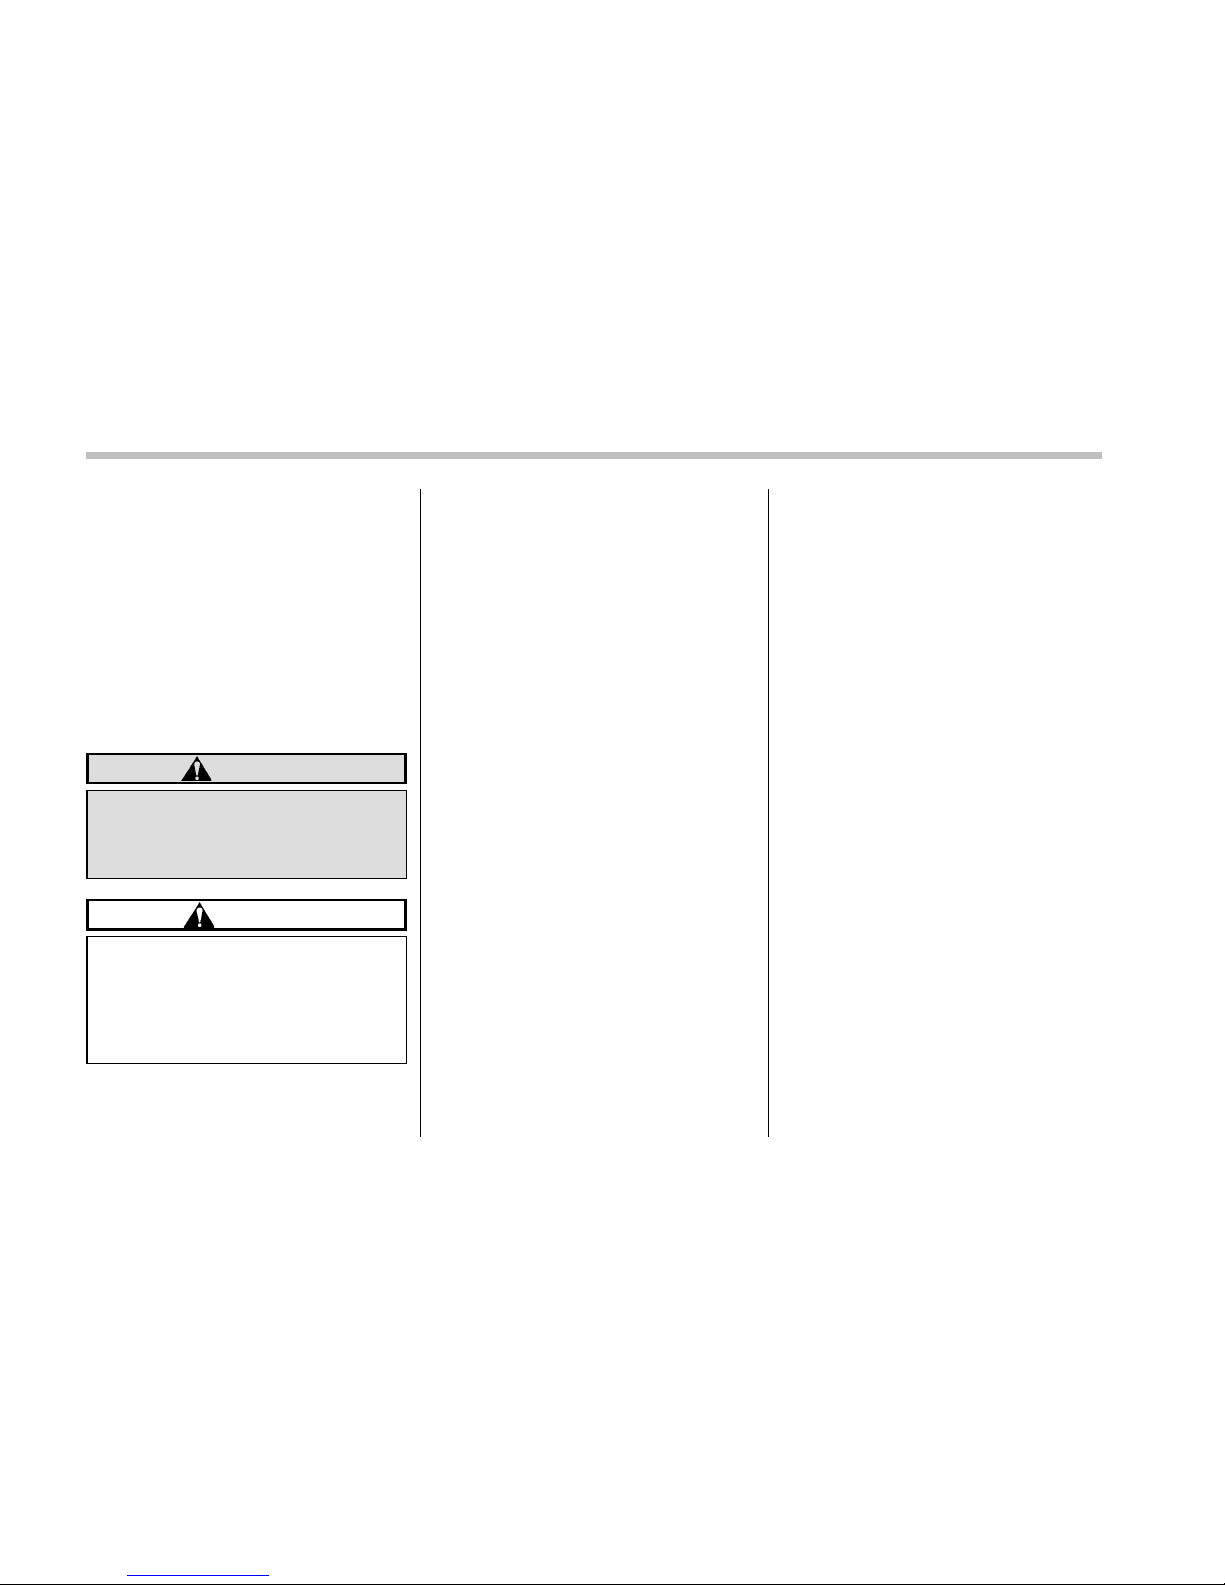
! Front seatbelts
1. Adjust the seat position:
Driver’s seat: Adjust the seatback to the
upright position. Move the seat as far from
the steering wheel as practical while still
maintaining full vehicle control.
Front passenger’s seat: Adjust the seatback to the upright position. Move the seat
as far back as possible.
2. Sit well back in the seat.
3. Pick up the tongue plate and pull the
belt out slowly. Do not let it get twisted. If
the belt stops before reaching the buckle,
return the belt slightly and pull it out more
slowly. If the belt still cannot be unlocked,
let the belt retract slightly after giving it a
strong pull, then pull it out slowly again.
4. Insert the tongue plate into the buckle
until you hear a click.
5. To make the lap part tight, pull up on
the shoulder belt.
6. Place the lap belt as low as possible
on your hips, not on your waist.
Page 39
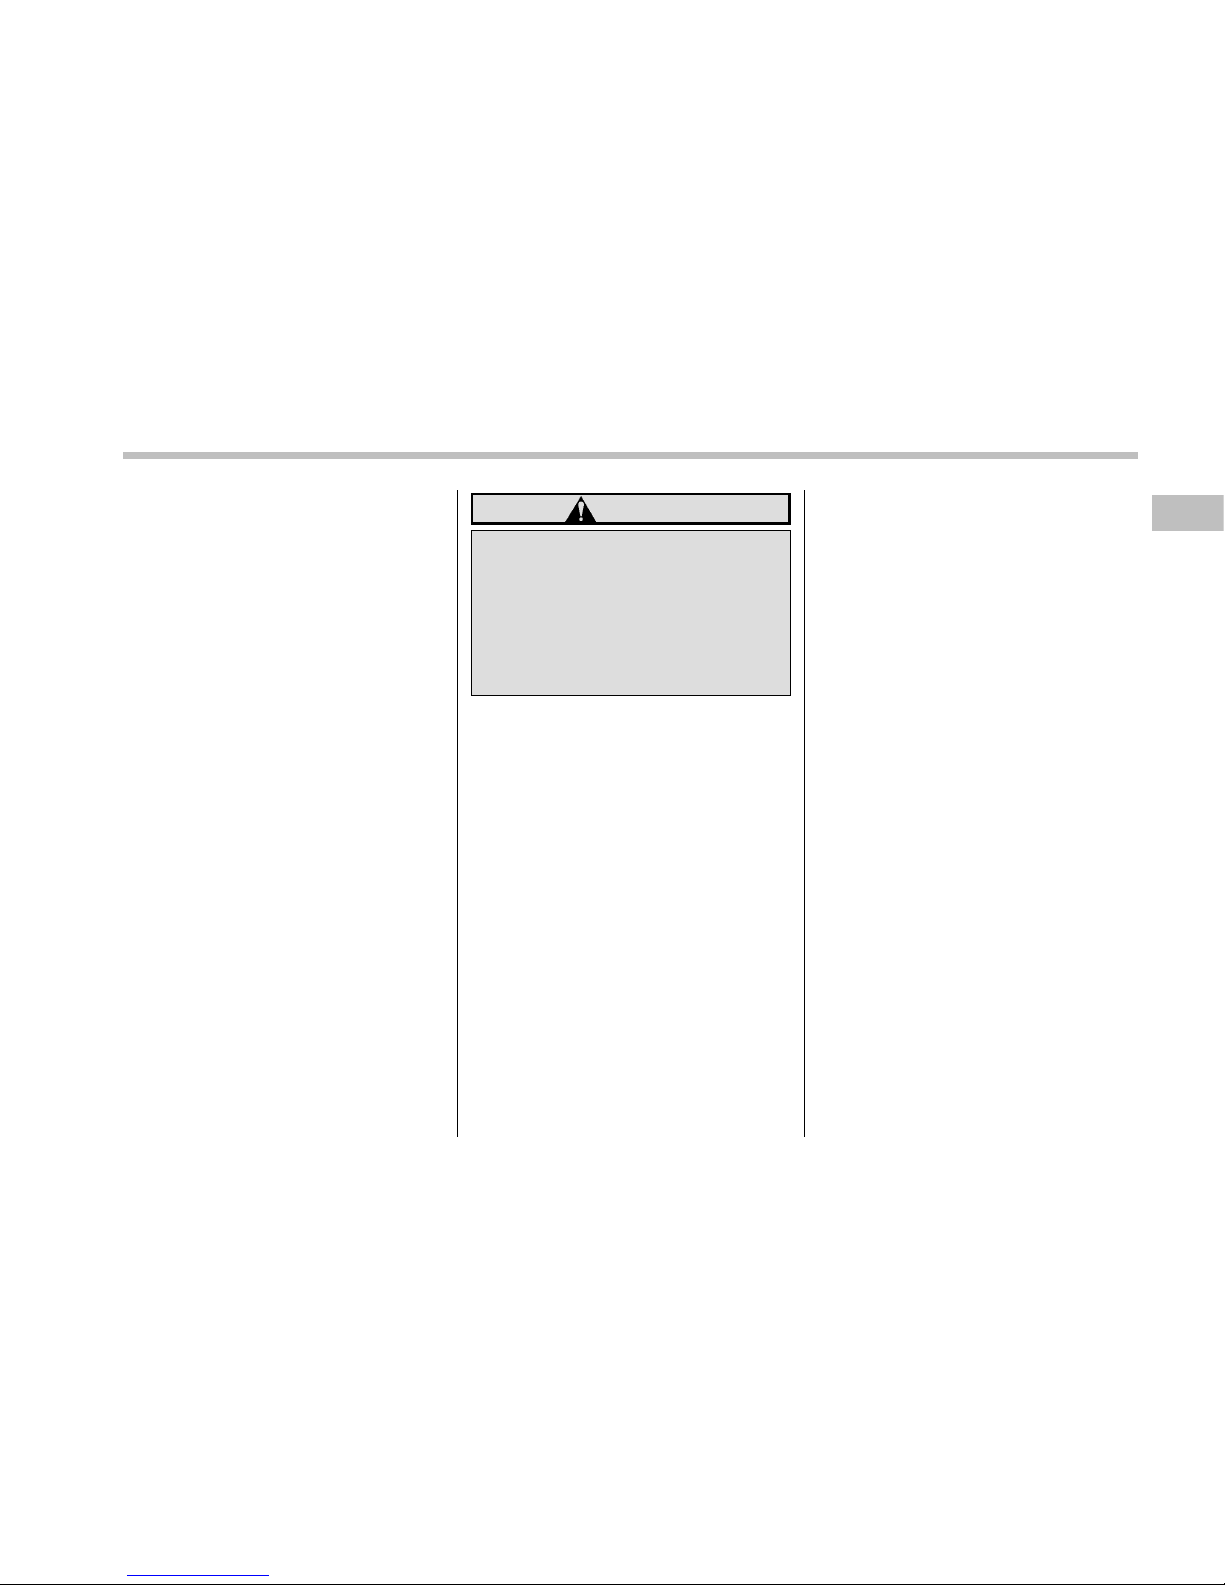
! Adjusting the front seat shoulder
belt anchor height
The shoulder belt anchor height should be
adjusted to the position best suited for the
driver/front passenger. Always adjust the
anchor height so that the shoulder belt
passes over the middle of the shoulder
without touching the neck.
To raise:
Slide the anchor up.
To lower:
Push the release button and slide the
anchor down.
Pull down the anchor to make sure that it
is locked in place.
WARNING
When wearing the seatbelts, make
sure the shoulder portion of the
webbing does not pass over your
neck. If it does, adjust the seatbelt
anchor to a lower position. Placing
the shoulder belt over the neck may
result in neck injury during sudden
braking or in a collision.
! Unfastening the seatbelt
Push the button on the buckle.
Before closing the door, make sure that
the belts are retracted properly to avoid
catching the belt webbing in the door.
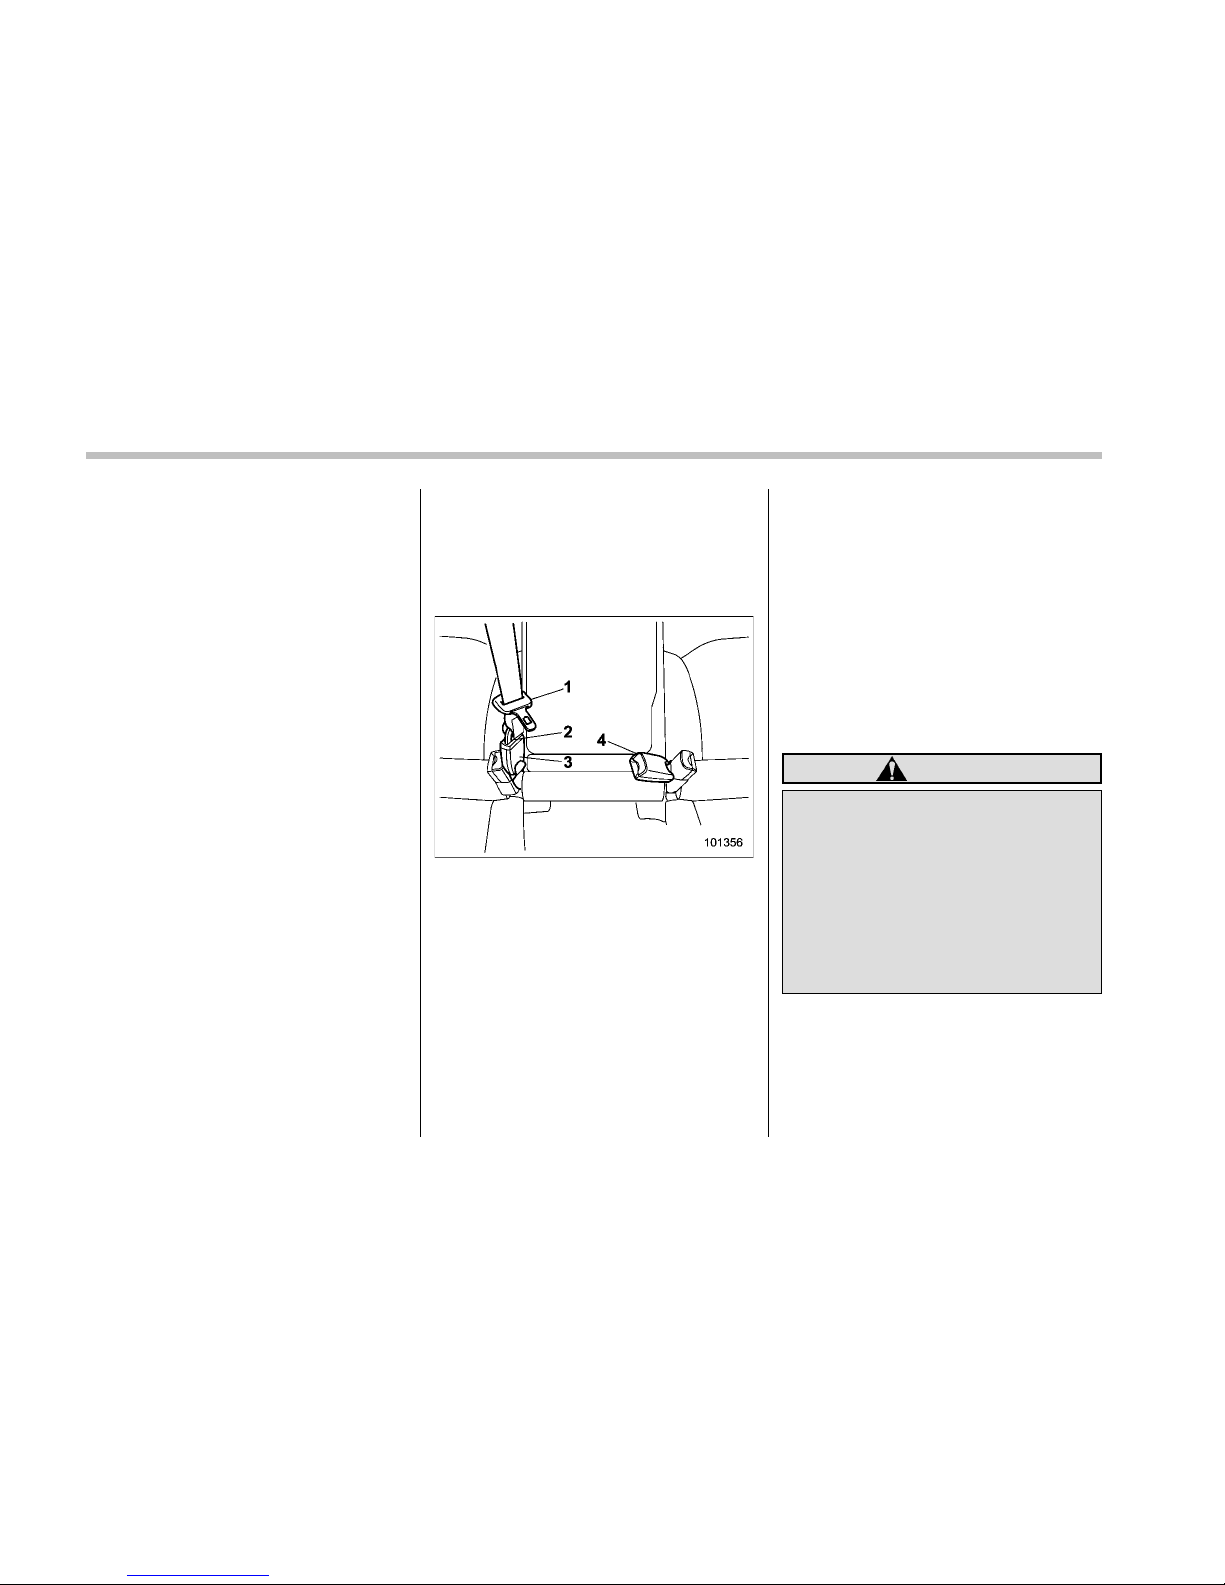
! Rear seatbelts (except rear center
seatbelt on Outback)
1. Sit well back in the seat.
2. Pick up the tongue plate and pull the
belt out slowly. Do not let it get twisted. If
the belt stops before reaching the buckle,
return the belt slightly and pull it out more
slowly. If the belt still cannot be unlocked,
let the belt retract slightly after giving a
strong pull on it, then pull it out slowly
again.
3. Insert the tongue plate into the buckle
until you hear a click.
Seat, seatbelt and SRS airbags 1-17
– CONTINUED –
Page 40
1-18 Seat, seatbelt and SRS airbags
4. To make the lap part tight, pull up on
the shoulder belt.
5. Place the lap belt as low as possible
on your hips, not on your waist.
! Unfastening the seatbelt
Push the button on the buckle.
Before closing the door, make sure that
the belts are retracted properly to avoid
catching the belt webbing in the door.
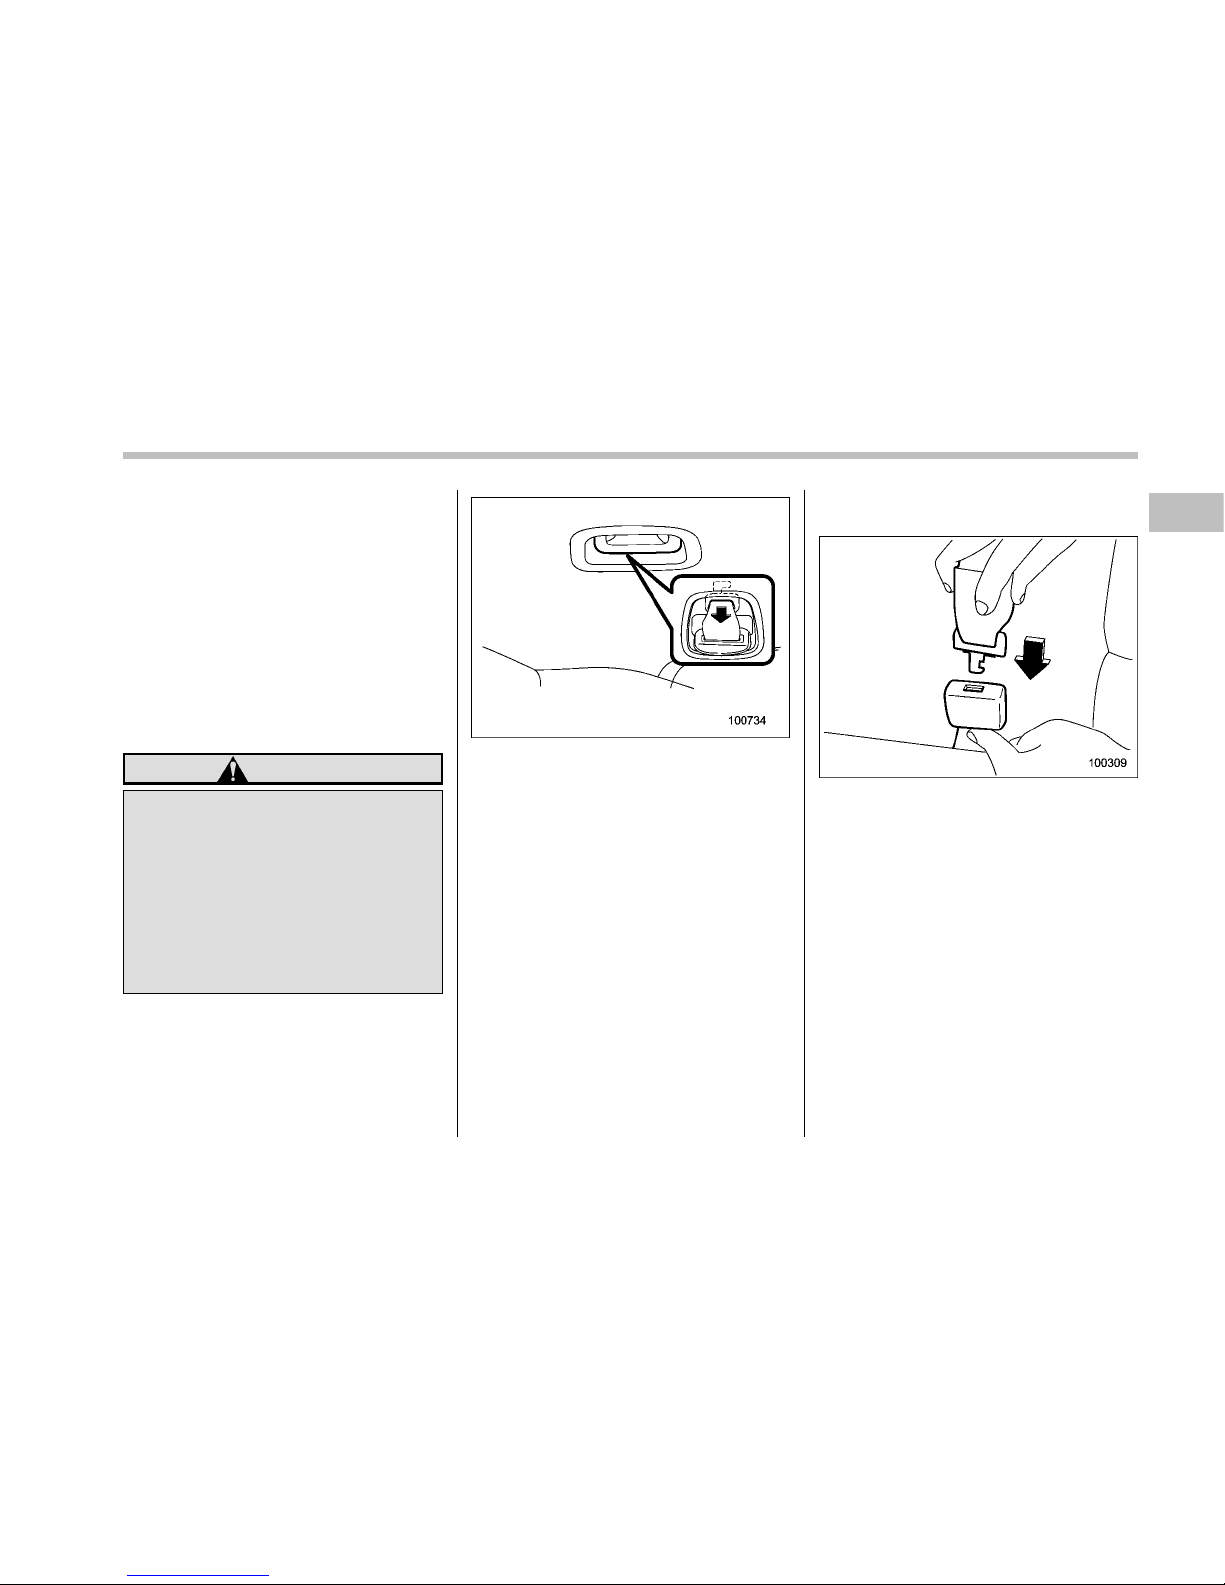
! Rear center seatbelt on Outback
1) Center seatbelt tongue plate
2) Connector (tongue)
3) Connector (buckle)
4) Center seatbelt buckle
WARNING
Fastening the seatbelt with the webbing twisted can increase the risk or
severity of injury in an accident.
When fastening the belt after it is
pulled out from the retractor, especially when inserting the connector’s tongue plate into the mating
buckle (on right-hand side), always
check that the webbing is not
twisted.
Page 41
WARNING
Be sure to fasten both tongue plates
to the respective buckles. If the
seatbelt is used only as a shoulder
belt (with the connector’s tongue
plate not fastened to the connector’s buckle on the right-hand side),
it cannot properly restrain the wearer in position in an accident, possibly resulting in serious injury or
death.
Rear center seatbelt is stowed in the
recess of the ceiling.
1. Retrieve the connector (tongue) plate
from the slot in the recess by pulling the
connector (tongue) plate.
2. Pull out the seatbelt slowly from the
retractor.
3. After confirming that the webbing is not
twisted, insert the connector (tongue)
attached at the webbing end into the
buckle on the right-hand side until a click
is heard. If the belt stops before reaching
the buckle, return the belt slightly and pull
it out more slowly. If the belt still cannot be
unlocked, let the belt retract slightly after
giving it a strong pull, then pull it out slowly
again.
Seat, seatbelt and SRS airbags 1-19
– CONTINUED –
Page 42
1-20 Seat, seatbelt and SRS airbags
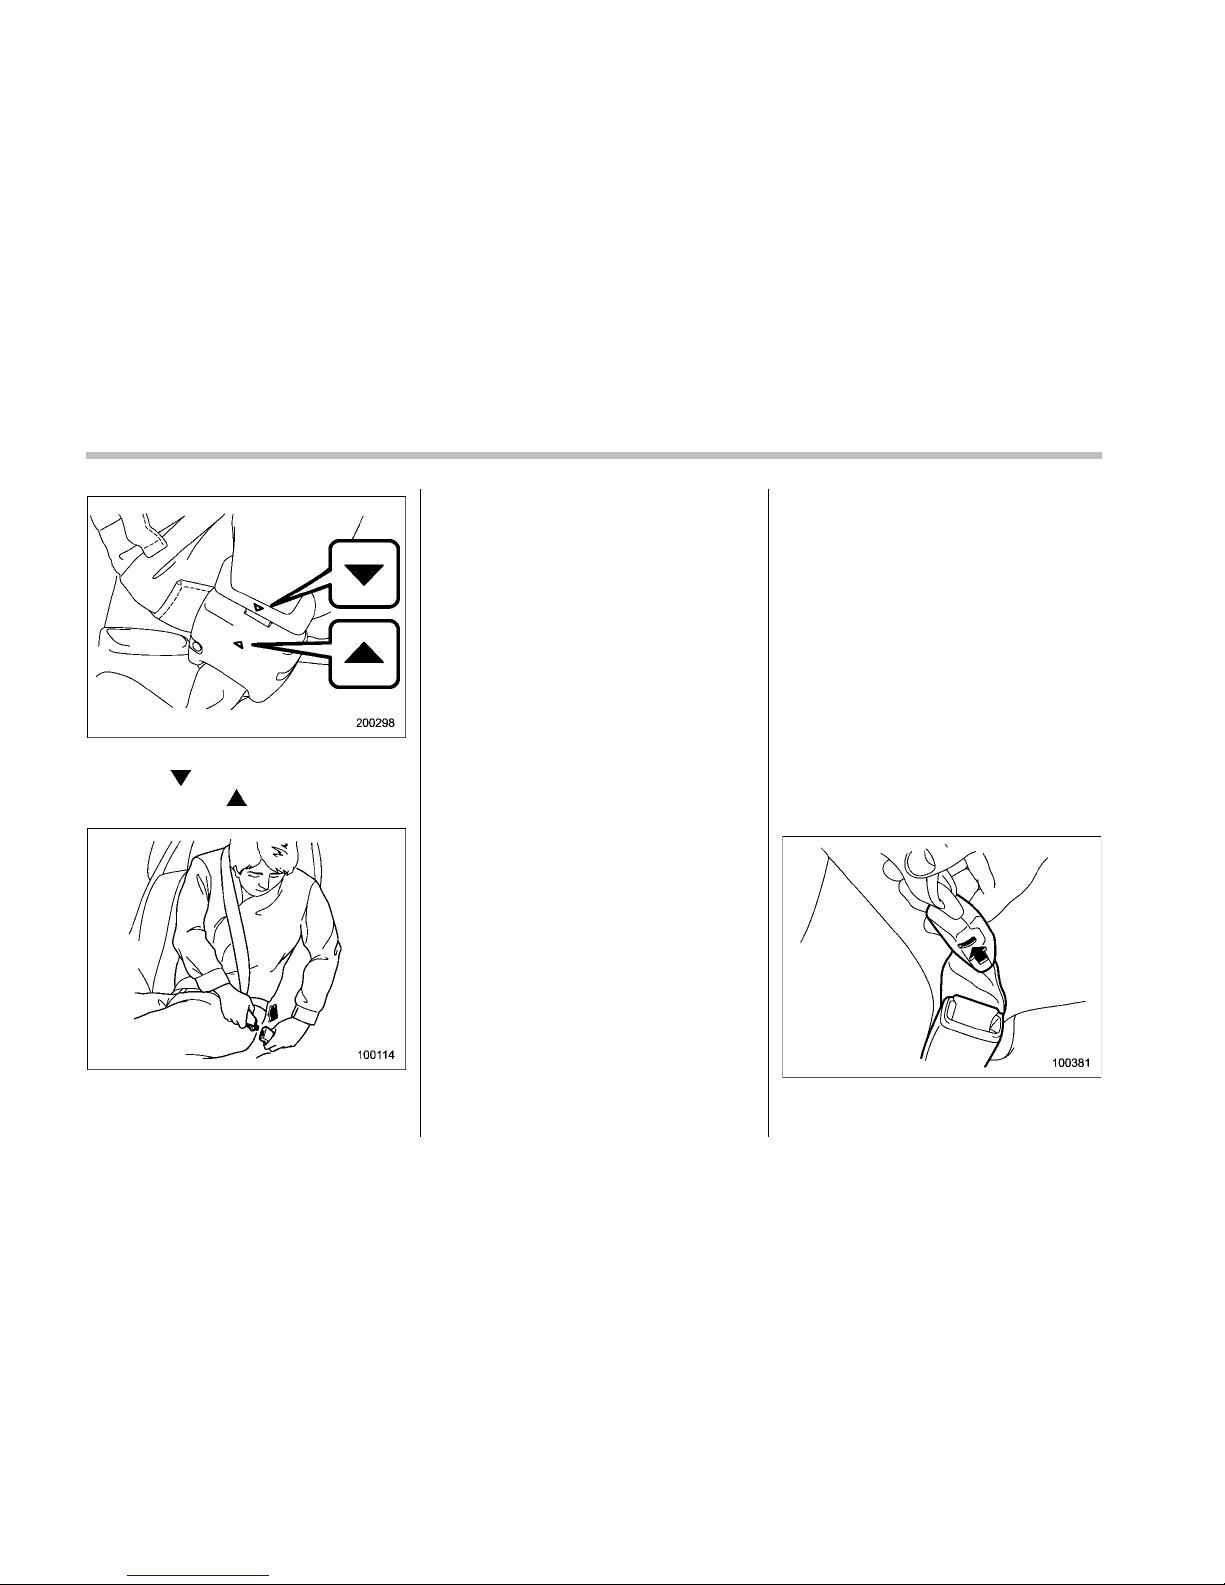
4. After fastening the seatbelt, make sure
that the “
” mark on the connector
(tongue) and the “
” mark on the buckle
face outwards.
5. Insert the center seatbelt tongue plate
into the center seatbelt buckle marked
“CENTER” on the left-hand side until it
clicks.
6. To make the lap part tight, pull up on
the shoulder belt. And place the lap belt as
low as possible on your hips, not on your
waist.
! Unfastening the seatbelt
Push the release button of the center
seatbelt buckle (on the left-hand side) to
unfasten the seatbelt.
Page 43
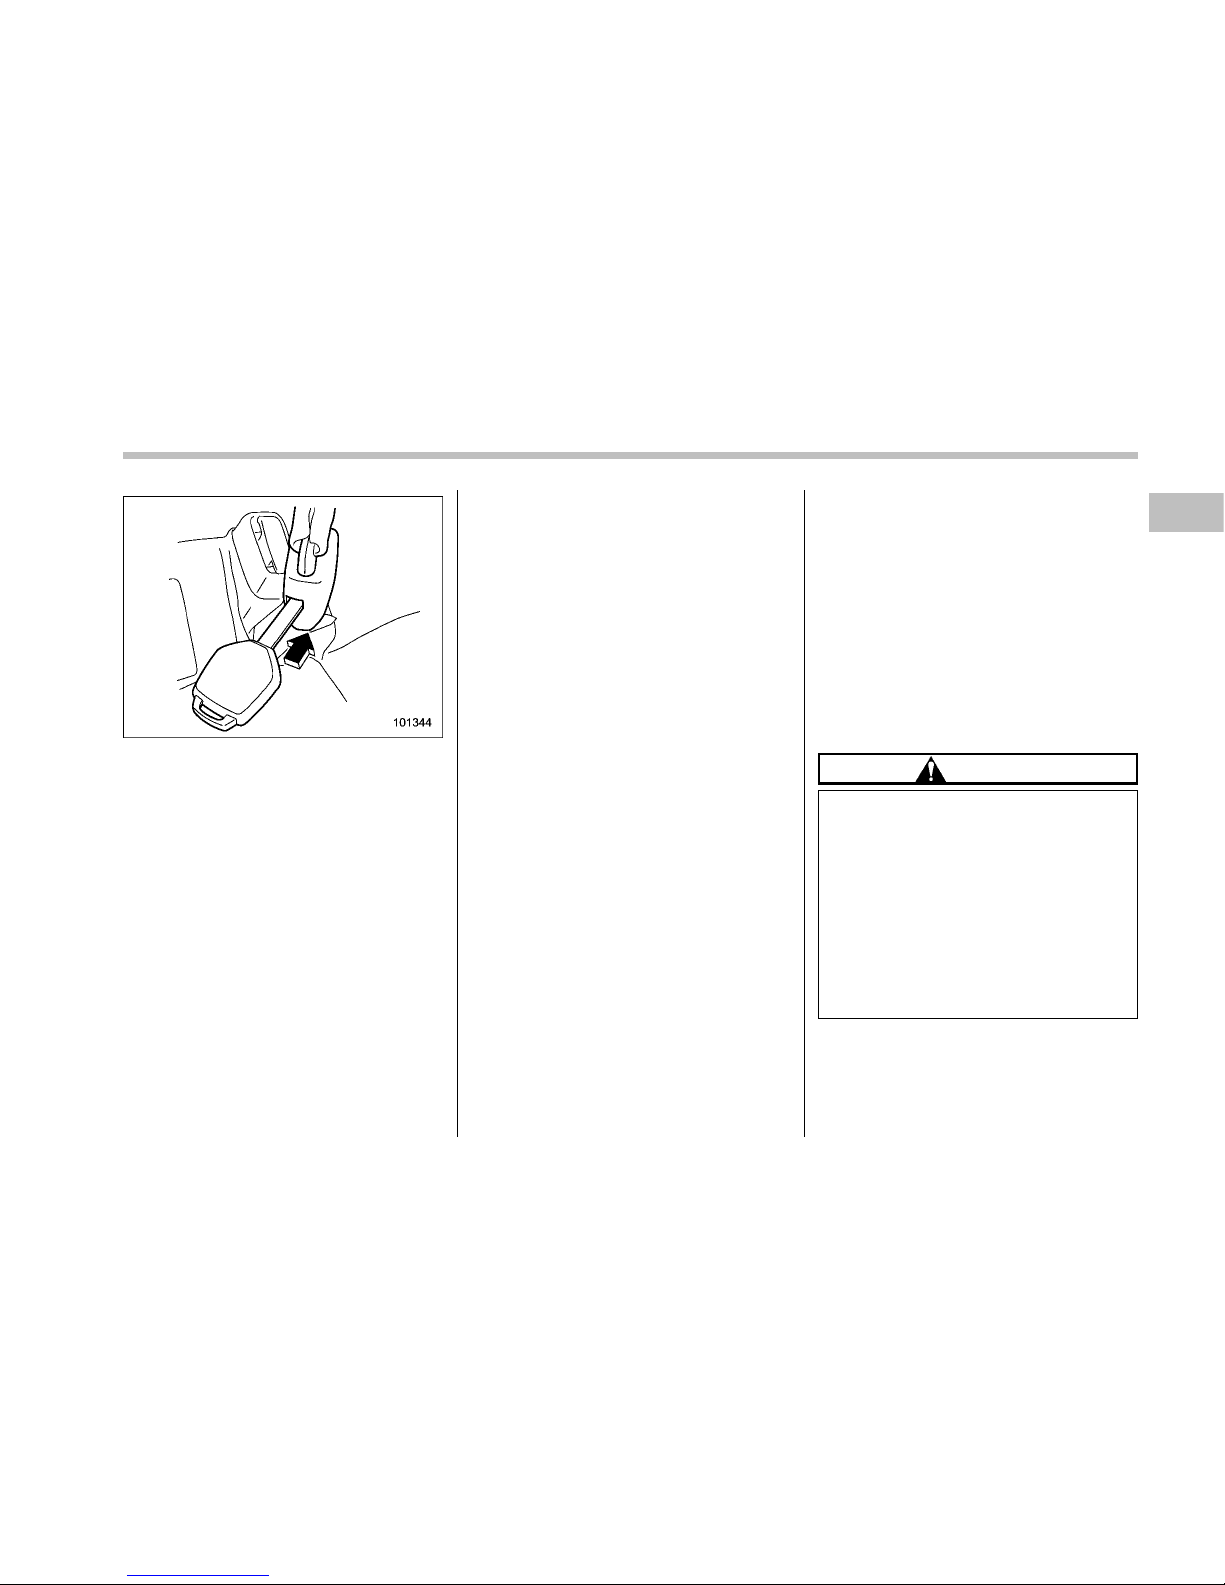
1. Insert a key or other hard pointed
object into the slot in the connector
(buckle) on the right-hand side and push
it in, and the connector (tongue) plate will
disconnect from the buckle.
2. Allow the retractor to roll up the belt.
You should hold the webbing end and
guide it back into the retractor while it is
rolling up. Neatly store the tongue plate in
the recess and then insert the connector
(tongue) plate into the slot.
CAUTION
. Do not allow the retractor to roll
up the seatbelt too quickly.
Otherwise, the metal tongue
plates may hit against the trim,
resulting in damaged trim.
. Have the seatbelt fully rolled up
so that the tongue plates are
neatly stored. A hanging tongue
plate can swing and hit against
the trim during driving, causing
damage to the trim.
Seat, seatbelt and SRS airbags 1-21
– CONTINUED –
Page 44
1-22 Seat, seatbelt and SRS airbags
& Seatbelt maintenance
To clean the seatbelts, use a mild soap
and lukewarm water. Never bleach or dye
the belts because this could seriously
affect their strength.
Inspect the seatbelts and attachments
including the webbing and all hardware
periodically for cracks, cuts, gashes,
tears, damage, loose bolts or worn areas.
Replace the seatbelts even if only minor
damage is found.
CAUTION
. Keep the belts free of polishes,
oils, chemicals and particularly
battery acid.
. Never attempt to make modifica-
tions or changes that will prevent
the seatbelt from operating properly.
Front seatbelt pretensioners
The driver’s and front passenger’s seatbelts have a seatbelt pretensioner. The
seatbelt pretensioners are designed to be
activated in the event of an accident
involving a moderate to severe frontal
collision.
The pretensioner sensor also serves as a
SRS frontal airbag sensor. If the sensor
detects a certain predetermined amount of
force during a frontal collision, the front
seatbelt is quickly drawn back in by the
retractor to take up the slack so that the
belt more effectively restrains the front
seat occupant.
When a seatbelt pretensioner is activated,
an operating noise will be heard and a
small amount of smoke will be released.
These occurrences are normal and not
harmful. This smoke does not indicate a
fire in the vehicle.
Once the seatbelt pretensioner has been
activated, the seatbelt retractor remains
locked. Consequently, the seatbelt can not
be pulled out and retracted and therefore
must be replaced.
NOTE
. Seatbelt pretensioners are not designed to activate in minor frontal
impacts, in side or rear impacts or in
roll-over accidents.
. The driver’s seat and passenger’s
seat pretensioners and frontal airbag
operate simultaneously.
. Pretensioners are designed to function on a one-time-only basis. In the
event that a pretensioner is activated,
both the driver’s and front passenger’s
seatbelt retractor assemblies must be
replaced and only by an authorized
SUBARU dealer. When replacing seatbelt retractor asse mblies, use only
genuine SUBARU parts.
. If either front seatbelt does not
retract or cannot be pulled out due to
a malfunction or activation of the
pretensioner, contact your SUBARU
dealer as soon as possible.
Page 45
. If the front seatbelt retractor assembly or surrounding area has been
damaged, contact your SUBARU dealer
as soon as possible.
. When you sell your vehicle, we urge
you to explain to the buyer that it has
seatbelt pretensioners by alerting him
to the contents of this section.
WARNING
. To obtain maximum protection,
occupants should sit in an upright position with their seatbelts
properly fastened. Refer to “Seatbelts” F1-12.
. Do not modify, remove or strike
the front seatbelt retractor assemblies or surrounding area.
This could result in accidental
activation of the seatbelt pretensioners or could make the system inoperative, possibly resulting in serious injury. Seatbelt
pretensioners have no user-serviceable parts. For required servicing of front seatbelt retractors
equipped with seatbelt pretensioners, see your nearest
SUBARU dealer.
. When discarding front seatbelt
retractor assemblies or scrap-
ping the entire vehicle due to
collision damage or for other
reasons, consult your SUBARU
dealer.
& System monitors
SRS airbag system warning light
A diagnostic system continually monitors
the readiness of the seatbelt pretensioner
while the vehicle is being driven. The
seatbelt pretensioners share the control
module with the airbag system. Therefore,
if any malfunction occurs in a seatbelt
pretensioner, the SRS airbag system
warning light will illuminate. The SRS
airbag system warning light will show
normal system operation by lighting for
approximately 6 seconds when the igni-
tion switch is turned to the “ON” position.
The following components are monitored
by the indicator.
. Front sub sensor (right-hand side)
. Front sub sensor (left-hand side)
. Airbag control module (including im-
pact sensors (all models) and rollover
sensors (Outback))
. Frontal airbag module (driver’s side)
. Frontal airbag module (front passen-
ger’s side)
. Side airbag sensor (center pillar right-
hand side)
. Side airbag sensor (center pillar left-
hand side)
. Side airbag module (driver’s side)
. Side airbag module (front passenger’s
side)
. Curtain airbag sensor (rear wheel
house right-hand side)
. Curtain airbag sensor (rear wheel
house left-hand side)
. Curtain airbag module (right-hand side)
. Curtain airbag module (left-hand side)
. Seatbelt pretensioner (driver’s side)
. Seatbelt pretensioner (front passen-
ger’s side)
. Seatbelt buckle switch (front passen-
ger’s side)
. Front passenger’s occupant detection
Seat, seatbelt and SRS airbags 1-23
– CONTINUED –
Page 46
1-24 Seat, seatbelt and SRS airbags
system weight sensor
. Front passenger’s occupant detection
control module
. Front passenger’s frontal airbag ON
and OFF indicator
. All related wiring
WARNING
If the warning light exhibits any of
the following conditions, there may
be a malfunction in the seatbelt
pretensioners and/ or SRS airbag
system. Immediately take your vehicle to your nearest SUBARU dealer
to have the system checked. Unless
checked and properly repaired, the
seatbelt pretensioners and/or SRS
airbags will operate improperly (e.g.
SRS airbags may inflate in a very
minor collision or not inflate in a
severe collision), which may increase the risk of injury.
. Flashing or flickering of the warn-
ing light
. No illumination of the warning
light when the ignition switch is
first turned to the “ON” position
. Continuous illumination of the
warning light
. Illumination of the warning light
while driving
& System servicing
WARNING
. When discarding a seatbelt re-
tractor assembly or scrapping
the entire vehicle damaged by a
collision, consult your SUBARU
dealer.
. Tampering with or disconnecting
the system’s wiring could result
in accidental activation of the
seatbelt pretensioner and/or airbag or could make the system
inoperative, which may result in
serious injury. Do not use electrical test equipment on any
circuit related to the s eatbelt
pretensioner and airbag systems. For required servicing of
the seatbelt pretensioner, consult
your nearest SUBARU dealer.
CAUTION
The front sub sensors are located in
both front fenders and the airbag
control module including the impact
sensors is located under the center
console. If you need service or
repair in those areas or near the
front seatbelt retractors, have an
authorized SUBARU dealer perform
the work.
NOTE
If the front part of the veh icle is
damaged in an accident to the extent
that the seatbelt pretensioner does not
operate, contact your SUBARU dealer
as soon as possible.
& Precautions against vehicle
modification
Always consult your SUBARU dealer if
you want to install any accessory parts to
your vehicle.
CAUTION
Do not perform any of the following
modifications. Such modifications
can interfere with proper operation
of the seatbelt pretensioners.
. Attachment of any equipment
(bush bar, winches, snow plow,
skid plate, etc.) other than genuine SUBARU accessory parts to
the front end.
Page 47
. Modification of the suspension
system or front end structure.
. Installation of a tire of different
size and construction from the
tires specified on the vehicle
placard attached to the door
pillar or specified for individual
vehicle models in this Owner’s
Manual.
Child restraint systems
Infants and small children should always
be placed in an infant or child restraint
system in the rear seat while riding in the
vehicle.
You should use an infant or child restraint
system that meets Federal Motor Vehicle
Safety Standards or Canada Motor Vehicle Safety Standards, is compatible with
your vehicle and is appropriate for the
child’s age and size.
All child restraint systems are designed to
be secured in vehicle seats by lap belts or
the lap belt portion of a lap/shoulder belt
(except those covered under the section in
this manual, entitled “Installation of child
restraint systems by use of lower and
tether anchorages (LATCH)” F1-33).
Children could be endangered in an
accident if their child restraints are not
properly secured in the vehicle. When
installing the child restraint system, carefully follow the manufacturer’s instructions.
According to accident statistics, children
are safer when properly restrained in the
rear seating positions than in the front
seating positions.
All U.S. states and Canadian provinces
require that infants and small children be
restrained in an approved child restraint
system at all times while the vehicle is
moving.
Seat, seatbelt and SRS airbags 1-25
– CONTINUED –
Page 48
1-26 Seat, seatbelt and SRS airbags
WARNING
Never let a passenger hold a child
on his or her lap while the vehicle is
moving. The passenger cannot protect the child from injury in a collision, because the child will be
caught between the passenger and
objects inside the vehicle. Additionally, holding a child in your lap or
arms in the front seat exposes that
child to another serious danger.
Since the SRS airbag deploys with
considerable speed and force, the
child could be injured or even killed.
WARNING
Children should be properly restrained at all times. Never allow a
child to stand up, or to kneel on any
seat. Unrestrained children will be
thrown forward during sudden stop
or in an accident and can be injured
seriously.
Additionally, children standing up or
kneeling on or in front of the front
seat are exposed another serious
danger. Since the SRS airbag deploys with considerable speed and
force, the child could be injured or
even killed.
& Where to place a child re-
straint system
The following descriptions are SUBARU’s
recommendations on where to place a
child restraint system in your vehicle.
A: Front passenger’s seat
You should not install a child restraint
system (including a booster seat) due to
the hazard to children posed by the
passenger’s airbag.
B: Rear seat, window-side seating
positions
Recommended positions for all types of
child restraint systems.
In these positions, Automatic/Emergency
Locking Retractor (A/ELR) seatbelts and
lower anchorages (bars) are provided for
Page 49
installing a child restraint system.
Some types of child restraints might not be
able to be secured firmly due to projection
of the seat cushion.
In this seating position, you should use
only a child restraint system that has a
bottom base that fits snugly against the
contours of the seat cushion and can be
securely retained using the seatbelt.
C: Rear seat, center seating position
Installing a child restraint system is not
recommended, although the A/ELR seatbelt and an upper anchorage (tether
anchorage) are provided in this position.
Some types of child restraints might not be
able to be secured firmly due to projection
of the seat cushion.
In this seating position, you should use
only a child restraint system that has a
bottom base that fits snugly against the
contours of the seat cushion and can be
securely retained using the seatbelt.
WARNING
Put children in the rear seat properly
restrained at all times. The SRS
airbag deploys with considerable
speed and force and can injure or
even kill children, especially if they
are not restrained or improperly
restrained. Because children are
lighter and weaker than adults, their
risk of being injured from deployment is greater.
For that reason, be sure to secure
ALL types of child restraint devices
(including forward facing child
seats) in the REAR seats at all times.
You should choose a restraint device which is appropriate for the
child’s age, height and weight. According to accident statistics, children are safer when properly restrained in the rear seating positions than in the front seating positions.
WARNING
SINCE YOUR VEHICLE IS
EQUIPPED WITH A PASSENGER’S
SRS AIRBAG, DO NOT INSTALL A
REARWARD FACING CHILD
SAFETY SEAT IN THE FRONT PASSENGER’S SEAT. DOING SO RISKS
SERIOUS INJURY OR DEATH TO
THE CHILD BY PLACING THE
CHILD’S HEAD TOO CLOSE TO
THE SRS AIRBAG.
Seat, seatbelt and SRS airbags 1-27
– CONTINUED –
Page 50
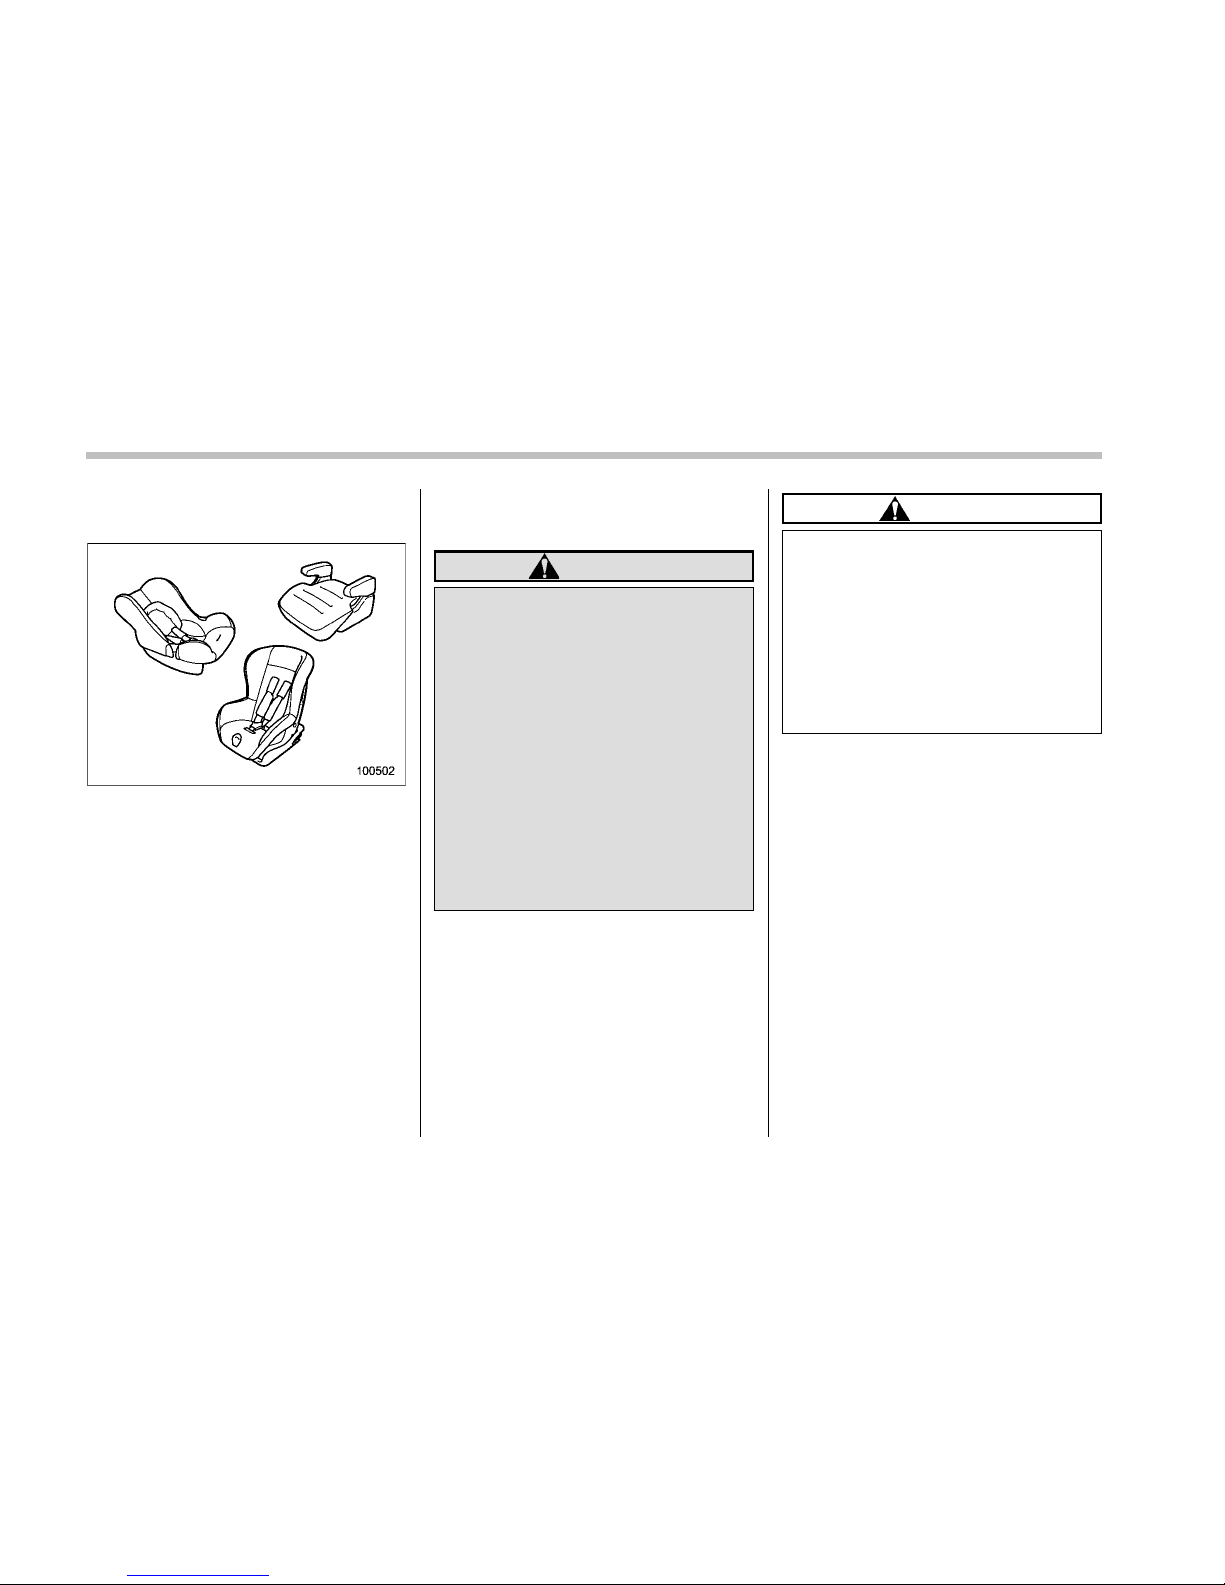
1-28 Seat, seatbelt and SRS airbags
& Choosing a child restraint
system
Choose a child restraint system that is
appropriate for the child’s age and size
(weight and height) in order to provide the
child with proper protection. The child
restraint system should meet all applicable requirements of Federal Motor Vehicle Safety Standards for United States or
Canada Motor Vehicle Safety Standards
for Canada. It can be identified by looking
for the label on the child restraint system
or the manufacture’s statement of compliance in the document attached to the
system. Also it is important for you to
make sure that the child restraint system
is compatible with the vehicle in which it
will be used.
& Installing child restraint sys-
tems with A/ELR seatbelt
WARNING
. Child restraint systems and seat-
belts can become hot in a vehicle
that has been closed up in sunny
weather; they could burn a small
child. Check the child restraint
system before you place a child
in it.
. Do not leave an unsecured child
restraint system in your vehicle.
Unsecured child restraint systems can be thrown around inside of the vehicle in a sudden
stop, turn or accident; they can
strike and injure vehicle occupants as well as result in serious
injuries or death to the child.
CAUTION
When you install a child restraint
system, follow the manufacturer’s
instructions supplied with it. After
installing the child restraint system,
check to ensure that it is held
securely in position. If it is not held
tight and secure, the danger of your
child suffering personal injury in the
event of an accident may be increased.
! Installing a rearward facing child
restraint
1. Place the child restraint system in the
rear seating position.
2. Run the lap and shoulder belt through
Page 51
or around the child restraint system
following the instructions provided by its
manufacturer.
3. Insert the tongue plate into the buckle
until you hear a click.
4. Take up the slack in the lap belt.
5. Pull out the seatbelt fully from the
retractor to change the retractor over from
the Emergency Locking Retractor (ELR)
to the Automatic Locking Retractor (ALR)
function. Then, allow the belt to rewind
into the retractor. As the belt is rewinding,
clicks will be heard which indicate the
retractor functions as ALR.
6. Push and pull the child restraint
system forward and side to side to check
if it is firmly secured in the center of the
seat.
Sometimes a child restraint can be more
firmly secured by pushing it down into the
seat cushion and then tightening the
seatbelt.
7. Pull at the shoulder portion of the belt
to confirm that it cannot be pulled out (ALR
properly functioning).
8. To remove the child restraint system,
press the release button on the seatbelt
buckle and allow the belt to retract
completely. The belt will return to the
ELR mode.
WARNING
NEVER INSTALL A REARWARD FACING CHILD SEAT IN THE FRONT
PASSENGER’SSEAT.DOINGSO
RISKS SERIOUS INJURY OR DEATH
TO THE CHILD BY PLACING THE
CHILD’S HEAD TOO CLOSE TO THE
SRS AIRBAG.
Seat, seatbelt and SRS airbags 1-29
– CONTINUED –
Page 52

1-30 Seat, seatbelt and SRS airbags
NOTE
When the child restraint system is no
longer in use, remove it and restore the
ELR function of the retractor. That
function is restored by retracting the
seatbelt fully.
! Installing forward facing child re-
straint
1. Place the child restraint system in the
rear seating position.
2. Run the lap and shoulder belt through
or around the child restraint system
following the instructions provided by its
manufacturer.
3. Insert the tongue plate into the buckle
until you hear a click.
4. Take up the slack in the lap belt.
5. Pull out the seatbelt fully from the
retractor to change the retractor over from
the Emergency Locking Retractor (ELR)
to the Automatic Locking Retractor (ALR)
function. Then, allow the belt to rewind
into the retractor. As the belt is rewinding,
clicks will be heard which indicate the
retractor functions as ALR.
6. Before seating a child in the child
restraint system, try to move it back and
forth and left and right to verify that it is
firmly secured in the center of the seat.
Sometimes a child restraint can be more
firmly secured by pushing it down into the
seat cushion and then tightening the
seatbelt.
7. Pull at the shoulder portion of the belt
to confirm that it cannot be pulled out (ALR
properly functioning).
Page 53
Legacy
Outback
8. If the child restraint system requires a
top tether, latch the hook onto the top
tether anchor and tighten the top tether.
For additional instructions, refer to “To p
tether anchorages” F1-35.
9. To remove the child restraint system,
press the release button on the seatbelt
buckle and allow the belt to retract
completely. The belt will return to the
ELR mode.
NOTE
When the child restraint system is no
longer in use, remove it and restore the
ELR function of the retractor. That
function is restored by allowing the
seatbelt to retract fully.
& Installing a booster seat
WARNING
. Child restraint systems and seat-
belts can become hot in a vehicle
that has been closed up in sunny
weather; they could burn a small
child. Check the child restraint
system before you place a child
in it.
. Do not leave an unsecured child
restraint system in your vehicle.
Unsecured child restraint systems can be thrown around inside of the vehicle in a sudden
stop, turn or accident; they can
strike and injure vehicle occupants as well as result in serious
injuries or death to the child.
Seat, seatbelt and SRS airbags 1-31
– CONTINUED –
Page 54
1-32 Seat, seatbelt and SRS airbags
CAUTION
When you install a child restraint
system, follow the manufacturer’s
instructions supplied with it. After
installing the child restraint system,
check to ensure that it is held
securely in position. If it is not held
tight and secure, the danger of your
child suffering personal injury in the
event of an accident may be increased.
1. Place the booster seat in the rear
seating position and sit the child on it. The
child should sit well back on the booster
seat.
2. Run the lap and shoulder belt through
or around the booster seat and the child
following the instructions provided by its
manufacturer.
3. Insert the tongue plate into the buckle
until you hear a click. Take care not to
twist the seatbelt.
Make sure the shoulder belt is positioned
across the center of child’s shoulder and
that the lap belt is positioned as low as
possible on the child’s hips.
4. To remove the booster seat, press the
release button on the seatbelt buckle and
allow the belt to retract.
WARNING
. Never use a belt that is twisted or
reversed. In an accident, this can
increase the risk or severity of
injury to the child.
. Never place the shoulder belt
under the child’s arm or behind
the child’s back. If an accident
occurs, this can increase the risk
or severity of injury to the child.
. The seatbelt should fit snugly in
order to provide full restr aint.
Loose fitting belts are not as
effective in preventing or reducing injury.
. Place the lap belt as low as
possible on the child’s hips. A
high-positioned lap belt will increase the risk of sliding under
the lap belt and of the lap belt
sliding up over the abdomen, and
both can result in serious internal injury or death.
. Make sure the shoulder belt is
positioned across the center of
child’s shoulder. Placing the
shoulder belt over the neck may
result in neck injury during sudden braking or in a collision.
Page 55
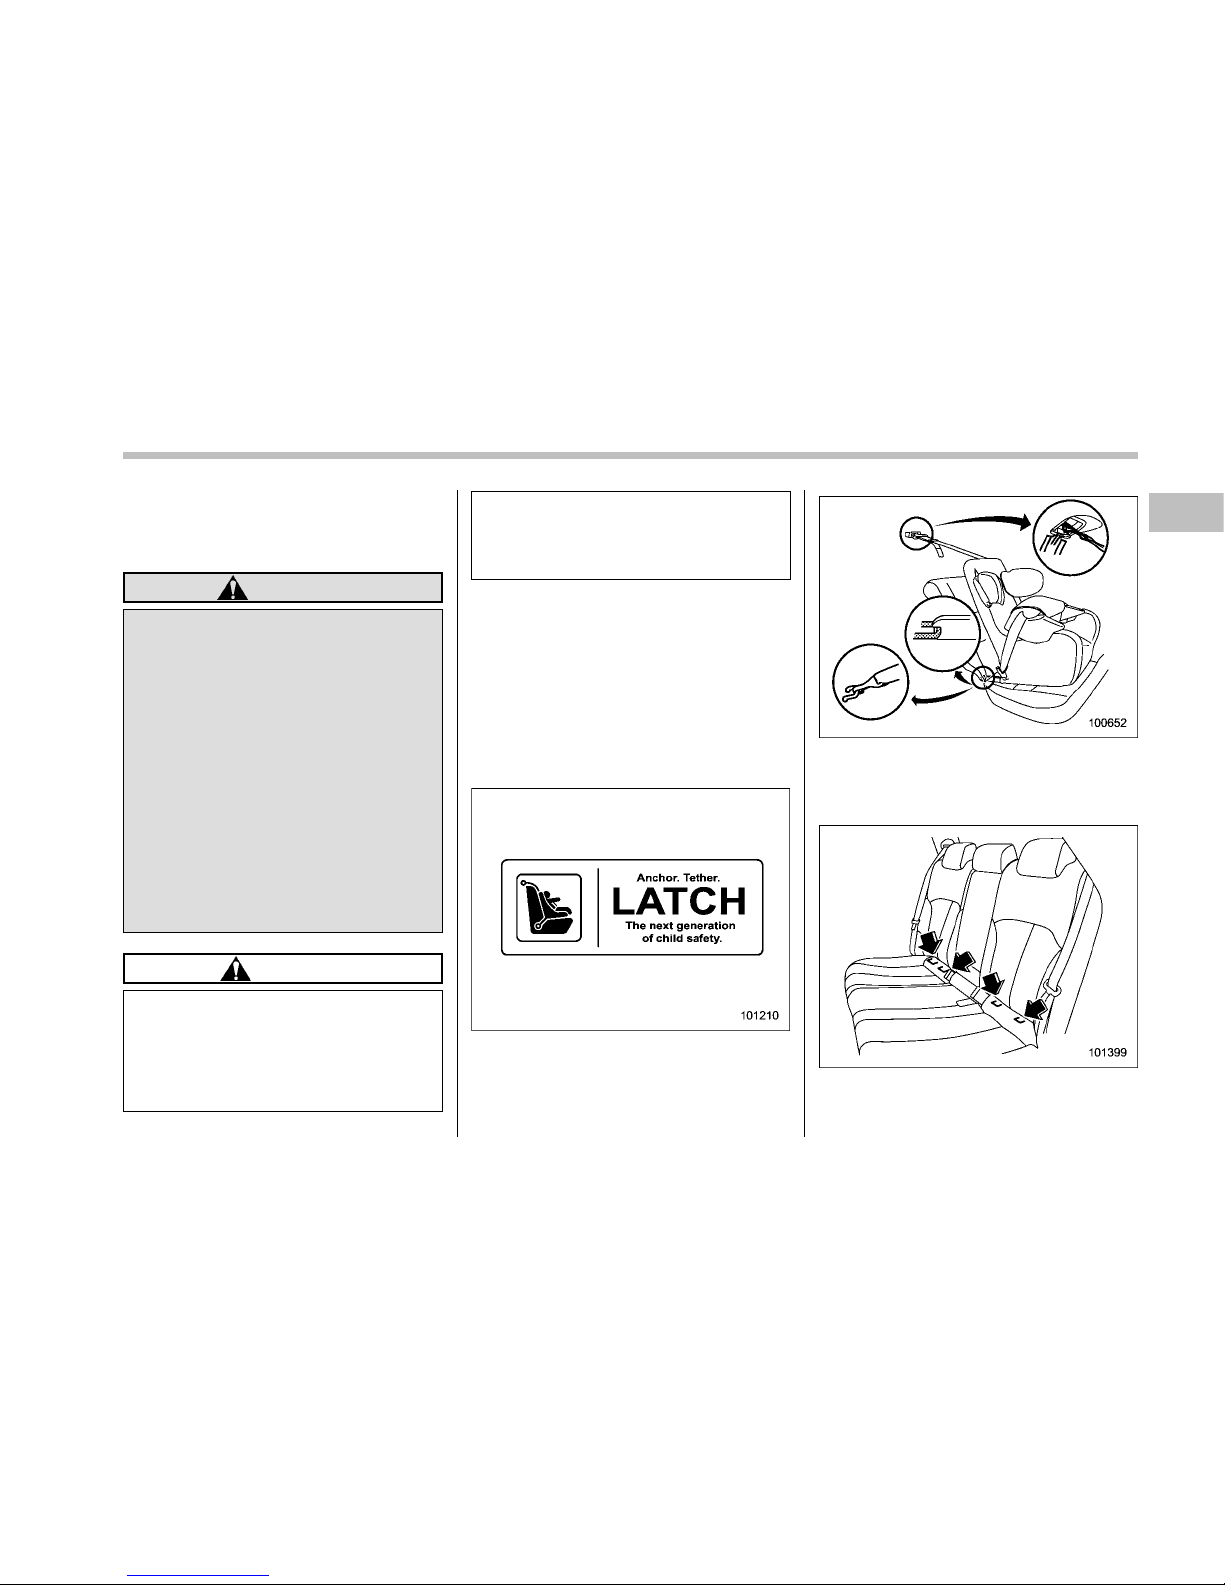
& Installation of child restraint
systems by use of lower and
tether anchorages (LATCH)
WARNING
. Child restraint systems and seat-
belts can become hot in a vehicle
that has been closed up in sunny
weather; they could burn a small
child. Check the child restraint
system before you place a child
in it.
. Do not leave an unsecured child
restraint system in your vehicle.
Unsecured child restraint systems can be thrown around inside of the vehicle in a sudden
stop, turn or accident; they can
strike and injure vehicle occupants as well as result in serious
injuries or death to the child.
CAUTION
When you install a child restraint
system, follow the manufacturer’s
instructions supplied with it. After
installing the child restraint system,
check to ensure that it is held
securely in position. If it is not held
tight and secure, the danger of your
child suffering personal injury in the
event of an accident may be increased.
Some types of child restraint systems can
be installed on the rear seat of your
vehicle without use of the seatbelts. Such
child restraint systems are secured to the
dedicated anchorages provided on the
vehicle body.
The lower and tether anchorage s are
sometimes referred to as the LATCH
system (Lower Anchors and Tethers for
CHildren).
Your vehicle is equipped with four lower
anchorages (bars) and three upper anchorages (tether anchorages) for accommodating such child restraint systems.
The lower anchorages (bars) are used for
installing a child restraint system only on
Seat, seatbelt and SRS airbags 1-33
– CONTINUED –
Page 56
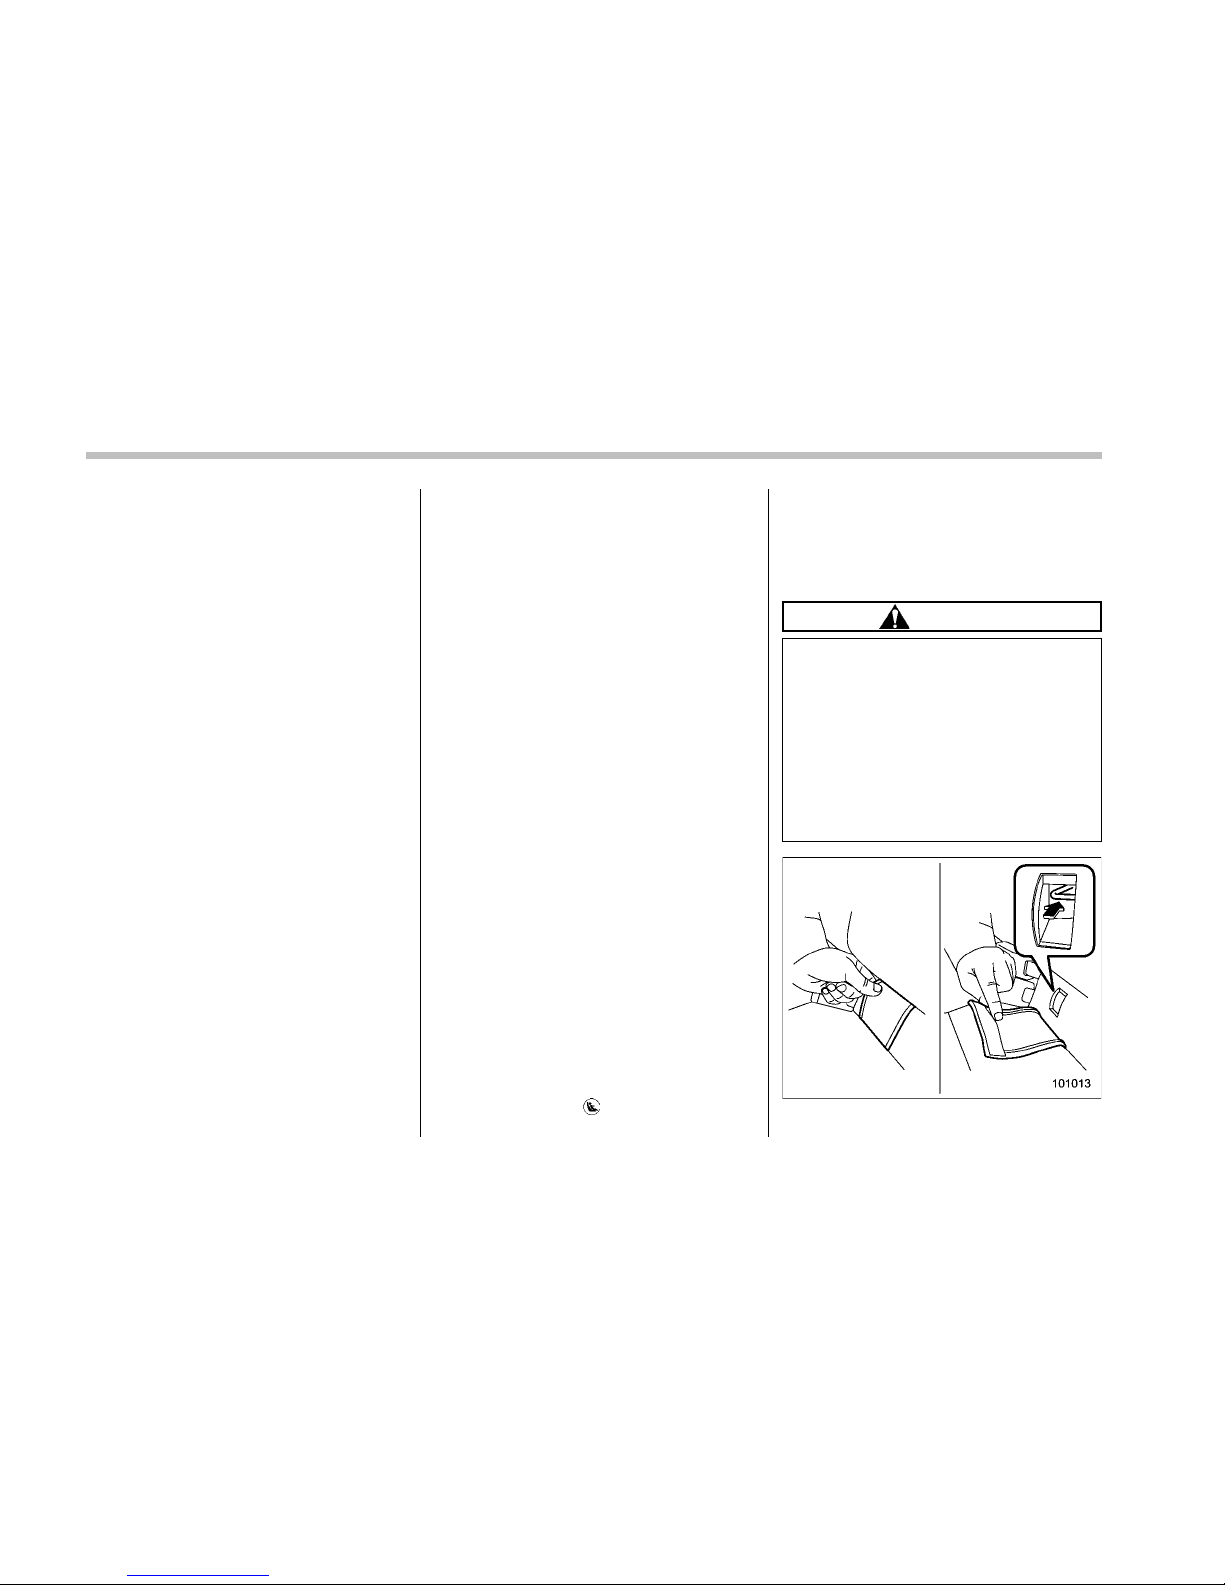
1-34 Seat, seatbelt and SRS airbags
the rear seat window-side seating positions. For each window-side seating position, two lower anchorages are provided.
Each lower anchorage is located behind
the cover of seatback bottom.
Legacy
Outback
The tether anchorages (upper anchorages) are provided for all the seating
positions (center and both window-side
ones) of the rear seat.
You will find marks “ ” at the bottom of the
rear seat seatbacks. These marks indicate
the positions of the lower anchorages
(bars).
Each lower anchorage is located behind
the cover of seatback bottom.
CAUTION
When you install a child restraint
system, follow the manufacturer’s
instructions supplied with it. After
installing the child restraint system,
check to ensure that it is held
securely in position. If it is not held
tight and secure, the danger of your
child suffering personal injury in the
event of an accident may be increased.
Page 57
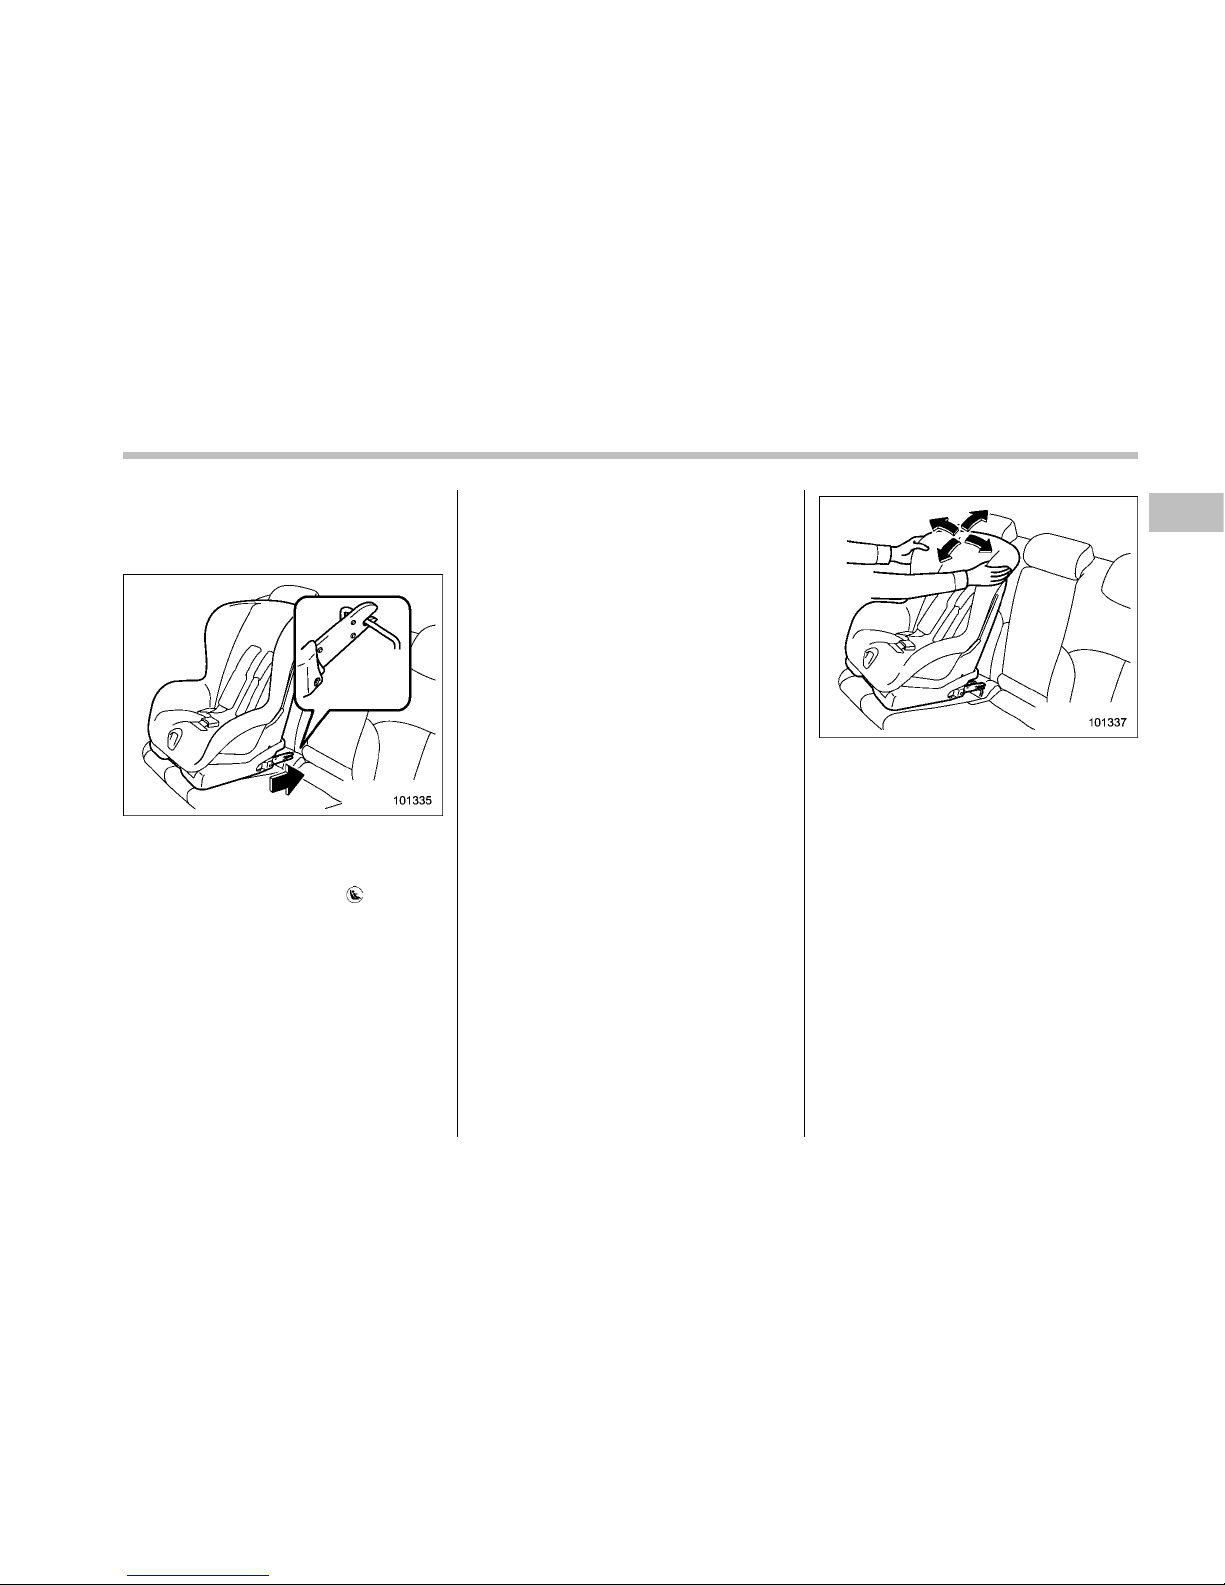
Peel off the anchorage cover from the
selected side of the rear seatback to
expose the anchorages (bars) to be used
for installation of the child restraint system.
1. While following the instructions supplied by the child restraint system manufacturer, connect the lower hooks onto the
lower anchorages located at “
” marks on
the bottom of the rear seatback. When the
hooks are connected, make sure the
adjacent seatbelts are not caught.
2. If your child restraint system is of a
flexible attachment type (which uses
tether belts to connect the child restraint
system properly to the lower anchorages),
while pushing the child restraint into the
seat cushion, pull both left and right lower
tether belts up to secure the child restraint
system firmly by taking up the slack in the
belt.
3. Connect the top tether hook to the
tether anchorage and firmly tighten the
tether. For information on how to set the
top tether, refer to “Top tether anchorages”
F1-35.
4. Before seating a child in the child
restraint system, try to move it back and
forth and left and right to verify that it is
firmly secured in the center of the seat.
5. To remove the child restraint system,
follow the reverse procedures of installation.
If you have any question concerning this
type of child restraint system, ask your
SUBARU dealer.
& Top tether anchorages
Your vehicle is equipped with three top
tether anchorages so that a child restraint
system having a top tether can be
installed in the rear seat. When installing
a child restraint system using top tether,
proceed as follows, while observing the
Seat, seatbelt and SRS airbags 1-35
– CONTINUED –
Page 58
1-36 Seat, seatbelt and SRS airbags
instructions by the child restraint system
manufacturer.
Since a top tether can provide additional
stability by offering another connection
between a child restraint system and the
vehicle, we recommend that you use a top
tether whenever one is required or available.
! Tether anchorage location
! Legacy
Three tether anchorages are installed on
the rear shelf behind the rear seat head
restraint. Open the cover flap to use each
anchorage.
! Outback
Three tether anchorages, i.e., ones for the
right, center and left positions, are already
installed on the rear edge of the roof.
Open the cover flap to use each anchorage.
! To hook the top tether
CAUTION
Always remove the head restraint
when mounting a child restrain t
system with a top tether. Failure to
do so may prevent the top tether
from being fastened tightly.
! Legacy
1. Fold down the rear seatback for the
window side seating position. Refer to
“Folding down the rear seatback” F1-8.
2. Remove the head restraint at the
seating position where the child restraint
system has been installed with the seatbelt or lower anchorages; lift up the head
Page 59
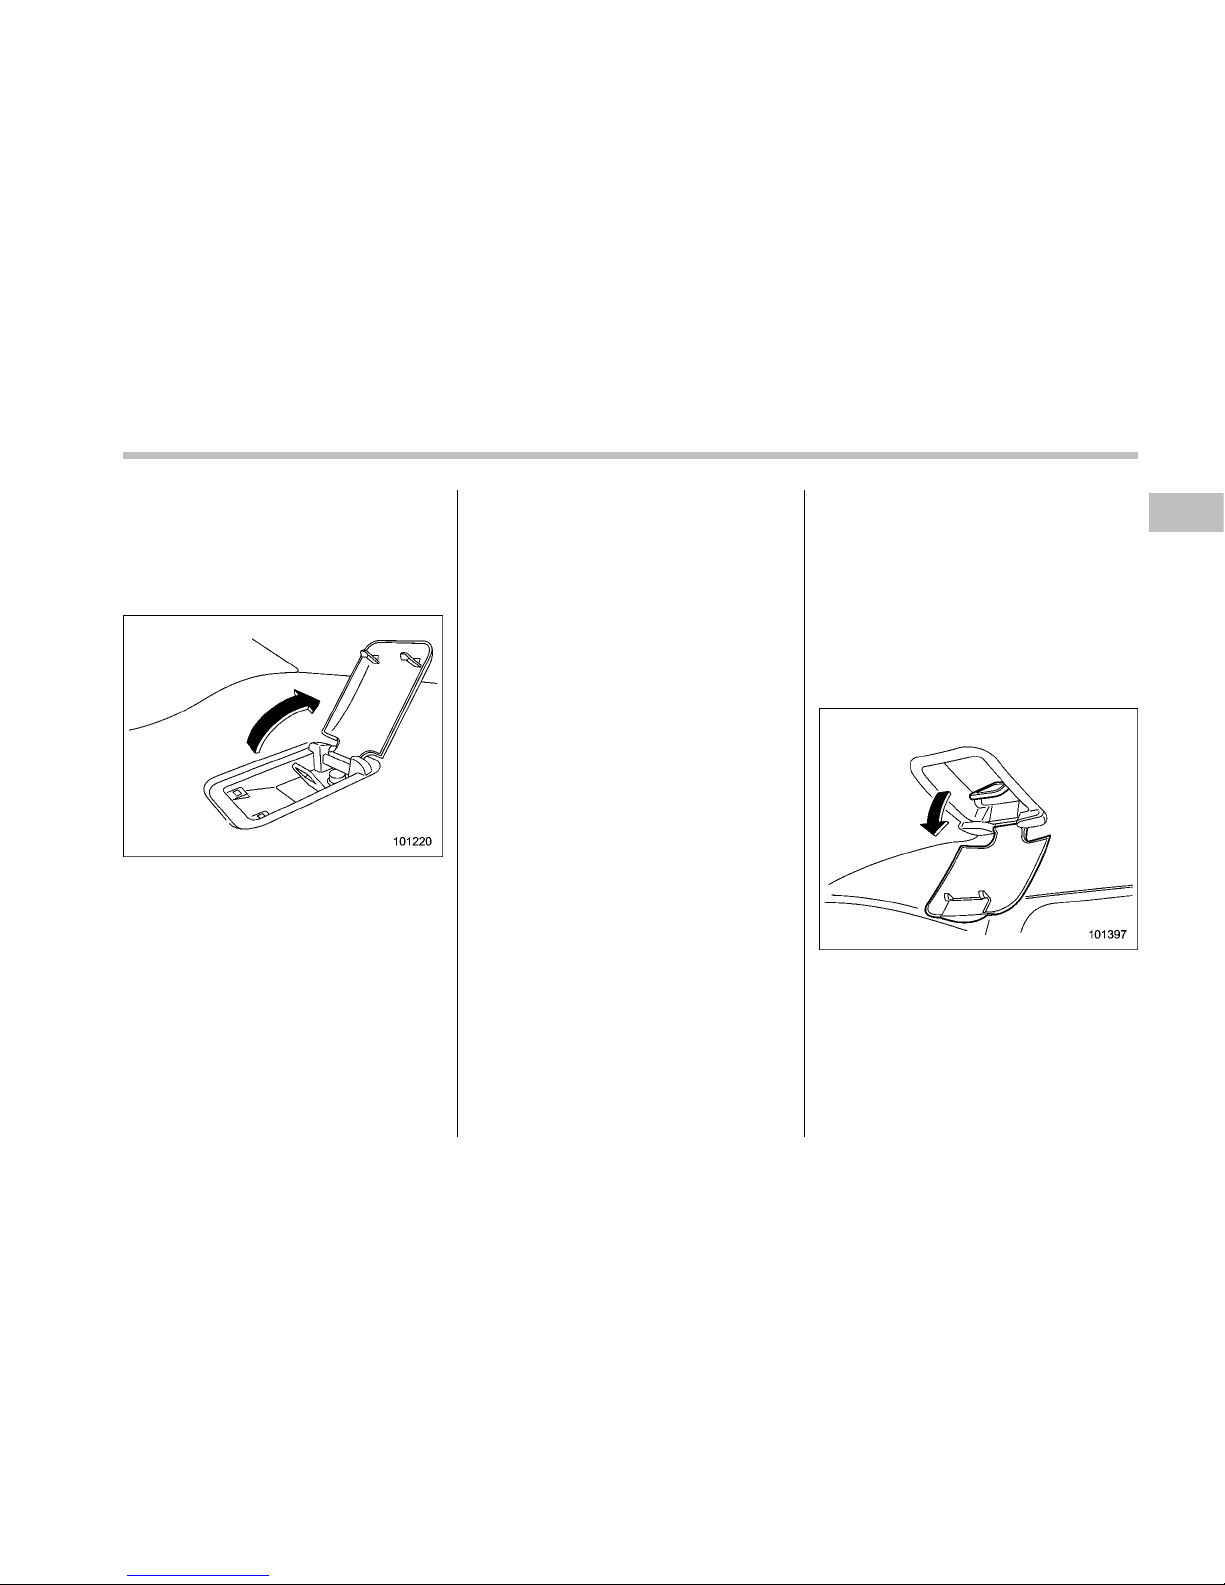
restraint while pressing the release button.
Store the head restraint in the trunk. Avoid
placing the head restraint in the passenger compartment to prevent it from being
thrown around in the passenger compartment in a sudden stop or a sharp turn.
3. Open the cover flaps to use the
anchorages.
4. Fasten the top tether hook of the child
restraint system to the appropriate upper
anchorage.
5. Tighten the top tether securely.
! Outback
1. Remove the head restraint at the
seating position where the child restraint
system has been installed with the seatbelt or lower anchorages; lift up the head
restraint while pressing the release button.
Store the head restraint in the cargo area.
Avoid placing the head restraint in the
passenger compartment to prevent it from
being thrown around in the passenger
compartment in a sudden stop or a sharp
turn.
2. Open the cover flaps t o use the
anchorages.
Seat, seatbelt and SRS airbags 1-37
– CONTINUED –
Page 60
1-38 Seat, seatbelt and SRS airbags
3. Fasten the top tether hook of the child
restraint system to the appropriate upper
anchorage.
4. Tighten the top tether securely.
*SRS airbag (Supplemental
Restraint System airbag)
*SRS: This stands for supplemental restraint system. This name is used because the airbag system supplements the
vehicle’s seatbelts.
Your vehicle is equipped with a crash
sensing and diagnostic module, which will
record the use of the seatbelt by the front
passenger when any of the SRS frontal,
side and curtain airbags deploys.
& Models with SRS airbags and
lap/shoulder restraints for
driver, front passenger, and
window-side rear passengers
Your vehicle is equipped with a supplemental restraint system in addition to a
lap/shoulder belt at each front seating
position and each rear window-side seating position. The supplemental restraint
system (SRS) consists of six airbags.
The configurations are as follows:
. Driver’s and front passenger’s frontal
airbags
. Driver’s and front passenger’s side
airbags
. Curtain airbags (for driver, front pas-
senger, and window-side rear passen-
gers)
These SRS airbags are designed only
as a supplement to the primary protection provided by the seatbelt.
The system also controls front seatbelt
pretensioners. For operation instructions
and precautions concerning the seatbelt
pretensioner, refer to “Front seatbelt pretensioners” F1-22.
WARNING
. To obtain maximum protection in
the event of an accident, the
driver and all passengers in the
vehicle should always wear seatbelts when the vehicle is moving.
The SRS airbag is designed only
as a supplement to the primary
protection provided by the seatbelt. It does not do away with the
need to fasten seatbelts. In combination with the seatbelts, it
offers the best combined protection in case of a serious accident.
Not wearing a seatbelt increases
the chance of severe injury or
death in a crash even when the
vehicle has the SRS airbag.
For instructions and precautions
concerning the seatbelt system,
Page 61
refer to “Seatbelts” F1-12.
. Do not sit or lean unnecessarily
close to the SRS airbag. Because
the SRS airbag depl oys with
considerable speed – faster than
the blink of an eye – and force to
protect in high speed collisions,
the force of an airbag can injure
an occupant whose body is too
close to SRS airbag.
It is also important to wear your
seatbelt to help avoid injuries
that can result when the SRS
airbag contacts an occupant not
in proper position such as one
thrown forward during pre-accident braking.
Even when properly positioned,
there remains a possibility that
an occupant may suffer minor
injury such as abrasions and
bruises to the face or arms
because of the SRS airbag deployment force.
. The SRS airbags deploy with
considerab le speed and force.
Occupants who are out of proper
position when the SRS airbag
deploys could suffer very serious
injuries. Because the SRS airbag
needs enough space for deploy-
ment, the driver should always
sit upright and well back in the
seat as far from the steering
wheel as practical while still
maintaining full vehicle control
and the front passenger should
move the seat as far back as
possible and sit upright and well
back in the seat.
. Do not place any objects over or
near the SRS airbag cover or
between you and the SRS airbag.
If the SRS airbag deploys, those
objects could interfere with its
proper operation and could be
propelled inside the vehicle and
cause injury.
WARNING
. Put children in the rear seat
properly restrained at all times.
The SRS airbag deploys with
considerable speed and force
and can injure or even kill children, especially if they are not
restrained or improperly restrained. Because children are
lighter and weaker than adults,
their risk of being injured from
deployment is greater.
Consequently, we strongly recommend that ALL children (including those in child seats and
those that have outgrown child
restraint devices) sit in the REAR
Seat, seatbelt and SRS airbags 1-39
– CONTINUED –
Page 62
1-40 Seat, seatbelt and SRS airbags
seat properly restrained at all
times in a child restraint device
or in a seatbelt, whichever is
appropriate for the child’s age,
height and weight.
Secure ALL types of child restraint devices (including forward facing child seats) in the
REAR seats at all times.
According to accident statistics,
children are safer when properly
restrained in the rear seating
positions than in the front seating positions.
For instructions and precautions
concerning the child restraint
system, refer to “Child restraint
systems” F1-25.
. NEVER INSTALL A REARWARD
FACING CHILD SEAT IN THE
FRONT SEAT. DOING SO RISKS
SERIOUS INJURY OR DEATH TO
THE CHILD BY PLACING THE
CHILD’S HEAD TOO CLOSE TO
THE SRS AIRBAG.
. Never allow a child to stand up,
or to kneel on the front passenger’s seat, or never hold a child
on your lap or in your arms. The
SRS airbag deploys with considerable force and can injure or
even kill the child.
CAUTION
. When the SRS airbag deploys,
some smoke will be released.
This smoke could cause breathing problems for people with a
history of asthma or other
breathing trouble. If you or your
passengers have breathing problems after SRS airbag deploys,
get fresh air promptly.
. A deploying SRS airbag releases
hot gas. Occupants could get
burned if they come into direct
contact with the hot gas.
NOTE
When you sell your vehicle, we urge
you to explain to the buyer that it is
equipped with SRS airbags by alerting
him or her to the applicable section in
this Owner’s Manual.
Page 63

! Components
1) Front sub sensor (right-hand side)
2) Front sub sensor (left-hand side)
3) SRS airbag system warning light
4) Frontal airbag module (driver’s side)
5) Front passenger’s frontal airbag ON and
OFF indicator
6) Frontal airbag module (front passenger’s
side)
7) Airbag control module (including impact
sensor)
Seat, seatbelt and SRS airbags
1-41
– CONTINUED –
Page 64

1-42 Seat, seatbelt and SRS airbags
1) Curtain airbag sensor (left-hand side)
2) Curtain airbag module (left-hand side)
3) Curtain airbag module (right-hand side)
4) Front passenger’s occupant detection
control module
5) Side airbag sensor (left-hand side)
6) Seatbelt pretensioner (left-hand side)
7) Side airbag module (left-hand side)
8) Seatbelt buckle switch (right-hand side)
9) Curtain airbag sensor (right-hand side)
10) Side airbag module (right-hand side)
11) Seatbelt pretensioner (right-hand side)
12) Side airbag sensor (right-hand side)
13) Front passenger’s occupant detection
system weight sensor
Page 65
& SUBARU advanced frontal
airbag system
Your vehicle is equipped with a SUBARU
advanced frontal airbag system that complies with the new advanced frontal airbag
requirements in the amended Federal
Motor Vehicle Safety Standard (FMVSS)
No. 208.
The SUBARU advanced frontal airbag
system automatically determines the deployment force of the driver’s SRS frontal
airbag at the time of deployment as well as
whether or not to activate the front
passenger’s SRS frontal airbag and, if
activated, the deployment force of the
SRS frontal airbag at the time of deployment.
Your vehicle has warning labels on the
driver’s and front passenger’s sun visors
beginning with the phrase “EVEN WITH
ADVANCED AIR BAGS” and a tag
attached to the glove box lid beginning
with the phrase “Even with Advanced Air
Bags”. Make sure that you carefully read
the instructions on the warning labels and
tag.
Always wear your seatbelt. The SUBARU
advanced frontal airbag system is a
supplemental restraint system and must
be used in combination with a seatbelt. All
occupants should wear a seatbelt or be
seated in an appropriate child restraint
system.
The driver’s SRS frontal airbag is stowed
in the center portion of the steering wheel.
The front passenger’s SRS frontal airbag
is stowed near the top of the dashboard
under an “SRS AIRBAG” mark.
In a moderate to severe frontal collision,
the driver’s and front passenger’s SRS
frontal airbags deploy and supplement the
seatbelts by reducing the impact on the
driver’s and front passenger ’s head and
chest.
WARNING
NEVER INSTALL A REARWARD FACING CHILD SAFETY SEAT IN THE
FRONTSEAT.DOINGSORISKS
SERIOUS INJURY OR DEATH TO
THE CHILD BY PLACING THE
CHILD’S HEAD TOO CLOSE TO
THE SRS AIRBAG.
WARNING
Never allow a child to stand up, or to
kneel on the front passenger’s seat.
The SRS airbag deploys with considerable force and can injure or
even kill the child.
Seat, seatbelt and SRS airbags 1-43
– CONTINUED –
Page 66
1-44 Seat, seatbelt and SRS airbags
WARNING
Never hold a child on your lap or in
your arms. The SRS airbag deploys
with considerable force and can
injure or even kill the child.
WARNING
The SRS airbag deploys with considerable speed and force. Occupants who are out of proper position
when the SRS airbag deploys could
suffer very serious injuries. Because the SRS airbag needs enough
space for deployment, the driver
should always sit upright and well
back in the seat as far from the
steering wheel as practical while
still maintaining full vehicle control
and the front passenger should
move the seat as far back as
possible and sit upright and well
back in the seat.
It is also important to wear your
seatbelt to help avoid injuries that
can result when the SRS airbag
contacts an occupant not in proper
position such as one thrown toward
the front of the vehicle during preaccident braking.
WARNING
Do not put any objects over the
steering wheel pad and dashboard.
If the SRS frontal airbag deploys,
those objects could interfere with its
proper operation and could be propelled inside the vehicle and cause
injury.
Page 67
WARNING
Do not attach accessories to the
windshield, or fit an extra-wide mirror over the rear view mirror. If the
SRS airbag deploys, those objects
could become projectiles that could
seriously injure vehicle occupants.
! Driver’s SRS frontal airbag
The driver’s SRS frontal airbag uses a
dual stage inflator. The inflator operates in
different ways depending on the severity
of impact.
Have the system inspected by your
SUBARU dealer immediately if the SRS
airbag system warning light illuminates.
NOTE
The driver’s SRS side airbag, SRS
curtain airbag a nd seatbelt pretensioner are not controlled by the
SUBARU advanced frontal airbag system.
! Front passenger’s SRS frontal air-
bag
The front passenger’s SRS frontal airbag
uses a dual stage inflator. The inflator
operates in different ways depending on
the severity of impact.
The total load on the seat is monitored by
the passenger’s occupant detection system weight sensor under the seat.
Using the total seat load and seatbelt
buckle swi tch, the occupant detection
system determines whether the front
passenger’s SRS frontal airbag should or
should not be inflated.
The occupant detection system may not
inflate the front passenger’s SRS frontal
airbag even when the driver’s SRS frontal
airbag deploys. This is normal.
Observe the following precautions. Failure
to do so may prevent the SUBARU
advanced frontal airbag system from
functioning correctly or cause the system
to fail.
. Do not apply any strong impact to the
front passenger’s seat such as by kicking.
. Do not spill liquid on the front passenger’s seat. If liquid is spilled, wipe it off
immediately.
. Do not remove or disassemble the front
passenger’s seat.
. Do not install any accessory (such as
an audio amplifier) other than a genuine
SUBARU accessory under the front passenger’s seat.
. Do not place anything (shoes, umbrella, etc.) under the front passenger’s seat.
. The front passenger’s seat must not be
used with the head restraint removed.
. Do not leave any articles on the front
passenger’s seat or the seatbelt tongue
and buckle engaged when you leave your
vehicle.
. Do not place a magnet near the
seatbelt buckle and the seatbelt retractor.
. Do not use front seats with their backward-forward position and seatback not
being locked into place securely. If any of
them are not locked securely, adjust them
again. For adjusting procedure, refer to
“Manual seat” F1-3 (models equipped
with manual seats only).
If the seatbelt buckle switch and/or front
passenger’s occupant detection system
have failed, the SRS airbag system
warning light wil l illuminate. Have the
system inspected by your SUBARU deal-
Seat, seatbelt and SRS airbags 1-45
– CONTINUED –
Page 68
1-46 Seat, seatbelt and SRS airbags
er immediately if the SRS airbag system
warning light illuminates.
If your vehicle has sustained impact, this
may affect the proper function of the
SUBARU advanced frontal airbag system.
Have your vehicle inspected at your
SUBARU dealer.
NOTE
The front passenger’s SRS side airbag,
SRS curtain airbag and seatbelt pretensioner are not controlled by the
SUBARU advanced frontal airbag system.
! Passenger’s frontal airbag ON and
OFF indicators
ON / : Front passenger’s frontal airbag ON
indicator
/ : Front passenger’s frontal airbag OFF
indicator
The front passenger’s frontal airbag ON
and OFF indicators show you the status of
the front passenger’s SRS frontal airbag.
The indicators are located next to the
clock in the center portion of the dashboard.
When the ignition switch is turned to the
“ON” position, both the ON and OFF
indicators illuminate for 6 seconds during
which time the system is checked. Following the system check, both indicators turn
off for 2 seconds. After that, one of the
indicators illuminates depending on the
status of the front passenger’s SRS frontal
airbag determined by the SUBARU advanced frontal airbag system monitoring.
If the front passenger’s SRS frontal airbag
is activated, the passenger’s frontal airbag
ON indicator will illuminate while the OFF
indicator will remain off.
If the front passenger’s SRS frontal airbag
is deactivated, the passenger’s frontal
airbag ON indicator will remain off while
the OFF indicator will illuminate.
With the ignition switch turned to the “ON”
position, if both the ON and OFF indicators remain illuminated or off simultaneously even after the system check
period, the system is malfunctioning.
Contact your SUBARU dealer immediately for an inspection.
! Conditions in which front passen-
ger’s SRS frontal airbag is not
activated
The front passenger’s SRS frontal airbag
will not be activated when any of the
following conditions are met regarding the
front passenger’s seat:
. The seat is empty.
. The seat is equipped with a rearward
facing child restraint system and an infant
is restrained with it. (See WARNING that
follows.)
. The seat is equipped with a forward
Page 69
facing child restraint system and a small
child is restrained with it. (See WARNING
that follows.)
. The seat is equipped with a booster
seat and a small child is in the booster
seat. (See WARNING that follows.)
. The seat is relieved of the occupant
load for a time exceeding the predetermined monitoring time period.
. The seat is occupied by a child who
has outgrown a child restraint system
(See WARNING that follows.) or by a
small adult.
. The front passenger’s occupant detec-
tion system is faulty.
WARNING
NEVER INSTALL A REARWARD FACING CHILD SEAT IN THE FRONT
PASSENGER’S SEAT EVEN IF THE
FRONT PASSENGER’S SRS FRONTAL AIRBAG IS DEACTIVATED. Be
sure to install it in the REAR seat in
a correct manner. Also, it is strongly
recommended that any forward facing child seat or booster seat be
installed in the REAR seat, and that
even children who have outgrown a
child restraint system be also
seated in the REAR seat. This is
because children sitting in the front
passenger’s seat may be killed or
severely injured should the front
passenger’s SRS frontal airbag deploy. REAR seats are the safest
place for children.
When the front passenger’s seat is occupied by a child, observe the following
precautions. Failure to do so may increase
the load on the front passenger’s seat,
activating the front passenger ’ sSRS
frontal airbag even though that seat is
occupied by a child.
. Do not place any article on the seat
other than the child occupant and a child
restraint system.
. Do not place more than one child on
the seat.
. Do not install any accessory such as a
table or TV onto the seatback.
. Do not store a heavy load in the
seatback pocket.
. Do not allow the rear seat occupant to
place his/her hands or legs on the front
passenger’s seatback, or allow him/her to
pull the seatback.
! If the front passenger’s frontal air-
bag ON indicator illuminates and the
OFF indicator turns off even when
an infant or a small child is in a child
restraint system (including booster
seat)
Turn the ignition switch to the “LOCK”
position if the front passenger’s frontal
airbag ON indicator illuminates and the
OFF indicator turns off even when an
infant or a small child is in a child restraint
system (including booster seat). Remove
the child restraint system from the seat. By
referring to the child restraint manufacturer’s recommendations as well as the
child restraint system installation procedures in “Child restraint systems” F1-25,
correctly install the child restraint system.
Turntheignitionswitchtothe“ON”
position and make sure that the front
passenger’s frontal airbag ON indicator
turns off and the OFF indicator illuminates.
If still the ON indicator remains illuminated
while the OFF indicator turns off, take the
following actions.
. Ensure that no article is placed on the
seat other than the child restraint system
and the child occupant.
. Ensure that there is no article left in the
seatback pocket.
. Ensure that the backward-forward po-
Seat, seatbelt and SRS airbags 1-47
– CONTINUED –
Page 70

1-48 Seat, seatbelt and SRS airbags
sition and seatback of front passenger’s
seat are locked into place securely by
moving the seat back and forth. (Models
equipped with manual seats only)
If the ON indicator still remains illuminated
while the OFF indicator turns off after
taking relevant corrective actions described above, relocate the child restraint
system to the rear seat and immediately
contact your SUBARU dealer for an
inspection.
NOTE
When a child who has outgrown a child
restraint system or a small adult is
seated in the front passenger’s seat,
the SUBARU advanced frontal airbag
system may or may not activate the
front passenger’s SRS frontal airbag
depending on the occupant’s seating
posture. If the front passenger’s SRS
frontal airbag is activated (the ON
indicator remains illuminated while
the OFF indicator turns off), take the
following actions.
. Ensure that no article is placed on
the seat other than the occupant.
. Ensure that there is no article left in
the seatback pocket.
If the ON indicator still remains illuminated while the OFF indicator turns off
despite the fact that the actions noted
above have been taken, seat the child/
small adult in the rear seat and immediately contact your SUBARU dealer
for an inspection. Even if the system
has passed the dealer inspection, it is
recommended that on subsequent trips
the child/small adult always take the
rear seat.
Children who have outgrown a child
restraint system should always wear the
seatbelt irrespective of whether the airbag
is deactivated or activated.
! Conditions in which front passen-
ger’s SRS frontal airbag is activated
The front passenger’s SRS frontal airbag
will be activated for deployment upon
impact when any of the following conditions is met regarding the front passenger’s seat.
. When the seat is occupied by an adult.
. When a heavy article is placed on the
seat.
When the front passenger’s seat is occupied by an adult, observe the following
precautions. Failure to do so may lessen
the load on the front passenger’s seat,
deactivating the front passenger’s SRS
frontal airbag despite the fact that the seat
is occupied by an adult.
. Do not allow the rear seat occupant to
lift the front passenger’s seat cushion
using his/her feet.
. Do not place any article under the front
passenger’s seat, or squeeze any article
from behind and under the seat. This may
lift the seat cushion.
. Do not squeeze any article between
the front passenger’s seat and side trim/
pillar, door or center console box. This
may lift the seat cushion.
! If the passenger’s frontal airbag OFF
indicator illuminates and the ON
indicator turns off even when the
front passenger’s seat is occupied
by an adult
This can be caused by the adult incorrectly sitting in the front passenger’s seat.
Turn the ignition switch to the “LOCK”
position. Ask the front passenger to set
the seatback to the upright position, sit up
straight in the center of the seat cushion,
correctly fasten the seatbelt, position his/
her legs out forward, and adjust the seat to
the rearmost position. Turn the ignition
switch to the “ON” position. If the OFF
indicator remains illuminated while the ON
indicator remains off, take the following
actions.
. Turn the ignition switch to the “LOCK”
position.
Page 71

. Ensure that there is no article, book,
shoe, or other object trapped under the
seat, at the rear of the seat, or on the side
of the seat.
. Ensure that the backward-forward position and seatback of front passenger’s
seat are locked into place securely by
moving the seat back and forth. (Models
equipped with manual seats only)
. Next, turn the ignition switch to the
“ON” position and wait 6 seconds to allow
the system to complete self-checking.
Following the system check, both indicators turn off for 2 seconds. Now, the ON
indicator should illuminate while the OFF
indicator remains off.
If the OFF indicator still remains illuminated while the ON indicator remains off,
ask the occupant to move to the rear seat
and immediately contact your SUBARU
dealer for an inspection.
! Effect vehicle modifications made
for persons with disabilities may
have on SUBARU advanced frontal
airbag system operation (U.S. only)
Changing or moving any parts of the front
seats, seat belts, front bumper, front side
frame, instrument panel, combination meter, steering wheel, steering column, tire,
suspension or floor panel can affect the
operation of the SUBARU advanced air-
bag system. If you have any questions,
you may contact the following SUBARU
distributors:
<Continental U.S., Alaska and the District
of Columbia>
Subaru of America, Inc.
Customer Dealer Services Department
P.O. Box 6000
Cherry Hill, NJ 08034-6000
1-800-SUBARU3 (1-800-782-2783)
<Hawaii>
Servco Subaru Inc., dba Subaru Hawaii
2850 Pukoloa Street, Suite 202, Honolulu,
HI 96819
808-839-2273
<Guam>
Shen’s Corporation dba Prestige Automo-
bile
491, East Marine Drive, Route 1 Dededo,
Guam
671-633-2698
<Puerto Rico>
Trebol Motors
P.O. Box 11204, San Juan, Puerto Rico
00910
787-793-2828
There are currently no SUBARU distributors in any other U.S. territories. If you are
in such an area, please contact the
SUBARU distributor or dealer from which
you bought your vehicle.
! Operation
1) Driver’s side
2) Passenger’s side
Seat, seatbelt and SRS airbags
1-49
– CONTINUED –
Page 72
1-50 Seat, seatbelt and SRS airbags
The SRS airbag can function only when
the ignition switch is in the “ON” position.
The SUBARU advanced frontal airbag
system is designed to determine the
activation or deactivation condition of the
front passenger’s SRS frontal airbag
depending on the total load on the front
passenger’s seat monitored by the front
passenger’s occupant detection system
weight sensor. For this reason, only the
driver’s SRS frontal airbag may deploy in
the event of a collision, but this does not
mean failure of the system.
If the front sub sensors inside both front
fenders and the impact sensors in the
airbag control module detect a predetermined amount of force during a frontal
collision, the control module sends signals
to the airbag module(s) (only driver’s
module or both driver’s and front passenger’s modules) instructing the module(s)
to inflate the SRS frontal airbag(s). The
driver’s and front passenger’s SRS frontal
airbags use dual stage inflators. The two
inflators of each airbag are triggered either
sequentially or simultaneously, depending
on the severity of impact in the case of the
driver’s SRS frontal airbag and depending
on the severity of impact and the total load
on the seat in the case of the front
passenger’s SRS frontal airbag.
After deployment, the SRS airbag immediately starts to deflate so that the driver’s
vision is not obstructed. The time required
from detecting impact to the deflation of
the SRS airbag after deployment is shorter than the blink of an eye.
Both when only the driver’s SRS frontal
airbag deploys and the driver’s and front
passenger’s SRS frontal airbags deploy,
the driver’s and front passenger’s seatbelt
pretensioners operate at the same time.
Although it is highly unlikely that the SRS
airbag would activate in a non-accident
situation, should it occur, the SRS airbag
will deflate quickly, not obscuring vision
and will not interfere with the driver’s
ability to maintain control of the vehicle.
When the SRS airbag deploys, a sudden,
fairly loud inflation noise will be heard and
some smoke will be released. These
occurrences are a normal result of the
deployment. This smoke does not indicate
a fire in the vehicle.
CAUTION
Do not touch the SRS airbag system
components a round the steering
wheel and dashboard with bare
hands right after deployment. Doing
so can cause burns because the
components can be very hot as a
result of deployment.
The driver’s SRS frontal airbag and front
passenger’s SRS frontal airbag are designed to deploy in the event of an
accident involving a moderate to severe
frontal collision. It is basically not designed
to deploy in lesser frontal impacts because the necessary protection can be
achieved by the seatbelt alone. Also, they
are basically not designed to deploy in
side or rear impacts or in roll-over accidents because deployment of only the
driver’s SRS frontal airbag or both driver’s
and front passenger’s SRS frontal airbags
would not help the occupant in those
situations. The driver’s and front passenger’s SRS frontal airbags are designed to
function on a one-time-only basis.
SRS airbag deployment depends on the
level of force experienced in the passenger compartment during a collision. That
level differs from one type of collision to
another, and it may have no bearing on
the visible damage done to the vehicle
itself.
Page 73
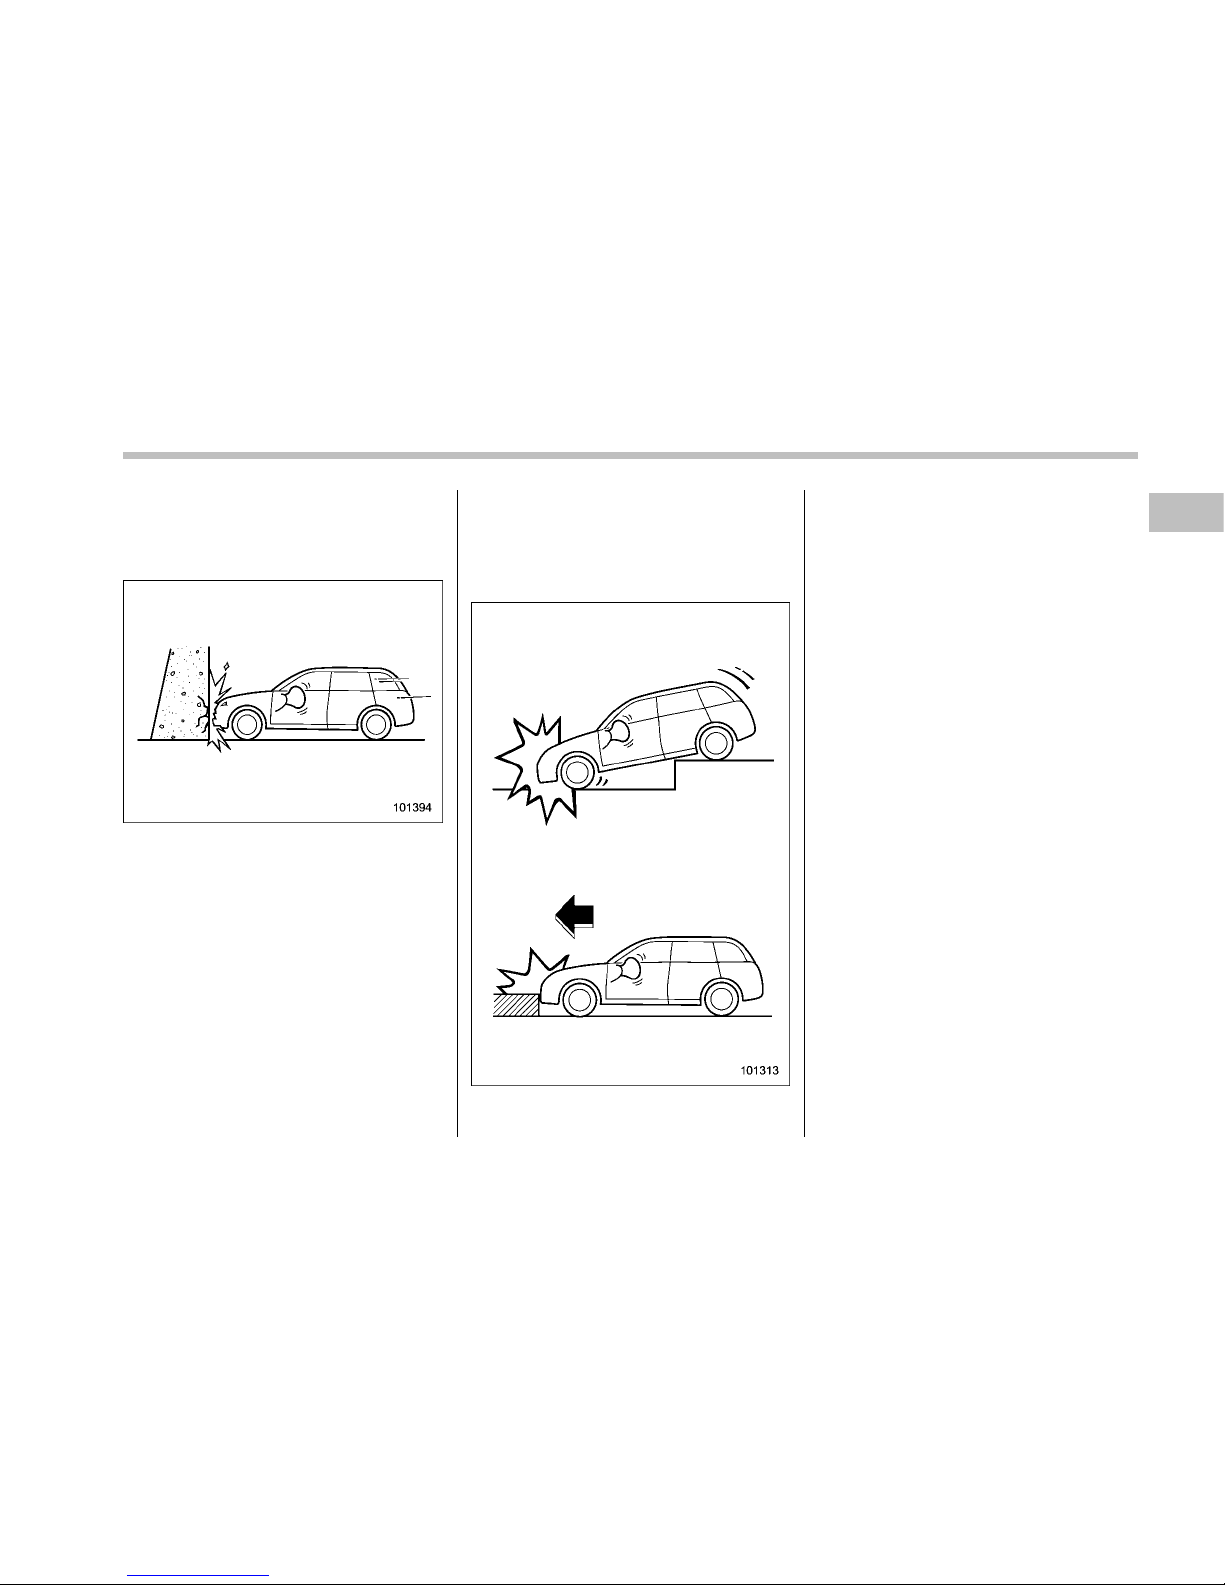
! Examples of accident in which the
driver’s/driver’s and front passenger’s SRS frontal airbag(s) will most
likely deploy.
A head-on collision against a thick concrete wall at a vehicle speed of 12 to 19
mph (20 to 30 km/h) or higher activates
only the driver’s SRS frontal airbag or both
driver’s and front passenger’s SRS frontal
airbags. The airbag(s) will also be activated when the vehicle is exposed to a
frontal impact similar in fashion and
magnitude to the collision described
above.
! Examples of the types of accidents
in which it is possible that the
driver’s/driver’s and front passenger’s SRS frontal airbag(s) will deploy.
Only the driver’s SRS frontal airbag or
both driver’s and front passenger’s SRS
frontal airbags may be activated when the
vehicle sustains a hard impact in the
undercarriage area from the road surface
(such as when the vehicle plunges into a
deep ditch, is severely impacted or
knocked hard against an obstacle on the
road such as a curb).
Seat, seatbelt and SRS airbags 1-51
– CONTINUED –
Page 74

1-52 Seat, seatbelt and SRS airbags
! Examples of the types of accidents in which deployment of the driver’s/driver’s
and front passenger’s SRS frontal airbag(s) is unlikely to occur.
1) The vehicle strikes an object, such as a
telephone pole or sign pole.
2) The vehicle slides under the load bed of
a truck.
3) The vehicle sustains an oblique offset
frontal impact.
4) The vehicle sustains an offset frontal
collision.
5) The vehicle strikes an object that can
move or deform, such as a parked
vehicle.
There are many types of collisions which
might not necessarily require deployment
of driver’s/driver’s and front passenger’s
SRS frontal airbag(s). In the event of
accidents like those illustrated, the driver’s/driver’s and front passenger’s SRS
frontal airbag(s) may not deploy depending on the level of accident forces involved.
Page 75
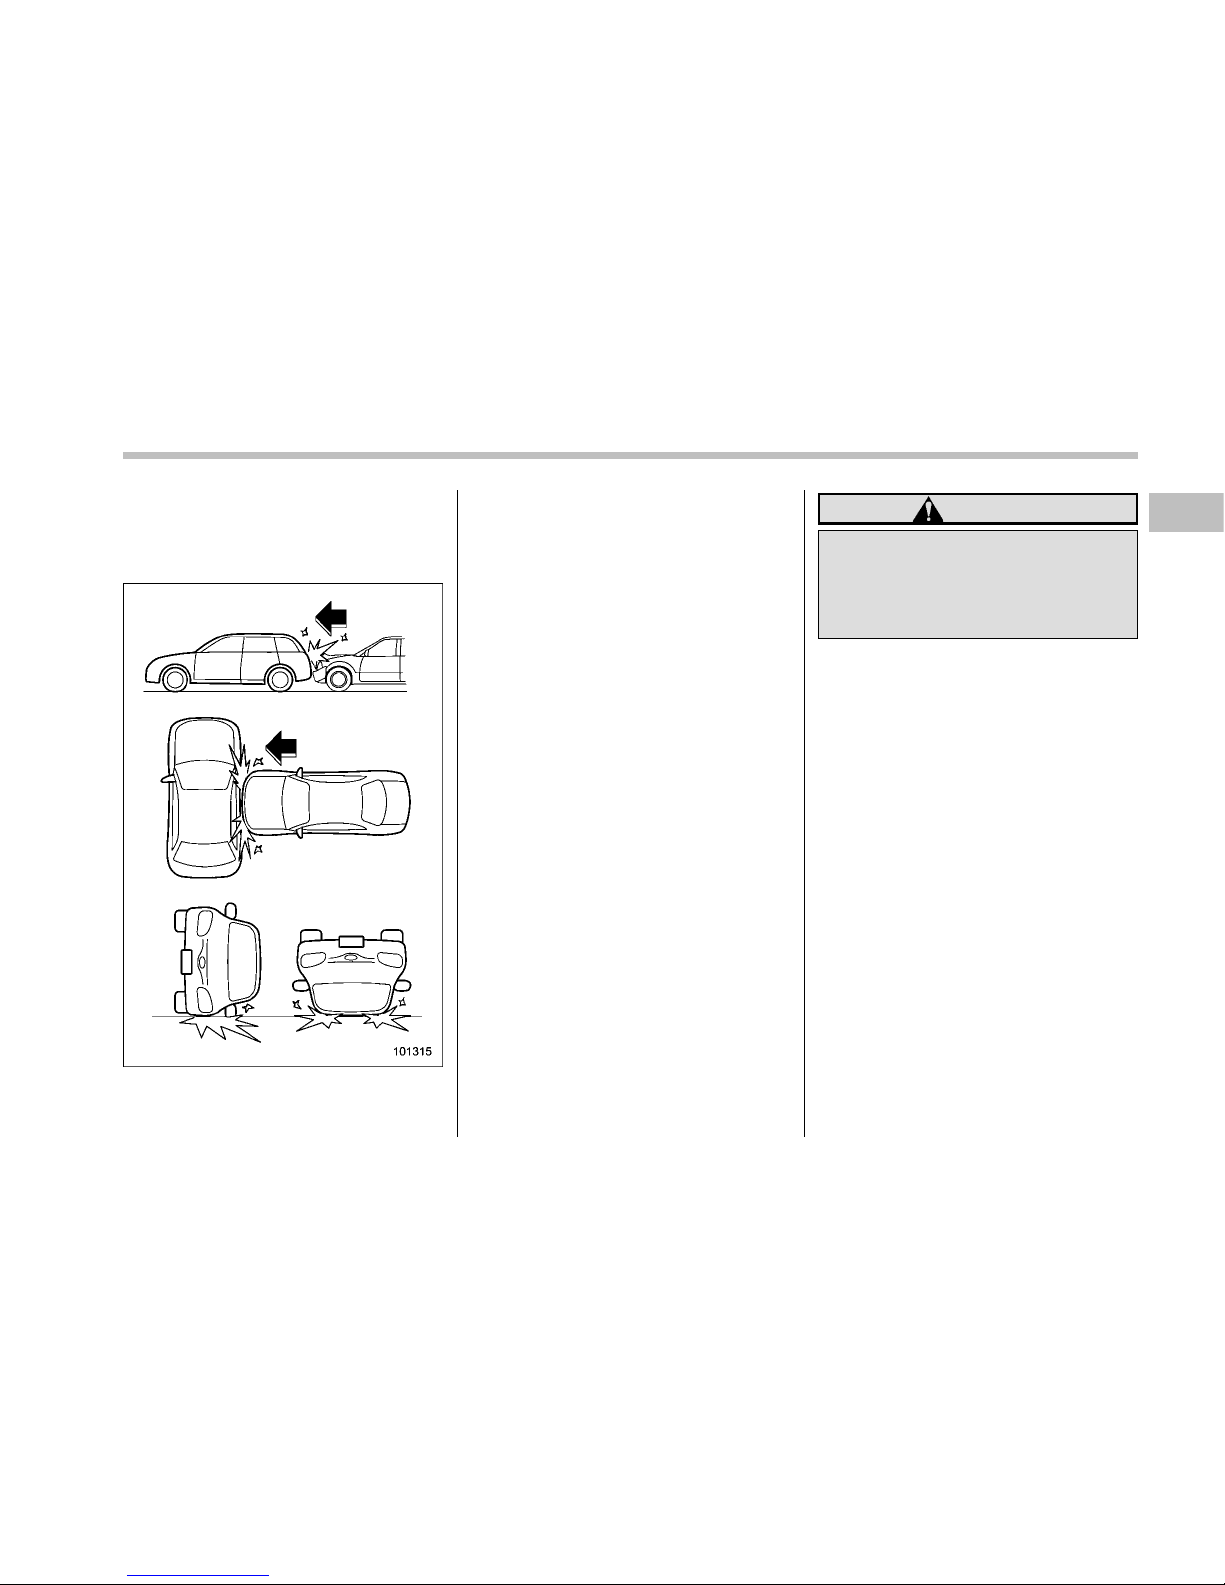
! Examples of the types of accidents
in which the driver’s/driver’s and
front passenger’s SRS frontal
airbag(s) will basically not deploy.
The driver’s and front passenger’s SRS
frontal airbags are designed basically not
to deploy if the vehicle is struck from the
side or from behind, or if it rolls onto its
side or roof, or if it is involved in a lowspeed frontal collision.
1) First impact
2) Second impact
In an accident where the vehicle is
impacted more than once, the driver’s
and/or front passenger’s SRS frontal
airbag(s) will deploy only once on the first
impact.
Example: In the case of a double collision,
first with another vehicle, then against a
concrete wall in immediate succession,
once either or both of the driver’s and front
passenger’s SRS frontal airbags is/are
activated on the first impact, it/they will not
be activated on the second impact.
WARNING
If the vehicle is damaged in an
accident but the SRS frontal airbag
does not deploy, contact your
SUBARU dealer as soon as possible.
& SRS side airbag and SRS
curtain airbag
The SRS side airbag is stored in the door
side of each front seat seatback, which
bears an “SRS AIRBAG” label.
Inamoderatetoseveresideimpact
collision, the SRS side airbag on the
impacted side of the vehicle deploys
between the occupant and the door panel
and supplements the seatbelt by reducing
the impact on the occupant ’s chest and
waist. The SRS side airbag operates only
for front seat occupants.
The SRS curtain airbag on each side of
the cabin is stored in the roof side
(between the front pillar and a point over
the rear seat). An “SRS AIRBAG” mark is
located at the top of each center pillar.
Inamoderatetoseveresideimpact
collision, the SRS curtain airbag on the
impacted side of the vehicle deploys
between the occupant and the side
Seat, seatbelt and SRS airbags 1-53
– CONTINUED –
Page 76
1-54 Seat, seatbelt and SRS airbags
window and supplements the seatbelt by
reducing the impact on the occupant’s
head.
WARNING
The SRS side airbag and S RS
curtain airbag are designed as only
a supplement to the primary protection provided by the seatbelt. They
do not do away with the need to
fasten seatbelts. It is also important
to wear your seatbelt to help avoid
injuries that can result when an
occupant is not seated in a proper
upright position.
WARNING
. Do not sit or lean unnecessarily
close to either front door. The
SRS side airbag is stored in both
front seat seatbacks next to the
door, and it provides protection
by deploying rapidly (faster than
the blink of an eye) in the event of
a side impact collision. However,
theforceofSRSsideairbag
deployment may cause injuries
if your head or other parts of the
body are too close to the SRS
side airbag.
. Since your vehicle is equipped
with SRS curtain airbags, do not
sit or lean unnecessarily close to
the front or rear door on either
side. Also, do not put your head,
arms and hands out of the window. The SRS curtain airbag on
each side of the cabin is stored in
the roof side (between the front
pillar and a point over the rear
seat), and it provides protection
by deploying rapidly (faster than
the blink of an eye) in the event of
a side impact. However, the force
of its deployment may cause
injuries if your head is too close
to it.
Page 77
WARNING
Do not rest your arm on either front
door or its internal trim. It could be
injured in the event of SRS side
airbag deployment.
WARNING
. Never allow a child to kneel on
the front passenger’s seat facing
the side window or to wrap his/
her arms around the front seat
seatback. In the event of an
accident, the force of the SRS
side airbag deployment could
injure the child seriously because his/her head or arms or
other parts of the body are too
close to the SRS side airbag.
Since your vehicle is also
equipped with a front passenger’s SRS frontal airbag, children
aged 12 and under should be
placed in the rear seat anyway
and should be properly restrained at all times.
. Never allow a child to kneel on
any passenger’s seat facing the
side window or put their head,
arms and hands out of the window. In the event of an accident,
the force of the SRS curtain
airbag deployment could injure
the child seriously because his/
her head is close to the SRS
curtain airbag.
WARNING
. Do not attach accessories to the
door trim or near either SRS side
airbags and do not place objects
Seat, seatbelt and SRS airbags 1-55
– CONTINUED –
Page 78
1-56 Seat, seatbelt and SRS airbags
near the SRS side airbags. In the
event of the SRS side airbag
deployment, they could be propelled dangerously toward the
vehicle’s occupants and cause
injuries.
. Do not attach a hands-free micro-
phone or any other accessory to
a front pillar, a center pillar, a rear
pillar, the windshield, a side window, an assist grip, or any other
cabin surface that would be near
a deploying SRS curtain airbag.
A hands-free microphone or
other accessory in such a location could be propelled through
the cabin with great force by the
curtain airbag, or it could prevent
correct deployment of the curtain
airbag. In either case, the result
could be serious injuries.
. Do not hang coat hangers or
other hard or pointed objects on
the coat hooks. If such items
were hanging on the coat hooks
during deployment of the SRS
curtain airbags, they could cause
serious injuries by coming off the
coat hooks and being thrown
through the cabin or by preventing deployment of the curtain
airbags.
Before hanging clothing on the
coat hooks, make sure there are
no sharp objects in the pockets.
Hang clothing directly on the
coat hooks without using hangers.
WARNING
Do not put any kind of cover or
clothes or other objects over either
front seatback and do not attach
labels or stickers to the front seat
surface on or near the SRS side
airbag. They could prevent proper
deployment of the SRS side airbag,
reducing protection available to the
front seat’s occupant.
! Operation
The SRS side airbag and SRS curtain
airbag can function only when the ignition
switch is in the “ON” position.
The driver’s and front passenger’s SRS
side airbags and SRS curtain airbags
deploy independently of each other since
each has its own impact sensor. Therefore, they may not both deploy in the same
accident. Also, the SRS side airbag and
SRS curtain airbag deploys independently
of the driver’s and front passenger’s SRS
frontal airbags in the steering wheel and
instrument panel.
An impact sensor, which senses impact
force, is located in each of the left and
right center pillars and rear wheel houses.
Another impact sensor, which also senses
Page 79
impact force, is located in the airbag
control module.
If one of the center pillar impact sensors
and the impact sensor that is located in
the airbag control module together sense
an impact force above a predetermined
level in a side collision, the control module
causes both the SRS side airbag and
curtain airbag on the impacted side to
inflate regardless of whether the rear
wheel house impact sensor on the same
side senses an impact.
If one of the rear wheel house impact
sensors and the impact sensor that is
located in the airbag control module
together sense a sufficiently strong impact
force, the control module causes only the
SRS curtain airbag on the impacted side
to inflate.
After the deployment, the SRS side airbag
immediately starts to deflate. The time
required from detection of an impact to
deflation of an SRS side airbag after
deployment is shorter than the blink of
an eye.
The SRS curtain airbag remains inflated
for a while following deployment then
slowly deflates.
The SRS side airbag and SRS curtain
airbag deploy even when no one occupies
the seat on the side on which an impact is
applied.
When the SRS side airbag and SRS
curtain airbag deploy, a sudden, fairly loud
inflation noise will be heard and some
smoke will be released. These occurrences are a normal result of the deployment. This smoke does not indicate a fire
in the vehicle.
CAUTION
Do not touch the SRS side airbag
system components around the
front seat seatback with bare hands
right after deployment. Doing so can
cause burns because the components can be very hot as a result of
deployment.
After deployment, do not touch any
part of the SRS curtain airbag
system (from the front pillar to the
part of the roof side over the rear
seat). Doing so can cause burns
because the components can be
very hot as a result of deployment.
The SRS side airbag and SRS curtain
airbag are designed to deploy in the event
of an accident involving a moderate to
severe side impact collision. It is basically
not designed to deploy in a lesser side
impact. Also, it is basically not designed to
deploy in frontal or rear impacts because
SRS side airbag and SRS curtain airbag
deployment would not help the occupant
in those situations.
Each SRS side airbag and SRS curtain
airbag are designed to function on a onetime-only basis.
SRS side airbag and SRS curtain airbag
deployment depend on the level of force
experienced in the passenger compartment during a side impact collision. That
level differs from one type of collision to
another, and it may have no bearing on
the visible damage done to the vehicle
itself.
Seat, seatbelt and SRS airbags 1-57
– CONTINUED –
Page 80
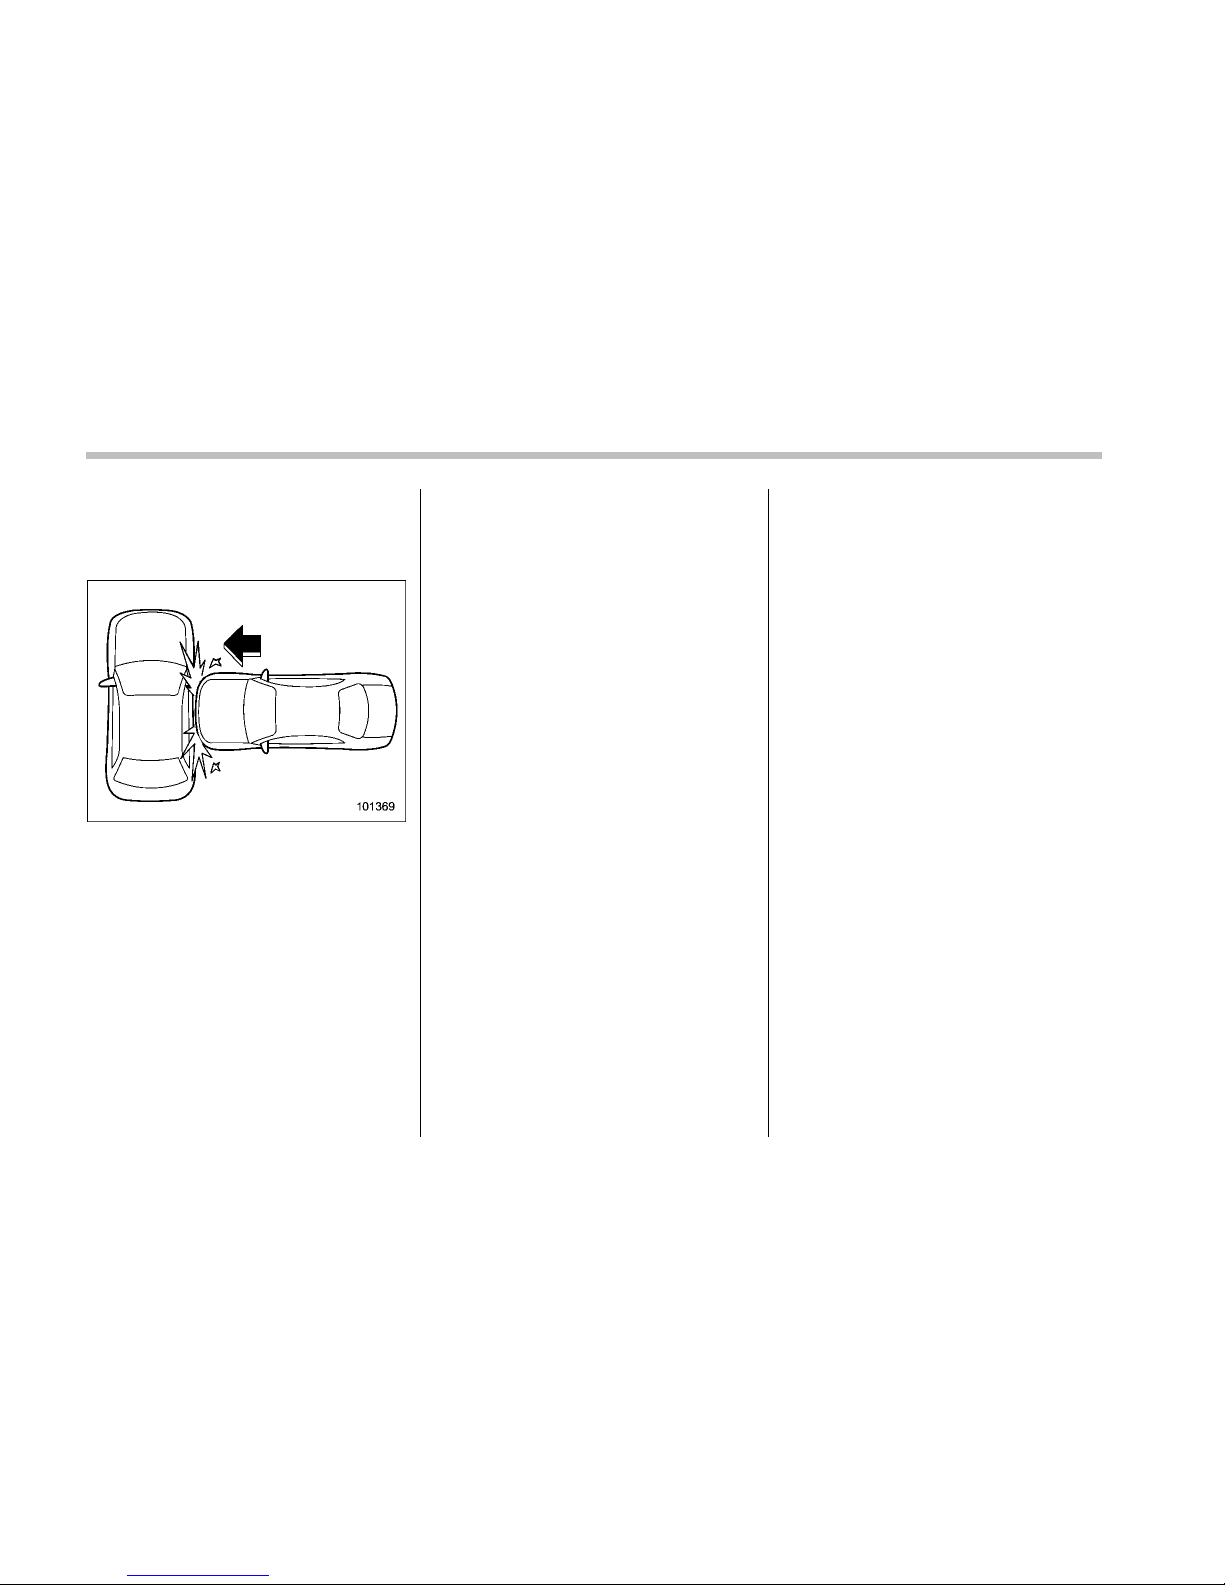
1-58 Seat, seatbelt and SRS airbags
! Example of the type of accident in
which the SRS side airbag and SRS
curtain airbag will most likely deploy (Legacy).
A severe side impact near the front seat
activates the SRS side airbag and SRS
curtain airbag.
Page 81
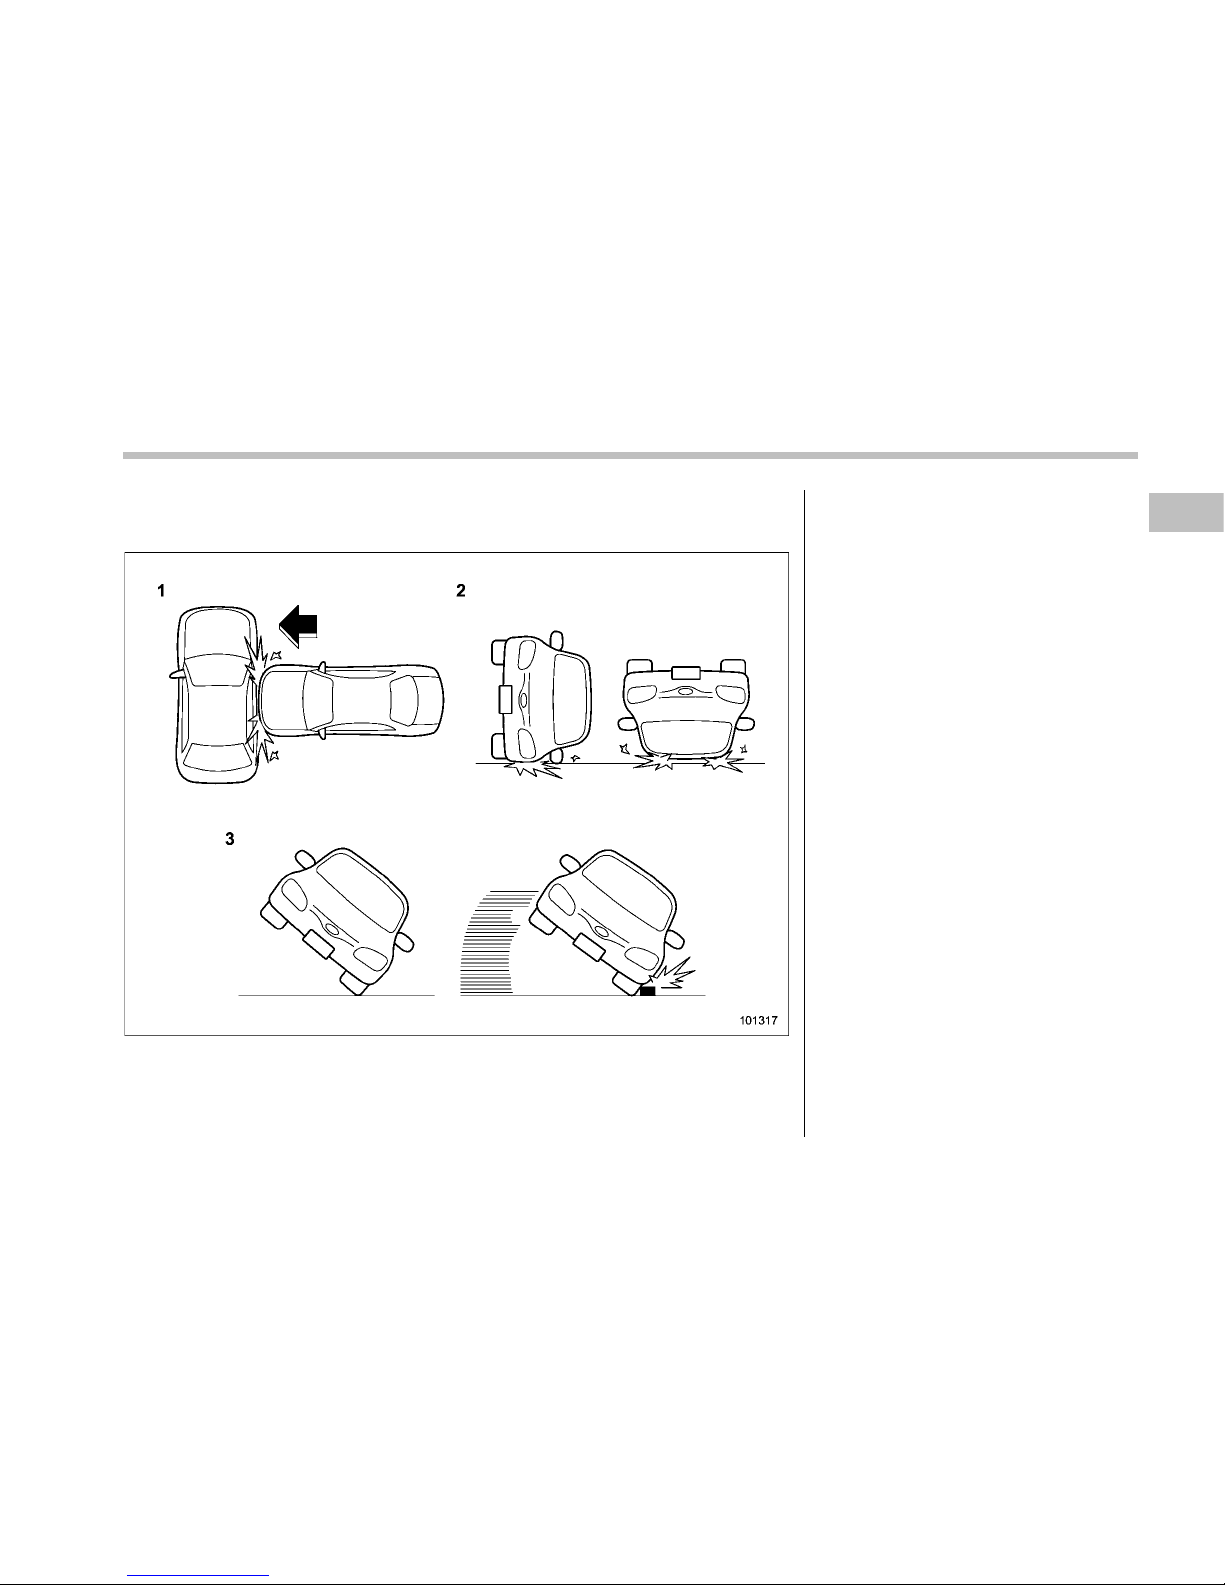
! Examples of the types of accidents in which the SRS curtain airbag will most
likely deploy (Outback).
1) A severe side impact near the front seat
or the rear seat activates the SRS curtain
airbag.
2) The vehicle rolls onto its side or the roof.
3) If the angle of vehicle tip-up is marginal
or if the skidding vehicle’s tires hit a
curbstone laterally.
Seat, seatbelt and SRS airbags
1-59
– CONTINUED –
Page 82
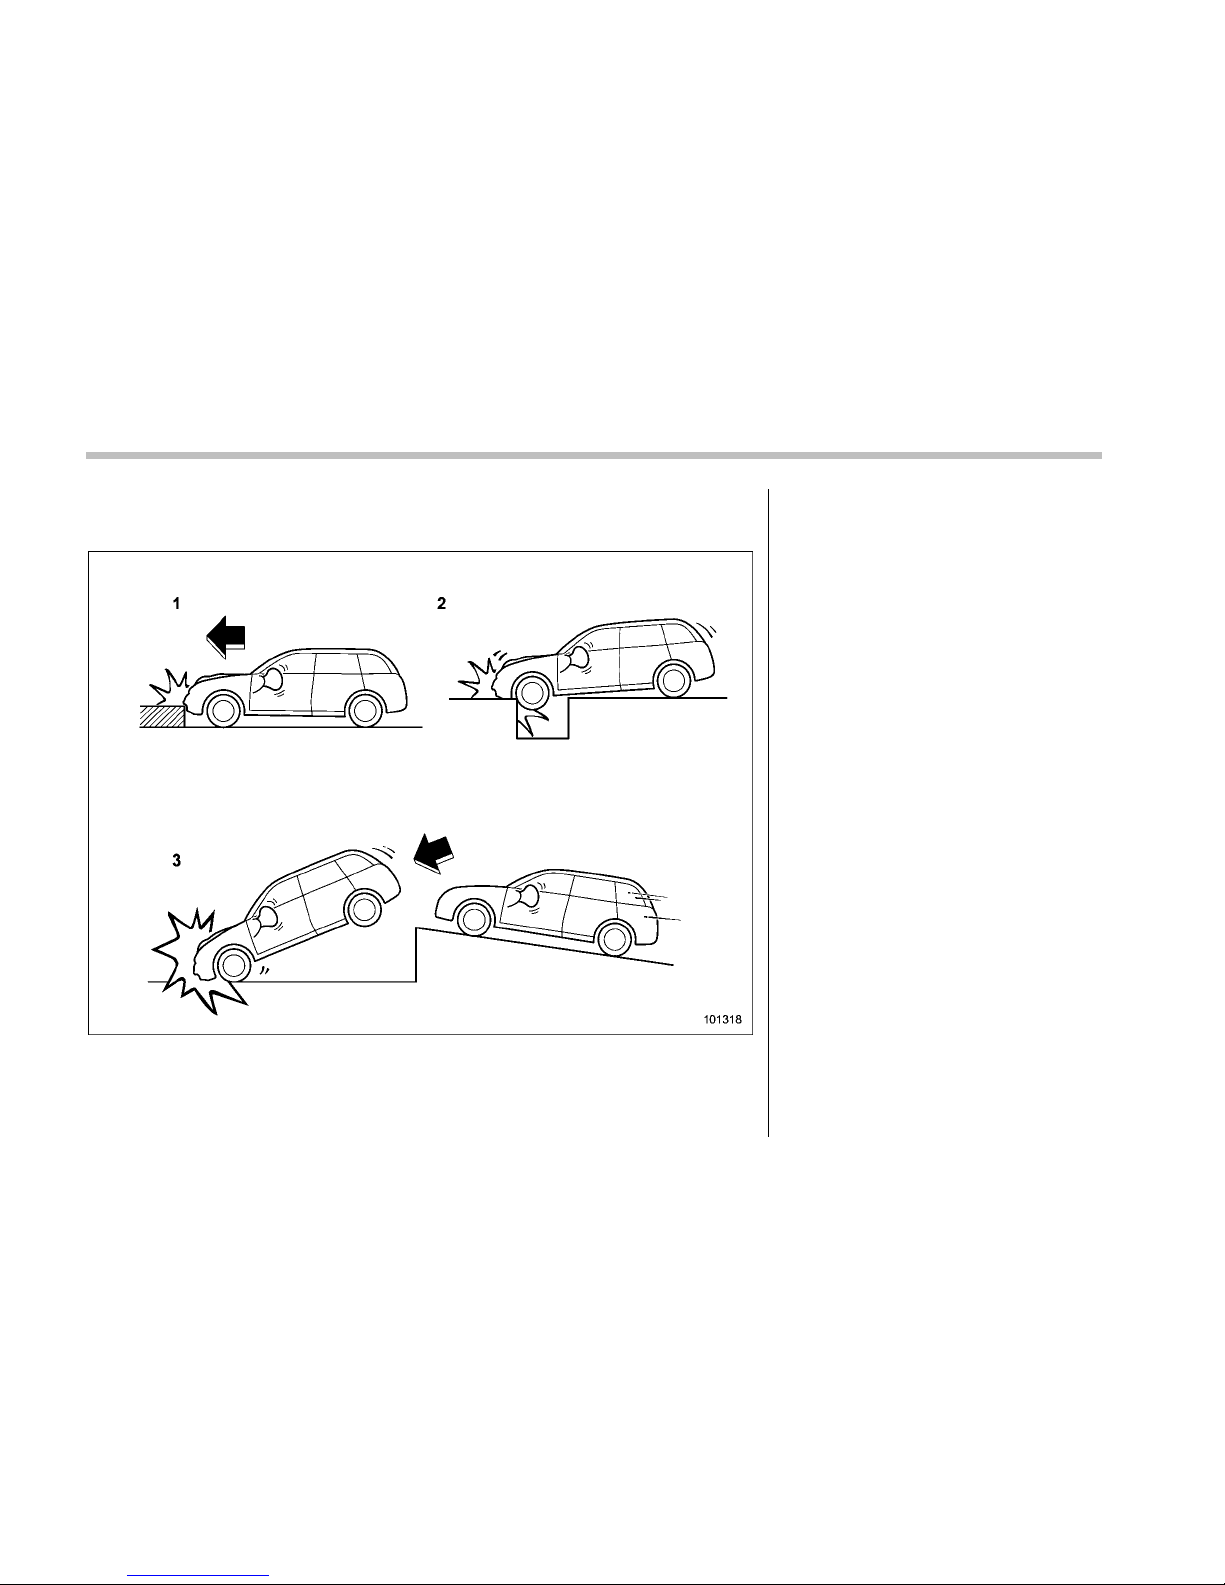
1-60 Seat, seatbelt and SRS airbags
! Examples of the types of accidents in which it is possible that the SRS side
airbag and the SRS curtain airbag will deploy (Outback).
1) Hitting a curb, edge of pavement or hard
surface
2) Falling into or jumping over a deep hole
3) Landing hard or vehicle falling
It is possible that the SRS side and curtain
airbags will deploy if a serious impact
occurs to the underside of your vehicle.
Some examples are shown in the illustration.
Page 83
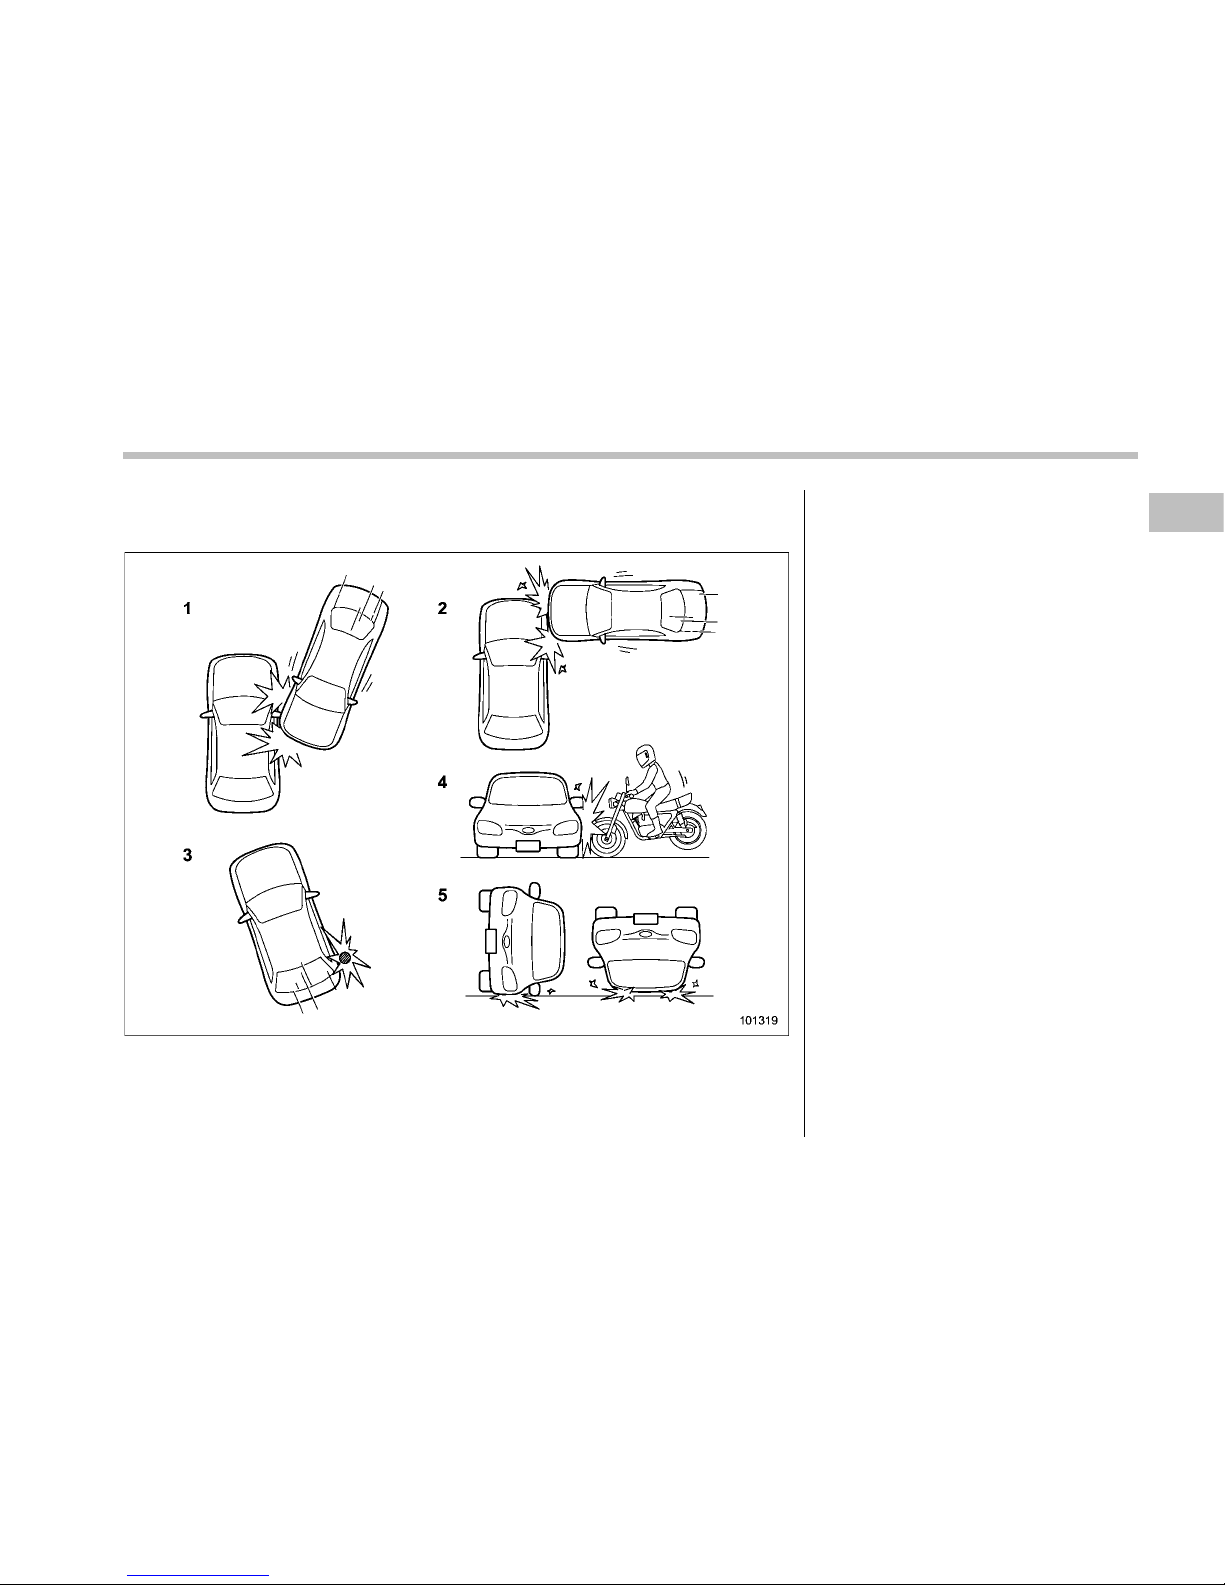
! Examples of the types of accidents in which the SRS side airbag and SRS
curtain airbag are unlikely to deploy.
1) The vehicle is involved in an oblique
side-on impact.
2) The vehicle is involved in a side-on
impact in an area outside the vicinity of
the passenger compartment.
3) The vehicle strikes a telephone pole or
similar object.
4) The vehicle is involved in a side-on
impact from a motorcycle.
5) The vehicle rolls onto its side or roof.
There are many types of collisions which
might not necessarily require SRS side
airbag and SRS curtain airbag deployment. In the event of accidents like those
illustrated, the SRS side airbag and SRS
curtain airbag may not deploy depending
on the level of accident forces involved.
Seat, seatbelt and SRS airbags 1-61
– CONTINUED –
Page 84
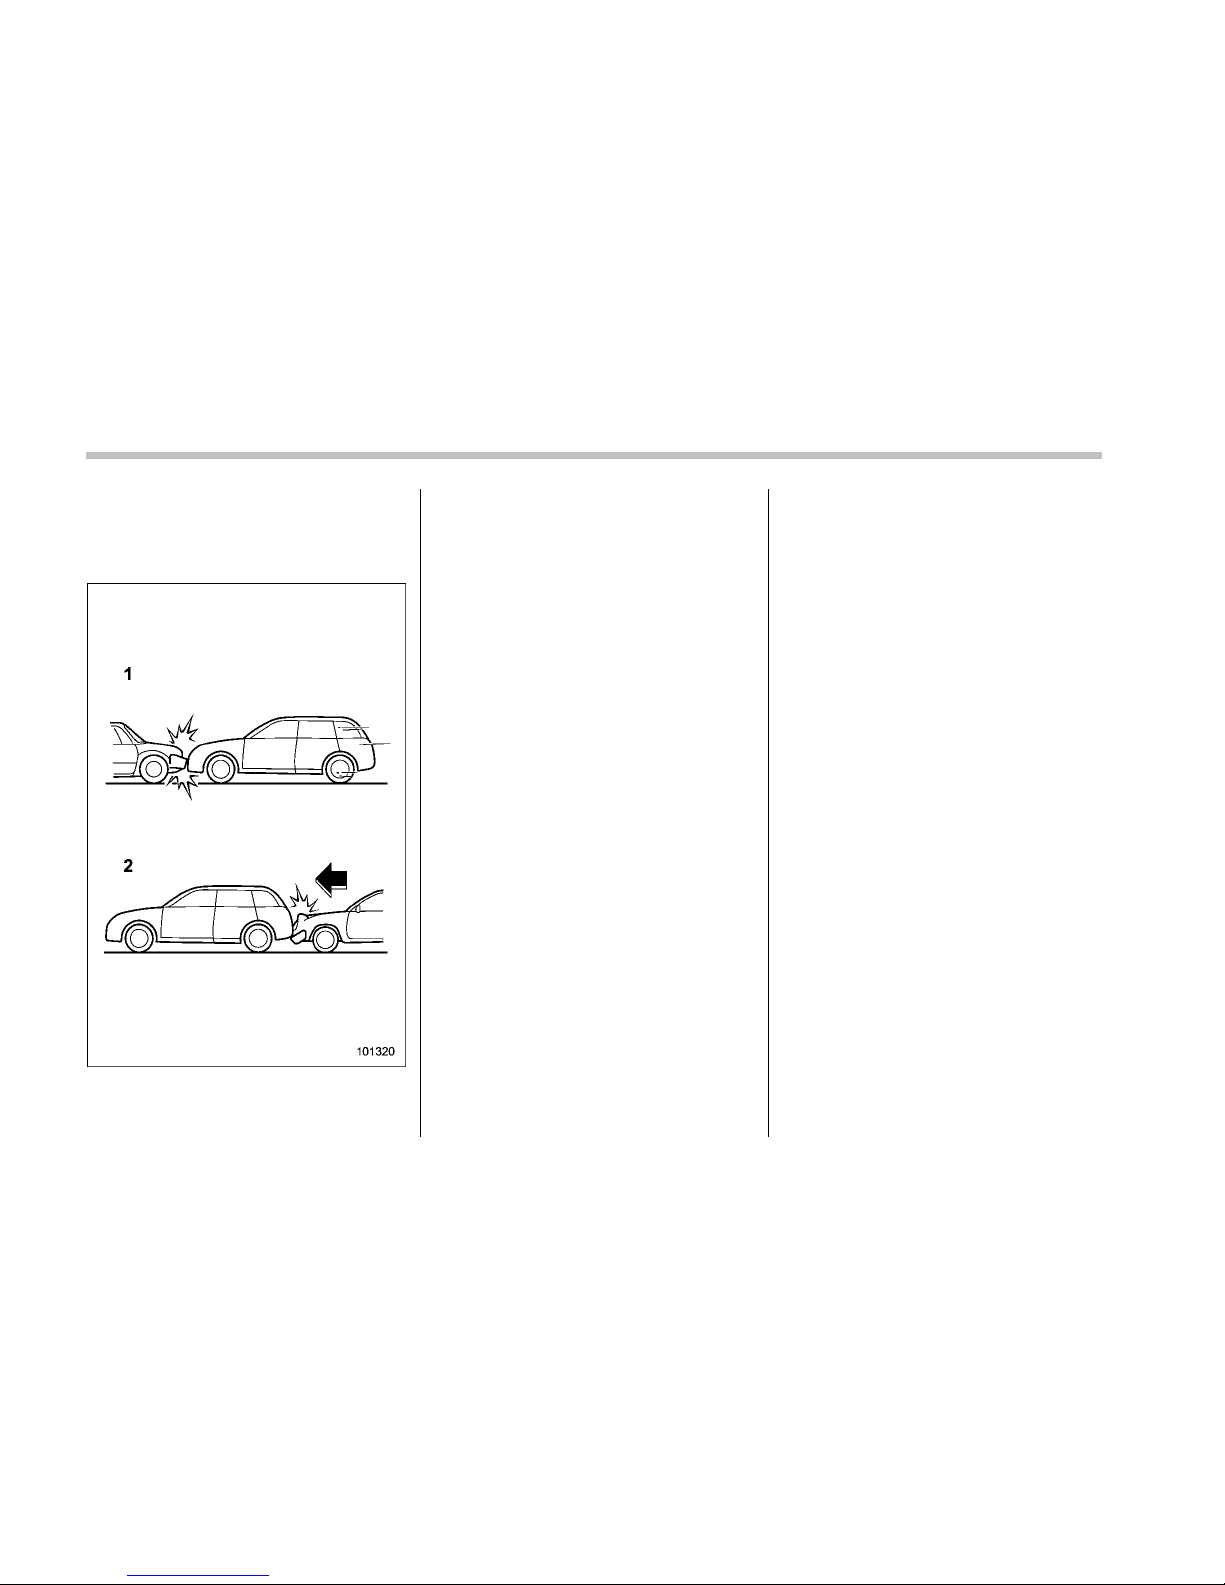
1-62 Seat, seatbelt and SRS airbags
! Examples of the types of accidents
in which the SRS side airbag and
SRS curtain airbag will basically not
deploy.
1) The vehicle is involved in frontal collision
with another vehicle (moving or stationary).
2) The vehicle is struck from behind.
The SRS side airbag and SRS curtain
airbag are basically not designed to
deploy if the vehicle is involved in a frontal
collision or is struck from behind. Examples of such accidents are illustrated.
1) First impact
2) Second impact
A) SRS curtain airbag
B) SRS side airbag
In an accident where the vehicle is struck
from the side more than once, the SRS
side airbag and SRS curtain airbag deploy
only once on the first impact.
Example: In the case of a double side
impact collision, first with one vehicle and
immediately followed by another from the
same direction, once the SRS side airbag
and SRS curtain airbag are activated on
the first impact, they will not be activated
on the second.
& SRS airbag system monitors
A diagnostic system continually monitors
the readiness of the SRS airbag system
(including front seatbelt pretensioners)
while the vehicle is being driven. The
SRS airbag system warning light “AIRBAG” will show normal system operation
by lighting for approximately 6 seconds
when the ignition switch is turned to the
“ON” position.
The following components are monitored
by the indicator.
. Front sub sensor (right-hand side)
. Front sub sensor (left-hand side)
Page 85
. Airbag control module (including impact sensors (all models) and rollover
sensors (Outback))
. Frontal airbag module (driver’s side)
. Frontal airbag module (front passen-
ger’s side)
. Side airbag sensor (center pillar right-
hand side)
. Side airbag sensor (center pillar left-
hand side)
. Side airbag module (driver’s side)
. Side airbag module (front passenger’s
side)
. Curtain airbag sensor (rear wheel
house right-hand side)
. Curtain airbag sensor (rear wheel
house left-hand side)
. Curtain airbag module (right-hand side)
. Curtain airbag module (left-hand side)
. Seatbelt pretensioner (driver’s side)
. Seatbelt pretensioner (front passen-
ger’s side)
. Seatbelt buckle switch (front passen-
ger’s side)
. Front passenger’s occupant detection
system weight sensor
. Front passenger’s occupant detection
control module
. Front passenger’s frontal airbag ON
and OFF indicator
. All related wiring
WARNING
If the warning light exhibits any of
the following conditions, there may
be a malfunction in the seatbelt
pretensioners and/or SRS airbag
system. Immediately take your vehicle to your nearest SUBARU dealer
to have the system checked. Unless
checked and properly repaired, the
seatbelt pretensioners and/or SRS
airbags will operate improperly (e.g.
SRS airbags may inflate in a very
minor collision or not inflate in a
severe collision), which may increase the risk of injury.
. Flashing or flickering of the warn-
ing light
. No illumination of the warning
light when the ignition switch is
first turned to the “ON” position
. Continuous illumination of the
warning light
. Illumination of the warning light
while driving
& SRS airbag system servicing
WARNING
. When discarding an airbag mod-
ule or scrapping the entire vehicle damaged by a collision, consult your SUBARU dealer.
. The SRS airbag has no user-
serviceable parts. Do not use
electrical test equipment on any
circuit related to the SRS airbag
system. For required servicing of
the SRS airbag, consult your
nearest SUBARU dealer. Tampering with or disconnecting the
system’s wiring could result in
accidental inflation of the SRS
airbag or could make the system
inoperative, which may result in
serious injury.
Seat, seatbelt and SRS airbags 1-63
– CONTINUED –
Page 86
1-64 Seat, seatbelt and SRS airbags
CAUTION
If you need service or repair in areas
of your vehicle listed in the following, have an authorized SUBARU
dealer perform the work. The SRS
airbag control module, impact sensors and airbag modules are stored
in these areas.
. Under the center console
. Inside each front fender
. Steering wheel and column and
nearby areas
. Top of the dashboard on front
passenger’ssideandnearby
areas
. Each front seat and nearby area
. Inside each center pillar
. In each roof side (from the front
pillar to a point over the rear seat)
. Between the rear seat cushion
and rear wheel house on each
side
. Under the rear center seat
In the event that the SRS airbag is
deployed, replacement of the system
should be performed only by an authorized SUBARU dealer. When the components of the SRS airbag system are
replaced, use only genuine SUBARU
parts.
NOTE
In the following cases, contact your
SUBARU dealer as soon as possible.
. The front part of the vehicle was
involved in an accident in which only
the driver’s SRS frontal airbag or both
driver’s and front passenger ’sSRS
frontal airbags did not deploy.
. The pad of the steering wheel, the
cover over the front passenger’s SRS
frontal airbag, or either roof side (from
the front pillar to a point over the rear
seat) is scratched, cracked, or otherwise damaged.
. The center pillar, rear wheel house
or rear sub frame, or an area near these
parts, was involved in an accident in
which the SRS side airbag and SRS
curtain airbag did not deploy.
. The fabric or leather of either front
seatback is cut, frayed, or otherwise
damaged.
. The rear part of the vehicle was
involved in an accident.
& Precautions against vehicle
modification
WARNING
To avoid accidental activation of the
system or rendering the system
inoperative, which may result in
serious injury, no modifications
should be made to any components
or wiring of the SRS airbag system.
This includes the following modifications:
. Installation of custom steering
wheels
. Attachment of additional trim
materials to the dashboard
. Installation of custom seats
. Replacement of seat fabric or
leather
. Installation of additional fabric or
leather on the front seat
. Attachment of a hands-free mi-
crophone or any other accessory
to a front pillar, a center pillar, a
rear pillar, the windshield, a side
window, an assist grip, or any
other cabin surface that would be
near a deploying SRS curtain
airbag.
Page 87
. Installation of additional electri-
cal/electronic equipment such as
a mobile two-way radio on or
near the SRS airbag system
components and/or wiring is not
advisable. This could interfere
with proper operation of the
SRS airbag system.
CAUTION
Do not perform any of the following
modification s. Such modifications
can interfere with proper operation
of the SRS airbag system.
. Attachment of any equipment
(bush bar, bullbar, winches, snow
plow, skid/sump plate, etc.) other
than genuine SUBARU accessory parts.
. Modification of the suspension
system or front end structure.
. Installation of a tire of different
size and construction from the
tires specified on the vehicle
placard attached to the driver’s
door pillar or specified for individual vehicle models in this Owner’s Manual.
. Attachment of any equipment
(side steps or side sill protectors,
etc.) other than genuine SUBARU
accessory parts to the side body.
Always consult your SUBARU dealer if
you want to install any accessory parts on
your vehicle.
Seat, seatbelt and SRS airbags 1-65
Page 88

————————————————————————————————————————
————————————————————————————————————————
————————————————————————————————————————
————————————————————————————————————————
————————————————————————————————————————
————————————————————————————————————————
————————————————————————————————————————
————————————————————————————————————————
————————————————————————————————————————
————————————————————————————————————————
————————————————————————————————————————
————————————————————————————————————————
————————————————————————————————————————
Page 89

Keys ..................................................................... 2-2
Key number ........................................................ 2-2
Immobilizer .......................................................... 2-3
Security ID plate.................................................. 2-3
Security indicator light ........................................ 2-4
Key replacement ................................................. 2-4
Door locks ........................................................... 2-5
Locking and unlocking from the outside .............. 2-5
Locking and unlocking from the inside ................ 2-6
Battery drainage prevention function ................... 2-6
Power door locking switches ............................. 2-7
Key lock-in prevention function ........................... 2-7
Remote keyless entry system ............................ 2-8
Locking the doors ............................................... 2-9
Unlocking the doors ............................................ 2-9
Opening the trunk lid (Legacy)............................ 2-10
Unlocking the rear gate (Outback)....................... 2-10
Vehicle finder function........................................ 2-10
Sounding a panic alarm...................................... 2-10
Selecting audible signal operation ...................... 2-11
Replacing the battery ......................................... 2-11
Replacing lost transmitters ................................. 2-12
Alarm system ..................................................... 2-16
System alarm operation...................................... 2-16
Activating and deactivating the alarm system ..... 2-16
If you have accidentally triggered the alarm
system ............................................................ 2-16
Arming the system ............................................ 2-17
Disarming the system ........................................ 2-18
Valet mode ........................................................ 2-18
Passive arming.................................................. 2-18
Tripped sensor identification .............................. 2-19
Shock sensors (dealer option)............................ 2-19
Child safety locks.............................................. 2-20
Windows............................................................. 2-21
Power window operation by driver ..................... 2-21
Power window operation by passengers............. 2-23
Initialization of power window ............................ 2-24
Trunk lid (Legacy).............................................. 2-24
To open and close the trunk lid from outside...... 2-24
To open the trunk lid from inside........................ 2-24
Internal trunk lid release handle ......................... 2-25
Rear gate (Outback)........................................... 2-27
Moonroof (if equipped)...................................... 2-28
Moonroof switches ............................................ 2-29
Sun shade ......................................................... 2-30
Keys and doors
2
Page 90
2-2 Keys and doors
Keys
1) Master key
2) Submaster key
3) Valet key
4) Key number plate
5) Security ID plate
Three types of keys are provided for your
vehicle:
Master key, submaster key and valet key.
The master key and submaster key fit all
locks on your vehicle.
. Ignition switch
. Driver’s door
. Glove box
. Trunk lid
The valet key fits only the ignition switch
and door locks. You can keep the trunk
and glove box locked when you leave your
vehicle and valet key at a parking facility.
CAUTION
Do not attach a large key holder or
key case to either key. If it bangs
against your knees while you are
driving, it could turn the ignition
switch from the “ON” position to the
“Acc” or “LOCK” position, thereby
stopping the engine.
& Key number
1) Key number plate
2) Security ID plate
The key number is stamped on the key
number plate attached to the key set.
Write down the key number and keep it in
another safe place, not in the vehicle. This
number is needed to make a replacement
key if you lose your key or lock it inside the
vehicle.
For information on making replacement
keys for models with the immobilizer
system, refer to “Security ID plate” F2-3.
Page 91
Immobilizer
The immobilizer system is designed to
prevent an u nauthorized person from
starting the engine. Only keys registered
with your vehicle’s immobilizer system can
be used to operate your vehicle. Even if
an unregistered key fits into the ignition
switch and can be turned to the “START”
position, the engine will automatically stop
after several seconds.
Each immobilizer key contains a transponder in which the key’s ID code is
stored. When a key is inserted into the
ignition switch and turned to the “ON”
position, the transponder transmits the
key’s ID code to the immobilizer system’s
receiver. If the transmitted ID cod e
matches the ID code registered in the
immobilizer system, the system allows the
engine to be started. Since the ID code is
transmitted and acted upon almost instantly, the immobilizer system does not
impede normal starting of the engine.
If the engine does not start, pull out the
key once before trying again. Refer to
“Ignition switch” F3-3.
This device complies with Part 15 of
the FCC Rules and with RSS-210 of
Industry Canada. Operation is subject
to the following two conditions: (1) This
device may not cause harmful interference, and (2) this device must
accept any interference received, including interference that may cause
undesired operation.
Changes or modifications not expressly approved by the party responsible for compliance could void the
user’s authority to operate the equipment.
NOTE
To protect your vehicle from theft,
please pay close attention to the following security precautions:
. Never leave your vehicle unattended
with its keys inside.
. Before leaving your vehicle, close all
windows and lock the doors (all models) and rear gate (Outback).
. Do not leave spare keys or any
record of your key number in the
vehicle.
CAUTION
. Do not place the key under direct
sunlight or anywhere it may
become hot.
. Do not get the key wet. If the key
gets wet, wipe it dry with a cloth
immediately.
& Security ID plate
1) Key number plate
2) Security ID plate
The security ID is stamped on the security
ID plate attached to the key set. Write
down the security ID and keep it in
another safe place, not in the vehicle.
This number is needed to make a replacement key if you lose your key or lock it
inside the vehicle.
This number is also needed for replacement or repair of the engine control unit,
integrated unit, combination meter (all
models) and security control unit
Keys and doors 2-3
– CONTINUED –
Page 92

2-4 Keys and doors
(Canada-spec. models).
& Security indicator light
The security indicator light deters potential
thieves by indicating that the vehicle is
equipped with an immobilizer system. It
begins flashing approximately 60 seconds
after the ignition switch is turned from the
“ON” position to the “Acc” or “LOCK”
position or immediately after the key is
pulled out.
If the security indicator light does not flash,
the immobilizer system may be malfunctioning. If this occurs, contact your
SUBARU dealer as soon as possible.
In case an unauthorized key is used (e.g.
an imitation key), the security indicator
light illuminates.
NOTE
Even if the security indicator light
flashes irregularly or its fuse blows
(the light does not flash if its fuse is
blown), the immobilizer system will
function normally.
& Key replacement
Your key number plate and security ID
plate will be required if you ever need a
replacement key made. Any new key must
be registered for use with your vehicle’s
immobilizer system before it can be used.
Up to four keys can be registered for use
with one vehicle.
For security, all the keys registered with
your vehic le’s immobilizer system will
have their ID codes e rased and reregistered when a ne w ke y is made.
Therefore, all of your vehicle’s keys must
be presented when a new key is registered. Any key that is not re-registered
when a new key is made cannot be used
after the other keys are re-registered. For
information on replacement keys and on
the registration of keys with your immobilizer system, contact your SUBARU
dealer.
NOTE
A vehicle that is equipped with the
remote engine start system as a dealer
option can register up to four keys for
use with one vehicle.
Page 93
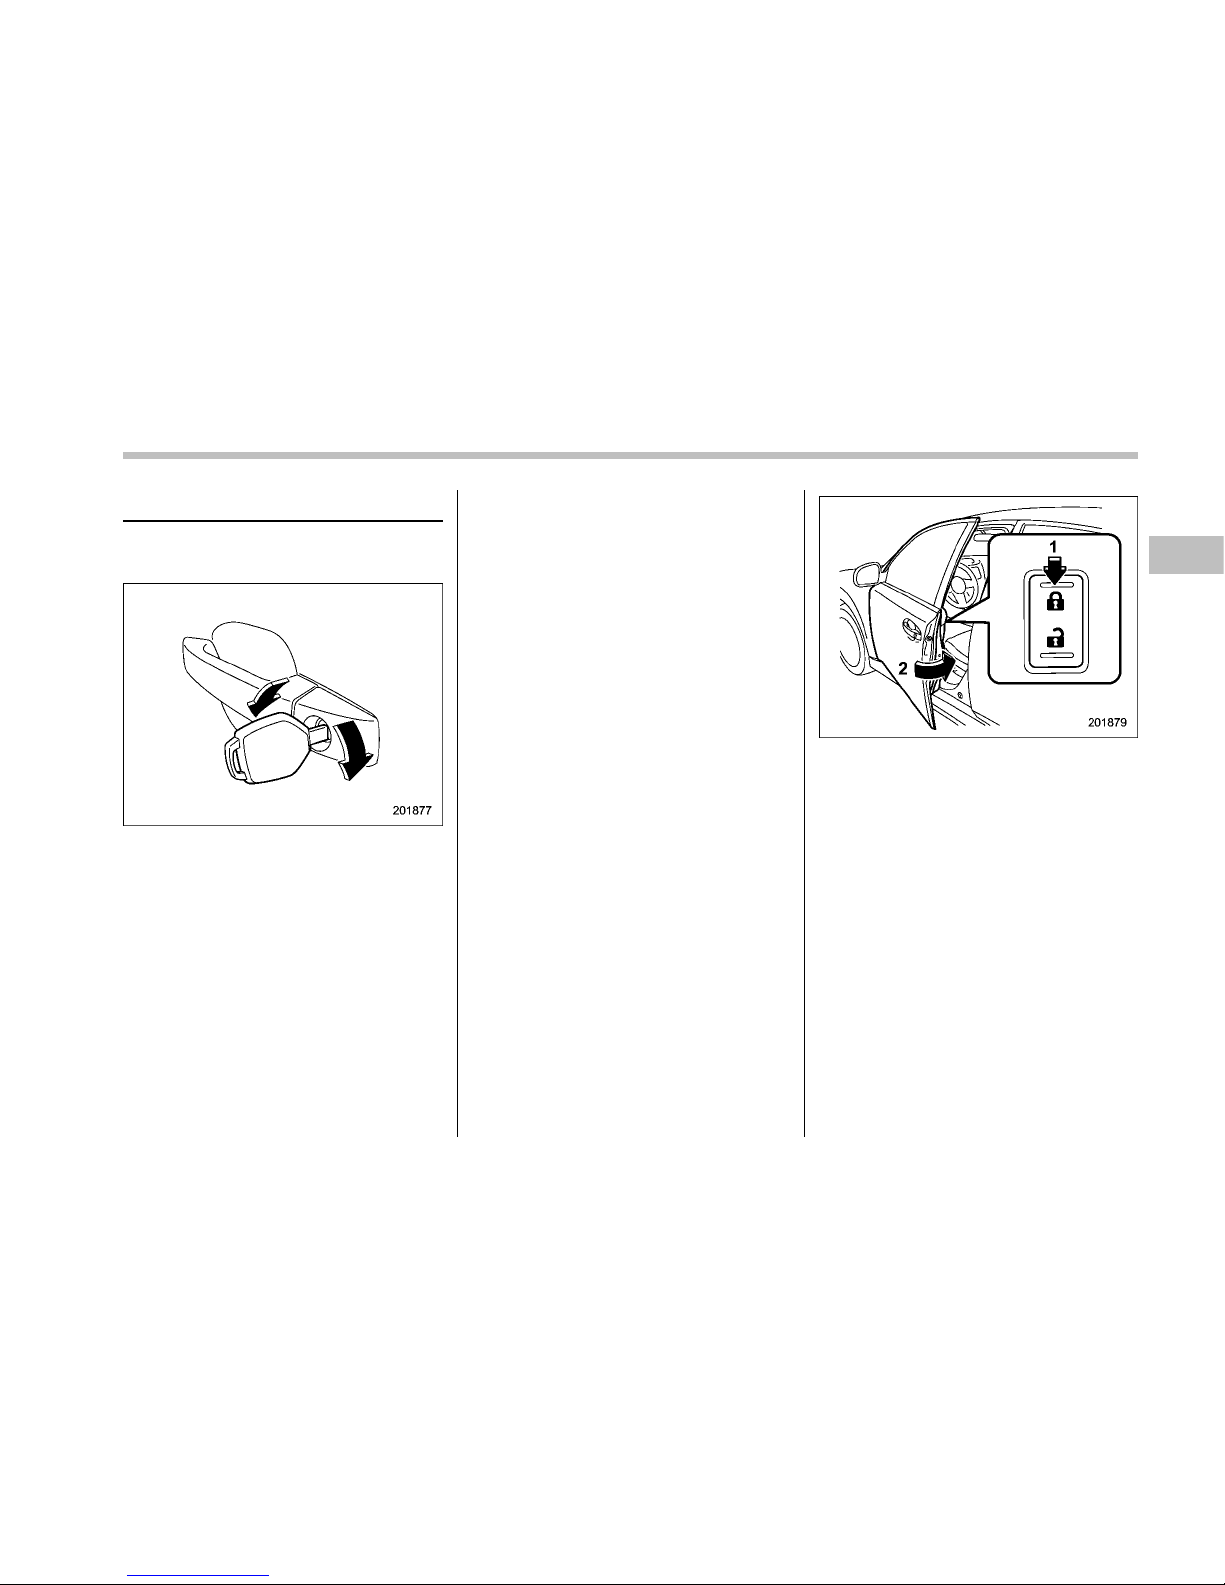
Door locks
& Locking and unlocking from
the outside
To lock the driver’s door from the outside
with the key, turn the key toward the rear.
To unlock the door, turn the key toward the
front.
Lift the outside door handle to open an
unlocked door.
Locking without the key
1) Rotate the lock lever rearward.
2) Close the door.
To lock the door from the outside without
the key, rotate the lock lever rearward and
then close the door.
Locking without the key
1) Press the front side of the power door
locking switch.
2) Close the door.
To lock the door from the outside using the
power door locking switch, press the front
side of the switch (“LOCK” side) and then
close the door. In this case, all closed
doors and the rear gate (Outback) are
locked at the same time.
Always make sure that all doors and the
rear gate are locked before leaving your
vehicle.
NOTE
Make sure that you do not leave the key
inside the vehicle before locking the
doors from the outside without the key.
Keys and doors 2-5
– CONTINUED –
Page 94
2-6 Keys and doors
& Locking and unlocking from
the inside
WARNING
Keep all doors locked when you
drive, especially when small children are in your vehicle.
Along with the proper use of seatbelts and child restraints, locking
the doors reduces the chance of
being thrown out of the vehicle in an
accident.
It also helps prevent passengers
from falling out by preventing a door
from being accidentally opened, and
intruders from unexpectedly opening doors and entering your vehicle.
1) Lock
2) Unlock
To lock the door from the inside, rotate the
lock lever rearward. To unlock the door
from the inside, rotate the lock lever
forward.
The red mark on the lock lever appears
when the door is unlocked.
Pull the inside door handle to open an
unlocked door.
Always make sure that all doors and the
rear gate (Outback) are closed before
starting to drive.
& Battery drainage prevention
function
If a door or the rear gate (Outback) is not
completely closed, the interior lights will
remain illuminated as a result. However,
several lights are automatically turned off
by the battery drainage prevention function to prevent the battery from going
dead. The following interior lights are
affected by this function.
Item
Switch
position
Automatically turning
off
Map lights OFF
*1
Approximately 20
seconds later
Dome
lights
DOOR
Approximately 20
minutes later
Ignition
switch light
—
Approximately 20
minutes later
Door step
lights
— None
*2
Cargo area
light
DOOR
Approximately 20
minutes later
*1: The map lights can be controlled by the
battery drainage prevention function only when
the map light switches are in the OFF position
and the door interlock switch is in the DOOR
position. For the switch positions, refer to “Map
light” F6-2
.
*2: The door step lights are not affected by the
battery drainage prevention function, so the
Page 95
lights do not turn off automatically. To turn off
the lights, it is necessary that each door is
completely closed.
The operational/non-operational setting of
this function can be changed by a
SUBARU dealer. Contact the nearest
SUBARU dealer if you would like to
change the setting.
NOTE
. The factory setting (default setting)
for this function is set as “operational”.
. When leaving the vehicle, please
make sure that all doors and the rear
gate (Outback) are completely closed.
. The battery drainage prevention
function does not operate while the
key is in the ignition switch.
Power door locking switches
1) Lock
2) Unlock
All doors and the rear gate (Outback) can
be locked and unlocked by the power door
locking switches located at the driver’s
side and the front passenger’s side doors.
To lock the doors, press the front side of
the switch.
To unlock the doors, press the rear side of
the switch.
When you close the doors after you set
the door locks, the doors remain locked.
NOTE
Make sure that you do not leave the key
inside the vehicle before locking the
doors from the outside using the power
door locking switches.
& Key lock-in prevention func-
tion
This function prevents the doors from
being locked with the key still in the
ignition switch.
! Behavior with key lock-in preven-
tion function operational
With the driver’s door open, the doors are
automatically kept unlocked even if the
front side of the power door locking switch
is pressed.
! Behavior with key lock-in preven-
tion function non-operational
. If the lock lever is turned to the rear
(“LOCK”) position with the driver’s door
open and the driver’s door is then closed
with the lock lever in that position, the
driver’s door is locked.
. If the spare key is used to lock the
driver’s door from the outside of the
vehicle, the door is locked.
This function’s operational/non-operational setting can be changed by a
SUBARU dealer. Contact a SUB ARU
dealer for details.
Keys and doors 2-7
– CONTINUED –
Page 96
2-8 Keys and doors
NOTE
. The factory setting (default setting)
for this function is set as “operational”.
. When leaving the vehicle, make sure
you are holding the key before locking
the doors.
Remote keyless entry system
CAUTION
. Do not expose the remote trans-
mitter to severe shocks, such as
those experienced as a result of
dropping or throwing.
. Do not take the remote transmit-
ter apart except when replacing
the battery.
. Do not get the remote transmitter
wet. If it gets wet, wipe it dry with
a cloth immediately.
. When you carry the remote trans-
mitteronanairplane,donot
press the button of the remote
transmitter while in the airplane.
When any button of the remote
transmitter is pressed, radio
waves are sent and may affect
the operation of the airplane.
When you carry the remote transmitter in a bag on an airplane,
take measures to prevent the
buttons of the remote transmitter
from being pressed.
This device complies with Part 15 of
the FCC Rules and with RSS-210 of
Industry Canada. Operation is subject
to the following two conditions: (1) This
device may not cause harmful interference, and (2) this device must
accept any interference received, including interference that may cause
undesired operation.
Changes or modifications not expressly approved by the party responsible for compliance could void the
user’s authority to operate the equipment.
The transmitter for the remote keyless
entry system is located inside the key
head.
The remote keyless entry system has the
following functions.
. Locking and unlocking the doors (and
rear gate (Outback)) without a key
. Opening the trunk lid (Legacy) without
key
. Sounding a panic alarm
. Arming and disarming the alarm sys-
tem. For detailed information, refer to
“Alarm system” F2-16.
The operabl e distance of the remote
keyless entry system is approximately 30
feet (10 meters). However, this distance
will vary depending on environmental
conditions. The system’s operable distance will be shorter in areas near a
Page 97
facility or electronic equipment emitting
strong radio waves such as a power plant,
broadcast station, TV tower, or remote
controller of home electronic appliances.
NOTE
The remote keyless entry system does
not operate when the key is inserted in
the ignition switch.
: Trunk lid/rear gate unlock button
: Unlock/disarm button
: Lock/arm button
A: Panic button
& Locking the doors
Press the “ ” button to lock all doors and
rear gate (Outback). An electronic chirp
will sound once and the turn signal lights
will flash once.
If any of the doors (or the rear gate/trunk
lid) is not fully closed, an electronic chirp
will sound five times and the turn signal
lights will flash five times to alert you that
the doors (or the rear gate/trunk lid) are
not properly closed. When you close the
door, it will automatically lock and then an
electronic chirp will sound once and the
turn signal lights will flash once.
& Unlocking the doors
Press the “ ” button to unlock the driver’s
door. An electronic chirp will sound twice
and the turn signal lights will flash twice.
To unlock all doors and the rear gate
(Outback), briefly press the “
” button a
second time within 5 seconds.
NOTE
If the interval between the first and
second presses of the “
” button (for
unlocking of all of the doors and the
rear gate) is extremely short, the system may not respond.
Keys and doors 2-9
– CONTINUED –
Page 98

2-10 Keys and doors
& Opening the trunk lid
(Legacy)
The trunk lid opens when the “ ” button
is pressed continuously for at least 2
seconds. An electronic chirp will sound
twice and the turn signal lights will flash
twice.
& Unlocking the rear gate
(Outback)
Pressing the “ ” button unlocks the rear
gate.
An electronic chirp will sound twice and
the turn signal lights will flash twice.
& Vehicle finder function
Use this function to find your vehicle
parked among many vehicles in a large
parking lot. Provided you are within 30 feet
(10 meters) of the vehicle, pressing the “
”
button three times in a 5-second period
will cause your vehicle’s horn to sound
once and its turn signal lights to flash three
times.
NOTE
If the interval between presses is too
short when you press the “
” button
three times, the system may not respond to the signals from the remote
transmitter.
& Sounding a panic alarm
To activate the alarm, press the “PANIC”
button once.
The horn will sound and the turn signal
lights will flash.
To deactivate the panic alarm, press any
button on the remote transmitter. If a
button on the remote transmitter is not
pressed, the alarm will be deactivated
after approximately 30 seconds.
Page 99
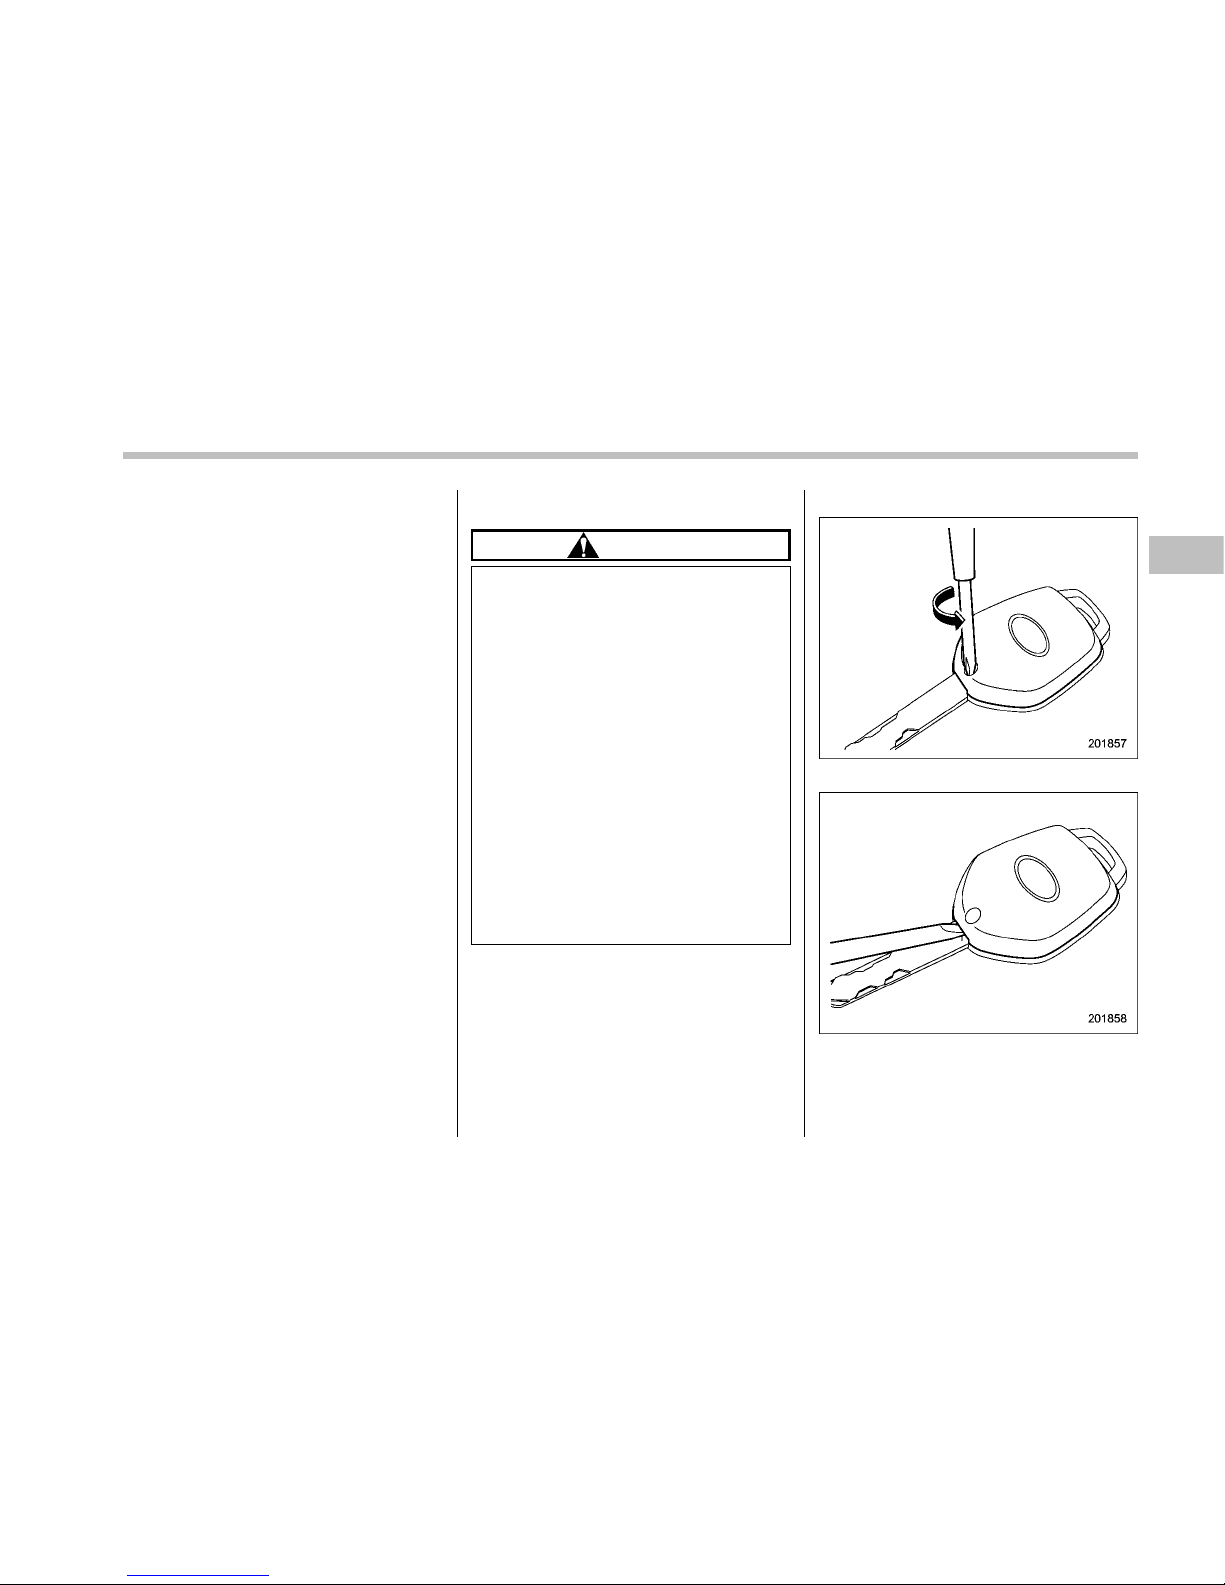
& Selecting audible signal op-
eration
Using an electronic chirp, the system will
give you an audible signal when the doors
lock and unlock. If desired, you may turn
the audible signal off.
To deactivate the audible signal, perform
the following procedure. You can also use
the same steps to restore the function.
1. Sit in the driver’s seat and shut all
doors and the rear gate.
2. Press the “UNLOCK” side of the power
door locking switch.
3. Insert the key into the ignition switch.
4. While holding down the “UNLOCK”
side of the power door locking switch, pull
the key out and re-insert it into the ignition
switch at least 5 times within 10 seconds
after performing step 2.
5. Open and close the driver ’ s door
within 10 seconds after performing step 4.
6. To indicate completion of the setting,
the turn signal lights flash 3 times and the
chirp sounds 3 times.
You may have the above procedure
preformed by your SUBARU dealer.
& Replacing the battery
CAUTION
. Do not let dust, oil or water get on
or in the transmitter when replacing the battery.
. Be careful not to damage the
printed circuit board in the transmitter when replacing the battery.
. Be careful not to allow children to
touch the battery and any removed parts; children could
swallow them.
. There is a danger of explosion if
an incorrect replacement battery
is used. Replace only with the
same or equivalent type of battery.
. Batteries should not be exposed
to excessive heat such as sunshine, fire or the like.
If the transmitter fails to operate when
used within the standard distance, this
may indicate a weak battery. Replace the
battery as soon as possible. The battery
can be replaced by your authorized
SUBARU dealer. If you replace the battery
by yourself, use utmost care that no dust,
oil or water enters the transmitter.
To replace the battery:
1. Remove the screw on the key head.
2. Open the key head using a flat-head
screwdriver.
Keys and doors 2-11
– CONTINUED –
Page 100
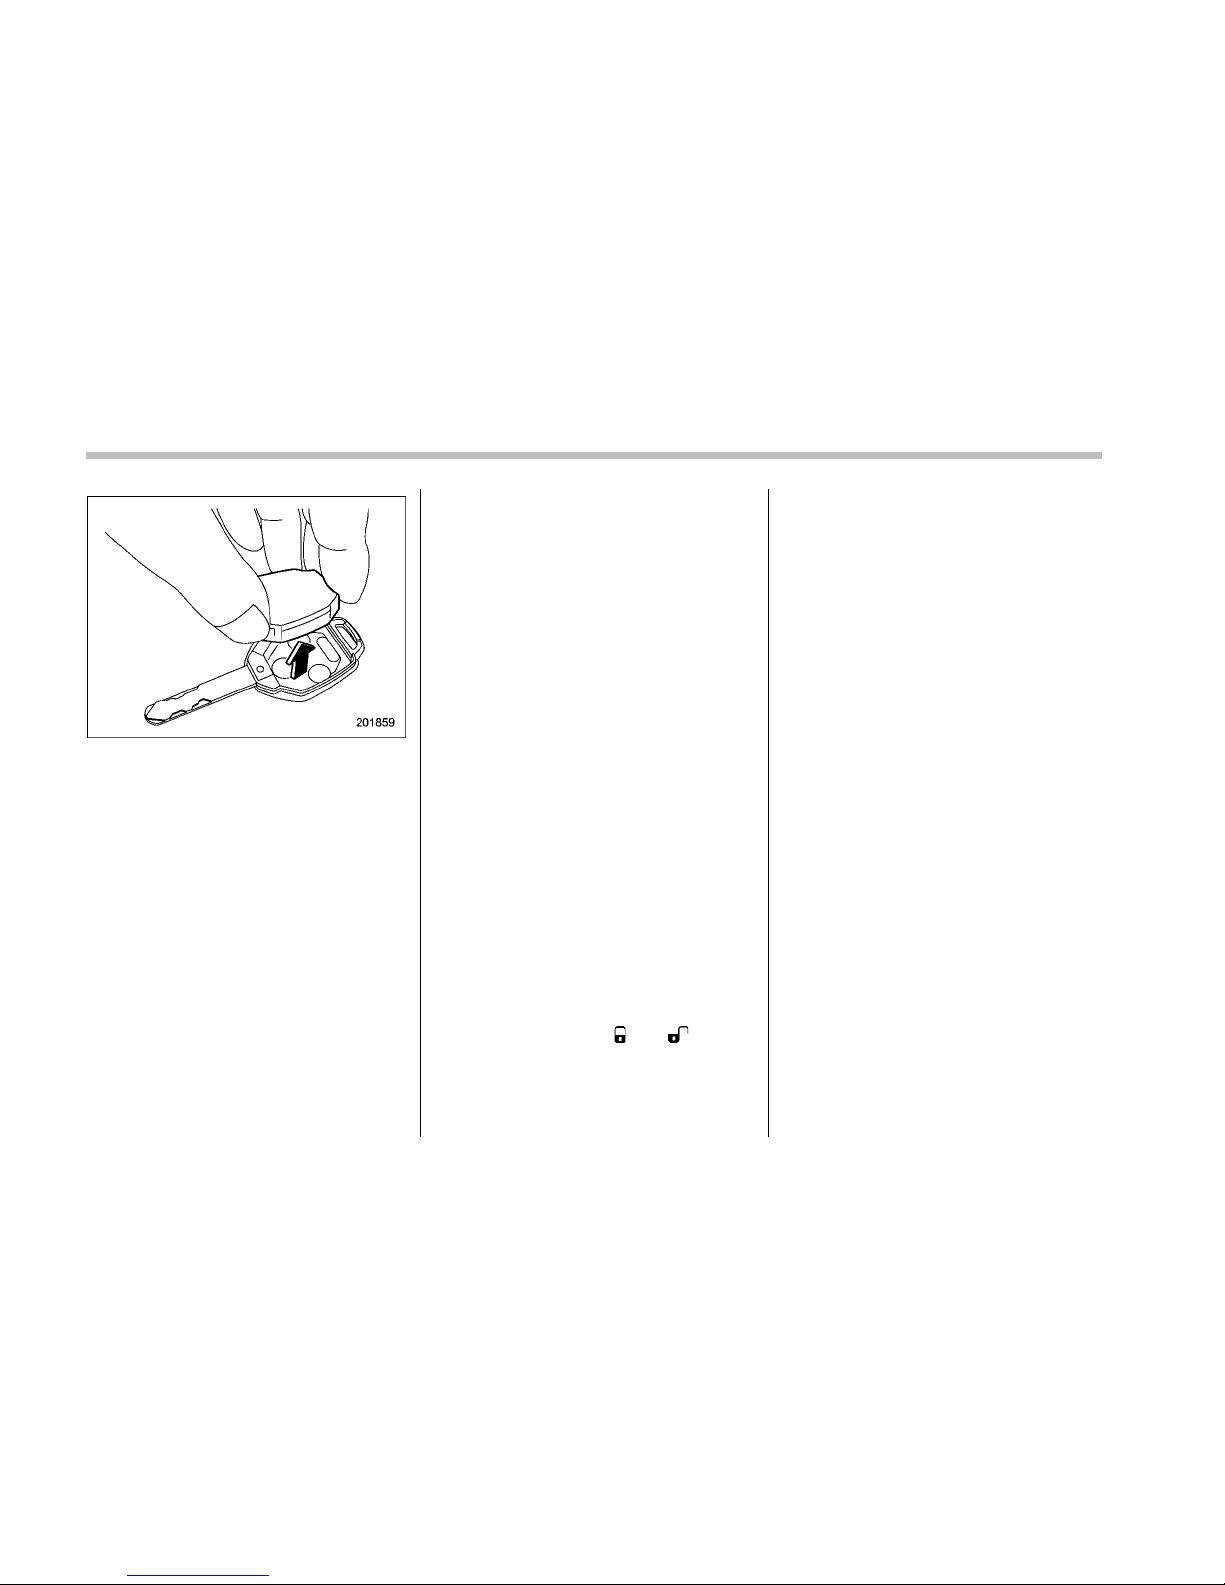
2-12 Keys and doors
3. Remove the transmitter case from the
key head.
4. Open the transmitter case by releasing
the hooks.
1) Negative (−) side facing up
5. Replace the old battery with a new
battery (Type CR1620 or equivalen t)
making sure to install the new battery with
the negative (−) side facing up.
6. Put together the transmitter case by
fitting the hooks on the case.
7. Reinstall the transmitter case in the
key head.
8. Reinstall the screw on the key head.
After the battery is replaced, the transmitter must be synchronized with the
remote keyless entry system’s control
unit. Press either the “
” or “ ” button
six times to synchronize the unit.
& Replacing lost transmitters
If you lose a transmitter or want to
purchase additional tr ansmitters (up to
four can be programmed), you should reprogram all of your transmitters for security reasons. It is recommended that you
have your dealer program all of your
transmitters into your system.
! Programming the transmitters
The remote keyless entry system is
equipped with a special code learning
feature that allows you to program new
transmitter codes into the system or to
delete old ones. The system can learn up
to four unique transmitter codes. The four
transmitter codes may be the same or
different.
 Loading...