

Style selections SSD18TB, SSD24TA, 049699, 050092, SSD24TR Installation & Operation Instructions
...Page 1
1
LS-WYL060-01-0805
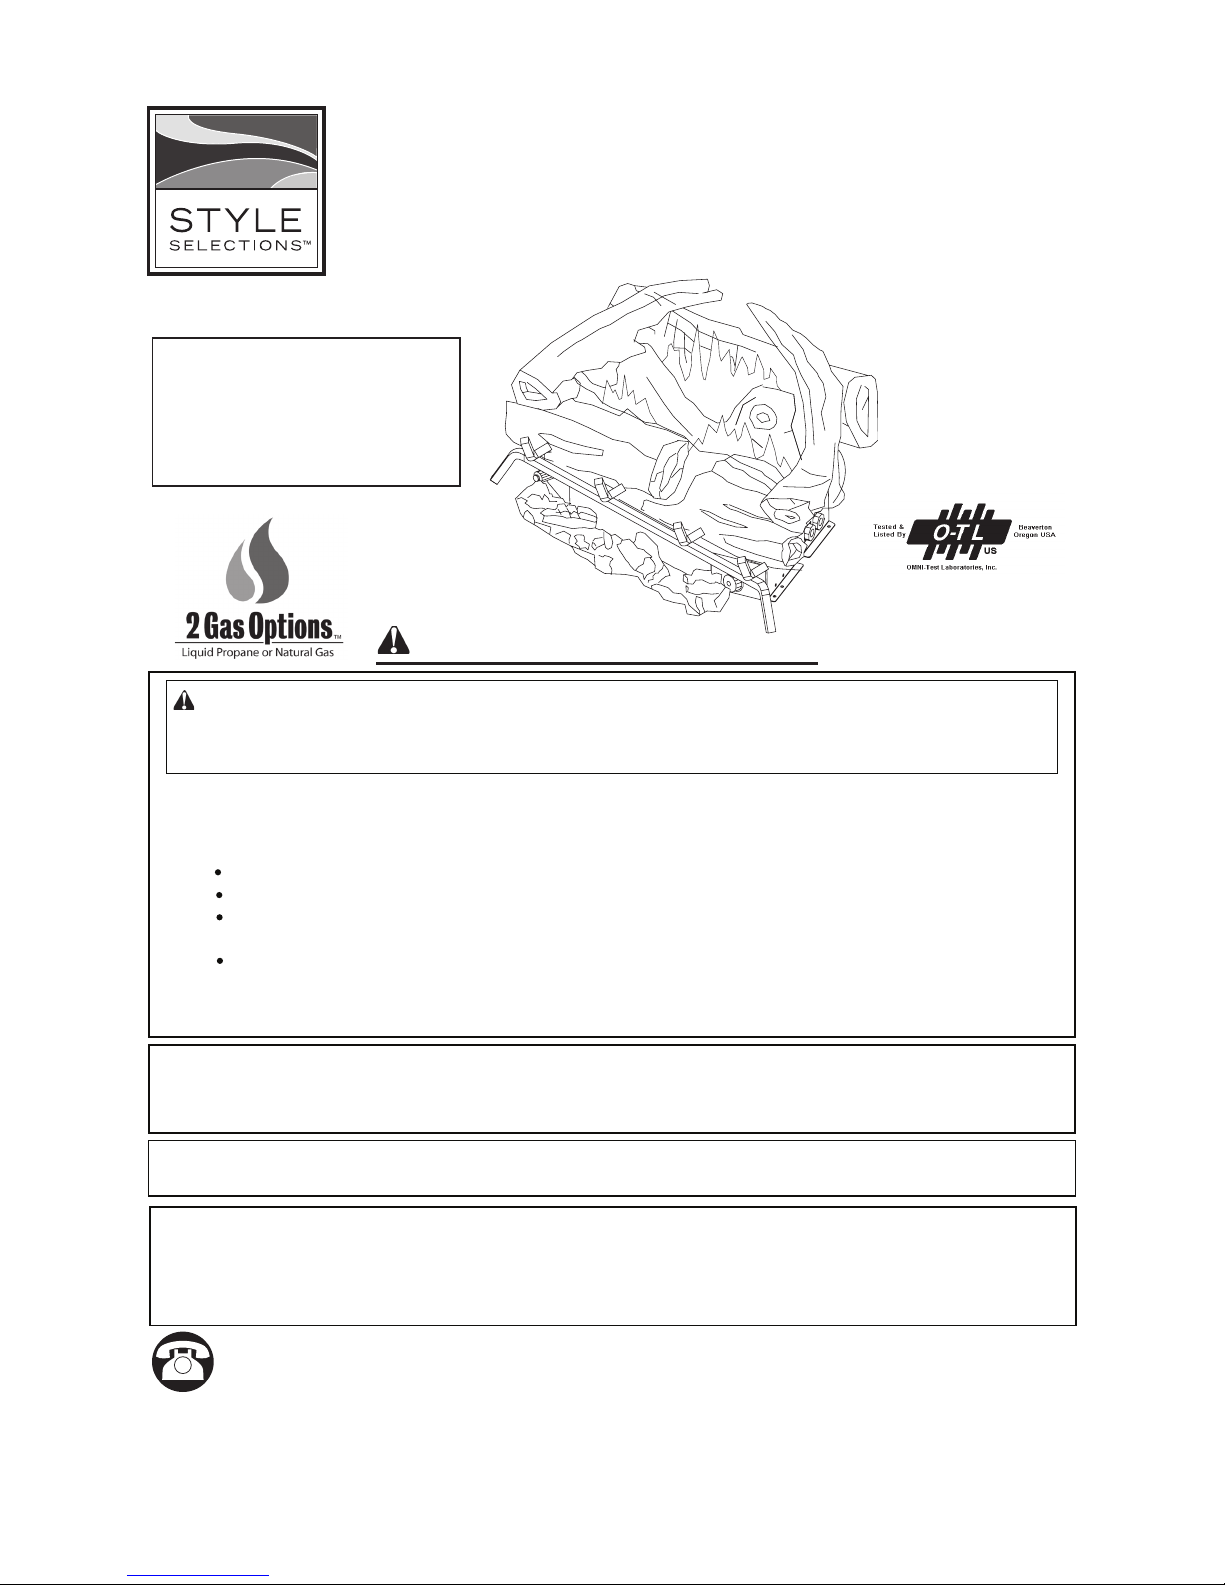
VENT-FREE GAS LOG
MODEL NO.
SSD18TB
SSD24TA
SSD24TR
SSD30TR
ITEM NO.
049699
049801
050092
050409
WARNING: This appliance
is equipped for (Natural and
Propane) gas. Field conversion is not permitted other
than between natural or propane gases.
Questions about installation, operation, or troubleshooting? Before
returning to your retailer, contact our customer service department at
1
-866-573-0674, 8:00 a.m.- 4:30 p.m., EST, Monday-Friday, or e-mail
CAUTION - FOR YOUR SAFETY
WARNING: IF THE INFORMATION IN THIS MANUAL IS NOT FOLLOWED
EXACTLY, A FIRE OR EXPLOSION MAY RESULT CAUSING PROPERTY
DAMAGE, PERSONAL INJURY, OR LOSS OF LIFE.
--
Do not store or use gasoline or other ammable vapors and liquids in vicinity
of this or any other appliance.
WHAT TO DO IF YOU SMELL GAS
Do not try to light any appliance.
Do not touch any electrical switch; do not use any phone in your building.
Immediately call your gas supplier from a neighbor’s phone. Follow the
gas supplier’s instructions.
If you cannot reach your gas supplier, call the re department.
-- Installation and service must be performed by a qualied installer, service
agency or the gas supplier.
This is an unvented gas-red heater. It uses air (oxygen) from the room in which it is
installed. Provisions for adequate combustion and ventilation air must be provided.
Refer to Air For Combustion and Ventilation section on page 8 of this manual.
INSTALLER: DO NO DISCARD THIS MANUAL – LEAVE FOR HOMEOWNER’S
FUTURE REFERENCE
This appliance may be installed in an aftermarket, permanently located manufactured
(mobile) home, where not prohibited by local codes. This appliance is for use with
the type of gas indicated on the rating plate only. This appliance is not convertible for
use with other gases.
Page 2
2
2
TABLE OF CONTENTS
Important Safety Information .............................................................................................................3
Air For Combustion and Ventilation …....…...…...……………..........................................................7
Installation ….........................…………………...........................................................................................10
Operation ..................…………...................................................................................................................23
Care And Maintenance ......................................................................................................................30
Troubleshooting ………....……………....................................................................................................31
Replacement Parts ………....………....................................................................................................34
WARNING: READ THE INSTALLATION & OPERATION INSTRUCTIONS BEFORE
USING THIS APPLIANCE
IMPORTANT: Read instructions and warnings carefully before starting installation.
Failure to follow these instructions may result in a possible re hazard and will void the
warranty.
TABLE OF CONTENTS
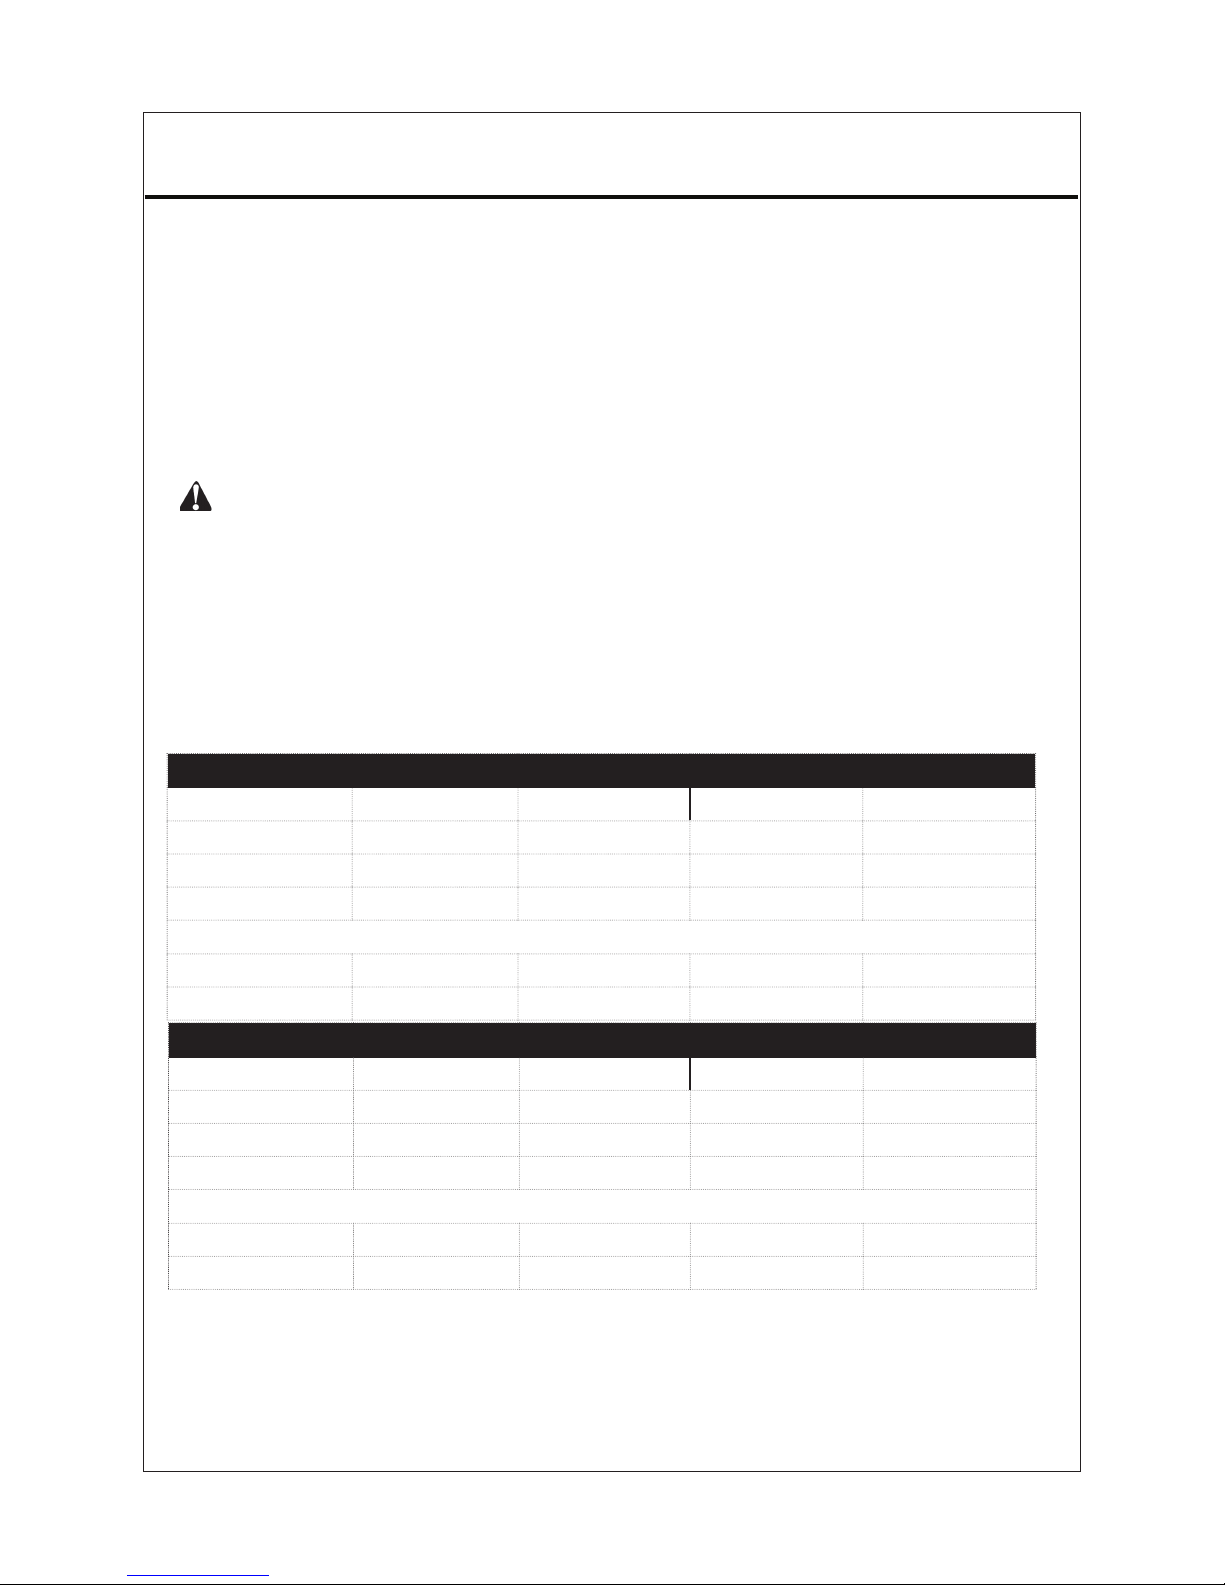
ITEM NO. 18 IN. VENT-FREE GAS LOGS 24 IN. VENT-FREE GAS LOGS
Input Rating 30,000 BTU/Hr 30,000 BTU/Hr 32,000 BTU/Hr 32,000 BTU/Hr
Gas Type Natural LP/Propane Natural LP/Propane
Ignition Electronic Piezo Electronic Piezo Electronic Piezo Electronic Piezo
Manifold Pressure 4 in. W.C 9 in. WC. 4 in. W.C 9 in. WC.
Inlet Gas Pressure *For purposes of input adjustment
Maximum 10.5 in. W.C 1
4 in. W.C 10.5 in. W.C 14 in. W.C
Minimum* 5 in. W.C 1
1 in. W.C 5 in. W.C 11 in. W.C
PRODUCT SPECIFICATIONS
ITEM NO. 24 IN. VENT-FREE GAS LOGS 30 IN. VENT-FREE GAS LOGS
Input Rating 34,000 BTU/Hr 34,000 BTU/Hr 39,000 BTU/Hr 39,000BTU/Hr
Gas Type Natural LP/Propane Natural LP/Propane
Ignition Electronic Piezo Electronic Piezo Electronic Piezo Electronic Piezo
Manifold Pressure 4 in. W.C 9 in. WC. 4 in. W.C 9 in. WC.
Inlet Gas Pressure *For purposes of input adjustment
Maximum 10.5 in. W.C 1
4 in. W.C 10.5 in. W.C 14 in. W.C
Minimum* 5 in. W.C 1
1 in. W.C 5 in. W.C 11 in. W.C
Page 3
333
IMPORTANT SAFETY INFORMATION
IMPORTANT: Read this owner’s manual carefully and completely before trying to assemble,
operate, or service this heater. Improper use of this heater can cause serious injury or death
from burns, re, explosion, electrical shock, and carbon monoxide poisoning.
WHAT TO DO IF YOU SMELL GAS
Do not try to light any appliance.
Do not touch any electrical switch; do not use any phone in your building.
Immediately call your gas supplier from a neighbor’s phone. Follow the gas supplier’s
instructions.
If you cannot reach your gas supplier, call the re department.
Installation and service must be performed by a qualied installer, service agency, or
local gas supplier.
WARNING: Do not store or use gasoline or other ammable vapors or liquids in the
vicinity of this or any other appliance.
This appliance is for use with only the type of gas indicated on the rating plate. This
appliance is not convertible for use with other gases.
CARBON MONOXIDE POISONING: Early signs of carbon monoxide poisoning resemble
the u, with headaches, dizziness, or nausea. If you have these signs, the heater may not
be working properly. Get fresh air immediately! Have heater serviced. Some people are
more affected by carbon monoxide than others. These include pregnant women, persons
with heart or lung disease or anemia, those under the inuence of alcohol, and those at
high altitudes.
NA
TURAL AND PROPANE/LP GAS: Natural or propane/LP gas is odorless. An odor-
producing agent is added to natural or propane/LP gas. The odor helps you detect a
natural or propane/LP gas leak. However, the odor added to natural or propane/LP gas can
fade. Natural or propane/LP gas may be present even though no odor exists. Make certain
you read and understand all warnings. Keep this manual for reference. It is your guide to
safe and proper operation of this heater.
WARNING: Do not use a blower insert, heat exchanger insert or any accessory not
approved for use with this log set.
WARNING: Do not allow fans to blow directly into the heater. Avoid any drafts that al-
ter burner ame pattern including ceiling fans. Altered burner patterns can cause sooting.
WARNING: Any change to this heater or its controls can be dangerous.
WARNING: Do not place clothing or other ammable material on or near the appli-
ance. Never place any objects in or on the replace.
WARNING: Due to high temperatures, place the log set of trafc and away from furni-
ture and draperies.
WARNING: The log set becomes very hot while running heater. Keep children and
adults away from the hot surface to avoid burns or clothing ignition. Heater will remain
hot for a short time after shut off. Allow surface to cool before touching.
•
•
•
•
IMPORTANT SAFETY INFORMATION
Page 4
444
IMPORTANT SAFETY INFORMATION
WARNING: Carefully supervise young children when they are in the same room with
the heater.
WARNING: Make sure a replace screen is in place before running the log set.
WARNING: Do not install in bedrooms or bathrooms.
WARNING: Keep the appliance area clear and free from combustible materials,
gasoline, and other ammable vapors and liquids.
1. This appliance is for use with only the type of gas indicated on the rating plate. This
applance is not convertible for use with other gases.
2.
Do not place propane/LP supply tank(s) inside any structure. Store propane/LP supply
tank(s) outdoors.
3.
This heater should not be installed in a bedroom or bathroom unless installed as a
vented appliance.
4.
Solid fuels should not be burned in a replace in which vent-free log set is installed.
5. Do not add extra logs or ornaments such as pine cones, vermiculite, or rock wool.
Using these added items can cause sooting. Do not add lava rock around base. Rock
and debris could fall into the control area of heater. After servicing, always replace
screen before operating heater.
6.
If replace has glass doors, never operate this heater with glass doors closed. If you
operate heater with doors closed, heat will build up inside replace and cause glass
to burst. If replace opening has vents at the bottom, you must open the vents before
operating log set. Always operate heater with glass doors fully open.
7.
This log heater is designed to be smokeless. If logs ever appear to be smoking, turn
off heater and call a qualied service technician. NOTE: During initial operating, slight
smoking could occur due to log curing and heater burning off manufacturing residues.
8.
To prevent the creation of soot, follow the instructions (see Care and Maintenance
page 30).
9.
Before using furniture polish, wax, carpet cleaner, or similar products, turn heater off.
If heated, the vapor from these products may create a white powder residue within
burner box or on adjacent walls and furniture.
1
0. This heater needs fresh, outside air ventilation to run properly. This heater has an
Oxygen Depletion Sensor (ODS) safety shutoff system. The ODS shuts down the
heater if not enough fresh air is available. (See Air For Combustion And Ventilation,
pages 7-9)
Page 5

5
11. Do not run heater where ammable liquids or vapors are used or stored under
dusty conditions.
12
. Turn off heater before using furniture polish, wax, carpet cleaner, or similar products.
13.
Do not use heater if any part has been underwater. Immediately call a qualied
service technician to inspect the room heater and replace any part of the control
system and any gas control which has been underwater.
14.
Turn off and let cool before servicing. Only a qualied service technician should
service and repair heater.
1
5. Operating heater above elevations of 4,500 feet could cause pilot outage.
16. Do not use this heater if any log is broken. Do not operate heater if a log is chipped
(dime-size or larger).
17.
Do not use this heater to cook food or burn paper or other objects.
QUALIFIED INSTALLING AGENCY
Installation and replacement of gas piping, gas utilization equipment or accessories and
repair and servicing of equipment should be performed only by a qualied agency.
The
term “qualied agency” means any individual, rm, corporation, or company that either
in person or through a representative is engaged in and is responsible for:
The installation, testing, or replacements of gas piping or
The connection, installation, testing, repair, or servicing of equipment; that is
experienced in such work; that is familiar with all precautions required; and that has
complied with all the requirement of the authority having jurisdiction.
In areas that prohibit the use of vent-free heaters, the log set has been tested and
approved to the
ANSI Z21.60 standard for Vented Decorative Logs.
a)
b)
PRODUCT FEATURES:
This log set has been tested and approved to ANSI Z21.11.2 standard for Unvented
Heaters and can be operated with the ue damper closed. State and local codes in some
areas prohibit the use of vent-free heaters.
SAFETY PILOT
This heater has a pilot with an Oxygen Depletion Sensing (ODS) safety shutoff system.
The ODS/pilot shuts off the heater if there is not enough fresh air.
THERMOSTAT HEAT CONTROL
The control automatically cycles the burner on and off to maintain a desired room
temperature. See page 25.
PIEZO IGNITION SYSTEM
This heater is equipped with an electronic piezo ignitor. This system requires AAA batteries (provided).
CAUTION: Do not remove the metal data plates from the grate assembly The data
plates contain important product information.
2 FUEL OPTIONS CAPABLE
Your log heater is equipped to operate on either propane or natural gas. The replace
is shipped from the factory ready for connecting to propane. The replace can easily be
changed to natural gas by having your qualied installer follow the instructions on page
18 and the markings on the replace.
Page 6
6
LOCAL CODES
lnstall and use heater with care. Follow all local codes. In the absence of local codes, use
the latest edition of The National Fuel Gas Code, ANSI Z223.1/NFPA 54.
*Available from:
American National Standards Institute, Inc.
1430 Broadway
New York, NY 10018
National Fire Protection Association, lnc.
1 Batterymarch Park
Quincy, MA 02269-9101
State of Massachusetts: The installation must be made by a licensed plumber or gas
tter in the Commonwealth of Massachusetts.
Sellers of unvented propane or natural gas-fired supplemental room heaters shall
provide to each purchaser a copy of 5
27 CMR 30 upon sale of the unit.
In the state of Massachusetts, unvented propane or natural gas-fired space heaters
shall be prohibited in bedrooms and bathrooms.
In the State of Massachusetts the gas cock must be a “T” handle type. The State
of Massachusetts requires that a exible appliance connector cannot exceed
three feet in length.
PREPARING FOR INSTALLATION
Before beginning assembly or operation of the product, make sure all parts are present.
Compare parts with package contents list and diagram above. If any part is missing or
damaged, do not attempt to assemble, install or operate the product. Contact customer
service for replacement parts.
Estimated Assembly Time: 1 to 2 hours
Tools Required for Assembly:
Before installing heater, make sure you have the the following:
Hardware package (provided with heater)
Approved exible gas hose (not provided) if allowed by local codes
Sealant (resistant to natural or propane/LP gas, not provided)
Electric drill with 3/16- in. drill bit
Phillips screwdriver
External regulator (supplied by installer)
Piping (check local codes)
Equipment shutoff valve
Test gauge connection
Sediment trap
Tee joint
Pipe wrench
UNPACKING
1. Remove logs and burner base assembly from carton. NOTE: Do not pick up burner
base assembly by burners as this could damage heater. Always handle base
assembly by grate.
2. Remove all protective packaging applied to logs and heater for shipment.
3. Check all items for any shipping damage. If damaged, promptly inform dealer where
you purchased the heater.
•
•
•
•
•
•
•
•
•
•
•
•
Page 7

777
IMPORTANT SAFETY INFORMATION
WATER VAPOR: A BY-PRODUCT OF UNVENTED ROOM HEATERS
Water vapor is a by-product of gas combustion. An unvented room heater produces
approximately one (1) ounce (30 mL) of water for every 1,000 BTUs (.3KW) of gas
input per hour. Unvented room heaters are recommended as supplemental heat (a
room) rather than a primary heat source (an entire house). In most supplemental heat
applications, the water vapor does not create a problem. In most applications, the water
vapor enhances the low humidity atmosphere experienced during cold weather.
The following steps will help insure that water vapor does not become a problem:
1. Be
sure the heater is sized properly for the application, including ample combustion
air and circulation air.
2.
Ifhighhumidityisexperienced,adehumidiermaybeused to helplowerthewater
vapor content of the air.
3. Do not use an unvented room heater as the primary heat source.
PRODUCING ADEQUATE VENTILATION
The following are excerpts from National Fuel Gas Code. NFPA 54/ANS Z223.1. Air
for Combustion and Ventilation. All spaces in homes fall into one of the three following
ventilationclassications:
1. Unusually
Tight Construction
2. UnconnedSpace
3. ConnedSpace
The information on pages 7 through 9 will help you classify your space and provide
adequate ventilation.
Conned and Unconned Space
TheNationalFuelGasCode,ANSZ223.1denesaconnedspaceasaspacewhose
volume is less than 50 cu. ft. per 1,000 BTU/hr (4.8 m^3 per kw) of the aggregate input
ratingofallappliancesinstalledinthatspaceandanunconningspaceasaspace
whose volume is not less than 50 cu. ft. per 1,000 BTU/hr (4.8 m^3 per kw) of the
aggregate input rating of all appliances installed in that space. Rooms communicating
directly with the space in which the appliances are installed*, through openings not
furnishedwithdoors,areconsideredapartoftheunconnedspace.
Thisheatershallnotbeinstalledinaconnedspaceorunusuallytightconstruction
unless provisions are provided for adequate combustion and ventilation air.
* Adjoining rooms are connecting only if there are doorless passageways or ventilation grills
between them.
WARNING:Thisheatershallnotbeinstalledinaconnedspaceorunusuallytight
construction unless provisions are provided for adequate combustion and ventilation
air. Read the following instructions to ensure proper fresh air for this and other fuelburning appliances in your home.
AIR FOR COMBUSTION AND VENTILATION
Page 8

8
Example:
Gas water heater 40,000 BTU/hr
Vent-free heater + 31,500 BTU/hr
Total = 71,500 BTU/hr
BTU/hr
BTU/hr
BTU/hr
BTU/hr
BTU/hr
BTU/hr
BTU/hr
DETERMINING FRESH-AIR FLOW FOR HEATER LOCATION
Determining if You Have a Conned or Unconned Space
Use this worksheet to determine if you have a conned or unconned space.
Space: Includes the room in which you will install heater plus any adjoining rooms with
doorless passageways or ventilation grills between the rooms.
1
. Determine the volume of the space
Length × Width × Height = cu. ft. (volume of space)
Example: Space size 20 ft. (length) × 16 ft. (width)× 8 ft. (ceiling height)= 2560 cu. ft.
(volume of space)
If additional ventilation to adjoining room is supplied with grills or openings, add the
volume of these rooms to the total volume of the space.
2. Divide the space volume by 50 cubic feet to determine the maximum BTU/hr the space
can support.
(volume of space) ÷ 50 cu. ft.= (Maximum BTU/hr the space can support)
3.
Add the BTU/hr of all fuel burning appliances in the space.
Vent-free heater
Gas water heater*
Gas furnace
Vented gas heater
Gas heater logs
Other gas appliances* +
Total =
*Do not include direct-vent gas appliances. Direct-vent draws combustion air from the
outdoors and vents to the outdoors.
Unusually Tight Construction
The air that leaks around doors and windows may provide enough fresh air for combustion
and ventilation. However, in buildings of unusually tight construction, you must provide
additional fresh air.
Unusually tight construction is dened as construction where:
walls and ceilings exposed to the outside atmosphere have a continuous water vapor
r
etarder with a rating of one perm (6×10
-11
kg per pa-sec-m2) or less with openings
gasketed or sealed and
Weather stripping has been added on openable windows and on doors and
Caulking or sealants are applied to areas such as joints around window and door
frames, between sole plates and floors, between wall ceiling joints, between wall
panels, at penetrations for plumbing, electrical, and gas lines, and at other openings.
If your home meets all of the three criteria above, you must provide additional fresh
air. See “Ventilation Air From Outdoors”. If your home does not meet all of the three
criteria above, proceed to “Determining Fresh-Air Flow For Heater Location”.
a)
b)
c)
d)
Page 9
9
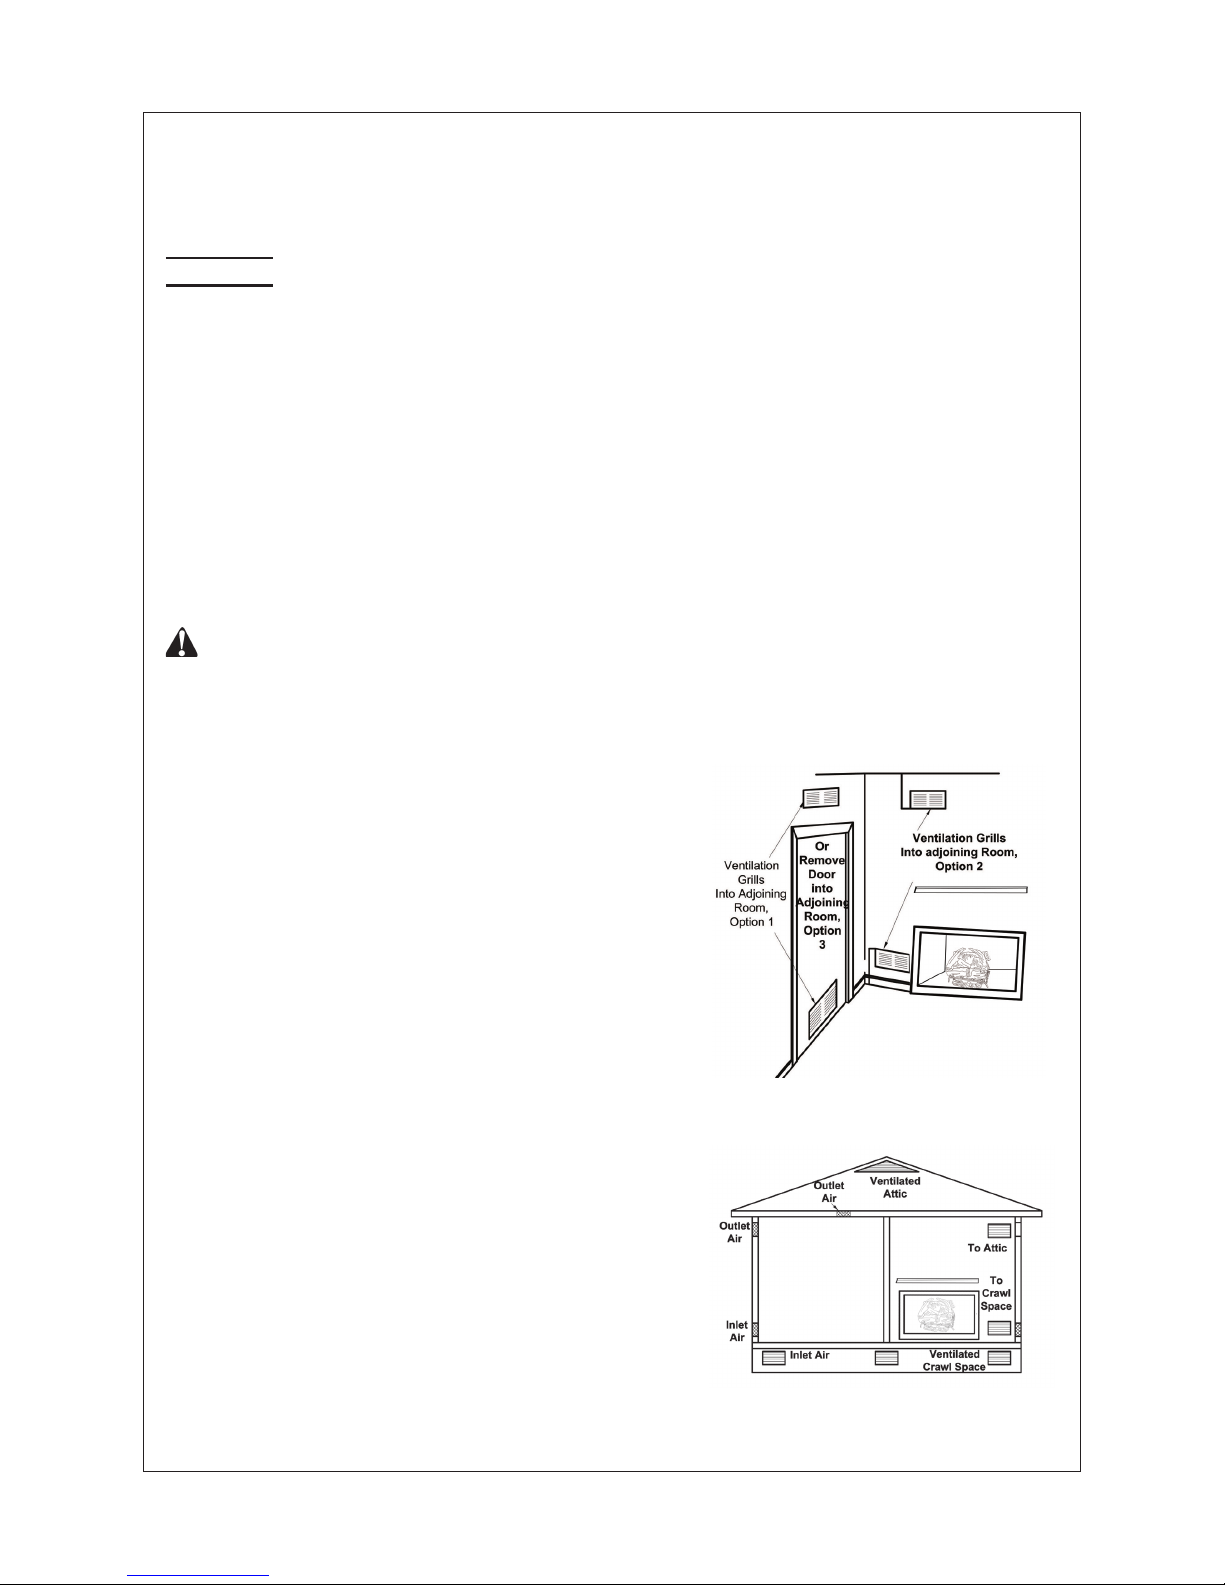
Figure 1 - Ventilation Air from
Inside Building
Figure
2 - Ventilation Air from
Outdoors
Ventilation Air From Inside Building
This fresh air would come from adjoining un-
conned space. When ventilating to an adjoining unconned space, you must provide two
permanent openings: one within
12 inches of
the wall connecting the two spaces (see options 1 and 2, Figure 1). You can also remove
door into adjoining room (see option 3, Figure
2). Follow the National Fuel Gas Code NFPA
54/ANS Z223.1. Air for Combustion and Ven-
tilation for required size of ventilation grills or
ducts.
Ventilation Air From Outdoors
Provide extra fresh air by using ventilation grills
or duct. You must provide two permanent
openings: one within
12 inches of the
ceiling and one within 12 inches of the oor
Connect these items directly to the outdoors
or spaces open to the outdoors. These spaces
include attics and crawl spaces. Follow the
National
Fuel Gas Code NFPA 54/ANS Z223.1,.
Air for Combustion and Ventilation
for required size of ventilation grills or ducts.
The space in the above example is a conned space because the actual BTU/hr used
is more than the maximum BTU/hr the space can support. You must provide additional
fresh air. Your options are as follows:
R
ework worksheet, adding the space of an adjoining room. If the extra space
provides an unconned space, remove door to adjoining room or add ventilation grills
between rooms. See “Ventilation Air From Inside Building”, page 9.
V
ent room directly to the outdoors. See “Ventilation Air From Outdoors”, page 9.
Install a lower BTU/hr heater, if lower BTU/hr size makes room unconfined. If the
actual BTU/hr used is less than the maximum BTU/hr the space can support, the
space is an unconned space. You will need no additional fresh air ventilation.
NOTE: If the area in which the heater may be operated is smaller than that dened
as an unconned space or if the building is of unusually tight construction, provide
adequate combustion and ventilation air by one of the methods described in the
National Fuel Gas Code, ANS Z223.1/NFPA. Air for combustion and ventilation or
applicable local codes.
a)
b)
c)
4. Compare the maximum BTU/hr the space can support with the actual amount of
BTU/hr used
BTU/hr (maximum the space can support)
BTU/hr (actual amount of BTU/hr used)
Example : 5
1,200 BTU/hr(maximum the space can support)
71,000 BTU/hr(actual amount of BTU/hr used)
Page 10
10
IMPORTANT: Vent-free heaters add moisture to the air. Although this is benecial,
installing heater in rooms without enough ventilation air may cause mildew to form
from too much moisture. See Air for Combustion and Ventilation, pages 8 through
10.
CHECK GAS TYPE
Make sure your gas supply is correct for your log set. If supply is not correct, do not install
heater. Call dealer where you purchased heater for proper gas log set.
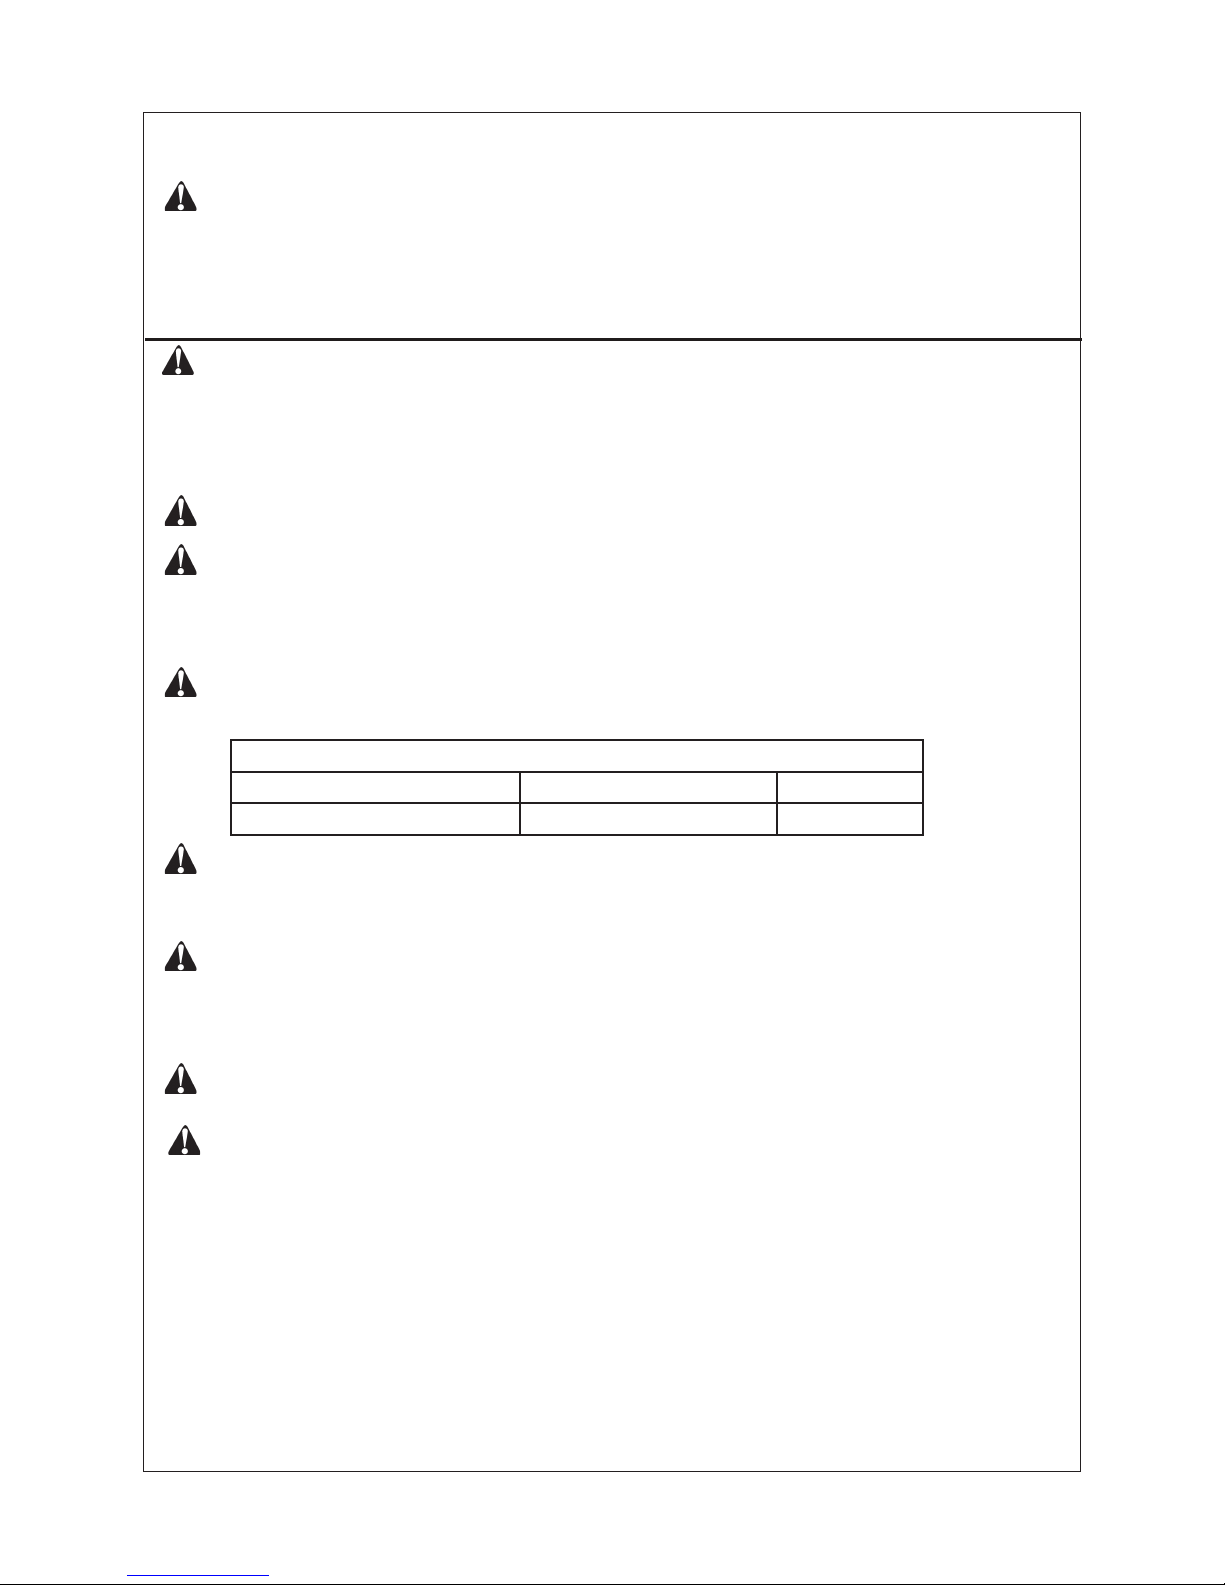
Minimum Fireplace Clearance to Combustible Materials
Log size Side wall Ceiling
1
8 in., 24 in., 30 in. 16 in. 42 in.
IMPORTANT: Do not provide openings for inlet or outlet air into attic if attic has a
thermostat controlled power vent. Heated air entering the attic will activate the power
vent. Rework worksheet, adding the space of the adjoining unconfined space. The
combined spaces must have enough fresh air to supply all appliances in both spaces.
INSTALLATION
NOTICE: This heater is intended for use as supplemental heat. Use this heater along
with your primary heating system. Do not install this heater as your primary heat
source. If you have a central heating system you may run the system’s circulating
blower while using the heater. This will help circulate the heat throughout the house.
In the event of power outage, you can use this heater as your primary heat source.
WARNING: A qualied technician must install heater. Follow all local codes.
WARNING: Before installing in a solid flue burning firebox, the chimney flue and
firebox must be cleaned of soot, creosote, ashes and loose paint by a qualified
chimney cleaner. Creosote will ignite if highly heated. A dirty chimney ue may create
and distribute soot within the house. Inspect chimney ue for damage.
WARNING: Maintain the minimum clearances. If possible, provide greater clearances
from the oor, ceiling, and adjoining wall than required.
WARNING: Seal any fresh air vents or ash clean-out doors located on the oor or
wall of replace to prevent drafting caused by pilot outage or sooting. Use a heatresistant sealant. Do not seal chimney ue damper.
CAUTION: This heater creates warm air currents. These currents move heat to
wall surface next to heater. Installing heater next to vinyl or cloth wall coverings
or operating heater where impurities (such as tobacco smoke, aromatic candles,
cleaning uids, oil or kerosene lamps, etc.) in the air exist may discolor walls.
NOTICE: State or local codes may only allow operation of this appliance in a vented
conguration. Check your state or local codes.
Page 11
11
WARNING: This appliance is designed for installation in only a solid-fuel burning ma-
sonry or UL 127 factory-built replace or in a listed ventless rebox enclosure. Exception: DO NOT install this appliance in a factory-built replace that includes instruc-
tions stating it has not been tested or should not be used with unvented gas logs.
MI
NIMUM CLEARANCE FOR SIDE
Combustible Material, Side Wall, and Ceiling.
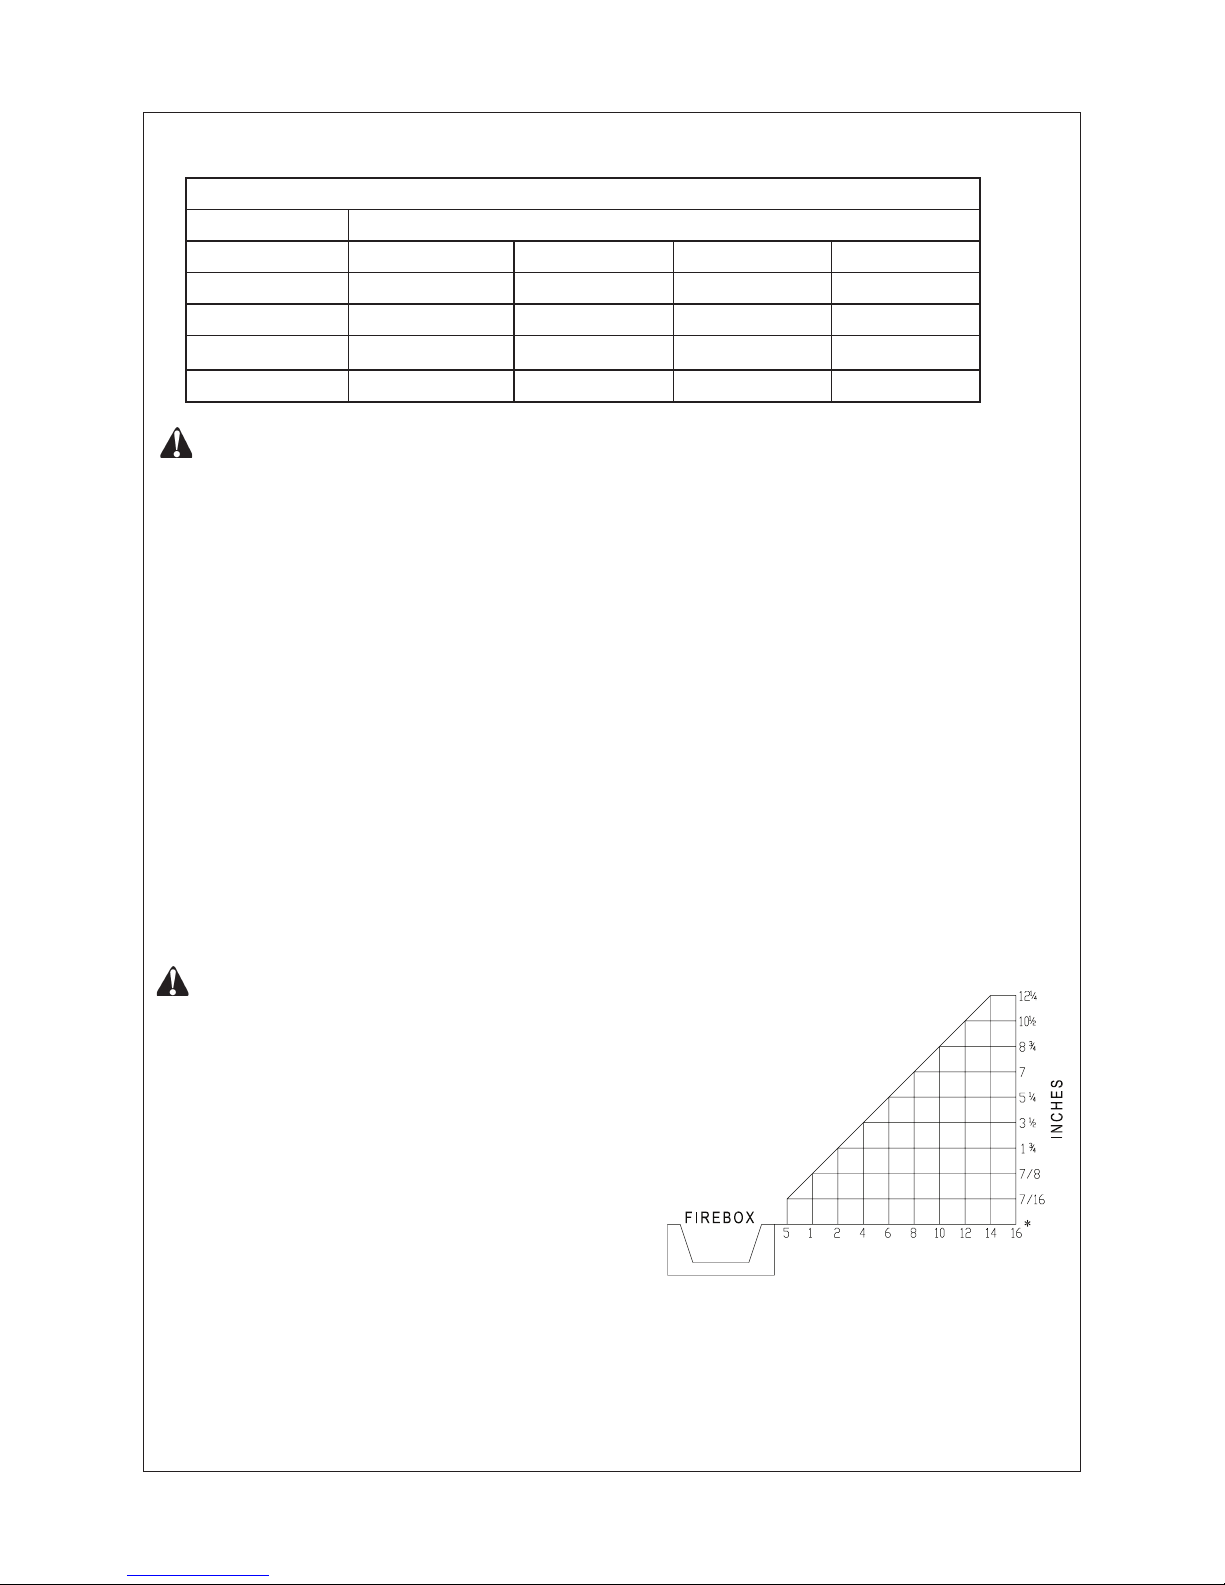
Clearance from the side of the replace opening to any combustible material and
wall should follow diagram in Figure 3.
Clearance from the top of the replace opening
to the ceiling must not be less than
42 inches.
MINIMUM NONCOMBUSTIBLE MATERIAL CLEARANCE
If Not Using Mantel
You must have noncombustible material(s) above the replace opening. Noncombustible
materials (such as slate, marble, tile, etc.) must be at least 1/2 in. thick. With sheet metal,
you must have noncombustible material behind it, such as a noncombustible replace
hood accessory. See Figure 5 next page for minimum clearance requirements.
A.
B.
LOG SIZING REQUIREMENTS
Log Size Minimum Firebox Size
Height Depth Front Width Rear Width
SSD
18TB 20 in. 1
3 in. 29 in. 23 in.
SSD24TA 20 in. 1
4 in. 30 in. 22 in.
SSD24TR 20 in. 14 in. 30 in. 22
in.
SSD30TR 2
0 in. 14 in. 34 in. 24 in.
NOTICE: This heater may be used as a vented
product. If so, you must always operate log set
with chimney ue damper open. If running log
set with damper open, noncombustible material
above replace opening is not needed. Go to
Installing Damper Clamp Accessory for Vented
Operation, page
13.
Figure 3 - Minimum Clearance for
Combustible to Wall
Page 12
12
Heat Resistant
Material
If Using Mantel
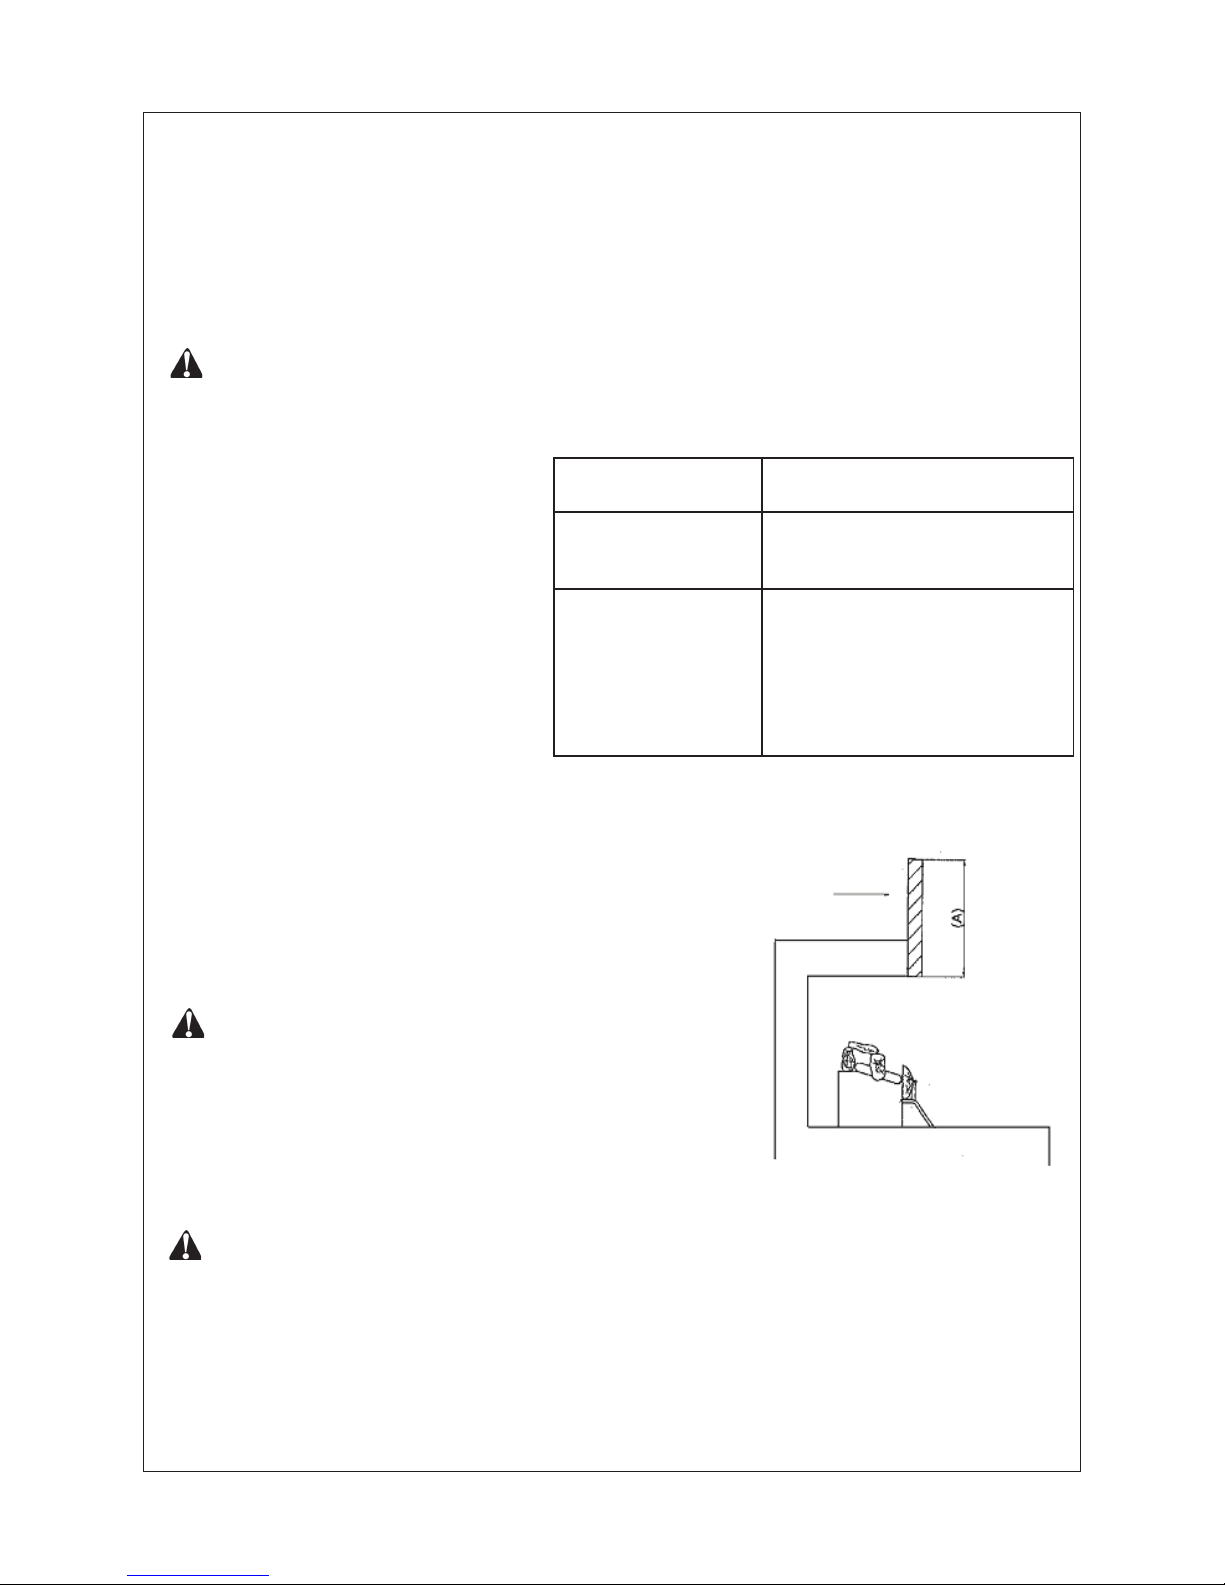
You must have noncombustible material(s) (such as slate, marble, tile, etc.) at least 1/2
in. thick. With sheet metal, you must have noncombustible material behind it. Noncombustible material must extend at least 8 inches up. If noncombustible material is less than
12 in., you must install the replace hood accessory. Even if noncombustible material is
more than 12 in., you may need the hood accessory to deect heat away from mantel
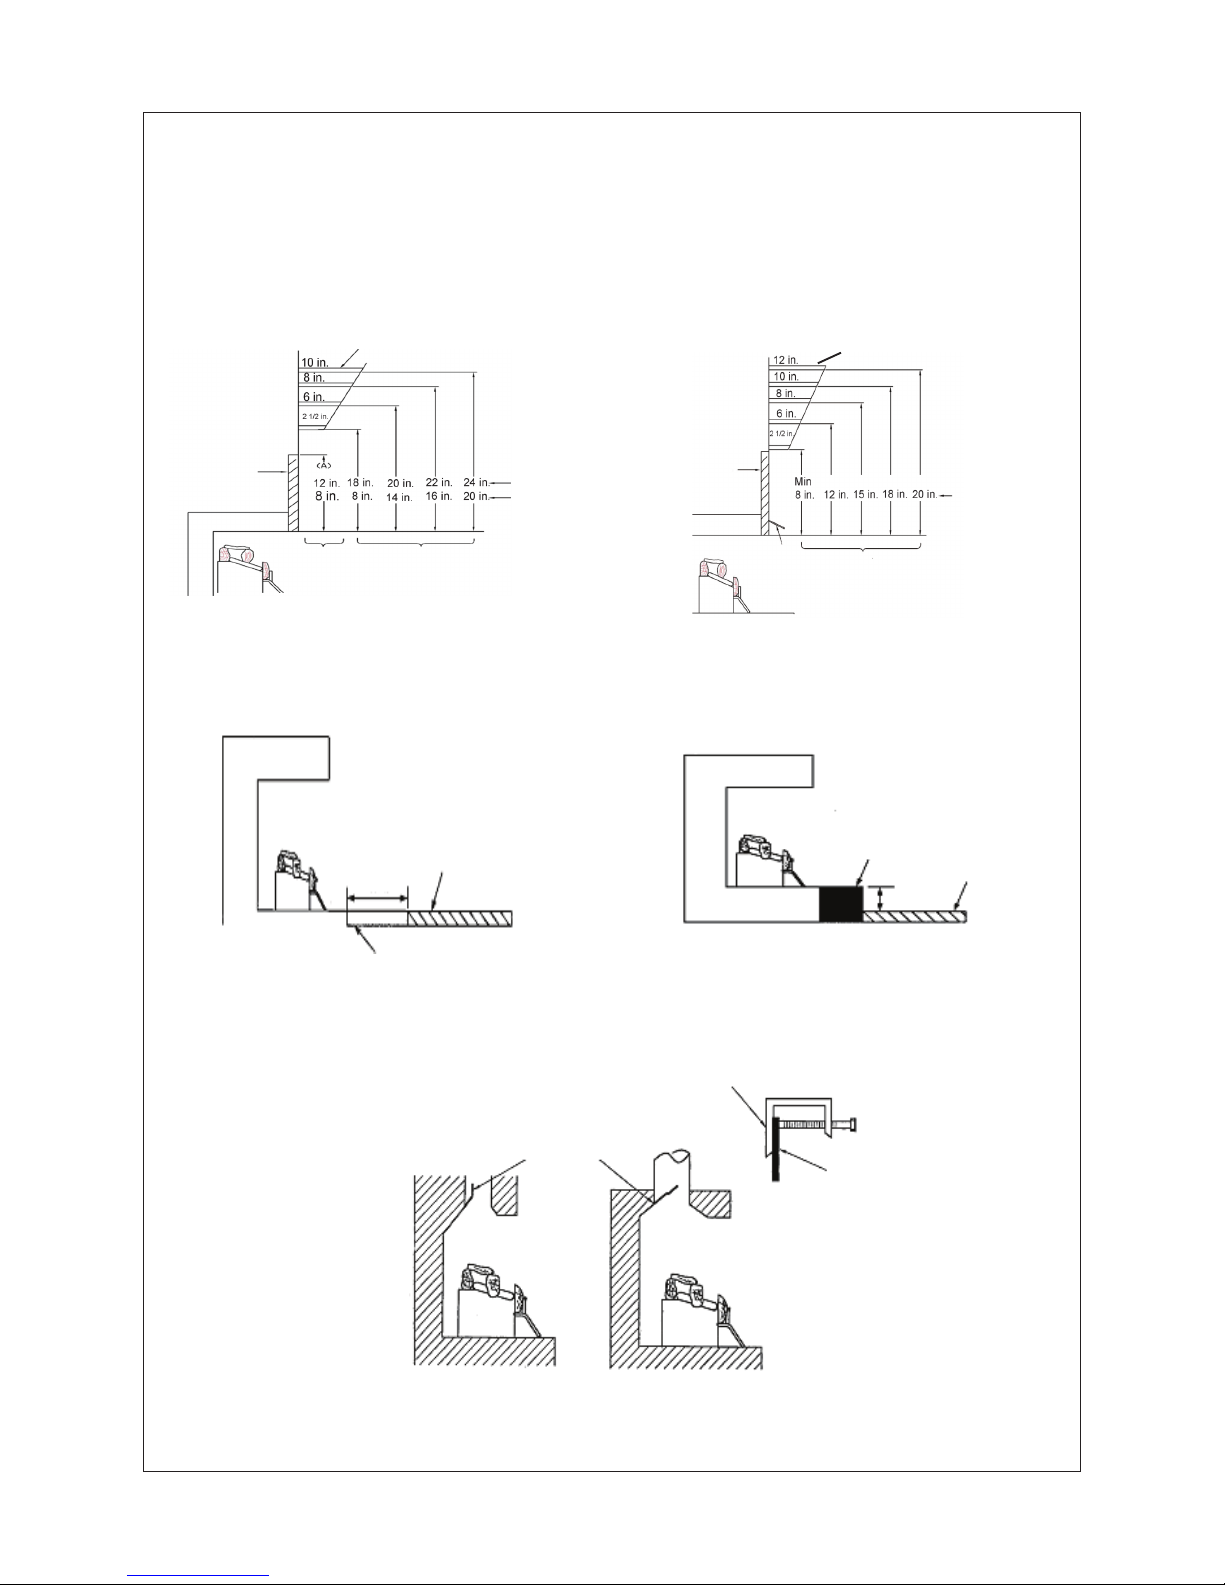
shelf. See Figures 4, 5 and 6 for minimum clearances requirements.
IMPORTANT: If these minimum clearances are not met, you must operate heater
with chimney ue damper open. Go to “Installing Damper Clamp Accessory for
Vented Operation,” page 13.
Noncombustible
Material Distance
Requirements for
Safe Installation
8 inches or more Noncombustible material
okay.
Less than 8 inches Noncombustible material
must be extended to at least
8 inches. See between 8
inches and
12 inches above.
If you can not extend material, you must operate heater
with ue damper open.
MANTEL CLEARANCES
In addition to meeting noncombustible
material clearances, you must also
meet required clearances between
replace opening and mantel shelf.
If the clearances listed below are
not met, you will need a hood.
Determining Mantel Clearances
If you meet minimum clearance
requirements between mantel
shelf and top of replace opening,
a hood is not necessary
(see Figure 5).
Determining Minimum Mantel Clearance
When Using a Hood
If minimum clearances in Figure 6
are not met, you must have a hood.
When using a hood there are still certain
minimum mantel clearances required.
Follow minimum clearances shown in Figure
6 when using a hood.
NOTICE: Surface temperature
of adjacent walls and mantels
become hot during operation. Walls and
mantels above the rebox may become too
hot to touch. If installed properly, these
temperatures meet the requirement of
the national product standard. Follow
all minimum clearances shown in this manual.
NOTICE: If your installation does not meet the
minimum clearances shown, you must do one of
t
he following: Operate the logs with the ue
damper open only. Raise the mantel to an
acceptable height.
Figure 4 - Heat resistant
material (slate, marble, tile,etc.)
above replace
Page 13
13
Figure 5 - Minimum mantel clearances
without using hood
Figure 6 - Minimum mantel clearances
when using hood
Figure 7- Minimum replace
clearances if installed at oor level
Combustible Material
14 in. Min
Noncombustible Material
Figure 8 - Minimum replace
clearances above combustible ooring
Combustible Material
5 in. Min
Hearth
Figure 9 - Attach Damper to Fireplace
24 in. Model
Log set
18 in. Model
Top of
Fireplace
Opening
Underside of
Mantel Shelf
All minimum
distances are
in inches
Mantel Shelf
Minimum NonCombustible
Material
Distances to
Underside of
Mantel
Minimum
NonCombustible
Material
Height
Log set
18 in., 24in.,
Models
Top of Fireplace
Opening
Underside of
Mantel Shelf
Mantel Shelf
Minimum NonCombustible
Material
Hood
Distances to
Underside of
Mantel
All minimum
distances are in
inches
Damper
Damper
Clamp
Damper
FLOOR CLEARANCES
a) If installing appliance on oor level, you must maintain the minimum distance of 14
inches to combustibles (see Figure 7).
b) If combustible materials are less than 14 inches to the replace, you must install
appliance at least 5 inches above the combustible ooring (see Figure 8).
Page 14
14
INSTALLING DAMPER CLAMP ACCESSORY FOR VENTED OPERATION
NOTE: When used as a vented heater, appliance must be installed only in a solid-fuel
burning replace with a working ue constructed of noncombustible material. You may
use this heater as a vented product. There are three reasons for operating your heater as
a vented model:
1.
The replace does not meet the clearance requirements for vent-free operation.
2. State or local codes do not permit vent-free operation.
3. You prefer vented operation.
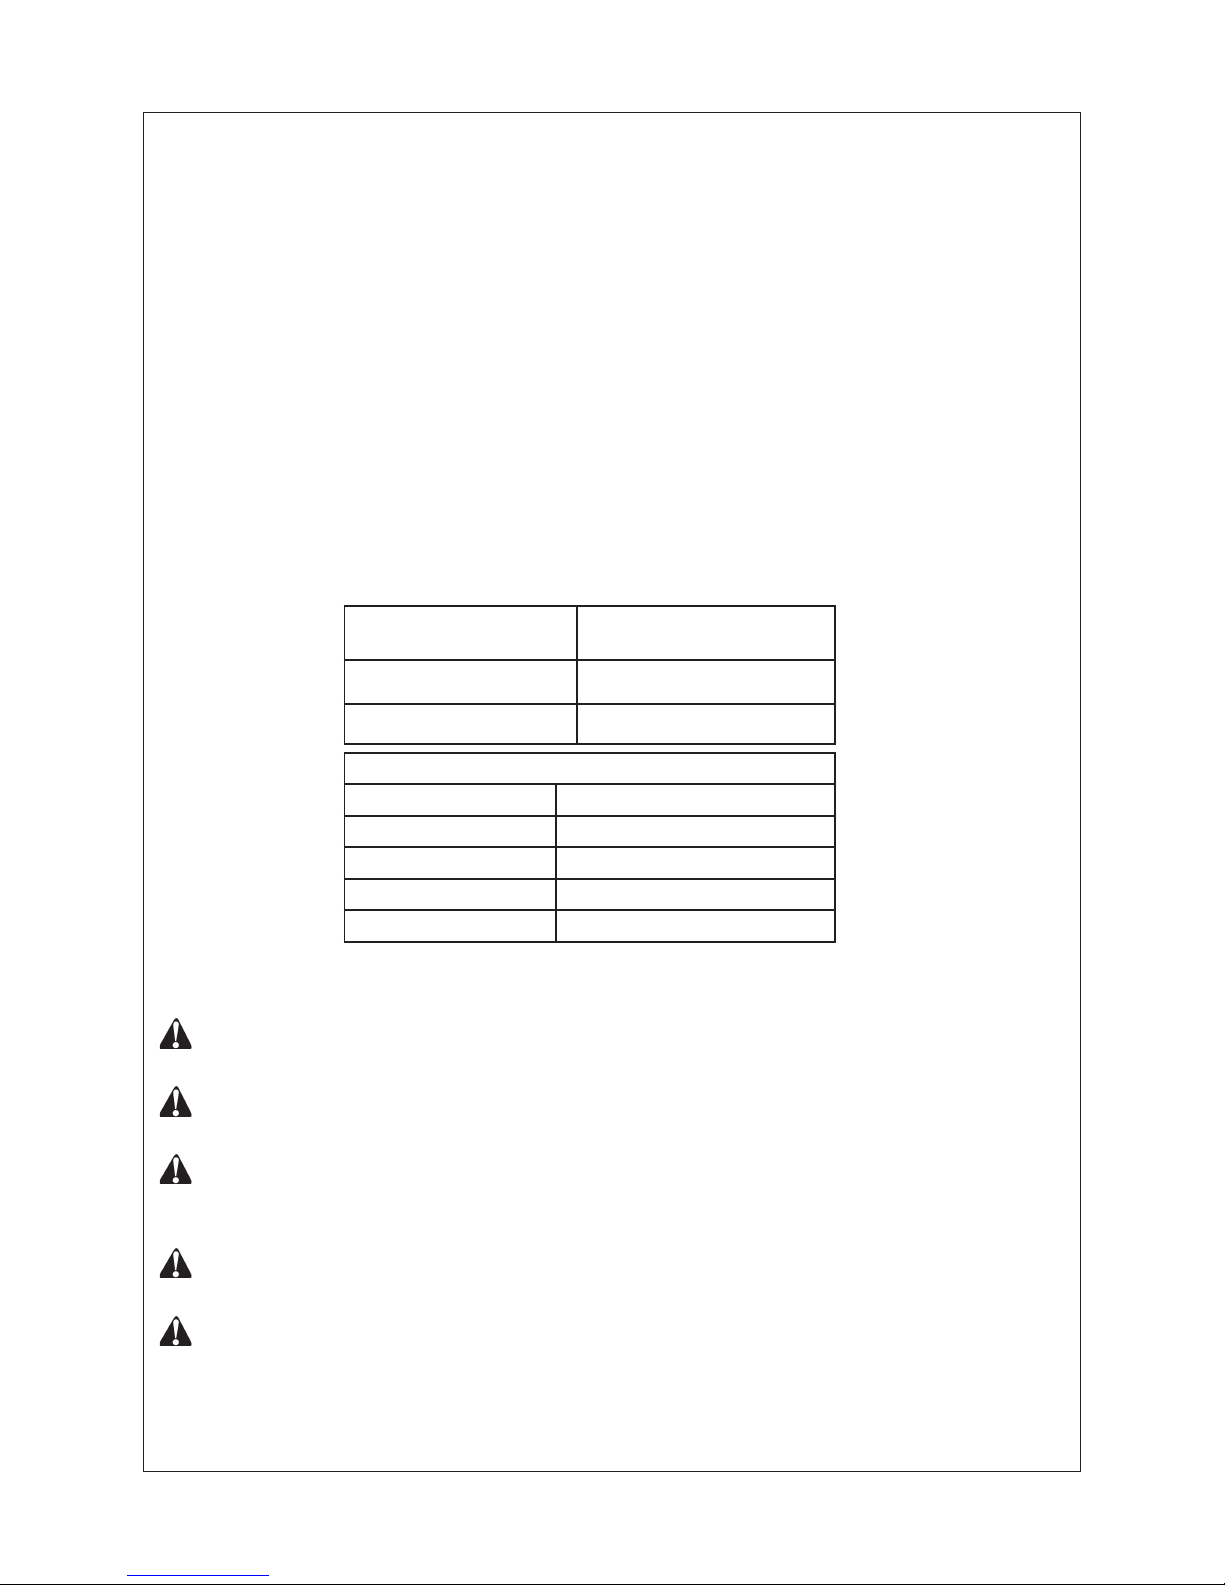
If reasons number 1 or 2 above apply to you, you must permanently open chimney ue
damper. You must install the damper clamp accessory (not provided). This will ensure
vented operation (see Figure 9). The damper clamp will keep damper open. Installation
instructions are included with clamp accessory.
See chart below for the minimum permanent ue opening you must provide. Attach
damper clamp so the minimum permanent opening will be maintained at all times.
Chimney Height (ft.) Minimum Permanent
Flue Opening (sq. in)
6 ft to 15 ft 39 sq. in.
1
5 ft to 30 ft 29 sq. in.
Area of Various Standard Round Flues
Diameter (in.) Area (sq. in.)
5 in. 2
0 sq.in.
6 in. 2
9 sq.in.
7 in. 39 sq in.
8 in. 5
1 sq in.
INSTALLING HEATER BASE ASSEMBLY
CAUTION: Do not remove the metal data plates attached to the heater base assembly.
The data plates contain important warranty information.
WARNING: You must secure this heater to replace oor. If not, heater will move when
you adjust controls. Moving heater may cause a gas leak.
WARNING: If installing in sunken replace, special care is needed. You must raise the
replace oor to allow access to heater control panel. This will insure adequate air ow
and guard against sooting. Raise replace oor with noncombustible material.
CAUTION: Do not pick up heater base assembly by the burner. This could damage
heater. Handle base assembly only by grates.
IMPORTANT: Make sure the heater burners are level. If heater is not level, heater will
not work properly. Avoid damage to thermostat bulb. Avoid nicks or sharp bends in thermostat bulb wire. Keep thermostat bulb in mounting bracket.
Page 15
15
CONNECTING TO GAS SUPPLY
WARNING: A qualied service technician must connect heater to gas supply.
Follow all local codes.
WARNING: This appliance requires 1/2-inch NPT (National Pipe Thread) inlet
connection to the pressure regulator.
WARNING: Never connect heater to private (non-utility) gas wells. This is com-
monly known as well-head gas.
CAUTION: Never connect heater directly to the natural or propane/LP supply.
This heater requires an external regulator (not supplied). Install the external
regulator between the heater and natural or propane/LP supply.
1.
Apply pipe joint sealant lightly to tting threads. Connect approved exible gas
hose to gas regulator of heater (see Figure 11).
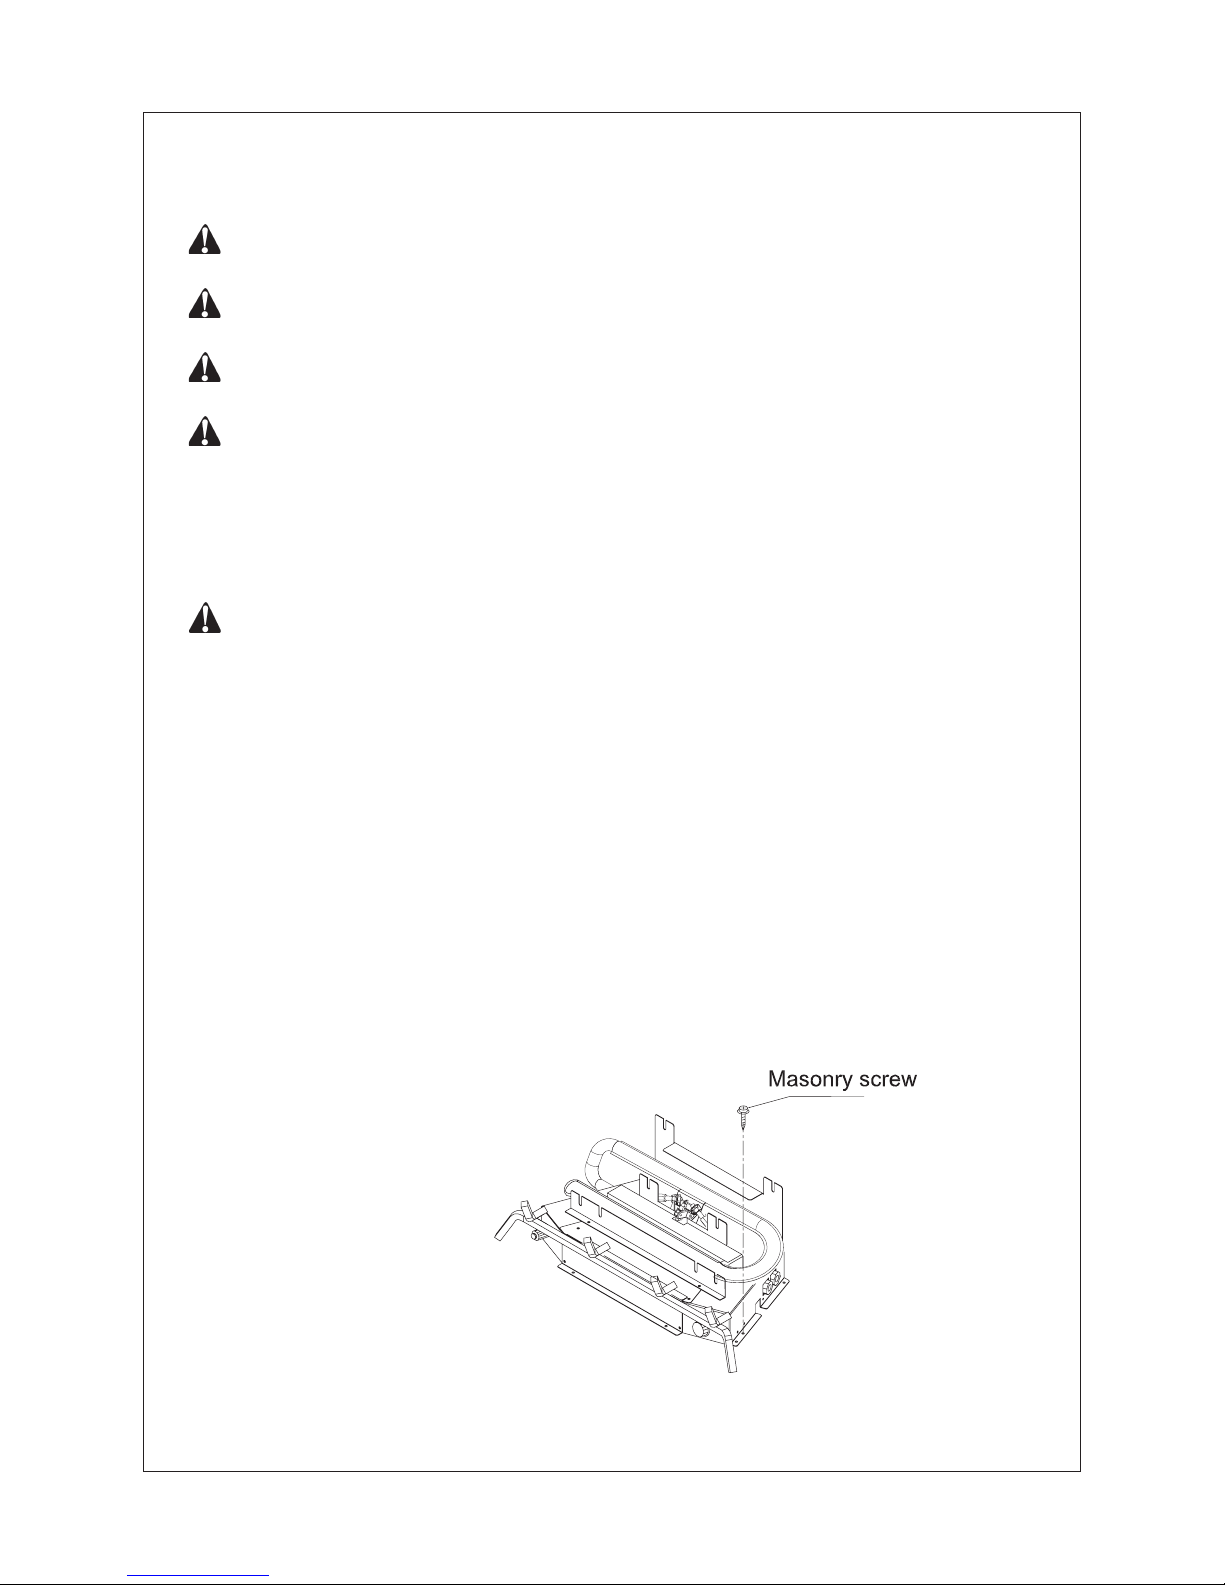
Figure 10 - Attaching Heater Base to Fireplace Floor
NOTE: Never apply pipe sealant to are tting threads.
IMPORTANT: Hold gas regulator with wrench when connecting exible gas hose.
2. Locate masonry screws in hardware package.
3. Position heater base assembly in replace.
4. Place logs in their proper position on heater base.
5. Center heater base and logs front-to-front and side-to-side in replace.
6. Carefully remove logs without moving heater base.
7. Mark screw locations through holes in mounting brackets (see Figure 11). If install
-
ing in a brick-bottom replace, mark screw locations in mortar joint of bricks.
8.
Remove heater base from replace.
9. Drill holes at marked locations using 3/16-inch drill bit.
10. Attach base assembly to replace oor using two masonry screws (in hardware
package) (see Figure 10).
Page 16
16
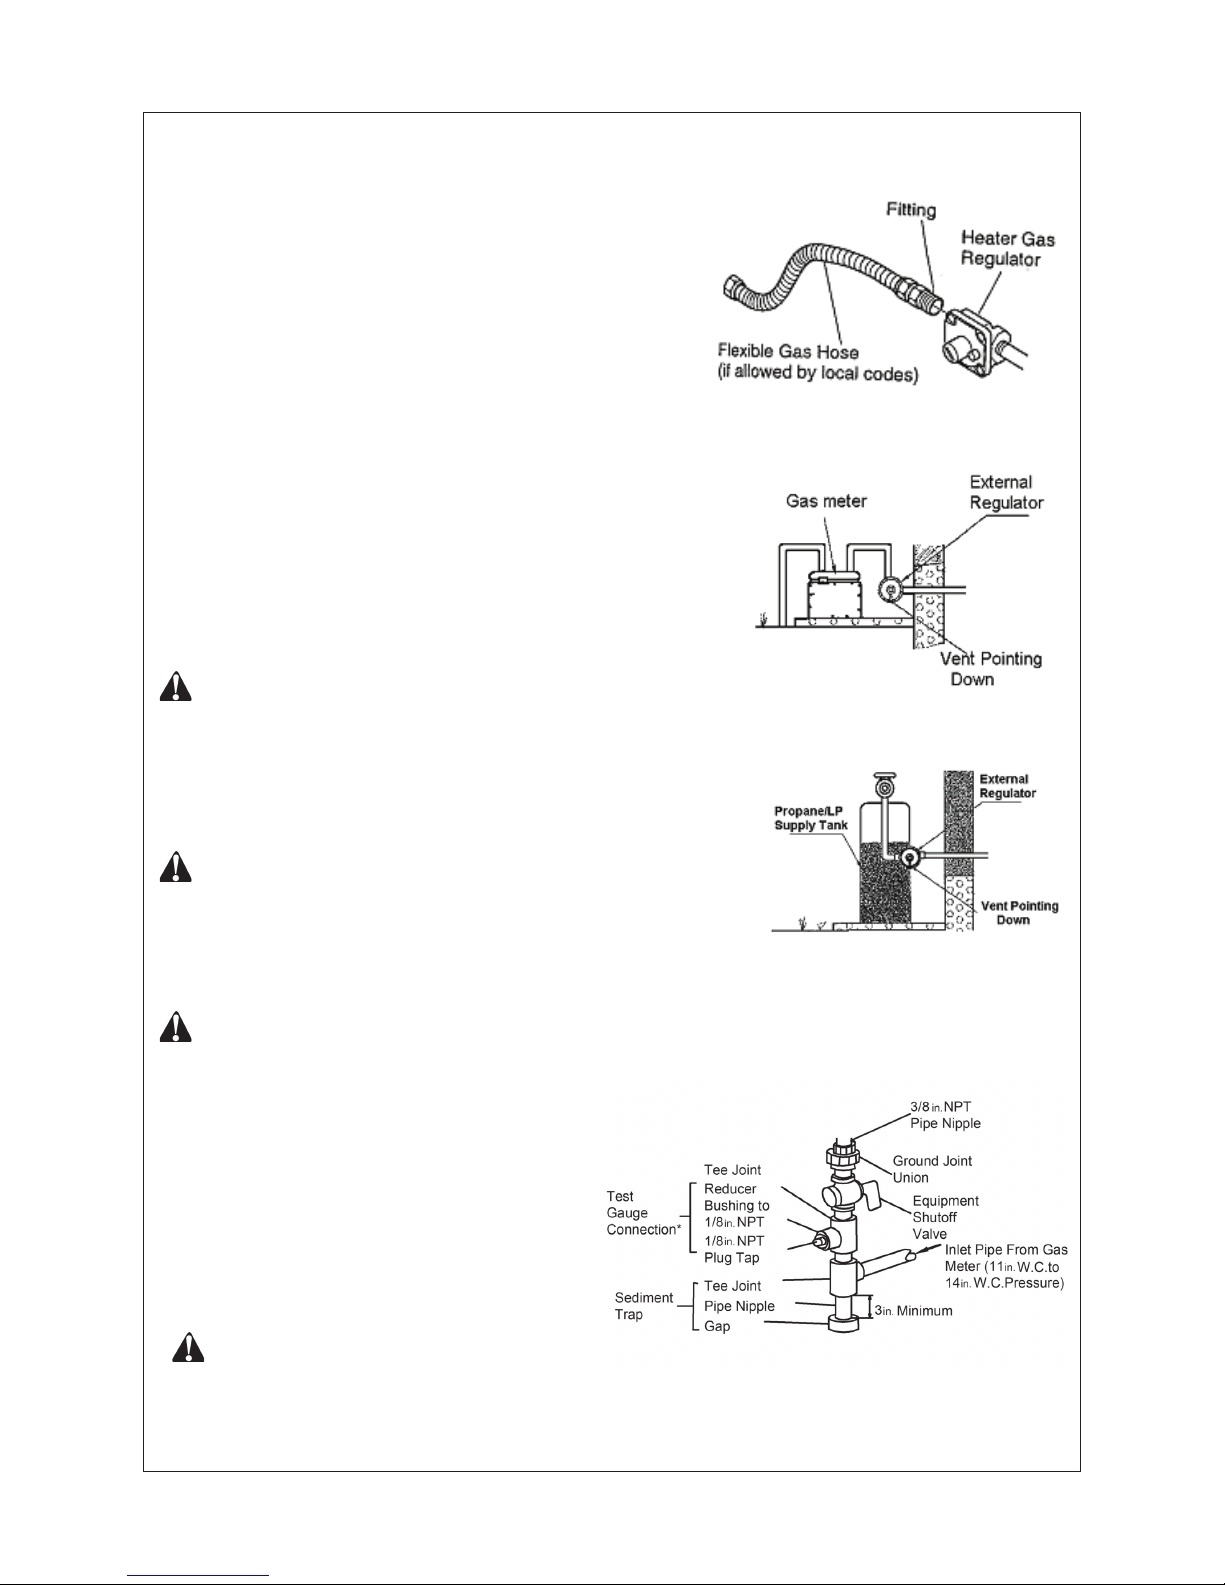
Figure 11 - Attaching Flexible Gas
Hose to Heater Gas Regulator
Figure 12-A - External Regulator
with Vent Pointing Down For NG
Figure 12-B - External Regulator
with Vent Pointing Down For LP
A CSA/AGA design-certied equipment shutoff valve
with
1/8-inch NPT tap is an acceptable alternative to
test gauge connection. Purchase the optional CSA/
AGA design-certied equipment shutoff valve from
your dealer.
The installer must supply an external regulator. The
external regulator will reduce incoming gas pressure.
You must reduce incoming gas pressure to minimum
allowable on rating label. If you do not reduce incoming gas pressure, heater regulator damage could
occur. Install external regulator with the vent down as
shown in Figure
12. Pointing the vent down protects it
from freezing rain or sleet.
Installation must include equipment shutoff valve,
union, and plugged
1/8-inch NPT tap. Locate NPT tap
within reach for test gauge hook up. NPT tap must
be upstream from heater (see Figure
13). To prevent
performance problems, Propane/LP tank of less than
1
00 lb. capacity is not recommended.
IMPORTANT: Install an equipment shutoff valve
in an accessible location. The equipment shutoff
valve is for turning on or shutting off the gas to the
appliance. Apply pipe joint sealant lightly to male
threads. This will prevent excess sealant from going into pipe. Excess sealant in pipe could result
in clogged heater valves.
CAUTION: Use only a new, black iron or steel
pipe. Internally-tinned copper tubing may be used
in certain areas. Check your local codes. Use
pipe of large enough diameter to allow proper gas
volume to heater. If pipe is too small, undue loss
of pressure will occur.
CAUTION: Use pipe joint sealant that is resistant
to natural gas (NG) or liquid petroleum (LP) gas.
Figure
13 - Gas Connection
We recommend that you install a sediment
trap in the supply line as shown in Figure
1
3. Place sediment trap where it is within
reach for cleaning and where trapped
matter is not likely to freeze. A sediment
trap traps moisture and contaminants.
This keeps them from going into heater
controls. If sediment trap is not
installed or is installed incorrectly,
heater may not run properly.
IMPORTANT: Hold pressure
regulator with wrench when
connecting it to gas piping
and/or ttings.
Page 17
17
CAUTION: Two gas line installation at the same time is forbidden.
Heater is pre-set at factory for propane gas, no changes are required for connecting to
propane. Only a qualied installer or service technician can perform gas selection and
connecting to gas supply.
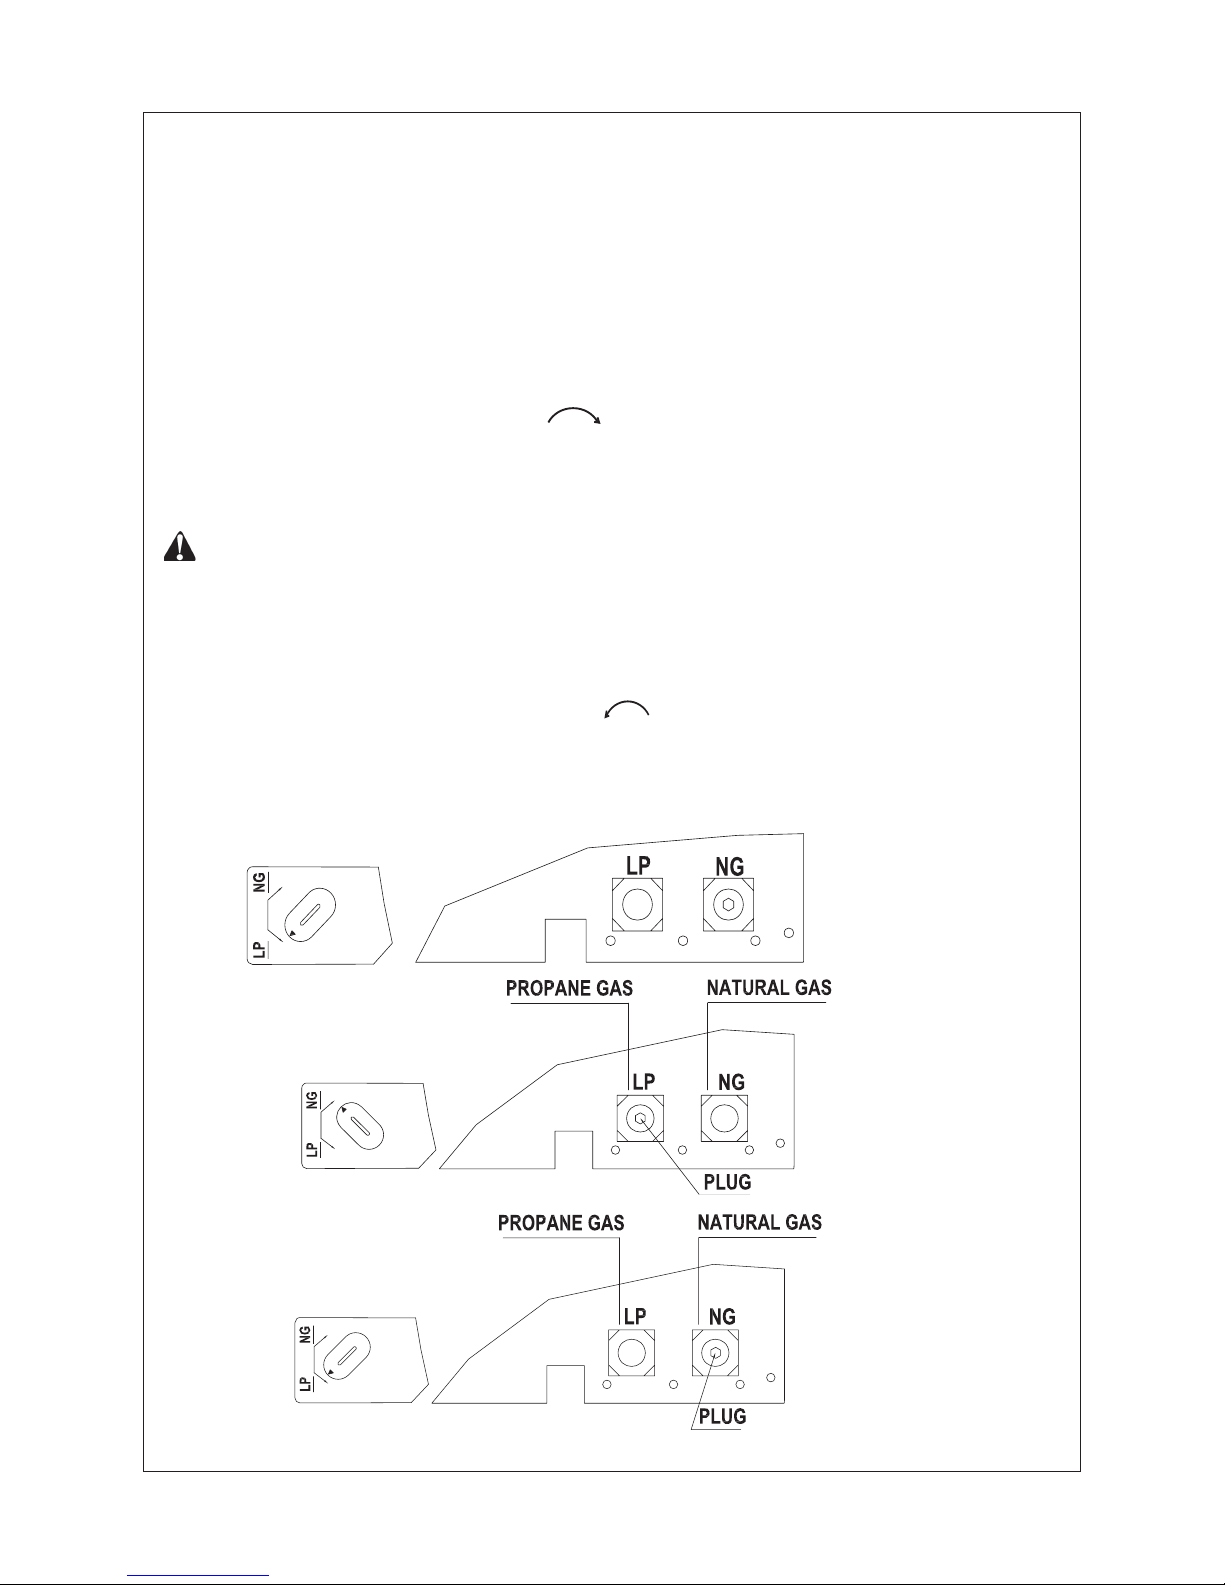
For changing from propane to natural gas supply:
1. Overturn chassis, See Figure 14.
2. For NATURAL GAS, press knob using a at screwdriver with a blade the thickness of
a quarter and turn knob clockwise until the knob locks into the NG position (see
Figure 15). Selection valve must be locked in the NG position. Do not operate heater
between locked positions!
3. Remove
hex plug (with wrench provided) from natural gas inlet of regulator and install
into LP inlet of regulator; use thread sealant to assure there are no leaks.
CAUTION: To avoid gas leakage at the inlet of regulator, a qualied installer or service
technician must use hex plug with sealant.
For changing from natural gas supply to propane supply:
1. Overturn chassis, See Figure 14.
2. For propane gas, press in knob using a at screwdriver with a blade the thickness of a
quarter and turn knob counterclockwise until the knob locks into the LP position,
see Figure 16. Selection valve must be locked in the LP position. Do not operate heater
between locked positions.
3. Remove hex plug from liquid propane inlet of regulator and install into NG inlet of
regulator; use thread sealant to assure there are no leaks.
Figure 14
Figure 16
Figure 15
Page 18
18
CHECKING GAS CONNECTIONS
WARNING: Test all gas piping and connections for leaks after installing or servic-
ing. Never use an open ame to check for leaks. Apply a mixture of liquid soap
and water to all joints. Bubbles forming indicate a leak. Correct all leaks immedi-
ately.
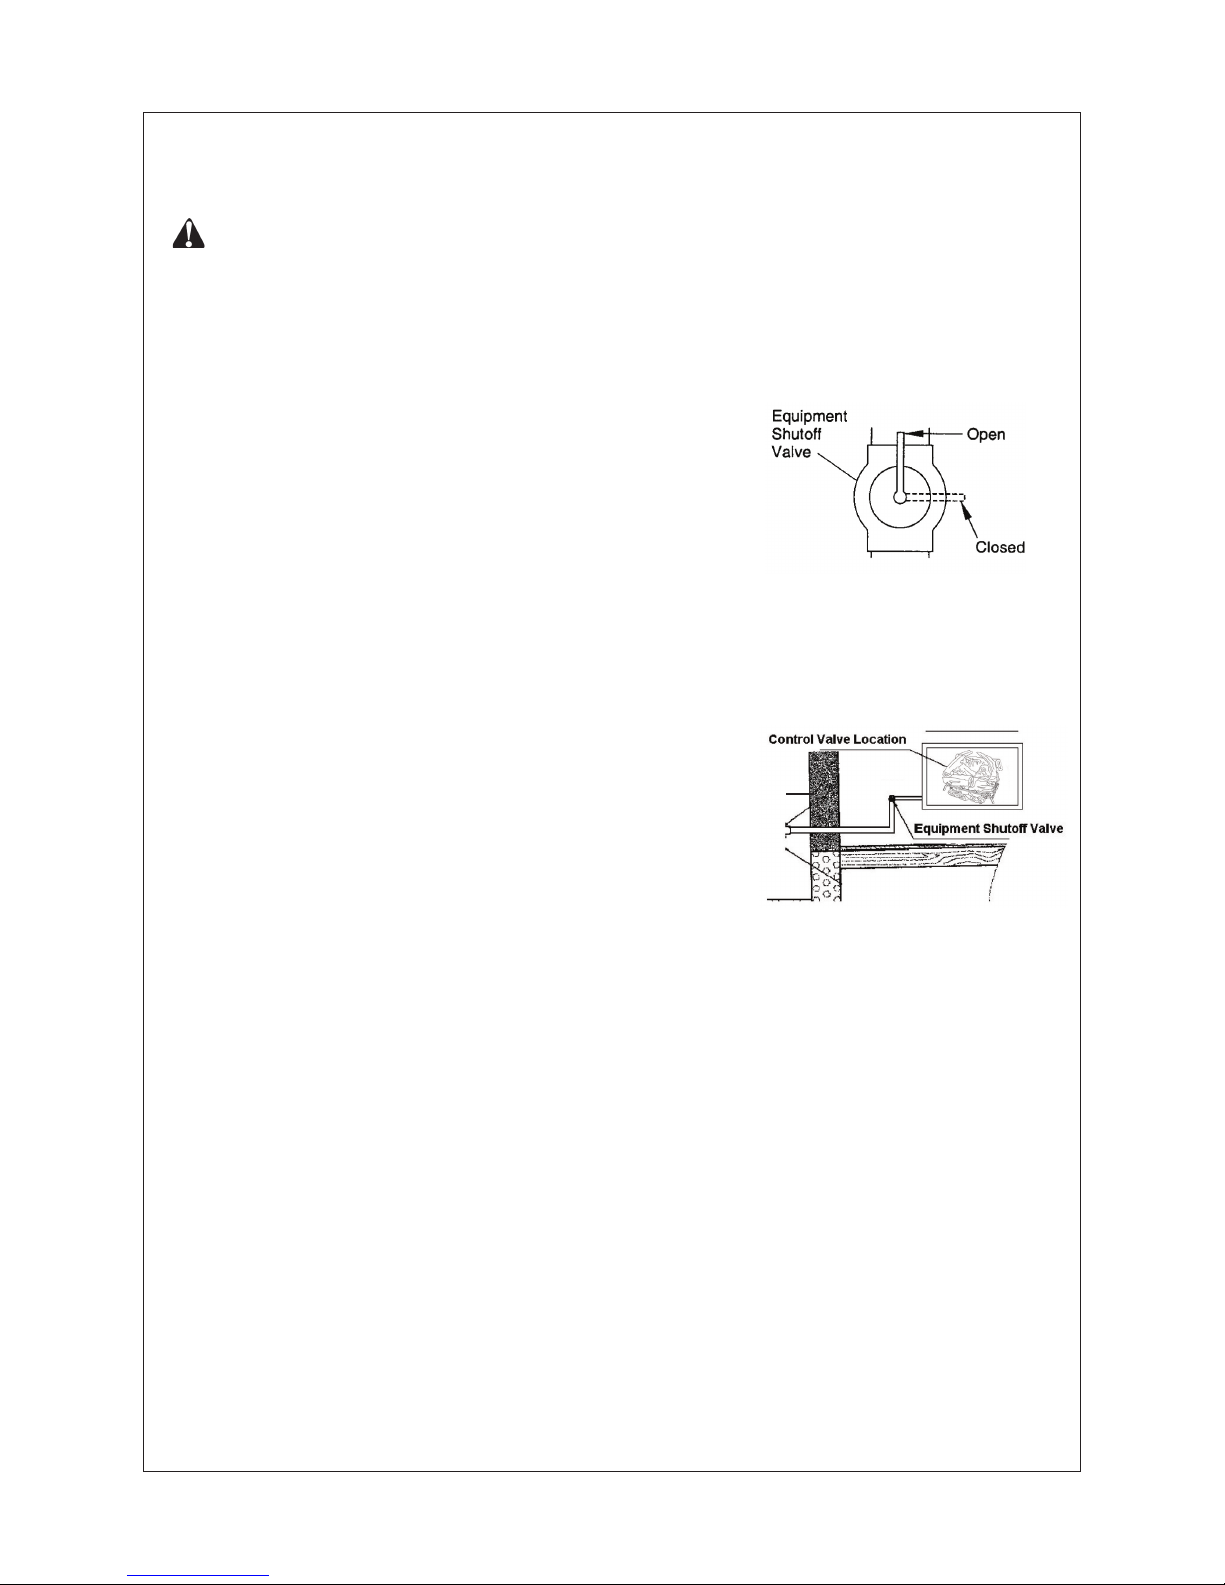
Figure 17- Equipment Shutoff
Valve
Figure 18 Checking Gas Joints
Pressure Testing Gas Supply Piping System
Test Pressure in Excess Of 1/2 PSIQ (3.5 K Pa)
1
. Disconnect appliance with its appliance main gas
valve (control valve) and equipment shutoff valve
from gas supply piping system. Pressure in excess of
1/2 psig will damage heater regulator.
2. Cap off open end of gas pipe where equipment
shutoff valve was connected.
3. Pressurize supply piping system by either using
compressed air or opening main gas valve located
on or near gas tank.
4. Check all joints of gas supply piping system. Apply
a mixture of liquid soap and water to gas joints.
Bubbles forming indicate a leak.
5. Correct all leaks immediately.
6. Reconnect heater and equipment shutoff valve to gas
supply. Check reconnected ttings for leaks.
Test Pressures Equal To or Less Than 1/2 PSIQ
1
. Close equipment shutoff valve (see Figure 17).
2. Pressurize supply piping system by either using
com pressed air or opening main gas valve located
on or near gas supply tank.
3.
Check all joints from gas tank to equipment shutoff
valve (see Figure 18). Apply mixture of liquid soap
and water to gas joints. Bubbles forming show a leak.
4. Correct all leaks immediately.
Pressure Testing Heater Gas Connections
1. Open equipment shutoff valve (see Figure 17).
2. Open main gas valve located on or near gas tank.
Fuel
Supply
3. Make sure control knob of heater is in the OFF position.
4. Check all joints from equipment shutoff valve to control valve (see Figure 18). Apply
mixture of liquid soap and water to gas joints. Bubbles forming show a leak.
5.
Correct all leaks immediately.
6 Light heater (see Operation, pages 23 through 28). Check the rest of the internal
joints for leaks.
7.
Turn off heater (see “To Turn Off Gas to Appliance,” page 24).
Page 19
19
INSTALLING LOGS
WARNING: Failure to position the parts in accordance with these diagrams or failure
to use only parts specically approved with this heater may result in property damage
or personal injury.
CAUTION: After installation and periodically thereafter, check to ensure that no yellow
ame comes in contact with any log. With the heater set to High, check to see if
Provided Logs: 7
yellow ames contact any log. If so, reposition
logs according to the log installation instructions
in this manual. Yellow ames contacting logs will
create soot.
It is very important to install the logs exactly as
instructed. Do not modify logs. Use only logs
supplied with heater.
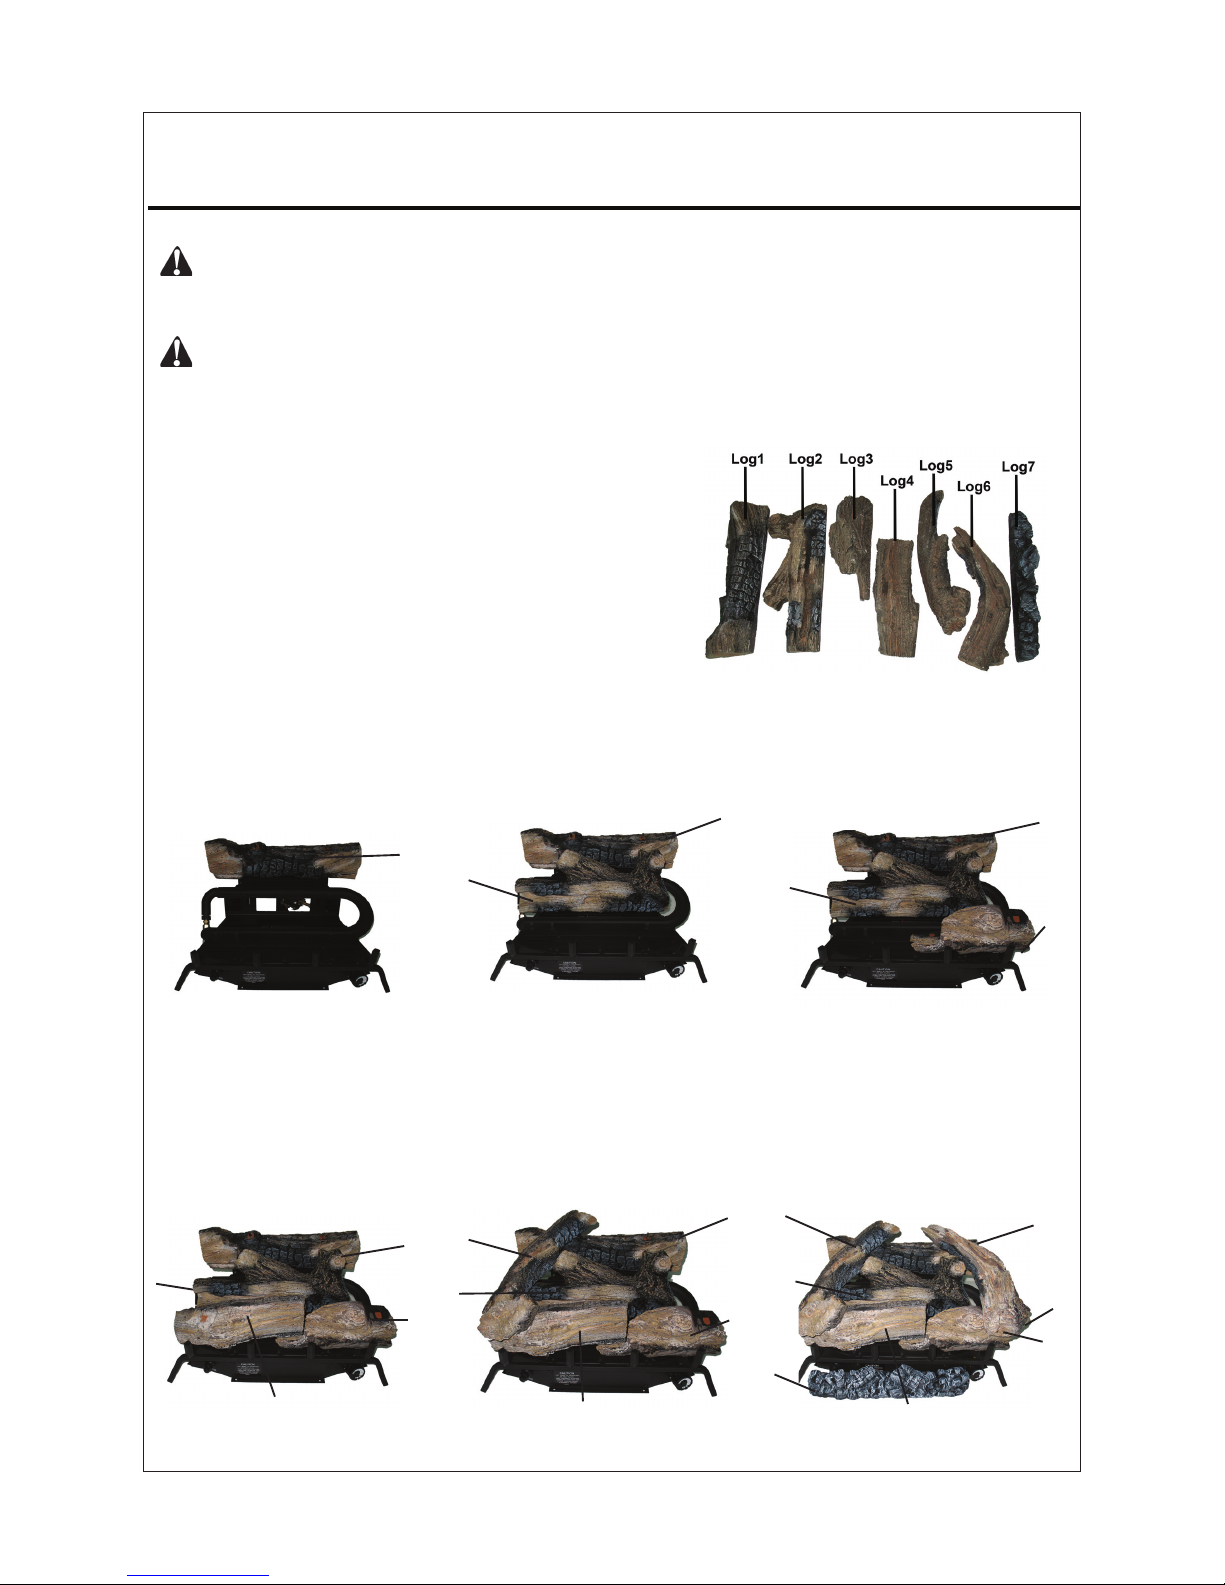
Each log is marked with a number. This number
will help you to identify the logs when installing.
After installing logs, add decorative cinders
around the grate base, do not place any
decorative cinders on logs or burner.
1. Insert log #1 into slots in
rear log bracket on grate
base, and tighten nuts.
Figure 20 - Installing Log #2
Figure 21 - Installing Log #3
Figure 22 - Installing Log #4 Figure 24 - Installing Log #6, and
Log #7
Figure
23 - Installing Log #5
1
2
5
4
3
5. Insert the recessed hole
on the bottom of log #5
onto pin on log #
1, with
the other end placed on
log #4.
5
2
7
4
1
3
6
6. Insert the recessed hole
on the bottom of log #6
onto pin on log #
1, with
the other end placed on
log #3.
Position #7 log on re-
place bottom in front of
controls.
4. Insert log #4 into slots in
front log bracket on grate
base and tighten nuts.
3
4
1
2
1
2
3
3.
Insert log #3 into slots in
front log bracket on grate
base and tighten nuts.
1
2
2. Insert log #
2 into slots in
middle grate bracket and
tighten nuts.
Figure 19 - Installing Log #1
1
18 IN. VENT-FREE GAS LOGS
Page 20
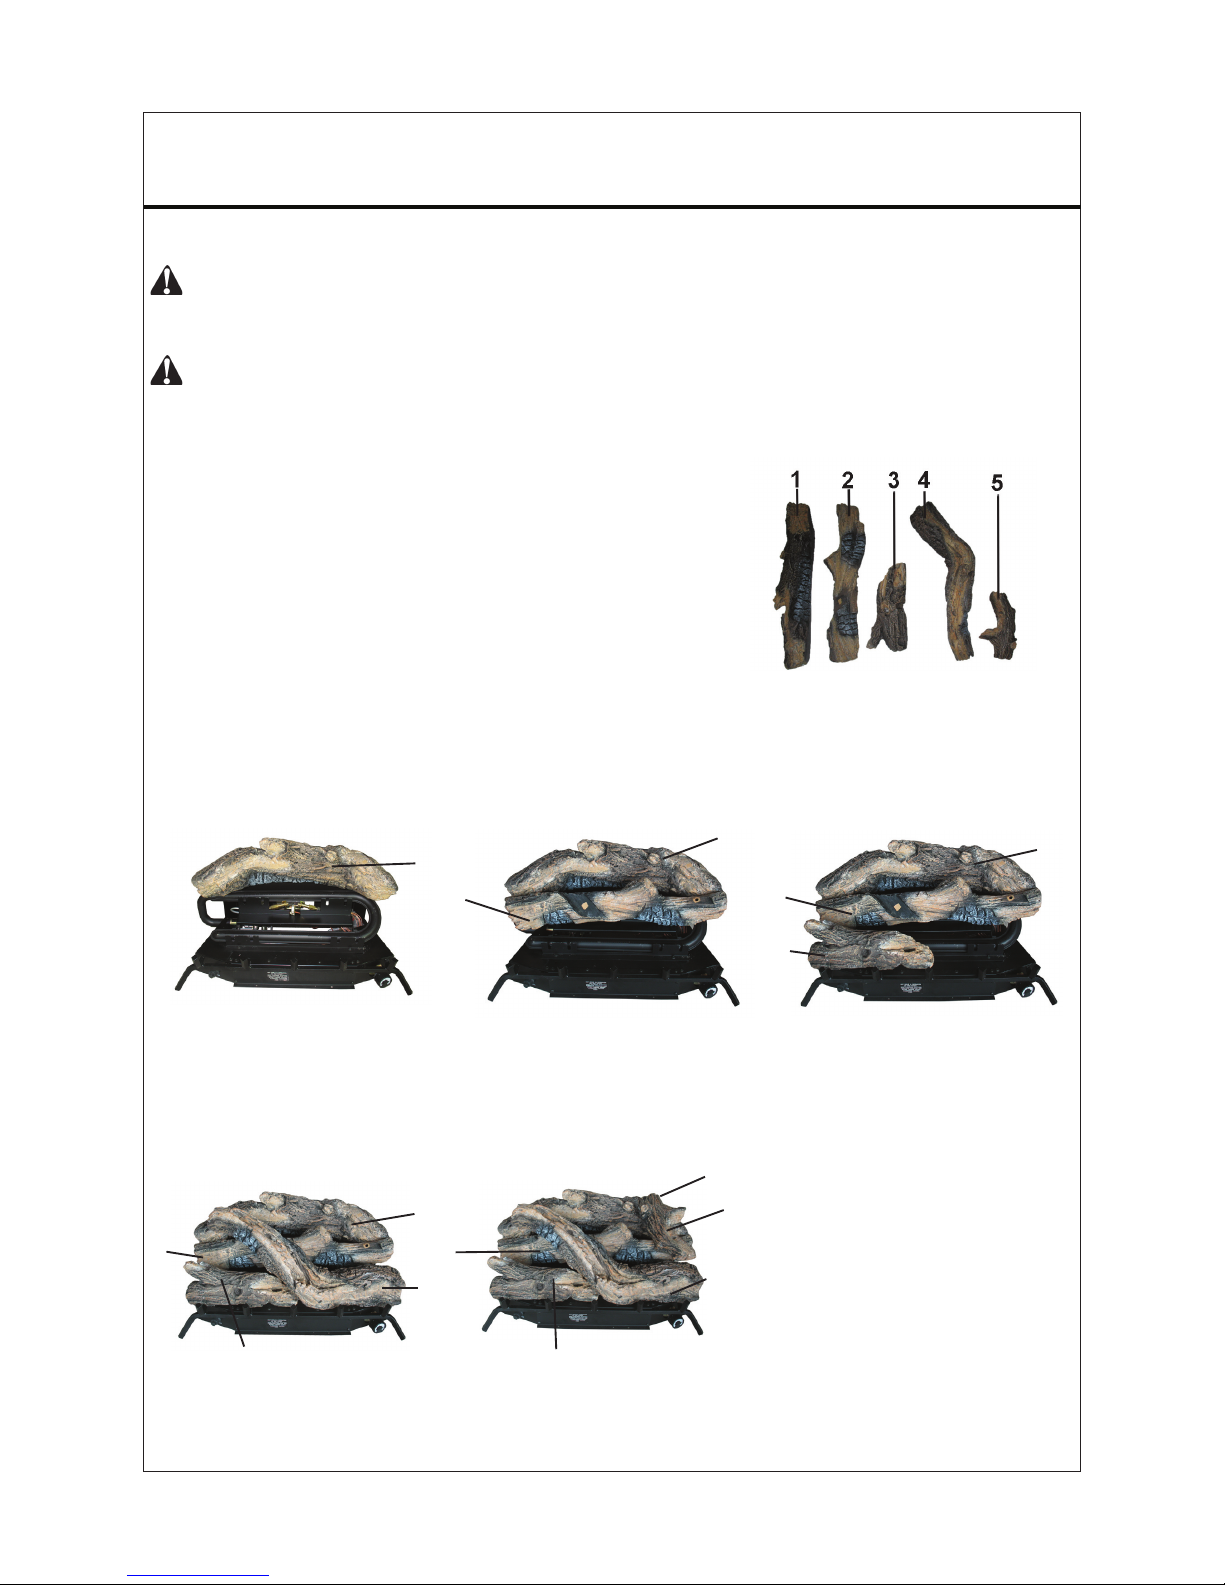
20
INSTALLING LOGS
WARNING: Failure to position the parts in accordance with these diagrams or
failure to use only parts specically approved with this heater may result in property
damage or personal injury.
CAUTION: After installation and periodically thereafter, check to ensure that no
Provided Logs: 5
1. Insert
log #1 into slots in
rear log bracket on grate
base, and tighten nuts.
Figure 26 - Installing Log #2
Figure 27 - Installing Log #3
Figure 28 - Installing Log #4 Figure 29 - Installing Log #5
1
2
5
3
4
5. I
nsert the recessed hole on
the bottom of log #5 onto
pin on log #1, with the other
end placed on log #2.
4. Insert log #4 into slots in
front log bracket on grate
base and tighten nuts.
4
3
1
2
1
2
3
3.
Insert log #3 into slots in
front log bracket on grate
base and tighten nuts.
1
2
2. I
nsert log #2 into slots in
middle grate bracket and
tighten nuts.
Figure 25 - Installing Log #1
1
24 IN. VENT-FREE GAS LOGS
yellow ames contact any log. If so, reposition
logs according to the log installation instructions
in this manual. Yellow ames contacting logs will
create soot.
It is very important to install the logs exactly as
instructed. Do not modify logs. Use only logs
supplied with heater.
Each log is marked with a number. This number
will help you to identify the logs when installing.
After installing logs, add decorative cinders
around the grate base, do not place any
decorative cinders on logs or burner.
Page 21
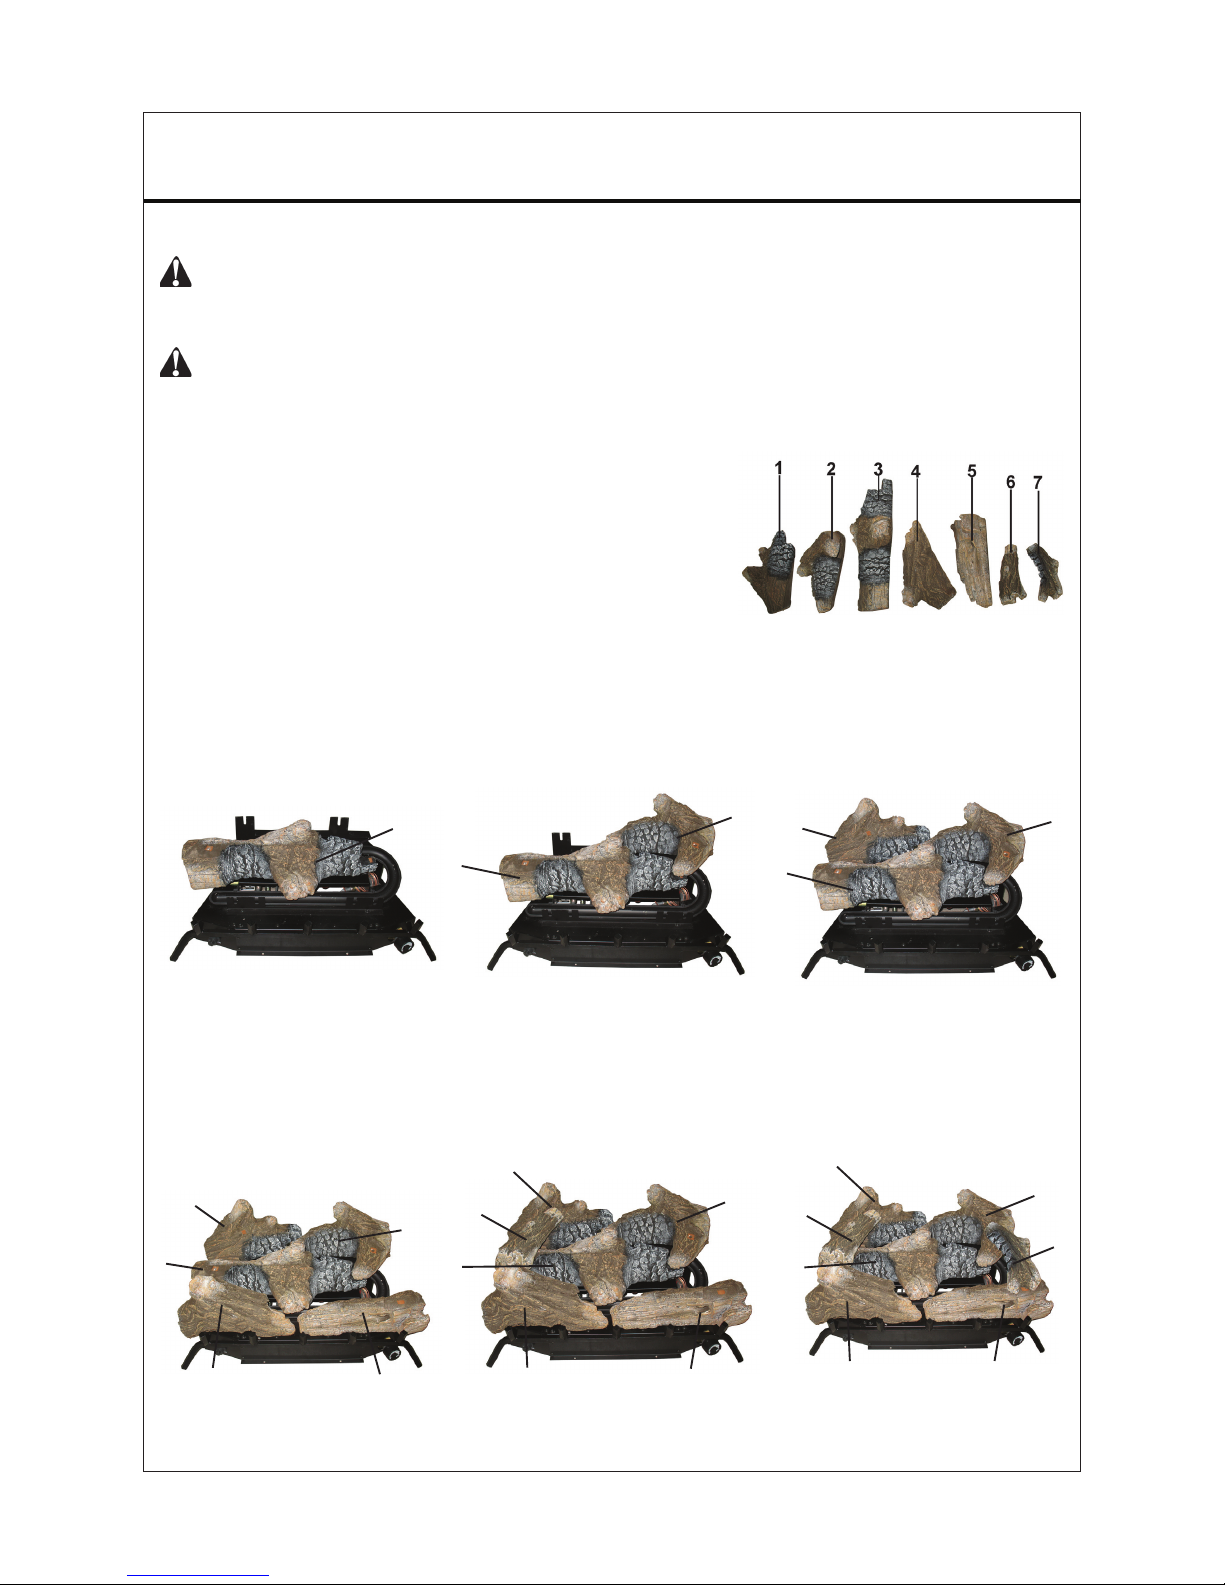
21
INSTALLING LOGS
WARNING: Failure to position the parts in accordance with these diagrams or failure to
use only parts specically approved with this heater may result in property damage or
personal injury.
CAUTION: After installation and periodically thereafter, check to ensure that no yellow
Provided Logs: 7
1. I
nsert log #3 into slots in
middle grate, and tighten
nuts.
Figure 31 - Installing Log #2
Figure 32 - Installing Log #1
Figure 33 - Installing Log #4 and
loge #5
Figure 35 - Installing Log #7Figure 34 - Installing Log #6
2
3
1
4
5
5. I
nsert the recessed hole
on the bottom of log #6
onto pin on log #1, with the
other end placed on log #3.
6. Insert the recessed hole
on the bottom of log #7
onto
pin on log #2, with
the other end placed on
log #5.
4. Insert log #4, log #5 into
slots in front log bracket
on grate base and tighten
nuts.
1
4
2
3
2
3
1
3.
Insert log #1 into slots in
rear log bracket on grate
base, and tighten nuts.
2
3
2. I
nsert log #2 into slots in
rear log bracket on grate
base, and tighten nuts.
Figure 30 - Installing Log #3
3
24 IN. VENT-FREE GAS LOGS & 30 IN. VENT-FREE GAS LOGS
5
6
2
3
1
4
5
6
7
yellow ames contact any log. If so, reposition
logs according to the log installation instructions
in this manual. Yellow ames contacting logs will
create soot.
It is very important to install the logs exactly as
instructed. Do not modify logs. Use only logs
supplied with heater.
Each log is marked with a number. This number
will help you to identify the logs when installing.
After installing logs, add decorative cinders
around the grate base, do not place any
decorative cinders on logs or burner.
Page 22
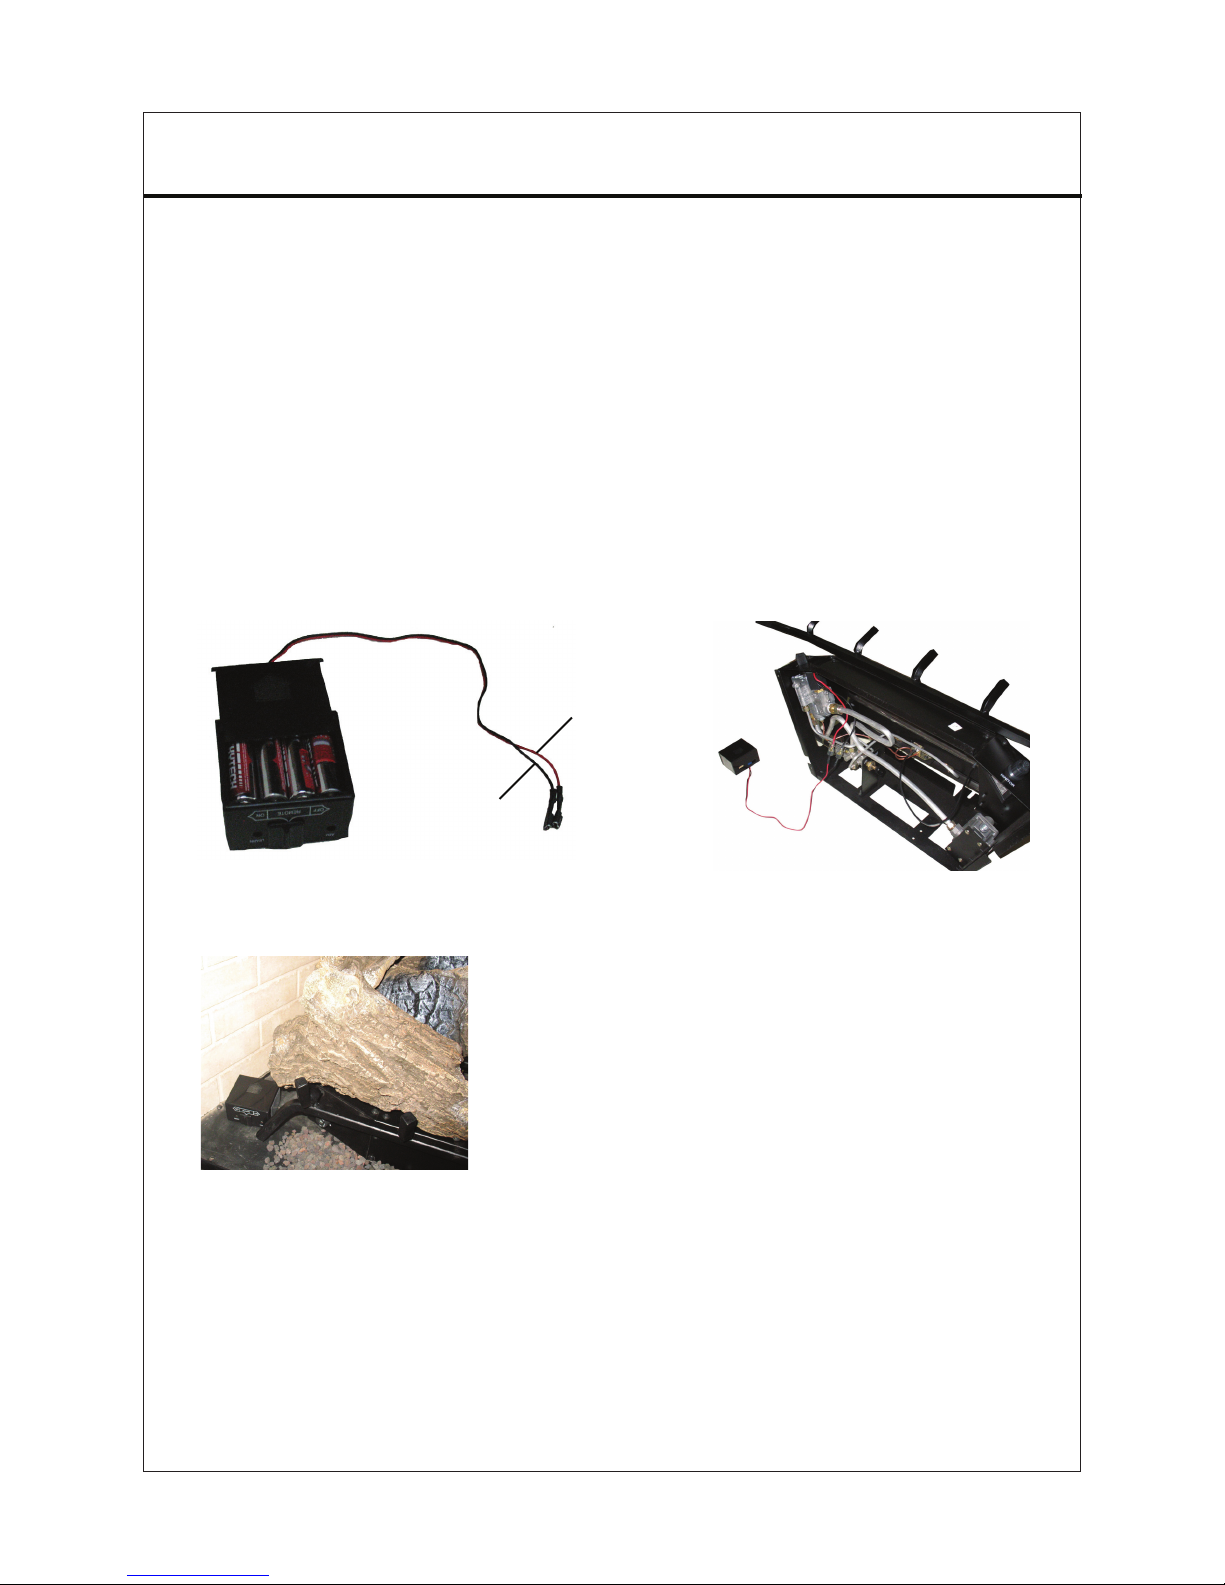
2222
INSTALLING REMOTE RECEIVER MODELS SSD24TR AND SSD30TR
The remote receiver operates on four 1.5V AA-size batteries. Use ALKALINE batteries
for longer battery life and maximum microprocessor performance.
IMPORTANT: New or fully charged batteries are essential for proper operation of the
remote receiver as the solenoid power consumption is higher than standard remote control
systems.
1
. Remove battery cover along the direction shown on the battery box, and install four
1.5V AA-size batteries into the box. (See Figure 36)
2. Rotate the log set and connect two wires (black and red) with two wires from AF-1100
valve. (See Figure 37)
3. With receiver wired to the valve, place receiver to the side of the log set. (See Figure 38)
Figure 36
Figure 37
Figure 38
Red wire
Black wire
Page 23
2323
Avoid any drafts that alter burner ame patterns. Do not allow fans to blow directly
into the replace. Do not place a blower inside the burn area of the rebox. Ceiling
fans may create drafts that alter ame patterns. Sooting and improper burning will
result.
During manufacturing, fabricating and shipping, various components of this appliance
are treated with certain oils, lms or bonding agents. These chemicals are not harmful
but may produce annoying smoke and smells as they are burned off during the initial
operation of the appliance, possibly causing headaches or eye or lung irritation. This
is a normal and temporary occurrence.
The initial break-in operation should last two to three hours with the burner at the highest setting. Provide maximum ventilation by opening windows or doors to allow odors
to dissipate. Any odors remaining after this initial break-in will be slight and will disappear with continued use.
This appliance must not be used with glass doors in the closed position. This can lead
to pilot outages and severe sooting outside the replace.
Always operate heater with glass doors fully open.
FOR YOUR SAFETY READ BEFORE LIGHTING
WARNING: If you do not follow these instructions exactly, a re or explosion may
result causing property damage, personal injury or loss of life.
When lighting the pilot, follow these instructions
exactly.
BEFORE LIGHTING smell all around the appliance area for gas. Be sure to smell
next to the oor because some gas is heavier than air and will settle on the oor.
WHAT TO DO IF YOU SMELL GAS
Do not try to light any appliance.
Do not touch any electrical switch; do not use any phone in your building.
Immediately call your gas supplier from a neighbor’s phone. Follow the gas
supplier’s instructions.
If you cannot reach your gas supplier, call the re department.
U
se only your hand to push control. Never use tools. If the appliance does not oper-
ate, don’t try to repair it; call a qualied service technician or gas supplier. Forced or
attempted repair may result in a re or explosion.
A.
B.
•
•
•
•
C.
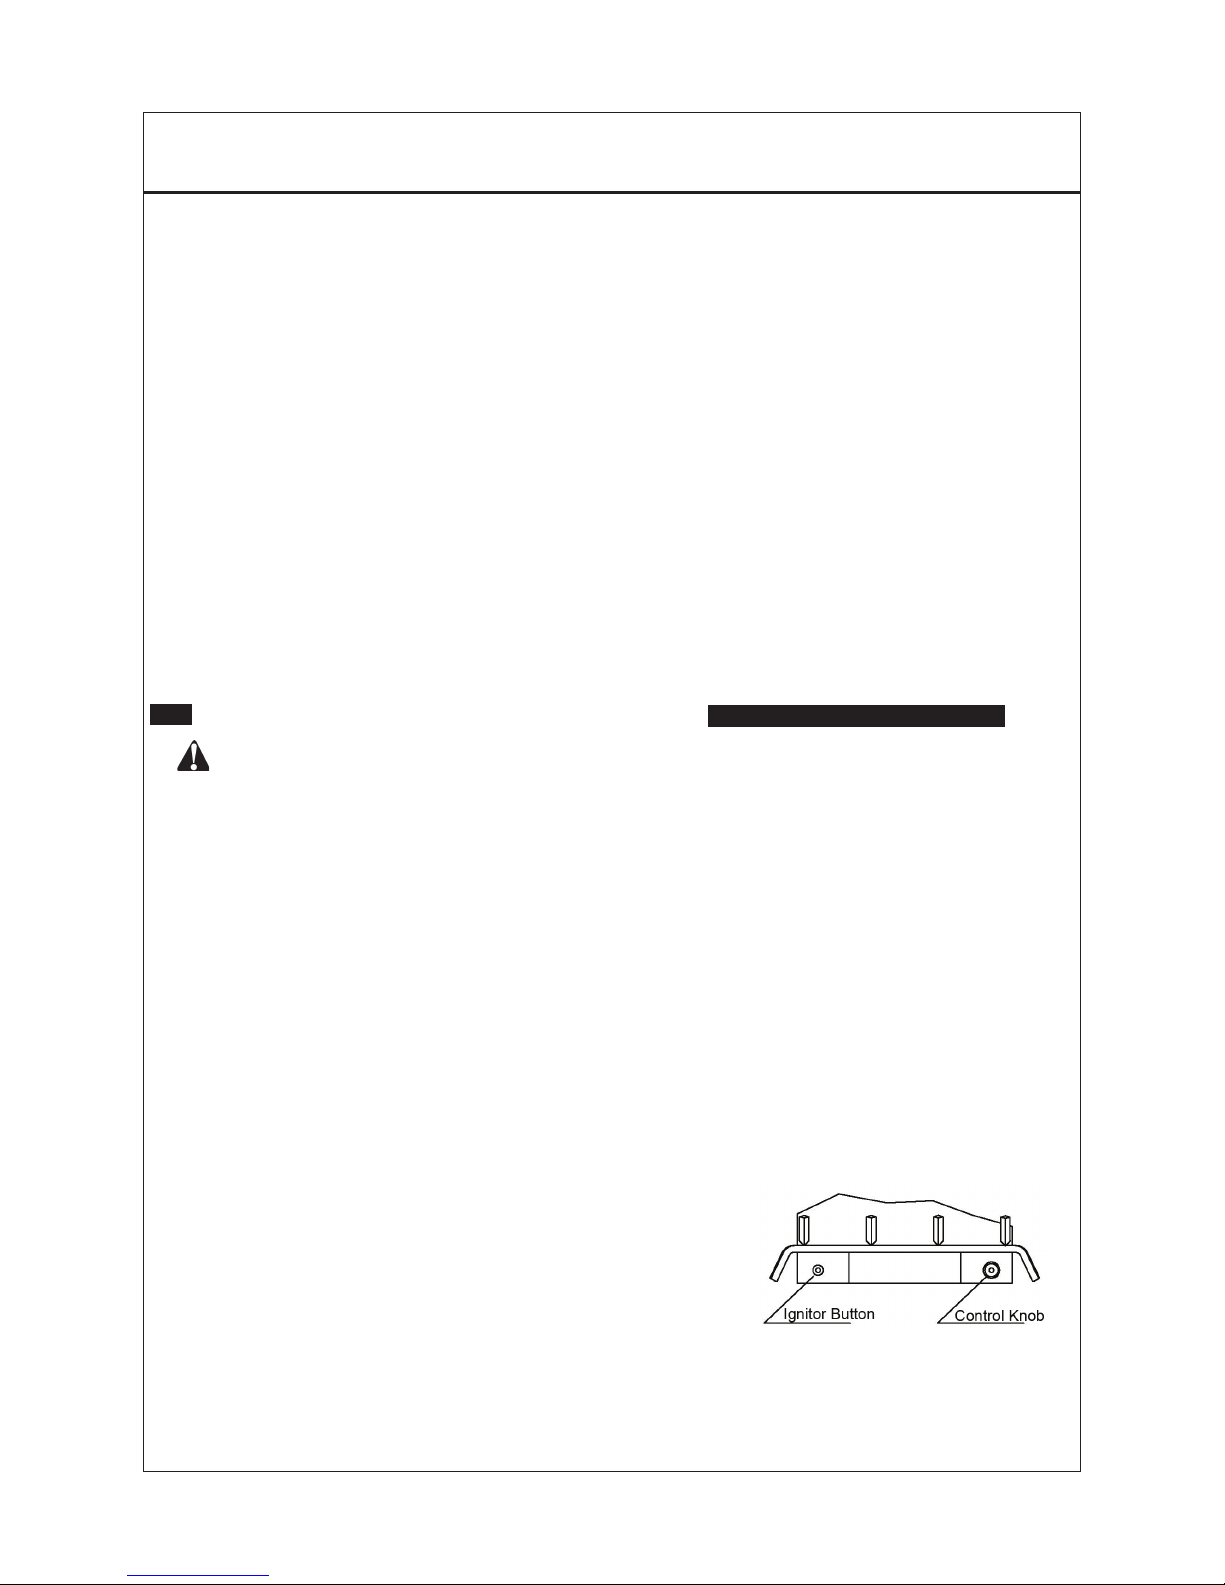
Figure 39 - Control Knob
and Ignitor Button Location
Do not use this appliance if any part has been
under water. Immediately call a qualied service
technician to inspect the appliance and to replace
any part of the control system and any gas control
which has been under water.
D.
OPERATION
Page 24
24
CAUTION: Do not try to adjust heating levels by using the equipment shutoff valve.
1. Unscrew ignitor cap and install a AAA type battery with the anode (+) pointing out.
Replace cap.
2. STOP! Read the safety information on front and back of the warning plate.
3. Make sure manual shutoff valve is fully, open.
4. Push in gas control knob slightly and turn clockwise to the OFF position.
5. Wait ve (5) minutes to clear out out any gas. Then smell for gas, including near the
oor. If you smell gas, STOP! Follow "B" in the safety information label. If you do not
smell gas, go to the next step.
6. Push in gas control knob slightly and turn counterclockwise to “PILOT” and
depress for ve (5) seconds. NOTE: The rst time the heater is operated after
connecting the gas supply, the control knob should be depressed for about thirty(30)
seconds. This will allow air to bleed from the gas system.
7. With control knob pushed in, press and hold ignitor button, located on the other side
of front panel. This will light the pilot. If needed, keep ignitor button pressed until pilot
lights.
8. Continue pushing the control knob in for a further 60 seconds to allow themocouple to
warm up. Release the control knob.
Note: If pilot goes out, repeat steps 3 through 7. This heater has a safety interlock
system. W
ait one (1) minute before lighting pilot again.
9. Turn control knob counterclockwise to desired heating level. The main burner should
light. Set control knob to any heat level between 1 and 5.
TO TURN OFF GAS TO APPLIANCE
Shutting Off Heater
Turn control knob clockwise to the OFF position.
Shutting Off Burner Only (pilot stays lit )
Turn control knob clockwise to the PILOT position.
LIGHTING INSTRUCTIONS
MATCH LIGHTING INSTRUCTIONS
1. Remove any items necessary for easy access to the pilot (for example: logs,
screens, etc.).
2
. Follow appropriate lighting instructions found above. Instead of pushing the piezo
button, light a match and hold the ame to the end of the pilot and ignite the pilot.
3.
After control knob has been released and pilot stays lit, reinstall any items that
were removed for pilot access.
4.
Call a qualied service technician for repair or replacement of the piezo ignitor.
18 IN. VENT-FREE GAS LOGS & 24 IN. VENT-FREE GAS LOGS
Page 25
25
LIGHTING INSTRUCTIONS MODELS
1. STOP! Read the safety information on front and back of the warning plate.
2. Make sure manual shutoff valve is fully open, and install three 1.5 V batteries in the
transmitter.
3. Push in control knob slightly and turn clockwise to the OFF position. If the switch
is on ON or OFF position, adjust it to REMOTE position.
4. Wait ve (5) minutes to clear out any gas. Then smell gas around heater and near
oor. If you smell gas, STOP! Follow "B" in the safety information on Warning plate.
If you don't smell gas, go to the next step.
5. Push in the control knob slightly and turn counterclockwise to “ PILOT ” and
depress for ve (5) seconds. NOTE: The rst time the heater is operated after
connecting the gas supply, the control knob should be depressed for about thirty (30)
seconds. This will allow gas to bleed from the gas system.
6. With the control knob pressed in, push down and release the ignitor button. This will
light the pilot. If needed, keep pressing ignitor button until pilot lights.
7. Keep the control knob depressed for ten (10) seconds after lighting pilot. If pilot goes
out, repeat step 5,6 and 7.
8. Rotate counterclockwise to ON position, and then press button to light burner.
Note: You may be operating this heater for the rst time after hooking up to gas
supply. If so, the lighting will be lasted for 30 seconds. This will allow air to bleed
from the gas system.
Note: If you miss your transmitter, adjust switch to ON position to light burner from the
gas system.
THERMOSTATIC CONTROL OPERATION
18 IN. VENT-FREE GAS LOGS & 24 IN. VENT-FREE GAS LOGS
The thermostatic control used on this model differs from standard thermostats. Standard
thermostats simply turn the burner on and off. The thermostat used on this heater senses
the room temperature. At times the room may exceed the set temperature. If so, the
burner will shut off. The burner will cycle back on when room temperature drops below
the set temperature. The control knob can be set to any comfort level.
Note: The thermostat sensing bulb measures the temperature. The thermostatic control
used on this model differs from standard thermostats. Standard thermostats simply turn
the burner on and off. The thermostat used on this heater senses the room temperature.
At times the room may exceed the set temperature. If so, the burner will shut off. The
burner will cycle back on when room temperature drops below the set temperature. The
control knob can be set to any comfort level between HIGH (5) and LOW (1).
24 IN. VENT-FREE GAS LOGS & 30 IN. VENT-FREE GAS LOGS
Page 26
26
REMOTE CONTROL OPERATION
This appliance must not be used with glass
doors in the closed position. This can lead to
pilot outages and severe sooting outside the
replace.
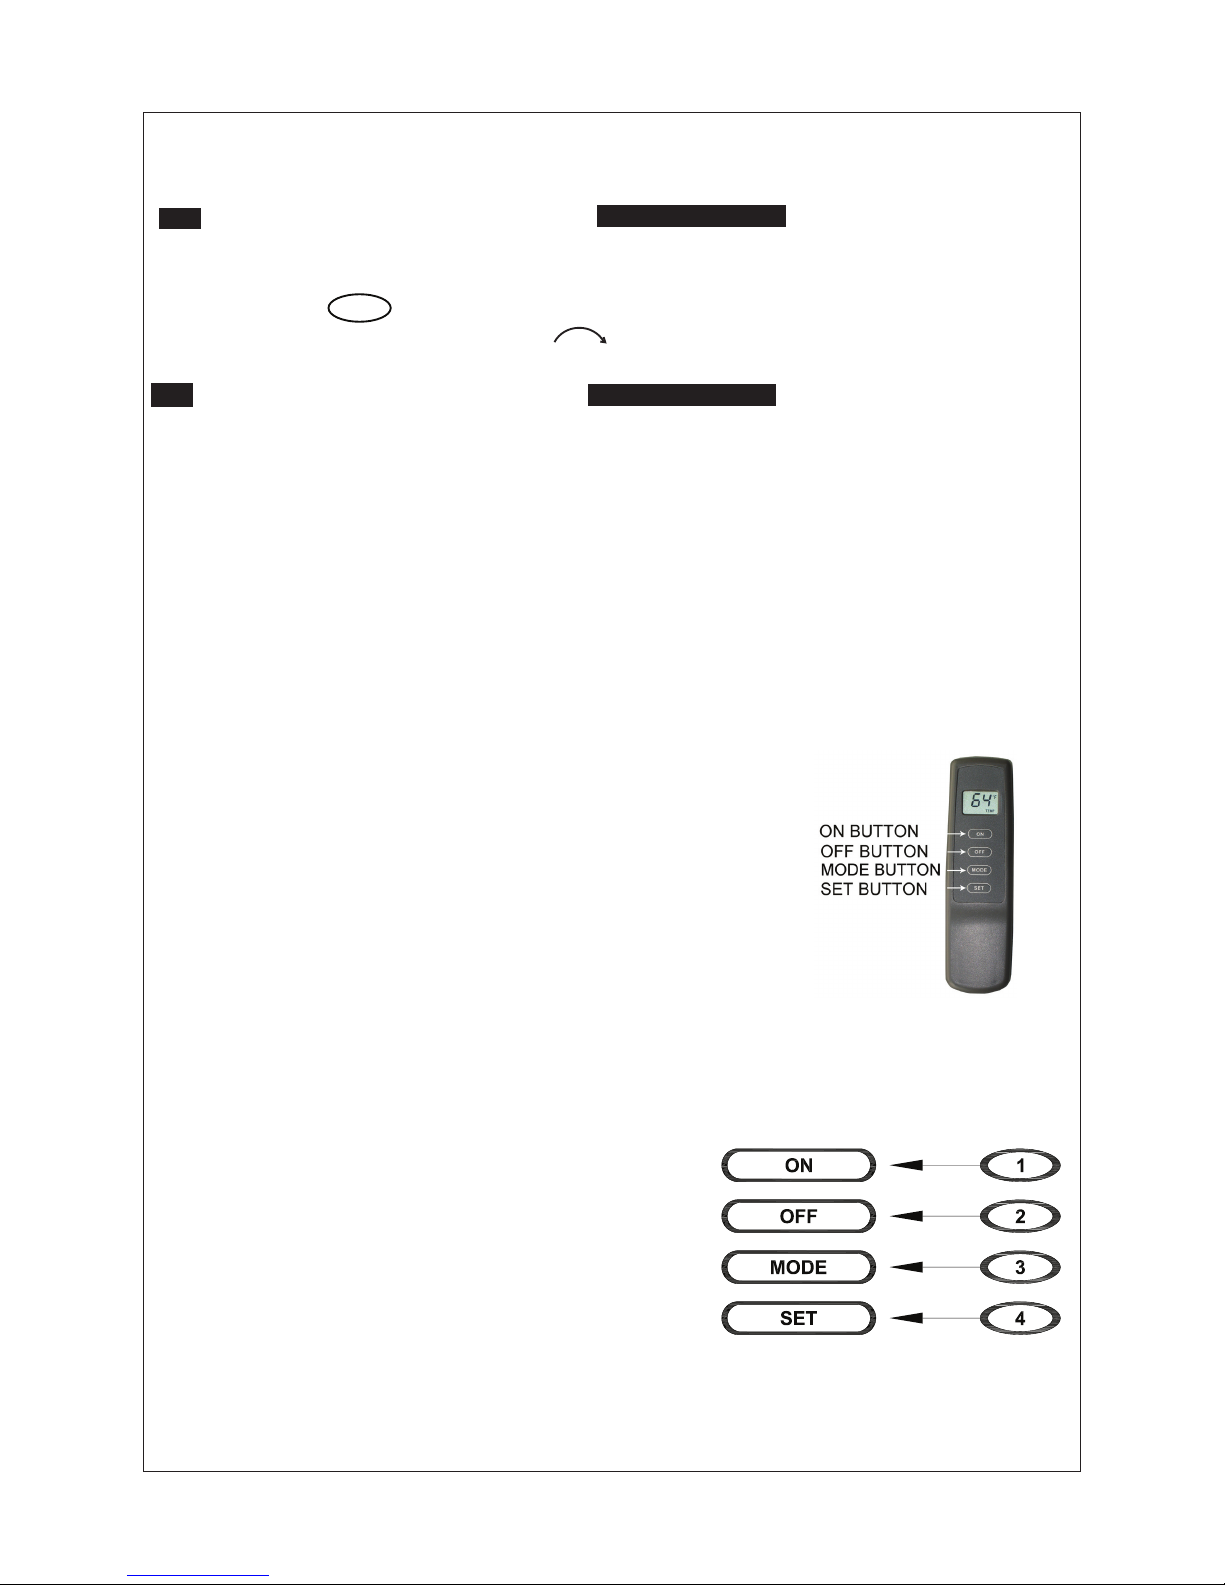
The transmitter operates on a (2) 1.5V AAA
batteries.
KEY SETINGS
ON - Operates unit to on position, Manually
operated solenoid ON.
OFF - Operates unit to off position, Manually
operated solenoid OFF.
MODE - Changes unit from manual mode to
thermo mode.
SET - Sets temperature in thermo mode.
Figure 40 - Transmitter
Figure 41
MATCH LIGHTING INSTRUCTIONS
1. Remove any items necessary for easy access to the pilot (for example: logs,
screens, etc.).
2
. Follow appropriate lighting instructions found previously. Instead of pushing the
piezo button, light a match and hold the ame to the end of the pilot and ignite
the pilot.
3.
After control knob has been released and pilot stays lit, reinstall any items that
were removed for pilot access.
4.
Call a qualied service technician for repair or replacement of the piezo ignitor.
TO TURN OFF GAS TO APPLIANCE
Shutting off heater
1. Press the OFF button to let pilot stay.
2. Turn gas control knob clockwise to OFF position to shut off burner.
Page 27
27
Figure 42
Figure 43
Figure 44
Figure 45
Figure 46
Figure 47
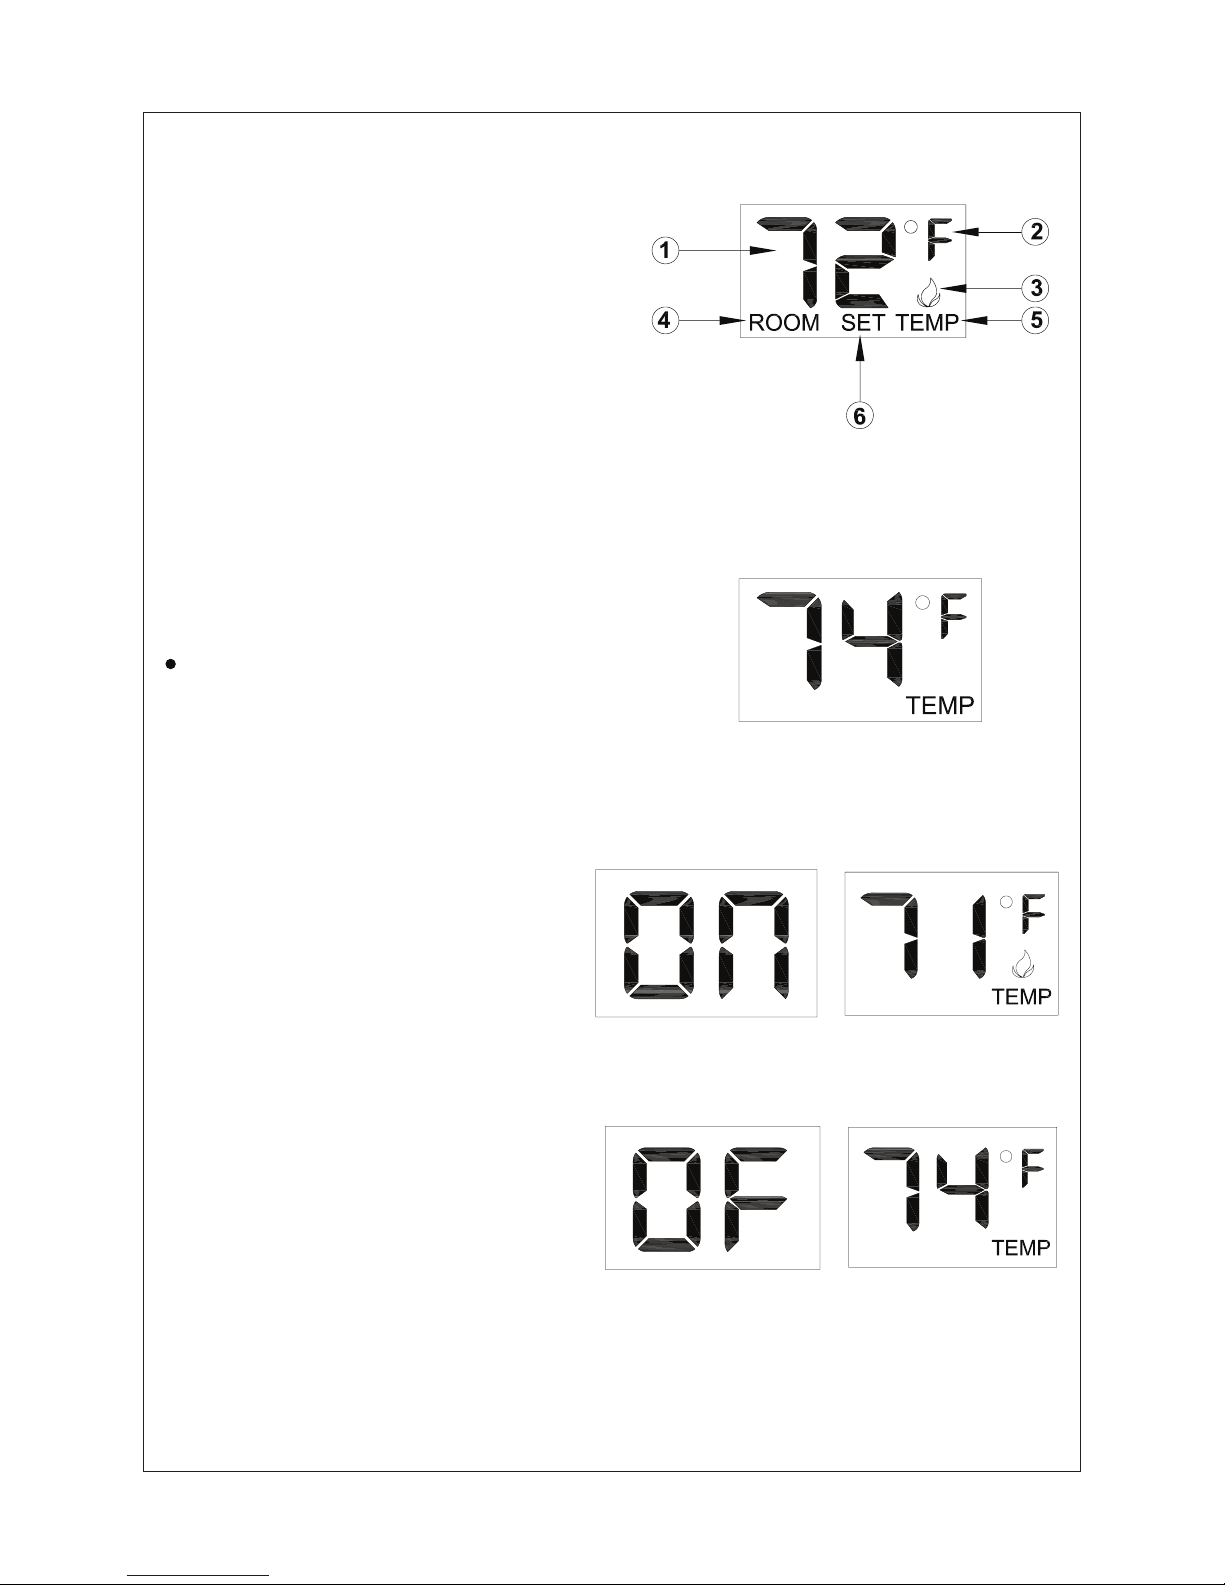
MANUAL FUNCTION
To operate the system in the manual
“MODE” do the following.
ON OPERATION
Press the ON key and the appliance
ame will come on. During this time
the LCD screen will show ON (Figure
44). After 3 seconds the LCD screen will
default to display room temperature and
the word TEMP will show (Figure 45).
(Flame icon will appear on LCD screen
in manual on mode).
OFF OPERATION
Press the OFF key and the appliance
ame will shut off. During this time
the LCD screen will show OF (gure 46).
After 3 seconds the LCD screen will
default to display room temperature
and the wood TEMP will show (gure
47).
LCD Liquid Crystal Display
1
. DISPLAY Indicates CURRENT room
temperature.
2. °F OR °C Indicates degrees Fahrenheit
or Ceisius.
3. FLAME Indicates bumer/valve in
operation.
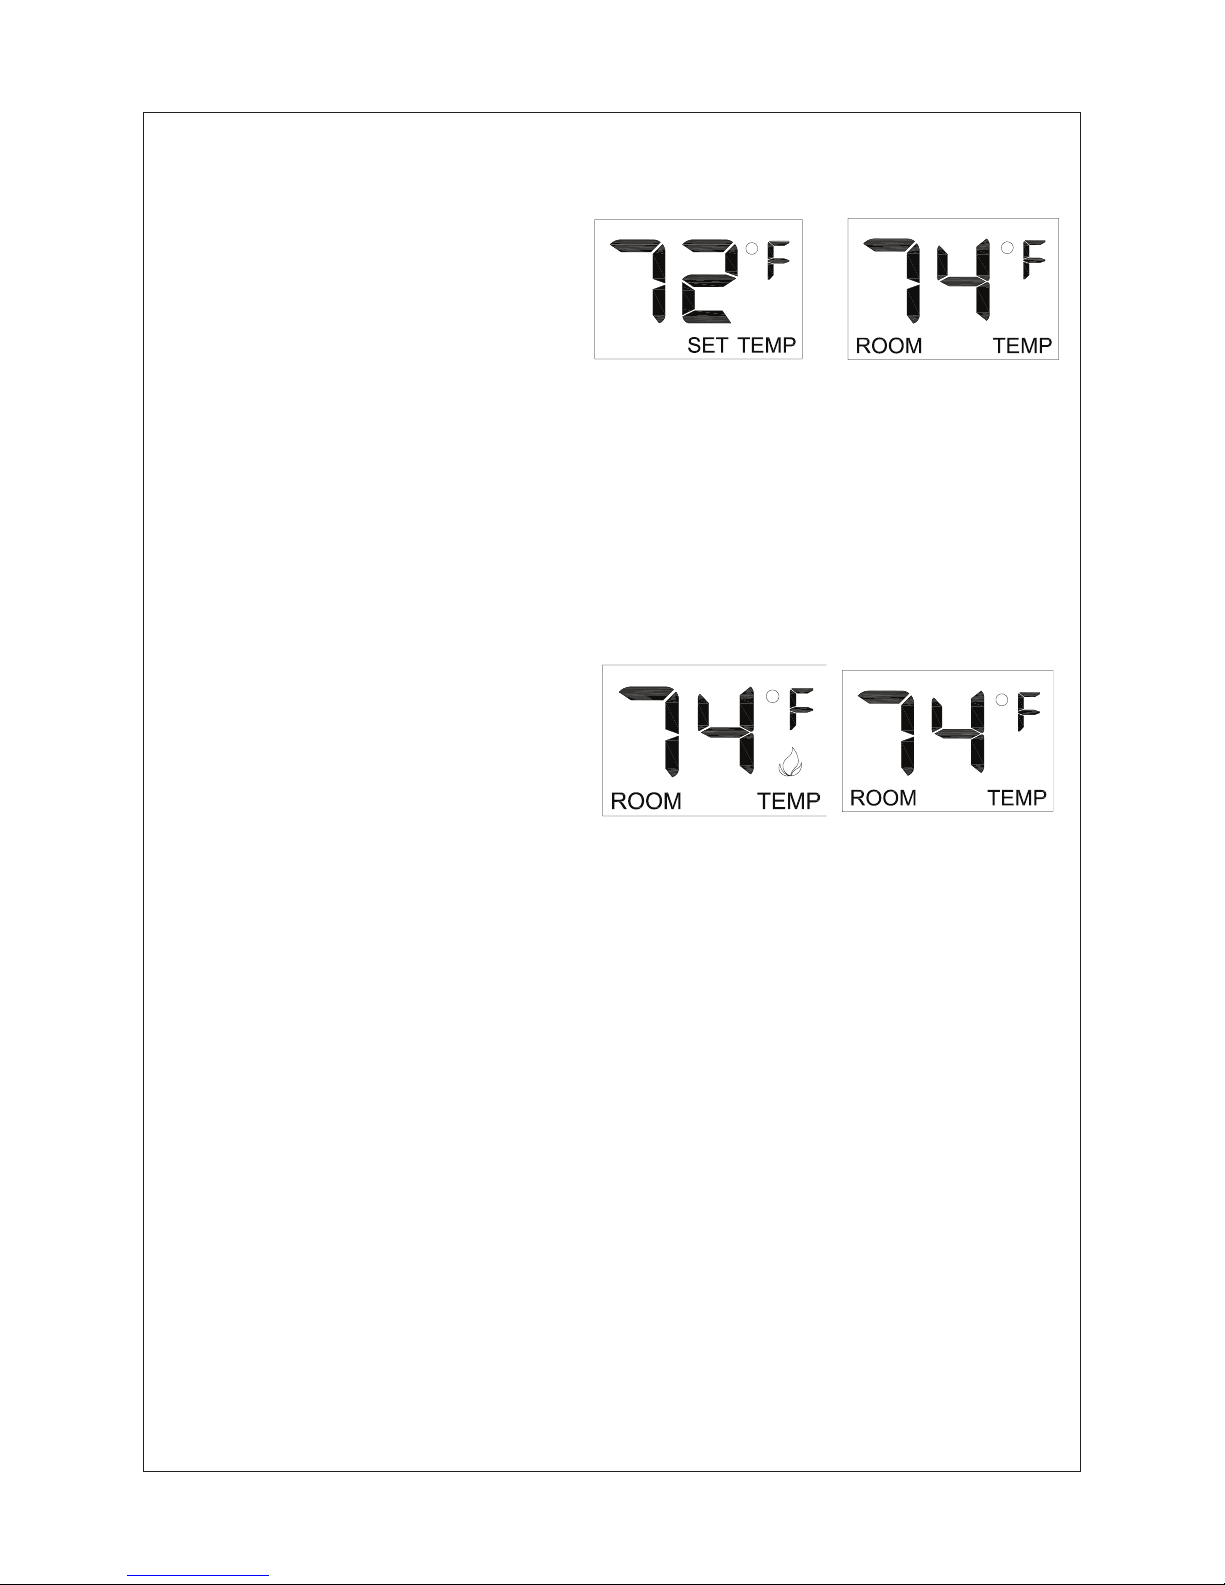
4. ROOM Indicates remote is in THERMO
operation.
5. TEMP Appears during manual operation.
6. SET Appears during time the of setting
the desired temperature in the thermo operation.
SETTING°F/°C SCALE
The factory setting for temperature is °F. To
change this setting to°C ,
First
Press the ON key and the OFF key on the
transmitter at the same time this will change
from°F to °C. Follow this same procedure to
change from°C back to°F.
Page 28
28
TO CHANGE THE SET TEMPERATURE
Press and hold the SET key until the
desired set temperature is reached.
(By pressing and holding the set key
the LCD screen set numbers will
increase from 45° to 99° then restart
over at 45°). Next release the SET
key. The LCD screen will display the
set temperature for 3 seconds. Then
will ash the set temperature for 3 seconds. Then the LCD screen will default to display
the room temperature. Press the MODE key to disengage the thermo mode.The word
ROOM on the LCD screen will not show when the thermo is not in operation.
NOTE: The highest SET
temperature is 99°F (32°C) and the lowest temperature is
45°F (6°C)
REMOTE CONTROL OPERATION NOTES:
The Thermo Feature on the transmitter operates the appliance whenever the ROOM
TEMPERATURE varies a certain number of degrees from the SET TEMPERATURE.
This variation is called the “SWING” or TEMPERATURE DIFFERENTIAL. The normal
operating cycle of an appliance may be
2-4 times per hour depending on how well the
room or home is insulated from the cold or drafts.The factory setting for the “swing
number” is 2. This represents a tempereature variation of +/-2°F (1°C) between SET
temperature and ROOM temperature, which determines when the replace will be
activated.
The transmitter has ON and OFF manual functions that are activated by pressing either
button on the face of the transmitter. When a button on the transmitter is pressed the
word ON or OF will appear on the LCD screen to show while the signal is being sent.
Upon initial use, there may be a delay of three seconds before the remote receiver will
respong to the transmitter. This is part of the system’s design.
Figure 48
Figure 49
THERMOSTAT FUNCTION
SETTING DESIRED ROOM
TEMPERATURE
This remote control system can
control the thermostat when
the transmitter is in the THERMO
mode (The word ROOM must be
displayed on the screen). To set
the THERMO MODE and desired
room temperature, Press the MODE
key until the LCD screen shows the word ROOM. Then the remote is in the thermostatic
mode. Press and hold the SET key until the desired set temperature is reached. (By
pressing and holding the set key the LCD screen set numbers will increase from 45° to
99° and then restart over at 45°) Next release the SET key. The LCD screen will display
the set temperature for 3 seconds and the LCD screen will ash the set temperature for 3
seconds. Then the LCD screen will default to display the room temperature.
Page 29
29
INSPECTING BURNERS
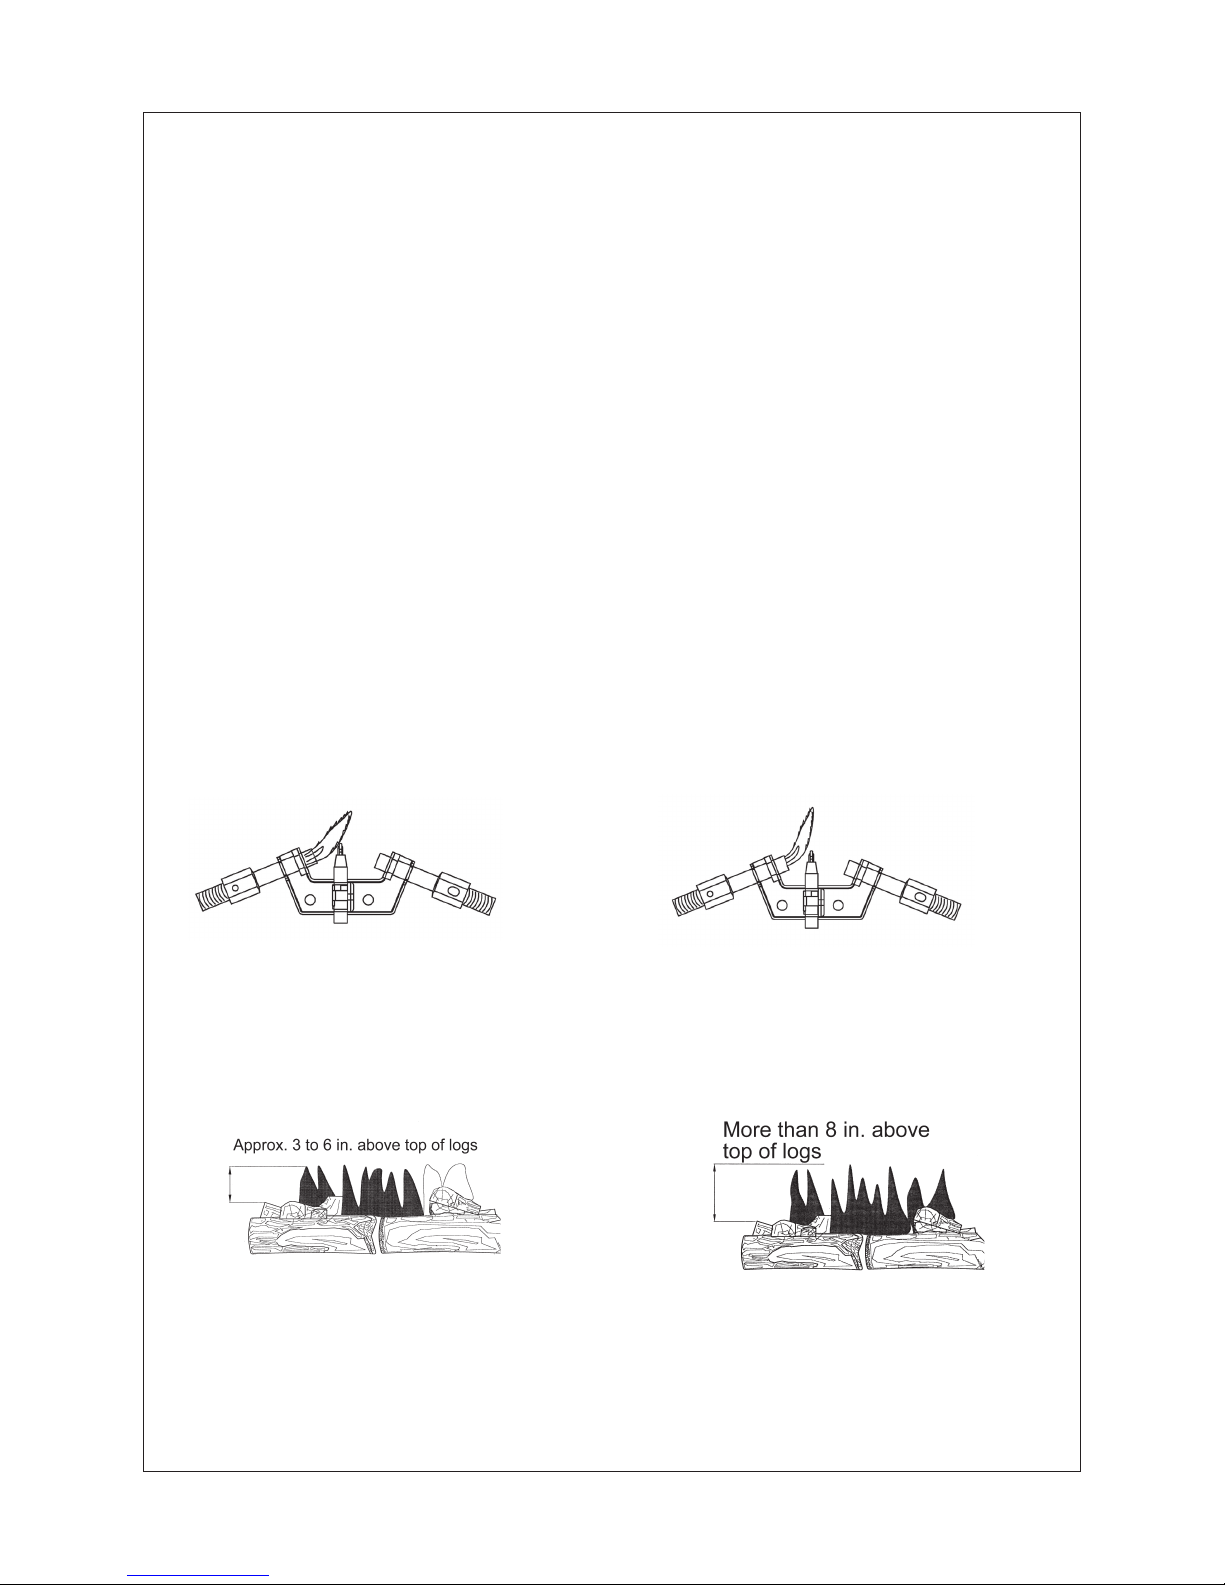
Check pilot ame pattern and burner ame patterns often.
PILOT FLAME PATTERN
Figure 50 shows a correct pilot ame pattern. Figure 51 shows an incorrect pilot ame
pattern. The incorrect pilot ame is not touching the thermocouple. This will cause he
thermocouple to cool. When the thermocouple cools, the heater will shut down.
If pilot ame pattern is incorrect, as shown in Figure 51:
Turn heater off (see “To Turn Off Gas To Appliance”).
See Troubleshooting, page 3
1.
BURNER FLAME PATTERN
Figure 52 shows a correct burner ame pattern. Figure 53 shows an incorrect burner
ame pattern. If burner ame is incorrect, as shown in Figure 53:
Turn heater off.
See Troubleshooting, page 3
1.
•
•
•
•
Figure 53– Incorrect Flame Pattern with
Control Knob Set to High Flame
Figure 50 – Correct Pilot Flame Pattern
Figure 5
1– Incorrect Pilot Flame Pattern
Figure 52– Correct Flame Pattern with
Control Knob Set to High Flame
MATCHING SECURITY CODES
Program the remote receiver to LEARN a new scurity code by pushing in the LEARN
button the top of the remote receiver and then pressing any button on the transmitter.
NOTE: This equipment has been tested and found to comply with the limits for Class B
digital device, pursuant to part 15 of the FCC Rules. These limits are designed to provide
reasonable protection against harmful interference in a residential installation.This
equipment generates, uses and can radiate radio frequency energy and, if not installed
and used in accordance with the instructions, may cause harmful interference to radio or
television reception, which can be determined by turning the equipment off and on, the
user is encouraged to try to correct the interference by one or more of the following
measures:
• Reorient or relocate the receiving antenna.
• Increase the separation between the equipment and the receiver.
• Connect the equipment into an outlet on a circuit different from that to which the
receiver is connected.
• Consult the dealer or an experienced radio/TV technician for help.
Page 30
30
WARNING: Turn off heater and let cool before cleaning.
CAUTION: You must keep control areas, burner, and circulating air passageways
of heater clean. Inspect these areas of heater before each use. Have heater in-
spected yearly by a qualied service technician. Heater may need more frequent
cleaning due to excessive lint from carpeting, bedding material, pet hair, etc.
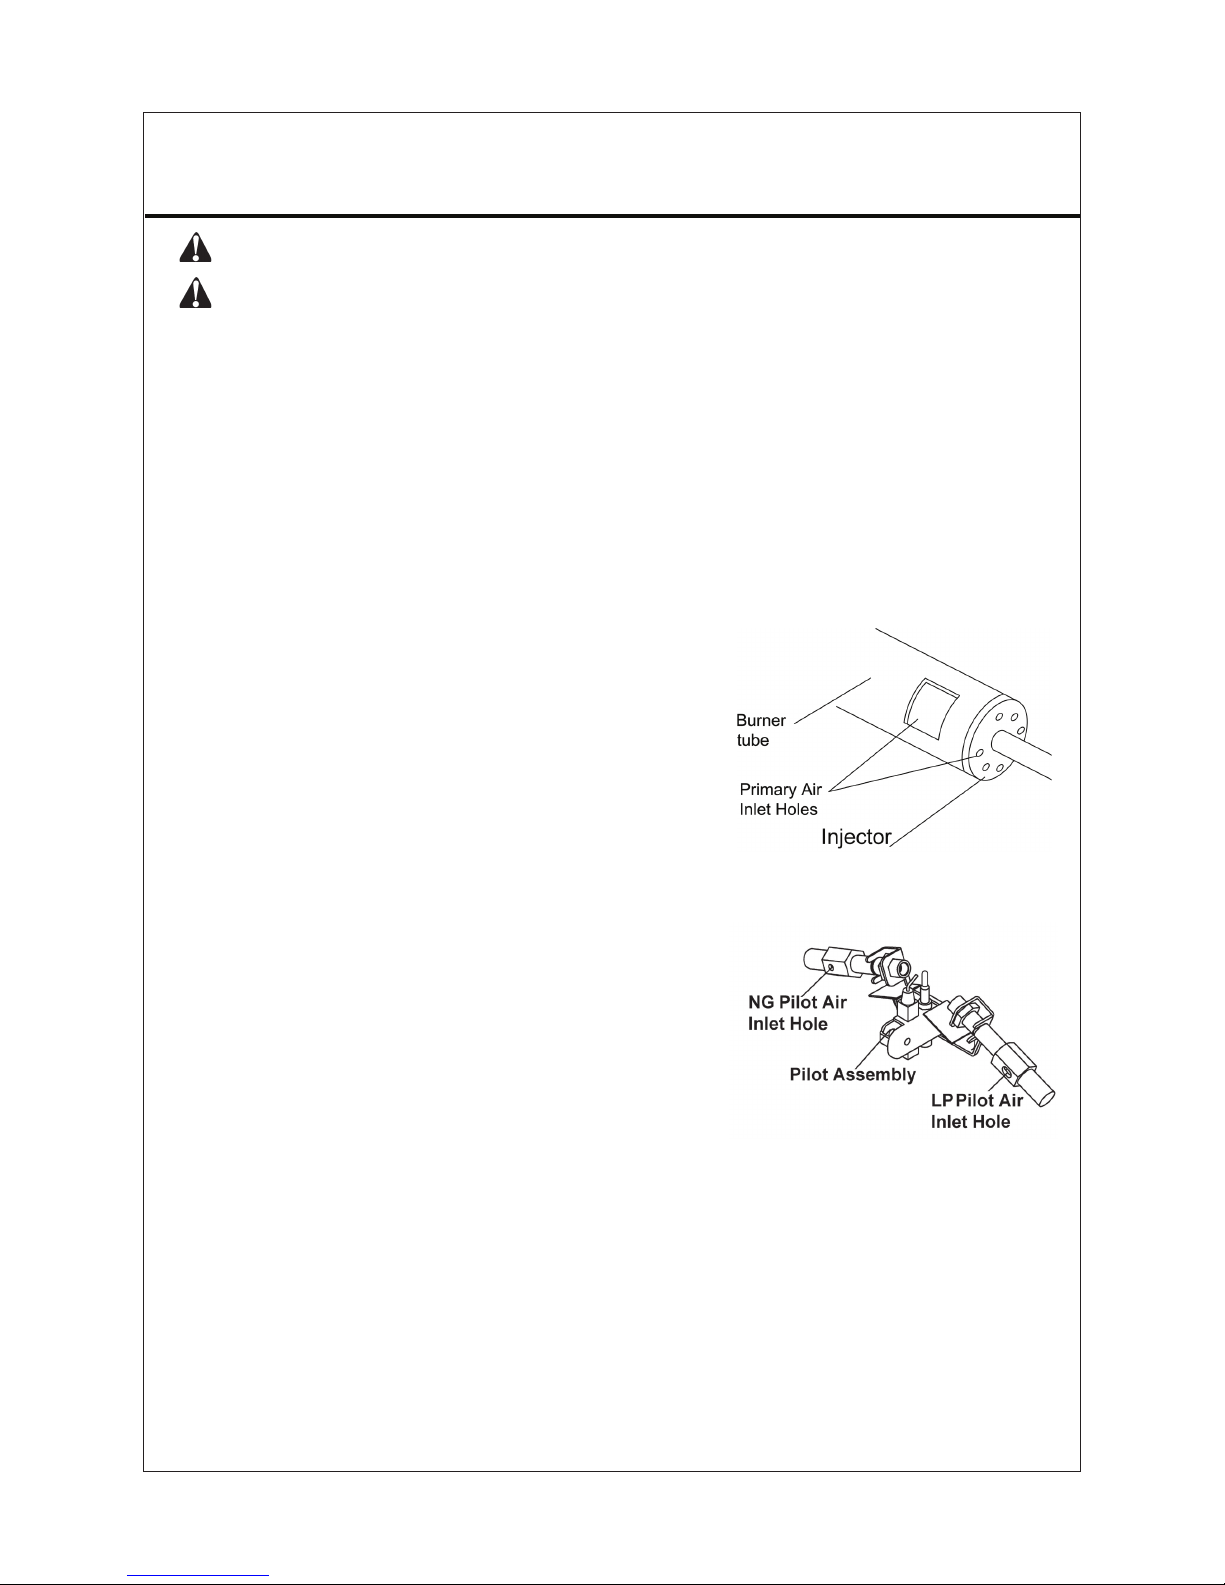
The primary air inlet holes allow the proper amount of air to mix with the gas. This pro-
vides a clean burning ame. Keep these holes clear of dust, dirt and lint. Clean these
air inlet holes prior to each heating season. Blocked air holes will create soot. We rec-
ommend that you clean the unit every 500 hours of operation or every three months.
CLEANING BURNER PILOT AIR INLET HOLE
We also recommend that you keep the burner tube and pilot assembly clean and free
of dust and dirt. To clean these parts we recommend using compressed air no greater
than 30 PSI. Your local computer store, hardware store, or home center may carry
compressed air in a can, or you can use a vacuum cleaner in the blow position. If using
Figure 54– Injector Holder On
Outlet Burner Tube
Figure 55– Pilot Inlet Air
Hole
compressed air in a can, please follow the diretions
on the can, or you could damage the pilot assembly.
1
. Shut off the unit, including the pilot. Allow the
unit to cool for at least thirty minutes.
2. Inspect burner, pilot, and primary air inlet holes
on injector holder for dust and dirt (see Figure
54).
3.
Blow air through the ports/slots and holes in the
burner.
4.
Check the injector holder located at the end of
the burner tube again. Remove any large particles of dust, dirt, lint, or pet hairs with a soft cloth
or vacuum cleaner nozzle.
5.
Blow air into the primary air holes on the injector
holder.
6.
In case any large clumps of dust have now been
pushed into the burner repeat steps 3 and 4.
CARE AND MAINTENANCE
Also clean the pilot assembly. A yellow tip on the pilot
ame indicates dust and dirt in the pilot assembly.
There is a small pilot air inlet hole about two inches
from where the pilot ame comes out of the pilot assembly (see Figure 55). With the unit off, lightly blow
air through the air inlet hole. You may blow through a
drinking straw if compressed air is not available.
Page 31
3131
LOGS
If you remove logs for cleaning, refer to "Installing Logs" to properly replace logs.
Replace log(s) if broken or chipped (dime-size or larger).
MAIN BURNER
Periodically inspect all burner ame holes with the heater running. All slot burner ame
holes should be open with yellow ame present.
All round burner flame holes should be open with a small blue flame present. Some
burner ame holes may become blocked by debris or rust, with no ame present. If so,
turn off heater and let cool. Either remove the blockage or replace the burner. Blocked
burner ame holes will create soot.
•
•
WARNING: If you smell gas
Shut off gas supply.
Do not try to light any appliance.
Do not touch any electrical switch; do not use any phone in your building.
Immediately call your gas supplier from a neighbor’s phone. Follow the gas
supplier’s instructions.
If you cannot reach your gas supplier, call the re department.
IMPORTANT: Operating heater where impurities in air exist may create odors.
Cleaning supplies, paint, paint remover, cigarette smoke, cements and glues, new
carpet or textiles, etc., create fumes. These fumes may mix with combustion air and
create odors.
WARNING: Only a qualied service technician should service and repair heater.
CAUTION: Never use a wire, needle, or similar object to clean ODS/pilot. This can
damage ODS/ pilot unit.
N
OTE: All troubleshooting items are listed in order of operation.
•
•
•
•
•
•
TROUBLESHOOTING
Page 32

3232
TROUBLESHOOTING
When ignitor button
is pressed in, there
is no spark at ODS/
pilot.
1. Ignitor electrode positioned wrong.
2. Ignitor electrode broken.
3. Ignitor electrode not connected to
ignitor cable.
4.
Ignitor cable pinched or wet.
5. Broken ignitor cable.
6. Bad piezo ignitor.
7. Battery too low.
1. Replace electrode.
2. Replace electrode.
3. Reconnect ignitor cable.
4. Free ignitor cable if pinched
by any metal or tubing.
Keep ignitor cable dry.
5.
Replace ignitor cable.
6. Replace ignitor.
7. Replace battery.
ODS/pilot lights but
ame goes out
when control knob
is released.
1. Gas supply turned off or
equipment shutoff valve closed.
2.
Control knob not fully pressed in
while pressing ignitor button.
3.
Air in gas lines when installed.
4. ODS/pilot is clogged.
5. Control knob not in pilot position.
6. Gas regulator setting is not correct.
1. Turn on gas supply or open
equipment shutoff valve.
2.
Fully press in control knob
while pressing ignitor button.
3. Continue holding down
control knob. Repeat igniting operation until air is
removed.
4. Clean ODS/pilot (see Care
and Maintenance page 30).
or replace ODS/pilot
assembly.
5. Turn control knob to pilot
position.
6. Replace gas regulator.
PROBLEM POSSIBLE CAUSE
REMEDY
1. Control knob not fully pressed in.
2. Control knob not pressed in
long enough.
3. Equipment shutoff valve not
fully open.
4. Thermocouple connection loose
at control valve.
5. Pilot ame not touching
thermocouple, which allows
thermocouple. This problem could
be caused by one or both of the
following:
a) Low gas pressure.
b) Dirty or partially clogged
ODS/pilot
6. Control valve damaged.
1. Pressed in control knob
fully.
2. After ODS/pilot lights,
keep control knob pressed
in 30 seconds.
3. Fully open equipment
shutoff valve.
4. Hand tighten until snug,
and then tighten 1/4 turn
more.
5.
a) Contact local natural or
propane/ LP gas company.
b) Clean ODS/pilot (see Care
and Maintenance page 30),
or replace ODS/pilot
assembly.
6.
Replace control valve.
When ignitor button
is pressed in, there
is a spark at ODS/
pilot but no ignition.
Page 33
33
Burner(s) does not
light after ODS/pilot
is lit.
1. Burner orice is clogged.
2. Burner orice diameter is
too small.
3.
Inlet gas pressure is too low.
1. Clean burner orice (see
Care and Maintenance page
30) or replace burner orice.
2.
Replace burner orice.
3. Contact local natural or propane/LP gas company.
Delayed ignition of
burner(s).
1. Manifold pressure is too low.
2. Burner orice is clogged.
1. Contact local natural or propane/LP gas company.
2. Clean burner (see Care and
Maintenance page 30) or
replace burner orice.
Burner backring
during combustion.
1.
Burner orice is clogged or
damaged.
2
. Burner damaged.
3. Gas regulator defective.
1. Clean burner orice (see
Care and Maintenance
page 30) or replace Burner
orice.
2
. Replace burner.
3. Replace gas regulator.
Slight smoke or odor
during initial operation.
1. Residues from manufactory.
2. Not enough combustion/
ventilation air.
1. Problem will stop after a few
hours.
2
. Refer to air for combustion
and ventilation requirements.
PROBLEM POSSIBLE CAUSE
REMEDY
White powder residue
forming within burner
box or on adjacent
walls or furniture.
1. When heated, vapors from
furniture polish, wax, carpet
cleaners, etc., turn into white
powder residue.
1
. Turn heater off when using
furniture polish, wax, carpet
cleaner or similar products.
Heater produces a
clicking/ticking noise
just after burner is lit
or shut off.
1
. Metal expanding while
heating or contracting while
cooling.
1
. This is common with most
heaters. if noise is excessive,
contact qualied service
technician.
Heater produces
unwanted odors.
1. Heater burning vapors from
paint, hair spray, glues,
cleaners, chemicals, new
carpet, etc. (See IMPORT
ANT, page 31).
2. Gas leak. See “ Warning ”
statement, page 31.
1. Open window and ventilate
room. Stop using.
2.
Locate and correct all leaks
(see
“ Checking Gas Connec-
tions ” page 18).
Page 34
34
Heater shuts off in use
(ODS operates).
1. Open window and/or door
for ventilation.
2. Contact local natural or propane/LP gas company.
3. Clean ODS/pilot (see Care
and Maintenance page 30).
1. Not enough fresh air is
available.
2. Low line pressure.
3. ODS/pilot is partially
clogged.
Gas odor even when
control knob is in OFF
position.
1
. Locate and correct all
leaks(see
“Checking Gas
Connections” page 18.
2. Replace control valve.
1. Gas leak. See Warning
statement, page 31.
2. Control valve defective.
Gas odor during
combustion.
1
. Foreign matter between
control valve and burner.
2. Gas leak. See Warning
statement page 31.
1. Take apart gas tubing and
remove foreign matter.
2. Locate and correct all leaks
(see “Checking Gas Connections “page 18.)
PROBLEM POSSIBLE CAUSE REMEDY
REPLACEMENT PARTS
NOTE: Use only original replacement parts. This will protect your warranty coverage
for parts replaced under warranty.
PARTS UNDER WARRANTY
Contact authorized dealers of this product. If they can’t supply original replacement
parts, call Customer Service toll free at (
1-866-573-0674) for referral information.
When calling Customer Service or your dealer, have ready:
• Your name
• Your address
• Model and serial number of your heater
• How heater was malfunctioning
• Type of gas used (Propane/LP or Natural gas/NG)
• Purchase date
• Usually, we will ask you to return the defective part to the factory
PARTS NOT UNDER WARRANTY
Contact authorized dealers of this product. If they can’t supply original replacement
part(s) call Customer Service toll free at (
1-866-573-0674) for referral information.
When calling Customer Service have ready:
• Model number of your heater
• The replacement part number
Page 35
3535
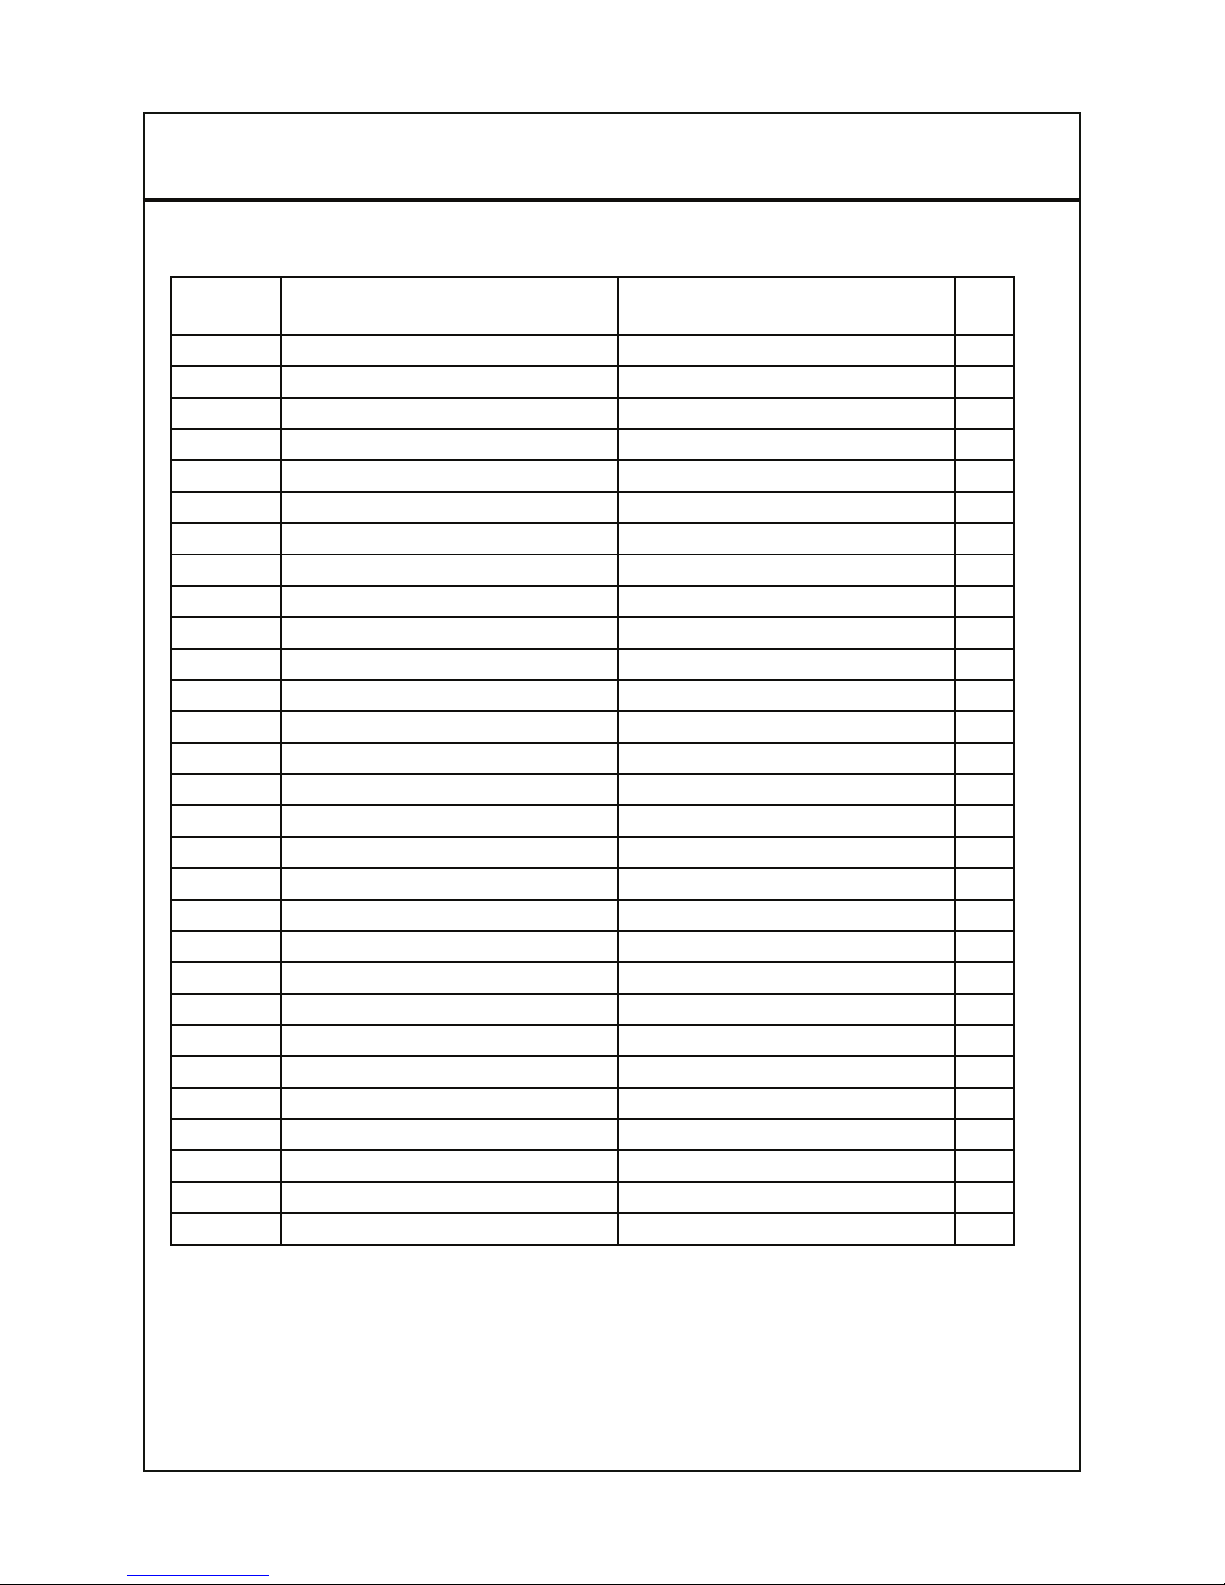
This list contains replaceable parts for your heater. When ordering replacement parts,
follow the instructions listed under Replacement Parts on page 34 of this manual.
KEY
NO
PART NUMBERS DESCRIPTION QTY
1 WYL001-01DT Back Side Panel 1
2 WYL002-01DT Left Side Panel 1
3 WYL003-01DT Right Side Panel 1
4 WYL004-01 Front Side panel 1
5 WYL005-01 Front Log Bracket 1
6 WYL006-01D Middle Log Bracket 1
7 AL092-01 Ignitor 1
8 WYB002-01 Log Fence Assembly 1
9 WYL008-01 T-Stat Valve Bracket 1
10 WYL007-01D Regulator Bracket 1
11 SIT545 SIT545 T-Stat Valve Bracket
1
12-A RV83FI(L)(S) Dual Fuel Regulator 1
12-B PF120820 Regulator Plug 1
13 WYB204-01D ODS Inlet Tube Assemly 1
14 WYB202-01D Inlet Tube Assembly 1
15 WYB203-01D Outlet Tube Assemnly 1
16 WYB204-01DN ODS Outlet Tube Assembly (NG)
1
17 WYB204-01DL ODS Outlet Tube Assembly (LP)
1
18 ML029-01 Main Valve Nut 1
19 MDL304B Knob 1
20 NBY28D-160 Burner 1
21 NDD0308 Dual fuel ODS 1
22 WYL501-01 Log 1 1
23 WYL502-01 Log 2 1
24 WYL503-01 Log 3 1
25 WYL504-01 Log 4 1
26 WYL505-01 Log 5 1
27 WYL506-01 Log 6 1
28 WYL507-01 Log 7 1
18 IN. VENT-FREE GAS LOGS
Page 36
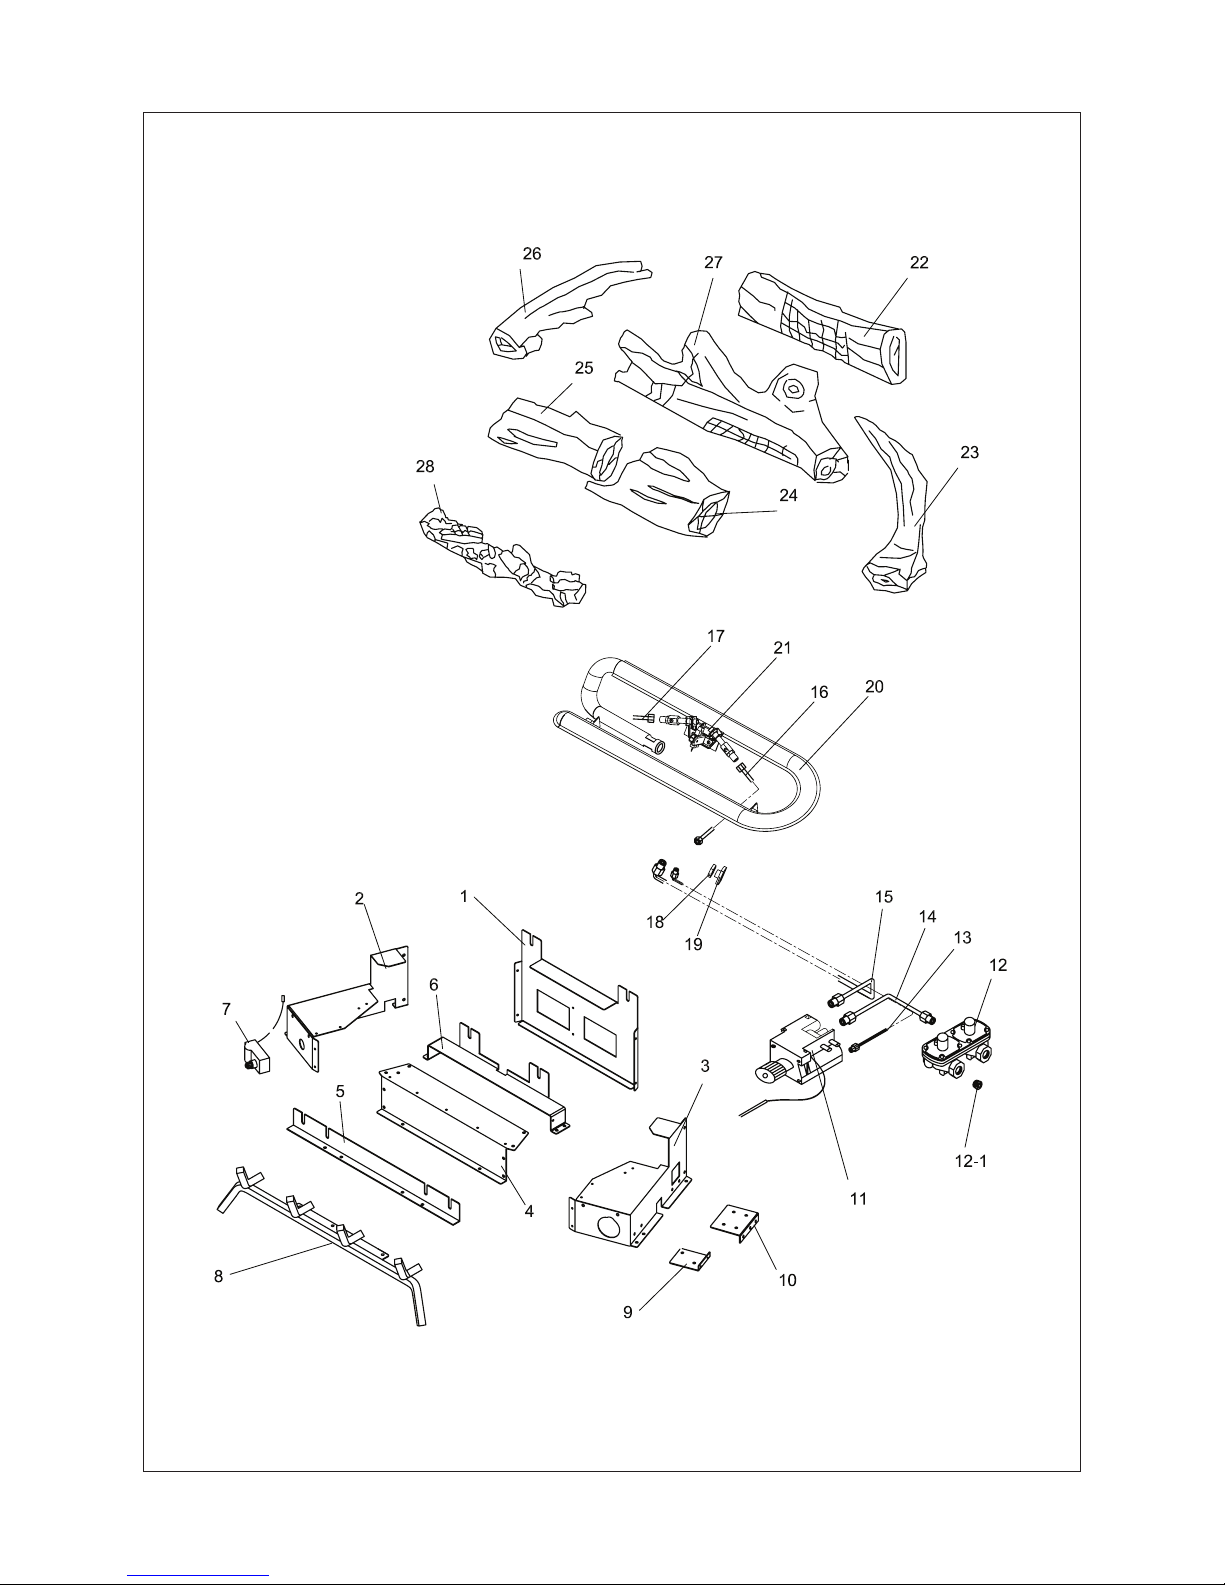
3636
18 IN. VENT-FREE GAS LOGS
Page 37
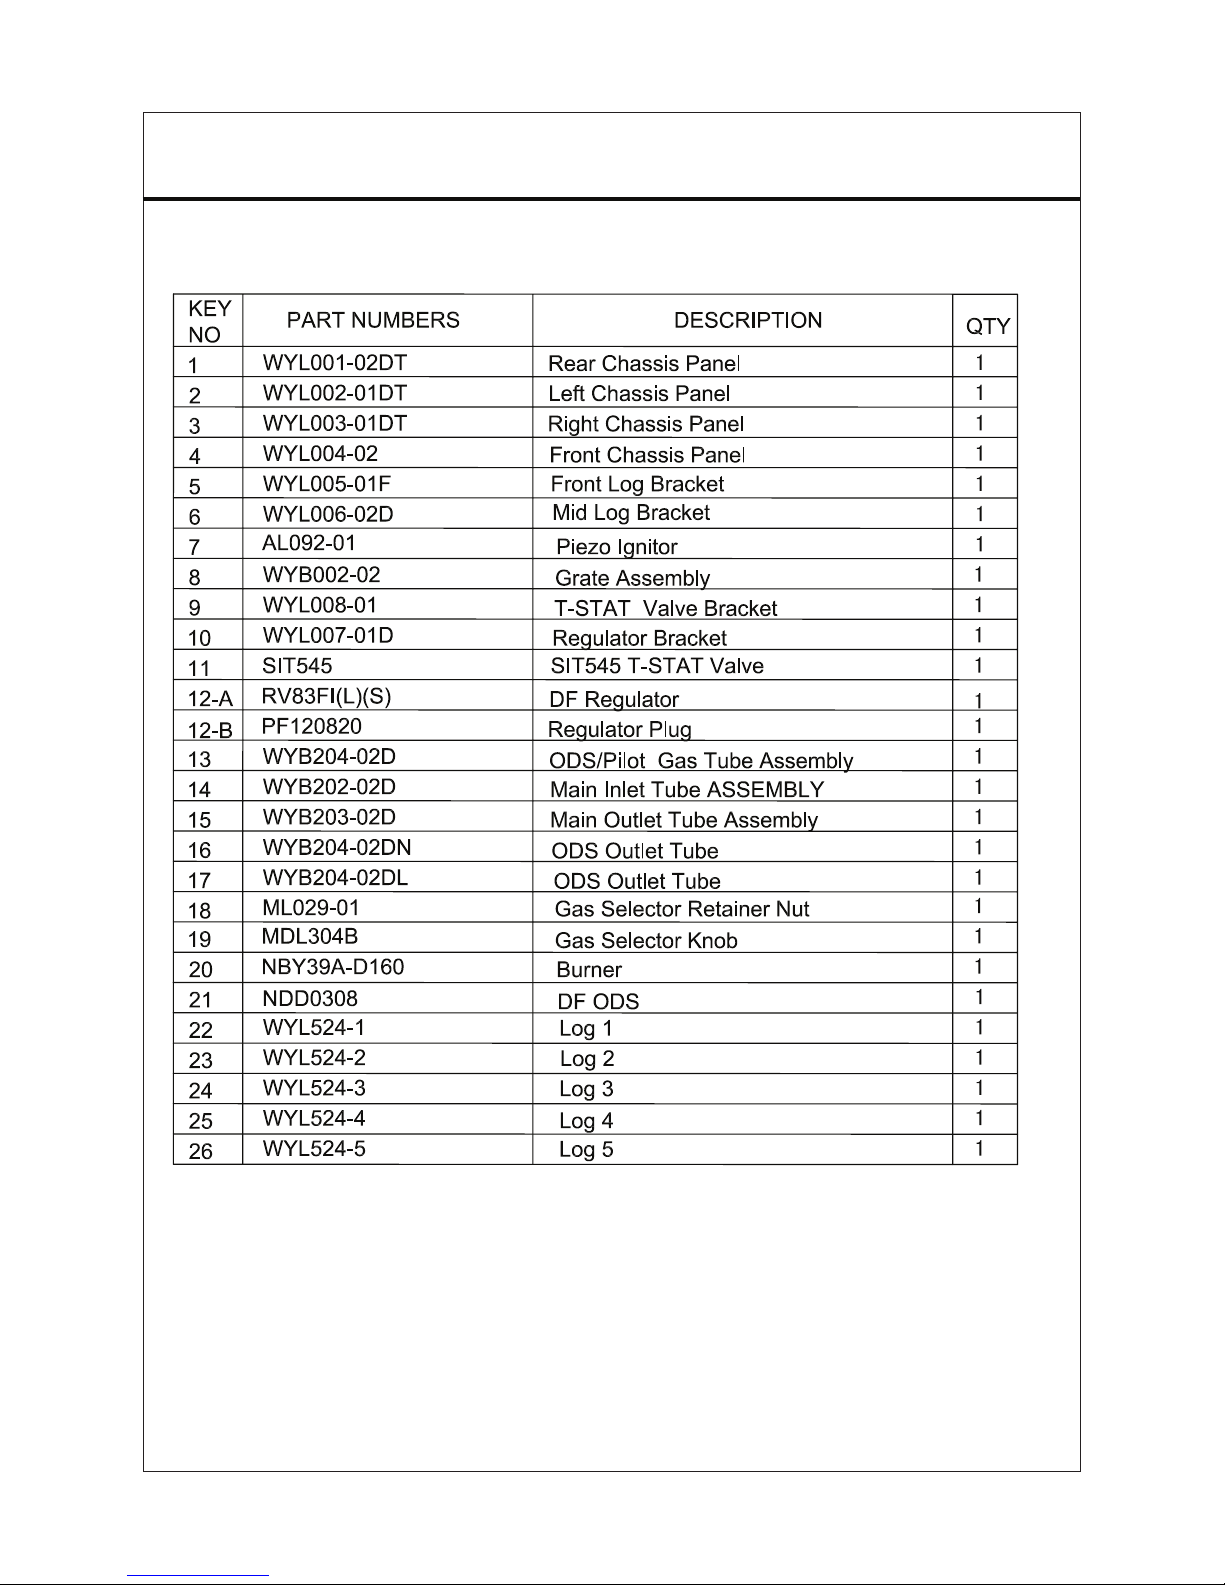
3737
This list contains replaceable parts for your heater. When ordering replacement parts,
follow the instructions listed under Replacement Parts on page 34 of this manual.
24 IN. VENT-FREE GAS LOGS
Page 38
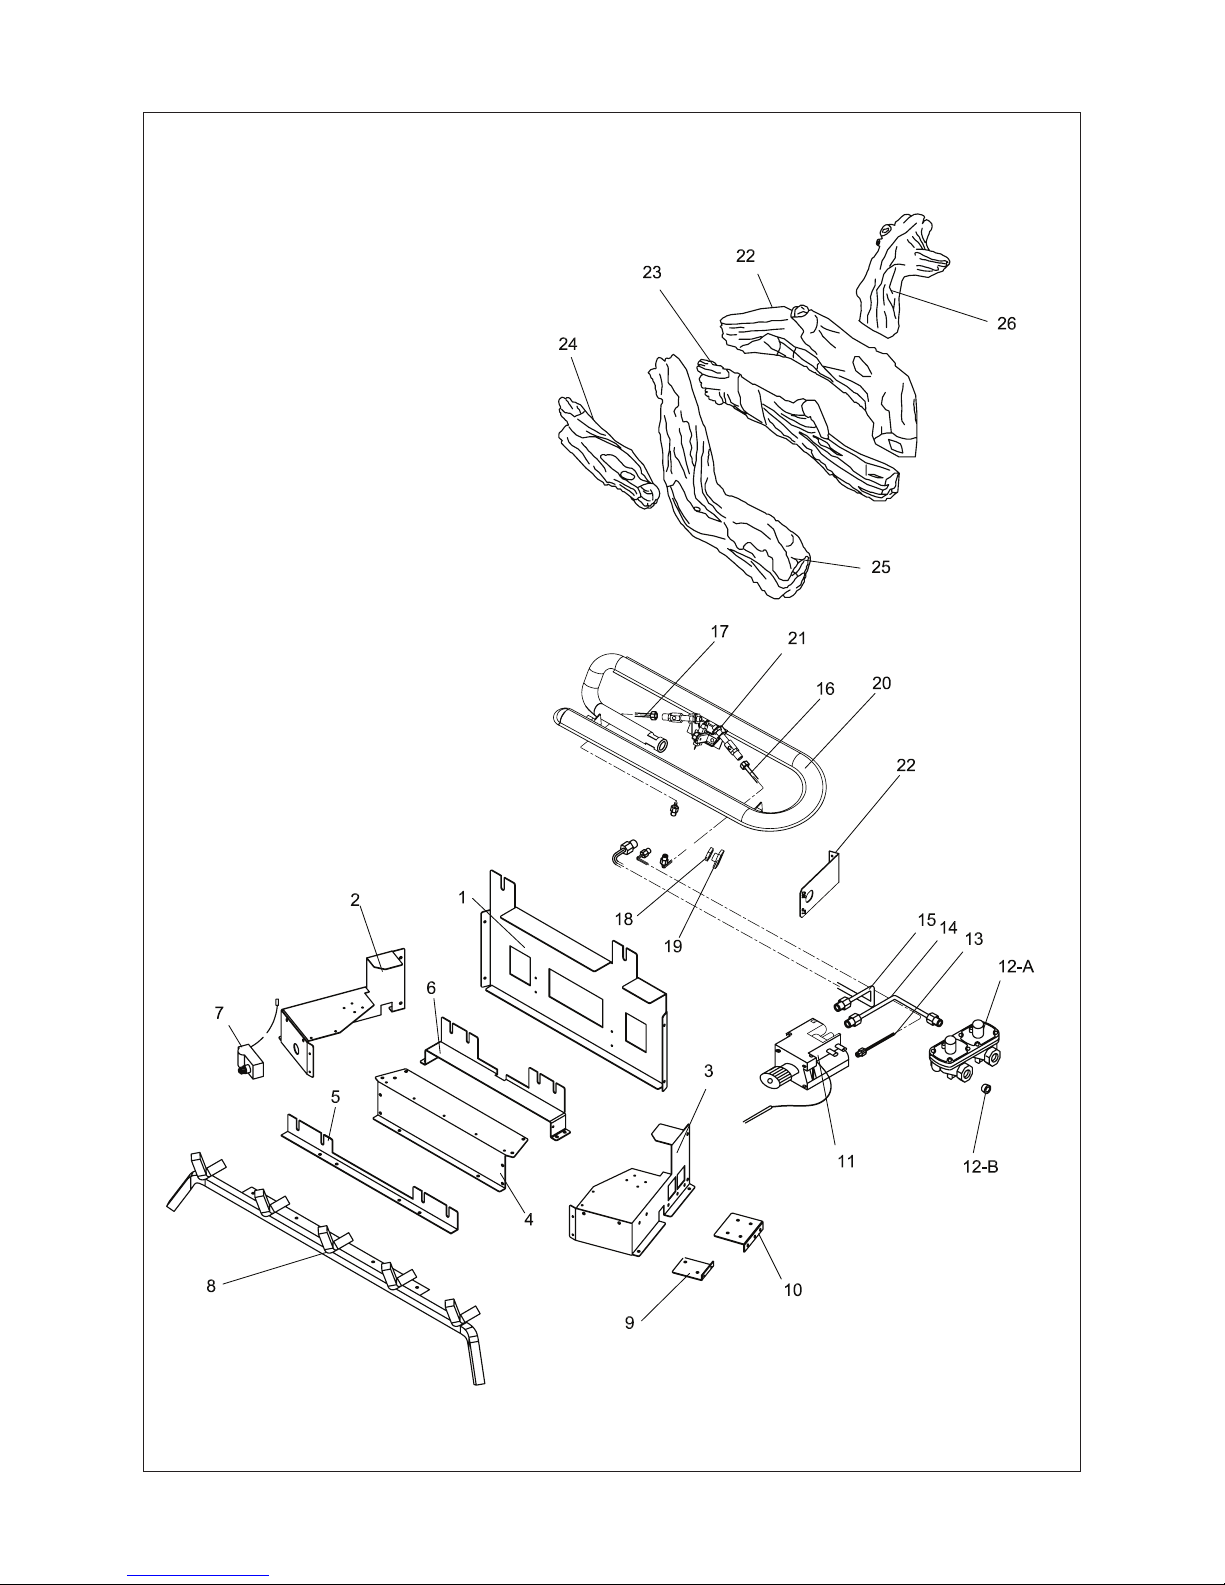
3838
24 IN. VENT-FREE GAS LOGS
Page 39
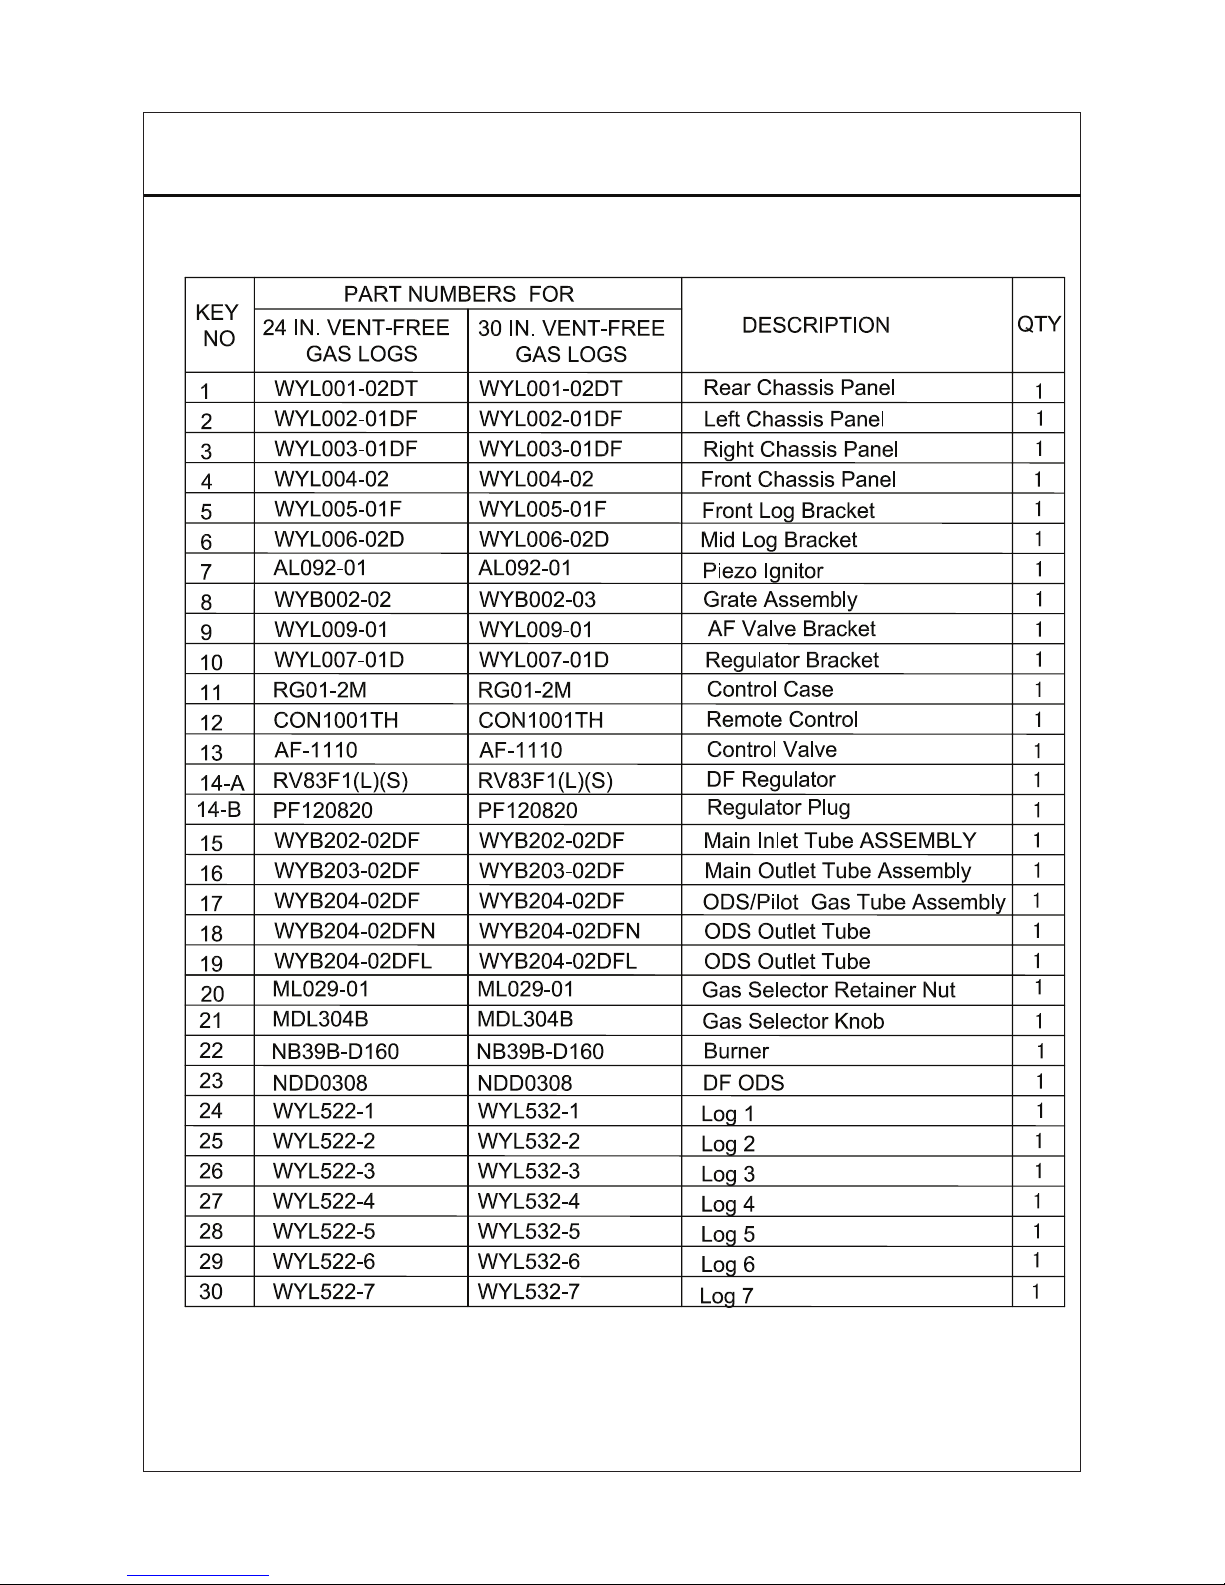
3939
This list contains replaceable parts for your heater. When ordering replacement parts,
follow the instructions listed under Replacement Parts on page 34 of this manual.
24 IN. VENT-FREE GAS LOGS & 30 IN. VENT-FREE GAS LOGS
Page 40
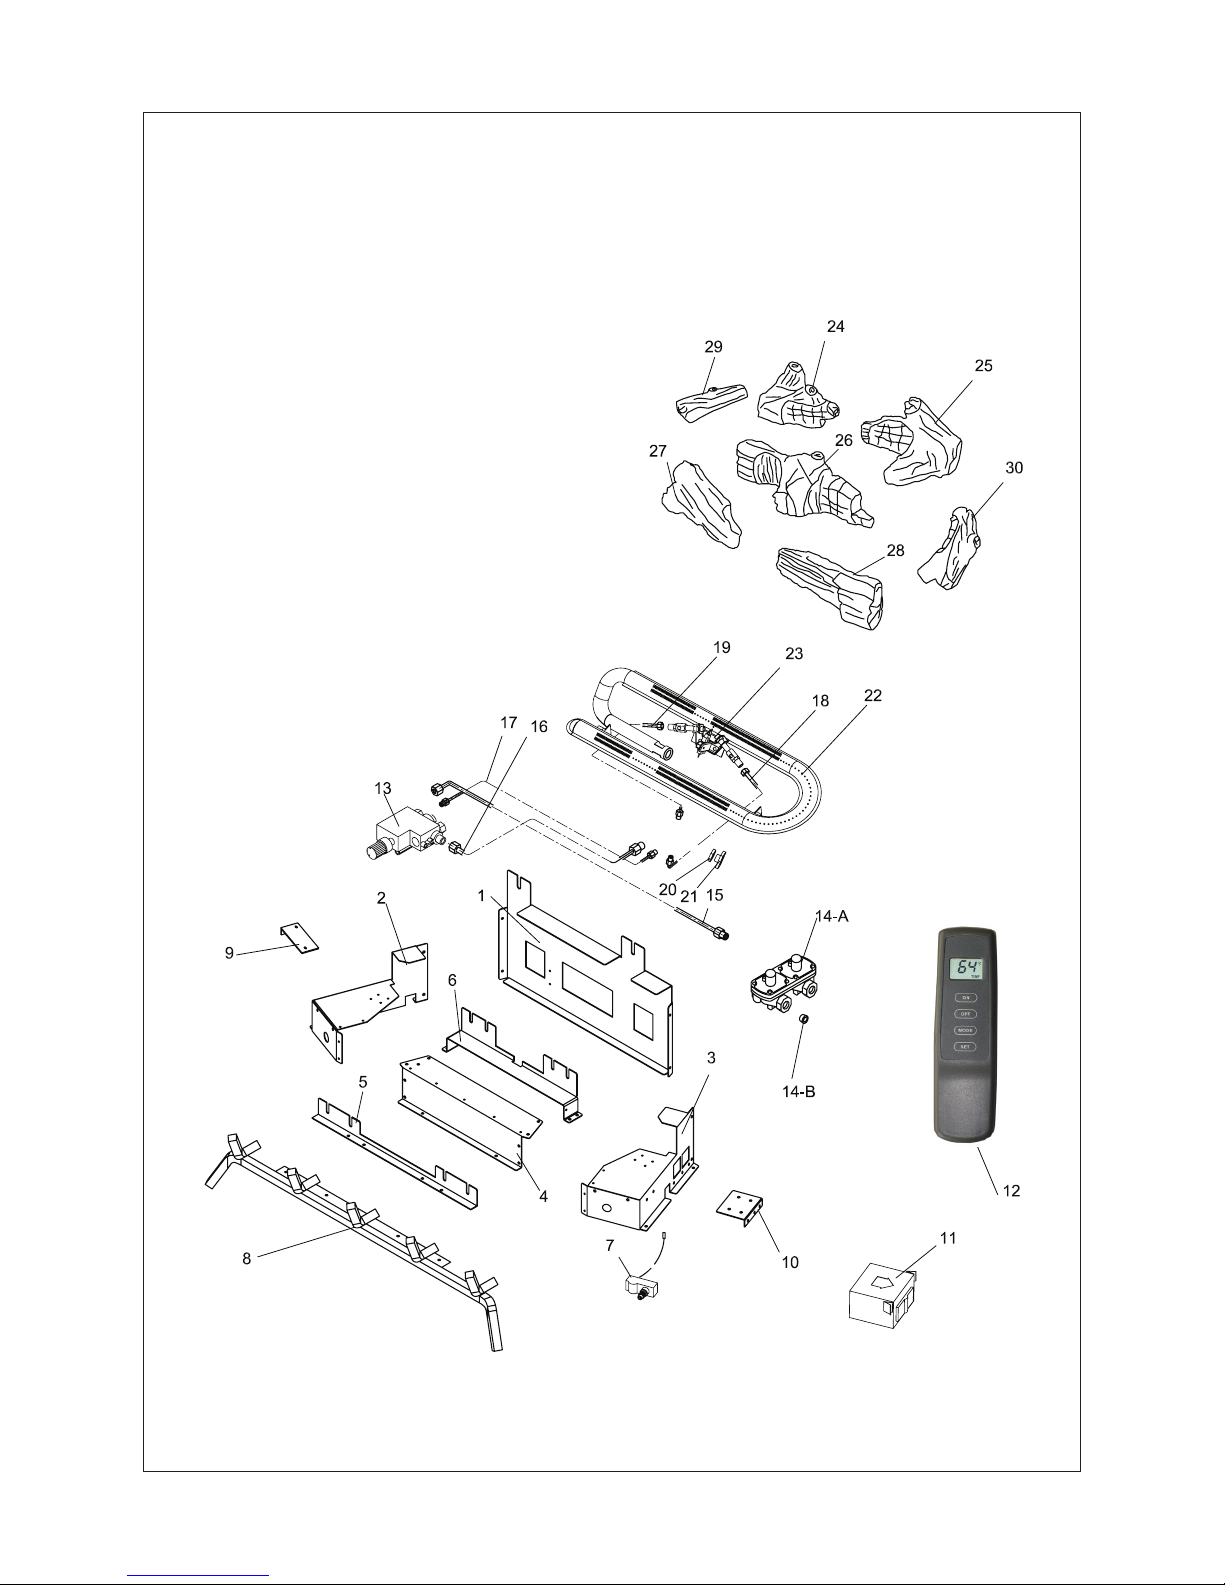
4040
24 IN. VENT-FREE GAS LOGS & 30 IN. VENT-FREE GAS LOGS
Page 41

4141
The manufacturer warrants this product to be free from defects in workmanship and
material present at time of shipment from the factory for three (3) years from the date
of purchase. This warranty applies only to the original purchaser. The manufacturer
agrees to correct such defect at no charge or, at our option, replace the product with
a comparable or superior model.
To obtain warranty service, call our customer service department at 1-866-573-0674
for return authorization and shipping instructions. You may be required to present a
copy of your sales receipt as proof of purchase. All costs of removal and reinstallation
are the expressed responsibility of the purchaser. Any damage to the product by
accident, misuse or improper installation, or by afxing accessories not produced by
the manufacturer, are the purchaser’s responsibility. The manufacturer assumes no
responsibility whatsoever for installation during the warranty period.
There is no further expressed warranty. The manufacturer disclaims any and all
implied warranties. The manufacturer shall not be liable for incidental, consequential
or special damages arising at or in connection with product use or performance
except as may otherwise be accorded by law. This warranty gives you specic legal
rights, and you also have other rights which vary from state to state. This warranty
supersedes all prior warranties.
Distributed by:
L G Sourcing, Inc.
P.O. Box 1535
N. Wilkesboro, NC 28659 USA
3-YEAR LIMITED WARRANTY
Printed in China
Patent Pending
 Loading...