

Page 1

Styku S100 User Guide
V2.201808
Page 2

2
Copyright Information
No part of this document, including the products and software described herein may be copied, reproduced in any way, stored
or translated in any form or by any means except by the purchaser for backup purposes without the express written permission
of Styku, LLC (“Styku”).
Styku provides this document “as-is” without any warranty or implication of warranty, including but not limited to any implied
warranty about the described product’s fitness for a particular purpose. In no event shall Styku or its personnel be liable for
any damages (including damages for loss of profits, business, loss of or use of data, interruption of business, etc.), even if Styku
has been advised of the possibility of such damages arising for any error in this document or product.
Products and corporate names, including Asus, Microsoft, Kinect or other products and names may or may not be registered
trademarks or copyrights of their respective companies, and are used in this document only for identification or explanation
and to the purchaser’s benefit, without intent to infringe.
The information contained in this document are provided for informational purposes only and are subject to change at any
time and without notice. The information disclosed herein should not be construed as a commitment by Styku, and Styku
assumes no responsibility or liability for any errors or inaccuracies that may appear in this document, including the products
and software described in it.
Copyright © 2017 Styku, LLC All Rights Reserved
Software Terms and Conditions
RECEIVING THIS PACKAGE AND USING THIS SOFTWARE CONSTITUTES YOUR ACCEPTANCE OF THESE TERMS. IF YOU DO NOT
ACCEPT THE TERMS OF THIS AGREEMENT, PLEASE RETURN THE SOFTWARE AND DOCUMENTATION TO STYKU, LLC OR THE
PARTY THAT DELIVERED IT TO YOU WITHIN 15 DAYS AFTER RECEIPT.
STYKU, LLC ("STYKU"), the developer of the attached software grants you a personal, non-transferable, non-exclusive license to
use the Software and Documentation attached to this agreement and continues to be the owner of the software.
The Software and Documentation are copyrighted by STYKU and contain valuable trade secrets of STYKU. You may not transfer
the Software or Documentation or otherwise make it available to anyone else. Any and all data generated by the software or as
a consequence of running the software, including but not limited to raw capture data, mesh data, measurement data, images,
and screen captures, are non-transferable. You may not reverse engineer, disassemble, decompile, update, revise, or enhance
the software.
THE SOFTWARE AND DOCUMENTATION ARE PROVIDED TO YOU "AS IS", AND STYKU DISCLAIMS ALL WARRANTIES, EXPRESSED
OR IMPLIED, INCLUDING ANY IMPLIED WARRANTIES OF MERCHANT-ABILITY AND FITNESS FOR A PARTICULAR PURPOSE. IN NO
EVENT SHALL STYKU BE LIABLE FOR ANY DIRECT, INDIRECT, SPECIAL, EXEMPLARY, OR CONSEQUENTIAL DAMAGES ARISING
FROM THE USE OF THE SOFTWARE OR DOCUMENTATION OR ANY ASSOCIATED HARDWARE. BY ACCEPTING THIS AGREEMENT,
YOU RELEASE STYKU FROM AND AGAINST ALL LIABILITY FOR PERSONAL INJURY AND/OR PROPERTY DAMAGE OR DOWNTIME
ARISING EITHER DIRECTLY OR INDIRECTLY FROM INACCURACIES OR MALFUNCTION.
We respect your privacy. Our Privacy Statement is incorporated into and forms a part of these Terms of Use and is part of our
agreement with you. Please read our Privacy Statement carefully since it describes, among other things, how we collect, use,
share, transmit, process, transfer, sell, rent, store and secure information obtained when you access and/or use our Services.
Your failure to comply with the terms of this agreement shall terminate your license and this agreement. Upon termination you
shall be obligated to destroy all copies of the Software and Documentation.
Page 3

3
Table of Contents
COPYRIGHT INFORMATION ........................................................................................................................................2
SOFTWARE TERMS AND CONDITIONS .........................................................................................................................2
SAFETY GUIDELINES ...................................................................................................................................................4
IMPORTANT SAFETY PRECAUTIONS.............................................................................................................................................. 4
WARNINGS REGARDING POWER ADAPTERS AND CABLES ................................................................................................................ 4
CAUTION REGARDING TRIPPING AND FALLING HAZARDS................................................................................................................. 4
GET TO KNOW YOUR STYKU S100 ...............................................................................................................................5
1 SENSOR TOWER .............................................................................................................................................................. 6
2 ROTATING PLATFORM ...................................................................................................................................................... 6
3 NOTEBOOK COMPUTER .................................................................................................................................................... 6
SETTING UP YOUR STYKU S100 ...................................................................................................................................7
CREATE YOUR STYKU ACCOUNT .................................................................................................................................................. 7
• CONNECT NOTEBOOK COMPUTER TO AN AVAILABLE WIFI NETWORK **INTERNET CONNECTION IS REQUIRED TO USE THE STYKU
S100 SOFTWARE** ................................................................................................................................................................. 7
ACTIVATE YOUR STYKU S100 SOFTWARE ..................................................................................................................................... 7
• LAUNCH THE STYKU SOFTWARE ON THE NOTEBOOK BY DOUBLE-CLICKING THE STYKU ICON ON DESKTOP .............................................. 7
• WHEN PROMPTED, ENTER YOUR STYKU ACCOUNT EMAIL AND PASSWORD AND CONTINUE ................................................................ 7
POSITION THE SENSOR TOWER AND ROTATING PLATFORM ............................................................................................................... 7
IMPORTANT LOCATION GUIDELINES ............................................................................................................................................. 8
CONNECT THE SENSOR TOWER ................................................................................................................................................... 9
CONNECT THE ROTATING PLATFORM ......................................................................................................................................... 10
PERFORM YOUR FIRST STYKU BODY SCAN ................................................................................................................ 16
LAUNCH THE SOFTWARE AND PRESS THE SCAN BUTTON ................................................................................................................ 16
CREATE A CUSTOMER PROFILE .................................................................................................................................................. 11
REVIEW SCANNING INSTRUCTIONS ............................................................................................................................................ 16
FRAME THE SUBJECT IN THE SENSOR VIEW AND START SCANNING ................................................................................................... 17
REVIEW THE SCAN AND SAVE OR DELETE IT ................................................................................................................................. 19
SCAN AGAIN OR EXIT SCANNING ................................................................................................................................................ 20
VALIDATE THE SCANNER RESULTS ............................................................................................................................ 20
SCAN YOUR SUBJECT MULTIPLE TIMES ........................................................................................................................................ 20
LOAD ALL OF THE SCANS INTO STYKU STUDIO .............................................................................................................................. 20
DISPLAY MEASUREMENT PRECISION RESULTS .............................................................................................................................. 21
TROUBLESHOOTING TIPS.......................................................................................................................................... 23
WARRANTY INFORMATION ...................................................................................................................................... 24
CONTACT US ............................................................................................................................................................ 24
BY MAIL: .............................................................................................................................................................................. 24
BY PHONE:............................................................................................................................................................................ 24
BY EMAIL: ............................................................................................................................................................................. 24
REGULATORY INFORMATION ................................................................................................................................... 25
STYKU S100 .......................................................................................................................................................................... 25
SENSOR TOWER ..................................................................................................................................................................... 25
ROTATING PLATFORM ............................................................................................................................................................. 25
NOTEBOOK COMPUTER ........................................................................................................................................................... 25
Page 4

4
Safety Guidelines
Important Safety Precautions
• Keep components and power cables away from water.
• Keep components and cables out of reach of children under 12 years old.
• The product should only be used in environments with ambient temperatures between 5°C (41°F)
and 35°C (95°F).
• Electrocution Hazard: Do not use damaged power cords, accessories and other peripherals with
your product.
• Falling Hazard: Do not place the platform or sensor tower on uneven or unstable surfaces.
• Take care while stepping on or off the platform to avoid tripping.
• Never step on or off of the platform while it is in motion.
• Take care to cover and contain the cables to avoid tripping or breaking connectors.
• Follow the included instructions for proper use of the product, and never stand on the platform in
an unsupported way.
Warnings Regarding Power Adapters and Cables
• Failure to take the following precautions can result in serious injury or death from electric shock,
fire or damage to your product.
• Use only the power supply units and AC power cords that came with your product.
• Confirm that your electrical outlet provides the type of power indicated on the power supply units
(Voltage (V) and frequency (Hz)). If you are not sure of the type of power supplied to your
location, consult a qualified electrician.
• Do not use non-standard power sources, such as generators or inverters. Use only AC power
provided by a standard wall outlet.
• Ensure that your wall outlet, extension cord, power strip or other electrical receptacle is not
overloaded. Confirm that they are rated to handle the total current (in amps (A)) drawn by the
power supply units and any other devices that are on the same circuit.
Caution Regarding Tripping and Falling Hazards
• To reduce tripping or entanglement hazards, arrange any cables or power cords so that people are
not likely to trip over them or pull them as they walk through the area. Do not allow children to
play with cables and power cords.
• Always use your product on level, even surfaces to avoid falling or tripping hazards. Take care
when stepping on and off of the platform.
Please review the additional safety information for the sensor and notebook computer in the product
guides included with your Styku S100 hardware.
Page 5
5
Get to know your Styku S100
Page 6

6
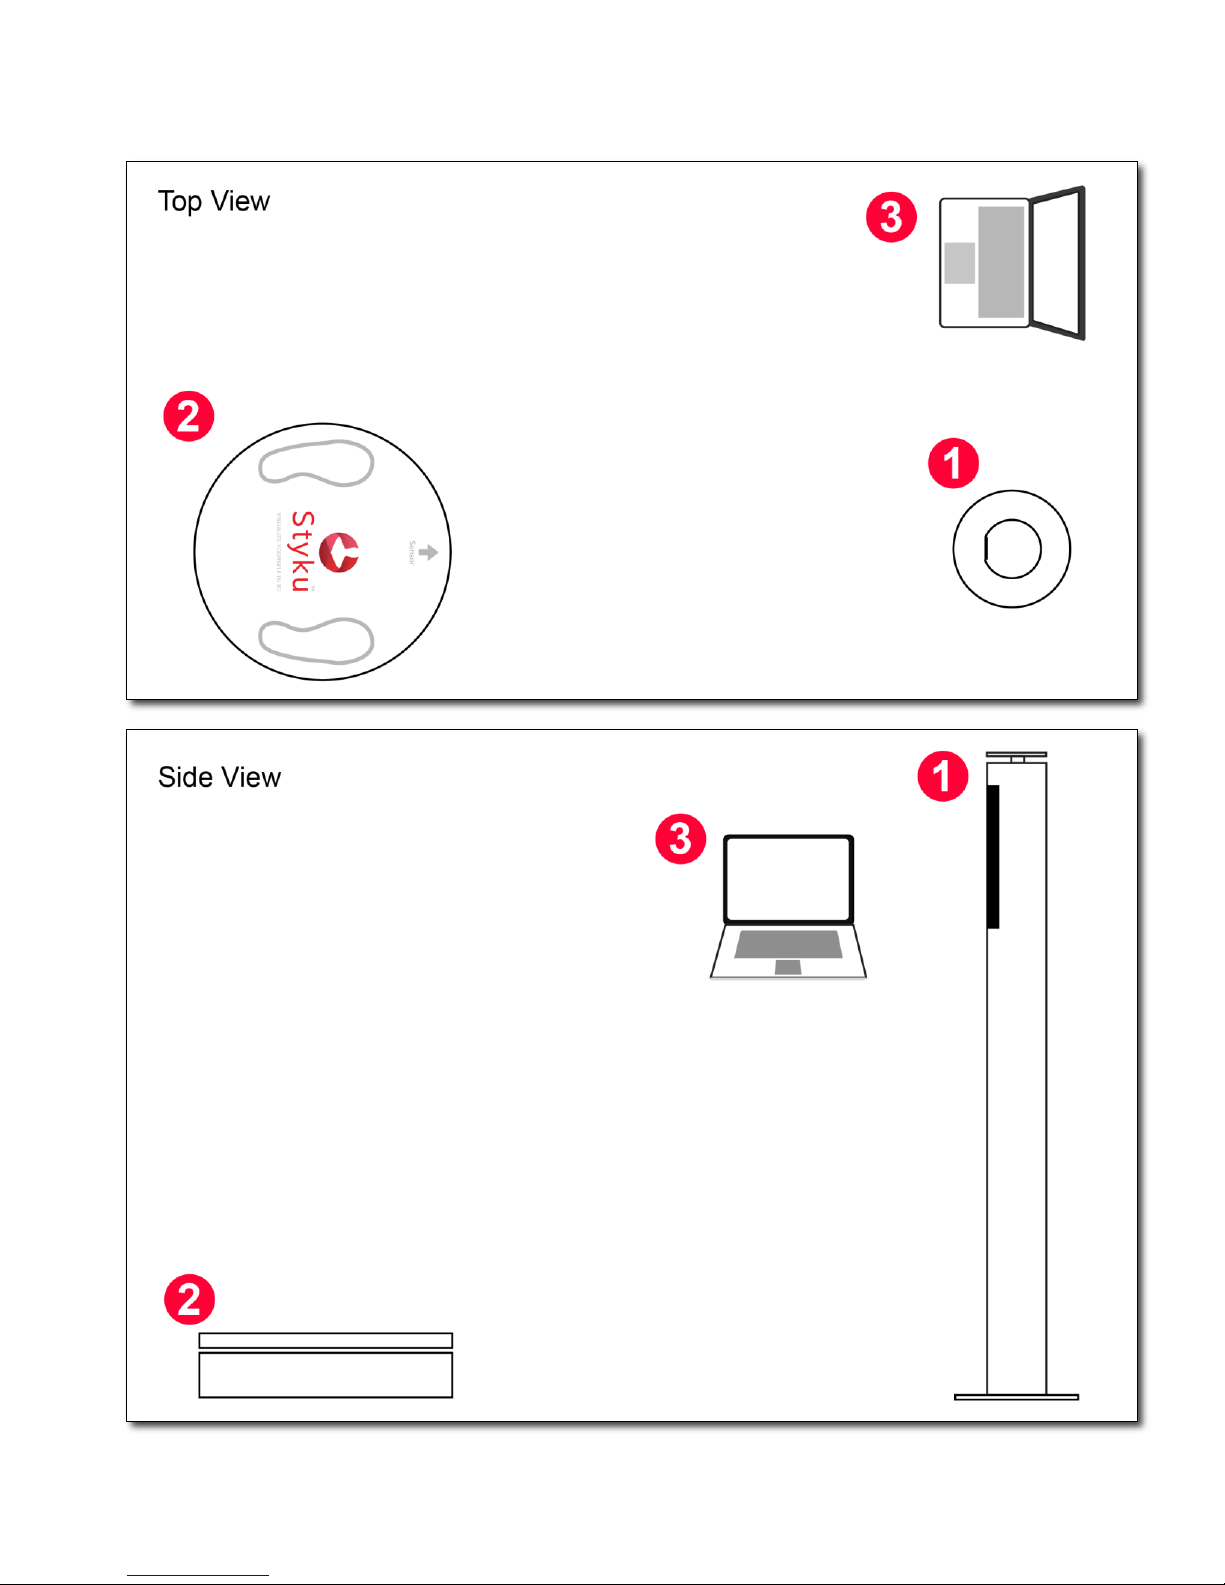
1 Sensor Tower
The sensor tower is an aluminum stand containing a high resolution USB 3.0 3D camera that is used to
capture the body in 3D. It connects to a notebook computer via USB 3.0 SuperSpeed cable (provided).
It weighs approximately 13 lbs (6 kg).
2 Rotating Platform
The rotating platform turns the body while data is being captured so that the sensor can see the body
from all angles. It connects to a notebook computer via USB 2.0 cable (provided). The platform weighs
approximately 23 lbs (10.5 kg) and can support a max load of 550 lbs (250kg). A full rotation takes
approximately 30-40 seconds.
3 Notebook Computer
A notebook computer is included. The notebook includes a powerful Intel processor and a gaming
quality graphics card capable of processing the captured body data to create 3D body scans. The Styku
Studio software can be downloaded via Styku’s Client Portal, at https://app.styku.com .
Page 7

7
Setting Up Your Styku S100
Create Your Styku Account
• Connect notebook computer to an available WiFi Network
**Internet connection is required to use the Styku S100 Software**
Use the Windows network connection tool to connect the notebook computer to an available WiFi network.
An internet connection is required to use the Styku S100 software.
• Double-click the “How to use Styku” link on the desktop.
OR
Visit https://app.styku.com from a web-enabled computer
The included notebook computer comes pre-installed with a link to setup instructions for the Styku S100.
Press the “How to use Styku” link on the desktop to go to Styku’s website. Alternatively, you can visit Styku’s
website at https://app.styku.com from a web-enabled computer.
• On Styku’s website, click the “Sign up Now” link to create Styku User Account- this will allow you to
activate your Styku S100 software and view any additional setup instructions
On Styku’s website, Press the “Sign up now” link to create your Styku account. Once you have an account, you
will be able to activate your Styku S100 software and view additional setup instructions.
Activate your Styku S100 Software
• Launch the Styku software on the notebook by double-clicking the Styku icon on desktop
• When prompted, enter your Styku Account email and password and continue
Launch the Styku software on the notebook computer by double-pressing the Styku icon on the desktop. You
will see a window appear asking for your email address and password. Enter the email and password you used
to create your Styku account to activate the software and continue.
Position the sensor tower and rotating platform
Note: You can view a video of the hardware setup process by visiting the Styku website and choosing the
Support\Setup link, at https://app.styku.com .
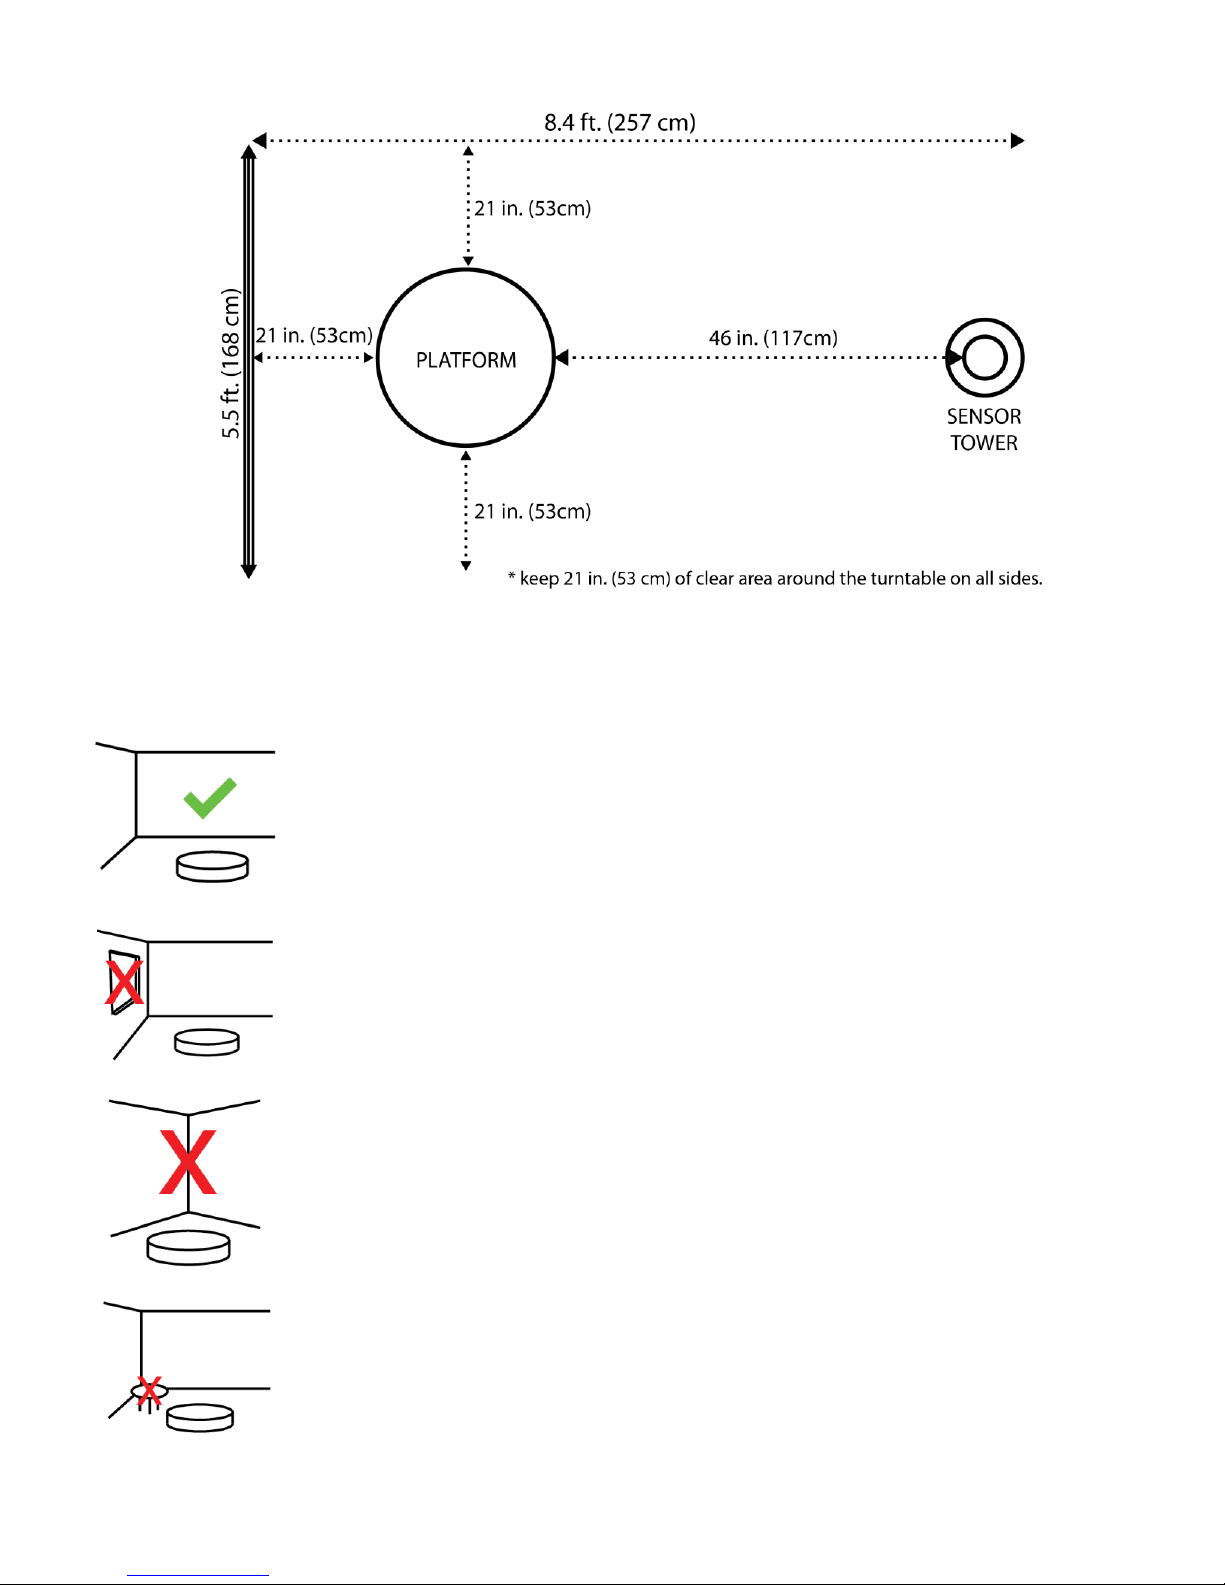
The rotating platform should be placed in front of the sensor tower, with 21 inches (53 cm) of empty space
around it on all sides. The front of the turntable should be about 46 inches (117 cm) away from the sensor
tower.
Page 8
8
Important location guidelines
Ensure there is a flat, solid wall behind the rotating platform.
Avoid reflective surfaces, natural light and indoor lighting that emits infrared light.
Do not place the rotating platform in a corner of a room.
Keep the area around the rotating platform clear of objects.
Page 9
9
Connect the sensor tower
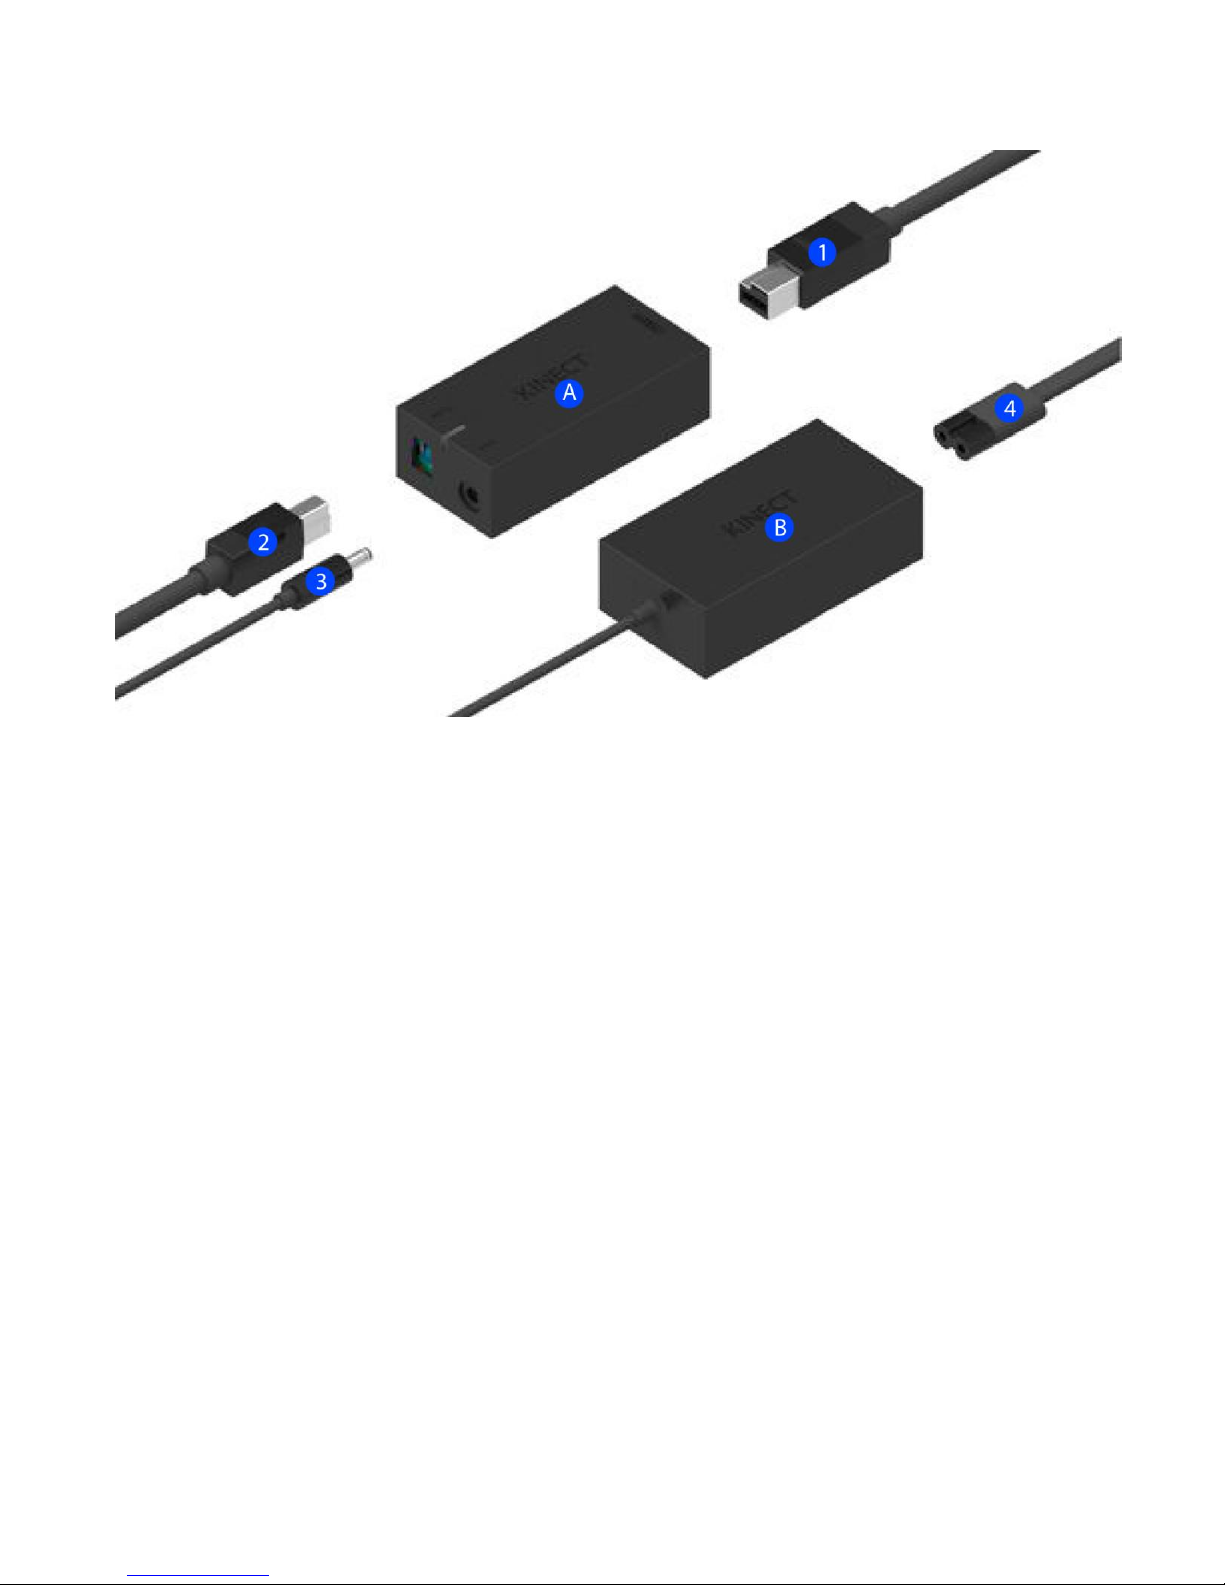
I. Connect the sensor cable coming from the bottom of the tower (1) to the smaller black brick
(A).
II. On the other side of the brick (A), plug in the USB cable (2). The other end of this cable will
connect to the notebook computer.
III. The larger black brick (B) has a thin cable coming out from it (3) ; plug that into the other side of
the smaller brick (A). This is for the power.
IV. Plug the power plug (4) to the other side of the larger brick (B). Plug the power into a power
outlet.
V. You should see a yellow light on the smaller brick (A) when the power is connected.
VI. Next, plug the USB cable (2) into an empty USB 3.0 port on your computer, typically colored
blue or with an SS symbol.
Page 10
10
Connect the rotating platform
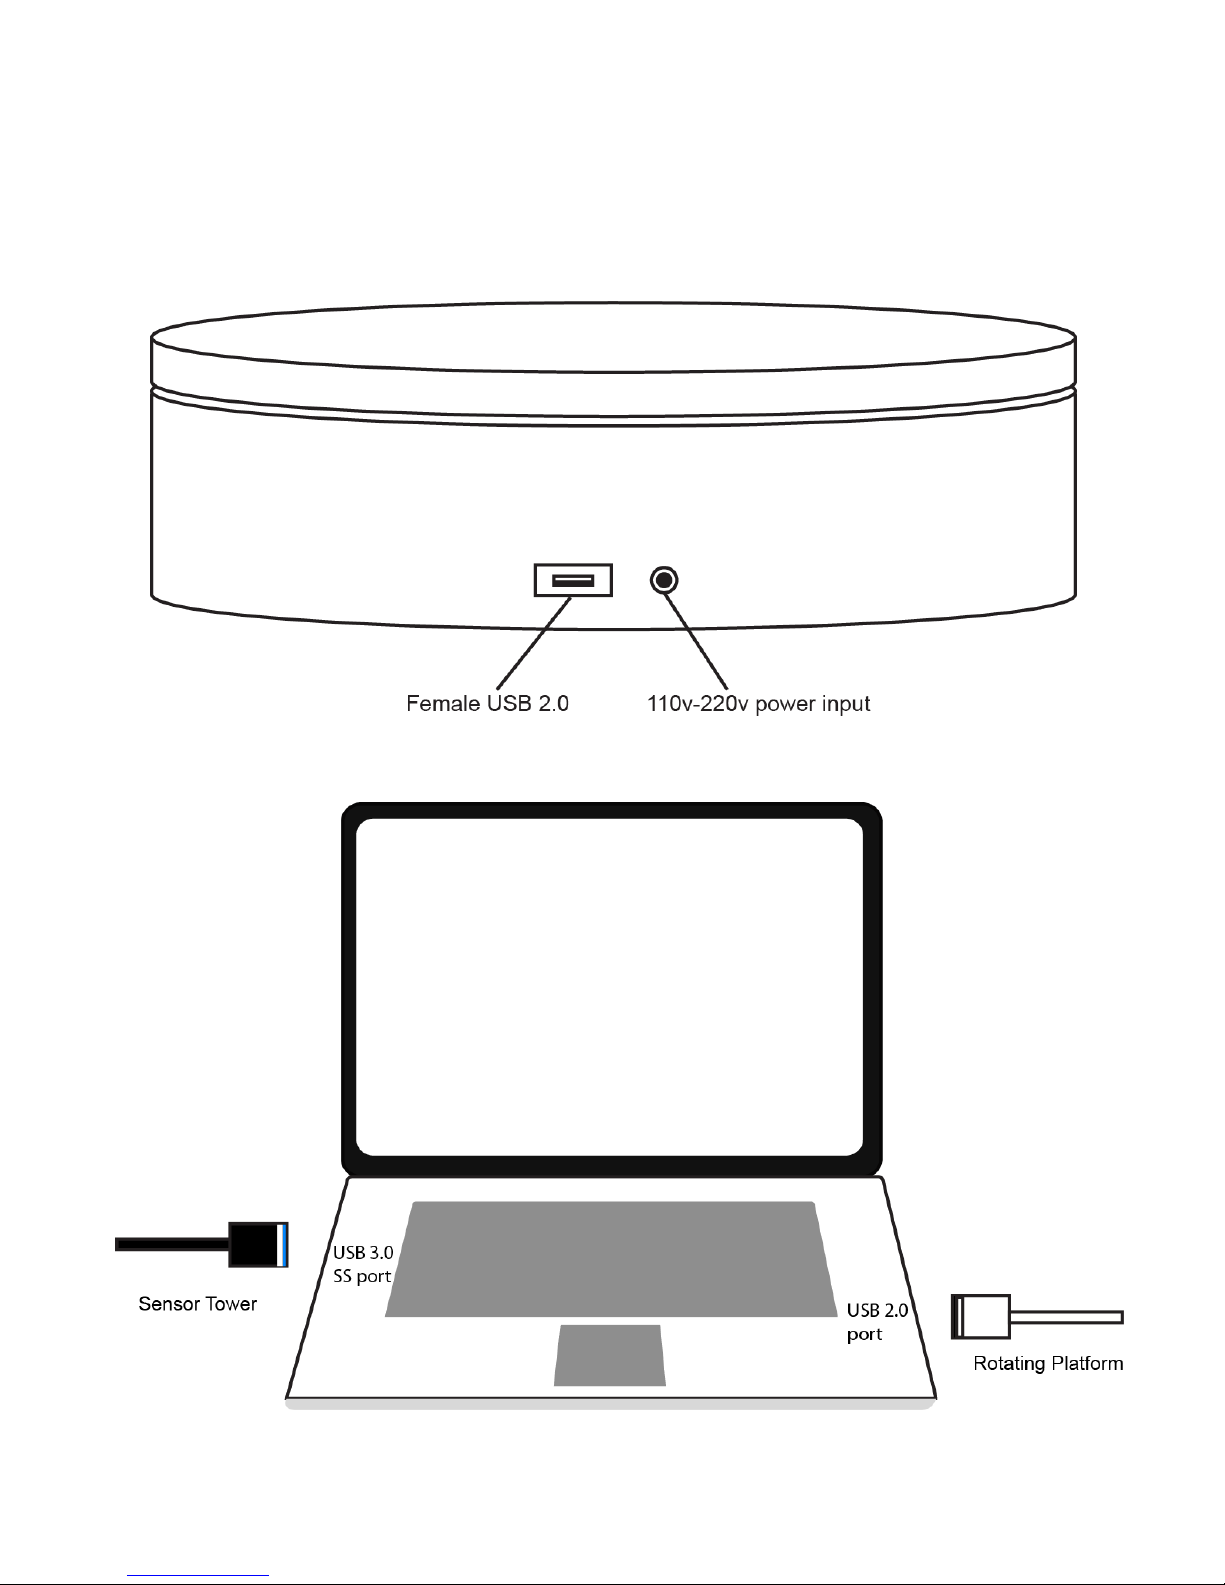
1. Connect the power adapter to the rotating platform and to a wall power outlet.
2. Then, connect the provided USB cable from the platform to an open USB 2.0 port on your computer.
Page 11
11
Check the hardware
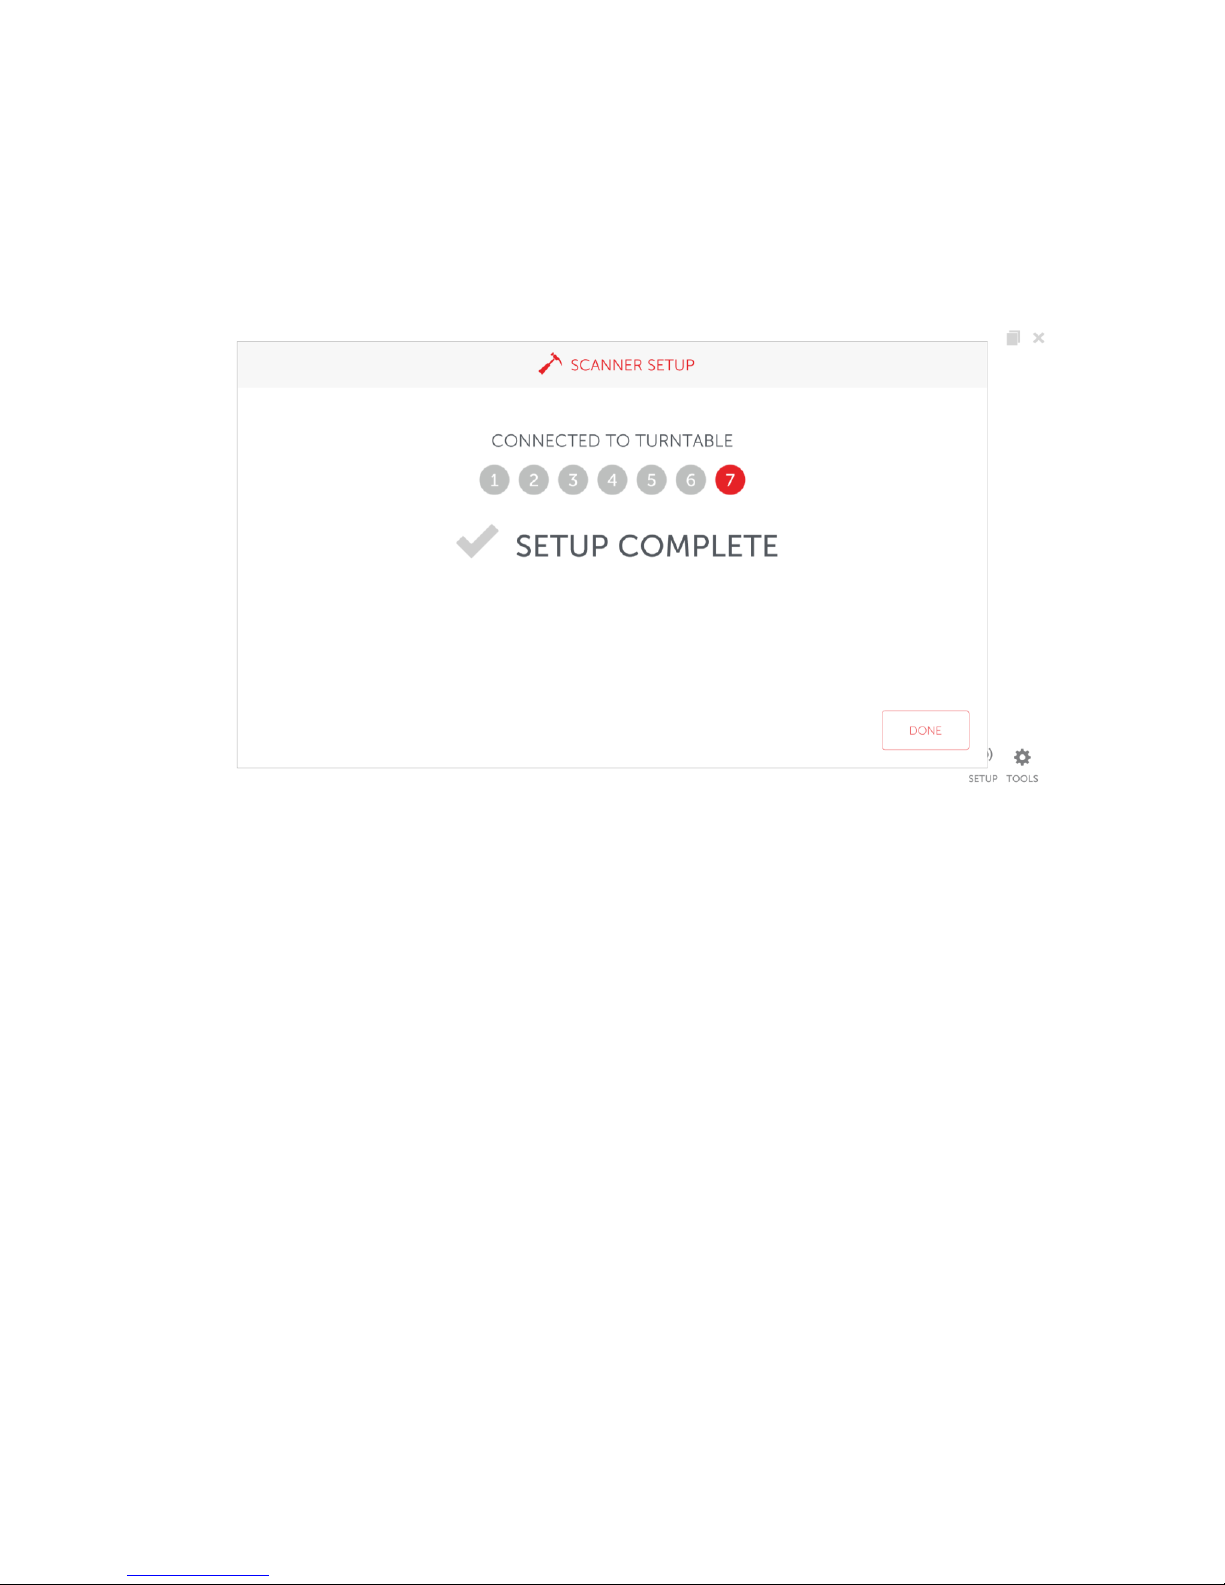
Press the setup button on the home screen
Press the setup button to go through a hardware check. When it reaches step 7 hardware is properly
connected. Click done
Accessing the tools menu
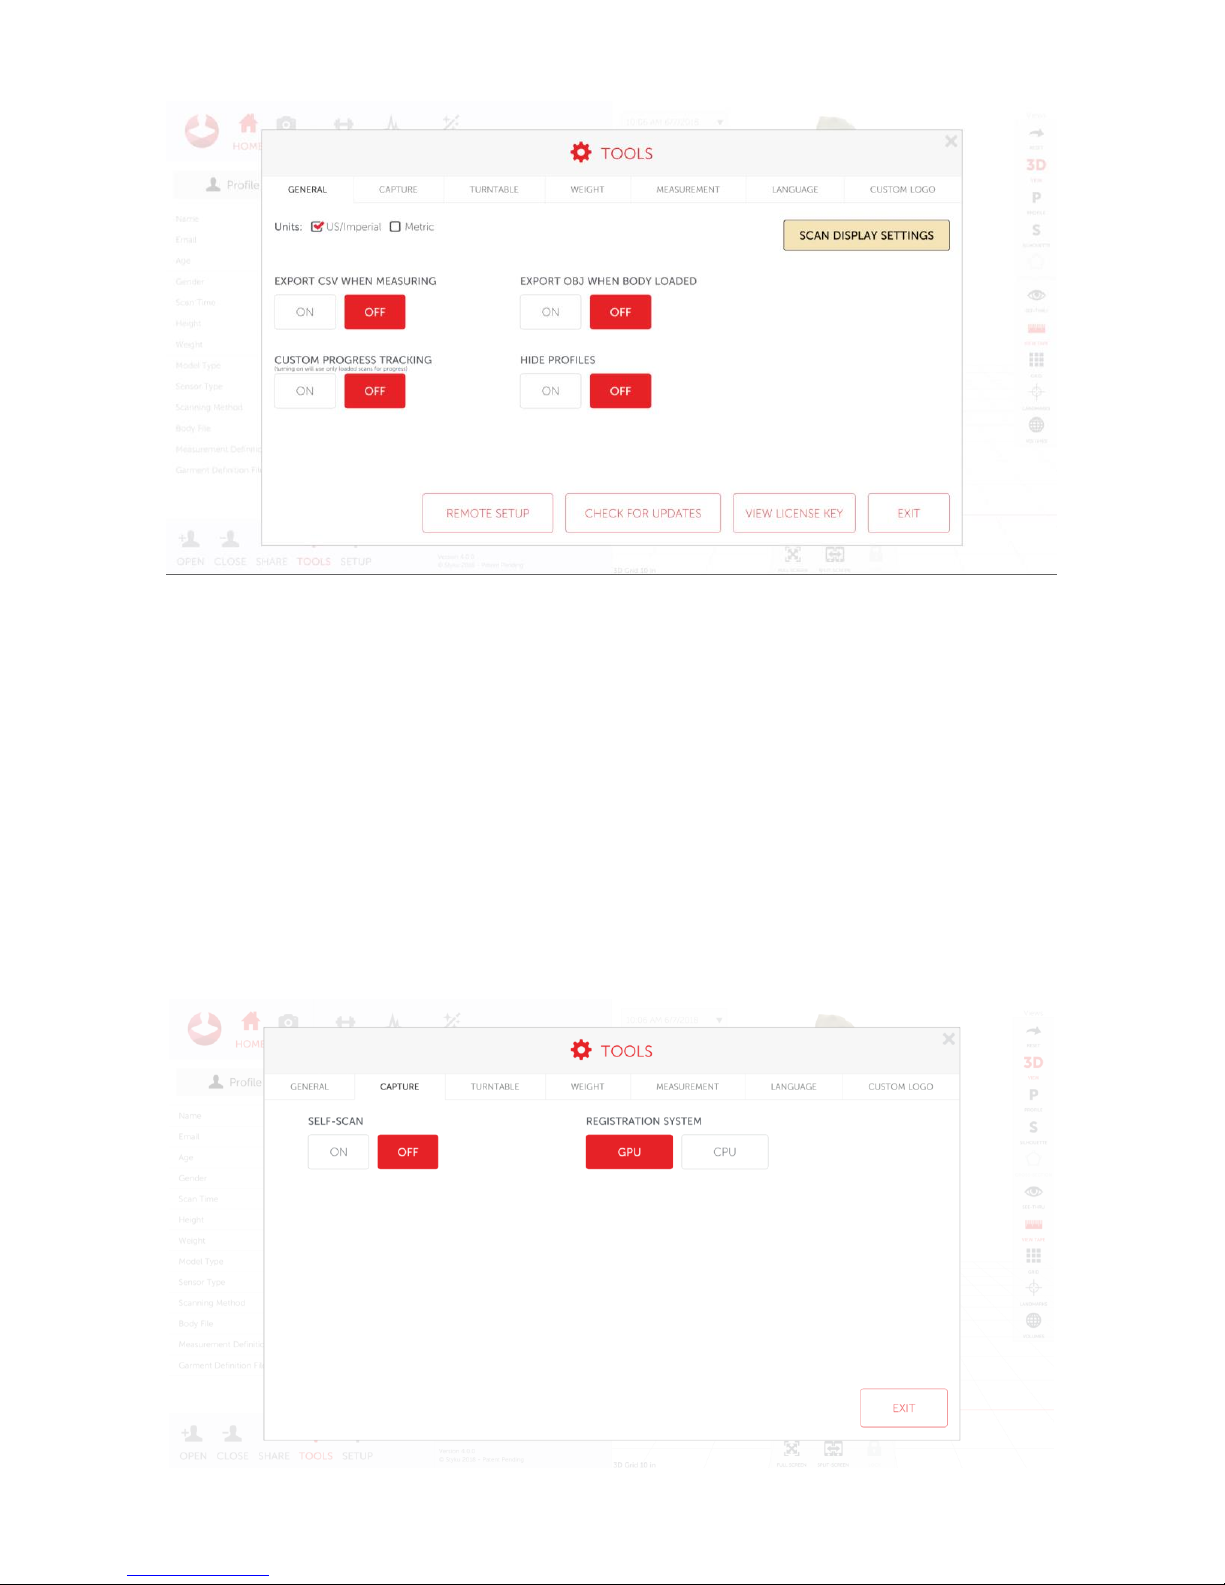
To access the tools menu press tools in the lower right hand area of screen
General
Page 12
12
• To change the unit, click US/Imperial or Metric depending on preferred units
• To change the look of the scan, click “scan display settings”
• To hide profiles during the “open profile” or “choose existing” options set “hide profiles” to off
• If a progress report is needed to be done on only loaded scans turn “custom progress tracking” on.
This will create progress reports using only loaded scans, rather than all scans in a profile
Capture
To access the capture screen, click capture
Page 13
13
• To set self scan on click “on” in the self-scan option. Self scan allows scans to automatically start
when the scan subject is in the correct position
• Registration system should be set to GPU if you are using the Styku provided laptop
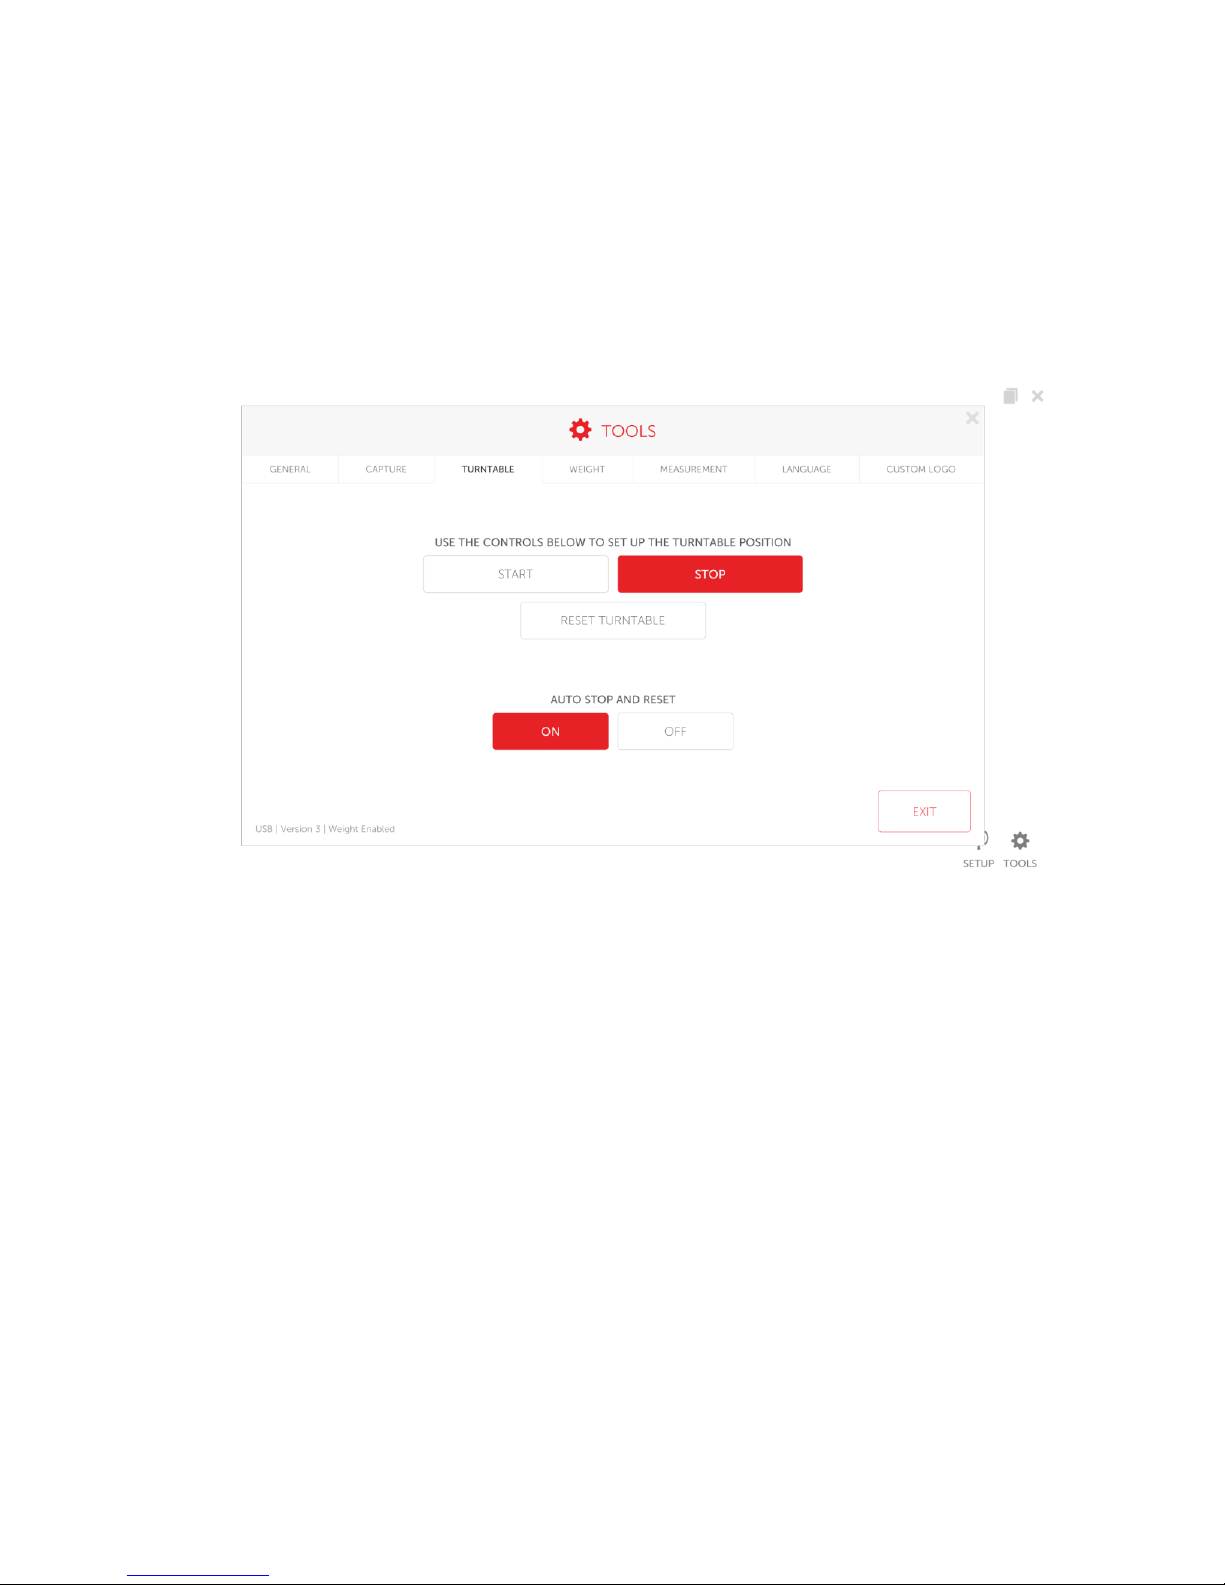
Turntable
To access the turntable menu click “Turntable”
• The turntable can be started manually by pressing the start and stop button.
• On the bottom left edge of the screen is the model turntable that is used with the system
• The reset turntable option will reset the turntable back to the position where the last scan was
started
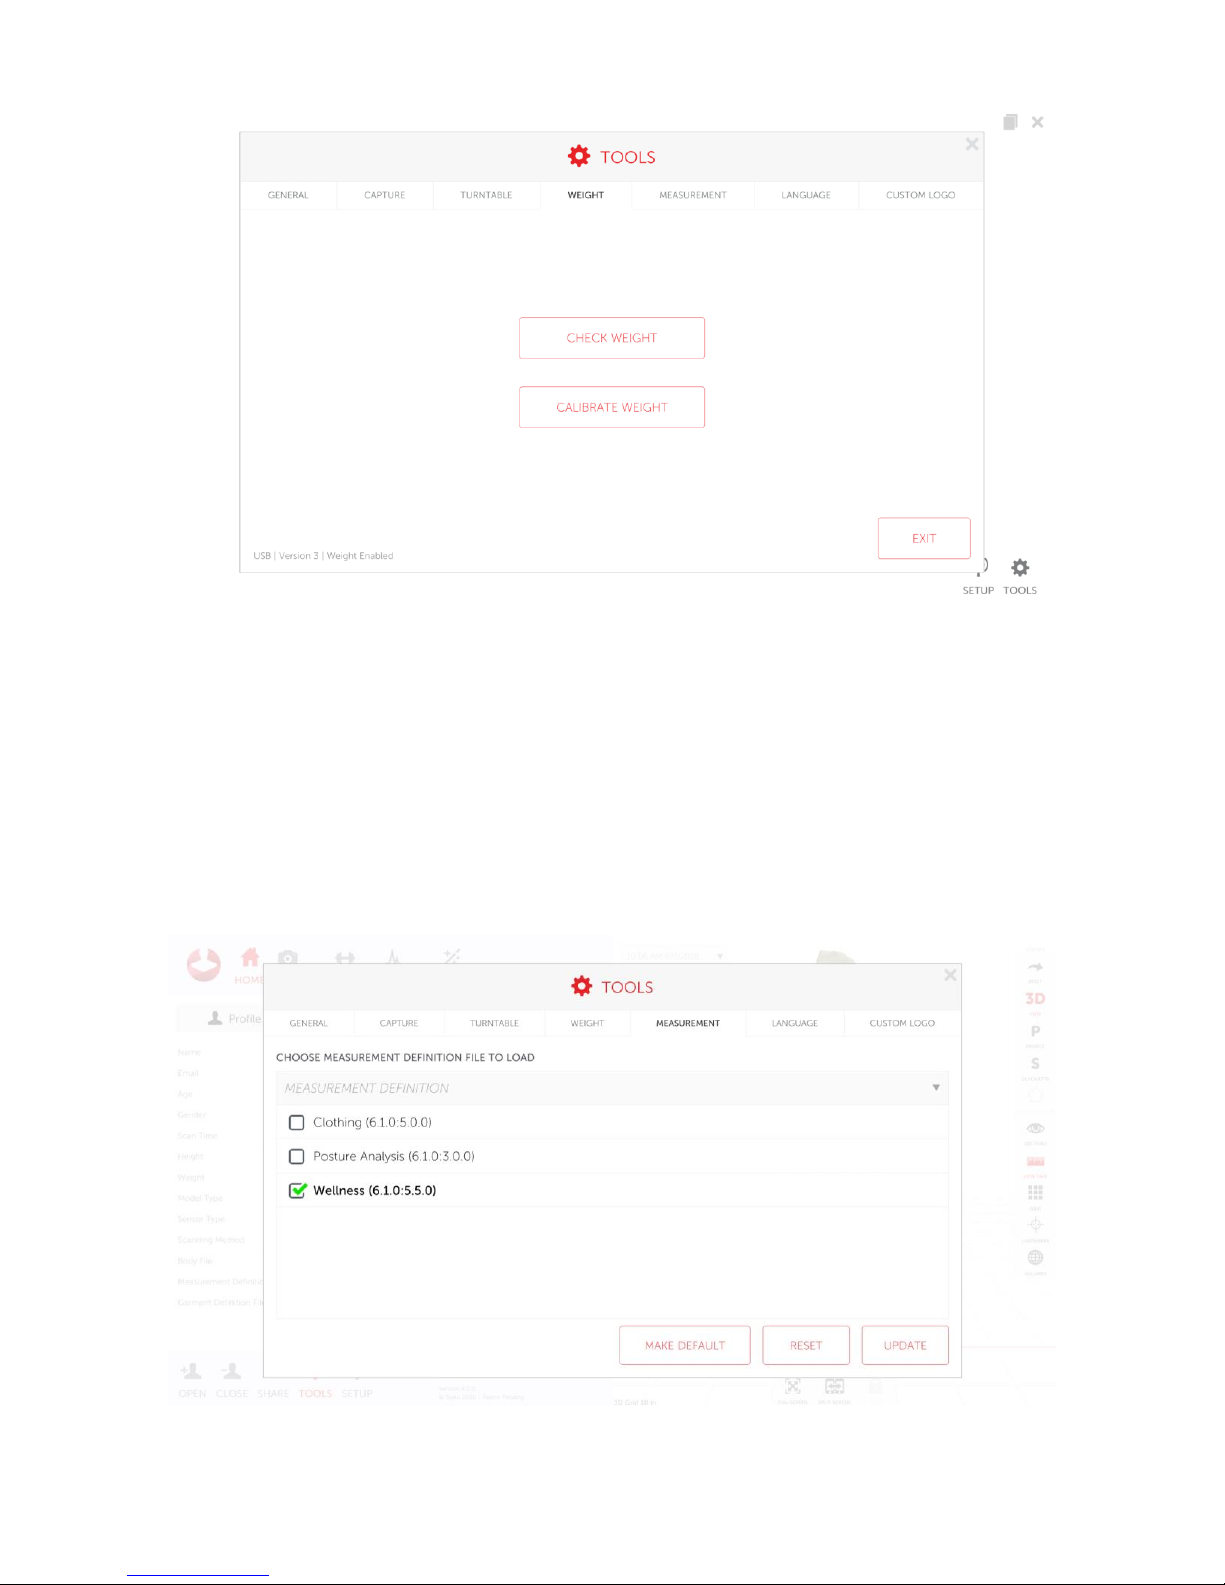
Weight
If you have a weight scale turntable press the “Weight” option to access the weight menu. This option will only
show if the system is connected to a weight scale turntable
Page 14
14
• Press the check weight option to weigh someone manually. Follow the onscreen prompts
• To calibrate the weight scale, click the “calibrate weight” option. Follow the on screen prompts to
calibrate it.
Measurement
To change the loaded measurement set click the “Measurement” option. Click on one of the measurement
sets and click “update” to load. If you wish to make that measurement the default option click “make default”.
Page 15
15
• The clothing measurement set are measurements typically used by a tailor or made to measure
company
• The posture analysis measurement set is used to measure someone’s posture. It gives vector
points through the body to show asymmetry
• The wellness measurement set is the default measurement set. It provides the different body
circumferences
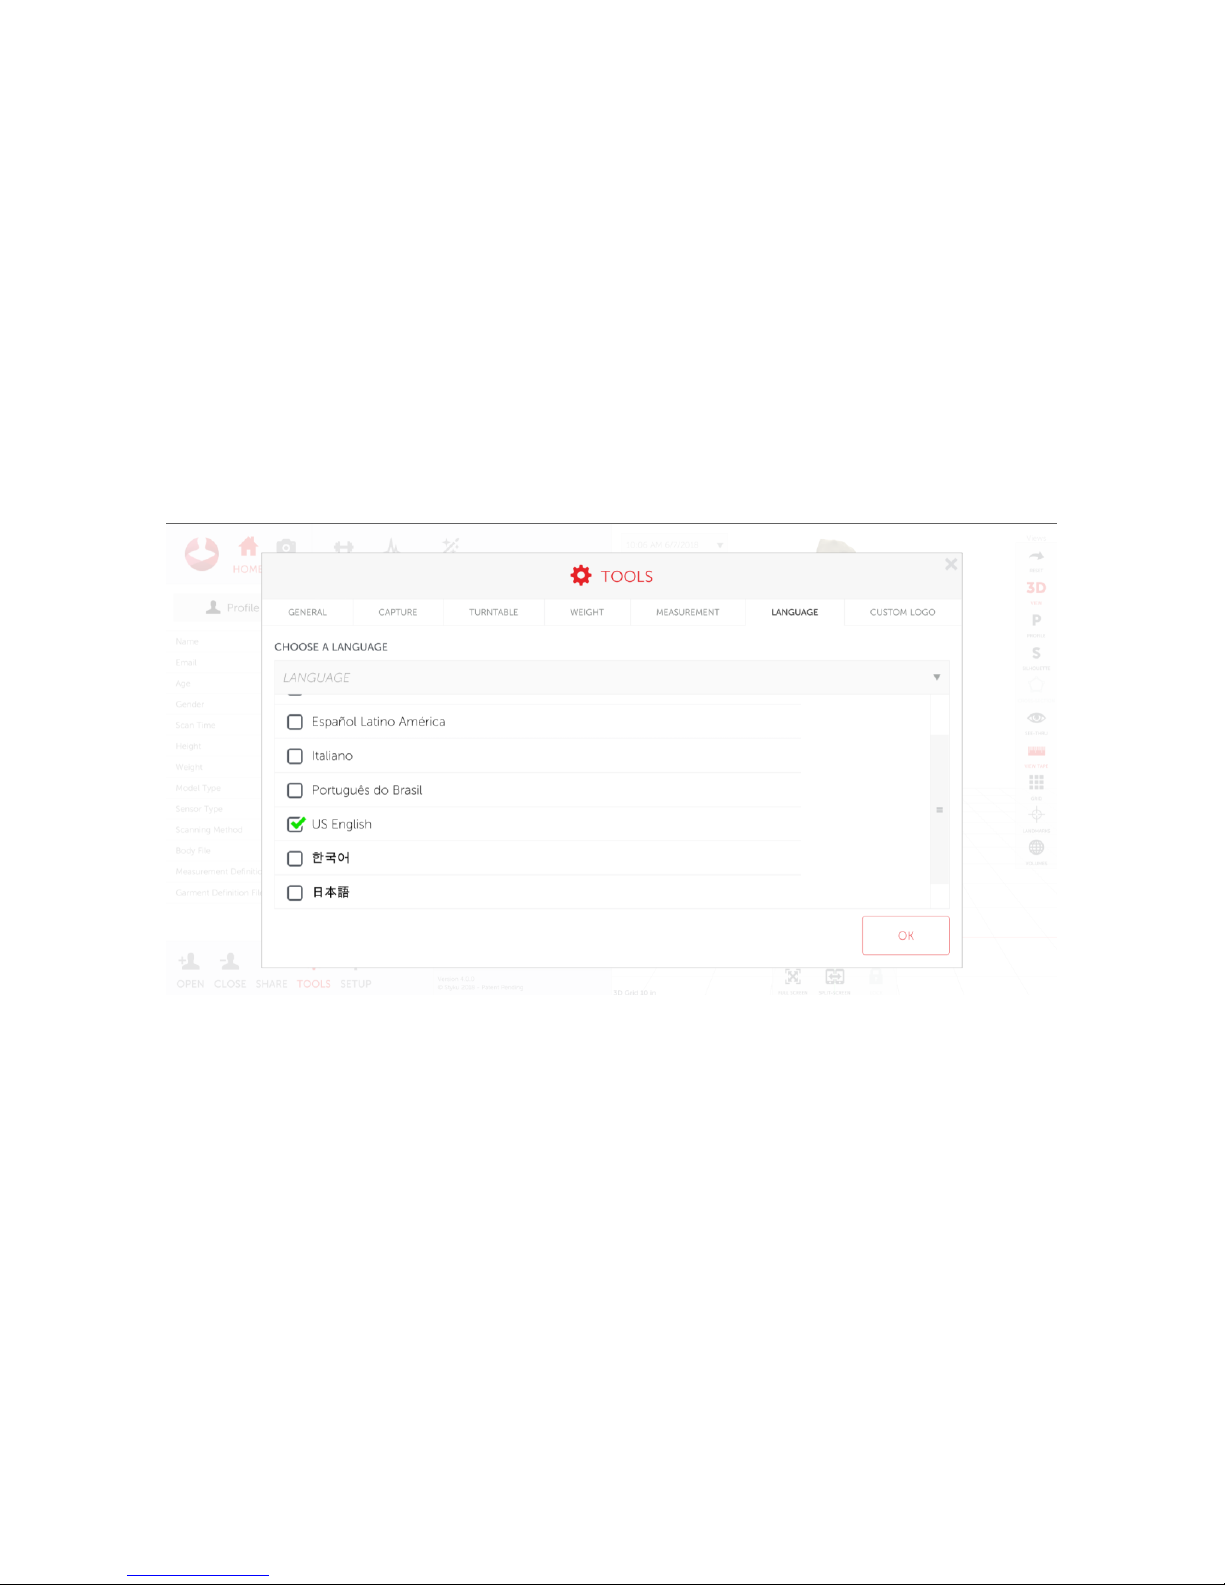
Language
If you wish to change the language click the “language” button. Select the language you wish to change to,
then click ok. The app will restart.
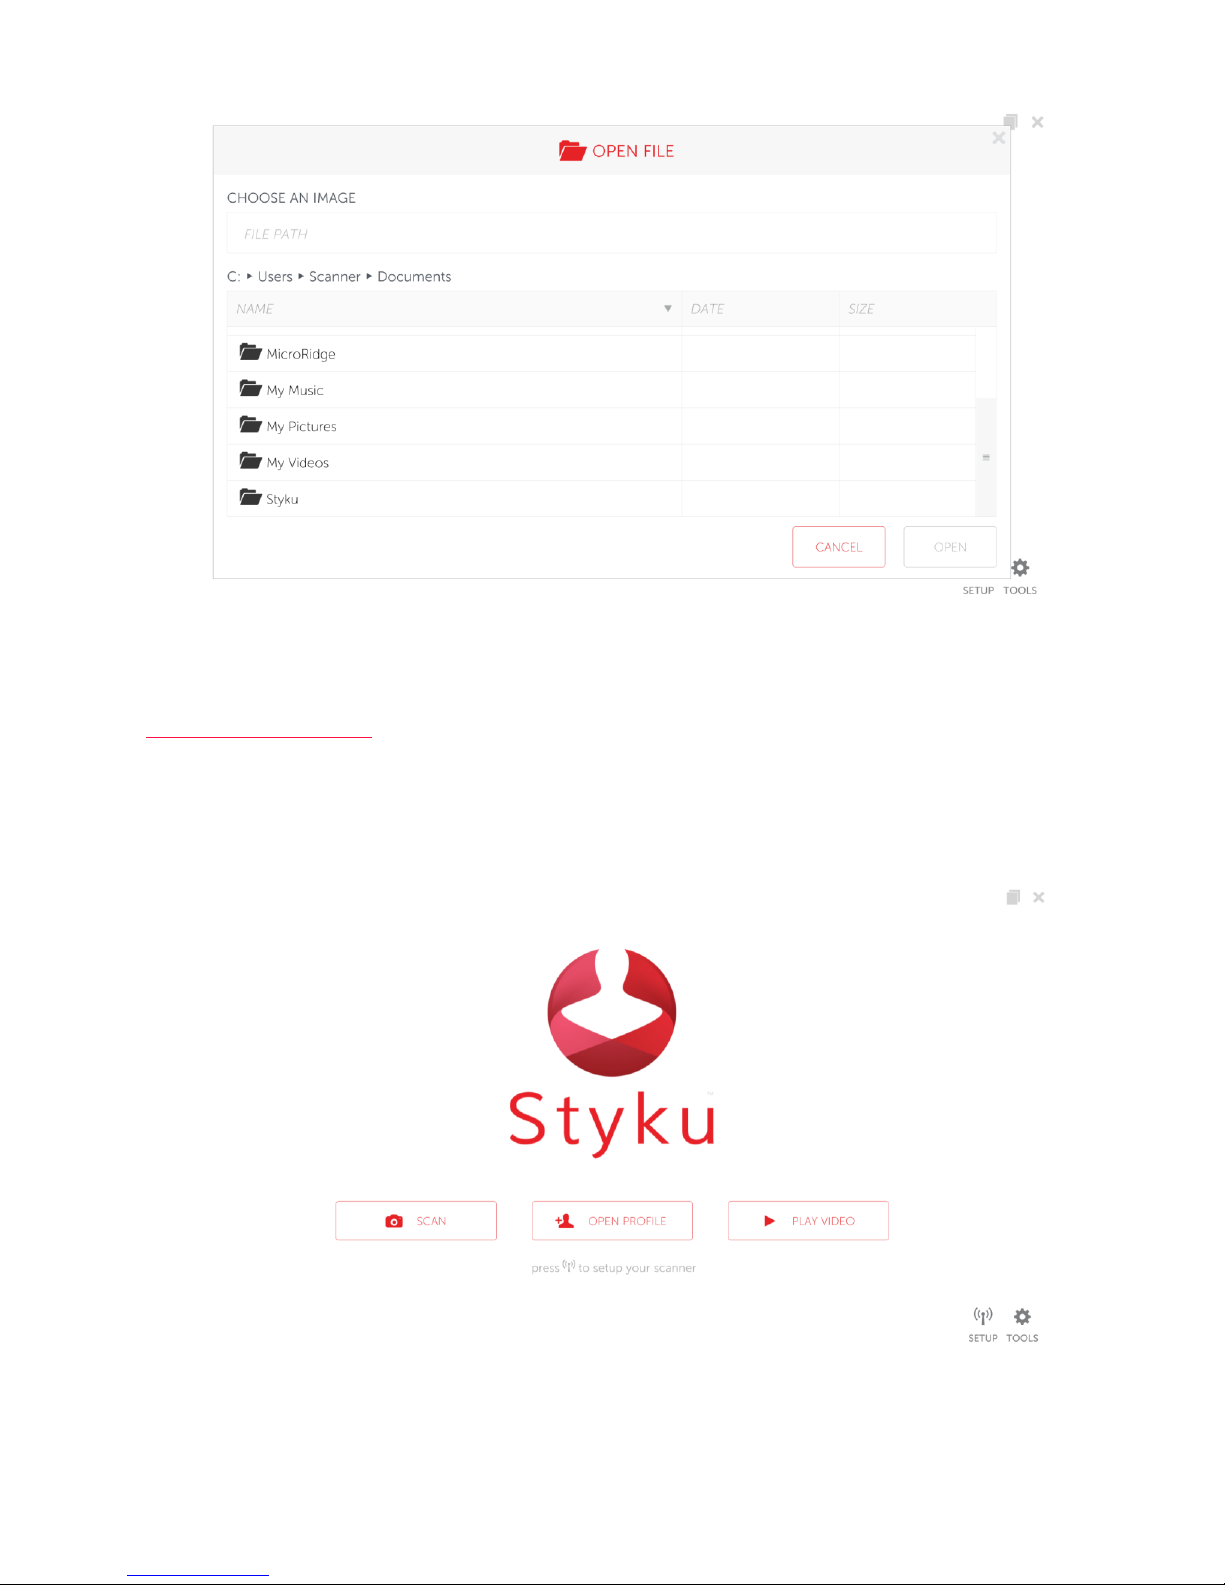
Custom logo
A custom logo can be added to the reports. To add a logo make sure it is a .png file then place the file on the
computer. Use the built in navigation menu to find the file. Select the file and click open.
Page 16
16
Perform your first Styku body scan
Note: You can view a video of the scanning process by visiting the Styku Web Portal and choosing the Setup
link, at https://app.styku.com .
Launch the software and press the Scan button
To begin a scan, press the Scan button in the main window of Styku.
Review scanning instructions
Page 17
17
After pressing scan, you will come to two windows that show recommendations for the scanning environment
and the scan subject. Here are the most important points:
For the scanning environment:
• Keep the scanning area clear of objects near or around the turntable, or blocking the view of the
sensor. However, make sure you have a wall behind the turntable.
• Avoid natural light – daylight can interfere with the sensor. Some halogen lights can also cause issues
with the sensor.
• Avoid reflective objects in the view of the sensor – don’t scan in front of mirrors or other very
reflective surfaces.
For the scan subject:
• They should wear form-fitting clothing – this sensor does not see through clothing!
• Long hair should be tied up off of the neck and shoulders.
• Take shoes and socks off prior to stepping on the turntable. Shoes can damage the turntable.
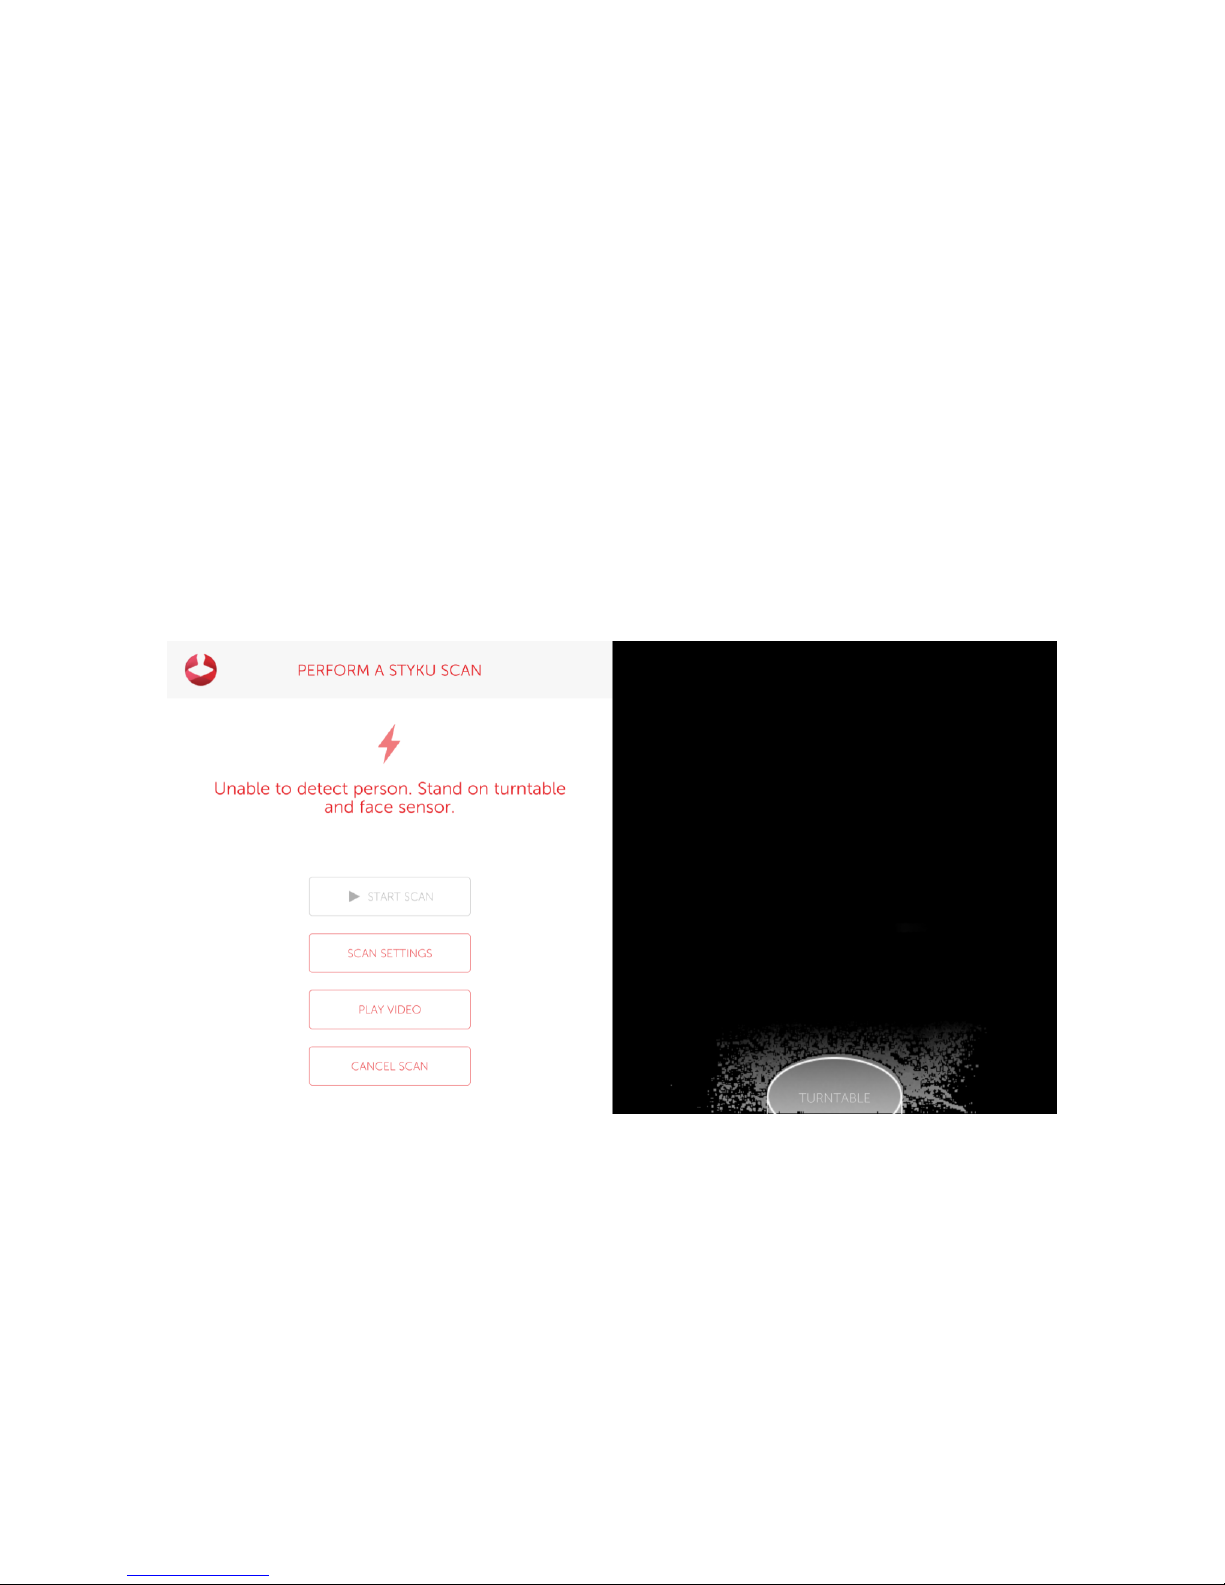
Align the turntable and sensor tower
Move the turntable and/or sensor tower so that the turntable is in the white outline
Frame the subject in the sensor view and start scanning
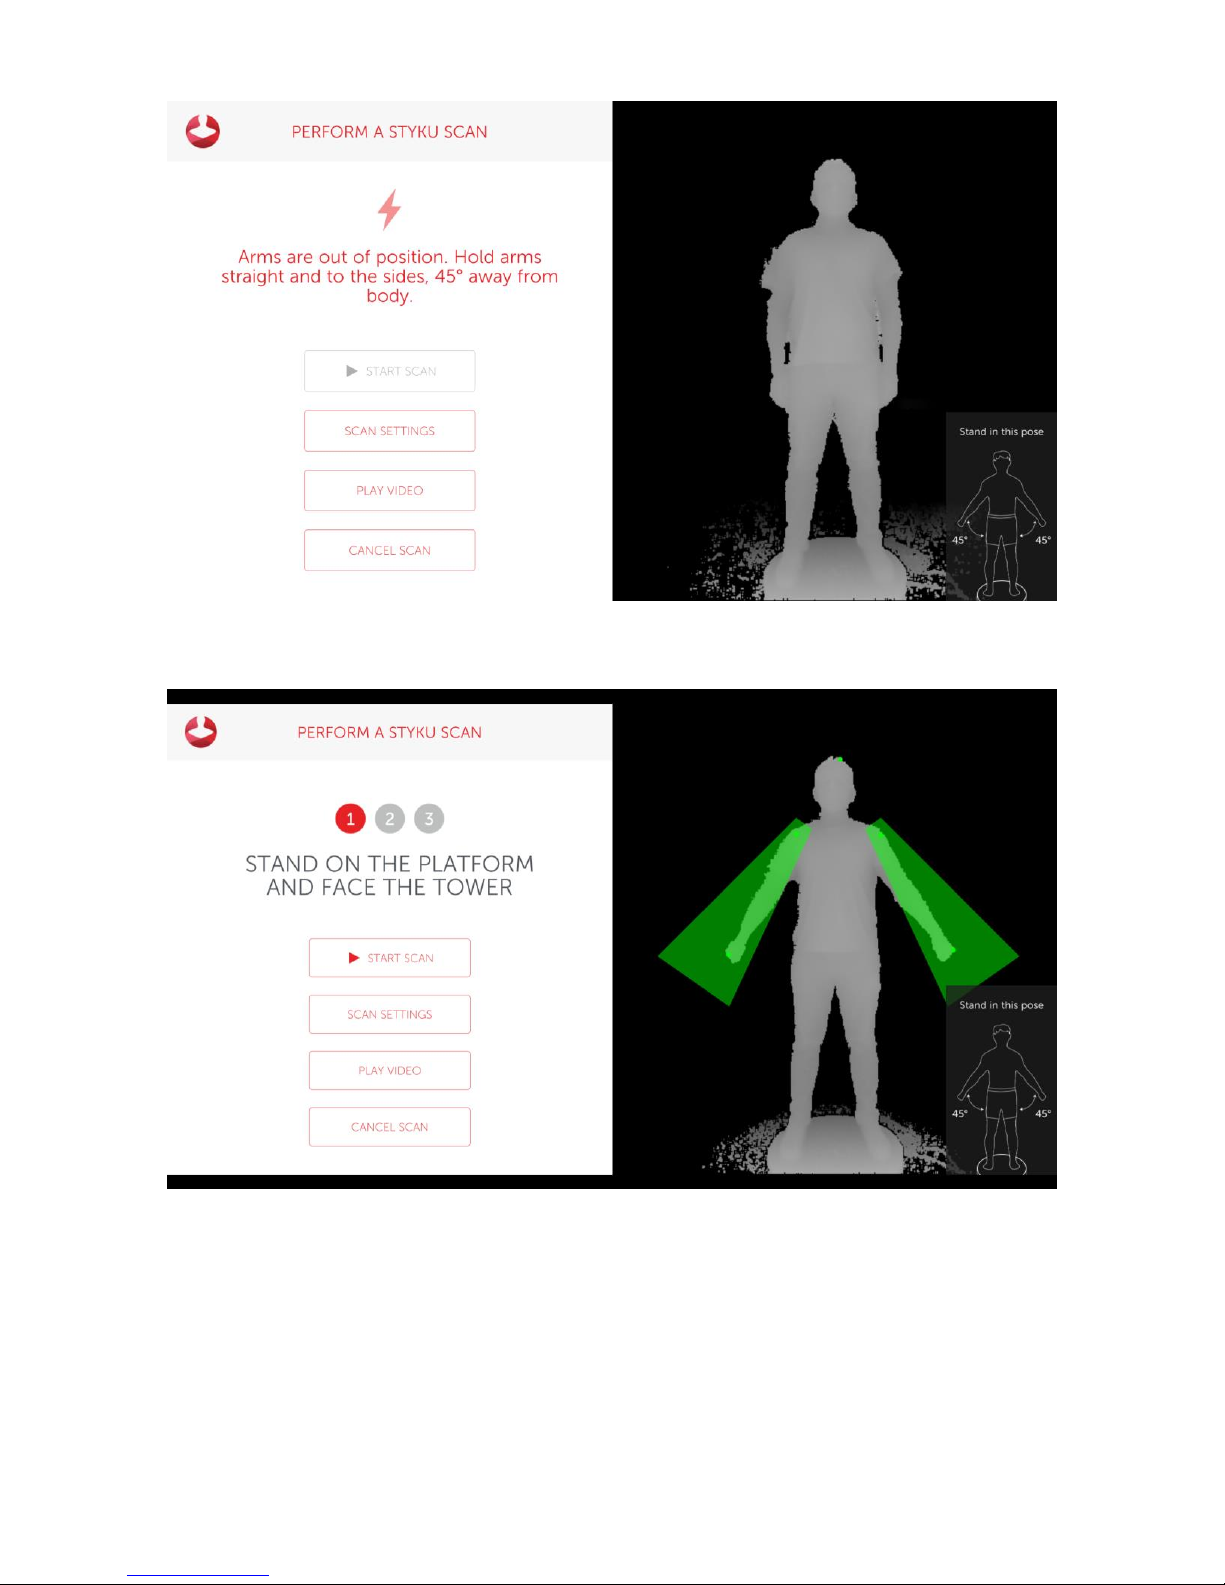
You will come next to the scanning view. You’ll see on the right that there is an outline of a person in the
correct posture.
Tips:
• Have your scan subject stand on the turntable and match the posture shown in the picture.
• Their feet should be about 8 inches apart(stand on the foot prints), and their arms 30-45 degrees away
from their body.
• Their fingers should be curled into fists, and they should be facing the sensor head on.
Page 18
18
When they are in position and standing still, the Start button will be enabled. Press ‘Start’ to begin scanning.
The turntable will begin to rotate automatically. When the scan is finished the turntable will stop by itself. The
subject will rotate for more than 360 degrees before the turntable stops and the scan completes. A progress
wheel will be displayed
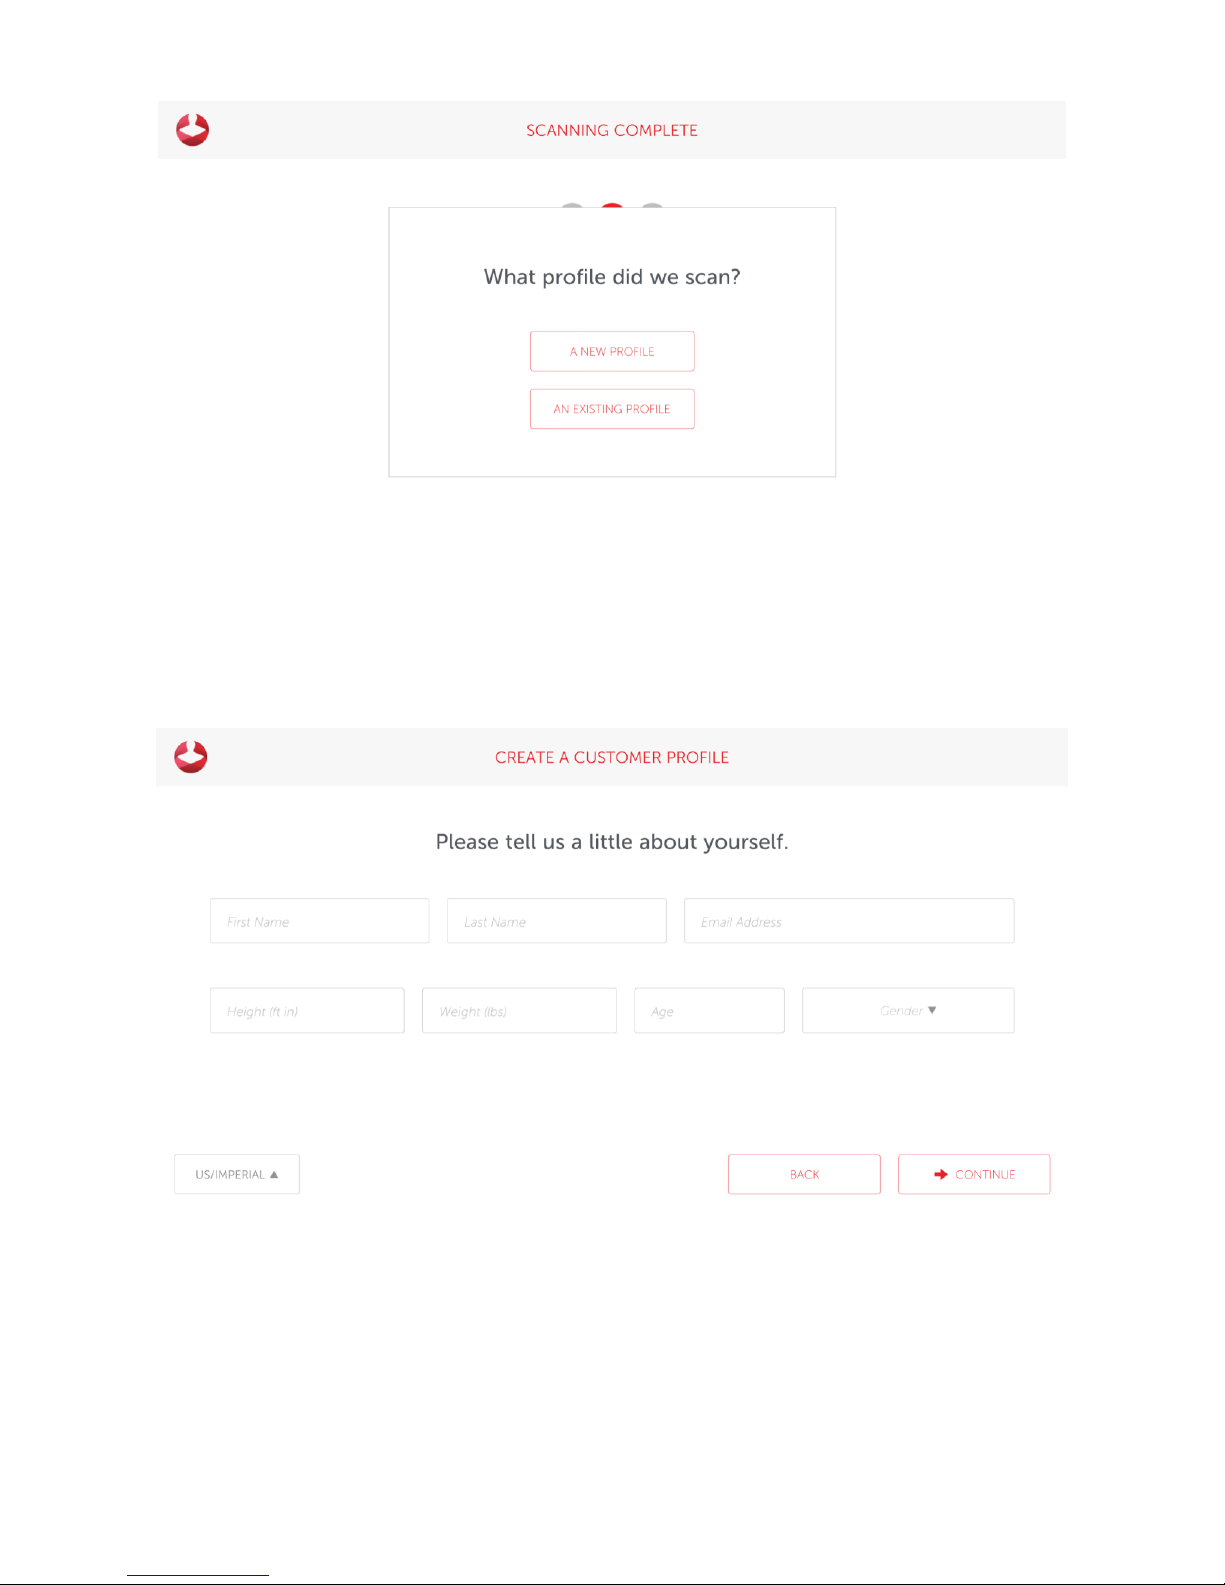
Next, press the A NEW PROFILE option to create a new customer scan profile.
Page 19
19
Complete the Customer Profile form, then press Continue. If you have a supported rotating platform, the
weight will automatically be taken.
Review the scan and Save or Delete it
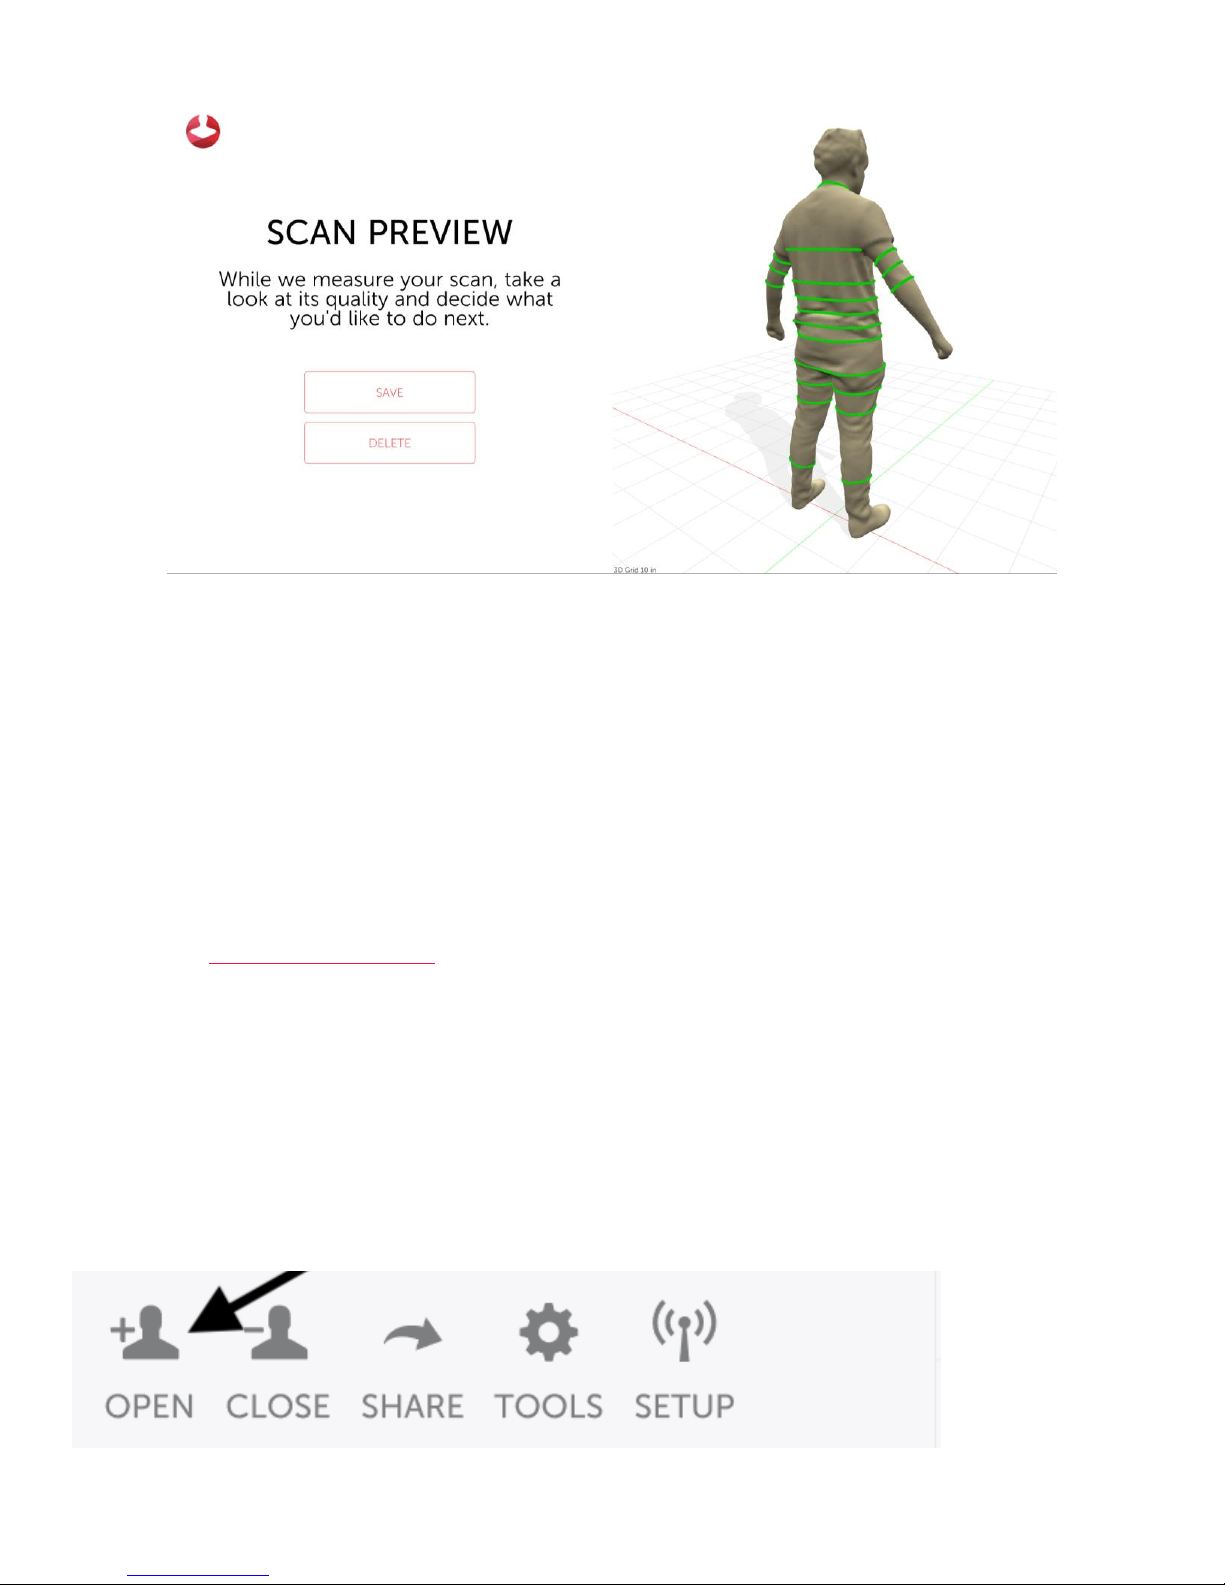
Styku will process the scan data and show you a preview of the scan while it extracts measurements. You can
either ‘Save’ the scan, or ‘Delete’ it if you see a problem and would like to re-scan.
Page 20
20
Scan again or exit scanning
Once Styku has finished measuring, you will have the option to ‘Scan Again’ which means scan using the same
profile information, perform a ‘New Scan’ which means scan using a new profile, or ‘View Details’, which
means close the scanning part of Styku and go back to the rest of the program.
Validate the Scanner Results
Note: You can view a video of the validation process by visiting the Styku Web Portal and choosing the
Setup link, at https://app.styku.com .
Scan your subject multiple times
To see that your Styku S100 scanner is set up properly and is generating precise measurements, scan a subject
in the proper clothing 3 times in a row. You can click the “Scan Again” button to use the same customer
profile for each scan.
Load all of the scans into Styku
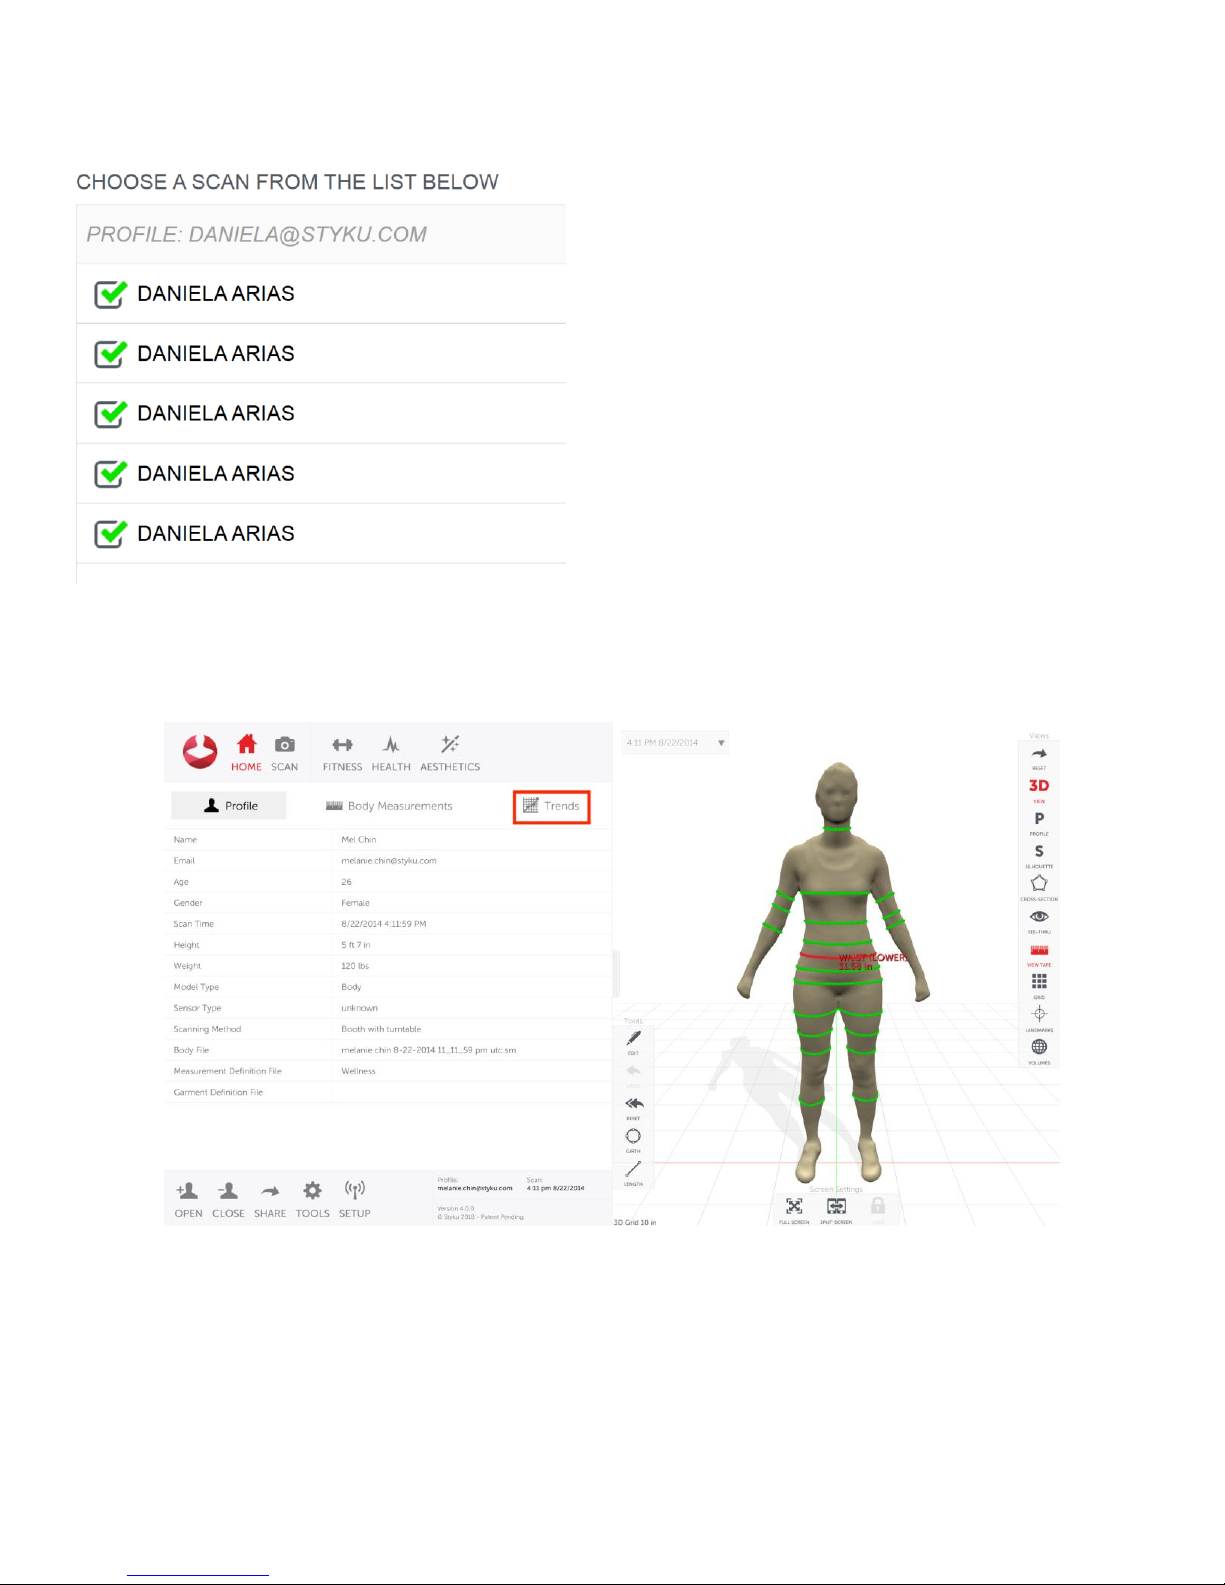
Open up all of the scans into the 3D viewer by pressing the Open button in the bottom left hand corner, and
choosing the profile you created for the subject.
Page 21
21
You will see a list of scans. Make sure they are all selected and then click ‘Load to load them all into the 3D
viewer.
Display measurement precision results
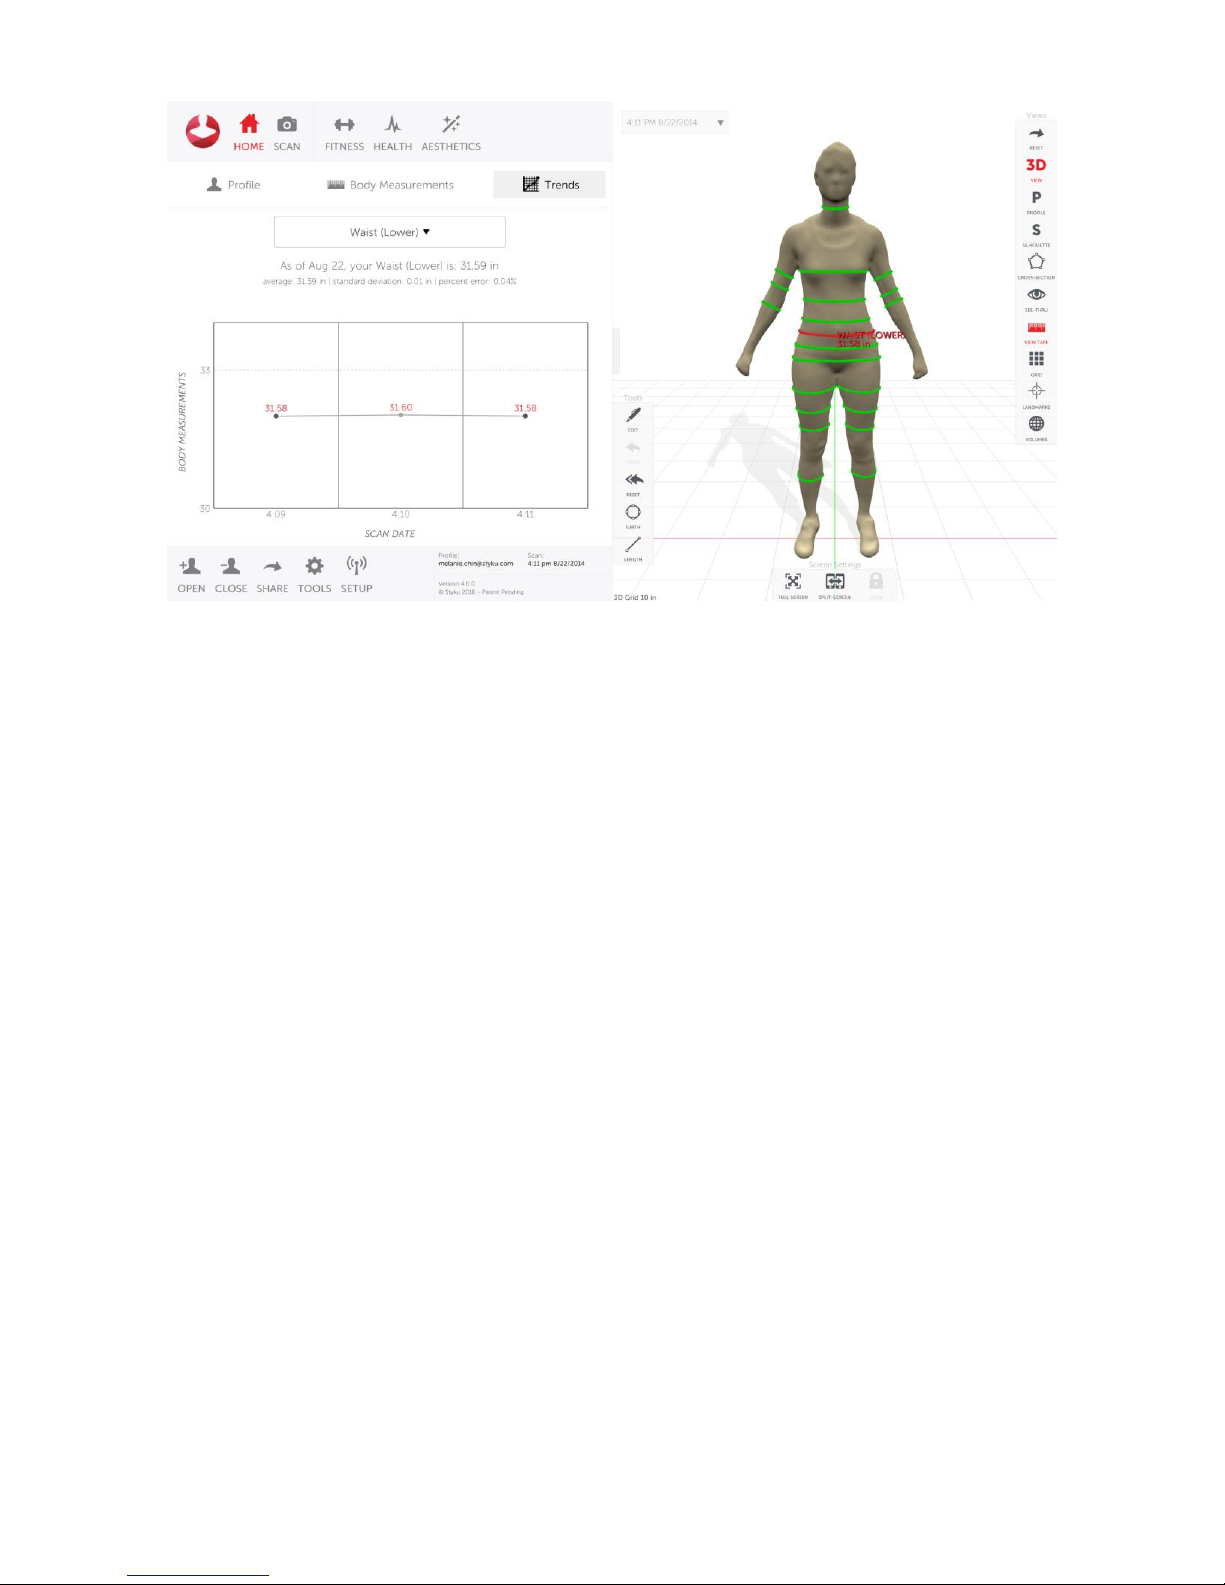
Once all of the bodies are loaded into the 3D viewer, click on the Trends tab.
Tap on one of the green measurement lines on the 3D body on the right to display a graph.
Your graph should show close to the same measurements for each of the scans.
Above the graph are values for Average measurement, Standard Deviation and Percent Error.
The Percent Error for all of the measurements in the torso should be at or under 0.5%.
The Percent Error for the rest of the measurements in the limbs should be at or under 1.0%.
Page 22
22
If you are seeing large differences between scans or you see parts of the body that are cut off or that look
strange, check your scanning environment to make sure you are meeting the requirements. Correct any
issues, and then scan again.
Note: How the scanner takes measurements:
The measuring tape is known to be error-prone. Measure in a place just a little bit different from the last time
or with a different technique, and the measurement can be off by multiple centimeters!
The Styku scanner is an excellent tool for tracking change in a person’s body over time. With it, you will be
able to give up using the measuring tape altogether. Styku is able to eliminate human error as it is able to
measure the same location in the same way each time.
The Styku scanner takes digital measurements that are extremely precise. However, they may not match the
measurements you get by using a measuring tape. That’s ok! Because the Styku scanner’s measurements are
precise, you can be sure that changes you see when you scan someone after a period of time (for example, if
you scan someone now and then two weeks from now) are a result of changes to their body, and not error
due to measuring.
Page 23

23
Troubleshooting Tips
Please see below for troubleshooting tips if your Styku S100 scanner is not working properly.
Symptom
Resolution
Sensor Not Detected
-Check the cables and adapter plugs (see pg. 12)
-Disconnect USB from computer, restart computer and reconnect USB
-Connect to different USB 3.0 port
Turntable isn’t working
-Ensure power adapter is connected to the turntable and power outlet.
-Ensure USB cable is connected to both turntable and computer
-If your turntable has a power switch, ensure that it is on by checking to see
if the “-“ is depressed.
Connection Error
-Connect to the internet using WIFI or ethernet cables.
-Check that wifi card drivers are updated
Face distorted or limbs
missing
-Subject moved during scan. Remind them to face forward and be as still as
possible.
Application freezes and/or
runs slow
-Check for Windows updates. Install if needed.
-Restart the computer
How do I update Styku?
Updates are checked automatically each time you run Styku. To Install
updates, just follow the prompts.
The 3D camera view
stutters, lags, or looks
choppy
-Ensure that the laptop computer is plugged in
-Ensure that your computer is to “high performance” mode. This can be set
in power options, in the control panel.
If the Styku S100 system or Styku Studio continues to work improperly, please contact your Styku
representative, or Styku support at +1- 323 484 8490. Contact us through email at [email protected].
Page 24

24
Warranty Information
Styku includes a 3 year limited warranty on the rotating platform and the aluminum enclosure, and a 1
year limited warranty on the laptop and Kinect camera.
Warranty is void if:
Outside software is loaded onto the computer
Computer, aluminum enclosure, turntable and/or Sensor are opened
Contact Us
For questions, concerns or feedback, please use the following information to contact Styku:
By Mail:
Styku, LLC
5462 Jillson St.
Commerce, CA 90040
By Phone:
For Sales : +1 323 248 0745
For Support : +1 323 484 8490
By Email:
For inquiries outside of the U.S.A., please contact your local distributor for sales and support related
questions.
Page 25
25
Regulatory Information
Styku S100
Styku, LLC hereby declares that this product is in compliance with the essential
requirements and other relevant provisions of Directive 2014/32/EU and all other
relevant EU directive requirements.
The Declaration of Conformity can be found at the end of this User Guide.
Sensor Tower
The Styku S100 Sensor Tower contains a Microsoft ® Xbox One Kinect sensor and an Xbox One Kinect
Adapter for Windows.
Microsoft Corporation provides a Declaration of Conformity for each device. Copies of these can be
found at:
download.microsoft.com/download/A/B/8/AB8FB84D-8FE7.../EU_DoC_1520.pdf
download.microsoft.com/documents/en-ie/eucompliancedoc/.../EU_DoC_1637.pdf
Additional regulatory information can be found in the Xbox One Kinect and Xbox One Kinect Adapter
for Windows product manuals included with the Styku S100.
Rotating Platform
Styku, LLC hereby declares that this product is in compliance with the essential requirements and
other relevant provisions of Directive 2014/35/EU and all other relevant EU directive
requirements. The complete declaration of conformity can be found at the end of this User
Guide.
Styku, LLC hereby declares that this product is in compliance with FCC Part 18 and all other
relevant regulations.
Notebook Computer
The Styku S100 includes a notebook computer manufactured by another company. Relevant
regulatory information can be found in the notebook computer user manual included with the Styku
S100.
Trademark Legal Notice. All product names, logos, and brands are property of their respective owners. All
company, product and service names used in this document are for identification purposes only. Use of these
names, logos, and brands does not imply endorsement.
 Loading...