

Page 1

AX
1500
2500
3500
Professional Power Amplifiers
USER GUIDE
Page 2

STUDIOMASTER AX Amplifier Series
Contents
Instructions
Unpacking 1
Safety Instructions 1
Front panel controls and features 2
Rear panel controls and features 3 - 5
Operation 6
Ventilation 6
Protect LEDs 6
Cables 7
Rack Mounting 7
Trouble Shooting 7
Service Information 8
Technical Information
Technical Specification 9 - 10
Glossary of Terms 11
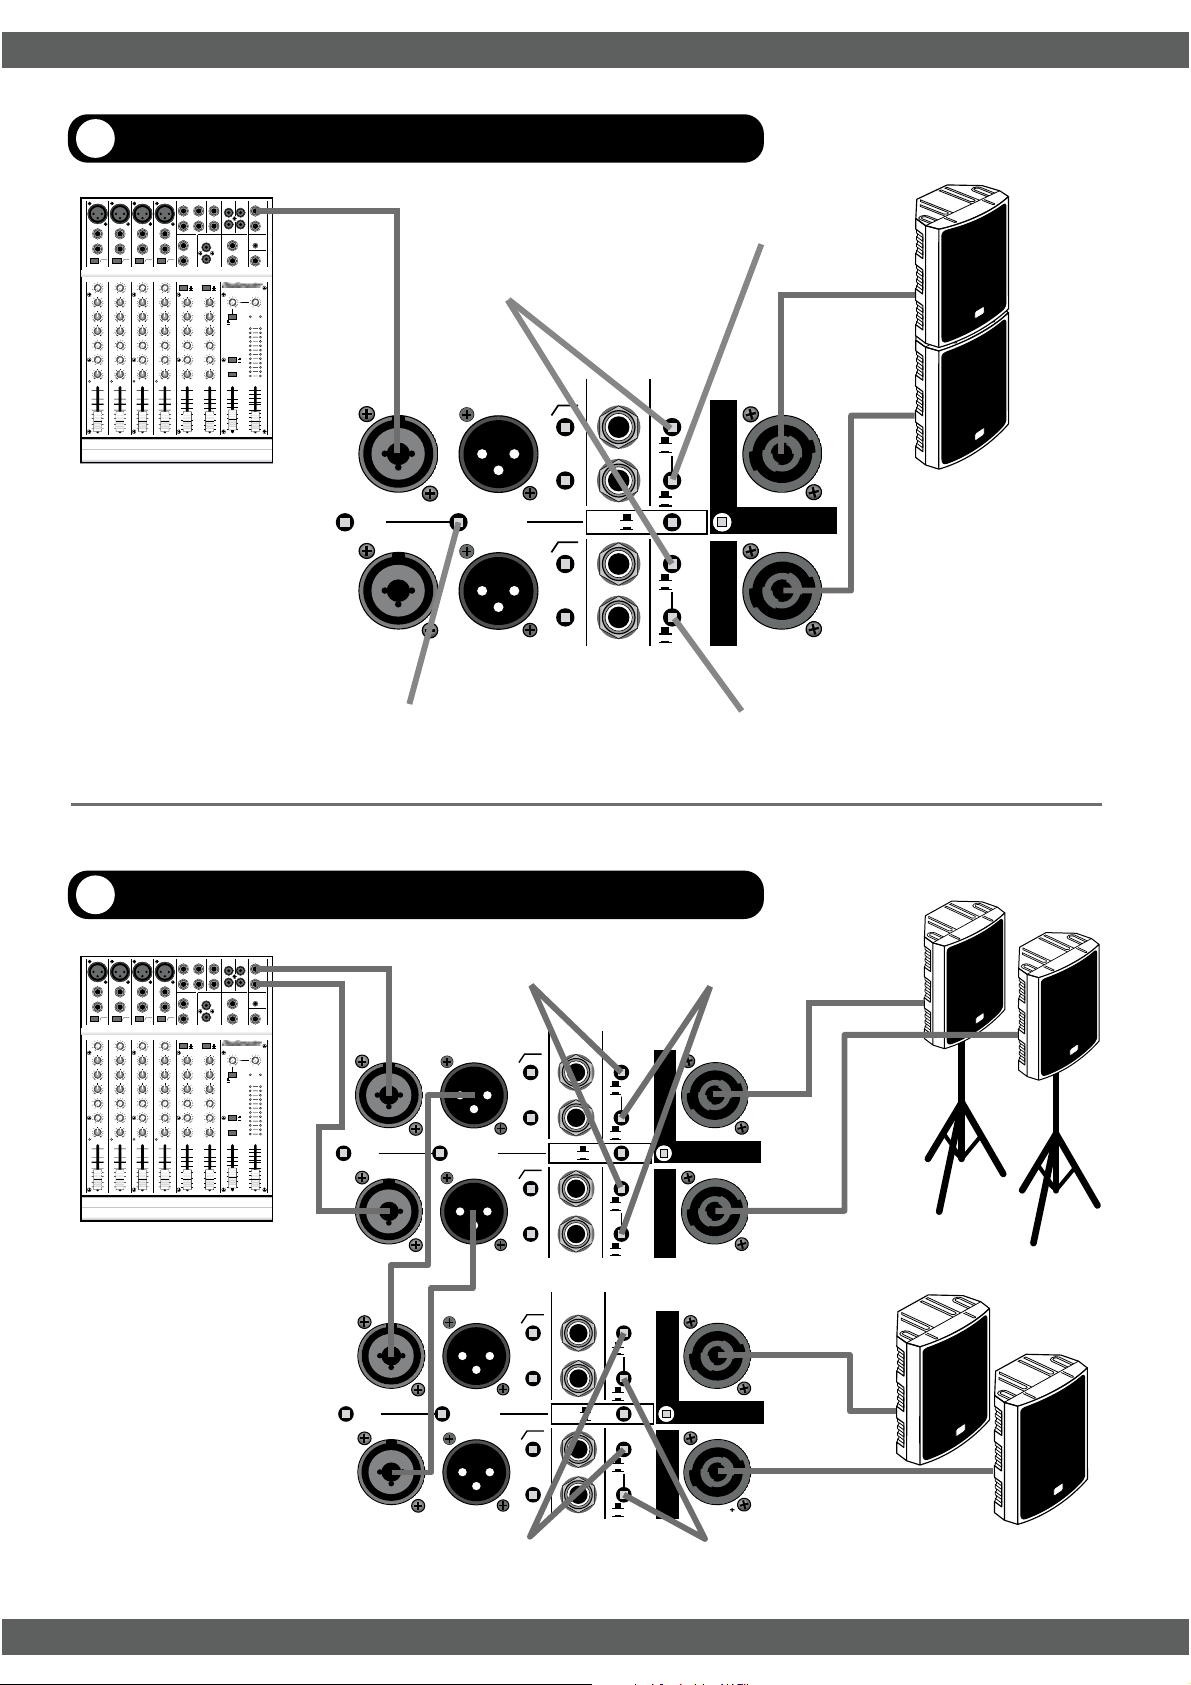
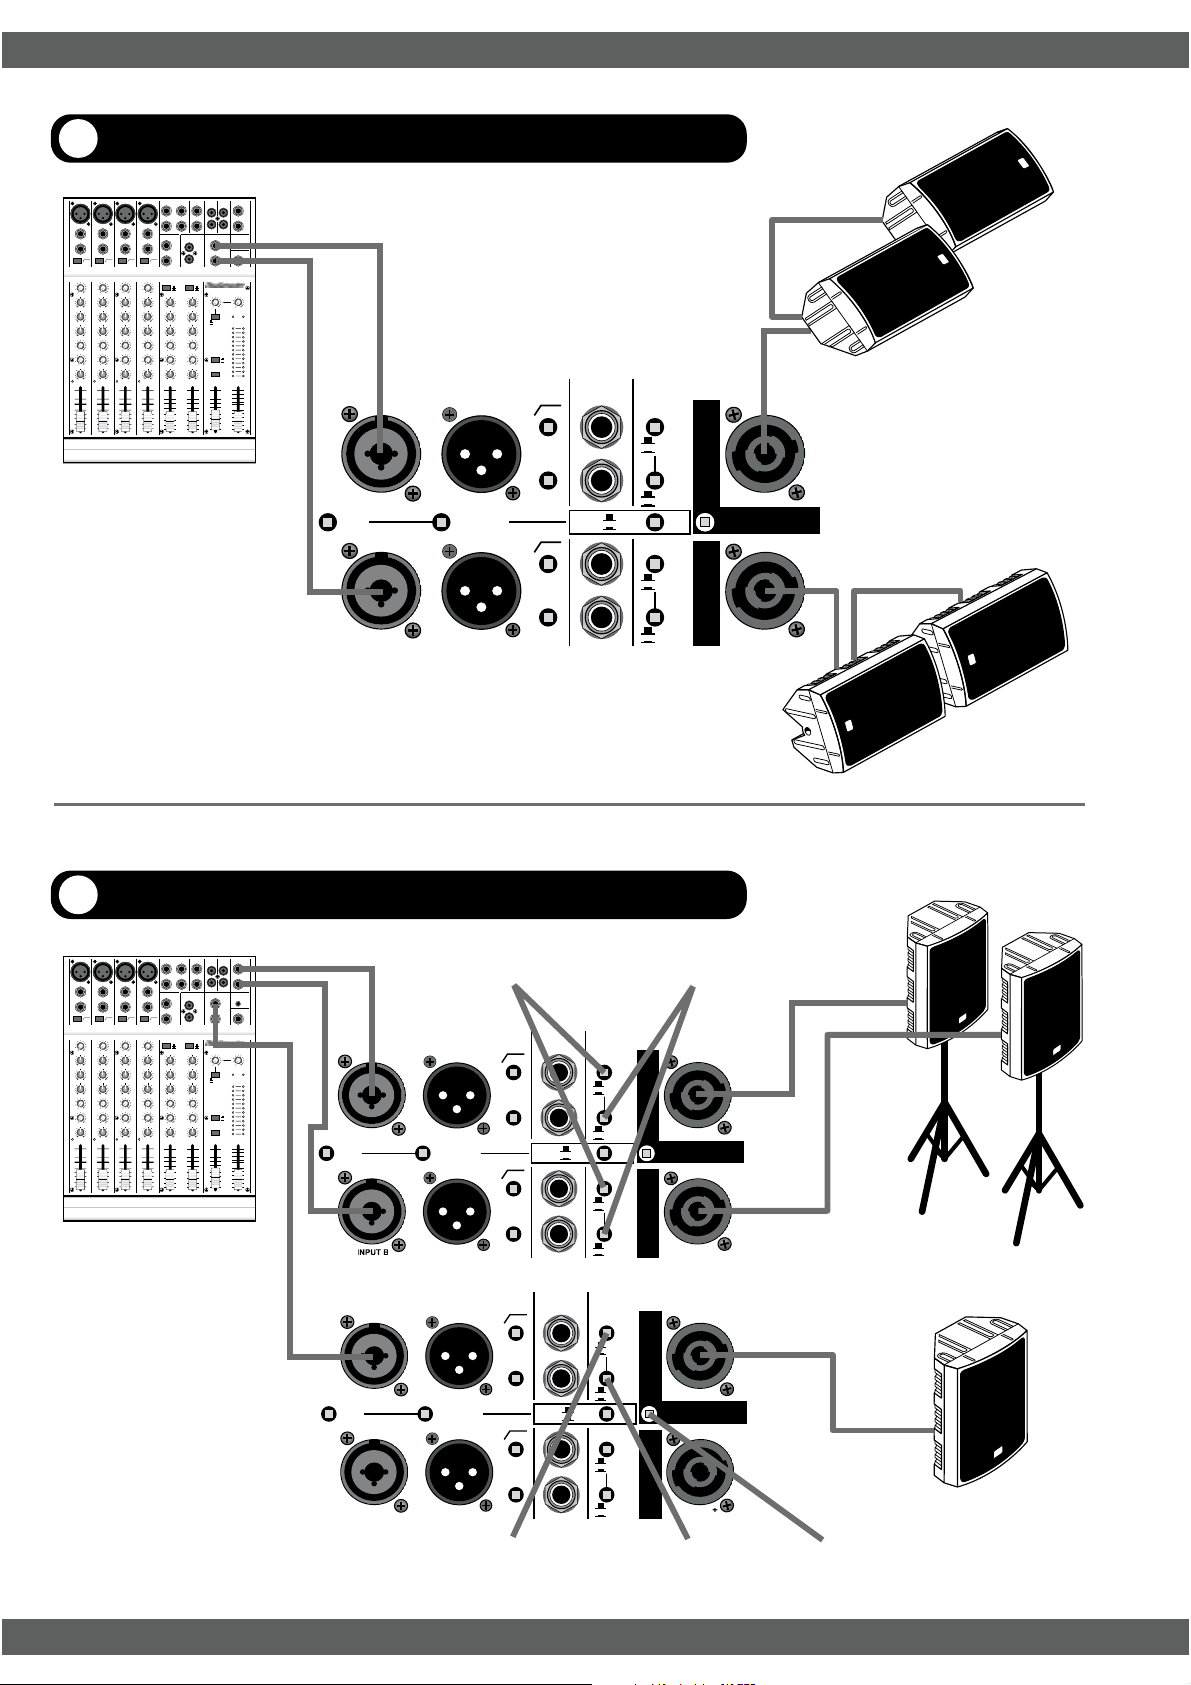
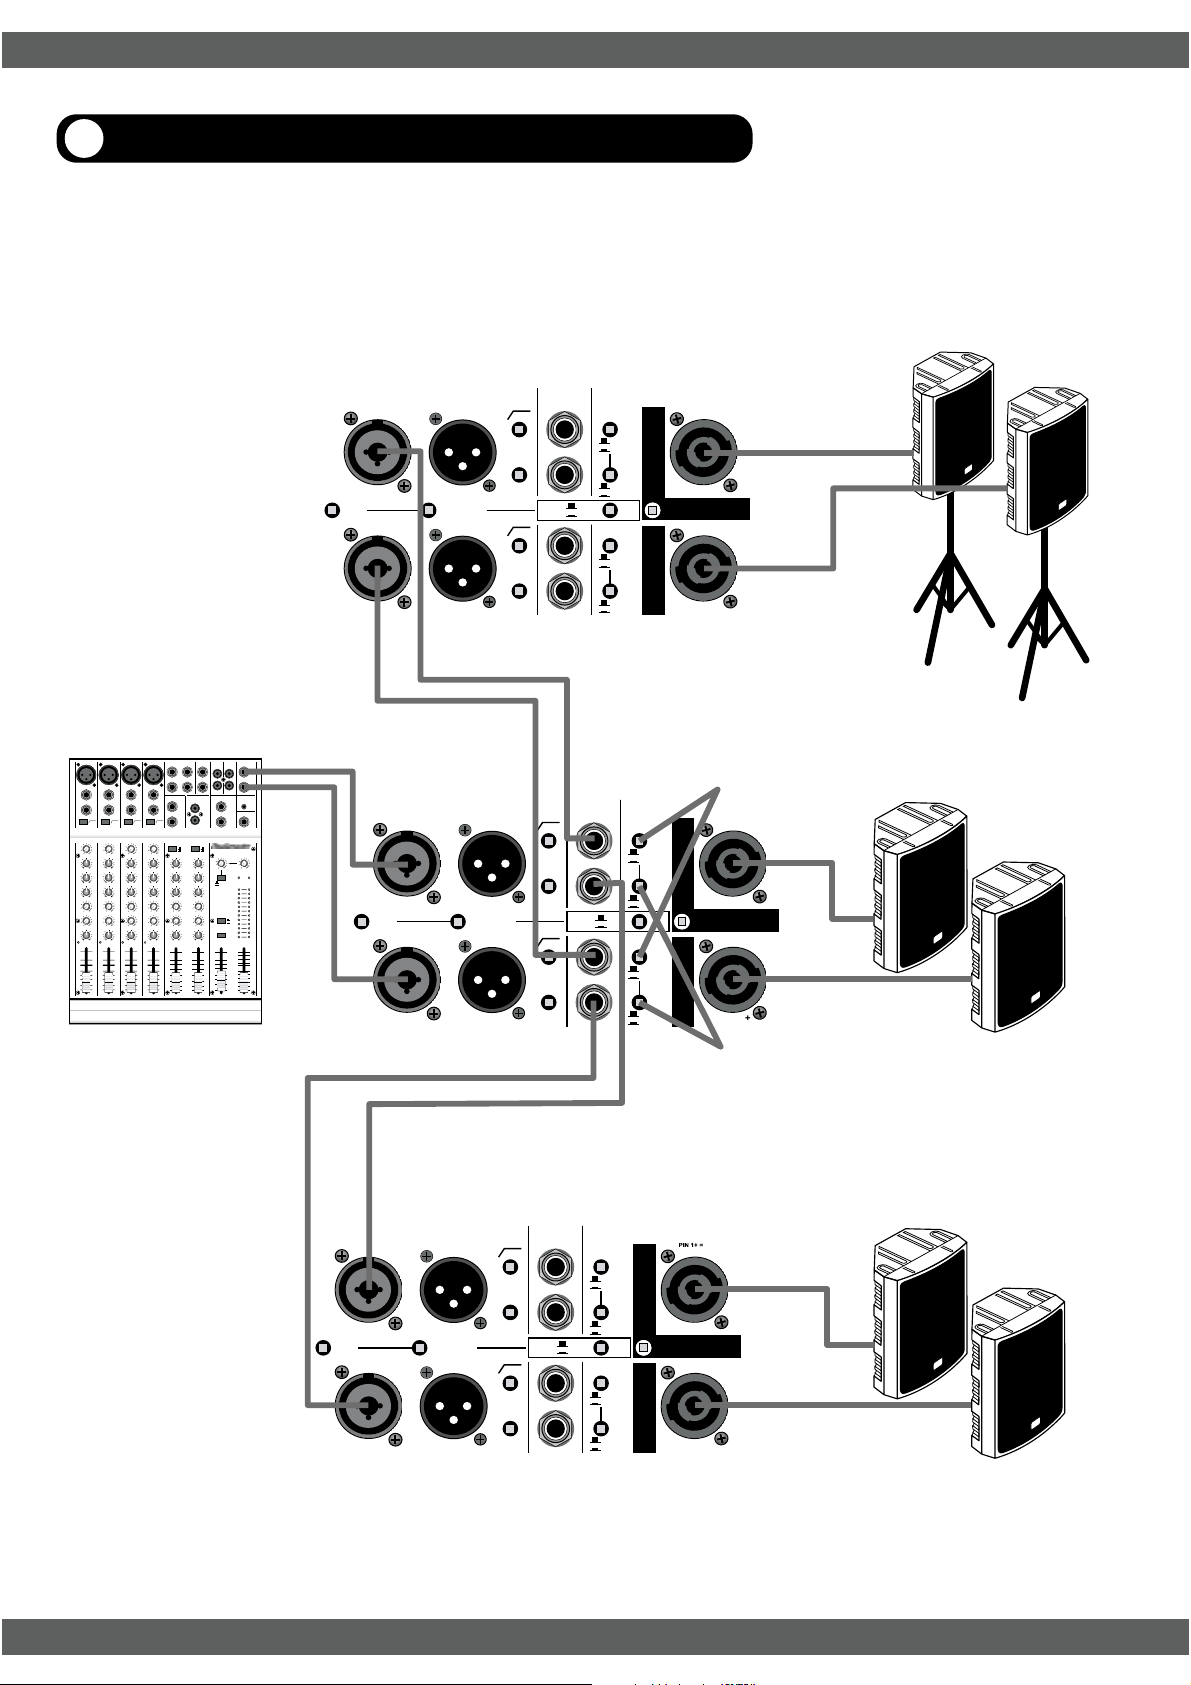
Set-up Diagrams
Mono Mix 12
Stereo Mix 12
Mono Bi-amp 13
Stereo Bi-amp 13
2-way Monitor Mix 14
Stereo Bi-amp with Mono sub bass 14
2-way stereo with additional amplifiers 15
Notes 16
STUDIOMASTER AX Amplifier Series
Page 3

STUDIOMASTER AX Amplifier Series
Congratulations on your purchase of a Studiomaster AX Series power amplifier. Like
all Studiomaster products, it has been designed to meet the highest standards of
performance, safety and reliability. We are confident that this amplifier will fully meet
your needs for many years to come. Please read this guide carefully and keep it safe
in case you need to refer to it in the future.
Unpacking
Remove your AX amplifier from its packing. Check that the carton includes an
AC power cord/mains lead and a warranty card. It is important to retain the carton
and all packing material in the event that the unit needs to be returned to your dealer
for service or repair. Please complete and return your warranty card. Returning the
completed warranty card does not diminish your statutory rights in any way.
Safety instructions
1. Make sure you have the correct product for your local supply Voltage. This will be marked on
the rear panel of the amplifier.
2. Only use the A.C. power cord/mains lead supplied with the product. If it becomes damaged in
any way it should be replaced.
3. Never operate without, or remove, the safety ground (earth) from the A.C. power cord/mains
lead.
4. Do not attempt to remove screws or panels. There are no user serviceable parts inside.
5. Do not operate the unit next to heat sources such as electric fires, central heating etc.
Note : Exposure to strong sunlight (eg outdoors) could cause the amplifier to over heat.
6. The unit should not be operated or stored near rain or moisture.
7. This equipment must not be exposed to dripping or splashing and no objects filled with liquids
should be placed on top of it.
8. Always ensure that both front and rear ventilation holes are clear of obstructions.
9. Write the serial number in the box provided below for future reference.
10. If the unit gets damaged or appears to have developed a fault refer to the Service Information
section for details.
WARNING: THIS APPARATUS MUST BE EARTHED (GROUNDED)
STUDIOMASTER AX Amplifier Series 1
Page 4
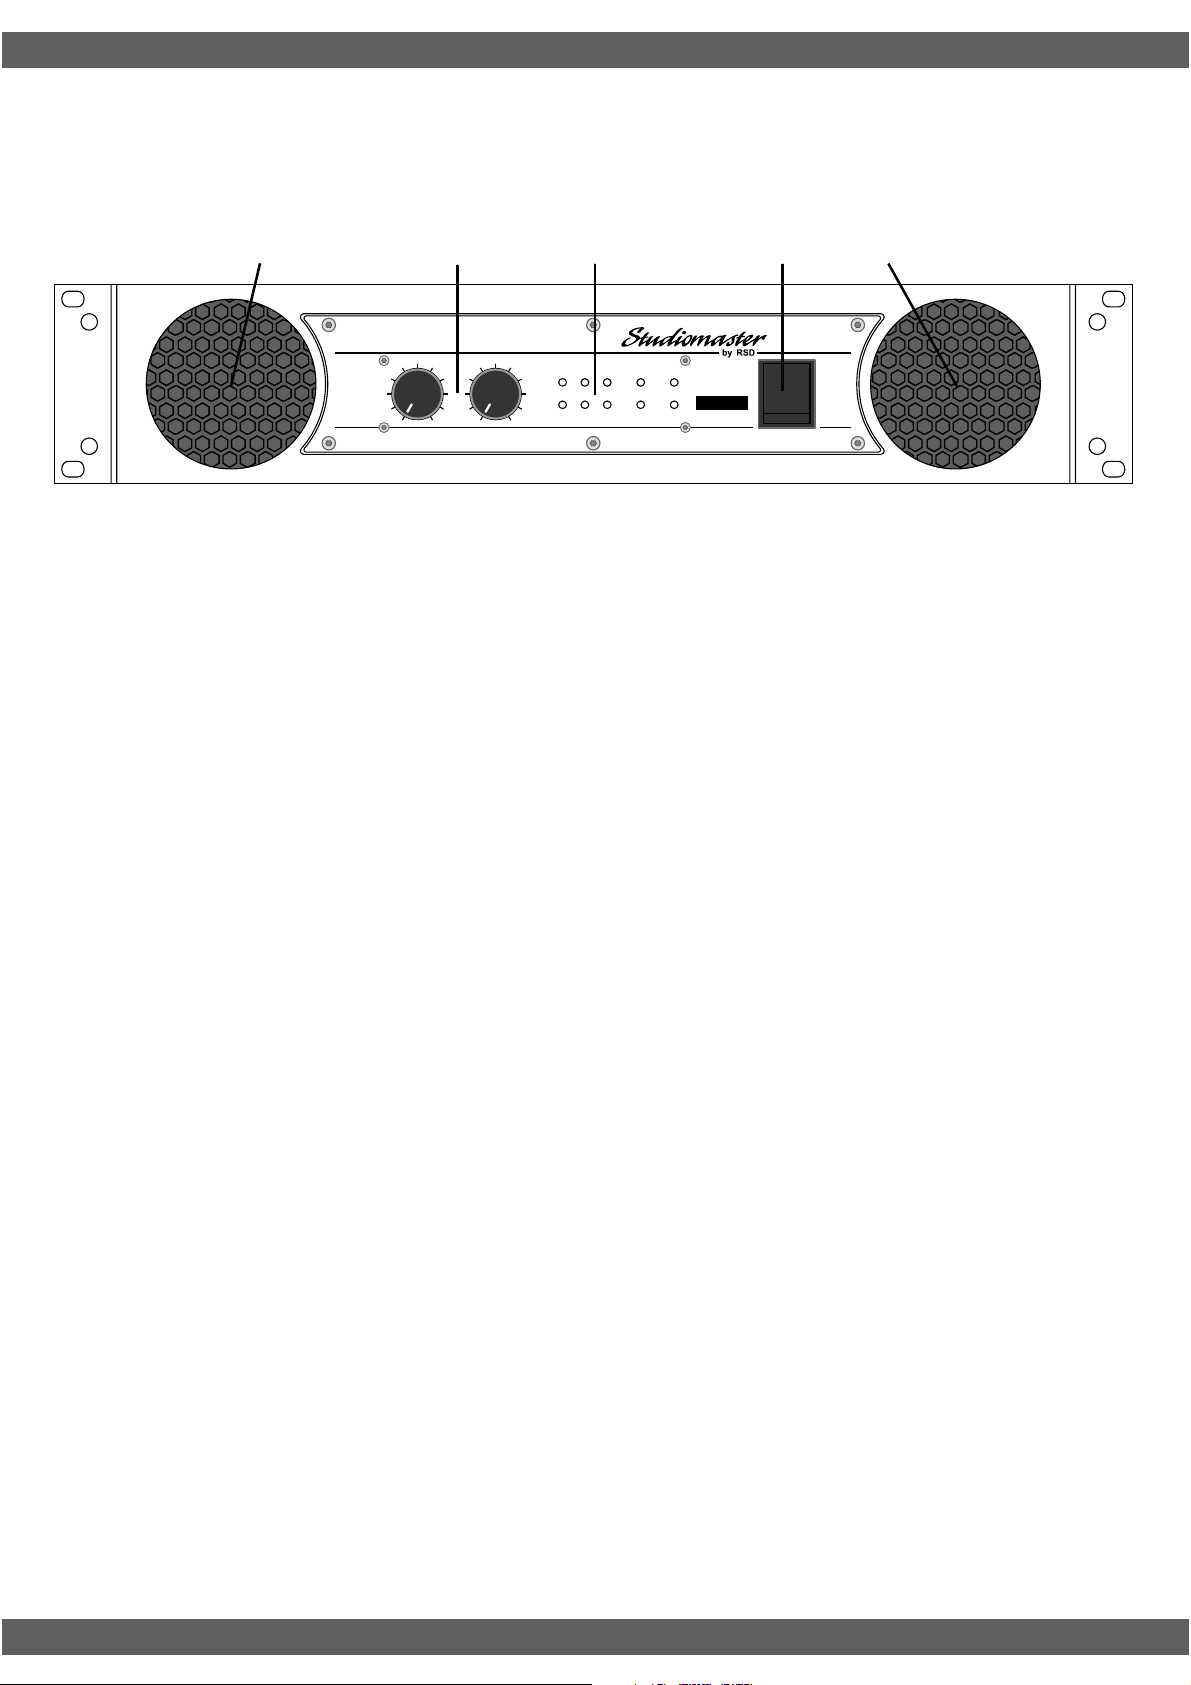
Front panel controls and features
STUDIOMASTER AX Amplifier Series
4
P r o f e s s i o n a l P o w e r A m p l i f i e r
-20
-30
AB
1
-10
-15
8
0dB
-10
-15
-5
-3
-5
-20
-30
-3
8
0dB
2
CHANNEL A
SIG
-6dB PEAK PROTECT
CHANNEL B
POWER
BRIDGE
AX
2500
3
I
O
4
1. LEVEL controls adjust signal levels for channels A and B.
2. Status LEDS indicate the following:
a SIG indicates a signal is present and sound should be heard from the
speakers.
b -6 shows a strong signal is present.
c PEAK shows maximum output power has been reached. Increasing
the level control or input signal will not increase the output power.
d PROTECT illuminates when the amplifier is muted at switch on. After a
couple of seconds they will turn off and the speakers are connected for
normal operation. If at any stage, they stay illuminated, a fault has
occurred. See section under PROTECT LEDs for more information.
e POWER shows the amplifier is switched on.
f BRIDGE indicates the amplifier is in BRIDGE mode.
3. POWER switch.
4. Fan ventilation holes. Do not obstruct.
STUDIOMASTER AX Amplifier Series2
Page 5
STUDIOMASTER AX Amplifier Series
P
P
INPUT A
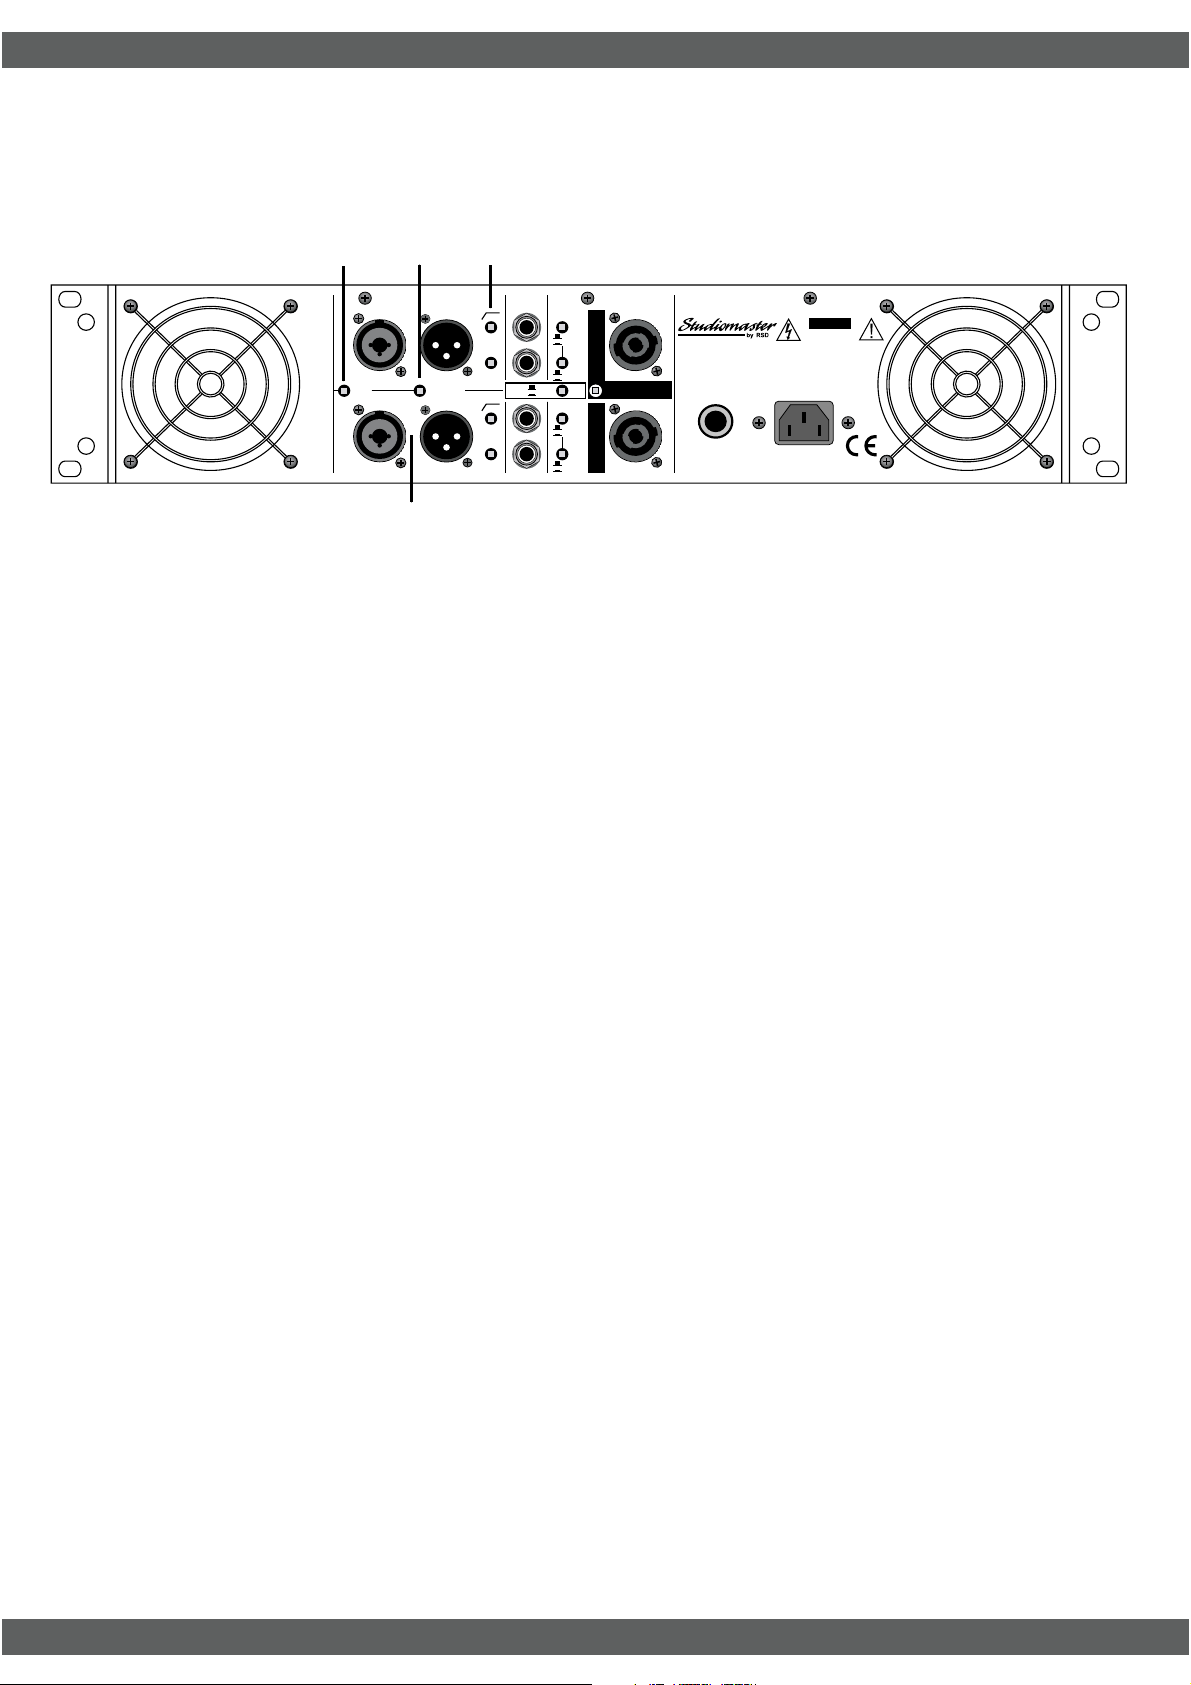
Rear panel controls and features
2
D
R
E
A
T
E
C
R
U
D
R
N
T
A
S
T
B
N
O
O
E
R
B
F
T
S
T
O
N
N
E
T
V
S
R
I
U
A
M
N
O
I
T
U
A
C
3
GND
LIFT
INPUT B
LINK
PARALLEL
INPUTS
LINK
4
35Hz
LIMITER
OFF
35Hz
LIMITER
OFF
HI
XOVER OUTPUT
LO
HI
XOVER OUTPUT
LO
100Hz
150Hz
XOVER
TO CH A - AMP
OFF
ON
HI
LO
XOVER
TO CH B - AMP
OFF
ON
HI
LO
CH
A
CH
B
BRIDGE
CH. A
IN 1+ =
IN 1- =
PIN 1+ =
PIN 1- =
PIN 1+ =
PIN 2+ =
+
-
+
-
CIRCUIT
BREAKER
+
-
CAUTION
RISK OF ELECTRIC SHOCK
DO NOT OPEN
230V
ASSEMBLED IN CHINA
1
1. There are two INPUT CONNECTORS per channel. One is a combination 3
pin XLR and 3 pole (TRS) ¼" jack socket, the other a male XLR for linking to
other amplifiers. Both balanced and unbalanced signals can be used to drive
the amplifier.
XLR connector wiring
Balanced Operation Unbalanced operation
PIN 1 Ground PIN 1 Ground
PIN 2 +Ve/in-phase signal PIN 2 +Ve/in-phase signal
PIN 3 -Ve/out-phase signal PIN 3 Link to ground (pin1)
Jack connector wiring
Balanced Operation Unbalanced operation
3 pole/TRS/stereo ¼ " jack 2 pole/TS/mono ¼ " jack
TIP +Ve/in-phase signal TIP +Ve/in-phase signal
RING -Ve/out-phase signal SLEEVE Ground
SLEEVE Ground
2. Input GND LIFT (ground lift) switch removes the ground connection to all input
connectors. This can solve hum loop problems when connecting equipment
with different A.C. supplies.
Under no circumstances should the electrical safety ground (earth) from the
A.C. supply be disconnected.
3. PARALLEL INPUTS links Channel A input to Channel B. A single input signal
will now supply both channels. The volume levels of each channel can still be
adjusted individually.
4. 35Hz high pass filter reduces the level of very low frequency signals
reaching the speakers, improving bass clarity and power handling. It is
recommended that this filter is always used for live P.A/Sound re-inforcement.
Ported / Vented / 'bass reflex' speaker cabinets can be damaged if driven with
high power low frequency. For Studio monitoring where a totally flat response
is required, deselect the High Pass Filter. The filter has an 18dB / octave cut off slope.
STUDIOMASTER AX Amplifier Series 3
Page 6
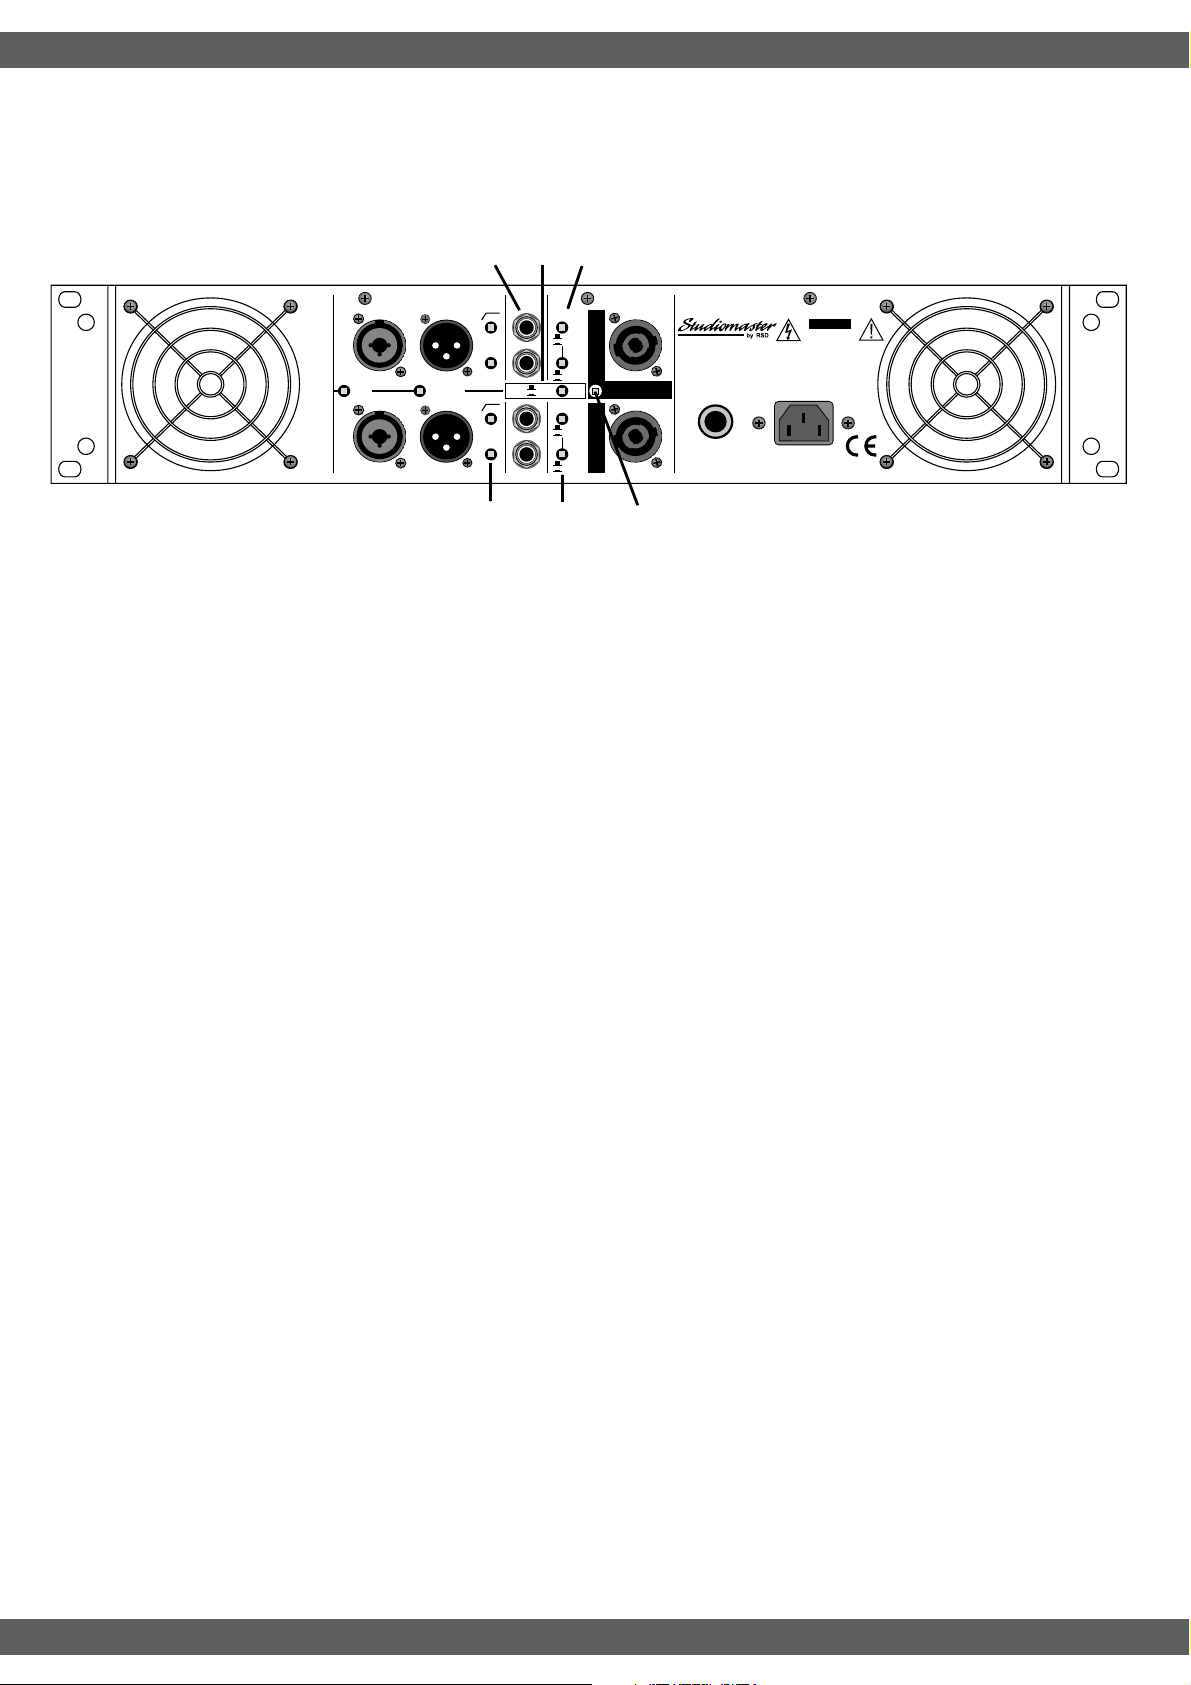
Rear panel controls and features
INPUT B
9
HI
LINK
PARALLEL
INPUTS
LINK
35Hz
LIMITER
OFF
35Hz
LIMITER
OFF
XOVER OUTPUT
LO
HI
XOVER OUTPUT
LO
D
R
E
A
T
E
C
R
U
D
R
N
T
A
S
T
B
N
O
O
E
R
B
F
S
T
N
E
V
R
I
A
N
O
I
T
U
A
C
INPUT A
T
O
GND
N
LIFT
T
S
U
M
STUDIOMASTER AX Amplifier Series
7
6
PIN 1+ =
CH
A
CH
B
BRIDGE
CH. A
PIN 1- =
PIN 1+ =
PIN 1- =
PIN 1+ =
PIN 2+ =
+
-
+
-
CIRCUIT
BREAKER
+
-
CAUTION
RISK OF ELECTRIC SHOCK
DO NOT OPEN
230V
ASSEMBLED IN CHINA
100Hz
150Hz
XOVER
TO CH A - AMP
OFF
ON
HI
LO
XOVER
TO CH B - AMP
OFF
ON
HI
LO
5
8 10
5. LIMITER OFF disables the clip limiter circuit. At maximum power output, the
limiter virtually prevents amplifier clipping, minimising audible distortion. It
should only be turned off in specific applications, as serious speaker damage
can occur if the amplifier is allowed to clip regularly.
6. X-OVER turns on the internal two way crossover circuit. The crossover splits
the audio band into high frequencies, suitable for mid/high speakers and low
frequencies suitable for bass speakers. If the crossover function is not
required this switch should remain off (out position).
7. The frequency switch selects the crossover frequency between 150Hz and
100Hz. For most systems 150Hz is recommended although some, typically
when using 18" subs, will work better with 100Hz. The internal crossover has
a '3rd order' response.
8. HI LO selects which signal from the crossover the amplifier receives. When
HI (out position) is selected only frequencies above 100 or 150Hz feed the
amplifier. When LO (in position) is selected only frequencies below 100 or
150Hz feed the amplifier.
9. XOVER OUTPUT sockets allow the high or low frequencies from the
crossover circuit to feed additional amplifiers. See examples in the Set Ups
section.
10. BRIDGE mode combines the output power of both amplifier channels into one
load. This is useful when driving a single, high powered speaker. Only channel
A output socket connects to the speaker but has to be wired in a different way.
See the section below regarding speaker wiring.
In this mode only Channel A input and level control are used.
STUDIOMASTER AX Amplifier Series4
Page 7
STUDIOMASTER AX Amplifier Series
INPUT A
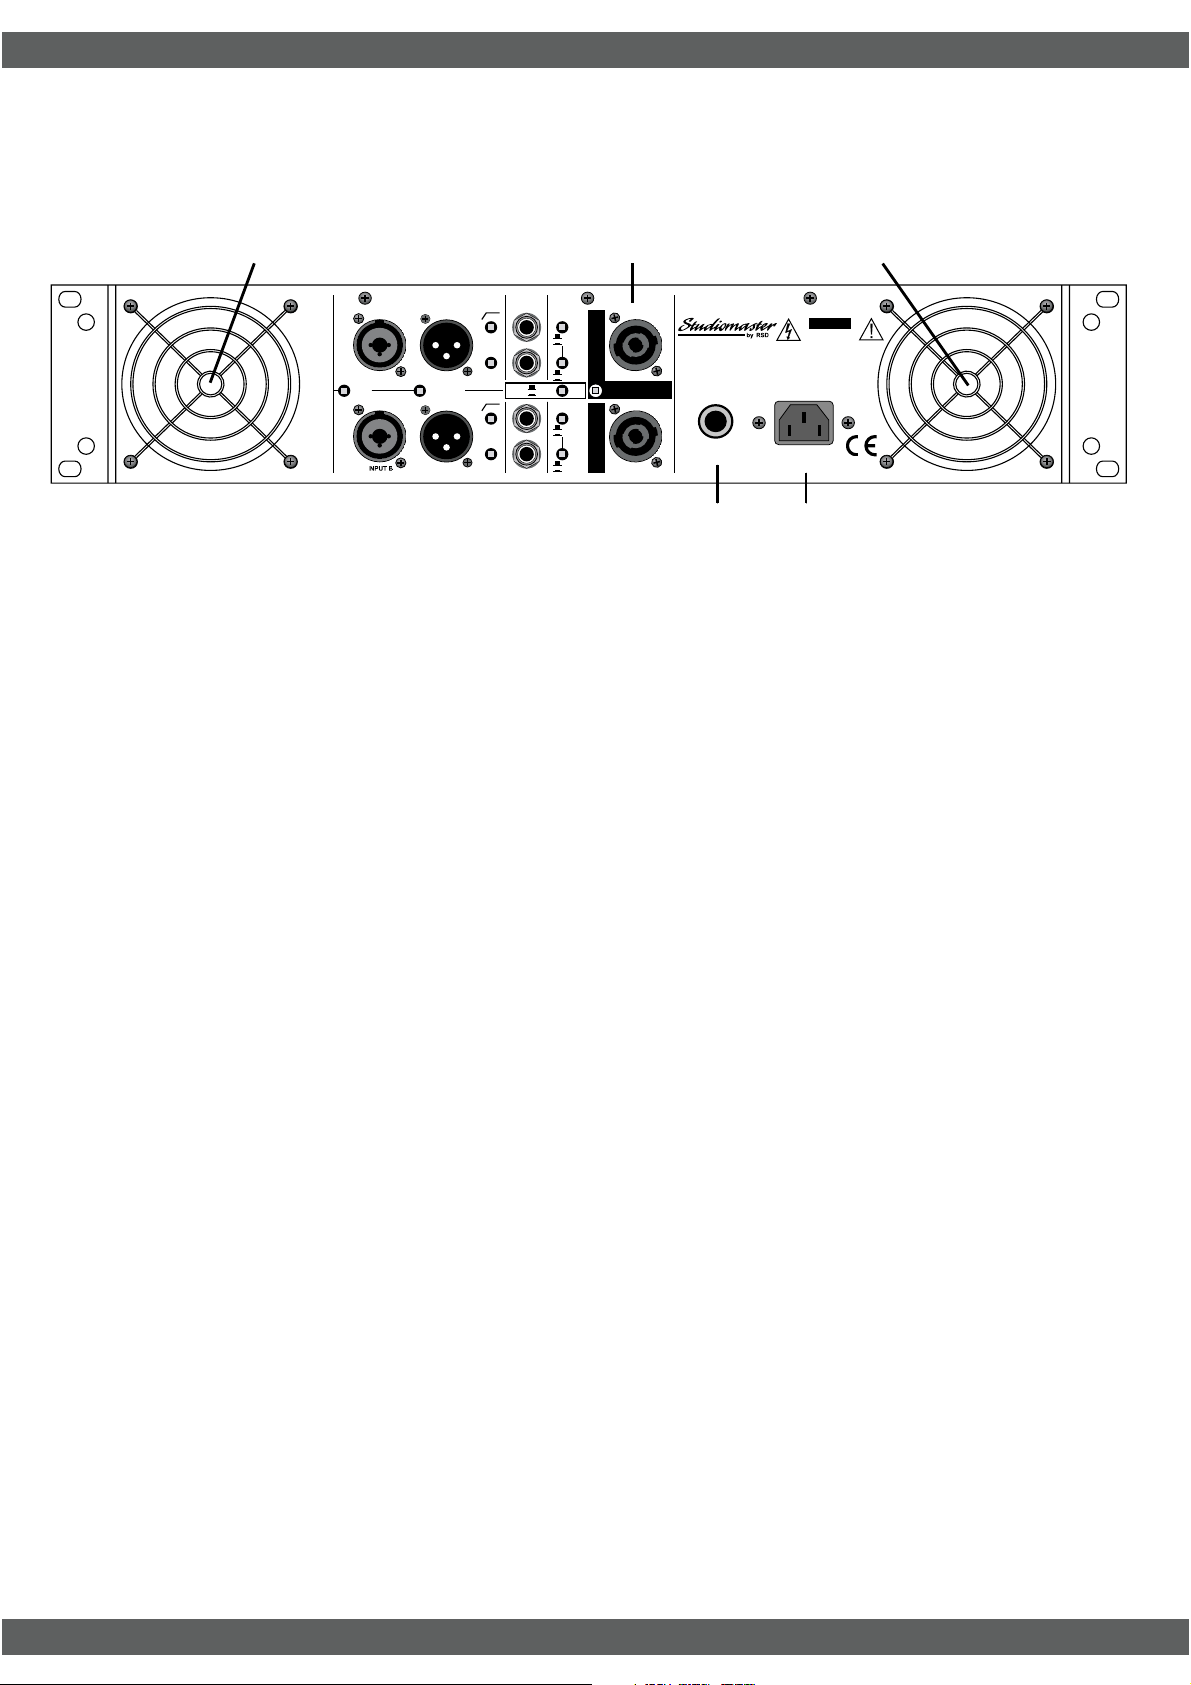
Rear panel controls and features
14
11
PIN 1+ =
HI
XOVER
XOVER OUTPUT
LO
HI
XOVER OUTPUT
LO
100Hz
150Hz
TO CH A - AMP
OFF
ON
HI
LO
XOVER
TO CH B - AMP
OFF
ON
HI
LO
LINK
PARALLEL
INPUTS
LINK
35Hz
LIMITER
OFF
35Hz
LIMITER
OFF
D
R
E
A
T
E
C
R
U
D
R
N
T
A
S
T
B
N
O
O
E
R
B
F
T
S
T
O
N
GND
N
E
LIFT
T
V
S
R
I
U
A
M
N
O
I
T
U
A
C
INPUT B
CH
A
CH
B
BRIDGE
CH. A
PIN 1- =
PIN 1+ =
PIN 1- =
PIN 1+ =
PIN 2+ =
+
-
+
-
CIRCUIT
BREAKER
+
-
RISK OF ELECTRIC SHOCK
230V
ASSEMBLED IN CHINA
CAUTION
DO NOT OPEN
14
1312
11. Speaker Wiring. Each channel uses SPEAKON NL4 connectors. Using cable
as specified (See CABLES) speaker connections are as follows:-
Each channel connected individually to a speaker:
PIN 1- Negative (-) PIN 2- Not used
Two Speakers connected to both channels in a single 4 core cable:
Use only Channel A connector wired:
Channel A PIN 1- Negative (-) Channel B PIN 2- Negative (-)
PIN 1+ Positive (+) PIN 2+ Not used
Channel A PIN 1+Positive (+) Channel B PIN 2+ Positive (+)
Bridged operation:
Use only Channel A connector wired:
PIN 1- Not used PIN 2- Not used
PIN 1+ Positive (+) PIN 2+ Negative (-)
Always ensure speaker cables are wired the same way. When any cable has
the pin wiring reversed, some speakers will be out of phase, usually resulting
in a loss of volume or bass.
12. Circuit Breaker will only activate if the amplifier has developed a fault or been
driven too hard into very low speaker impedances. The button on the circuit
breaker will protrude approximately 6mm when tripped. Check speaker wiring
and load before re-setting. To reset turn off the amplifier power switch and
push in the reset button. If the breaker trips again, the amplifier could have
developed a fault. If this happens refer to the Service Information section.
13. A.C. power inlet.
14. Fan ventilation holes. Do not obstruct.
STUDIOMASTER AX Amplifier Series 5
Page 8

STUDIOMASTER AX Amplifier Series
Operation
Decide the required mode for the amplifier and select the appropriate rear panel
switches. The set up diagrams later in this guide will help.
Always ensure that all signal and power connections to the amplifier are properly
made before switching on. It is recommended to turn the level controls to minimum
initially as well.
Any amplifier(s) in a system should always be switched on LAST and switched off
FIRST to prevent damaging thumps, originating from other equipment.
1. Make sure that the speakers being used have the correct power rating for the
amplifier. This will help avoid possible damage to the speakers.
2. The optimal speaker load impedance for power delivery and long term operation is 4
ohms per channel; 8 ohms in bridged mode.
The amplifier will operate into 2 ohm loads; 4 ohms bridged, although continuous
flashing of the PEAK LED should be avoided to prevent thermal protection shutting
down the amplifier.
3. Always use the LIMITER (rear panel switch in the out position) as it helps prevent
distortion on large signal peaks.
4. Use the 35Hz filter (rear panel switch 'in' position) as it will improve the bass power
handling and clarity of the system. This is especially important with vented / ported /
'bass reflex' cabinets.
5. When used with a pro-audio mixer, adjust the level controls to a position compatible
with the mixer metering. A suggested starting position for the level controls is '-10'.
Hints and tips
Ventilation
It is essential that air can circulate freely around the amplifier to provide adequate
cooling. The fans take air in from the rear of the amplifier and exhaust through the
front panel. Both the front and rear ventilation holes must not be obstructed.
When the amplifier is rack mounted, care must be taken to ensure that the rack is
open at the front and rear to allow sufficient air flow.
In some installations, racks are fitted with covers for security reasons. If these restrict
the air flow in any way they must be removed while the amplifier is in operation.
Where multiple amplifiers are installed in a rack, additional forced ventilation or a
source of fresh cooling air may be required.
Protect LEDs
Operate independently and show that the speaker outputs have been muted
resulting in no sound. They illuminate under the following conditions:
1. When the amplifier is turned on. After a couple of seconds the LEDs will turn off
showing normal operation.
2. If the amplifier has reached an over temperature condition the volume of one or both
channels will rapidly reduce resulting in little or no sound. Once the fans cool down
the heatsinks, normal operation will resume. However, if the transformer has
overheated then it can take a few hours to cool.
3. If a fault has occurred on one or both channels the relevent PROTECT LED(s) will
stay illuminated and there will be no output. The amplifier should be returned to an
authorised Studiomaster service centre in the original packing, to prevent shipping
damage. See Service Information.
STUDIOMASTER AX Amplifier Series6
Page 9

STUDIOMASTER AX Amplifier Series
Cables
Speaker cables should be as short and as heavy gauge as possible to prevent unwanted
power loss caused by high resistance, which can result in loss of both signal level and
quality. Heavy duty, twin core A.C. power cable is generally suitable.
Cable with a conductor size of 1.5mm² / 16AWG, 2.5mm² / 14AWG or 4.0mm² / 12AWG
is recommended. Note the losses caused by using thinner cable:
Cable length Wire size Loss @ 8 ohms Loss @ 4 ohms Loss @ 2 ohms
5 metres 1.0mm²/17AWG 2.15% 4.1% 7.75%
10 metres 1.0mm²/17AWG 4.12% 7.75% 14%
Rack Mounting
The AX series amplifiers are designed to be fitted into a standard 19" rack. They each
occupy 2 Units (2U) of rack space. If the amplifier is to be used in a mobile application, a
good quality, flight cased amp rack is essential if damage is to be prevented. We
recommend the use of 6mm rack screws with plastic or nylon washers underneath the
screw heads to avoid damaging the front panel.
Always use both the front and rear mounting holes, especially for mobile and touring
applications.
Trouble Shooting
No power on LED...
1. Check A.C. power cord/mains lead is connected to the wall supply and switched on.
2. Check A.C. power cord/mains lead is fully pushed into the amplifier socket.
3. Check that the amplifier is switched on.
4. UK only - Check fuse in the 'mains' plug.
5. Check A.C. supply house breaker / fuse.
No sound…
1. Check that the signal source (from mixer, CD player etc.) is working.
2. Check that the LEVEL control(s) are not in the minimum (anti clockwise) position.
3. Check that the speakers are connected correctly.
Distorted sound and PEAK LED(s) illuminated...
1. Possible short circuit on speaker cable or cabinet. Change speaker cable and check
cabinet.
2. If only on channel A, check a 4 core speaker cable is not being used with a speaker that
links PIN1+ to PIN2+ of the Speakon connector.
One or Both Amplifier channels stop working briefly…
(one or both Protect LEDs illuminate briefly)
1. Check the ventilation holes both front and rear for good air flow.
2. Check that the speaker load on each channel is not less than 2 ohms.
3. Check that the amplifier is not being over driven - red peak LEDs should not be illuminated
'continuously'.
Amplifier stops working and one or more PROTECT LEDs are illuminated…
1. The amplifier is in an over temperature or fault condition. See PROTECT LED section for
more information.
STUDIOMASTER AX Amplifier Series 7
Page 10
STUDIOMASTER AX Amplifier Series
Service Information
If you have a problem with your Studiomaster product or think it has developed a
fault you should first carefully check the Trouble Shooting section in this guide. If this
does not solve the problem or if the product is physically damaged, contact your local
dealer or distributor for service details.
Should it be recommended you return the product to your nearest Studiomaster
Service Centre you must first contact them.
You will be asked for the product type and serial number. You will then be given a
Returns Authorisation (RA) number.
Pack the unit in its original carton to protect it from shipping damage.
You must have the Returns Authorisation number clearly marked on the outside of
the carton or we may refuse the delivery. Studiomaster cannot be held responsible
for damage resulting from the equipment being packed incorrectly.
Label the equipment clearly with your name and address and include a clear
description of the fault. The more information you supply helps the service engineer,
minimising repair cost when out of warranty.
Please write your Serial number here for future reference....
STUDIOMASTER AX Amplifier Series8
Page 11
STUDIOMASTER AX Amplifier Series
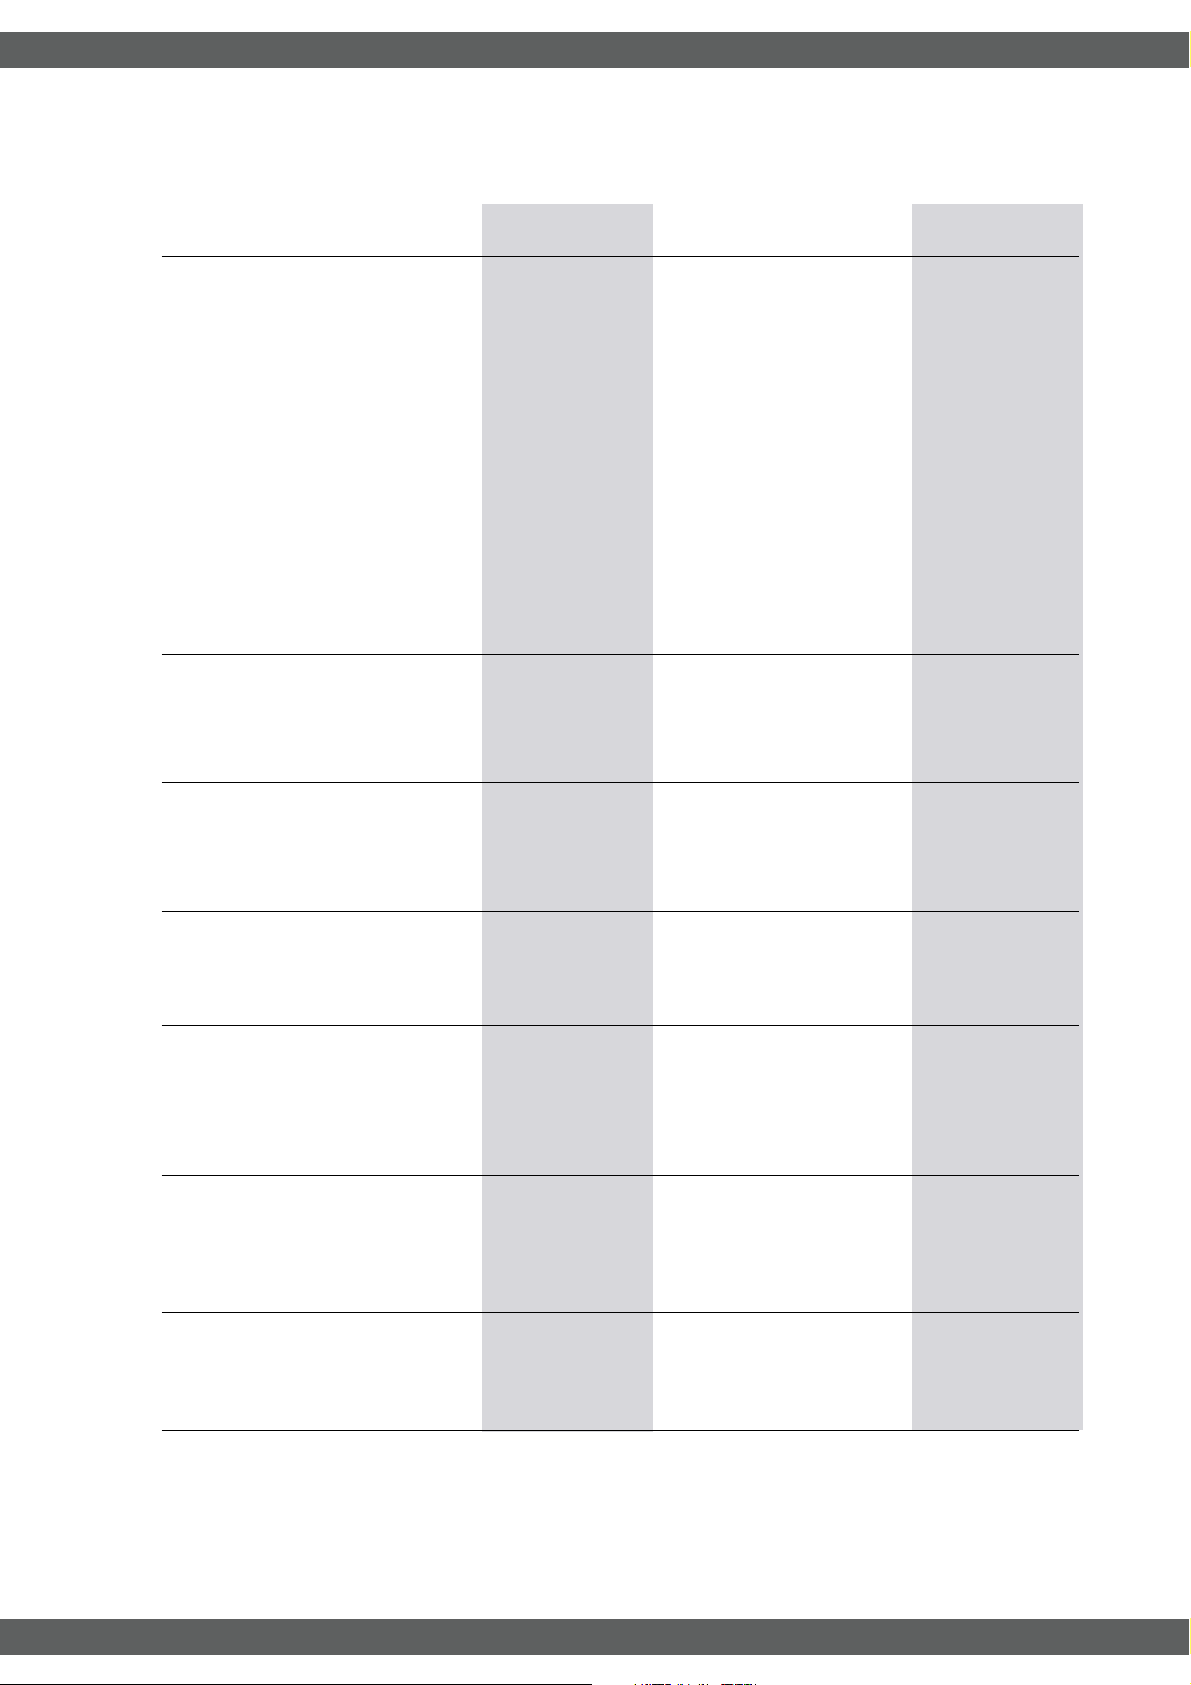
Technical Specification
AX1500 AX2500 AX3500
Power Output
in watts per channel
At onset of Clipping
Both Channels 8 ohms 270 450 710
Both Channels 4 ohms 450 750 1100
Both Channels 2 ohms 575 990 1450
Bridged 8 ohms 900 1500 2200
Bridged 4 ohms 1150 1980 2900
Input Sensitivity
Ref: Rated Power 4 ohms 0dBu 0dBu 0dBu
0.775V 0.775V 0.775V
Distortion (THD)
1kHz @ rated power 0.01% 0.01% 0.02%
(1 channel driven)
Frequency Response
20Hz - 20kHz +0/-0.5dB +0/-0.5dB +0/-0.5dB
Signal to Noise Ratio
(unweighted)
Ref: Rated Power 4 ohms 100dB 100dB 100dB
Crosstalk
@ 1kHz 80dB 80dB 80dB
Damping Factor
Ref : 1kHz 8 ohms 200 200 200
Crossover Selectable 100 / 150Hz. 3rd order filter
STUDIOMASTER AX Amplifier Series 9
Page 12
STUDIOMASTER AX Amplifier Series
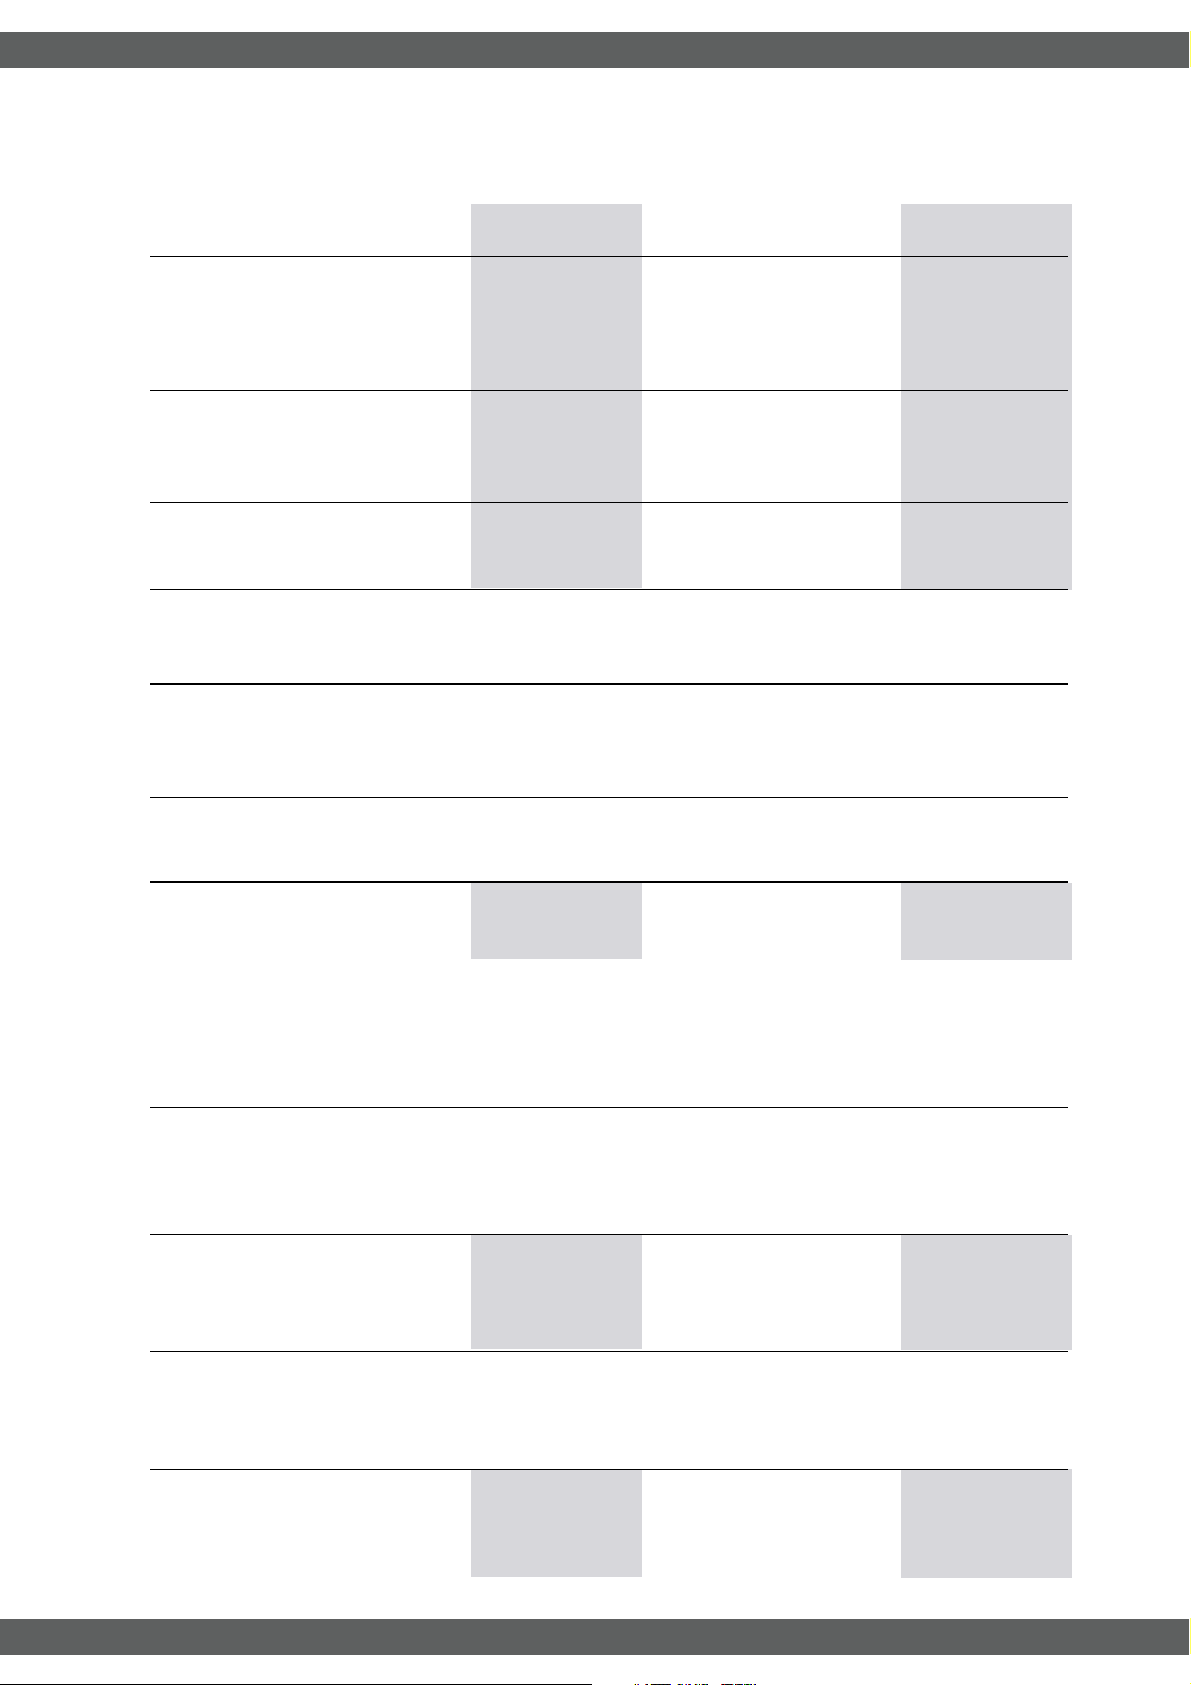
Technical Specification
AX1500 AX2500 AX3500
Input Filter
3rd order (18dB / octave)
-3dB @ 35Hz 35Hz 35Hz
Input Impedance 10k Unbal 10k Unbal 10k Unbal
20k Bal 20k Bal 20k Bal
Voltage Gain 35dB 37dB 39dB
Cooling
Continuously variable speed Twin Fans, back to front airflow.
Amplifier Protection Full short circuit, open circuit, thermal, ultrasonic and RF
protection. All units are stable into mismatched or reactive loads.
Load Protection Power up/down muting.
Output Curcuit type AB H (2) H (3)
H(2) : Class AB complementary linear output with Class H
2-step high efficiency circuit
H(3) : Class AB complementary linear output with Class H
3-step high efficiency circuit
AB : Class AB complementary linear output
Dimensions 19" (48.3cm) width
2U 3.5" (8.9cm) height
15.5" (39.4cm) depth (rack mounting to rear rack ears)
Weight
Shipping 20.2kg (44.4lbs) 23.6kg (51.9lbs) 26kg (57.2lbs)
Net 16kg (35.2lbs) 19.4kg (42.7lbs) 21.8kg (48lbs)
Power Requirements 230V Model : 220-240V AC 50/60Hz
120V Model : 110-127V AC 50/60Hz
Power Consumption
@230V AC 1/3 power pink noise 4.6A 7A 8.2A
(double the current rating for 120V models)
STUDIOMASTER AX Amplifier Series10
Page 13

STUDIOMASTER AX Amplifier Series
Glossary of Technical Terms
AC or a.c. Alternating current.
AC POWER SUPPLY Local electrical supply
BALANCED Balanced 3 connection circuitry is
widely used in audio equipment from
cheap dynamic microphones to top
quality studio devices. The balanced
system is used as it cancels outside
interference in the connecting cables
resulting in a cleaner signal
BANDWIDTH The bandwidth is the range of
frequencies that will pass through a
piece of equipment.
BRIDGE / BRIDGED In bridged mode both channels of the
amplifier are combined to provide the
total power of the amplifier into a
single load.
COLD The negative phase of a signal.
Usually the black wire in a balanced
cable. For an unbalanced signal the
SCREEN is used for the COLD
connection.
DECIBEL (dB) A logarithmic method of
measurement for acoustics and
electronics. One decibel (1/10th of a
Bel) is the 'standard' change in
loudness perceptible by the human
ear, although 'trained ears' can
detect smaller changes. 0dB
(acoustic) is the threshold of human
hearing at mid range frequencies.
dBA The most commonly used unit for
measuring sound pressure levels. The
'A weighting' takes account of the ear's
varying sensitivity to different
frequencies, which is most pronounced
at low volumes.
dBu A standard reference voltage = 0.775 V
rms. Derived from the earlier dBm
which was used to measure the power
in 600ohm circuits.
dBV A standard reference voltage = 1V rms.
F.O.H. Front of House. The speaker system
which is used to project the sound
from the stage to the audience. It
is also used to describe the position,
in front of the stage, where the main
mixing console is situated.
FOLDBACK Sound which is sent from the main
mixing position back to the stage so the
performers can hear it. Often, with a
large sound system an entirely
separate foldback (or monitor) system
with a dedicated console is located on
one side of the stage so the performers
can communicate easily with the
operator.
GROUND Earth
HERTZ (Hz) A measurement of frequency.
1Hz = 1 cycle per second.
HIGH (or TOP) The treble or high frequency content
of a sound or the speakers (often
compression drivers attached to
horns or flares) used to reproduce it.
HOT The positive phase of a signal.
Usually the red wire in a screened
cable.
IMPEDANCE Similar to resistance, except that
impedance also reflects the effect of
any inductance or capacitance in the
circuit.
KILOHERTZ (kHz) A measurement of frequency.
1000 Hertz = 1kHz (1000 cycles per
second).
LEVEL The size of a signal, at any given point,
in an audio system.
LINE LEVEL A signal level higher than microphone
level used to interconnect equipment. A
typical level of semi pro equipment is
-10dBV while pro equipment is
usually +4dBu and often balanced.
Typical line levels can be from 100mV
to 4V (-15 to +15dBu).
MONO Single channel sound reproduction
(short for monaural).
MONITOR The speakers used by the performers
or operator to hear signals in a
recording studio or on-stage. Also used
in live sound as an alternative name for
FOLDBACK.
NOISE Any sound you didn’t want (hiss, hum
etc).
OHM A unit of electrical resistance.
1000 Ohms = 1kOhm (or 1000W =
1kW)
RESISTANCE A measure of the ratio of Voltage and
Current in a circuit or component.
Resistance (Ohms) = Voltage/Current.
RMS Root Mean Square. The method
normally used to measure AC
Voltages.
SCREEN The interference suppressing outer
conductor in mic and line cables.
SEND The connectors or controls used to
send a signal, connected externally to
a mixing console.
SIGNAL TO NOISE The ratio used to describe the
relationship between the level of a
signal and the background noise that
accompanies it.
SPEAKON™ A high quality connector designed for
use with high power amplifiers and
loudspeakers.
SPL Sound Pressure Level.
STEREO Two channel sound reproduction where
the two signals are sent to separate left
and right speaker systems.
TRS Tip, Ring, Sleeve. 1/4" three pole jack
plug. Often referred to as a stereo jack
plug (phone jack in USA). Used for
balanced line signals, insert (send
/return) points and some stereo
headphones.
TS Tip, Sleeve. 1/4" two pole jack plug.
Often referred to as a mono jack
(phone jack in USA). Used for
unbalanced signals.
UNBALANCED Two wire connection using one
signal and one screen conductor.
XLR An industry standard connector used
for audio signals (usually 3 pin). They
are used for low level signals (like
microphones) and line level signals (as
on the inputs of AX series amplifiers).
STUDIOMASTER AX Amplifier Series 11
Page 14
STUDIOMASTER AX Amplifier Series
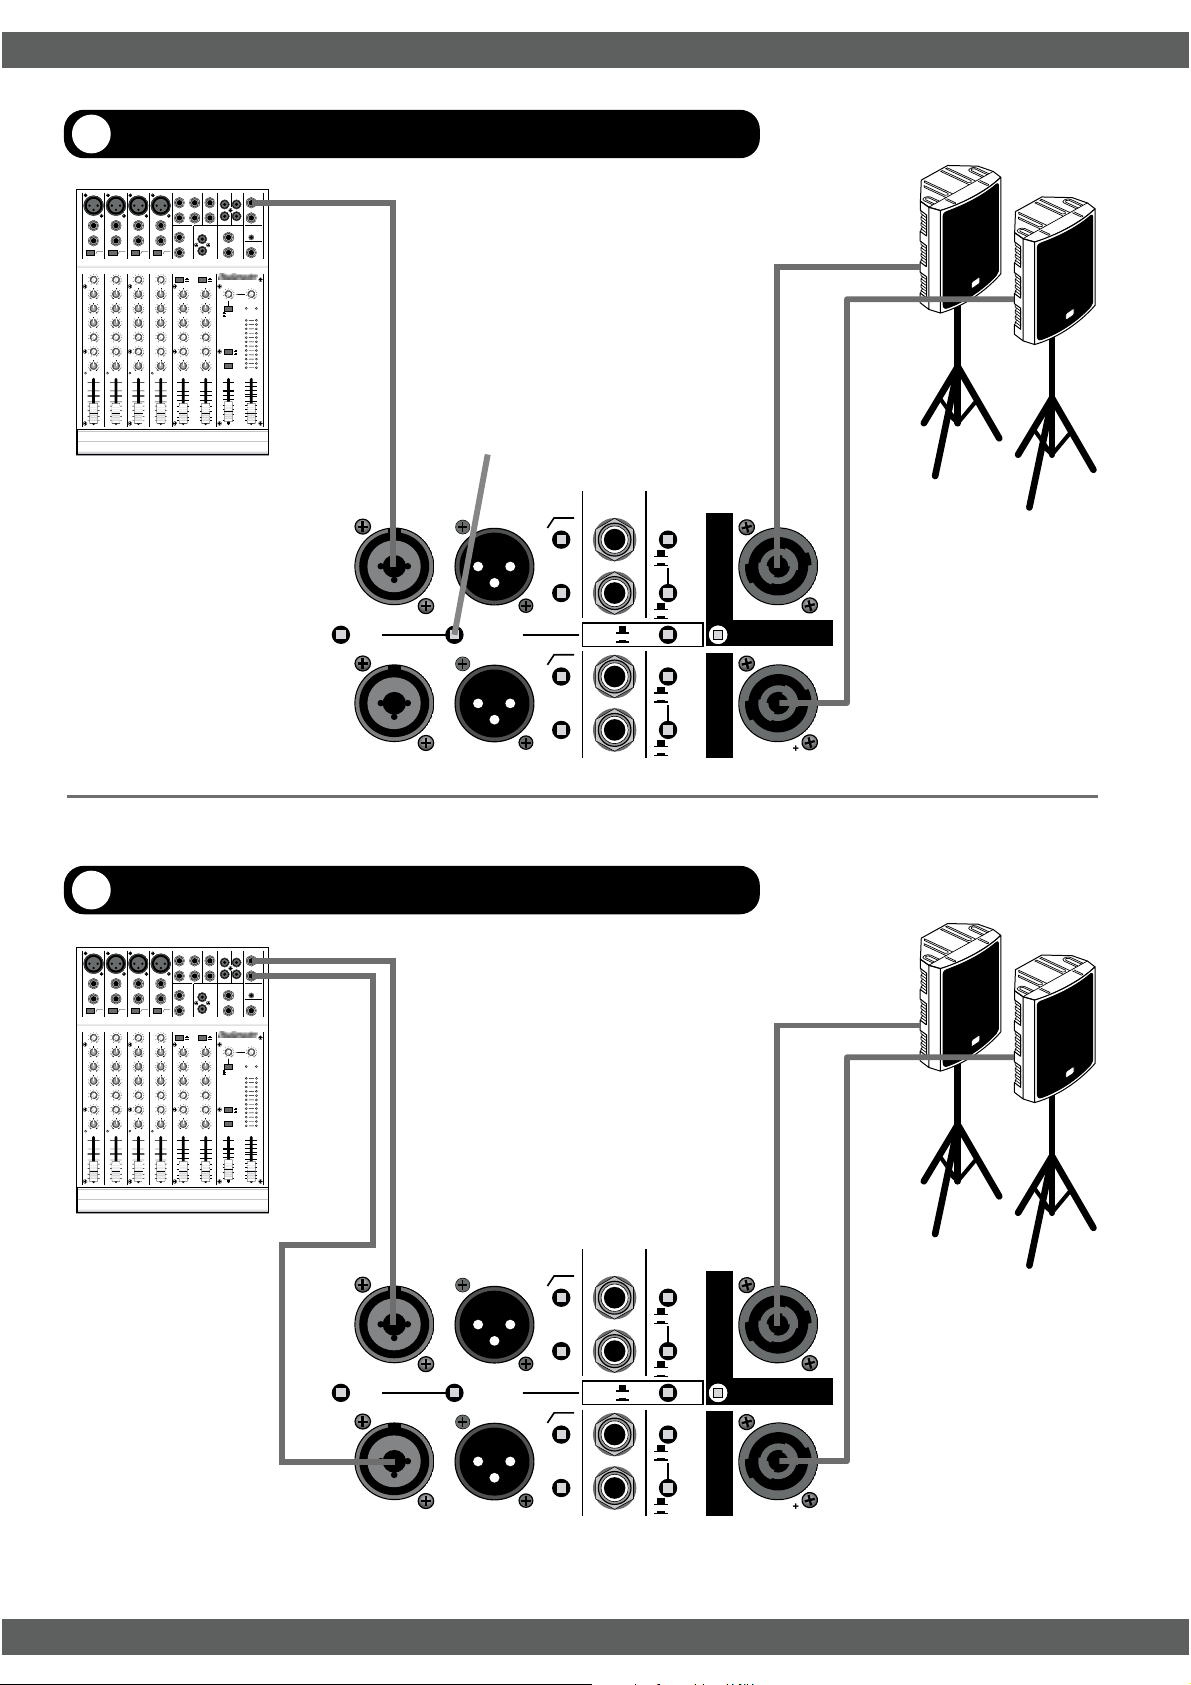
1 Mono Mix
GND
LIFT
Parallel Switch IN
INPUT A
INPUT B
LINK
PARALLEL
INPUTS
LINK
30Hz
LIMITER
OFF
30Hz
LIMITER
OFF
HI
XOVER OUTPUT
LO
HI
XOVER OUTPUT
LO
100Hz
150Hz
XOVER
TO CH A - AMP
OFF
ON
HI
LO
XOVER
TO CH B - AMP
OFF
ON
HI
LO
CH
A
CH
B
BRIDGE
CH. A
PIN 1+ =
PIN 1- =
PIN 1+ =
PIN 1- =
+
-
PIN 1+ =
PIN 2+ =
Left
Speaker
Right
Speaker
+
-
-
2 Stereo Mix
Left
Right
GND
LIFT
INPUT A
INPUT B
LINK
PARALLEL
INPUTS
LINK
30Hz
LIMITER
OFF
30Hz
LIMITER
OFF
HI
XOVER OUTPUT
LO
HI
XOVER OUTPUT
LO
100Hz
150Hz
XOVER
TO CH A - AMP
OFF
ON
HI
LO
XOVER
TO CH B - AMP
OFF
ON
HI
LO
CH
A
CH
B
BRIDGE
CH. A
PIN 1+ =
PIN 1- =
PIN 1+ =
PIN 1- =
+
-
PIN 1+ =
PIN 2+ =
Left
Speaker
Right
Speaker
+
-
-
STUDIOMASTER AX Amplifier Series12
Page 15
STUDIOMASTER AX Amplifier Series
INPUT B
INPUT A
INPUT A
3 Mono Bi-amp
XOVER ON
Switch IN
GND
LIFT
LINK
PARALLEL
INPUTS
LINK
30Hz
LIMITER
OFF
30Hz
LIMITER
OFF
HI
XOVER OUTPUT
LO
HI
XOVER OUTPUT
LO
100Hz
150Hz
Select HI
Switch OUT
XOVER
TO CH A - AMP
OFF
ON
CH
A
HI
LO
XOVER
TO CH B - AMP
CH
OFF
ON
B
HI
LO
BRIDGE
CH. A
PIN 1+ =
PIN 1- =
PIN 1+ =
PIN 1- =
+
-
PIN 1+ =
PIN 2+ =
+
-
Mid / HI
Speaker
Bass / LO
Speaker
+
-
Parallel Switch IN
4 Stereo Bi-amp
Left
Right
GND
LIFT
Select same
frequency (100 or 150Hz)
on both Amplifiers
GND
LIFT
INPUT B
INPUT A
INPUT B
XOVER ON
Switch IN
LINK
PARALLEL
INPUTS
LINK
LINK
PARALLEL
INPUTS
LINK
30Hz
LIMITER
OFF
30Hz
LIMITER
OFF
30Hz
LIMITER
OFF
30Hz
LIMITER
OFF
HI
XOVER OUTPUT
LO
HI
XOVER OUTPUT
LO
HI
XOVER OUTPUT
LO
HI
XOVER OUTPUT
LO
100Hz
150Hz
100Hz
150Hz
XOVER
TO CH A - AMP
OFF
ON
HI
LO
XOVER
TO CH B - AMP
OFF
ON
HI
LO
XOVER
TO CH A - AMP
OFF
ON
HI
LO
XOVER
TO CH B - AMP
OFF
ON
HI
LO
Select LO
Switch IN
Select HI
Switch OUT
PIN 1+ =
+
PIN 1- =
CH
-
A
BRIDGE
PIN 1+ =
PIN 2+ =
CH. A
CH
B
PIN 1+ =
+
-
PIN 1- =
PIN 1+ =
PIN 1- =
CH
A
BRIDGE
PIN 1+ =
PIN 2+ =
CH. A
CH
B
PIN 1+ =
PIN 1- =
Left
Mid / HI
Speaker
Right
Mid / HI
Speaker
+
-
Left
Bass / LO
Speaker
+
-
Right
Bass / LO
Speaker
+
-
-
STUDIOMASTER AX Amplifier Series
XOVER ON
Switch IN
Select LO
Switch IN
13
Page 16
STUDIOMASTER AX Amplifier Series
P
INPUT A
INPUT A
5 2-way Monitor Mix
Monitor Outputs
1
2
INPUT A
GND
LIFT
INPUT B
LINK
PARALLEL
INPUTS
LINK
30Hz
LIMITER
OFF
30Hz
LIMITER
OFF
HI
XOVER OUTPUT
LO
HI
XOVER OUTPUT
LO
100Hz
150Hz
XOVER
TO CH A - AMP
OFF
ON
HI
LO
XOVER
TO CH B - AMP
OFF
ON
HI
LO
CH
A
CH
B
BRIDGE
CH. A
PIN 1+ =
PIN 1- =
PIN 1+ =
PIN 1- =
Stage
Monitor
+
-
PIN 1+ =
PIN 2+ =
+
-
Stage
Monitor
Total Load on each channel
= NOT less than 2 Ohms
eg: If each monitor is 8 Ohms
then 8 divide 2 = 4
A maximum of 4 8 Ohm
+
monitors per channel can be
-
used.
Stage
Monitor
6 Stereo Bi-amp with Mono Sub Bass
Select same
frequency (100 or 150Hz)
on both Amplifiers
Left
Right
Mono Out
GND
LIFT
GND
LIFT
INPUT B
INPUT B
XOVER ON
Switch IN
LINK
PARALLEL
INPUTS
LINK
LINK
PARALLEL
INPUTS
LINK
30Hz
LIMITER
OFF
30Hz
LIMITER
OFF
30Hz
LIMITER
OFF
30Hz
LIMITER
OFF
HI
XOVER OUTPUT
LO
HI
XOVER OUTPUT
LO
HI
XOVER OUTPUT
LO
HI
XOVER OUTPUT
LO
100Hz
150Hz
100Hz
150Hz
TO CH A - AMP
TO CH B - AMP
XOVER
OFF
ON
HI
LO
XOVER
OFF
ON
HI
LO
XOVER
TO CH A - AMP
OFF
ON
HI
LO
XOVER
TO CH B - AMP
OFF
ON
HI
LO
Select HI
Switch OUT
PIN 1+ =
IN 1- =
CH
A
BRIDGE
PIN 1+ =
PIN 2+ =
CH. A
CH
B
PIN 1+ =
PIN 1- =
PIN 1+ =
PIN 1- =
CH
A
BRIDGE
PIN 1+ =
PIN 2+ =
CH. A
CH
B
PIN 1+ =
PIN 1- =
+
-
+
-
+
-
Use ONLY Channel A
+
-
output. Note special
wiring.
+
-
-
Stage
Monitor
Left
Mid / HI
Speaker
Bass / LO
Speaker
Right
Mid / HI
Speaker
XOVER ON
Switch IN
Select LO
Switch IN
STUDIOMASTER AX Amplifier Series14
Select BRIDGE
Switch IN
Page 17
STUDIOMASTER AX Amplifier Series
INPUT B
P
B
INPUT A
7 2-way Stereo with additional Amplifiers
GND
LIFT
INPUT
LINK
PARALLEL
INPUTS
LINK
30Hz
LIMITER
OFF
30Hz
LIMITER
OFF
HI
XOVER OUTPUT
LO
HI
XOVER OUTPUT
LO
100Hz
150Hz
XOVER
TO CH A - AMP
OFF
ON
HI
LO
XOVER
TO CH B - AMP
OFF
ON
HI
LO
CH
A
CH
B
BRIDGE
CH. A
PIN 1+ =
PIN 1- =
PIN 1+ =
PIN 1- =
PIN 1+ =
PIN 2+ =
Left
Mid / HI
Speaker
Right
Mid / HI
Speaker
+
-
+
-
+
-
Left
Right
GND
LIFT
INPUT A
INPUT B
GND
LIFT
INPUT A
LINK
PARALLEL
INPUTS
LINK
LINK
PARALLEL
INPUTS
LINK
LIMITER
LIMITER
30Hz
OFF
30Hz
OFF
30Hz
LIMITER
OFF
30Hz
LIMITER
OFF
HI
XOVER OUTPUT
LO
HI
XOVER OUTPUT
LO
HI
XOVER OUTPUT
LO
HI
XOVER OUTPUT
LO
TO CH A - AMP
100Hz
150Hz
TO CH B - AMP
XOVER
XOVER
OFF
ON
HI
LO
OFF
ON
HI
LO
100Hz
150Hz
XOVER
TO CH A - AMP
OFF
ON
HI
LO
XOVER
TO CH B - AMP
OFF
ON
HI
LO
CH
A
CH
B
BRIDGE
CH. A
XOVER ON
Switch IN
PIN 1+ =
+
PIN 1- =
-
CH
A
BRIDGE
PIN 1+ =
PIN 2+ =
CH. A
CH
B
PIN 1+ =
PIN 1- =
-
Select LO
Switch IN
PIN 1+ =
+
IN 1- =
-
PIN 1+ =
+
-
PIN 2+ =
PIN 1+ =
+
-
PIN 1- =
Left
Bass / LO
Speaker
Right
Bass / LO
Speaker
+
-
Left
Bass / LO
Speaker
Right
Bass / LO
Speaker
STUDIOMASTER AX Amplifier Series 15
Page 18
Notes
STUDIOMASTER AX Amplifier Series
STUDIOMASTER AX Amplifier Series16
Page 19
Notes
STUDIOMASTER AX Amplifier Series
STUDIOMASTER AX Amplifier Series
Page 20
AXM ENG V3
Recording Studio Design Limited
7 Eden Way, Pages Industrial Park
Leighton Buzzard, Bedfordshire LU7 4TZ UK
Tel : +44 (0)1525 217111 Fax : +44 (0)1525 378466
email : [email protected]
www.studiomaster.com
In Accordance with our progressive product development, Studiomaster / Recording Studio Design
reserve the right to change features and specifications without prior notice.
 Loading...