

Page 1
www.studiocasa.ro
MASINA DE PREPARAT PAINE
BM 1401 B - French Taste
MANUAL DE UTILIZARE
Page 2

Page 3

www.studiocasa.ro
1
MĂSURI DE PRECAUȚIE IMPORTANTE
CITIȚI ACESTE INSTRUCȚIUNI ÎNAINTE DE UTILIZARE.
NU ARUNCAȚI ACESTE INSTRUCȚIUNI!
1. Asigurați-vă că tensiunea de pe plăcuța de informare a aparatului corespunde cu
cea a rețelei de alimentare.
2. Nu utilizați aparatul în cazul în care cablul de alimentare sau ștecherul sunt
deteriorate sau dacă aparatul în sine este defect; apelați la Centrul de Asistență
Autorizat.
3. Nu lăsați niciodată cablul pe marginea mesei sau a suprafeței de lucru.
4. Nu așezați niciodată corpul aparatului, ștecherul sau cablul de alimentare în apă sau
alte lichide; ștergeți-le întotdeauna cu o laveta.
5. Pentru a deconecta aparatul, prindeți ștecherul și scoateți-l direct din priză. Nu
trageți niciodată de cablul de alimentare pentru a deconecta aparatul.
6. Nu lăsati aparatul nesupravegheat atunci când este utilizat de sau în apropierea
copii(lor).
7. Evitati contactul cu componentele aflate în functiune.
8. Nu lăsați niciodată aparatul nesupravegheat atunci când este conectat la sursa de
alimentare; deconectați-l după fiecare utilizare.
9. Nu atingeți niciodată piesele atunci când sunt în mișcare și nu introduceți mâinile sau
ustensile de bucătărie în interiorul jgheabului de umplere. Utilizați numai accesoriul
pentru presare.
10. Dacă aparatul cade sau intra în contact cu apa în mod accidental, scoateti-l imediat
din priză. Nu băgati mâna în apă. Nu utilizati aparatul în cazul în care a căzut sau a
fost introdus accidental în apă.
11. Nu utilizati aparatul într-o pozitie instabilă, pentru a nu vă răni sau a nu produce
daune altor bunuri.
12. Nu utilizati aparatul în alte scopuri decât cel pentru care a fost destinat.
13. Folosirea pieselor care nu sunt originale sau care nu au fost aprobate de către
producător poate pune în pericol performanțele și siguranța acestui aparat.
14. Întotdeauna deconectati aparatul de la sursa de alimentare dacă îl lăsati
nesupravegheat sau înainte de montarea, demontarea sau curătarea acestuia.
15. Nu utilizati aparatul în mediul extern.
16. În cazul în care cablul de alimentare este avariat, acesta trebuie înlocuit de
producător, agentul de service sau de persoane calificate, pentru a evita orice
pericol.
17. Acest aparat poate fi folosit de către persoane cu capacități fizice, senzoriale sau
Page 4

www.studiocasa.ro
2
mentale reduse sau fără experiență și cunoștințe, dacă acestea beneficiază de
supervizare sau instrucțiuni cu privire la utilizarea aparatului în condiții de siguranță
și dacă înțeleg riscurile implicate.
18. Carcasa exterioara a acestui aparat se incalzeste in timpul utilizarii.
19. Nu atingeti nicio piesă a aparatului, care se miscă sau se învârte în timpul coacerii.
20. Nu porniti niciodată aparatul fără a pozitiona corect cuva de pâine umplută cu
ingrediente.
21. Nu loviti partea inferioară sau laterală a cuvei de pâine pentru a scoate pâinea,
deoarece cuva se poate deteriora.
22. Nu se vor introduce folii de aluminiu sau alte materiale în aparatul pentru preparat
pâine, deoarece acest lucru poate cauza un risc de incendiu sau de scurtcircuitare.
23. Nu acoperiti niciodată aparatul pentru preparat pâine cu un prosop sau cu un alt
material, deoarece căldura si aburul trebuie să iasă la suprafata. Se poate declansa
un incendiu dacă aparatul este acoperit sau intră în contact cu material combustibil.
24. Pastrati aceste instructiuni de folosire.
ACEST PRODUS ESTE DESTINAT NUMAI PENTRU UZ CASNIC SI NU SE VA FOLOSI
IN SCOP INDUSTRIAL.
Asezati aparatul pe o suprafată uscată, plană si rezistenta la căldură.
Nu asezati aparatul în apropierea arzătoarelor pe gaz, cuptoarelor electrice sau altor
surse de căldură.
Asigurati-vă că fantele de aerisire ale aparatului nu sunt acoperite.
Nu asezati obiecte pe aparat si nu-l acoperiti în timpul functionării. Pericol de
incendiu!
Atentie, masina de pâine devine fierbinte. Atingeti doar mânerele si butoanele tactile
ale aparatului. Dacă este necesar folositi o cârpă de bucătărie.
Nu mutati masina de copt paine dacă vasul de copt contine ingrediente fierbinti sau
lichide.
Evitati contactul cu paletele rotative în timpul functionării. Pericol de accidentare!
Nu folositi aparatul de copt paine pentru depozitarea alimentelor sau ustensilelor.
Utilizati masina de pâine numai pentru coacerea pâinii într-un mediu de uz casnic.
Nu folositi aparatul pentru uscarea produselor alimentare sau a altor obiecte.
Page 5
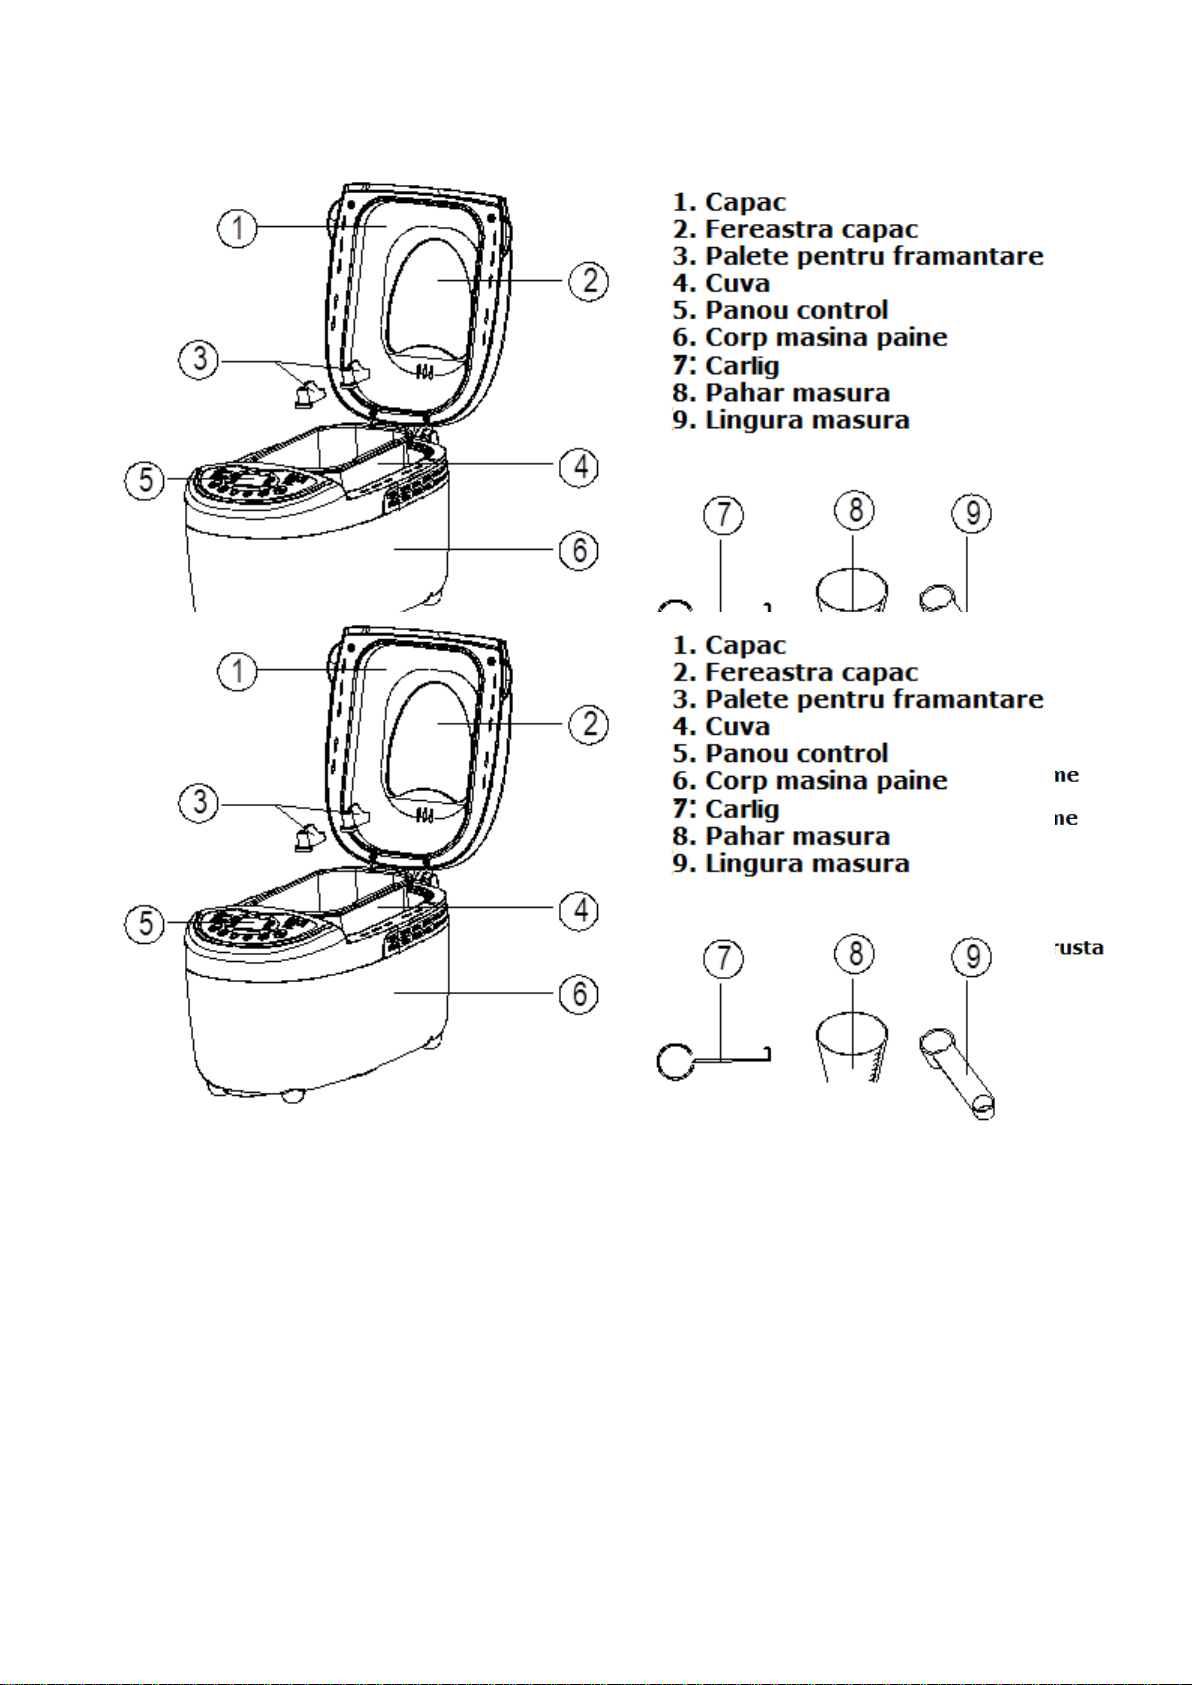
DESCRIEREA MASINII DE PREPARAT PAINE
3
www.studiocasa.ro
ÎNAINTE DE PRIMA UTILIZARE
Înainte de a utiliza aparatul pentru prima oară, despachetati cu grijă aparatul împreună cu
accesoriile acestuia si îndepărtati orice ambalaj sau etichetă. Curătati toate componentele
respectând instructiunile de CURĂTARE SI ÎNTRETINERE. Îndepărtati folia de protectie de
pe panoul de control.
Aparatul poate emite putin fum si un miros caracteristic atunci când îl porniti pentru prima
oară. Acest lucru este normal si se va opri in cel mai scurt timp. Asigurati-vă că aparatul are
o aerisire suficientă.
• Puteti alege unul dintre cele 12 programe de coacere diferite.
• Puteti framanta coca/aluat sau puteti face gem.
• Cu programul de coacere "fără gluten", puteti pregati cu succes retete cu făină fără gluten,
cum ar fi faina de porumb, făină de hriscă sau făină de cartofi.
Page 6

www.studiocasa.ro
4
Panoul de control
A. Afisaj
1. Afisaj pentru selectarea greutătii: 750g, 1000g, 1250g
2. Timpul de coacere rămas si timpul programat (minute)
3. Gradul de rumenire selectat: Mediu → Inchis → Rapid → Foarte Putin
4. Numărul programului selectat
5. Evolutie program
B. Meniu
Apasati butonul pentru selectarea programului de coacere dorit. Numărul programului si
timpul de coacere corespunzator va aparea pe ecran.
Important:
Toate butoanele tactile la apasare in timpul programarii vor declansa un semnal
acustic. Dupa inceperea programului selectat (butonul ON-OFF a fost apasat) butoanele nu
vor mai declansa semnale acustice.
C. Dimensiunea
Selectati greutatea brută dorita, avand posibilitatea sa alegeti intre: 750g, 1000g, 1250g.
Apăsati butonul de mai multe ori până când apare pe ecran un indicator in dreptul greutatii
dorite.
Notă: Setarea implicită la activarea aparatului este de 1250g. Programele 6, 7, 11 si 12 nu
permit reglarea dimensiunii painii.
D. Delay Timer
Dacă doriti ca aparatul să nu pornească imediat, puteti folosi această functie pentru a seta
durata întârzierii.
E. Culoare crusta
Selectati gradul de rumenire (Mediu → Inchis → Rapid → Foarte putin). Apăsati butonul de
selectare a culorii crustei de mai multe ori până când va apare pe ecran un marcaj
deasupra gradul dorit de rumenire.
Schimbările de timp de coacere, în functie de nivelul selectat de rumenire:
- Pentru programele de coacere 1-4 puteti activa modul rapid prin apăsarea butonului până
când triunghiul indică programul rapid.
- pentru programele 6, 7, si 11 nu puteti selecta setarea de culoare.
F. Start / Stop
Folositi acest buton pentru a porni si opri programul de coacere selectat.
Pentru a porni programul, apăsati butonul „START/STOP” o singură dată. După pornirea
programului toate butoanele vor fi dezactivate, cu exceptia butonului „START/STOP”.
Pentru a opri programul apăsati butonul „START/STOP” timp de aprox. 3 secunde, până
Page 7

www.studiocasa.ro
5
când un semnal sonor confirmă faptul că programul a fost oprit. Această caracteristică va
ajuta la prevenirea întreruperii neintentionate a functionării programului.
Daca doriti sa verificati evolutia procesului pe parcursul functionarii aparatului, puteti utiliza
fereastra, dar nu apasati butonul START-STOP.
Functia “MEMORY”
In cazul in care in timpul functionarii aparatului apare o intrerupere de curent de maxim 10
minute, la reluarea alimentarii masina de paine va porni programul deja setat din pozitia
anterioara deconectarii de la retea. In cazul in care intreruperea este mai mare de 10
minute atunci trebuie sa resetati program.
Programe de coacere
Selectati programul dorit prin apăsarea butonului din meniu. Numărul de program
corespunzător este indicat pe ecran. Timpul de coacere depinde de programul selectat.
Programul 1: PAINE – RETETA CLASICA
Pentru pâine albă si mixta, realizata în principal din făină de grâu sau făină de secară.
Pâinea are o consistentă compactă. Puteti regla gradul de rumenire a pâinii prin utilizarea
butonului pentru culoare crusta.
Programul 2: PAINE – RETETA FRANTUZEASCA
Pentru pâine fratuzeasca, realizata din făină fină. În mod normal, pâinea este pufoasa si
are o crusta crocanta. Acest program nu este potrivit pentru coacerea retetelor care
necesită unt, margarina sau lapte.
Programul 3: PAINE INTEGRALA DE GRAU
Pentru pâine care necesită o perioada mai lungă de frământare si crestere (de exemplu,
făină de grâu întreg si făină de secară). Pâinea va fi mai compacta si mai grea.
Programul 4: COZONAC
Pentru pâine cu aditivi, cum ar fi sucurile de fructe, nucă de cocos rasă, stafide, fructe
uscate, ciocolata sau adaos de zahăr. Datorita faptului ca necesita o perioada mai lunga
de crestere pâine va fi luminoasa si aerisita.
Programul 5: Super rapid – PAINE “RAPIDA”
Frământare, crestere si coacere într-un mod foarte rapid. Pâinea coaptă rezultata este cea
mai compacta dintre toate meniurile de pâine.
Programul 6: ALUAT GOGOSI
Pentru prepararea aluatului cu drojdie, special pentru chifle, pizza sau împletituri. Acest
program nu contine si program de coacere.
Programul 7: ALUAT PASTE
Pentru prepararea aluatului pentru tăitei. Acest program nu contine si program de coacere.
Page 8

www.studiocasa.ro
6
Programul 8: PAINE CU LAPTE
Pentru pâine realizata cu lapte bătut sau iaurt.
Program 9: PAINE FARA GLUTEN
Pentru pâine obtinuta din făină fără gluten si amestecuri de copt. Făină fără gluten necesită
mai mult timp pentru absorbtia lichidelor si are proprietăti diferite la crestere.
Programul 10: CHEC
Frământarea, afanarea si coacerea aluatului. Necesita adaugarea prafului de copt.
Program 11: GEM
Dedicat pentru prepararea gemului din fructe.
Program 12: Coacere suplimentara
Pentru coacere suplimentară. Dedicate sortimentelor de pâine care necesita o coacere mai
indelungata.
In cazul in care doriti sa opriti functionarea aparatului in timpul rularii unui program tineti
apasat butonul START-STOP pentru 3 secunde. Trecerea acestor secunde este marcata
acustic de un semnal prelung. Pentru inchiderea aparatului deconectati masina de paine de
la reteaua de energie electrica prin scoaterea stecherului din priza.
Pentru programele 1, 2, 3, 4, 5, 6, 8 si 9 semnalul acustic din timpul functionarii marcheaza
momentul in care puteti adauga stafide/nuci/seminte, fara ca acestea sa mai fie sfaramate
de paletele malaxorului.
Daca ati selectat optiunea pornire intarziata puteti adauga impreuna cu ingredientele de
baza nuci/stafide/seminte, iar acestea vor fi integrate in coca (in bucati mici).
Setarea functiei de pornire intarziata
Aceasta functie permite pornirea cu intarziere a masinii de facut paine. Prin utilizarea
butoanelor ▲ si ▼ puteti seta momentul pornirii. Selectati apoi programul. Pe ecran va fi
indicata perioada de timp necesara finalizarii programului. Apasand tasta ▲ puteti modifica
timpul de finalizare cu intervale de timp din 10 in 10 min (aveti optiunea de a apasa pas cu
pas sau sa tineti apasat butonul pentru a avansa cu mult mai repede). Dupa setarea
timpului, pe ecran va aparea timpul ramas pana la finalizarea programului setat cu pornire
intarziata. In cazul in care doriti sa reduceti acest timp de pornire intarziata apasati tasta ▼ .
Confirmati aceasta optiune prin apasarea tastei START-STOP. Ecranul se va aprinde
confirmand setarea efectuata pentru pornirea cu intarziere. La finalizarea programului
aparatul va emite 10 semnale acustice si pe ecran va aparea 0:00.
Exemplu: Ora curenta este 8 dimineata si doriti sa savurati o paine proaspata in 7 ore si 15
Page 9

www.studiocasa.ro
7
minute (adica 3:15 pm). Selectati programul 1 apoi apasati butonul ▲ pana cand pe ecran
va aparea 7:15 ceea ce se traduce prin faptul ca programul setat pentru preparare paine se
va finaliza in 7 ore si 15 min. Luati in calcul faptul ca programul de pornire intarziata nu este
posibil pentru programul de pregatire GEM.
Nota: Nu utilizati aceasta functie pentru preparatele care necesita alimente perisabile ca
oua/lapte/creme/branza, deoarece acestea se pot degrada in intervalul de timp necesar
pana la coacere.
Sfaturi pentru coacere
Pentru a avea rezultate maxime tineti cont de urmatoarele aspecte:
Ingrediente
- Curatati vasul malaxorului si asigurati-va ca in interiorul masinii de paine nu s-au
acumulat resturi de alimente/faina, deoarece in timpul coacerii temperatura este una
crescuta si exista riscul unui incendiu.
- Introduceti ingredientele in vas in ordinea indicata in retetar.
- Aveti grija ca toate ingredientele introduse in vas sa aiba o temperatura apropiata de
cea a mediului inconjurator, astfel incat drojdia sa poata sustine la capacitate
maxima procesul de crestere.
- Masurati cu atentie ingredientele. Adaugarea in exces sau in cantitati mai mici
afecteaza direct rezultatul final, iar o cantitate in exces poate genera scurgerea
aluatului in afara vasului, cu riscul renerarii unui incendiu.
Prepararea painii
Cititi cu atentie indicatiile din manual. Asezati masina de facut paine pe o suprafata plana si
rezistenta la caldura.
1. Scoateti din aparat vasul.
2. Fixati in baza vasului paletele malaxoare. Verificati ca acestea sa fie fixate
corespunzator.
3. Introduceti in vas ingredientele in cantitatile indicata in retetar. Prima data introduceti
lichidele, zaharul si sarea, apoi faina si la final drojdia (ultimul ingredient).
Nota: In momentul in carea adaugati drojdia aveti grija ca aceasta sa nu intre in contact cu
lichidele sau cu sarea. Nu depasiti cantitatile de faina si drojdie indicate in retetar.
4. Amplasati vasul in interiorul masinii de facut paine si fixati-l corespunzator.
5. Inchideti capacul.
6. Introduceti stecherul in priza. Se va auzi un semnal sonor si pe ecran va aparea
programul 1 si timpul aferent acestuia.
Page 10

www.studiocasa.ro
8
7. Selectati programul dorit. Fiecare modificare va fi insotita de un semnal acustic.
8. Selectati gradul de coacere (culoarea crustei). Pe ecran va fi indicata optiunea
aleasa: Mediu / Inchis / Foarte Putin. Puteti seta optiunea RAPID pentru reducerea
timpului de coacere.
Nota: pentru programele 6, 7 si 11 nu sunt posibile setarile de culoare crusta: Inchis /
RAPID.
9. Puteti seta daca doriti ca programul sa inceapa sa ruleze sau sa programati pornirea
cu intarziere. Perioada maxima ce poate fi setata pentru pornirea cu intarziere este
de 15 ore.
Nota: aceasta functie nu este posibila pentru programul 11.
In timpul functionarii
Dupa ce ati urmat pasii descrisi mai sus apasati butonul START – STOP.
Programul va rula mai multi pasi, in functie de numarul programului setat. Puteti observa
evolutia acestora prin intermediul ferestrei de pe capacul masinii de facut paine. In mod
ocazional poate aparea efectul de condensare pe fereastra in timpul coacerii, acest
fenomen fiind unul normal si nu reprezentand o defectiune a aparatului. Puteti ridica in
timpul rularii programului capacul masinii de facut paine (perioda de malaxare).
Nota: nu ridicati capacul in perioada de coacere, in caz contrar painea s-ar putea sa nu
mai fie la fel de pufoasa.
Sfat: Dupa 5 minute de la inceputul programului de malaxare verificati consistenta pe
care o prezinta coca: trebuie sa fie usoara, usor lipicioasa. Daca este prea uscata
adaugati putin lichid. In cazul in care este umeda adaugati cateva lingurite de faina
(maxim 2).
La finalul programului
In momentul in care procesul de coacere se finalizeaza aparatul va emite zece semnale
acustice si pe ecran va aparea 0:00. In mod automat aparatul va trece pe functia de
mentinere a temperaturii, aceasta functie fiind activa pentru o perioada de 60 minute.
Puteti opri aceasta functie in orice moment tinand apasat butonul START-STOP pana
cand veti auzi doua semnale acustice emise de aparat.
Atentie: inainte de a deschide capacul aparatului extrageti stecherul din priza. Nu tineti
aparatul conectat la reteaua electrica daca acesta nu este in uz.
Scoaterea painii din masina
Deoarece painea are o temperatura mare la finalizarea procesului de coacere, este
indicat sa folositi pentru scoaterea ei din vas un prosop de bucatarie sau manusi de
Page 11

www.studiocasa.ro
9
bucatarie, evitand astfel accidentarea. Rasturnati cu grija vasul si painea va cadea din
cos. In cazul in care paletele de malaxare raman blocate in paine le puteti extrage cu
ajutorul carligului ajutator.
Nota: nu utilizati pentru scoaterea painii obiecte metalice ascutite deoarece acestea pot
distruge vasul. Dupa scoaterea painii din vas clatiti vasul cu apa calduta, acest lucru
facilitand curatarea de eventualele resturi generate in timpul procesului de coacere.
Sfat: daca extrageti paletele de malaxare inainte de inceperea procesului de coacere
painea rezultata va fi intactata pe partea inferioara. Pentru extragerea paletelor urmati
pasii:
a) Apasati butonul START-STOP imediat ce procesul de malaxare s-a finalizat.
Scoateti stecherul din priza.
b) Deschideti capacul si scoateti coca (in prealabil puneti faina pe mana).
c) Scoateti paletele si reintroduceti coca in vas.
d) Introduceti stecherul in priza si apasati butonul START-STOP. Programul de coacere
va incepe imediat.
e) Dupa finalizarea procesului de coacere lasati painea sa se raceasca 15-30 minute.
Inainte de a taia painea verificati inca o data faptul ca paletele de malaxare au fost
scoase din paine.
Atentie: Nu incercati sa utilizati masina de paine imediat ce a fost finalizat un program
anterior, aparatul trebuie sa se raceasca.
Daca pe ecran apare mesajul “HHH” dupa ce un program a fost setat inseamna ca
temperatura in interior este mult prea ridicata si ca trebuie sa opriti aparatul si sa-l
scoateti din priza. Ridicati capacul pentru a grabi procesul de racire.
Daca pe ecran apare mesajul “LLL” inseamna ca temperatura interioara este prea joasa
si ca trebuie sa lasati aparatul sa se acomodeze cu temperature ambianta (cel mai
probabil ati depozitat aparatul intr-o camera cu o temperatura prea joasa).
In cazul in care pe ecran apare mesajul:
- “EE0” senzorul de temperatura este defect si trebuie verificat de personal autorizat.
- “EE1” senzorul de temperatura a fost scurtcircuitat si trebuie inlocuit de personal
autorizat.
CURATAREA SI ÎNTRETINEREA
Scoateti întotdeauna aparatul din priza înainte de curatare. Pentru a va proteja împotriva
electrocutarii nu introduceti cablul, stecherul sau aparatul în apa sau în alt lichid. Dupa
fiecare utilizare asigurati-va ca stecherul este scos din priza.
Page 12

www.studiocasa.ro
Ce pot sa fac daca paleta de framantare
este blocata in partea inferioara a
vasului dupa coacere?
Introduceti apa calda in vas si rotiti usor stanga-
dreapta paleta de framantare pentru a o elibera.
Ce se intampla daca dupa coacere am
uitat paine in interiorul masinii de facut
paine?
Aparatul este dotat cu o functie ce permite
pastrarea calda a painii pentru apeoximativ o
ora si o potejeaza de umiditate. In cazul in care
painea ramane pentru o perioada mai lunga
atunci ea se va umezi.
Formele de copt pot fi spalate in masina
de spalat vase?
Nu. Formele de copt si paletele de framantare
nu se vor spala in masina de spalat vase.
De ce nu se misca aluatul chiar daca
motorul este in functiune?
Verificati daca paletele de framantare si vasul
sunt pozitionate corect.
Ce pot sa fac daca paletele de
framantare au ramas in paine?
Puteti extrage paletele de framantare utilizand
carligul special destinat pentru aceasta
operatiune.
Ce se intampla daca exista o pana de
curent in timpul utilizarii?
Daca pana de curent este pentru o perioada mai
mica de 10 min atunci aparatul va continua
programul setat pana la finalizarea procesului.
Cat dureaza sa faci o paine?
Aflati aceasta informatie din capitolul dedicat
programelor.
Ce gramaj poate avea painea?
Aparatul de facut paine poate prepara o paine
de maxim 1.250 g.
De ce nu se poate utiliza functia de
programare a coacerii atunci cand
pregatim alimente cu lapte cald?
Alimentele proaspete ca laptele sau ouale se pot
degrada in cazul in care raman prea mult timp in
aparat si exista riscul imbolnavirii.
Stafidele devin casante daca au fost
pregatite in aparat.
Stafidele sau alte fructe proaspete
asemanatoare se adauga doar dupa semnalul
sonor.
10
Curatati toate piesele detasabile dupa fiecare utilizare folosind apa calda cu detergent de
vase. Nu spalati vasul/paletele malaxoare cu ajutorul masinii de spalat vase.
Stergeti suprafata exterioara a aparatului cu o laveta moale si umeda, pentru a elimina
petele.
Nu utilizati substante abrazive pentru curatare. Nu zgariati vasul sau paletele de malaxare.
Puneti toate piesele la loc in cutie si pastrati-le pentru urmatoarea utilizare.
Page 13
11
Page 14
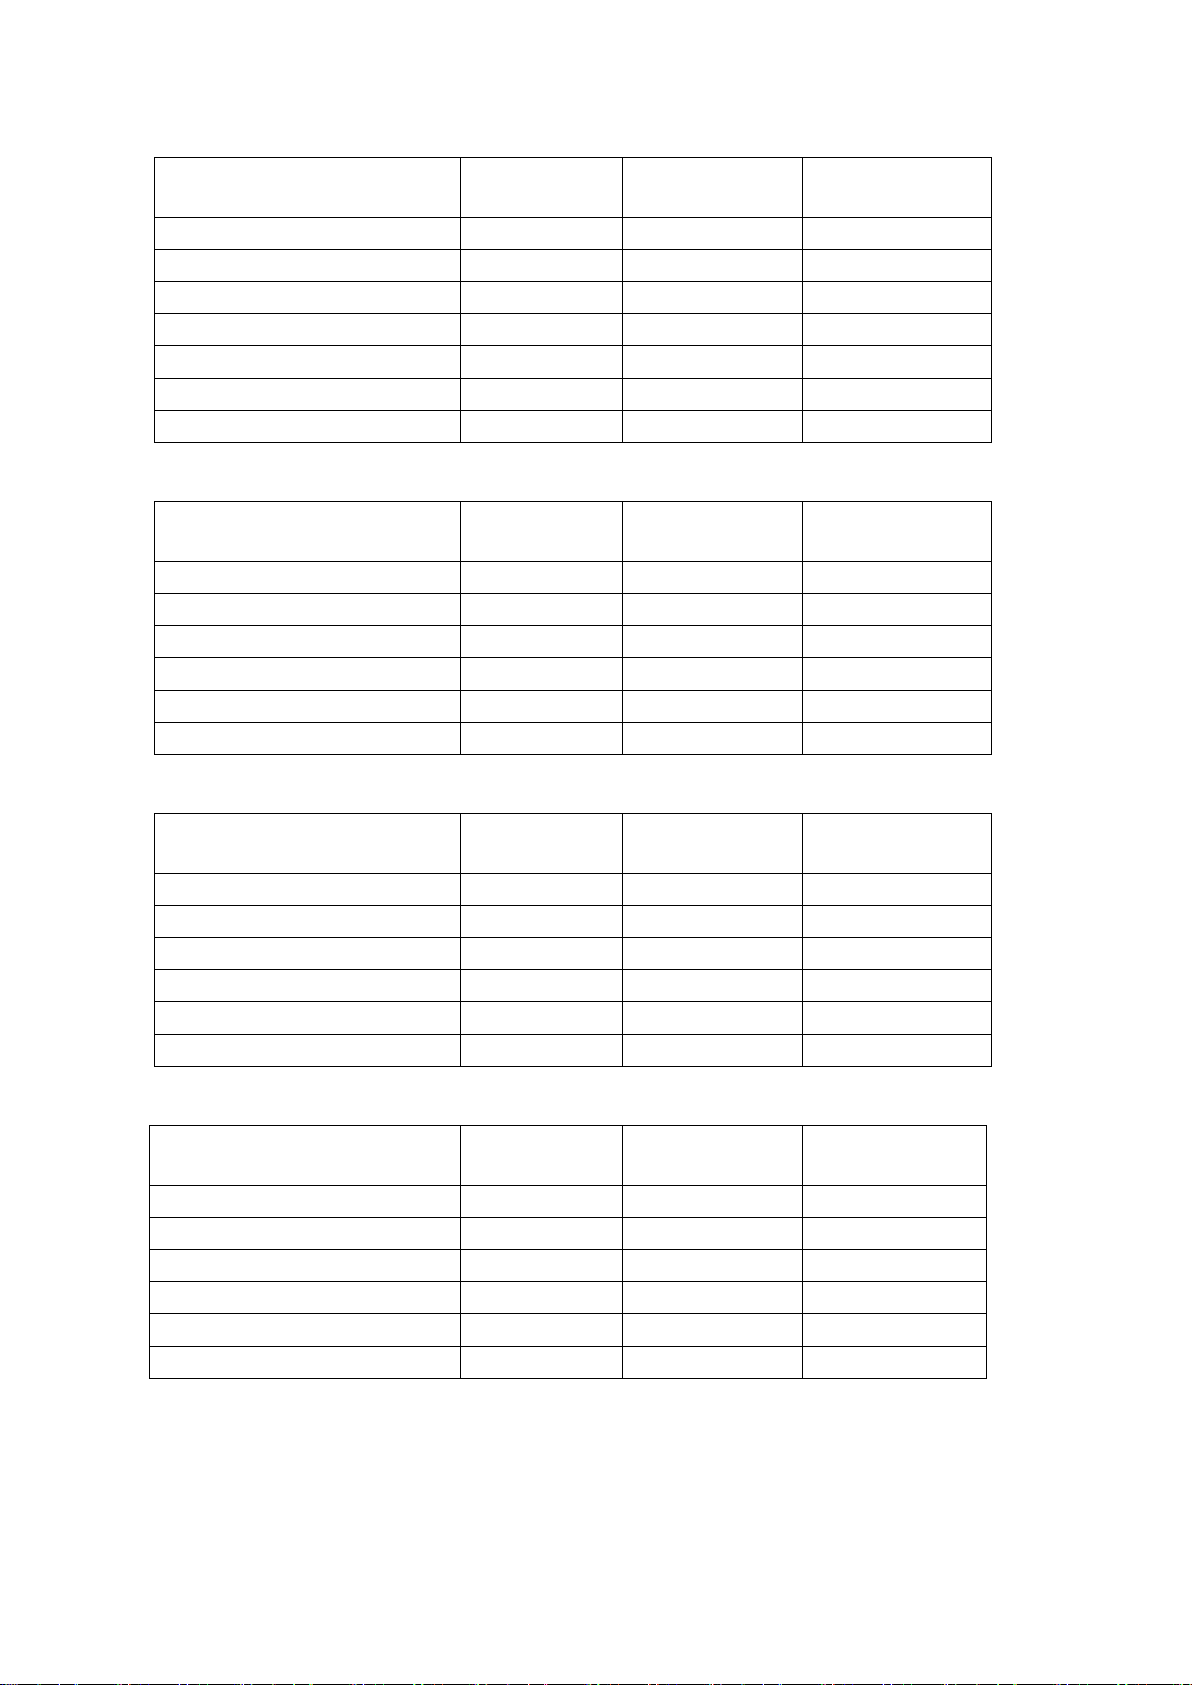
COZONAC
Cantitate ingrediente pentru
un cozonac cu gramaj de:
750g
1000g
1250g
1.APA
240ml
300ml
400ml
2.ULEI VEGETAL
2 linguri
3 linguri
4 linguri
3.SARE
1 lingurita
1 lingurita
1.5 lingurite
4.FAINA INTEGRALA
3 cani
4 cani
5 cani
5.ZAHAR
3 linguri
4 linguri
5 linguri
6.DRAJDIE
0.75 lingurite
1 lingurite
1.25 lingurite
7.LAPTE PRAF
2 linguri
2 linguri
3 linguri
Cantitate ingrediente pentru
o paine cu gramaj de:
750g
1000g
1250g
1.APA(48℃)
270ml
350ml
440ml
2.ULEI
2 linguri
3 linguri
4 linguri
3.SARE
1 lingurita
1 .5 lingurite
2 lingurite
4.FAINA INTEGRALA
3 cani
4 cani
5 cani
5.ZAHAR
3 linguri
4 linguri
5 linguri
6.DROJDIE
1 lingura
1 .25 lingurite
1.5 lingurite
Cantitate ingrediente pentru
aluat gogosi cu gramaj de:
750g
1000g
1250g
1.APA
270ml
350ml
440ml
2.ULEI
2 linguri
3 linguri
4 linguri
3.SARE
1 lingurita
2 lingurite
2 .5 lingurite
4.FAINA INTEGRALA
3 cani
4 cani
5 cani
5.ZAHAR
2.5 linguri
2.5 linguri
3 linguri
6.DROJDIE
0.75 lingurite
1 lingurite
1.25 lingurite
Cantitate ingrediente
pentru o paine cu gramaj de:
750g
1000g
1250g
1.LAPTE
150ml
200ml
300ml
2.ULEI
120ml
150ml
150ml
3.SARE
1lingurite
1.5 lingurite
2 lingurite
4.FAINA
4 cani
4 cani
5 cani
5.ZAHAR
1.5linguri
2linguri
3 linguri
6.DROJDIE
0.75 lingurite
1 lingurite
1.25 lingurite
12
PAINE “RAPIDA”
www.studiocasa.ro
ALUAT GOGOSI
PAINE CU LAPTE
Page 15
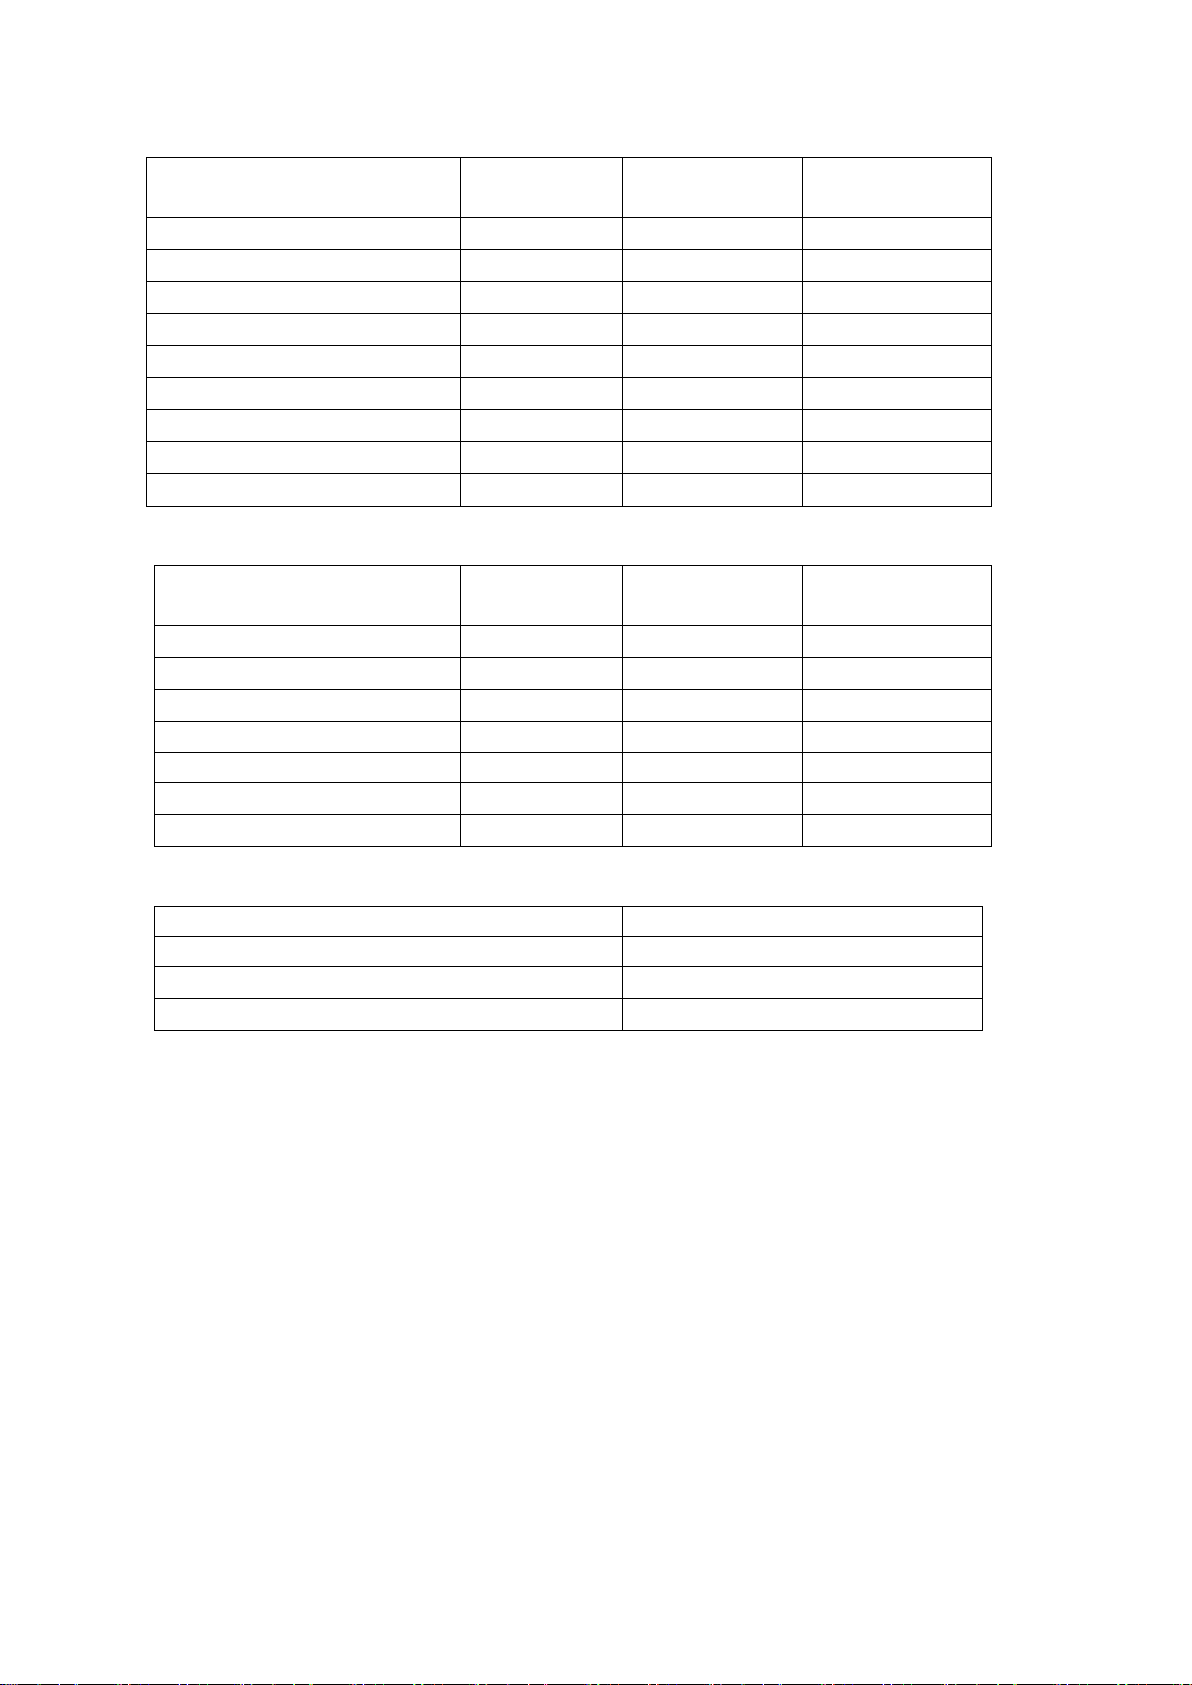
PAINE FARA GLUTEN
Cantitate ingrediente pentru
o paine cu gramaj de:
750g
1000g
1250g
1. APA
1/2 cani
2/3 cani
1 cana
2.ULEI
3 linguri
4 linguri
5 linguri
3.MIERE
1/4 cani
1/ 3cani
1/ 2cani
4.OTET
1 lingurita
1 lingurita
1 lingurita
5.OUA
2 2 3
6.FAINA DE PORUMB
3 cani
4 cani
5 cani
7.ZAHAR
3 linguri
4 linguri
5linguri
8.SARE
0.5 lingurite
0.5 lingurite
0.75 lingurite
9.DROJDIE
0.75 lingurite
1 lingurita
1.25 lingurite
Cantitate ingrediente pentru
o prajitura cu gramaj de:
750g
1000g
1250g
1.UNT
1cani
1.2 cani
1.5cani
2.ZAHAR
0.5 cani
0.75 cani
1cani
3.OUA
4 6 8
4. Făină de auto-creștere
2 cani
3 cani
4 cani
5. ESENTA
1 lingurita
1 lingurita
1 lingurita
6.SUC LAMAIE
1 linguri
1.5 linguri
2 linguri
7.DROJDIE
0.75 lingurite
1 lingurita
1.25 lingurite
Ingrediente
1.Capsuni
4 cani
2.Zahar
1 cana
3.BUDINCA PULBERE
1 cana
13
CHEC
www.studiocasa.ro
GEM
Instrucţiuni
1. Ingredientele trebuie să fie introduse în ordinea indicate în retetar.
1. Cantitatea de drojdie diferă în funcţie de temperatură. Dacă temperatura din încăpere
este mai mare de 25˚C reduceţi cantitatea de drojdie; dacă temperatura este mai mică
de 25˚C adăugaţi mai multă drojdie.
2. Făina trebuie să fie albă, curată şi cu o bună flexibilitate.
3. Protejaţi tamburul interior. Nu utilizaţi ustensile metalice pentru a-l curăţa.
4. Orificiul din mijlocul braţelor de frământare trebuie să fie curăţat bine, apoi uns cu puţin
unt.
Page 16
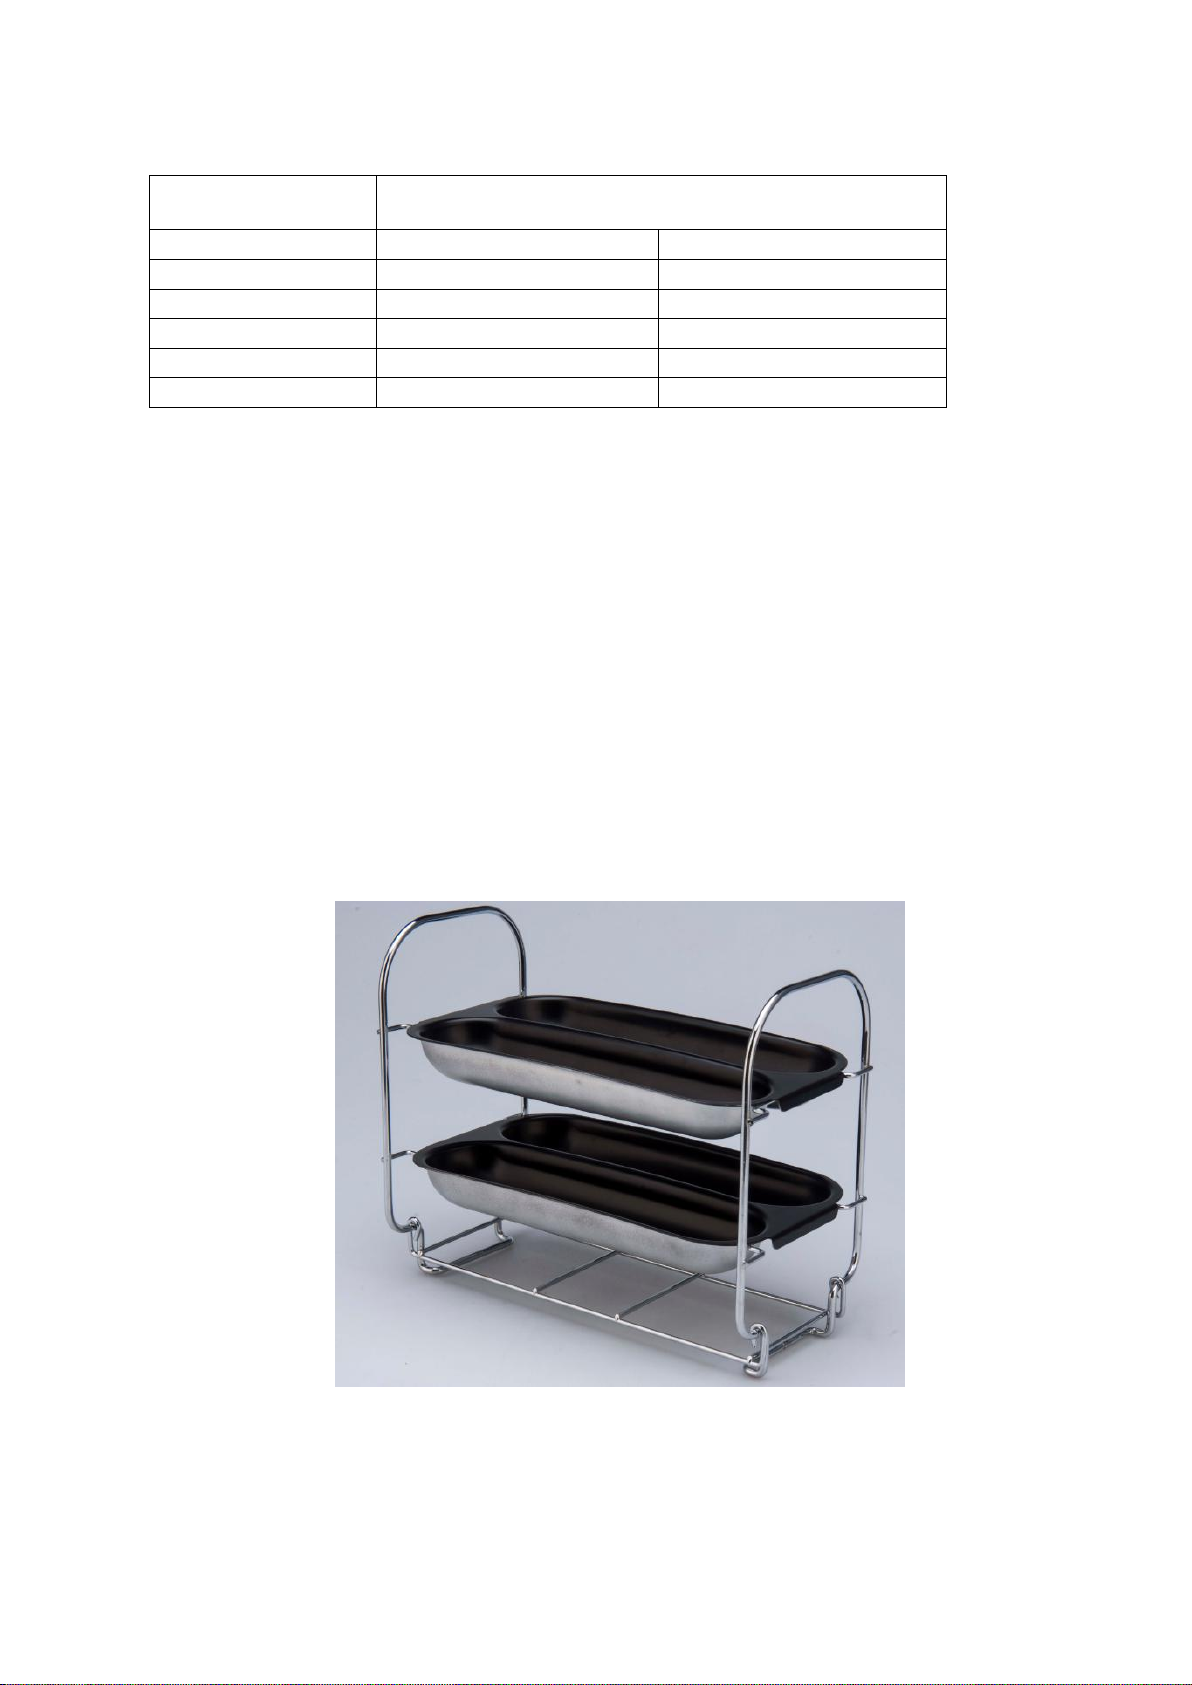
www.studiocasa.ro
Ingrediente
Cantitati pentru 4 baghete de 150 g
(cantitatile sint trecute in coloana doi in grame)
1.Apa
220 ml
220g
2.Ulei
2 linguri
24g
3.Sare
1 lingurita
7g
4.Zahar
2 linguri
26g
5.Faina
2.65 cani
400g
6.Drojdie
1 lingurita
3g
14
Reteta pentru bagheta frantuzeasca FRENCH TASTE:
1. Introduceti in vas cantitatile mentionate anterior (pastrand ordinea de introducere a
ingredientelor indicate in prezentul manual de utilizare).
2. Alegeti programul “DOUGHT” – ALUAT GOGOSI si dupa finalizarea programului (1
ora si 50 minute) scoateti coca.
3. Portionati coca in 4.
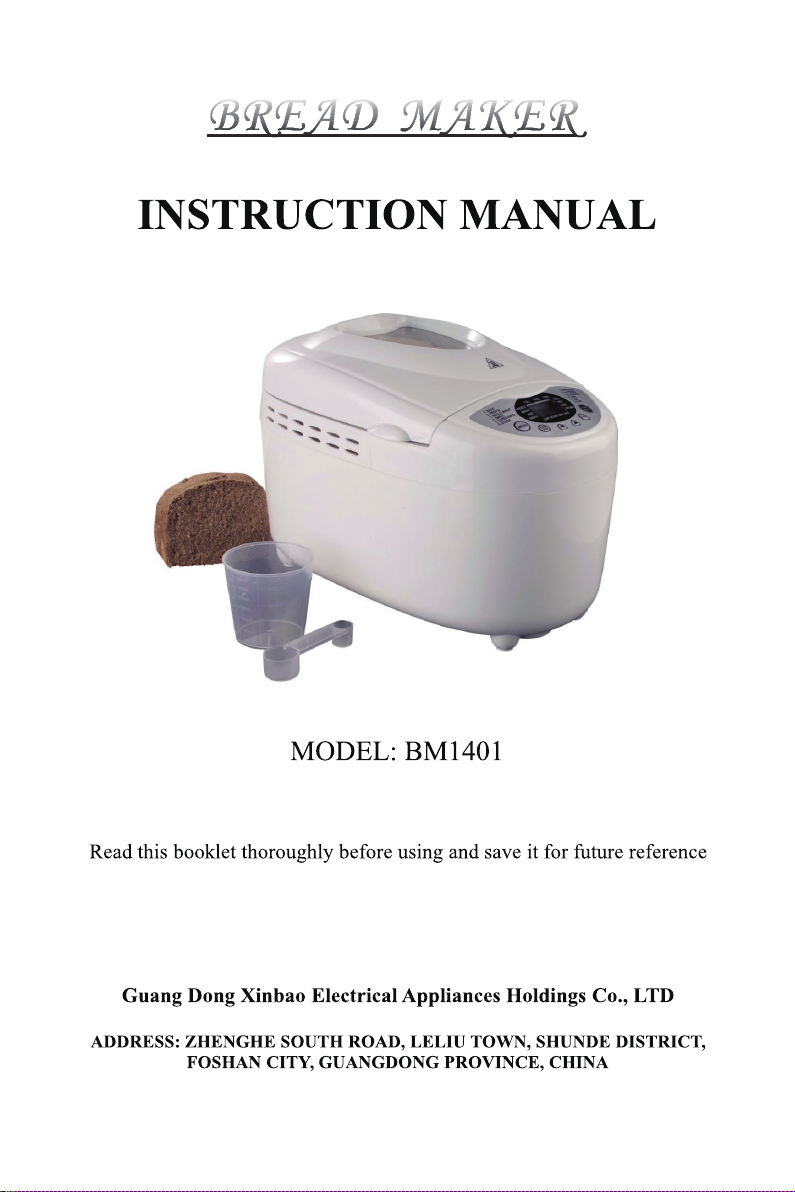
4. Scoateti vasul din masina de facut paine si introduceti accesoriul French grill in
interior.
5. Asezati pe fiecare din cele 4 tavite cate o portie din coca.
6. Alegeti programul de coacere.
7. Savurati in 60 min o savuroasa bagheta frantuzeasca.
Page 17
Page 18

123
Page 19

123
Important information for your safety
Device overview
Accessories
Proper use
Before the first use
Properties
Control panel
Baking programs
Setting the timer
Before baking
Baking bread
Cleaning and care
Technical data
Warranty & customer service
Disposal
Program sequence
Troubleshooting the bread maker
17
Page 20

123
Read the operating instructions carefully before using
the appliance for the first time and preserve this
booklet for later reference. Hand over the manual to
anyone you pass on the appliance to.
Important information for your safety
Setup
• Check the bread maker for transport damage after
unpacking. If necessary, contact your supplier.
• Place the appliance on a dry, flat and heat-resistant
surface.
• Do not place the appliance near gas burners, electric
ovens or other heat sources.
• Do not place the appliance near any inflammable
materials, explosive and/or self-igniting gases.
• Make certain that the ventilation slits of the appliance are
not covered.
• Before plugging in the appliance, check whether the
electricity type and mains voltage match the information on
the type plate.
• Do not draw the power cord over sharp edges or close to
hot surfaces or objects. This may damage the insulation of
the power cord.
• To prevent anyone from tripping over, the appliance is
provided with a short power cord.
• If you plan to use an extension cable, make sure that the
maximum permissible power rating of the cable
corresponds with that of the bread maker.
• Place the extension cable in such a way as to prevent
anyone from tripping over it or pulling it accidentally.
During operation
• Check the condition of the power cord and plug
frequently. If the power cord of this appliance is damaged,
it must be replaced by the manufacturer, the manufacturer's
18
Page 21

123
customer service or a similarly qualified person to avoid
associated dangers.
• Children using electrical appliances or standing close to
them may be allowed only under the supervision of an
adult.
• This appliance complies with the normal safety
regulations. Inspection, repair and technical maintenance
may only be performed by a qualified specialist.
• Do not place any objects on the appliance and do not
cover it during operation. Fire Hazard!
• Caution, the bread maker becomes hot. Only touch the
handles and touch buttons of the appliance. If necessary,
use a kitchen cloth.
• Before taking out the accessories or inserting them, allow
the appliance to cool down and unplug the power cord.
• Do not re-locate the bread baking machine if the baking
mould contains hot ingredients or liquids.
• Avoid contact with the rotating kneading paddles during
operation. Injury hazard!
• Stop the appliance off by means of the On/Off button,
then pull the power plug out of the wall socket to
disconnect the appliance from the power supply.
Do not pull at the cable but pull out the plug from the
socket.
• When not in use or before cleaning the appliance, unplug
the power cord as a safety measure.
• Do not use the bread baking machine for the storage of
foods or utensils.
Cleaning
• Do not immerse the bread maker in water or other fluids.
Hazard of lethal electrical shocks!
• Do not clean the appliance with abrasive scrubbers.
Detached particles of the scrubber may come into contact
19
Page 22
123
with the electrical components and cause severe electric
shocks.
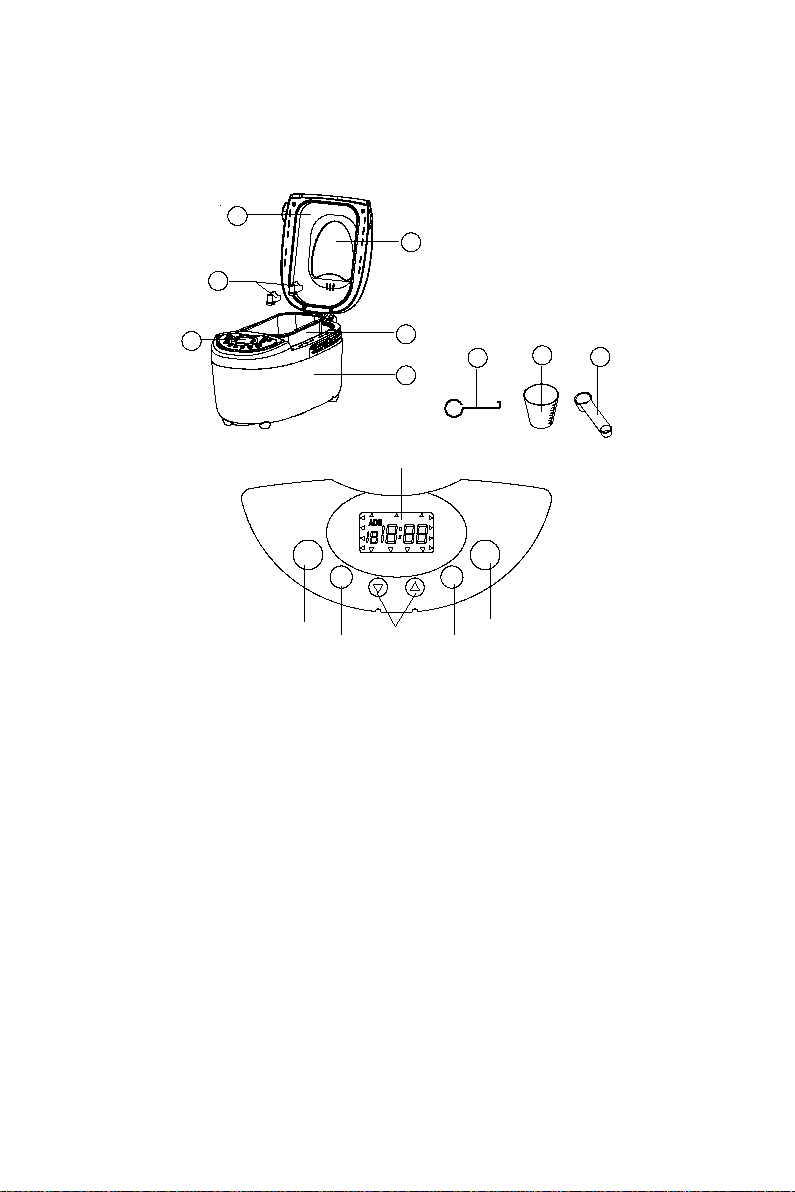
Device Overview
1
2
3
4
5
6
7
8
9
① Appliance lid
② Viewing window
③
2 kneading paddles
④ Baking mould
⑤ Control panel
⑥
Housing
⑦
Kneading paddle remover
⑧ Measuring cup
⑨
Measuring spoon
Proper use
Only use your bread maker for baking bread in a household
environment. Do not use the appliance for drying
foodstuffs or other objects.
20
A
.BASIC
1
2. FRENCH
3. WHOLE WHEAT
4. SWEET
5. SUPER RAPID
6. DOUGH
MENU
750g 1000g 1250g
PREHEAT
KNEAD1
RISE1
KNEAD2
LOWER
LOAF
SIZE
MEDIUM DARK
RAPID
RISE2
RISE3
BAKE
KEEP-WARM
COLOR
7. PASTA DOUGH
8. BUTTER MILK
9. GLUTEN FREE
10.CAKE
11. JAM
12. BAKE
START
STOP
B
C
D
F
E
Page 23

123
Do not use the bread machine outdoors. Use accessories
recommended by the manufacturer only. Accessories not
recommended may cause damage to the appliance.
Before the First Use
The appliance may emit a little smoke and a characteristic
smell when you turn it on for the first time. This is
normal and will soon stop. Make sure the appliance has
sufficient ventilation.
Disposing of the packaging material
Unpack your appliance and dispose of the packaging
material in accordance with the prevailing regulations.
Initial cleaning
Wipe the baking mould, kneading paddle and outer surface
of the bread baking machine with a clean, damp cloth
before putting into operation. Do not use any abrasive
scrubbers or cleaning powders. Remove the protective film
on the control panel.
Properties
You can use the automatic bread maker to bake according
to your taste.
• You can choose from among 12 different baking
programs.
• You can use ready-to-use baking mixtures.
• You can knead noodle dough or roll dough and make jam.
• With the "gluten-free" baking program, you can
successfully make gluten-free baking mixtures and recipes
with gluten-free flours, such as corn flour, buckwheat flour
and potato flour.
Control panel
A. Display
1. Display for selection of the weight
(750g, 1000g, 1250g)
2. The remaining baking time in minutes and the programmed time
21
Page 24

123
3. The selected degree of browning
(Medium→Dark→Rapid→Lower)
4. The selected program number
5. The program processing sequence
B. Menu
Load the desired baking program. The program number and the
corresponding baking time appear on the display.
Important:
When pressing all touch buttons an acoustic signal must be audible,
unless
the appliance is in operation(namely all the program have been set, and
the Start/Stop button has been pressed down, the others button without
acoustic signal ).
C. Loaf size
Select the gross weight (750g, 1000g, 1250g). Press the button enough
times until the marking appears beneath the desired weight.
Note:
The default setting upon activation of the appliance is 1250g. The
program 6, 7, 11 and 12 can not adjust the loaf size.
D. Delay Timer
Time-delayed baking.
E. Color
Select the degree of browning (Medium→Dark→Rapid→Lower). Press
the button of Color enough times until a marking appears above the
desired degree of browning. The baking time changes depending on the
selected level of browning. For baking programs 1 - 4 you can activate
rapid mode by pressing the button until the triangle indicates the rapid
program. The program 6, 7, and 11 can not select the color setting.
F. Start/Stop
To start and stop the operation or to delete a set timer. To interrupt
operation, briefly press the Start/Stop button, until an acoustic signal is
heard and the time flashes on the display. By pressing the Start/Stop
button again operation can be resumed. If you do not pressing the
Start/Stop manually, the machine will resume to process program
automatically after 10 minutes. To finish operation and delete the settings,
press the Start/Stop button for 3 seconds until one long acoustic signals
are audible.
Note:
Do not press the Start/Stop button, if you only want to check the state of
your bread.
Memory function
22
Page 25

123
When being switched on again after a power failure of up to approx. 10
minutes, the program will continue from the same point. This does not
apply, however, when you cancel/terminate the baking process by
pressing the Start/Stop button for 3 seconds.
Window
You can check the baking process through the window.
Baking programs
You select the desired program by pressing the button menu. The
corresponding program number is showed on the display. The baking
time depends on the selected Program combinations. See chapter
"Program sequence”.
Baking program 1: Basic
For white and mixed breads mainly consisting of wheat flour or rye flour.
The bread has a compact consistency. You can adjust the degree of
browning of the bread via the button Color.
Baking program 2: French
For light breads made from fine flour. Normally the bread is fluffy and
has a crispy crust. This is not suitable for baking recipes requiring butter,
margarine or milk.
Baking program 3: Whole Wheat
For breads with heavy varieties of flour that require a longer phase of
kneading and rising (for example, whole wheat flour and rye flour). The
bread will be more compact and heavy.
Baking program 4: Sweet
For breads with additives such as fruit juices, grated coconut, raisins, dry
fruits, chocolate or added sugar. Due to a longer phase of rising the bread
will be light and airy.
Baking program 5: Super rapid
Kneading, rise and baking in a very fast way. But the baked bread is the
most rough among all bread menus.
Baking Program 6: Dough
For preparing the yeast dough for buns, pizza or plaits. In this program no
baking is done.
Baking program 7: Paste dough
For preparing noodle dough. In this program no baking is done.
Baking Program 8: Butter Milk
For breads made with buttermilk or yoghurt.
Program 9: Gluten Free
For breads of gluten-free flours and baking mixtures. Gluten-free flours
require longer for the uptake of liquids and have different rising
properties.
23
Page 26

123
Baking program 10: Cake
Kneading, rise and baking, but rise with soda or baking powder
Program 11: Jam
For making jams.
Program 12: Bake
For additional baking of breads that are too light or not baked through. In
this
program there is no kneading or resting. The bread will be kept warm for
nearly an hour after the end of the baking operation. This prevents the
bread from becoming too moist.
• To prematurely terminate this function press the Start/Stop button for
three seconds, until one long acoustic signals are heard. To switch off the
appliance, disconnect the appliance from the power supply.
In programs 1, 2,3, 4, 5, 6, 8and 9 hurried acoustic signal sounds during
the program sequence. Soon thereafter, add the ingredients such as fruits
or nuts. And the “ADD” letter will appear. The ingredients are not
chopped by the kneading paddle.
If you have set the delayed timer, you can put all the ingredients into the
baking mould
at the beginning. In this case, however, fruits and nuts should be cut into
smaller pieces.
Setting the Timer
The timer function enables delayed baking. Using the arrow keys ▲and
▼, set the desired end time for the baking operation. Select a program.
The display indicates the required baking time. Using the arrow key
▲you can change the end time of baking operation in steps of 10 minutes
to a later point of time. Keep the arrow key pressed to carry out this
function faster. The display shows the total duration of baking time and
the delayed time. If you overshoot while changing the time, you can
correct it using the arrow key ▼. Confirm the timer setting by means of
the Start/Stop button. The colon on the display flashes and the
programmed time starts to run. When the baking process has been
completed, ten acoustic signals are issued and the display indicates 0:00.
Example:
It is 8 a.m. and you would like fresh bread in 7 hours 15 minutes at 3.15
p.m. First select program 1, then press the timer button until 7:15 appears
on the display, as the time until the bread is finished is 7 hours 15 minutes.
Note that the Timer function may not be available in jam program.
Note
Do not use the timer function when working with quickly spoiling
ingredients
24
Page 27

123
such as eggs, milk, cream or cheese.
Before baking
For a successful baking process, please consider the following factors:
Ingredients
• Take the baking mould out of the housing, before putting in the
ingredients.
If ingredients reach the baking area, a fire may be caused by them heating
up on the heating elements.
• Always put the ingredients in the stated order into the baking mould.
• All ingredients should have room temperature to maintain an optimal
rising result of the yeast.
• Measure the ingredients precisely. Even negligible deviations from the
quantities specified in the recipe may affect the baking results.
Note
Never use larger quantities than those specified. Too much dough can rise
out
of the baking mould and drop onto the hot heating elements, causing a
fire.
Baking bread
Preparation
Observe the safety instructions in this manual. Place the bread machine
on an even and firm base.
1. Pull the baking mould upward out of the appliance.
2. Push the kneading paddles onto the drive shafts in the baking mould.
Make sure they are firmly in place.
3. Put the ingredients for your recipe in the stated order into the baking
mould. First add the liquids, sugar and salt, then the flour, adding the
yeast as the last ingredient.
Note: Make certain that yeast does not come into contact with salt or
liquids.
The maximum quantities of the flour and yeast which may be used
refer to the recipe.
4. Place the baking mould back in the appliance. Make sure that it is
positioned properly.
5. Close the appliance lid.
6. Plug the power plug into the socket. An acoustic signal sounds and the
display indicates the program number and the duration of the normal
program 1.
7. Select your program with the menu button. Each input is confirmed by
an acoustic signal.
8. Select the color of your bread. The marking on the display shows
25
Page 28

123
whether you have chosen light, medium or dark. You can also select the
setting "Rapid" to shorten the baking time.
Note
For programs 6,7,11, the functions "browning degree" and "Rapid" are
not available.
9. You now have the possibility of setting the finish time of your program
via the timer function. You can enter a maximum delay of up to 15 hours.
Note
This delayed function is not available for program11.
Starting a Program
Now start the program using the Start/Stop button.
The program will automatically run various operations. You can watch
the program sequence via the window of your bread baking machine.
Occasionally, condensation may occur during baking in the window. The
appliance lid can be opened during kneading.
Note
Do not open the appliance lid during baking. The bread can collapse.
Tip: After 5 minutes of kneading, check the consistency of the dough. It
should be a soft, sticky lump. If it is too dry, add some liquid to it. If it is
too moist, add
some flour (1/2 to 1 teaspoon one or more times, as needed).
Ending a program
When the baking process has been completed, ten acoustic signals are
issued and the display indicates 0:00. At the end of the program the
appliance automatically changes to a warming mode for up to 60 minutes.
In this mode, warm air circulates inside the appliance. You can
prematurely terminate the warming function by keeping the Start/Stop
button pressed until two acousitc signals are heard.
Warning
Before opening the appliance lid, pull the power plug out of the wall
socket. When not in use, the appliance should never be plugged in!
Taking out the bread
When taking out the baking mould, always use pot holders or oven gloves.
Hold the baking mould tilted over a grid and shake lightly until the bread
slides out of the baking mould. If the bread does not slip off the kneading
paddles, carefully remove the kneading paddles using the enclosed
kneading paddle remover.
Note
Do not use any metal objects that may lead to scratches on the non-stick
coating. After removing the bread, immediately rinse the baking mould
with warm water. This prevents the kneading paddles from sticking to the
26
Page 29

123
driving shaft.
Tip: If you remove the kneading paddles after the last kneading of the
dough, the bread will remain intact when you remove it from the baking
mould.
• Briefly press the Start/Stop button, to interrupt the baking process or
pull the power plug out of the wall socket.
• Open the appliance lid and take out the baking mould. You can take the
dough out with floured hands and remove the kneading paddles.
• Replace the dough and close the appliance lid.
• Push the plug back into the wall socket and press the Start/Stop button.
The baking program is continued. Let the bread cool for 15-30 minutes
before eating. Before cutting bread, make sure that no kneading paddle is
still in the baking mould.
Warning
Do not attempt to start operating the bread maker, before it has either
cooled down or warmed up. If the display shows “HHH” after the
program has been started, it means that the temperature inside of bread
pan is too high. You should stop the program and unplugged the power
outlet immediately. Then open the lid and let the machine cool down
completely before using again (except the program of BAKE and JAM).
If the display shows “LLL” after the program has been started, it means
that the temperature inside of bread pan is too low. You should place the
bread maker on a higher environment for using(except the program of
BAKE and JAM). If the display shows “EE0” after you have pressed
Start/Stop button, it means the temperature sensor open circuit, please
check the sensor carefully by Authorized expert. If the display shows
“EE1”, it means the temperature sensor short circuit.
Cleaning and Care
Warning
Pull the power plug out of the wall socket each time and allow the
appliance
to cool down. Protect the appliance against splashing water and moisture,
as these could lead to an electric shock. Please also observe the safety
instructions. Important
The parts and accessories of the appliance should not be washed in a dish
washing machine.
Casing, lid, baking chamber
Remove all particles left behind inside the baking area using a wet cloth
or a slightly wet soft sponge. Wipe the casing and the lid too with a wet
cloth or sponge. Make sure that the inside area is fully dry. For easy
cleaning, the appliance lid can be removed from the housing:
27
Page 30
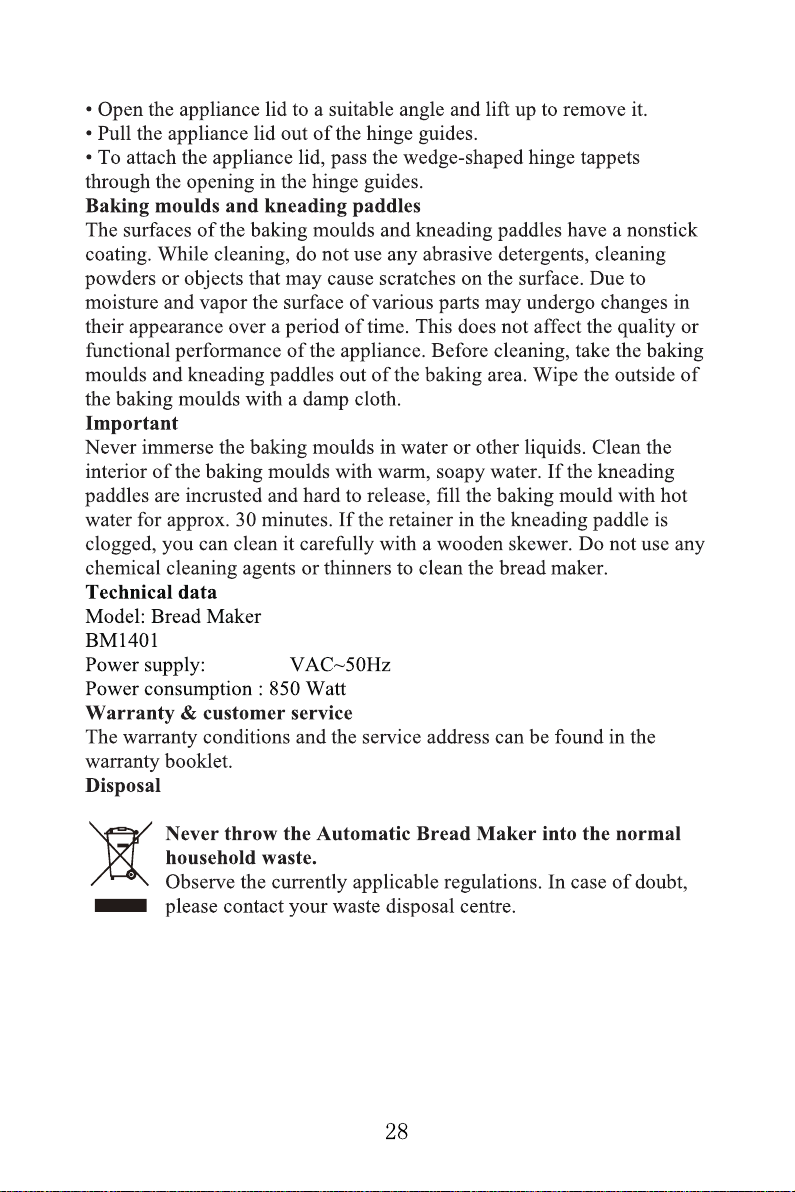
220-240
Page 31

123
Troubleshooting
What should I do if the kneading
paddle is stuck inside the baking
mould after baking?
Add hot water to the baking
mould and turn the kneading
paddle to loosen encrusted
material underneath.
What happens if the finished
bread is left inside the bread
maker?
The function "Keep warm"
ensures that the bread is kept
warm for nearly 1 hour and
protected from humidity. If the
bread remains in the baking
machine for longer than 1 hour, it
may become moist.
Can the baking moulds be washed
in a dishwasher?
No. Please wash the baking
moulds and kneading paddles by
hand.
Why doesn't the dough get stirred,
even if the motor is running?
Make sure that the kneading
paddles and baking mould are
positioned properly.
What do I do if the kneading
paddle remains in the bread?
Remove the kneading paddles
with the kneading paddle remover.
What happens if there is a power
failure when a program is
running?
In case of power failure for up to
10 minutes, the bread maker will
run the last implemented program
till the end.
How long does it take to bake
bread?
Please consult the program
sequence table for the exact times.
What size breads can I bake?
With the large baking mould, you
can bake bread up to 1250g.
Why can the timer function not be
used when baking with fresh
milk?
Fresh products such as milk or
eggs get spoilt if they remain in
the appliance for too long.
The added raisins get crushed in
the appliance.
To avoid the chopping of
ingredients such as fruit or nuts,
add these to the dough only after
the signal is sounded.
29
Page 32

BM1401 recipe:
30
一、BASIC BREAD:
SIZE
MATERIAL
1.WATER 270ml 350ml 440ml
2.OIL 2 tablespoons 3 tablespoons 4 tablespoons
3.SALT 1teaspoons 1.5 teaspoons 2 teaspoons
4.FLOUR 4 cups 4 cups 5 cups
5.SUGAR 1.5tablespoons 2tablespoons 3 tablespoons
6.MILK POWDER 2tablespoons 3 tablespoons 4 tablespoons
7.YEAST 0.75 teaspoons 1 teaspoons 1.25 teaspoons
二、FRENCH BREAD:
SIZE
MATERIAL
1.WATER 270ml 330ml 420ml
2.OIL 2 tablespoons 3 tablespoons 4 tablespoons
3.SALT 1 teaspoons 2 teaspoons 2 teaspoons
4.FLOUR 3 cups 4 cups 5 cups
5.SUGAR 1 tablespoons 1.5 tablespoons 2tablespoons
6.YEAST 0.75 teaspoons 1 teaspoons 1.25 teaspoons
750g 1000g 1250g
750g 1000g 1250g
三、WHOLE WHEAT BREAD:
SIZE
MATERIAL
1.WATER 270ml 350ml 440ml
2.OIL 2tablespoons 3 tablespoons 4 tablespoons
3.SALT 1 teaspoons 1.5 teaspoons 2 teaspoons
4.WHOLE WHEAT 1.5 cups 2 cups 3 cups
5.FLOUR 1.5cups 2 cups 2 cups
6.BROWN SUGAR 1.5tablespoons 2.5 tablespoons 3 tablespoons
7.MILK POWDER 2 tablespoons 3 tablespoons 4 tablespoons
8.YEAST 0.75 teaspoons 1 teaspoons 1.25 teaspoons
四、SWEET BREAD:
SIZE
MATERIAL
1.WATER 240ml 300ml 400ml
2.VEGETABLE OIL 2 tablespoons 3 tablespoons 4 tablespoons
3.SALT 1teaspoon 1teaspoon 1.5 teaspoons
4.REFINED FLOUR 3 cups 4 cups 5 cups
5.SUGAR 3 tablespoons 4 tablespoons 5 tablespoons
6.YEAST 0.75 teaspoons 1 teaspoons 1.25 teaspoons
7.MILK POWDER 2 tablespoons 2 tablespoons 3 tablespoons
750g 1000g 1250g
750g 1000g 1250g
Page 33
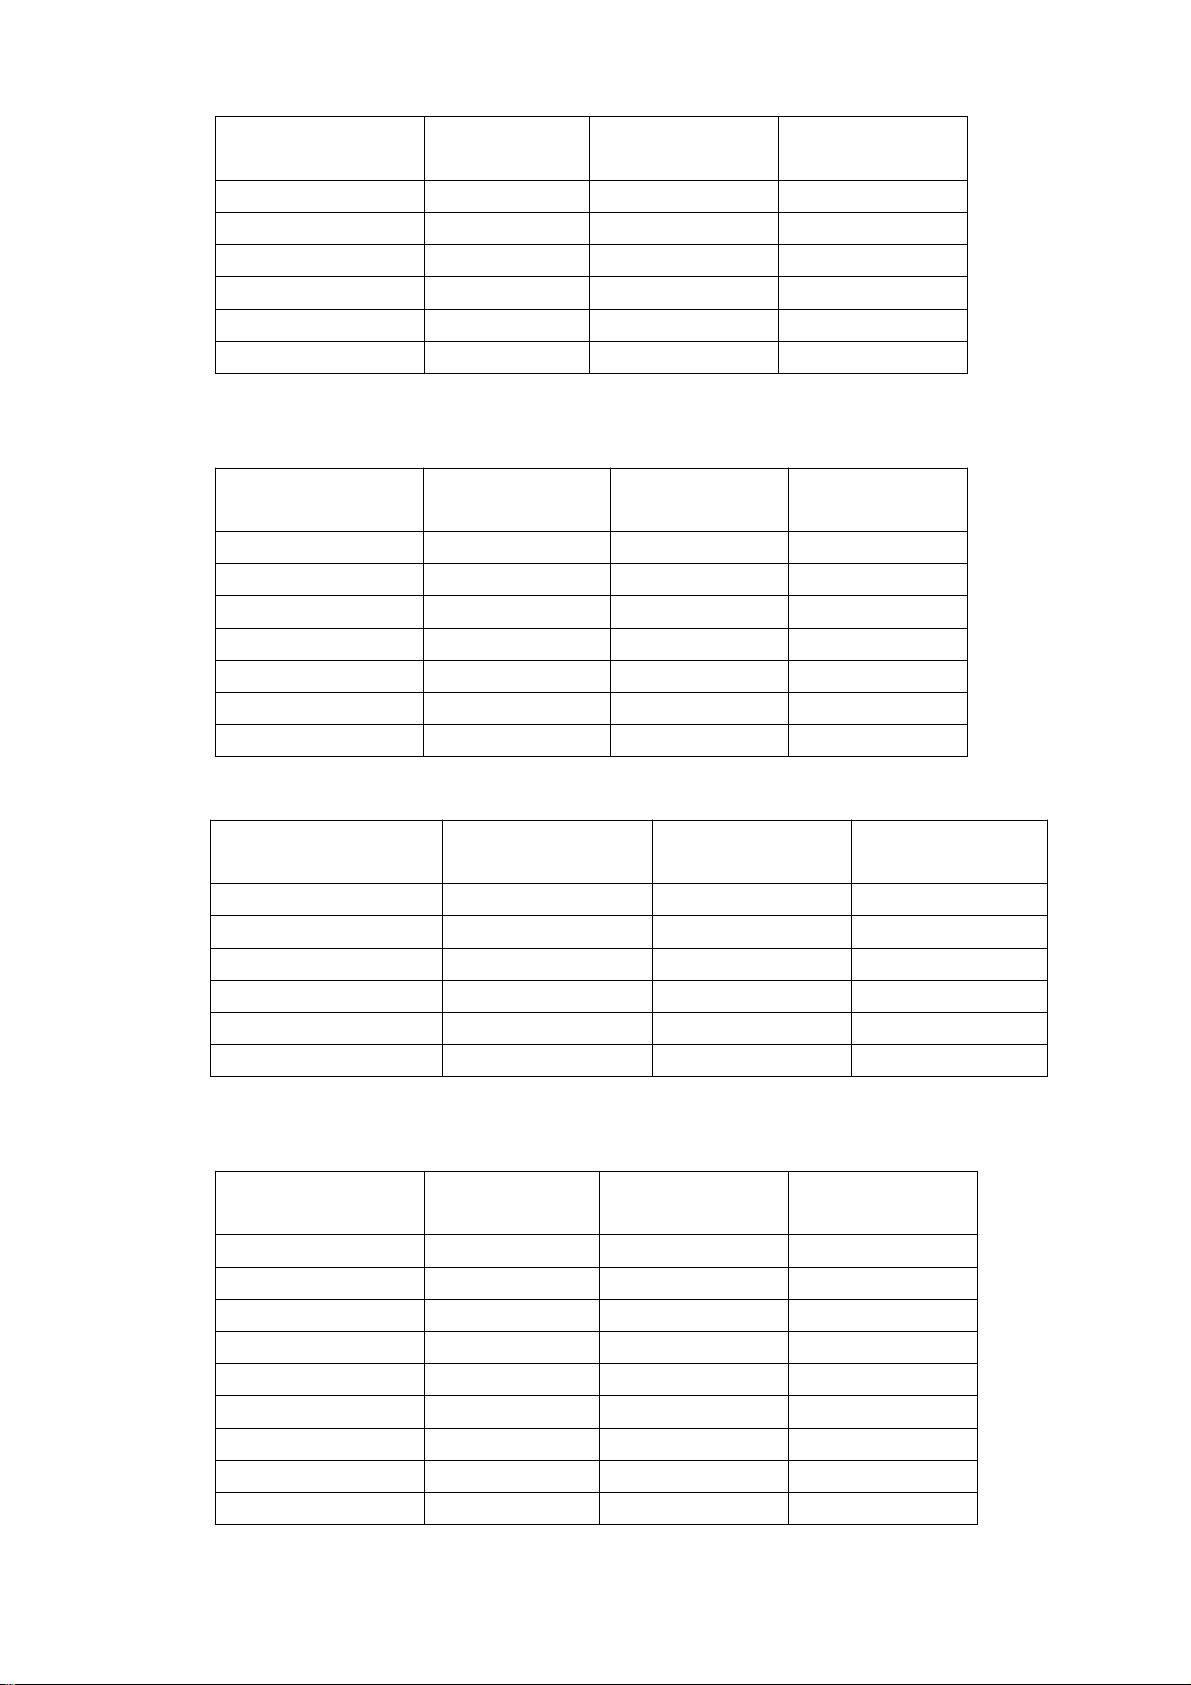
五、SUPER RAPID BREAD:
31
SIZE
MATERIAL
1.WATER(48℃) 270ml 350ml 440ml
2.OIL 2 tablespoons 3 tablespoons 4 tablespoons
3.SALT 1 1 .5 2
4.REFINED FLOUR 3 cups 4 cups 5 cups
5.SUGAR 3 tablespoons 4 tablespoons 5 tablespoons
6.YEAST 1 teaspoon 1 .25 teaspoon 1.5 teaspoon
六、DUOGH 七、 PASTA DOUGH :
SIZE
MATERIAL
1.WATER 270ml 350ml 440ml
2.OIL 2 tablespoons 3 tablespoons 4 tablespoons
3.SALT 1teaspoon 2 teaspoons 2 .5 teaspoon
4.REFINED FLOUR 3 cups 4 cups 5 cups
5.SUGAR 2.5 tablespoons 2.5 tablespoons 3 tablespoons
6.YEAST 0.75 teaspoons 1 teaspoons 1.25 teaspoons
750g 1000g 1250g
750g 1000g 1250g
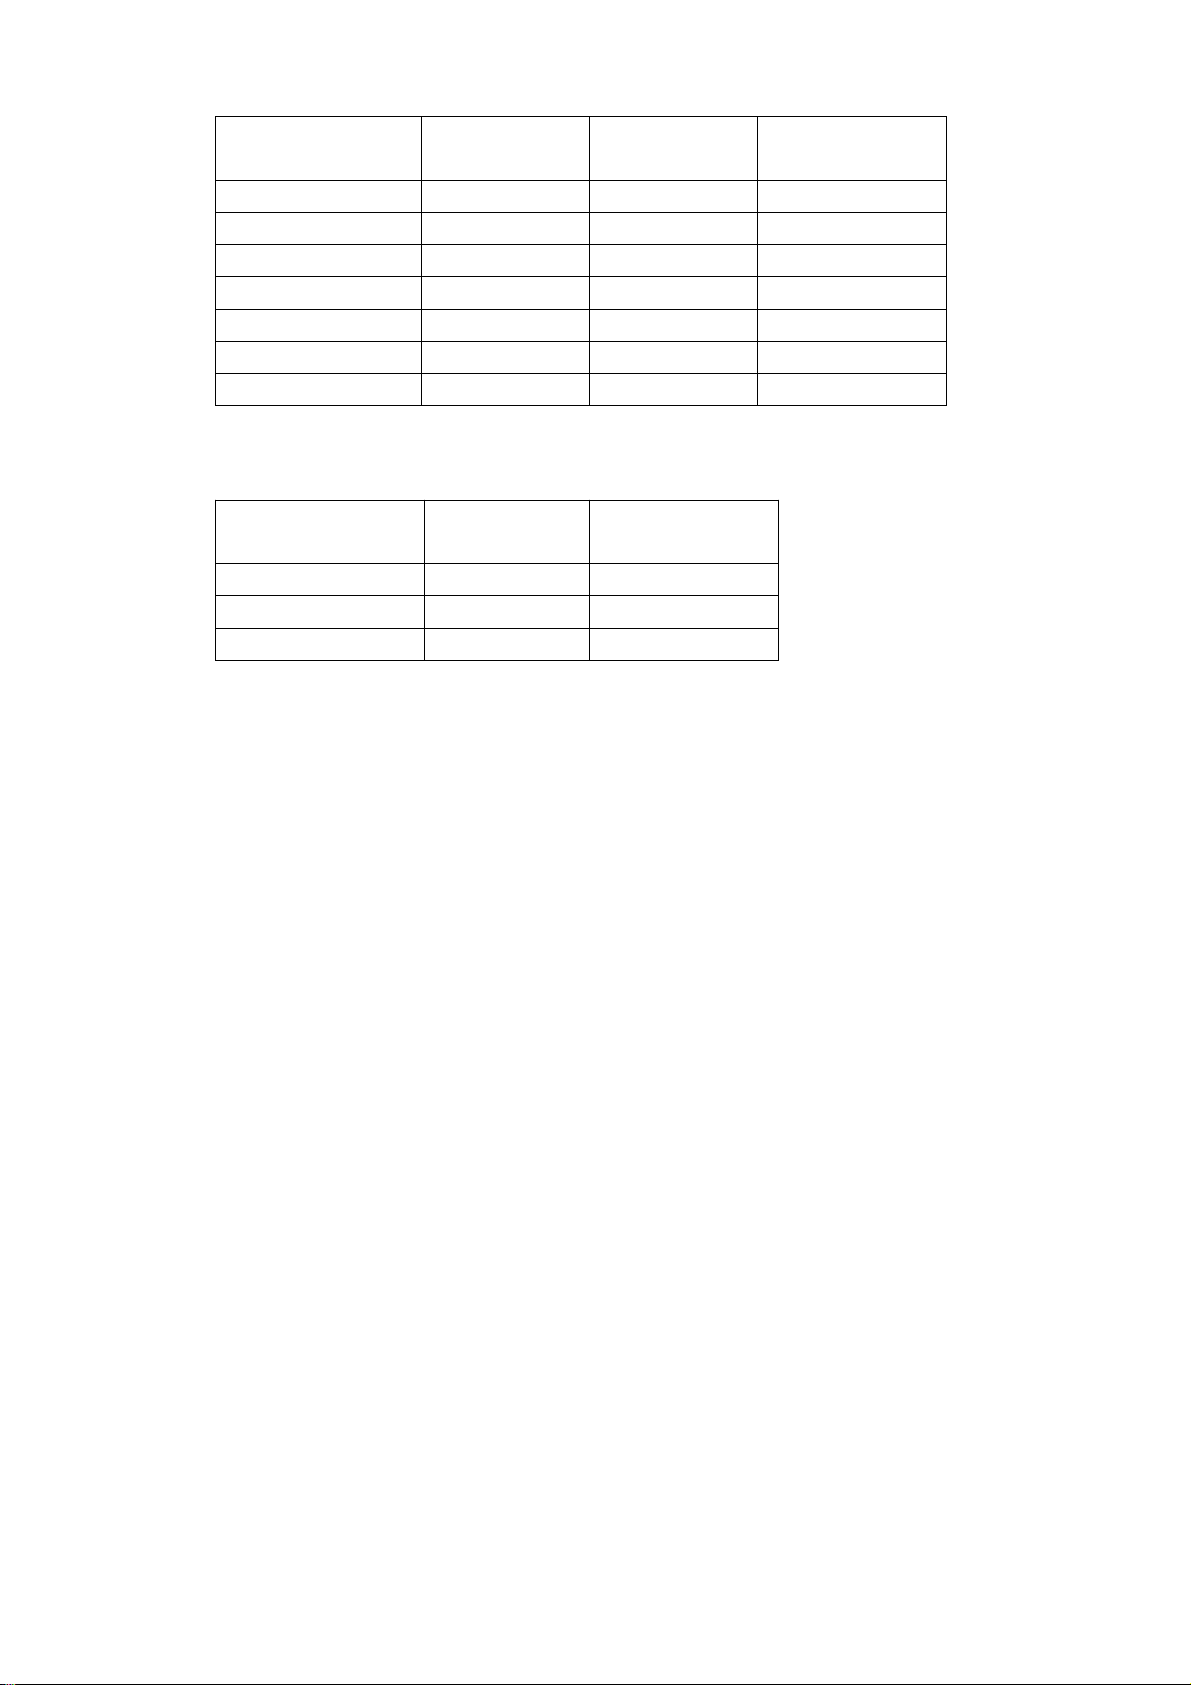
八、BUTTER MILK
SIZE
MATERIAL
1.MILK 150ml 200ml 300ml
2.OIL 120ml 150ml 150ml
3.SALT 1teaspoons 1.5 teaspoons 2 teaspoons
4.FLOUR 4 cups 4 cups 5 cups
5.SUGAR 1.5tablespoons 2tablespoons 3 tablespoons
6.YEAST 0.75 teaspoons 1 teaspoons 1.25 teaspoons
九、GLUTE-FREE:
SIZE
MATERIAL
1. WATER
2.OIL 3 tablespoons 4 tablespoons 5 tablespoons
3.HONEY 1/4 cups 1/ 3cups 1/ 2cups
4.VINEGAR 1 teaspoon 1 teaspoon 1 teaspoon
5.EGG 2 2 3
6.CORN FLOUR 3 cups 4 cups 5 cups
7.SUGAR 3 tablespoons 4 tablespoons 5tablespoons
8.SALT 0.5 teaspoon 0.5 teaspoon 0.75 teaspoon
9.YEAST 0.75 teaspoons 1 teaspoons 1.25 teaspoons
750g 1000g 1250g
750g 1000g 1250g
1/2 cups 2/3 cups 1cups
Page 34
十、 CAKE :
32
SIZE
MATERIAL
1.BUTTER 1cups 1.2 cups 1.5cups
2.SUGAR 0.5 cups 0.75 cups 1cups
3.EGG 468
4.Self-raising flour 2 cups 3 cups 4 cups
5.Flavouring essence 1 teaspoon 1 teaspoon 1 teaspoon
6.LEMON JUICE 1 tablespoons 1.5 tablespoons 2 tablespoons
7.YEAST 0.75 teaspoons 1 teaspoons 1.25 teaspoons
十一、JAM:
SIZE
MATERIAL
1.Smashed strawberry 4 cups
2.SUGAR 1 cup
3.Pudding powder 1 cup
750g 1000g 1250g
十二、BAKE:
将 DUOGH 好的面团 BAKE。
Page 35
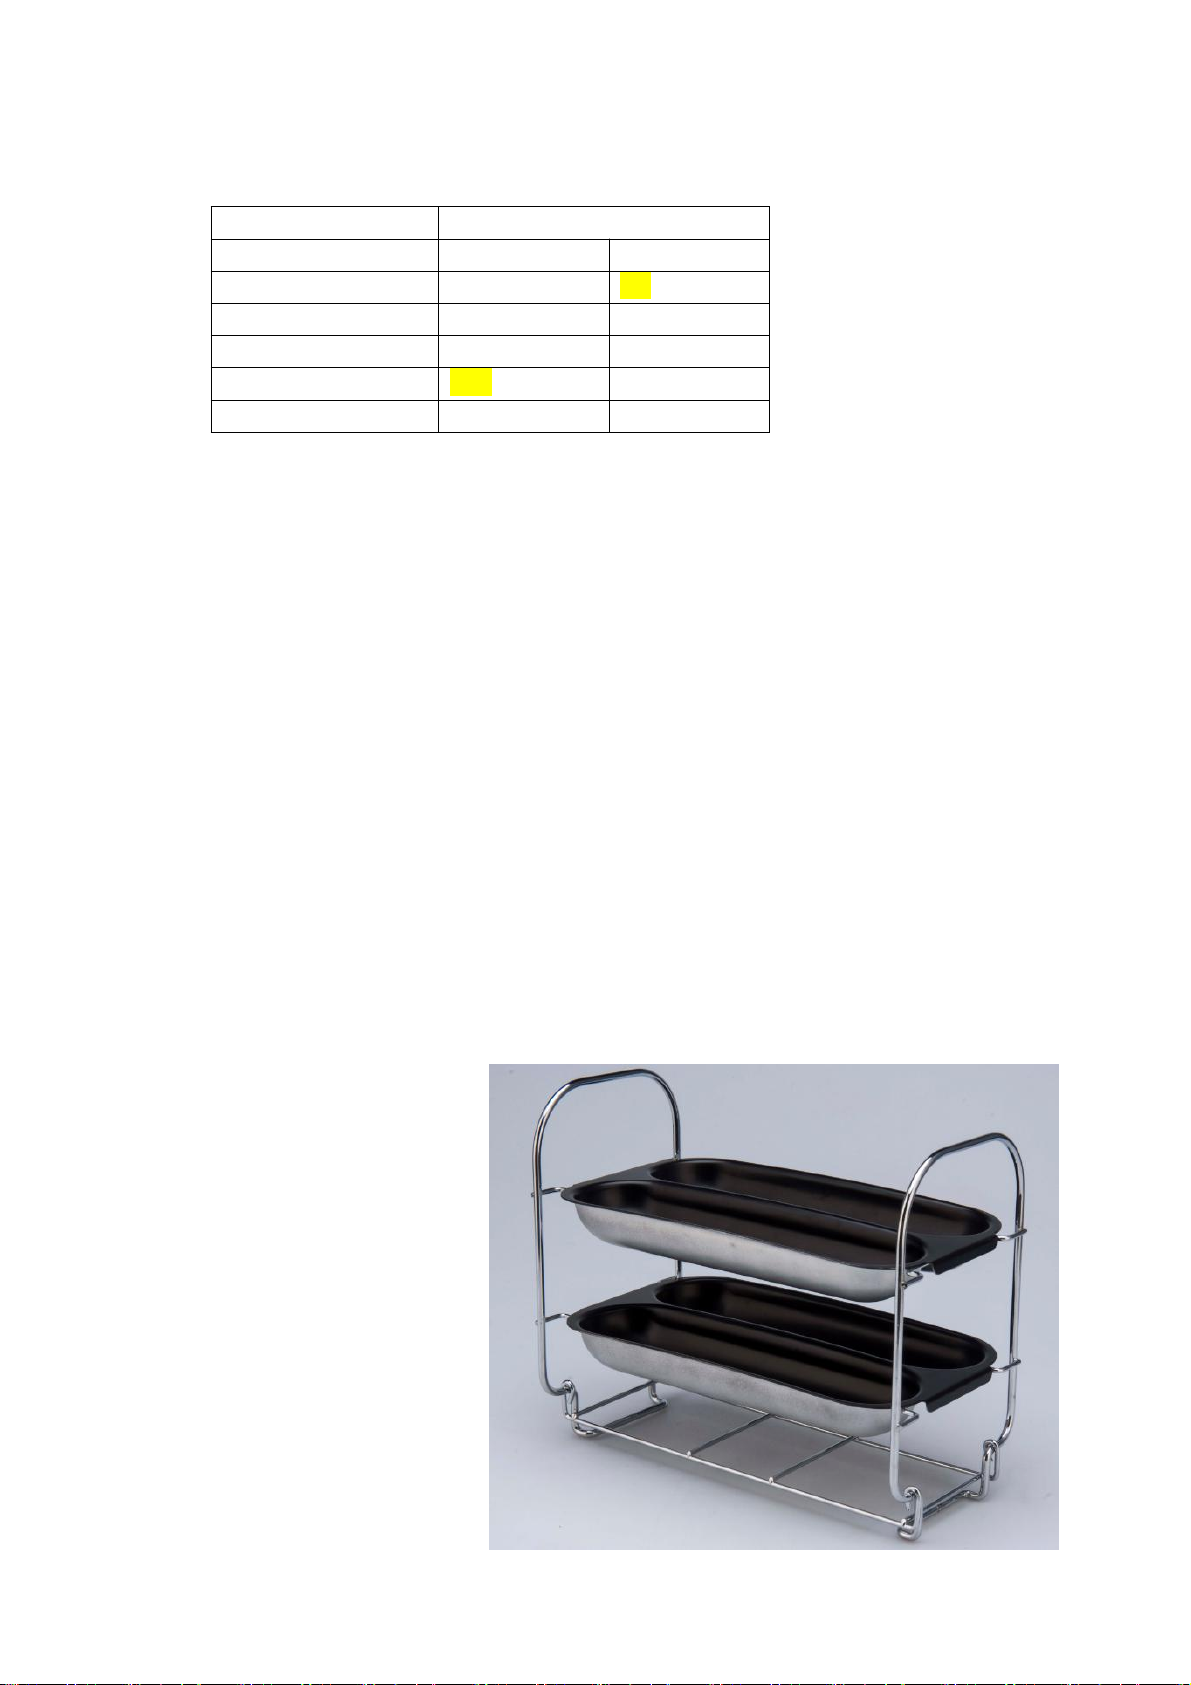
Recipe
33
:
SIZE MATERIAL 4X150g
1.Water 220 ml 220g
2.Oil 2 tablespoons
3.Salt 1 teaspoons 7g
4.Sugar 2 tablespoons 26g
5.Flour
6.Yeast 1 teaspoons 3g
400g 2.65 cups
24g
Process
:
According to above recipe, put all materials in to bread pan, use menu
“DOUGH”, after 1 hour and 50min, take out the dough, cut it into 4
slice, and then separately put them into the 4 grill, then put the whole
grill into the bread maker and choose “BAKE” menu, after 60min,
good taste bread stick finished.
Remarks
Flour:1 cups=150g
Oil: 1tablespoons=12g
Salt:1 teaspoons=7g
Sugar:1tablespoons=13g
Milk powder:1tablespoons=7g
Yeast:1 teaspoons=3g
:
Page 36

 Loading...