

Page 1

Page 2

Page 3

CO
N T
EN
T S
Instruments
and
Controls
Run-in Period
Operating the
Car
Lubrication
If
you
must
change
a tire
Maintenance
and
Car.
of Car
Service
and
Adjultments
Seasonal
Sorvicel .
Technical Reference
Data.
Index.
Page 4

A
WORD
TO T
HE
OWNER
You
ARE UNDOUBTEDLY AS PROUD of
your
new Stude-
baker
as
we who de signed
and
built it. Y
ou
will
want
it
to
give you first cl
ass
performance
at
all
times
under all
condit
ions
of weather
and
roads.
And
you'll
wa
nt
to
keep
. its sp
arkling,
shining, new
car
appea
rance.
To
tha
t e
nd
we
have
assembled
in
this
book
informa-
ti
on which we believe will guide you . We
have
included
the main answers
to
the
questions of W
hat
you
have
, Dow
it
is operated, a
nd
How
it
is
car
ed for.
We
have
not atte
mpted
to
ma
ke a r
epair
or
adjust
men
m
anual
of
this Guid
e,
for such a book would
be
of
little
value
or
interest
to
the
average ow
ner
. We
have
included,
however, some
te
chnical service
inf
ormation
so
that
\
will be able
to
give this book to
any
mechanic
for
ezp.erg
service
or
adj
ustment
if
such e
ver
becomes necessary
w
you
are away fro
m
the vicinity
of
an authQ
ri:z;ed Stud'e-
bak
er
deale
r.
Such
an occ
asion
rarely ar
ises,
for
you
have
thel as-
su
ran
ce
of a friendly, natio
n-wide dealer
service
orga
niza-
tion.
In addition,
Studebaker regional offi
ces and facto ry
parts
depots are conveniently
l
ocab~d
in leadi
ng cities
t
hrough
out the country.
Always
lo
ok for
the
Studebake
r a
uthorized service
sign.
It
mea
ns specialized a
nd exper
ienced atten
tion to
your car, and a continuing
interest
in yo
ur satisfactory
use
of
it.
THE STUDEBA
KER
CORPOR
ATION
SOUTH BEND
27.
I
NDIANA
2
Page 5

Page 6

ST
UDEBAKER FACTORY
,WARRAN
TY
WE WARRA
NT E
ACH
NEW MOT
OR
V
EHI
CLE
sold
by
us
to
be
free
from
defects
in mater
ial
and work
manship under normal
use and
service,
our
obligati
on u
nder
this
warranty
being limited
to
maki
ng
good
at
Studeba
ker factories
any
part
or
parts
ther
eof, including
all
equip-
ment
or trade accessories
(except
tires) supp
lied
by Studebaker
as
standard
or optional equ
ipment,
which
shall, within
nine
ty
(90)
days
a
fter making
delivery
of
such
vehicle
to
the origin
al purchaser or
before
such
vehicle
has
been
driven
four t!lOusand
(4,0
00) miles
,
wh
ichever
event
shall
first
occur,
be
ret
urned
to
us with,
transportation
ch
arges
prepaid
and
wh
ich
our
examination shall
disclose
to
our
satis
fact
ion
to
have
been thus
defective;
this
warranty
being
expr
-;;
ssly
in
lieu
of
all other warranties,
express
or implied, and
of a
ll
oth
er
obligations
or liabilities
on
our
part,
and
we neither
ass
ume
nor
aut
horize any
other
person
to
assume
for
us
any 'oth
er
liabili
ty
in
con
nection
with
the sale or
use
of
our
mot
or
vehicles.
This warranty
shall
not app
ly
to any
motor
veh
icle
which
shall
have
been repai
red
or
altered
outside
of
Stu
deba
ker
factori
es
in
flY
way
so
as,
in
our judge
ment,
to
aff
ect
its
stability
or reliability,
1101'
which
has been
subject
to
misuse
, neg
ligence
or
accid
ent, nor
to
an~
commercial motor
vehi cle sold
by
us
which shall
have been operate
at a speed exceeding
the
factory
rated spee
d,
or
loaded
beyond
thfe
fact
ory
rated
load
capacity
. /
THE STUDEBAKER 'CORPORATION
SOU
TH
BEN
D 27,
INDIANA
We
reserve the
right
to
make
changes
in design
or to
make
additi o
n~
to
or improvem
ents
upon
our products wit
hout
incu
rring
any
ob
ligations to install
the
same on vefLicles previou
sly
built
.
BAT
TERY
WARRAN
TY
THE
;J.~
LARD
,
STORAGE
BATTERY
COMPANY
provides
a 90
day
standa
rd,~ct
~r
y
"
irar
ranty
on
the battery. They
also provide
an
ad
j ustment: policy prorated
on a
sliding
scale based
on
the length
of
service
of
the
bat
ter
y.
Your Stu
debaker
deal
er
will
be
pleased
to
handle
deta
ils
of
batteryn
warranty
ser
vice
for you.
RRANTY
A PHILCO R
ADIO
warranty
,J
gistration
tag
is
attached
to
each
radio
whf'n
it
is
shipped
from,.th;
factory.
If
your
cllr
iH
equipped
with
Il
!'lIdio,
your
dealer
will'
fill
in
the
tag
properly
Ilnd
attach it
to
the
radio. This
tag
is
necessary
to
obtain
radio
wnnanty
service
from
you!'
Studebaker
dealer.
J
!
4
Page 7

L
OCATIO
N OF VEHI
CLE
NUMBERS
SE
RIAL
NUMBER
The seri
al
number
of your
car
is sta
mped
on
a
pla
te
attac
hed
to
the
left
front
door lock
p
illar
post. Re
cord
it
in
the
space
prov
ided.
E
NeINE
NUMBER
The
engine
numbe
r is
stamped
on
a ma-
chin
ed
pad
at
the
npp
er
left
front
of
the
cyl-
inde
r block. Record
it
in the space
pro
vided.
T
he
body
nu
mb
er
is sta
mped
on
a p
late
a
ttached
to
the
dash under the
hood. Record
it
in
the
space
pro
vided:
.'
~l'
I gnition and front
do~
t
~
___
_
__
_
This
number
is stampe
\ ' on
Ii
me
tal
tag
furnished
with
the
keys\ Record
it
in
the
space
pro
vided.,
\
,
Package Compar
tme
nt
and
Lu
ggage Com-
partme
nt
Doo
rs:
;.
,
.
~
____
_
This
number
is
stamped'
Qn
~
the, compart-
ment
key
or
on
the
lock
hou
sin¥.;,Rec
ord
it
.
..
",\'-
..
~ '''': )~'~
.m
the
spa
ce provIded. " , .
PAINT AND TRIM: W
he
~~,~ring
paint
mate
rials
be
su
re the
body and
serial
n
UIll
\1rii
above
af:"
well
as
the
paint
f~'~
_ : .
..
1.
-
~'.l.:
symbol
printed
on t
he sticker
attac
Jlt
ed'to.
th-eundersideof
the
pac
kage
compart
me
nt
aC~6mpany
yo~r
order
.
, '~,
When
trim
mat
eri
als
are
needed,
it
is
imp
orta
nt that
the
serial
and
bo
~
numoers
which
you
have
recorded
above be
furnish~d.
·
i
5
Page 8

'L
t
...
REAR
VIEW
MIRROR
,,"
-,~,
.:
WiN
DSHIELD
WIP
ER
CONTROL
)
£#"
..&::
.
!£
"
p.
DOOR
WINDOW
DOOR
REMOTE
HANDLE
YAP
" 'GHT
--------
-
GEA!tSHIFI
LEVER
....-
BR
IGt-IT LIG
HT
SIGNAL
'"
5"fEDOMETER AND ODOMET
ER
GAGES
(HEAT-OIL-FUEL-
AMPERES)
HORN
PUSH
BAR
-----
ASH
TRAY --------
CIGAR
LIGHTER
--
----
CLiMA
TIZER
AIR CONT
ROL
DEFROSTER
CONTROL
~
FOG LIGHT SWITCH -'!
CLiMA
TIZER
WATER
CONT
ROL
HO OD LOCK
RELEASE
- -
--
OVERDRIVE
CONTROL
--
-~
COWL
vENnLATOR INN
ER
DOOR
AC
CELERATOR
PEDAL
---
-
BRA
KE PEDAL
----
--
~
CLUTCH
PED
AL--
---~
ST
ARTER SWIT
CH B
UnoN
-
HEADLIGHT
BEAM
TCH
, ~e:
INSTRUMENT
AND MAP LIGHT
~
SWIT
CH
HEAD AND PARKING LIGH T
SWITCH
Page 9

INSTRUMENTS AND 'CONTROLS
The driver
of a new ca
r should become familiar
with
the
functions
of
the ins
truments and contr
ols illus
trated
on the opp osite. page before operat
ing
the car,
Th
eir
func-
tio
ns are described below. Standard equi
pment
varies on
different models. The illustration includes
standard
and
extra
equipment.
IG
NITION
SWITCH
Th
e i
gni
tion
switch
is
operated
by
m
eans
of a key
which,
when turned
to
the
right,
sup
plies
cu
rre
nt
to the ignition
system
and
accessories.
Turned
to
the left,
the
key
completes
the
ele
ctrical
circuit
to the gaso-
line gage,
radi
o,
and
other
accesso
ries
but
not
to the igni
-
tion.
The ig
nition
key
should always
be
removed whe:l'bYou
leave the car.
STARTER
SWITCH
The
start
er
is
cont rolleu 1
by a button
~
on
the
toeboard
loc
ated
directly
beneath
the
clutch pedal.
By completely
depres
sing
the
clutch
peda
l,
the
electrica
l
circuit
through the
sta
rter swi
tch is comple
ted.
'Do rlot
operate
starter
when the
engi
ne
is running.
.
AMMETER W
hen the e
ngine
is
not
running
and any
of the
electri
cal
circuits
are
in use,
the
ammeter
will,
register
a di
scharge (-).
Wi
th the
engine
run
ning
at
a
reas
onable speed, even though all e
lectrical
circ
uits are
in
use, the
amm
eter
will
register a charge
(+)
u
ntil the
bat
-
t
ery
is completely
cha
rge
d,
after
wh
ich
the needle
should
swi ng
back an
d r
em
ain around
the zero
mark.
Any
abn
or-
mal fluctuati
on
of the
ammeter
needle
in
either
directi
on
is a si g
nal
to
the driver
to
have
the
electrica
l sys
tem
checked and
serviced by
his
authorized
Studebaker
dealer.
HEAT INDICATOR
The
temperat
ure
of
the
coolant
in
the
engi
ne cooling
system
is
shown
by
the
electric
hea~Jll
dicat
or
which, under
normal
conditions,
should
regt~
approximately
170
0
F.
(76,7
0
C.
).
In Hummer,
and
on
hot,
l
ong drives
this
may norma
lly be a littiP hig-her.
If
the
gage
regis
ters an
:IiJl'upt
or
continuous
rise
to
7
..
»,
Page 10

212
0
F . (100"
C.),
stop the
car
immedia
tely and inv
gate.
Check the
water
level,
fan
belt, hose co
nne
ctions,
al
look
for
wate
r leaks. Co
ntinue
d use at 2120 F . (1000 C.)
will
cause ser
ious d
amage
and unnecessary expen
se.
The gage
re
gisters only
when
the
ignition
key
is
t
urne
d either
to
the
rig
ht
or
left.
Check the
water
level frequently.
GASOLINE GAGE
The
gasoline
gage registers
wh
en
the
ign
itiun key is
turn
ed
either
to
the right or le
ft.
If
you
wish to
kn
ow
the
quantity
of
fuel
in
the tank when
the
engine is not r unning, t
urn
the ignition key to
the lef
t.
It
ta
kes
about
30 seconds
for
the gage
to
register
aft
~
the
ignitio
n key is t
urne
d.
OIL PR
ESSURE
GAGE
The
oil
pressure
gage
ind
ica
tes
t
he
work
ing pressur
e of t
he
oil
as
it
cir
culates w
ithin the
'
engine.
Norm
ally, the
gage
will register
bet
ween
20 and'
40 po
und
s (1,4
an
d 2,8 kgs.) at 40 miles
(64 km
.) p
er
hour.
Th48
gage
doe
s not indicate the
am
ount
of
oil
in
th
e cTankcase.
If
t
his
gage
should fluct
uate rap
idly
or drop to zero,
STOP the
car
immedi
ately
and
check the cause .
Continu
ed
operation of the
car
under
these conditi
ons
will
proba
bly
cause
serious' damage.
tOCKS AND
KEYS
' Two
sets
of keys
are
furn
ished
wi
th
the
car. One
key
opera
tes the fro
nt
door exte
rnal
locks and the
ignition
switch.
The oth
er
key
operate
s loc
ks
on the pac
kage
compart
me
nt
door and
the
luggage com-
p
artment
li d.
To p
reve
nt ul1authori zed
persons
from
purch
asing
a
du~licate
ignition key, the
-py
num
ber does
not
appear
on
the
lcey
or
on the fac
e. of"
the
l
o~k,
b
ut
is stam
ped
on a
small
me
tal
tag
s
uppl!~d
with
the
keys.
The
compartment
key
number
is st
am12
ed on the key
or
on
the
lock hou s
ing
.
B
ot
h
k<,y
numbers shoul
d be recorded on
page
5
of
this
8
Page 11

.
anual
and
elsewhe
re
amo
ng the
own
er's
permanen
t pos-
sessions,
after wh
ich
the
me
tal
tag
shou
ld be destroy
ed.
Dupli
cat
e keys may be
orde
red
by
key p
umb
er
from
the
nearest
au
thorized
Stu
debake
r dealer .
If
the key
num-
bers
are
not
kno
wn,
the order
must
be
accom
panie
d by
the car
serial number.
Fr
ont
door
lock con
trols
are
des
igne
d so
th
at
either
f
ront
do or, locked
from the inside,
may
be
opened from
t
he
outside with the key.
This
is an ad
van
tage
in
parking
lo
ts
whe
n close pa
rkin
g blocks one door. .
If
an inside
front
door handle is set
to
"lock" po
sitio
n
with
the door
op
en and
the
door
is
then
closed, t
he
lock
relea
ses;
Studebaker
front
doo
rs
must
be key-locked
in
such circums
tances.
The
key will al
ways
unlock
either
of
the front door
s f
rom
the ou
tside
no
matt
er
whether
it
has
\ been locke d from the i
nside
with the
door lock control
or
~ocked
from
the
outsi
de
with the
key.
The
next three par
agraphs
explain the
op~ration
of
the door
locks. . .
l.
Front
door
inside
handles,
when pushed
up from
t
he norm
al
posit
ion
to
lock
the door from
the
ins
ide,
will
spring back
to
the normal
posi
tion alt
hough
the
lock will re
ma
in
set.
2.
The front doors are
locked
from the
out
side
by
m
aking
one-qu
arter
t
urn
with
the
key. T
urn
the
key clockwise on
left front
dooFs a
nd
cou
ntercl
ock-
wi
se on
rig
ht front
doors.
Retu
rn the
key
to
the
v
erti
cal
posit
ion
to
remov
e it
from
the
lock. To
unlock
th
e f
ront
doors
follow
the
same
procedu
re
e
xcept
turn
the
key
one-quarter
ru~n
in
the
opposite
direction to
that
used
to
loek
tbe
door .
3. To lo
ck eith
er
rear
dbor
of
sedans, ·simply
mo
ve
the
ins
ide
door
hand
le
upward,
wheth
er the
door
is op
en
or
closed.
The
door' will
remain
locked
un
til
the
insi
de
rear
door
haiidle is moved down-
ward
to the
full open position.
9
.
~
Page 12

HOOD
LOCK
Th
e hood lock
safeguards
your
batte~
car
bur
etor,
and
other
un{}er
-the-hood
equipment
against
theft
and
tampering
as
long
as
the
car
doors are locked.
The
hOod
control
(marked
"H")
is
the middle
one
of
t he
three
controls located on
the driver's
si de of t
he
car just
below
the
lower
end
of .the
instrument panel.
To
unlock
the
hood, pull
the
control until t
he aut
oma
tic hood
lo~k
is
released. To
raise
the
hood, release
the saf
ety latc
h as
illus
trated.
As a sa
fety measure,
after
raising
the
hood ,
rem
ove
the
end
of
the
hood
prop
from its
. br
ack
et
and.pla
ce .
it in t
he
hole provided on
the
underside
of the hood at
the front.
C
are
should always be
taken
in
raIsmg or
lowering
the
hood.
Never
try
to force
the
hood lock
or
safety
lat
ch ..
This
might
affect
adjustments which
would r
esu
lt in
an
improperly
operating
part.
,.
/
Lower
the
hood firmly so
that
the
automatic
hood
latch
and
the
safety
latch
are
fastened
securely,
Page 13

. LIGHT CONTROL SWITCH A
pull
type
switch
control
1S located
on the driver's
side
of
the
lower
instrument board
to oper
ate the
tail
lights,
parking
lights,
and
headlights.
PARKING AND
TAil
LIGHTS
Pull
light
switch
control
to
the
firs t
posit
ion
for
parking
and tail li
ghts.
HEAD
LIGHTS
AND
TAIL
LIGHTS
Pull
the
light
switch
control
as
far
out
as
possible (second position)
to
operate
the hea
dligh
ts
and
tail
lights.
HEADLIGHT BEAM CONTROL SWITCH
The
foot
-op
er-
.
ated switch
to the
left
of
the
clutch
pedal
operates
the
. head
lig
ht
beam.
Pressi
ng
down on
the
switch
will
change
the
hea
dli
ghts from cou ntry
to
traffic beam,
and
vice
versa
as
traffic cond
itions
require. Wh
en the
country
beam
is
in
uSe
the
red tell-
tale ligh
t in
the
speedometer
face
will
be
lighte
d. Use
the
traffic
beam
when approaching
oncoming
,
'\ tra
ffic
and
in
city dri
ving.
\
I
NSTR
UMENT
AND
MAP
LIGHTS
The
instruments
are
lig
hted wit
h non-gl
are
bl
ack
light.
The
lights
are .cont
rolled
by
a pull
type switch
located
next
to
the
headlight
switc
h.
,
Pull
the
control
to
the
firs~
position
for
ins
trument
lights
.
Pull the
control
to
the
second
position
for
the
~ap
lig
ht
when
front
doors are closed.
The
map
lig
ht
is on
whenever
eit
her
fro
nt door
is
open.
DOME LIGHT
The
dome
light
goes on
in
2-door
mode
ls
when
either
door
is opened. In 4-door moaels
the dome light
goes on
when
either
of
the
rear
doors
is opened. Wh
en
the
doors
ar
e closed, the dome light
may
be o'Rerated
by the
switc
h just to
the
rear
of
the
right front
d09r. '
There
is no dome
lig
ht
on
convertible
models.
LICENSE
PLA
TE LIGHT
The
light for
the "rear
license
plate
is loca
ted
in
the
center
of
the
luggage
comparttiten
t
handle
. The
ligh
t operat",s
whenever
the
headlights are
t
urned
on.
STOP
LIGHTS
They
light
whenever
the
brake peda
l
11
Page 14

is
depressed,
making
a
distinct
red
lig
ht
shine
to
wa"
follow
ing
vehicles.
LUGGAGE COMPARTMENT LIGHT
Th
is
light
goes on
when
tail
lights are lighted and the
luggage
compartmen
t
lid
is
ope ned. The luggage compaT
tme
nt
light
is
available
at slight e
xtra
cos
t on Champion Delux e
m@
dels.
PACKAGE COMPARTMENT To open
the package
com-
partme
nt door
after unlocking, turn
the rotary
knob
to the
right and
open door. A light (ext
ra cost
on
Cham
pion
models) g
oe
s on when the door
is
opened.
ASH
RECEIVER
To remove the tr
ay
for
clean
ing,
pus
h
down on
the
retain
er while pulli
ng
outward
on
the tray.
FRONT
SEAT
ADJUSTMENT
T
h~
front
se
at
is
eas
ily
adjusted
forward
or b
ackward
by
rai
sing
the
control
lever
at
the
driver's
si de of t
he
seat
(as
shown in the
illus t
ra~
tion) which unlocks the m
echanism and
permit
s the
seat
to be
~hifted
to
the
desi
red
position.
In
ad~ition
to this
quickly
adjus
ted
shift
, t
her
e a
re
thr
ee basic p
Of;>itions
in
which
the
seat can
be
bolted by
,
.'
your
authorized Stu
debaker
dealer
to
acco
mmodate the
leg
len
gth
of t
he owner.
Fro
m a
ny
of
these
basic
positions,
th'e
"'
front
"~~a
t
a
dju
stmen
t mec
hanism
will
give
you
the
full
adjustment
range.
Page 15

CLUTCH PEDAL
The clutch pedal
disengages
the
clutch
.vh
en
dep
res
sed, engages
it when
released.
The
clut
ch peda
l,
de
pr
essed
to the
floorbo
ard, also oper
ates
the
starter but
ton
loca
ted
dire
ctly
under the
ped
al.
STEERING POST GEARSHIFT
The steering post gear-
shif
t is operated
in
the
conventional
manner, and p
rovide
s
th
ree speeds f
orwa
rd
and
one speed
reve
rse.
LUGGAGE
COMPART
MENT
LID
AND
LOCK
The
luggage
compartme
nt
lid is controlled
by
a lock and
hand
le w
hic
h
form
the
right
"wing"
of
the rear eInblem incorporatin
g
the
lice
nse
plate
light
and rear
license pla
te
brac
ket.
The
luggag
e com
partment
lock is op
erat
ed w
ith
the
same key
whic
h op
erates
the
package
compartme
nt
lock.
To open
th
e lu
gga
ge
compartment,
unlock t
he
handle
wit
h t
he
key,
press
down s
lightly with
the
left han
d on .
t
he
left
"wing"
of the
emblem
and
at the sa
me time
raise
\
~he
right
"wing" app
roxim
ately 45
0
,
as
shown in
the· illus- .
tr
at
ion.
The
lid can nO
'N
be raised.
Counterbalanced hinge
sprin
gs keep the
lid in
the open
posi tion
for
you
r con-
venie
nce in rem
ovi
ng luggage,
spar~
wh
eel, etc >
To close the
luggage
compartment,
place (he
h
ar.~d
le
in
its
straight hOTizo'Yl,ta
l position.
Th
is is
important
to
s
ecure the
latch
when the lid is
lowered
. !Jo
ck
the
handle
·
a
nd remove the key. Lower lid firmly
to
be
sure
-
<it
has
latc
hed. T
he
tig
ht
rubber
weat
herseals
have a $pring
a:e,ttpn
whic
h will tend
to
hold lid
in a slig
htly rais
ed posit
}prf
unless
it
is firmly closed.
Page 16

BR
AKE
CONTROLS
Braking
pressure
is
applied
to
I>.,
fo
ur
wheels in proportioll to
the
amount
of
foot
pressurto.
ap
plied to
the
brake
pedal.
The
parking
brake
lever
operates
independently of
the
hydraulic
brake
system, apply
ing
brake
pressu
re
to
the rear
wheels only. To
set
the
parking
brake,
depress
brake pedal and pull back on pat-king brake handle.
To re-
lease the
parking
hrake,
depress
brake
pedal, pull 'back
slig
htl
y on
the
handle,
press
the
release
button
with the
thumb,
and
let
the handl
e move fo
rward.
WINDSHIELD WIPER
AND
WASHER CONTROL
The
win
d-
sh
ie ld
wiper
control knob, located
at
the
top
center
of the
instrument
board, m
ust
be
turn
ed clockwise
to
operate
the
wi
per
blades. Speed
of
the
wiper action
can
be
governed
by
thi
s control.
The
windshield
washer
(on
car
s so equipped) is oper- .
ated
by
turn
ing
the
windshield wiper cont
rol
counte
r .
...
cl
ockwise
and
then turnin
g
the
contro
l clock
wise to
ob
tain wat
er
flow
and
wiper
operation.
Washer
automat
-
ically
shuts
itself
off
when
the
cycle
has
been completed.
Windshield
Washer
is availab
le
at
extra
cost.
SEAT
CUSHION AUXILIARY SPRINGS To
vary
the
front
seat cushion resiliency
for
the
driver
or
fron
t se
at
pa
s-
senger, Select- O-S
eat
cushion
springs are
available as
an
accessory.
These
springs
may
be inst
alled
in sets
of
fo ur
and
are
supplied
in
two
degrees
of
resiliency, firm
or
extra-
.;.
firm . One
set
may
be installed
in
the dri
ver's
side
or
one
set
in t
he
passenger's
side
of
the
front
seat
or
in
both
sides
of
the
seat
cushion.
Your
Studebaker
dea
ler
will be
happy
to discuss
Select
~
O-Seat
springs
with
you a
nd install them
as you wish.
Sele('t-O-Seat
Springs
are available
at
extra
cost .
14
•
Page 17
.
RUN-IN
PERIOD
The First
1000
Miles
(1609
km.)
All new mo
tors
require a
run-
in period
to insure
long
life wi th m
aximum
performance
and
economy. Follow
the
procedure outlined in
the next
paragraphs
.
CARBURETOR
SPEED
CONTROL
Your
car
is equipped
w
ith
a carburetor
speed control
wh
ich limits its
maximu
m
spe
ed du
ring
the
run-in per
iod.
This
speed c
ontr
ol should
r
ema
in on
the
car
unt
il y
our
Studebaker de
aler
removes
it
at 500 miles (805
km.),
500
TO
1000
MILES
(805
TO
1609 KM.) When
the
car
is ope
rated
at steady speeds above 40 miles (64,4
km
.)
.
per
hour,
re
lease the accelerator
occasionally
for
a
few seconds. This will aid
in pro
perly
breaki
ng
in
a new
, engine.
\ . Y
qur
car
speed
during
this
period should
not
exceed
'pO
miles (80,5
km
.) per ho
ur.
Engine
Oil
During
Run-In
The use
of
special
run-in
oils is
not
necessary. Use
only engine oils
pr
oduced
by
reputable
oil companies.
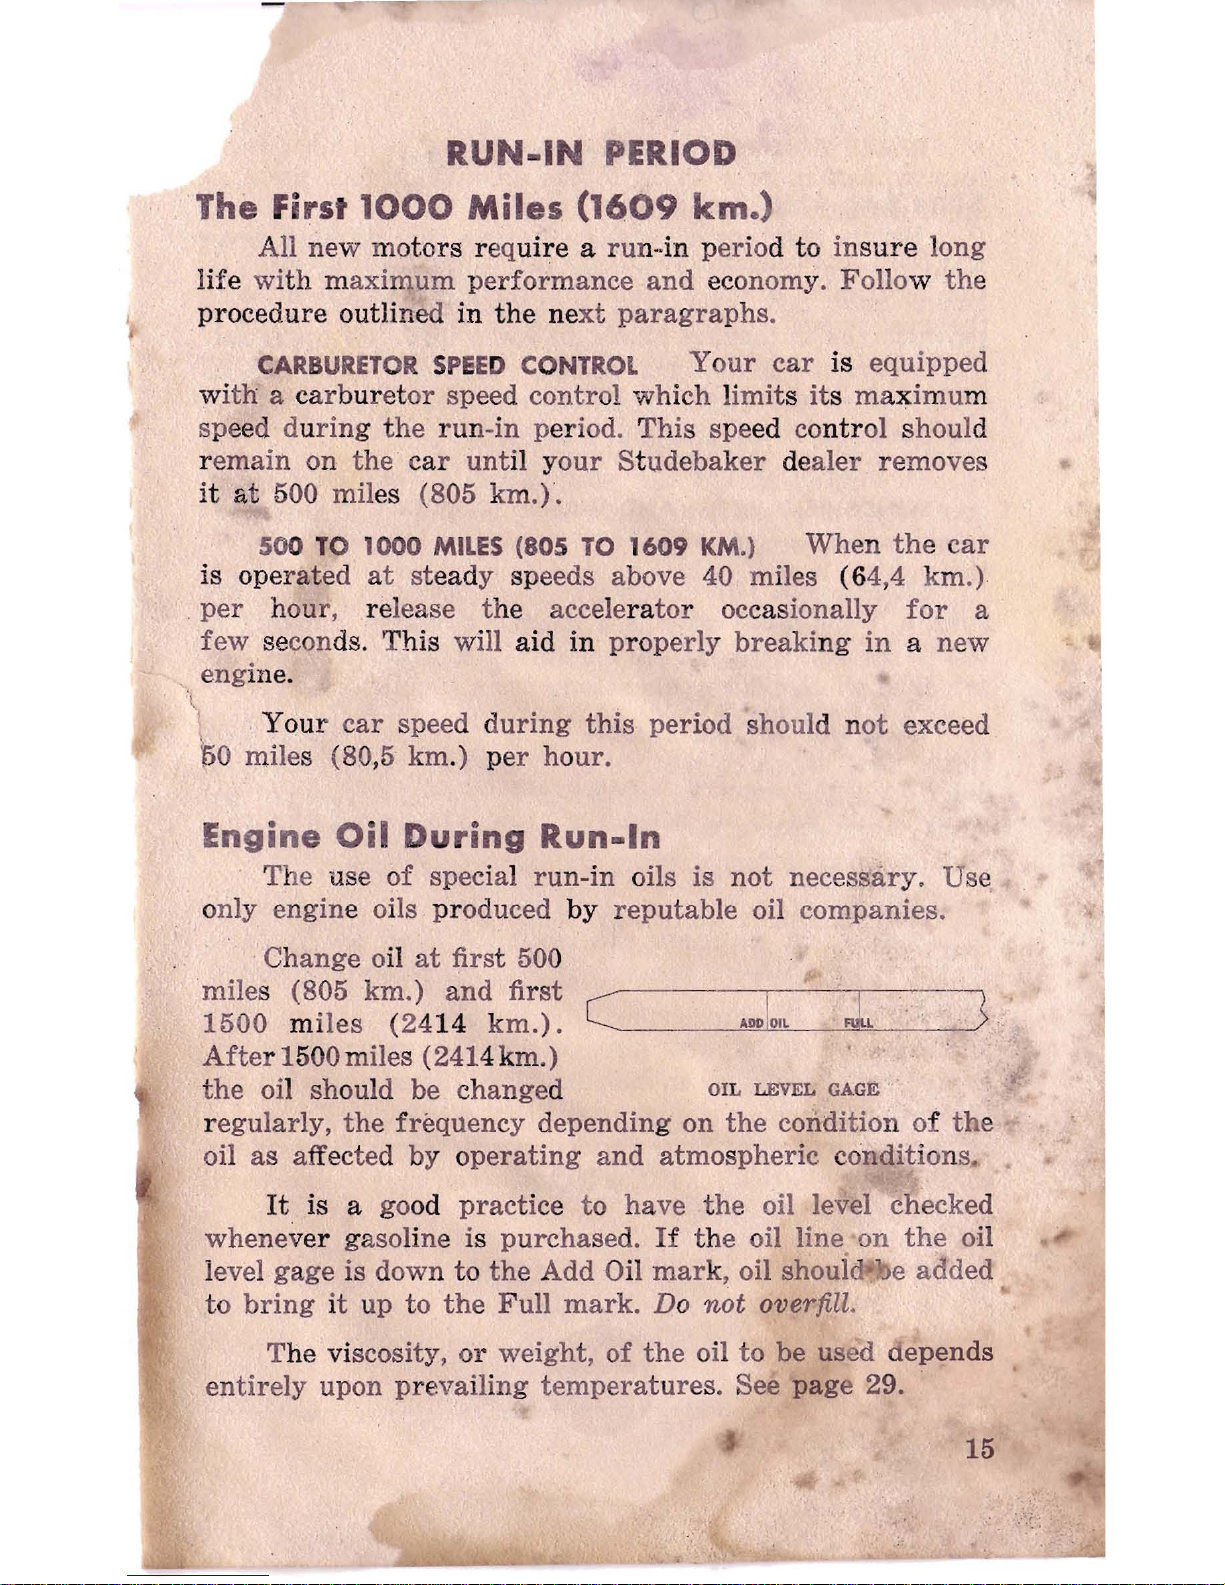
Change oil
at
first 500
miles (805 km.)
and
first I
~
}
1500 miles
(24
14
km.)
. C
~
"
~
.
ADD
OIL
. .
After
1500 miles (2414km.)
the
oil should be
change
d OIL LEVEL GAGE "
regularly,
the
frequency depending on
the
condition
of
the
oil
as
affected
by operating
and
atmospheric
conditions.
It
is a good
practice to
have
the
oil level checked
whene
ver
gasoline is purchased.
If
the oil line on
the
oil
level gage is down to
the
Add Oil
mark,
oil
shouid
~b
e
added
to
bring
it up
to
the
Full
mark.
Do
not
overfill.
The viscosity,
or
weight, of
the
oil
to
be
used depends
entirely
upon
prevailing
temperatures.
See
page
29.
15
Page 18
l
OPERATING
THE
CAR
\
Starting
the
Engi ne
Before s
tarting
the engine be
sure
the gearshi
ft lev
er
is
in
neutr
al position. ·
Depr
ess the accelerator
to
the
toe-
bo
ard
on
ce
only
and then immedia
tely release it.
This
per
mit
s the
aut
omatic choke
to
come in
to
full
operat
ion.
This operation is essen
tial to easy
start
ing.
Tu
rn t
he ign
i-
tion key
to
the right. Then depress the clutch pedal
to
the
toeboard to
operate
the starter.
If
engine should
not start after
a
few
revolutions,
co
mpietely depress accel
erator
and, holding it
in
this
posi-
tion, opera
te
star
ter
.
STARTING
A H
OT
ENGINE
It
is easier
to
start a ho
t
engine
if
the
acce
lerator
is held a
pproximat
ely
halfway to
the
floorboard until the
eng
ine starts
, Release the accelera-
t or as soon
as
· the
eng
ine starts.
,
WARMING UP
THE ENGI
NE
A . gaso
line engi
ne pe r-
for
ms be
st
when
it reaches an opera
tin
g tem
perature
o
~
approximately 1700 F.
(76,7
0
C.). In cold
we
ath
er
the
engine
temperature
should be r
ais
ed by allowing
the eng
ine
to
idle slowly
bef
ore driv
ing
the
car,
Do
not
driv
e the
car
un
til
oil
pr
essure
reg
ist
ers
on
the
gag
e.
If
it
registers
above 40 lbs. (2,8 kgs.) , drive
slowly un
til
pressu
re
ret
urns
to normal,
or
appro
ximat
ely
40 lbs.
(Z,8
kgs.).
-.
After
start
ing, the
high
idle system may cause the
engine
to
"race"
.
If
so, depress and imme
diately
release
the accelerator.
I
"',
CAUTION
CARBON
MONO
XIDE
is
a lethal gas, odorless,
tas tel ess, and colorless, fou
nd
in the e
xha
ust fume
s
pf
all engines.
Never st
art
the engine in a closed
garage.
Always
open garag e doors
wid
e before
start'ing and k
eep the
m open as long as
the engin
e
is opeTati'flG.
16
Page 19
lush
or
Tow
Starting
Should
the
battery
fail
to
supply
enough cur
rent
to
st
art
the
engine
wit
h the
starter,
place
the
transmission
. in conventional
high
gear
and
eith
er
push
or
tow the car
until
the
engine
sta
rts.
OD
hand
le
(on
cars
so
equipped)
must
be
in
Out
position
. Be
sure ignition
is
On
and
parking
brake
released.
Shifting
the
Gears
To
shift
the gears
in
either
the co
nventional
or
over-
drive ratios
with the steering
post
gearshift lever, follow
this
procedu
re:
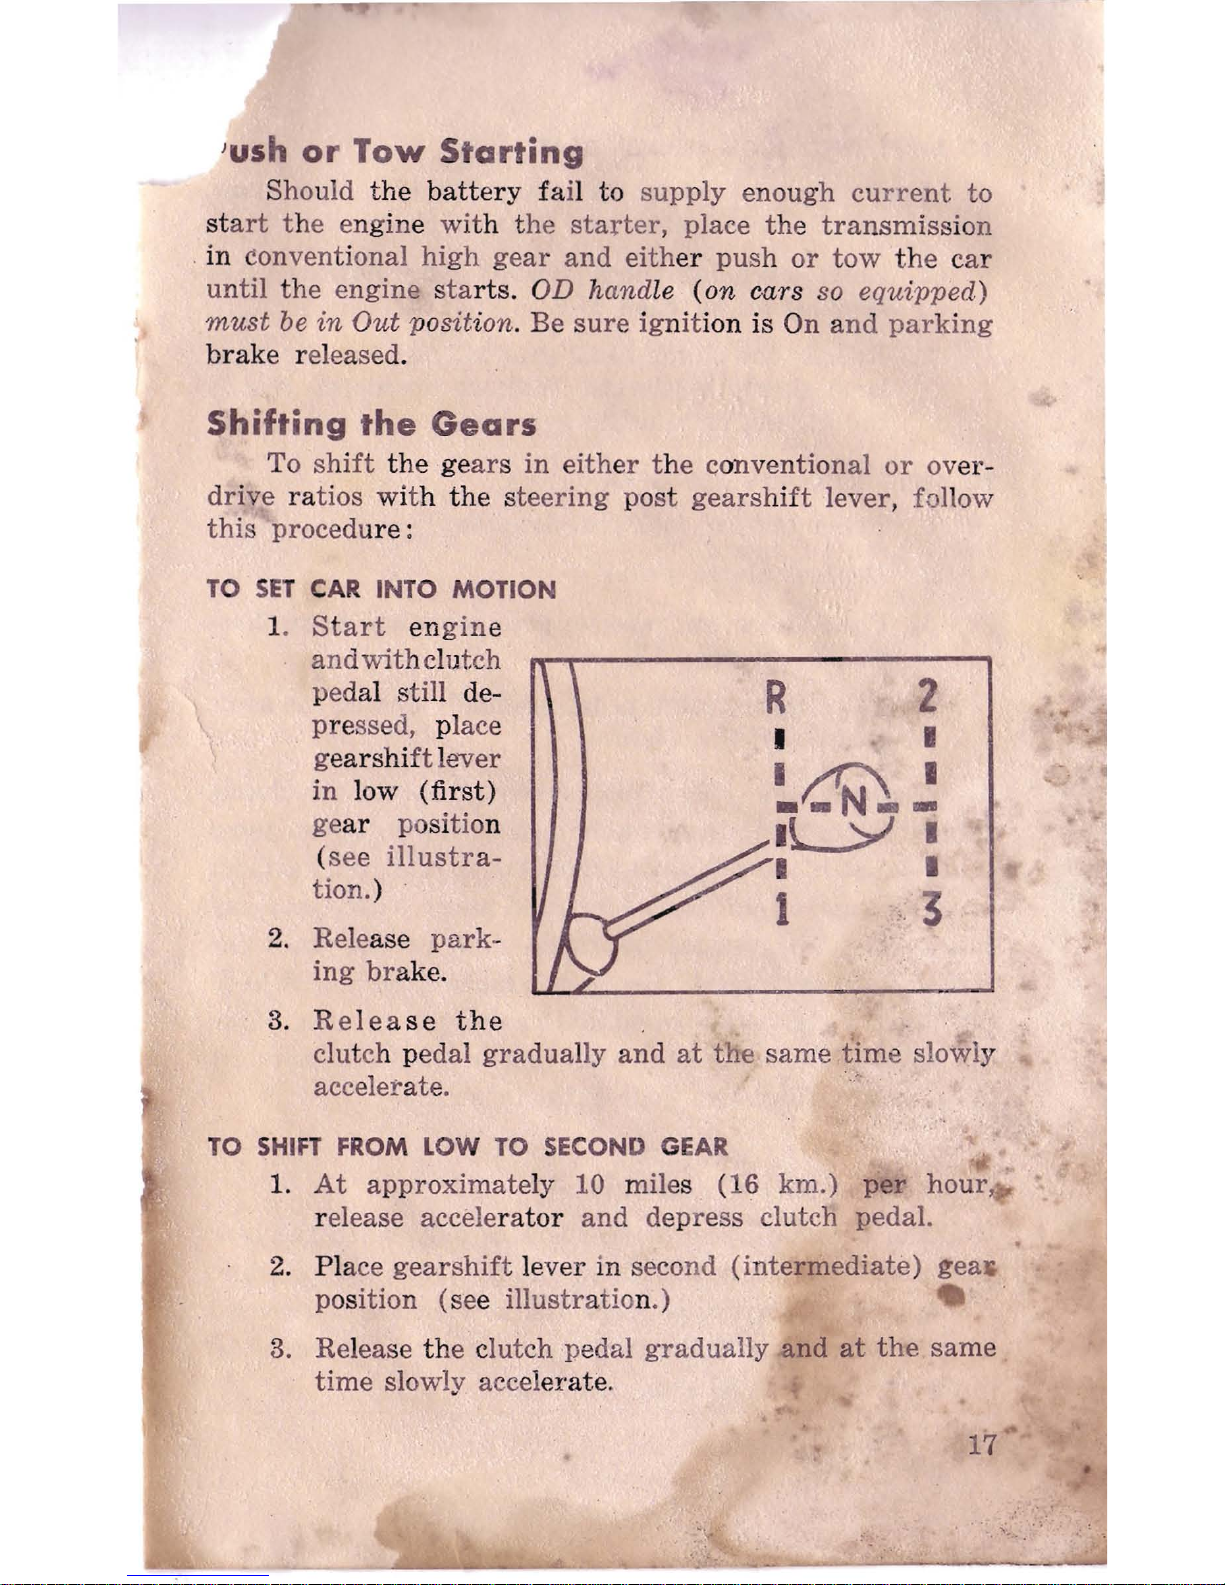
TO
SET
CAR
INTO MOTION
1.
Start
en
gin
e
and
with
clutch
pedal still de-
p
re
ssed, place
g
earshi
ft lever
in
low
(first)
ge
ar
positio n
(
see
illustra-
tion.)
2.
Release
park
-
ing brake.
3.
Relea
se
the
R
2
I - I
I~
--N--
I
IL->J
Ii
I •
1
;:
3
..
clutch pedal
gradually
and
at
the
same
time
slowly
accelerate. '
TO
SHIFT
FROM LOW
TO
SECOND
GEAR
1.
At
approximate
ly 10 miles (16 km.)
per
hour
.
release accele
rator
and
depress clutch pedal.
2. Place
gearshift
lever in second
(intermediate)
gea~
position
(see illustratio
n.)
3. Release
th
e clutch pedal
gradually
and
at
the
same
time
slowly accel
erate
.
17
.
";~Jp
.•
Page 20
TO
SHIFT
INTO
HIGH
(THIRD) GEAR
1.
At
approximately
18 miles (29
km.)
per
hour,
rclea~;e
accelerator
and
depress
clutch
pedal.
2.
Shift
lever
into
high
(third)
gear
position
(see
illustrat
ion on
page
17).
3. Rel
ease the
elutch pedal
gradually
and
at
the
same
time slowly accelerate.
Without
overdr
ive,
this
is
the
highest
or
cruising gear ratio
.
TO
SHIFT
INTO
REVERSE
GEAR
1.
Bring
the
car to a complete stop.
2.
Depress
clutch
pedal.
3.
Place
lever
in
reverse
gear
position
(se
e illus-
tration
on
page
17) .
4. Release
the
clutch
pedal gradually
and
at
the
same
time
slowly accele r
ate.
SHIFTING
TIPS
To avoid excessive
wear
on
the
clutch,
transmission,
and
drive
mechanisms,
never
try
to
jump
gears
(that
is, do n
ot
shift from
low
to high,
or
start
out
in
second
and
avoid using low )
and never shift
from
any
gear
- evep.
the
neutral position
- i
nto
rev
erse until
the
car's
motion
is stopped. Also,
never
make a gear
shift
until
the
clutch pedal is
depr
essed, di
sengaging
the
clutch
. Make
it a habit
to
pause for an instant
in
neutral
as
the
gearshift
l~er
passes
fro
m one gear r
atio
to anot
her.
ransmission
Overdrive
ThE;
automatic
overdrive
operates
only w
hen
the con-
trol
handle,
marked
OD,
iH
in
its
fu
ll
forward
position.
It
engages
autom
atically
when
the
accelerat
or
is
released
momentarily
at
or
above the
overdrive
cut-in
speed
of
30
to
35 miles (50
to
55
km.)
per
hour
.
18
Page 21
If,
while in ov
erdrive, it
is desired
to
gain
more
power
for
passing
cars
jn
traffic
or
on
grades,
push
the
accele
rator
to
the
floorboard.
This cuts
out
the overdrive
and
it
will
.remain inope
rative
until the acce
lerator
is
again released.
At
tha
t time
the overdrive
again
engag
es autom
ati
cally.
The overdrive handle c
an
be pulled
out, thereby
locking
the
transmis
sion in
the
conventional position.
Thi
s should
be done
for
descending steep, moun tainous
grades,
or when
pushing or towing the car to start the engine.
The
circum
-
-stances un der which
this change
can be
made
safely
are
as follow
s:
1. To cha
nge the
transmission
from
overdrive
to
the
locked-
in
conventional position while
the
car
is
sta
nding
still, merely pull
out
the
OD
control handle.
2.
To change the tran
smission
from
overdrive
to
the
locked-
in conv
entional pos ition when
driving
below
the overdrive
cut-in speed of
approximately
30-35
m.p.h. (50-55 km.) accelerate
the
engine
and
at
the
sa
me
time
pull out
the
OD
con
trol
handle.
3. To change
the
transmission
from
overdrive
to
the
locked-in conventional pos ition when "driving in
overdrive, completely de
press
the
accelerator
pas
t
..
r.
th
e wide-open t
hrottl
e pos i
tion
and
as
'!;loon
as
the
transmi ssion is in
~onventional,
pull
obt
the
OD
control handle.
If
the
OD
contr
ol handle is
in
the
locked-in conven-
tiona
l position (pulled o
ut)
it
can be placed in
the
overdrive
position while the
car
is
standing
still. To make
this
change
when
the
car is
m~ving
at
any
forward
speed, accelerate
slightly
and
push
the
control handle fully
forward.
Overdrive is availa
ble
at
extra
cost.
19
Page 22
Automatic
Hill
Holder
The
automatic
Hill Holder
retains the
same
degree
of
braking
effort on
an
upgrade
as
that
applied
by
the
driver
in
stopping
as long as
the clut
ch pedal is depressed.
The
Hill
Holder does not
opera
te
on level or descending
surf
aces.
However,
the
clutch
pedal
must
be depressed
before re-
lea
sing the
brake
pedal.
This
permits
the right
foot to
be
re
moveri from t
he
brake
pedal
to
operate
the acc
elerator
when
ready
to
resume forward
mo
tio
n. Rel e
asing
the
clutch
pedal
re
leases
the
action
of
the
Hill Holder.
To use
the
Hill Hol
der
when stoppi
ng
on an
upgrade
,
depress the clutch
peda
l and
then
apply foot brakes. The
ri
ght
foot may now he removed f
rom
the
brak
e pedal. To
release Hill
Holder
acti
on, release
the
clutch
peda
l.
Hill Holder is · special equ
ipment
for the Champion
available at ext
ra
cost.
Studebaker
Climatizer
and
Defroster
The
Studebake
r Clim
atizer
is a fresh
air
heating
and
ven
tilati
ng system. Fresh
air
passes
through
an
air
duct
and then
through
the
Climatizer
heater
core.
The warmed
a
ir
is disc!1arged for
ward
and
rearwar
d from below
the
front
;
~ea.t
and
spreads
uniformly t
hrou
gh
the car interior
.
J
.t:'
he:
,
Climatiz
er
heat
outp
ut
is
thermostatic
ally
co
n-
troll
ed·
·~Q
'
that
you
may
select t
he
degree
of heating
desire
d
and
be
'
~ssured
of
its re
maining
constant
unt
il you
reset
the
control.
The
control
(marked
"W
") sets a thermos
tat
which in
turn
controls the flow
of
wat
er
thro
ugh
the heater
coils.
The
further
outward
you pull
the
control,
the
warme
r
will be
the
l?-ot
air
output
of the
Climatiz
er.
When
the
engine cooling
water
is cold
and the
contro
l
handle is
in
the
closed position,
the thermostat
permits
a
full flow
of
water
into the hea
ter core
until the
temperature
at
the
thermostat
unit (just above
the
accele
rator
pedal)
20
Page 23
reaches
approximately
70°
F.
(21
0
.
C.) . As
the
wat~r
Kct
:{
warnw)',
the
thermo
sta
t will
ma
int
ain
tha
t t
emperature.
If
you
desire
more heat
in
the
car
, pull
out
on
the
"w"
control.
Aft
er
using the
Clim
atizer
a
few
times
you
will
find
the
position
of the
control
which
gives you
the
heat
in
the car which
be~t
suits
your
comfort
and
further
reg-
ulation
of
the control
will
be
unnecessary.
If
you
wish
to
obtain
maximum
heat fl
ow
in
extremely
cold
weather,
pull
the
hand
le to its full
"out"
posit
ion.
This
will lock
the
valve open
until
you p
ush
the
handle forward.
Climatiz:er
Operation
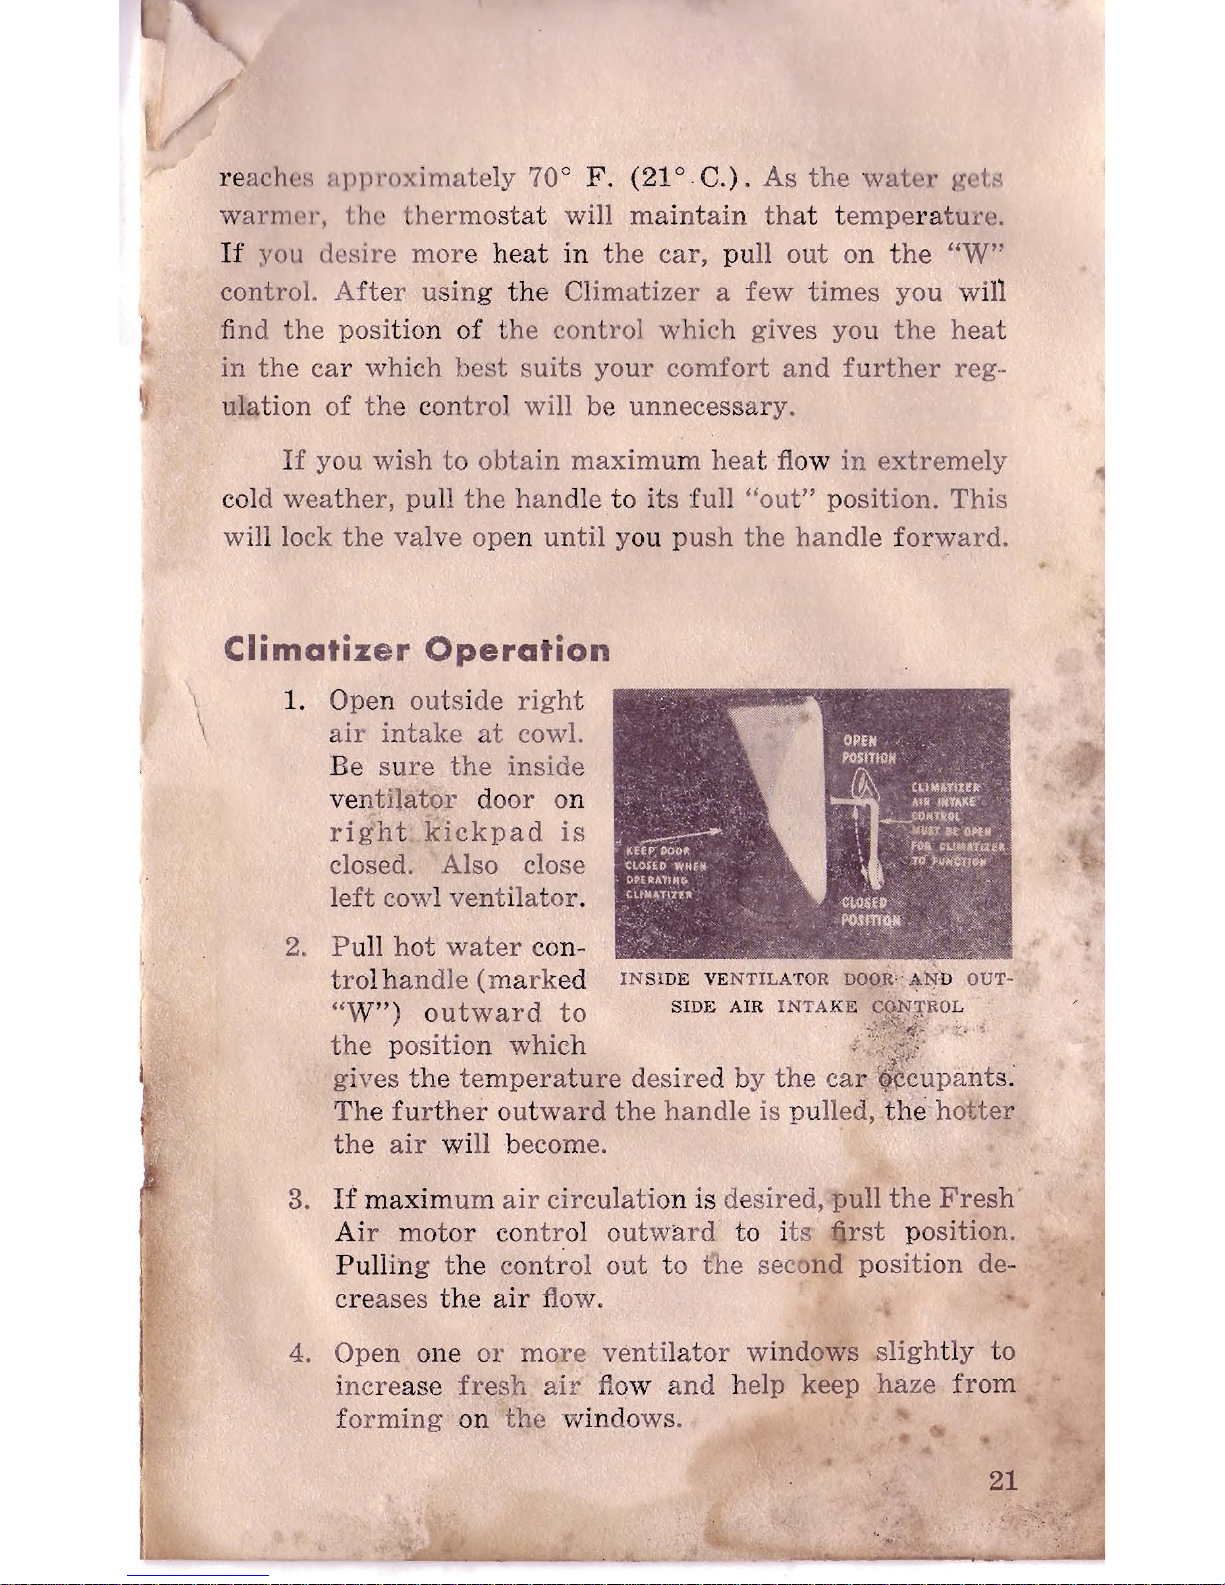
\ 1. Open
outs
ide
right
\
air
intake
at
cowl.
Be
sure
the
inside
ve
ntilator
do
or
on
right
kickpad
is
closed. Also close
left
cowl
ventilator
.
2. P ull
hot
water
con-
trol ha
ndle (marked
IN
SlDE VE
NTILATOR
DOOR'
~l'!
D
OUT-
"
W") outward
to
SIDE
AIR
INTA
KE CC{.rf;tROL
"
f!;),
,,,,,
" " . •
the position
which
i'c:~,~~
;;
.
'
gives
the
temperature
desired by
the
car~¢cupant
s
:
The
further
out
ward
the
handle
is pulled, 'the-
hotter
the
air
will become.
3.
If
maximum
air
circulatio
n is desired,
pull
the
Fresh
'
Air
motor
co
ntr
ol
outward
to its
fjrst
position.
Pulli
ng the
control
out
to t'he second
position
de-
creases the
air
flow.
4. Open o
ne
or
more
ventilator
windows
sligh
tly to
incre
ase
fresh
air
flo
w
and
help keep
haze
from
f
orming
on
the
windows.
21
Page 24
DEFROSTER
OPE
RATION Pull
the
defroster
control
on
iristrument
pnnel oulWlI ru to I
hI'
first
posi
tion
for
maxi
m
um
hot
air
flo\\'
til
1'\I11gh
\tit
:
c11'i"roster
ducts;
pulliny
control
to
the
~t!('o!ld
plI[iif.ion rcd l
J('C's
the
air
flow,'
Climati
U'
I
1111t1
dl
frosiPl'
IIff]
l;jJ('citll. equipment a'vail
able
at
extra
('osf.
Operation
of
the
Convertible
Top
The
m(>cilHlIically
operated top
of the
Studebaker
con-
vertible
mo(ltol:'l
is
raised and
lowe
red
by
an
electric
motor
and
prC'1I1!II'j('ated
driving
arms
and
gears.
The mechanism
is coni
r~)lI(>d
by a lever located
at
the
left
of
the
three
control
handle'!
aL
the
lower
edge
of
the
instrument
panel
on
the
driver's
side
of
the
car.
Moving
the
h-wr
to
the
left
raises
the
toP.
and
to
Ihe rig-hi .
lowl'I'H
IL.
When the
lever
is re-
leased
from
l'iUIl~I'
of th('fie pos itions,
it
automatically
returns
to
the
central
posit
ion,
stopping
the
elec
tric
motor.
Always
let the
motor
operate the top -
never
try
to
force
the
top
up
or down
by
hll1ld.
Top
Operation
Motor
Circuit
Breaker
ThlH!kdric
motor
i~
~IIHded
against short
circuit
and
overload
by~
H
:W'<ltlllH>n'
circuit
breaker.
Should a short
circllit
01'
o
....
t~l'lnad
O(Tll),
in
the
top
operating
system, the
circuit
br~1I1(t~r
\
ill
automatica
lly i
nterrllPt
the
circuit
and
wilI COil
tihuc
to
illterr
upt
it
until
thC'
('a lise is
eliminated.
Page 25
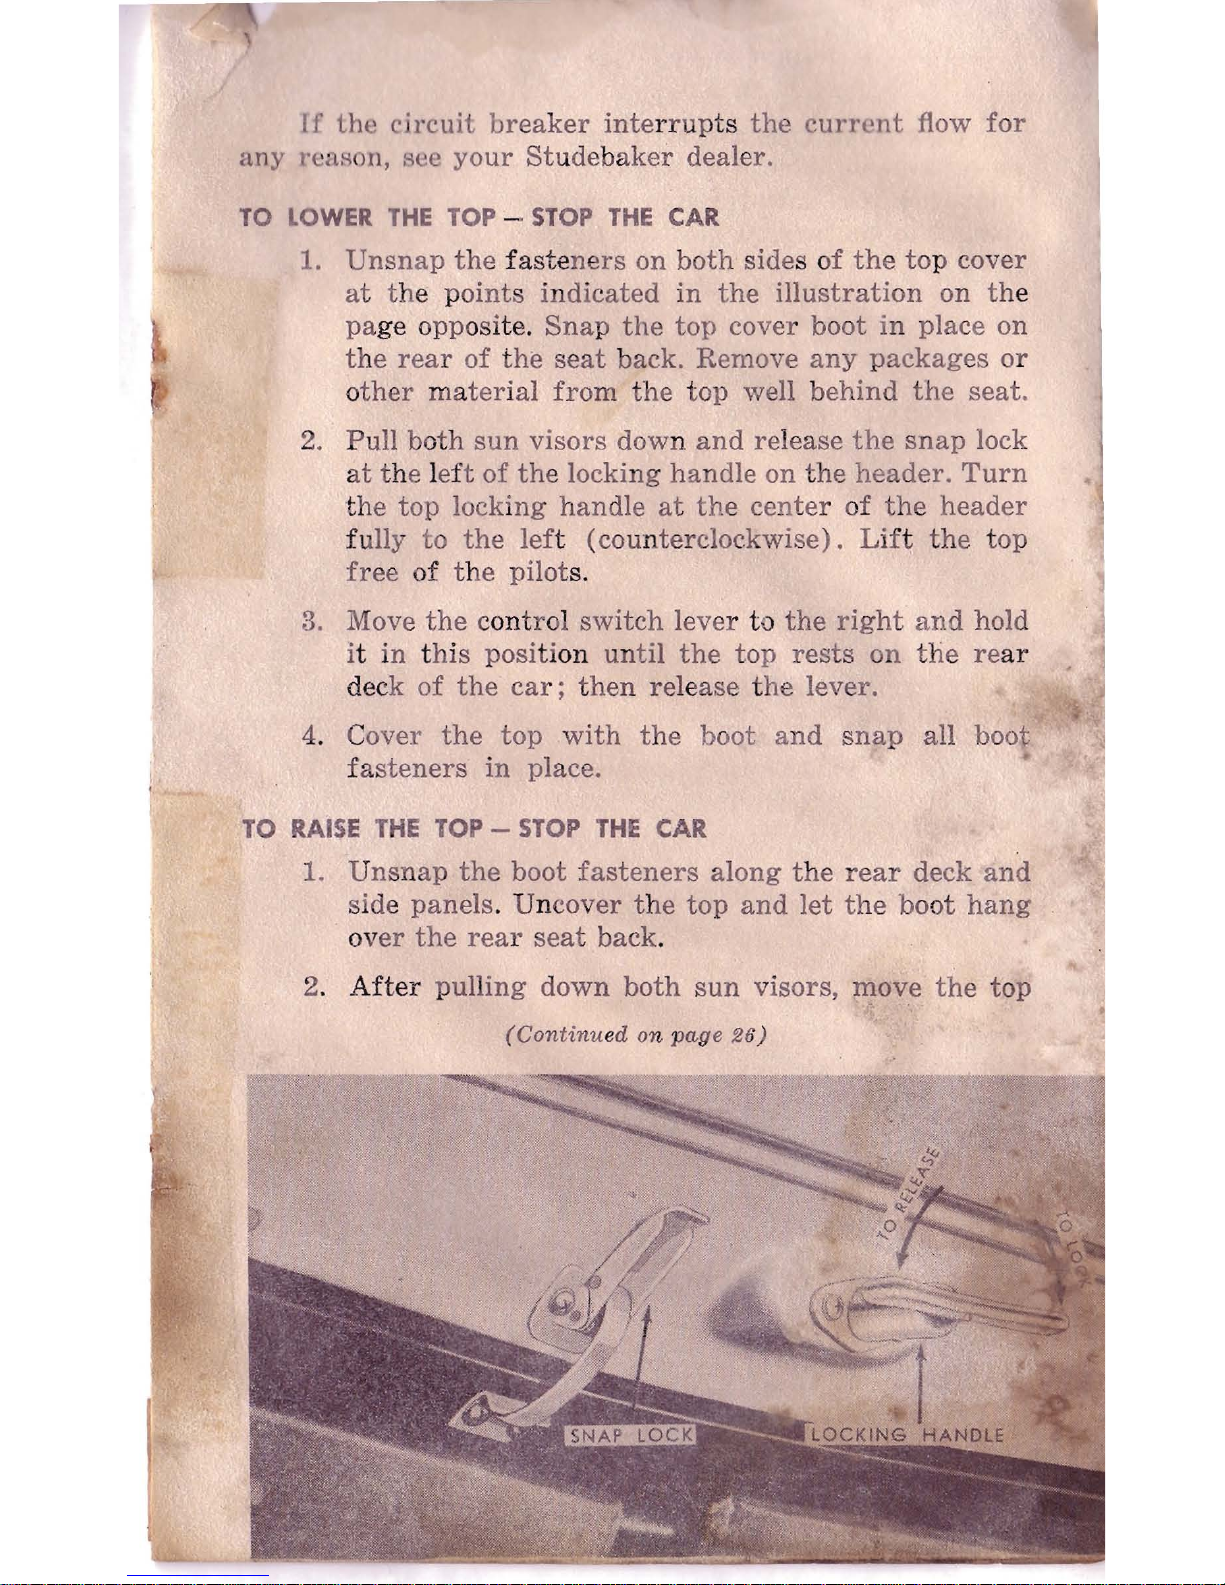
If
the
circuit
breaker
interrup
ts
the
current
flow
for
any
\"(!;LHon,
see
your Studebaker
dealer.
TO
LOWER
THE
TOP -
STOP
THE
CAR
1.
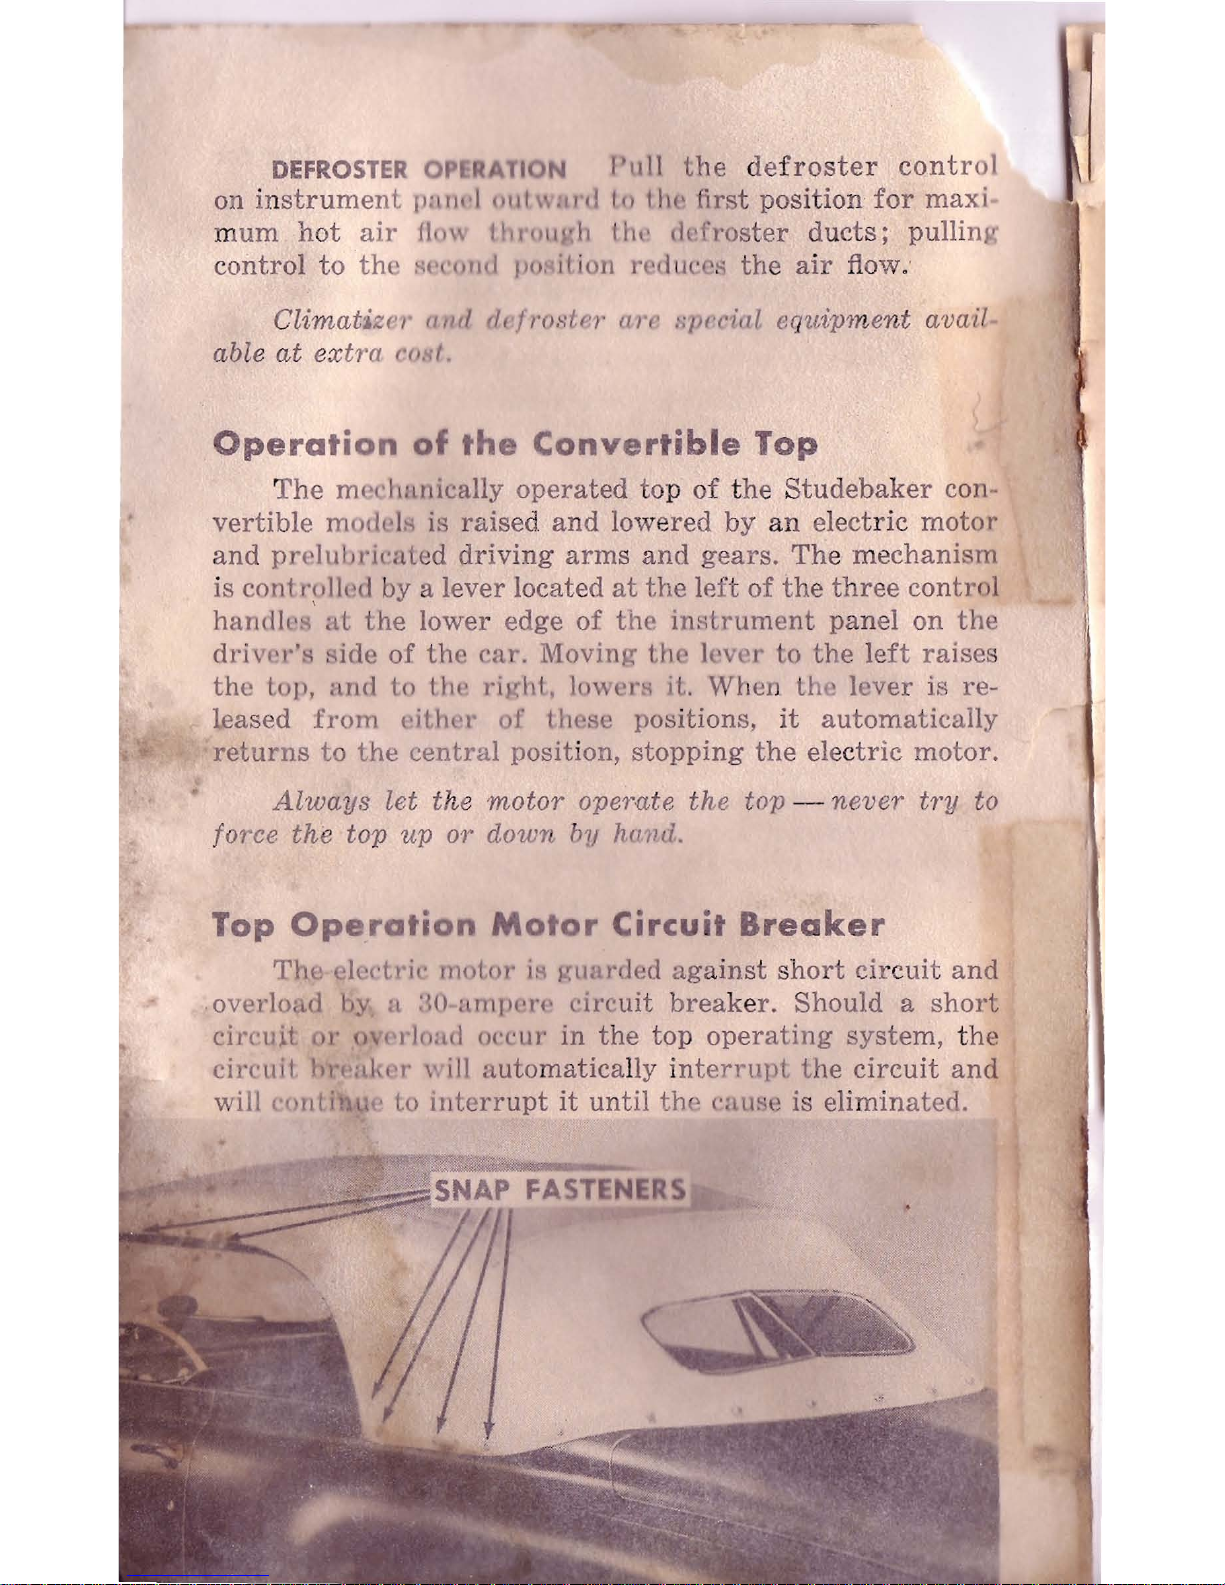
Unsnap
the fastene
rs
on
both
sides of
the top cov
er
at the po
int
s indicated
in
the
illustration
on the
pa
ge opposite.
Snap the
top
cover boot in place on
the
rear of
the
seat
back. Remove
any
packages
or
o
ther
ma
ter
ial
fro
m the
top
well b
ehind
the
seat.
2.
Pu
ll both
sun
visors dow n
and release
the
snap
lock
at the left
of the locking
handle
on the
header.
Turn
the top
locki
ng
handle
at
the
center
of
the
header
fully
to
the
lef
t (counterclockwise).
Lif
t t
he
top
free
of the pilots.
3. Move
the cont
rol
switch
lever to
the
right
and
hold
it in this posi
ti
on until
the
top
rests
on
the rear
deck
of
the
car;
the n rele
ase
the lever.
4. Cover
the
top
with
the
boot
and
snap
all boot
fa
steners
in
place.
TO
RAISE
THE
TOP -
STOP
THE
CAR
1.
Unsnap
the
boot
fasteners
along
the
rear
deck
and
side panels . Uncov
er
the
top
and
let
the
boot
hang
ov
er
the
rear seat
back.
2.
After
pulling down
both
sun
visors,
II!-0ve
the
top
(Continu
ed on p
age
26
)
Page 26
GENERATOR-20
ile
ro-
OIL
FILT ER
- Under
Norma
l C
ond
ithma,
l\:)
SAE
No. 20 En
gine
Oil
th
e
Oil
F
ilte
r Ca
rb-Iag. Should
b.
Re-
p
1.a.c
ed
.Ue,. Five to
Sis
Thou.e
eul
d
Mil
..
of Ope
r at ion. W h e
re Severo
Dual and Dirt
Conditione Prev,.!!
It
will
b.
N.c
....
ry
to
Rep
lac
e U
le
Oil Fillor
Certridg
e
""
t
Cor
.
r
08pondingly Lower Milaag
••.
"'"
CA
RBURETOR
AIR C
LEANER
-
S
ervice
EVl'!r
y 1,0
00 Mile
•. Where
DUllt
Conditione
Prnvail
,
it
May
be
N.c
....
ry
to
Service
the Unit Daily:
or
MON
Ofton
Unde
r S
ave
re
Dua
t C
ond
ition
•.
To S ervice the "
Oil
Bath
"
Typ
e.
Remove
Cloaner
, W
eah FiltorElempt
In Kero••ne
and
Drain
Thoroug
hly. CI
Nn
Oil R
un-
voir and
R.
WI
to Indicated Level
. U
••
SAE
50
Engine
Oil for
above ....32'
F.
and
SAE
20 Engi
ne
au
for bcio", +32"F.
Do
Not
u
••
a n
OU
L
ighte,.
than
SAE
20.
Tc
Service
the
"OU C
ooted
Flit.,.
"
Type.
Remov.
the
FiUer
Elemcml,
W."h
in
Ker
o-
STEERING
GEAR-Special
Lubri.
c
ant
as
approved
by
Ros
s G
ear
..
n. a rid Shake
Out Until
Dry. Reoil
the
an
d T ool
Company
of
Lafayett
e,
Elomont
Tho
roulJhly
With
rT
..
h CI..
n
Indian
a.
Oil , •
.\llow the
EKce.!Ut
Oil to
Dr
am
O
li
and
Rein
atfl;U
El
ement.
GE
ARSHIFT CONT
ROL
CASE
-
ENGINE O
IL LEVEL
GAG
E-
Rem
ove
Plu g -Pack Case
with
C
heck
Oil
LoI!!'v
el.
C
hassis
Lubricant
-
Reinstall
Add
or
Chanpe
Oil
a.
R
oql!ir
cd
Plu
g.
Crankcaall
Capaclty-6
U.
S. Ouan.
Low
e.t
Tem
p. A nticJpRt
od
Od
Vieeoa-ity
~32~
r.
SA~
30
ST
ART
ER
MOT
OR-l Oner-SAE
~ 1O~
F .
SAE
20
No.
20
Eng
ine Oil.
_lOoF .
SAE
10-IOW
or
lOW
S
TEERING B
ELL
CRANK
SHA
FT
UPP
ER
AND
LOWER
CONT
ROL
- 1
Fitting-
Chass
is Lubr
ican
t.
ARM
BUSHINGS
- 4
Fitting.
each
Arm -
Chassis
Lub
ric
ant
UPPER
AND LOWER CONTRO
L
FR
ONT WHEEL BEARINGS-
ARM
BUSHINGS
- 4
Fitting.
Wheel
Bear
ing
Lubrrca
nt
.
~;=
ea
ch
Arm
-
Chass
is Luh
ricanl
STEERING
KNUCKL
E - I
FRO
NT
WHEEL
BE
ARIN
GS-
Wheel Bearing Lubr
icanl
JOINTS
- 2 Fit-
K
NUCKL
E-l
Fitting
Lubr
icant
GEARSHIFT
RODS-
Engine
Oil
TIE RO
D B
ALL JOINTS-
2
Fittinga
-
Chassis
·
Lu
bricant.
CL
UTCH
OPERATING
SHAFT
B
RACKET
BEARlNG-
TRA
NSMISS
ION
- C
onventional
Engin
e
Oil
and
Ov
erdri
ve
CH
ECK
LEVEl,
,.. I D
RAI
N AND
FLUSH
LUBRICANT-
HiGh
a_d.
Min_I on
1 F
itti
ng -Chassis Lubrican
t
0
....
Lubricant
(Regular
Typ.
Oear
Luh-
Tic.nt)
of
SAE
No. 9 0 VllaCoaity or S
J\E
No
.
40
EnGin.
au lo r
Both
Summ.,.
and
W~.r.
O.ar
L
ubri
cant. Containing
Any
CLU
TCH
PEDAL
LINKA
GE-
Extr.m.
PNallU
:N
Ingredi.nt., Such
a.
2
Cle
vis Pins-Engine
Oil
L••d,
Sulp
hu.r.
or
C
hlo
rine
Compoun
d.
M
u,.t N ot
B.
UN
do
CLUT
CH
RELEASE SHAF
T -
1
Fitting
- C
hassi
s L
ubricant
UNIVERSAL
JOI
NTS-
3
Fittinga-Chas
sis
Lub
ricant
HILL HOL
DER LINKAGE-SprRY
-Engine
Oil
RE
AR
AXLE-
_ CHEC
K LEVEL
,.. I
DRAIN AND FLUS
H
LUBRI
CANT
- U
••
Stu
debak
olr Hy.
p
oid
L
tlbrlc.nl
or
Any
SAE
No.
90
H,.p
old
Lubr
icant
{Mu
lti-Purpo
••
Ilear Lubrican
t}
Ma
nufac
ture
d
by a Reputabl. on Com-
p.IIny. D o Not
.t
A
ny
Time
Mis VariO
\lB
PR
OPELLER
SHAFT
SPLINES-
Branda
of
Hypold
Lubt'ican\al.
1 Fitti n g - C
ha
ssis Lubricant
REAR
AXLE
SHAFT BEARlN
G-
REAR AXLE
SHAFT BEARING-
Wheel Bearing Lubricant
Wh
eel
Bearing Lubr
ican
t
r-:l
The
Lubricati
on
Points
Estab
lished
Are
For
Avera
ge
Use
and
01
Should
Be
Cha
nged
to
Suit Individual
Operatin
g C
ond
ition
s
COMMANDER
Page 27
\
operating
lever to
the
left
and
hold it
in this posi-
t
io
n until
the
top head
er
is
appr
oxim
ate
ly one foot
above
the
wi ndshie ld pilots ; then
relea
se the lever.
3.
Grasp the top locking
handle
firmly with t
he rig
ht
hand
and
guide
the
top down
over
the
winds
hie
ld
pilots
wh
ile
the
left hand hol ds
the
top
opera
ting
lever at
its "Rai
se" position. Wh
en the
header
res
ts
on the
windsh
ield , rele
ase
the
control lever. Lock
the sna
p lock at t
he
left
of
the
locking
han
dle on
the he
ad
er.
Lock the
top
securely to
the
windshi
eld
by
turning
the
top
lock
ing
handle clockwise two
or thr
ee complete t
urn
s. Test
the lock
by
attemptin
g
to
lift the top free
of
the
pilots.
4. S
nap
the f
astene
rs
in
place along t
he
top side
rail
s
and
side panels on
both
sides of
the top.
Th
ere
are
6 of these f
astener
s on each side. Let the bo
ot
fold down into
the
top
compartment or unsnap
the boot
from
the re
ar seat
ba
ck
and
place it in
t he boot
bag
prov
ided.
Package
Compartmen
t
Car
d
You should
refer
to
this
card
frequently.
The erasa
ble '
record
will be found
handy
.
Its
location on the back
of the package c
ompartmen
t
door
provide
s a
constant rem
ind
er.
Ask
your service
ma
n to writ
e,
in
the appropriate
.spaces, the mileage and date
at
which the diff
erent serv
ices
are
performed.
26
Page 28
LUBRICATION
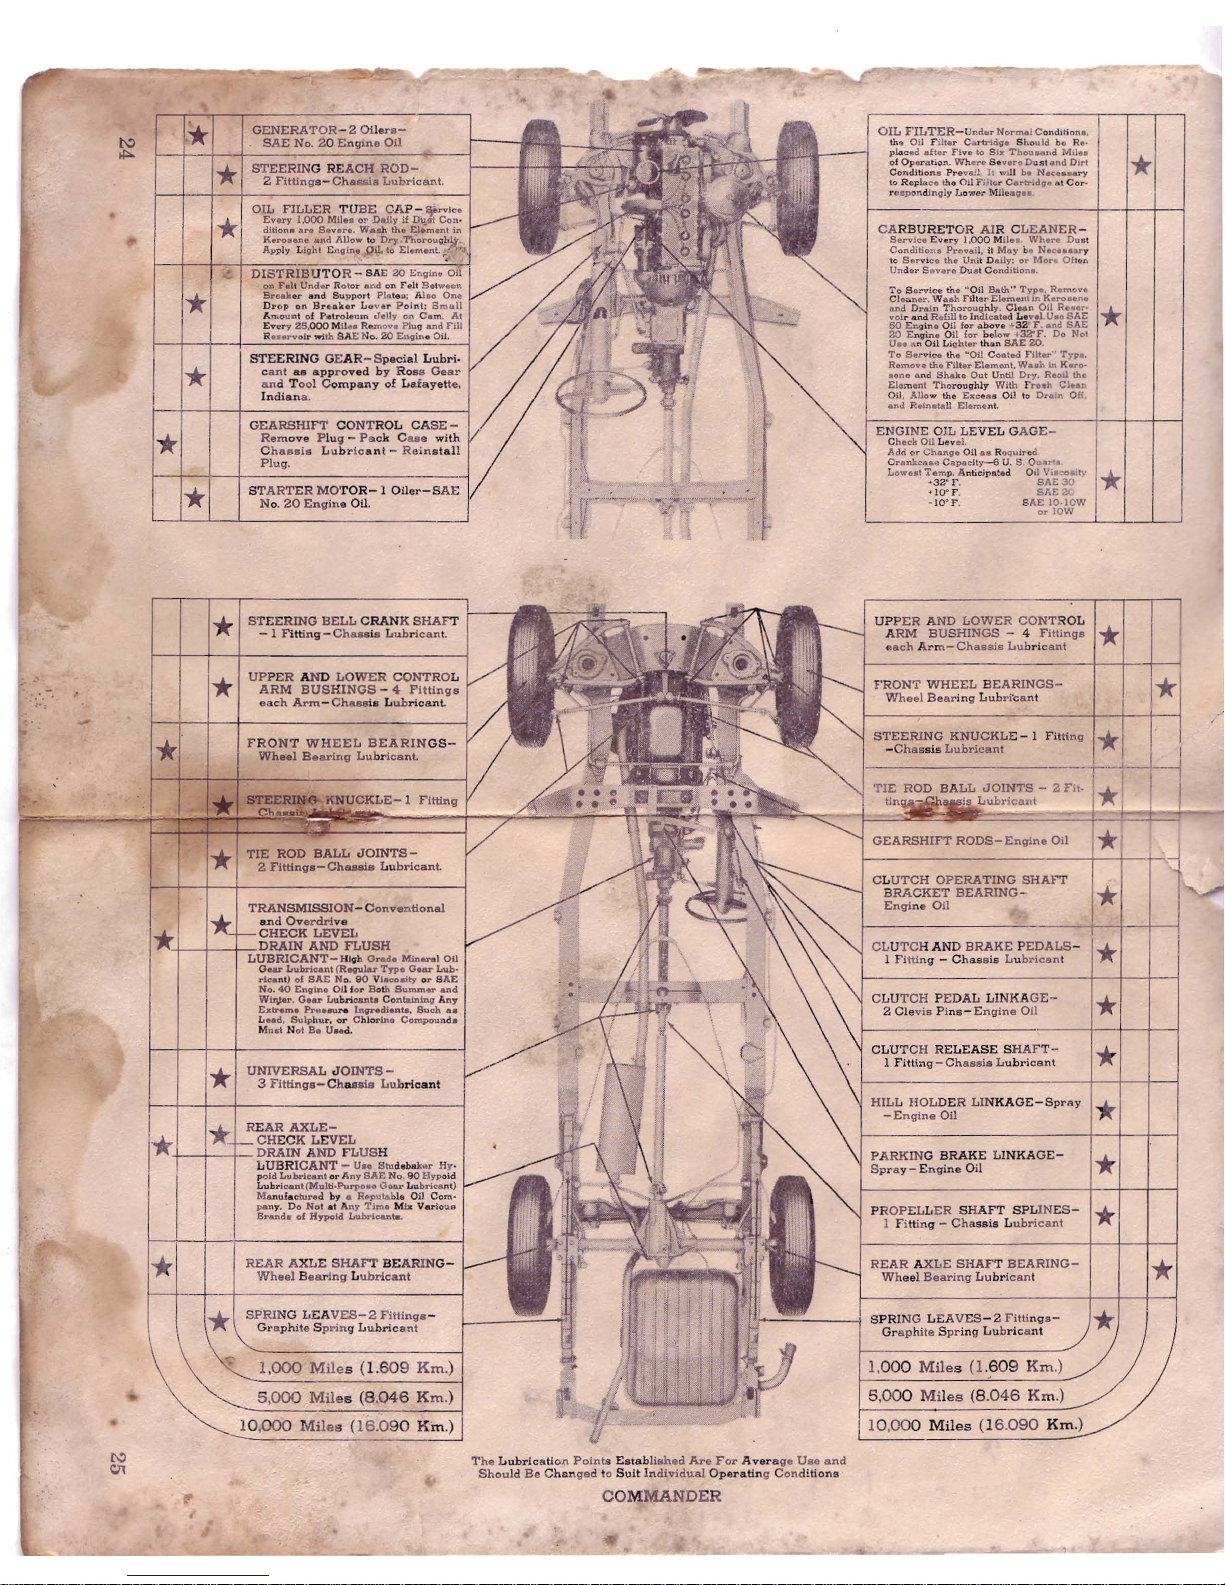
Periodic
Inspections
It
is well for
reaso
ns
of
economy and
to for
est
all un-
expected need
of
ser
vice
to have
your
car
inspected once
a
month
or
at
100
0 mile (1609 km.)
lubri
cation periods.
An
ideal time to
have many
of
the
par
ts
or
units inspected
is while
the car
is on the lub
rication
hois t in the
raised
position.
Lubrication
and
Related
Operations
Pr
oper lubri
cation is good as
surance
that
your car
will continue
to perform wit
h in
creasing
saLigiaction. Only
h
igh
quality
lubricants
should be used on
your
car.
Your
Studeba
ker
dealer
kn
ows eve
ry
lubrica
tion
require
ment f
or
your
car. Take
it
to
him
for
peri
odic
lubricat
ion.
The
recom
mendations
given in
the
followi
ng
paragraphs
are,
in many
way
s, the
most
important
in
the
ent
ire
booklet.
If
a lub
ricat
ion service must,
of
necessity,
be
perfor
med by a non
-Studebaker serviceman, be
sure
he
understands
the
requirements mention
ed
in
this
section
and
on the chart on
pages
24
and
25.
UNIVERSAL JOINTS Lu b
ri
cate
with
light
weight
chas
sis
lub
ricant at
1000 m
il
e (1609 km.)
intervals
. Only a low
press
ure (hand) gu
n should be
use
d to
lubrica
te
these
bea
ring
s.
TRANSMISSION LUBRICANT T
he
transmission shoul
d
be filled to
the
level
of
the
filler
plug
hole
with
S.A.E.
90
mine
ral
oil gear lu
brica
nt
or S.A .
E.
40 engine oil,
bot
h
summer and winter.
On
cars
equ
ipp
ed with overdrive
trans-
mission
the
main case and the overdri
ve case should be
filled separa
te
ly.
For
transm
ission
capacities
see
table
on
page 47.
REAR
AXLE
LUBRICANT
Use Studebaker
hypoid
lubri
-
ca
nt
or a
ny
S.A.
E.
90 hypoid
lubricant
(multi-purpose
type
gea
r lub
ricant) for summer
and
winter
.
Do
not
mix
various
27
Page 29
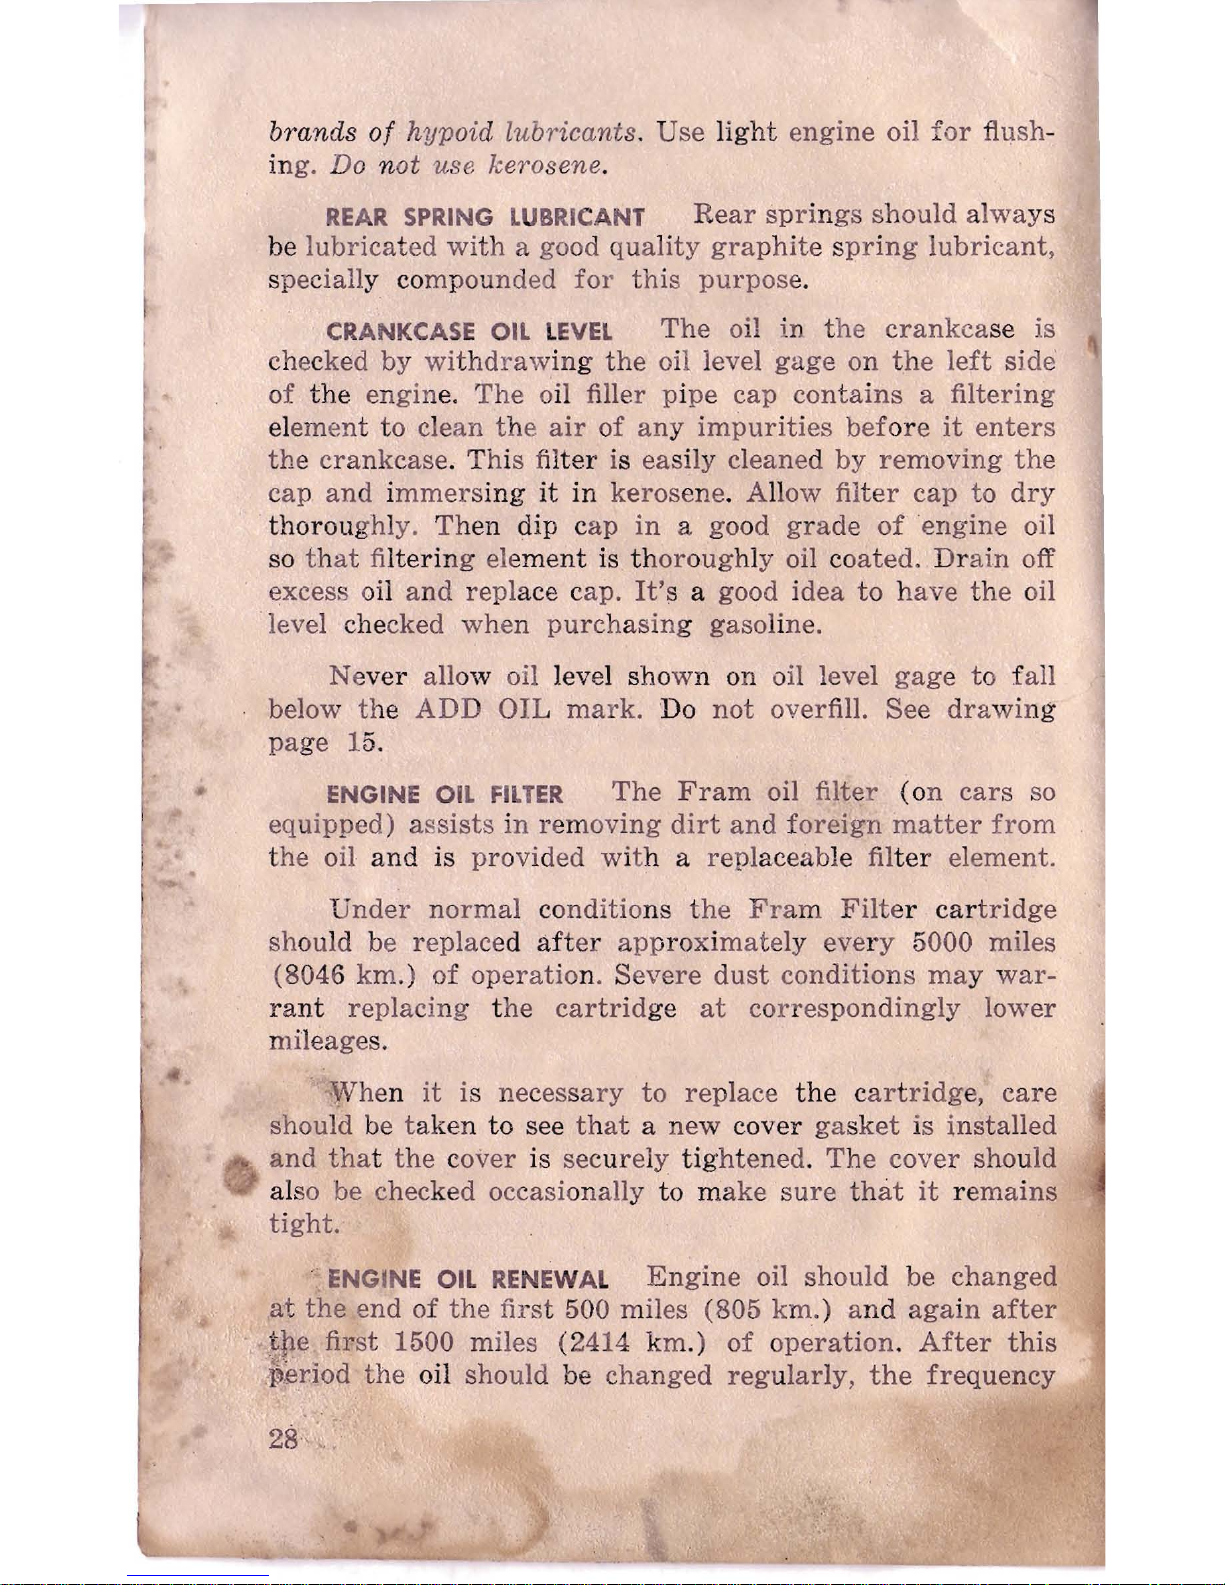
brands
of
hypoid lubricants .
Use
light engine
oil
for flush
-
ing.
Do
not use kerosene.
REAR
SPRING
LUBRIC.ANT
Rear
springs
should
alwa
ys
be
lubricated
with a good
quality
graphit
e spri
ng
lubricant
,
specially
co
mpou
nded
for
this
purpos
e.
CRANKCASE OIL L
EVEL
The
oil
in the
crank
case is
ch
ecked
by with
drawing t
he
oil level
gage
on the
left
side'
of
the engin
e.
The
oil filler pi
pe
cap
contains
a
filtering
elemen
t to clean the
air
of any
impurities
before
it
enters
the cra
nkc
ase
. This
fil
ter
is easily cleaned
by
removing
the
ca
p,
and immers
ing
it
in
kerosene. All
ow
filter
cap
to
dry
thorou
ghly.
Th
en
dip c
ap
in
a good grade
of
eng
ine oil
so t h
at filterin
g ele
ment
is thoroug
hly oil coated. Dr
ain
off
excess oil and
repl
ace cap.
It'
s a good idea
to have the oil
'level checked
when
purcha
sing
gaso
line.
N e
ver
allow oil level shown on oil level
gag
e to fall
below the
ADD
OIL
mark.
Do
not
overfill.
See dra
wing
page 1
5.
ENGINE OIL
FILTER
The Fr
am
oil filter (on
cars
so
equipped) as
sists
in
removing dirt
and foreign
matter
from
t
he oil and
is provi d
ed
with a replaceable fil
ter element.
U
nder normal
conditions t
he
Fra
m
Filt
er
cartridge
sh
ould be replaced after
app
roxi
matel
y every 5000 miles
(8046
km
.) of op
eratio
n. Seve
re
dust
conditio
ns
may war-
ra
nt
replacing the
cartrid
ge
at
cor
resp
ondingly
lower
mileages.
"'
Wh
en
it
is
ne
cess
ary
to
rep
lace
the cartridg
e, care
shou
ld be tak
en
to
see th
at a new
cover gasket
is i
nst
alled
and
tha
t the c
over
is securely
tig
htened. The co
ver shou
ld
al
so be checked occasionally
to
ma
ke sure that
it remains
tight.
' ENGiNE OIL
RENE
WAL En
gine
oil s
hould
be
changed
at
the
end
of
the
firs t 500 miles (805
km.
) and
aga
in
after
',;ipe
first
1500 miles (2414 km.)
of operation. After
th
is
Jeriod
the
oil should be
changed
regularly,
the
fre
que ncy
28
,.~>
,
Page 30
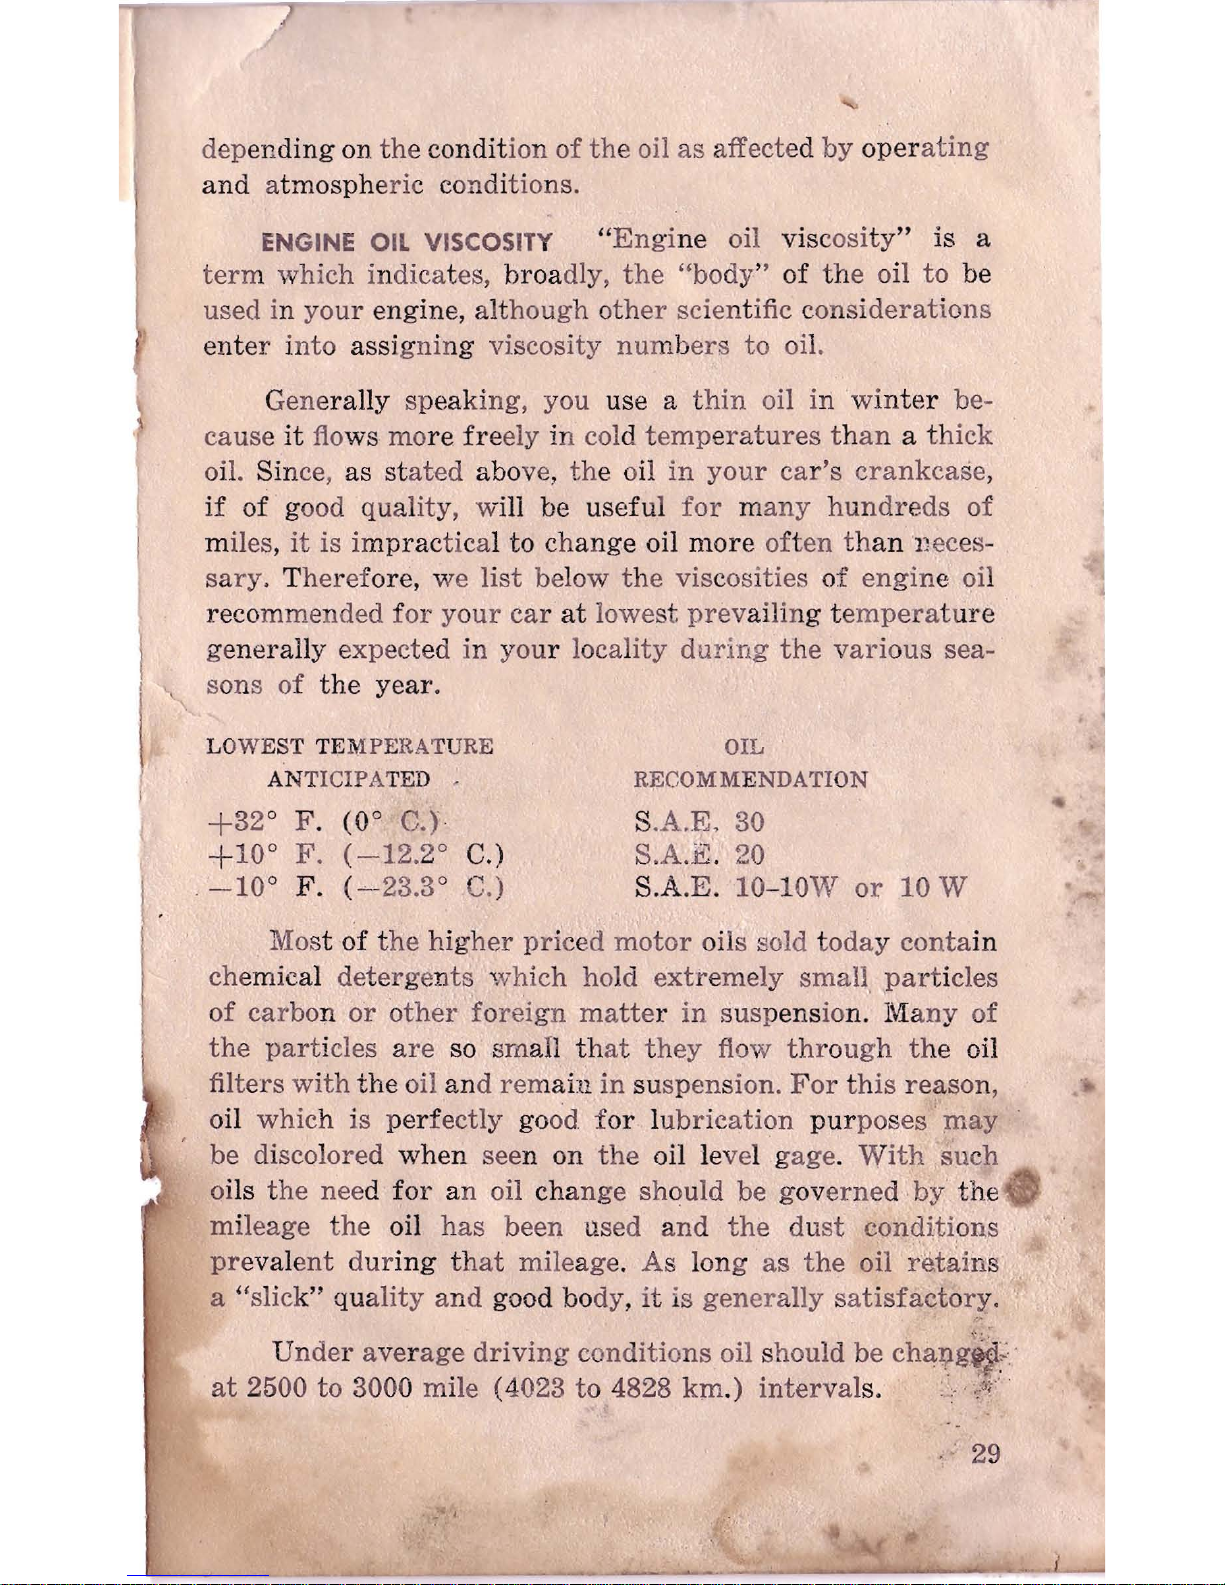
"
dep
ending
on
the
condit
ion
of
the
oil
as
affected
by
oper
ating
and atmospheric c
onditions.
ENGINE
OIL
VISCOSITY "
Engi
ne
oil viscosity"
is
a
term
which
indicates,
broa
dly,
the
"body"
of
the oil
to
be
used in
your
engine, alt
hough
other
scien
tific c
onsiderations
ente
r i
nto
assi
gnin
g viscosity
numbers
to
oil.
Gene
rally speak
ing, you use a
thin
oil
hi
wi
nter
be-
cause
it
flo
ws mo
re
fre
ely in cold
temperatures than a thick
oil.
Sin
ce,
as stated
above, the oil
in
your
car's
crankcase
,
if
of
good
quality,
will
be
useful
for many
hundreds
of
miles ,
it
is i
mpract
ical
to change
oil
more oft
en than
Deces-
sary. Theref
ore,
we
list below
the
vis
cosities of
engin
e qil
reco
mmended
for
your
car
at
lowest
prev
ailing t
emperat
ure
ge
nerally
expect
ed
in
your locality d
uring the
various
sea
-
I '
''"
sons
of
the
year
.
LOWE ST TEMPERATURE
OIL
AN
TICIPA
TED "
R~COMMENDATION
+32
0
F.
(00 C.)
S.A
.E.
30
+ 10
0
F.
(-12.20
C.)
S.A.B:'. 20
, - 10
0
F.
(~-23.
3°
C.)
S.A.E. 10-
l0W
Or
10
W
Most
of the
higher
priced
~otor
oils sold
today
conta
in
che
mical
detergents
which
hold
extremely
small
part
icles
of
carbon or
other 'foreign
matter in
susp
ens
ion.' l
\'[
any
of
the
part
icles a
re
so
sm
all that
they
flow
through the oil
filters
with
the
oil and
remain
in suspension.
For
this
reaso
n,
oil
which
is
perf
ectly good f
or lubrication
pur
poses
' :may
be discolored
when
seen
on
the
oil level g
age. With
such
oils
the
need for an oil
cha
nge
should
be gov
erned ,by
the
mileage
the
oil
has
been
used
and
the
dust
cond~tions
.'
pr
eval
ent
dur
ing that
mileage.
As
long
as
the
oil
~~t~illS
a
"slick
" qu
ality
and
good bo dy ,
it
is
generally
satisfactory.
f·
,
U
nder average
driving
conditions
oil
should
be
cha~g~~
at
2500
to
3000 mile (4023
to
4828
km
.)
interval
s.
.J,;'
,: 29
- .
i
Page 31
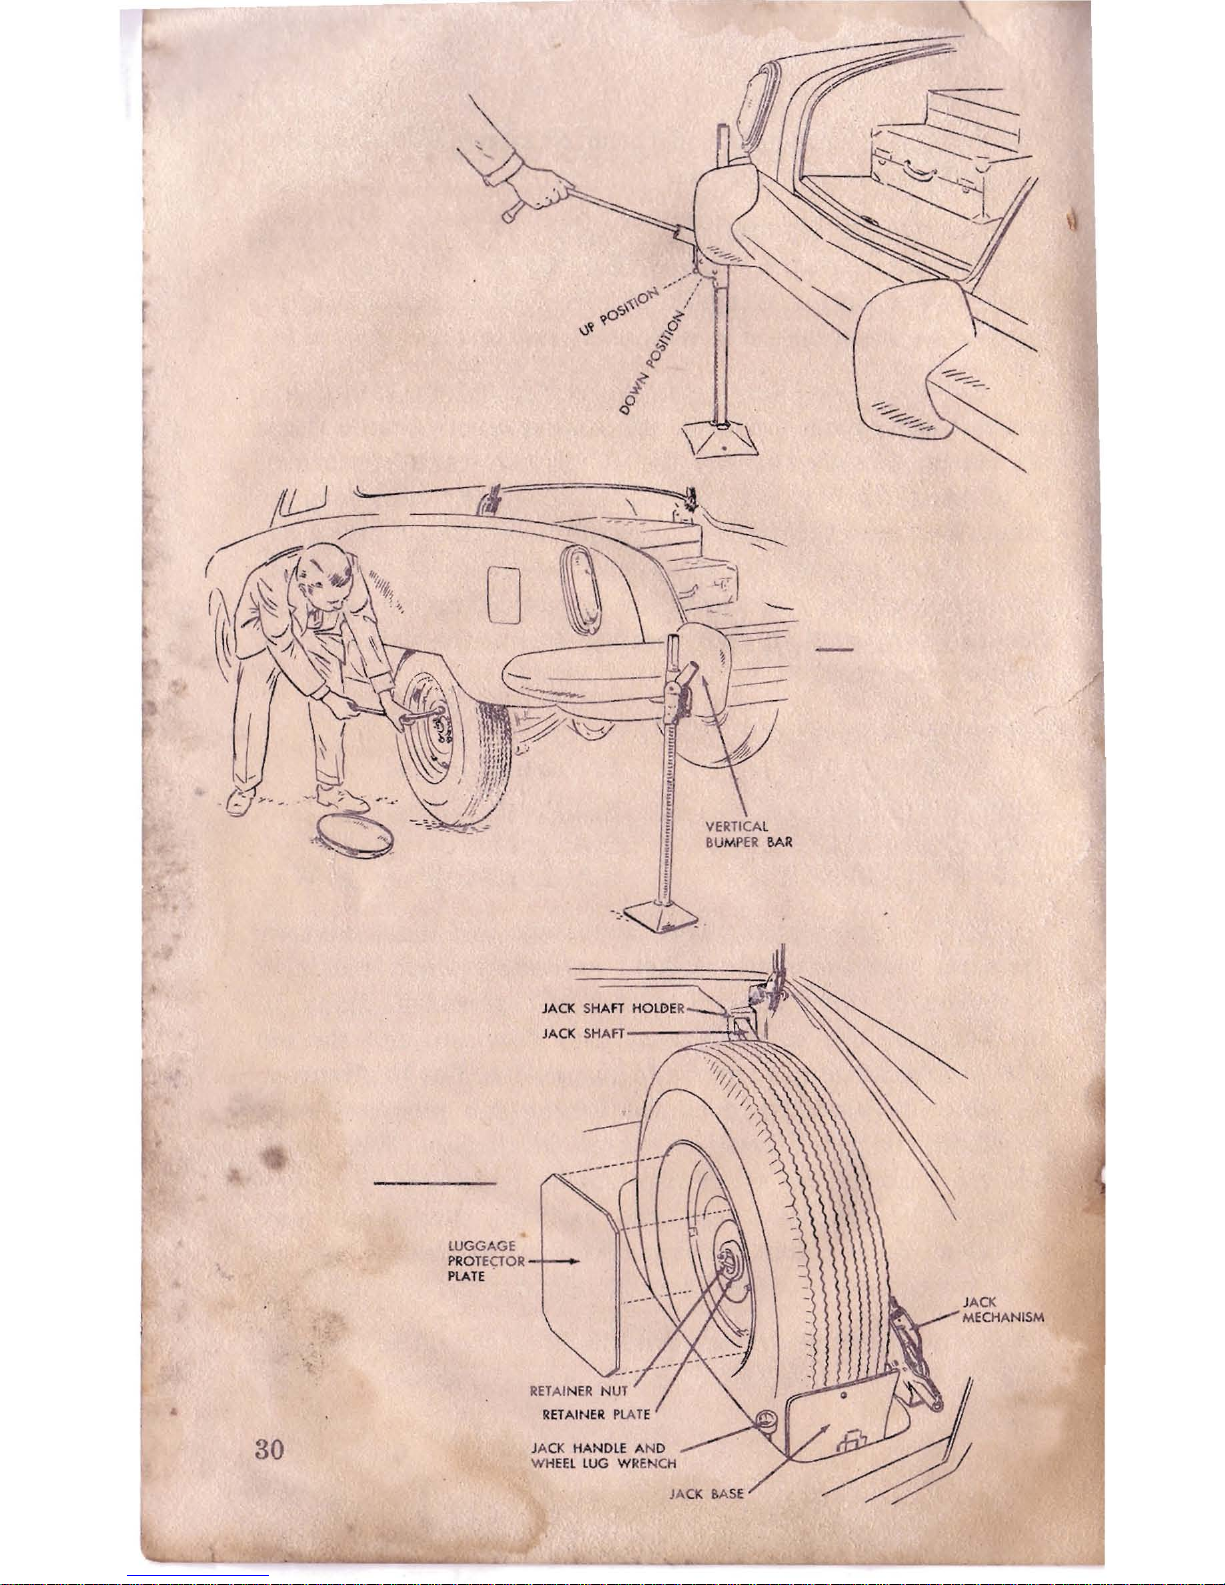
\l
30
LUGGAGE
PROTECTOR
PLATE
.
VERTICAL
B
UMP
ER
BAR
JA
CK
BA
SE
Page 32
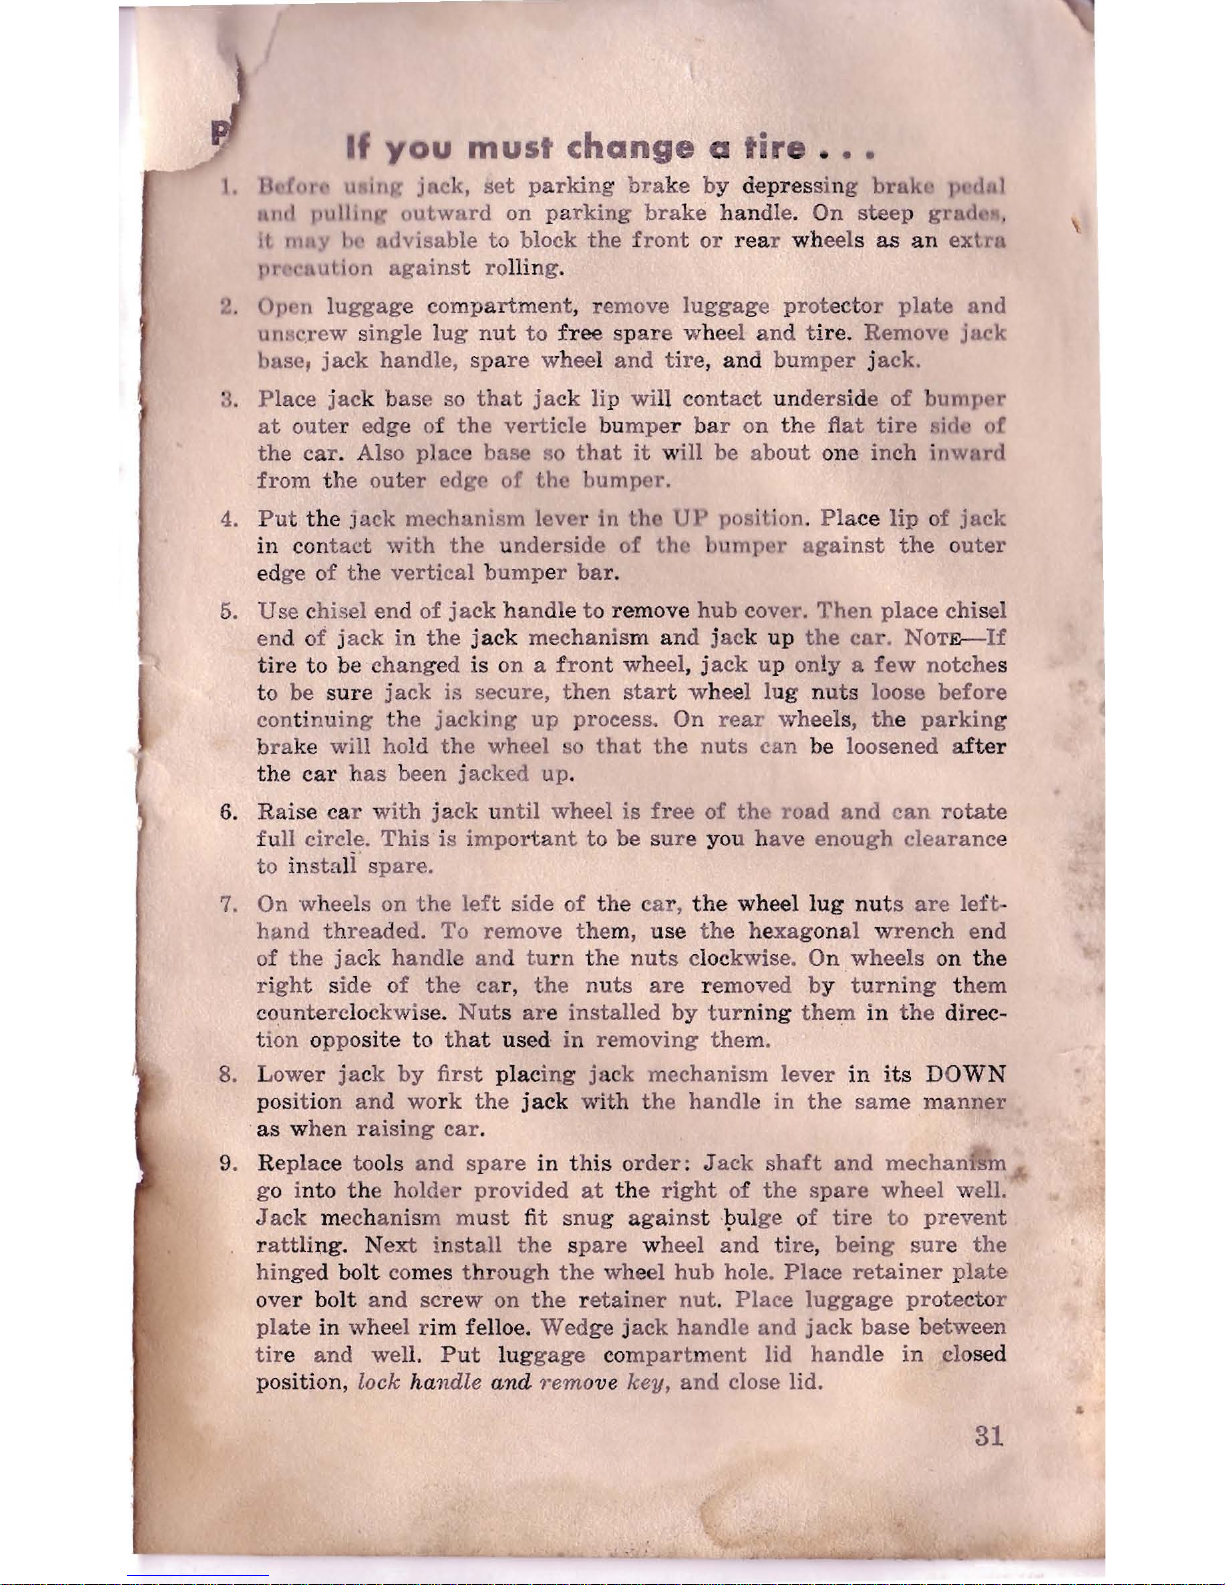
If
you
must
change
a
fir
.. .
I.
IkC •• ,,: lI £
ill
lC
ja
ck,
set parking
br.ake by
depres
sing
bruk,'
1""lnl
Illlo!
pllllilll-:'
u
utwllrd
on pa
rking
brake
handl
e.
On
steep
gracl.· ,
\
it, "
11')<
I,,·
ILll
vis
able
to
block
the
front
01
'
rear wh
eels
as
an
extrn
pl
'\""
lution
against ro
llin
g.
' J
OPI'It
luggage
compa
rtment, re
move
luggage
prot
ect
or
plate
and
un!iC,
rew
single lug
nut
to
free spare whe
el
and tire.
RemoV(' jllck
buse,
jack
handle, spa
re
wheel and
tire, and
bumper jack.
3.
Place
jack bas
e so
that
jack lip will
cont
act underside of
bumpl'r
at
outer
edg
e of
the
verticle bumper bar on the
fiat
tire
I'ick
(If
the
car
. Also
place
base
RO
that
it will
be
about
one
inch
inwllrd
from the
outer
cdgC'
of
the
bumper.
4.
Put
the
Jack
mcchani~m
lever
in
the
UP
position,
Pla
ce
lip
of
jack
in
con
tact
with
the
und
erside
of
the
!Jumper a
gainst
the outer
ed
ge
of
the
vertical
bump
er
bar
.
5.
Use chisel
end
of
jack handl
e t o
remove
hub
cover.
Then
place
chi
sel
en
d of j
ack
in
the
jack
mechanism an
d jack
up
the
car. NOT
E--
If
tire
to
be
changed
is
on a front wheel
, j
ack
up
only a few
notche
s
to
be
sure
jack is
secure,
then
star
t w
hee
l l
ug nuts
loose
before
cont
inu
ing
the
jacking
up
process.
On
rear
whe
els, the par
king
brake
will ho
ld
the
wheel so
that
the
nuts
can
be loosened
after
the
car
has
been
jacked
up.
6.
Raise car
with jack until
wheel
is
free
of the r
oad
and can
rotate
fu
ll circle.
This
is
important
to
be sure you h
ave
enough
clearanc
e
to inst
ali'
spare.
7.
On wheels
on
the
left side
of
the
car,
the
wheel
lug
nuts are
left-
hand
threaded.
To
remove
the
m,
use
the
hexagonal
wrench
end
of
the
jack
handle
and turn
the
nuts
clockwise. On
wheels
on
the
right side
of
the car,
the nuts
are
removed by
turning them
co
unter
clockwise.
Nut
s are
installed
by
tur
ning
them
in
the
direc-
tion oppo
site
to that
used
in
removing
the
m.
8. L
ower
jack
by
first
plac
ing jack mechanism
lever
in
its
DO
WN
position
and
work
the
jack
with the
handle
in
the
same
man
ner
as when
raisi
ng
car
.
9. Re
pla
ce tools
and
spare
in this
ord
er: Jack
shaft
and
mechamsm
go i
nto
the
holder
provided
at the
right
of
the
spare
wheel
well.
Jack
mech
anism
mu
st fit
snug
again
stl;>ul
ge
of
tire
to
prevent
r
attli
ng. Next
inst
all
the spare
wheel
and tire, being
sure the
hinged bolt comes thr
ough
the wheel
hub
hole.
Place
retainer
plate
over
bolt
and
scr
ew on
the retainer
nut. Place
luggage protector
plate
in wheel r
im
felloe.
Wed
ge jack
handle
and
jack
base between
tire and
well.
Put
lug
gage comp
artment
lid
handle
in
closed
position,
lock handle
and
Temo
ve
key,
and
close lid.
~
31
Page 33
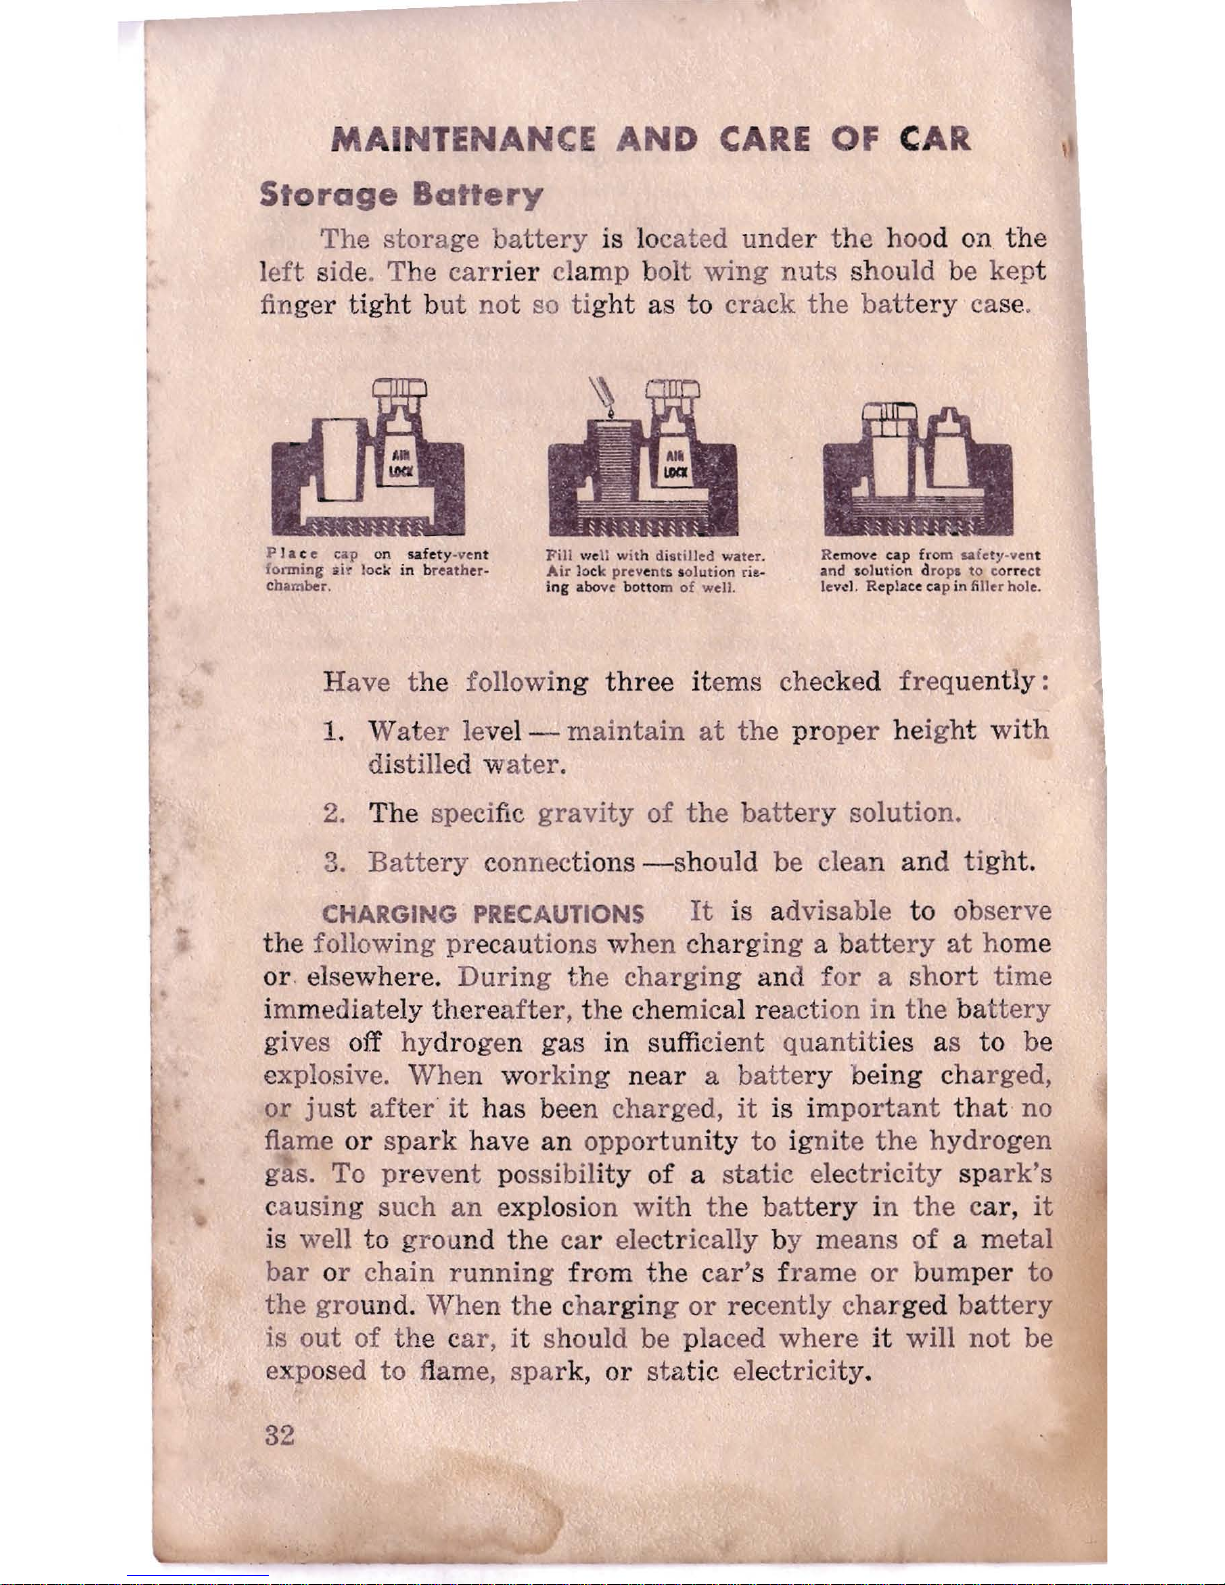
MAINTENANCE AND
CARE
OF CAR
Storage
Battery
The
stor
age
battery
is lo
cat
ed
under the hoo
d on
the
left
side.
The
carr
ier
cla
mp
bolt
wing
nuts
should be kept
fin
ger
tight but
not
so tight
as to
crack
the
battery ca se.
It!
P
J.
( e cap on
safety
-vent
Fill
well with distilled water.
Remove cap from
saiety
-vent
forming
.ii~
lock in breather-
Air lock prevents solution rie-
.an
d solution drops to co
rre
ct
chamber.
ing
abo
ve
bottom
of
'Nell.
Ie-v
d . Replace cap in filler hole.
Have the
followi
ng
three items checked
frequently
:
1.
Water
level -
maintain
at
the proper heig
ht with
distilled
water
.
. 2.
The
specific
gravity
of
the
battery
solution.
3.
Battery connect
ions
-sho
uld be clean
and tight.
CHARGING PRECAUTIONS
It
is advisable
to
observe
the
following precautions
when charg
ing
a batt
ery
at
home
or
. elsewhere.
During
the
charging
and for
a
short
time
immediately
there
after,
the
chemic
al reaction
in
the battery
gi
ves off
hy
dro
gen
gas
in
sufficie
nt
quant
ities as
to
be
explosive.
When working
near
a
batter
y b
eing charged,
or just aft
er
it
has
been
charged,
it
is important
th
at no
flame
or
spark
have
an
oppor
tun
ity
to igni
te
the
hydrogen
gas. To prevent possibili
ty
of a static
ele
ctricity spark's
c
ausing
such
an
explosi on
with the
batt
ery
in
the car,
it
is well
to
grou
nd
the car electrically by
means
of
a m
etal
bar
or
chain run
ning
from
the car'
s f
rame
or
bum
per
to
the
gro
und.
When the charging or
recently
cha
rged battery
is
out
of the c
ar,
it should be placed
where
it
will
not
be
exposed
to
flame,
spa
rk,
or
sta
tic ele
ctrici
ty.
32
Page 34
Minimize
Oil
Dilution
and
Sludg
e
T
he
crankcase
is provided with a cross
ventilation
system
to
reduce harm
ful dil ution
of
the
en
gine
oil by
wa
ter
and
fuel. Crankcase
dil
ution
is aggravat
ed
by
low
sp
eed
drivi
ng
with
freq
uent
stops
and
sta
rts because
the
en
gine
does
not
war
m up
to
the
normal operating tempera-
ture. The driv
er
can
materi
ally .assist
in
preventing this
condition by
observin
g t
he
followin g suggestions :
1.
After
sta
rti
ng, give
the
engine
time
to
war
m up
bef
ore
dri
vi ng.
2. Keep
the
engine
in
good
me
chanical cond
ition. See
that the compress
ion
is
good and
that
the igni
tion
and
carburetion s
ystems
are k
ept
in
peak
condition.
3 . . Cle
an
the
crankcase
at
least
once a year,
prefe
rabl
y
when
winter
oil is chan
ged for
summ
er weight
oil.
4. Use t
he
proper
gra
de
of a rep
utab
le en
gine
oil.
5.
Use a good grade
of
fre
sh
gasoline.
6.
Check ther
mostat
op
era
tion.
,
Ope
rating
an
engine
at subnormal
temperatur
es causes
a much m
ore
rapid dil
ution
of
the cra
nkcase oil than
is
exper
ienced
at
normal
temper
ature
s.
Rust
and
COJ'rosion.lnhibito
r '
Because of
the
chemical
reaction
betwe
en metal
and
the
li
me
or oth
er minera
ls in water
, one U.S.
pint (.8S3I
mperial
. ,
pt., 0,47 lite
rs)
of
an
appr
oved ,
inhi
bit
or
such as Stu
debake
r
Co
oling Sy
stem
Rust Inhibit
or
or Resist
or
should
be
added
to the cooling
syste
m of
every
new
car
and replenis
hed
as- needed
th
rough
out the
life
of the
car.
l'his
will help
pro
tect the
entire
cooli
ng syst
em
(radiator,
cylind
er
block,
cylin
der head, and wat
er
pum
p)
from
an
y chemica
l c
or-,
rosions,
rust,
or calcification
wit
hin
the
radiato
r core
whi
ch
may res
tri
ct
the passages.
This
does not, however, dis
pense
wi
th
the
need
of
flu
shi
ng
t he cooling sy
stem
seasona
lly,
I
33
Page 35
spri
ng
an
d fall. Following each d
raining
a
pint
of
the
inhibitor should be us ed unless it is included
in
the
new
coolant.
Many anti-
fre
eze compounds do contain a rus( inhibitor.
Ask your dea
ler
whether the
anti-freeze you use
during
the winter is of
this
kind.
If
so, it will not be necessa
ry
..
to inst
all a rust inhibitor
in the cooling
syst
em · while such
an
anti,..freeze is
in use.
Gasolin.,
Economy
Th
e k
ind
ot
gasoline you use
in your new Studebaker
is
an impo
rta
nt fac
tor
in
performan
ce, economy, and service.
It
is im
porta
nt
to
purch
ase your gasoline f
rom
a deal
er
selling the
product
of a
reputab
le refinery
in
sufficient
volume to a
ssure fresh,
clean
gas
oline which hasn't accu-
mulated moisture, d
irt and
tank set
tli
ngs
fro
m lying dor-
mant for
relatively long
pe
riods .
SPEED
Drive at
a modera
te
and
constant speed .
IDLING
Shu
t off
the
engine while
parked,
even
for
a
few
minutes
, such
as
waitin
g for long freight trains at
railroa
d crossings. Idling, exc
ept
to warm up a cold en gine,
is s
heer
waste.
STOPPING Come to a g
radual stop whenev
er
possible.
This
sav
es fuel, brake '
linin
g,
and
th:~s.
ACCELERATING
If
pe
ak
economy is to be o
bta
ined,
acceleration
must
be
gradual.
Rapid
acce
lera
tion
wastes
gasoline.
TIRES
Keep yo
ur
tir
es prope
rly
inflated.
LUBRICATION Keep
both
the
engine and chas
sis well
lubricated at all times. This reduces friction to a minimum.
MECHANICAL
CONDITION
Periodic
"tuni
ng" of
the
engine by yo
ur Studebaker
deale
r's
service department
will
insure
maximum
mechanical
effi
ciency necess
ary
to
good
gasoline mileage .
.I
34
Page 36
Tire
Inflation
and
Care
Inflate
and
check
tires to
recommended
pressures
given
on page 47 with
the
tires
cold (
at
atmospheric temper
-
atures),
and not
after
a long
run.
If
your tires
are
checked immediately aft
er a long
run,
do n
ot
' pe
rmit
the
attendant to
reduce
the
pres
sures by
letti
ng
out ai
r.
Wait
until the t
ires
have
had a ch
ance
to
cool l:!efore check
ing
pressure
s.
You
can
ensu
re
mo
re
even we
ar
of all
tires
by
having
yo
ur Studebak
er
dea
ler cris
s-cro
ss them
according
to
the
latest factory recomme
ndations
at appr
oximately 4000 mile
(6437 km.) i
nt
ervals.
Ha
ve tires
and
wh
eels checked
for
need of balance
afte
r each criss-crossing.
Octane
Selector
The
engine
is equipped
with
an oct
ane
selector
which
permits
the
advance
or retar
d of t
he
igni
tion
timing to
give econo
my
of
fuel
consumption
and
noiseless
combustion
re
lati
ve
to
the
type
of gasoline used.
The
selector should
be
adjusted
by
your
Studebaker
dealer.
Carburetor
Air
Cleane
r
Tw
o types
of
air cle
aner are
available f
or
Studeba
ker
ca
rs.
One
is
of the
"oil we
tte
d"
type
for
cars
operat
ed
a
,g
reater
pa
rt
of
the
time
over
pavement and
roads
which
are compar
atively f
ree
fro
m dust.
The
other
is
kno
wn as
the
"oil
bath" type
and
is
available
at
extra
cost
as an
accessory for
ca
rs
ope
rated whe
re
dust
condi
tions are severe.
Dust
part
icles, a
lthough
microscopically small,
are
highly
abrasive and
tend to score and
cut
the
smooth
glas
s-
like
surf
aces
of
working part
s -
in
creasing
the rate
of
wear.
The
prop
er
type
of
air
cleaner installed
on
your
car, pro
perly
maintained
and
serviced, will
increa
se
the
35
Page 37
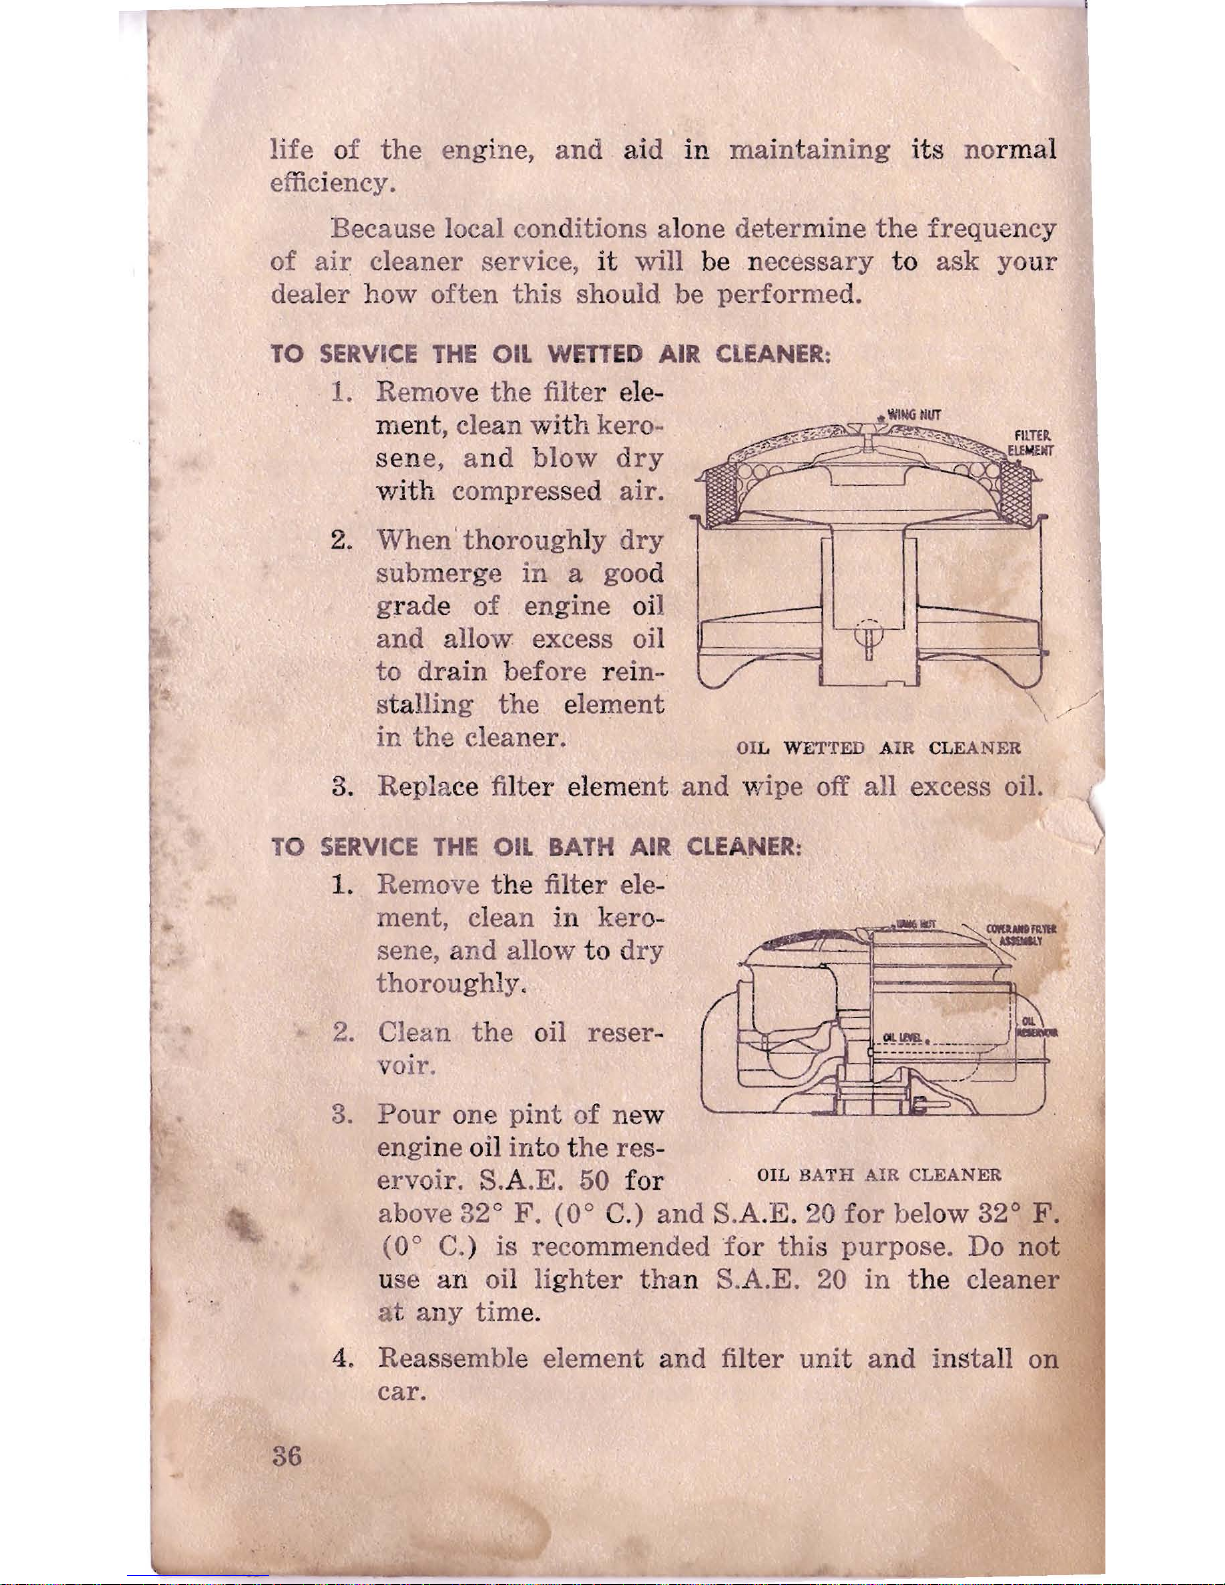
life
of
the
en
gine,
and aid
in
maintaining
its
normal
efficiency.
Because local conditions alone
determine
the
frequency
of
air
cleaner
service,
it
will be n
ecessary
to
ask
yo ur
dealer
how
often
this
should be
performed.
TO
SERVICE
THE
OIL
WETT
ED
AIR
CLEANER:
1. Remove
the
filter ele-
men
t, clean with kero-
sen
e, a
nd
blow
dry
with
compres
sed
air.
2.
When'thorough
ly
dry
submerge
in
a good
gr
ade of
engine
oil
and
allow excess oil
.
to dra
in
before
rei
n-
stalling
the element
in
the
cleaner.
OIL W
ET'fED AIR CLEANER
3. Replace
filter
elem e
nt
and
wipe off
all
excess oil.
TO
SERVICE
THE
OIL BATH AIR
CLEANER:
1. Remove t
he
filt er ele-
ment, clean
in
kero-
~~-*IT~M
sene,
and
allow
to dry
thorou
ghly.
2. Clean
the
oil
reser
-
voir.
3.
Pour
one pi
nt
of new
engine oil
in
to t
he res-
ervoir.
S.A
.E.
50
for
OIL
BATH
AIR
CLEANER
above 32°
F.
(0° C.)
and
S.A.
E.
20
for
below 32°
F.
(0°
C.
) is recommended
for
this
purpose.
Do
not
use an oil lig
hter
tha
n S.A.E. 20
in
the
cleaner
at
any
tim
e.
4. Reassembl e element
an
d filter
unit
and ins
tall
on
car.
\
36
Page 38
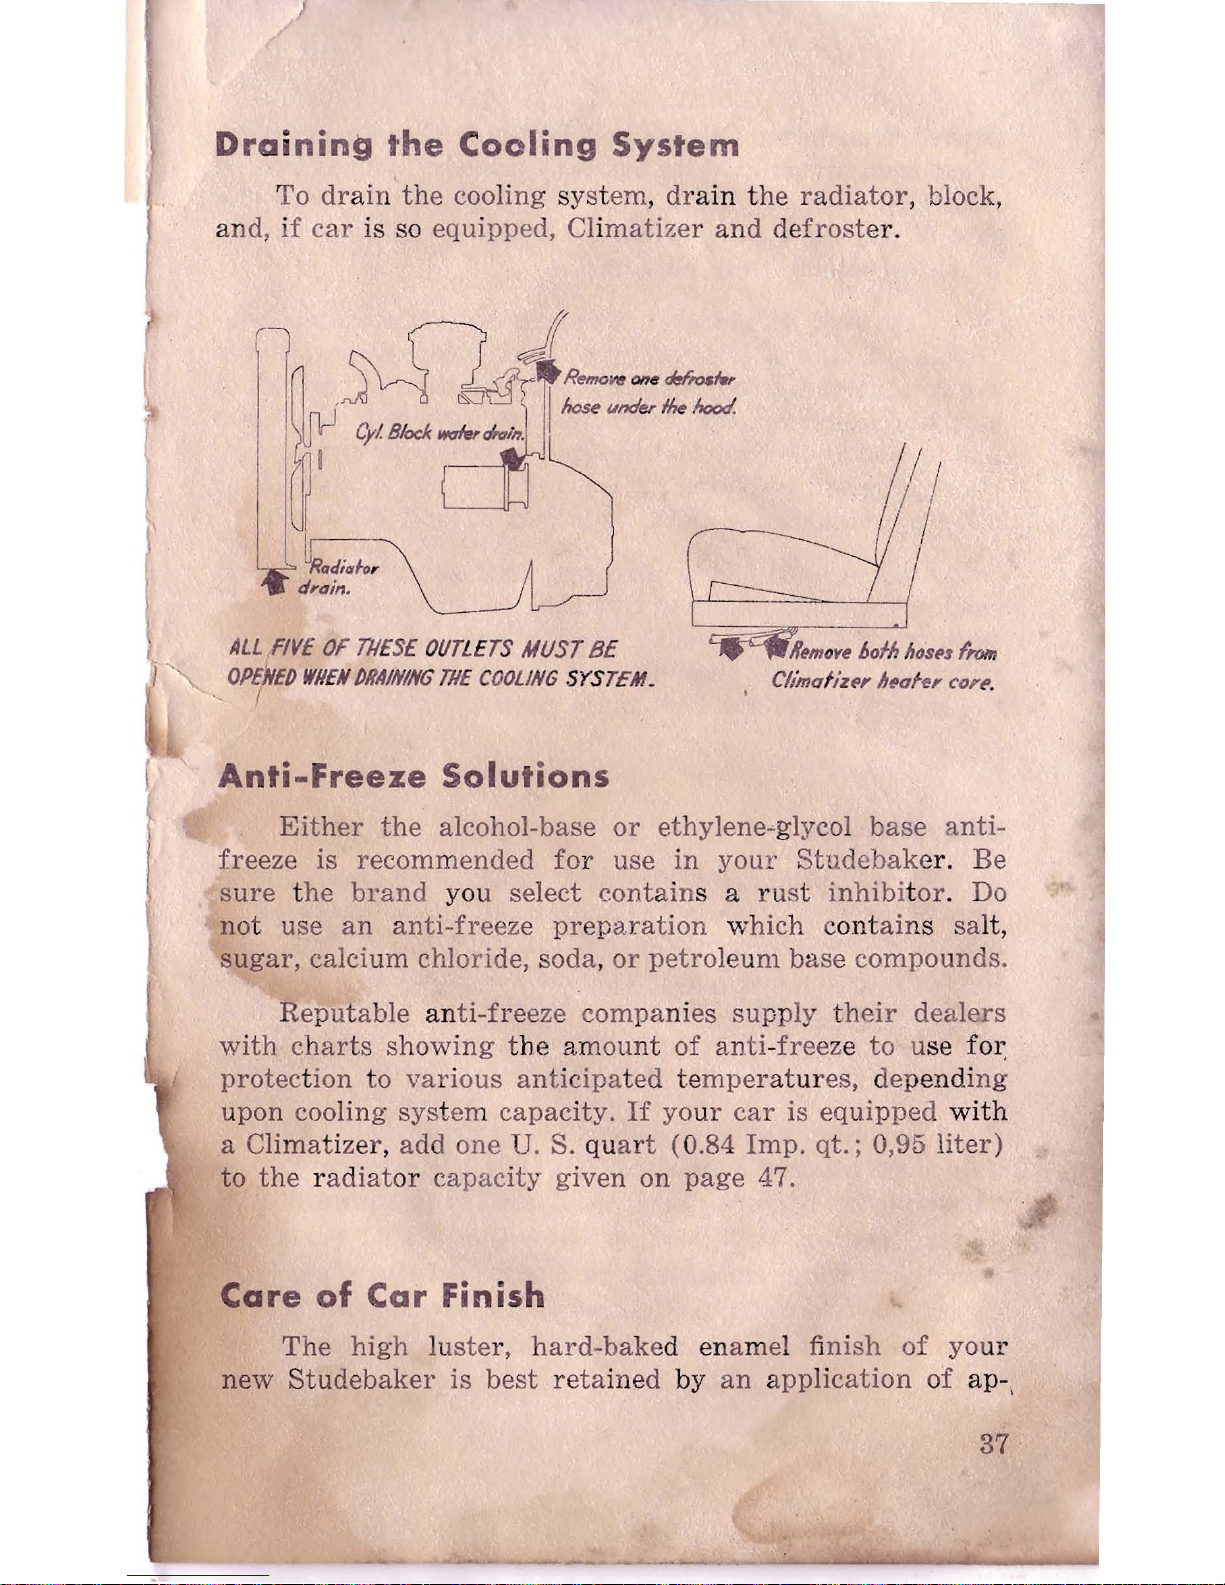
Draining
the
Cooling
System
To drain '
the
cooling system, dra
in the
radiator
, block,
and, if
car
is so equipped, Cli
matizer
and de
froste
r.
~
J
~
l, )
~tRemovt!
Ofte
tkrl'O$/w,
.j
V]
M
~
Ihose under
~
hoot/.
)i
0<&0&(1
r
//;
~
:\
~
r
d,am.
L
~
L----r--'
~
ALL
.FIVE
OF
TIIESE OUTLETS
MUST
BE
~em
o ye
Dofll
hO$(l1
from
1
",-
OPiNED
WHEN
DRAINING TNE
C
OOLIN
G SYS
TE
M.
Climofiu,
IIeole, co,t'.
" /
Anti-Freeze
Solutions
Either
the
alcohol-base
or
ethylene~
g
lycol
base
anti-
freeze is
recommended
for use
in
your
Studebake
r.
Be
sure the
brand
you select
eonta
ins a rust
inhibitor
. Do
not use
an
anti-freeze
preparation
w
hich
contains salt,
sugar,
calcium chloride,
soda, or
petrole
um
base
compounds.
Reputable
an
ti-freeze
companies supply
their
dealers
wi
th charts
showing
the
am
ount of
anti-freeze to
use
fOl~
protection to
various
anticipa
ted temperatures, dependi
ng
upon cooling
system
capacity.
If
yo
ur
car
is
equipped
with
a Climatizer,
add
one
U. S. quart (0.84
Imp.
qt.;
0,95
liter)
to
the
rad
iat
or
capacity
given
on
page
47.
Care
of
Car
Fini
sh
The
high luste
r,
hard-bake
d enamel finish
of
yo
ur
ne
w Stu
debaker
is
best retaine
d by
an application
of ap- ,
37
Page 39
pr
oved Studebak
er Clea
ner and
Polish
or Clean
er
and
Wax
a
iter
each wa
shing.
The
enam
el, howe ver, shou
ld
not
be
subjected
to
an
applica
tion of w
ax
of
any
kind
during
the
first 60
day
s so
that
sufficient
time may
be provided'
for
the
finish to become fully h
ardened.
Ap
proved
Studebak
er ap
pearance maintena
nce
ma
-
t
eri
als a
re
available
from
your
Studebaker
dealer.
These
a
re
recommended
to remove t
he accumulation
of
road scu
m
an
d dullness
resultin
g f
rom
we
ath
er
or
toad
conditions
and
to
restore
the
luster
of
the
enamel finis
h. Do n
ot
become
al
armed
wh
en polishing
or
waxing
if
a sli
ght
amo
unt
of
color
appears
on the cloth.
This
is a natura:l c
ondition.
Alcohol,
anti-f reeze
mixtures
con
tainin
g alcohol,
and
calc
ium
chl
orid
e or
othe
r chemical mi
xtures
used
to
melt
sn
ow
and
ice or
to
sett
le dust should
be
flush ed
with
wat
er
as so
on
as
po
ssi
ble
in
order
to
the ename
l fin
ish
and
chromium
parts.
av
oid
damage
to 1 /
..
.
Washing
the
Car
When
wash
ing
the car, first
saturate
all
foreign sub-
st;mces on
the finish with
cold
water.
Then use
a clean
sponge
and
r un
ning
water for
the
removal of
dirt. Dry
the
body with a clean, d
amp cha
mois skin,
using a straight
horizon
tal
or vertical
motion, rather than a circular
mo-
ti
on.
It
is
important tha
t a di
fferent
sponge
and
chamois
sk in be used
on the
body
from
that
used on
the
chassis.
Ch
romium
and
nick
el p
lated
finis
hes
are
of a perish
:'
able n
atu
re
and
will deter
iorate
if
not pro
perly cared
for.
These
parts
should be kept clean a
nd
free
from
dirt
and
foreig
n ma
tter. For
cleaning
chromium
plated
parts
use
either
clear
water
and
a clean clo
th
or
Studebaker
Chromium
Cleaner, av
ail
able from
Stude
bake
r dealers.
To
protect
the
finish
after
the
parts
are
cleaned,
rub
with a clean
cloth
t
hat
has
been
dampened
with
oil,
or
apply a coating
of
wax.
38
Page 40
Care
of
Cloth
Upholstery
Clean upho
lstery mea
ns
not
only a bet
ter
looking
aut
o-
mobile
but
gives longer wear and affo
rds
greater comfort
and
enjoyment.
The use of a vacuum cle
ane
r a
nd
a thoro
ugh bru
shi
ng
of the uphol stery and headlining (wi
th
the nap or pile)
will usually b
righten the interior no ticeably, Remo ve
the
cushions
from the ca r
an
d br
ush
to
r emove f
oreign par-
ticles from
the
fab
ric
.
Stu
debaker
Fab
ric Cleaner
(av
ailable through
Stu
de-· .
b
ak
er dealer
s) is effective
in removing all
types of stains
,
and d
oe
s not harm
the
upholstery.
Seat and side upholstery
can
be
wa
shed
safe
ly
wit
h
soap
and water
. Use luke
warm water and
a neutral soap.
,e
suds should be good and
fro
thy,
not
watery. Apply
m moder
ate quantit
ies
with
a damp clo
th,
sponge,
or
soft
brush.
Remove soap suds
wit
h a clea n, damp clo
th
or
sponge,
then
wipe
the
surface several
times
with
a
dr
y
cloth. While the
materia
l is still
da
mp,
brush
it
lightly
with
a whisk broom
or brush
of
medi um stiffn{,!ss. P
erm
it
air
to
circulate freely ov
er the
wet
upholstery.
When dry,
brush aga
in to loosen any minute
matting.
Wh
en
brushing,
alwa ys brush
fabr
ic
with the lay
of
the pile
or
nap.
Cleaning
Leather
Upholstery
Leather
upholstery
may
be cleaned with a
soft
sponge ·
a
nd sad
dle soap. Make a light suds with luk
ewarm
water
an
d saddle soap.
This
typ
e of so
ap
is es pecially
suit
able
for
cl
ean
ing lea
ther and leaves the su
rface soft
and pliable .
Rinse the sponge occasionally
in
cle
an
water.
After
co
mpleting
the
cleaning operation, use a clean,
soft
clo
th
to poli
sh
the surface of
the leath
er.
39
Page 41
Cleaning
Rubber
Parts
St
udebaker Chromium Cle
aner (powd
er type
AC- 1464)
is recommended f
or
clean
ing
white
sidewall
tires.
Stude-
baker
Black
Rubber Finish is
recommended
for
black
tires
and
all black
rubber
parts.
C
are
of
the
Convertible
Fabric
Top
Studebaker
conve
rti
ble models '
are
equ
ipp
ed
wit
h a
two-ply top.
The
fac e of
the
ma
terial
is
ma
de
of
cott
on
and
rayon
rubber
ized to a cot
ton
back, producing a
water-
pr
oof
mate
rial.
Traffic
grime and most
oth
er
soili
ng
may
be removed
by • wa
shing
the
top
wi
th
a
sudsy
mix
ture
of
mild soap
abd
warm
water. Strong
solvents,
naphth
a,
or carbon
tetra
-
ch
lo
ride a
re not
rec
ommended
for
cle
aning
this
fabriC'
Some spots
can
be removed with art
gum rubber
an&.
suede
brush.
Mud
splashings
can
be
washed
or
doused off wi th
cool
water.
....
The life
of
the
to~
can
be
mate,rially lengthel,led
if
care
is
taken
to loiver the top only
'When
it
is
dry.
Never
operate the top when the car is
in
motion
.
•
'
40
Page 42
SERVICE
AND ADJUSTMENTS
Engin e
Tune-Up
Occasionally
your
serv
icem
an
will
recommend
an
engine
tune-up.
The
frequency
of
tune-ups
depends alm
ost
enirely
on
the
amolint of driv
ing
and
the
type
of
driving
you
do.
When
you
purchase
a
tune-up,
we
recommend
that
you
request
at
least
the
following
operations:
1.
Check
the
mani
fold
heater val
ve
for
free
operati
on.
2. Cle
an
and adju
st
spark plugs;
insta
ll with
new
gaske
ts.
..
3. Clean
carburetor
air
cleaner.
4,.
Clean
fuel
pu
mp
bowl
and
str
aine
r; install
with
new
gasket.
5.
Clean inside of
distributor
cover, cable
termina
ls,
a
nd
sockets.
6.
Tighten cylinder
head cap
screws
to recom
mended
ten
sion.
7.
Adjust
fan
belt
.
8.
Remove
and
clean car
buret
or
choke
the
rmostatic
co
ntrol.
Replace wi
th
new
gasket
and
adj ust,
if
necessa
ry.
9. Check
and
set
ignitio
n timing.
10.
Adjust
carburetor
idle
scr
ew with
engine
at
nor-
mal operating
temperat
ures.
11.
Adjust
idle stop sc
rew
to produc
e e
ngi1le
speed
corresponding
wi
th
8 miles
(13
km
.)
per
hour
road
speed
in high gear.
41:
Page 43
Adiust
me
nts
and
Other
Service
CARBUR
ETO
R ADJUSTMENT
FOR
HIGH ALTITU
DE
The
carburetor
is
carefu
lly ca
librated to provide effici
ent oper
a-
tion.
Stu
debak
er
deale
rs are
acquainted wi
th
the adjus
t-
ments
wh
ich are needed
for
high
alti
tud
e operation.
BRAKE
ADJUSTMENT
The
self-adju
sting
brak
es on
yo
ur
car are
self-compens
ating for
lin
ing
wear
and requir
e
no
adjust
me
nt. They
are
properly s
et
at the
factory
.
With
each app
lic
ati
on
of
the
brakes, however,
the
lin-
ings wear and, afte
r a tim
e,
new lining
s should be installed
to
provide t
he
maxi
mum braki
ng
area and
to avoid
damage
to the brake
dru
ms. When the li
ning
needs rep
lacement
,
the
self-adj
usting feature
ceases
to
op
erate.
When
thi
s
occurs, t
he brake
pedal fr
ee travel will inc
rease
and
the
driver is
warned that
the
brakes
need
relining.
E
your
'
br
akes do
not
operate satisfactorily, see yo
ur
Studebaker
/
dealer. .
CLUTCH
PEDAL
TRAVEL
ADJUSTMENT C
lutch pedal
f ree
travel
is the
distanc
e t
he
pedal moves
forward
before
r~
sistance
of
the release mecha
nis
m is felt. W
hen the
f
r~e
trave
l is
greater tha
n one
inch
(25,4 mm.)
or
less
than
one-half
inch (12,
7 mm.)
adjustm
ent should
be
ma
de by
your
Studebaker
dealer.
THE
HILL
HOL
DER
(on c
ars
so equipped)
should»
checked
and adjust
ed
if
nece
ssary
whenever
the
clutch
pedal.
travel
is adju
ste
d.
F
AN
BELT
ADJUSTMENT To
insure effi
cient fan,
water
pump and
generator
operation, it
is imp
ortan
t t
hat
the
fan
belt
IS
not
over-tightened.
Any
readjustment
should
be
perform
ed by a
Studebaker
dealer.
FRONT
WHEEL
CAM
BER
ADJUSTMENT
Camber
adjust-
ment
is
pr
operly
set
at
the fact
ory
,0 a greater
on
the
driver's .side of
th
e c
ar than
on the
other
side. Should a
front
end a
lignment
check reveal need of
camber
read
just-
42
Page 44
"t;
'htlUld
ill'
Hci
as
nea
rly to
:J4
0
on drive
r'H
Hille
IIml
Oil
tilt'
III
hl'l"
Hide
as
possibl
e.
In
any
setting, t hl'
driVl'r'H
fl
!
1'11111111'1"
HilOUld
be 0
0
more
than the
oth
er
Hi df!.
BODY DRAIN HOLES
All
d
rain
holes should
hI'
kept
open to
preve
nt accumulation of wa
ter
.
o
Th
e door drain holes are easily cleared
wit
h 1\
IH'll
kn
ife or oth
er flat inst ru
ment
whi
ch c
an
be
ins
ert(·d
II
I
the
holes and r un
ba
ck and forth a few t imes
to
IOOHI'II
an
y congestion.
Body
drain holeR
HIiOIlI(1
be clea
red
by
the
ser
viceman.
See page
44 f
or
min
imum seas
onal
service recom
mendatio
ns.
,I
(.
43
Page 45
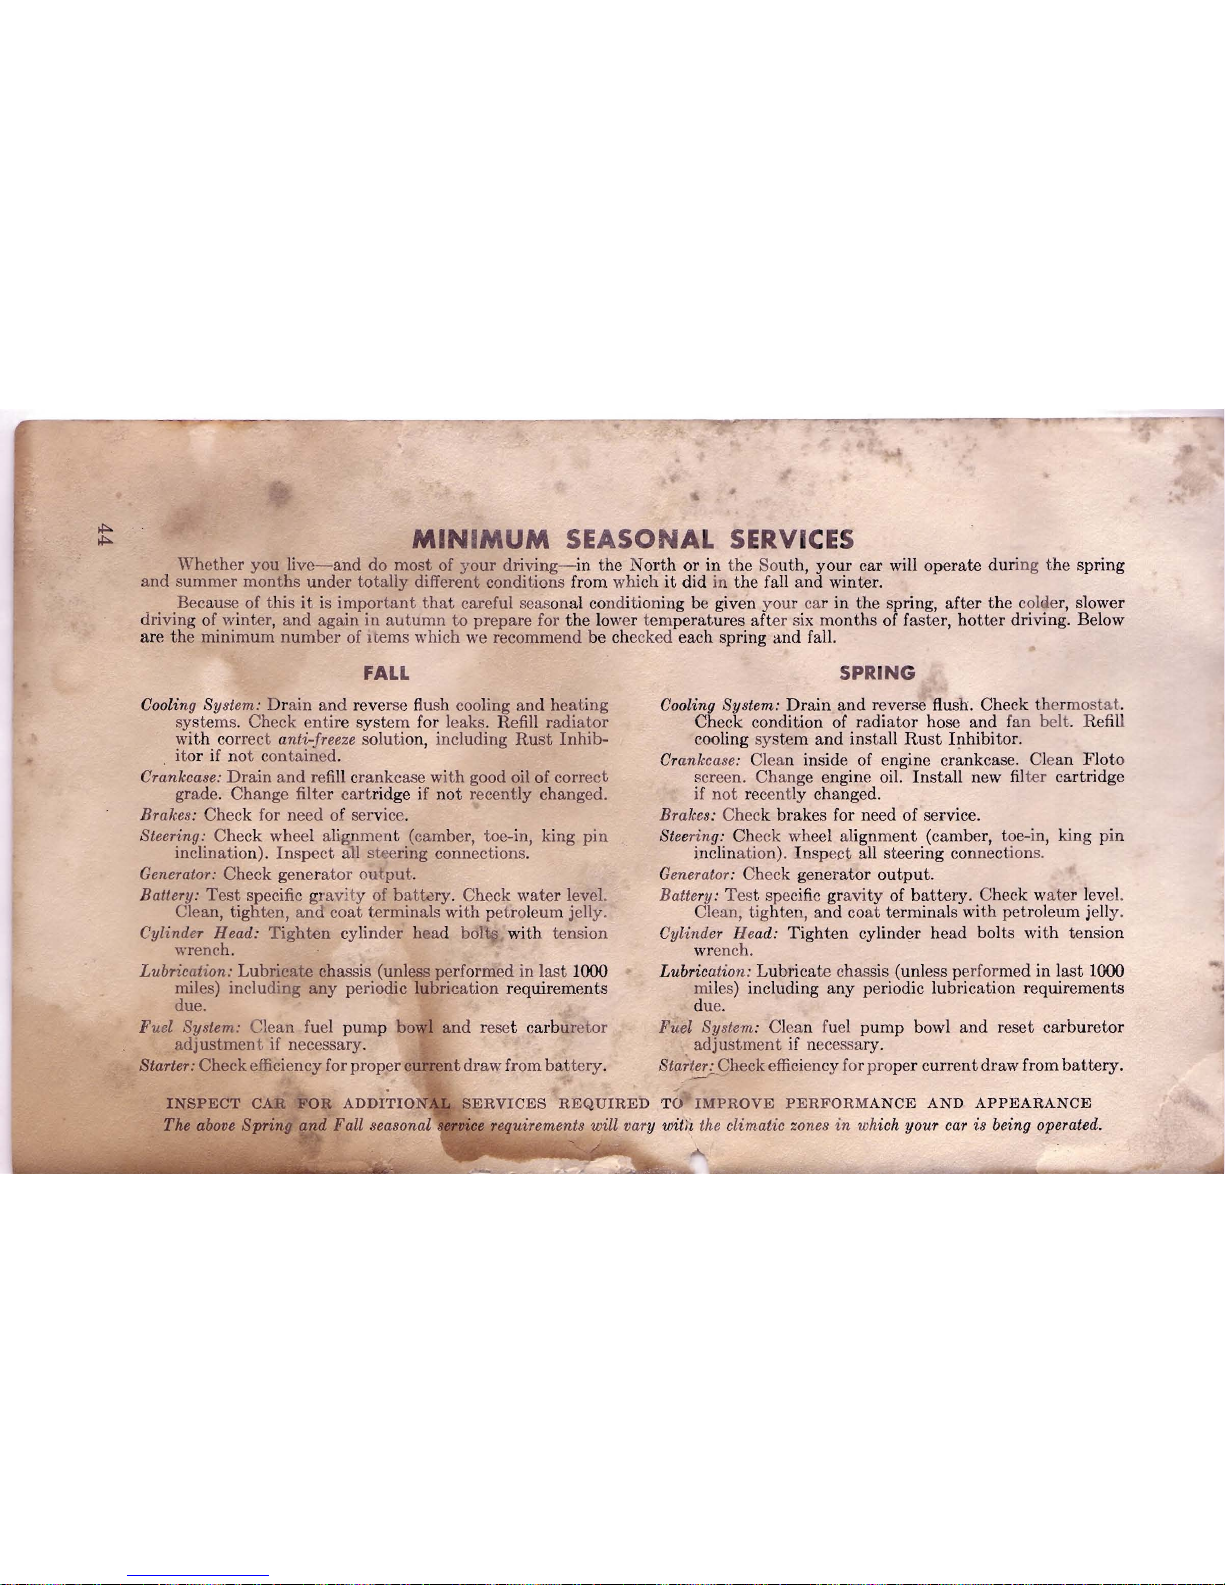
..
>I>>I>-
MINIMUM SEASONAL
SERVICES
Whether
you live-and
do
most
of
your
driving- in the N
orth
or
in the South,
your
car will operate
dur
ing the spring
and
summer
months
under
totally different conditions from which
it
did in the fall
and
winter.
Because of th
is
it is i
mportant
tha
t careful seasonal conditioning be given
your ca
r in
the
spring,
after
the colde
r,
slower
driving of wi
nter, and
again in
autumn
to
prepare for
the
lower temperatures af
ter
six m
onths
of faster,
hotter
driving. Below
are
th
e minimum
number
of Items which we recommend be checked each spring
and
fall.
FALL
Cooling S ystem:
Dra
in and reve rse flush cooling and h
eating
syste ms. Check
entir
e system for leaks. Refi
ll radiator
wi
th
correct anti-freeze solution, including
Rust
Inhib-
it
or if not c
ontained
.
Crankcase:
Drain
and refill
crankcase
with
good oil of correct
grade. Change filter
cart
ridge if
not
recently changed.
Brake~
:
Check for n
eed
of service.
Steering: Check wheel alignment (camber, toe-in, king
pin
inclination).
Inspec
t all steering connections.
Generator: Check gener
ator
out
put
.
Battery:
Test
specific
gravity of
battery
. Check
wate
r level.
Clean, tighten,
and
coat
terminals
wit
h p
etro
leum jelly.
Cylinder Hea
d:
Tighten
cyli
nder hea
d balt\l
with
tension
wrench.
Lubrication: Lubric!l.te chassis (unless performed in last 1000
miles) including
any
periodic l
ubrication
requirements
due.
Fuel System: Clean fuel pump bowl
and
reset
carb
uretor
adjustment
if necessary.
Starter: Check efficiency for
proper
current
draw
from battery
.
SPRING
Cooling System:
Drain
and
reverse flush. Check thermostat.
Check condition of
radiator
hose
and fan
belt.
Refill
cooling system
and
install
Rust
Inhibitor.
Crankcase: Clean inside of engine
cr~nkcase.
Cle
an
Flo
to
screen. Change engine oil.
Install
new
filter cartridge
if
not
recently changed.
Brakes:
Chec k brakes for need of service.
Stee
rin
g:
Ch
eck wheel alignm
ent
(camber, toe-in, king pin
i,nclination). Inspect all steering
co
nnections.
G
eneratoT
: Check generator
output.
Battery:
Tes
t specific gr
avi ty of
battery.
Check w
ate
r leve
l.
Clean, tig h
ten, and coat terminals with
petroleum jelly.
Cylinder Head: Tighten cylinder head bolts with tension
wrench.
Lubrication: Lublica
te
chas sis (unless performed in
last
1000
miles) including
any
periodic lubrication requirements
due.
Fuel System: Cl
ea
n fuel
pump
bowl
and
reset
carburetor
adjustment
if necessary.
Sta.
~!5.Check
efficien cy for pro
per
current
draw from
battery
.
INSPECT
CAR
FOR ADDITION
SERVICES REQUIRED TO IMPROVE PERFORM
ANCE
AND
APPEARANCE
T
he above
Spring qnd Fall seasonal
ll.
ennce requirements will vary
witl~
the
climatic zones
in which your car
is
being operated.
Page 46
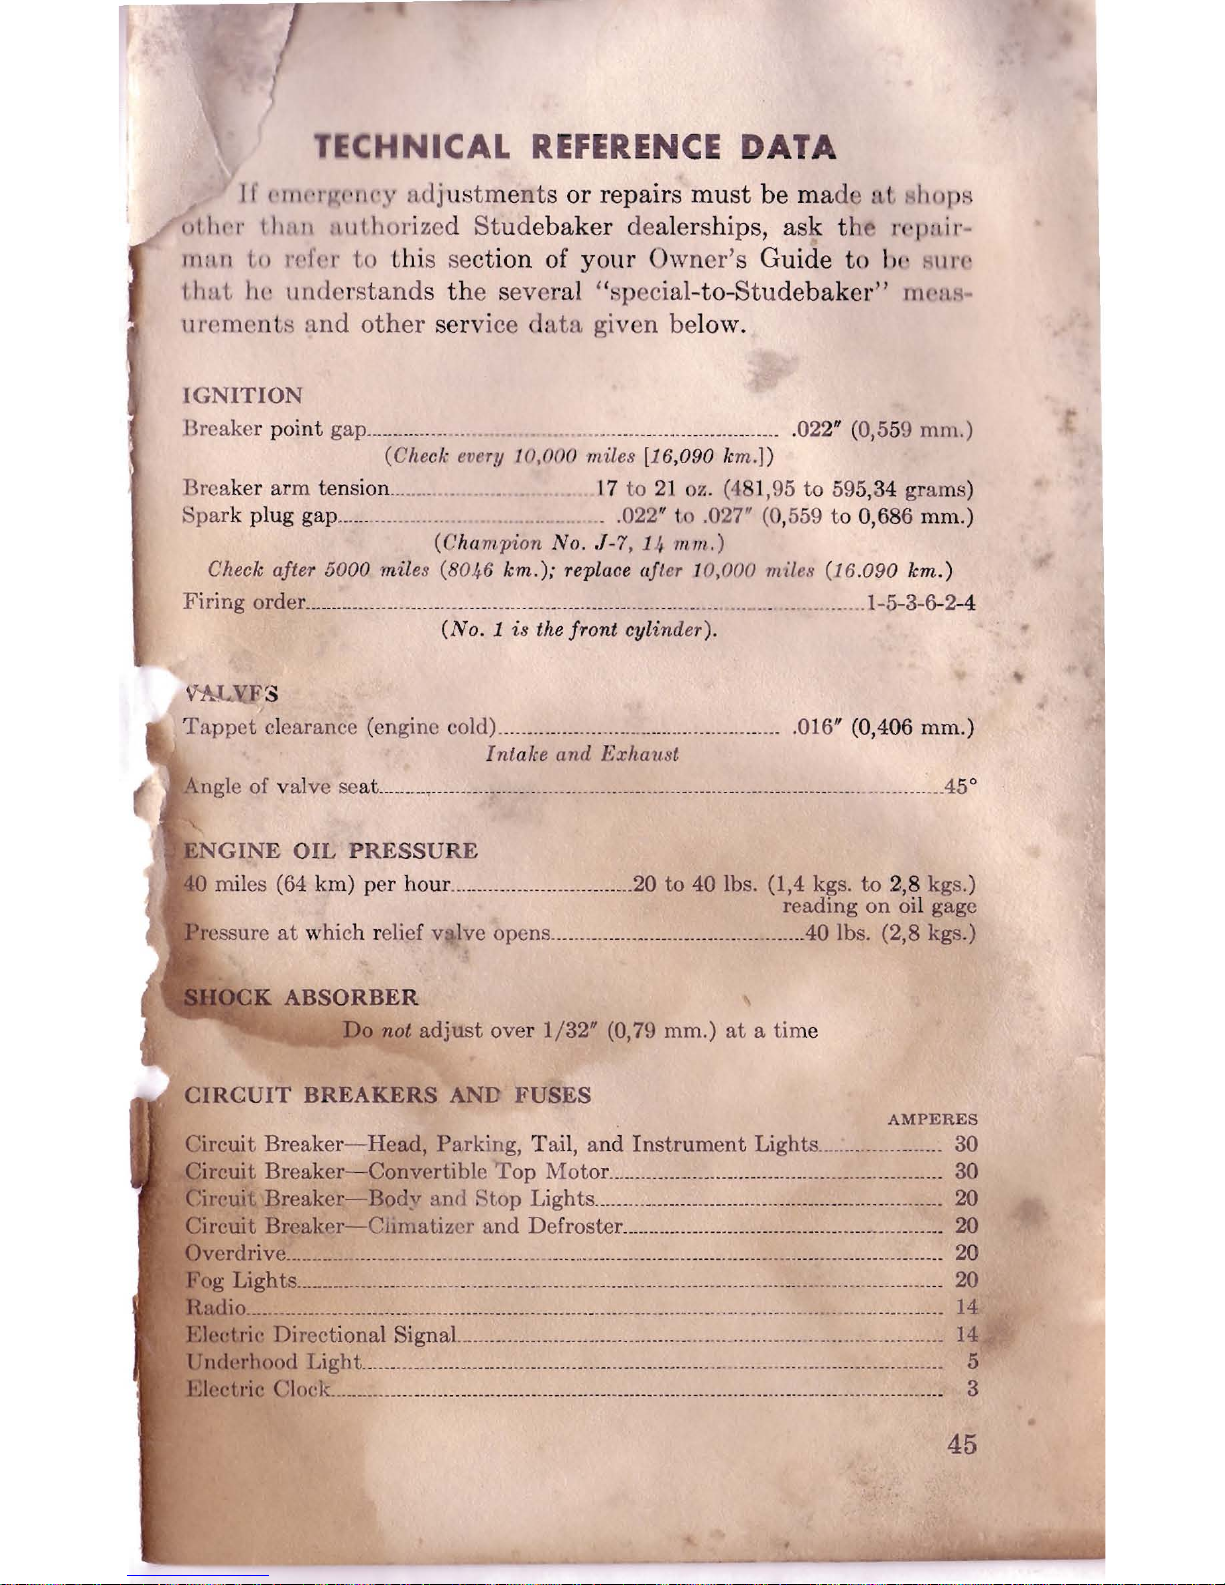
TECHNICAL
REFERENCE
DATA
If
l'IlIl"
~t '
IlI'
,
\'
mlj
u::;tments
or
repairs
must
be made a
t.
I'
hoJl"
;11111' 1' 1h
I!
II
JlII
t Itol'ized
St
udebaker
dealerships,
ask
the
n'!,,,
i
1'
-
TllIlll
I
tl
1'
1'1'\'1' I
()
this section of
your
Own
er's
Guide
to
II('
I'
ll
1'\'
t
1,
:tL II(' ullder
stands th
e several
"Hp
ecial-to-
Stu
debaker"
TlH'Il
,,'
IIl'emen
L
~
and
other
service
data
given below.
IGNITION
Brcak
er
point
gap.........
.........
..
.......
............................ ,022" (0,559 mm.)
(Check ev
ery
10,000 miles [16,090 km.
])
nrca
ker
arm
tension....
.......
17
to
21
oz
. (481,95
to
595,34 grams )
::)park plug
gap......
....... . .022" 10 .027" (0,559 to 0,686 mm.)
(Champion
No .
.1-
7, 14
mill,
)
Check after
5000
mil
es (8046
km.);
replaoe
lif
ter
JO,O()()
l1Iile,~
(16.
090
km.)
Firing
order....................................................................
.... ..
.......
.......... 1-5-3-6-2-4
(No.1
is
the front cylinder).
,
~F
.,
3
Tappct
clearance (enginc cold)..
..
....... ......
..............
..
...
016" (0,406 mm.)
Angle of valve
ENGINE
OIL
PRESSURE
Intalce
(md Exhaust
.......................20
to
40 Ibs. (1,4 kgs.
to
2,8 kgs,)
reading
on
oil gage
rcssurc
at
which relief valve opcns ...........................................40 lbs. (2,8 kgs.)
K
ABSORBER
Do
not
adjust
over
1/32"
(0,79 mm.)
at a tim
e
CIRCUIT
BREAKERS
AND
FUSES
AMPERES
Circuit
Breaker-Head,
Parking, T ail, a
nd Instrument
Lights
....
.................. 30
Circuit
Breaker-Convertible
Top
Moto
L ........................................................ 30
Circuit
Breaker-Body
and
Stop
Lights
............................................................ 20
Circuit
Breakpr-ClImatiz
er
and
Defroster ........................................................ 20
Overdrive ........................................
...
.....................................
............................... 20
Fog
Lil!hts .............................
..
...............................
... .............................. ..........
....
... 20
14
Elcctri(' Directional SignaL......................... .....................
..
....
.........
..
14
lJnd('rhood
Electric
5
3
45
Page 47
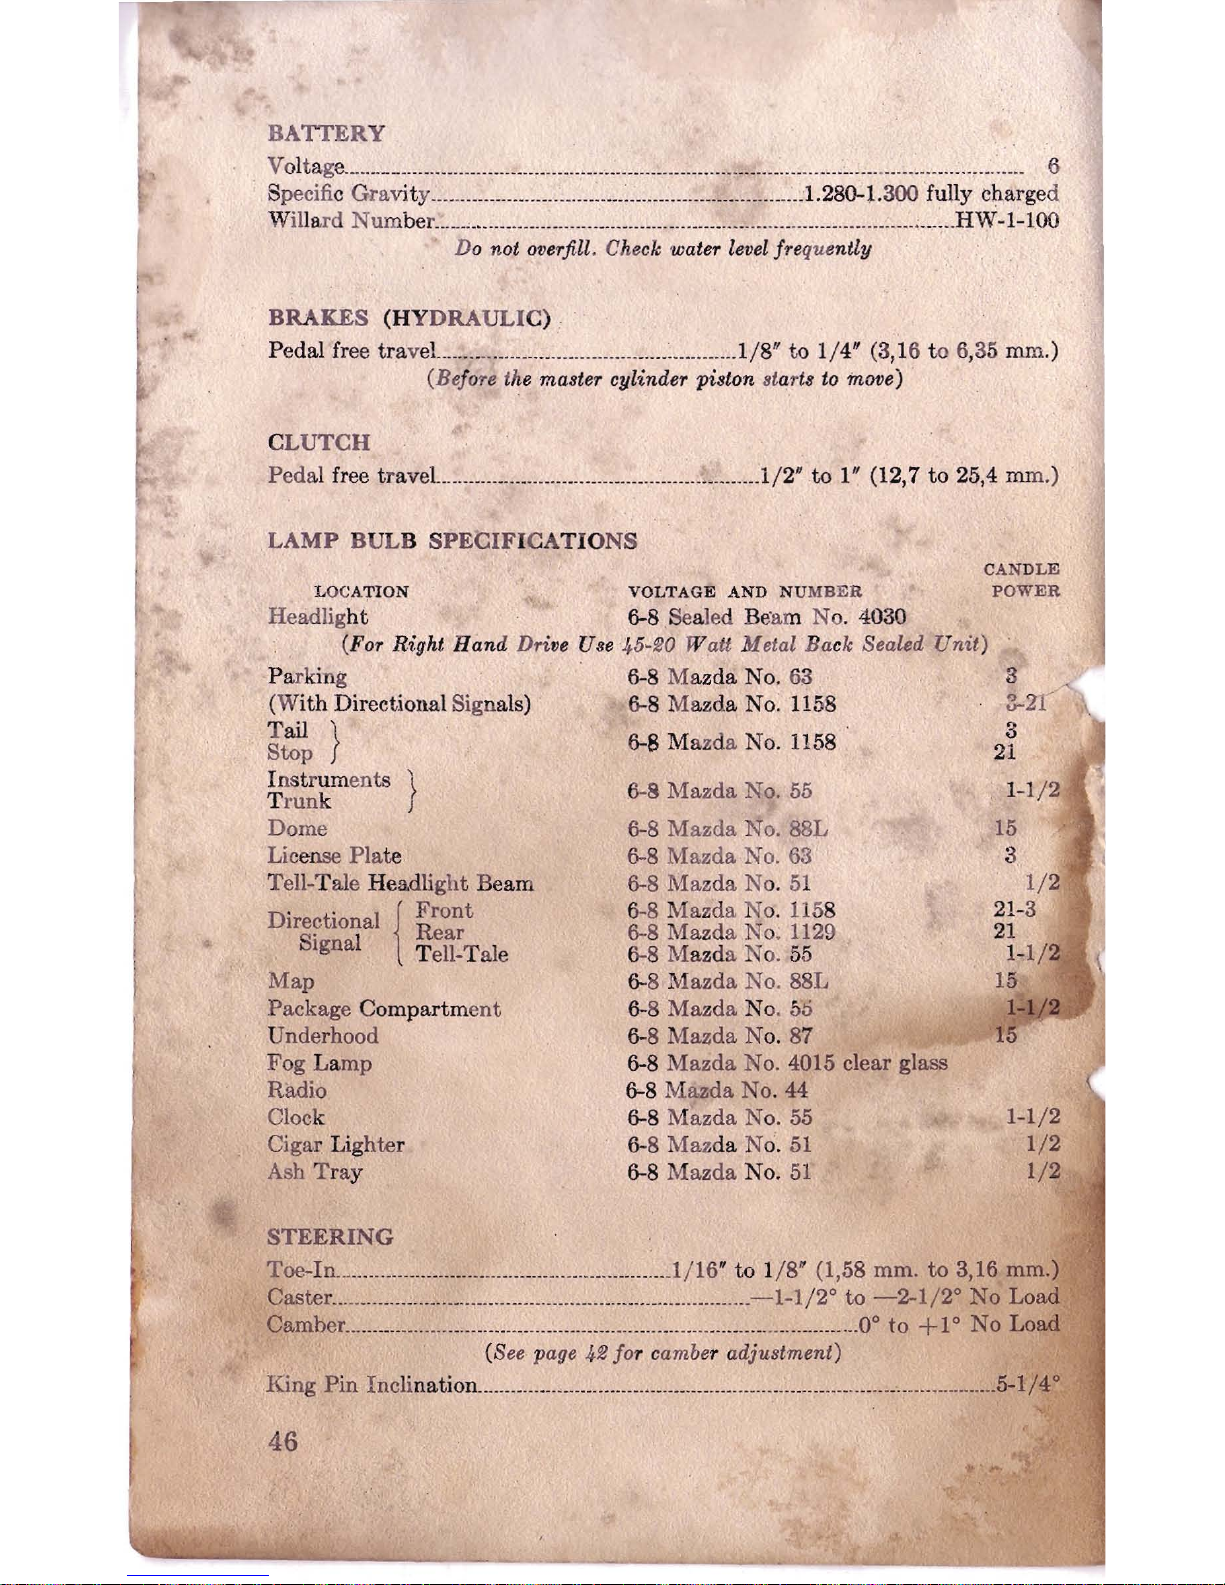
BATTERY
Vol
tage________
__
__
________ _______ ___:
__ __ __ ______________
__ ::__
______
____~
:-:
!
_______ ____
___ ,____
____
______________--------
6
- Specific
Gra
vity
___ ___
________
_
__
___________:____ :__________:__
_~___:
__
_~ ______
~L280--1.300
'fully charged
Willard Number
__
____,
__________
_____ _______
___
___
_______
___
_______ _________ ___
___
_____
__ ___
____
__ ;______HW
-1-100
Do not overfill. Check water level freque
ntly
BRAKES
(HY
DRAULIC)
Pedal free
traveL
_____
__
____________
____
__
__
____
____________
_
_____
1/ 8"
to
1/
4"
(3,
16 to 6,35 mm.)
(Before the master cylinder piston atarts
to
move)
C
LUTCH
Peda
l free tr
aveL__________
___
____________
__ ___ :____::
___
__
:
~:~
__ ___
_1/
2'
to
1~ (12,7
to
25,4
mm.)
LAMP
BULB
SPECIF
ICA
TIO
NS
CANDLE
L
OC
ATION
VOLTAGE
AND NUMBER
POWER
Headlight
6--8
.Sealed Be-am N0 _ 4030
(For Right
Hand
Dri
ve Use 45-20 W att Metal Back Sealed
Unit)
Parking
6--8
Mazda No. 63
3 A
(W
ith
Directional Signals)
6--
8 Mazda No: 1158
3--21
'
Til'
3
S~p
} 6-8 Mazda
No_
1158
21
Instr
uments
~
6-8
Mazda
No. 55
1-1
/2
T runk )
Dome
6-8
Mazda
No.
88L
15
License
Pla
te
6-8
Mazda
No. 63 3,
Tell-Tale Hea.
dli
ght
Beam
6-8
Mazda No.
51
1/2
6-8
Mazda
No. 1158
21-3
Directional {
~o~t
6-8 Maz
da
No; 1129
21
Signal T!il-Tale
6-8 Mazda N
0_ 55
Map
6-8 Mazda No. 88L
15
Package
Compartm
ent
6-8 Maz
da
No. 50
1
Underhood
6--8 Mazda No.
87
15
'Fog
Lam
p
6--8
Mazda
No_
4015 clear glass
Radio 6-8
Mazda
No. 44
Clock 6-8
M~zda
No.
55
1-1/2
Cigar Lighter
6--
8 Maz
da No'. 51
1/2
Ash
Tray
6-8
Mazda
No. 51
1/2
1-
1/2
STEERING
Toe--In____
_____
_____
__________ ____ ____ ____
__ ___ _______
__________
1/16
" to 1/8" (1,58 mm.
to
3,16
mm_)
Caster...
___
_____
______
__ ..__
__________
_____________
__________
_
___
____________-l-l/2°
to
-2--1/20 No Load
Camber
__ ..__________
....
___
..
_____ ..____ ..__
__ ..____
__
..
____ :___
______ ..___
.. _..
__ ___ __
____ ____
0
0
to +10 No Load
(S
ee page
42
fO
T camber adju8tment)
'King
Pin
Inclination
___
____
________
__ ..___________
__ .._
____
____
__ __ __ ______________ __ __ __
___ ___
_______________
5-1/4
0
46
Page 48
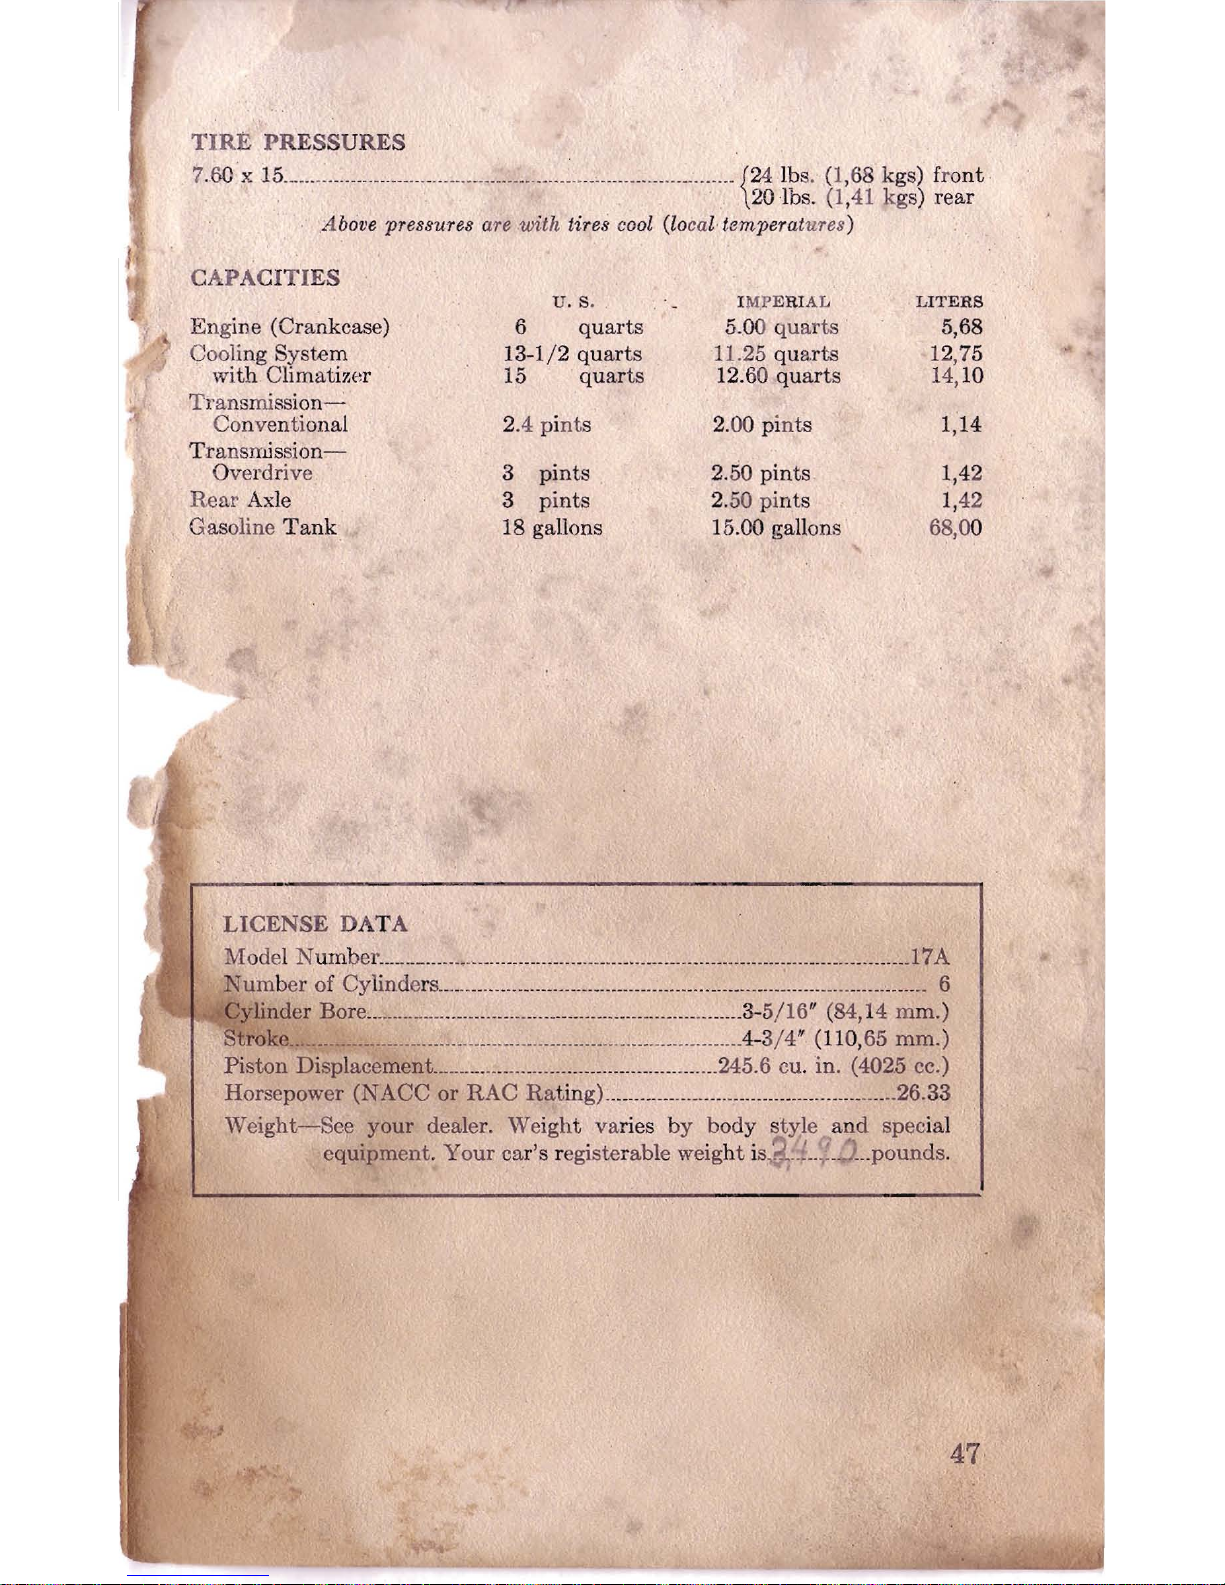
TIRE PRESSURES
7.
60
x
24 Ib8. (1,68 kgs) fro
nt
·
{
201
b8. (1,
41 kgs) rea
r
A
bov
e pressur
es
are with tir
es
cool (loca
l· temperatures)
CAPACITIES
u. s.
IM;I'ERIAL
LI
TERS
En
gine (C rankcase )
6 quar
ts
5 .. 00 quar
ts
5,68
Cooling Syste m
13
-1/2 quar
ts
11.25 quar
ts
12
,75
with Cl
imatizer
15
quarts
12.60 quar
ts
14,10
Tra
nsmission-
Conven tionai
2.4 pi
nt
s 2.00 pin
ts
1,14
Tr
ansmiss
ion-
Ov
erdrive
3
pi
nts
.
2.50 pi
nts
1,
42
Rear Axle
3
pints
2.
50 pints
1,42
Gasoline
Tank
18 gallons 15.00 gallons
68,00
Model N
umb
er ..
....
. _ ........ , .....................................
...
......
...
............
....
......... 17 A
Num
ber of Cyli
nders ...........................................................
~ ..
. ...
..
.
.. .
...
......... 6
Cylinder Bore
..
................................................................ 3-
5/16
" (84,14 mm.)
St
roke............................. , ................................
...
............ .4-3
/4
u (1
10
,65 mm.)
Pi
ston
Displacem
ent
.................................................. 245.6 cu. in. (4025 ce.)
Horsepower
(NACC
or
RAC Ratin
g) .............
........
......
...
.....
...
............ 26.33
Weight-Se~
your
dealer. Weight varies by body styleAand special
eq
uipment.
Your car's registerable weight i8.d...t..; ..:t.pounds
.
I
47
Page 49
•
I
ND
EX
Ai
r Cleaner.........
.................... : .
.. ......
. 35
Amm
ete
r .
...
........ ..... .................
...
~
....
.
.
7
Anti-freeze .............. ....... ......
..
...... ..... 37
Ash Receiver .......
...
..........
.-~
... ' ...........
12
Ba
t tery....
.........
..
......
....
::
.
~.
...
32
Body ,
dr
ain holes ...
.. .........:...
............ 43
Bod y N u mber.............
.. . ..
.............. 5
Br
akes, a
djustme
nt. 42
Brak
es,
cont
rols....
:.~
..... " ...... 14
Capacities, t
ab
le o
f...
.. :·.:
.......... ....... 47
Car
bon
Tll
onoxide .
.. .....~..:..
...
: .... ~....... 16
Carburetor, ad.ius
tment
....
...
,:<~
....
. 42
speed cont
roL
.............
,.,.., ... , ....... 15
Ca
re of
the car..........
.............. : ..
.......
. 32
g~~
~ftn;r:~k:~~::::
·
..
:::.::
•••
:.::
~:::
.::
: : :
:g
Climatizerand
defro
ste
r .
....
.. .. _::"
...
..
20
Clutch
r
ed~l...
....... ......
..
......... .... , ... ~ 13
trave
adj u
stme
nt
... ...
......
" ........... 4»
COIlVertible top, care.... ...
..... "
"" ..".
4;0
operation.,.
~
.
.....
..... ... ~......
............
..
22
Cooling sy
ste
m,.
draininK.',· ..
I
:.~
.....
. 31
Dealer Service P.oli cy..
: .......... ' . .-:....
=.3
Defros~r
<>perat!on ....,.-",.:
.......;
"'0.:
.. .•
Dome
hght
....... ........ ~... :.,... :
..
:c ...
....
..
.
Engine, oil .
reco.rrl'nendations
...
.. ....
:' .....
'.' .'
•.
28
Run-in period ................. : •...:,
, :
.....
15
Reference
data
.........
,,~;:
,
............. 45
::->tarting
......... · ... , ..,
..
:~·:L
....'-.•....... 16
Fan
belt, adJustmc!lt .......
·~.·
..
~::~~,
..
42
Fue
l economy ............. .... : ....
::L
.......
34
Fuses .......... : ......... ' ........................... 45
Gasoli ne gage.............. ... 8
Gea
rshi ft,
steer
ing
post
...............
.. ...
13
operation.........
.. ...................... 17
Gov<:)rn<,r....
.. .....
........................ 15
Head
li
ghts, beam
control
operation........................
.....
...
11
Heat
I ndicator.
....
....
................. 7
Hill-Hol
der
.......
........
.. ..
.............. .....
..
20
Hood lock. ............
..
...
..
...
................... 10
Horsepower..........
...
..................... 47
Ignition
, data..... .. ,
"
"""'~_
"
45
switch
operation
'h"'
·
""
~:
7
Inflation pressll"es,
l\·pi!.
...
,......
. 47
. ,pcction
.....
;......
.. ..
'.
27
.~.rument
hghts
........ : .................
11
InHrumcnts
and
controIR................ 7
Jac
k, use oL............ , ............
......
JO
Keys, numbers........ .. . ................. 5
locks....................... ........................ 8
Lamp
bulbs, specifications
....
.......... 43
License
dat
a ............... .... ......
.. ~...
....... 47
License pl
ate light....
........................
11
Lights, control... .................... ...... ~....
11
Locks
and
keys
..
...
..
.............. .........
..
8
Lubricati on,
chart
............................ 24
telated op
eratio
ns ..... ............
.-...
27
Lu
ggage
compartment, light
.....
.....
12
L
oc·1;.
and
lid .....
...
.........
..
.............. 13
Maintena
nce and
car
e of caL ........ 32
M
ap
light................ • ... .....
..!. .... .......
11
Model number............................... 47
Octane selector.
....
. .... :.!
........
35
Oil, dilution
and
sludge.. 33
filter service .....
~..
.
28
level 28
.
~
..... "
...
...... 8
28
29
16
18
2
--
;jJ
-
card ................. ..
.. ......: ....
'~
... . r
.....
26
Paint
, ordering hy
symbo
l...
...
.. c...
. '
Parking
brake
operation
...... .
Parking
lights
....
. ...... , ... ......... .....
..
. 1.0:
Push
or tow ,'Starting
..
v
..
bl'iCAl\L..
,,",asonal ser
vICes.....
............. 44
Seat
adjustmenL.... , ! ..
..
. .. ;.. 12
Serial
number
....
Service
and
adjuRtrneuts
Service policy
..
Shifting gears
...
Spring lubricant,
rear
Startc~
:;wi
Leh
................
..
Starting
the
engine ........
_!,.~~;.."'!'::
Steering
data
................................ 46
Stoplights......
..
....................
11
Tail
ligh ls ...........
c.
..
........~•
••
: "
.....
11
T~chlllcal
reference
~lI:tA;
....... .........
41
T Ires, care
and
servJ~~
................ 35
chttnging............
r... ...............
30
Transmission
lubr;(.rit
....................
'1:1
Tune-up
.................... .
......
....
""'" 41
Universal join
ts, lubr
ication ......
'"
27
Uphol
ster
y, care of............ . ......... :
J<J
Warming
up
engine.................. 16
Warrant
ies. 4
Washer,
wirll~l\>ield
......................... 14
Windshield
wipQI'
............................. : 1
4;.
Word
to
the
owner.......................... 2
Page 50
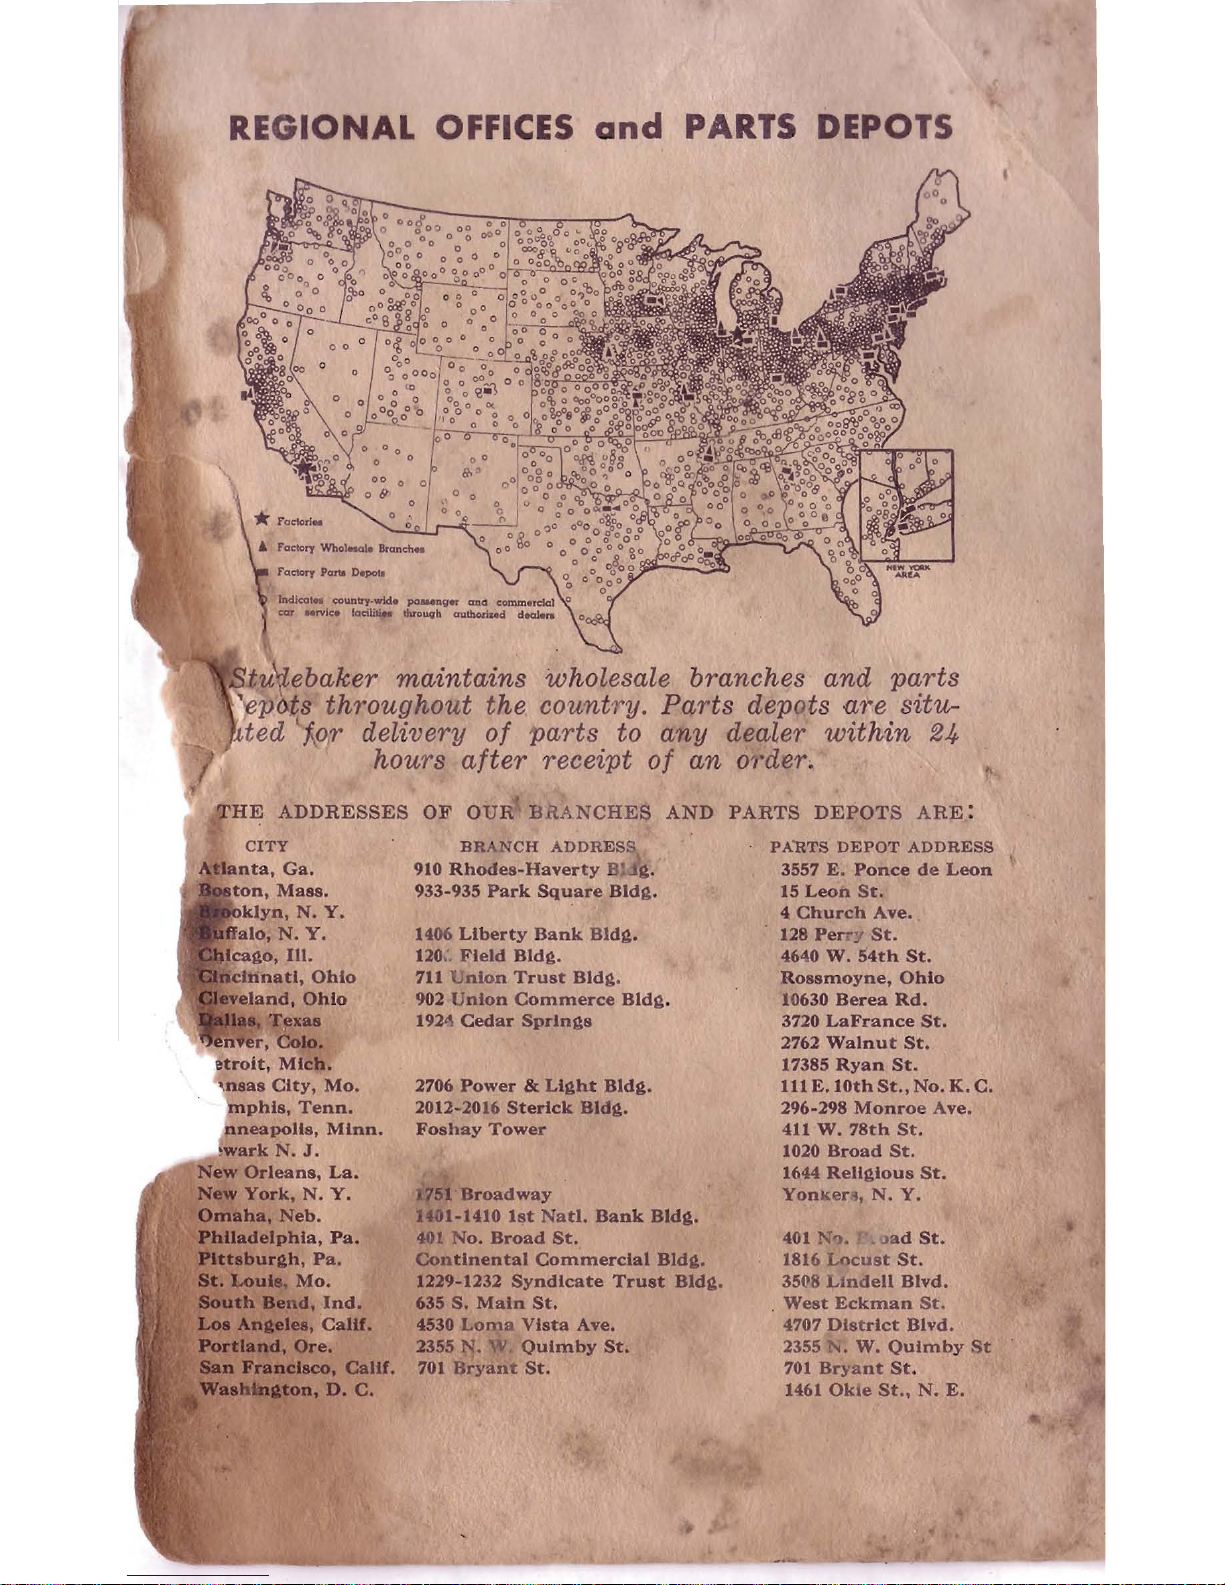
REGIONAL OFFICES
and
PARTS DEPOTS
~tuVebaker
maintains wholesale branches and parts
~";ep().ts
throughout the country. Parts depots
are
situ-
~ted
\f..w
delivery
of
parts to
any
dealer
within
24
hours
after
receipt
of
an
O'/·der.
ADDRESSES
OF
OUR
BRANCHES
AND
PARTS
DEPOTS
ARE:
ton,
Mass.
,klyn, N.
Y.
ffalo,
N.
Y.
lca!1o,
Ill.
clnnatl,
Ohio
eveland,
Ohio
la
..
TJ'xas
'
eh"er,
Colo.
BRANCH
ADDRESS
910
Rhodes-Haverty
Bhig.
933-935
Park
Square
Bldg.
1406
Liberty
Bank
Bld!1.
1l0;.
Field
Bld!1.
711
Union
Trust
Bld!1.
902
Union
Commerce
Bldg
.
192<'.
Cedar
Sprin!18
PA'RTS
DEPOT
ADDRESS
3557
E.
Ponce
de
Leon
15
Leon
St.
4
Church
Ave.
118
Perry
St.
4640
W.
54th
St.
Rossmoyne,
Ohio
10630
Berea
Rd.
3720
LaFrance
St.
2762
Walnut
St.
etroit,
Mich.
\nsas
City,
Mo.
phis,
Tenn.
neapolis,
Minn.
,wark
N.
J.
New
Orleans,
La.
New
York,
N.
Y.
Omaha,
Neb.
Philadelphia,
Pa.
Plttsbureh,
Pa.
St. Louis.
Mo.
South
Bend,
Ind.
Los
Angeles,
Calif.
Portland,
Ore.
San
Francisco,
Calif.
Washington,
D.
C.
2706
Power
& LI!1ht
Bldg.
2011-2016
Sterlck
Bld!1.
Foshay
Tower
751
Broadway
14il1-1410
let
Natl.
Bank
Bldg.
401
No.
Broad
St.
Continental
Commercial
Bldl1.
1129-1232
Syndicate
Trust
Bide.
635
S.
Main
St.
4530
Lorna
Vista
Ave.
2355
N. W Quimby
St.
701
Bryant
St.
17385
Ryan
St.
UI
E.
10th
St.,
No.
K.
C.
296-298
Monroe
Ave.
411 W.
78th
St.
1020
Broad
St.
1644 Rell!1lous
St.
Yonker
.• ,
N.
Y.
401
1'0.,.
"ad
St.
1816
Locust
St.
35(18
LIndell
Blvd.
West
Eckman
St.
4707
District
Blvd.
23551'<.
W.
Quimby
St
701
Bryant
St.
1461 OkIe
St.,
N.
E.
Page 51
t-
o
z
u
!:
::J
0
t-
11.1
...
:.:
0
0
10
0
III
>-
X
Z
....
A-
11.1
U
c(
to-
Z
~
:.:
A-
 Loading...