

Version 1.0
HEAT
STIR
HOT
100
50
Power
on/off
heat-stir
US152
150
200
250
4
3
2
1
off
5
6
7
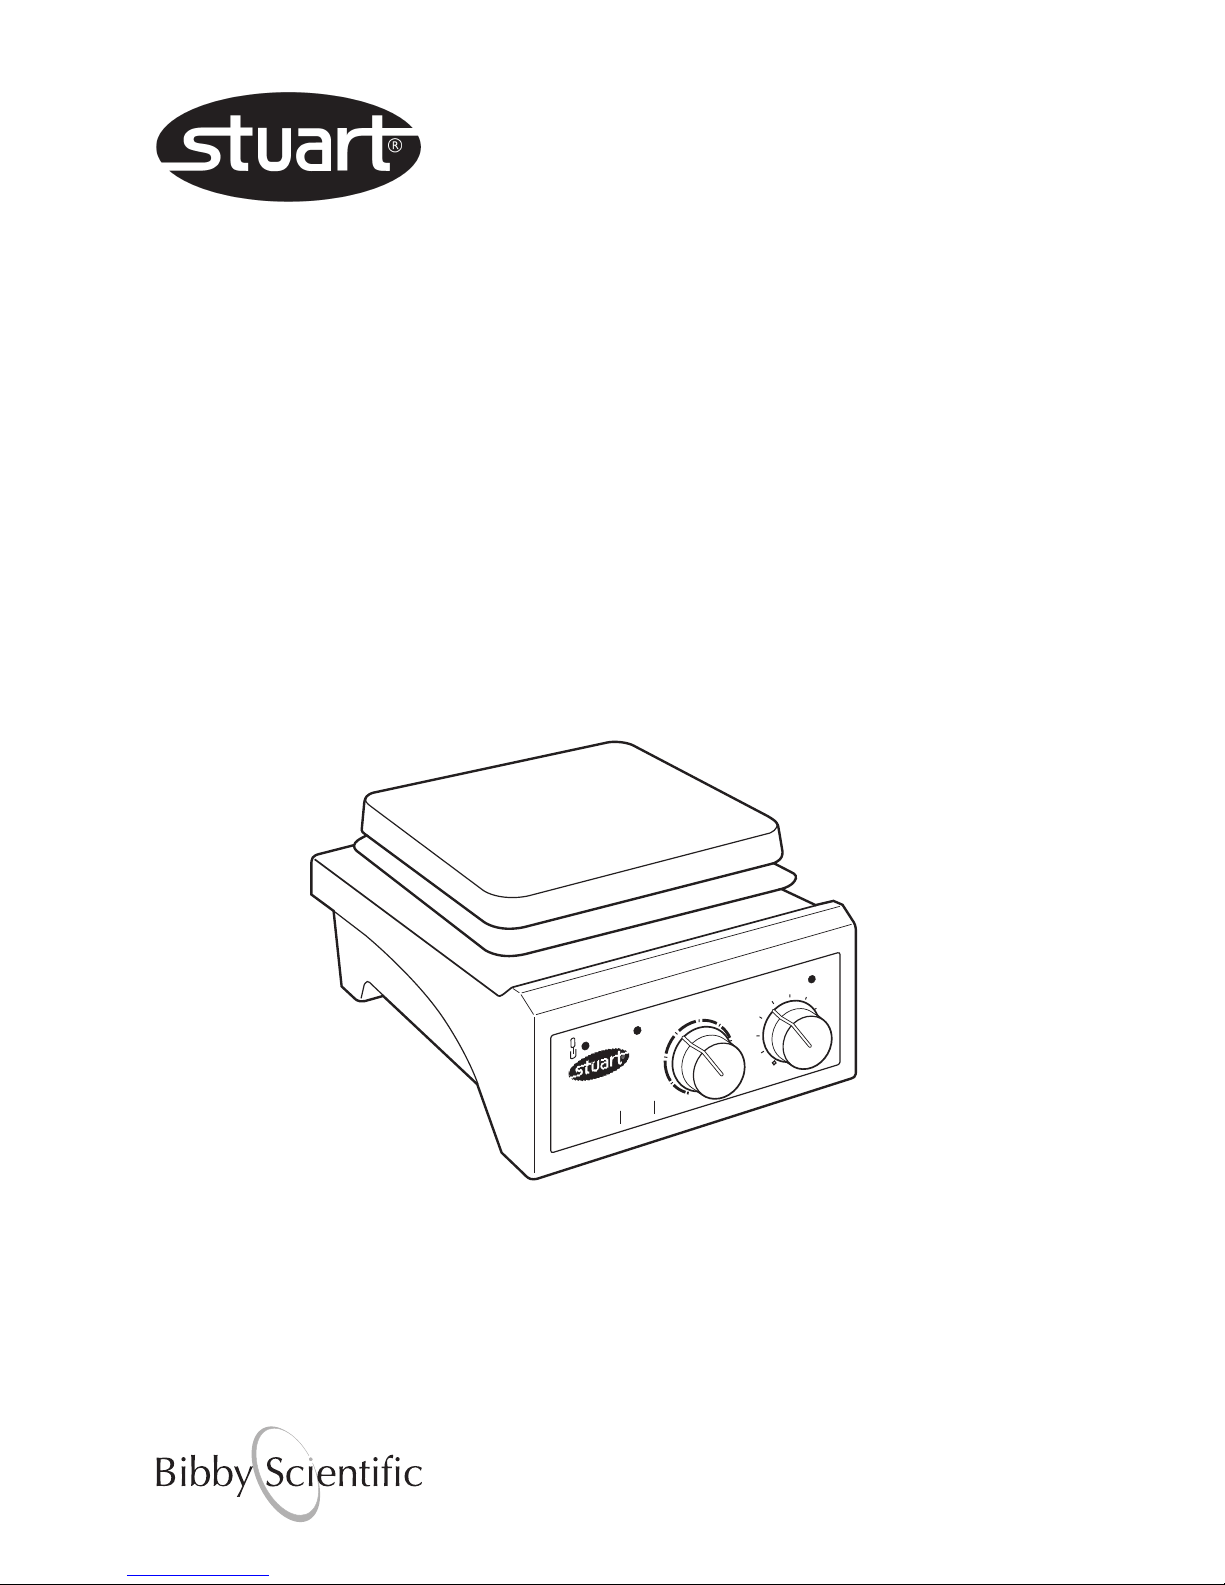
Hotplates & Stirrers
Instructions for use
Manuel d’utilisation
Istruzioni per l’uso
Instrucciones de funcionamiento
Bedienungsanweisung
UC150 UC151 UC152
US150 US151 US152
English
Figure
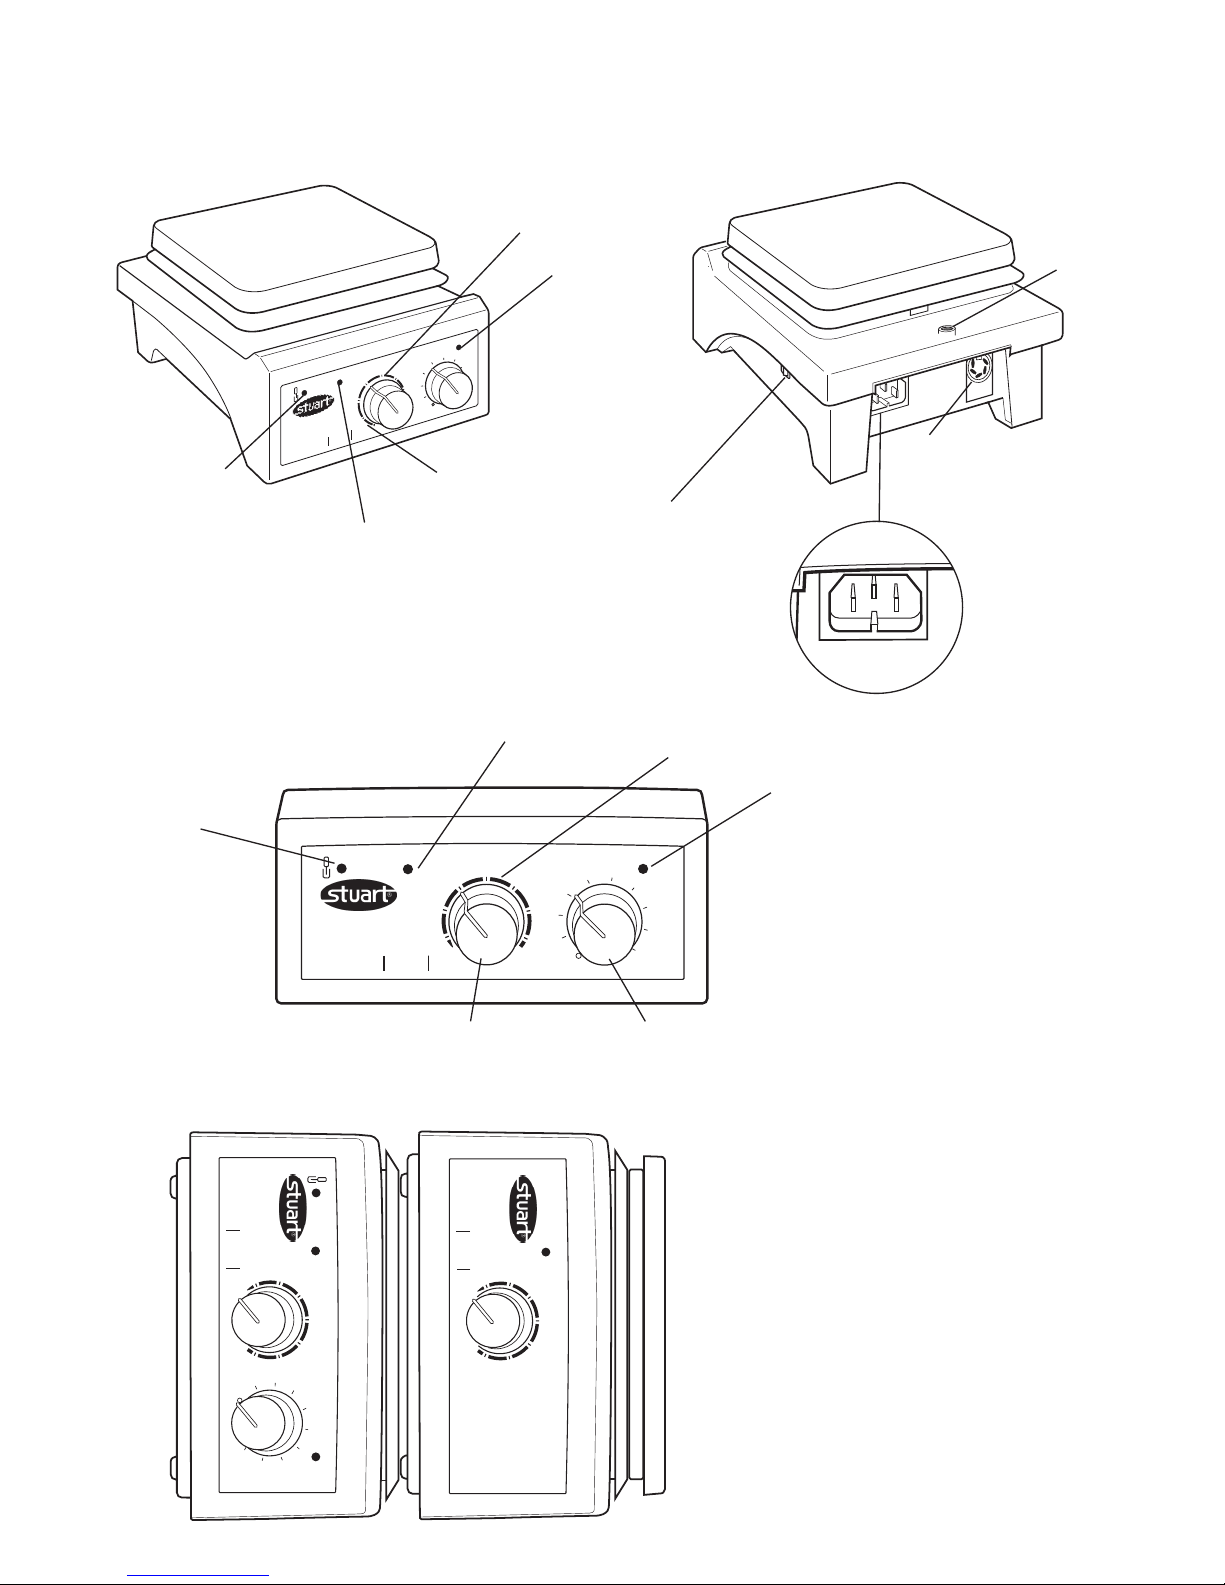
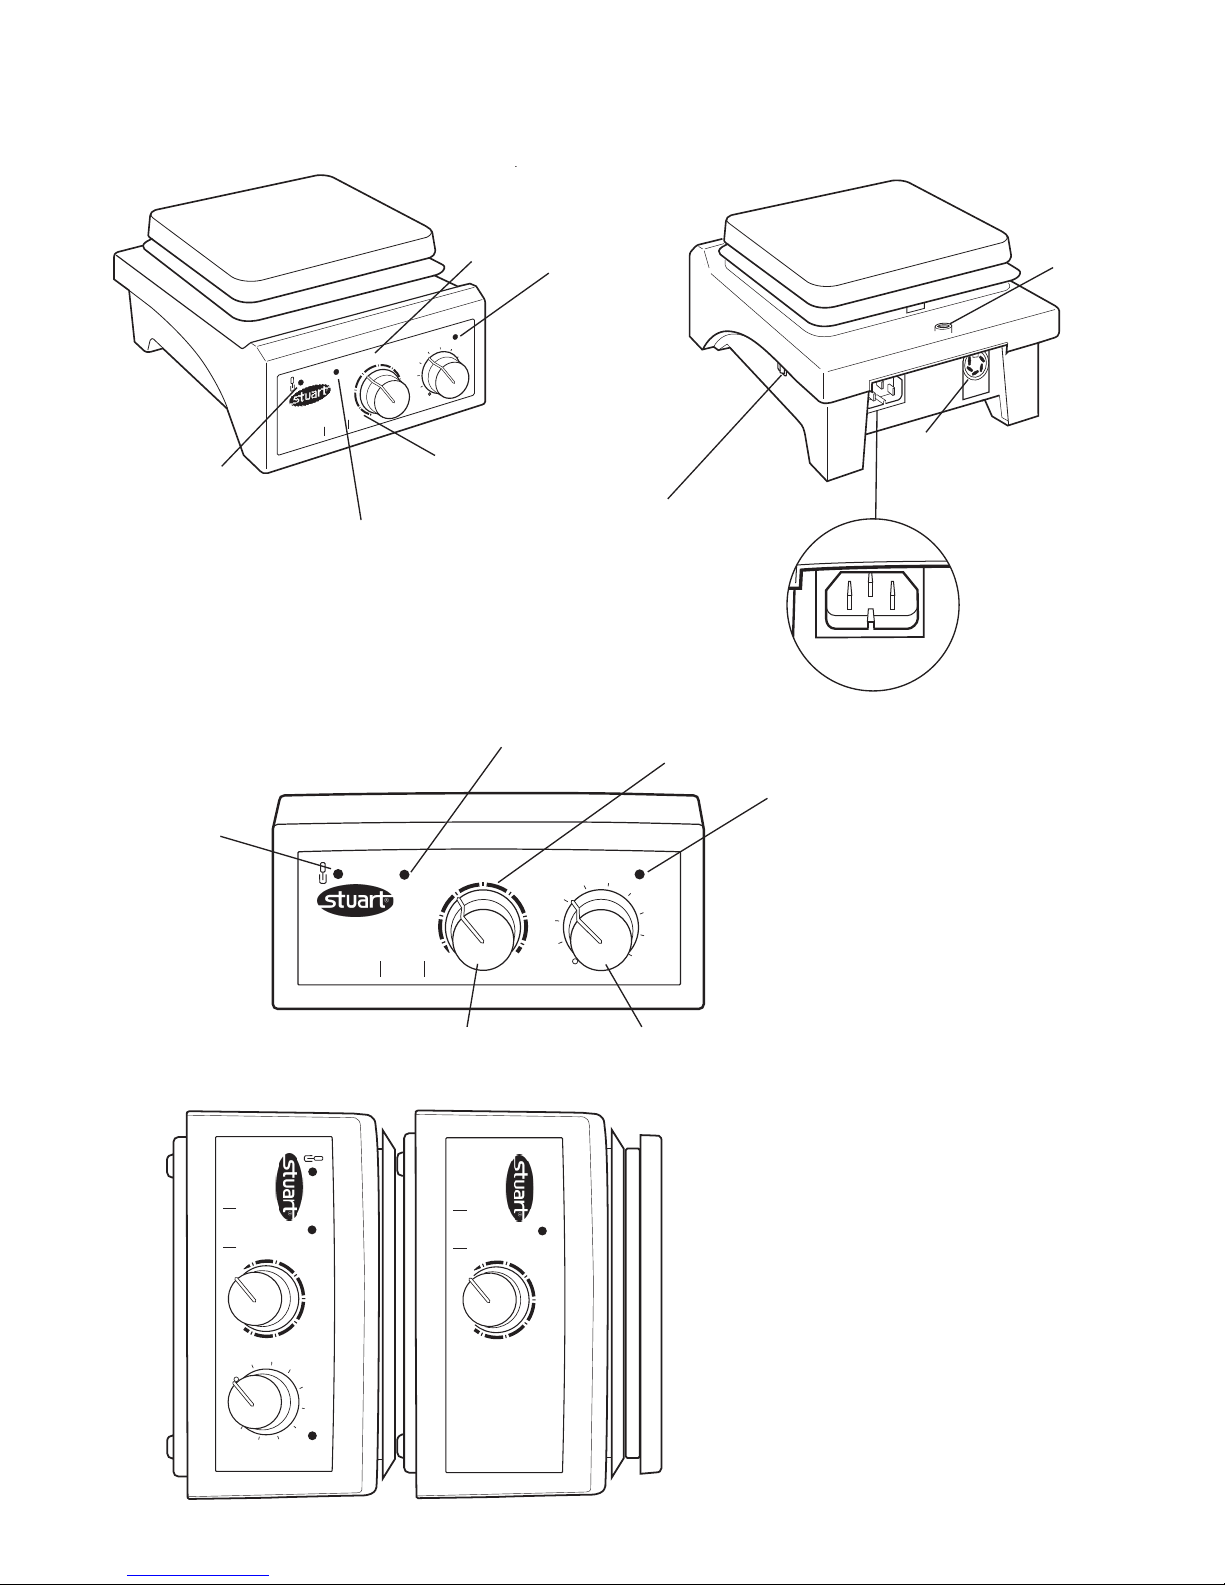
2 - Rear view
Figure
1 - Front view
HEAT
STIR
HOT
100
50
Power
on/off
heat-stir
US152
150
200
250
4
3
2
1
off
5
6
7
‘Hot’ warning light
LED heat display
Stirrer
on
light
Contact
thermometer
indicator
HEAT
STIR
HOT
100
50
Power
on/off
heat-stir
US152
150
200
250
4
3
2
1
off
5
6
7
IEC power
socket
for hot
condition
plug
Retort
rod
fitting
DIN socket
Mains on/off
switch
(not on stirrer
only unit)
Figure 3 - Front view
heat-stir
US152
HOT
1
2
3
4
5
6
7
8
9
STIR
undergrad
off
Power
on/off
100
150
250
200
300°C
50
HEAT
‘Hot’ warning
light
Heat display
Stir on light
Stir control
Heat control
Contact
thermometer
indicator
Power on green light
US152
HOT
1
2
3
4
5
6
7
8
9
STIR
undergrad
off
Power
on/off
100
150
250
200
300°C
50
HEAT
Power
on/off
100
150
250
200
300°C
50
HEAT
heat-stir
US152
HOT
1
2
3
4
5
6
7
8
9
STIR
undergrad
off
Power
on/off
100
150
250
200
300°C
50
HEAT
heat
UC150
HOT
undergrad
Power
on/off
100
150
250
200
300°C
50
HEAT
Figure 4 - Stacked on side view

Thank you for purchasing this Bibby
Scientific product. To get the best
performance from the equipment, and for
your personal safety, please read these
instructions carefully before use.
Bibby Scientific hotplates and stirrers are designed
to operate under the following conditions:-
❖ For indoor use only
❖Use in a well ventilated area
❖Ambient temperature range +5°C to +40°C
❖Altitude to 2000m
❖Relative humidity not exceeding 80%
❖Mains supply fluctuations not exceeding 10%
of nominal
❖Overvoltage category II IEC60364-4-443
❖Pollution degree 2 IEC664
❖Use with a minimum distance all round of
200mm from walls or other items
If the equipment is not used in the manner
described in this manual the protection provided
by the equipment may be impaired.
For details of individual model specifications
please refer to product literature and the Bibby
Scientific website: www.bibby-scientific.com
Electrical Installation
THIS EQUIPMENT MUST BE EARTHED
Before connection please ensure that the
line supply corresponds to 230V, 50Hz,
single phase.
Power requirements:
Model Wattage Model Wattage
UC150 500W US150 700W
UC151 50W US151 50W
UC152 550W US152 750W
There is a hot condition IEC socket at the rear of
the instrument for connection to the mains
supply (see figure 2). The unit is supplied with a
mains lead fitted with a UK 3-pin or "Shuko"
2-pin hot condition IEC plug for connection to
the instrument.
Should the lead not be suitable for connecting to
the mains, replace the plug with a suitable
alternative. This involves cutting off the moulded
plug, preparing the cable and connecting to the
1
rewireable plug in accordance with it's
instructions.
IT IS IMPORTANT THAT THIS OPERATION
SHOULD ONLY BE UNDERTAKEN BY A
QUALIFIED ELECTRICIAN.
NOTE: Refer to the equipments rating plate to
ensure that the plug and fusing are suitable for
the voltage and wattage stated
THE WIRES IN THE MAINS CABLE ARE
COLOURED AS FOLLOWS:
BROWN - LIVE
BLUE - NEUTRAL
GREEN/YELLOW - EARTH
THIS PRODUCT MUST BE EARTHED
Should the mains lead require replacement a
cable of 1mm
2
of harmonised code H05RR-F or
H05RN-F connected to an IEC hot condition plug
should be used.
IF IN DOUBT CONSULT A QUALIFIED
ELECTRICIAN
The mains lead should be connected to the
instrument BEFORE connection to the mains
supply.
NOTE: that when connected to the mains supply
and the power switch is operated, a green light
on the front of the unit illuminates (see figure 1).
Operation
Heating
UC150, UC152, US150, US152
Switch the unit on using the mains on/off switch
(see figure 2). The control knob labelled “HEAT”
on the front panel controls the heat output and
hence the plate temperature. It is graduated with
an approximate temperature scale. This scale
refers to the temperature of the top plate and
1
2
3
4
5
6
7
8
9
STIR
un de rgr ad
off
Power
on/off
100
150
250
200
300°C
HEAT
Power
on/off
100
150
250
200
300°C
50
HEAT
2
not to the temperature of the contents of the
vessel being heated. Turn the control knob
clockwise to the required plate temperature. As
the plate heats up the LED temperature segments
will light up in turn and their light intensity
increase until the set surface temperature is
reached. Conversely if the unit is cooling, the LED
temperature segments will go out as the plate
approaches the set temperature.
WARNING: When the surface becomes
too hot to touch the red "HOT" warning
light on the front panel will begin to flash (see
figure 1). This will continue to flash while the
plate temperature is above 50°C for a maximum
of 30 minutes, even if the unit is disconnected
from the electricity supply.
WARNING: The plate may still be hot
beyond 30 minutes when large masses are
left on the plate, even though the "HOT"
warning light has gone out.
WARNING: The top surface of the
instrument may be HOT, especially in free
air when a surface temperature of 450°C can be
achieved on the ceramic top models and 325°C
on the metal top models. Do not leave heaters
switched on when not in use.
WARNING: During heating the hotplate
casing around the hotplate surface can
become hot to touch.
Stirring
UC151, UC152, US151, US152
Switch the unit on using the mains on/off switch
(see figure 2). The control knob labelled “STIR”
on the front panel controls the stirrer speed.
When switched on a green stir-on light
illuminates, (see figure 1).
The knob is graduated with an arbitrary 1-9 scale.
Turning the knob to a higher number increases
the stirrer speed.
Using the Optional Accessory SCT1
Temperature Controller with the
UC150, UC152, US150, US152
The SCT1 temperature controller allows accurate
temperature control of aqueous and oil based
samples in the laboratory and can be used in two
different modes, as a precise temperature
controller from 20 to 200°C or as a digital
thermometer from -4 to 325°C.
Connection of the SCT1 temperature controller
probe is via the DIN probe socket located at the
rear of the hotplate (figure 2). The analogue heat
control is disabled, allowing precise setting of
temperature via the SCT1 temperature controller.
The illuminated contact thermometer indicator
LED indicates communication between the SCT1
temperature controller and hotplate (figure 3).
For full instructions on use please refer to the
SCT1 temperature controller manual.
NOTE: When the SCT1 is used, the LED
temperature segments adjacent to the "HEAT"
control knob refer to the surface temperature of
the plate, not the sample.
Safety Advice
❖Do not use the instrument to heat inflammable
liquids.
❖Never lift or carry the instrument until it has
been switched off and allowed to cool for at
least 30 minutes. The hot warning light will
give guidance.
❖The unit should be carried using both hands
with the fingers under the side edges.
❖Never move or carry the unit with containers
on the top plate or while still connected to the
mains supply.
❖There is a danger of liquid spillage if containers
are over-filled and stirred at high speed. Always
build stirrer speed slowly and never stir more
rapidly than necessary.
❖NEVER place a cold glass vessel onto a hotplate
which is already hot.
❖NEVER use a retort rod longer than 600mm.
❖When a retort rod is installed with apparatus
attached, or when swivelling support rods, take
care that there is sufficient weight on the plate
to prevent the whole unit tipping over.
❖When using a retort stand, in order to provide
the unit with adequate ventilation the base of
the retort stand must NOT exceed 19.5 mm in
height and 125 mm in width.
Caution
Hot

Cleaning and Care
❖Before attempting cleaning:
Ensure that the top is cool, disconnect from the
mains electricity supply.
The metal casing should be cleaned using a damp
cloth and a mild detergent solution.
Ceramic top units:
A damp cloth will normally remove most types of
contamination. For more difficult stains a
domestic cream cleanser is recommended.
Cleaning is made easier if spillages are attended
to promptly. In any case, spillages of alkali,
phosphoric acid and hydrofluoric acid MUST be
removed immediately as these chemicals can
attack and damage the glass ceramic. Ensure that
the appropriate safety precautions are observed.
During cleaning and general operation take care
not to scratch the surface of the top plate as this
could result in subsequent thermal breakage.
WARNING: A ceramic top which is
scratched, chipped, chemically etched or
damaged must not be used.
Metal top units:
The metal top plate should be cleaned using a
damp cloth and a mild detergent solution.
Cleaning is made easier if spillages are attended
to promptly. In any case, spillages of acids and
alkalis MUST be removed immediately as these
chemicals can attack and damage the surface of
the coated aluminium alloy. Ensure that the
appropriate safety precautions are observed.
NOTE: Please consult Bibby Scientifics' Technical
department if there is any doubt about the
compatibility of decontaminating or cleaning
agents.
Preparation of media
Take particular care when heating liquids having
a high viscosity. Viscous liquids can act as thermal
insulators and can cause thermal breakage of the
glassware. This is very important with media
solutions as the viscosity will usually increase as
the temperature rises.
❖Check that the stirring action is sufficient to
agitate the whole of the liquid. Unstirred areas
in the liquid can result in uneven heat transfer
and “hot spots” in the glassware. This can
induce thermal stress and so cause failure.
❖Check the stirring action regularly to ensure
that it remains adequate as the viscosity of the
solution increases.
❖Always use the largest magnetic follower
possible and if necessary, use a mechanical
overhead stirrer.
❖Do not use glass vessels with thick walls, e.g.
Pyrex Heavy Duty Ware or standard beakers
and flasks having capacities of 5 litres or
greater.
❖NEVER heat glass bottles on a hotplate.
❖Ensure that the heat is built up slowly to avoid
localised overheating.
❖Ensure the glassware is completely free from
scratches or other defects.
❖Place the hotplate in a tray large enough to
contain the liquid in the event of glassware
failure.
❖Wear the appropriate safety clothing e.g.
gloves, goggles, protective apron etc.
Storage
The unit is designed so that the top plate fits into
the base plate of the next unit for easy and
compact storage when placed on their side (see
figure 4).
Accessories
❖SR1 Rod is available to support apparatus used
with the instrument. The instrument is
equipped with a fitting on the rear to accept
the support rod catalogue number SR1 (see
figure 2). To fit the rod to your instrument, first
isolate from the mains supply and allow to
cool. Then simply screw the threaded end of
the support rod into the fitting on the rear of
the instrument.
The shape of the base also allows a rectangular
shaped retort rod stand, whose dimensions
must not exceed 19.5mm high and 125mm
wide, to be placed directly underneath the
unit.
SR1 is 12 x 600mm (W x H).
❖SCT1 Temperature Controller (see page 2 for
details).
❖For a complete list of accessories please visit
the Bibby Scientific website
www.bibby-scientific.com
3

Servicing and Repair
This product range does not require any routine
servicing.
Note: There are no internal user replaceable
parts.
In the event of product failure it is recommended
that any repair is only undertaken by suitably
qualified personnel. For advice or to receive a
service manual please contact the Service
Department of Bibby Scientific Ltd.
Only spare parts supplied by Bibby Scientific or its
agent should be used. Fitting of non-approved
parts may affect the performance of the safety
features of the instrument.
Note: The magnetic stirrer drive utilises
strong magnets.
If in doubt, please contact the Service
Department of Bibby Scientific Ltd.
Stone, Staffordshire ST15 0SA
United Kingdom
Tel: +44 (0)1785 812121
Fax: +44 (0)1785 813748
e-mail info@bibby-scientific.com
www.bibby-scientific.com
Spares
For a comprehensive parts list please contact the
Service Department of Bibby Scientific Ltd
quoting model and serial number.
4
Warranty
Bibby Scientific Ltd warrants this instrument to be
free from defects in material and workmanship,
when used under normal laboratory conditions,
for a period of three (3) years. In the event of a
justified claim Bibby Scientific Ltd will replace any
defective component free of charge.
This warranty does NOT apply if,
1. A ceramic top has broken due to mechanical
impact, scratching, chipping or chemical
etching.
2. Any repair has been made or attempted other
than by Bibby Scientific or its agent.
3. Minor coating chips and scratches appear from
what is deemed normal use.
5
Français
Figure 3 - Vue avant
heat-stir
US152
HOT
1
2
3
4
5
6
7
8
9
STIR
undergrad
off
Power
on/off
100
150
250
200
300°C
50
HEAT
Témoin d'avertissement 'Hot'
Affichage de chaleur
Témoin d'agitation activée
Commande d'agitation
Commande de
chaleur
Témoin de
thermomètre
de contact
heat-stir
US152
HOT
1
2
3
4
5
6
7
8
9
STIR
undergrad
off
Power
on/off
100
150
250
200
300°C
50
HEAT
heat
UC150
HOT
undergrad
Power
on/off
100
150
250
200
300°C
50
HEAT
Figure 4 - Vue d'unités empilées sur
tranche
HEAT
STIR
HOT
100
50
Power
on/off
heat-stir
US152
150
200
250
4
3
2
1
off
5
6
7
Figure
2 - Vue arrière
Figure
1 - Vue avant
Indication de chaleur
à témoin DEL
Témoin de
thermomètre
de contact
HEAT
STIR
HOT
100
50
Power
on/off
heat-stir
US152
150
200
250
4
3
2
1
off
5
6
7
Douille
d'alimentation
IEC
pour fiche
haute
température
Fixation
de tige
de statif
Douille DIN
Interrupteur
marche/arrêt
d'alimentation
(sauf sur unité
d'agitateur
seul)
Témoin vert de mise
sous tension
US152
HOT
1
2
3
4
5
6
7
8
9
STIR
undergrad
off
Power
on/off
100
150
250
200
300°C
50
HEAT
Power
on/off
100
150
250
200
300°C
50
HEAT
Témoin d'avertissement 'Hot'
Témoin
d'agitateur
sous tension

6
Nous tenons à vous remercier pour votre
achat d'un produit Bibby Scientific. Pour
maximiser les performances de l'équipement
et pour votre sécurité personnelle, veuillez
lire ces instructions avec soin avant
utilisation.
Les plaques chauffantes et les agitateurs Bibby
Scientific sont conçus pour fonctionner dans les
conditions suivantes :-
❖ Utilisation à l’intérieur uniquement.
❖Utilisation dans une pièce bien aérée
❖Température ambiante comprise entre +5°C et
+40°C
❖Altitude jusqu'à 2 000 m
❖Taux d’humidité relative n’excédant pas 80 %
❖Fluctuations de l’alimentation électrique
n’excédant pas 10 % de la valeur nominale
❖Surtension catégorie II IEC60364-4-443
❖Degré de pollution 2 IEC664
❖Utilisation à une distance minimum de 200 mm
des murs ou d’autres appareils
Si l'équipement n’est pas utilisé de la façon
décrite dans ce manuel, la protection qu'il offre
peut être affectée.
Pour en savoir plus sur les spécifications
individuelles du modèle, veuillez consulter la
documentation du produit et le site Web de
Bibby Scientific : www.bibby-scientific.com
Installation électrique
CET ÉQUIPEMENT DOIT ÊTRE MIS À LA
TERRE
Avant la connexion, assurez-vous que
l'alimentation est bien de type 230 V, 50 Hz
et monophasée.
Alimentation électrique :
Modèle Puissance Modèle Puissance
UC150 500 W US150 700 W
UC151 50 W US151 50 W
UC152 550 W US152 750 W
Une douille IEC haute température est prévue à
l’arrière de l’instrument pour la connexion à
l’alimentation secteur (voir figure 2). L'unité
comporte un câble secteur équipé d'une fiche
anglaise à 3 broches ou d'une fiche IEC à 2
broches haute température de type "Shuko"
pour la connexion à l’instrument.
Si le câble n'est pas adapté pour une connexion
au secteur, remplacez la fiche par une autre
appropriée. Vous devez alors couper la fiche
moulée, préparer le câble et connecter une fiche
à recâbler conformément à ses instructions.
IL EST IMPORTANT DE CONFIER CETTE
OPÉRATION UNIQUEMENT À UN ÉLECTRICIEN
QUALIFIÉ.
NOTE : Consultez la plaque signalétique de
l'équipement pour vous assurer que la fiche et les
fusibles sont adaptés à la tension et à la
puissance mentionnées.
LES FILS DU CÂBLE SECTEUR RESPECTENT LE
CODE DE COULEURS SUIVANT :
BRUN - TENSION
BLEU - NEUTRE
VERT/JAUNE - TERRE
CE PRODUIT DOIT ÊTRE MIS À LA TERRE
Si le câble secteur doit être remplacé, utilisez un
câble de 1 mm
2
selon le code harmonisé H05RR-F
ou H05RN-F connecté à une fiche IEC haute
température.
EN CAS DE DOUTE, CONSULTEZ UN
ÉLECTRICIEN QUALIFIÉ
Le câble secteur doit être connecté à l'instrument
AVANT sa connexion au secteur.
NOTE : une fois connecté au secteur et avec
l'interrupteur d'alimentation activé, un témoin
vert sur l'avant de l'unité s'allume (voir figure 1).
Utilisation
Chauffage
UC150, UC152, US150, US152
1
2
3
4
5
6
7
8
9
STIR
un de rgr ad
off
Power
on/off
100
150
250
200
300°C
HEAT
Power
on/off
100
150
250
200
300°C
50
HEAT
7
Mettez l'unité sous tension avec l'interrupteur de
marche/arrêt (voir figure 2). Le bouton de
commande marqué “HEAT” sur le panneau avant
commande la sortie de chauffage et donc la
température de la plaque. Il est gradué selon une
échelle de température approximative. Cette
échelle correspond à la température de la plaque
chauffante et non du contenu du récipient
chauffé. Tournez le bouton de commande dans le
sens horaire sur la température requise pour la
plaque. À mesure que la plaque chauffe, les
segments de température du témoin DEL
s'allument tour à tour et leur intensité lumineuse
augmente jusqu'à atteindre la température de
surface requise. À l'inverse, si l'unité refroidit, les
segments de température du témoin DEL
s'éteignent tour à tour à mesure que la plaque
approche de la température réglée.
AVERTISSEMENT : Quand la surface
devient trop chaude au toucher, un voyant
d'avertissement "HOT" rouge clignote sur le
panneau avant (voir figure 1). Il continue à
clignoter tant que la température de surface est
supérieure à 50°C - au maximum 30 minutes même si l’unité est débranchée de son
alimentation électrique.
AVERTISSEMENT : La plaque peut rester
chaude au-delà de 30 minutes si des
masses importantes sont laissées dessus, même si
le témoin d'avertissement "HOT" s'est éteint.
AVERTISSEMENT : La surface supérieure
de l’instrument peut être CHAUDE,
spécialement à l'air libre. Une température de
surface de 450°C peut être atteinte sur les
modèles à surface céramique et de 325°C sur les
modèles à surface métallique. Ne laissez pas les
chauffages en marche inutilement lorsqu’ils ne
sont pas utilisés.
AVERTISSEMENT : Durant le chauffage, le
boîtier de la plaque chauffante autour de la
surface de la plaque chauffante peut
devenir chaud au toucher.
Agitation
UC151, UC152, US151, US152
Mettez l'unité sous tension avec l'interrupteur de
marche/arrêt (voir figure 2). Le bouton de
commande marqué "STIR" sur le panneau avant
commande la vitesse d’agitation. Sous tension,
un témoin vert d'agitation s’allume (voir figure 1).
Le bouton est gradué arbitrairement de 1 à 9. La
rotation du bouton vers un nombre plus élevé
augmente la vitesse d’agitation.
Emploi de l'accessoire optionnel SCT1 contrôleur de température - avec les modèles
UC150, UC152, US150, US152
Le contrôleur de température SCT1 régule avec
précision la température des échantillons en
phase aqueuse et huileuse en laboratoire et
propose deux modes d'utilisation différents :
comme un régulateur précis de la température de
20 à 200°C ou comme un thermomètre
numérique de -4 à 325°C.
La sonde du contrôleur de température SCT1 se
connecte avec la douille DIN pour sonde située à
l’arrière de la plaque chauffante (figure 2). La
commande analogique de chauffage est
désactivée. Il est ainsi possible de régler
précisément la température avec le contrôleur de
température SCT1. Le témoin DEL du
thermomètre de contact allumé signale une
communication entre le contrôleur de
température SCT1 et la plaque chauffante (figure
3). Pour des instructions d'utilisation complètes,
consultez le manuel du contrôleur de
température SCT1.
NOTE : Lorsque le SCT1 est utilisé, les segments
de température du témoin DEL adjacent au
bouton de commande "HEAT" indiquent la
température de surface de la plaque et non celle
de l'échantillon.
Conseils de Sécurité
❖N'utilisez pas l’instrument pour chauffer des
liquides inflammables.
❖Ne soulevez et ne portez jamais l’instrument s’il
n’a pas été éteint et laissé à refroidir pendant
au moins 30 minutes. Le voyant d’alarme
"HOT" est là pour vous en informer.
❖L’unité doit être déplacée en utilisant les deux
mains avec les doigts sous les bords latéraux.
❖Ne déplacez et ne portez jamais l’unité avec
des récipients posés sur la plaque supérieure
ou encore connectée à son alimentation
secteur.
Caution
Hot

8
❖Si les récipients sont trop remplis et agités à
une vitesse excessive, le liquide risque de
déborder. Augmentez toujours la vitesse
d’agitation progressivement et n'agitez jamais
plus vite que nécessaire.
❖Ne placez JAMAIS un contenant en verre froid
sur une plaque chauffante déjà chaude.
❖N'utilisez jamais une tige à cornue de plus de
600 mm.
❖Si une tige à cornue est fixée à l'appareil ou en
cas de pivotement de tige de statif,
assurez-vous que le poids sur la plaque est
suffisant pour éviter que l'ensemble ne bascule.
❖Si vous utilisez un statif, et pour assurer la
ventilation correcte de l'unité, la base du statif
ne doit pas dépasser 19,5 mm de haut et
125 mm de large.
Nettoyage et entretien
❖Avant de procéder au nettoyage :
Assurez-vous que la surface est froide et
déconnectez l'alimentation secteur.
Le boîtier métallique doit être nettoyé avec un
chiffon humide et une solution détergente douce.
Unités avec surface en céramique :
Un chiffon humide enlève normalement la
plupart des types de contamination. Pour des
taches plus difficiles, une crème de récurage
domestique est recommandée.
Le nettoyage est facilité s’il est fait rapidement
après les salissures. Dans tous les cas, les
déversements d'alcalins, d’acide phosphorique ou
d’acide fluorhydrique DOIVENT être éliminés
immédiatement avant que ces produits chimiques
n’attaquent et n'endommagent la vitrocéramique.
Assurez-vous de respecter les précautions de
sécurité appropriées.
Pendant le nettoyage et l’utilisation en général,
assurez-vous de ne pas rayer la surface de la
plaque supérieure, au risque d'une rupture
thermique lors de l’utilisation suivante.
AVERTISSEMENT : Une surface en
céramique rayée, ébréchée voire attaquée
ou éraflée chimiquement ne doit pas être
utilisée.
Unités avec surface métallique :
La surface métallique doit être nettoyée avec un
chiffon humide et une solution détergente douce.
Le nettoyage est facilité s’il est fait rapidement
après les salissures. Dans tous les cas, les
déversements d'alcalins et d’acides DOIVENT être
éliminés immédiatement avant que ces produits
chimiques n’attaquent et n'endommagent la
surface en alliage d'aluminium du revêtement.
Assurez-vous de respecter les précautions de
sécurité appropriées.
NOTE : Veuillez consulter le service technique de
Bibby Scientific en cas de doute sur la
compatibilité des agents de nettoyage ou de
décontamination.
Préparation du milieu
Faites spécialement attention lors du chauffage
des liquides à viscosité élevée. Les liquides
visqueux peuvent agir comme des isolants
thermiques et occasionner une rupture thermique
de la verrerie. Il s'agit d'un aspect très important
pour les milieux préparés : la viscosité augmente,
en effet, généralement en même temps que la
température s’élève.
❖Vérifiez que l’agitation est suffisante pour
agiter la totalité du liquide. Les parties non
agitées du liquide peuvent occasionner un
transfert thermique hétérogène et aboutir à la
formation de "points chauds" dans la verrerie,
induisant une contrainte thermique, source de
cassure.
❖Vérifiez l’agitation régulièrement pour s’assurer
qu’elle reste adaptée à l’augmentation de la
viscosité de la solution.
❖Utilisez toujours le plus grand barreau
magnétique possible et, si nécessaire un
agitateur suspendu mécanique.
❖N'utilisez pas de verrerie aux parois épaisses,
ainsi les verres en Pyrex haute résistance, ni des
béchers ou des fioles présentant une capacité
de 5 litres ou plus.
❖Ne chauffez JAMAIS de bouteilles en verre sur
une plaque chauffante.
❖Assurez-vous que le chauffage est progressif
afin d’éviter toute surchauffe localisée.
❖Assurez-vous que la verrerie est complètement
exempte d’éraflures ou autres défauts.

❖Placez la plaque chauffante dans un plateau
assez grand pour contenir le liquide en cas de
casse de la verrerie.
❖Portez des vêtements de sécurité appropriés,
ainsi des gants, des lunettes, un tablier
protecteur, etc.
Rangement
L'unité est conçue de sorte que la plaque
supérieure tienne sur la plaque de base de l'unité
suivante, assurant un rangement compact et
pratique une fois placée sur tranche (voir figure
4).
Accessoires
❖Une tige SR1 est disponible pour soutenir les
appareils utilisés avec l’instrument. L'instrument
comporte une fixation à l'arrière pour recevoir
la tige de statif référencée SR1 dans le
catalogue (voir figure 2). Pour adapter la tige à
votre instrument, isolez d'abord de
l'alimentation secteur puis laissez refroidir.
Ensuite, vissez simplement le bout fileté de la
tige de statif dans la fixation à l'arrière de
l'instrument.
De par sa forme, la base accepte aussi un statif
de forme rectangulaire, dont les dimensions ne
doivent pas dépasser 19,5 mm de haut pour
125 mm de large, à positionner directement
sous l'unité.
Le SR1 mesure 12 x 600 mm (l x H).
❖Contrôleur de température SCT1 (voir page 2
pour en savoir plus).
❖Pour une liste complète des accessoires,
veuillez visiter le site Web de Bibby Scientific :
www.bibby-scientific.com
Entretien et réparation
Les produits de cette gamme ne nécessitent
aucun entretien de routine.
Note : aucune des pièces internes n'est
remplaçable par l'utilisateur.
En cas de défaillance du produit, nous
recommandons de confier toute réparation
exclusivement à un personnel correctement
qualifié. Si vous nécessitez des conseils voire un
manuel d'entretien, contactez le service entretien
de Bibby Scientific Ltd.
Utilisez uniquement des pièces de rechange
fournies par Bibby Scientific ou l'un de ses
agents. L'emploi de pièces non conformes peut
affecter les performances des fonctionnalités de
sécurité de l'instrument.
Note : l'agitateur magnétique utilise des
aimants très forts.
En cas de doute, veuillez contacter le service
entretien de Bibby Scientific Ltd.
Stone, Staffordshire ST15 0SA
Royaume-Uni
Tél. : +44 (0)1785 812121
Fax : +44 (0)1785 813748
e-mail bibby@bibby-scientificasia.com
www.bibby-scientific.com
Pièces de rechange
Pour obtenir une liste complète des pièces,
veuillez contacter le service entretien de Bibby
Scientific Ltd en indiquant le modèle et le
numéro de série.
Garantie
Bibby Scientific Ltd garantit cet instrument pièces
et main d'œuvre en cas d'utilisation dans des
conditions de laboratoire normales pour une
durée de trois (3) ans. En cas de réclamation
justifiée, Bibby Scientific Ltd s'engage à remplacer
tout composant défectueux à titre gratuit.
Cette garantie ne s’applique PAS si :
1. Une plaque supérieure en céramique a été
cassée suite à un impact mécanique, une
éraflure, un ébrèchement ou une attaque
chimique.
2. Une réparation a été effectuée ou tentée par
quelqu'un d'autre que Bibby Scientific ou l'un
de ses agents.
3. Le revêtement est légèrement ébréché ou
éraflé du fait de ce qui semble une usure
normale.
9

Italiano
Figura 3 - Vista anteriore
heat-stir
US152
HOT
1
2
3
4
5
6
7
8
9
STIR
undergrad
off
Power
on/off
100
150
250
200
300°C
50
HEAT
Spia superficie
calda ("Hot")
Display riscaldamento
Spia di
agitatore
acceso
Comando agitatore
Comando
riscaldamento
Indicatore
termometro
contatto
heat-stir
US152
HOT
1
2
3
4
5
6
7
8
9
STIR
undergrad
off
Power
on/off
100
150
250
200
300°C
50
HEAT
heat
UC150
HOT
undergrad
Power
on/off
100
150
250
200
300°C
50
HEAT
Figura 4 - Versione impilata,
vista laterale
HEAT
STIR
HOT
100
50
Power
on/off
heat-stir
US152
150
200
250
4
3
2
1
off
5
6
7
Spia superficie calda ("Hot")
Display
riscaldamento a LED
Spia di
agitatore
acceso
Indicatore
termometro
contatto
HEAT
STIR
HOT
100
50
Power
on/off
heat-stir
US152
150
200
250
4
3
2
1
off
5
6
7
Presa
alimentazione
IEC
per la spina
condizione
di caldo
Foro per
asta di
supporto
Presa DIN
Interruttore di
alimentazione
on/off
(non presente
sui dispositivi
con solo unità
agitatore)
Luce verde di accensione
US152
HOT
1
2
3
4
5
6
7
8
9
STIR
undergrad
off
Power
on/off
100
150
250
200
300°C
50
HEAT
Power
on/off
100
150
250
200
300°C
50
HEAT
Figura
2 - Vista posteriore
Figura
1 - Vista anteriore
10

11
collegamento con una spina a 3 pin (Regno
Unito) o una spina IEC a 2 pin "Shuko" per
applicazioni calde.
Se il cavo non dovesse essere adatto per il
collegamento all'alimentazione, sostituire la spina
con un modello alternativo. Per farlo, tagliare la
spina sagomata e preparare il cavo adatto
seguendo le istruzioni riportate.
QUESTE OPERAZIONI DEVONO ESSERE
EFFETTUATE SOLO DA UN ELETTRICISTA
ESPERTO.
NOTA: fare riferimento alle indicazioni riportate
sul dispositivo per assicurare che la spina e i
fusibili siano compatibili con la tensione e la
potenza nominale dell'unità.
I FILI ALL'INTERNO DEL CAVO DI
ALIMENTAZIONE PRESENTANO I SEGUENTI
COLORI:
MARRONE - SOTTO TENSIONE
BLU - NEUTRO
VERDE/GIALLO - MASSA
QUESTO PRODOTTO DEVE ESSERE
COLLEGATO A MASSA
Se è necessario sostituire il cavo, utilizzare un
cavo da 1mm
2
con il codice di armonizzazione
H05RR-F o H05RN-F collegato a una presa per
applicazioni calde IEC.
IN CASO DI DUBBIO, RIVOLGERSI A UN
ELETTRICISTA QUALIFICATO
Il cavo di alimentazione deve essere collegato al
dispositivo PRIMA del collegamento
all'alimentazione.
NOTA: in caso di collegamento all'alimentazione
e di attivazione dell'interruttore, si accenderà una
luce verde sulla parte anteriore dell'unità (vedere
la Figura 1).
Grazie per aver acquistato un prodotto Bibby
Scientific. Per ottenere prestazioni ottimali e
garantire la sicurezza degli operatori,
leggere attentamente le istruzioni prima
dell'utilizzo del dispositivo.
Le piastre e gli agitatori Bibby Scientific sono
prodotti progettati per funzionare nelle seguenti
condizioni:
❖ Utilizzo esclusivo al chiuso
❖Utilizzo in un'area ben ventilata
❖Temperatura ambiente compresa tra
+5 e +40 °C
❖Altitudine fino a 2000 m
❖Umidità relativa non superiore all'80%
❖Fluttuazioni dell'alimentazione non superiori al
10% dell'alimentazione nominale
❖Categoria di sovratensione II IEC60364-4-443
❖Livello di inquinamento 2 IEC664
❖Distanza minima di 200 mm da pareti o da
qualsiasi altro elemento
Se non utilizzato nel modo descritto nel presente
manuale, la protezione assicurata dal dispositivo
potrebbe risultare compromessa.
Per ulteriori informazioni sulle specifiche dei
singoli modelli, fare riferimento alla letteratura
del prodotto e al sito Web di Bibby Scientific
all'indirizzo www.bibby-scientific.com
Installazione elettrica
IL DISPOSITIVO DEVE ESSERE
COLLEGATO A MASSA
Prima del collegamento, verificare che
l'alimentazione di linea sia a 230 V, 50 Hz, a
fase singola.
Requisiti di alimentazione:
Modello Potenza nominale Modello Potenza
nominale
UC150 500 W US150 700 W
UC151 50 W US151 50 W
UC152 550 W US152 750 W
Sulla parte posteriore del dispositivo è presente
una presa IEC per applicazioni calde da collegare
all'alimentazione elettrica (vedere la Figura 2).
L'unità è dotata di un cavo di alimentazione per il

12
Funzionamento
Riscaldamento
UC150, UC152, US150, US152
Accendere l'unità utilizzando l'interruttore di
alimentazione on/off (vedere la Figura 2). La
manopola di comando con l'indicazione "HEAT"
sul pannello anteriore controlla l'uscita di calore e
quindi la temperatura della piastra. Riporta una
scala della temperatura approssimativa che fa
riferimento alla temperatura della piastra e non a
quella del contenuto del recipiente da riscaldare.
Ruotare la manopola in senso orario sulla
temperatura scelta. Mentre la piastra si riscalda, i
segmenti della temperatura a LED si illuminano a
turno mentre la loro intensità aumenta fino a
quando non viene raggiunta la temperatura
impostata. Al contrario, se l'unità si sta
raffreddando, i segmenti della temperatura a LED
scompariranno quando la piastra raggiunge le
temperatura impostata.
ATTENZIONE: quando la superficie
diventa troppo calda per essere toccata, la
spia "HOT" sul pannello anteriore inizia a
lampeggiare (vedere la Figura 1). La spia continua
a lampeggiare se la temperatura è superiore ai 50
°C per un massimo di 30 minuti anche se l'unità
viene scollegata dall'alimentazione elettrica.
ATTENZIONE: la piastra potrebbe essere
ancora calda dopo 30 minuti se su di essa
vengono lasciate grandi masse, anche se la spia
"HOT" si è spenta.
ATTENZIONE: la superficie superiore del
dispositivo potrebbe essere CALDA,
soprattutto all'aria quando si raggiunge la
temperatura superficiale di 450 °C sui modelli in
ceramica e di 325 °C sui modelli in metallo. Non
lasciare i riscaldatori accesi quando non vengono
utilizzati.
ATTENZIONE: durante il riscaldamento,
la struttura intorno alla superficie della
piastra potrebbe essere calda.
Mescolamento
UC151, UC152, US151, US152
Accendere l'unità utilizzando l'interruttore di
alimentazione on/off (vedere la Figura 2). La
manopola con l'indicazione "STIR" consente di
controllare la velocità della mescolamento.
Quando l'unità è accesa, la spia verde di
attivazione del mescolamento si illumina (vedere
la Figura 1).
La manopola è graduata con una scala da 1 a 9.
Ruotandola su un numero più alto, la velocità di
mescolamento aumenta.
Utilizzo dell'accessorio opzionale Controller
della temperatura SCT1 con
UC150, UC152, US150, US152
Il controller della temperatura SCT1 consente un
controllo accurato della temperatura di campioni
a base di olio e acqua in laboratorio e può essere
utilizzato in due modi diversi: come regolatore di
precisione della temperatura da 20 a 200 °C
oppure come termometro digitale da -4 a 325 °C.
Il collegamento della sonda del controller della
temperatura SCT1 viene effettuato tramite la
presa della sonda DIN posizionata sulla parte
posteriore della piastra (Figura 2). Il controllo
analogico del calore è disabilitato per consentire
l'impostazione precisa della temperatura tramite il
controller della temperatura SCT1. L'indicatore a
LED del termometro di contatto illuminato indica
la presenza di comunicazione tra il controller della
temperatura SCT1 e la piastra (Figura 3). Per
leggere le istruzioni complete sull'utilizzo, fare
riferimento al manuale del controller della
temperatura SCT1.
NOTA: quando si utilizza il controller della
temperatura SCT1, i segmenti della temperatura
a LED vicini alla manopola "HEAT" fanno
riferimento alla temperatura superficiale della
piastra, non a quella del campione.
1
2
3
4
5
6
7
8
9
STIR
un de rgr ad
off
Power
on/off
100
150
250
200
300°C
HEAT
Power
on/off
100
150
250
200
300°C
50
HEAT
Caution
Hot

13
Note sulla sicurezza
❖Non utilizzare il dispositivo per riscaldare liquidi
infiammabili.
❖Non sollevare o trasportare lo strumento se
non è stato spento e lasciato raffreddare per
almeno 30 minuti. La spia di superficie calda
fornisce un'utile indicazione al riguardo.
❖L'unità deve essere trasportata con entrambe le
mani e con le dita posizionate sotto i bordi
laterali.
❖Non muovere o spostare l'unità con i
contenitori posizionati sulla piastra o mentre è
collegata all'alimentazione elettrica.
❖Se i contenitori sono troppo pieni e vengono
mescolati ad alta velocità, sussiste il rischio di
perdite di liquido. Aumentare la velocità
lentamente e non mescolare più rapidamente
del necessario.
❖NON posizionare un contenitore di vetro freddo
sulla piastra già calda.
❖NON utilizzare un'asta di supporto lunga più di
600 mm.
❖Quando viene installata un'asta di supporto
con l'apparecchio collegato oppure quando
vengono utilizzate aste di supporto girevoli,
verificare che sulla piastra sia presente un peso
sufficiente a evitare il ribaltamento dell'unità.
❖Quando viene utilizzata una base di supporto
per assicurare un'adeguata ventilazione
all'unità, tale base NON deve superare i 19,5
mm di altezza e i 125 mm di larghezza.
Pulizia e conservazione
❖Prima di iniziare la pulizia del dispositivo:
Verificare che la parte superiore sia fredda e
scollegare l'alimentazione elettrica.
Pulire la struttura di metallo utilizzando un panno
umido e una soluzione con un detergente
delicato.
Unità con superfici in ceramica:
Normalmente un panno umido elimina quasi tutti
i tipi di contaminazione. Per lo sporco più difficile
è invece consigliato un normale detersivo in
crema per uso domestico.
La pulizia sarà più semplice se le macchie dei
liquidi vengono rimosse immediatamente. In ogni
caso, le fuoriuscite di acidi alcalini, acido fosforico
e acido fluoridrico DEVONO essere eliminate
immediatamente, poiché tali sostanze possono
intaccare e danneggiare la superficie in
vetroceramica. Verificare che vengano osservate
tutte le precauzioni per la sicurezza.
Durante la pulizia e il funzionamento in generale,
prestare attenzione a non graffiare la superficie
della piastra per evitare una rottura termica.
ATTENZIONE: non utilizzare se la
superficie di ceramica è graffiata,
scheggiata, corrosa o danneggiata da
sostanze chimiche.
Unità con superfici in metallo:
Pulire la piastra di metallo con un panno umido e
una soluzione con un detergente delicato.
La pulizia sarà più semplice se le macchie dei
liquidi vengono rimosse immediatamente. In ogni
caso, le fuoriuscite di acidi e di sostanze alcaline
DEVONO essere eliminate immediatamente,
poiché tali sostanze possono intaccare e
danneggiare la lega di alluminio del rivestimento.
Verificare che vengano osservate tutte le
precauzioni per la sicurezza.
NOTA: contattare il reparto tecnico di Bibby
Scientific in caso di dubbi sulla compatibilità degli
agenti di decontaminazione o di pulizia.
Preparazione dei supporti
Prestare particolare attenzione quando i liquidi
riscaldati hanno una viscosità elevata. Infatti
possono agire come isolanti termici e determinare
una rottura termica del contenitore di vetro.
Questo è importante con le soluzioni, poiché in
genere la viscosità aumenta all'aumentare della
temperatura.
❖Verificare che l'azione di mescolamento sia
sufficiente per agitare tutto il liquido. Le aree
non mescolate del liquido possono portare a
un trasferimento non uniforme del calore e a
"punti caldi" all'interno del contenitore di
vetro, con conseguente stress termico che non
consente di ottenere risultati corretti.
❖Controllare con regolarità l'azione del
mescolamento per assicurare che sia adeguata
anche all'aumentare della viscosità.

❖Utilizzare la barretta magnetica più grande
possibile e, se necessario, un agitatore
meccanico dall'alto.
❖Non utilizzare contenitori di vetro spessi (ad
esempio, contenitori resistenti in pyrex o
bottiglie standard che abbiano una capacità di
5 litri o più grandi).
❖NON riscaldare le bottiglie di vetro sulla piastra.
❖Verificare che la temperatura aumenti in modo
graduale per evitare un surriscaldamento
localizzato.
❖Verificare che il contenitore di vetro non
presenti graffi o altri difetti evidenti.
❖Posizionare la piastra su un vassoio grande
abbastanza da contenere il liquido in caso di
rottura del contenitore di vetro.
❖Utilizzare abbigliamento e strumenti di
protezione adeguati, quali guanti, occhiali,
camice protettivo e così via.
Conservazione
L'unità è stata progettata in modo che la piastra
superiore si alloggi perfettamente nella piastra
base dell'unità successiva per consentirne una
conservazione semplice e con un ingombro
ridotto quando adagiata sul lato (vedere la Figura 4).
Accessori
❖L'asta SR1 è disponibile come apparecchio di
supporto utilizzabile con il dispositivo. Lo
strumento è dotato di un raccordo sulla parte
posteriore per installare l'asta di supporto SR1
(vedere la Figura 2). Per fissare l'asta allo
strumento, è necessario scollegare l'unità
dall'alimentazione elettrica e farla raffreddare.
Quindi avvitare l'estremità filettata dell'asta di
supporto presente sulla parte posteriore del
dispositivo.
La forma della base consente inoltre l'utilizzo
di una base per l'asta di supporto di forma
rettangolare, le cui dimensioni non devono
superare i 19,5 mm di altezza e i 125 mm di
larghezza, da posizionare direttamente sotto
l'unità.
Le dimensioni di SR1 sono 12 x 600 mm
(larghezza x altezza).
❖Controller della temperatura SCT1 (vedere
pagina 2 per ulteriori informazioni).
❖Per un elenco completo degli accessori
disponibili, visitare il sito Web di Bibby
Scientific:
www.bibby-scientific.com
Manutenzione e riparazione
Il presente prodotto non richiede alcuna
manutenzione periodica.
Nota: non sono presenti componenti interni
sostituibili dall'utente.
In caso di funzionamento non corretto del
prodotto, qualsiasi riparazione deve essere
effettuata solo da personale qualificato. Per
ricevere indicazioni o per ottenere il manuale di
assistenza, contattare il reparto di assistenza di
Bibby Scientific Ltd.
Utilizzare solo ricambi forniti direttamente da
Bibby Scientific o dai suoi rappresentanti.
L'utilizzo di ricambi non approvati potrebbe
limitare la sicurezza del dispositivo.
Nota: la guida dell'agitatore magnetico
utilizza delle calamite molto potenti.
In caso di dubbio, consultare il reparto di
assistenza di Bibby Scientific Ltd.
Stone, Staffordshire ST15 0SA
Regno Unito
Tel.: +44 (0)1785 812121
Fax: +44 (0)1785 813748
E-mail: info@bibby-scientific.com
www.bibby-scientific.com
Ricambi
Per un elenco completo dei ricambi disponibili,
contattare il reparto di assistenza di Bibby
Scientific Ltd. indicando il modello e il numero di
serie.
Garanzia
Bibby Scientific Ltd. garantisce che il presente
dispositivo non presenta difetti di materiale e di
realizzazione per tre (3) anni se viene utilizzato
nelle normali condizioni di laboratorio. In caso di
reclamo giustificato, Bibby Scientific Ltd. sostituirà
qualsiasi parte difettosa senza alcun costo per
l'utente.
La garanzia sul prodotto NON è valida se:
1. La superficie di ceramica si è rotta a causa di
urti, graffi, scheggiature o corrosioni chimiche.
2. È stata effettuata o tentata una riparazione da
un soggetto diverso da Bibby Scientific o dal
suo rappresentante.
3. Sono visibili scheggiature e graffi del
rivestimento lievi durante il normale utilizzo.
14

HEAT
STIR
HOT
100
50
Power
on/off
heat-stir
US152
150
200
250
4
3
2
1
off
5
6
7
15
Espanol
˜
Ilustración
2 - Vista trasera
Ilustración
1 - Vista frontal
Ilustración 3 - Vista frontal
heat-stir
US152
HOT
1
2
3
4
5
6
7
8
9
STIR
undergrad
off
Power
on/off
100
150
250
200
300°C
50
HEAT
Luz de advertencia "Caliente"
Pantalla de calor
Luz de
agitador
encendido
Control de agitación
Control de calor
Indicador del
termómetro
de contacto
heat-stir
US152
HOT
1
2
3
4
5
6
7
8
9
STIR
undergrad
off
Power
on/off
100
150
250
200
300°C
50
HEAT
heat
UC150
HOT
undergrad
Power
on/off
100
150
250
200
300°C
50
HEAT
Ilustración 4 - Vista de las unidades
apiladas de forma lateral
HEAT
STIR
HOT
100
50
Power
on/off
heat-stir
US152
150
200
250
4
3
2
1
off
5
6
7
Luz de advertencia
"Caliente"
Indicador del
termómetro
de contacto
Toma de
corriente IEC
para
altas
temperaturas
Conexión
de la varilla
de retorta
Toma DIN
Interruptor de
encendido/
apagado de la
corriente eléctrica
(no incluido en la
unidad que solo
incluye función
de agitación)
Luz verde de encendido
US152
HOT
1
2
3
4
5
6
7
8
9
STIR
undergrad
off
Power
on/off
100
150
250
200
300°C
50
HEAT
Power
on/off
100
150
250
200
300°C
50
HEAT
Luz de agitador
encendido
Pantalla LED de calor

Gracias por la compra de este producto de
Bibby Scientific. Le recomendamos que, para
sacar el máximo rendimiento posible a este
producto y proteger su seguridad personal,
lea detenidamente estas instrucciones.
Las placas calefactoras y agitadores Bibby
Scientific están diseñados para funcionar en las
siguientes condiciones:
❖ Solo para uso en interiores
❖Utilizar en una zona bien ventilada
❖Rango de temperatura ambiente de +5 °C a
+40 °C
❖Hasta 2000 m de altitud
❖Humedad relativa no superior a 80%
❖Fluctuaciones de suministro eléctrico no
superiores a un 10% del valor nominal
❖Categoría de sobrevoltaje II IEC60364-4-443
❖Nivel de polución 2 IEC664
❖Usar a una distancia mínima de 200 mm de
paredes u otros elementos
Si el equipo no se utiliza de la forma descrita en
este manual, podría afectar a la protección que
proporciona el equipo.
Si desea obtener más información sobre las
especificaciones de un modelo concreto, consulte
la documentación del producto y el sitio web de
Bibby Scientific: www.bibby-scientific.com
Instalación eléctrica
ESTE DISPOSITIVO DEBE CONECTARSE
A TIERRA
Antes de realizar la conexión, asegúrese de
que el suministro eléctrico corresponda a 230
V, 50 Hz, monofásico.
Requisitos de alimentación:
Modelo Vatiaje Modelo Vatiaje
UC150 500 W US150 700 W
UC151 50 W US151 50 W
UC152 550 W US152 750 W
La parte trasera del instrumento presenta una
toma de corriente IEC para altas temperaturas
diseñada para conectar el dispositivo al suministro
eléctrico (consulte la ilustración 2). La unidad
incluye de fábrica un cable eléctrico equipado
con un enchufe IEC para altas temperaturas de 3
clavijas para el Reino Unido o "Shuko" de 2
clavijas para la conexión con el instrumento.
En caso de que el cable no resulte adecuado para
su conexión a la red eléctrica, sustitúyalo por el
enchufe correspondiente. Este proceso conlleva
el corte del enchufe moldeado, preparar el cable
y conectarlo al enchufe al que pueden colocarse
cables siguiendo sus instrucciones.
IMPORTANTE: ESTA OPERACIÓN
ÚNICAMENTE DEBE REALIZARLA UN
ELECTRICISTA CUALIFICADO.
NOTA: Consulte la placa nominal del dispositivo
para asegurarse de que el enchufe y los fusibles
resultan idóneos para el voltaje y el vatiaje
indicados
LOS HILOS DEL CABLE ELÉCTRICO DEBEN
PRESENTAR LOS SIGUIENTES COLORES:
MARRÓN: ACTIVO
AZUL: NEUTRO
VERDE/AMARILLO: TIERRA
ESTE PRODUCTO DEBE CONECTARSE A
TIERRA
En caso de que el cable eléctrico requiera la
sustitución, debe utilizarse un cable de 1 mm
2
de
código harmonizado H05RR-F o H05RN-F
conectado a un enchufe IEC para altas
temperaturas.
SI TIENE ALGÚN TIPO DE DUDA, PÓNGASE
EN CONTACTO CON UN ELECTRICISTA
CUALIFICADO
El cable eléctrico debe conectarse al instrumento
ANTES de conectarlo al suministro eléctrico.
NOTA: Cuando se conecta al suministro eléctrico
y se activa el interruptor de encendido se ilumina
la luz verde de la parte frontal de la unidad
(consulte la ilustración 1).
16

17
Funcionamiento
Calefacción
UC150, UC152, US150, US152
Encienda la unidad utilizando el interruptor de
encendido y apagado de la electricidad (consulte
la ilustración 2). El control giratorio “CALOR” del
panel frontal controla la emisión de calor y, por lo
tanto, la temperatura de la placa. Está graduado
con una escala de temperatura aproximada. Esta
escala hace referencia a la temperatura de la
placa superior, y no a la temperatura del
contenido del recipiente que se está calefactando.
Gire el control giratorio hacia la derecha hasta la
temperatura que desea que alcance la placa. A
medida que la placa alcance temperatura, los
segmentos de temperatura LED se iluminarán de
uno en uno y la intensidad de la luz aumentará
hasta que se alcance superficie alcance la
temperatura establecida. Si la unidad está
refrigerando, los segmentos LED de temperatura
se apagarán a medida que la placa alcance la
temperatura definida.
ADVERTENCIA: Cuando la temperatura de
la superficie es tan alta como para tocar el
instrumento, la luz de advertencia "CALIENTE"
del panel frontal empezará a parpadear (consulte
la ilustración 1). Esta luz seguirá parpadeando
mientras la temperatura de la placa sea superior a
50 °C durante un periodo máximo de 30
minutos, incluso si la unidad se desconecta del
suministro eléctrico.
ADVERTENCIA: La placa podría seguir
estando caliente durante los 30 minutos
posteriores si se dejan en la placa objetos de ran
tamaño, incluso a pesar de que la luz de
advertencia "CALIENTE" se haya apagado.
ADVERTENCIA: La superficie superior del
instrumento podría estar CALIENTE
especialmente al aire libre, entorno en el que la
superficie podría alcanzar una temperatura de
450ºC en los modelos con placa superior
cerámica y 325ºC en los modelos con placa
superior metálica. No deje los calefactores
encendidos mientras no esté usando la unidad.
ADVERTENCIA: Durante el proceso de
calefacción, la carcasa de la placa
de calefacción que se encuentra en torno a
la superficie de la placa de calefacción
podría alcanzar temperaturas demasiado
elevadas como para tocarla.
Agitación
UC151, UC152, US151, US152
Encienda la unidad utilizando el interruptor de
encendido y apagado de la electricidad (consulte
la ilustración 2). El control giratorio “STIR”
(AGITAR) del panel frontal controla la velocidad
del agitador. Cuando el agitador está activado se
ilumina la luz verde de agitador activado
(consulte la ilustración 1).
El control giratorio está graduado con una escala
arbitraria que va del 1 al 9. Al girar el control
giratorio a un valor numérico más alto, la
velocidad del agitador aumenta.
Uso del accesorio ocpional Controlador de
temperatura SCT1 con los modelos
UC150, UC152, US150, US152
El controlador de temperatura SCT1 permite el
control preciso en el laboratorio de la
temperatura de muestras con base acuosa y con
base de aceite, y puede usarse en dos modos
diferentes: como controlador de temperatura
preciso, desde 20 hasta 200 °C o como
termómetro digital, desde -4 hasta 325 °C.
La conexión de la sonda del controlador de
temperatura SCT1 se realiza a través de la toma
de sonda DIN que se encuentra situada en la
parte trasera de la placa de calefacción
(ilustración 2). El control de calefacción analógito
se deshabilita, lo que permite ajustar la
temperatura con precisión a través del
controlador de temperatura SCT1. El LED
indicador del termómetro de contacto iluminado
indica la comunicación entre el controlador de
temperatura SCT1 y la placa de calefacción
1
2
3
4
5
6
7
8
9
STIR
un de rgr ad
off
Power
on/off
100
150
250
200
300°C
HEAT
Power
on/off
100
150
250
200
300°C
50
HEAT
Caution
Hot

18
(ilustración 3). Si desea conocer las instrucciones
de uso completas, consulte el manual del
controlador de temperatura SCT1.
NOTA: Cuando se usa el accesorio SCT1, los
segmentos de temperatura LED adyacentes al
control giratorio "CALOR" hacen referencia a la
temperatura de la superficie, no a la de la
muestra.
Advertencia de seguridad
❖No use el instrumento para calefactar líquidos
inflamables.
❖No eleve ni transporte nunca el instrumento
hasta que no se haya apagado, y deje que se
enfríe durante un periodo mínimo de 30
minutos. La luz de advertencia de alta
temperatura le dará indicaciones.
❖La unidad debe transportarse con las dos
manos, situando los dedos bajo los bordes
laterales.
❖Nunca mueva o transporte la unidad con
contenedores sobre la placa superior, ni
mientras esté conectada al suministro eléctrico.
❖Existe el riesgo de que se viertan líquidos si los
recipientes se llenan en exceso y se agitan a
alta velocidad. Seleccione siempre una
velocidad de agitación lenta, y nunca agite a
una velocidad superior a la necesaria.
❖No coloque NUNCA recipientes de vidrio fríos
sobre una placa de calefacción que ya se
encuentre caliente.
❖No utilice NUNCA una varilla de retorta con
una longitud superior a 600 mm.
❖Si se instala una varilla de retorta con un
aparato conectado, o al girar las varillas de
apoyo, tenga la precaución de que haya
suficiente peso en la placa como para evitar
que toda la unidad se caiga.
❖Al usar un soporte de retorta, y con el fin de
ofrecer a la unidad la ventilación pertinente, la
base del soporte de retorta NO debe superar
los 19,5 mm de altura y los 125 mm de
anchura.
Limpieza y mantenimiento
❖Antes de intentar realizar la limpieza del
instrumento:
Asegúrese de que la placa superior esté fría,
desconéctela del suministro eléctrico.
La carcasa metálica debe limpiarse con un paño
humedecido y un detergente suave.
Unidades con placa superior cerámica:
En condiciones normales, con un paño
humedecido podrá eliminar la mayoría de tipos
de contaminación. Para las manchas más difíciles
se recomienda utilizar una crema limpiadora
doméstica.
La limpieza será más sencilla si los vertidos se
limpian a la mayor brevedad posible. En todos los
casos, los vertidos de álcali, ácido fosfórico y
ácido fluorhídrico DEBEN eliminarse de forma
inmediata, ya que estos productos químicos
pueden atacar y dañar el vidrio cerámico.
Asegúrese de que se respetan las precauciones de
seguridad pertinentes.
Durante los procesos de limpieza y uso generales,
tenga la precaución de no arañar la superficie de
la placa superior, ya que esto podría provocar el
posterior choque térmico.
ADVERTENCIA: No deben usarse placas
superiores cerámicas arañadas,
fragmentadas, grabadas químicamentes o
dañadas.
Unidades con placa superior metálica:
La placa superior metálica debe limpiarse con un
paño humedecido y un detergente suave.
La limpieza será más sencilla si los vertidos se
limpian a la mayor brevedad posible. En todos los
casos, los vertidos de ácidos y álcali DEBEN
eliminarse de forma inmediata, ya que estos
productos químicos pueden atacar y dañar la
superficie de la aleación de aluminio revestido.
Asegúrese de que se respetan las precauciones de
seguridad pertinentes.
NOTA: Si tiene algún tipo de duda sobre la
compatibilidad de agentes descontaminantes o
de limpieza, póngase en contacto con el
departamento técnico de Bibby Scientifics.

Preparación de los medios
Tenga especial cuidado al calefactar líquidos que
presenten una alta viscosidad. Los líquidos
viscosos pueden actuar como aislantes térmicos,
y pueden provocar el choque térmico de los
materiales de vidrio. Esto es muy importante con
los medios de cultivo, ya que el nivel de
viscosidad normalmente aumentará a medida
que aumenta la temperatura.
❖Asegúrese de que la acción de agitación sea lo
suficientemente alta como para agitar el
líquido en su totalidad. Las áreas no agitadas
del líquido podrían traducirse en transferencias
de calor desiguales, y en “puntos calientes” en
los materiales de vidrio. Esto podría provocar
estrés térmico, y por ello provocar fallos.
❖Compruebe periódicamente la acción de
agitación para asegurarse de que es la correcta
a medida que aumenta la viscosidad de la
solución.
❖Utilice siempre el imán teflonado de agitación
de mayor tamaño posible y, en caso de ser
necesario, utilice un agitador de altura
mecánico.
❖No utilice recipientes de vidrio de pareses
gruesas, como los recipientes Heavy Duty Ware
de Pyrex o vasos y frascos de 5 litros o más
capacidad.
❖NUNCA caliente botellas de vidrio sobre una
placa de calefacción.
❖Asegúrese de que la calor se acumula
lentamente, para evitar sobrecalentamiento
localizado.
❖Asegúrese de que los recipientes de vidrio no
presenta arañazos ni ningún otro defecto.
❖Coloque la placa de calefacción en una
bandeja que tenga una longitud suficiente
como para que el líquido no se vierta en caso
de producirse un fllo en el recipiente de vidrio.
❖Utilice la vestimenta de seguridad
correspondiente (guantes, gafas de seguridad,
delantal protector, etc.).
Almacenamiento
La unidad está diseñada para que la placa
superior encaje en la placa base de la siguiente
unidad, para facilitar su almacenamiento sencillo
y compacto cuando se coloca en posición lateral
(consulte la ilustración 4).
Accesorios
❖Está disponible la varilla SR1 para apoyar los
aparatos utilizados con el instrumento. El
instrumento presenta una conexión en la parte
trasera que permite colocar la varilla de apoyo,
con número de catálogo SR1 (consulte la
ilustración 2). Para colocar la varilla en el
instrumento, aíslelo primero del suministro
eléctrico y deje que se enfríe. A continuación,
simplemente atornille el extremo roscado de la
varilla de apoyo en la conexión de la parte
trasera del instrumento.
La format de la base también permite colocar
un soporte de varilla de retorta de forma
rectangular, cuyas dimensiones no deben ser
superiores a los 19,5 mm de alto y 125 mm de
ancho, para colocarla directamente debajo de
la unidad.
La dimensiones del modelo SR1 son 12 × 600
mm (ancho × alto).
❖Controlador de temperatura SCT1 (consulte la
página 2 para obtener más información).
❖Si desea acceder a una lista completa de los
accesorios, visite el sitio web de Bibby Scientific
www.bibby-scientific.com
Servicio y reparaciones
Esta gama de productos no requiere ningún tipo
de tarea de servicio rutinaria.
Nota: La unidad no incluye piezas internas
que el usuario pueda reparar.
En caso de producirse un fallo en el producto, se
recomienda que las reparaciones únicamente las
realice personal cualificado. Si desea recibir
asesoramiento o recibir un manual de servicio,
póngase en contacto con el Departamento de
servicio de Bibby Scientific Ltd.
Solo deberán utilizarse piezas de recambio
proporcionadas por Bibby Scientific o sus
agentes. La instalación de piezas no aprobadas
podría afectar al rendimiento de las funciones de
seguridad del instrumento.
Nota: El motor de accionamiento del
agitador magnético utiliza imanes de gran
potencia.
19

Si tiene algún tipo de duda, póngase en contacto
con el Departamento de servicio de Bibby
Scientific Ltd.
Stone, Staffordshire ST15 0SA
Reino Unido
Tel: +44 (0)1785 812121
Fax: +44 (0)1785 813748
Correo electrónico: info@bibby-scientific.com
www.bibby-scientific.com
Piezas de repuesto
Si desea obtener una lista de piezas completa,
póngase en contacto con el Departamento de
servicio de Bibby Scientific Ltd, y mencione el
modelo y el número de serie.
Garantía
Bibby Scientific Ltd garantiza que este
instrumento no presentará fallos de materiales y
mano de obra, siempre que se utilice bajo
condiciones de laboratorio normales, durante un
periodo de tres (3) años. En caso de emitirse una
reclamación justificada, Bibby Scientific Ltd
sustituirá los componentes defectuosos de forma
gratuita.
Esta garantía NO será de aplicación en los
siguientes casos:
1. La placa superior cerámica se ha roto debido a
impacto mecánico, arañazos, fragmentación o
grabado químico.
2. Se han realizado o intentado realizar
reparaciones por entidades o personas
diferentes a Bibby Scientific o su agente.
3. Aparecen arañazos y fragmentación del
revestimiento de menor importancia a raíz de
lo que se considera un uso normal.
20

21
Deutsch
Abbildung 2 - RückansichtAbbildung 1 - Frontansicht
HEAT
STIR
HOT
100
50
Power
on/off
heat-stir
US152
150
200
250
4
3
2
1
off
5
6
7
„Heiß“-Warnlampe
„Wärme ein“-LED
„Rühren
ein“-LED
Kontaktthermometer-Anzeige
HEAT
STIR
HOT
100
50
Power
on/off
heat-stir
US152
150
200
250
4
3
2
1
off
5
6
7
IEC-Netzbuchse
für hitzebeständigen
Stecker
RetortenstabAnschluss
DIN-Buchse
Netz-Ein-/
Ausschalter
(nicht auf
einzelner
Rührer-Einheit)
Abbildung 3 - Frontansicht
heat-stir
US152
HOT
1
2
3
4
5
6
7
8
9
STIR
undergrad
off
Power
on/off
100
150
250
200
300°C
50
HEAT
„Heiß“-Warnlampe
Wärmeanzeige
„Rühren
ein“-Anzeige
Rührsteuerung
Wärmesteuerung
Kontaktthermometer-Anzeige
heat-stir
US152
HOT
1
2
3
4
5
6
7
8
9
STIR
undergrad
off
Power
on/off
100
150
250
200
300°C
50
HEAT
heat
UC150
HOT
undergrad
Power
on/off
100
150
250
200
300°C
50
HEAT
Abbildung 4 - Ansicht seitlich gestapelt
Grüne Leuchtanzeige
„In-Betrieb“
US152
HOT
1
2
3
4
5
6
7
8
9
STIR
undergrad
off
Power
on/off
100
150
250
200
300°C
50
HEAT
Power
on/off
100
150
250
200
300°C
50
HEAT

Vielen Dank, dass Sie sich für dieses Bibby
Scientific Produkt entschieden haben. Für eine
optimale Leistung des Geräts und für Ihre
persönliche Sicherheit lesen Sie bitte vor
Gebrauch diese Anleitung sorgfältig durch.
Bibby Scientific Heizplatten und Rührer sind zum
Betrieb unter folgenden Bedingungen bestimmt: -
❖ Ausschließliche Verwendung im Innern von
Gebäuden.
❖Verwendung in einem gut gelüfteten Bereich.
❖Umgebungstemperatur von +5 °C bis +40 °C.
❖Einsatzhöhe bis 2 000 m.
❖Relative Luftfeuchtigkeit von maximal 80 %.
❖Netzschwankungen maximal 10 % des
Nennwerts.
❖Überspannungskategorie II IEC60364-4-443
❖Verschmutzungsgrad 2 IEC664
❖Der Mindestabstand zwischen Gerät und
Wänden oder anderen Gegenständen muss auf
allen Seiten 200 mm betragen.
Betriebssicherheit und Schutz des Geräts sind nur
dann gewährleistet, wenn das Gerät entsprechend
dieser Betriebsanleitung betrieben wird.
Details über die einzelnen Modell-Spezifikationen
entnehmen Sie bitte der Produktdokumentation
und der Bibby Scientific Website: www.
bibby-scientific.com
Elektroinstallation
DIESES PRODUKT MUSS GEERDET SEIN
Vor dem Anschluss bitte kontrollieren, dass
die Stromversorgung 230 V, 50 Hz, einphasig
entspricht.
Leistungsaufnahme:
Modell Wattzahl Modell Wattzahl
UC150 500W US150 700W
UC151 50W US151 50W
UC152 550W US152 750W
Auf der Rückseite des Gerätes befindet sich eine
IEC-Steckdose für den Anschluss an das Stromnetz
(siehe Abbildung 2). Die Einheit ist mit einem
Netzkabel mit britischem 3-poligem oder
2-poligem „Schuko“ hitzebeständigem IEC-Stecker
zum Anschluss an das Gerät ausgestattet.
22
Sollte die Zuleitung nicht für den Anschluss an
das Stromnetz geeignet sein, ersetzen Sie den
Stecker mit einer geeigneten Alternative. Dies
beinhaltet das Abschneiden des Steckers, die
Vorbereitung des Kabels und dessen
Neuverkabelung an den Kabelstecker gemäß
entsprechender Vorgaben.
DIES SOLLTE AUSSCHLIESSLICH DURCH EINEN
ELEKTROFACHMANN AUSGEFÜHRT WERDEN.
HINWEIS:Beachten Sie das Typenschild des
Geräts, um sicherzustellen, dass Stecker und
Sicherung für die angegebene Spannung und
Wattzahl geeignet sind.
DEN ADERN DES NETZKABELS SIND
FOLGENDE FARBEN ZUGEORDNET:
BRAUN - STROMFÜHREND
BLAU - NEUTRAL
GRÜN/GELB - ERDE
DIESES PRODUKT MUSS GEERDET SEIN
Bei einem eventuellen Austausch des Netzkabels
wird ein Kabel vom Typ H05RR-F oder H05RN-F
mit 1 mm
2
Aderquerschnitt und hitzegeeignetem
IEC-Stecker benötigt.
IM ZWEIFELSFALL EINEN
ELEKTRO-FACHMANN HINZUZIEHEN
Das Kabel muss zuerst am Gerät eingesteckt
werden BEVOR der Anschluss an die
Stromversorgung erfolgt.
Hinweis:Wenn das Gerät an die
Stromversorgung angeschlossen ist und der
Netzschalter betätigt wird, leuchtet auf der
Vorderseite des Geräts ein grünes Licht auf (siehe
Abbildung 1).

23
Bedienung
Heizung
UC150, UC152, US150, US152
Schalten Sie das Gerät über den Netzschalter on/
off ein (siehe Abbildung 2). Der Regler mit der
Aufschrift „HEAT“ auf der Frontplatte regelt die
Wärmeabgabe und somit die Plattentemperatur.
Er ist mit einer ungefähren Temperaturskala
graduiert. Diese Skala bezieht sich auf die
Temperatur der oberen Platte und nicht auf die
Temperatur des zu erwärmenden Gefäßinhalts.
Drehen Sie den Regler im Uhrzeigersinn, um die
gewünschte Plattentemperatur einzustellen.
Während der Aufheizung der Platte leuchten die
LED-Temperatursegmente der Reihe nach auf und
steigern die Lichtintensität, bis die eingestellte
Oberflächentemperatur erreicht ist. Der
umgekehrte Vorgang erfolgt bei der Abkühlung
des Geräts und die LED-Temperatursegmente
erlöschen, wenn die Solltemperatur erreicht
wurde.
WARNUNG:Wenn die Oberfläche so stark
erwärmt ist, dass sie nicht mehr berührt
werden kann, beginnt auf der Gerätevorderseite
die „HOT“-Warnleuchte zu blinken (siehe
Abbildung 1). Auch wenn das Gerät vom
Stromnetz getrennt wurde, wird die Warnleuchte
für maximal 30 Minuten weiterblinken, wenn die
Temperatur der Platte über 50 °C liegt.
WARNUNG:Wenn große Mengen auf der
Platte verbleiben, kann die Platte auch
dann noch heiß sein, wenn die „HOT“
-Warnleuchte nach 30 Minuten erloschen ist.
WARNUNG
:Die Oberfläche des Geräts
kann HEISS sein, vor allem in freier
Umgebung, in der Oberflächentemperaturen von
450 °C auf den Modellen mit Keramikoberfläche
und 325 °C auf den Modellen mit
Metalloberfläche erreicht werden können. Lassen
Sie Heizplatten, die nicht in Gebrauch sind, nicht
eingeschaltet.
WARNUNG:Während des Erhitzens kann
das Gehäuse rund um die
Heizplattenoberfläche
zum Anfassen zu heiß werden.
Rühren
UC151, UC152, US151, US152
Schalten Sie das Gerät über den Netzschalter on/
off ein (siehe Abbildung 2). Der Regler mit der
Aufschrift „STIR“ auf der Frontplatte regelt die
Geschwindigkeit des Rührers. Bei eingeschaltetem
Gerät leuchtet eine grüne Anzeige für den Rührer
auf (siehe Abbildung 1).
Der Regler ist in eine freie Skala von 1 - 9
unterteilt. Das Einstellen des Reglers auf eine
höhere Zahl erhöht die Rührerdrehzahl.
Verwendung des optionalen Zubehörs SCT1Temperaturregler mit den Modellen
UC150, UC152, US150, US152
Der SCT1-Temperaturregler ermöglicht eine
präzise Temperaturregelung von Proben auf
Wasser- und Ölbasis im Labor und kann in zwei
verschiedenen Modi verwendet werden: als
genaue Temperaturregelung im Bereich +20 bis
+200 °C oder als digitales Thermometer im
Bereich -4 bis +325 °C.
Der Anschluss der SCT1-Temperaturreglersonde
erfolgt über die DIN-Sondenbuchse auf der
Rückseite der Heizplatte (Abbildung 2). Das
analoge Wärme-Steuerelement wird deaktiviert;
dies ermöglicht die genaue Einstellung der
Temperatur über die SCT1-Temperatursteuerung.
Das beleuchtete Kontaktthermometer-LED zeigt
die Kommunikation zwischen SCT1
Temperatursteuerung und Heizplatte an
(Abbildung 3). Eine vollständige
Bedienungsanleitung finden Sie im Handbuch der
SCT1-Temperatursteuerung.
HINWEIS:Beim Einsatz der SCT1 beziehen sich
die LED-Temperatursegmente neben dem „HEAT“
Drehknopf auf die Oberflächentemperatur der
Platte, nicht auf diejenige der Probe.
Caution
Hot
1
2
3
4
5
6
7
8
9
STIR
un de rgr ad
off
Power
on/off
100
150
250
200
300°C
HEAT
Power
on/off
100
150
250
200
300°C
50
HEAT

24
Sicherheitshinweise
❖Verwenden Sie das Gerät nicht zum Erhitzen
brennbarer Flüssigkeiten.
❖Das Gerät erst dann anheben oder tragen,
wenn es ausgeschaltet wurde und mindestens
30 Minuten abkühlen konnte. Beachten Sie die
Temperatur-Warnanzeige.
❖Das Gerät mit beiden Händen so tragen, dass
die Finger unter beide Seitenkanten greifen.
❖Das Gerät unter keinen Umständen
transportieren, wenn sich noch Behälter auf
der oberen Platte befinden oder während das
Gerät noch am Netz angeschlossen ist.
❖Bei überfüllten Behältern, deren Inhalt bei
hoher Geschwindigkeit gerührt wird, besteht
die Gefahr, mit der Flüssigkeit in Kontakt zu
kommen. Steigern Sie die Rührgeschwindigkeit
stets langsam und rühren Sie nie schneller als
erforderlich.
❖Stellen Sie NIEMALS ein kaltes Glasgefäß auf
einer Heizplatte ab, die bereits erhitzt ist.
❖Verwenden Sie NIEMALS einen Retortenstab,
der länger als 600 mm ist.
❖Bei der Installation eines Retortenstabs, an dem
Gerätschaft befestigt ist oder beim Schwenken
von Retortenstäben, ist auf ausreichende
Beschwerung der Platte zu achten, um ein
Umkippen des gesamten Geräts zu verhindern.
❖Bei Benutzung eines Stativs darf die Platte des
Stativs 19,5 mm in der Höhe und 125 mm in
der Breite nicht überschreiten, damit das Gerät
ausreichend belüftet wird.
Reinigung und Pflege
❖Vor der Reinigung:
Stellen Sie sicher, dass die Oberseite kühl und das
Gerät vom Stromnetz getrennt ist.
Es empfiehlt sich, für die Reinigung des
Metallgehäuses ein feuchtes Tuch und ein mildes
Reinigungsmittel zu verwenden.
Einheiten mit Keramikoberfläche:
Die meisten Arten von Verunreinigung können in
der Regel mit einem feuchten Tuch entfernt
werden. Bei hartnäckigeren Flecken wird ein
cremiger Haushaltsreiniger empfohlen.
Ein umgehendes Entfernen verspritzter Flüssigkeit
erleichtert die Reinigung. Sollte Alkali,
Phosphorsäure oder Fluorwasserstoffsäure
verschüttet worden sein, MÜSSEN diese
Substanzen sofort entfernt werden, da diese
Chemikalien die Glaskeramik angreifen und
schädigen können. Die Einhaltung angemessener
Sicherheitsvorkehrungen ist sicherzustellen.
Bei der Reinigung und dem allgemeinen Betrieb
muss darauf geachtet werden, die Oberfläche der
oberen Platte nicht zu zerkratzen, da dies
thermischen Bruch verursachen könnte.
WARNUNG: Eine zerkratzte,
angeschlagene, chemisch verätzte oder
beschädigte Keramikplatte darf nicht
verwendet werden.
Einheiten mit Metalloberfläche:
Es empfiehlt sich, für die Reinigung der
Metallplatte ein feuchtes Tuch und ein mildes
Reinigungsmittel zu verwenden.
Ein umgehendes Entfernen verspritzter Flüssigkeit
erleichtert die Reinigung. Sollten Säuren oder
Alkalien verschüttet worden sein, MÜSSEN diese
Substanzen sofort entfernt werden, da diese
Chemikalien die Oberfläche der
Aluminium-Legierung angreifen und schädigen
können. Die Einhaltung angemessener
Sicherheitsvorkehrungen ist sicherzustellen.
HINWEIS: Sollten Sie zu der Eignung von
Reinigungs- oder Dekontaminationsmitteln
Fragen haben, wenden Sie sich bitte an die
Technische Abteilung von Bibby Scientific.
Vorbereitung von Medien
Besondere Vorsicht ist beim Erhitzen von
Flüssigkeiten mit hoher Viskosität geboten.
Viskose Flüssigkeiten können als thermische
Isolatoren wirken und thermischen Glasbruch
verursachen. Dies ist bei Medienlösungen sehr
wichtig, da sich die Viskosität bei steigender
Temperatur in der Regel erhöht.

25
❖Überprüfen Sie, ob die Rührwirkung ausreicht,
um die gesamte Flüssigkeit zu bewegen. Nicht
durchrührte Bereiche in der Flüssigkeit können
zu einer ungleichmäßigen Wärmeübertragung
und „Hotspots“ in den Gläsern führen. Dies
kann thermische Belastung verursachen und zu
Beschädigungen führen.
❖Überprüfen Sie regelmäßig die Rührwirkung,
um sicherzustellen, dass sie stets der
steigenden Viskosität der Lösung angemessen
ist.
❖Verwenden Sie immer den größtmöglichen
Magnetrührer und, wenn nötig, ein
mechanisches Rührwerk.
❖Verwenden Sie keine dickwandigen Glasgefäße
wie Pyrex Heavy Duty Ware oder
handelsübliche Bechergläser und Flaschen mit
einem Fassungsvermögen von 5 Litern oder
mehr.
❖Glasflaschen dürfen KEINESFALLS auf einer
heißen Platte erhitzt werden.
❖Stellen Sie sicher, dass sich die Wärme langsam
aufbaut, um punktuelle Überhitzung zu
vermeiden.
❖Stellen Sie sicher, dass das Glas keinerlei
Kratzer oder andere Beschädigungen hat.
❖Platzieren Sie die Heizplatte in einer Wanne,
die groß genug ist, die Flüssigkeit
aufzunehmen, falls ein Glas zerbricht.
❖Tragen Sie geeignete Schutzkleidung wie
Handschuhe, Schutzbrille, Schutzschürze etc.
Lagerung
Für eine einfache und platzsparende
Seitenlagerung passt die obere Platte in die
Bodenplatte des nächsten Geräts (siehe
Abbildung 4).
Zubehör
❖Als Halterung für Apparate, die mit dem
Instrument eingesetzt werden, ist der
SR1-Retortenstab verfügbar. Auf der Rückseite
ist das Gerät mit einem Anschluss für die
Befestigung des Retortenstabs,
Katalognummer SR1, ausgestattet (siehe
Abbildung 2). Zur Montage des Stabs das
Gerät zunächst vom Stromnetz trennen und
abkühlen lassen. Dann einfach das Gewinde
des Stabs in das Anschlussstück auf der
Geräterückseite einschrauben.
Die Form der Basis ermöglicht auch die
Anwendung einer rechteckigen Bodenplatte
direkt unter dem Gerät, deren Abmessung
19,5 mm in der Höhe und 125 mm in der
Breite nicht überschreiten darf.
Abmessung SR1: 12 x 600 mm (B x H).
❖SCT1-Temperatursteuerung (weitere
Einzelheiten siehe Seite 2).
❖Eine vollständige Liste der Zubehörteile finden
Sie auf der Bibby Scientific Website
www.bibby-scientific.com
Wartung und Reparatur
Diese Produktreihe erfordert keine regelmäßige
Wartung.
Hinweis: Das Gerät enthält keine Teile, die
vom Benutzer ausgetauscht werden können.
Bei Fehlfunktion des Geräts sollten Reparaturen
nur durch entsprechend qualifiziertes Personal
durchgeführt werden. Bitte wenden Sie sich an
die Service-Abteilung von Bibby Scientific Ltd.
wenn Sie Beratung wünschen oder eine
Bedienungsanleitung anfordern möchten.
Verwenden Sie ausschließlich von Bibby Scientific
oder seinen Vertretern gelieferte Ersatzteile. Der
Einbau nicht zugelassener Ersatzteile kann die im
Gerät eingebauten Sicherheitseinrichtungen
beeinträchtigen.
Hinweis: Der Magnetrührantrieb nutzt
starke Magnete.

Bitte wenden Sie sich an die Service-Abteilung
von Bibby Scientific Ltd. wenn Sie Fragen haben.
Stone, Staffordshire ST15 0SA
United Kingdom
Tel.: +44 (0)1785 812121
Fax: +44 (0)1785 813748
E-Mail info@bibby-scientific.com
www.bibby-scientific.com
Ersatzteile
Eine vollständige Liste der Ersatzteile erhalten Sie
von der Service-Abteilung von Bibby Scientific
Ltd. unter Angabe der Modell- und
Seriennummer.
Garantie
Bibby Scientific Ltd gewährleistet die
einwandfreie Material- und Herstellungsqualität
dieses Instruments bei Verwendung unter
normalen Laborbedingungen über einen Zeitraum
von drei (3) Jahren. Im Fall einer berechtigen
Reklamation ersetzt Bibby Scientific die defekte(n)
Komponente(n) bzw. das Gerät kostenfrei.
Diese Garantie gilt NICHT, falls
1. ein Keramik-Oberteil durch mechanische
Einwirkung, Zerkratzen, Anschlagen oder
chemisches Verätzung zerbrochen ist;
2. eine Reparatur durch andere als Bibby Scientific
oder seine Vertreter durchgeführt oder
versucht wurde.
3. kleine Kratzer und Absplitterungen in der
Beschichtung auftreten, die als normale
Gebrauchsspuren zu bewerten sind.
26

Notes

Notes

These products meet the relevant EC
harmonised standards for radio frequency
interference and may be expected not to
interfere with, or be affected by, other equipment with
similar qualifications. We cannot be sure that other
equipment used in their vicinity will meet these standards
and we cannot guarantee that interference will not occur
in practice. Where there is a possibility that injury,
damage or loss might occur if equipment malfunctions
due to radio frequency interference, or for general advice
before use, please contact the Technical Department of
Bibby Scientific Ltd.
Declaration of Conformity

INSPECTION REPORT
MODEL
SERIAL No.
ELECTRICAL SAFETY
1. Earth continuity
❏
2. Insulation ❏
3. Flash test ❏
FUNCTIONAL
1. Indicators
❏
2. Heater/stirrer control ❏
3. Visual acceptance ❏
QUALITY CONTROL INSPECTOR
✓
✓
✓
✓
✓
✓
Bibby Scientific Ltd
Beacon Road Stone
Staffordshire ST15 0SA
United Kingdom
Tel: +44 (0)1785 812121
Fax: +44 (0)1785 810405
e-mail: info@bibby-scientific.com
www.bibby-scientific.com
Bibby Scientific France SAS
ZI du Rocher Vert - BP 79
77793 Nemours Cedex
France
Tel: +33 1 64 45 13 13
Fax: +33 1 64 45 13 00
e-mail: bsf@bibby-scientific.fr
www.bibby-scientific.com
Bibby Scientific Italia Srl
Via Alcide de Gasperi 56
20077 Riozzo di Cerro al Lambro
Milano Italia
Tel: +39 (0)2 98230679
Fax: +39 (0)2 98230211
e-mail: marketing@bibby-scientific.it
www.bibby-scientific.it
Bibby Scientific US Ltd
3 Terri Lane Suite 10
Burlington NJ 08016
USA
Tel: 800-225-9243
Fax: 609-589-2571
www.bibby-scientific.com
Bibby Scientific Ltd - Singapore
Prudential Tower Level 26
30 Cecil Street
Singapore 049712
Tel: +65 6631 2976
Fax: +44 (0)1785 810405
e-mail: sales@bibby-scientific.com
www.bibby-scientific.com
Bibby Scientific - Middle East
PO Box 27842
Engomi 2433,
Nicosia, Cyprus
Tel: +357 22 660 423
Fax: +357 22 660 424
Email: sales@bibby-scientific.me
Web: www.bibby-scientific.com
 Loading...