

Stuart SSM1, SSM3, SSM4, SSM5, SSL1 Instruction Manual
...
Shakers and Rockers
SSM1, SSM3, SSM4, SSM5,
SSL1, SSL2, SSL3, SSL4, SSL5
Instruction Manual
Version 1.2
English
IEC connector
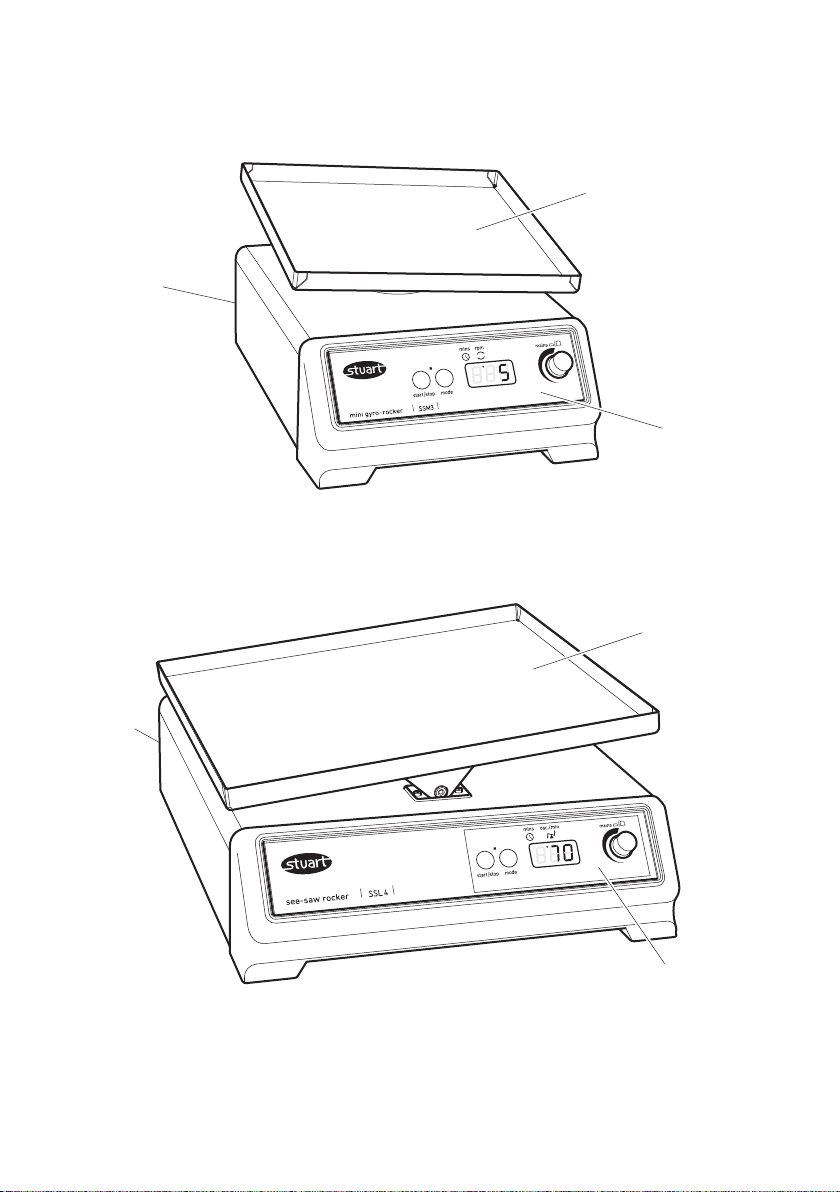
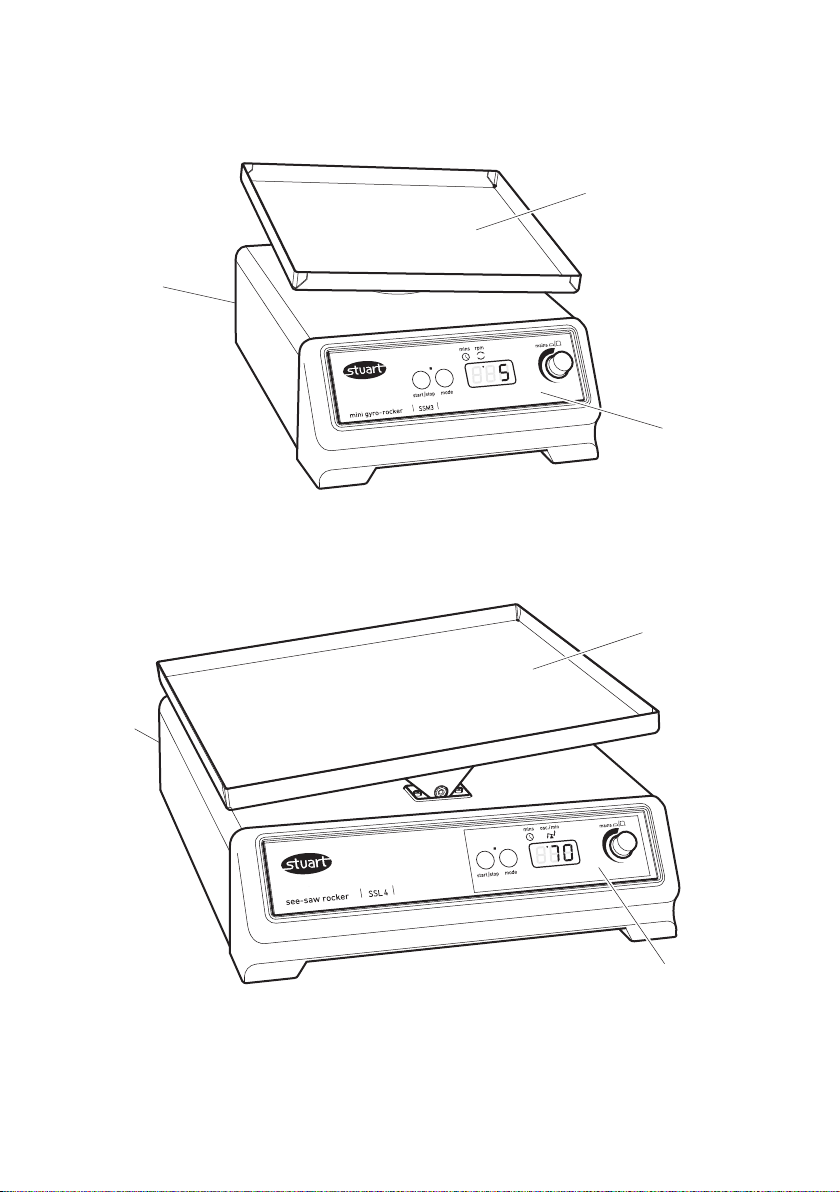
Model: SSM3 & SSM4
Rockers
Sample tray
(235 x 235mm)
Digital control
panel (see fig. 3)
Sample tray
(355 x 355mm)
IEC
connector
Model: SSL3 & SSL4
Figure 1
Digital control
panel (see fig. 3)
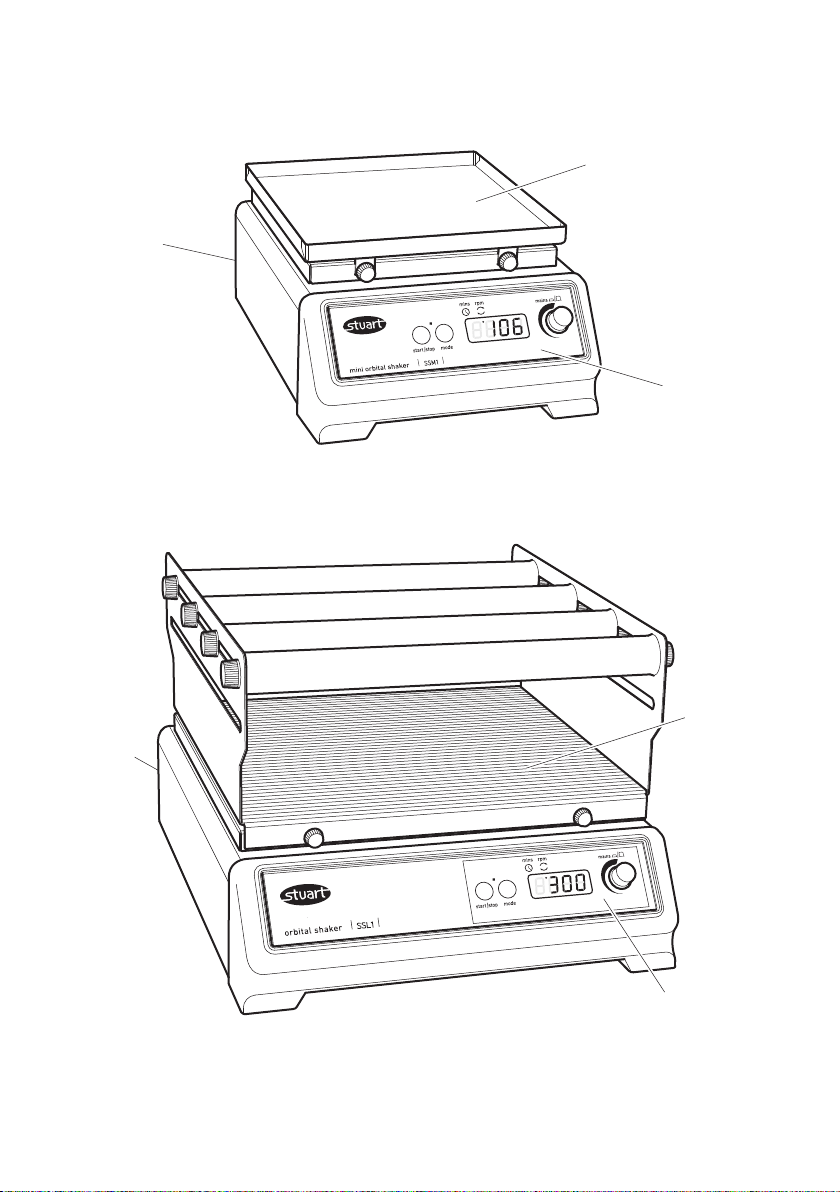
IEC connector
Model: SSM1 & SSM5
Shakers
Sample tray
(220 x 220mm)
Digital control
panel (see fig. 3)
IEC
connector
Model: SSL1 & SSL2
Figure 2
Cradle
System
Digital control
panel (see fig. 3)
1

SHAKERS & ROCKERS
SSM1, SSM3, SSM4, SSM5, SSL1, SSL2,
SSL3, SSL4, SSL5
1. Introduction
Thank you for purchasing this piece of Stuart
equipment. To get the best performance from the
equipment please read these instructions carefully
before use.
Before discarding the packaging check that all
parts are present and correct.
For your own safety and that of others
please read and understand the safety advice
given below before using the equipment.
2. Safety Advice before use
If the equipment is not used in the manner
described in this manual and with
accessories other than those recommended by
Cole-Parmer the protection provided might be
impaired.
This equipment is designed to operate under the
following conditions: -
❖ For indoor use only
❖ Use in a well ventilated area
❖ Ambient temperature range +5°C to +40°C
❖ Altitude to 2000m
❖ Relative humidity not exceeding 80%
❖ Mains supply fluctuation not exceeding 10%
❖ Over-voltage category II IEC60364-4-443
❖ Pollution degree 2
❖ Use with a minimum distance all around of
200mm from walls or other items
The unit should be carried using both hands.
Do not use in a hazardous atmospheres or with
hazardous materials.
Ensure that the load is balanced.
Do not attempt to stop movement by hand.
Never move or carry the unit when in use or
connected to the mains electricity supply.
In the case of mains interruption, the unit will
not restart on restoration of the electricity
supply.
In the case of mechanical interruption, (e.g.
motor stall), the unit will continue operating on
removal of interruption.
Mechanical energy can lead to breakage of glass
vessels. Use with care.
Mechanical hazard SSL2. Cradle to be
assembled onto platform before operating.
3. General Description
Stuart shakers and rockers are ideal instruments
for mixing and aerating various biological and
chemical samples in the laboratory. All models
have digital setting of both speed and an
adjustable digital timer that automatically stops
after the set time (1 to 9999 minutes, 1 second
to 90 minutes or 1 minute to 9 hours). The SSM
range comprise of personal units with a small
footprint while the SSL is the larger labscale
equivalent.
Model SSM1 and SSL1 provides a smooth
uniform circular motion with an orbit of 16mm.
Speed range is 30 to 300rpm. Max load 3kg and
10kg respectively.
Model SSL2 has a side-to-side
reciprocating action ideal for vigorous
shaking applications. Speed range is 25 to
250rpm. Max load 10kg*.
IMPORTANT
* Maximum speed with 10kg load is 200rpm.
Maximum load for a speed setting of 250rpm is
5kg.
Model SSM3 and SSL3 provides a 3D gyratory
motion, ideal for low foaming agitation, DNA
extractions, staining and de-staining procedures
etc. Speed range is 5 to 70 rpm. Max load 3kg
and 10kg respectively. The angle of tilt can be
adjusted manually, without the need for tools,
between 3 and 12° (see section 4.6 for
instructions).
Model SSM4 and SSL4 have a see-saw rocking
action that creates a wave motion within vessels
such as culture flasks, Petri dishes etc. Speed
2

range is 5 to 70 rpm. Max load 3kg and 10kg
respectively.
Models SSM5 and SSL5 are designed for
use with microtitre plates and
microcentrifuge tubes. High speed
combined with a tiny orbit creates the vibrational
shaking action required for mixing very small
volumes. Speed range is 250 to 1,200 rpm.
IMPORTANT Maximum load is 1kg.
4. Preparation for Use –
All models
4.1 Electrical Installation
THIS INSTRUMENT MUST BE
EARTHED
Before connection please read and understand
these instructions and ensure that the line supply
corresponds to that shown on the rating plate.
All models are designed for use on 230V 50Hz.
The power consumption of each unit is 50W.
The instruments are fitted with an IEC socket at
the rear of the instrument for connection of the
mains lead.
Caution: Fuses fitted in both live and neutral
lines.
These units are supplied with two mains leads
fitted with IEC plugs for connection to the
instrument. One lead has a U.K. 3 pin plug and
the other has a 2-pin “Shuko” plug for
connection to the mains. Choose the lead
appropriate for your electrical installation and
discard the other.
Should neither lead be suitable, take the lead
with the U.K. plug and replace the plug with a
suitable alternative. This involves cutting off the
moulded plug, preparing the cable and
connecting to the rewireable plug in accordance
with its instructions.
IT IS IMPORTANT THAT THIS OPERATION
SHOULD ONLY BE UNDERTAKEN BY A
QUALIFIED ELECTRICIAN
NOTE: Refer to the equipment’s rating plate to
ensure that the plug and fusing are suitable for
the voltage and wattage stated.
The wires in the mains cable are coloured as
follows:
LIVE - BROWN
NEUTRAL - BLUE
EARTH - GREEN/YELLOW
The appropriate mains lead should be connected
to the instrument BEFORE connection to the
mains supply.
Should the mains lead need replacement a cable
2
of 1mm
connected to an IEC320 plug should be used.
N.B. The U.K. mains lead is protected by a 10A
fuse mounted in the plug top.
IF IN DOUBT CONSULT A QUALIFIED
ELECTRICIAN
4.2 Connect to the electricity supply – DO NOT
SWITCH ON.
4.3 Place the unit on a firm level non slip
surface ensuring that there is sufficient free
space on all sides to allow movement without
coming into contact with anything during use.
4.4 Assemble cradle and rollers onto platform
where applicable (ie SSL1, SSM1 with SSM1/1 &
SSL2), making sure that the thumb screws have
been tightened prior to operation.
4.5 Load the shaker/rocker with samples
ensuring that the load is evenly balanced and
does not exceed the maximum load stated.
4.6 Adjusting the angle of tilt on the 3D gyratory
motion rockers, models SSM3 and SSL3. Set the
rocker to the minimum speed (5rpm).
Underneath the platform you will see a
cylindrical shaft with a nut on it, stop the rocker
when the nut faces you. Do not loosen the
nut. The platform can now be tilted at right
angles to the front fascia. Once you are happy
with the angle of tilt restart the rocker.
of harmonised code H05VV-F
3

5. Operation
5.1 Setting the speed
Start/stop button
Mode button
Figure 3
Switch the unit ON by pressing the control knob
in (see fig 3). The unit will carry out a self test
routine and then the red display will show the
last stored set speed (red dot in the display
shows RPM is selected). This can be adjusted by
turning the control knob. Once the correct speed
is displayed press the start / stop button to begin
motion.
The speed can be adjusted without halting the
unit.
The unit can be halted at any time by pressing
the start / stop button.
5.2 Setting the timer
In order to use the timer, halt rotation and press
the mode button. The red dot on the display
moves over to time. The display will show the
last stored time in minutes.
Select the desired count down time using the
control knob. When the display shows the
correct time in minutes, press the start / stop
button to begin operating.
During operation, motion can be paused at any
time by pressing the start / stop button. If the
button is pressed again, motion will start again
and the timer will continue to count down.
The timer can be adjusted without halting the
unit.
When the timer reaches zero, the unit will be
automatically halted and an alert will sound.
Red digital display
Press the start / stop button to revert back to the
last time and speed values set or select new
values following instructions given above.
N.B To disable the timer and revert to
continuous rotation, select - - - in the
display during timer mode.
To switch the unit OFF completely, press the
control knob in. The display will show OFF.
5.3 Saving speed/time values
In order to save a commonly used speed/time
value, switch the unit ON by pressing the control
knob in (see fig 3). Select both a speed value
and a time value (either 1 to 999 minutes, or
continuous - - -) using the instruction given
above. Switch the unit OFF by pressing in the
control knob. Wait 5 seconds and switch the unit
back ON by pressing the control knob in. The
input values are now saved in memory. They can
be altered at any time by following the same
procedure.
N.B. When the unit is switched OFF using
the control knob, whatever values of speed/
time were set prior to turning the unit off
will be saved, and will be the values
restored when the unit is switched back on.
Changing the timer unit
The unit timer is defaulted to minutes only (1
minute to 9999). To change to minutes and
hours (1 minute to 9 hours, H is displayed in the
left digit of the timer display), or to change to
Control knob
4

seconds and minutes (1 second to 90 minutes)
turn the unit off using the control knob then
switch the mains power off at the plug. Hold
down both the start/stop button and the mode
button whilst simultaneously switching the mains
power back on. The display will temporarily
show 88:88 then OFF. Using the control knob
turn the unit on, the display will show nn:ss for
minutes and seconds, H:nn for hours and
minutes and nn for minutes, turn the control
knob to select the desired timer unit and turn
the unit off by the control knob, OFF will be
displayed. When the unit is next used the timer
will have been altered to the set unit.
6.2 Accessories
Code Description
SSM5/1 Tube holder for 1.5ml tubes
SSM5/2 Tube holder for 0.5ml tubes
SSM3/1 Tier system (for mini rockers)
SSL3/1 Tier system (for large rockers)
SSM1/1 Cradle system (for SSM1)
SSM1/2 Large platform (for 8 well plates)
for SSM1
SSM1/3 Plastic lid (for SSM1)
SSL1/1 Large platform, 510 x 510mm
6. Maintenance, Servicing
& Repair
WARNING: Ensure the unit is disconnected
from the mains electricity supply before
attempting maintenance or servicing.
This range of equipment does not require routine
servicing. The only maintenance required is to
clean external surfaces with a damp cloth and
mild detergent. Spillages or splashes should be
cleaned up straightaway after isolating the unit
from the mains electricity supply.
6.1 Repairs
Any repairs or replacement of parts MUST be
undertaken by suitably qualified personnel.
Only spare parts supplied or specified by
Cole-Parmer or its agent should be used.
Fitting of non-approved parts may affect the
performance of the safety features designed
into the instrument.
For a comprehensive list of parts required by
service engineers conducting internal repairs, or
to receive a service manual, please contact the
Sales Department of Cole-Parmer quoting both
the model and serial number.
If in any doubt please contact the Technical
Department of Cole-Parmer.
7. Warranty
Cole-Parmer Ltd. warrants this instrument to be
free from defects in material and workmanship,
when used under normal laboratory conditions,
for a period of three (3) years. In the event of a
justified claim, Cole-Parmer will replace any
defective component or replace the unit free of
charge.
This warranty does NOT apply if damage is
caused by fire, accident, misuse, neglect,
incorrect adjustment or repair, damage caused
by installation, adaptation, modification, fitting
of non-approved parts or repair by unauthorized
personnel.
Cole-Parmer Ltd.
Beacon Road,
Stone, Staffordshire,
ST15 0SA, United Kingdom
Tel: +44 (0)1785 810475
Email: cpservice@coleparmer.com
Web: www.stuart-equipment.com
5
Français
Prise
alimentation
Modèles: SSM3 & SSM4
Agitateurs 3D & à bascule
Plate-forme
(235 x 235mm)
Face avant
(voir fig. 3)
Plate-forme
(355 x 355mm)
Prise
alimentation
Modèles: SSL3 & SSL4
Figure 1
6
Face avant
(voir fig. 3)

Prise
alimentation
Modèles: SSM1 & SSM5
Agitateurs orbitaux
Plate-forme
(220 x 220mm)
Face avant
(voir fig. 3)
Prise
alimentation
Modèles: SSL1 & SSL2
Figure 2
Plate-forme
de maintien
Face avant
(voir fig. 3)
7

AGITATEURS 3D, 2D OU
ORBITAUX
SSM1, SSM3, SSM4, SSM5, SSL1, SSL2,
SSL3, SSL4, SSL5
1. Introduction
Tout d’abord, nous vous remercions d’avoir choisi
un appareil Stuart. Pour en tirer le meilleur parti,
nous vous demandons de lire attentivement les
instructions d’utilisations ci-dessous.
Avant de jeter l’emballage, vérifiez bien de ne
rien avoir oublié dedans et que toutes les pièces
sont bien présentes.
Pour votre sécurité et celle des autres,
veuillez lire attentivement les consignes de
sécurité ci-dessous avant d’utiliser l’appareil.
sur la plate-forme.
Ne pas arrêter le mouvement avec les mains.
Ne jamais déplacer l’appareil durant son
utilisation ou connecté à l’alimentation
électrique.
En cas de coupure d’électricité l’appareil ne
recommencera pas à fonctionner tout seul une
fois le courant rétabli.
En cas d’arrêt mécanique de l’appareil (point
mort du moteur) l’agitation repartira dès la fin
de l’interruption.
Une agitation trop forte et non adapté à
l’utilisation risque de cassé la verrerie utilisée ou
de faire déborder les contenants. Régler la vitesse
en fonction de l’utilisation.
Sur le modèle SSL2, s’assurer que la
plate-forme est bien mise en place avant
utilisation.
2. Conseils de sécurité
avant utilisation
Si cet appareil n’est pas utilisé de la façon
décrite dans ce manuel et avec les
accessoires Stuart recommandé par la Sté
Cole-Parmer, vous risquez de l’endommager et
Cole-Parmer décline toute responsabilité.
Cet appareil a été conçu pour fonctionner dans
les conditions suivantes :
❖ Utilisation en intérieur uniquement
❖ A utiliser dans une pièce correctement
ventilée
❖ Température de fonctionnement comprise
entre +5°C et +40°C
❖ Altitude inférieure à 2000m
❖ Humidité relative < 80%
❖ Fluctuation de l’alimentation électrique <
10%
❖ Catégorie de sur-voltage II IEC60364-4-443
❖ Degré de pollution 2
❖ Placer l’appareil sur une paillasse de taille
suffisante avec, au minimum 200 mm
d’espace libre autour de l’appareil
L’appareil doit être déplacer avec les deux mains.
Ne pas utiliser avec des produits ou dans une
atmosphère dangereux.
Vérifier que la charge est uniformément répartie
3. Description générale
Les agitateurs Stuart sont parfaitement adaptés à
l’agitation de produits chimiques ou biologiques
dans tous les laboratoires. Tous les appareils sont
équipés d’un affichage digital de la vitesse
d’agitation et disposent d'une commande de
vitesse réglable entre 5 et 60 t/min et d'un
minuteur numérique réglable qui arrête
automatiquement après le temps programmé (de
1 à 9999 minutes, 1 seconde à 90 minutes ou 1
minute à 9 heures). Les modèles SSM sont de
taille “mini” pour des utilisations en petite série
alors que les modèles SSL sont conçus pour de
plus grandes utilisations.
Les modèles SSM1 et SSL1 offrent une
agitation circulaire (orbitale) douce avec une
orbite de 16 mm. La vitesse d’agitation est
comprise entre 30 et 300 tr/min. La charge
maximum respective est de 3kg et 10kg.
Le modèle SSL2 a une agitation
va-et-vient idéale pour une agitation
vigoureuse. La vitesse d’agitation est
comprise entre 25 et 250 tr/min. La charge
maximum est de 10kg *.
IMPORTANT
* La vitesse maximum avec une charge de 10kg
est de 200 tr/min.
8

La charge maximum avec la vitesse maximum de
250 tr/min. est de 5kg.
Les modèles SSM3 et SSL3 offrent une
agitation 3D idéale pour les applications en
bio-technologie. La vitesse d’agitation est
comprise entre 5 et 70 tr/min. La charge
maximum respective est de 3kg et 10kg. L’angle
d’inclinaison est réglable sans outils entre 3 et
12° (voir section 4.6 pour les instructions).
Les modèles SSM4 et SSL4 ont une agitation
sous forme de bascule pour créer un mouvement
de vague dans les flacons culture, boites de Petri,
etc. La vitesse d’agitation est comprise entre 5 et
70 tr/min. La charge maximum respective est de
3kg et 10kg.
Les modèles SSM5 et SSL5 est conçu
pour l’agitation des plaques de
micro-titration et des micro-tubes à
centrifuger. Une vitesse d’agitation rapide
associée à un faible orbite crée un mouvement
idéal et vigoureux pour l’agitation de petits
volumes. La vitesse d’agitation est comprise entre
250 et 1200 tr/min.
IMPORTANT
La charge maximum est de 1kg.
4. Installation tout modèle
4.1 Installation électrique
CES APPAREILS DOIVENT ÊTRE
RELIÉS À LA TERRE !
Avant utilisation, lire les instructions ci-dessous et
s’assurer de la conformité de l’alimentation
électrique par rapport à la plaque située à
l’arrière de l’appareil.
Tous les modèles sont fait pour fonctionner avec
une alimentation de 230V / 50Hz. La puissance
électrique est de 50W.
Les appareils sont tous équipés d’une prise CEE à
l’arrière, pour le raccordement à l’alimentation
électrique.
Attention! Il y a un fusible sur le neutre et
un sur la phase.
Ces appareils sont livrés avec deux câbles de
raccordement. Un est spécial pour l’Angleterre (3
broches) et l’autre pour l’Europe (2 broches).
Choisir le câble approprié en fonction du pays
d’utilisation.
Si aucune de ces deux prises ne conviennent,
prendre le câble anglais, retirer la prise et la
remplacer par une adéquate en respectant le
câblage.
CETTE OPÉRATION DOIT ÊTRE EFFECTUÉE
PAR DU PERSONNEL QUALIFIÉ !
NOTE : Se référer à la plaque située à l’arrière de
l’appareil pour s’assurer que le voltage et le
fusible sont appropriés.
Le câblage est le suivant :
PHASE - MARRON
NEUTRE - BLEU
TERRE - VERT/JAUNE
Le câble doit être raccordé à l’instrument avant
d’être raccordé à l’alimentation électrique.
Si le câble doit être remplacé, cela doit l’être par
un câble de 3 x 1 mm
terminant par une prise IEC320.
N.B. Le câble anglais est protégé par un fusible
de 10A logé dans la prise.
EN CAS DE DOUTE, CONSULTEZ UN
ÉLECTRICIEN QUALIFIÉ !
4.2 Raccorder l’appareil à l’alimentation
électrique. Ne pas le mettre en marche.
Placer l’appareil sur une paillasse solide et non
glissante avec suffisamment d’espace autour
de l’appareil pour qu’il ne tape pas sur quelque
chose durant son fonctionnement.
Assembler la plate-forme et les barres de
maintien lorsque c’est le cas (SSL1, SSM1 avec
SSM1/1 & SSL2), et s’assurer que les vis de
maintien sont bien serrées avant tout démarrage.
Placer les échantillons sur la plate-forme de
façon à ce qu’ils soient répartis équitablement et
que cela ne dépasse pas la charge maximum de
l’appareil.
Ajuster l’angle d’agitation sur l’agitateur 3D
(modèles SSM3 & SSL3). Mettre la vitesse
d’agitation sur 5 tr/min. Dessous la plate-forme il
y a un cylindre avec une noix de réglage, il faut
arrêter l’agitation lorsque la noix est face à vous.
Ne pas perdre la noix ! La plate-forme peut
alors être ajustée à l’angle souhaité. Mettre
ensuite l’appareil en marche, normalement.
2
, norme H05VV-F se
9
 Loading...