

Stuart SRT6, SRT9D, SRT6D, SRT9 Instructions For Use Manual
Version 1.1
Roller Mixers
SRT6 SRT6D SRT9 SRT9D
Instructions for use
Mode d’emploi
Istruzioni per l’uso
Instrucciones de uso
Bedienungsanleitung
English
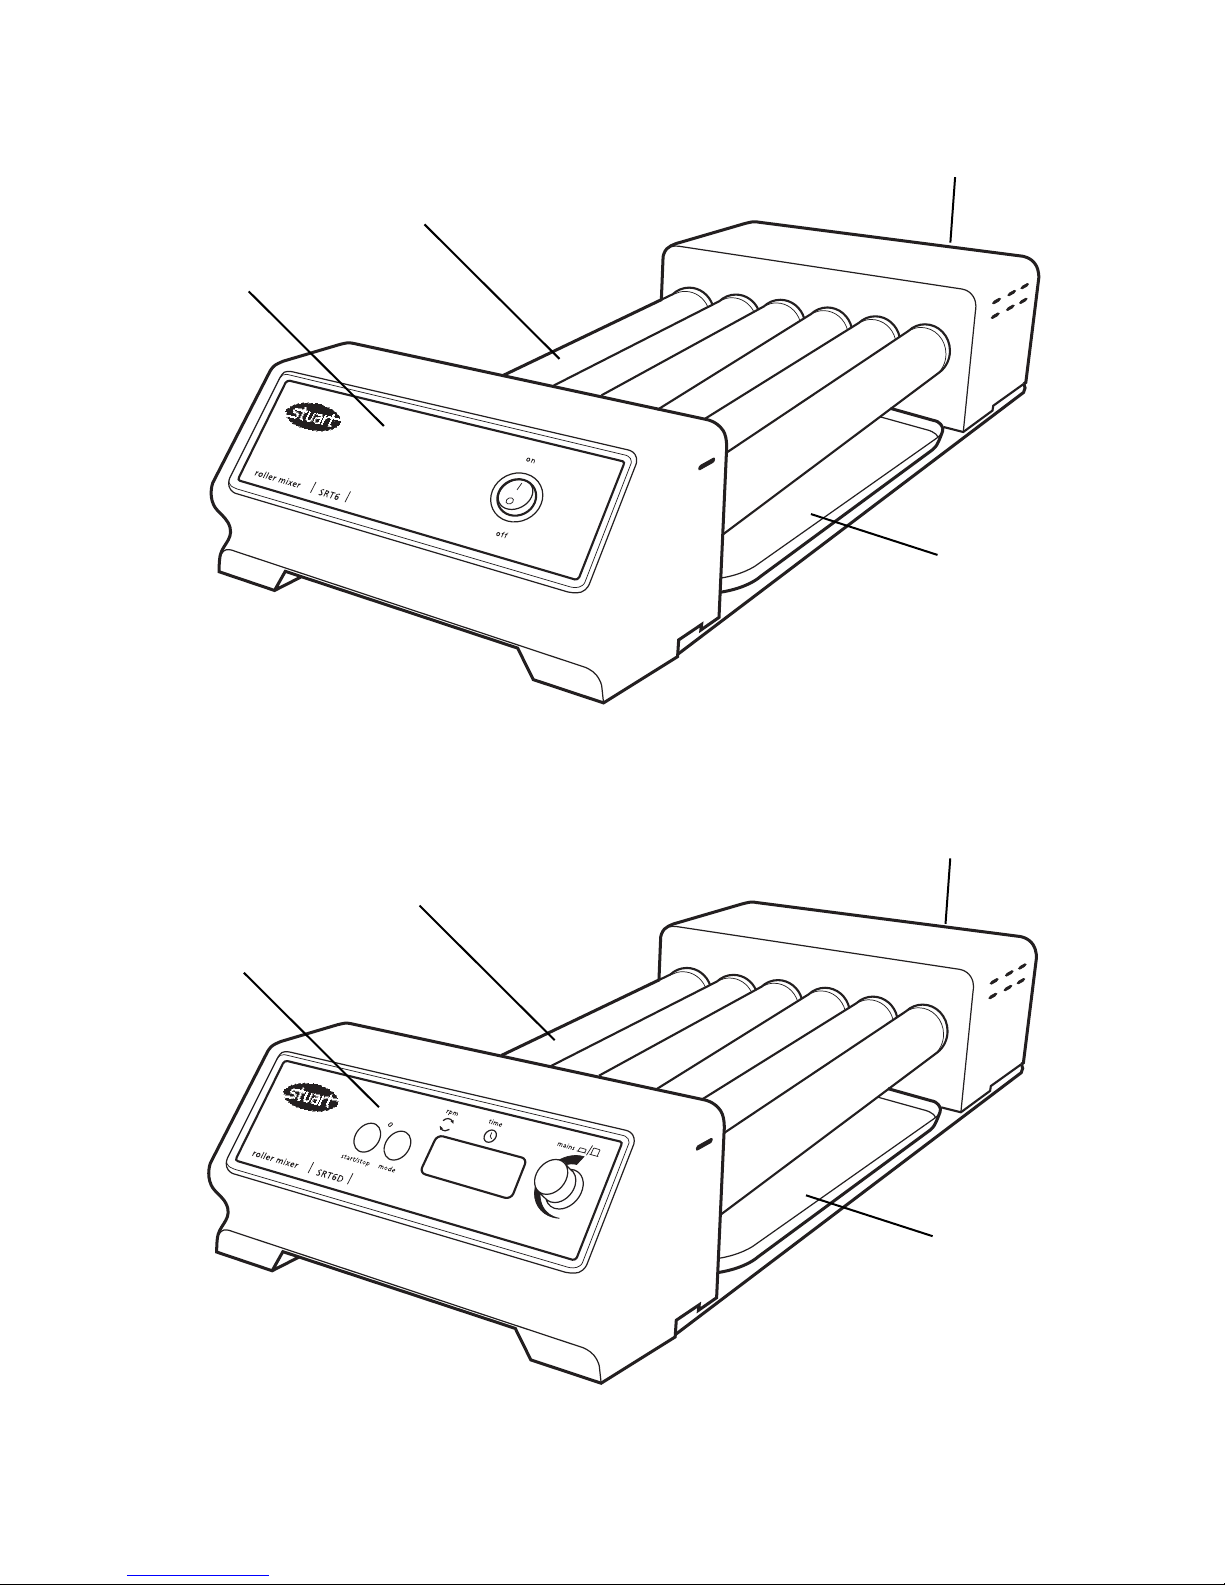
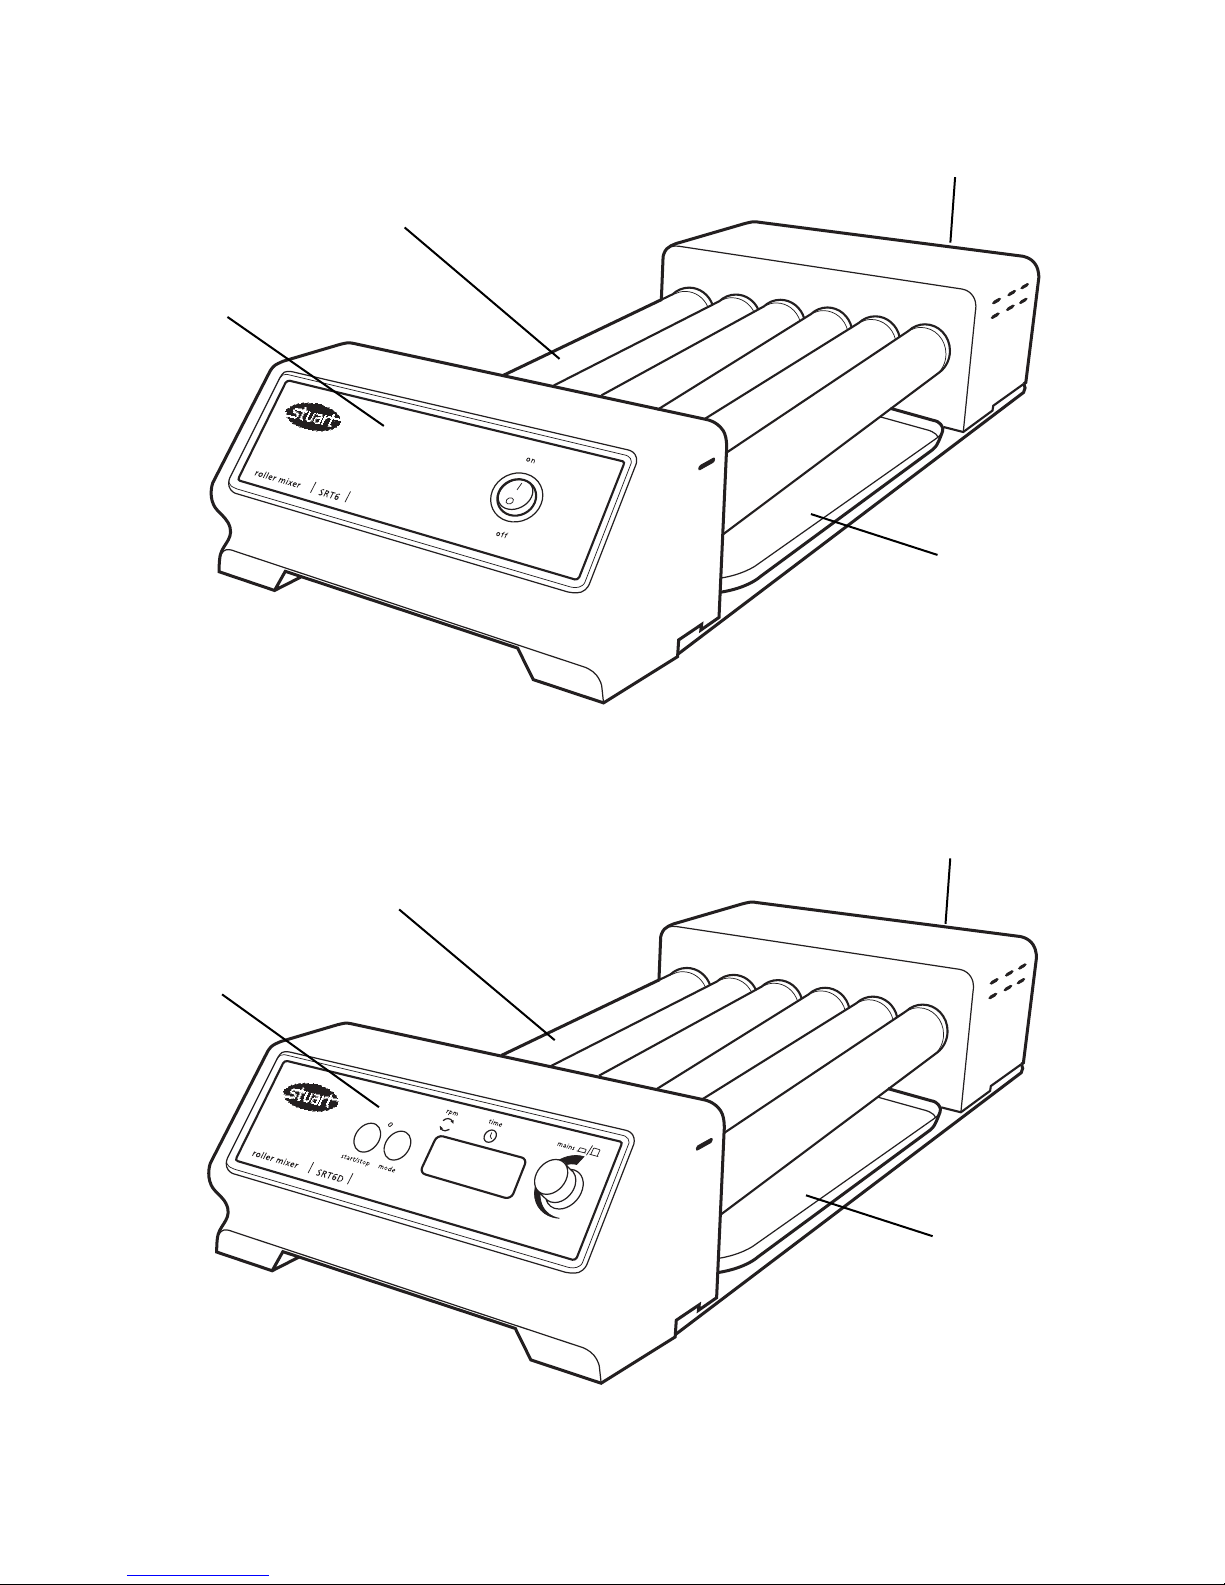
SRT6 & SRT9
SRT6D & SRT9D
Drip tray
Rollers
IEC power socket
Control panel
Drip tray
Rollers
IEC power socket
Control panel

1
Thank you for purchasing this piece of
Stuart equipment. To get the best
performance from the equipment, and for
your own safety, please read these
instructions carefully before use.
This equipment is designed to operate under the
following conditions:-
❖ For indoor use only
❖ Use in a well ventilated area
❖ Ambient temperature range +4°C to +60°C
❖ Altitude to 2000m
❖ Relative humidity not exceeding 80%
❖ Mains supply fluctuation not exceeding 10%
❖ Overvoltage category II IEC60364-4-443
❖ Pollution degree 2 IEC664
If the equipment is not used in the manner
described in this manual the protection provided
by the equipment may be impaired.
Electrical Installation
THIS EQUIPMENT MUST BE EARTHED
Before connection please ensure that the
line supply corresponds to that shown on
the rating plate. This model requires a
supply rated at 220 - 240V, 50 Hz, ~, single
phase.
Power requirements
Model Wattage
SRT6 & 9 50W
There is an IEC socket at the rear of the
instrument for connection to the mains supply.
The unit is supplied with two mains leads fitted
with IEC plugs for connection to the instrument.
One has a UK 3 pin plug and the other has a 2
pin “Shuko” plug for connection to the mains.
Choose the lead appropriate for your electrical
installation and discard the other. Should neither
lead be suitable, take the lead with the UK plug
and replace the plug with a suitable alternative.
See the enclosed instruction sheet for advice on
how to carry out this procedure. Should the
mains lead require replacement a cable of 1mm
2
of harmonised code H05W-F connected to an
IEC 320 plug should be used.
IF IN DOUBT CONSULT A QUALIFIED
ELECTRICIAN
The mains lead should be connected to the
instrument BEFORE connection to the mains
supply.
General Description
The Stuart Roller Mixers provide a gentle, but
highly efficient, rocking and rolling action. On
the SRT6 & 9 the rollers rotate at a fixed speed
of 33rpm and rise and fall 16mm. The SRT6D &
9D have adjustable speed control between 5 and
60rpm, and an adjustable digital timer that
automatically stops rotation after the set time
(1 to 9999 minutes, 1 second to 90 minutes or 1
minute to 9 hours).
Most sizes of tube, Bijoux, Universals and other
bottles can be accommodated
SRT6 & 6D: Have 6 rollers
SRT9 & 9D: Have 9 rollers
Available separately are stacking blocks to
allow up to three units to be stacked vertically,
optimizing bench space. Order: SRT/STACK
Stacking system for rollers (4 x stack blocks).
Safety Advice Before Use
❖ The unit should be carried using both hands
with fingers under each side frame.
❖ Never move or carry the unit when in use or
connected to the mains electricity supply.
❖ Do not mix flammable liquids or use the
equipment in hazardous atmospheres.
❖ In case of mains interrupting, a fault or
mechanical failure, the unit will continue to
operate on removal of fault.
❖ Mechanical energy can lead to breakage of
glass vessels. Use with care.
Roller Mixers
SRT6 SRT6D SRT9 SRT9D

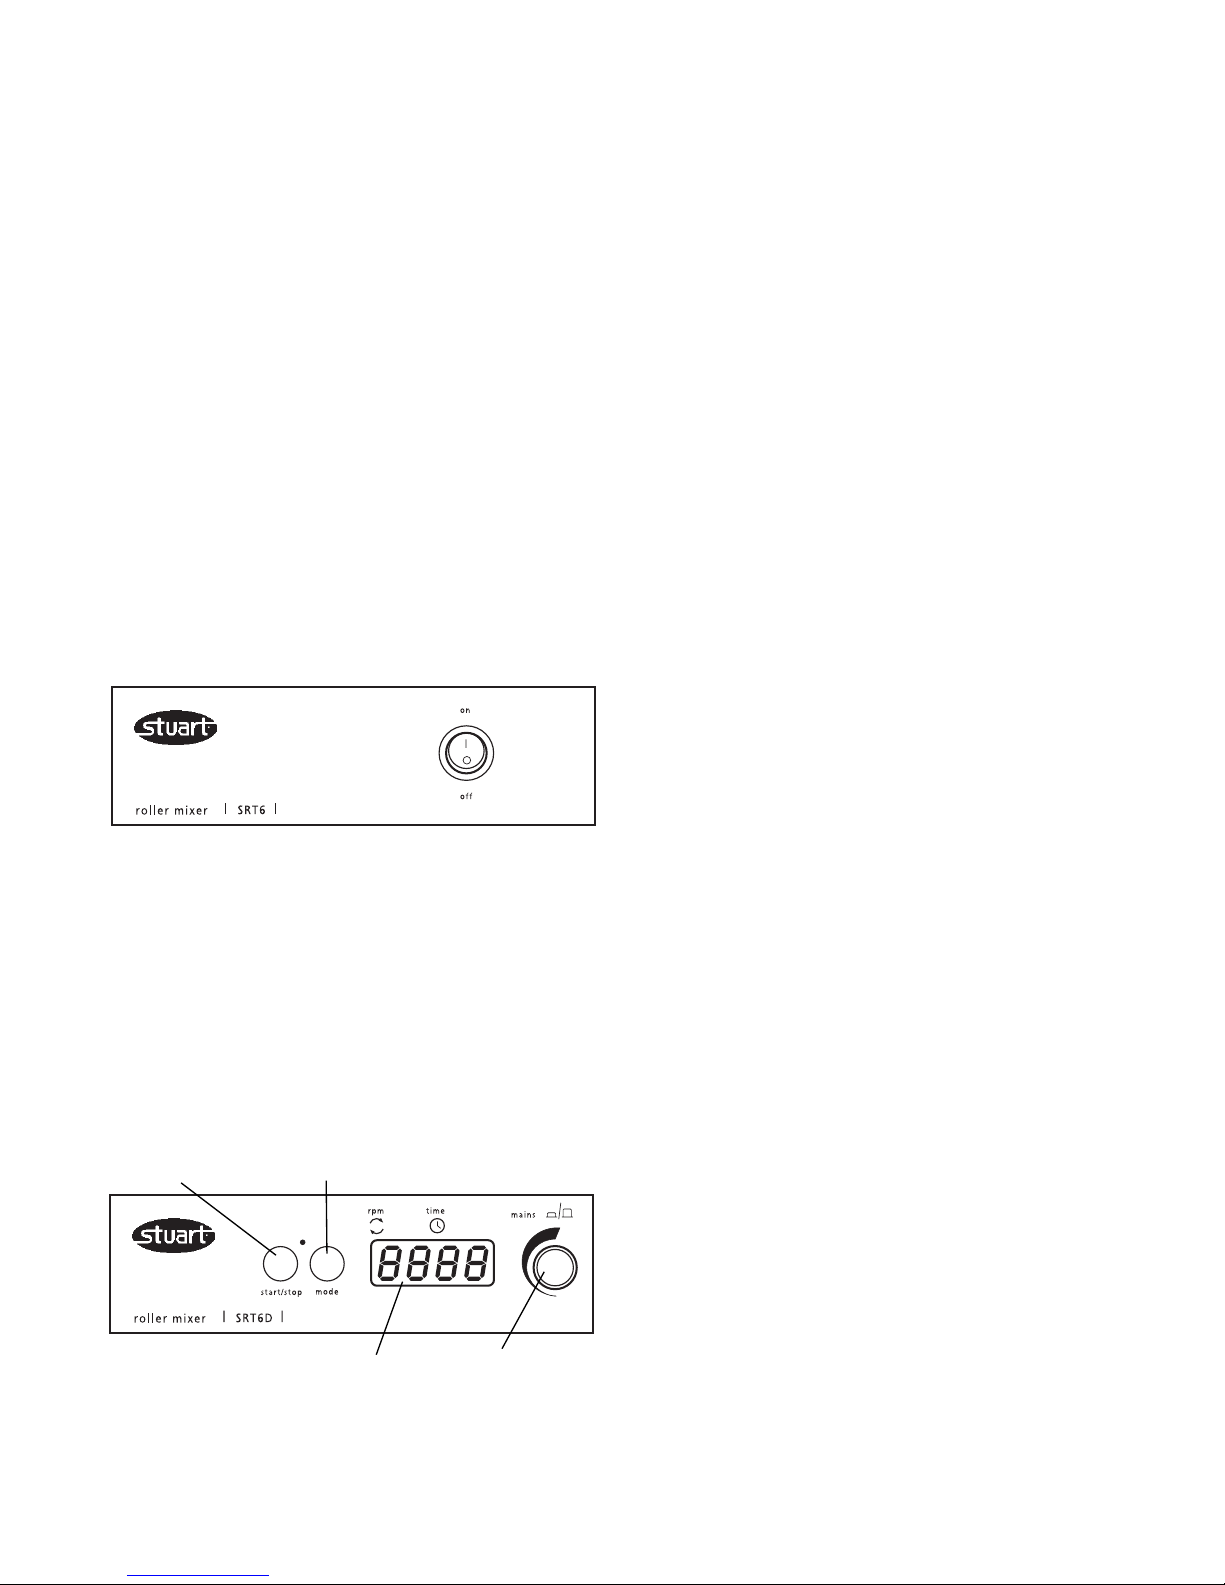
Operation SRT6 & 9
Position the apparatus on a firm level surface and
connect to the mains electricity supply. Place the
samples to be mixed between the rollers. Once all
the samples have been set, switch the Roller
Mixer ON using the Mains On/Off switch.
Operation SRT6D & 9D
Fig 1
Position the apparatus on a firm level surface and
connect to the mains electricity supply. Place the
samples to be mixed between the rollers. Once all
the samples have been set, switch the Roller
Mixer ON by pressing the control knob (see fig 1)
The unit will carry out a self test routine and then
the display will show the last stored set speed (red
dot in the display shows RPM is selected). This can
be adjusted by turning the control knob. Once the
correct speed is displayed press the start / stop
button to begin motion. The speed can be
adjusted without halting the unit. The unit can be
halted at any time by pressing the start / stop
button.
Setting the timer.
In order to use the timer press the mode button.
The red dot on the display moves over to time.
The display will show the last stored time in hours
and minutes (H is displayed on left hand side of
digital display) or seconds and minutes depending
on the timer unit selected (see below to change).
Select the desired count down time using the
control knob (--- indicates continuous, no timer
set). When the display shows the correct time in
minutes, press the start / stop button to begin
operating. During operation, motion can be
paused at any time by pressing the start / stop
button. If the button is pressed again, motion
will start again and the timer will continue to
count down. The current timer or speed can be
displayed or adjusted by using the mode button
to toggle between the two and altered with the
control knob, without halting the unit. When the
timer reaches zero, the unit will be automatically
halted and an alert will sound. Press the start /
stop button to revert back to the saved time and
speed values set (see instructions below to adjust
saved values) or select new values following
instructions given above.
N.B To disable the timer and revert to
continuous rotation, select - - - in the
display during timer mode.
To switch the unit OFF completely, press the
control knob in. The display will show OFF.
Saving speed/time values.
In order to save a commonly used speed/time
value, switch the unit ON by pressing the control
knob in (see fig 1). Select both a speed value
and a time value (either 1 to 9999 minutes, 1
second to 90 minutes or 1 minute to 9 hours or
continuous - - -) using the instruction given
above. Switch the unit OFF by pressing in the
control knob. Wait 5 seconds and switch the unit
back ON by pressing the control knob in. The
input values are now saved in memory. They can
be altered at any time by following the same
procedure.
N.B. When the unit is switched OFF using
the control knob, whatever values of
speed/time were set prior to turning the
unit off will be saved, and will be the values
restored when the unit is switched back on.
Changing the timer unit
The unit timer is defaulted to minutes only (1
minute to 9999). To change to minutes and
hours (1 minute to 9 hours, H is displayed in the
left digit of the timer display), or to change to
seconds and minutes (1 second to 90 minutes)
turn the unit off using the control knob then
switch the mains power off at the plug. Hold
down both the start/stop button and the mode
button whilst simultaneously switching the mains
2
Start/stop button
Mode button
Digital display Control knob
rpm/time indicator

3
power back on. The display will temporarily
show 88:88 then OFF. Using the control knob
turn the unit on, the display will show nn:ss for
minutes and seconds, H:nn for hours and
minutes and nn for minutes, turn the control
knob to select the desired timer unit and turn
the unit off by the control knob, OFF will be
displayed. When the unit is next used the timer
will have been altered to the set unit.
Maintenance & Servicing
WARNING: Ensure the unit is
disconnected from the mains electricity
supply before attempting maintenance or
servicing.
Periodically clean the instrument using a damp
cloth and mild detergent solution. Do not use
harsh or abrasive cleaning agents.
Any repairs or replacement of parts MUST
be undertaken by suitably qualified
personnel.
The following spares and accessories are
available from your laboratory dealer.
Description Catalogue Number
Stacking system SRT/STACK
For a comprehensive list of parts required by
service engineers conducting internal repairs and
a service manual, please contact the Technical
Service Department of Bibby Scientific Ltd.
quoting both the model and serial number.
Only spare parts supplied or specified by Bibby
Scientific Ltd. or its agents should be used.
Fitting of non-approved parts may affect the
performance and safety features designed into
the instrument.
If in any doubt, please contact the Technical
Service Department of Bibby Scientific Ltd. or the
point of sale.
Bibby Scientific Ltd.
Stone, Staffordshire ST15 0SA
United Kingdom
Tel: +44 (0)1785 812121
Fax: +44 (0)1785 813748
e-mail info@bibby-scientific.com
www.bibby-scientific.com
Warranty
Bibby Scientific Ltd warrants this instrument to
be free from defects in material and
workmanship, when used under normal
laboratory conditions, for a period of three (3)
years. In the event of a justified claim Bibby
Scientific will replace any defective component
or replace the unit free of charge. This warranty
does NOT apply if damage is caused by fire,
accident, misuse, neglect, incorrect adjustment
or repair, damage caused by incorrect
installation, adaptation, modification, fitting of
non approved parts or repair by unauthorised
personnel.

Technical Specification
SRT6 SRT6D
Number of rollers 6 6
Speed 33rpm 5 to 60rpm
Amplitude 16mm 16mm
Maximum load 10kg 10kg
Controls Analogue Digital
Timer No Yes
Roller size (length x diameter) 340x30mm 340x30mm
Overall dimensions (w x d x h) 565x240x110mm 565x240x110mm
Net weight 5.1kg 5.1kg
Electrical Supply 230V, 50Hz, 50W 230V,50Hz, 50W
SRT9 SRT9D
Number of rollers 9 9
Speed 33rpm 5 to 60rpm
Amplitude 16mm 16mm
Maximum load 10kg 10kg
Controls Analogue Digital
Timer No Yes
Roller size (length x diameter) 340x30mm 340x30mm
Overall dimensions (w x d x h) 565x360x110mm 565x360x110mm
Net weight 6.9kg 6.9kg
Electrical Supply 230V, 50Hz, 50W 230V,50Hz, 50W
4
5
SRT6 et SRT9
SRT6D et SRT9D
Egouttoir
Rouleaux
Entrée secteur IEC
Panneau de
commande
Egouttoir
Rouleaux
Entrée secteur IEC
Panneau de
commande
Français

6
Agitateurs-mélangeurs
à rouleaux
SRT6 SRT6D SRT9 SRT9D
Merci d'avoir acheté ce matériel Stuart. Pour
en obtenir les meilleures performances et
pour votre propre sécurité, lisez
attentivement le présent mode d'emploi
avant d'utiliser l'appareil.
Ce matériel est conçu pour fonctionner dans les
conditions suivantes :
❖ Usage exclusivement en intérieur
❖ Utilisation dans une zone bien ventilée
❖ Plage de températures ambiantes de +4 à
+60 °C
❖ Altitude jusqu'à 2000 m
❖ Humidité relative ne dépassant pas 80 %
❖ Fluctuations de l'alimentation sur secteur ne
dépassant pas 10 %
❖ Surtensions de catégorie II selon la norme
IEC60364-4-443
❖ Pollution de degré 2 selon la norme IEC664
Si ce matériel n'est pas utilisé de la manière
décrite dans le présent manuel, la protection
fournie risque d'être compromise.
Installation électrique
CE MATERIEL DOIT ETRE RELIE A LA
TERRE.
Avant de procéder au branchement, vérifiez
que l'alimentation secteur correspond à celle
figurant sur la plaque signalétique. Ce
modèle nécessite une alimentation nominale
de 220 - 240 V, 50 Hz, ~ monophasée.
Puissance nécessaire
Modèles Puissance nominale
SRT6 et SRT6D 50 W
SRT9 et SRT9D 50 W
Une prise IEC installée à l'arrière de l'appareil
permet de le brancher sur secteur. Cet appareil
est livré avec deux cordons secteur équipés de
fiches IEC permettant le branchement. L'un
présente une fiche à 3 broches type Royaume-
Uni et l'autre est équipé d’une fiche “Shuko” à 2
broches permettant le branchement sur secteur.
Choisissez le cordon adapté à votre installation
électrique et jetez l'autre. Si aucun cordon n’est
adapté, prenez le cordon équipé de la fiche type
Royaume-Uni et remplacez la fiche par une prise
de rechange adaptée.
Consultez sur la fiche d’instructions jointe les
conseils de mise en œuvre de cette procédure.
S'il s'avère nécessaire de remplacer le cordon
secteur, utilisez un câble de 1mm
2
au code
harmonisé H05VV-F raccordé à une fiche IEC
320.
EN CAS DE DOUTE, CONSULTEZ UN
ELECTRICIEN QUALIFIE
Branchez le cordon secteur à l'appareil AVANT
de le brancher à l'alimentation sur secteur.
Description générale
Les agitateurs-mélangeurs à rouleaux Stuart
fournissent une action d'agitation et de
roulement en douceur mais hautement efficace.
Sur les modèles SRT6 et 9, les rouleaux tournent
à une vitesse fixe de 33 t/min et montent et
descendent de 16 mm. Les modèles SRT6D et 9D
disposent d'une commande de vitesse réglable
entre 5 et 60 t/min et d'un minuteur numérique
réglable qui arrête automatiquement la rotation
après le temps programmé (de 1 à 9999
minutes, 1 seconde à 90 minutes ou 1 minute à
9 heures).
Les rouleaux peuvent recevoir la plupart des
tailles de tubes, piluliers, fioles universelles et
autres flacons.
SRT6 et 6D: équipés de 6 rouleaux.
SRT9 et 9D: équipés de 9 rouleaux.
Proposés séparément, des cales d'empilement
permettront d'empiler jusqu'à trois appareils
verticalement, optimisant l'espace disponible sur
la paillasse. Commandez le système
d'empilement : SRT/STACK pour rouleaux (4
cales d'empilement).
7
Conseils de sécurité avant
utilisation
❖ Portez l'appareil à deux mains en plaçant les
doigts sous les deux bâtis latéraux.
❖ Ne déplacez et ne transportez jamais
l'appareil lorsqu'il est en service ou branché à
l'alimentation électrique sur secteur.
❖ Ne mélangez pas des liquides inflammables et
n'utilisez pas ce matériel dans des
atmosphères dangereuses.
❖ En cas de coupure secteur, de défaut ou de
défaillance mécanique, l'appareil reprendra
son fonctionnement une fois la panne
résolue.
❖ L'énergie mécanique peut entraîner le bris
des récipients en verre. Utilisez ce matériel
avec précautions.
Fonctionnement
SRT6 et SRT9
Positionnez l'appareil sur une surface horizontale
stable et branchez-le à l'alimentation électrique
sur secteur. Placez les échantillons à mélanger
entre les rouleaux. Une fois tous les échantillons
posés, mettez en marche l'agitateur-mélangeur à
rouleaux à l'aide de l'interrupteur marche/arrêt
(“on / off”).
Fonctionnement
SRT6D et SRT9D
Fig. 1
Positionnez l'appareil sur une surface horizontale
stable et branchez-le à l'alimentation électrique
sur secteur. Placez les échantillons à mélanger
entre les rouleaux. Une fois tous les échantillons
posés, mettez en marche l'agitateur-mélangeur à
rouleaux à l'aide de la molette de commande
(voir fig. 1). L'appareil effectue une routine
d'autodiagnostic puis l'afficheur indique la
dernière vitesse programmée en mémoire (le
point rouge sur l'afficheur indique que la vitesse
de rotation (“rpm”) est sélectionnée). La molette
de commande permet de régler cette vitesse.
Une fois la vitesse voulue affichée, appuyer sur le
bouton marche/arrêt (“start / stop”) pour
enclencher le mouvement. Vous pourrez régler la
vitesse sans arrêter l'appareil. Appuyer sur le
bouton marche/arrêt permet d'arrêter l'appareil à
tout moment.
Réglage du minuteur
Pour pouvoir utiliser le minuteur, appuyez sur le
bouton de mode. Le point rouge sur l'afficheur
passe sur la fonction de temps (“time”).
L'afficheur indique le dernier temps enregistré en
heures et minutes (H s'affiche sur le côté gauche
de l'afficheur numérique) ou en minutes et
secondes selon l'unité sélectionnée sur le
minuteur (voir changement ci-dessous).
Sélectionnez la durée de compte à rebours
voulue à l'aide de la molette de commande (“--“
indique un fonctionnement continu, sans
programmation du minuteur). Lorsque
l'afficheur indique le temps voulu en minutes,
appuyez sur le bouton marche/arrêt pour
enclencher le fonctionnement. Appuyer sur le
bouton marche/arrêt permet de mettre l'appareil
en pause à tout moment pendant qu'il
fonctionne. Si vous appuyez de nouveau sur ce
bouton, le mouvement reprend et le minuteur
continue son compte à rebours. Le bouton de
mode permet de basculer entre le minuteur et la
vitesse pour les afficher ou pour les régler à
l'aide de la molette de commande, sans arrêter
l'appareil. Lorsque le minuteur atteint zéro,
l'appareil s'arrête automatiquement et une
alarme retentit. Appuyez sur le bouton
marche/arrêt pour revenir aux valeurs de durée
et de vitesse programmées enregistrées (voir les
instructions ci-dessous pour régler les valeurs
enregistrées) ou sélectionnez de nouvelles valeurs
en suivant les instructions données ci-dessus.
Remarque : pour désactiver le minuteur et
revenir en rotation continue, sélectionnez
“- - -” sur l'afficheur en mode minuteur.
Bouton marche/arrêt
Bouton de mode
Afficheur numérique Molette de commande
 Loading...