

Stuart SMP11 Instruction Manual
Melting Point Apparatus
SMP11
Instruction Manual
Version 1.5

English
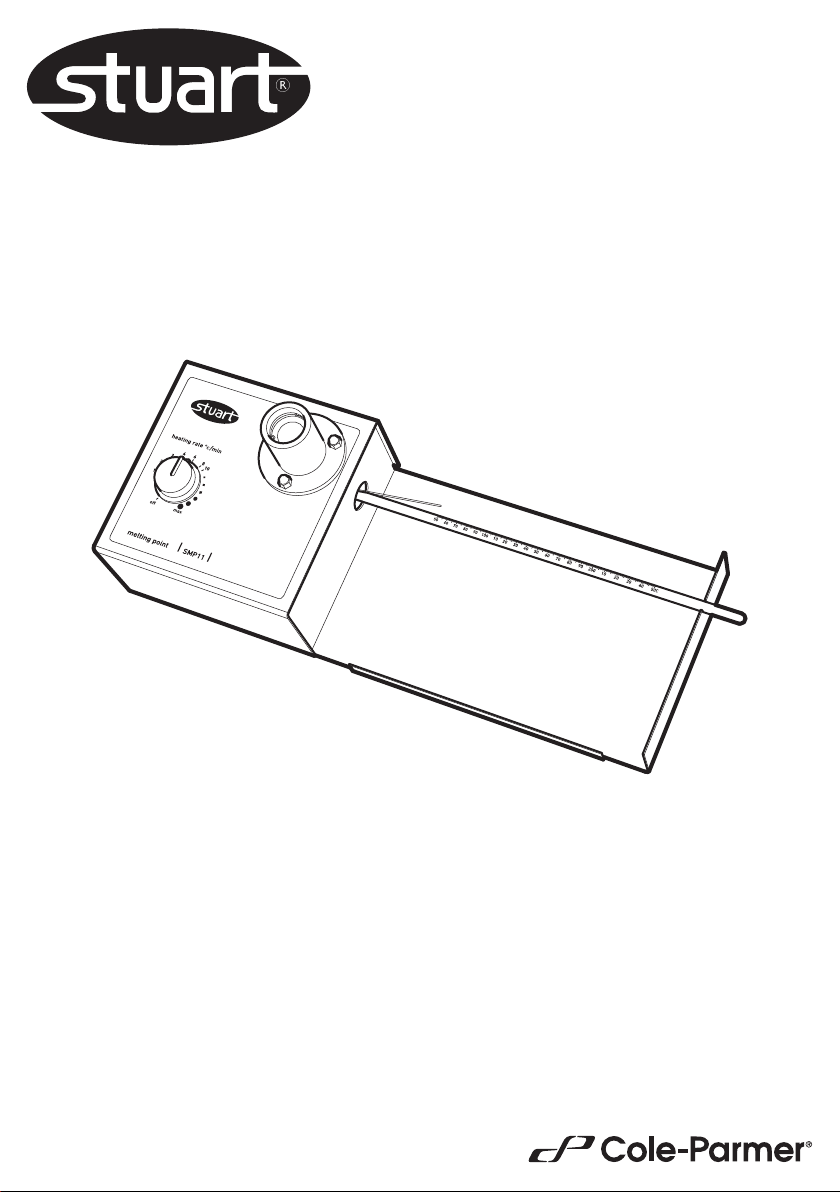
IEC connector Lens
Heating
controller
Fig 1
MELTING POINT
APPARATUS
SMP11
Thank you for purchasing this Stuart product.
To get the best performance from the
equipment, and for your own safety, please read
these instructions carefully before use. (For an
illustration of the controls, see Fig 1).
Capillary tube
Thermometer
Thermometer
support
Safety advice before use
This equipment is designed to operate under the
following conditions: -
❖ For indoor use only
❖ Use in a well ventilated area
❖ Ambient temperature +5°C to +40°C
❖ Altitude to 2000m
❖ Relative humidity not exceeding 80%
❖ Mains supply fluctuation not >10%
❖ Overvoltage category II IEC60364-4-443
❖ Pollution degree 2 IEC664
❖ Use with a minimum distance all around of
200mm from walls or other items
If the equipment is not used in the
manner described in this manual the
protection provided by the equipment
may be impaired.
2
Electrical installation
THIS EQUIPMENT MUST BE EARTHED
Before connection please ensure that the line
supply corresponds to that stated on the rating
label. Power consumption is 50W.
There is an IEC socket at the rear on the left
hand side of the instrument for connection to
the mains supply, (see figure 1). The unit is
supplied with two mains leads fitted with IEC
plugs for connection to the instrument. One has
a U.K. 3 pin plug and the other has a 2 pin
“Schuko” plug for connection to the mains
supply. Choose the lead appropriate for your
electrical installation and discard the other.
Should neither lead be suitable you should
obtain a moulded lead locally. If this is not
possible, take the lead with the U.K. plug and
replace the plug with a suitable alternative. See
the enclosed instruction sheet for advice on how
to carry out this procedure.
Should the mains lead require replacement a
cable of 1mm
connected to an IEC 320 plug should be used.
N.B. The UK mains lead is protected by a 10A
fuse mounted in the plug top.
The mains lead should be connected to the
instrument BEFORE connection to the mains
supply.
IF IN DOUBT CONSULT A QUALIFIED
ELECTRICIAN
2
of harmonized code H05V V-F
Before use
1. The SMP11 is supplied in custom-made
packaging; it is recommended that the
instrument should be kept in this packaging
between uses to maintain it in optimum
condition.
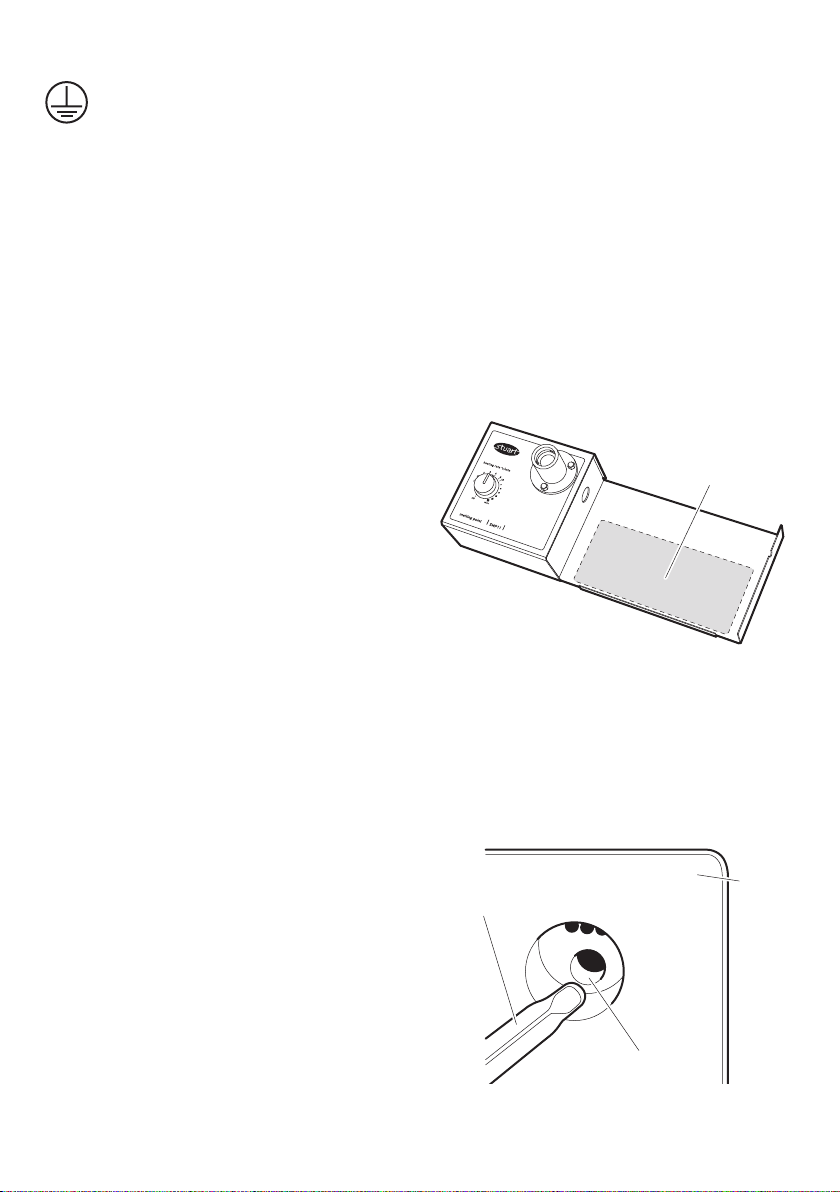
2. (First time only) Once the unit is unpacked,
select the appropriate choice of self adhesive
instruction label from the multi-language set
provided. Peel off the backing and stick the
label onto the large recessed metal area on
the right side of the SMP11 (see Fig 2). Apply
the label carefully using a flat object to
smooth away air bubbles.
Instructions
for use
Fig 2
3. Place the unit on a firm, level surface.
4. Insert the bulb of the non-toxic spirit filled
thermometer into the side of the heating
block (see Fig 3), while resting the other end
in the slot on the right hand side.
General description
The sample for the melting point test is placed in
a capillary tube and inserted in to the aluminium
block inside the heater. Using the manually
adjustable heating rate, the SMP11 will rapidly
heat samples up to 20°C per minute to the melt
temperature and up to the maximum
temperature of 250°C. An accurate reading to
within 1°C of the melt temperature can be
achieved by using a slower heating rate of
between 1 and 10°C per minute. The sample is
observed through the magnifying lens until the
melt occurs and the melt temperature read from
the thermometer.
SMP11
Thermometer
Heating block
Fig 3
3
Measuring a melting point
N.B. If the unit has been used recently the block
may be too hot for your sample. If this is the case
turn the apparatus off and allow the unit to cool
before proceeding. An optional brass cold finger
(ref. SMP1/2) can be inserted into the
thermometer hole; this has the effect of drawing
heat out of the heating block and so considerably
reduces the cooling time.
1. The SMP11 is supplied with a pack of 1.9mm
open-ended capillary tubes. It is recommended
that one end of the tubes should be sealed
with a Bunsen burner flame, by a fully trained
person, prior to use. Alternatively a pack of
capillary tubes that have been sealed on one
end can be purchased from your Stuart
stockist (ref. SMP10/1).
2. Place a small amount of your powdered
sample into the end of a 1.9mm diameter
glass capillary tube.
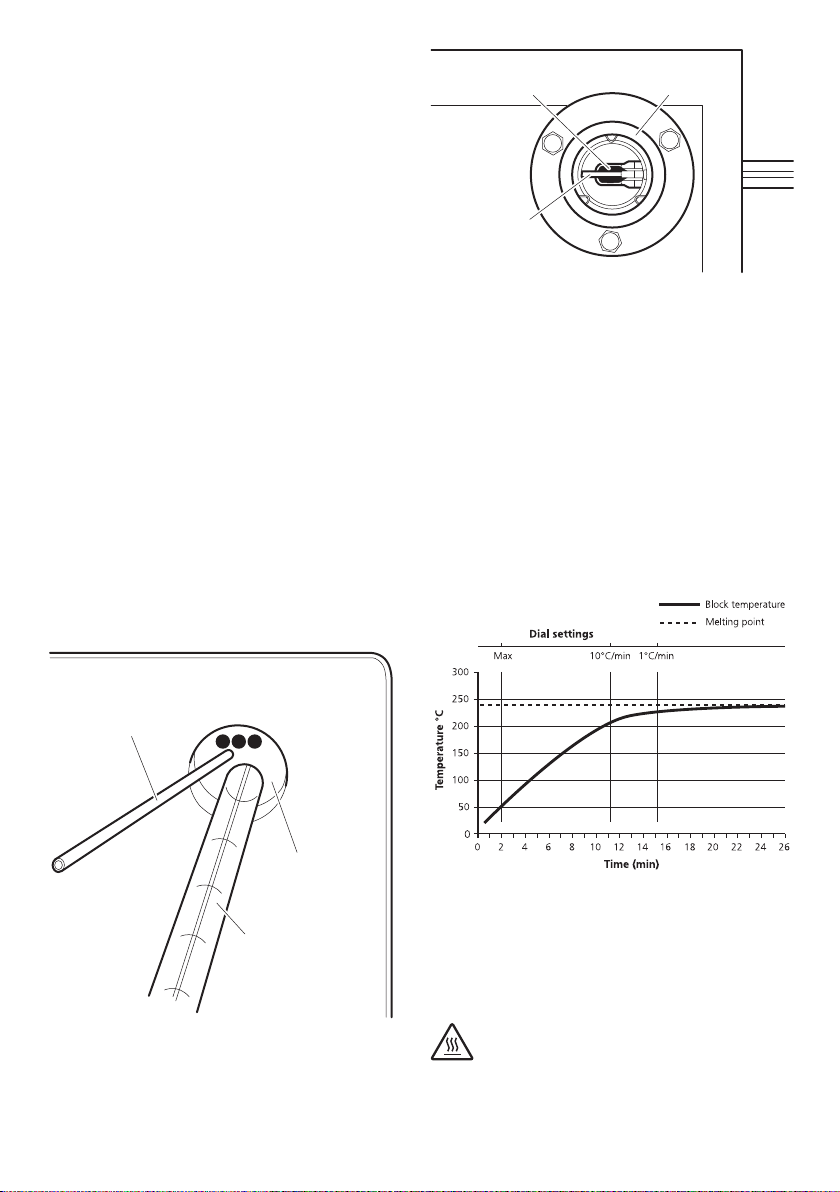
3. Insert the capillary tube into the side of the
heating block via the holes provided (see Fig
4). A maximum of 3 capillary tubes can be
inserted at any one time.
Thermometer
Capillary
tube
Fig 5
5. It is assumed that the approximate melting
point range is known, if not a rough run may
be required to gauge the approximate range.
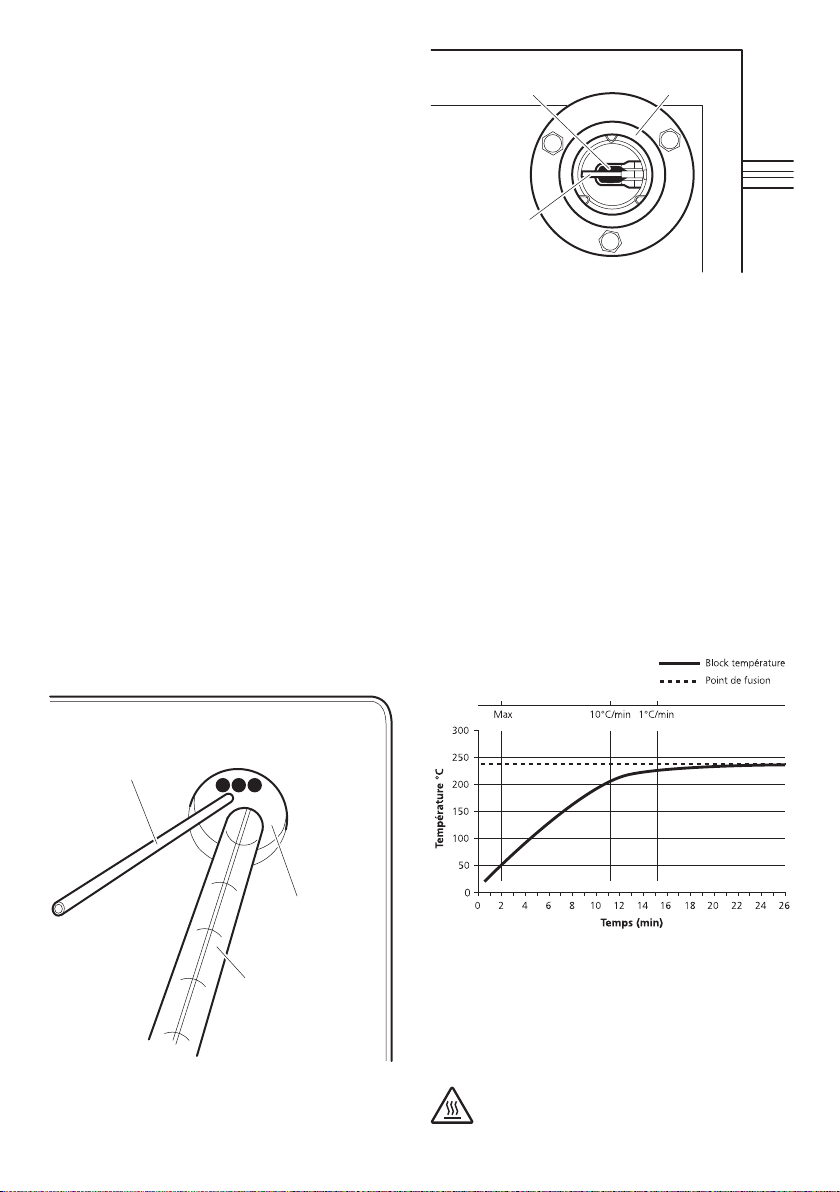
6. In order to achieve a fast and accurate
melting point range it is important to use a
rapid heating rate as the sample heats up
from ambient and a much reduced heating
rate as the sample approaches melt, see Fig
6 for an ideal heating curve for a sample
with a melting point of 240°C.
Ideal heating curve
Lens
Capillary tube
Heating
block
Thermometer
Fig 4
4. Look down the lens and position the tube so
that the sample can be observed clearly
(see Fig 5).
4
Fig 6
7. Connect to the mains electricity supply.
8. Start by heating the sample at the maximum
rate by setting the heating controller to max.
Caution: The heating block may be HOT.
9. Once the thermometer reaches 60% of the
expected melting point the heating controller
should be reduced to 10°C/min, by turning
the heating controller anti-clockwise.
10. Continue to reduce the heating controller so
that it is on 1°C/min when the sample is
within 15°C of the expected melt.
11. Observe the melt through the eyepiece,
while recording the temperature on the
thermometer; make a note of the melt
temperature.
12. Turn off to begin cooling, or insert the
accessory brass insert to speed up cooling.
Cleaning & Servicing
WARNING: Ensure the unit is
disconnected from the mains electricity
supply and allowed to cool before
attempting any cleaning or servicing.
Cleaning
Periodically clean the instrument using a damp
cloth and mild detergent solution. Do not use
harsh or abrasive cleaning agents.
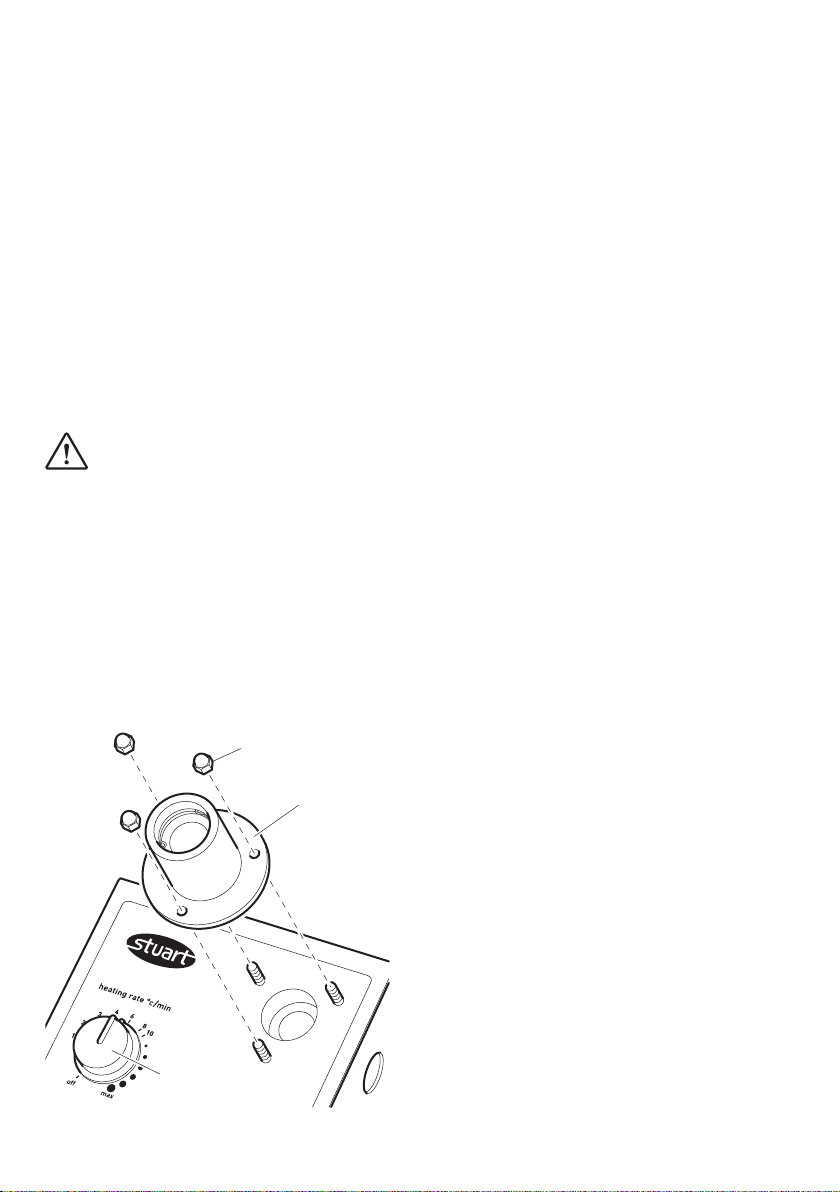
In the event of any breakage of the thermometer
bulb or capillary tubes disconnect the unit from
the mains supply. Any debris can be removed
simply by unscrewing the dome nuts holding the
Dome nuts
Lens
lens and then lifting the lens out (see Fig 7). The
instrument can then be turned upside down so
that any debris falls out. Once the lens has been
removed the chamber can be cleaned with a
damp cloth or a soft brush.
Servicing
This unit does NOT require routine servicing.
Repairs
There are no user replacement parts on this
instrument. If this unit were to stop working or
malfunction in any way, only suitably qualified
personnel should investigate the problem. Prior to
any internal repairs being undertaken a service
manual should be requested from the Technical
Service Department of Cole-Parmer quoting both
the model and serial number of your product.
NB: Fuses are mounted in both the live and
neutral line.
Only spare parts supplied or specified by
Cole-Parmer or its agents should be used. Fitting
of non-approved parts may affect the
performance and safety features designed into
the instrument.
If in any doubt, please contact the Service
Department of Cole-Parmer or the point of sale.
Cole-Parmer Ltd.
Beacon Road,
Stone, Staffordshire,
ST15 0SA, United Kingdom
Tel: +44 (0)1785 810475
Email: cpservice@coleparmer.com
Web: www.stuart-equipment.com
Fig 7
Heating
controller
5

Warranty
Cole-Parmer Ltd. warrants this instrument to be
free from defects in material and workmanship,
when used under normal laboratory conditions,
for a period of three (3) years. In the event of a
justified claim, Cole-Parmer will replace any
defective component or replace the unit free of
charge.
This warranty does NOT apply if damage is
caused by fire, accident, misuse, neglect,
incorrect adjustment or repair, damage caused
by installation, adaptation, modification, fitting
of non-approved parts or repair by unauthorized
personnel.
Technical Specification
Number of samples Three
Temperature range Ambient to 250°C
Heating rates 1°C to a max of 20°C/min
Dimensions (WxDxH) 370 x 140 x 110 mm
Net weight 1.7 Kg
Electrical supply
SMP11 230V, 50/60Hz, 50W
SMP11/100V/60 100V, 50/60Hz, 50W
SMP11/120V/60 120V, 50/60Hz, 50W
Spares / Accessories
SMP11/1 Spare spirit filled thermometer,
0 to 250°C.
SMP1/2 Brass cooling plug
SMP1/4 Melting point tubes (open both ends)
SMP2/1 Melting point tubes (sealed both ends)
SMP10/1 Melting point tubes (sealed a one end)
6

Français
Connecteur IEC Loupe
Régulation
du chauffage
Fig 1
APPAREIL A POINT DE
FUSION
SMP11
Merci d’avoir acheté ce produit Stuart. Pour tirer
les meilleures performances de cet appareil, et
pour votre propre sécurité, veuillez lire
attentivement ces instructions avant utilisation
(pour une illustration des commandes, voir Fig. 1).
Tube capillaire
Thermomètre
Support du
thermomètre
Conseils de sécurité avant
utilisation
Cet appareil est conçu pour fonctionner dans les
conditions suivantes : -
❖ Utilisation uniquement en intérieur
❖ Utilisation dans un endroit bien ventilé
❖ Température ambiante +5°C à +40°C
❖ Altitude jusqu’à 2000 m
❖ Humidité relative ne dépassant pas 80%
❖ Variation du secteur ne dépassant pas 10%
❖ Catégorie surtension II IEC60364-4-443
❖ Degré de pollution 2 IEC664
❖ Utilisation à une distance minimale de 200
mm de toute paroi ou autre élément
Toute utilisation de cet appareil d’une
façon non décrite dans ce manuel peut
altérer la protection intrinsèque de
l’appareil.
7

Installation électrique
CET APPAREIL DOIT ETRE RELIE A LA
TERRE.
Avant de connecter l’appareil, vérifier que
l’alimentation délivrée par le secteur correspond
à celle précisée sur l’étiquette d’identification. La
consommation électrique est de 50 W.
L’appareil possède une prise IEC à l’arrière du
côté gauche pour le raccordement au secteur
(voir figure 1). L’appareil est alimenté par deux
cordons d’alimentation équipés de fiches IEC
pour la connexion de l’appareil. Un des cordons
possède une fiche U.K. à 3 broches et l’autre
une fiche à 2 broches “Schuko” pour le
raccordement au secteur. Choisir le cordon
correspondant à son alimentation électrique et
mettre l’autre de côté.
Si aucun câble ne correspond, se procurer
localement un cordon moulé. Si cela est
impossible, prendre le cordon avec la fiche U.K.
et remplacer la fiche par un dispositif approprié.
Se reporter à la fiche d’instructions jointe pour
des conseils sur la procédure à suivre.
Si le cordon d’alimentation doit être remplacé,
utiliser un câble de 1mm
H05V V-F connecté à une fiche IEC 320.
N.B. Le cordon d’alimentation UK est protégé
par un fusible de 10 A installé sur le dessus de la
fiche.
Connecter le cordon d’alimentation sur l’appareil
AVANT de le raccorder au secteur.
EN CAS DE DOUTE, CONSULTER UN
ELECTRICIEN QUALIFIE.
2
du code harmonisé
Description générale
L'échantillon pour le test portant sur le point de
fusion est placé dans un tube capillaire et inséré
dans le bloc en aluminium à l'intérieur du
réchauffeur. A l'aide de la commande manuelle
de réglage de chauffage, le SMP11 chauffe
rapidement les échantillons jusqu'à 20°C par
minute, pour atteindre une température
maximale de 250°C. Une lecture précise à une
marge d'1°C de la température de fusion peut
être obtenue en utilisant une vitesse de
chauffage inférieure comprise entre 1 et 10°C
par minute. L'échantillon est observé à travers
d'une part une loupe grossissante jusqu'à ce que
la fusion se produise, et d'autre part la lecture de
la température de fusion à partir du
thermomètre.
Avant utilisation
1. Le SMP11 est livré dans un emballage
spécialement adapté ; nous conseillons de
conserver l’appareil dans cet emballage entre
deux utilisations pour le conserver dans un
état optimal.
2. (Première utilisation uniquement) Lorsque
l’appareil est déballé, choisir l’étiquette
d’instructions adhésive appropriée parmi le
choix de langues. Décoller l’arrière et coller
l’étiquette sur la grande zone métallique
creuse du côté droit du SMP11 (voir Fig. 2).
Appliquer délicatement l’étiquette à l’aide
d’un objet plat pour lisser et chasser les
bulles d’air.
Instructions
d’utilisation
Fig 2
3. Placer l’appareil sur une surface plane et
solide.
4. Insérer le bulbe du thermomètre à alcool non
toxique dans le côté du bloc chauffant (voir
Fig. 3), tout en faisant reposer l’autre
extrémité dans l’encoche du côté droit.
SMP11
Thermomètre
Bloc chauffant
Fig 3
8
Mesure d’un point de
fusion
N.B. Si l’appareil a été utilisé récemment, le bloc
peut être trop chaud pour l’échantillon. Dans ce
cas, éteindre l’appareil et le laisser refroidir avant
de continuer. Un cylindre de refroidissement en
laiton optionnel (réf. SMP1/2) peut être inséré
dans le trou du thermomètre ; ceci a pour effet
d’extraire la chaleur hors du bloc chauffant et de
raccourcir considérablement le temps de
refroidissement.
1. Le SMP11 est livré avec un paquet de tubes
capillaire de 1,9 mm à extrémités ouvertes. Il
est conseillé de faire sceller par une personne
formée une des extrémités des tubes à l’aide
d’un bec Bunsen avant utilisation. Il est
également possible d’acheter un paquet de
tubes capillaires déjà fermés à une extrémité
auprès d’un distributeur de Stuart (réf.
SMP10/1).
2. Placer une petite quantité de l’échantillon en
poudre dans l’extrémité du tube capillaire en
verre de 1,9 mm de diamètre.
3. Insérer le capillaire dans le côté du bloc
chauffant dans les trous prévus (voir Fig. 4).
3 capillaire maximum peuvent être insérés en
une seule fois.
Thermomètre
Tube
capillaire
Fig 5
5. La plage approximative du point de fusion
est supposée connue; sinon, un test rapide
peut être nécessaire pour estimer la plage
approximative.
6. Pour atteindre une plage de point de fusion
rapide et précise, il est important d’utiliser
une vitesse de montée en température rapide
lorsque l’échantillon est chauffé à partir de la
température ambiante, et une vitesse plus
faible lorsque l’échantillon approche de la
fusion. Voir Fig. 6 pour une courbe de
chauffage idéale pour un échantillon de
point de fusion de 240°C.
Courbe de chauffage idéale
Loupe
Tube capillaire
Block
chauffant
Thermomètre
Fig 4
4. Observer à travers la loupe et positionner le
tube pour que l’échantillon puissent être
clairement observé (voir Fig. 5).
Fig 6
7. Raccorder l’appareil au secteur.
8. Démarrer en chauffant l’échantillon à la
puissance maximale en réglant le régulateur
de chauffage sur max.
Attention: Le bloc de chauffage peut
être CHAUD
9
 Loading...