

Stuart SC6 Plus Instructions For Use Manual

ave
save
average
reset
print
correct
Version 1.2
Colony Counter
Instructions for use
Mode d'emploi
Istruzioni per l'uso
Instrucciones de funcionamiento
Bedienungsanweisung
SC6 Plus
English
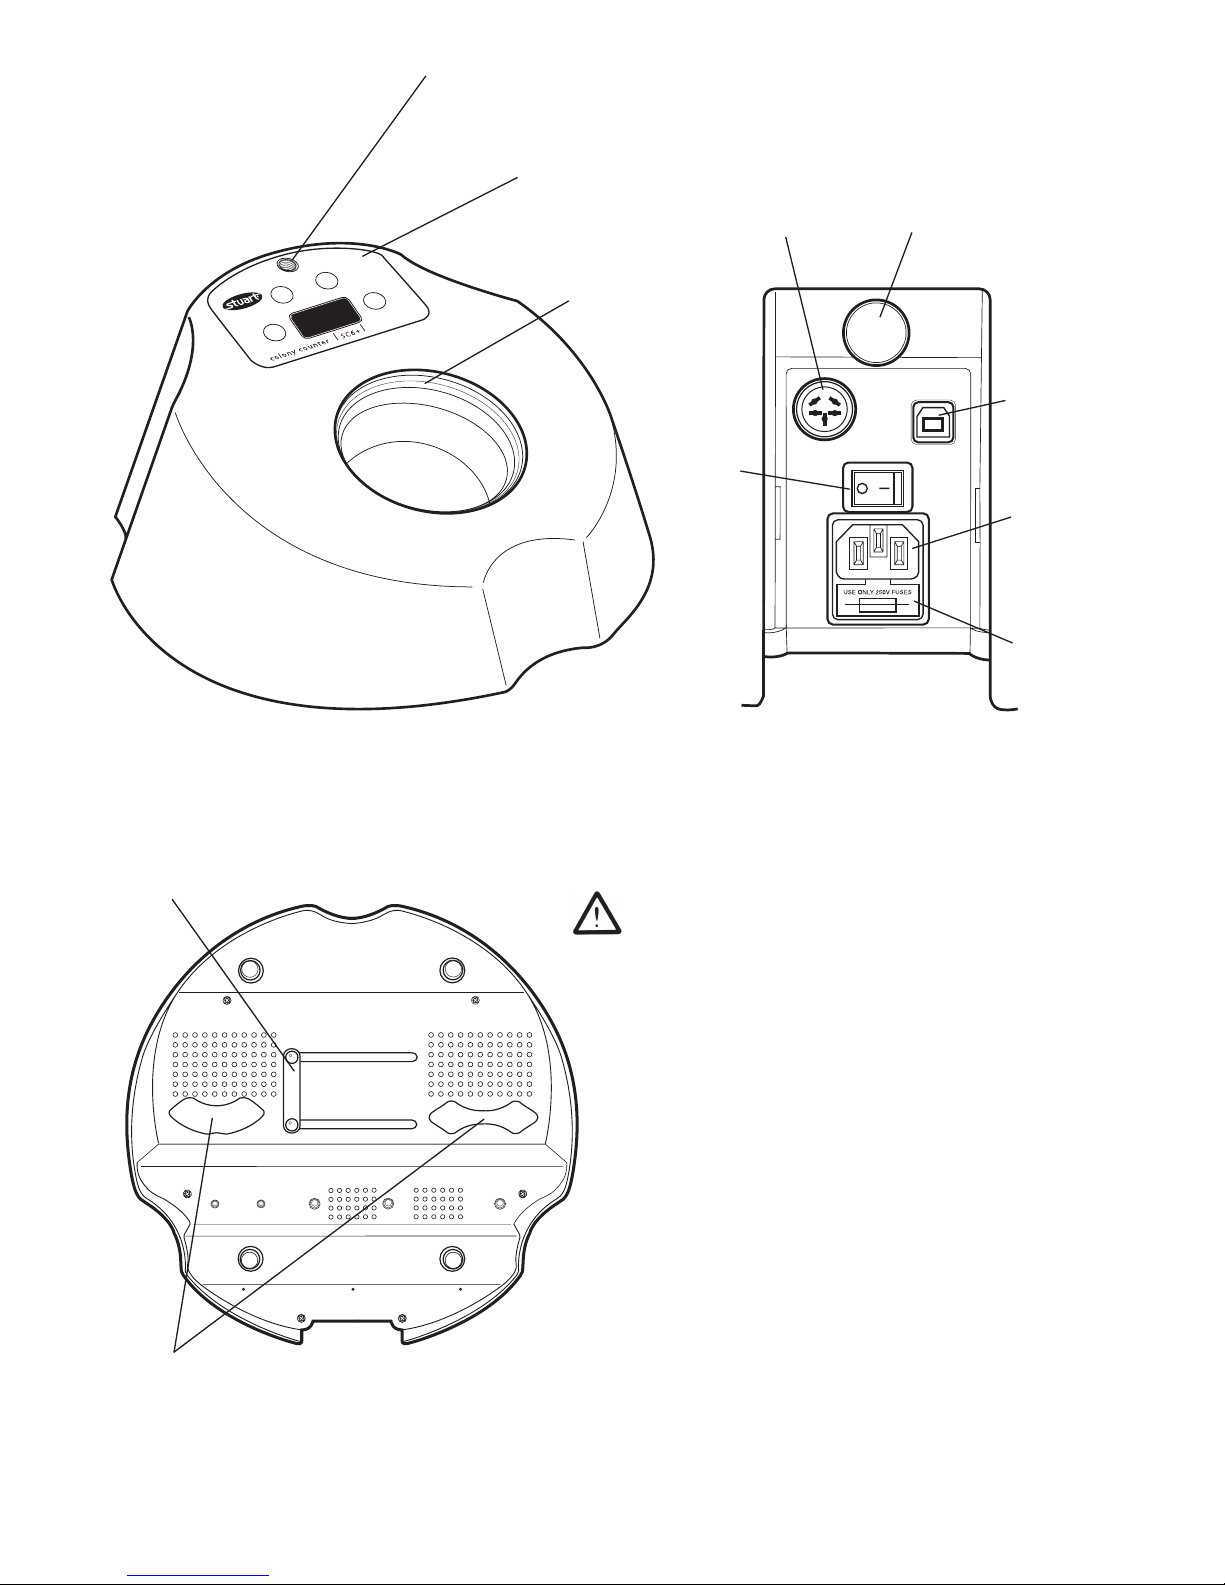
Figure 3: Underneath the SC6 Plus
Thank you for purchasing this piece of Bibby
Scientific equipment. To get the best
performance from the equipment, and for
your own safety, please read these
instructions carefully before use.
This equipment is designed to operate under the
following conditions:-
❖ For indoor use only
❖ Use in a well ventilated area
❖ Ambient temperature range +5°C to +40°C
❖ Altitude to 2000m
❖ Relative humidity not exceeding 80%
❖ Mains supply fluctuation not exceeding 10%
❖ Overvoltage category II IEC60364-4-443
❖ Pollution degree 2 IEC664
If the equipment is not used in the manner
described in this manual the protection provided
by the equipment may be impaired.
Background
adjustment
Dish adapters
ave
save
average
reset
print
correct
Figure 1: SC6 Plus controls
Control panel
Receiver
plate
Magnifier position
Sensitivity
adjustment
Figure 2: SC6 Plus back panel
PC
connector
(USB)
Printer
connector
Mains
on/off
switch
IEC
mains
socket
Fuse

Electrical Installation
THIS EQUIPMENT MUST BE EARTHED
Before connection, please read and
understand this instruction manual and
ensure that the line supply corresponds to
that shown on the rating plate.
Power consumption is:
Model Power Frequency Fuses
SC6+ 70W 50/60Hz 2xF3.15A
The SC6 model is supplied with two mains leads
fitted with IEC plugs for connection to the
instrument. One has a UK 3 pin plug and the
other has 2 pin “Shuko” plug for connection to
the mains. Choose the lead appropriate for your
electrical installation and discard the other.
Should neither lead be suitable, take the lead
with the UK plug and replace the plug with a
suitable alternative. This involves cutting off the
moulded plug, preparing the cable and
connecting to the rewireable plug in accordance
with its instructions.
IT IS IMPORTANT THAT THIS OPERATION
SHOULD ONLY BE UNDERTAKEN BY A
QUALIFIED ELECTRICIAN
NOTE: Refer to the equipment’s rating plate to
ensure that the plug and fusing are suitable for
the voltage and wattage stated. The wires in the
mains cable are coloured as follows:
Live - Brown
Neutral - Blue
Earth - Green/yellow
The instruments are fitted with an IEC socket at
the rear of the instrument for connection of the
mains lead. The appropriate mains lead should be
connected BEFORE connection to the mains
supply.
Should the mains lead need replacement a cable
of 1mm
2
of harmonised code H05W-F connected
to an IEC320 plug should be used. N.B. the UK
mains lead is protected by a 10A fuse mounted
in the plug top.
IF IN DOUBT CONSULT A QUALIFIED
ELECTRICIAN
1
General Description
The unit consists of an illuminated receiver plate
and a large LED display. The pressure of marking
a colony with a felt-tip pen registers a count by
an audible bleep and advance on a digital display.
A built in averaging facility allows multiple plates
to be counted and then the average colony count
calculated. The pressure required to register a
count can be adjusted.
A choice of light or black background is available,
and the unit is supplied complete with one
Wolffhuegel graticule, segmentation disc and
centering adapters for 50-90mm dishes. A
printer and a magnifier for counting very small
colonies are available as accessories.
Counting results can also be sent to a computer
via USB.
Safety Advice Before Use
❖ The unit should be carried using both hands.
❖ Never move or carry the unit when in use or
connected to the mains electricity supply.
❖ In the case of mains interruption, a fault or
electrical failure, the unit will continue to
operate on removal of the fault.
Controls
Figure 1 shows the controls for the SC6.
Figure 2 shows the back of the unit.
Figure 3 shows the underside of the unit.
2
Operation
Setting up the SC6 Colony Counter
To select either the dark or white background,
slide the panel, which can be found underneath
the unit to the left or right until the background
clicks home in to place. To use a petri dish of less
than 90mm in diameter, select the appropriate
adapter, which can also be found on the
underside of the unit and place on the receiver
plate.
The SC6 is provided with a pack of clear discs,
designed to protect the receiver plate from dust
and scratches. Place a disc in the receiver plate.
If this becomes damaged, remove and replace
with another. If the Wolffhuegel graticule or
segmentation disc is required, place on top of the
clear protective disc on the receiver plate.
Position the apparatus on a firm level surface.
The sensitivity control knob, located at the back
of the unit, can adjust the pressure required to
register a count. Turning it clockwise will increase
the sensitivity, turning it anti-clockwise will
decrease the sensitivity.
If small colonies are to be counted, a magnifier is
available as an accessory. To assemble, screw the
flexible support arm in to the designated area
located on top of the unit. Adjust the flexible
support arm until the required magnification and
field of view is achieved.
Turn the unit ON at the ON/OFF switch located at
the back of the unit.
Counting
Position the Petri dish on the receiver plate using
the centering adapter if required. Ensure the
display is set to zero before counting by pressing
and holding the <correct/reset> key. Mark each
colony with a felt tip pen. Every time a colony is
marked, the apparatus will register the count
with a bleep and counter advance. If unwanted
counts are made, they can be removed from the
display by pressing the <correct/reset> key once
for each count. When the count is complete
either set the display to zero using the <correct/
reset> key or switch the unit OFF at the mains.
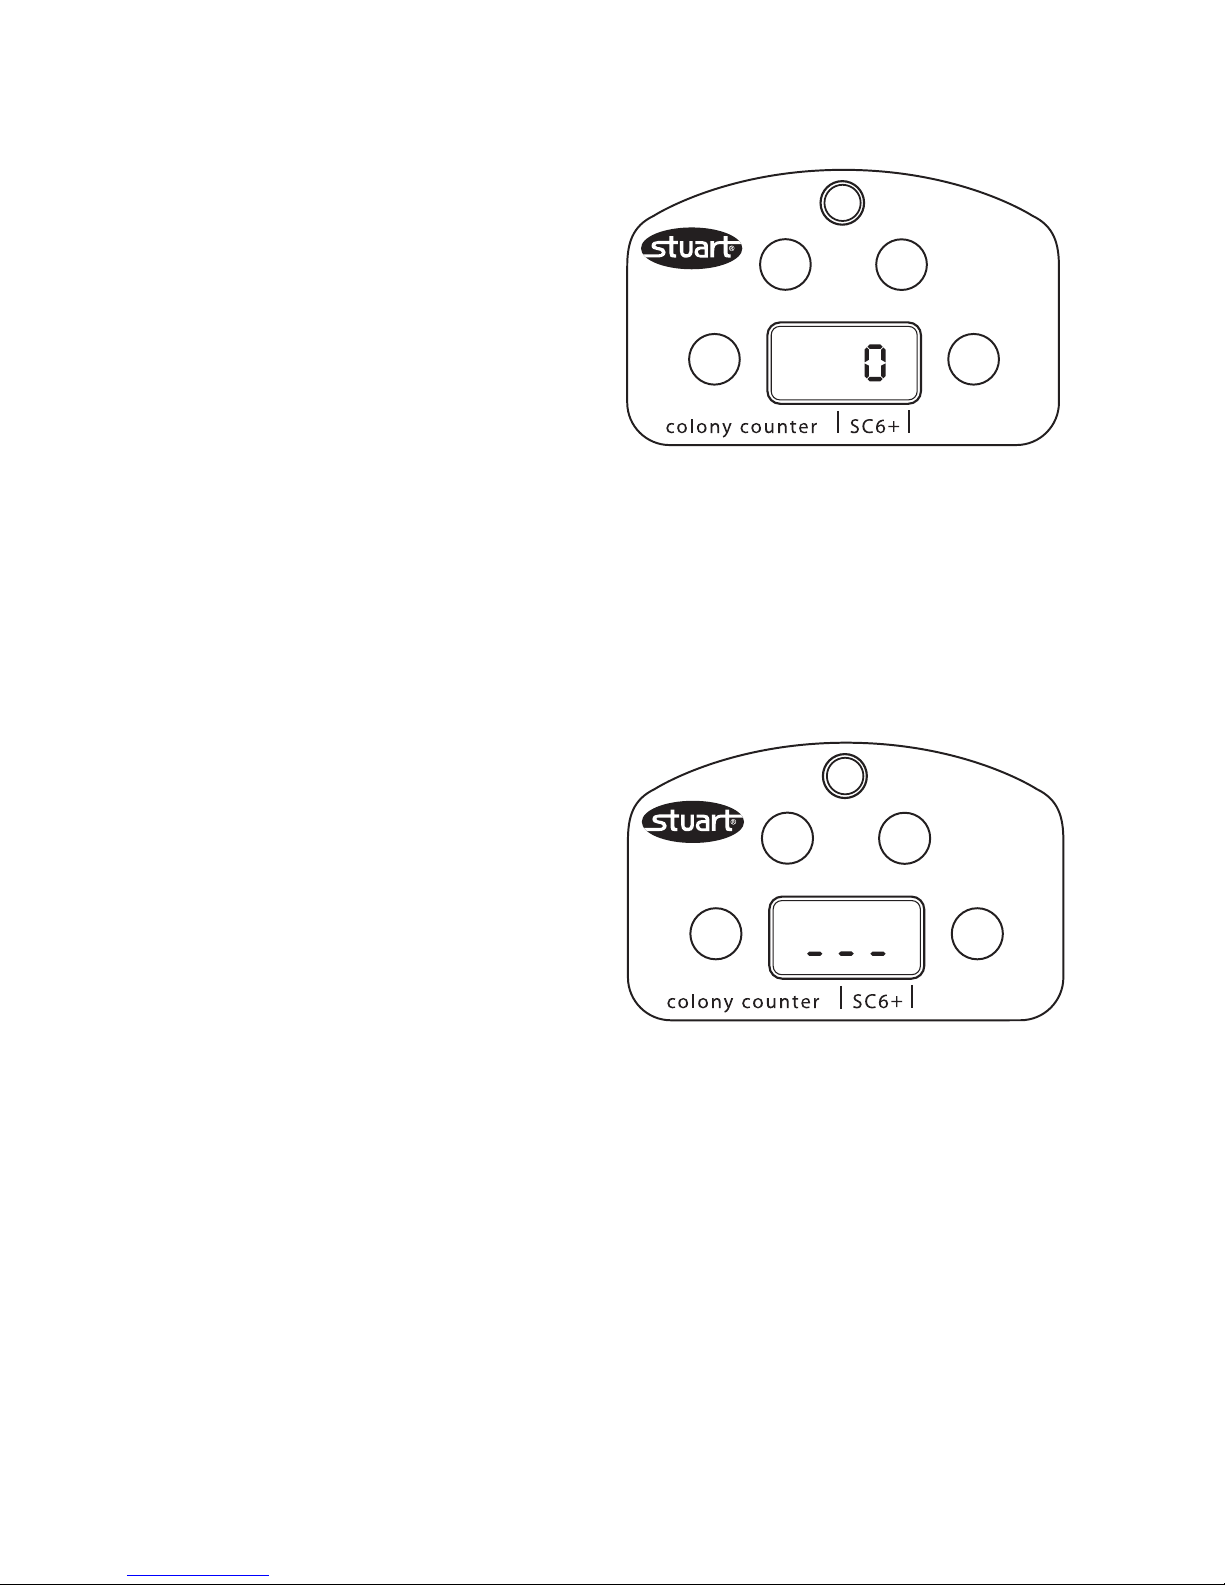
Averaging
To use the averaging facility, place the first Petri
dish on the receiver plate. At the end of the
count, press the <save> key to store the count in
the memory. This will be indicated by three
dashes on the display:
Figure 4: Saving counts on the SC6
Replace the Petri dish with the next and press
<save> to resume the count. Repeat until all
dishes have been counted. At the end of the
run, press the <average> key to display the
average count. The average count will be
calculated from all previously saved counts. The
average count may be viewed at any time during
the batch counting of Petri dishes by pressing the
<average> key when the three dashes are visible
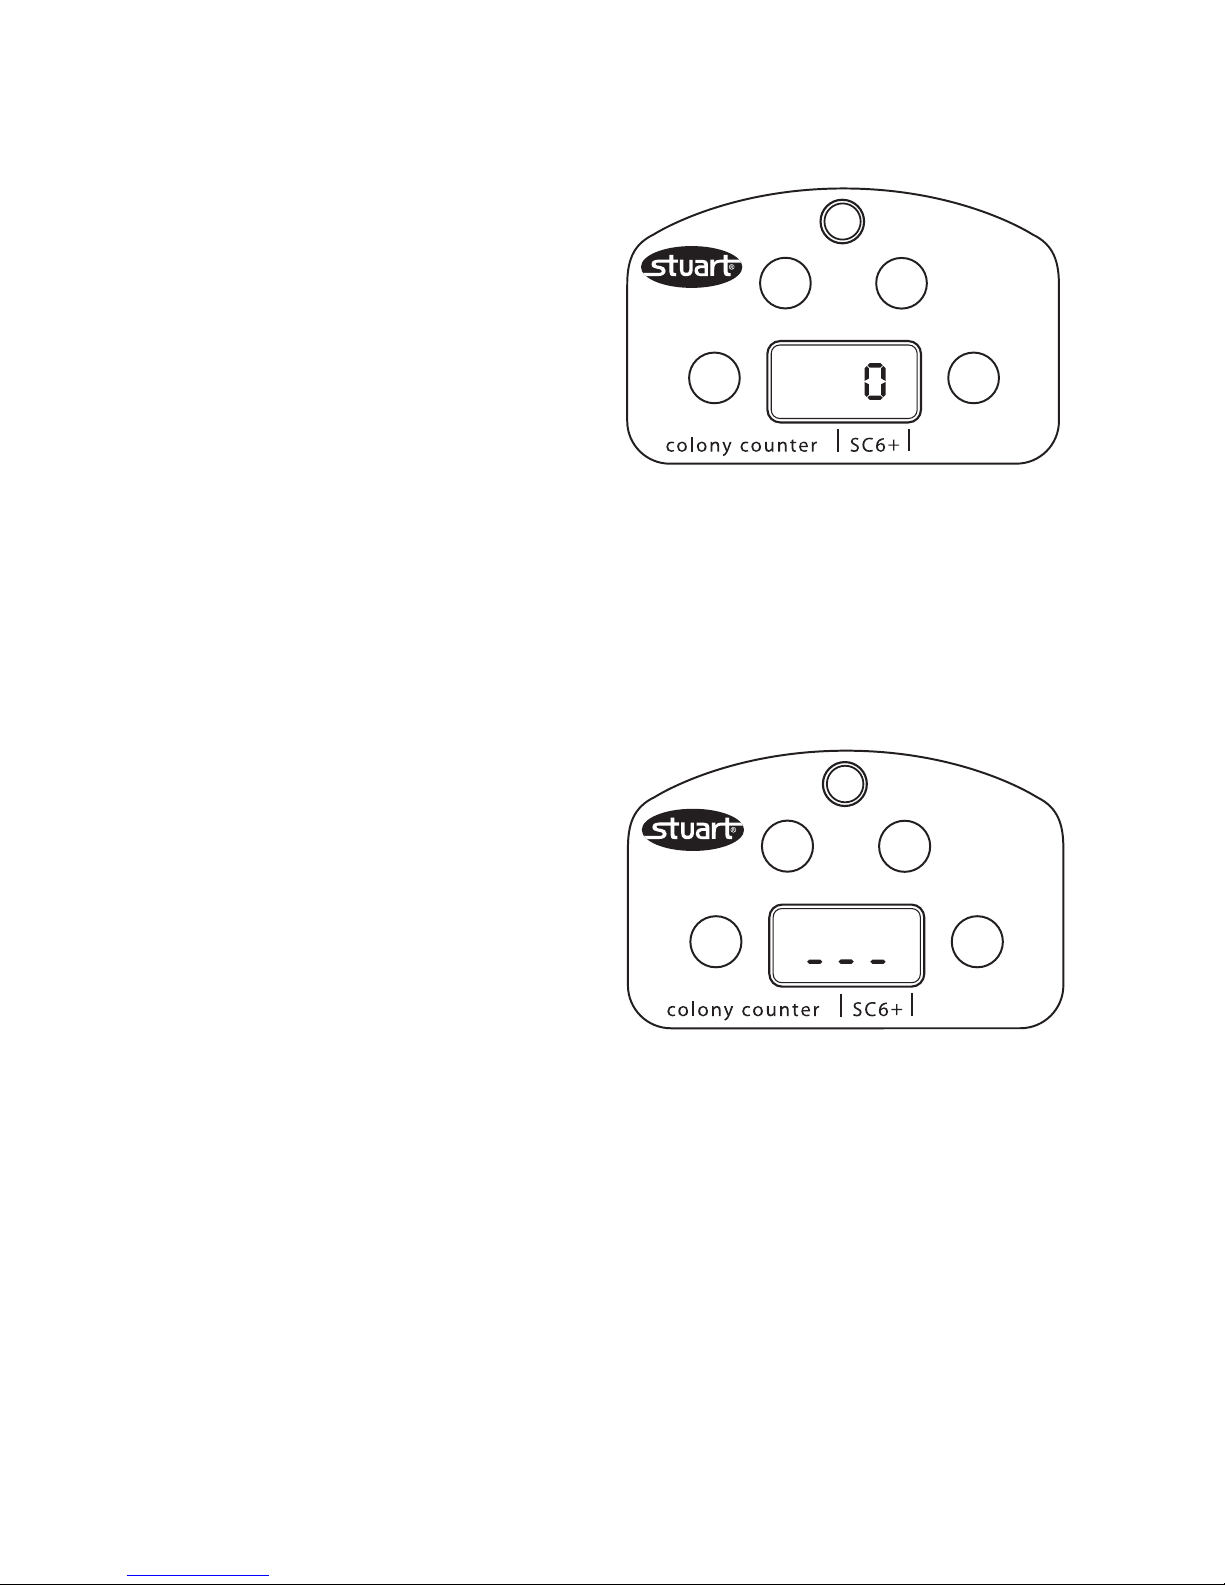
on the display. When the average facility is active
ave
save
average
reset
print
correct
ave
save
average
reset
print
correct
ave
save
average
reset
print
correct
Figure 3: SC6 Control Panel

a red LED spot at the top left hand corner of the
display will be visible:
Figure 5: Active averaging facility on the SC6
To resume counting press the <average> key
again. When the count is complete, press and
hold the <correct/reset> key until the display
returns to zero. This will clear the memory of
saved counts.
When all counting is completed switch the unit
OFF at the mains.
Printing results
Ensure the colony counter is off. Plug the printer
into the port on back of the SC6 Plus (see fig 2)
and connect the printer to the mains. Turn the
SC6 Plus on.
To print the results of a single dish, complete the
count and then press the <save> key to confirm.
Three dashes will appear on the screen. Press the
<print> key and the printer will be activated.
Remove the dish and press the <save> key again
followed by RESET to set the display to zero. You
can now count another dish.
To print the results of multiple dishes, count each
dish in turn pressing the <save> key after each
count. The results can be printed by pressing the
<print> key whenever the three dashes appear
on the screen. The printed results will include all
the dishes counted up to that point.
When the count and print is complete, press and
hold the <correct/reset> key until the display
returns to zero. This will clear the memory of
saved counts.
Transfering data to a computer
Turn the SC6 Plus off and connect to a computer
using the USB cable provided.
Turn on the computer and install the free SC6
Software*.
Turn on the SC6 Plus and count either single or
multiple plates following the directions above.
Now when the <print> key is pressed the data
will be sent to the computer programme.
Turning the audible counting bleep
ON or OFF
Turn the unit off at the mains ON/OFF switch.
Hold the <save> key down and switch the unit
ON at the mains ON/OFF switch.
Select either ‘ON’ or OFF using the <correct/
reset> key.
To confirm, press the <average> key.
The colony counter is now ready to use.
To turn the bleep on, repeat steps 1 to 5.
Cleaning the receiver plate
The receiver plate can easily be removed for
cleaning.
To remove, make sure that the instrument is
switched off at the mains. Tip the colony counter
upside down to remove the plate. Clean the plate
using a damp cloth only. Once cleaned the plate
should be returned to the colony counter.
Replacement plates are available (see Spares and
Accessories section).
* This can de downloaded from the Stuart
website at www.stuart-equipment.com
3
ave
save
average
reset
print
correct
ave
save
average
reset
print
correct
ave
save
average
reset
print
correct

4
Maintenance & Servicing
WARNING: Ensure the unit is
disconnected from the mains electricity
supply before attempting maintenance or
servicing.
Periodically clean the instrument using a damp
cloth and mild detergent solution. Do not use
harsh or abrasive cleaning agents.
Any repairs or replacement of parts MUST be
undertaken by suitably qualified personnel.
Spares and Accessories
The following spares and accessories are available
from your laboratory dealer:
Description Catalogue
Number
x1.7 magnifier SC6/1
x3 magnifier SC6/1/3
Wolffhuegel graticule
& segmentation disk (pack of 10) SC6/2
Centering adapter (pack of 2) SC6/3
Clear protective discs (pack of 5) SC6/4
Receiver plate SC6/5
Printer SMP30/1
For a comprehensive list of parts required by
service engineers conducting internal repairs,
please contact the Sales Department at Bibby
Scientific Ltd quoting both the model and serial
number.
Only spare parts supplied or specified by
Bibby Scientific Ltd. or its agents should be
used. Fitting of non-approved parts may
affect the performance and safety features
designed into the instrument.
If in any doubt, please contact the Technical
Service Department of Bibby Scientific Ltd. or the
point of sale.
Bibby Scientific Ltd.
Stone, Staffordshire ST15 0SA
United Kingdom
Tel: +44 (0)1785 812121
Fax: +44 (0)1785 813748
e-mail info@bibby-scientific.com
www.bibby-scientific.com
Warranty
Bibby Scientific Ltd warrants this instrument to be
free from defects in material and workmanship,
when used under normal laboratory conditions,
for a period of three (3) years. In the event of a
justified claim, Bibby Scientific will replace any
defective component or replace the unit free of
charge.
This warranty does NOT apply if damage is
caused by fire, accident, misuse, neglect,
incorrect adjustment or repair, damage caused by
installation, adaptation, modification, fitting of
non-approved parts or repair by unauthorized
personnel.
Technical Specification
Digital display 3 digit LED
Light source White LED
Count 0 to 999
Dish size up to 90 mm
Dimensions (w x d x h) 310 x 300 x 140 mm
Net weight 1.5Kg

Français
Figure 3 : partie inférieure du compteur
SC6 Plus
Merci d'avoir acheté cet appareil Bibby
Scientific. Pour le fonctionnement correct de
l'appareil et votre sécurité, veuillez lire
attentivement les instructions ci-dessous
avant de l'utiliser.
Cet appareil est conçu pour fonctionner dans les
conditions suivantes :-
❖ Utilisation intérieure uniquement
❖ Utilisation dans un lieu correctement ventilé
❖ Température ambiante : +5°C à +40°C
❖ Altitude maximale 2 000m
❖ Humidité relative inférieure à 80 80%
❖ Variations de l'alimentation secteur
inférieures à 10%
❖ Catégorie de surtension II IEC60364-4-443
❖ Niveau de pollution 2 IEC664
Si l'appareil n'est pas utilisé conformément aux
instructions indiquées dans ce manuel, les
fonctions de sécurité et de protection peuvent
être altérées.
Réglage du
fond
Adaptateurs pour boîtes de Pétri
ave
save
average
reset
print
correct
Figure 1 : commandes du compteur SC6 Plus
Panneau de
commande
Platine
réceptrice
Position de la loupe
Réglage de
la sensibilité
Figure 2 : face arrière du compteur SC6 Plus
Connecteur
pour PC
(USB)
Printer
connector
Interrupteur
ON/OFF
(Marche/
Arrêt)
Prise
secteur
EC
Fusible
5

Installation électrique
CET APPAREIL DOIT ÊTRE RELIÉ À LA
TERRE
Avant de connecter l'appareil, veuillez lire et
comprendre parfaitement ce manuel. Vérifiez
que l'alimentation électrique correspond aux
caractéristiques indiquées sur la plaque
signalétique.
Consommation électrique :
Modèle Puissance Fréquence Fusibles
SC6+ 70W 50/60Hz 2xF3.15A
Le compteur SC6 Plus est fourni avec deux
cordons d'alimentation équipés de prises IEC.
Pour la connexion au secteur, un de ces cordons
est équipé d'une prise britannique à 3 broches,
l'autre d'une prise “Shuko”. Choisissez le cordon
adapté à votre installation électrique et mettez
l'autre de côté. Si aucun cordon ne convient,
utilisez le cordon équipé d'une prise britannique
après avoir remplacé cette dernière par la prise
appropriée. Pour cela, coupez le cordon du côté
de la prise moulée, préparez les fils et
raccordez-les à une prise démontable,
conformément aux instructions fournies avec
cette dernière.
IL EST IMPORTANT QUE CETTE OPÉRATION
SOIT RÉALISÉE UNIQUEMENT PAR UN
ÉLECTRICIEN QUALIFIÉ
REMARQUE: REMARQUE : examinez la plaque
signalétique de l'appareil pour vérifier que la prise
et les fusibles sont adaptés à la tension et à la
puissance indiquées. Les couleurs des fils du
cordon d'alimentation sont les suivantes :
Phase - Marron
Neutre - Bleu
Terre - Vert/Jaune
Les appareils sont équipés d'une prise IEC sur la
face arrière pour connecter le cordon
d'alimentation. Le câble doit être relié à
l'instrument AVANT de brancher l'alimentation
électrique.
Si le cordon d'alimentation doit être remplacé,
utilisez un câble de section 1 mm2 de type
H05VV-F harmonisé raccordé à une prise IEC320.
Remarque : le cordon d'alimentation équipé
d'une prise britannique est protégé par un fusible
de 10 A monté dans la partie supérieure de la
prise.
EN CAS DE DOUTE, CONSULTEZ UN
ÉLECTRICIEN QUALIFIÉ
Description générale
L'appareil se compose d'une plaque réceptrice
éclairée et d'un grand afficheur à diodes électroluminescentes. La pression de marquage d'une
colonie avec un crayon feutre enregistre un coup
par un bip sonore et l'avance sur un afficheur
numérique. Une fonction incorporée de calcul de
la moyenne permet de compter plusieurs plaques,
puis de calculer la numération moyenne des
colonies. La pression nécessaire pour enregistrer
un coup est réglable.
Vous avez le choix entre un fond éclairé et un
fond noir ; l'appareil est livré avec un réticule de
Wolffhuegel, un disque de segmentation et des
adaptateurs de centrage pour des boîtes de 50 à
90 mm. Une imprimante et une loupe permettant
de compter les très petites colonies sont
disponibles comme accessoires.
Il est également possible d'envoyer les résultats
des comptages à un ordinateur via une
connexion USB.
Consignes de sécurité
❖ L'appareil doit être porté à deux mains.
❖ Ne déplacez et ne portez jamais l'appareil
pendant son fonctionnement ou lorsqu'il est
raccordé au secteur.
❖ En cas de coupure du secteur, de
dysfonctionnement ou de panne électrique,
l'appareil fonctionne toujours lorsque le
problème est résolu.
Commandes
La Figure 1 illustre les commandes du compteur
SC6 Plus.
La Figure 2 représente la face arrière de l'appareil.
La Figure 3 représente la partie inférieure de
l'appareil.
6
Utilisation
Configuration du compteur de colonies SC6
Plus
Pour sélectionner le fond sombre ou blanc, faites
coulisser le panneau qui se trouve à gauche ou à
droite sous l'appareil jusqu'à ce que le fond
s'enclenche. Un clic est alors audible. Pour utiliser
une boîte de Pétri de diamètre inférieur à 90 mm,
sélectionnez l'adaptateur approprié qui se trouve
également sur la partie inférieure de l'appareil et
placez-le sur la plaque réceptrice.
Le compteur SC6 Plus est livré avec un paquet de
disques translucides qui protègent la plaque
réceptrice de la poussière et des rayures. Placez
un disque sur la plaque réceptrice. S'il est
endommagé, retirez-le et remplacez-le par un
autre. Si le réticule de Wolffhuegel ou le disque
de segmentation est nécessaire, placez-le
au-dessus du disque protecteur translucide sur la
plaque réceptrice.
Placez l'appareil sur une surface stable et
horizontale. La molette de commande de
sensibilité située à l'arrière de l'appareil permet
de régler la pression nécessaire pour enregistrer
un coup. Tournez-la dans le sens des aiguilles
d'une montre pour augmenter la sensibilité (dans
le sens inverse pour la diminuer).
Si les colonies à compter sont de petite taille, une
loupe est disponible comme accessoire. Pour la
monter, vissez le bras support souple à
l'emplacement indiqué situé sur la partie
supérieure de l'appareil. Ajustez le bras support
pour obtenir le grossissement et le champ de
vision voulus.
Allumez l'appareil : appuyez sur l'interrupteur
ON/OFF situé à l'arrière de l'appareil.
Comptage
Placez la boîte de Pétri sur la plaque réceptrice à
l'aide de l'adaptateur de centrage si nécessaire.
Vérifiez que l'afficheur est réglé à zéro avant le
comptage : appuyez et maintenez enfoncée la
touche <correct/reset>. Marquez chaque colonie
à l'aide d'un crayon feutre. A chaque marquage
d'une colonie, l'appareil enregistre le coup avec
un bip et une avance du compteur. Si des coups
involontaires sont réalisés, vous pouvez les retirer
de l'afficheur : appuyez sur la touche <correct/
reset> une fois par coup. Lorsque la numération
est terminée, réglez l'afficheur sur zéro à l'aide de
la touche <correct/reset> ou éteignez l'appareil.
Calcul de la moyenne
Pour utiliser la fonction de calcul de la moyenne,
placez la première boîte de Pétri sur la plaque
réceptrice. A la fin de la numération, appuyez sur
la touche <save> pour enregistrer la numération
en mémoire. Cela est indiqué par trois tirets sur
l'afficheur :
Figure 4 : enregistrement des numérations sur le
compteur SC6 Plus
Remplacez la boîte de Pétri par la suivante et
appuyez sur <save> pour reprendre la
numération. Recommencez jusqu'à ce que toutes
les boîtes soient comptées. A la fin du cycle,
appuyez sur la touche <average> pour afficher la
numération moyenne. La numération moyenne
est calculée à partir de toutes les numérations
précédemment sauvegardées. Vous pouvez
afficher à tout moment la numération moyenne
lors du comptage en lot des boîtes de Pétri :
appuyez sur la touche <average> lorsque les trois
tirets sont visibles sur l'afficheur. Lorsque le calcul
ave
save
average
reset
print
correct
ave
save
average
reset
print
correct
ave
save
average
reset
print
correct
Figure 3: Panneau de commande du SC6
7
 Loading...