

Struers TegraPol-11, TegraPol-15, TegraForce-1, TegraDoser-1 Instruction Manual

TegraPol-11/ -15
TegraForce-1
TegraDoser-1
Instruction Manual
Manual No.:15517001
Date of Release: .0.201

TegraPol-11/ -15
A
A
TegraForce-1
Instruction Manual
FCC Notice
This equipment has been tested and found to comply with the limits for a
Class A digital device, pursuant to Part 15 of the FCC Rules. These limits
are designed to provide reasonable protection against harmful interference
when the equipment is operated in a commercial environment. This
equipment generates, uses, and can radiate radio frequency energy and, if
not installed and used in accordance with the instruction manual, may
cause harmful interference to radio communications. Operation of this
equipment in a residential area is likely to cause harmful interference in
which case the user will be required to correct the interference at his own
expense.
Pursuant to Part 15.21 of the FCC Rules, any changes or modifications to
this product not expressly approved by Struers A/S could cause harmful
radio interference and void the user’s authority to operate the equipment.
lways state Serial No and Voltage/frequency if you have technical questions or when ordering spare parts.
You will find the Serial No. and Voltage on the type plate of the machine itself. We may also need the Date
and Article No of the manual. This information is found on the front cover.
The following restrictions should be observed, as violation of the restrictions may cause cancellation of
Struers legal obligations:
Instruction Manuals: Struers Instruction Manuals may only be used in connection with Struers equipment
covered by the Instruction Manual.
Service Manuals: Struers Service Manuals may only be used by a trained technician authorised by Struers.
The Service Manual may only be used in connection with Struers equipment covered by the Service Manual.
Struers assumes no responsibility for errors in the manual text/illustrations. The information in this manual is
subject to change without notice. The manual may mention accessories or parts not included in the present
version of the equipment.
Original instructions. The contents of this manual are the property of Struers. Reproduction of any part of
this manual without the written permission of Struers is not allowed.
ll rights reserved. © Struers 2012.
Struers A/S
Pederstrupvej 84
DK-2750 Ballerup
Denmark
Telephone +45 44 600 800
Fax +45 44 600 801

TegraPol-11/ -15
TegraForce-1
Instruction Manual
TegraPol-11 & TegraPol-15
Safety Precaution Sheet
To be read carefully
before use
1. The operator(s) should be fully instructed in the use of the machine,
any connected equipment and accessories and the applied consumables according to the relevant Instruction Manuals.
2. The machine must be placed on a safe and stable table with an
adequate working height. All functions on the machine and any
connected equipment must be in working order.
3. Operators should ensure that the actual voltage corresponds to the
voltage on the back of the machine. The machine must be earthed.
Follow the local regulations. Always turn the power off and remove the
plug or the cable before opening the machine or installing additional
components like TegraForce or TegraDoser-5.
4. Connect only to cold water. Make sure that the water connections are
leak-proof and that the water outlet is working.
5. Struers recommend that the mains water supply is shut off or
disconnected if the machine is to be left unattended.
6. Alcohol based consumables: follow the current safety rules for
handling, mixing, filling, emptying and disposal of the alcohol-based
liquids.
7. Make sure that the grinding or polishing discs are correctly mounted,
the driving pins engaged with the holes in the turntable.
8. Keep clear of the rotating disc and the specimen mover during
operation. While grinding manually, be careful not to touch the grinding
disc. Do not attempt to collect a specimen from the tray while the disc is
running.
9. If you observe malfunctions or hear unusual noises - stop the machine
and call technical service.
10. The machine must be disconnected from the mains prior to any service.
Wait until residual potential on the capacitors is discharged.
11. Do not cycle mains power more than once every three minutes.
Damage to the drive will result.
The equipment should only be used for its intended purpose and as detailed in the Instruction Manual.
The equipment is designed for use with consumables supplied by Struers. If subjected to misuse, improper
installation, alteration, neglect, accident or improper repair, Struers will accept no responsibility for
damage(s) to the user or the equipment.
Dismantling of any part of the equipment, during service or repair, should always be performed by a qualified
technician (electromechanical, electronic, mechanical, pneumatic, etc.).

TegraPol-11/ -15
TegraForce-1
Instruction Manual
TegraForce-1
Safety Precaution Sheet
To be read carefully
before use
1. The operator should be fully aware of the use of the machine according
to the Instruction Manual.
2. Keep your hands clear of the specimen holder or specimen mover plate
when lowering TegraForce-1.
3. Do not touch the rotating parts during operation.
4. When working at machines with rotating parts care has to be taken that
clothing and/or hair cannot be caught by the rotating parts. Appropriate
safety clothing must be used.
5. If you observe malfunctions or hear unusual noises - stop the machine
and call technical service.
6. Alcohol based consumables: follow the current safety rules for
handling, mixing, filling, emptying and disposal of the alcohol-based
liquids.
7. If the TegraPol with TegraForce has to be moved to a new location the
TegraForce has to be detached from the TegraPol. (See section
Installing TegraForce)
The equipment should only be used for its intended purpose and as detailed in the Instruction Manual.
The equipment is designed for use with consumables supplied by Struers. If subjected to misuse, improper
installation, alteration, neglect, accident or improper repair, Struers will accept no responsibility for
damage(s) to the user or the equipment.
Dismantling of any part of the equipment, during service or repair, should always be performed by a qualified
technician (electromechanical, electronic, mechanical, pneumatic, etc.).

TegraPol-11/ -15
TegraForce-1
Instruction Manual
Disposal
Equipment marked with a WEEE symbol
electronic components and must not be disposed of as general
waste.
Please contact your local authorities for information on the correct
method of disposal in accordance with national legislation.
contain electrical and


TegraPol-11/ -15
1
TegraForce-1
Instruction Manual
Table of Contents Page
1. Getting Started
Checking the Contents ....................................................................... 3
Getting Acquainted with TegraPol ...................................................... 4
Unpacking TegraPol ........................................................................... 6
Placing TegraPol ................................................................................ 6
Supplying Water ................................................................................. 6
Connection to Water Mains ....................................................... 6
Connection to Water Outlet ....................................................... 6
Connecting a Recirculation Cooling Unit ............................................ 7
Connecting the Water Inlet ....................................................... 7
Connecting the Water Outlet ..................................................... 7
Connecting the Communication Cable ..................................... 7
Supplying Power ................................................................................ 8
Single-phase Supply ................................................................. 8
2-phase Supply ......................................................................... 8
Connection to the Machine ....................................................... 8
2. Basic Operation of TegraPol
Front Panel ......................................................................................... 9
Front Panel Controls ................................................................. 9
Reading the Display ................................................................ 10
Acoustic signals ...................................................................... 10
Software Settings ............................................................................. 11
Changing the Language and Display Contrast ....................... 11
Editing Numeric Values ........................................................... 13
Editing Alphanumeric Values .................................................. 14
Preparation Process Set-up ............................................................. 15
Mounting a Disc ...................................................................... 16
Setting the Preparation Parameters ........................................ 16
Starting the Process ......................................................................... 17
Stopping the Process ....................................................................... 17
3. Installing TegraForce-1 on TegraPol
Checking the Packing Contents ....................................................... 18
Getting Acquainted with TegraForce-1 ............................................ 18
Setting up TegraForce-1 on TegraPol .............................................. 19
Disc Margin ............................................................................. 20
Electrical Connections ...................................................................... 21
Compressed Air Connections .......................................................... 21
Emptying the Water / Oil Filter ................................................ 21
Removing TegraForce-1 from TegraPol ........................................... 22

TegraPol-11/ -15
2
TegraForce-1
Instruction Manual
4. Operating TegraPol with TegraForce-1
Inserting Specimen Mover Plates / Holders ..................................... 23
Inserting a Specimen Mover Plate .......................................... 23
Inserting a Specimen Holder ................................................... 23
Switching on the TegraPol with a TegraForce-1 Installed ................ 23
Setting the Preparation Parameters ................................................. 24
Manual Preparation .......................................................................... 25
Force Reduction ............................................................................... 26
Pause Between steps ...................................................................... 27
Preparation with TegraForce ............................................................ 28
Recommendations for Grinding .............................................. 29
5. Operating TegraPol
with TegraForce and TegraDoser-1
Checking the Packing Contents ....................................................... 30
Getting Acquainted with TegraDoser-1 ............................................ 30
Filling TegraDoser-1 ......................................................................... 30
Cleaning TegraDoser-1 .................................................................... 31
TegraDoser-1 Mounting ................................................................... 32
Fitting TegraDoser-1 ............................................................... 32
Removing TegraDoser-1 ......................................................... 32
Configuring TegraDoser-1 ................................................................ 33
Setting Preparation Parameters ....................................................... 34
Running an Entire Preparation Method
by Changing TegraDoser-1 .............................................................. 35
6. Accessories .............................................................................. 36
7. Trouble-shooting .................................................................... 37
8. Maintenance
Daily Service .................................................................................... 40
Weekly Service ................................................................................ 40
Service Information .......................................................................... 41
9. Technical Data ........................................................................ 42

Checking the Contents
TegraPol-11
TegraPol-15
TegraPol-11/ -15
TegraForce-1
Instruction Manual
1. Getting Started
In the packing box you should find the following parts:
1 TegraPol-11
1 Splash ring
1 Disposable bowl liner (clear plastic)
2 Mains cables
1 Inlet hose 3/4" (2 m)
1 Filter gasket
1 Gasket ø11/ø24 (1.5 mm)
1 Reduction ring with gasket
1 Outlet hose ø32 (1.5 m)
1 88° bend outlet pipe ø32
2 Hose clamps
1 Set of Instruction Manuals
1 TegraPol-15
1 Splash ring
1 Disposable bowl liner (clear plastic)
2 Mains cables
1 Inlet hose 3/4" (2 m)
1 Filter gasket
1 Gasket ø11/ø24 (1.5 mm)
1 Reduction ring with gasket
1 Outlet hose ø32 (1.5 m)
1 88° bend outlet pipe ø32
2 Hose clamps
1 Set of Instruction Manuals
3
TegraPol-11/ -15
TegraForce-1
Instruction Manual
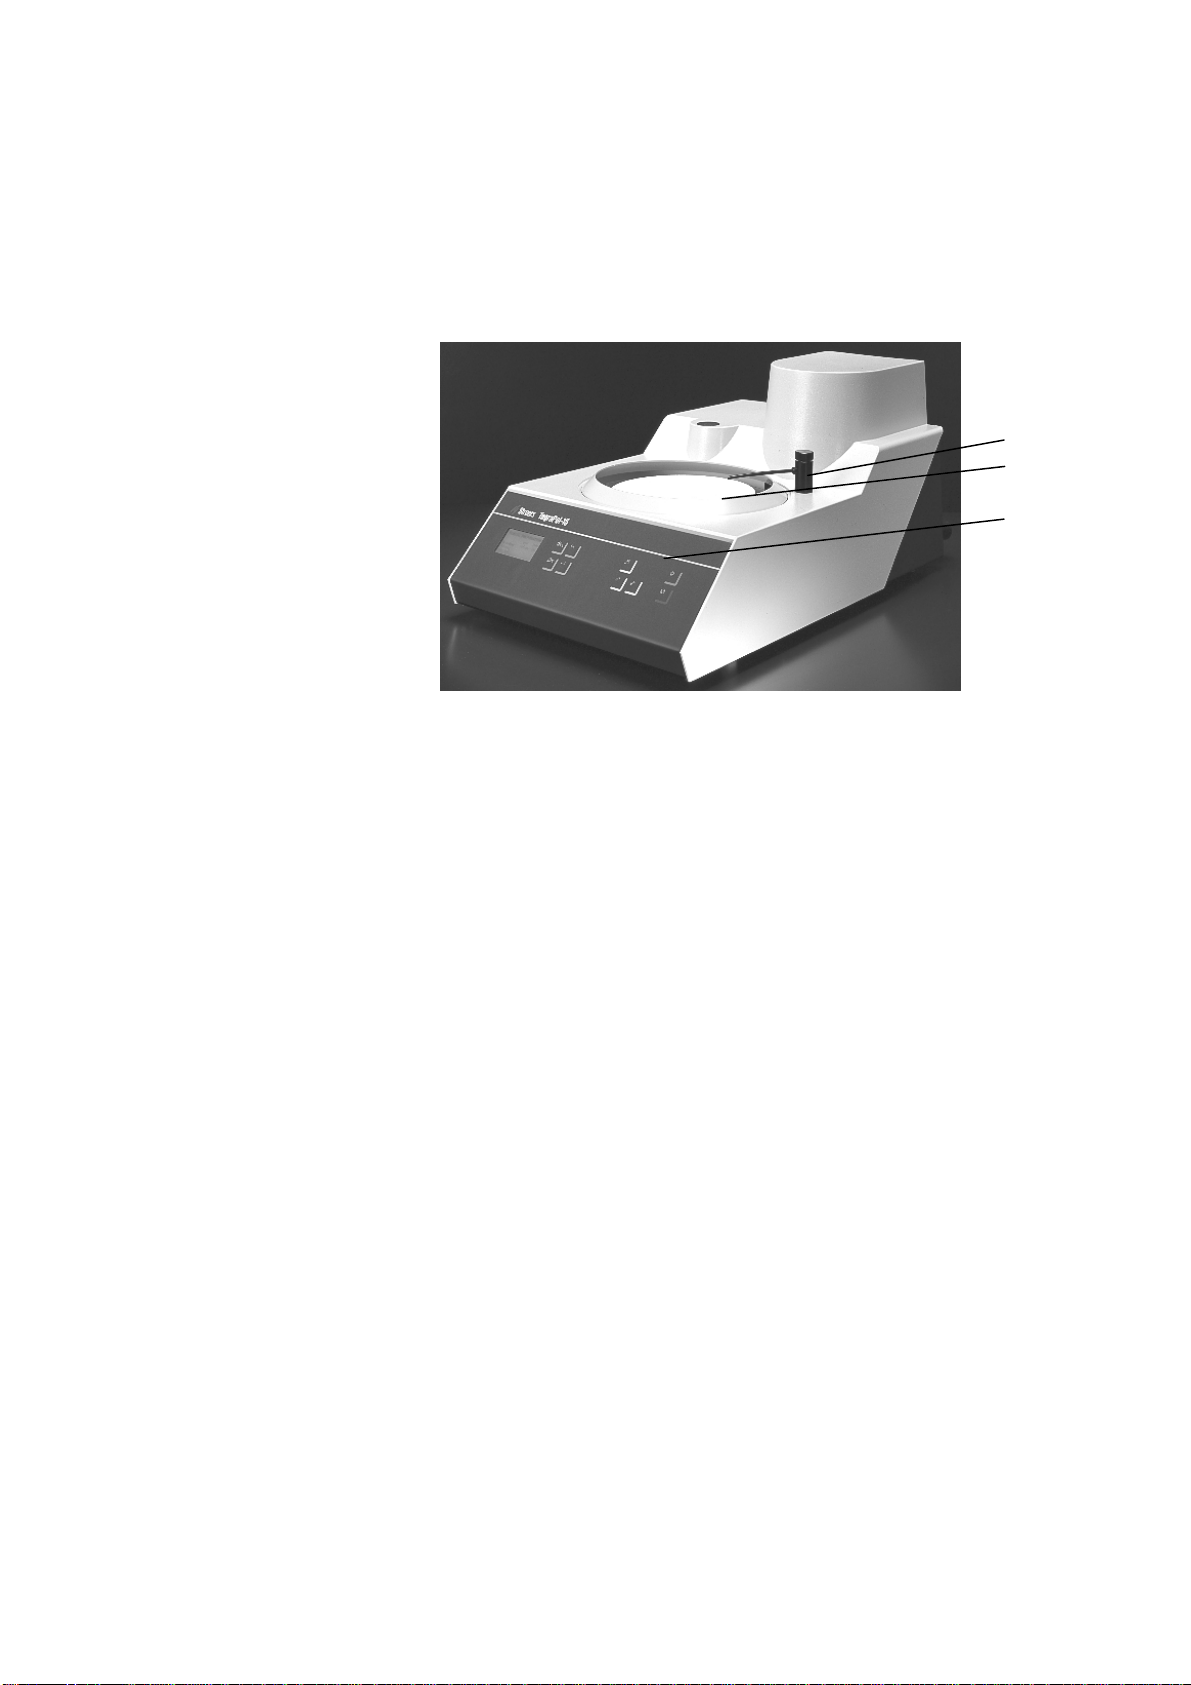
Getting Acquainted with TegraPol
Front View of TegraPol-11
Take a moment to familiarise yourself with the location and names of
all the TegraPol components:
A Water tap with sprinkler tube
B Turntable
C Front panel control(s)
A
B
C
4
TegraPol-11/ -15
5
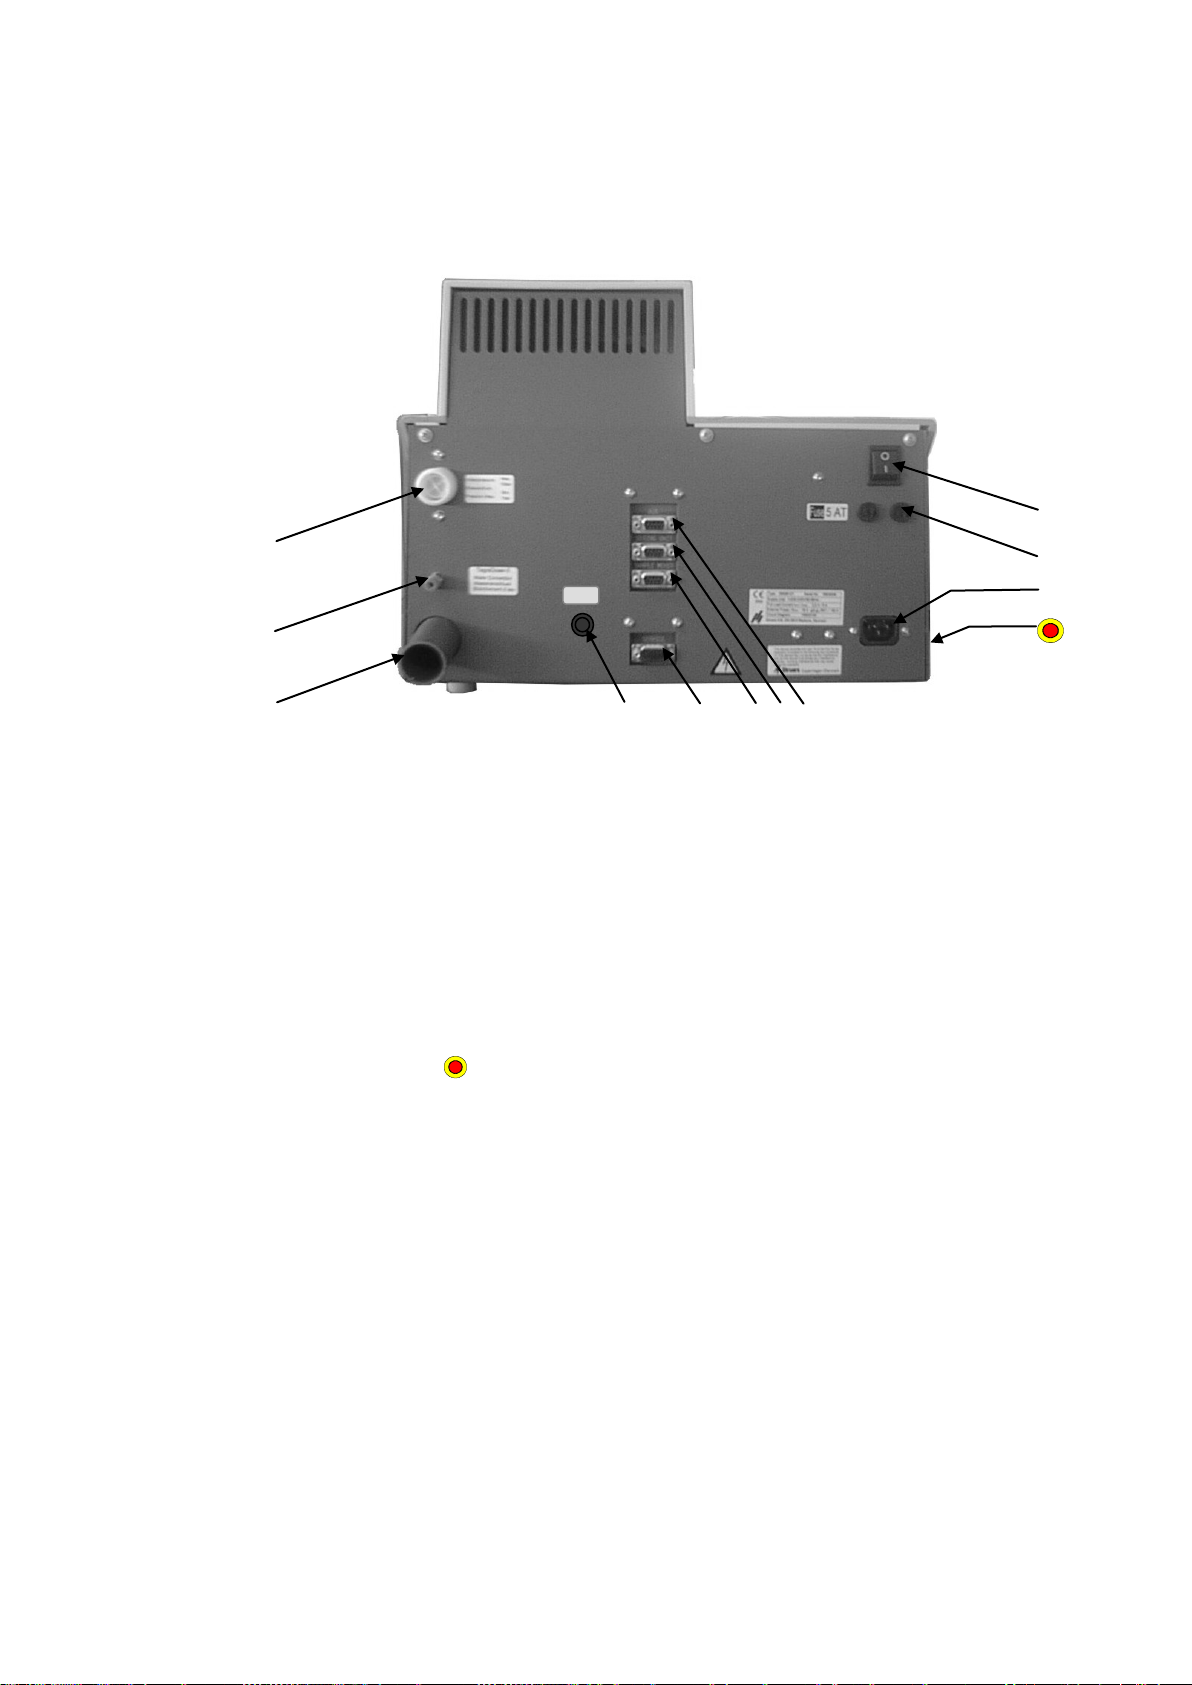
Rear of TegraPol
TegraForce-1
Instruction Manual
Water inlet tube
Water outlet for TegraDoser-5
Water outlet tube
Service socket
Sample Mover (TegraForce) socket
Doser unit (TegraDoser-5) socket
Auxiliary socket (not currently in use)
Main switch
Fuse
Mains connection
Communication socket (Cooli Control Box)
Emergency Stop

TegraPol-11/ -15
TegraForce-1
Instruction Manual
Unpacking TegraPol
Placing TegraPol
Supplying Water
Connection to Water Mains
Connection to Water Outlet
Detach TegraPol from the bottom of the packing case by removing
the four screws from below.
Place TegraPol on a steady table with an adequate working height.
The machine must be close to the power supply, water mains and
water outlet facilities.
Water for wet grinding may be supplied from the water mains or a
Recirculation Cooling Unit (instructions on the next page).
IMPORTANT
The cold water supply must have a head pressure in the
range 1 – 10 bar (14.5 – 145 psi).
Mount the 90° end of the inlet hose onto the water inlet tube on
the back of TegraPol (see Getting Acquainted with TegraPol):
Insert the filter gasket in the coupling nut with the flat side
against the pressure hose.
Tighten the coupling nut completely.
Mount the straight end of the inlet hose on the water mains tap
for cold water:
Mount the reduction ring with gasket on the water mains tap,
if necessary.
Introduce the gasket and tighten the coupling nut
completely.
Mount the outlet hose onto the water outlet tube (Lubricate with
grease or soap to facilitate insertion). Use a hose clamp for
fastening.
If there is only limited space behind the TegraPol, use the pipe
bend and attach it directly to the outlet tube on the back of the
TegraPol. Then attach the drain hose to the other end of this
bend.
Lead the other end of the drain hose to the water outlet. Arrange
the tube so that it slopes downward towards the drain throughout
its length. Shorten the hose, if necessary.
REMEMBER
Make sure that the drain hose slopes downward towards the drain
throughout its length and avoid sharp bends in the drain hose.
6
TegraPol-11/ -15
TegraForce-1
Instruction Manual
Connecting a Recirculation Cooling Unit
Connecting the Water Inlet
A
Connecting the Water Outlet
B
Connecting the Communication Cable
To ensure optimal cooling, TegraPol can be fitted with a Struers
Recirculation Cooling Unit.
Please note:
The Recirculation Cooling Unit cannot be used with TegraPol units running
methods that include the dosing of oxide polishing suspensions.
Note
Before connecting the cooling unit to the TegraPol,
follow the instructions in the Struers Cooling Units Instruction Manual
to prepare it for use.
Take the inlet hose delivered with TegraPol and cut off the
coupling nut on the straight end.
Slide the hose clamp onto the hose and insert the quick coupling
delivered with the pump for the recirculation cooling unit. Tighten
the hose clamp.
Connect the quick coupling on the inlet hose directly to the cooling
unit’s pump outlet (A).
If necessary, use one of the hoses delivered with the pump to
extend the inlet hose.
Mount the other end to the water inlet tube.
Mount the outlet hose onto the water outlet tube. Use a hose
clamp to secure the hose.
If there is only limited space behind the TegraPol, use the pipe
bend and attach it directly to the outlet tube on the back of the
TegraPol. Then attach the drain hose to the other end of this
bend.
Lead the other end into the mounting hole in the bracket on top of
the static filter unit (B). Arrange the tube so that it slopes
downward towards the drain throughout its length. Shorten the
hose, if necessary.
Connect the communication cable to the Cooli Control Box and
then connect to the socket 1 at the rear of the TegraPol.
IMPORTANT
Before connecting, check that the mains voltage corresponds to the voltage
stated on the type plate on the side of the machine.
7
TegraPol-11/ -15
8
Supplying Power
Single-phase Supply
2-phase Supply
Connection to the Machine
TegraForce-1
Instruction Manual
Always remember to switch the power off when installing electrical
equipment.
DANGER!
The machine must be earthed
IMPORTANT
Check that the mains voltage corresponds to the voltage stated on the type
plate on the back of the machine.
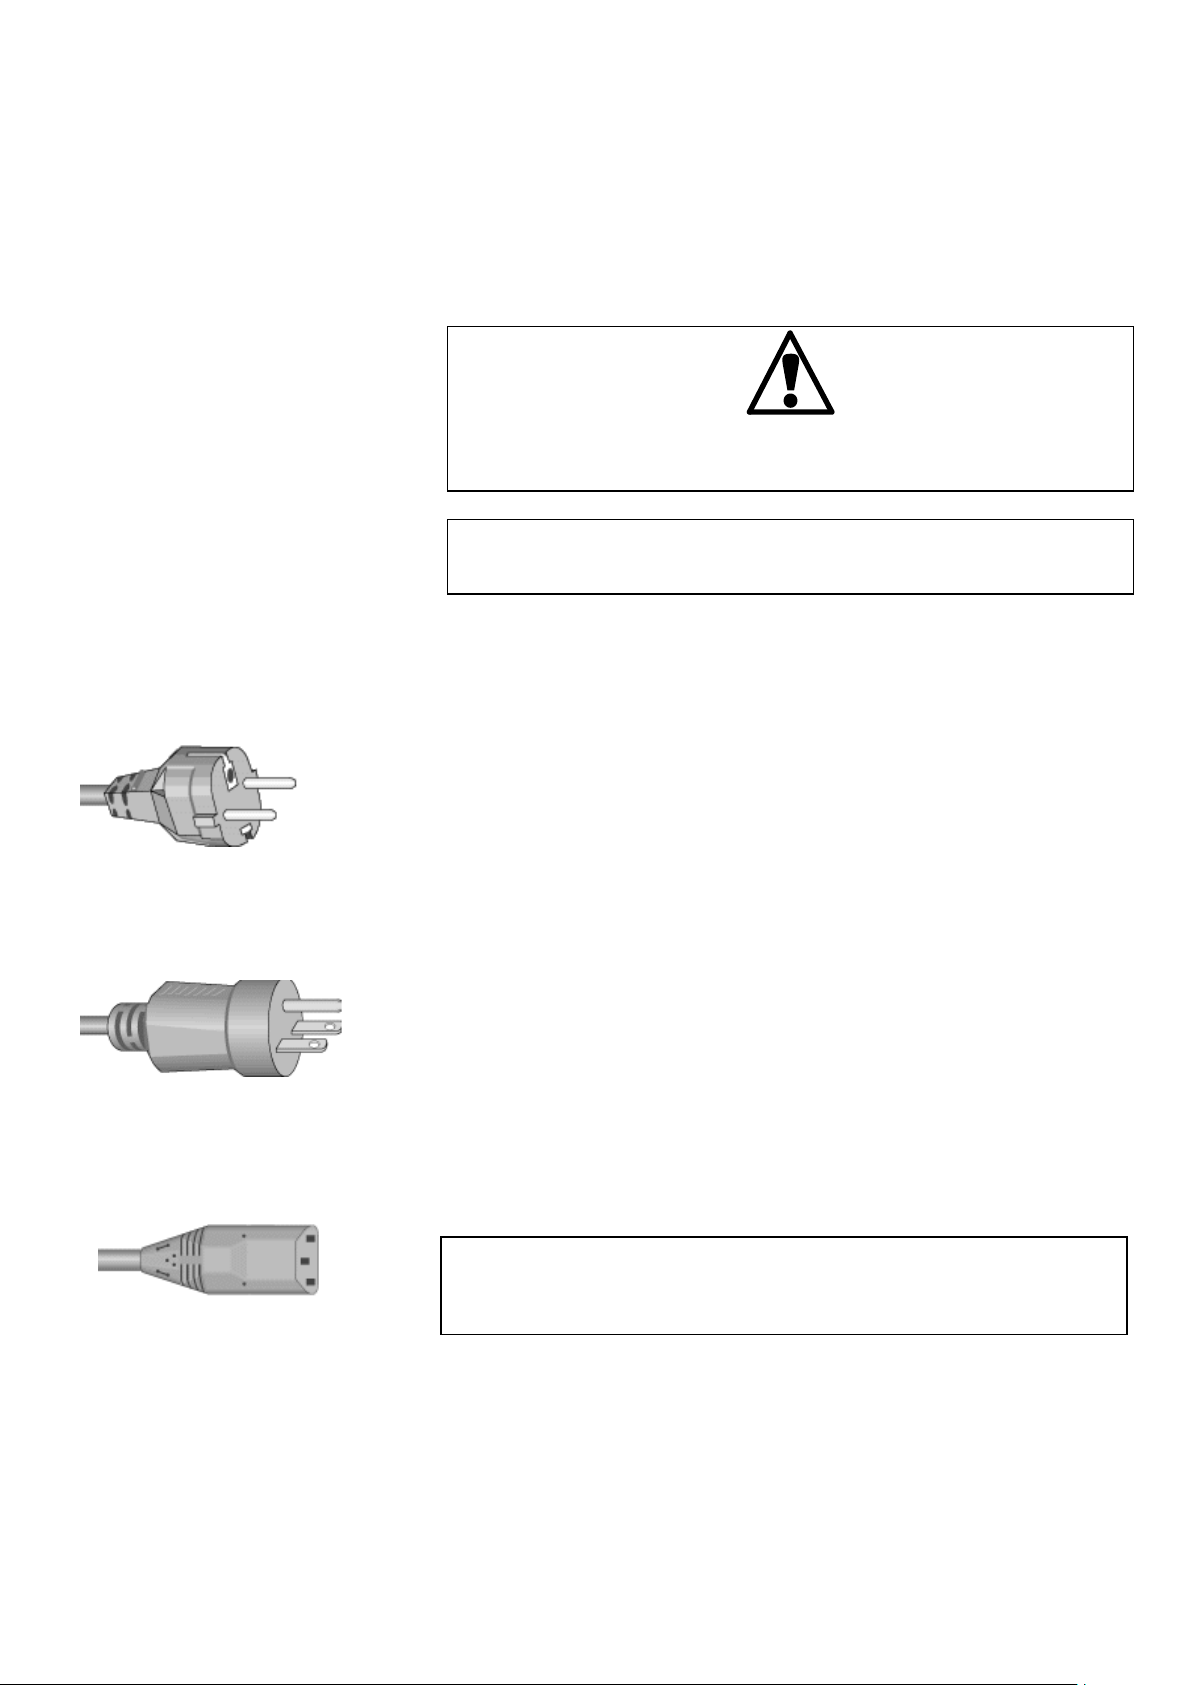
The TegraPol is shipped with 2 types of Mains cables:
The 2-pin (European Schuko) plug is for use on single-phase
connections.
If the plug supplied on this cable is not approved in your country,
then the plug must be replaced with an approved plug. The leads
must be connected as follows:
Yellow/green: earth
Brown: line (live)
Blue: neutral
The 3-pin (North American NEMA) plug is for use on 2-phase power
connections.
If the plug supplied on this cable is not approved in your country,
then the plug must be replaced with an approved plug. The leads
must be connected as follows:
Green: earth
Black: line (live)
White: line (live)
Both cables are on the other end equipped with an IEC 320 cable
connector that has to be connected to the TegraPol.
WARNING!
The output voltage from this cable is 200 – 240V and not 110V.
DO NOT use this cable to connect equipment that use an 110V power
supply. Failure to adhere to this may result in material damage.
TegraPol-11/ -15
9
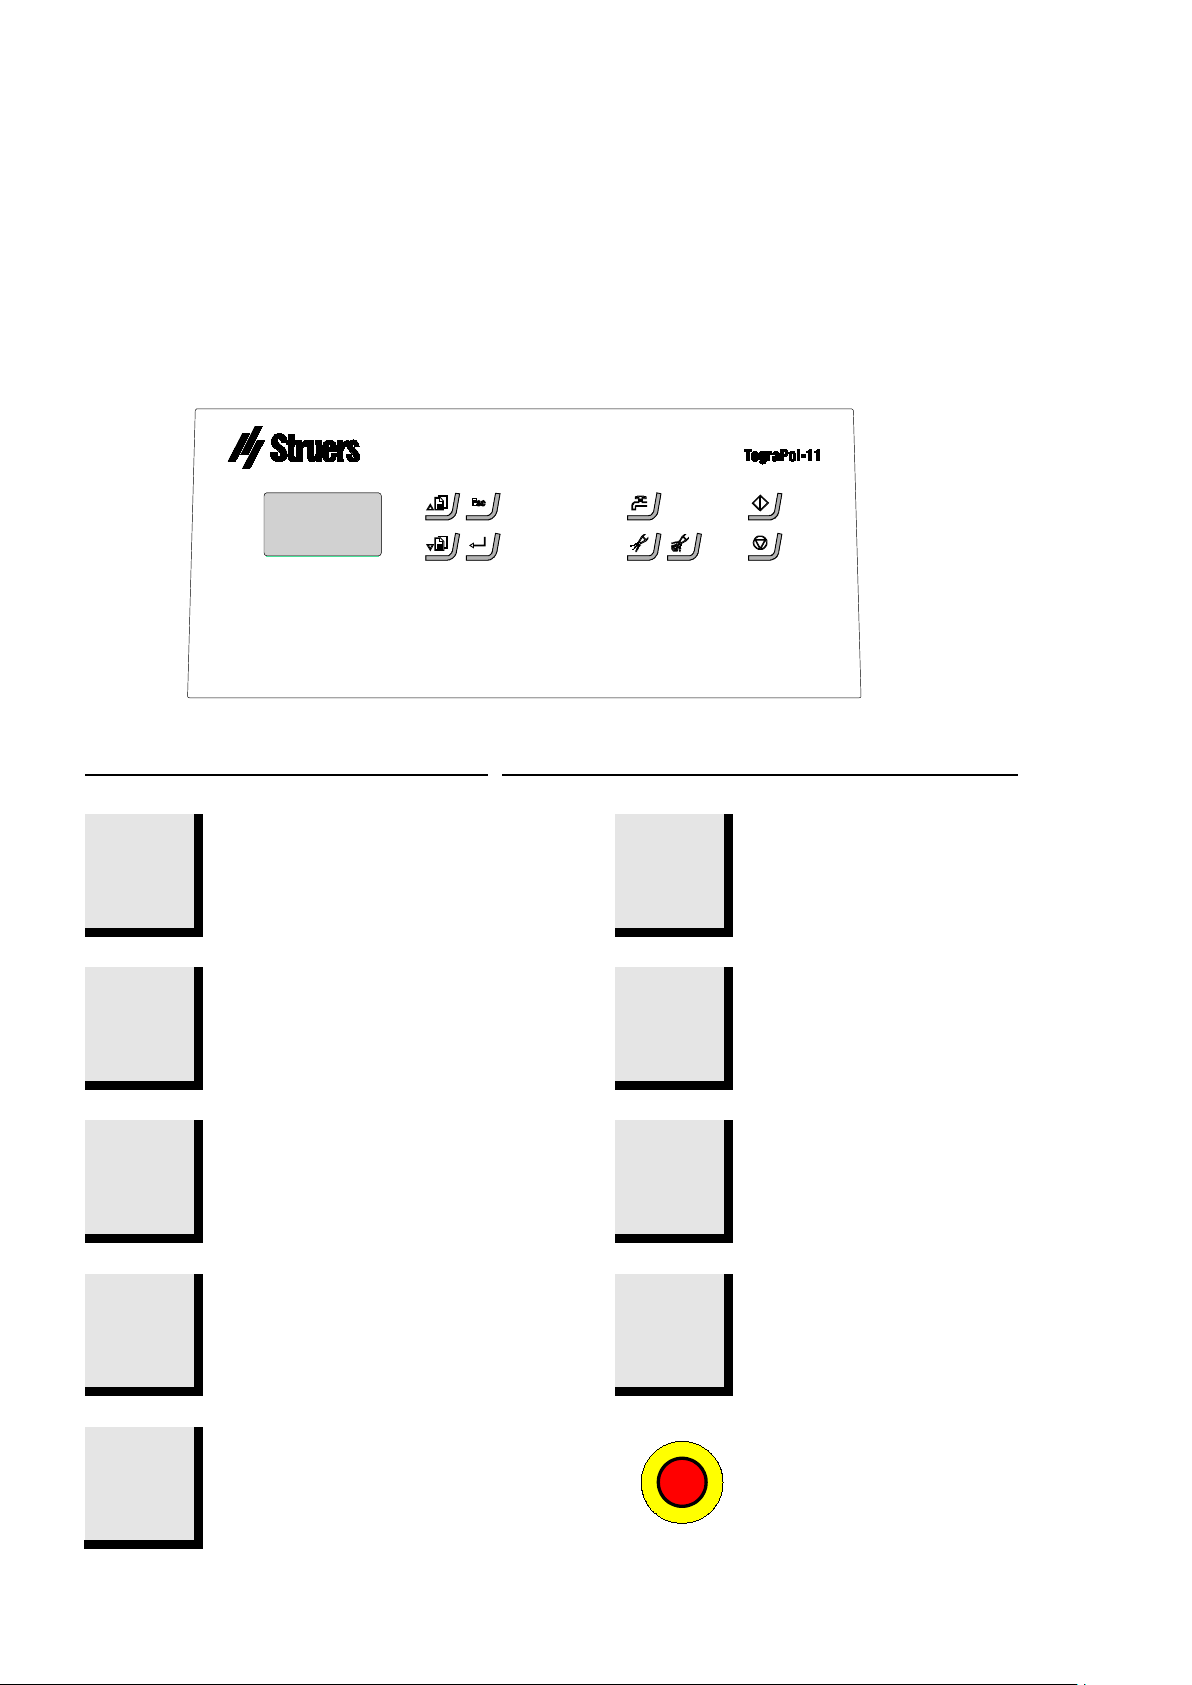
Front Panel
Front Panel Controls
TegraForce-1
Instruction Manual
2. Basic Operation of TegraPol
Key Function
Moves cursor in display upwards
Esc
or increases the value when
editing parameter values.
Moves cursor in display
downwards or decreases the
value when editing parameter
values.
Leaves the present menu or
aborts functions/changes.
Enables selected parameter
values to be activated for editing.
Saves the edited parameter
values. Toggles when only 2
parameters available.
Key Function
Only active when TegraDoser-1
or TegraDoser-5 is fitted.
Manual override – push button to
apply lubricant from the doser
bottle.
Only active when TegraDoser-1
or TegraDoser-5 is fitted.
Manual override – push button to
apply suspension from the doser
bottle.
Push button for starting the
preparation process or to start
Spin function for drying discs
and consumables.
Push button for stopping the
preparation process.
Manual override - push button &
hold to apply water (applies
water during preparation
processes and when no process
is running).
EMERGENCY STOP
- Push the red button to stop.
- Turn the red button
clockwise to release.
TegraPol-11/ -15
10
Reading the Display
Acoustic signals
A
TegraForce-1
Instruction Manual
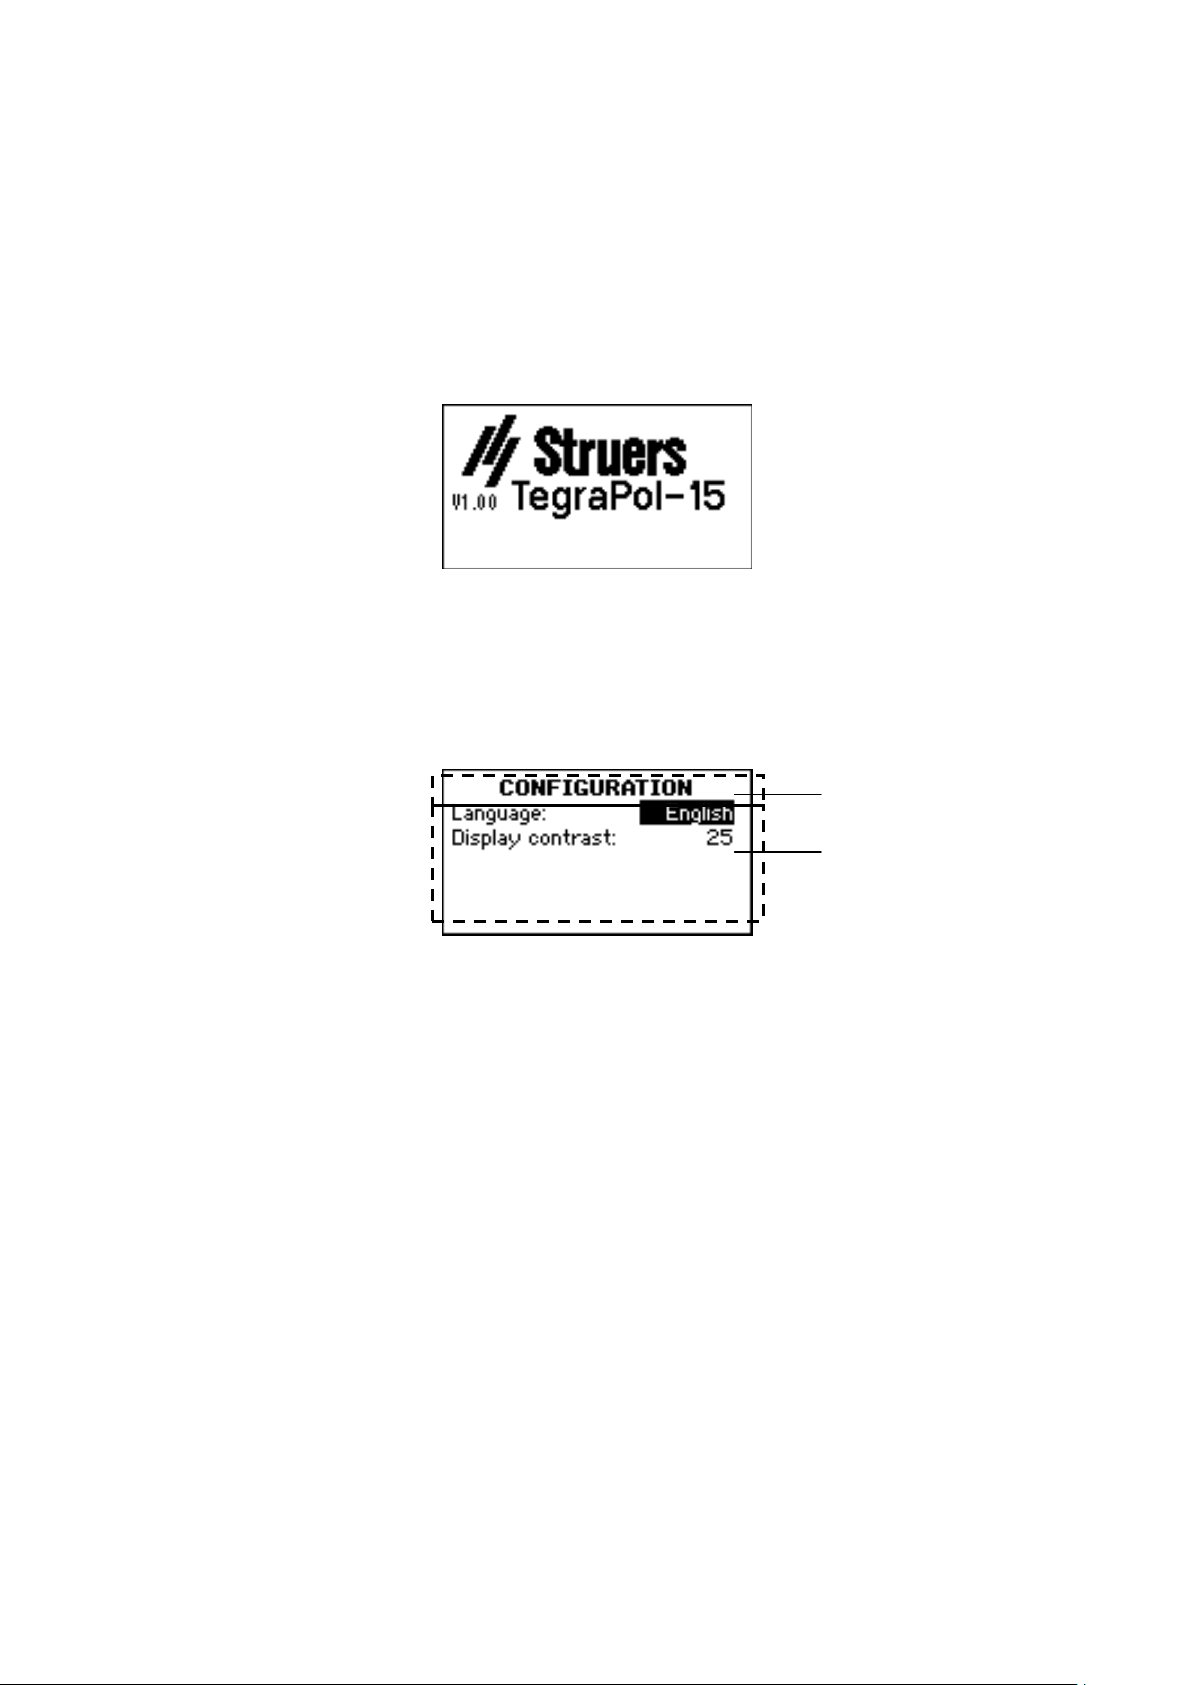
The display on the front panel provides different levels of status
information. For example, when the machine is switched on using the
Mains switch located at the rear of the machine, the display informs
you about the physical configuration of the TegraPol and the version
of software that is installed:
When operating the TegraPol, this display is the user-interface to
TegraPol’s software.
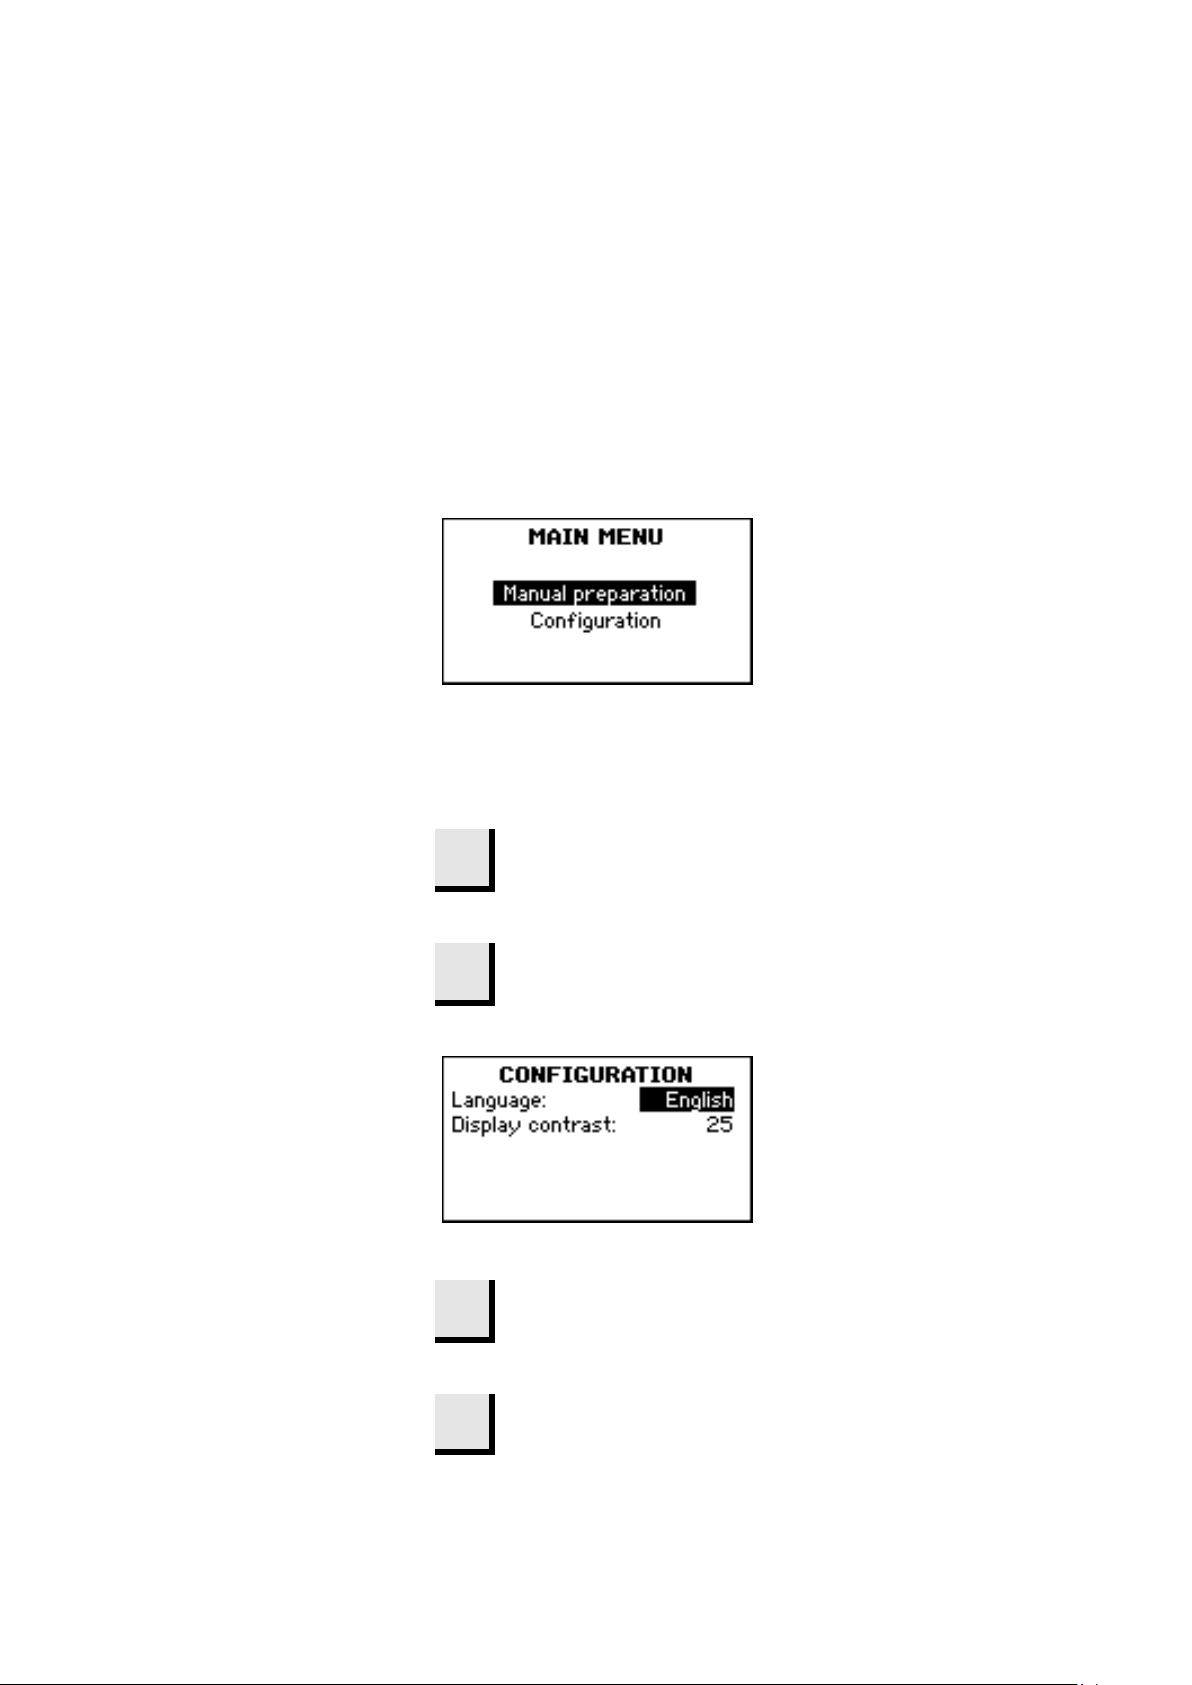
The display is primarily divided into 2 areas. The position of these
areas and the information they contain are explained in the
illustration below, which uses the CONFIGURATION Menu as an
example:
B
A Heading: this is a navigational aid, telling you where you are in
the software’s hierarchy.
B Information fields: these will either be numerical values or text
fields providing information associated with the process shown in
the heading. The inverted text shows the cursor position.
When pressing a key, a short beep indicates that the command has
been accepted, whereas a long beep indicates that the key cannot
be activated at the moment.
TegraPol-11/ -15
11
Use the Arrow buttons to select
pop-up menu.
Software Settings
Changing the Language and Display Contrast
TegraForce-1
Instruction Manual
When the machine is started for the first time, a screen display
prompts you to select your preferred language. If you want to change
the language after this, refer to “Changing the Language and Display
contrast”.
During normal operation, immediately after start up, where the splash
screen is displayed, the software goes to the MAIN MENU. This is
the highest level in the menu structure. From this menu, you can
enter the Preparation and Configuration menus.
Before continuing, we recommend that you select the language that
best suits you if you have not done so already.
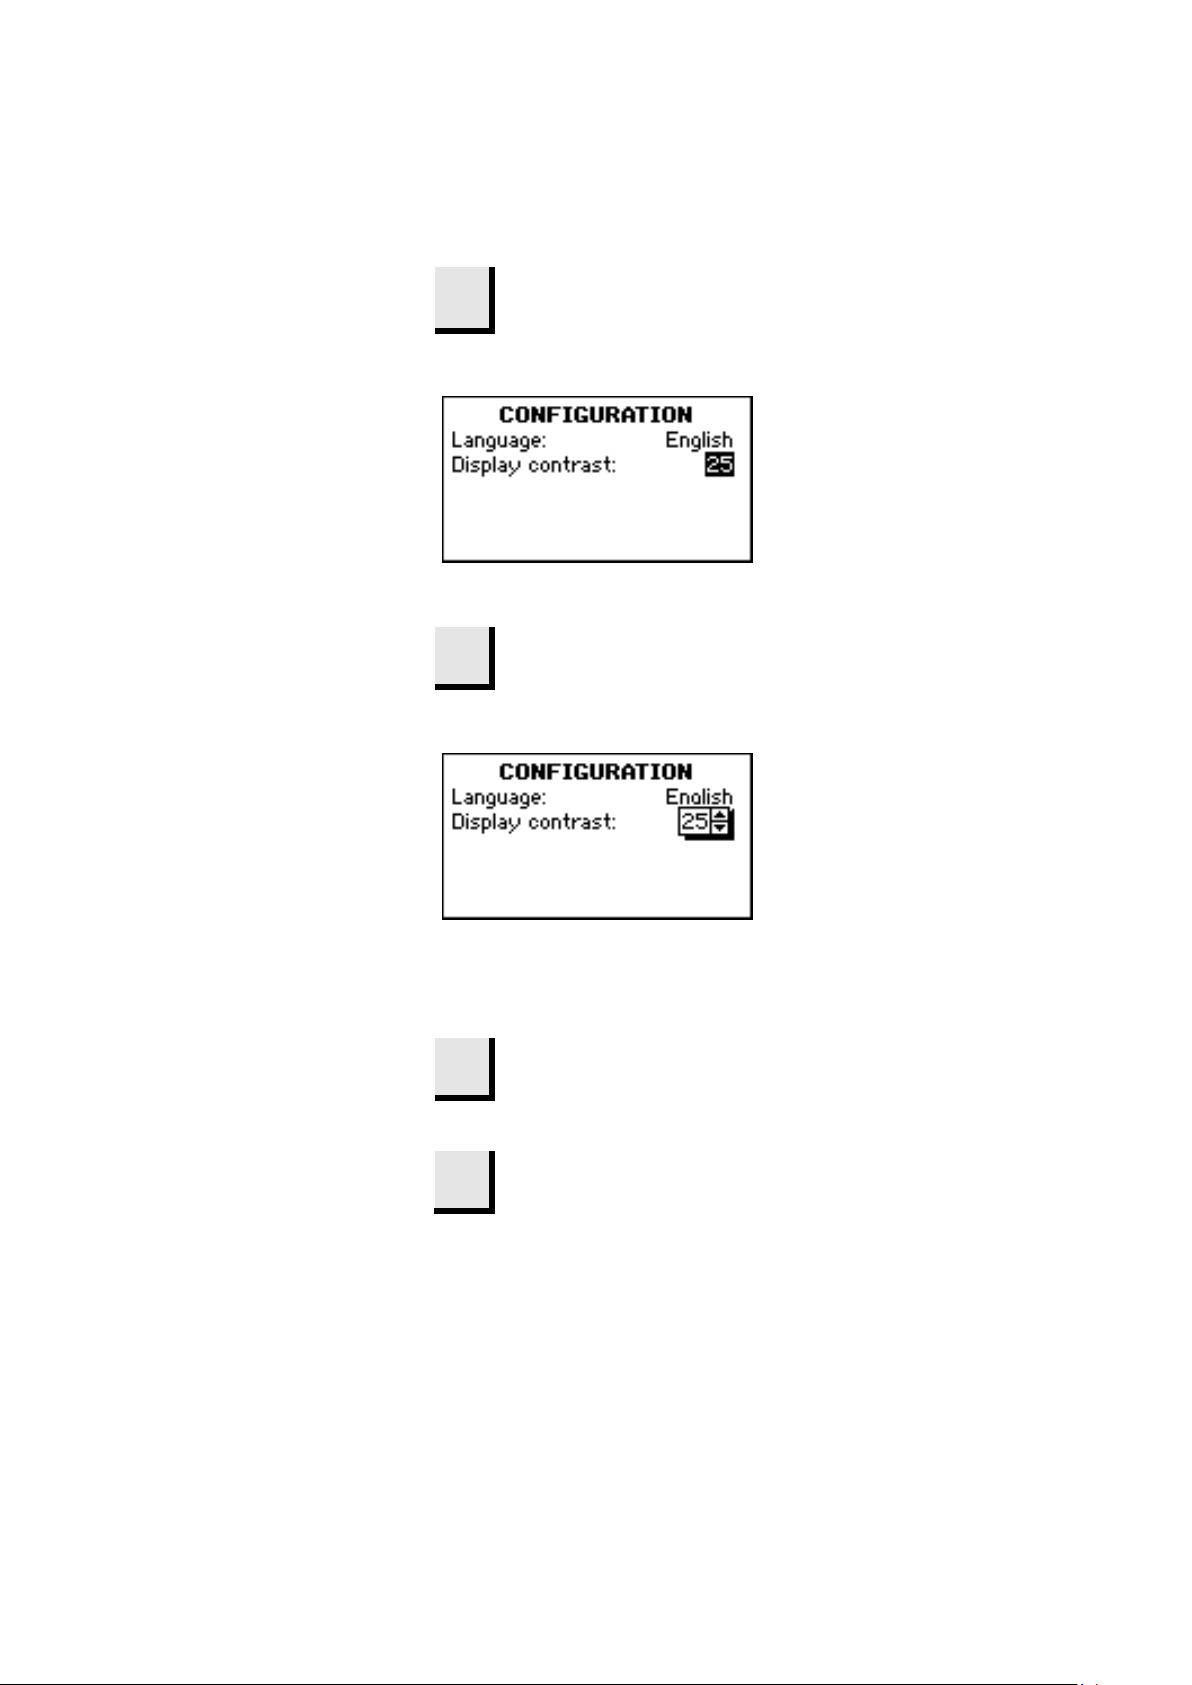
Configuration.
Press ENTER to activate the
CONFIGURATION Menu.
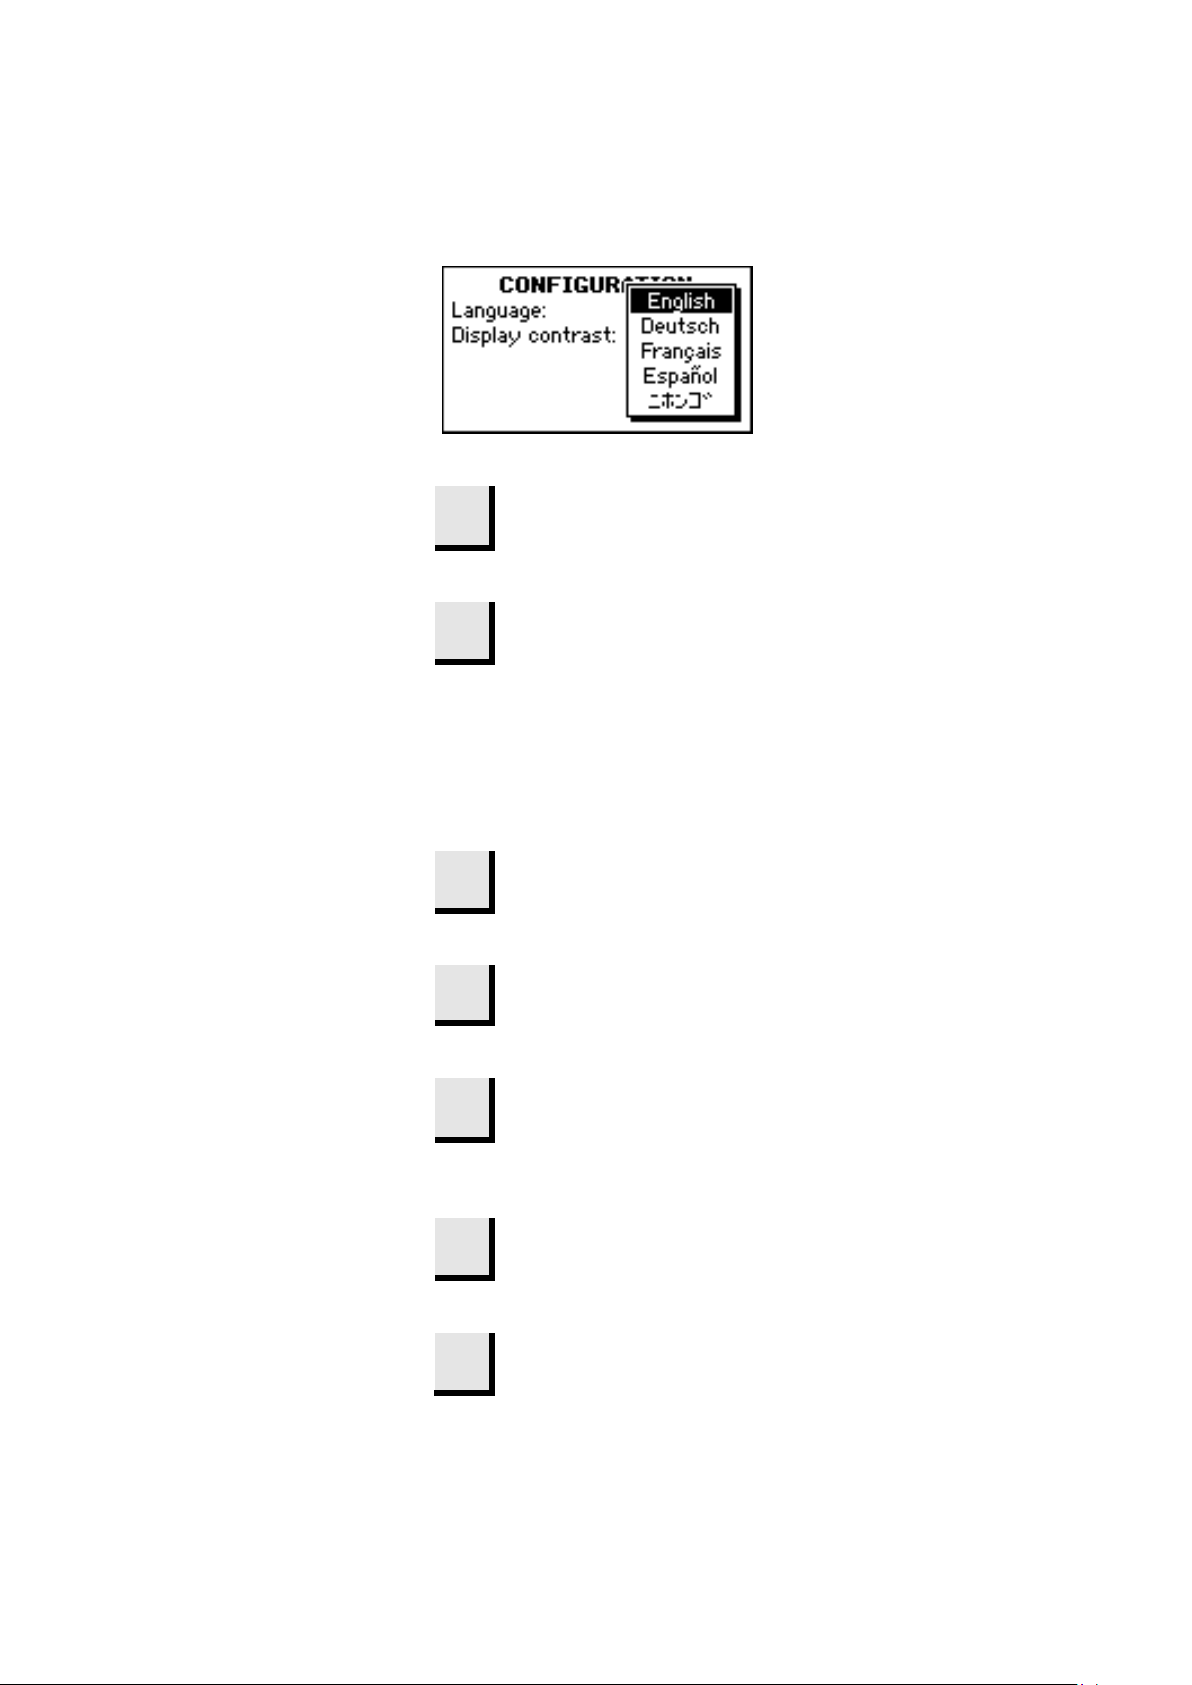
Use the Arrow buttons
Press ENTER to activate the Language
to select Language.
TegraPol-11/ -15
12
The CONFIGURATION Menu now appears in the
menu.
Contrast settings are:
Default: 25
Change increment: 1
TegraForce-1
Instruction Manual
Use the Arrow buttons
language you prefer.
to select the
Press ENTER to accept the language.
language you have chosen.
If the Display contrast setting is OK, press Esc to return to
the MAIN MENU.
To change the Display contrast setting, continue from
here.
Use the Arrow buttons
Press ENTER to activate the Display contrast pop-up
Use the Arrow buttons
prefer.
to select Display contrast.
to select the setting you
Contrast range: 0 – 50
Esc
Press ENTER to accept the setting.
Press Esc to return to the MAIN MENU.
TegraPol-11/ -15
13
Use the Arrow buttons
to select the value to be
A popup box showing the current value and up/down
arrows is displayed.
Note:
options and ignore the following steps.
Editing Numeric Values
TegraForce-1
Instruction Manual
changed, e.g. Display contrast:
Press ENTER to edit the value.
If there are only two options, the popup box is not
displayed. Use ENTER
Use the Arrow buttons
numeric value.
Press ENTER to accept the new value. (Pressing Esc,
aborts the changes, preserving the original value.)
to toggle between the two
to increase or decrease the

TegraPol-11/ -15
14
Use the Arrow buttons
to select the text value to be
Note
options and ignore the following steps.
aborts the changes, preserving the original value.)
Editing Alphanumeric Values
TegraForce-1
Instruction Manual
changed, e.g. Language
Press ENTER to edit the value.
A popup box showing all the options available is displayed:
:
If there are only two options, the popup box is not
displayed. Use ENTER
Use the Arrow buttons
Press ENTER to accept the new value. (Pressing Esc,
to toggle between the two
to select the correct option.

TegraPol-11/ -15
TegraForce-1
Instruction Manual
Preparation Process Set-up
TegraPol-11 and TegraPol-15 are designed for the preparation of
most materials. In Struers Metalog Guide™ you will find a detailed
description of grinding/polishing methods for automated mechanical
specimen preparation.
Struers Metalog Guide™ offers preparation methods for the most
common materials, based on a simple analysis of two key properties:
hardness and ductility. Finding the right method is easy, including
choice of consumables.
Always consult Struers Metalog Guide™ on the Struers website for
the correct preparation method for the actual specimens.
Metalog Guide™
A complete guide to materialographic specimen preparation.
struers.com/KNOWLEDGE/Metalog Guide
15
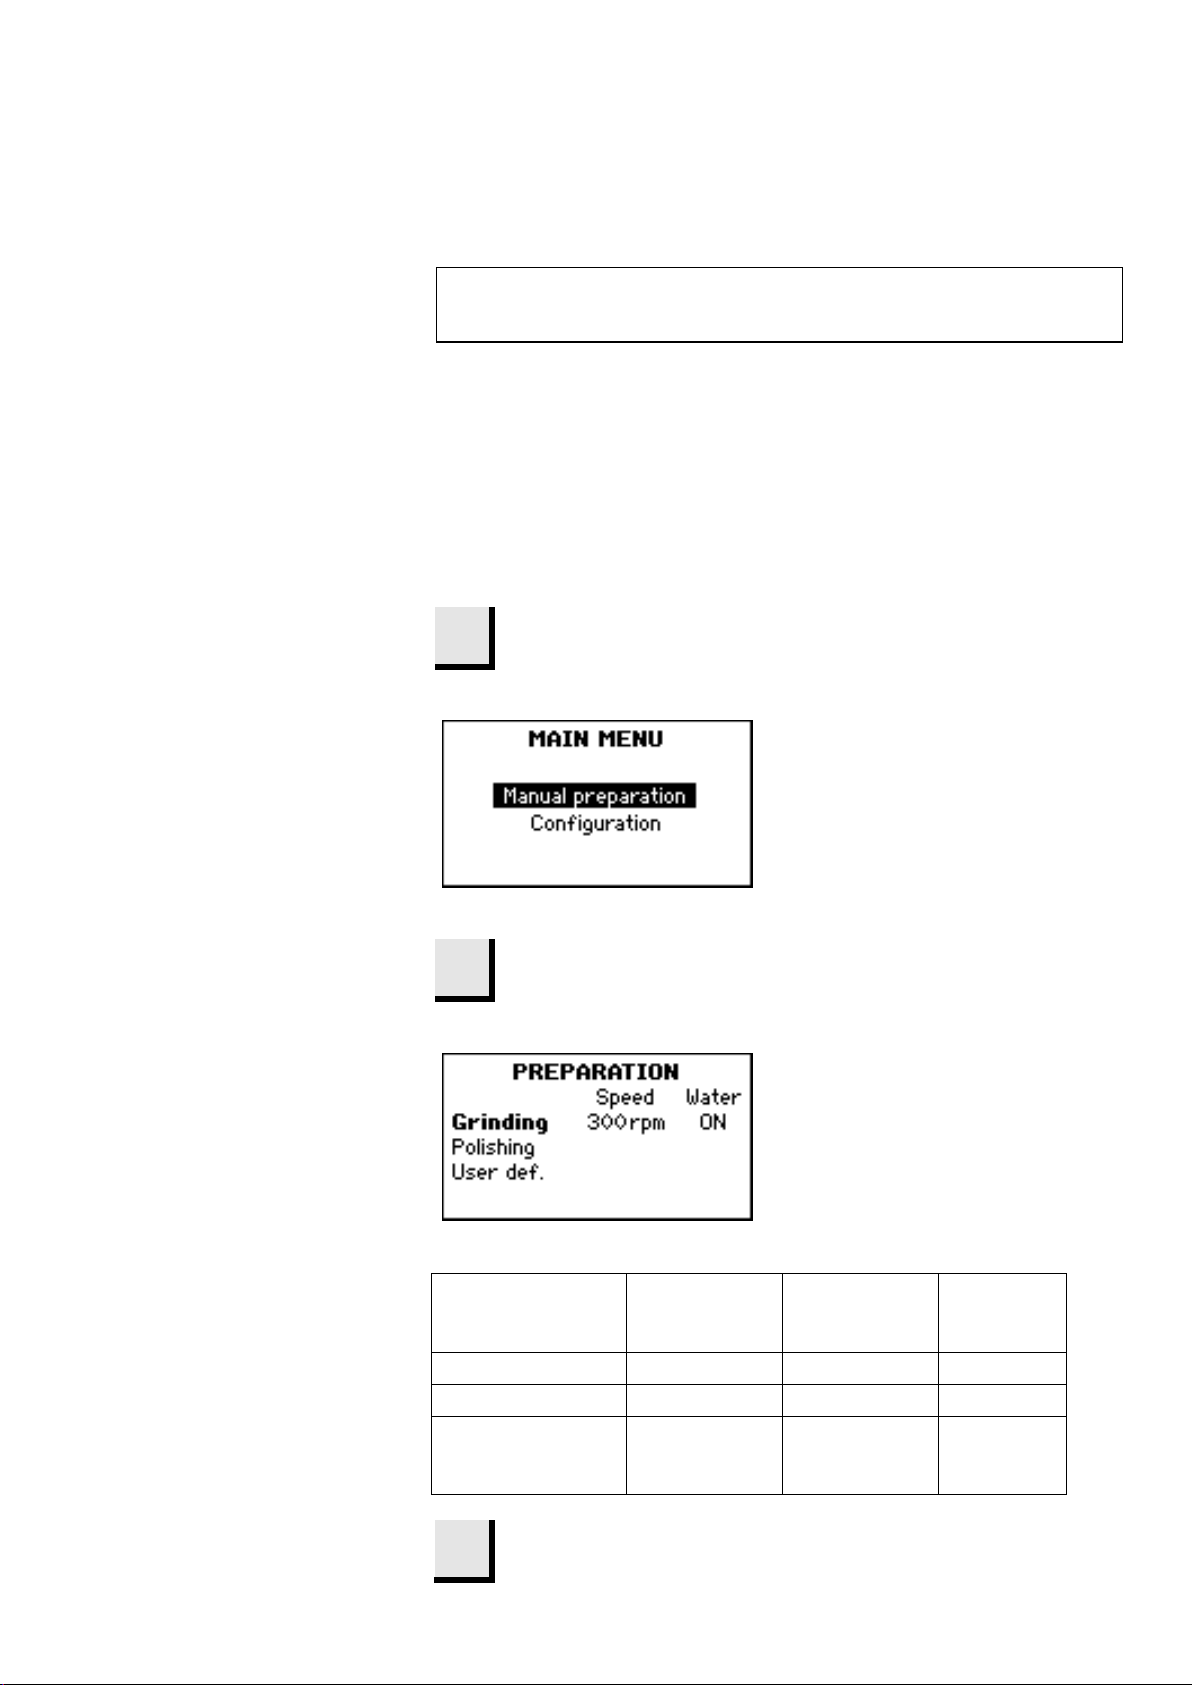
16
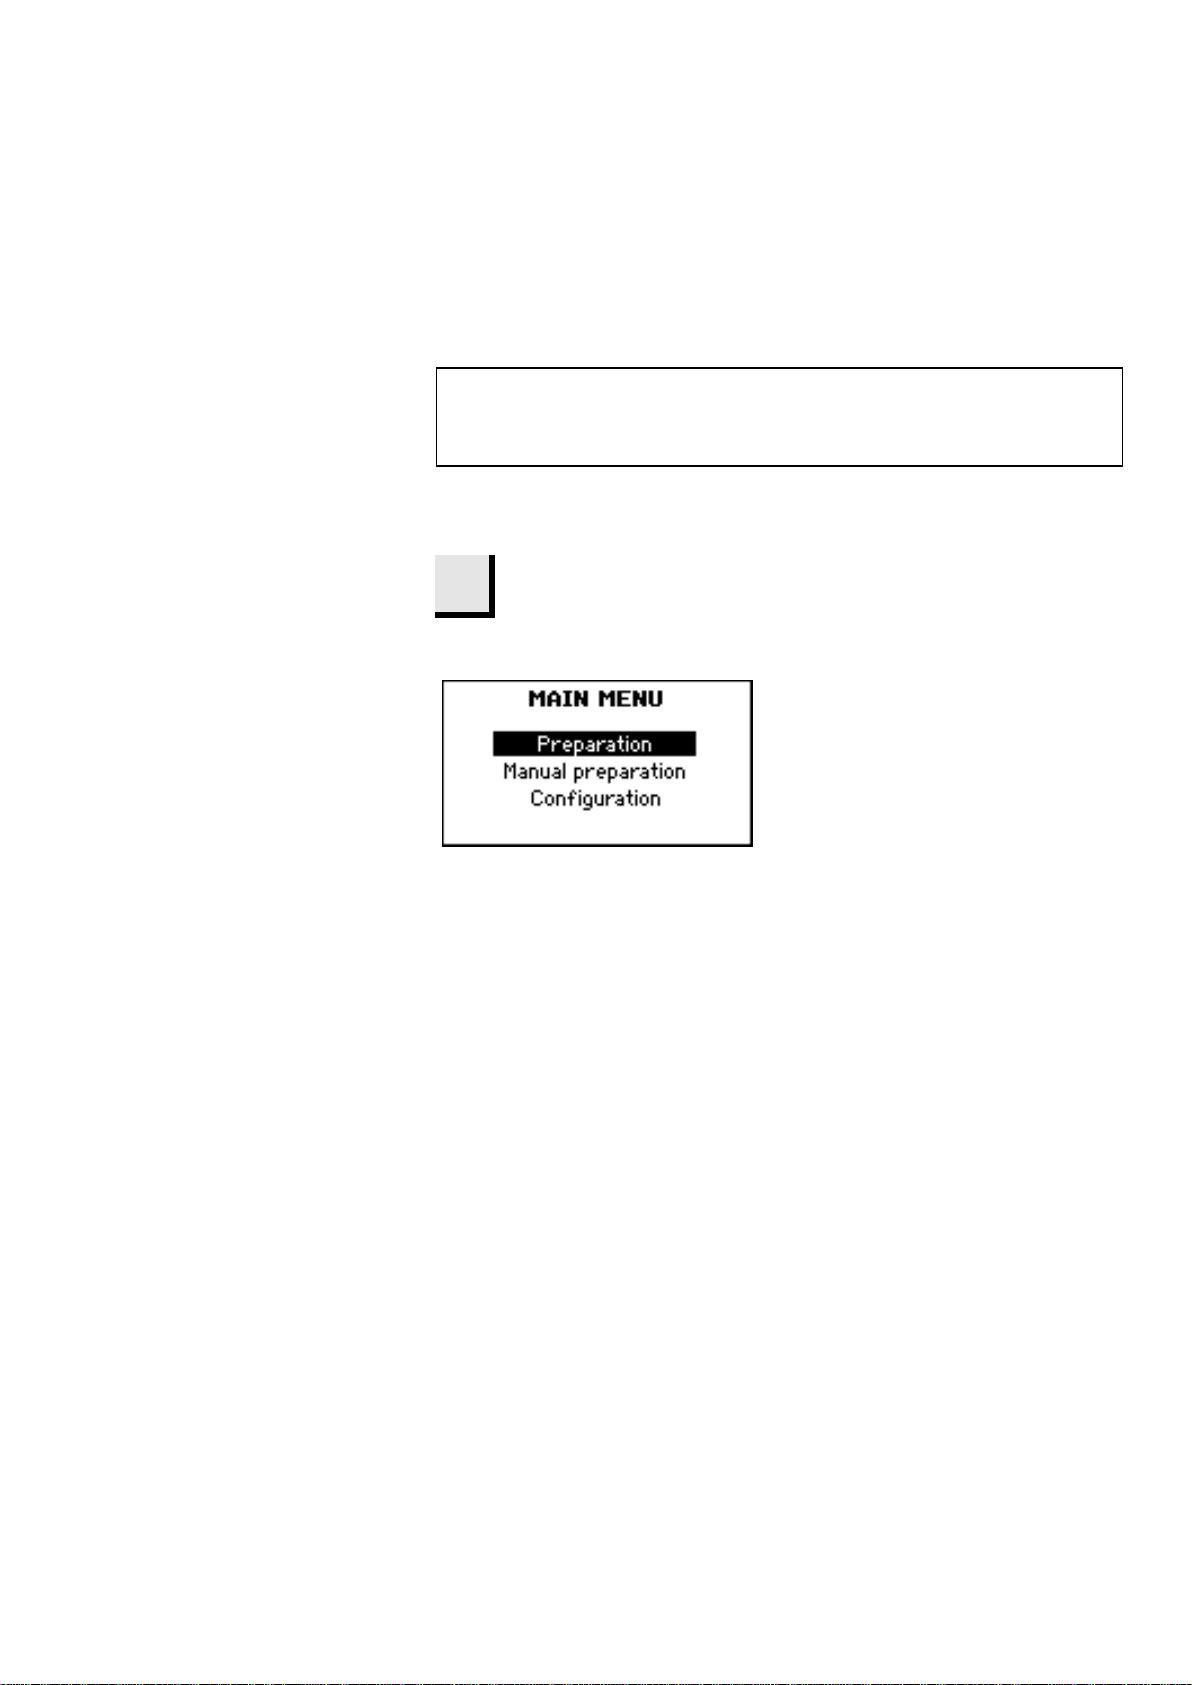
If the MAIN MENU is not currently displayed, press Esc
Mounting a Disc
Setting the Preparation
Parameters
TegraPol-11/ -15
TegraForce-1
Instruction Manual
Important!
Ensure that the back of the disc is clean and has nothing attached to it that
may prevent it lying flat on the turntable
Place the disc on the turntable and rotate it until the 3 driving pins
engage with the holes in the turntable.
Before starting the preparation process, the disc speed and water
application need to be specified. This is done using the control panel
software:
until the MAIN MENU appears
Use the Arrow buttons
Press ENTER to activate the PREPARATION Menu.
to select Manual preparation:
Within this menu, there are 3 preparation options
Options Speed(s)
Grinding 300 ON
Polishing 150 OFF
User def.
for TegraPol-11
for TegraPol-15
Use the Arrow buttons
preparation option.
[rpm]
50 - 300
40 – 600
Water Change
ON or OFF
ON or OFF
to select the desired
Increment
[rpm]
10

Starting the Process
Stopping the Process
Spin Function
TegraPol-11/ -15
TegraForce-1
Instruction Manual
If User def. is selected, use the standard editing
procedures to specify the desired preparation conditions.
D
The TegraPol software is now ready to begin the preparation
process.
Once the desired process has been selected, press
turntable rotating.
If water is required to an otherwise dry process, press
the process settings and apply water. This occurs as long as
held.
To stop the turntable (and water application if using a wet
process), press
Or,
Press the emergency stop button to stop the process.
The emergency stop button must be turned to release it before
the machine can be restarted.
The sample mover will return to its initial position before the
process can be re-started.
After a grinding process has been finished, the built-in Spin function
can be used to rotate the preparation disc at high speed to remove
water from the surface of the disc.
This function can be used to remove water from a MD-grinding disc
or a SiC-paper before removing it, or to dry an MD-Disc or an MDChem cloth.
The Spin function can only be used when the specimen mover is moved
Press and hold the Start key for at least one second to start the
Spin function. (Two short beeps can be heard).
If the specimen mover is in the down position the first short beep
will be followed by one long beep.
Release the Start key to stop the Spin function.
o.
Note:
into the top position.
s to start the
w to override
w is
17
Checking the Packing Contents
Getting Acquainted with TegraForce-1
TegraPol-11/ -15
TegraForce-1
Instruction Manual
3. Installing TegraForce-1 on TegraPol
1 TegraForce-1
1 Pressure hose, ¼" (3 m)
1 Nylon air hose ø4/ø6, (1m)
1 Hose clamp
1 Quick coupling
1 Hose nipple
6 Screws M5x15.0
1 Allen key 2.5 mm
1 Allen key 5 mm, with handle
Handle to unlock TegraForce-1 for moving into upward position
D-Sub connector for TegraDoser-1 or nozzle block of
TegraDoser-5
LED-light to illuminate preparation disc
Release outlet valve from water/oil filter for compressed air
18
TegraPol-11/ -15
19
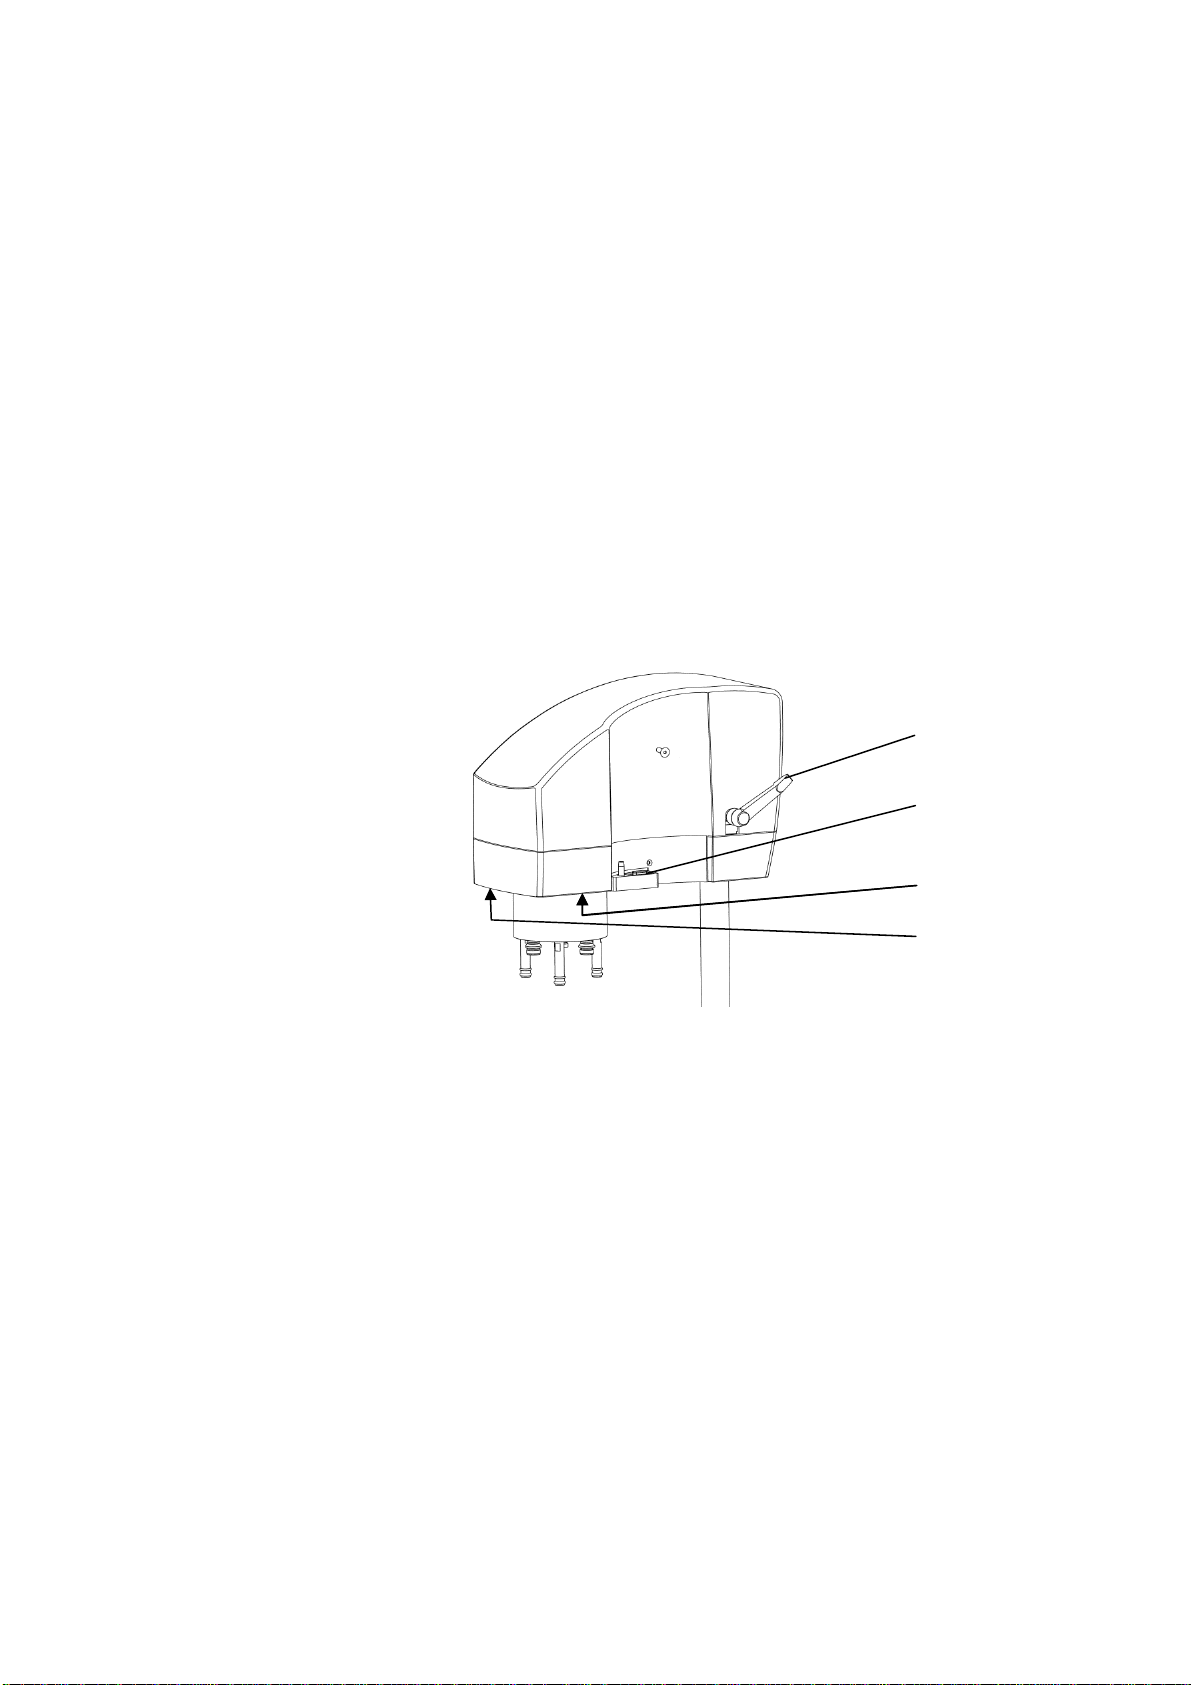
Setting up TegraForce-1 on TegraPol
Support Hole
Fastening
TegraForce-1
Instruction Manual
Remove the cap covering the support hole placed on the top of
the TegraPol cabinet.
Screws
Remove the two caps covering the fastening screws on the left-
hand side of the TegraPol cabinet by lifting them off with a knife.
Lead the supporting column of TegraForce-1 down into the hole
at the back of the TegraPol.
Then both the distance between disc and specimen mover plate
and the position of the specimen mover plate over the disc have
to be adjusted.
To adjust the correct distance mount a preparation disc on
TegraPol and a specimen mover disc on the TegraForce-1.
Loosen the 2 fastening screws and adjust the space between the
disc and specimen mover plate to about 1 -1.5 mm.
Re-tighten the 2 fastening screws again.
To set the correct position, see Disc Margin in the following
section.
TegraPol-11/ -15
20
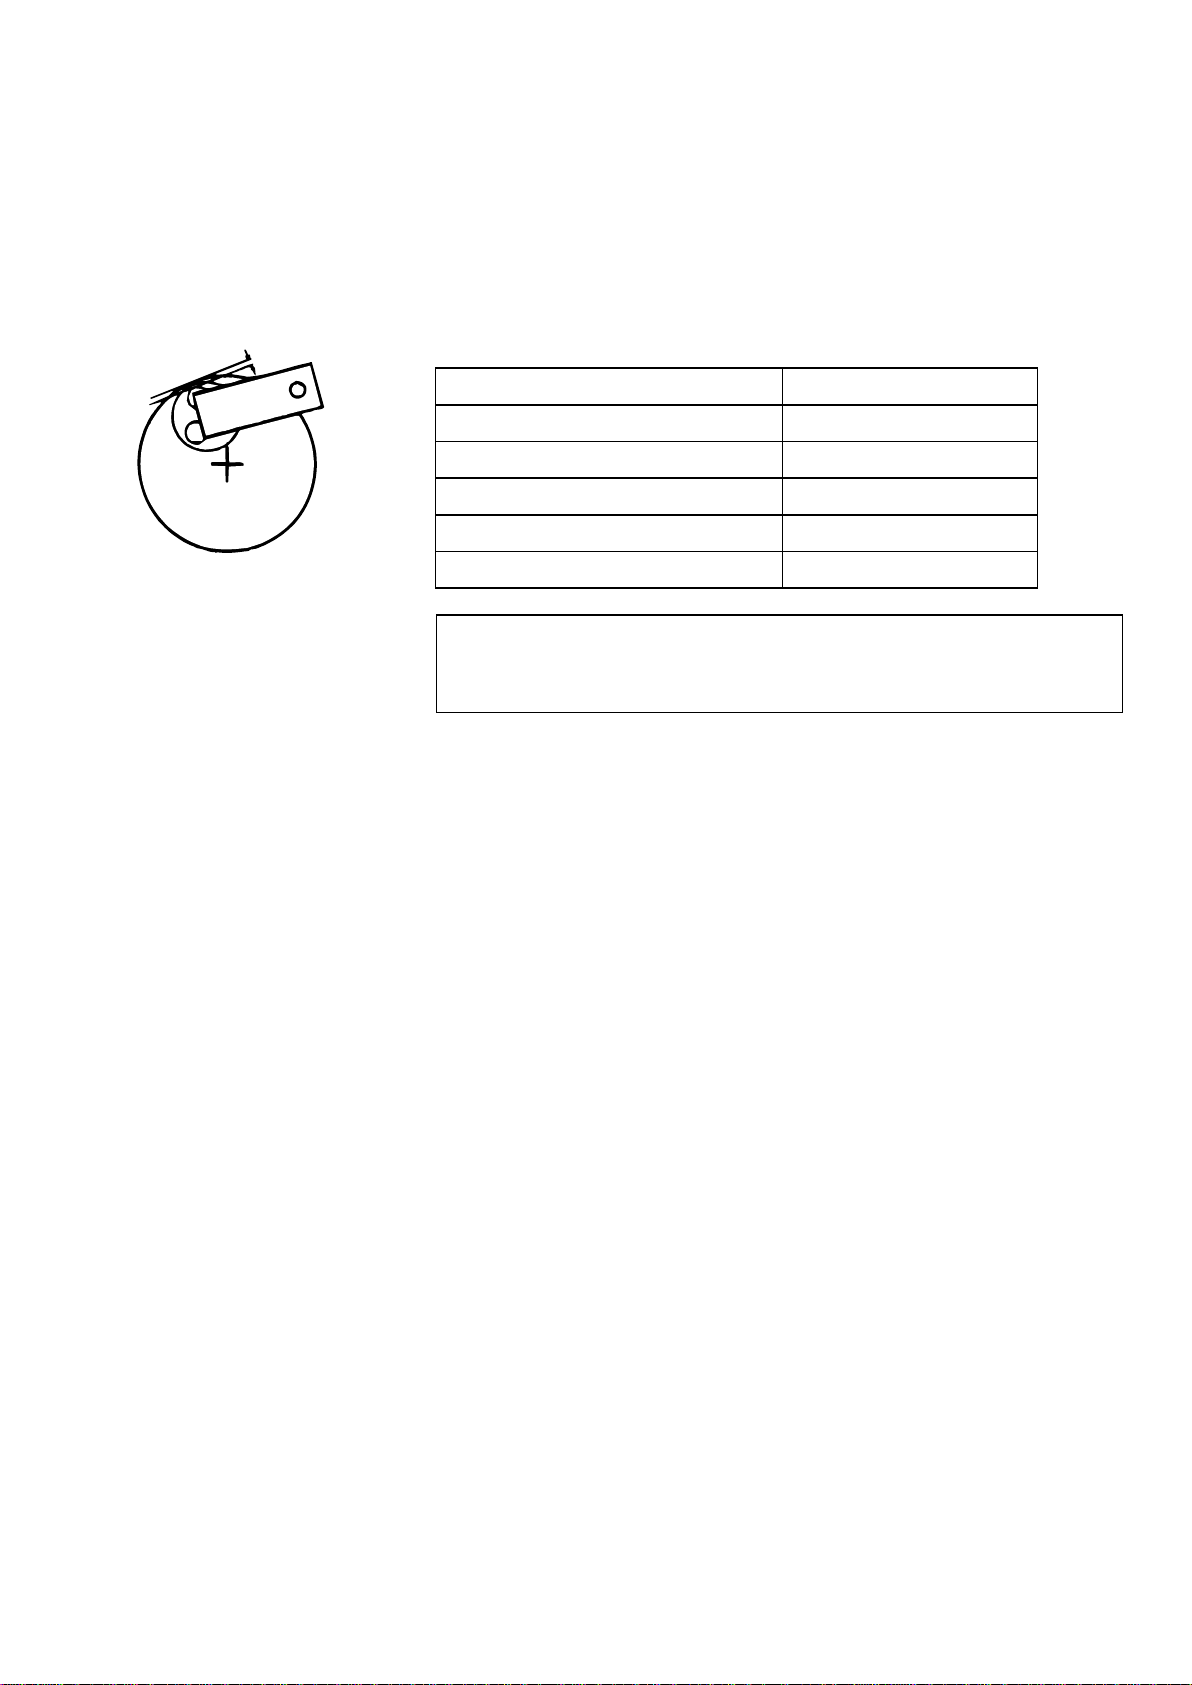
Disc Margin
TegraForce-1
Instruction Manual
Before final tightening of the two fastening screws or the bottom nut
you must check the margin between the specimen holder plate hole
and the edge of the grinding / polishing disc. This distance should be:
Diameter of the Holes Disc Margin
40 mm 1.5 mm
1½" 2.5 mm
1¼" 6.0 mm
30 mm 6.5 mm
25 mm 9.0 mm
IMPORTANT
Having adjusted the disc margin, tighten the two fastening screws firmly.
Make sure that the distance between disc and specimen mover plate still is
correct. The column should now remain in position.
Mount the two caps on the holes for the fastening screws.
TegraPol-11/ -15
TegraForce-1
Instruction Manual
Electrical Connections
Compressed Air Connections
Emptying the Water / Oil Filter
There is a single electrical connection between the TegraPol and the
TegraForce. This provides both the 24V power supply to the
TegraForce and a data bus, which enables the TegraPol and
TegraForce to communicate.
Switch off the TegraPol.
Use the single cable attached to the TegraForce, and connect it
to the Sample Mover connector on the rear of the TegraPol. To
locate this connector, refer to the diagram for the back of the
TegraPol in the section "Getting Acquainted with TegraPol".
The quality of the air in the compressed air system used with this
machine must meet the standards stated in ISO 8573-1. To connect
the TegraSystem:
Mount the quick coupling on the pressure hose and secure it with
the hose clamp supplied.
Connect the air hose to the quick coupling and fit the other end
into the compressed air inlet on TegraForce-1.
IMPORTANT
The air pressure must be between 5 bar (72 psi) and 10 bar (145 psi) and
have a quality specified in ISO 8573-1.
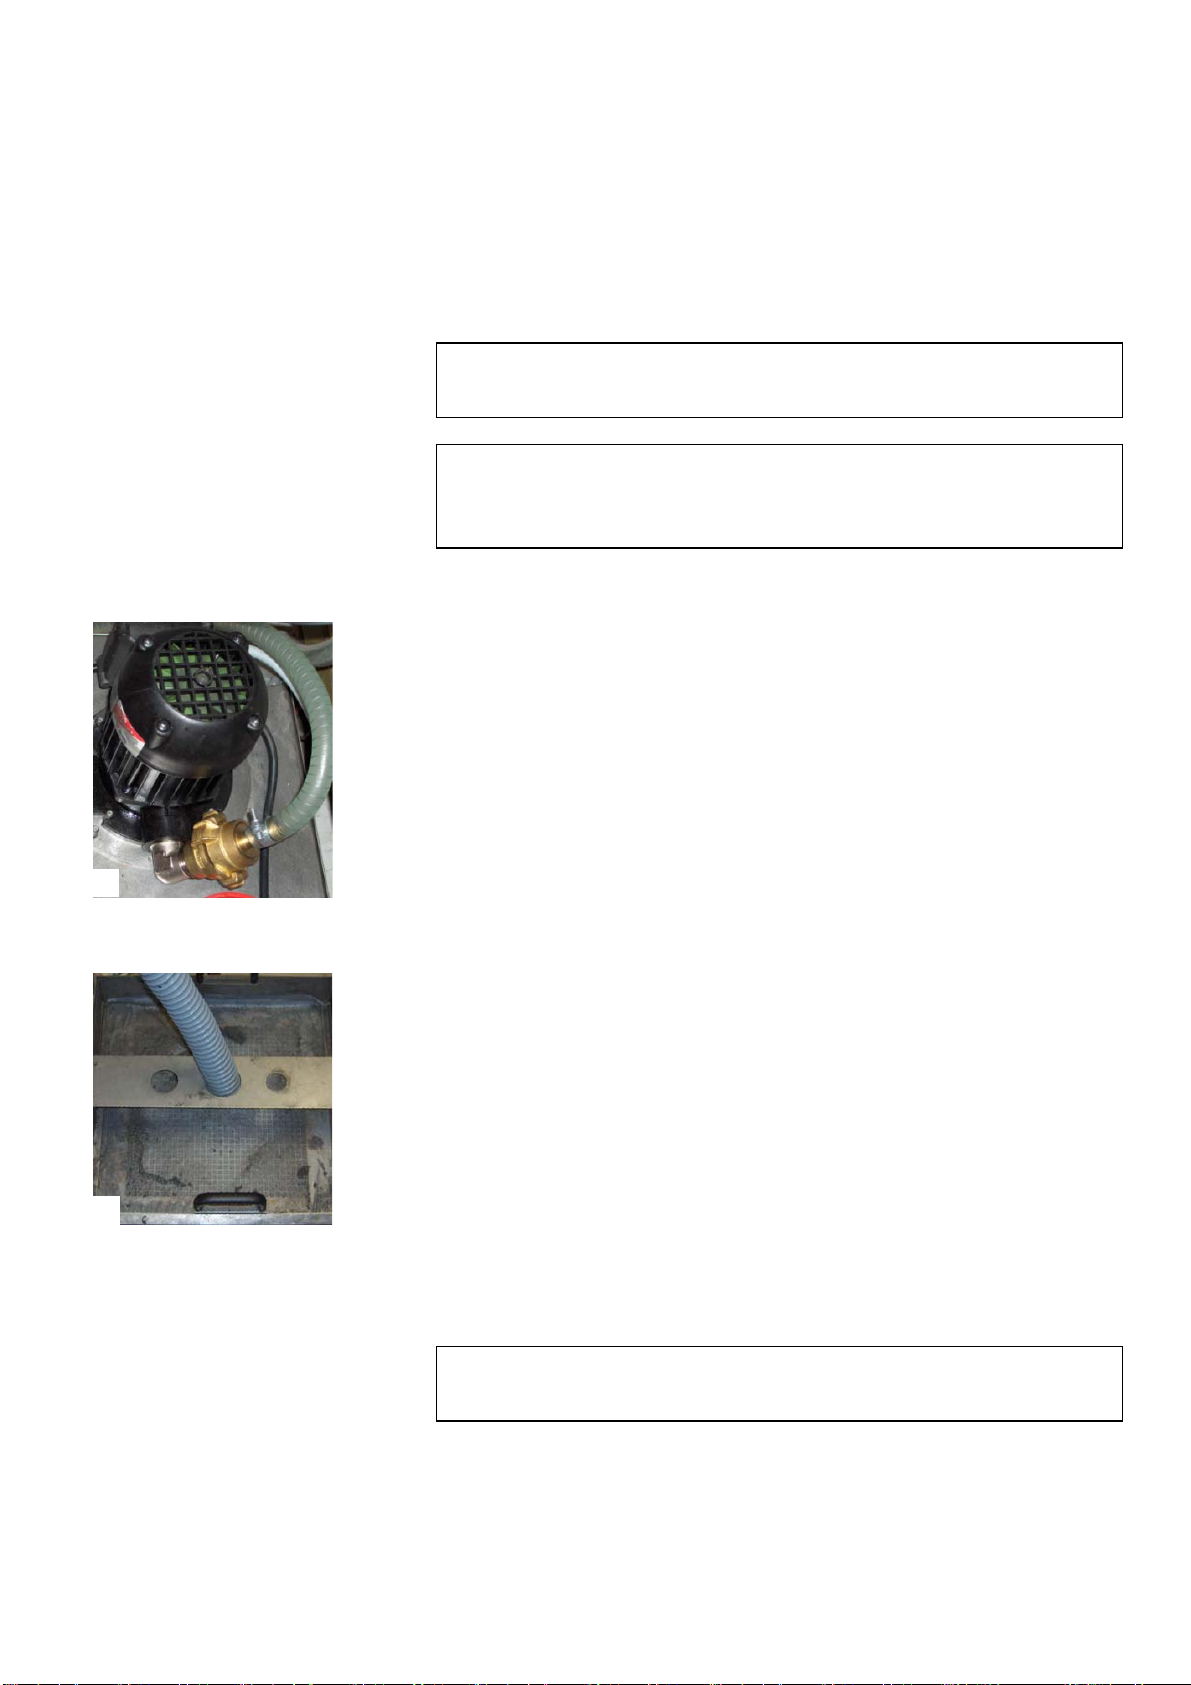
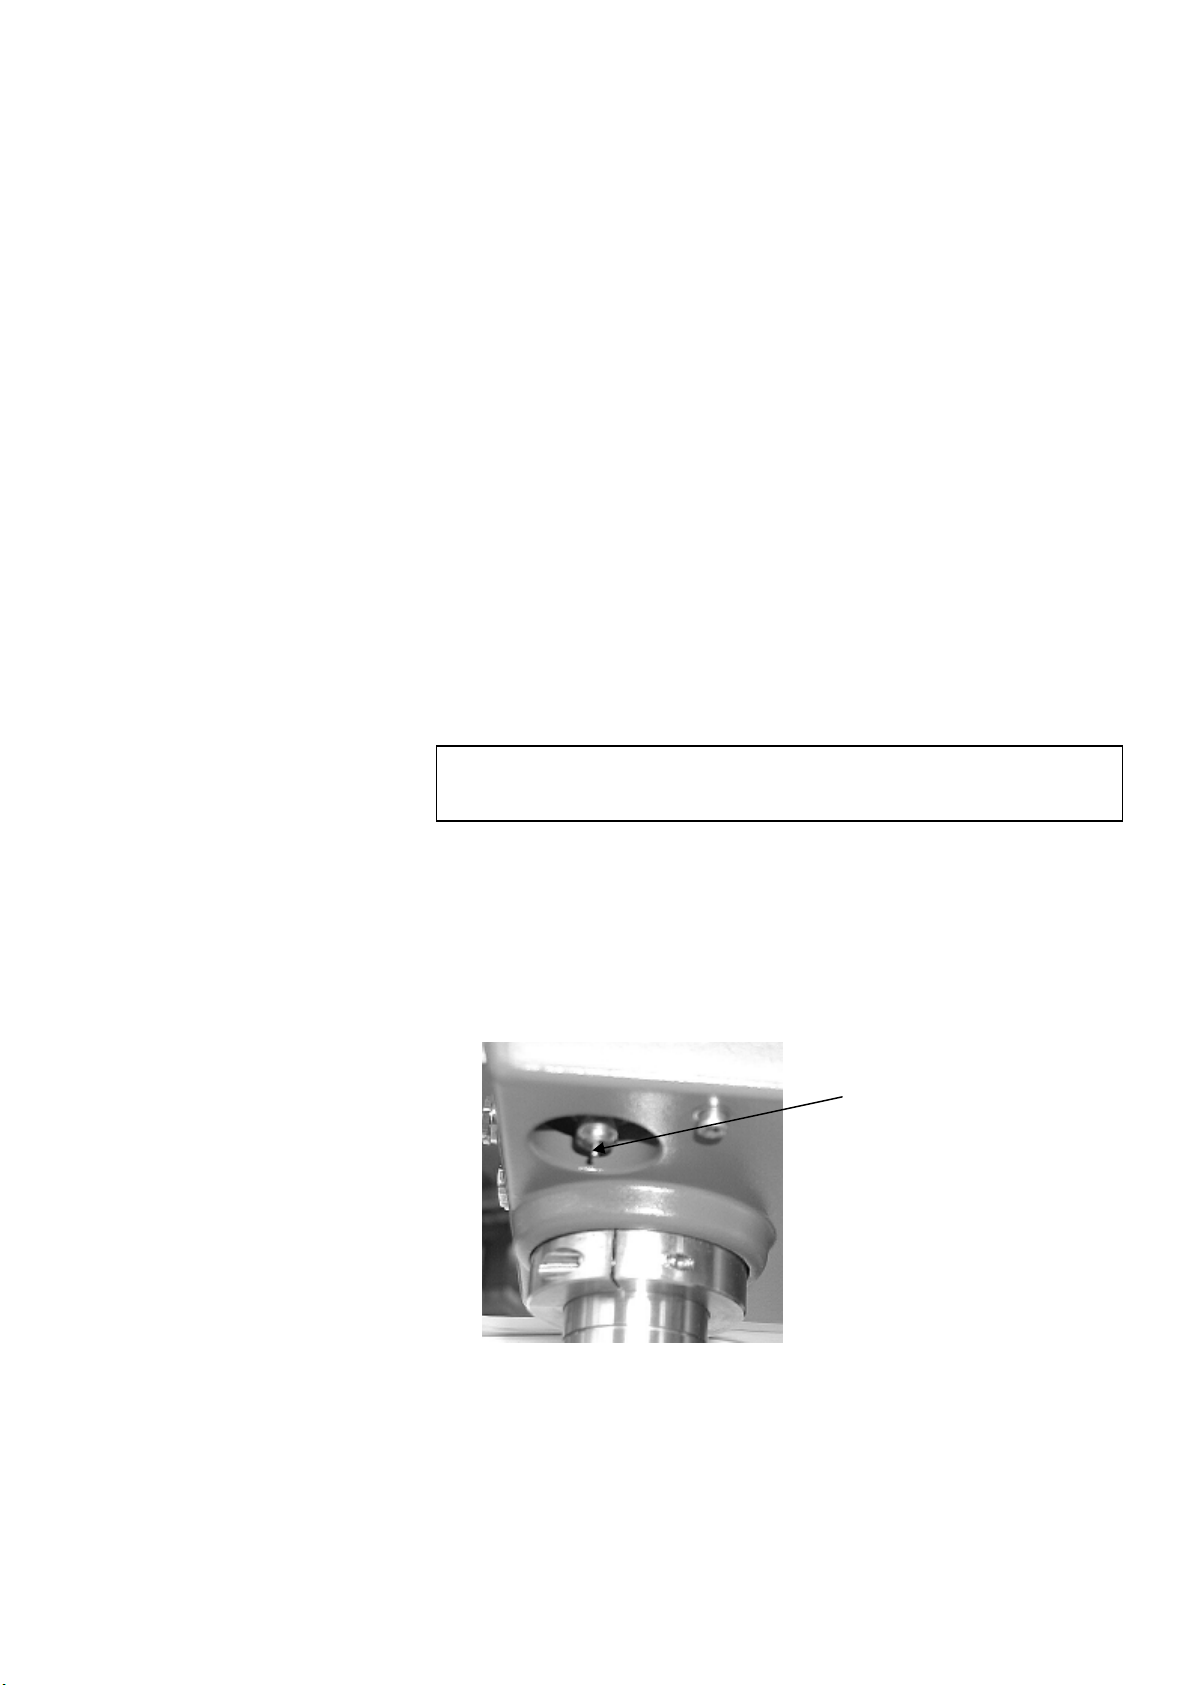
TegraForce is fitted with a water / oil filter that removes excessive
amounts of these substances from the compressed air supply. As a
result of this, it is necessary to empty the filter periodically:
Remove the preparation disc from the work area. Failure to do
this may result in the preparation disc being contaminated by
water and oil particles landing on it.
Locate the release outlet valve on the bottom of the filter glass.
Release Outlet Valve
Hold a container under the filter to retain any water released and
press the release valve.
Replace the preparation disc.
21

TegraPol-11/ -15
22
Removing TegraForce-1 from TegraPol
TegraForce-1
Instruction Manual
To remove TegraForce from TegraPol:
Switch off TegraPol with the switch at the back of the machine.
Disconnect TegraForce from the compressed air supply.
Remove the TegraDoser-1 or the dosing nozzle from
TegraDoser-5 from the TegraForce.
Disconnect the TegraForce from the TegraPol by removing the
plug.
Release the handle and let the TegraForce swing in the upper
position.
Remove the preparation disc.
Press the TegraForce down again until the head is locked in
position.
Remove the two caps covering the fastening screws on the left-
hand side of the TegraPol cabinet by lifting them off with a knife.
Loosen the two fastening screws while holding the TegraForce in
position.
WARNING!
TegraForce is relatively heavy. When loosening the two fastening screws it
might slide downwards. Keep your hands off the column and away from
between specimen mover disc and turntable.
Lift the TegraForce straight up and place it on a safe and stable
support.
23
Inserting Specimen Mover
Plates / Holders
Inserting a Specimen Mover Plate
Inserting a Specimen Holder
Switching on the TegraPol with a TegraForce-1 Installed
TegraPol-11/ -15
TegraForce-1
Instruction Manual
4. Operating TegraPol with TegraForce-1
The TegraForce-1 can be operated with either a specimen mover
plate or a specimen holder.
Unlock the TegraForce-1 using the handle and let it swing into
the upright position.
Remove the three screws securing the specimen mover plate or
slide the specimen holder off the legs.
Put a specimen mover plate in position and secure it with the
three screws.
Insert the correct preparation disc and press TegraForce-1 down
until the lock engages.
Unlock the TegraForce-1 using the handle and let it swing into
the upright position.
Remove the three screws securing the specimen mover plate.
Slide the specimen holder evenly onto the three legs.
Insert the correct preparation disc and press TegraForce-1 down
until the lock engages.
WARNING!
When working with specimen holders make sure that the screws clamping
the specimens do not stick out of the specimen holder.
Use different length of screws for samples with different diameters.
When a TegraPol, which has been fitted with a TegraForce-1, is
switched on, the software inside the TegraPol is able to detect the
TegraForce-1, automatically, and informs you of its presence in the
start-up display.
TegraPol-11/ -15
24
Setting the Preparation Parameters
TegraForce-1
Instruction Manual
Before starting the preparation process, the disc speed, preparation
time, force and water application need to be specified. This is done
using the control panel software:
Note!
If a TegraDoser-5 is mounted on the TegraForce and connected to the
TegraPol, then refer to the TegraDoser-5 instruction manual for the correct
procedure for setting the preparation parameters.
If the MAIN MENU is not currently displayed, press Esc
until the MAIN MENU appears
Use the Arrow buttons
to select Preparation:
 Loading...