

Page 1
Page 2

Page 3

1
Content
I. Reference .................................................................................................. 4
1.1 General Features .......................................................................... 4
1.2 Accessories .................................................................................... 5
II. Product Overview .................................................................................... 5
2.1 FrontPanel .................................................................................... 5
2.2 Rear Panel ..................................................................................... 6
2.3 Remote Control Unit (RCU)........................................................ 7
III. STB ........................................................................................................ 9
IV. Installation .............................................................................................. 9
4.1 Dish Setting ................................................................................. 10
4.2 Manual scan ................................................................................ 10
4.3 Auto Scan .................................................................................... 11
4.4 Blind Search ................................................................................ 11
4.5 OTA Menu .................................................................................. 12
4.6 Motorized Setting ....................................................................... 12
4.7 USALS Setup .............................................................................. 13
V. System Settings...................................................................................... 13
5.1 System ......................................................................................... 13
5.2 OSD Settings ............................................................................... 15
5.3 A/V Output Setting ..................................................................... 15
5.4 Video Settings ............................................................................. 16
5.5 Parental Control ......................................................................... 17
5.6 Timer Adjust ............................................................................... 18
5.7 IP Settings ................................................................................... 21
5.8 Database Reset ............................................................................ 21
5.9 Help ............................................................................................. 22
VI. Channels .............................................................................................. 22
6.1 Edit Channels ............................................................................. 23
6.2 Set Favorites ............................................................................... 24
Page 4

2
6.3 Sort Channels ............................................................................. 24
6.4 Delete Satellite Channels ........................................................... 25
6.5 Multi Screen Application ........................................................... 25
VII. Channels ............................................................................................. 25
IX. USB ..................................................................................................... 25
9.1 USB Menu ................................................................................... 25
X. CA Menu ............................................................................................... 26
XI. System Information.............................................................................. 26
XII. Additional Information ....................................................................... 26
12.1 Glossary .................................................................................... 26
Page 5

3
Safety Precaution
This STB has been designed and manufactured to satisfy the international
safety standards. Please read the following safety precautions carefully before
operating this receiver.
Main Supply:
Before operating, please check the units operating voltage is 90~250V AC
50/60Hz.
Overload:
Do not overload a wall outlet, extension cord or adapter, neither use damaged
power cord or touch it with wet hand as this may result in electric shock.
Liquid:
The receiver shall not be exposed to dripping or splashing water, and that no
objects filled with liquids, such as base, shall be placed on the apparatus.
Ventilation:
Keep the slots on top of the receiver uncover to allow sufficient airflow to the unit.
Do not put the receiver on soft furnishings or carpets. Do not expose the
receiver to direct light or do not place it near a heater or in humid conditions. Do
not stack other electronic equipments on top of the receiver.
Cleaning:
Plug out the receiver from the wall outlet before cleaning. Clean the receiver by
a soft cloth or mild solution of washing-up liquid (no solvents).
Connection:
Disconnect the receiver from the mains when you connect it to satellite LNB or
disconnect it from LNB. Failure would possibly cause damage to the LNB.
Location:
Put the receiver indoor in order to avoid lightening, raining or sunlight.
Uncover:
Do not remove the cover, to reduce the risk of electric shock. Contact qualified
and licensed service personnel to repair the receiver, or contact your dealer.
Page 6

4
I. Reference
1.1 General Features
DVB-S/DVB-S2 Satellite Compliant (MPEG-II/ MPEG-IV/ H.264)
SCPC & MCPC receivable from Ku and C band satellites
Universal, Single, Single S & C Band Wideband LNB
Sensitive Tuner with Loop-Through
DiSEqC1.0/1.1/1.2/1.3 (USALS)
Unicable Supported
Blind search supported
Auto DiSEqC Search
PAL/NTSC Conversion
True full Color (32 bits) on screen display (OSD)
8 favorite group and parental lock supported
Multi-language menu supported
Multi-language audio supported
Multi-language DVB Subtitle output
7 days Electronic Program Guide (EPG)
Teletext output through VBI and OSD
Multi-Picture supported
Page 7
5
1.2 Accessories
Users manualǂ
Remote Control Unitǂ
Batteries ǂ
. HDMI Cable
A/V Cable ǂ
II. Product Overview
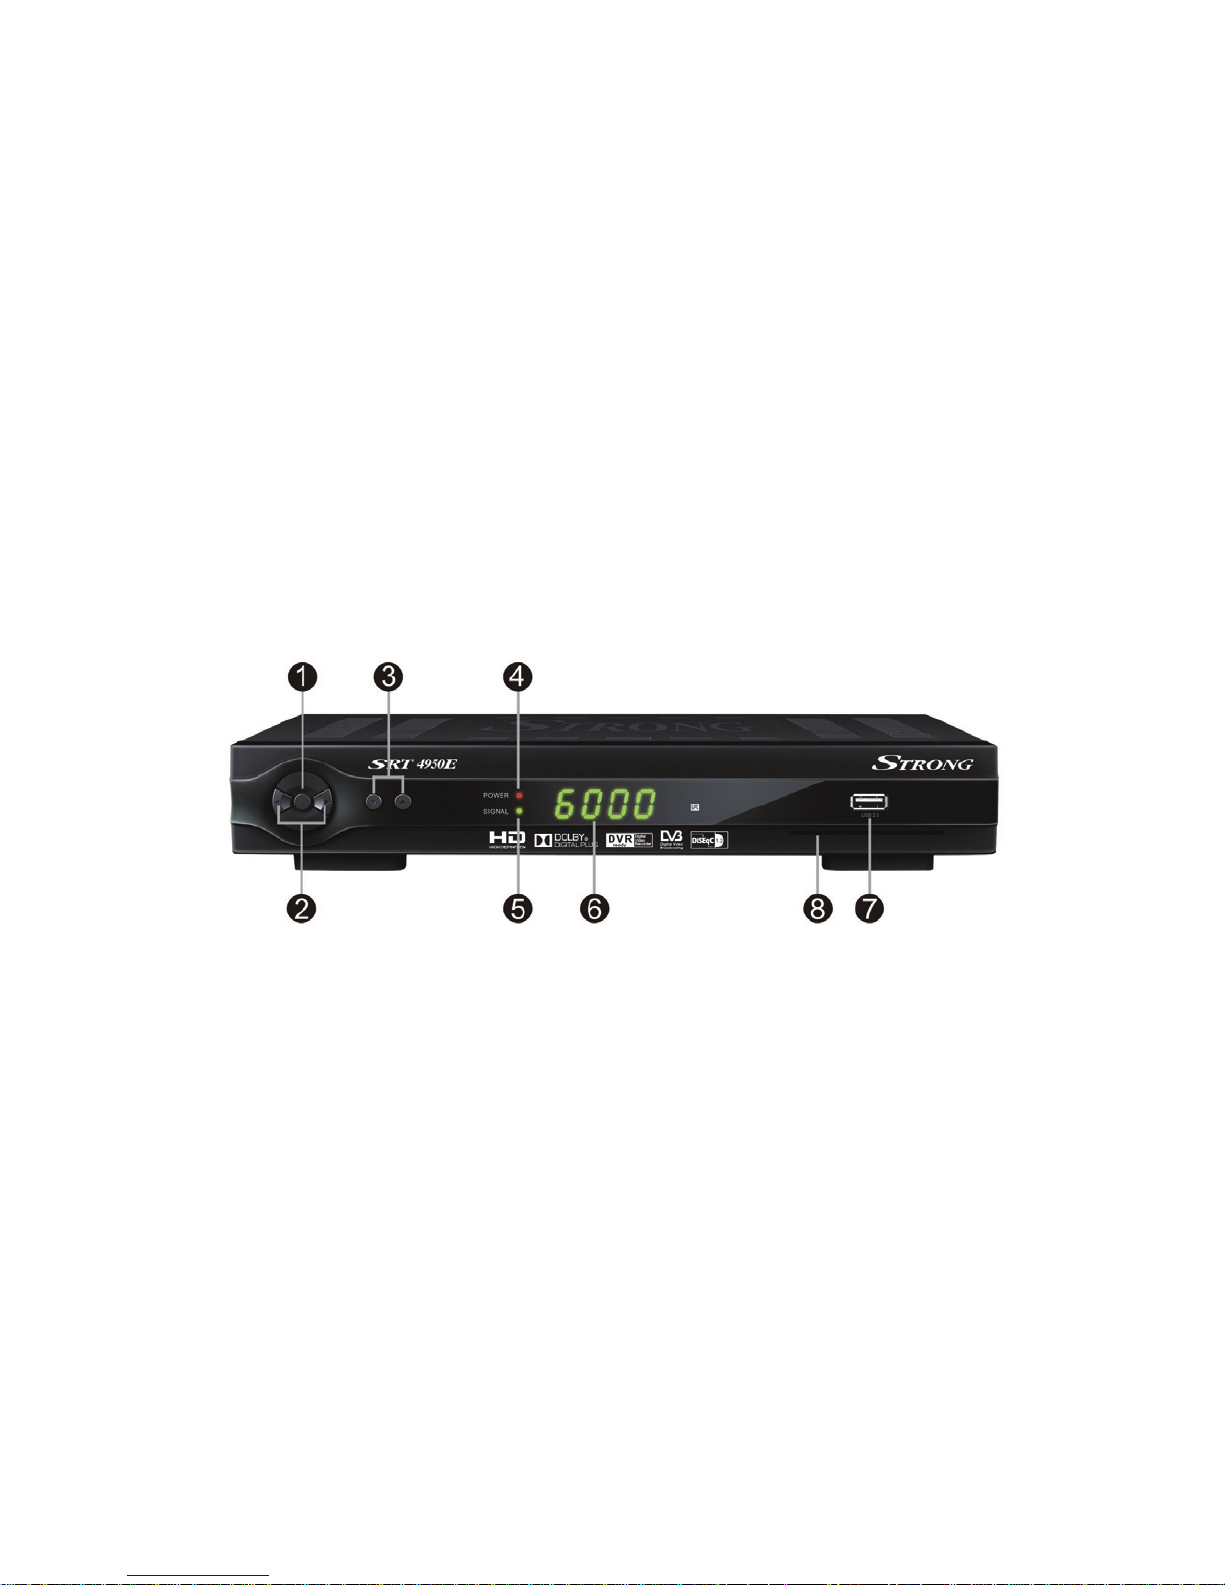
2.1 FrontPanel
1. Power
Switch between operation and standby modes.
2. VOL+/-
Change volume while watching program or change option from up to
down.
3. CH+/-
Change channels while watching program or change option from left
to right.
4. POWER LED
Power Indicator(RED).
5. SIGNAL LED
Page 8
6
Signal Indicator(Green).
6. DISPLAY
The LED display channel information. In standby mode it displays
local time.
7.USB2.0
One USB 2.0 Host Port.
8.CA
CA card’s slot.
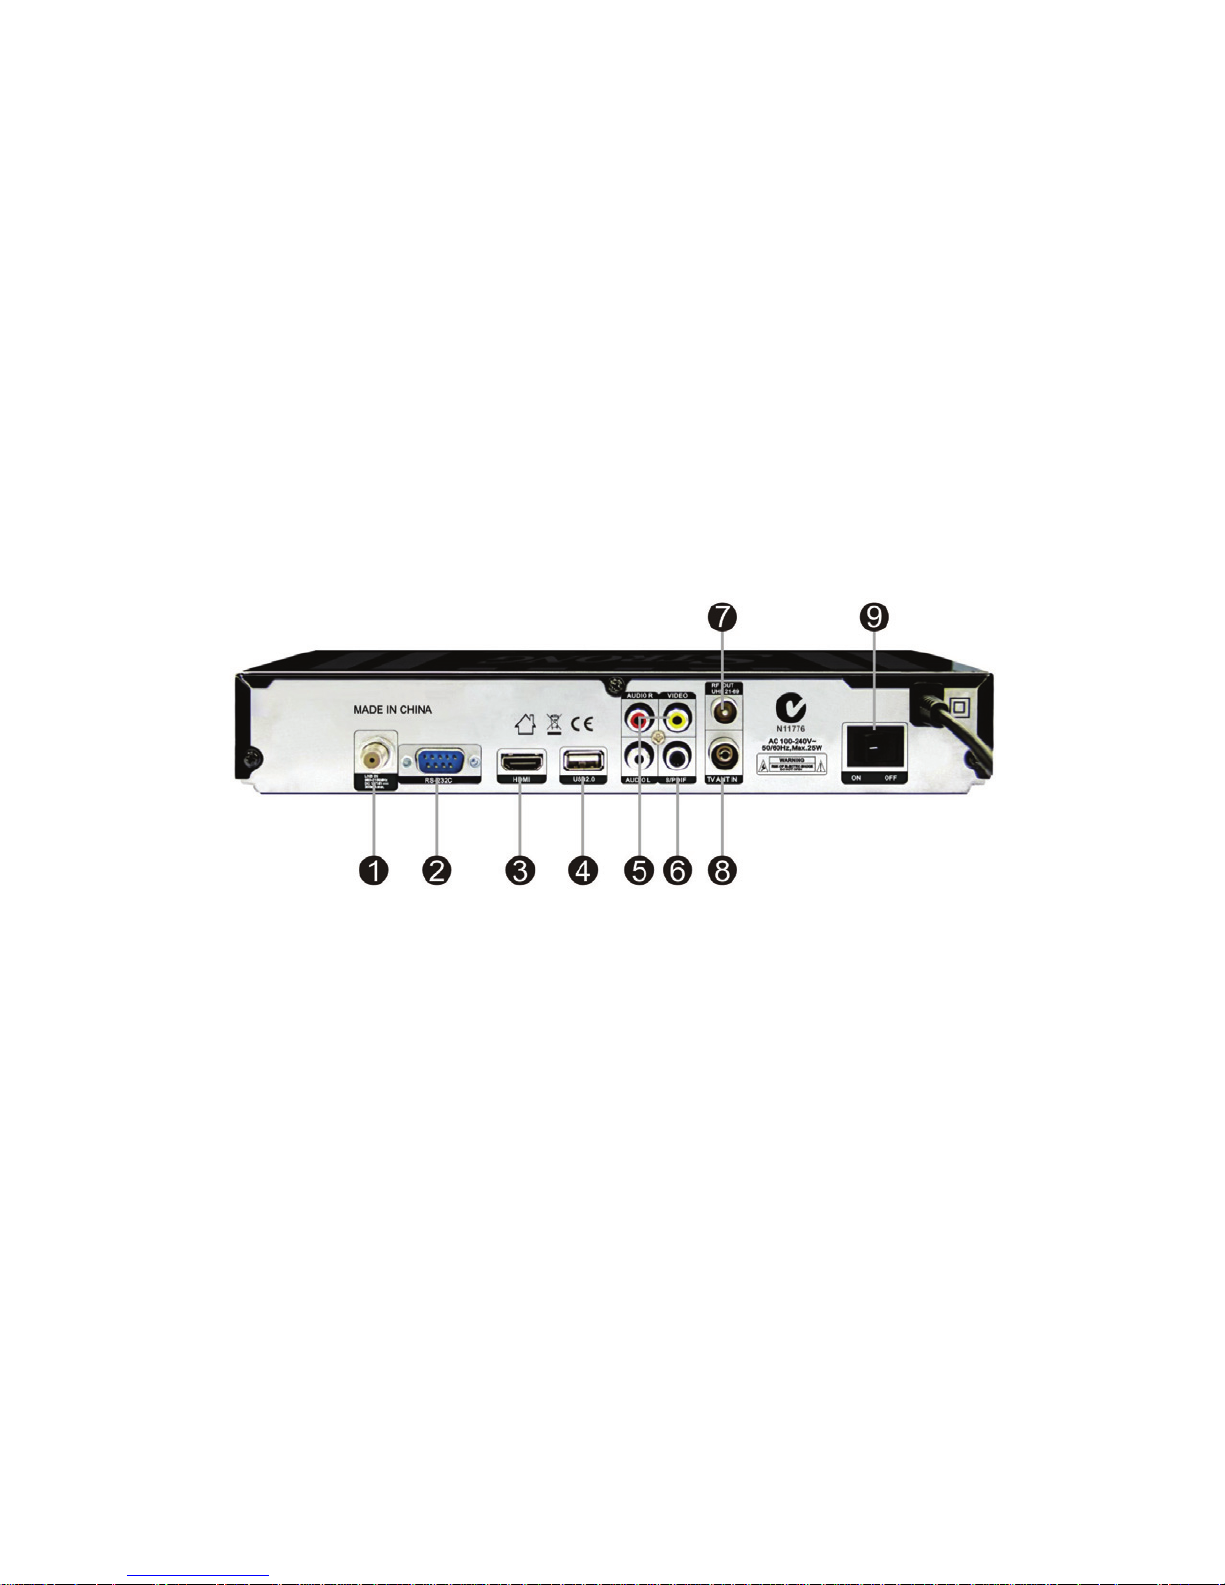
2.2 Rear Panel
1. LNB IN
Connect the Satellite Dish LNB.
2. RS232-C
Connect to the computer using a serial line.
3. HDMI
Connect to the TV using an HDMI cable.
4.USB2.0
One USB 2.0 Host Port.
5.AUDIO/ VIDEO
Connect to the TV using an RCA cable.
6. SPDIF
Digital Audio output (COAXIAL).
Page 9
7
7.RF OUT
Radio Frequency Output Interface
8.TV ANT IN
TV Antenna Input Interface
9.POWER Switch
Change the state of power on or off
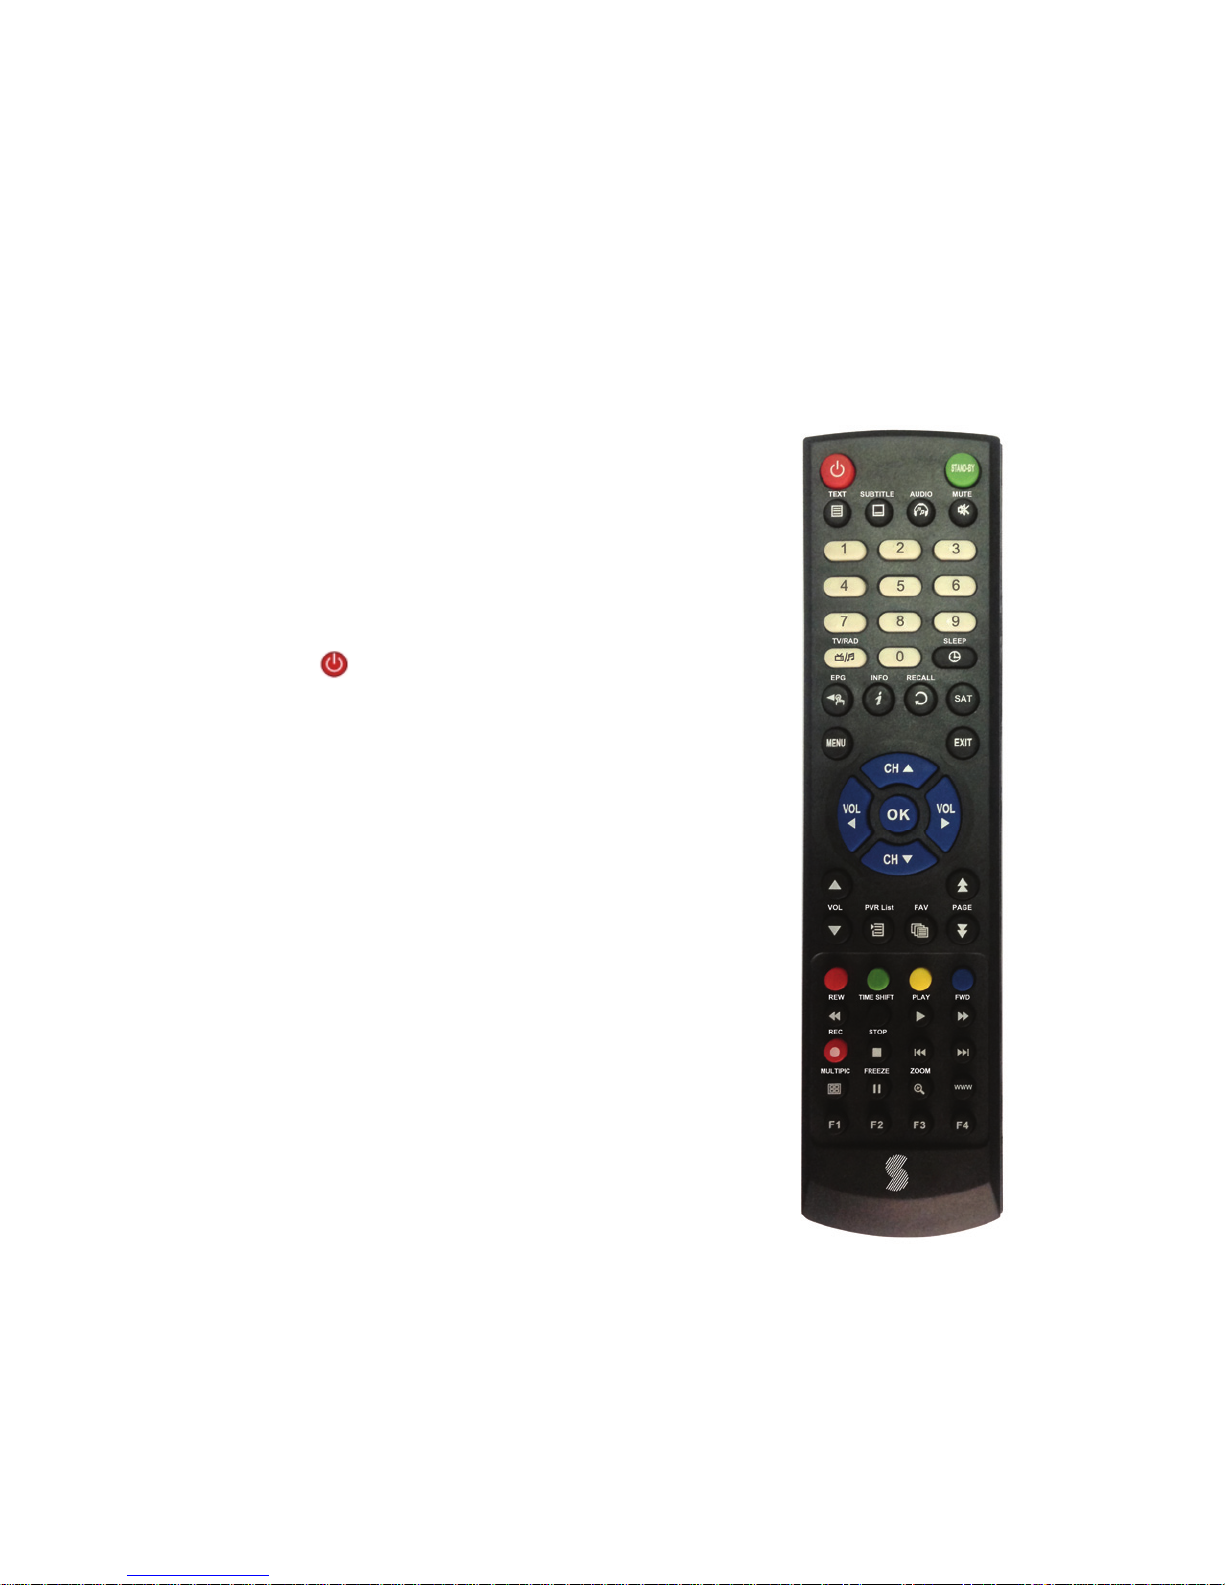
2.3 Remote Control Unit (RCU)
You can control this receiver by this remote
controller with full function.
1. POWER: Change the state of power on or off.
2.STAND-BY
˖
Change standby modes.
3. TEXT: Display the teletext.
4. SUBTITLE: Display the subtitle language list
5. AUDIO: Display the audio list.
6. MUTE: Mute audio.
7. NUMERIC KEY (0~9): Enter a TV/radio channel
number or menu option number.
8. TV/RAD: Switch between TV and RADIO.
9.SLEEP
˖
Enter the sleep timer menu.
10. EPG (Electronic Program Guide): Display the
program guide.
11. INFO: Display the program information.
12. Recall: Show the previous viewed channels list;
Or switch to the previous viewed channel.
13. SAT: Show the scanned satellite list.
14. MENU: Activate main menu or exit to live channel
15. VOL+/- : Navigates through the Menus or change volume in viewing mode.
16. CH+/-: Navigates through the Menus or changes program
Page 10

8
17. OK: Confirm the selected operation or display the channel list while
watching a program.
18. EXIT: Exit current menu step by step.
19. VOL : Navigates through the Menus or change volume in viewing mode.
20.PVR List
˖
Display the PVR list.
21. FAV: Display favorite channel list you set before.
22.COLOR BUTTON: Accrording prompt message to select the Red, Green,
Yellow and Blue button.
23.
Fast rewind.
24.TIME SHIFT: pause a live broadcast and return to it later and continue where
you left off.
25.:Play
26.
: Fast forward.
27.: Record
28.:Stop
29.
: Previous
30.
: Next
31. MUTIPIC: Multi picture display
32.
: Pause the program
33. ZOOM: Picture zooming function.
34.WWW:Entertainment Menu
35.F1: Accessorial function
36.F2: Switch 4:3 & 16:9 Screen Formats.
37.F3:Setup event timer.
38.F4:Network IP Setting Menu
Page 11
9
III. STB
You should install the receiver when powering on your product for the first time
after purchase.
Note: The default password is 0000. If you have forgotten your password,
please contact your local product distributor.
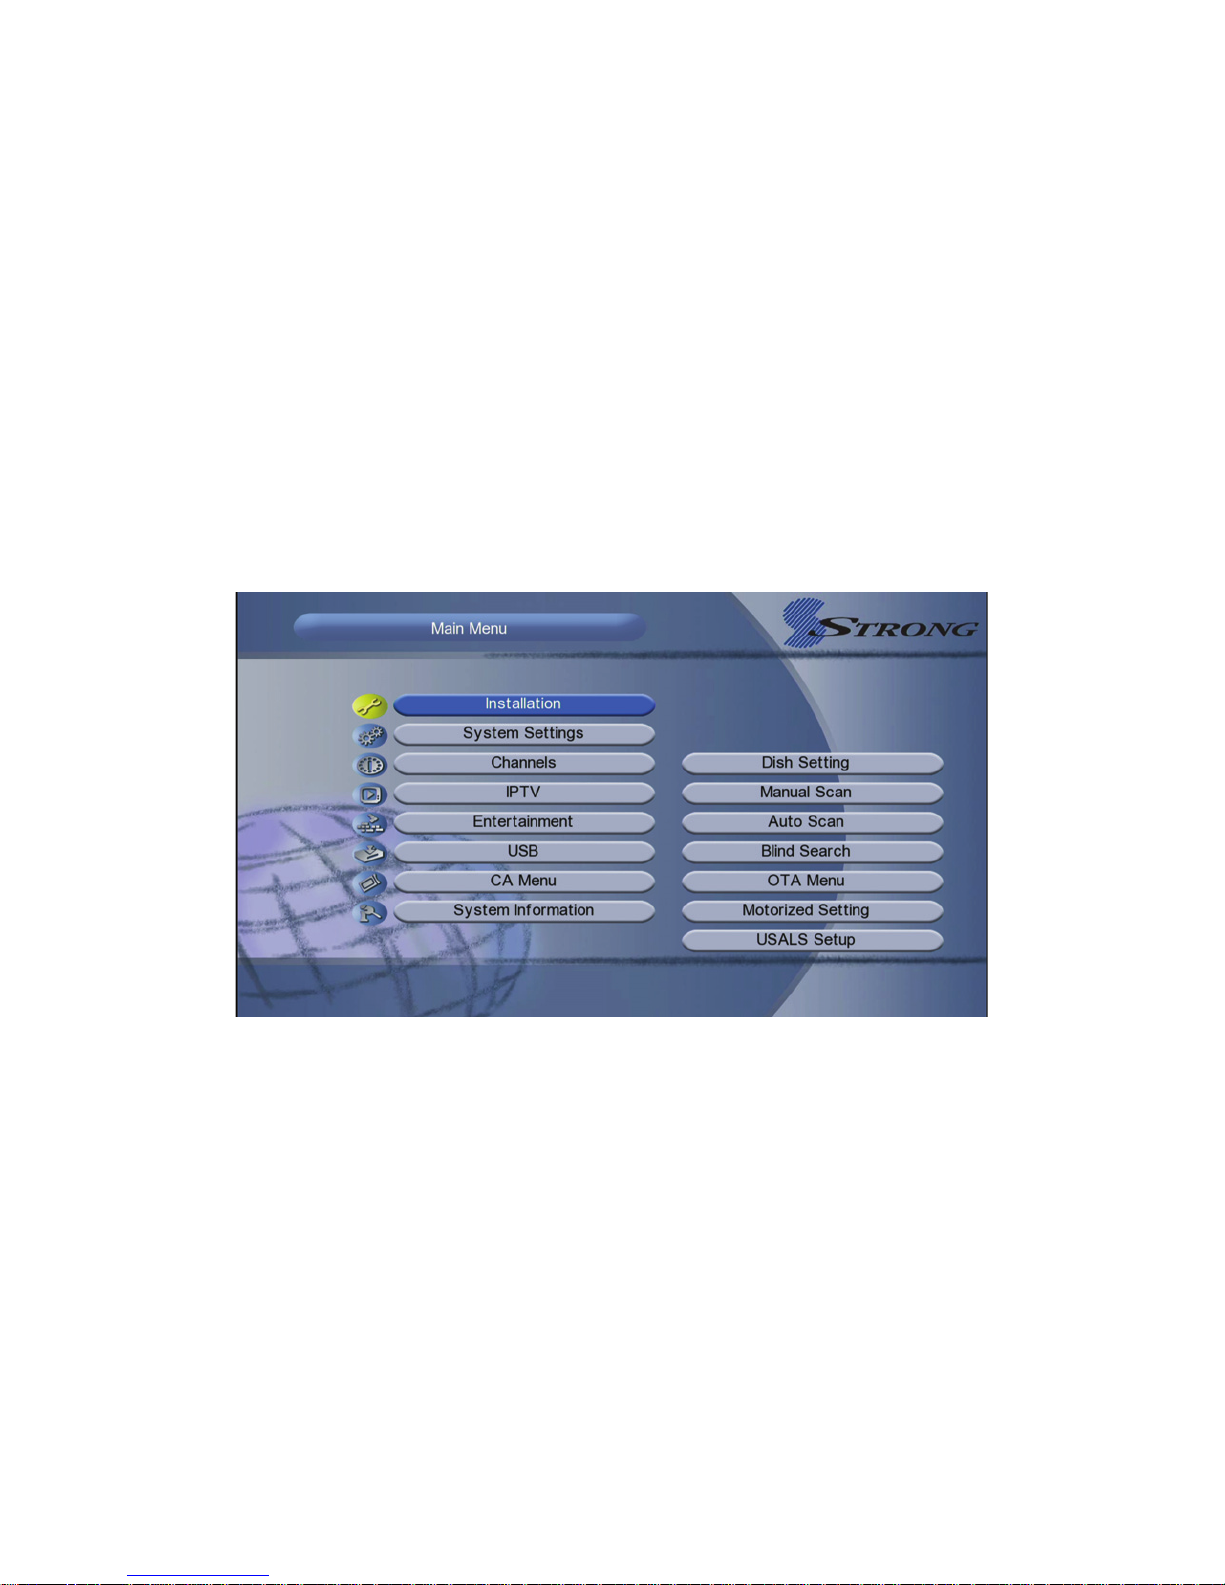
Main menu
Press the MENU button when you exit all menu, highlight the option which you
want to operation,press OK button.
IV. Installation
Highlighted to Installation,press the OK button to enter into the installation
menu .In Installation menu,you can make antenna setting, usals setup,Factory
Default and so on.
Page 12
10
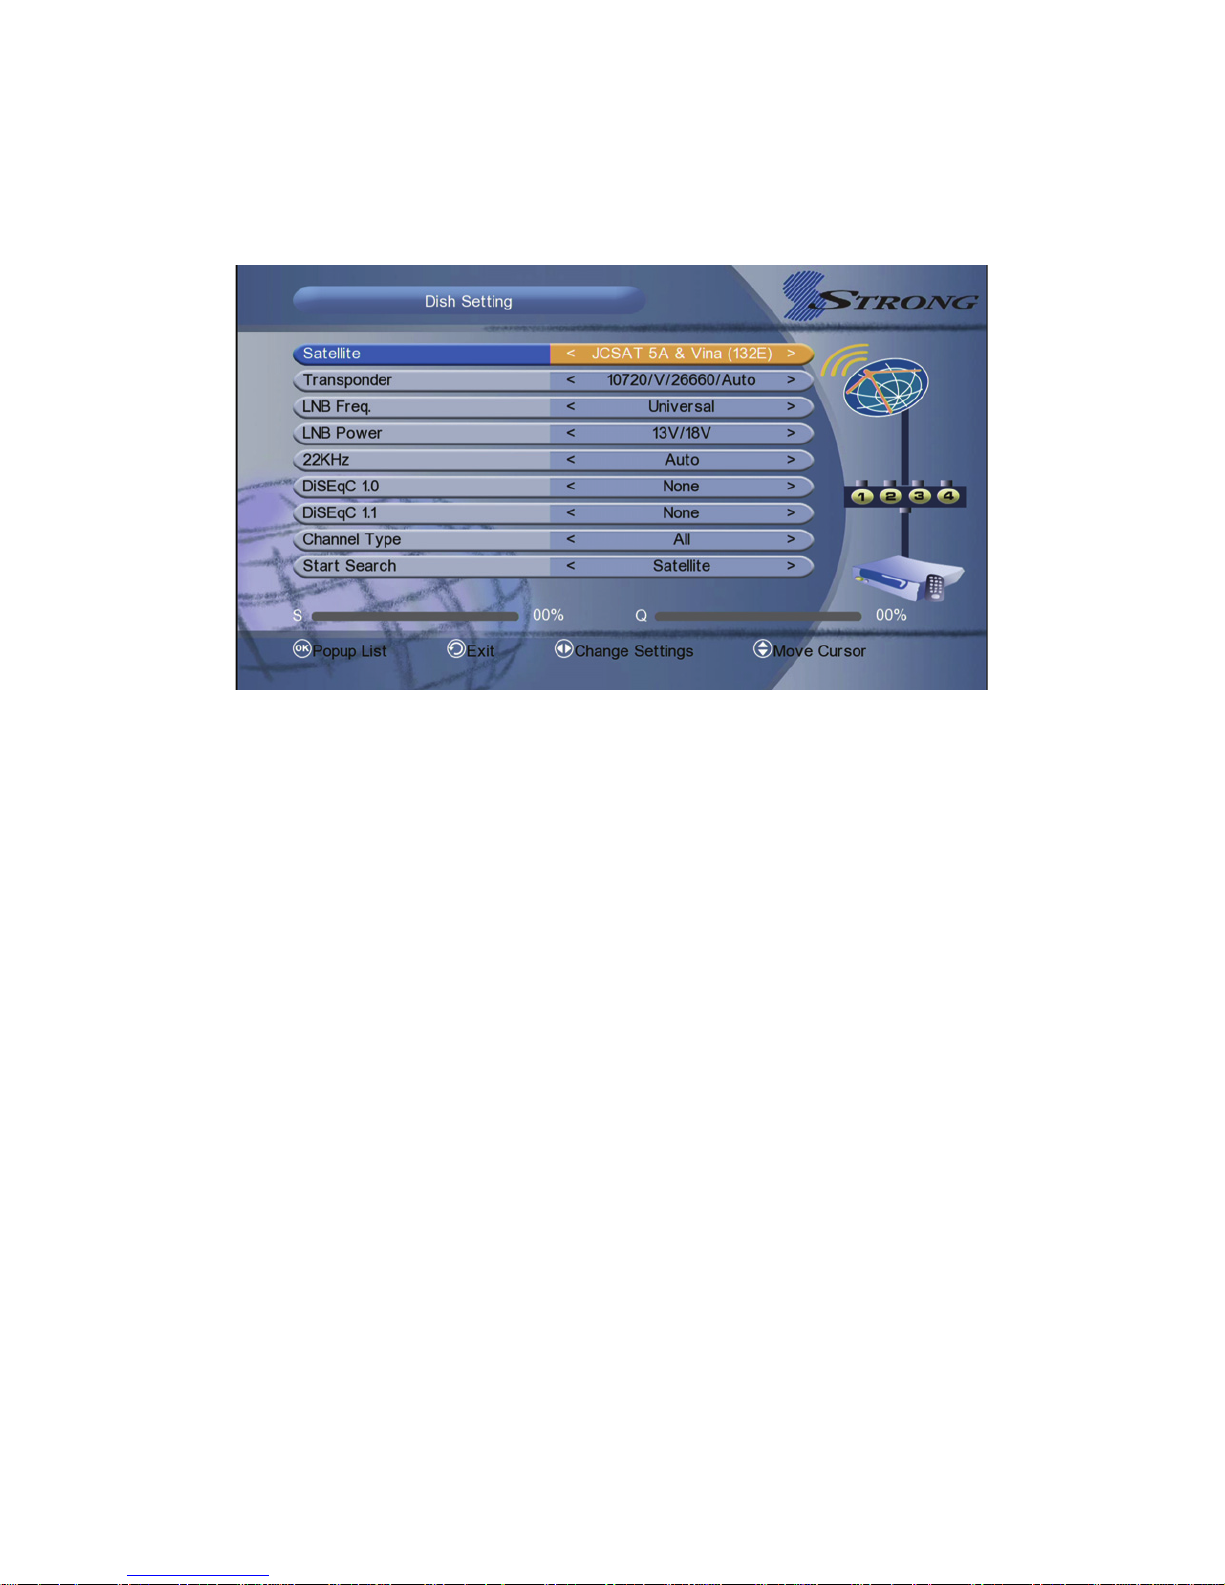
4.1 Dish Setting
Dish Setting allows you to configure the antenna setting parameters.
1. Satellite: Select the satellite which you want to setup.
2. Transponder: press OK button into TP list then press CH+/CH- button to
change the TP, then press CH+/CH- button to Add/Delete/Edit TP.
3. LNB Freq: Press the VOL+/- button to change the LNB frequency.
4. LNB Power: Select the required LNB power.
5. 22KHz: It used to control the 22 KHz switch (On for open, Off to Off, or Auto
for automatic Settings 22 KHz).
6. DiSEqC 1.0: It used to set DiSEqC1.0 port ,press the VOL+/VOL- button to
select the required.
7. DiSEqC 1.1: Press the VOL+/VOL- button to select the required DiSEqC1.1
input.
8. Channel Type
˖
Select the Channel type from All chanel, TV and Radio.
9. Start Search
˖
Select search model from the Satellite, Transponder, Multi-Sat
and Blind Search.
4.2 Manual scan
Page 13
11
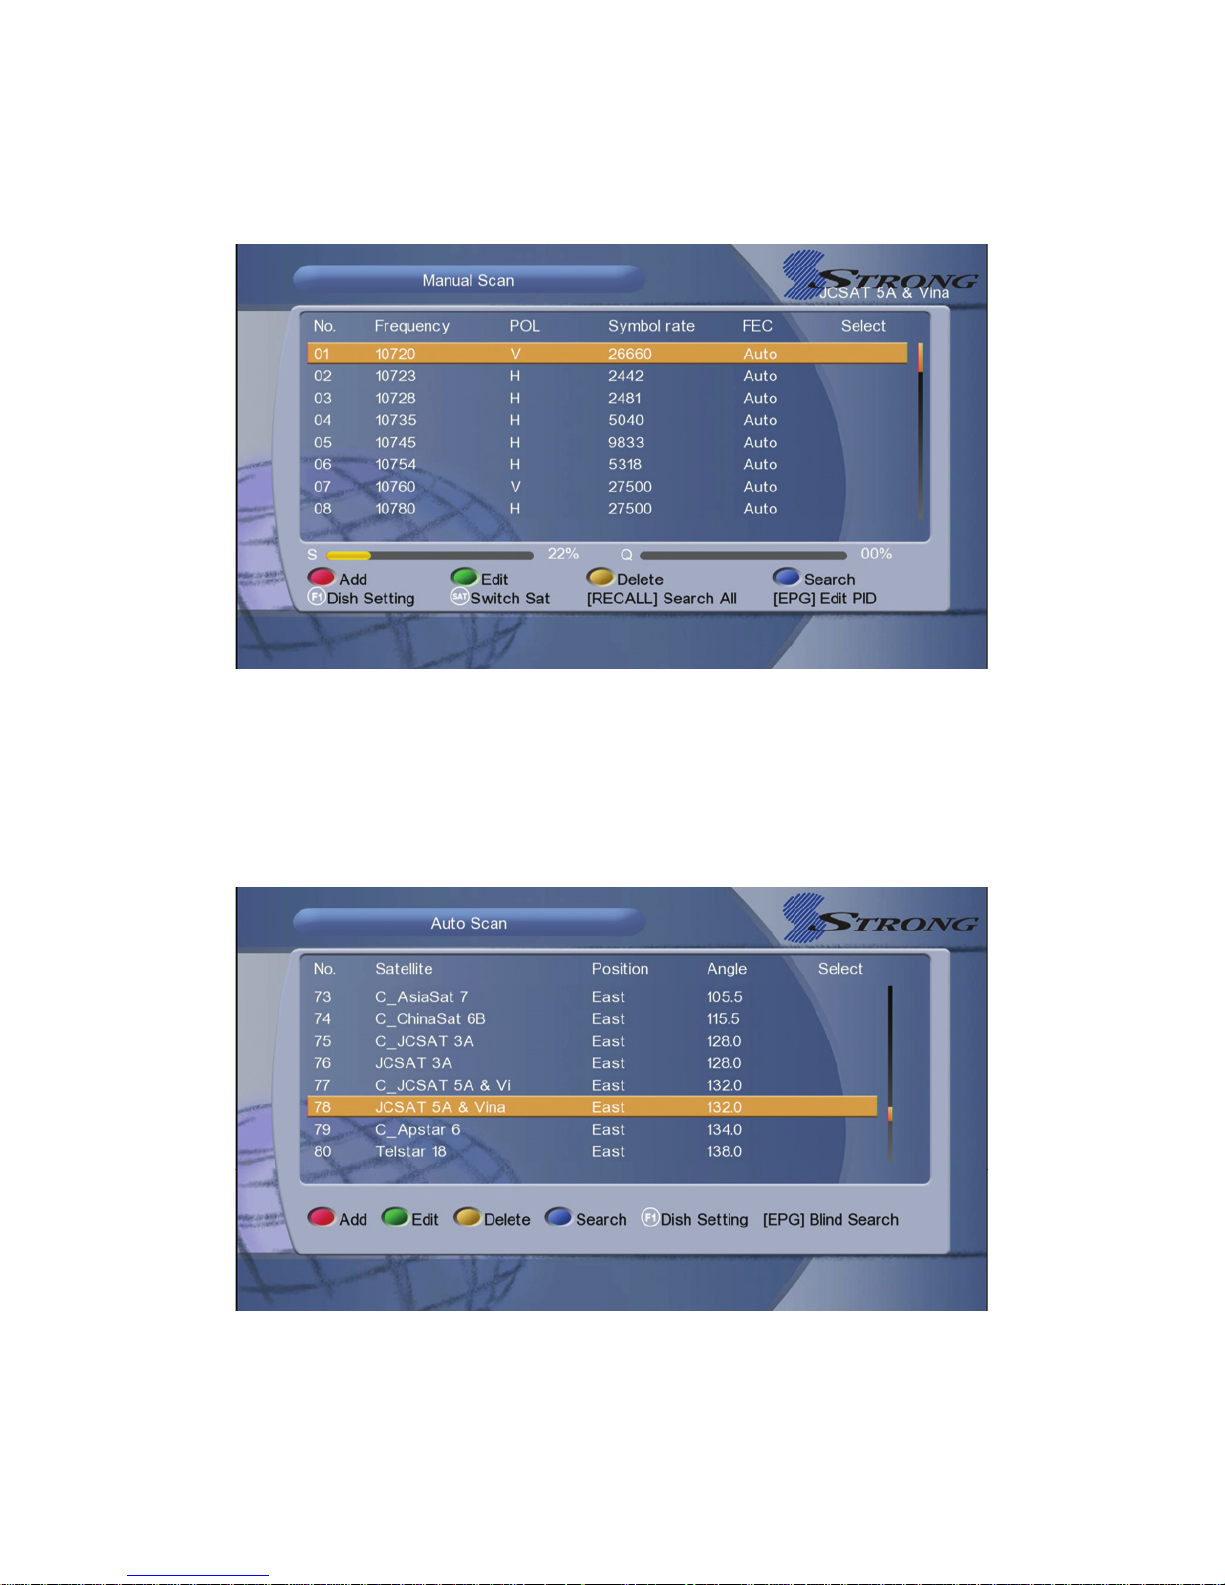
Menu->Installation-> Manual Scan
In this menu you can select the frequnecy in manual scan way.
4.3 Auto Scan
Menu->Installation-> Auto Scan
In this menu you can select the satellite in auto scan way.
4.4 Blind Search
Page 14
12
Menu->Installation-> Blind Search
All the frequency search that you selected satellites.
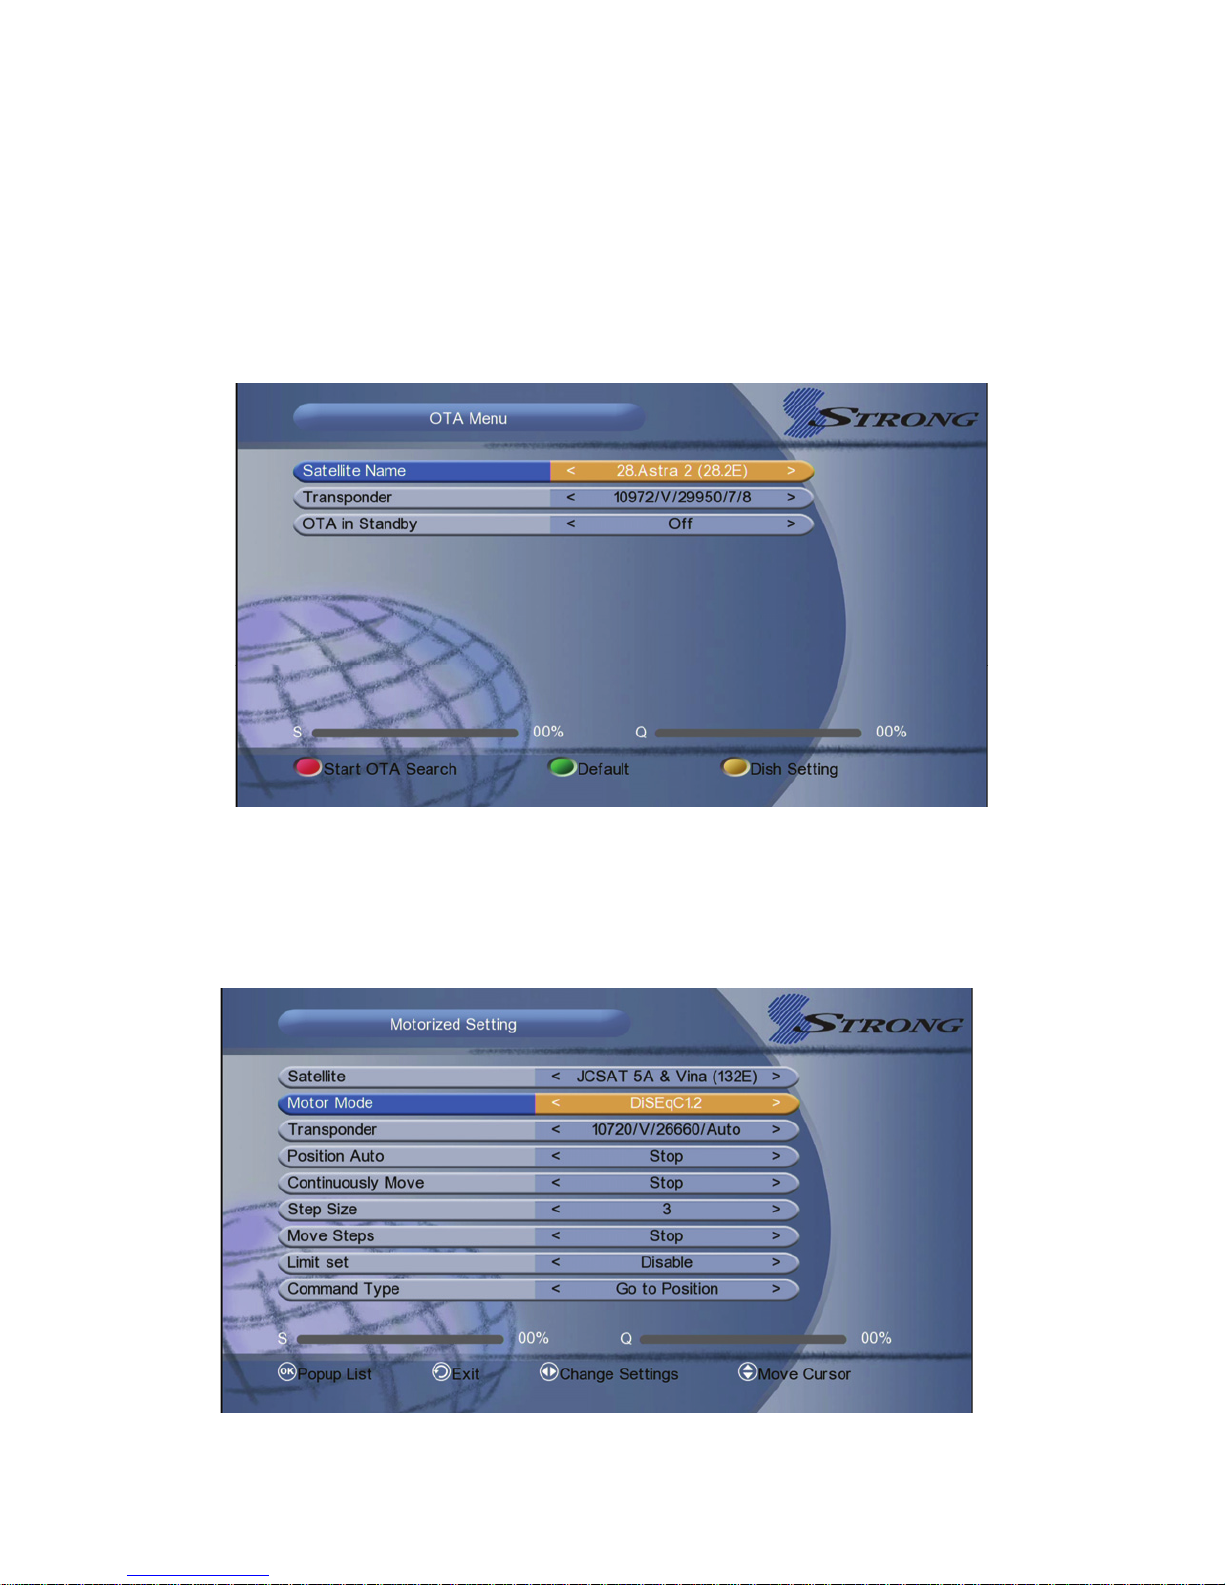
4.5 OTA Menu
Menu->Installation-> OTA Menu
Select the OTA in Standby from on and off.
4.6 Motorized Setting
Menu->Installation-> Motorrized Setting
You can select motor mode input from DiSEqC 1.2 and USALS.
Page 15
13
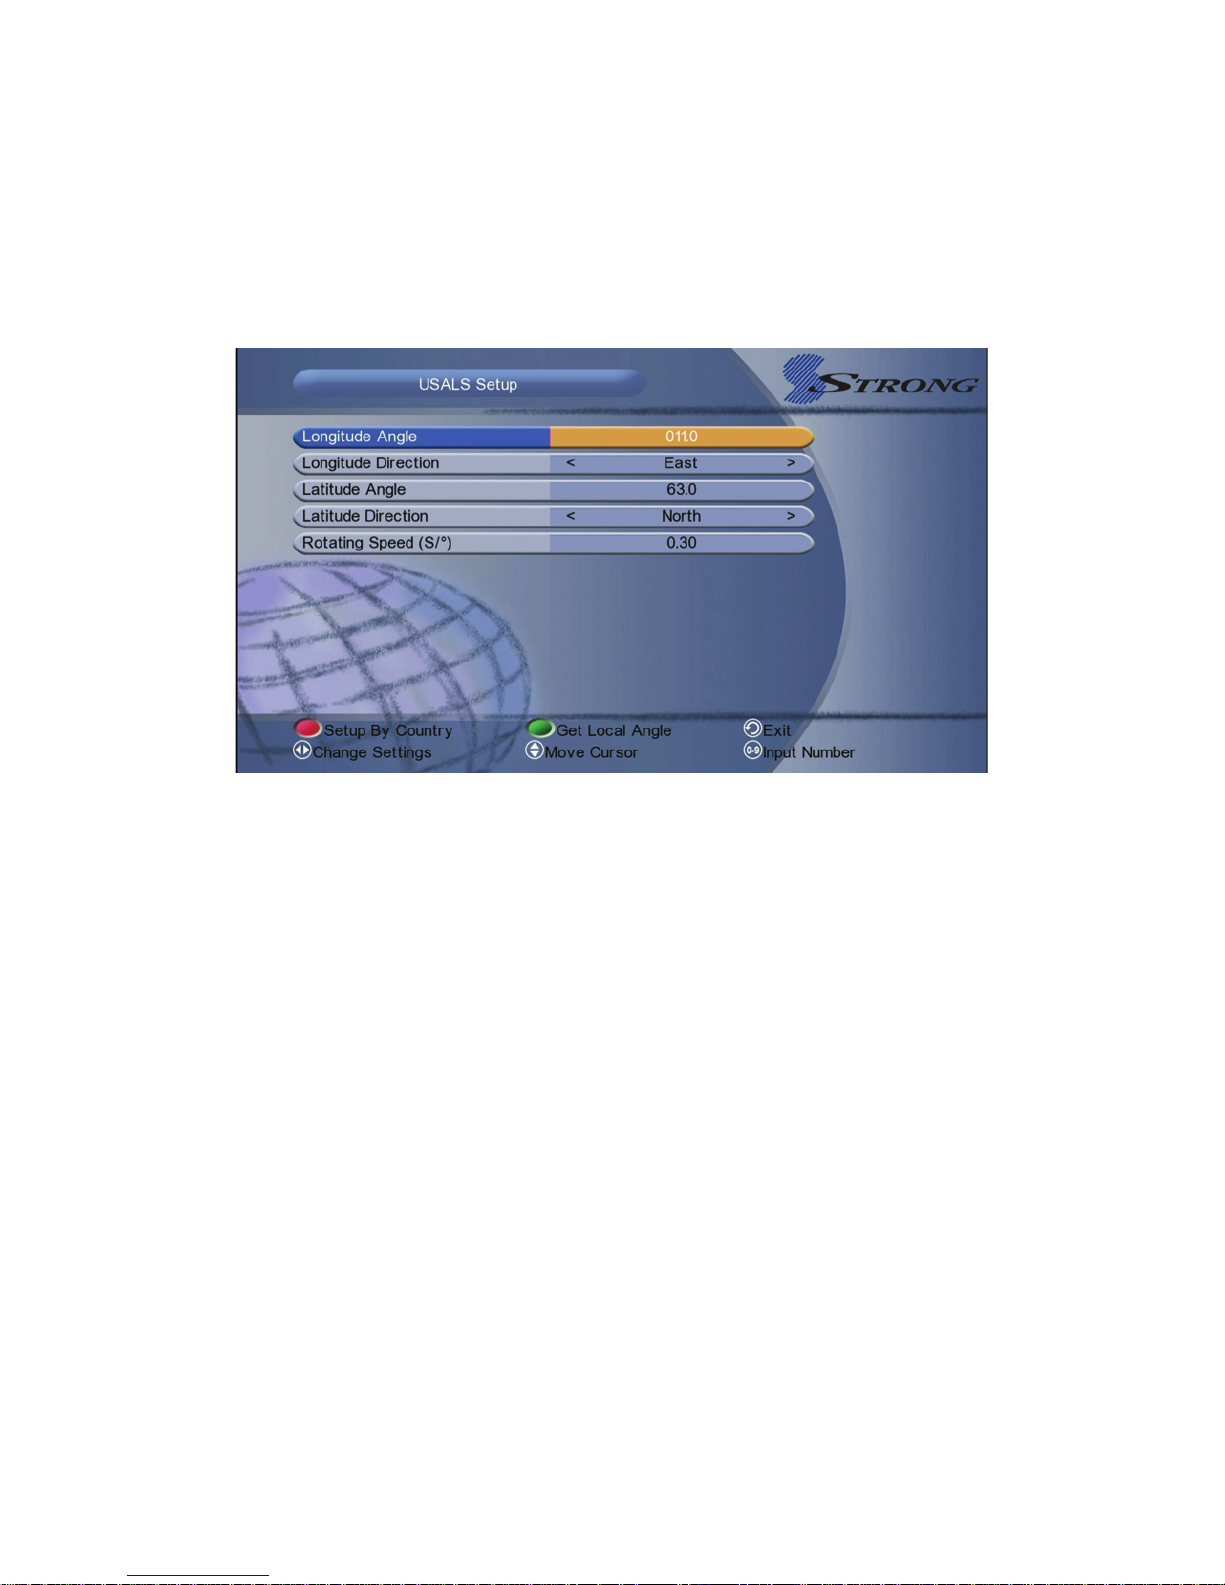
4.7 USALS Setup
Menu->Installation-> USALS Setup
If you set the Motor Mode to USALS, you need set the longitude and the latitude
in USALS Setup.
Setup By Country: Press the RED button, you can choose the country, press
OK button, you will view the city in this country that you select.
Get local Angle: Press the Green button, in this function you need connect to
the network.
V. System Settings
Highlighted to System Settings, and press the OK button to enter into the
system settings menu. In this menu you can make some system settings.
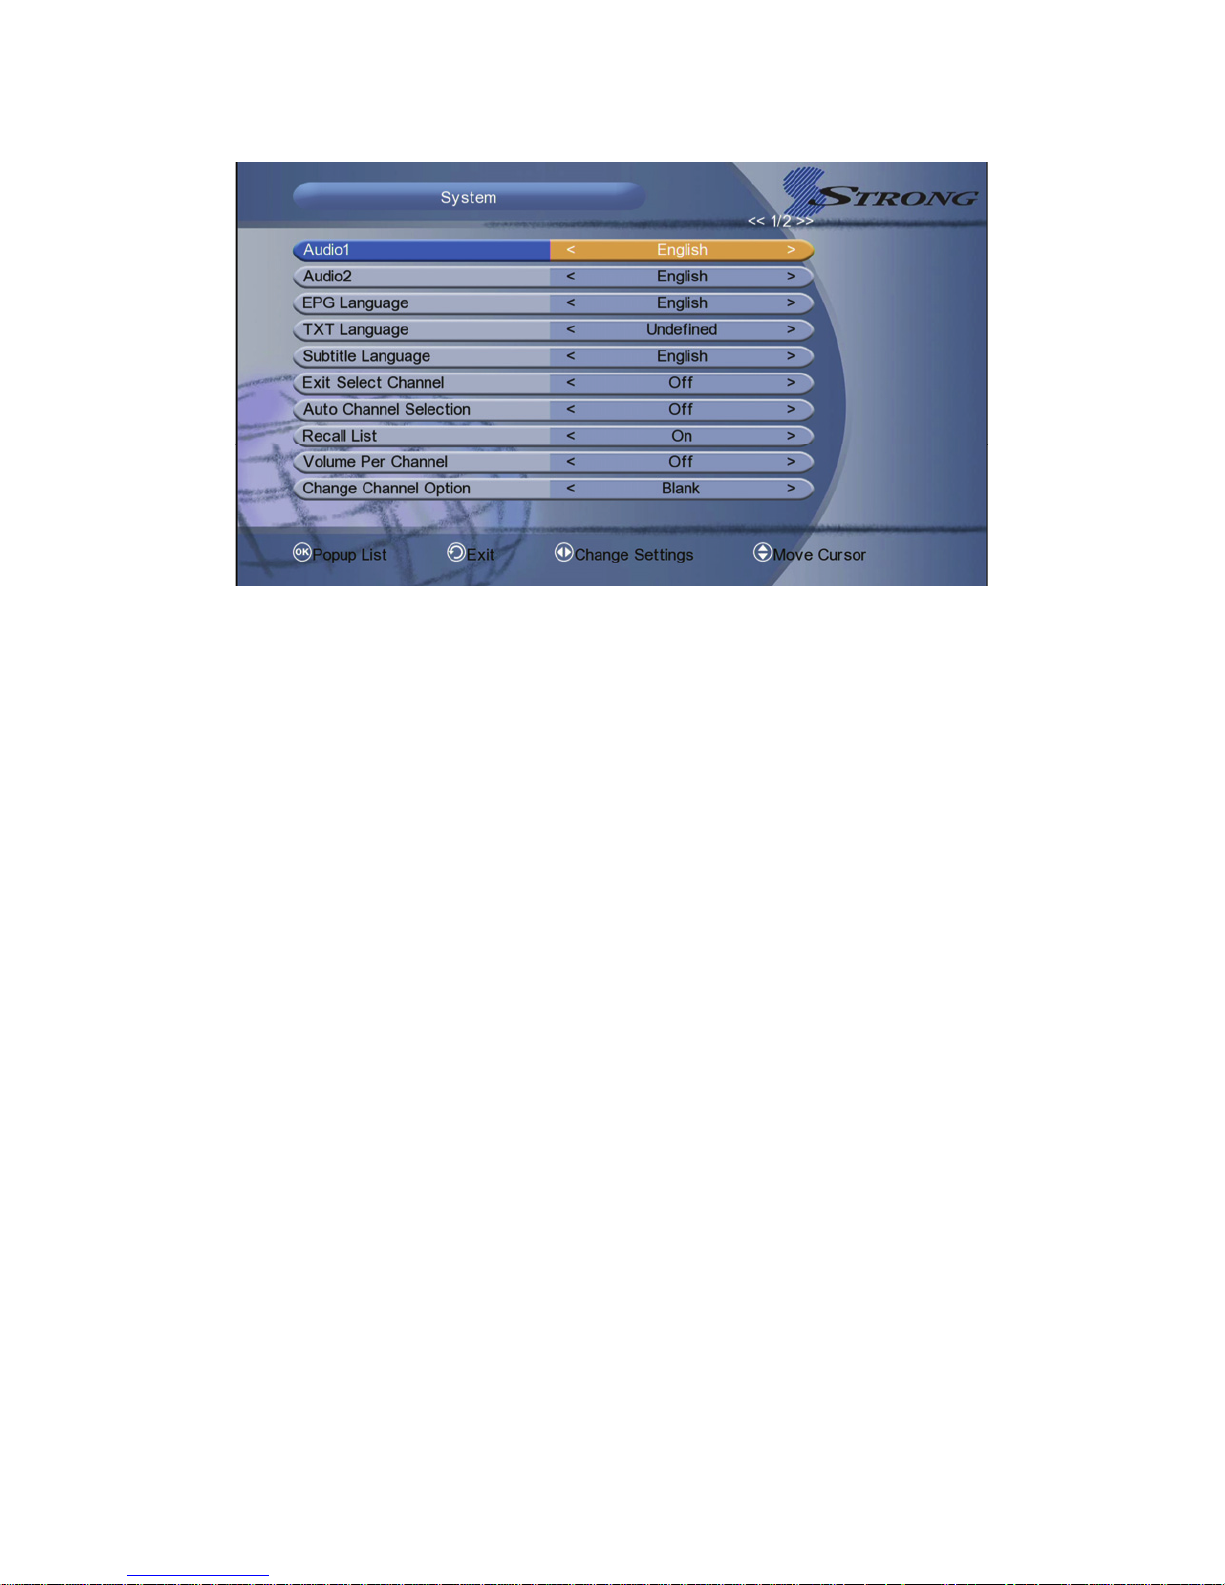
5.1 System
Menu-> System Settings-> System
Page 16
14
1. Audio1: Set the preferred audio language.
2. Audio2: Set the sub-prime audio language.
3. EPG Language: Set the preferred EPG language.
4. TXT Language: Set the preferred TXT language.
5. Subtitle Language: Set the Preferred Suntitle language.
6. Exit Select Channel:You can select the exit select channel from On or OFF.
7. Auto Channel Selection: If you set ON, in the channel list will play
automatically when you highlight the channel. If you set OFF, in the channel list
when you highlight the channel, you should press the OK button to play it.
8. Recall List:
You can turn Recall List on or off. If you set ON, when you press
Recall button of RCU you can get the recall list. If you set OFF, when you press
recall button you can go back to the last program you have selected.
9. Volume Per Channel: If you set ON, you can set different volume for each
channel. If you set OFF, all channels can only have one volume.
10. Change Channel Option: You can change the channel option from Black
and Freeze.
11. Front Panel Light: You can change the front panel light from 1 to 4.
12. Channel list Style: If you select CH 10, there will be 10 channels in
channel list. If you select CH 20 or CH 30, channel will be 20 or 30 in channel
list.
Page 17
15
12. Save Find Result:
13. Desk Weather: If you select On, there will show the weather information. If
you select OFF, you aren’t going to see the weather information.
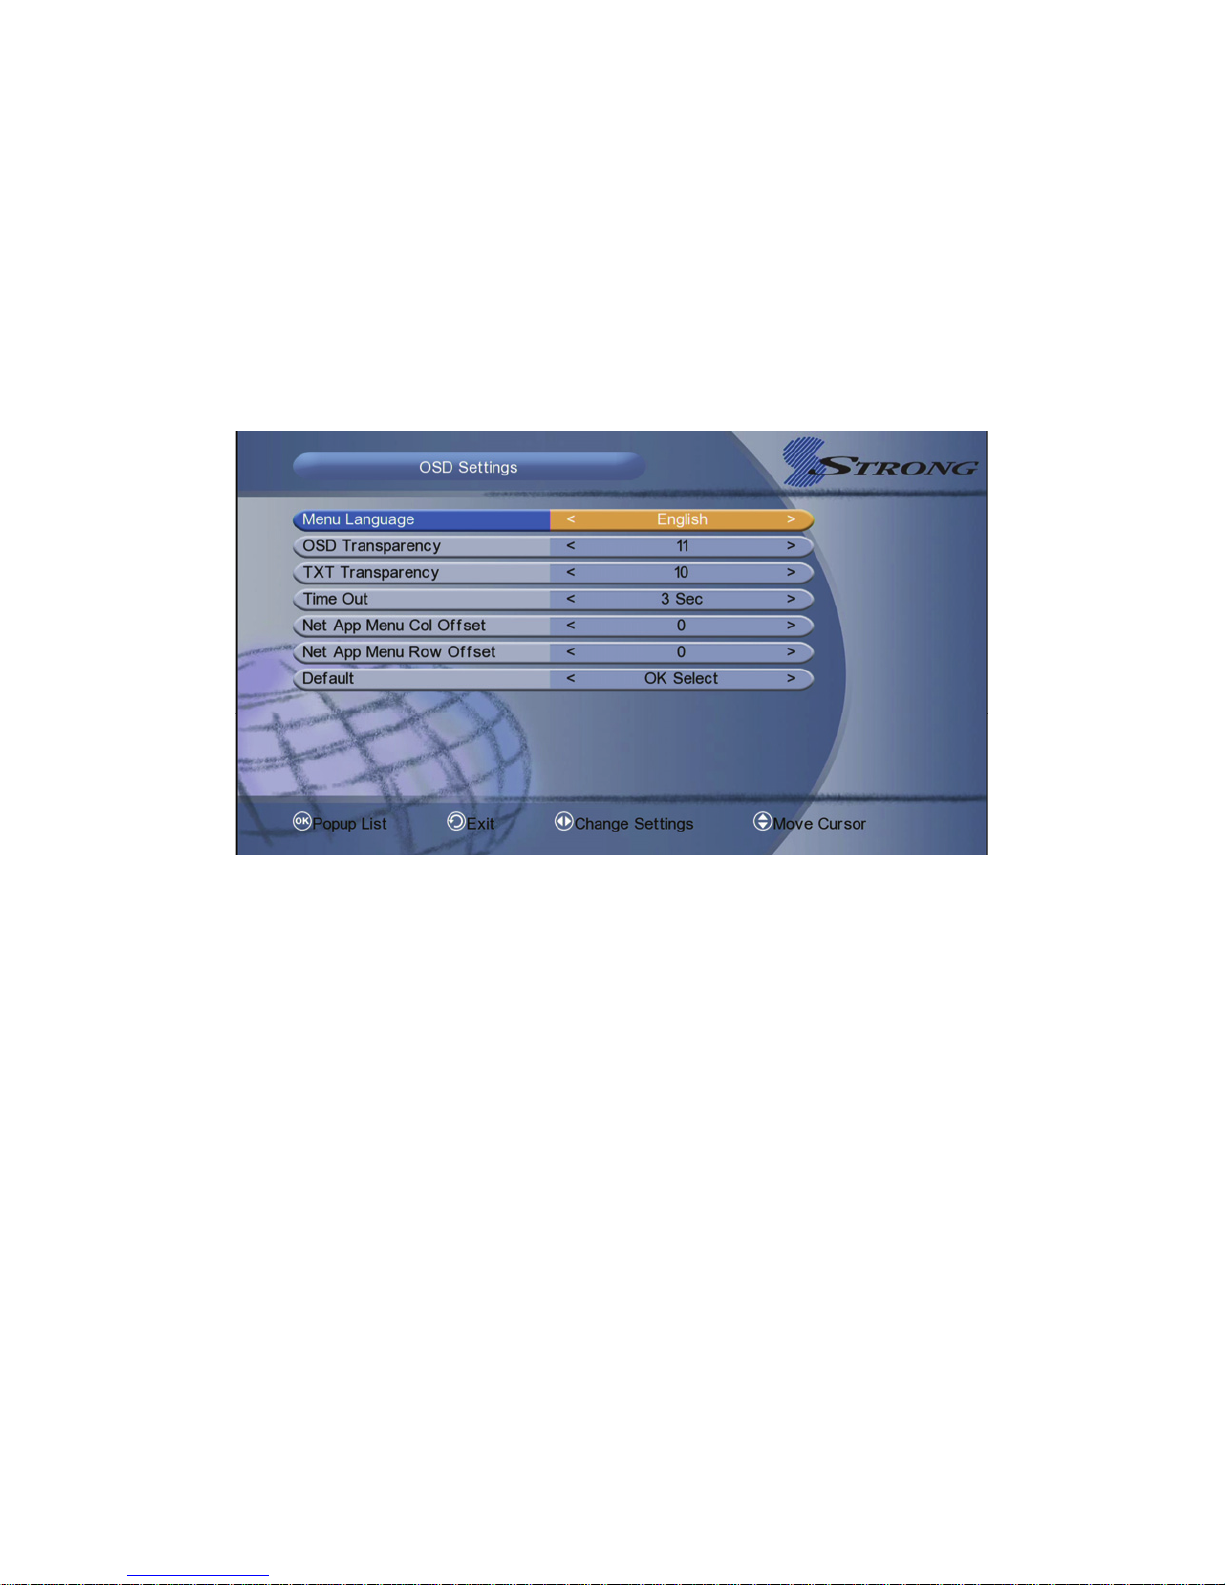
5.2 OSD Settings
Menu-> System Settings-> OSD Settings
1. Menu Language: Set the menu language.
2. OSD Transparency: Set the transparency of all menus.
3. TXT Transparency: Set the transparency of teletext.
4. Time Out: Set the display time of the programme information.
5. Net App Menu Col/ROW Offset: You can turn the Net App Menu Col/Row
Offset to 0, 5, 10, 15 and 20.
6. Default: If you want to reset, please hightlight to default and press OK button.
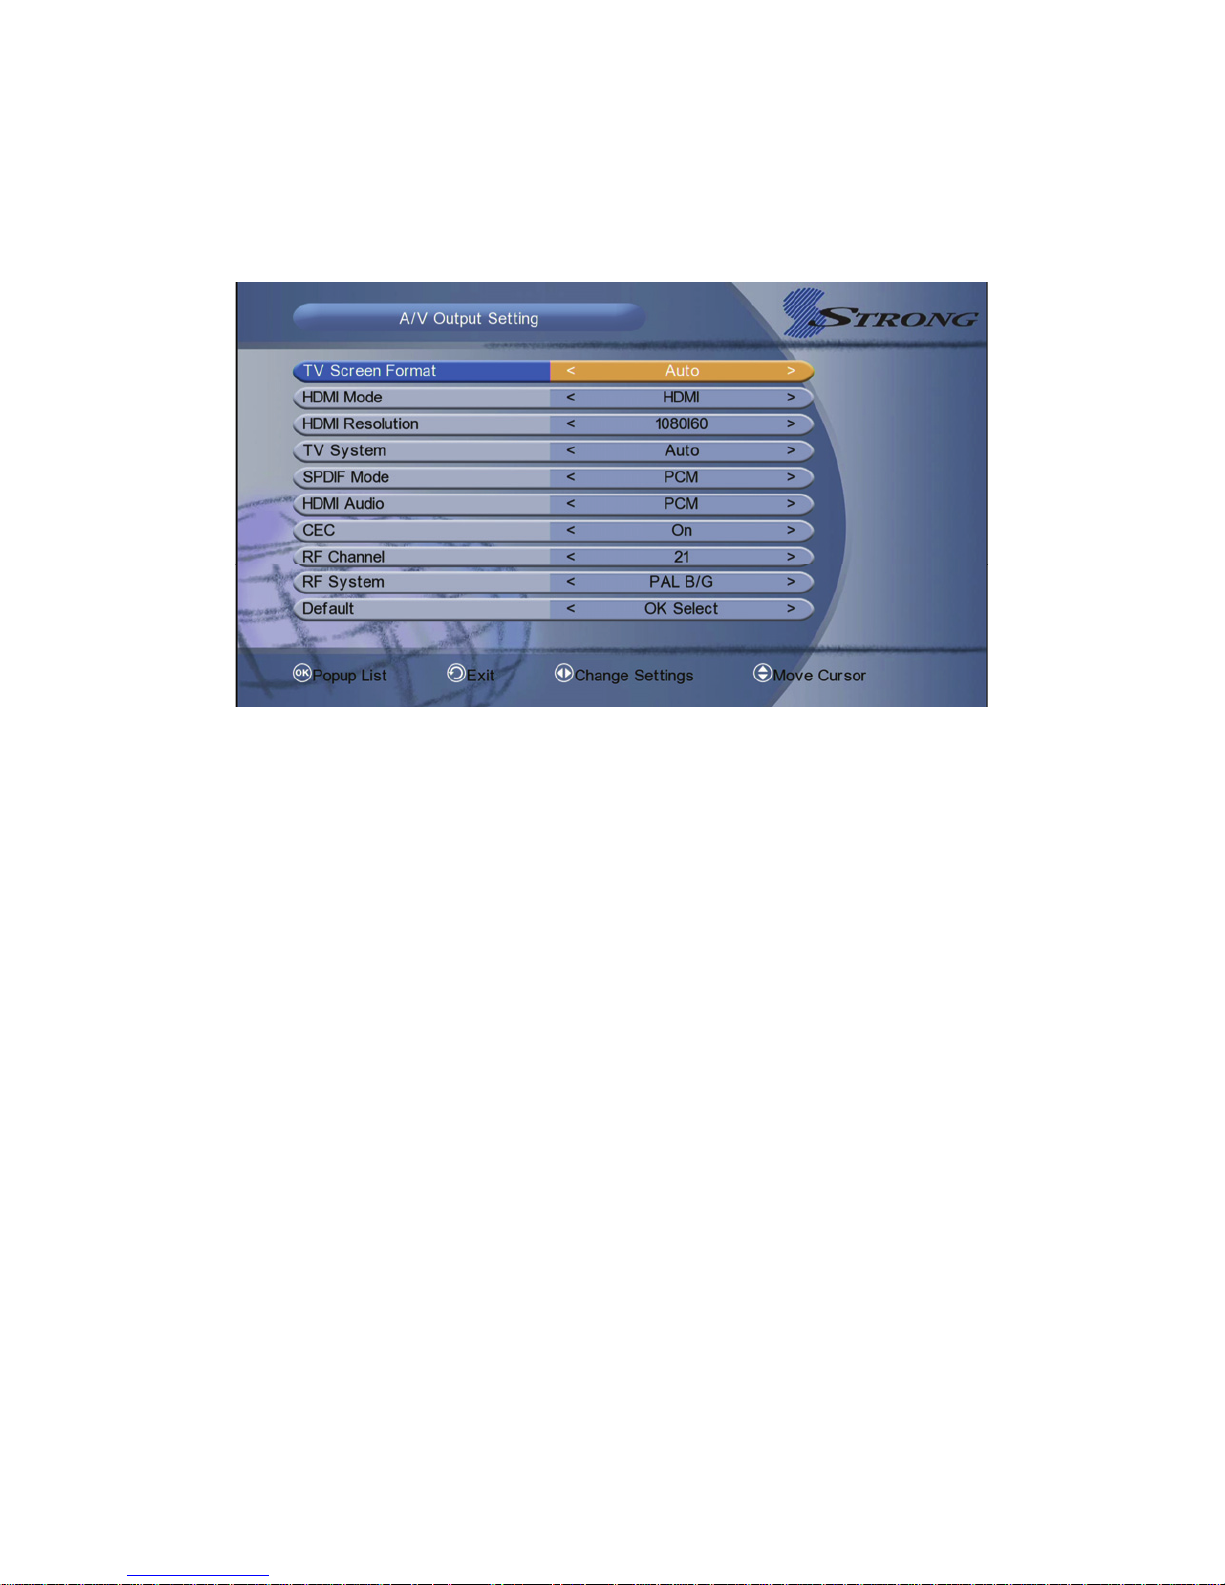
5.3 A/V Output Setting
Menu-> System Settings-> A/V Output Setting
1. TV System: Set the TV system mode.
Page 18
16
2. HDMI Mode: Set the HDMI output mode.
3. HDMI Resolution: Set the HDMI output Resolution.
4. TV System: Set the TV system mode.
5. SPDIF Mode: Set the SPDIF output mode.
6. HDMI Audio: Set the HDMI output mode.
7. CEC: You can turn the CEC mode to On or Off.
8. RF Channel: You can select preferred RF channel from channel 21 to
channel 69.
9.
Default: If you want to reset, please hightlight to default and press OK
button.
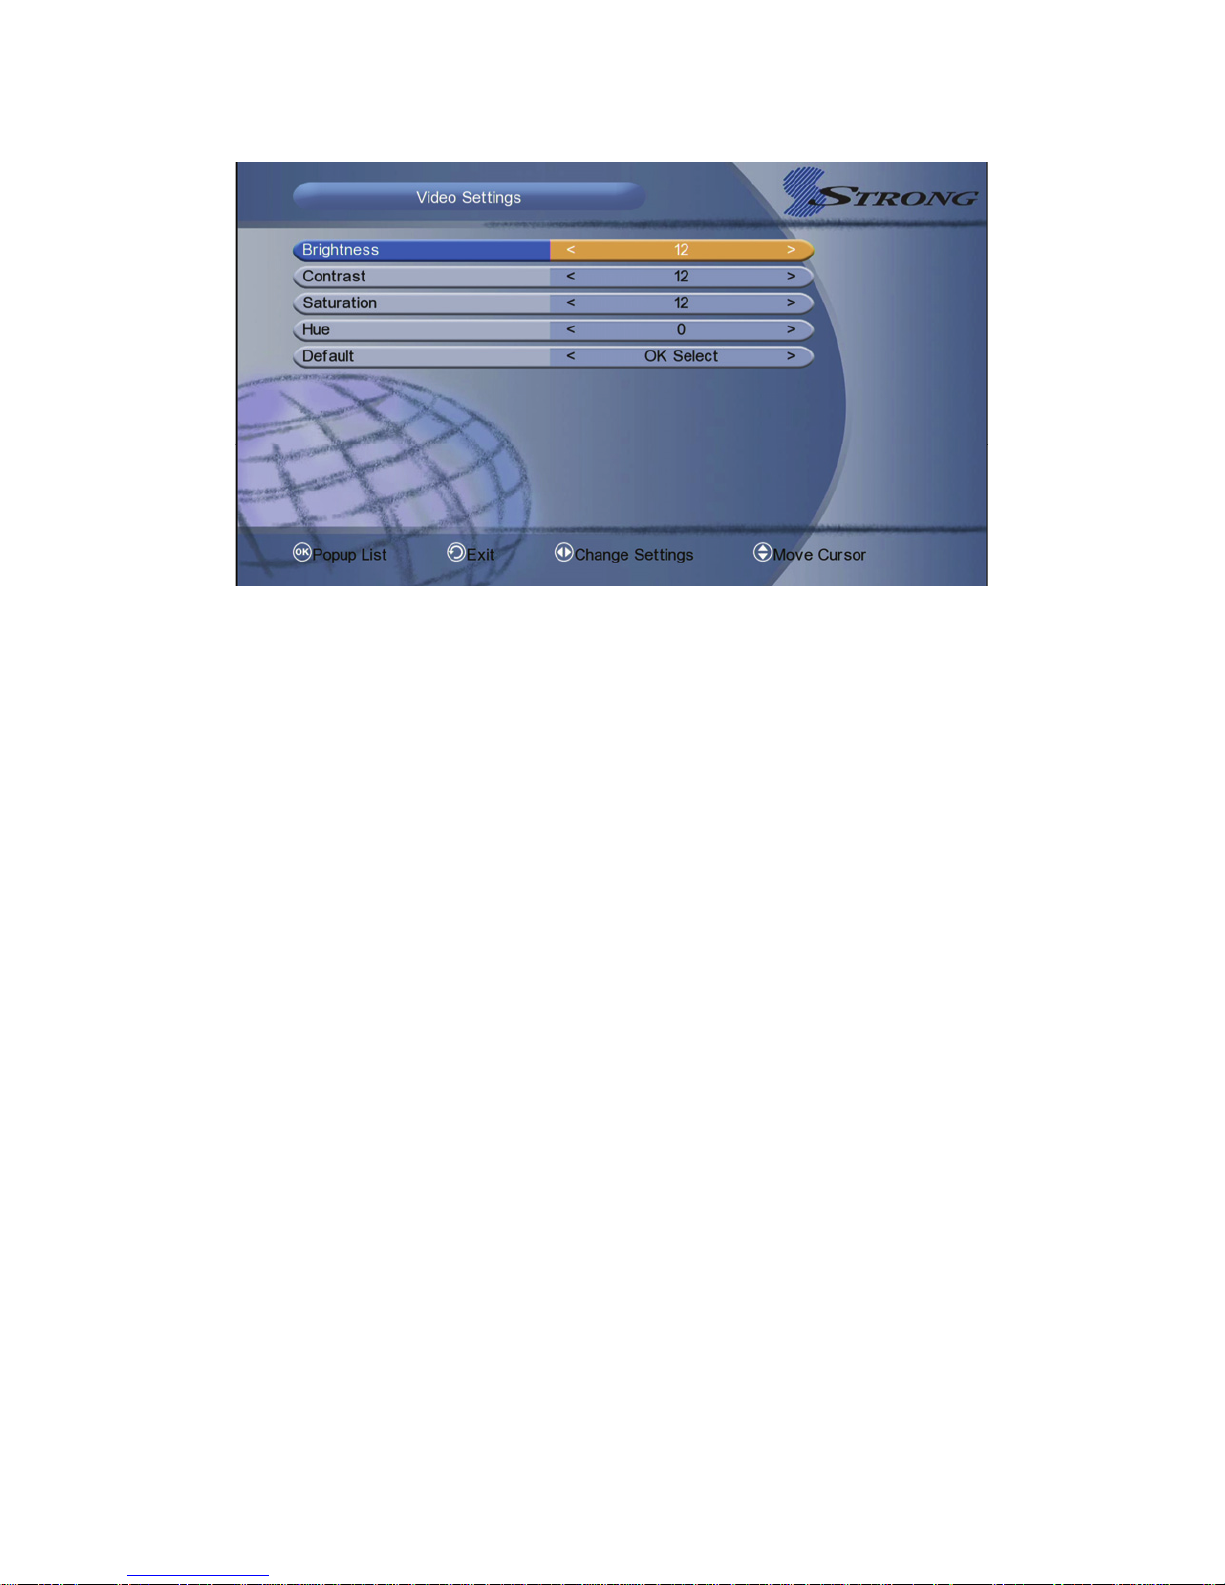
5.4 Video Settings
Menu-> System Settings-> Video Settings
Page 19
17
1. Brightness: Set the video brightness.
2. Contrast: Set the video contrast.
3. Saturation: Set the video saturation.
4. Hue: Set the video hue.
5. Default: If you want to reset video settings, please hightlight to default and
press OK button.
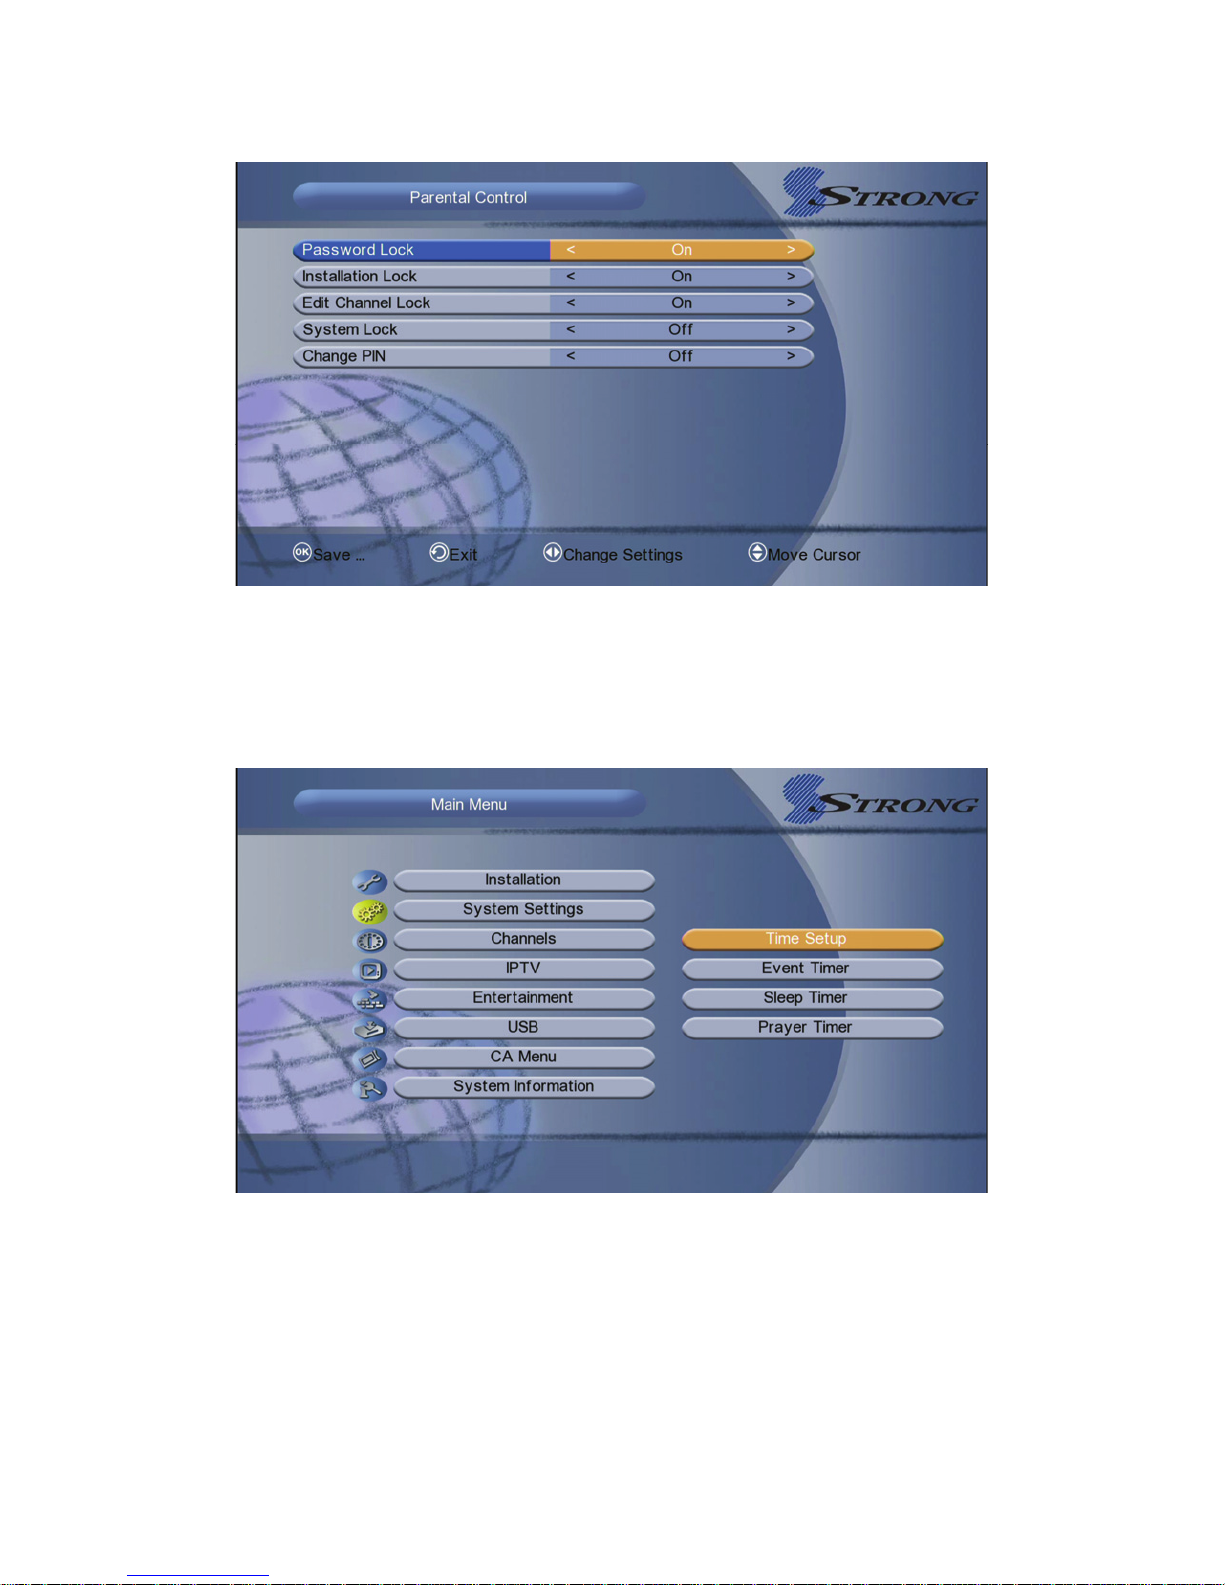
5.5 Parental Control
Menu-> System Settings->Parental Control
Parental Control allows you to set limits for each programme or change your
previous password. You can also lock the changes you have made using
Password Lock, Installation Lock,Edit Channel Lock , System Lock and
Change PIN.
Page 20
18
5.6 Timer Adjust
Menu-> System Setting->Timer Adjust
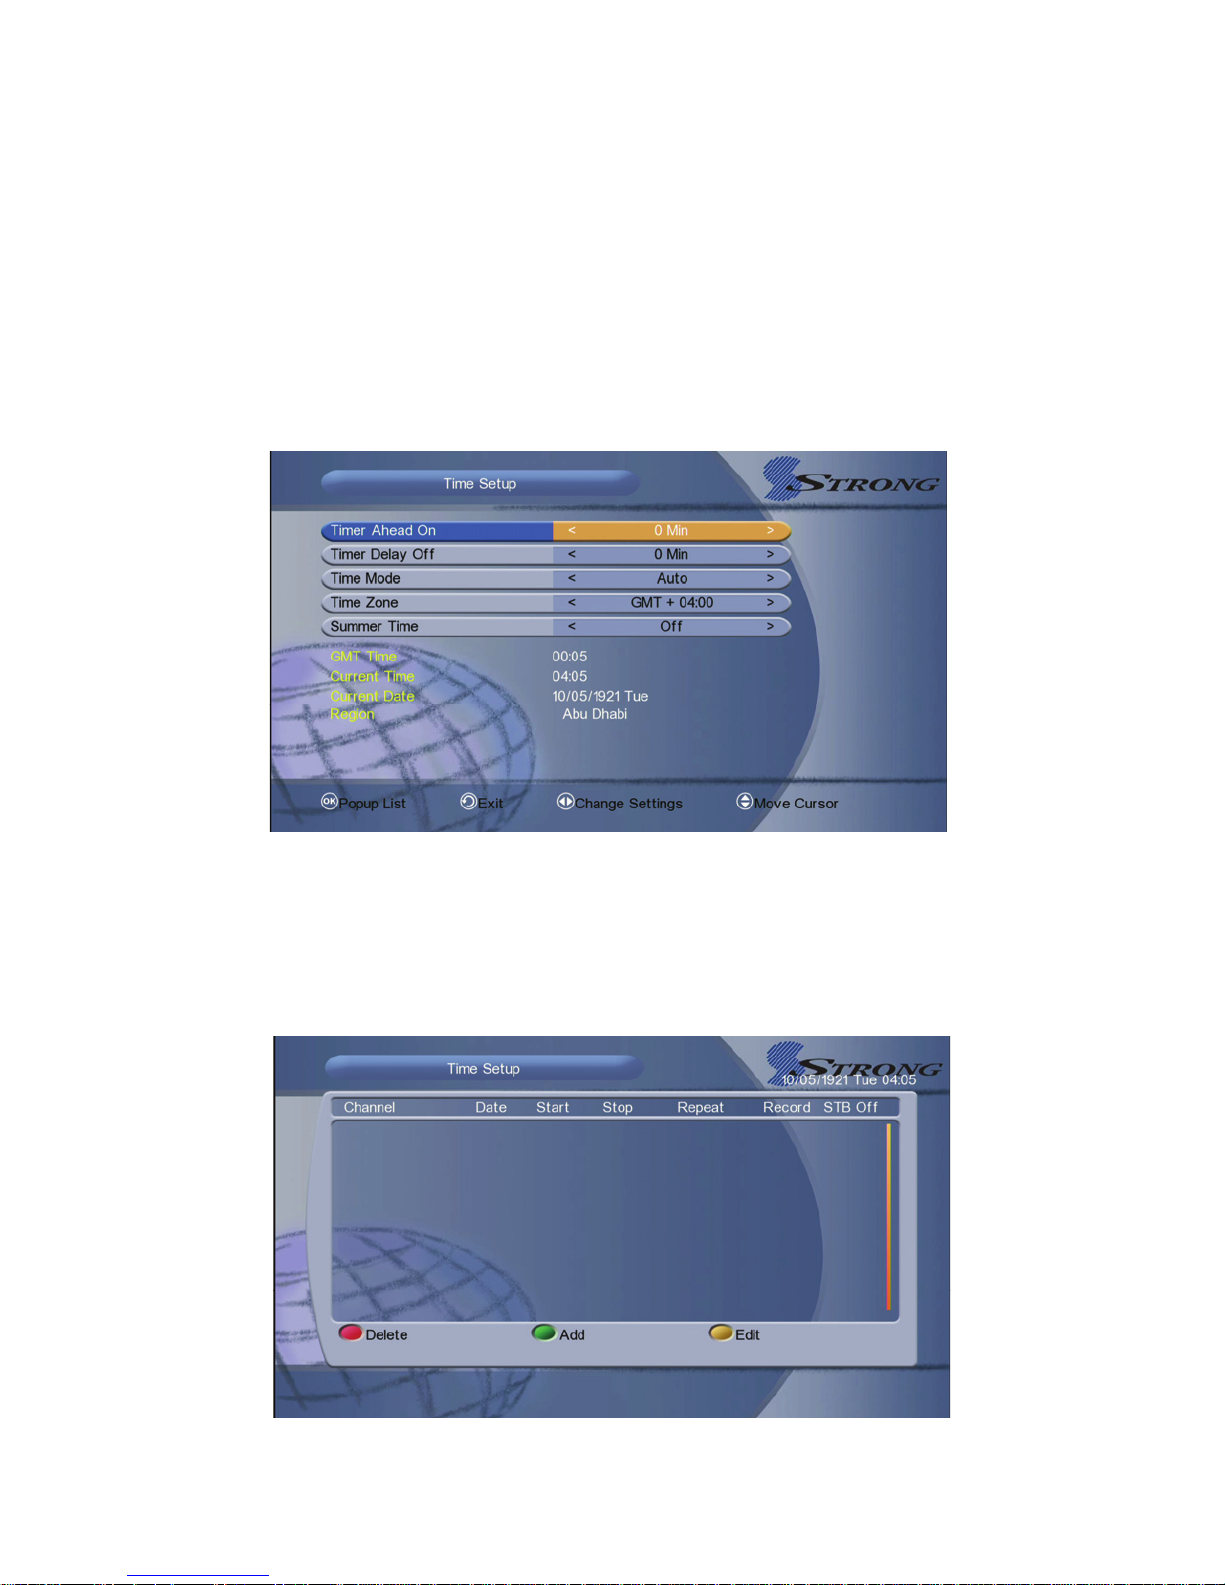
5.6.1 Time Setup
Menu-> System Settings->Timer Adjust->Time Setup
You can setup the system time.
Page 21
19
1. Timer Ahead On: Additional recording time before the recording starts.
2. Timer Delay off: Additional recording time after the recording ends.
3. Timer Mode: Set the system time mode.
4. Timer Zone: Set the timer zone according to your city.
5. Summer Time: Set the summer time On or Off.
Note: The time you set will be shown on the front panel when you set receiver to
standby mode.
5.6.2 Time Setup
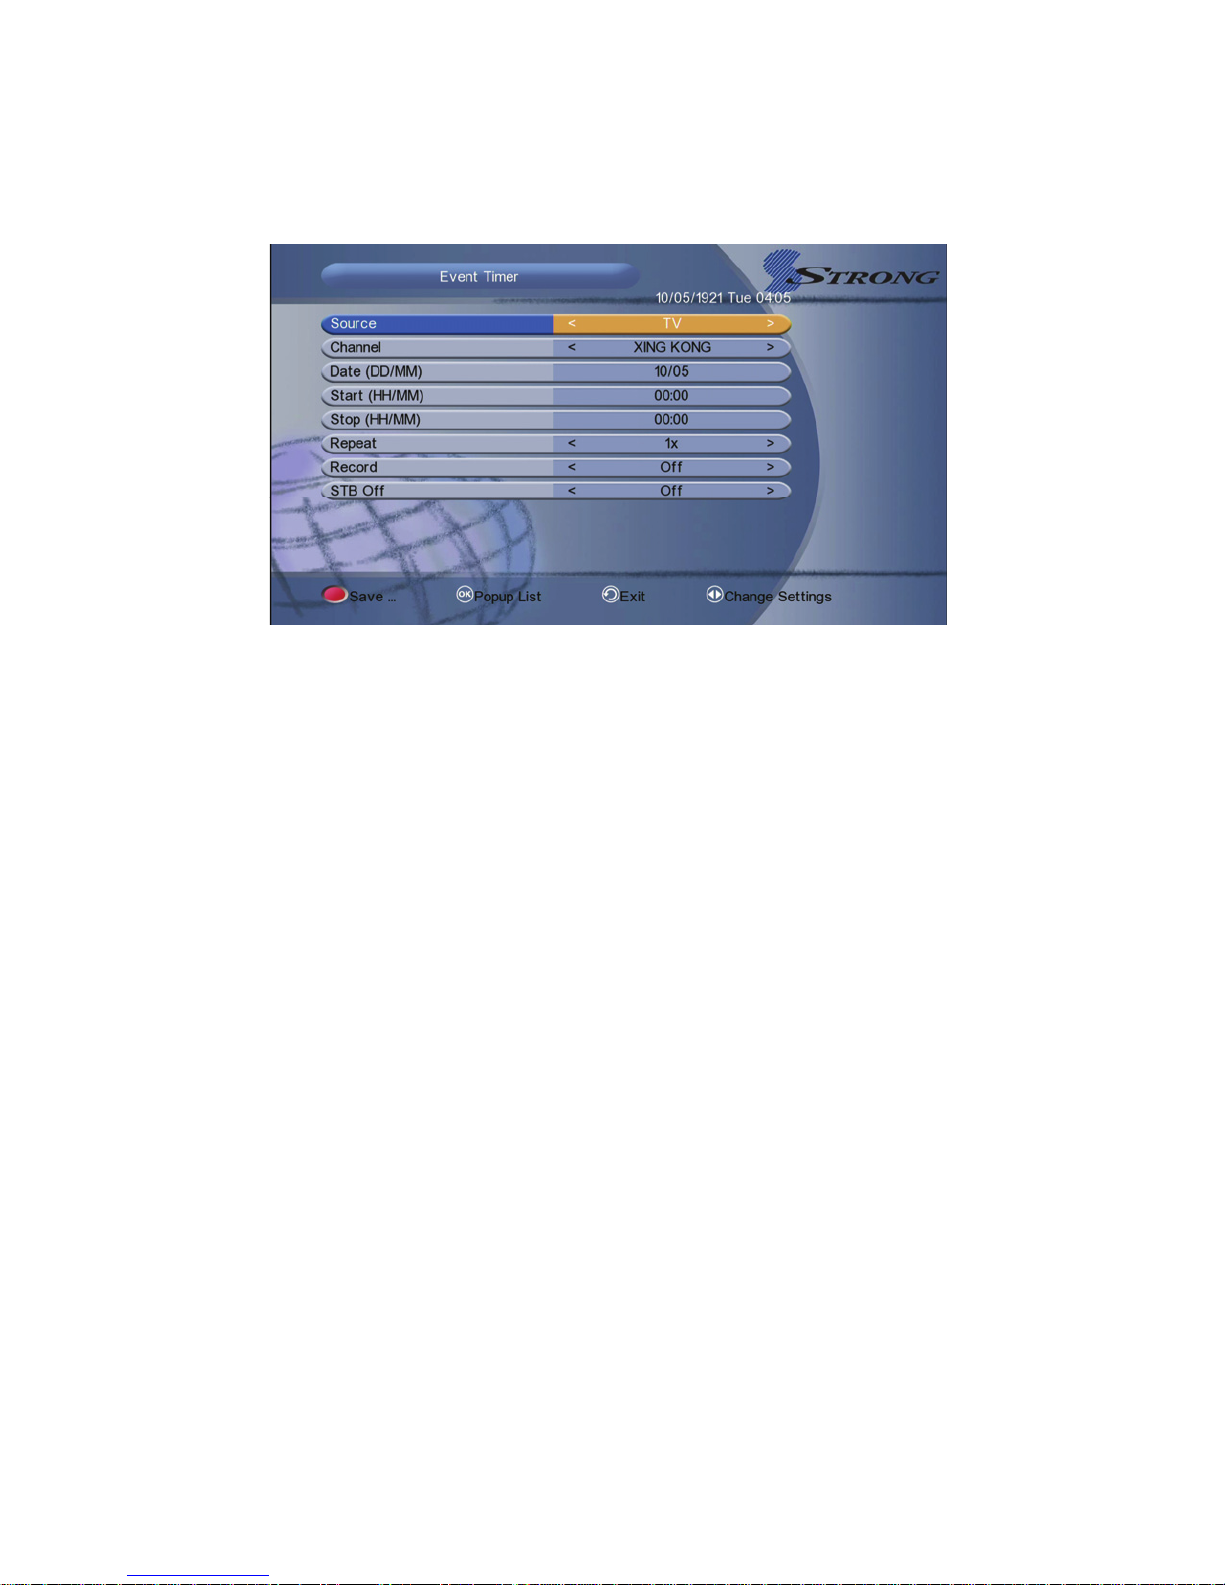
Menu-> System Setting->Timer Adjust->Event Timer
You can set unlimited timer events when memory is not full. It will record or play
the programme automatically according to the timer event list that you set.
Page 22
20
Press the GREEN button to setup a timer, press the RED button will delete this
timer and press the YELLOW button can go to edit this timer.
1. Source: Switch TV and radio.
2. Channel: Press the VOL+/- button to display the channel list and press the
OK button to select the channel.
3. Date: Input the date of the timer.
4. Start: Input the start time of the timer.
5. Stop: Input the stop time of the timer.
6. Repeat: Select the repeat times of the timer. (one time/every day/one
week/from Monday to Friday/from Saturday to Sunday)
7. Record: To set if you want to record the timer.
8. STB Off: Set ON, the receiver will go to standby mode after the timer, set
OFF it won’t be standby.
5.6.3 Sleep Timer
SLEEP Timer can set the automatic turn off time.
1. Go to Menu->System Setting->Timer Adjust->Sleep Timer or press the
SLEEP button directly.
2. Press the VOL+/- button to select the option or input the number at “-- Min”
option.
3. Press the OK button to save.
Page 23
21
5.6.4 Prayer Timer
You can visit the Prayer Times to choose a city to see it five times a day of
worship.
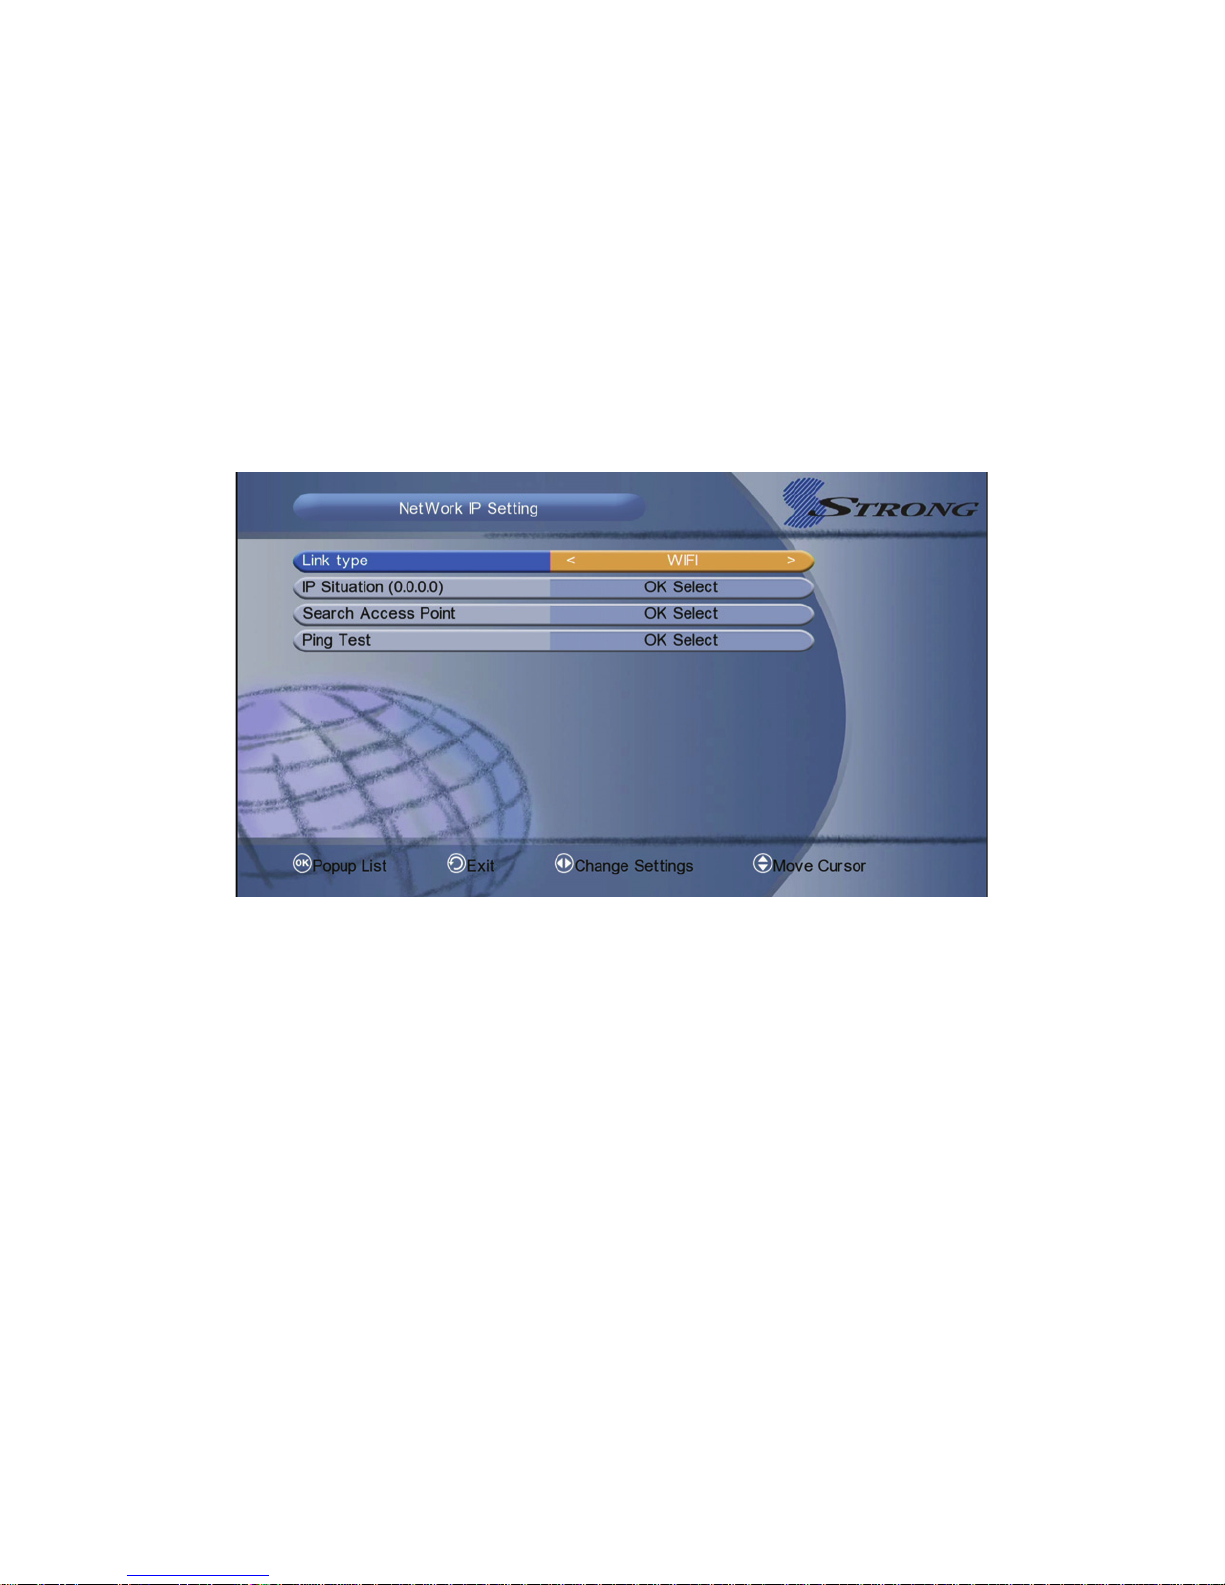
5.7 IP Settings
Menu-> System Settings->IP Settings
In this menu, you can connect WIFI, cable LAN or 3G to Network.
5.8 Database Reset
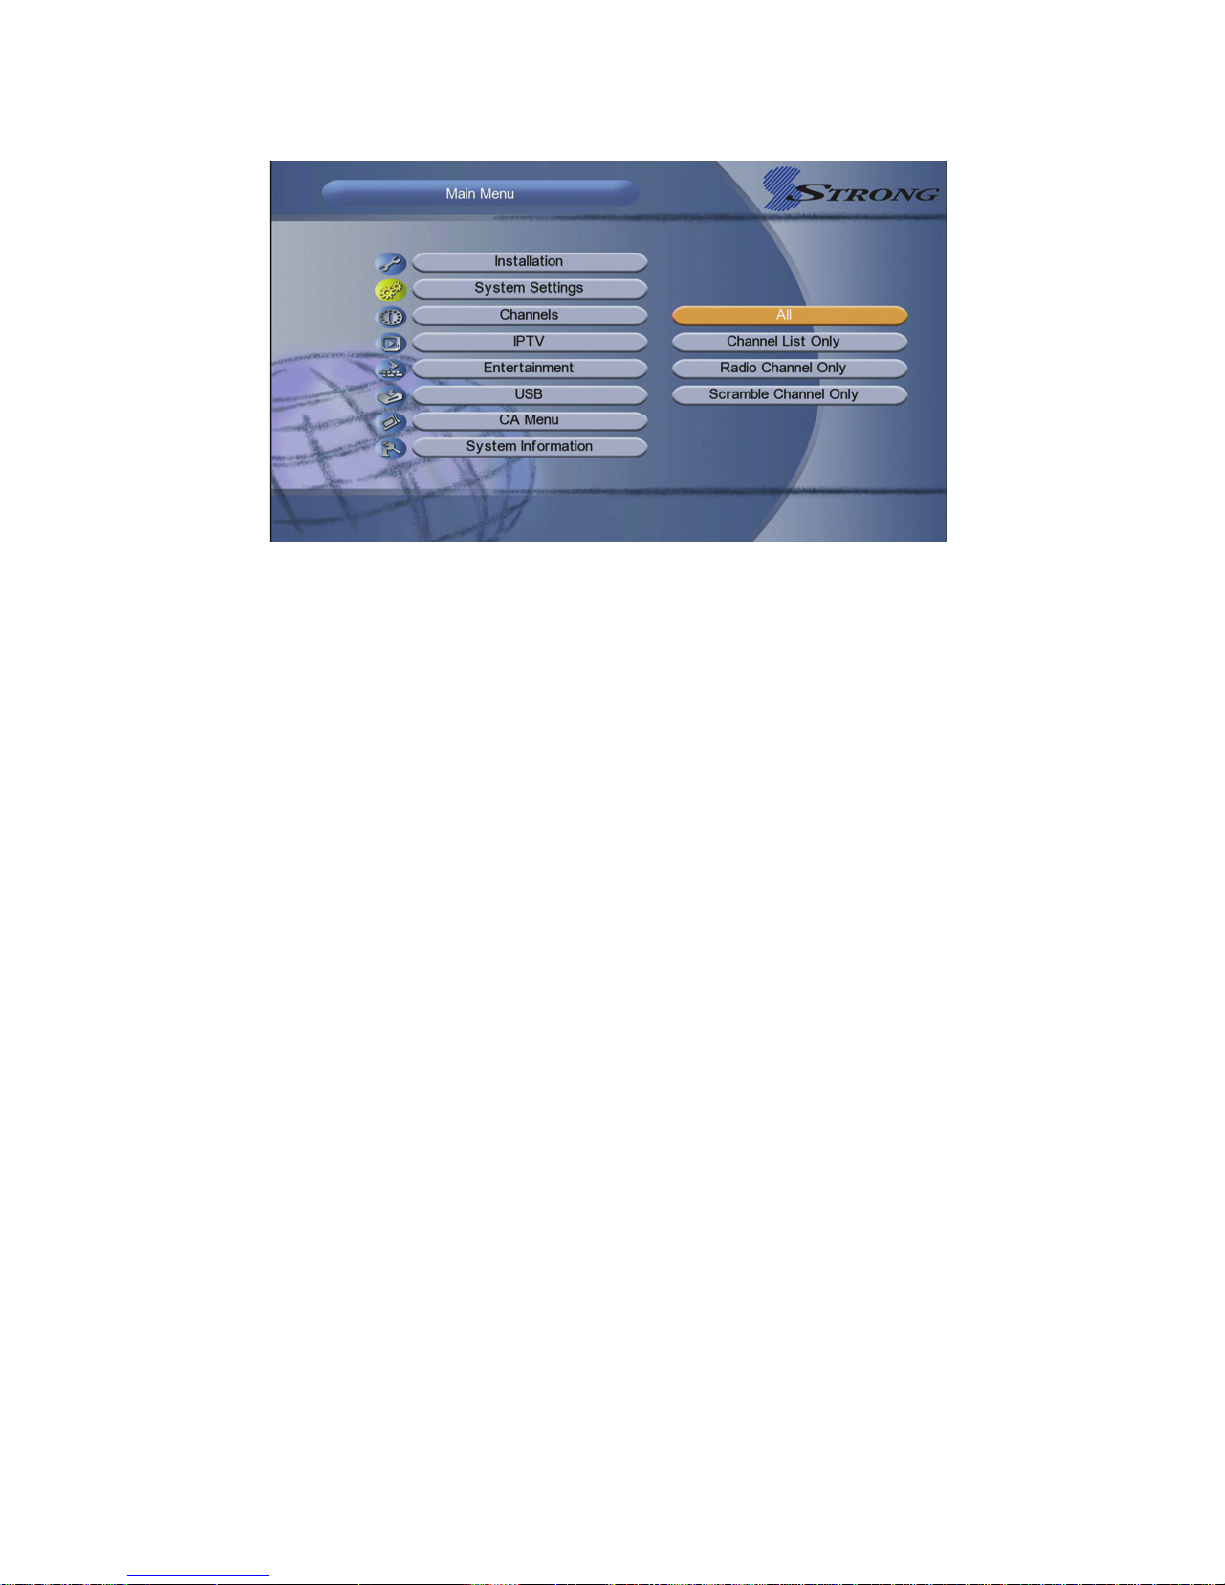
Menu-> System Settings->Database Reset
You can restore the product to the factory default and you can also setup it
according to the wizard.
Note: Please note that once you perform All, all data and settings will be
deleted.
Page 24
22
Highlight the option you want and press the OK button to execute it.
1.All: All data and settings will be deleted.
2.Channels List only: All channels data will be deleted.
3. Radio Channel only: All radio channels data will be deleted.
4. Scramble Channels only : All scramble channels data will be deleted.
5.9 Help
Menu-> System Settings->Help
Before contacting your local service centre, please read the help infomation
carefully. If the problem persists after completing the following procedure,
please contact your local product distributor or service centre for further
instructions.
VI. Channels
Highlighted to Channels, and press the OK button to enter into the Channels
menu. In this menu you can use Edit Channels, Set Favorite, Sort Channels,
Delete Satellite Channels and Multi Screen Application.
Page 25
23
6.1 Edit Channels
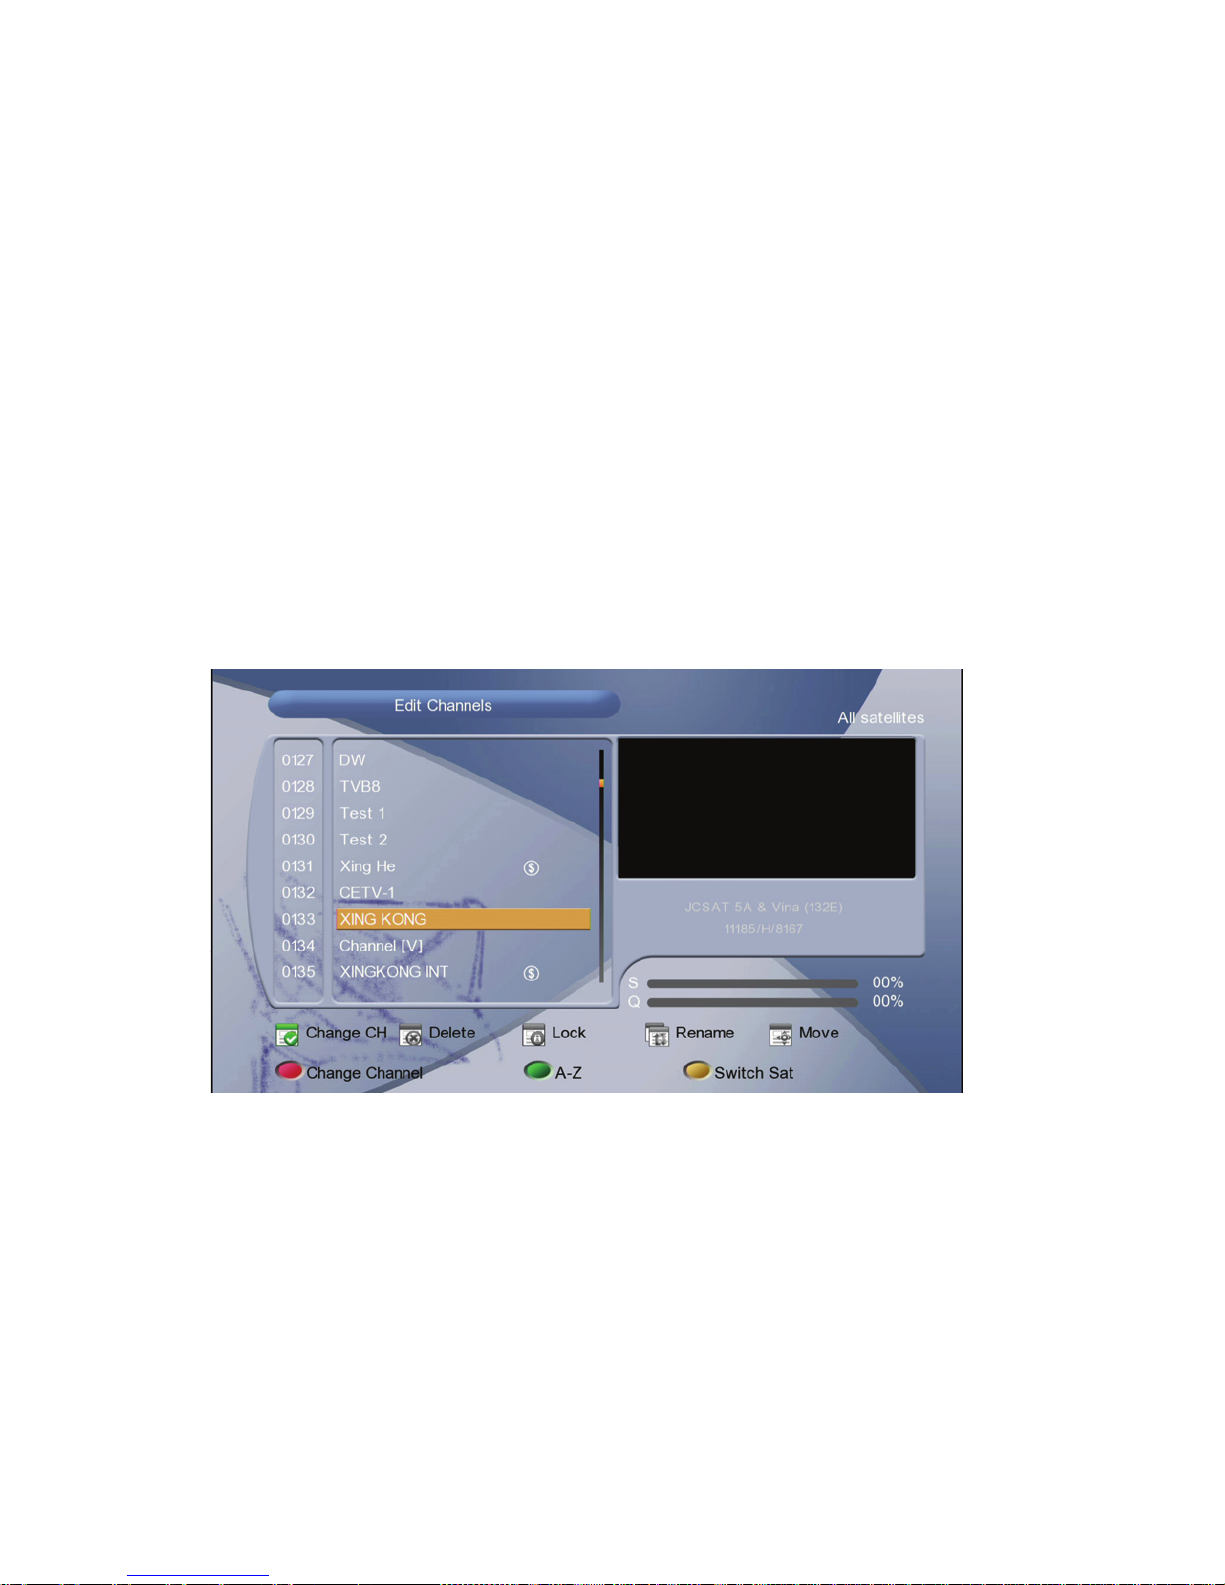
Menu->Channels->Edit Channels
Edit Channels: Enables you to delete, rename, move or lock/unlock the
channels in the channel list conveniently.
1. Delete Channels: Highlight to Delete and input the password, and press OK
button to select the channel. Press the CH+/- button or press the NUMERIC(0-9)
buttons to the destination in the channel list and press the OK button. And press
the EXIT button, here, select Yes will delete the chosen channels.
2. Move Channels: Highlight to Move, and press OK button to select the
channel. Press the CH+/- button or press the NUMERIC(0-9) buttons to the
destination in the channel list and press the OK button. And press the EXIT
button, here, select Yes will delete the chosen channels.
3. Lock and Unlock Channels: Highlight to Lock and input the password to
lock the channel.
4.Rename Channels: Hightlight to Lename and enter a channel name directly
using the keyboard displayed on the screen.Press the RED button to complete.
Page 26
24
6.2 Set Favorites
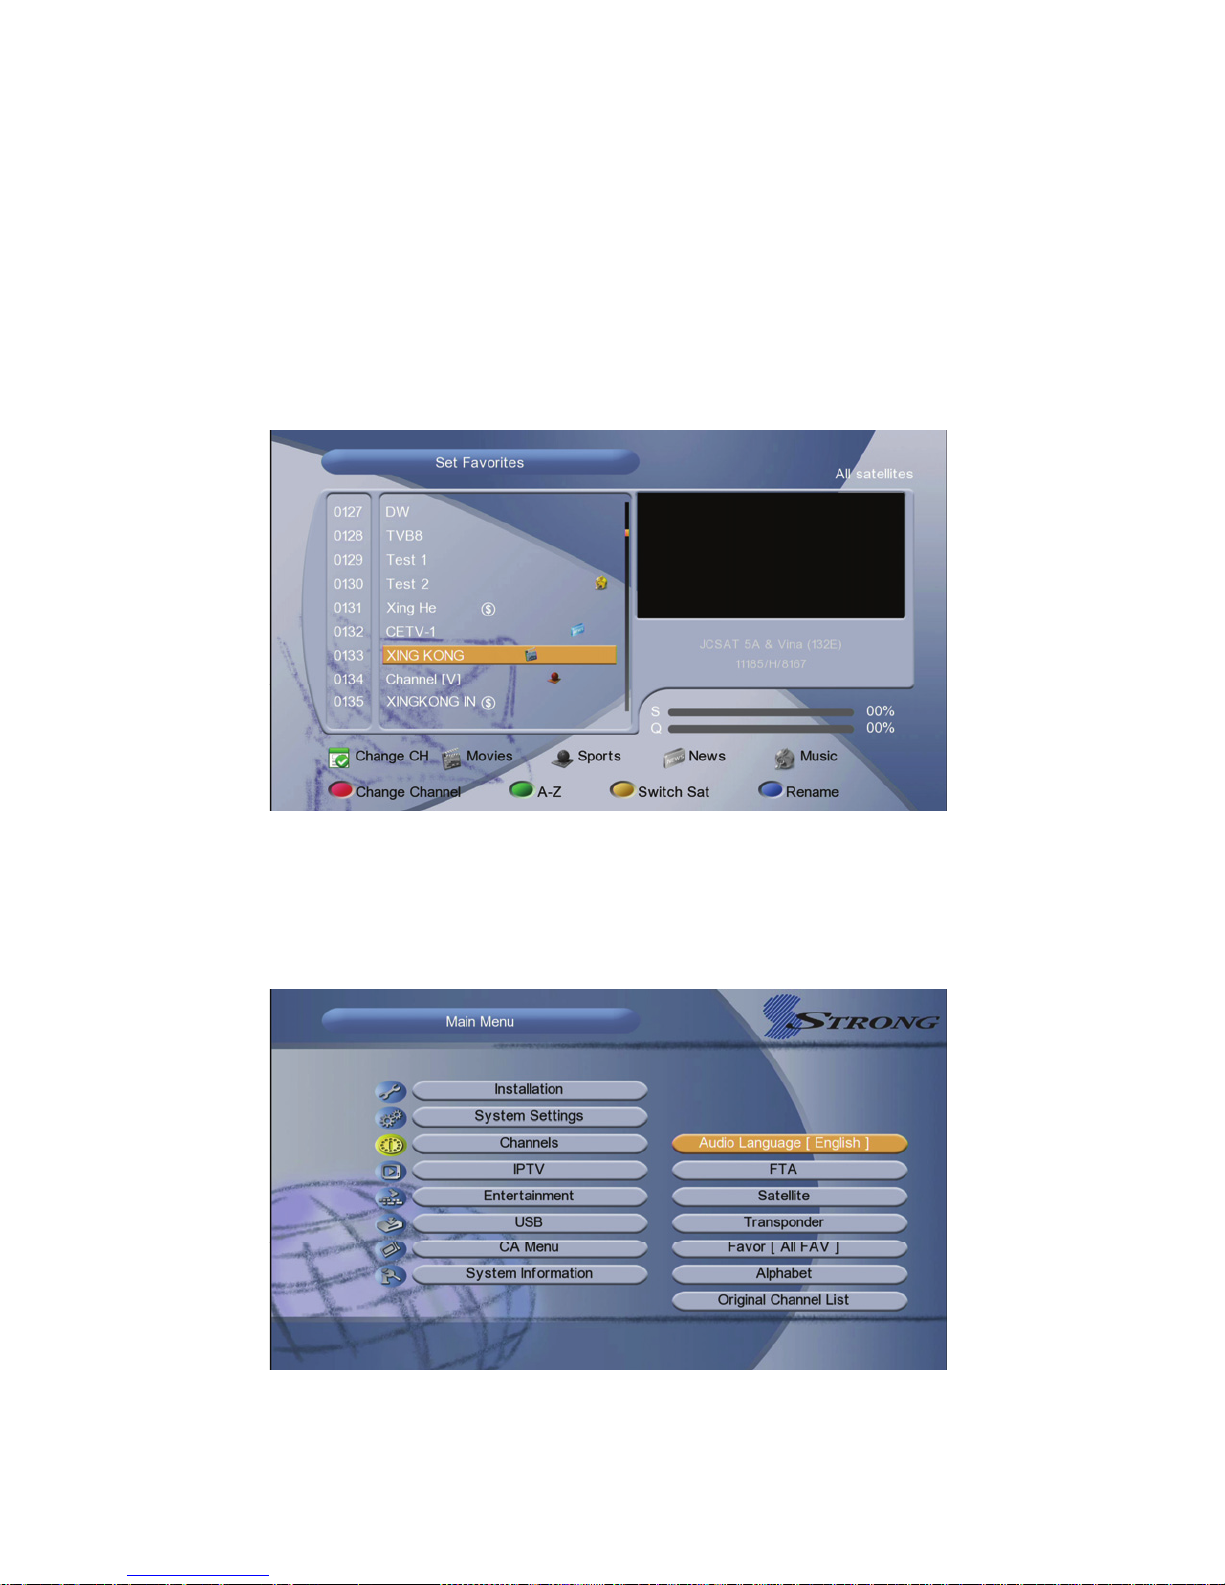
Menu->Channels->Set Favorites
Input the Password to enter, and then press the Vol+/- button to add the
Favorite Channel you want to setup. Like Movies/ Sports/ News/ Music/
Children’s/ Education/ Social/ Culture. Press the Red button can change the
types.
6.3 Sort Channels
You can sort the channels list.Highlight the option you want and press the OK
button to sort the channel list.
Page 27

25
6.4 Delete Satellite Channels
Menu->Channels->Delete Satellite Channels
Highlight the satellite you want to delete,you can delete all channels of one satellite.
6.5 Multi Screen Application
Menu->Channels-> Multi Screen Application
Highlight the Multi Screen Application, you can see the two-dimension code for
the G-Mscreen android and ISO.
VII. Channels
IPTV application includes G-IPTV / G-VOD / GTV / Royal IPTV and Net Link.
VIII. Entertainment
Entertainment inclues Youtube, Dailymotion, Weather Forecast, Google
Map, NetPhoto, Stock View, RSS, B32 Game, DLNA, VEOH, DUBAMEDIA,
ONLAINFILM, LIVESTREAM, ALJ, Shahid and Google-Mail.
IX. USB
9.1 USB Menu
Menu->USB-> USB Menu
USB Menu can play many kinds of media files, you can record program and
playback it and you can do various operations when using USB HDD or USB
disk.
1. Press the VOL+/- to select the file type.
2. Press the CH+/- to change the folder or file and press the OK button to open
Page 28

26
the folder or play the file.Press the colourful button to do some other operations.
3. USB menu support play Movie/Music/Picture/Software and so on.
4. Press Red button to Manage the USB. USB manager can Create Folders,
Delete, Rename, Format Disk, PVR Setting and Set Recording Path.
X. CA Menu
Menu->CA Menu
Before using CA Menu, please insert the CA smart card.
XI. System Information
Menu->System Information
System Information can get the information about the STB, such as
product name, software & hardware version, and serial number and so on.
When you need service from the dealer you need to submit this information in
order go get the correct and fast after sales service.
XII. Additional Information
12.1 Glossary
Antenna
A device that collects and radiates electromagnetic waves. Includes a satellite
dish and broadband antenna.
EPG
An electronic equivalent to a printed television listings magazine; it is an
application used with digital set top boxes and digital television sets to list
current and scheduled programs that are or will be available on each channel,
including a short summary or commentary for each program. The information
supplied in the EPG is sent and updated by the channel broadcaster.
Page 29

27
DiSEqC
DiSEqC(Digital Satellite Equipment Control)system, it is a communication bus
between satellite receivers and peripheral equipment using only the existing
coaxial cable.
DVB
The Digital Video Broadcast group was created to establish a technical
framework for the introduction of digital video broadcasting systems.
LNB (low-noise block converter) or LNBF
An electronic unit mounted on the satellite dish. It receives the signals reflected
by the dish and converts them to signals that can be used by the digital satellite
receiver.
HDMI (High-Definition Multimedia Interface)
An all-digital audio/video interface that supports standard, enhanced, or
high-definition video, plus multi-channel digital audio on a single cable. It
transmits all ATSC HDTV standards and supports 8-channel digital audio.
GHz
The prefix giga means milliard, and Hertz means cycles per second. Signals in
the GHz range are often called microwaves.
MHz
The prefix mega means million, and Hertz means cycles per second.
MPEG
Moving Picture Experts Group. Established by the International Standards
Organization to provide the basis for a picture coding and compression system.
Forward Error Correction (FEC)
A system of error control for data transmission.
Polarization
Polarization allows several programmers to be fit into the same frequency band.
The signals from a satellite are transmitted either with linear (vertical or
horizontal) polarizations or circular (right or left) polarization.
QPSK/8PSK(Quaternary Phase Shift Keying/8 Phase Shift Keying)
Phase-shift keying in which four different phase angles are used.
Page 30

28
Transponder
An automatic device that receives, amplifies and retransmits a signal on a
different frequency.
Symbol rate
Speed of the digital transmission
Scrambled TV programmer
Some TV programmers are transmitted in scrambled form.
Page 31

Page 32

 Loading...