

Page 1
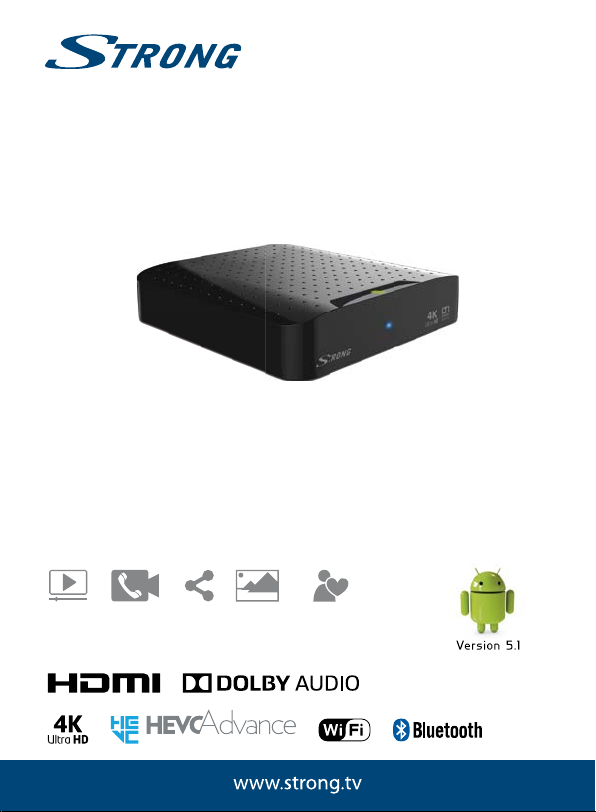
Android IP Box
streaming
SRT 2021
Picture similar
User Manual
Bedienungsanleitung
Manuel d'u lisa on
Manuale d'uso
Manual del Usuario
Manual do U lizador
Bruksanvisning
video
video
phone c alls
share
contents
picture
slide show
Instrukcja obsługi
Návod k obsluze
Használa útmutató
Посібник користувача
Ръководство за употреба
Руководство пользователя
user-friendly and
easy to h andle
Page 2
Page 3
Page 4
Supplied by STRONG & Co, Japan
Represented by
STRONG Ges.m.b.H.
Franz-Josefs-Kai 1
1010 Vienna
Austria
Email: [email protected]
01 Sep 2016 21:01
Page 5
LICENSES
ANY USE OF THIS PRODUCT IN ANY MANNER OTHER THAN PERSONAL USE THAT
COMPLIES WITH THE MPEG-2 STANDARD FOR ENCODING VIDEO INFORMATION FOR
PACKAGED MEDIA IS EXPRESSLY PROHIBITED WITHOUT A LICENSE UNDER APPLICABLE
PATENTS IN THE MPEG-2 PATENT PORTFOLIO, WHICH LICENSE IS AVAILABLE FROM MPEG
LA, LLC, 6312 S.
Fiddlers Green Circle, Suite 400E, Greenwood Village, Colorado 80111 U.S.A.
THIS PRODUCT IS LICENSED UNDER THE AVC PATENT PORTFOLIO LICENSE FOR THE PERSONAL AND
NONCOMMERCIAL USE OF A CONSUMER TO (i) ENCODE VIDEO IN COMPLIANCE WITH THE AVC
STANDARD (“AVC VIDEO”) AND/OR (ii) DECODE AVC VIDEO THAT WAS ENCODED BY A CONSUMER
ENGAGED IN A PERSONAL AND NON-COMMERCIAL ACTIVITY AND/OR WAS OBTAINED FROM A
VIDEO PROVIDER LICENSED TO PROVIDE AVC VIDEO. NO LICENSE IS GRANTED OR SHALL BE IMPLIED
FOR ANY OTHER USE. ADDITIONAL INFORMATION MAY BE OBTAINED FROM MPEG LA, L.L.C. SEE
HTTP://WWW.MPEGLA.COM
This product contains one or more programs protected under international and U.S. copyright
laws as unpublished works. They are confidential and proprietary to Dolby® Laboratories. Their
reproduction or disclosure, in whole or in part, or the production of derivative works therefrom
without the express permission of Dolby® Laboratories is prohibited. Copyright 2003-2009 by Dolby®
Laboratories. All rights reserved.
THIS PRODUCT IS SOLD WITH A LIMITED LICENSE AND IS AUTHORIZED TO BE USED ONLY
IN CONNECTION WITH HEVC CONTENT THAT MEETS EACH OF THE THREE FOLLOWING
QUALIFICATIONS: (1) HEVC CONTENT ONLY FOR PERSONAL USE; (2) HEVC CONTENT THAT IS NOT
OFFERED FOR SALE; AND (3) HEVC CONTENT THAT IS CREATED BY THE OWNER OF THE PRODUCT.
THIS PRODUCT MAY NOT BE USED IN CONNECTION WITH HEVC ENCODED CONTENT CREATED BY A
THIRD PARTY, WHICH THE USER HAS ORDERED OR PURCHASED FROM A THIRD PARTY, UNLESS THE
USER IS SEPARATELY GRANTED RIGHTS TO USE THE PRODUCT WITH SUCH CONTENT BY A LICENSED
SELLER OF THE CONTENT. YOUR USE OF THIS PRODUCT IN CONNECTION WITH HEVC ENCODED
CONTENT IS DEEMED ACCEPTANCE OF THE LIMITED AUTHORITY TO USE AS NOTED ABOVE.
STRONG declares that this item complies with the basic requirements and other relevant regulations of directives
2004/108/EC and 73/23/EC, RoHS 2002/95/EC
Subject to alterations. In consequence of continuous research and development technical specifications, design and
appearance of products may change. Android and Google Wallet are trademarks of Google Inc. Wi-Fi is a registered
trademark of Wi-Fi Alliance®. Skype is a trade mark of Skype and STRONG is not affiliated, sponsored, authorised or
otherwise associated by/with the Skype group of companies. HDMI, the HDMI logo and High-Definition Multimedia
Interface are trademarks or registered trademarks of HDMI Licensing LLC in the United States and other countries.
Manufactured under licence from Dolby Laboratories. Dolby Audio and the double-D symbol are registered trademarks of
Dolby Laboratories. All other product names are trademarks or registered trademarks of their respective owners.
02 Sep 2016 17:42
© STRONG 2016. All rights reserved.
1
Page 6

TABLE OF CONTENTS
1.0 INTRODUCTION 3
1.1 Safety Instructions 3
1.2 Storage 3
1.3 Equipment Set-up 4
1.4 Accessories 4
1.5 Usage of external USB devices 4
2.0 YOUR IP BOX 5
2.1 DEFAULT PIN: 1234 5
2.2 Front Panel 5
2.3 Rear Panel 5
2.4 Side Panel 5
2.5 Remote control 5
2.6 Installing the batteries 6
2.7 Using the remote control and USB
adapter 6
3.0 CONNECTIONS 7
3.1 Basic connection 7
3.2 Connecting to the Internet 7
3.3 Connecting to a Digital Audio Amplifier 7
3.4 Connection of a wireless mouse or key
board* 8
3.5 Connection of a USB web camera* 8
4.0 FIRST INSTALLATION 8
5.0 HOW TO USE THE ANDROID PLATFORM 9
5.1 Connect to wireless networks 9
5.2 Open the browser 10
5.3 Picture gallery 10
5.4 Video player 10
5.5 Music library 10
5.6 File Manager 11
5.7 S link for streaming from other devices 11
5.8 The Store 11
5.9 Applications 11
5.10 Open all applications 12
6.0 SETTING OF SYSTEM 12
6.1 Network 12
6.2 Add accessory (Bluetooth) 13
6.3 Display 13
6.4 Sounds 13
6.5 Language 13
6.6 Storage & Reset 13
6.7 Info (About) 14
6.8 More Settings 15
6.9 HDMI CEC 15
7.0 TROUBLESHOOTING 15
8.0 TECHNICAL SPECIFICATIONS 16
2
Page 7

1.0 INTRODUCTION
Thank you for choosing the Android IP Box from STRONG. It has been produced with the latest new
technology and offers extensive entertainment and great versatility. We wish you many hours of new
great experiences exploring the Android world and watching IPTV in High Definition quality!
1.1 Safety Instructions
DO NOT INSTALL YOUR IP BOX:
In a closed or poorly ventilated cabinet; directly on top of or under any other equipment; on a
surface which might obstruct the ventilation slots.
DO NOT EXPOSE THE IP BOX OR ITS ACCESSORIES:
To direct sunlight or any other equipment that generates heat; to rain or intense moisture; to
intense vibration and to any shock which may cause permanent damage to your IP Box or to
any magnetic objects, such as loudspeakers, transformers, etc.
Do not use a damaged power cord. It may cause a fire or an electric shock. Do not touch a
power cord with wet hands. It may cause an electric shock.
When the IP Box is not used for a long period of time, you should unplug the power cord from
the wall socket.
Do not use alcohol or ammonia based liquids to clean the IP Box. If you wish, you may clean
your IP Box with a soft lint-free cloth slightly made damp with a mild soap solution, and only
after disconnecting from the mains voltage supply. Make sure no foreign objects fall through
the ventilation slots because this could cause fire or an electric shock.
Do not place any objects on top of the IP Box because this might prevent proper cooling of the
components inside.
Safety Precautions
Never try to open the IP Box. Opening the IP Box will void the warranty of the product. Refer all
maintenance or servicing to suitably qualified personnel.
When you are connecting cables, be sure that the IP Box is disconnected from the mains
supply voltage. Wait a few seconds after switching off the IP Box before you move the IP Box or
disconnect any equipment.
It is a necessity that you only use an approved extension and compatible wiring that is suitable
for the electrical power consumption of the installed equipment. Please ensure that the
electrical power supply corresponds with the voltage on the electrical identification plate at the
back of the IP Box.
If the IP Box does not operate normally even after strictly following the instructions in this user
manual, it is recommended to consult your dealer.
1.2 Storage
Your IP Box and its accessories are stored and delivered in a packaging designed to protect against
electric shocks and moisture. When unpacking it, make sure that all the parts are included and keep
the packaging away from children. When transporting the IP Box from one place to another or if you
are returning it under warranty conditions, make sure to repack the IP Box in its original packaging
3
Page 8
with its accessories. Failing to comply with such packaging procedures could damage the product
and void your warranty.
1.3 Equipment Set-up
Please follow the instructions below:
Use a high quality, well shielded HDMI cable to watch also in highest screen resolutions.
This user manual provides complete instructions for installing and using this IP Box. The symbols will
serve as follows:
Warning Indicates warning information.
Tips Indicates any other additional important or helpful information.
MENU Represents a button on the remote control or the IP Box. (Bold characters)
Move to Represents a menu item within a window. (Italic characters)
1.4 Accessories
Installation Instructions
1 Remote control
1 USB adapter for the remote control
2x batteries (AAA type)
HDMI cable
Power adapter
Warning: The batteries should not be recharged, disassembled, electrically short-
1.5 Usage of external USB devices
It is recommended to use USB 2.0 storage devices or higher. If your device is not compatible to
USB 2.0 specifications, playback and other multimedia functions of the IP Box might not work
properly.
STRONG cannot guarantee compatibility with all types of USB devices such as web cams,
keyboards, mouse devices, storage devices.
STRONG cannot guarantee perfect operation when a HDD and a web cam are used at the same
time.
If you are going to use external USB HDDs (Hard Disk Drives), please consider that power
specifications may exceed the supported output of your box (max. 5 V/500 mA). If so, please
connect your USB HDD to an external power adapter.
It is advised not to store important information on USB storage devices used with the box.
Always make backups of data on your USB storage device before using it with this box.
STRONG will not take responsibility for any loss of information or circumstances caused by loss
of information.
circuited, be mixed or used with other types of batteries.
4
Page 9
2.0 YOUR IP BOX
2.1 DEFAULT PIN: 1234
2.2 Front Panel
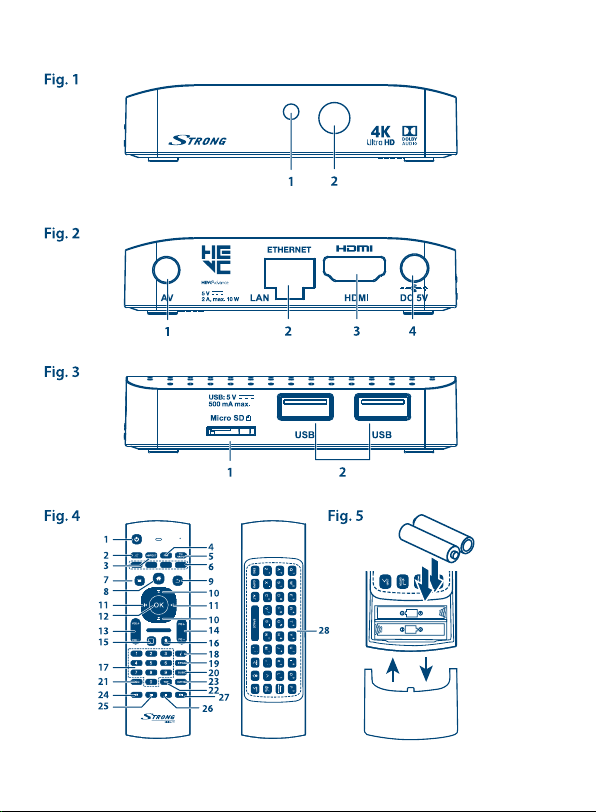
1. Status indicator: Indicates status of ON or OFF modes.
2. IR sensor: Receives Standby/On signal from the remote control.
2.3 Rear Panel
1. AV To connect your IP Box to an audio amplifier.
2. LAN To connect to your router with a RJ 45 network cable.
3. HDMI To connect your IP Box to your TV via HDMI cable.
4. Powe r To connect the included power adapter of 5 V.
2.4 Side Panel
1. Micro SD card slot To insert an optional Micro SD card.
2. USB: To connect USB devices like: mouse/keyboard/storage devices
2.5 Remote control
1. q Turns the IP Box ON/Standby
2. ! Turns the sound on or off.
3. ASPECT No function
4. FAV No function
5. TV/RADIO No function
6. COLOUR BUTTONS Different functions in menu mode
7. Opens selection of wall papers
8. Returns to the Android menu
9. Returns to the previous menu or exits the App
10. pq Moves the highlight up/down in the menu
11. tu Navigates through the menus or changes values of settings in a
12. OK Confirms a selection
13. VOL+/VOL- Increases/decreases the volume level
14. PG+/PG- Switches to the next/previous pages
Switches to recently watched apps
15.
16.
Turns the air mouse function ON or OFF.
17. 0-9 Numeric value input
No function
18.
19. EPG No function
menu
Fig. 1
Fig. 2
Fig. 3
Fig. 4
5
Page 10
20. SUB No function
21. 4 No function
22. TXT No function
23. AUDIO No function
24. 7 Jumps to the previous file during playback.
25. 12 Starts/resumes playback
26. 3 Stops playback of multimedia files
27. 8 Jumps to the next file during playback.
28. Standard QWERTY keyboard
2.6 Installing the batteries
Open the cover on the remote control and insert 2x AAA batteries into the compartment.
The correct position of batteries polar diagram is shown inside the batteries compartment.
1. Open the cover.
2. Insert the batteries.
3. Close the lid.
Warning: The batteries should not be recharged, disassembled, electrically short-
circuited, be mixed or used with other types of batteries.
Fig. 5
2.7 Using the remote control and USB adapter
Please first insert the USB adapter of the remote control in a free USB port. This USB adapter receives
the RF (radio controlled) signals from remote control. Without this adapter only the Standby button
will work via the IR sensor (infrared). The remote control has an in-built “G-sensor” which is used as
pointer on your screen in the Android mode. This is called as “Air mouse” function and allows you to
move the pointer by moving the remote control through the air.
Note: As this function uses more power as normal pressing of buttons we
Under normal conditions your remote control has been paired with the USB adapter in the factory
and therefore the “Air mouse” function of your remote control will directly work for your IP box. In
case you can only use the q button on the remote control and none of the other buttons have a
function, or in case the red LED on the remote control keeps blinking, it could be that the pairing
between the remote control and the USB adapter is not correct.
In that case you need to pair the USB adapter to the remote control manually:
1. Remove the USB adapter from the USB slot on the IP box.
2. Make sure the IP box is switched ON.
6
recommend using Alkaline batteries to ensure longer operation time
of your remote control. When the batteries are almost empty the LED
indication on the remote control will start blinking for 15 seconds after you
press any button.
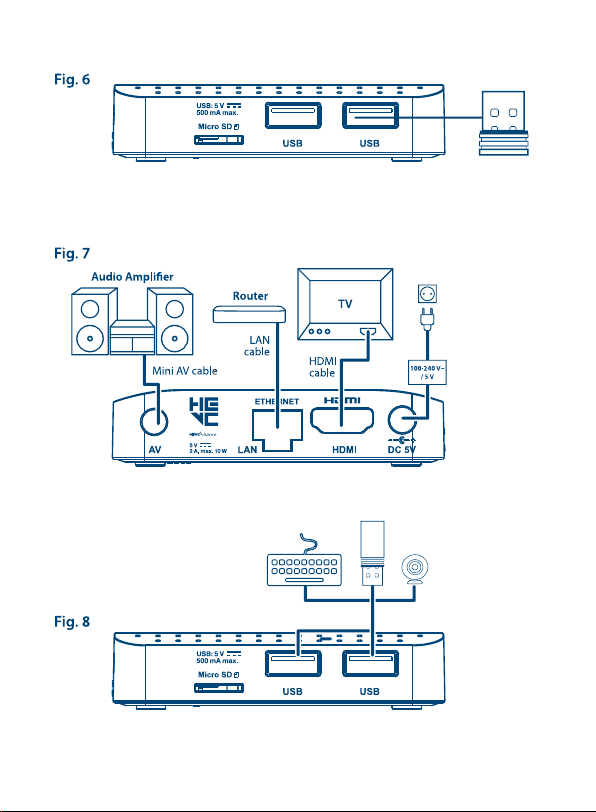
Fig. 6
Page 11
3. Remove the batteries from the remote control and insert them again. The LED on the remote
control starts flashing.
4. Press and hold the OK and buttons at the same time for a few seconds. The LED on the
remote control flashes more quickly.
5. Insert the USB adapter into a free USB port of the box and wait until the LED on the remote
control stops flashing (fig. 6).
6. Now the remote control is paired with the USB adapter.
NOTE: The function of Standby on the remote control is limited or not possible if
there are obstacles in front of the remote control sensor on the front panel
of the IP Box. If only the Standby button is working and there is no reaction
when pressing any other button it could be that the batteries are empty or
the USB adapter was removed or, as mentioned above, you need to pair
the USB adapter to the remote control manually.
3.0 CONNECTIONS
3.1 Basic connection
a. Connect one end of a good quality HDMI cable to the HDMI output on your IP Box and the
other end to the HDMI input of your TV.
b. Connect the LAN cable from your router/Internet connection into the RJ45 LAN input.
c. Plug in the power plug from the 5 V adapter and insert the adapter into a suitable wall outlet.
3.2 Connecting to the Internet
a. For the best performance we advise using a wired connection to your router.
b. Alternatively, you can use the in-built wireless adapter to connect to the Internet via your
wireless router.
Note: Be aware that the Internet speed will be reduced by walls or long distance
between the IP Box and the router when using wireless connection. This
will lead to lower quality of video streams from the Internet.
Fig. 7
Fig. 7
3.3 Connecting to a Digital Audio Amplier
Use the HDMI output to connect your IP Box to the HDMI input of your Hi-Fi system or audio amplifier
and connect the HDMI output from your Hi-Fi system to the HDMI input of your TV. In the Android
sounds menu, you can select the Digital sounds option to activate Dolby digital audio by selecting
HDMI or select PCM for downmix to stereo audio.
Fig. 7
7
Page 12
3.4 Connection of a wireless mouse or key board*
For optimal usage of the Android part we recommend using also a mouse or wireless mouse for
maximum freedom, besides the remote control. This enables tracking and dropping of functions, just
as you can do on mobile phones.
Switch the main power Off and insert a mouse or wireless mouse dongle into one of the free USB
slots. Switch the main power back On. The device will be automatically recognised and you can start
using it.
In the same way you can use a keyboard.* It will make typing of information (web addresses,
searching) much more convenient.
*Not included in the packaging.
3.5 Connection of a USB web camera*
If you like to take pictures or talk to other people and watch with video conference apps as SkypeTM,
you can connect a USB web camera with an in-built microphone to your Android IP Box.
Download and install the latest new video app from the Store first. Then switch the main power Off
and insert the USB webcam connector into one of the free USB slots. Switch the main power back On.
The webcam will be automatically recognised and you can start using it.
*Not included in the packaging.
Note: Please check on our web site www.strong.tv for the supported webcam
If you like to change the login name, camera model or if you don’t get the webcam running, enter
“Settings – Apps – Skype -- Clear data” first and then login to Skype
new login works.
4.0 FIRST INSTALLATION
This procedure will enable you to enjoy and setup your Android IP Box just with a few steps. It is
recommended to follow the First Installation step by step. It will guide you through the basic
installation.
Step 1: Language Select your preferred language for the on screen menu. Use tu to change
Step 2: Resolution Select the screen resolution you prefer. Default selection is Automatic, which
Step 3: Screen Size Use pq to adjust the size of the screen so it exactly fits the screen you are
Step 4: Network If you have already connected the Ethernet cable to your router, in most
8
models.
TM
to test a video call and if the
language and press OK to confirm your selection.
already shows the best setting of the connected screen. Press OK to confirm
your selection and the IP Box will follow. A banner appears to confirm the
new setting by selecting OK.Confirm again with OK. If you do not see this
banner immediately, wait a couple of seconds and the screen will return to its
previous state. Then try another resolution.
using. Press OK to confirm.
cases the unit finds the correct settings automatically and jumps directly
Fig. 8
Fig. 8
Page 13

to Step 5. If you haven’t connected a Ethernet cable, but prefer using Wi-Fi,
select Wi-Fi and press OK to open the menu with the available wireless
networks. Use pq to select your network and enter the key or password.
Step 5: Date&Time: If you have successfully connected to the Internet in Step 4, this screen will
Step 6: Final step: Select Login to Google Play Store to set up a Google account. Select Home
After the above steps have been made the IP Box will go into operating mode and show the home
screen. Now you can use and enjoy it!
5.0 HOW TO USE THE ANDROID PLATFORM
This chapter describes how to use the Android platform. After turning on your IP Box, Home opens.
The app icons you keep in the tray remain visible on every Home screen. All app icons in the centre
are permanent. Press to see all your apps and widgets. The middle of your Home screen can hold
app and widget icons as well as folders. To open an app, folder or widget, click on its icon.
5.1 Connect to wireless networks
To fully use the Android platform you first need to setup connection to the Internet. If you missed
this setup in Step 4 of the First Installation you can setup this connection by selecting Settings from
the Home screen and press OK. Select Network and press OK again. In this menu you can setup if
you want to connect via Wi-Fi or Ethernet (LAN cable). Press OK to confirm and to open and select
your network. Enter and store your passwords or gateway ports here. Passwords and IP settings
are provided by your Internet provider (or in-house router). A message appears to inform about a
successfully made setup. Press until you return to the Home screen.
When all settings have been installed, select Browser and press OK access the Internet.
Turn your wireless on and connect it to a wireless network
If a wireless network has been added during the first time installation, Wi-Fi is turned on
automatically.
1. Click the settings icon Setting on the Home or All Apps screen.
2. Click the icon More and then choose Wi-Fi.
Slide the Wi-Fi switch to the On position. The device scans for available wireless networks and displays
the names of those it finds. Secured networks are indicated with . If the device finds a network that
you have connected to previously, it connects to it.
3. Click a network name to see more details or connect to it. If the network is secured, you will be
prompted to enter a password or other credentials. (Ask your network administrator for details.)
To modify the settings of a network, click and hold the network name.
Forget a wireless network
You can make the device forget about the details of a wireless network that you have added, if you
don’t want your device to connect to it automatically or if it is a network that you use no longer.
1. Turn on Wi-Fi if it is not already on.
The 0 ~ 9 buttons on the remote control can also be used for entering.
automatically show the date and your local time. If necessary you can select
an item to modify it manually.
page to skip this step, go directly to the Android main page and set up your
Google account later.
9
Page 14

2. In the Wi-Fi settings screen, click on the name of the network.
3. Click Forget in the dialogue that opens.
When you connect to a wireless network, the USB device obtains a network address and other
information it needs from the network, using the DHCP protocol.
5.2 Open the browser
Click on the Browser icon at the bottom of the Home screen or on the Application icon in the launcher.
The browser also opens when you click on a web link in an email or text message. Use pqtu
to select an item, menu or web address search bar to enter a website address (URL) of your wish.
Alternatively you can press on the button to simulate pqtu with the mouse function. Press OK
to confirm or to go one step back. You can press this button more times until you to return to the
Home screen.
5.3 Picture gallery
Click on the Pictures icon in the launcher or on the Home screen. The gallery presents pictures stored
on your Micro SD card or USB storage device including pictures which have been downloaded from
the web or other locations or that are stored in web albums. You can also edit the pictures on your
USB device and share them with friends. Press to stop until you to return to the Home screen.
5.3.1 View and browse pictures
1. Open an album in the Gallery with a mouse click or press OK on one of the folders/pictures.
2. The folder gallery opens and on top of this screen you can select the picture grid view to
change between Film strip or Grid view.
3. Select a picture to show it in full on your screen.
4. Use now tu to step through the pictures collection.
5. Press the button to start a slideshow.
6. Click to zoom in or out.
7. You can call more functions like Rotate, Edit, Crop and Slideshow setup with .
5.4 Video player
Click the Video player icon in the launcher or on the Home screen, then press OK.
Choose a video and press OK to display the video. The Video player presents the video on your Micro
SD card or USB storage device including videos which have been downloaded from the web or
streamed from other locations.
5.5 Music library
Click on the Music icon in the launcher or on the Home screen. If you have copied music to your
Micro SD card or USB storage device and connected the Micro SD card or USB storage device to one
of the ports, it will search for music files and build a catalogue of your music, based on information
about each file that is stored in the file itself. Depending on the number of files it can take from a few
seconds to several minutes. When the catalogue is complete, the music library screen opens with
tabs so you can click to view your music library sorted by artists, albums, songs or playlists. Choose
the song you want to listen to and press OK.
10
Page 15
5.6 File Manager
Click the File Manager icon in the launcher or on the Home screen, then press OK. In this menu you
can see folders and files on the external and internal memory. If you like you can Delete, Edit, Copy
files and Paste those to other folders. Also copy from external and internal memory or vice versa.
5.7 S link for streaming from other devices
Click on the S link icon in the launcher or on the Home screen. You will conveniently be able to
connect your mobile phone or tablet with your TV screen to watch pictures, videos and music from
these devices. You must also install apps from the Store on these devices to make it functioning.
5.8 The Store
Click on the Store icon in the launcher or on the Home screen. When you open the Store for the first
time, please read and accept the terms of service to continue.
You need to create a Google Account or enter your existing account and password before you can
use the Store. This menu will guide you through the steps. Once ready you can start using the Store
market by following the steps below.
5.9 Applications
Note: STRONG cannot warrant and cannot be hold responsible of the (mal-)
5.9.1 Browse for applications
You can browse for apps by category and sort them in different ways.
1. Click a top-level category, such as Apps or Games. Click on a subcategory to view its list of apps.
2. Scroll to view subcategories and click on the one you want to explore. Click to view top paid,
top free or the most recent apps in this subcategory. Click on an app to open its details screen.
3. Click Top paid, Top free or Just in to sort the subcategory further.
5.9.2 Search for applications
1. Click the Search icon at the top right-hand side of the screen
2. Enter what you want to search for and click Search again. You can enter all or only a part of an
app’s name or description or the developer’s name which you want to search for. When you
find an app you like, you can install it on your SD card or USB storage device.
3. Click on the Search result to open the details screen of that app.
The details screen describes the app and contains buttons for downloading it and performing other
tasks. You can also press and enter Setting.
5.9.3 Download and install an application
Find an app you want and open its details screen. In the details screen of the app, you can read more
about it including costs, rating and user comments and information about the developer. Click to
function and working of third party apps. Some applications function only
well in devices with GPS.
11
Page 16
download and install the app. (If it is a paid app, the button is labelled with the price.) Wait until it is
installed and shows “open” to use this new app.
5.9.4 Create a Google WalletTM account
You can pay for the items you purchase from the Store with a Google WalletTM account. Set up a
Google WalletTM account the first time you purchase an item from the Store or prior in a web browser.
In a web browser, go to https://wallet.google.com/ to establish a Google WalletTM account. Another
possibility is to set up a Google WalletTM account the first time you use your Android IP Box to buy an
item from the Store when you are asked to enter your billing information.
Warning: When you have used Google Wallet
5.9.5 Managing your downloads
After downloading and installation of an app, you can access the Store and enter the app name
again. Here you can rate it, view it in a list with your other downloaded apps and configure it
to update itself automatically and much more. Also you have the option to uninstall the app.
Alternatively you can select Settings, More Settings from the Home screen and click on Apps. In this
menu you can clear data, force stop or even uninstall the selected app.
Note: Be careful what you do in these menus as it can lead to deletion of settings,
5.9.6 View your downloaded applications
You can view a list of the apps that you have downloaded from the Store and use the list for a number
of purposes. On the Home screen, select the All App icon and press OK to see the installed apps.
5.10 Open all applications
Click on the All Apps icon in the launcher or on the home screen. This menu displays all your apps
short links on one or more screens. Press q once and then use tu to see all apps. If you select one,
you can open it by pressing OK or press to manage apps or go directly to the Settings menu.
6.0 SETTING OF SYSTEM
Click on the Setting icon in the launcher or in the home screen. This menu allows you to set up all your
important settings such as Network, Bluetooth, Display, Sounds, Language and more.
6.1 Network
In this menu you can change or setup connection to the Internet by Wi-Fi or LAN (RJ45 cable). Enter
and store your passwords and/or gateway ports here.
12
from the Store, the Android IP Box remembers your password. For this
reason, you should secure your Android IP Box to prevent others from
using it without your permission.
app or users data.
TM
account once to purchase an app
Page 17

6.2 Add accessory (Bluetooth)
This menu allows you to open the Bluetooth search detection ON or OFF, to setup new connections
to other Bluetooth devices.
If you like to make connection you need to open on both devices this function. With a confirmation
by numeric key you make a secured connection.
6.3 Display
Here you can set your Screen resolution, Screen position and Daydream.
6.3.1 Screen resolution
In this menu you can select your preferred HDMI output resolution which is supported by the
connected TV. The AUTO mode automatically selects the best output resolution of the combination
(so called 'handshake').
6.3.2 Screen position
Select Screen position if the size of the displayed screen is a bit too large or too small for the
connected screen.
6.3.3 Daydream
You can set your Daydream screen in None or Colours.
Choose the period of inactivity to start Daydream: (5, 10, 15, 30, 60 minutes, Never).
When to sleep: Screen turns OFF after this period of inactivity: (30minutes, 1, 3, 6, 12 hours, Never).
6.4 Sounds
In this menu you can setup the correct audio output setting if you like to use Dolby audio to connect
to a digital amplifier.
System sounds: Select On to hear every time a click of remote buttons as confirmation. Select
Digital sounds: The selection HDMI sends Dolby audio. The selection PCM gives only Stereo
6.5 Language
Select the OSD language which shall be used for the menus on screen.
6.6 Storage & Reset
This menu gives you an overview of your storage device.
You can also do a Factory data reset.
6.6.1 Storage
Here you get an overview from the used space on your storage device.
You can also clear your cached data for all apps in Cached data.
Off for no click sound.
to all outputs.
13
Page 18
6.6.2 Factory data reset
Select this ONLY if you want to restore all settings back to factory default. All personal data will be
erased from the internal memory storage, including information about your Google WalletTM account,
other accounts, system and app settings and downloaded apps. When resetting the Android IP Box,
the system software updates you have downloaded and installed will not be deleted.
6.6.3 System Password
Default PIN code 1234.
6.6.4 System Password Change
To change the default password 1234 into a personal password:
Go to Settings -- Personal -- Security & Restrictions -- Change Password.
Here you have to enter the old PIN code and if accepted, you can enter the new PIN code.
You will be asked to enter the new PIN code again and the message Success will be shown.
6.7 Info (About)
Select this menu to see technical details of the IP Box as model name, software version, Wi-Fi MAC
address, Ethernet MAC address, IP address and serial number. You can also find options to upgrade
the software.
6.7.1 Update
From time to time you can check if there is an improved software version available. This can be
checked and downloaded from our website www.strong.tv. Enter the type number into the service
support on our website. If there is an improved software version you can download the file and copy
it to the root of a USB device. Once ready insert the USB device to one of the free USB slots of the
Android IP Box. Select Local update and select the USB device and the upgrade file. Press OK and the
upgrade process will start.
Alternatively you can select Online update to upgrade the software directly from the server online.
This service is not available in all regions. Please, check information from your local dealer or visit our
website www.strong.tv for more information.
Note: Upgrades reset the Android IP Box back to the factory settings. Make
sure that you make a backup of the apps, or note the apps you have
downloaded before.
Warning: During the upgrade and flash process, do not switch off the main power!
14
Wait until the Android IP Box reboots and restarts automatically.
Page 19
6.8 More Settings
In this menu you can set up, modify and change many settings of the Android part like you are used
to from your tablet or smartphone. All basic functions can be modified as Wi-Fi, Bluetooth, Ethernet,
Sounds, Display, Storage, Permissions and Managing installed apps.
6.9 HDMI CEC
CEC (Consumer Electronics Control) can be used for controlling your equipment with only 1 remote
control.
Set One key play to ON to use all connected CEC supported equipment that shall be switched ON
when SRT 2021 is switched ON by the remote control.*
Set One key power off to ON to use all connected CEC supported equipment that shall be switched
OFF when SRT 2021 is switched OFF by the remote control.*
* CEC supported equipment is NOT always compatible with each other.
7.0 TROUBLESHOOTING
There may be many reasons that affect the correct operation of your Android IP Box. If the IP Box does
not work as you expect, please follow the steps outlined below. If after performing these operations
the IP Box still does not work well, contact your dealer or service centre in your area or write an email
to our support via our website www.strong.tv.
If you experience problems, first check whether it is caused by an application. Try to clear the data or
remove the app and check if this solves the problem. Please enter Settings – Apps -- (select the app)
-- Clear data and then return to the menu and test if all works again.
If not successful you can reset the IP Box back to the factory settings and try to install it again. Refer to
chapter 6.6.2 of this user manual.
Warning: Do not open the IP Box cover. This action will damage the warranty seals
The remote control is not
working. The remote LED
is blinking 15 seconds after
pressing a button.
Some buttons of the remote
control are not working
Cannot turn on the IP Box The power adapter is not
and warranty repairs will be denied.
Problem Possible reason Remedy
The battery is exhausted
The remote control is
incorrectly aimed. The USB
adapter of the remote control
has been removed.
The Air mouse function is
activated
connected to the 230 V outlet
or 5 V plug into IP Box.
Change the batteries
Aim the remote control at the IP
Box, or check that nothing blocks
the path to the IP Box front. Insert
the USB adapter belonging to the
remote control.
Press
to switch this function
OFF.
Check whether the power
connector is completely
plugged into the DC socket of
the IP Box.
15
Page 20
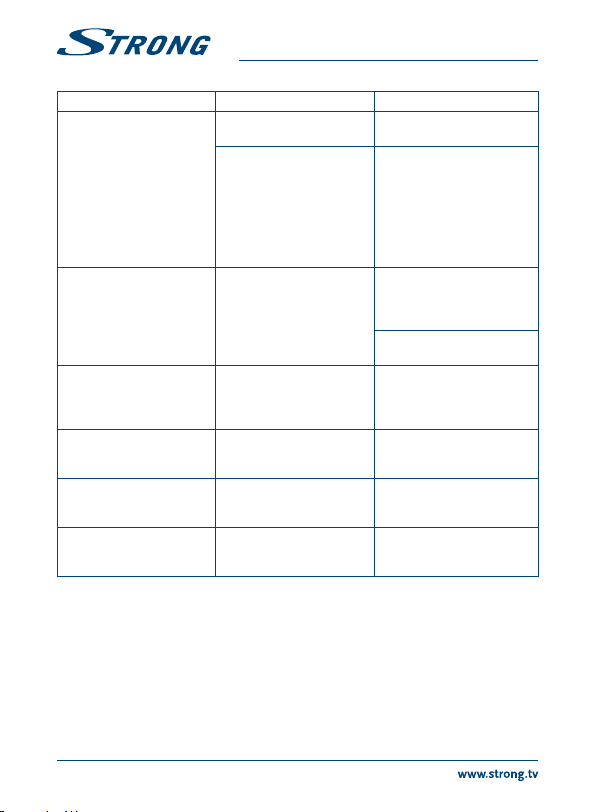
Problem Possible reason Remedy
No menu or signal from the
Android IP Box on the TV
No internet connection/
activities
Some HDTVs cannot display
the entire picture
The IP Box switches off after 3
hours of no commands of the
remote control
Forgotten your PIN code Default PIN is 1234 Contact your local Service
The external USB HDD does
not start.
Wrong input on the TV Check whether the correct HDMI
The connections are not done
properly.
The quality of the connected
cables is insufficient.
The power saving Auto
standby function is activated
The power consumption is
too high.
input on your HDTV is selected.
Ensure that the connections are
done correctly and are fitting
well to the connected input/
output.
Check that the quality of all
cables is good. Reconnect all
cables between the IP Box and
the TV set.
Make sure the Wi-Fi network
is connected and the security
key for the encrypted network
is correct.
Make sure you select the
correct IP address settings.
Setup the screen ratio on your
HDTV as automatic or change
the screen size in the system
menu.
Switch the Auto standby
function off, if you don’t like it.
Hotline or send an email to our
support via www.strong.tv
Connect an extra power supply
adapter to your USB HDD
device.
8.0 TECHNICAL SPECIFICATIONS
Video decoder
Aspect ratio: 16:9, Auto/Full screen
Video resolution: 2160p*, 1080p, 1080i, 720p
*2160p is only presented in the menu when HDMI is connected to a 4K UHD TV (HDMI cable of good quality advised).
16
Page 21

Audio decoder
Audio decoding: Dolby® Digital/ Dolby® Digital Plus*, MPEG-1 layer1/2, MPEG-2
Audio mode: Mono, L/R, Stereo
*Dolby Digital Plus, Dolby Digital and the double-D symbol are registered trademarks of Dolby Laboratories
System & Memory
Android Version: 5.1
Chipset: Amlogic S905-B
CPU: Quad Core ARM Cortex-A53 2.0 GHz
GPU: Quad Core ARM Mali-450@600 MHz+
SDRAM: DDR3, 1 GB
Flash: eMMC: 8 GB
Connectors
AV
LAN RJ45
HDMI
2x USB 2.0 slots
MICRO SD slot
DC IN (5 V, 2 A)
General data
Wi-Fi: 802.11 b/g/n
Bluetooth: 4.0
Power supply: 100 - 240 V AC, 50/60 Hz
Input voltage: DC 5 V, 2 A
Power consumption: 10 W max., 4 W typ.
Power consumption in standby: max. 0.5 W
Operating temperature range: 0 ~ +40 °C
Storage temperature: -10 ~ +65 °C
Dimensions (W x D x H) in mm: 85 x 85 x 18.5
Weight: 0.15 kg
Layer II
17
Page 22

18
 Loading...