

Page 1
HD MEDIA PLAYER
USER MANUAL
Page 2

2
Page 3
3
TO REDUCE THE RISK OF FIRE AND ELECTRIC SHOCK, DO NOT EXPOSE THIS UNIT TO RAIN OR MOISTURE.
CAUTION: To reduce the risk
of fire and electric shock, do not remove the cover (or back) of the unit. Refer servicing
only to qualified service personnel.
The lightning flash with arrowhead symbol within an equilateral
triangle, is intended to alert the user to the presence of uninsulated
“dangerous voltage” within product’s enclosure that may be of
sufficient magnitude to constitute a risk of electric shock.
The exclamation point within an equilateral triangle is intended to
alert the user to the presence of important operation and servicing
instructions in the literature accompanying the appliance.
WARNING: TO REDUCE THE RISK OF FIRE OR ELECTRIC SHOCK, DO NOT
EXPOSE THIS APPLIANCE TO RAIN OR MOISTURE.
The apparatus shall not be exposed to dripping or splashing, and that no objects filled
with liquids shall be placed on the apparatus.
In addition to the careful attention devoted to quality standards in the manufacture of
your video product, safety is a major factor in the design of every instrument. However,
safety is your responsibility too. This page lists important information that will help to
assure your enjoyment and proper use of the video product and accessory equipment.
Please read them carefully before operating and using your video product.
1. Read and Follow Instructions – All the safety and operation instructions should
be read before the video product is operated.
2. Retain Instructions – The safety and operation instructions should be retained for
future reference.
3. Heed all Warnings – Comply with all warnings on the video product and in the
operating instructions.
4. Polarization – This video product is equipped with a polarized alternating-current
line plug. To prevent electric shock, do not use this polarized plug with an
extension cord, receptacle, or other outlet unless the blades can be fully inserted
without blade exposure. If you need an extension cord, use a polarized cord.
5. Power Sources – This video product should be operated only from the type of
power source indicated on the marking label.
6. Overloading – Do not overload wall outlets or extension cords as this can result
in a risk of fire or electric shock. Overloaded AC outlets, extension cords, frayed
power cords, damaged or cracked wire insulation, and broken plugs are
dangerous and may result in a shock or fire hazard. Periodically examine the
cord, and if its appearance indicates damage or deteriorated insulation, have it
replaces by your service technician.
7. Power Cord Protection – Power supply cords should be routed so that they are not
likely to be walked on or pinched by items placed upon or against them, paying
particular attention to cords at plugs, convenience receptacles, and the point
where they exit from the video product.
8. Ventilation – Slots and openings in the case are provided for ventilation to ensure
reliable operation of the video product and to protect it from overheating. These
openings must not be blocked or covered. The openings should never be blocked
by placing the video product on a bed, sofa, rug, or heat register. This video
product should not be placed in areas such as a book case or rack, unless proper
ventilation is provided or the video product manufacturer’s instructions have been
followed.
9. Attachments – Do not use attachments unless recommended by the video product
manufacturer as they may cause hazards
10. Water and Moisture – do not use this video product near water, for example near
a bath tub, wash bowl, kitchen sink, laundry tub, in a wet basement, or near a
swimming pool. Caution: Maintain electrical safety. Power line operated
equipment or accessories connected to this unit should bear safety certification
mark on the accessory itself and should not be modified so as to defeat the safety
features. This will help to avoid any potential hazard from electrical shock or fire.
If in doubt, contact a qualified service personnel.
11. Power Lines – An outside antenna system should not be located in the vicinity of
overhead power lines, other electric light or power circuits, or where it can fall
into such power lines or circuits. When installing an outside antenna system,
extreme care should be taken to keep from touching or approaching such power
lines or circuits, as contact with them might be fatal. Installing an outdoor
antenna can be hazardous and should be left to a professional antenna installer.
12. Use (Cleaning) – Unplug this video product from the wall outlet before cleaning.
Do not use liquid cleaners or aerosol cleaners. Use a damp cloth for cleaning.
13. Objects that may touch dangerous voltage points or “short-out” parts could r esult
in a fire or electric shock. Never spill liquid of any kind on the video product.
14. Lightning- For added protection for this video product during a lightning storm,
or when it is left unattended and unused for long periods of time, unplug it from
the wall outlet and disconnect the antenna or cable system. This will prevent
damage to the video product due to lightning and power line surges.
Page 4

4
15. Servicing – Do not attempt to service this video product yourself, as opening or
removing covers may expose you to dangerous voltage or other hazards. Refer all
servicing to qualified service personnel.
16. Conditions Requiring Service – Unplug this video product from the wall outlet
and refer servicing to qualified service personnel under the following conditions:
a. When the power-supply cord or plug is damaged.
b. If liquid has been spilled, or objects have fallen into the video product.
c. If the video product has been exposed to rain or water.
d. If the video does not operate normally by following the operating
instructions.
Adjust only those controls that are covered by operating instructions. Improper
adjustment of other controls may result in damage and will often require
extensive work by a qualified technician to restore the video product to its
normal operation.
e. If the video product has been dropped or cabinet has been damaged.
f. When the video product exhibits a distinct change in performance – this
indicates a need for service.
17. Replacement Parts – When replacement parts are required, have the service
technician verify that the replacements he uses have the same safety
characteristics as the original parts. Use of replacements specified by the video
product manufacturer can prevent fire, electric shock, or other hazards.
18. Safety Check – Upon completion of any service or repairs to this video product,
ask the service technician to perform safety checks recommended by the
manufacturer to determine that the video product is in safe operating condition.
19. Wall or Ceiling Mounting – The product should be mounted to a wall or ceiling
only as recommended by the manufacturer.
20. Heat – The product should be situated away from heat sources such as radiators,
heat registers, stoves, or other products (including amplifiers) that produce heat.
*Note: The Rock-Box is best utilized in conjunction with a wireless
mouse and keyboard (not included) as well as HDMI cabling (not
included) for display output.
For more information, visit the Strong homepage at www.strong.com.au or our website dedicated to
this product www.rock-box.com.au.
Page 5

5
Table of Contents
The Remote Control ......................................................................................................................... 6
The Back Panel .................................................................................................................................. 7
Setting Up .......................................................................................................................................... 7
Home Screen & Basic Functionality................................................................................................ 8
How To Play Movies & TV Shows .................................................................................................. 9
Internet (Wi-Fi & Ethernet) ............................................................................................................ 9
Settings ............................................................................................................................................. 10
Language ................................................................................................................................... 10
Video Resolution ...................................................................................................................... 10
Time, Date and Format ............................................................................................................. 11
Add/Remove Online Accounts ................................................................................................. 12
Check Storage Space ................................................................................................................ 13
Taking Screenshots ................................................................................................................... 14
Installing/Uninstalling Apps ..................................................................................................... 15
Back Up Your Device ............................................................................................................... 16
Resetting Your Device to Factory Default ................................................................................ 16
Customizing You Device ................................................................................................................. 17
Changing Your Background Image .......................................................................................... 17
Adding Widgets to Your Home Screen .................................................................................... 18
Adding App Shortcuts to Your Home Screen ........................................................................... 19
Change Text Size ...................................................................................................................... 19
Troubleshooting .............................................................................................................................. 20
Blank Screen on Startup ........................................................................................................... 20
Apps That Constantly Crash/Stop Working ............................................................................. 20
No Audio................................................................................................................................... 20
Using eHomeMediaCenter ............................................................................................................. 20
Appendix .......................................................................................................................................... 23
Page 6
6
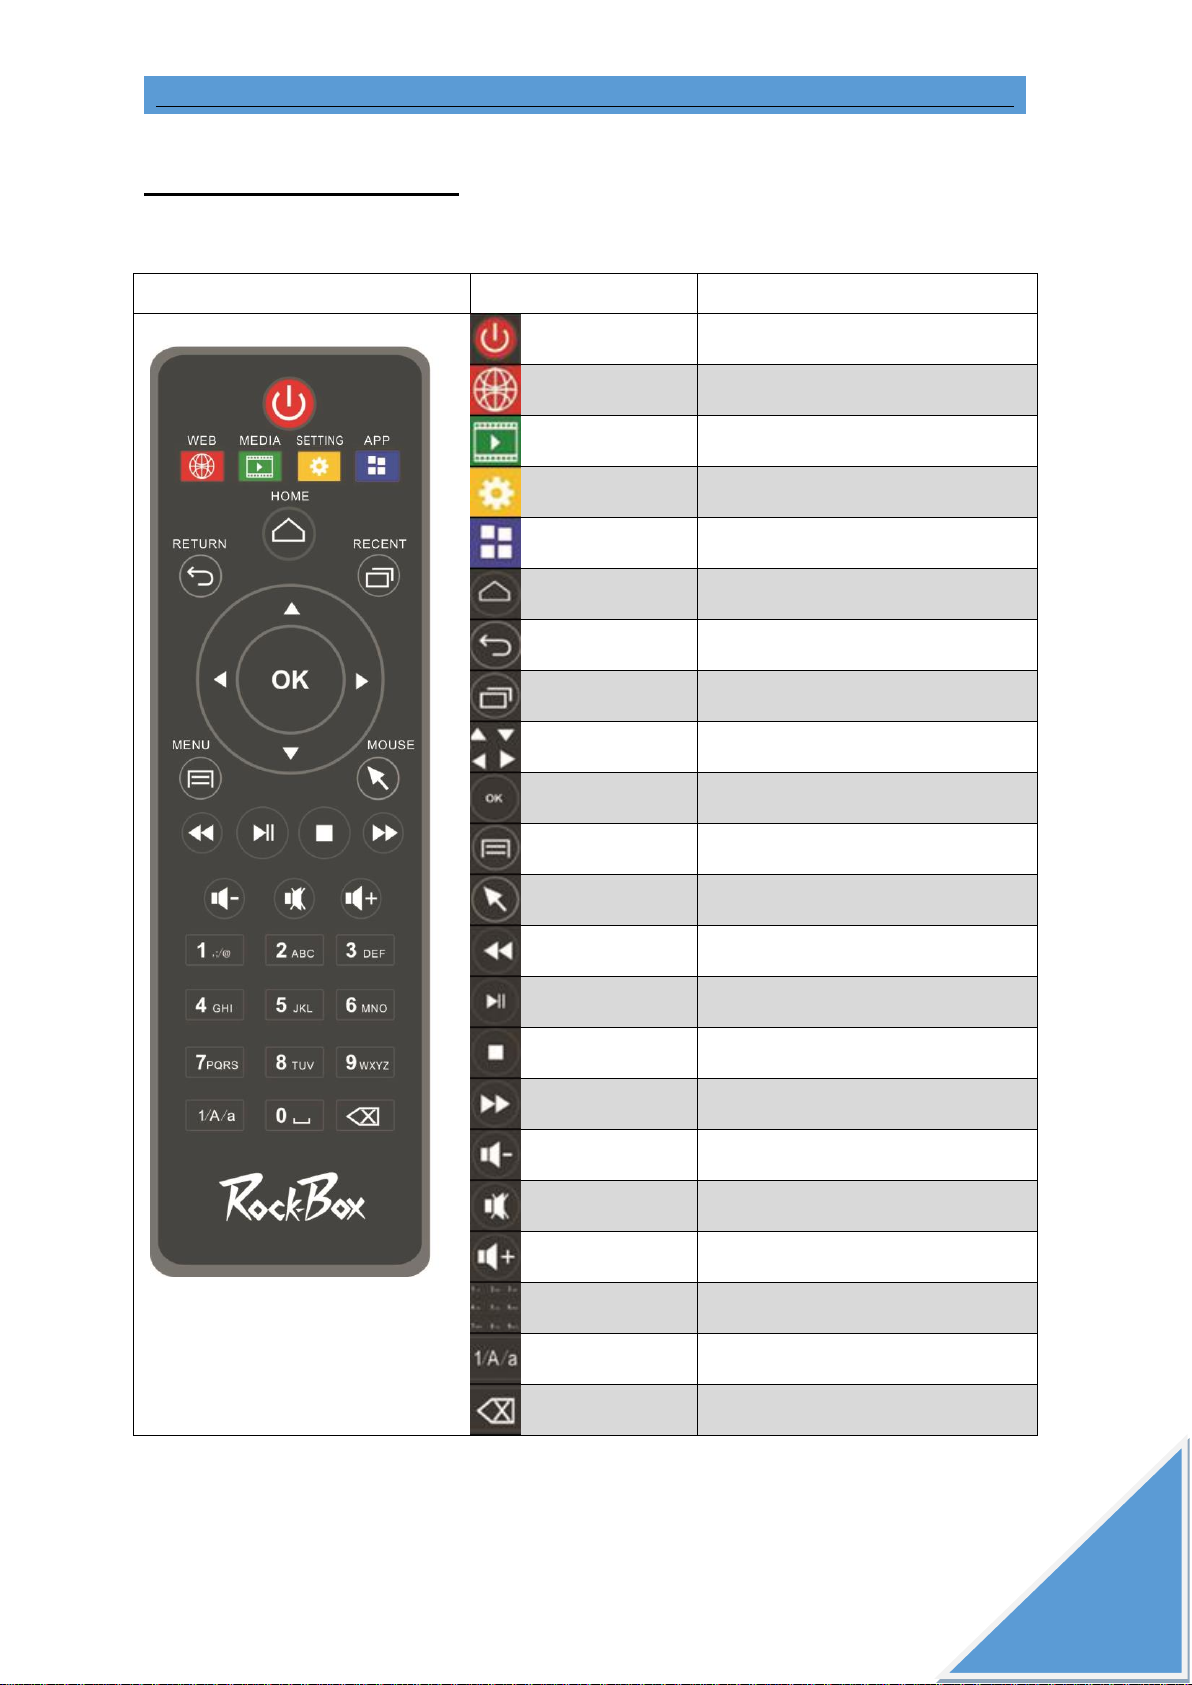
The Remote Control
Photograph
Key
Function
Power
Turns on or off the device
RED Browser
Opens the Browser app
GREEN Media
Opens the Video app
YELLOW Settings
Opens the Settings app
BLUE Apps
Opens the Apps list
Home
Goes back to the Home Screen
Back
Returns to the previous page
Recent Apps
Opens a list of running apps
Arrows
Navigates around the interface
OK
Confirms selection
Options
Bring up a context-sensitive menu
Mouse
Enables mouse-like operation
Rewind
Rewinds current playback
Play/Pause
Starts or pauses current playback
Stop
Stop current playback
Fast Forward
Fast forwards current playback
Volume Down
Turns down audio (separate to TV)
Mute
Mutes audio (separate to TV)
Volume Up
Turns up audio (separate to TV)
Numpad
Used for numeric input
Numpad Mode
Swaps numpad from numbers to letters
Delete
Deletes the most recent character
*Note: The fast-forward and rewind buttons will only work with the stock Video app, and
compatibility with other 3rd party apps is not guaranteed.
Page 7

7
The Back Panel
Setting Up
1. Plug the power cable into the back of the device, and the other end into the wall
socket.
2. Plug the AV or HMDI (not included) cable into your TV, and the other end into the
relevant socket on the back of the device.
3. Connect an RJ45 Ethernet cable from the device to your modem/router for easy
access to your Internet connection. Otherwise the device contains Wi-Fi access to
your router out-of-the-box.
4. Turn the power on at the socket and a blue light will appear on the top of the device
indicating it’s been powered on.
5. Turn on your TV and change the source to either AV or HDMI (depending on the
type of video cable you used).
6. The device will take some time to set itself up for the first time, please wait until the
device boots into the Home screen as shown on page 8 of this user manual.
7. To put your device on standby, press the power button on your remote, or the power
button at the bottom of the screen, then press OK.
*Note that changing the Source input on your TV then back again with the device
in standby will turn the device back on.
8. Connect to the Internet (via Wi-Fi or Ethernet) through the Settings app. Refer to
page 9 for more information on setting up Internet access.
9. Sign in to your existing Gmail account, or add a new one. This is required if you
would like to download apps and update existing ones. Refer to page 12 for more.
Page 8

8
Home Screen & Basic Functionality
1. Press the Home button to return to this screen from anywhere.
2. Press the Back button to return to any previous page.
3. Use either the remote control directional and OK buttons, or a
USB/wireless mouse & keyboard (not supplied, but recommended) to navigate
around the device.
4. Pressing the mouse button on the remote control will make a cursor appear on
screen that can be used to simulate a mouse. Press it again to change control mode.
5. Press and hold the left/right arrow buttons (remote) or click and drag the home
screen to the side (mouse) to switch home screens.
6. Click the APPS button at the bottom of the screen, or the blue button on the
remote to access a list of all the applications on the device.
7. To download new apps, click on the Play Store app (you must have a Gmail
account.)
Page 9

9
How To Play Movies & TV Shows
1. Plug in external storage device (USB or HDD via USB, up to 3TB)
2. Click on the MX Player app.
3. Navigate to the file you want to play and press OK.
Internet (Wi-Fi & Ethernet)
To connect to your Wi-Fi:
1. Click on the Settings app.
2. Click on Wi-Fi to enter options (alternatively press the Right directional button).
3. Click on “WiFi Switch” to turn off or on Wi-Fi and search for wireless channels.
4. Click on the wireless channel that matches the name of your modem/router. This
will open up a new window.
Page 10

10
5. Enter the password for your Internet, then click the back button, then click Connect.
6. The text under your network should read “Connected”.
To connect to your Internet via a direct cable:
1. Connect one end of the RJ45 Ethernet cable into your modem/router.
2. Connect the other end into the back of your unit.
3. In the Settings app, check the box next to “Ethernet” in the Ethernet tab. The
internet should not obtain all settings automatically.
Settings
Language
1. Click on the Settings app.
2. Click “Language & input”.
3. Click “Language”.
4. Press the Down button and select your desired language.
Page 11

11
Video Resolution
1. Click on the Settings app.
2. Click “Screen”.
3. Click “HDMI Mode”.
4. Highlight the resolution of your TV (see your TV manual to see what resolution it is)
and press OK.
Time, Date and Format
1. Click on the Settings app.
2. Click “Date & time”.
3. If you want to manually set the date, uncheck “Automatic date & time”, then click
Set date and/or Set time to change these values.
4. Click on the date, time and hour of your choice. You will need either a mouse or the
mouse mode for this function (activate by pressing the mouse pointer button on the
Page 12

12
remote).
5. Select “Select time zone”, and select the time zone closest to yours.
6. You can change the 24/12 hour format by checking the “Use 24-hour format”
option.
7. You can also change the date format by Selecting “Choose date format”.
Add/Remove Online Accounts
To set up a Gmail account for the first time:
1. Open the Gmail or Play Store app, and click either “Existing” or “New”
2. Enter your details and follow the prompts/
To set up other accounts:
1. To add a new account, go to the Settings App and go down to “Add Account”.
a. Select the type of account you wish to add, and select OK.
b. Enter your details.
c. Make sure you are connected to the internet so that the device and
synchronize with your account regularly, then press OK.
2. To remove an existing account, go to the Settings App and go down to the account
you want to delete.
a. Press the icon in the top right corner of the screen, or the Option button on
your remote control, and select Remove Account from the drop-down menu.
b. Read the warning, then select Remove Account.
Page 13

13
Check Storage Space
1. Click on the Settings app.
2. Click “Storage”
3. Initially you can see a percentage-based bar of how full your internal storage device
is. The more grey space you have in the bar, the more space you have left.
4. To view a detailed rundown of how much space each app is taking up, click on
Apps. Press the Back button to return.
5. You can delete cached data by clicking Cached data, then clicking OK.
6. You will then see another percentage-based bar of how full your Nand Flash storage
device is. Here you can check all of your downloads by selecting “Downloads”.
7. You can also erase all the data on your Nand Flash by selecting “Erase Nand Flash”
Page 14

14
Taking Screenshots
Screenshots are useful in helping to explain problems with your device to other people. To
take one:
1. Click on the Settings app.
2. Click “Screenshot Setting”.
3. The screenshot will activate after a certain amount of time, defined by the option
listed in the “Select delay time to capture the screen” option. Click this to change
the countdown timer. The countdown will start after you select the timer.
4. You can change where the screenshot saves to by selecting “Set the location of
screenshot storage”.
Page 15

15
Installing/Uninstalling Apps
1. To install an app, you must first be logged into your Google account (see
Add/Remove Online Accounts). Then:
a. Click on the Play Store app.
b. Search for the app you want.
c. Click the green “Install” button if it’s free, or the same green button that has
the apps listed price (this will incur charges to your Google account).
2. To uninstall an app:
a. Click on the Settings app.
b. Click “Apps”.
c. Keep pressing the Right button until the “ALL” tab is selected.
d. Navigate to the app you want to uninstall and press OK.
e. Select Uninstall.
f. Select OK.
Page 16

16
Back Up Your Device
To back up App data, Wi-Fi passwords, Browser bookmarks and other personal device
settings with Google servers:
1. Click on the Settings app.
2. Click “Backup & Reset”.
3. Check “Back up my data”.
Resetting Your Device to Factory Default
To erase all custom data on your device:
1. Click on the Settings app.
2. Click “Backup & Reset”.
3. Click “Factory data reset”.
4. Read the warning, and if you want to delete all your files such as music or photos,
check the “Erase SD card” option.”
5. Click “Reset device”.
Page 17

17
How to Update Your Device
1. Check the Strong website for a new update, then download it.
2. Insert a USB into the computer, then drag the update file onto the USB.
3. Remove the USB and plug it into the Rock-Box.
4. The Rock-Box should recognize the update file and will ask if you want to update.
5. Click “Install”.
6. Wait for the device to install and reboot.
Customizing Your Device
Changing Your Background Image
1. On the Home Screen, use a mouse or the mouse function on the remote control,
then press and hold the left mouse button or OK button on an empty space and hold
it down for a few seconds.
2. A box will come up, asking what app you want to use to navigate to your wallpaper.
Select whichever one you prefer.
3. Navigate to the picture file you want to use as your wallpaper.
4. If you use the Gallery app, you can select how much of the image you want to use
as the wallpaper.
Page 18

18
*Note that you can plug in a USB device with pictures on it to use for your
wallpaper. However if you do, then remove the USB and then change the
wallpaper to something else. You cannot set the wallpaper to an image on the USB
until you re-insert the USB.
5. Select OK or Set Wallpaper to select your new wallpaper.
Adding Widgets to Your Home Screen
1. Widgets are like mini apps that run on your home screen, and can be added by
opening the Apps list and navigating to the Widgets list.
2. Switch to mouse mode if using a remote control, then navigate to the widget you
want to add to the Home Screen.
3. Select and hold the widget to pick it up, wait a few seconds then let go to drop it on
your home screen.
*Note that widgets can only be moved and re-sized using a mouse (sold
separately)
Page 19

19
Adding App Shortcuts to Your Home Screen
1. Using the mouse mode or a mouse, press and hold the OK button on the app you
wish to add to your Home Screen.
*Note to move the app icons around on the Home Screen you must use a mouse
(sold separately).
2. To move an app, click and drag it across the screen.
3. Release the button to drop the app.
4. To move the app to the next screen over, keep holding the app to the side of the
screen and it will slide into the next screen. Release to drop the app.
Change Text Size
1. Click on the Settings app.
2. Click “Display”.
3. Select Font size, and choose how large you want the text to be.
Page 20

20
Troubleshooting
Blank Screen on Startup
Check that the power cable is not damaged and is securely attached to both the
device and the power outlet
Check that the HDMI cable is not damaged and is securely attached to both the
device and the TV.
Press the Source button on your TV remote until you reach the source that your
device is set to.
Apps That Constantly Crash/Stop Working
1. Uninstall the App.
2. Reinstall the App from the Play Store App.
3. Make sure the App is compatible with Android version 4.2.2 (You can check this by
looking down the bottom of the Apps page on the Play Store.
No Audio
Press the mute button on both the remote for the unit, and the remote for the TV.
Check that all cables are securely plugged in and are not damaged or bent.
Turn the unit off, wait 10 seconds and turn it back on again.
Try another set of audio cables.
Try another TV.
Using eHomeMediaCenter
eHomeMediaCenter is an App used to stream media both to and from the unit. The other
device connecting to the unit must be UPnP or DLNA enabled (refer to the manual of the
other device). In some cases, the other device may need additional software to use
Page 21

21
eHomeMediaCenter (such as Bubble UPnP for Android, which can be downloaded from
the Play Store). To stream files from the unit to another device:
1. Click on the eHomeMediaCenter app.
2. Click on “Media Server”.
3. Click on “Add Share”.
4. To select a single folder to share, click on “Add a directory to share”.
a. Navigate to the folder you wish to share
b. Press and hold the OK button to share that folder and everything inside it.
c. Press and hold again to stop sharing that same folder.
5. To select a single type of file to share, click on “Set local media store to share”.
a. By default, the “Pictures” “Music” and “Videos” folders will be enabled to
share. To stop sharing them, press and hold the OK button while selecting
them.
b. Click OK to Confirm.
c. Click “Start Share” to start sharing.
Page 22

22
d. Click “Stop Share” to stop sharing.
6. On the other device, use a similar UPnP app. Open it up.
7. Refer to the app manual on how to find the streaming unit with the other device
a. This will usually be under “devices” or similar.
To stream files from another device to the unit, repeat the above steps for the other device
until step 8, at which point:
8. Open the eHomeMediaCenter app, then click “Media Player”.
10. Find the other device, and select it.
11. Search through the folders until you find the file you wish to play, and click it.
Page 23

23
Specifications
Configuration parameters
Product Type
Dual or Quad Core Android HD Media Player
CPU
RK3066 or RK 3188
Main Frequency
Cortex-A9 up to 1.6GHz or 1.8GHz
GPU
Mali-400 MP 256Kb L2 Cache
RAM
1GB or 2GB DDR3
Storage
8GB or 16GB
External Storage
Micro SD, External Hard Drive (Up to 3TB)
Operating system
Android 4.2.2
Main Applications-
User interface
Stock Android Launcher interface style
Browser
Stock Android Browser
Video
AVI, MKV, MP4, MPG, VOB, TS, RMVB, RM and supports
others via third party applications
Audio
MP3/WMA/APE/FLAC/AAC/OGG/AC3/WAV
Music
Can be connected to the Internet, listen to music online
Picture
JPG, PNG, BMP and supports others such as RAW, GIF via third
party applications
Flash
Supports Flash 11.1
Interface definitions and specifications
USB
4 x USB HOST 2.0 (Back port side with micro SD can also write)
Micro SD
Micro SD (TF) card
HDMI
Supports HDMI cabling
RJ45
10/100 Ethernet
External Antenna
802.11 a/b/g/n 2.4GHz and Bluetooth Antenna
Remote control
Supports included IR remote control and 2.4GHz Wireless
Mouse/Keyboard via USB dongle
AV output
Audio Stereo、Video CVBS output
Voltage parameters
5V-2A DC
Appearance description
Display
Through the HDMI output display
Product Dimension L×W×H(mm)
115*115*30(mm)
* Note: Use Micro SD (TF) card, if you want to pull out the TF card, safe operation is to select Settings - > Storage - >
Unmount SD card.
Disclaimer Note: product appearance, technical parameters, function, price, name, and software may be changed by us
without prior notice.
 Loading...