

Page 1
USER MANUAL
ENGLISH
Page 2
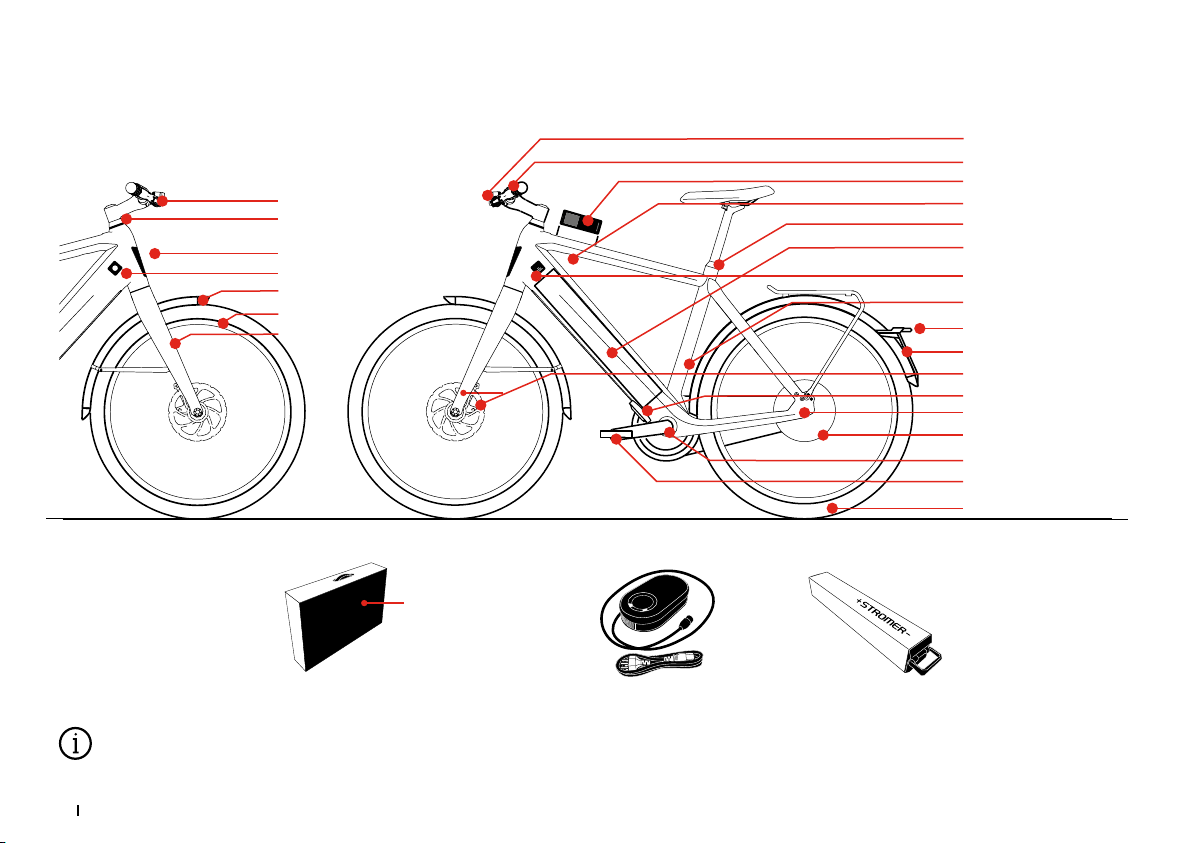
COMPONENTS FOR THE STROMER S-PEDELEC
Brake with sensor
Stem
Daytime running light /
USB connector
Battery eject button
Mudguard
Rim
Fork
Delivery scope
Contents:
- Operating instructions
Stromer S-Pedelec
- Battery charger
Headlights
Operating element
Touchscreen
Power button
Saddle clamp
Battery box
EnergyBus socket
ST5: Di2 battery charger socket
Rear light with brake light
Number plate holder
Brake disc
Electronic horn
Torque sensor
Motor
Crank
Pedal
Tire
The S-Pedelec bought by you may look different. These instructions describe S-Pedelecs.
These operating instructions are part of the S-Pedelec delivery scope and only apply for the models ST3 and ST5.
2 3
Page 3
DEAR CUSTOMER,
We would like to start by congratulating you on
your new Stromer and provide you with some important information regarding your new premium
vehicle.
It will help you use this technology more effectively and prevent risks. Please carefully read
these operating instructions and keep them in a
safe place.
The Stromer you have received has been assembled and adjusted according to your body type. If
this isn’t the case, please contact a Stromer shop
to have this necessary work performed on your
bike.
It is assumed that the bike’s user has acquired
the basic and needed knowledge to operate this
S-Pedelec. All persons involved in
• using,
• repairing or maintaining,
• cleaning
• or disposing of
this S-Pedelec must have fully read and understood the content and meaning of these operating
instructions. Make sure to ask a Stromer dealer if
you have any questions or when some issues are
not clear to you, to ensure your own safety.
All information in these operating instructions
relate to structure, technology, care and maintenance. Please adhere to this information, as it is
often safety-related and disregard it may lead to
severe accidents and economic damage.
We have only described the most important issues, as modern S-Pedelecs have very powerful
technology.
The instructions of the respective manufacturers
of the components used must be consulted for
special, technical details. They can be found on
the Internet at www.stromerbike.com/support
Check which driving license you need to ride
a Stromer before starting your first ride!
Know your country’s road traffic regulations
and follow them accordingly.
Before riding your S-pedelec on public roads,
read up on the national regulations applicable
in your specific country. The national regulations
contain information on how your S-pedelec must
be equipped when operated on public roads and
which bike permit is required to ride the Stromer.
Some of the information covered includes:
• Which light systems have to be installed or carried with you
• Which brakes the S-pedelec must be equipped
with
• Possible age restrictions that apply to riding in
specific areas
• Possible restrictions regarding children riding
on public roads
• Possible requirements about wearing helmets
ENGLISH
Page 4
SAFETY INFORMATION
Please thoroughly read all of the warnings and
instructions in this operating manual before you
begin riding the S-Pedelec. Please always store
these operating instructions near your S-Pedelec,
so that they are accessible at any time.
Before the first ride, please be sure to read the
chapters “Before the first ride” and “Before every ride”!
Should you hand your S-Pedelec to third parties,
make sure to hand over these operating instructions with it. These instructions include symbols
that require your special attention. Whenever
these symbols are shown, there is a risk that the
problem described actually occurs! The area to
which the explicit warning applies is identified by
red lettering.
Note: This symbol provides you with infor-
mation about handling the product or the part
covered in the instruction manual and should be
read with attention.
Attention: This symbol warns of misuse
which could result in damaging the product or the
environment.
Danger: This symbol indicates a possible
risk of injury when the appropriate, required actions are not implemented or the respective precautionary measures are not taken.
Important screw joint: Here, you must
tighten with the exact torque. To find out the correct tightening torque, you can either look at the
bike part itself or in the table listing the tension
values, which is found on page 29. A torque
wrench must be used to apply the exact tightening torque value. If you don’t have a torque
wrench, bring your bike to a Stromer shop for repair! Parts that have been installed incorrectly
may fall off or break! This may result in severe
falls!
Modern S-Pedelec technology is high-tech!
Working on it requires technical knowledge, experience and special tools! Do not work on your
S-Pedelec by yourself! Take your S-Pedelec to a
specialist workshop when it is in need of repair,
maintenance or restoration!
Regularly check that all screw connections are
tight and all components are undamaged.
Snagging hazard
Moving and turning parts of your Stromer
may lead to danger during use, maintenance and
upkeep.
Protect yourself by not wearing loose clothes that
may get caught. During use, maintenance and upkeep, stay away from turning parts (wheels, brake
discs, cassettes). Do not touch moving, sharp or
protruding parts (chains, pedals).
4 5
Page 5
CONTENTS
Components for the Stromer S-Pedelec 2
Dear customer, 3
Safety information 4
Quick Start Guide for Stromer 6
For your safety 8
Instructions about electrics and
electronics 8
Lighting system 9
Child seats, child trailers and load
trailers 9
Trailer 10
Installation 10
Instructions for parents and guardians 10
Before the first ride 11
Before each ride 13
If you have fallen 13
Luggage and load transport 14
Rack 14
Legal requirements 14
Appropriate use 15
Replacing parts on your speed pedelec 15
Riding a Stromer 16
Power button 16
Switching on 16
Switching off 16
Sleep mode 16
Operating element 16
Support levels 16
Lighting system 16
Braking mode / Recuperation 17
Electronic bike horn 17
Touchscreen 17
USB changing socket 18
Menu and settings 18
Menu structure 18
Handling the battery 19
Safety notes concerning the battery 19
Storing the battery 20
Removing the battery 21
Inserting the battery 21
Safety information regarding the charger 21
Charging the battery 22
Service / Maintenance 23
Screws and torque spanners 23
Chain / Drive 24
Rims / Tires 24
Dealing with punctures 25
Brakes 25
Gears 26
S-Pedelec tuning is prohibited 26
Inspection plan 26
Lubrication 28
Screw connections 29
Warranty, defects, wear 31
Wear 31
Technical data 31
Environmental tips 33
Legal disclosure 33
Service Schedule 34
ENGLISH
Page 6
QUICK START GUIDE FOR
STROMER
These are brief operating instructions intended for experienced S-Pedelec riders. You
must read the entire original operating instructions to ensure safe riding, even when you already
have experience with S-Pedelecs!
a) Charge battery externally
Detailed supplementary information regarding the functions and settings are provided by the Stromer app or on the Internet at
www.stromerbike.com/support
1) Completely charge the battery before
the first ride, internally or externally.
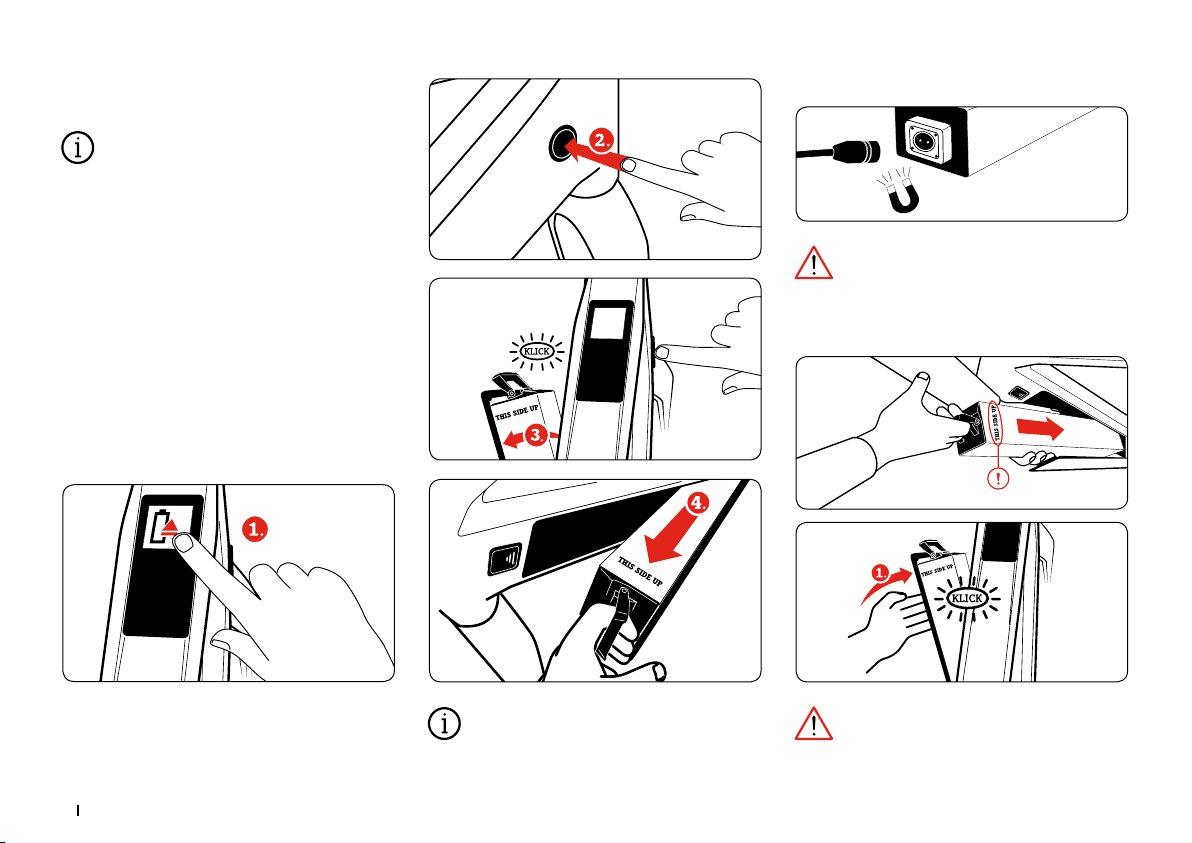
a) External charging:
Removing the battery
Click the “Eject Battery” icon
6 7
The battery can only be unlocked when sta-
tionary.
Only charge the Stromer battery with a
Stromer charger.
Inserting the battery
The writing “THIS SIDE UP” must be visible
on the top.
Page 7
b) Charge battery internally
Only charge the Stromer battery with a
Stromer charger.
2) Switch on the electrical system
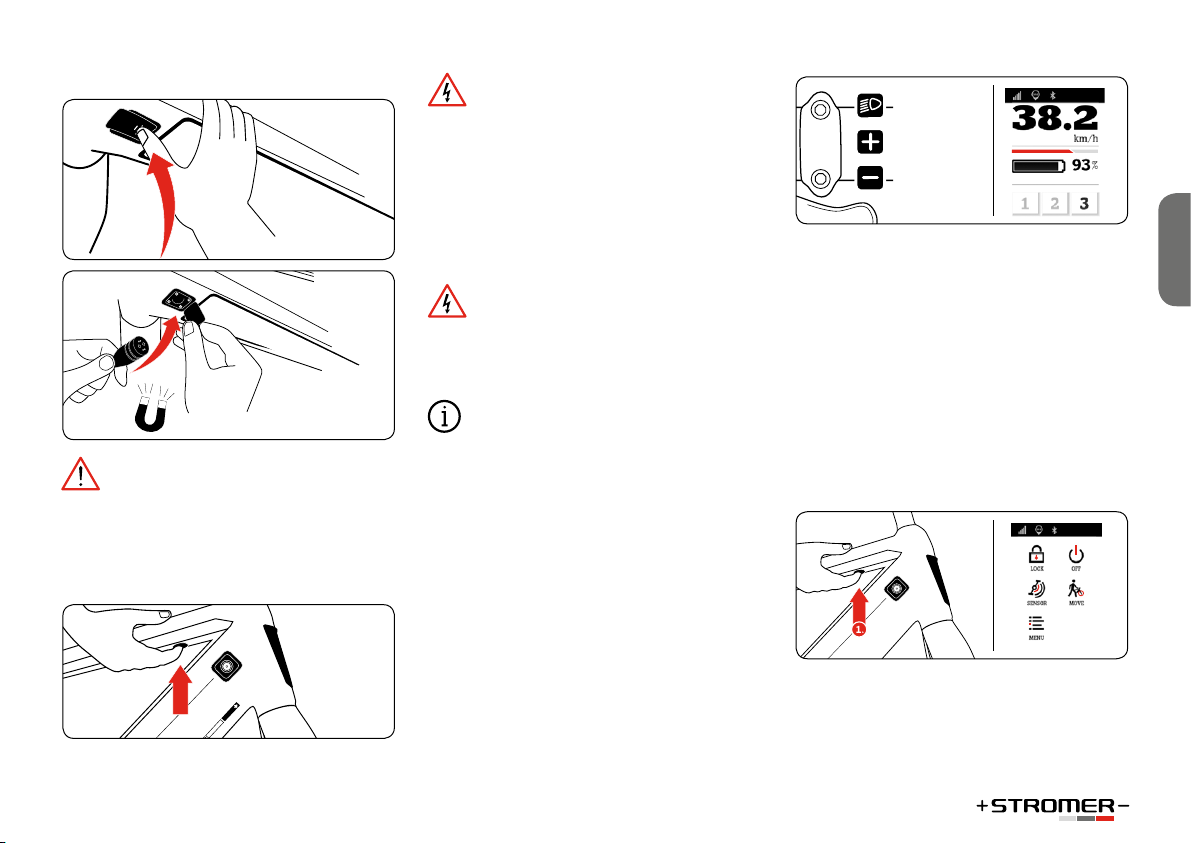
The power button is located at the bottom of the
top tube, below the touch screen.
The motor of the Stromer only starts up
once a minimum speed has been reached to ensure your safety. Always keep one brake engaged
before placing the first foot onto the pedal. The
strong acceleration feels very unfamiliar. Uncontrolled starting up in road traffic or on loose
ground can lead to a fall or severe injuries. Practice operating and riding your Stromer in a quiet
and safe place before you take to public roads!
Never ride when the battery is not inserted.
The battery compartment can in this case not be
locked. This poses an additional risk of falls and
injuries.
The Stromer can obviously also be used like
a normal bicycle without a motor.
The motor support depends on the force that acts
on the pedals. The more firmly you step onto the
pedals, the stronger the support from the motor.
The motor support stops when you stop pushing
the pedals during the ride. Motor support is only
reactivated when you start working the pedals.
Operating element
Important functions of the Stromer can be controlled while riding and without taking your hands
off the handlebar, by using the operating element
on the handlebar.
Switch on the
light/main light
Support mode
Plus
Support mode
Minus
Basic settings Driving mode Touchscreen display
3) Switch the electrical system off after
the ride
1. Press the Power button to get to the shortcut
display.
2. Select OFF
Sleep mode
When the Stromer is not switched off, it will
switch to sleep mode after approx. 5 minutes of
inactivity. The sensor system remains active during sleep mode. The system wakes up by itself as
soon as you move the Stromer.
Switching off Touchscreen display
ENGLISH
Page 8
FOR YOUR SAFETY
Before riding your S-Pedelec on public roads, you
should inform yourself about the applicable national regulations in your specific country.
In many countries you will require a driving license for driving an S-Pedelec. Check the legal
situation in the respective country before use.
The operating instructions assume that you can
ride a bicycle. These instructions are not intended
to teach you how to ride an S-Pedelec. They are
also not intended to provide information regarding the assembly or repair of an S-Pedelec or how
to assemble and repair your Stromer.
Remain aware that riding an S-Pedelec is generally and always associated with risks. You, the
rider, are particularly at risk. Always remain aware
that you are not as protected as you would be, for
example, in a car. You have no airbag and no protective car body. You are nevertheless faster and
drive on other parts of the road than pedestrians
or many cyclists, who do not have a sufficiently
strong auxiliary drive. Pay particular attention to
others on the road.
The following information regarding the rider
must also be considered:
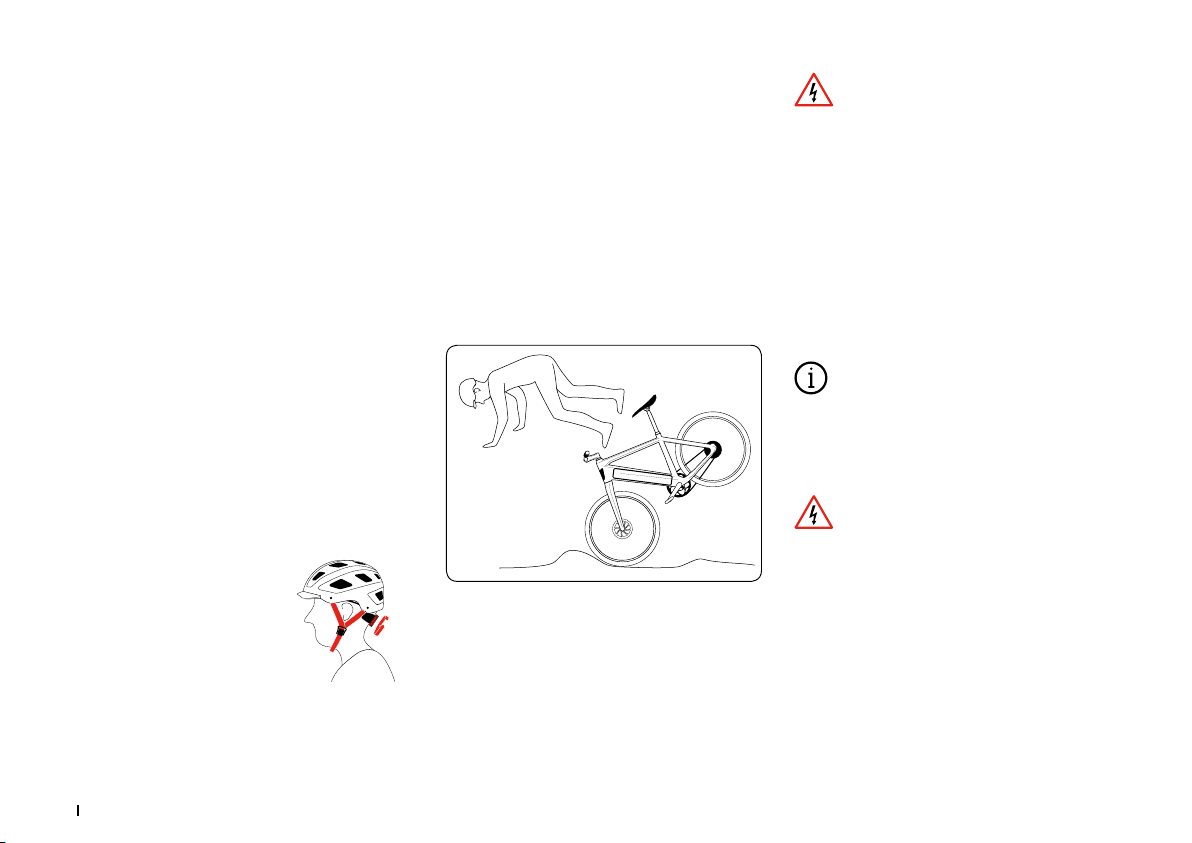
• Always wear a fitted and suitable S-Pedelec helmet. Use it
each time you ride!
• Read the instructions of the helmet manufacturer to learn about
fitting the helmet correctly.
• Whenever you ride, wear bright clothing or
sports clothes with reflective elements (e.g. reflective vest); This is important to ensure that
you are seen in time by other traffic participants.
• Tight clothes and trouser clips are mandatory
to wear. Your shoes should have an anti-skid,
stiff sole.
• Never ride hands-free!
• Never ride with headphones. Never talk on the
phone while riding your S-Pedelec. Never ride
your bike if you are not in a situation where you
are completely able to control it. You must always be fully fit to ride.
• Under wet and slippery conditions, alter your
way of riding accordingly. In this case, you
should ride more slowly and apply your brakes
earlier and more gradually as the braking distance becomes significantly longer.
• Ride at an appropriate speed and in accordance
with the terrain and your riding capabilities.
Take note that you are exposed to special risks when
participating in traffic on an S-Pedelec. Protect yourself and others by riding responsibly and safely!
Take note that you will be riding much faster on an S-Pedelec than on a bicycle without an
electrical drive. Other traffic participants might
misjudge that. Only use your S-Pedelec in an appropriate manner. Important, relevant information is provided in the “Appropriate use” section.
Ask your Stromer dealer if you are not sure about
the purpose of use and the limits of the appropriate use of an S-Pedelec.
INSTRUCTIONS ABOUT ELECTRICS AND ELECTRONICS
You can find information about the bike’s operation, maintenance, upkeep and technical data
in this Instruction Manual, under
www.stromerbike.com/support and on each of
the component manufacturer’s websites.
The electrical installation of your S-Pedelec
is very powerful. Correct and safe operation requires you to have your Stromer regularly maintained by a Stromer dealer. Have your S-Pedelec
regularly maintained by a Stromer dealer. They
will check the current software status and ensure
that important updates that affect the safety and
riding comfort are installed.
Immediately switch off the electrical system and
remove the battery when you notice damage to
the electrical system or, for example, when live
parts are exposed after a fall or accident.
8 9
Page 9
Always contact your Stromer dealer when you require repairs, want to ask a question, experience
problems or discover a defect. A lack of technical
knowledge can lead to severe accidents or damage!
Always turn off the electrical system and
remove the battery before doing any kind of work
on your S-Pedelec. Ensure that the charger is not
connected.
If your Stromer S-Pedelec does not start, although no error message is shown, check whether
both brake levers are in their initial position! No
motor power is transmitted when one of the brake
levers is activated!
LIGHTING SYSTEM
When the daytime running light is activated, it is
on whenever the Stromer is switched on. (See daytime running light www.stromerbike.com/com/
support). The daytime running light is dimmed
when the headlight is switched on, so that drivers
in oncoming vehicles are not blinded.
The daytime running light is not legal in certain
countries and can accordingly not be activated
there. Please stay informed regarding the legal
situation!
We recommend activating the daytime run-
ning light at all times, as far as this is permitted
in the respective country. You can then more
easily be seen by other traffic participants and
thus increase road traffic safety.
A working lighting system is essential for
your safety! Have the installation, inspection and
repair performed by a Stromer dealer.
S-Pedelecs used on public roads must be
equipped with a dynamo, a battery for a constant
battery light or with a rechargeable power storage
device as a power source for the front and rear
lights to work. The lighting system of the Stromer
is powered by the battery or, when this has been
drained, by a motor with dynamo function.
Stromer S-Pedelecs are provided with lights based
on the latest LED technology.
It is not possible to replace the bulbs in
modern LED lights. Clean your reflectors and
lights on a regular basis. Warm water with cleaning fluid or washing up liquid is suitable here.
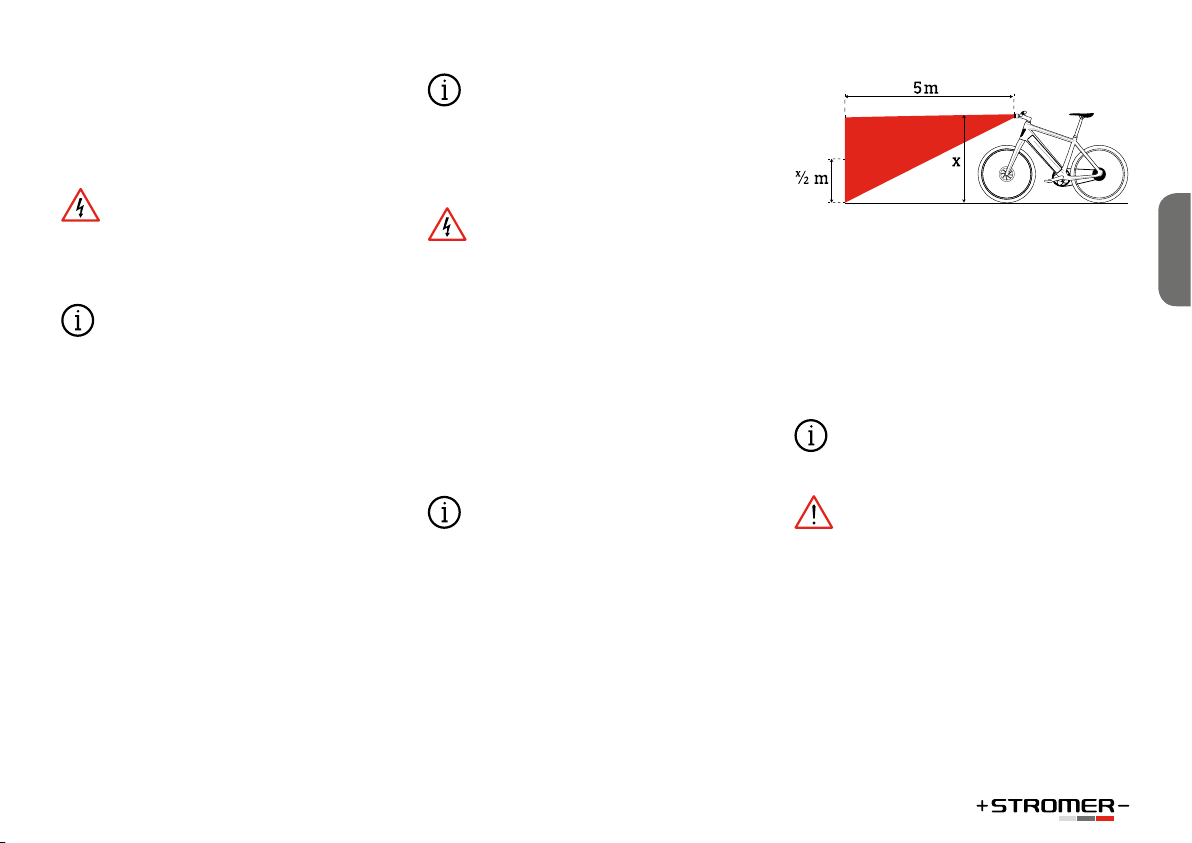
It is recommended to adjust the headlight pointing downwards so that the center of the light cone
emitted drops to half its height between the headlight and a point at a distance of 5 m. The law in
Germany prescribes this setting.
Changes to the lighting system are not permitted
and may lead to a loss of warranty, guarantee and
insurance cover!
Additional information regarding this issue is provided at www.stromerbike.com/support
CHILD SEATS, CHILD TRAILERS AND LOAD TRAILERS
Stromer S-Pedelecs may not be operated
with child seats!
Do not let children who are unattended ride
the S-Pedelec without first thoroughly instructing
them in how to use it! Explain to children the dangers of using electrical devices.
If a child wants to ride the S-Pedelec, check
whether the child has reached the prescribed
age and has the appropriate driving permit as required!
ENGLISH
Page 10
Always check the applicable national regulations before using child trailers and load trailers.
These may also concern the permitted maximum
speed and the permitted total weight! The use of
child trailers in combination with S-Pedelecs is
prohibited in many countries.
Trailer
For operation with trailers, please research
the applicable regulations in your country.
Only use your Stromer with trailers that have explicitly been released for use with S-Pedelecs. Take
note that many countries prohibit the transport of
children in a trailer attached to an S-Pedelec.
Please take note that the driving characteristics
of the Stromer change when attaching a trailer.
Some trailers tend to tilt in tight bends. Drive
carefully and adapt your speed and riding style
to the situation.
Some trailers are only approved by their manufacturers for use with bicycles or Pedelecs (peddling
support up to 25 km/h). It is essential to adhere
to the instructions of the respective manufacturer.
Legal situation in Switzerland
Transporting a trailer is permitted under certain circumstances as long as certain restrictions are adhered to (Swiss federal road traffic regulations (VRV)
Art. 68 para. 1 in connection with Art. 68 para. 7).
At most two children in protected seats may be transported in one trailer (VRV Art. 63 para. 3 Letter d).
On fast Pedelecs with assisted pedaling of more
than 25 km/h, the carrying of children in a trailer
is permitted. A child seat and a child trailer must
not be operated at the same time. (VRV [German
federal road traffic regulations] Art. 63 para. 3 lett.
d. VrV)
It is permitted to transport a child on a trailing
unit (according to VTS [Swiss technical requirements for road vehicles] Art. 210 para. 5) such as
the one made by FollowMe, when the child can
use the pedals while sitting (VRV Art. 63 para. 3
Letter b).
Children being transported are not obliged to wear
a helmet in Switzerland. However, we recommend
that children in the trailer always wear a helmet
and to buckle them in with the trailer’s internal
safety belt system.
Please check the legal requirements of your
country.
Installation
Have the trailer and its attachment mounted
by a Stromer dealer.
The installation of the following trailer connection
systems was tested by Stromer.
• Thule ezHitch, Weber-E and Burley couplings
can be mounted on the optional Stromer Trailer
Plate Kit (Art. 221019). Check other coupling
systems before you buy.
• Various manufacturers offer optional fullaxle couplings/adapters with the dimensions
M10x1. These couplings make it possible to
mount, for example, a BobYak or a FollowMe
to the Stromer Trailer Plate Kit (Art. 221019).
Get advice from a Stromer dealer on the operation
of the trailer.
Instructions for parents and
guardians
As a legal guardian, you are responsible for
watching over the child and his or her safety. This
includes taking care of the S-Pedelec’s technical
state and supervising the rider.
You must be sure that the child has learned safe
handling of the S-Pedelec and fulfills all legal and
country-specific requirements, e.g. has reached a
possibly prescribed minimum age and has the appropriate driving license as required.
Ensure that your child has learned and understood
safe and responsible handling of their S-Pedelec
in the appropriate environment.
Do not let children who are unattended ride
the S-Pedelec without first thoroughly instructing
them in how to use it! Explain to children the dangers of using electrical devices.
10 11
Page 11
BEFORE THE FIRST RIDE
Please thoroughly read all of the warnings and
instructions in this operating manual before you
begin riding the S-Pedelec.
Please also consider the operating instructions of
the individual component manufacturer, which
are available on the Internet.
Your specialist Stromer dealer will be happy to answer any further questions you have after reading
this manual. Ensure that the S-Pedelec is ready for
use and adjusted to fit your body. This includes:
• Setting the position and fixture of the seat and
handlebars
• Checking the assembly and settings of the
brakes
• Securing the wheels into the frame and forks
To ensure that you enjoy a safe and comfortable
riding position, please allow your Stromer dealer
to set up your handlebars and stem.
• Adjust the seat to a safe and comfortable position for you (see page 12).
• Allow your Stromer dealer to set up the brakes so
that the brake levers are always within easy reach.
• Ensure that you know which lever operates
which brake. The right brake lever operates the
rear wheel brake. The left brake lever operates
the front wheel brake.
Familiarize yourself with the new bicycle in
a protected area.
Modern braking systems can have significantly stronger and different braking effects to the
brakes you are familiar with. Please get to know
the brakes on a safe piece of land before setting
off on your first ride with the bicycle!
Also remember that the effectiveness of brakes
can be dangerously different in wet conditions or
on slippery surfaces. Please take the possibility
of longer braking distances and slippery surfaces
into account when riding!
If rubber or plastic pedal covers have been
put on your S-Pedelec, familiarize yourself with
their grip. When wet, rubber and plastic pedals
are very slippery!
Ensure that the wheels are securely fastened in
the frame and fork. Check the firm attachment of
the quick-release axles and all important fastening screws and nuts (see section “Screw connections”).
If you hear rattling or other unusual noises during
operation, have your Stromer dealer determine the
cause and remove it before you continue riding.
Push the S-Pedelec forwards while pulling the
brake lever. The back brake should completely prevent the back wheel from moving, while the front
brake should lift the back wheel off the ground with
its braking effect. The bicycle’s steering should not
rattle while braking or exhibit any play.
Please take an initial test ride in a safe place
where you can familiarize yourself with the new
brakes! Modern brakes have a very strong braking effect.
Check the air pressure in the tires. You will find
instructions as to the correct tire pressures on the
sides of the tires. Please adhere to the required
minimum and maximum pressure!
If you cannot find any recommended pressures,
3 bar/43.5 psi is a suitable pressure for most tires.
Hint: As a general rule of thumb when you are
out on a ride, you can check the tire pressure by
doing the following: If you place your thumb on
a pumped up tire, you should not be able to significantly change its shape by applying pressure.
Check the tires and rims. Scan them for any damage, cracks or deformations, as well as embedded
particles, e.g. shards of glass or sharp stones.
If you should find any cuts, rips or holes, please
refrain from riding! First have your S-Pedelec
checked by a specialist.
It is also necessary for you to check the following
components of your S-Pedelec:
• Check that the battery box is safely closed with
the battery inside.
• Check the charging state of the battery to ensure
that the charge is sufficient for the drive planned.
ENGLISH
Page 12
• Familiarize yourself with the functions of the
operating element.
Always squeeze the brakes of your S-Pedelec before you place a foot on the pedal! The motor
starts propelling as you step on the pedal. This
boost is unusual and can lead to falls or cause
dangerous traffic accidents.
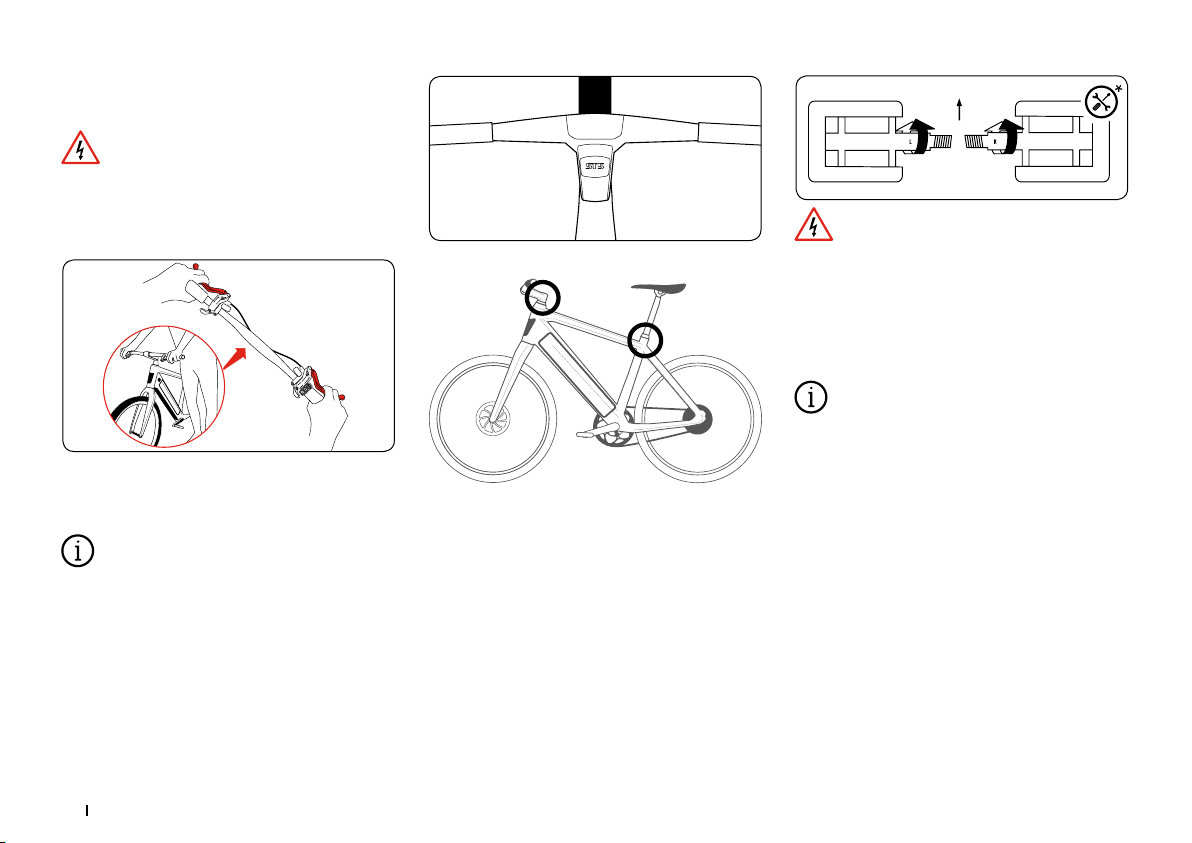
Setting up the position of the handlebars /
stem
Specially designed Stromer stem.
Positions of screw connections for adjusting the sitting position
Direction
Ensure that you have read the manufacturer’s instructions before using step-in or clipless
pedals.
Practice clipping your shoes in and out of the pedals’ locking system before your first ride in a quiet,
safe place. Clipless pedals which do not properly
release are a safety hazard.
In the case of step-in pedals, you are able to
adjust how much force is required to release the
shoe from the pedal. Please test this on your first
ride with a setting that releases easily! Regularly
clean your step-in pedals and keep them in good
condition with a suitable spray lubricant.
Consider that not every stem is suitable for
every steer tube when retrofitting your S-Pedelec!
Only use Stromer stems. Only allow Stromer dealers to work on your handlebars and stem!
12 13
Installing pedals
If your S-Pedelec was supplied without the pedals
pre-installed, these have to be attached with the
correct wrench. Please note that the pedals have
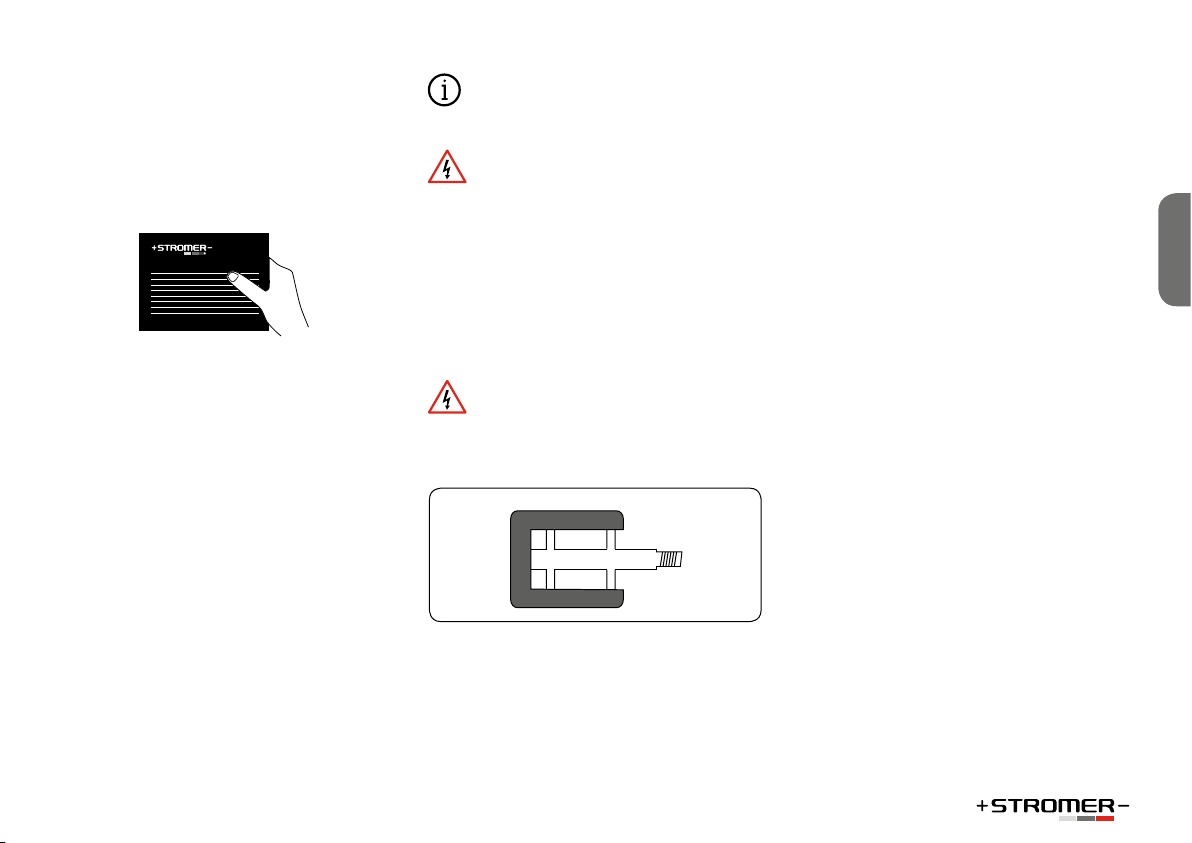
to be screwed on in different directions and secured with a high mounting torque (see page 29).
Apply assembly grease to both threads.
Setting up the seating position
Before you use your Stromer S-Pedelec for the first
time, the seating position has to be set up to suit
your body size. This is vital for riding safely and
securely.
To do this, the seat’s height, alignment and angle
have to be set up, as do the height and alignment
of the handlebars with the stem.
Page 13
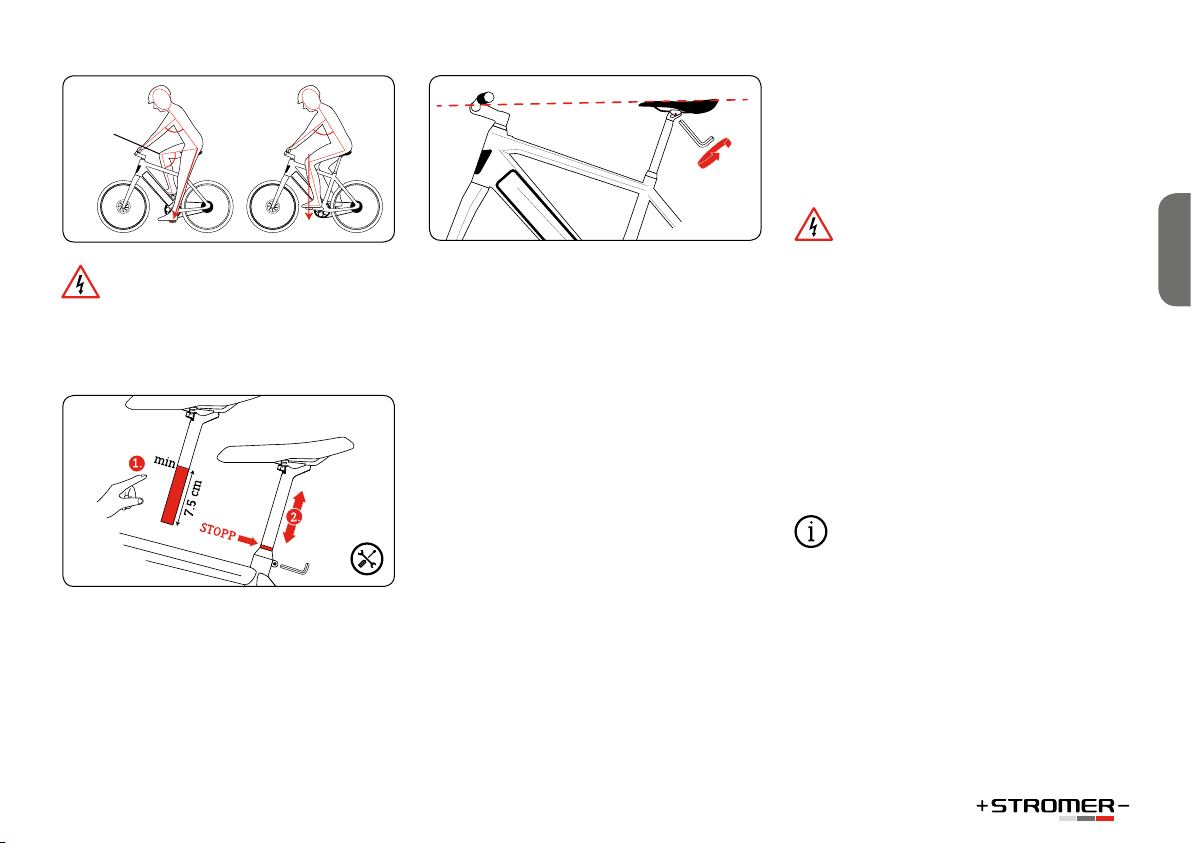
Knee angle 90°
When adjusting the height of the seat, never pull the seat post further out than the maximum extension length marked! If your tube does
not have a maximum marking, then you must
leave a minimum insertion length of 7.5 cm.
Setting up the angle of the seat
Once you have set the height of the seat, you have
to check that the angle of the seat is suitable. In
general, the upper surface of the seat should be
horizontal. You can adjust this by loosening the
clamping bolts in the seat post.
BEFORE EACH RIDE
Before every ride, please check:
• That the bell/horn, all electrical plug-in connectors and lighting function correctly and are
safely attached
• That the brakes are working safely and are
properly secured
• That the battery box is safely closed with the
battery inside.
• The tightness of the pipes and connections
• Tires and rims for damage, eccentricity and
penetrating alien objects, particularly after
rides off fortified roads
• That the tires have a sufficient tread depth
• That the suspension components are working
properly and are safely secured
• The firm attachment of screws and nuts of quickrelease axles (see “Screw connections” section),
even when the vehicle was only unsupervised
for a short time.
• That the frame and forks are not misshapen or
damaged
• That the handlebars, stem, seat post and seat
are both correctly and securely fastened as well
as set up in the right position
• That the seat post and seat are secure. Try
turning the seat or tipping it upwards or downwards. It should not move.
• When you are riding with clipless/step-in pedals: Functional testing is required. The pedals
must release easily and without problems.
Do not ride off when you are not completely
sure that your S-Pedelec is in flawless condition.
Have it inspected by a Stromer dealer.
It is particularly important if you use your
S-Pedelec a lot, either for sport or daily use, that
you regularly have all the important parts checked
by a Stromer dealer.
Frame and forks, suspension components and
other parts relevant to your safety such as brakes
and wheels are subject to heavy wear, which can
impact on the operating safety of these parts.
Components might spontaneously fail when the
predetermined usage period or service life is exceeded. This can lead to falls and serious injury!
Please make these checks before continuing
after a fall or if your S-Pedelec falls over! Bent or
damaged aluminium parts cannot be safely bent
back into shape, and carbon components can sustain damage which is not recognisable to the eye.
If you have fallen
Check the whole of the S-Pedelec for changes. These
may be dents and cracks in the frame and the fork,
but also bent components. You must also check the
function and safe attachment of parts that have been
shifted or twisted, e.g. the handlebars or the seat.
ENGLISH
Page 14
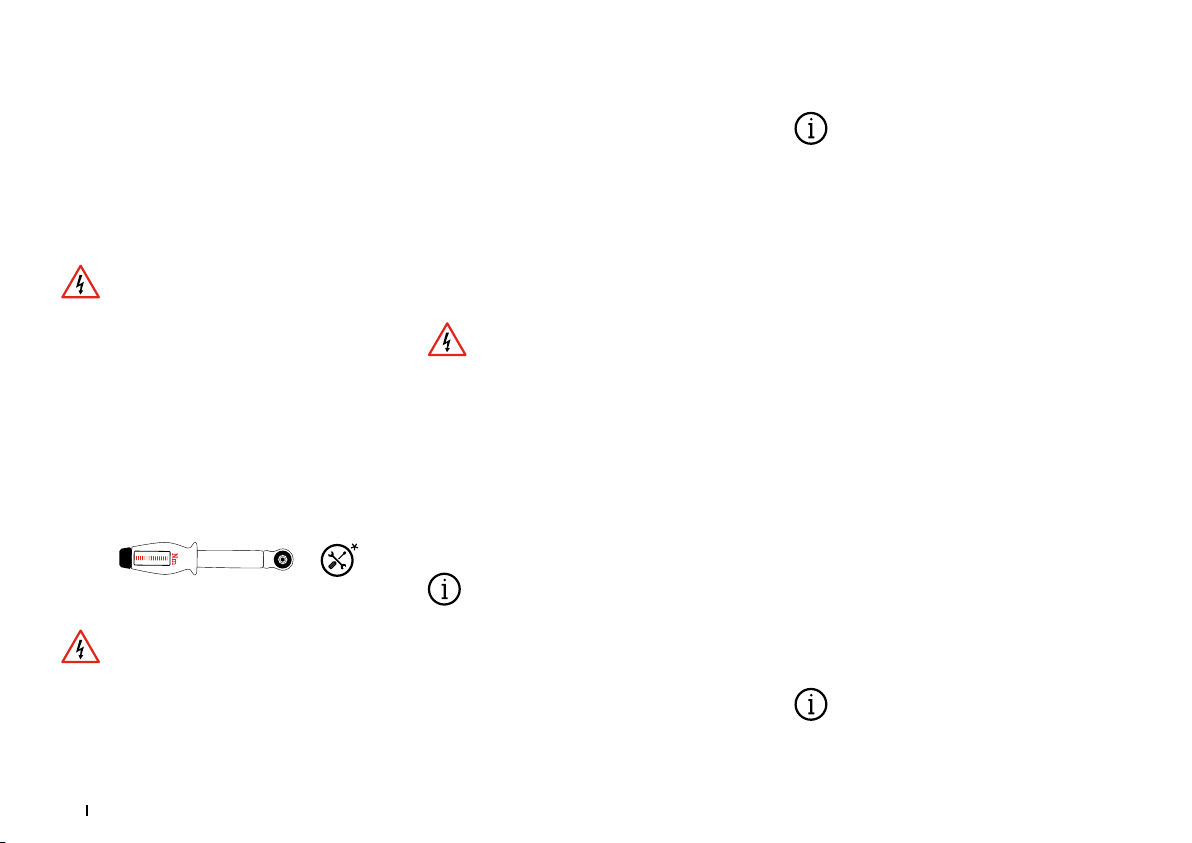
If you notice any changes to your S-Pedelec, DO
NOT continue cycling. Do not re-tighten any loose
parts without first checking them and always use
a torque wrench.
Bring your S-Pedelec to a Stromer dealer, describe
the fall and get your S-Pedelec inspected!
LUGGAGE AND LOAD
TRANSPORT
Attached accessories must always be installed according to the regulations and instructions. You must ensure the correct fastening
torques for all screw connections (see “Screw connections” on page 29)
• Only use add-on parts that comply with the
respective legal regulations and road traffic
regulations.
• The use of unlicensed parts may lead to accidents.
You should therefore only use original accessories and add-on parts which fit your S-Pedelec.
• Use the advice of a Stromer dealer.
Rack
Only retrofit luggage racks to S-Pedelecs
that have been approved by Stromer for this purpose. Use only the intended fixing devices.
Ask your Stromer dealer whether and how luggage may be transported when using add-on parts
made of carbon. Don’t fix racks to the seat post! It
is not constructed for this use. Overloading of the
seat post with a luggage rack may break the seat
post and lead to serious accidents.
The permitted total weight of the vehicle may not
be exceeded, even when a luggage rack with a
higher carrying capacity would enable that!
Front-wheel luggage carriers
Front-wheel luggage carriers may not be installed
or operated.
Safety information for luggage transport
Luggage loads change the behavior of your
S-Pedelec. They extend the braking distance, among
other things. This may lead to severe accidents or
falls. Adapt your riding style to different driving
characteristics, i.e. brake earlier and consider the
more sluggish steering properties. Only transport
luggage on the luggage rack intended for this purpose! Child seats may not be installed or operated.
Please ensure that nothing can get caught in the
spokes and turning wheels.
If you are riding with luggage, ensure that
you do not exceed the maximum permissible
weight of the S-Pedelec. Information on the
weight capacity of the rack is also stated here.
Additional information regarding this issue is provided at www.stromerbike.com/support
LEGAL REQUIREMENTS
The regulations and requirements for e-bikes
are continuously being revised and may change
at any time. Obtain information regarding the
valid legal requirements so that you are always up
to date.
For S-Pedelecs, special provisions apply for their
limit of use. This means that e-bikes are sometimes
operated like a bicycle and at other times not.
Before riding on public roads with your Stromer,
inform yourself about the current legal requirements enforced in your country.
This information can be found at your Stromer retail store or on the websites of national bike or
e-bike associations.
There you can obtain information on how your
Stromer must be equipped in order to drive in
traffic on public roads. These sources describe,
for example, which lighting systems have to be
installed and which brakes the S-Pedelec must
have.
The currently valid, national regulations also deal
with age restrictions and specify from which age
people are allowed to drive on which part of the
road and whether certain driving permits are required. The regulations for children riding on public roads are also found here. It will be made clear
if a helmet is required to be worn by law.
Check whether your private third-party-liability insurance covers possible damage caused
by using a Stromer S-Pedelec.
14 15
Page 15
APPROPRIATE USE
S-Pedelecs are means of transport designed
to be ridden by one person. It is not permitted to
transport children in trailers of S-Pedelecs within
the scope of validity of EU law!
Transporting an additional person by using an
S-Pedelec, e.g. in a child trailer, can only be permitted within the framework of the respective,
national law. We urgently advise against transporting additional persons, even in specific cases
where this might be permitted.
If you would like to transport luggage, this requires that your S-Pedelec is fitted with suitable
equipment. Children may not be transported by
S-Pedelecs within the scope of EU law and they
may only be transported in trailers dedicated for
this purpose in Switzerland. We recommend not
taking any chances when it comes to quality in
this area! Please take note of the permitted total
weight and the stipulated maximum speed for the
trailer.
The total weight of the Stromer S-Pedelec is
150 kg. Permitted total weight: Weight of driver +
weight of S-Pedelec, including weight of battery +
weight of luggage + weight of trailer (if trailer is
permitted). Stromer ST5 and ST3 Weight: 29.2 kg.
Use as intended also includes adherence to the
operating, servicing and maintenance conditions
that are described in this manual.
Dangers of improper use
Only use your Stromer for its intended use.
Please read the section “Intended Use” in this
original instruction manual.
This also includes adherence to the operating,
servicing and maintenance conditions that are
described in this manual.
Inform other users of the intended use and the
dangers of not adhering to it.
Improper use, overloading and lack of maintenance may lead to accidents and falls involving
severe injuries to you and other people!
Stromer S-Pedelecs may be used on public roads
and fortified paths when they are equipped as prescribed by national law.
Manufacturers and dealers are not liable for damages resulting from use outside of intended use.
This applies particularly to damages resulting
from non-adherence to the safety instructions,
e.g., in terms of:
• Use on terrain
• Overloading, or
• The incorrect remedying of defects
Stromer S-Pedelecs have not been designed for
extreme loads, e.g. driving over stairs, rider tricks
or jumps.
REPLACING PARTS ON YOUR
SPEED PEDELEC
Specific components are defined in the approvals
process which are allowed to be used on this vehicle. In other words, the S-Pedelec is only permitted if your vehicle uses these parts or replacement
parts which have been approved for use with your
model.
If parts are replaced by the user, only original
parts or replacements which are approved for use
on the S-pedelec may be used, otherwise the user
must seek individual permission from the local
regulatory authority.
Parts which must only be replaced like-for-like or
with approved parts are as follows:
1. Frame
2. Fork
3. Motor unit
4. Battery
5. Tires
6. Rims
7. Brake system
8. Front light
9. Rear light
10. Number plate holder
11. Side stand
12. Handlebars
13. Stem
14. Seat post
ENGLISH
Page 16
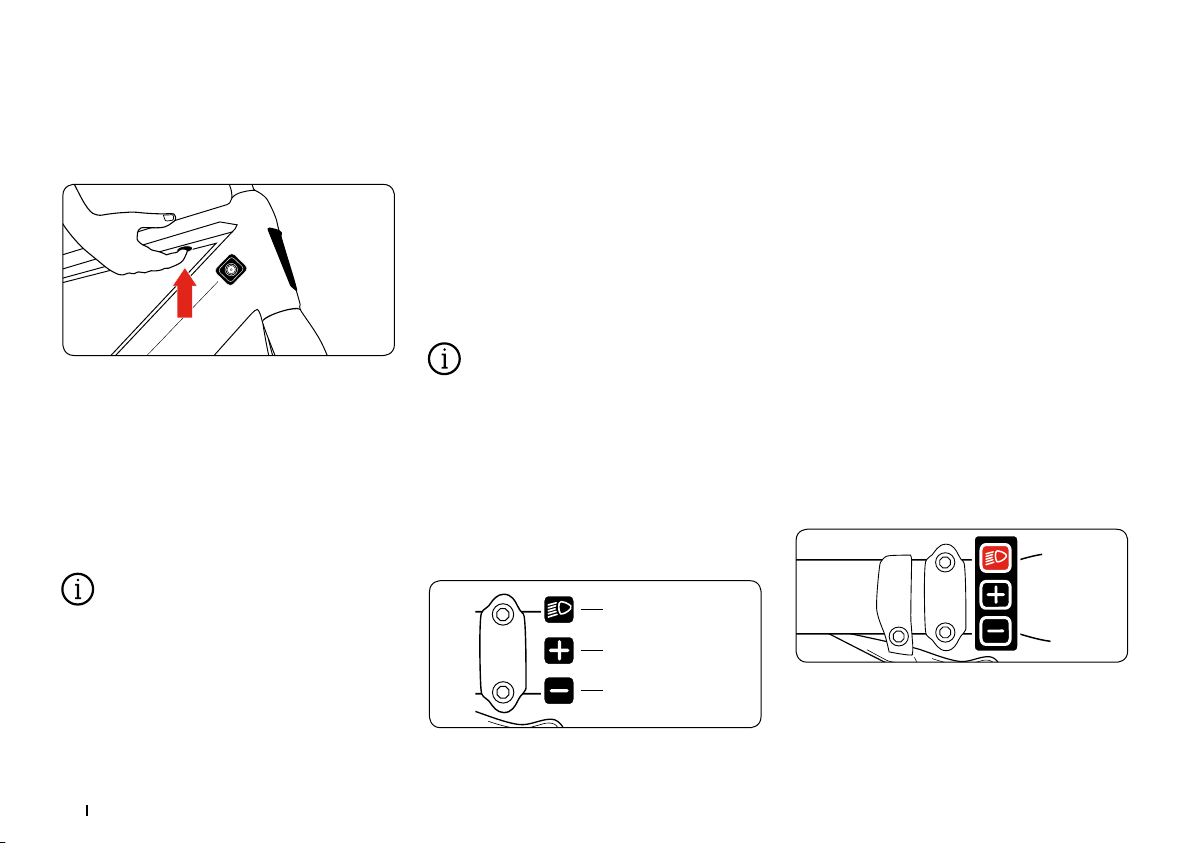
RIDING A STROMER
Light button
Plus button
Minus button
Power button
The power button is located at the bottom of the
top tube, below the touch screen.
The power button has the following functions:
• Waking up from sleeping mode
• Change from shortcut display to riding display
• Change from riding display to shortcut display
• Change from any point in the menu to the
shortcut display
Switching on
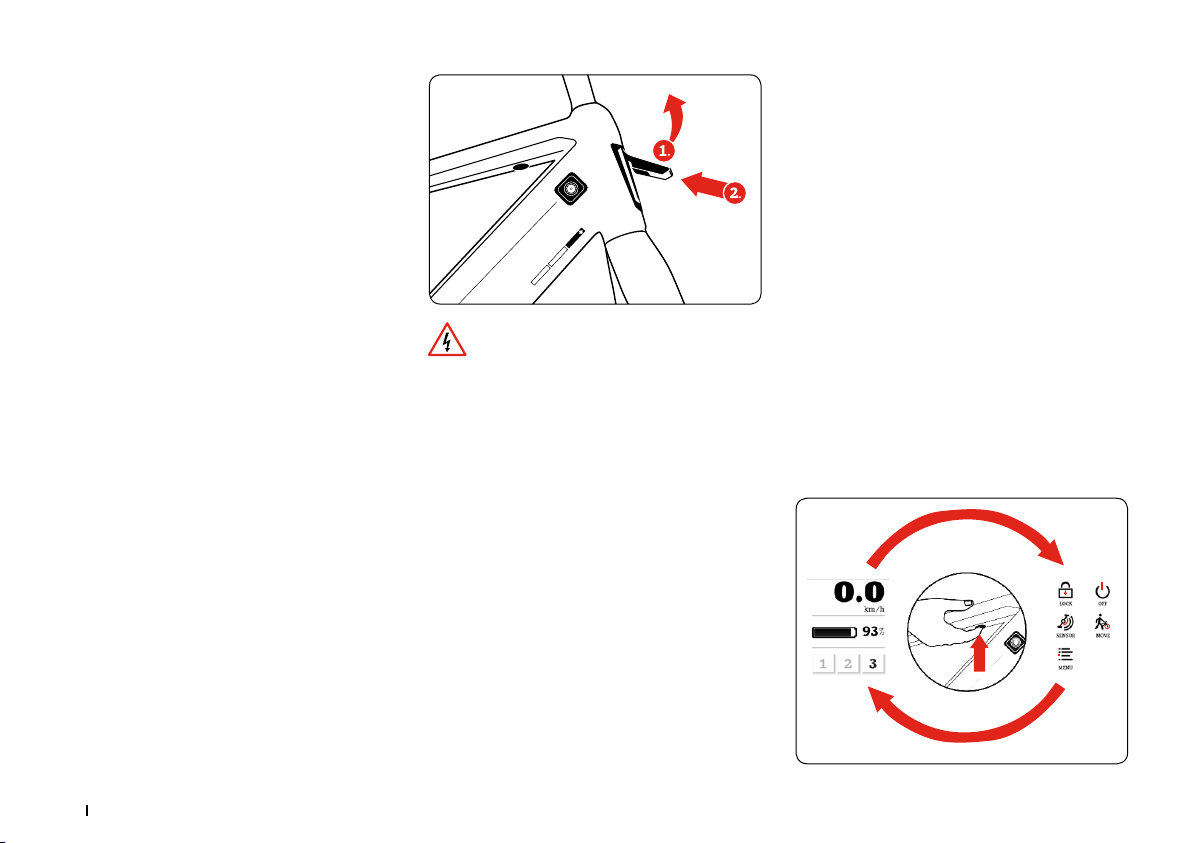
Press the power button to switch on.
When your Stromer has been locked with a
PIN, you must unlock your Stromer after switching it on before you can use it. (See “Theft protection” chapter)
Switching off
1. Press the Power button to get to the shortcut
display.
2. Select OFF.
Sleep mode
When the Stromer is not switched off, it will
switch to sleep mode after approx. 5 minutes of
inactivity. The sensor system remains active during sleep mode. The system wakes up by itself as
soon as you move the Stromer.
Alternatively, you can also wake up your Stromer
by using the power button.
Always switch off your Stromer by using the
touch screen when you want to prevent it from
switching itself on.
OPERATING ELEMENT
Important functions of the Stromer can be controlled while riding and without taking your hands
off the handlebar, by using the operating element
on the handlebar.
Support levels
The + and – buttons of the operating element
on the handlebar make it possible to change between the following support modes:
Bicycle mode: The motor is switched off.
Support mode 1: Low motor support, optimized
for large driving range.
Support mode 2: Medium motor support – this
support mode can be fine-tuned by using the
Stromer app.
Support mode 3: High motor support for maximum speed.
The motor support depends on the force that acts
on the pedals. The more firmly you step onto the
pedals, the stronger the support from the motor.
The motor support stops when you stop pushing
the pedals during the ride. Motor support is only
reactivated when you start working the pedals.
Lighting system
A daytime running light is integrated into your
Stromer to increase safety in daily traffic.
16 17
To switch between dipped beam and full beam,
press the light button on the control element on
the handlebar. Your Stromer is equipped with a
lighting system that provides both dipped beam
Page 17
and full beam light. Just like with cars, a brake
light is integrated into the rear light.
In some countries, the daytime running light can
not be turned off.
Braking mode / Recuperation
Stromer S-Pedelecs can also generate energy
with their motor and thus charge the battery, for
example, when driving downhill. In this case the
motor acts like a dynamo, i.e. it performs a braking function and thus generates the power that
charges the battery. This may significantly extend
the driving range for a tour. Recuperation can further be used as a convenient “engine brake” on
steep or long declines.
As soon as you brake, the motor switches to recuperation/brake mode and supports your braking effort.
The braking energy is stored in your battery and
therefore increases the driving range of your
Stromer.
The Stromer offers a braking aid for prolonged
downhill drives. To use this, keep the minusbutton pressed for 2 seconds. The braking force of
your Stromer can now be adjusted by again pressing the plus or minus button.
To terminate recuperation, again keep the + or –
button pressed for another 2 seconds.
A weak recuperation level brakes less and is
therefore suitable for flat declines, while strong
recuperation levels brake significantly more. The
range is therefore easily and conveniently optimized.
The recuperation is automatically terminated
when the speed falls below a certain minimum
and you step onto the pedals. This speed varies
according to the version of the firmware loaded. It
is usually below 10 km/h.
Electronic bike horn
Your Stromer is equipped with an electronic bike
horn. The control button is located on the left handlebar grip. Only use the horn to call attention to
yourself in potentially dangerous situations.
TOUCHSCREEN / DISPLAY
Touchscreen
The display of the Stromer is equipped with a resistive touch screen.
That means that the touch screen does not respond to touch, like capacitive touch screens, but
responds to gentle finger pressure and can therefore easily be operated with gloves. Gentle pressure on the touch screen is sufficient to navigate
through various menus or change to the riding
display.
Riding display
The touchscreen changes to the driving display as
soon as you start riding your Stromer.
ENGLISH
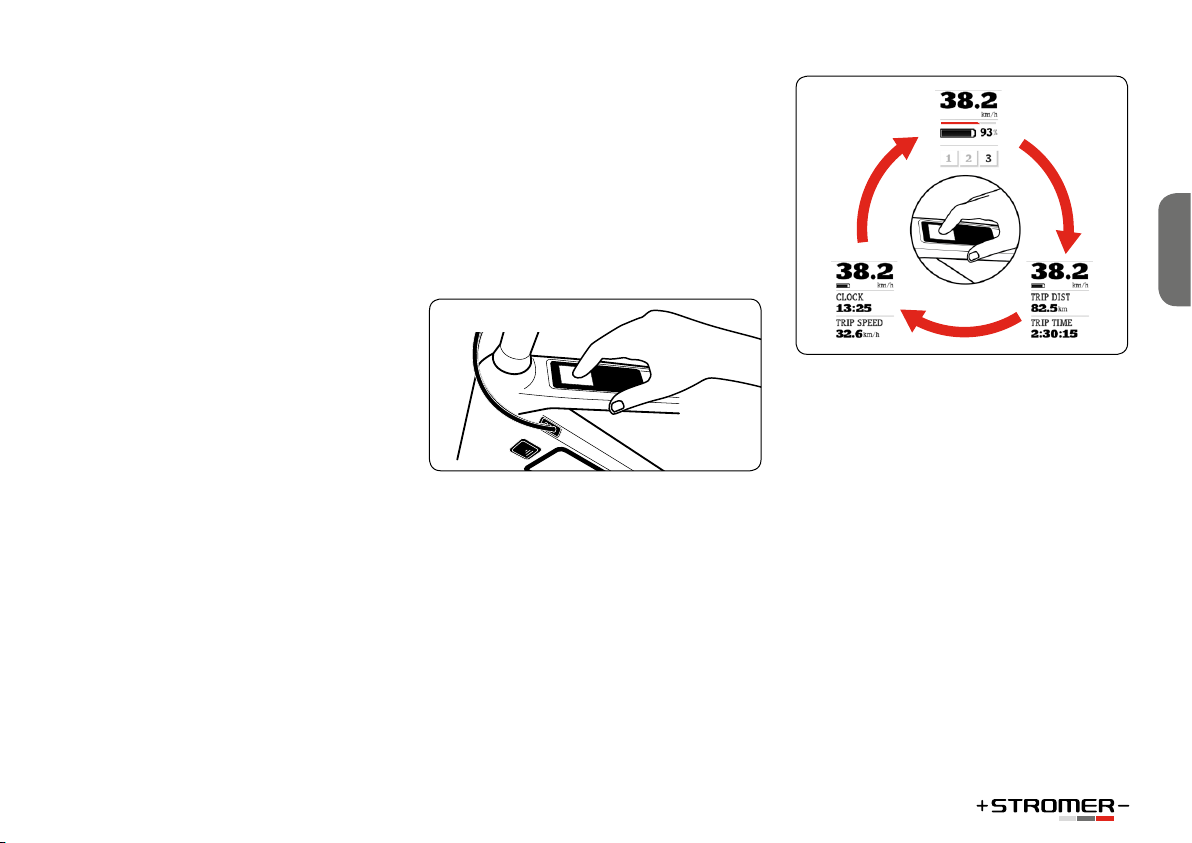
The riding display shows your speed and information regarding the ride. You can change between
riding displays by pressing the touch screen until
the desired information is being displayed.
Theft protection
Activate lock
The Stromer offers optimal theft protection. You
can lock the Stromer with a PIN when you switch
it off. The Stromer can then only be switched on
by re-entering your PIN.
1. Press the Power button to get to the shortcut
display.
2. Select LOCK.
The theft mode is activated when the locked
Stromer is moved.
The Stromer can in this case only be returned from
theft mode by using the Stromer OMNI App. This
makes the Stromer very unattractive for thieves.
Your Stromer automatically switches off when it
Page 18
has not been switched off or locked, but has not
been used for a prolonged period. However, the
lock is not activated in this case.
Deactivating the lock
Proceed as follows to deactivate the lock:
1. Press the Power button.
2. Enter your PIN using the touch screen.
Stromer OMNI App
Get the maximum out of your Stromer. Install the
Stromer app on your smartphone and discover the
world of Stromer.
The Stromer app is the easiest way to configure
your Stromer for your needs. Fine-tune the support mode to your personal needs.
The app also shows you the position and the battery charging state – even when you are not near
the Stromer.
USB CHANGING SOCKET
Is the battery of your smartphone empty? – No
problem. The Stromer has been equipped with a
USB charging socket. Connect your smartphone to
recharge the battery.
The charging socket is located in front on the daytime running light and is sealed by a rubber lip.
Only connect your smartphone when the SPedelec is standing. Do not change your smartphone while riding.
Range
The achievable range per charge is dependent on
various factors:
• Support level: The higher the support level
used, the lower the range.
• Riding style: You can save energy with the
optimal use of the gear shift. In lower gears
you need to use less power, the support will be
less and your S-Pedelec’s drive consumes less
energy.
• Ambient temperature: A battery discharges
faster in cold weather.
• Weather and vehicle weight: In addition to
the ambient temperature, wind conditions also
have influence on the range. More force has to
be applied while riding through strong headwinds. The weight increases with luggage etc.
and more power is also then needed.
• Technical condition of your S-Pedelec: Too
low air pressure in the tires increases the rolling resistance. Dragging brakes also affect
range.
• Battery capacity: The battery capacity indi-
cates the capacity of a fully charged battery,
to store a certain amount of electricity. As the
capacity decreases with the increasing age of a
battery, the amount of storable energy in a full
charge also decreases.
• Road quality and the route profile: Rough pavement or gravel reduce the range. You can ride
much further on flat surroundings than when
riding on slopes.
MENU AND SETTINGS
Menu structure
Pressing the power button takes you to the shortcut display. Here you have direct access to all
functions and settings:
18 19
Page 19
Pressing the power button again brings you back
to the driving mode display.
Time
You can individually set the time and the display
format.
1. Go to MENU and SETTINGS.
2. The TIME section can be used to select the de-
sired display format and to set the time.
Languages
The Stromer supports the following languages:
German, English, French, Italian and Dutch.
1. Go to MENU and press SYSTEM.
2. Select the language required in the LAN-
GUAGE section.
Units (km/miles)
The Stromer supports metric (km; km/h; Wh/km)
and imperial (Mi; mph; Wh/Mi) measuring units.
1. Got to MENU and press SYSTEM.
2. The UNITS section can be used to select the
preferred measuring units.
Detailed information regarding the individual
settings is provided in the respective sub-chapters
or online at www.stromerbike.com.
The function of the settings described may
change after a software update. A description of
the current functions is provided online at www.
stromerbike.com.
The menu us only available when the
Stromer stands still. As soon as you start moving,
the touch screen changes to the riding display.
You cannot call up the menu during the ride for
your own safety.
Break mode
You can adjust the strength of the motor braking
of the Stromer to your driving style with the braking strength.
1. Go to MENU and press BIKE.
2. The strength of the brake mode can be set in
the BRAKEMODE section.
Setting the PIN
1. Press the Power button to get to the shortcut
display.
2. Select MENU in the shortcut display and then
press SETTINGS.
3. The PIN column can be used to set a new PIN.
Your first locking code is randomly generated
and will be sent to you by SMS to the registered
mobile number and by e-mail to the registered email address when your Stromer is activated.
If your Stromer was locked with a PIN, you
must unlock your Stromer after switching it on before you can use it (see “Theft protection” above).
Torque sensor
You can adapt the response characteristics of your
Stromer to your riding style. The ratio between
rider power and motor support is controlled by the
sensor sensitivity.
1. Go to MENU and press BIKE.
2. You can set the sensitivity of the sensor in col-
umn TORQ. SENS.
Higher sensitivity implies that your Stromer will
respond more to low pressure on the pedals.
A change of sensor sensitivity influences the
response behavior of the Stromer at all support
levels. Higher sensitivity reduces the driving
range.
HANDLING THE BATTERY
Safety notes concerning the
battery
• Only charge the battery with the charger it be-
longs to. The use of other chargers poses the
risk of fire.
• Do not drop or throw the battery and avoid
strong impacts. The battery might otherwise
leak fluid, start a fire or explode.
• Do not apply force to the battery. The integrated
protection mechanism may be damaged when
the battery is deformed. This may result in fire
and explosion.
ENGLISH
Page 20
• Do not use the battery when it is damaged. The
liquid contained may leak and contact with the
eyes may result in blindness! Avoid contact,
otherwise rinse off the liquid with lots of water
and immediately consult a doctor.
• Obtain information regarding the currently valid regulations when you want to transport the
S-pedelec, e. g. by car.
• Remove the battery of your Stromer before
transportation and transport it separately.
The battery is considered a hazardous good!
Remove the battery when you want to perform
any kind of work on the S-Pedelec, e.g. maintenance or assembly. Unintentionally activating the
On/Off switch might lead to injury or an electric
shock.
• Don’t ever open up the battery; This can cause
the battery to short circuit. All warranty and
guarantee claims expire when the battery was
opened.
• Do not store the battery with metal objects
that may cause shorts, e.g. office clips, nails,
screws, keys, coins. A short circuit may cause
burns or fires.
• Keep the battery away from heat, e.g. strong
sunlight and fire. There is a risk of explosion.
• Protect the battery from coming into contact
with water and other fluids. Contact may damage the protective circuit and the protective
mechanism of the battery. This may cause fire
and explosions.
• Do not clean the battery with a pressure washer. Use a damp rag when cleaning the battery.
Never use corrosive cleaning solutions.
• In the event that fumes escape after inappropriate use or damage, ensure exposure to
fresh air and consult a doctor if you experience
any medical problems. Before starting a ride,
the battery must be fully locked in place in its
holder and the battery box must be closed. You
may otherwise lose the battery while riding.
• Prevent deep discharging of the battery. It may
cause irreversible damage to the cells.
• The battery is exclusively intended for use with
Stromer electrical bicycle drives. Inappropriate
use or wrong handling may cause injury or a
fire. Stromer is not liable for damage caused by
inappropriate use.
• Never send a battery in the mail! Batteries are
hazardous goods. Only send batteries for your
S-Pedelec through your Stromer dealer. The
battery may overheat and catch fire under certain circumstances.
• The battery may not be disposed of with domestic waste. The sales outlet will take it back and
will ensure appropriate disposal.
• Never store several batteries on top or next to
each other. This may lead to overheating and
fire.
Storing the battery
Store the battery in a dry and well-ventilated
place. A room temperature of approx. 20 °C is
optimal to prevent loss of capacity. Only use the
battery for rinding the Stromer in cold conditions.
Store it in a warm environment, which increases
the range. Ensure that the Stromer is switched off
when you want to store your battery in your bike.
Check its charging level approx. every 4– 8 weeks
and recharge it as required.
Store the battery with a battery charging state of
at least 40% when you do not intend to use it for a
prolonged period, e.g. during a winter break.
This is the most effective way of preventing deep
discharging. Ensure that the battery is never
stored in a fully discharged state, as this may lead
to deep discharging and irreversible cell damage.
Possible guarantee or warranty claims may then
become void.
The battery must be recharged within 2-3 days after it has been fully discharged in order to prevent
deep discharging.
Storage at a battery charging level of 40-60%
is best suited to preserving your battery. Please
consider that this shortens the period after which
deep discharging is possible when compared to a
fully charged battery! The capacity of a battery decreases with age, even when it is well-maintained.
You should change a battery that has not been
used or recharged for a prolonged period before
you install it in your S-Pedelec.
Permissible storage temperature range:
-20 – 60 °C
Permissible discharging temperature range:
-20 - 60 °C
Permissible charging temperature range: 0 – 50 °C
20 21
Page 21
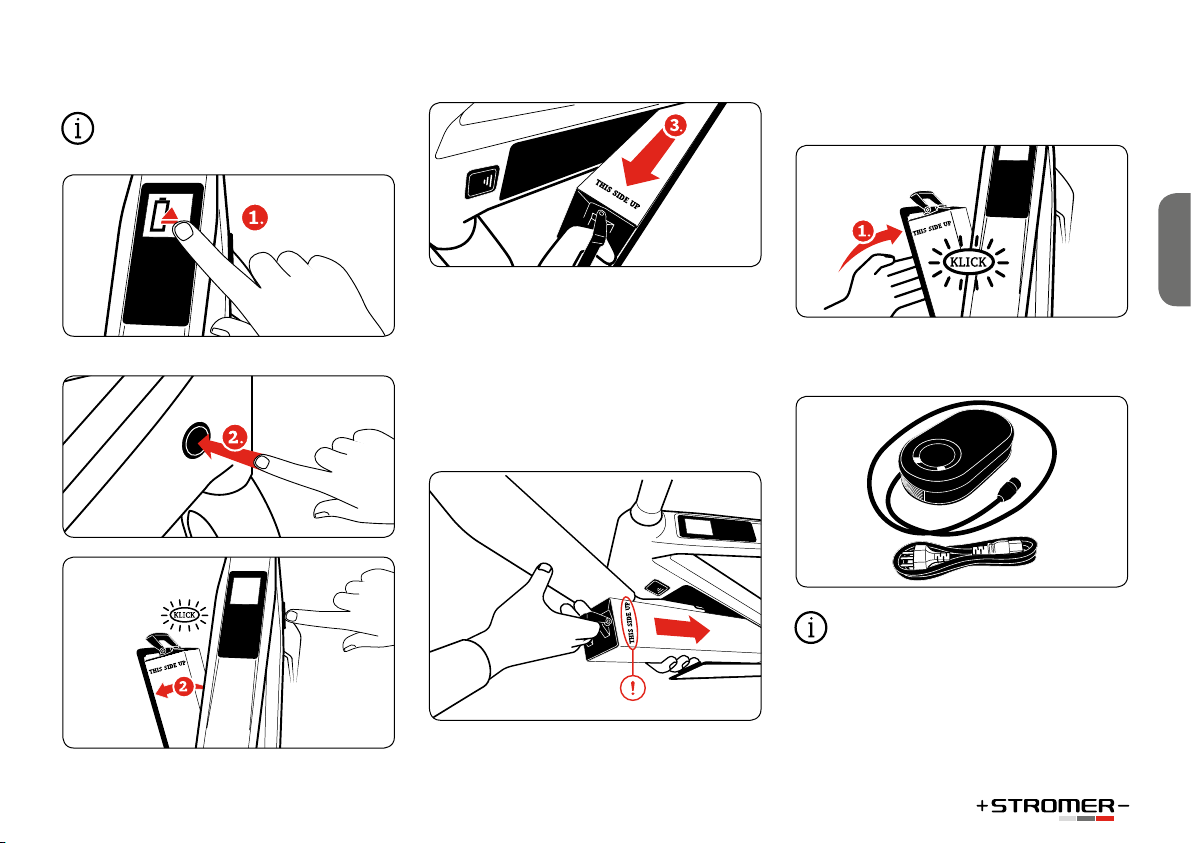
Removing the battery
The battery can only be removed when sta-
tionary.
Click the “Eject Battery” icon
Pull out the battery.
The battery is very heavy, so take care not to drop
it. You could get injured and/or the battery might
get damaged.
Inserting the battery
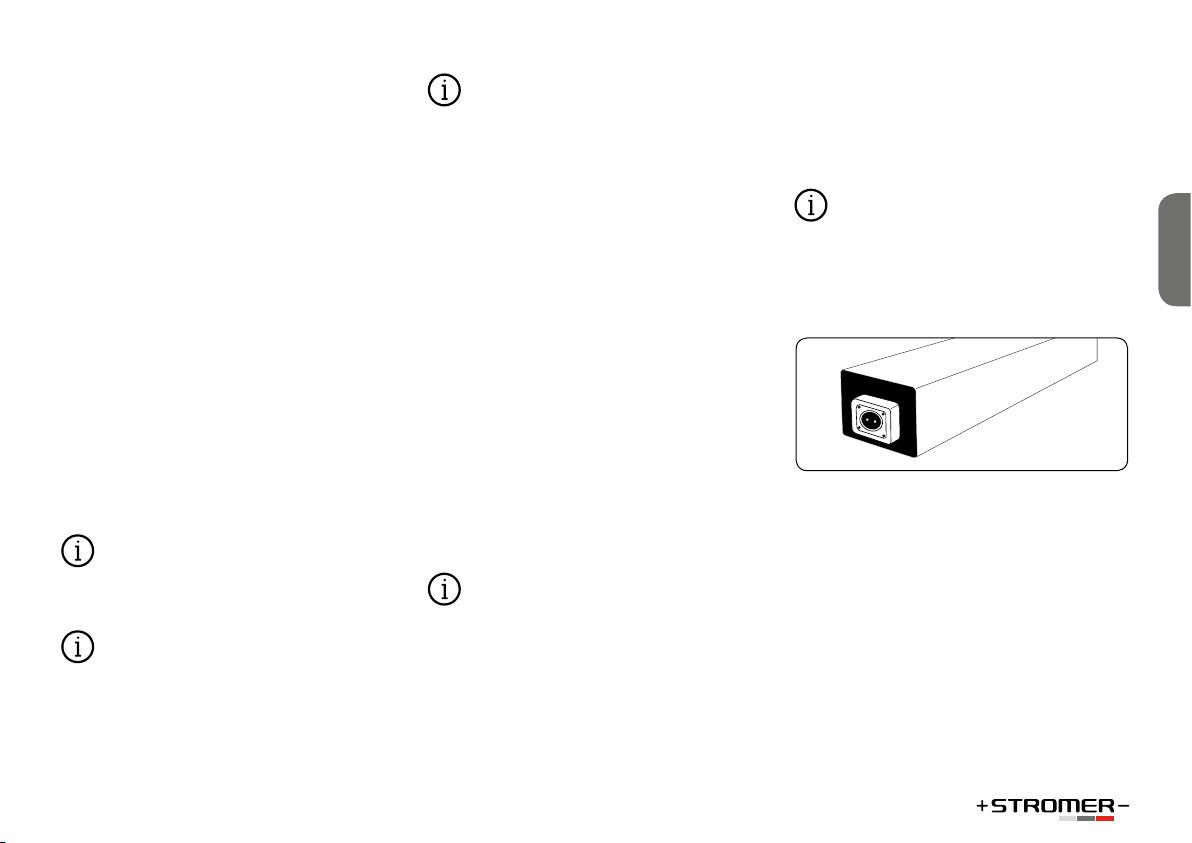
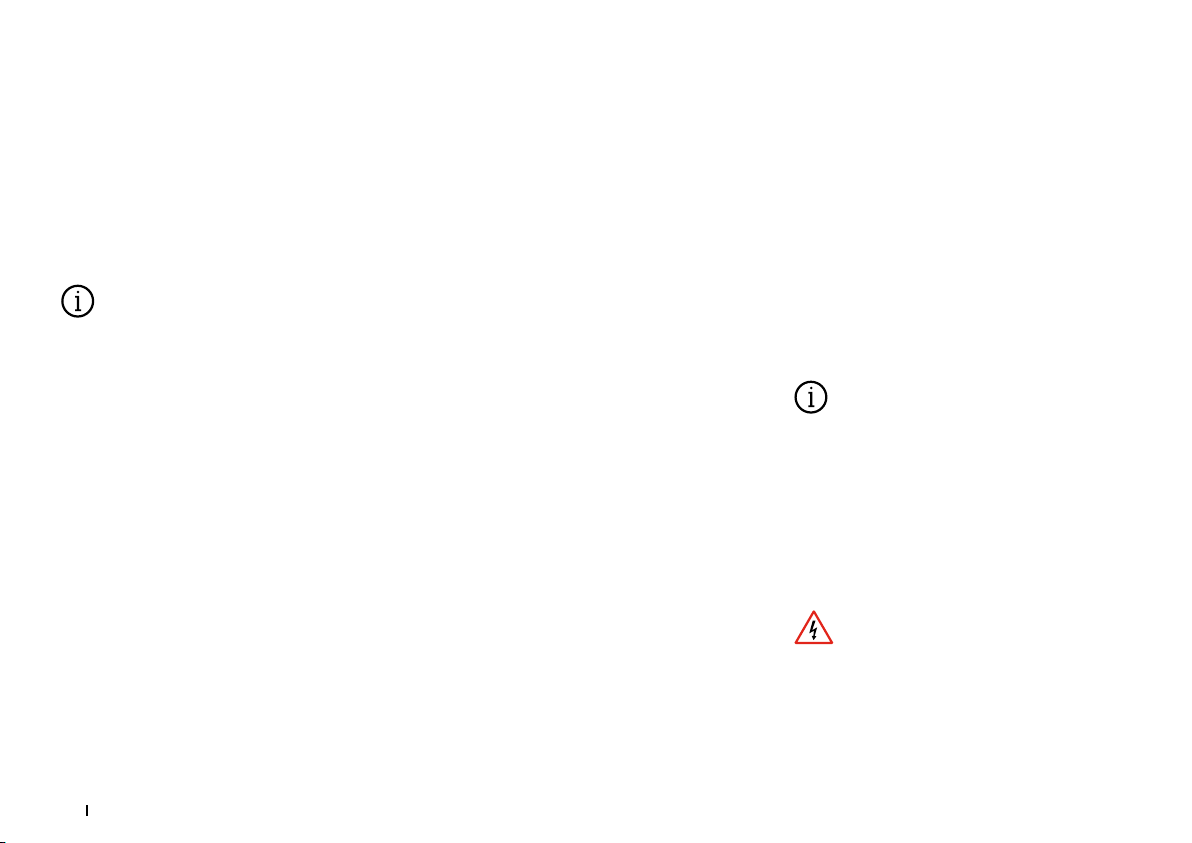
Place the battery into the battery box. Take care
that the connector points downwards and that the
lettering THIS SIDE UP is visible on top. Push the
battery downwards until it latches.
Close the battery box. Press on the cover with the
palm of your hand until it snaps into place with
a quiet click. and remove the key from the lock.
ENGLISH
Safety information regarding
the charger
Read the operating instructions for the charger before beginning to charge the battery.
You can change the battery of your Stromer while
it is installed in your S-Pedelec. However, you
can also remove the battery from the S-Pedelec
and charge it in another place. It is particularly
Page 22
advantageous to charge it in a warmer environment (room temperature) when it is cold outside,
in order to shorten the charging period. Avoid
charging processes below 0 °C or above 40 °C and
in tightly sealed spaces. The charging process is
automatically stopped at temperatures below 0 °C
or above 40 °C.
Please note that a sudden change of temperature from cold to warm can cause condensation
to build up in the charger. Avoid this by storing
the battery in the same place where it is charged.
Only use the charger supplied or a charger released by Stromer to avoid the risk of fire.
Use the charger in a dry room and don’t cover it up
while it is in use. It could otherwise short circuit
or cause a fire.
Check the mains voltage before connecting the
charger! The voltage of the power source must
correspond to the information on the type plate
of the charger.
• Always pull the plug out of the socket before
cleaning the charger.
• The charger should be disconnected from the
mains once the charging process has been
completed.
For safety reasons, always place the charger
on a dry, non-flammable surface.
A defective battery should neither be
charged nor used any further. A battery can become warm while charging. It must not get hot.
When the battery heats up strongly, immediately
terminate the charging process.
Never ride when the battery is not inserted.
The battery compartment can in this case not be
locked. This poses an additional risk of falls and
injuries.
Charging the battery
Always read the charger information first.
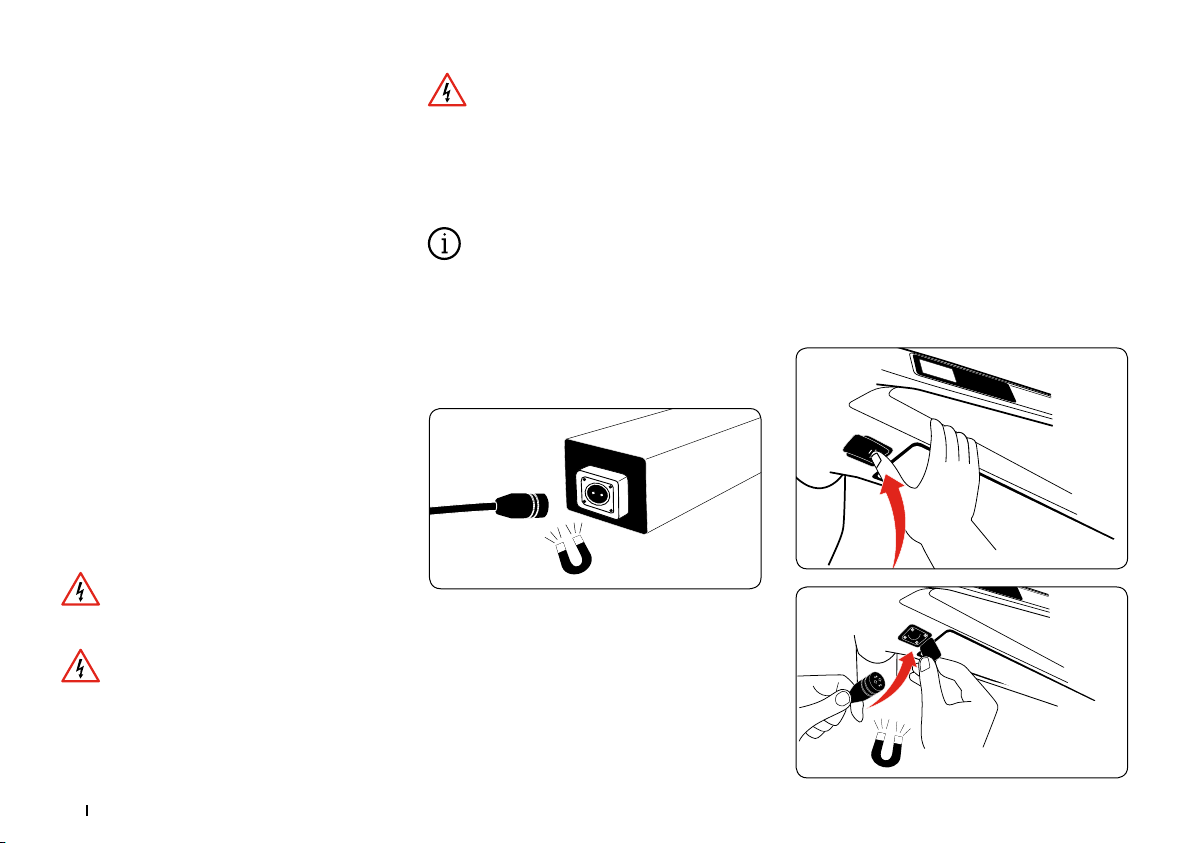
Charging the battery externally, outside
the S-Pedelec
First connect the charger to the mains pug (LEDs
light up red and green) and then to the battery.
Hold the charging cable loosely in your hands and
bring it gradually closer to the socket of the battery.
The magnets will help you to position the plug
correctly.
The LEDs in the charger light up in orange and
green during the charging process.
The LEDs in the charger light up in green when
the battery has been fully charged. Separate the
battery/Stromer from the Stromer charger and
then the charger from the mains connector.
Charging the battery internally in the
S-Pedelec
The connection for the charging cable is located
on the left side of the down tube, slightly below
the connection to the head tube.
Open the cover of the charging socket.
1. Connect the charger to the power mains. The
integrated LEDs light up in red and green.
2. Hold the charging cable loosely in your hands
and slowly move it near the socket of your
Stromer. The magnets will help you to position the plug correctly.
3. Connect the Stromer charger with the Stromer.
The LEDs light up in orange and green.
22 23
Page 23
Charging duration
The charging time may vary according to the version and the model of the battery and the charger.
Accurate charging times are provided in the information at www.stromerbike.com/support.
Charging status indicator
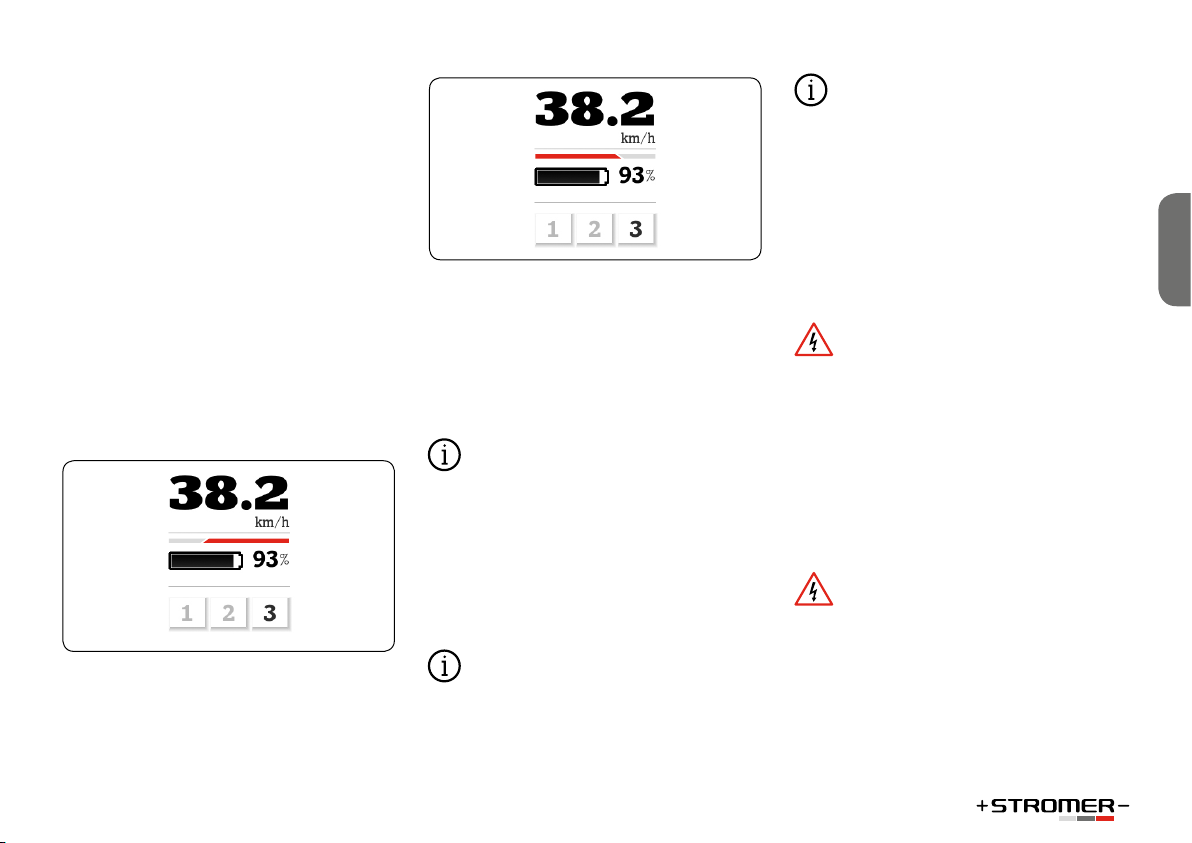
The driving display provides the option of tracking the battery charge status of your Stromer. The
battery charge status is shown in the form of a bar
and a percent value. The Stromer automatically
switches off the motor and changes to bicycle
mode (no support) when the battery is empty.
The bar above the battery charge status indicates
the current energy flow. The display helps to ride in
an energy-saving way with a large driving range.
The longer the bar, the higher the energy flow.
The bar points from right to left as soon as the motor provides support.
The battery is charged during brake mode, so the
dark bar points from left to right.
A small part of the battery energy is saved in order
to sustain the basic functions of your Stromer and
keep you safe. The lighting and display still work
for approximately another hour when the battery
is empty and the motor support has stopped.
SERVICE / MAINTENANCE
Regularly have your S-Pedelec inspected by
a Stromer dealer. These experts can identify damaged and worn parts and are able to advise you in
selecting replacements. They will also check the
current software status and ensure that important
updates that improve safety and riding comfort
have been installed.
Refrain from repairing key parts yourself (frame,
forks, handlebars, stem, headset, brakes, lights).
Your S-Pedelec can only function safely and
effectively if you replace parts with suitable, authorized replacements. Please consult your manufacturer, importer or Stromer dealer for advice on
suitable replacement parts.
Only replace broken or worn parts with original replacement parts from the manufacturer or
parts approved by your manufacturer. This is prescribed for some components and an appropriate
list is provided in the “Exchange of components of
the fast Pedelec” section.
In this case, using non-original or non-approved
parts also invalidates the registration of the
S-Pedelec. The use of other non-approved parts
generally invalidates the warranty and guarantees with the manufacturer for other parts.
If you install non-original or the incorrect
replacement parts, this can lead to a severe loss of
function! Tires with bad grip or tires that were not
designed for use in S-Pedelecs, brake pads with
inappropriate friction coefficient and wrongly
used or badly designed light-weight components
can cause accidents with the most severe of consequences. The same applies for improper assembly!
Screws and torque spanners
When working on the S-Pedelec, please ensure that all screws are tightened to the correct
torque. The required torque is printed on many
parts with a screwed connection. This amount is
stated in Newton meters (Nm) and this work
should be carried out using a torque wrench. Best
suited are torque wrenches that slip and provide
an acoustic signal when the predefined fastening
torque is reached. Otherwise, screws may snap or
ENGLISH
Page 24
break. If you don’t own a torque wrench then you
Chain OK
Chain worn
should always leave this work to a Stromer dealer!
A table with the most important fastening torques
for screw connections is provided in the “Screw
connections” section.
Torque spanners
• Open live parts should only be maintained and
cleaned at a Stromer dealer!
• Remove the battery before cleaning your
S-Pedelec. Ensure that the battery box is again
completely closed.
• Ensure that you do not touch and thus possibly
connect contacts when cleaning the battery.
You risk being hurt and the battery may suffer
damage if the contacts are live.
• Cleaning with a high-pressure cleaner may
damage the electrical system. The high pressure might also push cleaning liquid into
sealed parts and thus damage them.
• Avoid damage to cables and electrical components. When this has happened, the S-Pedelec
must be deactivated until it has been inspected
by a Stromer dealer!
Chain / Drive
The drive chain must be regularly cleaned and
lubricated to ensure appropriate functioning (see
the “Deadlines and inspection work” section). Dirt
can be removed with the normal S-Pedelec wash.
Otherwise you can clean the chain by rubbing
it with an oily cloth. When the chain is clean, it
should be greased at the joints with suitable lubricant. After being left to soak, the excess lubricant
should then be removed.
Chain tension
To ensure that the chain and gears can work safely, the chain must have a certain level of tension.
Otherwise it can come off and lead to a fall. Chain
gear systems tense the chain automatically.
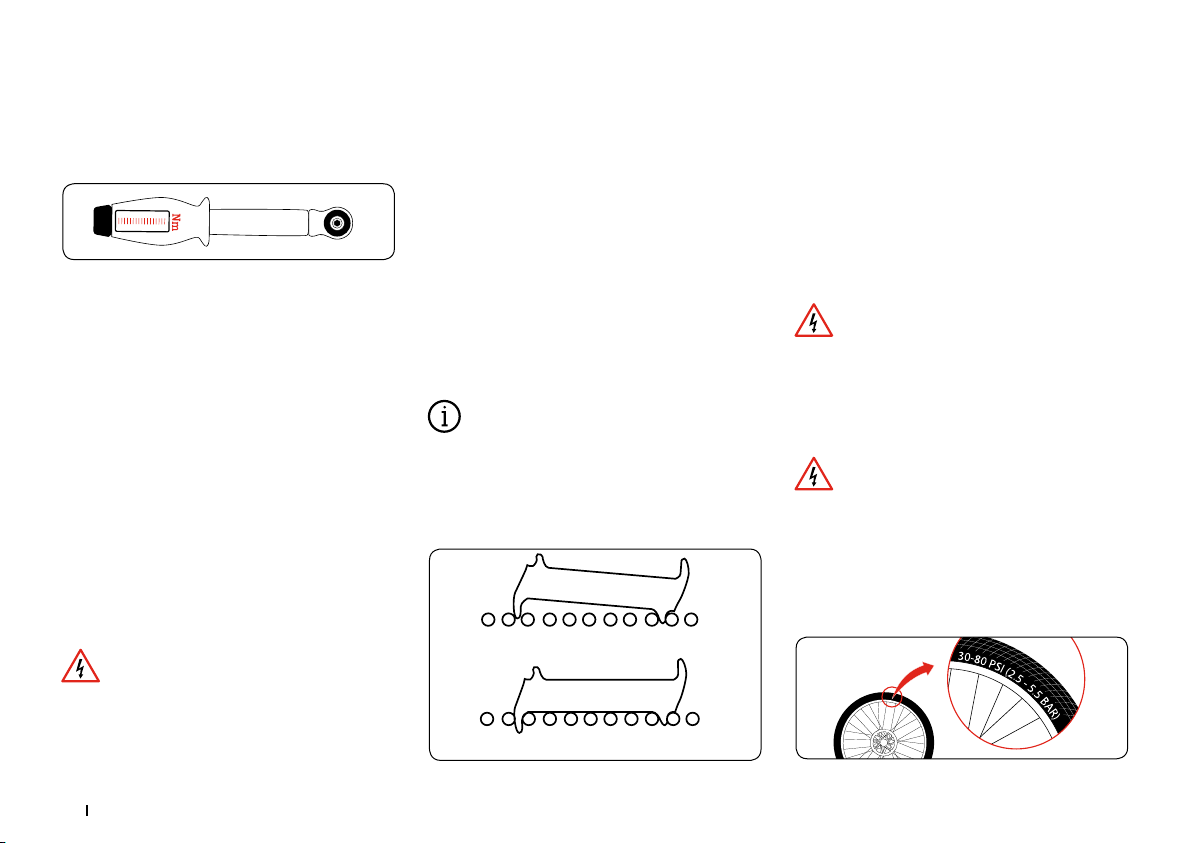
Dirt and permanent strain wear the chain.
The chain should be replaced as soon as it can be
significantly lifted (approx. 5 mm) from the front
chain ring with your fingers.
Replacement of the chain is to be expected after
approx. 1500 km, depending on the load.
Many modern chains for derailleur gear systems
no longer have chain connectors. Special tools
are required to open/exchange/close them. They
should be exchanged by a Stromer dealer.
Other chains are supplied/mounted with chain
joints. In some cases, these can be opened without the need for tools. These chain connectors can
also be used to repair a damaged chain on a ride,
if they have the correct width for the drive train.
Rims / Tires
Rims are subject to a great deal of strain
and are vital to your safety on the bike. They wear
during riding. Do not ride with a rim once you can
see damage. Have them checked by a Stromer
dealer and replaced, as required. Wear can weaken rims and lead to falls and serious accidents.
Also check the tyres of your S-Pedelec regularly. The lowest and highest authorised pressures can be found on the side of the tyre. Please
adhere to them, otherwise the tyre may detach
from the rim of the wheel or burst. If differing
pressures are specified for the rim and the tyres,
the lower maximum pressure and the higher minimum pressure are to be taken into account.
Switch off the electrical system, remove the
battery and close the battery box before performing any kind of work on your S-Pedelec.
24 25
Page 25
For Stromer tyres in sizes e 57– 584 a pres-
sure of 2.2 bar/32 psi is recommended.
Tires are wear parts. You should therefore regularly check the pressure, tread and condition of your
tires. Not every tire is designed for every type of use.
The tires of an S-Pedelec may only be exchanged
for authorized products that were approved by the
manufacturer. Here it is important to ensure the
correct size. Seek advice from your Stromer dealer
when selecting tyres. It is essential to get advice
from a Stromer dealer when selecting tires.
There are special tires for use in winter. Ask
your Stromer dealer for tires with a special profile
and a suitable rubber compound.
The following tire dimensions are permitted for
the Stromer:
Customs designation ETRTO size
27.5 x 2.25" (650b) e 57–584
Dealing with punctures
Contact your Stromer dealer or an authorised
S-Pedelec workshop to fix flat tyres.
Brakes
Your Stromer is equipped with a hydraulic disk
brake.
Brakes are vital to your safety on the bike.
You should therefore maintain them on a regular
basis. This requires specialist knowledge and special tools. Leave all work on your S-Pedelec to
your Stromer dealer! Work that is improperly carried out endangers your safety on the S-Pedelec!
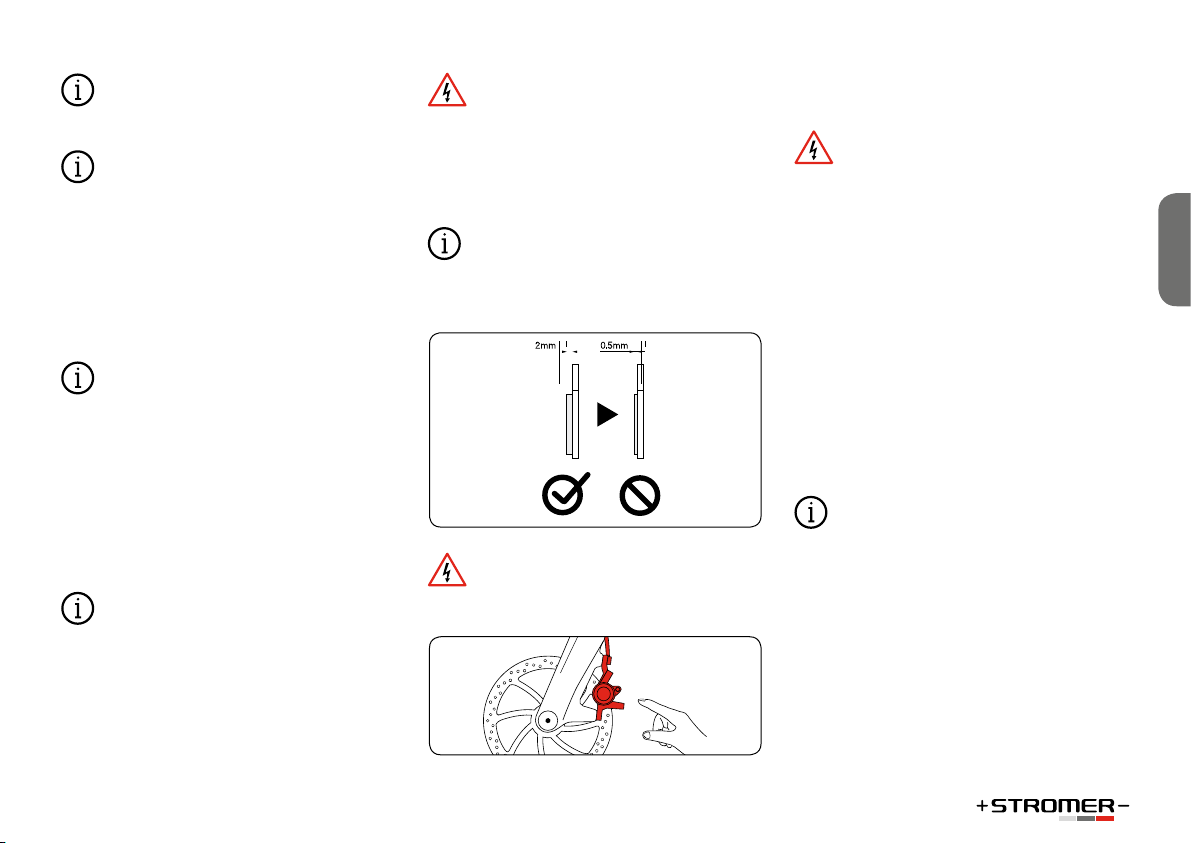
Brake discs and brake pads are particularly
subject to wear. Please allow a specialist retailer
to check these key parts on a regular basis and
replace any worn parts if necessary.
Source: Shimano® techdocs
Do not touch the brake disk while it is rotating or directly after braking. This could result in
injury or burns.
Safety instructions for hydraulic disk
brakes
Avoid permanently braking for longer periods, as can be the case during long, steep descents. Otherwise this can allow vapor bubbles to
form and cause a complete failure in the braking
system. This could result in serious falls and injury.
The brake lever must not be applied if the
S-Pedelec is on its side or upside down. Otherwise
air bubbles can enter the hydraulic system which
could cause the brakes to fail. After transporting the bicycle, check if the pressure point of the
brakes seems softer than it was before. Slowly apply the brakes several times. This allows the braking system to discharge any bubbles.
If the pressure point remains soft, please refrain
from riding. The Stromer dealer must bleed the
brake.
You can avoid this problem by applying the
brake lever before transport and then fixing it in
this position using a strap. This prevents any air
from entering the hydraulic system.
When you come to clean the braking system,
please first read the instructions provided by the
component manufacturer.
ENGLISH
Page 26
You can get more information about your
S-Pedelec’s brakes as well as cleaning and maintenance in the operating manual provided by your
manufacturer or on the manufacturer’s website:
www.stromerbike.com/support
Gears
Gears are vital to your safety on the bike!
Please read the operating instructions supplied to
you by your manufacturer and familiarize yourself
with how to operate the S-Pedelec and switch
gears before your first ride. Allow your Stromer
dealer to undertake any work on your bicycle’s
gears! Work that is improperly carried out endangers your safety on the S-Pedelec!
Information regarding the gears of your
S-Pedelec can be found in the manufacturer’s instructions at www.stromerbike.com/support and
on their websites on the Internet
S-Pedelec tuning is prohibited
Do not modify the S-Pedelec’s technology
in any way. Manipulating the bike in any way to
increase performance or speed can lead to legal
problems and/or make the bike less safe to ride.
Possible legal implications:
• The S-Pedelec is required by law to be registered for approval and insured. All legal requirements regarding the bike’s configuration
and as stated by the road traffic licensing authority must be adhered to.
• The manufacturer does not offer any kind of
guarantee, warranty or liability.
• Criminal consequences cannot be ruled out. For
instance, a negligent bodily injury may result
in a legal offence.
• Termination of bicycle insurance.
Possible technological implications:
• Tampering with the bike’s technology may
limit its capabilities, cause defects or break the
bike parts.
• The motor and battery may become overloaded
and overheat. Consequences: Irreparable damages and risk of fire.
The brakes and other parts may become overworked. Consequences: Malfunction, overheating,
increased wear and tear.
Inspection plan
Modern S-Pedelec technology provides high
performance, but must be regularly maintained
by qualified persons. This requires specialist
knowledge and specialist tools. Leave the work on
your S-Pedelec to your Stromer dealer!
Work that you can safely perform yourself is
highlighted in bold. To ensure that your bicycle
remains in a safe condition and fulfills the conditions of the warranty, the following terms apply:
• Clean your S-Pedelec after every ride and check
it for possible damage.
• Have inspections carried out by the Stromer
dealer.
• Check your S-Pedelec every 300 – 500 km or
every three to six months.
• Check that all screws, nuts and quick release
axles are secure.
• Use a torque wrench to tighten screw joints!
• Clean and grease moving parts (excluding
brake surfaces) according to the manufacturer’s
instructions.
• Have paintwork touched up.
• Ask a specialist retailer to replace any broken
and worn parts.
You can get more information about your bicycle’s parts as well as cleaning and maintenance
in the operating manual provided by your manufacturer or on the manufacturer’s website:
www.stromerbike.com/support
26 27
Page 27
Schedule and inspection work
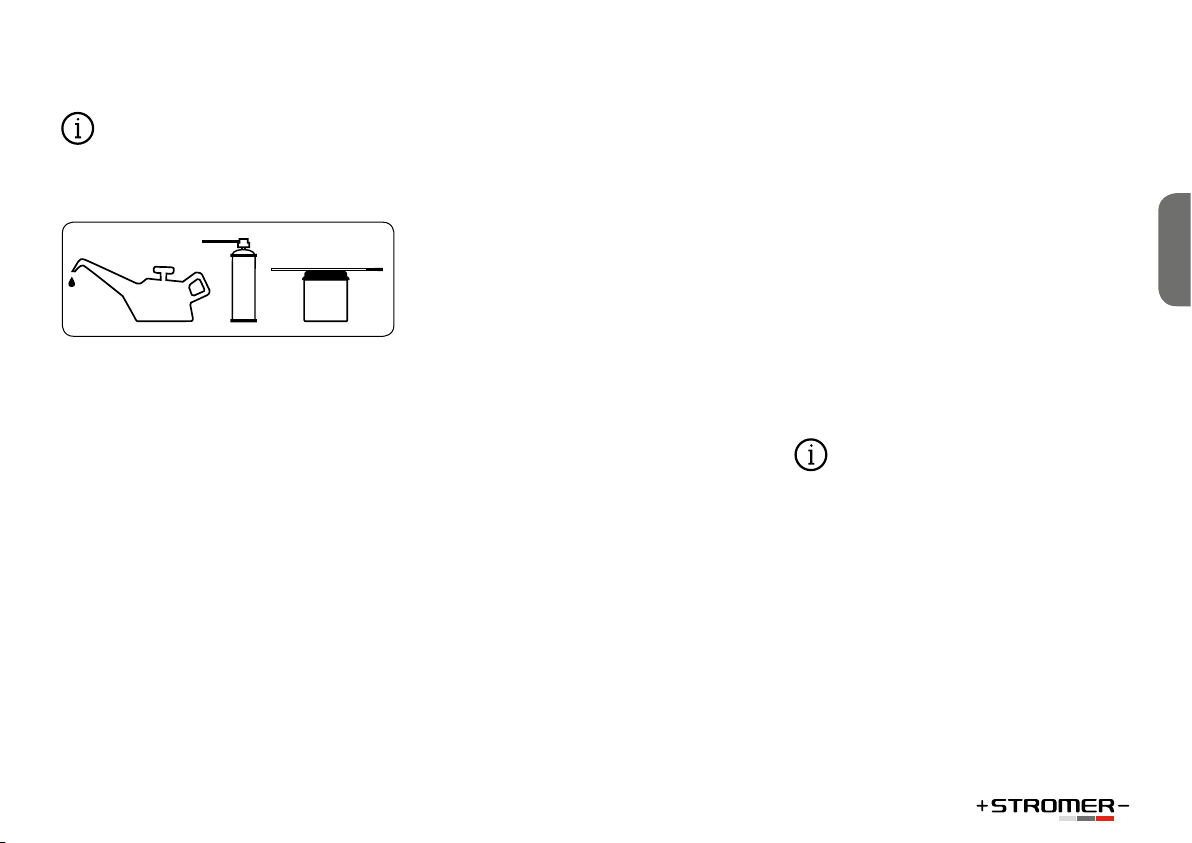
Ask your Stromer dealer for suitable lubricants! Not all lubricants are designed for all purposes. Using the wrong lubricants can lead to
damage and impact the part’s performance!
Spray
lubricant
Work to be undertaken
Check the following:
• Tires and wheels
Torques:
• Handlebars
• Cranks
Make any adjustments to the following components:
• Headset
• Brakes
• Pedals
• All mounting screws
• Seat post
• Seat
• Gear system
• Suspension elements
Before each use of the S-Pedelec
Work to be undertaken
Maintenance / Inspection:
Check the following:
• Spokes
• Rims for wear and concentricity
• Tires for damage and foreign bodies
• Quick release axles
• The functionality of the gear system
• The functionality of the brakes
• Hydraulic brakes: Tightness
• Lighting
• Bell or horn
• Tires: Safe seat and correct air pressure
Every 300 to 500 kilometers
Work to be undertaken
Check the following:
• Drive chain
• Check the brake pads for wear, replace them
if required
Clean:
• Drive chain
Grease:
• The chain with suitable lubricant
Check the following:
• All screw joints are secure
Every 3000 kilometers
Work to be undertaken
To be checked, cleaned,
and possibly replaced by the Stromer dealer:
• Hubs
• Pedals
• Brakes
• Headset
• Gear system
• Chain
After rides in the rain
Work to be undertaken
• Remove humidity, dry
Cleaning and greasing:
• Gears
• Chain
The first inspection is particularly important
for ensuring that your S-Pedelec remains safe and
problem-free! Cables and spokes stretch, while bolted connections can loosen. Therefore always allow
a Stromer dealer to carry out the first inspection.
ENGLISH
Page 28
Lubrication
Working on the S-Pedelec requires special knowledge, experience and special tools! Only allow Stromer deal-
ers to work or check key parts of the bicycle!
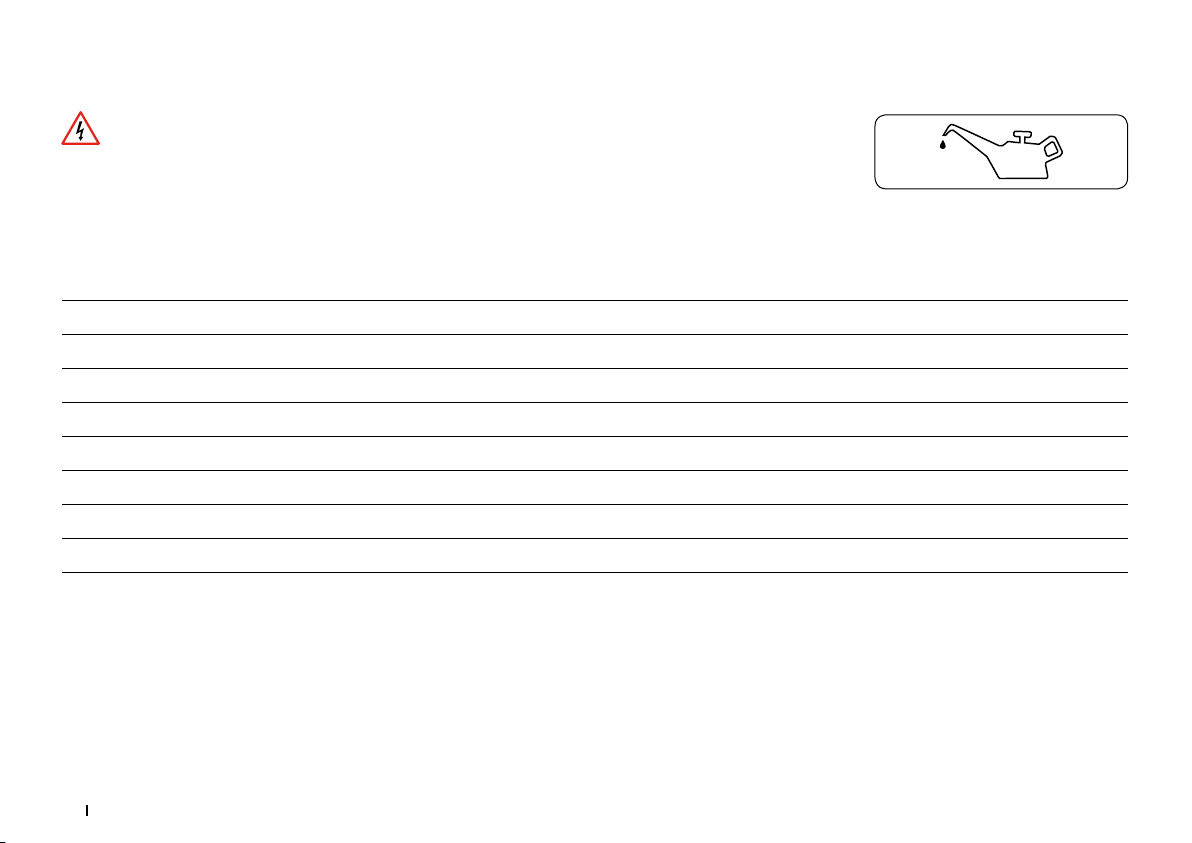
Lubrication schedule
What must be lubricated? At what intervals? With which lubricants?
Chain after removing dirt, after riding in the rain, every 250 km chain oil
Gear cables when not functioning well, once a year silicon-free grease
Wheel bearings, pedal bearings, inside bearing once a year bearing grease
Thread during mounting during mounting mounting grease
Contact surfaces of carbon parts during mounting carbon mounting paste
Sliding surfaces of screw joints once a year grease, spray oil
Metal seat post in metal frame during mounting grease
Gear joints when not functioning well, once a year spray oil
28 29
Page 29
Screw connections
It is vital that all bolted connections on the
S-Pedelec have the correct torque in order to ensure that they are secure. Too much torque can
damage the screw, nut or component. Always use
a torque spanner to tighten screw joints. You are
not able to correctly tighten these bolted connections without this specialist tool!
If a component specifies a torque for its bolted connections, then this should be strictly adhered to. Please read the instructions provided by
the manufacturer, which often list the correct
mounting torques.
When a screw connection was treated with
threadlocking adhesive (screw adhesive, e.g. Loctite), threadlocking adhesive must be used whenever this connection is opened, loosened or retightened.
Component ST5 ST3 Torque
Grip clamp (Ergon GS1-L) – handlebar stem unit/handlebar
Brake lever clamp (HD944) – handlebar stem unit
Brake lever clamp (HD942) – handlebar
Gear lever clamp (Shimano Alfine Di2) – handlebar stem unit
Gear lever clamp (Microshift) – handlebar
Expander clip-on
Stem clamp – handlebar
Stem clamp – fork tube (aluminium)
Headset top cap clamp – fork tube (handlebar stem unit)
Plastic cover on stem
SP gadget adapter
Saddle subframe clamp
Seat angle clamp
Saddle clamp – frame – saddle supports
Front axle
Rear axle
Brake disc (6-hole, front hubs)
Brake disc (4-hole, rear hubs)
Inner bearing, FSA MegaExo
* *
*
*
*
*
*
*
* *
* *
* *
* *
* *
* *
* *
* *
* *
* *
* *
* *
5 Nm
5 – 7 Nm
5 – 7 Nm
5 – 7 Nm
3 Nm
7 Nm
6 Nm
5 Nm
3,5 Nm
0,5 Nm
0,5 Nm
13 – 15 Nm
10 – 12 Nm
10 Nm
20 Nm
25 Nm
4 – 6 Nm
9 – 11 Nm
40 – 50 Nm
ENGLISH
Page 30

General torque for bolted connections
Component ST5 ST3 Torque
Foot pedal arm, FSA MegaExo
Pedals
Rear derailleur
Battery box
Drinking bottle holder
Brake calliper
Brake pad pins
Special items
Screw – mudguard to frame bridge
Screw – mudguard adapter to rear bottom bracket
Screw – rear mudguard stays to frame
Screw – number plate holder to mudguard
Screw – light to number plate holder
Screw – baggage carrier stays to frame
Screw – front baggage carrier to mudguard
Screw – rear baggage carrier to mudguard
Screws – mudguard stays to fork
Screw – upper mudguard to fork
Screws – front light to stem (Supernova)
Screws – front light to stem (Roxim)
* *
* *
* *
* *
* *
* *
* *
* *
* *
* *
* *
* *
* *
* *
* *
* *
* *
*
*
38 – 41 Nm
40 Nm
8 – 10 Nm
0.5 Nm
3.5 Nm
6 – 8 Nm
0.8 – 1.2 Nm
5.5 Nm
1 Nm
4 Nm
2 Nm
2 Nm
5,5 Nm
3.5 – 4 Nm
3.5 – 4 Nm
1,3 Nm
5 Nm
5 – 6 Nm
4 Nm
Steel screws in aluminum thread
M3 1.4 Nm
M4 2.0 Nm
M5 3.9 Nm
M6 6.7 Nm
M8 15.3 Nm
M10 31.5 Nm
Steel screws in steel thread
M4 2.2 Nm
M5 4.3 Nm
M6 7.4 Nm
M8 17.0 Nm
M10 35.0 Nm
30 31
Page 31
WARRANTY, DEFECTS, WEAR
TECHNICAL DATA
You were given the warranty and limitation of liability separately at the time of purchase of your
S-pedelec. You can also consult them anytime at
www.stromerbike.com/support.
Wear
Take note that the components of the S-pedelec
are subject to higher wear than the components
of a bicycle without an additional drive. This is
due to the greater weight of the vehicle and the
higher average speed that is achieved through the
propulsion.
This higher wear is not a defect and is not subject
to warranty.
Typical components affected are:
• Tires
• Brake pads
The battery is subject to aging and therefore a
wearing part. Please take note that age and duration of use affect the battery, e.g. result in a clearly reduced driving range. This must be considered
when planning trips. Exchange our battery in due
time for a new one. Replacement batteries are
available from your Stromer dealer.
• Drive components
• Spokes
Permitted total weight of Stromer S-Pedelec: 150 kg
Vehicle including battery + driver + luggage + trailer
Stromer ST5 and ST3 Weight: 29.2 kg
ST5 ST3
MOTOR
MOTOR SUPPORT up to 45 km/h up to 45 km/h
POWER 850 W 820 W
POWER USA 650 W 600 W
TORQUE 48 Nm 44 Nm
RANGE up to 180 km up to 180 km
* Depending on the location of use, a driving permit and insurance/number plate may be required.
The A-weighted emission sound pressure levels at the rider’s ears is below 70 dB(A).
CHARGERS
INPUT
OUTPUT
OPERATING TEMPERATURE RANGE [°C] 0...40°C
SYNO Drive Sport* SYNO Drive II*
CR245
100-240VAC
50-60 Hz
3A
54.6VDC / 4.5A
11.2VDC / 1A
~
ENGLISH
Page 32
LI-ION BATTERIES
VOLTAGE [V]
CAPACITY [AH
ENERGY [WH]
CHARGING TIME WITH CHARGER CR190 [H:MIN]
CHARGING TIME WITH CHARGER CR254 [H:MIN]
CHARGING TIME WITH CR65 CHARGER [H:MIN]
PERMITTED STORAGE TEMPERATURE RANGE [°C]
PERMITTED DISCHARGING TEMPERATURE RANGE [°C]
PERMITTED CHARGING TEMPERATURE RANGE [°C]
APPROXIMATE WEIGHT [KG]
If the charging time indicated is clearly exceeded, discontinue the charging process. Have
the battery and the charger checked by the Stromer distributor.
BQ814
48 48 47,06
15,9 19,8 20,4
814 983 983
5:30 6:30 6:30
4:45 5:30 5:30
15:00 18:00 18:00
-20…60°C -20…60°C -20…60°C
-20…60°C -20…60°C -20…60°C
0…50°C 0…50°C 0…50°C
5 5 5
Model ST1306AC
BQ983
BQ983
Model ST983
32 33
Page 33
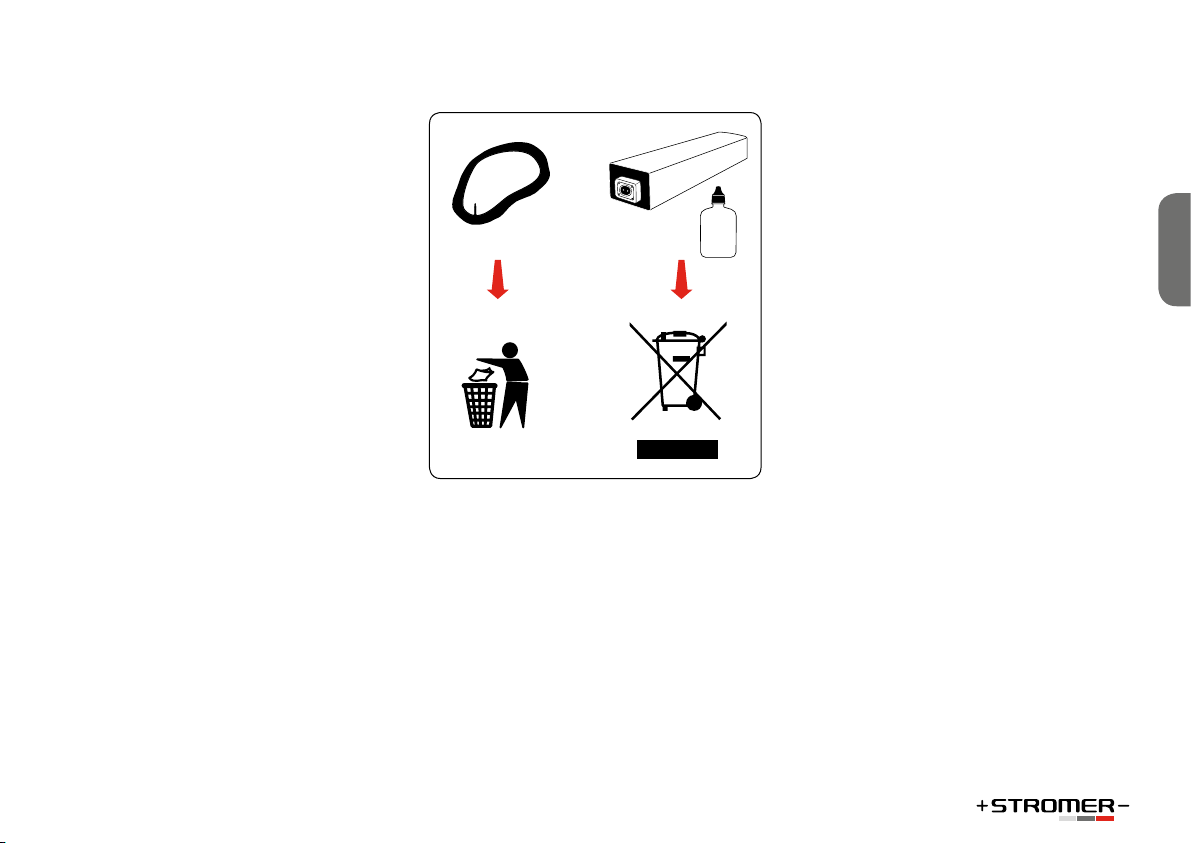
ENVIRONMENTAL TIPS
LEGAL DISCLOSURE
Take care to dispose of all packaging material
according to the regulations and sorted by waste
type.
General care and cleaning products
Please take the environment into account when
caring for and cleaning your S-pedelec. You
should use care and cleaning products which are
biodegradable wherever possible.
Please ensure that no cleaning fluid enters the
drainage system. When cleaning the chain, use a
suitable chain cleaning tool and dispose of chain
lubricant properly at a suitable waste disposal
site.
Brake cleaner and lubricants
Take the same approach to using brake cleaner
and lubricants as you do to general care and
cleaning products.
Tires and inner tubes
Tires and inner tubes are not residual waste or domestic rubbish and have to be disposed of at your
local recycling center.
S-pedelec batteries
Batteries belonging to S-pedelecs should be treated as hazardous and are therefore subject to compulsory special labeling. They have to be disposed
of by Stromer dealers or manufacturers.
myStromer AG
Freiburgstrasse 798
CH-3173 Oberwangen
Europe:
[email protected]
Telephone: +41 31 848 23 00
USA:
[email protected]
Telephone: (800)819-4262
Responsible for distributing and marketing the
operating instructions: inMotion mar.com
Rosensteinstr. 22, D-70191 Stuttgart
Tel +49 711 35164091 · Fax +49 711 35164099
[email protected], www.inmotionmar.com
Content and images: Veidt Anleitungen, Friedrich-Ebert-Strasse 32, 65239 Hochheim, Germany
Tel +49 1522 8982009, [email protected]
Legal inspection by a lawyer’s office specializing
in intellectual property
These operating instructions cover the requirements and the scope of DIN EN ISO 4210 and DIN
EN ISO 15194:2017-12.
In case of delivery and use outside of this scope,
the manufacturer of the vehicle must supply the
required manuals.
© Copying, reprinting and translation as well as
any commercial use (including extracts, in printed or digital form) is only permitted if specifically
granted in writing in advance.
ENGLISH
Stromer ST5 ST3 Version 1.0 May 2018
Page 34

SERVICE SCHEDULE
1st Inspection:
Work done:
_______________________________________________________
_______________________________________________________
_______________________________________________________
Materials used:
_______________________________________________________
_______________________________________________________
_______________________________________________________
Date: ________________________________________
Signature: ________________________________________
Retailer stamp
2nd Inspection:
Work done:
_______________________________________________________
_______________________________________________________
_______________________________________________________
Materials used:
_______________________________________________________
_______________________________________________________
_______________________________________________________
Date: ________________________________________
Signature: ________________________________________
Retailer stamp
3rd Inspection:
Work done:
_______________________________________________________
_______________________________________________________
_______________________________________________________
Materials used:
_______________________________________________________
_______________________________________________________
_______________________________________________________
Date: ________________________________________
Signature: ________________________________________
Retailer stamp
34 35
Page 35
4th Inspection:
5th Inspection:
6th Inspection:
Work done:
_______________________________________________________
_______________________________________________________
_______________________________________________________
Materials used:
_______________________________________________________
_______________________________________________________
_______________________________________________________
Date: ________________________________________
Signature: ________________________________________
Retailer stamp
Work done:
_______________________________________________________
_______________________________________________________
_______________________________________________________
Materials used:
_______________________________________________________
_______________________________________________________
_______________________________________________________
Date: ________________________________________
Signature: ________________________________________
Retailer stamp
Work done:
_______________________________________________________
ENGLISH
_______________________________________________________
_______________________________________________________
Materials used:
_______________________________________________________
_______________________________________________________
_______________________________________________________
Date: ________________________________________
Signature: ________________________________________
Retailer stamp
Page 36

7th Inspection:
8th Inspection:
9th Inspection:
Work done:
_______________________________________________________
_______________________________________________________
_______________________________________________________
Materials used:
_______________________________________________________
_______________________________________________________
_______________________________________________________
Date: ________________________________________
Signature: ________________________________________
Retailer stamp
Work done:
_______________________________________________________
_______________________________________________________
_______________________________________________________
Materials used:
_______________________________________________________
_______________________________________________________
_______________________________________________________
Date: ________________________________________
Signature: ________________________________________
Retailer stamp
Work done:
_______________________________________________________
_______________________________________________________
_______________________________________________________
Materials used:
_______________________________________________________
_______________________________________________________
_______________________________________________________
Date: ________________________________________
Signature: ________________________________________
Retailer stamp
36 37
Page 37
10th Inspection:
11th Inspection:
12th Inspection:
Work done:
_______________________________________________________
_______________________________________________________
_______________________________________________________
Materials used:
_______________________________________________________
_______________________________________________________
_______________________________________________________
Date: ________________________________________
Signature: ________________________________________
Retailer stamp
Work done:
_______________________________________________________
_______________________________________________________
_______________________________________________________
Materials used:
_______________________________________________________
_______________________________________________________
_______________________________________________________
Date: ________________________________________
Signature: ________________________________________
Retailer stamp
Work done:
_______________________________________________________
ENGLISH
_______________________________________________________
_______________________________________________________
Materials used:
_______________________________________________________
_______________________________________________________
_______________________________________________________
Date: ________________________________________
Signature: ________________________________________
Retailer stamp
Page 38
Version 1.0
User Manual L1e-B ST3, ST5, 401549
myStromer AG
Freiburgstrasse 798 | CH-3173 Oberwangen | Switzerland
stromerbike.com | [email protected]
 Loading...