


Document number: 60-16-033-006
CHARON-AXP V4.8 for Windows
Users Guide
November, 2017
1 / 375

Contents
Introduction . . . . . . . . . . . . . . . . . . . . . . . . . . . . . . . . . . . . . . . . . . . . . . . . . . . . . . . . . . . . . . . . . . . . . . . . . . . . . . . . . . . . . . . . . . . . . . . . . . 3
Conventions . . . . . . . . . . . . . . . . . . . . . . . . . . . . . . . . . . . . . . . . . . . . . . . . . . . . . . . . . . . . . . . . . . . . . . . . . . . . . . . . . . . . . . . . . . . . . . . . . 6
CHARON-AXP for Windows installation . . . . . . . . . . . . . . . . . . . . . . . . . . . . . . . . . . . . . . . . . . . . . . . . . . . . . . . . . . . . . . . . . . . . . . . . . . . . 7
Running and managing CHARON-AXP for Windows . . . . . . . . . . . . . . . . . . . . . . . . . . . . . . . . . . . . . . . . . . . . . . . . . . . . . . . . . . . . . . . . . . 33
CHARON-AXP for Windows configuration . . . . . . . . . . . . . . . . . . . . . . . . . . . . . . . . . . . . . . . . . . . . . . . . . . . . . . . . . . . . . . . . . . . . . . . . . . 50
Migration to CHARON-AXP for Windows . . . . . . . . . . . . . . . . . . . . . . . . . . . . . . . . . . . . . . . . . . . . . . . . . . . . . . . . . . . . . . . . . . . . . . . . . . . 77
CHARON-AXP for Windows licensing . . . . . . . . . . . . . . . . . . . . . . . . . . . . . . . . . . . . . . . . . . . . . . . . . . . . . . . . . . . . . . . . . . . . . . . . . . . . . 91
CHARON-AXP for Windows utilities . . . . . . . . . . . . . . . . . . . . . . . . . . . . . . . . . . . . . . . . . . . . . . . . . . . . . . . . . . . . . . . . . . . . . . . . . . . . . . . 109
Host Device Check . . . . . . . . . . . . . . . . . . . . . . . . . . . . . . . . . . . . . . . . . . . . . . . . . . . . . . . . . . . . . . . . . . . . . . . . . . . . . . . . . . . . . . . . 110
Network Control Center . . . . . . . . . . . . . . . . . . . . . . . . . . . . . . . . . . . . . . . . . . . . . . . . . . . . . . . . . . . . . . . . . . . . . . . . . . . . . . . . . . . . . 113
MkDisk . . . . . . . . . . . . . . . . . . . . . . . . . . . . . . . . . . . . . . . . . . . . . . . . . . . . . . . . . . . . . . . . . . . . . . . . . . . . . . . . . . . . . . . . . . . . . . . . . . 150
MkDskCmd . . . . . . . . . . . . . . . . . . . . . . . . . . . . . . . . . . . . . . . . . . . . . . . . . . . . . . . . . . . . . . . . . . . . . . . . . . . . . . . . . . . . . . . . . . . . . . 159
HASP View . . . . . . . . . . . . . . . . . . . . . . . . . . . . . . . . . . . . . . . . . . . . . . . . . . . . . . . . . . . . . . . . . . . . . . . . . . . . . . . . . . . . . . . . . . . . . . 162
License Update Service . . . . . . . . . . . . . . . . . . . . . . . . . . . . . . . . . . . . . . . . . . . . . . . . . . . . . . . . . . . . . . . . . . . . . . . . . . . . . . . . . . . . . 164
License expiration check . . . . . . . . . . . . . . . . . . . . . . . . . . . . . . . . . . . . . . . . . . . . . . . . . . . . . . . . . . . . . . . . . . . . . . . . . . . . . . . . . . . . 167
mtd . . . . . . . . . . . . . . . . . . . . . . . . . . . . . . . . . . . . . . . . . . . . . . . . . . . . . . . . . . . . . . . . . . . . . . . . . . . . . . . . . . . . . . . . . . . . . . . . . . . . . 178
CHARON Log Monitor and Dispatcher . . . . . . . . . . . . . . . . . . . . . . . . . . . . . . . . . . . . . . . . . . . . . . . . . . . . . . . . . . . . . . . . . . . . . . . . . 179
HOSTPrint . . . . . . . . . . . . . . . . . . . . . . . . . . . . . . . . . . . . . . . . . . . . . . . . . . . . . . . . . . . . . . . . . . . . . . . . . . . . . . . . . . . . . . . . . . . . . . . 182
CHARON Guest Utilities for OpenVMS . . . . . . . . . . . . . . . . . . . . . . . . . . . . . . . . . . . . . . . . . . . . . . . . . . . . . . . . . . . . . . . . . . . . . . . . . 184
CHARON-AXP for Windows configuration details . . . . . . . . . . . . . . . . . . . . . . . . . . . . . . . . . . . . . . . . . . . . . . . . . . . . . . . . . . . . . . . . . . . . 188
General Settings . . . . . . . . . . . . . . . . . . . . . . . . . . . . . . . . . . . . . . . . . . . . . . . . . . . . . . . . . . . . . . . . . . . . . . . . . . . . . . . . . . . . . . . . . . 189
Core Devices . . . . . . . . . . . . . . . . . . . . . . . . . . . . . . . . . . . . . . . . . . . . . . . . . . . . . . . . . . . . . . . . . . . . . . . . . . . . . . . . . . . . . . . . . . . . . 198
Console . . . . . . . . . . . . . . . . . . . . . . . . . . . . . . . . . . . . . . . . . . . . . . . . . . . . . . . . . . . . . . . . . . . . . . . . . . . . . . . . . . . . . . . . . . . . . . . . . 216
Placement of peripheral devices on PCI bus . . . . . . . . . . . . . . . . . . . . . . . . . . . . . . . . . . . . . . . . . . . . . . . . . . . . . . . . . . . . . . . . . . . . . 225
Disks and tapes . . . . . . . . . . . . . . . . . . . . . . . . . . . . . . . . . . . . . . . . . . . . . . . . . . . . . . . . . . . . . . . . . . . . . . . . . . . . . . . . . . . . . . . . . . . 266
KZPBA PCI SCSI adapter . . . . . . . . . . . . . . . . . . . . . . . . . . . . . . . . . . . . . . . . . . . . . . . . . . . . . . . . . . . . . . . . . . . . . . . . . . . . . . . . 267
KGPSA-CA PCI Fibre Channel adapter . . . . . . . . . . . . . . . . . . . . . . . . . . . . . . . . . . . . . . . . . . . . . . . . . . . . . . . . . . . . . . . . . . . . . 275
Acer Labs 1543C IDE/ATAPI CD-ROM adapter . . . . . . . . . . . . . . . . . . . . . . . . . . . . . . . . . . . . . . . . . . . . . . . . . . . . . . . . . . . . . . . 295
PCI I/O Bypass controller . . . . . . . . . . . . . . . . . . . . . . . . . . . . . . . . . . . . . . . . . . . . . . . . . . . . . . . . . . . . . . . . . . . . . . . . . . . . . . . . 297
Networking . . . . . . . . . . . . . . . . . . . . . . . . . . . . . . . . . . . . . . . . . . . . . . . . . . . . . . . . . . . . . . . . . . . . . . . . . . . . . . . . . . . . . . . . . . . . . . . 304
DEFPA PCI FDDI adapter . . . . . . . . . . . . . . . . . . . . . . . . . . . . . . . . . . . . . . . . . . . . . . . . . . . . . . . . . . . . . . . . . . . . . . . . . . . . . . . . . . . 313
PBXDA-xx series PCI serial adapters . . . . . . . . . . . . . . . . . . . . . . . . . . . . . . . . . . . . . . . . . . . . . . . . . . . . . . . . . . . . . . . . . . . . . . . . . . 318
Sample configuration files . . . . . . . . . . . . . . . . . . . . . . . . . . . . . . . . . . . . . . . . . . . . . . . . . . . . . . . . . . . . . . . . . . . . . . . . . . . . . . . . . . . 323
HP AlphaServer 800 configuration file . . . . . . . . . . . . . . . . . . . . . . . . . . . . . . . . . . . . . . . . . . . . . . . . . . . . . . . . . . . . . . . . . . . . . . 324
HP AlphaServer 4000 configuration file . . . . . . . . . . . . . . . . . . . . . . . . . . . . . . . . . . . . . . . . . . . . . . . . . . . . . . . . . . . . . . . . . . . . . 329
HP AlphaServer DS20 configuration file . . . . . . . . . . . . . . . . . . . . . . . . . . . . . . . . . . . . . . . . . . . . . . . . . . . . . . . . . . . . . . . . . . . . . 333
HP AlphaServer ES40 configuration file . . . . . . . . . . . . . . . . . . . . . . . . . . . . . . . . . . . . . . . . . . . . . . . . . . . . . . . . . . . . . . . . . . . . . 338
HP AlphaServer GS80 configuration file . . . . . . . . . . . . . . . . . . . . . . . . . . . . . . . . . . . . . . . . . . . . . . . . . . . . . . . . . . . . . . . . . . . . . 343
"configuration_name.icfg" configuration file . . . . . . . . . . . . . . . . . . . . . . . . . . . . . . . . . . . . . . . . . . . . . . . . . . . . . . . . . . . . . . . . . . 348
CHARON-AXP for Windows deinstallation . . . . . . . . . . . . . . . . . . . . . . . . . . . . . . . . . . . . . . . . . . . . . . . . . . . . . . . . . . . . . . . . . . . . . . . . . . 349
Appendixes . . . . . . . . . . . . . . . . . . . . . . . . . . . . . . . . . . . . . . . . . . . . . . . . . . . . . . . . . . . . . . . . . . . . . . . . . . . . . . . . . . . . . . . . . . . . . . . . . . 355
Log monitoring - logmond best practice . . . . . . . . . . . . . . . . . . . . . . . . . . . . . . . . . . . . . . . . . . . . . . . . . . . . . . . . . . . . . . . . . . . . . . . . . 356
How to implement time synchronisation between CHARON-AXP Host OS and Guest OS . . . . . . . . . . . . . . . . . . . . . . . . . . . . . . . . . 369
2 / 375

Document number: 60-16-033-006
Introduction
Table of Contents
General Description
The principles of HP Alpha Hardware Virtualization
Virtualized hardware
Host platform
General Description
HP Alpha Hardware Virtualization allows users of HP Alpha (Previously known as DIGITAL Alpha) computers to move application software and user data
to a modern Intel or AMD based x64 compatible platform without having to make changes to software and data. HP Alpha Hardware Virtualization is a
software solution that replaces HP Alpha hardware.
This approach is best understood when the HP Alpha Hardware Virtualization Software is viewed as a special interface between the old HP Alpha
software and a new hardware platform. Basically, the CHARON software presents a HP Alpha hardware interface to the original HP Alpha software, so
that the existing software cannot detect a difference. This means no changes have to be made to the existing software. User programs and data can be
copied to a new modern industry standard server (64-bit Intel or AMD) and continue to run for many more years.
The HP Alpha virtualization software is designed to replace single and multi-CPU HP Alpha computer systems, including:
AlphaServer 400
AlphaServer 800
AlphaServer 1000
AlphaServer 1000A
AlphaServer 1200
AlphaServer 2000
AlphaServer 2100
AlphaServer 4000
AlphaServer 4100
AlphaServer DS10
AlphaServer DS10L
AlphaServer DS15
AlphaServer DS20
AlphaServer DS25
AlphaServer ES40
AlphaServer ES45
AlphaServer GS80
© Stromasys, 2017
3 / 375

Document number: 60-16-033-006
AlphaServer GS160
AlphaServer GS320
Back to Table of Contents
The principles of HP Alpha Hardware Virtualization
Virtualized hardware
CHARON-AXP virtualizes various HP Alpha architectures and meets or exceeds the performance level of these HP Alpha systems when run on the
recommended hardware platform.
The following table shows which hardware boards CHARON virtualizes:
Subsystem Covered HP Alpha hardware
Serial Lines Controllers On-board serial line port COM2, Family of PCI controllers: PBXDA-BA, PBXDA-BB, PBXDA-AC, PBXDA-AC
IDE/ATAPI CD-ROM Controller Virtual Acer Labs 1543C
PCI Fibre Channel Controller KGPSA-CA
PCI SCSI Controller KZPBA
PCI FDDI Controller DEFPA
PCI Network Controllers DE435, DE450, DE500AA, DE500BA, DE602, DE602AA
Back to Table of Contents
Host platform
The Virtualization Software presents standard HP Alpha devices to the HP Alpha operating system, allowing the OS to function as though it were still
running on a HP Alpha computer. For example, virtual disk container files in a directory or physical devices of the host Windows platform are presented by
the Virtualization Software to the HP Alpha OS as emulated SCSI disks attached to a PCI SCSI adapter.
© Stromasys, 2017
4 / 375

Document number: 60-16-033-006
With the use of current storage technology, disks do not have to be physically attached to the Host platform, they can also reside on a SAN or iSCSI
storage structure.
A similar translation process is also valid for other emulated hardware devices.
Back to Table of Contents
© Stromasys, 2017
5 / 375

Document number: 60-16-033-006
Conventions
Throughout the document(s) these conventions are followed
Notation Description
$ The dollar sign in interactive examples indicates an operating system prompt for VMS.
The dollar sign can also indicate non superuser prompt for UNIX / Linux.
# The number sign represents the superuser prompt for UNIX / Linux.
> The right angle bracket in interactive examples indicates an operating system prompt for Windows command (cmd.exe).
User input Bold monospace type in interactive examples indicates typed user input.
< >path Bold monospace type enclosed by angle brackets indicates command parameters and parameter values.
Output Monospace type in interactive examples, indicates command response output.
[ ] In syntax definitions, brackets indicate items that are optional.
... In syntax definitions, a horizontal ellipsis indicates that the preceding item can be repeated one or more times.
dsk0 Italic monospace type, in interactive examples, indicates typed context dependent user input.
The following definitions apply
Term Description
Host The system on which the emulator runs, also called the Charon server
Guest The operating system running on a Charon instance, for example, Tru64 UNIX, OpenVMS, Solaris or MPE
© Stromasys, 2017
6 / 375

Document number: 60-16-033-006
CHARON-AXP for Windows installation
Table of contents
Introduction
Hardware Requirements
Number of CPU cores
CPU type and speed
Operative memory
Disk storage
Ethernet adapters
Software Requirements
Host system preparation
Before installation
Distribution preparation
Installation
CHARON-AXP home directory
License installation
Regular HASP USB dongle
Network HASP USB dongle
Software license
License validity verification
Troubleshooting
Network configuration
After installation
Introduction
The CHARON-AXP product is distributed in the form of a zip file that contains the CHARON-AXP installation executable ("InstallShell.exe"). The
InstallShell procedure offers the option to select which modules to install (optionally). It is recommended to install all modules (the default) by not selecting
"Display components" checkbox.
Before installing CHARON-AXP, please perform all hardware and software host system checks to ensure the host platform meets minimum
CHARON-AXP installation requirements
Optionally, create a specific CHARON username with administrative privileges
CHARON-AXP installation steps:
Extract the CHARON-AXP installation procedure files from its archive
Install CHARON-AXP by running the "InstallShell.exe" installer and follow the instructions
Install CHARON-AXP license (hardware dongle or software license)
Configure CHARON-AXP host system, for example, network adapter, disable some Windows features (see further), etc.Host system preparation
Back to Table of Contents
Hardware Requirements
Number of CPU cores
Each CHARON-AXP emulated CPU requires a corresponding physical core. The total number of host CPUs must exceed the number of emulated CPUs
since some of the host CPUs must be dedicated to serving CHARON I/O operations and fulfil host operating system needs. If several CHARON instances
run in parallel, the required number of CPU cores is cumulative.
© Stromasys, 2017
7 / 375

Document number: 60-16-033-006
The following table shows the minimum and number of CPUs required for each models for one instance (note that each model instance isrecommended
able to run on 2 CPU cores hosts, but this configuration does not support emulation of all the virtual CPUs):
CHARON-AXP models Minimum number of host CPU cores Recommended number of host CPU cores
HP AlphaServer 400 - HP AlphaServer 4100 2 2
HP AlphaServer DS10 2 2
HP AlphaServer DS20 4 4
HP AlphaServer ES40 6 8
HP AlphaServer GS80 10 16
HP AlphaServer GS160 18 32
HP AlphaServer GS320 34 48
CPU type and speed
Since CHARON-AXP utilizes LAHF instructions in the HP Alpha CPU emulation, please avoid using early (pre-2005) AMD64 and Intel 64 CPUs for the
CHARON host system since they lack this capability. AMD Athlon 64, Opteron and Turion 64 revision D processors from March 2005 and Intel
Pentium 4 G1 stepping from December 2005 are LAHF instruction capable.
Concerning CPU speed, the general recommendation is that higher CPU frequency is better since it allows better emulated HP Alpha performance. The
minimum recommendation is at least 3 GHz.
Operative memory
The minimum host memory size depends on the amount of HP Alpha memory to be emulated and the number of CHARON-AXP instances to be run on
one host.
The minimum host memory is calculated according to the following formula:
The minimum host memory = (2Gb + the amount of HP Alpha memory emulated) per CHARON-AXP instance.
Disk storage
The total amount of disk space required for CHARON-AXP can be calculated as a sum of all the disk/tape image sizes plus 50 MB for the CHARON
software plus space required for the normal host OS. Temporary disk storage is often needed when setting up a new server, for saveset storage, software
installation kits, etc.
Ethernet adapters
CHARON-AXP networking requires dedicated host Ethernet adapters; their number must be equal to the emulated adapters to be configured in
CHARON-AXP. One adapter (optionally) can be left to the host for TCP/IP networking etc.
Back to Table of Contents
Hyperthreading must be switched off completely. Disable hyperthreading in the BIOS settings of the physical host or, for a VMware virtual
machine, edit the virtual machine properties, select the Resources tab then select Advanced CPU. Set the Hyperthreaded Core Sharing mode
to .None
For VMware-based CHARON hosts it is mandatory to use the "E1000" virtual network adapter. Please avoid usage of the "E1000E" adapter
since it may lead to problems with some TCP/IP services!
© Stromasys, 2017
8 / 375

Document number: 60-16-033-006
1.
2.
3.
4.
Software Requirements
Microsoft Windows Server 2016 Standard and Datacenter Editions, 64 bit version
Microsoft Windows Server 2012 R2 Standard and Datacenter Editions, 64 bit version (please notice that only R2 revision is supported)
Microsoft Windows Server 2008 R2 (SP1) Standard and Enterprise Editions, 64 bit version (please notice that only R2 revision is supported)
Microsoft Windows 7 Professional and Ultimate (SP1) Editions, 64 bit version
Windows 8.1 Professional Edition, 64 bit version
Windows 10 Professional and Enterprise Editions, 64 bit version
VMware ESXi 5.5 and 6.x up to 6.5 (requires a supported Windows operating system on top of a ESXi virtual machine)
Microsoft Hyper-V (requires a supported Windows operating system on top of a Hyper-V virtual machine)
Back to Table of Contents
Host system preparation
If a network-wide license (red dongle or software license) is going to be used, do the following:
On server side (where the network license will reside): open port 1947 for both TCP and UDP
, if broadcast search for remote licenses is to be used, UDP traffic from port 1947 of the license server to ports On the client side 30000-65535 of
the client must be permitted.
: sBoth on server and client sides et default gateway
Please consult with your Windows User's Guide for details.
If any magneto-optical (MO) drive installed on host system is going to be used with CHARON (mapped as "\\.\PhysicalDrive<N>" to CHARON emulated
disk controllers) the host "MediaChangeNotification" (MSN) service must be switched off manually for these drives according to the following procedure:
Type "regedit" in the search field under "Start" menu or press Windows+R and enter "regedit"; press Enter to run the program.
Find the "AlwaysDisableMCN" parameter in the following path:
HKEY_LOCAL_MACHINE
+ SYSTEM
+ CurrentControlSet
+ Enum
+ SCSI
+ Disk&Ven_DEC&Prod_RWZ53_____(C)DEC This one depends on Vendor and Model of your MO drive <-
+ 5&fd233cf&0&000500 This one depends on hardware connection (SCSI ID of MO drive, location of SCSI HBA<-
on the host's mainboard, etc ...)
+ Device Parameters
+ MediaChangeNotification
+ AlwaysDisableMCN = DWORD:00000000
Change the "AlwaysDisableMCN" parameter to "1", for example: "AlwaysDisableMCN = DWORD:00000001".
Reboot the host system.
Back to Table of Contents
All antivirus, screen saver, automatic (scheduled) backup and any other CPU consuming software as well as software that is able to temporarily
lock CHARON files (such as automatic indexing) must be turned off, uninstalled and disabled. Alternatively it is also possible to exclude all
CHARON executables and material folders from scanning for viruses, but please note that scanning slows down CHARON host anyway - it may
be critical for some installations requiring maximum performance.
The power scheme must be set to "High Performance" with all the "Sleep" and "Standby" modes turned off.
The automatic installation of Microsoft updates must be disabled. MS updates to the CHARON host must be done only in specific service
maintenance periods established by the system administrator. Before applying new updates one must shutdown the operating system running
on CHARON and stop all the running CHARON instances and services.
If stricter firewall rules are required, it is possible to open the ports 30000-65535 and 1947 only for the "Sentinel HASP License Manager" (haspl
service (installed by CHARON-AXP ).ms.exe)
© Stromasys, 2017
9 / 375

Document number: 60-16-033-006
1.
2.
3.
4.
5.
1.
2.
Before installation
Login as the local system administrator ("Administrator") on the host system.
Create a special user for running CHARON-AXP (optional). This user must have all the administrative privileges. Please consult with your
Windows User's Guide on details.
Stay logged in as local system administrator ("Administrator") or log off and login as the CHARON-AXP user having administrative privileges (if
this option has been chosen).
Create a special directory for the CHARON-AXP distribution kit and copy the provided files there.
Due to CHARON installation procedure update, it is required to uninstall all CHARON products before installing CHARON-AXP version 4.8
Back to Table of Contents
Distribution preparation
Extract the content of the distribution archive to the current directory or copy the content of the provided distribution directory to the current
directory.
Run the "InstallShell.exe" file:
Back to Table of Contents
Installation
The following description assumes that this is the first installation of CHARON-AXP on the target host. Installation of additional CHARON products follows
the same procedure.
The first dialog lists the CHARON-AXP product:
The CHARON installation procedure will create a special group called CHARON-GRP and the current user will be automatically
included to this group. Do not remove this group and do not remove any CHARON user from it, otherwise a problem with virtual
memory allocation may appear on CHARON startup.
The created user may belong to some domain, but please note that in this case you have to add this user to the CHARON-GRP
,manually as described in this article and then reboot the CHARON host.
© Stromasys, 2017
10 / 375

Document number: 60-16-033-006
Select , or all products, by checking the corresponding box. the CHARON-AXP product Select the "Display components page" to include the products
components page if you need it. Typically it is not required.
Press the "Next" button.
s may be highlighted with a red color. This indicates that the CHARON host configuration does not meetThe CHARON product
CHARON minimal requirements. To see what requirements are not met, point the mouse cursor on that product and a pop-up box with details
will appear.
© Stromasys, 2017
11 / 375

Document number: 60-16-033-006
Read the license, check "Agree" and press the "Next" button.
© Stromasys, 2017
12 / 375

Document number: 60-16-033-006
If the "Display components page" option was selected, the setup procedure will display a dialog for the CHARON-AXP product components:
It is strongly recommended to leave the selection as it is unless you clearly understand what the impact is if you uncheck some modules.
© Stromasys, 2017
13 / 375

Document number: 60-16-033-006
Select a directory to be used for the CHARON installation or use the default. The path can either be entered manually or selected using the "Browse"
button.
© Stromasys, 2017
14 / 375

Document number: 60-16-033-006
Once done, press the "Next" button to start the installation of the selected components.
© Stromasys, 2017
15 / 375

Document number: 60-16-033-006
During the CHARON installation procedure, you will have to confirm the installation of the CHARON-specific network driver. Press the "Install" button:
Once the installation is done, the following dialog will be displayed:
It is strongly recommended to reboot the CHARON host system immediately: leave the "Reboot computer now" box checked and press the "Finish"
button.
Once the host system is up again, you will notice a new shortcut, "CHARON Virtual Machines Manager", created on the desktop during the installation
procedure:
© Stromasys, 2017
16 / 375

Document number: 60-16-033-006
The CHARON Virtual Machines Manager is an essential utility for CHARON management. CHARON installation always keeps most up-to-date version of
CHARON Virtual Machines Manager provided by all the installed kits.
The CHARON installation procedure creates the following simple structure under the "Start" menu:
Back to Table of Contents
© Stromasys, 2017
17 / 375

Document number: 60-16-033-006
CHARON-AXP home directory
By default CHARON-AXP is installed in the "C:\Program Files\CHARON" directory. It has the following sub-directories:
Directory Description
Build_XXX\x64 Contains product executables and libraries
Drivers Contains the CHARON drivers
InstallShell Contains the CHARON installation procedure executables
Logs Contains the CHARON installation log
Redistributables Contains the redistributables needed for CHARON running (already installed)
Virtual Machines Manager Contains the most up-to-date version of CHARON Virtual Machines Manager
Virtual Machine Templates Contains templates for creating CHARON Virtual Machines
Virtual Machines Contains the CHARON Virtual Machines
Virtual Disk Images Contains the CHARON virtual disk images, for example "idle_vms_pkg_v3.0"
The " " directory contains template configuration files to build CHARON virtual machines using Virtual Machine Templates the CHARON Virtual Machines
. We will focus our attention on this subject in the next chapter.Manager
Back to Table of Contents
License installation
Regular HASP USB dongle
If the CHARON license is stored on a regular USB dongle, just connect it to a host USB port.
Network HASP USB dongle
If the CHARON license is a network license (red USB dongle), it is possible either to connect it to the host USB port (to use it locally and provide it to other
hosts on the local network at the same time) or to install it on a local network "license server" for remote access from this particular host.
If a remote license server is to be used:
Copy the file " " from the CHARON distribution to any directory on thehasp_install\Sentinel_LDK_Run-time_cmd_line_ .zipX.XX
server, for example " ".C:\Temp
Extract the contents of this archive to the same directory.
Login as " " on the server and open " " from the "Start" menu.Administrator cmd.exe
Switch to that directory.
Install the extracted file:
Example:
...> cd c:\temp
> c:\temp haspdinst.exe -fr -kp -nomsg
> c:\temp haspdinst.exe -install -cm
Connect the network HASP dongle to the server USB port.
If the CHARON host is accessed remotely, please note that the contents of a regular HASP license cannot be displayed using RDP. ILO or
iDRAC, some other console-capable program must be used.
Network HASP (red dongles) licenses have no restrictions with respect to remote access.
© Stromasys, 2017
18 / 375

Document number: 60-16-033-006
1.
Software license
If the CHARON license is a software license (SL), it is installed on the host using the following procedure:
Double click the "CHARON Virtual Machines Manager" icon on the desktop or select this utility in the tray menu; select the "Host Information and
Utilities" section and press the "License Update Tool" button:
© Stromasys, 2017
19 / 375

Document number: 60-16-033-006
2.
:The following default dialog window will appear
Ensure no license dongle is connected, select the "Installation of new protection key" radio-box and press the "Collect Information" button. The
following window will appear:
If you're installing a "Provisional" (demo) license, jump to step 5
© Stromasys, 2017
20 / 375

Document number: 60-16-033-006
3.
4.
5.
6.
Specify the directory and name of the system "fingerprint" file to be created the press the "Save" button.
The " " will save the fingerprint file under the given name and will report the status:License Update Service
Send the resulting file to STROMASYS. In return STROMASYS will provide you with a ".v2c" file, for example "Your License.v2c".
Copy the received v2c file to the CHARON host in a folder of your choice and select the "Apply License File" tab:
Press the "..." button and browse for the received v2c file.
Example:
© Stromasys, 2017
21 / 375

Document number: 60-16-033-006
7.
8.
Press the "Open" button to apply the license.
From the "CHARON Virtual Machines Manager" utility (see above) select the "Host Information and Utilities" section and press the "Sentinel
Admin Control Center" button or (optionally) invoke the system default web browser and enter the URL to display the "http://localhost:1947 Senti
" ( ) web interface. This interface allows you to view and manage the CHARON licenses.nel Admin Control Center ACC
Ensure that the software license is now visible in the " " section of the .Sentinel Keys ACC
Software licenses are always network licenses. Hence, they have no restrictions with respect to being displayed or accessed via a remote
connection.
© Stromasys, 2017
22 / 375

Document number: 60-16-033-006
Back to Table of Contents
License validity verification
Check the CHARON license validity by invoking the " " utility to make sure that the CHARON license is visible and is correct. Charon License Details Doubl
e click the "CHARON Virtual Machines Manager" icon on the desktop or select this utility in the tray menu; select the "Host Information and Utilities"
section and press the "HASP License Details" button:
© Stromasys, 2017
23 / 375

Document number: 60-16-033-006
Verify the the license content is displayed correctly and no error message is shown
Verify the content of the license looks correct. Check for example the license number, the major and minor versions, the minimum and maximum
build numbers, the CHARON-AXP products and allowed hardware (CHARON-AXP models). More details on the license content can be found in
the of this Guide.CHARON-AXP Licensing chapter
© Stromasys, 2017
24 / 375

Document number: 60-16-033-006
1.
2.
3.
Troubleshooting
If the CHARON license content cannot be displayed by the " " utility or is incorrect, check that the license is available andCHARON License Details
correctly used:
From the "CHARON Virtual Machines Manager" utility (see above) select the "Host Information and Utilities" section and press the "Sentinel
Admin Control Center" button or (optionally) invoke the system default web browser and enter the URL to display the "http://localhost:1947 Senti
" ( ) web interface.nel Admin Control Center ACC
Click on the " " link to open up the " " pageSentinel Keys Sentinel Keys Section
Make sure that one and only one CHARON HASP or SL license is present.
Problem Action
No license is displayed Make sure that all the recommendations above about remote access to the host are fulfilled (if remote access takes
place) and the HASP USB key is not broken and its LED indicator is lit (meaning that it is used by the host).
Only one License key / SL is
seen and its content is
incorrect
Contact STROMASYS to request a new license update.
Several License keys / SLs are
displayed
Remove all of them except the one provided by STROMASYS for the installed version of CHARON.
Removing licenses can be done by physical disconnection of the corresponding USB HASP keys from the CHARON host and physical disconnection of
the network HASP keys from all hosts on a local network (or by disabling remote access to network licenses from the CHARON host - see detailed
explanation below).
Software licenses can also be uninstalled using the method, described in the " " chapter of this GuideRemoving CHARON-AXP Software Licenses
It is also possible to disable access to network licenses if only a local license is to be used: open the Sentinel ACC and click on the " " link toConfiguration
open up the " " page.Configuration for Sentinel Manager
Uncheck the " " and the " " checkboxes from the "Allow Access to Remote Licenses Broadcast Search for Remote Licenses Access to Remote
" tab then press the " " button to apply changes.License Managers Submit
Back to Table of Contents
It is possible to have several licenses available to CHARON-AXP at the same time. In this case you have to specify in the CHARON-AXP
configuration file the license key ids to be used.
Example:
set session license_key_id[0]=1877752571
It is also possible to have one "main" and one "backup" license in case the main license becomes unavailable:
set session license_key_id[0]=1877752571 license_key_id[1]=354850588
CHARON-AXP checks its licenses from time to time starting with the main license. If it is not available, it attempts to access the backup license.
© Stromasys, 2017
25 / 375

Document number: 60-16-033-006
Network configuration
If the CHARON virtual machine needs access to the network, one or more dedicated network interfaces cleared from any other protocols including TCP/IP
will have to be defined.
Configuring the network is done with the " " (NCC) utility. Network Control Center Double click the "CHARON Virtual Machines Manager" icon on the
desktop or select this utility in the tray menu; select the "Host Information and Utilities" section and press the "Network Control Center" button:
In the appearing dialog, select " ":Configure NIC
© Stromasys, 2017
26 / 375

Document number: 60-16-033-006
he following dialog will appear:Press the "Next" button, t
© Stromasys, 2017
27 / 375

Document number: 60-16-033-006
Select the interface to be dedicated to CHARON (in our example it is Realtek PCIe GBE Family Controller named "Charon") and press the "Dedicate
adapter to CHARON" button.
CHARON supports VLAN adapters. If you are going to use them, proceed with their installation and configuration according to the network
adapter vendor User's Guide and then select the VLAN interface in the dialog shown above, the same as you would for a regular network
interface. There is no difference in configuring a regular network adapter and a VLAN one, so all the provided instructions are fully applicable for
VLAN adapters as well.
© Stromasys, 2017
28 / 375

Document number: 60-16-033-006
After a few seconds the chosen interface will be assigned to CHARON:
It is possible to release the interface back to the CHARON host by selecting the target interface and pressing the "Release adapter to HOST" button.
© Stromasys, 2017
29 / 375

Document number: 60-16-033-006
displays the text to be included in the CHARON configuration file for the interface dedicated to CHARON. Select the target interface andThe next step
press the "Next" button. The following dialog will appear:
Selecting the target emulated network interface displays the configuration lines specific for the selected CHARON host network interface. Press the "Copy
suggestions to clipboard" button to copy the suggested configuration lines. They can be pasted into the CHARON-AXP configuration file during the next
editing session by pressing "Ctrl-V".
Press the "Cancel" button to exit from the " " utility.Network Control Center
© Stromasys, 2017
30 / 375

Document number: 60-16-033-006
Restart the "Network Control Center" utility again and select "Disable TCP chimney offload for CHARON":
Press the "Next" button to apply the "offload" parameters settings.
Press the "Cancel" button to exit from the "Network Control Center" utility.
When the NIC properties are configured in Windows, a reboot of the CHARON host is required for the changes, specifically "offload" parameters, to
take effect.
Back to Table of Contents
© Stromasys, 2017
31 / 375

Document number: 60-16-033-006
1.
2.
3.
4.
After installation
If you plan to use the local system administrator acount ("Administrator") or the CHARON-AXP user having administrative privileges, no other actions are
required.
Otherwise it is possible to use a standard account (both local and domain) for running CHARON-AXP:
Login as the local system administrator ("Administrator") on the host system.
Create a special user for running CHARON-AXP. This user must have standard privileges. Please consult with your Windows User's Guide on
details.
Add this user to the CHARON-GRP group as it is described in this article and then reboot CHARON host.
Login as the created user.
Back to Table of Contents
If the CHARON-AXP user belongs to some domain, you have to add this user to the CHARON-GRP group as described in and thenthis article
reboot the CHARON host.
© Stromasys, 2017
32 / 375

Document number: 60-16-033-006
Running and managing CHARON-AXP for Windows
Table of Contents
Starting CHARON Virtual Machines Manager
Creating a CHARON Virtual Machine
Creating a CHARON VM using provided templates
Creating a CHARON VM using an existing configuration file
Running a CHARON Virtual Machine
Stopping a CHARON Virtual Machine
Removing a CHARON Virtual Machine
Modifying a CHARON Virtual Machine
Exploring CHARON Virtual Machine Home Directory
Making a new virtual disk
CHARON Virtual Machine configuration file
CHARON Virtual Machine startup mode
CHARON version to be used for CHARON VM
Service functions
Running CHARON utilities
Starting CHARON Virtual Machines Manager
CHARON execution is controlled by the "CHARON Virtual Machines Manager" that manages each CHARON instance, called a "CHARON Virtual
Machine", running on the host.
The CHARON installation procedure creates a shortcut on the desktop for the CHARON Virtual Machines Manager.and under the Windows Start menu
Desktop shortcut:
"Start" menu shortcut:
The CHARON Virtual Machines Manager runs automatically at Windows startup. If it is minimized to tray, it can be re-opened in the following way:
© Stromasys, 2017
33 / 375

Document number: 60-16-033-006
After clicking the shortcuts, the main dialog of CHARON Virtual Machines Manager appears.
Back to Table of Contents
Creating a CHARON Virtual Machine
Creating a CHARON VM using provided templates
CHARON installation contains a set of template files for creating a base configuration for each AXP model. Once the CHARON Virtual Machine (VM) is
created using these templates it can be configured further to meet your requirements and all the specifics of the emulated system.
Start the CHARON Virtual Machines Manager (see above) and press the "Create VM from Template" button:
In the appearing dialog select the Alpha hardware model:
By default the CHARON templates do not contain any specification for disks and network; you need to update the configuration file created from
the template to specify your specific disk and network configuration.
© Stromasys, 2017
34 / 375

Document number: 60-16-033-006
Note the Home Directory for the VM (see screenshot below), it will be used by default for storing logs, virtual disk images, toy and container files if no path
is specified . in the configuration file
Specify a name for the VM and press the "Create" button:
The CHARON Virtual Machines Manager will report the VM has been created successfully:
© Stromasys, 2017
35 / 375

Document number: 60-16-033-006
It will then appear in the left pane:
Back to Table of Contents
Creating a CHARON VM using an existing configuration file
It is also possible to use an existing configuration file for creating a CHARON Virtual Machine.
Open the CHARON Virtual Machines Manager (see above) and press the "Add Existing VM" button:
© Stromasys, 2017
36 / 375

Document number: 60-16-033-006
In the appearing dialog select the target configuration file by pressing the "Browse" button:
Select the configuration file and press the "Open" button:
© Stromasys, 2017
37 / 375

Document number: 60-16-033-006
Enter the CHARON Virtual Machine name and note the Home Directory for this VM, it will be used by default for storing logs, virtual disk images, toy and
container files if no path is specified in the configuration file.
Press the "Create" button:
The CHARON Virtual Machines Manager will report the VM has been created successfully:
© Stromasys, 2017
38 / 375

Document number: 60-16-033-006
It will then appear in the left pane:
Back to Table of Contents
Running a CHARON Virtual Machine
Select the target CHARON VM in the left pane and press the "Start" button:
:CHARON Virtual Machines Manager will display the execution log
© Stromasys, 2017
39 / 375

Document number: 60-16-033-006
Note the color meaning:
Colors Meaning Example
Red Error This is an error message
Light blue Warning This is a warning message
Light yellow Information This is an informational message
Purple Begin/End
of the Windows
system log
Begin / End
The console of this particular CHARON VM will then appear (if defined in the configuration file):
© Stromasys, 2017
40 / 375

Document number: 60-16-033-006
Depending on settings, Windows may display a Firewall warning dialog asking to confirm CHARON access to different networks.
Check the desired options and press the "Allow access" button.
Back to Table of Contents
If you closed the CHARON VM console, it is always possible to re-open it by pressing the "Show Console" button:
Closing the console will not stop the CHARON Virtual Machine
© Stromasys, 2017
41 / 375
Document number: 60-16-033-006
Stopping a CHARON Virtual Machine
Note: before stopping the virtual machine from the , a clean shutdown of the operating system running on the VMCHARON Virtual Machines Manager
has to be performed.
Select the target CHARON VM in the left pane and press the "Stop" button. A dialog will appear to confirm, select "Yes" to continue to stop the VM:
Back to Table of Contents
Removing a CHARON Virtual Machine
To remove a CHARON VM, select it and pressing the "Remove VM" button:
© Stromasys, 2017
42 / 375

Document number: 60-16-033-006
The Virtual machine has to be stopped before removing it (see chapter above)Stopping a CHARON Virtual Machine
A confirmation dialog will be displayed:
Press the "Remove" button and confirm the CHARON VM removal by pressing the "Yes" button:
© Stromasys, 2017
43 / 375

Document number: 60-16-033-006
Back to Table of Contents
Modifying a CHARON Virtual Machine
Select the target CHARON VM and switch to the "VM Configuration" tab to see its features:
Using this dialog it is possible to:
Explore the Home Directory of the CHARON VM.
Create virtual disks by pressing the "Create Virtual Disks" button.
Edit the CHARON VM configuration file.
Change the startup mode.
Select the CHARON version used for this Virtual Machine.
Back to Table of Contents
Exploring CHARON Virtual Machine Home Directory
Press the "Explore" button to open up a Windows Explorer window showing the content of the selected CHARON VM home folder:
This content includes the CHARON VM configuration file and may also include virtual disks and tapes images, logs, ROM files, etc.
Back to Table of Contents
© Stromasys, 2017
44 / 375

Document number: 60-16-033-006
Making a new virtual disk
It is very convenient to use the "Create Virtual Disk" button to create empty disk images in the CHARON VM Home Directory:
The MkDisk utility will be called for this operation:
Refer to the " " section of this User's Guide for more information about the utility.Utilities MkDisk
Back to Table of Contents
CHARON Virtual Machine configuration file
Press the "Edit Configuration file" button:
© Stromasys, 2017
45 / 375

Document number: 60-16-033-006
Alternatively it is possible to select the target CHARON VM and press the "Edit Configuration" button:
The configuration file specifies all the settings of the CHARON VM. This will be discussed in the next chapter.
Back to Table of Contents
CHARON Virtual Machine startup mode
By default, the CHARON VM startup mode is set to "Manual" meaning a user has to start the CHARON VM manually using the CHARON Virtual
Machines Manager after a host reboot. If the CHARON VM has to start automatically, select the "Automatic" option.
Setting the mode to "Automatic" will only start the CHARON VM, it will not boot the operating system. This part will be discussed in the next chapter.
Select the CHARON VM startup behavior in the "Startup type" drop down list:
Back to Table of Contents
© Stromasys, 2017
46 / 375

Document number: 60-16-033-006
CHARON version to be used for CHARON VM
The CHARON installation procedure allows several versions of CHARON to be installed on the host at the same time (V4.8 and later only). This option
can be used for testing.
If a patch has been applied to a specific version, only the patched version will appear, not the vanilla one. If you need to rollback to a vanilla version,
please uninstall the patch according to the documentation provided with the patch.
Select the target CHARON version from the "Executable" drop-down list and press the "Apply" button:
Back to Table of Contents
© Stromasys, 2017
47 / 375

Document number: 60-16-033-006
Service functions
Additional functionalities are available and described below:
Function Description
Update
Log
The CHARON Virtual Machines Manager updates the displayed log every 5 minutes by default. It can be changed in the "Settings"
dialog of the program system menu.
Right click on top of the CHARON Virtual Machines Manager window and select "Settings":
In the appearing dialog you can change the interval:
If it is required to see most up-to-date version of the log, press the "Update Log" button.
Display
Log
Available from the VM control tab, bottom right.
Creates a separate window containing the selected CHARON VM log
Show
Console
Available from the VM control tab, bottom right, and if the VM is running.
Opens the selected CHARON VM console if it has been closed
© Stromasys, 2017
48 / 375

Document number: 60-16-033-006
Running CHARON utilities
Select the "Host Information & Utilities" tab to get a quick access to the CHARON utilities:
These utilities are described below:
Button
Description
Sentinel Admin Control Center Used to view CHARON licenses and manage them.
HASP License Details Used to display the CHARON license content.
License Update Tool Used to manage the CHARON licenses, collect the host system fingerprint.
Network Control Center Used to configure the CHARON network.
Device Check tool Used to review the system resources that can be mapped to CHARON.
Virtual Disk Tool GUI-based utility used to custom or standard CHARON virtual disk containers.create
Back to Table of Contents
© Stromasys, 2017
49 / 375

Document number: 60-16-033-006
CHARON-AXP for Windows configuration
Table of Contents
Creation of CHARON VM configuration
HP Alpha model specification
Configuration name
Log file parameters
Rotating log (default)
Single log
CPU affinity
Number of host CPUs dedicated to CHARON I/O
Setting a specific HP Alpha model
Reducing number of emulated CPUs
Setting system serial number
TOY and ROM containers
Emulated memory (RAM) size
Console
Mapping to system resources
Exit on pressing F6 button
Improve granularity of emulated timer
ATAPI CD/DVD-ROM configuration
Networking
Disk/tape subsystem
KZPBA PCI SCSI disk/tape controller
KGPSA-CA PCI FC disk controller
KGPSA-CA mapping to the host resources
KGPSA-CA mapping to a storage controller using its "presentation" mode
KGPSA-CA pass through mode
FDDI support via DEFPA PCI FDDI controller in "pass through" mode
Serial lines support via emulated PBXDA-xx family PCI controllers in "pass through" mode
Auto boot
Creation of CHARON VM configuration
When a CHARON Virtual Machine (VM) is created from a template using the CHARON Virtual Machines Manager, it has to be updated to meet the
desired configuration.
This configuration is represented as a text file ("configuration file") containing some specific keywords to define the main settings such as amount of
memory, number of CPUs, peripheral devices as well as specifics of CHARON VM executions such as name of VM log file, number of host CPUs used for
emulation, etc.
To change the configuration file, open the CHARON Virtual Machines Manager from its shortcut on Desktop / Start menu or from the tray menu item,
select the target CHARON VM and press the "Edit Configuration" button:
© Stromasys, 2017
50 / 375

Document number: 60-16-033-006
Notepad will be used to edit the configuration file:
© Stromasys, 2017
51 / 375

Document number: 60-16-033-006
Back to Table of Contents
HP Alpha model specification
The first configuration statement is the specification of the exact HP Alpha hardware model to emulate, for example:
set session hw_model = AlphaServer_ES40
You must leave this line untouched.
If you create the CHARON VM configuration file from scratch, it must be the very first uncommented line in the configuration file.
Back to Table of Contents
Configuration name
The next configuration statement is the "Configuration name" option:
#set session configuration_name = My_ES40
You can optionally uncomment this line to differentiate this in a multi-instance environment. The configuration name can beCHARON VM from all others
© Stromasys, 2017
52 / 375

Document number: 60-16-033-006
any label that is meaningful.
It is possible to specify a configuration name containing spaces, in this case use quotation marks:
set session configuration_name = "My ES40"
The configuration name is reported in the log file and is used to set the log file name for rotating log (see further: ).Rotating log (default)
Back to Table of Contents
Log file parameters
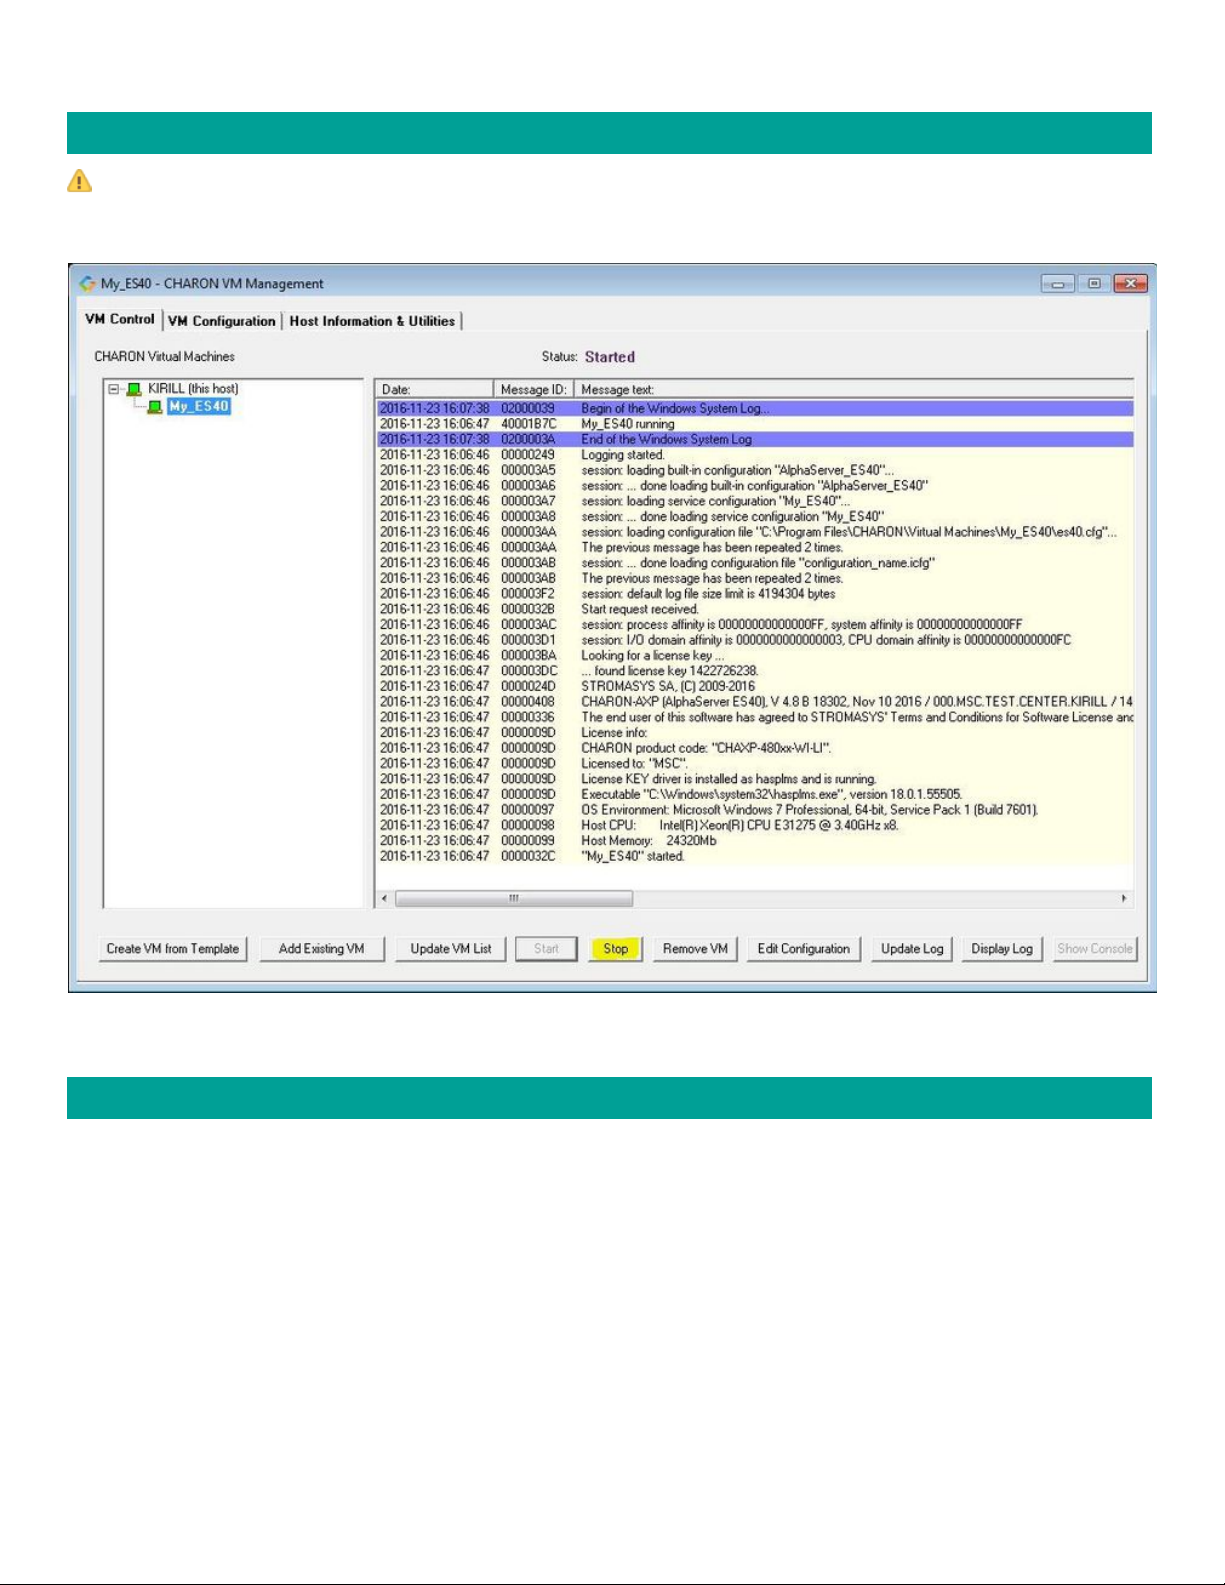
The execution of a CHARON VM creates one log file or a set of log files reflecting the progress of its start-up and ongoing operations: start and end time
of execution, system information, license and configuration details, warnings, reports on problems that may occur, etc. In case of problems with either the
running CHARON VM or the emulated system configuration (such as the absence or malfunction of certain devices), the log file is the primary source to
be analyzed for troubleshooting.
If it becomes necessary to contact Stromasys for support, the configuration and log files, plus the license number, will be requested to begin the
problem resolution.
Here is an example of a CHARON VM log file:
20160906:123954:INFO :0:00000249:ethane.cxx(8343): Logging started.
20160906:123954:INFO :0:000003A5:ethane.cxx(9414): session: loading built-in configuration
"AlphaServer_ES40"...
20160906:123954:INFO :0:000003A6:ethane.cxx(9446): session: ... done loading built-in configuration
"AlphaServer_ES40"
20160906:123954:INFO :0:000003A7:ethane.cxx(9604): session: loading service configuration "My_ES40"...
20160906:123954:INFO :0:000003A8:ethane.cxx(9639): session: ... done loading service configuration "My_ES40"
20160906:123954:INFO :0:000003AA:ethane.cxx(9687): session: loading configuration file "C:\Program
Files\CHARON\Virtual Machines\My_ES40\My_ES40\es40.cfg"...
The previous message has been repeated 2 times.
20160906:123954:INFO :0:000003AB:ethane.cxx( 540): session: ... done loading configuration file
"configuration_name.icfg"
The previous message has been repeated 2 times.
20160906:123954:INFO :0:000003F2:sesmgr.cxx(1394): session: default log file size limit is 4194304 bytes
20160906:123954:INFO :0:0000032B:ethane.cxx(2581): Start request received.
20160906:123954:INFO :0:000003AC:ethane.cxx( 739): session: process affinity is 00000000000000FF, system
affinity is 00000000000000FF
20160906:123954:INFO :0:000003D1:ethane.cxx(1397): session: I/O domain affinity is 0000000000000003, CPU domain
affinity is 00000000000000FC
20160906:123954:INFO :0:000003BA:ll_sentine( 730): Looking for a license key ...
20160906:123954:INFO :0:000003DC:ll_sentine( 825): ... found license key 1422726238.
20160906:123954:INFO :0:0000024D:ethane.cxx(2712): STROMASYS SA, (C) 2009-2016
20160906:123954:INFO :0:00000408:ethane.cxx(2754): CHARON-AXP (AlphaServer ES40), V 4.8 B 18302, Nov 11 21 2016
/ 000.MSC.TEST.CENTER.KIRILL / 1422726238
20160906:123954:INFO :0:00000336:ethane.cxx(2795): The end user of this software has agreed to STROMASYS' Terms
and Conditions for Software License and Limited Warranty, as described at: http://www.stromasys.com/pub/doc/30-
17-033.pdf
20160906:123954:INFO :0:0000009D:ethane.cxx(2859): License info:
CHARON product code: "CHAXP-480xx-WI-LI".
Licensed to: "MSC".
License KEY driver is installed as hasplms and is running.
Executable "C:\Windows\system32\hasplms.exe", version 18.0.1.55505.
20160906:123954:INFO :0:00000097:ethane.cxx(2868): OS Environment: Microsoft Windows 7 Professional, 64-bit,
Service Pack 1 (Build 7601).
20160906:123954:INFO :0:00000098:ethane.cxx(2873): Host CPU: Intel(R) Xeon(R) CPU E31275 @ 3.40GHz x8.
20160906:123954:INFO :0:00000099:ethane.cxx(2878): Host Memory: 24320Mb
20160906:123955:INFO :0:0000032C:ethane.cxx(2617): "My_ES40" started.
The next group of parameters defines the name of the CHARON VM log file and how the CHARON VM will use it:
set session log_method = append
#set session log_method = overwrite
#set session log = "AlphaServer_ES40.log"
© Stromasys, 2017
53 / 375

Document number: 60-16-033-006
Rotating log (default)
By default the CHARON VM utilizes a so-called "rotating log" method. This means that a new default log file is always created each time the CHARON
VM starts and if the size of the log file exceeds 64Kb (previous log files are kept).
This mode is turned on if all the log parameters above are disabled (commented out) or the "session_log" parameter is pointing to a directory rather than
to a file. If a directory is specified, the log files will be created in that directory.
The names of the rotating log files are composed as follows:
configuration_name-YYYY-MM-DD-hh-mm-ss-xxxxxxxxx.log
If the "Configuration name" parameter described before is omitted (commented out), the log name has the following format instead:
-YYYY-MM-DD-hh-mm-ss-xxxxxxxxx.loghw_model
Note that "xxxxxxxxx" is an increasing decimal number starting from "000000000" to separate log files with the same time of creation.
The "log" parameter, if specified, must correspond to an existing folder.
If the path is not specified, the log file is created in the "Home directory" mentioned in the VM Configuration tab of the CHARON Virtual Machine
.Manager
Single log
Alternatively it is possible to use a single log file. Uncomment the "set session log" line and specify the desired log file name. Optionally, a path can be
added to the log file name.
If the path is not specified, the log file is created in the "Home directory" mentioned in the VM Configuration tab of the CHARON Virtual Machine
.Manager
The log file can be extended specifying "log_method = append" (*recommended for reporting issues*) or overwritten, specifying "log_method = overwrite".
Below is a specification of a CHARON VM log file located in the " " directory which will be appended each time the CHARON VM starts:C:\CHARON logs
set session log_method = append
set session log = "C:\CHARON logs\my_ES40.log"
Back to Table of Contents
CPU affinity
This setting binds the running CHARON VM CPUs to particular host CPUs.This should be used for soft partitioning host CPU resources or for isolating
multiple CHARON VMs on the same host from each other. By default the emulator instance allocates as many host CPUs as possible.
“Affinity” overrides the default and allows explicit specification of which host CPUs will be used by the instance. Affinity does not reserve the CPU for
exclusive use.
set session affinity="0, 1, 2, 3"
The example above directs CHARON VM to use CPU 0,1,2 and 3.
If this parameter is omitted CHARON host will allocate available CPUs automatically.
Note that the number of the specified host CPUs must correspond to the number of the emulated CPUs (one host CPU for one emulated CPU; this
value is specific for each HP Alpha model) and number of CPUs needed for CHARON application itself ("n_of_io_cpus").
Back to Table of Contents
Number of host CPUs dedicated to CHARON I/O
This setting reserves host CPUs (of those specified by “affinity” parameter, if any) for use by CHARON VM for I/O handling. By default reserCHARON VM
ves one third of available host CPUs for I/O processing (round down, at least one).
© Stromasys, 2017
54 / 375

Document number: 60-16-033-006
The “n_of_io_cpus” overrides the default by specifying the number of I/O host CPUs explicitly
:Example
set session n_of_io_cpus=2
The example above directs CHARON VM to use 2 CPUs for CHARON I/O operations.
Note that the number of the specified CPUs dedicated to CHARON VM I/O operations must correspond to the total number of available for CHARON
CPUs (restricted by "affinity" parameter if needed) and the number of the virtual HP Alpha CPUs to be emulated.
Back to Table of Contents
Setting a specific HP Alpha model
CHARON-AXP allows to specify an exact model of HP Alpha.
For example for HP AlphaServer ES40 family the template configuration file contains the following options:
#============================================================================
#
# AlphaServer ES40 6/500
#
#----------------------------------------------------------------------------
#set ace cpu_architecture = EV6
#set rom dsrdb[0] = 1816 system_name = "AlphaServer ES40 6/500"
#set rom version[1] = 1.98-4 version[2] = 1.92-5
#============================================================================
#
# AlphaServer ES40 6/667
#
#----------------------------------------------------------------------------
set ace cpu_architecture = EV67
set rom dsrdb[0] = 1820 system_name = "AlphaServer ES40 6/667"
Just uncomment the provided lines to apply a certain model (It is "AlphaServer ES40 6/667" in the example above).
The full description of the parameters and other models that can be also configured is available in the " " chapter of this User's Guide.Configuration details
Back to Table of Contents
Reducing number of emulated CPUs
If the CHARON host does not contain enough CPUs to emulate full range of the CPUs provided by a certain HP Alpha model, it is possible to direct the
CHARON VM to reduce the number of emulated Alpha CPUs:
set session n_of_cpus=1
Back to Table of Contents
Setting system serial number
If necessary, a specific system serial number instead of the default one:
set rom system_serial_number = SN01234567
Back to Table of Contents
© Stromasys, 2017
55 / 375

Document number: 60-16-033-006
TOY and ROM containers
The TOY and ROM containers have to be configured. Their presence depends on the HP Alpha model. It is always recommended to enable them. If a
container file of the given name does not exist, starting the CHARON VM will create it.
TOY means "Time of Year". Its container records time, date and some console parameters while the CHARON VM is not running. It is highly
recommended to define and activate this container:
set toy container="clipper.dat"
The ROM container stores an intermediate state of the Flash ROM and some console parameters. It is highly recommended to define and activate this
container:
set rom container="clipper.bin"
© Stromasys, 2017
56 / 375

Document number: 60-16-033-006
Back to Table of Contents
Emulated memory (RAM) size
The next parameter defines the amount of host memory the CHARON VM reserves for the emulation:
#set ram size=4096
set ram size=32768
The amount of RAM is specified in MB. It cannot exceed or be lower than certain values specific for each HP Alpha model. It is very important to keep the
listed predefined increment between possible memory values.
The following table shows all the parameters:
Hardware Model RAM size (in MB)
Min Max Default Increment
AlphaServer 400 64 1024 512 64
AlphaServer 800 256 8192 512 256
AlphaServer 1000 256 1024 512 256
AlphaServer 1000A 256 1024 512 256
AlphaServer 1200 256 32768 512 256
AlphaServer 2000 64 2048 512 64
AlphaServer 2100 64 2048 512 64
AlphaServer 4000 64 32768 512 64
AlphaServer 4100 64 32768 512 64
AlphaServer DS10 64 32768 512 64
AlphaServer DS10L 64 32768 512 64
AlphaServer DS15 64 32768 512 64
AlphaServer DS20 64 32768 512 64
AlphaServer DS25 64 32768 512 64
AlphaServer ES40 64 32768 512 64
AlphaServer ES45 64 32768 512 64
AlphaServer GS80 256 65536 512 256
AlphaServer GS160 512 131072 512 512
AlphaServer GS320 1024 262144 1024 1024
It is possible to leave the RAM line commented out. In this case the model's default RAM amount is used.
Note that in some particular orders your license may restrict the maximum RAM amount of each HP Alpha model.
Back to Table of Contents
© Stromasys, 2017
57 / 375

Document number: 60-16-033-006
Console
Mapping to system resources
The next step is the specification of the HP Alpha console (OPA0) serial line:
#load physical_serial_line OPA0 line="COM1:"
#load virtual_serial_line OPA0 port=10003
#load virtual_serial_line OPA0 port=10003 application="opa0.ht"
load virtual_serial_line OPA0 port=10003 application="putty -load OPA0"
#load virtual_serial_line OPA0 port=10003 application="c:\kea\user\opa0.ktc
The goal of this configuration step is to tell the CHARON VM what host device to use as the virtual system console. The following options are available:
Option Description
physical_serial_line Mapping to host "\\.\COM<n>" ("COM<n>:") physical serial line.
virtual_serial_line Mapping to an IP port of CHARON host.
Using this mapping it is possible to connect to the CHARON VM console and disconnect from it at any time without usage of
. It is also possible to start up some chosen application to connect toCHARON Virtual Machines Manager "Show Console" option
the CHARON console IP port.
Parameter Description
port Specifies a unique IP port on the host to which the console will be mapped.CHARON VM
application A string specifying a name of an application to be started together with CHARON to provide emulation of HP
Alpha console (terminal emulator). It is assumed that this application has already been configured to use the IP
port specified by the corresponding "port" parameter
Example:
load virtual_serial_line/chserial OPA0 port=10003 application="putty.exe -load OPA0"
In the example above, the CHARON VM uses the IP port "10003" for the HP Alpha console and starts the "Putty" terminal
Ifemulator (included in the CHARON installation kit) with the "OPA0" saved session directing it to connect to the IP port "10003".
the terminal emulator is closed, it is always possible to reopen it with the "Show Console" feature from the CHARON Virtual
Machines Manager.
The default setting is:
load "virtual_serial_line/chserial OPA0 port=10003 application="putty.exe -load OPA0
The second console line "TTA0" can be also optionally configured (for 1 CPU models such as HP AlphaServer 400, HP AlphaServer 800, HP AlphaServer
1000, HP AlphaServer 1000A, HP AlphaServer DS10, HP AlphaServer DS10L and HP AlphaServer DS15):
#load physical_serial_line TTA0 line="COM1:"
#load virtual_serial_line TTA0 port=10003
#load virtual_serial_line TTA0 port=10003 application="tta0.ht"
load virtual_serial_line TTA0 port=10003 application="putty -load TTA0"
#load virtual_serial_line TTA0 port=10003 application="c:\kea\user\tta0.ktc"
set COM2 line=TTA0
Note that additional parameters for the CHARON VM serial lines configuration can be added. Follow for details.this link
© Stromasys, 2017
58 / 375

Document number: 60-16-033-006
1.
2.
Exit on pressing F6 button
Despite the fact that the CHARON VM can stop with the " " command entered at SRM console level, it is recommended to set a hot key topower off
stop the VM from the console (when the console is accessed remotely for example):
set OPA0 stop_on = F6
This line allows the CHARON VM to be stopped by pressing the " " key.F6
Back to Table of Contents
Improve granularity of emulated timer
The next configuration option can be applied for improving granularity of emulated CHARON-AXP timer:
#set isa clock_period=1000
Do not uncomment this parameter unless there are some problems with the system time or the system clock intervals in the guest OS.
Back to Table of Contents
ATAPI CD/DVD-ROM configuration
If the sample configuration file provides this parameter it is possible to map this particular CHARON VM emulator's "DQA0" CD-ROM to the host
CD/DVD-ROM with the following setting:
set ide container="\\.\CdRom0"
Back to Table of Contents
Networking
CHARON-AXP supports DE435, DE450, DE500AA, DE500BA, DE602 and virtual network adapters.DE602AA
All of them are configured in a similar way:
load DE500BA/dec21x4x EWA interface=EWA0
load packet_port/chnetwrk EWA0 interface="connection:Charon"
load EIA interface=EIA0DE602/i8255x
load packet_port/chnetwrk EIA0 interface="connection:Charon"
In the examples above the first line loads DE500BA/DE602 virtual adapter with a name "EWA"/"EIA" (note that "/i8255x" syntax must be used only with
DE602 and DE602AA adapters); the following line maps it to the host network interface having a name "Charon" ("connection" is a key word). Note that
the mapping is performed in 2 steps:
A mapping object "packet_port" with a name "EWA0"/"EIA0" is loaded and connected to the host interface named "Charon", so the CHARON VM
will use this interface for its networking
The loaded DE500BA/DE602 virtual adapter "EWA"/"EIA" is connected to the "packet_port" object "EWA0"/"EIA0".
It is possible to load several DE435, DE450, DE500AA, DE500BA or DE602 controllers. For example (for DE500BA):
load DE500BA/dec21x4x EWA interface=EWA0
load packet_port/chnetwrk EWA0 interface="connection:Charon1"
load DE500BA/dec21x4x EWB interface=EWB0
load packet_port/chnetwrk EWB0 interface="connection:Charon2"
© Stromasys, 2017
59 / 375

Document number: 60-16-033-006
Some network adapters available in CHARON-AXP are preloaded (for example, HP AlphaServer DS15 contains 2 preloaded adapters EWA and EWB),
so their configuration in CHARON VM is even more simple:
load packet_port/chnetwrk EWA0 interface = "connection:Charon"
Follow for more details of CHARON-AXP network controllers configuration.this link
Back to Table of Contents
Disk/tape subsystem
The disk and tapes subsystems and the mapping to the system resources can be done using the samples given in the template configuration files.
CHARON-AXP supports KZPBA and KGPSA-CA adapters.
KZPBA PCI SCSI disk/tape controller
Below is the typical configuration options for the KZPBA PCI SCSI disk/tape controller:
load KZPBA PKA scsi_id = 7
#set PKA container[0] = "<file-name>.vdisk"
#set PKA container[100]="\\.\PhysicalDrive0"
#set PKA container[101]="\\.\PhysicalDrive(DevID=XXX-XXXX-XXXX-XXXX-XXXX-XXXX-XXXX-XXXX)"
#set PKA container[102]="\\.\PhysicalDrive(iScsiTarget = <iSCSI target>, LUN = <LUN number>)"
#set PKA container[200]="\\.\ScsiN:X:Y:Z"
#set PKA container[300]="\\.\CdRom0"
#set PKA container[300]="\\.\CdRom<N>"
#set PKA container[400] = "<file-name>.iso"
#set PKA container[500]="\\.\Tape0"
#set PKA container[500]="\\.\Tape<N>"
#set PKA container[600] = "<file-name>.vtape"
#set PKA container[600]="\\.\A:"
#set PKA media_type[600]="RX23"
The first line ("load KZPBA PKA") loads a disk controller KZPBA with name "PKA", followed by 8 groups of lines showing different ways of mapping to the
host resources:
File representing a physical disk of the HP Alpha system (disk image)
"<file-name>.vdisk"
These files can be created from scratch with " " utility. Data and OS disks backups are transferred from the original system viaMkDisk
tapes or network and restored into these container files.
Mapping may also include the full path, for example: "C:\My disks\my_boot_disk.vdisk". If the path is not specified, the disk images are
expected to be in the CHARON VM home directory.
.
Physical disk
"\\.\PhysicalDrive<N>"
Be careful not to destroy all the information from the disk dedicated to CHARON VM by mistake.
These disks must not be formatted by the host OS.
.
Physical disk by its WWID
CHARON supports VLAN adapters. If used, proceed with their installation and configuration according to the network adapter vendor User's
Guide and then use the resulting VLAN interface the same way as the regular network interface.
Using compressed folders to store virtual disks and tapes is not supported
© Stromasys, 2017
60 / 375

Document number: 60-16-033-006
"\\.\PhysicalDrive(DevID =XXXX-XXXX-XXXX-XXXX-XXXX-XXXX-XXXX-XXXX)"
Be careful not to destroy all the information from the disk dedicated to CHARON VM by mistake.
These disks must not be formatted by the host OS.
DevID addresses the target physical disk by its WWID (hexadecimal 128-bit identifier assigned to the disk drive by its
manufacturer/originator).
Example:
set PKA container[100]="\\.\PhysicalDrive(DevID= 6008-05F3-0005-2950-BF8E-0B86-A0C7-0001)"
.
iSCSI disks
"\\.\PhysicalDrive(iScsiTarget = <iSCSI target>, LUN = <LUN number>)"
Parameter Description
iScsiTarget Addresses the disk by its iSCSI target name.
LUN Specifies the LUN on the connected iSCSI disk.
Example:
set PKA container[200]="\\.\PhysicalDrive(iScsiTarget= iqn.2008-04:iscsi.charon-target-test1, LUN= 1)"
.
SCSI device unknown to Windows for direct mapping, for example, a SCSI disk or tape reader
"\\.\Scsi<N>:<X>:<Y>:<Z>"
The values of N, X, Y and Z can be collected using special utility " " included in the CHARON distributive - or manuallyHost Device Check
by investigation of the devices connected to CHARON host in the "Device Manager" applet.
Parameter Description
N A logical number assigned by host operating system (Microsoft Windows) to logical or host’s physical storage resource
such as physical SCSI HBA
X An internal SCSI bus number (usually 0) on host’s physical SCSI HBA
Y A SCSI ID of physical SCSI target device attached to host’s physical SCSI HBA
Z A logical unit number inside physical SCSI target device attached to host’s physical SCSI HBA
.
CD-ROM device
"\\.\CdRom<N>"
.
ISO file for reading distribution CD-ROM image
"<file-name>.iso"
Mapping may also include the full path, for example: "C:\My disks\vms_distributive.iso". If the path is not specified, the CD-ROM images
are expected to be in the CHARON VM home directory.
.
Host tape device
"\\.\Tape<N>"
.
File representing the tape (tape image)
"<file-name>.vtape"
These files are created automatically.
Mapping may also include a full path, for example: "C:\My tapes\backup.vtape". If the path is not specified, the tape images are expected
to be in the CHARON VM home directory.
.
Floppy drive
"\\.\A:"
.
Other type of drive, for example magneto-optical drive
Using compressed folders to store virtual disks and tapes is not supported
© Stromasys, 2017
61 / 375

Document number: 60-16-033-006
"\\.\<N>:"
.
Additionally it is possible to specify a parameter "media_type" to assign the type of the attached media explicitly.
:Example
set PKA media_type[600]="RX23"
The numbers in the square brackets represent the SCSI addresses and LUNs associated with each container of the KZBPA controller. They have the
following structure:
, where[XXYY]
Parameter Range Description
XX 0...15 Stands for SCSI ID of each connected unit.
Note that the KZPBA itself has some ID associated with it. By default it is 7 but it can be changed in the following way:
load KZPBA PKA scsi_id = 0
In this example an instance "PKA" of KZPBA controller is assigned with SCSI ID 0.
YY 00...07 Stands for LUN.
It is possible to load several KZPBA controllers: DKB, DKC, etc. by configuring specific placement for them on the PCI bus. It is discussed in details in the
" " chapter of this Guide.Configuration details
Some HP Alpha systems emulated by CHARON-AXP have already one or two KZPBA controllers pre-loaded. If the system has only one preloaded
controller, the template configuration file usually provides some sample line on how to add another one. For example:
load KZPBA PKA bus=pci_1 device=1 function=0 irq_bus=isa irq=24
Follow for details on the KZPBA controllers configuration.this link
Back to Table of Contents
KGPSA-CA PCI FC disk controller
Optionally it is possible to configure KGPSA-CA FC disk controllers.
They can be configured in 3 modes:
Direct mapping to the host resources
Usage of "presentation mode" of connected or external storage controllers
Pass Through mode
Below is an example of a KGPSA-CA controller loading:
load KGPSA FGA
Optionally another KGPSA-CA adapter can be loaded in a similar way:
load KGPSA FGB
Follow for details on the KGPSA-CA controllers configuration.this link
Back to Table of Contents
© Stromasys, 2017
62 / 375

Document number: 60-16-033-006
KGPSA-CA mapping to the host resources
Below is the typical configuration options for a KGPSA-CA PCI FC disk controller, mapped to the host resources:
load KGPSA FGA
#set FGA container[0] = "<file-name>.vdisk"
#set FGA container[100]="\\.\PhysicalDrive0"
#set FGA container[200]="\\.\PhysicalDrive(DevID=XXX-XXXX-XXXX-XXXX-XXXX-XXXX-XXXX-XXXX)"
#set FGA container[300]="\\.\PhysicalDrive(iScsiTarget = <iSCSI target>, LUN = <LUN number>)"
The first line ("load KGPSA FGA") loads a disk controller KGPSA named "FGA" followed by 2 groups of lines showing different ways of mapping to the
host resources:
File representing a physical disk of the HP Alpha system (disk image)
"<file-name>.vdisk"
These files can be created from scratch with " " utility. Data and OS disks backups are transferred from the original system viaMkDisk
tapes or network and restored into these container files.
Mapping may also include the full path, for example: "C:\My disks\my_boot_disk.vdisk". If the path is not specified, the disk images are
expected to be in the CHARON VM home directory.
.
Physical disk
"\\.\PhysicalDriveN"
Be careful not to destroy all the information from the disk dedicated to CHARON VM by mistake.
These disks must not be formatted by the host OS.
.
Physical disk by its WWID
"\\.\PhysicalDrive(DevID =XXXX-XXXX-XXXX-XXXX-XXXX-XXXX-XXXX-XXXX)"
Be careful not to destroy all the information from the disk dedicated to CHARON VM by mistake.
These disks must not be formatted by the host OS.
DevID addresses the target physical disk by its WWID (hexadecimal 128-bit identifier assigned to the disk drive by its
manufacturer/originator).
Example:
set PKA container[100]="\\.\PhysicalDrive(DevID= 6008-05F3-0005-2950-BF8E-0B86-A0C7-0001)"
.
iSCSI disks
"\\.\PhysicalDrive(iScsiTarget = <iSCSI target>, LUN = <LUN number>)"
iScsiTarget addresses the disk by its iSCSI target name. LUN specifies LUN on the connected iSCSI disk.
Example:
set PKA container[200]="\\.\PhysicalDrive(iScsiTarget= iqn.2008-04:iscsi.charon-target-test1, LUN= 1)"
.
The numbers in the square brackets represent the KGPSA-CA units. They can be in the range of 0 to 32766 but no more than 255 units can be
configured on a single controller.
Back to Table of Contents
Using compressed folders to store virtual disks and tapes is not supported
© Stromasys, 2017
63 / 375

Document number: 60-16-033-006
KGPSA-CA mapping to a storage controller using its "presentation" mode
Some storage controllers allows CHARON VM to use their resources using so called "presentation" mode.
In this type of mapping the CHARON VM automatically creates a set of virtual FC devices for each of the units provided by the storage controller and
connects to them through its KGPSA-CA FC adapter.
The main benefit in this type of mapping is a flexible way of the virtual disks management depending on the mapped storage controller configuration. For
example if an extra disk is added to the storage controller, it automatically appears as a new disk unit on the corresponding KGPSA-CA virtual adapter
mapped to that storage controller.
Below is an example of KGPSA-CA PCI FC disk controller mapped to some storage controller (for example SAN) using its "presentation" mode:
load KGPSA FGA storage_controller_path_id = 5008-05F3-0005-2950-5008-05F3-0005-2951
This line loads an instance of KGPSA-CA controller and maps it to some external controller having ID "5008-05F3-0005-2950-5008-05F3-0005-2951".
Type of mapping Description
storage_controller_path_id
= <Storage controller path
ID>
"Storage controller path ID" is a storage (for example SAN) controller path ID.
This ID can be obtained from the special utility "Device check tool" (accessible in the "Host Information and Utilities"
. Once specified, all the disks attached to the storage are automaticallysection of the CHARON Virtual Machines Manager)
mapped as disk units to the CHARON VM.
Back to Table of Contents
© Stromasys, 2017
64 / 375

Document number: 60-16-033-006
1.
2.
3.
4.
KGPSA-CA pass through mode
It is also possible to use the emulated KGPSA-CA in "pass through" mode to address a physical EMULEX LightPulse PCI/PCI-X/PCIe FC adapter
plugged into the host’s PCI/PCI-X/PCIe slot.
The sample configuration file provides a template for this type of mapping:
#set FGA host_bus_location = "PCI bus X, device Y, function Z"
#set FGB host_bus_location = "PCI bus A, device B, function C"
The "host_bus_location" parameter addresses the host EMULEX LightPulse PCI/PCI-X/PCIe FC adapter in the following way:
Parameters Description
"PCI bus X" PCI bus number of the host EMULEX LightPulse PCI/PCI-X/PCIe FC adapter
"device Y" PCI bus device number of the host EMULEX LightPulse PCI/PCI-X/PCIe FC adapter
"function Z" The "function" parameter of the the host EMULEX LightPulse PCI/PCI-X/PCIe FC adapter
To establish "pass through" mode do the following:
Install the EMULEX LightPulse PCI/PCI-X/PCIe FC adapter (see below for a list of supported models) to some spare PCI/PCI-X/PCIe slot of the
host system
Boot a Windows operating system
Install the EMULEX LightPulse PCI/PCI-X/PCIe FC adapter driver from the following directory "C:\Program
Files\CHARON\Drivers\EMULEX_X.X.0.XXXXX" by choosing the "Install from a list or specific location (Advanced)" option and then selecting the
"emulex_lp_ppt_amd64.inf" file.
Reboot the host
Now it is possible to collect the parameters for CHARON VM mapping to the EMULEX LightPulse PCI/PCI-X/PCIe FC adapter.
© Stromasys, 2017
65 / 375

Document number: 60-16-033-006
Open the “Computer Management” application and select “Device Manager”:
© Stromasys, 2017
66 / 375

Document number: 60-16-033-006
On the right panel select the desired physical EMULEX LP FibreChannel adapter under "CHARON PCI Pass Through":
© Stromasys, 2017
67 / 375

Document number: 60-16-033-006
Open the properties sheet by double-clicking on the selected adapter:
The “Location:” on the above picture gives X, Y, and Z for the "host_bus_location" parameter. For example:
set FGA host_bus_location = "PCI bus 3, device 1, function 0"
Non-US-EN installations of Windows may present “Location:” string in local language, but "host_bus_location" parameter requires English notation, so
the words “PCI”, “bus”, “device”, and “function” must be specified in English.
The following is the list of EMULEX LightPulse PCI/PCI-X/PCIe FC adapters supported by the CHARON-AXP PCI Pass Through driver and suitable for
the emulation of a KGPSA-CA PCI FC adapter in CHARON PCI Pass Through mode:
Supported Not Supported Not tested
LP8000
LP9000
LP9002
LP9802
LP10000
LP10000DC
LP10000-S
LPX1000
LP11002
LPe11002 (FC2242SR, A8003A)
LPe1105
LPe1150 (FC2142SR, A8002A) LPe11000
Back to Table of Contents
© Stromasys, 2017
68 / 375

Document number: 60-16-033-006
1.
2.
3.
4.
FDDI support via DEFPA PCI FDDI controller in "pass through" mode
Optionally it is possible to configure a DEFPA PCI FDDI controller in "pass through" mode, mapped to a physical DEFPA FDDI adapter installed on the
host:
load defpa FDDI host_bus_location = "PCI bus X, device Y, function Z"
set FDDI bus=pci_1 device=1 function=0 irq=24 irq_bus=isa
Pay attention to the proper placement of the emulated DEFPA adapter on the virtual HP Alpha PCI bus (it is controlled by "bus", "device", "function", "irq"
and "irq_bus" parameters). Refer to of this Guide for more information.this chapter
The "host_bus_location" parameter addresses the host DEFPA FDDI adapter in the following way:
Parameters Description
"PCI bus X" PCI bus number of the host DEFPA FDDI adapter
"device Y" PCI bus device number of the host DEFPA adapterFDDI
"function Z" The "function" parameter of the the host DEFPA adapterFDDI
To establish the "pass through" mode do the following:
Install the DEFPA adapter to some spare PCI slot of the host system. FDDI
Note that PCIe and PCI-X are not supported by the .DEFPA FDDI adapter
Boot a Windows operating system
Install the DEFPA adapter driver from the following directory: "C:\Program Files\CHARON\Drivers\DEFPA_X.X.X.XXXXX" by choosing theFDDI
"Install from a list or specific location (Advanced)" option and then selecting the "defpa_ppt_amd64.inf" file.
Reboot the host
Now it is possible to collect the parameters for CHARON VM mapping to the DEFPA FDDI host adapter.
© Stromasys, 2017
69 / 375

Document number: 60-16-033-006
Open the “Computer Management” application and select “Device Manager”:
© Stromasys, 2017
70 / 375

Document number: 60-16-033-006
On the right panel select the installed DEFPA adapter:
© Stromasys, 2017
71 / 375

Document number: 60-16-033-006
Open the properties sheet by double-clicking on the selected adapter:
The “Location:” on the above picture gives X, Y, and Z for the "host_bus_location" parameter. For example:
set FDDI host_bus_location = "PCI bus 1, device 9, function 0"
Non-US-EN installations of Windows may present “Location:” string in local language, but "host_bus_location" parameter requires English notation, so
the words “PCI”, “bus”, “device”, and “function” must be specified in English.
Back to Table of Contents
© Stromasys, 2017
72 / 375

Document number: 60-16-033-006
1.
2.
3.
4.
Serial lines support via emulated PBXDA-xx family PCI controllers in "pass through" mode
Optionally it is possible to configure the folIowing models of PBXDA-xx family controllers mapped to specific models of the physical DIGI serial lines
adapters installed on the CHARON VM host:
DEC PBXDA-xx adapter Name of the device to map to Controller Vendor ID Device ID
PBXDA-BA DIGI AccelePort 4r 920 ASIC PCI 114Fh 0026h
PBXDA-BB DIGI AccelePort 8r 920 ASIC PCI 114Fh 0027h
PBXDA-AC DIGI AccelePort Xem ASIC PCI 114Fh 0004h
PBXDA-AC DIGI AccelePort Xem ASIC PCI 114Fh 0008h
Below is an example of mapping to a physical DIGI adapter installed on the host:
load digi PBXDA host_bus_location=“PCI bus 3,device 1,function 0”
set PBXDA bus=pci_1 device=1 function=0 irq=24 irq_bus=isa
Pay attention to the proper placement of the emulated PBXDA-xx adapter on the virtual HP Alpha PCI bus (it is controlled by "bus", "device", "function",
"irq" and "irq_bus" parameters). Refer to of this Guide for more information.this chapter
The "host_bus_location" parameter addresses the host DIGI adapter in the following way:
Parameters Description
"bus X" PCI bus number of the host DIGI adapter
"device Y" PCI bus device number of the host DIGI adapter
"function Z" The "function" parameter of the the host DIGI adapter
To establish the "pass through" mode do the following:
Install the adapter of the required type to some spare PCI/PCI-X/PCIe slot of the host system. DIGI
Boot a Windows operating system
Install the DIGI adapter driver from the following directory: "C:\Program Files\CHARON\Drivers\DIGI_X.X.X.XXXXX" by choosing "Install from a
list or specific location (Advanced)" option and then selecting the "digi_ppt_amd64.inf" file.
Reboot the host
Now it is possible to collect the parameters for CHARON VM mapping to the DIGI host adapter.
© Stromasys, 2017
73 / 375

Document number: 60-16-033-006
Open the “Computer Management” application and select “Device Manager”:
© Stromasys, 2017
74 / 375

Document number: 60-16-033-006
On the right panel select proper physical DIGI adapter:
© Stromasys, 2017
75 / 375

Document number: 60-16-033-006
Open te properties sheet by double-clicking on the selected adapter:
The “Location:” on the above picture gives X, Y, and Z for the "host_bus_location" parameter. For example:
set PBXDA host_bus_location = "PCI bus 1, device 7, function 0"
Non-US-EN installations of Windows may present “Location:” string in local language, but "host_bus_location" parameter requires English notation, so
the words “PCI”, “bus”, “device”, and “function” must be specified in English.
Back to Table of Contents
Auto boot
The CHARON VM can be configured to automatically boot an operating system at start up by specifying the default boot device and setting the 'auto_ac
' parameter to ' ' from the console.tion restart
: dka0 is defined as the default boot deviceExample
>>> set bootdef_dev dka0
>>>set auto_action restart
Back to Table of Contents
© Stromasys, 2017
76 / 375

Document number: 60-16-033-006
Migration to CHARON-AXP for Windows
Table of Contents
Introduction
Creating CHARON Virtual Machine
Collecting information about the source HP Alpha system
Creation of the CHARON-AXP configuration file
Making disk images
Installation of HP Alpha operating system
Making remote backups
Restore backups to CHARON-AXP disks
Alternative ways of data transfer
Introduction
This section describes how to migrate your HP Alpha system to CHARON-AXP. We will use a sample HP AlphaServer ES40 system running OpenVMS to
. The process is similar for all CHARON-AXP models.demonstrate the migration procedure
Back to Table of Contents
Creating CHARON Virtual Machine
As a first step it is required to create a CHARON Virtual Machine (VM) using the CHARON Virtual Machines Manager in the following way:
Press the "Create VM from Template" button:
© Stromasys, 2017
77 / 375

Document number: 60-16-033-006
Specify the HP Alpha model to be emulated and the name of the VM then press the "Create" button:
The VM will be created:
© Stromasys, 2017
78 / 375

Document number: 60-16-033-006
Select the VM from the left pane and switch to the "VM Configuration" tab.
:, press the "Edit Configuration file" buttonIn order to reproduce the target HP Alpha configuration
Alternatively it is possible to select the target CHARON VM and press the "Edit Configuration" button.
Back to Table of Contents
© Stromasys, 2017
79 / 375

Document number: 60-16-033-006
Collecting information about the source HP Alpha system
The next step is to determine the exact configuration of the HP Alpha hardware in order to create the CHARON VM configuration file.
Turn on the source HP Alpha system. At the ">>>" prompt, issue the " " command:show device
>>>show device
sys0.0.0.0.0 SYS0 System ROOT Device
ewa0.0.0.1.1 EWA0 F8-D1-11-00-67-E6
pka0.0.0.2.1 PKA0 Q-Logic/ISP PCI SCSI HBA
pga0.0.0.3.1 PGA0 WWN 1000-0000-0248-C550
pqa0.0.0.15.0 PQA0 ALi 1553C Integrated IDE Controller
pqb0.0.1.15.0 PQB0 ALi 1553C Integrated IDE Controller
dqa0.0.0.15.0 DQA0 TSSTcorpCDDVDW SH-222BB
dka0.0.0.2.1 DKA0 DEC RZ28 (C)DEC
dka100.1.0.2.1 DKA100 DEC RZ22 (C)DEC
dka200.2.0.2.1 DKA200 DEC RZ23 (C)DEC
mka600.6.0.2.1 MKA600 Virtual SCSI Tape
>>>
© Stromasys, 2017
80 / 375

Document number: 60-16-033-006
To get more detailed information, boot OpenVMS and issue the "show device /full" command:
$ show device /full
Disk PFCAXP$DKA0:, device type RZ28, is online, mounted, file-oriented device,
shareable, available to cluster, error logging is enabled.
...
Disk PFCAXP$DKA100:, device type RZ22, is online, file-oriented device,
shareable, available to cluster, error logging is enabled.
...
Disk PFCAXP$DKA200:, device type RZ23, is online, file-oriented device,
shareable, available to cluster, error logging is enabled.
...
Disk PFCAXP$DQA0:, device type TSSTcorpCDDVDW SH-222BB, is online,
file-oriented
device, shareable, available to cluster, error logging is enabled.
...
Disk $1$DGA0: (PFCAXP), device type RZ24, is online, file-oriented device,
shareable, available to cluster, error logging is enabled.
...
Magtape PFCAXP$MKA600:, device type Virtual SCSI Tape, is online, file-oriented
device, available to cluster, error logging is enabled, device supports
fastskip (per_io).
...
Terminal OPA0:, device type VT102, is online, record-oriented device, carriage
control.
...
Device EWA0:, device type DE500, is online, network device, device is a
template
only.
...
Device FGA0:, device type KGPSA Fibre Channel, is online, shareable, error
logging is enabled.
...
Device PGA0:, device type SCSI FCP, is online, error logging is enabled.
...
Device PKA0:, device type Qlogic ISP1020 SCSI port, is online, error logging is
enabled.
...
Device $1$GGA32767:, device type Generic SCSI device, is online, shareable.
$
If Tru64 UNIX V5 is running on the host system, it is recommended to use the following commands to get information on the host configuration:
Command Description
#/sbin/hwmgr view devices Get detailed information about the host hardware configuration
#/sbin/hwmgr show scsi Get specific information about the host SCSI controllers and attached disks
#/sbin/hwmgr view hierarchy Get information about the host controllers
Please refer to the Tru64 UNIX User's Guide for more details.
© Stromasys, 2017
81 / 375

Document number: 60-16-033-006
The source HP Alpha peripheral configuration in this example is:
Controller Devices on controller Description
KZPBA -DKA0 (RZ28)
-DKA100 (RZ22)
-DKA200 (RZ23)
-MKA600 (tape)
SCSI disk/tape controller
KGPSA-CA -DGA0 (RZ24) FC disk controller
OPA0 System console
TSSTcorpCDDVDW SH-222BB -DQA0 IDE CD-ROM controller
EWA0
Network interface, MAC address: "F8-D1-11-00-67-E6"
Now collect some general information about the HP AlphaServer ES40 system:
>>>show cpu /full
System: PFCAXP, AlphaServer ES40 6/667
SMP execlet = 3 : Enabled : Streamlined.
Config tree = None
Primary CPU = 0
HWRPB CPUs = 4
Page Size = 8192
Revision Code =
Serial Number = SN01234567
Default CPU Capabilities:
System: QUORUM RUN
Default Process Capabilities:
System: QUORUM RUN
....
>>>
>>>show mem
System Memory Resources on 5-FEB-2015 09:29:16.42
Physical Memory Usage (pages): Total Free In Use Modified
Main Memory (512.00MB) 65536 56496 8610 430
...
>>>
So the collected information about the HP AlphaServer ES40 system is:
Component Value
System Type AlphaServer ES40 6/667
Serial Number SN01234567
Number of CPUs 4
System memory 512 Mb
© Stromasys, 2017
82 / 375

Document number: 60-16-033-006
To find out the exact types of controllers and other useful information refer to the source HP Alpha system documentation.
Back to Table of Contents
In some particular situations it is also important to know the exact placement of all the peripheral devices on the HP Alpha PCI bus. To do so,
issue the "show config" command at the SRM prompt (>>>) on the HP Alpha console. For example:
>>>show config
...
PCI Bus
Bus 00 Slot 03: DECchip 21142 Network Controller
ewa0.0.0.3.0 00-00-F8-03-9A-6D
Bus 00 Slot 07: Cypress PCI Peripheral Controller
Bus 00 Slot 07: Function 1: PCI IDE
Bus 00 Slot 07: Function 2: PCI IDE
Bus 00 Slot 07: PCI USB
Bus 00 Slot 08: DECchip 21052 PCI to PCI Bridge
Bus 01 Slot 08: ISP1040 Scsi Controller
pka0.7.0.1008.0 SCSI Bus ID 7
dka0.0.0.1008.0 RZ2DD-KS
dka400.4.0.1008.0 RRD45
>>>
The "show config" command collects the following information of placement of peripheral devices on the PCI bus:
Bus number
Slot number
Function number
© Stromasys, 2017
83 / 375

Document number: 60-16-033-006
Creation of the CHARON-AXP configuration file
Using the above information, the following parameters and values can be set in the configuration file:
#
# HP AlphaServer model: AlphaServer ES40 6/667
#
set session hw_model = AlphaServer_ES40
set ace cpu_architecture = EV67
set rom dsrdb[0] = 1820 system_name = "AlphaServer ES40 6/667"
...
#
# Override default System Serial Number, set it to "SN01234567"
#
set rom system_serial_number = SN01234567
#
# Specify RAM size: 512 Mb
#
set ram size=512
#
# Map OPA0 console to "Putty" terminal emulator (included in CHARON-AXP kit)
#
load virtual_serial_line OPA0 port=10003 application="putty -load OPA0"
#
# Сonnect the emulator's DQA0 to the host's ATAPI CD/DVD-ROM drive.
#
set ide container="\\.\CdRom0"
#
# Load optional DE500BA PCI Ethernet Adapter (EWA0) and map it to the "Charon" host network interface
#
load DE500BA/dec21x4x EWA interface=EWA0
load packet_port/chnetwrk EWA0 interface="connection:Charon"
#
# Load DEC-KZPBA SCSI controller and map it to 3 disk containers and 1 tape container
#
load KZPBA PKA scsi_id = 7
set PKA container[0] = "C:\My disks\bootable.vdisk"
set PKA container[100] = "C:\ \RZ22.vdisk"My disks
set PKA container[200] = "C:\ \RZ23.vdisk"My disks
set PKA container[600] = "C:\ \my_tape.vtape" My tapes
#
# Load DEC-KGPSA-CA PCI FC adapter and map it to a disk container
#
load KGPSA FGA
set FGA container[0] = "C:\ \RZ24.vdisk"My disks
...
Back to Table of Contents
© Stromasys, 2017
84 / 375

Document number: 60-16-033-006
Making disk images
In our example, the mapping of the include disk and tape images. The tape images have not to be manually created whereas theKZPBA SCSI controller
disk images have to be created as described below.
Our example creates disk images of the original physical type. In reality, this step is the best opportunity in the migration to provision larger disks to get
extra storage space.
Create special directories for storing the disk and tape images. The created directories are referenced in the sample configuration file above.
...> cd C:\
C:\> " mkdir My disks"
" C:\> mkdir My tapes"
This operation can also be done using Windows Explorer.
Alternatively it is possible to put the tape and disk images in the CHARON VM Home Directory.
Start the " " utility by pressing the "Virtual Disk Tool" button in the "Host Information & Utilities" tab of the CHARON Virtual Machines Manager:MkDisk
© Stromasys, 2017
85 / 375

Document number: 60-16-033-006
The following dialog will appear:
Select "Alpha AXP" in the "Select System" drop-down menu, "SCSI" in the "All Controllers" drop-down menu and "RZ24" (for example) in the "Select Disk
Type" drop-down menu.
© Stromasys, 2017
86 / 375

Document number: 60-16-033-006
Press then the "Create Disk Image" button:
© Stromasys, 2017
87 / 375

Document number: 60-16-033-006
The utility will ask you to specify the output file name. Select the "C:\My disks" directory that has been created earlier, or create it directly in the dialog, and
press the "Save" button:
The " " utility will create the requested disk image:MkDisk
Repeat this sequence for the disks "RZ28.vdisk", "RZ22.vdisk" and "RZ23.vdisk". Place them in the same folder.
Back to Table of Contents
© Stromasys, 2017
88 / 375

Document number: 60-16-033-006
Installation of HP Alpha operating system
The next step is to transfer the data from the source HP Alpha system to CHARON-AXP. The easiest way to do this is via backup over the network but for
this operation a bootable network-enabled operating system on a CHARON-AXP disk image or physical disk is needed.
The example configures the CHARON-AXP AlphaServer ES40 system for installation of HP OpenVMS from a distribution CD-ROM (usually it is
"\\.\CdRom0" if the host has only one CD-ROM drive):
#
# DEC-KZPBA SCSI controller is mapped to 5 disk containers; one of them (DKA300) - for migration purposes;
# another one (DKA400) - for installation of fresh HP OpenVMS system from distributive
#
load KZPBA PKA scsi_id = 7
set PKA container[0] = "C:\My disks\bootable.vdisk"
set PKA container[100] = "C:\My disks\RZ22.vdisk"
set PKA container[200] = "C:\My disks\RZ23.vdisk"
set PKA container[300] = "C:\My disks\migration.vdisk"
set PKA container[400] = "C:\My disks\fresh_openvms.vdisk"
#
# CD-ROM for HP OpenVMS installation (DQA0)
#
set ide container="\\.\CdRom0"
DKA300 will be the disk where all the source disks will be copied so its size needs to be large enough to store all the disk backup images.
Create an empty disk image for installation of HP OpenVMS and another one for storing the backups from the source HP Alpha system as it is shown in
the section above.
Run the CHARON VM and boot from the CDROM named "dqa0" ("migration.cfg" is the configuration file we use in this example):
CHARON-AXP/ES40 for Windows x64 (AlphaServer ES40 6/667), Version 4.8.18100
(C) 2009-2016 STROMASYS SA.
All rights reserved.
P00>>>boot dqa0
Install HP Alpha/VMS including DECnet on "dka400". The DECnet address must belong to the same area as the source HP Alpha system.
Login to the newly installed OpenVMS system and initialize the disk that will be used to store the backups. Let's assume its prompt is " "newvms$
newvms$ INIT DKA300: SCRATCH
newvms$ MOUNT/SYSTEM/NOASSIST DKA300: SCRATCH
Back to Table of Contents
Making remote backups
Now we are ready to create the disk backups of the source HP Alpha system on the CHARON VM.
Boot the CHARON VM and make sure that the source HP Alpha system is available via DECnet.
Login to the source HP Alpha system. Stop all the batch queues, kick off the users, stop all the applications and close the databases if there are. The
commands listed in SYS$MANAGER:SYSHUTDWN.COM may be helpful. The goal is to close as many files as possible. The system disk will have
several files opened (pagefile, swapfile, etc.) and this is a normal situation.
The use of the "SHOW DEVICE /FILES" command would be of help to list opened files on a disk.
In this example, the CHARON VM system is node 1.400.
Issue the following commands from the source HP Alpha. Let's assume its prompt is " ":source$
© Stromasys, 2017
89 / 375

Document number: 60-16-033-006
source$ BACKUP/IMAGE/IGNORE=INTERLOCK DKA0: 1.400"username password"::DKA300:[000000]DKA0.BCK/SAVE
source$ BACKUP/IMAGE/IGNORE=INTER DKA100: 1.400LOCK "username password ::DKA300:[000000]DKA100.BCK/SAVE"
source$ BACKUP/IMAGE/IGNORE=INTER DKA200: 1.400LOCK "username password ::DKA300:[000000]DKA200.BCK/SAVE"
When the backup operation will be completed, the disk "DKA300" of the CHARON VM will contain 3 savesets: "DKA0.BCK", "DKA100.BCK" and
"DKA200.BCK".
Back to Table of Contents
Restore backups to CHARON-AXP disks
The savesets have now to be restored on their corresponding virtual disks. Login to the CHARON VM guest OS and issue this sequence of commands:
newvms$ MOUNT/FOREIGN DKA0:
newvms$ BACKUP/IMAGE DKA300:[000000]DKA0.BCK/SAVE DKA0:
newvms$ DISMOUNT DKA0:
newvms$ MOUNT/FOREIGN DKA100:
newvms$ BACKUP/IMAGE DKA300:[000000]DKA100.BCK/SAVE DKA100:
newvms$ DISMOUNT DKA100:
newvms$ MOUNT/FOREIGN DKA200:
newvms$ BACKUP/IMAGE DKA300:[000000]DKA200.BCK/SAVE DKA200:
newvms$ DISMOUNT DKA200:
If you are going to have the CHARON VM and the original physical HP Alpha on the network at the same time, you must change the network identity of
one system, usually the CHARON VM.
The easiest way is to boot the CHARON VM on the restored system disk with the network disabled and to configure new addresses then enable the
network and reboot.
The NIC can be disabled with a statement in the CHARON VM configuration file.interface="(disabled)"
Back to Table of Contents
Alternative ways of data transfer
Some alternative methods of data transfer are also possible. For example:
Connect a SCSI tape drive to the CHARON-AXP host via a PCI card
Map the tape drive in the CHARON VM configuration file
a. Restore the source HP Alpha system backups from tape to disk images via OpenVMS running on the CHARON VM.
b. Boot from standalone backups and restore the content to the CHARON VM virtual disks
Dump the source HP Alpha system backups to tape images using the " " utility and:mtd
a. Boot from the freshly installed OpenVMS system and restore the tape images to the CHARON VM virtual disks
b. Boot from the standalone backup and restore the content to the CHARON VM virtual disks
Create a network cluster between the source HP Alpha system and the CHARON VM (it is possible to use the source system as a boot server);
then perform simple backups from one disk to another:
$ BACKUP/IMAGE/IGNORE=INTERLOCK REAL$DKA0: DKA0:
Back to Table of Contents
© Stromasys, 2017
90 / 375

Document number: 60-16-033-006
CHARON-AXP for Windows licensing
Table of Contents
General description
Parameters defined by CHARON-AXP license
CHARON-AXP technical licensing models
Regular Sentinel HASP keys
Network Sentinel HASP keys
Software licenses
Multiple licenses configuration and backup license
License installation
Installation from scratch
Replacement of currently installed Sentinel run-time
Installation and update of CHARON-AXP Software License or HASP dongle License
License management
Sentinel Admin Control Center
General Description
Disable remote keys access
License management utility
Removing CHARON-AXP software licenses
License Deinstallation
Special "backup" license keys
General description
The CHARON-AXP product is protected by licenses issued on a customer basis by STROMASYS Inc. The CHARON-AXP license defines all the
specifics of a particular CHARON-AXP distribution and its usage.
The license is implemented in the form of a hardware dongle (a Sentinel HASP key) or a . Please be careful withsoftware license bound to the hardware
your license key, in case of loss or damage, the CHARON Virtual Machines (VM) will not run or start until the license key is replaced. For redundancy,
STROMASYS recommends to use a backup license key (purchased separately) that can replace the main license key for a restricted period of time. It
is possible to specify the backup license in the CHARON VM configuration file to prevent CHARON VM from stopping in case the main license dongle is
no longer available.
The CHARON-AXP license being checked upon the start of CHARON VM and at a specified interval (defined by the license) during the emulated system
execution (default is 1 hour). If CHARON VM detects the absence (or malfunction) of the license key or software license, CHARON VM will try to use a
backup license (if specified in the configuration file). If the license is not available or not specified, CHARON VM displays a warning message in the log file
requesting the license key reconnection or software license reactivation. If the license is not reconnected or reactivated within a given period of time (the
check interval), CHARON VM exits.
The CHARON-AXP main license is time restricted or unlimited, the backup license is limited by the number of executions (1 execution = 1 interval
check)
Note that if the time-restricted license is used and it expires, the CHARON VM tries to find its replacement automatically and, if found, proceeds using the
replacement license.
Update of the CHARON-AXP license can be performed on the fly without stopping the CHARON VM. The expiration date and execution counter can be
updated, however the CHARON VM virtual hardware configuration should remain unchanged. At the next license check, the CHARON VM will use the
updated license.
The following sections list all the main parameters of the CHARON-AXP licensing mechanism.
Back to Table of Contents
The CHARON-AXP software license is not distributed for Proof-of-Concept and evaluation installations. Only hardware dongles are used in
these cases.
It is important to keep the HASP license keys connected to a computer powered on even if the CHARON VM is not running because the keys
contain a built-in battery that needs to be charged. If the battery is completely discharged, the license key can be irreparably damaged.
© Stromasys, 2017
91 / 375

Document number: 60-16-033-006
Parameters defined by CHARON-AXP license
The following table represents all the parameters defined by the CHARON-AXP license:
General Products relevant Optional
Physical key ID
License Number
End user name
Master key ID
License release date
and time
Update Number
Purchasing Company
name. In most cases
the company to which
the key was issued
originally
Commercial product name
Commercial product code
Commercial product version and range of build numbers suitable for
running
Range of CHARON-AXP virtual models available for running
Type of host CPU required
Host operating system required
Number of virtual CPUs enabled for virtual SMP systems
Minimum number of host CPU cores required
Minimum host memory required
Maximum memory emulated. If not present the value defaults to the
maximum memory possible for the particular virtual system. Note that the
maximum memory may not be available to the virtual system if the host
computer has insufficient physical memory.
Maximum number of CHARON VMs that can be run concurrently
Whether or not CHAPI (CHARON API) can be used with this product
Product and Field Test expiration dates (if any)
Product and Field Test executions counter (if any)
Maximum number of hosts that may run CHARON VMs concurrently (in
the case of a networking license)
Level of support (if any), end date of any support contract, the "First Line"
Service Provider
Frequency of CHARON VM license checking during CHARON VM
running
Parameter that reduces the
maximum speed of CHARON-AXP
(might be required for
synchronization with legacy
hardware systems)
Parameter that enables the product
to support additional serial lines
through an option board from a
company such as DIGI
Parameter that prohibits use of
Advanced CPU Emulation. If not
present the Advanced CPU
Emulation is enabled
Back to Table of Contents
CHARON-AXP technical licensing models
CHARON-AXP licensing models are divided into 3 groups:
Regular Sentinel HASP keys
This is the most common way of CHARON-AXP licensing.
The CHARON-AXP license is embedded in a Sentinel HASP dongle. This license is available only on the host where the dongle is physically installed.
The CHARON-AXP installation procedure takes care of the Sentinel HASP run-time (driver) installation. Once the CHARON-AXP product has been
installed, it is possible to plug in the regular license key and proceed with using CHARON-AXP without additional configuration steps.
The number of CHARON VMs allowed to run on a particular host may be restricted by the license content (see above).
© Stromasys, 2017
92 / 375

Document number: 60-16-033-006
Network Sentinel HASP keys
The Network Sentinel HASP key (red dongle) can be shared between several hosts running CHARON virtual machines (including the host on which the
network license is installed).
If CHARON-AXP is installed on the host where the network key is connected, no additional steps are required. The Sentinel driver is activated as part of
the CHARON-AXP installation. If the host does not have CHARON-AXP installed, the host can still distribute the connected network license(s) to the
CHARON virtual machines running on other hosts. In this case the Sentinel driver must be installed on the host manually.
The Sentinel run-time driver is distributed as a part of the CHARON-AXP kit. Please see the "License installation" section of this chapter for details.
Once the Sentinel run-time driver is installed and the network license is connected, the CHARON VM can be started on any appropriate host on the LAN
network segment.
Software licenses
The CHARON-AXP Software License (SL) is a "virtual" key with exactly the same functionality as the hardware dongle. It does not require any hardware
but the installation of the Sentinel run-time environment is required.
Software licenses are always network-wide on Windows, so they behave the same way as Network HASP keys.
Back to Table of Contents
Multiple licenses configuration and backup license
For any type of licensing, a CHARON VM can use .only one valid ("active") license (of given vendor code) at a time
The "HASP License details" utility (it can be started from CHARON Virtual Machines Manager) displays a range of available licenses but note that, by
default, a CHARON VM may use any of them as the "active" one - unless it is directly specified by the "license_key_id" parameter (see below). The utility
provides the license numbers and ID / IP addresses of the hosts where the licenses are installed.
The general recommendation is to avoid the usage of multiple keys in one network segment. Use only one locally installed license per host or one network
license per local network segment containing several CHARON hosts.
CHARON-AXP/VAX version 4.7 build 171-01 introduced a change with respect to network licenses. In previous versions of CHARON-AXP/VAX
a network license controlled the maximum number of client host systems and CHARON instances per host system (station/instance mode).
In the current CHARON-AXP/VAX versions a network license controls the maximum overall number of active instances, which can be
distributed across client host systems according to the preference of the customer.
The Software Licenses (SL) are best suited for stable environments because their correct function depends on certain characteristics of the host
system. Changing any of these characteristics will invalidate the license.
If the CHARON host runs on real hardware, the software licenses are by default for which they weretightly bound to the hardware
issued. If major hardware characteristics of the system are changed, the license will be disabled.
If the CHARON host runs in a (e.g. VMware), software licenses are normally bound to the virtual machine ID andvirtual environment
a set of additional characteristics of the virtual machine. If any of these parameters are changed, the license will be disabled.
For a more detailed description of the restrictions, please refer to or contact your Stromasys representative.Software Licensing restrictions
A CHARON VM cannot:
check all the available license keys / software licenses,
choose one,
automatically switch from one key to another (except when the backup license is specified in its configuration file).
© Stromasys, 2017
93 / 375

Document number: 60-16-033-006
1.
2.
3.
4.
When needed, it is possible to use a special parameter in the CHARON VM configuration files to specify exactly which license must be used by each
particular CHARON VM:
Parameter Type Value
license_key_id[N],
N=0 or 1
Numeric A number (decimal Sentinel key ID) that specifies regular ( =0) and backup ( =1) license keys to be used by theN N
CHARON VM.
Example:
set session license_key_id[0]=1877752571
set session license_key_id[1]=354850588
It is also possible to specify both regular and backup key in one line.
Example:
set session license_key_id[0]=1877752571 license_key_id[1]=354850588
Depending on the presence of the regular and/or backup license key IDs in the configuration file, the CHARON VM
behaves differently:
No keys are specified
The CHARON VM behaves as usual (performs unqualified search for any suitable key). If no keys are found, the
CHARON VM stops.
Both keys are specified
The CHARON VM performs qualified search for regular license key. If it is not found, the CHARON VM performs
qualified search for backup license key. If it is not found, the CHARON VM stops.
Only regular key is specified
The CHARON VM performs qualified search for regular license key. If it is not found, the CHARON VM performs
unqualified search for any suitable key. If it is not found, the CHARON VM stops.
Only backup key is specified
The CHARON VM behaves as usual (performs unqualified search for any suitable key). If no keys are found, the
CHARON VM stops.
This parameter also specifies the license which will be used as backup if the active license expires.
Back to Table of Contents
© Stromasys, 2017
94 / 375

Document number: 60-16-033-006
1.
2.
3.
1.
2.
3.
4.
5.
6.
License installation
Installation from scratch
At the moment CHARON supports Sentinel HASP keys, Sentinel HL and Sentinel Software Licenses (SL).
Installation of a CHARON-AXP regular or network license consists of:
Installation of the Sentinel run-time environment on the CHARON-AXP host (regular and network keys) or on the host that will distribute
CHARON-AXP licenses over a local network segment (network key only). The Sentinel software is installed automatically by CHARON-AXP for
Windows.
Physical connection of the HASP license dongle to the CHARON-AXP host or to the host distributing the CHARON-AXP license over the local
network segment.
Collecting the system fingerprint (*.c2v file), sending it to STROMASYS and applying the update (*.v2c file) in case of software license (and in
case of updating HASP dongle license). See the details below.
When a manual installation of the Sentinel run-time is required (in the case of the network license server that does not have CHARON-AXP installed):
Login as Administrator
Open the CHARON-AXP kit folder
Switch to the "hasp_install" subfolder
Unzip the archive located in this folder
Open "cmd.exe" and switch to the folder where the files were unzipped
Execute the following commands:
...> haspdinst.exe -fr -kp -nomsg
...> haspdinst.exe -install -cm
Back to Table of Contents
Before installing the license make sure that the Sentinel run-time (driver) to be installed is collected from your CHARON kit or
provided by STROMASYS on request for your particular product. Do not update the Sentinel run-time (driver) from online or any other
sources, including the Sentinel web site.
In case of several CHARON kits containing different versions of Sentinel run-time (driver), the last one, having the most recent
version, must be installed. The CHARON installation performs this operation automatically.
Note that the following operations have to be performed on installation phase for network licenses:
On the server side (where the network license will reside): open port 1947 for both TCP and UDP
, if broadcast search for remote licenses is to be used, UDP traffic from port 1947 of the license server toOn the client side
ports 30000-65535 of the client must be permitted.
Both on server and client sides: setup default gateway
Please consult with your Windows User's Guide on details.
If stricter firewall rules are required, it is possible to open the ports 30000-65535 and 1947 only for the "Sentinel HASP License
Manager" (hasplms.exe) service (it will be installed by CHARON-AXP ).
© Stromasys, 2017
95 / 375

Document number: 60-16-033-006
Replacement of currently installed Sentinel run-time
Replacement of the currently installed Sentinel Run-time can be needed in case of installation of specific run-time provided by STROMASYS.
To proceed, remove the current version of Sentinel run-time:
Login as Administrator
Extract the content of the unique ZIP file residing in “hasp_install” directory of the CHARON distribution to the same folder.
Run “cmd.exe” from the “Start” menu of host computer
“cd” to the “hasp_install” directory
Issue the following command:
> ... haspdinst.exe -fr -kp -nomsg
Install the other Sentinel run-time:
“cd” to the directory where the target run-time resides
Issue the following command:
>... haspdinst.exe -install -cm
Back to Table of Contents
Installation and update of CHARON-AXP Software License or HASP dongle License
The CHARON-AXP software licenses can be installed / updated according to the procedure described below:
Install CHARON-AXP together with Sentinel run-time (Sentinel run-time is an essential part of CHARON-AXP for Windows distribution)
Reboot the host system
In case of Software License (SL) installation and if there are already installed network-wide SL's on the local network, disable access to the
network licenses in the following way:
Open the CHARON Virtual Machines Manager, switch to the "Host Information & Utilities" tab and press the "Sentinel Admin Control
Center" button:
You do not need to perform this procedure for Sentinel HL keys - local and network ones (red dongle) used as local.
© Stromasys, 2017
96 / 375

Document number: 60-16-033-006
or - alternatively - go to the page using your browser to access the "Sentinel HASP Admin Control Center" (ACC).http://localhost:1947
Select the "Configuration" option in the left pane then switch to the "Access to Remote License Managers" tab.
Uncheck the highlighted options:
Press the "Submit" button to apply the settings
Switch to the "Network" tab.
Set the "Network visibility" to "None":
© Stromasys, 2017
97 / 375

Document number: 60-16-033-006
Press the "Submit" button to apply the settings.
Do not forget to return these settings back after the software license installation.
Connect the HASP dongle (in case of update of a license located on a dongle)to the host system
Collect the CHARON-AXP host fingerprint file ("*.c2v"):
Open the CHARON Virtual Machines Manager, switch to the tab and press the "Host Information & Utilities" "License Update tool" button to
" " utility:envoke the License Update Service
© Stromasys, 2017
98 / 375

Document number: 60-16-033-006
In the utility dialog popup switch to the "Collect Status Information" tab (opened by default) then select:
"Installation of new protection key" in case of Software License if no Software License has been already installed on the host.
:Example
"Update of existing protection key" in case of HL/HASP dongle or Software License that has been already installed on the host and
needs updating.
:Example
Press the "Collect Information" button. In the popup dialog choose the place to store the "Fingerprint.c2v" file and press the "Save"
button:
When using HASP dongles, select only the "Update of existing protection key" option.
In case of Software License use the "Installation of new protection key" option if the host does not have any Software License
installed and the "Update of existing protection key" option if an already installed Software License has to be updated.
© Stromasys, 2017
99 / 375

Document number: 60-16-033-006
© Stromasys, 2017
100 / 375
 Loading...