

Page 1

Page 2
INSTRUCTION MANUAL
Before using this product
Please read this user manual carefully in order to ensure your safety
and the proper operation of this product. Keep for future reference.
Page 3

Always keep this product dry. Do not use in rain or in damp
conditions.
This product contains high-voltage electronic parts. Touching
the high-voltage circuit inside may result in electric shock. Do
not disassemble. Should repairs become necessary, this
product must be sent to an authorized maintenance center.
Stop using this product if it breaks open due to extrusion, falling
or strong hit. Otherwise, electric shock may occur if you touch
the electronic parts inside it.
Do not fire the flash directly into the eyes (especially those of
babies) within short distances. Otherwise visual impairment
may occur. When taking pictures for babies, keep the flash unit
at least 1 meter (3.3 feet) away from them. Using bounce flash
to reduce light intensity is also recommended.
Do not use the flash unit in the presence of flammable gases,
chemicals and other similar materials. In certain circumstances,
these materials may be sensitive to the strong light emitting
from this flash unit and fire or electromagnetic interference may
result.
Do not leave or store the flash unit in places where the ambient
temperature reads over 50°C (120°F). Otherwise the electronic
parts may be damaged.
Thank you for purchasing this product.
The Pro-Flash TLi is the world’s first Li-ion powered TTL speedlight,
a true innovation in the industry. The Lithium-Ion battery radically
shortens recycle time and gives you substantially longer life when
compared to traditional AA batteries. The Pro-Flash TLi-N is
compatible with Nikon DSLR cameras and Nikon flashes with I-TTL.
The Pro-Flash TLi-N offers fast, simple and accurate shooting,
giving you the same controls you expect from the leading speedlight
manufacturers. This speedlight features:
GN58 (ISO 100, @105mm). Adjustable from 1/1 to 1/128 in 1/3rd
stop increments.
Supports Nikon I-TTL, Manual and Multi flash modes
Functions as a Master or Slave unit in a wireless flash group
2000 mAh Li-ion Battery:
- 1.5s Full Power recycle time
- 650 Full Power Flashes
No expensive hassles of having to replace AA batteries or carry
external power packs
O
ptional Power adjustment and triggering with the Transmitter &
Receiver for Pro-Flash TLi-C/TLi-N (STR249) for Off-Camera use
Consistent color temperature and even light output
User-friendly LCD display & controls with upgradeable firmware
●
●
●
●
●
●
●
●
For Your Safety
Foreword
- 01 - - 02 -
Page 4

Foreword
For Your Safety
Name of Parts
Body
Control Panel
LCD Panel
What’s in the Box?
Additional Accessories (Sold Separately)
Battery
Features
Cautions
Inserting and Removing the Battery
Battery Level Indication
Attaching to a Camera
Power Management
Flash Mode - I-TTL Autoflash
FEC (Flash Exposure Compensation)
FV Lock (Flash Value Lock)
High-Speed Sync (FP flash)
Second-Curtain Sync
Flash Mode - M: Manual Flash
Flash Mode - Multi/Stroboscopic Flash
Wireless Flash
Wireless Settings
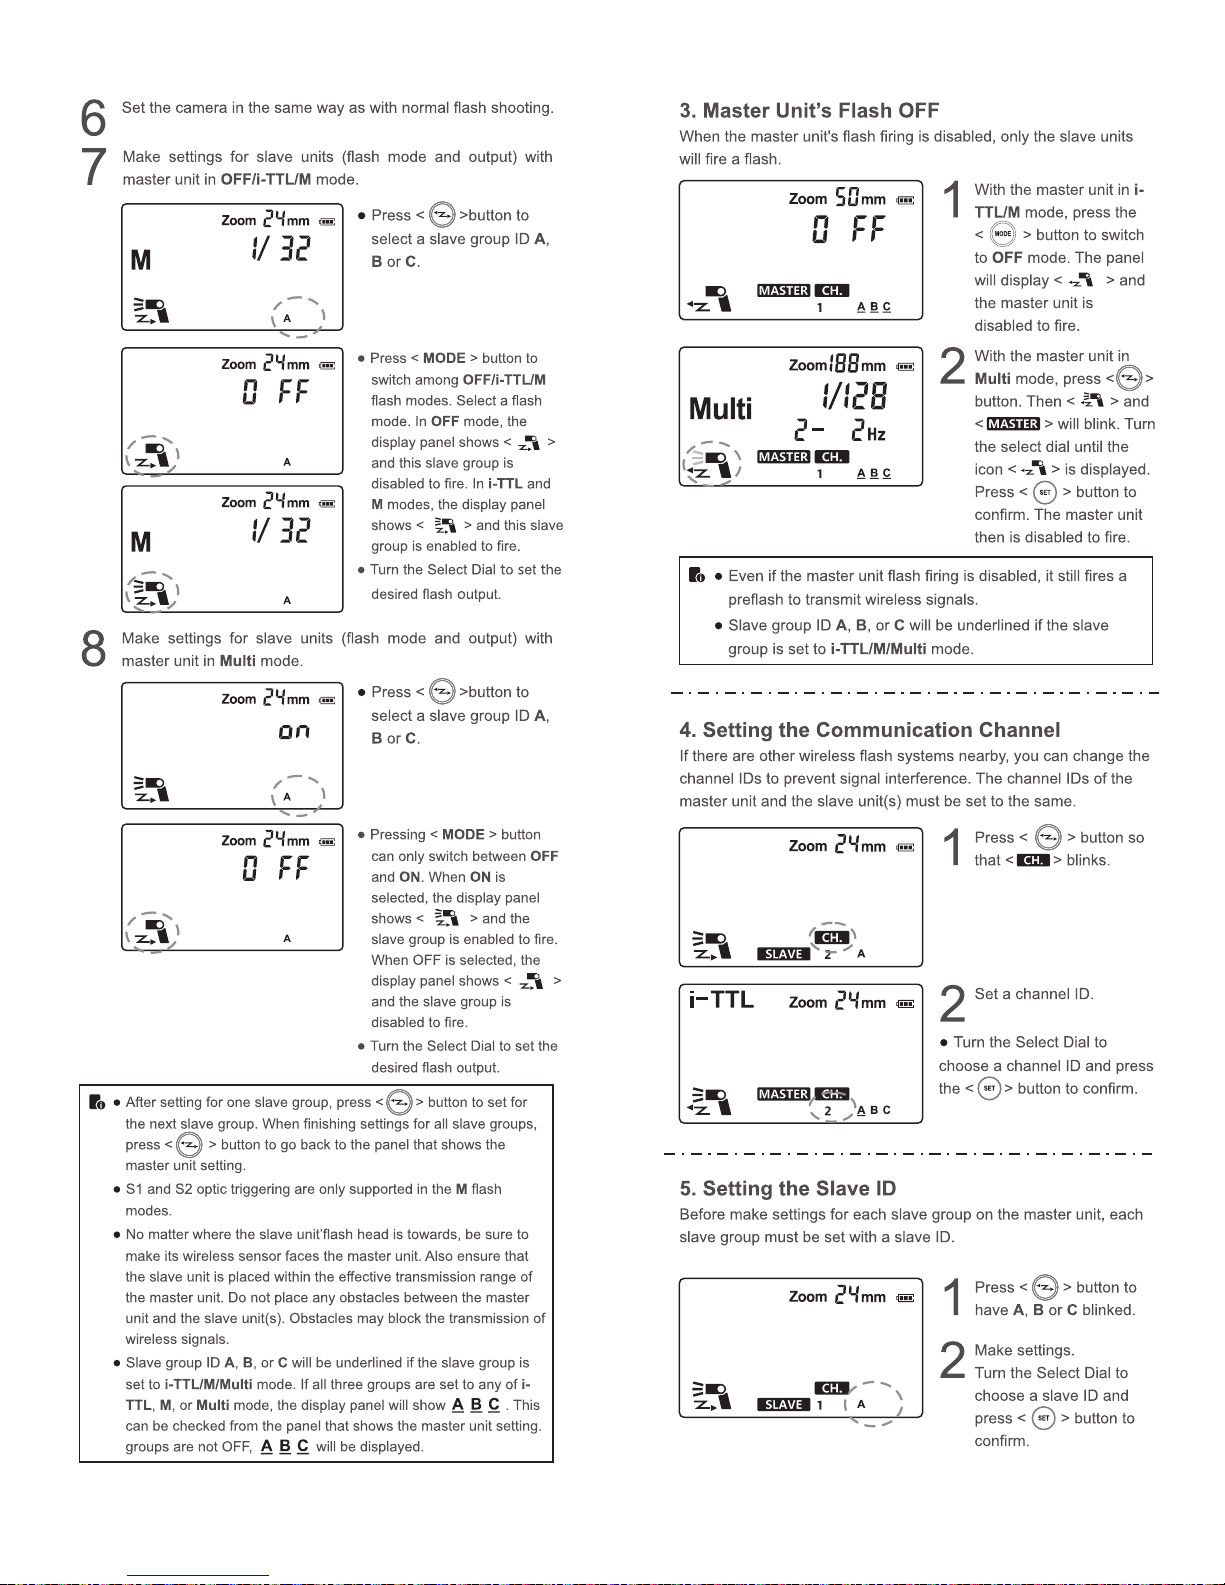
Settings on Master Unit
Master Unit's Flash OFF
Setting the Communication Channel
Setting the Slave ID
Other Applications
Wireless Control Function
Sync Triggering
Modeling Flash
Auto Focus Assist Beam
Bounce Flash
Creating a Catchlight
ZOOM: Setting the Flash Coverage and Using the Wide Panel
C.Fn: Setting Custom Functions
Protection Function
Technical Data
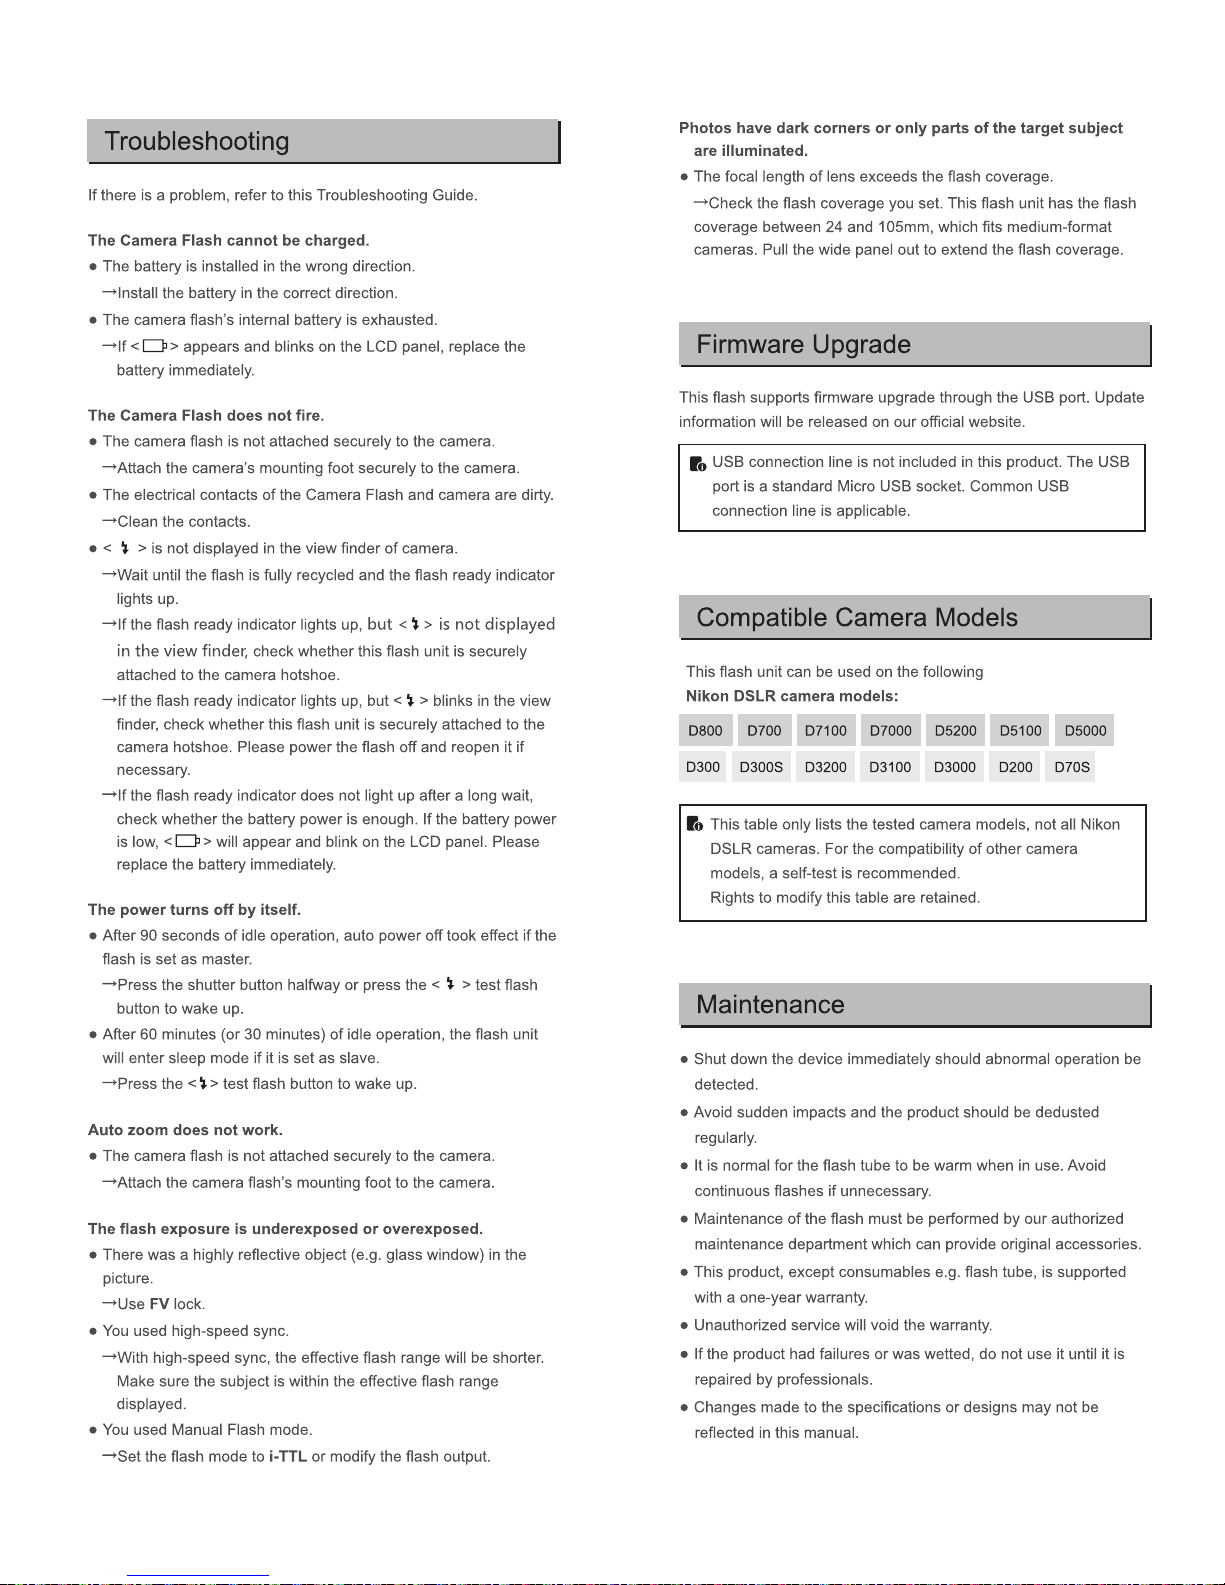
Troubleshooting
Firmware Upgrade
Compatible Camera Models
Maintenance
Contents
01
02
05
08
09
09
09
12
12
14
19
22
23
24
25
26
26
26
Conventions used in this Manual
●
and camera flash power switches are powered on.
● Reference page numbers are indicated by “p.**”.
● The following alert symbols are used in this manual:
The symbol gives supplemental information.
The symbol indicates a warning to prevent shooting
problems.
This manual is based on the assumption that both the camera
Caution
Note
- 03 - - 04 -
Page 5
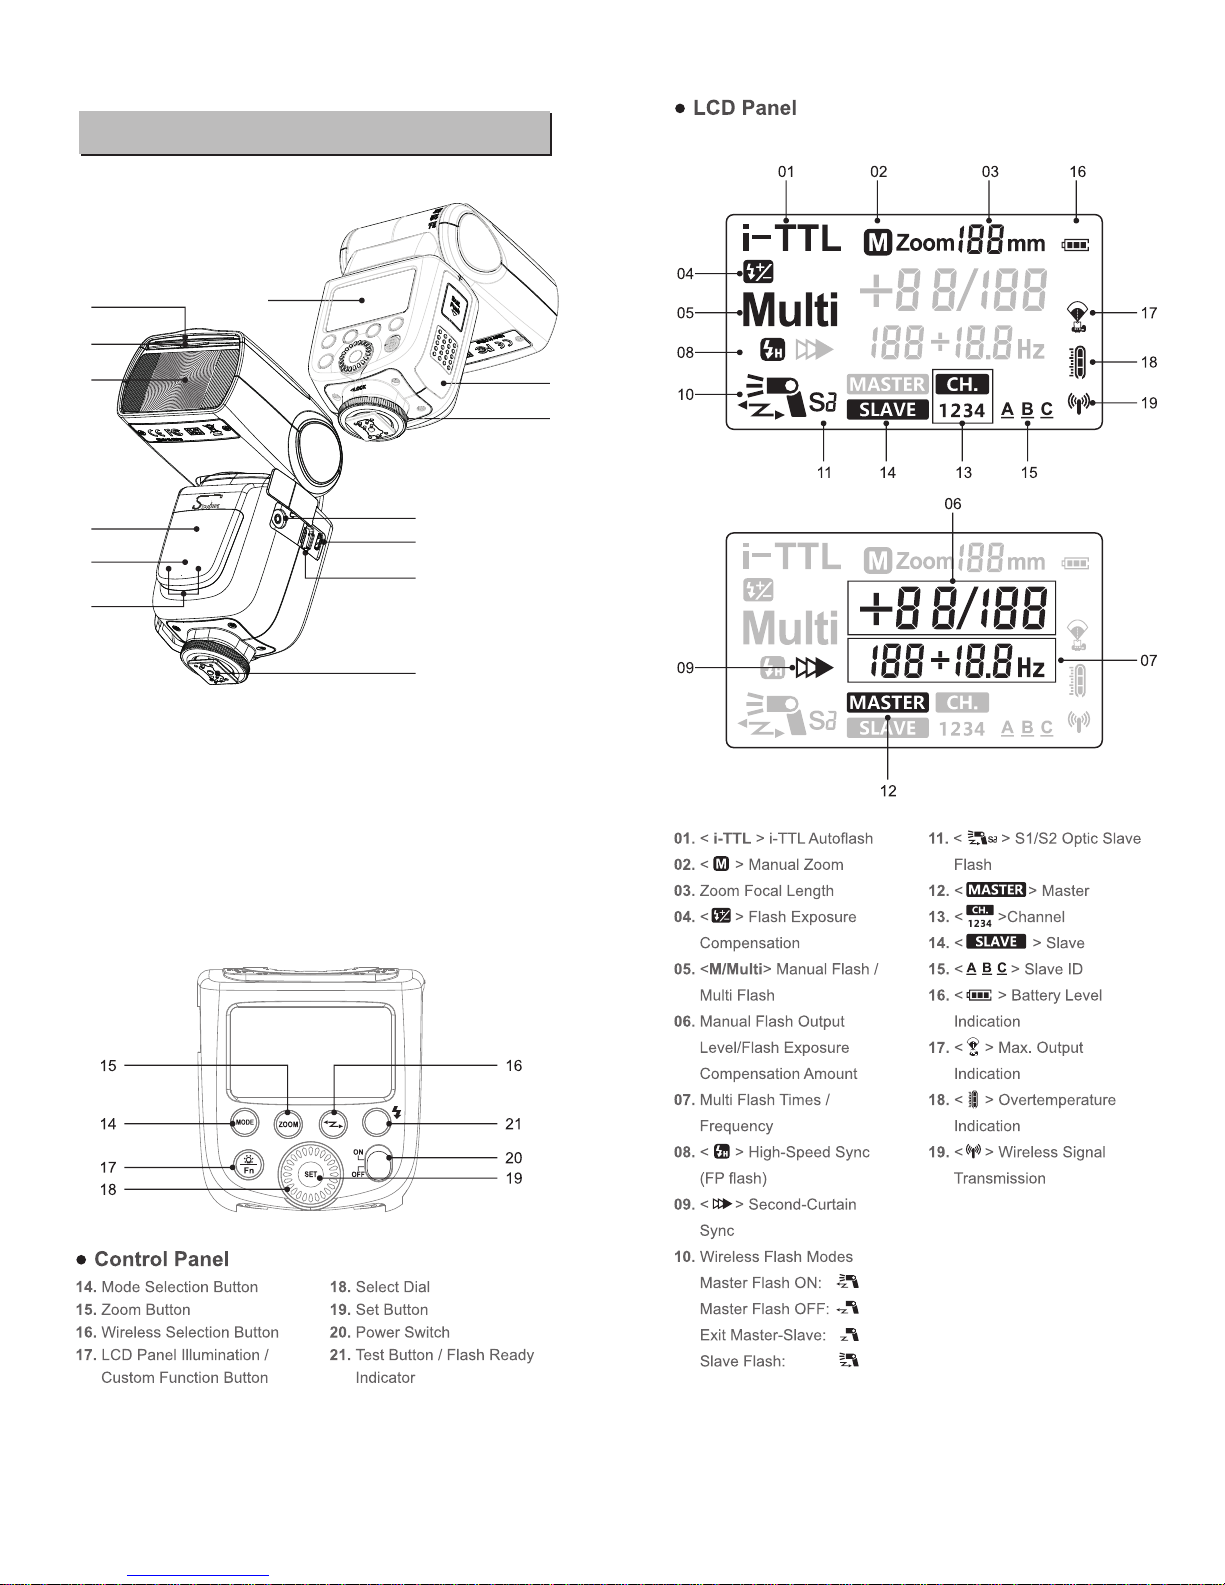
01. Catchlight Panel 08. Hotshoe
02. Built-in Wide Panel 09. LCD Panel
03. Flash Head 10. Lock Ring
04. Optic Control Sensor 11. Li-ion Battery Compartment
05. Focus Assist Beam 12. USB Port
06. Wireless Control Port 13. Slave Flash Ready
07. Sync Cord Jack Indicator
● Body
- 05 - - 06 -
09
07
12
06
08
10
11
05
13
Name of Parts
04
03
02
01
Page 6

● Features
1.
This flash unit uses a long-life Li-ion polymer battery
Available charge/discharge cycles - 500
2.
Inner circuitry protects against overcharge,
overdischarge, overcurrent, and short circuit.
3.
Recharge times is less than 3 hours when using the standard
battery charger.
● Caution
1. Do not short circuit.
2. Do not expose to rain or immerse into water. This battery is not
water proof.
3. Keep out of reach of children.
4.
Do not leave the battery on the charger for more than 24 hours.
5. Store in dry, cool, ventilated places.
6. Do not put aside or into fire.
7. Dead batteries should be disposed according to local regulations.
8.
Batteries lose their charge over time. If the battery has sat for
more than 3 months without use, please recharge before using.
● Loading and Unloading the Battery
● Battery Level Indication
Make sure the battery pack is securely loaded in the flash. Check
the battery level indication on the LCD panel to see the remaining
battery level.
Meaning
Full
Middle
Low
Battery Level Indication
Blinking
Battery
●
1.
4. Battery Charger Cable 5. Mini Stand
6. Protection Case 7. Instruction manual
What’s in the Box?
Flash unit 2. Li-ion Battery Pack 3. Battery Charger
●
Additional Accessories (Sold Separately)
The Pro-Flash TLi-N can be used in combination with the following
accessories (sold separately), for a variety of different effects.
STR248 - Car Charger for Pro-Flash TLi-C/TLi-N
STR249 - Transmitter and Receiver for Pro-Flash TLi-C/TLi-N
STR177/178/179 - Speedlight Bracket and Softbox Kits
STR109 - Strobies Bounce Kit
- 07 - - 08 -
1
2
To load the battery, push the
1
battery compartment cover
downward and open it.
Battery power will be empty and need
to be charged immediately.
2
According to the triangle
sign on the battery pack,
insert the battery into the
compartment until a white
knob locks the battery with a
clicking sound.
To unload the battery, tap the
3
white knob and the battery
pack will pop out. Then close
the compartment.
5
6
3
4
Page 7
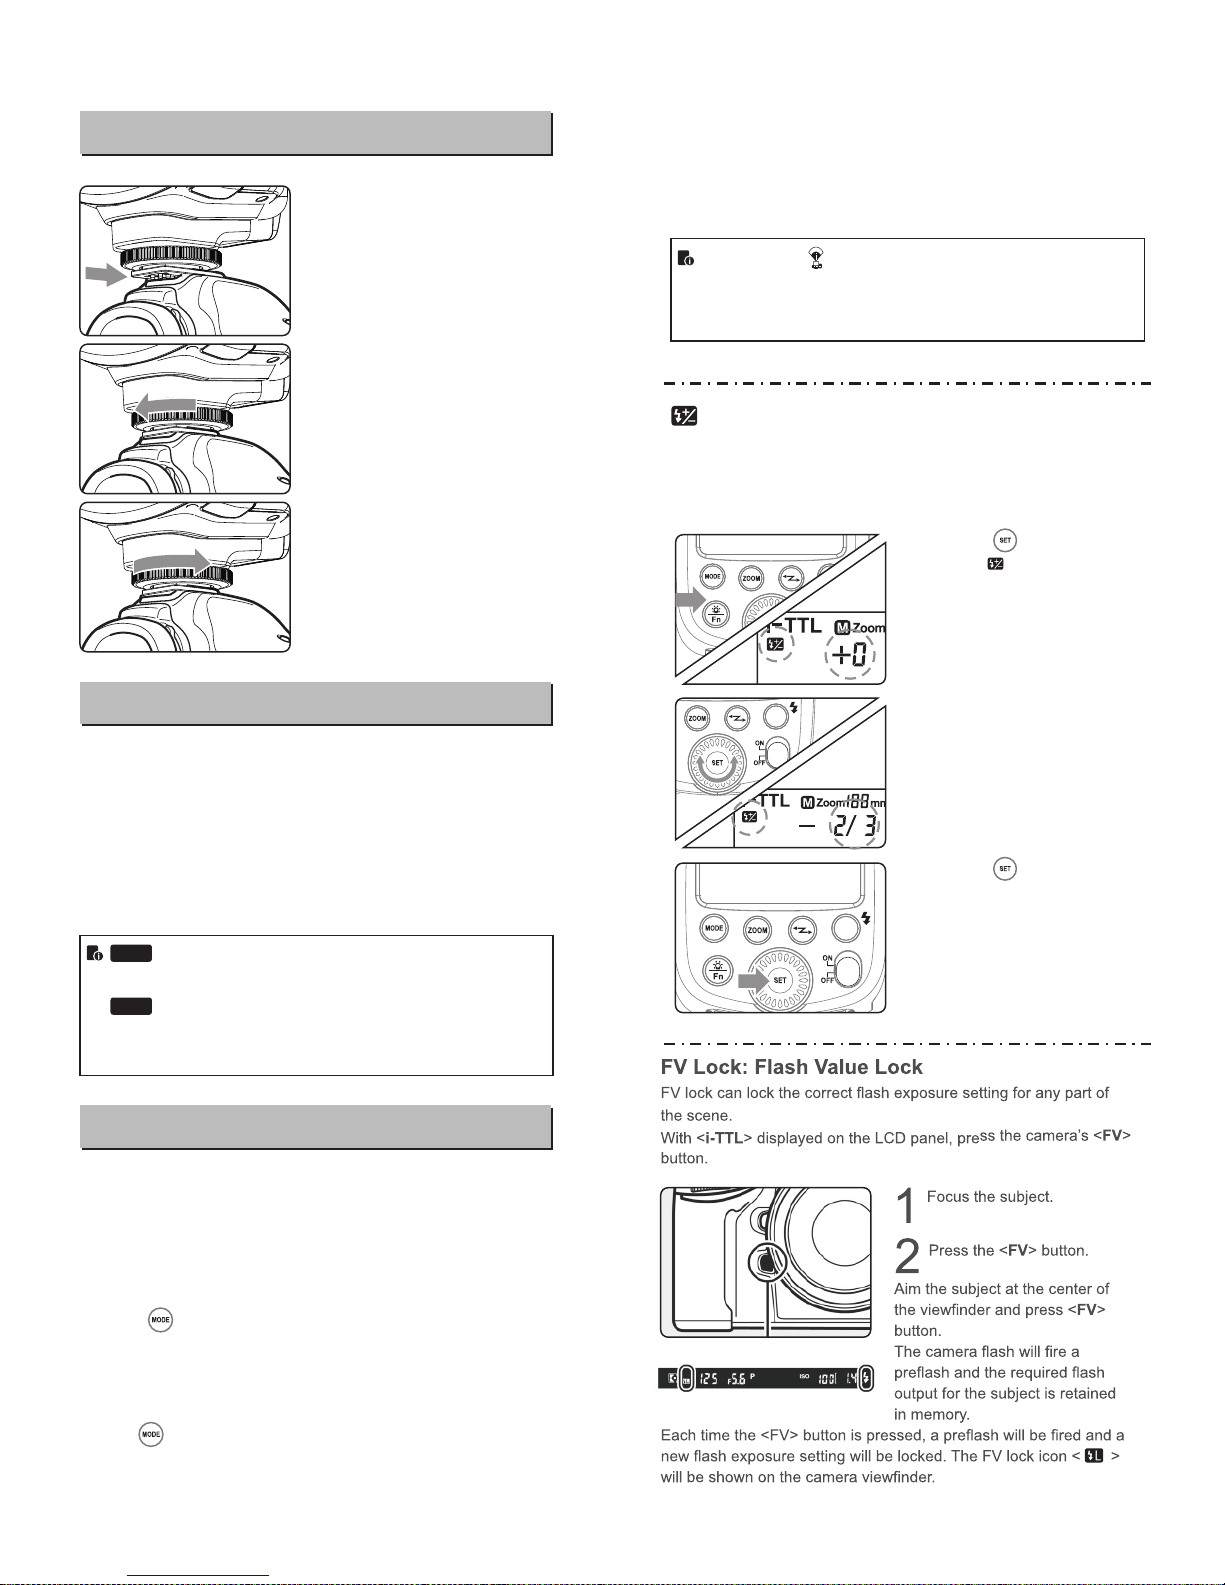
Attaching to a Camera
1
● Slip the camera flash’s
mounting foot into the
camera’s hotshoe all the
way.
Attach the Camera Flash.
2
● Rotate the lock ring on the
mounting foot until it locks
up.
Secure the Camera Flash.
3
● Rotate the lock ring on the
mounting foot until it is
loosened.
Detach the Camera Flash.
Power Management
Use ON/OFF Power Switch to power the flash unit on or off. Turn off
if it will not be used for an extended period of time. Setting as a
master flash, it will turn the power off automatically after a certain
period (approx. 90 seconds) of idle use. Pressing the camera
shutter halfway or pressing any flash button will wake up the flash
unit. Setting as a slave flash, it will enter sleep mode after a certain
period (adjustable, 60 minutes by default) of idle use. Pressing any
flash button will wake it up.
Disabling Auto Power Off function is recommended
when the flash is used off camera. (C.Fn-01, see P22)
Slave Auto Power Off Timer is set to 60 minutes by
default. Another option “30 minutes” is available. (C.Fn-
10, see P22)
Flash Mode—i-TTL Autoflash
This flash has three flash modes: i-TTL, Manual (M), and Multi
(Stroboscopic). In i-TTL mode, the camera and the flash will work
together to calculate the correct exposure for the subject and the
background. In this mode, multiple TTL functions are available:
FEC, , HSS, second curtain sync, FV lock, modeling flash, etc.
* Press < > Mode Selection Button and three flash modes will
display on the LCD panel one by one with each pressing.
i-TTL Mode
Press < > Mode Selection Button to enter i-TTL mode. The
LCD panel will display < i-TTL >.
When this icon appears on the LCD panel, it means the
flash unit is at the max. power output in i-TTL mode. If still
underexposed, please adjust settings on your camera in
terms of shutter speed, aperture, ISO, etc.
● Press the camera release button halfway to focus. The shutter
speed and aperture will be displayed in the viewfinder.
● When the shutter button is fully pressed, the flash will fire a pre-
flash that the camera will use to calculate exposure and flash
output the instant before the photo is taken.
FEC: Flash Exposure Compensation
With FEC function, this flash can adjust from -3 to +3 in 1/3rd stops.
It is useful in situations where minor adjusting of the TTL system is
needed based on the environment.
Setting FEC:
Press < > button. The
1
icon < > and flash
exposure compensation
amount will blink on the LCD
panel.
2
compensation amount.
●
amount.
● To cancel the flash exposure
compensation, set the amount
to “+0”.
Set the flash exposure
Turn the Select Dial to set the
Press < > button again to
3
confirm the setting. Then it
turns to FEB settings.
- 09 - - 10 -
C.Fn
C.Fn
Page 8

- 11 - - 12 -
If the subject is too far away and underexposed, the < >
icon will blink in the viewfinder. Move closer to the subject
and try the FV lock again.
If <i-TTL> is not di
Page 9

- 13 - - 14 -
Page 10

- 15 - - 16 -
Page 11
- 17 - - 18 -
Page 12

Wireless Control Function
The flash unit is built in with a Wireless Control Port so that you
can wirelessly adjust the power level of the flash and the flash
triggering. To control the flash wirelessly, you need the
Transmitter and Receiver for Pro-Flash TLi-C/TLi-N (STR249)
.
Insert
the rece into the Wireless Control Port on the flash
and insert the transmit
iverer
into
the camera hot shoe.
Settings made on the hotshoe-mounted transmiter
will be wirelessly communicated
to the flash through the receiver. Then you
can press the camera shutter
release button to trigger
the flash. You can also hold
the transmiter by hand to
control your off-camera flash.
Other Applications
● When the flash unit receives wireless signals, is shown
on the LCD display.
For full instructions on the use of STR249, see its user
manual.
●
Sync Triggering
The Sync Cord Jack is a Φ2.5mm plug. Insert a trigger plug here
and the flash will be fired synchronously with the camera shutter.
Modeling Flash
If the camera has a depth-of-field preview button, pressing it will fire
the flash continuously for 1 second. This is called modeling flash.
It enables you to see the shadow effects on the subject and the
lighting balance. You can fire the modeling flash during wireless or
normal flash shooting.
● To avoid overheating and deteriorating the flash head, do
not fire the modeling flash for more than 10 consecutive
times. If you fire the modeling flash 10 consecutive times,
allow at least 10 minutes’ break for the camera flash.
Auto Focus Assist Beam
In poorly-lit or low-contrast shooting environments, the built-in auto
focus assist beam will automatically light on to make it easier for
autofocus. The beam will light up only when autofocus is difficult
and get out as soon as the autofocus becomes correct.
● If you find the auto focus assist beam does not light up,
this is because the camera has a correct autofocus.
Position
Center
Periphery
Effective Range
0.6~10m / 2.0~32.8 feet
0.6~5m / 2.0~16.4 feet
Bounce Flash
By pointing the flash head toward a wall or ceiling, the flash will
bounce off the surface before illuminating the subject. This can
soften shadows behind the subject for a more natural-looking shot.
This is called bounce flash.
To set the bounce direction, hold the flash head and turn it to a
satisfying angle.
360
-7-90
- 19 - - 20 -
● If the wall or ceiling is too far away, the bounced flash might
be too weak and result in underexposure.
The wall or ceiling should be a plain, white color for high
reflectance. If the bounce surface is not white, a color cast
may appear in the picture.
●
Page 13

If you set the flash coverage manually, make sure it covers
the lens focal length so that the picture will not have a dark
periphery.
- 21 - - 22 -
Creating a Catchlight
With the catchlight panel, you can create a catchlight in the subject’s
eyes to add life to the facial expression.
Point the flash head upward
1
by 90°.
Pull out the wide panel. The
2
catchlight panel will come out
at the same time.
Push the wide panel back in.
3
Push in only the wide panel.
Follow the same procedures as
for bounce flash.
●
●
● Point the flash head straight ahead and then upward by
90°. The catchlight will not appear if you swing the flash
head left or right.
For best catchlight effect, stay 1.5m/4.9ft away from the
subject.
●
Page 14

- 23 - - 24 -
Technical Data
STR237
Pro-Flash TLi-N
Nikon DSLR Cameras (i-TTL autoflash)
58m @ ISO 100
190ft @ ISO 100
24 to 105mm (14mm with wide panel)
• Auto zoom (Flash coverage set automatically
to match the lens focal length and image size)
• Manual zoom
• Swinging/tilting flash head (bounce flash): 0 to 360°
horizontally and -7° to 90° vertically
1/300 to 1/20000 seconds
i-TTL autoflash and manual flash
FEB: +/-3 stops in 1/3 stop increments
FV Lock Button
High-speed sync (up to 1/8000 seconds),
first-curtain sync, and second-curtain sync
Provided (up to 100 times, 199Hz)
Master, Slave, Off, S1/S2 Optic Triggering
3 (A, B, and C)
Indoors: 12 to 15 m / 39.4 to 49.2 ft.
Outdoors: 8 to 10 m / 26.2 to 32.8 ft.
Master unit reception angle: ±40° horizontally,
±30° vertically
4 (1, 2, 3, and 4)
Two red indicators blink
Fired with camera’s depth-of-field preview button
Center: 0.6~10m / 2.0~32.8 feet
Periphery: 0.6~5m / 2.0~16.4 feet
11.1V/2000mAh Li-ion polymer battery
< 1.5 seconds. Red LED indicator will light up
when the flash is ready.
Approx. 650
Power off automatically after approx. 90 seconds
of idle operation. (60 minutes if set as slave)
Hotshoe, 2.5mm sync line, Wireless control port
5600±200k
64*76*190 mm
420g
540g
Model Number
Model Name
• Type
Compatible Cameras
Guide No.
(1/1 output @ 105mm)
Flash Coverage
Flash Duration
Exposure Control•
Exposure control system
Flash exposure
compensation (FEC)
FV lock
Sync mode
Multi flash
Wireless Flash•
Wireless flash function
Controllable slave groups
Transmission range
(approx.)
Channels
Slave-ready indicator
Modeling flash
• Auto Focus Assist Beam
Effective range (approx.)
• Power Supply
Power source
Recycle time
Full power flashes
Power saving
• Sync Triggering Mode
• Color Temperature
• Dimensions
W x H x D
Weight without battery
Weight with battery
Page 15
- 25 - - 26 -
Page 16

 Loading...