

Page 1

INSTRUCTION MANUAL FOR THE MS200 STRINGING MACHINE.
CONTENTS:
A. TO PREPARE THE MACHINE FOR USE.
1. The assembly of the machine.
2. The calibration of the tension unit.
B. THE OPERATION OF THE MACHINE.
1. Adjusting the tension.
2. To pull tension on a string.
3. Mounting a tennis racquet.
4. Mounting a badminton racquet.
5. Mounting a squash racquet.
6. Using the clamp system.
C. THE MAINTENANCE OF THE MACHINE.
1. Cleaning the string clamp of the tension unit.
2. Cleaning the clamps.
3. The guide bars of the clamp system T92
4. The guide bars of the clamp system. T98
5. Calibrating the tension unit.
D. THE OVERHAUL OF A STRINGWAY CLAMP.
A. TO PREPARE THE MACHINE FOR USE.
A1. The assembly of the machine.
The figures in the circles show the sequence of
the assembly.
Fixing the legs [fig.1]:
* Put the floorstand on the table.
* Assemble the 3 toes:
- Insert the bolt with the washer from the inside of
the frame.
* Tighten the bolts firmly with a spanner.
Fixing the tooltray to the stand.
Insert the bolts from inside the tube and fix the
tool
tray with the nuts.
Page 2

Fixing the console to the tension housing (Fig 2 and 3).
- Placing the tension unit and the racket
support table (fig.5):
* Turn the tension adjustment knob anti-clockwise
as far as possible .
* Push the release button down to unlock the
tension head and move the tension head
backwards (1)..
* Push the foot pedal down slowly until the pedal
is horizontal. (DO NOT PUSH THE PEDAL
DOWN ALL THE WAY!) (2)
.
* Turn the pedal lock up and let release the pedal
(5).
* Guide the pull rod into the pipe (4) and turn the
nut BY HAND a couple of revolutions (5).
* Tighten the nut with a spanner.
* Let the foot pedal come up and place the tension
unit on top of the floor stand.
* Move the tension unit backwards, so that the bolts move into their slots.
* Tighten the nuts with a spanner.
* Place the support table over the shaft (fig 5).
A2. The calibration of the machine.
Before the machine is used for the first time it is important to check the calibration as described under
“Maintenance of the machine” (part C5).
Page 3

B. THE USE OF THE MS200.
B1 Adjusting the stringing-tension.
B1a. Switching the tension range.
* The tension can be adjusted in 2 ranges between 7 and 33 kg (15
and 73 lbs). Figure 7A and B shows how to switch from the lower to
the higher range.
When the drawbar pulls on the outer pin the high range is selected
and on the inner pin the low range.
- Move the tension head a little forward with the foot pedal so that
there is no pressure on the connection between drawbar and the pins.
- Pull the drawbar off the pin against the spring action of it and place
it over the other pin.
B1b. Locking the system before adjusting the stringing tension.
Before adjusting the tension the foot pedal must be locked to take the
pressure off the adjustment system (Fig 8).
1) Turn the locking handle at the bottom upwards.
2) Push the pedal down a little.
3) Push the release button of the tension-head lock down.
4) Release the pedal.
B1c. Adjusting the stringing tension.
Figure 9 shows the tension-adjustment-knob.
TAKE CARE to switch the locking handle down before you start stringing, otherwise the travel of the
tension head is restricted.
Page 4
B2a. To pull tension on a string.
* The locking system:
The MS200 has an automatic locking system on the tension head;
- The tension head is locked in the starting position when no string is clamped in the tension head. The lock is
automatically released when a string is clamped in the tension head. When the lock is not released with very
thin strings the lock can be released by hand (action 3 on fig. 8).
* To insert the string in the string clamp
The string can be clamped in the tension head at the front or around the back:
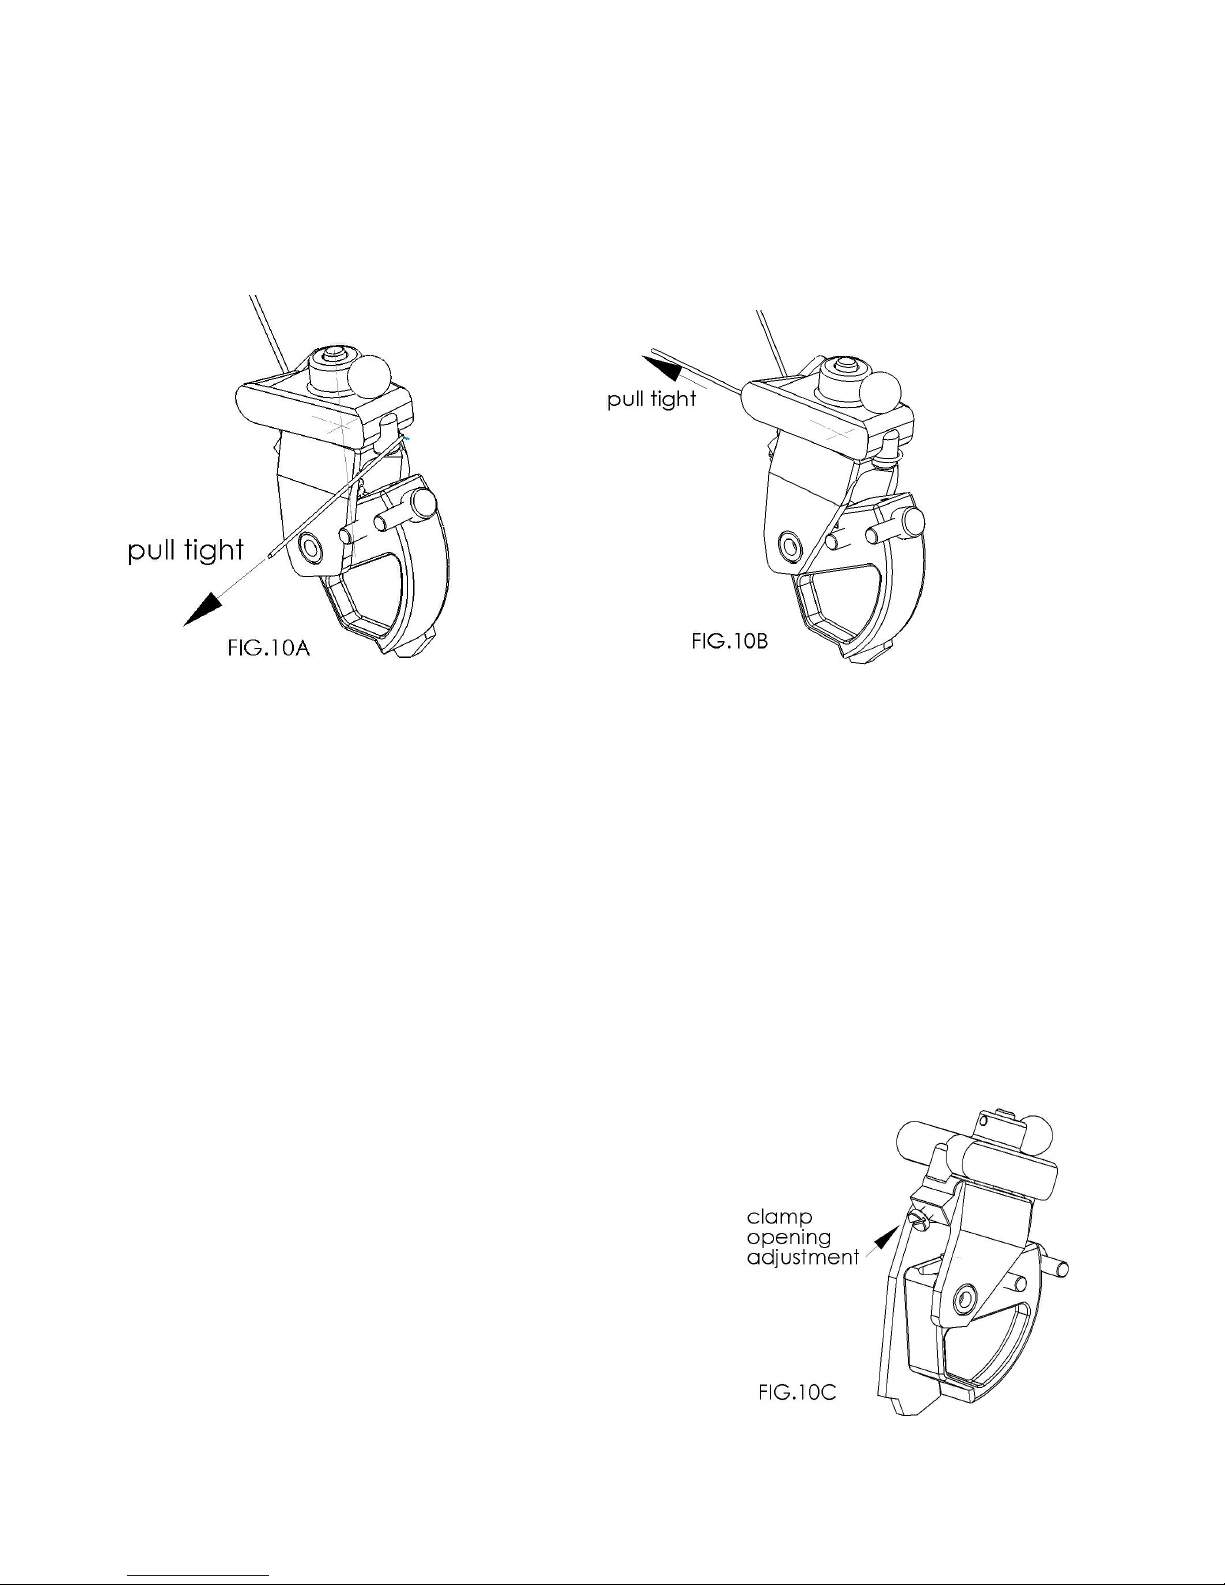
1) The advise is to go around the back Fig 10A:
- Pull the string tight around the back of the tensioner.
- Open the string clamp by pushing the pedal down and the string will slide into the clamp.
- Release the foot pedal and the string will be tensioned.
2) TO “DOUBLE CLAMP THE STRING”
To lower the pressure the string can also be clamped “double” using the front and the backside of the
string clamp:
- Wrap the string around the tension head.
- Lift the lever to open the string clamp.
- Pull the string straight towards the front.
- Move the string into the clamp at the front side.
- Close the string clamp and tension the string by releasing the foot
pedal
Double clamping should only be used with very fragile strings!
Always take good care that the string lies against the cams of
the upper jaw when the string is clamped!]
B2b. Adjusting the opening of the string clamp.
The opening of the string clamp can be adjusted with the screw (fig.
10c). Turning anti-clockwise will increase the to opening.
Page 5

B3. Mounting a tennis racquet
It is not necessary to mount the racquet in the middle of the turntable, Leave the head support at one end of
the table and move the throat support up and down to adjust it to the size of the racquet.
Mounting a tennis racquet goes as follows, the numbers in figure 11 show the sequence of the actions.
1) Move the central head support inwards.
2) Move the throat support inwards so that the racquet fits over the supports.
3) Put the racquet on the support plates, with the central main string positions at each side of the central
support. Place the racquet against the inside supports.
4) Put the clamping hooks at the head side on the racquet and turn the knob upwards so that the racquet can
not move off the plate.
5) Move the throat side post outwards until the flat side of the supports lie against the racquet
6) Fix the throat side post in that position with the clamping knob at the bottom.
7) Put the clamping hooks at the throat side on the racquet and tighten all clamping hooks.
8) Adjust the throat side supports upwards until they lie 2
mm below the tubes in the grommet.
9) Adjust the central against the racquet until it just hits the
racquet.
Check if the knobs that fix the posts are tightened!
“Babolat” retainer.
The Babolat retainer is used instead of the normal supports
for racquets with a low-profile-bridge..
But it can be used for most racquets if the stringer prefers that.
Page 6

B4. Mounting a badminton racquet.
A badminton racquet is clamped differently from a tennis racquet:
- Higher badminton supports are used at the head support instead of the white tennis supports.
- The clamping hooks at the throat side are not used to clamp a badminton racquet.
- The clamping piece with the screw is used to clamp the racquet. The screw is screwed into the threat in the
swivel plate.
- The V-block is used to position the shaft of the racquet.
Clamping the racquet goes as follows:
1) The head support is handled in the same way as with a tennis racquet.
2) Turn the throat supports downwards.
3) Put the racquet in the V-block.
4) Fix the racquet with the clamping piece.
5) Turn the throat supports upwards until they hit the racquet.
Check if the all supports lie against the inside of the racquet without clearance.
Check of the knobs that clamp the posts are tightened.
B5. Mounting a squash racquet.
Both support systems can be used for squash racquets, depending on the shape and the height of the profile.
Page 7

B6. Using the clamp systems.
All machines can be supplied with 3 clamp systems, flying clamps, double action fixed clamps and single
action clamps.
B6a Using flying clamps TH.
Figure 14 shows the flying clamp.
A flying clamps holds the tension by clamping the last string to the string before last.
The knob is used to adjust the clamp to the diameter of the string that is used.
Figure 15 shows the way to start with the center main strings with 2 flying clamps:
1) Clamp the center main strings in the first clamp near that side where the mains start.
2) Pull tension on the first and second main string towards the head.
3) Clamp the second string an position the clamp close to the other clamp.
4 )Check the adjustment of the clamps before every string job as shown as described in chapter B6d.
5) Continue by tensioning the mains and take care that the mains have to go in symmetrically.
Keep about the same number of strings at each side of the center.
B6b Using Double action fixed clamps T98.
With double action system T98 the string is clamped first and after that the system is clamped on the guiding
rails and in rotational direction by switching the handle (fig.16)
Page 8

The clamping force of the guiding system can be adjusted with the nut (fig.17).
VERY IMPORTANT:
- The clamping force on the rail should only be adjusted with the handle in the VERTICAL end position.
- During use the handle should always reach the vertical end position to be stable.
The clamp can be adjusted to the diameter of the string and the stringing tension that is used with the Alan
screw in the back side of the clamp.
B6c Using the single action fixed clamps T92.
The tensioned string locks the guiding system of T92 locks automatically.
The system can move in X an Y direction and the clamp can rotate and move up and down.
Fig.18 shows the movements of the T92 system.
The movement in the X and Y direction goes easy when the system is pushed in a low position close to the
guiding system.
When one pushes too high the system will lock.
To obtain minimum movement of the clamp when the clamp takes over the tension from the tensioner, push the
clamp in the pulling direction of the string (Fig.19)
B6d Checking the clamp adjustment.
It is very important to avoid sliding of the strings
through the clamps, because that will result in loss of
stringbed stiffness.
Therefore it is important to check the adjustment of
the clamps for EVERY string job as shown in figure
15 and 19:
- Hold the string behind the clamp.
- Release the tensioner.
- Check if the string slides through the clamp.
If the string slips through the clamp there can be 2
reasons:
- The clamp is greasy and has to be cleaned. (See C2).
- The clamp has to be adjusted at the diameter of the string and at the tension that is used.
Page 9

C. THE MAINTENANCE OF THE MACHINE.
C1. Cleaning the string clamp of the tension unit (fig. 20).
* Lift the lever so that the string clamp opens and pull the pin out of the upper jaw (2).
* Pull the upper jaw off the pull rod and clean the surfaces of the string clamp with white spirit.
C2. Cleaning the clamps [fig.20].
When the string slides through the clamp this can have 2 causes:
1. The adjustment of the clamp is wrong.
2. The silicone coating of the strings has made the clamp greasy, the clamp has to be cleaned:
* Fold a cloth around a thin plate and wet it with a degreasing fluid (white spirit).
* Move the plate and cloth between the jaws of the clamp, close the clamp and move the cloth and plate up and
down between the jaws.
C3. The guide bars of the 'T92' clamp
system.
The clamps can be moved very easy:
* When the longitudinal guide bars are kept
clean. (Don't use any grease!)
* When a little vaseline is put on the cross
guide bars.
* Put some grease every now and then on the
pin that holds the clamp.
C4. The guide bars and clamps of the clamp
system 'T98'.
When the guide bars are greasy the clamps can
slide over the guidebars.
Clean the guidebars regularly with white
spirite.
C5. Calibrating the tension unit.
It is good to check the calibration of the
machine regularly, with the calibrator that is supplied with the machine .
* Adjust the tension at 44,4 lbs.
* Check if the tension system is adjusted at the higher range.
* Switch the lower locking handle to the down position.
* Tension the string of the calibrator as shown in fig.. 21..
* Figure 21 shows the mark when the tension is too high, o.k. or too low.
* When the tension is too high or too low it can be adjusted with the adjusting screw down in the floor stand of
the machine.
Page 10

* Tension the string again and check if the mark ends in the right position.
D. OVERHAUL OF A STRINGWAY CLAMP.
After extensive use the clamps of the Stringway machines can be overhauled quite easily. Figure 1 shows the
parts of the clamp.
DISASSEMBLY
For the disassembly
and assembly it is easy to use a vise or a special piece of wood with a slot in it to hold the clamp as shown in
figure 2.
To disassemble the clamp unscrew the Alan bolt and take of the closing mechanism.
GRINDING THE CLAMP PARTS.
To clamp the string with a minimum clamping force the clamping
surface must be equally rough.
Grind the clamping surface by moving the clamp up and down over
a piece of grinding cloth.
Support the grinding cloth on a flat surface like a table.
THE ASSEMBLY OF THE
CLAMP.
- Put the spring in the hole
between the front and the back
of the clamp.
- Clamp both castings on top
of each other in the clamping device.
- Put the Alan bolt in from the back.
- Put the square nut on the Alan bolt and screw the bolt into the nut
until the nut is level with the surface of the clamp.
- Slide the spring washer over the Alan bolt.
- Turn the pull rod of the eccentric set on the Alan bolt until it
compresses the spring washer completely.
- Turn the pull rod ¼ revolution backwards.
- If the eccentric is in the right position, with the handle downwards, turn
the Alan bolt into the pull rod until the nylon washer hits the surface of
the clamp.
Page 11

If the closing mechanism is in the wrong position:
- Unscrew the Alan bolt holding the eccentric, so that the square nut comes out of the hole in the clamp.
- Turn the pull rod / eccentric in the right position.
- Turn the Alan Bolt into the pull rod until the nylon washer hits the surface of the clamp.
GREASING THE CLAMP.
For easy up and down sliding of the clamp it is advised to insert a thick layer of grease into the hollow that
clamps the clamp on the pin of the sliding system.
We wish you much pleasure with your MS200 stringing machine.
--------------------
.
 Loading...