


STRIDECORE
StrideRide Assembly Guide
Our Mission:
Creating fun, exciting, and innovative products
that inspire people to live healthier lives
1

WELCOME, AND CONGRATUALTIONS on your purchase of a new
StrideRide; the fun of Striding around on your new outdoor cardio machine is only
moments away.
Safety First
We strongly encourage you to read through the owner’s manual before you take your
new StrideRide for a spin. By doing so you will have a greater understanding for the
general operation of the various components found on your new ride. Safe riding
instructions are equally important and shouldn’t be overlooked. So even if you are an
experienced cyclist, please take a moment to read through this manual before you ride.
Sharing the Joy of the Ride
Nothing makes us happier than getting outside for some exercise. Our mission is to
create fun exciting, and innovative products that inspire people to live healthier lives. And
it’s this commitment to share the joy of exercise and inspire people to live healthier lives
that we offer the world’s most innovative cardio machine the StrideRide.
2

CONTENTS
Index p.3
General warning p. 4
1. First things First
A. Riders fit p. 5
B. Parental Advisory p. 5
2. Shipping Box Unpack and
Inventory
A. Assembly sequence p. 6
B. Loose part Inventory p. 7
C. Front wheel assembly p.8-10
D. Handle bar assembly p.11-12
E. Pedal cap assembly p.13
3.Fit
A. Handlebar height p. 14
B. Extender tube adjuster handle
alignment feature p.15
C. Brake reach p. 15
D. Mind your head P. 16
E. Riding posture P.16
3
4. Storage and transport
A. Proper Handling & Carrying Procedure p. 17
B. Kick Stand operation p. 18
C. Bike racks see wed site:
http://www.stridecore.com/bike_rack.html
5. Riding Tech
A. Brakes p. 19-21
B. Shifting gears p. 22
C. Tires and Tubes p. 24-25
6. Safety
A. The Basics p. 26-29
B. Mechanical Safety Check p. 30
C. Riding terrain and condition p. 31-32
D. First Ride p. 33
7. Service
A. Service Intervals p. 34-36
8. Warranty
Warranty Information p. 37-38
NOTE: This manual is not intended as a comprehensive use, service, repair or maintenance manual.

GENERAL WARNING:
Like any sport, StrideRiding involves risk of injury and damage. By choosing to ride a
StrideRide, you assume the responsibility for that risk, so you need to know — and to practice
— the rules of safe and responsible riding and of proper use and maintenance. Proper use and
maintenance of your StrideRide reduces risk of injury.
This Manual contains many “Warnings” concerning the consequences of failure to maintain or
inspect your StrideRide and of failure to follow safe cycling practices.
The combination of the safety alert symbol N! and the word WARNING indicates a
potentially hazardous situation which, if not avoided, could result in serious injury or death.
Many of the Warnings say “you may lose control and fall”. Because any fall can result in
serious injury or even death, we do not always repeat the warning of possible injury or death.
The combination of the damage alert symbol I! and the word ALERT calls attention to a
situation which, if not properly addressed or avoided, could cause serious damage to your
StrideRide and/or void your warranty.
Because it is impossible to anticipate every situation or condition which can occur while riding,
this manual makes no representation about the safe use of the StrideRide under all conditions.
There are risks associated with the use of any StrideRide which cannot be predicted or
avoided, and which are the sole responsibility of the rider.
4

1)First things First
NOTE: We strongly urge you to read the Manual in its entirety before your first ride. At the
very least, read and make sure that you understand each point in this section, and refer to
the cited sections on any issue which you don’t completely understand. Ask your dealer to
point out the features of your StrideRide.
Riders fit
StrideRides are designed to:
- Accommodate riders 5'-0" to 6'-4" tall
- Accommodate riders with a minimum weight of 100 lbs
- Accommodate riders with a maximum weight of 230 to 280 lbs (depending on model)
- Accommodate riders over 18 years only (They are NOT designed for children)
- NOT roll backwards (this feature for safer hill starts)
N! WARNING Riders must be at least 5" tall and 100 lbs.
Parental Advisory
The StrideRide is specifically designed to be ridden on paved or dirt roads for exercise by
adults weighing less than 230 pounds on the Standard and Limited models and less than
280 lbs on the Premium and Custom models.
N! WARNING The StrideRide should not be ridden by children at any time. THE
StrideRide DOES NOT MEET SAFETY STANDARDS FOR CHILDREN AND IS NOT INTENDED
FOR USE BY PERSONS LESS THAN 18 YEARS OF AGE. Because the StrideRide lacks many of
the safety features necessary for safe use by children, failure to follow this warning could
result in serious injury or death to your child.
5

StrideSports LLC
6
2) Shipping Box Unpack and Assembly
A. Assembly sequence
1) Unpack box perform inventory
2) Cut handle bar and front wheel shipping zip ties from main assembly
3) Assembly wheel quick release skewer into front wheel p.8
4) Assemble front wheel to main assembly p.9
5) Assemble front handle bar assembly to Extender p.10
6) Assemble stem cap to Extender p.10
7) Place Right and Left hand stride pads onto pedal assembly p.11
8) Screw in the four 5/32” cap screws to secure pads p.12
I! ALERT Do not pick up your StrideRide by its
plastic fender or you void your warranty (Fig #1)
O
P
P
P
Fig #1
StrideSports LLC
7
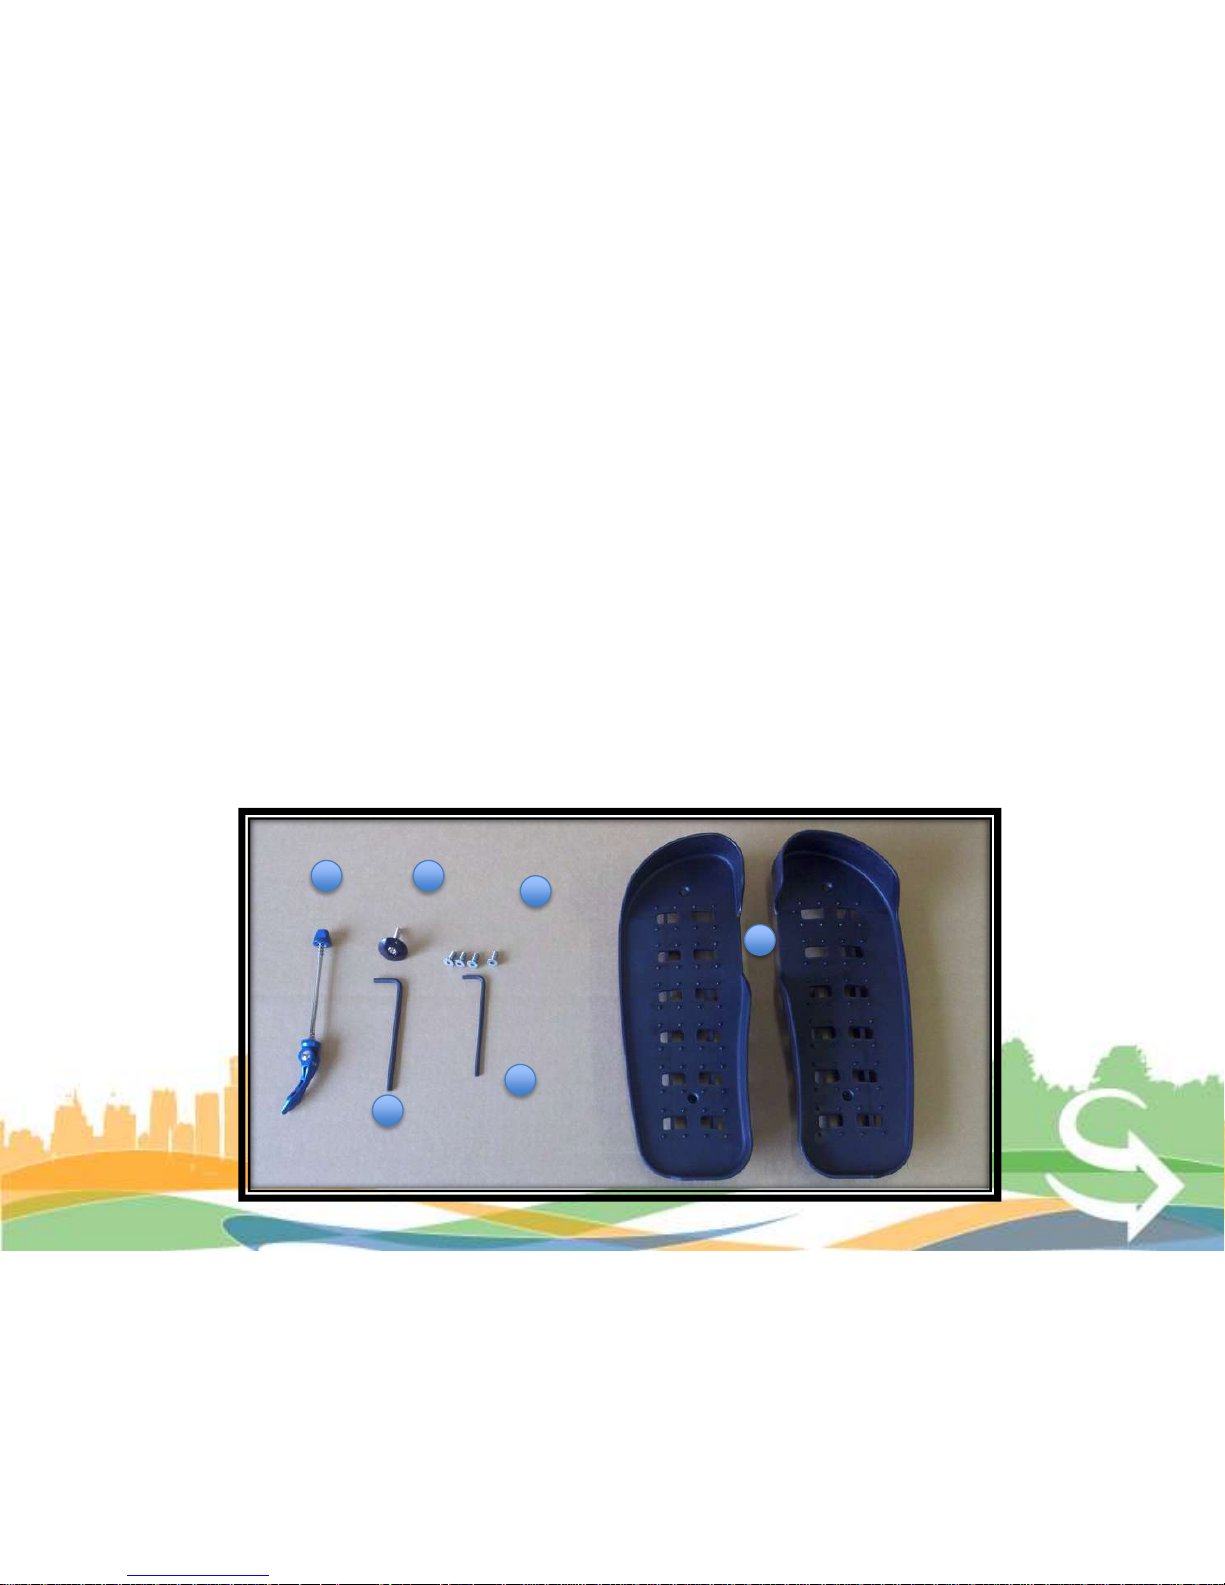
B. Loose Part Inventory
Exam loose parts make sure they are included in packaging:
1) Main bike assembly (not shown)
2) Front wheel assembly (not shown)
3) Front Quick release skewer
4) Stem cap
5) 5mm allen wrench
6) Four cap screws
7) 5/32” allen wrench
8) Left and right pedal pads
3
6
5
4
7
8

StrideSports LLC
8
C. Front wheel assembly
Wheel Quick Release:
N! WARNING: Riding with an improperly adjusted wheel quick release can
allow the wheel to wobble or fall off the StrideRide, which can cause serious
injury or death. Therefore, it is essential that you:
1. Ask your dealer to help you make sure you know how to install and remove
your wheels safely.
2. Understand and apply the correct technique for clamping your wheel in place
with a quick release.
3. Each time, before you StrideRide, check that the wheel is securely clamped.
The wheel quick release uses a cam action to clamp the StrideRide’s wheel in
place (see fig. 2). Because of its adjustable nature, it is critical that you
understand how it works, how to use it properly, and how much force you need
to apply to secure the wheel.

StrideSports LLC
9
Assemble the quick release mechanism to the front wheel:
- Remove the adjusting nut [4] and one spring from the quick release mechanism.
- Put the quick release mechanism [1] through the front wheel hub.
Assemble the front wheel to the fork:
- Put the wheel between the fork legs [3]. Make sure the axle is against the bottom of the
slot in each fork leg.
- Make sure the rotor goes between the brake pads in caliper brake housing.
- Put the spring and adjusting nut [4] back on the quick release mechanism.
- Do not tighten the adjusting nut at this time.
I! ALERT The front fork has a built in wheel retention feature
Adjusting the quick release mechanism:
- The words “open” and “close” are on opposite sides of the quick release lever.
- Move the quick release lever [1] to the “open”position [2] so the word “open” is
pointing away from the wheel.
- Adjust and tighten the quick release mechanism.

StrideSports LLC
10
N! WARNING: Failure to obey these steps can allow the front wheel to loosen while
riding. This can cause injury to the rider or to others.
I! ALERT: Operate the quick release lever by hand only. Do not use a hammer or any
other tool to tighten the quick release lever WARNING: Do not tighten the quick release
mechanism by turning the lever in a circular motion. This causes the clamping force to be
too light.
- You must use strong force to move the quick release lever to the “close” position.
- If you can easily move the lever to the “close” position, the clamping force is too
light.
- If the clamping force of the quick release mechanism is too light, the front wheel
can loosen while riding. This can cause injury to the rider or to others.
- Open and close the quick release lever with one hand while you turn the adjusting
nut with the other hand.
- Tighten or loosen the adjusting nut by hand, so that you first feel resistance to the
quick release lever when it is parallel with the axle.
- Put the wheel in the center of the fork and with strong force, push the cam lever
to the “close” position. When in the “close” position, make sure the quick release
lever lays along the fork.
- Make sure the both the adjusting nut and the opposite end of the quick release
mechanism make marks in the fork.
- If they do not mark the fork, but tighten the adjusting nut tighter than before
- The tightening torque of the quick release lever should be between 43 & 65 in.-lbs.
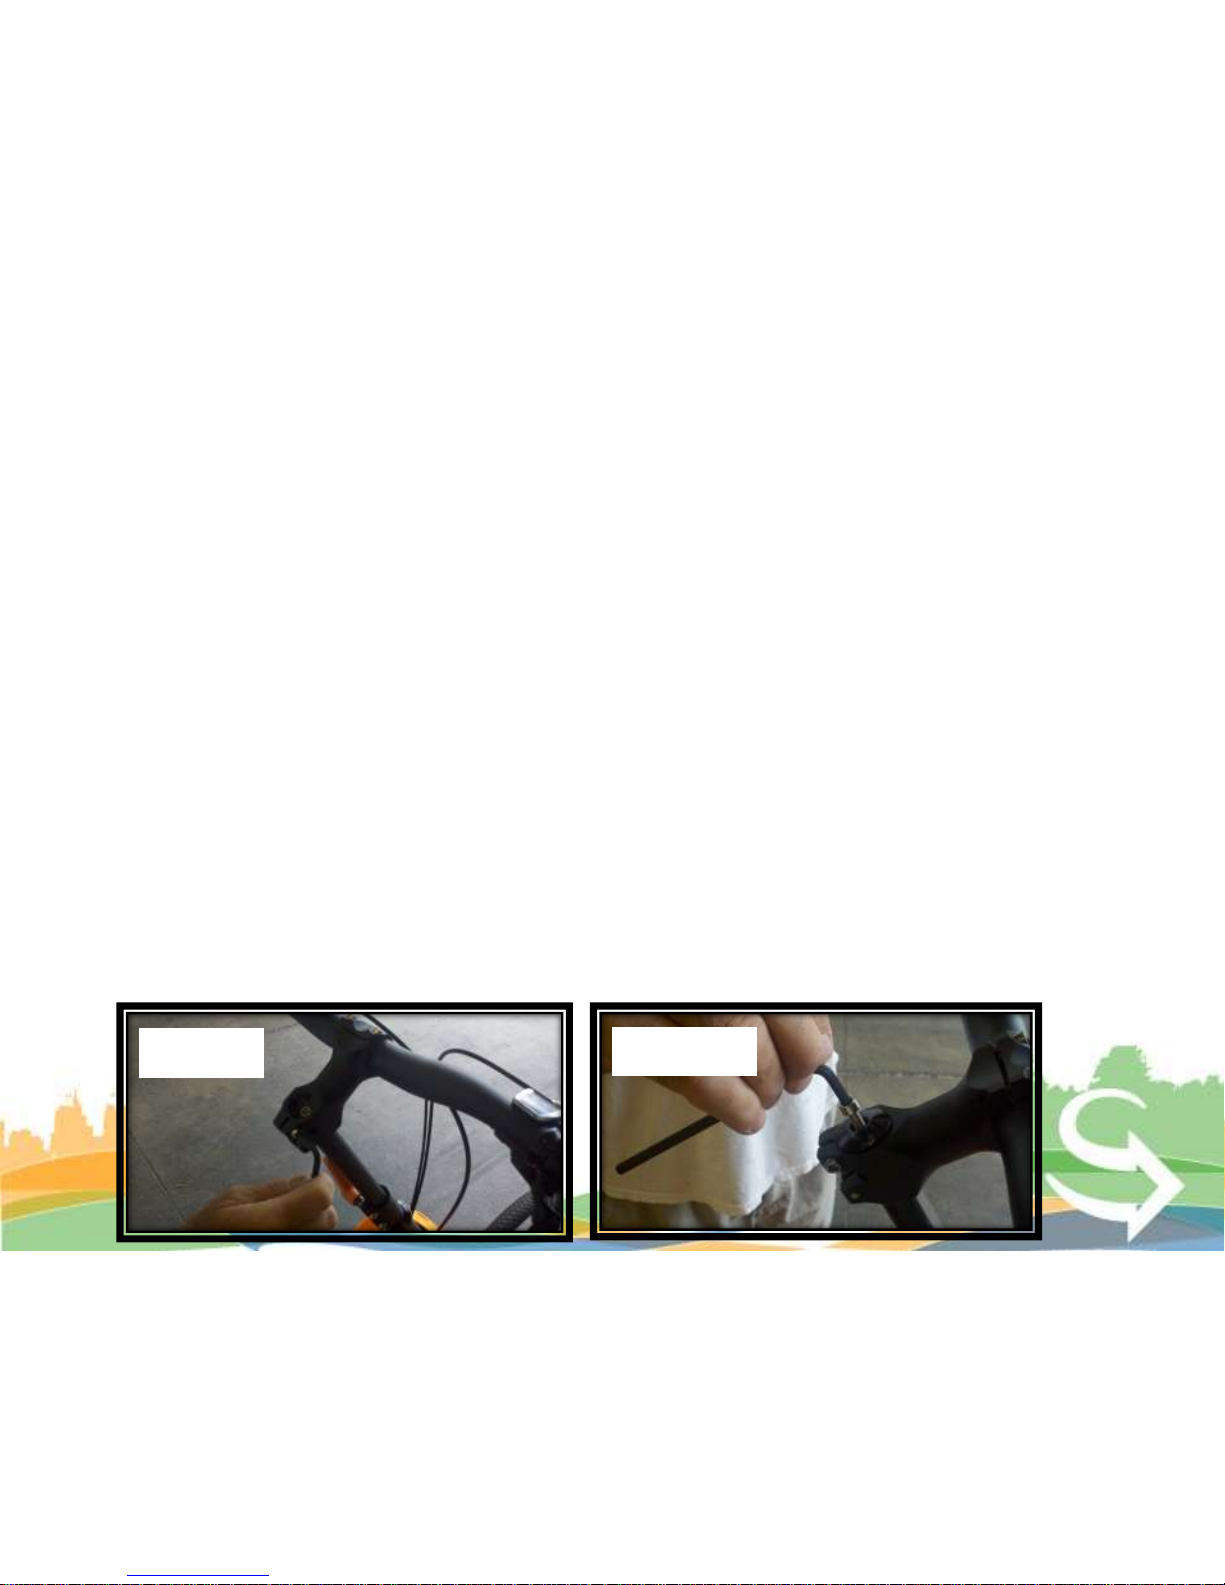
D. Handle bar assembly
Assemble the handle bar assembly onto the StrideRide:
- Place the stem on top of the extender. (Fig #9)
- Make sure control cables are not twisted. (next page Fig #11 to 13)
- Align handle bar to front wheel.
- Tighten the left and right hand stem bolts with 5mm Allen wrench.
- Place stem cap on top of extender and tighten with 5mm Allen wrench. (Fig #10)
- Re-Tighten all Right and left hand stem bolts and stem cap.
N! WARNING: Handlebar alignment:
Make sure the handlebar stem is parallel to the Strideride’s center line and clamped tight
enough so that you can’t twist it out of alignment.
N! WARNING: Handlebar ends:
Make sure the handlebar grips are secure and in good condition. If not, have your dealer
replace them. Make sure the handlebar ends and exten-sions are plugged. If not, plug them
before you ride. If the handlebars have bar end extensions, make sure they are clamped tight
enough so you can’t twist them.
N! WARNING: Loose or damaged handlebar grips or extensions can cause you to lose
control and fall. Unplugged handlebars or extensions can cut you and cause serious injury in
an otherwise minor accident.
11
Fig #9
Fig #10
N! WARNING: Cable alignment:
Make sure the cable are not twisted around the Strideride’s front frame. The left hand
brake cable should follow a straight path down to the caliper. See Fig #9
StrideSports LLC
12
Fig #12
Fig #11
Fig #13
Check that
the front
brake cable
is not
twisted
around the
frame
O
O
P
P
P

StrideSports LLC
13
E. Pedal cap assembly
Place the pedal caps onto the StrideRide pedal assembly
- Pedal cap are handed and only can go on one way
- Screw the two cap screws into pedal assembly with 5/32” Allen wrench

3)Fit
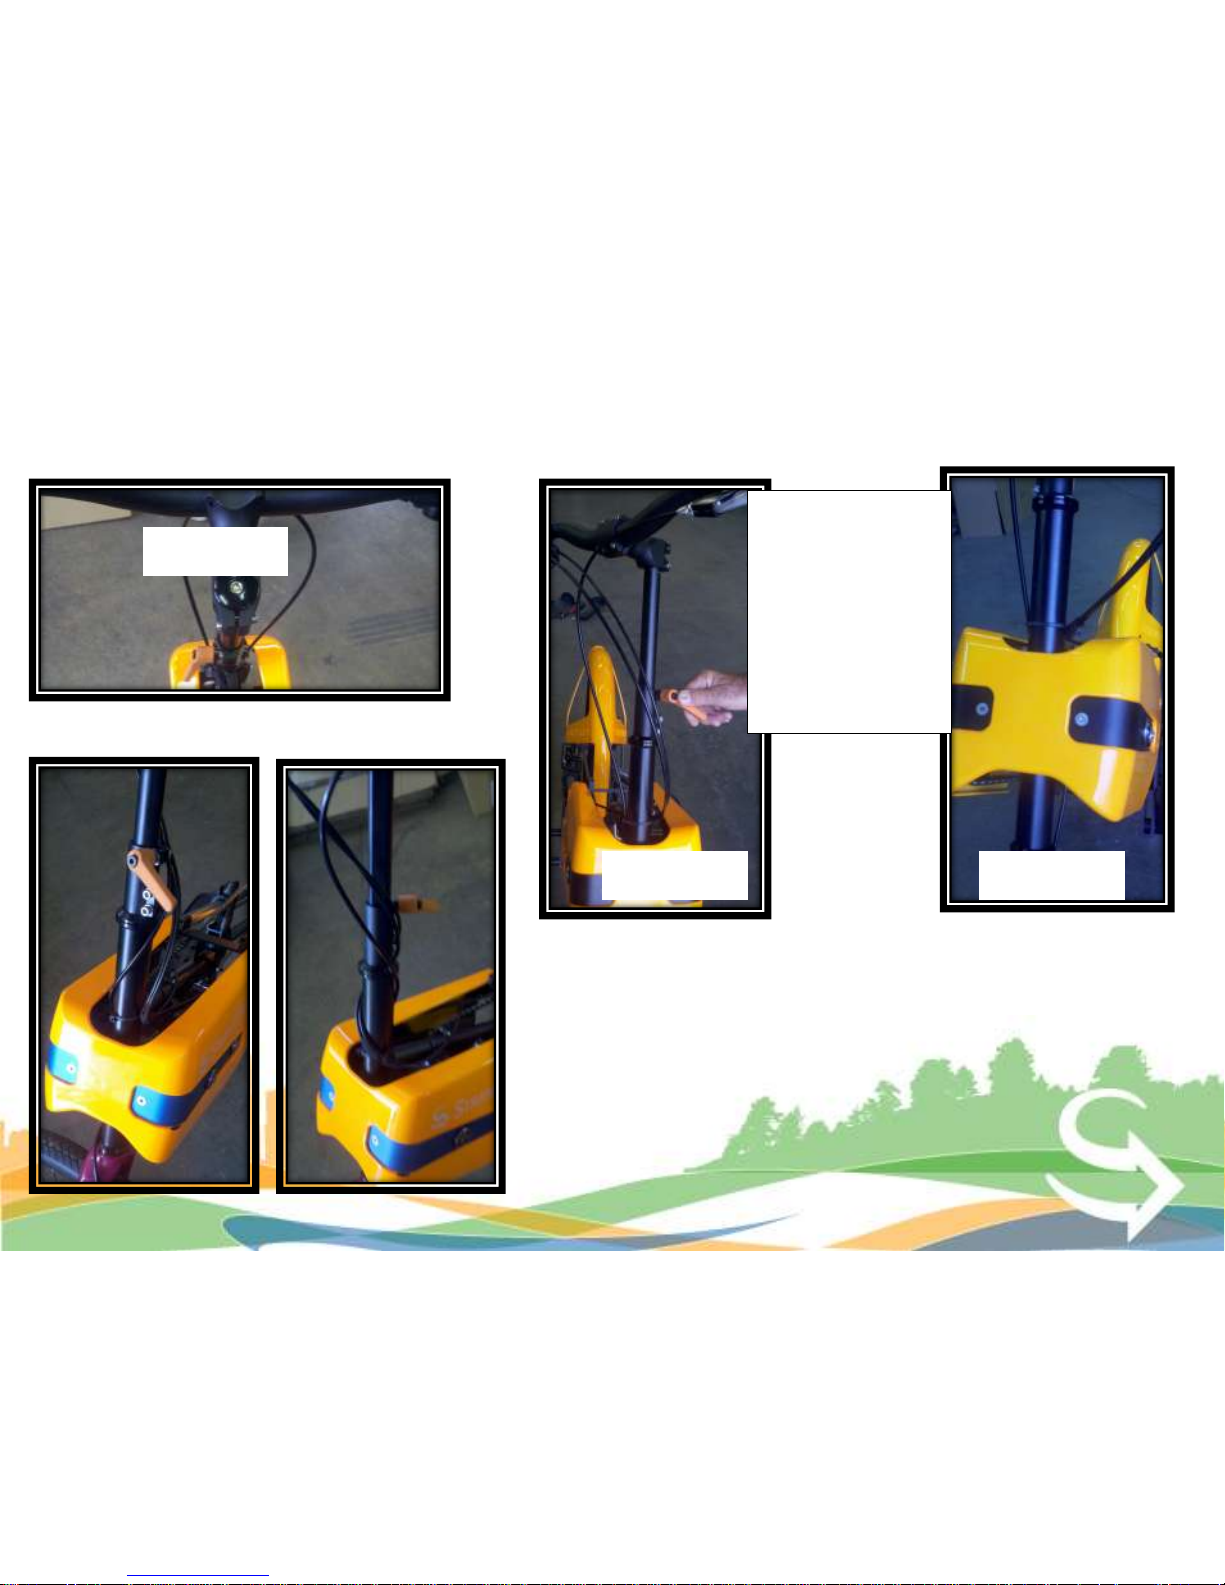
A. Handle Bar Extender tube adjuster
StrideRides are equipped with a handle bar Extender tube adjuster that enables riders to adjust
the handle bar height telescopically up and down by 9.5”.
- Screw the lever counter clockwise to loosen. (Fig. #16)
- Pull up or push down on the stem to adjust handle bar height. (Fig. #17)
- Screw the lever clockwise to tighten. (Fig. #18)
N! WARNING: Riding with an improperly tightened Extender tube adjuster can allow the
handle bars to move and cause you to lose control and fall. Therefore:
1. Ask your dealer to help you make sure you know how to correctly clamp Extender tube
adjuster.
2. Before you ride, first check that the handle bar Extender tube adjuster is securely clamped.
14
Fig #16
Fig #17
Fig #18

15
B. Extender tube adjuster handle alignment feature
StrideRides Extender tube adjuster lever can be realigned by pulling the lever out and re-
aligning it. This enables riders to get the lever out of the way of their leg’s stroke path.
- Pull the orange lever out. (Fig. #19)
- Rotate lever to reposition handle orientation. (Fig. #20)
- Screw the lever clockwise to tighten. (Fig. #18)
Fig #19 Fig #20
C. Brake reach
Make sure that your hands can reach and squeeze the brake levers comfortably. If your hands
are too small to operate the levers comfortably, consult your dealer before riding the ride. The
lever reach may be adjustable; or you may need a diferent brake lever design

16
D. Mind your head
N! WARNING: When riding the StrideRide, your head will be much higher off the ground than
it would be on a regular bicycle and you could suffer even more damage to your head as a result
of a collision or fall than you might if you fell off a conventional bicycle. As a result, wearing a
helmet is even more critical when riding the StrideRide and failure to do so could result in serious
injury or death.
E. Riding posture
Riding stance: Rest stance:

17
4)Storage:
A. Proper Handling & Carrying Procedure
Figure #22 demonstrates the proper method for handling, lifting or carrying your StrideRide. The
StrideRide should be handled with one hand on the top of the rear wheel and the other hand on
the front frame.
I! ALERT: The StrideRide should never be picked up by any of the moving mechanism
components such as the sliders, chain, rear fender or brake and shifter cables.
Fig #23

B. Kickstand Operation
The StrideRide is equipped with kickstand under the left rear frame. To operate the kickstand,
follow these steps:
Extending the Kickstand
- Holding the left handle bar grip lean the StrideRide away (Fig. #26)
- Rotate kick stand clockwise with toe 180 degrees. (Fig. #25)
- Pull the StrideRide back to you until it rest on the kick stand.
Retracting the Kickstand
- Holding the left handle bar grip lean the StrideRide away (Fig. #26)
- Rotate kick stand counter counterclock wise with toe. (Fig. #25)
N! WARNING: DO NOT STAND ON WITH KICKSTAND EXTENDED. STANDING ON THE
WITH THE KICKSTAND EXTENDED CAN INJURE THE PERSON AND DAMAGE YOUR FRAME
AND KICKSTAND, VOIDING YOUR WARRANTY.
18
Fig #26
Fig #24 Fig #25

5. Riding Tech
It’s important to your safety, performance and enjoyment to understand how things work on
your StrideRide. We urge you to ask your dealer how to do the things described in this section
before you attempt them yourself, and that you have your dealer check your work before you
StrideRide. If you have even the slightest doubt as to whether you understand something in
this section of the Manual, talk to your dealer.
A. Brake controls and features
It’s very important to your safety that you learn and remember which brake lever controls
which brake on your ride.
Make sure that your hands can reach and squeeze the brake levers comfortably. If your hands
are too small to operate the levers comfortably, consult your dealer before riding the ride. The
lever reach may be adjustable; or you may need a different brake lever design.
Check each time to make sure both brakes work correctly before you get on the StrideRide.
How brakes work the braking action of a StrideRide is a function of the friction between the
brake surfaces — usually the brake pads and the rotor. To make sure that you have maximum
friction available, keep your rotors and brake pads clean and free of dirt, lubricants, waxes or
polishes. Brakes are designed to control your speed, not just to stop the ride. Maximum
braking force for each wheel occurs at the point just before the wheel “locks up” (stops
rotating) and starts to skid. Once the tire skids, you actually lose most of your stopping force
and all directional control. You need to practice slowing and stopping smoothly without locking
up a wheel. The technique is called progressive brake modulation. Instead of jerking the brake
lever to the position where you think you’ll generate appropriate braking force, squeeze the
lever, progressively increasing the braking force. If you feel the wheel begin to lock up, release
pressure just a little to keep the wheels rotating just short of lockup. It’s important to develop
a feel for the amount of brake lever pressure required for each wheel at different speeds and
on different surfaces.
19

Brake controls and features
To better understand this, experiment a little by walking your ride and applying different
amounts of pressure to each brake lever, until the wheel locks. When you apply one or
both brakes, the ride begins to slow, but your body wants to continue at the speed at
which it was going. This causes a transfer of weight to the front wheel (or, under heavy
braking, around the front wheel hub, which could send you flying over the handlebars). A
wheel with more weight on it will accept greater brake pres sure before lockup; a wheel
with less weight will lock up with less brake pressure. So, as you apply brakes and your
weight is transferred forward, you need to shift your body toward the rear of the ride, to
transfer weight back on to the rear wheel; and at the same time, you need to both
decrease rear braking and increase front braking force. This is even more important on
descents, because descents shift weight forward. Two keys to effective speed control and
safe stopping are controlling wheel lock up and weight transfer. Practice braking and
weight transfer techniques where there is no traffic or other hazards and distractions.
Everything changes when you ride on loose surfaces or in wet weather. Tire adhesion is
reduced, so the wheels have less cornering and braking traction and can lock up with less
brake force. Moisture or dirt on the brake pads reduces their ability to grip. The way to
maintain control on loose or wet surfaces is to go more slowly to begin with
20

Brake controls and features
N! WARNING:
1. Riding with improperly adjusted brakes or worn brake pads is dangerous and can
result in serious injury or death.
2. Applying brakes too hard or too suddenly can lock up a wheel, which could cause you
to lose control and fall. Sudden or excessive application of the front brake may pitch the
rider over the handlebars, which may result in serious injury or death.
3. StrideRide brakes are disc brakes and are extremely powerful. Take extra care in
becoming familiar with these brakes and exercise particular care when using them.
4. Disc brakes can get extremely hot with extended use. Be careful not to touch a disc
brake until it has had plenty of time to cool.
5. See the brake manufacturer’s instructions for installation, operation and care of your
brakes. If you do not have the manufacturer’s instructions, see your dealer or contact the
brake manufacturer.
21

B. Shifting gears
Your StrideRide has a 9-speed derailleur type rear drivetrain with a (manual) 2-
speed front chain ring.
How a derailleur drivetrain works
The StrideRide derailleur drivetrain, the gear-changing mechanism will have:
• a rear cassette
• a rear derailleur
• one shifter on the right side of the handle bar
• two front sprockets called chainrings
• a drive chain
Shifting Gears
The StrideRide trigger style of shifter control 9 speeds
- Press the large lever to downshift
- Press the small lever to upshift
Manual shifting of the 2-speeds on the front chain rings.
- The large 42 tooth chain ring is for heavy riders
or
flat terrian
- The smaller 22 tooth chain ring is for lighter riders
or
hilly terrian
- To Manually change the chain rings see our web site for a demo video.
22

Shifting gears
The vocabulary of shifting can be pretty confusing. A downshift is a shift to a “lower” or
“slower” gear, one which is easier to pedal. An upshift is a shift to a “higher” or “faster”, harder
to pedal gear. The way to keep things straight is to remember that shifting the chain in towards
the centerline of the Strideride is for accelerating and climbing and is called a downshift. Moving
the chain out or away from the centerline of the StrideRide is for speed and is called an upshift.
Whether upshifting or downshifting, the StrideRide derailleur system requires that the drive
chain be moving forward and be under at least some tension. A derailleur will shift only if you
are pedaling forward.
23

C. Tires, Tubes and Valves
Your StrideRide uses the Schraeder type valves. The Schraeder valve (fig. 27) is like the
valve on a car tire. To inflate a Schraeder valve tube, remove the valve cap and clamp the
pump fitting onto the end of the valve stem. To let air out of a Schraeder valve, depress
the pin in the end of the valve stem with the end of a key or other appropriate object.
Your StrideRide used standard mountain bike tires 26x1.75 to 26x1.95 with a generalpurpose unidirectional tread designed to perform best under on road conditions wet and
dry. If, once you’ve gained experience with your new StriderRide, you feel that a
different tire might better suit your riding needs. The size, pressure rating, and on some
high-performance tires the specific recommended use, are marked on the sidewall of the
tire. The part of this information which is most important to you is Tire Pressure.
N! WARNING: Never inflate a tire beyond the maximum pressure marked on the
tire’s sidewall. Exceeding the recommended maximum pressure may blow the tire off the
rim, which could cause damage to the ride and injury to the rider and bystanders.
The best and safest way to inflate a StrideRide tire to the correct pressure is with a
bicycle pump which has a built-in pressure gauge.
N! WARNING: Patching a tube is an emergency repair. If you do not apply the
patch correctly or apply several patches, the tube can fail, resulting in possible tube
failure, which could cause you to loose control and fall. Replace a patched tube as soon
as possible.
24
fig. 27

Tires, Tubes and Valves
N! WARNING: There is a safety risk in using gas station air hoses or other air
compressors. They are not made for StrideRide tires. They move a large volume of air
very rapidly, and will raise the pressure in your tire very rapidly, which could cause the
tube to explode.
Tire pressure is given either as maximum pressure or as a pressure range. How a tire
performs under different terrain or weather conditions depends largely on tire pressure.
Inflating the tire to near its maximum recommended pressure gives the lowest rolling
resistance; but also produces the harshest ride. High pressures work best on smooth, dry
pavement.
Very low pressures, at the bottom of the recommended pressure range, give the best
performance on smooth, slick terrain such as hard-packed clay, and on deep, loose
surfaces such as deep, dry sand.
Tire pressure that is too low for your weight and the riding conditions can cause a
puncture of the tube by allowing the tire to deform sufficiently to pinch the inner tube
between the rim and the riding surface.
25

6. Safety
A. The Basics
N! WARNING: Many states require specific safety devices. It is your responsibility to
familiarize yourself with the laws of the state where you ride and to comply with all applicable
laws, including properly equipping yourself and your ride as the law requires.
Observe all local Bicycling laws and regulations. Observe regulations about licensing, riding on
sidewalks, laws regulating ride path and trail use, helmet laws, child carrier laws, special
Bicycling traffic laws, and so on. It’s your responsibility to know and obey the laws.
1. Always wear a cycling helmet which meets the latest certifica-tion standards and is
appropriate for the type of riding you do. Always follow the helmet manufacturer’s instructions
for fit, use and care of your helmet. Most serious StrideRide injuries involve head injuries which
might have been avoided if the rider had worn an appropriate helmet.
N! WARNING: Failure to wear a helmet when riding may result in serious injury or death.
2. Always do the Mechanical Safety Check (Section 6.B) before you ride.
3. Be thoroughly familiar with the controls of your StrideRide:
• brakes (Section 5.A.)
• shifting (Section 5.B.)
• handle bars height adjustment (Section 3.A.)
4. Be careful to keep body parts and other objects away from the sharp teeth of gears,
chainrings, the moving chain, the striding pedals, and the spinning wheels of your StrideRide.
26

The Basics cont.
5. You are sharing the road or the path with others — motorists, pedestrians and other cyclists.
Respect their rights.
6. Ride defensively. Always assume that others do not see you.
7. Look ahead, and be ready to avoid:
• Vehicles slowing or turning, entering the road or your lane ahead of you, or coming up
behind you.
• Parked car doors opening.
• Pedestrians stepping out.
• Children or pets playing near the road.
• Pot holes, sewer grating, railroad tracks, expansion joints, road or sidewalk
construction, debris and other obstructions that could cause you to swerve into traffic,
catch your wheel or cause you to have an accident.
• The many other hazards and distractions which can occur while you ride on a
StrideRide.
8. StrideRide in designated bike lanes, on designated bike paths or as close to the edge of the
road as possible, in the direction of traffic flow or as directed by local governing laws.
9. Stop at stop signs and traffic lights; slow down and look both ways at street intersections.
Remember that a StrideRide always loses in a collision with a motor vehicle, so be prepared to
yield even if you have the right of way.
27

The Basics cont.
10. Always wear:
• Shoes that will stay on your feet and will grip the pedals. Never ride barefoot or in
sandals.
• Bright, visible clothing that is not so loose that it can be tangled in the StrideRide or
snagged by objects at the side of the road or trail.
• Protective eyewear, to protect against airborne dirt, dust and bugs — tinted when the
sun is bright, clear when it’s not.
11. Don’t jump with your StrideRide. Jumping can put huge and unpredictable stress on the
StrideRide and its components. Riders who insist on jumping their StrideRides risk serious
damage, to their StrideRides as well as to themselves.
12. Ride at a speed appropriate for conditions. Increased speed means higher risk. 6. Use
approved hand signals for turning and stopping.
13. Never ride with headphones. They mask traffic sounds and emergency vehicle sirens,
distract you from concentrating on what’s going on around you, and their wires can tangle in
the moving parts of the StrideRide, causing you to lose control.
14. Never carry a passenger.
15. Never carry anything which obstructs your vision or your complete control of the
StrideRide, or which could become entangled in the moving parts of the StrideRide.
16. Never hitch a ride by holding on to another vehicle.
28

The Basics cont.
17. Don’t do stunts, wheelies or jumps.
18. Don’t weave through traffic or make any moves that may surprise people with whom you
are sharing the road.
19. Observe and yield the right of way.
20. Never ride your StrideRide while under the influence of alcohol or drugs.
21. If possible, avoid riding in bad weather, when visibility is obscured, at dawn, dusk or in
the dark, or when extremely tired. Each of these conditions increases the risk of accident.
29

B. Mechanical Safety Check
Routinely check the condition of your StrideRide before every ride.
Nuts & Bolts: Make sure nothing is loose. Lift the front wheel off the ground by two or
three inches, then let it bounce on the ground. Anything sound, feel or look loose? Do a
visual and tactile inspection of the whole StrideRide. Any loose parts or accessories? If so,
secure them. If you’re not sure, ask someone with experience to check.
Tires & Wheels: Make sure tires are correctly inflated (see Section 5.C).
Tires in good shape? Spin each wheel slowly and look for cuts in the tread and sidewall.
Replace damaged tires before riding the ride.
Wheels true? Spin each wheel and check for brake clearance and side-to-side wobble. If a
wheel wobbles side to side even slightly, or rubs against or hits the disk brake pads, take the
ride to a qualified ride shop to have the wheel trued.
N! WARNING: Wheel truing is a skill which requires special tools and experience. Do
not attempt to true a wheel unless you have the knowledge, experience and tools needed to
do the job correctly.
30

C: Riding terrain and conditions
Off Road
StrideRides are designed to be ridden on paved & dirt roads and cinder tails. However, they are
not designed to be ridden on rough terrain like mountain bike trails or designed to be jumped
off curbs.
Wet Weather Riding
N! WARNING: Wet weather impairs traction, braking and visibility, both for the StrideRider
and for other vehicles sharing the road. The risk of an accident is dramatically increased in wet
conditions. Under wet conditions, the stopping power of your brakes (as well as the brakes of
other vehicles sharing the road) is dramatically reduced and your tires don’t grip nearly as well.
This makes it harder to control speed and easier to lose control. To make sure that you can slow
down and stop safely in wet conditions, ride more slowly and apply your brakes earlier and
more gradually than you would under normal, dry conditions. See also Section 5.A.
Night Riding
Riding a StrideRide at night is many times more dangerous than riding during the day. A
bicyclist is very difficult for motorists and pedestrians to see. Therefore, children should never
ride at dawn, at dusk or at night. Adults who chose to ac-cept the greatly increased risk of
riding at dawn, at dusk or at night need to take extra care both riding and choosing specialized
equipment which helps reduce that risk. Consult your dealer about night riding safety
equipment.
N! WARNING:. Riding at dawn, at dusk, at night or at other times of poor visibility without
an adequate lighting system and without reflectors is dangerous and may result in serious injury
or death.
31

Riding terrain and conditions cont.
If you choose to ride under conditions of poor visibility, check and be sure you comply with
all local laws about night riding, and take the following strongly recommended additional
precautions:
• Purchase and install reflectors.
• Purchase and install battery or generator powered head and tail lights which meet all
regulatory requirements and provide adequate visibility.
• Wear light colored, reflective clothing and accessories, such as a reflective vest,
reflective arm and leg bands, reflective stripes on your helmet, flashing lights attached
to your body and/or your StrideRide ... any reflective device or light source that moves
will help you get the attention of approaching motorists, pedestrians and other traffic.
• Make sure your clothing or anything you may be carrying on the StrideRide does not
obstruct a reflector or light.
• Make sure that your StrideRide is equipped with correctly positioned and securely
mounted reflectors.
While riding at dawn, at dusk or at night:
• Ride slowly.
• Avoid dark areas and areas of heavy or fast-moving traffic.
• Avoid road hazards.
• If possible, ride on familiar routes.
If riding in traffic:
• Be predictable. Ride so that drivers can see you and predict your movements.
• Be alert. Ride defensively and expect the unexpected.
32

D. First ride
When you buckle on your helmet and go for your first familiarization ride on your new
StrideRide, be sure to pick a controlled environment, away from cars, other cyclists,
obstacles or other hazards. Ride to become familiar with the controls, features and
performance of your new StrideRide.
Familiarize yourself with the braking action of the StrideRide (see Section 5.A). Test the
brakes at slow speed, putting your weight toward the rear and gently applying the
brakes, rear brake first. Sudden or excessive application of the front brake could pitch
you over the handlebars. Applying brakes too hard can lock up a wheel, which could
cause you to lose control and fall. Skidding is an example of what can happen when a
wheel locks up.
Practice shifting the gears (see Section 5.B). Remember to only shift while you are
Striding. (IE Pedaling)
Check out the handling and response of the StrideRide; and check the comfort.
If you have any questions, or if you feel anything about the ride is not as it should be,
consult your dealer before riding.
33

A. Service Intervals
Some service and maintenance can and should be performed by the owner, and require no
special tools or knowledge beyond what is presented in this manual.
The following are examples of the type of service you should perform yourself. All other
service, maintenance and repair should be performed in a properly equipped facility by a
qualified StrideRide mechanic using the correct tools and pro-cedures specified by the
manufacturer.
Break-in Period: Your StrideRide will last longer and work better if you break it in before
riding it hard. Control cables and wheel spokes may stretch or “seat” when a new ride is first
used and may require readjustment at a bicycle shop.
Before every ride:
- Mechanical Safety Check (Section 6.B)
- Wipe off Dirt and Grim on Roller rods: Wipe down the roller rods with a wet towel
to remove and dirt and grim that accumulates
After every long or hard ride or after every 10 to 20 hours of riding:
- Squeeze the front brake and rock the ride forward and back. Everything feel solid? If
you feel a clunk with each forward or backward movement of the ride, you probably have
a loose headset. Have a bicycle shop check it.
- Lift the front wheel off the ground and swing it from side to side. Feel smooth? If you
feel any binding or roughness in the steering, you may have a tight headset. Have a
Bicycle shop check it.
34

Service Intervals cont.
- Carefully check the control cables and cable housings. Any rust? Kinks? Fray-ing? If so,
have a bicycle shop replace them.
- Squeeze each adjoining pair of spokes on either side of each wheel between your
thumb and index finger. Do they all feel about the same? If any feel loose, have a bicycle
shop check the wheel for tension and trueness.
- Check to make sure that all parts and accessories are still secure, and tighten any
which are not.
- Check the frame, particularly in the area around all tube joints; the handlebars; the
stem; and the seatpost for any deep scratches, cracks or discoloration. These are signs of
stress-caused fatigue and indicate that a part is at the end of its use-ful life and needs to
be replaced.
After every long or hard ride: if the ride has been exposed to water or grit; or at least
every 100 miles:
- Clean the ride and lightly oil the chains. Wipe off excess oil.
- Lubrication is a function of climate and conditions (use dry lube in sandy or salt water
ares.)
Every 25 (hard off-road) to 50 (on-road) hours of riding:
Take your StrideRide to local bicycle shop for a complete checkup.
35

N! WARNING: Like any mechanical device, a StrideRide and its components are subject
to wear and stress. Different materials and mechanisms wear or fatigue from stress at
different rates and have different life cycles. If a component’s life cycle is exceeded, the
component can suddenly and catastrophically fail, causing serious injury or death to the
rider. Scratches, cracks, fraying and discoloration are signs of stress-caused fatigue and
indicate that a part is at the end of its useful life and needs to be replaced. While the
materials and workmanship of your StrideRide or of individual components may be
covered by a warranty for a specified period of time by the manufacturer, this is no
guarantee that the product will last the term of the warranty. Product life is often related
to the kind of riding you do and to the treatment to which you submit the StrideRide. The
StrideRide’s warranty is not meant to suggest that the StrideRide cannot be broken or will
last forever. It only means that the StrideRide is covered subject to the terms of the
warranty.
36

8) WARRANTY
Satisfaction Guarantee
We guarantee that you will love your StrideRide . If you purchased your StrideRide
directly from StrideRide you can return it for any reason within 30 days of purchase for a
full refund, less return shipping charges, if any. Just contact us at
service@StrideRide.com to arrange the return. If you purchased from an authorized
dealer, that dealer’s Return Policy will apply instead.
Limited Warranty
We also guarantee that your StrideRide will be free from manufacturing defects,
including both workmanship and materials, as stated below:
Five years: Frame
Two years: Fork, Drive Pedals Arms, and Steering Column
30 days: All Other Components, Paint and Decals
This is the only warranty for your StrideRide and it is limited to the initial purchaser (it
expires upon resale or transfer of the to another party).
During the term of this warranty, if you experience a defect in your StrideRide , we will
either repair or replace your free of charge, other than return shipping charges, if any.
We will decide whether a repair or replacement is appropriate under the circumstances.
There are no other entitlements under this warranty beyond reparation or replacement of
your StrideRide as a result of a manufacturing defect
37

WARRANTY cont.
Limits to Coverage
This warranty does not cover damage to your StrideRide resulting from:
Normal wear and tear
Improper use (see Owner’s Manual discussion of proper and improper use)
Improper assembly of a component or the StrideRide
Improper servicing
Failure to perform routine maintenance
The use of parts other than the original replacement parts
Collisions, crashes, or physical abuse to the StrideRide
Neglect or use of the StrideRide when in a state of disrepair
Voiding Your Warranty
You void your warranty by:
Misusing the StrideRide (see Owner’s Manual discussion of proper and improper use)
Exceeding the rider weight limit
Making any modification to the StrideRide frame
Making any modification to the StrideRide components
38

WARRANTY cont.
Claims
To make a claim through this warranty, please contact service@StrideRide.com.
Subject to the laws of the governing jurisdiction, StrideRide shall not be responsible for any
incidental or consequential damages arising from this offer of warranty or that result directly or
indirectly from the use of the StrideRide . Your rights under this warranty are limited to the
reparation or replacement of your StrideRide , and the decision to repair or replace your StrideRide
resides solely with StrideRide. This warranty affords you certain rights that vary by jurisdiction.
Any limitations expressed in this warranty do not affect your statutory rights under the law of the
relevant jurisdiction. If a court of competent jurisdiction determines that one or more specific
provisions contained in this limited warranty cannot be applied, the inapplicability of that provision
shall not affect the enforceability of any other provision contained herein and all other provisions
shall remain in full effect for the term of the warranty.
39

Terminology & Component Overview
1. FRAME REAR
2. FRAME FRONT
3. SLIDER TUBES
4. SLIDERS
5. PEDAL CAP
6. CHAIN RING
7. SLIDERS CHAIN
8. DRIVE CHAIN
9. REAR WHEEL
10. 9 SPEED CASSETTE
11. REAR BRAKE CALIPER
12. FRONT BRAKE CALIPER
13. FRONT WHEEL
14. TIRE
15. FORK
16. EXTENDER
17. STEM
18. HANDLEBAR
19. SHIFTER RIGHT
20. BRAKE LEVER
21. GRIP
22 CONTROL CABLES
23. BRAKE ROTOR
24. FRONT WHEEL QUICK-RELEASE
25. EXTENDER TUBE ADJUSTER HANDLE
40
10
9
1
2
3
8 7
4
6
5
11
12
13
14
15
16
17
18
19
20
21
22
23
24
25
 Loading...