

Stricker CITY 7, City Kid, Ultra series Instructions Manual
Owners manual
strap
Eye bolt
Adapter for extension of wheelposition
Gripnut
Cranks with mountain drive
Grifpshift
Ergohandle
Steering tube
Slide tube with aloy angle
Straight tube
Steering rubbers
Automatic catch
Wheelchair clamp
Toothstrap or chain
Tooth disc or
‘chain wheel
Wheelchairl S1
with City 7
R & E Stricker
Reha-Entwicklungen GmbH
Klotzberg 64
D-77815 Bühl/Baden
Tel. 0049 7223/72510
Fax. 0049 7223/74947
www.stricker-handbikes.de
E-Mail:
info@stricker-handbikes.de
Find an installation Video at
www.stricker-handbikes.de
/installation
Manual English V16/04 page 1

Instructions
For Stricker Hand-Bikes
CITY 7, City Kid, Ultra-models
Version 16/04
The device complies with the current standards and directives of the EU. We certify this in
the EC declaration of conformity. If required we will be glad to send you the according
declaration of conformity.
Please read this manual and the safety instructions carefully before the first use!
1 SAFETY INSTRUCTIONS .......................................................................................... 3
2 OPERATING INSTRUCTIONS FOR OUR HAND-BIKE ........................................ 4
2.1 Handling of the Bike ...................................................................................................... 4
2.2 Tips for riding ................................................................................................................. 4
3 DESCRIPTION OF THE HAND-BIKE FOR WHEELCHAIRS .............................. 6
4 UNPACKING YOUR HAND-BIKE ............................................................................. 6
5 ATTACH YOUR HAND-BIKE TO THE WHEELCHAIR ......................................... 7
6 SEPARATE YOUR HAND-BIKE FROM THE WHEELCHAIR .............................. 9
7 ADJUST THE HAND-BIKE TO THE RIDER ......................................................... 10
7.1 Adjust the Hand-Bike to the width of the wheelchair .................................................. 10
7.2 First adaptation to the wheelchair ................................................................................ 11
7.3 Adjustment of the hand-crank position ........................................................................ 12
7.35 distances ....................................................................................................................... 13
7.4 Adjustment of the ground clearance (distance between the front wheels of the
wheelchair and the ground) .......................................................................................... 13
7.5 Straight tube City Kid .................................................................................................. 14
8 FUNCTION OF THE AUTOMATIC CLICK-IN ADJUSTER ................................ 16
9 FUNCTIONING OF THE STEERING ALIGNMENT ELASTOMER ................... 17
10 CITY 7 PLUS ADDITIONAL MOUNTAIN GEAR RATIO (MOUNTAIN DRIVE) 17
11 CITY 7 ADJUST THE TOOTH BELT ..................................................................... 18
12 ULTRA 21PLUS + DISCONNECTABLE BACKPEDAL BRAKE .......................... 18
13 WHEELCHAIR REQUIREMENTS .......................................................................... 19
14 SERVICING ................................................................................................................ 20
15 ADAPTER ................................................................................................................... 21
16 KICK STAND .............................................................................................................. 23
17 APPENDIX A WHEELCHAIR OVERVIEW ......................................................... 24
18 APPENDIX B TORQUE-LIST.................................................................................. 26
19 APPENDIX C……………………………………………………………………....27-36
Manual English V16/04 page 2

Please read this manual and the safety instructions carefully before the first use!
1. Safety Instructions
Important advice how to avoid accidents
These instructions are for your own safety!
Please read carefully before your first ride!
1. Your Hand-Bike is valid for a maximum speed of 25 km/h, please do not exceed this speed
in any circumstance.
2. If you ride your handbike on slops, it could be possibly that the front wheel will spin and
you will move back!
We recommend our extension for the wheelchair and on front a carrier or extra weight with
lead acid batteries additional to get more weight on front wheel.
Please do not mount backpacks or parts with weight on the rear of the wheelchair!
3. Please use your Hand-Bike downhill with a lower speed to enable safe braking.
4. If you use public transport (bus, train etc.), disconnect the handbike from your wheelchair
and place it in a safe position where it will not harm you or your fellow men in case of an
accident. If you leave the bike attached to your wheelchair, we will not assume liability.
5. The maximum load is 120 kg; please notice also the maximum load of your wheel chair
maximum load for City Kid is 60 kg.
6. Please always hold the handles with BOTH hands, while pedaling or braking, otherwise
serious accidents may occur.
7. Please always use the included lights for rides in the dark or twilight. Adjust the rear
flashing light to the backrest of your wheelchair. Check the batteries before every ride and
replace old ones in time.
8. Do not ride down curbs or steep steps - the Hand-Bike can tip over.
9. Please ride your Hand-Bike in ways suitable to your grade of disability. Drive carefully and
slowly, especially around corners. The Hand-Bike can tip over especially with narrow
wheelchairs and less camber of the wheels.
Please make the following safety checks before every ride:
1. Check the tyre pressure regularly: handbike tire: 58-72 psi, wheelchair tires 72 psi
2. Check the tension of the tooth belt (only model City 7): press both sides between the thumb
and forefinger – they should only drop 1-2cm, otherwise pull the belt up
(see chapter 11)
3. Check the belt also for damage or rips.
4. Check all parts, bolts and nuts. See if they are properly fixed – especially the four bolts of
the cross tube to avoid twisting of the tubes.
5. Check the steering tube for proper adjustment.
6. Check before every ride, if the drive wheel is centric to the wheelchair. If the difference is
more than 1 cm, the Hand-Bike needs adjustment. Use the middle of the footrests for a
visual check. For proper adjustment, use a stencil, as described in chapter 5.2.
An incorrectly adjusted front wheel can cause accidents.
Please note, that the safe use of the Hand-Bike needs training and experience. For beginners it
is necessary to ride slowly and carefully. Avoid steep hills and roads or ways in bad condition
until you get used to your Hand-Bike.
Advice for dealers:
Manual English V16/04 page 3

Please always hand this manual over with the delivery of the Hand-Bike and explain the
instructions above. Do not deliver a Hand-Bike WITHOUT manual!
2 Operating instructions for our Hand-Bike
2.1 Handling of the Bike
Steering:
The Hand-Bike is steered by turning the hand-cranks. The steering has a self-centering
mechanism for perfect function, which allows for a straight direction. However, please
avoid abrupt steering moves, especially at high speed.
Braking:
City 7 + City KID
These models have a drum brake, which also operated by turning the handles
reverse, which allows keeping the hands at the handles while braking. The
additional V- brake operated with a lever on the right side of the frame or a lever
at the ergo handle.
Ultra 21 + Ultra Sport
The models Ultra 21, Ultra Sport and ElectroDrive smart have a disc brake and a
V-Brake. The Ultra Sport model has a free wheel, which enables the rider to
pedal backwards anytime. The brakes operated with a brake lever at the ergogrip.
The V-brake can produce loud sounds while the first using.
After a certain time the sounds disappear by itself. Or you drive approx. 200
meters a steep mountain downwards with continuously braking.
Shifting:
City 7+ City KID
The City 7 model has a 7-speed internal gear hub. The control lever is mounted
between the hand-cranks. The gears can be changed any time, while riding or
standing. A mountain drive gear reduction is optionally available. Mountain
Drive offers seven reduced gears (see chapter 9).
As an option the shifting is at the ergo handle together with the brake lever.
City 8
The shifting is at the ergo handle together with the brake lever.
Ultra 21 + Ultra Sport
These models combine eight derailleur gears with three internal hub gears. The
derailleur gears can only be operated while pedaling; the internal gears can be
changed any time.
The gear controls are placed on the ergo handles.
2.2 Tips for riding
With the attachment of the Stricker Hand-Bike to your wheelchair you get a tricycle
with all advantages and inconvenient.
Manual English V16/04 page 4

A tricycle is not as stable as a wheelchair in curves.
Especially as a beginner, you have to be aware of this and get used to your hand bike
through careful riding.
This means: no abrupt steering moves
You can ride with higher speed but it is necessary to take time to get used to that higher
speed. Always control your speed with regard to the traffic situation.
Attention:
Always drive at a speed that enables you to brake in time in unpredictable situations.
Your hand-bike is not a racer.
Drive at a low speed, especially in curves and/or critical situations and bend your upper
body towards the curve direction (like a cyclist) to avoid tipping over.
Advice for users with children:
NEVER ride your hand-bike with a child on your knees. You are risking serious
injuries! The child can catch its fingers in the tooth belt or chain or can be hurt through
the turning hand-cranks.
Therefore, in the interest of your child: NEVER on the knees!
For your own safety, you should wear a cycling helmet.
The steering alignment elastomer keeps your front wheel straight and reduces the
steering movements.
The lateral stability is much higher, if you use a wheelchair with negative camber.
By shifting your body weight to the front, you avoid blocking of the front wheel
braking.
Reset of the wheelchair wheels avoids a slipping of the front drive wheel uphill.
The optimum is to use the Stricker wheelbase extension (optionally available with and
without suspension)
The following maneuvers are not allowed:
Ride several steps or stairs (crash danger)
Ride at an angle over a curb (crash danger)
U-turns on steep streets (crash danger)
Abrupt steering movements (crash danger)
Abrupt braking in curves (crash danger)
Manual English V16/04 page 5
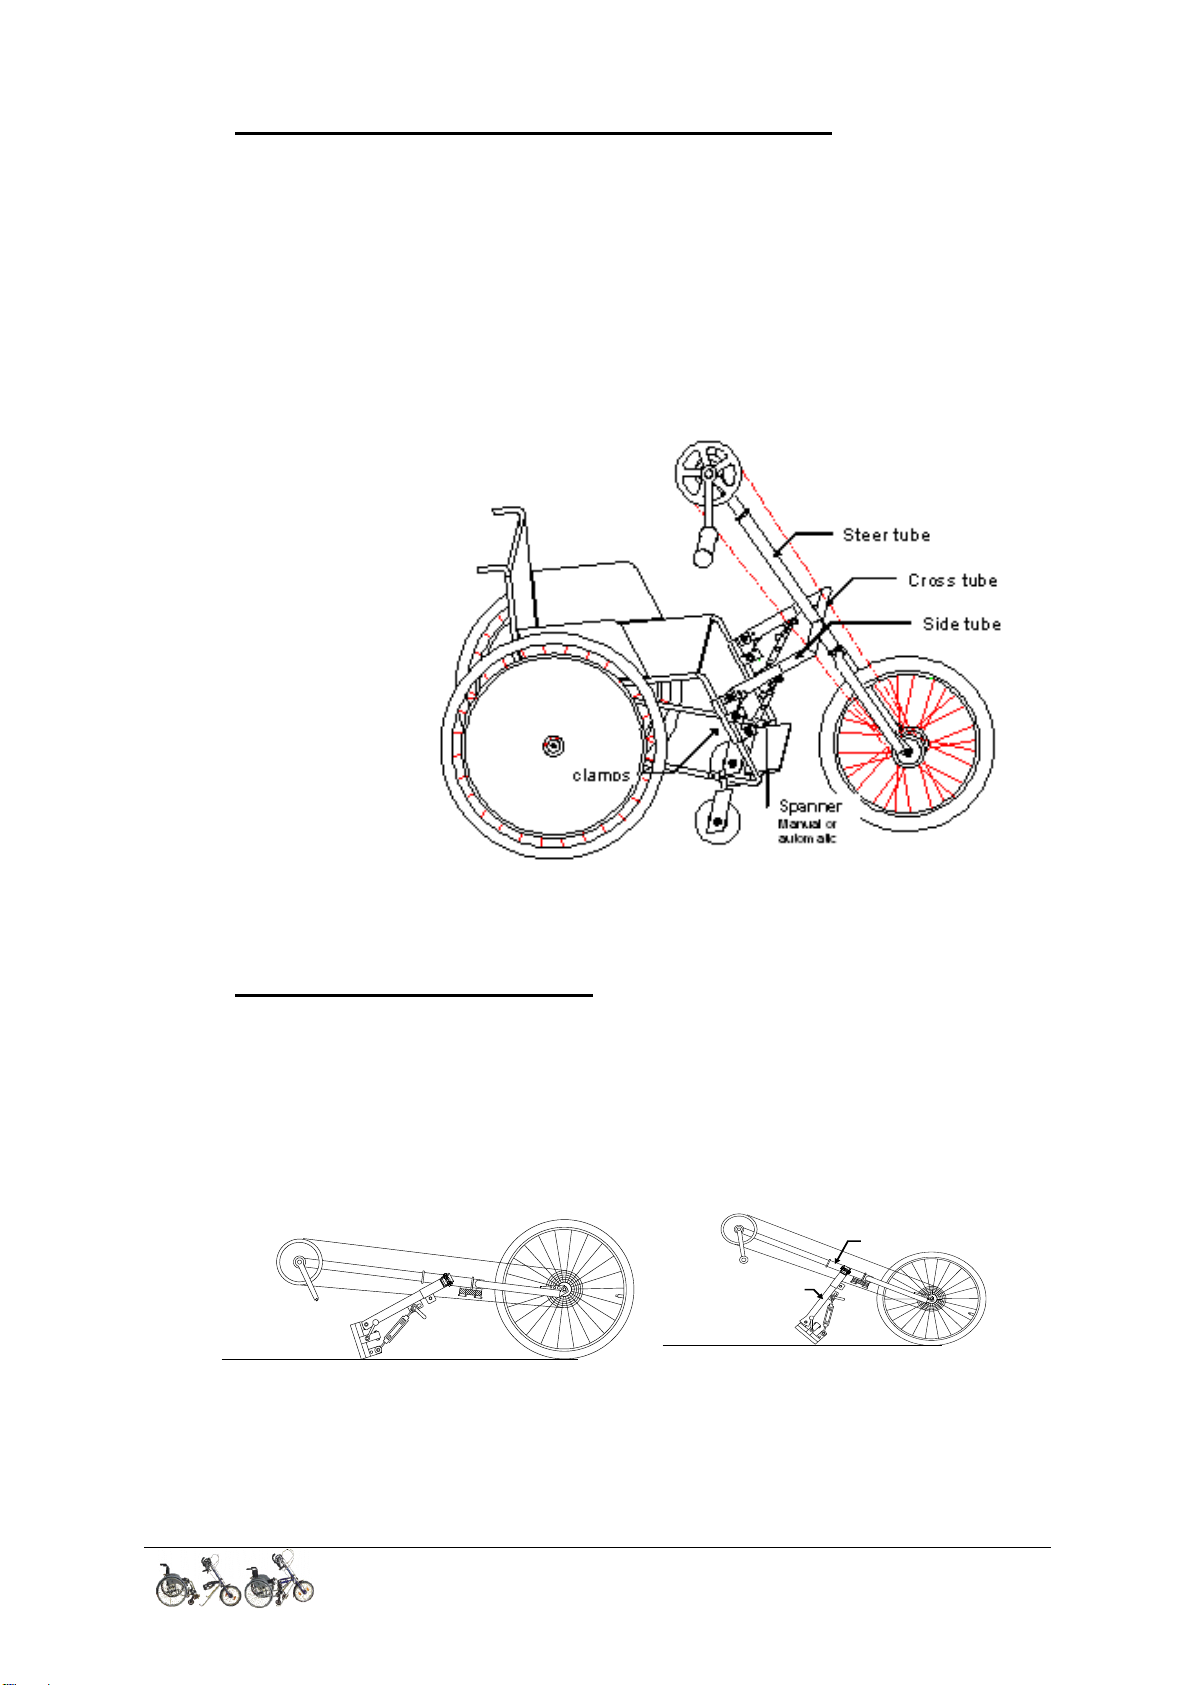
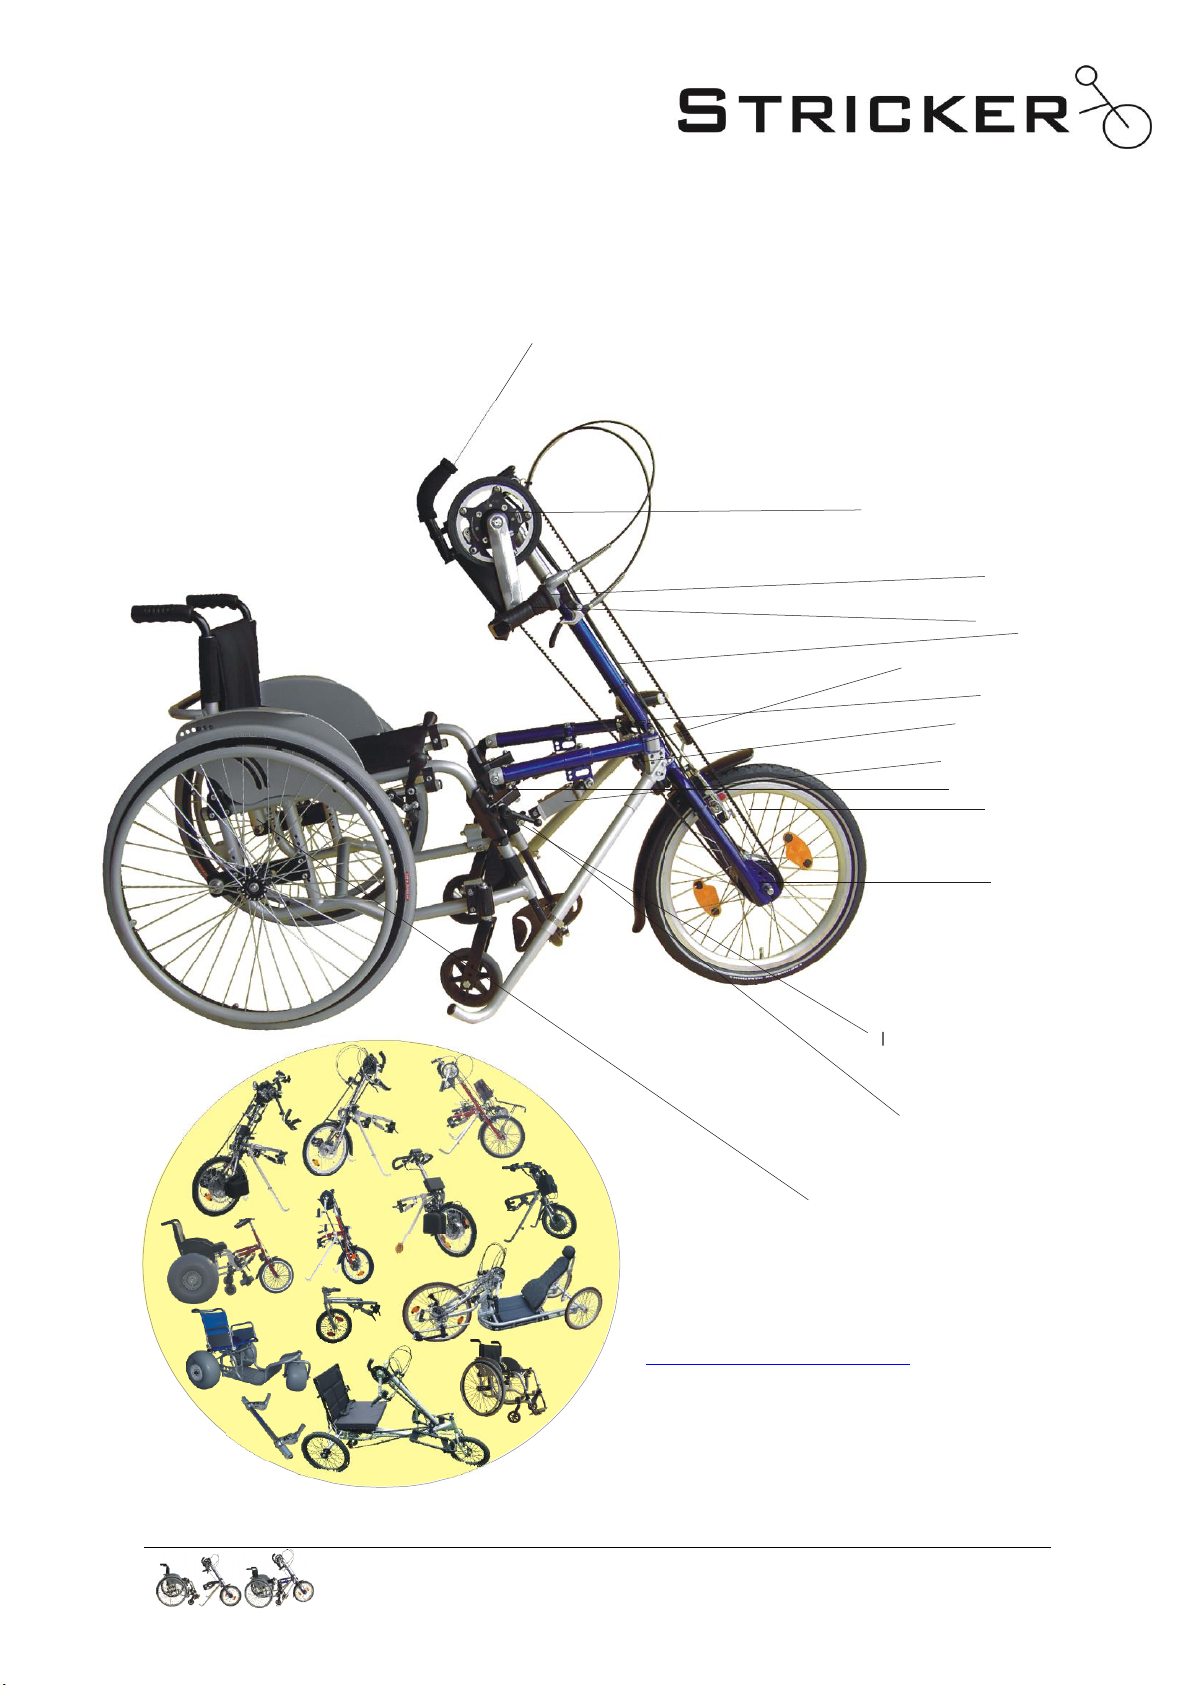
3 Description of the Hand-Bike for wheelchairs
Steer tube
Side tube
The hand-bike is an additional equipment device, which can be attached to nearly every
modern wheelchair (except toilet seats, electric wheelchairs and similar vehicles).
It is recommended, to use wheelchairs with rigid frames but foldable wheelchairs are
also no problem with the hand bike it is possible to ride much longer distances with less
effort. The Hand-Bike can be attached without additional help in most cases. No parts
remain on the wheelchair after the Hand-Bike is removed. (except 2 small plastic
clamps if you like)
picture 1
4 Unpacking your Hand-Bike
For transport purposes, both handgrips are removed and the side tubes turned to the top.
After undoing the 2 bolts S1L and S1R (see picture 8) with the enclosed long Allen key,
both side tubes should be turned into their normal position (approx. 90 degrees in
relation to the steering tube) and be fixed. Screw both handgrips on the hand-cranks
with a 15mm spanner. (Attention! The left crank has a left-hand thread)
picture. 2
Manual English V16/04 page 6

5 Attach your Hand-Bike to the wheelchair
handle
(There is also an Video CD available vor adjusting the handbike)
After the Hand-Bike is adjusted to the rider and to the wheelchair (see chapter 7) it can be
attached to the wheelchair.
Open the clamps wide enough to push them over the front frame tubes of the
wheelchair. Do not open too wide; otherwise, the bolts may come off.
Loosen the spanner levers H2L and H2R (picture 6), to enable the spanner to move
in the slot hole. Turn the clamps in such a way, that the spanners are approximately
in the middle of the slot hole.
Picture 3 picture 3a
Hold the Hand-Bike on the handle and attach it to the front of the wheelchair frame.
Then close the clamps (picture 6) on both sides.
CAUTION: Tighten the clamps with max. 6-8 Nm!
Hint1: To make the attachment even easier fix the handbrake on the front
wheel. This avoids uncontrolled movements of the Hand-Bike. By also
fixing the handbrakes on the wheelchair, you have both hands free to attach
the Hand-Bike.
Hint2: Attaching the Hand-Bike to the wheelchair is even easier with the
position-clamp (optional), which is attached to the wheelchair. Simply put
the Hand-Bike on top and fix the clamps.
Push the handle forward to lift the front wheels of the wheelchair, and then fix the
levers H2L and H2R (picture 6).
Attention:
The handle needs to be pushed, until the levers are in the front end of the slot
hole (above the recess, picture 4). Keep pushing the handle with one hand,
while you fix the levers with the other hand.
Manual English V16/04 page 7
Push the lever to
the front of the slot
hole
The pin have to come out
on both sides!
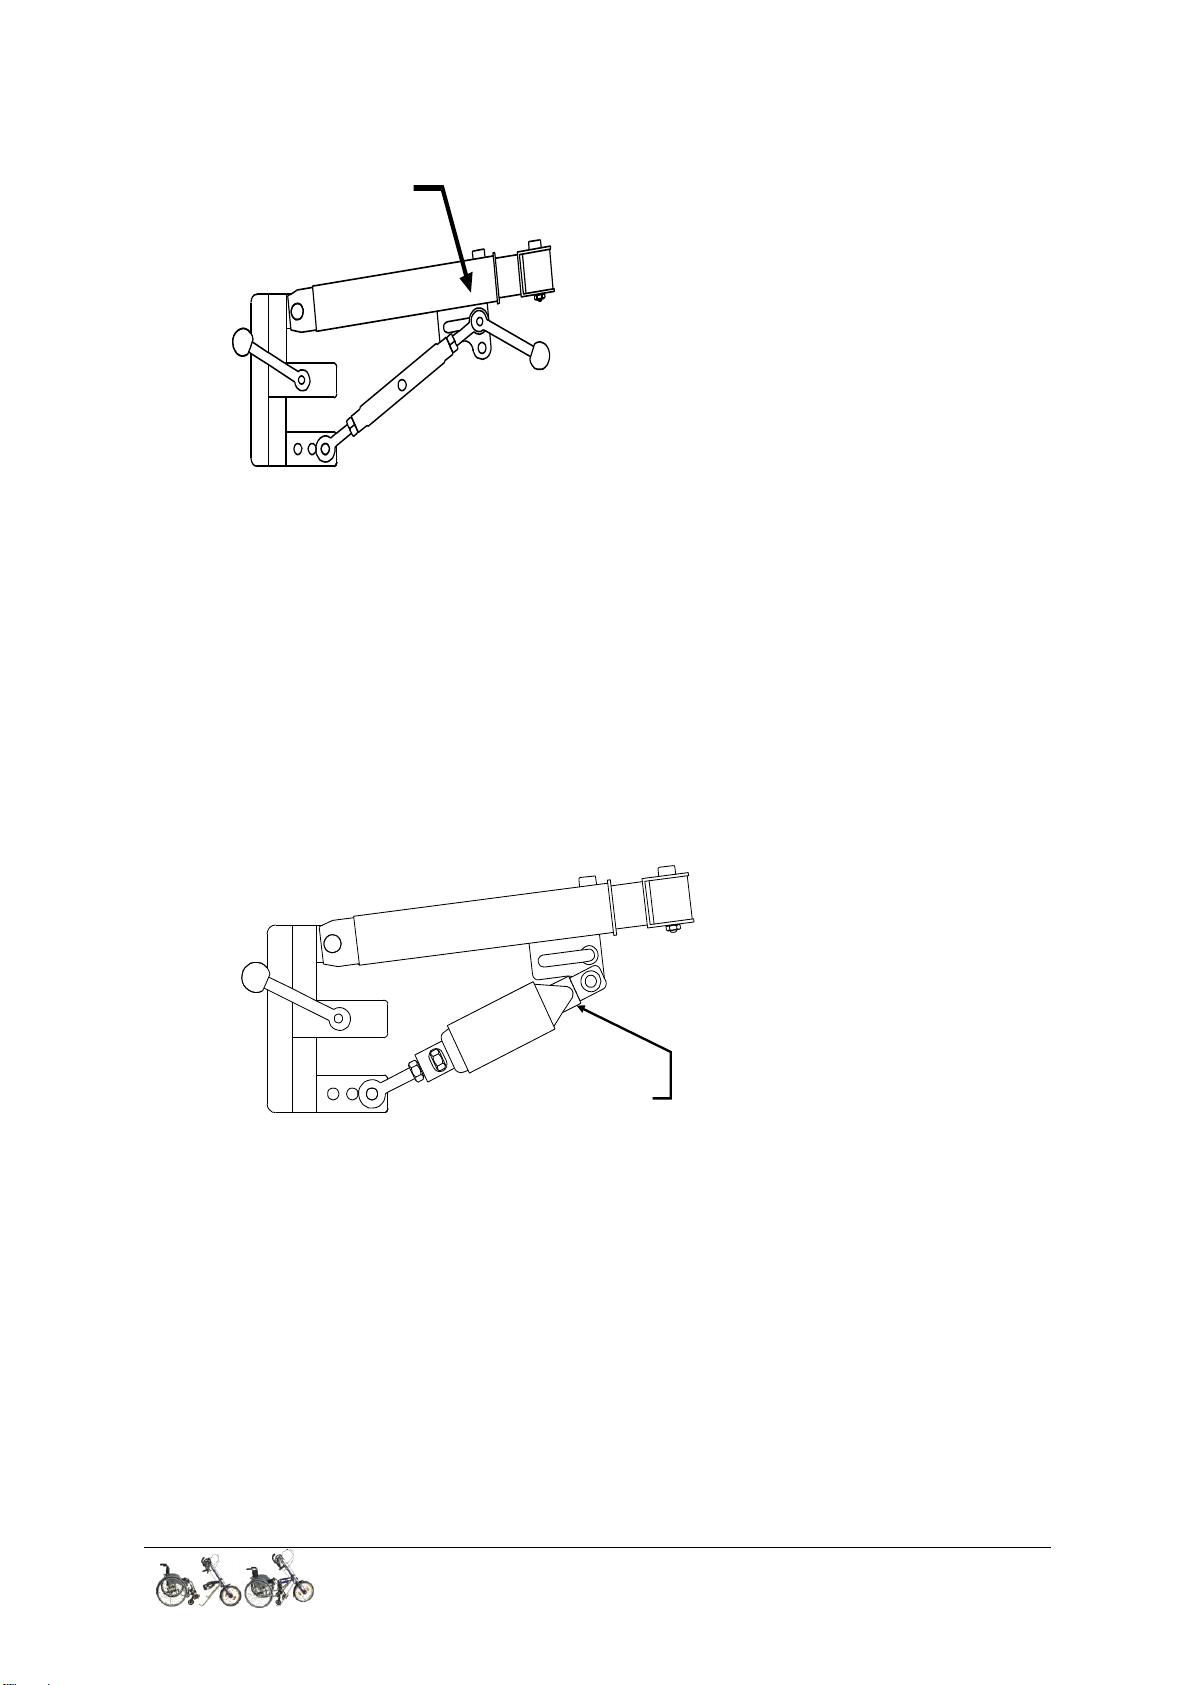
Models with Automatic click-in adjuster
The automatic click-in adjusters have to be unlocked, such that the slot holes are
visible. If this is not the case, unlock the automatic adjuster through opening the
flap and turning the clamps.
Then close the flap; or else you may injure yourself while turning the clamp levers.
Put the Hand-Bike on the handle on the front of the wheelchair and fix the clamps
on both sides carefully.
Push the handles forwards, until the front wheels of the wheelchair lift and the
automatic adjuster snaps into place on both sides. The pin must be visible (see
picture 5).
picture.4
Attention!
During connecting the handbike to the wheelchair, make sure that the clamps are parallel to
the tubes of the wheelchair. Otherwise, the PCV-protection can be damaged.
Before you start riding, please make sure, that the PVC- protection on the clamps are
undamaged. PVC-protection parts are wear parts and taken out from warranty!
If there are damages on the wheelchair tube caused by damaged PVC-protection parts
(scratches) we are not liable.
Manual English V16/04 page 8
picture 5
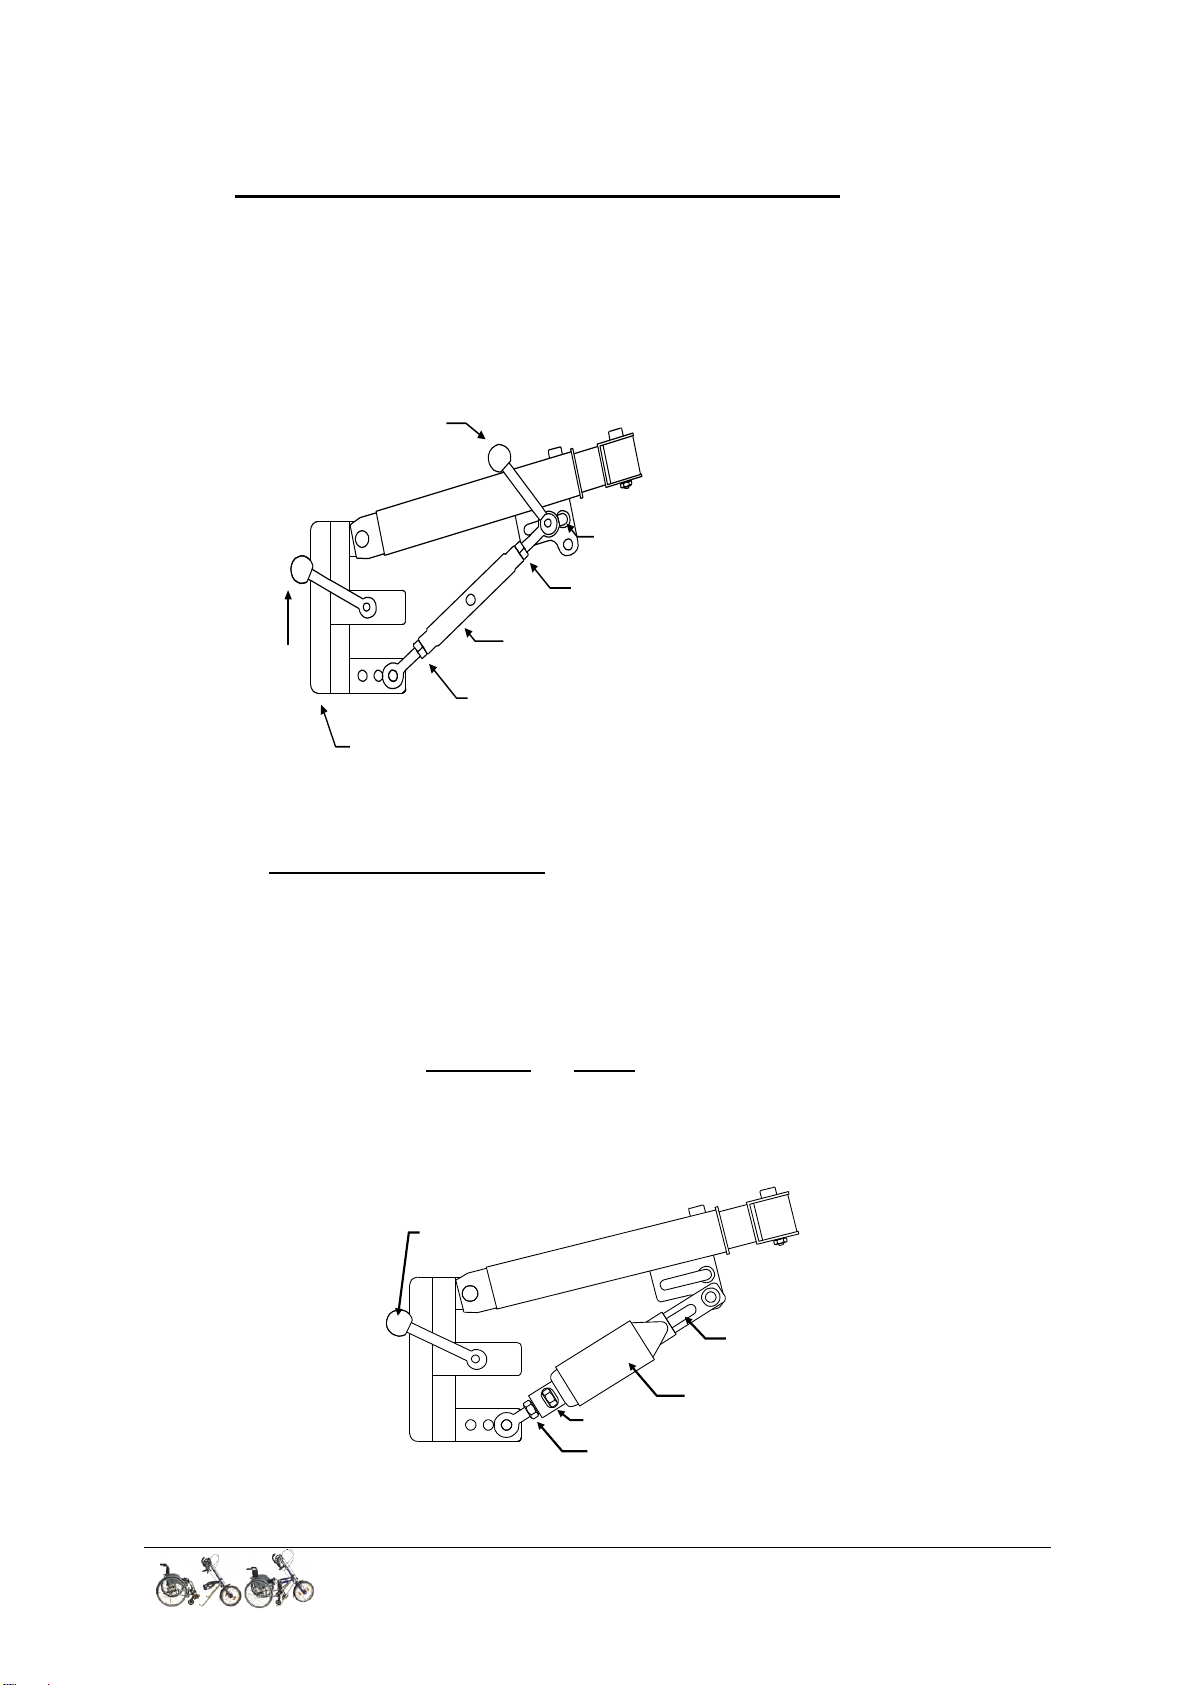
6 Separate your Hand-Bike from the wheelchair
Spanner
Jam nut
Jam nut
Slot hole
H2R(H2L)
H1R
(H1L)
clamp
Slot hole
flap
Adjuster nut
Jam nut
H1R
Loosen the two levers H2L and H2R (picture 6); the front wheels of the wheelchair
come back to ground.
Then loosen the levers H1L and H1R and take the Hand-Bike off. Do not open the
levers too far.
Picture 6
Models with automatic click-in adjuster
Open the flaps on both sides with pushing them backwards.
Push the Hand-Bike with the handle forwards to release the automatic adjusters.
The bolts are pushed back automatically through the flaps and open (The flaps snap
to the outside).
Take the handle back and let the front wheels of the wheelchair come down slowly.
Attention: Never try to push the bolts back with power, the
flaps can be bent! Then loosen the levers H1L and H1R and take
the Hand-Bike off. Do not open the levers too far.
Abb.7
Manual English V16/04 page 9
7 Adjust the Hand-Bike to the rider
The position of S1
can be on top or in front
The Hand-Bike can be adjusted to most wheelchairs. The adjustment depends on the
user. The whole process of adjustment has to be done only once, after that you simply
clamp the Hand-Bike to your wheelchair. Additional adjustments are not necessary.
Abb.8
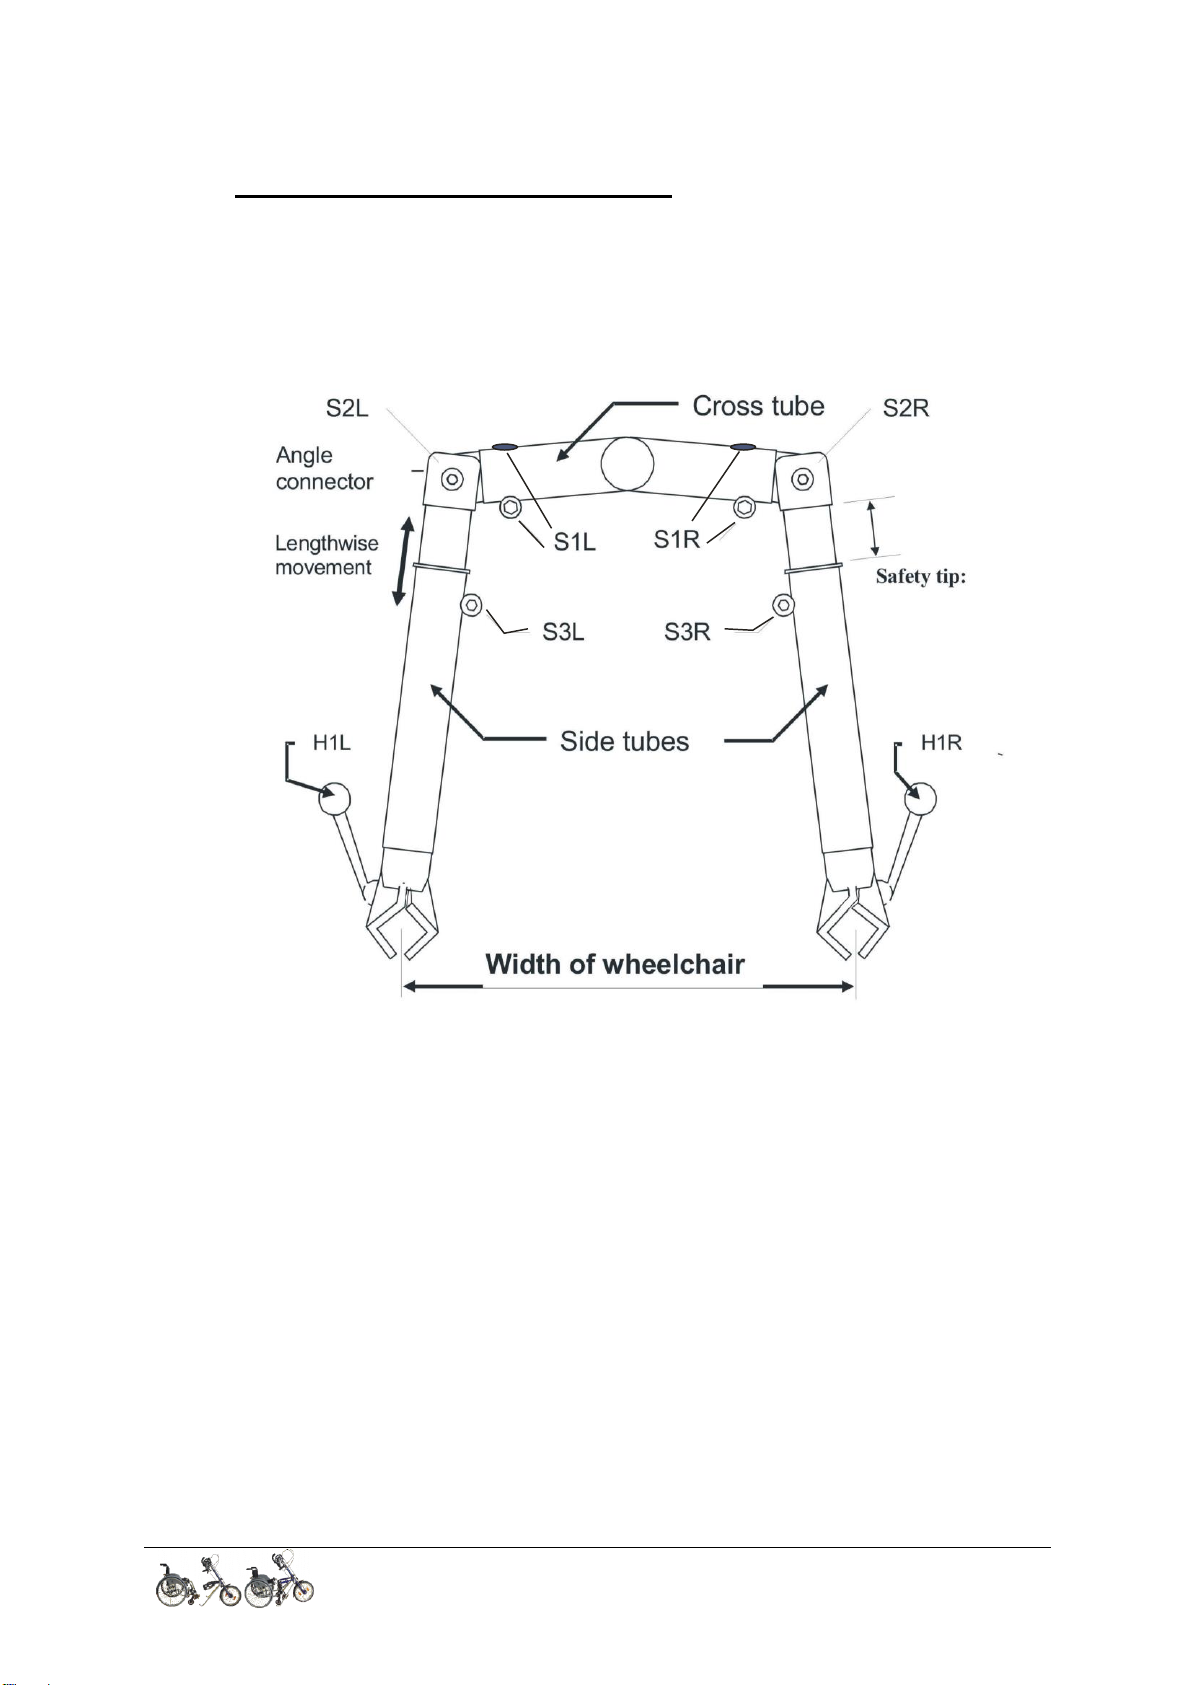
7.2 Adjust the Hand-Bike to the width of the wheelchair
For adjustment put the hand bike on the floor.
When you look at the Hand-Bike from the side, the two side tubes should have an
angle of approx. 90 degrees in relation to the steer tube. The angle has to be the same
on both sides. You can check this by aiming the backside tube over the front one.
Loosen bolts S1L and S1R for adjustment.
Now measure the width of the wheelchair at the front tubes of the frame. If the frame
tubes are not parallel, (V-form) the side tubes need to be turned. In order to do this
loosen the bolts S3L and S3R and adjust the side tubes to the angle of the wheelchair.
Make sure, that the side tubes are adjusted to the same length. Do not fix the bolts
completely at this stage.
Loosen the bolts S2L and S2R and bring the side tubes to the width of the wheelchair.
The side tubes should show approximately the same angle in relation to the steer tube.
Do not fix the bolts completely (see picture 9).
Manual English V16/04 page 10
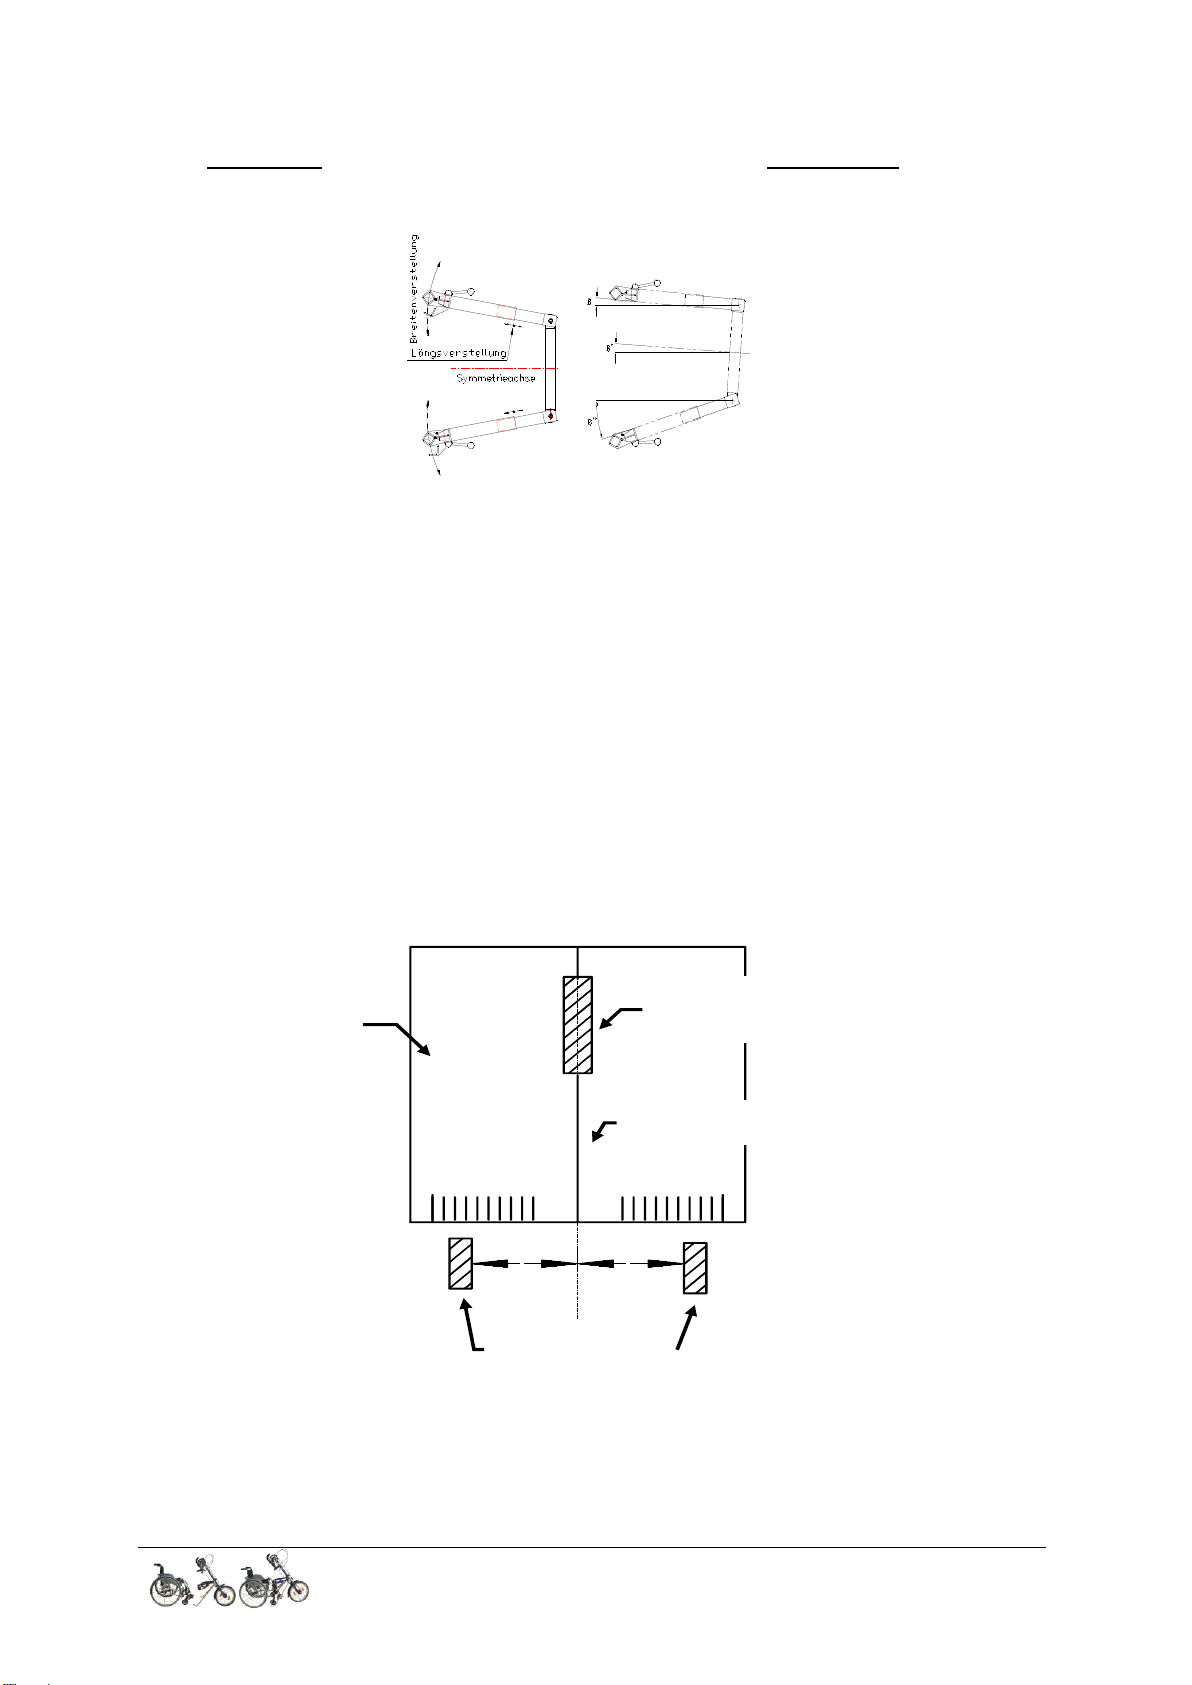
Safety tip: The angle connectors must be pushed completely into the cross
correct wrong
Drive-wheel
of the HandBike
Symmetry
axis
Front wheels of
the wheelchair
Adjustment
stencil
tube. Do not pull them out to adjust the width!
Abb. 9
7.3 First adaptation to the wheelchair
Clamp the Hand-Bike on a flat surface with opened clamps on to the wheelchair. The
bolts S1L and S1R are only slightly fixed, so that the drive wheel can be moved into all
directions. Make sure the wheel is straight.
The drive wheel has to be exactly in the symmetry axis of the wheelchair. Deviations
of max. 1cm are acceptable. Use the centre of the footrests to check. Incorrect
adjustment of the wheel can lead to accidents through bad alignment and vibration.
Please check correct adjustment of the drive-wheel before every ride.
To make adjustments easier, you can make a stencil (as shown in picture 10) out of
cardboard. This insures that the drive wheel is exactly in the middle of the symmetry
axis.
Manual English V16/04 page 11
picture10
Drive the wheelchair towards the stencil and make sure both front-wheels have the
same distance from the symmetry axis. Put the drive wheel of the Hand-Bike exactly
on the symmetry line. Make sure, that the Hand-Bike is standing upright and is not
leaning to one side.
Please take note then of the following adjustment instructions.
 Loading...