

Page 1
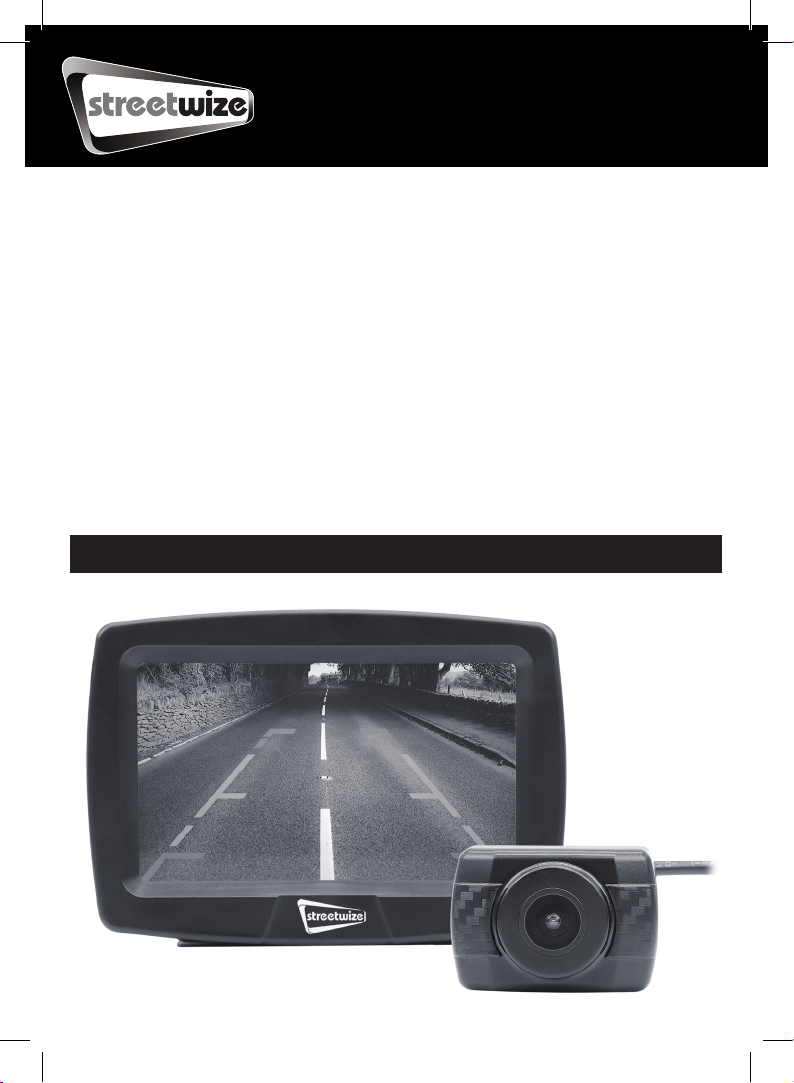
SWRC43
Wireless
Reversing Aid
Camera
with 4.3 inch LCD Monitor
Information For Use
1
Page 2

Table of Contents
Table of Contents
Intention for Use & Legal Disclaimer
Product Elements
How This Kit Works
Installation
Mounting the LCD Monitor
Mounting the Number Plate Bracket
Mounting the Buttery Bracket
Electrical Cable Installation Guide For Camera
Operating Instructions
How to Turn On/Off
Paring the Camera and LCD Monitor
Adjusting Brightness on Display
Screen Orientation
Reversing Guidelines
Cleaning & Maintenance
Technical Support
Spare Parts
Technical Specication
Product
Camera Specication
LCD Monitor Specication
03
03
04
04
05
05
06
06
07
07
07
07
08
08
09
10
10
11
11
11
12
2
Page 3
Thank you for purchasing this Wireless Reversing
Aid Camera Kit from Streetwize. This product is
intended for use as a reversing aid, to help drivers
reverse vehicles into tight spots. It is suitable for
use on vehicles such as hatchbacks, SUVs, small
motorhomes and vans.
PLEASE READ THROUGH THE BELOW INFORMATION IN
THIS DOCUMENT AND KEEP FOR FUTURE REFERENCE.
Legal Disclaimer
STREETWIZE WIRELESS REVERSING AID CAMERA KIT IS DESIGNED AS A DEVICE TO AID AND
ASSIST THE DRIVER. ALTHOUGH A VISUAL AID WHICH ALLOWS YOU TO CLEARLY SEE TO THE
REAR OF A VEHICLE, IT DOES NOT ADMONISH OR REMOVE THE RESPONSIBILITY OF DRIVING
A VEHICLE FROM THE DRIVER OF THE VEHICLE. THE RESPONSIBILITY OF THE VEHICLE IS
SOLELY WITH THE DRIVER OF THE VEHICLE AND SO THE DRIVER MUST ENSURE THAT THEY
FULLY ADHERE TO SAFE DRIVING PRACTICES AND THEIR LEGAL RESPONSIBILITY WHEN
USING THIS PRODUCT AT ALL TIMES.
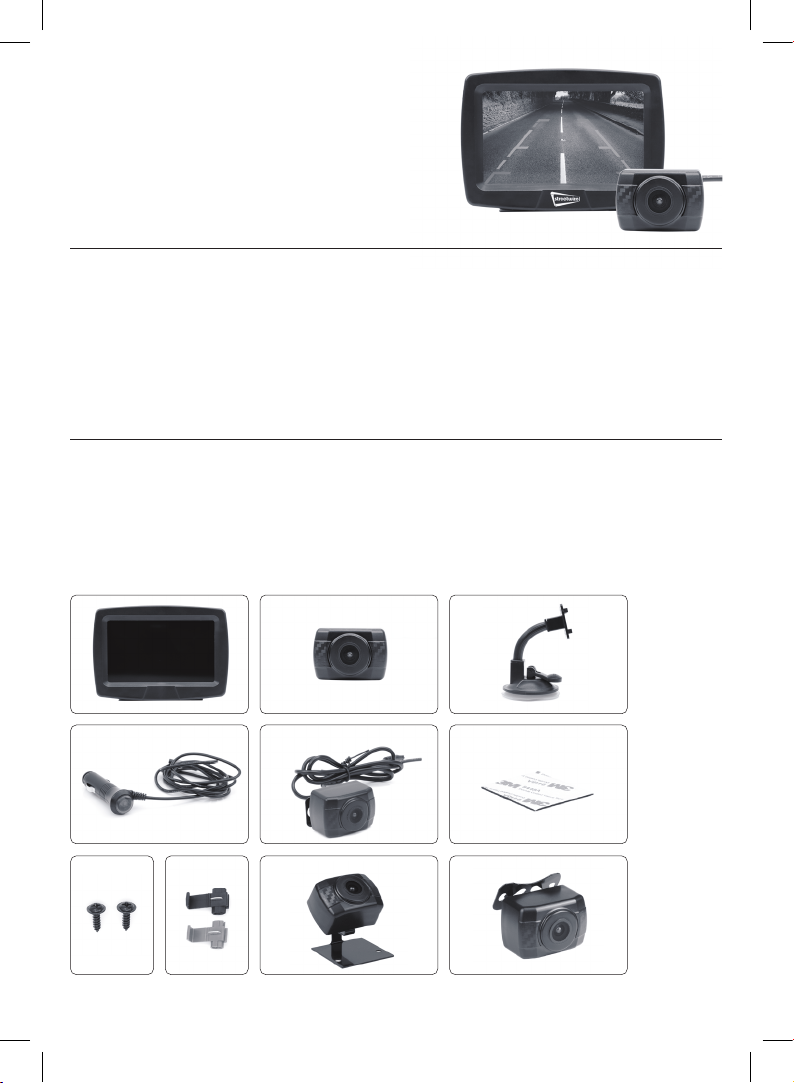
Product Elements
1. 4.3 inch LCD monitor
2. Waterproof camera
3. Suction mount attachment for monitor
4. 12V power cable for LCD monitor
5. Camera power cord and wireless transmitter
6. Double-sided adhesive pad
7. 2 x screws
8. 2 x buckles
9. License plate mounting bracket
10. Buttery mounting bracket
1.
4.
7.
2.
Cable shown attached to camera
5.
Bracket shown attached to camera Bracket shown attached to camera
9.8.
3.
6.
10.
3
Page 4
How This Kit Works
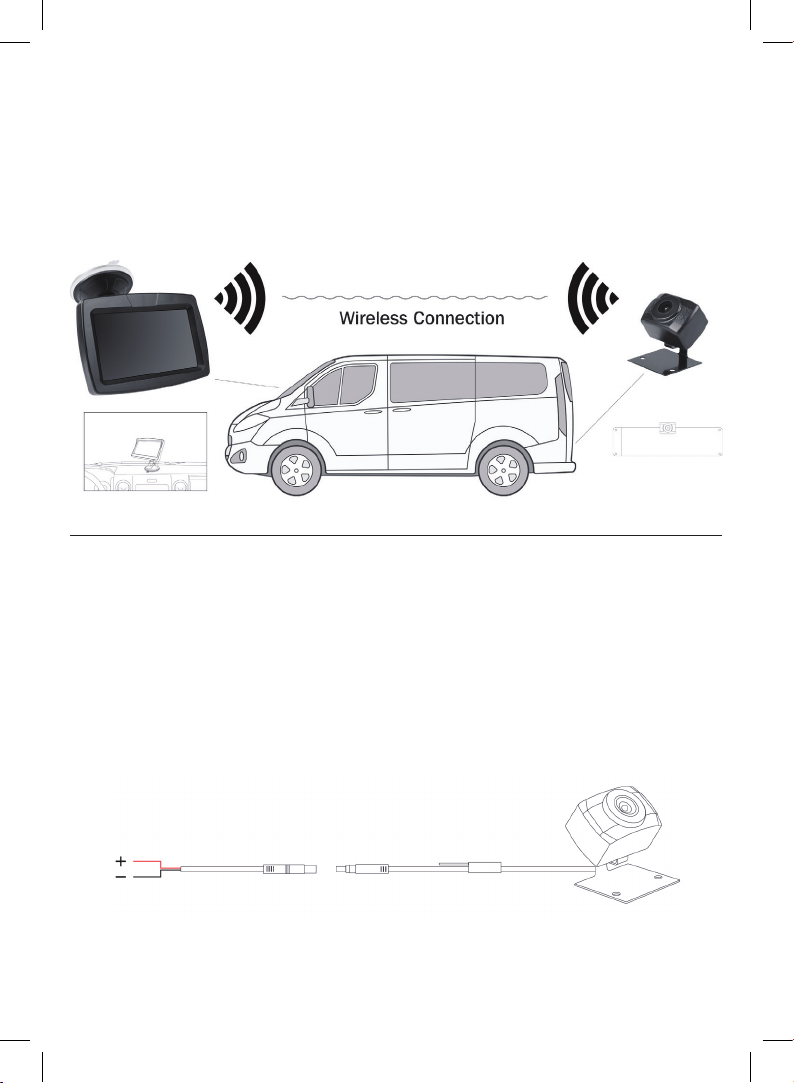
This reversing aid kit comprises two main components, the LCD display monitor and the
waterproof camera.
The waterproof camera wirelessly transmits the live video footage directly to the LCD display.
The LCD display is powered via your vehicle’s 12V socket and the waterproof camera is
powered via your vehicle’s reversing lights. Figure 1 below illustrates how this kit works.
Fi g. 1
Installation
When installing this kit, we highly recommend that you seek professional assistance,
especially for connecting the camera to the vehicles reversing lights and circuit.
Attention: When installing the camera to your vehicle, you will need to drill a hole in your
vehicle’s rear bumper to feed the waterproof camera’s wiring to your vehicle’s electronics board
for the reversing lights.
Please refer to your vehicle handbook to nd out how to access the wiring circuit for your
vehicle’s reversing lights.
Figure 2 below shows you the electronics connection guidelines. Please see page 6 for more
detailed instructions for wiring the camera.
Fi g. 2
Red wire connects to reversing light positive wire
Black wire connects to reversing light negative wire
4
Page 5
Mounting the LCD Monitor
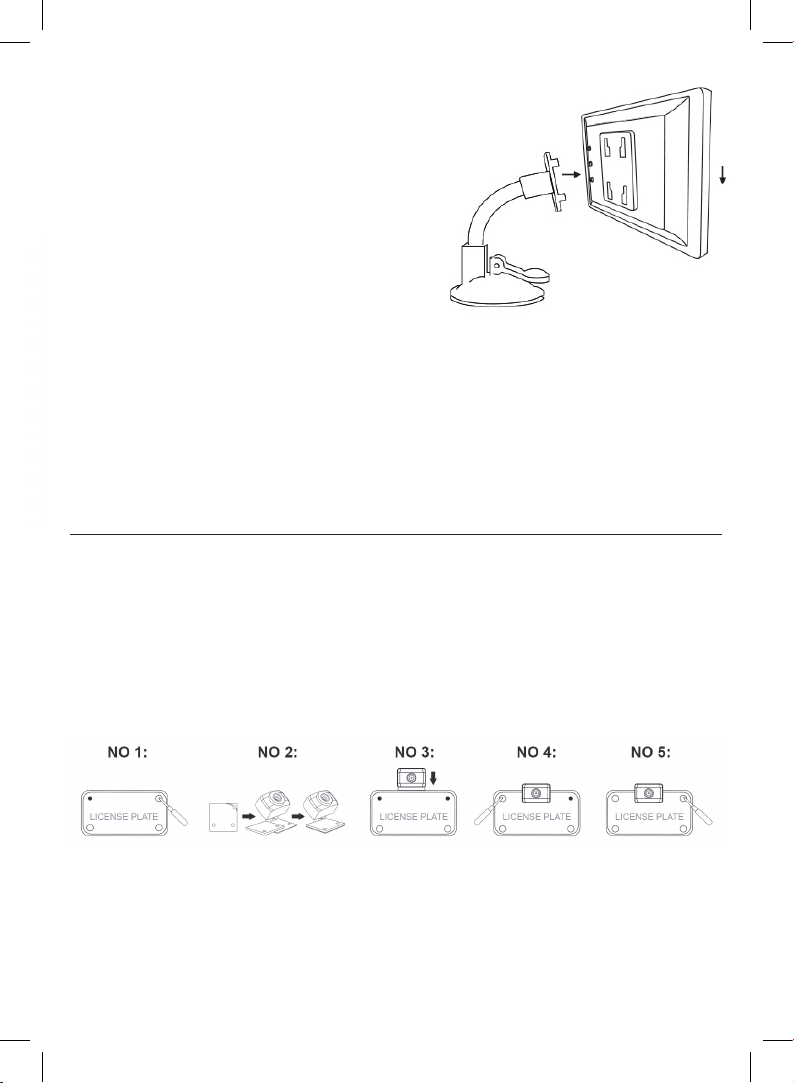
1. Attach the suction mount to the back of the
LCD monitor as shown in gure 3 and then
attach to the desired location in your vehicle i.e.
dashboard, windscreen etc.
2. Ensure that the surface for mounting is both clean
and dry before xing the suction mount.
3. Connect the cable attached to the monitor to the
12V power cable, and then insert the 12V power
cable into the vehicle’s 12V power socket.
Attention: When mounting the monitor, ensure that it
does not obstruct the drivers vision when driving.
IMPORTANT: The LCD monitor does NOT come with a rechargeable battery and will need to be
connected to your vehicle’s 12V power socket. If you need access to a 12V socket when using
this product, we recommend that you purchase a suitable 12V socket adaptor that converts
your single 12V socket into two or three 12V sockets. For this, we highly recommend you use
Streetwize products SWPS1, SWPS9 and SWTSA.
Fi g. 3
Mounting the Number Plate Bracket
1. Remove the top two rear number plate screws.
2. Stick on the double-sided tape on the front-facing side of the license plate mounting
bracket on the waterproof camera.
3. Position the camera on top of the number plate, ensuring the camera’s license plate
mounting bracket is behind the number plate.
4. Screw back the number plate screws.
5. Adjust the angle of the camera as needed.
5
Page 6
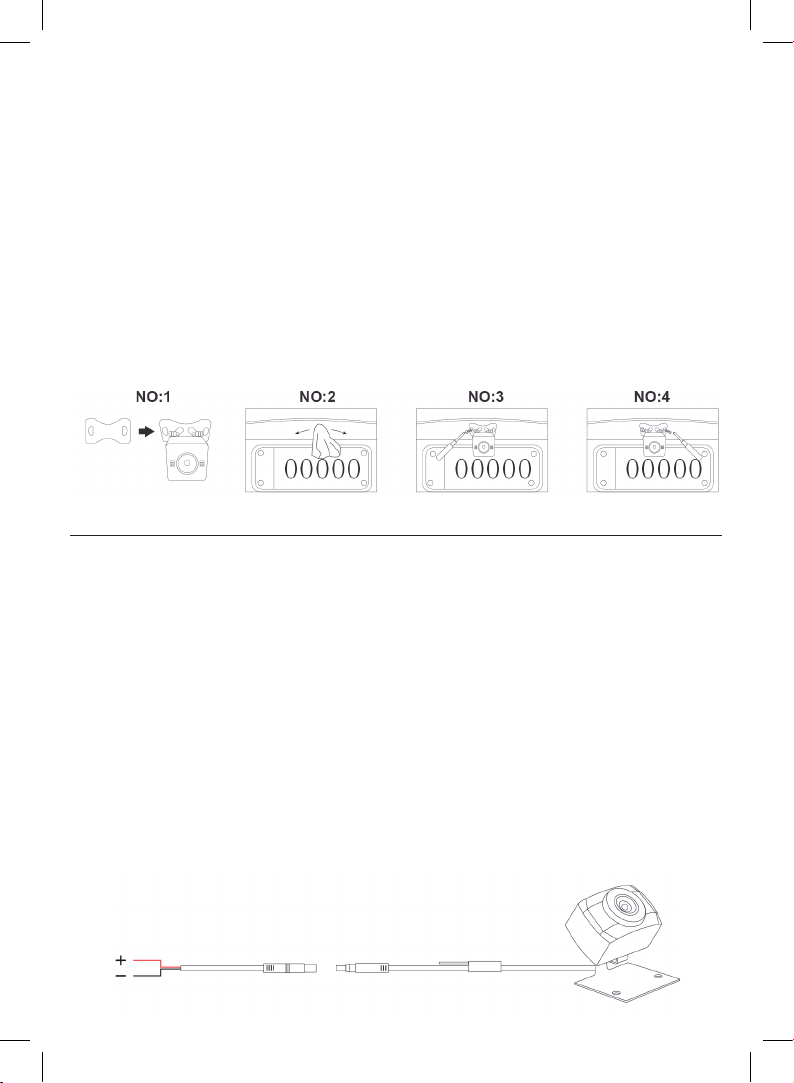
Mounting the Buttery bracket
Please note: The waterproof camera is already attached to the license plate mounting
bracket. To replace this with the buttery bracket, simply remove the two screws behind the
camera which attaches to the licence plate bracket. Then replace it with the buttery bracket
and attach it to the camera using the two screws that were used for the license plate bracket.
1. First, attach the buttery bracket to the waterproof camera. Then nd a suitable location
on the rear side of your vehicle.
2. Clean the area where you are going to mount the camera using a clean cloth (not
included) to remove any dirt, dust or grease.
3. Stick on the double-side tape on the rear side of the buttery bracket, then attach the
bracket with the camera to your vehicle. Press the bracket rmly onto your vehicle so
that the bracket is stuck on.
4. Screw the supplied xing screws via the bracket’s slots, but don’t fully tighten the
screws.
5. Adjust the angle of the camera if required, then tighten the bracket screws.
Electrical Cable Installation Guide For Camera
The instructions below outline a standardised guide on how to connect the camera’s wiring to
the reversing light (see Figure 2).
1. Once the camera has been mounted, either via the buttery bracket or onto the licence
plate, you will need to thread the wiring from the outside of your vehicle to your reversing
lights. First, ensure the cable is fully unravelled. And make sure your vehicle is fully
switched off. Never attempt to connect the wiring when the vehicle is switched on.
2. Depending on your vehicle, locate either a pre-drilled hole or grommets so you can
thread the camera’s wire through inside. If your vehicle does not have these holes, you
will need to drill a hole to feed the cable through.
3. Then, refer to your vehicle’s handbook to locate the positive and negative wires that
lead to your vehicle’s reversing light.
4. Using the supplied wiring buckles, connect the red buckle to the positive wire of the
reversing light and the black buckle to the negative wire of the reversing light.
5. Once connected, switch on your vehicle and follow the operating instructions overleaf.
Fi g. 2
Red wire connects to reversing light positive wire
Black wire connects to reversing light negative wire
6
Page 7
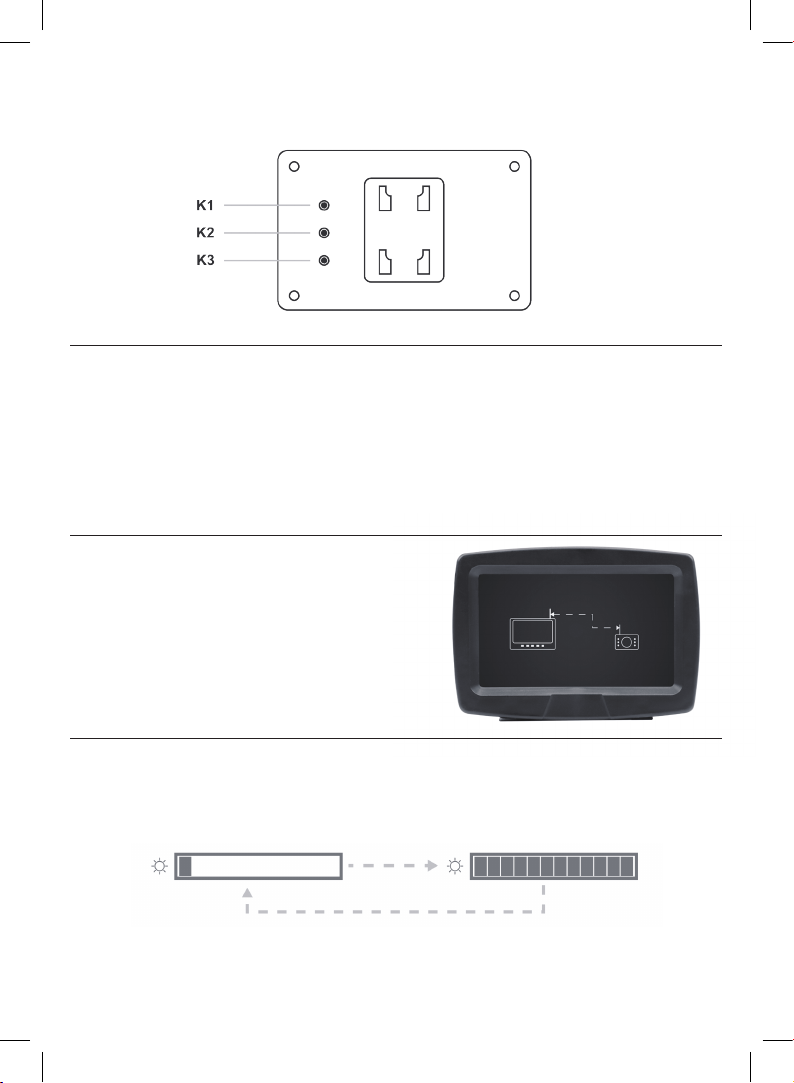
Operating Instructions
The LCD display has three buttons on the back as shown in Figure 6 below.
Fi g. 6
How to Turn On/Off
To turn on the reversing aid kit, rst ensure the LCD display is connected to your 12V socket
AND make sure your vehicle is switched on.
Then press the On/Off button found on the 12V plug. The switch button will emit a solid red
light to inform you that the unit is now switched on. Press the button again to turn off.
Pairing the Camera and LCD Monitor
Once the kit has been fully installed, you may need
to pair both the camera and monitor (however they
may pair automatically). To pair the camera and
monitor, turn on the monitor and press and hold
the K3 button for 3 seconds and the LCD monitor
will show the following display (Figure 7)
Once paired, the LCD monitor will display the live
feed directly from the camera.
Fi g. 7
Adjusting Brightness On Display
Press the K1 button repeatedly to adjust the brightness of the display. When the brightness
reaches its max, the brightness will reset to its lowest setting (see Figure 8).
Fi g. 8
7
Page 8
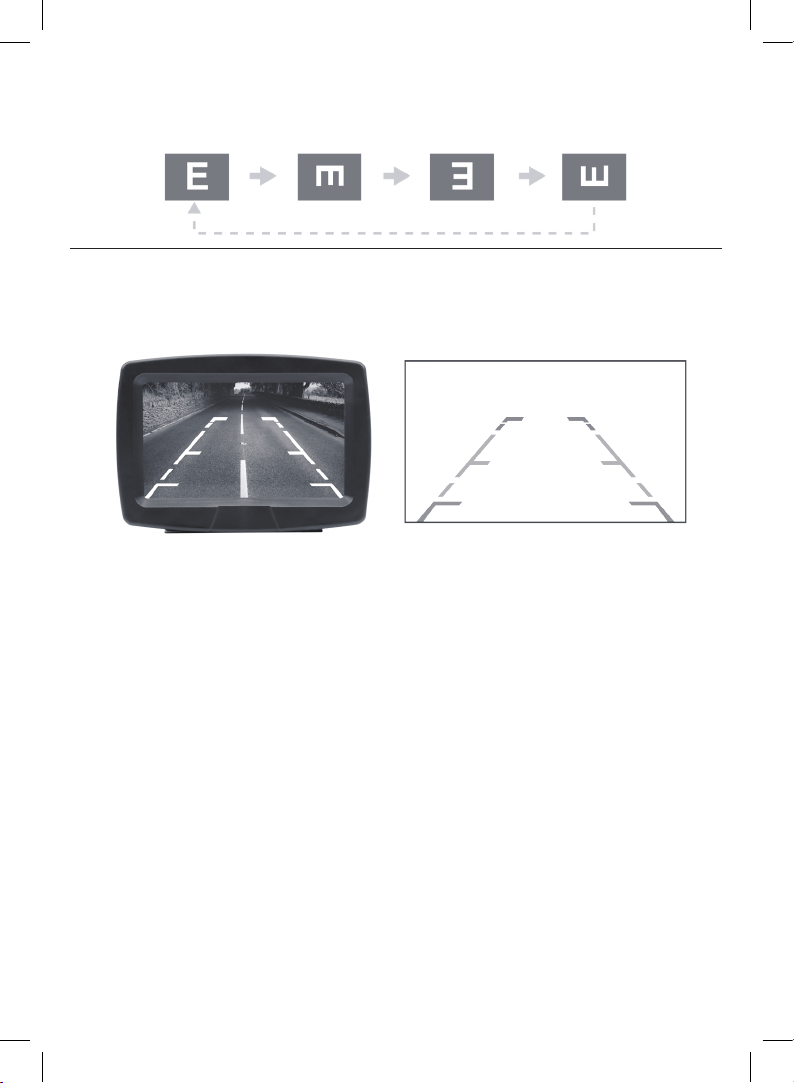
Screen Orientation
Press the K2 button repeatedly to adjust the brightness of the display. When the brightness
reaches its max, the brightness will reset to its lowest setting (see Figure 8).
Fi g. 9
Reversing Guidelines
Reversing Guidelines
You can toggle the reversing guidelines to appear on the screen by pressing K3. Figure 10
You can toggle the reversing guidelines to appear on the screen by pressing K3. Figure 10
shows how the reverse guidelines appear on screen.
shows how the reverse guidelines appear on screen.
Fig. 10
8
Page 9

Cleaning & Maintenance
Camera
• If the lens of the camera becomes obstructed with dirt, rain or snow, rinse
with water and wipe with a soft, dry cloth.
• To clean the camera, wipe with a soft, clean cloth and a mild cleaner, then
dry with a soft cloth. Do not use alcohol, benzene or thinner to clean the
camera as this will cause discoloration and/or damage to the camera.
Monitor
• Turn off the monitor. If the screen is dark, it will be easier to see the areas
that are dirty or oily.
• To clean the monitor use a soft, dry cloth to wipe the screen taking care
not to press too hard directly on the LCD screen as this can damage the
screen.
• For particularly stubborn marks, use a soft, damp cloth and a mixture
of water and/or white vinegar. The plastic surround on the edge of the
screen can be cleaned with any multipurpose cleaner, however take care
to avoid contact with the LCD screen itself.
• Avoid using paper towels, toilet paper, tissue paper, or fabric to wipe the
LCD screen as these materials can easily scratch the LCD screen.
• Avoid cleaning products that contain ammonia, ethyl alcohol, acetone,
toluene, ethyl acid, or methyl chloride. These chemicals can react with the
materials that the LCD screen is made of which could discolour and/or
damage the screen.
• Do not spray liquids directly onto the LCD screen, as liquids could
run inside the monitor and cause damage to both the Screen and the
internal wiring.
9
Page 10

Technical Support
If you require any technical support, please contact us on:
and provide product name and supplier code (see Technical Specications) along with the
technical query and proof of purchase.
Spare Parts
Should you require any replacement parts and/or spare parts for your product, please
contact us on
and provide the product name, supplier code (see Technical Specications) and model along
with the name of the part that needs replacing.
10
Page 11

Technical Specications
Product
Product Name
Supplier Code
Camera Specication
Sensor
Effective Pixels
Pixel Size
Minbimum Illumination
Sensitive
Dynamic Range
Audio Compression
Video Compression
Operating Frequency
Data Bandwdith
Modulation/demodulation mode
Code Match
Antenna impedance matching
Unobstructed effective range
Operating voltage
Operating current
Operating temperature
Operating humidity
Storage humidity
Streetwize Wireless Reversing Aid Camera Kit
SWRC43
Streetwize Wireless Reversing Aid Camera Kit
1280 x 720
3.0 x 3.0 um
0 (IR ON)/5 (IR OFF) Lux
4000mV/Lux
72dB
ADPCM
MJPEG
MHz 2400 - 2483.5
4M (max) bps
GFSK
Auto & Manual
50 Ω
>50m
DC 9~36V
0.3 Amps @ DC12V (max)
-20~+65°C
15%~85% RH
5%~95% RH
11
Page 12
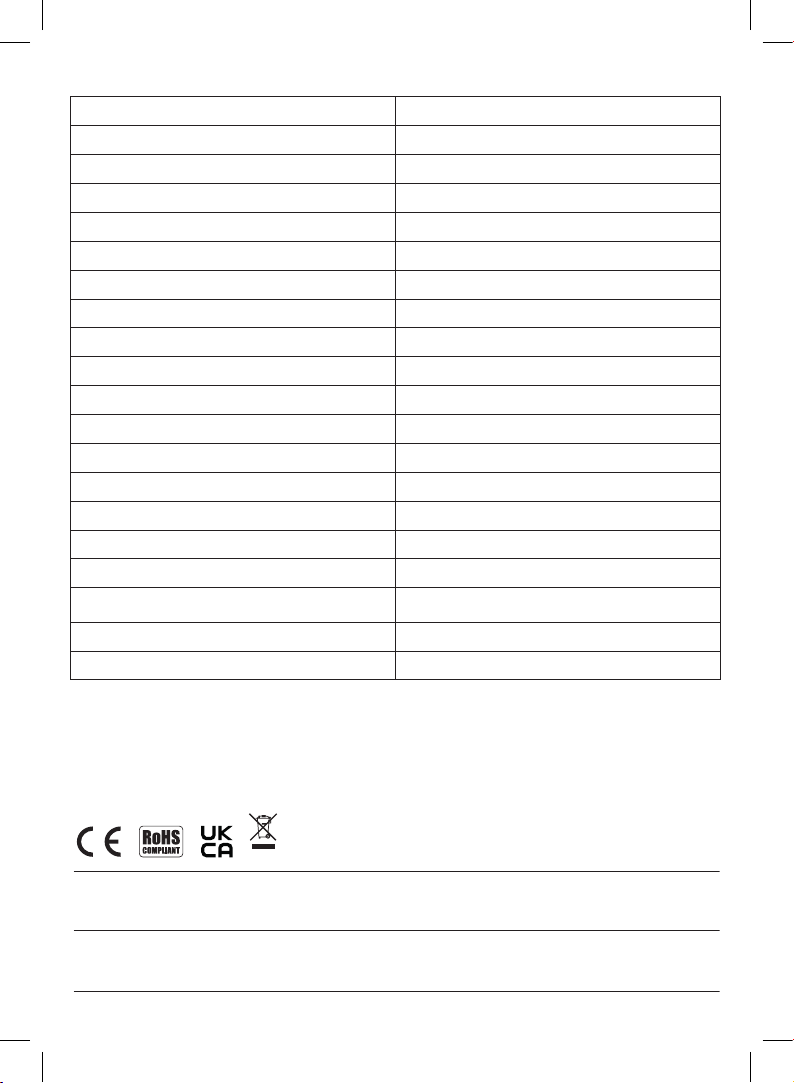
LCD Monitor Specication
Video Frame
25 (max) fps
Transmission Resolution
640 x 480 pixels
Screen Resolution
480 x 272 pixels
Screen Brightness CD/M
2≥200
Screen size
4.3 inch TFT
Video system
PAL/NSTC Auto
Audio Compression
ADPCM
Video Compression
MJPEG
Operating Frequency
MHz 2400 - 2483.5
Data Bandwdith
4M (max) bps
Code Match
Manual
Data encryption
AES128 Bit
Antenna impedance matching
50 Ω
Unobstructed effective range
>50m
Operating voltage
DC 9~36V
Operating current
0.5 Amps @ DC12V (max)
Operating temperature
-20~+65°C
Storage Temperature
-20~+65°C
Operating humidity
15%~85% RH
Storage humidity
15%~85% RH
LCD Monitor Specication
Video Frame
Transmission Resolution
Screen Resolution
Screen Brightness CD/M
Screen size
Video system
Audio Compression
Video Compression
Operating Frequency
Data Bandwdith
Code Match
Data encryption
Antenna impedance matching
Unobstructed effective range
Operating voltage
Operating current
Operating temperature
Storage Temperature
Operating humidity
Storage humidity
25 (max) fps
640 x 480 pixels
480 x 272 pixels
2≥200
4.3 inch TFT
PAL/NSTC Auto
ADPCM
MJPEG
MHz 2400 - 2483.5
4M (max) bps
Manual
AES128 Bit
50 Ω
>50m
DC 9~36V
0.5 Amps @ DC12V (max)
-20~+65°C
-20~+65°C
15%~85% RH
5%~95% RH
M17 1RY
Streetwize: Ashburton Road West, Trafford Park, Manchester, M17 1RY
www.streetwizeaccessories.com
For product support:
E: [email protected]
T: +44 (0)161 447 8597
EU Registered address: Ace Supply Co (Europe) Ltd. 25 Herbert Place, Dublin 2, D02 A098 Republic of Ireland.
For trade enquiries:
E: [email protected]
T: +44 (0)161 447 8580
For spare parts:
 Loading...