

Page 1
WARNING! EXPLOSION HAZARD
DO NOT EXPOSE BATTERY TO FIRE OR INTENSE HEAT AS IT MAY EXPLODE.
BATTERY CONTAINS NON-SPILLABLE SEALED LEAD ACID BATTERY: IF CASE SHOULD BECOME CRACKED,
DISPOSE OF IMMEDIATELY TAKING ADEQUATE SAFETY PRECAUTIONS TO PREVENT INJURIES OR DAMAGE TO
PERSONS OR PROPERTY. BATTERY MUST BE RECYCLED OR DISPOSED OF PROPERLY.
SPECIFICATIONS
Power Supply Battery: 17AH sealed lead acid
Power Supply DC Output: 12-volts nominal.
Power Supply Charging Time: 38 hours for the first time charging with AC charger;
34-36 hours to recharge with AC charger and
12-14 hours to recharge with 12-volt DC charger.
Storage Temperature: Store in a cool dry area.
The WEEE symbol on this product means that this product should be ethically dismantled or recycled to
minimise environmental impact. Please check with your local authority for more information.
IMPORTANT: ADDITIONAL SAFETY INFORMATION
This Power Station/Emergency Jumpstart is NOT intended for use by persons (including children) with reduced
physical, sensory or mental capabilities, or lack of experience and knowledge, unless they are supervised or
have been given instruction concerning use of the Power Station/Emergency Jumpstart by a person responsible
for their safety.
12v Portable Power Station &
Emergency Jumpstarter
SWPP2
WELCOME: This product has been carefully engineered and manufactured to give you dependable operation. Please
read this manual thoroughly before operating your new product as it contains the information you need to become
familiar with its features and obtain the performance that will bring you continued enjoyment for many years. Please
keep this manual on file for future reference.
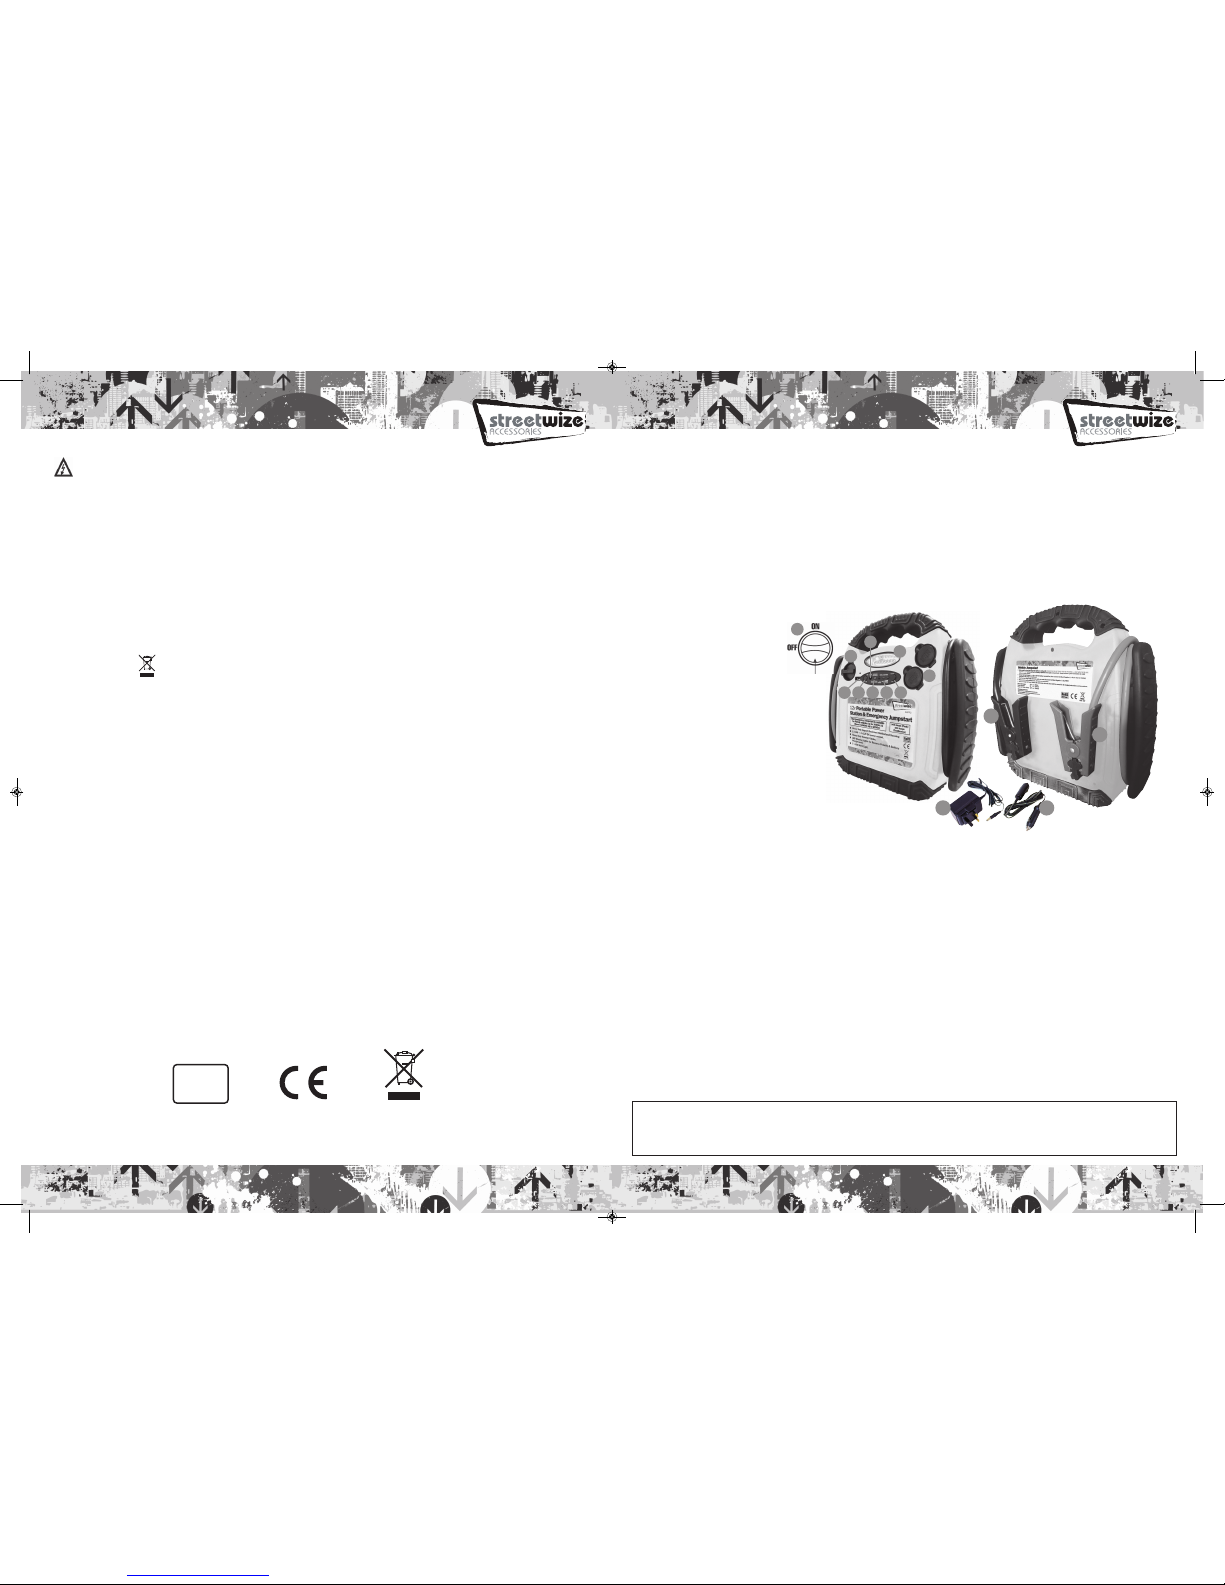
CONTROLS
1. The rotary switch on the left hand side of the unit controls the power to the booster cables.
Always leave this in the “OFF” position except when jumpstarting a vehicle.
2. 12 Volt Power Outlets x2..
3. Battery Test Button
4. Battery Power Indicator &
Charging Indicator LED’s.
5. Reverse Battery Polarity
LED Indicator.
6. Input Charging Socket.
7. Work Light/USB - ON/OFF Switch.
8. USB Socket.
9. 7 LED Work Light.
10. Negative (Black) Crocodile Clip.
11. Positive (Red) Crocodile Clip.
12. AC Charger.
13. DC Charging Cord.
CAUTIONS
• Never work alone with this product.
Make sure that someone is available to give
assistance if needed.
• Wear complete eye and clothing protection. Do not touch eyes while working near battery.
• Do not attempt to remove or replace the battery used in this device. When the battery has reached the
end of it’s useful lifetime, take the entire unit to a battery recycling facility.
• For proper and safe operation of the 12 Volt DC power accessory outlets, do not place anything into it
except the plug of the accessory to be used.
• Remove metal personal jewelry, such as rings, bracelets, necklaces and watches while working with a
lead-acid battery. It can produce a short-circuit that may cause severe burns.
• Never charge or jump-start a frozen battery.
• Never allow clamps (positive & negative terminals) to touch together or to connect the same piece of
metal to prevent short-circuits and arcing.
• Do not operate this device while wearing vinyl clothing. Static electricity may be generated when vinyl
clothing is rubbed.
• This product is not intended for use in the rain or temperatures above 130˚F.
• Use only the provided chargers, cables and clamps. Unauthorized parts may damage the unit.
• This product is not a toy. Keep out of the reach of children.
• Keep battery terminals clean. Be careful to keep corrosion from coming in contact with eyes.
• Do not operate this unit in or around water. Water can damage the unit.
• If battery acid comes into contact with eyes, flush the eyes with water for at least 10 minutes. Seek
medical attention immediately.
• Always turn the Jumpstart Sustem off when not in use. Store in a cool, dry place.
• Do not open the Jumpstart System. There are no servicable parts in the unit. Doing so will void the warranty.
IMPORTANT WARNING: This product is only supplied with a minimal amount of charge at manufacture,
therefore for this product to operate correctly it has to be fully charged for a period of 38 hours IMMEDIATELY
after purchase, this is essential BEFORE ANY USE! & cannot be used DURING the charge period. Failure to
adhere to these conditions may invalidate the products warranty.
1
2
9
563478
11
10
12 13
1
Streetwize Accessories: Sales enquiries: [email protected]
Technical enquiries: [email protected] www.streetwizeaccessories.com
RoHS
COMPLIANT
M17 1RY
SWPP2 Manual AW 2016.qxp_Layout 1 25/10/2016 14:27 Page 1
Page 2
JUMSTARTING AN ENGINE
JUMPSTART MUST BE FULLY CHARGED TO JUMPSTART AN ENGINE.
MAKE SURE THE ROTARY BOOSTER CABLE SAFETY SWITCH IS IN THE “OFF” POSITION.
Do not attempt to Jumpstart an engine if the green light does not illuminate when you press the battery check button
as this could permanently damage the battery.
Turn off ignition and all accessories (lights, radio, header, air conditioning, etc.) in the vehicle with the weak battery
that will not start. Place vehicle in park and set hand brake.
For maximum power, turn off all switches on your Jumpstart system and disconnect any accessories plugged into the
12 Volt power outlet.
Check that vehicle is negatively grounded (most vehicles). Securely connect the red positive clamp to the positive (+)
terminal of the vehicle battery. Then, securely connect the black clamp to a grounding point on the vehicle such
as the metal chassis frame, in the engine compartment, as far away from the battery as possible. DO NOT
connect it to the negative battery terminal. Make sure both clamps have good contact. Check cable connection
polarity indicator.
NOTE: DO NOT PLACE JUMPSTART WHERE IT COULD FALL WHEN VEHICLE STARTS UP. MAKE SURE THAT
CABLES ARE ROUTED AWAY FROM MOTOR FAN OR BELTS.
If indicator light is green, turn rotary switch to the “on” position and start your vehicle. If indicator light is red, reverse
clip connections before proceeding. Once vehicle starts, turn rotary switch to “off” position and disconnect black
clamp first and then, red clamp. Restore cables on Jumpstart System and recharge unit at first opportunity.
NOTE: WHEN STARTING VEHICLE, CRANK ENGINE IN 5-6 SECOND BURSTS. IF VEHICLE DOES NOT START UP
WITHIN 2-3 ATTEMPTS, ALLOW THE JUMPSTART TO COOL FOR 3 MINUTES BEFORE ATTEMPTING TO START
VEHICLE AGAIN. RETRY ONLY IF BATTERY CONDITION IS SATISFACTORY.
WARNING
Do not turn cable safety switch to “on” position if indicator light is red. Turn “on” only when light is green.
OPERATING WORKLIGHT
The Jumpstart System comes with a built-in worklight. The light is directly connected to the Jumpstart’s internal
battery. Light will operate for up to 40 hours from a fully charged battery. Turn off light when not required to conserve
battery power.
Replacement Bulb: The bulb in this unit is 12V 3 watt, designed to provide many hours of operation. In the unlikely
event that this should burn out or require replacement, bulbs can be obtained at local electrical supply outlet. To
replace bulb, remove lens by unscrewing screw. Gently remove blub. Replace bulb and reassemble light.
USE AS A 12 VOLT DC PORTABLE POWER SUPPLY
The Jumpstart System is equipped with an outlet socket and can be used to operate most 12 volt auto accessories
and appliances (11 AMP maximum) equipped with a cigarette lighter plug. Simply lift up cover on socket and plug in
appliance. Place power outlet switch located above socket in the “on” position. Length of time appliance will operate
will depend on condition of battery and current draw of appliance. Periodically check battery status during operation
and discontinue use immediately, if battery condition falls to red level. Recharge unit as soon as possible and before
further use.
Power outlet is protected by an interal circuit breaker to prevent damage to unit in case appliance has a short circuit or
exceeds 11 AMPS. If circuit breaker is tripped, disconnect appliance and have it checked. Circuit breaker will
automatically reset once it cools down (approx. 15-20 minutes). DO NOT PLUG A CIGARETTE LIGHTER INTO THE
OUTLET OF THE JUMPSTART.
BATTERY: This unit is equipped with a 12 Volt 17 Amp-hour maintenance free, sealed lead acid rechargeable battery,
which has a normal life expectancy of up to 1000 charging cycles and will give many years of dependable service if
properly cared for following the directions above. In the event that the battery needs replacement in the future, the
unit will have to be opened up by loosening the screws holding the housing together. Carefully lift off back housing to
gain access to the battery. Replace and reassemble.
Replacement batteries may be purchased from an electrical supply store. Old battery should be disposed of properly
and safely. Some states required recycling. Please contact your local solid waste authority for recycling information.
CHARGING THE JUMPSTART SYSTEM
This unit has a maintence free, built in sealed lead acid battery. Although the Jumpstart System arrives partially
charged from the factory, it MUST BE FULLY CHARGED FOR 38 HOURS BEFORE FIRST USE, even if the battery
status lights indicate a “full” charge. This initial charge pre-conditions the battery. Failure to follow this procedure
may permanently damage the battery.
CHARGING WITH THE AC POWER ADAPTOR
Plug the AC adaptor into any 230 volt AC wall outlet and the other end into the Input Socket of the Jumpstart
System. The Charging Indicator light will illuminate to indicate the unit is charging. Full charging will take
approximately 34-36 hours. (depending upon power used).
CHARGING WITH THE DC POWER CORD
Plug the DC power cord into your vehicle’s cigarette lighter socket and the other end into the Input Socket of the
Jumpstart System. Full charging will take approximately 14-16 hours. (depending upon power used)
Note: Some vehicle’s cigarette lighters and 12 volt power ports do not operate unless the ignition switch is
in the accessory position.
CHARGING TIPS AND WARNINGS
Keep battery power topped up, ready for emergencies. Unlike some rechargeable batteries, frequent charging will not
harm and in fact, will improve the performance of the internal battery. Recharge battery as soon as possible after
each use to prolong battery life. Frequent heavy discharges between recharging will reduce battery life. Do not leave
Jumpstart in a tolal discharged state for an extented period of time as this can cause battery failure. All lead acid
batteries suffer from self-discharge over time, especially under extreme temperatures. Store in cool dry place. It is
recommended to recharge unit every 2 months when not in use and more frequently in warmer or colder storage
conditions to keep battery at peak operating efficiency. Jumpstart system should not be charged for more than 48
hours continuously. Use only the charging adaptors provided with this unit.
NOTE: DO NOT OPERATE ANY OF THIS UNIT'S FUNCTIONS WHILE CHARGING IS IN PROGRESS.
POWER STATUS & CHARGE LEVEL INDICATOR LIGHTS
Indicates power jumpstart charge level. Depress the charge level indicator button - The charge level indicator LED(s)
will turn ON in sequence to indicate the current battery charge level status. When this button is released the charge
level LED(s) will turn OFF.
To receive an accurate battery status reading, unplug the charging adaptor from the unit.
CHARGING LIGHT INDICATOR
Red color LED will illuminate while POWER JUMPER battery is charging. When charging is completed the RED LED
will stay illuminated. The light will not turn off until the charging plug is removed.
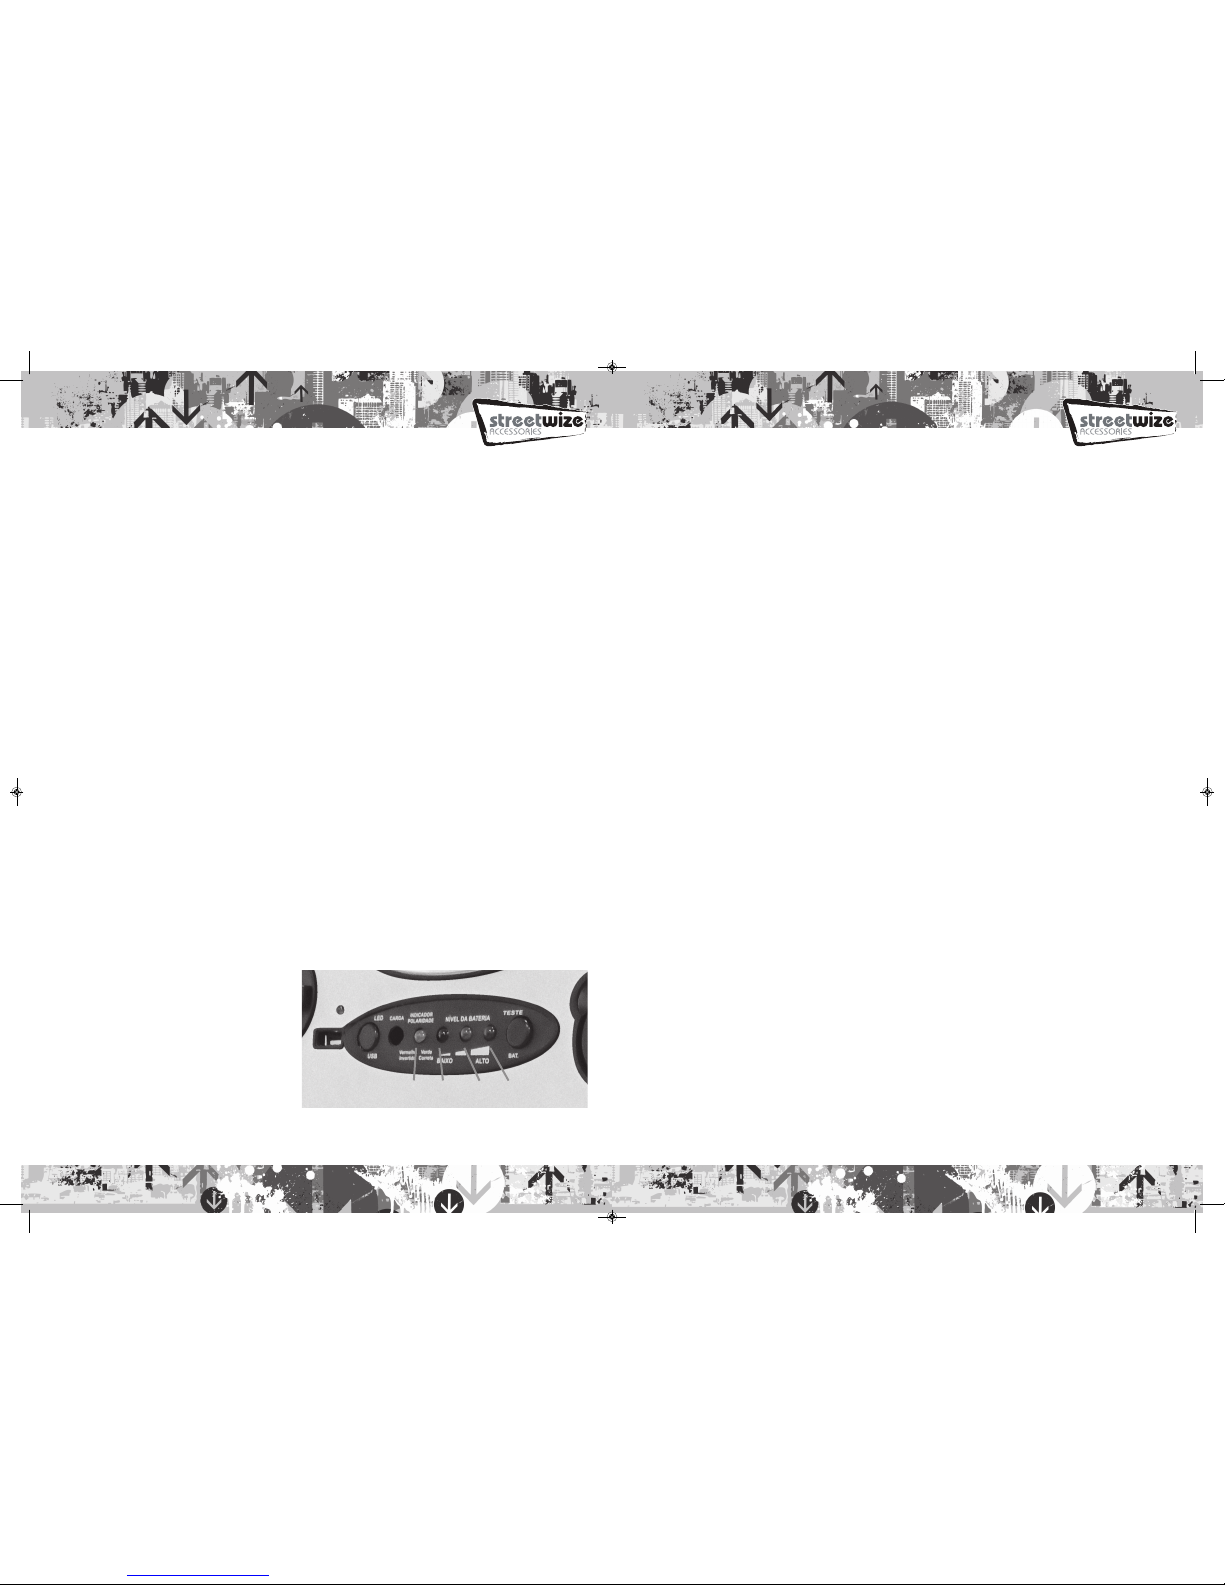
LED INDICATORS
LED’s illuminate when charging is in progress.
RED LED indicates charging, as the charging
progresses the RED & YELLOW LED will light
simultaneously, The GREEN LED indicates
charging complete. If no charging cable is attached
pressing the BATTERY CHECK button will give an
indication of the charging level. RED Indicates
immediate charging is required, YELLOW indictates
charge level is approaching low and should be
recharge as soon as possible, GREEN indicates a
good charge and will operate most 12V accessories.
But the battery may not be FULL. To check this attach a power cable and read the LED’s as above. When jump
starting a vehicle the RED/GREEN LED indicates correct (GREEN) or incorrect (RED) connection of the crocodile clips.
If the RED LED illuminates disconnect immediately and re-connect correctly.
RED/GREEN RED YELLOW GREEN
SWPP2 Manual AW 2016.qxp_Layout 1 25/10/2016 14:27 Page 3
 Loading...