

USB Internet Phone Ver1.5
USB Internet Phone Ver1.5
USB Internet Phone Ver1.5USB Internet Phone Ver1.5
1.
1. INTRODUCE GOODS
INTRODUCE GOODS
1.1.
INTRODUCE GOODSINTRODUCE GOODS
1)
1) ABSTRACT
ABSTRACT
1) 1)
ABSTRACTABSTRACT
According to the free internet phone user explosion recently, the free
phone service (PC to Phone) for business model leaps into fame suddenly.
However it is the reality that there is only the temporary member
increasing due to the low-quality call and its inconvenience. Which
results from the low priced & quality sound card for PC to Phone service
user due to the price competition among PC manufacturers so that led to
the low internet phone calling quality. Besides it brings inconvenience to
its user that the internet phone requires the user certification.
As the results, Streamnet made USB Internet Phone secured easy usage
and high calling quality for its user so that can attract more users and
create several kinds of beneficiary models.
The USB chip sets for USB Internet Phone Ver 1.0 enabling highly
efficient audio codec, acoustic echo-cancellation and several interfaces
support available solution for business model like e-commerce, internet
education, multiple-functional telephone.
2) System Requirements
2) System Requirements
2) System Requirements2) System Requirements
OVER
OVER Pentium 300MHz
CPU
CPU
CPUCPU
BROWSER
BROWSER
BROWSERBROWSER
HDD
HDD
HDDHDD
OPERATING SYSTEM
OPERATING SYSTEM
OPERATING SYSTEMOPERATING SYSTEM
CD
CD----ROM
ROM
CDCD
ROMROM
Pentium 300MHz
OVEROVER
Pentium 300MHz Pentium 300MHz
OVER
OVER MS
OVEROVER
EXTRA SPACE OVER
EXTRA SPACE OVER 100MB
EXTRA SPACE OVEREXTRA SPACE OVER
OVER MS WINDOWS 98
OVER MS WINDOWS 98
OVER MS WINDOWS 98OVER MS WINDOWS 98
OVER
OVER X 8
OVEROVER
MS Internet Explorer 5.0
Internet Explorer 5.0
MSMS
Internet Explorer 5.0 Internet Explorer 5.0
100MB
100MB100MB
X 8
X 8 X 8
RAM
RAM
RAMRAM
2.
2. FEATURE
FEATURE
2.2.
FEATUREFEATURE
Easy to use internet phone through Wowcall, Dialpad
Easy installment with USB Plug & Play
Securing safe and high fidelity sound by built-in DSP Codec
OVER
OVER 32 M/B
OVEROVER
32 M/B
32 M/B32 M/B

Voice data controlled by Full Duplex
No extra sound card required as a perfect USB Audio Device
Enable to play every kind of music file as full conversion to 100% digital
file(MP3, MIDI, WAVE)
High quality sound with low latency and echo cancellation
2. S
2. Specialties
pecialties
2. S2. S
pecialties pecialties
1) Concept
1) Concept
1) Concept 1) Concept
(1) Device :
(1) Device :
(1) Device :(1) Device :
Sound Device
Internal Speaker
Handset( MIC + Receiver Unit )
Headset 3.5 (Mono MIC + Mono Speaker) => Option
Hid Device
Hook Switch
LED
Function 3 Keys ( F0, F1, F2 )
(2) Command :
(2) Command :
(2) Command :(2) Command :
Enable to control Enable/Disable state of handset
Enable to control Enable/Disable state of internal speaker
Enable to control Enable/Disable state of Side Tone Effect
Enable to control On/Off state of LED
(3) Event :
(3) Event :
(3) Event :(3) Event :
On/Off Event – When On/Off hook, a event occurs through hook switch
Function 3 Keys – Pressing a Key, the event for respective key occurs
(4) Option:
(4) Option:
(4) Option:(4) Option:
Enable automatic changeover into handset or headset in the case of Audio Jack
added.
Option
OptionOption
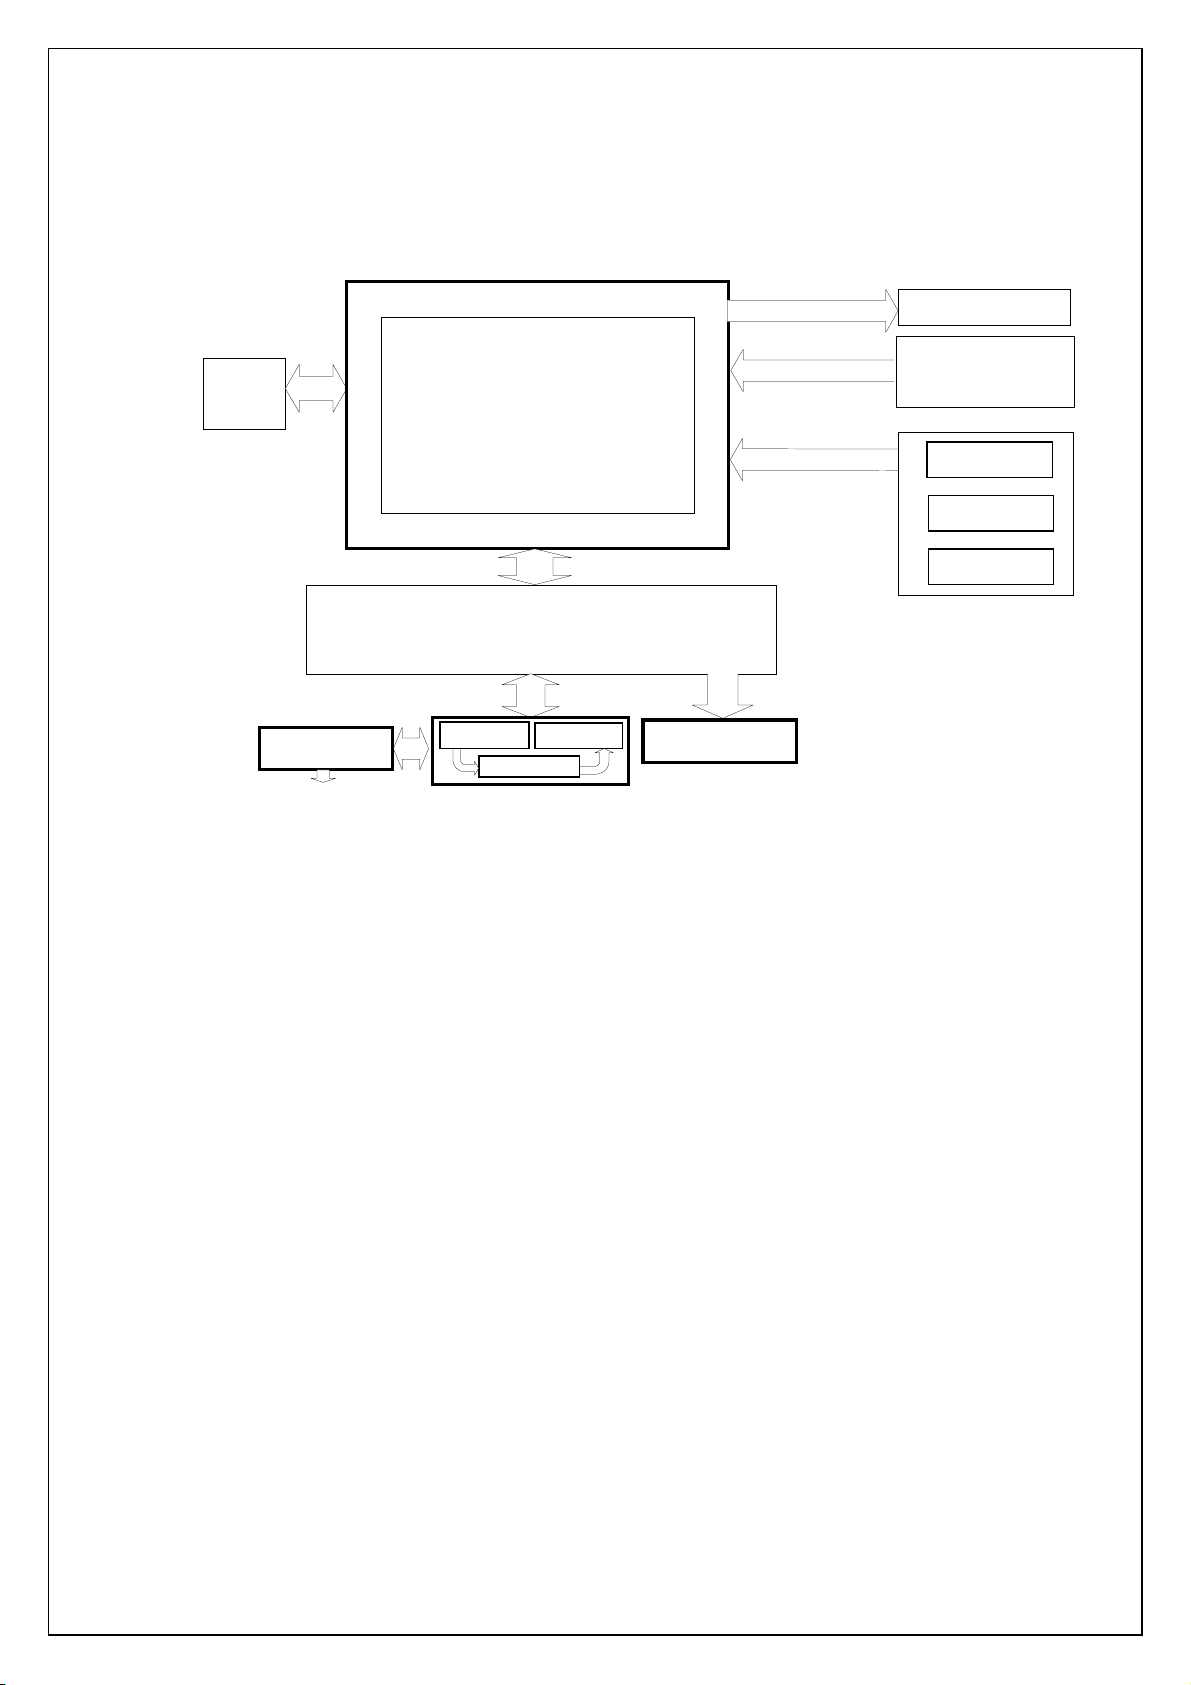
2222 )
) Block Organization
Block Organization
) )
Block OrganizationBlock Organization
USB
ZMM
DSP CODEC
Audio I/O
Analog exchange
I2C
LED
Hook switch
F0
F0
F0
F0
F0F0
F0F0
F1
F1
F1F 1
F2
F2
F2F2
M I C
M I C
M ono Audio
M ono Audio
M ono Audio M ono Audio
Jack
Jack
JackJack
(Opt ion)
(Opt ion)
(Opt ion)(Opt ion)
M I CM I C
spe aker
spe aker
spe akerspe aker
S ide T one
S ide T one
S ide T oneS ide T one
Handset
Handset
HandsetHandset
Intern al Sp e aker
Intern al Sp e aker
Intern al Sp e akerIn tern al Sp e aker
[U S B In tern et P HONE Version1.5]
[U S B In tern et P HONE Version1.5]
[U S B In tern et P HONE Version1.5][U S B In tern et P HONE Version1.5]

3. HOW TO USE USB Internet Phone Ver1.5
3. HOW TO USE USB Internet Phone Ver1.5
3. HOW TO USE USB Internet Phone Ver1.5 3. HOW TO USE USB Internet Phone Ver1.5
1) Handset Enable/Disable
1) Handset Enable/Disable
1) Handset Enable/Disable1) Handset Enable/Disable
4When Off Hook, handset mode Enable
(If Audio Jack is connected to Headset, sound is input/output through headset)
2) Internal Speaker Enable/Disable
2) Internal Speaker Enable/Disable
2) Internal Speaker Enable/Disable2) Internal Speaker Enable/Disable
4Enable - To notice a call from someone, special state with playing Wave file
3) Side Effect Enable/Disable
3) Side Effect Enable/Disable
3) Side Effect Enable/Disable3) Side Effect Enable/Disable
4When we use internet phone, Side Tone is Enable to make the same effect as regular
telephone
4) Lamp Enable/Disable
4) Lamp Enable/Disable
4) Lamp Enable/Disable4) Lamp Enable/Disable
4Notice the state of USB Internet Phone.
(1) SEND MODE
○1 Off Hook(Lifting Handset)
4Handset Enable
BChangeover into Audio I/O Handset or Headset
(Enable to change into headset mode by pressing special key)
4Internal Speaker Disable
4Side Effect Enable
4Lamp Enable
○2 Input Send Key (Supposed ‘ F0’ is a send Key)
4 As you press a Send key, you can link with a service through Internet Phone
Program by client program
○3 Call connection
4When the other part receives your call, a call by internet phone is available.

(2) Hang up mode
○1 On Hook(Hang up a handset)
4Handset Disable
4Internal Speaker Enable
4Side Effect Disable
4Lamp Disable
○2 When user puts down the handset on the phone to hang up, internet phone is
disconnected as data event is transmitted to client program by Device Hook switch
(3) Receive mode
4Internal Speaker Enable : Ring Wave file Play
4Lamp Enable, Disable Loop
(4) Input Digital Key
4As you press a function key built in Device, several functions is available by client
program with transmitted data.
4. Driver Installment for USB Internet Phone Ver1.5
4. Driver Installment for USB Internet Phone Ver1.5
4. Driver Installment for USB Internet Phone Ver1.5 4. Driver Installment for USB Internet Phone Ver1.5
USB Internet Phone using standard USB driver provided by Microsoft doesn’ t require
extra driver. Basically users can install it easily with the install CD for post Windows
version including Windows 98 .
Installment 4
Installment 4----Steps
Installment 4Installment 4
USB Multiple Device
USB Multiple Device
USB Multiple DeviceUSB Multiple Device
USB Human Interface Device
USB Human Interface Device
USB Human Interface Device USB Human Interface Device
USB Audio Device
USB Audio Device
USB Audio DeviceUSB Audio Device
Steps
StepsSteps
After completing the above installment, you can use USB Internet Phone. The next
step for installing S/W provided enables to realize several kinds of functions for
easy internet phone
1)
1)
USB Multiple Device Installment
USB Multiple Device Installment
1) 1)
USB Multiple Device InstallmentUSB Multiple Device Installment
When you connect both USB Internet Phone and USB port with USB cable, you can see the following picture
on your screen.
If you click the ‘‘‘‘ next’’’’ button, the following picture will be seen

After checking the item,
After checking the item, ‘‘‘‘ assigning the location to search
After checking the item, After checking the item,
‘‘‘‘ Windows installment CD
Windows installment CD’’’’ or
Windows installment CDWindows installment CD
assigning the location to search’’’’ , assign the place located either
assigning the location to searchassigning the location to search
or ‘‘‘‘ Windows installment program
Windows installment program’’’’ .
or or
Windows installment programWindows installment program
, assign the place located either
, assign the place located either , assign the place located either
After you assign the place located
After you assign the place located ‘‘‘‘ Windows
After you assign the place located After you assign the place located
automatically.
automatically.
automatically.automatically.
Windows installment program
Windows Windows
installment program’’’’ , the driver is installed
installment programinstallment program
, the driver is installed
, the driver is installed , the driver is installed

When the installment for USB multiple equipment is completed, the screen completed installment as
When the installment for USB multiple equipment is completed, the screen completed installment as
When the installment for USB multiple equipment is completed, the screen completed installment as When the installment for USB multiple equipment is completed, the screen completed installment as
the following picture will be shown.
the following picture will be shown.
the following picture will be shown. the following picture will be shown.
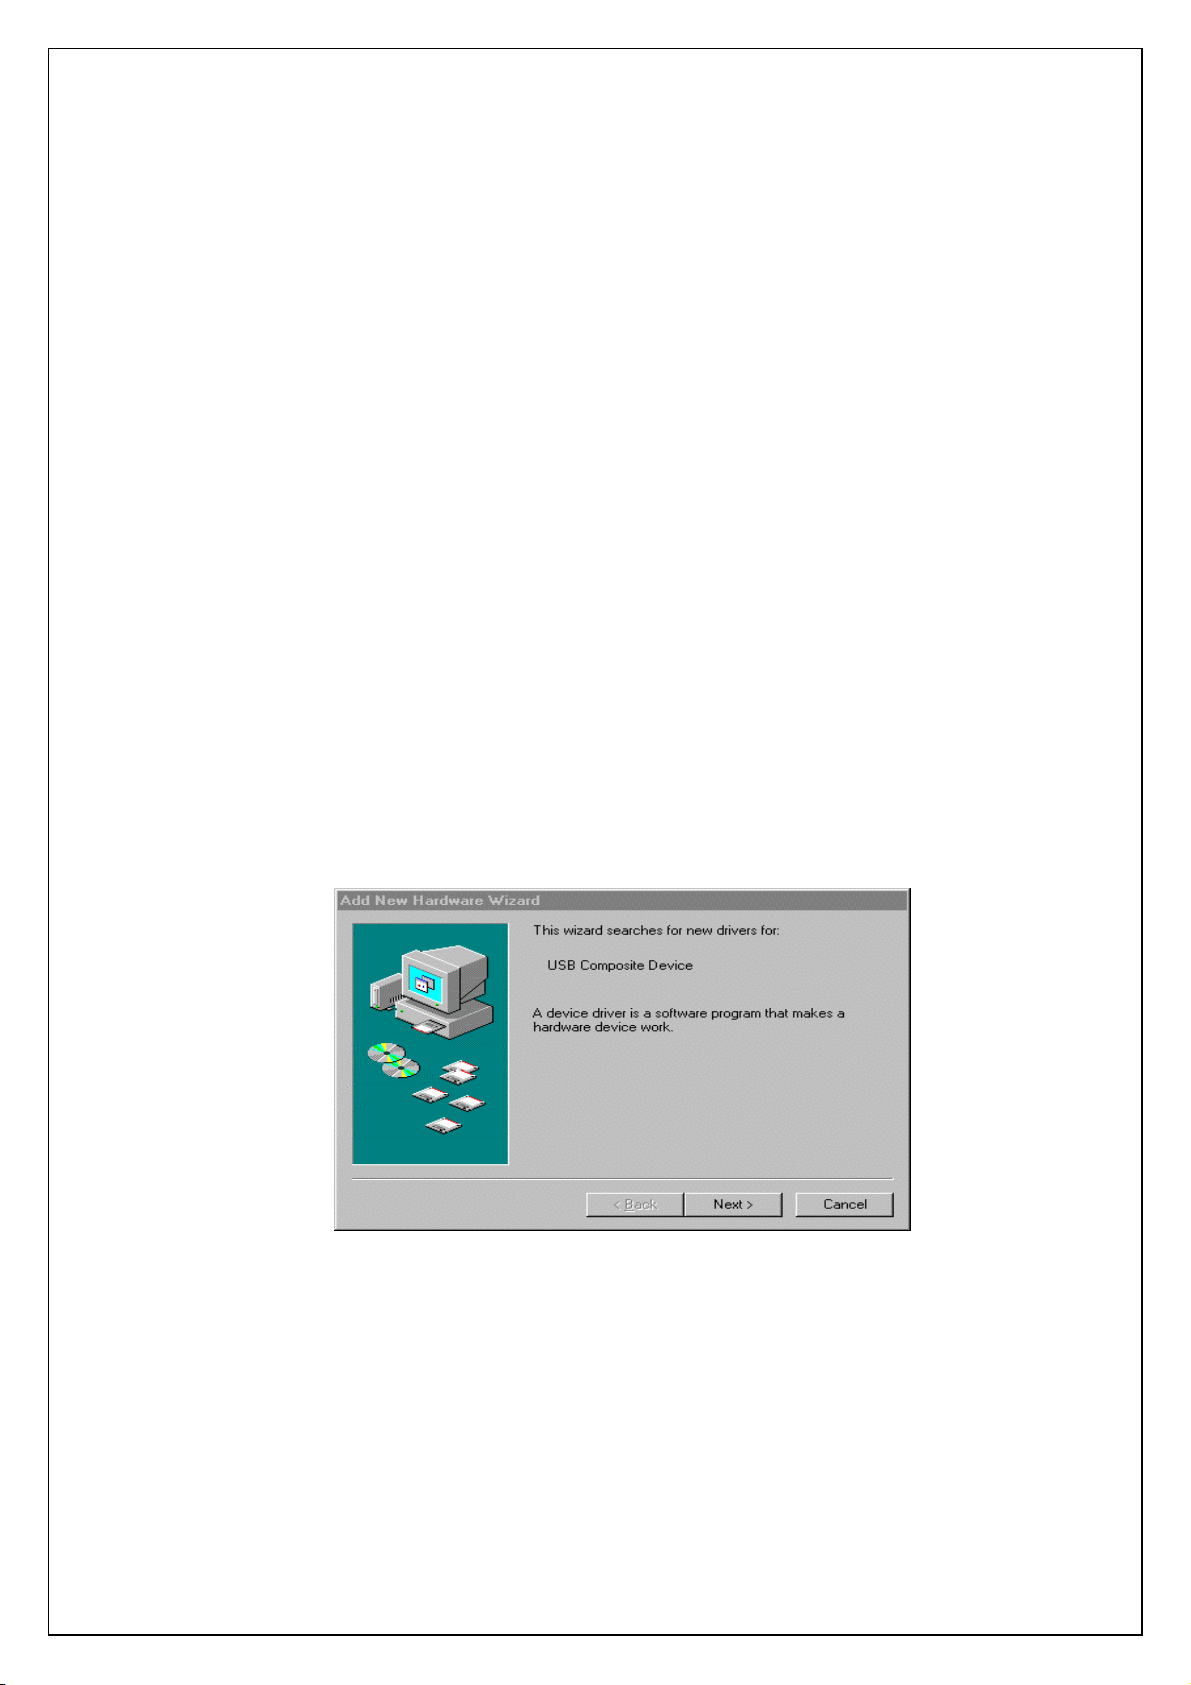
(2)
(2)
USB Human Interface Device installment
USB Human Interface Device installment
(2) (2)
USB Human Interface Device installmentUSB Human Interface Device installment
On
On finishing the installment for
finishing the installment for
On On
finishing the installment for finishing the installment for
interface device installment as the fo llowing picture
interface device installment as the fo llowing picture
interface device installment as the fo llowing pictureinterface device installment as the fo llowing picture
USB Multiple Device, you can see the screen for USB human
USB Multiple Device, you can see the screen for USB human
USB Multiple Device, you can see the screen for USB human USB Multiple Device, you can see the screen for USB human
.

As mentioned above, click the button
As mentioned above, click the button ‘‘‘‘ next
As mentioned above, click the button As mentioned above, click the button
next’’’’ ....
nextnext
USB human interface device inst
USB human interface device installment is completed. The next step is the installment for USB
USB human interface device instUSB human interface device inst
audio device.
audio device.
audio device.audio device.
allment is completed. The next step is the installment for USB
allment is completed. The next step is the installment for USB allment is completed. The next step is the installment for USB

(3) USB Audio Device Installment
(3) USB Audio Device Installment
(3) USB Audio Device Installment(3) USB Audio Device Installment
As the course as mentioned above, install USB audio device driver.
As the course as mentioned above, install USB audio device driver.
As the course as mentioned above, install USB audio device driver.As the course as mentioned above, install USB audio device driver.
If you can see this picture, USB interne
If you can see this picture, USB internet phone installment is completed.
If you can see this picture, USB interneIf you can see this picture, USB interne
Now you can use it as a sound card or internet phone.
Now you can use it as a sound card or internet phone.
Now you can use it as a sound card or internet phone.Now you can use it as a sound card or internet phone.
t phone installment is completed.
t phone installment is completed. t phone installment is completed.

5. Before using
5. Before using
5. Before using5. Before using
1) Checking DEVICE CONTROLLER
1) Checking DEVICE CONTROLLER
1) Checking DEVICE CONTROLLER 1) Checking DEVICE CONTROLLER
4After clicking the right button of the icon for MY COMPUTER
selecting the icon for DEVICE CONTRO
can see the following picture. You have to check whether USB Root Hub
Composite Device
Composite Device’’’’ ,
Composite DeviceComposite Device
recognized properly
DEVICE CONTROLLER
DEVICE CONTRODEVICE CONTRO
, ‘‘‘‘ USB Audio Device
USB Audio Device’’’’ ,
, ,
USB Audio DeviceUSB Audio Device
MY COMPUTER on BASIC SCREEN and
MY COMPUTERMY COMPUTER
LLER on the REGISTERD INFORMATION
LLERLLER
REGISTERD INFORMATION, you
REGISTERD INFORMATIONREGISTERD INFORMATION
USB Root Hub’’’’ ,
USB Root HubUSB Root Hub
, ‘‘‘‘ Human Interface Devices
Human Interface Devices’’’’ are
, ,
Human Interface DevicesHuman Interface Devices
, ‘‘‘‘ USB
USB
, ,
USB USB

2) Checking the
2) Checking the REGISTERD INFORMATION on MULTIMEDIA
2) Checking the 2) Checking the
REGISTERD INFORMATION on MULTIMEDIA
REGISTERD INFORMATION on MULTIMEDIAREGISTERD INFORMATION on MULTIMEDIA
4In the case of using existing sound card, you must set up Gz
audio device
Select MULTIMEDIA
MULTIMEDIA on ‘ START
MULTIMEDIAMULTIMEDIA
.
START -> Setting U p
STARTSTART
Setting Up-> Control P anel
Setting UpSetting Up
Control P anel’’’’ of BASIC S CREEN
Control P anelControl P anel
Gz as basic
GzGz
BASIC SCREEN.
BASIC SCREEN BASIC SCREEN

Set up both Playback
Playback and Recording
Playback Playback
Recording with USB Audio Device
Recording Recording
USB Audio Device and click the OK
USB Audio Device USB Audio Device
OK button.
OK OK
3) Recorder test
3) Recorder test
3) Recorder test3) Recorder test
4 After checking both Device Controller
check whether proper input/output are made with recording test.
Selecting Start
following Recorder window is seen.
Start -> Progr
StartStart
Device Controller and Multimedia Registered Information
Device ControllerDevice Controller
Program
am -> Assistant Program
ProgrProgr
am am
Assistant Program -> Recorder
Assistant ProgramAssistant Program
Multimedia Registered Information,
Multimedia Registered InformationMultimedia Registered Information
Recorder on Basic Screen,
Recorder Recorder
,
, ,
Basic Screen, the
Basic Screen, Basic Screen,
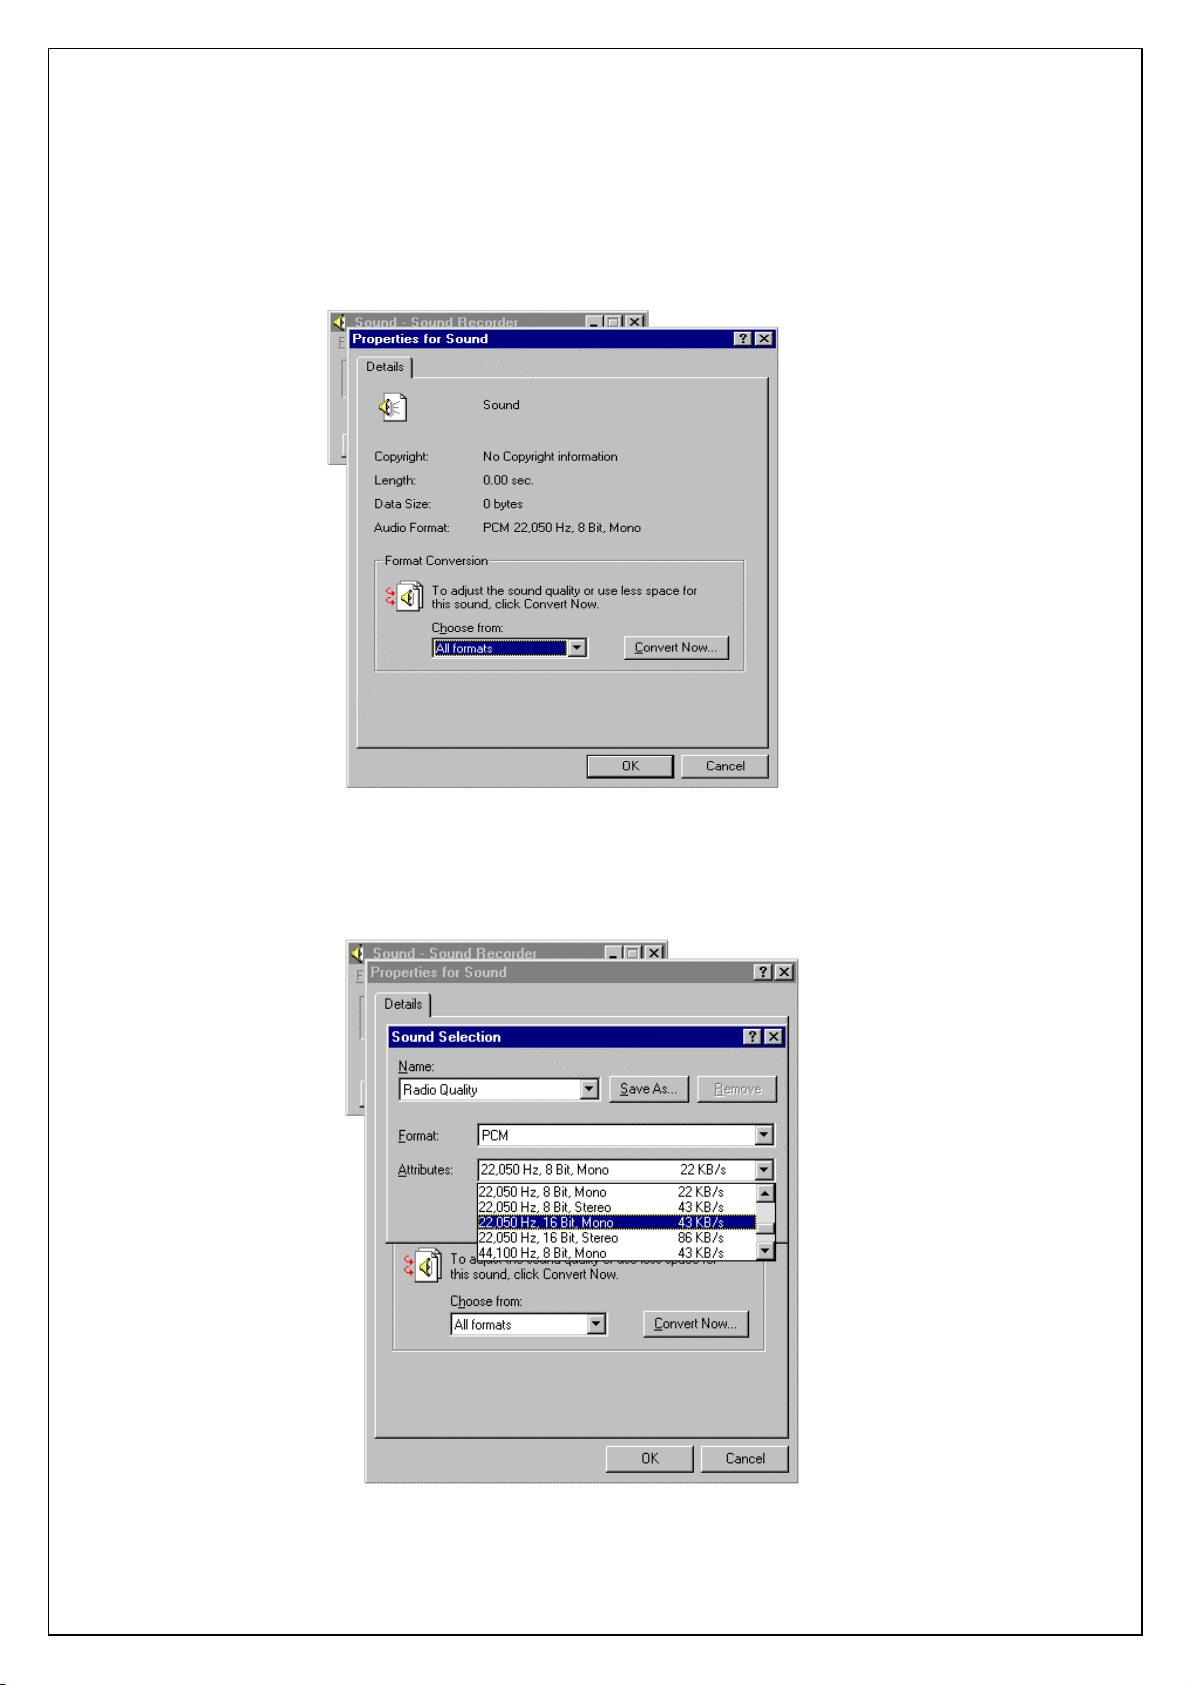
If you press Properties
Properties of File
PropertiesProperties
File in Menu, the following window is seen.
FileFile
After pressing the button, Convert Now
16bit, Mono
16bit, Mono’’’’ ,
16bit, Mono16bit, Mono
, press the OK
, ,
Convert Now and seting up Attribute
Convert Now Convert Now
OK button.
OK OK
Attribute into ’ 22,050 Hz,
AttributeAttribute
22,050 Hz,
22,050 Hz, 22,050 Hz,

After changing the Attribute
Attribute, test recording.
AttributeAttribute
 Loading...