

Streamline ISLAND Series, ISLAND S-180-ISMF-36, ISLAND S-200-ISMF-30, ISLAND S-201-ISMF-36, ISLAND S-240-ISMF-36 Installation Instructions, Maintenance, Use And Warranty
Page 1
ISLAND
Installation Instructions,
Maintenance, Use, and Warranty
S-180-ISMF-36
S-200-ISMF-30
S-201-ISMF-36
S-240-ISMF-36
CM
L
C
I
D
S
E
T
US
In te rt ek
IMPORTANT: READ AND SAVE THESE INSTRUCTIONS.
FOR RESIDENTIAL USE ONLY.
Disclaimer: Item purchased may be slightly different from the manual.
Page 2

A
WARRANTY, RETURNS,
& DELIVERY INSTRUCTIONS
3 Year Manufacturer’s Parts Warranty
This model comes with a 3-year manufacturer’s parts warranty. We will provide free of charge
replacement parts for the components that failed due to manufacturing defects. The customer must
contact Streamline & provide a description of the issue as well as photos & proof of purchase. If a
replacement unit is needed, this will be determined at Streamline’s sole discretion. If in fact it is needed,
then shipping will be paid for by the customer. The customer is also responsible for replacement part
shipping costs. The following parts are not covered by this warranty:
• Lightbulbs
• Metal, aluminum, & charcoal filters
The following is not covered by our warranty:
• Improper maintenance
• Normal wear and tear
• Damage due to accidents, misuse or improper installation
• Use of arsenic products
• Non-reported freight damage
• Deterioration of the appearance of the product or any cosmetic issues such as scratches, chips, rust
• Damage resulting from unauthorized replacement parts or improper modifications
Streamline is released from all liability due to indirect, consequential, or incidental damages.
All parts & finishes of Streamline range hoods are warranted to the original purchaser & to be free
from defects in material & workmanship. Labor charges and/or damage incurred in installation, repair,
or replacement as well as any other kind of loss or damages are excluded. This warranty is valid in
the United States and is non-transferrable.
Any applicable implied warranties, including the warranty of merchantability are limited in duration to
a period of express warranty as provided herein beginning with the date of original purchase at retail
and no warranties, whether express or implied shall be applied to this product.
This warranty does not extend to commercial or institutional use or installation.
Returns
We thank you for your purchase. Here at Streamline®, our goal is to provide customers with
exceptional bathroom and kitchen products. We understand that things sometimes don’t work out.
If you are unsatisfied with your Streamline® product and would like to initiate a return, please reachout
to [email protected].
We continue to grow and want to offer the best customer experience possible, and by reaching out to
us prior to initiating a return, we can ensure that these issues do not continue in the future.
Deliveries
Immediate inspection is required when receiving Streamline® items. It is important to notate any
damage or carton count discrepancy on the BOL / Proof of Delivery (POD) receipt when you sign for
the delivery, even if the package appears only slightly damaged. If the driver doesn't allow or won't wait,
notate on the BOL / POD "Driver will not allow inspection." Damages should be reported to Streamline®
within 3 calendar days of delivery. Customers who sign for delivery and do not provide proper detailed
description assume responsibility if merchandise is damaged or missing cartons. If the product itself
appears significantly damaged, you may refuse delivery after you notate it on the POD / BOL and provide
clear pictures to Streamline®. Please notify Streamline® of refusal so we can anticipate the return and
send out a new item.
Please look for the following when checking:
• Carton/Pallet Count
• Crumpled and pushed in areas
• Fork lift punctures
• Holes
• Any additional outside damage to packaging
Damages & Refusing a Freight Shipment
If the shipment is damaged, a customer has the option of refusing the shipment. Contact our customer
service representative immediately at [email protected] when and if you refuse a shipment.
Also, proper notation must be on the BOL / POD receipt. Any external evidence of loss or damage that
occurred during transit is considered visible loss or damage and must be noted on the BOL / POD and
signed by the carrier's agent (driver). Failure to adequately describe the visible loss or damage could
result in the carrier delaying or refusing to honor the freight claim. Any damage that occurred during
transit that was not visible at the time of delivery is considered concealed loss or damage. Due to rough
handling in transit it is possible to damage the contents of a carton without damaging the outer
packaging itself.
If such a situation occurs, it is important to contact Streamline® immediately for instructions on how
to handle this. You must open all received boxes and inspect products for concealed damage within
72 hours (3 calendar days) of delivery and Streamline® must be notified at that time. After this time
frame claims may not be honored. Streamline® reserves the right to replace any damaged merchandise
within 3 calendar days of notification by the customer. If a replacement item is available for shipping
within that time period, then a refund cannot be issued.
If no replacement is available, the damaged item(s) will be refunded in full if the damage was the fault
of freight carrier, and all return procedures were followed. Failure to follow return procedure for the
damaged item may result in a charge for the free replacement item.
— 1 —
— 2 —
Page 3
B
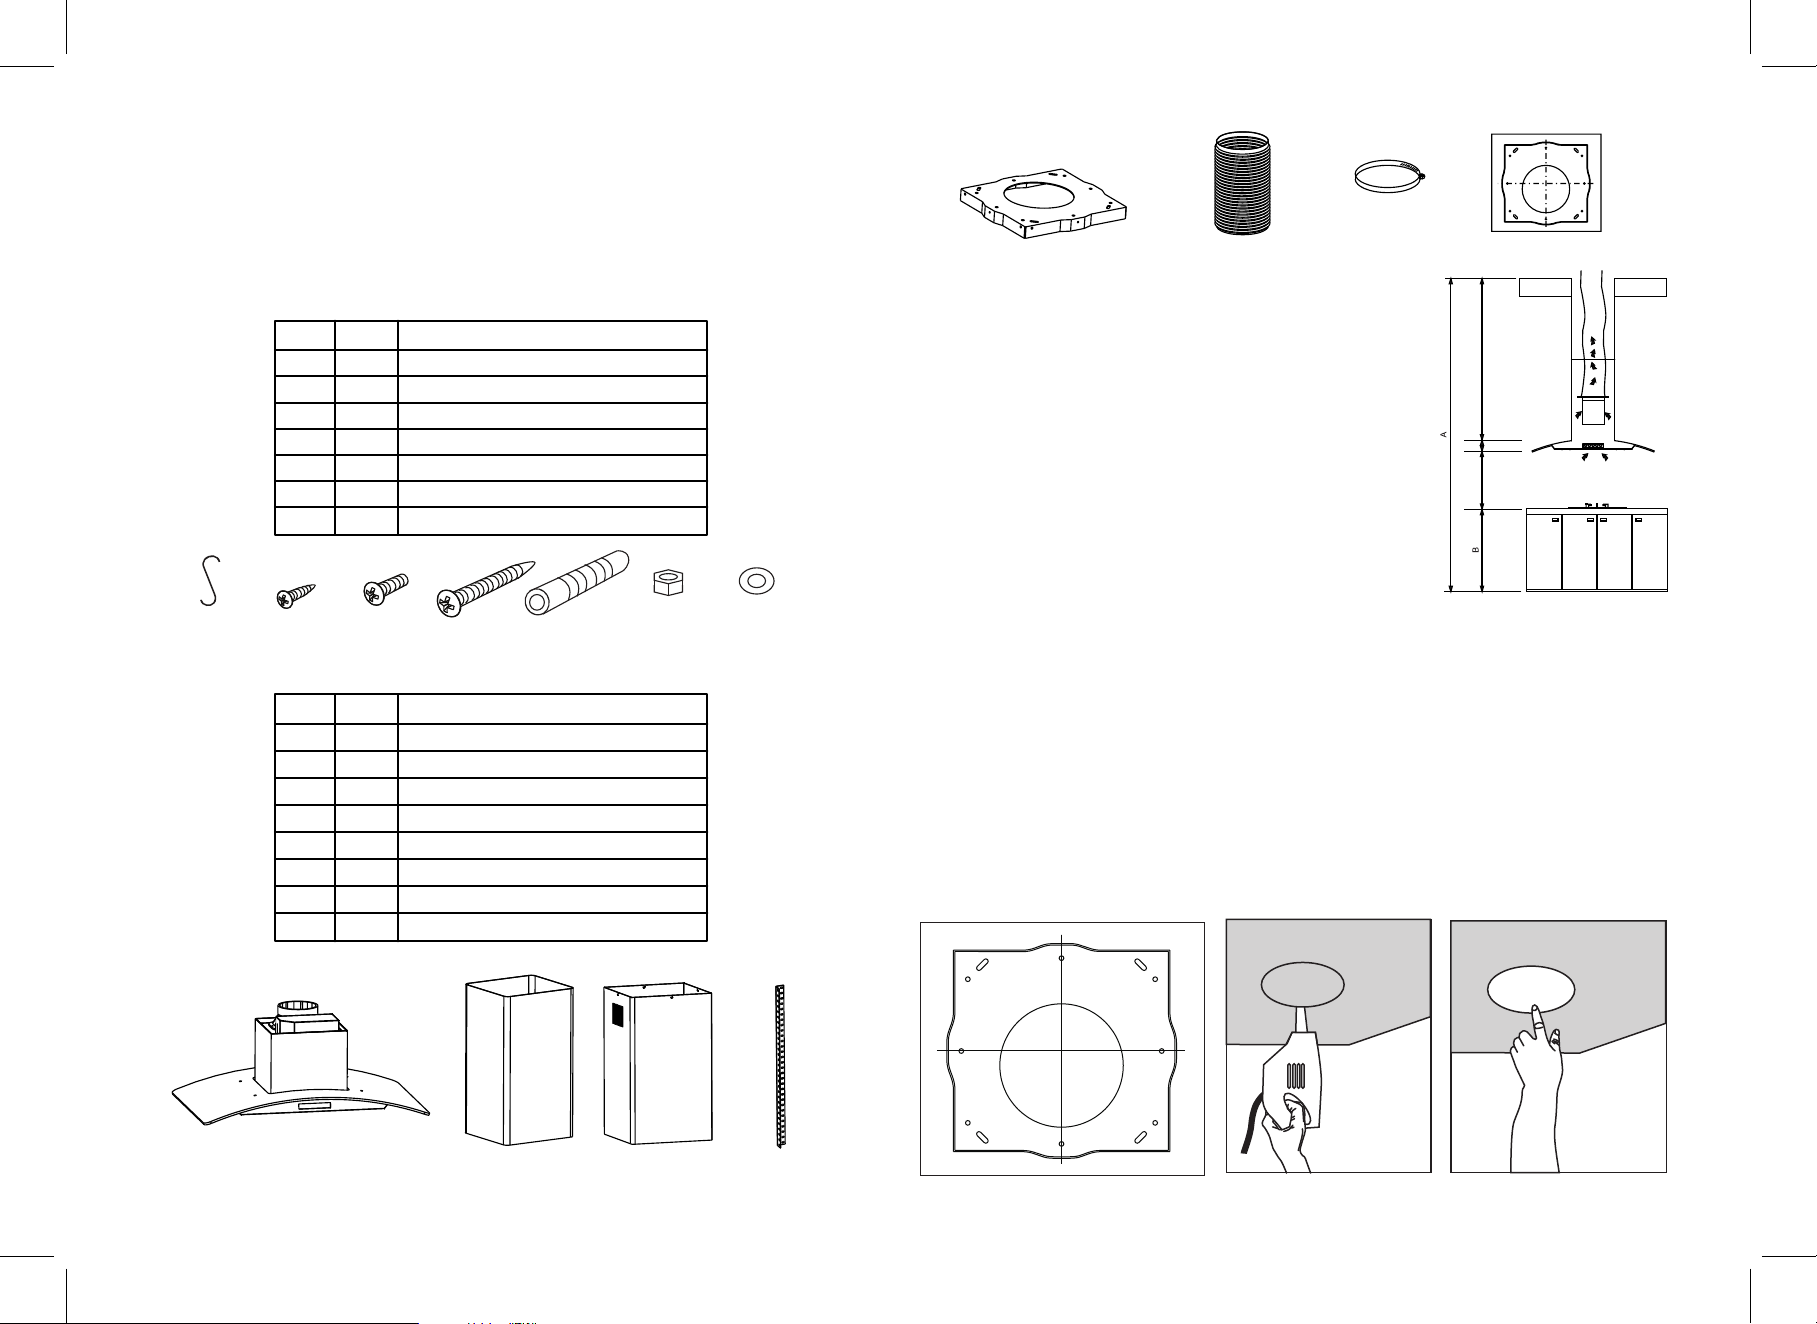
MOUNTING INSTRUCTIONS
L O M Q
HARDWARE L IST
KEY
A B C D E F G
QTY DESCRIPTION
x1 S-HOOK
A
x2 ST2.9X10 SMALL SCREWS
B
x4 M4X8 SCREWS
C
x8
D
E
x32
F
x16
G
x8
M4X35 LONG SCREWS
M5X8 BIG SCREWS
M5 HEX NUTS
M5 WASHERS
PARTS LIST
KEY
QTY DESCRIPTION
x1 INNER DUCT
J
x1
K
x1
L
x1
M
N
x8
x1
O
x1
P
x1 CEILING BRACKET GUIDE
Q
OUTER DUCT
CEILING BRACKET
HOSE CLAMP(S-240-ISMF-36 only)
SUPPORT BRACKET
FLEXIBLE DUCT EXHAUST HOSE
RANGE HOOD
Parts not supplied
• Duct tape
• Preinstalled ventilation system and ductwork
• Preinstalled outside duct cap or weatherproofing
Installing the range hood
This installation is for mounting the product to a ceiling.
Ensure your ceiling has the proper support to hold the
range hood weight. These instructions are general
guidelines, please consult a professional installation
specialist regarding the best type of mounting hardware
and support system based on your ceiling construction.
All island range hoods must be installed and supported
by studs and joists in your ceiling. All homes constructions
are different and installations will vary.
1. Begin installation by removing the filters and removing any tape on the air flow flappers.
2. Remove the protective film from range hood and ducting.
protective gloves to avoid sharp edges.
3. If your model has an electronic touch sensor control panel, remove the protective plastic film
covering the control panel (applicable to some models).
4. Find the center of the ceiling where you are installing the range hood and trace a 6" circle.
You can use the ceiling bracket guide(L) to position the 6" circle. Ensure there are no studs
where the opening is being made.
5. Using a sabre or jig saw, cut out the drywall for a 6'' hole.
6. This island range hood must be supported by ceiling studs or joists to the ceiling.
Fro nt
When handling the ducting please wear
X (Total length)
C (25.6 in-29.5 in) 3.1 in)
X=A-(B+C+3.1 in)
Step 9.
Lef t
P
— 3 —
K
J
N
Bac k
Rig ht
— 4 —
Page 4
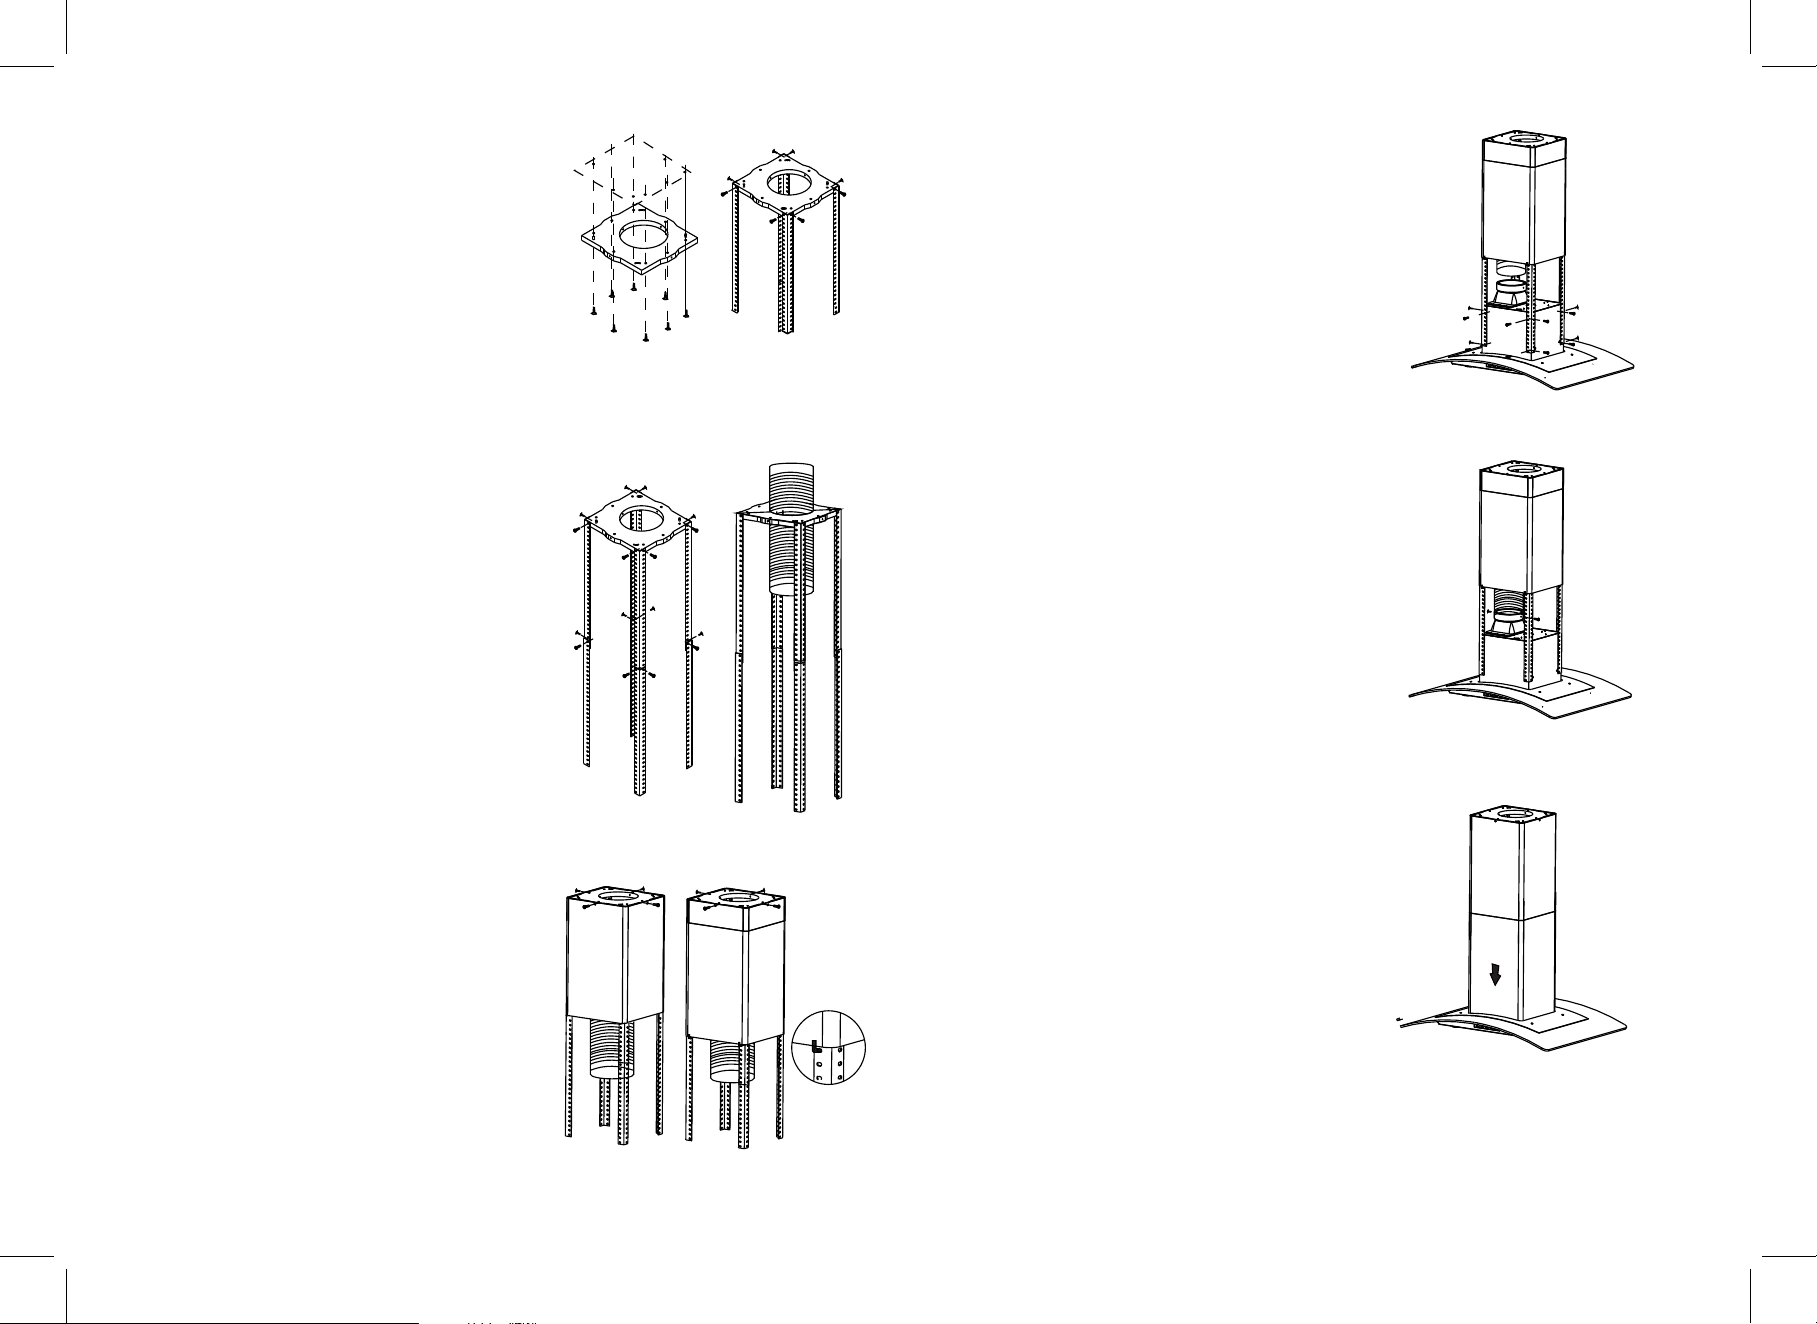
7. Attach the ceiling bracket (L) using the (8)
long screws (D) (the supplied screws may not
work with all installations, please check with
your installation professional).
8. Attach (4) support frame brackets (N) to the
ceiling mounting bracket (L). Each support
bracket will use (2) M5X8 big screws (E) and
(2) M5 washers (G).
9. Measure the distance that the bottom of the
range hood will be from the top of your range
(see previous page for reference). Attach another
(4) support brackets (N). Each support bracket will
use (4) M5X8 big screws (E) and (4) M5 washers (G).
10. Install the 6" round flexible duct exhaust hose (O).
Assemble ventilation to outside ducting using duct tape
and or trapping. Note: If you are choosing the
ductless/recirculating mode do not install the duct
exhaust hose.
11. Slip inner duct up through the support frames
and over the ceiling mount bracket. Be sure the
duct slides over the (4) mounting holes on each side.
12. The duct should cover the (4) mounting holes
on the sides of the ceiling bracket. Screw in
(4) M4X8 (C) screws through the predrilled holes
in duct work into the (4) mounting holes.
7.
14. Place the range hood underneath the
support frames and align the holes of the
support frame to the holes in the range hood.
WARNING: THIS WILL TAKE AT LEAST TWO PEOPLE.
Screw in (4) M5X8 big screws (E) through
the support frames into the pre-aligned
holes in the range hood on all four corners.
15. Install the round flexible duct exhaust hose
to the round vent air flap, and secure with
8.
(2) ST2.9X10 small screws (B) and tape or a
hose clamp and tape. Note: If you are choosing
the ductless/recirculating mode do not install
the duct exhaust hose.
16. Pull the power cord up through the ceiling cut out
and plug into an outlet. You may need to access
your ceiling. An extension cord may be required.
As electrical box locations may vary, please make
the proper accommodations during the installation
process.
17. Remove the S-hook and lower the bottom duct
on the top of the range hood in the grooved slot.
Go to operating instructions.
14.
15 -16.
.
.
13. Slip outer duct cover (K) through the support
frames and then temporarily over the inner duct.
Use S-Hook (E) to temporarily hold the duct cover
in place while securing the range hood motor
assembly. After the range hood motor assembly
is attached, you will remove the S-hook for final
assembly of the outer duct cover.
— 5 — — 6 —
9. 10.
17.
11-12. 13.
Page 5
C
D
OPERATION
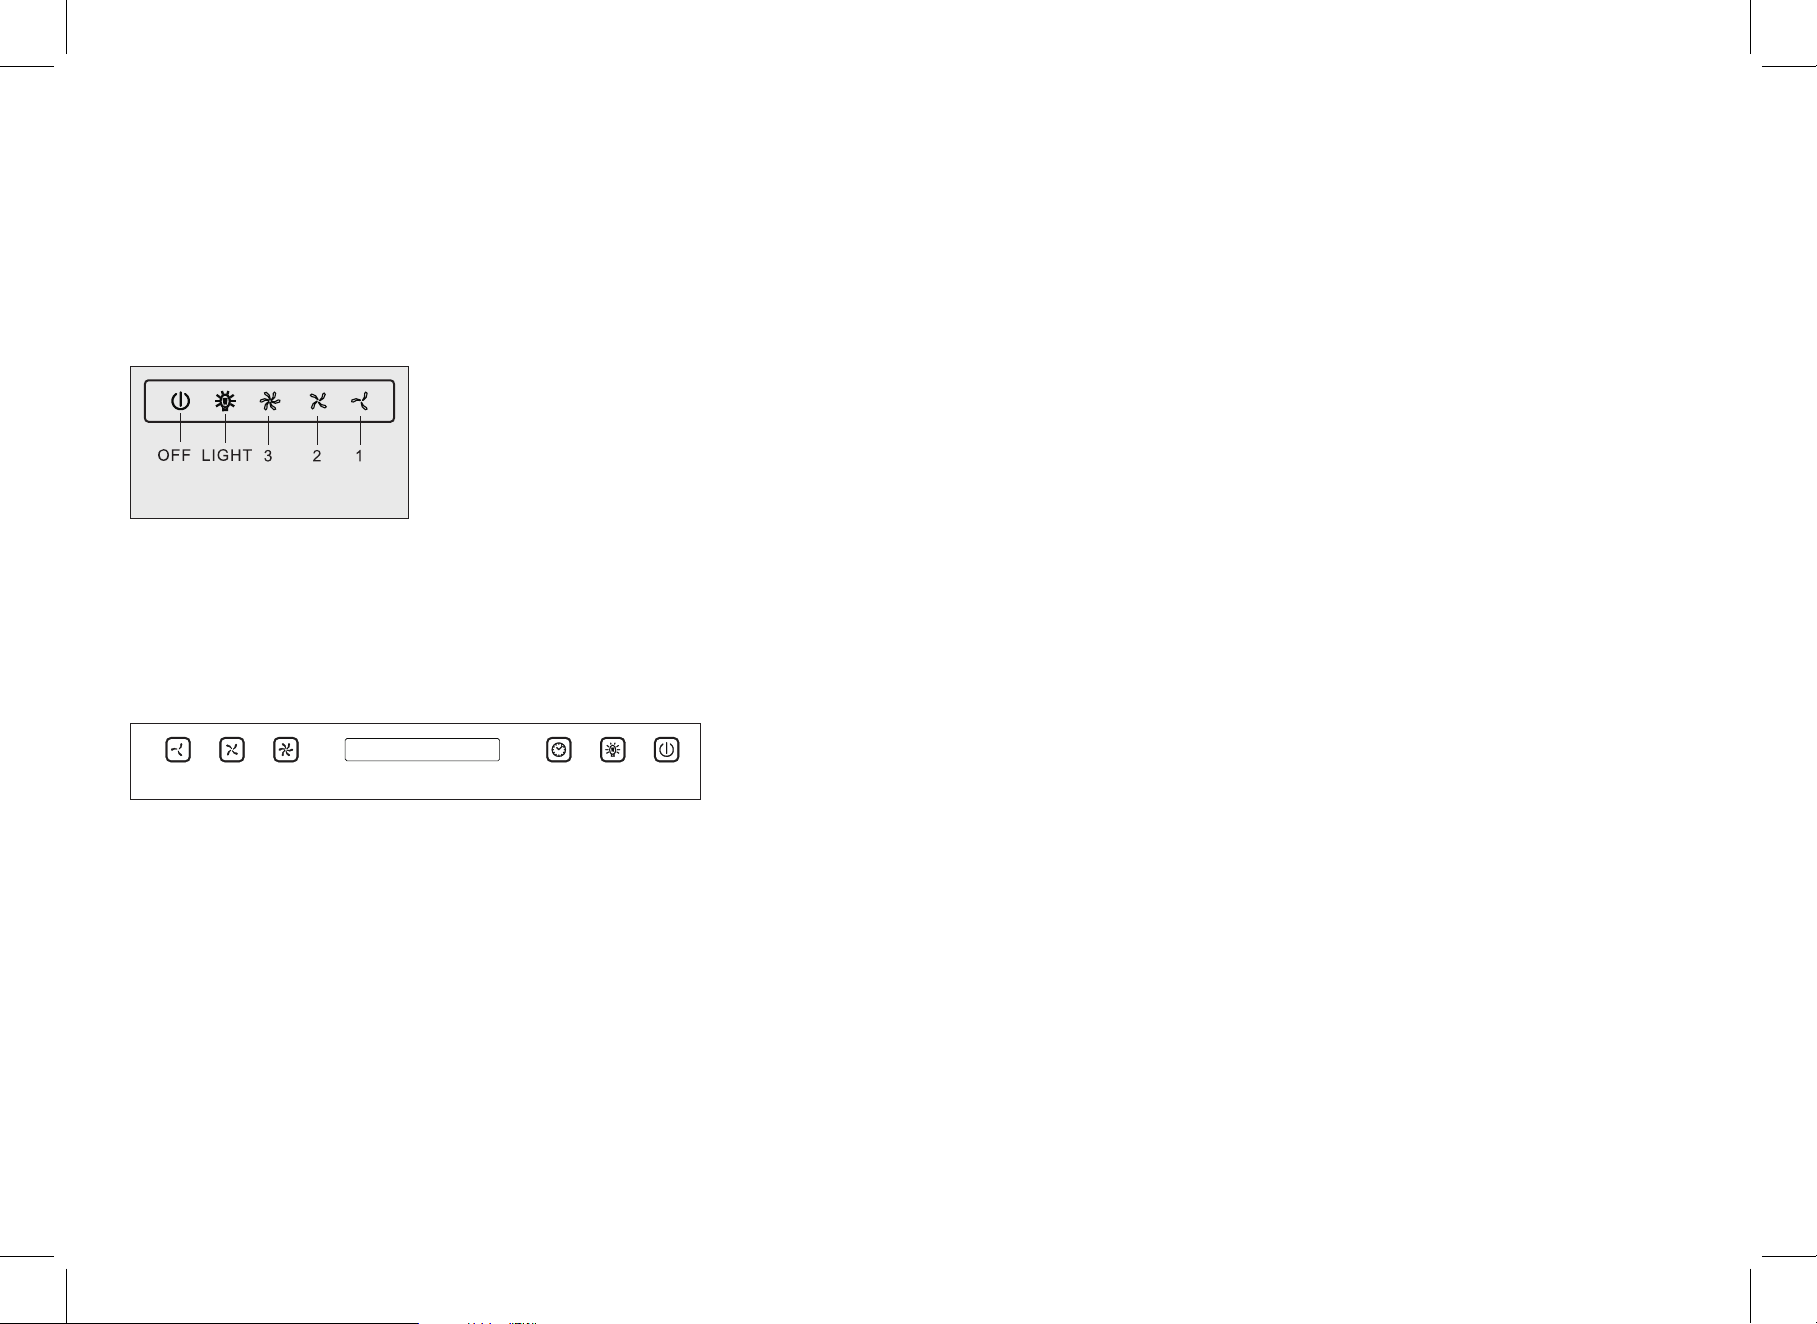
FIVE FINGER TOUCH BUTTON CONTROL PANEL
LIGHT BUTTON
Touch once: the light turns on
Touched again: the light turns off.
MOTOR BUTTON: 1, 2, 3
1: start the motor at minimum speed
2: start the motor at medium speed
3: start the motor at maximum speed
OFF
Touch once: stops the motor after 2-3 minutes and shows a flickering light
Touch twice: stops the motor immediately.
SIX FINGER TOUCH BUTTON CONTROL PANEL
1 2 3 TIMER LIGHT OF F
• Turn on the power: The buzzer will buzz, indicating the lights are on. Time will show 12:00. If no
options are selected, then the range hood will turn off automatically. In order to continue operation,
select a button.
• Adjust time: Turn the power on. The buzzer will buzz, indicating the lights are on. Touch and hold the
TIMER button for 3 seconds. The time will start flickering and you will be able to set the correct time.
Adjust the time by touching the 2 & 3 button and the timer button.
• OFF: Shuts off the power
• LIGHT: Turn the lights on or off
• TIMER: Turn off power within 2 minutes
MAINTENANCE AND CLEANING
Constant maintenance ensures the correct operation and efficiency of the appliance over time.
Special attention should be paid to the grease-trapping filters and the charcoal filters. Frequent cleaning
of the filters will ensure that fats and grease do not accumulate on the cooker hood, with the consequent
risk of fire.
1. METAL GREASE-TRAPPING FILTERS
These trap the fat and grease particles suspended in the air, and therefore should be washed every
month in hot water and detergent. DO NOT BEND. Wait until they are completely dry before repositioning
them. The metal filters can be cleaned in a dishwasher.
2. CHARCOAL FILTERS
These trap odors present in the stream of air that passes through them. The air is purified by passing
a number of times through the filters and then recirculated into the kitchen. The charcoal filters cannot
be cleaned, and should be replaced on average 3-4 months (according to use).
3. CLEANING THE OUTSIDE OF THE APPLIANCE
The outside of the cooker hood should be cleaned using a damp cloth and neutral liquid
detergent or denatured alcohol.
Do not use products that contain abrasive substances, rough cloths or cloths not specifically
designed for cleaning steel.
Using abrasive substances or rough cloths will inevitably damage the finish of the steel.
The steel surface will be irrevocably damaged if the instructions above are not complied with.
Keep these instructions together with the instructions for use of your hood.
The manufacturer accepts no liability for any damage caused by no-compliance with the
instructions above.
4. CLEANING THE INSIDE OF THE APPLIANCE
The electrical parts or parts of the motor assembly inside the range hood must not be cleaned
using liquids or solvents.
— 7 —
— 8 —
Page 6
E
SAFETY DISCLAIMER
• Read all instructions before installing and operating this appliance. This instruction booklet must be kept
together with the appliance for future reference. If the appliance is sold or consigned to other parties, please
ensure that the booklet is supplied with it in order to ensure that the new user has the correct information on
the operation of the range hood and aware of the warnings.
• The manufacturer disclaims all liability for any damage that may be directly or indirectly caused to people,
things, and animals due to the failure to follow all the instructions provided in this booklet and above all the
warnings relating to the installation, operation, and maintenance of the appliance.
• These warnings have been provided for your safety and the safety of others. As a result, please read them
carefully before installing and operating the appliance.
• The installation instructions in this manual is intended for qualified installers, service technicians
or persons with similar qualified background.
• It is dangerous to modify or attempt to modify the characteristics of this system. In the event of
malfunctions or if repairs are required to the appliance, do not attempt to solve the problems directly.
• Only qualified professionals should proceed with installation and electrical wiring. All installation and
wiring must be done with regard to any applicable codes and standards.
• DO NOT attempt to install this appliance yourself.
• Repairs performed by unqualified persons may cause damage. For all questions on repairs and other work
on the appliance, please contact [email protected]
• If the supply cord is damaged, it must be replaced by the manufacturer in order to avoid a hazard. Any
modifications that may be required to the electrical system for the installation of the cooker hood must only
be made by qualified electricians.
• Before performing any cleaning or maintenance operations, disconnect the appliance by unplugging it or
using the main switch.
• Always check that the electrical parts are off when the appliance is not being used.
• The range hood must only be used for the exhaust of cooking fumes in the home. The manufacture
disclaims all liability for any other use of the appliance. The maximum weight of any object placed above the
hood (or hung to) must not exceed 3.3 lbs.
• This range hood may NOT be used to exhaust hazardous materials.
• This appliance is not intended for use by young children. Young children should be supervised to ensure
they do not play with the appliance.
• Prior to removing any parts from the range hood, please ensure that you wear protective gloves.
The range hood may have very sharp edges.
• Do not connect the appliance to flues (from boilers, fireplace, etc.). Make sure the mains voltage
corresponds to the values on the rating plate located inside the cooker hood. The minimum safety
distance between the cooktop and the cooker hood must be at least 26 in.
• Check deep-fryers during use: Superheated oil may be flammable.
• Ensure that there is adequate ventilation of the room when the range hood is used at the same time as
appliances burning gas or other flues.
• The exhaust air must not be discharged into a flue which is used for exhausting fumes from appliances
burning gas or other fuels.
• Ensure that all regulations concerning the discharge of exhaust air have been fulfilled before you use
the appliance.
• Please follow all applicable safety standards and guidelines, such as those published by the NFPA,
the American Society of Heating, and local codes.
• Proper airflow is needed for proper ventilation and exhausting of gases through the duct in order to
prevent the gases returning into the home. When ducting the range hood, please ensure that you do
not damage any hidden wiring or utilities.
• Ensure to clean old ductwork regularly to avoid a grease fire and proper operation.
• Make sure that the duct work is properly connected and secured to the range hood and outdoors.
• Regularly clean the range hood from any grease that has accumulated as it should not be allowed to
accumulate on any surfaces or parts of the range hood.
• When cooking greasy foods or at high heat, always ensure that the highest settings are used on the
range hood.
• Never cook on open flames under the range hood.
• Never leave food unattended when cooking on the highest settings. This may cause grease spillovers
that can ignite.
• In the event of a stove top grease fire, smother the flame using a close fitting lid and never pick up
the flaming pan.
• If the flames do not go out, call the fire department and do NOT use water or wet dishcloths. Avoid
using flammable or combustible material from putting out the flame.
F
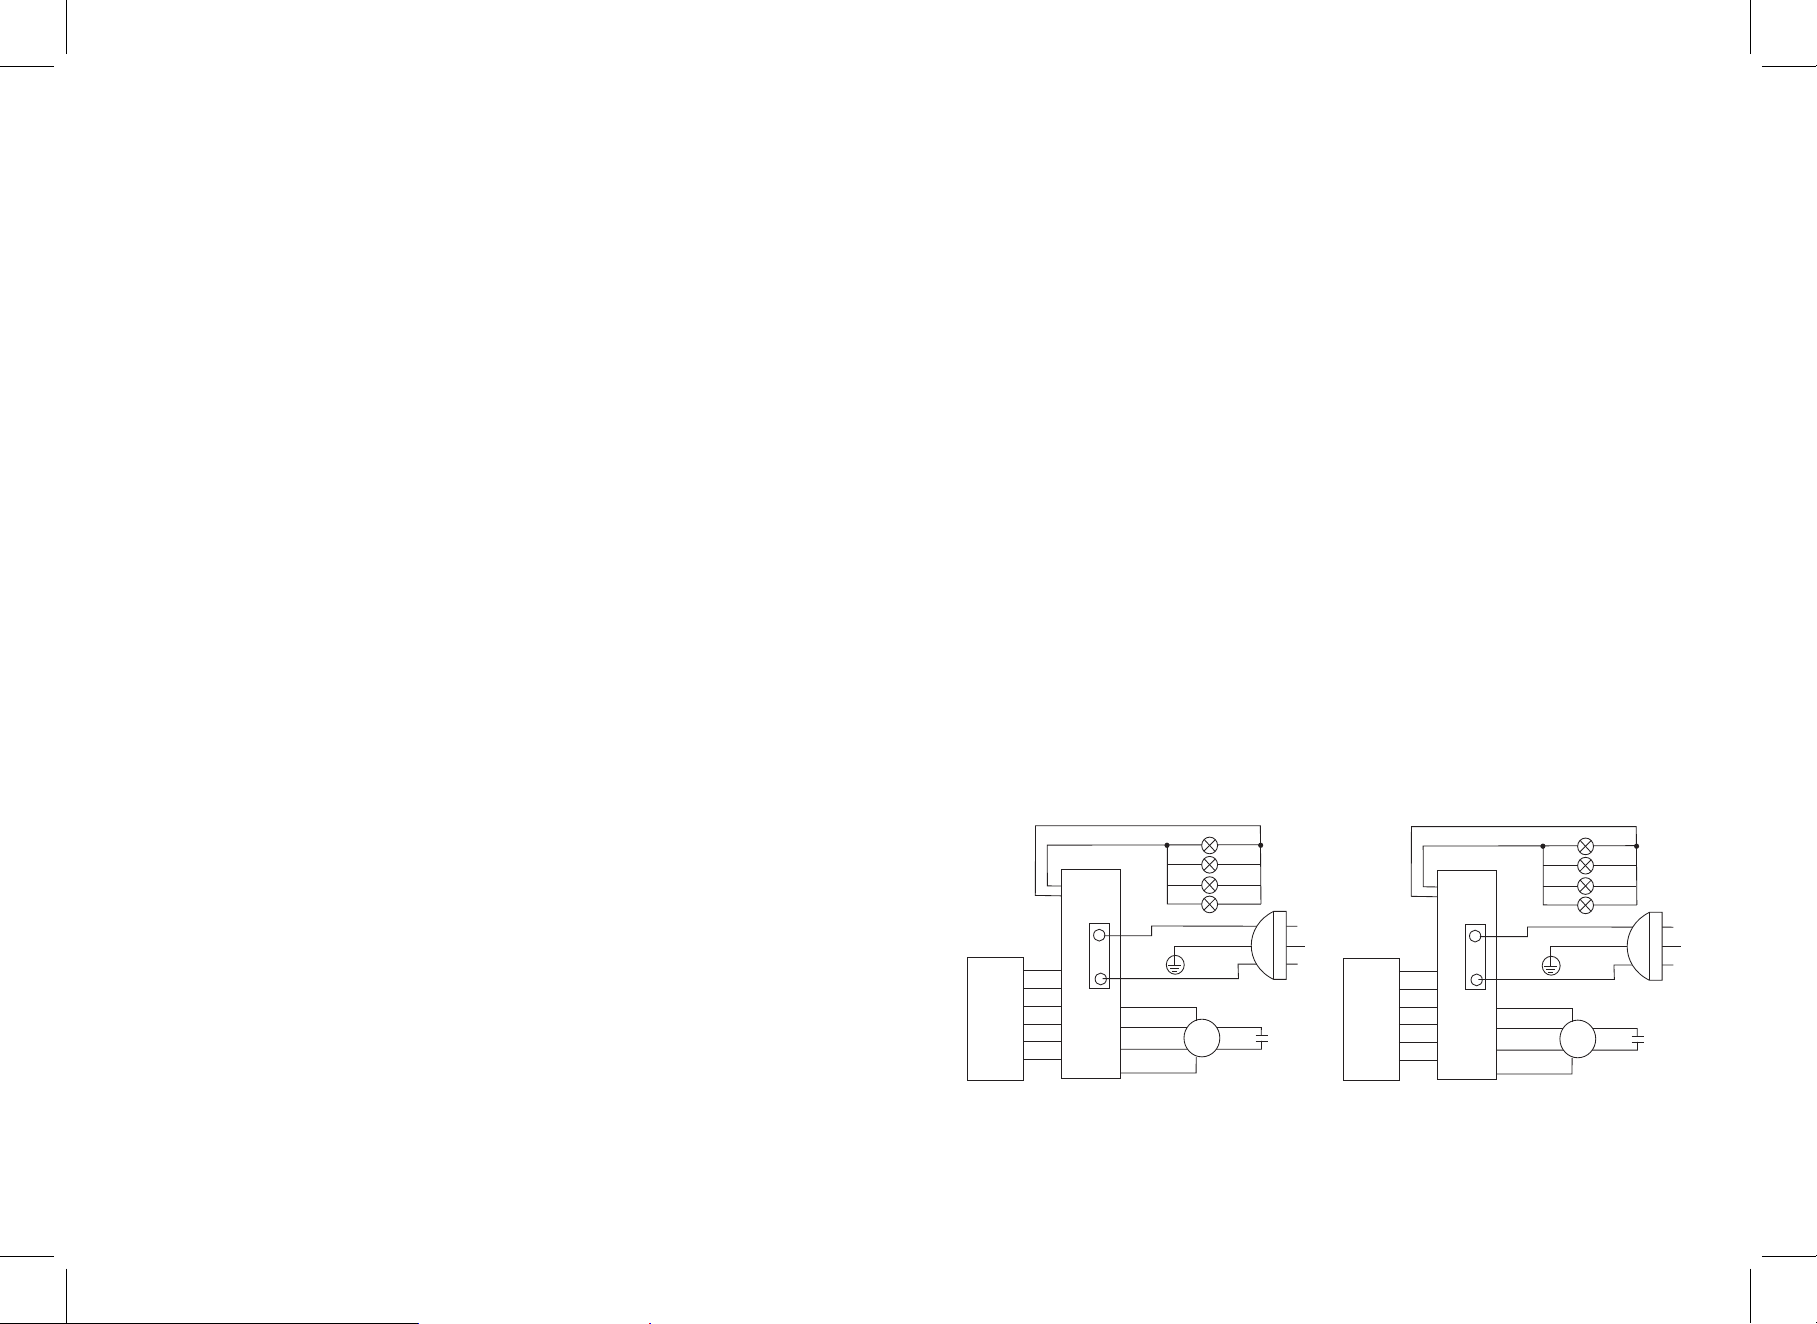
WIRING DIAGRAMS
Switch
panel
Brown (Re d)
110V
Black
White
N
L
Power
panel
Green
Black
Yell ow( L)
Brown (M)
Green (F)
Black
S-240-ISMF-36
110V~1 20V /60Hz
Orang e
M
White
35μF
Switch
panel
S-200-ISMF-30
S-201-ISMF-36
S-180-ISMF-36
110V
N
L
Power
panel
Brown (Re d)
Black
White
Green
Black
Yell ow( L)
Brown (M)
Green (F)
Black
110V~120V /60Hz
Orang e
M
White
12μF
— 9 —
— 10 —
 Loading...