

Streamit Maven user manual [rmware version 2.18.0]
Version: v8.0
Date: Nov 2012
c
2011 STREAMIT BV — All rights reserved
THE MATERIAL CONTAINED HEREIN IS COPYRIGHTED AND PROTECTED UNDER NATIONAL
AND INTERNATIONAL COPYRIGHT LAWS AS AN UNPUBLISHED WORK AND UNAUTHORIZED
REPRODUCTION OR MODIFICATION IS PROHIBITED WITHOUT WITHOUT THE EXPRESS PRIOR
WRITTEN CONSENT OF STREAMIT.
TABLE OF CONTENTS
Table of Contents
1 Foreword 3
1.1 Maven versions . . . . . . . . . . . . . . . . . . . . . . . . . . . . . . . . . . . . . . . . . . 3
1.2 Included materials . . . . . . . . . . . . . . . . . . . . . . . . . . . . . . . . . . . . . . . . 3
1.3 Introduction . . . . . . . . . . . . . . . . . . . . . . . . . . . . . . . . . . . . . . . . . . . . 4
1.4 If you do not succeed . . . . . . . . . . . . . . . . . . . . . . . . . . . . . . . . . . . . . . . 5
2 Installation 5
2.1 Additional requirements . . . . . . . . . . . . . . . . . . . . . . . . . . . . . . . . . . . . . 5
2.2 Preparing the Maven . . . . . . . . . . . . . . . . . . . . . . . . . . . . . . . . . . . . . . . 5
2.3 Connecting the Maven to the audio/video-installation . . . . . . . . . . . . . . . . . . . . 6
2.4 Connecting the Maven to the mains . . . . . . . . . . . . . . . . . . . . . . . . . . . . . . 6
2.5 Connection of the Maven to the ethernet connection or ADSL router . . . . . . . . . . . . 7
3 The conguration interface 7
3.1 On the Maven itself . . . . . . . . . . . . . . . . . . . . . . . . . . . . . . . . . . . . . . . 7
3.2 Via a browser . . . . . . . . . . . . . . . . . . . . . . . . . . . . . . . . . . . . . . . . . . . 7
3.3 Name and password for the conguration interface . . . . . . . . . . . . . . . . . . . . . . 8
4 Conguring the Maven 9
4.1 Network conguration . . . . . . . . . . . . . . . . . . . . . . . . . . . . . . . . . . . . . . 9
4.2 Audio conguration . . . . . . . . . . . . . . . . . . . . . . . . . . . . . . . . . . . . . . . 10
4.3 Video conguration . . . . . . . . . . . . . . . . . . . . . . . . . . . . . . . . . . . . . . . . 10
4.4 Streaming conguration . . . . . . . . . . . . . . . . . . . . . . . . . . . . . . . . . . . . . 12
4.4.1 A stream with audio and video . . . . . . . . . . . . . . . . . . . . . . . . . . . . . 12
4.4.2 An audio only stream . . . . . . . . . . . . . . . . . . . . . . . . . . . . . . . . . . 16
4.4.3 Downloading and uploading stream settings . . . . . . . . . . . . . . . . . . . . . . 16
4.5 Recording settings . . . . . . . . . . . . . . . . . . . . . . . . . . . . . . . . . . . . . . . . 17
4.6 Miscellaneous settings . . . . . . . . . . . . . . . . . . . . . . . . . . . . . . . . . . . . . . 18
4.6.1 Setting the time . . . . . . . . . . . . . . . . . . . . . . . . . . . . . . . . . . . . . 18
4.6.2 Username and password for the webinterface . . . . . . . . . . . . . . . . . . . . . 18
4.6.3 Loading factory default settings . . . . . . . . . . . . . . . . . . . . . . . . . . . . . 18
4.6.4 Reboot . . . . . . . . . . . . . . . . . . . . . . . . . . . . . . . . . . . . . . . . . . 19
4.6.5 Setting daily reboot . . . . . . . . . . . . . . . . . . . . . . . . . . . . . . . . . . . 19
4.6.6 Setting automatic shutdown . . . . . . . . . . . . . . . . . . . . . . . . . . . . . . . 19
4.6.7 Setting device name . . . . . . . . . . . . . . . . . . . . . . . . . . . . . . . . . . . 19
4.6.8 Updating rmware . . . . . . . . . . . . . . . . . . . . . . . . . . . . . . . . . . . . 19
5 Testing the Maven 19
6 Viewing the status of the Maven 20
7 Making a video recording 21
7.1 USB storage . . . . . . . . . . . . . . . . . . . . . . . . . . . . . . . . . . . . . . . . . . . . 21
7.2 Stream that is recorded . . . . . . . . . . . . . . . . . . . . . . . . . . . . . . . . . . . . . 21
7.3 Starting and stopping the recording . . . . . . . . . . . . . . . . . . . . . . . . . . . . . . 22
7.4 Downloading and removing the recording . . . . . . . . . . . . . . . . . . . . . . . . . . . 22
8 Controlling the Maven via the serial port 22
9 Switching o the Maven 23
10 Restoring factory default settings 23
11 Maven register 24
12 Specications 24
Version v8.0 Nov 2012 1 of 29
TABLE OF CONTENTS
13 Streamit support 25
14 Troubleshooting 26
14.1 The lights at the network connector do not light up . . . . . . . . . . . . . . . . . . . . . 26
14.2 The Maven makes a downward tone . . . . . . . . . . . . . . . . . . . . . . . . . . . . . . 26
14.3 Suggestions when using the Roland VR-3 / VR-5 . . . . . . . . . . . . . . . . . . . . . . . 26
14.4 The stream is not visible in the video station . . . . . . . . . . . . . . . . . . . . . . . . . 26
14.5 The stream does not get a play button in the video station . . . . . . . . . . . . . . . . . 26
14.6 There appears no image . . . . . . . . . . . . . . . . . . . . . . . . . . . . . . . . . . . . . 27
14.7 The image is blue . . . . . . . . . . . . . . . . . . . . . . . . . . . . . . . . . . . . . . . . . 27
14.8 The image is black and white, the colors are not right . . . . . . . . . . . . . . . . . . . . 27
14.9 The picture is pixelated . . . . . . . . . . . . . . . . . . . . . . . . . . . . . . . . . . . . . 28
14.10The image has stopped . . . . . . . . . . . . . . . . . . . . . . . . . . . . . . . . . . . . . . 28
14.11There is no audio in the stream . . . . . . . . . . . . . . . . . . . . . . . . . . . . . . . . . 28
14.12The webinterface of the Maven is not accessible . . . . . . . . . . . . . . . . . . . . . . . . 28
Version v8.0 Nov 2012 2 of 29
1. Foreword
1 Foreword
We would like to thank you for purchasing the Streamit audio-video encoder Maven. The Maven is an
audio-video encoder which easily transmits video and audio over the internet.
Via the graphical interface it is easy to congure the Maven. After that you literally only need a
single button press to convert the analog audio- (RCA) and videosignal (S-Video or Composite) to a
videostream (UDP, RTP, MPEG-TS, HTTP, RTMP or HLS) to transmit via the internet. The method
that is used (H264/AAC), guarantees high quality audio and video with limited bandwidth use.
In addition the Maven can also transmit an MP3 audio-only stream1. This function is specically meant
for people who use receivers that can play only audio. For example a Lukas or SIR device. This makes
it possible to serve both viewers and listeners with only one encoder.
The Maven is part of a complete Streamit solution including: distribution, storage and playing video via
internet. This way a video stream can easily be made available for viewers all over the world. By using
international standards the Maven is ready to connect to other systems like Wowza's Media Server and
can be used for a large number of other applications.
For more information about the products and solutions that Streamit can oer, we would like to invite
you to visit our website:
http://www.streamit.eu
.
Finally, we wish you a lot of success using your Maven.
Streamit B.V.
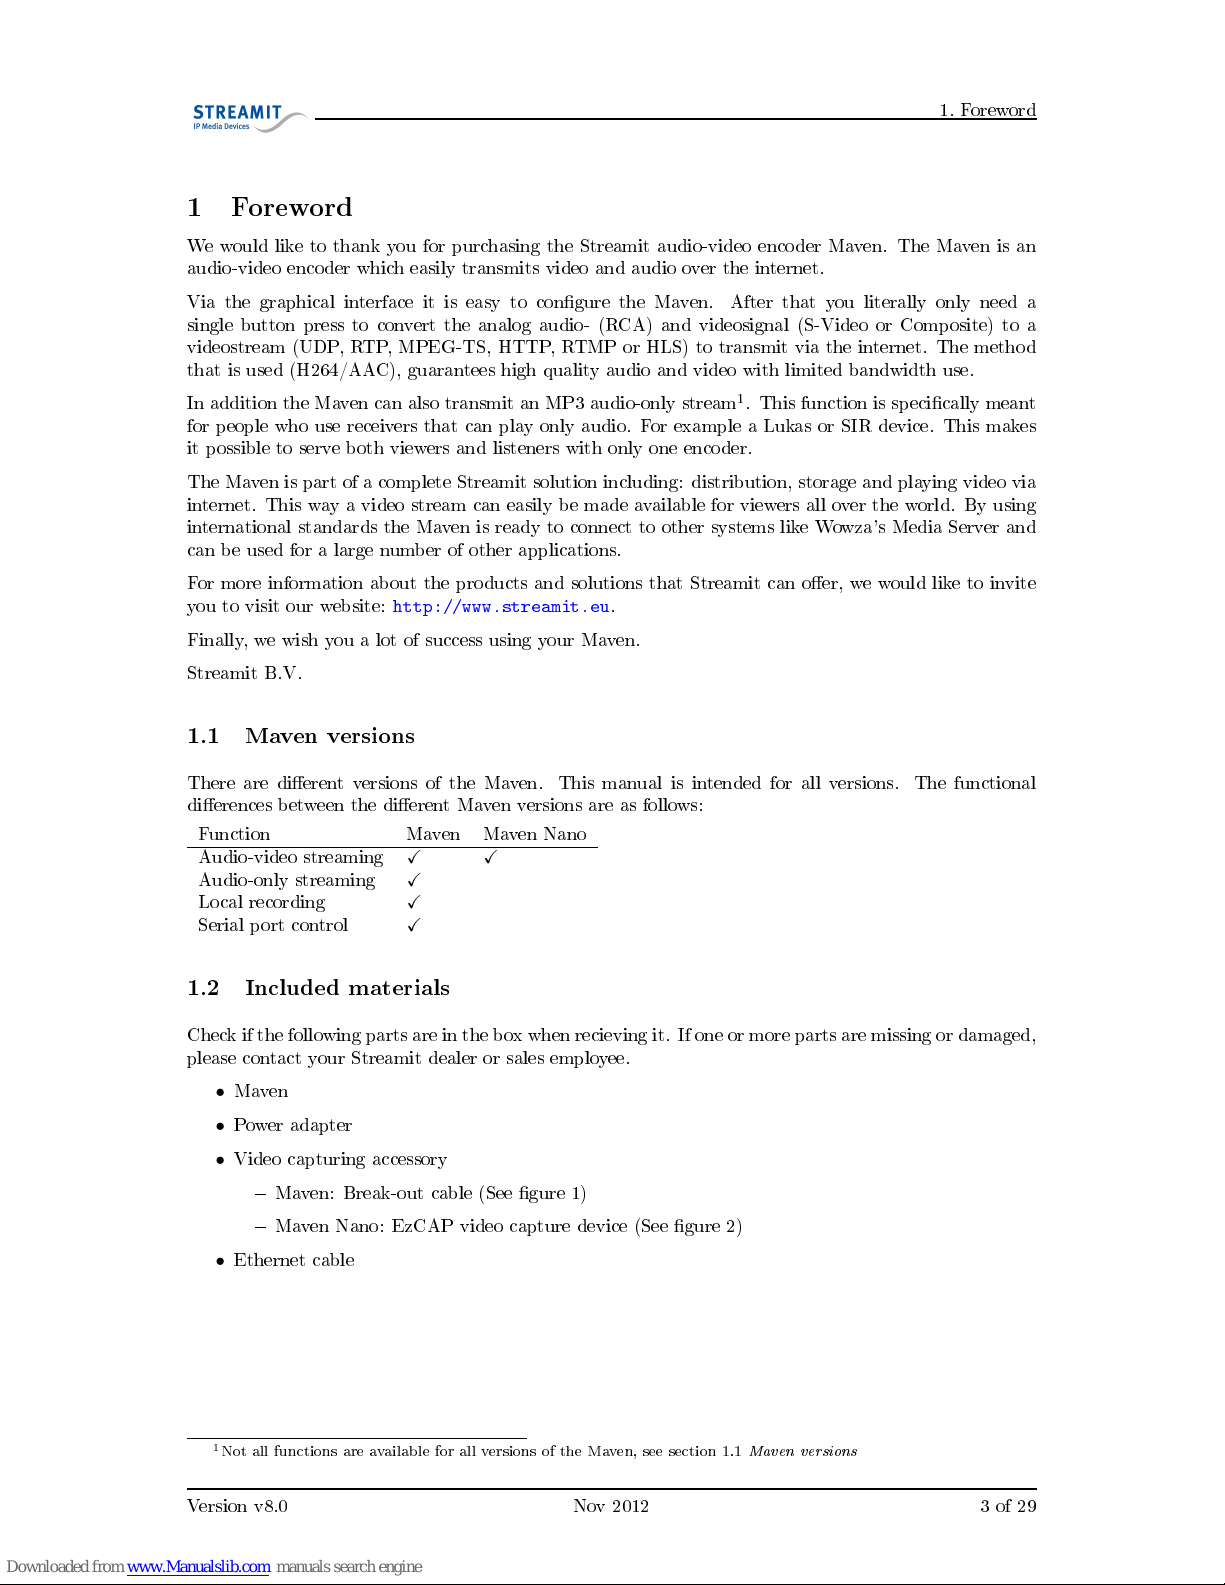
1.1 Maven versions
There are dierent versions of the Maven. This manual is intended for all versions. The functional
dierences between the dierent Maven versions are as follows:
Function Maven Maven Nano
Audio-video streaming
X X
Audio-only streaming
X
Local recording
X
Serial port control
X
1.2 Included materials
Check if the following parts are in the box when recieving it. If one or more parts are missing or damaged,
please contact your Streamit dealer or sales employee.
•
Maven
•
Power adapter
•
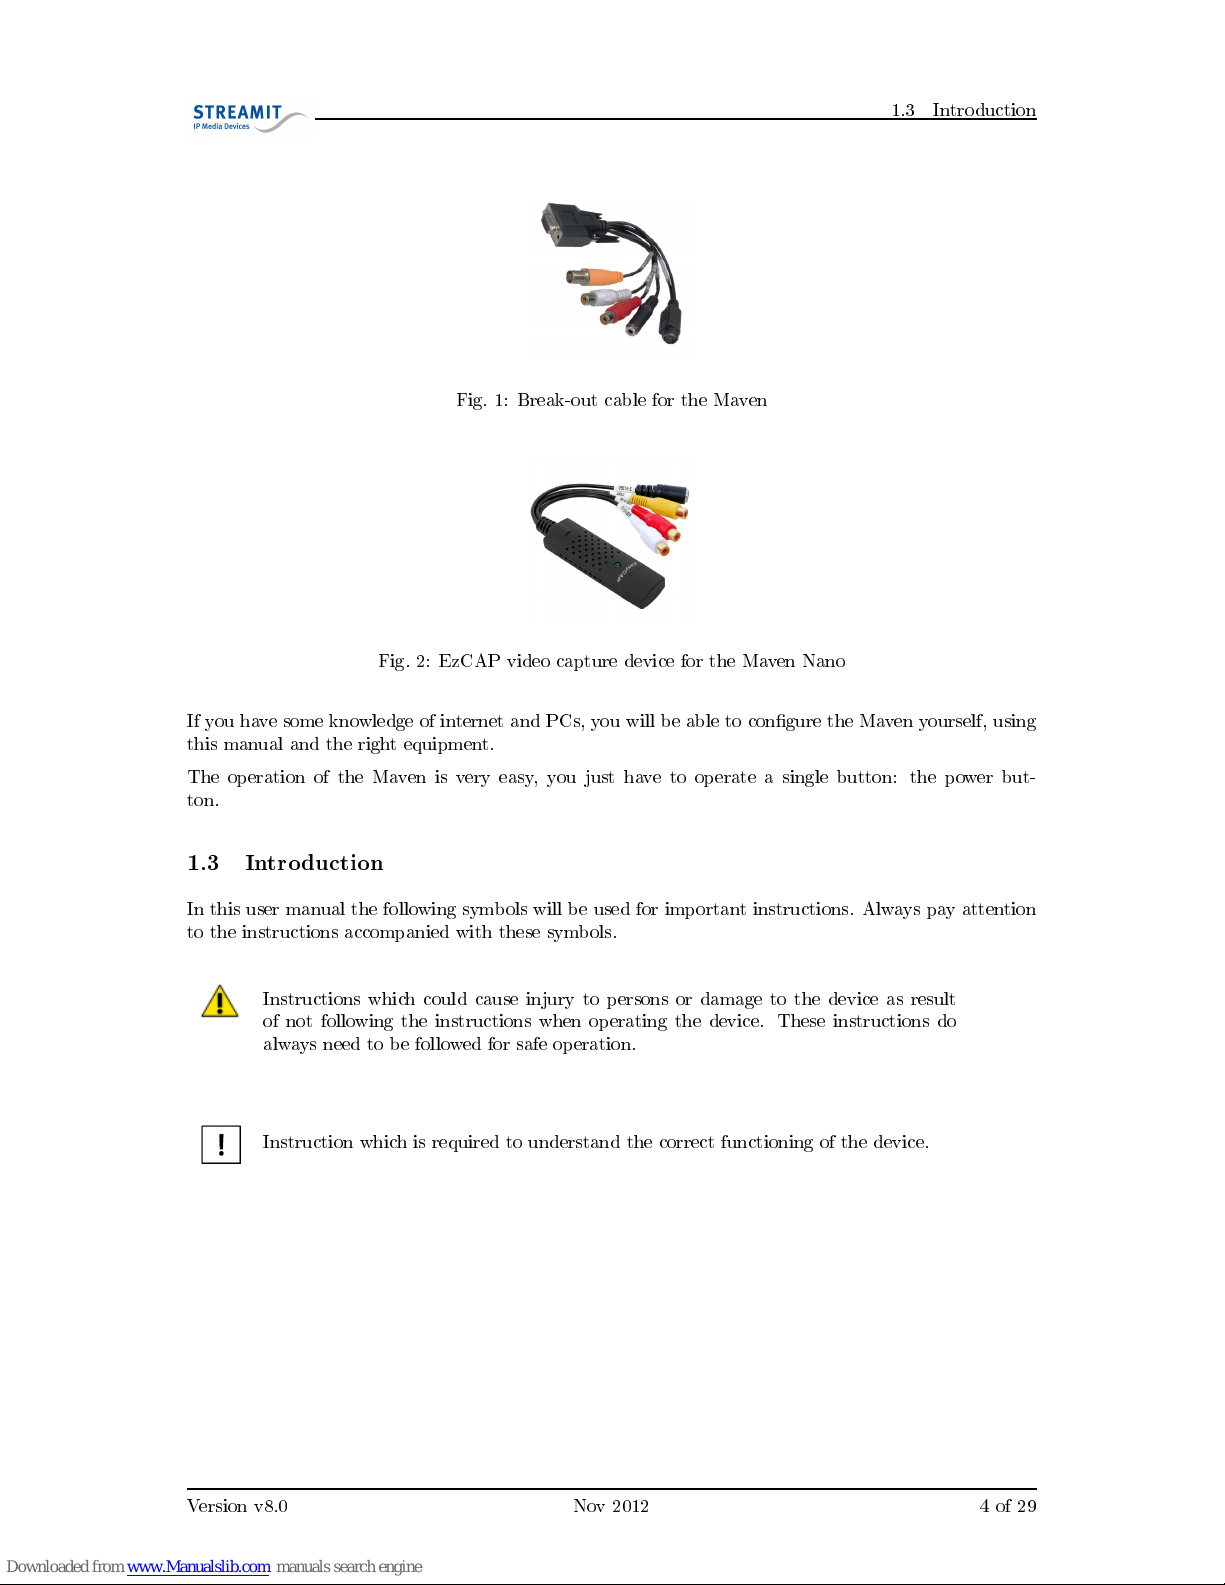
Video capturing accessory
Maven: Break-out cable (See gure 1)
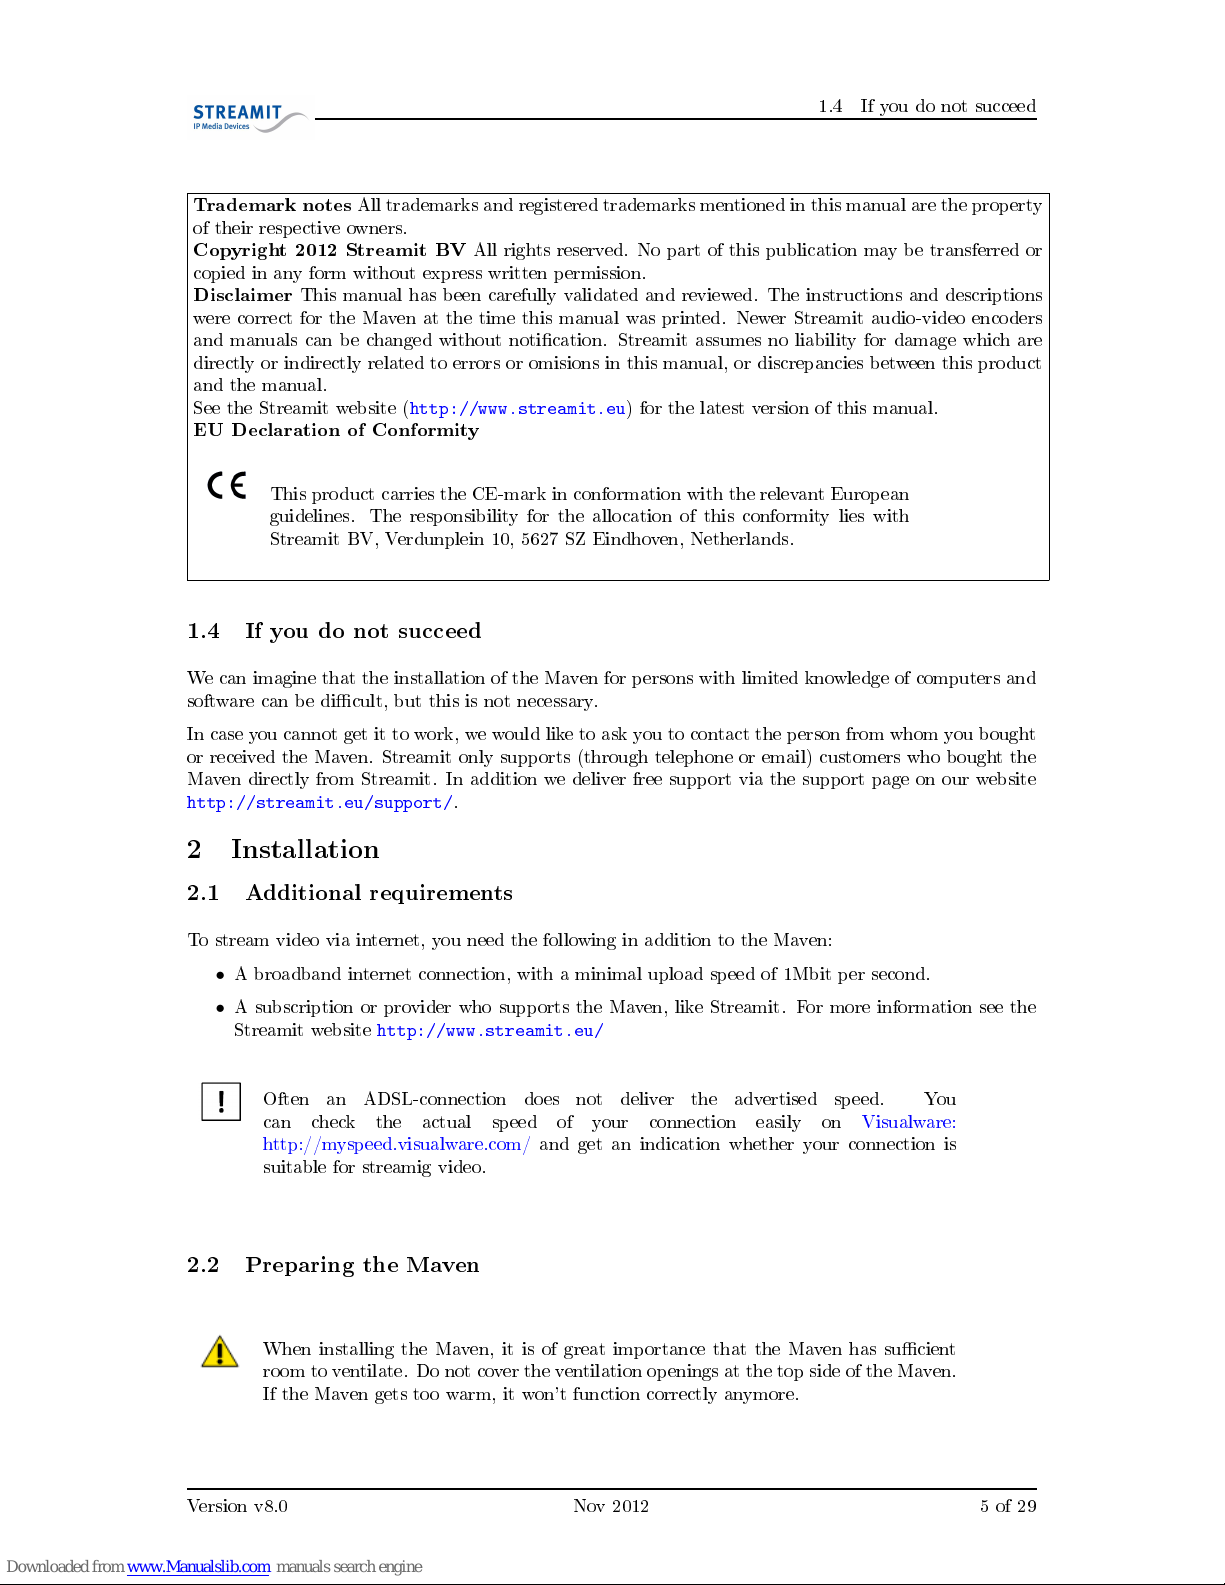
Maven Nano: EzCAP video capture device (See gure 2)
•
Ethernet cable
1
Not all functions are available for all versions of the Maven, see section 1.1
Maven versions
Version v8.0 Nov 2012 3 of 29
1.3 Introduction
Fig. 1: Break-out cable for the Maven
Fig. 2: EzCAP video capture device for the Maven Nano
If you have some knowledge of internet and PCs, you will be able to congure the Maven yourself, using
this manual and the right equipment.
The operation of the Maven is very easy, you just have to operate a single button: the power but-
ton.
1.3 Introduction
In this user manual the following symbols will be used for important instructions. Always pay attention
to the instructions accompanied with these symbols.
Instructions which could cause injury to persons or damage to the device as result
of not following the instructions when operating the device. These instructions do
always need to be followed for safe operation.
Instruction which is required to understand the correct functioning of the device.
Version v8.0 Nov 2012 4 of 29
1.4 If you do not succeed
Trademark notes
All trademarks and registered trademarks mentioned in this manual are the property
of their respective owners.
Copyright 2012 Streamit BV
All rights reserved. No part of this publication may be transferred or
copied in any form without express written permission.
Disclaimer
This manual has been carefully validated and reviewed. The instructions and descriptions
were correct for the Maven at the time this manual was printed. Newer Streamit audio-video encoders
and manuals can be changed without notication. Streamit assumes no liability for damage which are
directly or indirectly related to errors or omisions in this manual, or discrepancies between this product
and the manual.
See the Streamit website (
http://www.streamit.eu
) for the latest version of this manual.
EU Declaration of Conformity
This product carries the CE-mark in conformation with the relevant European
guidelines. The responsibility for the allocation of this conformity lies with
Streamit BV, Verdunplein 10, 5627 SZ Eindhoven, Netherlands.
1.4 If you do not succeed
We can imagine that the installation of the Maven for persons with limited knowledge of computers and
software can be dicult, but this is not necessary.
In case you cannot get it to work, we would like to ask you to contact the person from whom you bought
or received the Maven. Streamit only supports (through telephone or email) customers who bought the
Maven directly from Streamit. In addition we deliver free support via the support page on our website
http://streamit.eu/support/
.
2 Installation
2.1 Additional requirements
To stream video via internet, you need the following in addition to the Maven:
•
A broadband internet connection, with a minimal upload speed of 1Mbit per second.
•
A subscription or provider who supports the Maven, like Streamit. For more information see the
Streamit website
http://www.streamit.eu/
Often an ADSL-connection does not deliver the advertised speed. You
can check the actual speed of your connection easily on Visualware:
http://myspeed.visualware.com/ and get an indication whether your connection is
suitable for streamig video.
2.2 Preparing the Maven
When installing the Maven, it is of great importance that the Maven has sucient
room to ventilate. Do not cover the ventilation openings at the top side of the Maven.
If the Maven gets too warm, it won't function correctly anymore.
Version v8.0 Nov 2012 5 of 29
2.3 Connecting the Maven to the audio/video-installation
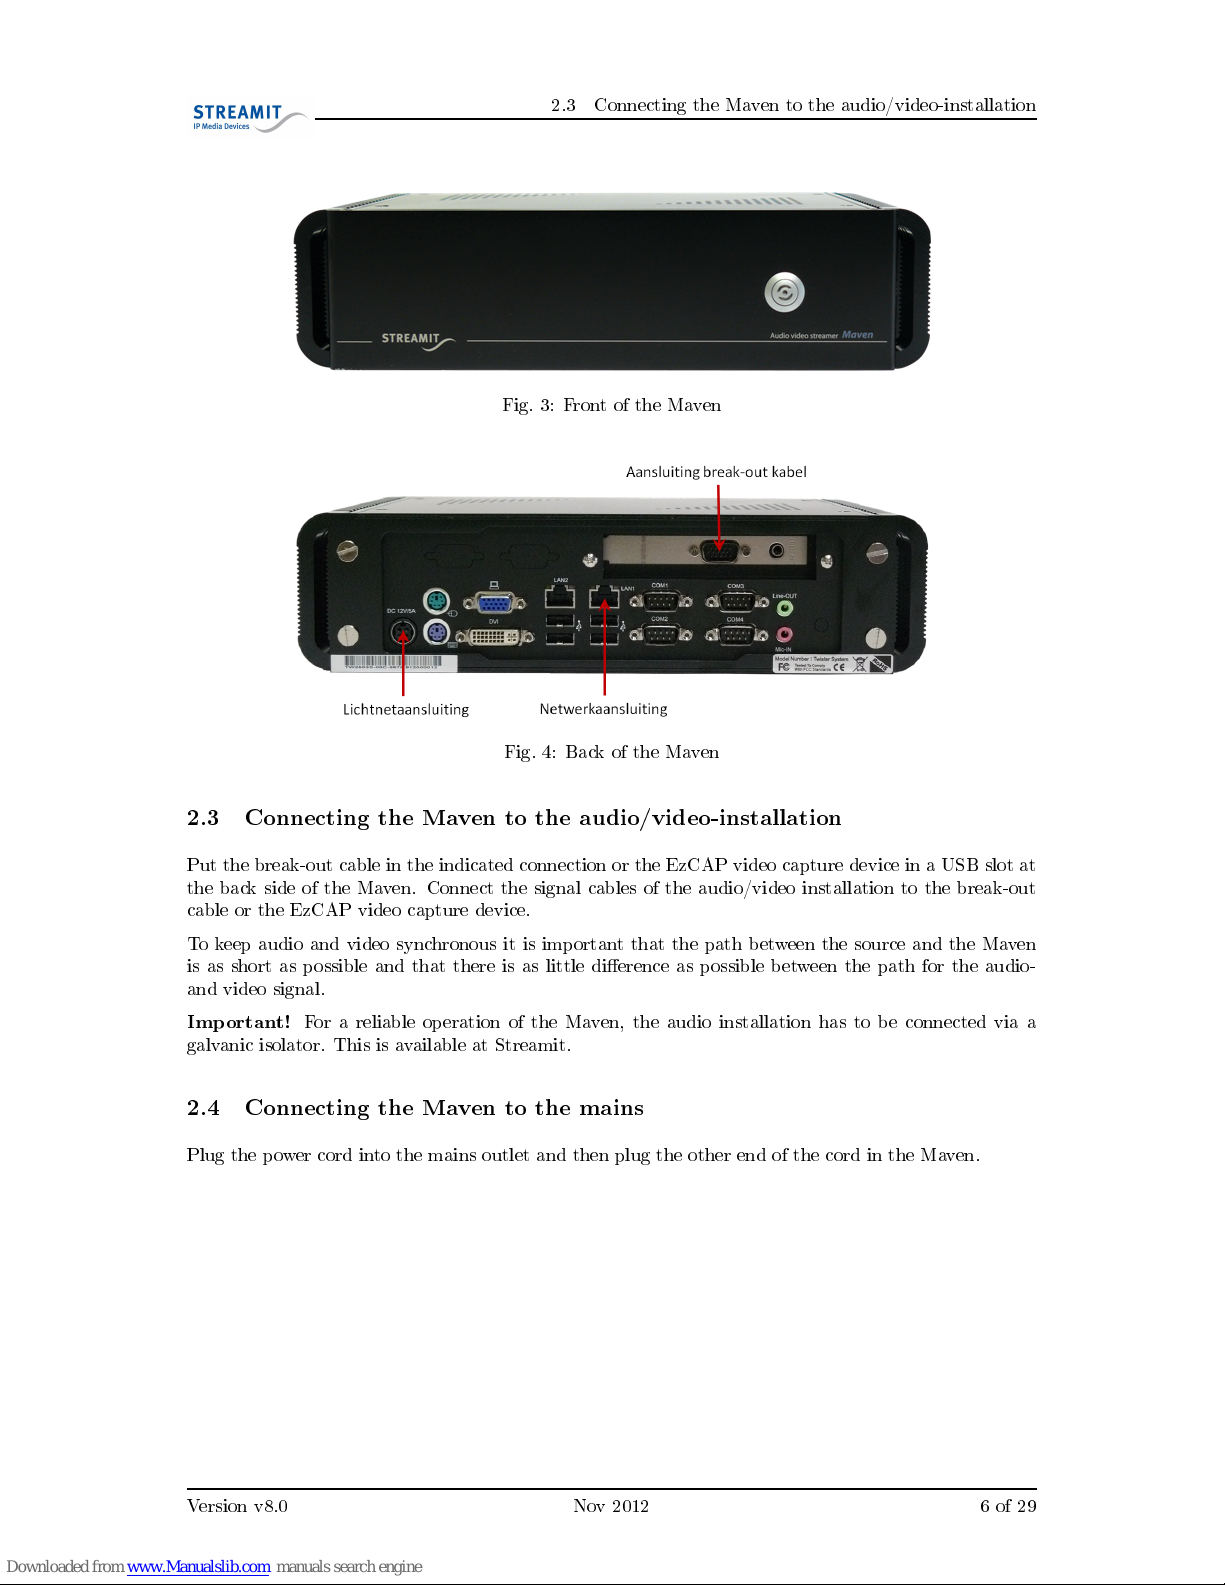
Fig. 3: Front of the Maven
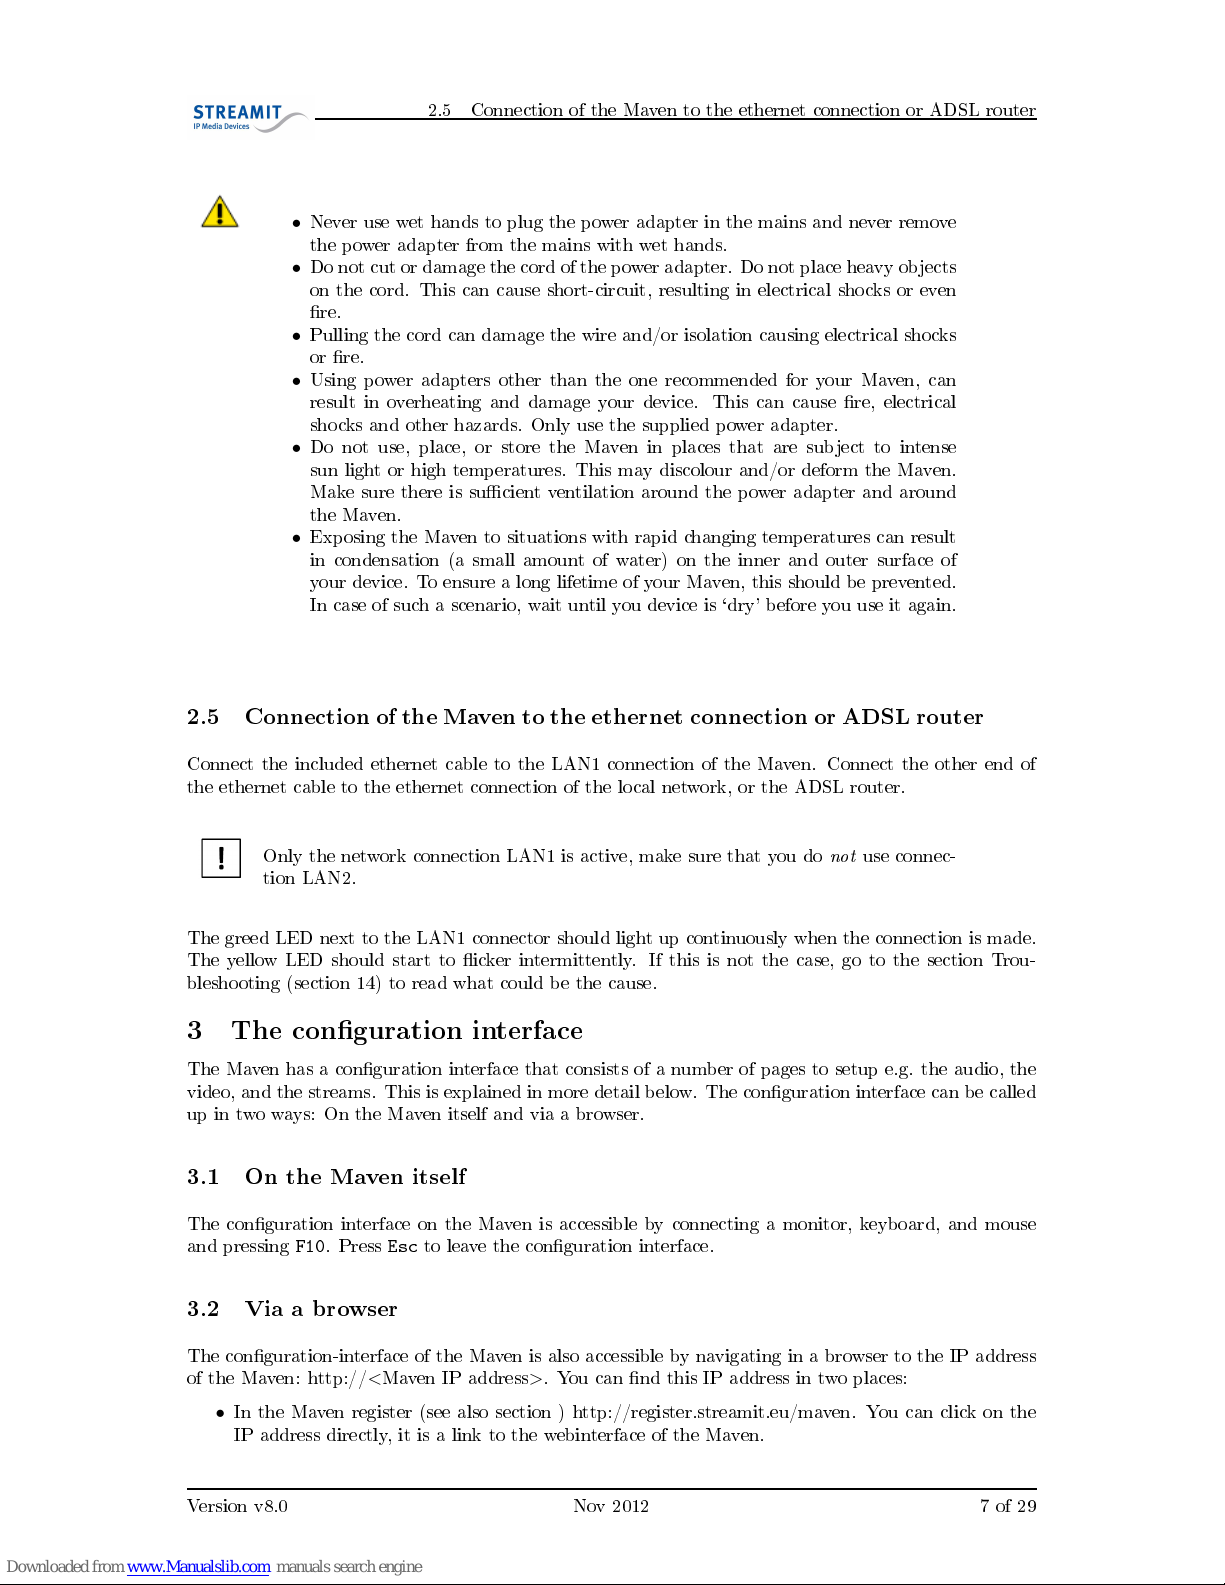
Fig. 4: Back of the Maven
2.3 Connecting the Maven to the audio/video-installation
Put the break-out cable in the indicated connection or the EzCAP video capture device in a USB slot at
the back side of the Maven. Connect the signal cables of the audio/video installation to the break-out
cable or the EzCAP video capture device.
To keep audio and video synchronous it is important that the path between the source and the Maven
is as short as possible and that there is as little dierence as possible between the path for the audio-
and video signal.
Important!
For a reliable operation of the Maven, the audio installation has to be connected via a
galvanic isolator. This is available at Streamit.
2.4 Connecting the Maven to the mains
Plug the power cord into the mains outlet and then plug the other end of the cord in the Maven.
Version v8.0 Nov 2012 6 of 29
2.5 Connection of the Maven to the ethernet connection or ADSL router
•
Never use wet hands to plug the power adapter in the mains and never remove
the power adapter from the mains with wet hands.
•
Do not cut or damage the cord of the power adapter. Do not place heavy objects
on the cord. This can cause short-circuit, resulting in electrical shocks or even
re.
•
Pulling the cord can damage the wire and/or isolation causing electrical shocks
or re.
•
Using power adapters other than the one recommended for your Maven, can
result in overheating and damage your device. This can cause re, electrical
shocks and other hazards. Only use the supplied power adapter.
•
Do not use, place, or store the Maven in places that are subject to intense
sun light or high temperatures. This may discolour and/or deform the Maven.
Make sure there is sucient ventilation around the power adapter and around
the Maven.
•
Exposing the Maven to situations with rapid changing temperatures can result
in condensation (a small amount of water) on the inner and outer surface of
your device. To ensure a long lifetime of your Maven, this should be prevented.
In case of such a scenario, wait until you device is `dry' before you use it again.
2.5 Connection of the Maven to the ethernet connection or ADSL router
Connect the included ethernet cable to the LAN1 connection of the Maven. Connect the other end of
the ethernet cable to the ethernet connection of the local network, or the ADSL router.
Only the network connection LAN1 is active, make sure that you do
not
use connec-
tion LAN2.
The greed LED next to the LAN1 connector should light up continuously when the connection is made.
The yellow LED should start to icker intermittently. If this is not the case, go to the section Trou-
bleshooting (section 14) to read what could be the cause.
3 The conguration interface
The Maven has a conguration interface that consists of a number of pages to setup e.g. the audio, the
video, and the streams. This is explained in more detail below. The conguration interface can be called
up in two ways: On the Maven itself and via a browser.
3.1 On the Maven itself
The conguration interface on the Maven is accessible by connecting a monitor, keyboard, and mouse
and pressing
F10
. Press
Esc
to leave the conguration interface.
3.2 Via a browser
The conguration-interface of the Maven is also accessible by navigating in a browser to the IP address
of the Maven: http://<Maven IP address>. You can nd this IP address in two places:
•
In the Maven register (see also section ) http://register.streamit.eu/maven. You can click on the
IP address directly, it is a link to the webinterface of the Maven.
Version v8.0 Nov 2012 7 of 29
3.3 Name and password for the conguration interface
•
On the Status page if you call up the conguration interface on the Maven itself (see the instructions
above).
If you have problems accessing the webinterface of the Maven, read the instructions in section 14.12
The
webinterface of the Maven is not accessible
.
It is strongly advised to make access to the conguration interface via a browser also
possible from outside the local network. That enables remote rmware updates and
allows for better support in case of problems. Congure port-forwarding for port 80
on the router between the Maven and the internet. See the manual of the router for
instructions regarding conguration of port-forwarding.
3.3 Name and password for the conguration interface
When you access the conguration interface, you will be asked for a user name and password (except for
the Status page). Enter the following credentials2:
user name streamit
password lukas
2
The credentials can be changed on the Misc page in the conguration interface.
Version v8.0 Nov 2012 8 of 29

4. Conguring the Maven
4 Conguring the Maven
4.1 Network conguration
Fig. 5: Maven network page
You can congure the IP address of the Maven in this page. At the bottom of the page the currently
used IP address and the Ethernet MAC address are shown.
We recommend you to have an IP address automatically assigned to the Maven (DHCP), this is the
default setting of the Maven. If you decide to give the Maven a static IP address, take the network
conguration of your router into account!
If the audio/video stream uses UDP ports, it might be required for the rewall behind the Maven to
open the Dynamic Outbound ports, also called Ephemeral ports. To limit the number of ports, a feature
has been built in to limit the port range.
By clicking on the button `Save & reboot' the new network settings are saved. Then the Maven reboots
to activate the new settings.
Version v8.0 Nov 2012 9 of 29

4.2 Audio conguration
4.2 Audio conguration
You can congure the following on this page:
Fig. 6: Maven audio page
Field Setting
Audio input Built-in capture card, Mic/Line input1, Roland VR-3 / VR-5 (USB) or
the Behringer UCA222 (USB)
Gain (0-100%) Set the strength of the signal when encoding the audio. This can be done
in ve steps, from `Very Low' to `Maximum'. By default you do not have
to change anything in the eld `Audio Gain', but if the incoming audio
signal is very weak or loud, you can adjust here.
Delay (ms) Adjust the delay between the audio- and videosignal. If the audio is
ahead of the video, enter a positive value to delay the audio. If the audio
lags, enter a negetive value to speed up the audio.
1
The Mic/Line input can be used for a single stream only: Either an audio-video stream or audio-only
stream. It is not possible to generate an audio-video as well as an audio-only stream when Mic/Line is
used as audio input.
4.3 Video conguration
You can congure the following on this page:
Fig. 7: Maven video page
Version v8.0 Nov 2012 10 of 29

4.3 Video conguration
Field Setting
Video input Composite, S-Video, EzCAP Composite (USB), EzCAP S-Video (USB)
or the Roland VR-3 / VR-5 (USB)
Video format PAL or NTSC.
Aspect ratio 16:9 By checking this box, the video image will be transmitted in 16:9 ratio
instead of 4:3
Image processor Choose which part of the Maven processes the images (color, brightness,
etc.). It can be the software of the Maven, but also the hardware that
converts the images from analog to digital. Which options for image
processing are shown, depends on the chosen image processor.
Hue, Brightness, Satura-
tion, Contrast, Gamma
Settings for the corresponding image parameters
Version v8.0 Nov 2012 11 of 29

4.4 Streaming conguration
4.4 Streaming conguration
The Maven can send two streams: one audio-video stream and one stream with only audio
3,4
.
Click on the button: (`Audio/video stream' or `Audio-only stream') and choose the stream type:
Audio and video A stream with and audio and video, see 4.4.1 for the conguration
Audio only A stream with just audio, see 4.4.2 for the conguration
4.4.1 A stream with audio and video
Fig. 8: Maven audio-video stream page
Field Setting
Streaming mode You can choose from dierent possibilities here, depending on your use.
We will explain some often used applications below.
Streamit AVDP You want to use the Streamit Audio Video Distribution Platform
(AVDP).
Direct Connection (STL) You want to setup a direct connection between the Maven and a video
decoder, without using a streaming server in between.
Unicast/multicast You want to use an another method of streaming. This can be a dierent
(Wowza) streaming server, a dierent receiver, or for example multicast
for distribution to (many) receivers in a local network
3
This function is exactly the same as the SAS100, so the functionality of the SAS100 is part of the Maven.
4
This function is not available on the Maven Nano
Version v8.0 Nov 2012 12 of 29
4.4 Streaming conguration
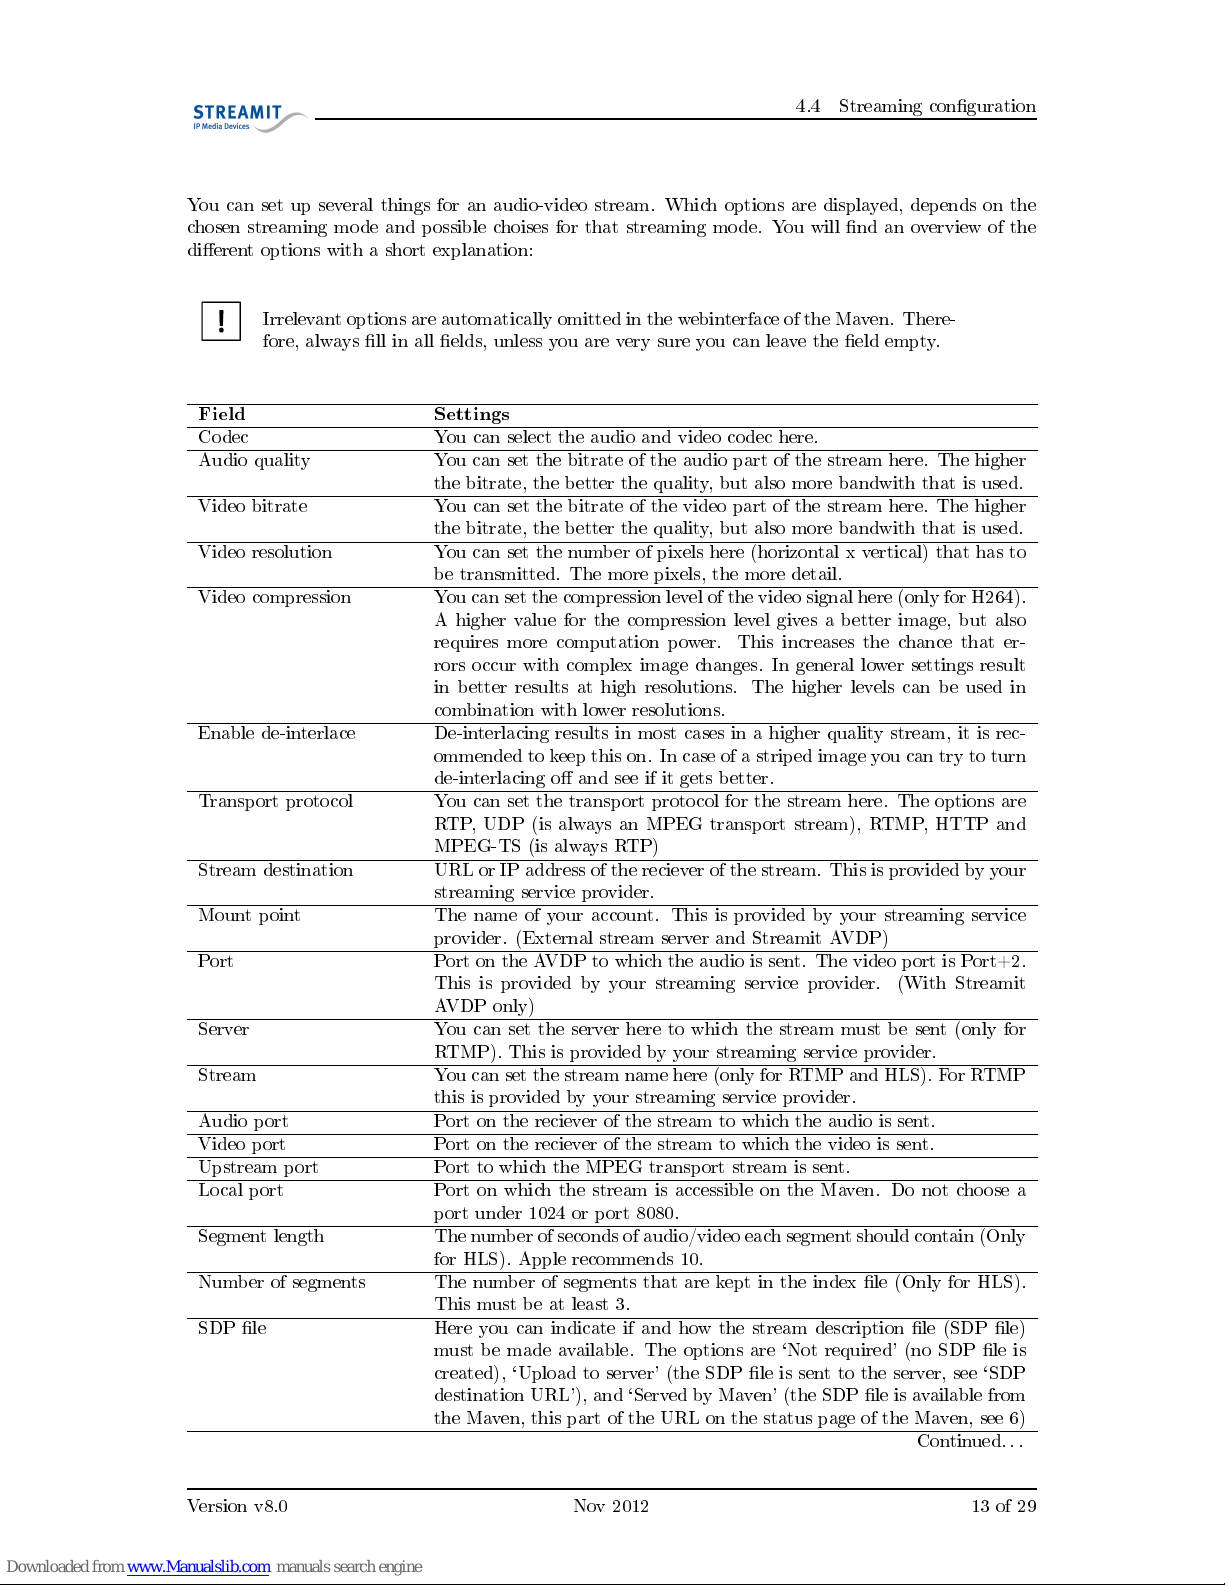
You can set up several things for an audio-video stream. Which options are displayed, depends on the
chosen streaming mode and possible choises for that streaming mode. You will nd an overview of the
dierent options with a short explanation:
Irrelevant options are automatically omitted in the webinterface of the Maven. There-
fore, always ll in all elds, unless you are very sure you can leave the eld empty.
Field Settings
Codec You can select the audio and video codec here.
Audio quality You can set the bitrate of the audio part of the stream here. The higher
the bitrate, the better the quality, but also more bandwith that is used.
Video bitrate You can set the bitrate of the video part of the stream here. The higher
the bitrate, the better the quality, but also more bandwith that is used.
Video resolution You can set the number of pixels here (horizontal x vertical) that has to
be transmitted. The more pixels, the more detail.
Video compression You can set the compression level of the video signal here (only for H264).
A higher value for the compression level gives a better image, but also
requires more computation power. This increases the chance that er-
rors occur with complex image changes. In general lower settings result
in better results at high resolutions. The higher levels can be used in
combination with lower resolutions.
Enable de-interlace De-interlacing results in most cases in a higher quality stream, it is rec-
ommended to keep this on. In case of a striped image you can try to turn
de-interlacing o and see if it gets better.
Transport protocol You can set the transport protocol for the stream here. The options are
RTP, UDP (is always an MPEG transport stream), RTMP, HTTP and
MPEG-TS (is always RTP)
Stream destination URL or IP address of the reciever of the stream. This is provided by your
streaming service provider.
Mount point The name of your account. This is provided by your streaming service
provider. (External stream server and Streamit AVDP)
Port Port on the AVDP to which the audio is sent. The video port is Port+2.
This is provided by your streaming service provider. (With Streamit
AVDP only)
Server You can set the server here to which the stream must be sent (only for
RTMP). This is provided by your streaming service provider.
Stream You can set the stream name here (only for RTMP and HLS). For RTMP
this is provided by your streaming service provider.
Audio port Port on the reciever of the stream to which the audio is sent.
Video port Port on the reciever of the stream to which the video is sent.
Upstream port Port to which the MPEG transport stream is sent.
Local port Port on which the stream is accessible on the Maven. Do not choose a
port under 1024 or port 8080.
Segment length The number of seconds of audio/video each segment should contain (Only
for HLS). Apple recommends 10.
Number of segments The number of segments that are kept in the index le (Only for HLS).
This must be at least 3.
SDP le Here you can indicate if and how the stream description le (SDP le)
must be made available. The options are `Not required' (no SDP le is
created), `Upload to server' (the SDP le is sent to the server, see `SDP
destination URL'), and `Served by Maven' (the SDP le is available from
the Maven, this part of the URL on the status page of the Maven, see 6)
Continued.. .
Version v8.0 Nov 2012 13 of 29

4.4 Streaming conguration
Field Settings
SDP le name Name of the SDP le as it is recognised by the video platform. (Not with
Direct connection)
SDP destination URL You can set here where the SDP le has to be sent. When a relative URL
is given (e.g. /streams/index.php), it will be combined with the adress
that is given at `Stream destination' to make a complete URL.
Enable monitoring When monitoring is active, a message is sent every minute via HTTP.
By this the receiver (see `Monitoring URL') knows that the Maven is still
online.
Monitoring URL Location to which the monitoring information has to be sent. When a
relative URL is given (e.g. /streams/index.php), it will be combined with
the adress that is given at `Stream destination' to make a complete URL.
Enable HTTP access to
stream
You can indicate whether the stream should be accessible via HTTP or
not. This stream comes straight from the Maven at port 8080 and is
identical to the other stream that is transmitted. This can be used for
example to see what the Maven sends out. The URL on which the maven
is accessible, is shown on the status page (see 6)
Play sound on error You can indicate here how often the Maven makes a downward series of
tones when internet- or serverproblems occur: Never, 1 time, or every
ten seconds.
Version v8.0 Nov 2012 14 of 29

4.4 Streaming conguration
There is a relation between the camera image, the resolution (the number of pixels),
the amount of motion in the image and the video bitrate. The more colorful and
the more varied the image is that the camera delivers, the higher the bitrate that is
required to transmit the image with sucient quality. The more motion there is in
the image, the more bits (higher bitrate) are needed to display that motion right.
With a given resolution and bitrate combination it is always possible to calculate the
number of bits per pixel. The more bits per pixel, the better the image (as long as the
network connection can handle it). At some point `saturation' occurs, where a higher
bit rate does not help, because there are enough bits to display each pixel correctly.
The more pixels, more details can be passed in the picture, but only if the bitrate is
sucient to transmit the details with sucient quality. More pixels (higher resolution)
with the same bit rate gives a lower quality and not necessarily a better viewing
experience. An exception to this is the situation where the bitrate is more than
sucient for the chosen resolution. In that case the image can become better by just
increasing the resolution.
If you have a good image quality at (for example) 3 bits per pixel and you increase
the resolution, you will need a higher resolution of 3 to the power of 0.75 bits per
pixel for the same quality. For example:
Current resolution Higher resolution
Pixels 352 x 288 768 x 576
Bitrate 300
to be determined
Bits/pixel 2.96
2.96
0.75
= 2.26
Then the required bitrate for the same quality is
768(hor)·576(ver)·2.26(bitper pix)
1000
= 998K bps
It is important to vary these parameters when conguring the Mavento tune optimally
to the local situation.
Version v8.0 Nov 2012 15 of 29

4.4 Streaming conguration
4.4.2 An audio only stream
Fig. 9: Maven audio-only stream page
You can set up te following for an audio only stream:
Field Settings
Stream Type Stream Type can be set to internal icecast-2, external shoutcast, external
icecast-2 or disabled.
Audio quality (MP3) Here can you set the bitrate of the stream. The higher the bitrate, higher
the quality but also the more bandwith is needed for listeners.
Stream title Here can you give a short description of the stream.
External stream server URL of the external streaming server. This is provided by your streaming
service provider. (not for internal icecast-2 server)
Mount point The name of the stream, this will return in the URL (not for shoutcast
server).
Upstream port Port to which the audio is sent. This is provided by your streaming
service provider.
Maximum clients The maximum number of listeners that can listen to this stream. This
is important if the bandwith to the internet is limited. (For internal
icecast-2 server only).
Password This is provided by your streaming service provider. (Not for internal
icecast-2 server)
Play sound on error You can indicate here how often the Maven makes a downward series of
tones when internet- or serverproblems occur: Never, 1 time, or every
ten seconds.
4.4.3 Downloading and uploading stream settings
To save and quickly restore stream settings, these settings can be downloaded and uploaded as XML le.
This option is presented on the streams page when a stream has been congured:
Fig. 10: Down- and uploading stream settings
Click on the link `here' to download the stream settings. Note that settings on the other pages are not
included in the downloaded le.
Click on the `Browse' button and navigate to the XML le with settings that you want to apply and
click `open'. Click on `upload' to load the settings. These settings are loaded now, click on `Save' to save
Version v8.0 Nov 2012 16 of 29

4.5 Recording settings
and apply these settings.
4.5 Recording settings
Fig. 11: Maven opname pagina
To make video recordings, see section 7.
Local video
recorder
Depending on the situation (USB storage present, stream congured, recording
running or not) you can start a local recording here by clicking on the corresponding
button. The status of the recorder and the remaining recording time available on
the USB storage are shown on this line.
Start local record-
ing when Maven
starts
Here you can set that immediately at startup the Maven should make a recording
of the stream that is sent.
Additionally, you nd information on this page on the USB storage that is connected:
USB storage If the storage is preset, in use, or can be removed.
Status Depending on the situation, information on the USB storage is given here, such
as the name of the recording that is being made, if the USB storage was removed
during recording, etc. This line is not always shown.
Recording time left The space left on the USB storage that is available for recordings, converted to
hours and minutes. This depends on the bit rate that is set for the audio and
video. The higher the bit rate, the smaller the amount of recording time that is
available on the USB storage.
Free space Free space on the USB storage, in Megabytes
Total space Total space on the USB storage, in Megabytes
At the bottom of the page the les on the USB storage are shown. When this page is viewed with a
browser, the recordings are presented as links. These links can be used to download the recordings from
the USB storage.
Next to recordings a trash can icon is shown. This can be used to remove the recording from the USB
storage.
Version v8.0 Nov 2012 17 of 29

4.6 Miscellaneous settings
4.6 Miscellaneous settings
Fig. 12: Maven miscellaneous settings page
Here the following functions are available:
4.6.1 Setting the time
The time on the Maven can be changed by clicking `synchronize' under the heading `Date and Time
Settings'.
The URL of the time server with which the Maven will be synchronized can be given in the eld `Time
Server'. Click on `set' to make this setting active.
4.6.2 Username and password for the webinterface
By default the username and password are set to `streamit' and `lukas'. You can change those by
navigating to the page `Misc/Other' (see 3.2 for opening the webinterface) and entering the desired
username and password below `Set Username/Password'.
The Maven must reboot to make the new settings active.
4.6.3 Loading factory default settings
The Maven factory default settings can be loaded by clicking the `Load' button below `General set-
tings'.
The factory default settings are loaded now, but not yet saved. If you restart the Maven without saving
settings, nothing has changed and the old settings will still be active.
The settings are saved by clicking `Save' on one of the other pages. The Maven must reboot to activate
the new settings.
Version v8.0 Nov 2012 18 of 29

5. Testing the Maven
4.6.4 Reboot
You can restart the maven by clicking `reboot' below `Special Functions'.
4.6.5 Setting daily reboot
When using the Maven for a long time, it is recommended to reboot the Maven once every 24 hours.
You can do this automatically by entering a time in the eld `Daily reboot time'. The restart of the
Maven takes approximately 1 minute. Give the time in the format hh:mm and leave the eld empty if
you do not want the Maven to reboot each day at the same time.
4.6.6 Setting automatic shutdown
The Maven can be congured to automatically switch o after a user-set period of time. This can be
used if, for example, the Maven is sometimes accidentally switched on or to avoid considerable streaming
costs. The time is set in minutes and countdown starts after the Maven has fully started. Leave the eld
empty if you do not want the Maven to shutdown automatically after a give period of time.
4.6.7 Setting device name
To easily recognize the Maven in the Streamit device register (http://register.streamit.eu) is it possible
to give each device an unique name, chosen by yourself5.
4.6.8 Updating rmware
The Maven rmware can be updated by clicking `Browse' below `Update Firmware'. Navigate to the
rmware that you received from Streamit, or that you downloaded from the Streamit website and click
`open'.
Click on `upload' to load and execute the rmware update in the Maven. The Maven will install the
new rmware and reboot. You will automatically be redirected to the Streamit Maven register (see
11).
Note: Do not turn o the Maven during the update, the update process should not
be interrupted.
5 Testing the Maven
The easiest way to test the Maven is to switch it on. If everything is OK,
you will hear after some time (approximately 30-50 seconds) 3 tones increasingly higher tones from the
loudspeaker of the Maven. This is the sign that te Maven has boot completely.
After that you can go to the video platform to see if the video actually appears. What should appear,
depends on your streaming service provider. On the Streamit portal (
http://eventcaster.streamit.
eu/
) a play button appears automatically at the station where the Maven transmits to, when switching
on a well-congured Maven. An example of such a play button is shown in gure 13.
5
If no device name is set, but the Maven streams to the Streamit EventCaster platform, the mount point is automatically
sent as name
Version v8.0 Nov 2012 19 of 29

6. Viewing the status of the Maven
Fig. 13: Play button for a video station with a live video
stream
When the Maven detects an internet- or serverproblem, it will play a downward tone every 10 seconds
(depending on the stream settings, see 4.4).
6 Viewing the status of the Maven
If a monitor is connected to the Maven, the global status is shown on it. More detailed information can
be found on the Status page of the conguration interface (see section 3 for more information on how to
call up this conguration interface):
On the status page you can nd the following information, this is refreshed every few seconds:
Fig. 14: Maven status page
Ethernet MAC address Physical address of the ethernet interface of the Maven.
Local IP address Address the Maven has in the local network.
Uptime This indicates how long the Maven is on already.
Packets sent Amount of bytes sent to the network.
CPU load The load of the processor of the Maven at that moment.
CPU temperature The temperature of the processor of the Maven at that moment.
Software Version Version of the current rmware.
Information is also given per stream. The Maven can send up to two streams at the same time, an
audio-video stream and an audio-only stream (see section 4.4
Streaming conguration
).
For the streams the following information is shown:
Version v8.0 Nov 2012 20 of 29

7. Making a video recording
Streaming mode The streaming method and protocol being used.
Title The name that is given to the stream.
Conguration The settings for the audio and video part of the stream.
Stream URL Address at which the stream can be watched or listed to on a locally connected PC.
When clicking this link, the media player on your PC should start, if installed. Our
preferred media player is VLC, downloadable for free at
http://www.videolan.
org/vlc.
Status This shows if the encoder is functioning well (text is black) or not (text is red).
Local video
recorder
Here you can see the status of the video recorder.
7 Making a video recording
The Maven can make a recording on attached USB storage of the audio-video stream that is transmitted.
The following applies to recordings of the stream that is transmitted:
•
A USB storage device must be attached with sucient free space available
•
A stream must be transmitted, no recording can be made without transmitting a stream
•
The recording has the same quality as the stream that is transmitted
•
The recording must be started
•
The recording must be stopped before the Maven is switched o
The requirements on the USB storage, the stream and the starting and stopping of the recording are
explained in the following sections.
7.1 USB storage
In principle any USB storage device can be attached and used, USB sticks as well as USB hard disks.
Note that USB hard disks may require additional power supply in some cases.
It can be convinient to use a USB extension cable to connect the USB storage. The back of the Maven
is not always well-accessible and an extension cable can bring the USB connection to a more accessible
location.
There must be sucient space available on the USB storage to make a recording. At the start of the
recording there must be room for at least 5 minutes of recording. If less space is available than that, the
recording will not start.
If space runs out during recording and the remaining space is less than 5 minutes of recording, a warning
signal is sounded.
If space runs out during recording and the remaining space is less than 1 minute of recording, a warning
signal is sounded and the recording is ended.
In case the USB storage is removed during recording, the recording is stopped. If USB storage is
attached again, a new recording is started immediately. Similarly, when the Maven should make a
recording immediately at startup and no USB storage is available: When USB storage is attached, the
recording will start.
7.2 Stream that is recorded
To make a recording, a stream must be congured and running. The quality that is congured for the
stream is the quality of the recording.
Version v8.0 Nov 2012 21 of 29

7.3 Starting and stopping the recording
Because the stream and the recording are related, the stream is interrupted when the
recording is started or stopped.
7.3 Starting and stopping the recording
Starting and stopping the recording can be achieved in four ways:
•
On the Maven itself via the global status screen
•
Via the conguration interface using a browser
•
Using commands via the serial port (see section 8 for more details)
•
The recording can start when the Maven starts (see 4.5
Recording settings
). However, the recording
cannot be stopped automatically when the Maven is switched o.
When the Maven is switched o, the recording is not stopped automatically. This can
result in a failed recording. You should therefore always stop the recording yourself
before switching o the Maven.
Because the recording is coupled to the stream, interruptions of the stream and the recording aect each
other:
•
When the stream starts, the recording starts
•
When the stream is interrupted, the running recording is stopped and a new recording is started
•
When the stream stops, the recording stops
•
When the recording starts while the stream is running, the stream is restarted
•
When the recording stops while the stream is running, the stream is restarted
The stream is restarted and therefore shortly interrupted in the case that the recording
stops because the USB storage is full.
7.4 Downloading and removing the recording
Recordings on the USB storage can be copied and removed by disconnecting the USB storage from the
Maven and connecting it to a PC.
On the page `Recording' of the conguration interface the les on the USB storage are shown. When
this page is viewed with a browser, the recordings are presented as links. These links can be used to
download the recordings from the USB storage.
Next to recordings a trash can icon is shown. This can be used to remove the recording from the USB
storage.
8 Controlling the Maven via the serial port
The components of the Maven (videostreamer, videorecorder en audiostreamer) as well as the Maven
itself can be controlled with commands via the serial port. The following commands are available:
Version v8.0 Nov 2012 22 of 29

9. Switching o the Maven
start stop status reboot
videostreamer
X X X
videorecorder
X X X
audiostreamer
X X X
system
X X
When the command
system stop
is used, the Maven will switch itself o completely.
If the Maven is switched o, it is not possible to switch the Maven on using a command
via the serial port.
The COM1 connection is used for the control of the Maven via the serial port with the following cong-
uration:
Speed (baud) 115200
Data bits 8
Parity None
Stop bits 1
9 Switching o the Maven
You can switch o the Maven by pressing the power button. If no recording is being made, it is also
possible to turn the Maven on and o with a timer or with a central switch, for example as part of an
installation that is switched on and o with a single switch.
The Maven can also be switched o via the serial port, see section 8 for details.
10 Restoring factory default settings
It is possible to restore the factory default settings without having access to the webinterface of the
Maven. There are two methods which are explained below:
Method 1: File on USB storage
•
Place a le named
reset
on the USB storage (it does not matter what is in the le, but the le
will be removed after loading the factory default settings)
•
Insert the USB storage into one of the Maven USB ports
•
Switch on the Maven
•
Wait till you hear 3 short beeps, the Maven has now loaded the factory default settings
Method 2: Keyboard
•
Connect a keyboard to the Maven
•
Reboot the Maven while pressing the CTRL button
•
Wait till you hear 3 short beeps, the Maven has now loaded the factory default settings
The factory default settings are loaded now, but not yet saved. If you restart the
Maven without saving settings, nothing has changed and the old settings will still be
active.
When you do no longer have access to the Maven, you can also follow the steps as described in
14.12.
Version v8.0 Nov 2012 23 of 29

11. Maven register
11 Maven register
If you switch on the Maven, it will report to the Streamit Maven register,
http://register.streamit.
eu/maven/
(see gure 15).
Fig. 15: The Maven register
Device type This is always `Maven' in the Maven register
Device name Name as set on the miscellaneous settings page (see section 4.6)
Local IP address The local IP address of the Maven. You can click on this link to navigate
with a browser to the conguration interface of the Maven
External IP address The public IP address (visible to the outside world) of the network to which
the Maven is connected
MAC address This is the MAC address of the Maven
Image version This is the version of core of the Maven
Firmware version The rmware version of the Maven, compare this to the version of this manual
Entry date and time The moment at which the Maven sent this information, which is a few seconds
after switching on the Maven
12 Specications
SPECIFICATIONS
Video encoder H.264
Sample frequency 25 fps
Bit rate (max) 200-10000 kbps
Resolution (max) 720x576 (adjustable)
Audio encoder Stereo AAC, MP3 (not for the Maven Nano
Sample frequency 44.1 Khz
Bit rate (max) 128 kbps
Ethernet controller 10/100/1000 Mbps
Power supply 100 - 240VAC/12Vdc - 5A
Webinterface English
INPUTS (Maven)
Video signal NTSC, PAL
Video connection S-video, Composite
Audio Stereo RCA
INPUTS (Maven Nano)
Video connection S-video, Composite
Audio Mic/Line
OUTPUTS
Ethernet RJ45
Monitor headphones jack 3.5 mm
Version v8.0 Nov 2012 24 of 29

13. Streamit support
13 Streamit support
With this manual we have tried to make the working of the Maven as clear as possible. We can imagine,
however, that you may come across a question or problem that is not covered in this manual That
that case we recommend to see if there is information on this matter on the Streamit website:
http:
//nl.streamit.eu
.
We appreciate your opinion on this product and your tips for improvement. So, feel free to drop by or
send us an email.
We wish you much pleasure using your Maven.
Version v8.0 Nov 2012 25 of 29

14. Troubleshooting
14 Troubleshooting
In this section will you nd tips to solve several possible problems. We advise you to read this carefully
before contacting us. (see 1.4
If you do not succeed
).
14.1 The lights at the network connector do not light up
Possible cause Solution
The Maven is not powered on Switch on the Maven
The network cable is not attached to
a working network connection on the
other side
Try if the network connection works via the cable if you
connect the network cable with a PC or laptop
14.2 The Maven makes a downward tone
Possible cause Solution
The Maven is not connected to the net-
work
Connect the Maven to the network with a network cable in
LAN1
The network cable is connected to the
wrong LAN connector
Connect the Maven to the network with a network cable in
LAN1
The stream settings of the Maven
are incorrect (External stream server,
Stream mount point, etc.)
Check the stream settings of the Maven (see 4.4)
14.3 Suggestions when using the Roland VR-3 / VR-5
Possible cause Solution
The Roland VR-3 / VR-5 is not pow-
ered on
Switch on the Roland VR-3 / VR-5
The USB output of the Roland VR-3 /
VR-5 is not in streaming mode
Put the USB output in streaming mode (see the user manual
of the Roland VR-3 / VR-5)
14.4 The stream is not visible in the video station
Possible cause Solution
The stream settings of the Maven are
incorrect
Check the stream settings of the Maven (see 4.4
The settings of the video station are in-
correct
Check the settings of the video station (see manual for sta-
tion administrators on the portal)
14.5 The stream does not get a play button in the video station
See 14.4.
Version v8.0 Nov 2012 26 of 29

14.6 There appears no image
14.6 There appears no image
Possible Source Solution
The Maven does not send the stream to
the correct ports on the video platform
Check if the ports are congured correctly (see 4.4
A rewall between the Maven and the
External stream server blocks UDP
ports
Make sure that all UDP ports are open for outgoing data
on the rewalls. If this is dicult or not possible, you can
limit the number of Dynamic output ports on the Maven
network coguration page.
14.7 The image is blue
Fig. 16: The video player shows a blue image
Possible Source Solution
There is no signal on the video input of
the Maven
Make sure there is a signal on the video input of the Maven
14.8 The image is black and white, the colors are not right
Possible cause Solution
The Maven is congured for the wrong
video input (Composite / S-Video)
Choose the right video input (see 4.3)
The video signal that comes into the
Maven is not of good quality
Connect a monitor to the signal that goes into the Maven
to see what the quality of the input signal is
Version v8.0 Nov 2012 27 of 29

14.9 The picture is pixelated
14.9 The picture is pixelated
Possible cause Solution
Bad network cable between the Maven
and the rest of the network
Use a cable with proven quality
Interference on the signal of the net-
work cable
Use a Cat5e or Cat6 cable
Malfunctioning of the local network Check the local network (Cables, routers, switches) for pos-
sible problems
Failure of the internet connection
(delay, jitter, packet loss)
Test the connection on suitability for video streaming on the
website of Visualware: http://myspee.dvisualware.com/
On the video platform is packet loss logged. This informa-
tion can be obtained from the person from whom you have
received or bought the Maven.
14.10 The image has stopped
See section 14.9, particularly the solution for a bad internet connection.
14.11 There is no audio in the stream
Possible cause Solution
The selected audio input is not available Check the selected audio input in the conguration interface
and select a dierent audio input, if necessary
Mic/Line is selected as audio input and
both an audio-video and an audio-only
stream are congured
Use a dierent audio input or choose between the audio-
video stream and the audio-only stream
The audio cables are connected to the
wrong input
Check which audio input is selected in the conguration
interface and connect the audio cables to the correct input
14.12 The webinterface of the Maven is not accessible
There can be serveral problems, for example that the Maven has a static IP address which is not valid
or not congured correctly.
The best method to get access to the webinterface of the Maven depends on your Maven image version
and your specic situation. You can see the Maven image version information when you connect a
monitor to the VGA-out connector of the Maven:
your situation:
•
Maven image version 5 or higher (the Maven shows a white screen with the Streamit logo on the
connected monitor): Follow the steps given in section
Using the conguration interface on the
Maven itself
below.
•
Maven image version 4: Follow the steps given in section
Using the on-board DHCP server
below.
•
Maven image version 2 or 3: When the Maven is in a network with a DHCP server, follow the steps
given in section
Using a DHCP server in the local network
below.
•
If none of the above options is applicable for you, follow the steps given in section
Maven en PC
in a separate network
below.
Of course, you can always reset the Maven to the factory default settings, see section 10 for details.
Version v8.0 Nov 2012 28 of 29

14.12 The webinterface of the Maven is not accessible
Using the conguration interface on the Maven itself
The conguration interface on the Maven is accessible by connecting a monitor, keyboard, and mouse
and pressing
F10
. Press
Esc
to leave the conguration interface.
Using the on-board DHCP server
Starting with image version 4, the Maven has a DHCP server on board which is coupled to the LAN2
connection. You can use this by connecting an ethernet cable to the LAN2 connection on the Maven
an putting the other end of the network cable directly in your PC (most modern operating systems can
handle this). Your PC will get a network address assigned by the Maven
Then start the browser of your PC and enter the following URL:
http://192.168.254.1/
, then the
webinterface of the Maven will appear.
If your PC does not receive a network address from the Maven with the cable directly between the
Maven and your PC, then connect both your PC and the Maven to 1 switch. Then try the URL
http://192.168.254.1/
again in the browser of your PC. Note: other devices on the same switch can
also get a network address assigned by the Maven.
If the network to which the Maven is connected via the LAN2 connection also starts
with 192.168.254, then the Maven will automatically switch to 192.168.1. The URL
for the webinterface of the Maven is then: 192.168.1.1
Do
not
connect the LAN2 connection of the Maven to a network where already a
DHCP server runs. This will lead to network problems, because the DHCP server on
the Maven may also assign network addresses to other devices on the network.
Using a DHCP server in the local network
When you are in a network with a DHCP server, the following steps are the easiest method to gain access
to the webinterface of the Maven:
•
Keep the network cable in the Maven LAN1 connector
•
Put a network cable in the Maven LAN2 connector on the back side of the Maven (there are now
two network cables in the Maven)
•
Connect a monitor to the VGA output of the Maven
•
Reboot the Maven
•
If all is OK, `Fallback address (dhcp)' now appears followed by the address to which you can
navigate using a browser to change the settings of the Maven.
Maven en PC in a separate network
The webinterface of the Maven is always accessible on another address: http://10.0.0.254. To use that,
you need to connect your PC and the Maven together with a switch and congure the PC with the
following settings (the other settings can remain the same):
IP adres 10.0.0.10
Netmask 255.255.255.0
You can now browse to http://10.0.0.254/ and change the settings of the Maven.
Version v8.0 Nov 2012 29 of 29
 Loading...