


LUKAS II
User‟s manual
September 2009
Version 1.2
i
ENGLISH ENGLISH
LUKAS II
User‟s manual
ENGLISH
Handleiding
NEDERLANDS

LUKAS II
User‟s manual
September 2009
Version 1.2
2
ENGLISH ENGLISH
Understanding of Instructions
WARNING: These are instructions which can cause harm to people or damage to the
device if not followed properly. It is important to read and follow these instructions carefully.
IMPORTANT: These instructions are important in order to understand the correct behavior
of the device.
Notices about trademarks
Lukas is a registered trademark of Streamit.
Streamit is a registered trademark.
All other tradenames which are used in this users guide, are owned by their respective
owners.
Copyright ©2009 Streamit
All rights reserved. Under the copyright laws, this manual cannot be reproduced in any form
without the written permission of Streamit. No patent liability is assumed, with respect to the use
of the information contained herein.
Disclaimer
This manual has been validated and reviewed for accuracy. The instructions and descriptions it
contains are accurate for the Lukas internet radios at the time of this manual‟s production.
However, succeeding Lukas internet radios and manuals are subject to change without notice.
Streamit assumes no liability for damages incurred directly or indirectly from errors, omissions or
discrepancies between the internet radio and the manual.
EU Declaration of Conformity
This product carries the CE-Mark in accordance with the related European Directives. CE
marking is the responsibility of Streamit B.V., Verdunplein 10, 5627 SZ Eindhoven, The
Netherlands.
This is a class A product. In a domestic environment this product may cause radio
interference in which case the user may be required to take adequate measures.
FCC Compliance Statement
NOTE: This device complies with Part 15 of the FCC limits for Class B digital devices
FOR HOME OR OFFICE USE (“home or office” interference requirements are more stringent
than “outdoor” requirements). Operation of this device is subject to the following conditions: (1)
This device may not cause harmful interference, and (2) this device must accept any interference
received, including interference that may cause undesired operation.
The Streamit Internet Radio device does not contain any user-serviceable parts. Repairs should
be made only by an authorized Streamit service center. Unauthorized repairs or modifications
could result in permanent damage to the equipment, and void your warranty and your authority to
operate the device under Part 15 regulations.

LUKAS II
User‟s manual
September 2009
Version 1.2
3
ENGLISH ENGLISH
ENGLISH
Contents
1 GETTING STARTED ...............................................................................................................4
1.1 FIRST AND FOREMOST… ....................................................................................................4
1.2 LUKAS SUPPORT ................................................................................................................4
1.3 UNPACKING YOUR DEVICE ..................................................................................................4
1.4 REFERENCES ......................................................... FOUT! BLADWIJZER NIET GEDEFINIEERD.
1.5 FRONT VIEW .....................................................................................................................5
1.6 REAR VIEW ........................................................................................................................6
1.7 REMOTE CONTROL .............................................................................................................6
2 INSTALLATION .......................................................................................................................7
2.1 PREPARING THE LUKAS ......................................................................................................7
2.2 CONNECTING YOUR LUKAS .................................................................................................7
2.2.1 Connecting the Lukas with the telephone line ............................................................7
2.2.2 Connecting the Lukas on ethernet network ................................................................7
2.2.3 Connecting the Power supply .....................................................................................7
2.3 CONFIGURING YOUR LUKAS FOR THE FIRST TIME .................................................................8
3 LUKAS CONFIGURATION – SETUP MENU ...................................................................... 10
3.1 CHANGING THE MENU LANGUAGE SETTING ....................................................................... 10
3.2 CHANGING THE LUKASMODE SETTING .............................................................................. 10
3.3 CHANGING THE COUNTRY SETTING .................................................................................. 11
3.4 CHANGING THE PREDIAL ‟0‟ SETTING ............................................................................... 11
3.5 CHANGING THE E POWER OFF SETTING ........................................................................... 12
3.6 CHANGING THE PROVIDER SETTING ................................................................................. 12
3.7 CHANGING THE REMOTE CONTROL SETTING .................................................................... 13
4 SERVICE MENU ................................................................................................................... 14
5 USING THE LUKAS ............................................................................................................. 16
5.1 SETTING UP THE FIRST CONNECTION ................................................................................ 16
5.2 CHOOSING ANOTHER CHANNEL ........................................................................................ 16
5.3 POWERING OFF THE DEVICE ............................................................................................ 16
5.4 ADJUSTING THE VOLUME ................................................................................................. 16
5.5 USING A HEADPHONE ...................................................................................................... 16

LUKAS II
User‟s manual
September 2009
Version 1.2
4
ENGLISH ENGLISH
ENGLISH
1 Getting Started
1.1 First and foremost…
thank you for purchasing the Lukas II internet radio device.
The Lukas is a fully autonomous working receiver that makes it possible to listen to broadcasts of
radio broadcasters, music distributors, churches and much more. The Lukas is suitable for
connecting to a phone line as well as to an ethernet network.
The Lukas can be used with a number of preconfigured providers. However, you also configure
the device yourself with the Streamit Terminal Program (STP), a user friendly software application
for Windows PC. This program can be downloaded from our website free of charge. Uniquely the
Lukas can identify itself, so the user is able to participate in authorized broadcastings.
For more information on the Streamit products and solutions, we invite you to visit our website
http://www.streamit.eu.
Finally, we wish you a lot of pleasure using your Lukas device…
Streamit B.V.
1.2 Lukas support
With this manual we have tried to clearly describe the operation your Lukas. But we can imagine
you have a question or came across an issue which is not covered in this manual. In such case,
you are welcome to visit our website (http://streamit.eu) where you will find up-to-date
documentation and the latest software release(s).
When you have purchased your Lukas from one of our local dealers, we recommend you contact
your dealer first.
1.3 Unpacking your device
Carefully take out of the package the device and the supplied materials. Make sure that all of the
following components are included:
Lukas II internet radio device
Remote control
9V-800mA or 9V-400mA power supply
3M RJ 45 ethernet cable
3M RJ11 telephone line cable
Telephone connector (not in all versions)
The CR2025 Lithium battery is already in the remote control. Before you can start to use the
remote control, the paper-thin plastic separator must be removed (pulled out).
LUKAS II
User‟s manual
September 2009
Version 1.2
5
ENGLISH ENGLISH
ENGLISH
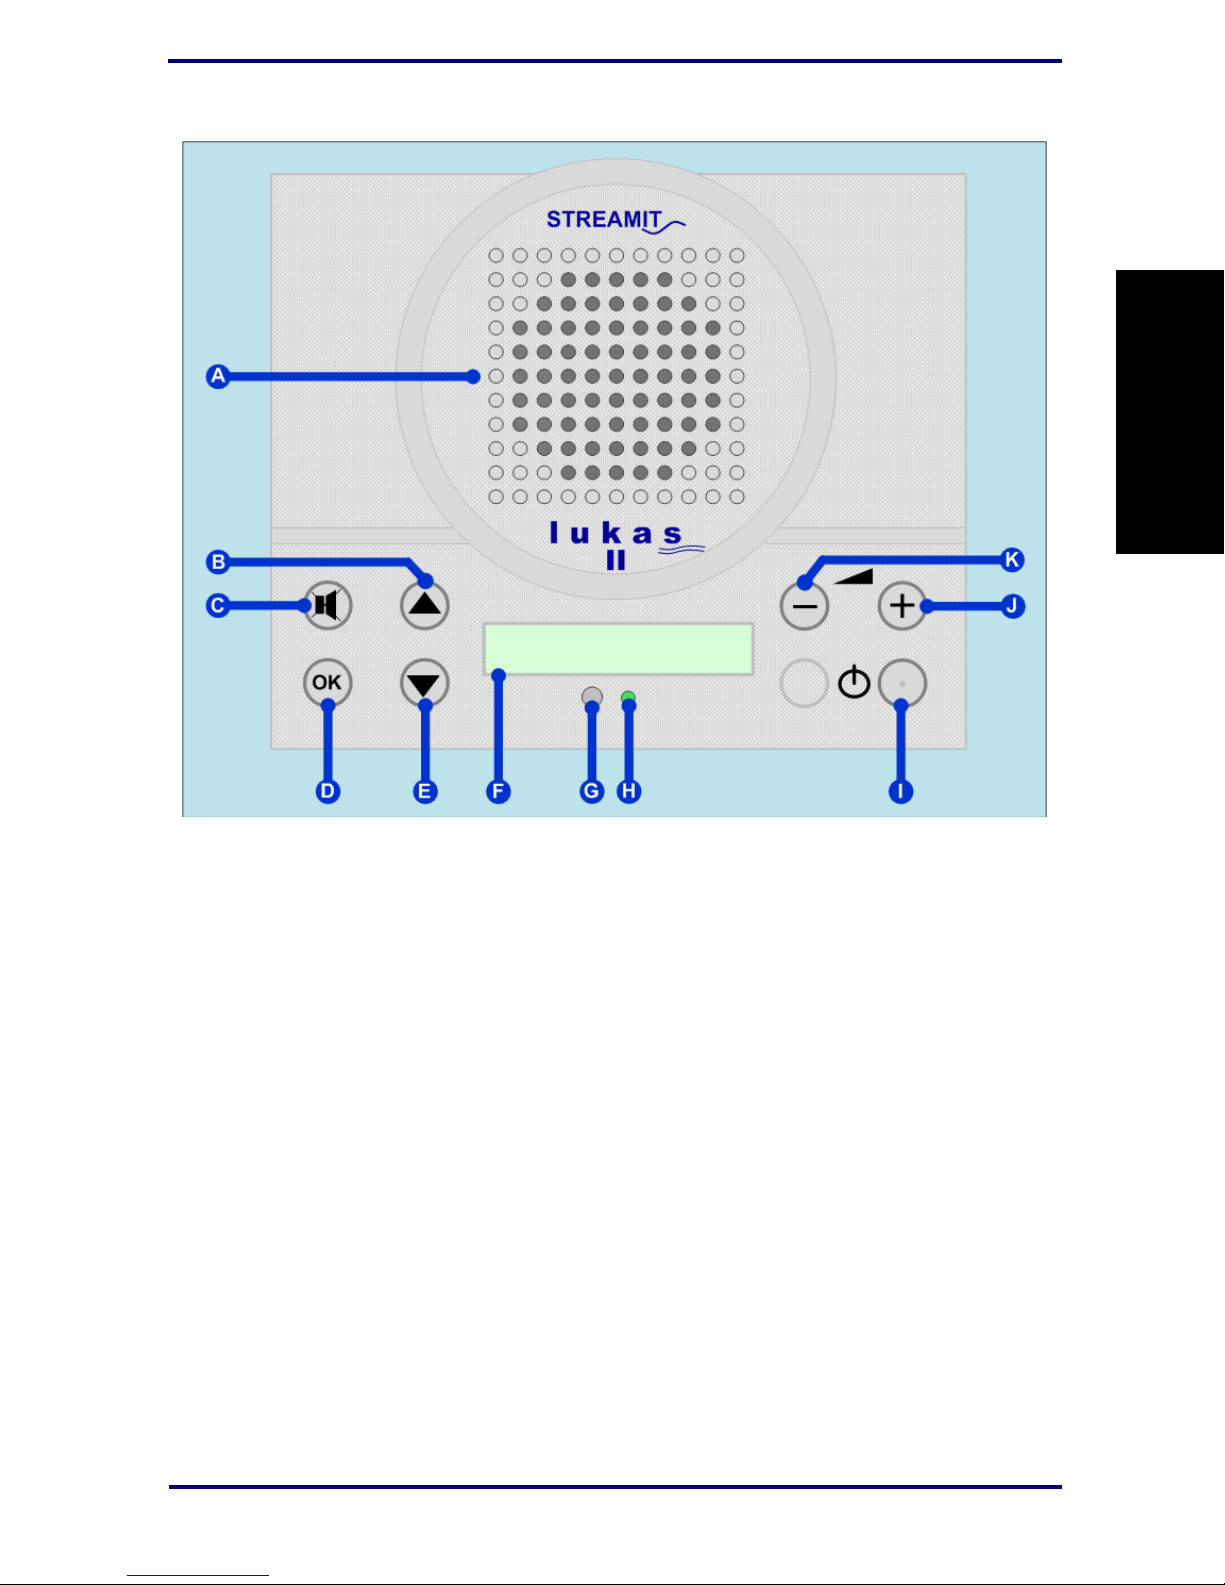
A – Speaker
B – Channel/menu up button
C – Mute button
D – OK button
E – Channel/menu down button
F – 12 characters LCD display
G – Infrared receiver
H – Status indicator
I – On/Off button
J – Volume up button
K – Volume down button
1.4 Front View
Figure 1.1: Lukas front view
LUKAS II
User‟s manual
September 2009
Version 1.2
6
ENGLISH ENGLISH
ENGLISH
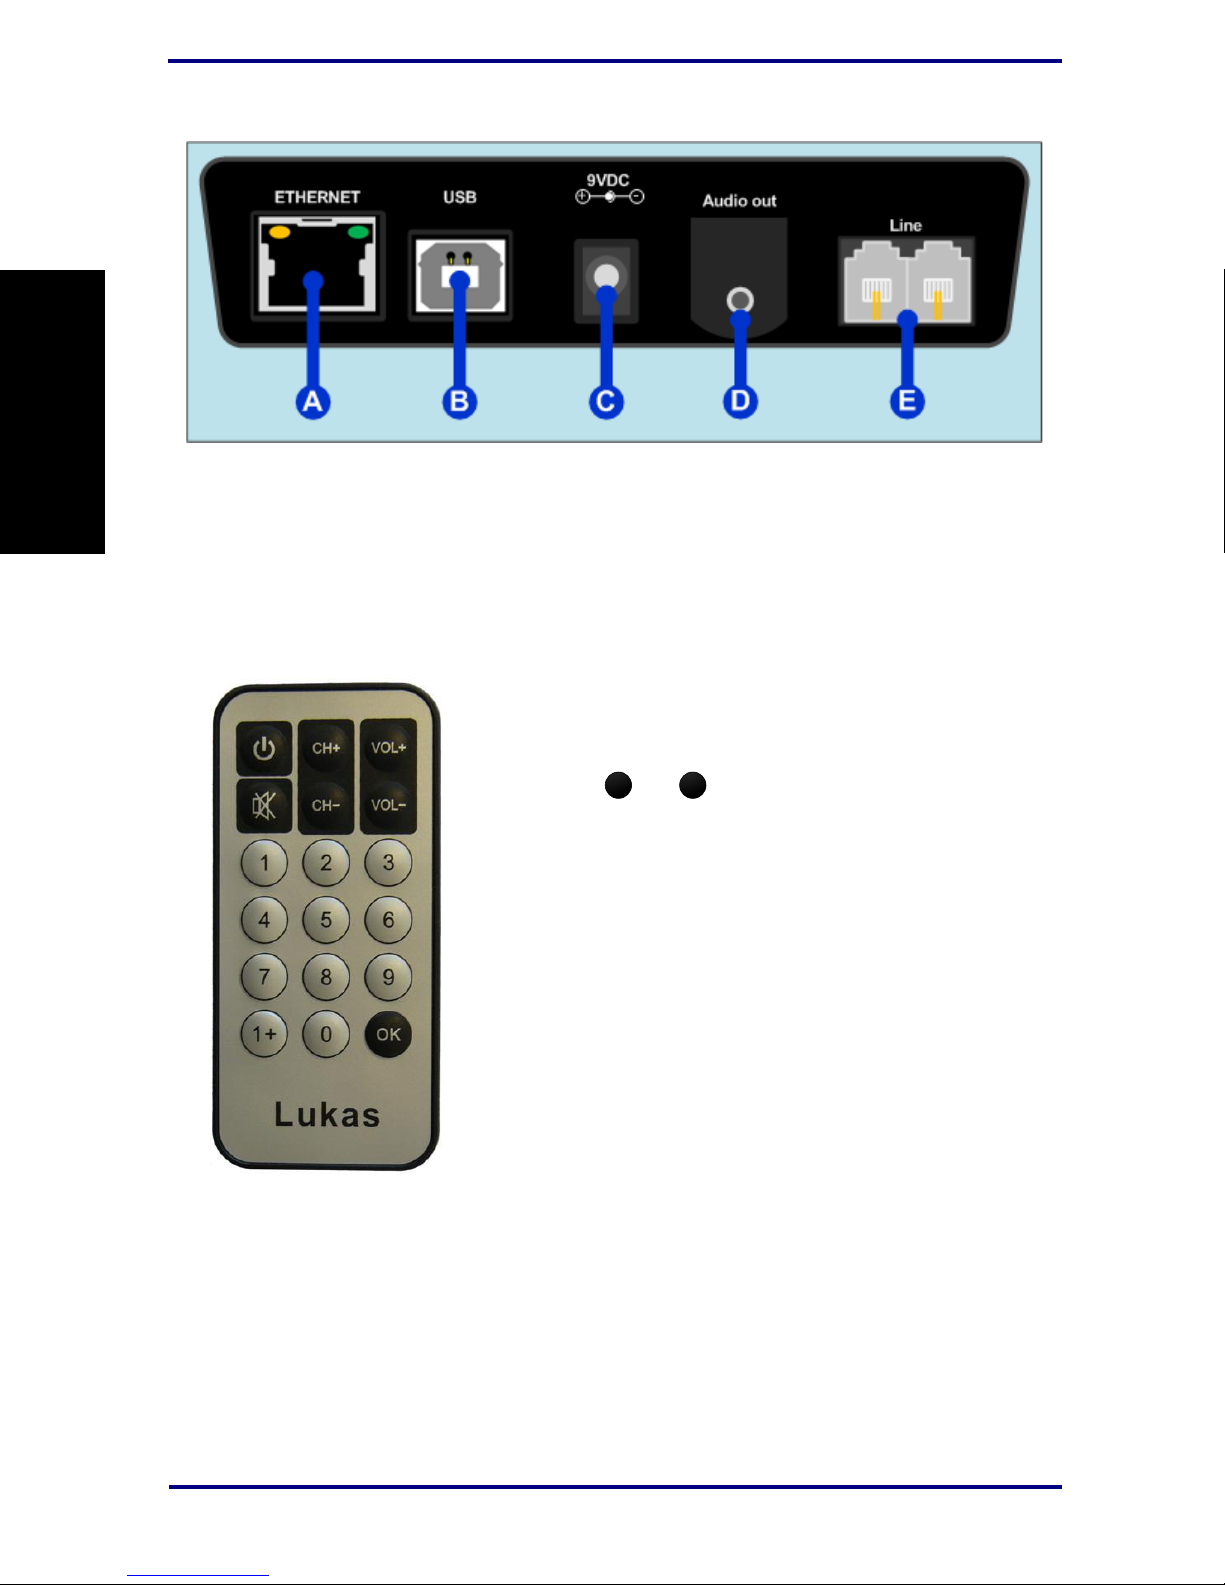
A – RJ45 Ethernet connector
B – USB connector
C – Power supply connector
D – Audio output connector
E – 2x RJ11 telephone line connector
Figuur 1.3: Remote control
The remote control has the same keys as the device. See the
drawing. The remote control also has the keys 0..9 and 1+.
With these keys you can select the channels directly instead
of using the
CH+
and
CH-
keys.
e.g. To directly connect to channel 12, you would need to first
press 1+ and then 2.
1.5 Rear view
Figure 1.2: Lukas rear view
1.6 Remote control
LUKAS II
User‟s manual
September 2009
Version 1.2
7
ENGLISH ENGLISH
ENGLISH
2 Installation
This section of the manual will cover the installation of your Lukas internet radio starting from how
to mount and connect your device, following with configuration and service tasks.
2.1 Preparing the Lukas
After you have unpacked your Lukas, it can be placed to the desired location. This location
should have a flat surface (e.g. a table) and should be near the telephone wall mount plug (in
case you use it in telephone mode) or a network modem/switch socket (in case you use it in
Ethernet mode).
2.2 Connecting your Lukas
As with every electronic device, there are some directives you need to be followed in order to
properly connect your Lukas device.
2.2.1 Connecting the Lukas with the telephone line
To connect the Lukas to the telephone line, use the supplied telephone line cord and, if
necessary, the telephone line plug.
2.2.2 Connecting the Lukas on ethernet network
Use the provided ethernet cable to connect your SIR with your cable modem, ADSL modem or
router. If everything is ok (and the power supply has also been connected) the yellow led of the
ethernet connector will light-up yellow continuously while being connected. The green led will
blink randomly.
Always leave the ethernet connector plugged in the Lukas. If you do not leave the connector
in the Lukas, it can take up to 1 minute before you can control the device again.
2.2.3 Connecting the Power supply
Plug the power adaptor to the mains outlet and then plug the connector to the Lukas. The
message “One moment…” will appear on the screen, and in a few seconds the Lukas will switch
off.
In the process of connecting the power to the Lukas we ask that you pay careful attention to the
following instructions:
Never use wet hands when plugging the power adapter in the mains and never remove the
power adapter from the mains with wet hands.
Do not cut or damage the cord of the power adapter; do not place heavy objects on the
cord. This can cause short-circuit, resulting in electrical shocks or even fire.
Pulling the cord can also damage the wire and/or isolation causing electrical shocks or fire.
Using power adapters other than the one recommended for your Lukas device, can result in
overheating and damage you device. This can cause fire, electrical shocks and other hazards.
Only use the supplied power adapter.
LUKAS II
User‟s manual
September 2009
Version 1.2
8
ENGLISH ENGLISH
ENGLISH
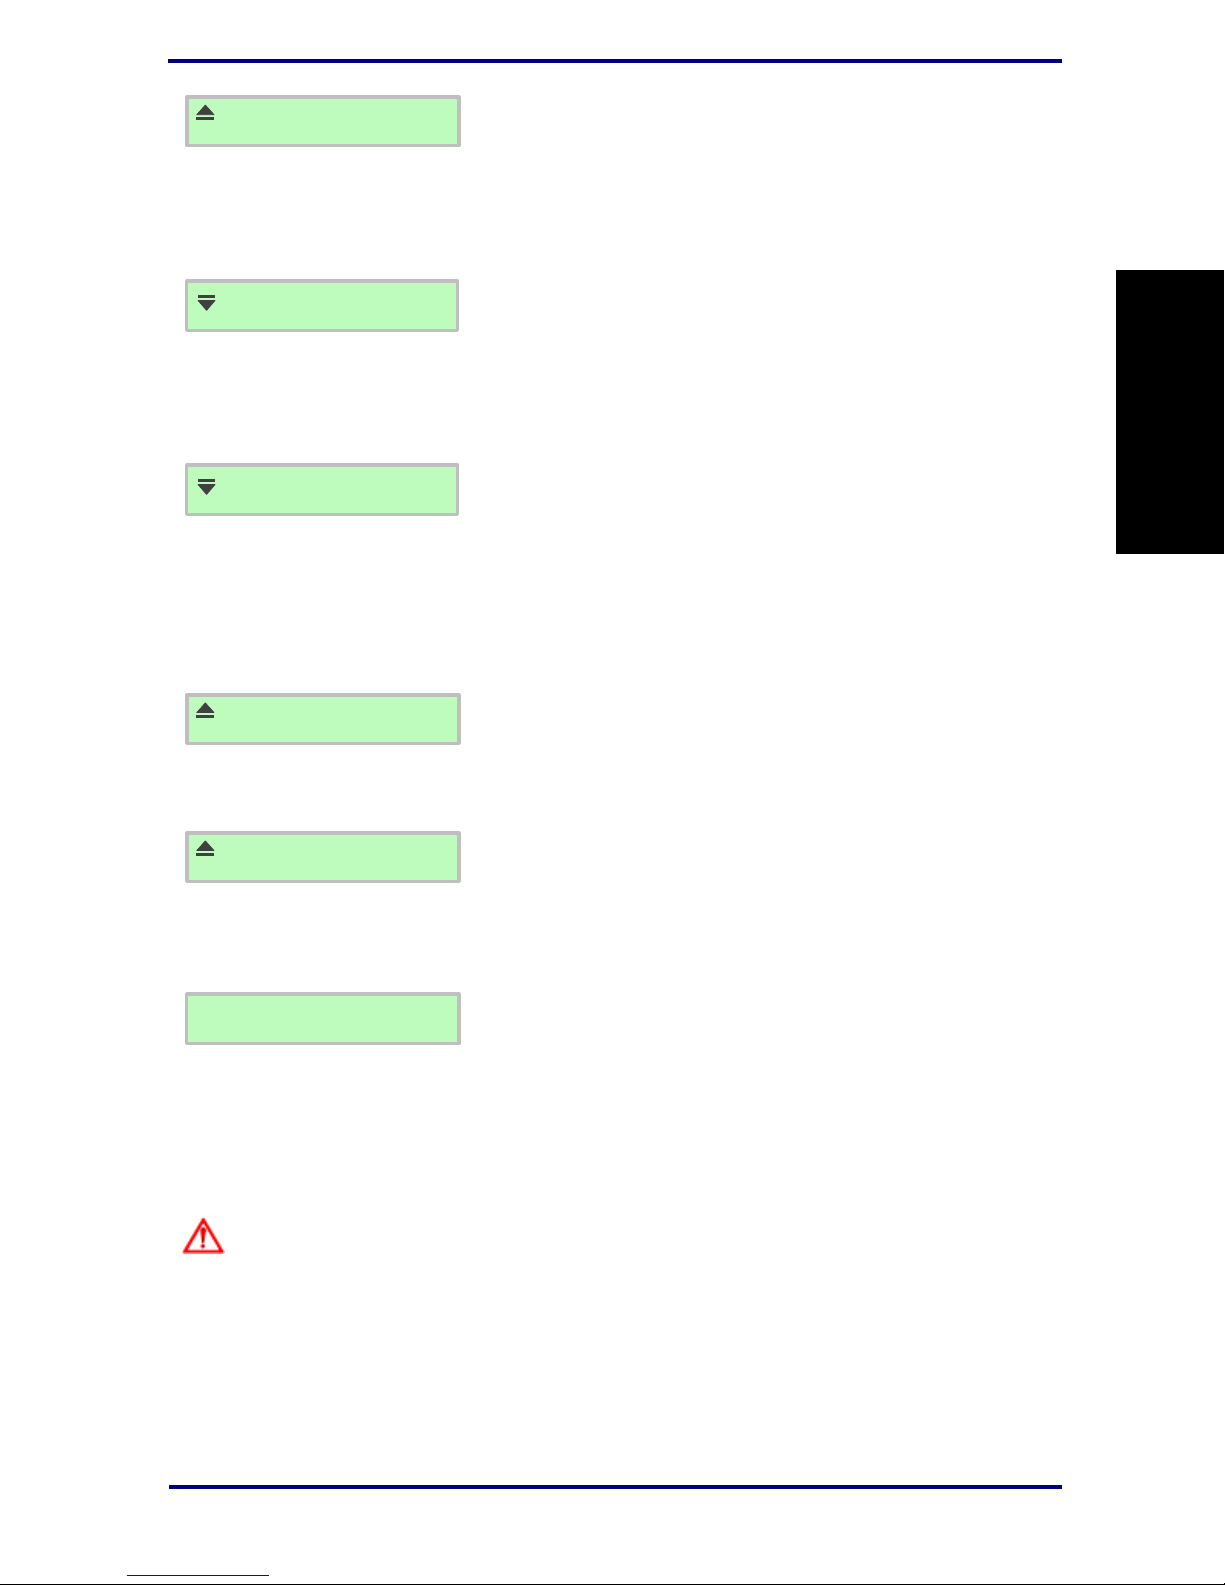
One moment..
Press the On/Off button to switch the Lukas on. First you get a
message on the LCD “One moment..”. Just wait for a few
seconds for the device to initialize itself.
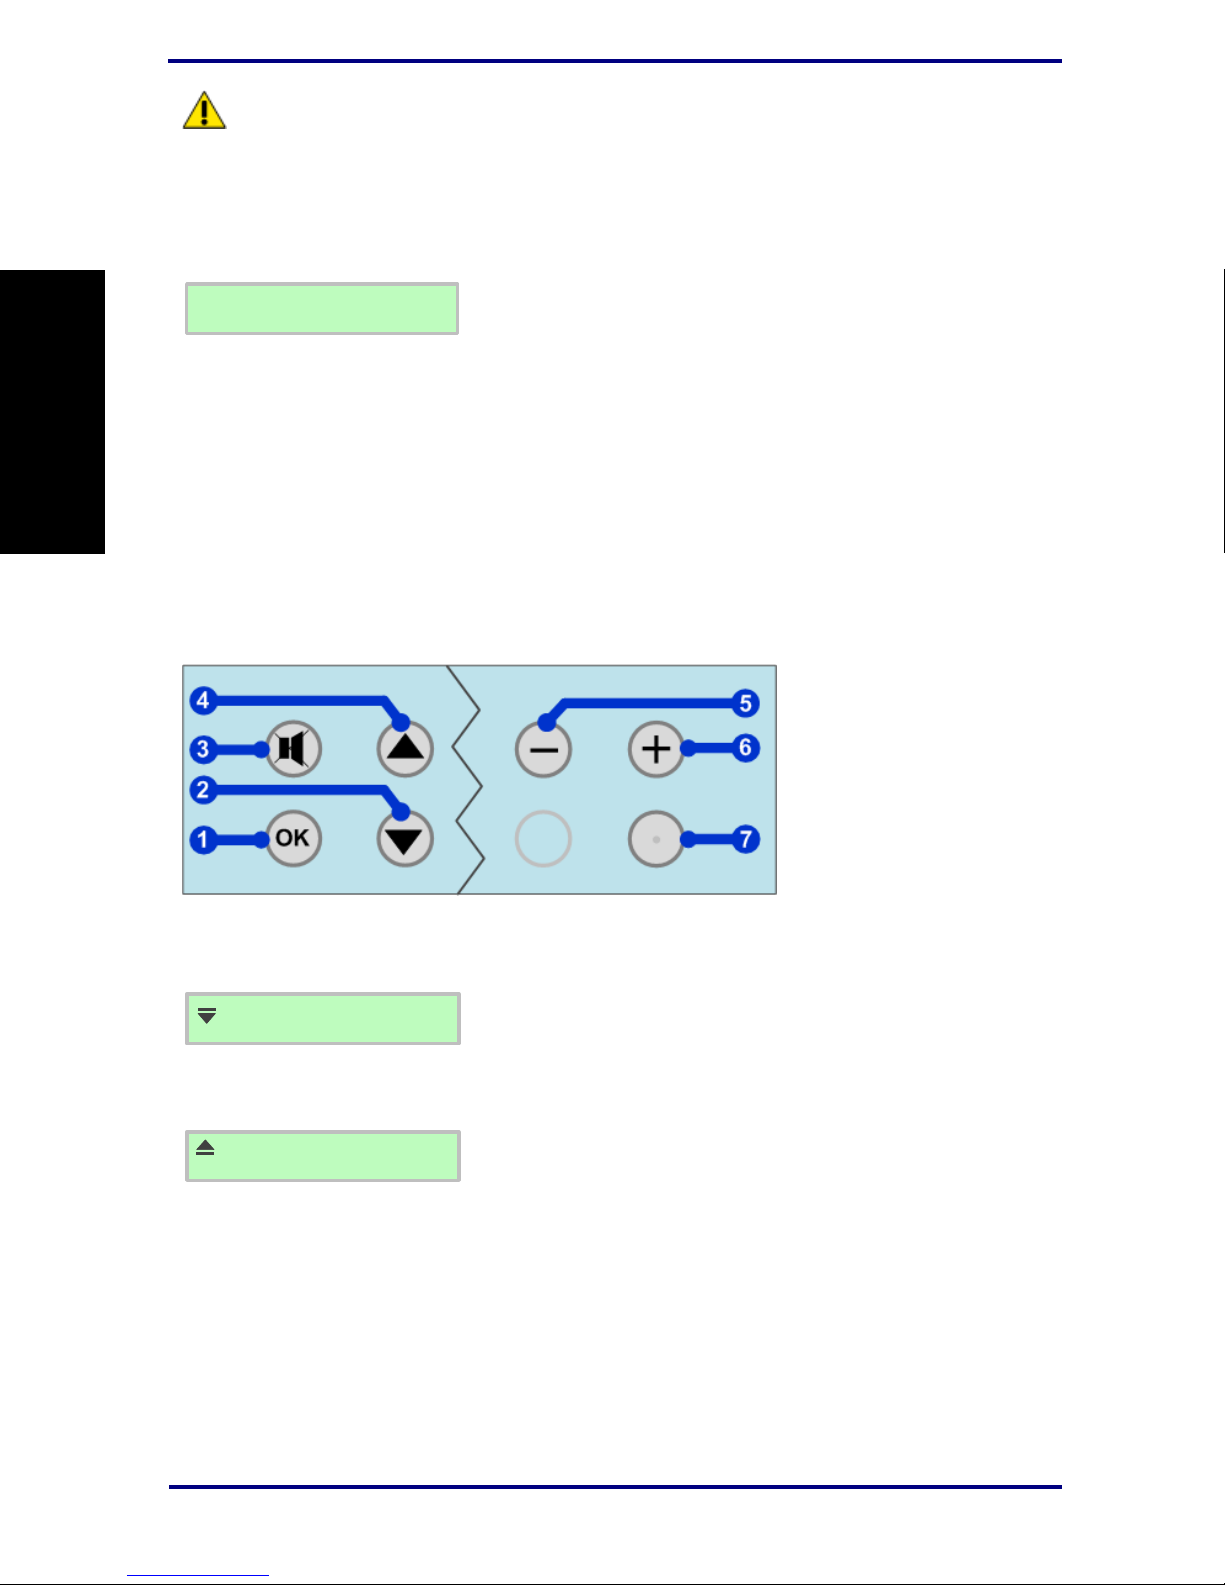
1 – OK button
2 – Menu-Down button
3 – Mute button
4 – Menu-Up button
5 – Volume-Down button
6 – Volume-Up button
7 – On/Off button
English
Step 1: Language setup
As default the wizard will start with [English]. Press OK button to
confirm the language preference (in this case [English]). You
could also choose between [Dutch] and [German] by using the
Menu-Up/Down buttons.
Tel e p h o n e
Step 2.0: Lukasmode setup
The Lukasmode is related to the method the device should use
to access the internet. There are two possible modes
[Telephone]; in case you are using Dialup connection and
[Ethernet] when using ADSL/cable. You can switch between the
two by using the menu up/down buttons.
Press OK button to confirm your choice. The choice will also
affect which wizard menu is shown next.
In case of [Telephone], the next menu would be the country
setting, in case of [Ethernet] you can skip the two coming steps
and go directly to step 3.
Applying the Lukas to situations with rapid changing temperatures can result in
condensation (small amount of water) on the inner and outer surface of your device. To ensure a
long lifetime of your Lukas, this should be prevented. In case of such a scenario, wait until you
device is „dry‟ before you use it again.
2.3 Configuring your Lukas for the first time
If you use the device for the first time (or the Lukas has not been configured), the first step of the
configuration wizard is shown (see further in this paragraph).
Depending on the wizard choices, you only see the steps which are applicable. In the explanation
of the wizard part it is described in which situations the step is shown.
If you want to change a setting at a later stage, you can do this via the Setup menu. This subject
is described in the next chapter.
In Figure 2.1 below, the menu buttons of your Lukas are depicted. Appended to the right are the
names they are referred to as in this manual.
Figure 2.1:The Lukas menu buttons
LUKAS II
User‟s manual
September 2009
Version 1.2
9
ENGLISH ENGLISH
ENGLISH
USA
Step 2.1: Country setup
This step is only applicable if [Telephone] was chosen in step
2.0. You will need to select the country where you want to use
the Lukas, from the available list of countries. Use the MenuUp/Down buttons to browse the list of available countries. When
your choice is not in the list please contact your dealer. Press
OK button to confirm the choice.
W i t h o u t ’ 0’
Step 2.2: Predial „0‟ setup
This step follows the country setting and also applies only when
[Telephone] was chosen in step 2.0. The two available options
are [With „0‟] and [Without „0‟]. You will need to use the option
[With „0‟] in case the Lukas is used behind a (home-)pabx. In all
other cases the option [Without „0‟] is used. Press OK button to
confirm your choice.
Autom off
Step 3: E Powering Off setup
This Step is only applicable if [Ethernet] was chosen in step 2.0.
If your choice was [Telephone], please go directly to step 4.
This feature conditions the behaviour of the Lukas device when
the stream it was playing from, stops. By selecting [Autom off],
the Lukas is automatically switched off after the stream is
stopped. When [Manual off] is chosen, the Lukas keeps waiting
for the stream and will only switch off when the On/Off button is
pressed. Press OK button to confirm your choice.
St r e a m i t
Step 4: Provider setup
This step only will be shown in case there is more than one
providers available and the device is not preconfigured. Choose
your provider (use Menu-Up/Down to browse list of available
providers) and press OK to confirm your choice.
Re m c o o n
Step 5: Remote control setup
This step can be used to enable/disable the IR remote control
the Lukas features. Respectively The option [Remco on], will
enable the remote control, while the option [Remco off] will
disable it. Switching between the two option is possible using
the Menu-Up/Down buttons. Press OK to confirm your choice.
Setup ready
Congratulations! You have completed the Lukas startup
configuration wizard. The device will automatically restart and
the wizard settings will be set up as default. On start up your
Lukas will connect to the selected provider‟s database (Streamit
in this case) and load from there an up to date channel list (and
other settings when available).
If you would like to preconfigure and use the Lukas with other settings, you should use the
Streamit Terminal Program.
During the first connecting of the Lukas with the provider‟s database, most probably the
software of the Lukas will be updated. The progress is shown on the LCD screen. Do NOT power
off the Lukas during software updates, as this can result in not functioning of the Lukas anymore.
LUKAS II
User‟s manual
September 2009
Version 1.2
10
ENGLISH ENGLISH
ENGLISH
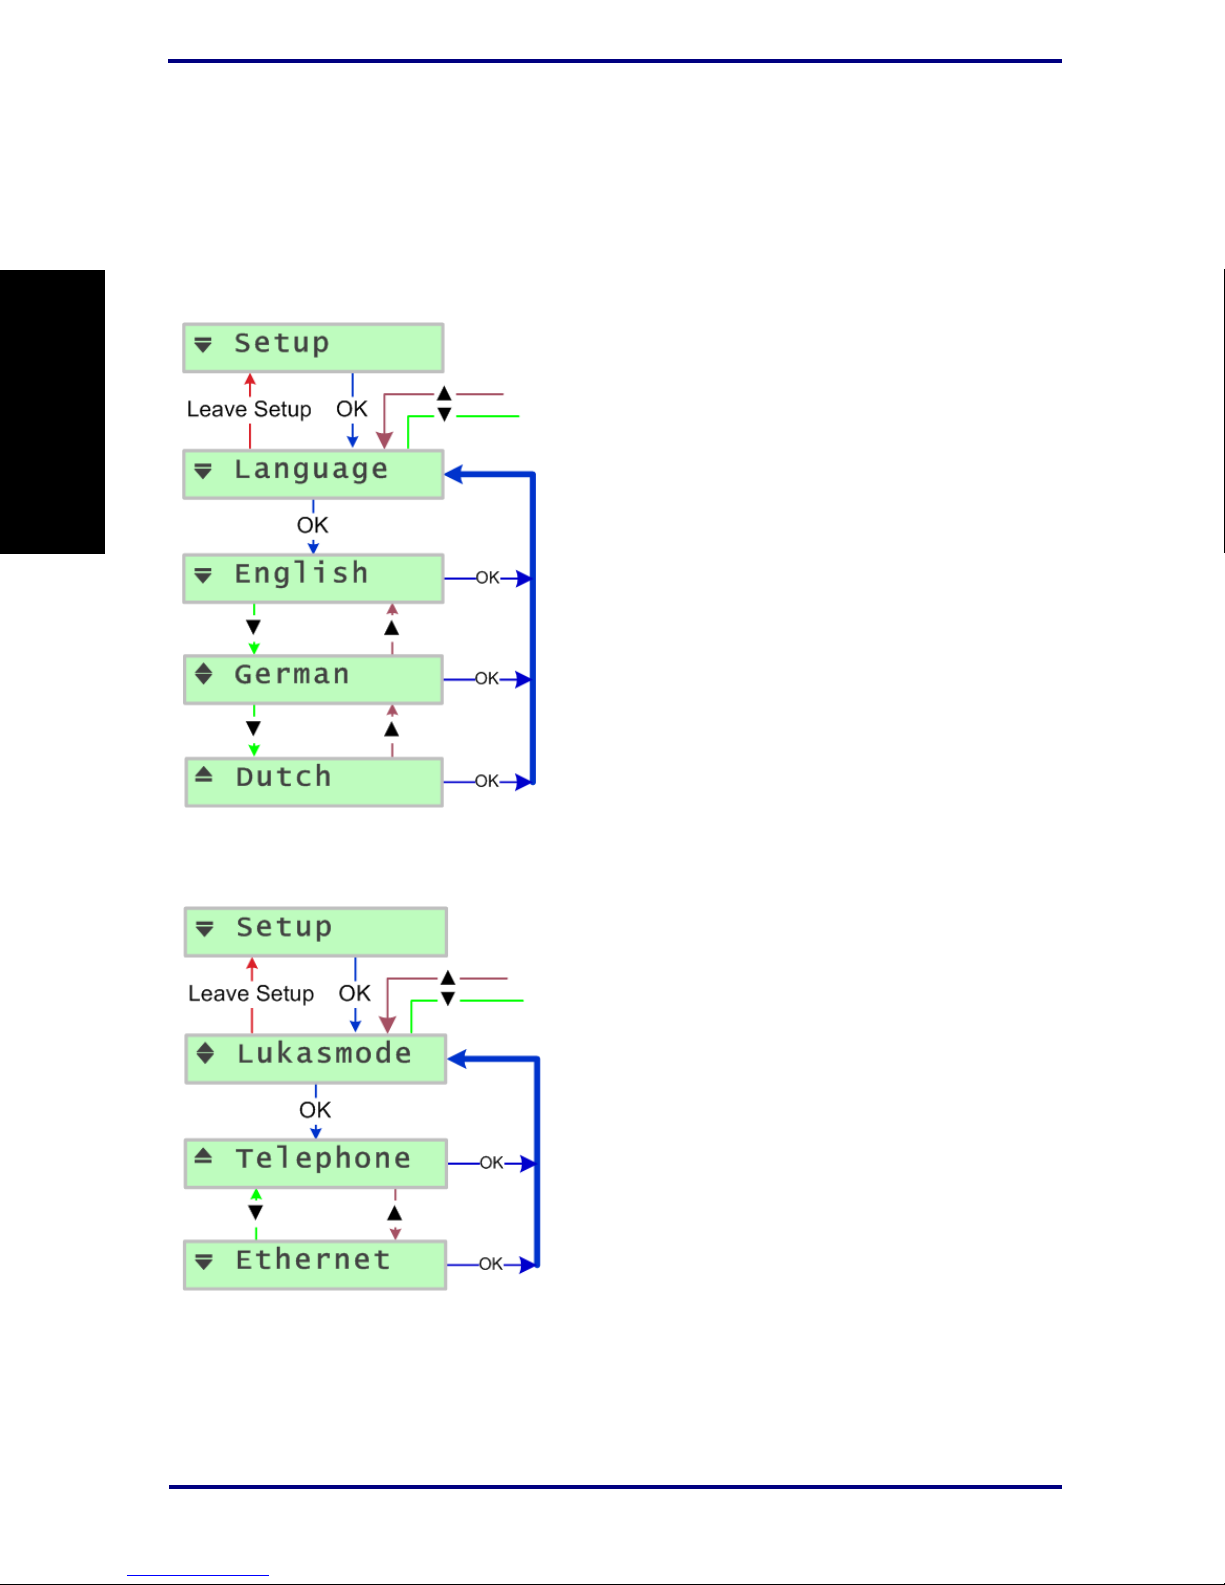
You can come to the language menu by entering the
Lukas setup. If you are already in [Setup], press the
Menu-Up/Down buttons until you reach the
[Language] option. Press OK button to access the
[Language] menu. You can use the Menu-Up/MenuDown buttons to browse through the available
languages and use the OK button to confirm your
choice. The chosen language will be applied and the
Lukas will return to the [Language] menu option.
You can come to the [Lukasmode] menu by entering
the [Setup] and pressing Menu-Down button. If you
are already in the [Setup] menu, just browse through
until you find the [Lukasmode] option.
Press OK to access this menu. The two available
options are [Telephone] and [Ethernet]. Choose for
[Telephone] in case you are using Dialup connection
or press Menu-Up to choose [Ethernet] when using
ADSL/cable.
Press OK button to confirm your choice. The changes
will be applied and the Lukas will return to the
[Lukasmode] menu option.
3 Lukas Configuration – Setup menu
In the Lukas setup menu you can manually change the configurations of your device. The menu
of your Lukas is accessed by pressing the Volume-Down and On/Off buttons together while the
device is in powered off state. The menu includes Setup and Service options. Press the OK
button to enter the Setup menu.
3.1 Changing the menu language setting
3.2 Changing the Lukasmode setting

LUKAS II
User‟s manual
September 2009
Version 1.2
11
ENGLISH ENGLISH
ENGLISH
You can come to the [Country] menu only when
[Telephone] was chosen in the [Lukasmode] menu.
When you are in the [Setup] menu, just browse
through until you find the [Country] option.
Press OK to access this menu. According to the
software version, there can be a number of available
options. Use Menu-Up/Down to browse through the
available countries.
Press OK button to confirm your choice. The changes
will be applied and the Lukas will return to the
[Country] menu option.
In case your country is not in this list, please contact
you dealer.
You can come to the [Predial 0] menu only when
[Telephone] was chosen in the [Lukasmode] menu.
When you are in the [Setup] menu, just browse
through until you find the [Predial 0] option.
Press OK to access this menu. The two available
options are [Without‟0‟] and [With ‟0‟]. Choose for
[With ‟0‟] in case the Lukas is used behind a (home-
)pabx, or press Menu-Down and choose for
[Without‟0‟] in all other cases.
Press OK button to confirm your choice. The changes
will be applied and the Lukas will return to the [Predial
0] menu option.
3.3 Changing the country setting
3.4 Changing the Predial ‟0‟ setting

LUKAS II
User‟s manual
September 2009
Version 1.2
12
ENGLISH ENGLISH
ENGLISH
You can come to the [E Power Off] menu only when
[Ethernet] was chosen in the [Lukasmode] menu.
When you are in the [Setup] menu, just browse
through until you find the [E Power Off] option.
Press OK to access this menu. The two available
options are [Autom off] and [Manual off]. Choose for
[Autom off] in case you want your Lukas to
automatically switch off when the audio stream it was
playing from is not available anymore. In case you
choose for [Manual off], the Lukas will keep retrying to
connect to the “not available” stream and only switch
off when you press the On.Off button.
Press OK button to confirm your choice. The changes
will be applied and the Lukas will return to the [E
Power Off] menu option.
The [Provider] menu is only available when your
Lukas device is not preconfigured.
You can come to the [Provider] menu by entering the
[Setup]] and pressing Menu-Down. If you are already
in the setup menu, just browse through until you find
the [Provider] option. Press OK to access the Provider
menu. You can use the Menu-Up/Menu-Down buttons
to browse through the available providers and use the
OK button to confirm your choice.
The changes will be applied and the Lukas will return
to the [Provider] menu option.
3.5 Changing the E Power Off setting
3.6 Changing the Provider setting

LUKAS II
User‟s manual
September 2009
Version 1.2
13
ENGLISH ENGLISH
ENGLISH
You can come to the [RemoteCon] menu by entering
the [Setup] and pressing Menu-Down button. If you
are already in the [Setup] menu, just browse through
until you find the [RemoteCon] option.
Press OK to access this menu. The two available
options are [Remco on] and [Remco off]. Choose for
[Remco on] in case you want to enable the Lukas IR
remote control or press Menu-Up to choose [Remco
off]. This will disable the IR remote control.
Press OK button to confirm your choice. The changes
will be applied and the Lukas will return to the
[RemoteCon] menu option.
3.7 Changing the Remote Control setting

LUKAS II
User‟s manual
September 2009
Version 1.2
14
ENGLISH ENGLISH
ENGLISH
Service
Enter the Lukas menu by pressing the Volume-Down and
On/Off buttons together while the device is in powered off
state. From the options available choose [Service]. Press OK
button to confirm your choice.
Luk a s I D
ID: 1 2 3 4 A
The first menu is the [Lukas ID]. Press OK button to access
this menu. The device‟s serial number will be shown on the
screen; in this example „1234A‟. The serial number of your
Lukas device is unique and especially important when you
want to get access to closed user group web casts. Through its
ID code a Lukas can identify itself and if the administrator has
added your Lukas in the list of allowed devices, then access is
granted. This happens automatically and is transparent to the
user.
Press OK button to get back to the [Service] menu.
SW V e r s i o n
V: 02 . 0 5 B 0 5
Your Lukas also shows you the version of software it is
running. This is available from the [SW Version] menu (press
OK to access it); in this example version 02.05 B05. It is
sometimes important for the technical support people at
Streamit (or your local dealer) to know this information, in order
to help you properly in case help is required.
Press OK button to get back to the [Service] menu.
Update SW
The Lukas features Remote Software Update feature. The
[Update SW] feature is used to force your device to perform an
update check. If you press OK button for this option, the Lukas
will check for a new software version (also known as firmware)
and when a new version is available, the Lukas will update to
this version. The messages on the screen will change
according to the update progress.
Do NOT power off the Lukas during software updates, as
this can result in not functioning of the Lukas anymore.
R-Selftest
S-Tes t : P A S S
The [R-Selftest] menu is used to shows the result of the last
selftest you performed on your Lukas, which must be PASS for
your device to operate properly. Press OK for the [R-Selftest]
menu to see the result of the last selftest .
Press OK button to get back to the [Service] menu.
Selftest
S-Te s t : P A S S
The Selftest functionality has been designed to diagnose in no
time if there is hardware malfunction of your Lukas. Press OK
button to start the selftest; wait for the result.
Press OK button to get back to the [Service] menu.
For an accurate result of the selftest, it is important that
4 Service Menu
The Service menu of your Lukas is used to show you some hardware/software information and
perform small service operations. Let us take a look at all the Service menu options and what
each of them does.

LUKAS II
User‟s manual
September 2009
Version 1.2
15
ENGLISH ENGLISH
ENGLISH
the device is fully switched off and on by releasing the power
adapter 30-seconds from the mains.
Reset
To load the settings of your device with default values, the
[Reset] option can be used. When you press OK button for the
[Reset] option, the text „Resetting…‟ is first shown on the
screen; then the device will enter the wizard mode.
Lea v e S r v c e
Use the [Leave Srvce] option to leave the [Service] menu and
return to the Lukas main menu.

LUKAS II
User‟s manual
September 2009
Version 1.2
16
ENGLISH ENGLISH
ENGLISH
5 Using the Lukas
5.1 Setting up the first connection
After the Lukas has been configured, the first connection with an audio channel can be setup. If
the Lukas is not switched on, do this by pressing the On/Off key.
After some time, the name of the first audio channel in the list appears on the screen.
You can choose the audio channel with the Menu-Up and Menu-Down buttons. After pressing the
OK button, the connection with this channel is made. If no key is pressed, the connection is
automatically made after some seconds.
5.2 Choosing another channel
Another channel can be chosen by pressing the Menu-Up (channel up) or Menu-Down (channel
down) buttons, as with an old-fashioned radio.
After pressing the OK button, the connection with this channel is made. If no key is pressed, the
connection is automatically made after some seconds.
This function is available only if more than one channel is available.
5.3 Powering off the device
The Lukas always can be switched off by pressing the On/off button.
The Lukas automatically is switched off after a channel is not available anymore.
5.4 Adjusting the volume
The volume can be adjusted by pressing the Volume-Up/Volume-Down buttons. The new volume
setting is stored automatically.
The sound can be temporally switched off by pressing the Mute button.
5.5 Using a headphone
The „Audio out‟ connector of the Lukas also can be used for connecting a stereo headphone.
The headphone impedance should be more than 30 ohms. It is also desired that the headphone
cable has a volume control, because the Lukas volume control cannot be used in case the
headphone is used.
A good headphone we suggest is the Philips HP 250 stereo headphone with volume control and
5 m cable.
When the headphone is connected to the „Audio out‟ connector, the speaker is switched off.

LUKAS II
Handleiding
September 2009
Versie 1.2
17
ENGLISH ENGLISH
NEDERLANDS
Begrip van Instructies
WAARSCHUWING: Het is belangrijk om deze instructies zorgvuldig op te volgen. Niet goed
opvolgen van de instructies kan nadelig zijn en het apparaat beschadigen.
BELANGRIJK: Deze instructies zijn belangrijk om het correct werken van het apparaat te
begrijpen
Notities over handelsmerken
De Lukas is een geregistreerd handelsmerk van Streamit.
Streamit is een geregistreerd handelsmerk
Alle andere handelsmerken die zijn gebruikt in dit document, zijn eigendom van de
desbetreffende bezitter.
Copyright ©2009 Streamit
Alle rechten voorbehouden. Geen enkel gedeelte van deze publicatie mag worden overgedragen of
gekopieerd, in welke vorm dan ook, zonder uitdrukkelijke schriftelijke toestemming.
Afwijzen van aansprakelijkheid
Deze handleiding is zorgvuldig gevalideerd en nagekeken. De instructies en beschrijvingen die
hierin staan zijn accuraat voor de Streamit internet Radio‟s op het moment van de productie van
deze handleiding. Echter nieuwere Streamit internet Radio‟s en handleidingen kunnen zonder
kennisgeving worden gewijzigd. Streamit aanvaardt dientengevolge geen aansprakelijkheid voor
opgelopen schade direct of indirect voortvloeit uit fouten of omissies in de handleiding, of uit
weglatingen of discrepantie tussen de internet radio en handleiding.
EU-verklaring van overeenstemming
Dit product draagt het CE-Merk in overeenstemming met de relevante Europese richtlijnen.
Het CE merk is de verantwoordelijkheid van Streamit B.V., Verdunplein 10, 5627 SZ Eindhoven,
Nederland.
Dit is een A klasse product. In een huiselijke omgeving kan dit product radio onderbrekingen
veroorzaken in dat geval kan van de gebruiker worden vereist om adequate maatregelen te treffen.
FCC-nalevings verklaring
NOTE: This device complies with Part 15 of the FCC limits for Class B digital devices FOR
HOME OR OFFICE USE (“home or office” interference requirements are more stringent than
“outdoor” requirements). Operation of this device is subject to the following conditions: (1) This
device may not cause harmful interference, and (2) this device must accept any interference
received, including interference that may cause undesired operation.
The Streamit Internet Radio device does not contain any user-serviceable parts. Repairs should be
made only by an authorized Streamit service center. Unauthorized repairs or modifications could
result in permanent damage to the equipment, and void your warranty and your authority to operate
the device under Part 15 regulations.

LUKAS II
Handleiding
September 2009
Versie 1.2
18
ENGLISH ENGLISH
NEDERLANDS
1 BEGINNEN ............................................................................................................................... 19
1.1 ALLEREERST ...................................................................................................................... 19
1.2 LUKAS ONDERSTEUNING ..................................................................................................... 19
1.3 HET APPARAAT UITPAKKEN .................................................................................................. 19
1.4 REFERENTIES ............................................................ FOUT! BLADWIJZER NIET GEDEFINIEERD.
1.5 VOORAANZICHT .................................................................................................................. 20
1.6 ACHTERAANZICHT ............................................................................................................... 21
1.7 AFSTANDSBEDIENING .......................................................................................................... 21
2 INSTALLATIE ........................................................................................................................... 22
2.1 DE LUKAS VOORBEREIDEN .................................................................................................. 22
2.2 DE LUKAS AANSLUITEN ....................................................................................................... 22
2.2.1 De telefoonlijn aansluiten ............................................................................................. 22
2.2.2 De Lukas op het Ethernet netwerk aansluiten ............................................................. 22
2.2.3 De stroomtoevoer aansluiten ....................................................................................... 22
2.3 DE LUKAS VOOR DE EERSTE KEER INSTELLEN ...................................................................... 23
3 LUKAS CONFIGURATIE – SETUP MENU ............................................................................. 25
3.1 DE MENUTAAL INSTELLINGEN WIJZIGEN ................................................................................ 25
3.2 DE LUKASMODE INSTELLINGEN WIJZIGEN ............................................................................. 25
3.3 DE LAND INSTELLINGEN WIJZIGEN ........................................................................................ 26
3.4 DE “VOORLOOP 0” INSTELLINGEN WIJZIGEN ......................................................................... 26
3.5 DE “UITSCHAKELEN” INSTELLINGEN WIJZIGEN ....................................................................... 27
3.6 DE PROVIDER INSTELLINGEN WIJZIGEN ................................................................................. 27
3.7 DE AFSTANDSBEDIENING INSTELLINGEN WIJZIGEN ................................................................ 28
4 SERVICE MENU ....................................................................................................................... 29
5 DE LUKAS GEBRUIKEN ......................................................................................................... 31
5.1 DE EERSTE KEER EEN VERBINDING OPBOUWEN .................................................................... 31
5.2 HET KIEZEN VAN EEN ANDER KANAAL ................................................................................... 31
5.3 HET UITZETTEN VAN HET APPARAAT ..................................................................................... 31
5.4 HET AANPASSEN VAN HET VOLUMENIVEAU............................................................................ 31
5.5 HET AANSLUITEN VAN EEN HOOFDTELEFOON ........................................................................ 31

LUKAS II
Handleiding
September 2009
Versie 1.2
19
ENGLISH ENGLISH
NEDERLANDS
1 Beginnen
1.1 Allereerst
hartelijk dank voor de aanschaf van de Lukas II internetradio ontvanger.
De Lukas is een volledig autonoom werkende ontvanger waarmee u kunt luisteren naar radio
uitzendingen, achtergrondmuziek en kerkdiensten. De Lukas kan aangesloten worden op een
telefoonlijn en op een ethernet aansluiting.
De Lukas kan gebruikt worden met een aantal voorgeprogrammeerde providers. Met het Streamit
Terminal Programma (STP), een gebruikersvriendelijk software programma dat u op uw PC kunt
installeren, kunt u het apparaat zelf configureren. STP kunt u gratis van de Streamit website
downloaden.
Voor meer informatie over de producten en oplossingen die Streamit kan leveren, nodigen we u uit
om onze website te bezoeken. http://www.streamit.eu
Ten slotte wensen wij u veel plezier met het gebruik van uw Lukas ontvanger.
Streamit B.V.
1.2 Lukas ondersteuning
Met deze handleiding hebben we geprobeerd om helder te beschrijven hoe de Lukas radio te
bedienen. Maar we kunnen ons voorstellen dat u nog een vraag hebt of nog een punt tegenkwam
dat niet in deze handleiding behandeld is. In dat geval bent u welkom om onze website te bezoeken
(http://www.streamit.eu) alwaar u up to date documentatie en de laatste softwareversies vindt.
Als u de Lukas via een van onze dealers hebt gekocht, raden we u aan om eerst contact met uw
dealer op te nemen.
1.3 Het apparaat uitpakken
Haal het apparaat en de bijbehorende materialen voorzichtig uit de verpakking. Verzeker u ervan
dat alle componenten aanwezig zijn:
Lukas II internet radio ontvanger
Afstandsbediening
9V-800mA of 9V-400mA voedingsadapter
3m Netwerkkabel
3m RJ11 telefoonsnoer
Telefoonstekker (niet in alle versies)
De CR2025 Lithium batterij zit al in de afstandsbediening. Voordat u de afstandsbediening gaat
gebruiken moet u eerst het dunne plastic velletje eruit trekken.

LUKAS II
Handleiding
September 2009
Versie 1.2
20
ENGLISH ENGLISH
NEDERLANDS
A – Luidspreker
B – Vorig kanaal/menu toets
C – Geluid uit toets
D – OK toets
E – Volgend kanaal/menu toets
F – 12 karakters LCD display
G – Indicatielampje voor infrarood ontvangst
H – Status indicatie
I – Aan/uit toets
J – Volume harder toets
K – Volume zachter toets
1.4 Vooraanzicht
Figuur 1.1: Lukas vooraanzicht

LUKAS II
Handleiding
September 2009
Versie 1.2
21
ENGLISH ENGLISH
NEDERLANDS
A –Netwerkaansluiting (RJ45)
B –USB aansluiting
C –Aansluiting voor de voeding
D – Speakeraansluiting
E – 2x telefoonlijn aansluiting (RJ11)
Figuur 1.3:Afstandsbediening
Op de afstandsbediening zitten dezelfde knoppen als op het
apparaat. Zie tekening. Tevens beschikt de afstandsbediening
over de knoppen 0..9 en 1+. Hiermee kunnen kanaalnummers
direct gekozen worden in plaats van de
CH+
en
CH-
toetsen te
gebruiken.
1.5 Achteraanzicht
Figuur 1.2: Lukas achteraanzicht
1.6 Afstandsbediening

LUKAS II
Handleiding
September 2009
Versie 1.2
22
ENGLISH ENGLISH
NEDERLANDS
2 Installatie
Dit hoofdstuk beschrijft het aansluiten van uw Lukas ontvanger, gevolgd door het instellen en
onderhouden ervan.
2.1 De Lukas voorbereiden
Haal de Lukas uit de doos en plaats deze op een vlakke ondergrond in de nabijheid van een
telefoonplug of een netwerk aansluiting, afhankelijk van hoe u het apparaat wilt gaan gebruiken.
2.2 De Lukas aansluiten
Zoals met elk electronisch apparaat, zijn er enkele richtlijnen die u moet volgen om deze goed te
laten functioneren.
2.2.1 De telefoonlijn aansluiten
Gebruik voor het aansluiten van de Lukas op de telefoonlijn, het bijgeleverde telefoonsnoer en
indien nodig de telefoonstekker.
2.2.2 De Lukas op het Ethernet netwerk aansluiten
Gebruik het bijgeleverde netwerksnoer om de Lukas op uw kabelmodem, ADSL modem of router
aan te sluiten. Als het goed is gaat (als de voedingsadapter ook aangesloten is) het gele lampje
van de netwerk connector bij het aansluiten continue branden. Het groene lampje gaat
onregelmatig knipperen.
Tip: als de afstand tussen de Lukas en het ADSL modem te groot is, kunt u overwegen het ADSL
modem in de buurt van de Lukas te plaatsen in plaats van een lange netwerkkabel te installeren.
Laat de netwerk connector altijd in de Lukas zitten. Als deze er niet inzit en u zet het apparaat
aan, kan het tot 1 minuut duren voordat u het apparaat weer kunt bedienen.
2.2.3 De stroomtoevoer aansluiten
Steek het snoer van de voedingsadapter in de Lukas.
Steek de voedingsadapter nooit met natte handen in het stopcontact en haal de stekker nooit
met natte handen uit het stopcontact.
Zorg ervoor dat u de snoer van de voedingsadapter niet doorsnijdt, beschadigt of wijzigt,
plaats geen zware voorwerpen op de snoer. Dit kan kortsluiting veroorzaken, of een elektrische
shock of zelfs brand ten gevolge hebben.
Aan de snoer trekken kan de draad en de isolatie hiervan beschadigen of blootleggen
waardoor kans op brand of elektrische schokken ontstaat.
Gebruik alleen de meegeleverde netadapter. Het gebruik van netadapters die niet zijn
aangeraden voor de Lukas, kan tot oververhitting en beschadiging van het apparaat leiden. Dit kan
brand, elektrische schokken en andere gevaren als gevolg hebben.
Snelle temperatuurwisselingen kan bij de Lukas tot condensatievorming (waterschade)
leiden. Voor een lange levensduur van de Lukas dient dit zoveel mogelijk voorkomen te worden.

LUKAS II
Handleiding
September 2009
Versie 1.2
23
ENGLISH ENGLISH
NEDERLANDS
Even geduld
De Lukas wordt aangezet door op de Aan/uit toets te drukken.
Op het scherm verschijnt nu eerst de tekst “Even geduld”
1 – OK toets
2 – Vorig kanaal/menu toets
3 – Geluid uit toets
4 – Volgend kanaal/menu toets
5 – Volume zachter toets
6 – Volume harder toets
7 – Aan/uit toets
Dutch
Stap 1: Taal instellen
Als standaard zal de wizard met Engels starten. Druk OK om
de taal voorkeur te bevestigen (in dit geval Dutch). U kunt ook
kiezen uit [English] en [German] door de menu
omhoog/omlaag toetsen te gebruiken.
Te l e f o o n
Stap 2.0: Lukas mode instellen
Met de Lukas mode wordt ingesteld hoe de Lukas een
verbinding met het internet opbouwt. Dit kan op twee
manieren: [Telefoon] in het geval u gebruik wilt maken van de
telefoonlijn en [Ethernet] als u gebruik wilt maken van uw
kabelmodem, ADSL modem of router. U kunt wisselen tussen
deze twee manieren door de menu omhoog/omlaag toetsen te
gebruiken.
Druk op de OK toets om uw keuze te bevestigen. Deze keuze
bepaalt ook welk wizard item als volgende getoond wordt. In
het geval van [Telefoon] is het volgende menu [Land], in het
geval van [Ethernet] kunt u de volgende twee stappen
overslaan en direct naar stap 3 gaan.
Mocht dit toch gebeuren, wacht dan tot het vocht volledig verdampt is voordat u het apparaat weer
gaat gebruiken.
2.3 De Lukas voor de eerste keer instellen
Als u het apparaat voor de eerste keer gebruikt (of de Lukas nog niet is ingesteld), komt u
automatisch in het eerste item van de opstart wizard terecht (zie verderop in deze paragraaf).
Afhankelijk van de uitvoering van de Lukas krijgt u de items te zien die van toepassing zijn. In de
uitleg bij het betreffende wizard onderdeel is vermeld in welke situaties het item getoond wordt.
Als u op een later moment een instelling wilt wijzigingen, kunt u dit via het Setup menu doen. Dit
onderwerp wordt in het volgende hoofdstuk beschreven.
Als u de Lukas voor de eerste keer aanzet èn de Lukas is nog niet ingesteld, doorloopt u een
eenvoudige wizard.
In de onderstaande Figuur 2.1 zijn de knoppen van de Lukas afgebeeld. Naast de figuur zijn de
namen opgesomd van de knoppen zoals ze in deze manual genoemd worden.
Figuur 2.1:De Lukas toetsen

LUKAS II
Handleiding
September 2009
Versie 1.2
24
ENGLISH ENGLISH
NEDERLANDS
Ne d e r l a n d
Stap 2.1: Land instellen
Deze stap is alleen van toepassing als u [Telefoon] heeft
gekozen in stap 2.0. U moet het land kiezen waar u de Lukas
wilt gebruiken. Als uw keuze niet in de lijst staat, neem dan
contact met uw dealer op. Druk op de OK toets om uw keuze
te bevestigen.
Zo n d e r ’ 0 ’
Stap 2.2: Voorloop 0 instellen
Deze stap volgt op de Land instelling en is alleen van
toepassing als [Telefoon] is gekozen in stap 2.0. De twee
beschikbare opties zijn [Met „0‟] en [Zonder „0‟]. De optie [Met
„0‟] moet gekozen worden als de Lukas achter een
huiscentrale gebruikt gaat worden. In alle andere situaties
moet u [Zonder „0‟] kiezen. Druk op de OK toets om uw keuze
te bevestigen.
Aut o m u i t
Stap 3: E uitschakelen
Deze stap is alleen van toepassing als [Ethernet] gekozen is
in stap 2.0. Als u [Telefoon] had gekozen, kunt u deze stap
overslaan en verder gaan met stap 4.
Deze instelling bepaalt wat de Lukas gaat doen indien het
station waarna u aan het luisteren bent, wegvalt. Als u [Autom
uit] kiest, wordt de Lukas in deze situatie automatisch
uitgeschakeld. Als u [Handm uit] kiest, blijft de Lukas wachten
op het radiostation. De Lukas wordt pas uitgeschakeld nadat u
op de Aan/uit toets gedrukt hebt. Druk op de OK toets om uw
keuze te bevestigen.
St r e a m i t
Stap 4: Provider instellen
Deze stap wordt alleen getoond in het geval er uit meer dan
één provider gekozen kan worden en de Lukas niet is
voorgeconfigureerd. Kies uw provider met behulp van de
menu omhoog/omlaag toetsen en bevestig uw keuze met de
OK toets.
Afs t B a a n
Stap 7: Afstand bediening
In deze laaste stap kunt u de afstandsbediening-ontvanger
van de Lukas aan- en uitschakelen. Als u [AfstB aan] kiest,
wordt de afstandsbediening-ontvanger aangezet, terwijl met
de [AfstB uit] keuze de afstandsbediening-ontvanger uitgezet
wordt. Uw keuze wordt met de OK toets bevestigd.
Setup gereed
Gefeliciteerd! …. Uw Lukas is nu helemaal ingesteld. Na
enkele seconden start de Lukas opnieuw op met de nieuwe
instellingen. Nadat de Lukas is opgestart, bouwt deze een
verbinding op met de database van de provider en haalt een
lijst met kanalen en andere instellingen op.
Als u uw Lukas wilt gebruiken met andere instellingen, dan moet u hiervoor het Streamit Terminal
Program gebruiken.
Tijdens het eerste contact van de Lukas met de database van de provider is het zeer
waarschijnlijk dat de software van de Lukas vernieuwd wordt. De voortgang hiervan wordt getoond
op het LCD scherm. Haal NOOIT de netspanning van de Lukas af tijdens software updates, omdat
dit kan resulteren in het niet meer werken van de Lukas.

LUKAS II
Handleiding
September 2009
Versie 1.2
25
ENGLISH ENGLISH
NEDERLANDS
Het [Taal] menu kunt u vinden door vanuit [Setup] één
of meerdere keren op de Vorig/Volgend menu toetsen
te drukken.
Druk op de OK toets om het [Taal] menu te kiezen.
Druk één of meerdere keren op de Vorig/Volgend
menu toetsen om een taal te kiezen.
Bevestig uw keuze door op de OK toets te drukken.
Uw keuze wordt meteen toegepast en de Lukas zal
teruggaan naar het [Taal] menu.
Het [Lukasmode] menu kunt u vinden door vanuit
[Setup] één of meerdere keren op de Vorig/Volgend
menu toetsen te drukken.
Druk op de OK toets om het menu te kiezen.
De twee beschikbare opties zijn [Telefoon] en
[Ethernet]. Kies voor [Telefoon] in het geval u gebruik
wilt maken van de telefoonlijn en [Ethernet] als u
gebruik wilt maken van uw kabelmodem, ADSL
modem of router.
Bevestig uw keuze door op de OK toets te drukken.
Uw keuze wordt meteen toegepast en de Lukas zal
teruggaan naar het [Lukasmode] menu.
3 Lukas Configuratie – Setup menu
In het Lukas Setup menu kunt u handmatig instellingen wijzigen. U kunt in het Setup menu komen
door het apparaat eerst uit te zetten met de Aan/uit toets. Vervolgens moet u gelijktijdig de Volume
zachter en Aan/uit toets indrukken. U ziet nu [Setup] in het scherm staan. Druk op de OK toets om
het Setup menu in te gaan.
3.1 De menutaal instellingen wijzigen
3.2 De Lukasmode instellingen wijzigen

LUKAS II
Handleiding
September 2009
Versie 1.2
26
ENGLISH ENGLISH
NEDERLANDS
Het [Land] menu is alleen beschikbaar als [Telefoon]
gekozen was in het [Lukasmode] menu.
Het [Land] menu kunt u vinden door vanuit [Setup]
één of meerdere keren op de Vorig/Volgend menu
toetsen te drukken.
Druk op de OK toets om het menu te kiezen.
Afhankelijk van de software versie worden een aantal
landen getoond. Gebruik de Volgend/vorig menu
toetsen om de beschikbare landen te zien.
Bevestig uw keuze door op de OK toets te drukken.
Uw keuze wordt meteen toegepast en de Lukas zal
teruggaan naar het [Land] menu.
Als uw keuze niet in de lijst staat, neem dan contact
met uw dealer op.
Het [Voorloop 0] menu is alleen beschikbaar als
[Telefoon] gekozen was in het [Lukasmode] menu.
Het [Voorloop 0] menu kunt u vinden door vanuit
[Setup] één of meerdere keren op de Vorig/Volgend
menu toetsen te drukken.
Druk op de OK toets om het menu te kiezen.
De twee beschikbare opties zijn [Met „0‟] en [Zonder
„0‟]. De optie [Met „0‟] moet gekozen worden als de
Lukas achter een huiscentrale gebruikt gaat worden.
In alle andere situaties moet u [Zonder „0‟] kiezen.
Druk op de OK toets om uw keuze te bevestigen. Uw
keuze wordt meteen toegepast en de Lukas zal
teruggaan naar het [Voorloop 0] menu.
3.3 De Land instellingen wijzigen
3.4 De “Voorloop 0” instellingen wijzigen

LUKAS II
Handleiding
September 2009
Versie 1.2
27
ENGLISH ENGLISH
NEDERLANDS
Het [E Uitschak] menu is alleen beschikbaar als
[Ethernet] gekozen was in het [Lukasmode] menu.
Het [E Uitschak] menu kunt u vinden door vanuit
[Setup] één of meerdere keren op de Vorig/Volgend
menu toetsen te drukken.
Druk op de OK toets om het menu te kiezen.
Deze instelling bepaalt wat de Lukas gaat doen indien
het station waarna u aan het luisteren bent, wegvalt.
Als u [Autom uit] kiest, wordt de Lukas in deze situatie
automatisch uitgeschakeld. Als u [Handm uit] kiest,
blijft de Lukas wachten op het radiostation. De Lukas
wordt pas uitgeschakeld nadat u op de Aan/uit toets
gedrukt hebt.
Druk op de OK toets om uw keuze te bevestigen. Uw
keuze wordt meteen toegepast en de Lukas zal
teruggaan naar het [E Uitschak] menu.
Het [Provider] menu is alleen beschikbaar als er uit
meer dan één provider gekozen kan worden en de
Lukas niet is voorgeconfigureerd.
Het [Provider] menu kunt u vinden door vanuit [Setup]
één of meerdere keren op de Vorig/Volgend menu
toetsen te drukken.
Druk op de OK toets om het menu te kiezen.
Kies uw provider met behulp van de menu
omhoog/omlaag toetsen en bevestig uw keuze met de
OK toets.
Uw keuze wordt meteen toegepast en de Lukas zal
teruggaan naar het [Provider] menu.
3.5 De “Uitschakelen” instellingen wijzigen
3.6 De provider instellingen wijzigen

LUKAS II
Handleiding
September 2009
Versie 1.2
28
ENGLISH ENGLISH
NEDERLANDS
Het [AfstandB] menu kunt u vinden door vanuit
[Setup] één of meerdere keren op de Vorig/Volgend
menu toetsen te drukken.
Druk op de OK toets om het [AfstandB] menu te
kiezen.
Als u [AfstB aan] kiest, wordt de afstandsbedieningontvanger aangezet, terwijl met de [AfstB uit] keuze
de afstandsbediening-ontvanger uitgezet wordt.
Bevestig uw keuze door op de OK toets te drukken.
Uw keuze wordt meteen toegepast en de Lukas zal
teruggaan naar het [AfstandB] menu.
3.7 De afstandsbediening instellingen wijzigen

LUKAS II
Handleiding
September 2009
Versie 1.2
29
ENGLISH ENGLISH
NEDERLANDS
Service
U kunt in het Service menu komen door het apparaat eerst uit
te zetten met de Aan/uit toets. Vervolgens moet u gelijktijdig de
Volume zachter en Aan/uit toets indrukken. Druk nu op de
Volgend/vorig menu toetsen totday u [Service] in het scherm
staan. Druk op de OK toets om uw keuze te bevestigen.
Luk a s I D
ID: 1 2 3 4 A
Het eerste menu is de [Lukas ID]. Druk op de OK button om dit
menu te kiezen.
Nu wordt het serienummer van de Lukas getoond; in dit
voorbeeld: 1234A. Het serienummer van uw Lukas ontvanger
is uniek en belangrijk als u toegang wilt krijgen tot uitzenden
van besloten gebruikers groepen. Dit nummer wordt als
identificatie gebruikt voor de provider en hiermee wordt uw
toegang tot de provider gegarandeerd. Dit gebeurt automatisch
en hier hoeft de gebruiker verder niets voor te doen.
Druk op de OK toets om weer terug te gaan naar het [Service]
menu.
SW Version
V: 0 2 . 0 5 B 0 5
Uw Lukas laat ook het versienummer zien van de software
(ook wel firmware genoemd) die erin is geladen.
Deze informatie is beschikbaar in het [SW Version] menu (druk
op de OK toets om dit menu te kiezen).
In dit voorbeeld is de versie 0.2.05 B05.
Het is soms belangrijk voor technische support mensen van
Streamit (of uw lokale dealer) om deze informatie te weten om
u adequaat te kunnen in het geval u vragen hebt.
Druk op de OK toets om weer terug te gaan naar het [Service]
menu.
Update SW
De Lukas ondersteunt automatische software updates.
Het [Update SW] menu is bedoeld om handmatig een software
update check te forceren. Nadat u op OK hebt gedrukt, checkt
de Lukas automatisch of er een nieuwe software versie
beschikbaar is. Als dit het geval is, wordt deze automatisch
geladen. Op het LCD scherm kunt u de voortgang zien.
Haal NOOIT de netspanning van de Lukas af tijdens
software updates, omdat dit kan resulteren in het niet meer
werken van de Lukas.
R-Selftest
S-Tes t : P A S S
In het [R-Selftest] menu kunt u de resultaten van de laatste
zelftest van de Lukas zien. Dit resultaat moet PASS zijn om
goed te kunnen functioneren. Druk op de OK toets om het
resultaat van de laatste zelftest te kunnen zien.
Druk op de OK toets om weer terug te gaan naar het [Service]
menu.
Zelftest
Met de zelftest functie kunt in korte tijd zien of uw Lukas een
hardware probleem heeft. Druk op de OK toets om de zelftest
te starten en wacht op het resultaat.
Druk op de OK toets om weer terug te gaan naar het [Service]
4 Service menu
In het Service van uw Lukas kunt u enige informatie over de Lukas bekijken en enkele testen
uitvoeren. In deze paragraaf bespreken we elk van de Service menu opties.

LUKAS II
Handleiding
September 2009
Versie 1.2
30
ENGLISH ENGLISH
NEDERLANDS
S-Te s t : P A S S
menu.
Voor een juist resultaat van de zelftest is het belangrijk
dat het apparaat eerst volledig is uitgeschakeld voordat de test
wordt opgestart. Dit kunt u doen door de voedingsadapter los
te halen en na 30 seconden weer aan te sluiten.
Re s e t
Uw Lukas kan weer teruggezet worden naar de
fabrieksinstellingen door de [Reset] optie te kiezen. Druk op de
OK toets om het apparaat te resetten. U ziet dan de tekst
“Resetting…” op het scherm. Vervolgens zal de Lukas weer
opstarten in de wizard mode.
Uit S e r v i c e
Kies de [Uit Service] optie om het [Service] menu weer te
verlaten en terug te gaan naar het hoofdmenu.

LUKAS II
Handleiding
September 2009
Versie 1.2
31
ENGLISH ENGLISH
NEDERLANDS
5 De Lukas gebruiken
5.1 De eerste keer een verbinding opbouwen
Nadat de Lukas is ingesteld, kan de eerste verbinding met een geluidskanaal gemaakt worden.
Als de Lukas nog niet aanstaat, kunt u dit doen door op de Aan/uit toets te drukken.
Na enige tijd verschijnt op het scherm de naam van het eerste geluidskanaal in de lijst.
Met de Vorig/volgend kanaal toetsen kunt u het gewenste kanaal kiezen. De verbinding met het
kanaal wordt opgebouwd nadat u op de OK toets hebt gedrukt. Als u geen toets indrukt, wordt
automatisch na enkele seconden de verbinding opgebouwd.
5.2 Het kiezen van een ander kanaal
Een ander gekozen kan gekozen worden door op de Vorig/volgend kanaal toetsen te drukken,
net als met een ouderwetse radio.
After pressing the OK button, the connection with this channel is made. If no key is pressed, the
connection is automatically made after some seconds.
De verbinding met het kanaal wordt opgebouwd nadat u op de OK toets hebt gedrukt. Als u geen
toets indrukt, wordt automatisch na enkele seconden de verbinding opgebouwd.
Deze functie werkt alleen als er meer dan één kanaal aanwezig is.
5.3 Het uitzetten van het apparaat
De Lukas kan te allen tijde uitgezet worden door de Aan/uit toets te drukken.
De Lukas wordt automatisch uitgezet nadat een uitzending gestopt is.
5.4 Het aanpassen van het volumeniveau
U kunt het volume aanpassen door op de Volume harder/zachter toetsen te drukken. Het nieuw
ingestelde volume wordt automatisch onthouden.
Het geluid kan tijdelijk uitgezet worden door op de Mute toets te drukken.
5.5 Het aansluiten van een hoofdtelefoon
Op de „Audio out‟ connector van de Lukas kunt u een hoofdtelefoon aansluiten.
Voor de hoofdtelefoon is het belangrijk dat deze een impedantie heeft van meer dan 30 ohm. Het
is ook wenselijk dat er een volumeregeling in de kabel naar de hoofdtelefoon zit, omdat de
Volume harder/zachter toetsen niet gebruikt kunnen worden als de luidspreker uitgeschakeld is
(dit is gewenst bij het gebruik van een hoofdtelefoon).
Een goede hoofdtelefoon voor gebruik met de Lukas is de Philips HP 250 stereo hoofdtelefoon
met volumeregeling en 5 m snoer.
 Loading...