

Page 1

tm
Stream Flow Plus (FP1)
User’s Manual
Page 2

Stream Drinking Water Systems
Table of Contents
General Information ..................................... 3
A. Operation & Maintenance
Specifications
B. Installation Overview & Parts
Preparing the Housing ................................. 5
A. Filter Cartridge Installation
02
Below the Sink Installation ........................ 6
A. Required Tool List
B. Attaching the Adapters to the Housing
C. Housing Assembly
03
Installing the Faucet ..................................... 8
A. Drill the Hole or Use Existing Hole
B. Mounting the Faucet
04
Connect to Plumbing ................................. 10
05
Start-up and Use ......................................... 14
A. Filter Life
08
Performance Data Sheets ......................... 16
A. Aesthetic Effects
B. Operational Specifications
C. California Certification
09
Connecting the
Drinking Water System .............................. 12
A. Adapter Connection
B. Tubing Connection
C. Ice Maker Connection
D. Placing Stream Flow Plus
Under the Sink
06
Troubleshooting & FAQs .......................... 20
A. Troubleshooting & FAQs
B. Maintenance Problems
2 Table of Contents
10
Performance Certification ......................... 15
A-130317
Thank you for choosing a Stream filtration system. It is our commitment to provide our valued customers
the very best in water quality and we look forward to serving you for many years. Here’s how to connect
Stream and begin enjoying quality water for less.
01
Sec.
02
Sec.
03
Sec.
04
Sec.
05
Sec.
10
Sec.
09
Sec.
08
Sec.
07
Sec.
06
Sec.
Stream Laboratories, Inc.
2520 Shell Road Ste B
Georgetown, TX 78628
Phone: (888)-615-5733
StreamFilters.com
Page 3

General Information
Model Number:
Replacement Filter Type:
Approximate Filter Capacity:
Approximate Flow Rate at 60 psi:
Housing Composition:
Rubber Items:
Inlet:
Outlet:
Maximum Working Pressure:
Minimum Working Pressure:
Maximum Operating Temperature:
Minimum Operating Temperature:
Particle Retention Size:
Certified by:
Stream Flow Plus (FP1)
Stream Flow Plus Cartridge Part (FC1)
750 gallons
0.75 gpm
Stainless Steel
Nitrile
1/4” NPTF x 1/4” tube
1/4” NPTF x 1/4” tube
100 psi / 8.8 kg/cm
2
30 psi / 2.1 kg/cm
2
100˚F / 38˚C for cold water use only
32˚F / 0˚C for cold water use only
sub micron (0.5 micron)
NSF International , CA Dept. of Public Health : Cert: #13-2190
1. The Stream Flow Plus Drinking Water System is installed
below the sink and connects to a separate faucet included in the
installation materials.
2. Replacement filters can be purchased at StreamFilters.com.
Filter life will vary in proportion to the amount of water used and
the level of impurities in the water being processed.
Replace the filter cartridge when the first of the following occurs:
(a) annually; (b) when the system’s rated capacity is reached;
(c) the flow rate diminishes; or (d) the filter becomes saturated
with bad tastes and odors. The rated capacity of the filter
cartridges is shown above.
3. This system is not intended to be used where the water is
microbiologically unsafe or with water of unknown quality without
adequate disinfection before or after the unit. Systems certified
for cyst reduction may be used on disinfected waters that may
contain filterable cysts.
4. Do not allow water to freeze in the unit. If unit is exposed to
freezing temperatures, drain water from unit and remove filter.
5. Do not allow water to sit in unit for extended periods of time
(10 or more days) without being used. If unit is to be left unused
for more than 10 days, drain all water from the system and remove
the filter. Upon your return, reconnect the filter in the housing and
continue use. In the event water does sit in the unit for 10 or more
days, the system should be flushed by allowing water to flow to
waste for about 3 minutes; then continue use as normal.
6. To dispose of the used filter, remove it from the housing and
place the old filter in your normal refuse.
Notes
A. Operation & Maintenance Specifications
3General Information
01
Sec.
Page 4
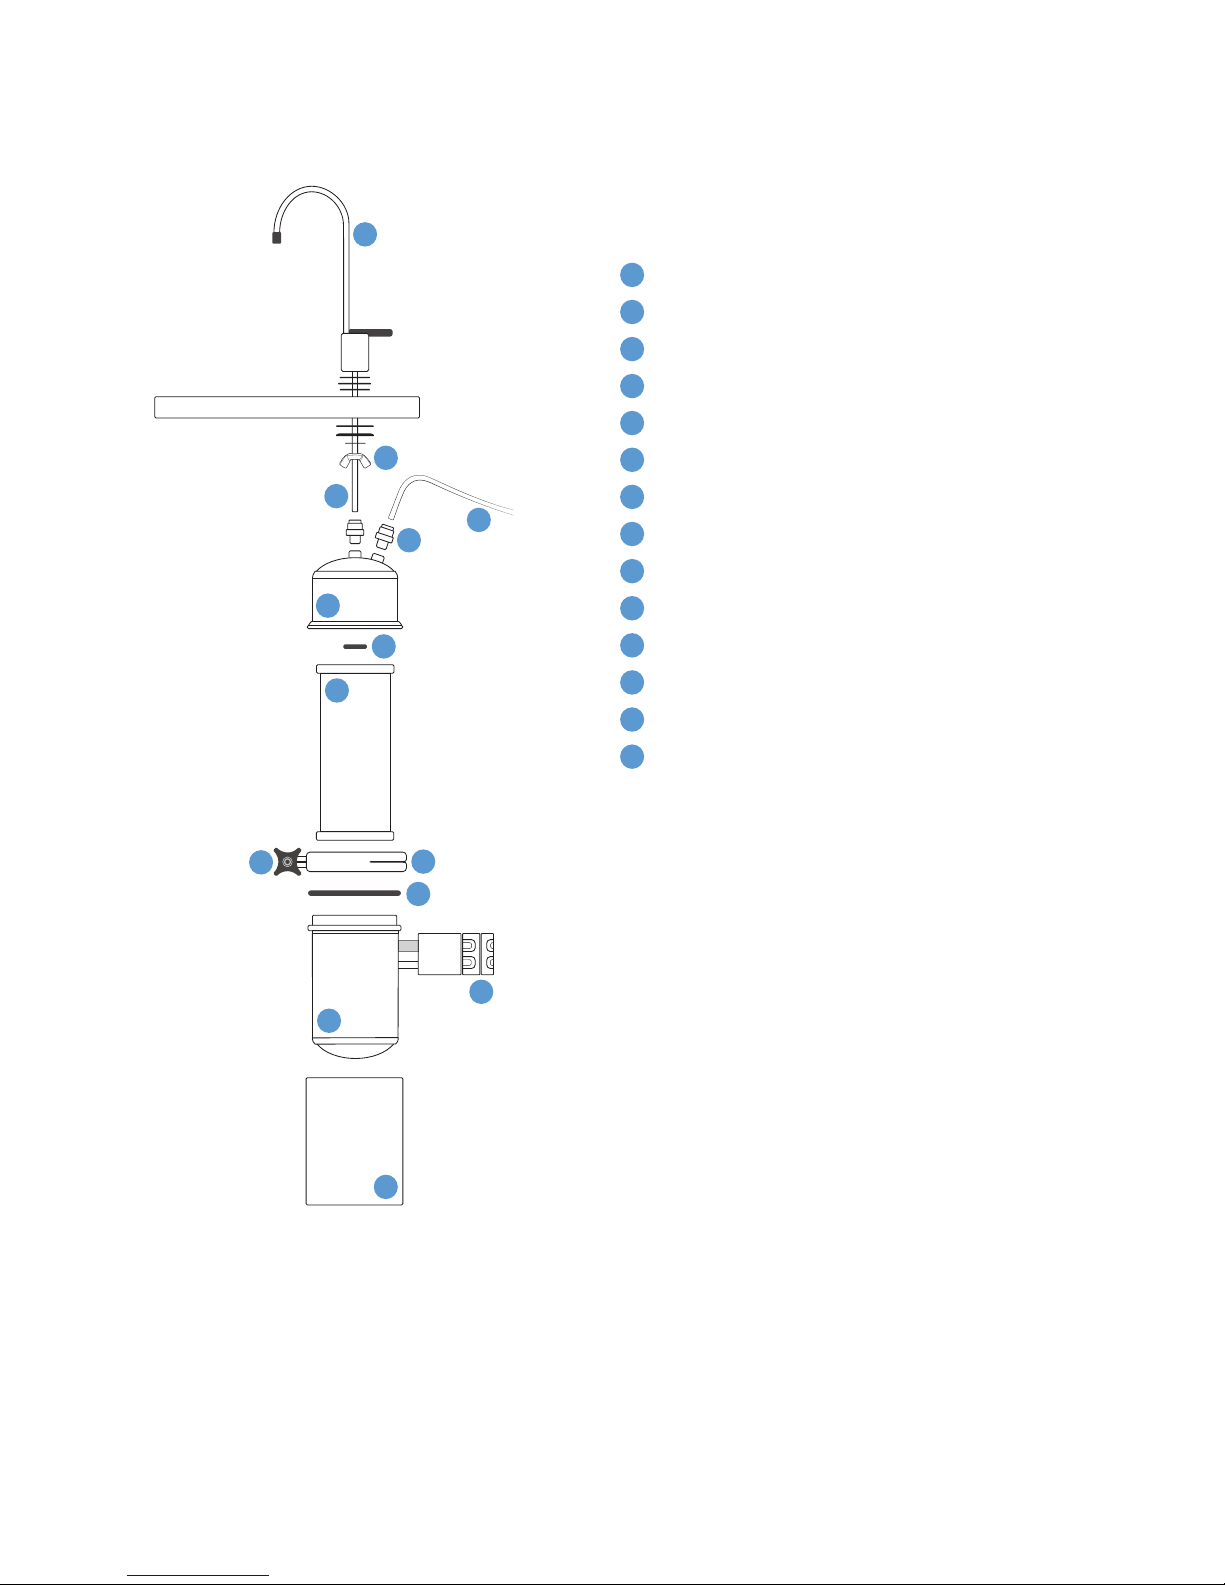
1
2
3
4
5
6
7
8
9
10
11
12
13
14
1
2
3
4
5
6
7
8
9
10
11
12
13
14
Faucet Assembly (with blue tubing attached*)
Wing Nut
Blue Tubing (connects outlet adapter to plumbing)
Clear Tubing (connects inlet adapter to plumbing)
Inlet and Outlet Adapters
Housing Top
Black Rubber Cushion (inside housing top)
Carbon Block Filter
V-band Knob
V-band
O-ring
Wall Bracket
Housing Bottom
Acrylic Sleeve
Stream Drinking Water Systems have been tested and certified, so you know that they will perform at the
highest level possible. Please read this manual before installing your Stream Flow Plus System, as installation,
operation, and maintenance will aid in your System’s performance. Not following these instructions
carefully could lead to product failure or possible damage.
If you need help or assistance, contact us at StreamFilters.com or (888) 615-5733.
*Faucet is not included as part of the NSF Unit Certification
4 General Information
B. Installation Overview & Parts
Page 5
5
Preparing the Housing
Please prepare the housing as outlined in this section before moving on to Section 3. Be sure to gather all
all recommended tools for the Stream Flow Plus below the sink installation before you begin.
Preparing the Housing
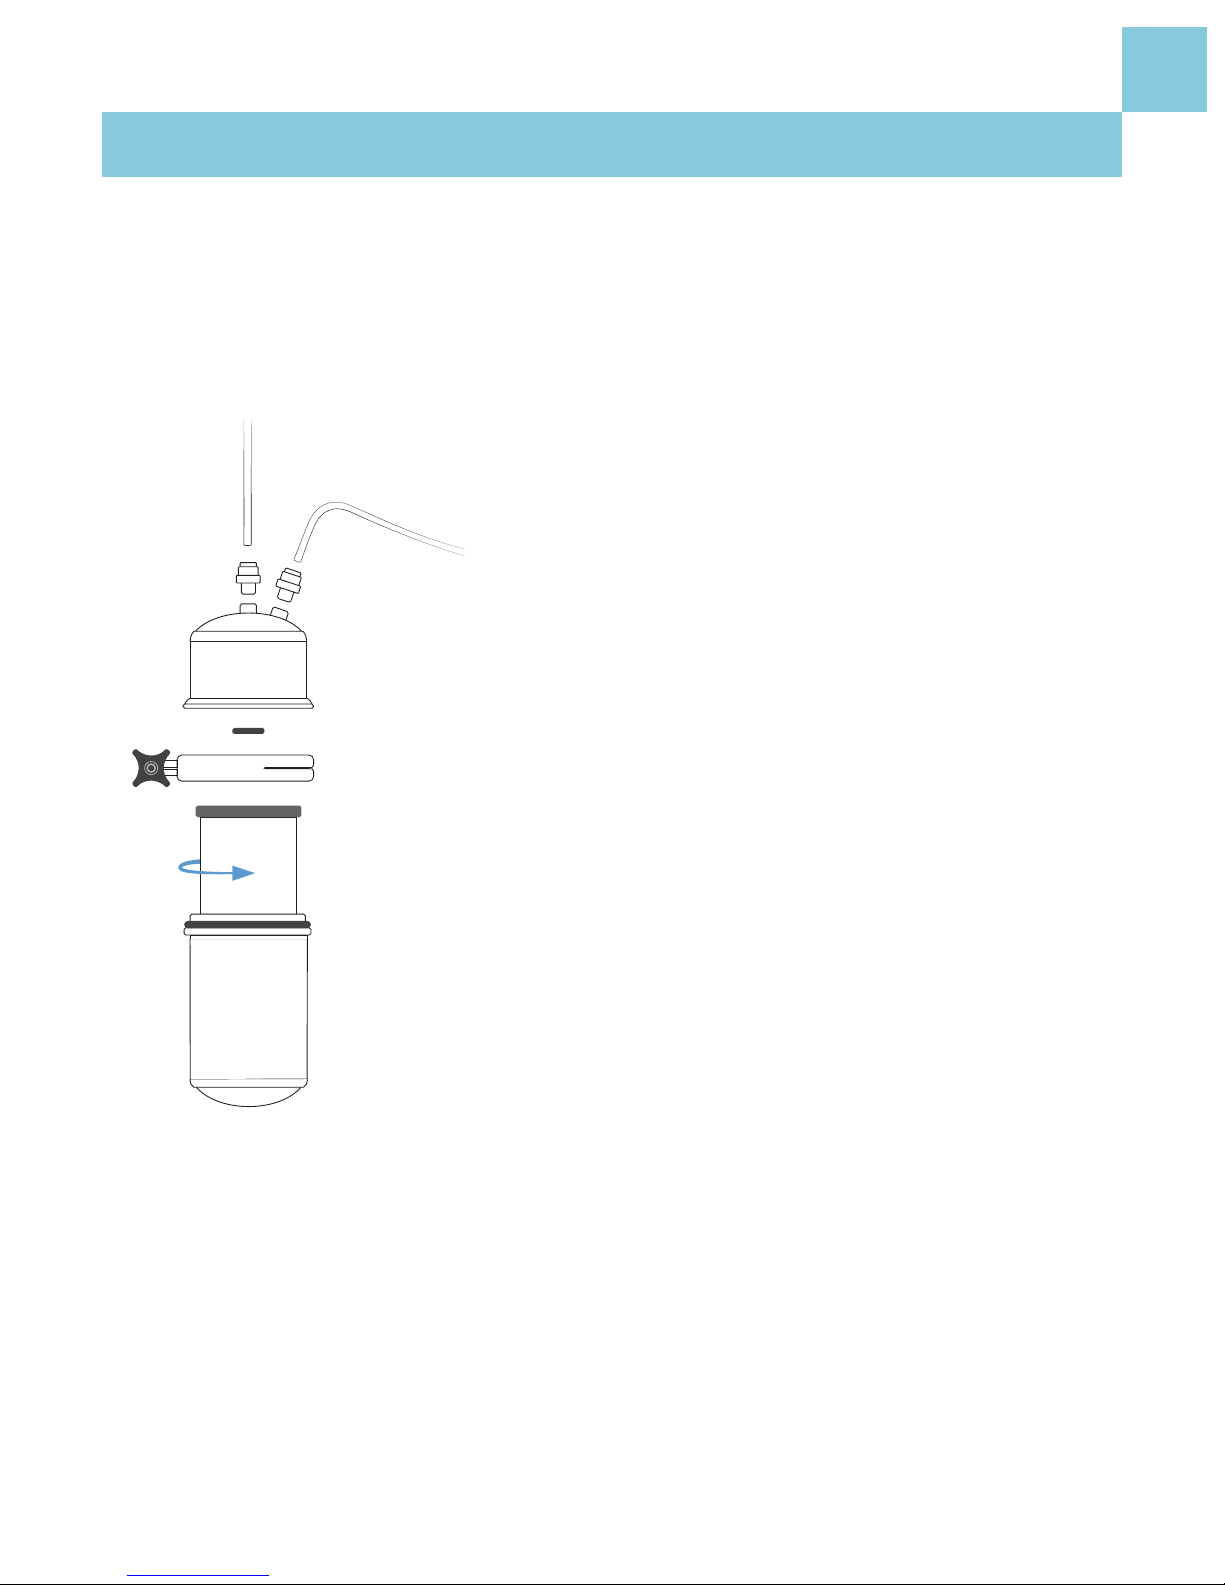
A. Filter Cartridge Installation
Turn to
connect
Bottom
V-band
To p
The filter cartridge is shipped outside of the unit housing
(in most cases) to protect your filter and drinking water system
from damage during shipping. Be sure to insert the filter cartridge
into the drinking water system housing before proceeding with
the installation.
First, remove the plastic wrapper and instruction wrap from
around the filter.
1. With the housing positioned upright, open the unit by
unscrewing the black knob on the locking v-band. Spread it
apart and remove the v-band.
2. Separate the unit, leaving the black rubber o-ring in place
on the housing.
3. . Screw the new filter (cartridge) in the housing top, turning it
until firm. Filter needs to make 4-5 complete revolutions in order
to ensure a firm seal. Be sure that the filter has been screwed in
straight. DO NOT OVER TIGHTEN.
4. Reconnect the housing top with bottom and replace locking
v-band; replace black knob and turn until tight. Be sure that the
locking v-band is fastened tightly by:
a. Checking the v-band to confirm that it is secured evenly
around the housing top and bottom.
b. Hand-tightening the black knob on the v-band until it is
as tight as possible.
02
Sec.
Page 6
6 Below the Sink Installation
Below the Sink Installation
A. Required Tool List
The following tools are required to install Stream Flow Plus Drinking Water System below the sink:
Installation of Faucet/Spigot
(Ceramic/Porcelain Sink):
• 3/8” Reversible electric drill
• 7/16” High speed steel drill bit
• Hammer
• Center punch
• 8” Adjustable wrench
• Pliers or vise grips
Adapt-a-Valve Installation:
• 8” Adjustable wrench
• Wire cutter or knife
B. Attaching the Adapters to the Housing
Stream Flow Plus models are shipped with all of the adapters and connectors needed for the filter system.
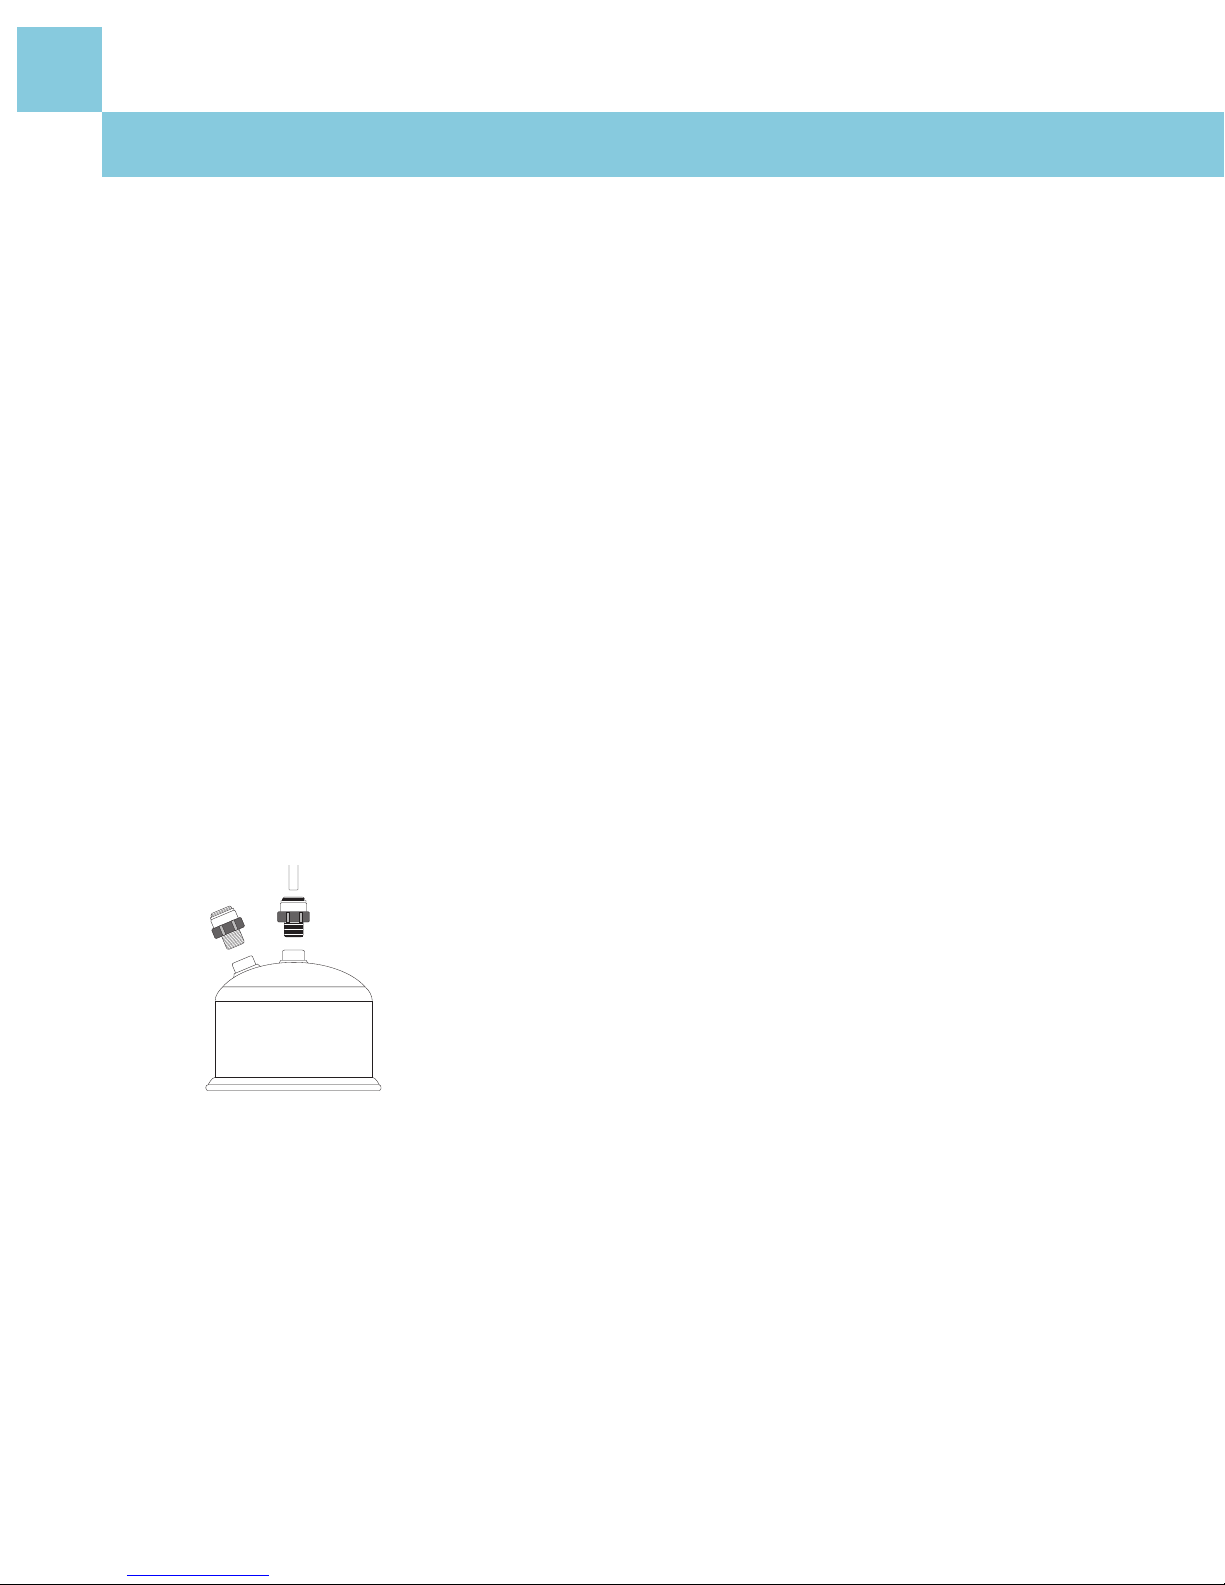
Here is how to connect them to the housing top:
To Connect Straight Adapters:
1. Connect the 1/4” outlet adapter to the outlet opening on the
housing by turning it clockwise. You can tighten it by hand and
then give it one to two more turns with a wrench.
2. Connect the 1/4” inlet adapter to the inlet opening on the
housing by turning it clockwise. Again, tighten it by hand and
then with a wrench.
Installation of Faucet/Spigot
(Stainless Steel Sink):
• 3/8” Reversible electric drill
• 7/16” High speed steel drill bit
• Hammer
• Center punch
• 8” Adjustable wrench
• Pliers or vise grips
• 1/8” High speed drill bit
03
Sec.
Page 7
7Below the Sink Installation
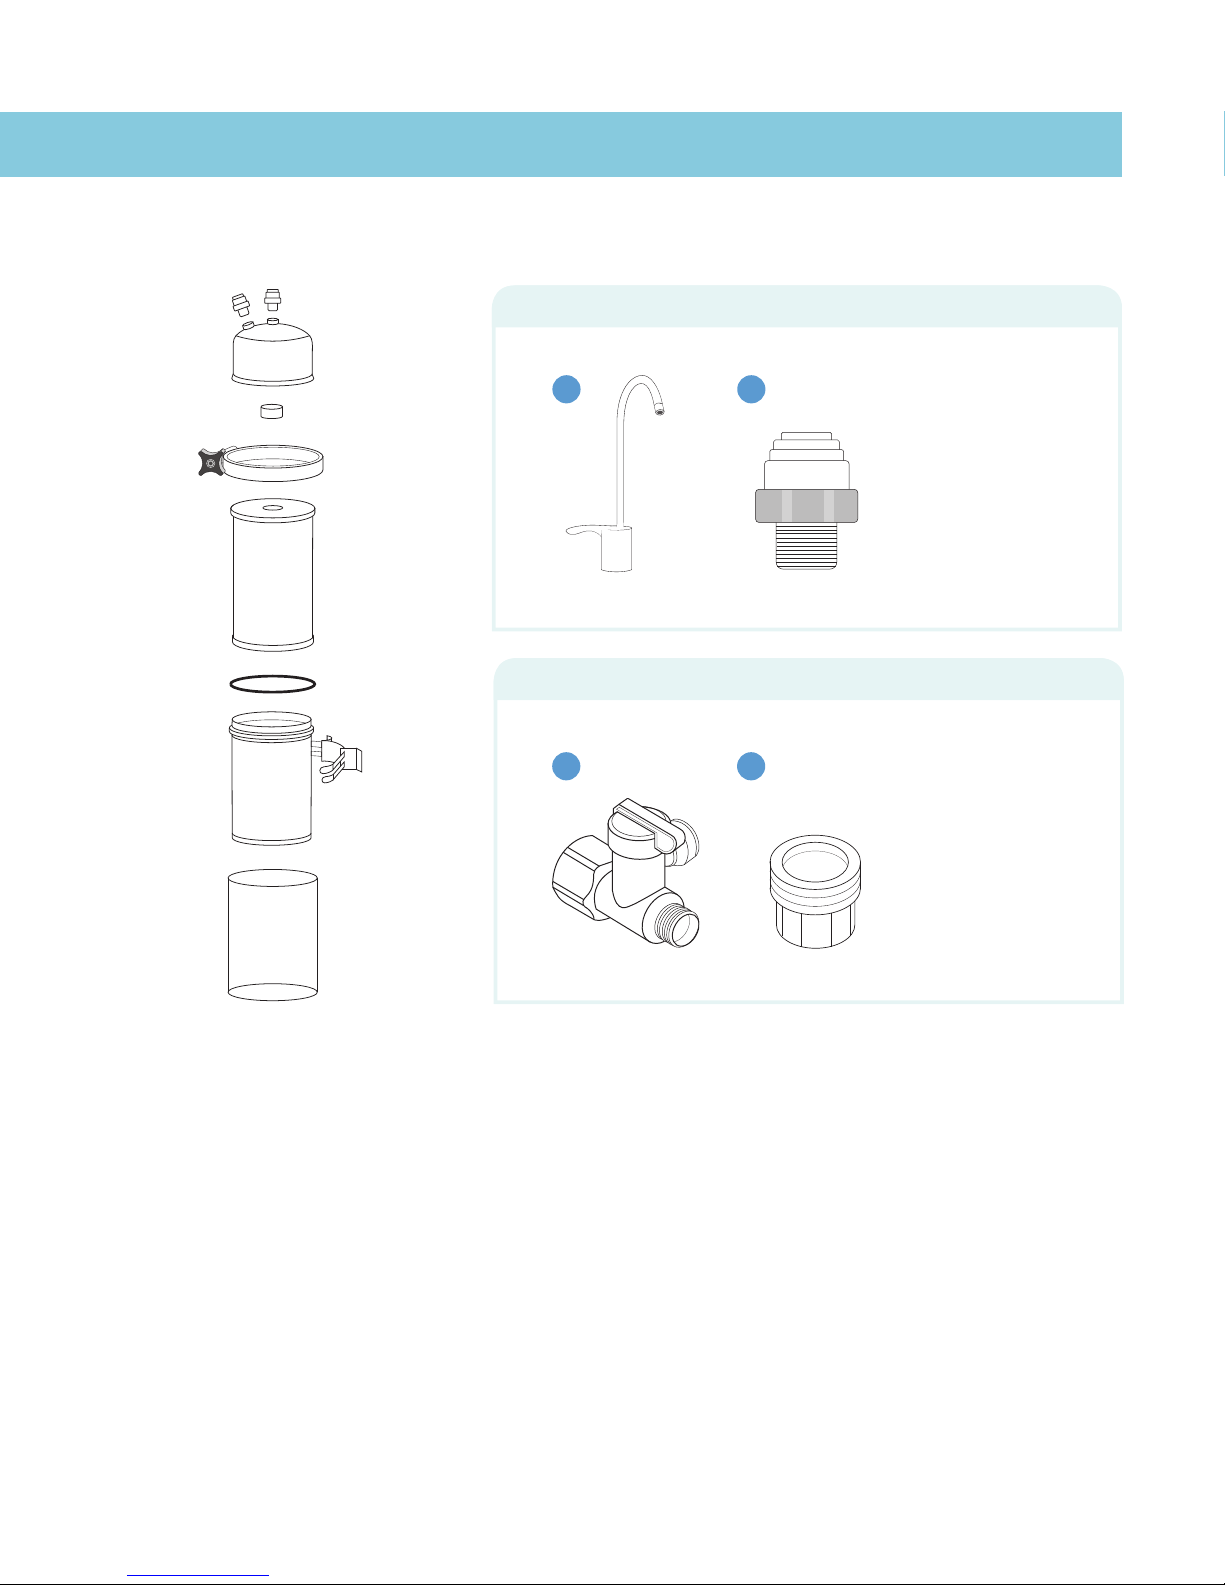
C. Housing Assembly
Housing Top
Inlet Connector
Rubber Cushion
V-Band
Filter
O-Ring
Wall Bracket
Housing Bottom
Acrylic Sleeve
Outlet Connector
Below Sink Installation Includes:
Adapt-a-Valve Assembly:
a b
a. Stainless Steel
Faucet with blue
tubing attached
b. 1/4” Inlet and
Outlet Connector
a b
a. Adapt-a-Valve
b. Threading
Adapter
*
*Faucet is not included as part of the NSF Unit Certification
Page 8
8 Installing the Faucet
Installing the Faucet
A. Drill the Hole or Use Existing Hole
1. Choose and then mark the spot you’d like to mount the faucet on
your sink top.
a. Make sure there aren’t any reinforcing ribs under the spot
you’ve selected.
b. If you have an extra hole in your sink for a spray hose, you
can disconnect that hose and use its hole for your drinking
water faucet.
2. Make an indentation with the center punch by tapping gently with
the hammer on the ceramic/porcelain where the hole will be drilled.
3. Use the 1/2” carbide tipped masonry drill bit to grind the
porcelain down to the metal so that you won’t damage the
porcelain when drilling.
4. Carefully use the 7/16” high speed steel drill bit to completely drill
a hole through the metal sink. Make sure you don’t let the drill bit
“grab” the porcelain.
Porcelain or Ceramic Surface
Here you can simply follow the same first two steps listed above,
then:
1. Use the 1/8” high speed steel drill bit to drill a pilot hole.
2. Use the 7/16” high speed steel drill bit to completely drill a hole
through the stainless steel sink.
Stainless Steel or Metal Surface
04
Sec.
Page 9
9Installing the Faucet
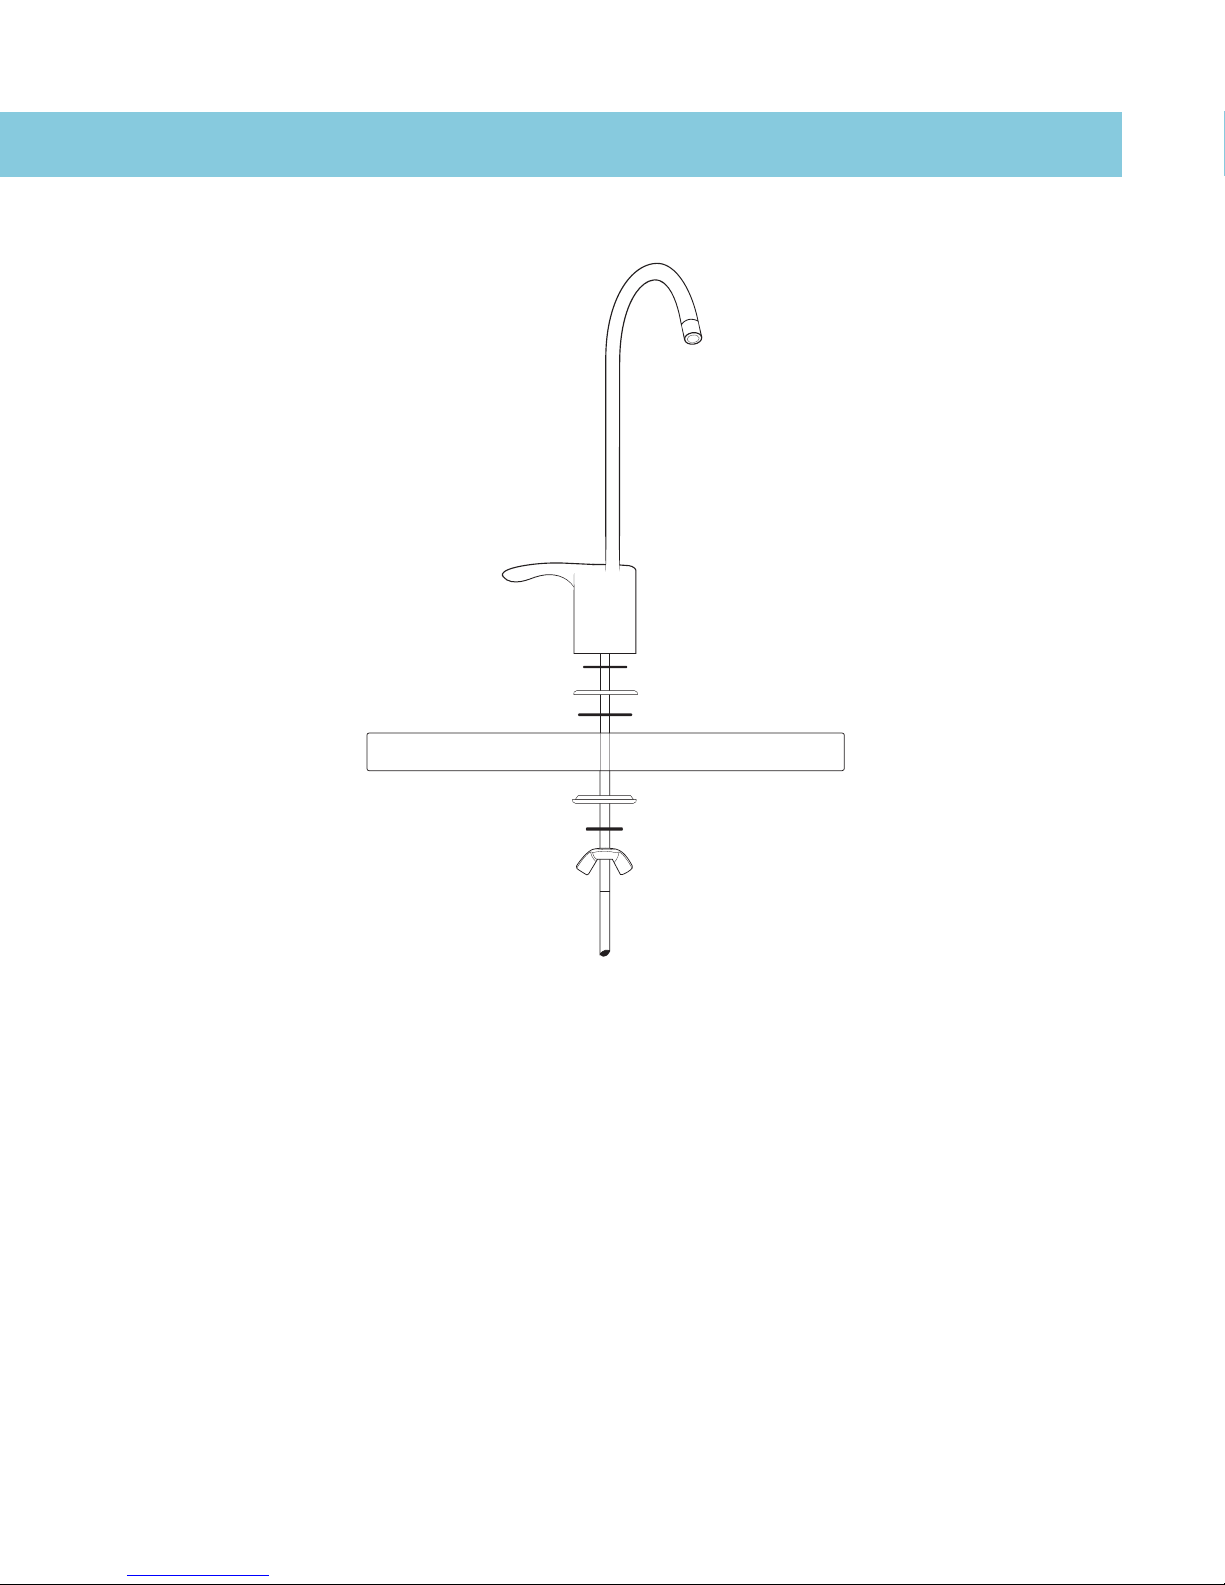
B. Mounting the Faucet
1. Make sure the blue tubing is attached to the faucet.
2. From the sink/counter top, place the following over the faucet hole:
a. The larger soft black rubber washer
b. The cover plate
c. The smaller soft black rubber washer
d. The faucet with blue tubing attached
3. From under the sink, slide over the blue tubing:
a. The hard black plastic washer (with the small side up)
b. The lock washer
c. The wing nut
4. Hand tighten the wing nut to secure the faucet. Using vice grips,
secure the wing nut and faucet below the sink.
Small Black Washer
Large Black Washer
Plastic Washer
Lock Washer
Wing Nut
Cover Plate
Blue Tubing
Counter top
*
*Faucet is not included as part of the NSF Unit Certification
Page 10
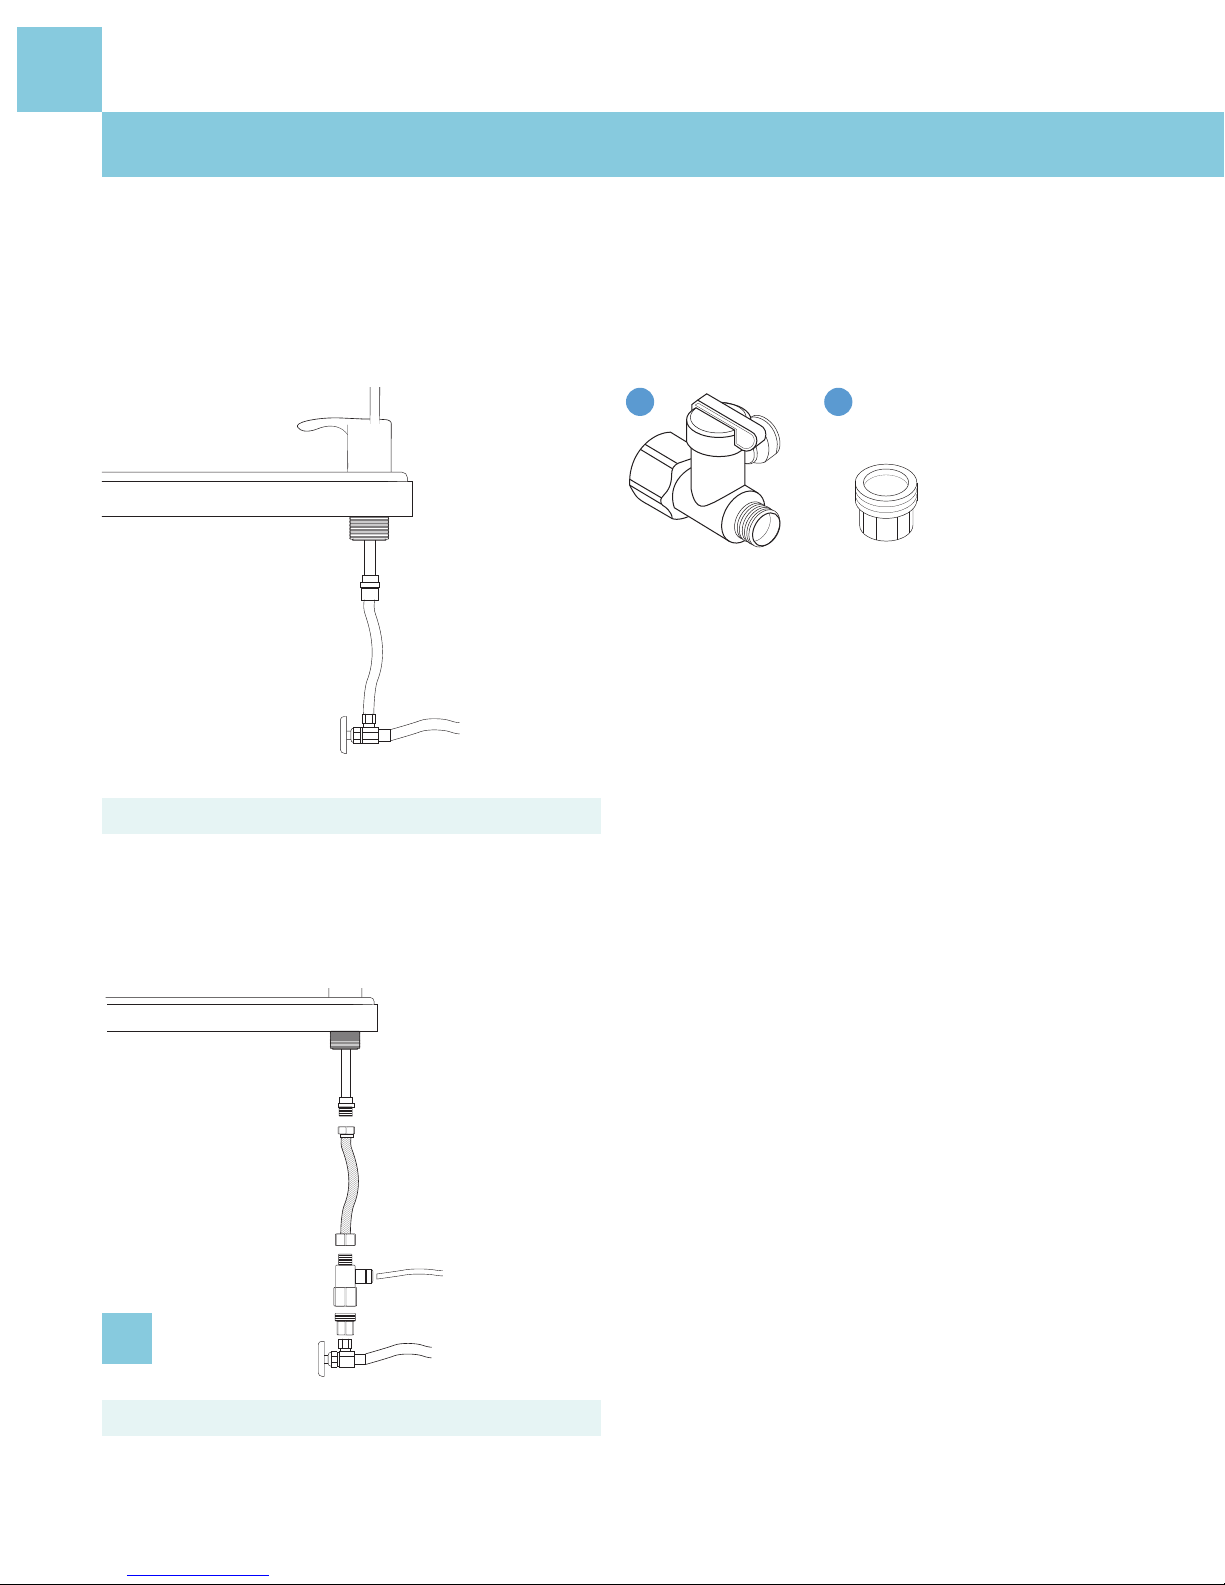
Water supply line before installation
10 Connect to Plumbing
Connect to Plumbing
The Adapt-a-Valve assembly includes an Adapt-a-Valve and adapter.
NOTE: When attaching the Adapt-a-Valve to straight pipe threads, use Teflon tape on the threads.
Wrap the tape around the pipe only once.
Water supply line with Adapt-a-Valve in 3/8” configuration
Before
After
Choose the configuration (3/8” or 1/2”) that fits your plumbing.
A
Included
A. Use the 3/8” configuration on a
water supply line with a 3/8” slip joint.
1 2
05
Sec.
Page 11
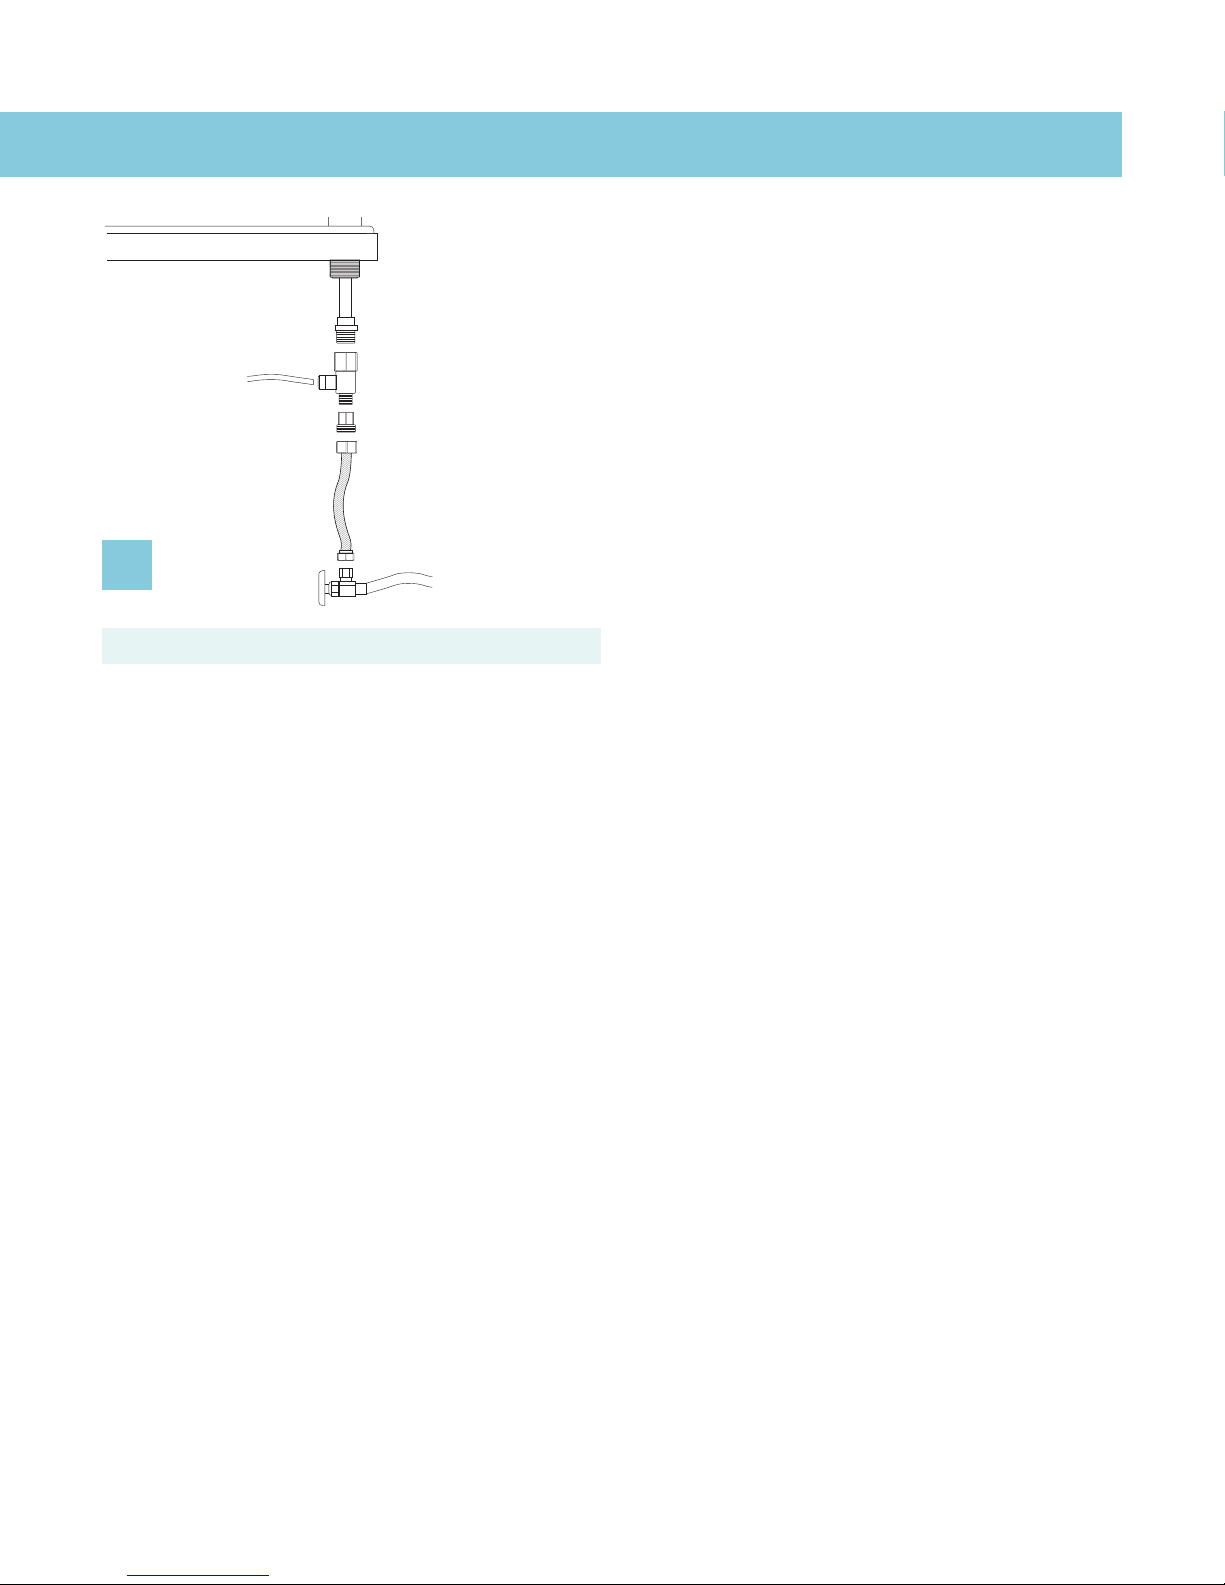
Water supply line with Adapt-a-Valve in 1/2” configuration
11Connect to Plumbing
B
B. Use the 1/2” configuration if you have a
water supply line that either does not have
a slip joint nut, or has a 1/2” slip joint nut at
the angle stop valve.
1. Turn the angle stop valve completely off to turn off the cold water supply.
2. Turn the slip joint nut counter clockwise with an 8” adjustable wrench to disconnect the cold water supply
line. This will either be located at the angle stop valve or at your faucet pipe, depending on your plumbing.
3. With your wrench, connect the Adapta-a-Valve to the pipe where you removed the slip joint nut.
Make sure the rubber washer is in place, and then turn it clockwise until it is tight, but not over-tight!
4. Connect the plumbing/supply line to the Adapta-a-Valve with the slip joint nut. If necessary, you can trim
the supply line before connecting to make sure the supply line doesn’t block the shut-off valve on the side.
5. Connect your 1/4” clear plastic tubing to the Adapta-a-Valve by inserting the tubing as far as it will go,
through the same small hole in the adapter that you attached to the shut-off valve.
a. Cut (square cut) the tip ends off the tubing using a sharp knife. Do not use scissors.
b. Push the tubing through the small hole in the valve until you feel resistance—at this point,
the tubing is still not fully inserted, so you’ll need to push firmly until the tubing is inserted as far
as it will go. Ultimately, the 1/4” clear tubing should be inserted about 5/8”.
6. Make sure that the unit shut-off valve, attached to the Adapta-a-Valve, is off by turning the handle
clockwise until it stops.
Install on the cold water line only:
Page 12
Connect The Drinking Water System
Now that you have installed the filter, adapters, and faucet and connected the device to the plumbing you
are ready to complete the installation of your Stream Flow Plus Drinking Water System.
A. Adapter Connection
If you have not already installed the adapters, see Section 3B on page 6.
B. Tubing Connection
Be sure to provide sufficient tubing for conveniently changing the filter when it is time to replace it.
1. Using wire cutters or a knife, cut the tips off of both the blue tube connected
to the faucet and the clear tube you previously connected to the plumbing.
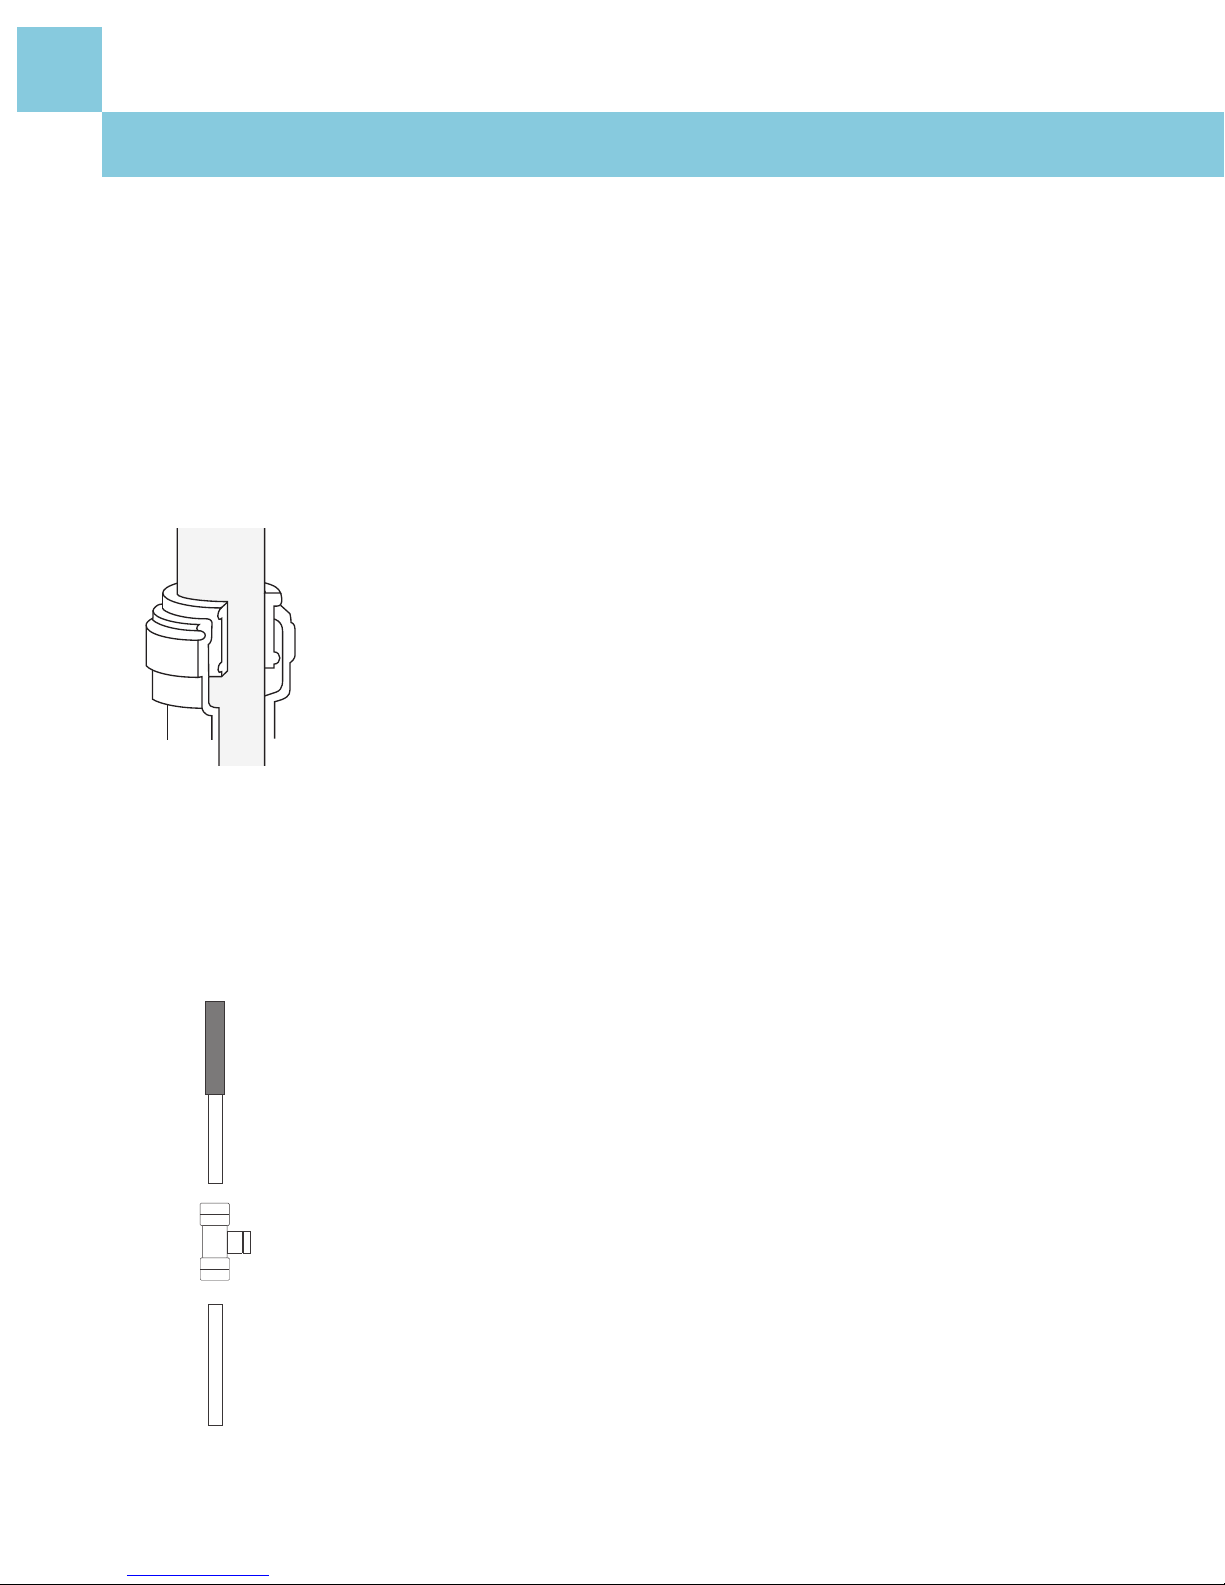
2. Insert the clear 1/4” plumbing tubing into the small hole in the inlet
connector as far as it will go. Ultimately this 1/4” tubing should be inserted
about 5/8”. Then pull to make sure that the tubing is secure.
Disconnecting the tubing: If you ever need to disconnect the tubing for
maintenance, you should first make sure that the system is depressurized.
Push the collar against the face of the fitting; then you can remove the tubing.
C. Ice Maker Connection
Not only can you use your Stream Flow Plus Drinking Water System for quality water at the sink, but you can
also connect that same unit to your refrigerator for quality ice. Here’s how:
1. Determine whether or not you have access to your refrigerator from your sink.
2. Cut 3” from the end of the blue faucet tubing.
3. Insert the tubing still connected to the faucet into the top of the
ice maker tee. Make sure you insert the tubing all the way—even past
the point of resistance, and then pull to make sure it is secure.
(Ultimately it should be inserted about 5/8”.)
4. Insert one end of the loose blue tubing into the bottom port of the
icemaker tee. Again, make sure you insert the tubing all the way—
even past the point of resistance, and then pull to make sure it is
secure. (Ultimately it should be inserted about 5/8”.)
5. Connect the other end of the blue tubing to the outlet connector.
6. Connect a separate 1/4” poly tube (available through your dealer or a
plumbing supplier) to the side port of the tee. Make sure you have enough
tubing to reach your refrigerator and service unit.
Connecting to Your Unit:
12 Connect The Drinking Water System
06
Sec.
Page 13
13Connect The Drinking Water System
D. Placing Stream Flow Plus Under the Sink
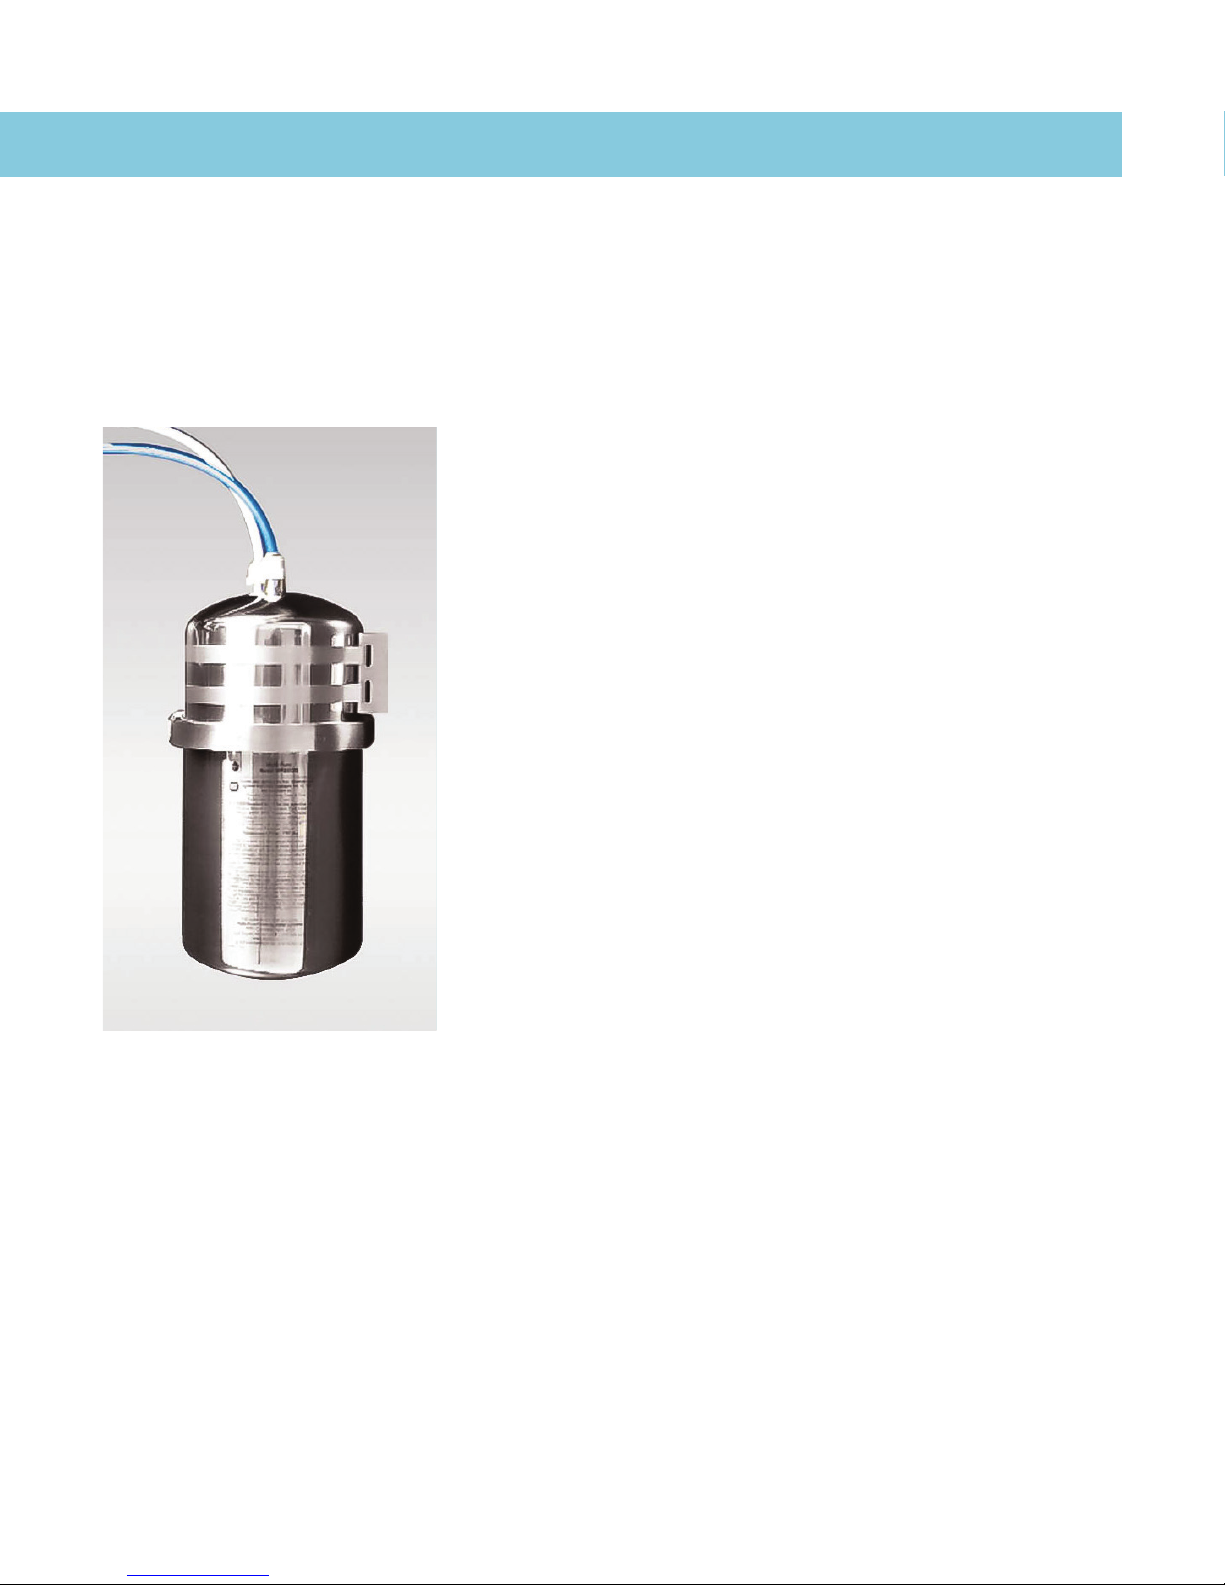
You can either set your Stream Flow Plus System on the cabinet floor or mount the unit on the cabinet wall
with the bracket included in your kit. If you do mount the unit on the cabinet wall, make sure it can support
the unit’s weight (about 7.5 with a dry filter and even more with a wet filter!).
Either way, be sure to provide enough tubing to conveniently change the filter when you need to.
1. Make sure you’ll have enough room to remove the stainless
steel housing from the bracket to change the filter in the future,
before beginning installation.
2. Position the bracket so that you will be able to get to it when
needed. Hold the bracket in place and then fasten it there with
only the top screws. (Don’t fasten the screws tight against the
bracket—leave enough space to hang and later remove the
bracket from the screws.)
3. Remove the bracket from the screws by lifting it straight up.
4. To install the bracket bands with worm screws, first unscrew
the worm clamp by turning the screw with a slotted screwdriver
counter clockwise until it is fully open.
5. Thread each band through the two slots on the bracket
(there will be one for the top and one for the bottom slot).
6. Install the bands around the housing top, above the v-band.
Position the slotted end of the band at the mouth of the worm
clamp opening. Then turn the screw of the worm clamp clockwise;
as you turn the screw, the band will close around the housing top
until it is secured tightly. Repeat for the second band.
7. Attach the bracket and unit to the wall by “hanging” the bracket
on the two screws you installed (Step 2).
Page 14

Start-up and Use
1. Dry off all the plumbing connections and the drinking water unit.
2. Make sure all of the connections are tight, but not over tight.
3. Turn on the shut-off valve under your sink where water enters your residence.
4. Turn the handle on the shut-off valve that you’ve installed (see Section 5) to turn on the water
to your Drinking Water System.
5. Turn the operating lever to open the drinking water faucet.
6. Let the water run through the unit and faucet for about 10 minutes so that all air can escape.
7. Adjust the handle on the shut-off valve so that the water flow will be minimal (To be precise,
it should not exceed 1.0 gpm. It takes about 15 seconds to fill a quart at 1.0 gallon per minute.)
8. Close the drinking water faucet and check for leaks.
a. Check the v-band to confirm that it is secured evenly around the housing top and bottom.
b. Hand-tighten the black knob on the v-band until it is as tight as possible.
9. Let the water run through the unit for about 30 minutes to flush any loose carbon fines.
10. Shut off the water and check for leaks.
The Stream Flow Plus Drinking Water System is now ready for use. You can enjoy having great
tasting, high quality water for drinking, cooking, beverages, food preparation, and more.
A. Filter Life
Filter life will vary depending on the amount of water used and the amount of impurities being
processed in your water. If your Stream Flow Plus clogs, it may be because it is protecting you from the
contaminants and physical matter in your drinking water. If this happens, see Section I.A Operation and Maintenance Specifications.
For the best performance possible and to maintain your warranty, you should replace your filter
when the first of the following occurs: (a) annually; (b) when you’ve reached the unit’s rated capacity;
(c) the flow rate slows or lessens; or (d) the filter starts to taste or smell bad.
14 Start-Up and Use
08
Sec.
Page 15
Performance Certification
15Performance Certification
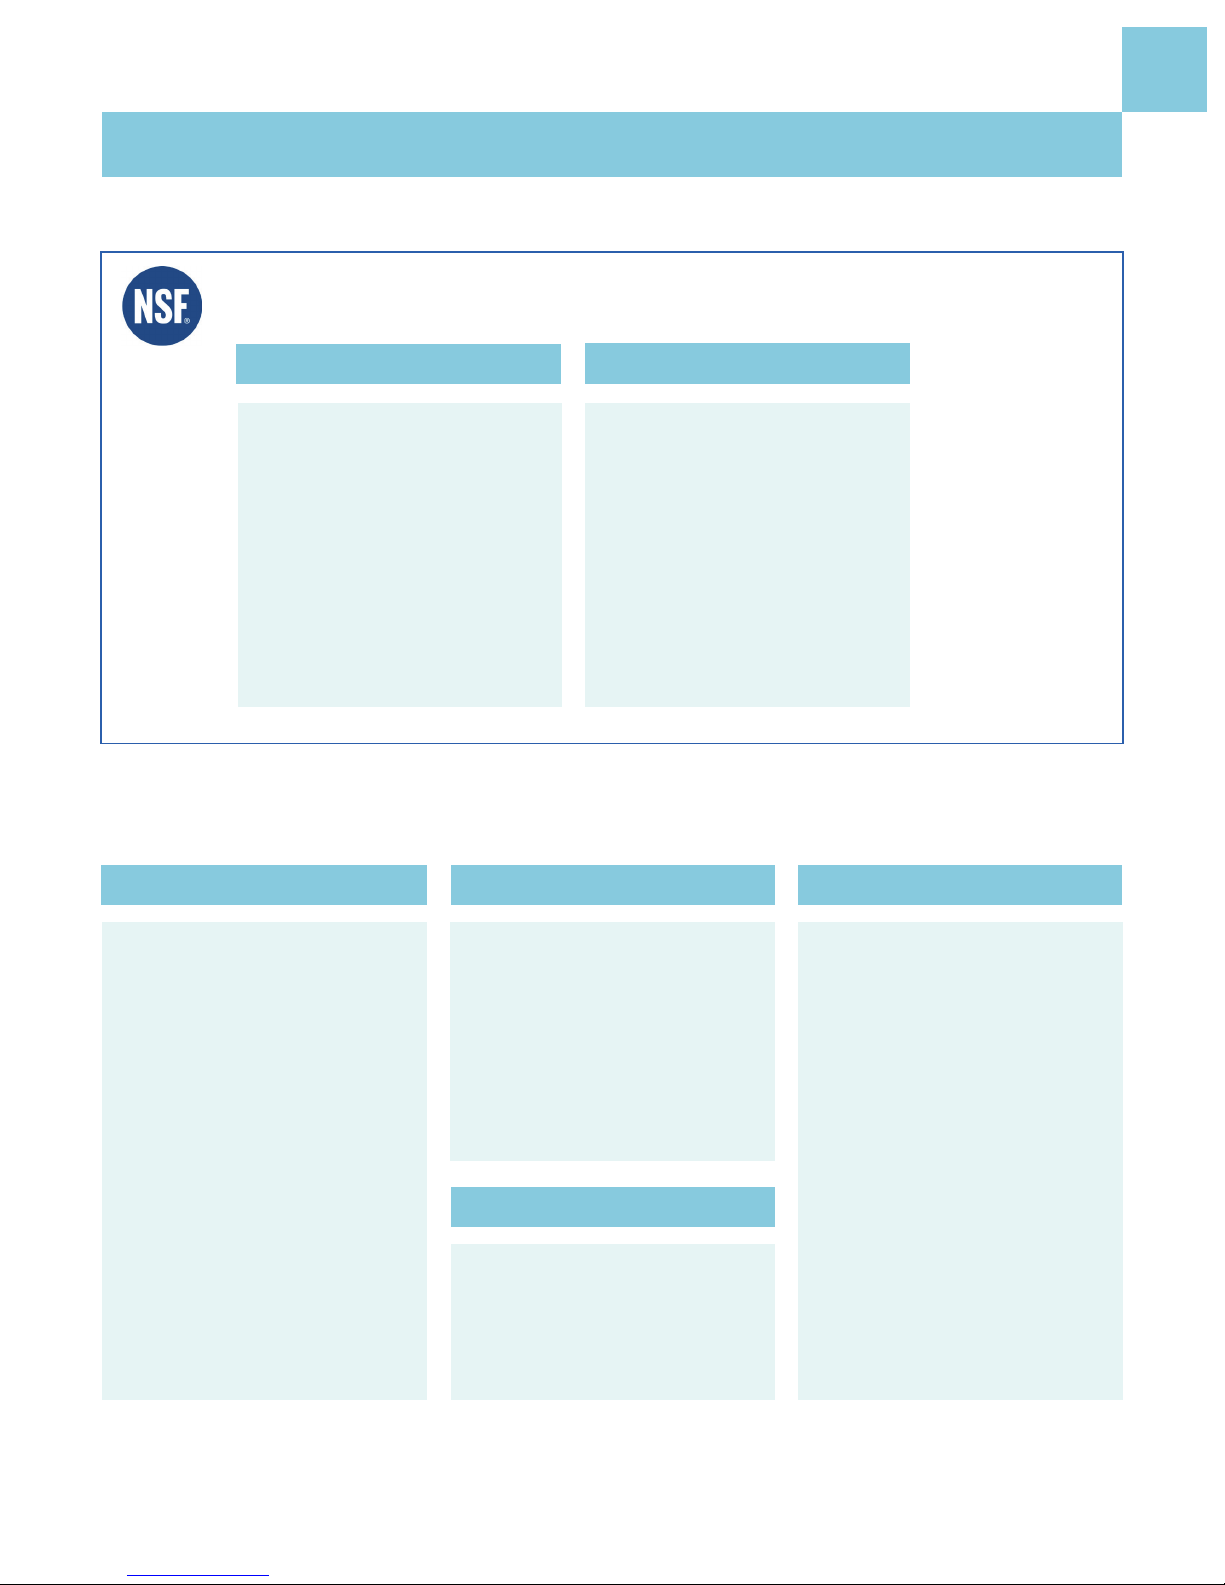
Stream Drinking Water Systems Product Performance Tested and Certified
Volatile Organic Chemicals (VOC) include:
Disinfection By-Products
• chloropicrin
• haloacetonitriles (HAN):
- bromochloroacetonitrile
- dibromoacetonitrile
- dichloroacetonitrile
- trichloroacetonitrile
• haloketones (HK):
- 1,1-dichloro-2-Propanone
- 1,1-trichloro-2-Propanone
• trihalomethanes (THMs; TTHMs):
- bromodichloromethane
- bromoform
- chloroform
- dibromochloromethane
• tribromoacetic acid
Pesticides
• carbofuran
• dibromochloropropane (DBCP)
• o-dichlorobenzene
• p-dichlorobenzene
• endrin
• ethylene dibromide (EDB)
• heptachlor
• heptachlor epoxide
• lindane
• methoxychlor
Chemicals
• benzene
• carbon tetrachloride
• chlorobenzene
• 1,2-dichloroethane
• 1,1-dichloroethylene
• cis-1,2-dichloroethylene
• 1,2-dichloropropane
• cis-1,3-dichloropropylene
• ethylbenzene
• hexachlorobutadiene
• hexachlorocyclopentadiene
• simazine
• styrene
• 1,1,2,2-tetrachloroethane
• tetrachloroethylene
• toluene
• trans-1,2-dichloroethylene
• 1,2,4-trichlorobenzene
• 1,1,1-trichloroethane
• 1,1,2-trichloroethane
• trichloroethylene
• xylenes (total)
Herbicides
• alachlor
• atrazine
• 2,4-D
• dinoseb
• pentachlorophenol
• 2,4,5-TP (silvex)
MODEL - FP1
Standard 42, Aesthetic Effects
• Chloramine
• Chlorine taste and odor
• Nominal Particulate Reduction,
Class I
Standard 53, Health Effects
• Asbestos
• Chlordane
• Cyst
• Lead
• Mercury
• MTBE
• PCB
• Toxaphene
• Turbidity
• VOC (listed below)
Stream Drinking Water System Tested and Certified by NSF International to NSF/ANSI
Standards 42 and 53 for the reduction of claims specified below.
08
Sec.
Page 16
Performance Data Sheets
16 Performance Data Sheets
MODEL - FP1
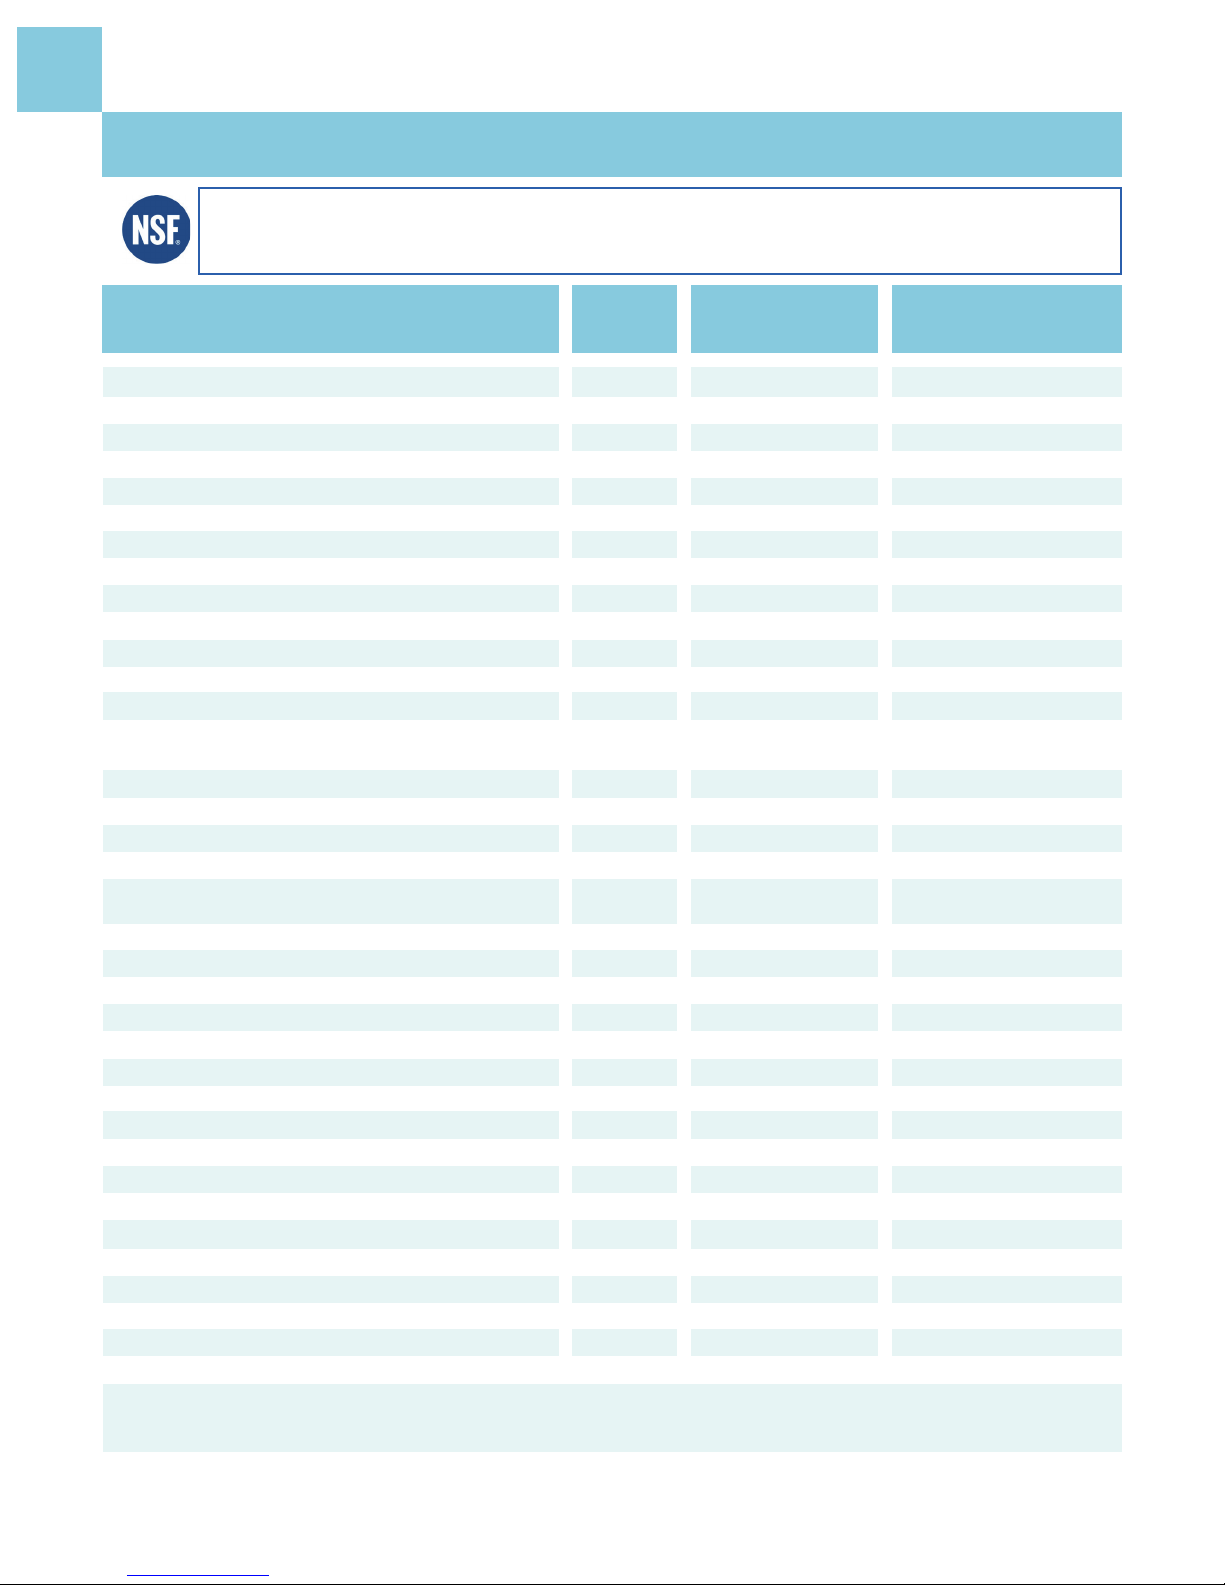
Stream Drinking Water Systems have been tested according to NSF/ANSI Standard No. 53 for reduction of the
substances listed below. The concentration of the indicated substances in water entering the system was reduced to
a concentration less than or equal to the permissible limit for water leaving the system, as specified in NSF/ANSI 53
Health Effects.
ALACHLOR*
ASBESTOS*
BROMODICHLOROMETHANE (TTHM)*
BROMOFORM (TTHM)*
CARBOFURAN (Furadan)*
ATRAZINE*
BENZENE*
CHLOROFORM (TTHM)* (surrogate chemical)
Cryptosporidium (CYST)
CARBON TETRACHLORIDE*
CHLORDANE
CHLOROBENZENE (Monochlorobenzene)
CHLOROPICRIN*
CYST (Giardia; Cryptospordium; Entamoeba;
Toxoplasma)
2, 4-D*
>98%
>99%
>99.8%
>99.8%
>99%
>97%
>99%
>99.8%
99.95%
98%
>99.4%
>99%
99%
99.95%
98%
DBCP (see Dibromochloropropane)*
1, 2-DCA (see 1, 2-DICHLOROETHANE)*
DIBROMOCHLOROPROPANE (DBCP)*
o-DICHLOROBENZENE (1, 2 Dichlorobenzene)*
p-DICHLOROBENZENE (para-Dichlorobenzene)*
1, 1-DCE (see 1, 1-DICHLOROETHYLENE)*
DIBROMOCHLOROMETHANE (TTHM;
Chlorodibromomrthane)*
1, 2-DICHLOROPROPANE (Propylene Dichloride)*
CIS-1, 3-DICHLOROPROPYLENE*
1, 2-DICHLOROETHANE (1, 2-DCA)*
1, 1-DICHLOROETHYLENE (1, 2-DCE)*
CIS-1, 2-DICHLOROETHYLENE*
TRANS-1, 2-DICHLOROETHYLENE*
DINOSEB*
EDB (see ETHYLENE DIBROMIDE)*
>99%
95%
>99%
>99%
>98%
>99%
>99.8%
>99%
>99%
95%
>99%
>99%
>99%
99%
>99%
ETHYLBENZENE*
ETHYLENE DIBROMIDE (EDB)*
ENDRIN*
Entamoeba (see CYSTS)
Furadan (see CARBOFURAN)*
Giardia Lamblia (see CYST)
99%
99.95%
>99%
>99%
>99%
>99.95%
0.05
10
7
to 108 fibers/L
0.3
0.3
0.19
0.1
0.081
0..300 +/- .30
minimum 50,000/ml
0.078
0.04 +/- 10%
0.077
0.015
minimum 50,000/ml
0.110
0.052
0.088
0.052
0.08
0.04
0.083
0.300
0.08
0.079
0.088
0.083
0.17
0.086
0.17
0.044
0.053
minimum 50,000/ml
0.088
0.044
0.19
minimum 50,000/ml
** Percent reduction reflects actual performance of Stream product as specifically tested (at 200% of capacity). Percent reduction
shown for VOCs* reflects the allowable claims for volatile organic chemicals/compounds as per tables. Chloroform was used as
a surrogate for VOC reduction claims; the Stream Systems actual reduction rate of chloroform was >99.8% as tested.
Substance
Percent
Reduction
Influence
Challenge
Concentration
Maximum
permissible product
water concentration
0.001
99%
reduction requirement
0.015
0.015
0.001
0.003
0.001
0.015
99.95%
0.0018
0.002
0.001
0.0002
99.95%
0.0017
0.00002
0.0048
0.00002
0.001
0.001
0.001
0.015
0.001
0.001
0.0048
0.001
0.0005
0.001
0.0002
0.00002
0.00059
99.95%
0.001
0.00002
0.001
99.95%
09
Sec.
Page 17

Note: This addresses the U.S. Environmental Protection Agency (USEPA) Primary and Secondary Drinking Water Regulations in effect
at its time of publication, as they relate to Stream’s performance in conformance to the industry performance criteria. These regulations
are continually being updated at the Federal level. Accordingly, this list of MCLs will be reviewed and amended when appropriate.
HALOACETONITRILES (HAN)*:
BROMOCHLOROACETONITRILE
TRICHLOROACETONITRILE
HALOKETONES (HK)*:
1, 1-DICHLORO-2-PROPANONE
DIBROMOACETONITRILE
DICHLOROACETONITRILE
HEXACHLOROCYCLOPENTADIENE*
LEAD (pH 6.5)
1, 1, 1-TRICHLORO-2-PROPANONE
HEPTACHLOR*
HEPTACHLOREPOXIDE*
HEXACHLOROBUTADIENE (Perchlorobutadiene)*
LEAD (pH 8.5)
LINDANE*
98%
98%
99%
98%
98%
>99%
>99.3%
96%
>99%
98%
>98%
>99.3%
>99%
MERCURY (pH 6.5)
MERCURY (pH 8.5)
Monochlorobenzene (see CHLOROBENZENE)*
MTBE (methyl tert-butyl ether)
POLYCHLORINATED BIPHENYLS (PCB, Aroclor 1260)
METHOXYCHLOR*
Methylbenzene (see TOLUENE)*
SIMAZINE*
Silvex (see 2, 4, 5-TP)*
PCE (see TETRACHLOROETHYLENE)*
PENTACHLOROPHENOL*
Perchlorobutadiene (see HEXACHLOROBUTADIENE)*
Propylene Dichloride (see 1, 2-DICHLOROPROPANE)*
STYRENE (Vinylbenzene)*
1, 1, 1-TCA (see 1, 1, 1-TRICHLOROETHANE)*
96.6%
96.8%
>99%
96.6%
97.2%
>99%
>99%
>97%
99%
>99%
>99%
>98%
>99%
>99%
95%
TETRACHLOROETHYLENE*
TOLUENE (Methylbenzene)*
TCE (see TRICHLOROETHYLENE)*
1, 1, 2, 2-TETRACHLOROETHANE*
TOXAPHENE
Toxoplasma (see CYSTS)
>99%
>99%
>99%
>99%
>92.9%
99.95%
0.022
0.015
0.0072
0.024
0.0096
0.060
0.15 +/- 10%
0.0082
0.025
0.0107
0.044
0.15 +/- 10%
0.055
0.006 +/- 10%
0.006 +/- 10%
0.077
0.015 +/- 20%
0.01 +/- 10%
0.050
0.078
0.120
0.270
0.081
0.096
0.044
0.080
0.15
0.084
0.180
0.081
0.081
0.078
0.015 +/- 10%
minimum 50,000/ml
0.0005
0.0003
0.0001
0.0006
0.0002
0.000002
0.010
0.0003
0.00001
0.0002
0.001
0.010
0.00001
0.002
0.002
0.001
0.005
0.0005
0.0001
0.001
0.004
0.0016
0.001
0.001
0.001
0.001
0.0005
0.0046
0.0010
0.001
0.001
0.001
0.003
99.95%
TRIBROMOACETIC ACID*
1, 2, 4 TRICHLOROBENZENE*
2, 4, 5-TP (Silvex)*
1, 1, 1-TRICHLOROETHANE (1 ,1, 1-TCA)*
1, 1, 2-TRICHLOROETHANE*
>99%
99%
95%
>99%
TURBIDITY
Unsym-Trichlorobenzene*
TRICHLOROETHYLENE (TCE)*
TRIHALOMETHANES (TTHM) (Chloroform; bromoform;
bromodichloromethane; dibromochloromethane)
Vinylbenzene (see STYRENE)*
XYLENES (TOTAL)*
>99%
>99.8%
98.8%
>99%
>99%
>99%
0.042
0.160
0.270
0.084
0.150
0.180
0.300 +/- .30
11 +/- 1 NTU
0.160
0.150
0.070
0.001
0.0005
0.0016
0.0046
0.0005
0.0010
0.015
0.5 NTU
0.0005
0.0005
0.001
17Performance Data Sheets
Page 18

18 Performance Data Sheets
A. NSF/ANSI 42 - AESTHETIC EFFECTS
CHLORAMINE as Aesthetic Effect (As Monochloramine)
CHLORINE as Aesthetic Effect
PARTICULATE, (Normal Particulate Reduction, Class I,
Particles 0.5 TO <1 UM
>97%
>97%
Class I >99%
3.0 mg/L +/- 10%
2.0 mg/L +/- 10%
At Least 10,000
particles/mL
0.5 mg/L
> or = 75%*
> or = 85%*
1. Stream Drinking Water Systems have been certified by NSF International for compliance to NSF/ANSI
Standard Nos. 42 and 53. Stream Drinking Water Systems have been certified by the State of California
Department of Public Health for the reduction of specific contaminants listed herein.
2. Chloroform was used as a substitute for claims of reduction of VOCs, where the Stream System’s actual
reduction rate of chloroform was greater than 99.8% when tested at 200% capacity.
3. Do not use with water that is microbiologically unsafe or of unknown quality without adequate
disinfection before or after the system. Systems certified for cyst reduction may be used on disinfected
waters that may contain filterable cysts.
4. Stream’s housing is warranted for a lifetime (with annual cleaning); all exterior hoses and attachments to
the System are warranted for one year. Please see the owner’s manual for complete product guarantee and
warranty information.
5. Please see the Owner’s Manual for installation and operating procedures.
6. In compliance with New York law, New York residents should have their water supply tested to determine
their actual water treatment needs before purchasing a water treatment system. Please compare the
capabilities of the Stream unit with your actual water treatment needs.
7. While testing was performed under standard laboratory conditions, actual performance may vary.
8. The list of substances that this device reduces does not necessarily mean that they are present in
your tap water.
B. Operational Specifications
Model Number: Stream Flow Plus (FP1)
Approximate Filter Capacity:
Minimum Working Pressure:
Maximum Operating Temperature:
Minimum Operating Temperature:
Approximate Flow Rate at 60 psi:
Maximum Working Pressure:
750 gallons
30 psi / 2.1 kg/cm
2
100˚F / 38˚C for cold water use only
32˚F / 0˚C for cold water use only
0.75 gpm
100 psi / 8.8 kg/cm
2
Replacement Filter Type: Stream Flow Cartridge (FC1)
The system has been tested according to NSF/ANSI 42 for reduction of the substances listed below. The
concentration of the indicated substances in water entering the system was reduced to a concentration less
than or equal to the permissible limit for water leaving the system, as specified in NSF/ANSI 42.
Page 19

19Performance Data Sheets
C. California Certification Department of Public Health
State of California Department of Public Health
Water Treatment Device
Certificate Number
13-2190
Date Issued: October 3, 2013
Trademark/Model Designation Replacement Elements
Stream Flow FL FC1
Stream Flow Plus FPL FC1
Manufacturer: Stream Laboratories, Inc.
The water treatment device(s) listed on this certificate have met the testing requirements pursuant to
Section 116830 of the Health and Safety Code for the following health related contaminants:
Microbiological Contaminants and Turbidity Inorganic/Radiological Contaminants
Organic Contaminants
Rated Service Capacity: 750 gallons Rated Service Flow: 0.75 gpm
Conditions of Certification
Do not use where water is microbiologically unsafe or with water of unknown quality, except that systems
for cyst reduction may be used on disinfected waters that contain filterable cysts.
Alachlor
Atrazine
Benzene
Carbofuran
Carbon Tetrachloride
Chlorobenzene
Chloropicrin
2,4-D
DBCP
o-Dichlorobenzene
p-Dichlorobenzene
1,2-Dichloroethane
1,1-Dichloroethylene
cis-1,2-Dichloroethylene
trans-1,2-Dichloroethylene
1,2-Dichloropropane
cis-1,3-Dichloropropylene
Dinoseb
Endrin
Lindane
Ethylbenzene
EDB
Haloacetonitriles
Bromochloroacetonitrile
Dichloroacetonitrile
Dibromoacetonitrile
Trichloroacetonitrile
Haloketones (HK)
1,1-Dichloro-2-Propanone
1,1,1-Trichloro-2-Propanone
Heptachlor
Heptachlor Epox ide
Hexachlorobutadiene
Hexachlorocyclopentadiene
Lindane
Methoxychlor
MTBE
Pentachlorophe nol
PCB
Simazine
Styrene
1,1,2,2-Tetrachlorethane
Tetrachloroethylene
Toluene
Toxaphene
2,4,5-TP (Silvex)
Tribromoacetic Acid
1,2,4-Trichlorobenzene
1,1,1-Trichloroethane
1,1,2-Trichloroethane
Trichloroethylene
Trihalomethanes (THM’s)
Bromodochloro methane
Bromoform
Chloroform
Chlorodibromomethane
Xylenes
Cysts
Turbidity
Asbestos
Lead
Mercury
California Department of Public Health Certification Number #13-2190. For conditions of use, health
claims certified by the CA Department of Public Health, and replacement parts, see Product Data
Sheet / Owner’s Manual.
Stream Laboratories, Inc.
2520 Shell Road Ste B
Georgetown, TX 78628
Phone: (888)-615-5733
StreamFilters.com
Page 20

Troubleshooting & FAQs
Why does the Stream System reduce
volatile organic compounds, but not
natural minerals?
You should replace your filter annually or
when the capacity is reached, whichever
occurs first (for rated capacity see
Section 1A).
When should I replace my filter cartridge? Filter life will vary depending on the
amount of water used and the amount of
impurities in the water.
You can order replacement filters from
your local water treatment dealer.
Where do I get a replacement filter? N/A
No
.
Will low pH or acidic water affect the
Stream filter?
Mineral components expressed as
acidity and alkalinity determines the pH.
Neutrality is 7; below 7 is acidity;
and above 7 is alkalinity.
No.Does de-ionized water or soft water af-
fect Stream water?
N/A
Yes, the below sink models can be
connected to your sink, refrigerator, and/or
any kind of water dispenser or ice maker.
Can the Stream Flow Plus System be
connected to an automatic ice maker?
To connect a single Drinking Water System
to both your sink and refrigerator, request
an “ice maker tee” from your dealer.
Question Answer
Comments
Yes, you can hand pump or siphon water
through the Stream System during an
emergency. But remember, the Stream
System isn’t meant to be used where the
water is microbiologically unsafe or with
water of unknown quality.
Can the Stream Flow Plus System be used
during an emergency or when the water is
turned off?
If your water source might be
contaminated, it should be disinfected
before use. Add 1/4 tsp of household
bleach per gallon of water; the Stream
System will remove this solution from
the water. Hand pump kits are available
from Stream.
When water is frozen, the natural minerals
solidify and they can appear as white
flakes or specks when the ice melts.
What causes “white” particles to
appear in Stream water when it is frozen
or boiled?
Natural minerals are good for you in
normal quantities, and so when you see
them in your drinking water, don’t be
alarmed.
Minerals are totally dissolved in the
solution and do not have an actual physical
size, and so the minerals pass through the
filter unchanged.
The materials used in Stream Drinking
Water Systems are specially designed to
react with chemicals in the water, but not
with natural minerals that are actually
good for you.
If you are in an area with excessive
sedimentation in the water, pre-filtering
can help extend the life and efficiency of
your Stream cartridge, but in most areas
this is not necessary.
Should I remove sediment with a standard
filter before using Stream?
The Stream System contains a triple
filter. The outside material is a pre-filter
that helps protect the solid carbon block
surface from clogging with large sediment.
Stream’s solid carbon block filters
are compacted into a dense structure so
that every molecule of water will be forced
through tiny pores of carbon. This reduces
a wide range of hazardous contaminants,
as well as tastes and odors, not typically
removed by loose granular systems.
Why is the compressed activated carbon
block filtration system more efficient than
loose granular systems?
The Water Quality Association reports
that “an activated carbon filter can reduce
organics and solid particles, as well as
offensive tastes and odors. Only pre-coat
and solid carbon block filters are designed
to provide 0.5 micron mechanical filtration
with efficient adsorption on very fine sized
activated carbon particles.”
A. Troubleshooting & FAQs
20 Troubleshooting & FAQs
10
Sec.
Page 21

Troubleshooting & FAQs
21Troubleshooting & FAQs
Softeners are not used to treat drinking
water; they are used only to change the
water’s “hardness.” They put sodium into
the water in exchange for magnesium or
calcium ions. Stream Drinking Water
Systems don’t remove dissolved
minerals so the pH is not changed.
What is the difference between a
“water softener” and the Stream Drinking
Water System?
Soft water is good for bathing, laundering,
and may extend the life of hot water
heaters and boilers. However, soft water
should not be used for watering plants
or lawns. You should not use a water
softener for drinking water.
If the water source is questionable, you
should disinfect it before use. Just add 1/2
tsp of bleach per gallon of water; then the
Stream System will remove this solution
from the water. Ask your nearest public
water utility for assistance or guidelines on
the proper treatment of untreated water.
Can the Stream System be used on
untreated water?
Stream Systems are designed to be
used on treated water systems; they are
not meant to be used where the water is
unsafe or with water of unknown quality
without first disinfecting the water.
However, systems certified for cyst
reduction can be used on water
that may contain filterable cysts.
Question Answer
Comments
Change your filter. What should I do if my water starts to
smell or taste bad?
The carbon block filter may adopt the
tastes and odors that it is absorbing.
You should keep 2 filters on hand. When
one begins to smell, remove it and let it dry
upside down on a paper towel. Once the
sulfur smell dissipates, you can reuse the
filter. Rotating filter cartridges like this will
also help extend the life of your filters.
What does it mean if my water starts to
smell like rotten eggs?
This is typically a sign of hydrogen sulfide
gas, which is not uncommon and can
occur at any time.
Just reduce the water pressure at the feed
water adapter below the sink.
What does it mean if there is a “milky”
color in my water?
This milky color is actually just small
bubbles, caused by a higher than normal
water pressure flowing through the
system. This won’t affect the performance
of the System.
You should replace your filters at least
every twelve months, or when its capacity
is reached, whichever comes first. You can
also try turning up the water pressure or
turning off other faucets or sprinklers that
may be on.
What do I do if the flow rate is too slow? The filter is designed to slow and
restrict flow when the filter is clogged
with contaminants. When the flow rate
slows, it is time to change your filter.
Allow the water to run through the unit for
about 30 minutes.
What should I do if my water is black? The black color is from carbon dust
and is nothing to worry about.
Simply flush the system.
Page 22

Flushing/Disinfecting the Unit Housing:
You should not let water sit for more than 10 days without being used. If you do, the System may need to be
flushed or disinfected before you start using it again.
1. Make sure the water to the unit is turned off.
2. Lessen the water pressure (if below sink unit) by opening the unit faucet.
3. Remove and throw out the used filter.
4. Rinse out the inside of the unit’s housing.
5. Add 5 to 7 drops of bleach, like Clorox™ or Purex™, to the bottom canister.
6. Reconnect the housing top and bottom without the replacement filter.
7. Turn on the water and let the unit housing fill up with the water/bleach solution.
8. Let the unit soak for at least 30 minutes.
a. To disinfect the spout, remove it and put it in a container with 1 quart of water
and 5 drops of bleach. Allow this to soak for 30 minutes.
9. After the housing has soaked for 30 minutes, disassemble the top and bottom and pour out the
water/bleach solution; then rinse out the inside of the housing.
10. Replace the filter (cartridge).
11. Once the new filter is installed, follow the instructions to reconnect and flush your unit.
B. Maintenance Problems
22 Troubleshooting & FAQs
Page 23

Stream believes in improving your water and your life, which is why we’ve tailored our warranty for you—
to make your life just a little bit easier.
Stream will repair or replace any System at absolutely no charge (baring the transportation to Stream
headquarters) during the warranty period. On top of that, all exterior hoses and attachments to the
System are warranted for defects in material and workmanship for one year, and your Drinking Water
System Housing is warranted for a lifetime, while you’re changing the filter once a year. That’s a lifetime
of clean water.
The Stream solid carbon block filters are warranted for defects in material and workmanship under
normal care.
Unless it is expressly stated above, Stream Corporation makes no warranties, expressed or implied, arising
by law or otherwise. This includes the implied warranties of merchantability and fitness for a particular
purpose, to any person. This limited warranty may not be changed or extended unless it is expressly
executed by Stream Corporation. The repair or replacement as provided under this limited warranty is
exclusive. In no event will Stream Corporation be liable for any consequential or incidental damages to
any person, including in cases of manufacturer negligence. This includes, without limitation, damages of
loss of use, cost of substitution, property damage, or other monetary loss.
The warranty is only valid if the Drinking Water System is operated within conditions listed herein.
Warranty
Page 24

Stream Laboratories, Inc.
2520 Shell Road Ste B
Georgetown, TX 78628
Phone: (888)-615-5733
StreamFilters.com
 Loading...