


User Guide

2

3
The CO2 Cylinder
The disposable CO2 cylinder
is produced from recyclable materials in accordance with the
sustainability and environment protection standards.
It is recommended to deliver the used cylinders to electronic waste collection points.
The Company is responsible for the proper operation of the gas cylinder under the following
conditions:
•
The CO2 cylinder
contains compressed carbon dioxide (
CO2).
• Do not expose the
CO2 cylinder
to temperatures above 500 Celsius or to direct sunlight.
• Do not expose the cylinder to fire.
• Do not pierce, dismantle or tamper with the
CO2 cylinder
in any way.
• Do not remove the
CO2 cylinder
from the water bar during the sparkling operation and
until the cylinder is empty.
• When performing maintenance on the water bar, cylinder removal will be performed only
by a qualified technician of the Company.
• Do not remove the
CO2 cylinder
from the water bar before emptying it, as this may
produce a loud noise and frostbite.
The
CO2 cylinder
is protected from being filled by unauthorized parties and the Company will
only be responsible for the safety and soundness of cylinders filled by authorized parties that
carry the Company’s safety stamp.

4
User Guide
Welcome to Strauss Water, your purchase of the water bar enables you and your family
to enjoy tasty and quality water; hot, cold, and sparkling water exactly the way you like it.
Why should I read it?
The following user guide is the shortest and best way to get to familiarize yourself with your
new water bar.
The user guide explains and answers most of the questions that may arise during the use of
the water bar.
How to contact us.
If you have an issue or a question to which you have not found an answer in the guide, you
are welcome to visit our website at www.strauss-water.com from a computer or mobile
device. The website will provide quick response using our chat service, on-site technician
visits, and personal service providing information regarding your personal account.
We have ensured that the product you have complies with the strictest international
standards so that you and your family can enjoy clear quality water. Therefore we recommend
that you dispense a cup of water, clear or sparkling, and enjoy.
Strauss Water

Our products comply with strict Israeli and international standards in order to
guarantee that your family and you will enjoy high quality and safe water.
The Strauss Water Company hereby declares that the
water bar complies
with Israeli and international standards for use in a food/drinking water
environment as well as electrical safety.
Standard Mark 1505 - Systems Handling Drinking Water for Home
Use - Filtration and Purification:
Odor and taste removal - level 1 chlorine reducer (at least 75%)
The system reduces the water bacterial load
Removes particles 2 microns and above
Safety Mark 5452 - defines testing of product that come in contact
with drinking water
European standard for electrical products safety
Strauss Water Co. Israel and its quality system have been certified according to
international standard ISO9001:2008.
Avishay Shapira
Quality Manager
Strauss Water
Manufacturer Compatibility Certificate

6
Table of Contents
1. Overview .....................................................................................................................................9
2. Operation/Control Panel.................................................................................................10
3. Water Bar Operation ..........................................................................................................11
a. Dispensing Cold Water .......................................................................................................................................11
b. Dispensing a Measured Quantity of Cold Water ............................................................................... 11
c. Dispensing Mixed Water.....................................................................................................................................11
d. Dispensing Hot Water ........................................................................................................................................ 12
e. Dispensing a Measured Quantity of Hot Water ................................................................................... 12
f. Dispensing Water with Child Lock ............................................................................................................... 13
g. Boiling the Water .................................................................................................................................................... 13
h. Dispensing a Jug of Cold Water .................................................................................................................... 13
3.f 13
i. Dispensing a Cup of Sparkling Water .......................................................................................................... 14
j. Dispensing a Cup of Strong Sparkling Water..........................................................................................14
k. Dispensing a Cup of Light Sparkling Water ............................................................................................14
l. Dispensing a Jug of Sparkling Water ...........................................................................................................15
m. Keypad Lock .............................................................................................................................................................15
4. Preferences Menu Actions ............................................................................................. 16
a. Defining a Measured Quantity ....................................................................................................................... 16
a.1. Setting the Quantity for Dispensing Cold Water .............................................................................16
a.2. Setting the Quantity for Dispensing Mixed Water ......................................................................... 17
a.3. Setting the Quantity for Dispensing Hot Water ............................................................................... 17
a.4. Setting the Quantity for Dispensing a Jug of Cold Water ..........................................................18
a.5. Setting the Quantity for Dispensing a Jug of Sparkling Water ............................................... 19
b. Setting Water Temperature .............................................................................................................................. 19
b.1. Setting Cold Water Temperature ..............................................................................................................19
b.2. Setting Mixedm Water Temperature ...................................................................................................... 20
b.3. Setting Hot Water Temperature .................................................................................................................20
c. Sparkling Levels Adjustment ........................................................................................................................... 20
d. Automatic Heating ................................................................................................................................................ 21
d.1. Smart Heating....................................................................................................................................................... 21
d.2. Wakeup ..................................................................................................................................................................... 22

7
Table of Contents
5. Actions in the Settings Menu ...................................................................................... 23
a. Clock ............................................................................................................................................................................... 23
a.1. Time & Day Adjustment .................................................................................................................................. 23
a.2. Setting Clock Format ........................................................................................................................................ 23
a.3. Clock Display ..........................................................................................................................................................24
b. Child Lock Mechanism ......................................................................................................................................24
c. Keypad Sound .......................................................................................................................................................... 25
d. Language Setting ...................................................................................................................................................25
6. Water Bar Maintenance & Periodic Care ................................................................ 26
a. Emptying the Drip Tray ....................................................................................................................................... 26
b. Filter and
UV Lamp Replacement ................................................................................................................26
c. Filter Replacement Instructions ..................................................................................................................... 26
d. Displaying and Resetting the Filter Replacement Timer ...............................................................27
e. Lamp Replacement Instructions ................................................................................................................... 27
f. Displaying and Resetting the UV Lamp Replacement Timer ....................................................... 28
g. Washing Tanks .......................................................................................................................................................... 28
h. CO
2
cylinder content ............................................................................................................................................ 29
i. Internal Cleaning ...................................................................................................................................................... 29
j. Maintenance After a Prolonged Period of Time .................................................................................... 29
k. Initialization ................................................................................................................................................................ 30
k.1. Restoring Factory Settings ............................................................................................................................ 30
k.2. Smart Heating Reset ......................................................................................................................................... 31
l. Energy Saving Mode .............................................................................................................................................. 31
l.1. Turning On Energy Saving Mode ...............................................................................................................31
m. Turn Off Mode ......................................................................................................................................................... 32
7. Replacement Date for the CO2 Cylinder ............................................................... 33
8. Replacing the CO2 Cylinder .......................................................................................... 34
9. Cleaning the Water Bar ....................................................................................................36
10. Safety Warnings ................................................................................................................. 37
11. Technical Specifications ................................................................................................38
12. Troubleshooting ................................................................................................................ 39
14. Service and Warranty Options .................................................................................. 41

8
9
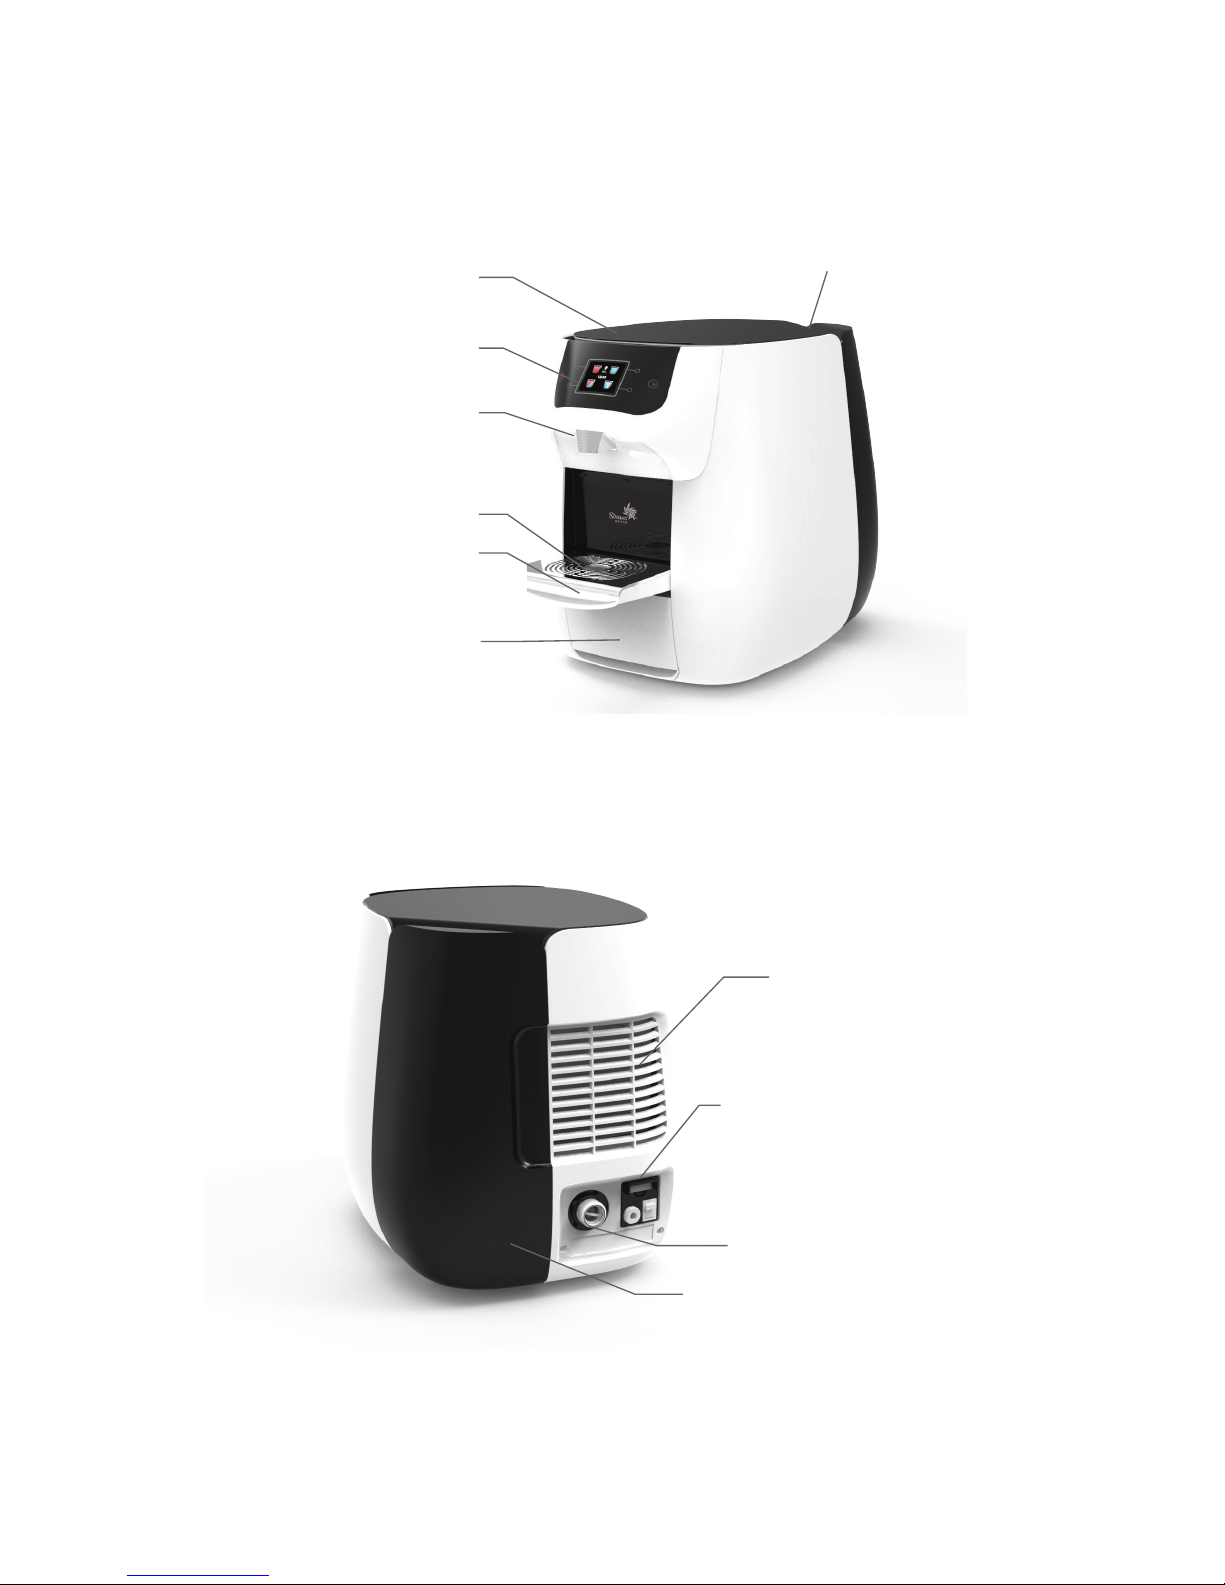
1. Overview
2 Top cover
3 Operation panel with
digital display
4 Dispensing spout
6 Folding tray
7 Drip tray
8 Ventilation vents
9 Electricity cable and
heating switch
11 CO2 cylinder housing
10 Water entry
5 Folding tray bars
1 CO2 cylinder cover

10
2. Operation/Control Panel
1. Measured quantity of mix water dispensing button
2. Extra hot - boiling button
3. Boiling control light (blinks until boiling has been completed)
4. Hot water dispensing button
5. Digital display
6. Boiling progress bar - when boiling temperature has been achieved, is
replaced with extra hot water icon
7. Wakeup / smart heating icon (appears when option is on)
8. Child lock icon (appears when the option is on)
9. Cold water dispensing button
10. Additional dispensing options button (short press) and settings / preferences
menu (long press)
11. Sparkling cup of water dispensing button
12. Cylinder emptying progress bar - appears when starting CO
2
emptying until
the process is complete
13. The CO
2
cylinder icon (appears when the CO2 cylinder is empty or no cylinder
is present or when it is not screwed-in all the way)
14. Clock
Please note! The above display is for illustration purposes only.
2
1314
3
11
10
1
4 75
9
8
12
6

11
3. Water Bar Operation
a. Dispensing Cold Water
To dispense cold water, press the marked top right button. Dispensing will
continue while the button is pressed. Please note that continuous dispensing is
limited to 4 minutes.
b. Dispensing a Measured Quantity of Cold Water
To dispense a measured quantity of cold water, briefly press the marked top
right button. Pressing any button during dispensing will stop the action.
c. Dispensing Mixed Water
Mixed water is a mixture of cold water filtered and purified by UV and hot water.
To dispense a measured quantity of warm water at a set temperature, briefly
press the bottom left button. Pressing any button during dispensing will stop
the action.
When child lock is on, it is necessary to press the marked bottom left button
and also briefly press the marked top right button. It is not necessary to
continue pressing the top right button during dispensing.
Caution! The mixed water is dispensed from 2 different nozzles. When
dispensing into a narrow neck bottle, use a funnel, or first dispense into a wide
neck jug.
Note: When the hot water temperature is low, the mixed water cup on the
display will be dimmed and dispensing will not be possible. When pressing the
mixed water button, the hot water progress bar will advance, the water will
start to heat until it reaches the dispensing temperature. When the dispensing
temperature is reached, the color of the hot and mixed cups on the display will
fill up.
PRESS ANY KEY TO STOP

12
*Please note! Due to variations in the water flow rate, the set quantity may vary. After dispensing it is
important to check that the required quantity
was received (especially when preparing food for infants,
medications etc.). In the event of quantity variations, the required quantity can be redefined.
d. Dispensing Hot Water
To dispense hot water, press the marked top right button.
The dispensing will continue while the button is pressed.
Note: When the hot water temperature is low, the hot water cup on the
display will be dimmed and dispensing will not be possible. When pressing
the hot water button, the hot water progress bar will advance, the water will
start to heat until it reaches the dispensing temperature. When the dispensing
temperature is reached, the color of the hot cup on the display will fill up.
e. Dispensing a Measured Quantity of Hot Water
To dispense a measured quantity of hot water, briefly press the marked top left
button.
Pressing any button during dispensing will stop the action. It is not possible to
dispense a measured amount of hot water when child lock is on.
Note: The dispensing a measured quantity of hot water function can be
canceled.
*Please note! Due to variations in the water flow rate, the set quantity may vary. After dispensing it is
important to check that the required quantity was received (especially when preparing food for infants,
medications etc.). In the event of quantity variations, the required quantity can be redefined.
PRESS ANY KEY TO STOP

13
f. Dispensing Water with Child Lock
To dispense hot water with child lock it is necessary to simultaneously press the
marked top left button and also briefly press the marked top right button. The
dispensing will continue as long as the top left button is pressed. There is no
need to continue pressing the top right button during dispensing.
Hot Water Dispensing with Child Lock will Always be Accompanied by a Beep.
g. Boiling the Water
To heat the water to a temperature close to boiling, press the marked left button.
When the button is pressed, the progress bar above the hot water cup will
advance, the water will be heated until it is near boiling, and the LED above the
button will start blinking. When the temperature is near boiling, the color of
the hot water cup on the display will fill up and the steam icon above the hot
water cup will be displayed instead of the progress bar.
h. Dispensing a Jug of Cold Water
To dispense a jug of cold water, briefly press the menu button. After moving
to the next dispensing menu, press the marked right top button. Pressing any
button during dispensing will stop the action.

14
i. Dispensing a Cup of Sparkling Water
To dispense a cup of sparkling water, press the marked right bottom button.
Pressing any button during dispensing will stop the action. The water
bar is designed to provide a fixed quantity of sparkling water per cup. It
is recommended to wait until dispensing has completed. The set default
sparkling level of the home screen is regular, but the sparkling level can be
changed from MENU > SPARKLING LEVELS (see section "c. Sparkling Levels
Adjustment" on page 20).
Note that it is not possible to change the measured quantity of sparkling water.
The sparkling levels are defined using the following icons
Strong Regular Light
j. Dispensing a Cup of Strong Sparkling Water
To dispense a cup of strong sparkling water, briefly press the menu button.
After moving to the next dispensing menu, briefly press the marked bottom
left button.
k. Dispensing a Cup of Light Sparkling Water
To dispense a cup of light sparkling water, briefly press the menu button. After
moving to the next dispensing menu, briefly press the marked top left button.

15
l. Dispensing a Jug of Sparkling Water
To dispense a jug of sparkling water, briefly press the menu button. After
moving to the next dispensing menu, briefly press the marked bottom right
button.
The default number of cups to be continuously dispensed into a jug is 5.
The setting can be changed to 2-7 cups (see section "a.5. Setting the Quantity
for Dispensing a Jug of Sparkling Water" on page 19).
m. Keypad Lock
This option enables locking all the water bar keys so that dispensing water
and using the menus are disabled. When the function is on, the icon will
permanently appear on the display. To lock and unlock the water bar keys,
simultaneously press the buttons
and for a few seconds.
*Please note! Before cleaning the touch screen and replacing the CO2 cylinder, turn on this option to avoid
unwanted water dispensing during the cleaning.

16
4. Preferences Menu Actions
The menu enables changing general water bar settings and customizing
settings. To enter the menu press button no. 1 for a few seconds.
Navigating the different menu options is performed using buttons no. 2 & 3.
Selecting an option is performed by pressing button no. 4.
To exit the selected option, press button no. 5.
*Please note! If the water bar's setting menu has not been accessed within 15 days of installation, a
message will be displayed on the water bar to remind the user that customization options are available.
a. Defining a Measured Quantity
To set the measured quantity for dispensing, enter the DEFINE QUANTITY sub
menu.
MENU PREFERENCES DEFINE QUANTITY
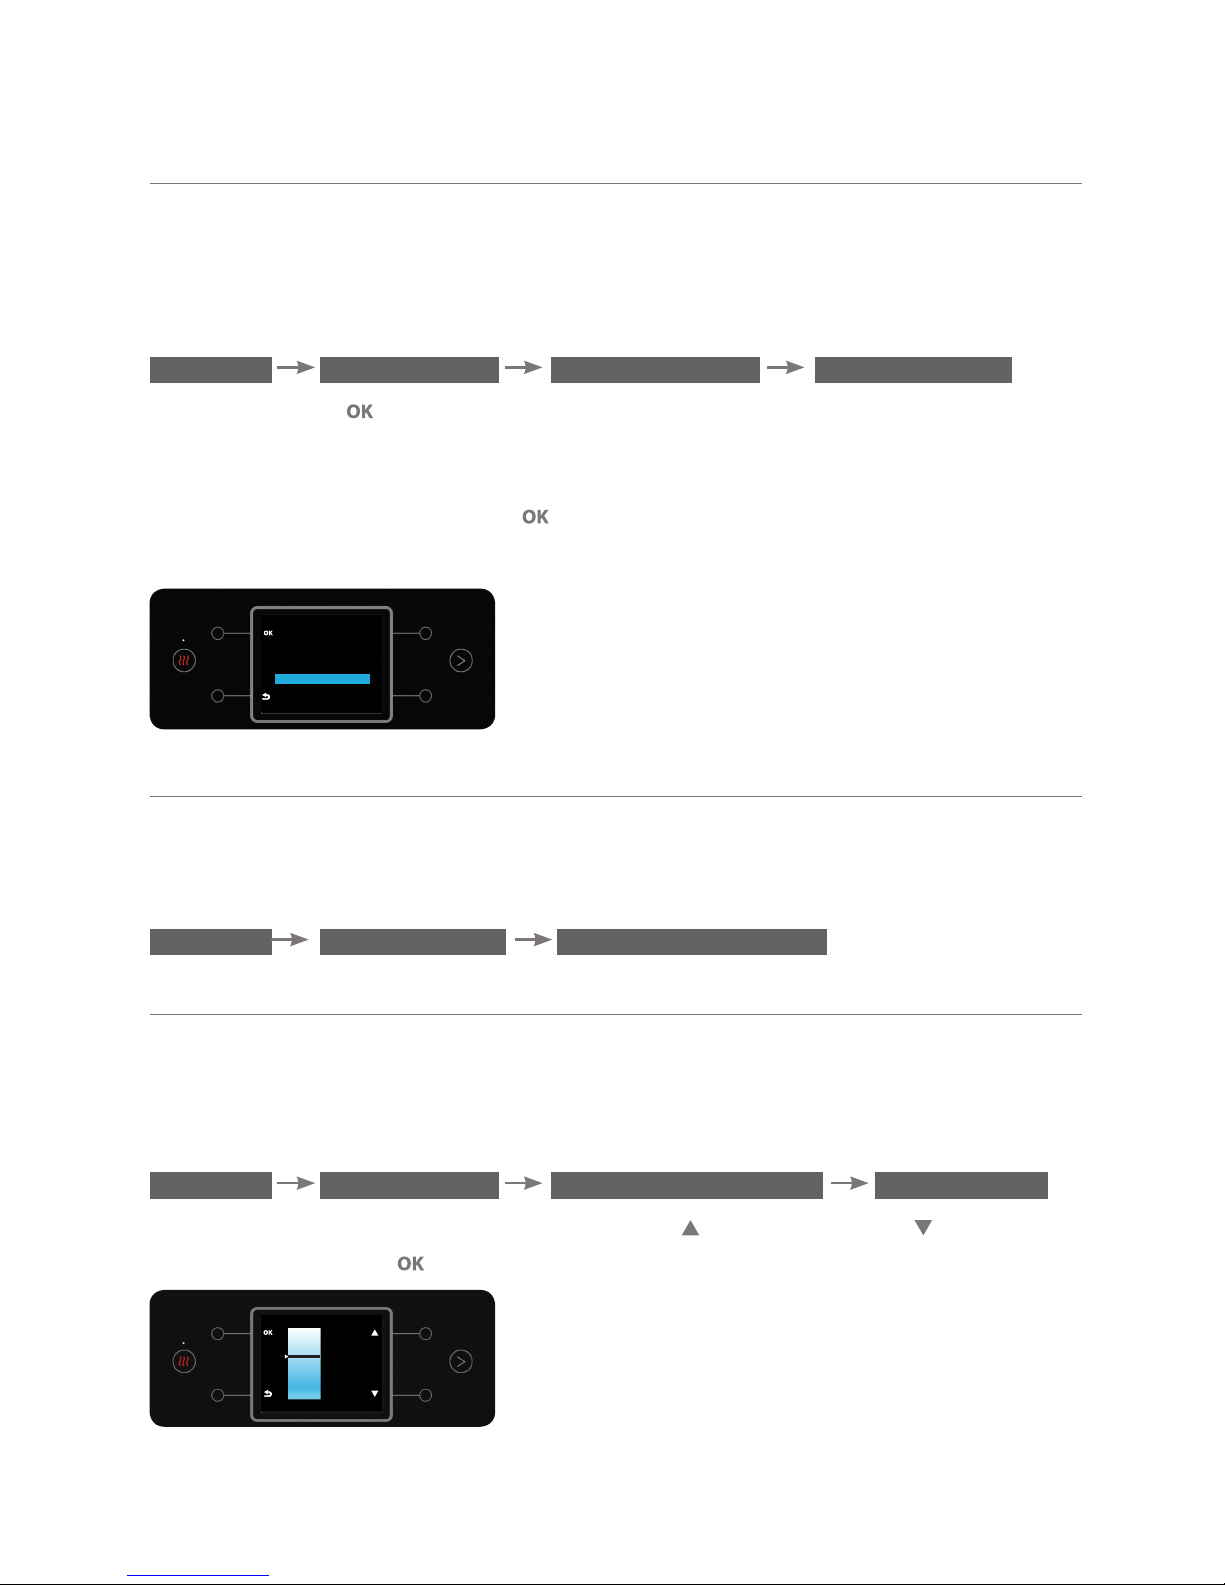
a.1. Setting the Quantity for Dispensing Cold Water
This option enables setting the quantity of cold water that will be dispensed
when briefly pressing the cold water button. To adjust the measured quantity,
enter the DEFINE QUANTITY sub menu.
MENU PREFERENCES DEFINE QUANTITY COLD CUP
Press the button . Place a cup beneath the dispensing spout and press the
button for a few seconds (the longer the press, the larger the set quantity
of water).
To confirm the action, press the button (a beep will sound).
Notes: (1) You can set a water quantity of 0-300 ml.
(2) To cancel the set quantity of cold water measured cup, briefly press the
button in the DEFINE QUNATITY COLD CUP screen.
1
24
35
MENU
PREFERENCES
SETTINGS
MAINTENANCE
ENERGY SAVING
SHUT DOWN
PREFERENCES
DEFINE QUANTITY
DEFINE TEMPERATURE
SPARKLING LEVELS
AUTOMATIC HEATING

17
a.2. Setting the Quantity for Dispensing Mixed Water
This option enables setting the quantity of mixed water that will be dispensed
when briefly pressing the mixed water button. To adjust the measured quantity,
enter the DEFINE QUANTITY sub menu.
MENU PREFERENCES
DEFINE QUANTITY MIX CUP
Press the button . Place a cup beneath the dispensing spout and press the
button for a few seconds (the longer the press, the larger the set quantity
of water).
To confirm the action, press the button (a beep will sound).
Notes:
(1) You can set a water quantity of 0-300 ml.
(2) To cancel the set quantity of mixed water measured cup, briefly press the
button in the DEFINE QUNATITY MIX CUP screen.
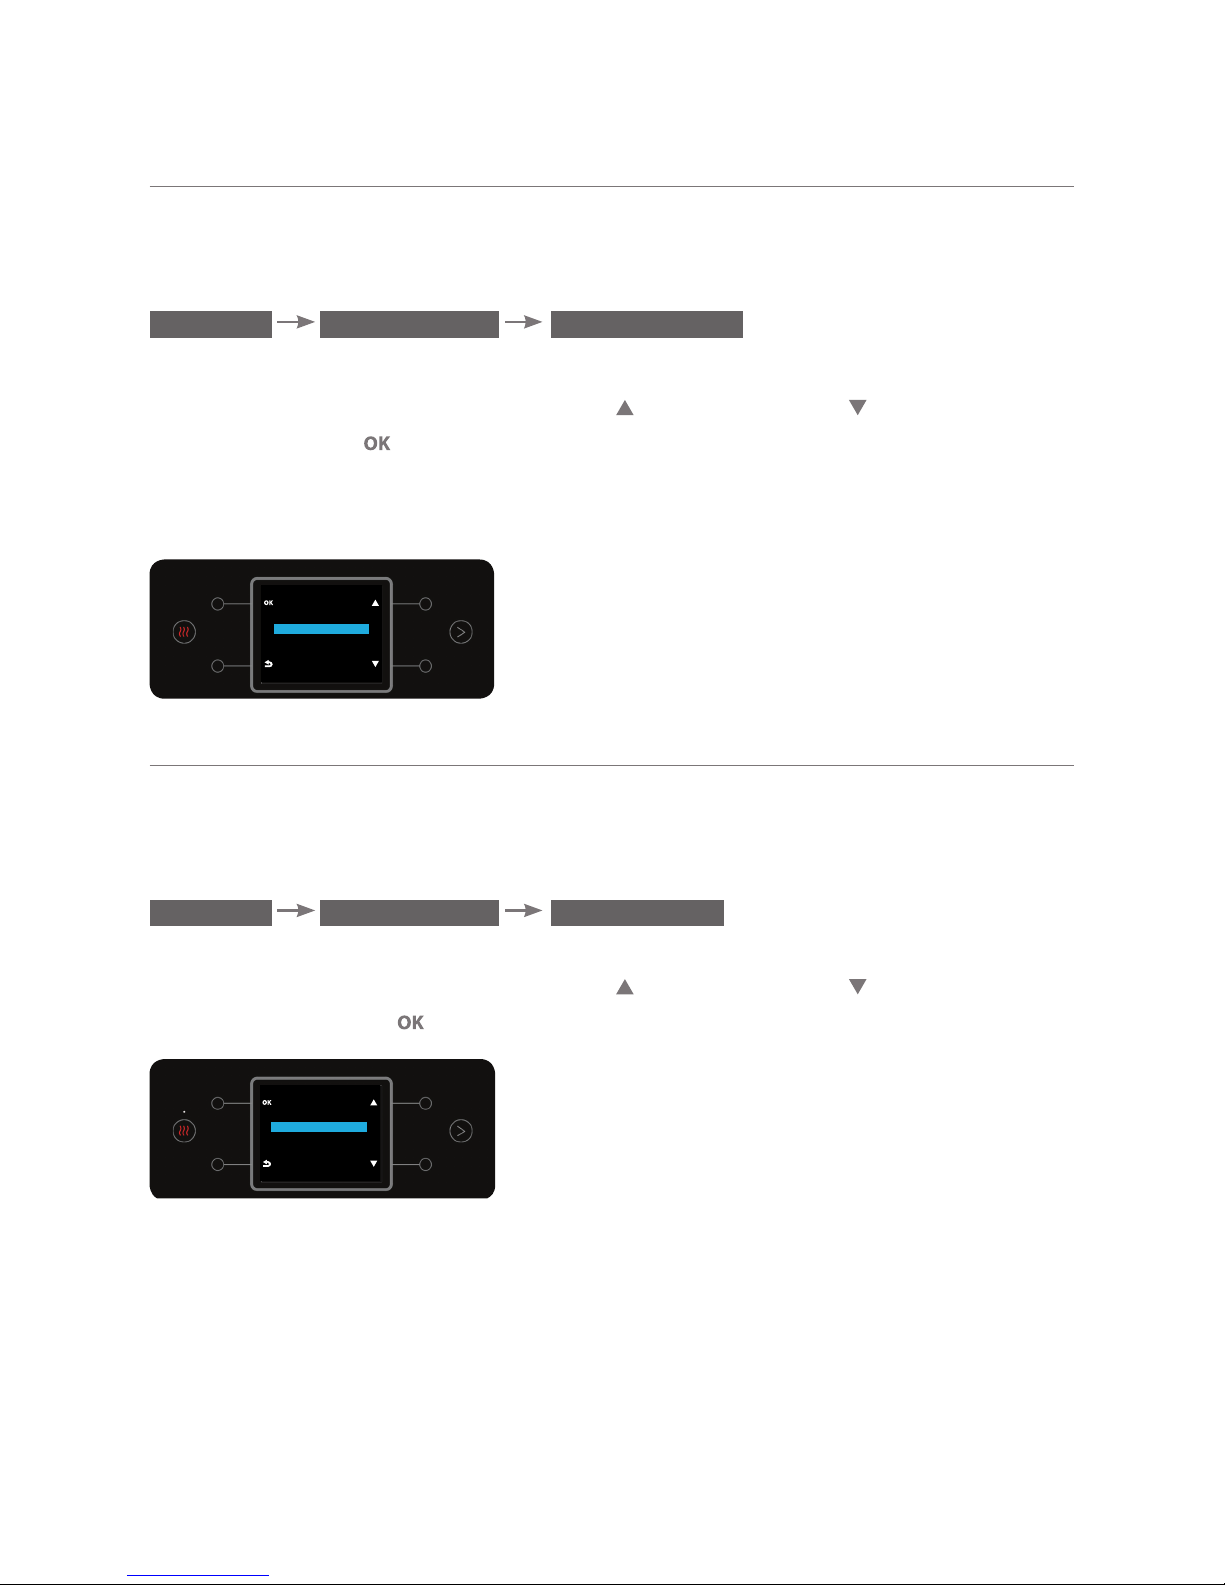
a.3. Setting the Quantity for Dispensing Hot Water
This option enables setting the quantity of hot water that will be dispensed
when briefly pressing the hot water button. To adjust the measured quantity,
enter the DEFINE QUANTITY sub menu.
MENU PREFERENCES
DEFINE QUANTITY HOT CUP
Press the button . Place a cup beneath the dispensing spout and press the
button for a few seconds. (The longer the press, the larger the set quantity
of water).
To confirm the action, press the button (a beep will sound).
COLD CUP
Recording...
Release OK to Stop
COLD CUP
Place a cup on the tray.
Press and hold the
OK button to
start Recording
MIX CUP
Place a cup on the tray.
Press and hold the
OK button to
start Recording
MIX CUP
Recording...
Release OK to Stop

18
Notes: (1) You can set a water quantity of 0-300 ml.
(2) It is not possible to dispense a measured amount of hot water
when child lock is on.
(3) To cancel the set quantity of hot water measured cup, briefly press the
button in the DEFINE QUANTITY HOT CUP screen.
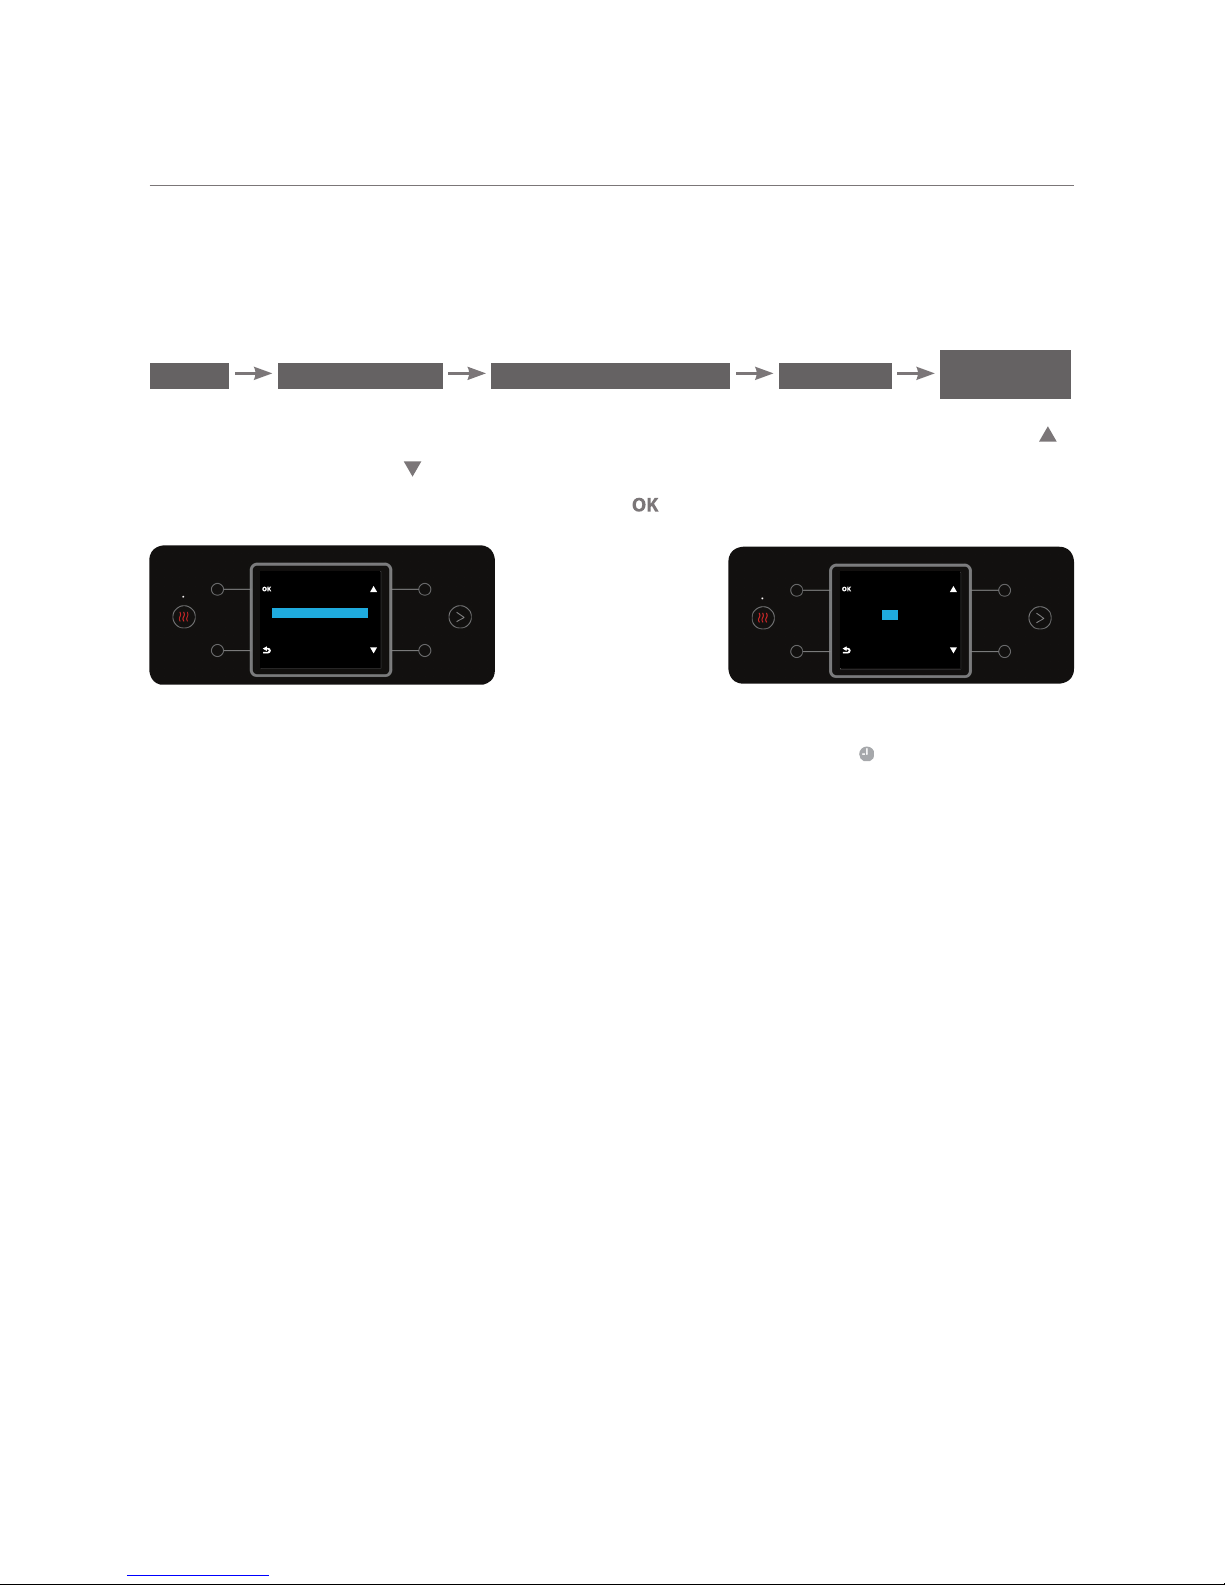
a.4. Setting the Quantity for Dispensing a Jug of Cold Water
This option enables setting the quantity of a jug of cold water that will be
dispensed when briefly pressing the cold water button. To adjust the measured
quantity, enter the DEFINE QUANTITY sub menu.
MENU PREFERENCES
DEFINE QUANTITY COLD JUG
Press the button . Place a jug beneath the dispensing spout and press the
for a few seconds. (The longer the press, the larger the set quantity of water).
To confirm the action, press the
button (a beep will sound).
Note: The set water quantity can be 0-1,000 ml.
*Please note! Due to variations in the water flow rate, the set quantity may
vary. After dispensing it is important to check that the required quantity was
received (especially when preparing food for infants, medications etc.). In the
event of quantity variations, the required quantity can be redefined.
HOT CUP
Place a cup on the tray.
Press and hold the
OK button to
start Recording
HOT CUP
Recording...
Release OK to Stop
COLD JUG
Recording...
Release OK to Stop
COLD JUG
Place a jug under the
faucet.
Press and hold the
OK button to
start Recording
19
a.5. Setting the Quantity for Dispensing a Jug of Sparkling Water
This option enables setting the quantity of a jug of sparkling water that will be
dispensed when briefly pressing the jug of sparkling water button. To adjust the
measured quantity, enter the DEFINE QUANTITY sub menu.
MENU PREFERENCES
DEFINE QUANTITY SPARKLING JUG
Press the button . Select 2-7 cups of sparkling water. The quantity dispensed
when pressing jug of sparkling water will contain a continuous dispensing of
the number for cups defined (each cup contains 200 ml of sparkling water).
To confirm the action, press the button (a beep will sound while pressing).
The default quantity for a jug of sparkling water is 5 cups (1 liter).
תוסוכ 2
תוסוכ 3
תוסוכ 4
תוסוכ 5
תוסוכ 6
תוסוכ 7
םיזגומ םימ ןקנק
SPARKLING JUG
2 CUPS
3 CUPS
4 CUPS
5 CUPS
6 CUPS
7 CUPS
b. Setting Water Temperature
To set the temperature of the water dispensed, enter the DEFINE TEMPERATURE
sub menu.
MENU PREFERENCES
DEFINE TEMPERATURE
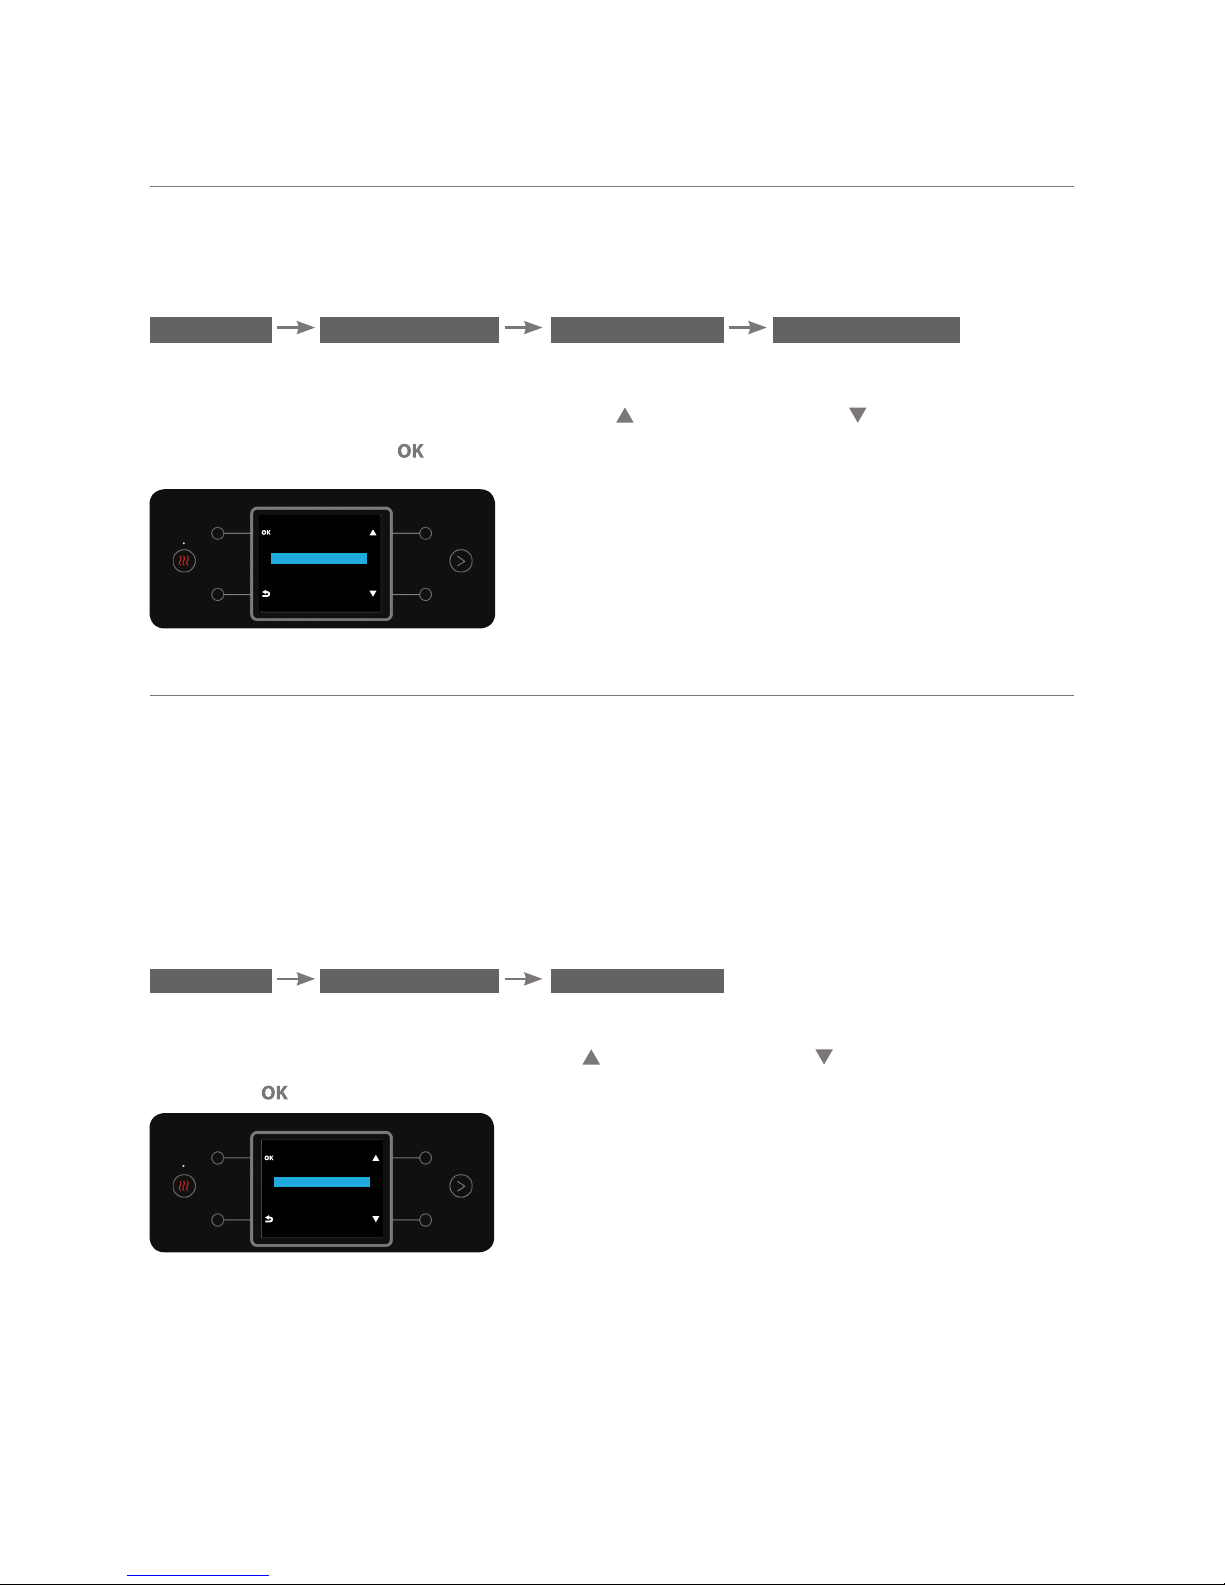
b.1. Setting Cold Water Temperature
This option enables setting the required cold water temperature
(cold or very cold).
To set the temperature, enter the DEFINE TEMPERATURE sub menu:
MENU PREFERENCES DEFINE TEMPERATURE COLD WATER
To change the temperature, use the top right and bottom right buttons.
To confirm, press the button.
COLD
COLDEST
COLD

20
b.2. Setting Mixedm Water Temperature
The option enables setting the required mixed water temperature. To set the
temperature, enter the DEFINE TEMPERATURE sub menu:
MENU PREFERENCES DEFINE TEMPERATURE MIX WATER
To change the temperature, use the top right and bottom right buttons.
To confirm, press the button.
b.3. Setting Hot Water Temperature
The option enables setting the required hot water temperature (hot or very
hot). To set the temperature, enter the DEFINE TEMPERATURE sub menu:
MENU PREFERENCES DEFINE TEMPERATURE HOT WATER
To change the temperature, use the top right and bottom right buttons.
To confirm, press the
button.
c. Sparkling Levels Adjustment
This option enables selecting the sparkling level of the sparkling water cup that
appears on the home screen. The sparkling level selected will be represented
by the number of bubbles that appear in the sparkling water cup on the home
screen.
HOTTEST
HOT
HOT
HOT
COLD
MIX

21
To select the preferred sparkling level for display on the home screen, enter the
SPARKLING LEVELS sub menu:
MENU PREFERENCES SPARKLING LEVELS
Select the preferred sparkling level and press the button to confirm.
The sparkling level default is REGULAR.
d. Automatic Heating
This option enables the user to set a time for boiling the water or change the
settings so that the water bar learns the user's water boiling habits and boils
the water on a regular basis according to the learned data.
To select the water boiling state, enter the AUTOMATIC HEATING sub menu.
MENU PREFERENCES AUTOMATIC HEATING
d.1. Smart Heating
This option enables the water bar to learn the user's hot water consumption
habits and boil water at fixed times customized to the user’s needs.
To set the smart heating, enter the SMART HEATING sub menu.
MENU PREFERENCES AUTOMATIC HEATING SMART HEATING
Turning on the smart heating function is done using the top right and the
bottom right buttons.
To confirm the required option, press the button.
*Please note! When this option is activated a “smart heating” icon
will be
displayed.
PREFERENCES
DEFINE QUANTITY
DEFINE TEMPERATURE
SPARKLING LEVELS
AUTOMATIC HEATING
SPARKLING LEVELS
STRONG
REGULAR
LIGHT
AUTOMATIC HEATING
SMART HEATING
WAKEUP
OFF
22
d.2. Wakeup
This option enables predefining two times for waking the heating system, for
example: Morning and evening.
To turn on the automatic wakeup, enter the WAKEUP sub menu:
MENU PREFERENCES WAKE UP
WAKE UP 1/
WAKE UP 2
AUTOMATIC HEATING
Turning on the automatic wakeup function is performed using the top right
and the bottom right buttons.
To confirm the required option, press the button.
*Please note! When this option is activated a “wakeup” icon
will be
displayed.
SET WAKE UP 1
OFF
ON
SET WAKE UP 1
08:00

23
5. Actions in the Settings Menu
a. Clock
A clock will appear on the display when the water bar is connected to the
electricity supply. It the event of an electricity outage lasting longer than
8 hours, the clock will need to be reset.
a.1. Time & Day Adjustment
To set the clock, enter the CLOCK sub menu.
MENU CLOCK SET TIME & DAYSETTINGS
The hour will appear on the display.
Setting hour/minutes/day is performed using the top right
and the
bottom right buttons.
To confirm, press the
button.
SET TIME & DAY
07:30
SUNDAY
AM
*Please note! Setting the hour and day is recommended for efficient
operation of the smart heating system.
a.2. Setting Clock Format
You can choose between a 12 or 24 hour clock.
MENU CLOCK CLOCK FORMATSETTINGS
The top right and the bottom right buttons will switch between the
12 HOURS and 24 HOURS options.
To confirm, press the button.
CLOCK FORMAT
24 HOURS
12 HOURS
*Please note! When the clock is set to 24 HOURS, AM/PM will not appear
alongside the hour.
24
a.3. Clock Display
The option enables a permanent time display on screen.
The select the clock display, enter the CLOCK DISPLAY sub menu:
MENU SETTINGS CLOCK CLOCK DISPLAY
The current setting will appear on the display: ON / OFF.
To change the setting, use the top right
and bottom right buttons.
To confirm, press the button.
CLOCK DISPLAY
OFF
ON
b. Child Lock Mechanism
When this option is on, dispensing hot water will be possible only by
simultaneously pressing the top right & top left buttons as described in
section "3.f" on page 13 - Water Bar Operation. Dispensing mixed water will be
possible only by simultaneously pressing the top right & bottom left buttons as
described in section "3.f" on page 13 - Water Bar Operation.
To turn on the option enter the CHILD LOCK sub menu:
MENU SETTINGS CHILD LOCK
The setting ON will always appear on the display (even when it is not on). To
change the setting, use the top right and bottom right buttons To confirm,
press the button.
CHILD LOCK
OFF
ON
25
c. Keypad Sound
When this option is on, a short beep will sound whenever a button is pressed.
To turn on the option, enter the KEYPAD SOUND sub menu:
MENU SETTINGS KEYPAD SOUND
The current setting will appear on the display: ON / OFF.
To change the setting, use the top right
and bottom right buttons To
confirm, press the button.
When the water bar is in child lock mode, pressing the hot and mixed
water buttons will always sound a beep.
KEYPAD SOUND
OFF
ON
d. Language Setting
This option enables selecting the display language: תירבע or English.
To change the language, enter the LANGUAGE sub menu:
MENU SETTINGS LANGUAGE
The current language will be checked on the display.
To change the setting, use the top right and bottom right buttons.
To confirm, press the button.
LANGUAGE
תירבע
ENGLISH

26
6. Water Bar Maintenance & Periodic Care
a. Emptying the Drip Tray
It is important to empty the drip tray on time (before it fills up). Order of
operations for emptying the drip tray.
(1) Close the folding tray. Wait a few seconds for the leftover water to drain into
the drip tray.
(2) Gently pull the drip tray to remove it without spilling the water. The purpose
of the drip tray is to collect excess drops from the water bar, do not use it for
other purposes.
b. Filter and UV Lamp Replacement
To main the quality of water and the soundness of the water bar, be sure
to replace the UV lamp every 12 months, and the filter every 6 months or
2,000 liters, whichever occurs earlier. Replacing the parts is easy and simple and
detailed replacement instructions are attached to the replacement lamps and
filters.
Prior to replacing the parts, read the attached instructions.
Note - The purification process is internal and protected. The water bar is
equipped with a mechanical mechanism that prevents turning on the lamp
outside its defined position.
Caution! UV-C radiation is hazardous to the eyes and skin.
c. Filter Replacement Instructions
1. Removing the filter: Remove the water bar’s top cover.
Press the PUSH button and pull the filer upwards using the extraction ribbon.
2. Inserting the filter: Remove the wrapping from the new filter.
Insert the new filter until you hear a click.
3. Water Dispensing:
Place a container beneath the dispensing spout.
Dispense about 4 jugs of cold water until a regular flow is achieved.
Warning!
Do not dispense hot water
while replacing the filter.

27
d. Displaying and Resetting the Filter Replacement Timer
This option enables showing the time till the next filter replacement on the display;
and resetting it if necessary. To display or reset the filter replacement timer, enter
the FILTER REPLACEMENT sub menu.
MENU MAINTENANCE FILTER REPLACEMENT
The number of days till the next filter replacement will appear on the display.
To reset the filter replacement timer, press . To confirm, select YES using the
top right and bottom right buttons. To confirm, press the button.
e. Lamp Replacement Instructions
1. Removing the lamp: Remove the water bar’s top cover.
Pull the lamp gently upwards. A message will appear on the display to install a
new lamp.
2. Inserting a new lamp: Remove the wrapper from the new lamp, avoid
touching the glass body of the lamp.
Insert the new lamp into the water bar. Select NEW LAMP.
3. Lamp successfully installed The message UV LAMP INSTALLED
SUCCESSFULLY will appear on the display.
Warning!
Do not use the UV lamp when
it is out of the water bar as
dangerous UV-C radiation may
affect your eyes and skin.

28
f. Displaying and Resetting the UV Lamp Replacement Timer
It is possible to show the time till the next lamp replacement on the display;
and reset it if necessary. To display or reset the UV lamp replacement timer,
enter the UV LAMP REPLACEMENT sub menu.
MENU MAINTENANCE UV LAMP REPLACEMENT
The number of days till the next lamp replacement will appear on the display.
To reset the filter replacement timer, press
. To confirm, select YES using the
top right
and bottom right buttons. To confirm, press the button.
g. Washing Tanks
This option enables washing the hot and cold water tanks. Place a saucepan
with a capacity of at least 5 liters beneath the dispensing spout prior to
beginning the action. To perform washing tanks , enter the WASHING TANKS
sub menu:
MENU MAINTENANCE WASHING TANKS
To start the washing action, press the OK button.
The water bar will start the washing process. Follow the instructions on the
display until the washing process is complete.
Important! First the water bar will wash the hot water tank, followed by the
cold water tank, and then the sparkling water tank. The washing takes a few
minutes per tank. If the saucepan has filled up and the washing is not yet
complete, press any button to stop the flow, empty the saucepan and press
OK
again to continue the washing.
It is recommended to perform this action after the water bar has not been in
use for a prolonged period of time.
WASHING TANKS
Place a large container
under the faucet
Press OK+EXTRA HOT
to begin washing hot
tank
WASHING TANKS
WARNING!
Process includes
pouring hot water
Press OK to continue

29
h. CO2 cylinder content
This option enables checking the CO2 cylinder content.
To check the contents of the CO
2
cylinder enter the CO2 CYLINDER STATUS
sub menu:
MENU MAINTENANCE CO2 CYLINDER STATUS
The cylinder status will appear on the display:
Blue indicates a 5-100% full cylinder. Red indicates 5% CO
2
left in the
cylinder
Please note! When the CO
2
cylinder is completely empty, the system will
discharge it completely so the cylinder can be removed. Do not release the CO
2
cylinder before it is discharged in a controlled manner, and a message that the
CO
2
cylinder can be replaced appears on the display.
i. Internal Cleaning
The option enables performing an internal cleaning using the system cleaning
capsules .
To perform the internal cleaning, enter the INTERNAL CLEANING sub menu:
MENU MAINTENANCE INTERNAL CLEANING
To start the cleaning process press the OK button.
The water bar will start the cleaning process. Follow the instructions on the
display until the cleaning process is complete.
Important! The cleaning process takes approximately 30 min and involves
dispensing hot water. The water bar cannot be used until the cleaning process is
complete.
j. Maintenance After a Prolonged Period of Time
When the water bas is not going to be used for more than 3 days, disconnect
the water bar from the electricity supply and turn off the water tap. The next
time the water bar is used, dispense cold water for approximately 1 minute, hot
water for approximately 2 minutes and 2 cups of sparkling water.
CO2 CYLINDER STATUS
FULL
EMPTY
FULL
EMPTY
CO2 CYLINDER STATUS

30
k. Initialization
This option enables performing 2 different actions. The first is initializing all
the water bar settings and restoring them to the factory defaults. The second
option enables resetting the smart heating data (the hot water usage data)
learned by the water bar.
k.1. Restoring Factory Settings
This option enables initializing and restoring all the water bar’s default settings:
Clock – 24 hour display
Cold water quantity/temp. – 200 ml at
4 degrees Celsius
Language – Hebrew Mixed water quantity/temp. – 200 ml at
50 degrees Celsius
Child lock – On Energy saving mode – On
Jug of cold water – 1 liter Jug of sparkling water quantity – 1 liter
Smart heating – On Sparkling level – Regular
Beep on press – On
Automatic wakeup – Off
To restore the aforementioned settings, enter the RESTORE FACTORY SETTINGS
sub menu.
To restore the settings, select the YES option using the top right
and bottom
right buttons.
To confirm, press the button.
FACTORY SETTINGS
Are you sure you want
to reset to the
factory settings?
NO
YES
MENU MAINTENANCE RESET RESTOR FACTORY SETTINGS

31
k.2. Smart Heating Reset
This option enables deleting of all the boiling habits learned by the water bar.
To reset the smart heating data, enter the SMART HEATING RESET sub menu.
MENU MAINTENANCE RESET SMART HEATING RESET
To reset the data, select YES using the top right and bottom right buttons.
To confirm, press the button.
l. Energy Saving Mode
The option enables turning the heating system off automatically after the last
boil. Is this state the water bar is ready for dispensing cold and sparkling water
and is not ready for dispensing hot or mixed water. To dispense hot or mixed
water in energy saving state, press the hot or mixed water dispensing button or
press the boil button.
l.1. Turning On Energy Saving Mode
To set the energy saving state, enter the ENERGY SAVING sub menu:
MENU ENERGY SAVING
Select the ACTIVE option using the top right and bottom right buttons.
To confirm, press the button.
The ENERGY SAVING state enables turning the water heating system off
automatically.
Is this state the water bar is ready for dispensing cold and mixed water and is
not ready for dispensing hot water. After dispensing war water, the heating
system will also be turned on.
ENERGY SAVING
INACTIVE
ACTIVE

32
m. Turn Off Mode
This option enables turning off the water bar’s display as well as it’s heating and
cooling systems.
To turn off, enter the TURN OFF sub menu:
MENU TURN OFF
Select YES using the top right and bottom right buttons.
To confirm, press the button.
To exit this state, press any key.
When the water bar is off, the LED above the
button will turn on to indicate
that the water bar is connected to the electricity supply but turned off.

33
7. Replacement Date for the CO2 Cylinder
When the CO2 cylinder is completely empty, a controlled discharging process
will be performed by the water bar. During this process the remaining CO
2
in
the cylinder is emptied into the water bar and may be accompanied by noise.
Please note! Do not remove the CO
2
cylinder before the controlled
discharging process is completed.
The process starts automatically immediately following the dispensing of the
last cup of sparkling water.
> During the cylinder discharging process, the water bar display will indicate
that the water bar has started the discharging process. Do not perform any
actions on the CO
2
cylinder until the water bar displays that the action is
complete and the cylinder can be replaced.
> During the discharging process, the sparkling water icon will be dimmed and
dispensing sparkling water will not be possible.
> A blue progress bar will be displayed above the icon and show the CO
2
cylinder emptying progress rate.
> At the end of the process, the message CO
2
CYLINDER PROCESS COMPLETED
will appear, an empty CO
2
icon will be displayed and the message PLEASE
REPLACE THE CO
2
CYLINDER will be displayed.
> Now you can remove the old CO2 cylinder and replace it with a new one.
> As soon as the replacement has been completes, the empty cylinder icon will
disappear and it will be possible to dispense sparkling water.
Please note! If the CO
2
cylinder is not replaced, the CO2 cylinder icon will
appear on the main screen and the sparkling water cup icon on the display will
be dimmed. In this state, attempting to dispense sparkling water will show an
alert on the display for 3 seconds accompanied by a beep.
For an explanation on replacing the CO
2
cylinder, see section "8. Replacing the
CO
2
Cylinder" on page 34.
To order CO
2
cylinders, contact the customer service center.

34
8. Replacing the CO2 Cylinder
1. Lock the keyboard by simultaneously pressing the and buttons for a few
seconds.
2. Pull gently to remove the magnetic cover of the CO
2
cylinder
. If necessary,
turn the water bar a little so you have easy access for removing the cover.
4. Turn the cylinder counterclockwise to release it from the threading.
3. Lift up the CO
2
cylinder
.
When the CO2 cylinder
empties and the empty cylinder icon appears on the
display, it will be possible to replace the CO
2
cylinder
using the following steps:
5. Release the cylinder by pulling it down towards the spring base and bending
the cylinder towards you.
Warning!
Do not remove the CO
2
cylinder from
the device before it is emptied!
Doing so could produce a loud noise
and frostbite!

35
6. Pull the used cylinder upwards. It is recommended to deliver the used
cylinders to electronic waste collection points. The cylinder can also be handed
to the Strauss Water delivery person with your next order.
8. Turn the cylinder clockwise till the end of the thread. Lower the CO2
cylinder
.
A beep will sound and a message will appear on the display.
7. Insert the new CO
2
cylinder
into the cylinder housing by pushing the spring
downwards and straightening the cylinder.
9. Return the cylinder’s magnetic cover.

36
9. Cleaning the Water Bar
Please note! When cleaning, lock the keypad of the water bar to avoid
unwanted water dispensing. see section "m. Keypad Lock" on page 15.
Do not clean the water bar with strong cleaning agents, concentrated
cleaning liquids, solvents or accessories that may damage the water
bar’s enclosure (e.g. Scotch-Brite or steel wool).
The water bar is connected to the electricity supply. Ensure the back of
the water bar does not get wet.

37
10. Safety Warnings
• The water bar dispenses water from 2 different nozzles. Use a wide neck
bottle or jug for dispensing.
• If the ministry of health or any other official authority announce of a health
hazard or any other issue with the supplied water quality, drinking water should
be boiled and you should act according to their instructions. After the health
issue has been resolved according to their announcements, we recommend that
you contact the Company to receive further instructions.
• For babies under the age of 1 year, drinking water should be boiled according to
the ministry of health instructions.
• The filtering process secretes small quantities of salts into the water at a level
permitted in drinking water. Susceptible people should consult a physician
before use.
• Operating the UV-C lamp outside the water bar is forbidden. Improper use of
the water bar or damage to the UV-C lamp holder may result in the escape of
UV radiation dangerous to the eyes and skin. Do not turn on a damaged water bar.
•
Runs on 230V. Connect the water bar to an electricity socket with a
10A fuse.
• When using the water bar and performing maintenance, use all the precautions
applying to electrical appliances.
• This water bar provides very hot water.
• The water bar can be set to child lock mode (see section "b. Child Lock
Mechanism" on page 24).
• Children under the age of 7 should be be permitted to use the water bar without
supervision. Additionally, place the cup in the intended place and remove your
hand during dispensing.
• The appliances are connected to the water mains by a system of detachable
flexible hoses. Use only the flexible hoses system provided by the Company.
Do not reuse flexible hoses.
• The customer is responsible for ensuring a dry environment around the water
bar and preventing users and passers by from slipping. In the event of an
identified leak/drip from the water bar causing a wet environment around it,
immediately turn off the water bar, ensure a dry environment and arrange for the
arrival of a technician to repair the water bar. Do not operate the water bar until
a technician arrives and repairs it. The Company will not bear any responsibility in
the event of injury and/or any other damage which may be caused due to water
in the vicinity of the water bar.
Any fault or tear in the water bar’s electricity cable will be replaced by the
manufacturer or an authorized technician on their behalf. The water bar is intended
for use in locations with a residual current protective device of 30mA.

38
Maximum working temperature +32ºC.
*
ASHRAE
conditions
evaporation temperature -23ºC.
**
Water output measured when ambient temperature is no higher than 25ºC and water
temperature in the mains is no higher than 22ºC.
***
If the pressure is higher, install a pressure regulator before the water bar.
****
200 ml cup.
*****
Dispensing cups of hot water is performed at 10 second intervals (after dispensing 4 cups,
the water needs to be boiled by pressing the boil button).
Dispensing cups of cold water is performed at 90 second intervals between cups.
******
System performance tested under lab conditions. Under normal usage conditions it is
possible to adjust the system’s performance in accordance with the environmental
conditions.
11. Technical Specifications
Electricity Supply
Voltage (single phase) 230 V
Frequency 50 Hz
Cooling power* 100 W
Heating power 1,800 W
Current rating 8.5 A
Water Supply
Heating System
Container
volume
1 liter
Water
output
60 cups per hour****/
12 liters (heating
range 92-96
ºC)
Minimum input
pressure
1.5 bar
Maximum input
pressure***
6 bar
Water flow rate 1.4 liter per minute
Sparkling Water Output
CO2 cylinder
content
380 grams
Output by
sparkling level
Strong- 80 cups
Regular - 120 cups
Light - 150 cups
Water Bar Measurements
Height (cm) 36.3
Depth (cm) 43.3 (46.8 open tray)
Width (cm) 31.8
Weight - dry (kg) 16
Cooling System
Cold/sparkling
water tank volume
1.6 liter
Cooling output** 125 W
Water output*** 40 cups per
hour****/
8 liters (cooling
range 5-20
ºC)
Sparkling Water
Output
Continuous
dispensing of
up to 5 cups
(cooling range
5-12
ºC)
Filtration & Purification
System
UV lamp 11 W
Active carbon filter 2 micron

39
Problem Description Possible Causes Actions for Resolution
No water dispensed from
water bar
The water bar is not connected
to the electricity supply
Ensue that the water bar is connected to
the electricity supply
The electric socket is not
working
Check the electric socket by using a
different appliance
Main water tap is closed Open the tap
Water outage Check for water in other taps
Control system reset required
folded water pipe keypad
lock on
Perform a water bar reset action (see
section "k. Initialization" on page 30)
release the fold
Stop keypad action (see section "m. Keypad
Lock" on page 15)
by pressing the hot water
button
a. The dispensed water is
not hot
High water consumption
Wait 3 min. and check again
b. No hot water is
dispensed at all
Water bar in ENERGY SAVING
mode
Wait for the HEATING FINISHED indication
Water bar in CHILD LOCK mode
Heating system switch is off
see section "m. Keypad Lock" on page 15
Check that the heating switch at the back
of the water bar is in the On position
by pressing the cold water
button
a. The dispensed water is
not cold
Cold water temperature set
too high
High cold water consumption
Check the cold water setting
(see section "a.1. Setting the Quantity for
Dispensing Cold Water" on page 16)
Wait 15 min. and check again
b. No cold water is
dispensed at all
UV system needs replacing Disconnect the
UV
lamp and reconnect it
Water bar leaks* (see
comment)
Drip tray full Empty the drip tray
A leak from the water bar Disconnect the water bar from the electri-
city supply, turn off the water tap, and call
the Digital Helpdesk from the website
“New” tastes The water bar is new
Wash the tanks (see section "g. Washing
Tanks" on page 28)
The water bar was not in use
for a prolonged period of time
Replace the filter and perform an automatic
wash
The filter was not replaced on
time
The measured water
quantity does not match
the setting
Low water pressure in the
house
Check the water pressure in your building/
house
The filter was not replaced on
time
Replace the filter
Before calling for a technician, if the water bar is not working, use the following table to
check whether the problem is with the water bar and not with the electricity or water
supply.
12. Troubleshooting

40
Problem Description Possible Causes Actions for Resolution
When pressing the sparkling
water button
No sparkling water is dispensed
at all
a. The CO
2
cylinder is empty Check if the CO2 cylinder empty icon
appears on the display. If it does, then
replace the CO
2
cylinder with a new
one (see section 8 on page 32). If not,
contact the company.
b. No cold water is
dispensed at all
Check if cold water is dispensed
when pressing the cold water
button. If cold water is dispensed,
disconnect the water bar from the
electricity supply, reconnect it after
10 seconds and try dispensing again.
If the problem has not been solved,
contact the company.
Sparkling level not strong
enough
a. Cold water temperature Check that the cold water
temperature is set to the coldest
temperature (see section "b.1. Setting
Cold Water Temperature" on page 19)
a. The CO
2
cylinder is empty Check if the CO2 cylinder empty icon
appears on the display. If it does, then
replace the CO
2
cylinder with a new
one (see section 8 on page 32). If not,
contact the company.
Non-sparkling water flow when
requesting sparkling water
Contact the company.
The quantity of sparkling water
is inaccurate
Dispense sparkling water once more
to check whether it was a once of
issue or a regular problem
contact
the company
if the problem is not
resolved.
If the above actions did not help, contact the company and schedule a technician
visit without any waiting time.
• Due to hot water expansion, the spout may drip a little. This is considered proper
system operation.
• Improper activity of the UV-C system stops the hot water flow and is
accompanied by a beep - in the event of a malfunction
contact the Digital Help
desk from the website
.

41
Strauss Water products are noted for their innovative technologies, especially smart
human engineering, and for their compliance with all the strictest standards for
filtering and purification systems.
It is important to us that you know that our water bar has been certified according
to SII 1505, Part 1 “Drinking Water Treatment Systems for Domestic Use”. In order to
maintain the high water quality, clarity and taste, the following should be replaced
on time: Filter - every 6 months, lamp - once a year.
Joining our service and warranty program will ensure that you and your family
continue drinking clear, high quality and tasty water. We will send you the necessary
filters and lamps via courier and you will enjoy discounts, special deals and preferred
service.
The active carbon filter absorbs chlorine, removes foreign bodies (such as sand and
rust) and prevents smells and aftertastes that exist in the water. To maintain the
water quality, taste and clarity, replace it every 6 months.
The
water bar’s ultraviolet lamp reduces the water’s bacterial load. The lamp’s
efficiency diminishes after a year, therefore it should be replaced once a year.
To maintain the water bar in working condition, you should know that
• Repairs to the water bar will be performed only by a service person from the
Company.
• Proper system maintenance for ensuring water quality includes using only original
disposable parts supplied by the manufacturer.
• The manufacturer, Strauss Water, will not be held liable for any malfunction and/or
fault and/or damage arising from using non-original parts.
• This system is only intended for handling drinking water supplied by the water grid.
14. Service and Warranty Options

With
Bubble Plus
water bars the family
drinks more water
Manufacturer: Strauss Water
Yoni Netanyahu Street 1c,
Or Yehuda 603761, Israel |
Manufactured in: Israel
2004359 Rev 01
 Loading...