

Page 1
Installation Guide
Revision 1.1
Last revised: August 29, 2018
Disclaimer:
This document and its contents are not certified.
Page 2

600840-000052
Page 2 of 8
Revision
Number
Stratus 3i Installation Guide
Stratus 3i Installation Guide
©2018 Appareo Systems, LLC. All Rights Reserved.
Stratus 3i Installation Guide. All content within is copyrighted by Appareo Systems, LLC, and
may not be reprinted without permission.
The content of this guide is furnished for informational use only, is subject to change without
notice, and should not be construed as a commitment by Appareo Systems, LLC. Appareo
assumes no responsibility or liability for any errors or inaccuracies that may appear in the
information content contained in this guide. Unauthorized replication of this guide is prohibited.
Appareo, Appareo Systems, Stratus, and the Appareo logos are either registered trademarks or
trademarks of Appareo Systems, LLC. MITRE is a registered tr ademark of the MITRE
Corporation. iPad, iPhone, and iPod touch are registered trademarks of Apple Inc. App Store is
a service mark of Apple Inc. All other trademarks and registered trademarks are the sole
property of their respective owners.
Appareo Systems, LLC, 1810 NDSU Research Circle North, Fargo, ND 58102 USA.
To view the most current version of this document, go to www.appareo.com/dealer-portal
or www.appareo.com/resources.
Record of Revision
Change Description Revision Date Inserted By
1.0 Initial release 7/11/18 AAL
1.1 Updated certification disclaimer 8/29/18 AAL
Page 3
600840-000052
Page 3 of 8
Stratus 3i Installation Guide
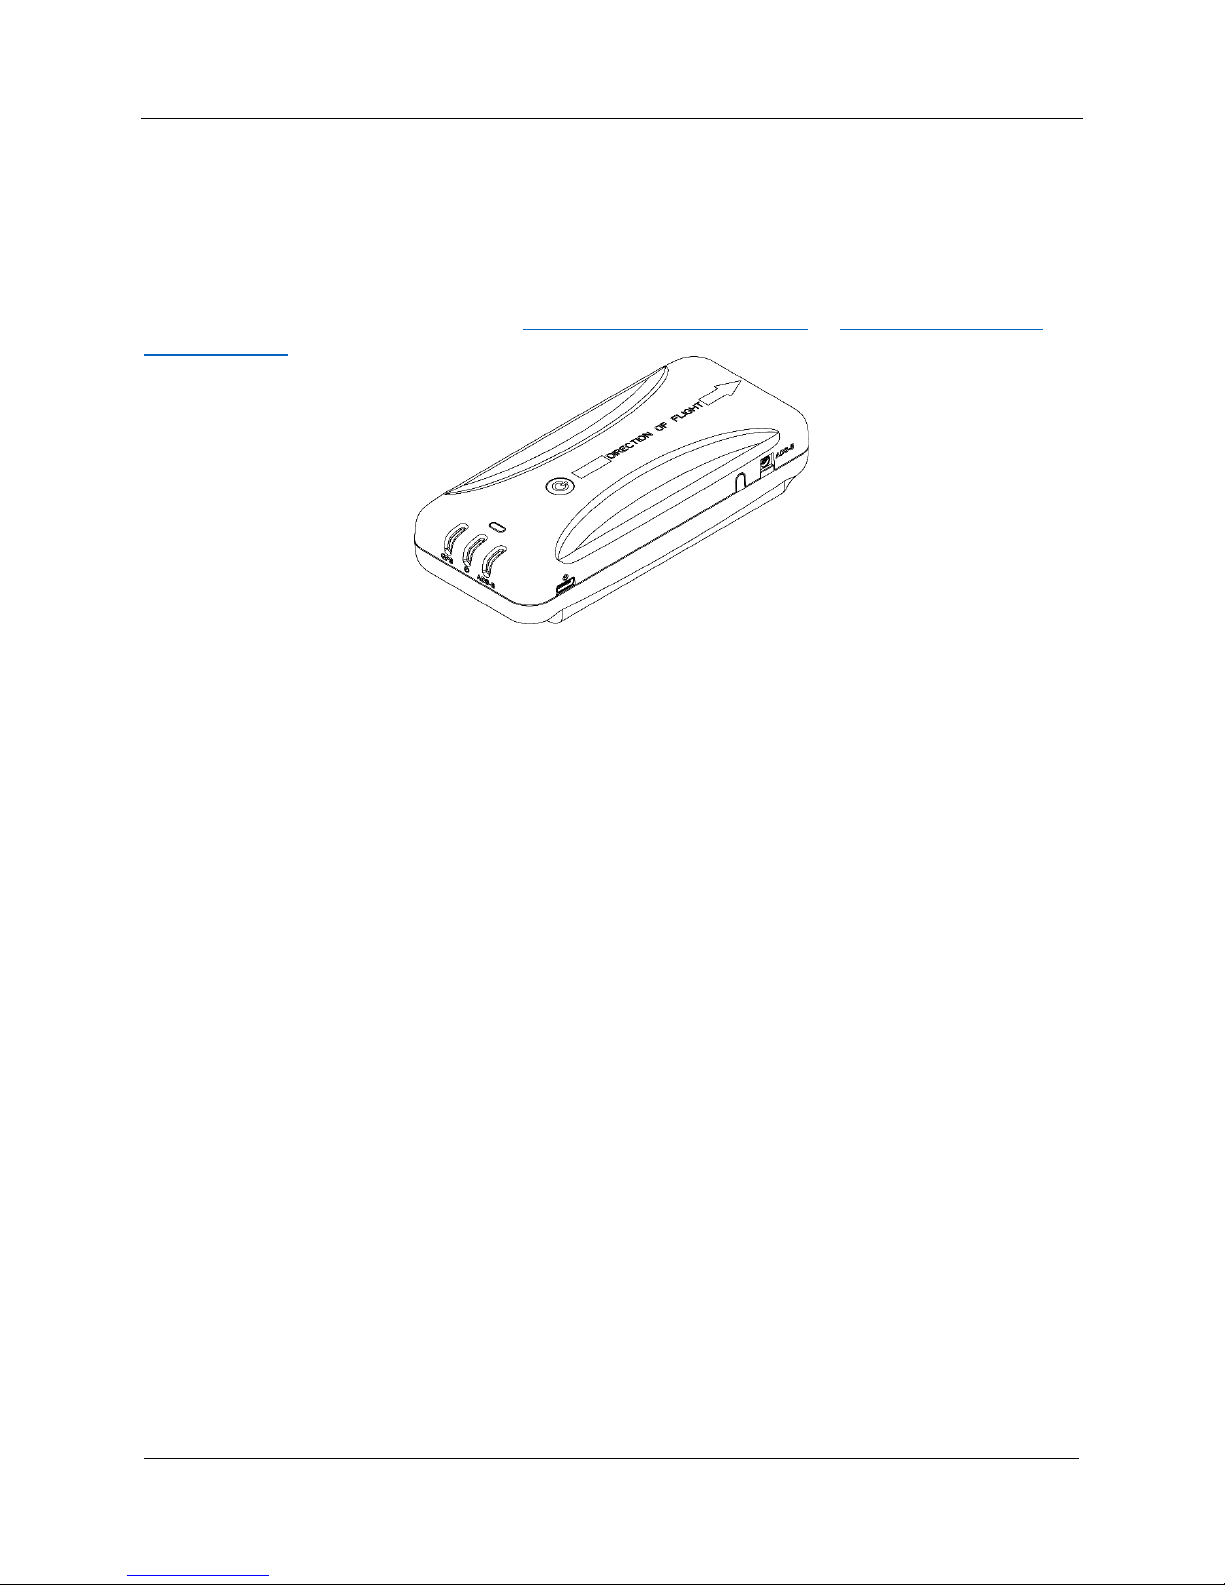
About Stratus 3i
Stratus 3i is a portable receiver that is wired to Stratus ES/ESG. It receives auxiliary power from
the transponder and also receives the ADS-B and GPS signal from the transponder’s externallymounted antennas.
Refer to the installation instructions on www.appareo.com/resources or
portal/manuals to install Stratus ES/ESG.
Supplied Components
• Stratus 3i ADS-B In portable receiver
• Mounting clip
• 9-pin D-Sub connector with mounting hardware
• Power serial interface cable
• BNC jack to blind mate adapter
• RF interface cable
appareo.com/dealer-
Placing Stratus 3i in the Aircraft
Stratus 3i can be placed anywhere in the cockpit in any orientation (including sideways or
upside down) as long as the Direction of Flight arrow on the top of the receiver points in the
direction of flight.
The provided mounting clip can be used to secure the receiver in the aircraft. The holes in the
Stratus 3i mount are also compatible with many RAM mounts.
Page 4
600840-000052
Page 4 of 8
CAUTION:
cabling
Stratus 3i Installation Guide
Make sure that aircraft power is disconnected before connecting any
.
Installing the Interface Cables
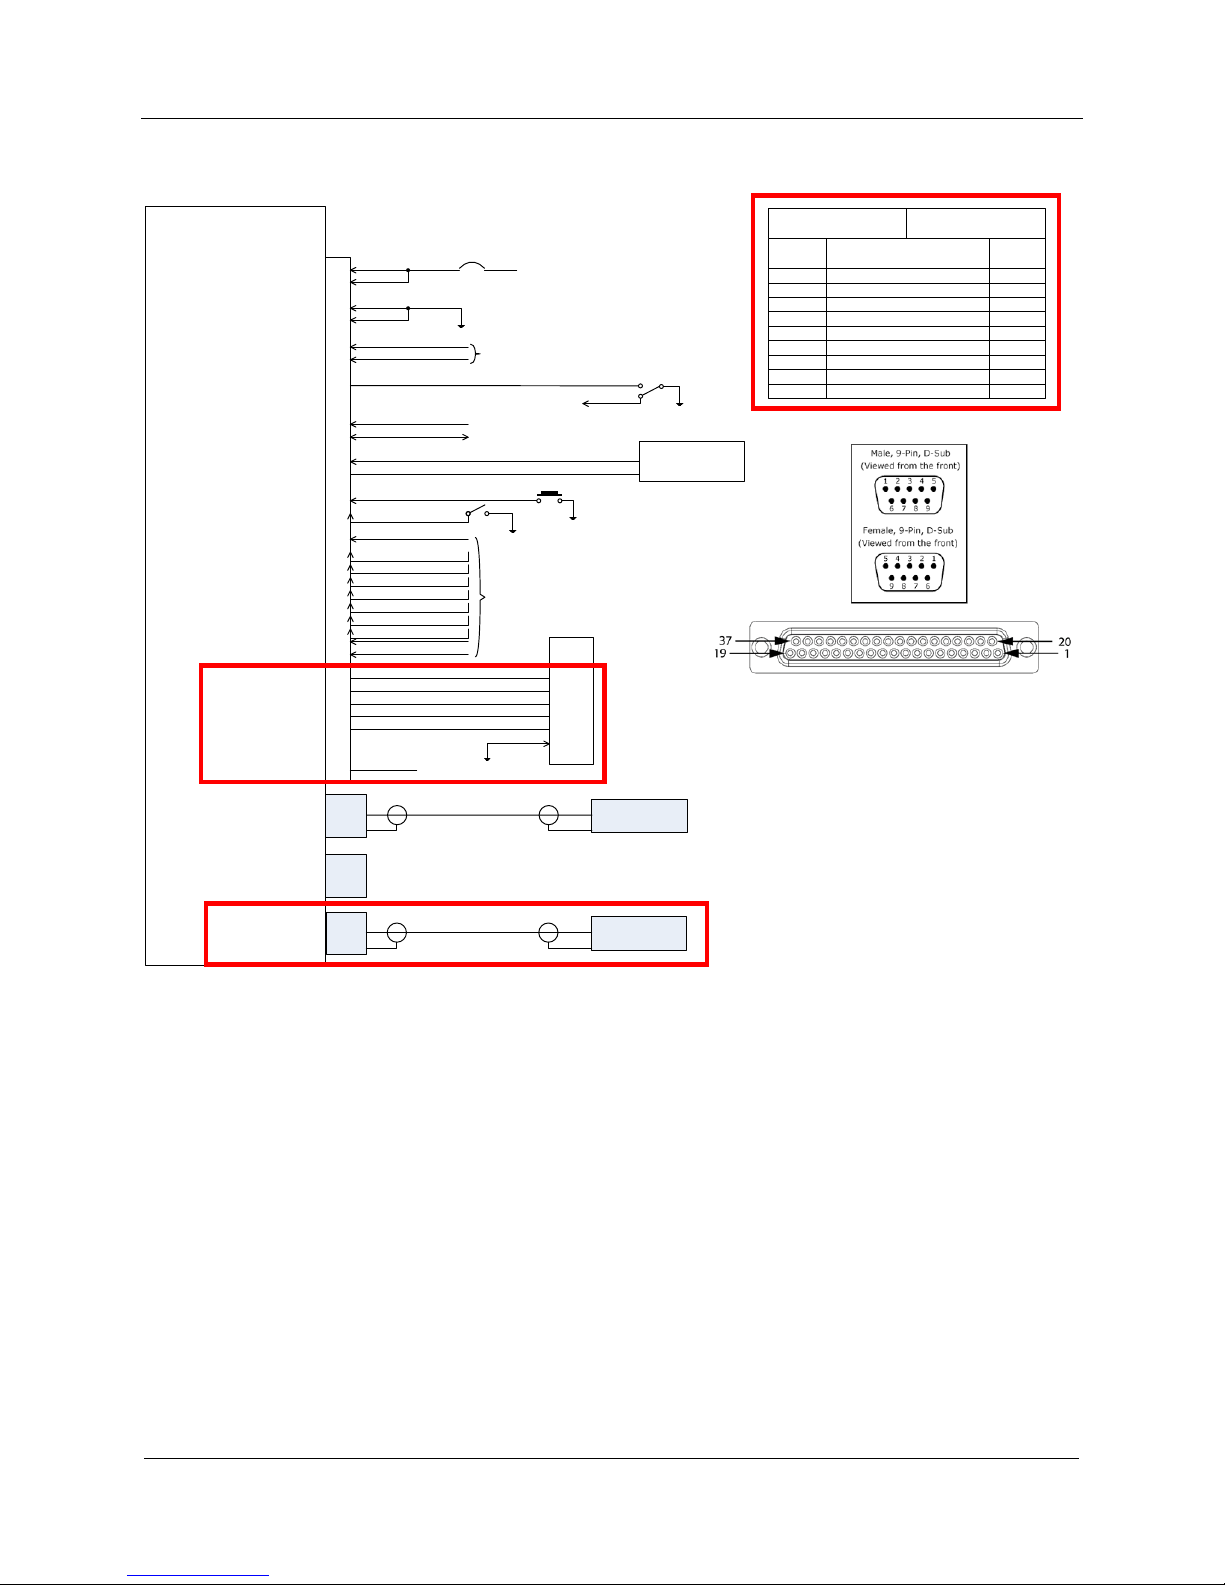
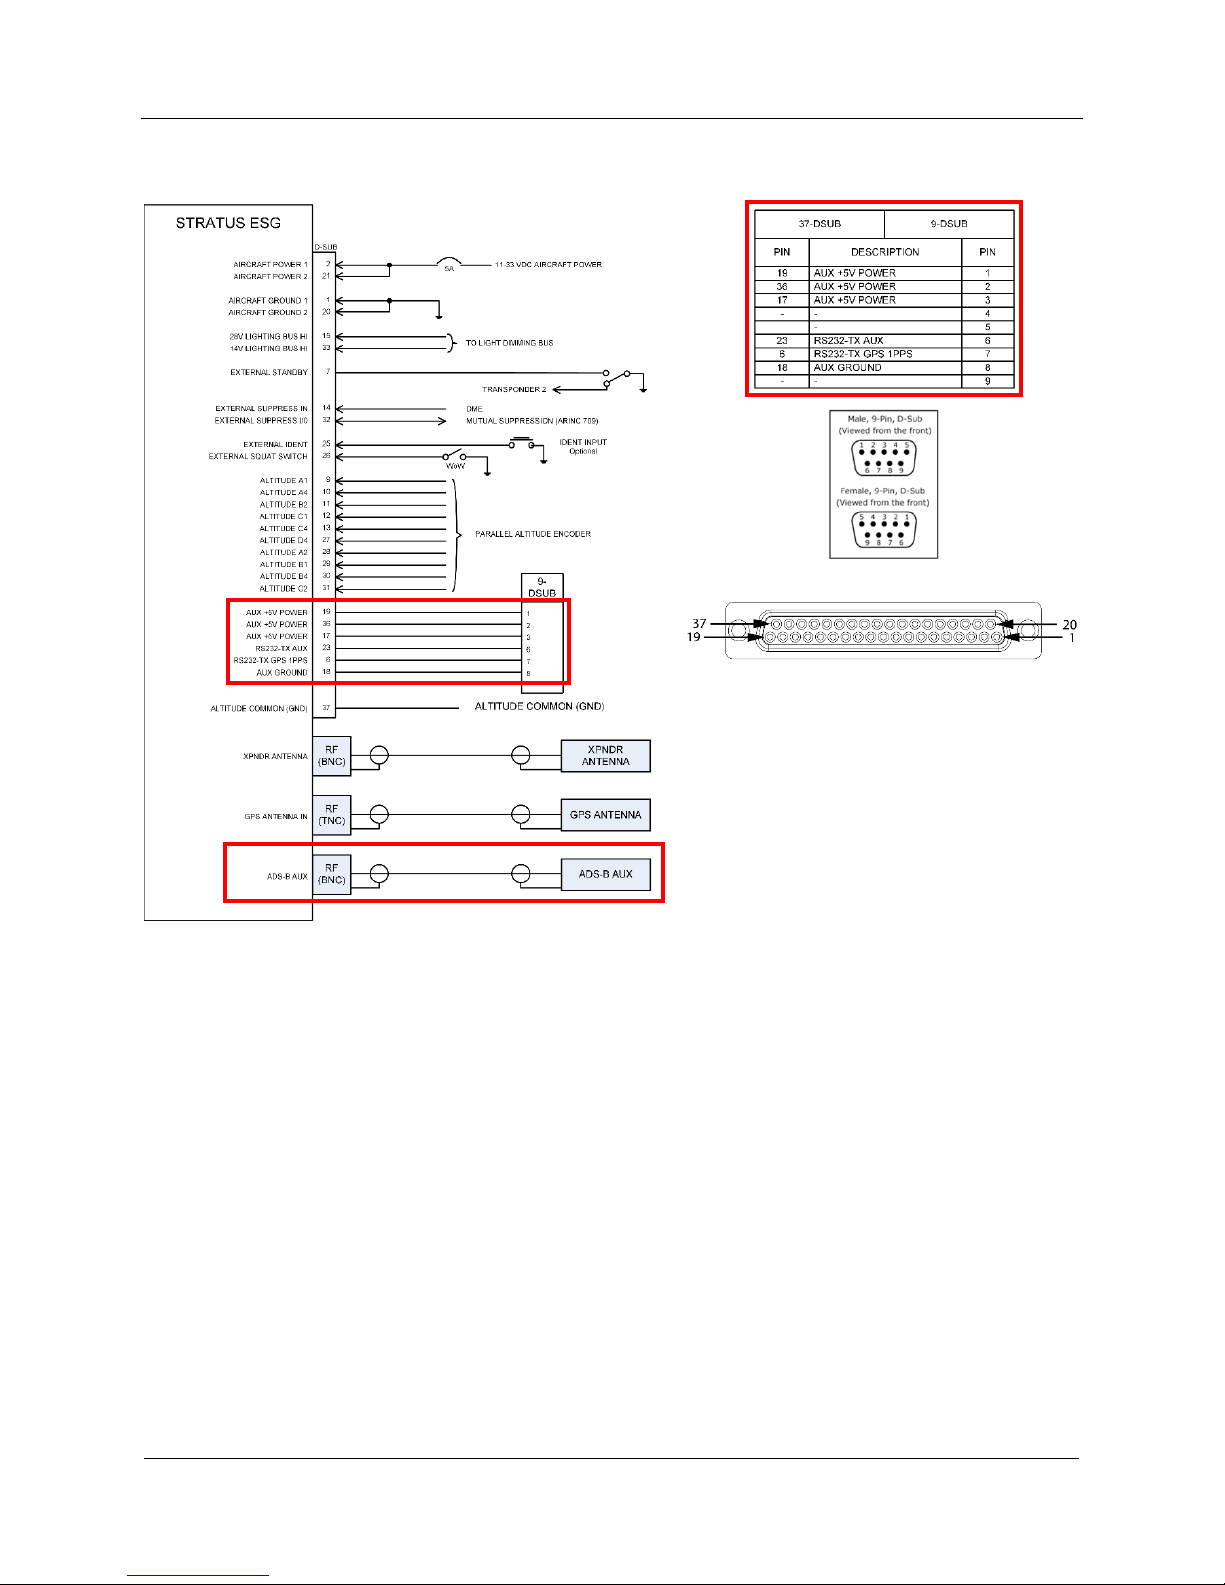
1. Wire the 9 pin D-Sub connector to the transponder following the wiring diagram on
Page 6 or 7 and the specifications below.
• Maximum harness length: 3 feet
• Wire gauge: 20 AWG
2. Plug the Stratus 3i power serial interface cable into the 9-pin D-Sub connector. Secure
using the thumb screws.
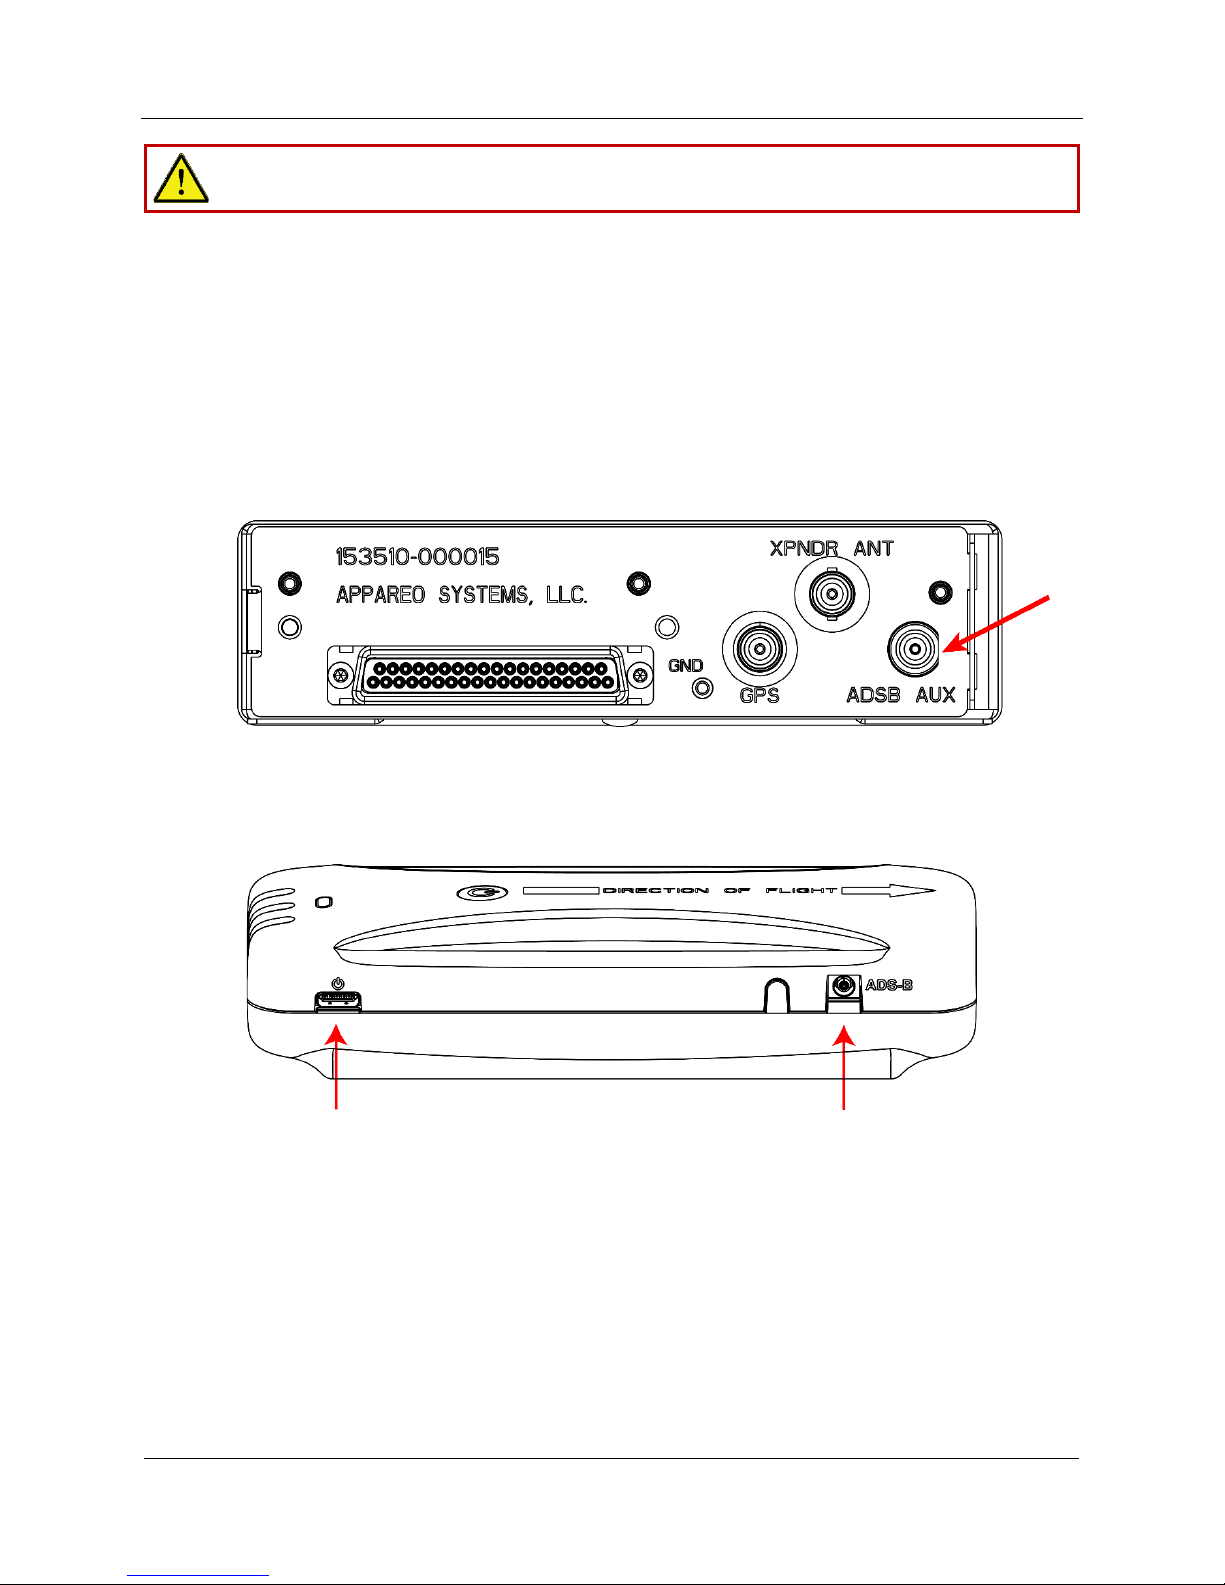
3. Install the BNC blind mate adapter in the ADSB AUX hole on the transponder backplate.
4. Plug the BNC connector of the Stratus 3i RF interface cable into the BNC adapter.
5. Connect the remaining end of the power serial cable into the power port of Stratus 3i,
and the remaining end of the Stratus 3i RF interface cable into the ADS-B port of
Stratus 3i. Secure cables as necessary.
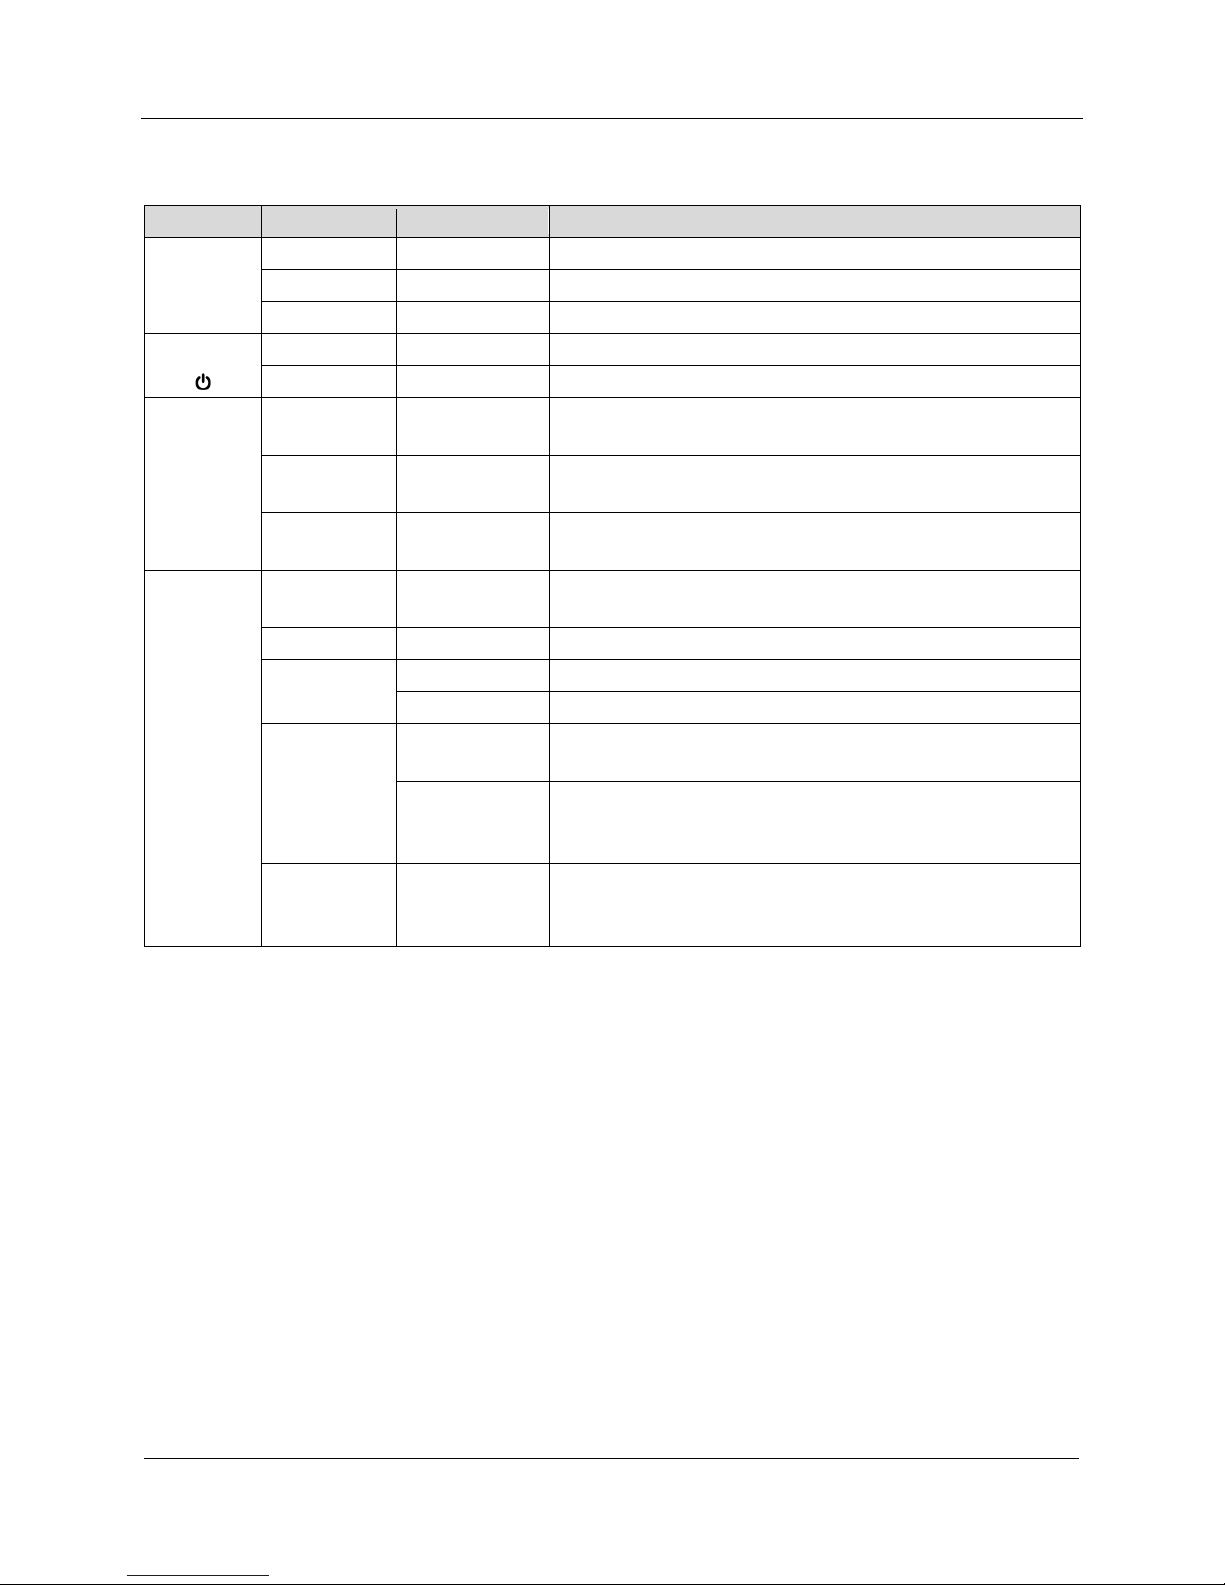
6. Power on the aircraft to make sure that Stratus 3i is receiving power. Refer to the LED
indicator statuses on Page 8.
Page 5

600840-000052
Page 5 of 8
Stratus 3i Installation Guide
Configuring the Transponder
After Stratus 3i has been installed, configure the transponder to allow for ADS-B In receiver
information.
1. Enter into configuration mode on the transponder.
To enter into configuration mode: While holding the FUNC key, press and release the
PWR key.
2. Press FUNC or the arrow keys to navigate to the ADS-B Capability screen. Press ENT.
3. Use the arrow keys to select UAT and 1090 ES. Press ENT.
Turning on Stratus 3i
Stratus 3i automatically turns on when it receives aircraft power.
If Stratus 3i is moved after being turned on, you must re-calibrate it in Stratus Horizon Pro or
ForeFlight Mobile.
Page 6
600840-000052
Page 6 of 8
PIN DESCRIPTION PIN
19 AUX +5V POWER 1
36 AUX +5V POWER 2
17 AUX +5V POWER 3
- - 4
- 5
23 RS232-TX AUX 6
6 RS232-TX GPS 1PPS 7
- AIRCRAF T G RO UND 8
- - 9
37-DSUB 9-DSUB
STRATUS ES
AI RCRAFT P OWE R 1
AI RCRAFT P OWE R 2
AIRCRAFT GRO UND 1
AIRCRAFT GRO UND 2
28V LIGHT ING BU S HI
14V LIGHT ING BU S HI
EXTERNAL S TANDBY
EXTERNAL S UPPRESS IN
EXTERNAL S UPPRESS I /0
RS232 EX TERNAL GPS
EXTERNAL G PS COMMON (GND)
EXT ER NAL IDEN T
EXT ER NAL SQUAT SWITCH
ALTITUDE A1
ALTITUDE A4
ALTITUDE B2
ALTITUDE C1
ALTITUDE C4
ALTITUDE D4
ALTITUDE A2
ALTITUDE B1
ALTITUDE B4
ALTITUDE C2
AUX +5V POW ER
AUX +5V POW ER
AUX +5V POW ER
RS232-TX AUX
RS232-TX GPS 1PPS
ALTITUDE COMMON (GND)
XP NDR A NT E NNA
GPS ANTENN A IN
(STRAT US ESG ONLY )
ADS-B AU X
2
21
1
20
15
33
7
14
32
3
18
25
26
9
10
11
12
13
27
28
29
30
31
19
36
17
23
6
37
11-33 VDC AIRCRAFT POW ER
D-SUB
5A
TO LIGHT DIMMING BUS
PARA LL EL ALTI TUDE EN CO DE R
MUTUAL SUP PRESS ION (ARINC 709)
DME
TRANSPONDE R 2
OPTIONAL
RF
(BNC)
XPNDR
ANTENNA
RF
(TNC)
ALTITUDE COMMON (GND)
IDENT INPUT
OPTIONAL
WoW
GPS SOURCE
RS232 OUT
COMMO N GROUND
1
2
3
6
7
8
9-
DSUB
RF
(BNC)
ADS-B AUX
Stratus ES to Stratus 3i Wiring Diagram
Stratus 3i Installation Guide
Page 7
600840-000052
Page 7 of 8
Stratus ESG to Stratus 3i Wiring Diagram
Stratus 3i Installation Guide
Page 8
600840-000052
Page 8 of 8
Label
LED Color
LED Status
Meaning
Green
Solid
3-D GPS lock achieved
Yellow
Flashing
No GPS lock, searching for signal.
Off
Off
Receiver is powered off.
Green
Flashing
Receiver is powered on and operational.
Off
Off
No power is being received; receiver is powered off.
ADS-B FIS-B signal has been received from
multiple towers in the past three seconds.
ADS-B FIS-B signal has been received from one
tower in the past three seconds.
ADS-B FIS-B signal has not been received in the
past three seconds.
Briefly red
then green
Red
Flashing
Built-in-test failure. Contact support for assistance.
Flashing
Installing firmware update.
Solid
Applying firmware update.
Solid for two
seconds
Off for five
then flashing
Green to
green
LED Indicator Status
GPS
Power
Green Solid
Stratus 3i Installation Guide
ADS-B
All
indicators
Yellow Solid
Off Off
Solid Receiver is powering on and calibrating.
Yellow
Green
seconds,
yellow to
Solid Factory reset is complete.
© 2018 Appareo Systems, LLC. All Rights Reserved.
Firmware update complete.
Power button is pressed. After 30 seconds, factory
reset process begins.
 Loading...