

Page 1
INSTALLATION
GUIDE
BEFORE YOU START
TOOLS AND HARDWARE REQUIRED
POST AND RAIL FENCING
Stratco Post and Rail fencing is a traditional and cost effective form of fencing. Its simple design makes it the ideal choice for a DIY
project, especially on sloping sites and uneven ground. Galvanised posts and rails are combined with fence sheets that come in a
range of different profiles, topped off with optional fence capping and a full spectrum of colours to complement any environment.
Before beginning your fencing project, ensure you have all the correct components and tools needed to nish the job. To ensure a
neat nish, any gates should be installed before beginning work on the rest of the fence.
• Tape Measure
• String Line
• Plumb Line
• Spirit Level
• Hack-Saw
• Tin Snips
• Rivet Gun
• Post Hole Digger
• Concrete Mix
• Drill and Hex-Head Adaptor
Post and Rail
Page 2
700mm Minimum depth
200mm Minimum diameter
String Line
Spirit level
Maximum
3m intervals
Plumb
Line
8-14mm
off vertical
Concrete
Chock up with
wooden blocks
Increase
Footing
depth by
100mm
700mm
Minimum
depth
500mm
Minimum
post depth
100
mm
150mm layer of
concrete mix,
agitated before
each subsequent
layer is poured.
Final layer
shaped to
slope away
from posts.
OVERLAP DETAILS FOR EACH SHEETING PROFILE
Wavelok
Smartspan
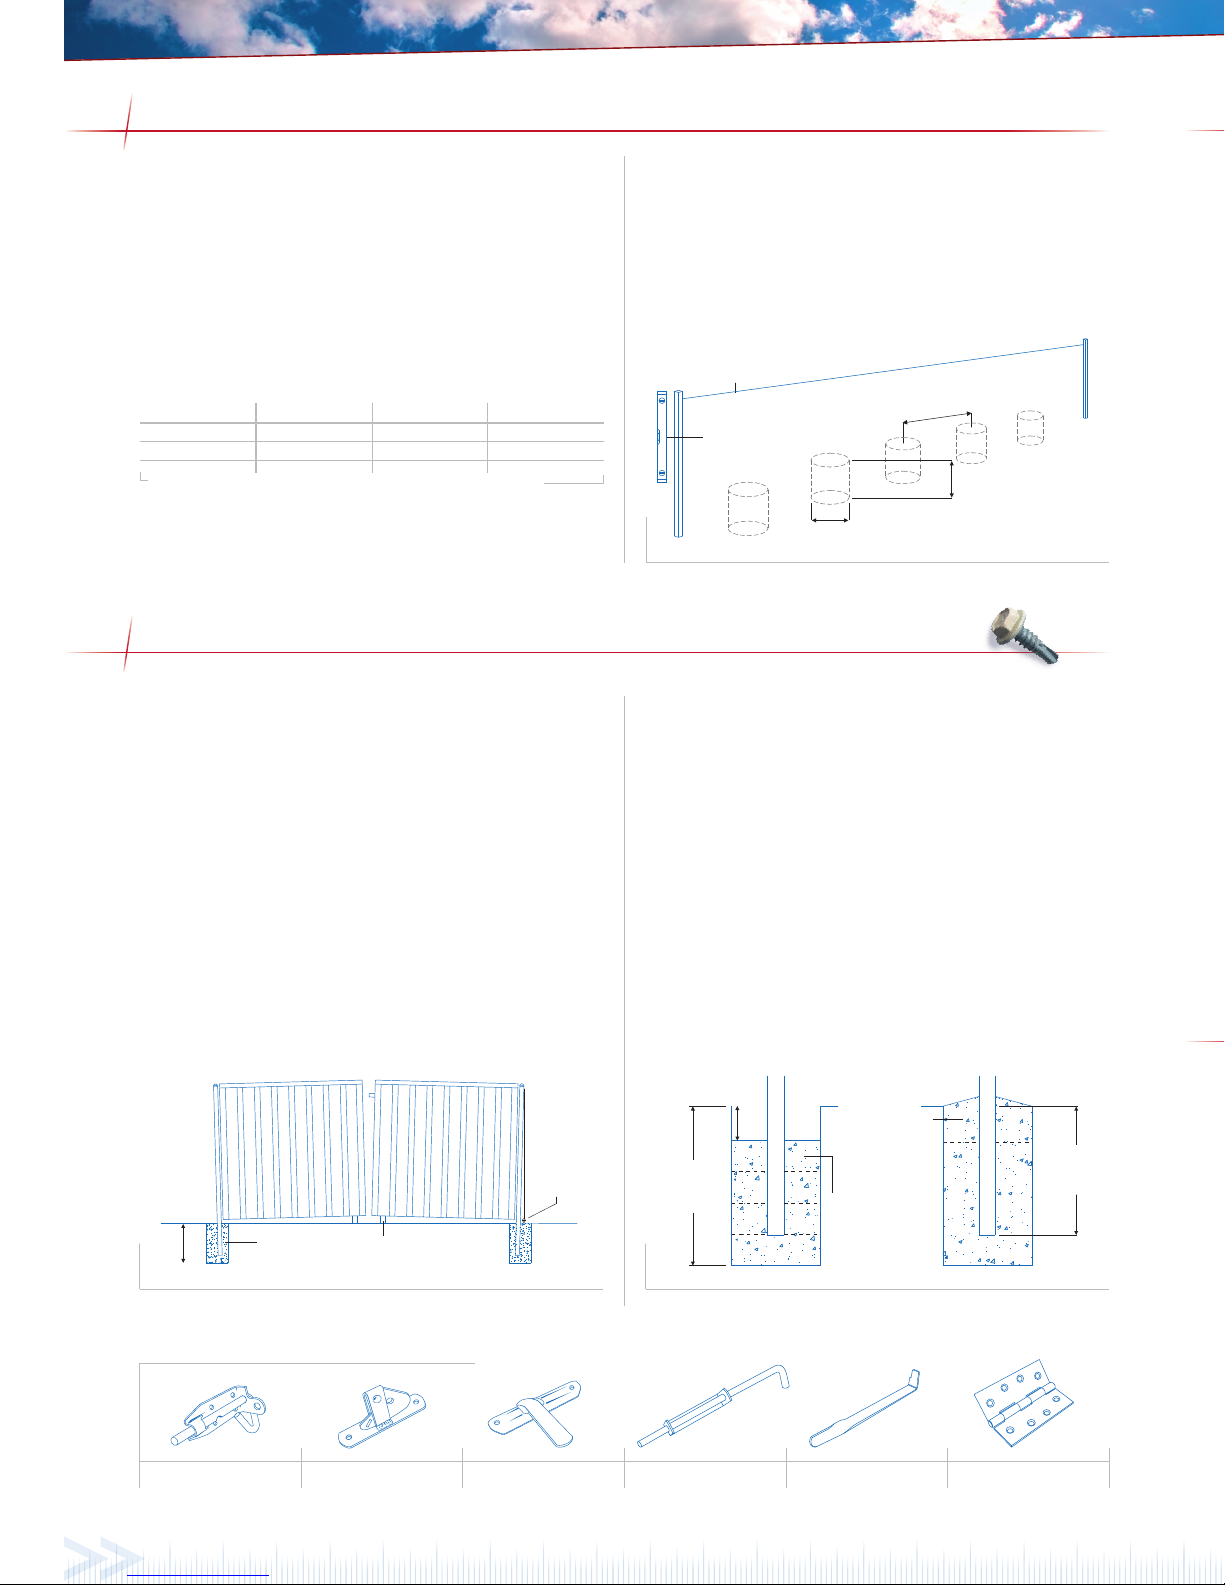
Accurately determine the position of the fence (in some cases
a surveyor may be required) and mark the position using a
temporar y string line. Using the spacing information provided
in the table below, mark the position of the posts. If you are
unsure of the wind speed for your area, refer to the brochure
titled “Determining Wind Speed”. You may decide to taper the
free end of a fence to help it withstand strong winds (gure 5.0).
Alternatively the post spacings at a free end are to be reduced
as indicated in the table below.
Once marked, the post holes can be dug. The use of a manual
or mechanical auger is recommended, especially for harder
clay soils. The footings should be a minimum of 700mm
deep by 200mm in diameter for a rm natural sandy clay. For
variable soil conditions these dimensions should be increased if
considered necessary. The last three holes near a free end and
for posts suppor ting a gate will need to be 100mm deeper than
the standard depth.
Figure 1.0
FENCE POST SPACINGS PER WINDSPEED
W28
W33
W41
Windspeed
Table 1.0
3000
2250
1500
Internal
1500
1200
800
Free End
3000
2250
1500
Tapered End
Figures are based on a maximum fence height of 1800mm. The free end spacings
are required for a distance equal to twice the fence height, if the end is not tapered.
GATE POST OPENINGS - Single Gate 865mm - Double Gate 3280mm
These are recommended measurements, check the gate widths before concreting the posts.
RAIL AND SHEET INSTALLATION
HORIZONTAL FENCING
Installing the gates
All gates should be installed before the remainder of the fence
is constructed. The gate must be xed to the SHS gate posts
before placing the posts in the ground. Fix the hinges to the
gate using the screws provided. Two hinges are required per
side. Fix the hinges to the SHS post, making sure the top of
the post is ush with the top of the gate. Place the assembled
gate and posts into the pre-dug holes. Gate posts should be
oset 25mm from the fence posts. The fence rails run into the
gate post with the outside face of the rail sitting ush with the
outside face of the gate post. To allow for deection under the
weight of the fence, the centre of the gate must be chocked
up with wooden blocks, so the gate posts can be positioned
bet ween 8mm and 14mm o ver tical. Use a plumb line to check
this measurement, then concrete into place, as outlined in
“Preparing the footings”.
Preparing the footings
If the fence has a tapered end, cut any posts involved in the taper
rst (refer to “Tapered End”). Position and prop the SHS posts
into their pre-dug holes, using the string line and spirit level
to keep them square and plumb. Prepare the Stratco concrete
mix as per the details on the bag. Posts should be embedded at
least 500mm into the concrete. Fill the hole with approximately
150mm of concrete. Using a shovel or a pole, agitate the concrete
to remove any air pockets. Add a further 150mm and agitate
again. This process should be repeated until the hole is full.
The top of the footing will need to be smoothed with a trowel to
ensure the surface slopes away from the post. No load should be
applied to the footing for at least 48 hours. Maximum concrete
strength may not occur for up to 28 days, so care should be
taken not to allow excessive force on the fence during this time.
Figure 2.0 Figure 2.1
Gate LatchPad Bolt Striker Plate Drop Bolt
Butt Hinge
Gate Latch Handle
FENCE COMPONENTS AND ACCESSORIES
The rails must be attached to the pre-installed posts. Use a
string line to position the rails. The rails are xed to the posts
by tting a saddle over the rail and xing it to each post with
two self-drilling screws (gure 3.0). Fit the post caps over the
end of the posts and knock into place. If you want to paint the
posts and rails, do this before at taching the sheets.
When positioning the sheets, it will look best if the sheet
overlap is arranged to face away from the most commonly
viewed angle. The top of the sheets should sit 250mm higher
than the top of the posts. Ensure the top of the sheets are level
by using a string line. Sheets are to be xed to the rails with
self-drilling screws, please refer to gure 3.1 for the number
of screws per sheet according to the sheet prole. The screws
are xed through the sheet along the centre of the rail. To keep
the screws in line with each other, use a string line along the
fence (see gure 6.0), or use a measuring stick that shows the
distance from the edge of the sheet to the centre of the rail.
Begin by following the previous sections on how to layout your
fence and concrete the posts. From the centre of each post to the
next, they should be no greater tha n 2400mm apar t. Horizon tal
fencing does not require any rails as the fence sheets are xed
directly to the posts. Only Superdek and Smartspan prole
sheets are used.
For strength, the fence sheets should be long enough to cover
three or more post spacings and should overlap by 150mm.
Position the sheets, with the overlap at the bottom. The top of
the fence sheets should sit ush with the top of the fence posts.
Install the top sheets rst using 10x16mm self-drilling screws,
but tempo ra rily leave the bot tom xing to allow th e lo wer sheet
to t under. Ensure that you lap the bottom sheet under the top
sheet for a neat appearance. Continue xing down the post.
Where the sheets lap, x the lapping with 3mm rivets or
10x16mm self-drilling screws. Complete the installation by
installing the capping as outlined on the back page.
GATE COMPONENTS AND ACCESSORIES
DESIGNING YOUR FENCE
GATE AND FOOTING INSTALLATION
Please Note: To prevent possible damage to the gate in high wind weather, the drop bolt must be installed on the gate.
Page 3
Place the rail just under the post
cap and attach the saddle to the
post with self-drilling screws.
Rail Attachment Detail
Rail
SHS post
Fence sheet
Saddle
Post cap
Rail
SHS Post
250mm
50mm
Superdek
OVERLAP DETAILS FOR EACH SHEETING PROFILE
CGI
CGI Mini
Wavelok
Smartspan
Use rivets to fix the capping
to the fence sheet.
Self tapping screws are used
to fasten the fence sheets to
the fence posts.
SHS post ends must sit flush
with the top of the fence.
Self-tapping screws or rivets
are used to secure the lap of
the fence sheets.
Fixing Detail
CappingPost Cap
Lapping Detail
Post End Detail
RAIL AND SHEET INSTALLATION
HORIZONTAL FENCING
FENCE COMPONENTS AND ACCESSORIES
SHS Post
50x 50mm
Post ExtensionPost CapSaddle
Capping
Joiner RHS Rail
38x 25mm
SHS Gate Post
65x 65mm
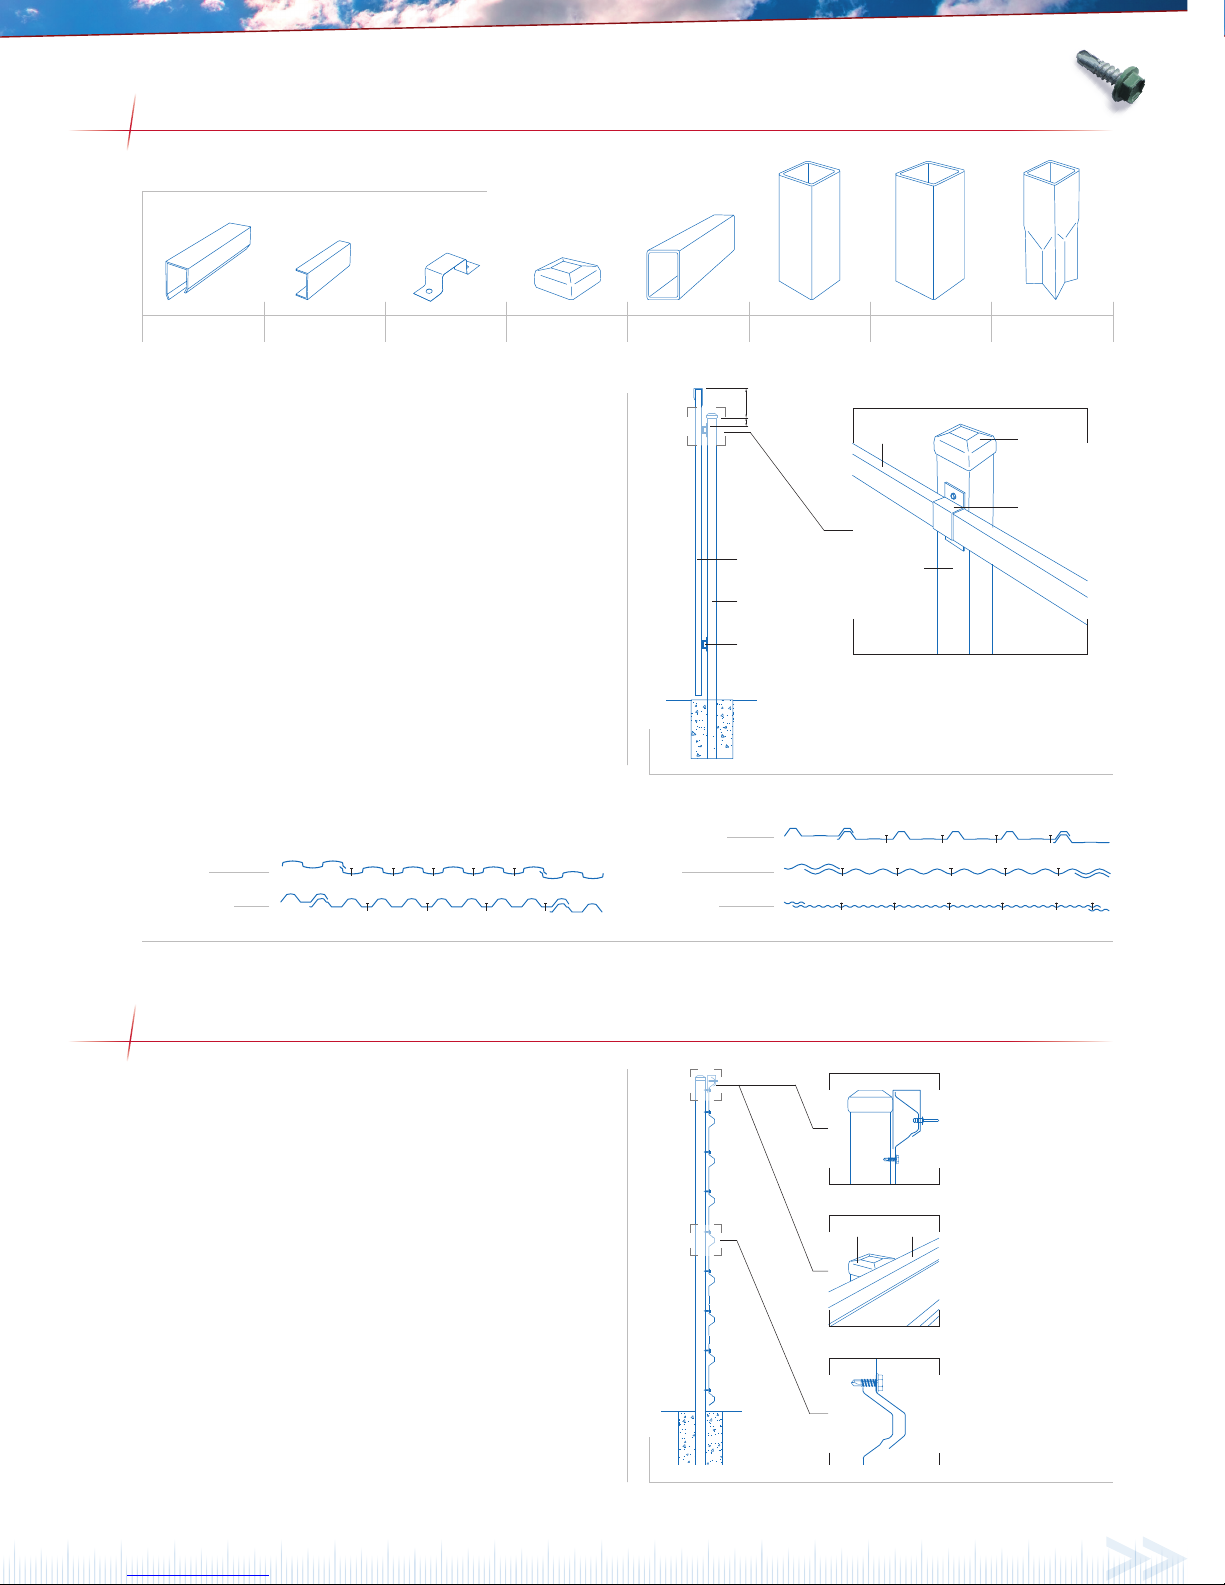
The rails must be attached to the pre-installed posts. Use a
string line to position the rails. The rails are xed to the posts
by tting a saddle over the rail and xing it to each post with
two self-drilling screws (gure 3.0). Fit the post caps over the
end of the posts and knock into place. If you want to paint the
posts and rails, do this before at taching the sheets.
When positioning the sheets, it will look best if the sheet
overlap is arranged to face away from the most commonly
viewed angle. The top of the sheets should sit 250mm higher
than the top of the posts. Ensure the top of the sheets are level
by using a string line. Sheets are to be xed to the rails with
self-drilling screws, please refer to gure 3.1 for the number
of screws per sheet according to the sheet prole. The screws
are xed through the sheet along the centre of the rail. To keep
the screws in line with each other, use a string line along the
fence (see gure 6.0), or use a measuring stick that shows the
distance from the edge of the sheet to the centre of the rail.
Figure 3.0
Begin by following the previous sections on how to layout your
fence and concrete the posts. From the centre of each post to the
next, they should be no greater tha n 2400mm apar t. Horizon tal
fencing does not require any rails as the fence sheets are xed
directly to the posts. Only Superdek and Smartspan prole
sheets are used.
For strength, the fence sheets should be long enough to cover
three or more post spacings and should overlap by 150mm.
Position the sheets, with the overlap at the bottom. The top of
the fence sheets should sit ush with the top of the fence posts.
Install the top sheets rst using 10x16mm self-drilling screws,
but tempo ra rily leave the bot tom xing to allow th e lo wer sheet
to t under. Ensure that you lap the bottom sheet under the top
sheet for a neat appearance. Continue xing down the post.
Where the sheets lap, x the lapping with 3mm rivets or
10x16mm self-drilling screws. Complete the installation by
installing the capping as outlined on the back page.
Figure 4.0
Figure 3.1
Page 4
H
2
3
H
Tapered length = height of the fence x 2
Capping
String line
Screw positions
when fixing the
sheet to the rail
Rivet through the capping at the crest of the sheet
INSTALLATION
GUIDE
© Copyright March 13 01/03/13
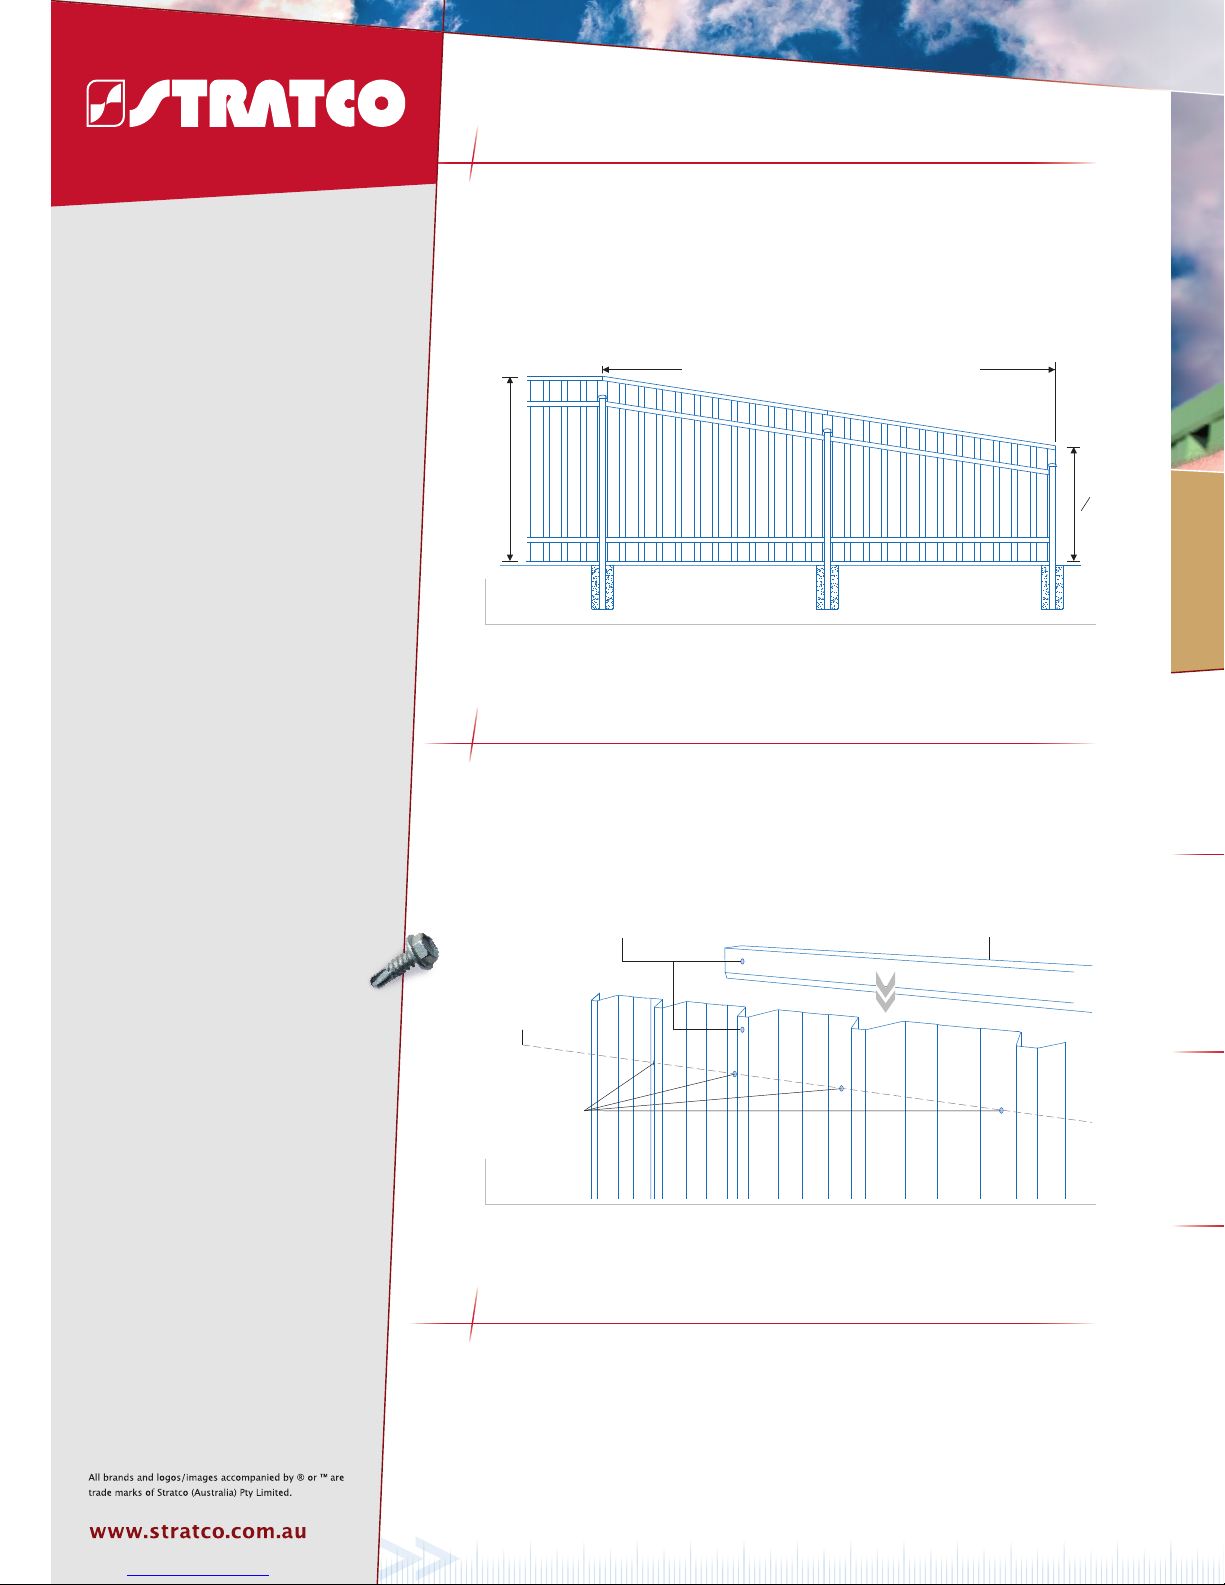
If you are tapering the free end of a fence, the taper must cover a length equal to
twice the height of the fence. The end height shall be a maximum of t wo thirds the
height of the rest of the fence. Cut the posts to the required height and attach the
rails to the posts following the taper. The fence sheets on the tapered end will need
to be marked and cut to the appropriate height. Avoid using an angle grinder to cut
the sheets as the swarf may stain the painted surface.
Fence capping is placed over the top edge of the fence sheet with the long side
of the capping facing the post and rail side of the fence. The capping is slightly
tapered to allow for overlapping. To x the capping, drill a hole at each end where
the crest of the fence sheet meets the inside of the capping. Use either a rivet or a
self-drilling screw to x the capping and the fence sheet together.
Fencing may not be suitable within 1000 metres of a marine environment or in severe
industrial or corrosive environments. It is important that dirt, compost, paving sand
or other materials are not placed against any Stratco steel sheeting. Zinc/Al based
materials must not be used in any of these circumstances, and in particular concrete
should not be poured against Zinc/Al based materials. For more information refer to
the “Selection, Use and Maintenance of Stratco Steel Products” Brochure.
Figure 5.0
Figure 6.0
BEFORE YOU START
TOOLS AND HARDWARE REQUIRED
POST AND RAIL FENCING
Stratco Post and Rail fencing is a traditional and cost effective form of fencing. Its simple design makes it the ideal choice for a DIY
project, especially on sloping sites and uneven ground. Galvanised posts and rails are combined with fence sheets that come in a
range of different profiles, topped off with optional fence capping and a full spectrum of colours to complement any environment.
Before beginning your fencing project, ensure you have all the correct components and tools needed to nish the job. To ensure a
neat nish, any gates should be installed before beginning work on the rest of the fence.
MAINTENANCE REQUIREMENTS
TAPERED END
CAPPING INSTALLATION
• Tape Measure
• String Line
• Plumb Line
• Spirit Level
• Hack-Saw
• Tin Snips
• Rivet Gun
• Post Hole Digger
• Concrete Mix
• Drill and Hex-Head Adaptor
Post and Rail
CONTACT
1300 165 165
BROCIPR
 Loading...