

uPrint® and uPrint® Plus
uPrint
®
SE and uPrint® SE Plus
Service Manual
Part No. 209010-0001, Rev D

Notice
The information in this document is subject to change without notice.
STRATASYS, INC. MAKES NO WARRANTY OF ANY KIND WITH REGARD TO THIS
MATERIAL, INCLUDING, BUT NOT LIMITED TO, THE IMPLIED WARRANTIES OF
MERCHANTABILITY AND FITNESS FOR A PARTICULAR PURPOSE. Stratasys, Inc. shall
not be liable for errors contained herein or for incidental or consequential damages in
connection with the furnishing, performance, or use of this material.
© 2012 Stratasys Inc. All rights reserved. Stratasys, Dimension, uPrint, Catalyst, FDM,
Dimension BST, Dimension SST, WaveWash, and Ecoworks are registered trademarks of
Stratasys Inc. FDM Technology, Fused Deposition Modeling, ABSplus, Catalyst EX, and
Smart Supports are trademarks of Stratasys, Inc. All other trademarks are the property of
their respective owners, and Stratasys assumes no responsibility with regard to the selection,
performance, or use of these non-Stratasys products. Product specifications are subject to
change without notice. Printed in the USA.
Stratasys, Incorporated
7665 Commerce Way
Eden Prairie, MN 55344 USA
Telephone: (952) 937-3000
Fax: (952) 937-0070
www.stratasys.com
Publication Date: July 2012
ii

About This Guide
This service guide is designed to help you easily find the information you need to
successfully service Dimension BST and SST systems. This guide is arranged in chapters with
tabs for easy reference.
When viewing the electronic PDF version, you can easily hyperlink to specific headings or
chapters using the following methods:
• Use the Bookmarks window in the PDF application as hyperlinks.
• Click on the headings and page numbers in the Table of Contents to go to a specific page
or chapter.
• Click on italicized text, which are cross-references to figures, headings, and chapters.
The following conventions are used in this guide:
• When you see text in blue, it indicates that the text is a linked reference to a specific figure,
heading, or page number.
• When you see text in Bold, it indicates important information that needs to be empha-
sized.
• Text representing Interface Messages that appear on the display panel are presented in a
bold font.
iii

Table of Contents
Safety _______________________________________________________ 1-1
Hazard Classifications ________________________________________________________ 1-1
Product Safety Symbols_______________________________________________________ 1-1
Safety Devices_______________________________________ ________________________ 1-1
System Overview ____________________________________________ 2-1
What happens when...________________________________________________________ 2-2
Powering up _____________________________________________________________ 2-2
Powering Down __________________________________________________________ 2-3
Loading Material _________________________________________________________ 2-3
Building a Part____________________________________________________________ 2-3
Electronics Overview __________________________ _______________________________ 2-5
Single Board Computer ___________________________________________________ 2-6
Controller Board_______________________ ____ ___ ____ _______ ___ ___ ____ ___ ____ 2-7
Overview_____________________________________________________________ 2-7
Voltage Generation __________________________________________________ 2-7
Dual Port Memory Interface ___________________________________________ 2-7
X, Y, Z Axis Control ____________________________________________________ 2-7
Material Motor Control ________________________________________________ 2-7
Temperature Control__________________________________________________ 2-7
Liquefier Temperature Control _________________________________________ 2-8
Actuators, Switches & Optical Sensors__________________________________ 2-9
Safety Devices________________________________________________________ 2-9
Controller Board Layout __ ____ ___ ___ ____ ___ ____ ___ _______ ___ ____ ___ ____ 2-9
Reset Button_________________________________________________________ 2-10
Dip Switches___ ___ ____ ___ ____ ___ ___ ____ ___ ____ ___ ____ ___ ___ ____ ___ ___ 2-10
SW2_________________________________________________________________ 2-10
SW5_________________________________________________________________ 2-10
SW6_________________________________________________________________ 2-11
Memory_____________________________________________________________ 2-11
LEDs_________________________________________________________________ 2-11
Power Distribution Board (PDB) ___________________________________________ 2-12
Chamber Temperature Control_______________________________________ 2-13
Test Points and LED’s _________________________________________________ 2-13
I/O Card________________________________________________________________ 2-16
Head Board_______ ___ ____ ___ ____ ___ ___ ____ ___ ____ ___ ____ ___ ___ ____ ______ 2-17
Printer overview_______________________________________________________ ___ ___ 2-18
Finding more information _______ ____________________________________________ 2-23
iv

Software_____________________________________________________ 3-1
Software Architecture ________ ________________________________________________ 3-2
Operating System ________________________________________________________ 3-2
Display Driver_____________ _______ ___ ___ ____ ___ ____ ___ ____ ___ ___ ____ ___ ____ 3-2
Comm Server ____________________________________________________________ 3-2
System Manager _____________________________ ____ ___ _______ ___ ____ ___ ____ 3-3
Move Compiler __________________________________________________________ 3-3
Feeder___________________________________________________________________ 3-3
Event/Command Monitor_________________________________________________ 3-3
DataStatEX __________________________________________________________________ 3-4
CatalystEX___________________________________________________________________ 3-5
CatalystEX Overview _________________________________________________ ____ 3-5
Conventional Help File______________ ___ ____ ___ ____ _______ ___ ___ ____ ___ ____ 3-5
Dynamic Help______________________________________________ ___ _______ ____ 3-5
MaracaEX Help ______________________________________________________________ 3-6
Overview ________________________________________________________________ 3-6
Select a Modeler _________________________________________________________ 3-6
Modeler States ___________________________________________________________ 3-6
Modeler Setup ___________________________________________________________ 3-7
Configuration ____________________________________________________________ 3-7
Status____________________________________________________________________ 3-7
Printer Status__________________________________________________________ 3-7
Versions ______________________________________________________________ 3-8
Travel Limits___________________________________________________________ 3-8
Filament______________________________________________________________ 3-8
Door _________________________________________________________________ 3-8
Miscellaneous ________________________________________________________ 3-8
Setting the Serial Number______________________________________________ 3-9
Materials_________________________________________________________________ 3-9
Cartridge Information _________________________________________________ 3-9
Tip Offset_________________ ___ ____ ___ ___ ____ ___ ____ ___ ____ ______ ____ ___ ____ 3-9
Gantry___________________________________________________________________ 3-9
Gantry Hysteresis______________________________________________________ 3-9
Part Calibration______________________________________________________ 3-10
Temperatures ___________________________________________________________ 3-10
Temperature Setpoints _______________________________________________ 3-10
Outputs_________________________________________________________________ 3-10
Table ___________________________________________________________________ 3-10
Get Calibration _________________________________________________________ 3-11
Send Calibration ___________________________________________ ___ ____ ___ ___ 3-11
Get Config______________________________________________________________ 3-11
Test Parts________________________________________________________________ 3-11
Reset Password__________________________________________________________ 3-11
Connect________________________________________________________________ 3-12
Help ____________________________________________________________________ 3-12
v

Service Procedures __________________________________________ 4-1
Maintenance Preparation ___________________________________ _________________ 4-3
Read these warnings before performing service on printer!______________ 4-3
Required Tools list ____________ ________________________________________________ 4-4
Distributer/Reseller supplied Tools__________________________________________ 4-4
Supplied by Stratasys _____________________________________________________ 4-4
Pre-Maintenance Procedures_________________________________________________ 4-4
Exterior Components ___________________________________________ ___ ___________ 4-5
Top Panel ________________________________________________________________ 4-5
Side Panels_______________________________________________________________ 4-7
Display Panel_____________ ___ ____ ___ ___ ____ _______ ___ ____ ___ ___ ____ ___ ____ 4-9
Front Panel______________________________________________________________ 4-11
Door Solenoid ___________________________________________________________ 4-13
Door Sensor _____________________________________________________________ 4-14
Electronics Bay Components ________________________________________________ 4-15
Lower Electronics Bay Cover _____________________________________________ 4-15
Upper Electronics Bay Cover _____________________________________________ 4-17
Removing the Electronics Bay ____________________________________________ 4-19
Electronics Bay Cooling Fan______________________________________________ 4-21
Controller Board_______________________ ____ ___ ____ _______ ___ ___ ____ ___ ___ 4-23
Single Board Computer (SBC) ____________________________________________ 4-26
Power Distribution I/O Card ______________________________________________ 4-29
Power Distribution Board (PDB) ___________________________________________ 4-31
Hard Drive ______________________________________________________________ 4-34
Line Filter________________________________________________________________ 4-40
Circuit Breaker __________________________________________________________ 4-42
AC Input________________________________________________________________ 4-44
Power Switch_________________________________ ___________________________ 4-46
24VDC Power Supply ____________________________________ ______ ____ ___ ___ 4-48
5/12VDC Power Supply ______________________________ ____ ______ ____ ___ ___ 4-51
120VDC Power Supply ___________________________________________________ 4-54
Head Components__________________________________________________________ 4-56
Head Cooling Fan__________________________________________ ___ _______ ___ 4-56
Toggle Head Assembly ________________ ____ ___ ____ ___ ____ ___ ___ ____ ___ ___ 4-58
Substrate Sensor_________________________________________________________ 4-64
Z Foam Level Assembly __________________________________________________ 4-67
Toggle Sensor ____________________________________ ___ ____ ___ ___ ____ ___ ___ 4-69
Toggle Bar ___________ ____ ___ ____ ___ ___ ____ ___ ____ ___ ____ ___ ___ ____ ___ ___ 4-71
Head Board_______ ___ ____ ___ ____ ___ ___ ____ ___ ____ ___ ____ ___ ___ ____ ______ 4-76
TC Amp board __________________________________________________________ 4-82
Umbilical Hose __________________________________________________________ 4-84
Material Tubes __________________________________________________________ 4-88
Umbilical Cable _________________________________________________________ 4-89
XY Table Components_______________________________________________________ 4-91
Y Home Sensor __________________________________________________________ 4-91
vi

Y EOT (End of Travel) Sensor ______________________________________________ 4-92
X Motor _________________________________________________________________ 4-93
Y Motor ________________________________________________________________ 4-100
Y Motor Belt ____________________________________________________________ 4-103
Y Drive Rod ____________________________________________________________ 4-110
XY Table _______________________________________________________________ 4-117
Z Stage Components ______________________________________________________ 4-137
Z Home Sensor _______________________________ ____ ___ ____ ___ ___ _______ __ 4-137
Z EOT (End of Travel) Sensor _____________________________________________ 4-138
Chamber Fans _________________________________________________________ 4-139
Chamber Heaters ______________________________________________________ 4-141
Thermal Fuses __________________________________________________________ 4-145
Chamber Thermocouple________________________________________________ 4-148
Z Motor _____________________ ____ ___ ___ ____ ___ ____ ___ ____ ______ ____ ___ __ 4-149
Z Stage _______ ____ ___ ____ ___ ____ ___ ___ ____ ___ _______ ____ ___ ___ ____ ___ __ 4-153
Calibrations & Adjustments ___________________________________ 5-1
Offset Calibrations ___________________________________________________________ 5-2
Adjusting Z Calibration and XY Tip Offset___________________________________ 5-2
Z Calibration ___ ___ ____ ___ ____ ___ ___ ____ ___ _______ ____ ___ ___ ____ ___ ____ 5-2
XY Tip Calibration___________________________________________ ______________ 5-5
Part Based Calibration____________________________________________________ 5-7
When to Perform Part Based calibration________________________________ 5-7
Tensioning the X & Y Drive Belts ______________________________________________ 5-37
Get/Send Calibration Files ___________________________________________________ 5-41
Get/Send calibration files ____________________________________________ 5-41
XY Table Leveling ________________________________________________________ ___ 5-43
Head Alignment Procedure__________________________________________________ 5-47
Troubleshooting______________________________________________ 6-1
User Troubleshooting _________________________________________________________ 6-2
Fault determination codes ________________________________________________ 6-3
Exporting printer configuration (.cfg) file ___________________________________ 6-4
Cycling power ___________________________________ ___ ____ ______ ____ ___ ____ 6-4
Diagnosing loss of extrusion ___________________________________________ ____ 6-4
Clogged tip______________________________________________________________ 6-5
Material Jam_____________________________________________________________ 6-6
Recovering from loss of extrusion __________________________________________ 6-8
Service Troubleshooting _____________________________________________________ 6-12
1.0 How to use this Guide ________________________________________________ 6-12
2.0 Code Errors __________________________________________________________ 6-13
Major Codes ____________ ____ ___ ___ ____ ___ ____ ___ ____ ___ ___ _______ ___ 6-13
Major Codes with Minor Codes _______________________________________ 6-14
Controller Abort Minor Errors (Code: 14, XX)____________________________ 6-14
Starting Up Failed Minor Errors (15.XX) _________________________________ 6-22
Controller Load Failed Minor Errors (17.XX) _____________________________ 6-22
Temperature Failed to Regulate Minor Errors (18.XX) ___________________ 6-23
vii

Controller Initialization Failed Minor Errors (19.XX)_______________________ 6-24
Door Unlatch Failed (20.XX)___________________________________________ 6-24
Controller Communications Failed Sub Errors (22.XX) _________ __________ 6-24
Universal Device Name Error (23.XX) __________________________________ 6-24
3.0 Non-Code Errors _____________________________________________________ 6-25
What happens during Power Up / Boot________________________________ 6-33
4.0 Connector Pinouts and Signals________________________________________ 6-40
Umbilical cable diagram_____________________________________________ 6-40
Umbilical cable pinouts ______________________________________________ 6-41
Upper harness _______________________________________________________ 6-42
Upper harness pinouts________________________________________________ 6-42
Lower harness ________ ___ ____ ______ ____ ___ ____ ___ ____ ___ ___ ____ ___ ___ 6-44
Lower harness pinouts_ ___ _______ ___ ____ ___ ____ ___ ____ ___ ___ ____ ___ ___ 6-45
Part Quality Troubleshooting ____________ _____________________________________ 6-46
Embedded support strands in model _____________________________________ 6-46
Brown streaks (burn marks)___________________________ ____ ___ _______ ___ ___ 6-47
Loss of Extrusion (LOE)________________________________ ____ ___ ___ ____ ___ ___ 6-48
Model embedded in to support__________________________________________ 6-49
Moisture in material______________________________________________________ 6-50
Open seams ____________________________________________________________ 6-51
Part curling______________________________________________________________ 6-52
Part fell over ____________________________________________________________ 6-53
Part shifting _____________________________________________________________ 6-54
Rough surface quality ___________________________________________________ 6-55
Rough quality all over____________________________________________________ 6-56
Model strands on parts___________________________________________________ 6-57
Witness marks ______________________ ___ ____ ___ ____ ___ ____ ___ ___ ____ ___ ___ 6-58
Wavy surface ___________________________________________________________ 6-59
Wavy parts______________________________________________________________ 6-60
Under fill ________________________________________________________________ 6-61
Material sagging on curved parts ________________________________________ 6-62
Fused layers_____________________________________________________________ 6-63
Z layers inconsistent_______ ___ ____ ___ ___ _______ ____ ___ ____ ___ ___ ____ ___ ___ 6-64
TeraTerm ___________________________________________________________________ 6-65
Using TeraTerm __________________________________________________________ 6-65
TeraTerm Commands____________________________________________________ 6-68
Preventive Maintenance _____________________________________ 7-1
Startup kit tools ______________________________________________________________ 7-2
Preventive Maintenance _____________________________________________________ 7-2
Daily_____________________________________________________________________ 7-2
500 Hour maintenance _____________________________________ ___ ____ ___ ____ 7-3
2000 Hour maintenance __________________________________________________ 7-9
Tip replacement and calibration_______________________________________ 7-9
viii

Illustrated Parts List ___________________________________________ 8-1
Front Door Area Components _________________________________________________ 8-2
Electronics Bay Components _________________________________________________ 8-3
Head Area Components _____________________________________________________ 8-5
XY Table Area Components __________________________________________________ 8 -8
Z Stage Area Components___________________________________________________ 8-10
Chamber Heater Area components__________________________________________ 8-11
Material Bay ________________________________________________________________ 8-12
Cables _____________________________________________________________________ 8-13
Checklists ___________________________________________________ 9-1
Hard Drive Installation Checklist_______________________________________________ 9-2
Toggle Head Assembly Installation Checklist __________________________________ 9-3
XY Table Assembly Installation Checklist ______________________________________ 9-4
Controller Board Checklist ____________________________________________________ 9-5
Required Tool List_____________________________________________________________ 9-6
Index_________________________________________________________ I-1
ix

Safety
Hazard Classifications
Please be aware of the following hazard classifications that are used throughout this guide.
Caution: Indicates a potentially hazardous situation which, if not avoided, may
result in minor or moderate injury.
Warning: Indicates a potentially hazardous situation which, if not avoided, could
result in death or serious injury.
Product Safety Symbols
The following symbol is located inside the system to warn you about high temperatures.
Note: Always read and adhere to safety statements, and be aware of the safety
symbol when you see it in the system.
Gloves: The gloves symbol indicates the presence of devices with high tempera-
tures. Always use extra care, and wear safety gloves, when working around
heated components.
ESD: Use standard electrostatic discharge (ESD) precautions
when working on or near electrical circuits.
Safety Devices
The following safety devices are incorporated into the system:
• Chamber T/C alarm – activated for a bad or missing thermocouple
• Liquefier T/C alarm – activated for a bad or missing thermocouple
• Power shut down signal from the PDB – activated if any thermal limit switches trip
• Thermal snap switch located on the Head Board.
• Main thermal fuse
uPrint/uPrint SE Service Manual 1-1

1-2

System Overview
What happens when...___________ _____________________________________ 2-2
Powering up ___________________ ___________________________________ 2-2
Powering Down ___________________________________________________ 2-3
Loading Material __________________________________________________ 2-3
Building a Part____________ ______ ____ ___ ____ ___ ____ ___ ___ ____ ___ ____ 2-3
Electronics Overview ____________ _____________________________________ 2-5
Single Board Computer ____________________________________________ 2-6
Controller Board___________________________________________________ 2-7
Overview______________________________________________________ 2-7
Voltage Generation ___________________________________________ 2-7
Dual Port Memory Interface ____________________________________ 2-7
X, Y, Z Axis Control _____________________________________________ 2-7
Material Motor Control _________________________________________ 2-7
Temperature Control___________________________________________ 2-7
Liquefier Temperature Control __________________________________ 2-8
Actuators, Switches & Optical Sensors___________________________ 2-9
Safety Devices_________________________________________________ 2-9
Controller Board Layout ________________________________________ 2-9
Reset Button___________________________ ___ ____ ___ ___ ____ ___ ___ 2-10
Dip Switches__________________________________________________ 2-10
SW2__________________________________________________________ 2-10
SW5__________________________________________________________ 2-10
SW6__________________________________________________________ 2-11
Memory ______________________________________________________ 2-11
LEDs__________________________________________________________ 2-11
Power Distribution Board (PDB) ____________________________________ 2-12
Chamber Temperature Control________________________________ 2-13
Test Points and LED’s __________________________________________ 2-13
I/O Card _________________________________________________________ 2-16
Head Board______________________________________________________ 2-17
Printer overview______________________________________ ___ ____________ 2-18
Finding more information ___________________________________________ 2-23
uPrint/uPrint SE Service Manual 2-1

What happens when...
Powering up
Once the unit is ready to build, the display will show Idle (no part in the queue) or Ready to
build
followed by the part name. Once a part is started the appropriate liquefier will begin to
heat. Once the liquefier and chamber reach the operating temperature (310C model, 300C
support, 77 Chamber) the system will begin to build a part.
2-2

Powering Down
When the Power Switch is turned off the unit begins a controlled shut down. The software
processes are stopped and the power to the liquefier and chamber heaters are turned off. The
Controller Board continues to monitor the temperature of the liquefier and the fans will
continue to run. During this time the display will show
continues to run to cool the liquefier down quickly to prevent backflow of material from the
liquefier. If the material is not cooled down during power down the system may experience a
loss of extrusion due to material build up at the liquefier. Once the liquefier temperature
drops below 102° C the SBC changes the display to
“Shutting down”. The head blower fan
“Shut down” and turns off.
Loading Material
When the load material button is pressed with carriers installed the SBC will ask the
Controller Board to unload the carriers requested by the operator. The most recent value for
material remaining is written to the cartridge EPROM. The material is run in reverse to
unload the liquefier. When filament is clear of the filament sensor the Controller Board tells
the SBC that the command is complete. The SBC sends
the carriers are unlatched, and the unit waits for you to respond.
“REMOVE CARRIER” to the display,
If there are no carriers in the printer when the material button is pushed, or if an unload has
just been completed, the SBC will ask the operator to
for a valid carrier EPROM. If there is no change to the EPROM status in 30 seconds, you are
asked if you want to RETRY. Once valid carriers are read, the unit begins the material load
sequence.
“INSERT CARRIER”. The unit will look
Building a Part
How to start building a part build is dependent upon whether or not a part is in the printer
queue:
1. If a part has not been sent to the printer for building (the build queue is empty):
2. The panel displays
A.
Wait for Part is blinking. Choose whether you want to start the build process from
a ‘remote’ location or from the display panel at the printer.
a. At Printer
work station. You start the build of the part from the printer.
B. Do not press the
C. From your CatalystEX work station, send a part to the printer.
D. The printer panel displays the name of the first model in the printer queue and
Start Model is blinking.
E. From the printer, press the
Idle and Queue Empty.
‘Start Model’ - You send a part to the printer from your CatalystEX
Wait for Part button
Start Model button to begin building the displayed part.
a. Remote
work station. The part automatically begins to build.
uPrint/uPrint SE Service Manual 2-3
‘Start Model’: - You send a part to the printer from your CatalystEX

F. From the printer, press the Wait for Part button.
Note: Make sure an empty modeling base is installed, then answer Yes to the prompt
Is Model Base Installed?
G.
Wait for Part is displayed in the upper window. Press Cancel if you wish to exit
the remote start mode.
H. From your CatalystEX work station, send a part to the printer. The printer will
automatically start to build the model.
3. If a part has been sent to the printer for build (there is at least one part in the build
queue), but is not building:
A. The panel displays
Ready to Build.
B. The name of the first model in the build queue is displayed.
C.
Start Model is blinking. Press the Start Model button to begin building the displayed
part.
Regardless of the method used to start building a part, the printer will perform the same
sequence of steps:
1. The printer drops (lowers) the substrate sensor.
2. System “touches down” six times which measures the height of the substrate.
3. SBC converts the model file (CMB) into the motion commands that the controller will
execute to build the model.
4. System completes substrate measurement.
5. Z stage moves to bottom of Z travel.
6. Head moves over the purge bucket and prepares to build purging the appropriate tip.
7. Once purge is complete, the printer will start to build the model.
During model construction, the printer will display the percentage of material remaining on
each spool. During building the keypad will allow you to pause the printer, or turn on the
chamber lights. The printer will stay in the Building State until the model is finished or the
printer pauses. If the printer pauses, it will enter a Pending Pause state until the current road
is finished. Once that road is complete, the head will move over the purge bucket, and the Z
stage will descend to the bottom of the envelope. In the Pause State the printer can be
resumed, material can be loaded and unloaded, the build can be canceled, and printer
maintenance may be performed.
2-4

PDB
Controller
Board
SBC
AC Input
+5 and +12
VDC Power
Supply
Support
heater +120
VDC power
supply
+24 VDC
power supply
1 20-240 V AC
in
120-240 VAC
I/O
Electronics Overview
Figure 2-1: Electronics Overview detail
uPrint/uPrint SE Service Manual 2-5

J2 power
input
IDE/SATA
Connector
P104
Connector
Display Panel
DB-9
Connector
RJ-45
Network
Connector
Single Board Computer
The single board computer (SBC) is the main processor in the system. See Figure 2-2.
showing the board layout.
The TCP/IP network interface connects directly to the RJ-45 connector on the SBC. The
network interface supports both 10baseT and 100baseT operation. The hardware
differentiates automatically. There are two LED’s at the RJ-45 connector. These show the
status of the network connection as follows:
• Green LED: Indicates there is a network connection present.
• Amber LED: Indicates there is a network communication.
The Hard Disk Drive (HDD) connects to the SBC with a standard IDE interface (ribbon cable)
or SATA cable. The HDD contains the Linux operating system and all the control software
needed to run the system (except the controller firmware). This is also where all the
downloaded models are stored in the queue.
The LCD Control Panel connects to the I/O Card. The signals then travel though the PDB
and on to the SBC. All user entered commands from the control panel buttons are routed
through the I/O and PDB and then on to the SBC.
The P104 connector on the top edge of the board is a bus level interface to the Controller
Board. This allows the SBC to read and write to the dual port ram on the Controller Board,
which forms the communication channel between the two boards.
Figure 2-2: Single Board Computer detail
2-6

Controller Board
Overview
The controller board provides all of the low level hardware control and sensing for the
system. The firmware runs on the controller CPU and is flash resident (rather than on the
HDD and SBC).
Voltage Generation
• +/-15 VDC is used for PMD DACs
• 10 VDC is used for DAC reference
• 3.3 VDC is used for controller board logic
Dual Port Memory Interface
The dual port memory located on the controller board provides the communication channel
with the single board computer (SBC) through the P104 connector. The SBC provides the
coordinates, velocities, and flow rate commands for modeling to the controller. The
controller board provides the status/error information about the hardware back to the SBC.
X, Y, Z Axis Control
The controller takes the flow rate information from the SBC and sends it to the PMD
processor. The PMD 2840 processor services the X and Y stepper motors and the model and
support head servo motors. The 3410 processor services the Z axis stepper motor. There is no
feedback from the stepper motors to the system (they are open-loop controlled).
Material Motor Control
The controller takes the flow rate information from the SBC and sends it to the PMD 2840
processors. The PMD uses this information along with the encoder signals from the material
motors to generate an output signal to drive the servo motors in the head assembly. Since the
encoders provide feedback the material motors have a closed-loop control. Their position
and rotation are precisely known at all times.
Temperature Control
The controller board reads the three thermocouple (T/C) inputs/signals - 2 for the head, 1
for the chamber.
uPrint/uPrint SE Service Manual 2-7

Liquefier Temperature Control
The liquefier T/C connects to the controller board through the power distribution board.
The T/C generates a variable low level current that depends on the temperature of the T/C.
This analog signal from the T/C is amplified by the head distribution. It is then sent down
the umbilical cable to the PDB, and then to the controller board. An A to D converter in the
ColdFire chip converts the analog signal to digital. In order to improve temperature
resolution, this signal is biased. The lowest reading possible is 109.5° C. The highest reading
is 330° C.
The liquefier temperature is maintained at: Model: 310° C, Support: 300° C
Temperature control is accomplished using “pulse wide modulation” See Figure 2-3.
Figure 2-3: Pulse Width Modulation (PWM)
Actual power to the liquefier heater is supplied by the PDB, which is controlled by the
controller board. The head heaters are turned off and on 1000 times a second (pulses). The
duration of the 120 VDC pulse determines the average power being supplied to keep the
liquefier at temperature. Temperatures can be read using a volt meter at test points TP5 for
model, and TP4 support on the PDB (10 mV per degree C).
2-8

Actuators, Switches & Optical Sensors
The input and output signals are passed through the PDB and then processed by the
controller board. The non-motor actuators on a uPrint system are 24 volt solenoids. The 24
volt power is supplied by the PDB which in turn is controlled by the controller board. The
following is a list of actuators:
• Door solenoid – locks the door to the modeling chamber.
• Carrier latches – holds carriers in the material bays.
• Material bay solenoids – engage the motor that feeds filament from carrier to the
liquefier during auto load.
The controller board reads and updates the remaining material information on the spool eprom. This is accomplished through a serial interface to the material bay encryption board.
The material encryption board in turn connects to the e-prom on the carrier/spool via two
pogo pins.
The controller board monitors these switches:
• Z limit switches – upper and lower
• X end of travel (EOT) switch
• Y end of travel (ETO) switch
The controller board monitors the following optical sensors:
• X home (BOT) sensor
• Y home (BOT) sensor
• Top of modeling base sensor
Safety Devices
The controller board monitors the following safety devices:
• Chamber T/C alarm – activated for a bad or missing T/C
• Liquefier T/C alarm – activated for a bad or missing T/C
• Head and chamber “snap” switches
• Two main thermal fuses
• Door open switch
• Door latch solenoid
Controller Board Layout
Figure 2-4. Shows the layout of the controller board connectors with labels indicating where
each of the functions described previously are connected. In addition to those functions, the
figure shows a reset button, a set of dip switches, and the LEDs (D1-D3 and D6-D13).
uPrint/uPrint SE Service Manual 2-9

Figure 2-4: Controller board connection detail
Reset Button
Located on the lower right side of the board, the reset button will do a hard reset of the
controller board. Before continuing with normal operation after resetting the board, system
power must be cycled before building. The reset button should only be used after using
TeraTerm.
Dip Switches
There are three dip switch banks (SW2, SW5, SW6) located on the top right side of the board.
Dip switches are factory set and should not be changed unless noted to be in another
position.
SW2
Number (in white) Description Default
16-24 Unused Off
SW5
Number (in white) Description Default
8-15 Unused Off
2-10

SW6
Number (in white) Description Default
0 Run built-in self test (BIST) Off
1 Load Firmware (turn on when using SNDBIN.EXE) Off
2 Disable door latching Off
3Unused Off
4 Don’t reset controller when in command is issued Off
5 Disable WatchDog timer Off
6 Enable use of dc commands Off
7Unused Off
Memory
There are three types of memory contained on the controller board.
• Dual Port RAM: The communication buffer between the controller board and the
single board computer. Events (from the controller), commands (from the SBC), and
motion control vertices (from the SBC) are passed through the P104 connector joining
the two boards.
• Flash Memory: Where the executable code resides.
Battery backup RAM; Where the controller board stores the following system parameters:
1. Results of last power-on self test (POST)
2. Results of certain built-in diagnostic tests, if used
3. Exception trace, which is a list of the most recent exception messages logged on the
controller board
4. State information, which stores printer state when it is powered off (includes things like
the type of gantry, whether material is loaded, the UDN, etc.).
LEDs
There are 11 LEDs located on the controller board. A grouping of three (D1-D3) are located
on the lower left side. The other group of eight (D6-D13) are located on the upper right side.
D1-D3 are lit when their associated voltage, as shown in table below, is present. The 3.3 VDC
supply is generated on the controller board, +5 and +12 VDC come from the PDB. One
function of the D6-D12 LEDs is that they turn on sequentially to show software download
progress. During normal operation, D13 will blink approximately once every two seconds to
indicate that the watchdog is monitoring the system and everything is operational.
LED Label Description
D1 +3.3 VDC Supply
D2 +5 VDC Supply
D3 +12 VDC Supply
D6-D12 Debug LEDs (software use only)
D13 Coldfire processor heartbeat
uPrint/uPrint SE Service Manual 2-11

Power Distribution Board (PDB)
Figure 2-5: PDB Detail
AJ1AC Power In
BJ2Power Switch/Thermostat
C J3 Chamber Heaters
D J22 Auxiliary 120VDC power supply
E J8 Z BOT, Z EOT, Chamber Fans, Frame ID, Filament detect sensor (not used)
FJ9Z motor
G J10 I/O board connection
H J11 I/O board connection
I J7 24VDC input
J Test points and LEDs (see detail in this section)
KJ45/12VDC input
L Voltage indicator LEDs (see detail in this section)
M J12 To material bay
N J16 To external UPS (optional)
O J18 LCD display from SBC
P J15 To controller board (ribbon cable)
Q J14 To controller board (ribbon cable)
R J13 To controller board (ribbon cable)
2-12

This board provides the power required to run the system. AC line voltage, +5 VDC, +12
VDC, and +24 VDC feed into the PDB. An additional +120 VDC input feeds into the PDB for
the support head heater.
AC line voltage comes into the PDB, See Figure 2-5. The voltage is routed through the solid
state relay to an auto switching circuit. The circuit is used to supply the chamber heater
voltage: 240 VAC in series, or 120 VAC in parallel. The solid state relay is controlled by the
controller board, and turns the heater on/off to regulate the chamber temperature. A second
solid state relay provides AC line voltage to the system. It is controlled by the controller
board and safely shuts down the system when the power down switch is turned off.
• The 5 VDC and 12 VDC are used by the controller board, single board computer, and
hard drive. The 12 VDC also powers the filament motors.
• The 24 VDC powers the stepper motors, solenoids, fans, and chamber lights.
• The 120 VDC circuit powers the model heater and a separate 120 VDC supply powers
the support heater.
There are two fuses on the power distribution board.
• Fuse F1 fuses the AC input to the +120 VDC supply.
• Fuse F2 fuses the +120 VDC output.
Chamber Temperature Control
The chamber thermocouple (T/C) connects via the I/O board to the PDB and is sent to the
controller board. The T/C generates a variable low level voltage that depends on the
temperature of the chamber. This analog signal from the chamber thermocouple is amplified
on the I/O board and sent to the PDB. From the amplifier, the signal goes to an A to D
converter in the ColdFire. The controller reads the chamber temperature and turns the
heaters on and off to maintain 77° C. The chamber fans run continuously when the system is
on. Temperatures can be read on the PDB using a volt meter at test points TP22 for model,
TP20 for support, and TP28 for the chamber NOTE: 10 mV = 1 degree C.
Test Points and LED’s
Test points and LED’s are very useful for troubleshooting the system. The test points and
LED’s are listed below with a brief description. See Figure 2-6. and Figure 2-7.
uPrint/uPrint SE Service Manual 2-13

Figure 2-6: Test points and LEDs detail
Component Test Pt Description
UPS TP29 Power fail signal from external UPS
+5V REF TP24 Head T/C service reference
Door Switch TP15 State of the door (open or closed)
On/Off Switch TP14 State of power down switch
Power Enable TP8 Enables power to circuitry (normally high)
Model Toggle TP17 Toggle travel complete
Chamber Thermocouple TP28 Voltage corresponds to chamber temperature (10 mV=° C)
Support Thermocouple TP20 Voltage corresponds to support temperature
Model Thermocouple TP22 Voltage corresponds to model temperature
HD Thermostat TP25 Chamber and head thermostat (snap switches)
Head TC Alarm TP26 High if head T/C not plugged in or open
Support Toggle TP16 Not used
Chamber TC Alarm TP27 High if chamber T/C not plugged in or open
X EOT TP18 X end of travel sensor (5 VDC), switches are wired normally closed (NC)
X Home TP19 X home sensor (5 VDC), switches are wired normally closed (NC)
Y EOT TP12 Y end of travel sensor (5 VDC), switches are wired normally closed (NC)
Y Home TP13 Y home sensor (5 VDC), switches are wired normally closed (NC)
Z EOT TP10 Z end of travel sensor (5 VDC), switches are wired normally closed (NC)
Z Home TP9 Z home sensor (5 VDC), switches are wired normally closed (NC)
Z Substrate TP23 Z substrate sensor (5 VDC)
(10 mV=° C)
(10 mV=° C)
(+5 VDC if both switches closed)
Normal = tp17 lo, tp19 hi
ch thermostat fault=tp17 lo, tp19 lo.
HD Type A TP21 Not used
HD Type B TP30 Not used
2-14

Figure 2-7: Voltage test points and LEDs detail
Component Test Pt Description
+ 5 VDC TP3 + 5VDC is present
+12 VDC TP4 + 12VDC is present
+12 VDC SW TP5 + 12VDC Switching is present
+24 VDC TP6 + 24VDC is present
+24 VDC SW TP7 + 24VDC Switching is present
uPrint/uPrint SE Service Manual 2-15

I/O Card
A J510 PDB Board connection
B J511 PDB Board connection
C J507 Chamber thermocouple
D J501 Y Motor
Figure 2-8: I/O card detail
E J502 X Motor
F J503 Y BOT and Y EOT sensors
G J504 Head blower fan, power on/off switch, left and right chamber lights, LCD display, door solenoid, door
switch.
H J505 Umbilical cable to: Model and support heaters, toggle sensor, X BOT and X EOT sensors
I J506 Umbilical cable to: Substrate detect sensor, head drive motor, chamber temperature alarm, model
thermocouple, support thermocouple, head temperature alarm
2-16

G
F
J
E
K
Rear view
Front view
D
A
B
C
I
H
Head Board
Figure 2-9: Head board layout
A J304 Z Sensor
B J302 Head Motor Power
C J303 Head Motor Ribbon Cable
D J301 Umbilical Cable
E J102 Support Heater
F U303 X Home Sensor
G J305 Toggle Sensor
H D1 Support 120VDC LED (120 VDC present if on)
I D2 Model 120VDC LED (120 VDC present if on)
J U304 X EOT Sensor
K J202 Model Heater
uPrint/uPrint SE Service Manual 2-17

Front view
2
3
4
5
1
6
Printer overview
uPrint SE and uPrint SE Plus build models from CAD STL files. The printer builds threedimensional parts by extruding a bead of ABS material through a computer-controlled
extrusion head, producing high quality parts that are ready to use immediately after
completion.
uPrint SE and uPrint SE Plus consist of two primary components — the 3D printer and
material bay. Catalyst
Windows Vista or Windows 7 platforms.
uPrint and uPrint SE build a maximum part size of 203 x 152 x 152 mm (8 x 6 x 6 in). uPrint
Plus and uPrint SE Plus build a maximum part size of 203 x 203 x 152 mm (8 x 8 x 6 in). Each
uPrint and uPrint Plus material carrier contains 492 cc (30 cu. in.) of usable material —
enough to build continuously for about 48 hours without reloading. Each uPrint SE and
uPrint SE Plus material carrier contains 688 cc (42 cu. in.) of usable material — enough to
build continuously for about 67 hours without reloading. You can add an optional second
material bay for extended build times.
®
EX is the preprocessing software that runs on Windows XP Pro,
Figure 2-10: Front and left side view of printer.
1 Display Panel 4 Optional Material Bay, Model Side
2 Material Bay, Support Side 5 Material Bay, Model Side
3 Optional Material Bay, Support Side 6 Power ON/OFF Switch
2-18

2
5
3
4
6
7
8
9
1
Figure 2-11: Interior chamber - front view
1Extrusion Head
2 Tip wipe assembly
3Purge bucket
4 Z stage platen
5 Modeling base retainers (x2)
6Modeling base
7 Z stage guide rods
8 Z stage lead screw
9 Extrusion Tips
uPrint/uPrint SE Service Manual 2-19

1
2
3
4
5
6
7
8
9
10
11
12
13
14
15
16
Figure 2-12: Rear view of printer
1 Model Material Y Connector 9 Support Material Tube
2Model Material Tube 10 UPS Connection
3 AC Power Cord Connector 11 Material Bay Cable Connector
4 Circuit Breaker 12 RJ-45 Network Connector
5 Material Bay 13 Diagnostics Cable Connector
6 Optional Model Material Tube 14 Material Bay Communications Cable
7 Optional Material Bay 15 Optional Material Bay Communications Cable
8 Support Material Y Connector 16 Optional Support Material Tube
2-20
Note: To avoid damage to the printer from an uncontrolled power loss, installation of
a UPS (Uninterruptible Power Supply) is recommended.

Support material carrier
Model material carrier
Modeling base
Figure 2-13: Material carriers
Figure 2-14: Modeling base
Caution: DO NOT reuse modeling bases. If a modeling base is reused, calibration
errors, poor part quality, and loss of extrusion may occur. Additional modeling
bases are available from your reseller.
uPrint/uPrint SE Service Manual 2-21

Figure 2-15: Startup Kit contents
1Gloves
2 Power cord (Euro)
3Power cord (US)
4 Crossover cable (orange)
5 Network cable (blue)
6 Tip replacement kit (A. Support tip B. Model tip C. 8 Tip shields D. 4 Tip wipe assemblies)
7 10x magnifier loupe
8Wire brush
9Cutters
10 1/8 inch T-Handle wrench (red)
11 7/64 inch T-Handle wrench (yellow)
12 Needle nose pliers
13 Model material spool
14 Support material spool
15 CatalystEX CD
16 System Software CD
17 User Guide CD
2-22

Finding more information
CatalystEX Online Help
Simple operating
instructions for
CatalystEX are
available in
CatalystEX
Dynamic Help. You
can also see
CatalystEX Help
from the menu bar -
Help>Contents
World Wide Web
Additional information is available at:
http://www.uprint3dprinting.com
uPrint/uPrint SE Service Manual 2-23

2-24

Software
Software Architecture ________________________________________________ 3-2
Operating System _________________________________________________ 3-2
Display Driver ______________________________________________________ 3-2
Comm Server _____________________________________________________ 3-2
System Manager __________________________________________________ 3-3
Move Compiler____________________________ ___ ____ ___ ___ _______ ____ 3-3
Feeder____________________________________________________________ 3-3
Event/Command Monitor__________________________________________ 3-3
DataStatEX___________________________________________________________ 3-4
CatalystEX___________________________________________________________ 3-5
CatalystEX Overview_______________________________________________ 3-5
Conventional Help File_____________________________________________ 3-5
Dynamic Help_____________________________________________________ 3-5
MaracaEX Help ________________________ ______________________________ 3-6
Overview _________________________________________________________ 3-6
Select a Modeler __________________________________________________ 3-6
Modeler States ____________________________________________________ 3-6
Modeler Setup ____________________________________________________ 3-7
Configuration _____________________________________________________ 3-7
Status_____________________________________________________________ 3-7
Materials__________________________________________________________ 3-9
Tip Offset__________________________________________________________ 3-9
Gantry____________________________________________________________ 3-9
Temperatures ____________________________________________________ 3-10
Outputs__________________________________________________________ 3-10
Table ____________________________________________________________ 3-10
Get Calibration___________________________________________________ 3-11
Send Calibration _________________________________________________ 3-11
Get Config_______________________________________________________ 3-11
Test Parts_________________________________________________________ 3-11
Reset Password____________________________ ___ ____ ___ ___ ____ ___ ___ 3-11
Connect_________________________________________________________ 3-12
Help _____________________________________________________________ 3-12
uPrint/uPrint SE Service Manual 3-1

Software Architecture
Figure 3-16. shows the major software components that control the system. The software that
runs on the Controller Board is EPROM based. The software that runs on the single board
computer is stored on the HDD and loaded during power up. Like all PC compatible
computers, the SBC runs a brief self-test on power up and then loads the operating system
followed by the system’s application components.
Figure 3-16: Software Architecture Diagram
Operating System
The system’s software currently runs on RedHat Linux. The OS is multi tasking allowing the
software components to run fairly independently. The OS also provides support for the
TCP/IP network interface and the HDD.
Display Driver
This software interacts with the operator display panel on the front of the system. This
software processes all button pushes. The driver also formats the information going to the
four line display and the context sensitive button labels.
Comm Server
The comm server software on the system is the other half of the download software that is
part of the Catalyst workstation software. Parts to be built (.cmb files) are received by the
comm server and saved on the data partition of the HDD. Queue management of the parts to
be built is also part of the comm server. Lastly the comm server provides Catalyst the system
status information that is displayed on workstation.
3-2

System Manager
The system manager software provides the overall control and decision making functions
that are used by the system during all operations. User requests are received from the
Display Driver (in response to button pushes). The requests are processed and commands
sent to the Controller Board to activate the appropriate hardware.
Move Compiler
When “start part” is requested the system manager activates the move compiler. The move
compiler retrieves the cmb file from the top of the queue. The cmb defines the tool path for
the part on a layer by layer basis. The move compiler calculates the proper extrusion rate for
the road thus combining tool path and extrusion. The resulting motion control is saved in a
PCB file.
Feeder
This driver takes the output of the move compiler and feeds the motion control information
to the Controller Board on demand. The feeder will typically start before the move compiler
has finished the calculations for the part. This eliminates waiting for all calculation to be
complete. As the Controller Board executes the motion control commands they are removed
from dual port memory. The feeder adds new commands as space becomes available.
Event/Command Monitor
This software handles all non-motion control interactions between the SBC and the
Controller Board. Events are printer status information being sent to the SBC. Commands
come from the SBC telling the Controller Board to do something such as find home.
uPrint/uPrint SE Service Manual 3-3

DataStatEX
DataStatEX is a “condensed” version of MaracaEX. It was developed to:
• Aid in troubleshooting system problems by allowing the customer to view and report
specific system information.
• Allow the customer to adjust Z Tip to Tip (difference in tip heights)
• Replacement toggle heads will be shipped with a factory Z Tip to Tip value. One the
head is installed the customer must enter this value using DataStatEX. Service
providers may also use MaracaEX to enter this value.
Using DataStatEX allows you to:
• Select a modeler.
• Add or delete a modeler.
• View a detailed system status window. The window includes important output
“state” information. This information will aid in troubleshooting system problems
without being on-site.
• View detailed material information.
• Adjust Z Tip to Tip.
• Reset the administrator password to null.
DataStatEX is located as a separate program on all system CD’s. DataStatEX will NOT install
on the workstation when performing a backend download. DataStatEX is used primarily for
diagnosing system problems. Generally the customer does not need to access DataStatEX.
For this reason, the customer should only use DataStatEX when requested by a trained
service representative.
Parts and Tools Required
• System CD
• Workstation
Procedure
1. Insert the system CD into workstation.
2. Select the CD drive and open the DataStatEX folder.
3. Select setup.exe.
4. Follow the install steps displayed to load the program on the workstation.
5. Open DataStatEX from Start – Programs pull down.
6. Select the “+” button and enter the system name, type and IP address. Do not enter
leading 0’s in the IP address.
7. Select the green arrow to close the window.
8. Select the “connect to modeler” (two blue arrows) button to establish communications to
the system.
9. Information is now shown in the Current Modeler and State windows of DataStatEX.
10. From this point the customer can open any of the button options.
3-4

CatalystEX
CatalystEX Overview
CatalystEX is an intuitive, user-friendly application designed to interface with Dimension 3D
printers. It allows you to quickly and easily open a 3D drawing of a part, prepare the
drawing for print, and send the print command to create the part.
CatalystEX provides 'Help' information in two ways - through a Conventional Help file and
through a Dynamic Help system.
Conventional Help File
The entire Help file is accessible through the Menu Bar (Help>Contents). This will open
CatalystEX Help in a separate window containing standard Help tools - TOC, Search, Index,
and personally selected Favorites.
Dynamic Help
Dynamic Help is available from within the CatalystEX application window. The right side of
the application window is dedicated to Dynamic Help.
uPrint/uPrint SE Service Manual 3-5

MaracaEX Help
Overview
MaracaEX is a program used for machine configuration and troubleshooting. It is intended
for use by trained service personnel only.
Caution: It is possible, using this program, to damage the controller software and
make the machine non-functional.
Using MaracaEX you can select a modeler to work with, modify machine-specific
configuration parameters, download new calibration file data, download new test parts, and
test the machine's operation.
• Select a Modeler
• Modeler States
• Modeler Setup
• MaracaEX Configuration
• Show Machine Status
• Materials
• Tip Offset and Liquefier Calibration
• Gantry
• Temperatures
• Outputs
• Table Calibration
• Get Calibration
• Send Calibration
• Get Configuration
• Test Parts
• Reset Password
• Connect
Select a Modeler
From the Current Modeler drop down list select a modeler to connect to with MaracaEX. To
add modelers to the list, use the plus button at the bottom of the window.
Modeler States
These three fields provide the current information for the state of the machine:
State
Internal State
Home State
3-6
The current machine state as reported to CatalystEX status.
The current internal software state (e.g. sttIdle)
The previous internal state in any state that cares about that state.

Modeler Setup
In order to use MaracaEX on a network modeler, you must first create a modeler definition.
You can create modeler definitions by clicking the + button in the main window.
A modeler definition is made complete by specifying the following:
• Modeler name (You can use any descriptive name for the modeler.)
• Modeler type
• Modeler IP address
You can delete a modeler definition by selecting the - button in the main window and then
choosing the modeler to delete from the current list of modelers.
Configuration
Clicking the properties icon, “Set up the display parameters”, in the main window will bring
up a dialog to select Metric or English units of measure. Click the green arrow to close the
window after making your selection. MaracaEX will now display numerical values in the
units you chose.
Status
MaracaEX machine status provides the ability to set the machines serial number and detailed
information about the current mechanical state of the machine.
• Position and Temperatures
• Versions
• Travel Limits
• Filament
• Door
• Setting the Serial Number
Printer St atus
Current Position
XYZ Scale/Inch
Current / Total Layers
Current Curve
Head Temp
Head PWM
Support Temp
Support PWM
Chamber Temp
The current X, Y and Z position in inches.
Scale factors in microsteps per inch.
The current build layer and the total number of layers in the model.
The current curve number of the model.
The model liquefier temperature and its set point in C.
Not used.
The support liquefier temperature and its set point in C (SST only).
Not used.
The actual chamber temperature and its set point in C.
uPrint/uPrint SE Service Manual 3-7

Versions
Product Version
Build Version
Firmware Version
PLD Version
Product serial number
The current version number for the complete software rel ease.
The build number for current SBC software.
The current version for the 186/Controller software.
The current version of the programmable logic devices on the 186 or Controller boards.
The serial number of the complete system.
Travel Limits
If the box is checked the switch is tripped.
Note: Only updates when system is looking for the input. Manually blocking the
sensor will not update this field.
X home
X Limit
Y Home
Y Limit
Z Home
Z Limit
Z Jam
Z Foam
The X axis home limit switch state.
The X axis end of travel limit switch state.
The Y axis home limit switch state.
The Y axis end of travel limit switch state.
The Z axis home limit switch state.
The Z axis end of travel limit switch state.
The Z jam encoder switch state.
The Z top of foam switch state.
Filament
Model Latched
Model in Head
Support Latched
Support in Head
Door
Door Latched
Door Open
Miscellaneous
Lights On
Chamber Heater
The model material cartridge latch state.
The state of the modeling material in the machine.
True = material moved out of cartridge.
False = material not moved out of cartridge.
The support material cartridge latch state.
The state of the support material in the machine.
True = material moved out of the cartridge.
False = material not moved out of the cartridge
The state of the door latch solenoid.
The state of the door switch.
State of the chamber light.
State of the chamber heater.
3-8

Setting the Serial Number
To set the system serial number enter the serial number in the “Product Serial Number” field
and click on the green check mark. The serial number displayed in this field is the current
serial number of the product.
Materials
Every cartridge has a SmartSpool EEPROM attached that tracks information about the
filament remaining on the cartridge, and shelf life information. The following information is
provided for each cartridge. The top cartridge is the Model material cartridge, and the
bottom cartridge is the Support material cartridge.
Cartridge Information
Serial Number
Material Type
Manufacturing Lot
Manufacturing Date
Use Date
Initial Quantity
Current Quantity
This is a unique number assigned to each cartridge.
This is the type of material on the cartridge. For example:
P400 - is a standard modeling material
P400R - is a standard release material.
P400SR - is a standard soluble release material.
This is a lot code used by Stratasys to control the manufacturing process.
This is the date that the cartridge was manufactured.
This is the date that the cartridge was first inserted in a machine.
This is the amount of material that was on the cartridge initially.
This is the amount of material currently on the cartridge.
Tip Offset
The tip offset control dialog allows you to adjust the tip offset values.
Tip Offset X,Y
Z Tip to Base
Z Tip to Tip
XY distance from model tip to support tip.
Depth of tip into modeling base.
Z distance from model tip to support tip with desired offset.
Gantry
The gantry controls the adjustment for the XY gantry. These values are set in the factory and
do not need to be adjusted unless the XY gantry is adjusted or replaced.
Gantry Hysteresis
Y Lash
X Adjust
uPrint/uPrint SE Service Manual 3-9
Mechanical lash is the tendency of the gantry to remain stationary after a change in direction until the
mechanical slop in the system is taken up by the move.
X Axis adjustment provides a method of removing additional linear part error that is present in the XY
Gantry after assembly.

Part Calibration
Left
Right
Front
Back
Left Front
Left Rear
Measured on left side of modeling base, front to back.
Measured on right side of modeling base, front to back.
Measured on front side of modeling base, left to right.
Measured on back side of modeling base, left to right.
Measured from front left corner to rear right corner.
Measured from front right corner to rear left corner.
Temperatures
The temperature control dialog allows you to adjust the set points for the head and chamber
temperatures, for both modeling and at standby.
Temperature Setpoints
Item Build Setpoint Standby Setpoint
Model 300 102.5
Support 300 102.5
Chamber 75 75
Outputs
The outputs dialog contains toggle buttons to control solenoids and motors that can not be
directly controlled on the Control Panel Display.
Model Latch
Motor Enabled
Motor Running
Support Latched
Motor Enabled
Motor Running
Door Latch
Lights On
The check box shows the state of the model (top) cartridge latch, and the toggle bu tt o n
changes that state.
The check button shows the state of the model (top) feed motor solenoid, and the toggle but-
ton changes that state.
The check box shows the state of the model (top) filament feed motor, and the toggle button
changes that state.
The check box shows the state of the support (bottom) cartridge latch, and the toggle button
changes that state.
The check box shows the state of the support (bottom) feed motor solenoid, and the toggle
button changes that state.
The check box shows that state of the support (bottom) filament feed motor, and the toggle
button changes that state.
This check box shows the state of the door latch solenoid, and the toggle button changes that
state.
This check box shows the state of the chamber lights, and the toggle button changes that
state.
Table
Table calibration consists of downloading the correct XY table calibration file to the machine
to properly adjust for table-to-table tolerance issues. The Table dialog allows you to browse
for and select the calibration file for the currently installed XY table and to download it to the
machine.
3-10

Get Calibration
The Get Calibration button allows a single calibration file to be retrieved from any machine
with a build number greater than or equal to 1132. This calibration file will also be on the
system calibration floppy disk/CD that ships in the electronics pan for systems with a build
number greater than or equal to 1132. This file contains all the factory calibration
information, including, but not limited to: Tip Offset, Tip Depth, Y Lash, X Correction, and
the table calibration DAT file.
When the button is pressed, a file selection dialog is presented allowing the assignment of a
file name and the selection of a storage location. This file should be updated any time
maintenance is performed that affects the factory calibration.
Send Calibration
The Send Calibration button allows you to send the complete set of factory calibrations to the
machine as a single file. This includes but is not limited to: Tip Offset, Tip Depth, YLash, X
Correction, and the gantry DAT file. This file is stored on the system calibration floppy disk/
CD if the system shipped with Controller software build 1132 or higher installed. A
calibration file can be retrieved from the modeler using Get Calibration from any system
with a build number of 1132 or higher.
When this button is pressed a dialog box appears that allows you to browse for and select the
calibration file to send to the machine.
Get Config
When the Get Config button is pressed a file selection dialog is presented allowing the
assignment of a file name and the selection of a storage location.
Test Parts
Test Parts consists of downloading sample and test part files to the machine. These file must
be in the .cmb.gz format produced by CatalystEX.
The Test Part dialog allows you to browse for and select the sample or test file and to
download it to the machine. The Test Parts are not preserved during a software upgrade. To
remove unwanted test parts, upgrade the software to the current level and only the factory
test parts will remain on the system.
Reset Password
This button resets the administrator password to null. This turns off password control of the
queue. This is used for clearing a forgotten password.
uPrint/uPrint SE Service Manual 3-11

Connect
If the system is not available over the network, when MaracaEX first loads, MaracaEX will
only try to connect one time. This allows you to interact with MaracaEX when it is not
connected to a machine. The Connect button allows you to request additional connection
attempts.
Help
Click the question mark to display the Help files.
3-12

Service Procedures
Maintenance Preparation ____________________________________________ 4-3
Required Tools list ____________________________________________________ 4-4
Distributer/Reseller supplied Tools ______________ ____ ___ _______ ___ ____ 4-4
Supplied by Stratasys ______________________________________________ 4-4
Pre-Maintenance Procedures_________________________________________ 4-4
Exterior Components _________________________________________________ 4-5
Top Panel __ ___ ____ ___ ____ ___ ___ ____ ___ ____ ___ _______ ___ ____ ___ ____ 4-5
Side Panels________________________________ ___ ____ ___ ___ ____ ___ ____ 4-7
Display Panel______________________________________________________ 4-9
Front Panel_______________________________________________________ 4-11
Door Solenoid ____________________________________________________ 4-13
Door Sensor ______________________________________________________ 4-14
Electronics Bay Components ________________________________________ 4-15
Lower Electronics Bay Cover ______________________________________ 4-15
Upper Electronics Bay Cover ______________________________________ 4-17
Removing the Electronics Bay _____________________________________ 4-19
Electronics Bay Cooling Fan_______________________________________ 4-21
Controller Board__________________________________________________ 4-23
Single Board Computer (SBC) ___________________________ __________ 4-26
Power Distribution I/O Card _______________________________________ 4-29
Power Distribution Board (PDB) ____________________________________ 4-31
Hard Drive _______________________________________________________ 4-34
Line Filter_________________________________________________________ 4-40
Circuit Breaker ___________________________________________________ 4-42
AC Input __________ ___ ____ ___ ___ ____ ___ ____ ___ ____ ___ ___ ____ ___ ___ 4-44
Power Switch_____________________________________________________ 4-46
24VDC Power Supply _____________________________________________ 4-48
5/12VDC Power Supply ___________________________________________ 4-51
120VDC Power Supply ____________________________________________ 4-54
Head Components__________________________________________________ 4-56
Head Cooling Fan________________________________________________ 4-5 6
Toggle Head Assembly ___________________________________________ 4-58
Substrate Sensor__________________________________________________ 4-64
Z Foam Level Assembly ___________________________________________ 4-67
uPrint/uPrint SE Service Manual 4-1

Toggle Sensor __________________________________________ ____ ___ ___ 4-69
Toggle Bar _______________ ___ ___ ____ _______ ___ ____ ___ ___ ____ ___ ___ 4-71
Head Board________________________ ___ ____ ___ ____ ___ _______ ___ ___ 4-76
TC Amp board ___________________________________________________ 4-82
Umbilical Hose ___________________________________________________ 4-84
Material Tubes ___________________________________________________ 4-88
Umbilical Cable__________________________________________________ 4-89
XY Table Components ___ ____________________________________________ 4-91
Y Home Sensor ___________________________________________________ 4-91
Y EOT (End of Travel) Sensor_______________________________________ 4-92
X Motor__________________________________________________________ 4-93
Y Motor_________________________________________________________ 4-100
Y Motor Belt_____________________________________________________ 4-103
Y Drive Rod _____________________________________________________ 4-110
XY Table ________________________________________________________ 4-117
Z Stage Components_______________________________________________ 4-137
Z Home Sensor _____________________________________________ ___ __ 4-137
Z EOT (End of Travel) Sensor ______________________________________ 4-138
Chamber Fans __________________________________________________ 4-139
Chamber Heaters _______________________________________________ 4-141
Thermal Fuses ___________________________________________________ 4-145
Chamber Thermocouple ________________________________________ 4-148
Z Motor ____________________________ ___ ____ ___ ____ ___ ___ ____ ___ __ 4-149
Z Stage ______________ ____ ___ ___ ____ ___ ____ ___ ____ ___ ___ _______ __ 4-153
4-2

Maintenance Preparation
Read these warnings before performing service on printer!
Warning: Make sure the power is disconnected when performing any of the
disassembly or assembly instructions in this chapter. Failure to do so can cause
severe personal injury or damage to the electronics.
Warning: Servicing instructions outlined in this chapter are intended for use by
qualified personnel only. Failure to follow these guidelines can cause severe
injury.
Warning: The Power Switch does NOT remove power from the printer. The
Breaker Switch located on the rear of the printer MUST be off before service is
performed on the printer. It is recommended that the AC power cord be
disconnected before performing maintenance outlined in this chapter.
Warning: Use extreme caution when the door solenoid is disabled. Axes may
move unexpectedly, which may cause serious injury. Always remember to
enable the door solenoid once service is completed.
Note: All references within this procedure to ‘Left’ or ‘Right’ are made
assuming that the printer is being viewed from the ‘Front’ (the door and user
interface panel side).
uPrint/uPrint SE Service Manual 4-3

Required Tools list
Distributer/Reseller supplied Tools
1. Standard screwdriver set
2. Phillips screwdriver set
3. Allen wrench set
4. Pliers
5. Channel locks
6. Small wire cutters
7. Needle nose pliers
8. Assorted wire ties
9. Box wrenches
10. Flashlight
11. Grounding strap
12. Voltmeter
13. Network crossover cable (for communication testing)
14. Laptop computer
15. Nut driver set
16. Dial indicator
17. Serial data cable (for issuing TeraTerm commands)
Supplied by Stratasys
1. Belt tension gauge (for adjusting XY table drive belts)
2. Y-Motor belt tensioning tool (for adjusting belt Y table motor belt)
3. Head dial indicator bracket (for XY table and Z stage leveling)
4. Spring Removal Tool
5. Drive Wheel Alignment Rod
6. Set of Shims (Feeler Gauges)
7. Liquefier Alignment Rod
8. Filament Guide Alignment Rod (For SST Only)
9. Service Guide (CD and Hardcopy)
10. MaracaEX CD
11. CatalystEX CD
12. Controller software CD
Pre-Maintenance Procedures
1. Unload model and support material.
2. Power the printer down using the power switch.
3. After the printer has powered down, turn the main power toggle switch off on the back
of the unit.
4. Remove the AC power cord, RJ-45 network cable and UPS cable (if used) from the back
of the unit.
4-4

Remove the 3 top
panel mounting screws
Exterior Components
Top Panel
Required Tools
5
⁄16” nut driver or standard screwdriver.
•
Hardware
1
• 10-32 x
Removing the top panel
⁄2” slotted screws (x3)
5
1. Using a
Figure 4-17.
2. Lift up and slide the top panel towards the back of the printer to remove. See Figure 4-18.
⁄16” nut driver or standard screwdriver, remove the 3 mounting screws. See
Figure 4-17: Top panel mounting screw location
uPrint/uPrint SE Service Manual 4-5

Slide top panel toward the
back of the printer and lift up
to remove.
Figure 4-18: Top panel removal
Installing the top panel
1. Slide the top panel towards the front and in to place, then push down.
2. Using a
5
⁄16” nut driver or standard screwdriver, reinstall the 3 mounting screws.
4-6

Remove the 3 left
side panel
mounting screws.
Slide top panel toward
the back of the printer
and pull outward to
remove the left side
panel.
Side Panels
Required Tools
5
⁄16” nut driver or standard screwdriver.
•
Hardware
1
• 10-32 x
Removing the left side panel
1. Remove the top panel. See Removing the top panel on page4-5.
2. Using a
Figure 4-19.
⁄2” slotted screws (x6)
5
⁄16” nut driver or standard screwdriver, remove the 3 mounting screws. See
Figure 4-19: Left side panel mounting screw locations
3. Slide panel towards the back of the printer and pull outward to remove. See Figure 4-20.
Figure 4-20: Removing the left side panel
uPrint/uPrint SE Service Manual 4-7

Remove the 3 right
side panel
mounting screws.
Pull the right side panel
out and towards the
back of the printer to
remove.
Removing the right side panel
5
1. Using a
⁄16” nut driver or standard screwdriver, remove the 3 mounting screws. See
Figure 4-21.
Figure 4-21: Right side panel mounting screw locations
2. Slide towards the back of the printer and pull outward to remove. See Figure 4-22.
Figure 4-22: Removing the right side panel
Installing the side panels
1. Slide the left side panel towards the front of the printer and push into place.
2. Using a
5
⁄16” nut driver or standard screwdriver, Reinstall the 3 mounting screws.
3. Slide the right side panel towards the front of the printer and push into place.
4. Using a
5. Reinstall the top panel. See Installing the top panel on page4-6.
5
⁄16” nut driver or standard screwdriver, Reinstall the 3 mounting screws.
4-8

Display Panel
Required Tools
• Standard screwdriver.
Removing the display panel
1. Open the chamber door.
2. Gently pry open the display panel access hatch with a standard screwdriver. See Figure
4-23.
Figure 4-23: Opening the display panel access hatch
3. Reach behind the display panel and press the tab to release the display panel. See Figure
4-24.
Figure 4-24: Removing the display
4. Disconnect J1 connector. See Figure 4-25.
uPrint/uPrint SE Service Manual 4-9

5. Remove the display panel.
Figure 4-25: Disconnecting the J1 connector
Installing the display panel
1. Connect the J1 Connector.
2. Gently push the display panel into place.
3. Close the display panel access hatch.
4. Close the chamber door.
4-10

Remove the 2 mounting
screws from behind the
display panel
Front Panel
Required Tools
5
⁄16” nut driver or standard screwdriver.
•
Hardware
1
• 10-32 x
Removing the front panel
1. Open the chamber door.
2. Remove the display panel. See Removing the display panel on page4-9.
3. Using a
behind the display panel. See Figure 4-26.
⁄2” slotted screws (x8)
5
⁄16” nut driver or standard screwdriver, remove the 2 mounting screws from
Figure 4-26: Front panel mounting screw locations
4. Using a
5
⁄16” nut driver or standard screwdriver, remove the 6 mounting screws from the
front panel. See Figure 4-27.
uPrint/uPrint SE Service Manual 4-11

Remove the 6
mounting
screws for the
front panel
Figure 4-27: Front panel mounting screw locations
5. Remove the front panel by pulling outward.
Installing the front panel
1. Align the front panel with the mounting holes.
2. Using a
3. Using a
5
⁄16” nut driver or standard screwdriver, reinstall the 6 mounting screws.
5
⁄16” nut driver or standard screwdriver, reinstall the 2 mounting screws behind
the display panel.
4. Reinstall the display panel. See Installing the display panel on page4-10.
5. Close the chamber door.
4-12

Disconnect the DRSOL
cable.
Door Solenoid
Required Tools
5
⁄16” nut driver or standard screwdriver.
•
Removing the door solenoid
1. Remove the display panel. See Removing the display panel on page4-9.
2. Remove the front panel. See Removing the front panel on page4-11.
3. Disconnect the door solenoid (DRSOL) cable by pressing down on the tab. See Figure 4-
28.
Figure 4-28: Door solenoid connector location
4. Push the solenoid pin out and down to remove from the mounting bracket. See Figure 4-
Installing the door solenoid
1. Push the solenoid pin out and slide door solenoid into place on the mounting plate.
2. Reconnect the DRSOL cable.
3. Reinstall the front panel. See Installing the front panel on page4-12.
4. Reinstall the display panel. See Installing the display panel on page4-10.
29.
Figure 4-29: Removing the door solenoid
uPrint/uPrint SE Service Manual 4-13

Disconnect the DRSW
cable.
Door Sensor
Required Tools
5
⁄16” nut driver or standard screwdriver.
•
Removing the door sensor
1. Remove the display panel. See Removing the display panel on page4-9.
2. Remove the front panel. See Removing the front panel on page4-11.
3. Disconnect the DRSW cable. See Figure 4-30.
Figure 4-30: Door sensor cable location
4. Gently pull the door sensor out of the mounting plate. See Figure 4-31.
Figure 4-31: Removing the Door Sensor
Installing the door sensor
1. Gently push the door sensor into place on the mounting plate.
2. Connect the door sensor (DRSW) cable.
3. Install the front panel. See Installing the front panel on page4-12.
4. Install the display panel. See Installing the display panel on page4-10.
4-14

Electronics Bay Components
The main circuit boards and power supplies for the printer are located in the electronics bay.
Note: When reinstalling components in the Electronics Bay area note that cable
J401 is unused. (Not connected)
Lower Electronics Bay Cover
Required Tools
5
⁄16” nut driver or standard screwdriver.
•
Hardware
3
• 10-32 x
⁄8” slotted screws (x3)
Opening the electronics bay
1. Remove the top panel. See Removing the top panel on page4-5.
2. Remove the side panels. See Side Panels on page4-7.
3. Remove the filament tubes from the Y connectors by pushing down on the ring and
pulling back on the filament tubes. See Figure 4-32.
Figure 4-32: Removing the filament tubes from the Y connectors
4. Using a
top of the electronics bay cover. See Figure 4-33.
5
⁄16” nut driver or standard screwdriver, remove the 3 mounting screws on the
uPrint/uPrint SE Service Manual 4-15

Remove the 3
mounting screws
Figure 4-33: Electronics bay cover mounting screw locations
5. Gently pull the electronics bay cover down. See Figure 4-34.
Figure 4-34: Electronics bay with cover lowered
Closing the electronics bay
1. Gently push the electronics bay cover back in to the closed position.
2. Using a
5
⁄16” nut driver or standard screwdriver, reinstall the 3 mounting screws.
3. Reconnect the filament tubes to the Y connectors.
4. Reinstall the side panels. See Installing the side panels on page4-8.
5. Reinstall the top panel. See Installing the top panel on page4-6.
4-16

Loosen but do not
remove the 2
mounting screws
Upper Electronics Bay Cover
Required Tools
5
⁄16” nut driver or standard screwdriver.
•
Hardware
3
• 10-32x
Removing the upper electronics bay cover
1. Remove the top panel. See Removing the top panel on page4-5.
2. Remove the side panels. See Side Panels on page4-7.
3. Using a
and right mounting screws. See Figure 4-35.
⁄8” slotted screws (x4)
5
⁄16” nut driver or standard screwdriver, loosen but do not remove the top left
Figure 4-35: Upper electronics bay cover top mounting screw locations
4. Using a
5
⁄16” nut driver or standard screwdriver, remove the bottom left and right
mounting screws. See Figure 4-36.
uPrint/uPrint SE Service Manual 4-17

Remove the bottom left and
right mounting screws
Figure 4-36: Upper electronics bay cover bottom mounting screw locations
5. Lift the cover up and off of the top mounting screws.
Installing the upper electronics bay cover
1. Slide the cover down on to the top left and right side mounting screws.
2. Using a
5
⁄16” nut driver or standard screwdriver, reinstall the bottom left and right side
mounting screws.
3. Using a
5
⁄16” nut driver or standard screwdriver, tighten the top left and right side
mounting screws.
4. Install the side panels. See Installing the side panels on page4-8.
5. Install the top panel. See Installing the top panel on page4-6.
4-18

I/O Card cable
locations
Chamber thermocouple
wire location
Removing the Electronics Bay
Required Tools
• 5⁄16” nut driver or standard screwdriver.
Hardware
• 10-32 x 1⁄2” slotted screws (x8)
Removing the electronics bay
1. Remove the top panel. See Removing the top panel on page4-5.
2. Remove the side panels. See Side Panels on page4-7.
3. Remove the upper electronics bay cover. See Removing the upper electronics bay cover
on page4-17.
4. Touch the metal plate of the electronics bay cover to discharge any static electricity.
5. Disconnect the 6 I/O card cables by pressing down on the long tabs and pulling out. See
Figure 4-37.
6. Disconnect the chamber thermocouple wire. See Figure 4-37.
Figure 4-37: I/O card cable locations
7. Remove the left and right side electronics bay mounting screws with a
standard screwdriver. See Figure 4-38.
5
⁄16” nut driver or
uPrint/uPrint SE Service Manual 4-19

Remove the 4 right
side mounting screws
Remove the 4 left side
mounting screws
PDB rear cable locations
Figure 4-38: Electronics Bay mounting screw locations
8. Slide the electronics bay out 3 inches (76mm) and disconnect the cables from the rear of
the power distribution board. See Figure 4-39.
Figure 4-39: Power Distribution Board rear cable locations
9. To remove, slide the entire electronics bay out from the back of the printer.
Installing the electronics bay
1. Slide the electronics bay into position, leaving 3 inches (76mm).
2. Connect the 4 rear power distribution board cables.
3. Slide the electronics bay back into position
4. Using a
5
⁄16” nut driver or standard screwdriver, reinstall the 4 left and 4 right side
mounting screws.
5. Connect the I/O card cables.
6. Reinstall the upper electronics bay cover. See Installing the upper electronics bay cover
on page4-18.
7. Reinstall the side panels. See Installing the side panels on page4-8.
8. Reinstall the top panel. See Installing the top panel on page4-6.
4-20

P1 Connector
Electronics Bay Cooling Fan
Required Tools
5
⁄16” nut driver or standard screwdriver.
•
5
•
⁄64” allen wrench.
Hardware
• 6-32 x 1
½” flat head cap screws (x4)
Removing the electronics bay cooling fan
1. Remove the top panel. See Removing the top panel on page4-5.
2. Remove the side panels. See Side Panels on page4-7.
3. Open the Electronics Bay. See Opening the electronics bay on page4-15.
4. Touch the metal plate of the electronics bay cover to discharge any static electricity.
5. Disconnect the P1 cable from the fan. See Figure 4-40.
Figure 4-40: Electronics bay cooling fan connector location
6. Using a
uPrint/uPrint SE Service Manual 4-21
5
⁄64” allen wrench, remove the 4 mounting screws. See Figure 4-41.

Remove the 4
mounting screws
Figure 4-41: Electronics bay cooling fan mounting screw locations
7. Remove the cooling fan.
Installing the electronics bay cooling fan
1. Align the cooling fan with the 4 mounting holes.
2. Using a
5
⁄64” allen wrench, reinstall the 4 mounting screws.
3. Reconnect the P1 cable.
4. Close the electronics bay. See Closing the electronics bay on page4-16.
5. Install the side panels. See Installing the side panels on page4-8.
6. Install the top panel. See Installing the top panel on page4-6.
4-22

Remove the 3
ribbon cables
Controller Board
Required Tools
5
⁄16” nut driver or standard screwdriver.
•
• Phillips screwdriver
Hardware
1
• 6-32 x
Removing the controller board
1. Open the electronics bay. See Opening the electronics bay on page4-15.
2. Touch the metal plate of the electronics bay cover to discharge any static electricity.
3. Remove the 3 ribbon cables by pressing the tabs outward and gently pulling the ribbon
cables out of the sockets. See Figure 4-42.
⁄4” Phillips pan head screws (x6)
Figure 4-42: Controller board ribbon cable locations
4. Using a standard screwdriver, loosen the 2 screws that hold the diagnostics DB-9 cable in
place. Then gently pull the cable out of the connector. See Figure 4-43.
uPrint/uPrint SE Service Manual 4-23

Remove the DB-9
connector
Remove the (6)
mounting screws
P104 Connector
Figure 4-43: Remove the 2 screws that hold the Diagnostics DB-9 cable in place
5. Using a Phillips screwdriver, remove the 6 controller board mounting screws. See Figure
4-44.
Figure 4-44: Controller board mounting screw locations
6. Gently lift the controller board up from the single board computer (SBC) at the P104
connector. DO NOT bend any pins on the board. See Figure 4-45.
Figure 4-45: P104 connector location
4-24

Installing the controller board
1. Align the pins of the Controller board with the P104 connector of the SBC and gently
press down in to position.
2. Using a Phillips screwdriver, reinstall the 6 mounting screws.
3. Reconnect the diagnostics DB-9 connector to the controller board.
4. Using a standard screwdriver, tighten the 2 mounting screws.
5. Reconnect the 3 ribbon cables to the PDB.
6. Close the Electronics Bay. See Closing the electronics bay on page4-16.
7. From the workstation, open CatalystEX.
8. Connect to the printer.
9. Insert the printer firmware CD into the workstation CD drive.
10. From the Printer Services tab, click on the Update Software button.
11. Navigate CatalystEX to the Upgrade (.UPG) file on the printer firmware CD.
12. The printer will load, reboot and verify the upgrade.
uPrint/uPrint SE Service Manual 4-25

Disconnect the
J2 connector
Single Board Computer (SBC)
Required Tools
5
⁄16” nut driver or standard screwdriver.
•
• Phillips screwdriver
Hardware
1
• 6-32 x
Removing the single board computer
1. Open the electronics bay. See Opening the electronics bay on page4-15.
2. Touch the metal plate of the electronics bay cover to discharge any static electricity.
3. Remove the controller board. See Removing the controller board on page4-23.
4. Disconnect the J2 power connector. See Figure 4-46.
⁄4” Phillips pan head screws (x4)
Figure 4-46: J2 power connector location
5. Disconnect the RJ-45 network cable. See Figure 4-47.
4-26

Disconnect the
RJ45 connector
Remove the 4
mounting screws
Disconnect the
IDE ribbon cable
Figure 4-47: RJ-45 network cable location
6. Using a Phillips screwdriver, remove the 4 mounting screws. See Figure 4-48.
Figure 4-48: SBC mounting screw locations
7. Lift the SBC and disconnect the IDE ribbon cable by pulling out of the socket. See Figure
4-49.
Figure 4-49: SBC IDE ribbon cable location
uPrint/uPrint SE Service Manual 4-27

Disconnect the
Display cable
8. Using a standard screwdriver, loosen the display cable mounting screws. See Figure 4-
50.
9. Disconnect the display cable from the SBC. See Figure 4-50.
Figure 4-50: SBC display cable location
Installing the single board computer
1. Reconnect the display cable.
2. Using a standard screwdriver, tighten the display cable mounting screws.
3. Reconnect the IDE ribbon cable.
4. Align the SBC with the mounting holes.
5. Using a Phillips screwdriver, reinstall the 4 mounting screws.
6. Reconnect the RJ-45 network cable.
7. Reconnect the J2 power cable.
8. Reinstall the controller board. See Installing the controller board on page4-25.
9. Close the electronics bay. See Closing the electronics bay on page4-16.
4-28

Disconnect all 6
of the cables
Disconnect the
chamber
thermocouple
Power Distribution I/O Card
Required Tools
5
⁄16” nut driver or standard screwdriver.
•
• Phillips screwdriver
Hardware
1
• 6-32 x
Removing the I/O card
1. Remove the top panel. See Removing the top panel on page4-5.
2. Remove the side panels. See Side Panels on page4-7.
3. Open the electronics bay. See Opening the electronics bay on page4-15.
4. Touch the metal plate of the electronics bay cover to discharge any static electricity.
5. Disconnect the 6 cables from the I/O card by pushing in on the locking tabs and pulling
outward. See Figure 4-51.
⁄4” Phillips pan head screws (x3)
Figure 4-51: I/O card cable locations
6. Disconnect the thermocouple from the back side of the I/O card by pulling outward. See
Figure 4-52.
Figure 4-52: Chamber thermocouple wire location
uPrint/uPrint SE Service Manual 4-29

Remove the 3
mounting screws
I/O card
connections
7. Using a Phillips screwdriver, remove the 3 mounting screws from the I/O card. See
Figure 4-53.
Figure 4-53: I/O card mounting screw locations
8. Gently pull the I/O card out from the power distribution board sockets.
Installing the I/O card
1. Gently slide the I/O card in to the power distribution board sockets.
2. Verify the I/O card is seated properly by viewing the connection through the viewing
slots. See Figure 4-54.
Figure 4-54: I/O card viewing slot location
3. Using a Phillips screwdriver, reinstall the 3 mounting screws.
4. Reconnect the thermocouple to the back side of the I/O card.
5. Reconnect the 6 cables to the I/O card.
6. Close the electronics bay. See Closing the electronics bay on page4-16.
7. Reinstall the side panels. See Installing the side panels on page4-8.
8. Reinstall the top panel. See Installing the top panel on page4-6.
4-30
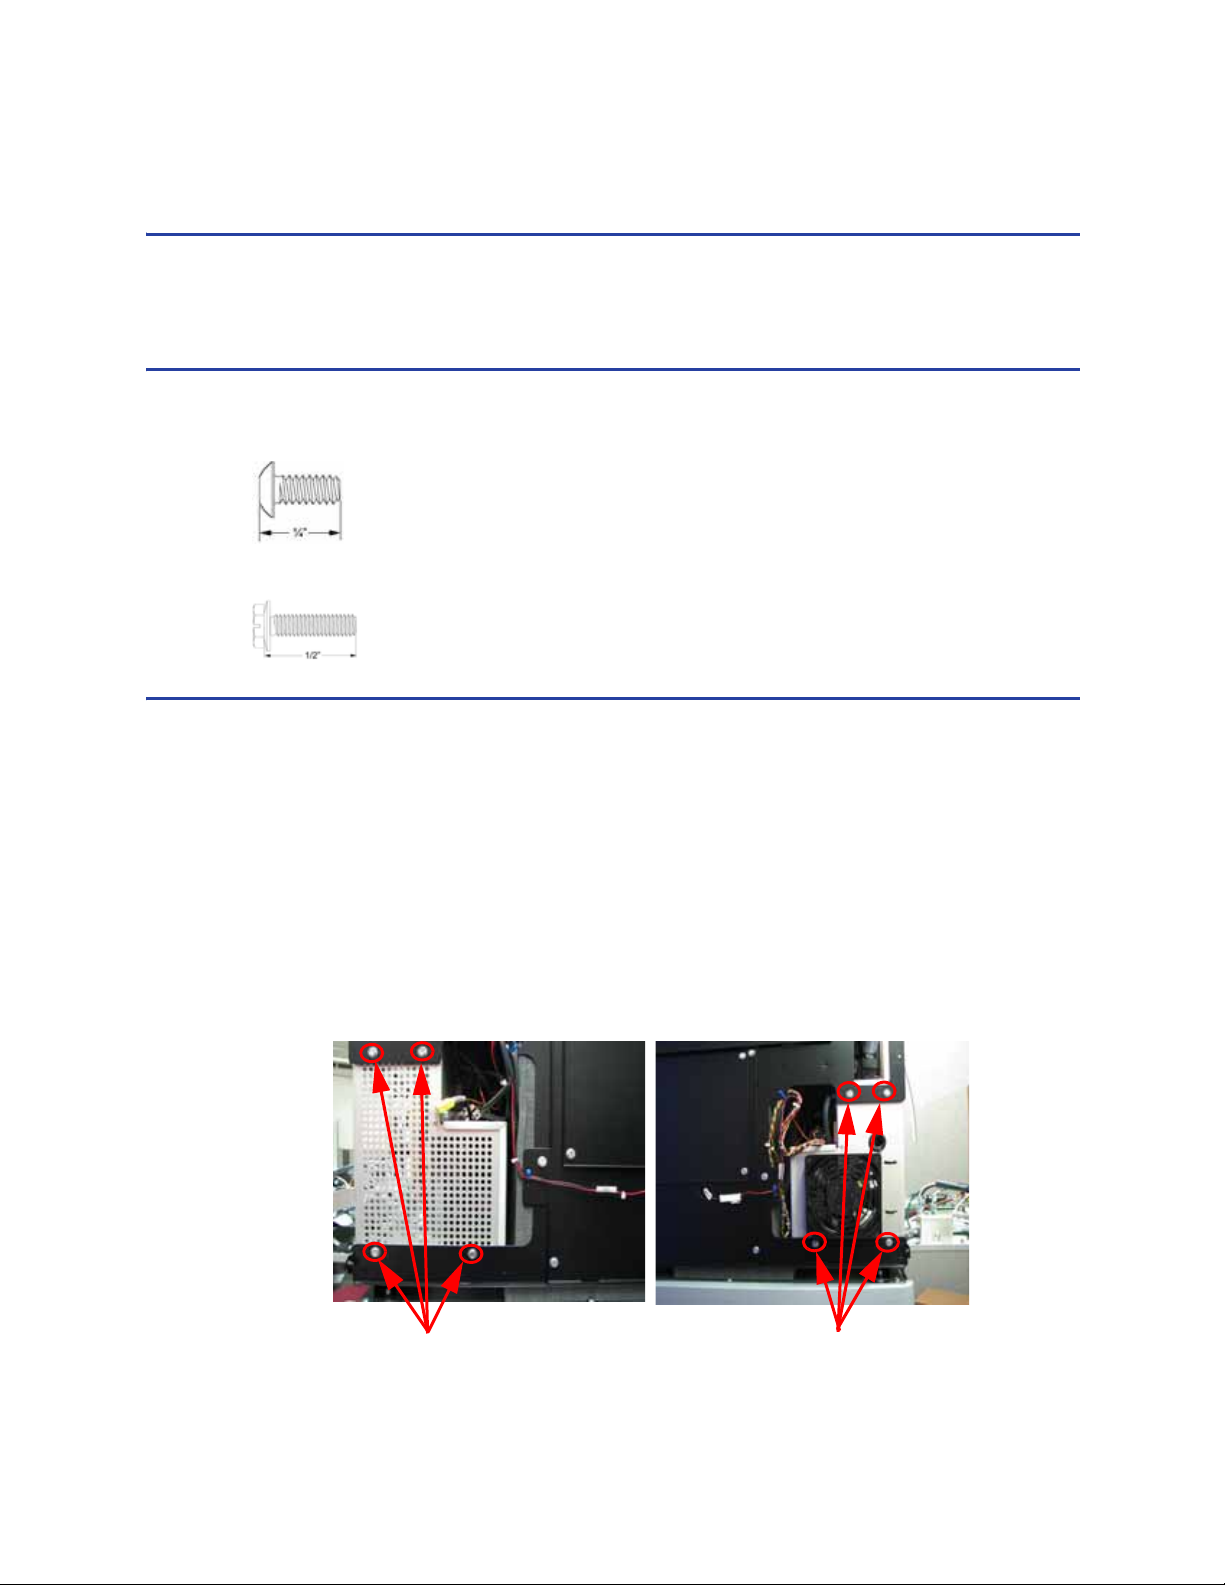
Remove the 4 right
side mounting screws
Remove the 4 left
side mounting screws
Power Distribution Board (PDB)
Required Tools
5
⁄16” nut driver or standard screwdriver.
•
• Phillips screwdriver
Hardware
1
• 6-32 x
⁄4” Phillips pan head screws (x12)
• 10-32 x
1
⁄2” slotted screws (x8)
Removing the power distribution board
1. Remove the top panel. See Removing the top panel on page4-5.
2. Remove the side panels. See Side Panels on page4-7.
3. Open the electronics bay. See Opening the electronics bay on page4-15.
4. Touch the metal plate of the electronics bay cover to discharge any static electricity.
5. Remove the I/O card. See Removing the I/O card on page4-29.
6. Using a
5
⁄16” nut driver or standard screwdriver, remove the 4 screws on the left and
right side of the electronics bay and carefully slide the electronics bay out of the printer
about 3 inches (76mm). See Figure 4-55.
Figure 4-55: Electronics bay mounting screw locations
uPrint/uPrint SE Service Manual 4-31

Disconnect the 4 cables on the back of the
Disconnect
the 3 ribbon
cables
Disconnect
the 3 ribbon
cables
Disconnect
the 4
cables
7. Disconnect the 4 cables from the back side of the power distribution board. See Figure 4-
56.
Figure 4-56: Power distribution board rear cable locations
8. Slide the Electronics Bay back into place.
9. Disconnect the 10 cables from the front of the PDB. See Figure 4-57.
Figure 4-57: Power distribution board front cable locations
10. Using a Phillips screwdriver, remove the 12 mounting screws. See Figure 4-58.
Figure 4-58: Power distribution board mounting screw locations
11. To remove, gently pull the power distribution board outward.
4-32

Installing the power distribution board
1. Align the power distribution board with the mounting holes.
2. Using a Phillips screwdriver, reinstall the 12 mounting screws.
3. Reconnect the 10 cables to the front of the power distribution board.
4. Carefully slide the electronics bay out 3 inches (76mm) and reconnect the 4 cables to the
back of the PDB.
5. Carefully slide the electronics bay back into position.
6. Using a
5
⁄16” nut driver or standard screwdriver, reinstall the 8 mounting screws on the
left and right sides.
7. Reinstall the I/O card. See Installing the I/O card on page4-30.
8. Close the electronics bay. See Closing the electronics bay on page4-16.
9. Reinstall the side panels. See Installing the side panels on page4-8.
10. Reinstall the top panel. See Installing the top panel on page4-6.
uPrint/uPrint SE Service Manual 4-33

Disconnect the
power input cable
Hard Drive
Required Tools
5
⁄16” nut driver or standard screwdriver.
•
• Phillips screwdriver
Hardware
1
• 6-32 x
Removing the SATA Hard Drive
1. Open the electronics bay. See Opening the electronics bay on page4-15.
2. Touch the metal plate of the electronics bay cover to discharge any static electricity.
3. Disconnect the power input cable by pressing the metal tab in and pulling down. See
Figure 4-59.
⁄4” Phillips pan head screws (x8)
Figure 4-59: Hard drive power cable location
4. Disconnect the SATA cable by pressing the metal tab in and pulling down. See Figure 4-
60.
4-34

Disconnect the
SATA cable
Remove the
mounting screws
Remove the
mounting screws
Remove mounting
brackets
Figure 4-60: SATA cable location
5. Using a Phillips screwdriver, remove the 4 mounting screws. See Figure 4-61.
Figure 4-61: Hard drive mounting screw locations
6. Slide the hard drive up and out of the electronics bay.
7. Using a Phillips screwdriver, remove the mounting brackets from the hard drive. See
Figure 4-62.
Figure 4-62: Hard drive mounting bracket screw locations
uPrint/uPrint SE Service Manual 4-35

Installing the SATA hard drive
1. Using a Phillips screwdriver, reinstall the 2 mounting brackets.
2. Push the hard drive in the slots and down into position.
3. Using a Phillips screwdriver, reinstall the 4 mounting screws.
4. Reconnect the SATA cable.
5. Reconnect the power input cable.
6. Close the electronics bay. See Closing the electronics bay on page4-16.
7. Power up the printer. The printer may take up to 45 minutes to run the Check Disc
command before any text is displayed on the display panel.
8. After the printer has rebooted and is idle, press
Maintenance > System > Set Network.
9. Select either Dynamic networking or Static networking.
10. If using Static networking, enter the printers IP Address, Default Gateway and Subnet
Mask values.
11. From the PC, open the CatalystEX.
12. Connect to the printer.
13. Insert the printer firmware CD into the workstation CD drive.
14. From the Printer Services tab, click on the Update Software button.
15. Navigate CatalystEX to the Upgrade (.UPG) file on the printer firmware CD.
16. The printer will load, reboot and verify the upgrade.
17. If the printer has System Software version 9.0 build 3230 or newer installation is
complete. If the printer System Software is older than version 9.0 build 3230, complete
the following steps:
A. Remove the printer calibration CD from the electronics bay and insert into the
workstation CD drive.
B. Install and open MaracaEX. Ensure that communications has been established
with the printer.
C. Select “Send” and browse to the CD drive.
D. Select the xxx.cal (where xxx equals printer name) from the CD by double
clicking on the file name.
E. To complete sending the file, click on the green check mark. This will write the
file to the printer hard drive.
F. Cycle power on the printer.
G. Replace the CD into the electronics bay.
H. Perform Offset calibrations, see Offset Calibrations on page5-2.
I. Perform Part Based calibration, see Part Based Calibration on page5-7.
4-36

Disconnect the
power input cable
Disconnect the IDE ribbon cable
Removing the IDE Hard Drive
1. Open the electronics bay. See Opening the electronics bay on page4-15.
2. Touch the metal plate of the electronics bay cover to discharge any static electricity.
3. Disconnect the power input cable by pressing the metal tab in and pulling down. See
Figure 4-59.
Figure 4-63: Hard drive power cable location
4. Disconnect the SATA cable by pressing the metal tab in and pulling down. See Figure 4-
60.
Figure 4-64: IDE cable location
5. Using a Phillips screwdriver, remove the 4 mounting screws. See Figure 4-61.
uPrint/uPrint SE Service Manual 4-37

Remove the mounting
screws
Remove the mounting
screws
Remove mounting
brackets
Figure 4-65: Hard drive mounting screw locations
6. Slide the hard drive up and out of the electronics bay.
7. Using a Phillips screwdriver, remove the mounting brackets from the hard drive. See
Figure 4-62.
Figure 4-66: Hard drive mounting bracket screw locations
4-38

Installing the IDE hard drive
1. Using a Phillips screwdriver, reinstall the 2 mounting brackets.
2. Push the hard drive in the slots and down into position.
3. Using a Phillips screwdriver, reinstall the 4 mounting screws.
4. Reconnect the SATA cable.
5. Reconnect the power input cable.
6. Close the electronics bay. See Closing the electronics bay on page4-16.
7. Power up the printer. The printer may take up to 45 minutes to run the Check Disc
command before you see anything on the display panel.
8. After the printer has rebooted and is idle, press
Maintenance > System > Set Network.
9. Select either Dynamic networking or Static networking.
10. If using Static networking, enter the printers IP Address, Default Gateway and Subnet
Mask values.
11. From the PC, open the CatalystEX.
12. Connect to the printer.
13. Insert the printer firmware CD into the workstation CD drive.
14. From the Printer Services tab, click on the Update Software button.
15. Navigate CatalystEX to the Upgrade (.UPG) file on the printer firmware CD.
16. The printer will load, reboot and verify the upgrade.
17. If the printer has System Software version 9.0 build 3230 or newer installation is
complete. If the printer System Software is older than version 9.0 build 3230, complete
the following steps:
A. Remove the printer calibration CD from the electronics bay and insert into the
workstation CD drive.
B. Install and open MaracaEX. Ensure that communications has been established
with the printer.
C. Select “Send” and browse to the CD drive.
D. Select the xxx.cal (where xxx equals printer name) from the CD by double clicking
on the file name.
E. To complete sending the file, click on the green check mark. This will write the
file to the printer hard drive.
F. Cycle power on the printer.
G. Replace the CD into the electronics bay.
H. Perform Offset calibrations, see Offset Calibrations on page5-2.
I. Perform Part Based calibration, see Part Based Calibration on page5-7.
uPrint/uPrint SE Service Manual 4-39

Disconnect the N1-1
spade connector
Disconnect the L1-1
spade connector
Disconnect the L2-1
spade connector
Disconnect the N2-1
spade connector
Line Filter
Required Tools
5
⁄16” nut driver or standard screwdriver.
•
• Phillips screwdriver
Hardware
1
• 6-32 x
Removing the line filter
1. Open the electronics bay. See Opening the electronics bay on page4-15.
2. Touch the metal plate of the electronics bay cover to discharge any static electricity.
3. Remove L1-1 and N1-1 spade connectors from the right side of the board by pulling back
on the connector. See Figure 4-67.
⁄4” Phillips pan head screws (x3)
Figure 4-67: L1-1 and N1-1 spade connector locations
4. Remove L2-1 and N2-1 Spade connectors from the left side of the board by pulling up on
the connector. See Figure 4-68.
Figure 4-68: L2-1 and N2-1 Spade connector locations
4-40

Remove the 3 mounting screws
5. Using a Phillips screwdriver, remove the 3 mounting screws. See Figure 4-69.
Figure 4-69: Line filter mounting screw locations
6. Lift board and gently remove the line filter.
Installing the line filter
1. Align the line filter with the mounting holes.
2. Using a Phillips screwdriver, reinstall the 3 mounting screws.
3. Reconnect the L2-1 and N2-1 spade connectors to the left side of the board.
4. Reconnect the LF2-P and LF2-N spade connectors to the right side of the board.
5. Close the electronics bay. See Closing the electronics bay on page4-16.
uPrint/uPrint SE Service Manual 4-41

CB1
Load
CB1 Line
CB2
Circuit Breaker
Required Tools
5
⁄16” nut driver or standard screwdriver.
•
• Phillips screwdriver
Removing the circuit breaker
1. Open the electronics bay. See Opening the electronics bay on page4-15.
2. Touch the metal plate of the electronics bay cover to discharge any static electricity.
3. Remove the Load and CB1 spade connectors from the circuit breaker by pulling up on
the connectors. See Figure 4-70.
Figure 4-70: Load and CB1 spade connector locations
4. Remove the CB1 Line and CB2 spade connectors from the circuit breaker by pulling up
on the connectors. See Figure 4-71.
Figure 4-71: CB1 Line and CB2 spade connector locations
5. Squeeze the tabs on the circuit breaker and push through the electronics bay panel. See
Figure 4-72.
4-42

Press tabs and push
the circuit breaker
through the panel
Figure 4-72: Removing the circuit breaker
Installing the circuit breaker
1. Push the circuit breaker through the electronics bay panel until it locks in place.
2. Reconnect the CB1 and CB2 spade connectors to the circuit breaker.
3. Reconnect the Load and CB1 spade connectors to the circuit breaker.
4. Close the electronics bay. See Closing the electronics bay on page4-16.
uPrint/uPrint SE Service Manual 4-43

LF-N (white)
LF-P (black)
LF-G (green)
AC Input
Required Tools
5
⁄16” nut driver or standard screwdriver.
•
• Phillips screwdriver
Hardware
1
⁄2” x 6mm Phillips pan head screws (x2)
•
Removing the AC Input
1. Open the electronics bay. See Opening the electronics bay on page4-15.
2. Touch the metal plate of the electronics bay cover to discharge any static electricity.
3. Remove the LF-G (green) spade connector. See Figure 4-73.
4. Remove the LF-N (white) spade connector. See Figure 4-73.
5. Remove the LF-P (black) spade connector. See Figure 4-73.
Figure 4-73: AC input connection locations
6. Using a Phillips screwdriver, remove the 2 mounting screws and remove the AC Input.
See Figure 4-74.
4-44

Remove the mounting
screws
Figure 4-74: AC input mounting screw locations
Installing the AC Input
1. Install the 2 AC Input mounting screws with a Phillips screwdriver.
2. Connect the LF-P (black) spade connector.
3. Connect the LF-N (white) spade connector.
4. Connect the LF-G (green) spade connector.
5. Close the electronics bay. See Closing the electronics bay on page4-16.
uPrint/uPrint SE Service Manual 4-45

Remove the 2
mounting screws
Power Switch
Required Tools
5
⁄16” nut driver or standard screwdriver.
•
Hardware
3
• 10-32 x
Removing the Power Switch
1. Remove the top panel. See Removing the top panel on page4-5.
2. Remove the left side panel. See Side Panels on page4-7.
3. Using a
mounting screws. See Figure 4-75.
⁄8” slotted screws (x2)
5
⁄16” nut driver or standard screwdriver, remove the 2 power switch housing
Figure 4-75: Power switch housing mounting screw locations
4. Remove the white SW2 wire from the spade connector labeled “3”. Remove the black
SW3 wire from the spade connector labeled “1a”. Remove the yellow NC wire from the
spade connector labeled “2a”. Remove the green COM wire from the spade connector
labeled “2”. See Figure 4-76.
4-46

Press tabs
to release
Press tabs
to release
Figure 4-76: Power switch connector locations
5. Press the Power Switch tabs in and push it out of the housing. See Figure 4-77.
Figure 4-77: Removing the power switch
Installing the power switch
1. Push the power switch into place on the power switch housing.
2. Connect the yellow NC wire to the spade connector labeled “2a”, connect the green COM
wire to the spade connector labeled “2”, connect the black SW3 wire to the spade
connector labeled “1a” and connect the white SW2 wire to the spade connector labeled
“3”.
3. Align the power switch housing with the mounting holes.
4. Using a
5
⁄16” nut driver or standard screwdriver, reinstall the 2 mounting screws.
5. Reinstall the left side panel. See Installing the side panels on page4-8.
6. Install the top panel. See Installing the top panel on page4-6.
uPrint/uPrint SE Service Manual 4-47

Remove the 3
mounting screws
24VDC Power Supply
Required Tools
5
⁄16” nut driver or standard screwdriver.
•
• Phillips screwdriver
Hardware
3
• 10-32 x
⁄8” slotted screws (x3)
• 6-32 x
1
⁄4” Phillips pan head screws (x2)
Removing the 24VDC Power Supply
1. Remove the top panel. See Removing the top panel on page4-5.
2. Remove the side panels. See Side Panels on page4-7.
3. Remove the electronics bay. See Removing the electronics bay on page4-19.
4. Using a
5
⁄16” nut driver or standard screwdriver, remove the 3 rear electronics bay
mounting screws. See Figure 4-78.
Figure 4-78: Rear electronics bay mounting screw locations
5. Open the rear panel of the electronics bay.
6. Touch the metal plate of the electronics bay cover to discharge any static electricity.
7. Disconnect the J1 connector on the 24VDC power supply. See Figure 4-79.
4-48

Disconnect J1
Disconnect J3
1 through 4
Remove the 2
mounting screws
Figure 4-79: J1 cable location
8. Disconnect J3 1 through 4 connectors using a Phillips screwdriver. Note the position of
the wires for reinstallation. See Figure 4-80.
Figure 4-80: J3 1 through 4 connector locations
9. Close the rear panel of the electronics bay and remove the 2 board mounting screws
using a Phillips screwdriver. See Figure 4-81.
Figure 4-81: Closing the rear panel of the electronics bay
10. Open the rear panel of the electronics bay and remove the 2 board mounting screws from
the top of the panel using a Phillips screwdriver. See Figure 4-82.
uPrint/uPrint SE Service Manual 4-49

Remove the 2
mounting screws
Figure 4-82: Removing the 2 mounting screws from the top of the panel
11. Remove the 24VDC power supply.
Installing the 24VDC power supply
1. Align the 24VDC power supply with the top of the rear panel of the electronics bay and
the tab to the right of the mounting location. See Figure 4-83.
Figure 4-83: Align the 24VDC power supply
2. Using a Phillips screwdriver, reinstall the 2 mounting screws to the top of the rear panel.
3. Close the rear electronics bay panel.
4. Using a Phillips screwdriver, reinstall the 2 mounting screws.
5. Reconnect J3 1 through 4 connectors using a Phillips screwdriver.
6. Reconnect J1 on the 24VDC power supply.
7. Close the rear panel of the Electronics Bay.
8. Using a
5
⁄16” nut driver or standard screwdriver, reinstall the 3 mounting screws.
9. Reinstall the electronics bay. See Installing the electronics bay on page4-20.
10. Reinstall the side panels. See Installing the side panels on page4-8.
11. Reinstall the top panel. See Installing the top panel on page4-6.
4-50

Remove the 3
mounting screws
5/12VDC Power Supply
Required Tools
5
⁄16” nut driver or standard screwdriver.
•
• Phillips screwdriver
Hardware
3
• 10-32 x
• 6-32 x
⁄8” slotted screws (x3)
1
⁄4” Phillips pan head screws (x3)
Removing the 5/12VDC power supply
1. Remove the top panel. See Removing the top panel on page4-5.
2. Remove the side panels. See Side Panels on page4-7.
3. Remove the electronics bay. See Removing the electronics bay on page4-19.
4. Using a
5
⁄16” nut driver or standard screwdriver, remove the 3 rear electronics bay
mounting screws. See Figure 4-84.
Figure 4-84: Rear electronics bay mounting screw locations
5. Open the rear panel of the electronics bay.
6. Touch the metal plate of the electronics bay cover to discharge any static electricity.
7. Disconnect the J2 spade connector by lifting up on the connector. See Figure 4-85.
uPrint/uPrint SE Service Manual 4-51

Figure 4-85: J2 spade connector location
8. Disconnect the SK2 connector by pressing the tab and lifting up on the connector. See
Figure 4-86.
Figure 4-86: SK2 connector location
9. Disconnect the power input cable by pressing the tab and lifting up on the connector. See
Figure 4-87.
4-52

Figure 4-87: Power input cable location
10. Using a Phillips screwdriver, remove the 3 mounting screws. See Figure 4-88.
Figure 4-88: 5/12 VDC supply mounting screw locations
11. Remove the 5/12VDC power supply.
Installing the 5/12VDC power supply
1. Align the 5/12VDC power supply and press down into place.
2. Using a Phillips screwdriver, reinstall the 3 mounting screws.
3. Reconnect the SK2 connector.
4. Reconnect the J2 spade connector.
5. Close the rear panel of the electronics bay.
6. Using a
5
⁄16” nut driver or standard screwdriver, reinstall the 3 rear electronics bay
mounting screws.
7. Reinstall the electronics bay. See Installing the electronics bay on page4-20.
8. Reinstall the side panels. See Installing the side panels on page4-8.
9. Reinstall the top panel. See Installing the top panel on page4-6.
uPrint/uPrint SE Service Manual 4-53
 Loading...