

Page 1

Analog Telephone
User Guide
December 2000
Page 2

Publication Information
Toshiba America Information Systems, Inc.,
Telecommunication Systems Division, reserves the right,
without prior notice, to revise this information publication for
any reason, including, but not limited to, utilization of new
advances in the state of technical arts or to simply change the
design of this document.
Further, Toshiba America Information Systems, Inc.,
Telecommunication Systems Division, also reserves the right,
without prior notice, to make such changes in equipment
design or components as engineering or manufacturing
methods may warrant.
SCS-UG-ANTEL-VA
4016183
Version A, December 2000
© Copyright 2000
Toshiba America Information Systems, Inc.
Telecommunication Systems Division
All rights reserved. No part of this manual, covered by the
copyrights hereon, may be reproduced in any form or by any
means—graphic, electronic, or mechanical, including
recording, taping, photocopying, or information retrieval
systems—without express written permission of the publisher
of this material.
Strata is a registered trademark of Toshiba Corporation.
Stratagy is a registered trademark of Toshiba America
Information Systems, Inc.
Trademarks, registered trademarks, and service marks are the
property of their respective owners.
Page 3

IMPORTANT SAFETY INSTRUCTIONS
Always follow basic safety precautions when using your telephone equipment to
reduce the risk of fire, electrical shock, and injury.
♦ Read and understand all instructions in the this User Guide.
♦ Read all warnings and follow all instructions marked on the product.
♦ Unplug this product from the wall outlet before cleaning. Use a damp cloth for
cleaning. Do not use liquid or aerosol cleaners.
♦ Do not use the telephone near water. For example, do not use near a bathtub,
wash bowl, kitchen sink, laundry tub, swimming pool, or in a wet basement.
♦ Do not place this product on an unstable cart or stand. The product may fall
causing serious damage to the product.
♦ Use only the type of power source indicated on the label. If you are not sure of
the type of power supply to your home, consult your dealer or local power
company.
♦ Do not place any objects on the telephone line cord. Do not locate the
telephone where the line cord will be walked on.
♦ Do not block or cover ventilation slots and openings in the bottom of the
telephone. The openings should never be blocked by placing the telephone on a
bed, sofa, rug, or other similar surfaces. The telephone should never be placed
near or over a radiator or heat register. The telephone should never be placed in a
built-in installation unless proper ventilation is provided.
♦ Never spill liquid on the telephone or push objects of any kind through
ventilation slots. Liquid or objects may touch dangerous voltage points or short
out parts that could result in a risk of fire or electrical shock.
♦ Do not disassemble this product. Opening or removing covers may expose you
to dangerous voltages or other risks. Incorrect reassembly can cause electrical
shock when the product is subsequently used.
♦ Do not overload outlets and extension cords. Some telephones require AC
power from an outlet. Overloading the outlets can result in the risk of fire or
electric shock.
♦ Avoid using a telephone during a local thunderstorm. There may be a remote
risk of electrical shock from lightning.
Page 4

♦ Do not use a telephone to report a gas leak in the vicinity of the leak.
♦ Unplug the telephone from the wall outlet and refer servicing to qualified
service personnel under the following conditions:
♦ When the line cord is frayed or plugs damaged.
♦ If liquid has been spilled into the telephone.
♦ If the telephone has been exposed to rain or water.
♦ If the telephone does not operate properly by following the operating
instructions. (Adjust only those controls covered by the operating
instructions. Improper adjustment of other controls may result in damage and
will often require extensive work by a qualified technician to restore the
product to normal operation.)
♦ If the telephone has been dropped or the housing damaged.
♦ If the telephone exhibits distinct change in performance.
SAVE THESE INSTRUCTIONS
Page 5

Contents
Introduction
Organization.........................................................................................................................v
Conventions ........................................................................................................................vi
Related Documents/Media................................................................................................ vii
Chapter 1 - The Grand Tour
Overview..............................................................................................................................1
Parts Identification ...............................................................................................................2
Buttons .................................................................................................................................3
Auto Memory....................................................................................................................3
Delete................................................................................................................................3
Dial ...................................................................................................................................3
Flash..................................................................................................................................3
Hold ..................................................................................................................................3
Mem Dial..........................................................................................................................4
Menu.................................................................................................................................4
Option ...............................................................................................................................4
Pause.................................................................................................................................5
Redial................................................................................................................................5
Speakerphone....................................................................................................................6
Store..................................................................................................................................6
Tone ..................................................................................................................................6
Volume .............................................................................................................................6
Strata CS Analog Telephone 12/00 i
Page 6

Contents
Chapter 2 - Installation/Set Up
Chapter 2 - Installation/Set Up
Installation............................................................................................................................7
Wall Mount Instructions ......................................................................................................8
Phone Setup .......................................................................................................................10
Change the Settings ........................................................................................................10
Chapter 3 - Features
Pulse and Tone Dialing......................................................................................................11
Receive Calls .....................................................................................................................12
Answer Call Using Handset............................................................................................12
Answer Call Using Speakerphone..................................................................................12
Place Calls..........................................................................................................................12
Make Call Using Handset...............................................................................................12
Make Call Using Speakerphone .....................................................................................13
Place Call On-hold.............................................................................................................13
Redial Number ...................................................................................................................13
Duration Counter ...............................................................................................................14
Automatic Memory............................................................................................................14
Data Port ............................................................................................................................15
Call Waiting Display..........................................................................................................15
Caller ID Features ..............................................................................................................16
Message Light.................................................................................................................16
Message Waiting ............................................................................................................16
Receive Calls ..................................................................................................................17
Review Calls...................................................................................................................17
Delete Calls.....................................................................................................................18
Callback ..........................................................................................................................18
Message Error.................................................................................................................19
No Data Sent...................................................................................................................19
Private Calls....................................................................................................................19
Unknown Calls ...............................................................................................................20
ii Strata CS Analog Telephone 12/00
Page 7

Contents
Chapter 4 - Maintenance/Troubleshooting
Chapter 4 - Maintenance/Troubleshooting
Maintenance Information...................................................................................................21
Troubleshooting .................................................................................................................22
Telephone Repair...............................................................................................................23
Appendix - Telephone Commands Quick Reference
Call Screening Menu..........................................................................................................26
Call Handling Menu...........................................................................................................26
Quick Call Menu................................................................................................................27
Voice Mail/Account Menu ................................................................................................28
Logging In ......................................................................................................................28
Voice Mail/Account Menu Commands..........................................................................28
Index.......................................................................................................................................31
Strata CS Analog Telephone 12/00 iii
Page 8

Contents
Chapter 4 - Maintenance/Troubleshooting
iv Strata CS Analog Telephone 12/00
Page 9

Introduction
This guide describes how to use the Strata CS-C2210 analog telephone with Strata CS
systems. The CS-C2210 model telephone covered in this guide is equipped with a
Liquid Crystal Display (LCD) and speakerphone.
Organization
This guide is divided as follows:
♦ Chapter 1 – The Grand Tour provides an overview of the phone and its feature
buttons.
♦ Chapter 2 – Installation/Set up gives you instructions on installing and setting
up the phone.
♦ Chapter 3 – Features covers the many features provided by the phone and gives
functional descriptions of the buttons, LED lights and LCD displays.
♦ Chapter 4 – Maintenance/Troubleshooting gives general maintenance tips and
solutions to common installation and set up problems.
♦ Appendix – Telephone Commands Quick Reference provides analog telephone
dial pad command instructions including control buttons, Call Handling, Quick
Call using
♦ Index
, and Voice Messaging Menus.
Strata CS Analog Telephone 12/00 v
Page 10
Introduction
Conventions
Conventions
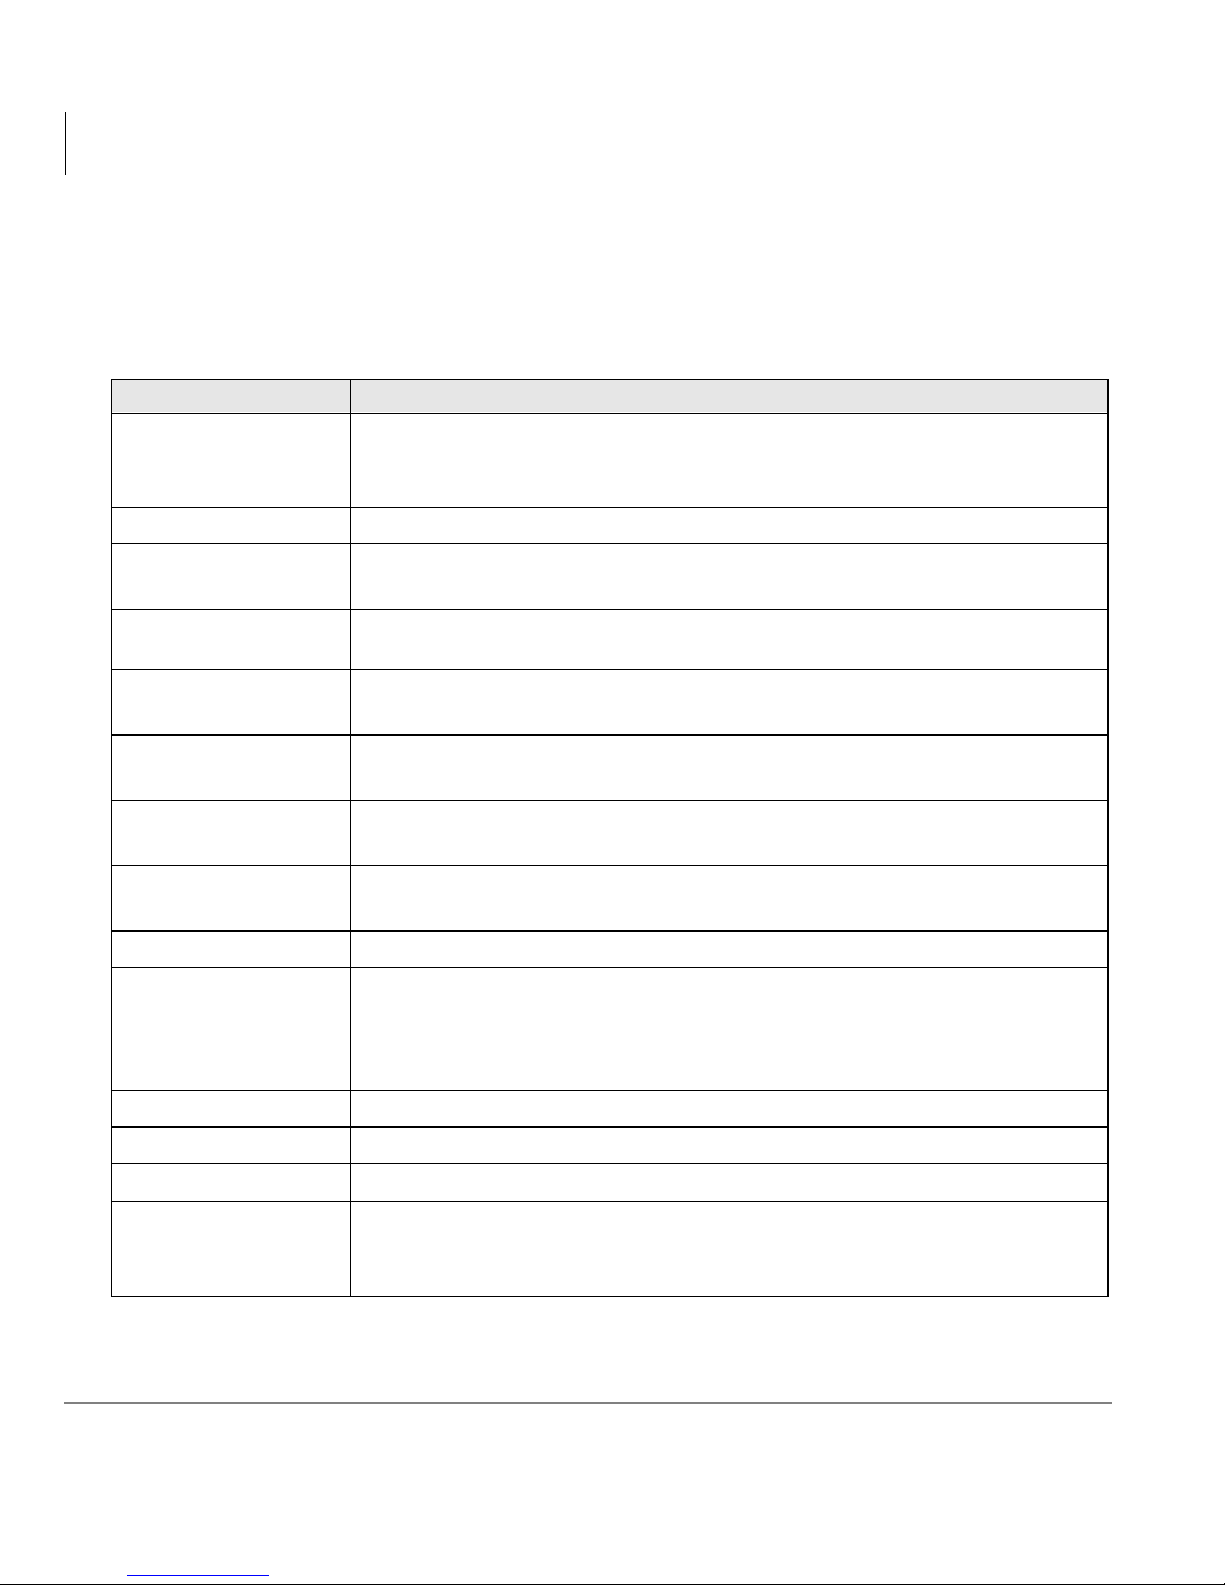
Letters in [brackets] represent buttons which have Directory Numbers on them. For
example:
Conventions Description
Note
Elaborates specific items or references other information. Within
some tables, general notes apply to the entire table and numbered
notes apply to specific items.
Important!
CAUTION!
WARNING!
[DN]
[PDN]
[SDN]
[PhDN]
$ULDO%ROG
Plus (+)
Calls attention to important instructions or information.
Advises you that hardware, software applications, or data could
be damaged if the instructions are not followed closely.
Alerts you when the given task could cause personal injury or
death.
Represents any Directory Number button, also known as an
extension or intercom number.
Represents any Primary Directory Number button (the extension
number for the telephone).
Represents any Secondary appearance of a PDN. A PDN which
appears on another telephone is considered an SDN.
Represents any Phantom Directory Number button (an additional
DN).
Represents telephone buttons.
Shows a multiple PC keyboard or phone button entry. Entries
without spaces between them show a simultaneous entry. Example:
Esc+Enter. Entries with spaces between them show a sequential
entry. Example:
# + 5.
Tilde (~) Means “through.” Example: 350~640 Hz frequency range.
➤ Denotes the step in a one-step procedure.
➤
Denotes a procedure.
Grey words within the printed text denote cross-references. In the
See Figure 10
electronic version of this document (Strata DK Library CD-ROM or
FYI Internet download), cross-references appear in blue hypertext.
vi Strata CS Analog Telephone 12/00
Page 11

Related Documents/Media
Note Some documents listed here may appear in different versions on the
CD-ROM, FYI, or in print. To find the most current version, check the
version/date in the Publication Information on the back of the document’s title
page.
You can find additional detailed information about Strata CS features in the following
companion documents:
♦ Strata CS General Description
♦ Strata CS Installation and Maintenance Manual
♦ Strata CS Administrator Manual
♦ Strata CS Client User Guide
Introduction
Related Documents/Media
♦ Strata CS Quick Reference Guide
♦ Strata CS Library CD-ROM
♦ Strata CS Application Software CD-ROM
For authorized users, Internet site FYI (http://fyi.tsd.toshiba.com) contains all current
Strata CS documentation and enables you to view, print, and download current
publications.
Strata CS Analog Telephone 12/00 vii
Page 12

Introduction
Related Documents/Media
viii Strata CS Analog Telephone 12/00
Page 13

The Grand Tour 1
Overview
The Strata CS-C2210 is a multi-featured analog phone that includes programmable
feature buttons, LED buttons, and an LCD display.
Features include:
♦ Call Waiting Caller ID – lets you see the name and number of an incoming call,
even while you are on another call.
♦ LCD Symbols – New Call, Repeat Call, Forward Call, Toll Call and Message
Waiting
♦ Extra-large, three-line LCD Panel with backlighting
♦ Programmable Area Code and Long Distance Code
♦ Ten Direct Dial Memory Numbers + 10 Dial Pad Memory Numbers
♦ Three languages – English, French and Spanish
♦ Electronic Hold with LED
♦ Frequency Shift Keying (FSK) and Stutter-dial Tone
♦ Tone/pulse Switchable
♦ Desk/wall Mountable
♦ 80-message Memory
♦ Last Number Redial
♦ Speakerphone
♦ Data port
♦ Flash
Strata CS Analog Telephone 12/00 1
Page 14
The Grand Tour
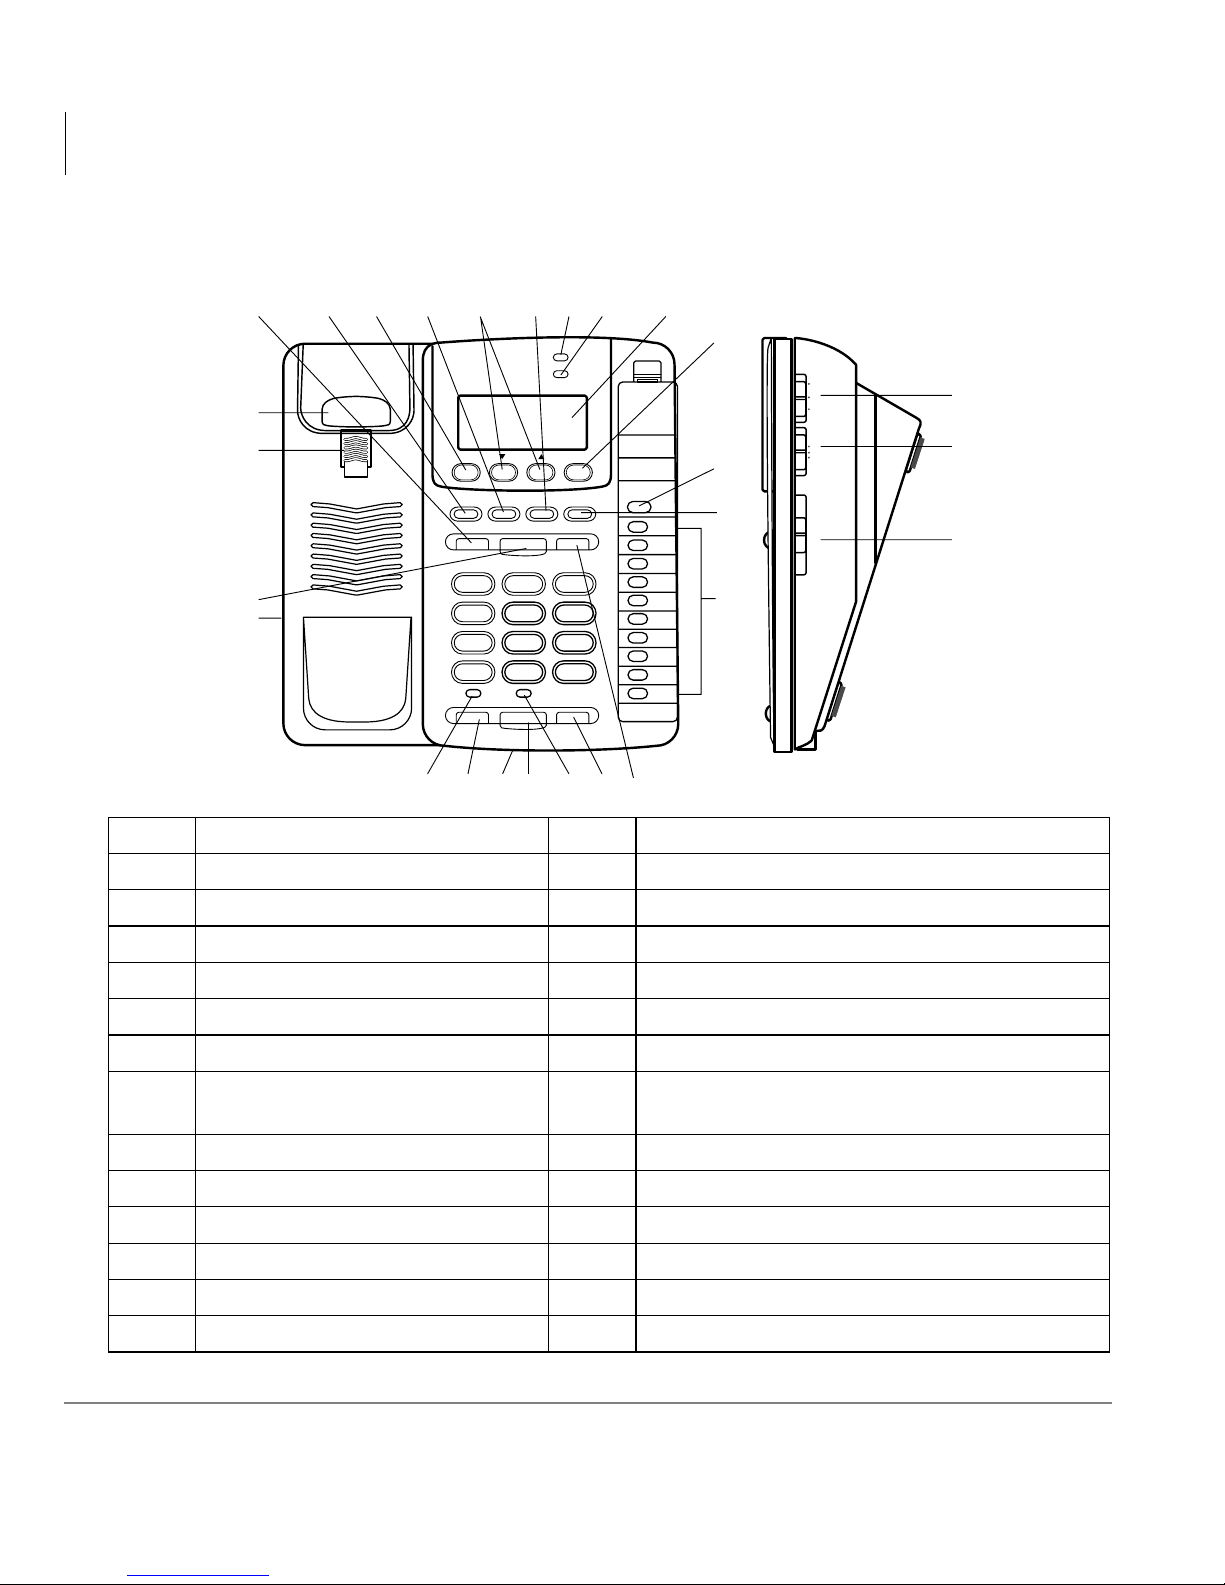
Parts Identification
Parts Identification
1678910111213
2
3
DELETE
NEW CALL
MESSAGE
REVIEW DIAL
AREA CODE
PHONE NO.
14
15
25
Pulse ToneOffSpeaker Volume Low HiMid Low Hi
26
VOLUME TONE MENU OPTION
PAUSE
MEM DIAL
STORE
4
5
24
ABC DEF
JKLGHI MNO
TUVPQRS WXYZ
OPERTONE
*
SPEAKERPHONE REDIALHOLD
23 22 21 20 19 18
321
654
9
87
0
#
1
2
3
4
5
6
7
8
9
10
AREA CODE PHONE #
FLASH
16
27
17
5532
1 6WRUH%XWWRQ 15 )ODVK%XWWRQ
2 +RRNVZLWFK 16 2SWLRQ%XWWRQ
3 +DQGVHW+RRN 17 $XWR0HPRU\%XWWRQV
4 0HP'LDO%XWWRQ 18 3DXVH%XWWRQ
5 +DQGVHW&RUG-DFN 19 5HGLDO%XWWRQ
6 9ROXPH%XWWRQ 20 6SHDNHUSKRQH/('
7 'HOHWH%XWWRQ 21 6SHDNHUSKRQH%XWWRQ
8 7RQH%XWWRQ 22
0HPRU\'LDO,QGH[
IRUDXWRPHPRU\EXWWRQV
9 5HYLHZ8S'RZQ%XWWRQV 23 +ROG%XWWRQ
10 0HQX%XWWRQ 24 +ROG/('
11 1HZ&DOO/('5HG 25 3XOVH7RQH6ZLWFK
12 0HVVDJH/('*UHHQ 26 5LQJHU6ZLWFK2II/RZ+L
13 /&''LVSOD\ 27 6SHDNHU9ROXPH6ZLWFK2II0LG+L
14 'LDO%XWWRQ
2 Strata CS Analog Telephone 12/00
Page 15

Buttons
See “Parts Identification” on page 2 for button locations.
Auto Memory
$XWR0HPRU\ enables you to store up to ten phone numbers (15-digits maximum
each) in memory using the 10
Delete
When reviewing calls in memory, press 'HOHWH to erase the call displayed on the
LCD. Pressing
Dial
When reviewing incoming stored calls on your phone’s LCD, you can press 'LDO to
automatically dial the displayed phone number. See “Callback” on page 18 for details.
The Grand Tour
Buttons
$XWR0HPRU \ buttons at the right of the phone.
'HOHWH for three seconds or more deletes all calls in memory.
Flash
Hold
This telephone provides a line break signal for accessing Private Automatic Branch
eXchange (PABX) service or for convenient use of Call Waiting from your local
telephone company. If you have Call Waiting service, you can alternate the Call
Waiting function per the following instructions.
1. While having a conversation, another party calls and you hear a tone.
2. Press
second call can be answered.
3. Press
caller and the second call is placed on-hold.
+ROG enables you to place a call on-hold and retrieve the call when you are ready to
resume the conversation. The Hold LED lights up when a call is on-hold.
)ODVK once and release. The first conversation is placed on-hold and the
)ODVK again and release. You can resume your conversation with the first
Strata CS Analog Telephone 12/00 3
Page 16
The Grand Tour
Buttons
Mem Dial
When you store a phone number on a dial pad button, you must first press 0HP 'LDO
and then the dial pad button in order to dial the stored number.
Menu
After you have set up the phone completely for the first time, use 0HQX to review or
reprogram the Language, Area Code or LDS Code. See “Phone Setup” on page 10.
Option
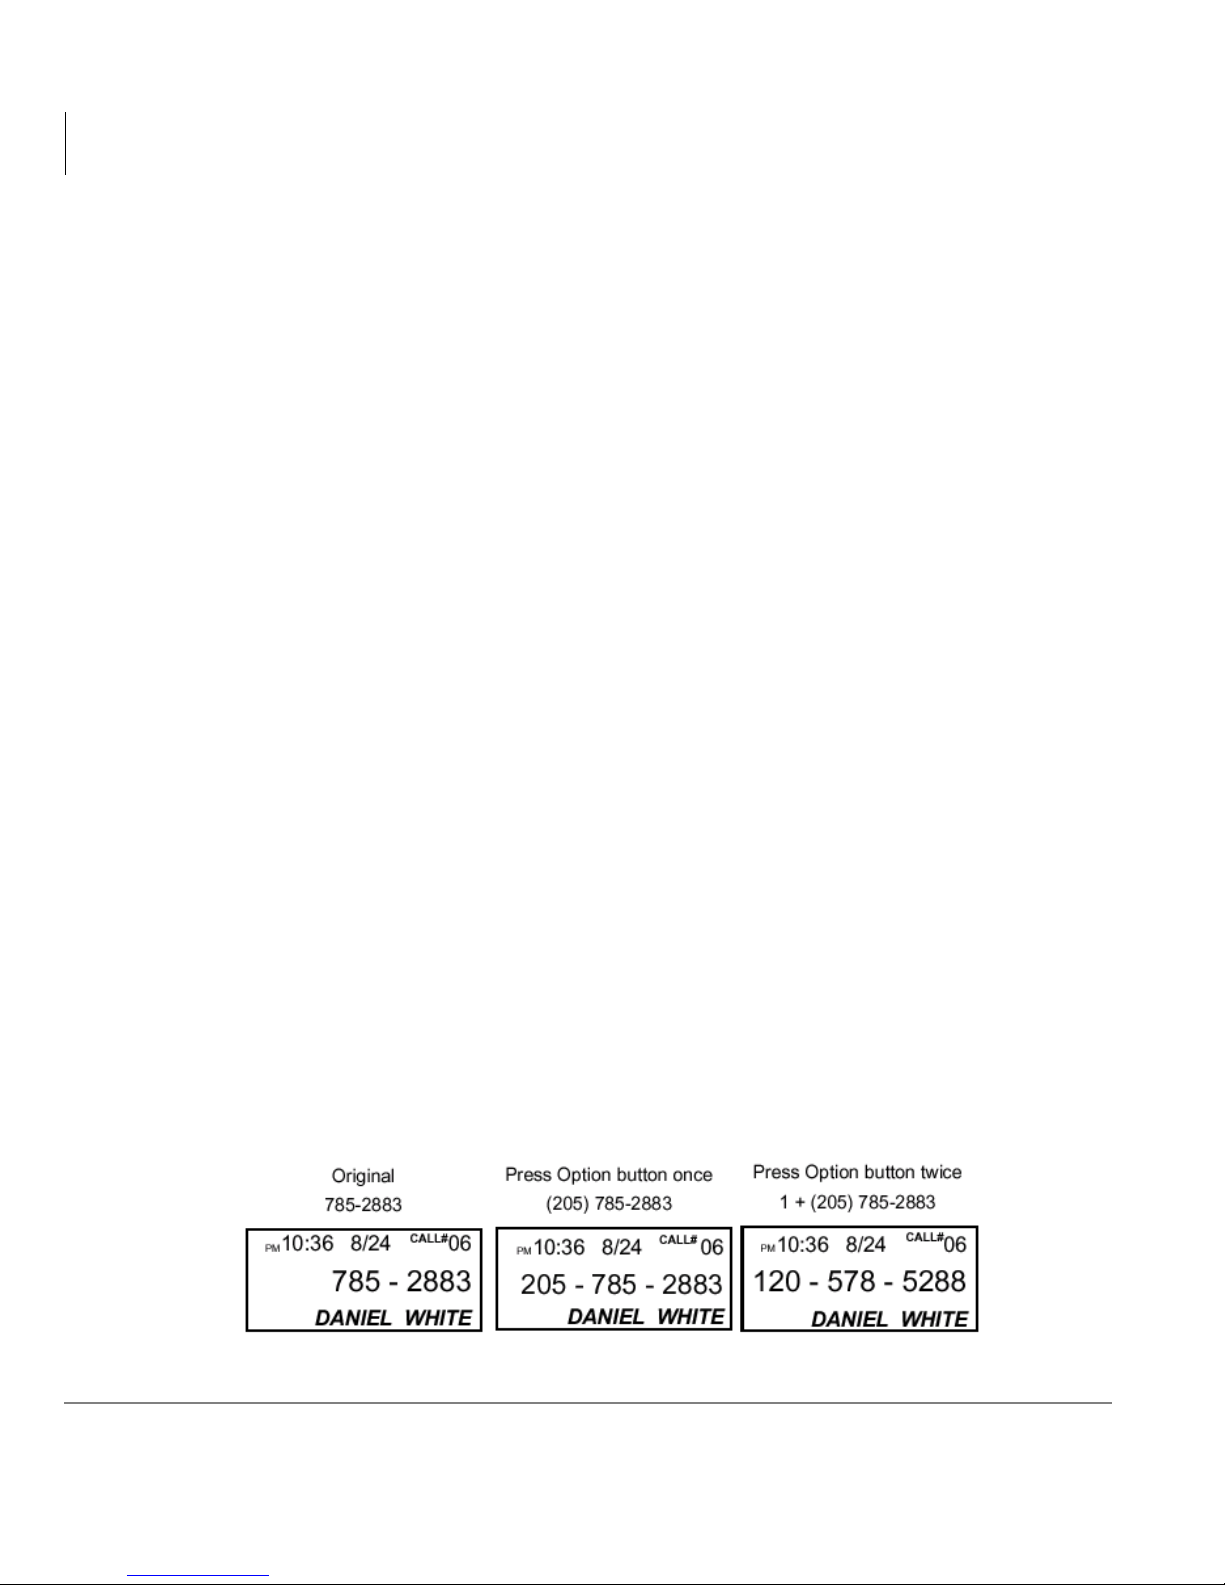
2SWLRQ enables you to change the format of the display number. The available
formats are:
♦ 7-digit 7-digit telephone number.
♦ 10-digit 3-digit area code + 7-digit telephone number.
♦ 11-digit 1-digit long distance code + 3-digit area code + 7-digit telephone
number.
Local Calls (7-digit number)
♦ Pressing 2SWLRQ once, changes it to a 10-digit format (your area code + 7-digit
number).
♦ Pressing 2SWLRQ twice, changes it to an 11-digit number (1 + your area code + 7-
digit telephone number).
♦ Pressing 2SWLRQ three times, changes it back to the original 7-digit telephone
number.
For example: Your area code is 205 and you are reviewing telephone number
785-2883. When the desired format of the telephone number is reached, press
'LDO to dial the display number.
4 Strata CS Analog Telephone 12/00
Page 17
Note Since the LCD can only display 10-digit telephone numbers, when you
change the format to 11-digits, only the first 10 digits can display, but
the full 11-digits are dialed if you press
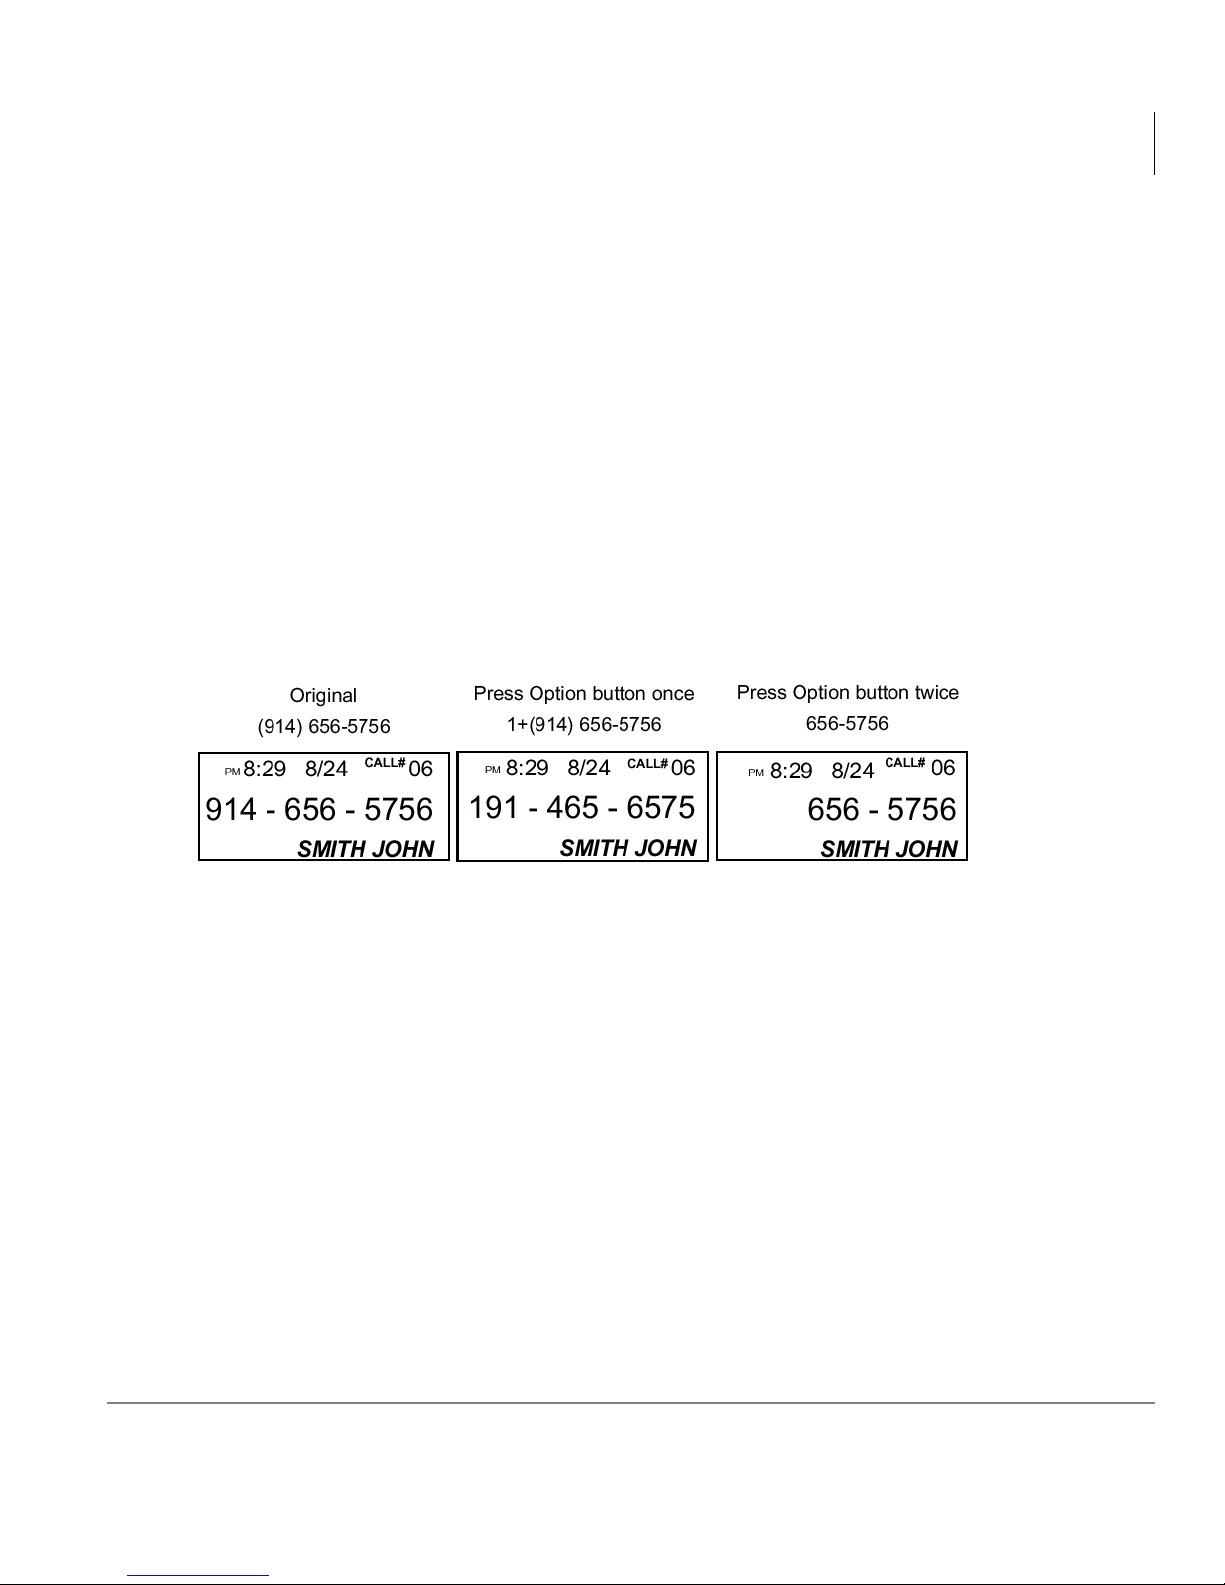
Long Distance Call (10-digit number)
♦ Pressing 2SWLRQ once, changes it to an 11-digit number (1+ 3-digit area code + 7-
digit telephone number).
♦ Pressing 2SWLRQ twice, removes the 3-digit area code and changes the display to
7-digit telephone number.
♦ Pressing 2SWLRQ three times, changes it back to the original 10-digit number.
For example: your own area code is 205, and you are reviewing telephone number
914-656-5756. When the desired format of the telephone number is reached, press
'LDO to dial the displayed number.
The Grand Tour
Buttons
'LDO.
Pause
3DXVH enables you to insert a 3.6-second pause in the dialing sequence. This is
particularly useful if you are connected to a PABX system where you must dial an
access code (usually
Press
desired. The
3DXVH once and release at any point in the dialing sequence where a pause is
3DXVH can be pressed more than once to create a longer pause.
) to obtain an outside line.
Redial
By pressing 5HGLDO, the last phone number dialed (31-digits maximum) is
automatically redialed.
Strata CS Analog Telephone 12/00 5
Page 18

The Grand Tour
Buttons
Speakerphone
Note AC Adaptor must be used to ensure proper function.
6SHDNHUSKRQH enables you to make and receive calls without lifting the handset.
Press
indicates the status of the speaker.
See “Answer Call Using Speakerphone” on page 12 and “Make Call Using
Speakerphone” on page 13 for details.
Store
6WRUH enables you to store up to 10 phone numbers (15-digits maximum each) in
memory using an
numbers using a dial pad button (
page 14.
6SHDNHUSKRQH to toggle the speaker On/Off. The Speakerphone LED
$XWR0HPRU\ button (, , , or ) and another 10 phone
, , , or ). See “Store Number in Memory” on
Tone
If the 3XOVHWRQH6ZLWFK is set to the Pulse position, and you want to make a tone
entry (e.g., telephone number into pager) after pulse dialing, press
dial the number. The number dialed is changed to tone dialing automatically without
setting the
Volume
A built-in amplifier feature enables you to increase the listening volume in the
receiver of the handset when speaking with your party. When needed, press
to achieve three different levels. The volume goes back to normal after you hang up
the handset.
7RQH once, then
3XOVHWRQH6ZLWFK to the Tone position.
9ROXPH
6 Strata CS Analog Telephone 12/00
Page 19
Installation/Set Up 2
This chapter covers desk and wall mount installation instructions, phone setup
procedures and procedures for changing the factory settings.
Installation
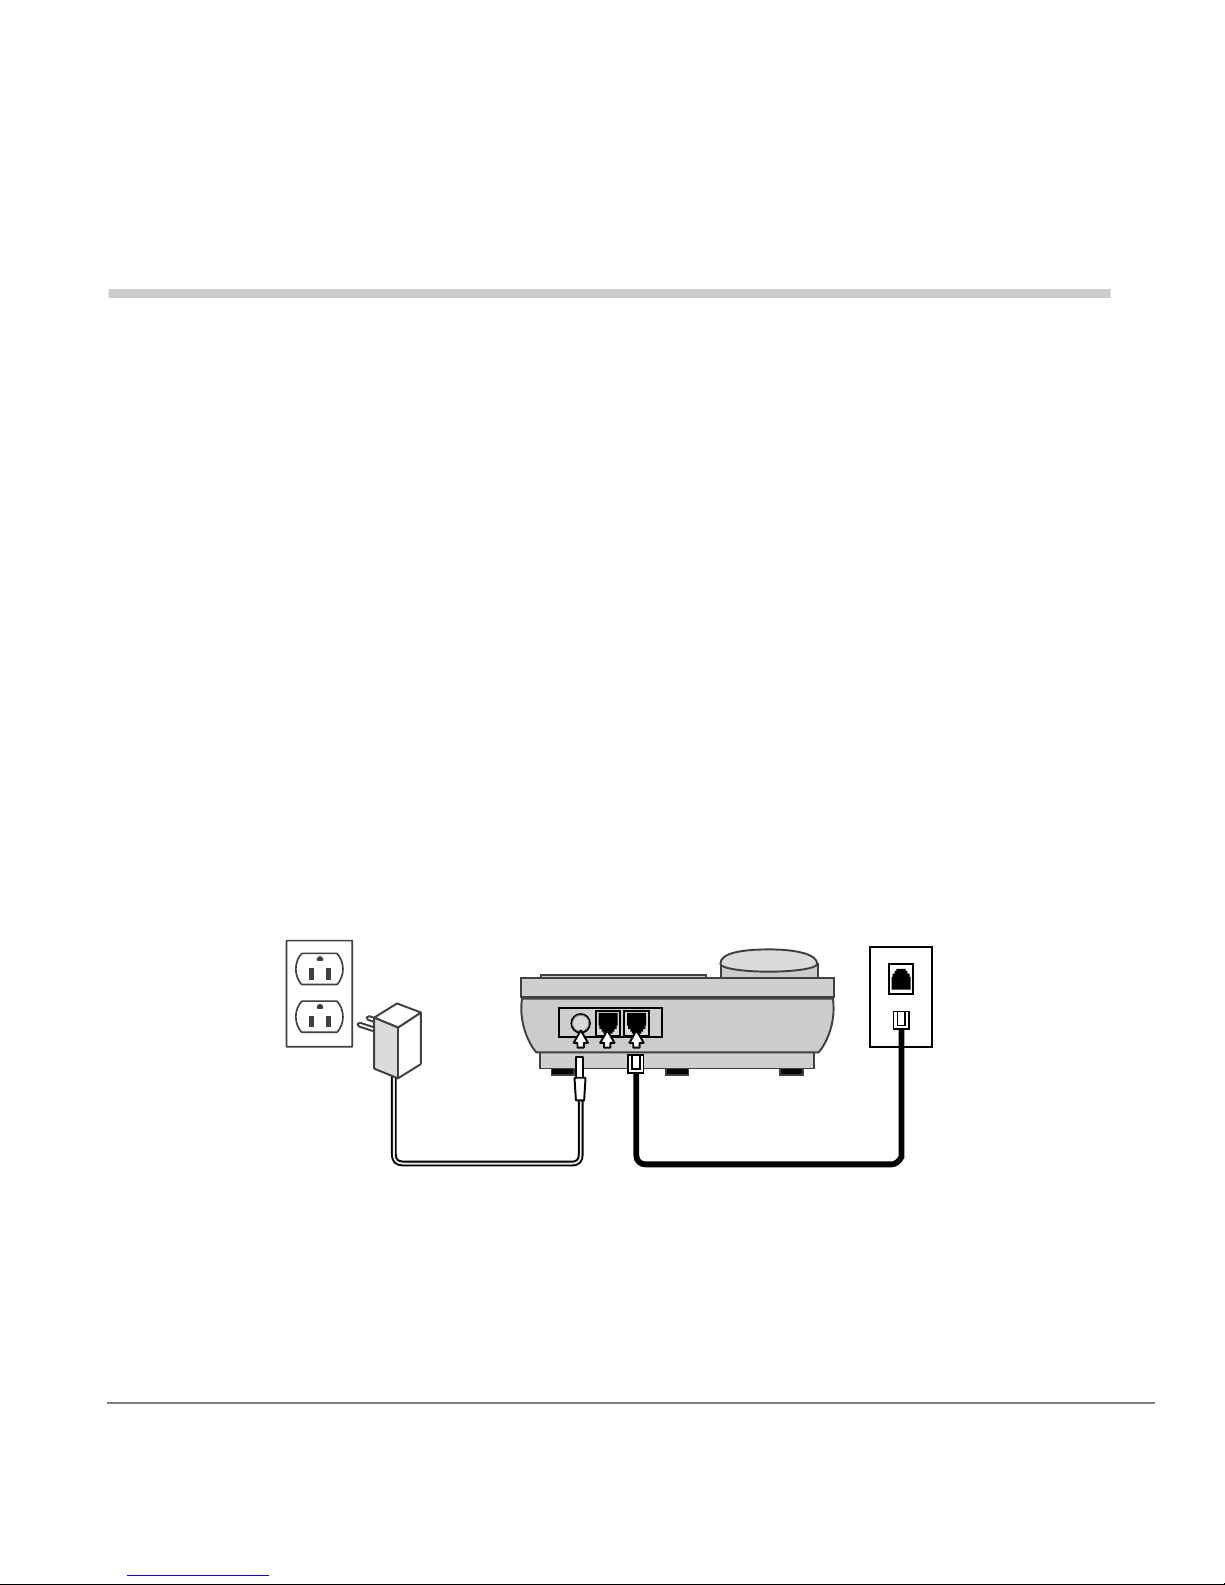
1. Connect Adapter. Plug the large part of the adapter into the wall outlet and the
adapter tip to the jack at the rear side of phone. (Use only 9VDC. 200mA, center
positive Class 2 adapter.)
2. Connect Telephone Line Cord. Use the new line cord to connect the phone jack of
your new caller ID phone to the modular wall jack (see figure below).
AC Power
Adapter
5530
Strata CS Analog Telephone 12/00 7
Page 20
Installation/Set Up
Wall Mount Instructions
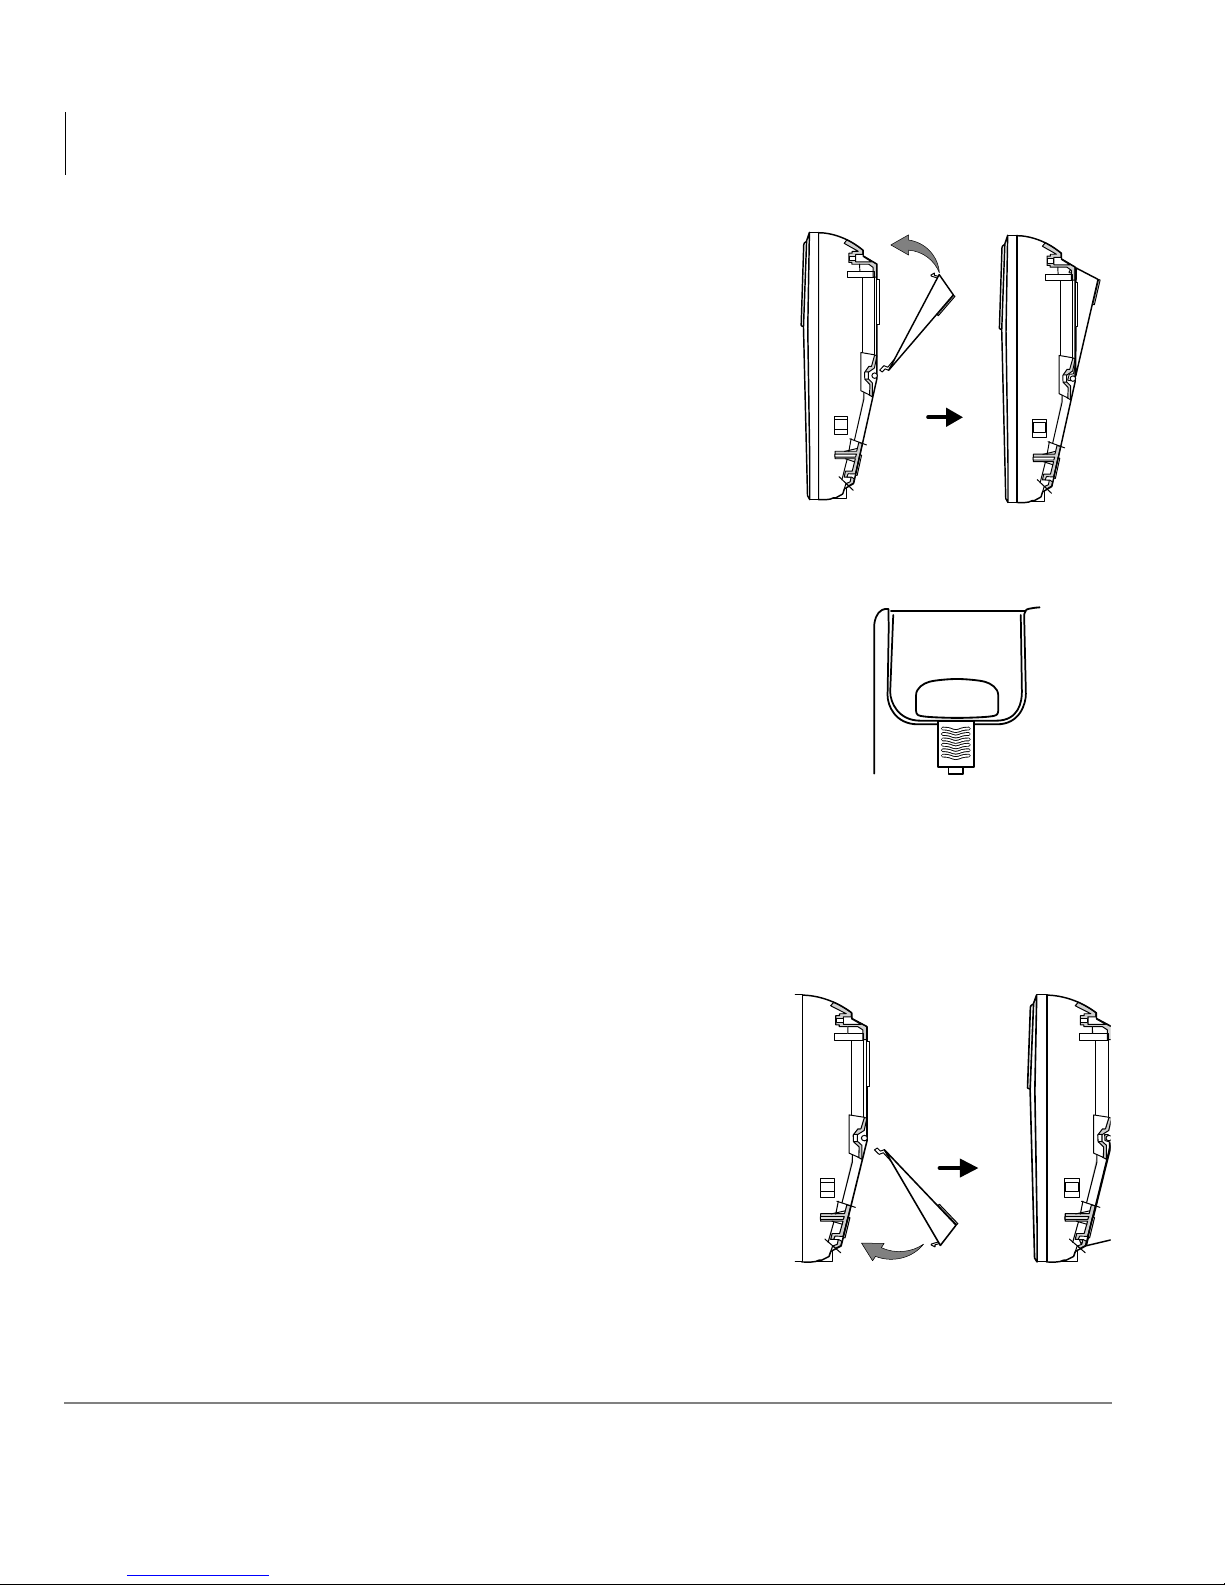
3. Check bracket is in correct position (shown at
right).
4. Check handset hook is in correct position (shown
at right).
5. Set up phone. See “Phone Setup” on page 10 for
instructions.
6. Locate phone. Place the phone on a flat table or
mount it on the wall. If you desire to place it on a
wall, use the wall mount bracket and short line
cord supplied to accomplish the wall mounting.
(See “Wall Mount Instructions” below.)
5525
Desk
5553
Handset Hook
Desktop Position
Wall Mount Instructions
1. Install wall mount bracket in wall mount position
(shown at right).
Wall
8 Strata CS Analog Telephone 12/00
5551
Page 21
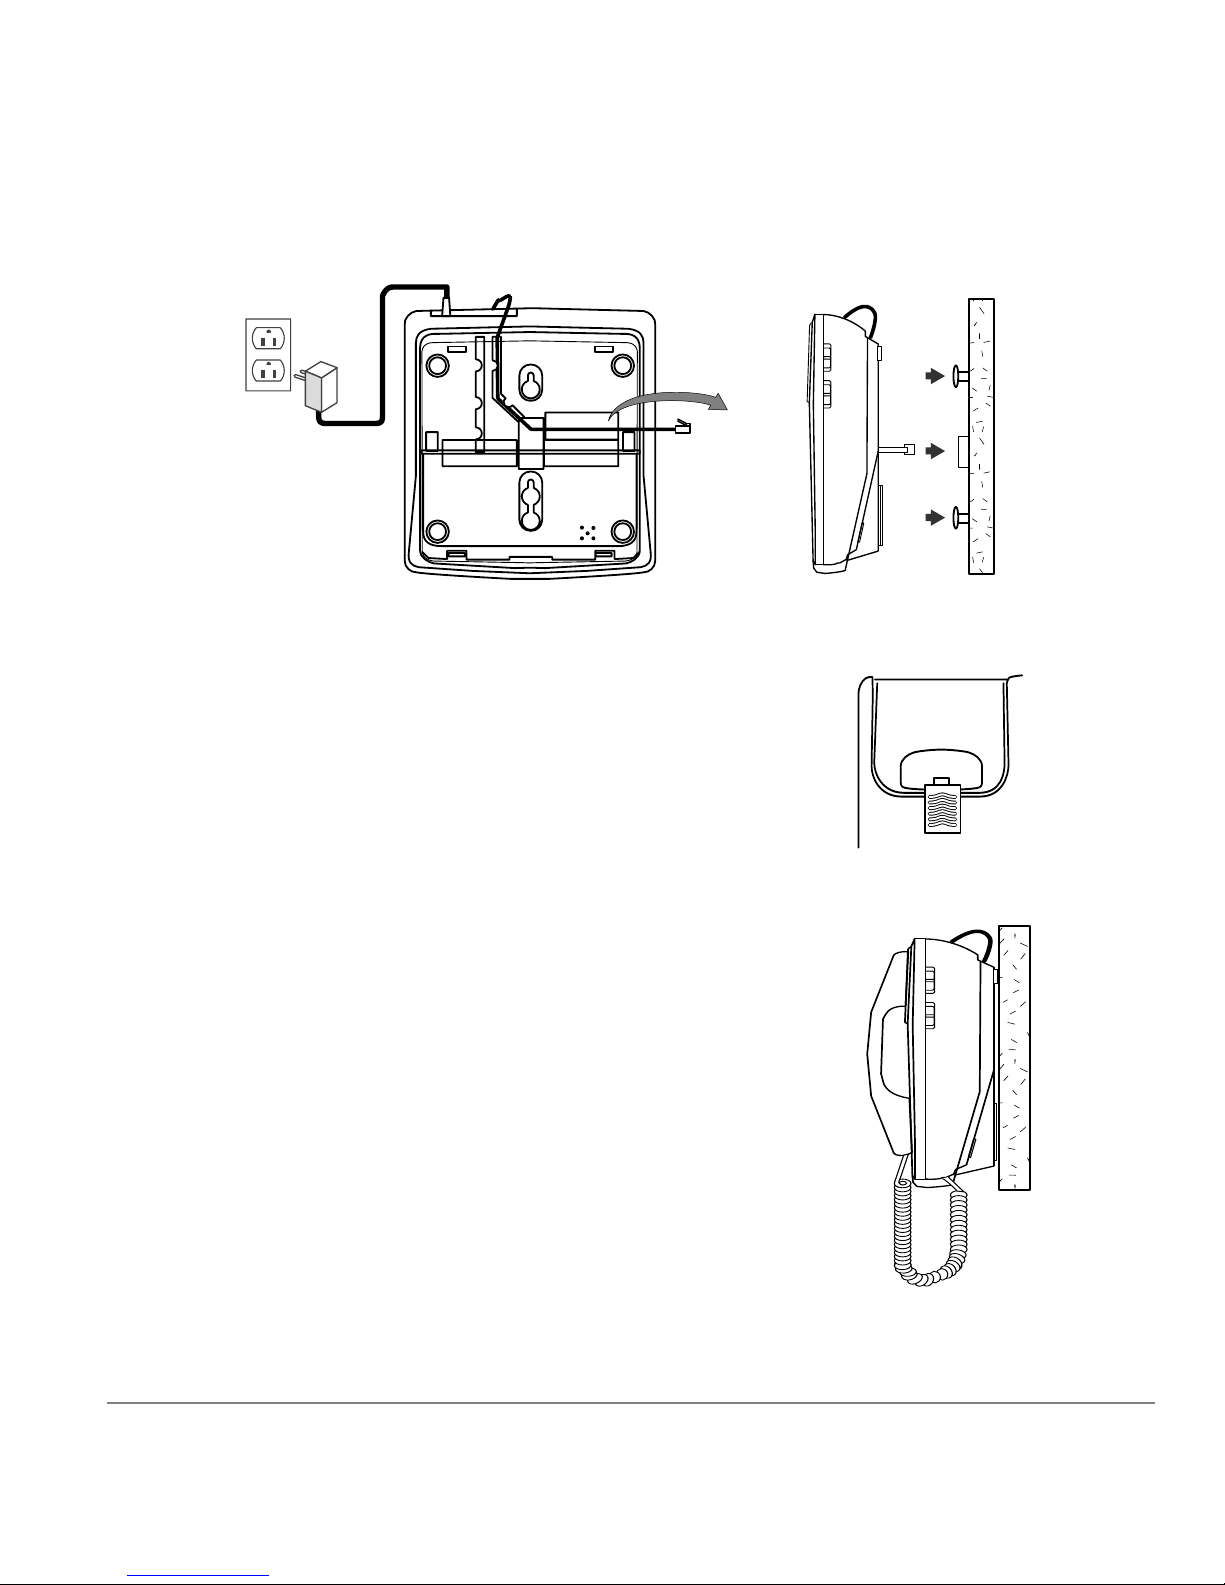
2. Route cords. Connect the adapter and the line cord (shown below).
AC Power
Adapter
Wall Jack Mounting Positions Wall
Wall Jack
3. Push out the handset hook and reattach in
opposite direction for the wall mount position
(shown at right), plug the coiled cord into the
handset, and then plug the other end of the cord
into the base.
4. Place the handset on the base (shown at right).
5. Set up phone. See “Phone Setup” on page 10 for
instructions.
5552
5554
Handset Hook
Wall Mount Position
Strata CS Analog Telephone 12/00 9
5555
Page 22
Installation/Set Up
Phone Setup
Phone Setup
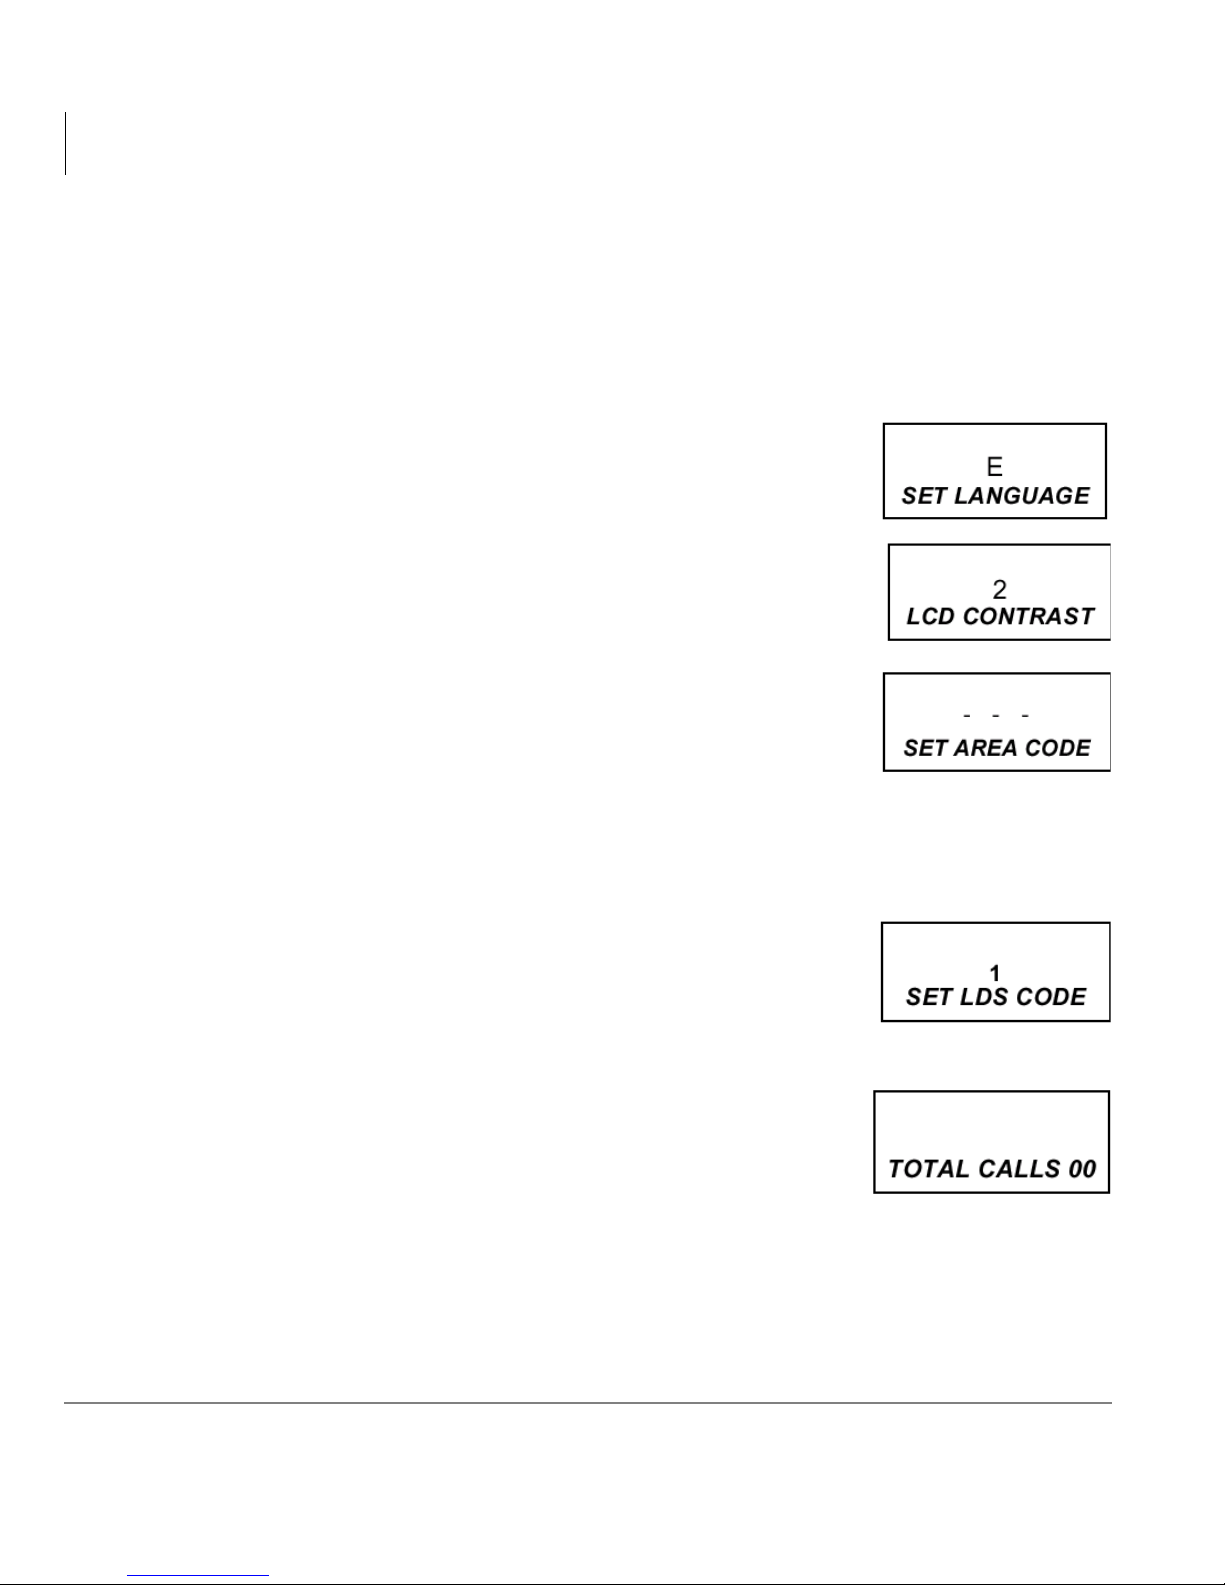
The following are the factory settings for your telephone: Language – English,
LCD Contrast – 1, Area Code – no setting, LDS Code – 1
Change the Settings
♦ [SET LANGUAGE] displays (shown right). Press
5HYLHZ8S (▲) to select the language. E - English,
F - French, S - Spanish, and then press
the selection.
♦ When [LCD CONTRAST] appears (shown right), press
5HYLHZ8S (▲) button to set the contrast darker, and
then you can press
contrast back to the preset.
♦ When [SET AREA CODE] appears (shown right),
use
5HYLHZ8S (▲ ) button and 5HYLHZ'RZQ (▼)
button to set your local area code.
'LDO to confirm
5HYLHZ'RZQ (▼) button to set the
5HYLHZ8S (▲) button to change the digit from
, , , ,
5HYLHZ'RZQ (▼) button to move to the next digit.
When you are finished setting the local area code, press
♦ When [SET LDS CODE] appears (shown right), press
5HYLHZ8S (▲ ) to change the long distance code from
, , , , . When you are finished, press 'LDO (display
shown at right). You are ready to receive calls
Note The LDS code for the USA or Canada must be set to 1.
♦ The time and date are automatically set when a Caller ID
.
'LDO.
(CID) number is received. The phone keeps the current
time accurately, and is updated each time a CID number
is received.
After you have set up the phone completely for the first time,
use the
0HQX button to review or reprogram the Language,
Area Code or LDS Code.
10 Strata CS Analog Telephone 12/00
Page 23

Features 3
Pulse and Tone Dialing
1. If your telephone line accepts touch-tone dialing, set the 3XOVHWRQH6ZLWFK to
the Tone position.
2. If your telephone line requires rotary (pulse) dialing, set the
6ZLWFK
3. If you are unsure which system you have, set the switch to the Tone position. Lift
the handset. When you get a dial tone, dial a telephone number. If the dial tone
continues, move the switch to Pulse, and then dial the telephone number again.
Note In order for the Caller ID callback to work (see “Caller ID Features” on page
to the Pulse position.
16), you must set the
3XOVHWRQH6ZLWFK to the Tone position.
3XOVHWRQH
Strata CS Analog Telephone 12/00 11
Page 24

Features
Receive Calls
Receive Calls
You can answer a call using either the phone’s handset or speakerphone. The New Call
LED at the top of the phone lights up to let you know when new calls are received.
Answer Call Using Handset
1. Be sure the 5LQJHU6ZLWFK is set to the Hi or Low position.
2. When the phone rings and the LCD displays the Caller ID information, lift the
handset and begin your conversation.
3. Set the
interrupted by the phone ringing. Remember to set the ringer switch back to Hi or
Low when you want to receive calls again.
5LQJHU6ZLWFK to the Off position when you do not want to be
Answer Call Using Speakerphone
1. When the phone rings and the LCD displays the Caller ID information, press and
release
distance of five-six inches.
2. You can adjust the volume of the caller’s voice by sliding the
6ZLWFK on the right side of the phone.
3. After the conversation has finished, press
6SHDNHUSKRQH and talk normally into the built-in microphone from a
Place Calls
You can place a call using either the handset or speakerphone.
Make Call Using Handset
6SHDNHU 9ROXPH
6SHDNHUSKRQH to hang up.
1. Lift the handset and wait for a dial tone.
2. Dial the telephone number you wish to call. The number appears in the LCD.
12 Strata CS Analog Telephone 12/00
Page 25

Make Call Using Speakerphone
1. Press and release 6SHDNHUSKRQH.
Features
Place Call On-hold
2. When you hear a dial tone, dial the number or press
would on any other push-button telephone. The number appears in the LCD.
3. When your party answers, adjust the sound level by sliding the
9ROXPH6ZLWFK located on the right side of the phone.
4. After the conversation has finished, press
Notes
● If you wish to switch from speakerphone to handset, simply lift the handset.
● If you wish to switch from handset to speakerphone, press and release
6SHDNHUSKRQH and then hang up the handset.
Place Call On-hold
1. To place a call on-hold, press +ROG and hang up the handset. The Hold LED lights
and remains lit until you resume your conversation.
2. To resume your conversation, lift the handset or that of any extension phone on
the same line or press and release
your call can continue.
$XWR0HPRU\ just as you
6SHDNHU
6SHDNHUSKRQH to hang up.
6SHDNHUSKRQH. The Hold LED goes out and
Redial Number
1. If the number you dialed is busy, or you want to call the last number dialed again,
lift the handset, or press and release the hookswitch for a new dial tone.
2. Press
3. The last number called (31-digits maximum) is automatically redialed.
Strata CS Analog Telephone 12/00 13
5HGLDO. The number appears in the LCD display.
Page 26

Features
Duration Counter
Duration Counter
A built-in counter starts counting for your reference six seconds after you lift the
handset or six seconds after you dial a telephone number.
Automatic Memory
You can store up to ten phone numbers (15-digits maximum each) in memory using
the
$XWR0HPRU\ buttons (, , , or ) and another ten phone numbers using dial
pad buttons (
Store Number in Memory
1. Press 6WRUH, [MEMORY STORING] displays.
2. Dial the telephone number (15-digits maximum) you want to store in memory.
, , , or ).
Note The memory locations can be chained together to store numbers of longer
length.
3. Press
4. Press the desired memory location.
➤ To store number on an $XWR0HPRU \ button (located on right-hand side of
base), press
...or to store in a dial pad memory location, press one of the dial pad buttons (
, or ).
5. Use the pull-out Memory Dial Index to write in the name and location (button)
where it is stored.
6WRUH again.
, , , or )
, ,
14 Strata CS Analog Telephone 12/00
Page 27
Dial Phone Number in Memory
1. Lift the handset and wait for a dial tone.
2. Press any memory location.
➤ To dial a number stored on an $XWR0HPRU \ button (located on right-hand side
of base), press the desired
...or to dial a number stored in a dial pad memory location, press 0HP'LDO first,
then the desired dial pad button (
3. The number displays and dials automatically.
Data Port
This is a connection which is in parallel with the telephone line. It enables the
connection of a device such as a modem, Caller ID, or an answering machine.
Features
Data Port
$XWR0HPRU\ button (, , , or )
, , , or ).
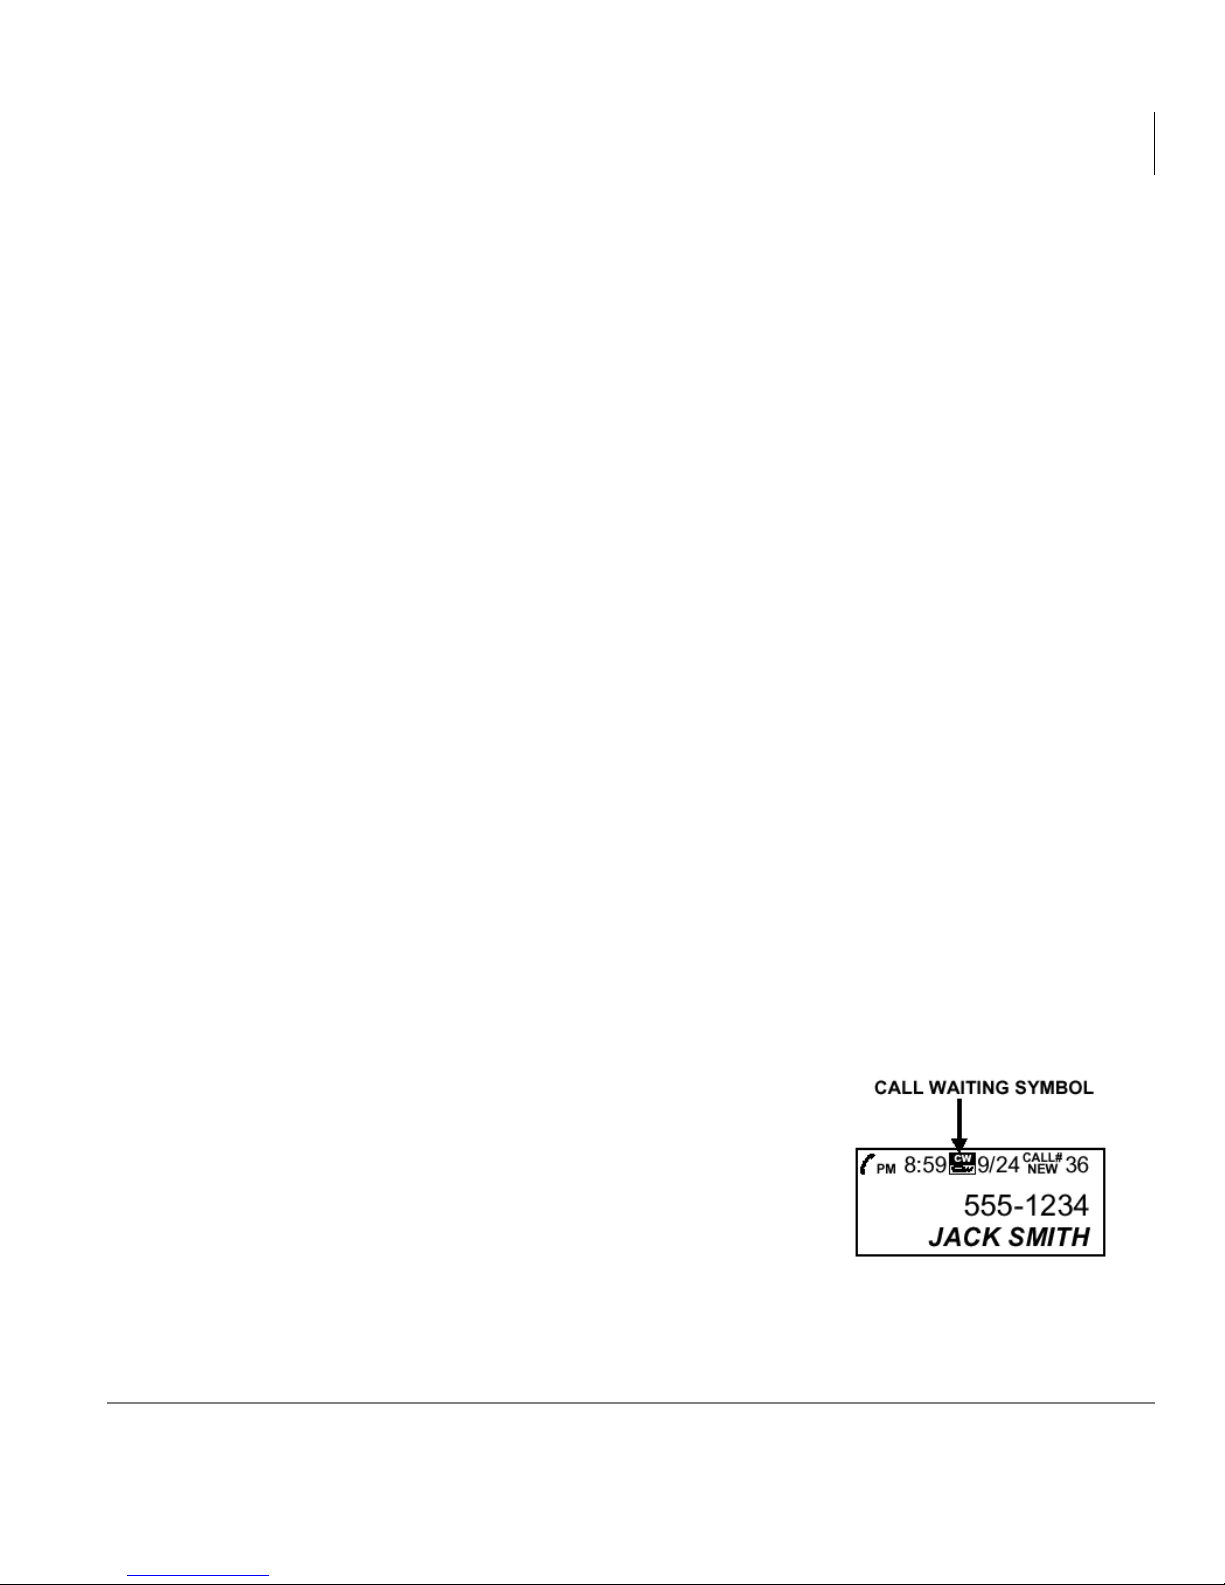
Call Waiting Display
With Call Waiting Caller ID, a tone alerts you there is a new call when you are on an
existing call, and lets you know who the caller is before you answer it. The call
waiting information is shown on the phone’s display.
The CALL WAITING (CW) symbol flashes for 16 seconds along with the telephone
number and name of the person who is on Call Waiting. Press
existing call on-hold and answer the new call.
No matter whether you answer the call or not, the Call
Waiting Caller ID stores the call information for future
reference.
Note Make sure you have subscribed to both Call Waiting
Caller ID and Caller ID service from your local
telephone company. If you only have Caller ID
service, the phone works for Caller ID only.
)ODVK to put the
Strata CS Analog Telephone 12/00 15
Page 28

Features
Caller ID Features
Caller ID Features
Message Light
The Message LED flashes to alert you to check your voice mail on the Strata CS for
your new messages.
The Message LED also monitors the phone’s status. When the phone is in use, the
Message LED is on continuously. If the LED is flashing quickly, it means the phone is
ringing. If it is not ringing and the light is flashing, the phone has experienced a power
outage.
Message Waiting
This phone’s Message Waiting detection is for both FSK and Stutter-dial Tone hone
systems.
If Your Service Is FSK
1. The Message LED flashes and [MESSAGE WAITING] displays on the LCD for
20 seconds when a message waiting On signal is received from the Strata CS.
2. The Message LED turns off and [MSG WAITING OFF] displays for 20 seconds if
the message waiting off signal is sent from the Strata CS.
If You Have a Stutter-dial Tone System
1. This phone checks your line for a stutter-dial tone every time you hang up or each
time a call goes unanswered. The Message LED flashes when there is a message
waiting.
2. You may experience some delay in seeing the Message LED light up even though
there are messages in your voice rnailbox. This delay is due to regulatory matters
and does not indicate a problem with the phone.
This phone may not be activated or deactivated under certain conditions. For example,
when you retrieve your message from an outside phone (not your own telephone
number), the Message LED may not be canceled when you return home. If you
experience this situation, pick up the receiver and hang up. The Message LED cancels.
16 Strata CS Analog Telephone 12/00
Page 29
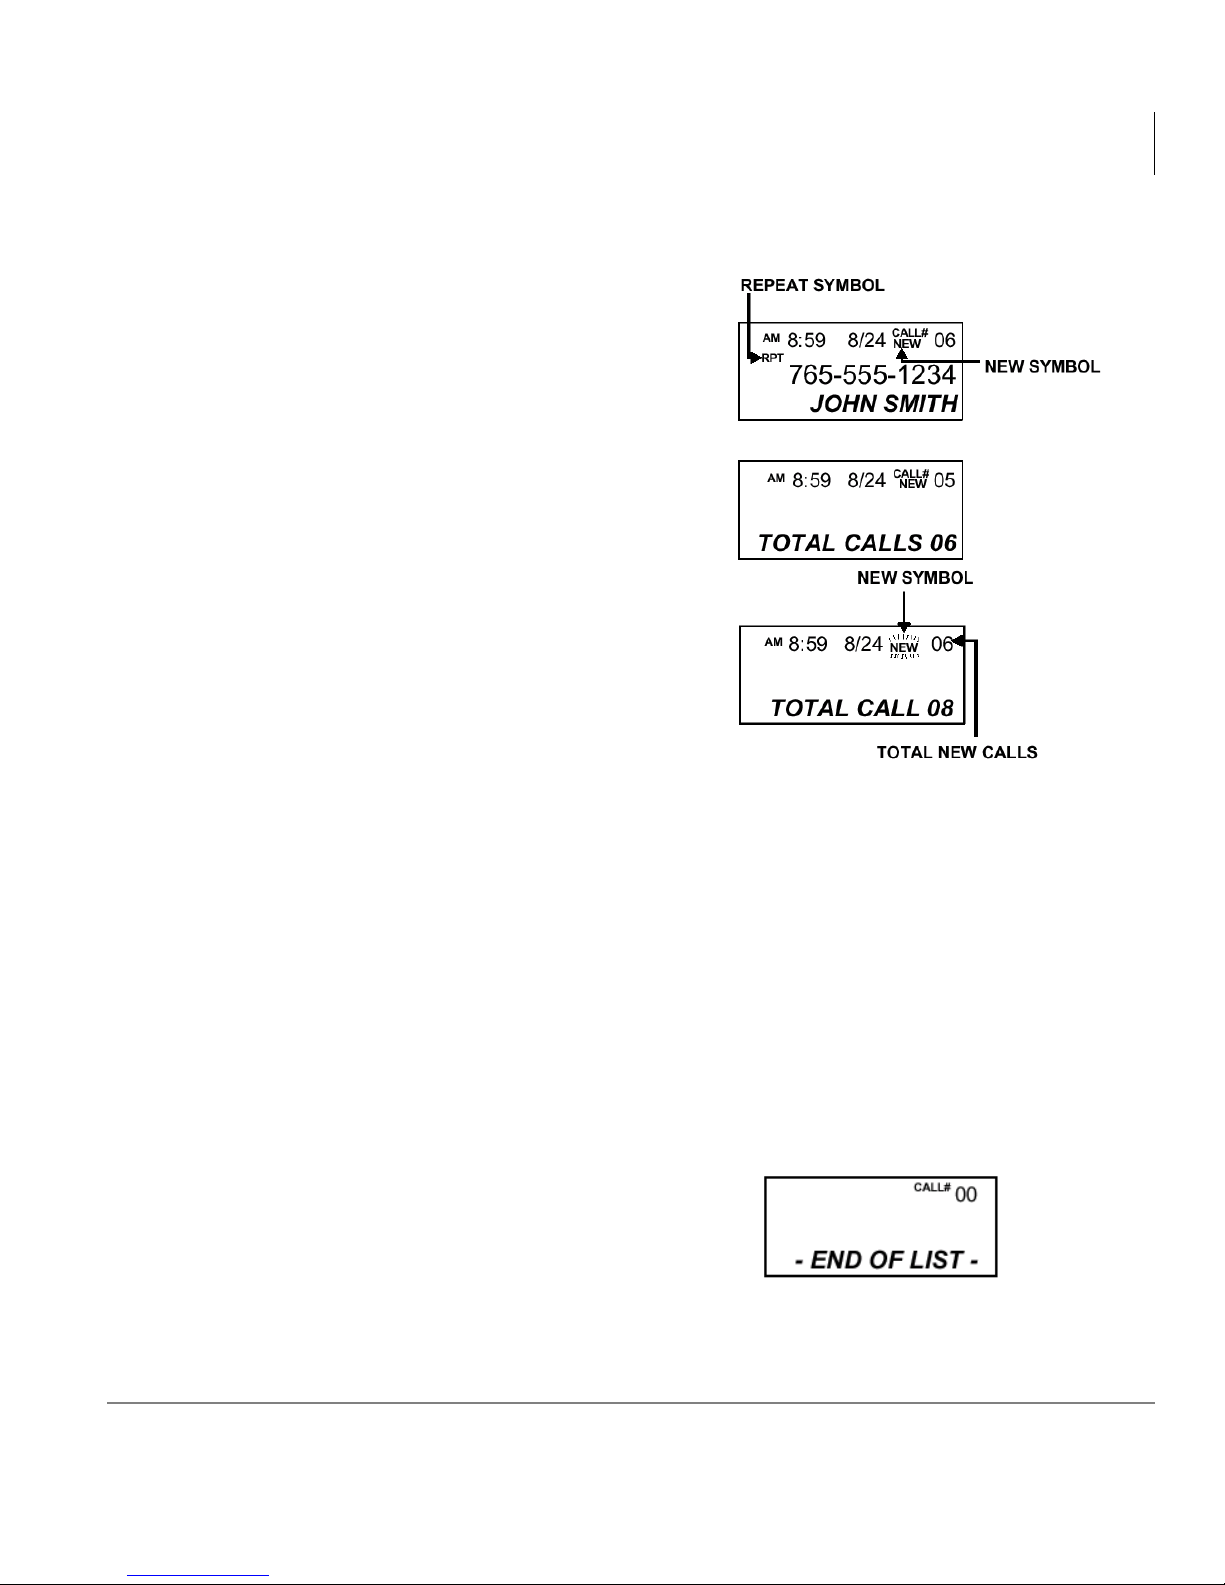
Receive Calls
1. When the telephone is not in use and a new
call is received, the LCD displays NEW,
the phone number, the caller’s name, and
time and date of the call for the first 20
seconds. The RPT (repeat) symbol appears
if the call has come in more than once.
2. After 20 seconds with no activity, the
display defaults to the Standby screen and
remains on until another call is received or
a button is pressed. The Standby screen
displays the total number of calls stored
and how many new calls have not been
reviewed.
Features
Caller ID Features
Review Calls
1. When you have new incoming calls, the NEW symbol flashes on the Standby
screen. Next to the NEW symbol is the total number of new calls. Press
8S
(▲ ) or 5HYLHZ'RZQ (▼) to review the incoming stored calls.
2. The NEW symbol attached to each call is removed after you review the call.
3. If the NEW symbol is still flashing when the display goes back to the Standby
screen, there are new calls that you have not yet reviewed.
4. The reviewed number can be stored into any of the
dial pad memory locations by pressing
buttons.
5. When you have reached the end of the call
records, [-END OF LIST-] displays,
confirming there are no more calls stored.
Note If the telephone number received is more
than 10 digits, the LCD only stores the first 10 digits in memory.
5HYLHZ
$XWR0HPRU\ buttons or
6WRUH first, then one of the memory
Strata CS Analog Telephone 12/00 17
Page 30
Features
Caller ID Features
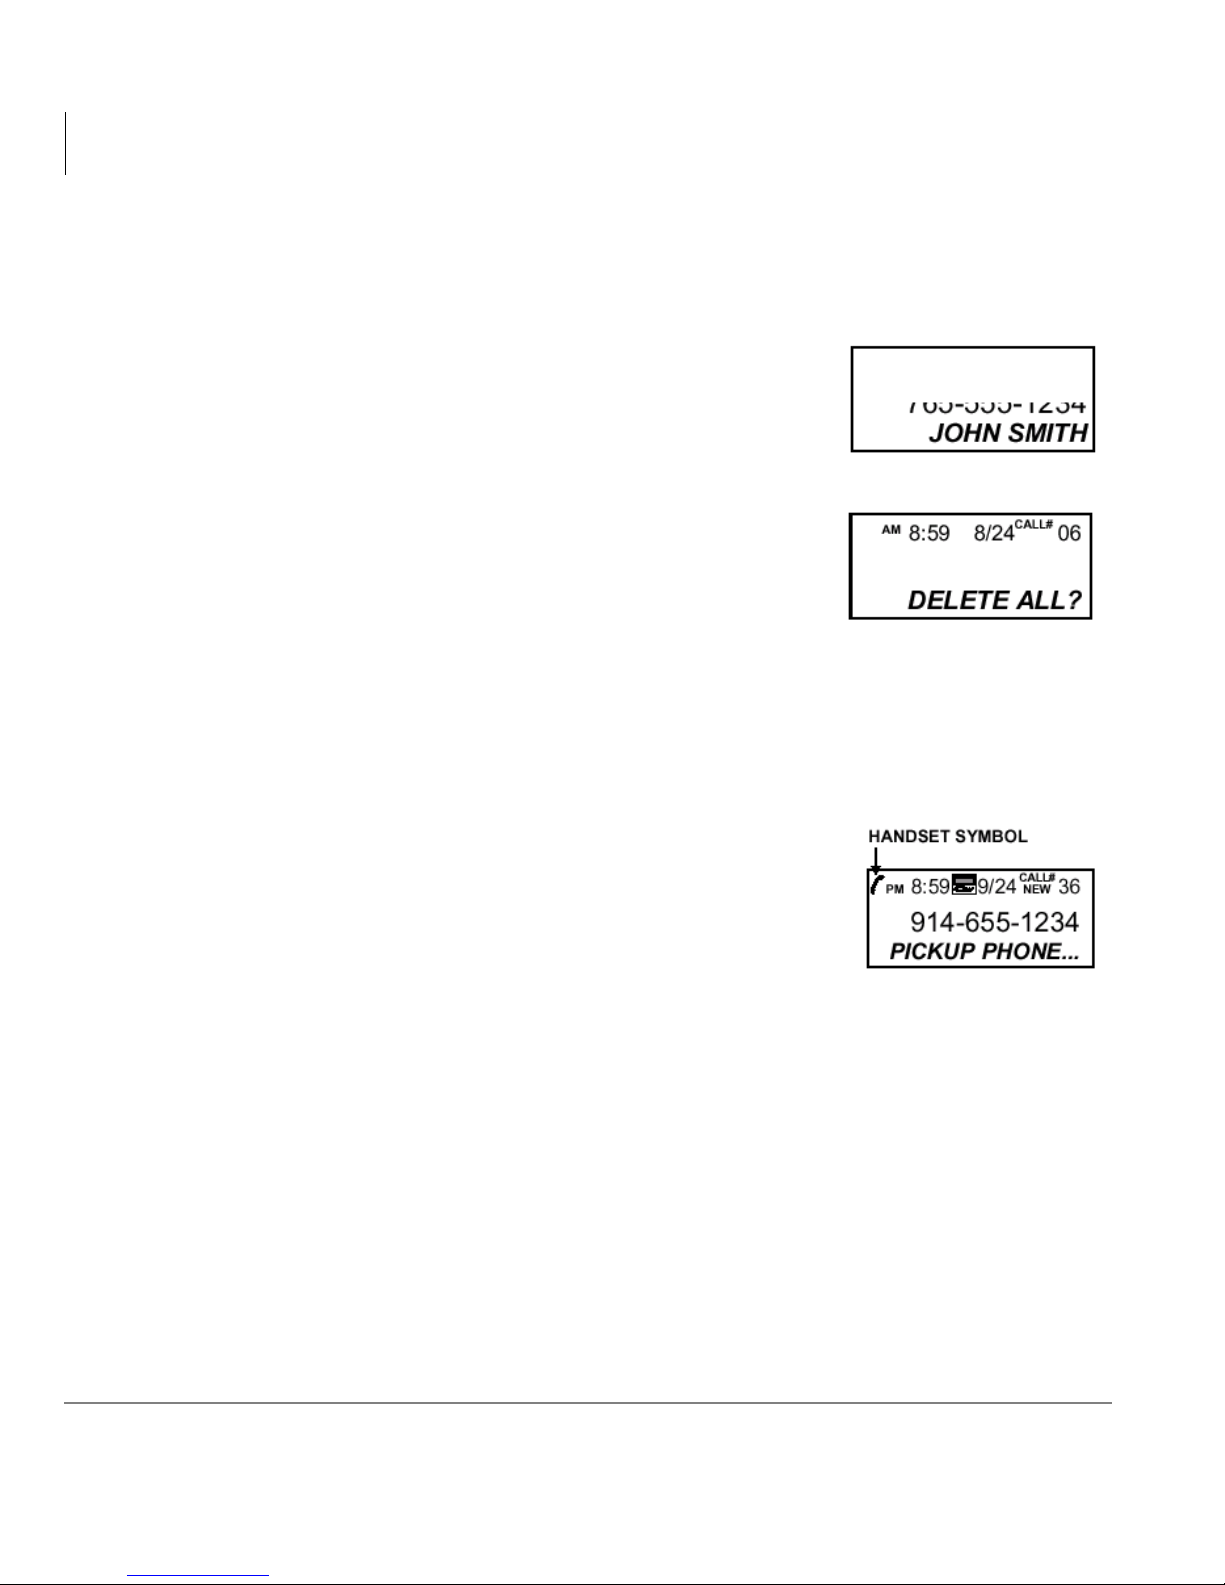
Delete Calls
Delete individual Call
➤ When reviewing calls, press 'HOHWH once. The display
erases each line, one at a time, and the remaining
records are renumbered.
Delete All Calls
➤ When reviewing calls, press and hold 'HOHWH for
more than three seconds. When [DELETE ALL]
displays, press
of all records. [-NO CALLS-] displays to show there
are no calls stored in memory.
'HOHWH again to confirm the deletion
Callback
When reviewing received calls, there are two ways using 'LDOto dial the telephone
numbers shown on the display.
1. With the handset in its cradle (on-hook), press
2. If you pick up the handset, review the calls, and press
Note The HANDSET displays in the LCD when the handset is picked up.
If [SET AREA CODE] appears prior to [PICKUP PHONE...] or dialing, it means you
have not programmed the local area code. Please hang up the telephone and program
the area code.
1. If a local call (a telephone number with the same area code as you set) is reviewed
'LDO.
[PICKUP PHONE...] displays in the LCD to ask you to
pick up the handset. Once you pick up the handset, the
number is dialed.
'LDO, the displayed number is dialed immediately.
and its 7-digit number displayed, press
'LDO to dial the number displayed.
18 Strata CS Analog Telephone 12/00
Page 31
2. If a long distance call (a telephone number with a different area code than you set)
is reviewed and its 10-digit number (3-digit area code + 7-digit telephone number)
is displayed, press
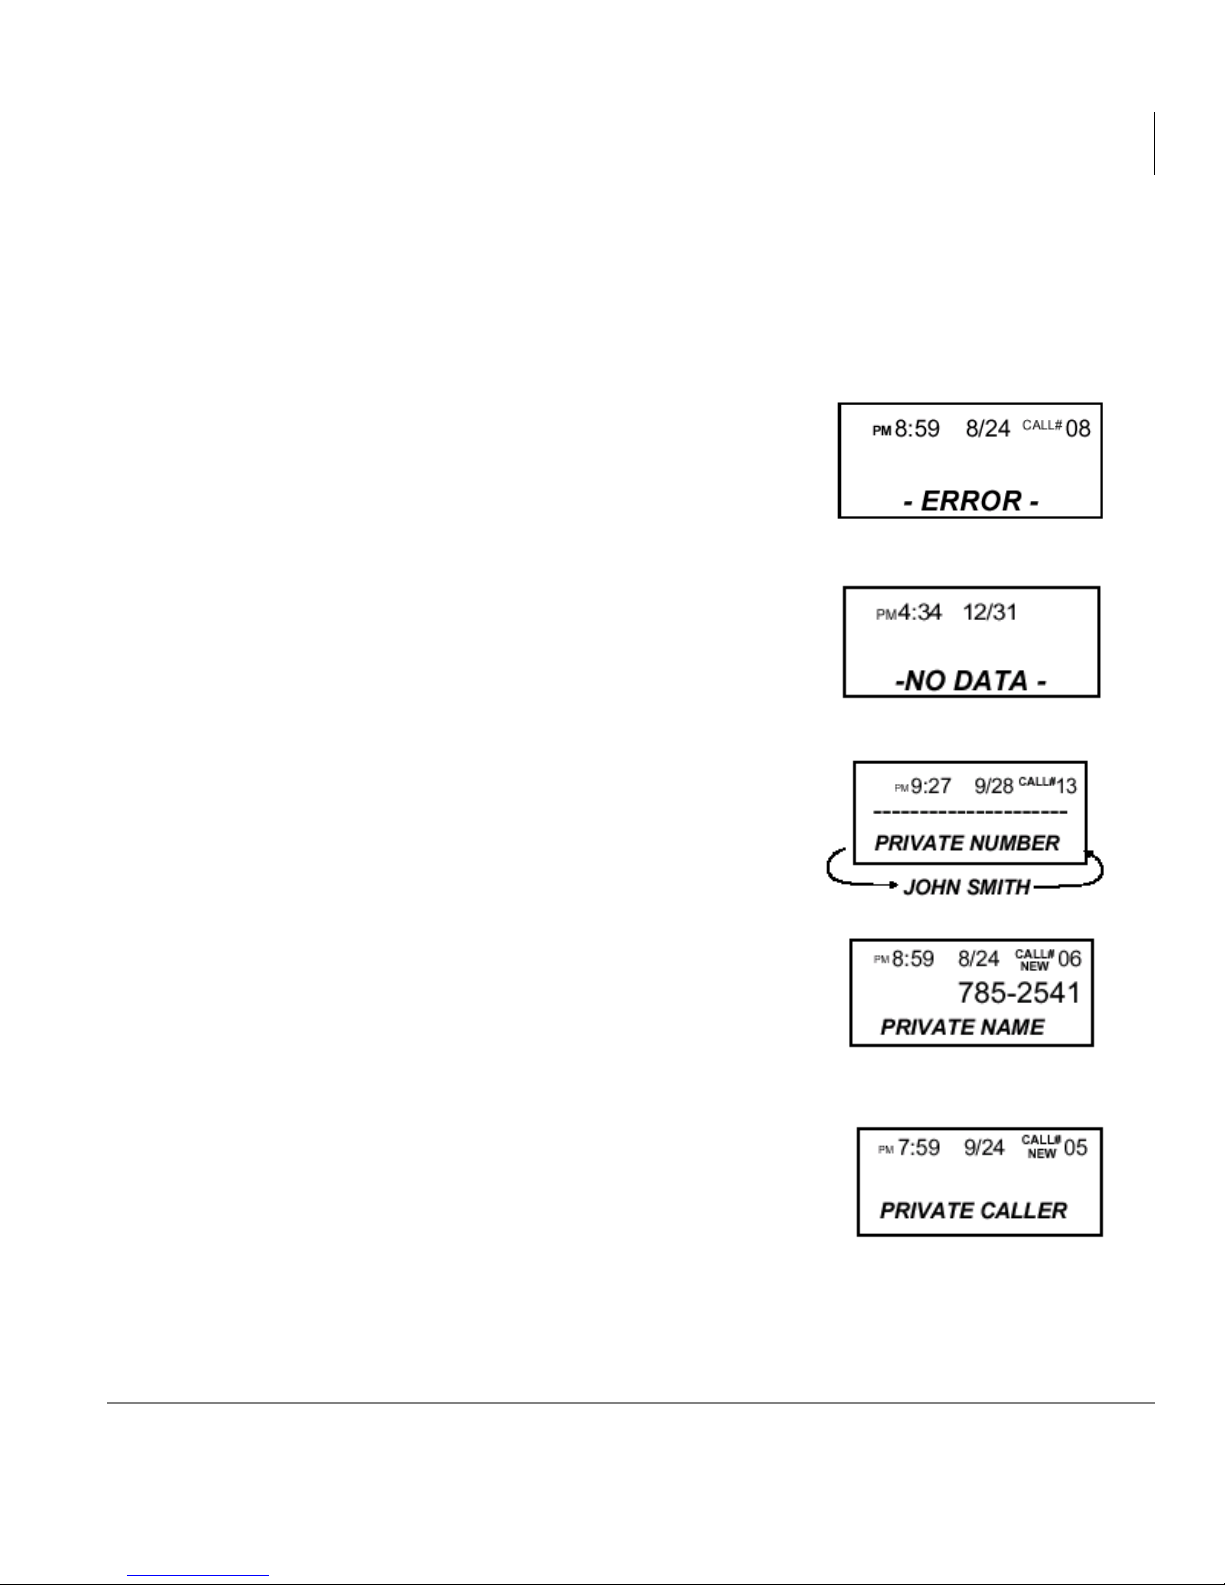
Message Error
[-ERROR-] displays (shown right) if your phone receives
a call that has an error in the transmission or reception.
No Data Sent
[-NO DATA SENT-] displays (shown right) if there is no
caller ID (CID) number sent from the telephone company
while ringing.
Features
Caller ID Features
'LDO to dial the number displayed.
Private Calls
If the caller has exercised the option to block his number
from being sent, [PRIVATE NUMBER] and his name
alternately displays on the screen when this information
is received.
If the caller has exercised the option to block his name
from being sent, [PRIVATE NAME] and his telephone
number displays on the screen.
If the caller has exercised the option to block his name and
number from being sent, then [PRIVATE CALLER]
displays on the screen.
Strata CS Analog Telephone 12/00 19
Page 32
Features
Caller ID Features
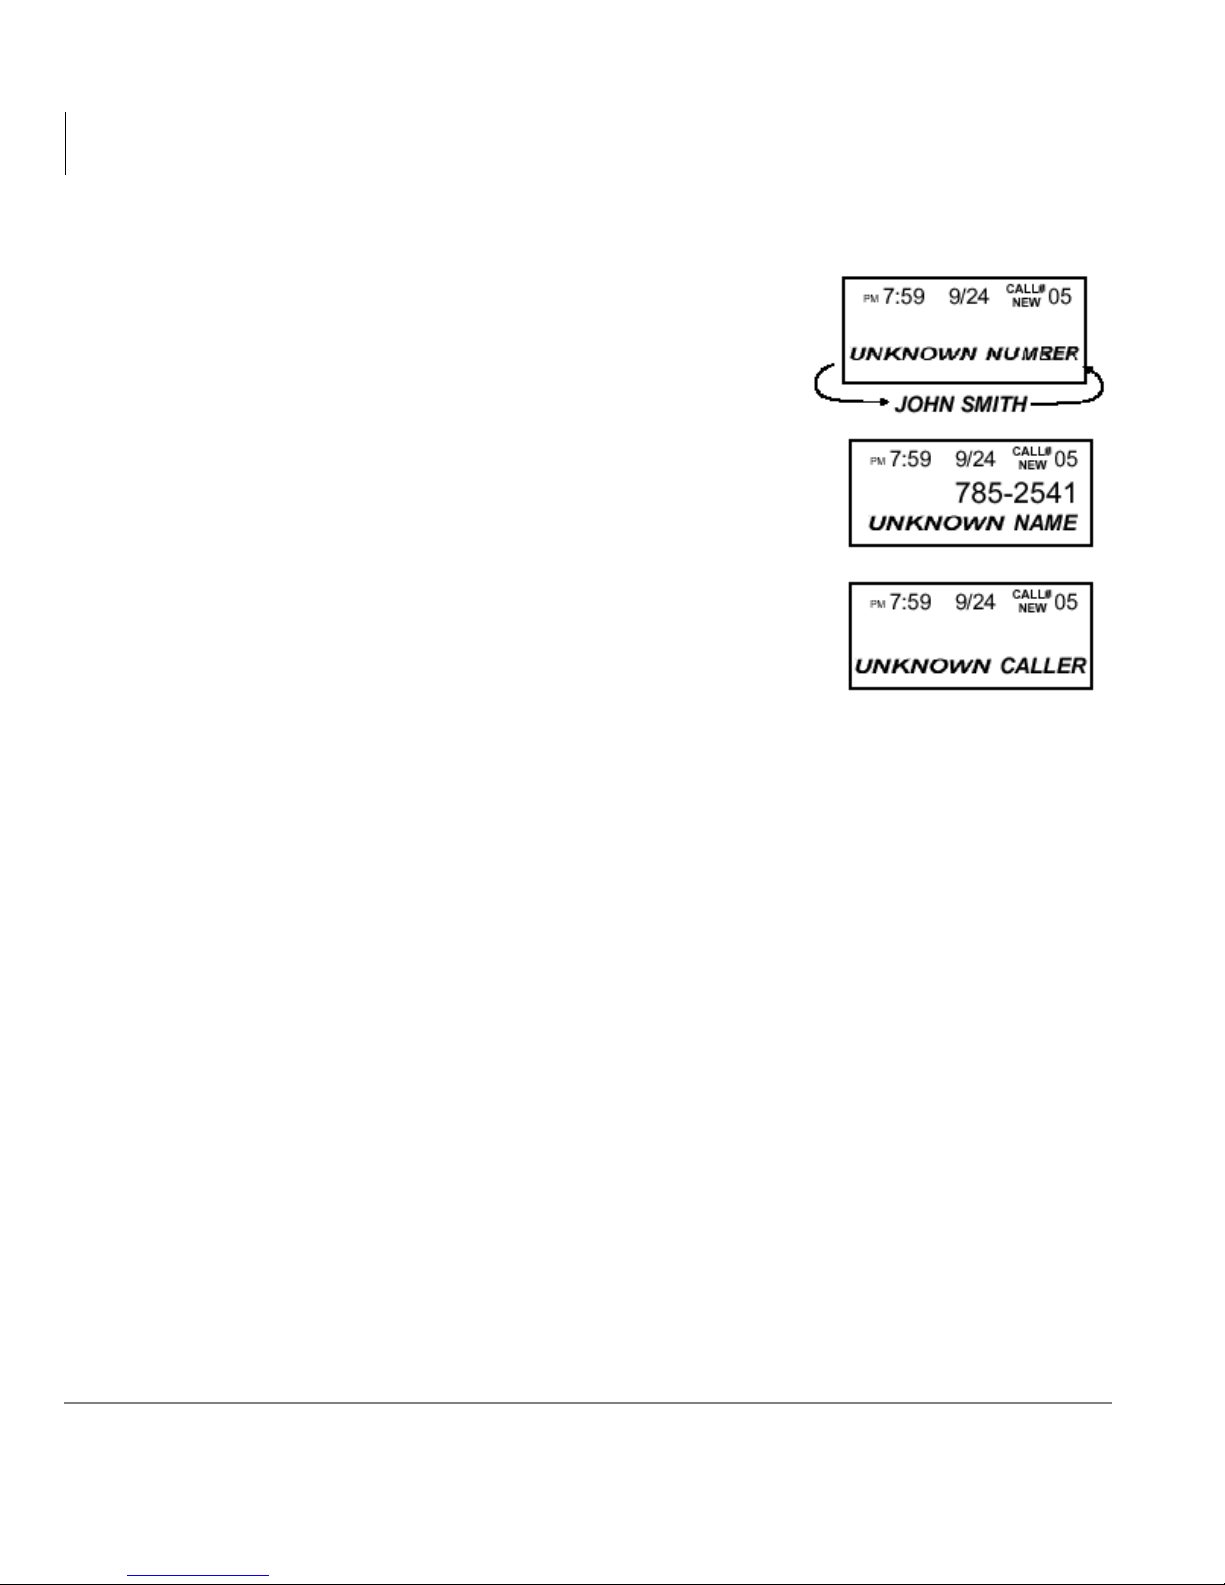
Unknown Calls
When the telephone company is unable to provide the
caller’s telephone number, [UNKNOWN NUMBER]
and the caller’s name alternately display on the screen.
When the telephone company is unable to provide the
caller’s name, [UNKNOWN NAME] and telephone
number displays on the screen.
When the telephone company is unable to provide the
caller’s name and number, [UNKNOWN CALLER]
displays on the screen.
20 Strata CS Analog Telephone 12/00
Page 33

Maintenance/Troubleshooting 4
Maintenance Information
♦ Treat your telephone equipment with care for trouble-free performance.
♦ Avoid dropping the handset. Carefully place the handset on-hook after use.
♦ Avoid putting near heating appliances and devices that generate electrical noise
(e.g., motors and fluorescent lamps).
♦ Clean your telephone equipment with a damp cloth. Stains may be removed with a
mild soap. Do not use liquid or aerosol detergents or cleaning agents.
♦ Do not expose to direct sunlight or moisture.
♦ Retain the original package in case you need to ship it at a later date.
Strata CS Analog Telephone 12/00 21
Page 34
Maintenance/Troubleshooting
Troubleshooting
Troubleshooting
Note If you have any problems with your telephone equipment service, determine if
the problem is with your phone or the telephone company lines. Before
calling the telephone company, be aware that they may charge you for a
service call if the problem is caused by your telephone equipment.
The following table provides solution(s) to common installation and setup problems.
Problem Solution(s)
Phone does not ring
♦ Hi/low/off 5LQJHU6ZLWFK is set to Off position.
♦ Line cord is disconnected at telephone outlet or at
telephone end.
♦ Phone is off-hook. Make certain the hookswitch is
depressed when the handset is in the cradle.
No dial tone
Have dial tone but cannot
dial out
Redial button does not
function
Blank screen
Caller IDs do not display
on LCD
No caller information
displays when hearing
call waiting audio sound
♦ 6SHDNHUSKRQH LED is On. Turn Off speakerphone.
♦ Check to make sure wire is connected at telephone jack
or at wall jack.
♦ Test the telephone in a different wall jack. If it works, the
first jack may be defective.
♦ Check if the 3XOVHWRQH6ZLWFK is at the correct
position.
♦ The telephone may have been momentarily disconnected
from the telephone jack.
♦ Check if the adapter is connected properly.
♦ Verify that you have subscribed to the appropriate service
(Caller ID and Call Waiting Caller ID) from your telephone
company. If you only subscribed to the Caller ID service
this phone will not display the call waiting caller ID
information.
♦ Verify that you have subscribed to the Call Waiting Caller
ID service from your telephone company.
22 Strata CS Analog Telephone 12/00
Page 35

Problem Solution(s)
Message error happens
frequently
Maintenance/Troubleshooting
Telephone Repair
♦ Caller information was not transmitted properly. Check
with your telephone company to see if there is a problem
with your phone line.
Since our special design will always retain your stored
call records, we encourage you to disconnect all the
telephone cords and adapter; and then reinstall the
phone step-by-step per this instruction manual before
you ask for service.
Note The call records are not erased when the adapter is
disconnected. A special E2PROM design enables the
phone to always retain your stored call records after
you disconnect the adapter.
Telephone Repair
Do not attempt to repair this product yourself. Call your Authorized Dealer for all
repairs.
Strata CS Analog Telephone 12/00 23
Page 36

Maintenance/Troubleshooting
Telephone Repair
24 Strata CS Analog Telephone 12/00
Page 37

Appendix - Telephone Commands
Quick Reference
This appendix provides a quick reference to the Strata CS Telephone Commands. For
more instructions on using Strata CS over the phone, see Chapters 3 through 6 in the
Strata CS Client User Guide.
Important! You can preprogram any of the Call Handling buttons, Quick Dial
commands, or Voice Mail/Account commands described in this
appendix as speed dial buttons using the
your analog phone. See “Automatic Memory” on Page 14 for
instructions.
$XWR0HPRU\ buttons on
Note From within any Telephone Commands menu, you can press
higher level menu.
Strata CS Analog Telephone 12/00 25
to return to the
Page 38
Appendix - Telephone Commands Quick Reference
Call Screening Menu
Call Screening Menu
If you have verbal call screening turned on, you are offered the following options
when you answer an incoming call, either by picking up the phone or pressing
after hearing the call waiting beep.
Table 1 Call Screening Commands
Press Description
)ODVK
Hang up
Connect to the caller.
Send the caller to your voice mail.
Send the caller to voice mail and monitor the message being left. Press
)ODVK to pick up the call in mid-message.
In call waiting situations, create a conference call with your current call and
the new one.
Send the caller to the next step on your routing list. Unless youÕve changed
your routing list, the next step is your voice mail, so hanging up is the same
as pressing
.
Call Handling Menu
As soon as you press )ODVK to put a call on hold, you’ll hear a context-sensitive menu
of call handling options. The caller does not hear these menu prompts. At any time
while listening to the prompts, you can press
Table 2 Call Handling Commands
)ODVK again to reconnect to the caller.
Press
(With a call on the line, press Flash, then)
Transfer the call
Send the call to voice mail
Disconnect from the call
Reconnect to the call
Description
26 Strata CS Analog Telephone 12/00
Page 39
Appendix - Telephone Commands Quick Reference
Table 2 Call Handling Commands (continued)
Quick Call Menu
Press
)ODVK
Create a conference call
Park the call
Silent hold (stops menu until next keypress)
Send a Flash to Centrex/PBX service beyond Strata CS
Get a dial tone (start another call)
Reconnect to the call
Quick Call Menu
When you press from a dial tone, you are offered the following options for placing
and answering calls:
Table 3 Quick Dial Commands
Description
(With a call on the line, press Flash, then)
Press Description
Strata CS Analog Telephone 12/00 27
Hear your phoneÕs station ID and extension.
Redial the last call you placed.
Dial the phone number of your last incoming call.
Disable call waiting for the next call.
Answer another ringing phone. Enter the extension of the
phone to answer.
Retrieve a parked call.
Dial a Strata CS user by name.
Manage your calls on hold.
Log off from remote session. Only available at a dial tone
when logged in from a remote phone.
Page 40
Appendix - Telephone Commands Quick Reference
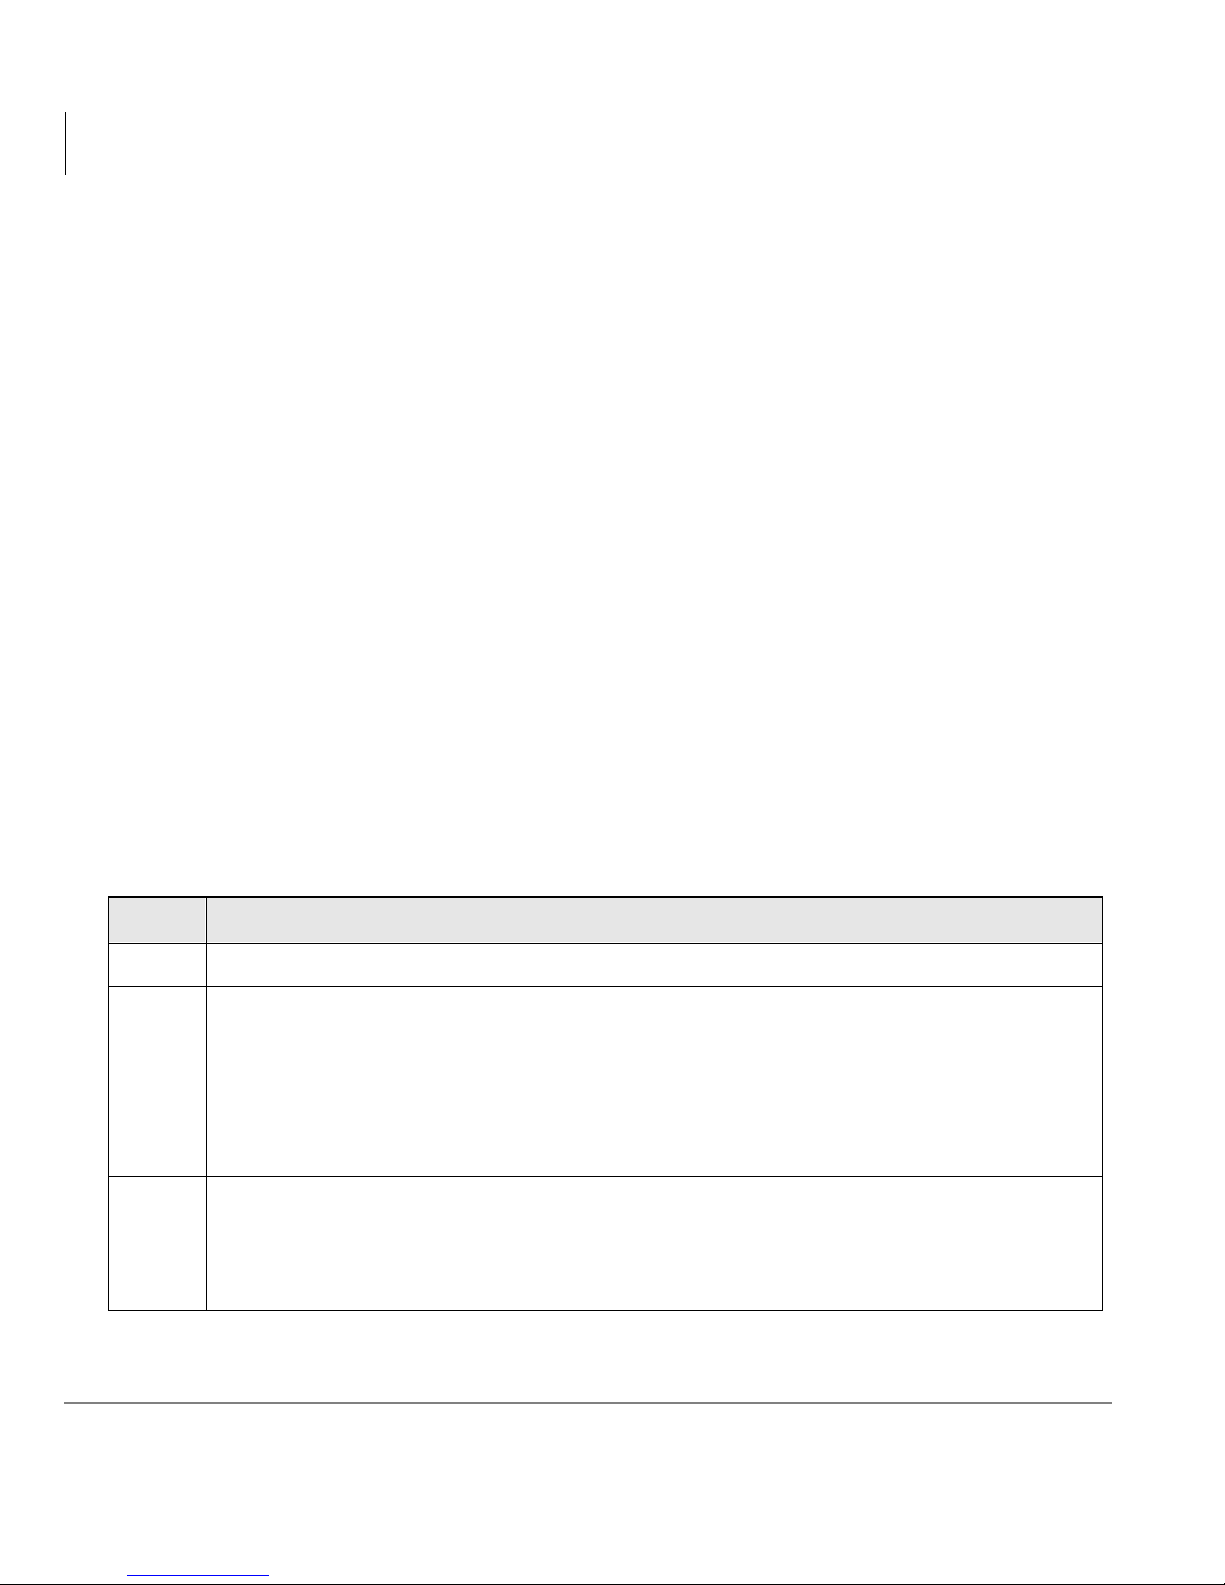
Voice Mail/Account Menu
Voice Mail/Account Menu
The Voice Mail/Account menu lets you listen to your voice mail, send messages to
other users’ voice mail, and change your Strata CS account settings. You need to log in
to access this menu.
Logging In
1. To log in to the Voice Mail/Account menu, pick up the phone and enter , <your
extension>
, , <your password>, and .
2. Enter
,,<your password>,andwhen logging in from your own
Strata CS phone.
Note Your extension does not need to be entered.
If your voice mailbox is almost full when you log in, you are given the option to
empty your Deleted folder. Messages in the Deleted folder count against your total
space. For more information, see “Voice Mailbox Size” on Page 101.
Voice Mail/Account Menu Commands
Table 4 Summary of Voice Mail/Account Menu Commands
Press Command Number and Name
Voice messages (Inbox folder)
Voice messages (Saved folder)
Replay
Reply
Previous message
Undelete all
Next message
Forward
Save
Fast Forward
Delete/Undelete message
Call back
Rewind
Skip message preamble;
skip rest of message
Send voice message
Send
Append
Cancel
Review
Mark Urgent
Re-record
Mark Private
28 Strata CS Analog Telephone 12/00
Page 41
Appendix - Telephone Commands Quick Reference
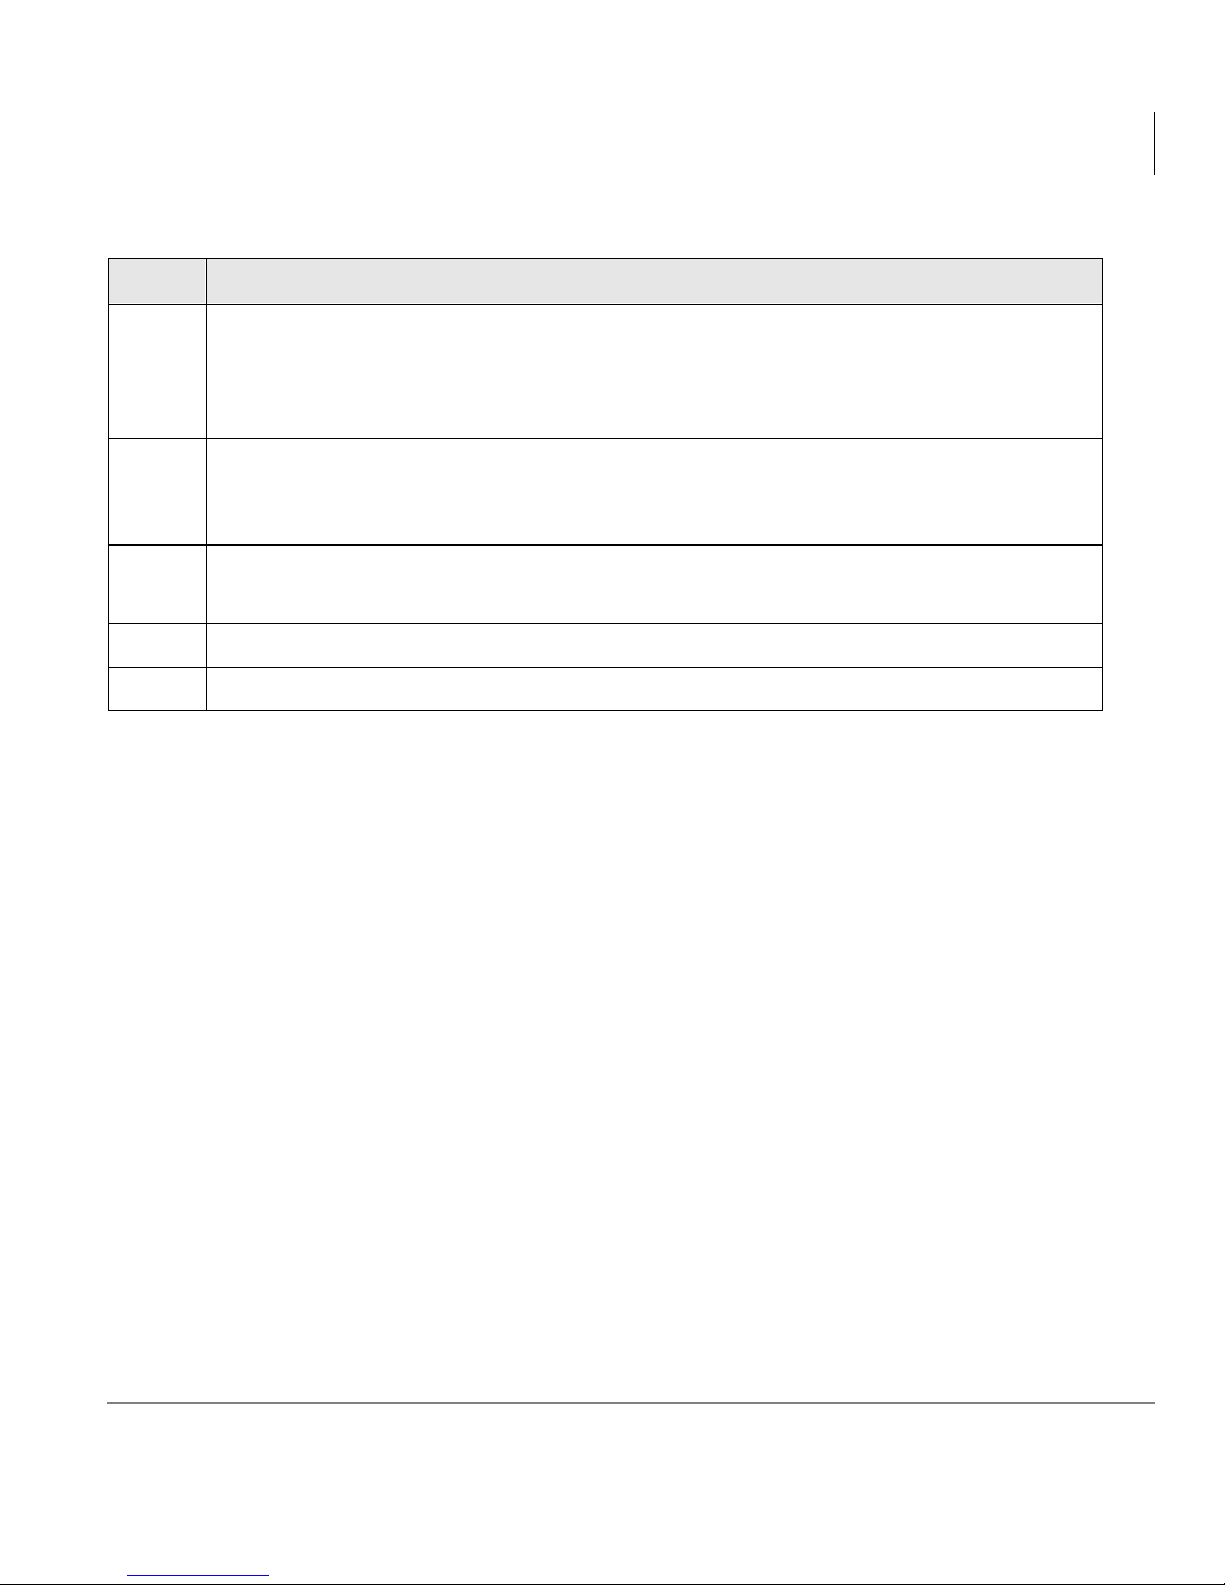
Table 4 Summary of Voice Mail/Account Menu Commands (continued)
Press Command Number and Name
Manage greetings
Voice Mail/Account Menu
Replay
Re-record
Next greeting
Revert
Make active
Record new greeting
Delete
Call forwarding
To this extension
Cancel forwarding
To internal
Query forwarding
To external
Toggle standard call rules
Account preferences
Do Not Disturb Record voice title Change password
Have Strata CS hang up
Dial tone to start another call
Note Option 7 is only available when logging in from an outside line.
Strata CS Analog Telephone 12/00 29
Page 42

Appendix - Telephone Commands Quick Reference
Voice Mail/Account Menu
30 Strata CS Analog Telephone 12/00
Page 43

Index
A
about this book
conventions,
related documents, vii
auto memory, 3, 14
vi
B
buttons, 3
auto memory, 3
delete, 3
dial, 3
flash, 3
hold, 3
mem dial, 4
menu, 4
option, 4
pause, 5
redial, 5
speakerphone, 6
store, 6
volume control, 10, 17
C
call forwarding
using via telephone commands,
call handling
menu,
call screening
menu,
call waiting display, 15
callback, 18
caller ID features, 16
change settings, 10
26
26
D
data port, 15
delete calls, 3, 18
dial, 3
duration counter, 14
F
flash, 3
H
28
Strata CS Analog Telephone 12/00 31
hold, 3
Page 44

Index
I ~ W
I
installation, 7
L
logging in
to the voice mail/account menu,
using telephone commands, 28
M
maintenance information, 21
mem dial, 4
menu, 4
message error, 19
message light, 16
message waiting, 16
N
no data sent, 19
O
option, 4
P
parts identification, 2
pause, 5
phone setup, 10
place call on-hold, 13
place calls, 12
private calls, 19
pulse and tone dialing, 11
28
S
safety instructions, 3
speakerphone, 6
store, 6
T
telephone commands
call handling commands,
call screening, 26
menus, 26
quick dial, 27
voice mail/account menu, 28
telephone repair, 23
troubleshooting, 22
U
unknown calls, 20
V
voice mail
account menu,
volume, 6, 10, 17
28
W
wall mount instructions, 8
26
R
receive calls, 12, 17
redial number, 5, 13
review calls, 17
32 Strata CS Analog Telephone 12/00
 Loading...