

Page 1
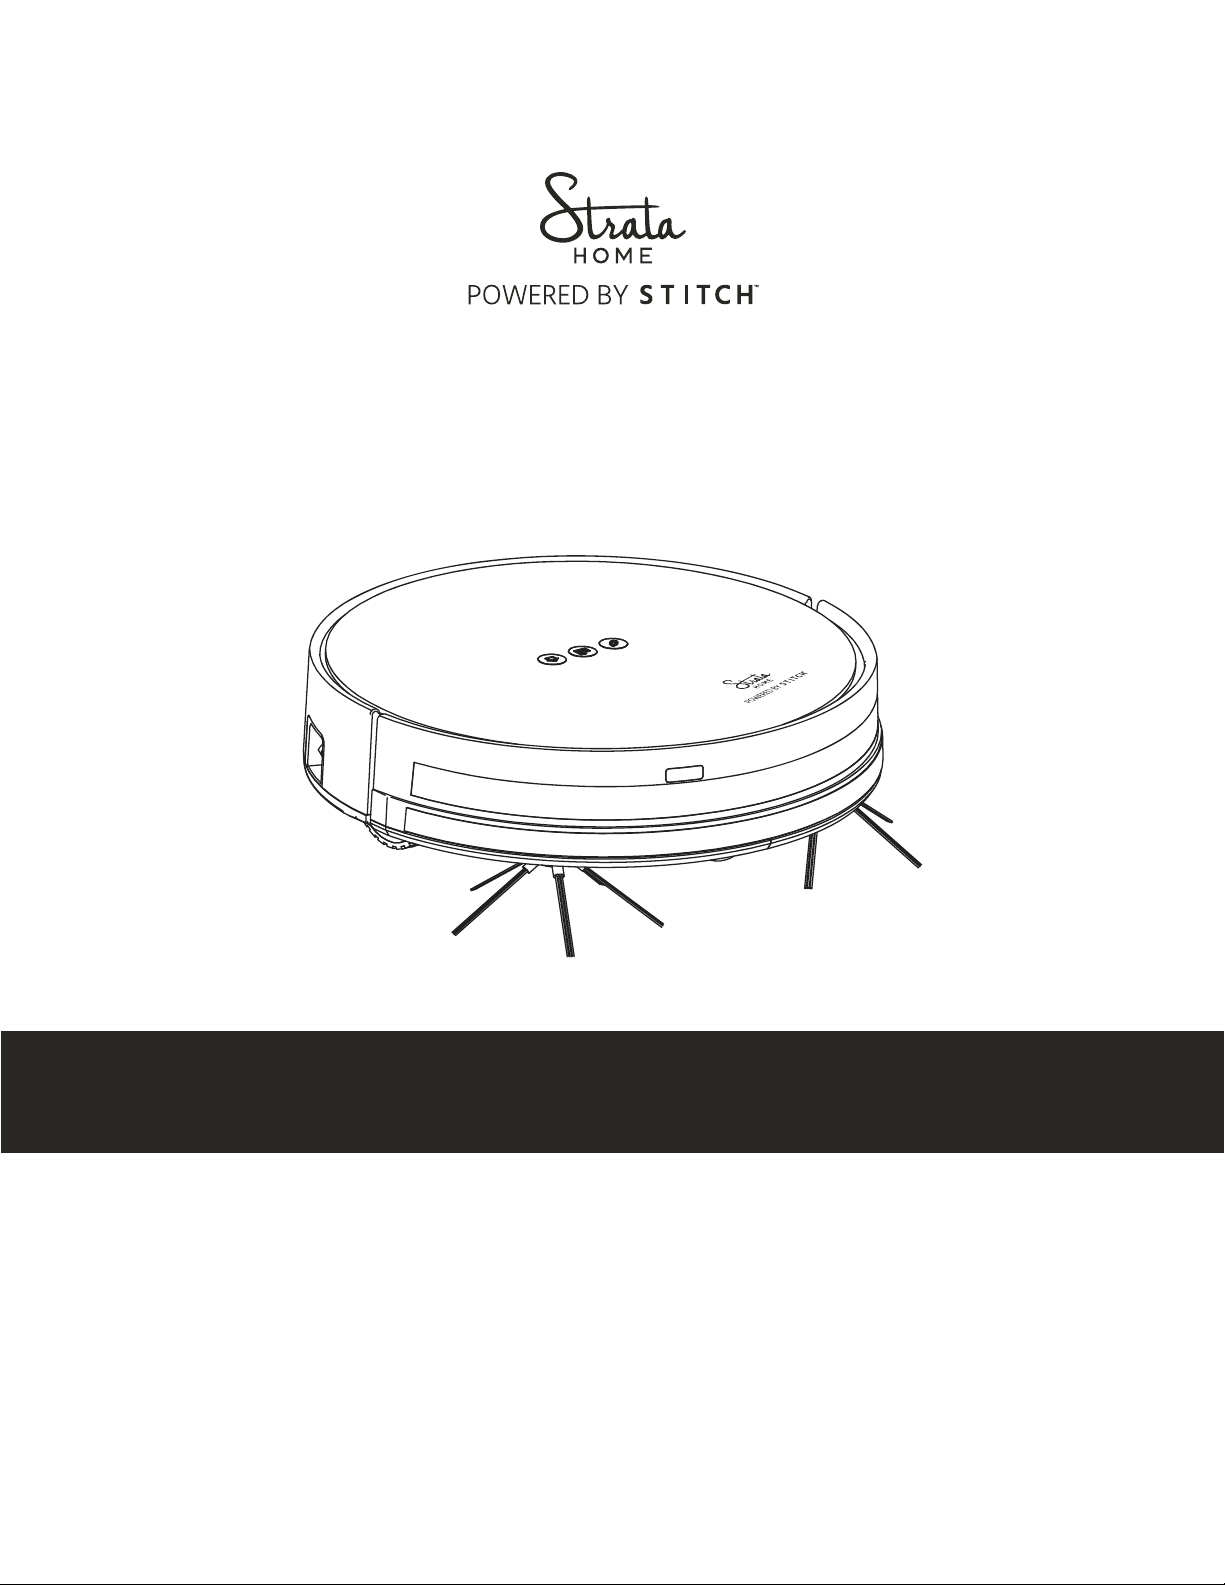
Wireless Smart
ROBOT VACCUUM
P/N 35513 (BLACK)/P/N 35514 (BLUE)
User’s Manual
Page 2

CONTENTS
SAFETY WARNINGS AND GUIDELINES ....................................................................................................................................... 4
INTRODUCTION ................................................................................................................................................................................................ 5
FEATURES .............................................................................................................................................................................................................. 5
CUSTOMER SERVICE .................................................................................................................................................................................... 6
PACKAGE CONTENTS ................................................................................................................................................................................. 6
APPLICATIONS .................................................................................................................................................................................................. 7
PRODUCT OVERVIEW ................................................................................................................................................................................. 7
Vacuum Top View ................................................................................................................................................................................... 7
LED Display .................................................................................................................................................................................................... 8
Control Buttons ......................................................................................................................................................................................... 8
Vacuum Bottom View ......................................................................................................................................................................... 8
Vacuum Rear View ................................................................................................................................................................................. 9
Water Tank Side/Top View ............................................................................................................................................................. 9
Water Tank Bottom View ................................................................................................................................................................. 9
Dust Box without Water Tank .................................................................................................................................................... 10
Charging Dock .......................................................................................................................................................................................... 10
Remote Control ........................................................................................................................................................................................ 11
Magnetic Strip ........................................................................................................................................................................................... 11
CHARGING .......................................................................................................................................................................................................... 12
Manual Charging .................................................................................................................................................................................... 12
Automatic Charging ............................................................................................................................................................................ 13
SETTING THE TIME ....................................................................................................................................................................................... 14
SCHEDULING .................................................................................................................................................................................................... 14
Time Mode ................................................................................................................................................................................................... 14
Full Go Mode ............................................................................................................................................................................................. 15
2
Page 3

BASIC OPERATING MODES ................................................................................................................................................................. 15
CLEANING MODES ...................................................................................................................................................................................... 16
Auto Cleaning Mode ........................................................................................................................................................................... 16
Spot Cleaning Mode ........................................................................................................................................................................... 16
Edge Cleaning Mode .......................................................................................................................................................................... 17
EXCHANGING THE DUST BOX AND WATER TANK ......................................................................................................... 17
MAINTENANCE ............................................................................................................................................................................................... 18
Side Brushes ............................................................................................................................................................................................... 18
Mopping Cloth ......................................................................................................................................................................................... 19
Main Brush ................................................................................................................................................................................................... 19
Dust Box ........................................................................................................................................................................................................ 20
Sensors and Charging Poles ......................................................................................................................................................... 21
APP INSTALLATION AND LOGIN ................................................................................................................................................... 22
ADD A DEVICE ............................................................................................................................................................................................... 23
APP FEATURES ............................................................................................................................................................................................... 25
LINK DEVICES TO AMAZON ALEXA ............................................................................................................................................ 26
TROUBLESHOOTING ................................................................................................................................................................................. 29
TECHNICAL SUPPORT .............................................................................................................................................................................. 29
SPECIFICATIONS ........................................................................................................................................................................................... 30
REGULATORY COMPLIANCE .............................................................................................................................................................. 31
Notice for FCC .......................................................................................................................................................................................... 31
RF Exposure Statement for FCC .............................................................................................................................................. 32
Notice for Industry Canada .......................................................................................................................................................... 32
RF Exposure Statement for Industry Canada .............................................................................................................. 32
3
Page 4

SAFETY WARNINGS AND GUIDELINES
Please read this entire manual before using this device, paying extra attention to these
safety warnings and guidelines. Please keep this manual in a safe place for future reference.
This device is intended for indoor use only.
Do not use this device in a wet or moist environment, such as a bathroom or
laundry.
Do not touch the device, the power cord, or any other connected cables with wet
hands.
Do not expose this device to excessively high temperatures. Do not place it in, on,
or near heat sources, such as a fireplace, stove, radiator, etc. Do not leave it in direct
sunlight.
Do not use this vacuum in proximity to curtains, cords, loose cables, fragile objects,
papers, loose debris, or anything that could get easily knocked over.
Do not use this vacuum around cigarette ends, lighters, matches, volatile liquids
such as gasoline, or any other flammable materials.
If the vacuum needs to be cleaned, it should be fully charged beforehand.
Do not sit on the vacuum or allow pets or children to sit on it. Take care when using
this around children or pets. Do not use in a baby room.
Do not use this product where it can easily fall, such as on tables, chairs, or next to
stairs.
Turn off the vacuum when transporting it or when it will not be used for a long
time.
Empty and clean the dust box and filters after each use.
Remove the batteries from the remote if it will be unused for a long time.
Fully charge the battery before first use and at least once every three months.
This device contains a rechargeable battery. Dispose of the device or battery only in
accordance with local, state, or federal regulations for electronic waste.
Do not allow small children to use or play with this vacuum.
4
Page 5

INTRODUCTION
Thank you for purchasing this Wireless Smart Robotic Vacuum! This vacuum provides a 2-
in-1 dry sweeping and wet mopping cleaning system for carpets and hard floors. It features
three cleaning modes and two scheduling modes. This wireless vacuum is compatible with
the STITCH™ by Monoprice mobile app, which allows for 24/7 remote monitoring and
control using your Android™ or iOS® smartphone or tablet from anywhere, at any time. The
vacuum and STITCH app communicate over your local wireless network, so you won't need
any separate mesh networks, hubs, or controllers. With the STITCH app, you can easily
create a schedule to simplify your cleaning routine and let the vacuum automatically clean
and remove dust, pollen, pet fur, and allergens from your home. The free app also provides
an all-in-one experience connecting all STITCH devices for a smarter connected home,
saving you money, energy, and time. You can also link to Amazon Alexa™ or Google™
Home for a hands-free, voice-controlled experience.
FEATURES
Dry sweeping and wet mopping options with interchangeable dust box and water
tank
Three cleaning modes and two scheduling modes
Automatically returns to charging station after cleaning to fully charge battery
Built-in anti-drop sensor to prevent falling
Invisible wall magnetic tape included to prevent vacuum from going into rooms
that are off-limits
Create a schedule or set a timer to turn your vacuum on or off at particular times of
the day
Provides simple 24/7 remote monitoring and remote navigational control using the
free STITCH™ by Monoprice app
Supports scene control and works with other STITCH by Monoprice "smart" devices
(sold separately)
5
Page 6
CUSTOMER SERVICE
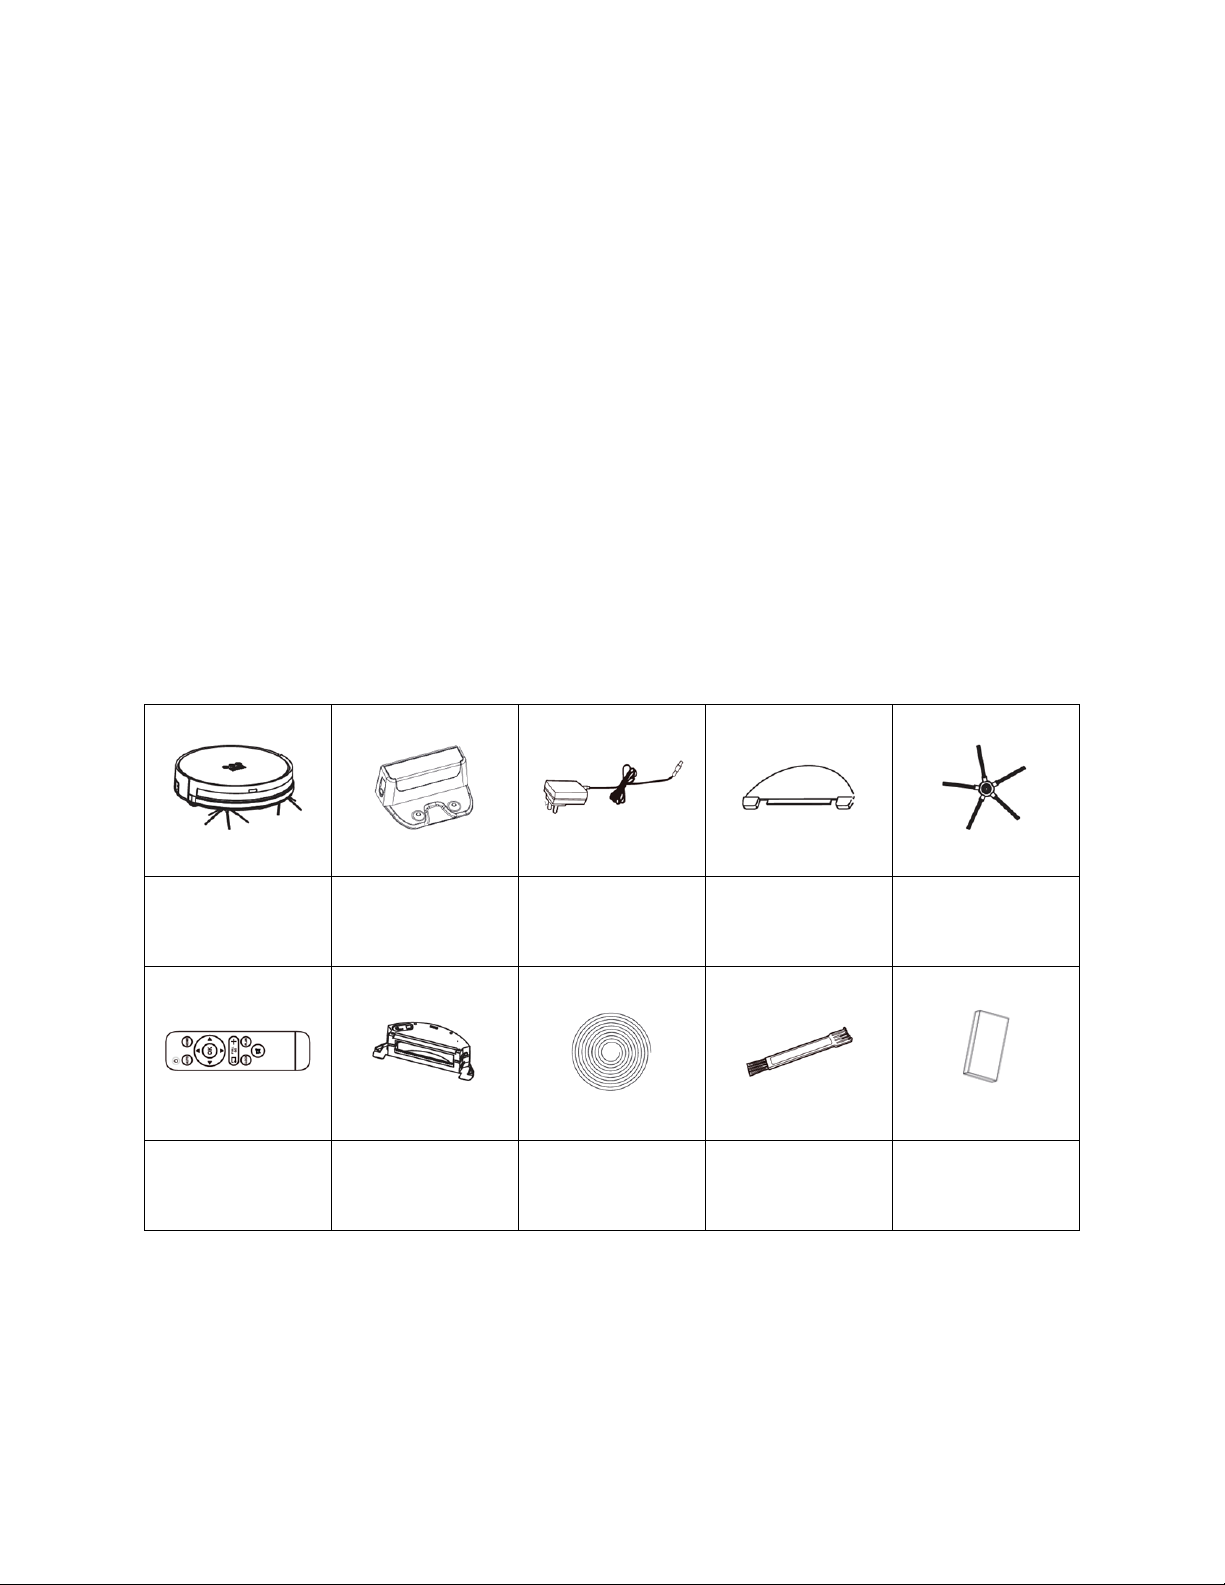
1x Smart
Vacuum
1x Charging
Station
1x AC Power
Adapter
2x Mopping
Cloths
2x Side Brushes
1x Remote
Control
1x Water Tank
1x Magnetic
Tape
1x Cleaning
Brush
1x User's
Manual
The Monoprice Customer Service department is dedicated to ensuring that your ordering,
purchasing, and delivery experience is second to none. If you have any problem with your
order, please give us an opportunity to make it right. You can contact a Monoprice
Customer Service representative through the Live Chat link on our website
www.monoprice.com or via email at [email protected]. Check the website for
support times and links.
PACKAGE CONTENTS
Please take an inventory of the package contents to ensure you have all the items listed
below. If anything is missing or damaged, please contact Monoprice Customer Service for a
replacement.
6
Page 7
APPLICATIONS
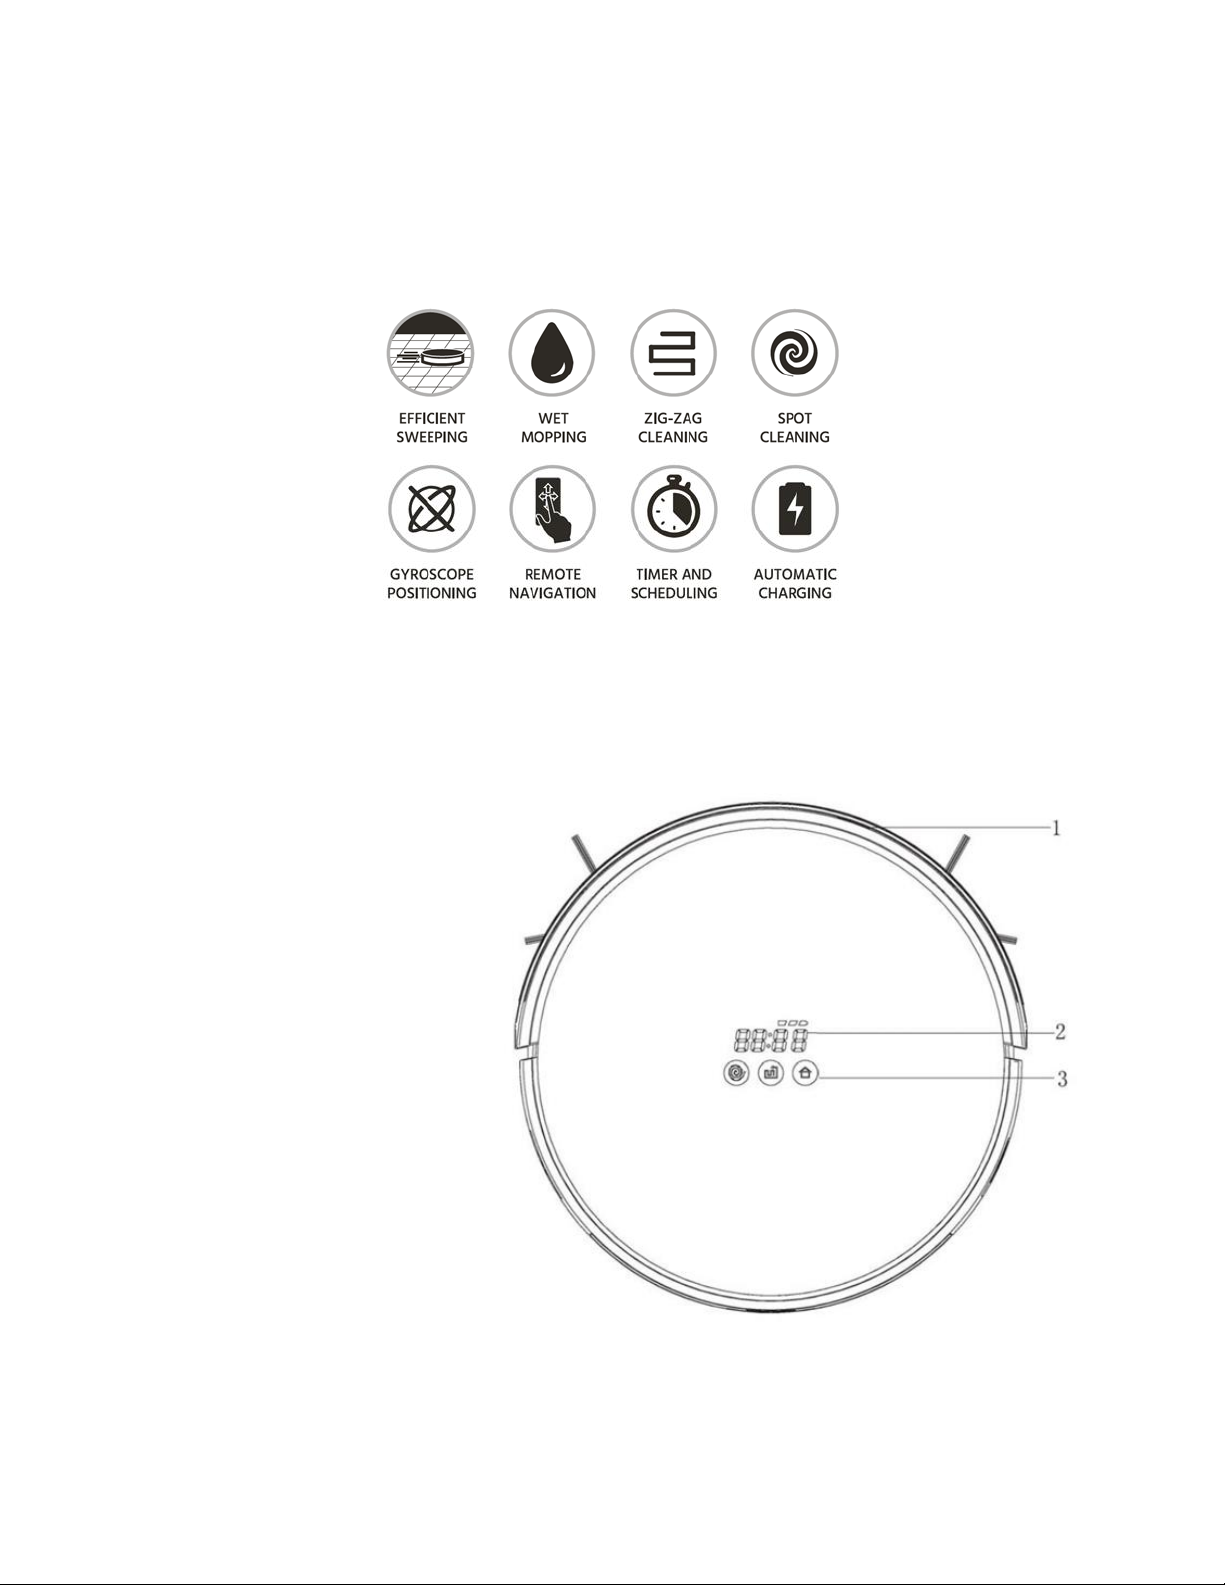
This Smart Vacuum features three cleaning patterns, two scheduling modes, and can be
configured for dry sweeping or wet mopping.
PRODUCT OVERVIEW
Vacuum Top View
1. Bumper
2. LED Display
3. Control Buttons
7
Page 8
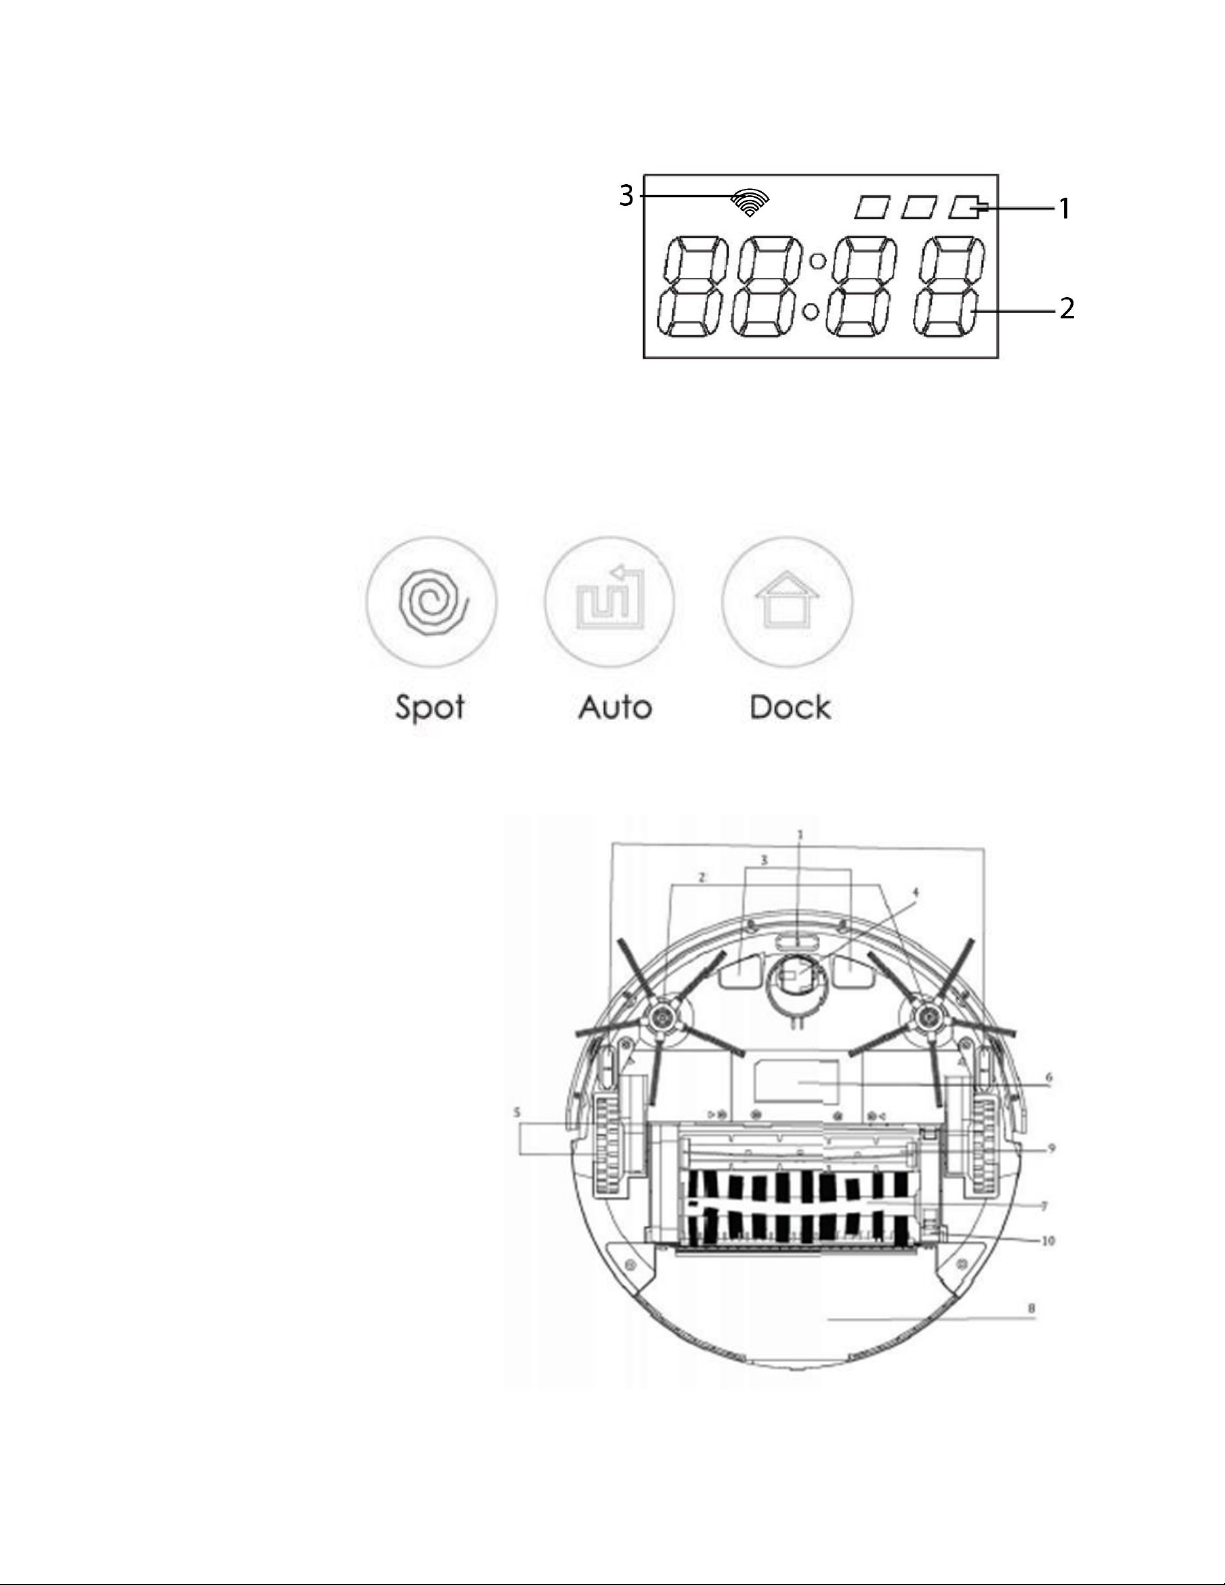
LED Display
1. Battery/Charging Status Indicator
2. Mode/Time Display
3. Wi-Fi Indicator
Control Buttons
Vacuum Bottom View
1. Anti-Drop Sensors
2. Side Brushes
3. Charging Poles
4. Universal Wheel
5. Drive Wheels
6. Battery Box Cover
7. Cleaning Brush
8. Dust Box/Water Tank
9. Roller Brush
10. Brush Guard Release
8
Page 9
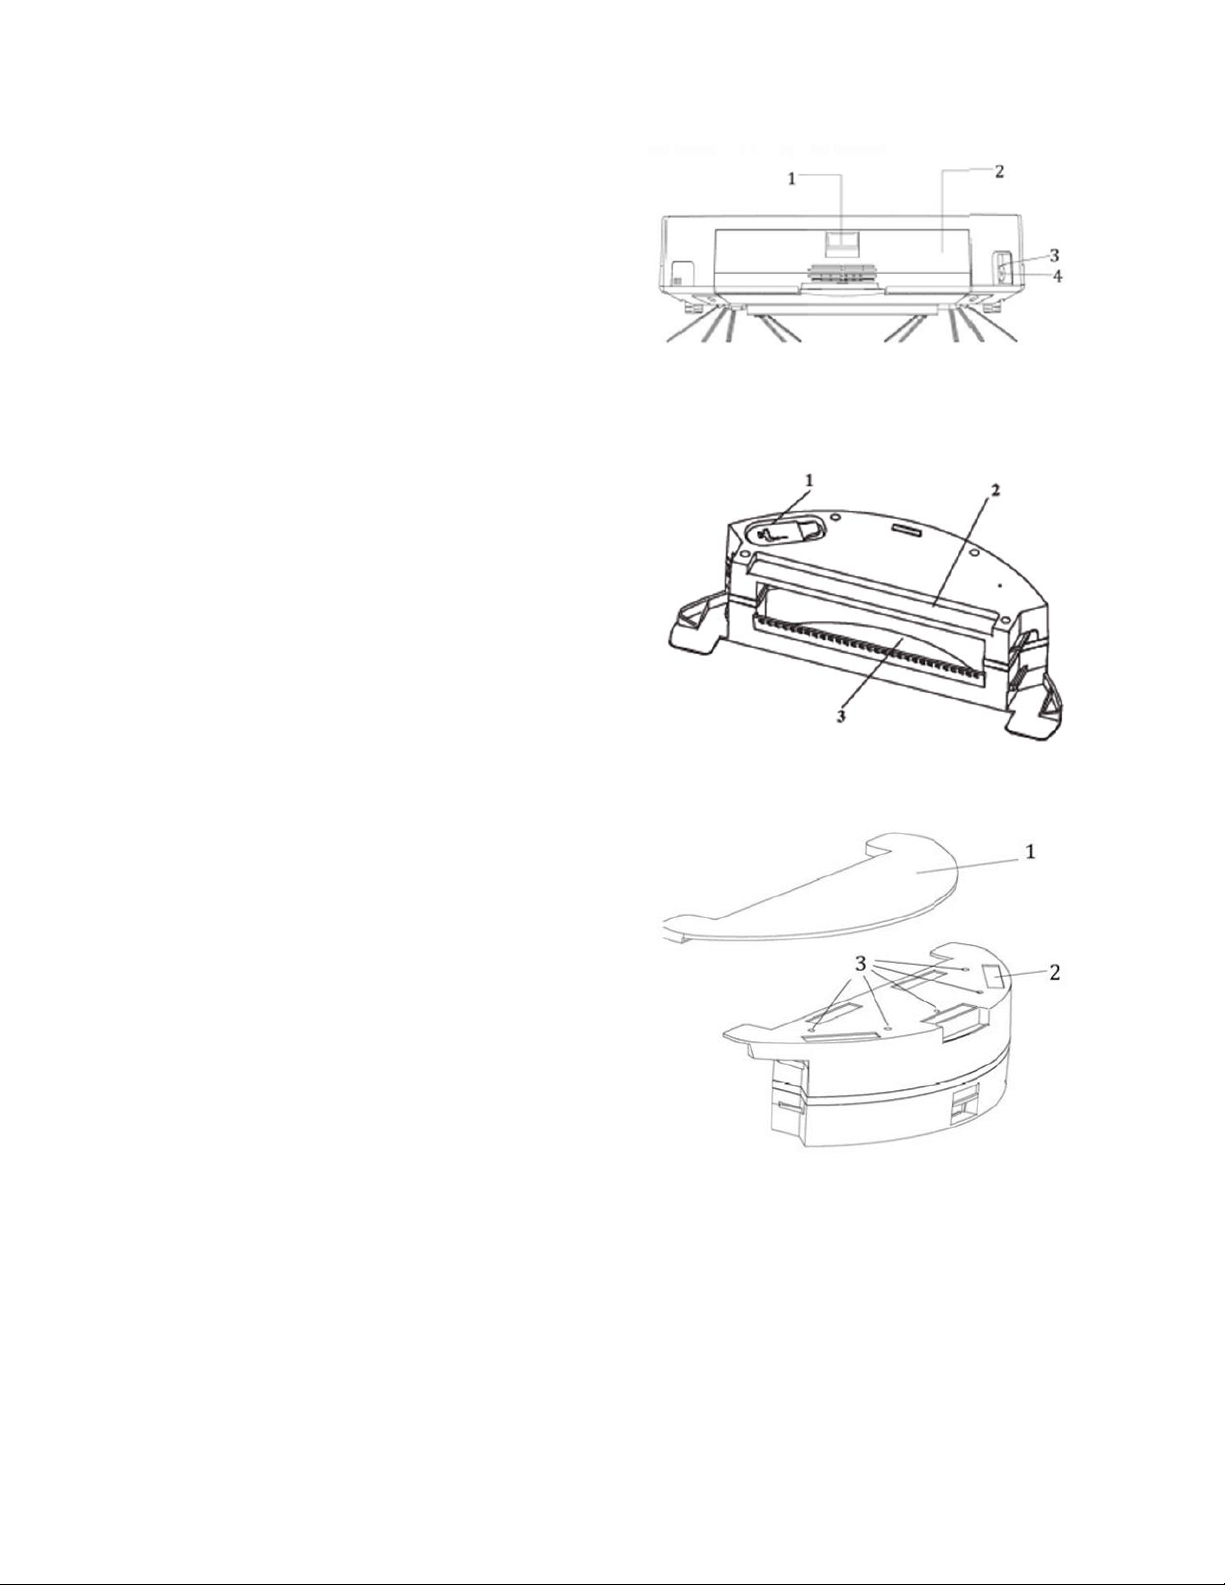
Vacuum Rear View
1. Dust Box/Water Tank Release Button
2. Dust Box/Water Tank
3. Power Switch
4. DC Charging Connector
Water Tank Side/Top View
1. Water Filling Hole
2. Water Tank
3. Dust Box Inlet
Water Tank Bottom View
1. Mopping Cloth
2. Hook and Loop Fasteners
3. Water Outlets
9
Page 10
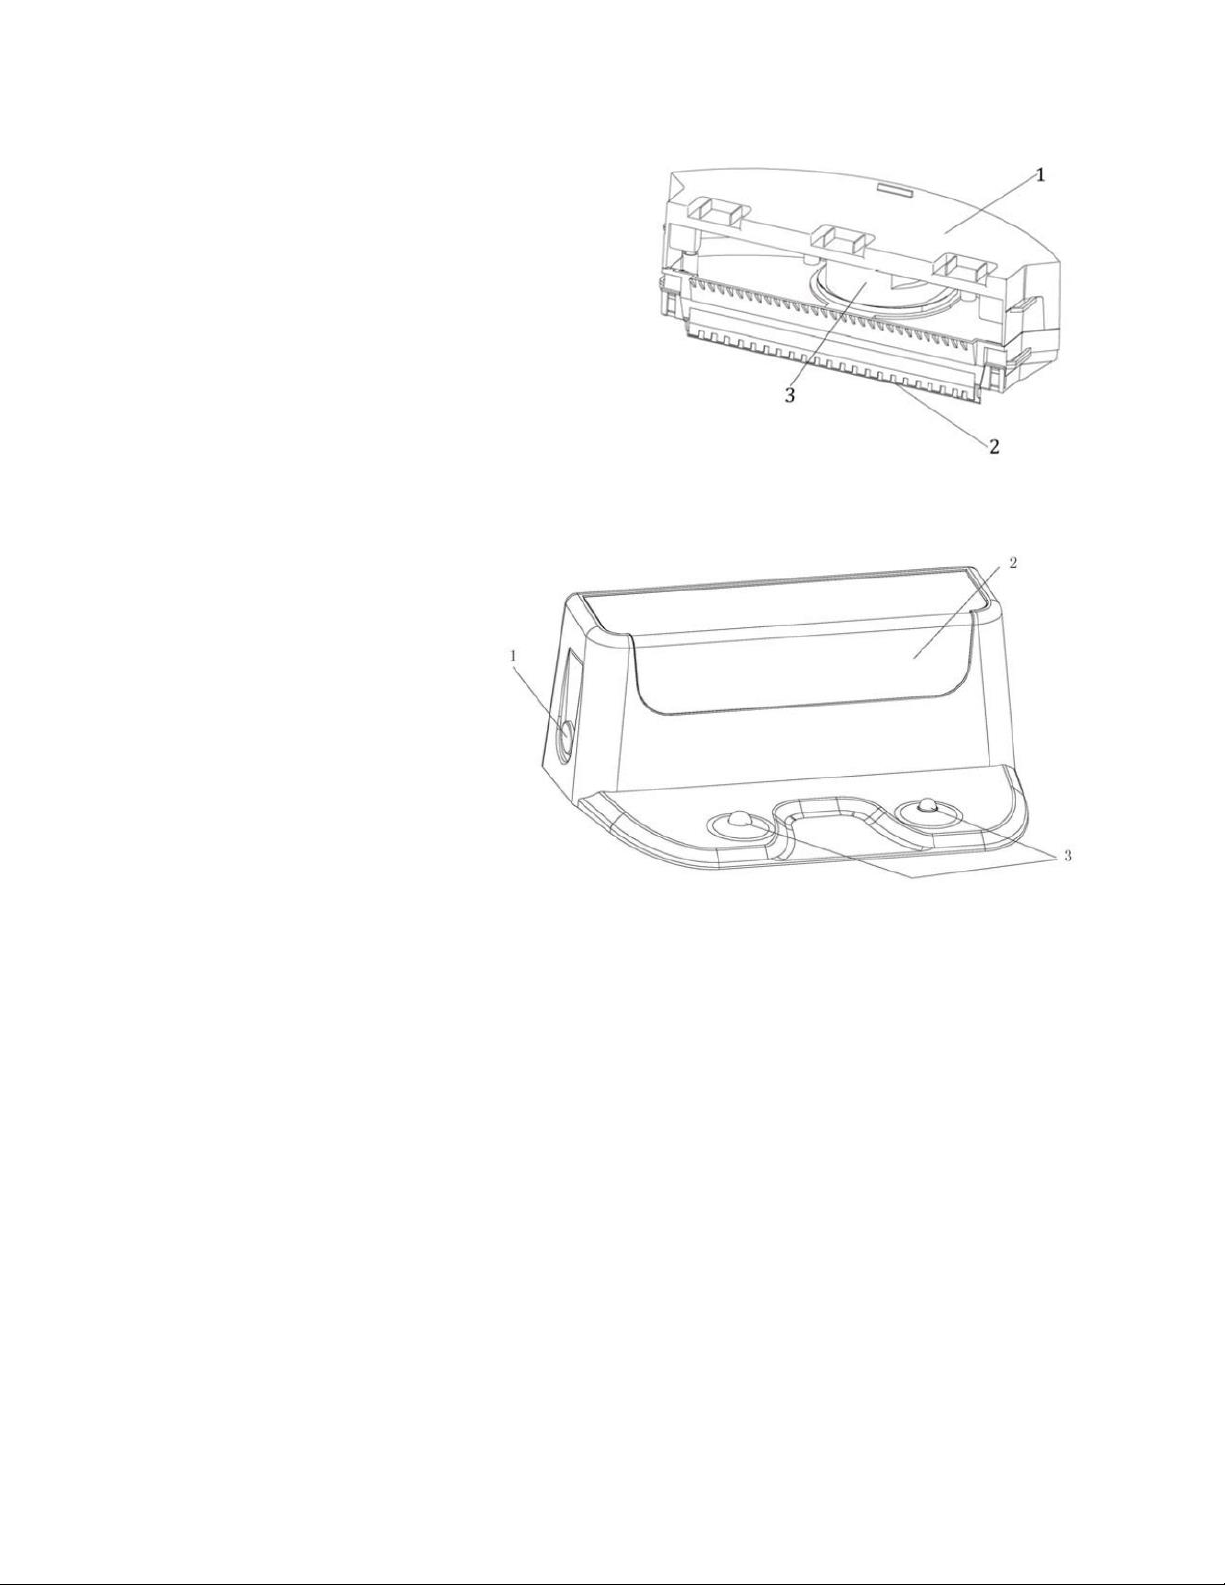
Dust Box without Water Tank
1. Dust Box
2. Vacuum Inlet
3. Dust Vacuuming Motor
Charging Dock
1. DC Charging Connector
2. Signal Receiving Window
3. Charging Poles
10
Page 11
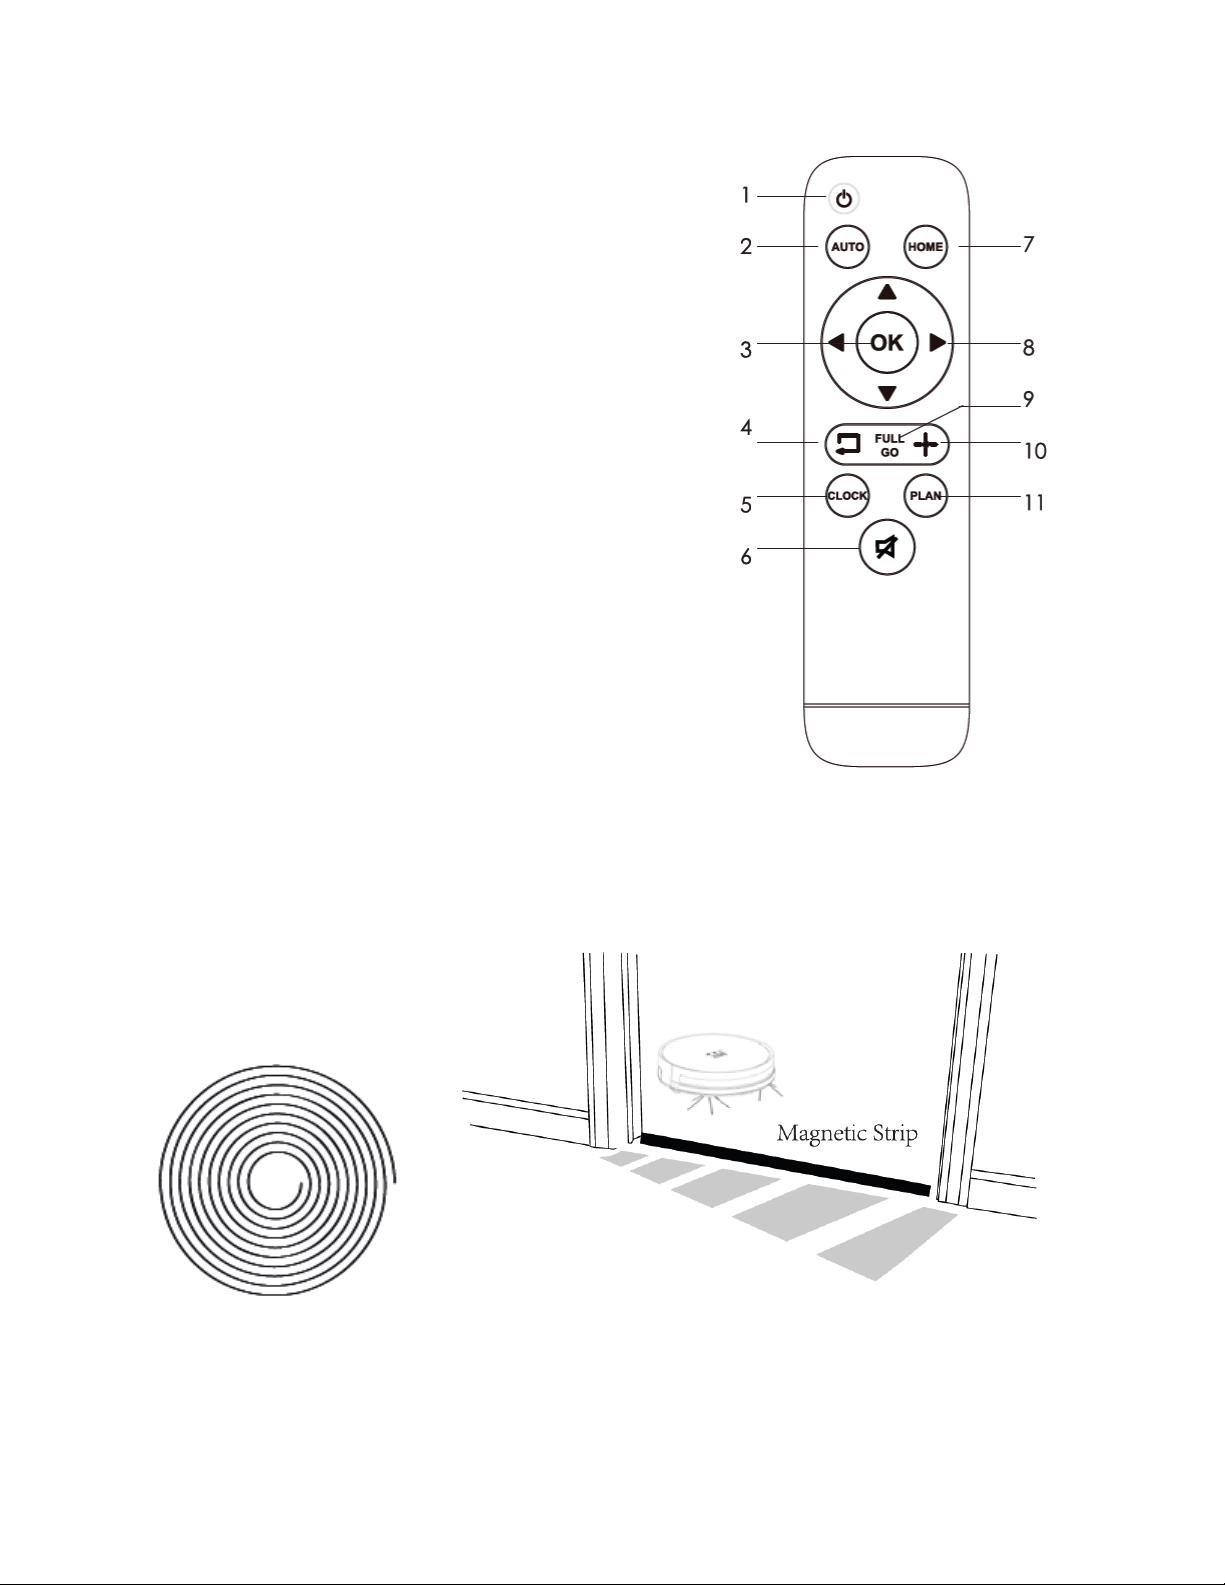
Remote Control
1. Power Button
2. Auto Cleaning Button
3. OK Button
4. Edge Cleaning Button
5. Set Time Button
6. Voice Muting On/Off Button
7. Home Button
8. Directional Buttons
9. Full Go Scheduling Button
10. Spot Cleaning Button
11. Set Schedule Button
Magnetic Strip
Place the included Magnetic Strip across a doorway or any other area that you don't want
the vacuum to access. The vacuum will treat the Magnetic Strip as a wall or other obstacle.
11
Page 12
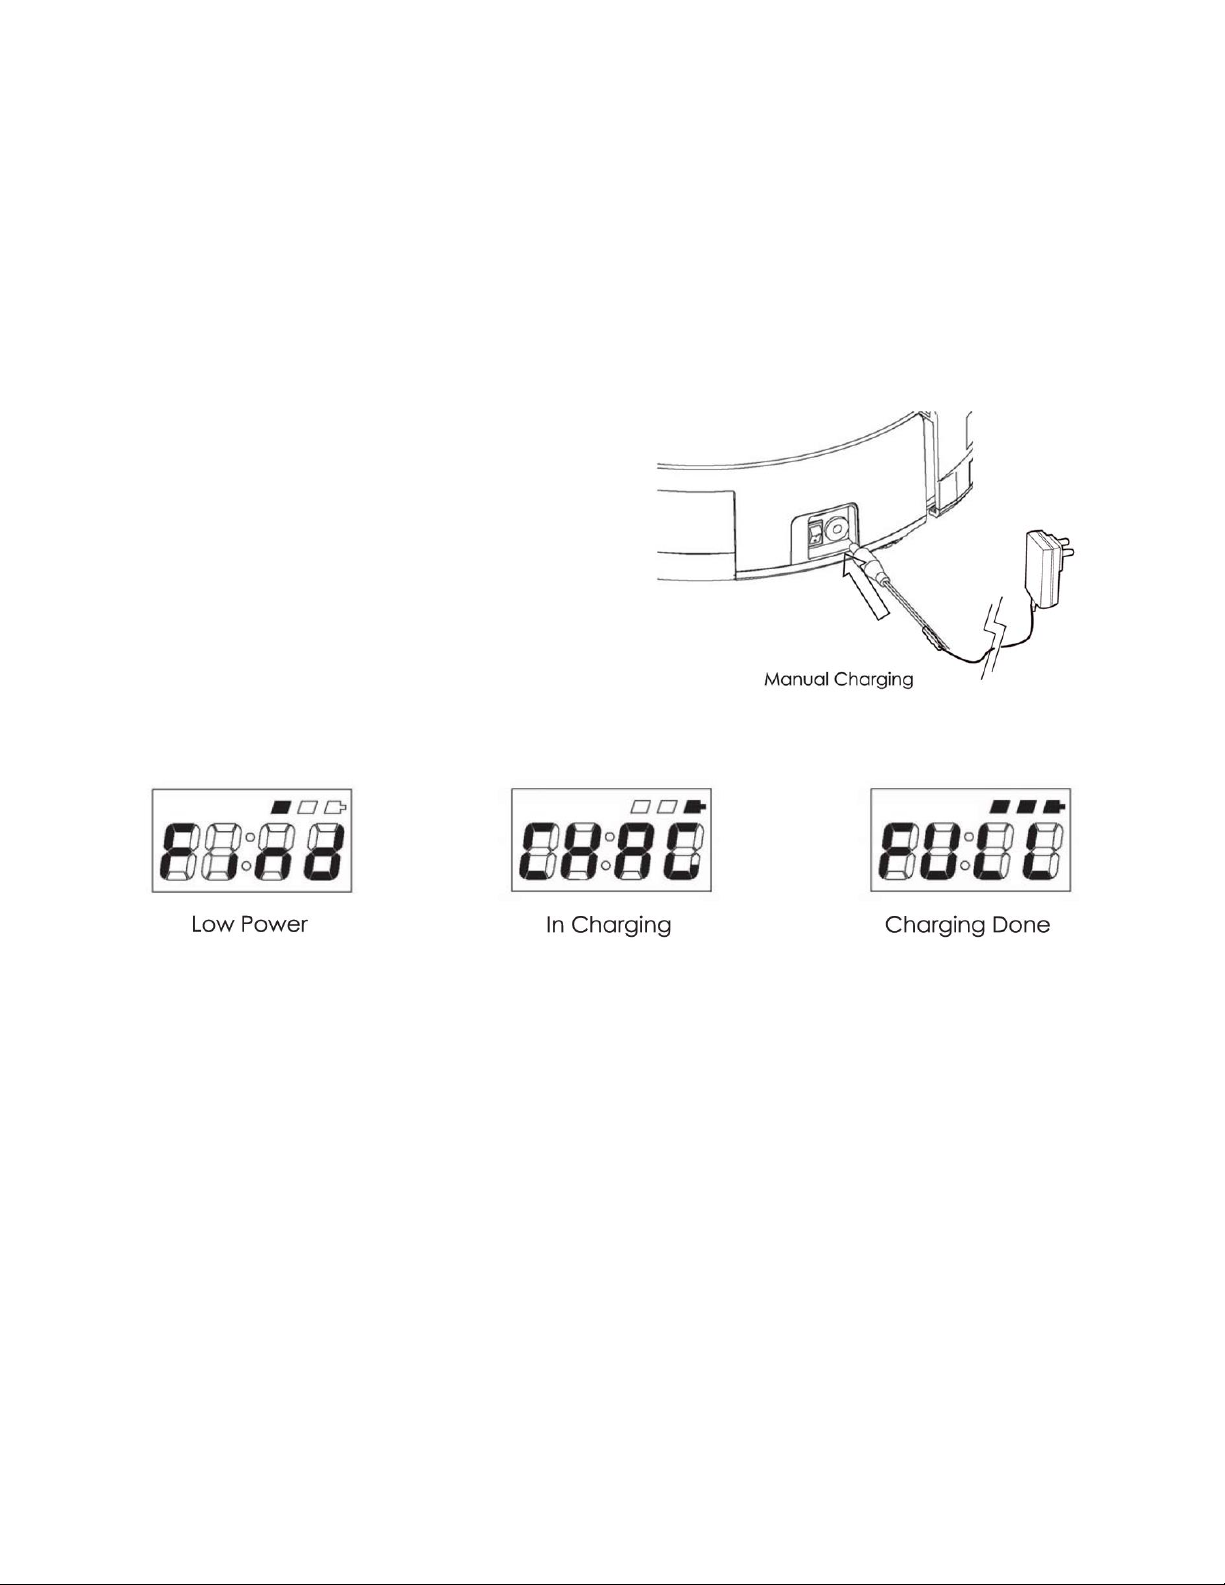
CHARGING
Manual Charging
The vacuum can be manually charged using the included AC power adapter. Perform the
following steps to manually charge the vacuum.
1. Flip the Power Switch on the vacuum to the OFF position.
2. Plug the DC barrel connector on the
included AC power adapter into the DC
Charging Connector on the vacuum,
then plug the adapter into a nearby AC
power outlet. The Charging/Power
Status Indicator will begin flashing.
3. When charging is complete, the
Charging/Power Status Indicator will
cease flashing.
Notes:
Manually charge the built-in battery for at least 6 hours prior to first use.
Charge the battery whenever the LED Display indicates Low Power status, as shown
in the image above.
During normal operation, the vacuum will automatically return to the Charging Dock
whenever it is finished with a cleaning task and whenever the battery is low.
If the vacuum will not be used for more than 3 months, flip the Power Switch to the
OFF position, charge the battery for at least 12 hours, then store it in a cool, dry
place.
12
Page 13
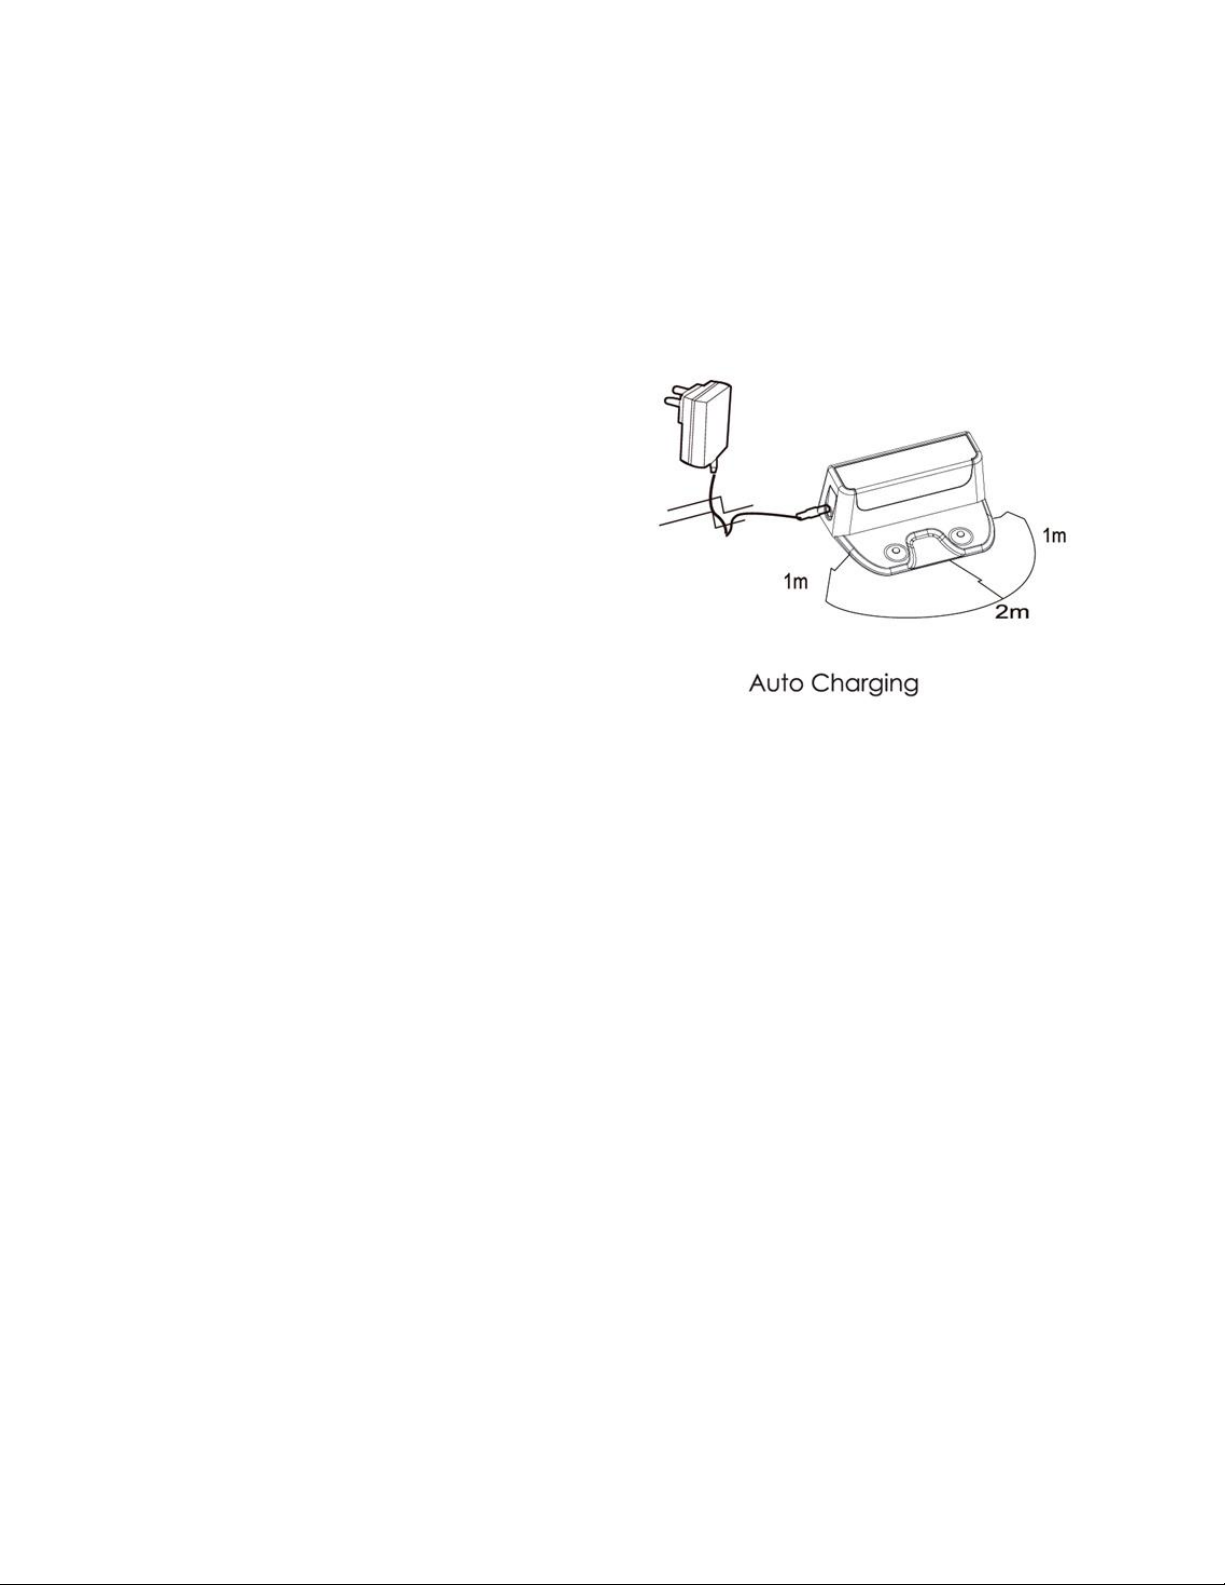
Automatic Charging
During normal operation, the vacuum will charge itself automatically using the Charging
Dock. Perform the following steps to setup the vacuum for automatic charging. Note that
the vacuum should be manually charged for at least six hours before setting it up for
automatic charging.
1. Place the charging station on the floor
against a wall with a nearby AC power
outlet. The Charging Dock should be at
least 1 meter from any wall or obstacle
on each side and have 2 meters
clearance at the front.
2. Plug the DC barrel connector on the
included AC power adapter into the DC
Charging Connector on the Charging
Dock, then plug the adapter into a nearby AC power outlet. The power indicator on
the dock will illuminate.
3. Flip the Power Switch on the vacuum to the ON position.
4. Place the vacuum on the floor near the Charging Dock, then press the Dock button
on the vacuum or the Home button on the remote control to cause it to dock itself
and begin charging. The Charging/Power Status Indicator on the vacuum will begin
flashing.
5. When charging is complete, the Charging/Power Status Indicator will cease flashing.
13
Page 14

SETTING THE TIME
Prior to scheduling a cleaning task, you must set the current time on the vacuum. Perform
the following steps to set the time.
1. Ensure that the vacuum is powered ON and not actively charging or cleaning.
2. Aim the Remote Control towards the vacuum's LED Display, then press the Set Time
Button (CLOCK). The left two digits on the vacuum's LED Display will begin flashing.
3. Use the Up and Down Directional Buttons to set the current hour.
4. Press the OK Button. The left two digits on the LED Display will cease flashing and
the right two digits will begin flashing.
5. Use the Up and Down Directional Buttons to set the current minute.
6. Press the OK Button. The LED Display will cease flashing and will display the current
time.
Note that if the battery is removed, the current time and any scheduled time will be reset.
SCHEDULING
Time Mode
After setting the current time on the vacuum, you can schedule a specific time for it to
automatically clean the floor. Perform the following steps to schedule a cleaning operation.
1. Ensure that the vacuum is powered ON and not actively charging or cleaning.
2. Aim the Remote Control towards the vacuum's LED Display, then press the Set
Schedule Button (PLAN). The left two digits on the vacuum's LED Display will begin
flashing.
3. Use the Up and Down Directional Buttons to set the scheduled hour.
4. Press the OK Button. The left two digits on the LED Display will cease flashing and
the right two digits will begin flashing.
5. Use the Up and Down Directional Buttons to set the scheduled minute.
14
Page 15

6. Press the OK Button. The LED Display will cease flashing and will display the current
Mode
Status
Cleaning
The vacuum is cleaning and the LED Display is ON
Standby
The Power Switch is ON and the LED Display is ON
Sleeping
The Power Switch is ON and the LED Display is OFF
time. Once the scheduled time is reached, the vacuum will begin cleaning in Auto
Mode.
Notes:
To cancel the scheduled cleaning time, set the scheduled time to 00:00.
If the battery is removed, the current time and scheduled time will be reset.
Full Go Mode
Instead of scheduling cleaning at a specific time, Full Go Scheduling Mode tells the vacuum
to start cleaning as soon as it is fully charged. With the vacuum powered ON, whether it is
cleaning or charging, press the Full Go Button on the remote control. The vacuum will
return to the charging dock if it is cleaning, then will start charging. When charging is
complete, the vacuum will automatically clean the floor.
BASIC OPERATING MODES
The vacuum can be in one of three basic operating modes, Cleaning, Standby, or Sleeping.
The LED Display will be ON or OFF, depending on the status.
15
Page 16
CLEANING MODES
The vacuum features three different cleaning modes: Auto, Spot, and Edge. The vacuum
uses inertial navigation and an advanced navigation algorithm to calculate the best path to
efficiently clean the room.
Auto Cleaning Mode
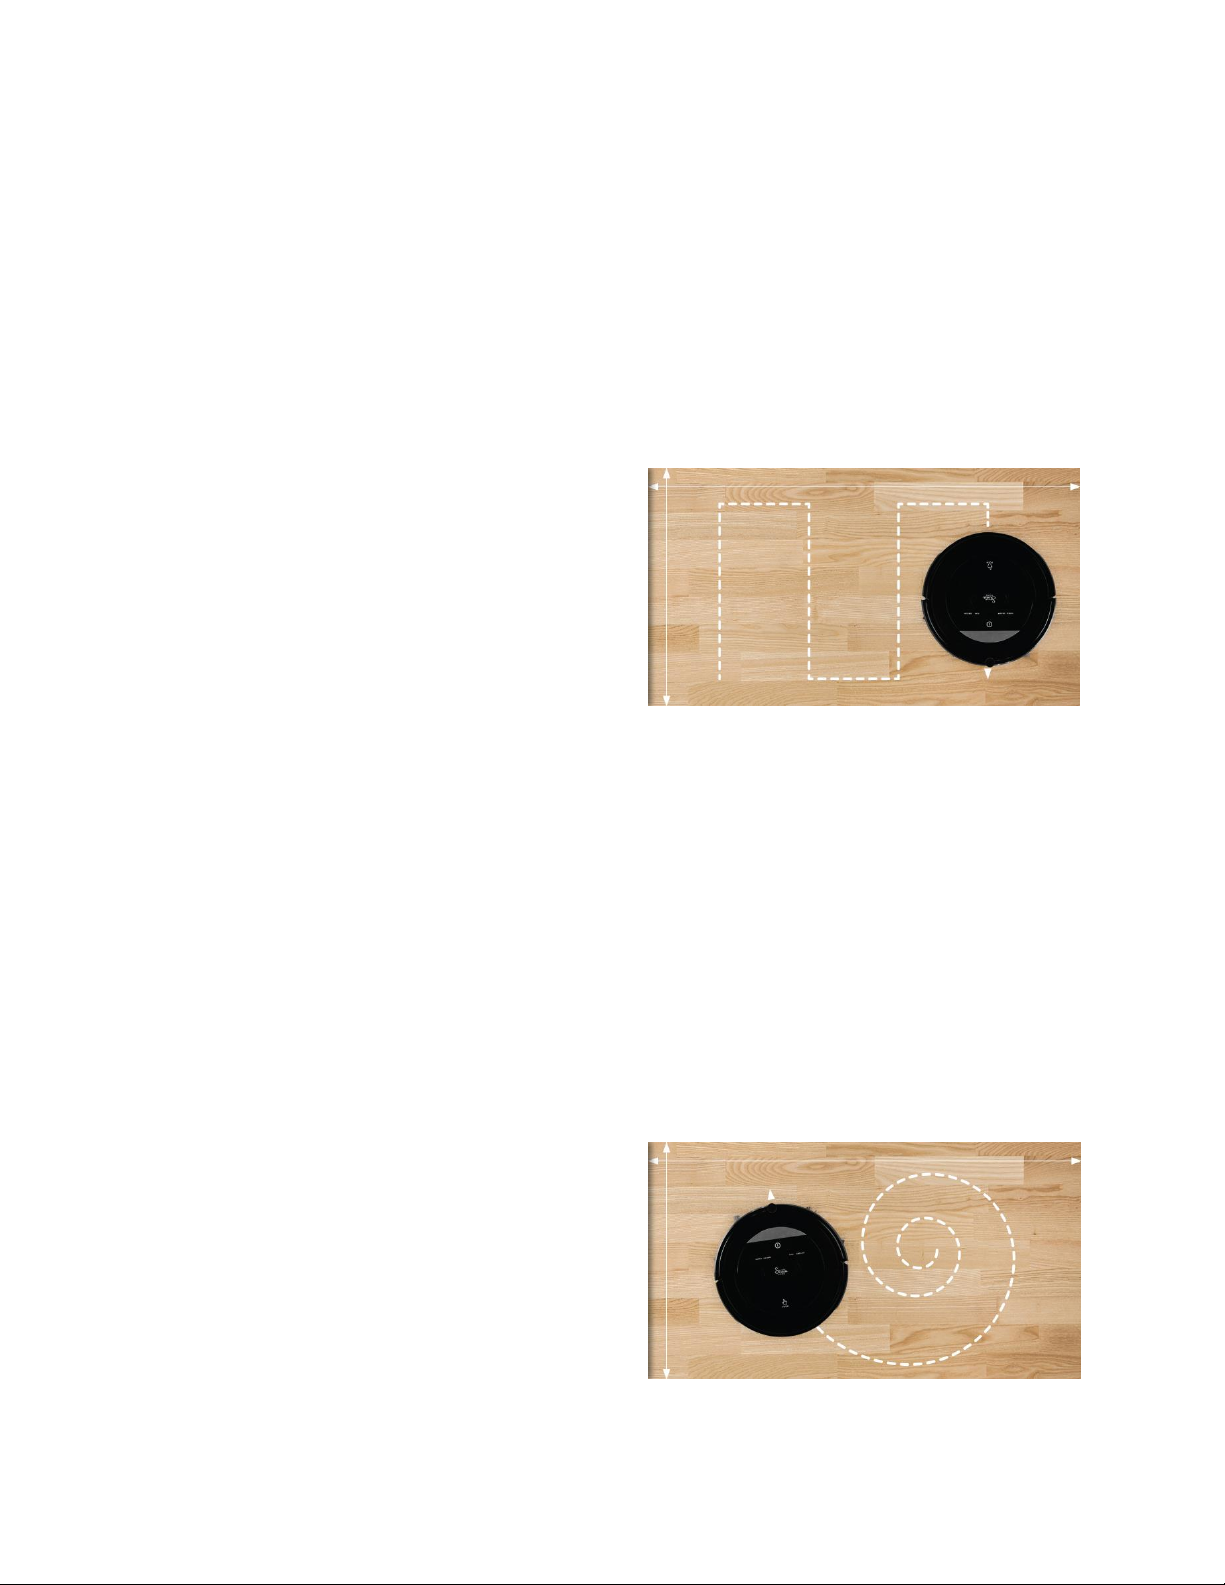
The Auto Cleaning Mode is the default. In Auto
mode, the vacuum typically follows a zig-zag
path to cover the floor.
When the vacuum encounters a particularly
dirty area of the floor, it will automatically
enter Spot Cleaning Mode, then will return to
the normal cleaning path when it is done with
the Spot cleaning.
When the vacuum encounters an obstacle, such as a wall, it will automatically enter Edge
Cleaning Mode. It will stay in Edge Cleaning Mode until either the Auto or Spot buttons are
pressed.
Note that while in Auto Cleaning Mode, you can use the Directional Buttons on the remote
control to direct the vacuum to a particular part of the floor or to navigate around
obstacles.
Spot Cleaning Mode
When the Spot Cleaning Mode is automatically
entered from Auto mode or when the Spot
button is pressed, the vacuum will start
spiraling out from a central point to intensively
clean that portion of the floor. Once Spot
cleaning is completed, the vacuum will
automatically return to Auto Cleaning Mode.
16
Page 17
Edge Cleaning Mode
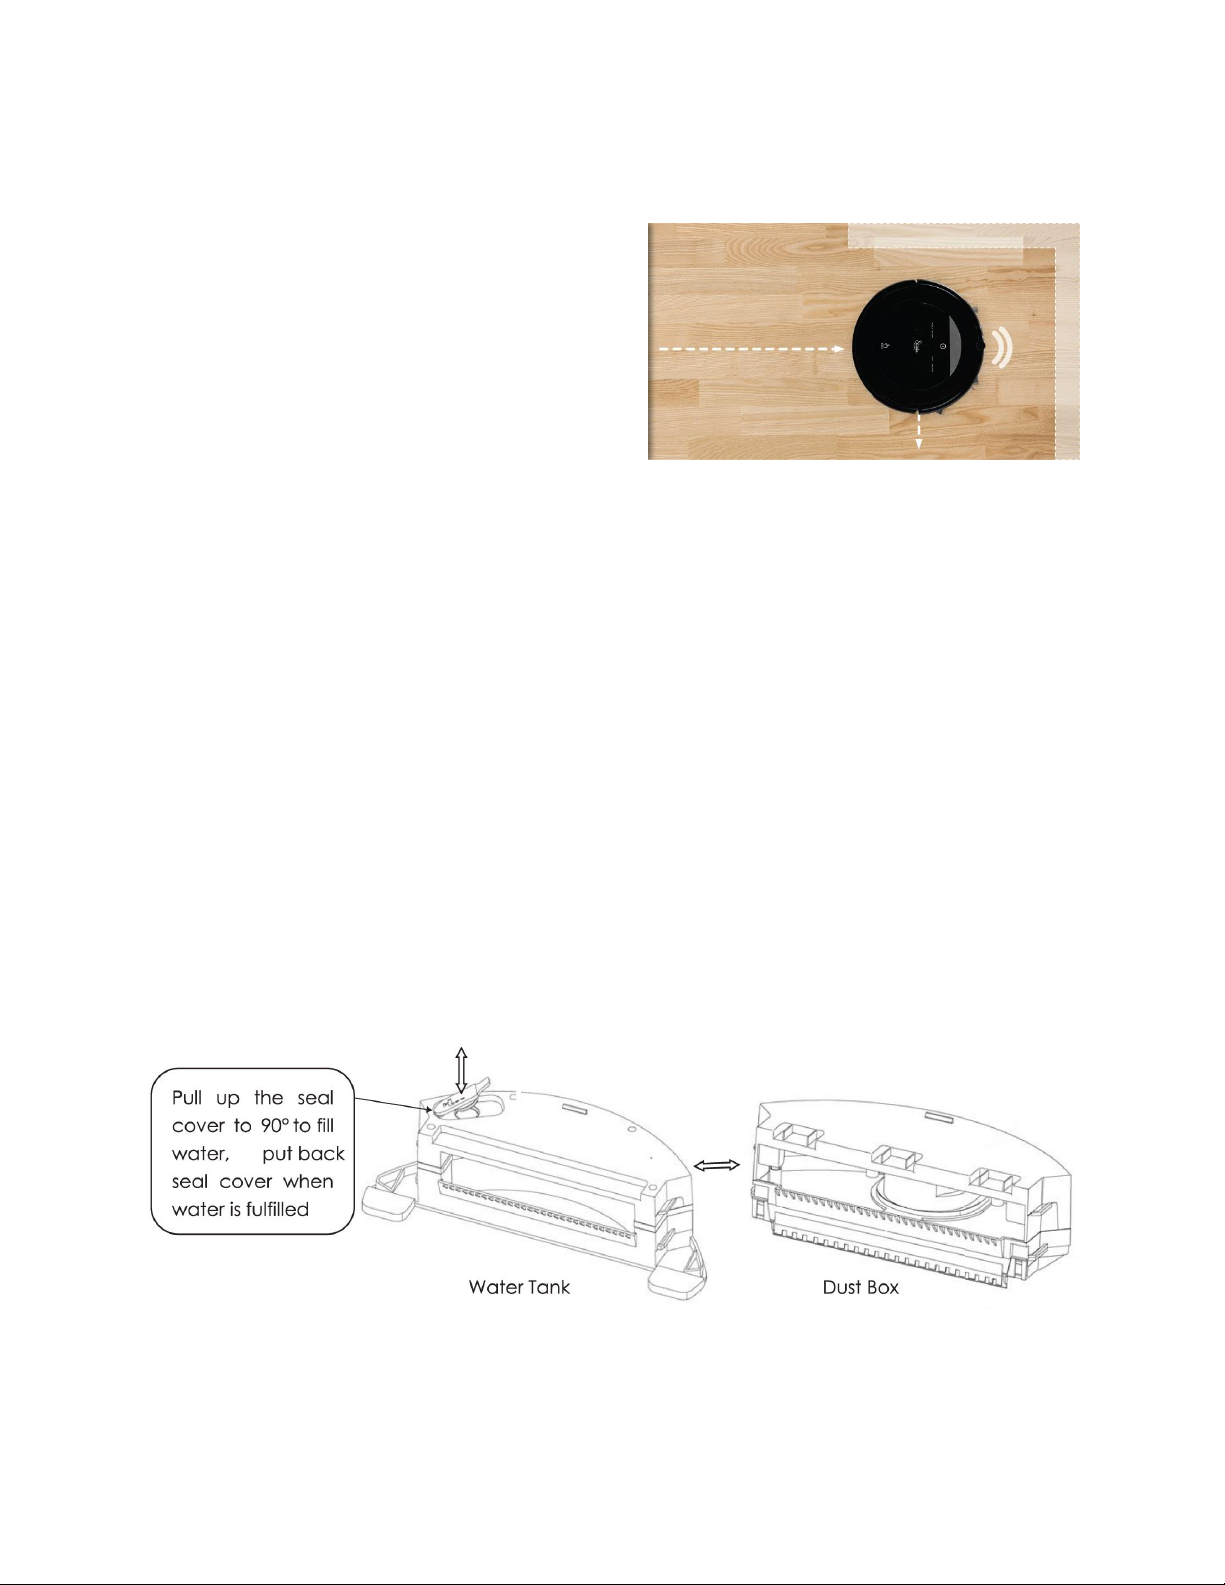
When the vacuum encounters an obstacle
during Auto cleaning, such as a wall, it will
automatically enter Edge Cleaning Mode. It will
return to Auto cleaning when it clears the
obstacle.
Alternatively, if the Edge Cleaning Button is
pressed, the vacuum will search for the nearest
wall or obstacle and will begin cleaning around the obstacles.
The vacuum will remain in Edge Cleaning Mode until either the Auto or Spot buttons are
pressed.
EXCHANGING THE DUST BOX AND WATER TANK
The vacuum includes both a Dust Box for dry sweeping and a Water Tank for wet mopping.
To change one for the other, press the Dust Box/Water Tank Release Button to release the
currently installed Box/Tank, then remove it and replace with the other.
To fill the Water Tank with water, pull the seal up, then fill the tank with water. Once the
tank is full, replace the seal.
Note that the Water Tank is washable and can be cleaned with soap and water. Never
clean the Dust Box with water. Clean the Dust Box using a soft, dry cloth only.
17
Page 18
MAINTENANCE
Side Brushes
The side brush can become dirty or deformed with regular use. Perform the following steps
to clean, reform, or replace the side brushes.
1. Flip the Power Switch on the vacuum to the OFF position.
2. Turn the vacuum over to access the side brushes.
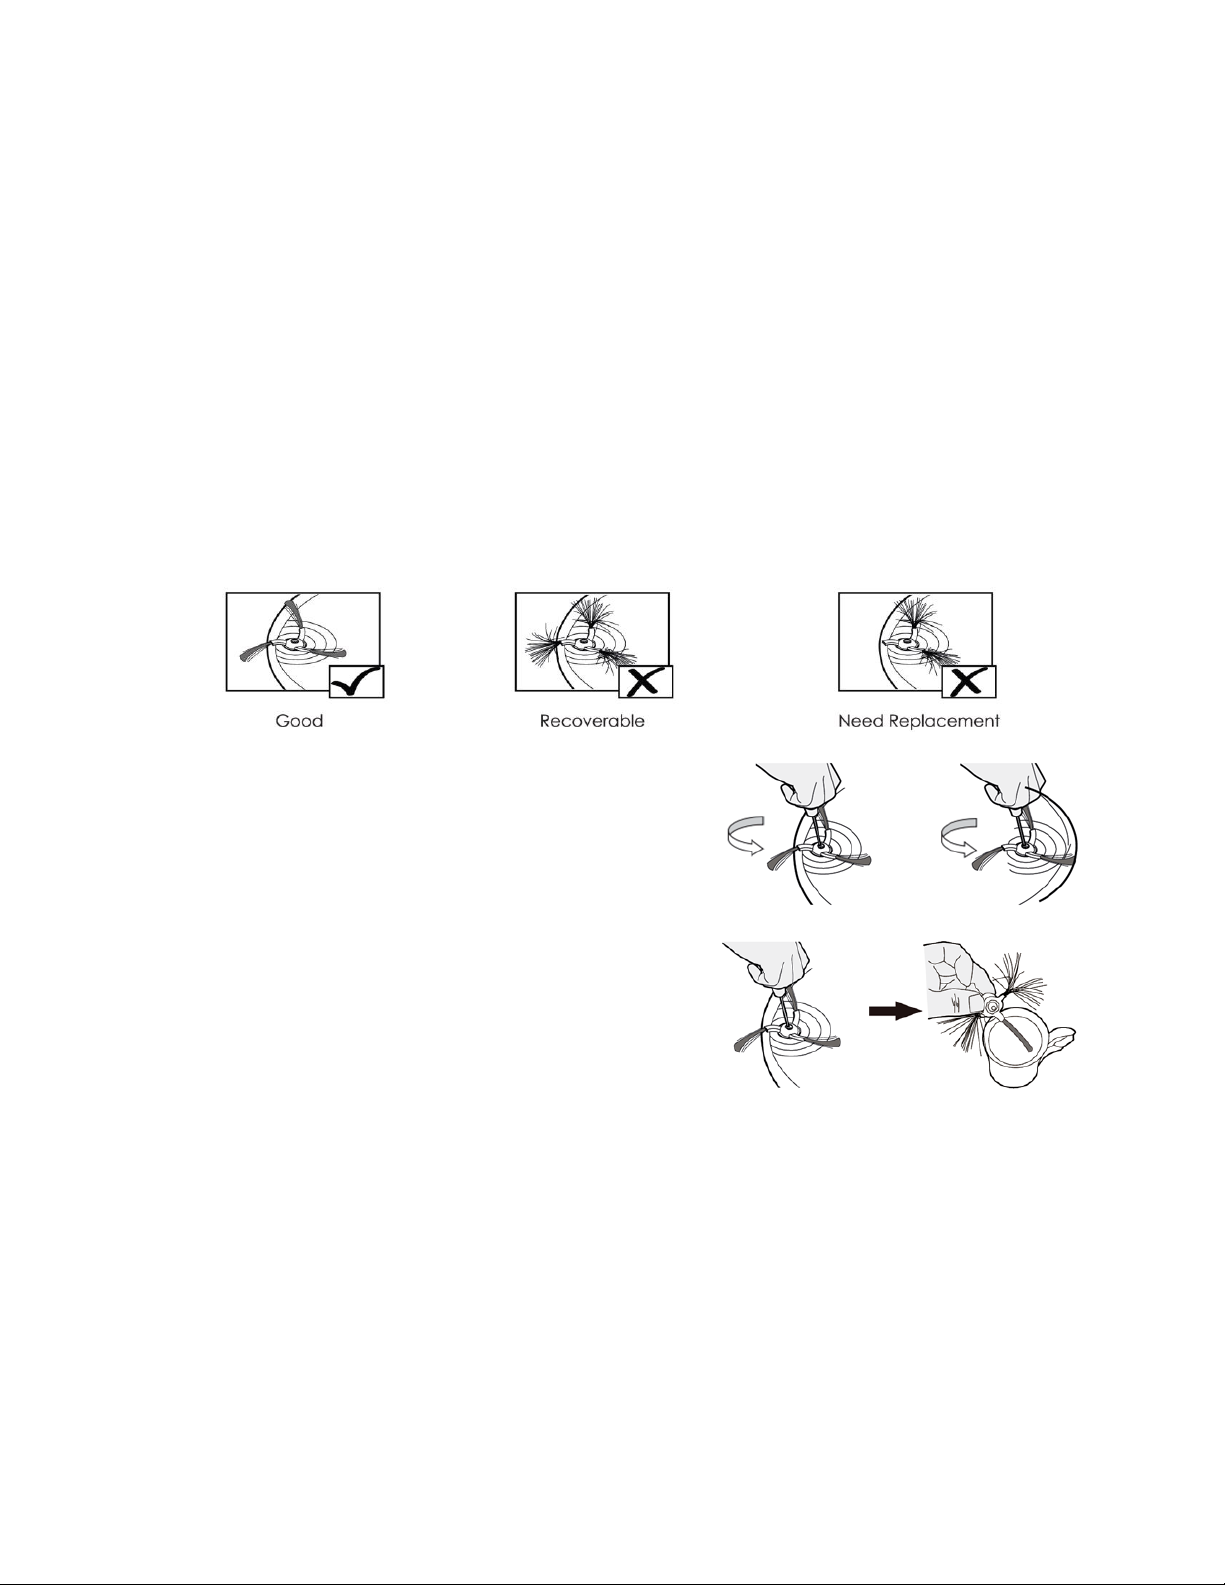
3. Inspect the side brushes to determine whether they are just dirty, whether they are
recoverable, or whether they need to be replaced. Compare the condition of the
side brushes with the images below.
4. Using a Philips screwdriver, turn the side brush
retaining screws counterclockwise to remove
the retaining screws.
5. If the brushes are dirty, clean them in warm
water. Use scissors to remove trapped hair and
debris, taking care not to damage the brushes
themselves.
6. If the brushes are deformed, soak them in
warm water to reform them.
7. Once the brushes have been cleaned and reformed, place them back on the vacuum
and secure them in place using the retaining screws removed in step 4 above. If the
brushes are damaged, replace them with new brushes.
18
Page 19
Mopping Cloth
The microfiber Mopping Cloth is washable and can be used many times. Perform the
following steps to remove and clean the Mopping Cloth.
1. Flip the Power Switch on the vacuum to the OFF position.
2. If the Water Tank is installed, press the Dust Box/Water Tank Release Button, then
remove the tank.
3. Hold the Water Tank still and remove the Mopping Cloth from the bottom.
4. Wash the Mopping Cloth with warm water, then allow it to dry.
5. Once the Mopping Cloth is dry, place it back on the Water Tank. Ensure that the
two sides are properly installed and that the Mopping Cloth is flat against the
Water Tank.
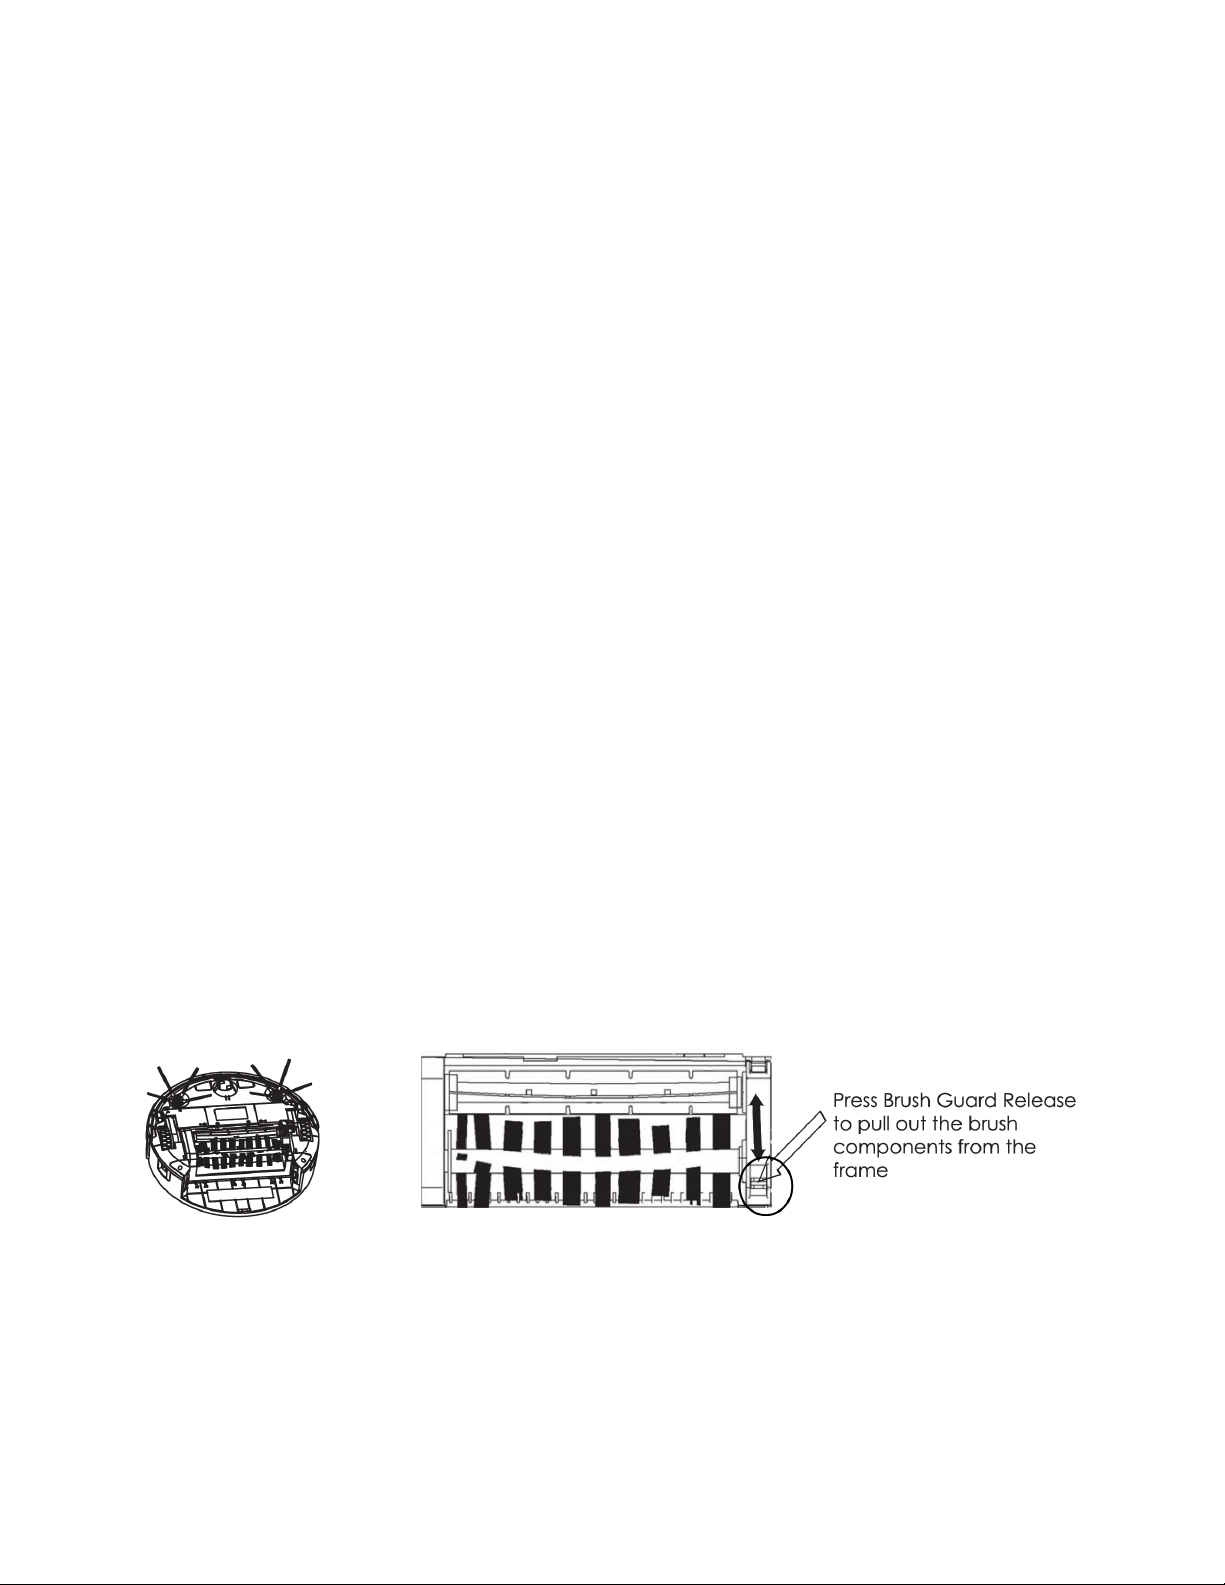
Main Brush
The Main Brush can be removed and washed. Perform the following steps to remove and
clean the Main Brush.
1. Flip the Power Switch on the vacuum to the OFF position.
2. Turn the vacuum over to access the Main Brush.
3. Press the Brush Guard Release to remove the Main Brush frame, then remove the
Main Brush components.
4. Wash the Main Brush with warm water. Use scissors to remove any trapped hair and
debris, taking care not to damage it.
5. Allow the Main Brush to fully dry before reinstalling it in the frame.
19
Page 20
Dust Box
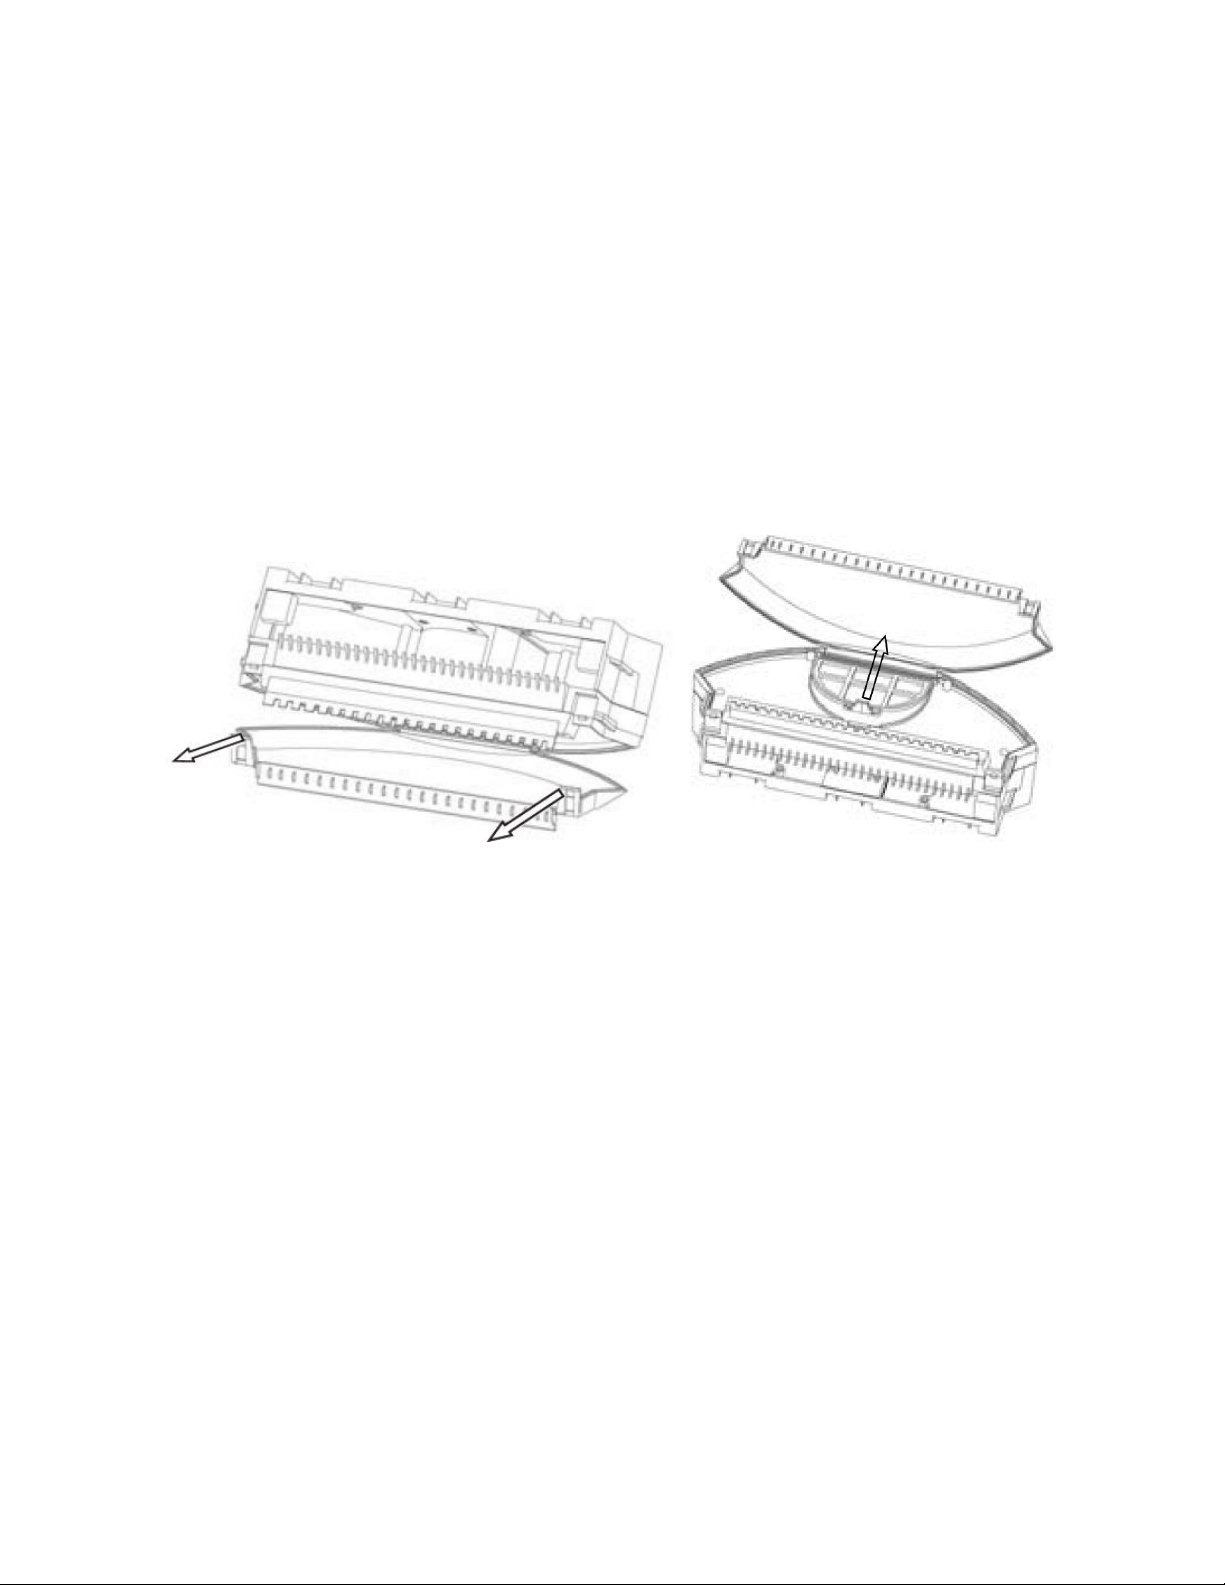
While the Dust Box itself should never be cleaned with water, the Filter element can.
Perform the following steps to remove and clean the Dust Box Filter.
1. Flip the Power Switch on the vacuum to the OFF position.
2. If the Dust Box is installed, press the Bust Box/Water Tank Release Button, then
remove it.
3. Empty the contents of the Dust Box into the garbage.
4. Lift the tabs on each side of the Dust Box, then lift the cover to remove it.
5. Remove the Dust Box Filter, then wash it with warm water.
6. Allow the Dust Box Filter to completely dry before reinstalling it.
Warning! The Dust Box contains a motor. Never wash it with water or otherwise expose
the motor to water. If water does get in or on the motor, allow the Dust Box and motor to
fully dry before using it again.
20
Page 21
Sensors and Charging Poles
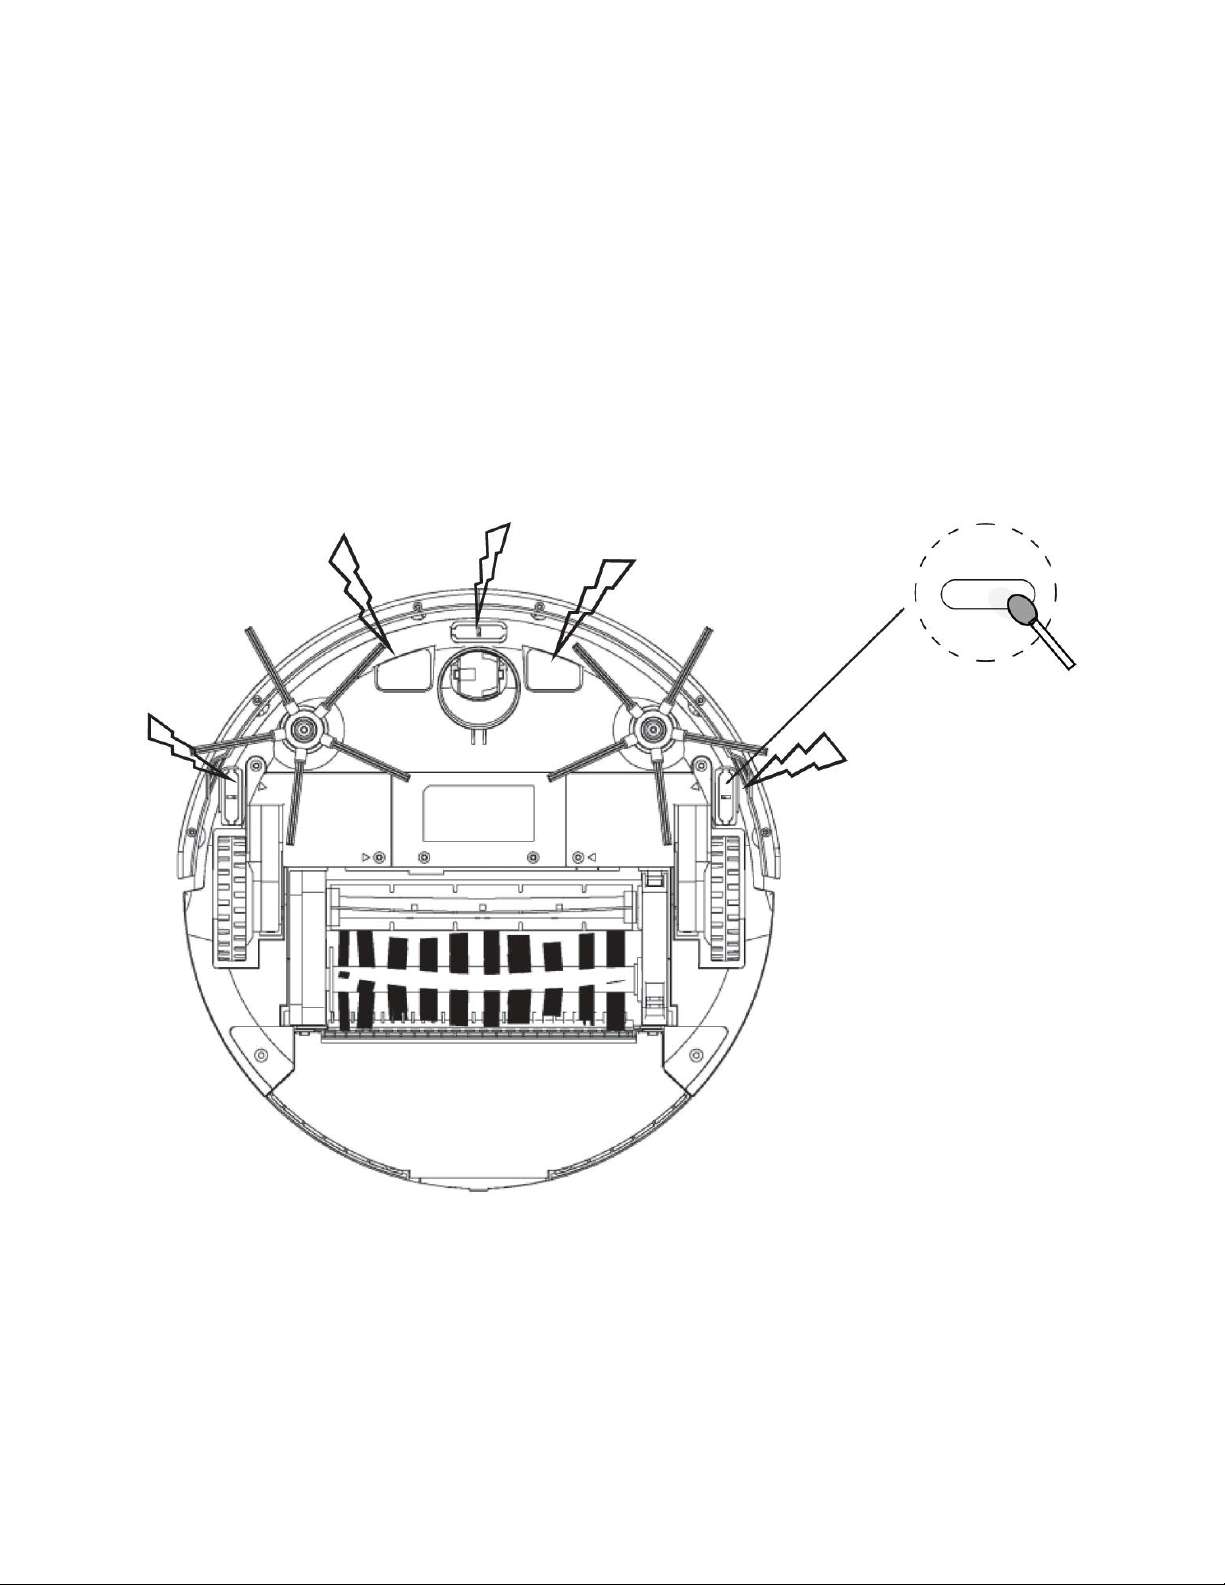
The Sensors and Charging Poles on the bottom of the vacuum can become covered in
dust, which can impair their performance. Perform the following steps to clean the Sensors
and Charging Poles.
1. Flip the Power Switch on the vacuum to the OFF position.
2. Turn the vacuum over to access the bottom.
3. Using a cotton swab (not included), wipe the Sensors and Charging Poles clean at
the points indicated in the image below.
21
Page 22
APP INSTALLATION AND LOGIN
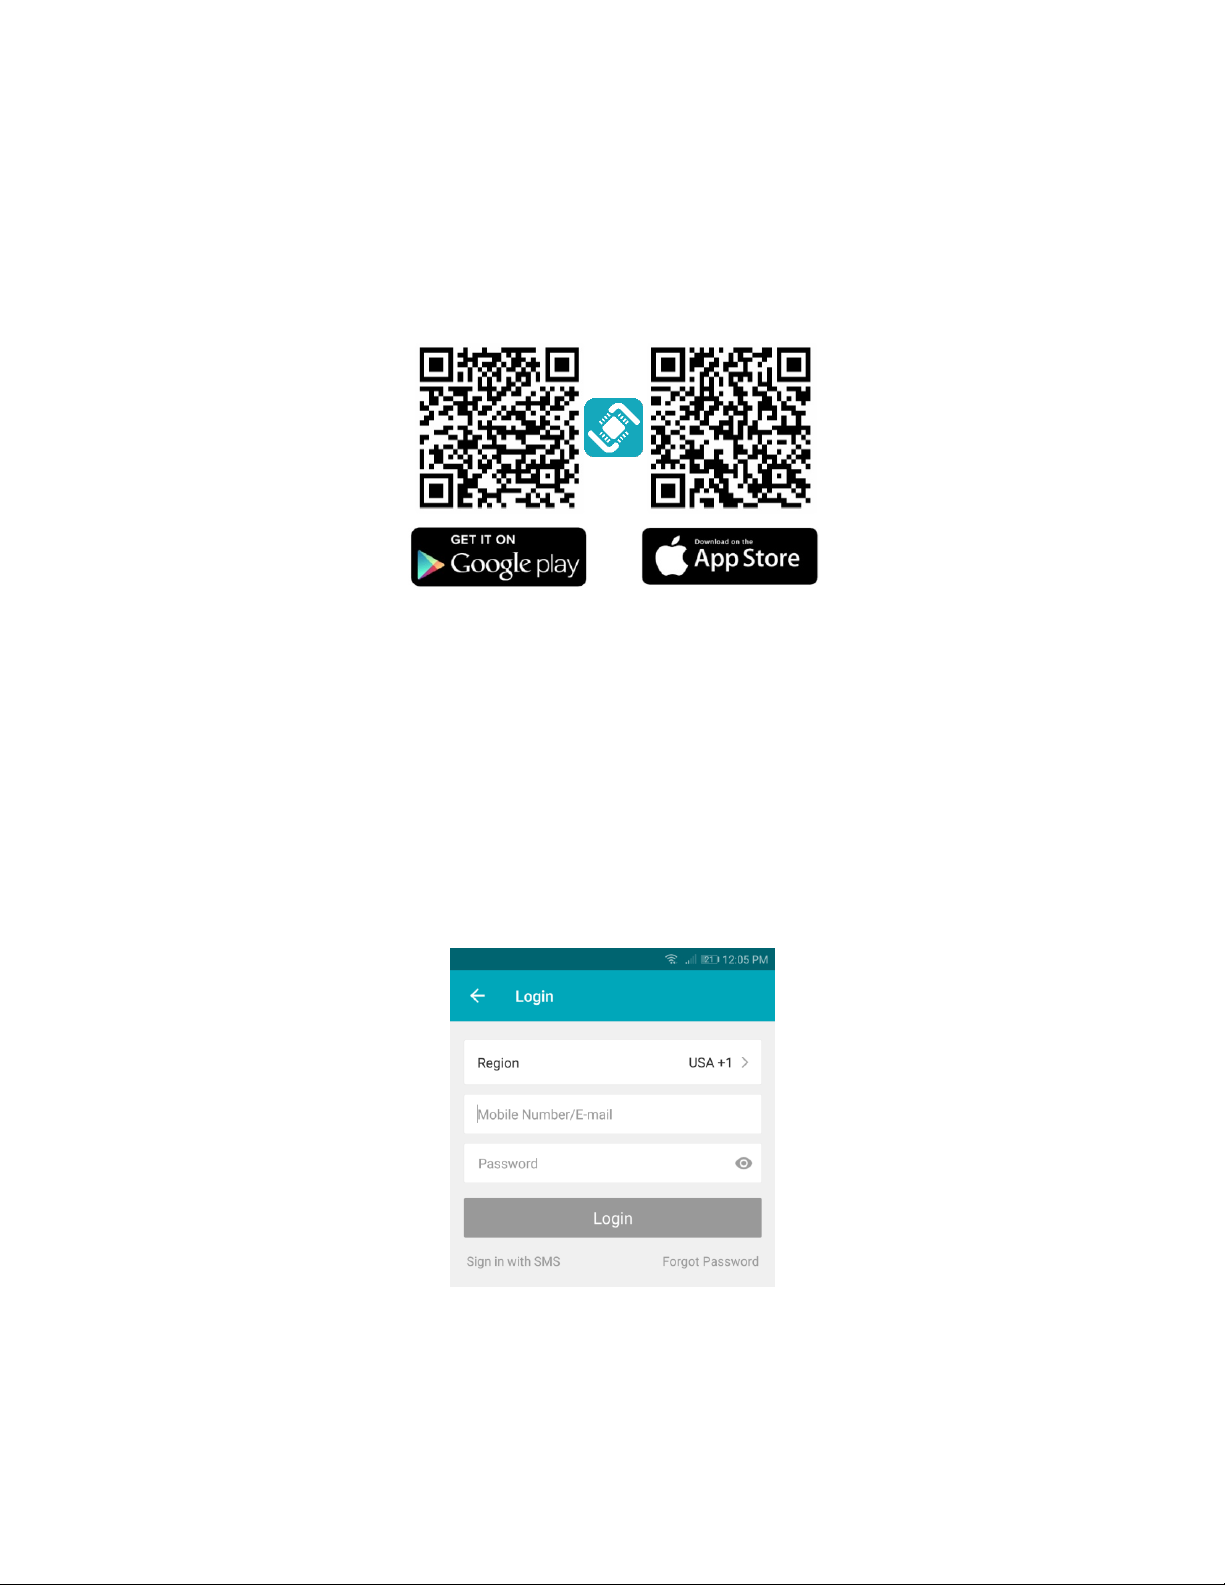
1. Download and install the free STITCH™ by Monoprice app from Google Play™ or the
App Store. Scan one of the two QR codes below to go directly to the appropriate
page in the app store.
2. Once the app is installed, launch it.
3. If you have already used the STITCH™ by Monoprice app, tap the Login button, then
enter your STITCH account information. If you have not installed and used the
STITCH app before, proceed to app registration. You can register using your phone
number or by using your email address. Follow the on-screen app instructions for
more details.
Note that the password must contain 6-20 characters and must include at least one
number.
22
Page 23
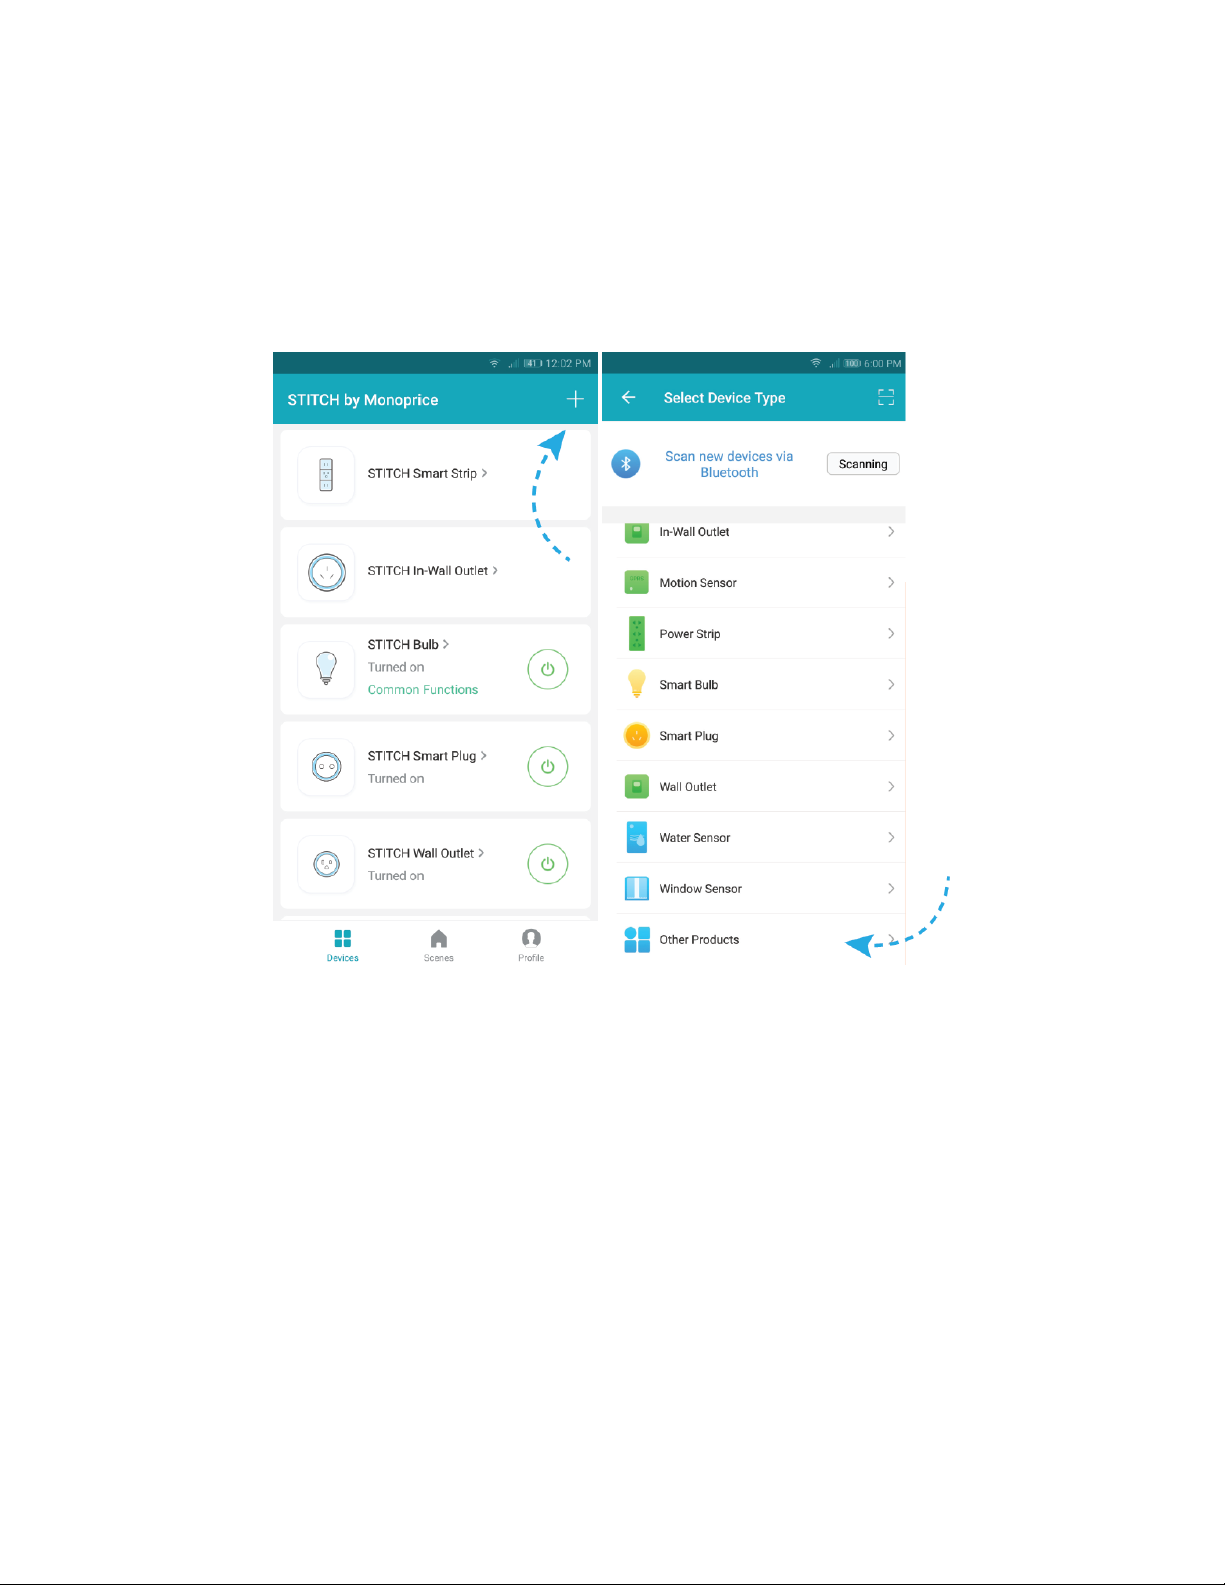
ADD A DEVICE
Smart Inclusion uses your wireless network to communicate between your smartphone
and the smart device.
1. Tap + on the Add Devices screen to add a new device.
2. Scroll through the list and select Other Products (or Robot Vacuum, if available) to
add the vacuum to the STITCH™ app.
23
Page 24
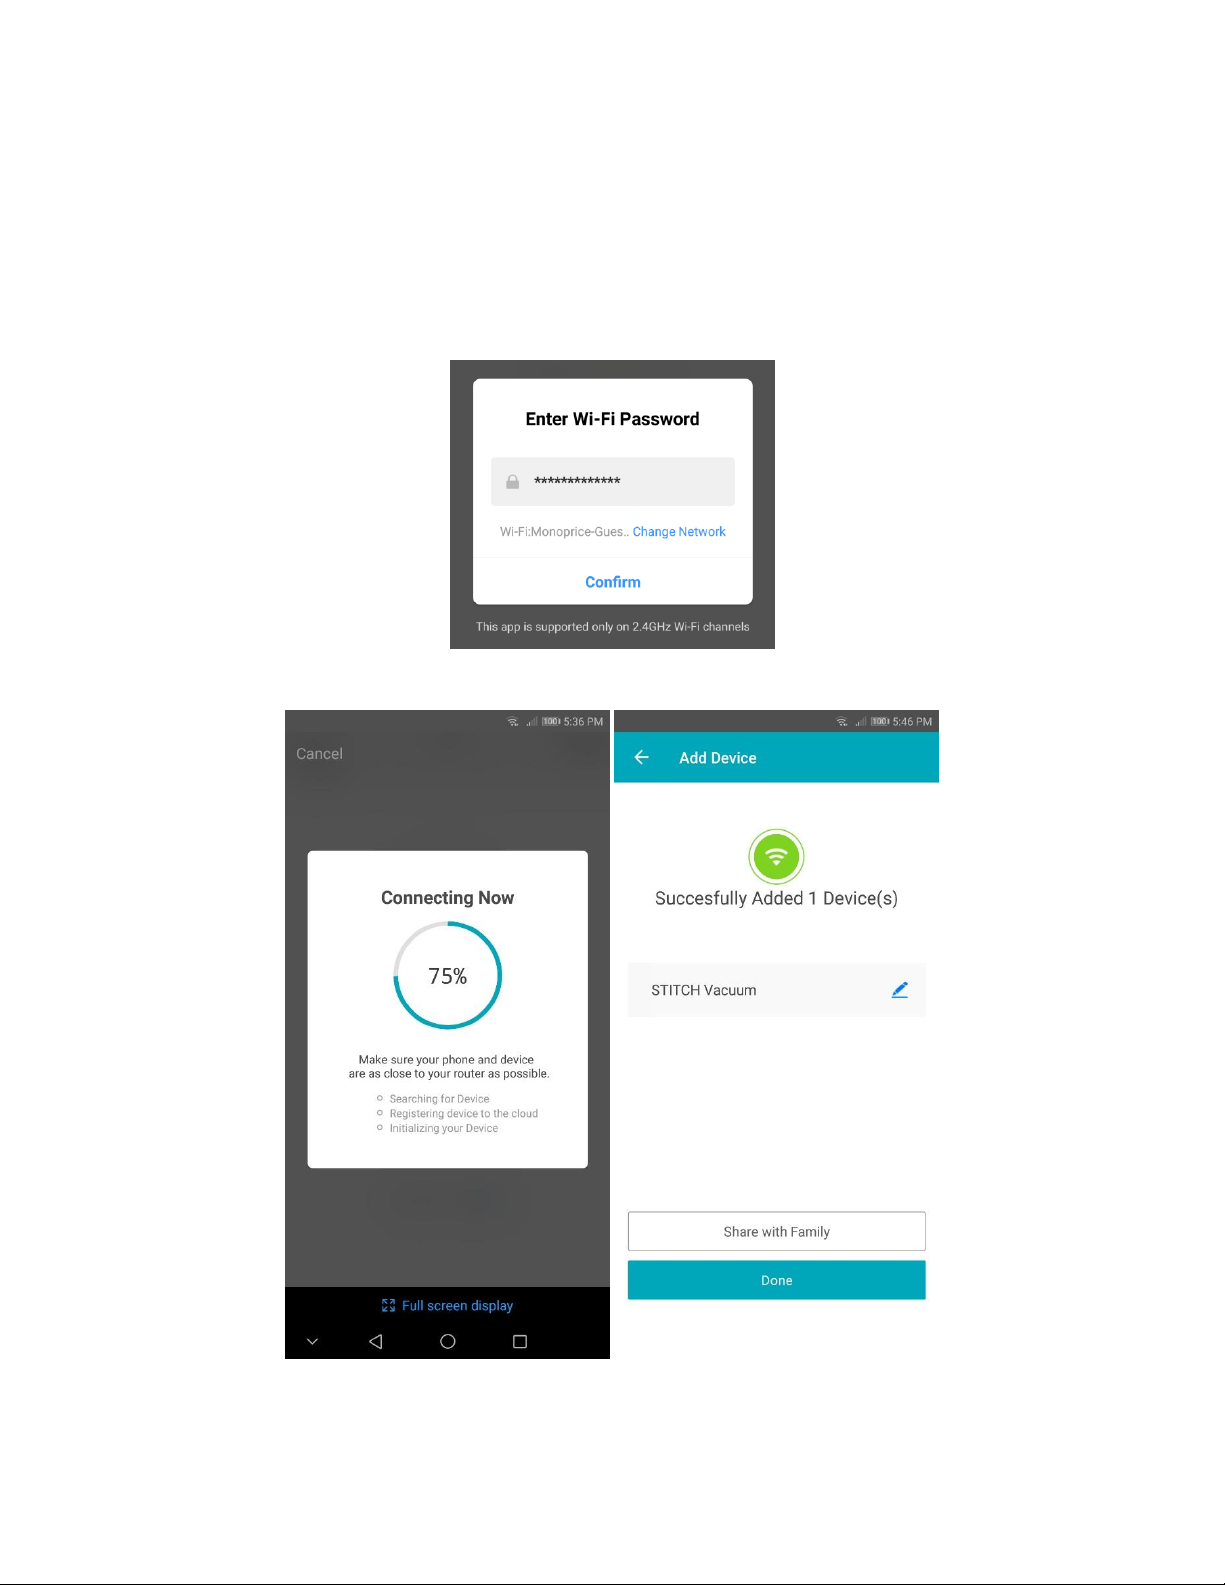
3. The Wi-FI® icon should be flashing rapidly, indicating that it is ready to be paired
with your network. If it is not flashing rapidly, press and hold the Auto button for 3
seconds.
4. Tap Confirm on the app to continue, input the password to your network, then tap
Confirm again.
5. The app will start connecting to the device. Tap Done once it is completed.
24
Page 25
APP FEATURES
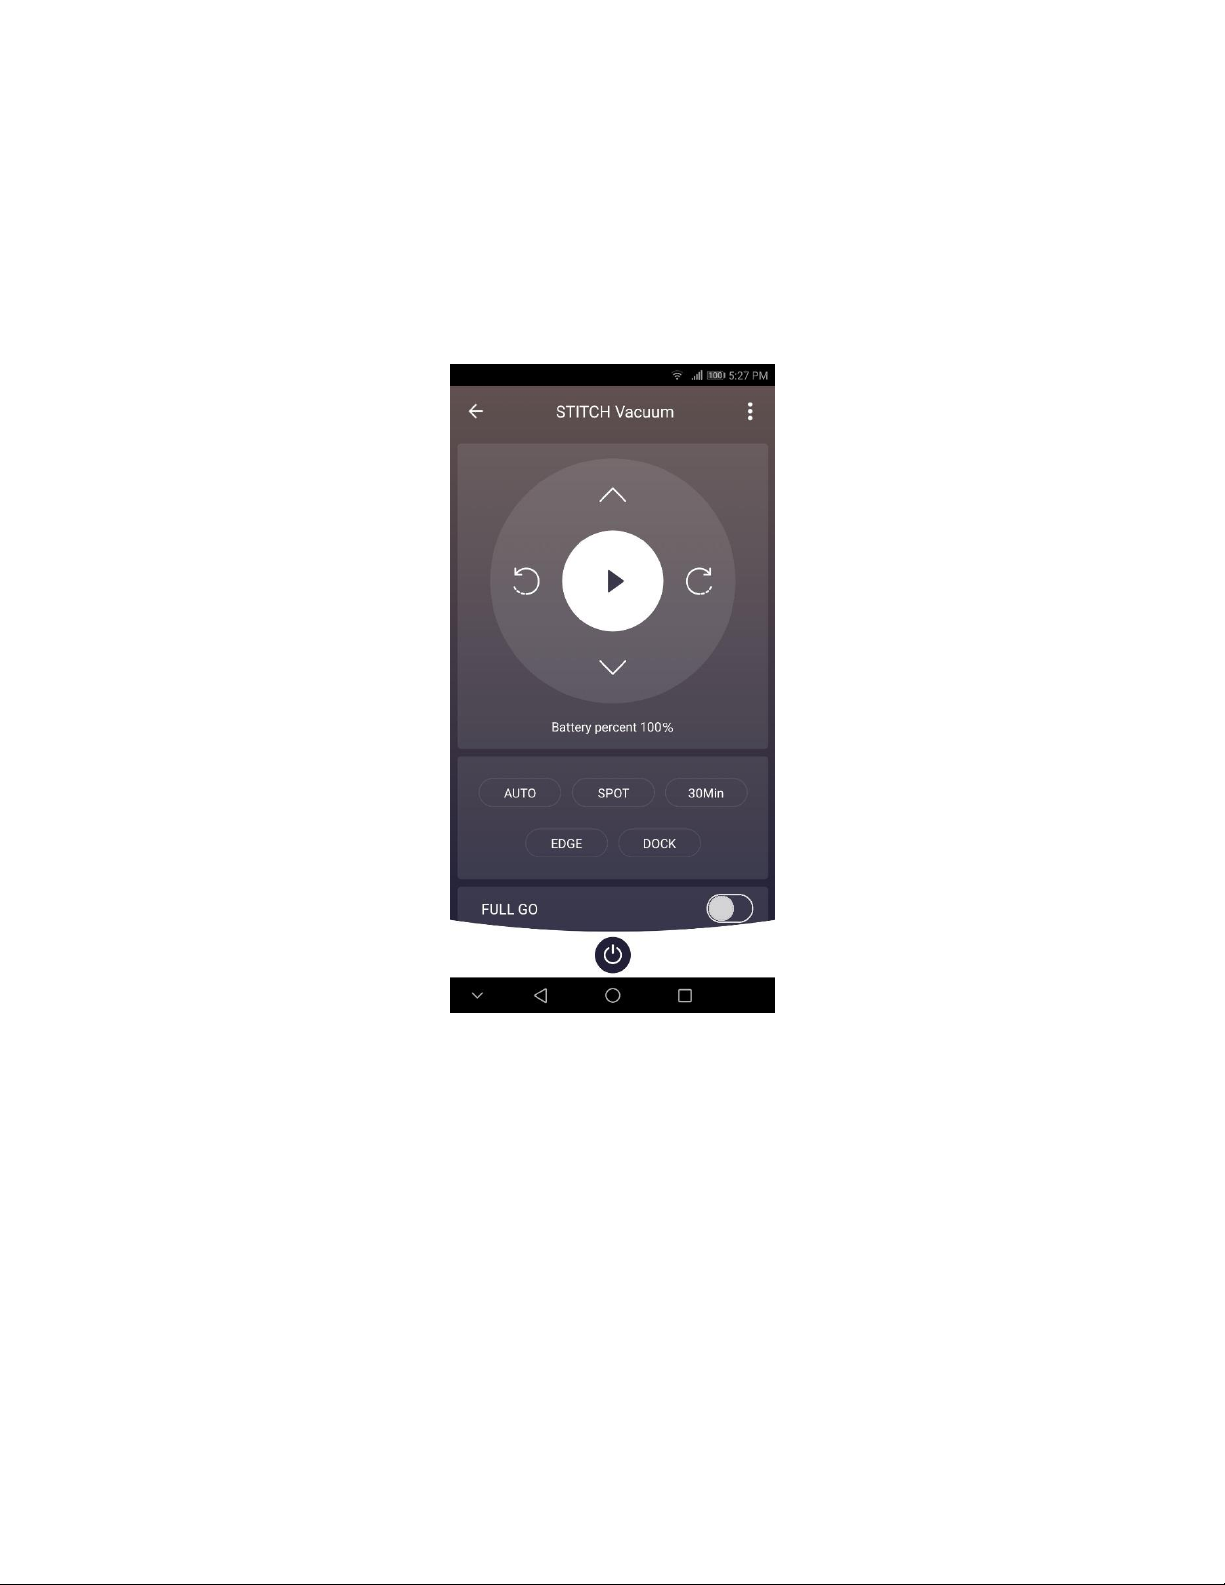
Navigate the robot vacuum with the app
Create a cleaning schedule for automatic cleaning any day and time of the week
Convenient cleaning mode options and power switch to turn the vacuum on or off
25
Page 26
LINK DEVICES TO AMAZON ALEXA
1. Before using Alexa™ to control your smart devices, make sure you meet the
following conditions:
Stable Wi-Fi® network that can access the Amazon server
An Amazon Echo™ device, including Echo, Echo Tap™, and Echo Dot™
An Amazon account
The STITCH™ by Monoprice app and account
At least one device added under STITCH™ by Monoprice account and the
device's name can be easily recognized by Echo
2. Add one or more devices in the STITCH by Monoprice app by following the
instructions in the
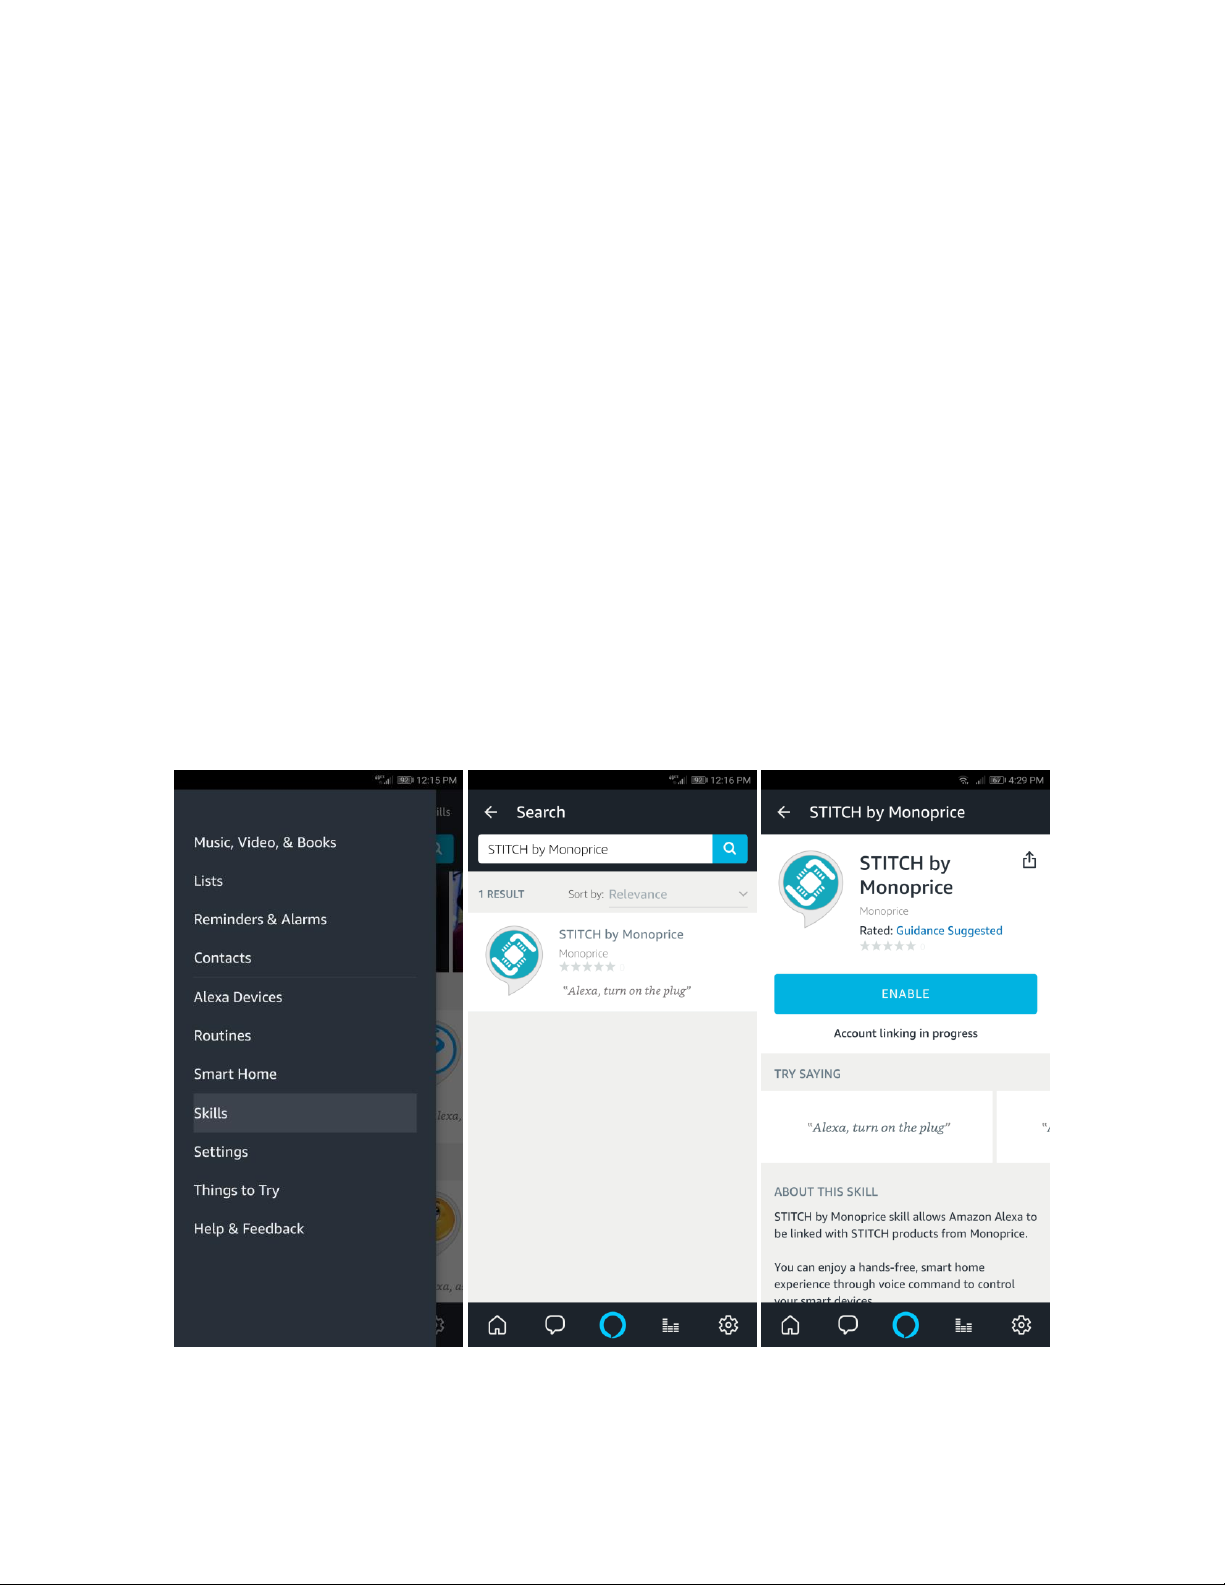
3. In the Amazon Alexa app menu, tap Skills, then search for and select the STITCH by
Monoprice entry. Tap ENABLE to enable Amazon Skills.
ADD DEVICE
section above.
26
Page 27
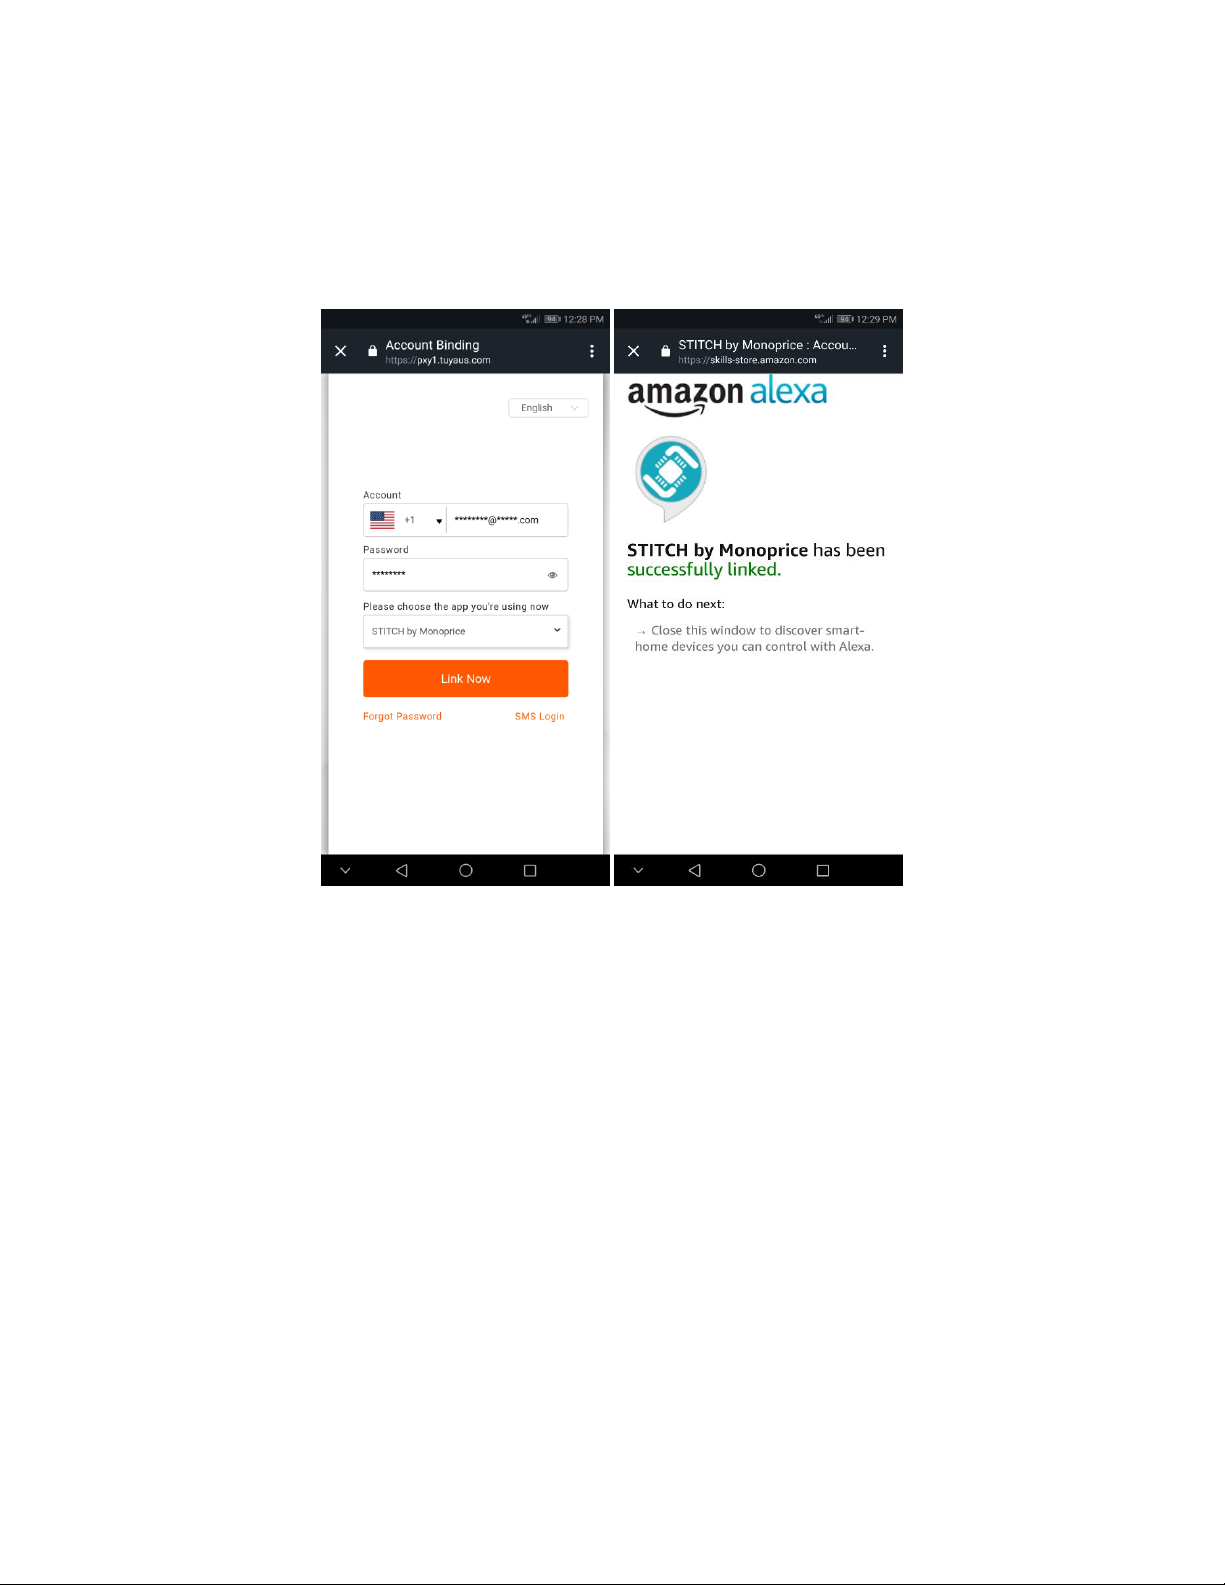
4. You will be redirected to the account link page. Select the proper country/region,
then input your STITCH™ by Monoprice account and password. Tap Link Now, then
tap Authorize. When the message STITCH by Monoprice has been successfully
linked appears, close the window.
27
Page 28
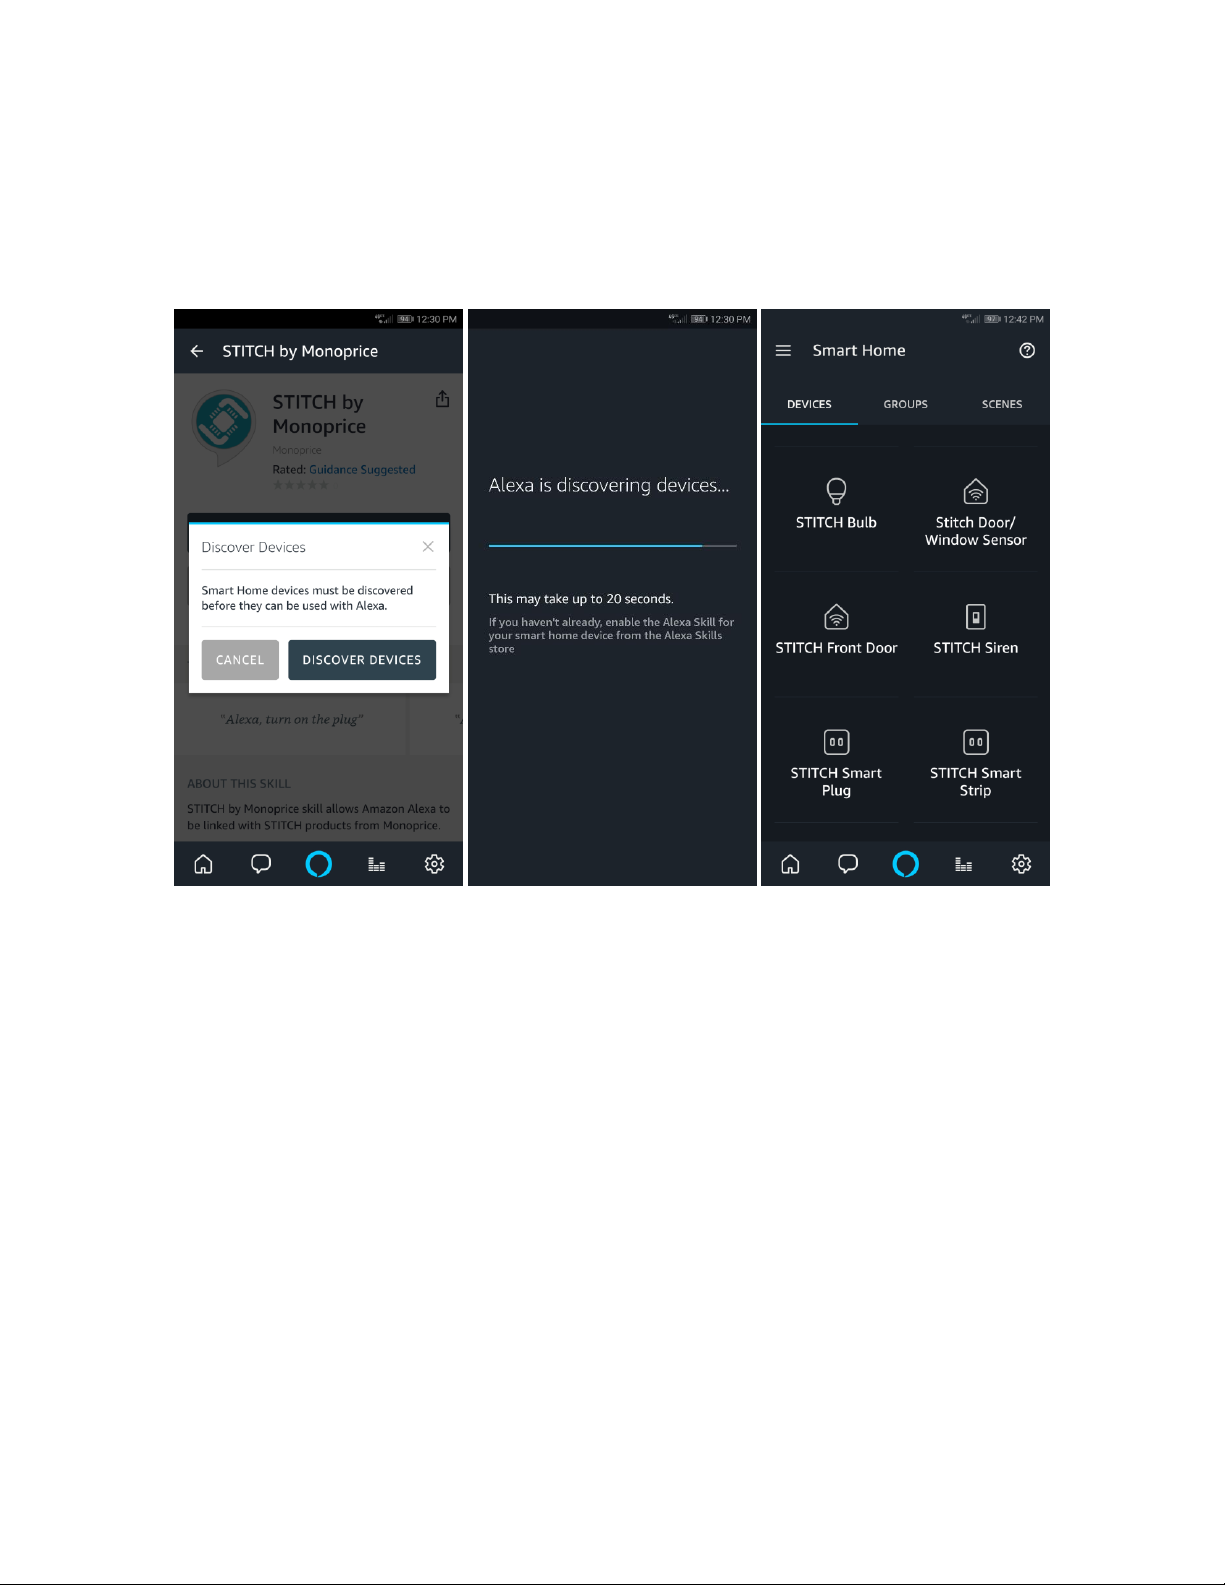
5. Alexa™ needs to "discover" your smart devices before it can control them. Say
"Alexa, discover devices" or tap Discover to start the discovery process. Alexa will
then discover and sync with compatible devices added in the STITCH™ by
Monoprice app. The discovered devices will be displayed in a list.
Note: Each time the device's name is changed in the STITCH™ by Monoprice app,
Alexa must rediscover it again before it can be controlled.
6. You can now control your smart devices with Alexa. You can use the following
command examples for a smart plug named bedroom light:
Alexa, turn on/off bedroom light
Alexa, set bedroom light to 50 percent
Alexa, brighten/dim bedroom light
7. You can also create groups in the Alexa app. Tap Groups to create a group and give
it a name, such as my smart lights. Select individual devices to add them to the
group, then tap Save. You can now control the entire group of devices with a single
command. For example, say "Alexa, turn on my smart lights" to turn on all lights in
the group.
28
Page 29

TROUBLESHOOTING
Error Code
Cause
Solution
Er 01
Right side brush stuck
Clean the right side brush
Er 02
Left side brush stuck
Clean the left side brush
Er 03
Main brush stuck
Clean the main brush
Er 04
Left wheel issue
Clean the left wheel
Er 05
Right wheel issue
Clean the right wheel
Er 06
Vacuum motor issue
Empty and clean the dust box
Er 07
Anti-drop sensor issue
Clean the anti-drop sensors
Er 08
Wheel of the ground
Place the vacuum on solid, flat floor
If a problem is detected, the vacuum will display and error code on the LED Display. Refer
to the following table for causes and solutions.
TECHNICAL SUPPORT
Monoprice is pleased to provide free, live, online technical support to assist you with any
questions you may have about installation, setup, troubleshooting, or product
recommendations. If you ever need assistance with your new product, please come online
to talk to one of our friendly and knowledgeable Tech Support Associates. Technical
support is available through the online chat button on our website www.monoprice.com
or through email by sending a message to [email protected]. Check the website for
support times and links.
29
Page 30

SPECIFICATIONS
Models
35513 (Black) and 35514 (Blue)
Dust Box Capacity
20.3 fl. oz. (600ml)
Water Tank Capacity
10.1 fl. oz. (300ml)
Cleaning Modes
Auto (zig-zag), Spot, Edge
Filter
HEPA and fabric filter
Supported Network Protocols
IEEE 802.11 b/g/n
Radio Frequency
2.4GHz
Battery Type
Lithium-ion
Battery Capacity
2600mAh
Charging Time
3-4 hours
Cleaning Time
2-3 hours
Input Power
18.4 VDC
Maximum Power Consumption
24 watts
AC Adapter Input Power
100 ~ 240 VAC, 50/60 Hz
Dimensions
ø12.6" x 3.5" (ø320 x 88 mm)
Weight
5.5 lbs. (2.5 kg)
30
Page 31

REGULATORY COMPLIANCE
Notice for FCC
This device complies with Part 15 of the FCC rules. Operation is subject to the following
two conditions: (1) this device may not cause harmful interference, and (2) this device must
accept any interference received, including interference that may cause undesired
operation.
Modifying the equipment without Monoprice's authorization may result in the equipment
no longer complying with FCC requirements for Class B digital devices. In that event, your
right to use the equipment may be limited by FCC regulations, and you may be required to
correct any interference to radio or television communications at your own expense.
This equipment has been tested and found to comply with the limits for a Class B digital
device, pursuant to Part 15 of the FCC Rules. These limits are designed to provide
reasonable protection against harmful interference in a residential installation. This
equipment generates, uses and can radiate radio frequency energy and, if not installed and
used in accordance with the instructions, may cause harmful interference to radio
communications. However, there is no guarantee that interference will not occur in a
particular installation. If this equipment does cause harmful interference to radio or
television reception, which can be determined by turning the equipment off and on, the
user is encouraged to try to correct the interference by one or more of the following
measures:
Reorient or relocate the receiving antenna.
Increase the separation between the equipment and receiver.
Connect the equipment into an outlet on a circuit different from that to which the
receiver is connected.
Consult the dealer or an experienced radio/TV technician for help.
31
Page 32

RF Exposure Statement for FCC
Caution
This equipment complies with radiation exposure limits set forth for an uncontrolled
environment. End users must follow the specific operating instructions for satisfying RF
exposure compliance. This transmitter must be at least 20 cm from the user and must not
be collocated or operated in conjunction with any other antenna or transmitter.
Notice for Industry Canada
This Class B digital apparatus complies with Canadian ICES-003.
Cet appareil numérique de la classe B est conforme à la norme NMB-003 du Canada.
RF Exposure Statement for Industry Canada
Caution
This equipment complies with radiation exposure limits set forth for an uncontrolled
environment. End users must follow the specific operating instructions for satisfying RF
exposure compliance. This transmitter must be at least 20 cm from the user and must not
be collocated or operated in conjunction with any other antenna or transmitter.
Android™ and Google Play™ are trademarks of Google LLC.
Cisco® and IOS® are registered trademarks or trademarks of Cisco Systems, Inc. and/or its
affiliates in the United States and certain other countries.
Wi-Fi® is a registered trademark of Wi-Fi Alliance.
Amazon™, Amazon Alexa™, Amazon Echo™, Echo Dot™, and all related logos are
trademarks of Amazon.com, Inc. or its affiliates.
STITCH™ and the STITCH logo are trademarks of Monoprice Inc.
32
Page 33

TECHNOLOGY AT PRICES THAT MAKE SENSE
www.monoprice.com
Need Help? We’re here for you!
Contact us: www.monoprice.com/contactus
Product pictures are for reference only.
Specifications described herein are subject to change without prior notification.
All trademarks are the sole property of their respective companies.
Stitch is a Sub-Brand for Smart Home of Monoprice.
Copyright © 2018 Monoprice, Inc. All rights reserved.
 Loading...