

Page 1
MANUAL
CRUISE LIGHT RELAY BOX AND WIRELESS CONTROLLER
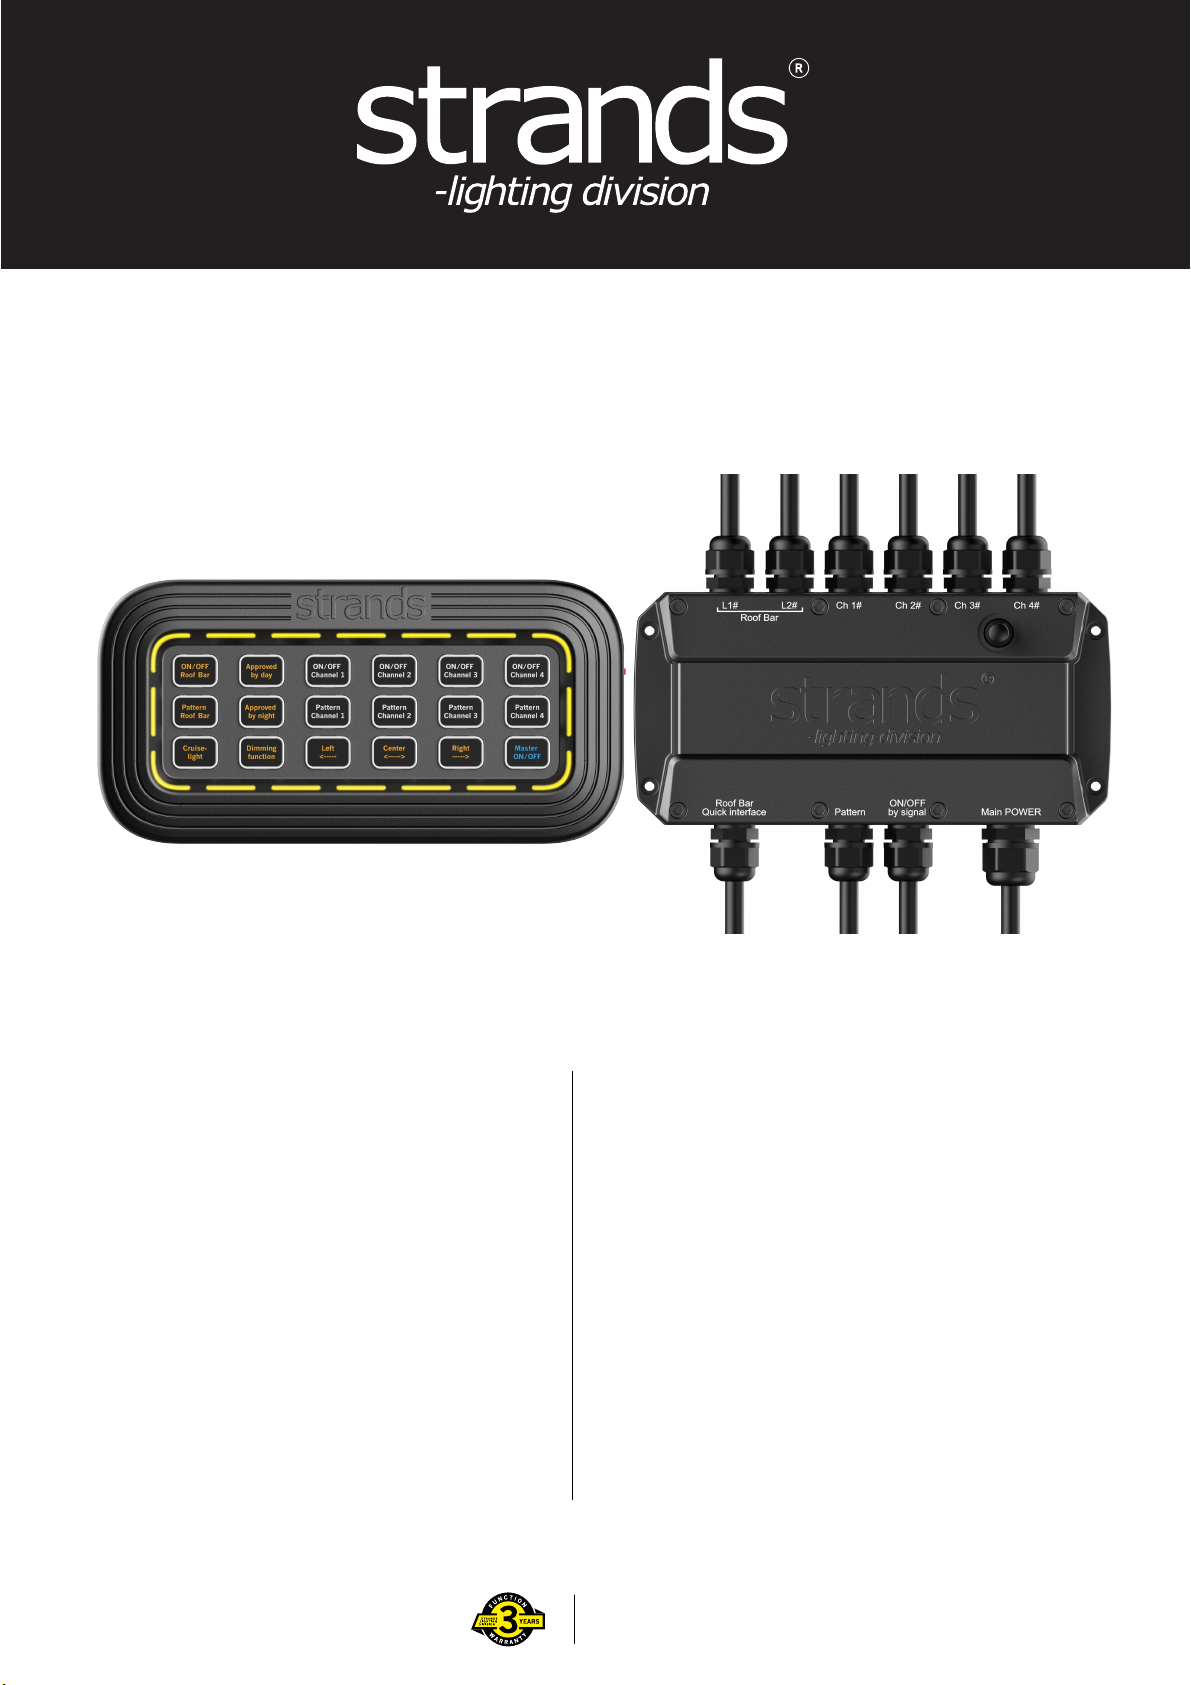
FUNCTION DESCRIPTION - WIRELESS CONTROLLER
Power: USB-C (for fixed installation) or 4x AAA (wireless).
9 buttons by Amber, 8 buttons by White, 1 button by Blue.
ON/OFF
Wireless controller ON/OFF switch on right side of controller.
ON/OFF ROOF BAR
Separate ON/OFF button for Roof bar`s.
PATTERN ROOF BAR
PATTERN select button.
CRUISE LIGHT
Cruise mode(steady-on).
APPROVED BY DAY
BY DAY approved mode (higher intensity).
APPROVED BY NIGHT
BY NIGHT approved mode (lower intensity).
DIMMING FUNCTION
When in used, the DIMMING is active on a specific flash
pattern. However, by day/by night/cruise, these patterns can't
be controlled by DIMMING.
Part no. 850208
Contact us if you need support: [email protected] or +46(0)320-450450
LEFT, CENTER, RIGHT
These buttons are used for traffic advising, flashing from right to left,
from centre and out, and left to right.
Roof bar pattern will be shown on the surrounding LED´s on the wireless
control, and for most of the functions, there will be a button backlight
on the active functions.
CHANNEL 1 - CHANNEL 4 ON/OFF
Separate ON/OFF button for each channel's power out.
CHANNEL 1 - CHANNEL 4 PATTERN
Separate PATTERN select button for each channel.
MASTER ON/OFF
When turned “OFF”, all the lights will be turned off. When turned “ON”,
all the lights will return to the same status before turning off (memory
function). Pressing 3 seconds will turn on all channels.
WHEN NOT IN USE
The surrounding LED´s will turn off after 10 seconds.
After 15 seconds also the button backlights will be off.
The frequency is 443MHz. (TTL).
Range:10-15 meter for controller.( It depends on surrounding)
www.strands.se
www.strandseurope.com
Page 2
FUNCTION DESCRIPTION - RELAY BOX
Voltage: 10-35V DC
Channels: 6, total 700W. 2x 150W (15A) intended for Cruise Light
Roof bar. 4x 100W (10A) for any type of lighting.
Input ports:
MAIN POWER
Incoming power VDC +/-
ON/OFF BY SIGNAL CABLE
Choose to control the relay functions by cable, by connecting a
signal cable(+VDC) to “ON/OFF Roof Bar or CH1-4#”, this will
activates the different channels. The output is activated when the
signal cable is continuously connected to the "ON/OFF” connection.
Activation by cable will override the wireless controller.
ROOF BAR QUICK INTERFACE
Quick roof bar function wire connection port, to control by cable
PATTERN
Pattern can be changed by additional cable connection.
WARNING!
Be careful while opening the top cover, which connected to an antenna cable.
On the circuit board, there are switches for positive (+) and negative (-) pattern changing setting.
Do not short circuit or overload the LED outputs, this may lead to permanent damage.
OUTPUT PORTS:
6 different Channels
L1#, L2# FOR ROOF BARS
Data A:White cable
Data B: Blue cable
Snychronize: Yellow cable(If Needed)
Voltage: 10-35V DC
Each channel, max 150W
Ch1# to Ch4# FOR ALL TYPE OF
LIGHTING Voltage: 10-35V DC
Each channel, max 100W
TROUBLESHOOTING:
• There are some batch of Cruise light Roof bar which might
have to follow instruction for Data A and Data B as Reverse
(Data A: Blue cable Data B: White cable)
• Please do not connect white cable and blue cable to Main
power( Positive Terminal) dircetly it most likely damage the
Roof bar
• If controller stop sending signal to relay box please contact
([email protected]) for reprogramming of controller.
WATERPROOF
Water sealed lid and rubber gaskets protecting the cable entries.
READ THIS BEFORE INSTALLATION
READ ALL INSTRUCTIONS AND STUDY DIAGRAMS BEFORE INSTALLING YOUR NEW PRODUCT!
-Pay attention to positive and negative polarity when installing batteries
-Always use new batteries and never mix new and old batteries in the device.
-When the sensitivity decreases, or the usable distance becomes smaller please replace the batteries
-If the control box is not being used for a long period, we suggest you remove the batteries.
-The control unit is not waterproof, do not allow control unit to get wet or use in a moist environment.
-Maximum operating temperature 50°C.
-Please recycle the batteries in a suitable way when expired.
LEGAL MOUNTING
Check with state or local authorities for laws governing usage and proper mounting of your new lights.
TAKE CARE OF YOUR PRODUCT
Keep the product clean. Dirt may shorten the products lifetime. We recommend using lukewarm water and alkaline degreasing.
Follow the degreasing instructions carefully and rinse off gently with cold or lukewarm water on low pressure.
WARNING!
Strong chemicals should not be used on the product. If you accidently get strong chemicals on the product, rinse off immediately, use plenty
of water so that no chemicals remain in any joint. Some chemicals have a small amount of solvent in them, this can dissolve sealing adhesives
and compromise the product's waterproofness. Some chemicals pull out liquid from plastic and rubber-based components, which makes the
plastic or rubber brittle and bursts more easily. Be careful not to use high water pressure close up on the product.
If you use high water pressure at short distances, most products find it difficult to close out the water.
WARNING!
Do not use higher volts than the product description states. This product becomes hot under continuous use. Don´t remove or touch the
casing for at least 30 minutes after turning the lamp off.
Part no. 850208
Contact us if you need support: [email protected] or +46(0)320-450450
www.strands.se
www.strandseurope.com
 Loading...